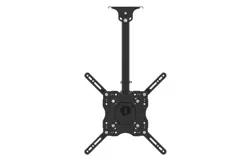
CEILING MOUNT 43"-65" OUTDOOR TV
SUPPORT DE PLAFOND POUR TÉLÉVISION EXTÉRIEURE
43 PO À 65 PO
SOPORTE DE TECHO PARA TV DE EXTERIOR DE 43" A 65"
MODEL/MODÈLE/MODELO: FAAABBK
LIPPERT ITEM NO./LIPPERT ARTICLE NO./ LIPPERT ARTÍCULO NO.:
QUICK START GUIDE ....................................................................................................... EN
GUIDE DE DÉMARRAGE RAPIDE .............................................................................................................. FR
GUÍA DE INICIO RÁPIDO ..................................................................................................................................FR
* Product picture for reference only
* Photo du produit pour référence uniquement
* El producto de la imagen es solo de referencia
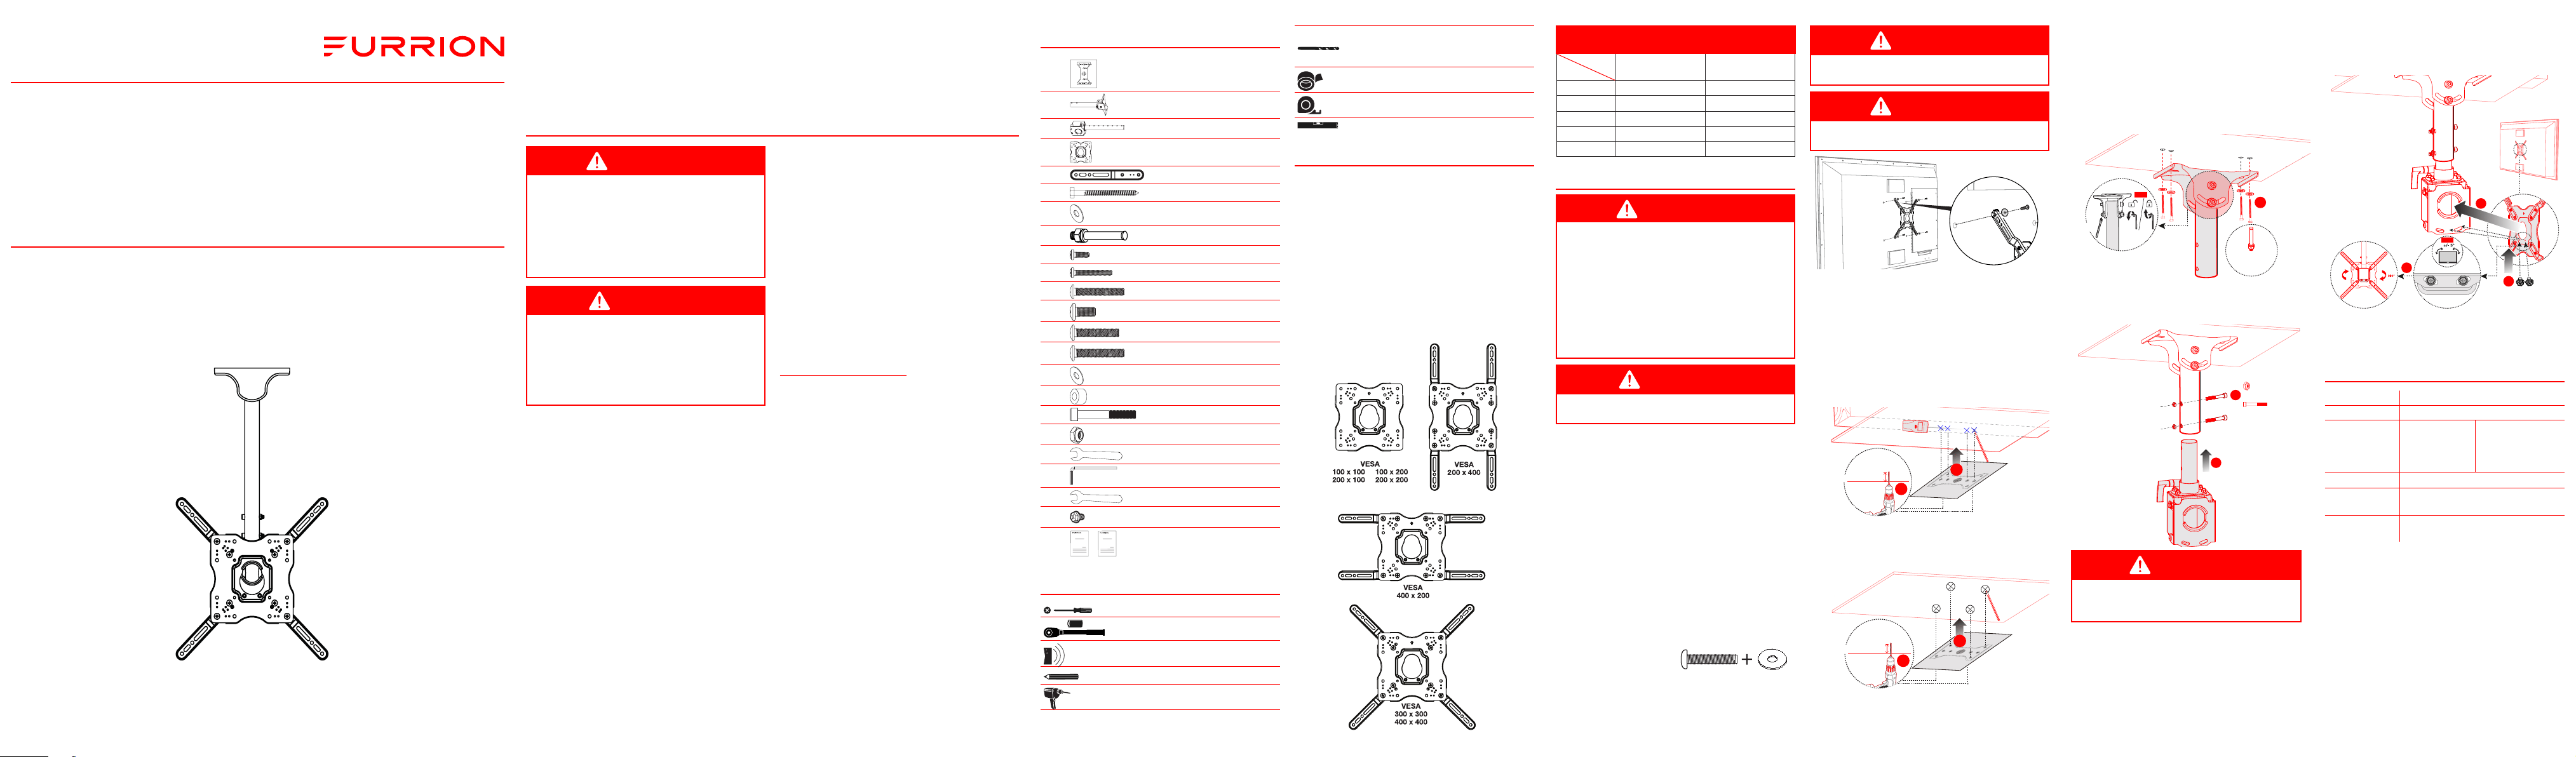
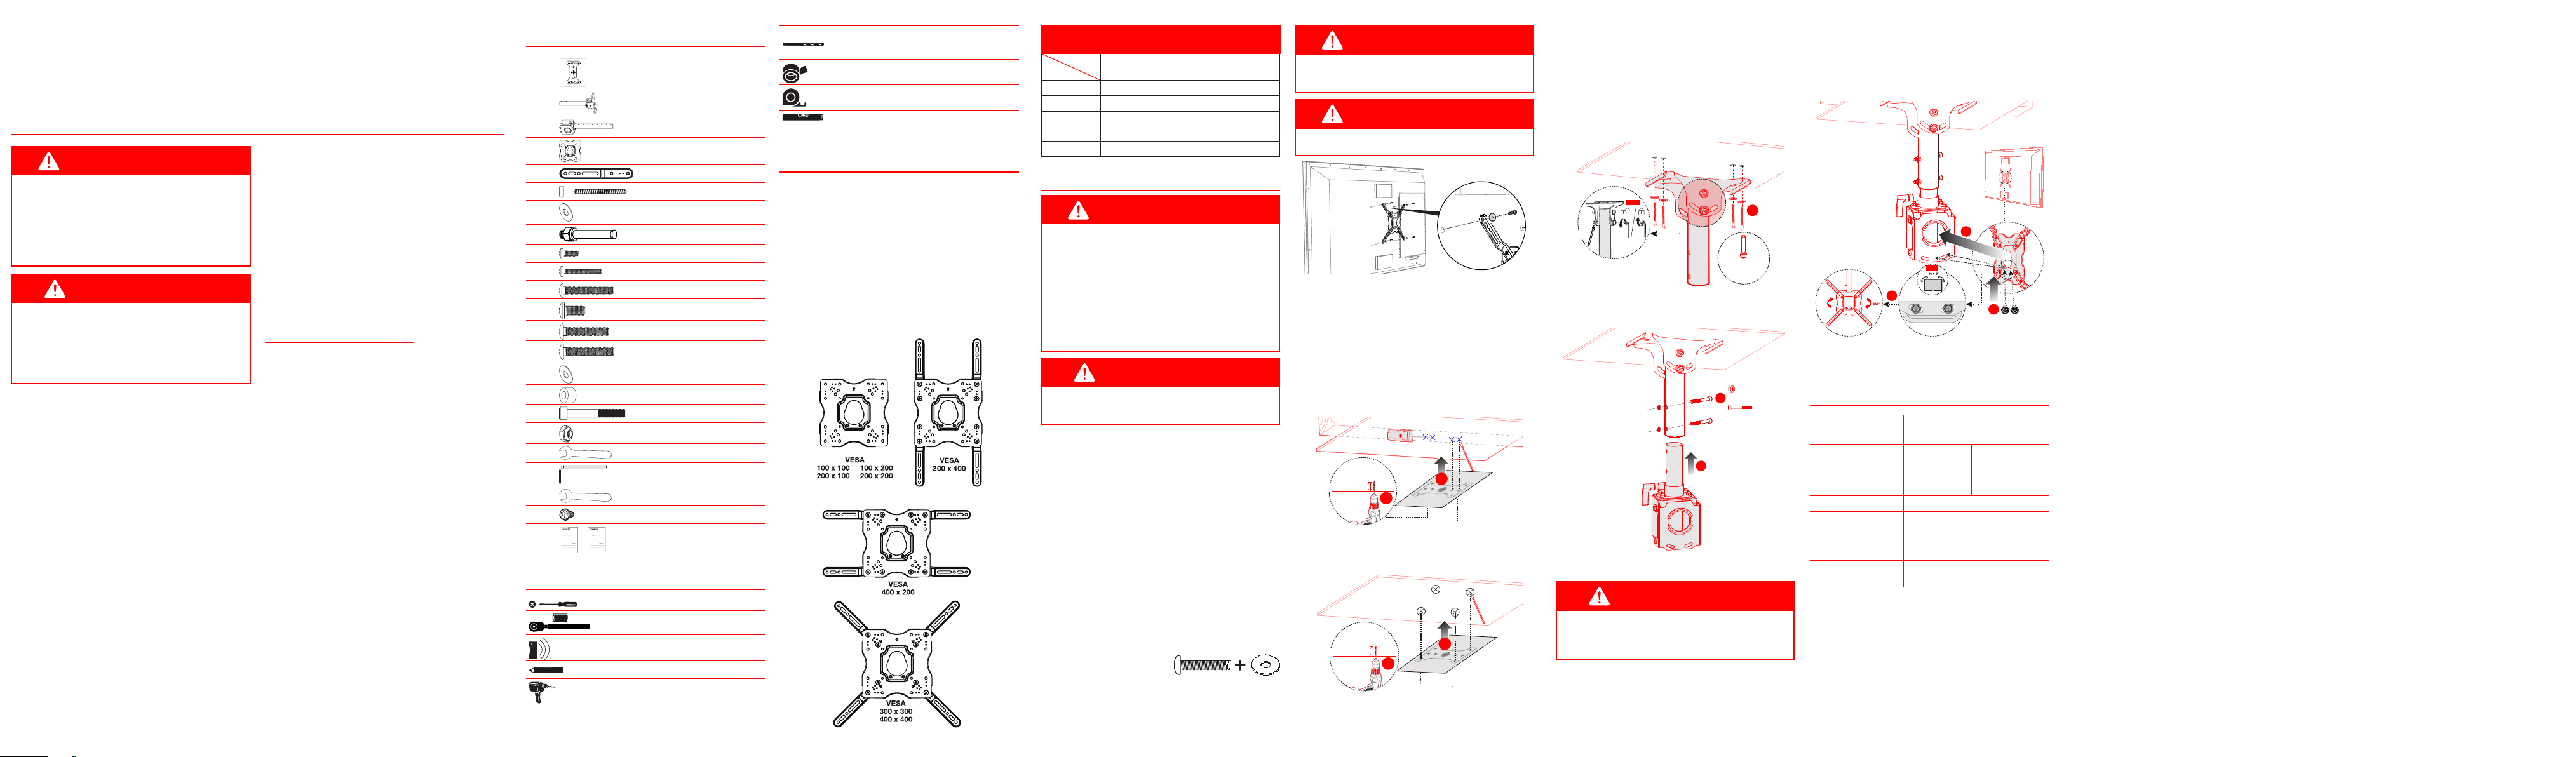
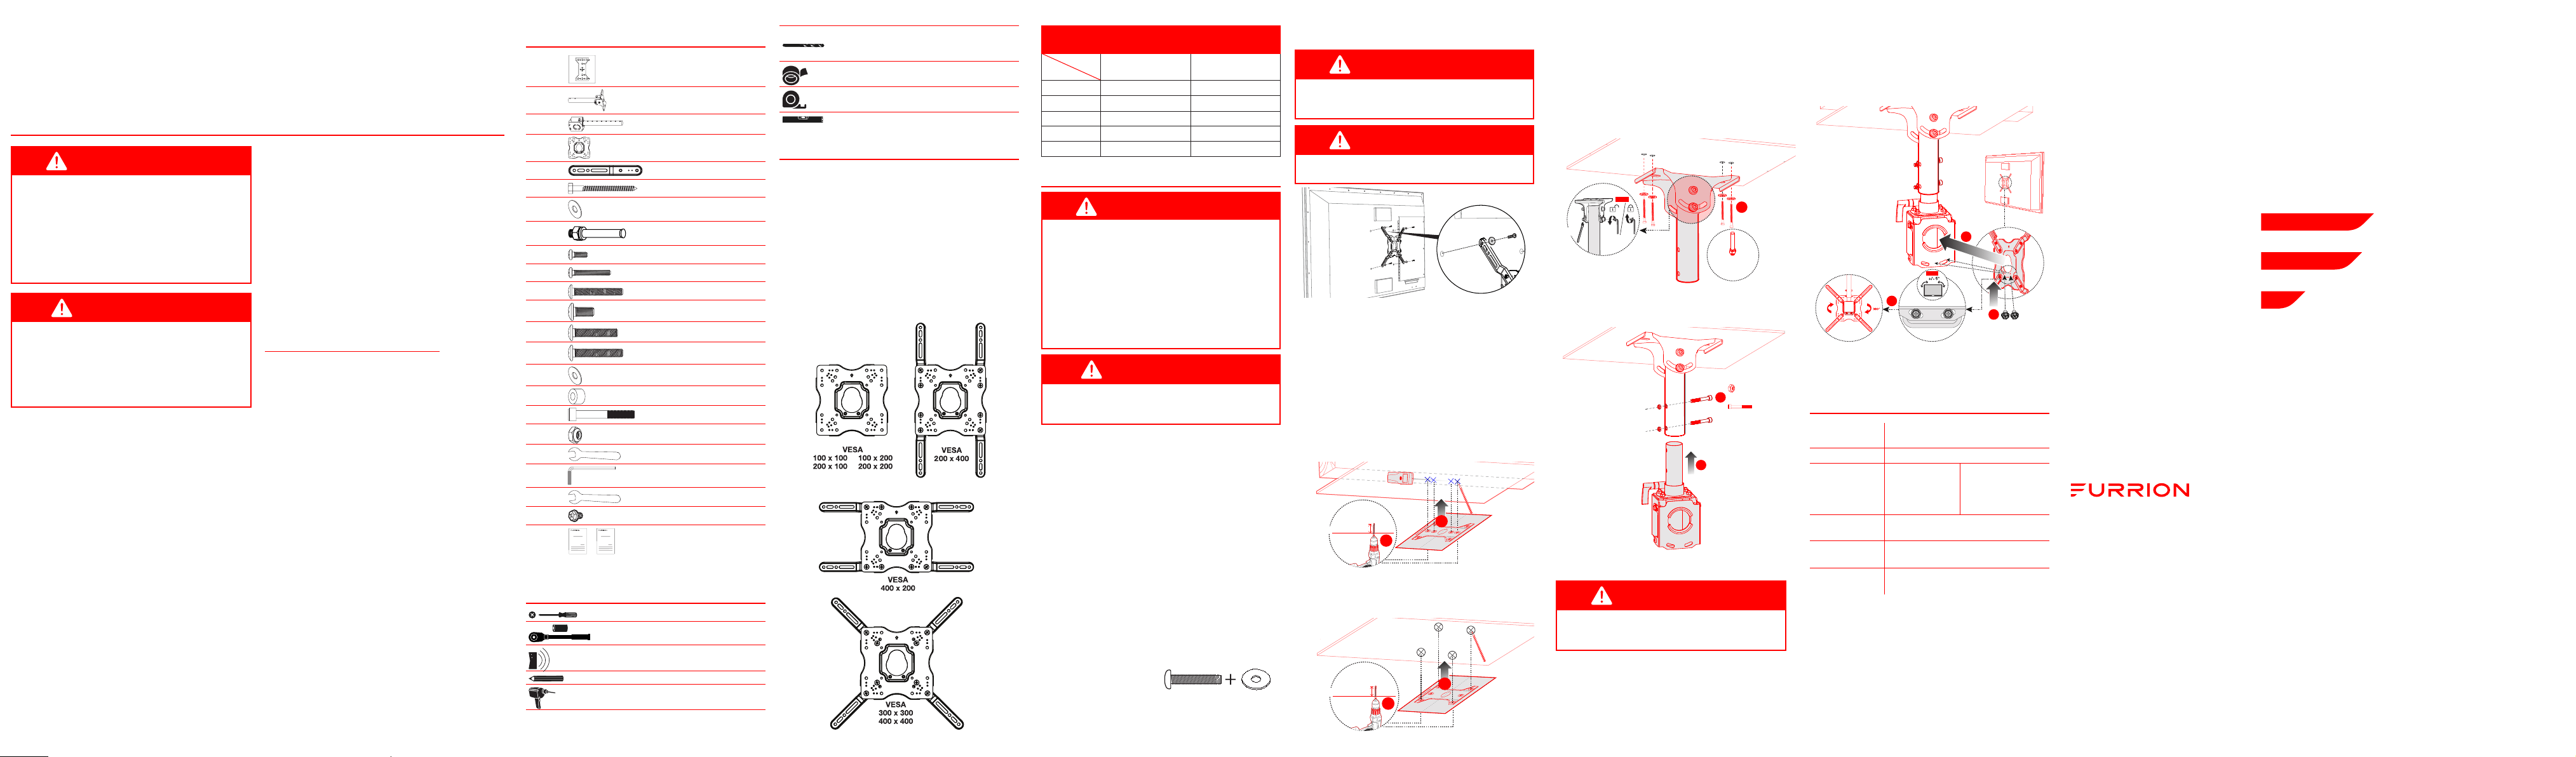
- For wooden roof installation,,
attach and fix the
bracket to ceiling using screws (M8 x 63mm)
and washers (M9).
- For concrete roof installation, attach and fix the
bracket to ceiling using metal anchor (M8 x 40).
NOTE: Use allen key and wrench to lock the
rod by turning counterclockwise, otherwise to
unlock. Ensure the rod is perpendicular to the
ground.
3
NOTE
S6 (O)
Metal Anchor
for oncrete roof
S13 (P)
4. Attach TV mount bracket to the rod.
5. Use 2 screws M8 x 55 mm (L) with M8 nuts (M) to
fix the joint
5
Screw Nuts: M8 x 2
Screws: M8 x 55 mm x 2
4
CAUTION
It is possible to dislodge your TV while you level it.
Use extreme caution until you tighten the leveling
and locking screws.
6. Hook the top support of the TV mount onto the
arm of the ceiling mount.
7. Secure the TV to the ceiling mount using two
screws (M6 x 8mm).
NOTE: You could turn the screws by hand to
adjust the leveling of your TV. Once adjustment is
finished, tighten the screws firmly in place, but do
not over tighten. Over-tightening can damage the
screws, greatly reducing their holding strength.
8. This mount allows a rotation of the TV of 360°
- rotate the TV to the desired location and then
tighten all screws.
6
7
8
Screws: M6 x 8mm
Screws:
TBC
NOTE
NOTE: It is recommended to be protected between
with the area near the wall and TV in case of damage
from strong winds or some other collision.
SPECIFICATION
Display Size 43 - 65" (1090 - 1650 mm)
Max Load 121 lbs (55 kg)
Mounting
Pattern
100 x 100 mm
200 x 100 mm
200 x 200 mm
300 x 200 mm
300 x 300 mm
400 x 200 mm
400 x 300 mm
400 x 400 mm
Tilt Range
Up to 15
° downwards
Pan/Swivel
Range
Up to 360
°
Distance From
Ceiling
24⁄ - 34" (614 - 864 mm)
Furrion Aurora™ TV VESA Mounting Pattern
(W x H mm)
FDU***CBS
FDU***CBR
FDU***CSA
43" 200 x 200mm 200 x 200mm
49" 200 x 400mm /
50" / 200 x 400mm
55" 400 x 400mm 400 x 200mm
65" 400 x 400mm 400 x 200mm
INSTALLATION
WARNING
When installing ceiling plate on cinder block, verify first
that you have a minimum of 1⅜" of concrete thickness
to be used for the concrete wall anchors (not included).
Do not drill into mortar joints! Be sure to mount in a
solid part of the block, generally 1"
minimum from the
side of the block. Cinder block must meet ASTM C-90
specifications. It is suggested that a standard electric
drill on slow setting is used to drill the hole instead of a
hammer drill to avoid breaking out the back of the hole
when entering a void or cavity. Concrete must be 2000
psi density minimum. Lighter density concrete may not
hold anchor.
CAUTION
Never try to hang a TV by yourself. Always use at
least two people to lift the TV into place.
!!IMPORTANT!!
● Handle the TV in a vertical position to avoid
damage to the screen. If placing the TV screen-side
down or leaning against a wall during installation,
cover the screen with a protective cloth or blanket.
● Check your TV manual before attaching brackets
to TV. Some models require attaching soundbar
brackets in tandem with attaching TV brackets.
Determine the correct length and diameter of screws
based on your TV hole patterns.
● If your TV back is flat, use the shorter screws with
washers.
● If your TV back is irregular or curved, use the longer
screws with washers and spacers (K).
* For Furrion Aurora™ TV, please use the screw size
M6x16 (D) and washers (J) to attach the TV bracket
to TV back.
Assemble the configured TV bracket on the back of
Furrion Aurora™ TV by using
(D) (J)
4 x M6x16 screws (D) and
washers (J). Ensure the
bracket is vertically centered
and leveled. Tighten the screws (D) to ensure the TV
bracket securely attached on TV back.
WARNING
Make sure to use the correct length screw for your
TV. A screw that is too long might damage your TV.
WARNING
Do not drill into mortar joints. Besure to drill holes
centered within studs or bricks.
1. Use the ceiling plater paper template to mark below:
- For wooden roof installation, mark A, B, C and D in
the ceiling.
- For concrete roof installation, mark a, b, c and d on
the ceiling.
2. Drill pilot holes into the circle marks (A, B, C, D or a, b,
c, d).
- For wooden roof installation, using a ¼" (6 mm) drill
bit to drill 4 pilot holes (A, B, C and D). Then remove
the wall mount paper template from wall.
Pilot holes must be drilled to a depth of 3" (75mm).
1
B
A
C
D
For wooden roof: 3" (75mm)
2
- For concrete roof installation, using a ⅜" (10 mm)
drill bit to drill 4 pilot holes (a, b, c and d) into solid
concrete. Pilot holes must be drilled to a depth of
1⁄" (40mm).
1
c
a
b
d
For concrete roof: 1⁄ " (40mm)
2
3. Installation continued:
Thank you and congratulations for purchasing this Furrion product. Before operating your new product, please
read these instructions carefully. This user manual contains information for safe use, installation and maintenance
of the product.
Please keep this manual in a safe place for future reference. This will ensure safe use and reduce the risk of injury.
Be sure to pass on this manual to new owners of this product.
The manufacturer does not accept responsibility for any damages due to not observing these instructions.
WHAT'S IN THE BOX
IT
A
a
c
b
d
BC
D
Ceiling Plate Paper Template
x 1
UP
x 1
LP
x 1
MP
x 1
AP
x 4
A
(M8 x 63mm) x 4
B
(M9) x 4
C
Metal Anchor (M8 x 40) x 4
D
(M6 x 16mm) x 4
E
(M6 x 18mm) x 4
F
(M6 x 25mm) x 4
G
(M8 x 10mm) x 8
H
(M8 x 18mm) x 4
I
(M8 x 25mm) x 4
J
(M6/M8) x 4
K
(M6/M8) x 8
L
(M8 x 55mm) x 2
M
(M8) x 2
N
(S10) x 1
O
(S6) x 1
P
(S13) x 1
Q
(M6 x 8mm) x 2
Warr ant y Ma nua l
Quic k S tart Gu ide
- Quick Start Guide x 1
- Warranty Manual x 1
TOOLS NEED (NOT INCLUDED)
Phillips Screwdriver
Screwdriver
Stud Finder
Pencil
Power Drill
WARNING
This product is designed to be installed on wood
stud or solid concrete ceilings. Before installing
make sure the ceiling or mounting surface will
safely support four times the combined weight of
the mounted equipment, including its accessories.
This product is designed to mount televisions and
any accessories weighing up to 121 lbs (55 kg) to a
properly rated ceiling structure.
CAUTION
● Never exceed the maximum load capacity of 121
lbs (55 kg). Serious injury or property damage
may occur.
● Improper installation may cause serious personal
injury or damage to the product, which will void
the warranty. It is recommended that a qualified
person should install the ceiling mount.
Safety measures must be practiced at all times during
the assembly of this product. Use proper safety
equipment and tools for the assembly procedure to
prevent personal injury.
● At least two qualified people should perform
the assembly procedure. Proper installation
must be followed as outlined in these installation
instructions. Personal injury and/or property
damage can result from dropping or mishandling
the TV.
● Ensure that there are no missing or defective parts
upon receipt. Never use defective parts.
● This product contains small parts that could be a
choking hazard.
● The ceiling you affix the ceiling mount to must be
capable of supporting four times the weight of the
television and the mount combined. A professional
installer or structural engineer should inspect
or verify the requirements of the structure it is
mounted to.
● Do not use this product for any purpose other than
to mount a VESA compliant TV on a vertical surface
as outlined in this manual.
● When mounting to metal structures or concrete
ceilings, it is recommended to add an anchor (not
included) to the TV, especially for areas where a lot
of wind shear is expected.
● Use an anchor (not included) in case you live in an
area where inclement weather occurs regularly.
● Always inspect mounting location for electrical
wires, water, and natural gas lines prior to
installation. Cutting or drilling into these utility lines
may cause serious personal injury or property
damage.
● Do not install near sources of high heat.
● Do not install on a structure that is prone to
vibration, movement or likelihood of being stricken
by other objects nearby.
NOTE: The included hardware is for mounting to flat
concrete surfaces concrete surfaces or wood trusses
and ceiling structures. If you are uncertain about the
nature of your wall, please consult your hardware or
installation professional for proper mounting to types
of walls.
SAFETY PRECAUTION
● Ensure these instructions are thoroughly
understood before attempting installation. Ifunsure
of any part of the installation process, contact a
professional installer for assistance.
● This product is for private household use only and
therefore may not be used in public places like
restaurants or hotels.
● Keep children and pets away while assembling up
the product.
● Do not let children play with the product.
● Do not use this product if any parts are missing, are
damaged or worn.
● Do not use power tools to assemble the product.
Power tools may strip or damage the parts.
● To avoid scratching the floor, assemble the product
on a soft surface, such as a carpet.
● Be careful not to pinch fingers during installation.
● Fasteners (hardware) must be tightly secured, but do
not overtighten screws. Over tightening can damage
the items, greatly reducing their holding power.
● Always use an assistant or mechanical lifting
equipment to safely lift and position equipment.
● Safety gear and proper tools must be used. Failure
to do so can result in property damage and/or
serious injury.
● Furrion recommends checking knobs, screws, and
bolts every 2-6 months and after inclement weather
conditions.
IMPORTANT SAFETY INSTRUCTION
Drill Bit
⁄" (12 mm) for Concrete
¼" (6 mm) for wood stud
Tape
Tape Measure
Level
CONFIGURE THE TV BRACKET
1. Choose one kind of configuration from below A,
B, C, D based on your TV and assemble the TV
bracket.
2. TV bracket expands to fit TV hole patterns from
3" x 3" (100 x 100mm) to 15" x 15"
(400 x 400mm).
3. Measure the width and height of your TV hole
pattern with a tape measure.
4. Assemble the TV bracket with 4 adaptor bars
and 8 M8x10 screws (G) for below B, C or D
configuration and keep the screws untightened,
slight adjust the 4 adaptor bars to make the
mounting holes aligned with the ones on the TV
back, tighten the screws to fix the 4 adaptor bars.
A B
C
D
CCD-0005594 Rev: 02-18-22
Size
Model
Merci etfélicitations pour l’achat deceproduit Furrion. Avant d’utiliser votre nouveau produit, veuillez lire attentivement
cesinstructions. Ce manuel d’utilisation contient des informations pour une utilisation, une installation etune maintenance sûres
duproduit.
Veuillez conserver cemanuel dans unendroit sûr pour toute référence ultérieure. Cela permettra degarantir une utilisation
sûreetderéduire les risques deblessures. Veillez àtransmettre cemanuel aux nouveaux propriétaires deceproduit.
Le fabricant n’accepte aucune responsabilité pour tout dommage dûaunon-respect deces instructions.
CE QU’IL Y A DANS LA BOITE
IT
A
a
c
b
d
BC
D
Gabarit papier pour plaque
deplafond x1
UP
(haut)
x1
LP
x1
MP
x1
AP
x4
A
(M8 x63mm) x4
B
(M9) x4
C
Ancrage métallique (M8 x40) x4
D
(M6 x16mm) x4
E
(M6 x18mm) x4
F
(M6 x25mm) x4
G
(M8 x10mm) x8
H
(M8 x18mm) x4
I
(M8 x25mm) x4
J
(M6/M8) x4
K
(M6/M8) x8
L
(M8 x55mm) x2
M
(M8) x2
N
(S10) x1
O
(S6) x1
P
(S13) x1
Q
(M6 x 8mm) x 2
Warr ant y Ma nua l
Quic k S tart Gu ide
- Guide dedémarrage rapide x1
- Manuel degarantie x1
OUTILS NÉCESSAIRES (NON INCLUS)
Tournevis Phillips
Tournevis
Détecteur degoujons
Crayon
Perceuse électrique
AVERTISSEMENT
Ce produit est conçu pour être installé sur des plafonds
àmontants enbois ouenbéton massif. Avant l’installation,
assurez-vous que leplafond oulasurface demontage peut
supporter entoute sécurité quatre fois lepoids combiné
del’équipement monté, ycompris ses accessoires. Ceproduit
est conçu pour monter des téléviseurs ettous les accessoires
pesant jusqu’à 121lb(55kg) sur une structure deplafond
correctement classée.
MISE EN GARDE
● Ne dépassez jamais lacapacité decharge
maximalede121lb(55kg). Cela pourrait entraîner des
blessures graves oudes dommages matériels.
● Une installation incorrecte peut entraîner des blessures
graves oudes dommages auproduit, cequi annule
lagarantie. Il est recommandé deconfier l’installation
dusupport deplafond àune personne qualifiée.
Des mesures desécurité doivent être appliquées àtout
moment pendant l’assemblage deceproduit. Utilisez les
équipements etoutils desécurité appropriés pour laprocédure
d’assemblage afin d’éviter toute blessure corporelle.
● Au moins deux personnes qualifiées doivent effectuer
laprocédure d’assemblage. Une installation correcte
doit être s
uivie comme indiqué dans ces instructions
d’installation. Une chute ouune mauvaise manipulation
dutéléviseur peut entraîner des blessures et/ou
desdommages matériels.
● S’assurer qu’il n’y apas depièces manquantes
oudéfectueuses àlaréception. Ne jamais utiliser depièces
défectueuses.
● Ce produit contient depetites pièces qui peuvent présenter
unrisque d’étouffement.
● Le plafond sur lequel vous fixez lesupport deplafond doit
être capable desupporter quatre fois lepoids dutéléviseur
etdusupport combiné. Un installateur professionnel
ouuningénieur enstructure doit inspecter ouvérifier les
exigences delastructure sur laquelle lesupport est monté.
● N’utilisez pas ceproduit àd’autres fins que lemontage
d’un téléviseur conforme àlanorme VESA sur une surface
verticale, comme indiqué dans cemanuel.
● En cas demontage sur des structures métalliques oudes
plafonds enbéton, ilest recommandé d’ajouter unancrage
(non fourni) autéléviseur, enparticulier dans les zones
oùuncisaillement duvent important est attendu.
● Utilisez unancrage (non fourni) sivous vivez dans
unerégion oùles intempéries sont fréquentes.
● Avant deprocéder àl’installation, vérifiez toujours
laprésence defils électriques, deconduites d’eau
etdegaz naturel sur lelieu demontage. Le fait
decouperoudepercer ces lignes peut entraîner
desblessures graves oudes dommages matériels.
● N’installez pas l’appareil près d’une source dechaleur
élevée.
● N’installez pas l’appareil sur une structure sujette
àdesvibrations, àdes mouvements oususceptible d’être
frappée par d’autres objets àproximité.
REMARQUE: La quincaillerie incluse est destinée àêtre
montée sur des surfaces plates enbéton ousur des fermes
enbois etdes structures deplafond. Si vous n’êtes pas sûr
delanature devotre mur, veuillez consulter votre quincaillier
ouunprofessionnel del’installation pour unmontage approprié
aux types demurs.
PRÉCAUTION DESÉCURITÉ
● Assurez-vous d’avoir bien compris ces instructions avant
deprocéder àl’installation. En cas dedoute sur une partie
duprocessus d’installation, contactez uninstallateur
professionnel pour obtenir del’aide.
● Ce produit est destiné àunusage domestique
privéetnepeut donc pas être utilisé dans des lieux publics
tels que les restaurants oules hôtels.
● Tenez les enfants etles animaux domestiques
àl’écartpendant lemontage duproduit.
● Ne laissez pas les enfants jouer avec leproduit.
● N’utilisez pas ceproduit sides pièces manquent,
sontendommagées ouusées.
● N’utilisez pas d’outils électriques pour assembler
leproduit. Les outils électriques risquent dedécaper
oud’endommager les pièces.
● Pour éviter derayer lesol, assemblez leproduit
surunesurface souple, comme untapis.
● Veillez ànepas pincer les doigts pendant l’installation.
● Les fixations (matériel) doivent être bien fixées, mais
neserrez pas trop les vis. Un serrage excessif peut
endommager les éléments, enréduisant considérablement
leur pouvoir demaintien.
● Utilisez toujours unassistant ouunéquipement delevage
mécanique pour soulever etpositionner l’équipement
entoute sécurité.
● Des équipements desécurité etdes outils appropriés
doivent être utilisés. Le non-respect decette consigne peut
entraîner des dommages matériels et/ou des blessures
graves.
● Furrion recommande devérifier les boutons, vis
etboulons tous les 2 à6mois etaprès des conditions
météorologiques défavorables.
INSTRUCTIONS DESÉCURITÉ IMPORTANTES
Foret
⁄po(12mm) pour lebéton
¼po(6mm) pour les montants enbois
Ruban adhésif
Ruban àmesurer
Niveau
CONFIGURER LESUPPORT
DETÉLÉVISION
1. Choisissez untype deconfiguration parmi les A, B, C, D
ci-dessous enfonction devotre téléviseur etassemblez
lesupport detélévision.
2. Le support télévision s’étend pour s’adapter aux modèles
detrous detélévision de3pox3po (100
x100mm) à15pox15po(400 x400mm).
3. Mesurez lalargeur etlahauteur delaconfiguration
destrous devotre téléviseur àl’aide d’un mètre ruban.
4. Assemblez lesupport télévision avec 4barres
d’adaptation et8visM8x10 (G) pour laconfiguration
ci-dessous B, C ouD etgardez les vis non serrées,
ajustez légèrement les 4barres d’adaptation pour
queles trous demontage soient alignés avec ceu
x
dudos dutéléviseur, serrez les vis pour fixer les4barres
d’adaptation.
A B
C
D
3. Installation (suite):
- Pour une installation sur untoit enbois,
fixezlesupport
auplafond àl’aide devis (M8 x63mm) etde
rondelles(M9).
- Pour une installation sur untoit enbéton, fixez lesupport
auplafond àl’aide d’un ancrage métallique (M8 x40).
REMARQUE: Utilisez laclé Allen etlaclé àmolette
pour verrouiller latige enlatournant dans lesens
inverse des aiguilles d’une montre, sinon pour
ladéverrouiller. Assurez-vous que latige est
perpendiculaire ausol.
3
NOTE
S6 (O)
Metal Anchor
for oncrete roof
S13 (P)
4. Fixer lesupport demontage dutéléviseur àlatige.
5. Utilisez 2visM8 x55mm(L) avec des écrousM8 (M)
pour fixer l’articulation.
5
Screw Nuts: M8 x 2
Screws: M8 x 55 mm x 2
4
MISE EN GARDE
Il est possible dedéloger votre téléviseur lorsque vous
lemettez àniveau. Faites preuve d’une extrême prudence
jusqu’à ceque vous ayez serré les vis demise àniveau
etdeblocage.
6. Accrochez lesupport supérieur dusupport detélévision
sur lebras dusupport deplafond.
7. Fixer letéléviseur ausupport deplafond àl’aide dedeux
vis (M6 x8mm).
REMARQUE: Vous pouvez tourner les vis àlamain
pour régler lamise àniveau devotre téléviseur. Unefois
leréglage terminé, serrez fermement les visenplace,
mais neserrez pas trop. Un serrage excessif peut
endommager les vis etréduire considérablement leur
force demaintien.
8. Ce support permet une rotation dutéléviseur de360°-
faites pivoter letéléviseur àl’endroit souhaité, puis serrez
toutes les vis.
6
7
8
Screws: M6 x 8mm
Screws:
TBC
NOTE
REMARQUE: Il est recommandé deleprotéger entre lazone
proche dumur etletéléviseur encas dedommages causés par
des vents forts oud’autres collisions.
SPÉCIFICATION
Taille del’écran 43 à65po(1090 à1650mm)
Charge maximale 55kg(121lb)
Type demontage
100 x100mm
200 x100mm
200 x200mm
300 x200mm
300 x300mm
400 x200mm
400 x300mm
400 x400mm
Plage d’inclinaison
Jusqu’à 15
° vers lebas
Portée
delafonction
panoramique/
pivotante
Jusqu’à 360
°
Distance duplafond 24⁄ à34po(614 à864mm)
Furrion Aurora™ TV VESA MODÈLE DE MONTAGE VESA
(W x H mm)
FDU***CBS
FDU***CBR
FDU***CSA
43 po 200 x 200mm 200 x 200mm
49 po 200 x 400mm /
50 po / 200 x 400mm
55 po 400 x 400mm 400 x 200mm
65 po 400 x 400mm 400 x 200mm
Modéle
Taille
INSTALLATION
AVERTISSEMENT
Lors del’installation delaplaque deplafond sur unparpaing,
vérifiez d’abord que vous disposez d’une épaisseur minimale
debéton de1⅜popour les ancrages muraux enbéton (non
inclus). Ne percez pas dans les joints demortier! Assurez-
vous demonter dans une partie solide dubloc, généralement
à1po
minimum ducôté dubloc. Le parpaing doit être conforme
aux spécifications delanorme ASTMC-90. Il est suggéré
d’utiliser une perceuse électrique standard àréglage lent pour
percer letrou plutôt qu’un marteau perforateur afin d’éviter
decasser l’arrière dutrou enentrant dans unvide ouune cavité.
Le béton doit avoir une densité minimale de2000lb/pi
2
. Un
béton dedensité plus légère risque denepas retenir l’ancrage.
MISE EN GARDE
N’essayez jamais desuspendre untéléviseur tout seul.
Utilisez toujours aumoins deux personnes pour mettre
letéléviseur enplace.
!! IMPORTANT !!
● Manipulez letéléviseur enposition verticale pour éviter
d’endommager l’écran. Si vous placez letéléviseur face
àl’écran ousivous l’appuyez contre unmur pendant
l’installation, couvrez l’écran avec untissu ouune couverture
deprotection.
● Consultez lemanuel dutéléviseur avant defixer lessupports
autéléviseur. Sur certains modèles, lessupports delabarre
deson doivent être fixés enmême temps que les supports
dutéléviseur.
Déterminez lalongueur etlediamètre corrects des vis
enfonction delaconfiguration des trous devotre téléviseur.
● Si ledos devotre téléviseur est plat, utilisez des vis plus
courtes avec des rondelles.
● Si ledos devotre téléviseur est irrégulier ouincurvé, utilisez
les vis plus longues avec des rondelles etdes entretoises
(K).
* Pour letéléviseur Furrion Aurora™, veuillez utiliser lataille
devisM6x16 (D) etles rondelles (J) pour fixerlesupport
detélévision audos dutéléviseur.
Assemblez lesupport télévision configuré àl’arrière
dutéléviseur Furrion Aurora™
enutilisant 4visM6x16 (D) etdes
rondelles(J). Assurez-vous que
lesupport est centré verticalement
et
mis àniveau. Serrez les vis (D) pour que lesupport
dutéléviseur soit bien fixé àl’arrière dutéléviseur.
(D) (J)
AVERTISSEMENT
Veillez àutiliser une vis delalongueur appropriée pour votre
téléviseur. Une vis trop longue peut endommager votre
téléviseur.
AVERTISSEMENT
Ne percez pas dans les joints demortier. Veillez àpercer
des trous centrés dans les montants oules briques.
1. Utiliser le
gabarit papier pour plaque deplafond
comme
modèle pour faire lesmarques ci-dessous:
- Pour une installation sur untoit enbois, marquez A, B, C etD
auplafond.
- Pour une installation sur untoit enbéton, marquez a, b,
cetdauplafond.
2. Percez des trous pilotes dans les marques circulaires (A, B, C,
D oua, b, c, d).
- Pour une installation sur untoit enbois, utilisez une mèche
de¼po(6mm) pour percer 4trous pilotes (A, B, C etD).
Retirez ensuite legabarit enpapier dumur.
Les trous pilotes doivent être percés àune profondeur
de3po(75mm).
1
B
A
C
D
For wooden roof: 3" (75mm)
2
- Pour une installation sur untoit enbéton, utilisez une mèche
de⅜po10mmpour percer 4trous pilotes (a, b, cetd) dans
dubéton solide. Les trous pilotes doivent êtrepercés àune
profondeur de1⁄po(40mm).
1
c
a
b
d
For concrete roof: 1⁄ " (40mm)
2
Gracias yfelicitaciones por adquirir este producto Furrion. Antes deutilizar sunuevo producto, lea atentamente estas
instrucciones. Este manual deusuario contiene información para eluso, lainstalación yelmantenimiento seguros
delproducto.
Guarde este manual enunlugar seguro para futuras consultas. Esto garantizará unuso seguro yreducirá elriesgo
delesiones. Asegúrese deentregar este manual alos nuevos propietarios deeste producto.
El fabricante nosehace responsable delos daños ocasionados por noseguir estas instrucciones.
QUÉ HAY EN LA CAJA
IT
A
a
c
b
d
BC
D
Plantilla depapel para
placa detecho x1
ARRIBA
x 1
LP
x 1
MP
x 1
AP
x 4
A
(M8 x63mm) x4
B
(M9) x4
C
Anclaje demetal (M8x40)
x4
D
(M6 x16mm) x4
E
(M6 x18mm) x4
F
(M6 x25mm) x4
G
(M8 x10mm) x8
H
(M8 x18mm) x4
I
(M8 x25mm) x4
J
(M6/M8) x4
K
(M6/M8) x8
L
(M8 x55mm) x2
M
(M8) x2
N
(S10) x1
O
(S6) x1
P
(S13) x1
Q
(M6 x 8mm) x 2
Warr ant y Ma nua l
Quic k S tart Gu ide
- Guía deinicio rápido x1
- Manual degarantía x1
HERRAMIENTAS NECESARIAS (NO
INCLUIDAS)
Destornillador Phillips
Destornillador
Detector devigas
Lápiz
Taladro eléctrico
ADVERTENCIA
Este producto está diseñado para instalarse
envigas demadera otechos dehormigón sólido.
Antes delainstalación, asegúrese deque eltecho
olasuperficie demontaje soportarán deforma segura
cuatro veces elpeso combinado del equipo montado,
incluidos sus accesorios. Este producto está diseñado
para montar televisores ycualquier accesorio que pese
hasta 121lbs (55kg) enuna estructura detecho con
laclasificación adecuada.
PRECAUCIÓN
● Nunca exceda lacapacidad decarga máxima
de121lbs (55kg). Pueden ocurrir lesiones graves
odaños alapropiedad.
● Una instalación incorrecta puede causar lesiones
personales graves odaños alproducto, loque
anulará lagarantía. Se recomienda que una persona
calificada instale elsoporte detecho.
Se deben tomar medidas deseguridad entodo
momento durante elmontaje deeste producto. Utilice
elequipo ylas herramientas deseguridad adecuados
para elprocedimiento demontaje para evitar lesiones
personales.
● Al menos dos personas calificadas deben realizar
elprocedimiento demontaje. Se debe
seguir
lainstalación adecuada como sedescribe enestas
instrucciones deinstalación. Pueden producirse
lesiones personales odaños alapropiedad sisecae
osemaneja mal eltelevisor.
● Asegúrese deque nohaya piezas faltantes
odefectuosas alrecibirlo. No utilice nunca piezas
defectuosas.
● Este producto contiene piezas pequeñas que pueden
representar unpeligro deasfixia.
● El techo alque fije elsoporte detecho debe ser
capaz desoportar cuatro veces elpeso del televisor
yelsoporte juntos. Un instalador profesional oun
ingeniero estructural debe inspeccionar overificar los
requisitos delaestructura enlaque está montado.
● No utilice este producto para ningún otro propósito que
nosea montar untelevisor compatible con VESA enuna
superficie vertical como sedescribe eneste manual.
● Al montar enestructuras metálicas otechos
dehormigón, serecomienda agregar unancla
(noincluida) altelevisor, especialmente para áreas
donde seespera mucha cizalladura del viento.
● Use unancla (no incluida) encaso deque viva en unárea
donde elclima inclemente ocurre regularmente.
● Siempre inspeccione laubicación donde realizará
elmontaje enbusca decables eléctricos, caños deagua
ydegas natural antes delainstalación. Cortar operforar
estos caños deservicios públicos puede causar lesiones
personales graves odaños alapropiedad.
● No loinstale cerca defuentes decalor intenso.
● No loinstale enuna estructura propensa avibraciones,
movimiento oprobabilidad deser golpeada por otros
objetos cercanos.
NOTA: El hardware incluido espara montar ensuperficies
planas dehormigón, superficies dehormigón ovigas
demadera yestructuras detecho.
Si noestá seguro acerca
delanaturaleza desupared, consulte asuprofesional
deinstalación ohardware para elmontaje adecuado
enlostipos deparedes.
PRECAUCIONES DESEGURIDAD
● Asegúrese deque estas instrucciones secomprendan
completamente antes deintentar lainstalación.
Si noestá seguro dealguna parte del proceso
deinstalación, comuníquese con uninstalador
profesional para obtener ayuda.
● Este producto essolo para uso doméstico privado y,
por lotanto, nosepuede utilizar enlugares públicos
como restaurantes uhoteles.
● Mantenga alos niños ylas mascotas alejados mientras
ensambla elproducto.
● No permita que los niños jueguen con elproducto.
● No utilice este producto sifalta alguna pieza, osiestá
dañada ogastada.
● No utilice herramientas eléctricas para ensamblar
elproducto. Las herramientas eléctricas pueden pelar
odañar las piezas.
● Para evitar rayar elsuelo, monte elproducto sobre una
superficie blanda, como una alfombra.
● Tenga cuidado denoapretarse los dedos durante
lainstalación.
● Los sujetadores (hardware) deben estar bien sujetos,
pero noapriete demasiado los tornillos. Apretar
demasiado puede dañar los elementos, reduciendo
engran medida supoder desujeción.
● Utilice siempre unasistente oequipo deelevación
mecánico para levantar ycolocar elequipo demanera
segura.
● Se debe utilizar equipo deseguridad yherramientas
adecuadas. El nohacerlo puede resultar endaños
alapropiedad olesiones graves.
● Furrion recomienda revisar las perillas, los tornillos
ylos pernos cada 2 a6meses ydespués delas
inclemencias del tiempo.
INSTRUCCIÓN DESEGURIDAD IMPORTANTE
Broca
⁄" (12mm) para hormigón
¼" (6mm) para viga demadera
Cinta
Cinta métrica
Nivel
CONFIGURAR ELSOPORTE DEL TV
1. Elija untipo deconfiguración delas siguientes A, B, C,
D según sutelevisor ymonte elsoporte deltelevisor.
2. El soporte deTV seexpande para adaptarse
alospatrones deorificios deTV de3" x3"
(100 x100mm) a15" x15" (400 x400mm).
3. Mida elancho ylaaltura del patrón deorificios
desutelevisor con una cinta métrica.
4. Ensamble elsoporte del televisor con 4barras
adaptadoras y8 tornillos M8x10 (G) para
laconfiguración deabajo B, C oD ymantenga los
tornillos sin apretar, ajuste levemente las 4 barras
adaptadoras para alinear los orificios demontaje
con los delaparte posterior del televisor, apriete los
tornillos para fijar las 4 barras adaptadoras.
A B
C
D
3. Continuación delainstalación:
- Para lainstalación entecho demadera,
ajuste yfije
elsoporte altecho con tornillos (M8 x63mm)
yarandelas (M9).
- Para lainstalación entecho dehormigón, ajuste yfije
elsoporte altecho con unancla demetal (M8x40).
NOTA: Utilice una llave Allen yuna llave inglesa
para ajustar labarra girándola hacia laizquierda;
delocontrario, para desatornillarla. Asegúrese
deque lavarilla esté perpendicular alsuelo.
3
NOTE
S6 (O)
Metal Anchor
for oncrete roof
S13 (P)
4. Fije elsoporte demontaje del TV alabarra.
5. Utilice 2 tornillos M8 x55mm(L) con tuercas M8(M)
para fijar lajunta.
5
Screw Nuts: M8 x 2
Screws: M8 x 55 mm x 2
4
PRECAUCIÓN
Es posible sacar sutelevisor mientras lonivela.
Tenga mucho cuidado hasta que ajuste los tornillos
denivelación ybloqueo.
6. Enganche elsoporte superior del soporte para elTV
enelbrazo del soporte para techo.
7. Asegure eltelevisor alsoporte detecho con
dostornillos (M6 x8mm).
NOTA: Puede girar los tornillos amano para ajustar
lanivelación desutelevisor. Una vez finalizado
elajuste, apriete los tornillos firmemente ensulugar,
pero noajuste demasiado. Ajustar demasiado puede
dañar los tornillos, reduciendo engran medida
sufuerza desujeción.
8. Este soporte permite una rotación del televisor
de360°: gire eltelevisor alaubicación deseada
yluego ajuste todos los tornillos.
6
7
8
Screws: M6 x 8mm
Screws:
TBC
NOTE
NOTA : Se recomienda protegerse entre elárea cercana
alapared yeltelevisor encaso dedaños por vientos
fuertes oalguna otra colisión.
ESPECIFICACIÓN
Tamaño de
lapantalla
43" a65" (1090 - 1650mm)
Carga máxima 121lbs (55kg)
Patrón de
montaje
100 x100mm
200 x100mm
200 x200mm
300 x200mm
300 x300mm
400 x200mm
400 x300mm
400 x400mm
Rango de
inclinación
Hasta 15° hacia abajo
Rango degiro Hasta 360°
Distancia desde
eltecho
24⁄ - 34" (614 - 864mm)
PATRÓN DE MONTAJE VESA TV Furrion Aurora ™
(W x H mm)
FDU***CBS
FDU***CBR
FDU***CSA
43" 200 x 200mm 200 x 200mm
49" 200 x 400mm /
50" / 200 x 400mm
55" 400 x 400mm 400 x 200mm
65" 400 x 400mm 400 x 200mm
Modelo
Tamaño
INSTALACIÓN
ADVERTENCIA
Al instalar laplaca detecho enunbloque dehormigón, primero
verifique que tenga unmínimo de1⅜" deespesor dehormigón
para usar con los anclajes depared dehormigón (no incluidos).
¡No taladre juntas demortero! Asegúrese demontarlo enuna
parte sólida del bloque, generalmente a1" como mínimo del
costado del bloque. Elbloque dehormigón debe cumplir
con las especificaciones ASTM C-90. Se sugiere que seuse
untaladro eléctrico estándar enajuste lento para perforar
elorificio enlugar deuntaladro percutor para evitar romper
laparte posterior del orificio alentrar enunvacío ocavidad. El
hormigón debe tener una densidad mínima de2000psi. Es
posible que elhormigón dedensidad más ligera nosesujete.
PRECAUCIÓN
Nunca intente colgar untelevisor por sucuenta. Utilice
siempre almenos dos personas para colocar eltelevisor
ensulugar.
¡IMPORTANTE!
● Manipule eltelevisor enposición vertical para evitar
dañar lapantalla. Si coloca eltelevisor con lapantalla
hacia abajo oapoyado contra una pared durante
lainstalación, cubra lapantalla con unpaño protector
ouna manta.
● Consulte elmanual desutelevisor antes decolocar los
soportes eneltelevisor. Algunos modelos requieren que
secoloquen los soportes delabarra desonido junto con
los soportes deTV.
Determine lalongitud yeldiámetro correctos delos
tornillos según los patrones deorificios desutelevisor.
● Si laparte posterior desutelevisor esplana, use
lostornillos más cortos con arandelas.
● Si laparte posterior desutelevisor esirregular
ocurvada, use los tornillos más largos con arandelas
yespaciadores (K).
* Para eltelevisor Furrion Aurora ™, utilice eltamaño
detornillo M6x16 (D) ylas arandelas (J) para sujetar
elsoporte del televisor alaparte posterior del televisor.
Monte elsoporte deTV configurado enlaparte posterior
deFurrion Aurora ™ TV usando
(D) (J)
4
tornillos M6x16 (D) yarandelas
(J). Asegúrese deque
elsoporte esté centrado
ynivelado verticalmente. Apriete los tornillos (D) para
asegurarse deque elsoporte del televisor esté bien sujeto
enlaparte posterior del televisor.
ADVERTENCIA
Asegúrese deutilizar eltornillo delalongitud correcta
para sutelevisor. Un tornillo demasiado largo podría
dañar sutelevisor.
ADVERTENCIA
No taladre juntas demortero. Asegúrese deperforar
agujeros centrados dentro delos postes oladrillos.
1. Utilice el
plantilla depapel para placa detecho
como
plantilla para marcar acontinuación:
- Para lainstalación entecho demadera, marque A, B, C
yD eneltecho.
- Para lainstalación entecho dehormigón, marque a, b,
cydeneltecho.
2. Taladre agujeros piloto enlas marcas del círculo (A, B, C, D
oa, b, c, d).
- Para lainstalación entechos demadera, use unabroca
de¼” (6mm) para perforar 4 orificios guía (A,B, C yD).
Luego, retire laplantilla depapel demontaje enpared
delapared.
Los orificios piloto deben perforarse auna profundidad
de3" (75mm).
1
B
A
C
D
For wooden roof: 3" (75mm)
2
- Para lainstalación entecho dehormigón, use una broca
de⅜" (10mm) para perforar 4 orificios guía (a,b, cyd)
enhormigón sólido. Los orificios piloto deben perforarse
auna profundidad de1⁄" (40mm).
1
c
a
b
d
For concrete roof: 1⁄ " (40mm)
2
Furrion Innovation Center & Institute of Technology
● 52567 Independence Ct., Elkhart, IN 46514, USA
● Toll free/Numéro gratuit/Línea telefónica gratuita:1-800-789-3341
● Email/Courriel/Correo electrónico: [email protected]
©2007-2022 Furrion Ltd. Furrion® and the Furrion logo are trademarks licensed for use by Furrion Ltd. and registered in the
U.S. and other countries.
©2007-2022 Furrion Ltd. Furrion® et le logo Furrion sont des marques commerciales utilisées sous licence par Furrion Ltd.
etdéposées aux États-Unis et dans d’autres pays.
©2007-2022 Furrion Ltd. Furrion® y el logotipo de Furrion son marcas autorizadas por Furrion Ltd. y registradas enEstados
Unidos yotros países.
For Patent Info: www.furrion.com/pages/patents
Pour des informations sur les brevets: www.furrion.com/pages/patents
Para obtener información sobre las patentes, visite: www.furrion.com/pages/patents
FURRION.COM
IM-FHA00060 V2.0