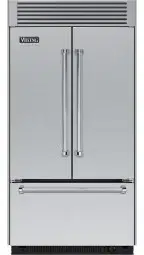
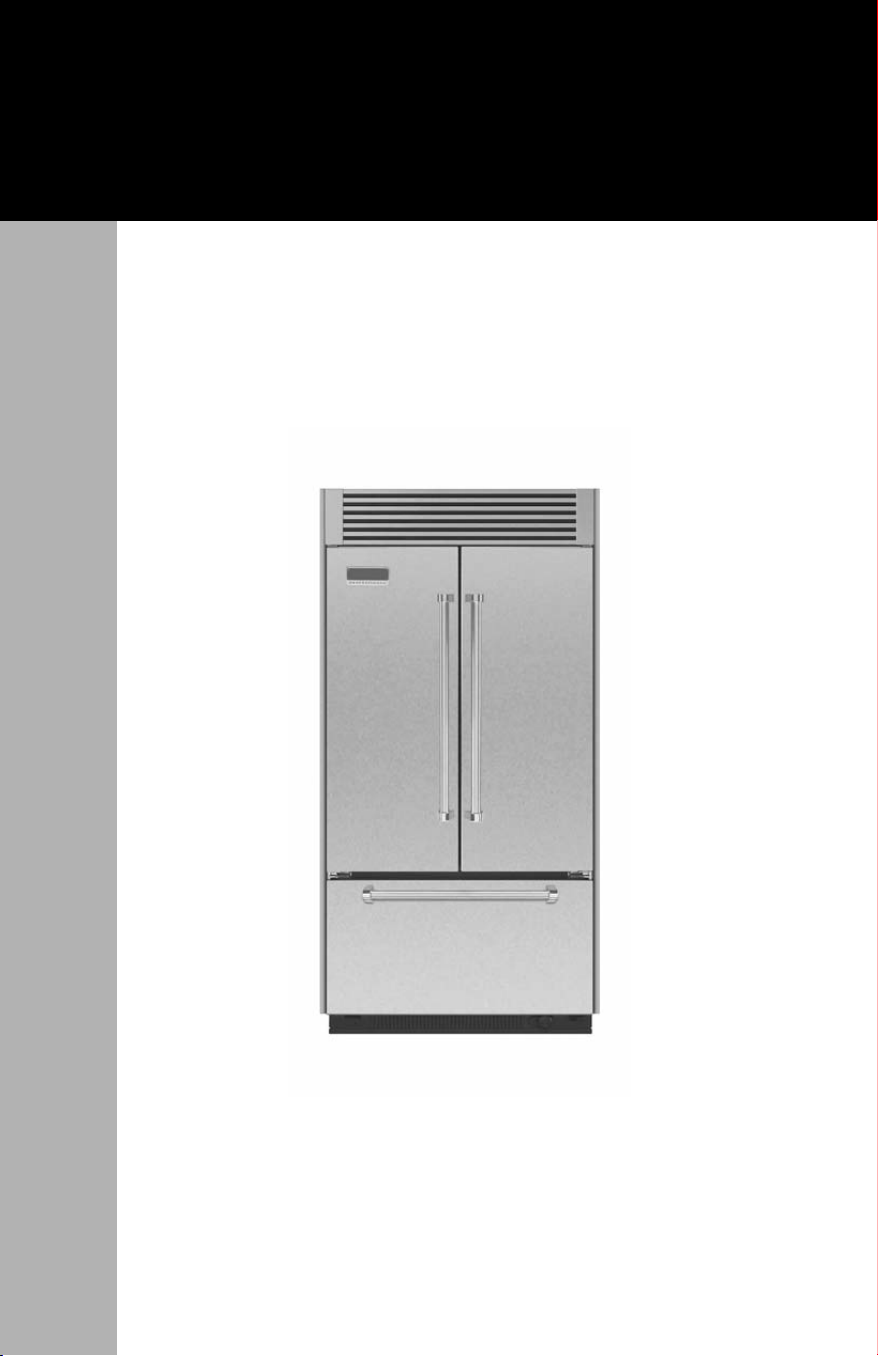
Built-in French Door
Bottom-Freezer Refrigerator
Use & Care Manual

We hope you will enjoy and appreciate the care and attention we have
put into every detail of your new, state-of-the-art refrigerator.
Your appliance is designed to offer years of reliable service. This Use
and Care Guide will provide you with the information you need to
become familiar with your refrigerator’s care and operation.
Your complete satisfaction is our ultimate goal. If you have any
questions or comments about this product, please contact the dealer
from whom you purchased it, or contact our Consumer Support Center
at 1-888-845-4641.
We appreciate your choice of our refrigerator and hope that you will
again select our products for your other major appliance needs.
For more information about the complete and growing selection
of products, contact your dealer or visit us online at vikingrange.com in
the US or at brigade.ca in Canada
Congratulations
2

Getting Started
Refrigerator Safety ____________________________________________4
Important Safety Instructions ___________________________________5
Proper Disposal (of old refrigerator)_____________________________6
Water Supply Requirements____________________________________8
Water System Preparation _____________________________________9
Product Controls
Using the Controls___________________________________________10
Temperature Controls ________________________________________12
Water Filter Indicator ________________________________________13
Rest Mode__________________________________________________14
Alarm Functions _____________________________________________15
Operation
Ice Maker___________________________________________________17
Water Filtration System_______________________________________18
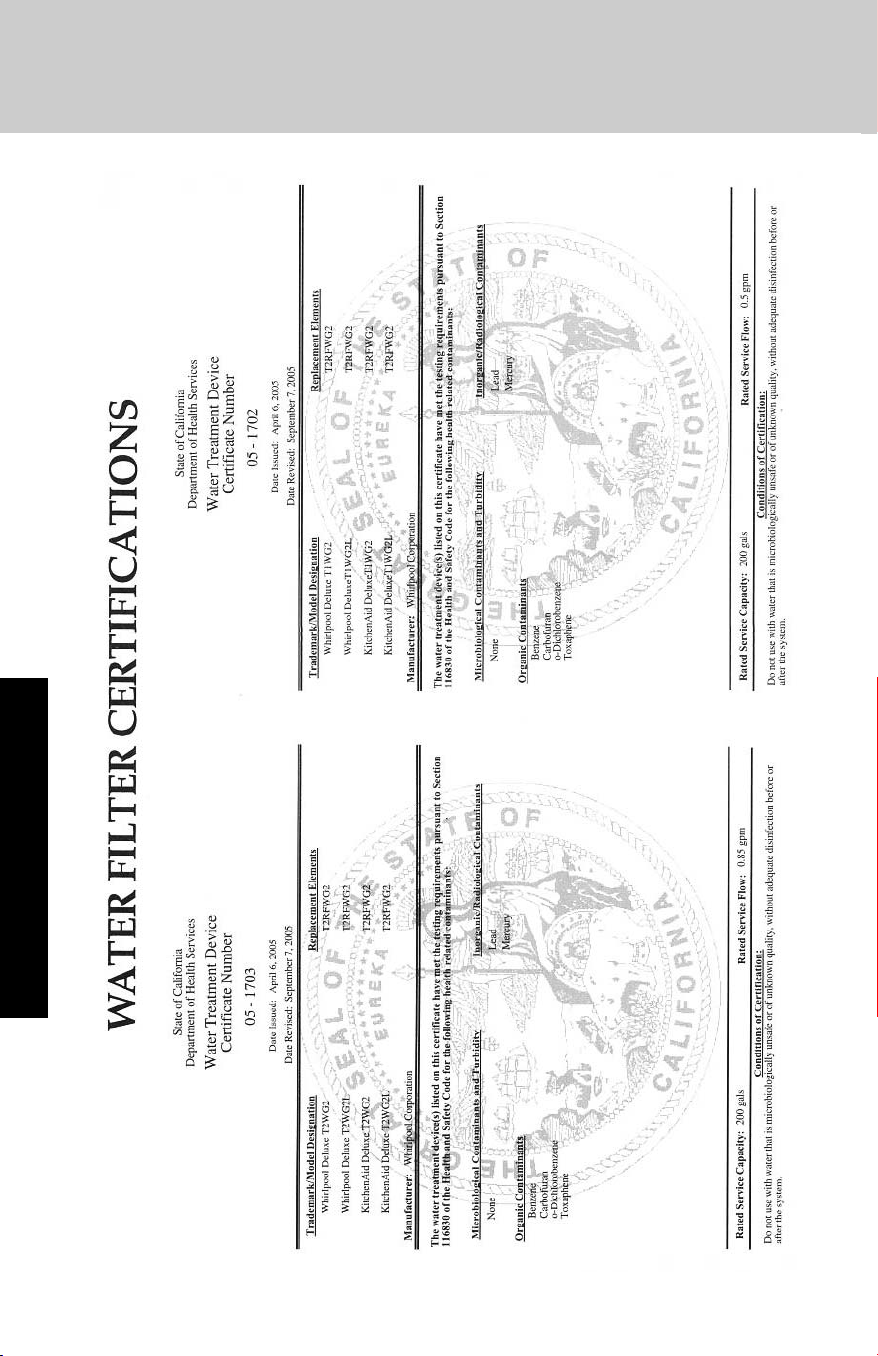
Water Filter Certifications_____________________________________20
Refrigerator Features_________________________________________22
Freezer Features_____________________________________________24
Product Care
Cleaning ___________________________________________________25
Changing the Light Bulb _____________________________________26
Troubleshooting _____________________________________________28
Service Information __________________________________________33
Warranty ___________________________________________________34
Table of Contents
3
4
Refrigerator Safety
Getting Started
WARNING
DANGER
CAUTION
WARNING
You can be killed or seriously injured if you don’t
immediately
follow instructions.
You can be killed or seriously injured if you don’t follow
instructions.
Hazards or unsafe practices which COULD result in minor
personal injury.
All safety messages will identify the hazard, tell you how
to reduce the chance of injury, and tell you what can happen if
instructions are not followed.
Recognize Safety Symbols, Words, Labels
Warning and Important Safety Instructions appearing in this manual
are not meant to cover all possible conditions and situations that may
occur. Common sense, caution, and care must be exercised when
installing, maintaining, or operating the appliance.
ALWAYS contact the manufacturer about problems or conditions you do not
understand.
Your safety is important to us.
This use and care manual contains
safety symbols and statements. Always read and obey all safety
messages.
This symbol alerts you to hazards such as fire, electrical
shock or other injuries.
WARNING
State of California Proposition 65 Warning
• This product contains one or more chemicals known to the State of
California to cause cancer.
• This product contains one or more chemicals known to the State of
California to cause birth defects or other reproductive harm.
5
Getting Started
To reduce the risk of fire, electric shock, or injury when using your
refrigerator, follow these basic precautions:
• Plug into a grounded 3-prong outlet.
• DO NOT remove ground prong.
• DO NOT use an adapter.
• DO NOT use an extension cord.
• Disconnect power before servicing.
• Replace all parts and panels before operating.
• Remove doors from your old refrigerator.
• Use nonflammable cleaner.
• Keep flammable materials and vapors, such as gasoline, away from
refrigerator.
• Use two or more people to move and install refrigerator.
• Disconnect power before installing ice maker (on ice maker kit
ready models only).
• Use a sturdy glass when dispensing ice (on some models).
SAVE THESE INSTRUCTIONS
Important Safety Instructions
Electrical Shock Hazard
Plug into a grounded 3 prong outlet.
Do not remove ground prong.
Do not use an adapter.
Do not use an extension cord.
Failure to follow these instructions can result in
death, fire, or electrical shock.
Explosion Hazard
Keep flammable materials and vapors, such as
gasoline, away from refrigerator.
Failure to do so can result in death, explosion,
or fire.
WARNING
WARNING
WARNING
WARNING
WARNING
WARNING
6
Proper Disposal (of old refrigerator)
Getting Started
IMPORTANT:
Child entrapment and suffocation are not problems of the past. Junked
or abandoned refrigerators are still dangerous—even if they will sit for
“just a few days”. If you are getting rid of your old refrigerator, please
follow these instructions to help avoid accidents.
Before You Throw Away Your Old Refrigerator or Freezer:
• Take off the doors.
• Leave the shelves in place so that children may not easily climb
inside.
Suffocation Hazard
Remove doors from your old refrigerator.
Failure to do so can result in death or brain damage.
WARNING
WARNING
7
Remove the Packaging
■ Remove tape and glue residue from surfaces before turning on the
refrigerator. Rub a small amount of liquid dish soap over the
adhesive with your fingers. Wipe with warm water and dry.
■ Do not use sharp instruments, rubbing alcohol, flammable fluids, or
abrasive cleaners to remove tape or glue. These products can
damage the surface of your refrigerator. For more information, see
“Refrigerator Safety.”
■ Dispose of/recycle all packaging materials.
Clean Before Using
After you remove all of the packaging materials, clean the inside of
your refrigerator before using it. See the cleaning instructions in
“Refrigerator Care.”
Before Using your Refrigerator
Important information to know about glass shelves and
covers:
Do not clean glass shelves or covers with warm water when
they are cold. Shelves and covers may break if exposed to
sudden temperature changes or impact, such as bumping.
Tempered glass is designed to shatter into many small,
pebble-size pieces. This is normal. Glass shelves and covers
are heavy. Use both hands when removing them to avoid
dropping.
CAUTION
Getting Started
Broken Glass Hazard
Do not hit refrigerator glass doors
Protect glass surface and edges during installation or
removal of doors.
Failure to do so can result in serious eye injury or minor
cuts.
WARNING
WARNING

8
Read all directions before you begin.
IMPORTANT:
■ When your refrigerator was installed, the water connection from
the water source should have been connected to your
refrigerator. If your refrigerator is not connected to a water
source, see “Connect to Water Line” in the Installation
Instructions. If you have any questions about your water
connection, see “Troubleshooting” or call a licensed, qualified
plumber.
■ If you turn the refrigerator on before the water line is connected,
turn the ice maker OFF. See “Ice Maker and Storage Bin.”
■ All installations must meet local plumbing code requirements.
A cold water supply with water pressure between 30 and 120 psi (207
and 827 kPa) is required to operate the water dispenser and ice maker.
If you have questions about your water pressure, see
“Troubleshooting” or call a licensed, qualified plumber.
Reverse Osmosis Water Supply
IMPORTANT: The pressure of the water supply coming out of a reverse
osmosis system going to the water inlet valve of the refrigerator needs
to be between 30 and 120 psi (207 and
827 kPa). If a reverse osmosis water filtration system is connected to
your cold water supply, the water pressure to the reverse osmosis
system needs to be a minimum of 40 psi (276 kPa).
If the water pressure to the reverse osmosis system is less than
40 psi (276 kPa):
■ Check to see whether the sediment filter in the reverse osmosis
system is blocked. Replace the filter if necessary.
■ Allow the storage tank on the reverse osmosis system to refill
after heavy usage.
■ If your refrigerator has a water filter, it may further reduce the
water pressure when used in conjunction with a reverse osmosis
system. Remove the water filter. See “Water Filtration System.”
If you have questions about your water pressure, call a licensed,
qualified plumber.
Water Supply Requirements
Getting Started
9
Please read before using the water system.
IMPORTANT
:
After connecting the refrigerator to a water source or replacing the
water filter, fill and discard two full containers of ice to prepare the
water filter for use, before using the ice.
1. Turn on the ice maker. Slide the ice maker On/Off control, located
on the left-hand side of the ice bin, to the ON (up) position. Please
refer to “Ice Maker and Storage Bin” for further instructions on the
operation of your ice maker.
NOTE: Allow 24 hours to produce the first batch of ice.
NOTE: If your model has a base grille water filter, make sure the water
filter is properly installed so that the Eject button is out. See “Water
Filtration System.”
Water System Preparation
Do not use with water that is microbiologically unsafe or of
unknown quality without adequate disinfection before or
after the system.
CAUTION
On/O Control
Getting Started
10
Product Controls
Using the Controls
Power ON/Off Switch
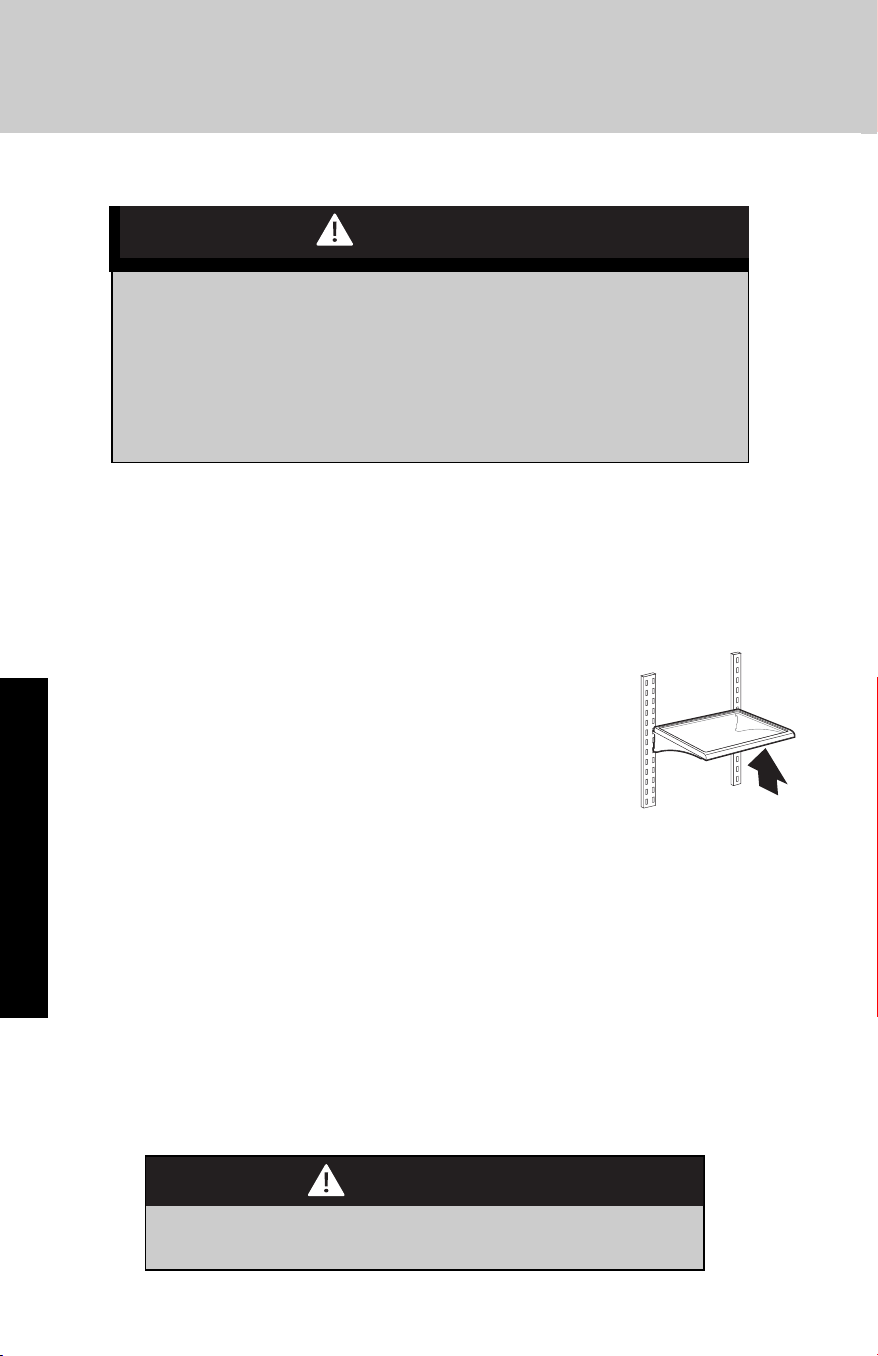
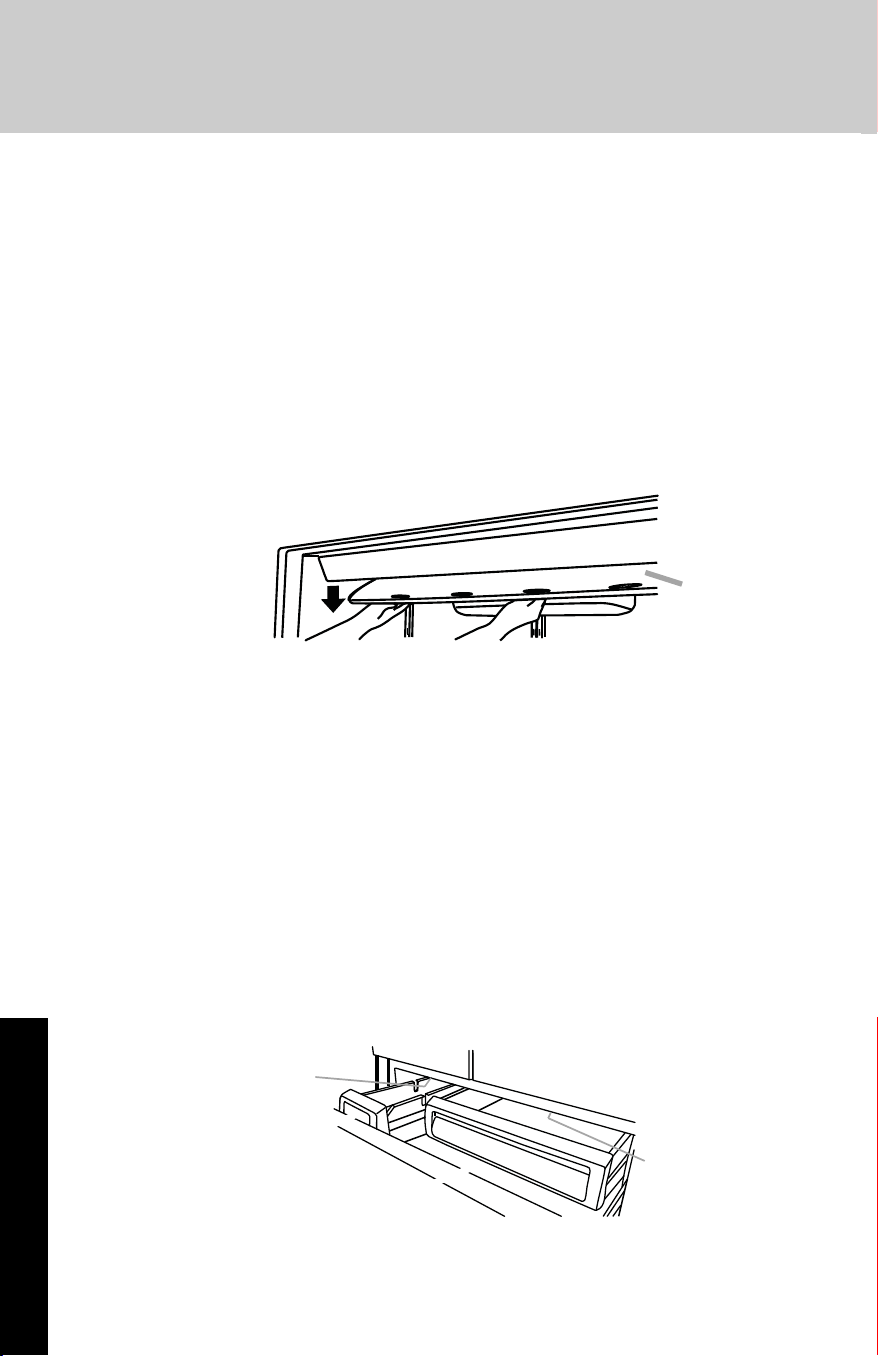
To install the Top Grille:
1. Remove the grille from the
packaging.
2. Locate pins above refrigerator..
3. Place grille on top pins.
4. Rotate grille downward. Grille
will snap in place once it is
secure on the bottom pins.
BACK
BACK
Before installing the top
grille, turn the power
switch to ON.
Power
Switch

11
Product Controls
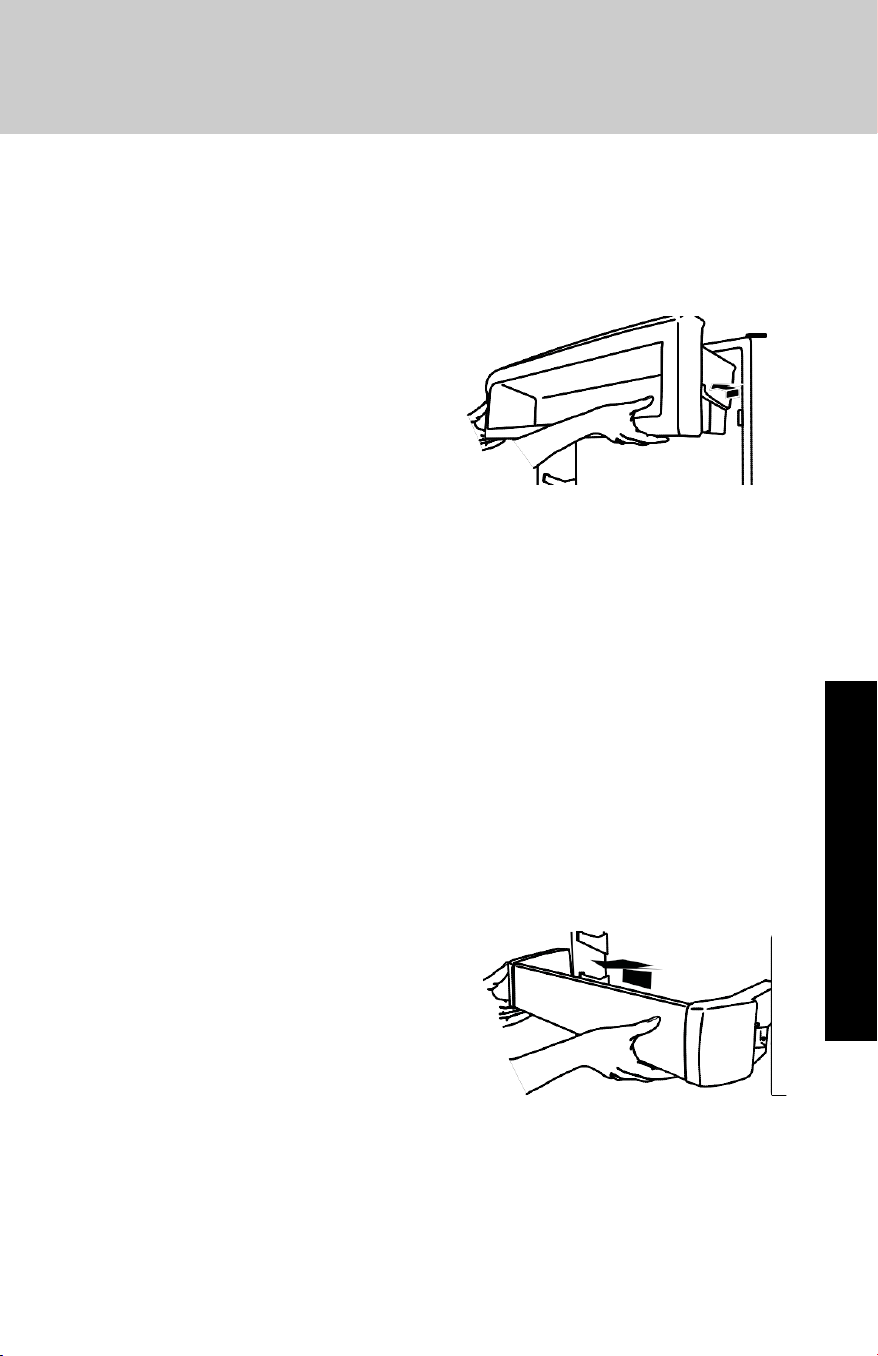
If you need to turn the power to your refrigerator Off after installation,
you must remove the top grille assembly to access the power switch.
Turn the power to the refrigerator Off when cleaning your refrigerator
or changing light bulbs.
To Remove Top Grille, reverse steps listed for installing the grille.
1. Grasp the grille at the bottom. Pull up slightly to unsnap from
bottom pins.
2. Lift upward to remove grille from top pins.
IMPORTANT: Be sure the power switch is set to the ON position after
cleaning refrigerator or changing the light bulbs.
Using the Controls
■ The refrigerator control adjusts the refrigerator compartment
temperature. The freezer control adjusts the freezer compartment
temperature.
■ Wait 24 hours after you turn on the refrigerator before you put food
into it. If you add food before the refrigerator has cooled
completely, your food may spoil.
NOTE: Adjusting the refrigerator and freezer controls to a lower
(colder) setting will not cool the compartments any faster.
■ If the temperature is too warm or too cold in the refrigerator or
freezer, first check the air vents to be sure they are not blocked
before adjusting the controls.
■ The preset settings should be correct for normal household usage.
The controls are set correctly when milk or juice is as cold as you
like and when ice cream is firm.
■ The actual temperature may differ from the display when a door is
open for an extended period of time.
NOTE: The factory recommended set points are 0°F (-18°C) for the
freezer and 37°F (3°C) for the refrigerator.
12
Operation
Using the Controls
Turning Refrigerator On and Viewing Set Points
■ Press the ON/OFF touch pad.
NOTE:
■ After the refrigerator is turned on, the Over
Temperature audio alarm and indicator light may activate every 1¹⁄₂
hours until the refrigerator and freezer temperatures are below
48°F (9°C) and 15°F (-9°C), respectively, or until the alarm is turned
off. To turn off the audio alarm and indicator light, see “Master
Alarm Reset.”
■ The ON/OFF touch pad on the control panel shuts down
refrigerator functions such as cooling, lighting, fans and
compressors. To turn the power off completely, use the power
ON/OFF switch located behind the top grille. See “Power On/ Off
Switch.”
Viewing the Celsius Temperatures
■ Press °C touch pad. To redisplay degrees
Fahrenheit, press °C again.
NOTE: If the freezer temperature is below zero, the
negative sign next to the freezer display will light up.
This is normal.
Adjusting Controls
NOTE: Wait at least 24 hours between adjustments. Recheck the
temperatures before other adjustments are made.
To Adjust Set Point Temperatures:
■ Press the refrigerator or freezer PLUS (+) or MINUS (-) touch pad
until the desired temperature is reached.
■ Press the Set To Recommended touch pad to reset the set points
to the factory recommended temperatures.
NOTE: The set point range for the freezer is -5°F to 5°F (-21°C to -
15°C). The set point range for the refrigerator is 33°F to 45°F (0°C
to 7°C).
037
13
Operation
Using the Controls
Water Filter Indicator and Reset
See “Water Filter Indicator” in the “Water Filtration System” section.
Max Cold
The Max Cold feature assists with periods of heavy ice usage, full
grocery loads, or temporarily warm room temperatures.
■ Press MAX COLD to turn on the Max Cold
feature. The Max Cold indicator light will remain
on for 24 hours unless manually turned off.
NOTE: The temperature display will remain at 34°F (1°C) and -5°F (-
21°C) for the refrigerator and freezer compartments, respectively, while
the Max Cold feature is enabled. After 24 hours, the refrigerator
returns to the previous temperature set points.
CONDITION/REASON
:
TEMPERATURE
ADJUSTMENT:
REFRIGERATOR too cold
Not set correctly for conditions
REFRIGERATOR
Control 1° higher
REFRIGERATOR too warm
High use or room very warm
REFRIGERATOR
Control 1° lower
FREEZER too cold
Not set correctly for conditions
FREEZER
Control 1° higher
FREEZER too warm/too little ice
High use or heavy ice use
FREEZER
Control 1° lower
14
Rest Mode
The Rest Mode feature is designed for the traveler or for those whose
religious observances require turning off the lights and ice maker. By
selecting this feature, the temperature set points and Deli Pan settings
remain unchanged, the ice maker will be disabled and the interior
lights will turn off. For most efficient refrigerator operation, it is
recommended to exit the Rest Mode when it is no longer required.
■ Press REST MODE to turn on the Rest Mode feature. This feature
will remain on until Rest Mode is pressed again.
NOTE: If the Max Cold feature has been selected
prior to turning on the Rest Mode feature, then the
set points will remain at 34°F (1°C) and -5°F (-21°C)
for the refrigerator and freezer compartments, respectively, until the
Max Cold feature times out. The refrigerator will then return to the
previous temperature set points chosen prior to the selection of the
Max Cold feature, but the lights and ice maker will remain off until the
Rest Mode is pressed again.
Energy Saver™ Feature
The Energy Saver feature controls the heaters located inside the
hinged seal between the refrigerator doors. The heaters help keep
external moisture from forming on the hinged seal.
■ Press ENERGY SAVER control to turn on this
feature for low humidity conditions. The ring
around the control will be lit when Energy Saver
is on. If moisture begins to collect on the hinged
seal between the doors, press ENERGY SAVER
control again to turn off this feature.
Using the Controls
Operation
Sales Demonstration Mode
This mode provides a sequential display of the
temperature displays and feature LEDs.
To enter the Demonstration Mode, press and hold
the Max Cool and Power On/Off keys for 2 seconds.
If the refrigerator or freezer door is open for 10
minutes, the interior lights will turn off.
15
Alarm Functions
Master Alarm Reset
Pressing Alarm Reset once will turn off the audio alarm and indicator
light. The audio alarm will not sound again for the current condition
that caused the alarm until a new condition occurs or until a Master
Alarm Reset is performed.
A Master Alarm Reset can be performed by pressing ON/ OFF twice
or by turning the power to the refrigerator off and on again. See
“Power On/Off Switch.” After performing a Master Alarm Reset, the
indicator light will reactivate if the condition that caused the alarm is
still present. See “Over Temperature,” “Call Service,” or “Door Open.”
Door Open
The Door Open indicator light will flash, an alarm will sound and the
interior lights will turn off when a door has been open for longer than
10 minutes. When the door is closed, the audio alarm will reset and
turn off, but the Door Open indicator light will continue to flash until
the temperature is equal to or below 45°F (7°C) and 15°F (-9°C) for the
refrigerator and freezer compartments, respectively.
NOTE: To deactivate the audio alarm and indicator light, see
“Master Alarm Reset.”
NOTE: The audio alarm will be disabled for subsequent occurrences of
over temperature alarm condition. To enable the audio alarm, see
“Master Alarm Reset.”
Using the Controls
Operation

16
Operation
Using the Controls
Over Temperature
IMPORTANT: If the Over Temperature Alarm activates, your food may
spoil. See the “Power Interruptions.” Minimize door openings until
temperatures return to normal.
The Over Temperature feature is designed to let you know when either
the refrigerator temperature rises above 48°F (9°C) or the freezer
temperature rises above 15°F (-9°C) for longer than
1¹⁄₂ hours. The audio alarm will shut off automatically when the
temperature returns to normal, but the indicator light will continue
to flash until the Alarm is pressed to let you know that an over
temperature condition has occurred.
If the over temperature condition is still present when an Over
Temperature Reset is performed, the indicator light will continue to
reactivate every 1¹⁄₂ hours until refrigerator and freezer
temperatures are below 48°F (9°C) and 15°F (-9°C), respectively.
Call Service
If the Call Service indicator light is flashing, call for service. See the
“Assistance or Service” section for information on calling for service.
NOTE: The audio alarm will be disabled for subsequent occurrences of
the call service alarm condition. To enable the audio alarm, see
“Master Alarm Reset
17
Operation
Ice Maker
IMPORTANT: After connecting the refrigerator to a water source or
replacing the water filter, fill and discard two full containers of ice to
prepare the water filter for use, before using the ice.
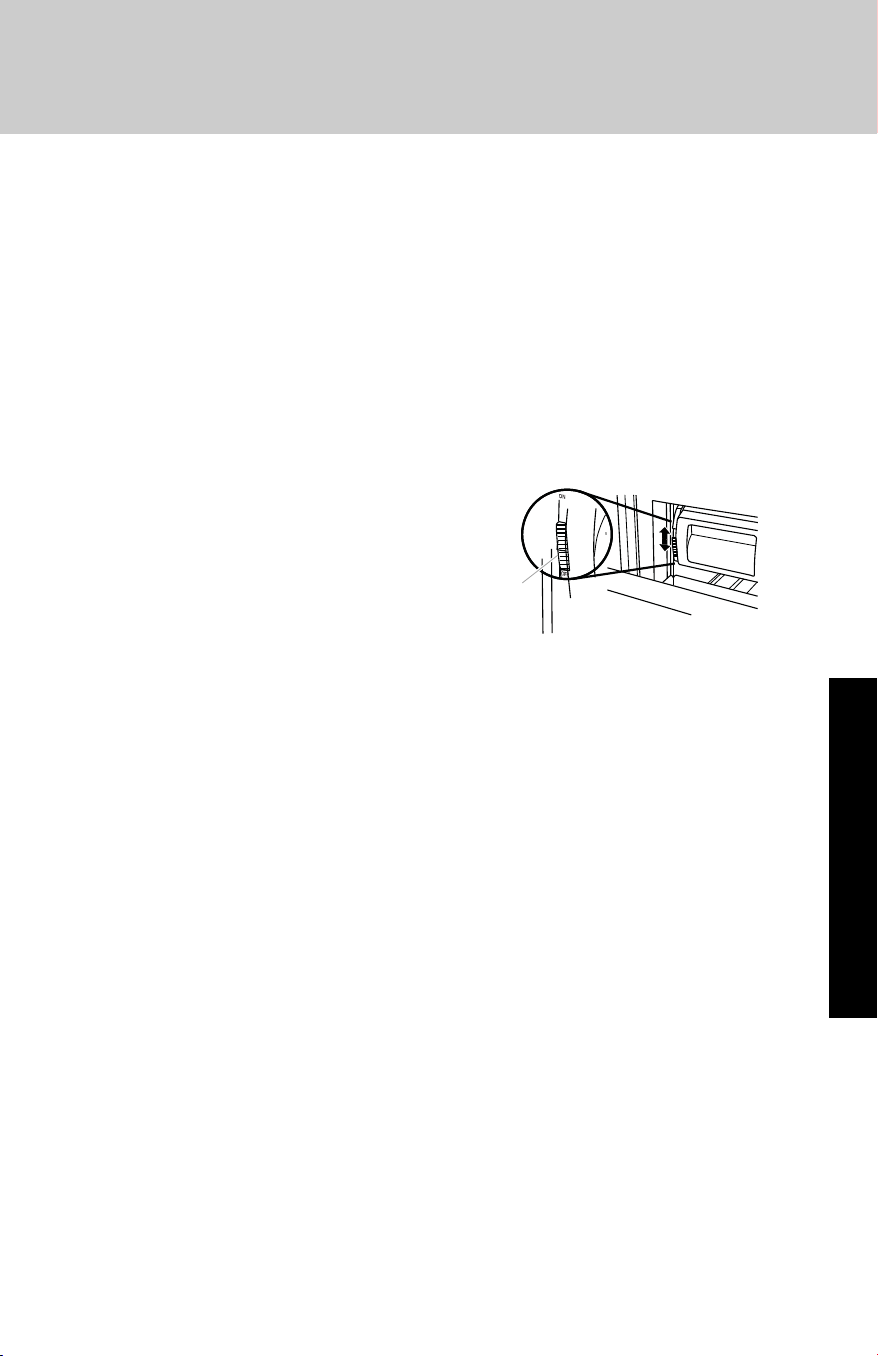
Turn the Ice Maker On/Off
The ice maker On/Off control is located on the left-hand side of the ice
bin.
1. To turn on the ice maker, slide the ice maker On/Off control to the
ON (up) position.
NOTE: Your ice maker has an automatic shutoff. As ice is made, the
ice cubes will fill the ice storage bin. The ice maker sensors will
automatically stop ice production, but the ice maker control will
remain in the ON (up) position.
2 To manually turn off the ice
maker, slide the ice maker
On/Off control to the OFF
(down) position as shown.
Ice Storage Bin Care
NOTE: It is normal for ice to stick together in the ice bin. It is
recommended that the ice bin be emptied and cleaned as needed.
To clean the ice storage bin:
1. Slide the ice bin out of the freezer and lift up and out.
2. Empty the ice bin. Use warm water to melt the ice if necessary.
NOTE: Do not use anything sharp to break up the ice in the bin.
This can cause damage to the ice container and the dispenser
mechanism.
3. Wash ice bin with warm water and a mild detergent, rinse well and
dry thoroughly. Do not use harsh or abrasive cleaners or solvents.
REMEMBER:
■ Allow 24 hours to produce the first batch of ice.
■ It may take 3 to 4 days for the ice bin to completely fill, if no ice is
used.
■ The quality of your ice will be only as good as the quality of the
water supplied to your ice maker.
■ Avoid connecting the ice maker to a softened water supply. Water
softener chemicals (such as salt) can damage parts of the ice
maker and lead to poor quality ice. If a softened water supply
cannot be avoided, make sure the water softener is operating
properly and is well maintained.
■ It is normal for the ice cubes to be attached at the corners. They
will break apart easily.
■ Do not store anything inside the ice bin.
On/O Control
18
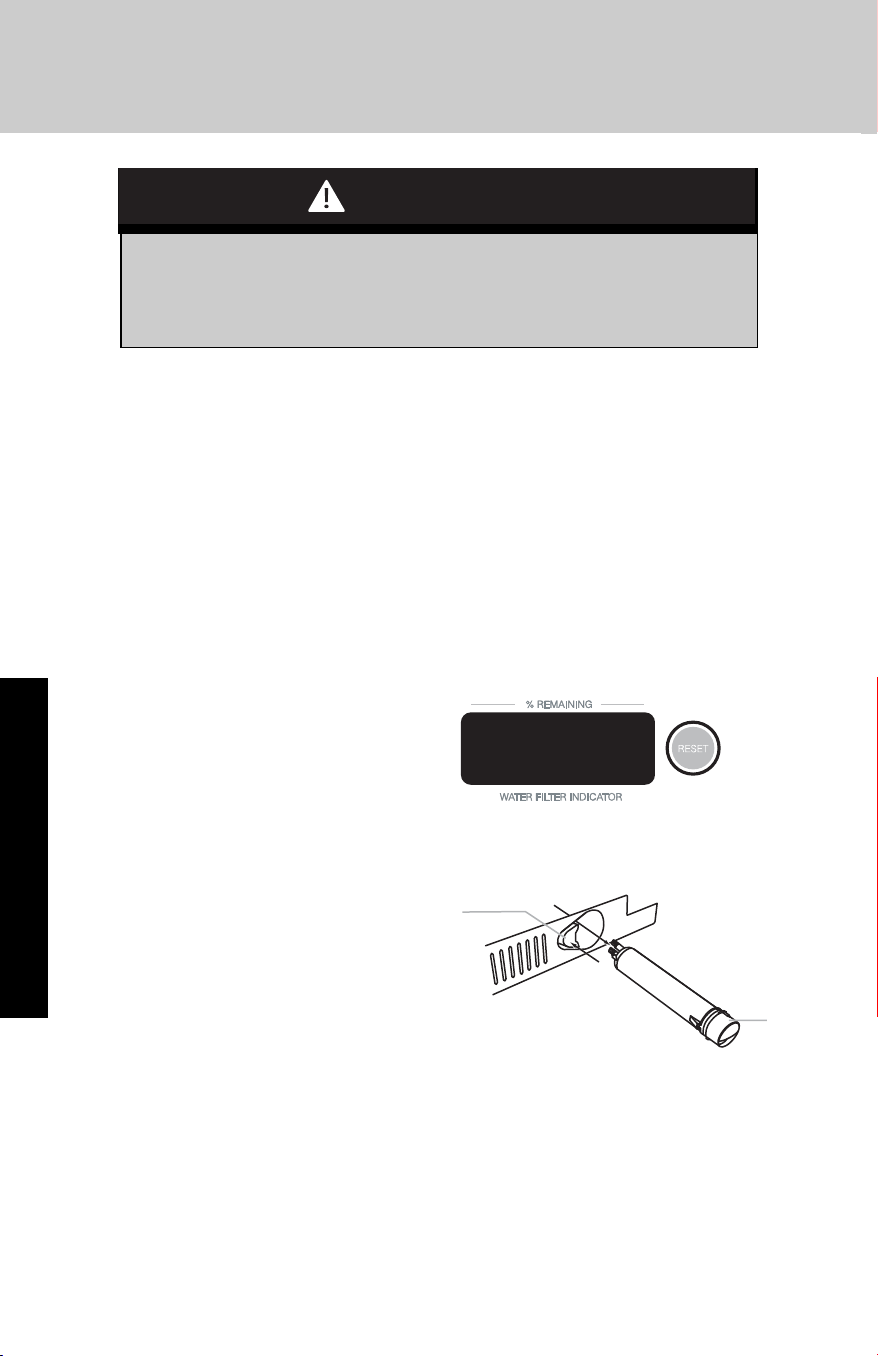
Water Filter Indicator
The water filter indicator, located on the control panel, will help you
know when to change the water filter.
A new water filter should display a reading of 99%. The reading in the
display will decrease as the filter life is used. A replacement water filter
should be ordered when “Order Filter” is displayed. It is
recommended that you replace the filter when “Change Filter” is
displayed or when water flow to your water dispenser and/or ice maker
decreases noticeably. See “Changing the Water Filter” later in this
section.
After changing the water filter,
press and hold RESET for
2 seconds until the status
display changes to 99%.
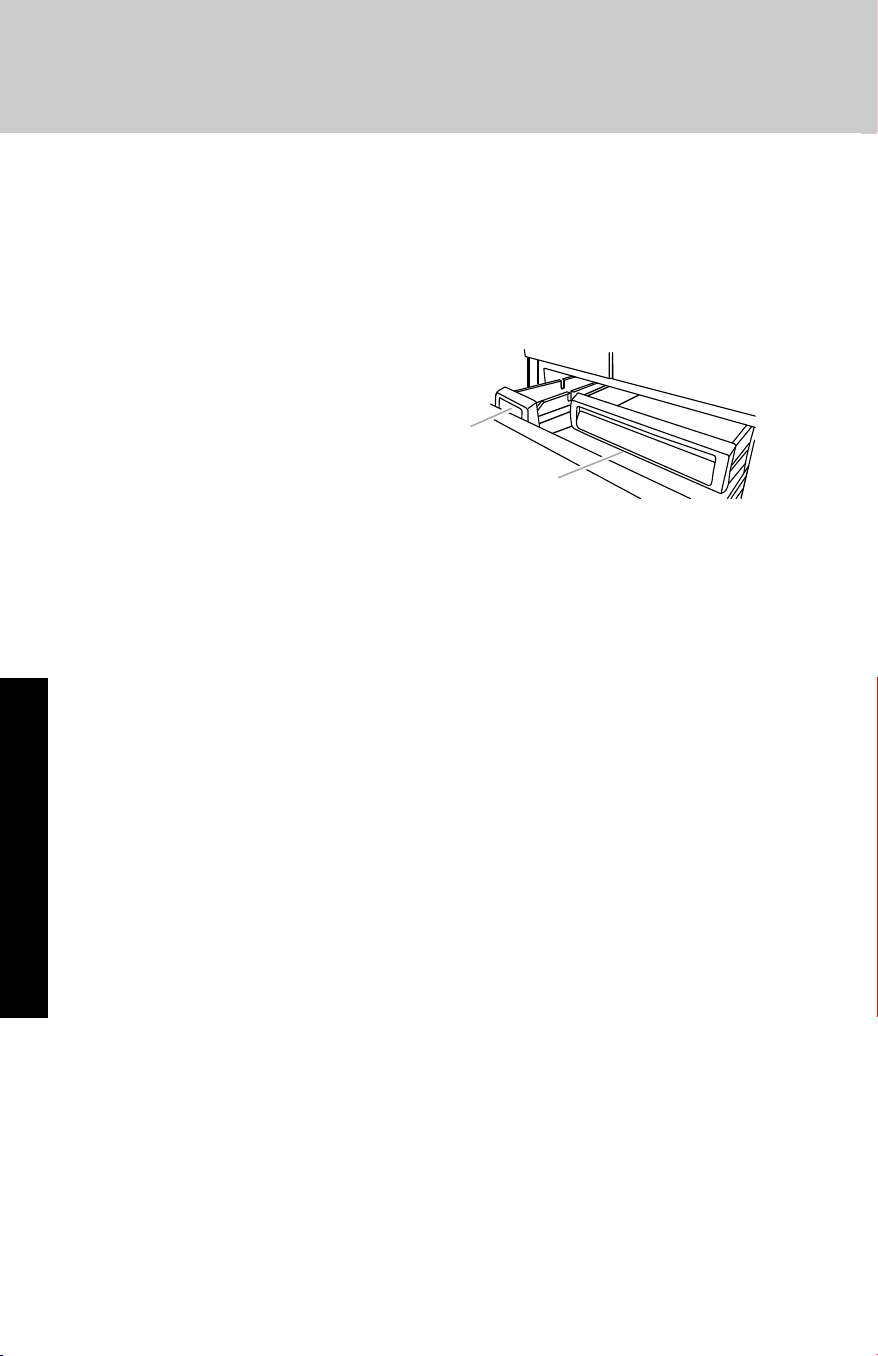
Changing the Water Filter
The water filter is located in the base grille below the freezer
compartment door. It is not necessary to remove the base grille to
remove the filter.
1. Remove the filter by
pressing the eject button
and pulling straight out on
the filter cap.
NOTES:
■ Avoid twisting the cap when removing the filter because this could
cause the cap to come off. If this occurs, replace the cap and pull
the filter straight out.
■ There will be water in the filter. Some spilling may occur.
2. Remove the cap by turning it counterclockwise until it stops.
IMPORTANT: Do not discard the cap. It is part of your refrigerator.
Keep the cap to use with the replacement filter.
Water Filtration System
Operation
Do not use with water that is microbiologically unsafe or of
unknown quality without adequate disinfection before or
after the system.
CAUTION
99
Eject
Button
Filte
r
Cap
19
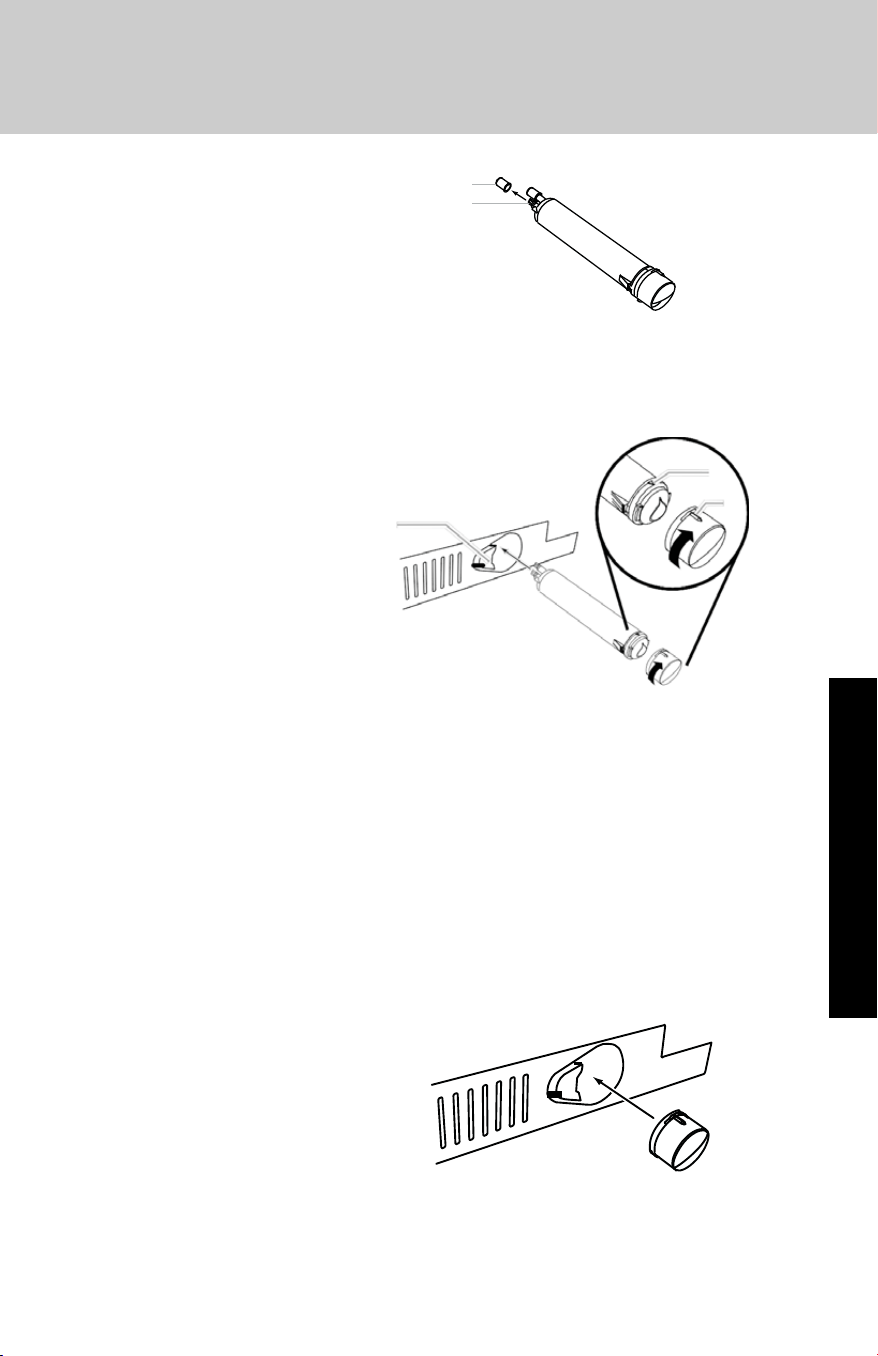
3. Align the ridge on the cap
with the arrow on the new
filter and turn the cap until
it snaps into place.
4. Remove the covers from the O-rings. Be sure the O-rings are still in
place after the covers are removed.
5. Place the cap (removed in Step 2) on the new filter. Align the ridge
on the cap with the arrow on the filter. Turn the cap clockwise until
it snaps into place.
6. Push the new filter
into the opening in
the base grille. As
the filter is inserted,
the eject button will
depress. The eject
button will pop back
out when the filter is
fully engaged.
7. Pull gently on the
cap to check that the filter is securely in place.
8. Flush the water system. Depending on your model, see “Water and
Ice Dispensers” or “Ice Maker and Storage Bin.”
Using the Ice Maker Without a Water Filter
You can operate the ice maker without a water filter. Your ice will not
be filtered.
1. Remove the filter by pressing the eject button and pulling on the
cap. See “Changing the Water Filter” earlier in this section.
2. Remove the cap by turning it counterclockwise until it stops.
IMPORTANT: Do not discard the cap. It is part of your refrigerator.
Keep the cap to use with the replacement filter.
3. With the cap in a
horizontal position, insert
the cap into the base grille
until it stops.
4. Turn the cap
counterclockwise until the
cap slips into the
attachment slot. Then, turn
the cap clockwise until it is in a horizontal position. NOTE: The cap
will not be even with the base grille.
Water Filtration System
Operation
Cover
O-Rings
Eject
Button
Arrow on
Filter
Ridge on
Cap
20
Operation
Water Filtration System
Performance Data Sheet
Operation
21
Refrigerator Features
Spillproof Plus Shelves with Nano Technology
Some refrigerator models include Spillproof Plus shelves. These
spillproof shelves contain liquids with no raised edges in order to
provide extra shelf capacity.
Standard Spillproof Shelves
Standard spillproof shelves are constructed of
polypropylene molded around the glass and metal rail.
This design means that the shelves are completely
enclosed and liquids can't seep under the glass. This
localizes spills and makes clean-up easier.
NOTE: Foods and beverages placed on the uppermost
shelf under the air vent may freeze.
Shelf Adjustment
You can adjust the shelves to match the way you use your refrigerator.
To remove the shelves, tilt the shelf up at the front releasing the hooks
from the shelf support, then pull the shelf straight out.
To replace shelves, guide the rear hooks of the shelf into the slots in the
shelf supports. Then, tilt the shelf up at the front until the hooks drop
into the slots, and lower the front of shelf to level position.
Glass Shelves and Covers
Do not clean glass shelves or covers with warm water when they
are cold. Shelves and covers may break if nicked, scratched, or
exposed to sudden temperature changes or impact, such as
bumping. Tempered glass is designed to shatter into many small,
pebble-size pieces. This is normal. Glass shelves and covers are
heavy. Use both hands when removing them to avoid dropping.
CAUTION
Shelves and Shelf Frames
Operation
22
To avoid personal injury and property damage, confirm shelf is
secure before placing items on shelf.
CAUTION

23
Operation
Deli / Crisper Pans and Deli Control Panel
The control panel located
above each deli pan has
the following three
temperture settings: Deli,
Produce, Meats (Cold to
Coldest) and the Quick
Chill setting. Select the
appropriate setting for the
food being stored
Crisper Pans
Deli
Pans
Deli
Pans
Deli Produce
Meats Quick Chill
INGREDIENT CARE CENTER
Refrigerator Features
Meat Storage Guide
Store most meat in original wrapping as long as it is airtight and
moisture-proof. Rewrap if necessary. See the following chart for
storage times. When storing meat longer than the times given, freeze
the meat.
Fresh fish or shellfish . . . . . . . . . . . . . use same day as purchased
Chicken, ground beef,
variety meat (liver, etc.) . . . . . . . . . . . 1-2 days
Cold cuts, steaks/roasts . . . . . . . . . . . 3-5 days
Cured meats. . . . . . . . . . . . . . . . . . . . 7-10 days
Leftovers - Cover leftovers with plastic wrap, aluminum foil, or plastic
containers with tight lids.
Quick Chill Setting
Each deli pan has a Quick Chill setting. Selecting Quick Chill lowers
the temperature of the deli pan for a 1-hour period.
NOTE: The deli pan temperature will be lower than the freezing point
for liquids. Remove items that may freeze, before setting the deli pan
to Quick Chill

24
Operation
Crisper Pan
Above each deli pan is a crisper pan (the larger of the pans) which is
for your larger produce items.
Remove and Replace the Deli/Crisper Pans
1. Slide the deli/crisper pan straight out to the stop. Lift the front of
the pan with one hand while supporting the bottom with the other
hand. Slide the pan out the rest of the way.
2. To replace the deli/crisper pan, pull out the pan slides until they are
fully extended and set the pan on the slides. Push the pan in
toward the back until it is in closed position.
3. Reopen the deli/crisper pan to make sure it has been replaced
properly.
Refrigerator Features
25
Utility Compartment
The utility compartment can be placed in any position on the
refrigerator door.
To Remove and Replace the Utility
Bin:
1. Remove utility compartment by
grasping both ends and lifting
compartment up and out.
2. Replace the bin by sliding it in
above the desired support and
pushing it down until it stops.
Door Bins
Large door bins hold gallon containers and the smaller door bins hold
2-liter bottles. The door bins are adjustable and removable for easy
cleaning and adjusting.
Gallon Door Bin
To Install Gallon Door Bin:
NOTE: The gallon door bin can only be placed on the lower support.
1. Position gallon door bin above lowest door adjustment slot.
2. Push down to secure bin.
3. Adjust other bins, as necessary to allow for milk or beverage
container height.
Small Door Bins
To Remove and Replace the Door Bins:
1. Remove the bin by lifting it up and
pulling it out.
2. Replace the bin by sliding it in
above the desired support and
pushing it down until it stops.
Refrigerator Features
Operation
26
Freezer Pan and Pull-out Ice Bin
The freezer pan can be used to store smaller items. The freezer pan is
not removable.
Remove and Replace the Ice Bin:
1. Slide the ice bin out of the freezer and lift up and out.
2. To replace the ice bin, pull
out the pan slides until they
are fully extended and set ice
bin on the slides. Push the ice
bin in toward the back until it
is in closed position.
3. Reopen the ice bin to make
sure it has been replaced
properly.
Frozen Food Storage Guide
Storage times will vary according to the quality and type of food, the
type of packaging or wrap used (should be airtight and moisture-
proof), and the storage temperature. Ice crystals inside a sealed
package are normal. This simply means that moisture in the food and
air inside the package have condensed, creating ice crystals.
Put no more unfrozen food into the freezer than will freeze within
24 hours (no more than 2 to 3 lbs of food per cubic foot
[907-1,350 g per 28 L] of freezer space). Leave enough space in
the freezer for air to circulate around packages. Be sure to leave
enough room for the door to close tightly.
For more information on preparing food for freezing, check a freezer
guide or reliable cookbook.
Freezer Features
Operation
Ice Bin
Freezer Pan

27
Both the refrigerator and freezer sections defrost automatically.
However, clean both sections about once a month to avoid buildup of
odors. Wipe up spills immediately.
To Clean Your Refrigerator:
1. Remove the top grille. See “Power On/Off Switch.”
2. Press power switch to OFF.
3. Remove all removable parts from inside, such as shelves, crispers,
etc.
4. Hand wash, rinse, and dry removable parts and interior surfaces
thoroughly. Use a clean sponge or soft cloth and a mild detergent
in warm water.
■ Do not use abrasive or harsh cleaners such as window sprays,
scouring cleansers, flammable fluids, cleaning waxes, concentrated
detergents, bleaches or cleansers containing petroleum products
on plastic parts, interior and door liners or gaskets. Do not use
paper towels, scouring pads, or other harsh cleaning tools. These
can scratch or damage materials.
■ To help remove odors, you can wash interior walls with a mixture of
warm water and baking soda (2 tbs to 1 qt [26 g to 0.95 L] of
water).
5. Clean the exterior surfaces.
■ To keep your stainless steel refrigerator looking like new and to
remove minor scuffs or marks, use a Stainless Steel Cleaner and
Polish.
IMPORTANT: Do not allow the Stainless Steel Cleaner and Polish
to come into contact with any plastic parts such as the trim pieces,
dispenser covers or door gaskets. If unintentional contact does
occur, clean plastic part with a sponge and mild detergent in warm
water. Dry thoroughly with a soft cloth. To order the cleaner, see
“Accessories.”
6. Press the power switch to ON.
7. Replace the top grille. See “Power On/Off Switch.”
Cleaning and Maintenance
Product Care
Explosion Hazard
Use non-flammable cleaners.
Failure to do so can result in death, explosion,
or fire.
CAUTION
Changing the Light Bulbs
NOTE: Not all appliance bulbs will fit your refrigerator. Be sure to
replace the bulb with one of the same size and shape. The lights
require a 40-watt maximum appliance bulb. Replacement bulbs are
available from your dealer.
Refrigerator Lights
There are three light bulbs located in the top front of the refrigerator
compartment behind a light shield.
1. Remove the top grille. See “Power On/Off Switch.”
2. Press power switch to the Off position.
3. Open the light shield. Grasp the light shield by the openings.
Gently push back and pull down, as shown, to access the light
bulbs.
4. Remove the light bulb and replace it with one of the same size,
shape and wattage.
5. Close the light shield by raising it up into place.
NOTE: If needed, clean the light shield with a damp soft cloth.
6. Press the power switch to the On position.
7. Replace the top grille. See “Power On/Off Switch.”
Freezer Lights
There are two light bulbs located in the top of the freezer
compartment. One bulb is over the ice bin, and the other bulb is over
the freezer pan.
1. Slide open the ice bin or freezer pan to access the light bulb.
2. Remove the light bulb and replace it with one of the same size,
shape and wattage.
Cleaning and Maintenance
28
Product Care
Light
Shield
Light
Bulb
Light Bulb

Power Interruptions
If the power will be out for 24 hours or less, keep the door or doors
closed (depending on your model) to help food stay cold and frozen.
If the power will be out for more than 24 hours, do one of the following:
■ Remove all frozen food and store it in a frozen food locker.
■ Place 2 lbs (907 g) of dry ice in the freezer for every cubic foot (28
L) of freezer space. This will keep the food frozen for 2 to 4 days.
■ If neither a food locker nor dry ice is available, consume or can
perishable food at once.
REMEMBER: A full freezer stays cold longer than a partially filled one. A
freezer full of meat stays cold longer than a freezer full of baked goods.
If you see that food contains ice crystals, it may be refrozen, although
the quality and flavor may be affected. If the condition of the food is
poor, dispose of it.
Vacation Care
Your refrigerator is equipped with the Rest Mode feature, which is
designed for the traveler who wishes to turn off the lights and ice aker.
By selecting this feature, the temperature set points remain unchanged,
the ice maker will be disabled and the interior lights will turn off. For
most efficient refrigerator operation, it is recommended to exit the Rest
Mode when it is no longer required.
If You Choose to Leave the Refrigerator on While You’re Away:
1. Use up any perishables and freeze other items.
2. Press REST MODE pad.
3. If your refrigerator has an automatic ice maker, shut off the water
supply to the ice maker.
4. Empty the ice bin.
5. When you return from vacation, press REST MODE to return to
normal operation.
If You Choose to Turn the Refrigerator Off Before You Leave:
1. Remove all food from the refrigerator.
2. If your refrigerator has an automatic ice maker:
■ Turn off the water supply to the ice maker at least one day ahead of
time.
■ When the last load of ice drops, slide the ice maker control to the
OFF (down) position.
3. Depending on your model, turn the Thermostat Control (or
Refrigerator Control) to OFF. See “Using the Controls.”
4. Clean refrigerator, wipe it, and dry well.
5. Tape rubber or wood blocks to the tops of all doors to prop them
open far enough for air to get in. This stops odor and mold from
building up.
Cleaning and Maintenance
29
Product Care

Troubleshooting
Problem
Cause Solution
The refrigerator
will not operate
Power cord unplugged?
Is outlet working?
Household fuse blown or
circuit breaker tripped?
Are controls on?
Is refrigerator defrosting?
New installation?
Plug into a grounded
3-prong outlet.
Plug in a lamp to see if the
outlet is working.
Replace the fuse or reset
the circuit breaker. If the
problem continues, call an
electrician.
Make sure the refrigerator
controls are on. See “Using
the Controls
”.
Allow 24 hours following
installation for the
refrigerator to cool
completely.
Note: Adjusting the
temperature controls to
coldest setting will not cool
either compartment more
quickly.
The motor seems
to run too much
Normal operation Your new refrigerator may
run longer than your old one
due to its high-efficiency
compressor and fans. The
refrigerator may run even
longer if the room is warm, a
large food load is added,
doors are opened often, or
if the doors have been left
open.
Refrigerator Operation
30
Product Care
Electrical Shock Hazard
Plug into a grounded 3 prong outlet.
Do not remove ground prong.
Do not use an adapter.
Do not use an extension cord.
Failure to follow these instructions can result in
death, fire, or electrical shock.
WARNING
WARNING
31
Product Care
Problem
Cause Solution
The refrigerator
seems noisy
Refrigerator noise has been
reduced over the years.
Due to this reduction, you
may hear intermittent
noises from your new
refrigerator that you did
not notice from your old
model. Listed on the right
are some normal sounds
with explanations.
Buzzing—heard when the
water valve opens to fill the
ice maker
Pulsating—fans/compressor
adjusting to optimize
performance
Hissing/Rattling—flow of
refrigerant, movement of
water lines, or from items
placed on top of the
refrigerator
Sizzling/Gurgling—water
dripping on the heater
during defrost cycle
Popping—contraction/
expansion of inside walls,
especially during initial
cool-down
Water running—may be
heard when water melts
during the defrost cycle
and runs into the drain pan
Creaking/Cracking—occurs
as ice is being ejected from
the ice maker mold.
The doors
will not close
completely
Door blocked open?
Bin or shelf in the way?
Move food packages away
from door.
Push bin or shelf back in
the correct position.
The doors are
difficult to open
Gaskets dirty or sticky? Clean gaskets and contact
surfaces with mild soap
and warm water. Rinse and
dry with soft cloth.
Refrigerator Operation
Troubleshooting (cont.)
Explosion Hazard
Use non-flammable cleaners.
Failure to do so can result in death, explosion,
or fire.
WARNING
WARNING
Troubleshooting (cont.)
Problem
Cause Solution
Temperature is
too warm
New installation?
Door(s) opened often or left
open?
Large load of food added?
Controls set correctly for the
surrounding conditions?
Refrigerator not cooling?
Air vents blocked?
Allow 24 hours following
installation for the
refrigerator to cool
completely.
Allows warm air to enter
refrigerator. Minimize door
openings and keep doors
fully closed.
Allow several hours for
refrigerator to return to
normal temperature.
Adjust the controls a setting
colder. Check temperature in
24 hours.
See “Using the
Controls”.
Turn the refrigerator OFF an
then ON to reset. If this
does notcorrect the problem,
call for service.
Remove any item from in
front of the air vents.
There is interior
moisture buildup
Note: Some
moisture buildup
is normal.
Humid room?
Door(s) left open?
Energy Saver on?
Contributes to moisture
buildup.
Allows humid air to enter
refrigerator. Minimize door
openings and keep door(s)
fully closed.
Turn the Energy Saver
feature OFF, if moisture is
collecting between the
refrigerator doors. See
“Using the Controls”.
Temperature and Moisture
32
Product Care
Problem
Cause Solution
Lights do not
work.
Is a light bulb loose in the
socket or burned out?
Is the refrigerator in Rest
Mode?
Has the door been open
more than 10 minutes?
See “Changing the Light
Bulbs”
See ‘Using the Controls”
See ‘Using the Controls”
Lights
33
Product Care
Troubleshooting (cont.)
Problem
Cause Solution
The ice maker is
not producing
ice or not
enough ice
Refrigerator connected to a
water supply and the supply
shutoff valve turned on?
Kink in the water source
line?
Ice maker turned on?
New installation?
Large amount of ice recently
removed?
Ice cube jammed in the ice
maker ejector arm?
Reverse osmosis water
filtration system connected
to your cold water supply?
Connect refrigerator to
water supply and turn water
shutoff valve fully open.
A kink in the line can reduce
water flow. Straighten the
water source line.
Make sure switch is in the
ON position.
Wait 24 hours after ice maker
installation for ice production
to begin. Wait 72 hours for
full ice production.
Allow 24 hours for ice maker
to produce more ice.
Remove ice from the ejector
arm with a plastic utensil.
This can decrease water
pressure.
See “Water Supply
Requirements”.
The ice cubes are
hollow or small
Note: This is an
indication of low
water pressure.
Water shutoff valve not fully
open?
Kink in the water source line?
Reverse osmosis water
filtration system connected
to your cold water supply?
Turn the water shutoff valve
fully open.
A kink in the line can reduce
water flow. Straighten the
water source line.
This can decrease water
pressure.
See “Water Supply
Requirements”.
Ice is sticking
together in the
ice storage bin.
It is normal for frost to be on
top of the ice storage bin
due to normal opening and
closing of the freezer.
It is normal for ice to stick
together when it is not
dispensed or used
frequently.
It is recommended tht the
ice storage bin be emptied
and cleaned as needed. See
“Ice Maker”
Ice and Water
34
Product Care
Troubleshooting (cont.)
Problem
Cause Solution
Off-taste, odor or
gray color in the
ice
New plumbing connections?
Ice stored too long?
Odor transfer from food?
Are there minerals (such as
sulfur) in the water?
Water filter installed on the
refrigerator?
New plumbing connections
can cause discolored or off-
flavored ice.
Discard ice. Wash ice bin.
Allow 24 hours for ice maker
to make new ice.
Use airtight, moisture proof
packaging to store food.
A water filter may need to
be installed to remove the
minerals.
Gray or dark discoloration in
ice indicates that the water
filtration system needs
additional flushing.
Ice and Water

35
Product Care
Service Information
If service is required after checking the troubleshooting guide, call your
dealer or authorized service agency. The name of the authorized
service agency can be obtained from the dealer or distributor in your
area.
When you make a service call, be sure to have the following
information handy:
• Model Number
• Serial Number
• Date of Purchase
• Name of dealer from whom purchased
Be ready to clearly describe the problem that you are having with your
refrigerator.
If you are unable to obtain the name of an authorized service agency,
or if you continue to have service problems, contact Viking Range, LLC
at (888) 845-4641 or write to:
VIKING RANGE, LLC
PREFERRED SERVICE
111 Front Street
Greenwood, Mississippi 38930 USA
Record the following information indicated below. You will need it if
service is ever required.
The serial number and model numbers for your refrigerator are located
on the upper wall, behind the lighting:
M o d e l N o . _ _ _ _ _ _ _ _ _ _ _ _ _ _ _ _ _ _ _ _ S e r i a l N o . _ _ _ _ _ _ _ _ _ _ _ _ _ _ _ _
D a t e o f P u r c h a s e _ _ _ _ _ _ _ _ _ _ D a t e I n s t a l l e d _ _ _ _ _ _ _ _ _ _ _ _ _ _ _ _
Dealer’s Name _ _ _ _ _ _ _ _ _ _ _ _ _ _ _ _ _ _ _ _ _ _ _ _ _ _ _ _ _ _ _ _ _ _ _ _ _ _ _ _ _ _
Address _ _ _ _ _ _ _ _ _ _ _ _ _ _ _ _ _ _ _ _ _ _ _ _ _ _ _ _ _ _ _ _ _ _ _ _ _ _ _ _ _ _ _ _ _ _ _ _
_ _ _ _ _ _ _ _ _ _ _ _ _ _ _ _ _ _ _ _ _ _ _ _ _ _ _ _ _ _ _ _ _ _ _ _ _ _ _ _ _ _ _ _ _ _ _ _ _ _ _ _ _ _ _
If service requires installation of parts, use only authorized parts to
insure protection under the warranty.
Keep this manual with your refrigerator for future reference.

36
FREESTANDING FRENCH DOOR BOTTOM MOUNT REFRIGERATOR/FREEZER WARRANTY
THREE YEAR FULL WARRANTY
Freestanding french door bottom mount refrigerator/freezers and all of their component parts, except as
detailed below*†, are warranted to be free from defective materials or workmanship in normal residential
use for a period of three (3) years from the date of original retail purchase or closing date for new construction,
whichever period is longer. Viking Range, LLC, warrantor, agrees to repair or replace, at its option, any part
which fails or is found to be defective during the warranty period.
*FULL NINETY (90) DAY COSMETIC WARRANTY: Product is warranted to be free from
cosmetic defects in materials or workmanship (such as scratches on stainless steel,
paint/porcelain blemishes, etc.) for a period of ninety (90) days from the date of original retail
purchase or closing date for new construction, whichever period is longer. Any defects must be
reported to the selling dealer within ninety (90) days from date of original retail purchase.
Viking Range, LLC uses high quality processes and materials available to produce all color
finishes. However, slight color variation may be noticed because of the inherent differences in
painted parts and porcelain parts as well as differences in kitchen lighting, product locations,
and other factors. Therefore, this warranty does not apply to color variation attributable to such
factors.
†FULL NINETY (90) DAY WARRANTY IN "RESIDENTIAL PLUS" APPLICATIONS: This full
warranty applies to applications where use of the product extends beyond normal residential
use, but the warranty period for products used in such applications is ninety (90) days.
Examples of applications covered by this warranty are bed and breakfasts, fire stations, private
clubs, churches, yachts, etc. Under this "Residential Plus" warranty, the product, its components
and accessories are warranted to be free from defective material or workmanship for a period
of ninety (90) days from the date of original retail purchase. This warranty excludes use of the
product in all commercial locations such as restaurants, food service locations and institutional
food service locations.
SIX YEAR FULL WARRANTY ON SEALED REFRIGERATION PARTS AS LISTED
Any sealed refrigeration system component, as listed below, is warranted to be free from defective
materials or workmanship in normal household use during the fourth through the sixth year from the date
of original retail purchase. Viking Range, LLC, warrantor, agrees to repair or replace, at its option, any part
which fails or is found to be defective during the warranty period.
Sealed Refrigeration System Components: Compressor, Evaporator, Condenser, Connecting Tubing,
Dryer/Strainer
TWELVE YEAR LIMITED WARRANTY ON SEALED REFRIGERATION PARTS AS LISTED
Any sealed refrigeration system component, as listed above, which fails due to defective materials or
workmanship in normal household use during the seventh through the twelfth year from the date of
original retail purchase will be repaired or replaced, free of charge for the part itself, with the owner
paying all other costs, including labor.
TERMS AND CONDITIONS
This warranty extends to the original purchaser of the product warranted hereunder and to each transferee
owner of the product during the term of the warranty and applies to products purchased and located in
the United States, Canada, Mexico, and the Caribbean (excluding Cuba, Dominican Republic, and Haiti).
Products must be purchased in the country where service is requested. If the product or one of its
component parts contains a defect or malfunction during the full warranty period after a reasonable
number of attempts by the warrantor to remedy the defect or malfunction, the owner is entitled to either a
refund or replacement of the product or its component part or parts. Replacement of a component part
includes its free installation, except as specified under the limited warranty. Under the terms of this
warranty, service must be performed by a factory authorized Viking Range, LLC service agent or
representative. Service will be provided during normal business hours, and labor performed at overtime or
premium rates shall not be covered by this warranty.
Owner shall be responsible for proper installation, providing reasonable and necessary maintenance,
providing proof of purchase upon request, and making the appliance reasonably accessible for service.
The return of the Owner Registration Card is not a condition of warranty coverage. You should, however,
return the Owner Registration Card so that Viking Range, LLC can contact you should any question of
safety arise which could affect you.
This warranty gives you specific legal rights, and you may also have other rights which may vary from
jurisdiction to jurisdiction.
Warranty

37
Warranty (cont.)
WHAT IS NOT COVERED BY THIS WARRANTY: This warranty shall not apply to damage resulting from
abuse, failure to provide reasonable and necessary maintenance, accident, delivery, negligence, natural
disaster, loss of electrical power to the product for any reason, alteration, outdoor use, improper installation,
improper operation, or repair or service of the product by anyone other than an authorized Viking Range,
LLC service agency or representative. This warranty does not apply to commercial usage.
LIMITATION OF REMEDIES AND DURATION OF IMPLIED WARRANTY
OWNER’S SOLE AND EXCLUSIVE REMEDY FOR A CLAIM OF ANY KIND WITH RESPECT TO THIS
PRODUCT SHALL BE THE REMEDIES SET FORTH ABOVE. VIKING RANGE IS NOT RESPONSIBLE
FOR CONSEQUENTIAL OR INCIDENTAL DAMAGE, INCLUDING BUT NOT LIMITED TO FOOD OR
MEDICINE LOSS, DUE TO PRODUCT FAILURE, WHETHER ARISING OUT OF BREACH OF
WARRANTY, BREACH OF CONTRACT OR OTHERWISE. Some jurisdictions do not allow the exclusion
or limitation of incidental or consequential damages, so the above limitation or exclusions may not apply
to you. ANY IMPLIED WARRANTIES OF MERCHANTABILITY OR FITNESS FOR A PARTICULAR
PURPOSE APPLICABLE TO THIS PRODUCT ARE LIMITED IN DURATION TO THE PERIOD OF
COVERAGE OF THE APPLICABLE EXPRESS WRITTEN LIMITED WARRANTIES SET FORTH ABOVE.
Some states do not allow limitations on how long an implied warranty lasts, so the above limitation may
not apply to you.
WARRANTY SERVICE
To obtain warranty service, contact an authorized Viking Range, LLC service agent, or Viking Range, LLC,
111 Front Street, Greenwood, Mississippi 38930, (888) 845-4641. Provide model and serial number and
date of original purchase or closing date for a new construction. For the name of your nearest authorized
Viking Range, LLC service agency, call Viking Range, LLC.
IMPORTANT: Retain proof of original purchase to establish warranty period.
Specifications subject to change without notice.

38

39

F21309A EN
(103114)
Viking Range, LLC
111 Front Street
Greenwood, Mississippi 38930 USA
(662) 455-1200
For product information, call
1-888-(845-4641) or visit our web site at vikingrange.com in the US or
brigade.ca in Canada
