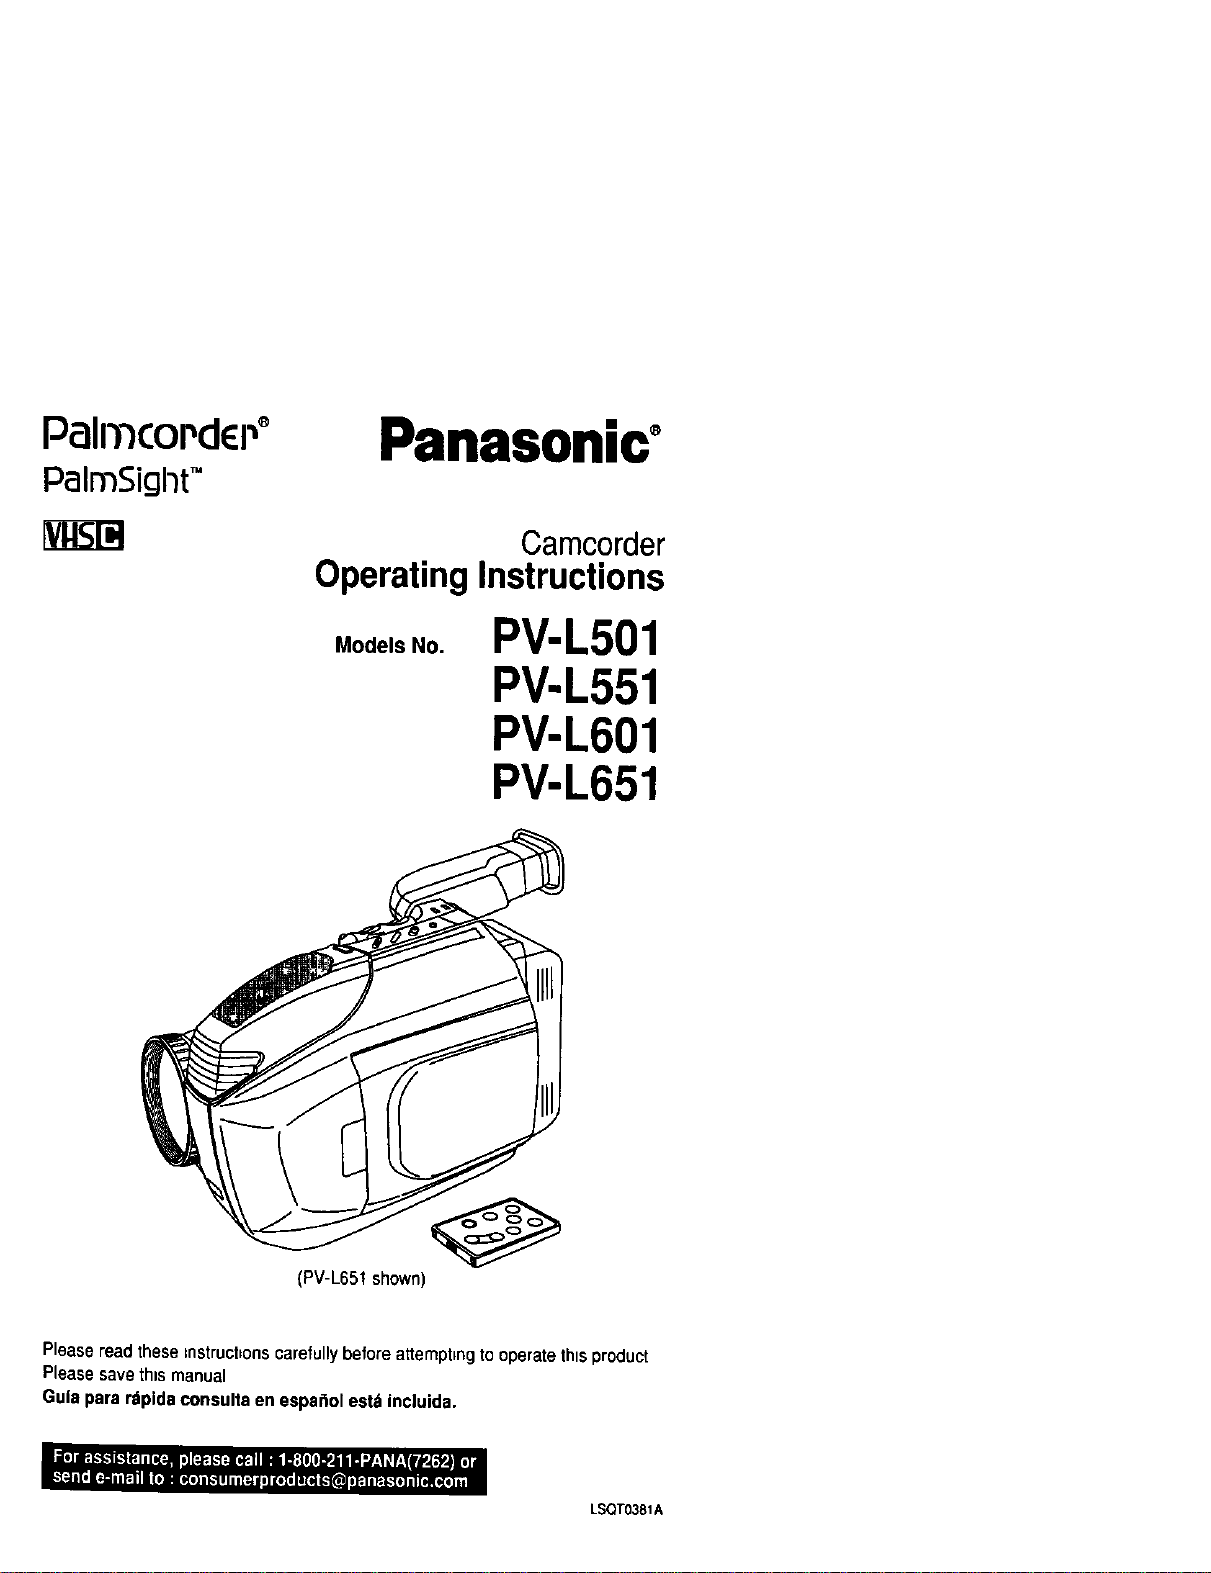
PalrncoPdEi .,°
palmSigl-}tTM
Panasonic°
Camcorder
Operating Instructions
Models No.
PV-L501
PV-L551
PV-L601
PV-L651
(PV-L651 shown)
Please read these mstrucbons carefully before attempting to operate this product
Please save this manual
Gula para rdpida consulta en espa_ol estd incluida.
LSQTO381A
Things YouShould Know
Jill
Thank you for choosing Panasonlc! DateofPurchase
Youhavepurchasedoneofthemost
sophisticatedandreliableproductsonthe
markettoday.Usedproperly,itwillbring
youyearsof enjoyment.Pleasetaketime
tofill intheinformationattheright.
Theserialnumberisonthetag locatedon
thebuttomofyourCamcorder.Besureto
retain this manual as your convenient
Camcorder information source.
DealerPurchasedFrom
DealerAddress
DealerPhone No.
ModelNo.
SerialNo.
i I
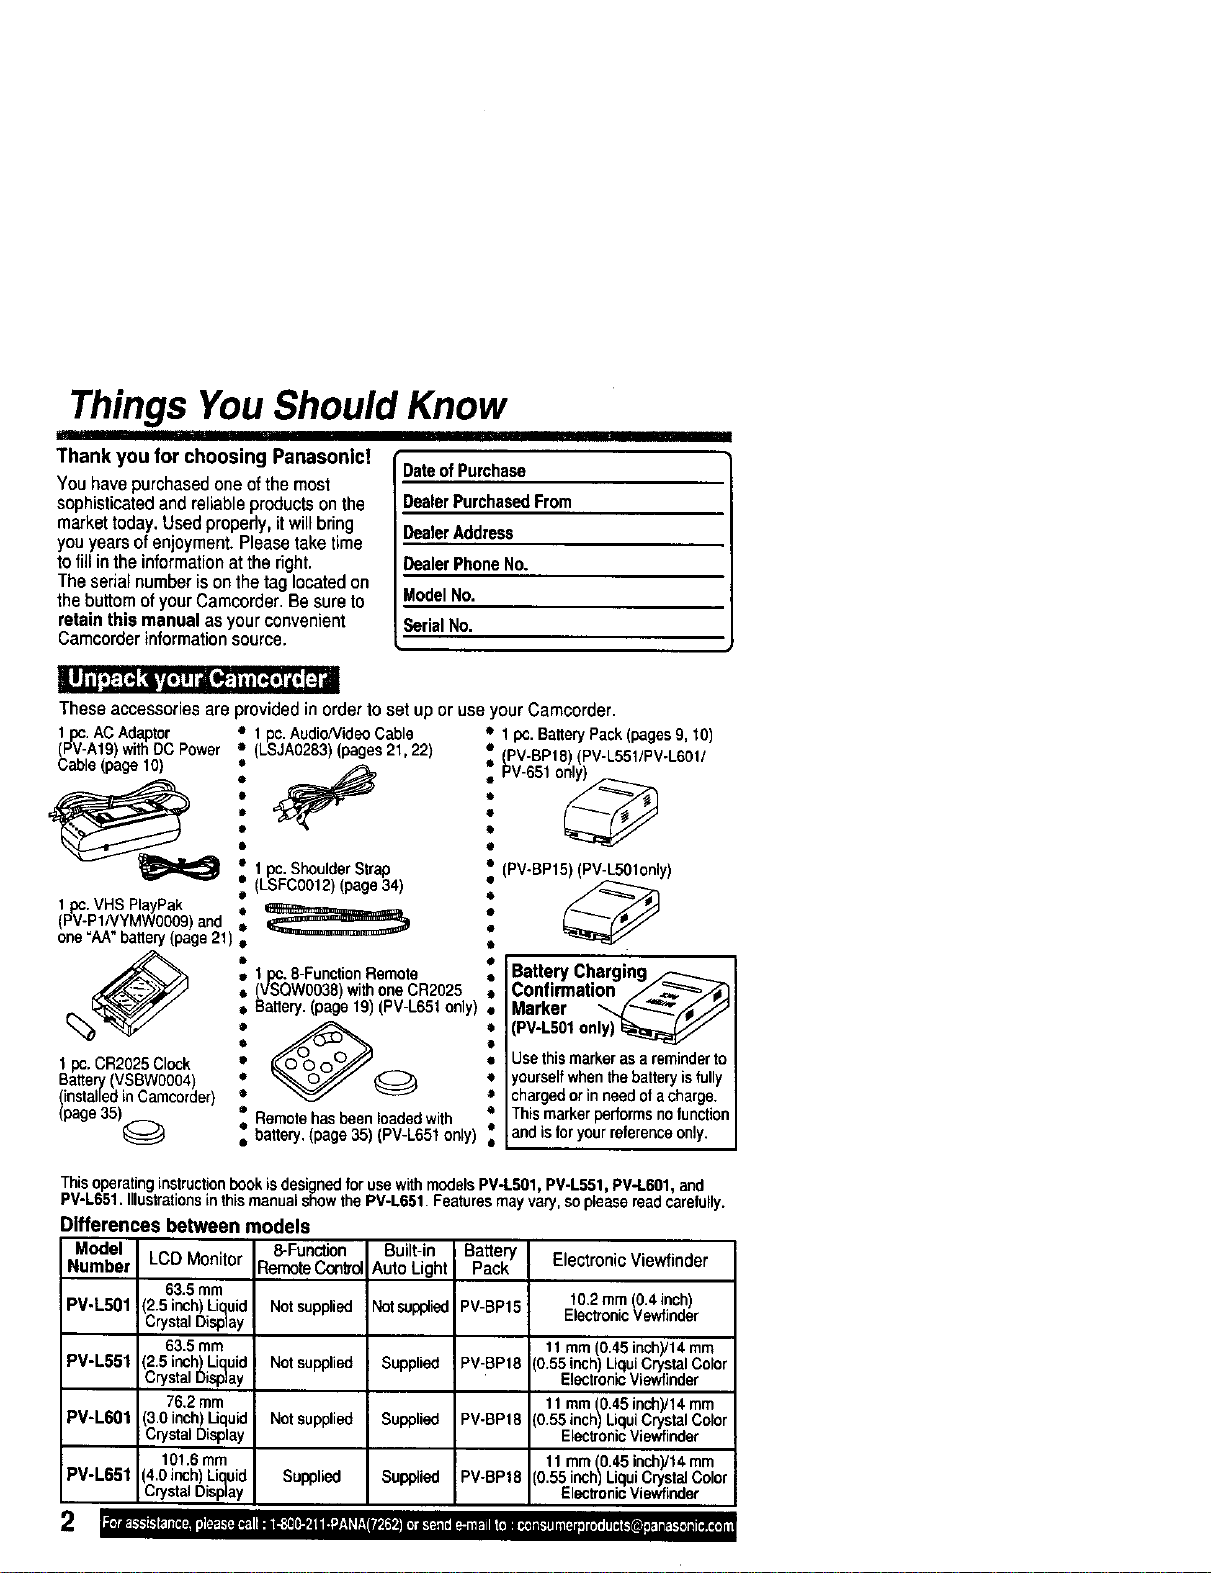
These accessories are provided in order to set up or use your Camcorder.
1pc.AC Adaptor _ 1pc.Audio/VideoCable • 1pc.Ba0eryPack(pages9, tO)
(PV-At9) withDCPower (LSJA0283)(pages21,22) : (PV-BPt8) (PV-L551/PV-L60t/
__Cable(page10) !l° '_ i, PV-651o_
1 pc. Shoulder Strap
• (LSFC0012) (page 34)
1pc. VHS PlayPak •
(PV-P1NYMW0009) and e
one "AA" battery(page 21) •
O
1 pc. CR2025 Clock •
Battery (VSBW0004 •
(installed in Cameorder) •
(page 35)@ •
o
1pc. 8-Function Remote
(VSQW0038) with one CR2025
Battery. (page 19) (PV-L651 only)
Remote has been loaded with
battery. (page 35) (PV-L65t only)
(PV-BP15) (PV-L50t only)
60
O
0
O
o
Battery Charging
Confirmation /___
Marker ",,_/_Jj
(PV-L501only)
Usethismarkerasareminderto
yourselfwhenthebatteryisfully
chargedorinneedofacharge.
Thismarkerperformsnofunction
and isforyourreferenceonly.
This operatinginstruction book is designed for use with models PV-L501 PV-L551, PV-L601, and
PV-L651. Illustrat ans n this manual show the PV-L661. Features may vary, soplease read carefully.
Differences between models
Model 8-Function
Number LCDMonitor RemoteCon_,ol
63.5mm
PV-L501 (2.5inch)Liquid
CrystalDisplay
63.5mm
PV-L551 (2.5inch)Liquid
CrystalDisplay
76.2mm
PV-L601 3.0 inch Liquid
CrystalDisplay
101.6mm
PV-L651 (4.0inch)Liquid Supplied
Crysa Dsplay
Notsupplied
Not supplied
Not supplied
Built-in Battery Electronic Viewfinder
Auto Light Pack
Notsupf_ied PV-BP15 10.2turn (0.4 inch)
Electronic Vewfinder
11 mm (0.45 inchyt4 rnm
Supplied PV-BPt8 (0.55inch Liqui Crystal Color
Eectronic Viewfinder
11 mrn (0.45 inch)/14 mrn
Supplied PV-BPt8 (O.55inch) Liqui Crystal Color
Elech'anicViewfieder
11 mm (0.45 inch)/t 4 mm
Supplied PV-BP16 (0.55 inch) Liqui Crystal Color
Elec_onic Viewfinder
Things YouShould Know
I II
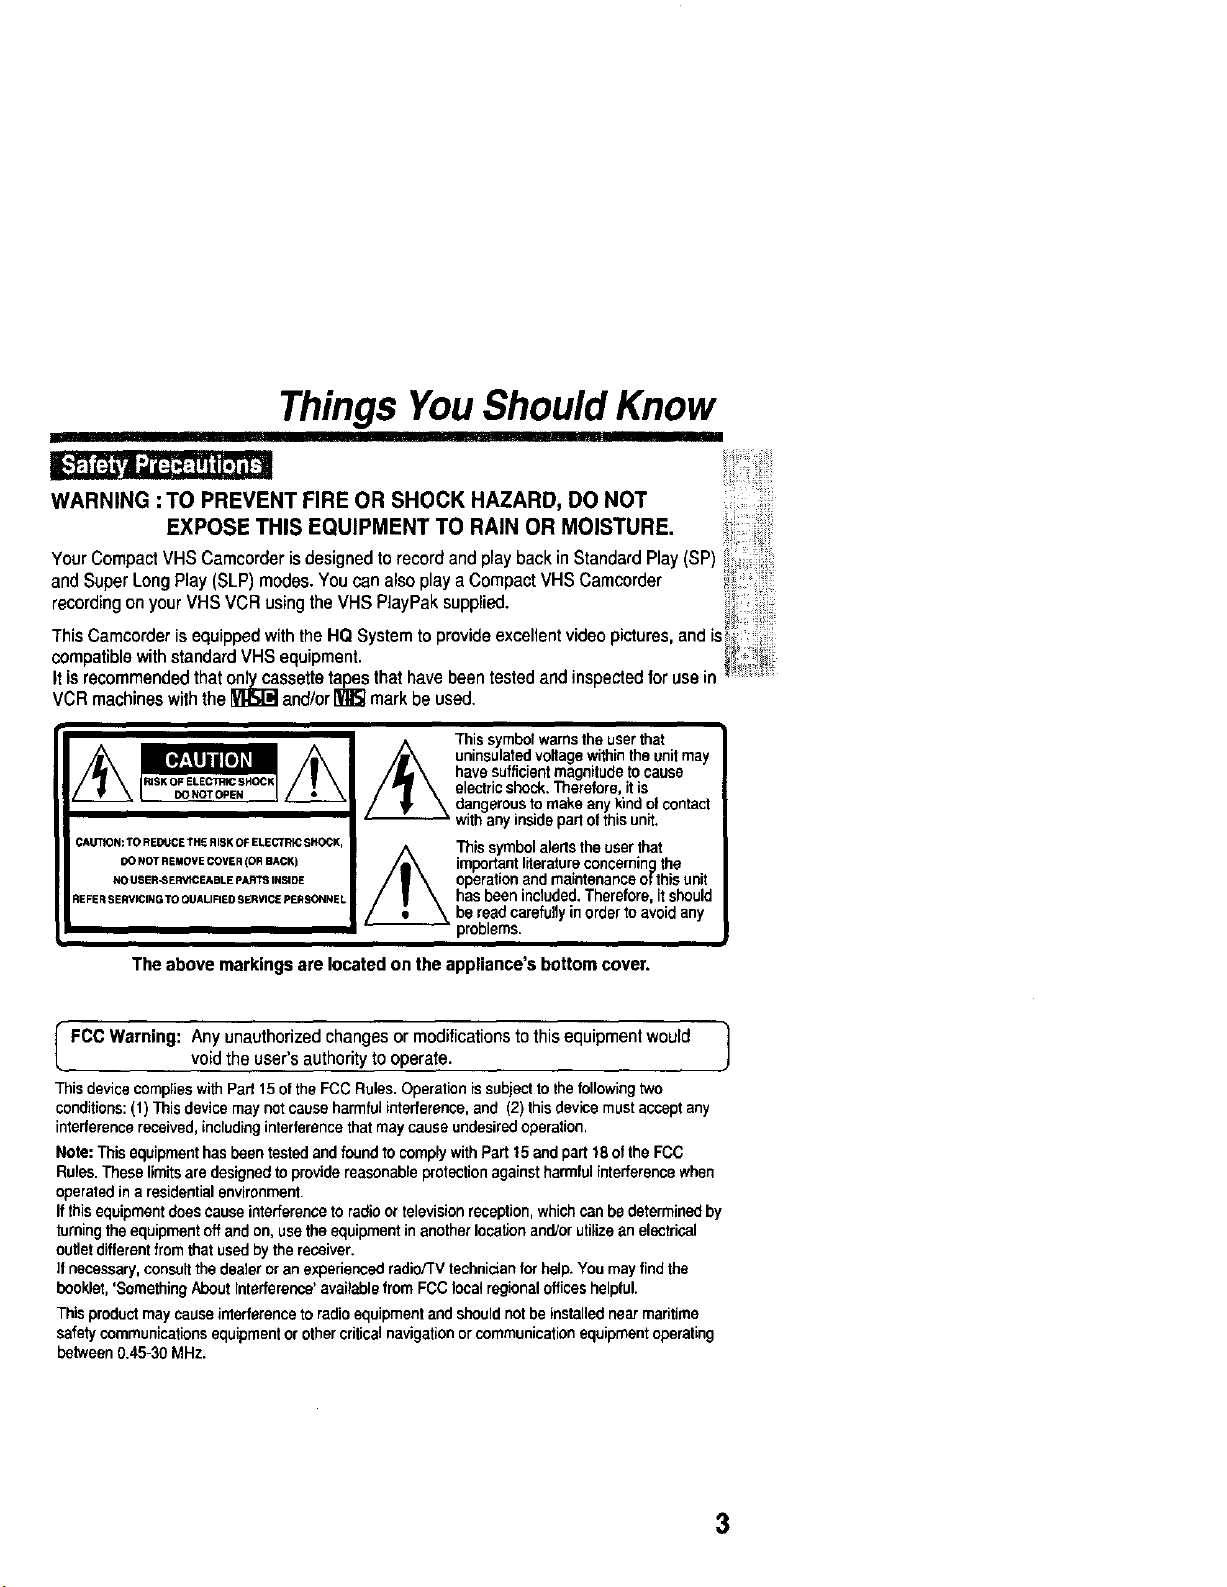
WARNING : TO PREVENT FIRE OR SHOCK HAZARD, DO NOT
EXPOSE THIS EQUIPMENT TO RAIN OR MOISTURE,
YourCompactVHSCamcorderisdesignedtorecordandplaybackin StandardPlay(SP)
and SuperLongPlay(SLP)modes,YoucanalsoplayaCompactVHSCamcorder
recordingonyourVHSVCRusingtheVHSPlayPaksupplied.
Th_s Camcorder s equipped w_th the HQ System to prowde excellent vtdeo ptctures, and _s
compatible with standard VHS equipment. _i'
It is recommended that onlycassettetapesthat have been tested and inspectedfor use in
VCR machines with the _ and/or_ mark be used.
DONOT OPIEN
DO NOT REMOVECOVER leR BACK)
NO USER-SERVICEABLE pART_ INSIDE
This symbolwarnstheuserthat
uninsulatedvoltagewithintheunitmay
havesufficientmagnitudetocause
electricshock.Therefore,itis
dangerousto makeanykindotcontact
withanyinsidepartofthisunit.
/_ Thissymbolalertstheuserthat
importantliteratureconcerningthe
operationandmaintenanceofthisunit
hasbeenincluded.Therefore.itshould
bereadcarefullyinordertoavoidany
problems.
The abovemarkingsarelocatedon theappliance'sbottomcover.
I FCCWarning: Anyunauthorizedchangesor modificationstothisequipmentwould
voidtheuser'sauthoritytooperate. J
This device complies with Pad 15 of the FCC Rules. Operation is subjectto the following two
conditions: (1) This device may not cause harmful interference, and (2) thisdevice must accept any
interference received, including interference that may cause undesired operation.
Note: This equipment has been tested and found to comply withPart 15and part 18 of the FCC
Rules. These limits are designed to provide reasonable protection against harmful interference when
operated in a residential environment.
If thisequipment does cause interference to radio or television reception, which can be determined by
turning the equipment off and on, use the equipment in another IocetJon and/or utilize an electrical
outlet different from that used by the receiver.
if necessary, consult the dealer or an exporienced radio/TV technician for help. You may find the
booklet,'SomethingAbout Interference' available from FCC local regional offices helpful.
This productmay cause interference to radio equipment and shouldnotbe installednear maritime
safety communicationsequipment or othercritical navigationorcommunicationequipment operating
between 0.45-30 MHz.
3
ImportantSafeguards
_ IIIIII!11111II
1. Read Instructions- All the safety and
operating instructions shouldbe read before
the unitis operated.
2. Retain Instructions - The safety and
operating instructionsshouldbe retainedfor
future reference.
3. Heed Warnings - Allwarningson the unit
and in the operatinginstructionsshouldbe
adhered to.
4. Follow Instructions - Alloperating and
maintenance instructionsshouldbe followed.
5. Cleaning - Unplug thisvideo unitfrom the
wall outlet before cleaning. Do not use liquid
or aerosol cleaners. Use a dry clothfor
cleaning.
6. Attachments - Do notuse attachments not
recommended by the video product
manufacturer as they may be hazardous.
7. Water and Moisture - Do notuse this video
unitnear water - for example near a bath tub,
wash bowl,kitchensink, or laundrytub, ina
wet basement, or near a swimming pool,and
the11ke.
8. Accessories- Oo notplace this video unit
on an unstablecart, stand, tripod,bracket,or
table. The video unitmay fall, causingserious
injury to a childor adult,and seriousdamage
to the unit. Useonly with a cart, stand, tripod,
bracket,or table recommended by the
manufacturer,or sold withthe video unit.Any
mounting of the unitshouldfollow the
manufacturer's instructionsand shoulduse a
mounting accessoryrecommended by the
manufacturer. An appliance and cart
combination shouldbe moved
with care. Quick stops,
excessiveforce, and uneven
surfacesmay causethe
appliance and cartcombination
to overturn.
9. Ventilation - Slotsand opaninQs in the
cabinet are previded for ventilationand to
ensure reliable operationof the video unit
and to protectit from overheating.These
_Oeevningsmust not be blocked orcovered.
erplace the video uniton a bed, sofa,
rug,or othersimilar surface, or near orover a
radiatoror heat register. This video unit
should not be placed in a built-ininstallation
such as a bookcase or rack unless proper
ventilationisprovided orthe manufacturer's
instructionshave been adhered to.
10. Power Sources - This video unitshouldbe
operated only from the type of power source
indicatedonthemarking label. If you are not
sure ofthe type ot power supply to your
home, consultyour appliance dealer orlocal
power company. For wdeo unitsintendedto
be operated from battery power,or other
sources, refer to the operating instructions.
4
III IIHIPIIIII
11. Grounding or Polarization - This video unit
may be equipped witheither a polarized2-
wireAC ALternating Current) line plug(a
plughaving one blade w der than the other)
or 3-wire groundingtype plug, a plug having
a third (grounding)pin,
The 2-wire polarized plug willfitintothe
poweroutlet onlyone way. This is a safety
feature. If you are unable to insertthe plug
fully intothe outlet,try reversingthe plug. If
the pluQstillfalls to fit, contactyour
elantric=antoreplace yourobsoleteoutlet.
Do notdefeat the salety purposeofthe
polarizedplug.
The 3-wire grounding type pluq willtitintoa
grounding type power outlet.This isa safety
leature. Ifyou are unableto insertthe plug
into the outlet,contactyourelectTicionto
replace yourobsoleteoutlet.Do not defeat the
safety purposeof the groundingtype plug.
12. Power-Cord Protection - Power-supply
cords should be routedso thatthey are not
likely to be walked on or pinchedby items
placed uponor againstthem. Paying
particularattentionto cords ofplugs,
convenience receptacles, and thepoint
where they exit from the unit.
13. Outdoor Antenna Grounding- Ifan
outsideantenna orcable system is
connectedto the video unit,be sure the
antenna or cable systemisgrounded so as
to provide some protectionagainstvoltage
surges and built-up static charges. Part 1of
the Canadian ElectricalCede, in USA
Section 810 of the National ElectricalCode,
provides informationwithrespecttoproper
grounding of the mast and supporting
structure, groundingofthelead-in wireto an
antenna dischargeunit,size ofgrounding
conductors, locationof antenna discharge
unit, connectionto grounding electrodes,and
requirements for the groundingelectrode.
( _
NEC SEC/I_ 110-;1 )
14. Lightning - For added protection ofthis
video unitreceiverduhnga lightningstorm,or
when it isleft unattendedandunused forlong
pededs oftime, unplugit lromthe walloutlet
and disconnectthe antennaor cablesystem.
This willprevent damage to the videounit due
to ligh_ng and power-treesurges.
ImportantSafeguards
t5 Power Lines - An outside en enna sys em b. If any liquid has been spilled into, or
should not be located in the vicinity of overhead objeutshave fallen onto, the video unit.
a_werlinesorotherelectriclightorpower
rculls,orwhereitcanfallintosuchpower
linesorcircuits.Wheninstallinganoutside
antennasystem,extremecareshouldbe taken
tokeepfromtouchingsuchpowerlineser
circuitsascontactwiththemmightbefatal.
t6, Overloading - Donotoverloadwalloutlets
andextensioncordsasthiscan resultina
riskoffireor electdcshock.
t7. Objects and Liquids- Neverpushobjects
ofan)'kindintothis videounitthrough
openingsastheymaytouchdangerous
voltagepointsor shortoutpartsthatcould
rasuifinafireorelectricshock,Neverspill
liquidofanykindontothevideounit.
18. Servicing- Donotattempttoservicethis
videounityourselfasopeningorremoving
coversmayexposeyoutodangerousvoltage
orotherhazards.Referallsorv=cingto
qualifiedservicepersonnel.
f9. DamageRequidngService- Unplugthis
videounitfromthewalloutletandrefer
servicingtoqualifiedservicepersonnelunder
thetol]owingconditions:
a.Whenthepower-supplycordor plugis
damaged.
c. Ifthe videounithas beenexposedtorain
orwater.
d. Ifthevideounitdoesnotoperatenormally
byfollowingtheoperatinginstructions.
Adjustonlythosecontrolsthatarecovered
bytheoperatinginstrucliens,asanimproper
adiusknentofothercontrolsmayresultin
damageandwilloftenrequireextensive
workbya qualifiedtechniciantorestorethe
videounittoitsnormaloperation.
e. Ifthevideounithasbeendroppedorthe
cabinethasbeendamaged.
f. Whenthevideounitexhibitsadistinct
changein performance- thisindicatesa
needfor service.
20. ReplacementParts- Whenreplacement
partsarerequired,besuretheservice
technicianhasusedreplacementparts
specifiedbythemanufacturerorhavethe
samecharacteristicsastheoriginalpart.
Unauthorizedsubstitutionsmayresultinfire,
electricshockorotherhazards.
21. SafetyCheck- Uponcompletionofany
serviceorrepairstothisvideounit,askthe
servicetechniciantoperformsafetychecks
todeterminethatthevideounitisinsafe
operatingorder.
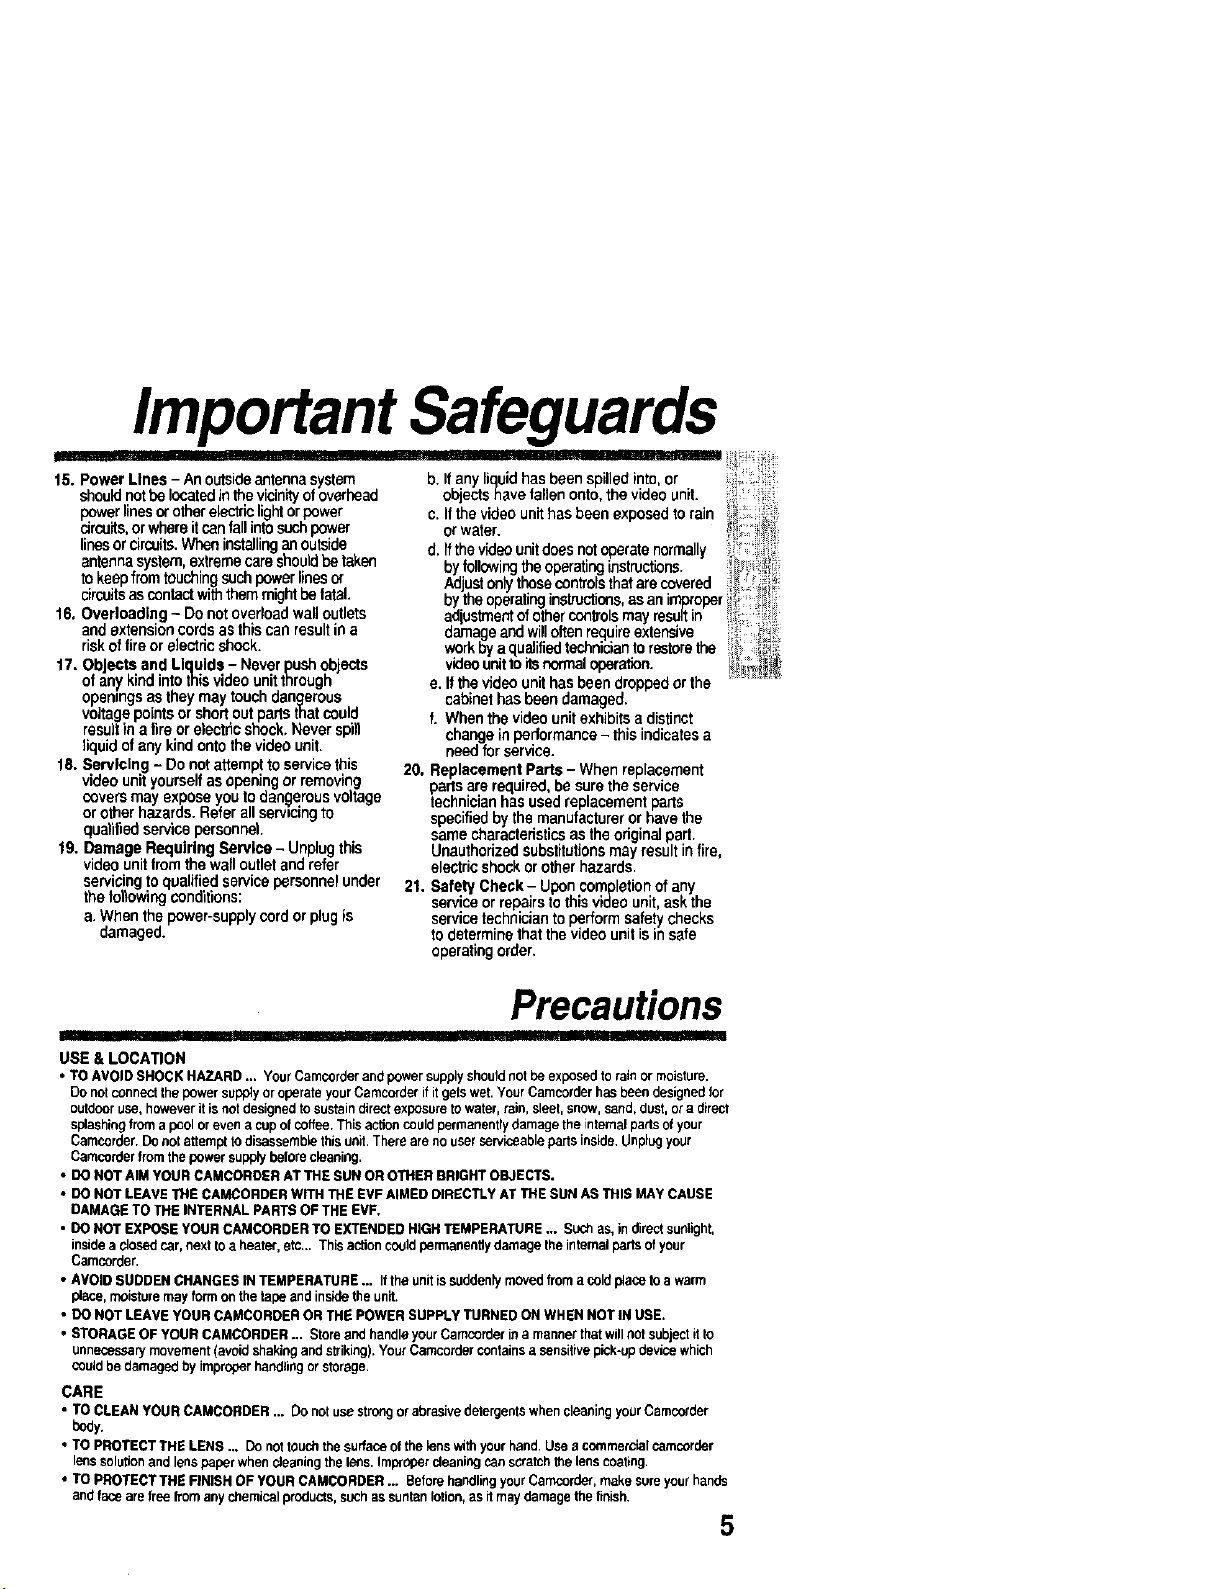
Precautions
in=l,,, ,,i,i ,i I ill I II
USE & LOCATION
• TO AVOID SHOCK HAZARD ... Your Camcorder and power supplyshould not be exposed to rain or moisture.
Do notconnect the power sup_y oroperate your Camcorder if it gets wet.Your Camcorder has been designed for
outdoor use, however it is not designed to sustain directexposure to water, rain, sleet, snow, sand, dust,or a direct
splashingfrom a podi or even a cup of coffee. This actioncouldpermanently damage the internalparts ofyour
Camcorder. Do notattempt to disassemble this unit.There are no user serviceable parts inside. Unplug your
Camcorder from the power supply beforecleaning.
• DO NOT AIM YOUR CAMCORDER AT THE SUN OR OTHER BRIGHT OBJECTS.
• DO NOT LEAVE THE CAMCORDER WiTH THE EVF AIMED DIRECTLY AT THE SUN AS THIS MAY CAUSE
DAMAGE TO THE INTERNAL PARTS OF THE EVF.
• DO NOT EXPOSE YOUR CAMCORDER TO EXTENDED NIGH TEMPERATURE .. SUChas, in directsunlight,
insidea dosed car, next to a heater, etc... This action codidpormanenlly damage the internal parts ofyour
Camcorder.
• AVOID SUDDEN CHANGES IN TEMPERATURE ... If the unitis suddeatf moved from a cold place to a warm
place, moisturemay form on the tape and inskJethe unit,
• DO NOT LEAVE YOUR CAMCORDER OR THE POWER SUPPLY TURNED ON WHEN NOT IN USE.
• STORAGE OF YOUR CAMCORDER., Store and handleyour Camcorder in a manner thatwill riotsubjectit to
unnecessary movement (avoid shaking and striking).Your Camcorder contains a sensitive pick-updevice which
couldbe damaged by improperbendling or storage.
CARE
• TO CLEAN YOUR CAMCORDER ,.. Do not use strong orabrasive detergents when cleaning your Camcofder
body.
• TO PROTECT THE LENS .. Do nottouch the surface ol the lens with yourhand Use a commercisl camcorder
lens solutionand lenspaper when sieading the lens, Improper cleaning can scratch the lenscoating.
• TO PROTECTTHE RNISH OF YOUR CAMCORDER ... Before handling yourCamcorder, make sure yourhands
and face are free fromany chemical products, suchas suntan lotion,as it may damage the finish.
5
Table of Contents
Things You Should Know ............................................................................. 2-3
Important Safeguards ................................................................................... 4-5
Precautions ........................................................................................................ 5
Self Demo Mode ................................................................................................ 7
Quick Operation Guide ..................................................................................... 8
Supplying Power (BatteryCharge/Use/RefreslVCare,ACAdaptor,CarBatteryCord)...9-10
Cassette Information ...................................................................................... 11
Using MENU Mode .......................................................................................... 12
Setting the Clock ('rimeZone,AutoDaylightSaving]]me)................................13-14
Built-in Auto Light (PV-I.5511PV-L601/PV-L651 only) (UsingtheLight)...........15
_ Camera Recording (Basic,Stand-by,ProgrammedRecording).........................16-18
8-Function Remote Control (PV-L651 only) .................................................. 19
Playing Back Recordings
(BasicPlayback,VisualSearch,StillPicture,Tracking,TV/VCRPlayback)......20-21
Copying your Tapes (dubbing) ...................................................................... 22
,iil
i! L_!!!
ii, i
Four-Speed Power Zoom................................................................................ 23
Backlight .......................................................................................................... 23
Focus (Auto/ManualFocus).........................................................................................24
High Speed Shutter (Auto/ManualShutter)..............................................................25
Auto Fade ......................................................................................................... 26
Color Digital Fade ........................................................................................... 27
Digital Zoom .................................................................................................... 28
Digital Electronic Image Stabilization (EIS) .................................................. 28
Security Mode.................................................................................................. 29
Intelligent Titler (Auto/ManualTitle,PhraseTitle)...............................................30-31
Viewfinder/LCD Monitor Indications ....................................................... 32-33
Operation Notes (UsingtheShoulderandHandStraps,CleaningEVF)..................34
Replacing Clock/Remote Battery................................................................... 35
Palmcorder Accessory System ..................................................................... 36
Palmeorder Acceesory Order Form .............................................................. 37
.... Specifications .................................................................................................. 38
Before Requesting Service (VideoHeadCleaning)...............................................39
Request for Service Notice ............................................................................ 40
Limited Warranty ............................................................................................. 41
Servlcenter List ............................................................................................... 42
Spanish Quick Use Guide/Guia Para Uso Rdpido ........................................ 43
Index ................................................................................................................. 44
6
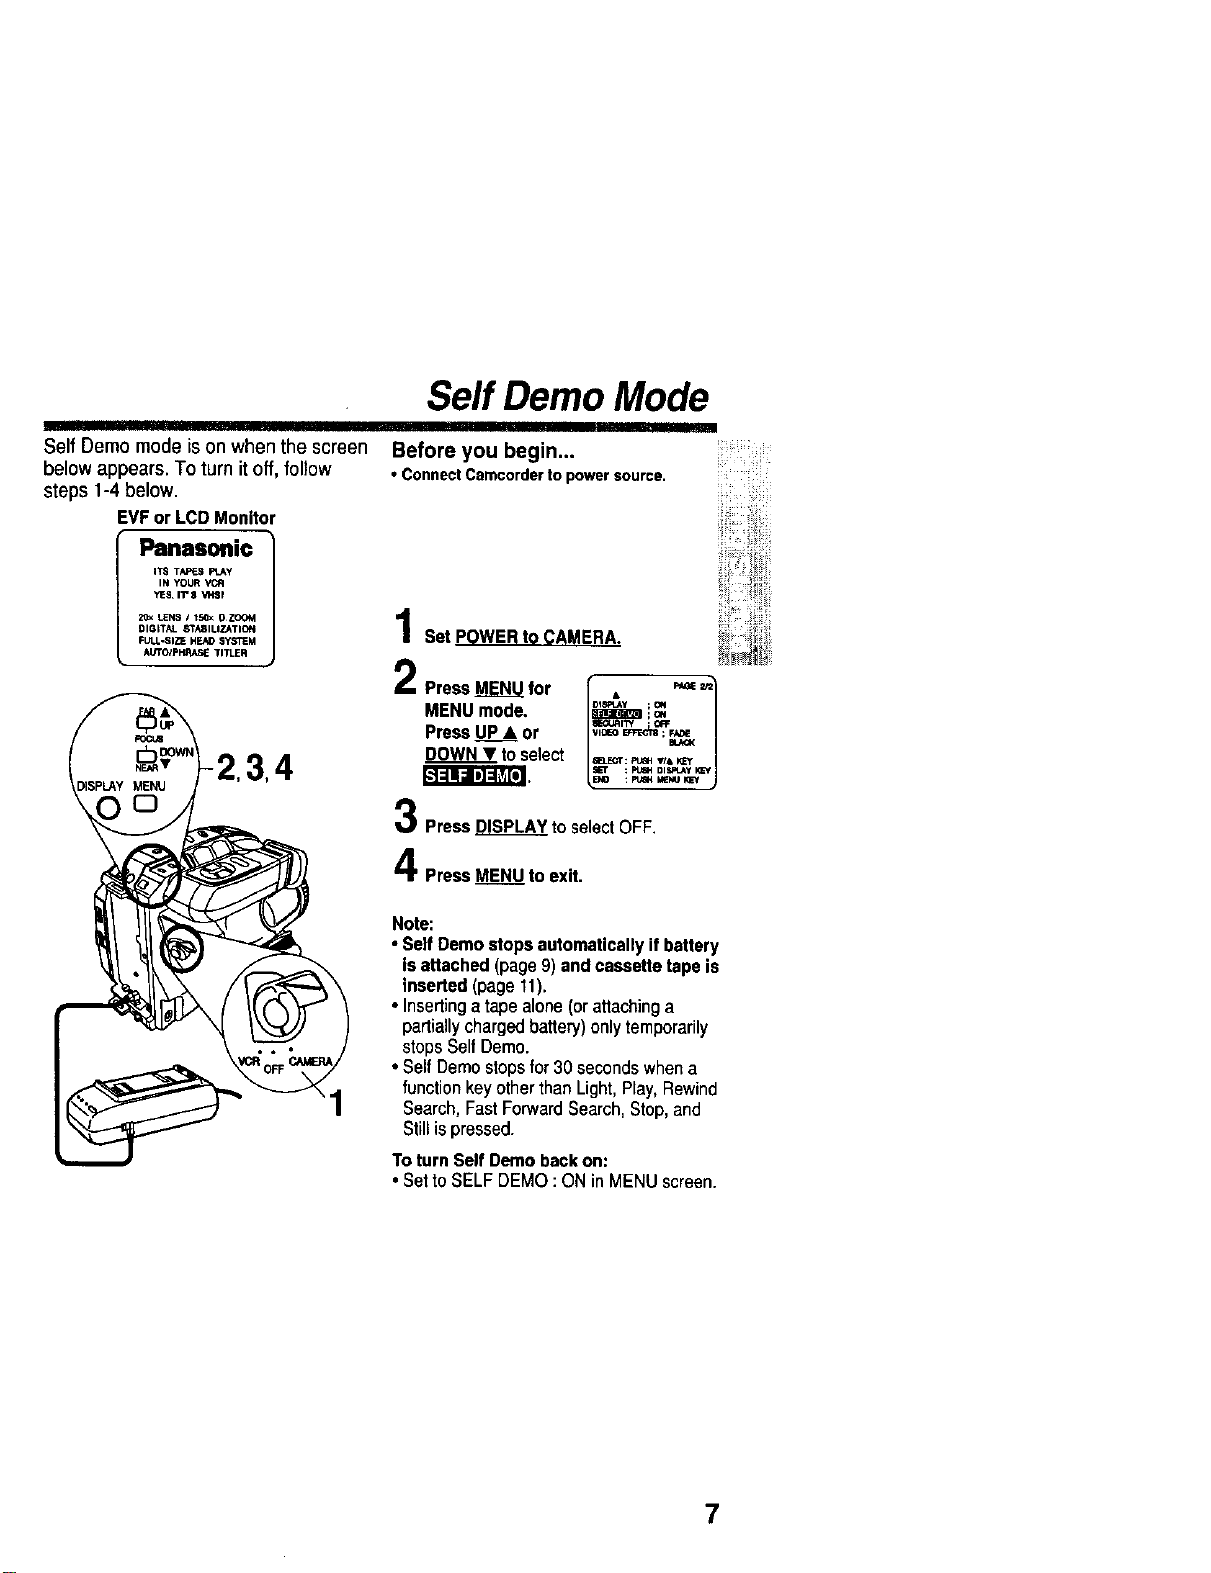
Self Demo mode ison when the screen
below appears. To turn it off, follow
steps 1-4 below.
EVForLCDMonitor
Panasonic J
ITS TAF_S FI.Ay
IN YOUR
YES,II" $ V_BI
2_ LENS / t5_< O ZOOM
DIGITAL STASIUZATION
FULL-SIZE HEAD SYSTEM
At/TO/pI';RA_ TITLER
Self Demo Mode
Before you begin...
• Connect Camcorder to power source.
Set POWER to CAMERA.
2 PressMENUfor r"D"'L"V;o. "_ _1
MENUmode. _ !,_
PressuP* or L"_°_',_ j
DOWNT toselect a_T:_,_,_
: P'_GH DISPLAy KEf
Press DISPLAY to selectOFF.
Press MENU to exit.
Note:
• SelfDemostopsautomaticallyifbattery
isattached(page9) andcassettetapeis
inseded(page11).
• Insertinga tapealone(orattachinga
partiallychargedbattery)onlytemporarily
stopsSelfDemo.
• SelfDemostopsfor30 secondswhena
functionkey otherthanLight,Play,Rewind
Search,FastForwardSearch,Stop,and
Stillispressed.
To turnSelfDemobackon:
• SettoSELFDEMO:ONin MENUscreen
7
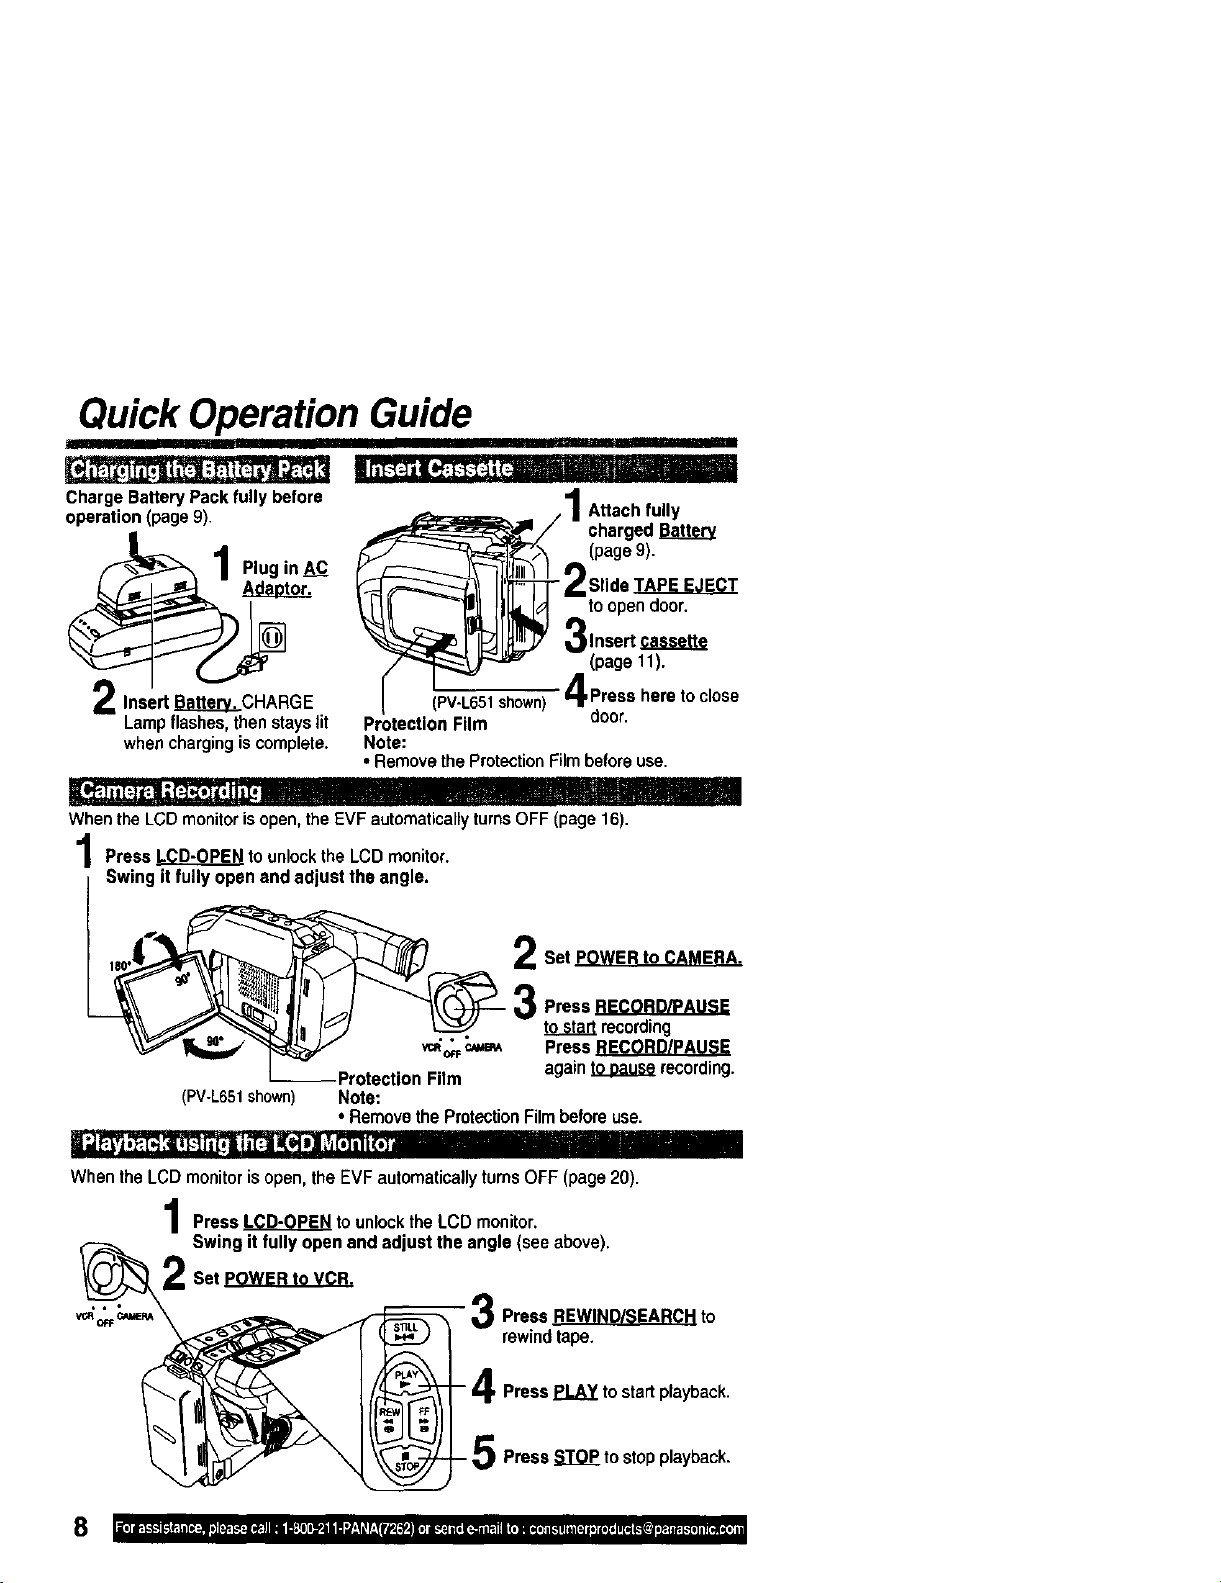
Quick Operation Guide
I I'11'I'll
Ilil"7t'ii_ ir !
ChargeBatteryPackfullybefore
operation(page9).
Adaotor.Plugin_
InsertH_. CHARGE
Lampflashes,thenstayslit
whenchargingiscomplete.
Ili_.i ii[.--lCi:ll f:t_f,,]t, ilil
/ 1Attach fully
_/ charged
_:T_ (page 9),
t11_Id toopendoor.
3,nsertc.....
(page 11).
65_ 4 Press he_ to cl°se
Protection Film door.
Note:
• Remove the ProtectionFilmbefore use.
_l - I1TT1,I
When the LCD monitor isopen, the EVF automaticallyturns OFF (page 16).
Press LCD-OPEN to unlock the LCD monitor.
Swing it fully open and adjust the angle•
Set POWER to CAMERA.
Press
tosta_ recording
• • •
vc.o__ Press
--Protection Film again _ recording.
(PV-L651shown) Note:
• Remove the ProtectionFilm before use.
ii"j'_ ,'_ :i, f.-ll;l'tll _1_ii_ill] ,,,t_111i,I
When the LCD monitoris open, the EVF automaticallyturns OFF (page 20).
I Press LCD-OPEN to unlock the LCD monitor.
Swing it fully open and adjust the angle (see above).
Set POWER to VCR.
_o_'c,_ \ _ _ R Press REWIND/SEARCH to
,_ _ _ w rewind tape.
_ - _ 4 Press PLAY t° start playback'
I_ _/P_ _ rioP"_ 5 PresS STOP to StOpplayback-
m iii I
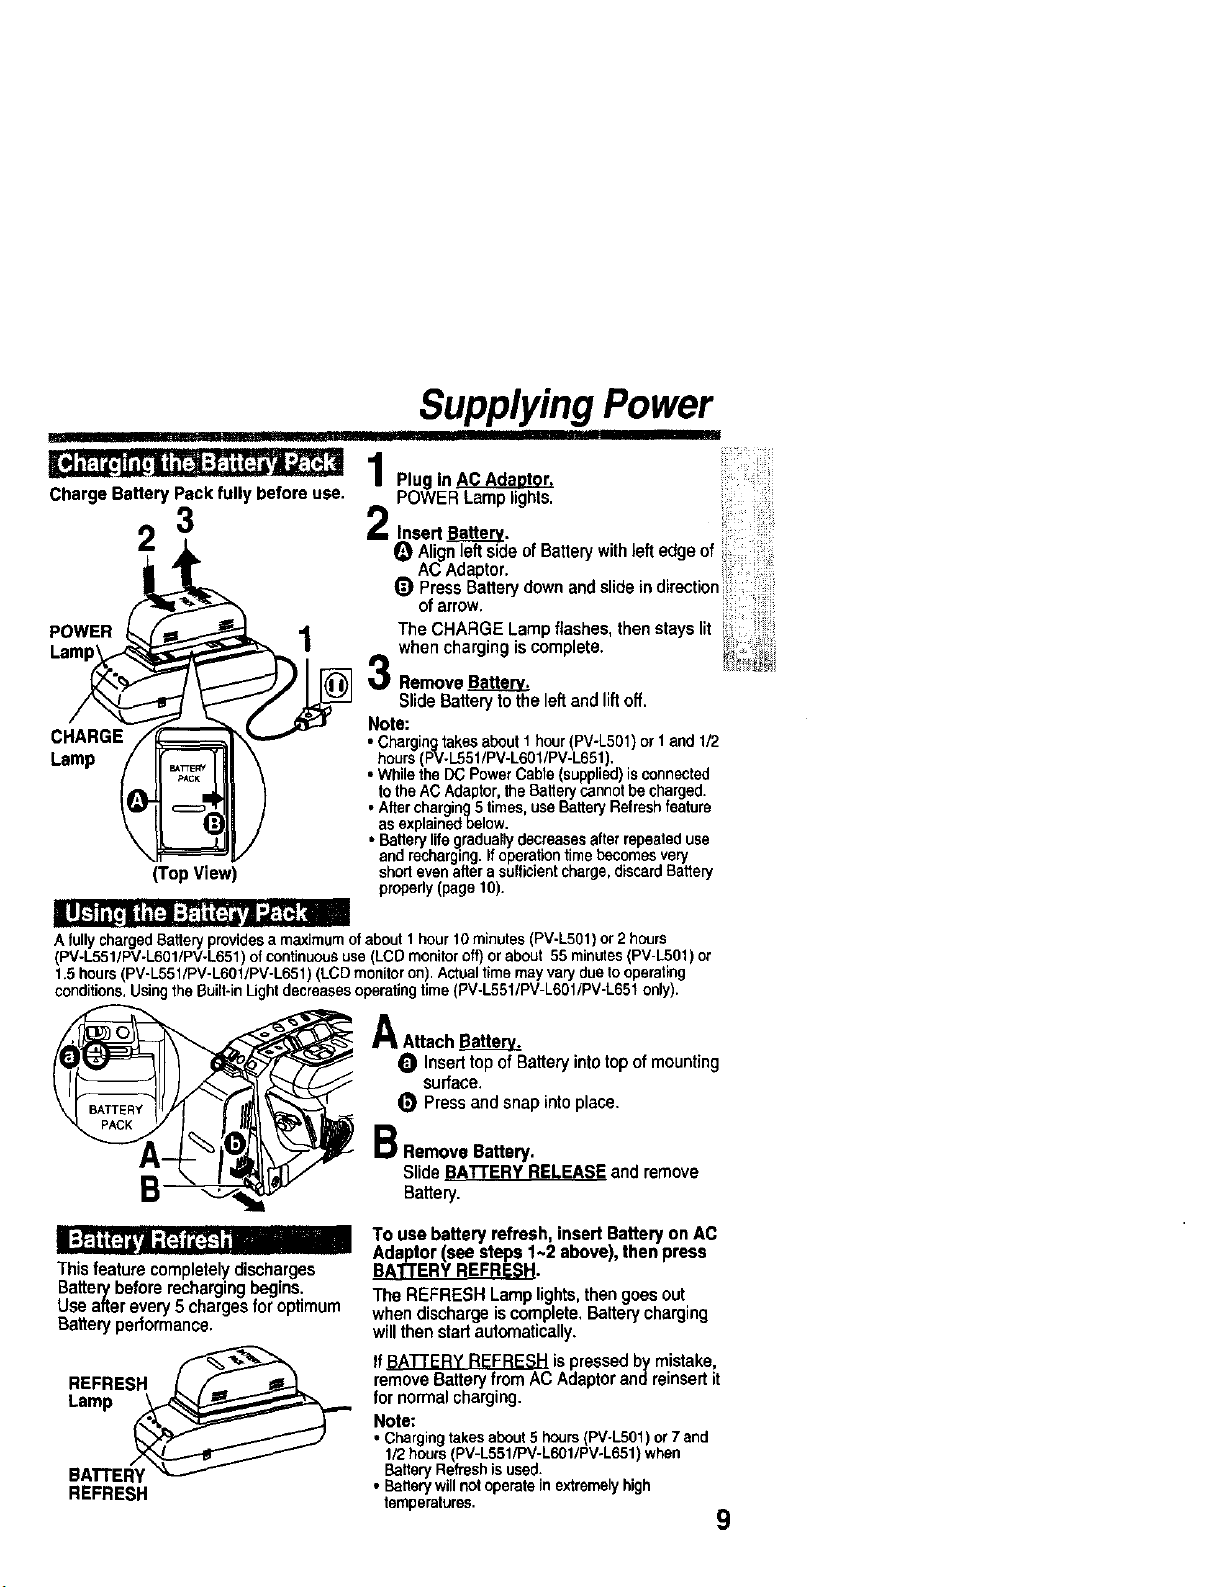
Charge Battery Pack fully before use.
POWER 2_/_
(Top View)
Supplying Power
Plug in
POWER Lamp lights.
2 Insert Ba___.@._.
e Alignleftside ofBattery withle. edge of
ACAdaptor.
Q Press Battery down and slide in direction
of arrow.
The CHARGE Lamp flashes,then stays lit
when charging is complete.
Remove BaHerv.
Slide Batteryto the left and lift off.
Note:
• ChargingtakesaboutI hour(PV-L501)or 1and 1/2
• hours PV-L551/PV-L601/PV-L651,
Whethe DCPowerCabe supped) s connected
totheAC Adaptor,theBatterycannotbecharged.
• Aftercharging5times,useBatteryRefreshfeature
asexplainedbelow.
• Batterylifegraduallydecreasesafterrepeateduse
andrecharging.If operationtimebecomesvery
shodevenafterasufficientcharge,discardBattery
propedy(page10).
AfullychargedBatteryprovidesa maximumofabout1hour10minutes(PV-LS01)or2 hours
(PV-L551/PV-L601/PV-L651)of continuoususe(LCDmonitoroff)or about 55minutes(PV-L501)or
1.5hours(PV-L551/PV-L601/PV-L651) (LCDmonitoron).Actualtimemayvarydueto operating
conditions.UsingtheBuilt-inLightdecreasesoperatingtime(PV-L551/PV-L601tPV-L651only).
B
A Attach Battery=.
O Inserttopof Battery into top ofmounting
surface.
(_ Press and snap into place.
B RemoveBattery.
SlideBATTERYRELEASEandremove
Ba_ely.
This feature completelydischarges
Batterybefore recharging begins.
Use after every 5 chargesfor optimum
Batteryperformance.
REFRESH
REFRESH
To use battery refresh, insert Battery on AC
Adaptor (see steps 1~2 above), then press
The REFRESH Lamp lights,then goesout
whendischargeiscomplete, Batterycharging
willthenstad automatically.
If_ is pressed by mistake,
removeBaRelyfromAC Adaptorandreinsert it
for normal charging.
Note:
• Chargingtakesabout5 hours(PV-L501)or7 and
1/2hours(PV-L551/PV-L601/PV-L651)when
BatteryRefreshisused.
• Batterywillnotoperateinextremelyhigh
temperatures.
9

Supplying Power
]l! I!
Caution:
• Chargeonlywithspecifiedcharger.
• Batterycanbechargedwithinatemperaturerangeof
10°C (50°F) ar_ 35°C (95°F).
• Batteryisnormallywarmafterchargingor ustafteruse.
• Donotuseaninsufficientlychargadorworn-outBattery.
Safetyprecautions:
• DonotgetBatterynear,ordisposeofinfire.
• Donotdirectlyconnect(shodcircuit)thepositive(+)and
negative(-) terminals.
• NeverattempttodisassembleorreassembleBattery.
I U.S.A. CONSUMERS: ATTENTION:
The productyou havepurchasedis poweredbya nickelcadmiumbattery
whichisrecyclable.Atthe end of its useful life under variousstate and local
laws, itisillegaltodisposeofthis batteryintoyour municipalwaste stream.
Please call 1-8OO-8-BATI'ERYfor informationonhow torecycle this battery.
To•void Batt•ry damage:
• Donotdroporjar Battery.
• UseBatterywithspecifiedunitsonly.
• IfBatteryisusedinextremelyhigh
temperatures,a safetydevicewill
automaticallypreventoperation,
To prolongBatterylife:
• Whilenotinuse,removeBattery
fromtheCamcorderandACAdaptor
andstoreina cool,dark,dryplace.
• KeepBatteryterminalsclean.
I
DC _ower Cable =•
POWER Lamp l_ !_ "_-'-'_ •
Cn'n"e""
ctor •
II
Car Battery Cord
i (optional)
Connector
ConnectACAdantorVCRD(_OUTto
Camcorder DC IN withsuppliedDC
Power Cable.
Plug in AC Adaptor.
POWER Lamp lights.
Note:
• While the DC PowerCable (supplied)is
connectedtothe AC Adaptor,the Battery
cannotbe charged.
• When notin use, unplugAC Adaptorfrom
AC outlet.(Adaptoruses 1.2 W ofelectricit
whilepluggedin.)
, CAUTION:
Thisunitwilloperateon110/120/220/240V AC.
AnACplugadaptormaybe requiredforvoltages
otherthant20 V AC.Pleasecontacteithera
localorforeignelectricalpartsdistributorfor
assistanceinselectinganalternateACplug.We
recommendusingtheaccessorypowerplug
adaptor(VJSS0070)inanareawhichhas
specialAC outlets.
Cigarette
Lighter
Socket (12 V)
Cigarette
LighterPlug
:1Connect PV-C16 Car Battery Cord
• (optional) to Camcorder DC IN.
i 2 _ Startenginefirst.
Plug Car Battery Cord into
• Cigarette lighter socket.
= • if Car Batterycord fuse needs
• replacing,use exact currentrating
• (in amps).
• Note"
• _"
• Ths cord only works invehicles
a equipped with DC 12 V (negative
• ground) battery. Check withyour car/
• truckdealer. Use only specifiedcar
• batterycord.
• • To avoid blowingthecar batterycord
• fuse, do step 2 in the properorder.
• • Runningvehicles mustbe well ventilated
• • When not in use, disconnectcigarette
• lighterplug.
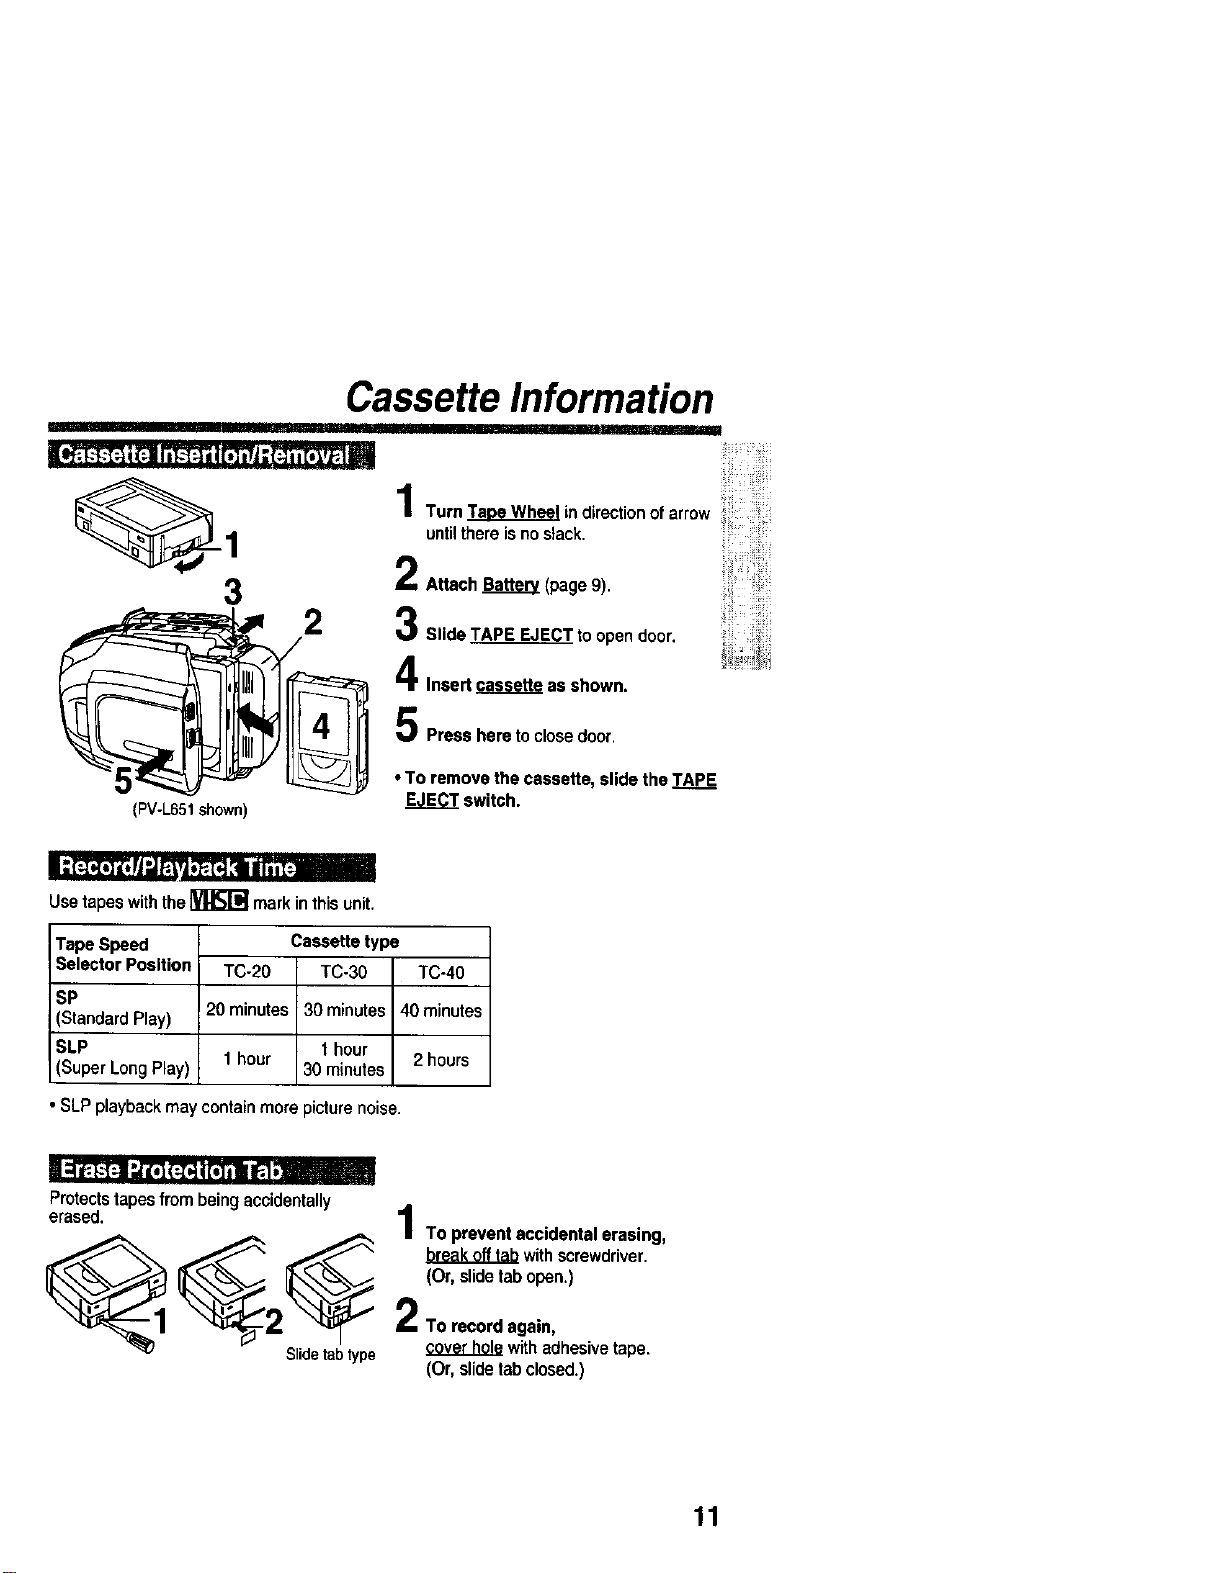
Cassette Information
3
(PV-L65t shown)
2
Turn Taoe Wh_l indirection of arrow
until there is no slack.
Attach Bakery (page 9).
Slide TAPE EJECT to open door.
Insert _ as shown.
Press here to closedoor
• To remove the cassette, slide the TAPE
EJECT switch.
Usetapeswiththe_ markinthis unit.
Tape Speed
Selector Position
SP
(Standard Play)
SLP
(Super Long Play)
• SLP playback may containmore picture noise.
Cassette type
TC-20 TC-30 TC-40
20 minutes 30 minutes 40 minutes
1 hour 1 hour
30 minutes 2 hours
Protects tapes from being accidentally
4
erased.
| To prevent accidental erasing,
_1_ _ .b.!.e,.8.!L.0..!__J_withscrewdriver.
(Or, slide tab open.)
2 2TO record again,
Slidetabtype _ with adhesive tape.
(Or, slide tab closed.)
11

Using MENU Mode
Before you begin...
• ConnectCamcordertopowersource.
• Set POWERto CAMERAor VCR.
3
Press MENU_for MENU mode.
The CAMERA or VCR MENU screen(see
below left) appears when Menu mode is
entered.
Press .U..P__orDOWNT to highlight the
desiredmenu item.
PressDISPLAYtosetselection.
PressMENUtoexit.
Note:
• The Menu mode is canceled if_,
DISPLAY, or MENU are not pressedwithin5
minuteswhen Self Demo mode is off.
• The Menu mode is canceled if UP/DOWN(,IJV_.
DISPLAY, or MENU are notpressedwithin30
secondswhen Self Demo mode is on.
il|||ill|ll||l|lll| ||1|
CMENU Mode (CAMERA) Screen_ 1
1\ --- ._u --- P.,__
-TITLE ;
-- -SHUTrER ;
57 •
SELECT: PUSHV/A _
SET ; PUSHDISPLAYKL=Y
6 "_ _END• : PUSH M_IUp_E_ _
7_ DISPLAy ;ON
"SELFDEMO ; OFF
8 I "SECURITY ; Off=
_VIDL=O BCFECT8 ; FADE
9 / _
SELECT: Pt_H 'l_l& SEY
_ : _ DISPLAY_
CMENU Mode (VCR) Screen _)
--- MENU---
5"-
CLOCK SET
6 -- -DISPLAY ; ON
SELEGT: PL_H _l& IO_Y
lililillliliNilllnliill
2
3
4
5
6
7
8
9
PROGRAMMEDREC(page18).
Camcorderstartsandstopsrecordingata
presettime.
TITLE (pages 30, 31).
AUTO/MANUAL : 16 items
PHRASE : 10 items
SHUTTER(page25).
Selectdesiredshutterspeed.
STAND-BY RELEASE (page 17).
ON: Enablesquick resumptionof recording
from Stand-bymode.
CLOCK SET (pages 13, 14).
Selectto set clock.
DISPLAY(page32).
ON: On-screenDisplay(OSD)screensare
displayed.
SELFDEMO(page7).
ON: SELFDEMOscreenisdisplayed.
SECURITY(page29).
ON: EnablesMotionSecurityrecording.
VIDEO EFFECTS (pages 26, 27).
AUTO FADE : BLACKor WHITE
DIGITAL FADE : TYPE -P, 7 types
COLOR --I, 8 colors

Setting the Clock
Set the followingitems in order:Time Before you begin...
Zone, Daylight Saving Time, Date, • ConnectCamcordertopowersource.
and Time. • Set POWERto CAMERAor VCR.
,2,3,4
PressMENUfor MENUmode.
PressUP& or DQWNT toselect
_ET : pWH Dl_lJ4y _cy 8_r : P_N DISPLAy )_[Y
[CAMERA MODEl [VCR MODE]
2
Press DISPLAY for
CLOCK SET menu,
Press P_ or W_
to selectTIME ZONE,
DST, or DATErrlME.
_ 1.. CLOr4(IET ...
D. S, T, ;MJTO
D_TEITtME ; 12:00:¢¢,4kl
JAN 1 ;_Ot
_ELECI* : Ft_ WA_'y
SET : I_ 01,_y _=y
: p_ MENU KEy
Press DISPLAY for menu of itemselected in
step2.
To change the setting:
r_'_l--.IF,t'_ -) Go to step 3a on page 14.
I}]k_ i! -') Go to step 3b on page 14.
--)Go to step 3(:on page 14.
Press _ twice to exit.
iii!_
(continued on next page)
13
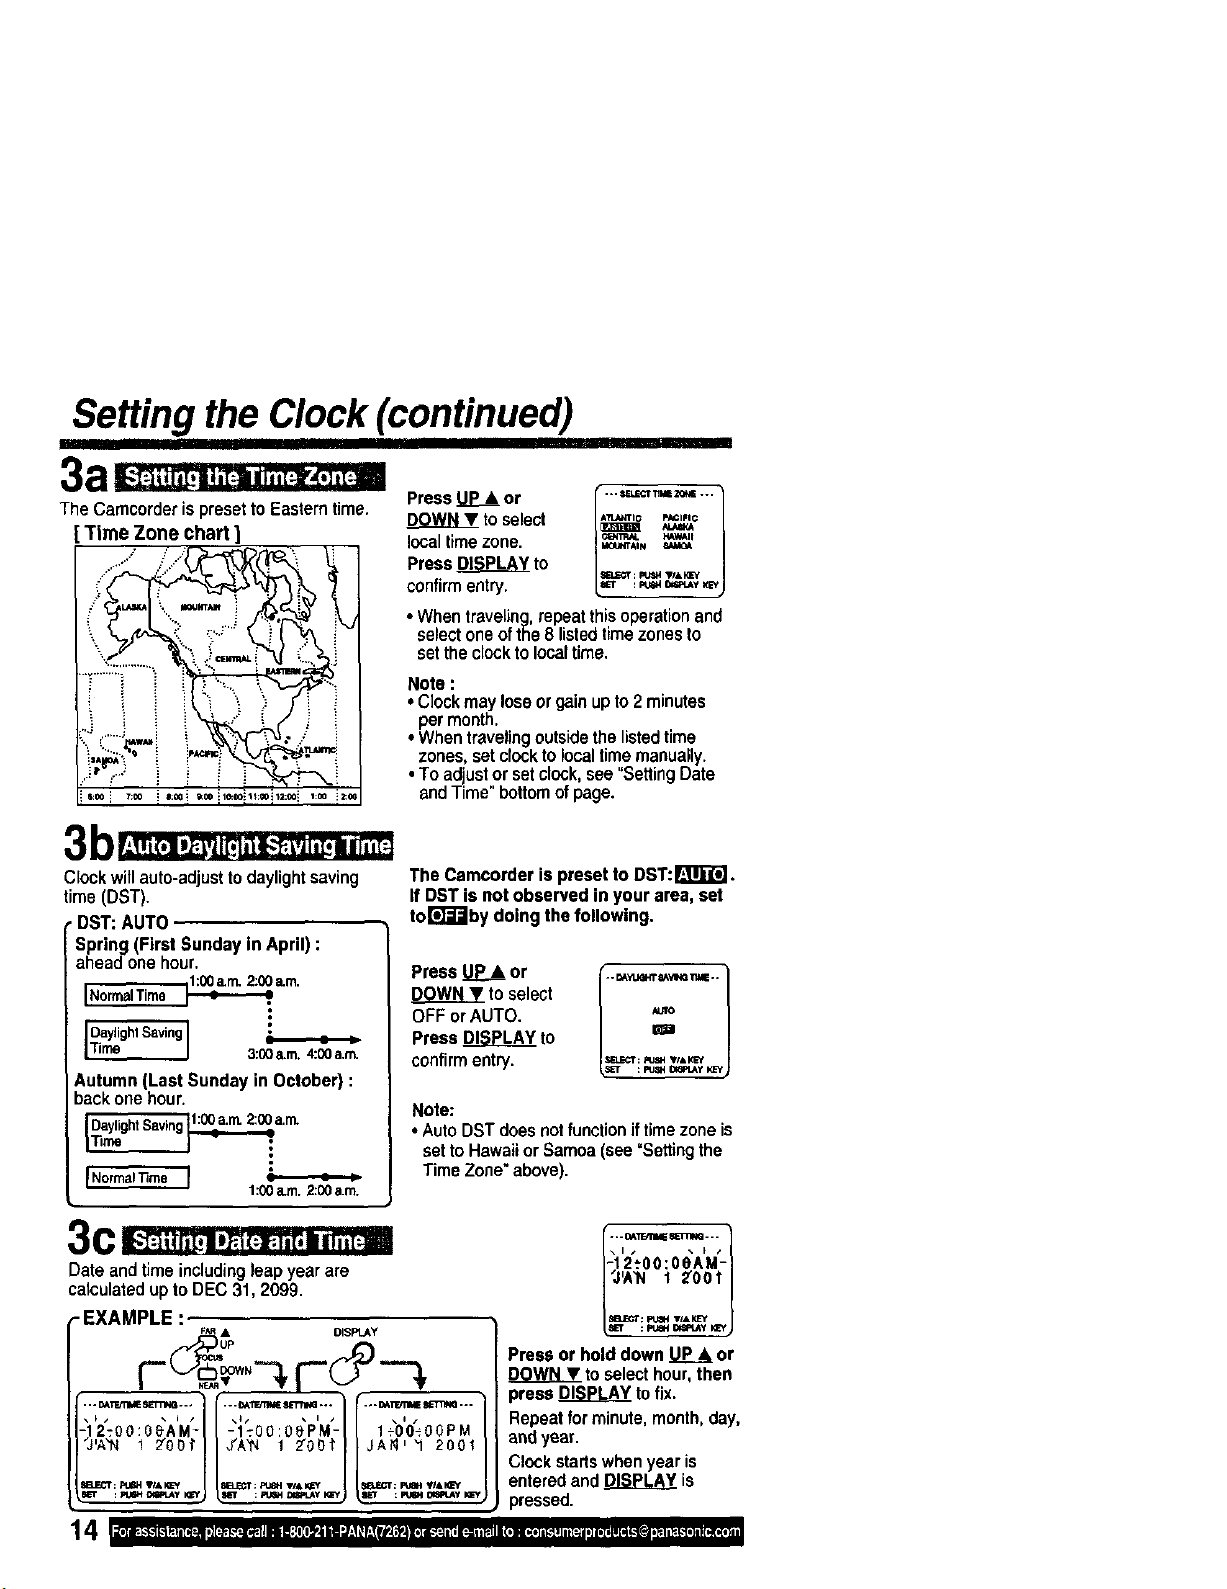
Setting the Clock (continued)
IIII
The Camcorder ispreset to Eastern time.
Time Zone chart ]
III
Press _ or
DOWNY to select
local timezone.
Press DISPLAY to
confirmentry.
[ . *. _l.L_'r TIIaEZONE ...
A'i_ANTIO p_ClFIC
• When traveling,repeatthis operation and
select one ofthe 8 listedtime zones to
set the clockto localtime.
Note :
• Clockmay lose orgain upto2 minutes
permonth.
• When travelingoutsidethe listedtime
zones, setclocktolocaltime manually.
• To adjustor set clock,see "SettingDate
and Time" bottomofpage.
Clockwill auto-adjust to daylightsaving
time (DST).
•DST: AUTO
Spring (First Sunday in April) :
ahead one hour.
iNormalTime _a.m.
•
3:00a.m.4:00a.m.
Autumn (Last Sunday in October) :
back one hour.
DaylightSaving1:00a._ 2:00a.rn.
1:00a.m.2:00a.m.
C " ! I I I , " d I II "
The Camcorderis presetto DST:_111_"_.
IfDSTis notobservedinyourarea,set
tor_"J"Jbydoingthefollowing.
Press _ or
DOWNY to select
OFF or AUTO.
Press _ to
confirm entry,
.. DAYLI_T _A'VlI_ _IE..
m
SELECT: _ ,Id, KE¢
Note:
• Auto DST does notfunctionif timezone is
set to Hawaii or Samoa (see =Settingthe
Time Zone"above).
Date and time including leap year are
calculatedup to DEC 31, 2099.
-EXAMPLE :
_,R • DISPLAY
rO-
/ **" OAlTdt'll_ 11_31_1""" /
-12_O0:OeAM-
IZOO?i
Press or hold down _ or
DOWN T to selecthour, then
press _ tofix.
Repeat for minute, month,day,
and year.
Clock startswhen year is
entered and DISPLAY is
, pressed.
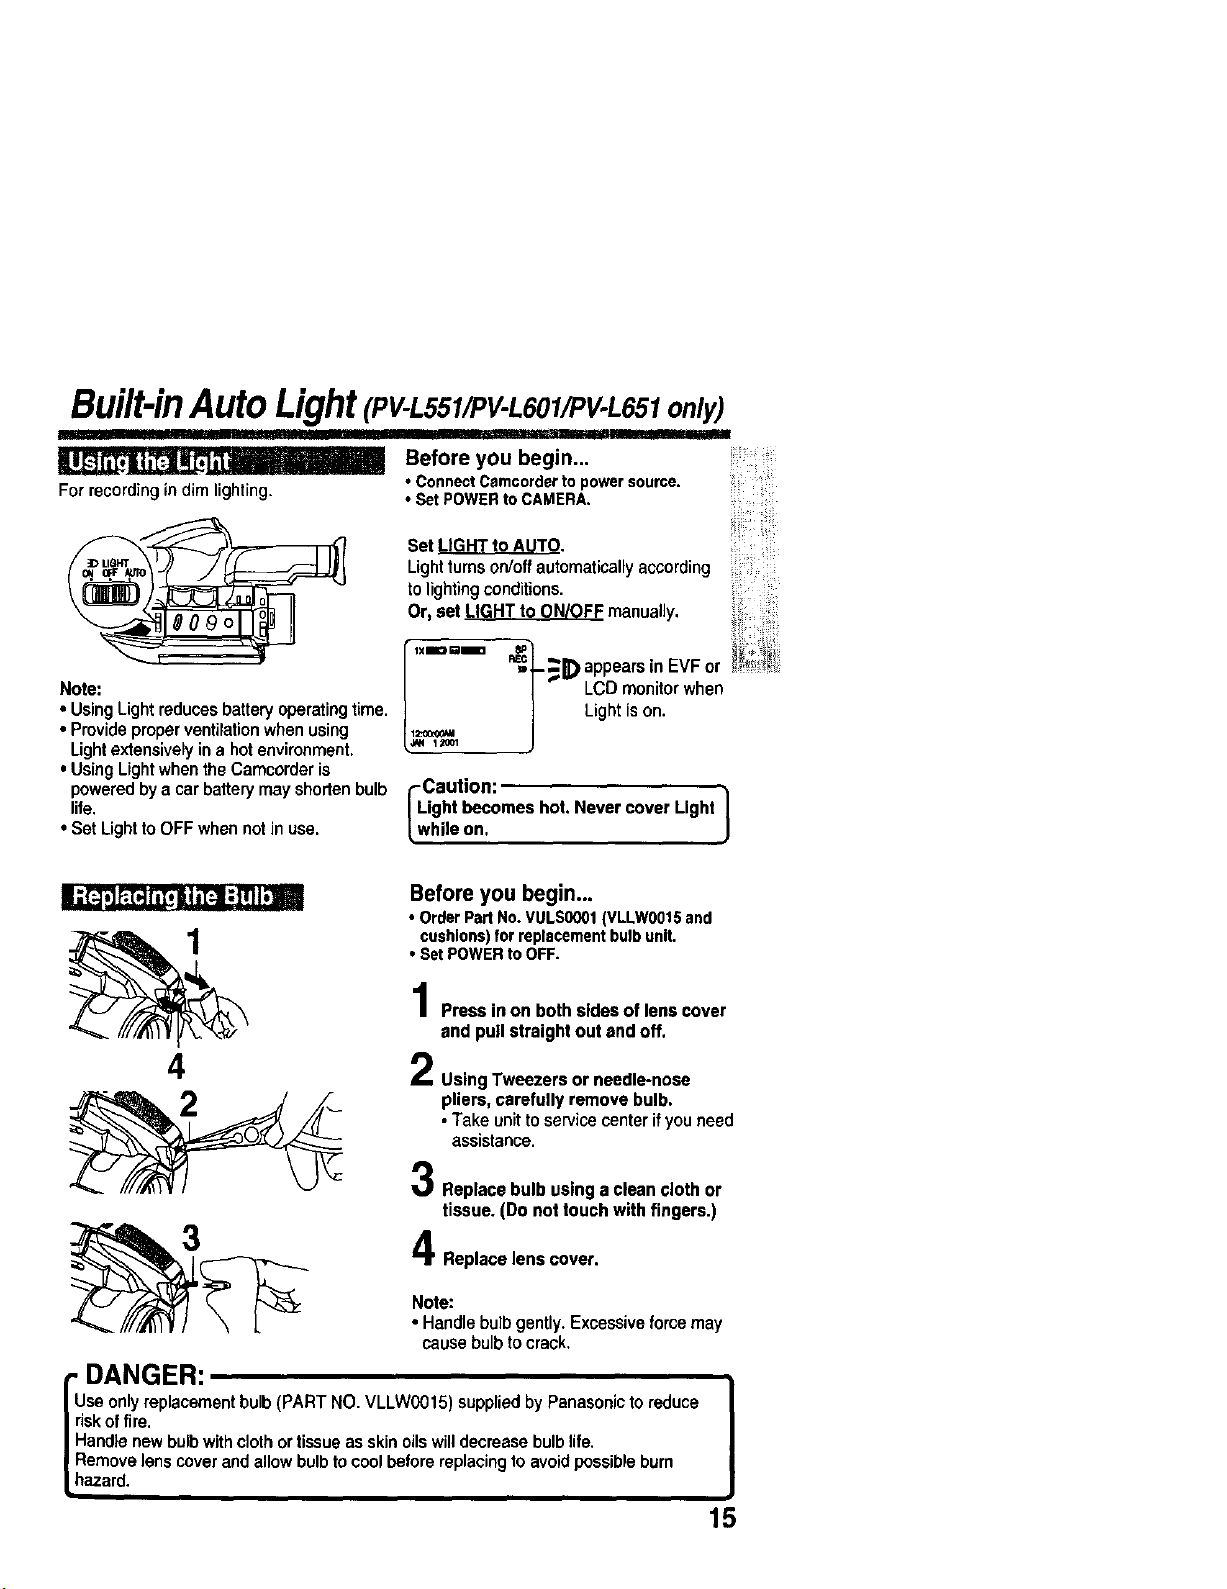
Built-inAutoLight(PV-L551/PV-L601/PV-L651only)
For recording in dim lighting.
Note:
• Using Light reduces battery operating time.
• Provide proper ventilation when using
Light extensively in a hot environment.
• Using Light when the Camcorder is
powered by a car battery may shorten bulb
life.
• Set Light to OFF when not in use.
I
Before you begin...
• ConnectCamcorderto powersource.
• SetPOWERto CAMERA
Set LIGHT to AUTO.
Lightturns on/offautomaticallyaccording
tolightingconditions.
Or, set LIGHT to ON/OFF manually.
=-- _- _E) appears in EVF Or
| LCD monitor when
] Light is on.
!
I.
1_,OOl
I Lcauti°n: I
ightbecomeshot.NevercoverLight
hileon.
4
3
Before you begin...
• OrderPart No.VULS0001(VLLW0015and
cushions)forreplacementbulbunit,
• SetPOWERto OFF.
Press in on both sides of leas cover
and pull straight out and off,
Using Tweezers or needle-nose
pliers, carefully remove bulb.
• Take unit to servicecenter ifyou need
assistance.
Replacebulbusinga cleanclothor
tissue.(Donottouchwithfingers.)
Replace lens cover.
Note:
• Handle bulbgently.Excessiveforcemay
cause bulb to crack.
ruDANGER:
I
se onlyreplacementbulb (PART NO, VLLW0015) suppliedby Panasonicto reduce |
Ifisk offire, ,,
I
I Handle newbulbwithclothor tissueas skin oilswilldecreasebulbhre.
_Remove lens coverand allowbulbto cool beforereplacingto avoidpossibleburn
Lhazard.
15
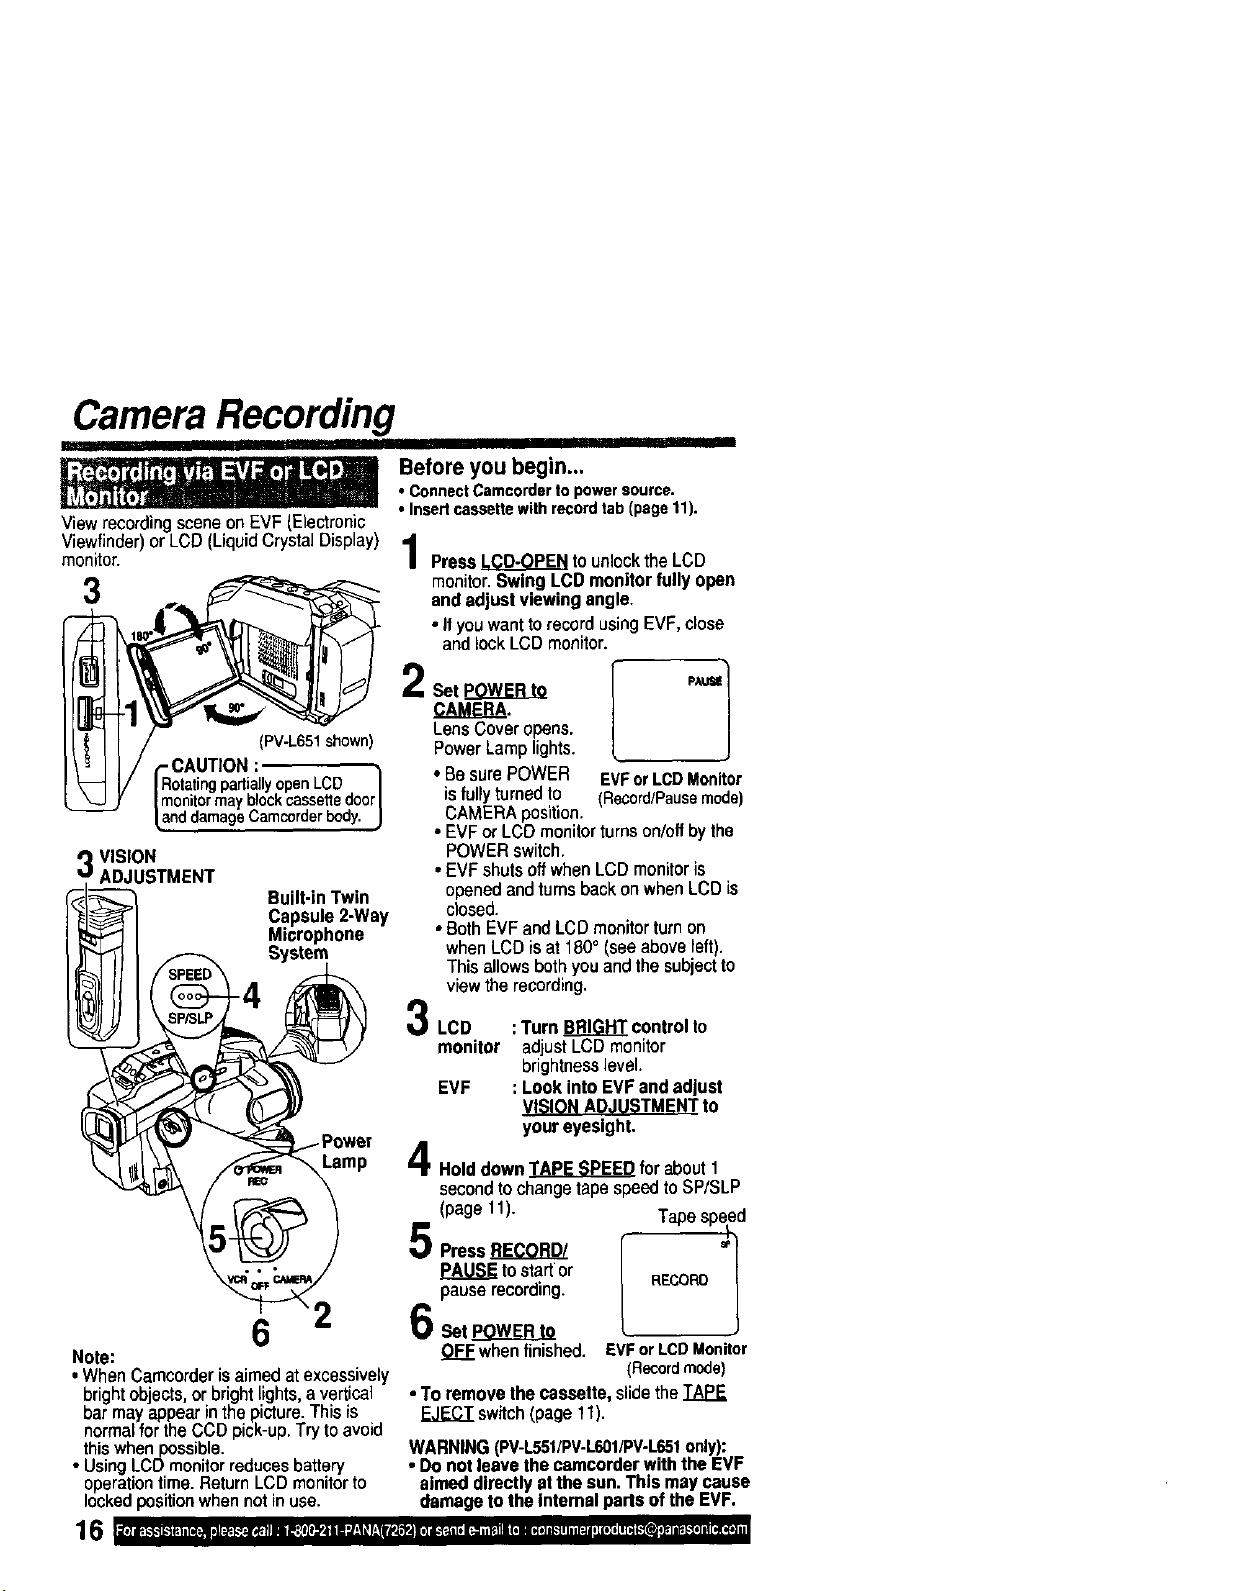
Camera Recording
II]1' L I I '1
ViewrecordingsceneonEVF(Electronic
Viewfinder)or LCD (LiquidCrystalDisplay)
monitor.
I
Before you begin...
• ConnectCamcordertopowersource.
•Insertcassettewithrecordtab(pagetl).
PressLCD-OPENtounlocktheLCD
monitor.SwingLCDmonitorfullyopen
3 andadjustviewingangle.
• If youwanttorecordusingEVF,close
andlockLCDmonitor.
LensCoveropens.
(PV-L651shown) PowerLamplights.
- CAUTION:
RotatingpartiallyopenLCD I • BesurePOWER EVForLCDMonitor
monitormayblockcassettedoor/ isfullyturnedto (Recard/Pausemode)
anddamageCamcorderbody.J CAMERAposition.
•EVForLCOmonitorturnson/offbythe
VISION POWERswitch.
ADJUSTMENT •EVFshutsoffwhenLCDmonitoris
('_[_ _ Built-inTwin openedandturnsbackonwhenLCDis
J_1_ _1 Capsule2-Way closed.
J_" 11 Microphone • BothEVFandLCDmonitorturnon
I_ 11 _ System whenLCDisat 180° (seeaboveleft).
_-_ I' _ Thisallowsbothyouandthesubjectto
viewtherecording.
_"_LCD : TurnBRIGHTcontrolto
monitor adjustLCDmonitor
brightnesslevel.
EVF : Look intoEVFandadjust
VISIONADJUSTMENTto
youreyesight.
Holddown_for about1
secondtochangetapespeedtoSP/SLP
(page 11). Tapespeed
5P.ss,,_r.o Lr--1
PAUSEto startor /
pauserecording. | RECORD
6Set_ L
Note: OFFwhenfinished. EVForLCDMonitor
• WhenCamcorderisaimedatexcessively (Recordmode)
brightobjects,or brightlights,avertical • Toremove the cassette,slidetheTAPE
bar mayappearinthepicture.This is _ switch(page11).
normalfortheCCDpick-up.Try toavoid
thiswhenpossible. WARNING(PV-L551/PV.L601/PV-L651only):
• UsingLCDmonitorreducesbattery •rDonotleavethecamcorderwiththeEVF
operationtime.ReturnLCDmonitorto aimeddirectlyatthe sun,Thismay cause
lockedpositionwhennotinuse. damagetotheInternalparisoftheEVF.
Ill I_k-k-Ib'll_. ti[l_..m !l_. I.'_..!_. Illl_{_lIl_,li BI./_l| _ r_rsl_4 ill l_t ii |_i_1 ii (I |dll ik'_l i i i[d i i1(.*it iiilll.'_l}l iI_.!-'_l] II[tl[_ll
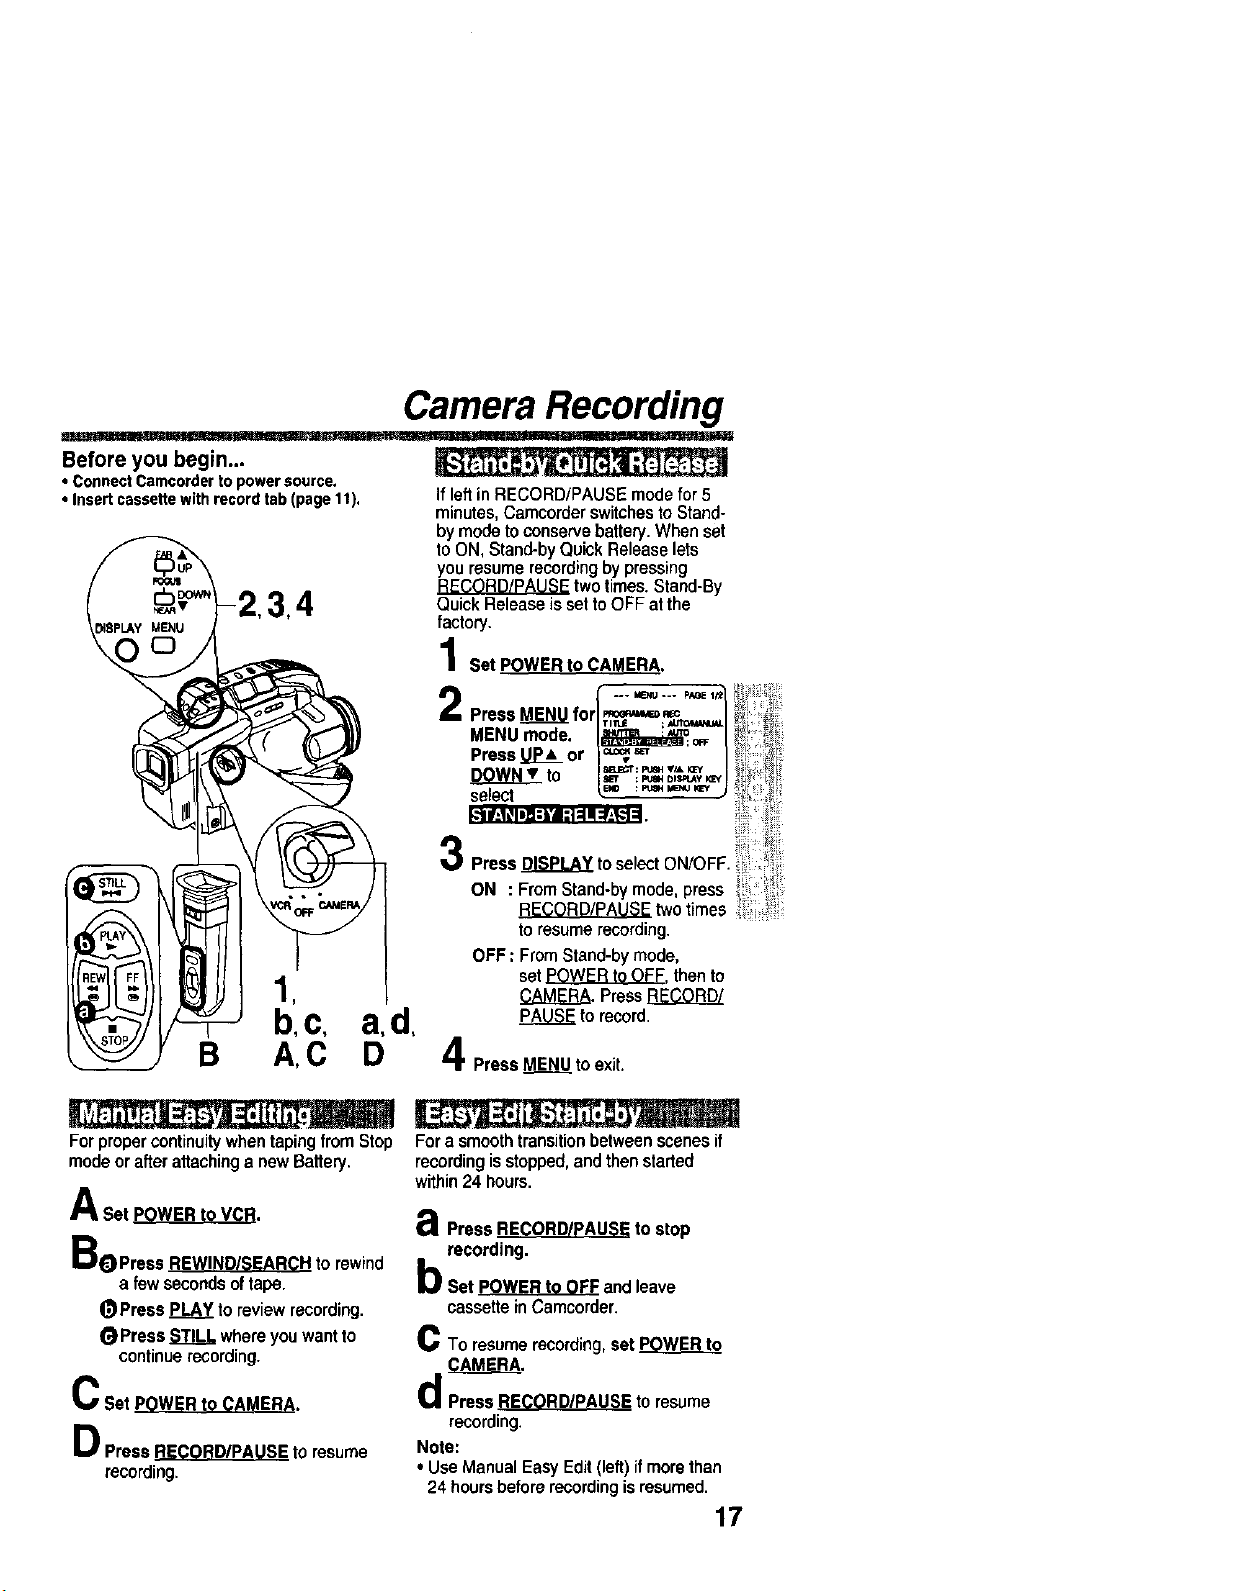
Camera Recording
Before you begin...
• ConnectCamcordertopowersource.
• Insertcassettewithrecordtab(page11).
1
b,c, a,d,
B A,C D
If leftin RECORD/PAUSE mode for 5
minutes, Camcorder switchesto Stand-
by mode to conserve battery. When set
to ON, Stand-by Quick Release lets
you resume recordingby pressing
two times. Stand-By
Quick Release is set to OFF at the
factory.
Set POWER to CAMERA.
... aeNu.-. ps,_l,'Z
MENU mode. I_ 1 ,
• r ___=__,o_
Press_o J'_ , | ,
se ecl
Press _ to se ect ON/OFF [,
ON . From Stand-by mode, press _
RECORD/PAUSE two times
toresume recording.
OFF : From Stand-by mode,
set POWER to OFF. thento
CAMERA. Press RECORD/
to record.
PressMENUto exit.
For proper continuity when taping fromStop
mode orafter attachinga newBattery.
A Set POWER to VCR.
aoPress _ to rewind
a few seconds of tape.
(_Press PLAY to review recording.
_Press STILL where youwant to
continuerecording.
C Set POWER to CAMERA.
D Press RECORD/PAUSE to resume
recording.
For a smoothtransitionbetween scenes if
recordingisstopped,and then staded
within24 hours.
a.,j=
€I Press RE(_ORD/pAUSE to stop
recording•
b set pOWER to OFF and leave
cassette inCamcorder.
C To resumerecording,set POWER to
CAMERA.
d Press RECORDIPAUSE to resume
recording.
Note:
• Use Manual EasyEdit (left) if morethan
24 hoursbeforerecordingisresumed.
17
Camera Recording
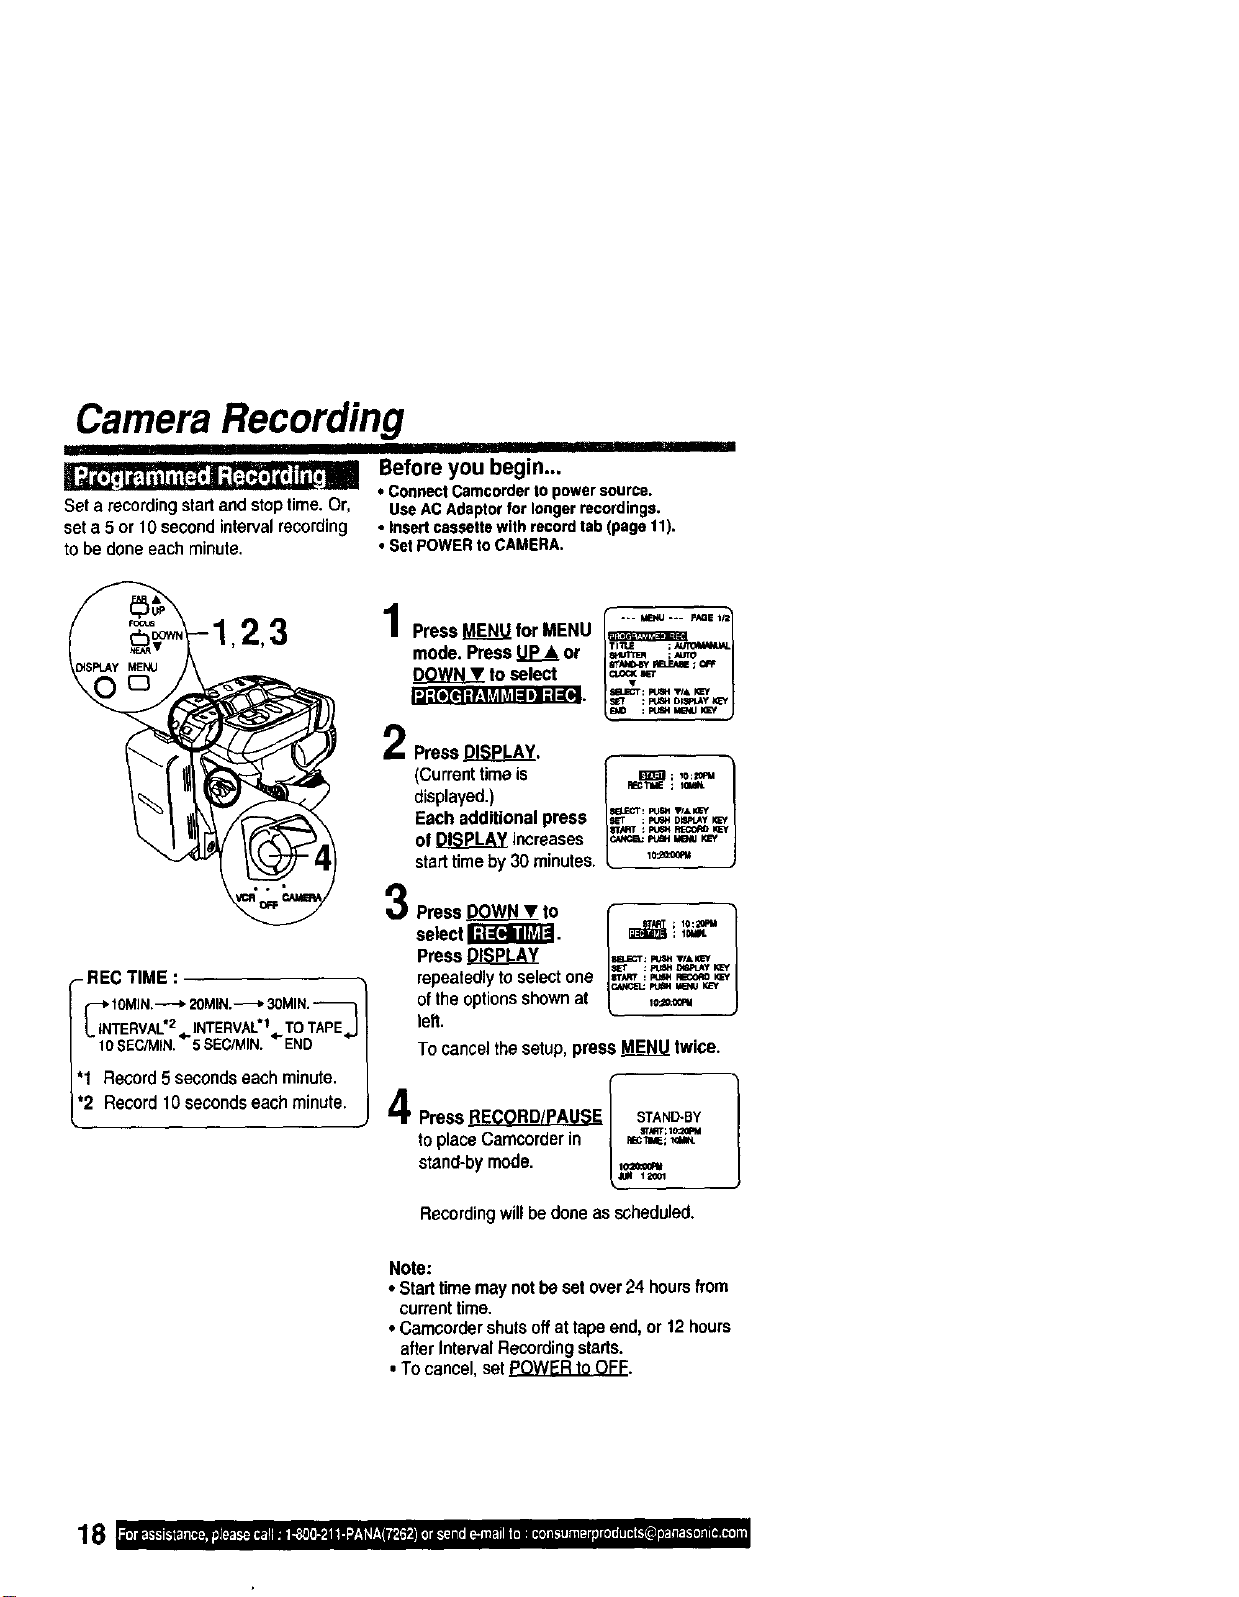
II
_j_,lt=z,ltti[_,|,[:z_,l_,, r_m_i Before you begin...
• ConnectCamcorderto powersource.
Seta recordingstartand stoptime. Or, UseACAdaptorforlongerrecordings.
seta 5 or 10 second intervalrecording • Insertcassettewithrecordtab(paget1).
tobe done eachminute, • Set POWERto CAMERA.
- REC TIME •
_iiNTIOMIN.----_20MIN._ 30MIN.
ERVAL'2,,INTERVALt,pTOTAPEJ
10$EC/MIN. 5SEC/MIN. END
'1 Record 5secondseach minute.
•2 Record 10 secondseach minute.
Press MENU for MENU --- _ --- p,_e,J_
mode. Press Up_.&or ,_,,,_
to select
PressDISPLAY.
(Currenttime is
displayed.)
Each additional press
of DISPLAY increases
start time by 30 minutes.
Press _ to
select I_.
Press DISPLAY
repeatedlytoselectone
ofthe optionsshownat
left.
F_CTIdE ; tOIt_N.
p4_: Iz_ TfAl_f
aTART : Ftl_ p,_ I_=y
_ p_ MB_J I_'Y
; l_qt.
To cancel the setup,press _ twice.
PressRECORD/PAUSEI STAND-BY ]
toplaceCamcorderin { _i_
stand-bymode. [._=_
Recordingwill bedoneasscheduled.
Note:
• Starttimemaynotbesetover24 hoursfi'om
currenttime.
• Camcordershutsoffattapeend,or12hours
afterIntervalRecordingstarts.
•Tocancel,setPOWERtoOFF.
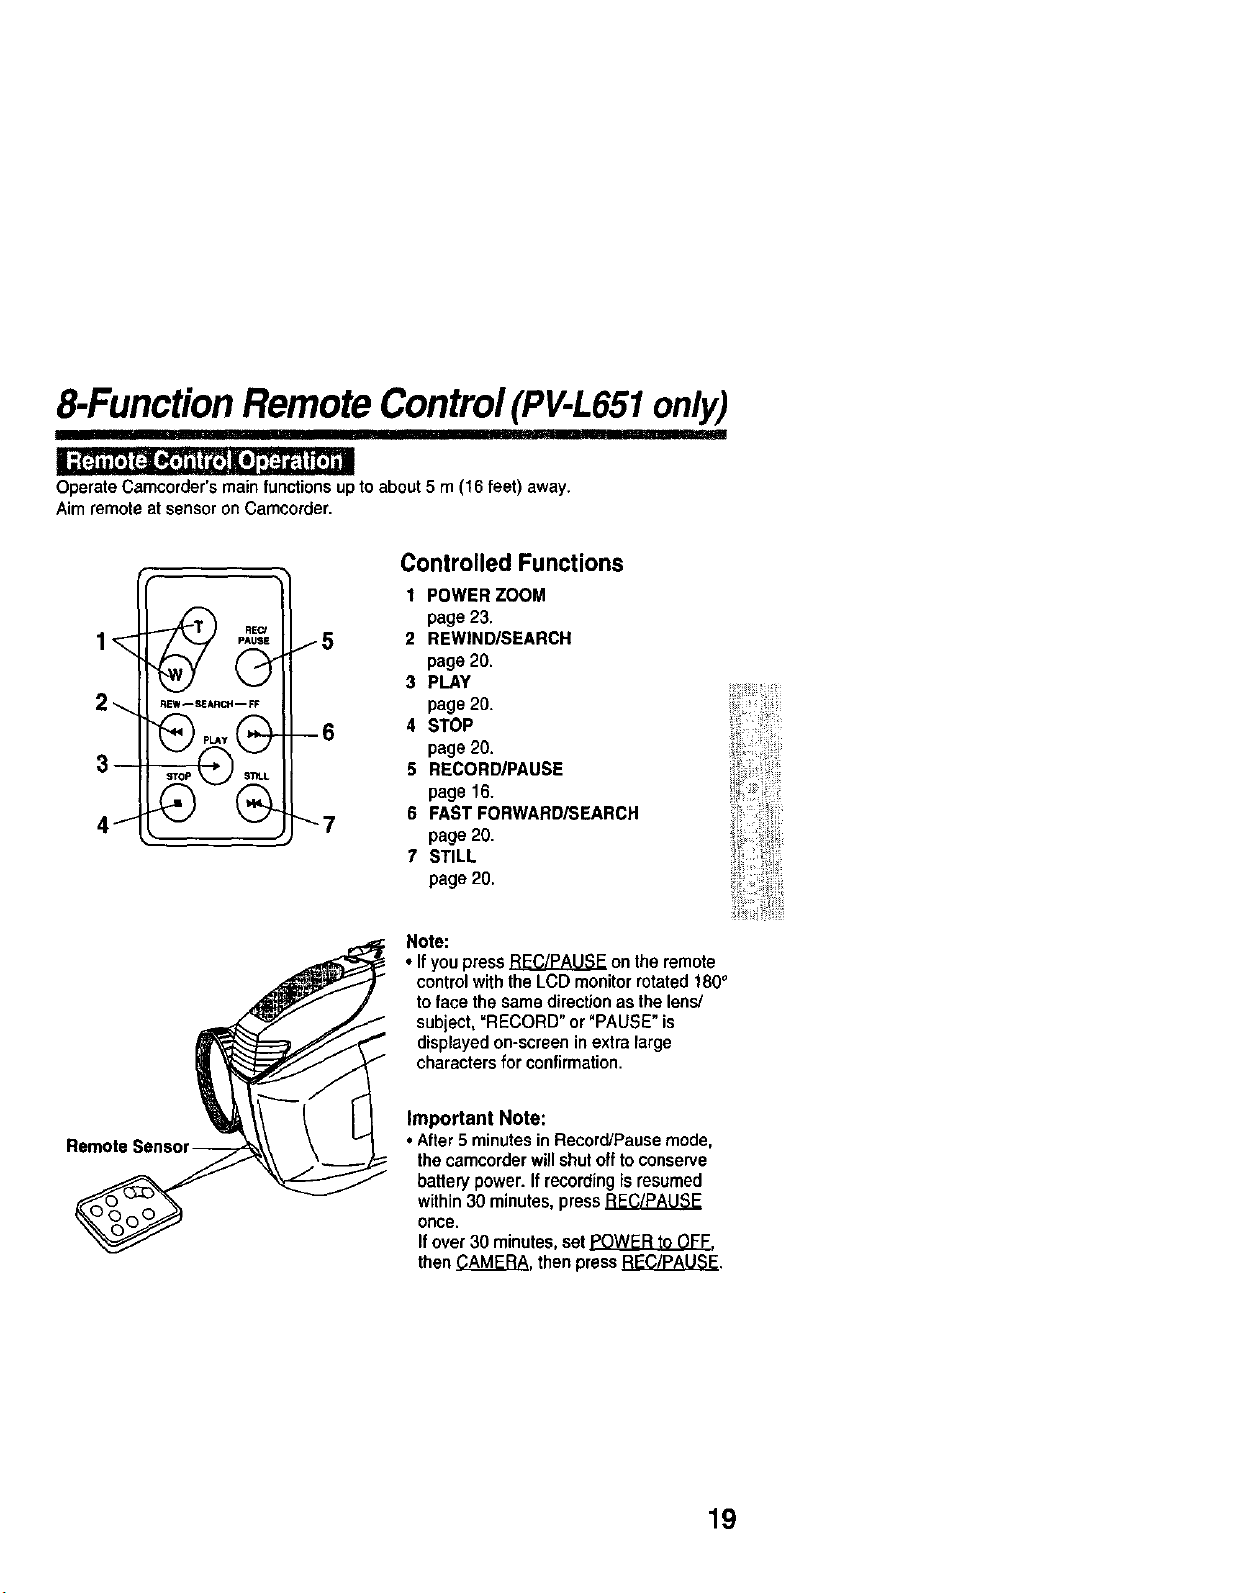
8-FunctionRemoteControl(PV-L651only)
iii
Operate Camcorder's main functionsupto about 5 m (16 feet) away.
Aim remote at sensor on Carncorder.
2_.
3-
J
/5
--6
"-7
Controlled Functions
1 POWER ZOOM
page 23.
2 REWIND/SEARCH
page 20.
3 PLAY
page 20.
4 STOP
page 20.
5 RECORD/PAUSE
page 16.
6 FAST FORWARD/SEARCH
page 20.
7 STILL
page 20.
Note:
• If you press _ on the remote
control with the LCD monitor rotated 180°
to face the same direction as the lens/
subject, =RECORD" or "PAUSE" is
displayed on-screen in extra large
characters for confirmation.
Remote
Important Note:
• After 5 minutesin Record/Pause mode,
the cemcorder willshut offto conserve
battery power. If recordingis resumed
within 30 minutes, press
once.
If over 30 minutes, set POWER to OFF.
then CAMERA, then press _.
19
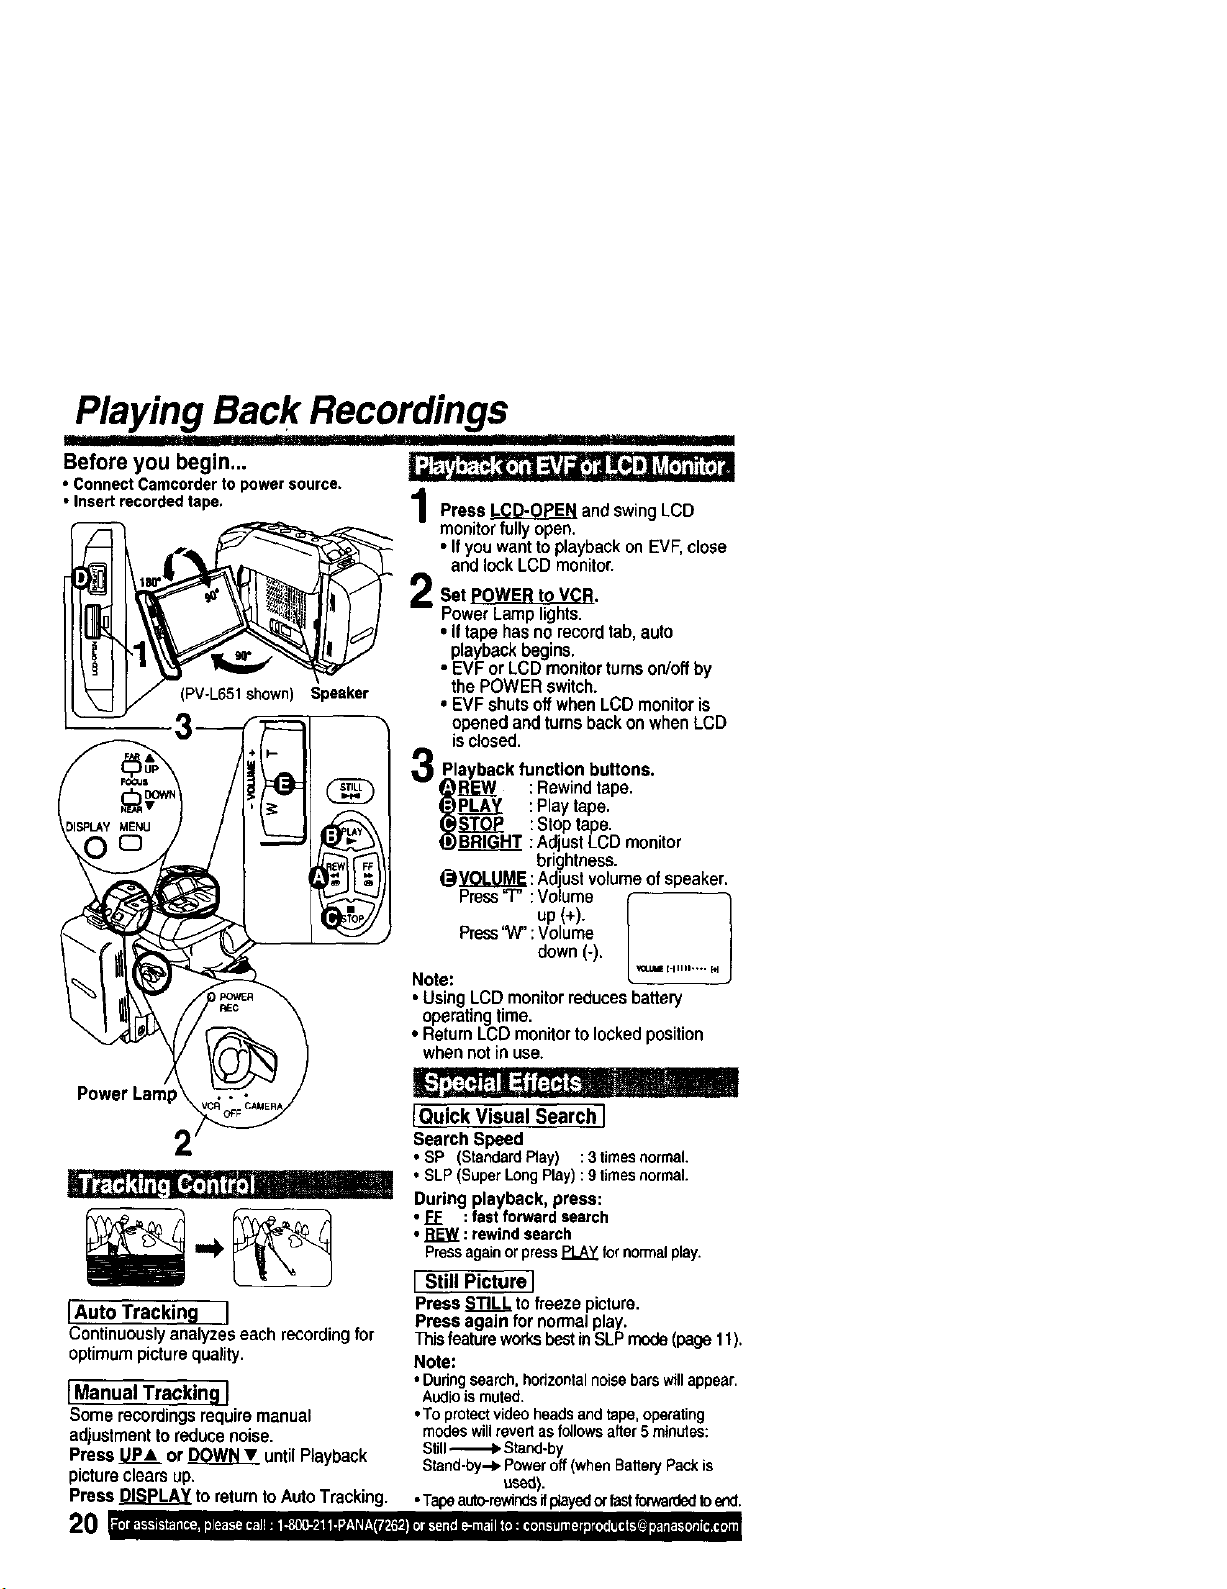
_playing Back Recordings ...........
Before you begin...
• ConnectCamcorderto powersource.
• Insertrecordedtape,
Z
(PV-L651 shown) Speaker
PowerLamp
• t I I
IAuto Tracking I
Continuouslyanalyzeseachrecordingfor
optimumpicturequality,
IManual Tracking }
Somerecordingsrequiremanual
adjustmenttoreducenoise.
PressP_ or DOWNY untilPlayback
pictureclearsup.
PressDISPLAYtoreturntoAutoTracking.
Press LCD-OPEN and swingLCD
monitorfully open.
• Ifyou want to playbackon EVF,close
and lock LCD monitor.
Set POWER to VCR.
PowerLamp lights.
• Iftape has no recordtab, auto
playback begins.
• EVF or LCD monitorturnson/offby
the POWER switch.
• EVF shutsoffwhen LCD monitoris
openedand turnsback onwhen LCD
isclosed.
Playback function buttons.
_REW : Rewindtape.
tj,)PL..P__I : Play tape.
(_EOJ_ :Stop tape.
!._BRIGHT : Adjust LCD monitor
brightness.
@Y_OJ..U.M_:Adjust volume of speaker.
Press"7" :Volume "t
, up(+).
J
Press'W":Volume
down (-).
Note: *=_'1_''""" _
• Using LCD monitorreducesbattery
operatingtime.
• Return LCD monitor to lockedposition
when not inuse.
IQuick Visual Search i
Search Speed
• SP (StandardPlay) :3timesnormal.
• SLP(SuperLongPlay):9timesnormal.
During playback, press:
• FF :fastforwardsearch
• _ : rewindsearch
PressagainorpressPLAYfornormalplay.
I Still Picture I
Press STILL tofreeze picture.
Press again fornormalplay,
ThisfeatureworksbestinSLPmode(page11),
Note:
•Duringsearch,horizontalnoisebarswillappear,
Audioismuted.
•Toprotectvideoheadsandtape,operating
modeswillrevertasfollowsafter5 minutes:
Still_ Stand-by
Stand-by.-_Poweroff(whenBatteryPackis
used).
•Tapeauto-rewindsifp_ayedorfastfocwardedtoend.
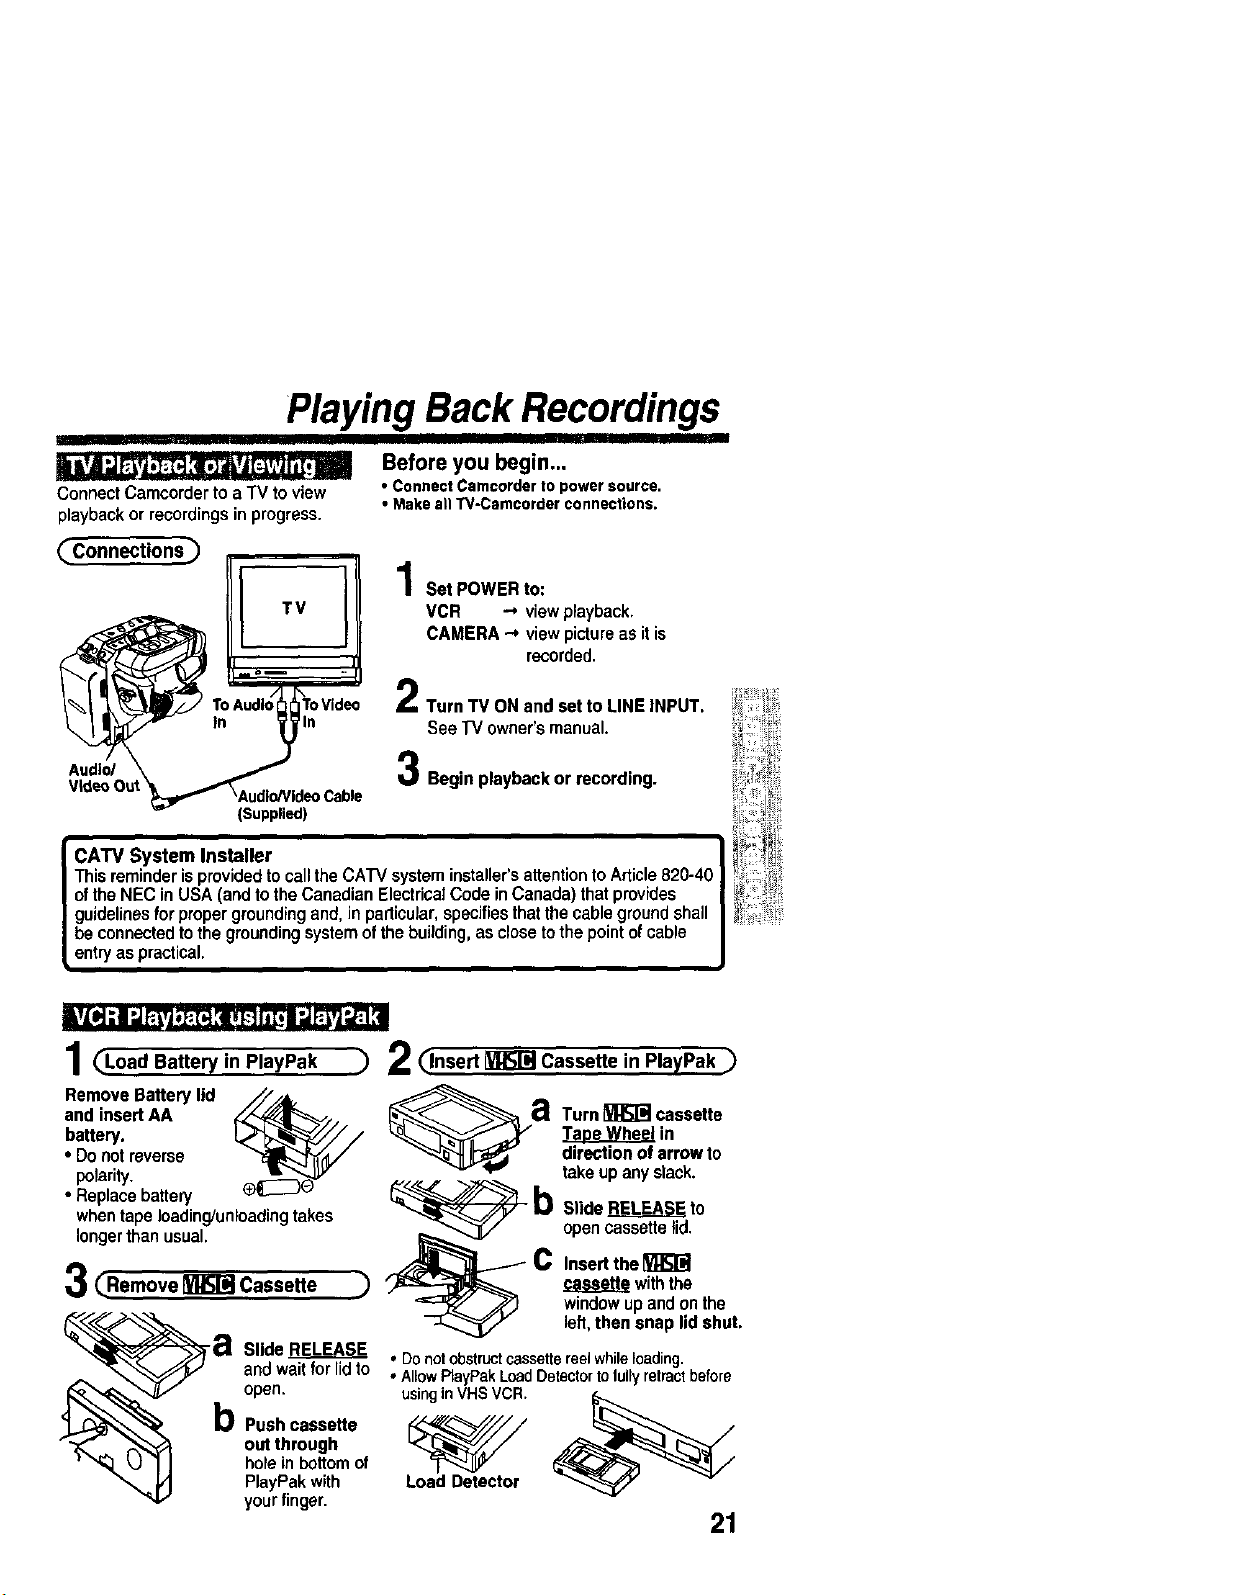
Playing Back Recordings
Connect Camcorder to a TV to view
playback or recordings in progress.
Before you begin...
• ConnectCamcorderto powersource.
• MakeallTV-Camcorderconnections.
_Connections) 1Set POWERto:
VCR _ view playback.
CAMERA "-*view picture as it is
recorded.
..... II
/_ I_ Tc _,,udlo/_ToVidec 2Turn TV ON and set to LINE INPUT.
_"- In _)_ln See TV owner's manual.
Audio/ \ _ 3 Begin playback or recording.
VideoOut _Audlo/Vldeo
Cable
(Supplied)
CATV System Installer
Thisreminderis providedto call the CATV system installer'sattentionto Article820-40
ofthe NEC in USA (and tothe Canadian ElectricalCode inCanada) thatprovides
guidelinesforpropergroundingand, in particular,specifiesthatthe cablegroundshall
be connectedto the groundingsystemofthe building, as close to the pointofcable
entryas practical.
1 (_Load Battery in PlayPak
Remove Battery lid _ @
and insert AA a
battery.
• Donotreverse
polarity.
• Replace battery b
whentape loading/unloadingtakes
longerthan usual. K_,,_ _._
C
3C.e.,ove C,,,e,o
) 2_lnsert _ Cassette in PlayPak ._
Turn_ cassette
_in
directionof arrowto
takeupanyslack.
SlideRELEASEto
opencassettelid.
Insertthe[_
casseHewiththe
windowupandonthe
open.
b Push cassette
out through
holein bottomof
PlayPak with
yourfinger.
left,then snap lid shut.
Slide L_E.E__A_S! , Donotobstructcassettereelwhileloading.
andwait for lidto • AllowPlayPakLoadDetectortolullyretractbefore
usinginVHSVCR.
Load Detector
21
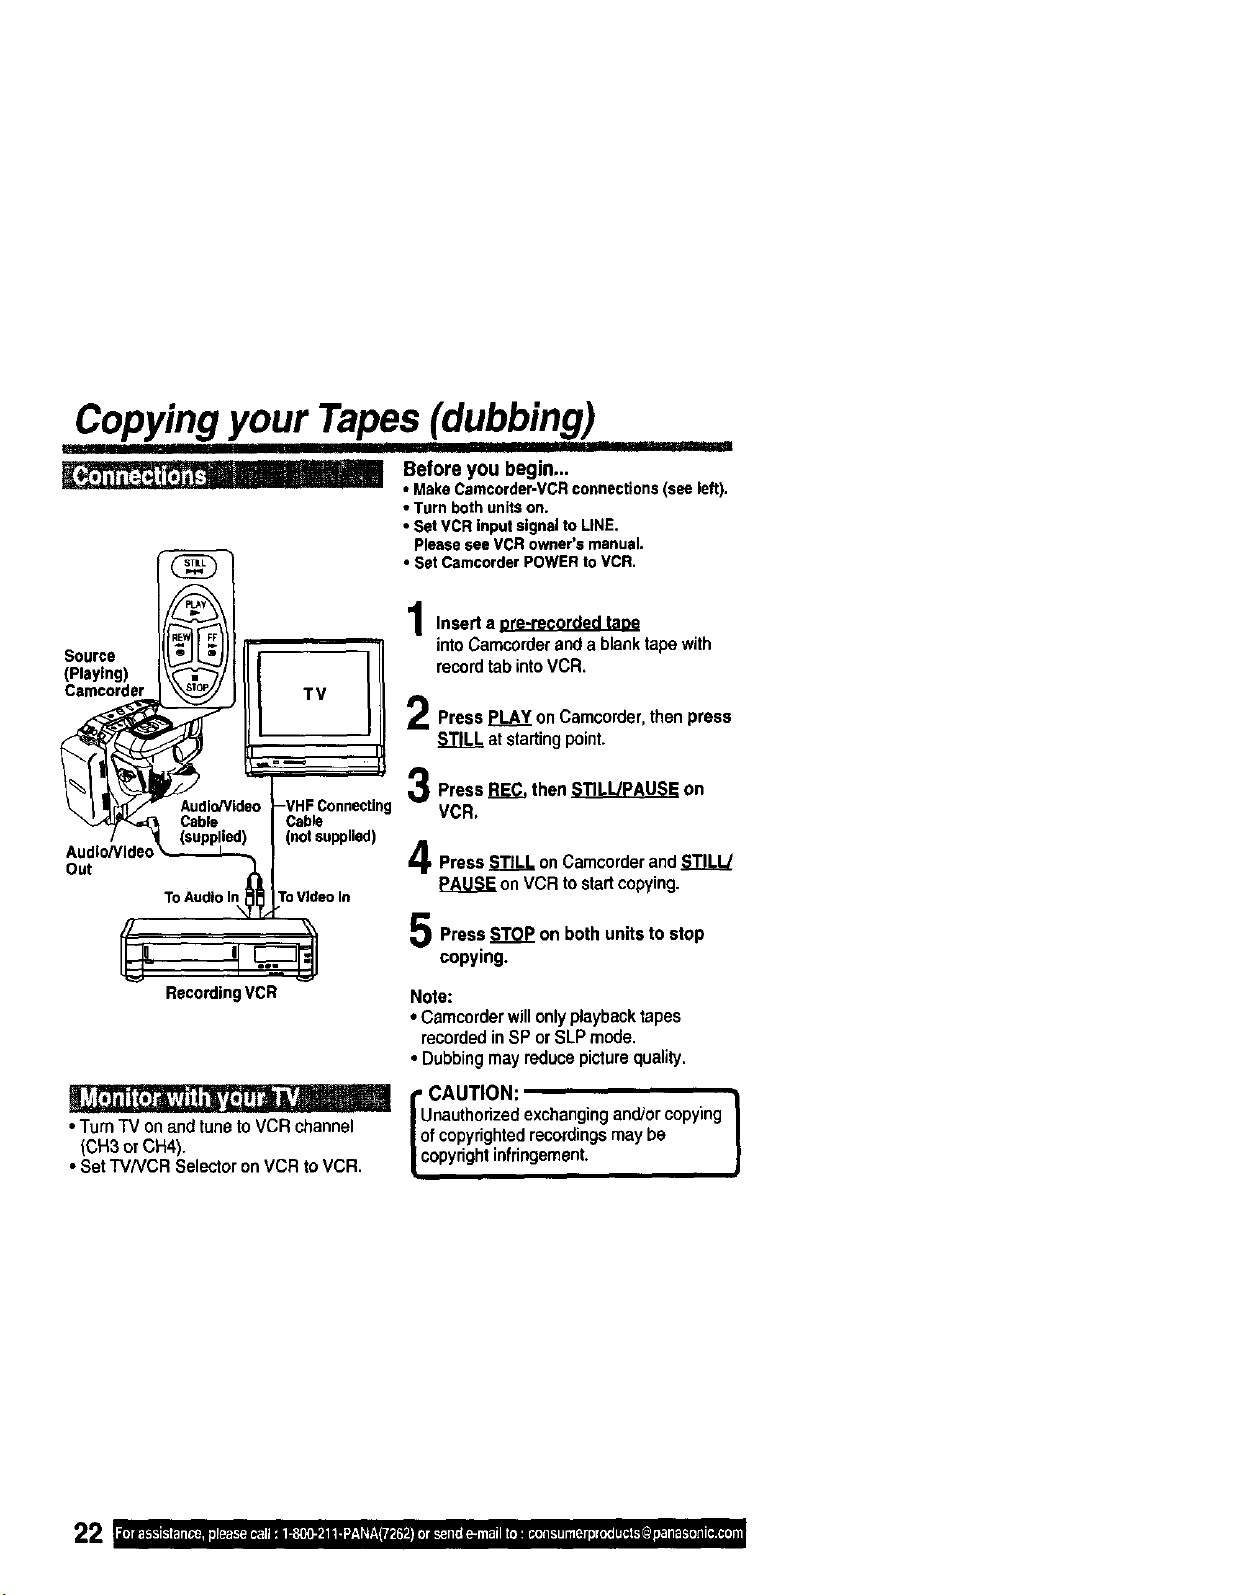
Copying your Tapes(dubbing)
I I
Before you begin...
• MakeCamcorder-VCRconnections(seeleft).
• Turnbothunitson.
• SetVCRinputsignaltoLINE.
PleaseseeVCRowner'smanual.
• Set CamcorderPOWERtoVCR,
Source
{Playing)
Camcorder
(not supplied)
Audio/Video
Out
To AudioIn ToVideo In
Insert a ore-recorded taoe
intoCamcorderanda blanktapewith
recordtabintoVCR.
PressPLAYonCamcorder,thenpress
atstartingpoint.
Press_ then_ on
VCR,
Press STILL onCamcorderand STILL/
PAUSE on VCR to startcopying.
Press STOP on both units to stop
copying.
RecordingVCR
• Turn TV on and tune toVCR channel
(CH3 or CH4).
• Set TV/VCR Selector on VCR to VCR.
Note:
• Camcorderwillonlyplaybacktapes
recordedin SP or SLP mode.
• Dubbingmay reducepiclurequality,
i CAUTION:
nautherizedexchangingand/or copying
f copyrightedrecordingsmay be
opyrightinfringement.
)

Four-Speed Power Zoom
Zoom in (close up) and out (wideangle) in Before you begin..,
one offourspeeds ranging from slow (16 • ConnectCamcorderto powersource.
seconds)tofast (2 seconds). • SetPOWERtoCAMERA.
Zoom In ("T")
l
I
ZoomOut("W")
• Zoom slowly:
Lightlypress_ or
POWERZOOMbutton.
• Zoom quickly:
Applymorepressuretothebutton.
lalllUnlllll|aslnililiilimuimilnlllulna|lial||ll||s|smlm_|l ,_
Backlight
Use when subject is darker than Before you begin... )
surroundings,in shadowed area, orin front • ConnectCamcorderto powersource,
ofthe light source. • SetPOWERtoCAMERA,
Press_ whilerecordingto
selectthelevelofbacklightcompensation.
In normal lighting, press
repeatedly until no indicator isdisplayed.
BACKLIGHT
EVF or LCD Monitor
I _ Third ress
Press BACKLIGHT. _ (:::hr_)Ppre."
23
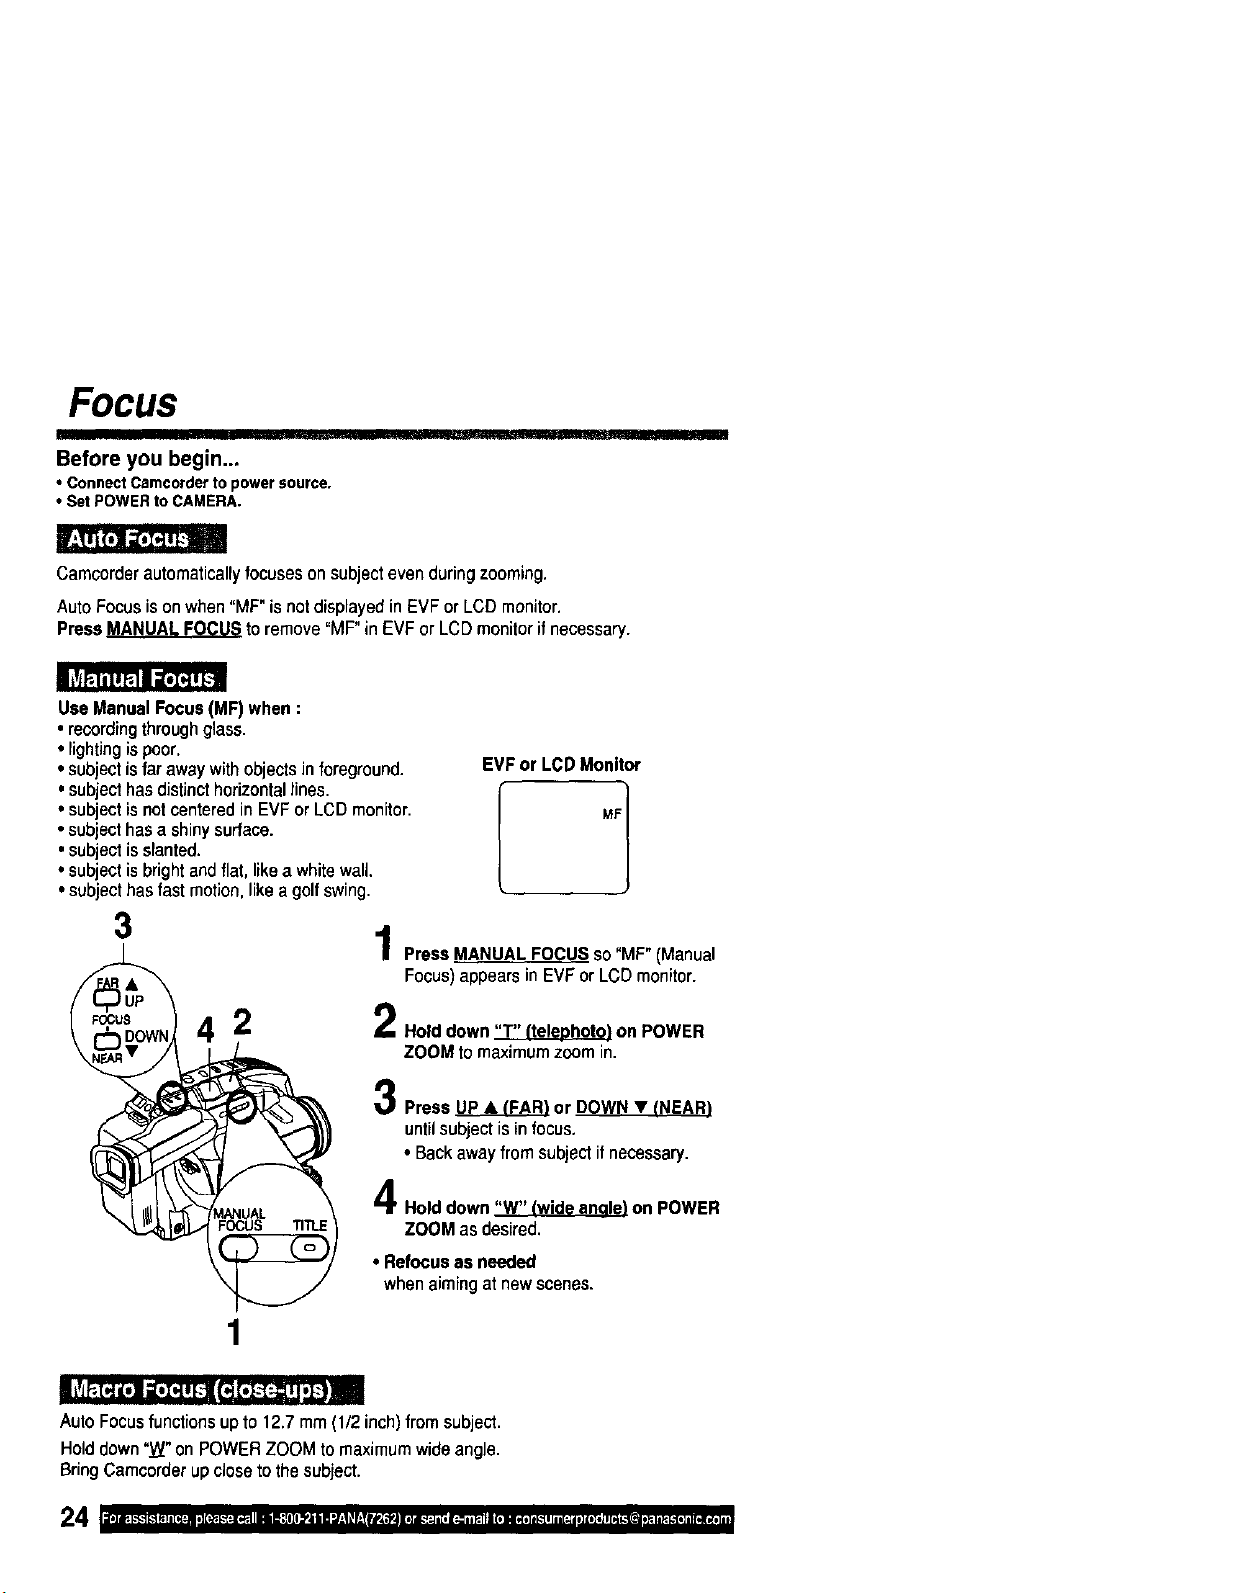
FOCUS
Before you begin...
• Connect Camcorder to power source.
• Set POWER to CAMERA.
Camcorderautomaticallyfocuseson subjectevenduringzooming.
AutoFocusisonwhen"MF"isnotdisplayedin EVFor LCDmonitor.
Press MANUALFOCUStoremove°MF"in EVFor LCDmonitorif necessary.
UseManualFocus(MF)when:
• recordingthroughglass.
• lightingispoor.
• subjectisfarawaywithobjectsin foreground. EVFor LCDMonitor
• subjectisnotcenteredin EVFor LeD monitor. MF
• subjecthasa shinysurface.
•subjectisslanted.
• subjectisbrightandflat,likea whitewaU.
•subjecthasfast motion,likea golfswing.
3
2
Press MANUAL FOCUS so "MF" (Manual
Focus) appears in EVF or LCD monitor.
Hold down "T" ffelephot¢) on POWER
ZOOMto maximumzoomin.
Press _ or DOWN • !NEAR)
until subject is in focus.
• Backaway from subjectifnecessary.
Hold down "W" Iwide angl_e)on POWER
ZOOM as desired.
• Refocusas needed
whenaimingatnewscenes.
1
,,,i IIII II
AutoFocusfunctionsupto12.7mm(1/2inch)fromsubject.
Holddown"W"onPOWERZOOMtomaximumwideangle.
BringCamcorderupclosetothesubject.
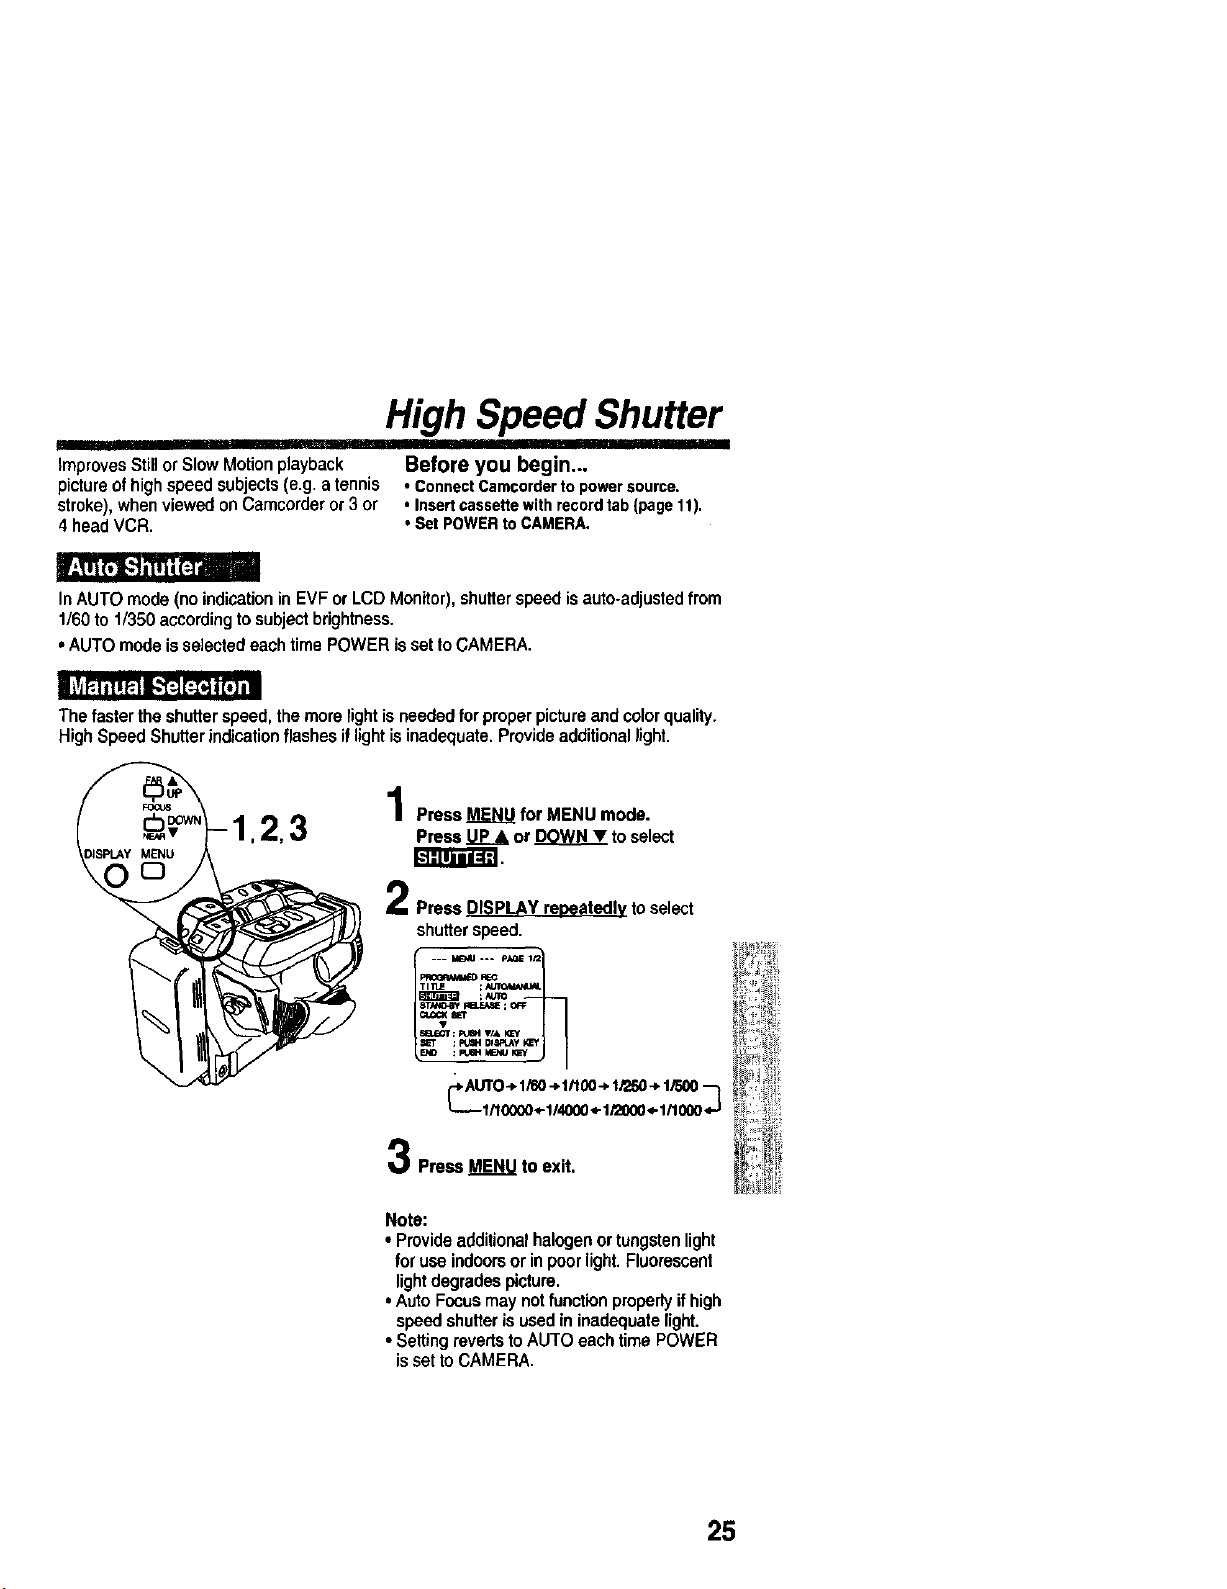
High Speed Shutter
II
ImprovesStillor SlowMotionplayback Before you begin...
pictureofhighspeed subjects(e.g. a tennis • ConnectCamcordertopowersource.
stroke),when viewedon Camcorderor 3 or * Insertcassettewithrecordtab{pagelt).
4 headVCR. oSet POWERtoCAMERA.
In AUTO mode (no indication in EVF or LCD Monitor), shutter speed is auto-adjusted from
1/60 to 1/350 accordingto subjectbrightness.
• AUTO mode isselectedeach time POWER issetto CAMERA.
The faster the shutterspeed, the morelight isneeded for proper pictureand colorquality.
HighSpeed Shutterindication flashes iflightisinadequate. Provideadditionallight.
Press MENU for MENU mode.
Press UP& or DOWNY toselect
Press DISPLAY repeatedly to select
shutterspeed.
_.A._O -_1/60-_ltt00-_1/250-*1/500--_
Press MENU to exit.
Note:
• Provideadditionalhalogenor tungstenlight
foruse indoorsor inpoor light.Fluorescent
lightdegrades picture.
• Auto Focusmay notfunctionproperlyif high
speed shutterisused in inadequatelight.
• SettingrevertstoAUTO each time POWER
issetto CAMERA.
25
Auto Fade
An interesting way to open and close
scenes.
IIII II II
Before you begin...
• ConnectCamcorderto powersource.
o;et POWERtoCAMERA,
1,2,3 4 - _=° PressMENUfor • _ _=
MENU mode. =_ _o.
)1SPLAYMENU Press UP__&or _ _ ;o_
, 2Press DISPLAY for
VIDEC _
menu.
VIDEO EFFECTS [ .., _o _ ...
L
O_iTAI. F_[_
Press _ or
FADE DOWNY toselect =_-T:_. ,p,_
AUTO FADE ;
COLOR menu.
Press UP.__or
DOWN • to select _=: _ D'_,__
BLACK orWHITE.
Press DISPLAY toconfirmentry.
PAUSE Press MENU to exit,
t
WHITE
Fade In
!
t
BLACK Fade Out
In RECORD/PAUSE mode, press FADE
so "FADE" flashesin EVF or LCD monitor.
PressRECORD/PAUSE.
Recordingstartsaspictureandsound
graduallyfadein.
I Fade Out:l
Whilerecording,pressFADEso"FADE"
flashesin EVFor LCDmonitor.
Press RECORD/PAUSE.
Pictureand soundgraduallyfade out,and
recordingispaused.
If FADE is pressedaccidentally,press
againso "FADE" disappears in EVF or LCD
monitor.
I]11
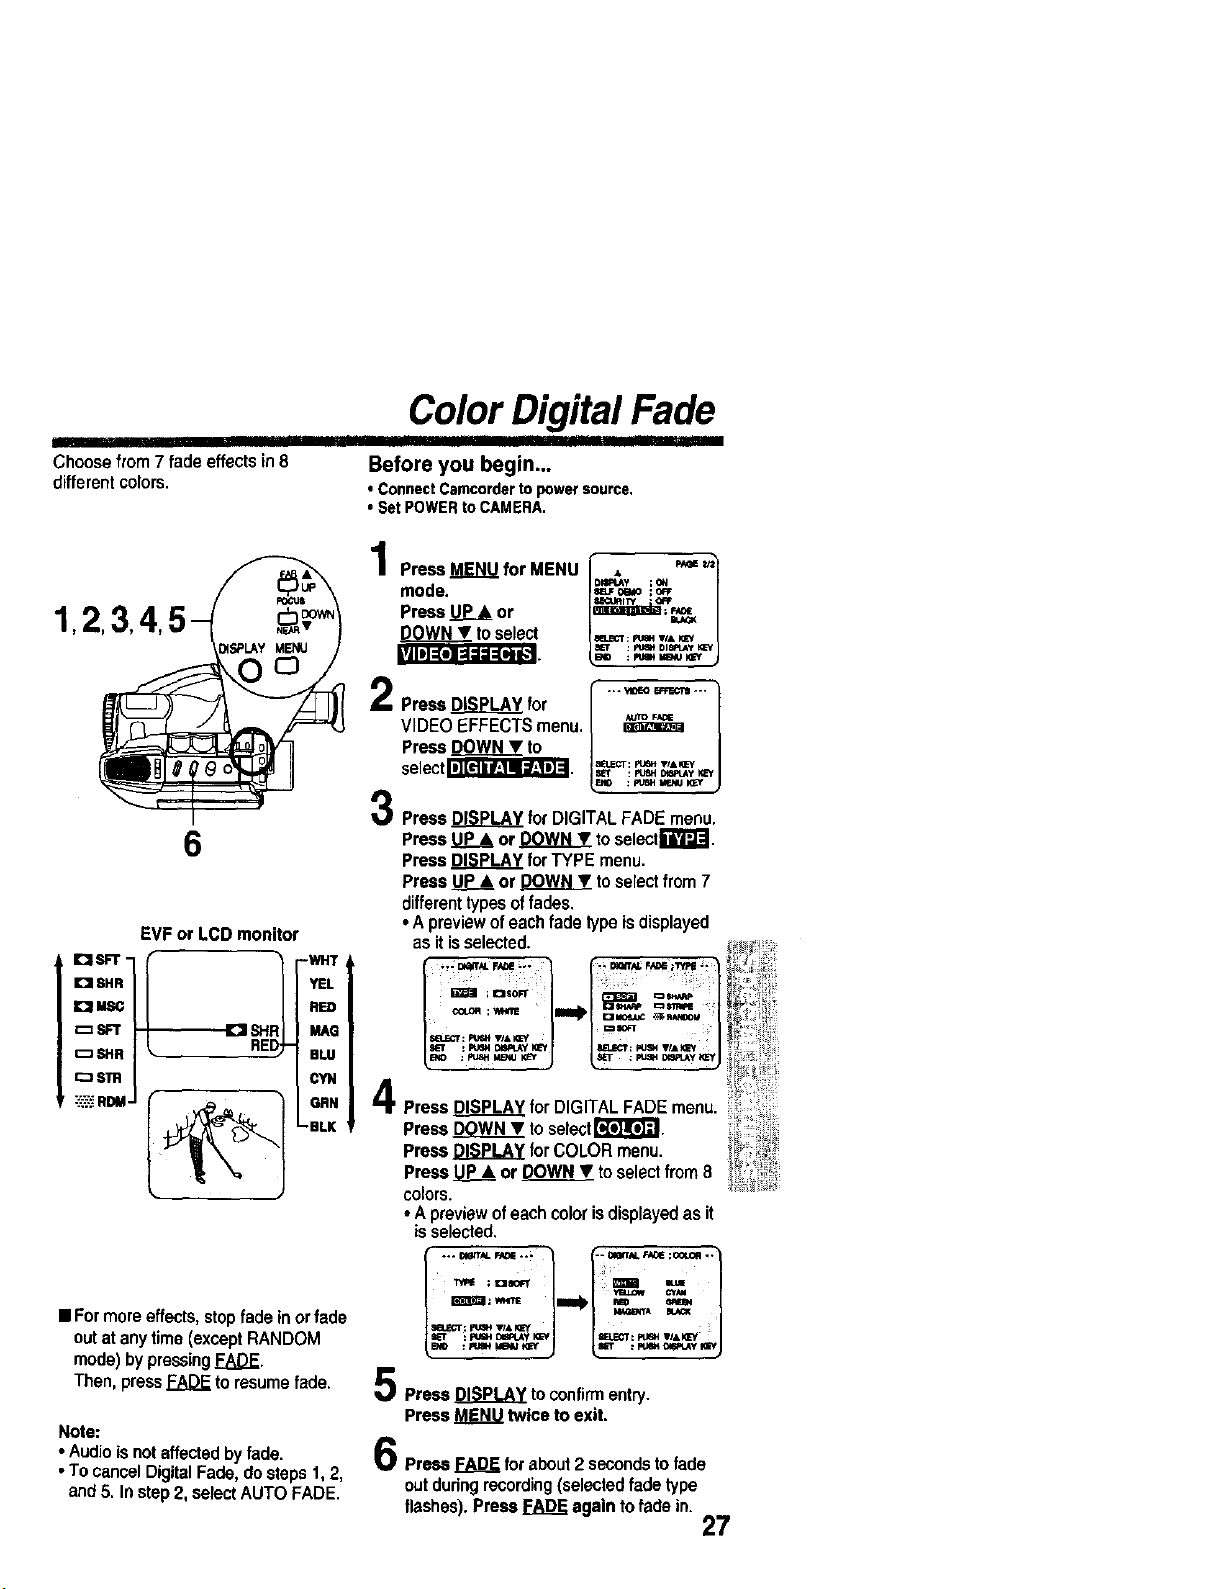
Choose from 7 fade effects in8
different colors.
Color Digital Fade
II
Before you begin...
• ConnectCamcordertopowersource.
• SetPOWERtoCAMERA.
1,2,3,4,
|U1IT-_o]=].I;1_=_.']
6
EVF or LCD monitor
r'J 8HR I YEL
IOl_-QGI RED
_SFT I- MAG
I:_ SHe t BLU
[:_ STR I CYN
-':,':_::RDM J _. _ ORN
-BLK
• Formoreeffects,stopfadein orfade
outat anytime(exceptRANDOM
mode)bypressingFADE.
Then,press_ toresumefade.
Note:
• Audio isnotaffected by fade,
• To cancel DigitalFade, do steps 1,2,
and 5, Instep 2, selectAUTO FADE,
Press MENU for MENU [ , _'==_/
DIIIPU_y ;(_
mode. =L,o=o ;_
Press UP& or _"=
l -1
tOselect m._-r:e_ ,,.
: FU_IH DIS_UW I_=Y
BO : Ft;_t MIE_IU_
i "* VIDEO 1_ "'"
Press DISPLAY for
VIDEO EFFECTS menu,
Press DOWN • to
se,ect
Press DISPLAY for DIGITAL FADE menu,
Press _ or (_.O.]!Y.._!.__toselectrlr/Lt'-J.
Press DISPLAY for TYPE menu.
Press _ or _ toselectfrom 7
differenttypesoffades,
• A previewof each fade type isdisplayed
as it isselected.
/-l°-°-o/
PressDISPLAYfor DIGITALFADEmenu.
Press D._ to selectF*t'_.
Press DISPLAY for COLOR menu.
Press P_ or POWN • to selectfrom 8
colors.
• A previewofeach color isdisplayedas it
isselected,
Press DISPLAY to confirm entry.
Press MENU twice to exit.
6
Prss,s_ for about2 secondsto fade
outduringrecording(selected fade type
flashes). Press _ again to fade in.
27
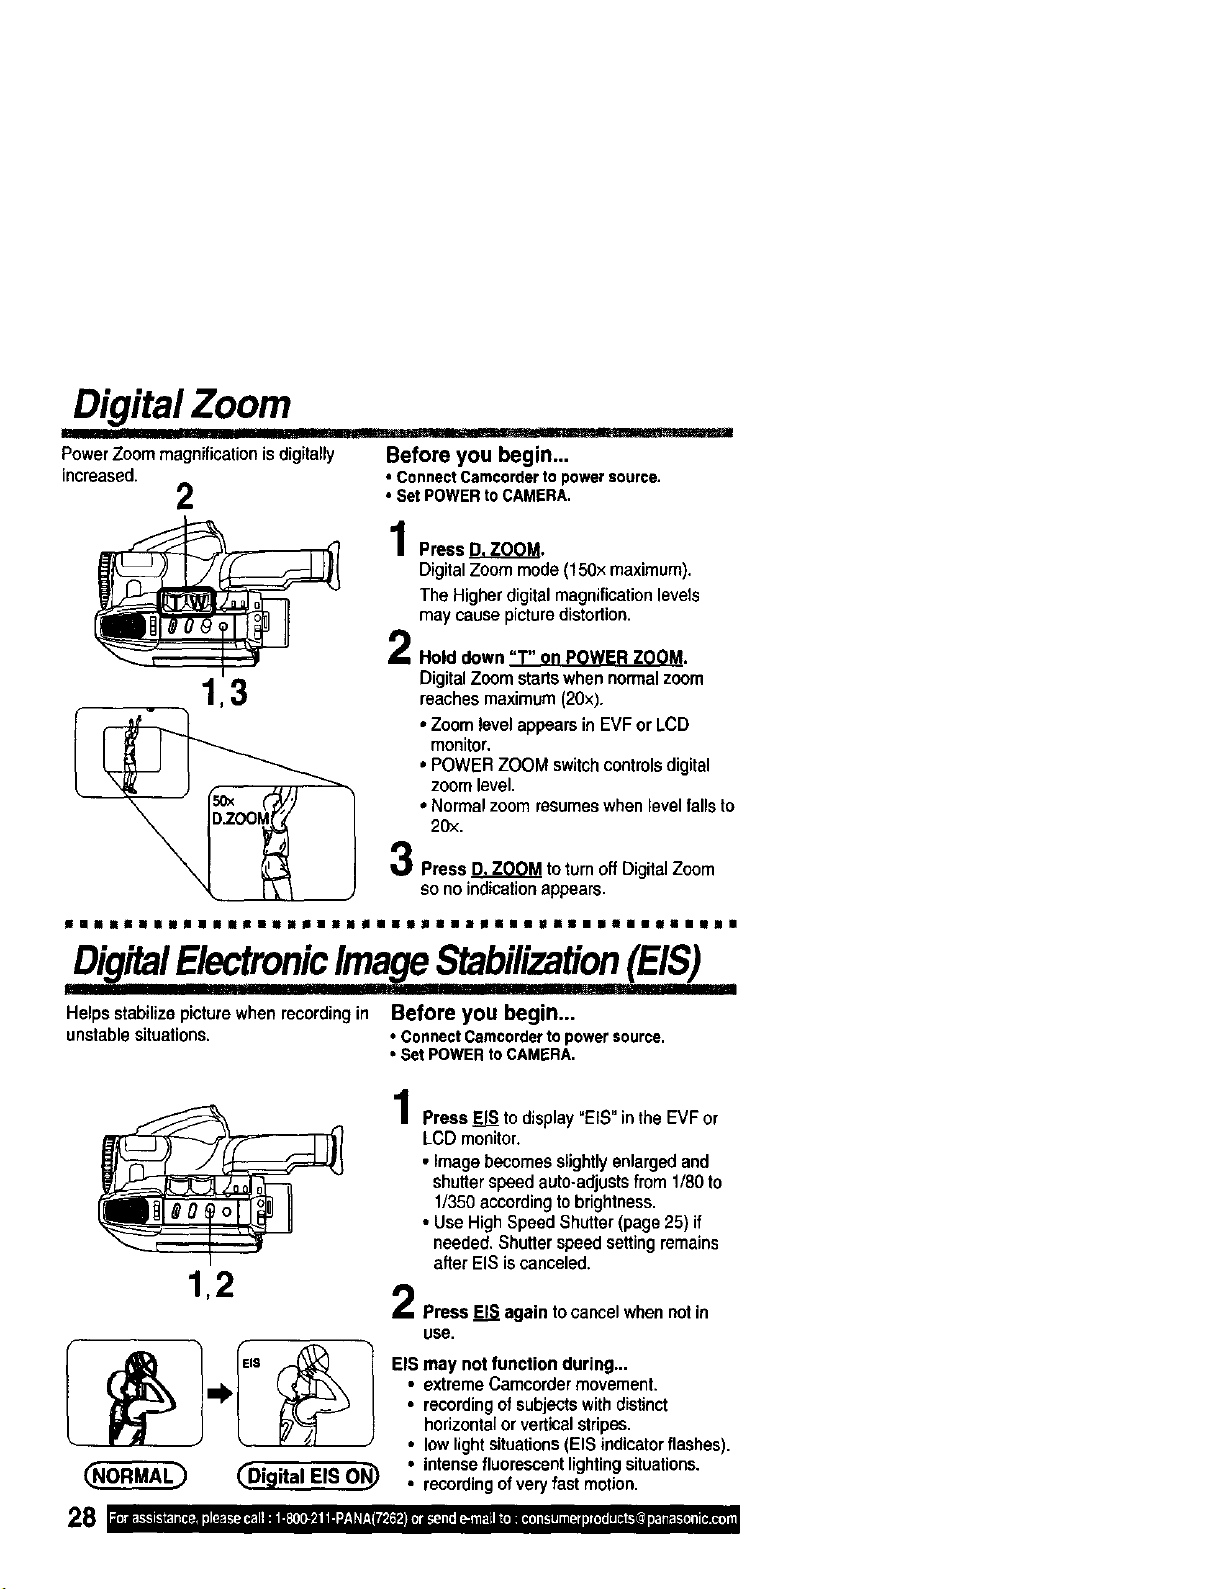
Digital Zoom
Power Zoommagnification is digitally
increased.
2
1,3
Before you begin...
• ConnectCarncordertopowersource.
• Set POWERtoCAMERA.
Press_.
Digital Zoom mode (150× maximum).
The Higher digital magnification levels
may cause picture distortion.
Hold down "" P Z M.
DigitalZoom startswhen normalzoom
reaches maximum(20×).
• Zoom levelappears in EVF or LCD
monitor.
oPOWER ZOOM switch controls digital
zoom level.
• Normal zoom resumeswhen level fallsto
20x.
Press D. ZOOM to turn off Digital Zoom
so no indication appears.
ni|lnlllil|lllii|i|idtllPll||lilS||i|Bilill|i!
DigitalElectronicImageStabilization(EIS)
IIII]IIHT _ ' rlrl!l!l
Helps stabilize picture when recording in Before you begin...
unstable situations. • Connect Camcorder to power source,
• Set POWER to CAMERA.
1,2
_Digital EIS ON_
Press E__ to display"EIS" in the EVF or
LCD monitor.
• Image becomesslightlyenlargedand
shutterspeed auto-adjustsfrom 1/80 to
1/350 accordingtobrightness.
• Use HighSpeed Shutter(page 25) if
needed. Shutterspeed settingremains
after EIS iscanceled.
PressEISagaintocancelwhennotin
use.
EIS may not function during,..
• extreme Camcorder movement.
• recordingofsubjectswithdistinct
horizontalor verticalstripes,
• lowlightsituations(EIS indicator flashes),
• intensefluorescentlightingsituations.
• recordingofvery fast motion,
8 I ;1o}ilK"k"["lk"iP"IlIi( "JI I ][*',F--]-'T"-I[_:"IliJi I_: {II| _ '_iE _J:|_ r__j_-)-4 Ii ]i_'_:_'_i'_(i_o_F'`t_[:J_}(_[`'j_`t_h_'liKk`_1_i_i_
Security Mode
Recording starts automaticallyif motion is
detected.
Before you begin...
• ConnectCamcorderto powersource,
UseACAdaptorfor longerrecordings.
• Insertcassettewith recordtab(page11).
• Set POWERtoCAMERA.
• Securely positionandaimCarncorder.
[_-]:(qlJ:l|i'J
Motion Security may mistakenly start
when:
• backgroundisplain,like a whitewall, or
hasdistinctvertical,horizontal,or
slantedstripes,like a venetianblind.
• brightnesssuddenlychanges.
Motion Security may not start when:
• motion isvery slowor fast.
• moving object is very small.
• motion occurs only in I corner of
viewing area.
• in poor lighting (in this case, MOTION
SECURITY flashes).
• background is plain, like a white wall, or
has distinct horizontal or vertical stripes.
Note:
• SecurityrecordingstartsifCamcorder is
bumpedor repositioned.
• Thisfeatureis not available duringnormal
recording.
• While in MotionSecuritystand-by,the
followingfunctionsare not available:
Record/Pause, Stand-by mode, Digital
EIS, Video Effects(Auto/DigitalFade).
PressMENUfor
MENU mode.
Press UP • or
DOWNY to select
D RI_JLY ; QH
/_L.I 0e_O ;OR I
: NSH OlSP, Ay NZY
PressDISPLAYtoselectON.
Press MENU for MotionSecurity
stand-bymode. (If cassette isnot
inserted, =l;"g" willflash.)
MOTION _'nON
SECURITY SECURITY
• Recordingwillstartabout3 seconds
after motion isdetected.
• Date and time are recorded if
displayed in EVF or LCD monitor
(page 16).
• Recordingstops about 30 seconds
after motionceases.
TocancelSecurityMode,set POWERto
OFF.
29
Intelligent Titler
item ,, ,111 I "llllll
Before you begin...
• ConnectCamcordertopowersource.
Camcorder auto-displays title greeting on • Insert cassette with record tab (page 11).
selected holidayswhen power isfirst
tumed on. See title list below.
• Set POWER to CAMERA.
Press MENU for
MENU mode.
Press UP& or
DOWNV to select
ling.
5
__--- 14ENU--- p_! l,t
Press DISPLAY toselectAUTO/
MANUAL.
Press MENU to exit.
To recordthe title,press RECORD/
PressTITLEwhilerecordingtoremove
title.
Note:
• Once removed,titlewillnot be
auto-displayed,To redisplay,or selectfrom
othertitles,use ManualTitle (see below).
EVF or
LCD Monitor
Automatic/Manual
Title Display
Automatic/Manual Title Display List
Dec. 31-Jan. 1
Feb. 14
2nd Sunday in May
Last Monday in May
3rd Sunday in Jun.
Jul. 4
1st Monday in Sep.
Oct. 31
4th Thursday in Nov.
Dec. 24-25
These Titles must be
displayed manually.
HAPPY NEW YEAR! / CHEERS!
VALENTINE'S DAY / BEMYVALENTINE
HAPPY MOTHER'S DAY / WE LOVEYOU!
MEMORIAL DAY
HAPPY FATHER'S DAY / WE LOVEYOU!
INDEPENDENCE DAY
LABOR DAY
HAPPY HALLOWEEN
HAPPY THANKSGIVING
MERRY CHRISTMAS / HO!HO!HO!
HAPPY EASTER
HAPPY ANNIVERSARY
HAPPY BIRTHDAY
VACATION
WEDDING DAY
A SPECIAL DAY
Intelligent Titler
Before you begin...
• ConnectCamcorderto powersource.
• Insertcassettewithrecordtab(page 11).
• SetPOWERtoCAMERA.
Confirm that TITLE: _
AUTO/MANUAL is set _ !_"_"
in Menu mode (steps t_"_ r'_';'_'°_
F,ELECT: pU_4 T/& KEY
gET : P;_40ISR,Ay I_f
1• Z In Record/Pausemode, press TITLE
repeatedly to displaytitlesfrom liston
page 30.
To record the title, Press RECORD/
t_ITLE while recording to remove
• To redisplaytitle, press TITLE in Record!
Pause mode.
NI II III II IIIII m l II II II II II II II II II II II IIII II
EVF or
LCD Monitor
I--
r------i-
Phrase Title Display
(_ _t_)
B_rlNIL
B_VOI
m CHEERS!
#
GIMMEA BREAK]
GOODLUCK
I LOVEYOU
WAYTOGO
L
A Press MENU for I --- _--- '_ '_
MENU mode. _ :_,,,_
S_I"tER ; ieriO
Press UP& or _--._r_N_,E ;
DOWN • tOselect _: _. ,,_*K_
: F'.BH OI_J_y I_¢f
B_ : _ltt tID, lU KEy
a Press DISPLAY to select PHRASE.
m
C Press MENU to exit.
Din RecordiPauss mode, press TITLE
repeatedly to displayphrasesfrom the
list at left.
E Do steps 3, 4 above to record and
remove phrase.
Note:
• To redisplayphrase, pressTITLE in Record/
Pause mode.
4
31
Viewfinder/LCD Monitor Indications
Taperemainingandbatterychargelevel
canbe displayed.
.A
Battery Remaining: Tape Remaining:
-_- (Notape)
FULL _ []_ FULL
EMP__,J_,,.-:_i-'--'_ EMPTY
Before you begin...
• ConnectCamcorderto powersource.
Set POWER to CAMERA.
Press _ (Initialstreet
repeatedly to select flXmm===
the following displays. /
• Tape remaining indicatoroperates a few
secondsafter tape starts moving.
Do steps1 and 2 above toselecttime/date,
date only, or no display.
Starta recording(page16).
•OnlytheDateand/orTimearerecorded.._=°0_'_1=_,
B PressME_ for MENUmode.
Press.U..P__&or DOWNT toselectr_
C PressDISPLAYtoselectOFF.
No Indication, except Intelligent Titler (pages 30, 31), willbe displayed.
A ""Set POWER to CAMERA or VCR. ,=
t E_,tJFfl_t ; OR=
B_ : pL_,t klB_ I_f
[CAMERAMODE
Press _ to exit. {
O Press DISPLAY repeatedlyto remove time/date.
indicationsare restoredthe nexttime Carncorderis ,===,.
turnedon. _ '_'
-,- M_4J ,-.
BO : FUeHM_U I_f
[VCRMODE]
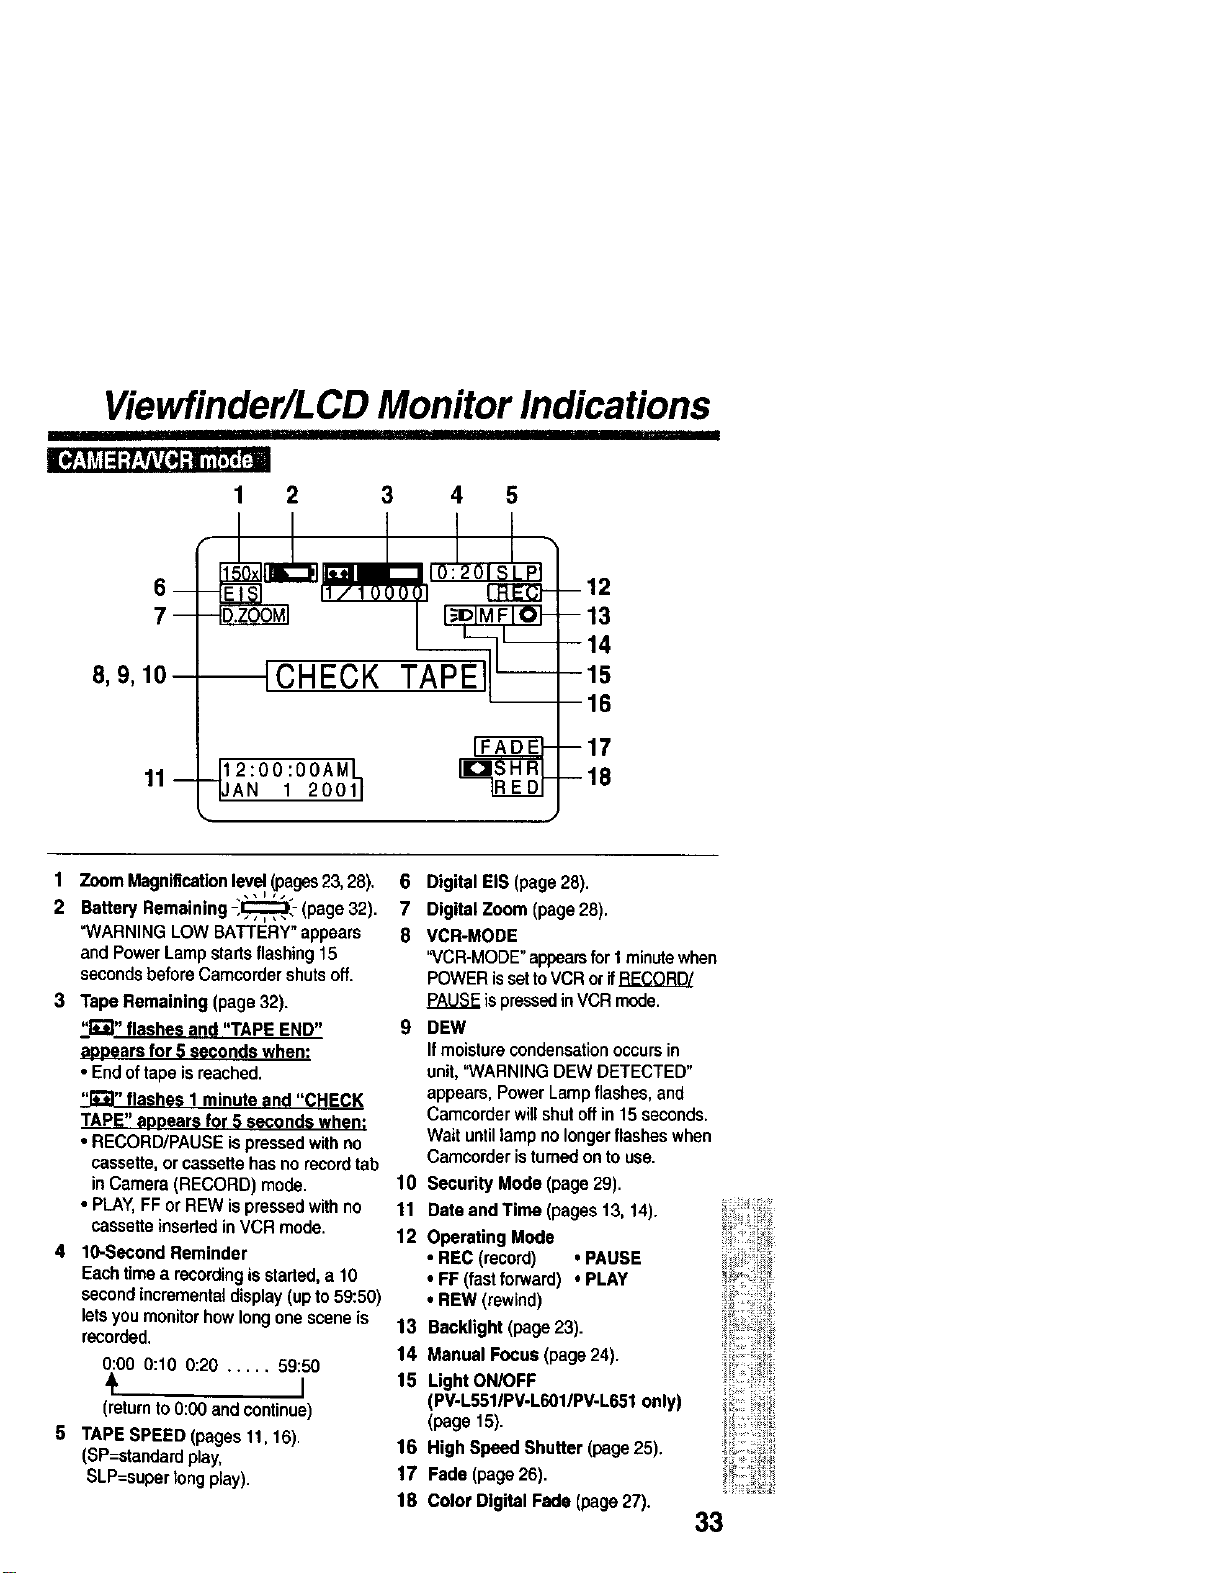
Viewfinder/LCD Monitor Indications
I
1 2 3 4 5
8_
6
7
11
14
16
17
18
1 Zoom Magnificationlevel (pages23, 28).
2 Battery Remaining -,,,,E=:_,_: (page 32).
"WARNING LOW BATTERY"appears
and Power Lamp startsflashing15
secondsbefore Camcordershutsoff.
3 Tape Remaining (page 32).
-I'_";t,,flashes and "TAPE END"
az)oearsfor 5 seconds when:
• Endof tape is reached.
_" flashes I minute and "CHECK
TAPE" aaeears for 5 seconds when;
• RECORD/PAUSE ispressedwithno
cassette, or cassettehas no recordtab
inCamera (RECORD) mode.
• PLAY,FF or REW ispressedwithno
cassette insertedinVCR mode.
4 10-Second Reminder
Eachtimea recordingis started,a 10
secondincremental display(up to 59:50)
letsyou monitorhow longone scene is
recorded.
0:O0 0:10 0:20 ..... 59:50
4 I
(return to 0:00 and continue)
5 TAPE SPEED (pages 11, 16).
(SP=atandard play,
SLP=super tong play).
6 Digital EIS (page 28).
7 Digital Zoom (page28).
8 VCR-MODE
"VCR-MODE" appearsfor I minutewhen
POWER issettoVCR orifRECORD/
PAUSEis pressedin VCR mode.
9 DEW
If moisture condensationoccursin
unit,"WARNING DEW DETECTED"
appears, Power Lamp flashes,and
Camcorder willshutoffin 15 seconds.
Wait untillamp nolongerflashes when
Camcorder istumed onto use.
10 Security Mode (page 29).
11 Date and Time (pages 13, 14).
12 Operating Mode
• REC (record) , PAUSE
• FF (fastforward) • PLAY
• REW (rewind)
13 Backlight (page 23).
14 Manual Focus (page 24).
15 Light ON/OFF
(PV-L5511PV-L601/PV-L651only)
(page 15).
16 High Speed Shutter (page 25).
17 Fade (page 26).
18 Color Digital Fade (page 27).
33
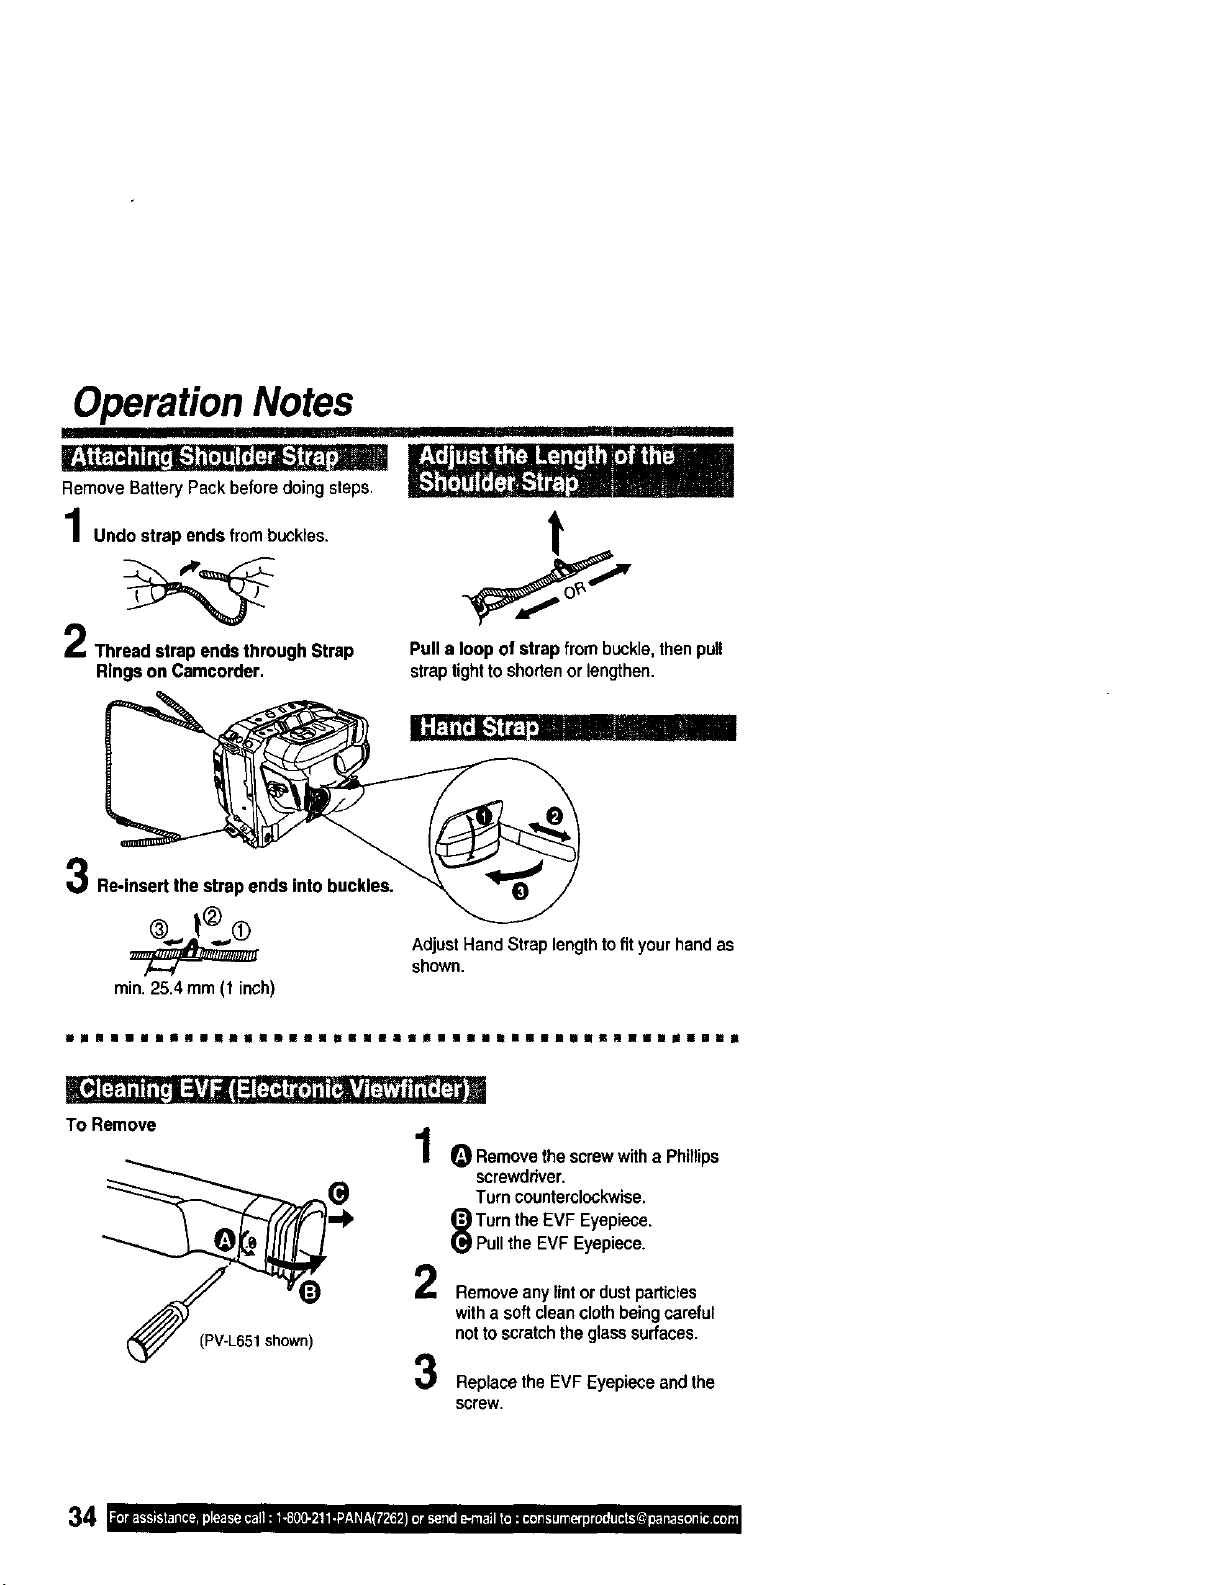
Operation Notes
Remove Battery Pack before doing steps.
Undo strap ends from buckles.
Thraad strap ends through Strap
Rings on Camcorder.
iir'liii
t
Pull a loop of strap from buckle, then pull
strap tighttoshorten or lengthen.
Re-Insert the strap ends Into buckles.
min.25.4 mm (1 inch)
AdjustHandStraplengthtofityourhandas
shown.
w la II n u II naJo n | nnll | nnu ii n n u n n n nn n n nil | u un| | nz n nu u in u u !
TO Remove
(PV-L651shewn)
1
2
3
O Remove the screwwith a Phillips
screwdriver.
Turn counterclockwise.
Turn the EVF Eyepiece.
Pullthe EVF Eyepiece.
Remove any lint ordustparticles
with a softclean clothbeingcareful
nottoscratch the glasssurfaces.
Replace the EVF Eyepiece and the
screw.
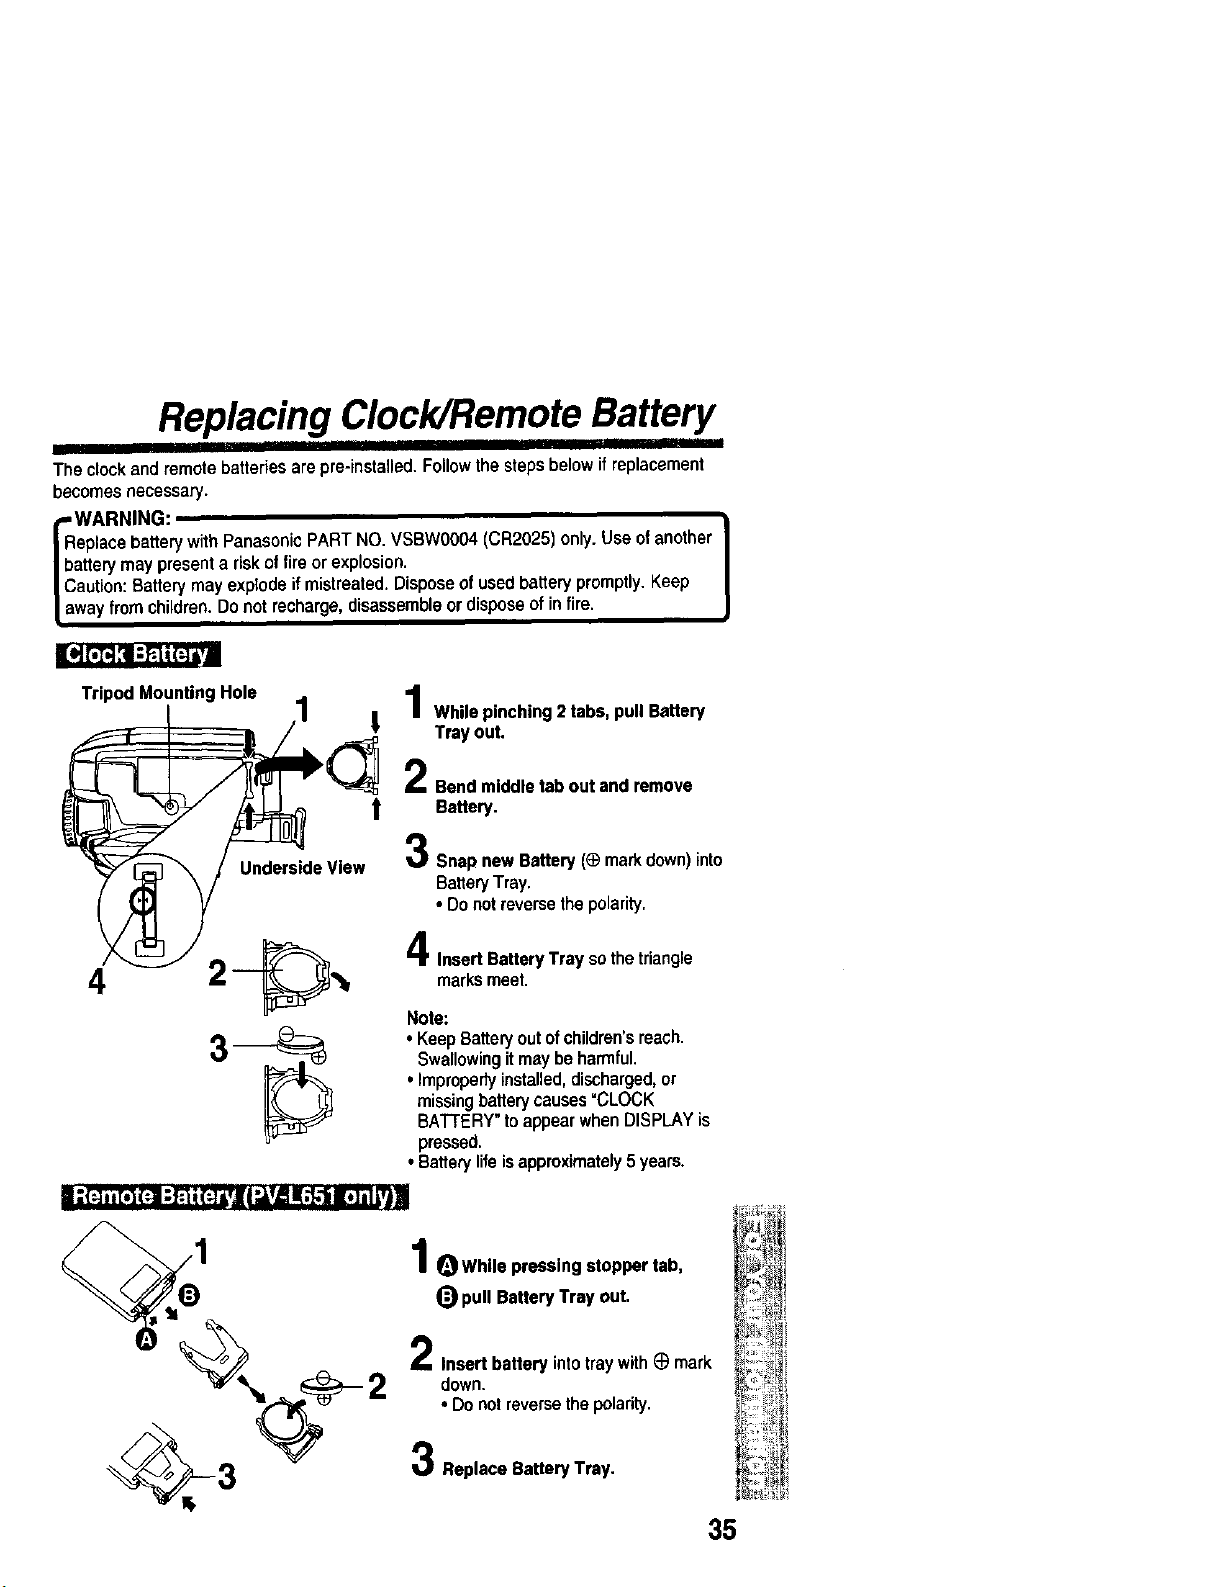
Replacing Clock/Remote Battery
liili'ili' i iiiii li i iiii ................
The clockand remotebatteriesare pre-installed.Followthe stepsbelow if replacement
becomes necessary.
eplace batterywith Panasonic PART NO. VSBWOO04(CR2025) only.Use ofanother
artery may present a risk of fire or explosion.
aution: Battery may explode if mistreated. Dispose of used battery promptly. Keep
way from children. Do not recharge, disassemble or dispose of in fire.
Tripod Mounting Hole
UndersideView
t
_, I While pinching 2 tabs, pull Battery
Tray out.
Bendmiddletaboutand remove
t Battery.
SnapnewBattery(_ markdown)into
BatteryTray.
• Donotreversethepolarity.
marksmeet.
Insert Battery Tray so the triangle
Note:
• KeepBatteryoutofchildren'sreach.
Swallowingitmaybeharmful.
• Improperlyinstalled,discharged,or
missingbatterycauses=CLOCK
BATrERY"toappearwhenDISPLAYis
pressed.
•Batterylifeisapproximately5 years.
I; (=]. [,] F.]I:Fi i(:]i,| I"J,v/5!,1.1iI;ITI L,t]I
1 OWhlle pressingstoppertab,
_) pullBatteryTrayout.
2
Insert batteryintotraywith@ mark
down.
• Donotreversethe polarity.
Replace Battery Tray.
35

PalmcorderAccessory System
AC Adaptor with Call Fro:
PV-A19 DC Power Cable Pricing
(Chargingofthe Nickel
CadmiumBatteryor Nickel
MetalHydrideBattery)
Up to 6 hr Battery Pack $119.95
HHR-V6OA/1B (RechargeableNickel
MetalHydrideBattery)
Up to 4 hr Battery Pack $69.95
HHR-V4OA/1B (RechergeableNickel
MetalHydrideBattery)
Up to 2 hr Battery Pack $59.95
HHR-V2OA/1B (RechargeableNickel
MetalHydrideBattery)
PV-AA6 _ "AA" Battery Case $20.00
PV-C16 _ Car Battery Cord $70.00
VHS PlayPak $39.95
PV-P1
PV-H18A _ Soft Sided $49.95
I_ Carrying Case
Note:
• Pricessubjectlo change withoutnotice.
B
For orderinginstructions, seethe AccessoryOrder Form page.
• The listedstandard batteryusetimesare basedoncontinuousrecordingusingthisPalmcorder.
Accessory # Figure Description Price
AC Adaptor with $139.95
PV-A17 DC Power Cable
(Chargingof the Nickel
CadmiumBattery)
Palmcorder Accessory Order Form
' I
Please photocopy this form when placing an order.
1. Palmcorder Model #
2. Items Ordered
Accessory # Description Price Each Quantity
Total Price
Subtotal
Your State & Local Sales Tax
Shipping& Handling 6.95
Total Enclosed
3. Method of payment (check one)
[] Check or Money Order enclosed (NO C.O.D,SHIPMENTS)
[] VISA Credit Card #
[] MasterCard Expiration Date
[] Discover Customer Signature
Make Check or Money Order to: PANASONIC ACCESSORIES
(Please do not send cash)
4. Shipping information (UPS delivery requires complete street address
ShipTo:
Mr.
Mrs.
Ms.
First Last
StreetAddress
City State Zip
Phone#:
Day (
Nighl (
TO OBTAIN ANY OF OUR PALMCORDER ACCESSORIES YOU CAN DO ANY OF THE
FOLLOWING:
VISIT YOUR LOCAL PANASONIC DEALER
OR
CALL PANASONIC'S ACCESSORY ORDER LINE AT 1-800-332-5368
[6 AM-5 PM M-F, 6 AM-10:30 AM SAT, PACIFIC TIME]
OR
MAIL THIS ORDER TO: PANASONIC SERVICES COMPANY ACCESSORY
ORDER OFFICE
20421 84th Avenue South Kent, WA. 98032
37
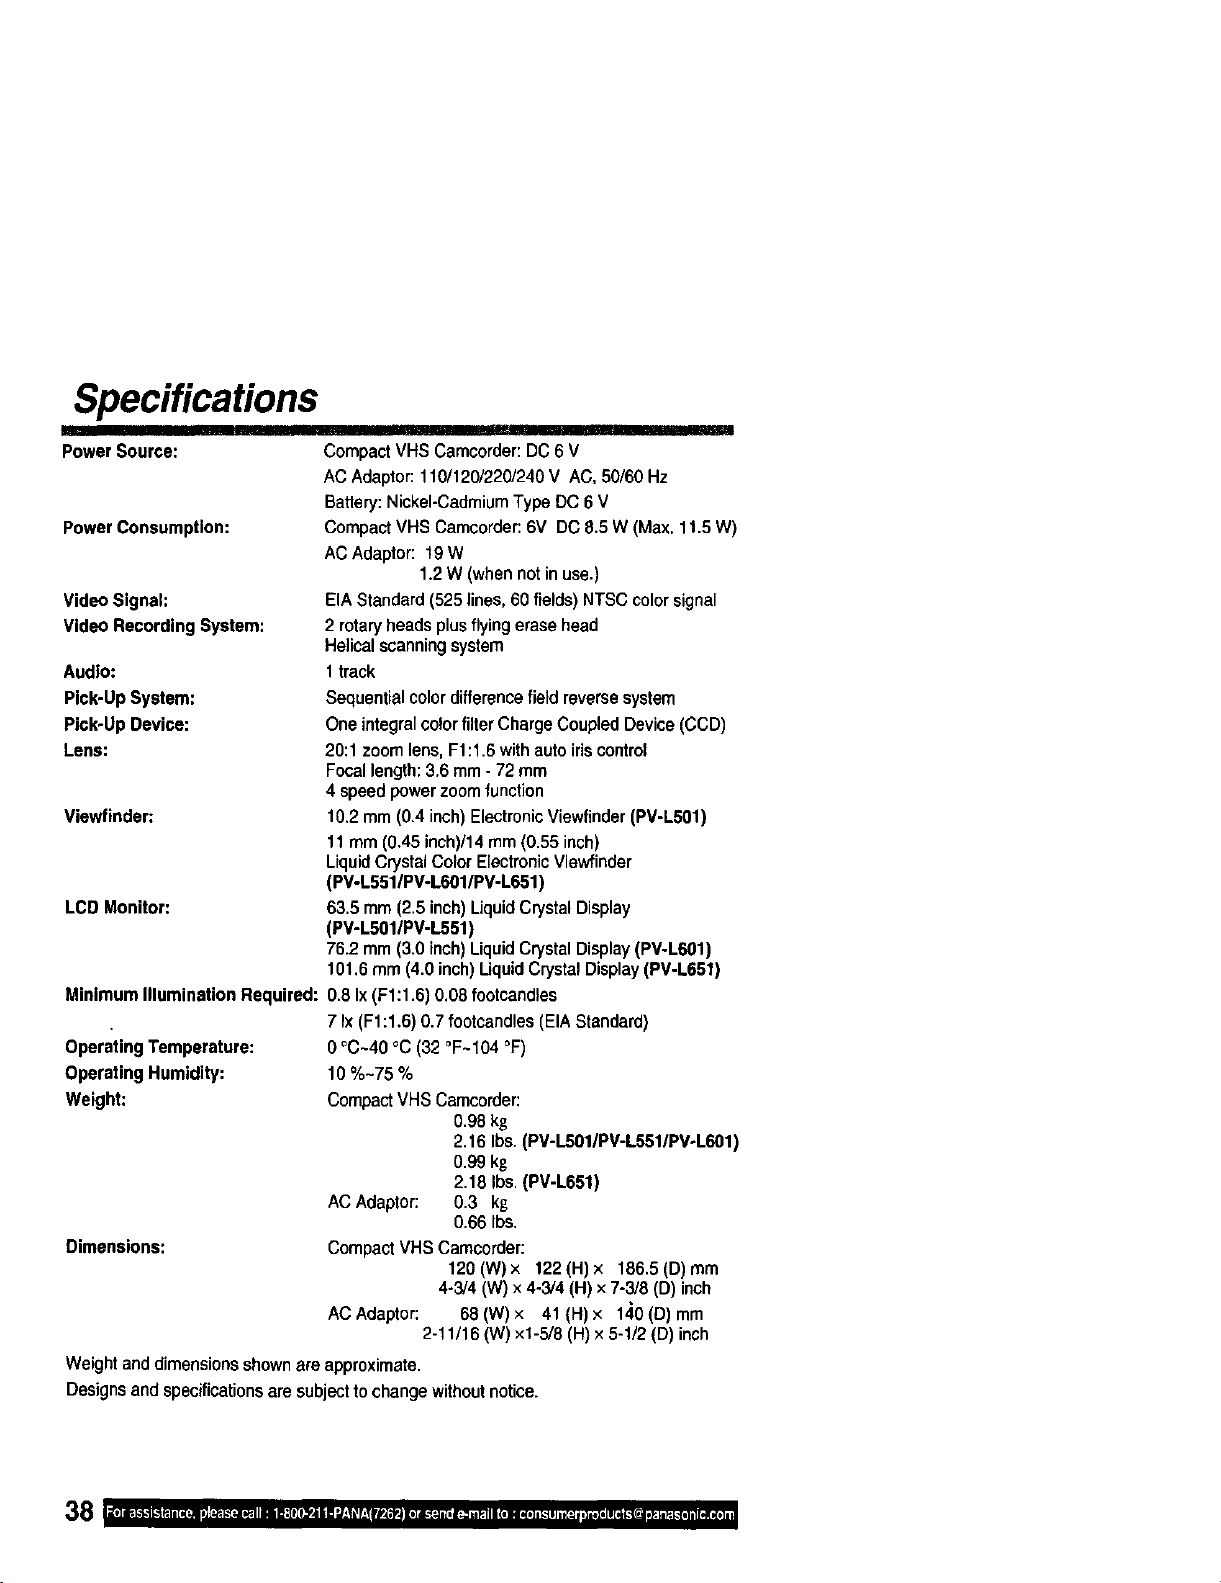
Specifications
II
Power Source:
Power Consumption:
Video Signal:
Video Recording System:
Audlo:
Compact VHS Camcorder: DC 6 V
AC Adaptor: 110/120/220/240 V AC, 50/60 Hz
Battery: Nickel-Cadmium Type DC 6 V
Compact VHS Camcorder: 6V DC 8.5 W (Max. 11.5 W)
AC Adaptor: 19W
1.2 W (when not in use.)
EIA Standard (525 lines, 60 fields) NTSC color signal
2 rotary heads plus flying erase head
Helical scanning system
1track
Pick-Up System: Sequential colordifferencefield reversesystem
Pick-Up Device: One integral colorfilter ChargeCoupled Device (CCD)
Lens: 20:1 zoom lens, F1:1.6 with autoiriscontrol
Focallength:3.6 mm - 72 mm
4 speed power zoom function
Viewfinder: 10.2 mm (0.4 inch) ElectronicViewfinder (PV-LS01)
11 mm (0.45 inch)/14 mm (0.55 inch)
Liquid Crystal Color Electronic Viewfinder
(PV-L551/PV-L601/PV-L651)
LCD Monitor: 63.5 mm (2.5 inch)LiquidCrystal Display
(PV-L501/PV-L551)
76.2 mm (3.0 inch)LiquidCrystal Display(PV-L601)
101.6 mm (4.0 inch) Uquid Crystal Display(PV-L651)
Minimum IlluminaUon Required: 0.8 Ix (F1:1.6) 0.08 footcandles
7 Ix(F1:1.6) 0.7 footcandles (EIA Standard)
0 °C~40 °C (32 °F~104 °F)
10%-75%
Operating Temperature:
Operating Humidity:
Weight:
Dimensions:
Compact VHS Camcorder:
0.98kg
2.16 Ibs. (PV-LS01/PV-L551/PV-L601)
0.99 kg
2.18 Ibs.(PV-L651)
ACAdaptor: 0.3 kg
0.66 Ibs.
Compact VHS Camcorder:
120 (W) x 122 (H) x 186.5 (D) mm
4-3/4 (W) x 4-3/4 (H) x 7-3/8 (D) inch
ACAdaptor: 68(W)x 41(H)× 140(D)mm
2-11/16 (W) xl-5/8 (H) × 5-1/2 (D) inch
Weightanddimensionsshownareapproximate•
Designsandspecificationsare subjectto changewithoutnotice.

Before Requesting Service
I Irllll'I' II1' IIIII Ir'l
Ifa problem arises,you may be able to correctit yourself.
See Symptom and Correctionlistbelow.
Symptom Correction
No picture in EVF or LCD monilor ... • Connect Power Source. (pp.9, 10)
• Set POWER to VCR o_CAMERA. (pp. 16, 20)
• Check for Dew Indication.(p. 33)
• Use fully charged Battely. (p. 9)
• Firmlyconnectall needed cables. (p. 10)
Video cassette cannot be inserted ... • Connect Power Source. (pp.9, 10)
• Insed cassette,windowside facing out. (p. 11)
V',,deocassette cannot be removed ... * Connect Power Source. (pp.9, 10)
Operation buttonsdo notwork... * Check for Dew Indication.(p. 33)
Recordingcannot be done ... • Make surerecordtab is intact. (p. 11)
• Check Battery Indicator. (p. 32)
• Check for Dew Indication.(p. 33)
Auto Focusdoes notoperate ... * Set FOCUS to AUTO. (p.24)
• Set POWER to CAMERA. (p. 16)
Sound from microphone can't be monitored ... • Set unittoREC or Record/Pause mode.
Camera pictureistoo dark ... * Set HIGH SPEED SHUI-rER to AUTO. (p. 25)
No playbackpicture,or the playback * Press UP &/DOWN • buttonduring playback
_ictura isnoisyor contains streaks ... (TrackingControl).(p. 20)
"PanasoniciTSTAPES PLAYINYOUR VCR ..." * Set POWER to CAMERA, then set SELF DEMO :
appearsinEVF orLCD Monitor... OFF in MENU screen tocancel Demo mode, (p. 7)
Top of playbackpicturewaves back and • A playbacksignal isnotas stable as an offthe air
forth excessively... TV signal, so the top ofyourTV screen may
appear bentor unstableduringplayback.This is
called,°Horizontal AFC time constantchange."To
correct,slowlyturn the TV horizontalholdcontrol
If yourTV does not have thiscontrol, oradjustingit
does nothelp, contactyour TV servicecenter.
(Some nominalservice chargesmay be required.)
Clogged Video Head
Whileheadcleaningisnormallynotneeded,playingoldor
damagedtapesmayclogtheheads.Whenplaybackpicture
resemblesexampleat theleft,headcleaningisrequired.
ideally, head cleaning should be performedby a qualified
service technician.When this is notpossible,purchase a
head cleaningcassette. Be sure tofollow cleaning cassette
instructionsexactly and onlyuse when symptomsoccur.
39
Request for Service Notice
Please photocopy this form when making a request for service notice.
Intheunlikelyeventthisproductneedsservice.
RequestforServiceNotice:•Pleaseincludeyourproofofpurchase.(Failuretoduesowilldelayyourrepair.)
• Tofurtherspeedyourrepairpleaseprovide
anexplanationofwhatiswrongwiththeunit
andanysymptomitisexhibiting.
Moil this completedform andyour Proofof Purchasealong withyour unitto:
Panasonic Services Company
1705 N. Randall Road
Elgin, IL. 60123-7847
Attn: Camcorder Repair
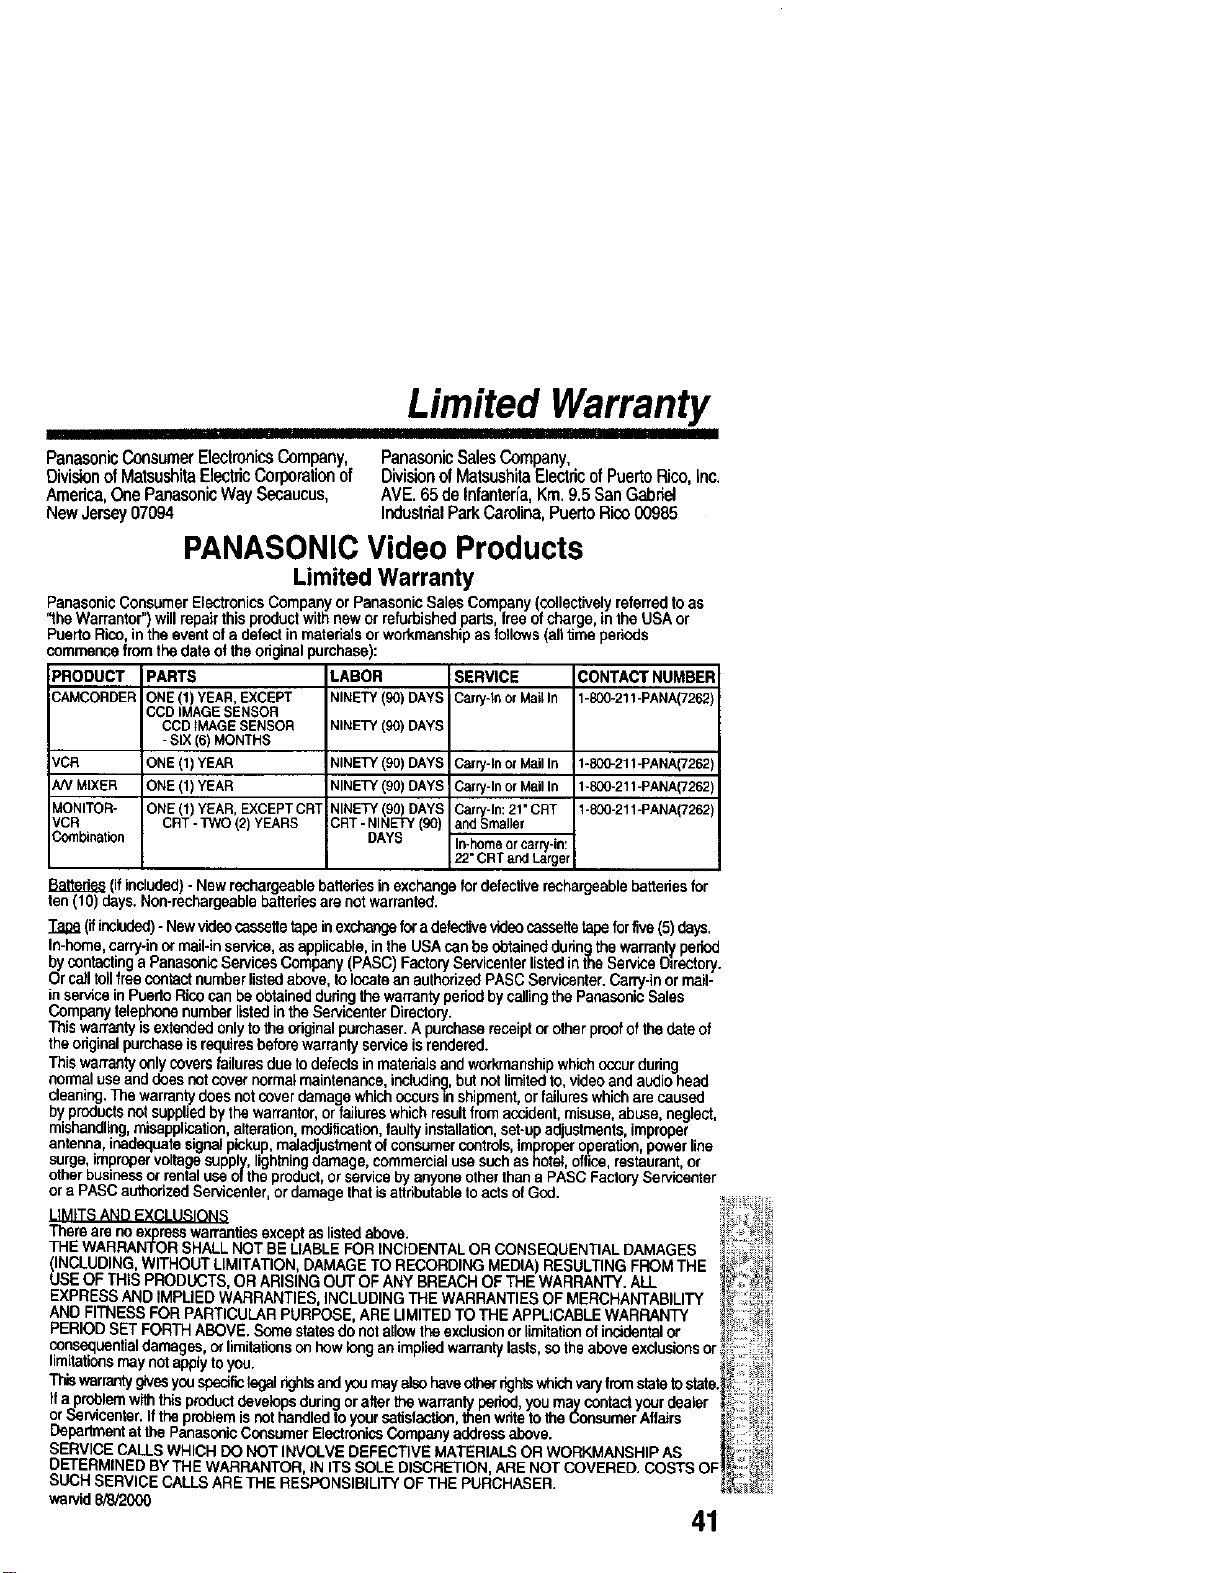
Limited Warranty
PanasonicConsumerElectronicsCompany, PanasonicSalesCompany,
Divisionof MatsushitaElectricCorporationof Divisionol MatsushilaElectricof PuertoRico, Inc.
America,One PanasonicWay Secaucus, AVE. 65de Infanterfa,Km 9.5 SanGabriel
NewJersey07094 IndustrialParkCarolina,PuertoRico 00985
PANASONIC Video Products
Limited Warranty
PanasanicConsumer ElactroniceCompanyor Panasonic Sales Company (collectivelyreferred toas
"the Warrantor")will repair this product withnew or refurbishedparts, free of charge, in the USA or
Puerto Rico,in the event of a defect in materials or workmanshipasfollows (all time periods
commence from the date of the originalpurchase):
LABOR
NINETY(90) DAYS
NINE]Y(90)DAYS
VCR
A/V MIXER
MONITOR-
VCR
Co_nbination
PRODUCT PARTS
CAMCORDER ONE(1) YEAR,EXCEPT
CCDIMAGESENSOR
CCDIMAGESENSOR
-SIX (6)MONTHS
ONE(1)YEAR
ONE(1)YEAR
ONE(1)YEAR,EXCEPTCRT
CRT- TWO(2) YEARS
NINETY (90) DAYS
NINEI_" (90) DAYS
NINETY 90) DAYS
CRT -NINETY (90
DAYS
;SERVICE CONTACT NUMBER
Carol-In or Mai_In 1-8CO-211-PANA(7262)
Carry-In or Mail In 1-800-211 -PANA(7282.)
Carry-In or Mail In 1-800-211 -PANA(7262)
Carry-In: 21" CRT 1-800-211-PANA(7262)
and Smaller
In-home or carry-in:
22" CRT and Larger
Ba_edes ifincluded)- New rechargeable batteriesinexchange fordefectiverechargeablepatteries for
ten 10) days. Non-rechargeablebattehesare notwarranted.
Tane (ifincluded)- Newvideocesselta tapeinexchangefora defectivevideocassettetape forfive (5) days.
In-home,carry-inor mail-in service,as applicable,inthe USA canbe obtainedduringthe warranb,/period
bycontacting a PanasonicServicesCompany(PASC) FactorySewicenler listedin the ServiceDirectory.
Or calltollfree contactnumber listedabove, to locatean authedzed PASC Servicenter.Carry-inormail-
in servicein PuertoRice can beobtainedduringthe warrantyperiodby callingthe PanasonicSales
Companytelephonenumber listedin the ServicentorDirectory.
Thiswarrantyisextendedonlyto the originalpurchaser.A purchasereceiptor otherproofof the date of
the originalpurchaseisrequiresbefore warranty serviceis rendered.
This warrantyonlysevers failures due to defects inmaterialsand workmanshipwhichoccurduring
normaluseand does notcover normal maintenance,includinQ,but not limitedto, videoand audio head
cleaning.The warrantydoes notcover damage whichoccursInshipment,orfailureswhichare caused
by productsnotsuppliedby the warrantor,or failures whichresultfrom accident misuse abuse neglect
mishandling, misepplkT,atico, alteration modificationfaulty installationset-upadustmants improper
antenna,inadequatesignalpickup,maladustmentof consumercontrols improper operation power line
surge, impropervoltage supply,lightningdamage, commercialuse such as hotel, office,restaurant or
other business or rentaluse of the product or servicebyanyone otherthan a PASC FactoryServicenter
or a PASC authorzed Serviconter,or damage thatis attdbotableto actsof God.
LIMITS AND EXCLUSIOH,_
There are no expresswarrantiesexcept as listed above.
THE WARRANTOR SHALL NOT BE LIABLE FOR INCIDENTAL OR CONSEQUENTIAL DAMAGES
(INCLUDING, WITHOUT LIMITATION, DAMAGE TO RECORDING MEDIA) RESULTING FROM THE
USE OF THIS PRODUCTS, OR ARISING OUT OF ANY BREACH OF THE WARRANTY. ALL
EXPRESS AND IMPLIED WARRANTIES, INCLUDING THE WARRANTIES OF MERCHANTABILITY
AND FITNESS FOR PARTICULAR PURPOSE, ARE LIMITED TO THE APPLICABLE WARRANTY
PERIOD SET FORTH ABOVE. Some statesdo not allowthe exclusion or limitation of inddontal or
consequential damages, or limitations on how long an implied warranty lasts, so the above exclusions or
limitationsmay not apply to you.
This warrantygivesyouspecificlegal rightsand you mayalso haveother lights which very fromstatetostate.
If a problem withthis product develops during or after the warranty period you may contact your dealer
or Servicenter. If the pmbfam is not handled to your satislectJon, then write to the Consumer Affairs
Department at the Panascoie Consumer ElectronicsCompanyaddress above.
SERVICE CALLS WHICH DO NOT INVOLVE DEFECTIVE MATERIALS OR WORKMANSHIP AS
DETERMINED BY THE WARRANTOR, IN ITS SOLE DISCRETION, ARE NOT COVEREO. COSTS OF
SUCH SERVICE CALLS ARE THE RESPONSIBILITY OF THE PURCHASER.
warvid8/8/2000
41
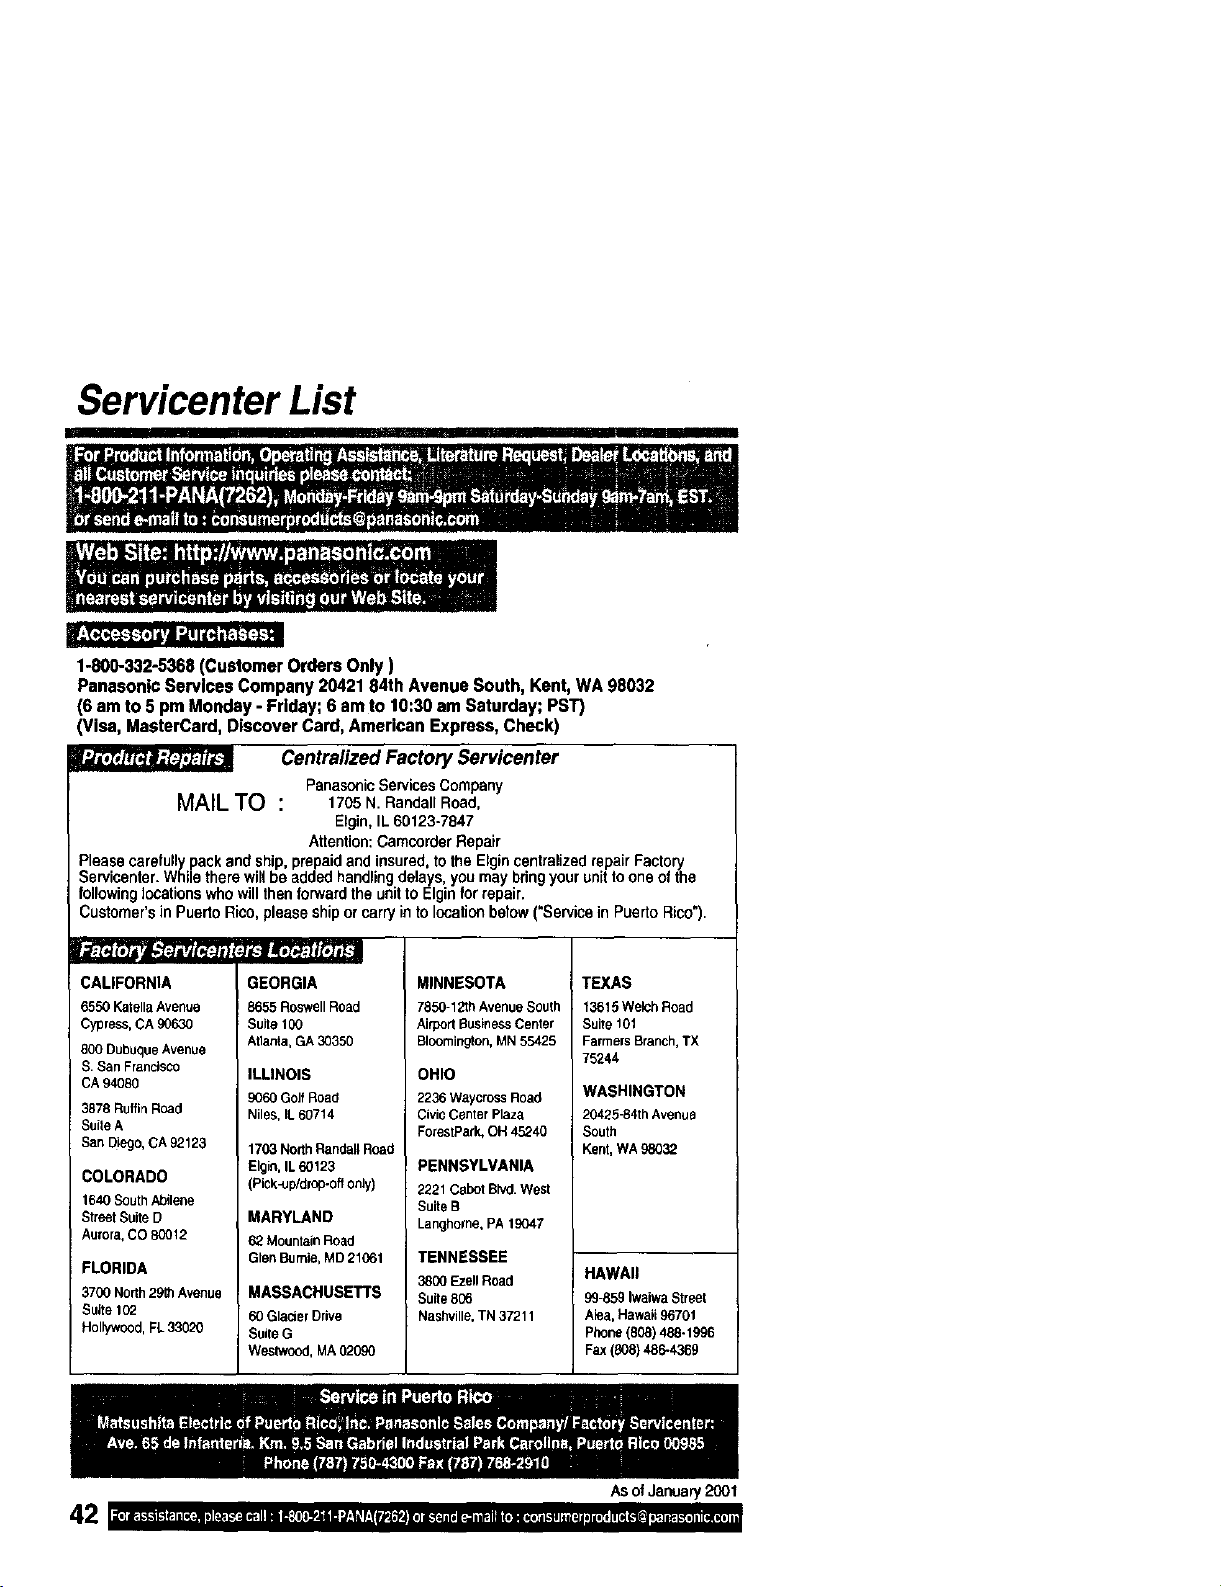
Servicenter List
II IIII II
1-800-332-5368 (Customer Orders Only )
Panasonic Services Company 20421 84th Avenue South, Kent, WA 98032
(6 am to 5 pm Monday - Friday; 6 am to 10:30 am Saturday; PST)
lisa, MasterCard, Discover Card, American Express, Check)
Centralized Factory Servicenter
Panasonic Services Company
MAIL TO : 1705 N. Randall Road,
Elgin, IL 60123-7847
Attention: Gamocrder Repair
Please carefully pack and ship, prepaid and insured, to the Elgin centralized repair Factory
Servicenter. While there will be added handling delays, you may bring your unit to one of the
following locations who will then forward the unit to Elgin tot repair.
Customer's in Puerto Rico,pleaseshipor carry in to location betow ("Servicein Puerto Rico").
CALIFORNIA
6550 Katella Avenue
Cypress, CA 90630
800 Dubuque Avenue
S. San Francisco
CA 94080
3878 Ruffirl Road
Suite A
San Diego, CA 92123
COLORADO
1640SouthAbilene
StreetSuiteD
Aurora,CO 80012
FLORIDA
3700North29thAvenue
Suite102
Hollywood,FL33020
GEORGIA
8655RoswellRoad
Suite 100
Atlanta,GA30350
ILLINOIS
9060Golf Road
Niles, lL 60714
1703 North Randall Road
Elgin, IL 60123
(Pick-up/drop-off only)
MARYLAND
62 Mountain Road
Glen Burnie, MD 21061
MASSACHUSETTS
60 Glacier Drive
Suile G
Westwood, MA 020gO
MINNESOTA
7850-12thAvenueSouth
AirportBusinessCenter
Bloomington,MN55425
OHIO
2236 WaycrossRoad
CivicCenterPlaza
ForestPark,OH45240
PENNSYLVANIA
2221CabotBlvd.West
SuiteB
Langhome,PA19047
TENNESSEE
3800 Ezell Road
Suite 806
Nashville, TN 37211
TEXAS
13615WelchRoad
Suite101
FarmersBranch,TX
75244
WASHINGTON
20425-84th Avenue
South
Kent, WA98032
HAWAII
99-859IwaiwaStreet
Aiea,Hawaii96701
Phone(808)488-1996
Fax(808)486-4369
AsofJaonary2001
SpanishQuickUseGuide/GuiaParsUsoR pido
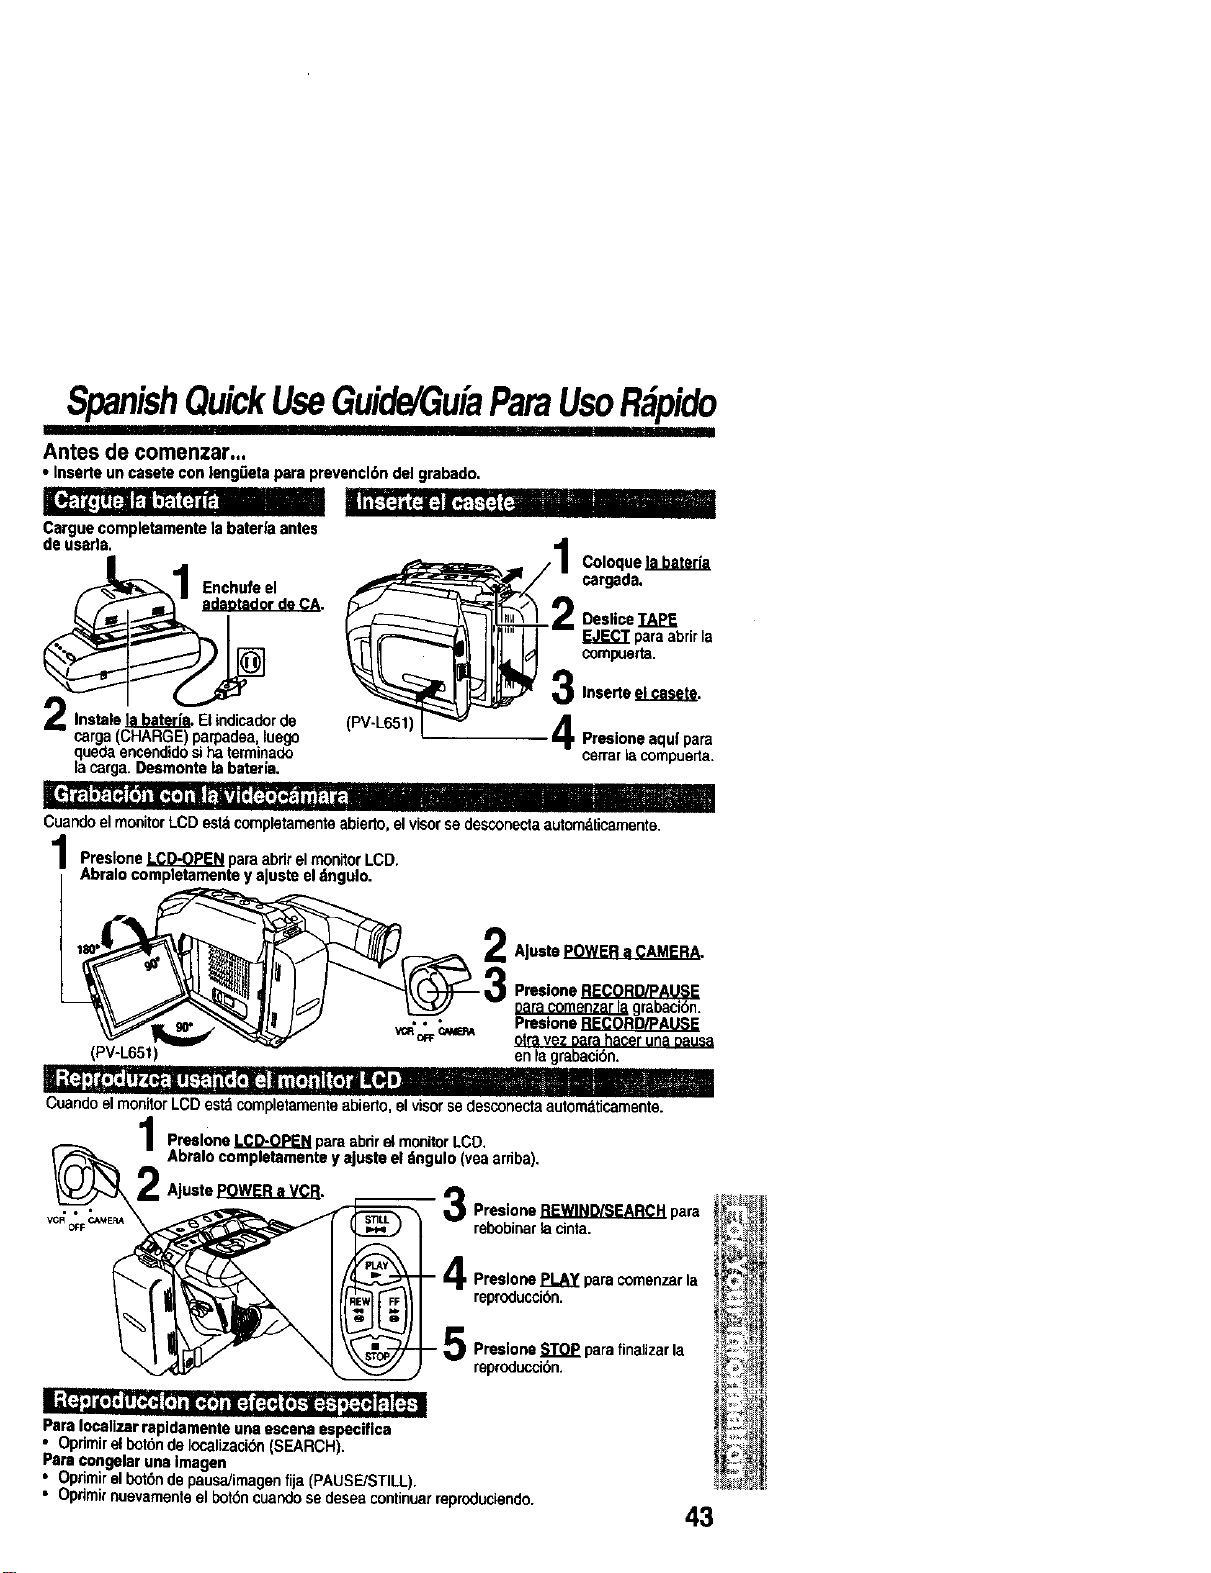
'"1 I
Antes de comenzar...
•Inserte un casete con leng0eta para prevencl6n del grabado.
Cargue completamente la bater|a antes
de usarla.
Enchufe el
r do CA.
2 Instals _. Elindicadorde
carga(CHARGE) parpadea, luego
quedaencendidosi ha terminado
la carga. Desmonte la bateHa.
Coloque
cargada.
(PV-L651
Deslice TAPE
paraabrir la
compuerta,
31nsedeelcasete.
Presioneaquipam
ce_arlacompue_a.
Cuando el monitor LCD estd cornpletamentoabierto, el visor se desconecta automklicamente.
PresloneLCD-OPENparaabrirelmonitorLCD.
AbralocompletamenteyaJusteeldngulo.
AJustePOWER a CAMERA.
Preslone RECORD/PAUSE
Datacomenzar la grabacibn.
• • • Pmslone RECORD/PAUSE
o_ _ otravez oara hacer una oausa
(PV-L65t) en ta grabacibn.
"'e ao * ". _m " --[ls _ |
Cuando el monitor LCD estd completamente abierto, elvisor se desconecta automaticamente.
Preslone LCD-OPEN para abdr el monitorLCD.
Abralo completamente y ajuste el ttngulo (vea srriba).
AJuste _.
3Presione REWIND/SEARCH pars
rebobinar lacinta.
FFI
,R
- Ir_ Preslone PLAY para comenzar la
reproduccibn.
- _ Preslone STOP para finaUzar la
reproducci0n.
Pars Iocalizar rapldamente una escena especiflca
• Oprimirel botonde Iocalizacibn (SEARCH).
Pars congelar una imagen
• Oprimirel bot6nde pausa/imagen fija (PAUSE]STILL).
• Opnmirnuevamenteel bot6ncuandose desea continuarreproduciendo.
43
Index
A
AC Adaptor ..................... 10
Accessories (Optional),.. 36
Accessories (Supplied) .... 2
Audio/VideoCable ... 21,22
AudioNideo Ou_ ....... 21, 22
Auto Daylight Saving
13me............................ 14
B
Backlight ......................... 23
BACKLIGHT Button ....... 23
Battery Pack ............... 9, 10
BATTERY RELEASE
Button ........................... g
BRIGHT Control ....... 16, 20
Built-in Twin Capsule 2-Way
Microphone System .... 16
C
CameraRecording...16_1B
Car BatteryCord............10
ChargingBattery..............9
CleaningEVF.................34
ClockBattery..................35
CIockSet..................13,14
CopyingyourTapes.......22
b
DC IN ............................. 10
DC Power Cable ............ 10
Digital EIS ...................... 28
Digital Zoom ................... 28
D.ZOOM Button ............. 28
DISPLAY Button. 12, 20, 32
Display-off Mode ............ 32
E
EISButton......................28
F
Fade.........................26,27
FADEButton............26,27
FASTFORWARD(
SEARCHSutton.........20
Focus.............................24
H
HandStrap.....................34
HighSpeedShutter........25
L
LCDMonitor.............16,20 T
LCD-OPENSutton... 16,20
LensCover.....................16
Light...............................15
LIGHTSwitch.................15
LimitedWarranty............41
M
MANUALFOCUSButton24
MENUButton.................12 LI
MENUMode...................12
P
PLAYButton................... 20
Playback ................... 20, 21
PlayPak .......................... 21
Power Lamp ............. 16, 20
Power Supply ............. 9, 10
POWER Switch.... 7, 16, 20
POWER ZOOM Button
........................ 23, 24, 28
Programmed Recording. 18
R
RECORD/PAUSE Button 16
Remote Control .............. 19
Replacing Clock/Remote
Battery ........................ 35
Requestfor Service Notice
............................ , ....... 40
REWIND/SEARCH Button.
.................................... 20
Safety Precautions ........... 3
Security Mode ................ 29
Self Damn Mode .........._...7
Servicenter List .............. 42
Shoulder Strap ............... 34
Speaker .......................... 20
Specifications ................. 38
STILL Button .................. 20
Still Picture ..................... 20
STOP Button .................. 20
Tab..................................It
TAPEEJECTSwitch. 11,16
TAPESPEEDButton .....16
TITLEButton............30,31
]Stler.........................30,31
TrackingControl.............20
TripodMountingHoLe.....35
UP• (FAR)/ DOWNT
(NEAR)Button 12,20,24
V
VHF Connecting Cable .. 22
Video Cassettes(tapes).. 11
Video Head C_eaning..... 39
Viewfind_r,'1_CDMor_itor
Indications ............ 32, 33
Viewing (TV/VCR) .......... 21
VISION ADJUSTMENT _ 16
VOLUME Control ........... 20
Z
Zoom........................23,28
PanesonlcConsumerEleotronics
Company,DivisionofMata'4shtte
ElectricCorporationof America
OnePenasonicWay Secaucus,
NewJersey07094
PanasonicSalesCompany("PSC"),
DivisionofMatsushltaElectricof
PuertoRk:o,Inc.
Ave,65de Infanteria.Kin.9.5
SanGabdelIndustrialPark
Carolina,PuertoRico00985 PrintedinIndonesia
LSQT0381A
$1200-0