Loading ...
Loading ...
Loading ...
Installation Instructions.
FaucetInstallation
Be sure there is room m_derneath and above the sink to make the
needed com/ections, ge/ore starting, make sure there is sutficient room
lot the batter} t/owered/imcet base. Select olJ,e of tlle {ollowing t/laces
to install the timcet:
I. In an existing sink Slimy attachment or soal/dispenser hole.
2. In a hole to be drilled in the sink top.
3. In a hole to be drilled in the cotmtertol/, next to the sink.
NOTE:Be sure thefaucet base will fit fiat against thesurfaceat thesdectect location
so the bottom gasket between thebase andsurfacearea will seal.
Installation Steps (refer to Fig. 4 for clarification)
I. // drilling- is needed, m_&e a 3/4" dimn('ter hole.
Be sure to use the proper procedure for drilling porcelain or stainless
steel Special drill bits may be needed. Consult a qualified plmnber for
the proper procedure.
2. Remo_e ttl+.' limpet wiil/t)r+.'-ilJ, stall+.'d tMfing, thin O-ling (D), limpet
base (E), bottom base gasket (F), lock washer (G), hex nut (H) and
mounting bracket (I)/i:om tile packaging.
3. Feed tubing connected to the/imcet througl/the thin o-ling (D),
timcet base (E), bottom base g,_lsket (F), lock w_lsher (G) and hex
nut (It).
4. Thread the hex nut (It) up the stem of the tilucet until the height
between tile bottom of the base gasket (F) and top of the lock
washer ((k) is slightly larger d/an the thickness of the morn/ling
sm'/i,ce (l).
5. Lower the thucet assembly into place in the mounting hole and
orient to/]nal position. Place tile mounting tlracket (I) above tile
lock w;4sher ((',) around the/hmet stem (Fig. 5). While holding
the mounting 1)ra(ket in place, seem:ely tighten the hex mu.
NOTE: Twopeople may be requiredto complete this step.
Instruccionesde instalacion.
Instalaciondelgrifo
Cercidrese de que ha}_ suti(iente est)_lcio (h'l)_!io y endlml del lav_q/latos
llara re_dizar la (onexidn ne(esada. Antes de emtlezar, (er(idrese de que
baya su/iciente esl)acio l/ara la base del grifo ol/erada por 1)ate_Sa.
Seleccione mlo de los siguientes lugm'es para instalar el gl+i/b:
1. En ml accesorio rociador existeme ell el la\'_qflatos u o_ilicio
dispens_ldor dejalldn.
2. En un ofificio a pertbrar en la tmrte superior del lm al_latos.
3. En un ofificio a t/erlbrar en el most_l(tor _1lado del law@atos.
NOTA: Cercibresectecluela base rid grifo quedeplana contra la superficieen la
ubicaci6nseleccionadademaneraqueel empaquede abajoentre la base}/el brea
de la superfMe quectesellado.
Pasos para la instalacion (consulte la Fig. # para aclaracion)
1. Si es ne(es;llio pel;lD1;al; tl_lg+a Iin orit]cio de 3/4" de (lifimetro.
Cerciorese de utilizar el procedimiento correcto para perforar porcelana
o acero inoxidable. Podrla necesitar brocas adicionales. Consulte a un
plomero calificado para el pmcedimiento correcto.
2. Retire del t)a(tuete el gTiIo con 1_1ml)er/a tn'einstM_lda, aro tdli(o Jill()
(D), l)_lse del gdlb (E), emt)_lque interior de la t/_t',e (F), _mmdela de
seguridad ((',), tuerc+1 hex+lgonal (It) _rsoporte de mont_je (I).
3. Inserte la tulleffa (one(ta(t_ _1glifo _ tI'_lv(,sdel m:o tdfi(o fill() (D), la
base del gfilb (E), el emp_l(lue inlbtior de la base (F), la anmdela de
segm:i(kld (G) y la tuer(_l hexugonal (t t).
4 Enrosquelatuer(;+hexagonal (It) en elv_istagodelgtitbhast_lque
la almra entre la parle in/bfior del empaque de la base (F) y la parte
superior de la anmdela de seguridad (C,) sea ligel_mlente mils
gnmde que el grosor de la SUl/erlk ie de mont_!ie (]).
5. Ik!ie la ensmnbladum del glilb a su lug_u: en el odfi(io de mont;_je y
ofiente h_wi_ 1_ tx/skidn finM. Coloque el soporte de monu!je (I) por
emima de h_ m:andela de segmidad ((;), _drededor del wlsmgo del
gai/b (Fig. 5). Mientms sostiene el soporte de mont_!ie en su lug_m
;4t)lJete ]il'lilel//ellte l:d ttlel?(_l tlexag+Ol/_tl,
NOTA: Esposibleclueseannecesariasdospersonaspara completareste paso.
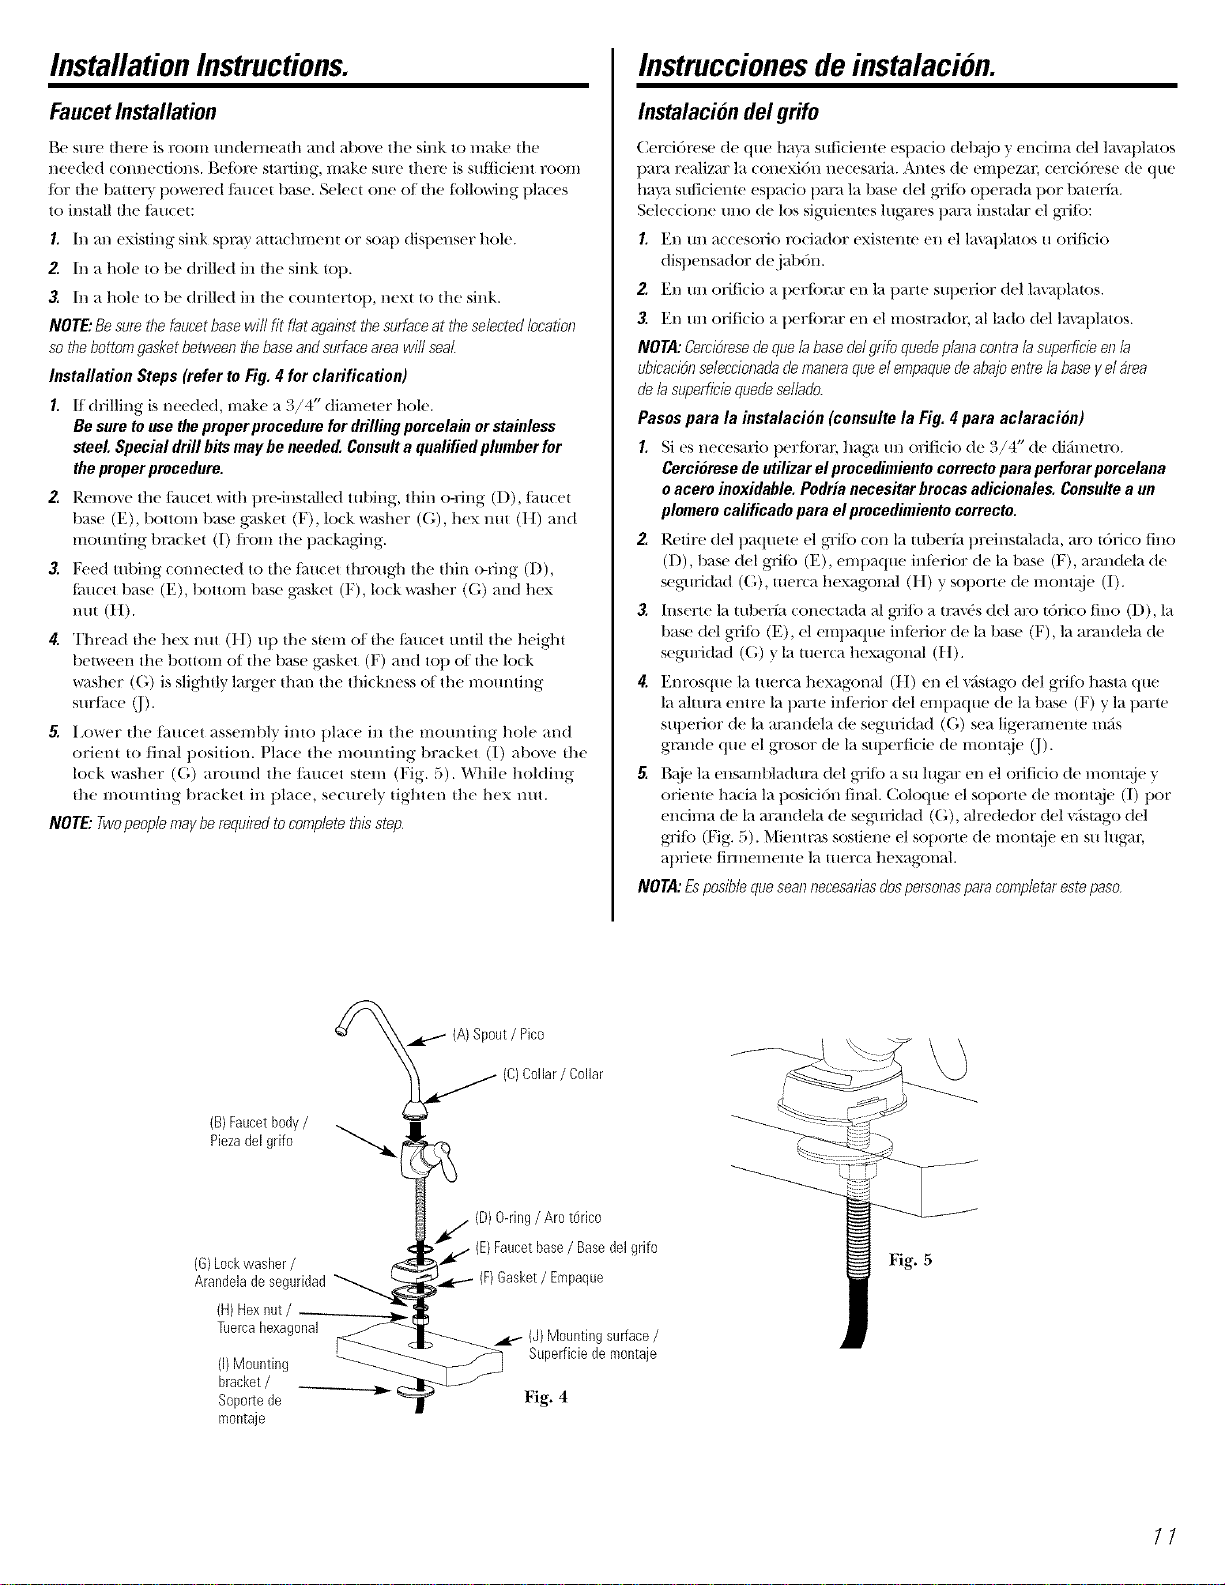
{B)Faucetbody/
Piezade,grifo "_._ (
(G)Lockwasher/
Arandeiadeseguridad_'
(H)Hexnut/
Tuercahexagonal
(i)Mounting
bracket/ __._,_
Soportede
montaje
(A)Spout/ Pica
(C)Collar/ Collar
(D)O-ring/Are t6rico
(E)Faucetbase/ Basedel grifo
(F)Gasket/Empaque
(J)Mountingsurface/
Superficiedemontaje
Fig. 4
Fig. 5
11
Loading ...
Loading ...
Loading ...