Loading ...
Loading ...
Loading ...
8
English
WARNING
The minimum vertical distance to combustible material
above the range cooking top is 30” (762mm), provided the
overhead construction does not extend 13” (330 mm) from
the rear wall. The recommended distance between the
floor and the bottom of the cutout opening is 4” (102mm).
NOTE: If installing a range hood or microwave hood
combination above the cooking surface, follow the
range hood or microwave hood combination installation
instructions for dimensional clearances above the cooktop
surface.
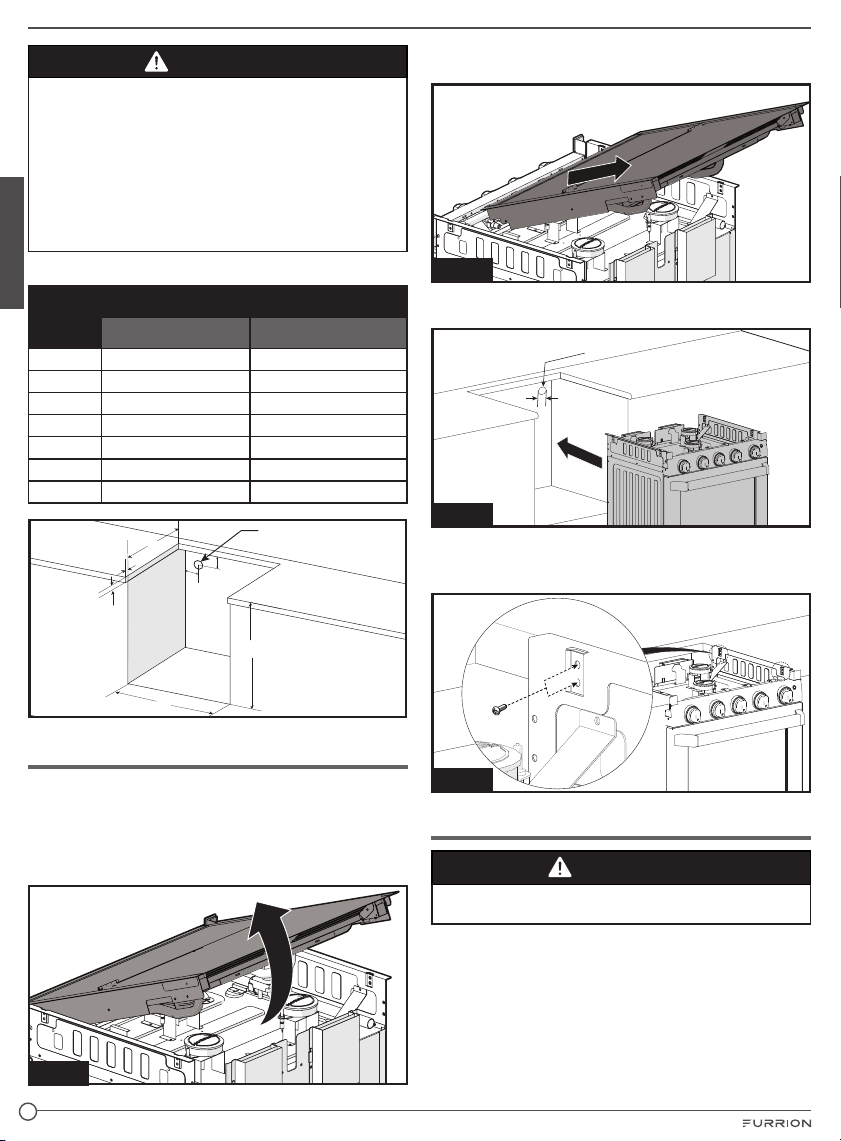
Cabinet and counter cutout dimensions:
Item
Model
17” RV Range 21” RV Range
A 17¾”(451mm) 17¾”(451mm)
B 20⅛”(511mm) 20⅛”(511mm)
C 16⅛”(410mm) 20⁄”(510mm)
D ⁄”(23mm) max. ⁄”(23mm) max.
E 1½”(38mm) max. 1½”(38mm) max.
F 4⁄” (110mm) 4⁄” (110mm)
G 3⁄” (90mm) 3⁄” (90mm)
A
B
D
E
C
Gas Hose Hole
F
G
Oven Installation
When the cabinet has been prepared according to the
dimensions given and the gas line is in place.
1. Take your range oven out of the carton and place on a flat
surface. Remove the packing materials.
2. Hold the baffle and pull upward to release the top glass
cover assembly from the oven. (Fig. 1)
Fig. 1
3. Push towards the rear of the oven and lift to remove to
remove the top glass cover from the oven. (Fig. 2)
Fig. 2
4. Slide the range oven into the cabinet opening. Verify that
the oven is level from side to side and front to rear. (Fig. 3)
Electrical Connection Hole
1
15
/
16
"
(50mm)
Fig. 3
5. Fix the range oven in the cabinet opening on both left and
right using four self-tapping screws on both left and right
(2 screws each side). (Fig. 4)
Fig. 4
Gas Connection
WARNING
Gas supply pipe must be installed with clearance from
knives contacting or cutting gas lines.
Connect a propane supply line with a ⅜” Flare Female
connection to the cooktop in the upper left rear corner of the
cabinet. (Fig. 5) Tighten the gas line joint to the cooktop using
2 wrenches.
IMPORTANT: Leave adequate space around the gas supply
pipe in case of bend or damage during installation. Make sure
the gas supply pipe cannot contact any moving parts after
installed. Be sure all openings in the cabinets around the gas
line are sealed at time of installation.
Loading ...
Loading ...
Loading ...