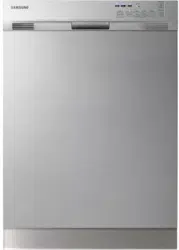
Using your dishwasher
Basic guidelines
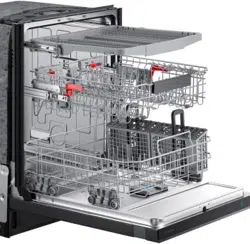
1. Open the door and load your dishes (see page 16).
- Place dishes into the upper and lower racks.
- Remove any food remains from the dishes before placing them in the rack(s).
- After placing the dishes into the racks, rotate the nozzles by hand to check whether any of the dishes will interfere with them. Push the racks back so that they are in place.
2. Add detergent to the dispenser (page 18).
- Make sure to use only automatic dishwasher detergent.
- Refer to “Using the dispenser” on how to add detergent. 3. Press the Power button.
- When the Power button is pressed, the entire display turns on and off and the most recently finished cycle light lights up.
- If “Low rinse” is illuminated, you should refill the rinse aid to improve the washing and drying performance.
4. Close the door & select a cycle button (see pages 10 and 22).
- Press the appropriate cycle button depending on the soil level of the dishes
- When a cycle is selected, the cycle light is illuminated. If the cycle button is pressed again, the light turns off and the cycle is canceled.
- On selecting a cycle according to the soil level of the dishes, see “Cycle Selector”.
5. Press the Start/Pause button.
- After you close the door and press the start button, the dishwasher starts the selected cycle after a few seconds.
- The door must be firmly closed. If the door is slightly ajar, the selected cycle will not start automatically.
6. When the wash cycle is completed.
- The Clean indicator light illuminates and the dishwasher sounds a chime.
- The power is automatically turned off.
When you want to load more dishes or pause the dishwasher while it is already running, press the Start/Pause button and make sure to open the door slowly and carefully as there is a possibility of injury from the hot steam inside the dishwasher. (If the door is opened while the dishwasher is running, a safety mechanism is activated and stops the cycle.)
You should use rinse aids for better drying performance. You can further increase the drying performance by additionally selecting the Sanitize option and increasing the water temperature.
Do not wash the following items
• Acrylic, Aluminum: Dishes with printed gold rim decoration may become discolored.
• Dishes treated with adhesive: Treated plastics, wood, ivory, copper and tin may come loose.
• Plastics with a temperature tolerance less than 194 ˚F (90 ˚C) : Thin plastics wash and dry poorly, and may be damaged due to elevated wash temperatures.
• Tin: Tin should be washed by hand and dried immediately as it may rust.
• Wooden utensils: Wooden items may crack. When using the dishwasher, try to arrange the dishes properly as described on page 16.
• You should remove food remains such as bones, fruit seeds, etc. and any other kind of waste such as toothpicks, paper, etc. from the dishes as these may cause damage to the dishes, create noise, or cause the dishwasher to malfunction.
• Select the appropriate cycle depending on the level of soil and the type of dishes.
• Use only the proper amount of detergent and rinsing agent.
Removing the plate support
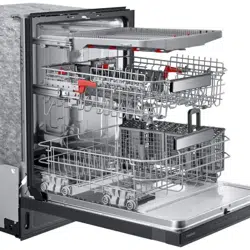
In the lower rack, the plate support can be easily removed to make room for large items such as pots and pans. To remove the plate support, lift up the handles (A). Then, refit the plate support, align it so it is in place, and then push down on the handles (A).
Adjusting the height of the upper rack
This Samsung dishwasher uses a rack able to accommodate larger sized plates. By adjusting the height of the upper rack, you can make room for different size dishes. You can place dinner plates with a diameter of 14 in. (36 cm) into the lower rack and plates up to 12 in. (30 cm) in diameter into the upper rack.
DMT300 Series / DMT210 Series
To adjust the height of the upper rack, follow these steps:
1. Remove the upper rack following the directions in Removing the Upper Rack below.
2. If you want to lower the upper rack, re-install the rack as shown in Figure A to the right.
3. If you want to raise the upper rack, re-install the rack as shown in Figure B to the right.
CAUTION : We recommend adjusting the height of the upper rack before loading dishes into the rack, as the dishes may be damaged.
Removing the upper rack
To remove the upper rack: Pull the upper rack towards the front and then remove it by lifting it up slightly and pulling it towards the front as shown in figures below.
CAUTION : While the upper rack is removable, it must be installed for the dishwasher to operate properly. If you attempt to operate the dishwasher without the rack, the dishwasher will be noisy and perform poorly
Using the dispenser
Filling the detergent dispenser
1. Open the cover by pushing the cover latch downwards.
2. Add the recommended amount of detergent to the main wash dispenser using the table below.
3. Close the dispenser cover. You will hear a ‘click’ when it is closed correctly.
4. When Heavy cycle is selected, add the recommended amount of detergent to the pre-wash dispenser using the table below.
The cover opens automatically to dispense the detergent during the wash.
Filling the rinse aid dispenser
Your dishwasher has been designed to use liquid rinse aid. The use of a rinse aid greatly improves the drying performance after the final rinse.
1. Turn the dispenser knob counterclockwise to open the cover.
2. Pour rinse aid into the opening until the indicator points to “MAX.” Avoid overfilling the dispenser.
3. Adjust the amount of rinse aid released during the rinse operation. You can adjust the amount over four levels (1~4). The greater the number, the larger the amount of rinse aid released. The factory default is 3. When the rinse dispenser is filled up, it is good for about 40 washes.
4. Close the cover. Turn the dispenser knob clockwise.
CAUTION : We strongly recommended using only liquid rinse aid.
Cleaning and maintaining your dishwasher
Keeping your dishwasher clean improves its performance, reduces unnecessary repairs, and lengthens its life.
Cleaning the exterior
It’s best to clean spills on the outside of your dishwasher as they occur. Use a soft damp cloth on the control panel to gently wipe away spills and dust. Do not use benzene, wax, thinner, chlorine bleach, or alcohol. These materials may discolor the inner walls and may cause stains. Do not clean the dishwasher by sprinkling water over it and avoid letting water come into contact with any of the electrical parts.
NOTE: If your dishwasher has a stainless steel door panel, it can be cleaned with a stainless steel cleaner for Home Appliances or similar product using a clean and soft cloth.
Cleaning the interior
Clean the interior of your dishwasher periodically to remove any dirt or food particles. Wipe the inside of the dishwasher and the inner part of the door with a wet dishcloth. We recommend filling the detergent dispenser with dish detergent, and then running the dishwasher empty periodically using either the Normal or Quick cycle with the sanitize option. This will keep your dishwasher clean. If white spots and odor are still present in your dishwasher, run the Normal cycle with the dishwasher empty and without detergent until it flushes. Then, interrupt the cycle and put an 8 ounce cup of white vinegar into the lower basket. Close the dishwasher and let the cycle finish.
CAUTION: Do not remove the Seal tub front (the long rubber seal enclosing the opening of the dishwasher).
Cleaning the nozzle
If the cleaning performance of your dishwasher is continually low or the nozzles seem clogged, you can clean each of the nozzles. When removing the nozzles, take care as they may break.
Lower nozzle
1. Check whether the nozzle holes are clogged by food particles.
2. If cleaning is needed, remove the nozzle by pulling it upwards.
3. Clean the nozzle and push it back into place.
4. Check whether the nozzle is engaged correctly by rotating it by hand.
Middle nozzle
1. Pull the upper rack towards the front and remove it.
2. Check whether the nozzle holes are clogged by food particles.
3. If cleaning is needed, remove the nozzle.
4. To remove the nozzle, unfasten and remove the nut, and remove the nozzle.
5. Clean the nozzle, insert it again and fasten the nut.
6. When fastening the nut, rotate it firmly by hand.
7. Check whether the nozzle is engaged correctly by rotating it by hand.
Upper nozzle
1. Check whether the nozzle holes are clogged by food particles.
2. If cleaning is needed, remove the nozzle.
3. To remove the nozzle, pull out the upper rack first, remove the duct connected to the nozzle from the tub bracket, and then remove the nozzle. To remove the bracket, use tools such as a screwdriver.
4. Clean the nozzle and connect it to the duct.
5. Insert the duct into the bracket.
6. Check whether the nozzle is engaged correctly by rotating it by hand.