

LME472
MO48L2211
www.greenworkstools.com
EN OPERATOR MANUAL
MANUAL DEL OPERADOR
MOWER
FR MANUEL DE L'UTILISATEURTONDEUSE
ES CORTACÉSPED
Doit utiliser (2) blocs-piles Greenworks 24 V entièrement chargés.
N’utilisez pas de batteries autres que Greenworks 24 V.
L’utilisation d’une seule batterie ne démarrera pas la machine.
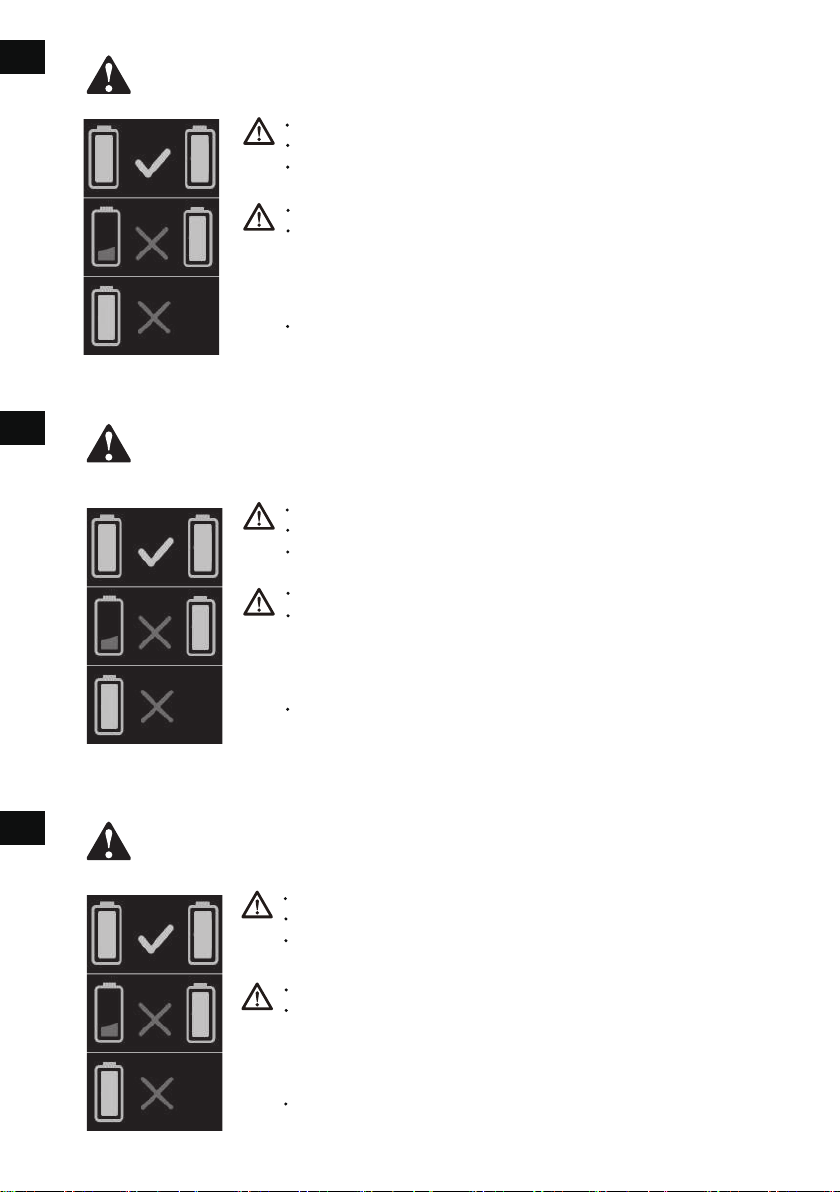
THIS MACHINE MUST HAVE TWO BATTERIES TO RUN!
Assurez-vous que les deux batteries sont entièrement chargées.
Si l’état de charge de chaque batterie est différente, l’autonomie de
la machine est soumise à la batterie la moins alimentée (par ex.,
: une batterie est entièrement chargée et l’autre ne l’est qu’à 50 %,
l'unité ne fonctionnera que jusqu'au 50 % de la batterie est épuisée).
Lors de l’utilisation de (2) batteries ayant différents
ampères-heures (Ah), la machine fonctionnera jusqu’à ce que la
batterie inférieure (Ah) soit épuisée.
EN
FR
ES
CETTE MACHINE DOIT AVOIR DEUX BATTERIES
POUR FONCTIONNER!
¡ESTA MÁQUINA DEBE TENER DOS BATERÍAS
PARA FUNCIONAR!
Must use (2) fully charged Greenworks 24V battery packs.
Do not use battery packs other than Greenworks 24V.
Using only one battery pack will not start the machine.
Ensure both batteries are charged 100%.
If each battery has a different charge state, the run-time of the
machine is subject to the lowest powered battery (For example:
one battery is charged 100%, and the other is charged 50%, the
unit will only run until the 50% battery is depleted).
When using (2) batteries with different amp hours (Ah),
the machine will run until the lower (Ah) battery is depleted.
Deben utilizarse (2) baterías Greenworks de 24V totalmente cargadas.
No utilice baterías que no sean de Greenworks 24V.
La utilización de una sola batería no hará que la máquina se ponga
en marcha.
Asegúrese de que ambas baterías estén cargadas al 100%.
Si cada batería tiene un estado de carga diferente, el tiempo de
funcionamiento de la máquina está sujeto a la batería de menor
carga (Por ejemplo: una batería está cargada al 100% y la otra al
50%, la unidad solo funcionará hasta que la batería del 50% se agote).
Cuando se utilizan (2) baterías con diferentes amperios hora (Ah),
la máquina funcionará hasta que la batería inferior (Ah) se agote.

1 Purpose...............................................4
2 Overview............................................ 4
3 Read all instructions......................... 4
3.1 Children and Bystanders....................................4
3.2 General Operation..............................................4
3.3 Slope Operation................................................. 6
3.4 Service/Maintenance......................................... 6
4 Symbols on the product.................... 6
5 Risk levels...........................................7
6 Environmentally safe battery
disposal...............................................7
7 Proposition 65....................................8
8 Installation......................................... 8
8.1 Unpack the machine.......................................... 8
8.2 Unfold and adjust the handle.............................8
8.3 Install the upper handle .....................................9
8.4 Install the grass catcher......................................9
8.5 Install the mulch plug........................................ 9
8.6 Set the blade height............................................9
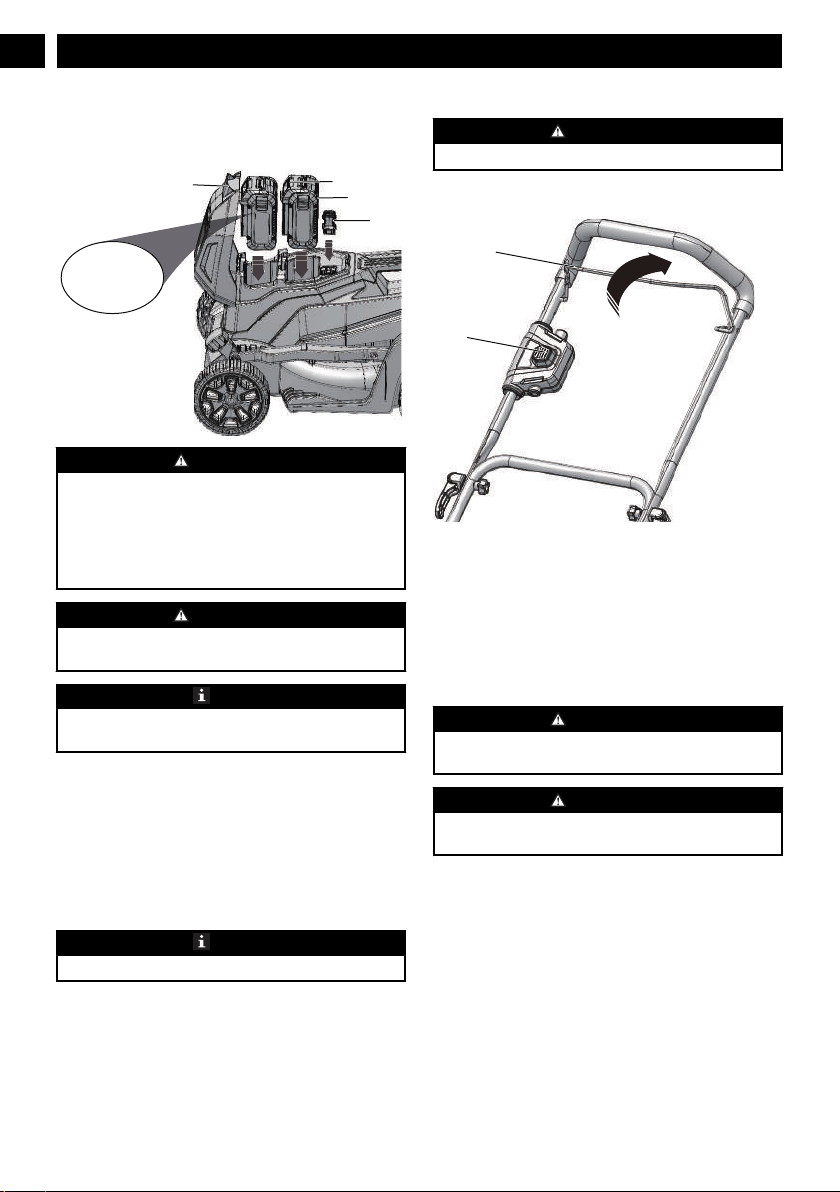
8.7 Install the battery pack.....................................10
8.8 Remove the battery pack................................. 10
9 Operation......................................... 10
9.1 Start the machine............................................. 10
9.2 Stop the machine............................................. 10
9.3 Empty the grass catcher...................................10
10 Maintenance.....................................11
10.1 General maintenance........................................11
10.2 Replace the blade.............................................11
10.3 Store the machine.............................................11
11 Troubleshooting............................... 11
12 Technical data..................................12
13 Limited warranty............................ 12
14 Exploded view..................................13
3
English
EN

1 PURPOSE
This machine is used for domestic lawn mowing. The cutting
blade must be approximately parallel to the ground. All four
wheels must touch the ground while you mow.
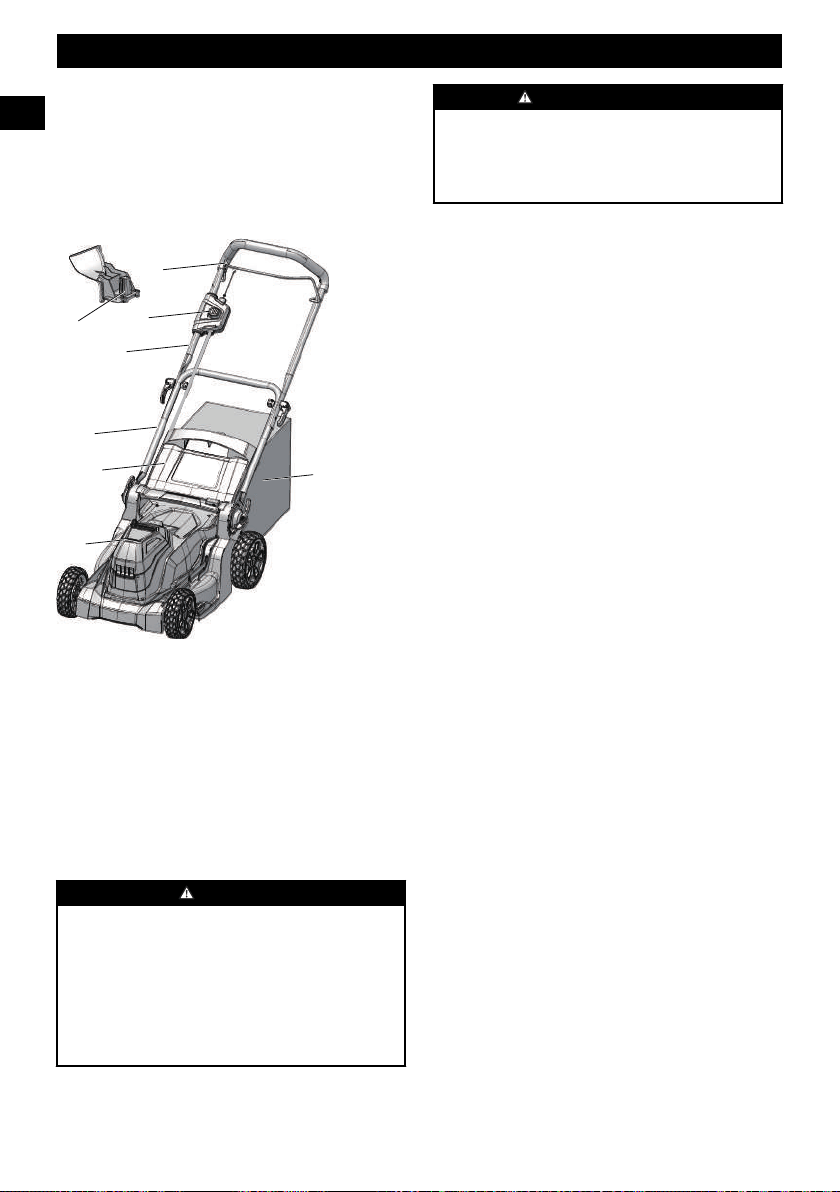
2 OVERVIEW
4
1
8
2
3
5
7
6
1
Bail switch
2
Start button
3
Upper handle
4
Lower handle
5
Rear discharge door
6
Battery door
7
Grass catcher
8
Mulch plug
3 READ ALL INSTRUCTIONS
DANGER
This machine was built to be operated according to the rules
for safe operation included in this manual. As with any type
of power equipment, carelessness or error on the part of the
operator can result in serious injury. This machine is
capable of amputating hands and feet and throwing objects.
Failure to observe all safety instructions could result in
serious injury or death.
WARNING
When using electric lawn mowers, basic safety precautions
should always be followed to reduce the risk of fire, electric
shock, and personal injury. These basic precautions include
the following:
3.1 CHILDREN AND BYSTANDERS
Tragic accidents can occur if the operator is not alert to the
presence of children or bystanders.
• Keep the area of operation clear of all persons,
particularly small children, and pets.
• Use extreme care when approaching blind corners,
doorways, shrubs, trees, or other objects that may obscure
your vision of a child or bystander. Keep children,
bystanders, helpers and pets at least 100 feet (30m) from
the mower while it is in operation. Stop the machine if
anyone enters the area.
• Never allow children under 14 years old to operate a
power mower. Operators 14 years old and over should
fully read and understand the operator’s manual and
safety rules. Only responsible individuals who are
familiar with these rules of safe operation should be
allowed to use this machine.
3.2 GENERAL OPERATION
• Read this operator’s manual carefully in its entirety
before assembling or operating this machine. Read,
understand, and follow all instructions on the machine
and in the manuals before operation. Familiarize yourself
with the controls and proper use of this machine before
operation. Save this manual for future and regular
reference.
• Do not use the lawn mower for any job except that for
which it is intended. Your lawn mower has been designed
to perform only one job: cut grass.
• Never attempt to make a wheel height adjustment while
the motor is running.
• Don’t force the lawn mower; it will do the job better and
more safely at the rate for which it was designed.
• Don’t overreach, keep proper footing and balance at all
times. Many injuries occur as a result of the mower being
pulled over the foot during a fall caused by slipping or
tripping. A slip and fall can cause serious personal injury.
If you feel you are losing your footing, release the control
handle immediately and the blade will stop rotating
within three seconds.
• Thoroughly inspect the area where the mower is to be
used and remove all stones, sticks, wires, dog bones, and
other foreign objects.
• Prevent unintentional starting. Ensure the switch is in the
off position before connecting to battery pack, picking up
or carrying the mower. Carrying the mower with your
finger on the switch or energizing mower that has the
switch on invites accidents.
4
English
EN

• Never pull the mower back toward you while you are
walking. If you must back the mower away from a wall or
obstruction, first look down and behind you to avoid
tripping, and then follow these steps:
• Step back from the mower in order to fully extend
your arms.
• Be sure that you are well balanced.
• Pull the mower back slowly.
• Remove the battery pack from the mower before making
any adjustments, changing accessories, or storing
appliance. Such preventive safety measures reduce the
risk of starting the mower accidentally.
• Before and while moving backwards with the mower,
look behind and down for small children and other
people.
• Do not operate the mower while under the influence of
alcohol or drugs. Stay alert and watch what you are doing
at all times. Use common sense and do not operate the
lawn mower when you are tired.
• Always wear safety glasses or safety goggles during
operation and while performing an adjustment or repair to
protect your eyes. Thrown objects that ricochet can cause
serious injury to the eyes. Always use a face or dust mask
if the operation is dusty.
• Keep clear of the discharge opening at all times. Do not
put hands or feet near rotating parts or under the cutting
deck. Contact with the blade can amputate hands and feet.
• Plan your mowing pattern to avoid discharge of material
toward roads, sidewalks, bystanders and the like. Also,
avoid discharging material against walls or obstructions,
which may cause discharged material to ricochet back
toward the operator.
• To help avoid the blade or an injury from a thrown
objects, stay in the operator zone behind the handles.
• A missing or damaged discharge cover can cause blade
contact or injuries from thrown objects.
• Objects struck by the lawn mower blade can cause severe
injuries to persons. The lawn should always be carefully
examined and cleared of all objects prior to each mowing.
• Stop the blade when crossing gravel drives, walks or
roads.
• Follow all charging instructions and do not charge the
battery pack or mower outside of the temperature range
specified in the instructions. Charging improperly or at
temperatures outside of the specified range may damage
the battery and increase the risk of fire.
• If lawn mower strikes a foreign object, follow these steps:
• Release the bail switch to disengage the motor.
• Remove the battery.
• Inspect for damage.
• Repair any damaged parts before restarting and
operating the lawn mower.
• Have servicing performed by a qualified repair person
using only identical replacement parts. This will ensure
that the safety of the product is maintained.
• Dress properly; do not wear loose clothing or jewelry that
can be caught in moving parts. Use of safety gloves and
proper footwear is recommended when working outdoors.
Wear sturdy, rough-soled work shoes and close-fitting
slacks and shirts. Shirts and pants that cover the arms and
legs and steel-toed shoes are recommended. Never
operate this machine in bare feet, sandals, slippery or
lightweight (e.g., canvas) shoes.
• Do not modify or attempt to repair the mower or the
battery pack (as applicable) except as indicated in the
instructions for use and care.
• Wear protective hair covering to contain long hair.
• Avoid dangerous environments; do not use the lawn
mower in damp/wet locations or if it is raining.
• Store idle lawn mower indoors. When not in use,
appliances should be stored indoors in dry, and high or
locked-up place – out of reach of children. Always
remove the battery from the mower before storing.
• Mow only in daylight or good artificial light. Walk, never
run while operating.
• If the mower should start to vibrate abnormally,
immediately stop the motor, remove the battery and check
for the cause. Vibration is generally a warning that the
mower is not functioning properly.
• Check bag frequently for deterioration and wear, and
replace worn bags. Check that replacement bags comply
with the original manufacturer's recommendations or
specifications.
• Before cleaning the mower, unclogging or removing the
grass bag, mulching insert, or side discharge chute, turn
the motor off and wait until the blade comes to a
complete stop, then remove the battery pack. The cutting
blade continues to rotate for a few seconds after the motor
is shut off. Never perform these functions until you are
sure the blade has stopped rotating.
• Keep cutting edges clean and sharp to ensure best
performance.
• Periodically inspect safety devices and cords for damage.
If damaged do not operate the unit until it has been
repaired by an authorized service professional.
• Never operate the mower without the proper discharge
cover, grass bag, mulching insert, side discharge chute, or
other safety devices in place and working. Never operate
the mower with damaged safety devices. Failure to do so
can result in personal injury.
• Use only approved batteries and chargers. Non-approved
batteries and chargers may cause damage to the mower or
injure the operator.
• Do not dispose of the battery in a fire. The cells could
catch fire or explode. Check with local codes and waste
management for proper disposal instructions.
• When battery pack is not in use, keep it away from other
metal objects, like paper clips, coins, keys, nails, screws
or other small metal objects that can make a connection
from one terminal to another. Shorting the battery
terminals together may cause burns or a fire.
5
English
EN

• Do not open or destroy the battery. Electrolytes contained
within the battery are corrosive and may cause damage to
eyes or skin if released. It may be toxic if swallowed.
• Under abusive conditions, liquid may be ejected from the
battery; avoid contact. If contact accidentally occurs,
flush with water. If liquid contacts eyes, additionally seek
medical help. Liquid ejected from the battery may cause
irritation or burns.
• Do not expose a battery pack or appliance to fire or
excessive temperature. Exposure to fire or temperature
above130°C may cause explosion.
• Exercise care in handling batteries to avoid shorting the
battery with conducting materials such as rings, bracelets,
keys, etc. The battery or conductor may overheat and
cause burns if contact with said materials is made.
• Do not use a battery pack or appliance that is damaged or
modified. Damaged or modified batteries may exhibit
unpredictable behavior resulting in fire, explosion or risk
of injury.
3.3 SLOPE OPERATION
Slopes are a major factor related to slip-and-fall accidents,
which can result in severe injury. Operation on slopes
requires extra caution. If you feel uneasy on a slope, do not
mow it.
Do:
• Mow across the face of slopes; never mow up and down.
Exercise extreme caution when changing direction on
slopes.
• Watch for holes, ruts, rocks, hidden objects, or bumps
which can cause you to slip or trip. Tall grass can hide
obstacles.
Do not:
• Mow excessively steep slopes.
• Mow near drop-offs, ditches or embankments; you could
lose your footing or balance.
• Mow slopes greater than 15 degrees.
• Mow on wet grass. Unstable footing could cause slipping.
3.4 SERVICE/MAINTENANCE
• Check the blade and the motor (machine) mounting bolts
at frequent intervals for proper tightness.
• Replace the blade if it is bent or cracked. An unbalanced
blade causes vibration that could damage the motor drive
unit or cause personal injury.
• Keep all nuts, bolts, and screws tight in order to ensure
the equipment is in safe working condition.
• Do not wash with a hose; avoid getting water in motor
and electrical connections.
• Never remove or tamper with safety devices. Check their
proper operation regularly. Never do anything to interfere
with the intended function of a safety device or to reduce
the protection provided by a safety device.
• Keep mower free of grass, leaves, or other debris build
up. Allow mower to cool before storing.
• Never make any adjustments or repairs with the motor
running.
• Always remove battery pack from mowers before
adjusting, cleaning, or repairing.
• Check grass catcher components and the discharge guard
frequently and replace with manufacturer’s recommended
parts, when necessary.
• Sharpen a dull blade equally at each end to maintain the
balance.
• Keep guards in place and in working order. Mower blades
are sharp, and can cut. Wrap the blades or wear gloves,
and use extra caution when servicing.
• Clean the blade thoroughly and check its balance by
supporting it horizontally on a thin nail through its center
hole. The nail should also be in a horizontal position. If
either end of the blade rotates downward, remove some
metal from the heavy or lower end until the blade is
balanced. It is balanced when neither end drops.
• Use identical replacement blades only.
• Maintain lawn mower with care. Keep cutting edges
sharp and clean for best and safest performance. Follow
instructions for lubricating and changing accessories.
Inspect lawn mower cord periodically and if damaged,
have it repaired by an authorized service facility.
• If situations occur that are not covered in this manual, use
care and good judgment or contact Customer Service for
assistance.
• Never operate the mower without proper guards, plates,
or other safety protective devices in place.
The recommended ambient temperature range:
Item
Temperature
Mower storage temperature range 32°F (0°C) - 113°F
(45°C)
Mower operation temperature
range
32°F (0°C) - 113°F
(45°C)
Battery charging temperature range 39°F (4°C) - 104°F
(40°C)
Charger operation temperature
range
39°F (4°C) - 104°F
(40°C)
Battery storage temperature range 32°F (0°C) - 113°F
(45°C)
Battery discharging temperature
range
32°F (0°C) - 113°F
(45°C)
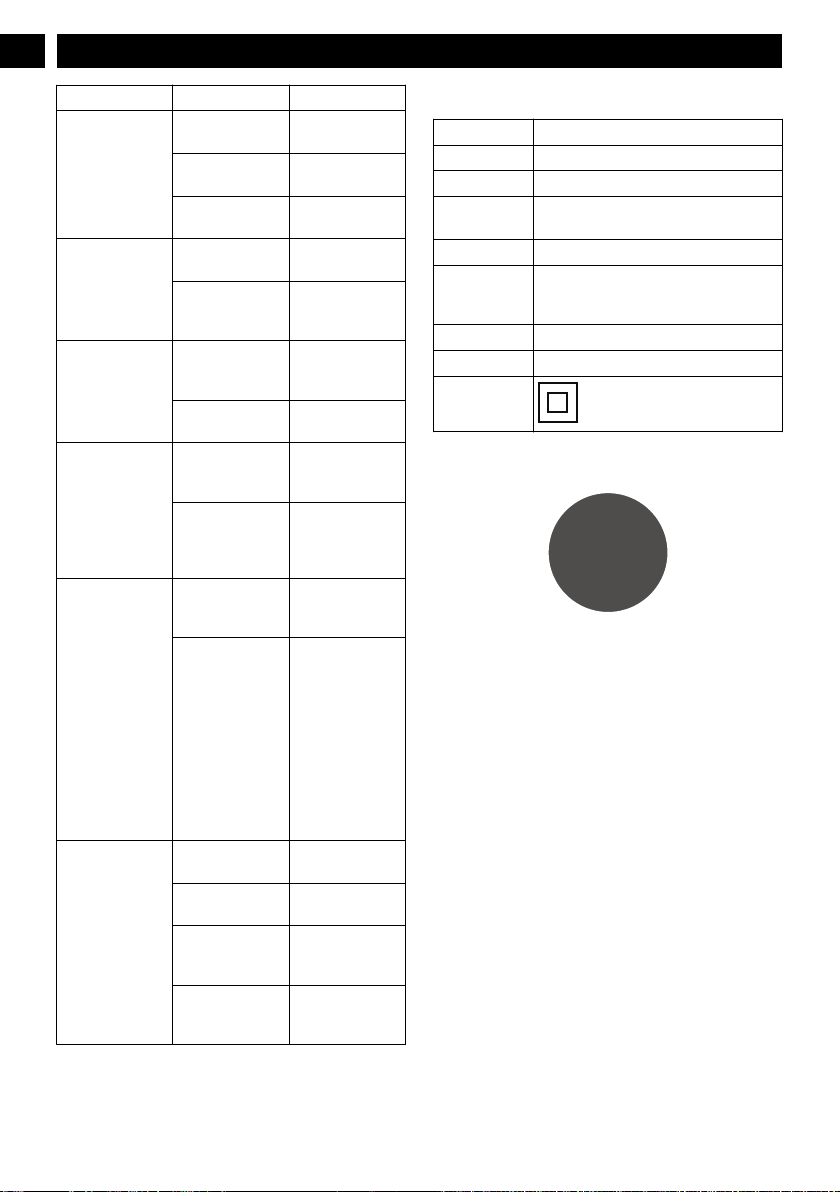
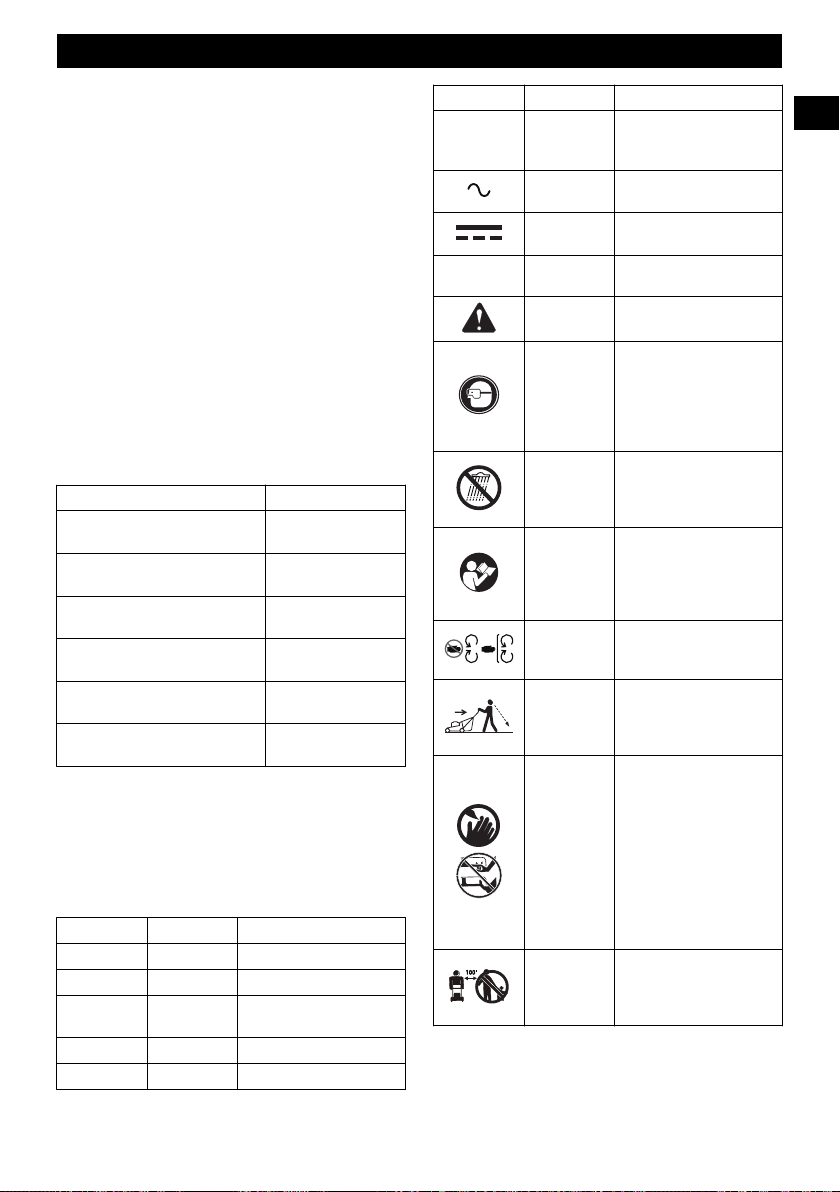
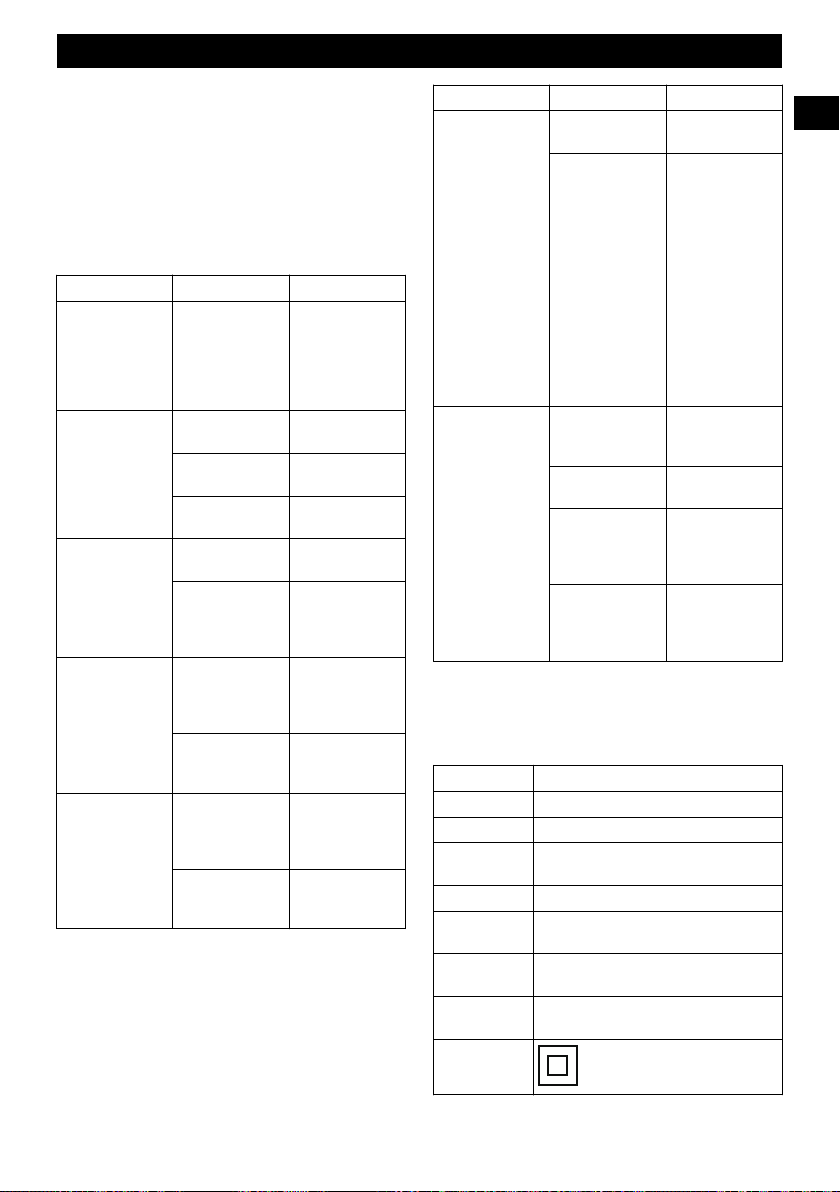
4 SYMBOLS ON THE PRODUCT
Some of the following symbols may be used on this tool.
Please study them and learn their meaning. Proper
interpretation of these symbols will allow you to operate the
tool better and safer.
6
English
EN
Symbol Name Explanation
V Volt Voltage
A Amperes Current
Hz Hertz
Frequency (cycles per sec-
ond)
W Watt Power
min Minutes Time
/min Per Minute
Revolutions, strokes, sur-
face speed, orbits etc., per
minute
Alternating
Current
Type of current
Direct Current
Type or a characteristic of
current
n
o
No Load
Speed
Rotational speed, at no load
Safety Alert
Precautions that involve
your safety.
Eye Protec-
tion
Always wear eye protection
with side shields marked to
comply with ANSI Z87.1
when operating this equip-
ment.
WARNING
--- Wet Con-
ditions
Do not expose the product
to rain or moist conditions.
Read Opera-
tor’s Manual
To reduce the risk of injury,
user must read and under-
stand operator’s manual be-
fore using this product.
Maintain
Safety Devi-
ces
Do not open or remove
safety devices while the
tool is running.
Looking Be-
hind While
Backing
Look down and behind first
to avoid tripping when pull-
ing back.
DANGER ---
Keep Hands
and Feet
Away
To reduce the risk of injury,
keep hands and feet away
from rotating parts. Do not
operate unless discharge
cover or grass bag is in its
proper place. If damaged,
replace immediately.
DANGER ---
Keep By-
standers Away
All visitors should be kept
at a distance from work
area.
DANGER ---
Thrown Deb-
ris
Remove objects that can be
thrown by the blade in any
direction. Wear safety
glasses.
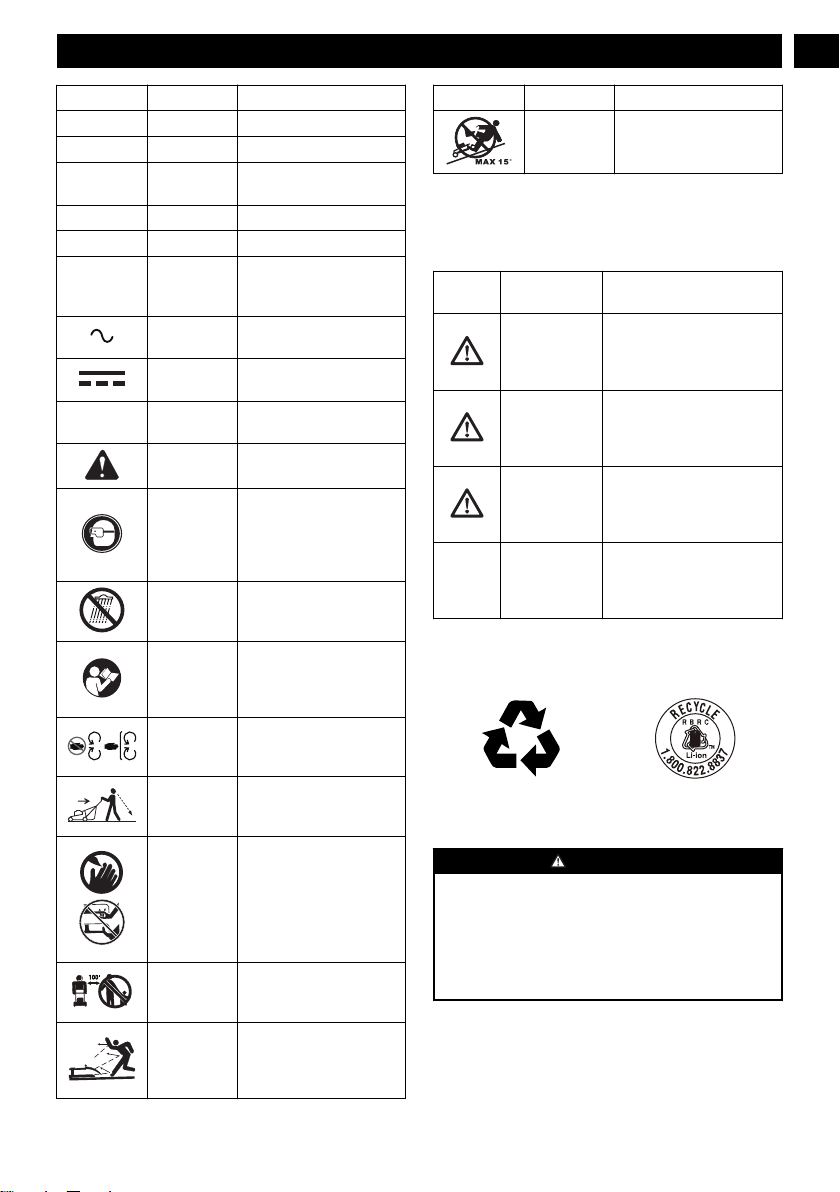
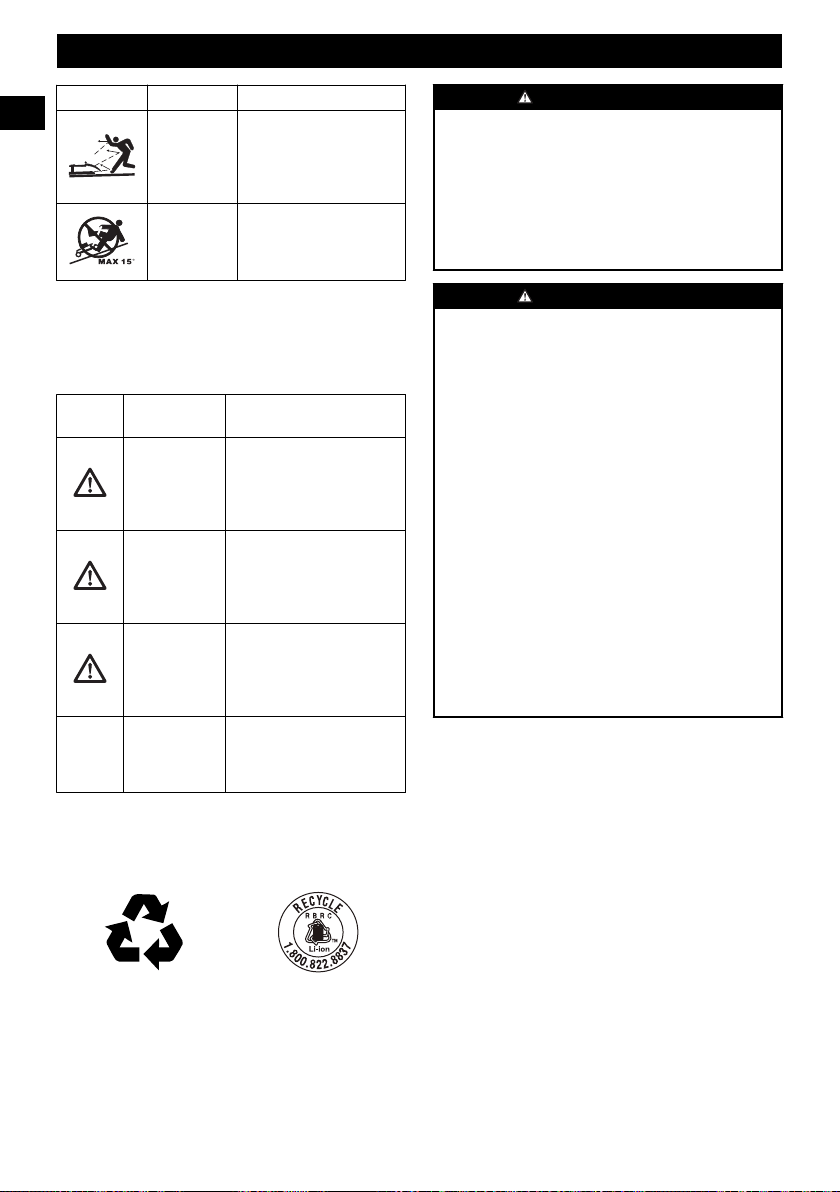
Symbol Name Explanation
DANGER ---
Steep Slope
Hazard
Use extra caution on slopes.
do not mow slopes greater
than 15 degrees.
5 RISK LEVELS
The following signal words and meanings are intended to
explain the levels of risk associated with this product.
SYM-
BOL
SIGNAL MEANING
DANGER Indicates an imminently haz-
ardous situation, which, if not
avoided, will result in death
or serious injury.
WARNING Indicates a potentially hazard-
ous situation, which, if not
avoided, could result in death
or serious injury.
CAUTION Indicates a potentially hazard-
ous situation, which, if not
avoided, may result in minor
or moderate injury.
CAUTION (Without Safety Alert Sym-
bol) Indicates a situation that
may result in property dam-
age.
6 ENVIRONMENTALLY SAFE
BATTERY DISPOSAL
The toxic and corrosive materials below are in the batteries
used in this machine: Lithium-Ion, a toxic material.
WARNING
Discard all toxic materials in a specified manner to prevent
contamination of the environment. Before discarding
damaged or worn out Li-ion battery, contact your local
waste disposal agency, or the local Environmental
Protection Agency for information and specific instructions.
Take the batteries to a local recycling and/or disposal center,
certified for lithium-ion disposal.
7
English
EN
WARNING
If the battery pack cracks or breaks, with or without leaks,
do not recharge it and do not use. Discard it and replace
with a new battery pack. DO NOT TRY TO REPAIR IT! To
prevent injury and risk of fire, explosion, or electric shock,
and to avoid damage to the environment:
• Cover the terminals of the battery with heavy-duty
adhesive tape.
• DO NOT try to remove or destroy any of the battery
pack components.
• DO NOT try to open the battery pack.
• If a leak develops, the released electrolytes are
corrosive and toxic. DO NOT get the solution in the
eyes or on skin, and do not swallow it.
• DO NOT put these batteries in your regular household
trash.
• DO NOT incinerate.
• DO NOT put them where they will become part of any
waste landfill or municipal solid waste stream.
• Take them to a certified recycling or disposal center.
7 PROPOSITION 65
WARNING
This product contains a chemical known to the state of
California to cause cancer, birth defects or other
reproductive harm. Some dust created by power sanding,
sawing, grinding, drilling, and other construction activities
contains chemicals known to cause cancer, birth defects or
other reproductive harm. Some examples of these chemicals
are:
• Lead from lead-based paints;
• Crystalline silica from bricks and cement and other
masonry products;
• Arsenic and chromium from chemically treated lumber.
Your risk of exposure to these chemicals varies depending
on how often you do this type of work. To reduce your
exposure to these chemicals, work in a well-ventilated area,
and work with approved safety equipment, such as dust
masks that are specially designed to filter out microscopic
particles.
Save these instructions.
8 INSTALLATION
WARNING
Do not change or make accessories that are not
recommended by the manufacturer.
WARNING
Do not put in the safety key or the battery pack until you
assemble all the parts.
8.1 UNPACK THE MACHINE
WARNING
Make sure that you correctly assemble the machine before
use.
WARNING
• If the parts are damaged, do not use the machine.
• If you do not have all the parts, do not operate the
machine.
• If the parts are damaged or missing, speak to the service
center.
1. Open the package.
2. Read the documentation in the box.
3. Remove all the unassembled parts from the box.
4. Remove the machine from the box.
5. Discard the box and package in compliance with local
regulations.
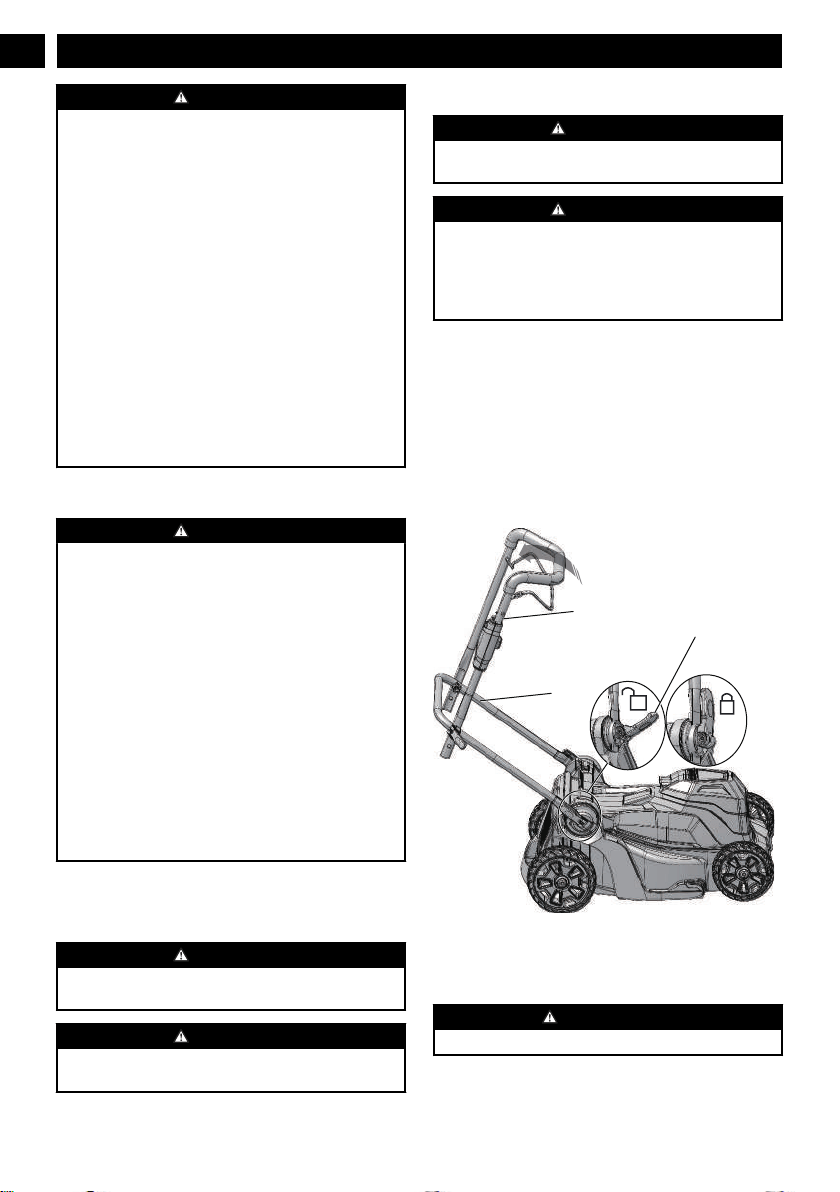
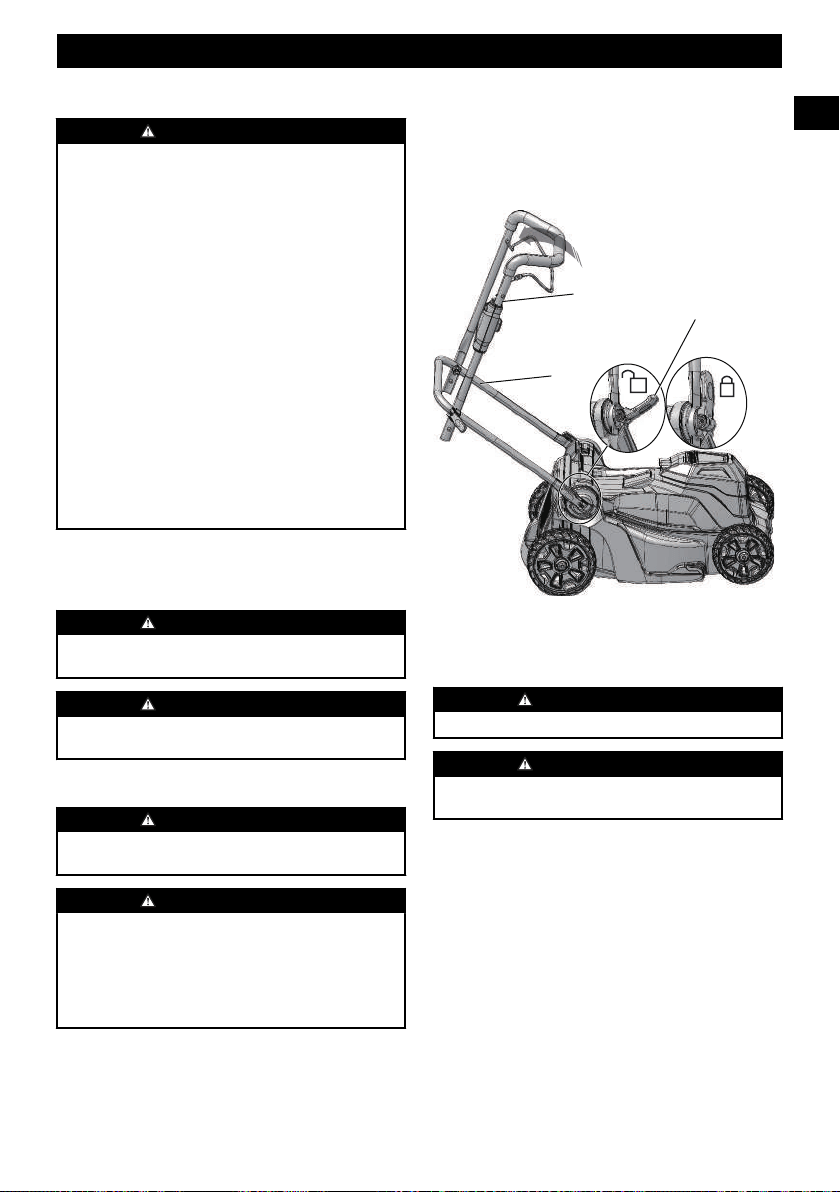
8.2 UNFOLD AND ADJUST THE
HANDLE
4
9
3
1. Pull up and back the upper handle (3) to lift the handle
into operating position.
2. Tighten the lower handle (4) with quick-release levers (9)
on the two sides.
ATTENTION
Make sure that the two handles are in the same position.
8
English
EN
WARNING
Do not make damage to the cables when you fold or unfold
the handle.
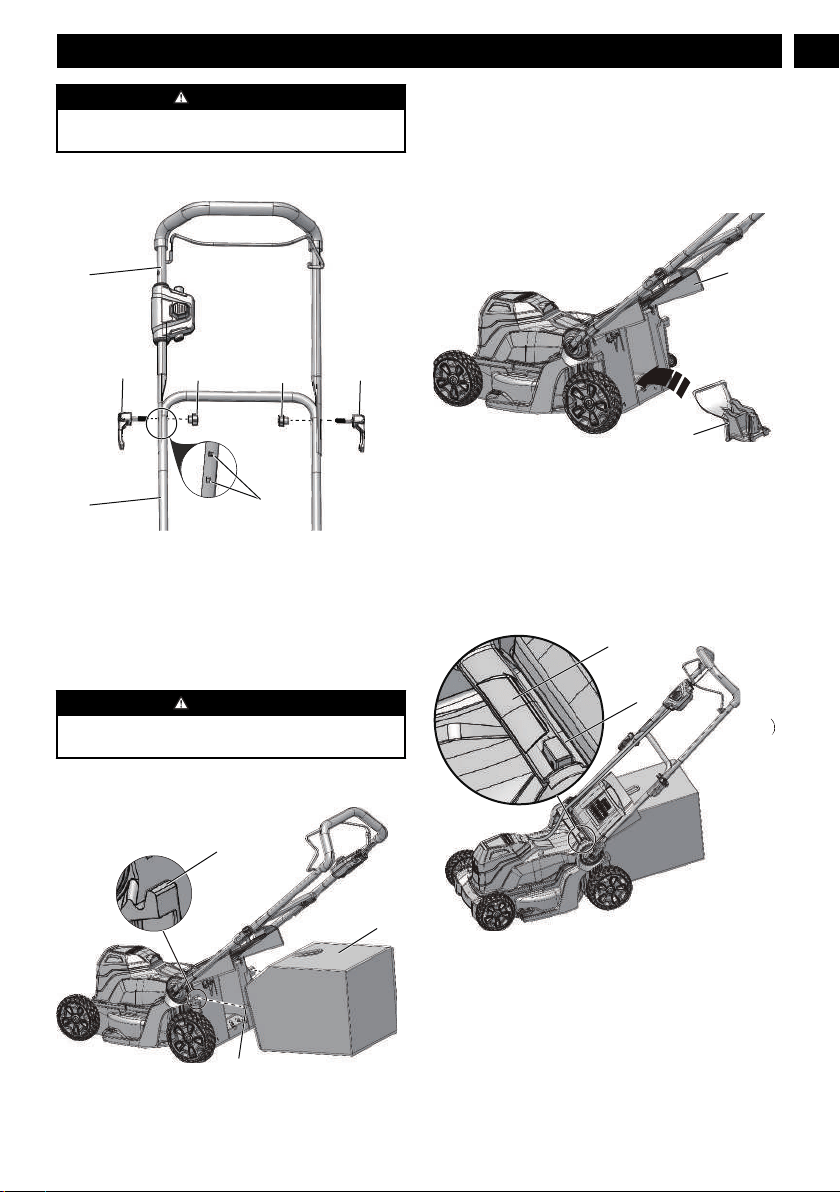
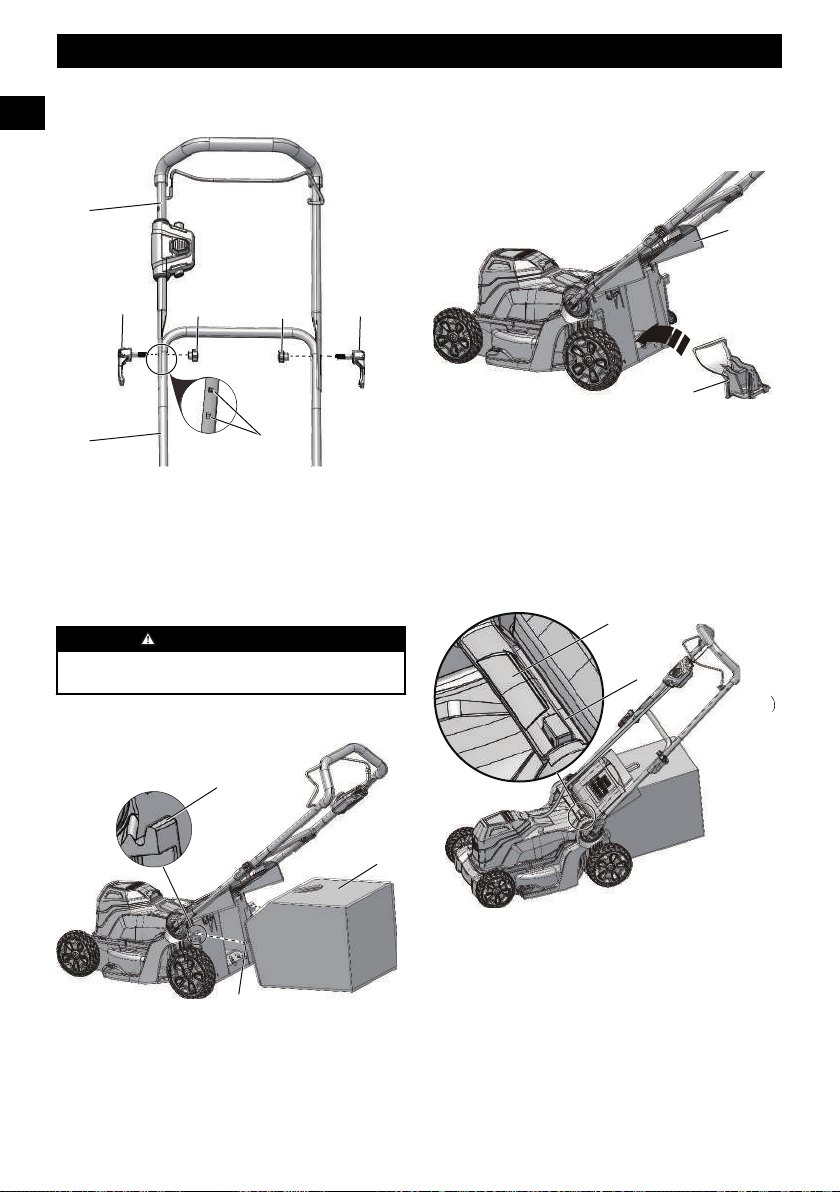
8.3 INSTALL THE UPPER HANDLE
3
10
10
11
11
4
P
1. Align the holes in the upper handle (3) and the lower
handle (4).
2. Put the cam locks (10) through the holes.
3. Tighten the knobs (11) onto the cam locks.
4. There are two positions (P) available to choose while
installing the upper handle.
5. Do the same operation on the other side.
WARNING
Use caution when installing upper handle to avoid potential
finger pinches.
8.4 INSTALL THE GRASS CATCHER
7
13
12
1. Remove the mulch plug.
2. Open the rear discharge door (5) and hold it.
3. Hold the the grass catcher (7) by its handle (12) and put
the hooks (12) over the slots (13).
4. Close the rear discharge door.
8.5 INSTALL THE MULCH PLUG
8
5
1. Remove the grass catcher.
2. Open the rear discharge door (5) and hold it.
3. Hold the mulch plug (8) by its handle and fit it in the
discharge chute.
4. Close the rear discharge door.
8.6 SET THE BLADE HEIGHT
The machine can be set to different blade heights.
17
21
1. Push the height adjustment button (17), lfit the height
adjustment bar (21) to a higher position to increase the
blade height.
2. Push the height adjustment button, press the height
adjustment bar to a lower position to decrease the blade
height.
9
English
EN
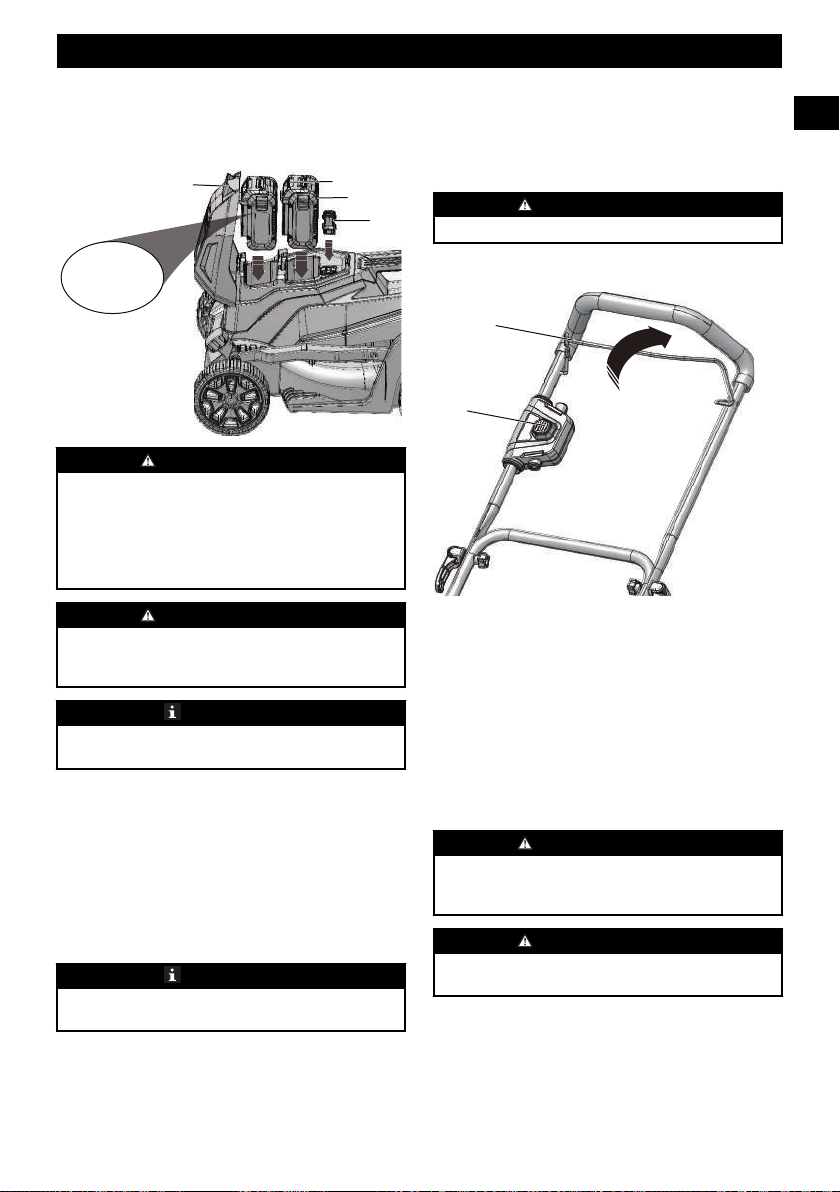
8.7 INSTALL THE BATTERY PACK
6
14
15
16
USE ONLY
24V BATTERY
WARNING
• If the battery pack or charger is damaged, replace the
battery pack or the charger.
• Stop the machine and wait until the engine stops before
you install or remove the battery pack.
• Read, know, and do the instructions in the battery and
charger manual.
WARNING
USE ONLY 24V BATTERY. DO NOT USE DUAL-
VOLTAGE 24/48V BATTERY.
NOTE
Both batteries should be installed into the compartments in
order to start the machine.
1. Open the battery door (6).
2. Align the lift ribs on the battery pack (14) with the
grooves in the battery compartment.
3. Push the battery pack into the battery compartment until
the battery pack locks into place.
4. When you hear a click, the battery pack is installed.
5. Do the same operation with the other battery.
6. Close the battery door.
NOTE
The motor starts only when you put in the safety key (15).
8.8 REMOVE THE BATTERY PACK
1. Open the battery door (6).
2. Push and hold the battery release button (16).
3. Remove the battery packs (14) from the machine.
9 OPERATION
WARNING
Wear eye protection during operation.
9.1 START THE MACHINE
1
2
1. Put in the safety key.
2. Push and hold the start button (2).
3. While you hold the start button, pull the bail switch (1) in
the direction of the handle bar.
4. Release the start button to start the machine.
9.2 STOP THE MACHINE
1. Release the bail switch to stop the machine.
WARNING
Wait until the blades fully stop before you start the machine
again. Do not quickly turn the machine off and on.
WARNING
Always remove the safety key and battery pack after you
complete the work.
9.3 EMPTY THE GRASS CATCHER
1. Stop the machine.
2. Remove the safety key.
3. Remove the battery pack.
4. Open the rear discharge door and hold it.
5. Hold the grass catcher by its handle and unhook it from
the slots.
6. Close the rear discharge door.
7. Empty the grass catcher.
10
English
EN
10 MAINTENANCE
WARNING
Remove the safety key and battery pack from the machine
before maintenance.
WARNING
Keep the motor and battery pack free from grass, leaves or
too much grease.
CAUTION
Use only approved replacement parts.
CAUTION
Do not let brake fluids, gasoline, petroleum-based materials
touch the plastic parts. Chemicals can cause damage to the
plastic, and make the plastic unserviceable.
CAUTION
Do not use strong solvents or detergents on the plastic
housing or components.
10.1 GENERAL MAINTENANCE
• Before each use, examine the machine for damaged,
missing, or loose parts such as screws, nuts, bolts and
caps.
• Tighten correctly all the fasteners and caps.
• Clean the machine with a dry cloth. Do not use water.
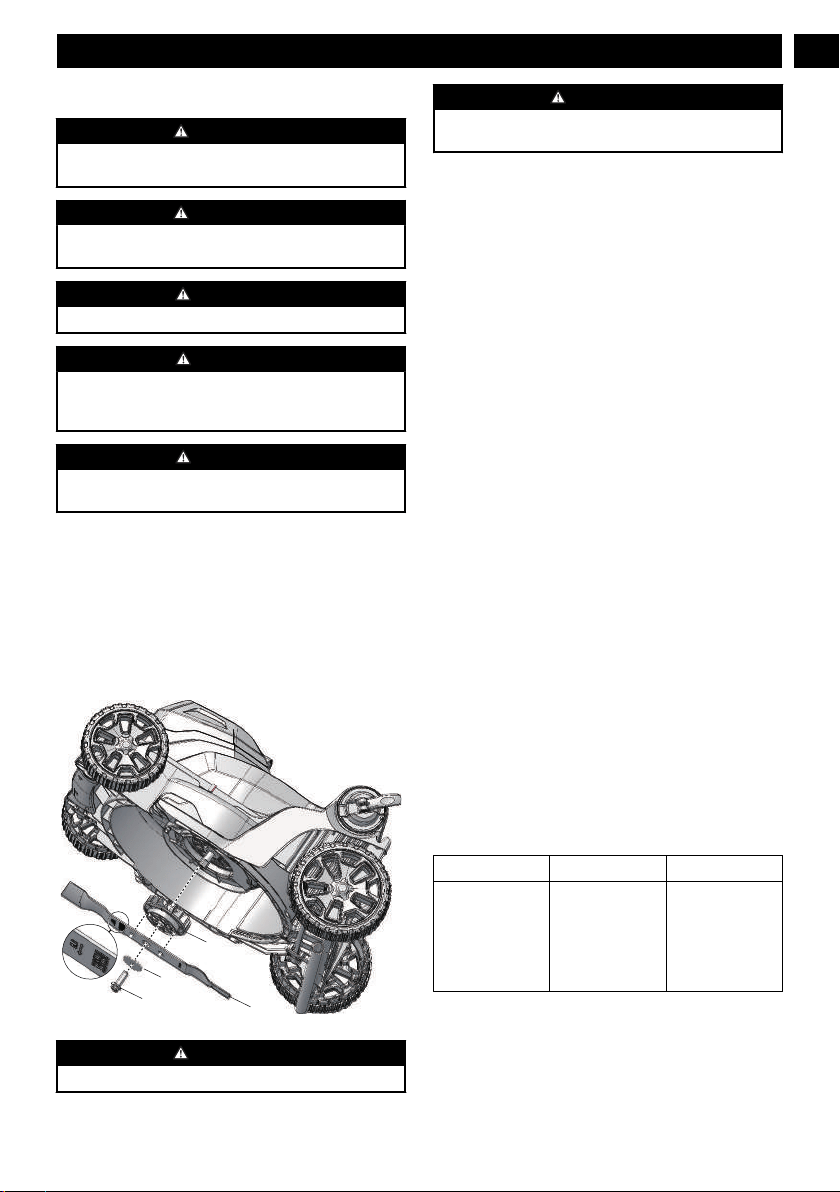
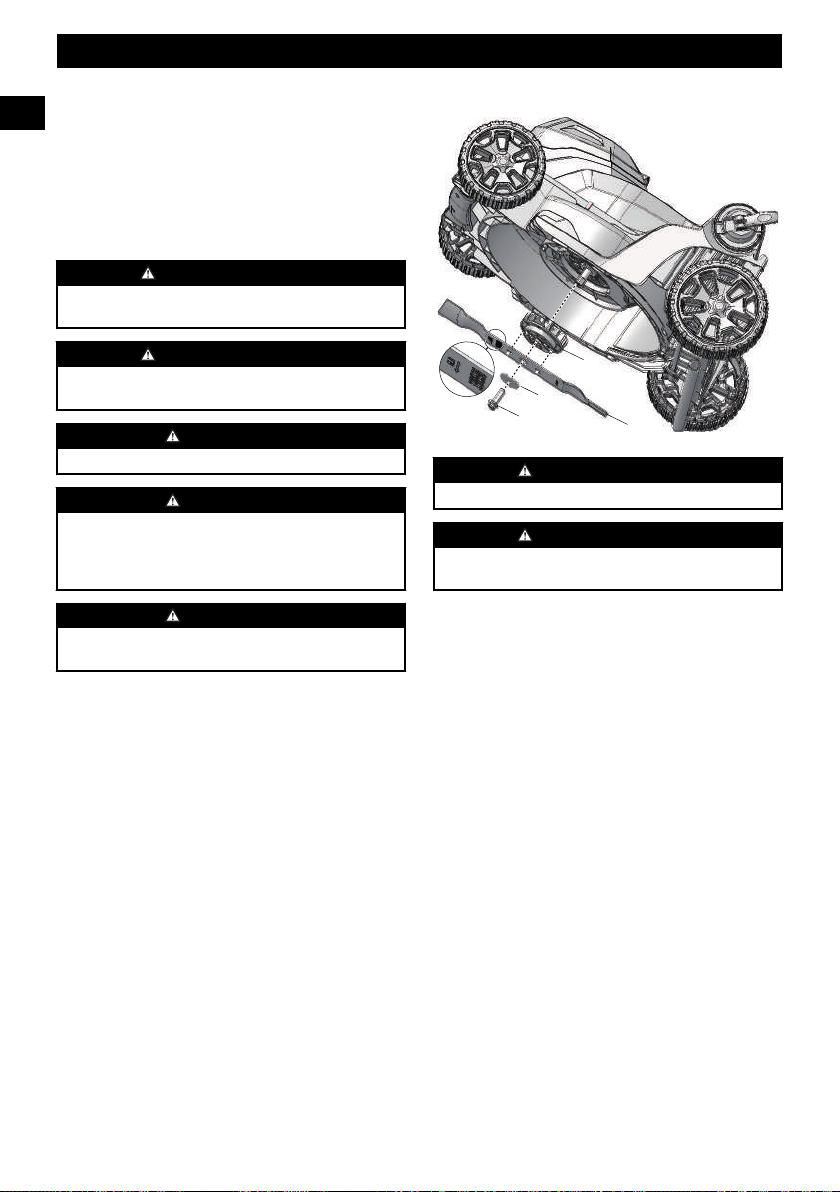
10.2 REPLACE THE BLADE
18
19
21
20
WARNING
Use only approved replacement blade.
WARNING
Wear heavy gloves or wind cloth around the blade when
you touch the blade.
1. Stop the machine.
2. Make sure that the blade fully stops.
3. Remove the safety key and battery pack.
4. Turn the machine to its side.
5. Use a piece of wood to prevent the movement of the
blade.
6. Remove the blade bolt (18), the spacer (19) with a
wrench or socket.
7. Remove the blade (20) and fan (21).
8. Install the new blade as shown in the figure. Make sure
the arrow-shaped holes on the blade engage the posts on
the fan.
9. Put in the spacer and tighten the balde bolt.
10.3 STORE THE MACHINE
• Clean the machine before storage.
• Make sure the motor is not hot when you put the machine
into storage.
• Make sure that the machine does not have loose or
damaged parts. If it is necessary, do these steps/
instructions:
• Replace the damaged parts.
• Tighten the bolts.
• Speak to a person of an approved service center.
• Store the machine in a dry area.
• Make sure that children cannot come near the machine.
You may lower the handle(s) before you put the machine into
the storage.
1. Fully loosen the handle fasteners on the sides of the
handle(s).
2. Fold away the handle(s).
3. Do not pinch or trap the cables.
11 TROUBLESHOOTING
Problem Possible cause Solution
The handle is not
in position.
The bolts are not
engaged correctly.
Adjust the height
of the handle and
make sure that the
knobs and bolts
are aligned cor-
rectly.
11
English
EN
Problem Possible cause Solution
The machine does
not start.
The battery ca-
pacity is low.
Charge the battery
pack.
The bail switch is
defective.
Replace the bail
switch.
The safety key is
not put in.
Put in the safety
key.
The machine cuts
grass unevenly.
The lawn is rough. Examine the mow-
ing area.
The blade height is
not set correctly.
Adjust the blade/
cutting height to a
higher position.
The machine does
not mulch correct-
ly.
Wet grass clip-
pings attach to the
deck.
Wait until the
grass dries before
mowing.
The mulch plug is
missing.
Install the mulch
plug.
The machine is
hard to push.
The grass is too
tall, or the blade
height is too low.
Increase the blade/
cutting height.
The grass catcher
and the blade
drags in thick
grass.
Empty the grass
clippings from the
grass catcher.
There is a high vi-
bration in the ma-
chine.
The blade is un-
balanced and
worn.
Replace the blade.
The motor shaft is
bent.
1. Stop the mo-
tor.
2. Remove the
safety key and
battery pack.
3. Inspect for
damage.
4. Repair the ma-
chine before
you start it
again.
The machine stops
during mowing.
The blade height is
too low.
Increase the blade/
cutting height.
The battery pack is
out of power.
Charge the battery
pack.
The grass clip-
pings attach to the
deck or the blade.
Remove the bat-
tery pack and
check the deck.
Operation temper-
ature of the ma-
chine is too high.
Cool the machine.
* If you cannot find the solution to these problems, go to the
service center.
12 TECHNICAL DATA
Voltage (2 X 24V) 48 V
No load speed 3600 RPM
Deck size 17"
Height adjust-
ments
1 3/8 - 3 3/8” (3.5 - 8.5 cm)
Functions 2-in-1 Mulch & Rear Bag
Weight (with-
out battery
pack)
34.2 lbs (15.5 kg)
Battery model BAG709/BAG710 and other BAG series
Charger model CAG812/CAG817 and other CAG series
Double-insula-
ted construction
13 LIMITED WARRANTY
YEAR
ANS
AÑOS
LIMITED WARRANTY
GARANTIE LIMITÉE
GARANTÍA
LIMITADA
3
Greenworks hereby warranties this product, to the original
purchaser with proof of purchase, for a period of three (3)
years against defects in materials, parts or workmanship.
Greenworks, at its own discretion, will repair or replace any
and all parts found to be defective, through normal use, free
of charge to the customer. This warranty is valid only for
units which have been used for personal use that have not
been purchased or rented for industrial/commercial use, and
that have been maintained in accordance with the instructions
in the owners’ manual supplied with the product when new.
ITEMS NOT COVERED BY WARRANTY:
1. Any part that has become inoperative due to misuse,
commercial use, abuse, neglect, accident, improper
maintenance, or alteration; or
2. The unit, if it has not been operated and/or maintained in
accordance with the owner's manual; or
3. Normal wear;
4. Routine maintenance items such as lubricants, blade
sharpening;
5. Normal deterioration of the exterior finish due to use or
exposure.
12
English
EN
HELPLINE:
Warranty service is available by calling our toll-free helpline
at 1-888-909-6757.
TRANSPORTATION CHARGES:
Transportation charges for the movement of any power
equipment unit or attachment are the responsibility of the
purchaser. It is the purchaser’s responsibility to pay
transportation charges for any part submitted for replacement
under this warranty unless such return is requested in writing
by Greenworks.
USA address: Canadian address:
Greenworks Tools Greenworks Tools Canada, Inc.
P.O. Box 1238 P.O. Box 93095, Newmarket,
Ontario
Mooresville, NC 28115 L3Y 8K3
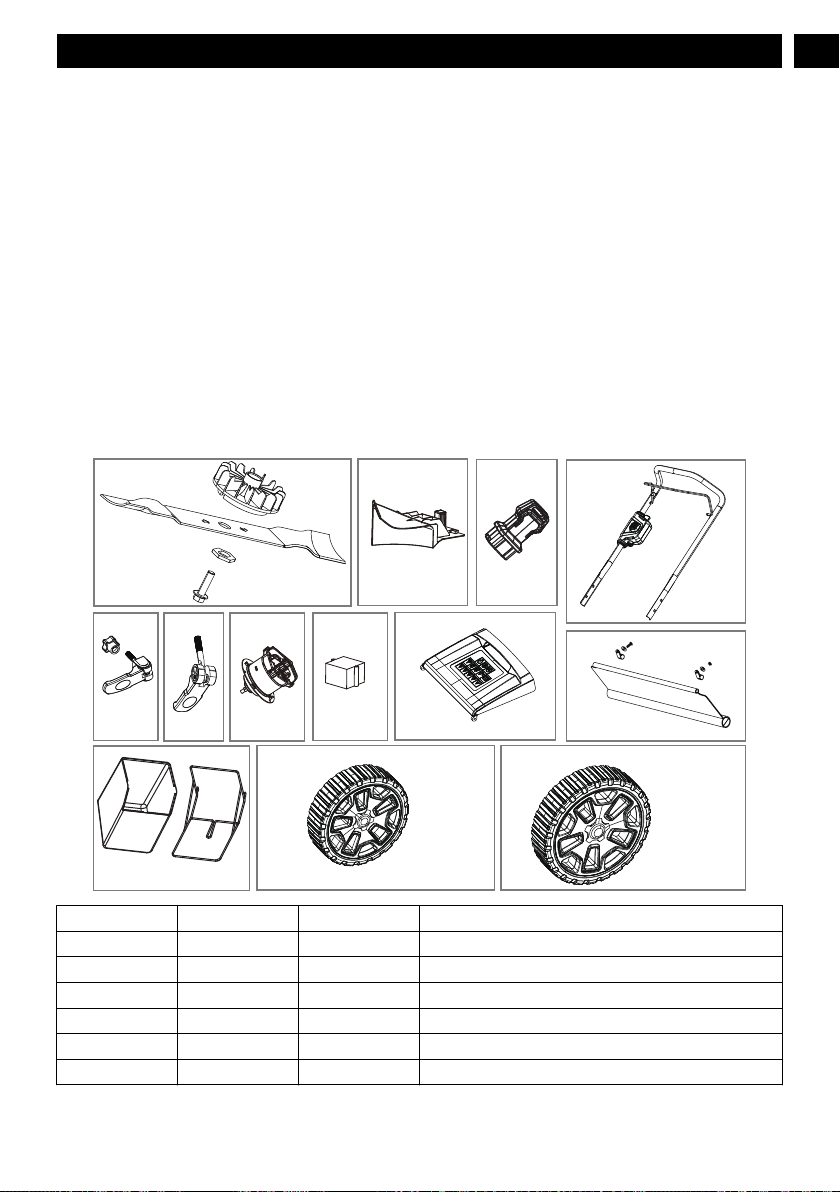
14 EXPLODED VIEW
1
2
4
3
5
11 12
13
6
7
8
9
10
No. Part No. Qty. Description
1 R0202426-00 1 Blade assembly kit
2 RB341041559 1 Mulch plug
3 R0200075-00 1 Safety key
4 R0202427-00 1 Upper control assembly
5 R0201858-00 2 Upper handle cam lock/knob
6 R0202428-00 2 Lower handle quick-release lever
13
English
EN

No. Part No. Qty. Description
7 R0202429-00 1 Motor
8 R0202430-00 1 PCB
9 R0202431-00 1 Rear discharge flap
10 R0202432-00 1 Rear shield
11 R0202433-00 1 Grass catcher
12 R0200928-00 2 Front wheel assembly
13 R0200929-00 2 Rear wheel assembly
14
English
EN

1 But.....................................................16
2 Aperçu.............................................. 16
3 Lire toutes les instructions..............16
3.1 Les enfants et les curieux.................................16
3.2 Fonctionnement............................................... 16
3.3 Utilisation sur une pente..................................18
3.4 Service/Entretien............................................. 18
4 Symboles figurant sur la
machine............................................ 19
5 Niveaux de risques...........................20
6 Élimination des batteries sans
danger pour l'environnement.........20
7 Proposition 65..................................21
8 Installation....................................... 21
8.1 Déballer la machine.........................................21
8.2 Déployez et réglez le guidon........................... 21
8.3 Installez la poignée supérieure ....................... 22
8.4 Installez le sac arrière...................................... 22
8.5 Installez le bouchon de déchiquetage.............. 22
8.6 Réglez la hauteur de la lame............................22
8.7 Installez le bloc-batterie...................................23
8.8 Retirer le bloc-batterie.....................................23
9 Utilisation.........................................23
9.1 Démarrez la machine.......................................23
9.2 Arrêtez la machine ..........................................23
9.3 Videz le sac arrière ..........................................23
10 Entretien...........................................24
10.1 Entretien général..............................................24
10.2 Remplacer la lame........................................... 24
10.3 Entreposez la machine.....................................24
11 Dépannage........................................25
12 Données techniques......................... 25
13 Limited warranty............................ 26
14 Vue éclatée........................................27
15
Français
FR
1 BUT
Cette machine est utilisée pour tondre le gazon à la maison.
La lame de coupe doit être approximativement parallèle au
sol. Les quatre roues doivent toucher le sol pendant que vous
tondez.
2 APERÇU
4
1
8
2
3
5
7
6
1
Barre de sécurité
2
Bouton de démarrage
3
Partie supérieure du guidon
4
Poignée inférieure
5
Couvercle d'éjection arrière
6
Couvercle de la batterie
7
Sac arrière
8
Bouchon de déchiquetage
3 LIRE TOUTES LES
INSTRUCTIONS
DANGER
Cette machine a été fabriquée pour être utilisée
conformément aux consignes de sécurité qui figurent dans
ce manuel. Comme avec tout autre type d'équipement
motorisé, la négligence ou une erreur de la part de
l'utilisateur peut provoquer des blessures graves. Cette
machine est capable d'amputer les mains et les pieds et de
projeter des objets. Le non-respect de toutes les consignes
de sécurité peut entraîner des blessures graves, voire
mortelles.
AVERTISSEMENT
Lorsque vous utilisez une tondeuse à gazon électrique, des
précautions de sécurité de base doivent toujours être prises
pour réduire les risques d'incendie, de choc électrique et de
blessures corporelles. Ces précautions de base comprennent
ce qui suit :
3.1 LES ENFANTS ET LES CURIEUX
Des accidents tragiques peuvent se produire si l'opérateur ne
fait pas attention à la présence des enfants ou des curieux.
• Garder la zone d'opération à l'écart de toute personne, en
particulier les jeunes enfants et les animaux domestiques.
• Soyez extrêmement prudent lorsque vous approchez un
angle mort, une porte, un arbuste, un arbre ou tout autre
objet qui pourrait obscurcir votre vision d'un enfant ou
d'un curieux. Gardez les enfants, les curieux, les
assistants et les animaux domestiques à au moins 30 m
(100 pi) de la tondeuse lorsqu'elle est en marche. Arrêtez
la machine si quelqu'un s'approche.
• Ne permettez jamais à des enfants de moins de 14 ans
d'utiliser une tondeuse électrique. Les opérateurs âgés de
14 ans et plus doivent lire et comprendre le manuel
d'opérateur et les règles de sécurité. Seules les personnes
responsables et qui connaissent ces règles de sécurité
doivent être autorisées à utiliser cette machine.
3.2 FONCTIONNEMENT
• Lisez attentivement ce manuel d'opérateur dans son
intégralité avant d'assembler ou d'utiliser cette machine.
Avant de démarrer, veuillez lire, comprendre et suivre
toutes les instructions présentes dans le manuel
d'utilisation et sur la machine. Familiarisez-vous avec les
commandes et l'utilisation correcte de cette machine
avant de l'utiliser. Conservez ce manuel pour référence
future et régulière.
• N'utilisez la tondeuse à gazon que pour les travaux
auxquels elle est destinée. Votre tondeuse à gazon a été
conçue pour effectuer un seul travail : couper l'herbe.
• N'essayez jamais de régler la hauteur des roues lorsque le
moteur est en marche.
• Ne forcez pas la tondeuse à gazon; elle fera le travail
mieux et de façon plus sécuritaire au rythme pour lequel
elle a été conçue.
• Ne vous penchez pas trop, gardez un bon équilibre en tout
temps. De nombreuses blessures surviennent lorsque la
tondeuse est tirée sur le pied lors d'une chute causée par
un glissement ou un trébuchement. Faites attention de ne
pas glisser et de ne pas tomber pour éviter des blessures
graves. Si vous sentez que vous perdez l'équilibre,
relâchez immédiatement le guidon et la lame s'arrêtera de
tourner dans les trois secondes.
• Inspectez soigneusement l'endroit où la tondeuse doit être
utilisée et enlevez toutes les pierres, les bâtons, les fils,
les os de chien et autres objets étrangers.
• Évitez tout démarrage accidentel. Assurez-vous que
l’interrupteur est en position d’arrêt avant de brancher la
16
Français
FR

batterie ou de soulever ou de transporter la tondeuse.
Transporter la tondeuse avec un doigt sur l’interrupteur
ou alimenter une tondeuse dont l'interrupteur est en
marche risque de provoquer des accidents.
• Ne tirez jamais la tondeuse vers vous lorsque vous
marchez. Si vous devez reculer la tondeuse loin d'un mur
ou d'un obstacle, regardez d'abord vers le bas et derrière
vous pour éviter de trébucher, puis suivez ces étapes :
• Éloignez-vous de la tondeuse pour allonger
complètement vos bras.
• Assurez-vous de rester bien en équilibre.
• Tirez lentement sur la tondeuse.
• Retirez la batterie de la tondeuse avant d'effectuer des
réglages, de changer des accessoires ou de ranger la
machine. De telles mesures de sécurité préventives
réduisent le risque d'un démarrage accidentel de la
tondeuse.
• Avant de reculer et en reculant avec la tondeuse, regardez
derrière vous et vers le bas pour voir s'il y a de jeunes
enfants et d'autres personnes.
• N'utilisez pas la tondeuse si vous êtes sous l'influence
d'alcool ou de drogues. Restez vigilant et faites attention à
ce que vous faites en tout temps. Faites preuve de bon
jugement et n'utilisez pas la tondeuse si vous êtes fatigué.
• Portez toujours des lunettes de sécurité ou des lunettes de
protection pendant l'utilisation et lors d'un ajustement ou
d'une réparation pour protéger vos yeux. Les objets
projetés qui ricochent peuvent causer de graves blessures
aux yeux. Utilisez toujours un masque facial ou un
masque anti-poussière si l'opération est poussiéreuse.
• En tout temps, se tenir à l'écart de l'ouverture de
déchargement. Ne placez jamais vos mains ou vos pieds
près d'une pièce en mouvement ou sous le plateau de
coupe. La lame en mouvement peut amputer les mains et
les pieds.
• Planifiez votre tracé de tonte de manière à éviter tout
déversement de matériaux vers les routes, les trottoirs, les
passants et autres endroits semblables. De plus, évitez de
décharger le produit contre des murs ou des obstructions,
ce qui pourrait faire ricocher le produit déchargé vers
l'opérateur.
• Pour éviter la lame ou une blessure par un objet projeté,
restez dans la zone de l'opérateur derrière les guidons.
• Un couvercle de décharge manquant ou endommagé peut
causer un contact avec la lame ou des blessures causées
par des objets projetés.
• Les objets heurtés par la lame de la tondeuse à gazon
peuvent causer de graves blessures aux personnes. Le
gazon doit toujours être soigneusement examiné et
débarrassé de tout objet avant chaque tonte.
• Arrêtez la lame lorsque vous traversez des chemins de
gravier, des chemins ou des routes.
• Suivez toutes les instructions de recharge et ne rechargez
pas la batterie ou la tondeuse en dehors de la plage de
température spécifiée dans ces instructions. Un
rechargement incorrect ou à des températures en dehors
de la plage spécifiée peut endommager la batterie et
augmenter le risque d'incendie.
• Si la tondeuse heurte un corps étranger, procédez comme
suit :
• Relâchez l'interrupteur d'arrêt d'urgence pour
désengager le moteur.
• Retirez la batterie.
• Vérifiez qu'elle n'est pas endommagée.
• Réparez toutes les pièces endommagées avant de
redémarrer et d'utiliser la tondeuse à gazon.
• Faites effectuer l'entretien par un réparateur qualifié en
n'utilisant que des pièces de rechange identiques. Cela
garantira le maintien de la sécurité du produit.
• Habillez-vous correctement; ne portez pas de vêtements
amples ou de bijoux qui pourraient se coincer dans les
pièces en mouvement. Le port de gants de sécurité et de
chaussures appropriées est recommandé pour travailler à
l'extérieur. Portez des chaussures de travail robustes à
semelle rugueuse et des pantalons et des chemises bien
ajustés. Une chemise et un pantalon qui protègent les bras
et les jambes et des chaussures à bout d'acier sont
recommandés. N'utilisez jamais cette machine pieds nus,
en sandales, en chaussures glissantes ou légères (par ex.,
en toile).
• Ne modifiez pas ou n’essayez pas de réparer la tondeuse
ou la batterie (selon le cas) sauf en conformité avec les
instructions d'utilisation et d'entretien indiquées dans ce
manuel.
• Portez un couvre-chef protecteur pour contenir les
cheveux longs.
• Évitez les environnements dangereux; n'utilisez pas la
tondeuse à gazon dans des endroits humides ou mouillés
ou s'il pleut.
• Rangez les tondeuses inutilisées à l'intérieur. Lorsqu'elle
n'est pas utilisée, la machine doit être entreposée à
l'intérieur, dans un endroit sec, surélevé ou verrouillé,
hors de portée des enfants. Retirez toujours la batterie de
la tondeuse avant de la ranger.
• Ne tondez qu'à la lumière du jour ou sous une bonne
lumière artificielle. Marchez, ne courez jamais pendant
l'opération.
• Si la tondeuse commence à vibrer anormalement, arrêtez
immédiatement le moteur, retirez la batterie et vérifiez la
cause. Les vibrations sont généralement un avertissement
indiquant que la tondeuse ne fonctionne pas correctement.
• Vérifiez fréquemment la détérioration et l'usure du sac et
remplacez les sacs usés. Vérifiez que les sacs de
remplacement sont conformes aux recommandations ou
aux spécifications du fabricant d'origine.
• Avant de nettoyer la tondeuse, de déboucher ou d'enlever
le sac à herbe, le dispositif de déchiquetage ou la goulotte
d'éjection latérale, arrêtez le moteur et attendez que la
lame s'arrête complètement, puis retirez la batterie. La
lame continue à tourner pendant quelques secondes après
que le moteur s'est éteint. N'exécutez jamais ces fonctions
tant que vous n'êtes pas sûr que la lame ne tourne plus.
17
Français
FR

• Gardez la lame de coupe propre et tranchante pour
assurer la meilleure performance.
• Inspectez périodiquement les dispositifs de sécurité et les
cordons pour vous assurer qu'ils ne sont pas
endommagés. Si l'appareil est endommagé, ne l'utilisez
pas avant qu'il n'ait été réparé par un professionnel
autorisé.
• N'utilisez jamais la tondeuse sans le couvercle de
décharge, le sac à herbe, le bouchon de déchiquetage, la
goulotte d'éjection latérale ou tout autre dispositif de
sécurité approprié en place et en fonctionnement.
N'utilisez jamais la tondeuse si ses dispositifs de sécurité
sont endommagés. Le non-respect de cette consigne peut
entraîner des blessures corporelles.
• Utilisez uniquement les batteries et les chargeurs
approuvés. Les batteries et les chargeurs non approuvés
peuvent endommager la tondeuse ou blesser l'opérateur.
• Ne jetez pas la batterie au feu. Les cellules peuvent
s'enflammer. Consultez les codes locaux et la gestion des
déchets pour connaître les instructions d'élimination
appropriées.
• Lorsque la batterie n'est pas utilisée, éloignez-la des
autres objets métalliques, comme des attaches trombones,
des pièces de monnaie, des clés, des clous, des vis ou
autres petits objets métalliques qui peuvent établir une
connexion d'une borne à une autre. Le court-circuitage
des bornes de la batterie peut provoquer des brûlures ou
un incendie.
• Ne tentez pas d'ouvrir ni de détruire la batterie. Les
électrolytes contenus dans la batterie sont corrosifs et
peuvent causer des dommages aux yeux ou à la peau s'ils
sont rejetés. L'électrolyte peut être toxique lorsqu'elle est
avalée.
• Dans des conditions abusives, du liquide peut être éjecté
de la batterie; évitez tout contact. En cas de contact
accidentel, rincez avec de l’eau. En cas de contact avec
les yeux, consultez également un médecin. Le liquide
s'échappant des batteries peut causer des irritations ou des
brûlures.
• N'exposez pas une batterie ou un appareil à un feu ou à
une température excessive. L'exposition au feu ou à une
température supérieure à 130°C peut provoquer une
explosion.
• Manipulez les batteries avec la plus grande prudence afin
d'éviter de court-circuiter la batterie avec des matériaux
conducteurs tels que bagues, bracelets, clés, etc. La
batterie ou le conducteur peut surchauffer et provoquer
des brûlures en cas de contact avec ces matériaux.
• N'utilisez pas une batterie ou un appareil endommagé ou
modifié. Les batteries endommagées ou modifiées
peuvent présenter un fonctionnement imprévisible et
provoquer un incendie, une explosion ou un risque de
blessure.
3.3 UTILISATION SUR UNE PENTE
Les pentes sont un facteur majeur lié aux accidents de
glissade et de chute, qui peuvent entraîner des blessures
graves. L'utilisation sur les pentes exige une prudence
supplémentaire. Si vous vous sentez mal à l'aise sur une
pente, ne tondez pas du gazon.
À faire :
• Tondez sur la face des pentes ; ne tondez jamais de haut
en bas. Faites très attention en changeant de direction sur
une pente.
• Surveillez les trous, les ornières, les pierres, les objets
cachés ou les bosses qui peuvent vous faire glisser ou
trébucher. Les herbes hautes peuvent masquer des
obstacles.
À ne pas faire :
• Tondre dans des pentes excessivement raides.
• Tondre près d’un dénivellement prononcé, d’un fossé ou
du rebord d’un talus; vous pourriez perdre pied ou perdre
l'équilibre.
• Tondre dans une pente de plus de 15 degrés.
• Tondre du gazon mouillé ou humide. L'instabilité de la
posture au sol peut provoquer des glissements.
3.4 SERVICE/ENTRETIEN
• Vérifiez fréquemment que la lame et les boulons de
fixation du moteur sont bien serrés.
• Remplacez la lame si elle est pliée ou fissurée. Une lame
déséquilibrée provoque des vibrations qui pourraient
endommager l'unité d'entraînement du moteur ou causer
des blessures corporelles.
• Gardez tous les écrous, boulons et vis serrés pour vous
assurer que l'outil est en état de fonctionnement
sécuritaire.
• Ne lavez pas avec un tuyau d'arrosage; évitez de mettre
de l'eau dans le moteur et les connexions électriques.
• Ne jamais retirer ou modifier les dispositifs de sécurité.
Vérifiez régulièrement leur bon fonctionnement. Ne
jamais faire quoi que ce soit qui puisse interférer avec le
fonctionnement prévu d'un dispositif de sécurité ou
réduire la protection offerte par un dispositif de sécurité.
• Débarrassez la tondeuse des brins d'herbe, feuilles et
d'autres débris qui pourraient s'y accumuler. Laissez la
tondeuse se refroidir avant l'entreposage.
• N'effectuez jamais de réglages ou de réparations quand le
moteur est en marche.
• Retirez toujours la batterie de la tondeuse avant de
procéder au réglage, au nettoyage ou à la réparation.
• Vérifiez fréquemment les éléments du sac arrière et le
dispositif de protection de la décharge et les remplacer au
besoin par les pièces recommandées par le fabricant.
• Affûtez une lame émoussée de façon égale à chaque
extrémité pour maintenir l'équilibre.
• Gardez les gardes protectrices en place et en bon état de
fonctionnement. Les lames de la tondeuse sont
tranchantes et peuvent blesser. Enveloppez la lame avec
un chiffon ou portez des gants et faites très attention en la
manipulant.
18
Français
FR
• Nettoyez soigneusement la lame et vérifiez son équilibre
en la soutenant horizontalement sur un clou fin par son
trou central. Le clou doit être également dans une position
horizontale. Si l'une ou l'autre extrémité de la lame tourne
vers le bas, enlevez un peu de métal de l'extrémité lourde
ou inférieure jusqu'à ce que la lame soit équilibrée. Elle
est équilibrée lorsque aucune des deux extrémités ne
tombe.
• Utilisez seulement des lames de rechange identiques.
• Entretenez soigneusement la tondeuse. Gardez les bords
de coupe tranchants et propres pour une performance
optimale et plus sûre. Suivez les instructions pour
lubrifier et changer les accessoires. Inspectez
périodiquement le cordon de la tondeuse. S'il est
endommagé, faites-le réparer par un réparateur agréé.
• En cas de situations qui ne sont pas couvertes dans ce
manuel, faites preuve de prudence et de bon jugement ou
contactez le Service à la clientèle pour obtenir de l'aide.
• N'utilisez jamais la tondeuse sans les protections, les
plaques ou d'autres dispositifs de protection de sécurité
appropriés en place.
La plage de température ambiante recommandée :
Article Température
Plage de température d’entreposage
de la tondeuse
32°F (0°C) - 113°F
(45°C)
Plage de température de fonc-
tionnement de la tondeuse
32°F (0°C) - 113°F
(45°C)
Plage de température de recharge-
ment de la batterie
39°F (4°C) - 104°F
(40°C)
Plage de température de fonc-
tionnement du chargeur
39°F (4°C) - 104°F
(40°C)
Plage de température d’entreposage
de la batterie
32°F (0°C) - 113°F
(45°C)
Plage de température de décharge-
ment de la batterie
32°F (0°C) - 113°F
(45°C)
4 SYMBOLES FIGURANT SUR
LA MACHINE
Certains des symboles suivants peuvent être utilisés sur cet
outil. Veuillez les étudier et apprendre leur signification. Une
bonne interprétation de ces symboles vous permettra de
mieux utiliser l'outil et de manière plus sécuritaire.
Symbole
Nom Explication
V Volt Voltage
A Ampères Courant
Hz Hertz
Fréquence (cycles par sec-
onde)
W Watt Puissance
min Minutes Heure
Symbole Nom Explication
/min Par minute
Tours, coups, vitesse pé-
riphérique, orbites, etc., par
minute
Courant alter-
natif
Type de courant
Courant direct
Type ou caractéristique du
courant
n
o
Vitesse à vide Vitesse rotationnelle, à vide
Alerte de sé-
curité
Précautions destinées à as-
surer la sécurité.
Protection des
yeux
Portez toujours des lunettes
de protection avec des pro-
tections latérales marquées
conformément à la norme
ANSI Z87.1 lorsque vous
utilisez cet équipement.
AVERTISSE-
MENT ---
Conditions
humides
Ne pas exposer la machine
à la pluie ou à l'humidité.
Lisez le man-
uel d'opéra-
teur
Pour réduire les risques de
blessures, l'utilisateur doit
lire et comprendre le man-
uel d'utilisation avant d'util-
iser ce produit.
Entretenir les
dispositifs de
sécurité
Ne pas ouvrir ou retirer les
dispositifs de sécurité lors-
que l'outil est en marche.
Regardez der-
rière vous
quand vous
reculez
Regardez d'abord vers le
bas et vers l'arrière pour
éviter de trébucher lorsque
vous tirez vers l'arrière.
DANGER ---
Maintenez à
distance les
mains et les
pieds
Pour réduire les risques de
blessures, éloignez les
mains et les pieds des
pièces en mouvement. Ne
pas faire fonctionner à
moins que le couvercle de
décharge ou le sac d'herbe
ne soit à sa place appro-
priée. S'il est endommagé,
remplacez-le immédiate-
ment.
DANGER ---
Gardez les
gens à dis-
tance
Tous les visiteurs doivent
être tenus à bonne distance
de la zone de travail.
19
Français
FR
Symbole Nom Explication
DANGER ---
Débris rejetés
Retirez les objets qui peu-
vent être projetés par la
lame dans n'importe quelle
direction. Portez des lu-
nettes de protection.
DANGER ---
Danger sur
pente abrupte
Soyez particulièrement pru-
dent sur les pentes. Ne ton-
dez pas sur une pente in-
clinée à plus de 15°.
5 NIVEAUX DE RISQUES
Les termes de mise en garde suivants et leur signification ont
pour but d'expliquer les niveaux de risques associés à
l'utilisation de ce produit.
SYM-
BOLE
SIGNAL SIGNIFICATION
DANGER Indique une situation danger-
euse imminente qui, si elle
n’est pas évitée, peut entraîner
la mort ou des blessures
graves.
AVERTISSE-
MENT
Indique une situation poten-
tiellement dangereuse qui, si
elle n’est pas évitée, peut en-
traîner la mort ou des bles-
sures graves.
MISE EN
GARDE
Indique une situation poten-
tiellement dangereuse qui, si
elle n'est pas évitée, pourrait
causer des blessures mineures
ou modérées.
MISE EN
GARDE
(Sans symbole d’alerte de sé-
curité) indique une situation
pouvant entraîner des dom-
mages matériels.
6 ÉLIMINATION DES
BATTERIES SANS DANGER
POUR L'ENVIRONNEMENT
Les matières toxiques et corrosives ci-dessous se trouvent
dans les batteries utilisées dans cette machine : Lithium-ion,
une substance toxique.
AVERTISSEMENT
Éliminez toutes les substances toxiques d'une manière
spécifiée afin de prévenir la contamination de
l'environnement. Avant de jeter une batterie au lithium-ion
endommagée ou usée, contactez votre agence locale
d'élimination des déchets ou l'agence locale de protection de
l'environnement pour obtenir des informations et des
instructions spécifiques. Apportez les batteries à un centre
local de recyclage ou d'élimination certifié pour
l'élimination de batteries au lithium-ion.
AVERTISSEMENT
Si la batterie se fend ou se brise, avec ou sans fuites, ne la
rechargez pas et ne l'utilisez pas. Jetez-la et remplacez-la
par une nouvelle batterie. N'ESSAYEZ PAS DE LA
RÉPARER ! Pour prévenir les blessures et les risques
d'incendie, d'explosion ou de décharge électrique, et pour
éviter tout dommage à l'environnement :
• Couvrez les bornes de la batterie avec du ruban adhésif
résistant.
• NE PAS essayer d'enlever ou de détruire les composants
de la batterie.
• NE PAS essayer d'ouvrir ou de réparer la batterie.
• En cas de fuite, les électrolytes rejetés sont corrosifs et
toxiques. NE laissez PAS entrer la solution dans les
yeux ou en contact avec la peau et ne l’avalez pas.
• NE PAS jeter vos batteries usagées dans votre poubelle
à ordures ménagères.
• N’incinérez PAS les batteries.
• NE LES Mettez PAS dans un endroit où ils feront partie
d'un site d'enfouissement de déchets ou d'un flux de
déchets solides municipaux.
• Emmenez-les dans un centre de recyclage ou
d'élimination certifié.
20
Français
FR
7 PROPOSITION 65
AVERTISSEMENT
Ce produit contient un produit chimique connu dans l'état
de Californie comme étant une cause de cancer, de
malformations congénitales ou d'autres problèmes de
reproduction. Certaines poussières produites par le ponçage
mécanique, le sciage, le meulage, le perçage et d'autres
activités de construction contiennent des produits chimiques
connus pour causer le cancer, des malformations
congénitales ou d'autres problèmes de reproduction. Voici
quelques exemples de ces produits chimiques :
• Plomb provenant de peintures à base de plomb;
• Silice cristalline provenant de briques, de ciment et
d'autres produits de maçonnerie;
• Arsenic et chrome provenant de bois traité
chimiquement.
Votre risque d'exposition à ces produits chimiques varie
selon la fréquence à laquelle vous faites ce type de travail.
Pour réduire votre exposition à ces produits chimiques,
travaillez dans un endroit bien ventilé et utilisez un
équipement de sécurité approuvé, comme des masques anti-
poussière spécialement conçus pour filtrer les particules
microscopiques.
Conservez ces instructions.
8 INSTALLATION
AVERTISSEMENT
Ne changez pas ou ne fabriquez pas des accessoires qui ne
sont pas recommandés par le fabricant.
AVERTISSEMENT
Ne mettez pas la clé de sécurité ou la batterie tant que vous
n'avez pas assemblé toutes les pièces.
8.1 DÉBALLER LA MACHINE
AVERTISSEMENT
Assurez-vous d'assembler correctement la machine avant de
l'utiliser.
AVERTISSEMENT
• Si les pièces sont endommagées, n'utilisez pas la
machine.
• Si vous n'avez pas toutes les pièces, n'utilisez pas la
machine.
• Si les pièces sont endommagées ou manquantes,
communiquez avec le centre de service.
1. Ouvrez l’emballage.
2. Lisez la documentation contenue dans la boîte.
3. Retirez toutes les pièces non assemblées de la boîte.
4. Retirez la machine de sa boîte.
5. Jetez la boîte et l'emballage en respectant les règlements
locaux.
8.2 DÉPLOYEZ ET RÉGLEZ LE
GUIDON
4
9
3
1. Tirer la poignée supérieure (3) vers le haut et vers l'arrière
pour soulever la poignée en position de fonctionnement.
2. Serrez la poignée inférieure (4) avec les leviers de
dégagement rapide (9) des deux côtés.
AVERTISSEMENT
Assurez-vous que les deux guidons dans la même position.
AVERTISSEMENT
N'endommagez pas les câbles lorsque vous pliez ou dépliez
le guidon.
21
Français
FR
8.3 INSTALLEZ LA POIGNÉE
SUPÉRIEURE
3
10
10
11
11
4
P
1. Alignez les trous dans la poignée supérieure (3) et dans la
poignée inférieure (4).
2. Insérez le dispositif de blocage (10) dans les trous.
3. Serrez les boutons (11) sur le dispositif de blocage.
4. Il y a deux positions (P) à choisir lors de l'installation de
la poignée supérieure.
5. Faites la même opération sur l'autre côté.
AVERTISSEMENT
Soyez prudent lors de l'installation de la poignée supérieure
pour éviter les pincements potentiels des doigts.
8.4 INSTALLEZ LE SAC ARRIÈRE
7
13
12
1. Retirez le bouchon de déchiquetage.
2. Ouvrez et retenez la trappe d'éjection arrière (5).
3. Tenez le bac de ramassage d'herbe (7) par sa poignée (12)
et placez les crochets (12) sur les fentes (13).
4. Fermez la trappe d'éjection arrière.
8.5 INSTALLEZ LE BOUCHON DE
DÉCHIQUETAGE
8
5
1. Retirez le sac arrière.
2. Ouvrez et retenez la trappe d'éjection arrière (5).
3. Tenez le bouchon de déchiquetage(8) par sa poignée et
insérez-le dans la goulotte d'éjection.
4. Fermez la trappe d'éjection arrière.
8.6 RÉGLEZ LA HAUTEUR DE LA
LAME
La lame de la machine peut être réglée à différentes hauteurs.
17
21
1. Poussez sur le bouton de réglage (17) de la hauteur,
soulevez la barre de réglage en hauteur (21) à une
position plus haute pour augmenter la hauteur de la lame.
2. Poussez sur le bouton de réglage de la hauteur, appuyez
sur la barre de réglage en hauteur à une position plus
basse pour réduire la hauteur de la lame.
22
Français
FR
8.7 INSTALLEZ LE BLOC-BATTERIE
6
14
15
16
UTILISEZ
UNIQUEMENT
UNE BATTERIE
24V
AVERTISSEMENT
• Si le bloc-batterie ou le chargeur est endommagé,
remplacez-le, au besoin.
• Arrêtez la machine et attendez que le moteur s'arrête
avant d'installer ou de retirer le bloc-batterie.
• Lisez, comprenez et suivez les instructions du manuel
du bloc-batterie et du chargeur.
AVERTISSEMENT
UTILISEZ UNIQUEMENT UNE BATTERIE DE 24 V
N'UTILISEZ PAS DE BATTERIE 24/48 V À DOUBLE
TENSION.
REMARQUE
Les deux batteries doivent être installées dans les
compartiments afin de démarrer la machine.
1. Ouvrez la trappe de la batterie (6).
2. Alignez les languettes du bloc-batterie (14) avec les
rainures du compartiment de batterie.
3. Poussez le bloc-batterie dans le compartiment de batterie
jusqu'à ce qu'il soit bien encliqueté.
4. Vous devriez entendre un clic lorsque le bloc-batterie sera
inséré correctement.
5. Faites la même opération avec l'autre bloc-batterie.
6. Fermez la trappe de la batterie.
REMARQUE
Le moteur ne démarre que lorsque vous insérez la clé de
sécurité (15).
8.8 RETIRER LE BLOC-BATTERIE
1. Ouvrez le couvercle de la batterie (6).
2. Poussez et maintenez enfoncé le bouton de déblocage de
la batterie (16).
3. Retirez les blocs de batteries (14) de la machine.
9 UTILISATION
AVERTISSEMENT
Portez des lunettes de protection pendant l'utilisation.
9.1 DÉMARREZ LA MACHINE
1
2
1. Insérez la clé de sécurité.
2. Appuyez sur le bouton de mise en marche et maintenez-le
enfoncé (2).
3. Pendant que vous maintenez le bouton de démarrage
enfoncé, tirez l'interrupteur d'écartement (1) dans la
direction du guidon.
4. Relâchez le bouton de démarrage pour démarrer la
machine.
9.2 ARRÊTEZ LA MACHINE
1. Relâchez la barre de sécurité pour arrêter la machine.
AVERTISSEMENT
Attendez que les lames s'arrêtent complètement avant de
redémarrer la machine. N'éteignez pas et n'allumez pas
brusquement la machine.
AVERTISSEMENT
Retirez toujours la clé de sécurité et le bloc-batterie après
avoir terminé le travail.
9.3 VIDEZ LE SAC ARRIÈRE
1. Arrêtez la machine.
2. Retirez la clé de sécurité.
23
Français
FR
3. Retirez le bloc-batterie.
4. Ouvrez et retenez la trappe d'éjection arrière.
5. Tenez le sac arrière par sa poignée et décrochez-le des
fentes.
6. Fermez la trappe d'éjection arrière.
7. Videz le sac arrière.
10 ENTRETIEN
AVERTISSEMENT
Retirez la clé de sécurité et la batterie de la machine avant
l'entretien.
AVERTISSEMENT
Veillez à ce que le moteur et la batterie soient exempts
d'herbe, de feuilles ou d'un excès de graisse.
ATTENTION
Utilisez seulement les pièces de rechange approuvées.
ATTENTION
Évitez que les liquides de freins, l'essence et les matériaux à
base de pétrole ne viennent en contact avec les pièces en
plastique. Les produits chimiques peuvent endommager le
plastique et le rendre inutilisable.
ATTENTION
N'utilisez pas de solvants ou de détergents puissants sur le
boîtier ou les composants en plastique.
10.1 ENTRETIEN GÉNÉRAL
• Avant chaque utilisation, vérifiez que la machine ne
contient pas de pièces endommagées, manquantes ou
desserrées, telles que vis, écrous, boulons et capuchons.
• Serrez correctement toutes les fixations et les capuchons.
• Nettoyez la machine avec un chiffon sec. N'utilisez pas de
l'eau.
10.2 REMPLACER LA LAME
18
19
21
20
AVERTISSEMENT
Utilisez uniquement une lame de rechange approuvée.
AVERTISSEMENT
Portez des gants épais ou enroulez la lame avec un chiffon
lorsque vous la touchez.
1. Arrêtez la machine.
2. Assurez-vous que la lame s’est complètement arrêtée.
3. Retirez la clé de sécurité et le bloc-batterie.
4. Tournez la machine sur le côté.
5. Utilisez un morceau de bois pour empêcher le
mouvement de la lame.
6. Retirez le boulon de la lame (18), l’espaceur (19) avec
une clé ou une douille.
7. Retirez la lame (20) et le ventilateur (21).
8. Installez la nouvelle lame comme indiqué sur la figure.
Assurez-vous que les trous en forme de flèche sur la lame
s'engagent dans les montants du ventilateur..
9. Insérez l’entretoise et serrez le boulon de la lame.
10.3 ENTREPOSEZ LA MACHINE
• Nettoyez la machine avant de l'entreposer.
• Assurez-vous que le moteur n'est pas chaud lorsque vous
entreposez la machine.
• Assurez-vous que la machine n'a pas de pièces mal fixées
ou endommagées. Au besoin, suivez ces étapes/
instructions :
• Remplacez les pièces endommagées.
• Serrez les écrous.
• Parlez à une personne d'un centre de service certifié.
• Entreposez la machine dans un endroit sec.
24
Français
FR
• Assurez-vous que les enfants ne peuvent pas s'approcher
de la machine.
Vous devez abaisser le guidon avant de ranger la machine.
1. Desserrez complètement les fixations de blocage sur les
côtés du guidon.
2. Pliage de poignée(s).
3. Ne pincez pas, ne coincez pas les câbles.
11 DÉPANNAGE
Problème Cause possible Solution
Le guidon n'est
pas bien installé.
Les écrous ne sont
pas bien enclench-
és.
Ajustez la hauteur
du guidon et assur-
ez-vous que les
boutons et les bou-
lons sont alignés
correctement.
La machine ne dé-
marre pas.
La capacité de la
batterie est faible.
Rechargez le bloc-
batterie.
La barre de sécur-
ité défectueuse.
Remplacez la
barre de sécurité.
La clé de sécurité
n'est pas insérée.
Insérez la clé de
sécurité.
La machine coupe
l'herbe de manière
irrégulière.
Le gazon est rabo-
teux.
Inspectez la zone
de tonte.
La lame n'est pas
réglée à la bonne
hauteur.
Réglez la lame/la
hauteur de coupe à
une position plus
élevée.
La machine ne dé-
chiquette pas cor-
rectement.
Des débris d'herbe
humide s'accroche
au plateau.
Attendez jusqu'à
ce que l'herbe soit
sèche avant la
tonte.
Le bouchon de dé-
chiquetage est
manquant.
Installez le bou-
chon de déchiquet-
age.
La machine est
difficile à pousser.
L'herbe est trop
haute ou la hauteur
de la lame est trop
basse.
Augmentez la hau-
teur de la lame/
hauteur de coupe.
Le sac arrière et la
lame traînent dans
l'herbe épaisse.
Videz les débris
d'herbe humide du
sac arrière.
Problème Cause possible Solution
Il y a une forte vi-
bration dans la
machine.
La lame est désé-
quilibrée et usée.
Remplacez la
lame.
L'arbre du moteur
est tordu.
1. Arrêtez le mo-
teur.
2. Retirez la clé
de sécurité et
le bloc-batter-
ie.
3. Vérifiez
qu'elle n'est
pas endomma-
gée.
4. Réparez la
machine avant
de la redémar-
rer.
Le moteur s'arrête
pendant la tonte.
La hauteur de la
lame est trop
basse.
Augmentez la hau-
teur de la lame/
hauteur de coupe.
Le bloc-batterie
est déchargé.
Rechargez le bloc-
batterie.
Des débris d'herbe
humide s'accroche
au plateau ou à la
lame.
Retirez la batterie
et vérifiez le pla-
teau.
La température de
fonctionnement de
la machine est trop
élevée.
Laissez la machine
se refroidir.
* Si vous ne trouvez pas une solution à ces problèmes,
communiquez avec le centre de service.
12 DONNÉES TECHNIQUES
Voltage (2 X 24V) 48 V
Vitesse à vide 3600 tr/min
Taille du pont 17"
Réglages de la
hauteur
1 3/8 - 3 3/8” (3.5 - 8.5 cm)
Fonctions 2-in-1Déchiquetage et sac arrière
Poids (sans
batterie)
34.2 lb (15.5 kg)
Batterie (mod-
èle)
BAG709/BAG710 et autres séries BAG
Chargeur (mod-
èle)
CAG812/CAG817 et autres séries CAG
Conception à
double isolation
25
Français
FR

13 LIMITED WARRANTY
YEAR
ANS
AÑOS
LIMITED WARRANTY
GARANTIE LIMITÉE
GARANTÍA
LIMITADA
3
Greenworks hereby warranties this product, to the original
purchaser with proof of purchase, for a period of three (3)
years against defects in materials, parts or workmanship.
Greenworks, at its own discretion, will repair or replace any
and all parts found to be defective, through normal use, free
of charge to the customer. This warranty is valid only for
units which have been used for personal use that have not
been purchased or rented for industrial/commercial use, and
that have been maintained in accordance with the instructions
in the owners’ manual supplied with the product when new.
ITEMS NOT COVERED BY WARRANTY:
1. Any part that has become inoperative due to misuse,
commercial use, abuse, neglect, accident, improper
maintenance, or alteration; or
2. The unit, if it has not been operated and/or maintained in
accordance with the owner's manual; or
3. Normal wear;
4. Routine maintenance items such as lubricants, blade
sharpening;
5. Normal deterioration of the exterior finish due to use or
exposure.
HELPLINE:
Warranty service is available by calling our toll-free helpline
at 1-888-909-6757.
TRANSPORTATION CHARGES:
Transportation charges for the movement of any power
equipment unit or attachment are the responsibility of the
purchaser. It is the purchaser’s responsibility to pay
transportation charges for any part submitted for replacement
under this warranty unless such return is requested in writing
by Greenworks.
USA address:
Canadian address:
Greenworks Tools Greenworks Tools Canada, Inc.
P.O. Box 1238 P.O. Box 93095, Newmarket,
Ontario
Mooresville, NC 28115 L3Y 8K3
26
Français
FR

14 VUE ÉCLATÉE
1
2
4
3
5
11 12
13
6
7
8
9
10
No No de pièce Qté. Description
1 R0202426-00 1 Ensemble de montage de lame
2 RB341041559 1 Bouchon de déchiquetage
3 R0200075-00 1 Clé de sécurité
4 R0202427-00 1 Ensemble du dispositif de contrôle supérieur
5 R0201858-00 2 Serrure / bouton à came de la poignée supérieure
6 R0202428-00 2 Levier de dégagement rapide de la poignée inférieure
7 R0202429-00 1 Moteur
8 R0202430-00 1 Cartes de circuits imprimés
9 R0202431-00 1 Volet d'éjection arrière
10 R0202432-00 1 Protection arrière
11 R0202433-00 1 Sac arrière
12 R0200928-00 2 Ensemble de roue avant
13 R0200929-00 2 Ensemble de roue arrière
27
Français
FR

1 Finalidad.......................................... 29
2 Perspectiva general......................... 29
3 Lea todas las instrucciones ............ 29
3.1 Niños y transeúntes .........................................29
3.2 Funcionamiento general.................................. 29
3.3 Funcionamiento en pendientes........................ 31
3.4 Servicio/Mantenimiento.................................. 31
4 Símbolos en el producto .................32
5 Niveles de riesgo.............................. 32
6 Eliminación de batería segura
para el medio ambiente...................33
7 Propuesta 65.....................................33
8 Instalación .......................................33
8.1 Desembalaje de la máquina............................. 34
8.2 Despliegue y ajuste del asa..............................34
8.3 Instalación del asa superior .............................34
8.4 Instalación del recogehierba............................ 34
8.5 Instalación del tapón de mulching...................35
8.6 Ajuste de la altura de la cuchilla......................35
8.7 Instalación de la batería................................... 35
8.8 Retirada de la batería....................................... 36
9 Funcionamiento...............................36
9.1 Puesta en marcha de la máquina......................36
9.2 Detención de la máquina ................................ 36
9.3 Vaciado del recogehierba ................................36
10 Mantenimiento ................................36
10.1 Mantenimiento general....................................36
10.2 Sustitución de la cuchilla.................................37
10.3 Almacenamiento de la máquina...................... 37
11 Solución de problemas.................... 37
12 Datos técnicos.................................. 38
13 Garantía limitada............................38
14 Vista despiezada.............................. 39
28
Español
ES
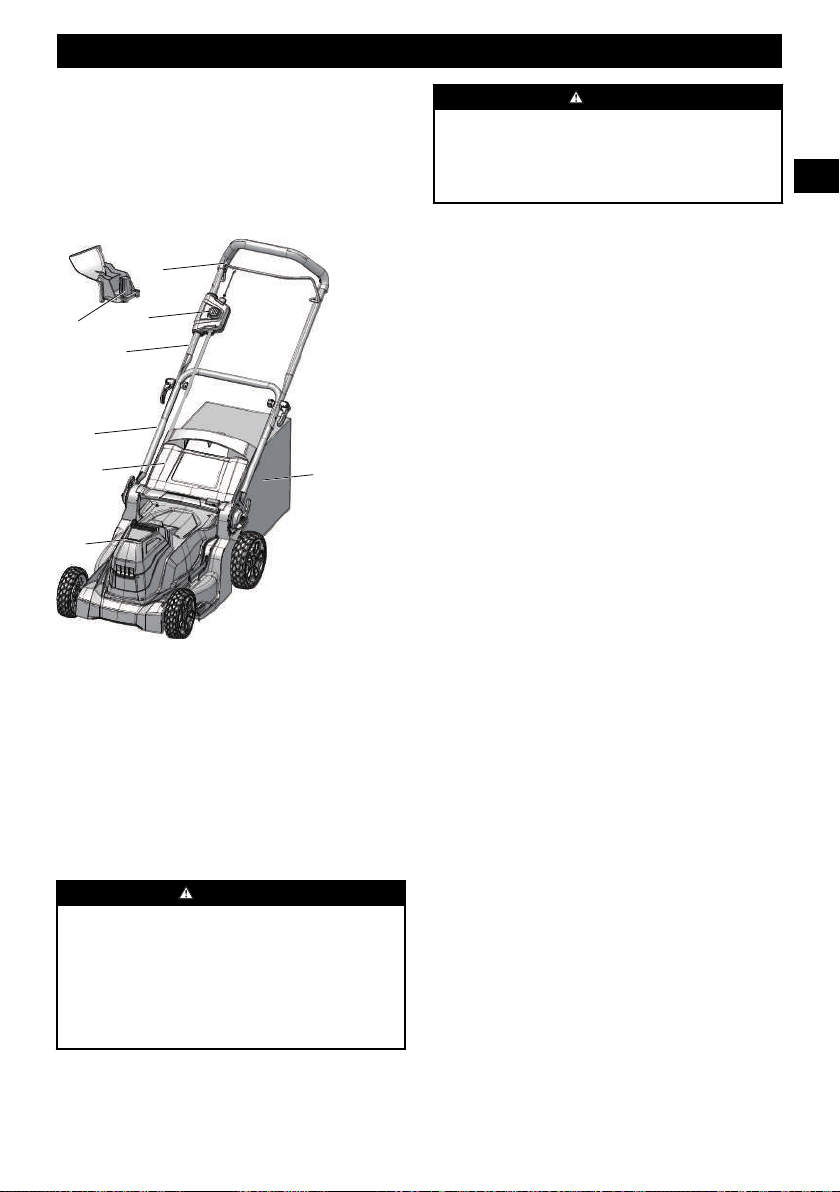
1 FINALIDAD
Esta máquina se utiliza para el corte de césped doméstico. La
cuchilla de corte debe estar aproximadamente paralela al
suelo. Las cuatro ruedas deben tocar el suelo mientras corta el
césped.
2 PERSPECTIVA GENERAL
4
1
8
2
3
5
7
6
1
Interruptor de seguridad
2
Botón de puesta en marcha
3
Asa superior
4
Asa inferior
5
Puerta de descarga trasera
6
Puerta de la batería
7
Recogehierba
8
Tapón de mulching
3 LEA TODAS LAS
INSTRUCCIONES
PELIGRO
Esta máquina se ha construido para utilizarse de acuerdo
con las normas para un funcionamiento seguro que se
incluyen en este manual. Como con cualquier tipo de
equipo eléctrico, un descuido o un error por parte del
operario puede provocar lesiones graves. Esta máquina es
capaz de amputar manos y pies y de lanzar objetos. El
incumplimiento de las instrucciones de seguridad podría
provocar lesiones graves o incluso la muerte.
AVISO
Cuando utilice cortacéspedes eléctricos, siempre deben
seguirse precauciones básicas de seguridad a fin de reducir
el riesgo de incendios, descargas eléctricas y lesiones
personales. Estas precauciones básicas incluyen lo
siguiente:
3.1 NIÑOS Y TRANSEÚNTES
Pueden producirse accidentes trágicos si el operario no está
alerta a la presencia de niños y transeúntes.
• Mantenga la zona de funcionamiento libre de cualquier
persona, especialmente niños pequeños y mascotas.
• Tenga mucho cuidado al acercarse a esquinas ciegas,
portales, arbustos, árboles u otros objetos que puedan
ocultar su visión de un niño o un transeúnte. Mantenga a
los niños, los transeúntes, los ayudantes y las mascotas al
menos a 100 pies (30m) del cortacésped cuando esté en
funcionamiento. Detenga la máquina si alguien entra en
la zona.
• Nunca permita que niños menores de 14 utilicen un
cortacésped eléctrico. Los operarios de 14 años en
adelante deben leer y entender en su totalidad el manual
del operario y las normas de seguridad. Únicamente están
autorizadas a utilizar la máquina personas responsables
que estén familiarizadas con estas normas de
funcionamiento seguro.
3.2 FUNCIONAMIENTO GENERAL
• Lea detenidamente este manual del operario en su
totalidad antes de montar o utilizar esta máquina. Debe
leer, entender y seguir todas las instrucciones en la
máquina y en los manuales antes del funcionamiento.
Familiarícese con los controles y el uso adecuado de esta
máquina antes del funcionamiento. Conserve este manual
para su consulta posterior y frecuente.
• No utilice el cortacésped para trabajos distintos del
previsto. El cortacésped se ha diseñado para realizar un
trabajo exclusivamente: cortar hierba.
• Nunca intente hacer un ajuste de altura de la rueda
mientras el motor esté en marcha.
• No fuerce el cortacésped; hará el trabajo mejor y con
mayor seguridad a la velocidad para la que se diseñó.
• No se estire, mantenga en todo momento una postura
adecuada y el equilibrio. Numerosas lesiones se producen
como resultado del paso del cortacésped sobre el pie
durante una caída debida a resbalones o tropiezos. En
caso de resbalar y caer pueden producirse lesiones
personales graves. Si siente que está perdiendo el
equilibrio, suelte la palanca de control inmediatamente y
la cuchilla dejará de girar en tres segundos.
• Inspeccione exhaustivamente la superficie donde va a
utilizarse el cortacésped y elimine todas las piedras,
ramas, cables, huesos de perros y otros objetos extraños.
• Evite el arranque accidental. Asegúrese de que el
interruptor esté en la posición de apagado antes de
conectar a la batería y al coger o transportar el
29
Español
ES

cortacésped. El transporte del cortacésped con el dedo en
el interruptor o la conexión de un cortacésped que tiene el
interruptor activado fomenta los accidentes.
• Nunca tire del cortacésped hacia usted mientras camina.
Si debe hacer retroceder el cortacésped desde una pared u
obstrucción, primero mire hacia abajo y hacia atrás para
evitar tropezar, a continuación, siga estos pasos:
• Aléjese del cortacésped para extender totalmente los
brazos.
• Asegúrese de tener un buen equilibrio.
• Tire del cortacésped hacia atrás lentamente.
• Retire la batería del cortacésped antes de realizar ajustes,
cambiar accesorios o almacenarlo. Estas medidas de
seguridad preventivas reducen el riesgo de que el
cortacésped se ponga en marcha accidentalmente.
• Antes y durante el retroceso con el cortacésped, mire
hacia atrás y hacia abajo para ver si hay niños pequeños y
otras personas.
• No utilice el cortacésped bajo la influencia de alcohol o
drogas. Manténgase alerta y observe lo que está haciendo
en todo momento. Emplee el sentido común y no utilice
el cortacésped cuando esté cansado.
• Lleve siempre gafas o anteojos de seguridad durante la
utilización y al realizar un ajuste o reparación para
proteger sus ojos. Los objetos proyectados que rebotan
pueden producir lesiones graves en los ojos. Lleve
siempre una máscara facial o antipolvo si se levanta
polvo durante el funcionamiento.
• Manténgase alejado en todo momento de la abertura de
descarga. No coloque las manos ni los pies cerca de las
piezas giratorias o debajo de la plataforma de corte. El
contacto con la cuchilla puede amputar manos y pies.
• Planifique su patrón de corte para evitar la descarga de
material hacia caminos, aceras, transeúntes y similares.
Asimismo, evite descargar material contra paredes u
obstrucciones, lo que puede hacer que el material
descargado rebote hacia el operario.
• Para ayudar a evitar la cuchilla o una lesión por un objeto
proyectado, permanezca en la zona del operario detrás de
las asas.
• Si falta la cubierta de descarga o si esta ha sufrido daños,
puede haber contacto con la cuchilla o lesiones por
objetos proyectados.
• Los objetos golpeados por la cuchilla del cortacésped
pueden producir lesiones graves a las personas. El césped
siempre debe examinarse detenidamente y deben
eliminarse todos los objetos antes de cada corte.
• Detenga la cuchilla cuando cruce senderos de grava,
aceras o caminos.
• Siga todas las instrucciones de carga y no cargue la
batería o el cortacésped fuera del intervalo de temperatura
especificado en las instrucciones. La carga incorrecta o a
temperaturas fuera del intervalo especificado puede dañar
la batería y aumentar el riesgo de incendio.
• Si el cortacésped golpea un objeto extraño, siga estos
pasos:
• Suelte el interruptor de seguridad para desacoplar el
motor.
• Retire la batería.
• Inspeccione si hay daños.
• Repare las piezas dañadas antes de volver a poner en
marcha y utilizar el cortacésped.
• Solicite a un técnico de reparación cualificado que realice
las tareas de servicio utilizando únicamente piezas de
repuesto idénticas. Esto garantizará el mantenimiento de
la seguridad del producto.
• Lleve indumentaria adecuada; no lleve ropa suelta ni
joyas que puedan quedar atrapadas en las piezas móviles.
Se recomienda el uso de guantes de seguridad y calzado
adecuado cuando se trabaje en el exterior. Lleve zapatos
de trabajo resistentes con suela dura y pantalones y
camisas ajustados. Se recomiendan camisas y pantalones
que cubran los brazos y piernas, así como zapatos con
punta de acero. Nunca utilice la máquina descalzo, con
sandalias o calzado resbaladizo o ligero (p. ej. de lona).
• No modifique ni intente reparar el cortacésped o la
batería (según corresponda), excepto según lo indicado en
las instrucciones de uso y cuidado.
• Lleve una protección capilar para sujetar el cabello largo.
• Evite los entornos peligrosos; no utilice el cortacésped en
lugares húmedos / mojados o si está lloviendo.
• Almacene el cortacésped inactivo en el interior. Cuando
no estén en uso, los aparatos deben almacenarse en el
interior, en un lugar seco y alto o cerrado, fuera del
alcance de los niños. Retire siempre la batería del
cortacésped antes de almacenarlo.
• Siegue únicamente con luz diurna o con una buena
iluminación artificial. Camine, no corra durante la
utilización.
• Si el cortacésped empieza a vibrar de manera anormal,
detenga inmediatamente el motor, retire la batería y
compruebe la causa. Normalmente la vibración es una
advertencia de que el cortacésped no funciona
correctamente.
• Compruebe la bolsa con frecuencia en busca de deterioro
y desgaste, y sustituya las bolsas desgastadas. Compruebe
que las bolsas de repuesto cumplan las recomendaciones
o especificaciones del fabricante original.
• Antes de limpiar el cortacésped, desatascar o retirar la
bolsa de hierba, el inserto para mulching o el conducto de
descarga lateral, apague el motor y espere hasta que la
cuchilla se detenga por completo, posteriormente retire la
batería. La cuchilla de corte sigue girando durante unos
segundos después de apagar el motor. Nunca realice estas
funciones hasta que esté seguro de que la cuchilla ha
dejado de girar.
• Mantenga los filos de corte limpios y afilados para
garantizar el mejor rendimiento.
• Inspeccione periódicamente los dispositivos de seguridad
y los cables en busca de daños. En caso de daños, no haga
funcionar la unidad hasta que haya sido reparada por un
profesional de servicio técnico autorizado.
30
Español
ES

• Nunca utilice el cortacésped sin la cubierta de descarga
adecuada, la bolsa de hierba, el inserto para mulching, el
conducto de descarga lateral u otros dispositivos de
seguridad en su posición y funcionando. Nunca utilice el
cortacésped con dispositivos de seguridad dañados. En
caso contrario podrían producirse lesiones personales.
• Utilice únicamente las baterías y cargadores aprobados.
Las baterías y cargadores no aprobados pueden producir
daños en el cortacésped o lesiones al operario.
• No deseche la batería en el fuego. Las celdas podrían
incendiarse o explotar. Compruebe los códigos locales y
de tratamiento de residuos para obtener instrucciones
adecuadas de eliminación.
• Cuando la batería no esté en uso, manténgala alejada de
otros objetos metálicos como clips, monedas, llaves,
clavos, tornillos u otros objetos metálicos pequeños que
puedan hacer una conexión entre los terminales. El
cortocircuito de los terminales de la batería puede
provocar quemaduras o un incendio.
• No abra ni destruya la batería. Los electrolitos contenidos
dentro de la batería son corrosivos y pueden producir
daños en los ojos o la piel si se liberan. Puede ser tóxico
en caso de ingestión.
• Bajo condiciones abusivas, es posible que salga líquido
despedido de la batería; evite el contacto. Si se produce
un contacto accidental, aclare con agua. Si el líquido
entra en contacto con los ojos, acuda también al médico.
El líquido despedido de la batería puede provocar
irritación o quemaduras.
• No exponga una batería o un aparato al fuego ni a
temperaturas excesivas. La exposición al fuego o a una
temperatura superior a 130°C puede provocar una
explosión.
• Tenga cuidado al manipular las baterías para evitar un
cortocircuito con materiales conductores, como anillos,
pulseras, llaves, etc. La batería o el conductor puede
sobrecalentarse y producir quemaduras si se hace
contacto con dichos materiales.
• No utilice una batería o un aparato que haya sufrido
daños o modificaciones. Las baterías dañadas o
modificadas pueden exhibir un comportamiento
impredecible que puede dar lugar a un incendio, una
explosión o un riesgo de lesiones.
3.3 FUNCIONAMIENTO EN
PENDIENTES
Las pendientes son un factor principal relacionado con los
accidentes por resbalones y caídas, que pueden provocar
lesiones graves. Durante el funcionamiento en pendientes, es
necesario tomar precauciones adicionales. Si no se siente
seguro en una pendiente, no la siegue.
Cosas que debe hacer:
• En las pendientes debe segarse transversalmente; nunca
siegue hacia arriba y abajo. Extreme las precauciones
cuando cambie de dirección en pendientes.
• Este atento por si hubiera agujeros, surcos, piedras,
objetos ocultos o baches que puedan hacer que resbale o
tropiece. La hierba alta puede ocultar obstáculos.
Cosas que no debe hacer:
• No siegue en pendientes excesivamente pronunciadas.
• No siegue cerca de precipicios, zanjas o terraplenes;
podría perder el equilibrio.
• No siegue en pendientes mayores de 15 grados.
• No siegue hierba mojada. Podría perder el equilibrio y
resbalar.
3.4 SERVICIO/MANTENIMIENTO
• Compruebe la cuchilla y los pernos de montaje del motor
(de la máquina) a intervalos frecuentes para verificar que
estén bien apretados.
• Sustituya la cuchilla si está doblada o agrietada. Una
cuchilla desequilibrada provoca vibraciones que podrían
producir daños en la unidad de accionamiento del motor o
provocar lesiones personales.
• Mantenga todas las tuercas, los pernos y los tornillos
apretados para garantizar que el equipo esté en
condiciones seguras de funcionamiento.
• No lave con una manguera; evite que entre agua en el
motor y las conexiones eléctricas.
• Nunca retire ni manipule los dispositivos de seguridad.
Compruebe su correcto funcionamiento periódicamente.
Nunca haga nada para interferir con la función prevista de
un dispositivo de seguridad o para reducir la protección
proporcionada por un dispositivo de seguridad.
• Mantenga el cortacésped libre de hierba, hojas u otros
residuos acumulados. Deje que el cortacésped se enfríe
antes de almacenarlo.
• Nunca realice ajustes o reparaciones con el motor en
marcha.
• Retire siempre la batería de los cortacéspedes antes de
realizar tareas de ajuste, limpieza o reparación.
• Compruebe los componentes del recogehierba y la
protección de descarga con frecuencia y sustitúyalos por
piezas recomendadas por el fabricante, cuando sea
necesario.
• Afile una cuchilla desafilada por igual en cada extremo
para mantener el equilibrio.
• Mantenga las protecciones en su posición y en estado de
funcionamiento. Las cuchillas del cortacésped están
afiladas y pueden cortar. Envuelva las cuchillas o lleve
guantes y tenga especial cuidado al realizar tareas de
servicio.
• Limpie la cuchilla exhaustivamente y compruebe su
equilibrio apoyándola horizontalmente sobre un clavo
delgado por su orificio central. El clavo también debe
estar en posición horizontal. Si cualquiera de los
extremos de la cuchilla gira hacia abajo, retire algo de
metal del extremo pesado o inferior hasta que la cuchilla
esté equilibrada. Está equilibrada cuando ninguno de los
extremos cae.
• Utilice únicamente cuchillas de repuesto idénticas.
31
Español
ES
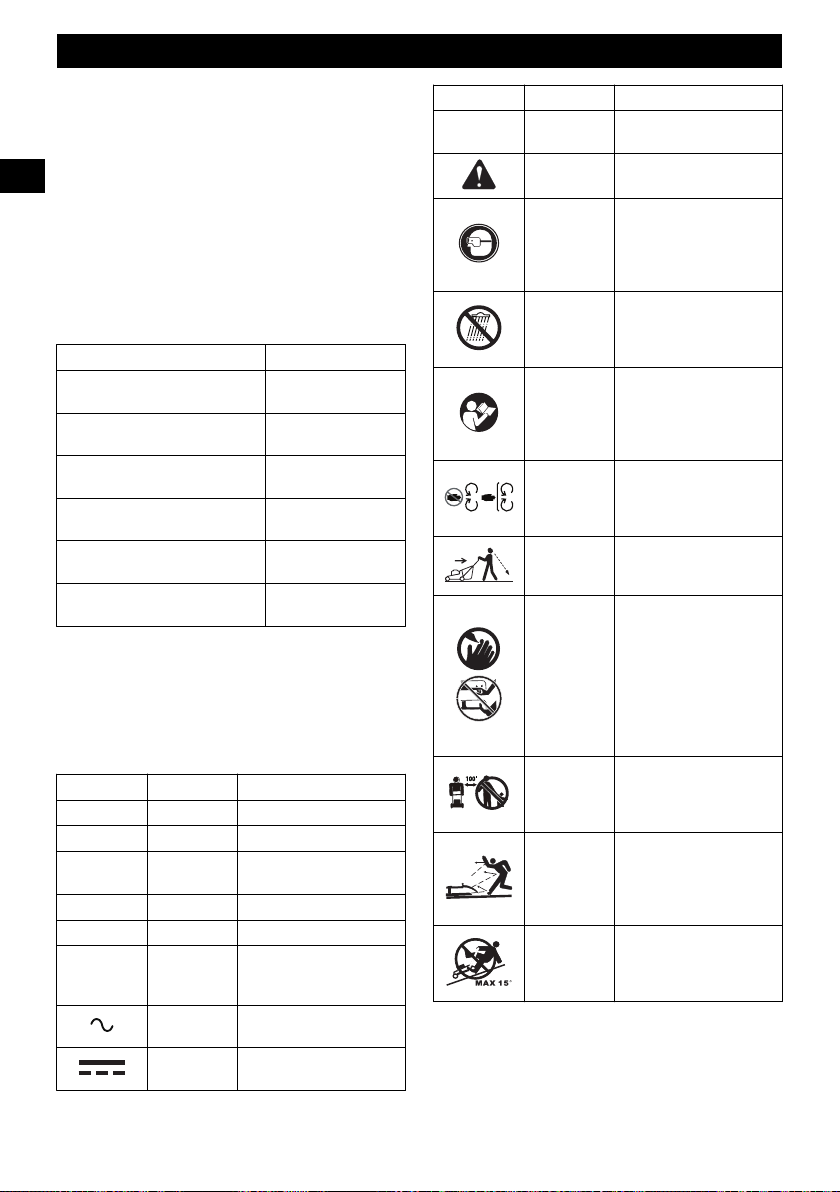
• Cuide el mantenimiento del cortacésped. Mantenga los
filos de corte afilados y limpios para obtener el mejor
rendimiento de forma segura. Siga las instrucciones para
la lubricación y el cambio de accesorios. Inspeccione
periódicamente el cable del cortacésped, y si está dañado,
haga que lo repare un centro de servicio técnico
autorizado.
• Si se producen situaciones que no están cubiertas en este
manual, tenga cuidado y utilice el buen juicio o contacte
con el servicio al cliente para obtener asistencia.
• Nunca utilice el cortacésped sin las protecciones, placas u
otros dispositivos de protección de seguridad adecuados
en su posición.
El intervalo de temperatura ambiente recomendado:
Elemento Temperatura
Intervalo de temperatura de alma-
cenamiento del cortacésped
32°F (0°C) - 113°F
(45°C)
Intervalo de temperatura de funcio-
namiento del cortacésped
32°F (0°C) - 113°F
(45°C)
Intervalo de temperatura de carga
de la batería
39°F (4°C) - 104°F
(40°C)
Intervalo de temperatura de funcio-
namiento del cargador
39°F (4°C) - 104°F
(40°C)
Intervalo de temperatura de alma-
cenamiento de la batería
32°F (0°C) - 113°F
(45°C)
Intervalo de temperatura de descar-
ga de la batería
32°F (0°C) - 113°F
(45°C)
4 SÍMBOLOS EN EL PRODUCTO
En esta herramienta pueden utilizarse algunos de los
siguientes símbolos. Le rogamos que los estudie y aprenda su
significado. La interpretación correcta de estos símbolos le
permitirá manejar la herramienta mejor y de manera más
segura.
Símbolo
Nombre Explicación
V Voltios Tensión
A Amperios Corriente
Hz Hertzios
Frecuencia (ciclos por se-
gundo)
W Vatios Potencia
min Minutos Tiempo
/min Por minuto
Revoluciones, carreras, ve-
locidad de superficie, órbi-
tas, etc., por minuto
Corriente al-
terna
Tipo de corriente
Corriente con-
tinua
Tipo o una característica de
corriente
Símbolo Nombre Explicación
n
o
Velocidad sin
carga
Velocidad rotacional, sin
carga
Alerta de se-
guridad
Precauciones que afectan a
su seguridad.
Protección oc-
ular
Lleve siempre protección
ocular con protectores later-
ales marcada para cumplir
la ANSI Z87.1 cuando uti-
lice este equipo.
ADVERTEN-
CIA --- Con-
diciones hú-
medas
No exponga el producto a la
lluvia o a condiciones de
humedad.
Lea el manual
del operario
Para reducir el riesgo de le-
siones, el usuario debe leer
y entender el manual del
operario antes de utilizar
este producto.
Mantenga los
dispositivos
de seguridad
No abra ni retire los dispo-
sitivos de seguridad mien-
tras la herramienta esté fun-
cionando.
Mire hacia
atrás cuando
retroceda
Mire hacia abajo y hacia
atrás en primer lugar para
evitar tropezar al retroceder.
PELIGRO ---
Mantenga ale-
jados los pies
y las manos
Para reducir el riesgo de le-
siones, mantenga las manos
y los pies alejados de las
piezas giratorias. No utilice
a menos que la cubierta de
descarga o la bolsa de hier-
ba estén en su posición. En
caso de daños, sustituya in-
mediatamente.
PELIGRO ---
Mantenga ale-
jados a los
transeúntes
No corte el césped cuando
haya niños u otras personas
cerca.
PELIGRO ---
Proyección de
residuos
Retire los objetos que pue-
dan ser proyectados por la
cuchilla en cualquier direc-
ción. Lleve gafas de seguri-
dad.
PELIGRO ---
Riesgo en
pendientes
pronunciadas
Tenga mucho cuidado en
las pendientes. No siegue
en pendientes con una incli-
nación superior a 15 grados.
5 NIVELES DE RIESGO
Las siguientes indicaciones y significados tienen como fin
explicar los niveles de riesgo asociados a este producto.
32
Español
ES
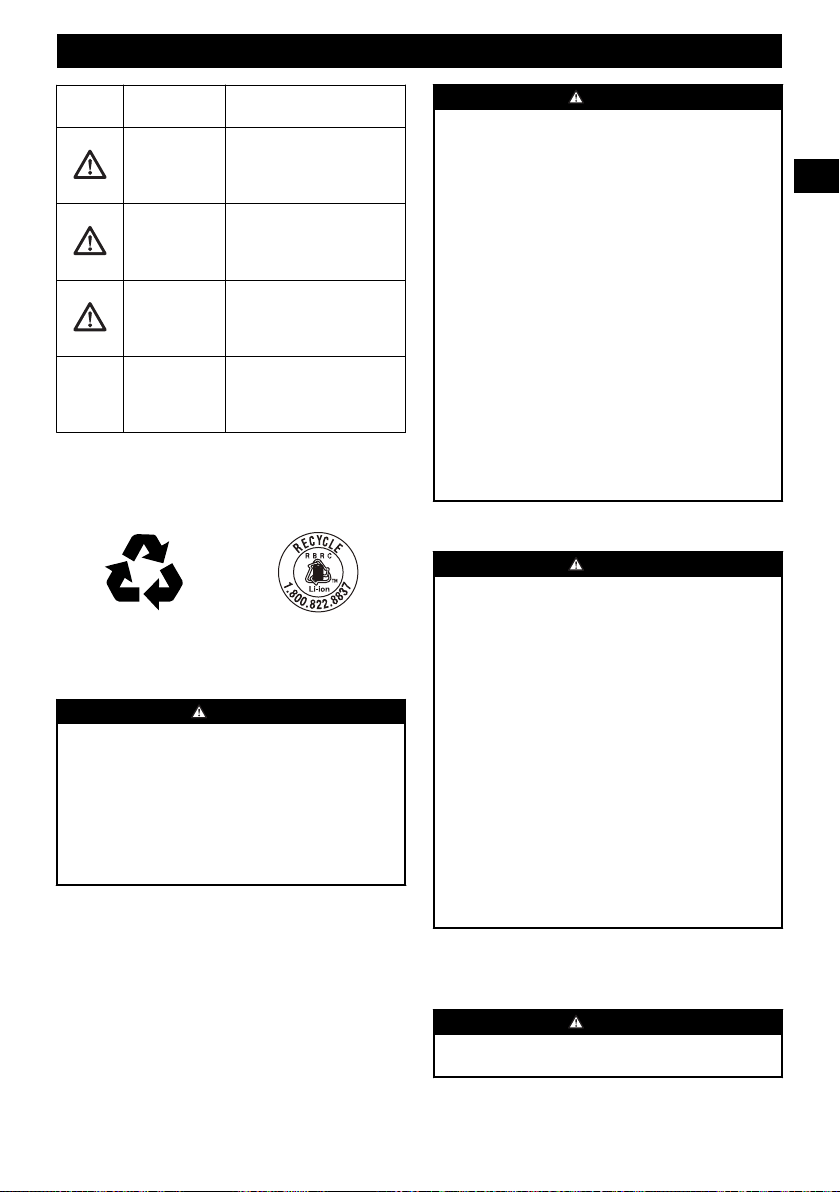
SÍMBO-
LO
INDICACIÓN SIGNIFICADO
PELIGRO Indica una situación de peli-
gro inminente que, de no evi-
tarse, provocará lesiones
graves o incluso la muerte.
ADVERTEN-
CIA
Indica una situación de peli-
gro potencial que, de no evita-
rse, podría provocar lesiones
graves o incluso la muerte.
PRECAUCIÓN Indica una situación de peli-
gro potencial que, de no evita-
rse, puede provocar lesiones
leves o moderadas.
PRECAUCIÓN (Sin símbolo de alerta sobre
seguridad) Indica una situa-
ción que puede provocar da-
ños materiales.
6 ELIMINACIÓN DE BATERÍA
SEGURA PARA EL MEDIO
AMBIENTE
Los materiales tóxicos y corrosivos que figuran a
continuación se encuentran en las baterías utilizadas en esta
máquina: Ion de litio, un material tóxico.
AVISO
Deseche todos los materiales tóxicos de una manera
especificada para evitar la contaminación del medio
ambiente. Antes de desechar una batería de ion de litio
dañada o agotada, contacte con la agencia local de
eliminación de residuos o con la agencia de protección
ambiental local para obtener información e instrucciones
específicas. Lleve las baterías a un centro de reciclaje o
eliminación local, certificado para la eliminación de ion de
litio.
AVISO
Si la batería se agrieta o se rompe, con o sin fugas, no la
recargue ni la utilice. Deséchela y sustitúyala por una
batería nueva. ¡NO INTENTE REPARARLA! Para evitar
lesiones y riesgos de incendio, explosión o descarga
eléctrica, y para evitar daños al medio ambiente:
• Cubra los terminales de la batería con cinta adhesiva
resistente.
• NO intente retirar o destruir ninguno de los
componentes de la batería.
• NO intente abrir la batería.
• Si se produce una fuga, los electrolitos liberados son
corrosivos y tóxicos. NO deje que la solución entre en
contacto con los ojos o la piel, y no la ingiera.
• NO deseche estas baterías con la basura doméstica
normal.
• NO incinere.
• NO lleve las baterías a lugares donde formarán parte de
vertederos de residuos o flujos de residuos sólidos
urbanos.
• Llévelas a un centro de reciclaje o eliminación
certificado.
7 PROPUESTA 65
AVISO
Este producto contiene una sustancia química conocida en
el estado de California como causante de cáncer, defectos
de nacimiento u otros daños reproductivos. El polvo
generado por el lijado eléctrico, el serrado, el esmerilado, la
perforación y otras actividades de construcción contiene
sustancias químicas que se sabe que son causantes de
cáncer, defectos de nacimiento u otros daños reproductivos.
Algunos ejemplos de estas sustancias químicas son:
• Plomo de pinturas con base de plomo;
• Sílice cristalina de ladrillos y cemento y otros productos
de albañilería;
• Arsénico y cromo de la madera tratada químicamente.
El riesgo de exposición a estas sustancias químicas varía
según la frecuencia con la que realice este tipo de trabajo.
Para reducir su exposición a estas sustancias químicas,
trabaje en una zona bien ventilada y trabaje con equipos de
seguridad aprobados, como máscaras antipolvo, que estén
especialmente diseñadas para filtrar partículas
microscópicas.
Conserve estas instrucciones.
8 INSTALACIÓN
AVISO
No cambie ni utilice accesorios que no sean los
recomendados por el fabricante.
33
Español
ES

AVISO
No coloque la llave de seguridad ni la batería hasta que no
haya montado todas las piezas.
8.1 DESEMBALAJE DE LA MÁQUINA
AVISO
Asegúrese de montar correctamente la máquina antes del
uso.
AVISO
• Si las piezas presentan daños, no utilice la máquina.
• Si no tiene todas las piezas, no utilice la máquina.
• Si faltan piezas o hay piezas dañadas, hable con el
centro de servicio.
1. Abra el embalaje.
2. Lea la documentación que se encuentra en la caja.
3. Retire todas las piezas sin montar de la caja.
4. Retire la máquina de la caja.
5. Deseche la caja y el embalaje de conformidad con los
reglamentos locales.
8.2 DESPLIEGUE Y AJUSTE DEL ASA
4
9
3
1. Tire hacia arriba y hacia atrás del asa superior (3) para
levantarla a la posición de funcionamiento.
2. Apriete el asa inferior (4) con las palancas de apertura
rápida (9) a ambos lados.
ATENCIÓN
Asegúrese de que las dos asas estén en la misma posición.
AVISO
No dañe los cables cuando pliegue o despliegue el asa.
8.3 INSTALACIÓN DEL ASA
SUPERIOR
3
10
10
11
11
4
P
1. Alinee los orificios del asa superior (3) y el asa inferior
(4).
2. Introduzca los cierres de leva (10) por los orificios.
3. Apriete los mandos (11) en los cierres de leva.
4. Hay dos posiciones (P) disponibles para elegir al instalar
el asa superior.
5. Realice la misma operación en el otro lado.
AVISO
Tenga cuidado al instalar el asa superior para evitar pillarse
los dedos.
8.4 INSTALACIÓN DEL
RECOGEHIERBA
7
13
12
34
Español
ES
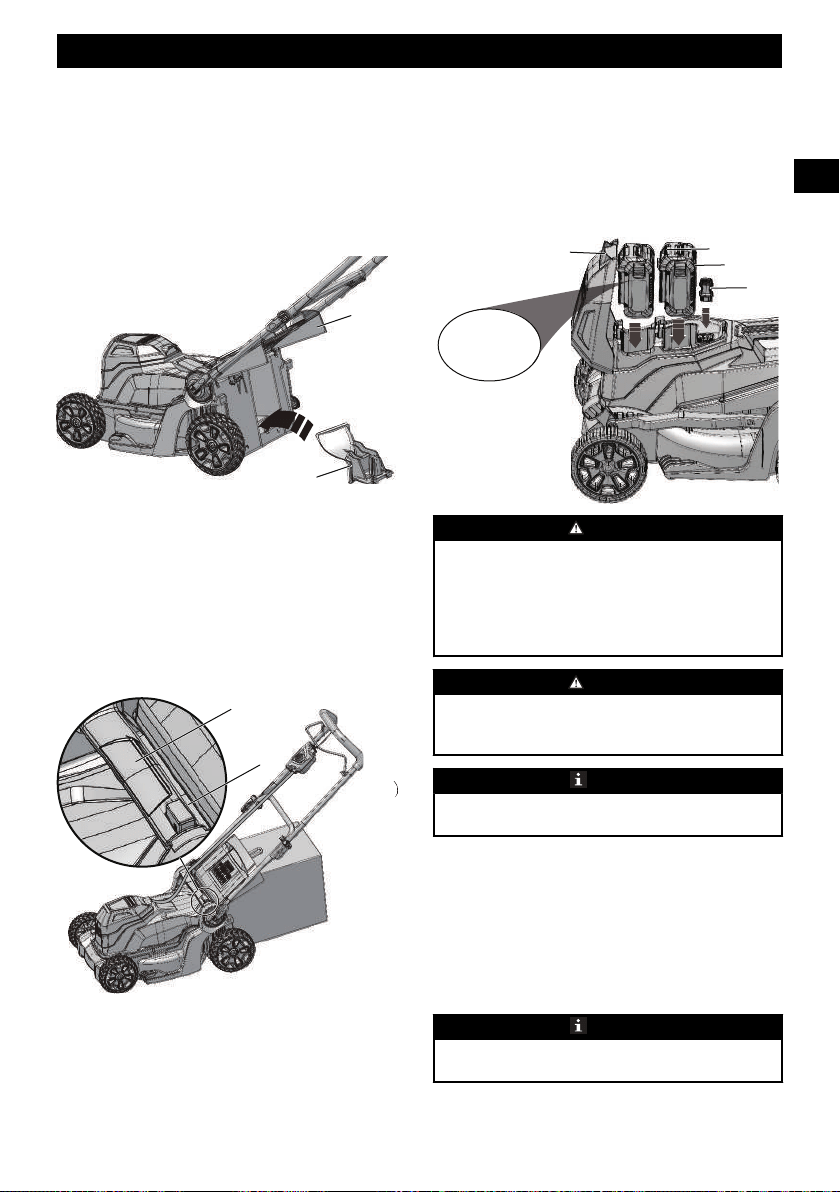
1. Retire el tapón de mulching.
2. Abra la puerta de descarga trasera (5) y sujétela.
3. Sostenga el recogehierba (7) por el asa (12) y ponga los
ganchos (12) sobre las ranuras (13).
4. Cierre la puerta de descarga trasera.
8.5 INSTALACIÓN DEL TAPÓN DE
MULCHING
8
5
1. Retire el recogehierba.
2. Abra la puerta de descarga trasera (5) y sujétela.
3. Sujete el tapón de mulching (8) por su asa y colóquelo en
el conducto de descarga.
4. Cierre la puerta de descarga trasera.
8.6 AJUSTE DE LA ALTURA DE LA
CUCHILLA
La máquina puede ajustarse a distintas alturas de cuchilla.
17
21
1. Pulse el botón de ajuste de altura (17), levante la barra de
ajuste de altura (21) a una posición más alta para
aumentar la altura de la cuchilla.
2. Pulse el botón de ajuste de altura, presione la barra de
ajuste de altura a una posición más baja para disminuir la
altura de la cuchilla.
8.7 INSTALACIÓN DE LA BATERÍA
6
14
15
16
UTILICE
ÚNICAMENTE
UNA BATERÍA
DE 24V
AVISO
• Si la batería o el cargador ha sufrido daños, sustituya la
batería o el cargador.
• Detenga la máquina y espere hasta que el motor se pare
antes de instalar o retirar la batería.
• Debe leer, conocer y seguir las instrucciones del manual
de la batería y el cargador.
AVISO
UTILICE ÚNICAMENTE UNA BATERÍA DE 24V. NO
UTILICE UNA BATERÍA DE DOBLE TENSIÓN DE
24/48V.
NOTA
Ambas baterías deben instalarse en los compartimentos para
poder poner en marcha la máquina.
1. Abra la puerta de la batería (6).
2. Alinee las nervaduras de elevación de la batería (14) con
las ranuras del compartimento de la batería.
3. Introduzca la batería en el compartimento de la batería
hasta que encaje en su posición.
4. Cuando escuche un clic, la batería está instalada.
5. Realice la misma operación con la otra batería.
6. Cierre la puerta de la batería.
NOTA
El motor arranca solo cuando se introduce la llave de
seguridad (15).
35
Español
ES
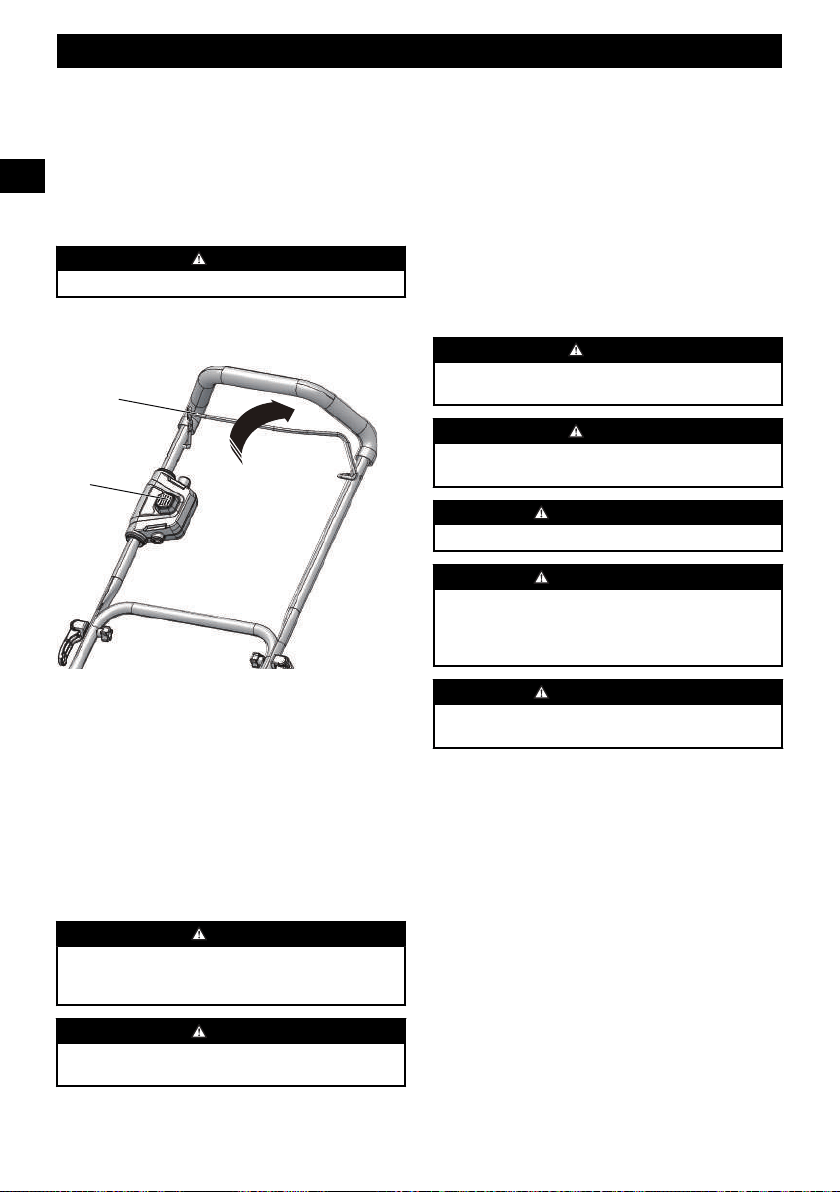
8.8 RETIRADA DE LA BATERÍA
1. Abra la puerta de la batería (6).
2. Pulse y mantenga pulsado el botón de desbloqueo de la
batería (16).
3. Retire las baterías (14) de la máquina.
9 FUNCIONAMIENTO
AVISO
Lleve protección ocular durante el funcionamiento.
9.1 PUESTA EN MARCHA DE LA
MÁQUINA
1
2
1. Introduzca la llave de seguridad.
2. Pulse y mantenga pulsado el botón de puesta en marcha
(2).
3. Mientras mantiene pulsado el botón de puesta en marcha,
tire del interruptor de seguridad (1) en la dirección del
manillar.
4. Suelte el botón de puesta en marcha para poner en marcha
la máquina.
9.2 DETENCIÓN DE LA MÁQUINA
1. Suelte el interruptor de seguridad para detener la
máquina.
AVISO
Espere hasta que las cuchillas se detengan por completo
antes de volver a poner en marcha la máquina. No apague y
encienda la máquina rápidamente.
AVISO
Retire siempre la llave de seguridad y la batería tras
finalizar el trabajo.
9.3 VACIADO DEL RECOGEHIERBA
1. Detenga la máquina.
2. Retire la llave de seguridad.
3. Retire la batería.
4. Abra la puerta de descarga trasera y sujétela.
5. Sostenga el recogehierba por el asa y desengánchelo de
las ranuras.
6. Cierre la puerta de descarga trasera.
7. Vacíe el recogehierba.
10 MANTENIMIENTO
AVISO
Retire la llave de seguridad y la batería de la máquina antes
de realizar tareas de mantenimiento.
AVISO
Mantenga el motor y la batería libres de hierba, hojas o un
exceso de grasa.
PRECAUCIÓN
Utilice únicamente piezas de repuesto aprobadas.
PRECAUCIÓN
No permita que líquidos de frenos, gasolina y otros
derivados del petróleo toquen las piezas de plástico. Las
sustancias químicas pueden dañar el plástico y hacer que
quede inservible.
PRECAUCIÓN
No utilice disolventes o detergentes fuertes en la carcasa o
los componentes de plástico.
10.1 MANTENIMIENTO GENERAL
• Antes de cada uso, examine la máquina para comprobar si
hay piezas dañadas, ausentes o sueltas como tornillos,
tuercas, pernos y tapas.
• Apriete correctamente todos los elementos de fijación y
las tapas.
• Limpie la máquina con un paño seco. No utilice agua.
36
Español
ES
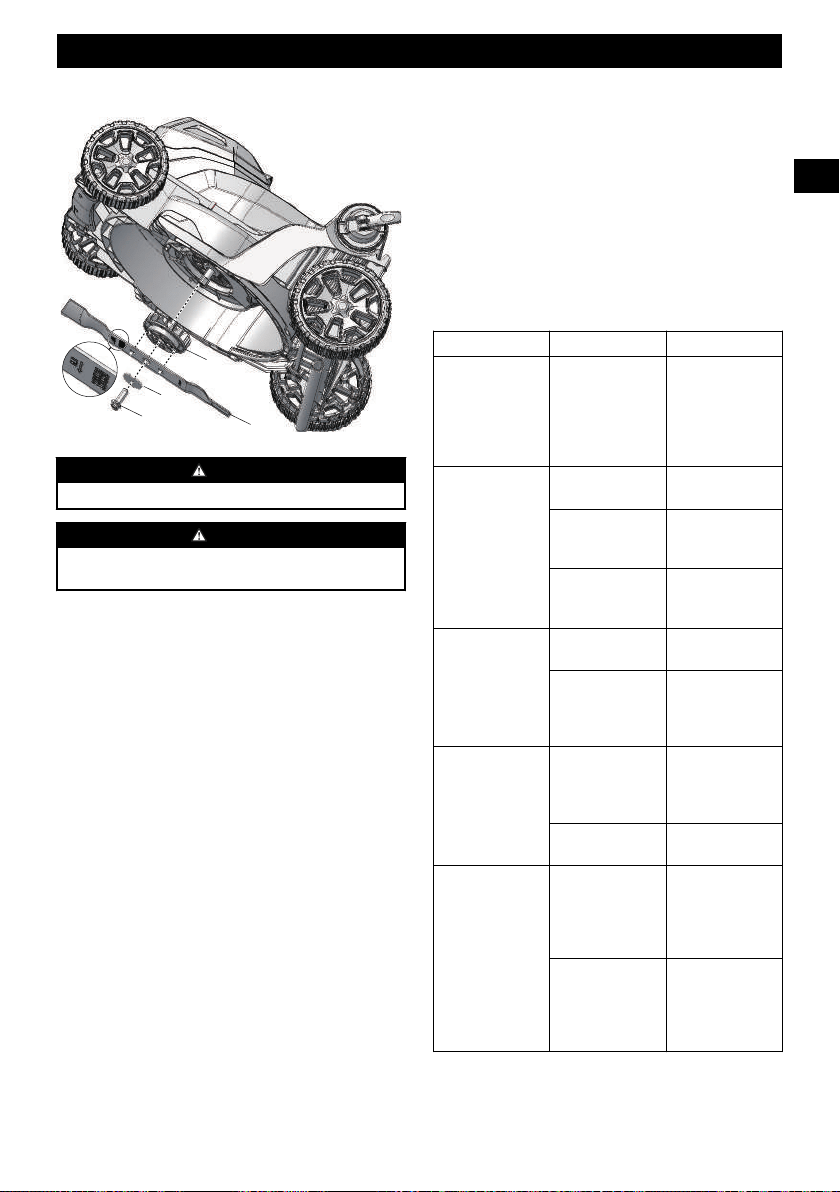
10.2 SUSTITUCIÓN DE LA CUCHILLA
18
19
21
20
AVISO
Utilice únicamente una cuchilla de repuesto aprobada.
AVISO
Lleve guantes gruesos o enrolle un trapo alrededor de la
cuchilla cuando la toque.
1. Detenga la máquina.
2. Asegúrese de que la cuchilla se detenga por completo.
3. Retire la llave de seguridad y la batería.
4. Apoye la máquina sobre un lateral.
5. Utilice un trozo de madera para impedir el movimiento de
la cuchilla.
6. Retire el perno de la cuchilla (18) y el espaciador (19)
con una llave o una llave de tubo.
7. Retire la cuchilla (20) y el ventilador (21).
8. Instale la cuchilla nueva como se muestra en la figura.
Asegúrese de que los orificios en forma de flecha de las
aspas encajen en los postes del ventilador.
9. Meta el espaciador y apriete el perno de la cuchilla.
10.3 ALMACENAMIENTO DE LA
MÁQUINA
• Limpie la máquina antes del almacenamiento.
• Asegúrese de que el motor no esté caliente cuando
almacene la máquina.
• Asegúrese de que la máquina no tenga piezas sueltas o
dañadas. Si es necesario, siga estos pasos/estas
instrucciones:
• Sustituya las piezas dañadas.
• Apriete los pernos.
• Hable con una persona de un centro de servicio
aprobado.
• Almacene la máquina en una zona seca.
• Asegúrese de que los niños no puedan acercarse a la
máquina.
Puede bajar las asas antes de almacenar la máquina.
1. Afloje completamente los elementos de fijación del asa
en los laterales de las asas.
2. Pliegue las asas.
3. No pellizque ni atrape los cables.
11 SOLUCIÓN DE PROBLEMAS
Problema Posible causa Solución
El asa no está en
posición.
Los pernos no se
han acoplado cor-
rectamente.
Ajuste la altura del
asa y asegúrese de
que los mandos y
los pernos se hay-
an alineado cor-
rectamente.
La máquina no se
pone en marcha.
La capacidad de la
batería está baja.
Cargue la batería.
El interruptor de
seguridad está de-
fectuoso.
Sustituya el inter-
ruptor de seguri-
dad.
La llave de seguri-
dad no se ha intro-
ducido.
Introduzca la llave
de seguridad.
La máquina corta
la hierba irregular-
mente.
El césped es
agreste.
Examine la super-
ficie de segado.
La altura de la cu-
chilla no se ha
ajustado correcta-
mente.
Ajuste la altura de
cuchilla/corte a
una posición más
alta.
La función de
mulching de la
máquina no se re-
aliza correcta-
mente.
Hay recortes de hi-
erba mojada ad-
heridos a la plata-
forma.
Espere hasta que
la hierba se seque
antes de segar.
Falta el tapón de
mulching.
Instale el tapón de
mulching.
Es difícil empujar
la máquina.
La hierba está de-
masiado alta o la
altura de la cuchil-
la es demasiado
baja.
Aumente la altura
de cuchilla/corte.
El recogehierba y
la cuchilla arras-
tran cuando se tra-
baja en hierba den-
sa.
Vacíe los recortes
de hierba del reco-
gehierba.
37
Español
ES

Problema Posible causa Solución
Hay una vibración
elevada en la má-
quina.
La cuchilla está
desequilibrada y
desgastada.
Sustituya la cu-
chilla.
El eje del motor
está doblado.
1. Detenga el
motor.
2. Retire la llave
de seguridad y
la batería.
3. Inspeccione si
hay daños.
4. Repare la má-
quina antes de
volver a po-
nerla en
marcha.
La máquina se de-
tiene durante el se-
gado.
La altura de la cu-
chilla es demasia-
do baja.
Aumente la altura
de cuchilla/corte.
La batería se ha
agotado.
Cargue la batería.
Hay recortes de hi-
erba adheridos a la
plataforma o a la
cuchilla.
Retire la batería y
compruebe la pla-
taforma.
La temperatura de
funcionamiento de
la máquina es de-
masiado alta.
Deje enfriar la má-
quina.
* Si no puede encontrar la solución a estos problemas, vaya al
centro de servicio.
12 DATOS TÉCNICOS
Tensión (2 X 24V) 48 V
Velocidad sin
carga
3600 RPM
Tamaño de pla-
taforma
17"
Ajustes de al-
tura
1 3/8 - 3 3/8” (3.5 - 8.5 cm)
Funciones 2-in-1 Mulching y bolsa trasera
Peso (sin bate-
ría)
34.2 lbs (15.5 kg)
Modelo de ba-
tería
BAG709/BAG710 y otras series BAG
Modelo de car-
gador
CAG812/CAG817 y otras series CAG
Estructura con
doble aisla-
miento
13 GARANTÍA LIMITADA
YEAR
ANS
AÑOS
LIMITED WARRANTY
GARANTIE LIMITÉE
GARANTÍA
LIMITADA
3
Por la presente Greenworks garantiza este producto, al
comprador original con el comprobante de compra, durante
un periodo de tres (3) años frente a defectos en materiales,
piezas o mano de obra. A su entera discreción Greenworks
reparará o sustituirá cualquiera y todas las piezas que resulten
ser defectuosas, con un uso normal, sin coste alguno para el
cliente. Esta garantía es válida únicamente para unidades que
se hayan utilizado para uso personal que no han sido
compradas o alquiladas para uso industrial/comercial y cuyo
mantenimiento se ha realizado de acuerdo con las
instrucciones del manual del propietario suministrado con el
producto nuevo.
ARTÍCULOS NO CUBIERTOS POR LA GARANTÍA:
1. Cualquier pieza que no funcione debido a mal uso, uso
comercial, abuso, negligencia, accidente, mantenimiento
inadecuado o alteración; o
2. La unidad, si no ha sido utilizada o mantenida de acuerdo
con el manual del propietario; o
3. Desgaste normal;
4. Artículos de mantenimiento de rutina tales como
lubricantes, afilado de cuchillas;
5. Deterioro normal del acabado exterior debido al uso o la
exposición.
LÍNEA DE ASISTENCIA TELEFÓNICA:
Puede contactar con el servicio de garantía llamando a
nuestra línea de asistencia telefónica gratuita a
1-888-909-6757.
COSTES DE TRANSPORTE:
Los costes de transporte por el desplazamiento de cualquier
unidad o accesorio de equipos eléctricos son responsabilidad
del comprador. Es responsabilidad del comprador pagar los
costes de transporte de cualquier pieza enviada para su
sustitución bajo esta garantía, a menos que dicha devolución
sea solicitada por escrito por Greenworks.
Dirección en EE.UU.:
Dirección en Canadá:
Greenworks Tools Greenworks Tools Canada, Inc.
38
Español
ES

P.O. Box 1238 P.O. Box 93095, Newmarket,
Ontario
Mooresville, NC 28115 L3Y 8K3
14 VISTA DESPIEZADA
1
2
4
3
5
11 12
13
6
7
8
9
10
Nº Nº pieza Cant. Descripción
1 R0202426-00 1 Kit de conjunto de cuchilla
2 RB341041559 1 Tapón de mulching
3 R0200075-00 1 Llave de seguridad
4 R0202427-00 1 Conjunto de control de superior
5 R0201858-00 2 Mando/bloqueo de leva de asa superior
6 R0202428-00 2 Palanca de apertura rápida de asa inferior
7 R0202429-00 1 Motor
8 R0202430-00 1 Placa de circuitos impresos
9 R0202431-00 1 Aleta de descarga trasera
10 R0202432-00 1 Protección trasera
11 R0202433-00 1 Recogehierba
12 R0200928-00 2 Conjunto de rueda delantera
13 R0200929-00 2 Conjunto de rueda trasera
39
Español
ES

DDG401
EN OPERATOR MANUAL
FR MANUEL D’OPÉRATEUR
DRILL DRIVER
PERCEUSE-VISSEUSE
ES MANUAL DEL OPERADORTALADRO ATORNILLADOR
DD24L00
www.greenworkstools.com
24V 1/2" Brushless Drill / Driver (35 Nm)


1 Description.........................................4
1.1 Purpose.............................................................. 4
1.2 Overview........................................................... 4
2 General power tool safety
warnings.............................................4
2.1 Work area safety................................................ 4
2.2 Electrical safety................................................. 4
2.3 Personal safety...................................................4
2.4 Power tool use and care.....................................5
2.5 Battery tool use and care................................... 5
2.6 Service............................................................... 5
3 Drill safety warnings.........................6
4 Symbols on the product.................... 6
5 Risk levels...........................................6
6 Proposition 65....................................7
7 Installation......................................... 7
7.1 Unpack the machine.......................................... 7
7.2 Install the battery pack.......................................7
7.3 Remove the battery pack................................... 7
7.4 Install the bit...................................................... 7
7.5 Remove the bit...................................................8
8 Operation........................................... 8
8.1 Start the machine............................................... 8
8.2 Stop the machine............................................... 8
8.3 LED light........................................................... 8
8.4 Two-speed switch.............................................. 8
8.5 Forward / reverse switch....................................8
8.6 Clutch settings................................................... 9
8.7 Drill materials....................................................9
9 Maintenance.......................................9
9.1 Clean the machine........................................... 10
10 Technical data..................................10
11 Limited warranty............................ 10
12 Exploded view..................................10
3
English
EN
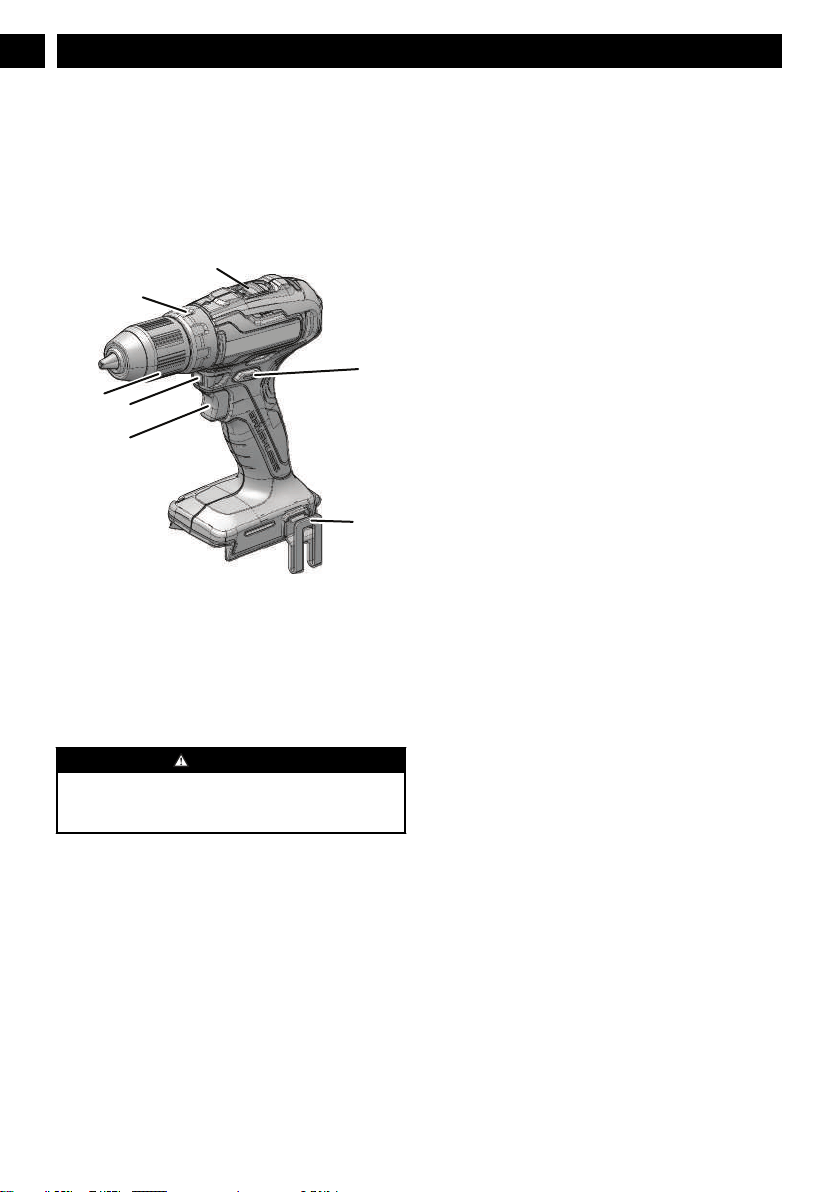
1 DESCRIPTION
1.1 PURPOSE
This machine is used to drill in all types of wood materials
(lumber, plywood, paneling, composition board, and hard
board), ceramics, plastics, fiberglass, laminates and metals.
1.2 OVERVIEW
1
2
3
5
7
6
4
1
High Speed / Low
Speed
2
Torque Adjustment
3
1/2" Keyless Chuck
4
LED Light
5
Trigger
6
Belt Clip
7
Forward / Reverse
2 GENERAL POWER TOOL
SAFETY WARNINGS
WARNING
Read all safety warnings and all instructions. Failure to
follow the warnings and instructions may result in electric
shock, fire and/or serious injury.
Save all warnings and instructions for future reference.
The term “power tool” in the warnings refers to your battery-
operated (cordless) power tool.
2.1 WORK AREA SAFETY
• Keep work area clean and well lit. Cluttered or dark
areas invite accidents.
• Do not operate power tools in explosive atmospheres,
such as in the presence of flammable liquids, gases or
dust. Power tools create sparks which may ignite the dust
or fumes.
• Keep children and bystanders away while operating a
power tool. Distractions can cause you to lose control.
2.2 ELECTRICAL SAFETY
• Power tool plugs must match the outlet. Never modify
the plug in any way. Do not use any adapter plugs
with earthed (grounded) power tools. Unmodified plugs
and matching outlets will reduce risk of electric shock.
• Avoid body contact with earthed or grounded
surfaces, such as pipes, radiators, ranges and
refrigerators. There is an increased risk of electric shock
if your body is earthed or grounded.
• Do not expose power tools to rain or wet conditions.
Water entering a power tool will increase the risk of
electric shock.
• Do not abuse the cord. Never use the cord for
carrying, pulling or unplugging the power tool. Keep
cord away from heat, oil, sharp edges and moving
parts. Damaged or entangled cords increase the risk of
electric shock.
• When operating a power tool outdoors, use an
extension cord suitable for outdoor use. Use of a cord
suitable for outdoor use reduces the risk of electric shock.
• If operating a power tool in a damp location is
unavoidable, use a residual current device (RCD)
protected supply. Use of an RCD reduces the risk of
electric shock.
2.3 PERSONAL SAFETY
• Stay alert, watch what you are doing and use common
sense when operating a power tool. Do not use a
power tool while you are tired or under the influence
of drugs, alcohol or medication. A lapse of attention
while operating power tools may result in serious
personal injury.
• Use personal protection. Always wear eye protection.
Protective products such as dust mask, non-skid safety
shoes, hard hat or hearing protection used appropriately
will reduce personal injuries.
• Prevent unintentional starting. Ensure the switch is in
the off position before connecting to power source
and/or battery pack and when picking up or carrying
the tool. Carrying power tools with your finger on the
switch or energizing power tools that have the switch on
invites accidents.
• Remove any adjusting key or wrench before turning
the power tool on. A wrench or a key left attached to a
rotating part of the power tool may result in personal
injury.
• Do not over-reach. Keep proper footing and balance
at all times. This enables better control of the power tool
in unexpected situations.
• Dress properly. Do not wear loose clothing or
jewellery. Keep your hair, clothing and gloves away
from moving parts. Loose clothes, jewellery or long hair
can be caught in moving parts.
• If devices are provided for the connection of dust
extraction and collection facilities, ensure these are
connected and properly used. Use of dust collection can
reduce dust related hazards.
4
English
EN

• Do not force the power tool. Use the correct power
tool for your application. The correct power tool will do
the job better and safer at the rate for which it was
designed.
• Do not use the power tool if the switch does not turn it
on and off. Any power tool that cannot be controlled with
the switch is dangerous and must be repaired.
• Disconnect the plug from the power source and/or the
battery pack from the power tool before making any
adjustments, changing accessories, or storing power
tools. Such preventive safety measures reduce the risk of
starting the power tool accidentally.
• Store idle power tools out of the reach of children and
do not allow persons unfamiliar with the power tool or
these instructions to operate the power tool. Power
tools are dangerous in the hands of untrained users.
• Maintain power tools and accessories. Check for
misalignment or binding of moving parts, breakage of
parts and any other condition that may affect the
power tool’s operation. If damaged, have the power
tool repaired before use. Many accidents are caused by
poorly maintained power tools.
• Keep cutting tools sharp and clean. Properly
maintained cutting tools with sharp cutting edges are less
likely to bind and are easier to control.
• Use the power tool, accessories and tool bits etc. in
accordance with these instructions, taking into
account the working conditions and the work to be
performed. Use of the power tool for operations different
from those intended could result in a hazardous situation.
• Keep handles and grasping surfaces dry, clean and
free from oil and grease. Slippery handles and grasping
surfaces do not allow for safe handling and control of the
tool in unexpected situations.
2.5 BATTERY TOOL USE AND CARE
• Recharge only with the charger specified by the
manufacturer. A charger that is suitable for one type of
battery pack may create a risk of fire when used with
another battery pack.
• Use power tools only with specifically designated
battery packs. Use of any other battery packs may create
a risk of injury and fire.
• When battery pack is not in use, keep it away from
other metal objects like paper clips, coins, keys, nails,
screws, or other small metal objects that can make a
connection from one terminal to another. Shorting the
battery terminals together may cause burns or fire.
• Under abusive conditions, liquid may be ejected from
the battery; avoid contact. If contact accidentally
occurs, flush with plenty of soap and water. If liquid
contacts eyes, immediately seek medical help. Liquid
ejected from the battery may cause irritation or burns.
• Do not use a battery pack or tool that is damaged or
modified. Damaged or modified batteries may exhibit
unpredictable behaviour resulting in fire, explosion or
risk of injury.
• Do not expose a battery pack or tool to fire or
excessive temperature. Exposure to fire or temperature
above 130 °C may cause explosion.
• Follow all charging instructions and do not charge the
battery pack or tool outside the temperature range
specified in the instructions. Charging improperly or at
temperatures outside the specified range may damage the
battery and increase the risk of fire.
2.6 SERVICE
• Have your power tool serviced by a qualified repair
person using only identical replacement parts. This
will ensure that the safety of the power tool is maintained.
• Never service damaged battery packs. Service of
battery packs should only be performed by the
manufacturer or authorized service providers.
5
English
EN
2.4 POWER TOOL USE AND CARE
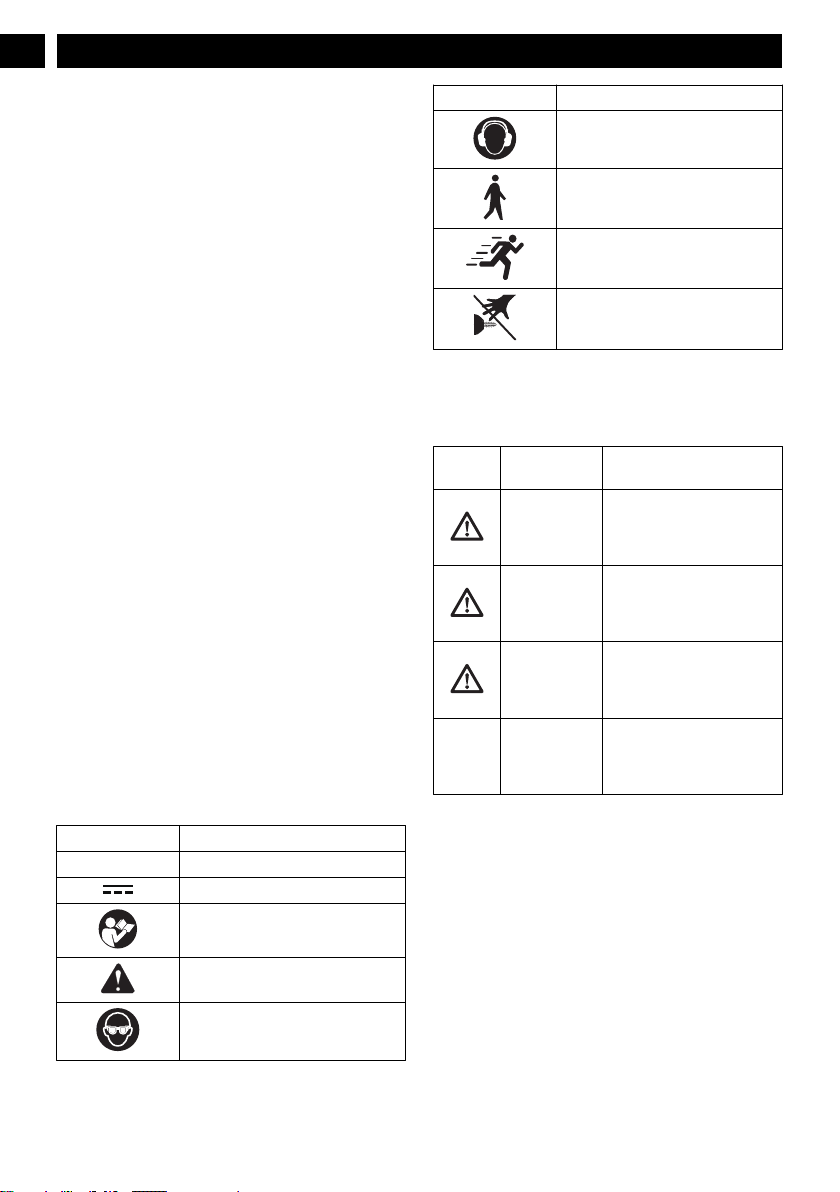
3 DRILL SAFETY WARNINGS
• Hold the power tool by insulated gripping surfaces,
when performing an operation where the cutting
accessory may contact hidden wiring. Cutting
accessory or fasteners contacting a "live" wire may make
exposed metal parts of the power tool "live" and could
give the operator an electric shock.
• Never operate at higher speed than the maximum
speed rating of the drill bit. At higher speeds, the bit is
likely to bend if allowed to rotate freely without
contacting the workpiece, resulting in personal injury.
• Wear ear protectors when impact drilling.Exposure to
noise can cause hearing loss.
• Apply pressure only in direct line with the bit and do
not apply excessive pressure. Bits can bend causing
breakage or loss of control, resulting in personal injury.
• Always start drilling at low speed and with the bit tip
in contact with the workpiece. At higher speeds, the bit
is likely to bend if allowed to rotate freely without
contacting the workpiece, resulting in personal injury.
• Know your power tool. Read operator manual
carefully. Learn its applications and limitations, as well
as the specific potential hazards related to this power
tool. Obey this instruction will reduce shock, fire or
serious injury.
• Always wear safety glasses with side shields marked to
comply with ANSI Z87.1. Obey this instruction will
reduce the risk of serious injury.
• Protect your lungs. Wear a face or dust mask if the
operation is dusty. Obey this instruction will reduce the
risk of serious injury.
• Protect your hearing. Wear hearing protection during
extended periods of operation. Obey this instruction
will reduce the risk of serious injury.
4 SYMBOLS ON THE PRODUCT
Some of the following symbols may be used on this tool.
Please study them and learn their meaning. Proper
interpretation of these symbols will allow you to operate the
tool better and safer.
Symbol
Explanation
V Voltage
Direct current
Read all safety warnings and all in-
structions.
Safety alert
Wear eye protection
Symbol Explanation
Wear ear protection
Low speed
High speed
Do not touch rotating part.
5 RISK LEVELS
The following signal words and meanings are intended to
explain the levels of risk associated with this product.
SYM-
BOL
SIGNAL MEANING
DANGER Indicates an imminently haz-
ardous situation,which, if not
avoided, will result in death
or serious injury.
WARNING Indicates a potentially hazard-
ous situation,which, if not
avoided, could result in death
or serious injury.
CAUTION Indicates a potentially hazard-
ous situation, which, if not
avoided, may result in minor
or moderate injury.
CAUTION (Without Safety Alert Sym-
bol) Indicates a situation that
may result in property dam-
age.
6
English
EN
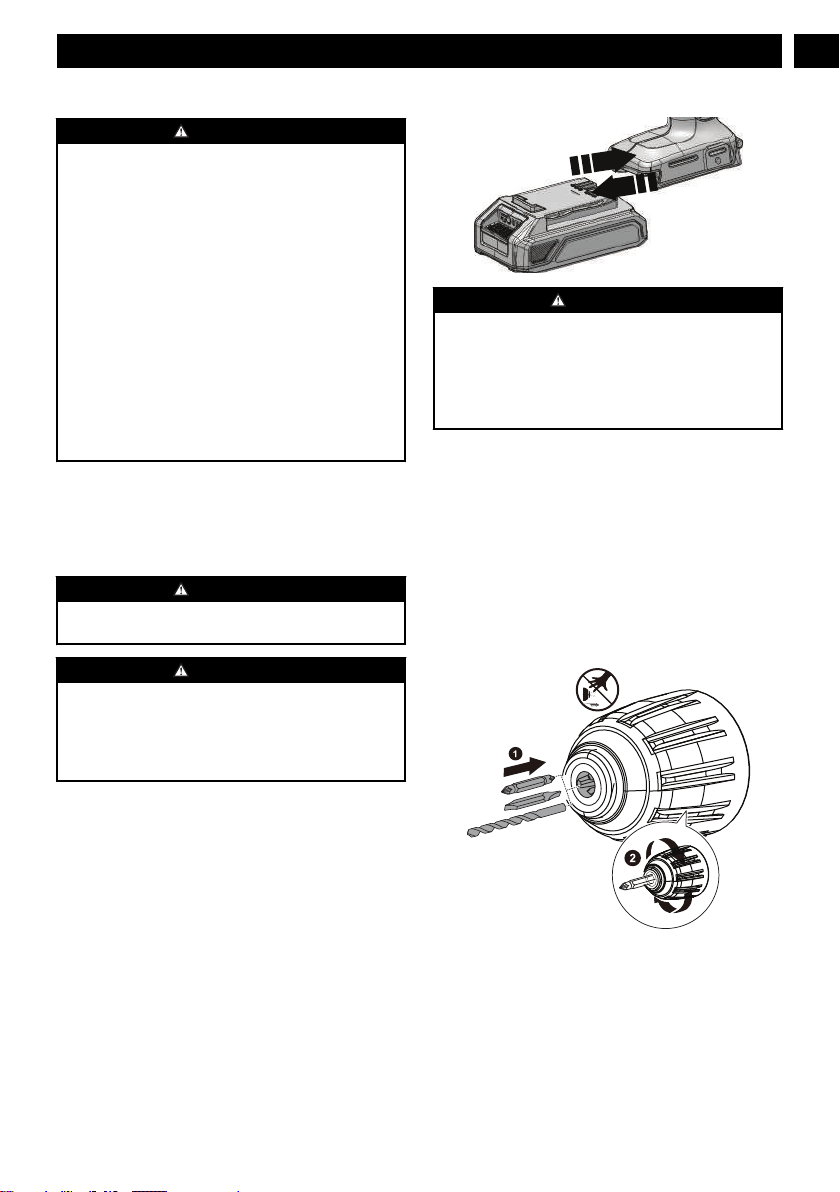
6 PROPOSITION 65
WARNING
This product contains a chemical known to the state of
California to cause cancer, birth defects or other
reproductive harm. Some dust created by power sanding,
sawing, grinding, drilling, and other construction activities
contains chemicals known to cause cancer, birth defects or
other reproductive harm. Some examples of these chemicals
are:
• Lead from lead-based paints;
• Crystalline silica from bricks and cement and other
masonry products;
• Arsenic and chromium from chemically treated lumber.
Your risk of exposure to these chemicals varies depending
on how often you do this type of work. To reduce your
exposure to these chemicals, work in a well-ventilated area,
and work with approved safety equipment, such as dust
masks that are specially designed to filter out microscopic
particles.
Save these instructions.
7 INSTALLATION
7.1 UNPACK THE MACHINE
WARNING
Make sure that you correctly assemble the machine before
use.
WARNING
• If the parts are damaged, do not use the machine.
• If you do not have all the parts, do not operate the
machine.
• If the parts are damaged or missing, speak to the service
center.
1. Open the package.
2. Read the documentation in the box.
3. Remove all the unassembled parts from the box.
4. Remove the machine from the box.
5. Discard the box and package in compliance with local
regulations.
7.2 INSTALL THE BATTERY PACK
WARNING
• If the battery pack or charger is damaged, replace the
battery pack or the charger.
• Stop the machine and wait until the motor stops before
you install or remove the battery pack.
• Read, know, and do the instructions in the battery and
charger manual.
1. Align the lift ribs on the battery pack with the grooves in
the battery compartment.
2. Push the battery pack into the battery compartment until
the battery pack locks into place.
3. When you hear a click, the battery pack is installed.
7.3 REMOVE THE BATTERY PACK
1. Push and hold the battery release button.
2. Remove the battery pack from the machine.
7.4 INSTALL THE BIT
1. Push forward / reverse switch in "neutral" position to lock
the trigger.
2. Turn the chuck counter-clockwise to open.
3. Tilt the machine upwards to keep the bit from falling out
4. Put the bit into the opening of the chuck.
5. Make sure that the bit is centered, then turn the chuck
clock-wise to tighten.
7
English
EN
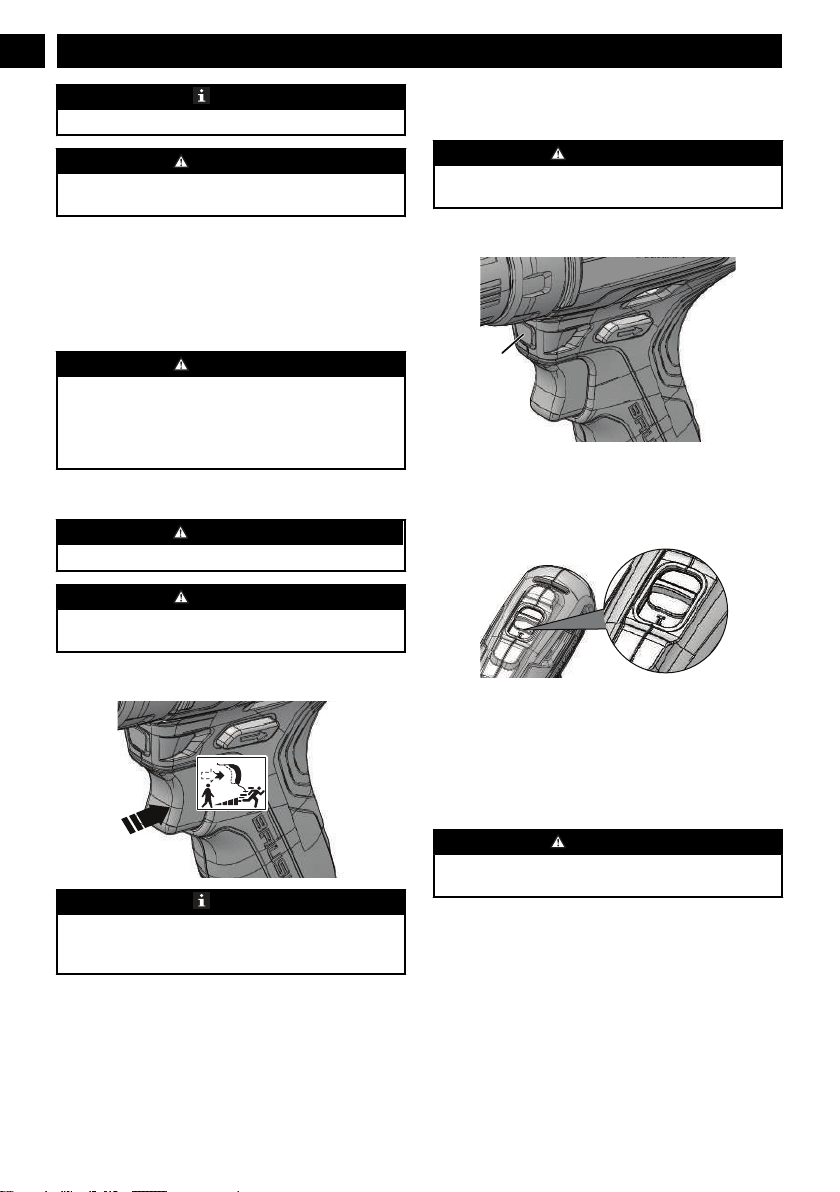
NOTE
Do not use a wrench to tighten or loosen the chuck.
WARNING
Put the bit straight into the chuck jaws. Do not put the bit
into the chuck jaws at an angle then tighten.
7.5 REMOVE THE BIT
1. Push forward / reverse switch in "neutral" position to lock
the trigger.
2. Turn the chuck counter-clockwise to open.
3. Remove the bit.
WARNING
Be prepared for binding at bit breakthrough. When these
situations occur, drill has a tendency to grab and kick
opposite to the direction of rotation and could cause loss of
control when breaking through material. If not prepared,
this loss of control can result in possible serious injury.
8 OPERATION
WARNING
Always wear eye protection.
WARNING
Do not use any attachments or accessories not
recommended by the manufacturer of this product.
8.1 START THE MACHINE
NOTE
The machine can not work until the forward / reverse switch
is pushed fully to the left or right. Do not operate the
machine at low speeds for extended periods of time.
1. Pull the trigger to turn the drill ON.
Variable speed
The machine has a variable speed switch that delivers higher
speed with increased trigger pressure and lower speed with
decreased trigger pressure.
8.2 STOP THE MACHINE
1. Release the trigger to turn the machine OFF.
WARNING
Release the trigger and allow the machine to come to a
complete stop.
8.3 LED LIGHT
4
The LED light illuminates when the trigger is depressed.
It provides extra light for increased visibility.
8.4 TWO-SPEED SWITCH
The machine has a two-speed switch designed for drilling or
driving at LO (1) or HI (2) speeds. A slide switch is on top of
the machine.
1. When you use the machine in the LO (1) speed, the speed
decreases and the machine has more power and torque.
2. When you use the machine in the HI (2) speed, the speed
increases and the machine has less power and torque.
WARNING
Use LO (1) speed for high power and torque applications
and HI (2) speed for fast drilling or driving applications.
8.5 FORWARD / REVERSE SWITCH
The machine has the switch (forward / reverse) above the
trigger to change rotation.
8
English
EN

1. When the switch is on the left side of the trigger, the bit
direction is forward (tightening).
2. When the switch is on the right side of the trigger, the bit
direction is reversed (loosening).
3. Put the switch in the OFF (center lock) position to help
decrease the possibility of accidental starting when not
operating.
WARNING
Release the trigger and let the chuck come to a complete
stop.
WARNING
Let the chuck to come to a complete stop before changing
the direction of rotation.
NOTE
The machine does not operate until the forward / reverse
switch is pushed fully to the left or right.
8.6 CLUTCH SETTINGS
A
B
1. A. The direction to decrease torque.
2. B. The direction to increase torque.
8.7 DRILL MATERIALS
• When drilling hard, smooth surfaces, use a center punch
to mark the desired hole location. This can prevent the
drill bit from slipping off-center as the hole is started.
• When drilling metals, use a light oil on the drill bit to
keep it from overheating. The oil can prolong the life of
the bit and increase the drilling action.
• If the bit jams in the workpiece or if the drill falls, stop to
use the machine immediately. Remove the bit from the
workpiece and analyze the cause of the jam.
NOTE
This drill has an electric brake. When the switch trigger is
released, the chuck stops turning. When the brake is
functioning properly, sparks can be visible through the vent
slots on the housing. This is normal and is the action of the
brake.
WOOD DRILLING
For maximum performance, use high speed steel bits for
wood drilling.
1. Operate the machine at a very low speed to prevent the
bit from slipping off the starting point. Increase the speed
as the drill bit bites into the material.
2. When drilling through holes, put a piece of wood behind
the workpiece to prevent ragged or splintered edges on
the back side of the hole.
METAL DRILLING
For maximum performance, use high speed steel bits for
metal or steel drilling.
1. Operate the machine at a very low speed to prevent the
bit from slipping off the starting point.
2. Hold consistent speed and pressure to avoid overheating
the bit. Applying too much pressure can: Overheat the
drill; Wear the bearings; Bend or burn bits; and Produce
off-center or irregular-shaped holes.
3. When drilling large holes in metal, start with a small bit,
then finish with a large bit. Also, lubricate the bit with oil
to improve drilling action and increase bit life.
9 MAINTENANCE
CAUTION
Do not let brake fluids, gasoline, petroleum-based materials
touch the plastic parts. Chemicals can cause damage to the
plastic, and make the plastic unserviceable.
CAUTION
Do not use strong solvents or detergents on the plastic
housing or components.
WARNING
Remove the battery pack from the machine before
maintenance.
9
English
EN
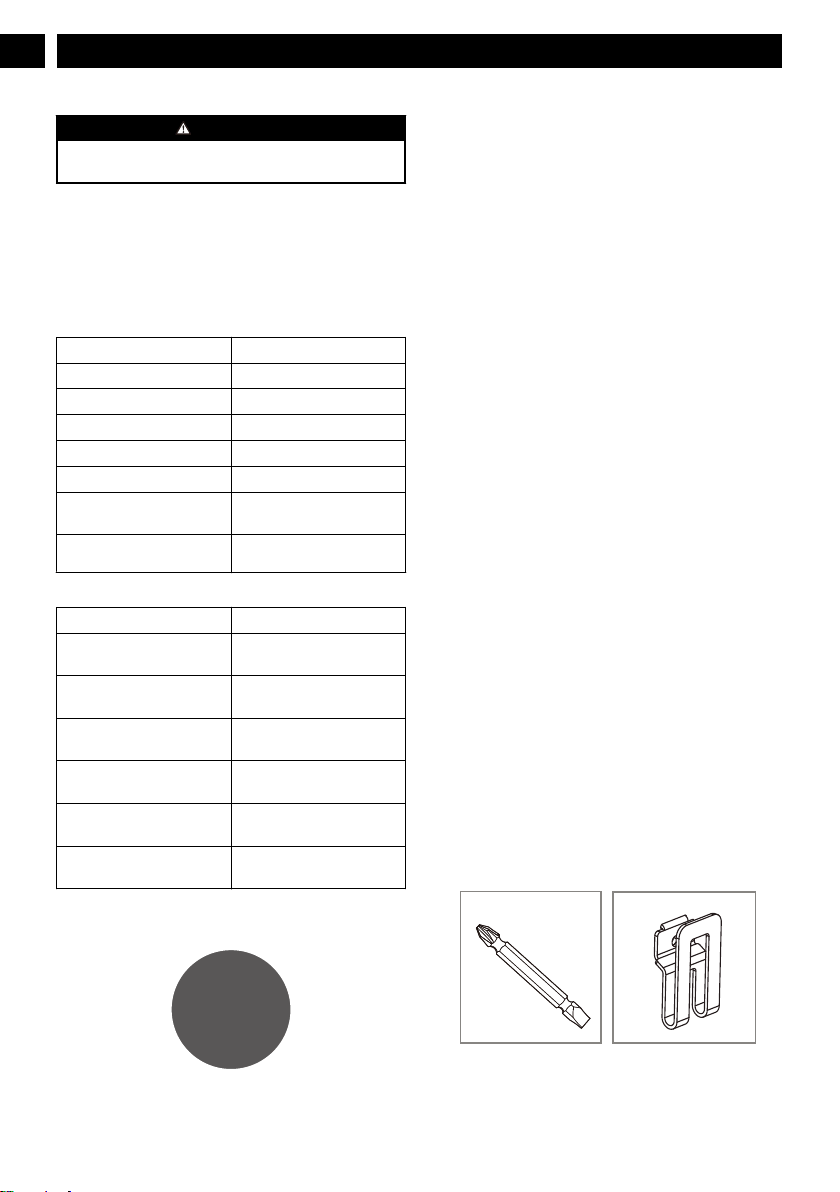
9.1 CLEAN THE MACHINE
CAUTION
The machine must be dry. Humidity can cause risks of
electrical shocks.
• Clear the unwanted material out of the air vent with a
vacuum cleaner.
• Do not spray the air vent or put the air vent in solvents.
• Clean the housing and the plastic components with a
moist and soft cloth.
10 TECHNICAL DATA
Voltage 24 V
Motor Brushless
No Load Speed 0-380 / 0-1450 RPM
Clutch Settings 18 Positions + Drill
Torque 310 In-lbs. / 35 N.m.
Weight Without Battery 2.27 lbs (1.03 kg)
Battery Model BAG708, BAG709, BAG710
and other BAG series
Charger Model 29862, 29972, CAG817 and
other CAG series
The recommended ambient temperature range:
Item Temperature
Appliance storage tempera-
ture range
32°F (0°C) - 158°F (70°C)
Appliance operation temper-
ature range
32°F (0°C) - 104°F (40°C)
Battery charging temperature
range
39°F (4°C) - 104°F (40°C)
Charger operation tempera-
ture range
39°F (4°C) - 104°F (40°C)
Battery storage temperature
range
32°F (0°C) - 73°F (23°C)
Battery discharging tempera-
ture range
32°F (0°C) - 113°F (45°C)
11 LIMITED WARRANTY
YEAR
ANS
AÑOS
LIMITED WARRANTY
GARANTIE LIMITÉE
GARANTÍA
LIMITADA
3
Greenworks hereby warranties this product, to the original
purchaser with proof of purchase, for a period of three (3)
years against defects in materials, parts or workmanship.
Greenworks, at its own discretion will repair or replace any
and all parts found to be defective, through normal use, free
of charge to the customer. This warranty is valid only for
units which have been used for personal use that have not
been hired or rented for industrial/commercial use, and that
have been maintained in accordance with the instructions in
the owners’ manual supplied with the product from new.
ITEMS NOT COVERED BY WARRANTY:
1. Any part that has become inoperative due to misuse,
commercial use, abuse, neglect, accident, improper
maintenance, or alteration; or
2. The unit, if it has not been operated and/or maintained in
accordance with the owner's manual; or
3. Normal wear, except as noted below;
4. Routine maintenance items such as lubricants, blade
sharpening;
5. Normal deterioration of the exterior finish due to use or
exposure.
HELPLINE:
Warranty service is available by calling our toll-free helpline,
at 1-888-909-6757.
TRANSPORTATION CHARGES:
Transportation charges for the movement of any power
equipment unit or attachment are the responsibility of the
purchaser. It is the purchaser’s responsibility to pay
transportation charges for any part submitted for replacement
under this warranty unless such return is requested in writing
by Greenworks.
USA address: Canadian address:
Greenworks Tools Greenworks Tools Canada Inc.
P.O. Box 1238 P.O. Box 93095, Newmarket, Ontario
Mooresville, NC 28115 L3Y 8K3
12 EXPLODED VIEW
1
2
10
English
EN

No. QTY Description
1 1 Double Sided Bit
2. 1 Belt Clip
11
English
EN

1 Description.......................................13
1.1 But................................................................... 13
1.2 Aperçu............................................................. 13
2 Avertissements généraux de
sécurité des outils électriques......... 13
2.1 Sécurité de la zone de travail...........................13
2.2 Sécurité électrique........................................... 13
2.3 Sécurités des personnes................................... 13
2.4 Personal safety.................................................14
2.5 Utilisation et entretien des outils électriques...14
2.6 Utilisation et entretien de l’outil sur batterie...14
2.7 Service............................................................. 15
3 Avertissements de sécurité de la
perceuse-visseuse............................. 15
4 Symboles figurant sur la machine..15
5 Niveaux de risques...........................16
6 Proposition 65..................................16
7 Installation....................................... 16
7.1 Déballez la machine.........................................16
7.2 Installez la batterie...........................................17
7.3 Retirez la batterie.............................................17
7.4 Installez la mèche............................................ 17
7.5 Retirez la mèche.............................................. 17
8 Utilisation.........................................17
8.1 Démarrez la machine.......................................17
8.2 Arrêtez la machine...........................................18
8.3 Lumière DEL...................................................18
8.4 Interrupteur à deux vitesses............................. 18
8.5 Interrupteur avant / arrière...............................18
8.6 Réglages du couplage...................................... 19
8.7 Matériaux de perçage.......................................19
9 Entretien...........................................19
9.1 Nettoyez la machine........................................ 19
10 Données techniques......................... 19
11 Garantie limitée...............................20
12 Vue éclatées......................................20
12
Français
FR
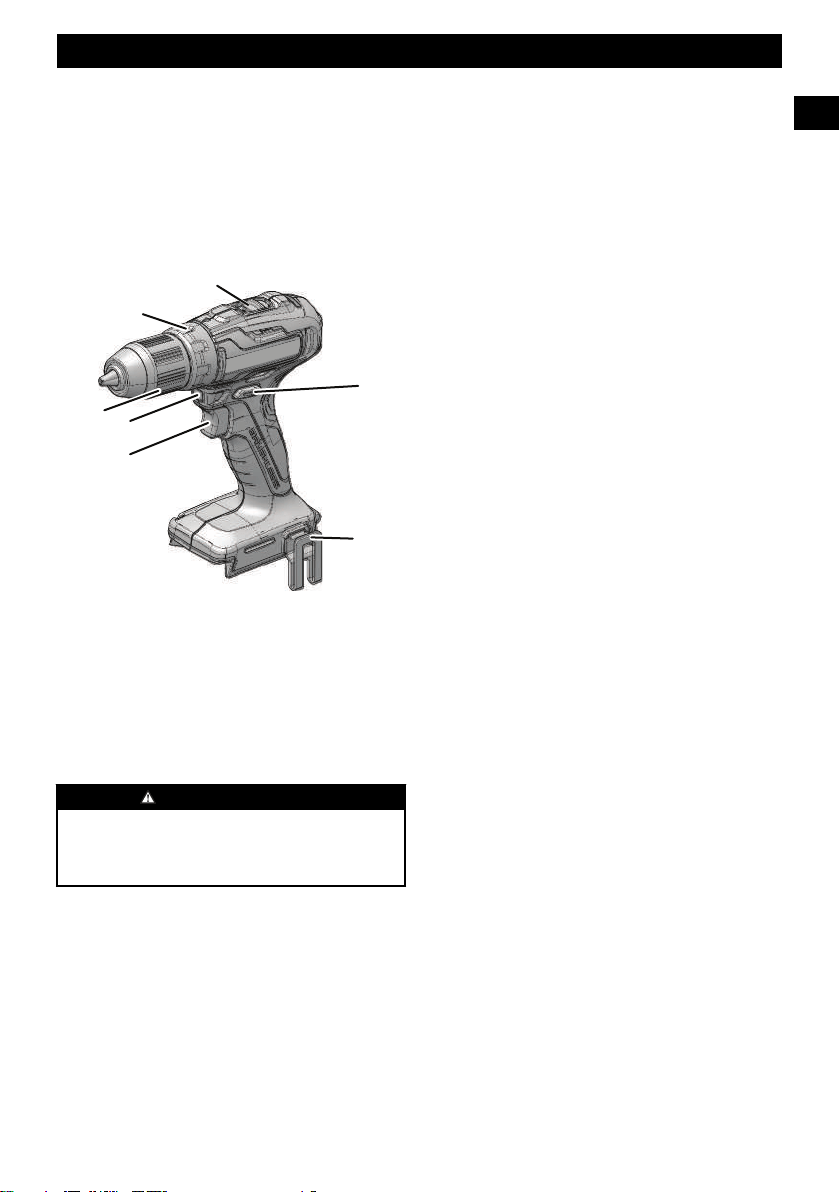
1 DESCRIPTION
1.1 BUT
Cette machine est utilisée pour percer tous les types de bois
(bois d'œuvre, contreplaqué, panneaux, panneaux de
composition et panneaux durs), céramiques, plastiques, fibre
de verre, stratifiés et métaux.
1.2 APERÇU
1
2
3
5
7
6
4
1
Vitesse forte/vitesse
faible
2
Réglage du couple
3
Mandrin sans clé 1/2"
4
Lumière DEL
5
Gâchette
6
Clip de ceinture
7
Avant / arrière
2 AVERTISSEMENTS
GÉNÉRAUX DE SÉCURITÉ
DES OUTILS ÉLECTRIQUES
AVERTISSEMENT
Lisez tous les avertissements de sécurité et toutes les
instructions. Le non-respect de ces avertissements et de ces
instructions peut entraîner un choc électrique, un incendie
et/ou des blessures graves.
Conservez tous les avertissements et instructions pour
référence ultérieure.
Le terme « outil électrique » dans les avertissements fait
référence à votre outil électrique (sans fil) fonctionnant sur
batterie.
2.1 SÉCURITÉ DE LA ZONE DE
TRAVAIL
• Gardez la zone de travail propre et bien éclairée. Les
endroits encombrés ou sombres favorisent les accidents.
•
N'utilisez pas les outils électriques dans des
environnements explosifs, par exemple en présence de
liquides, gaz ou poussières inflammables. La mise en
marche des outils électriques crée des étincelles qui
peuvent enflammer la poussière ou les vapeurs.
• Tenez les enfants et les curieux à l'écart lorsque vous
utilisez un outil électrique. Les distractions peuvent
vous faire perdre le contrôle.
2.2 SÉCURITÉ ÉLECTRIQUE
• Les prises de l'outil électrique doivent être
compatibles avec la prise de courant. Ne modifiez
jamais la prise d'aucune façon. N'utilisez pas
d'adaptateur de prise avec des outils à prise de terre.
Des prises non modifiées et leurs prises de courant
respectives réduisent les risques de choc électrique.
• Évitez que le corps n'entre en contact avec des
surfaces mises à la terre comme les tuyaux, les
radiateurs, les cuisinières et les réfrigérateurs. Il y a un
risque accru de choc électrique si votre corps est en
contact avec la terre.
• N'exposez pas les outils électriques à des conditions
humides ou mouillées. L'eau qui pénètre dans un outil
électrique augmente le risque de choc électrique.
• N'abusez pas du cordon. N'utilisez jamais le câble
pour porter, tirer ou débrancher l'outil. Éloignez le
cordon de la chaleur, de l'huile et des bords
tranchants ou des pièces mobiles. Les cordons
endommagés augmentent le risque d’un choc électrique.
• Lorsque vous utilisez un outil électrique en extérieur,
utilisez une rallonge de câble adaptée à l'usage en
extérieur. Utiliser un câble adapté à un usage en
extérieur réduit le risque de choc électrique.
• Si vous ne pouvez éviter d'utiliser l'outil dans un
environnement humide, utilisez une alimentation
protégée à courant différentiel. Le respect de cette règle
réduira le risque de chocs électriques.
2.3 SÉCURITÉS DES PERSONNES
• Restez vigilant, soyez attentif à ce que vous faites et
faites preuve de bon sens lorsque vous utilisez un outil
électrique. N’utilisez pas l’appareil lorsque vous êtes
fatigué, sous l’emprise de l’alcool ou de drogues ou
après avoir pris des médicaments. Un simple moment
d’inattention lors de l’utilisation d’un outil électrique
peut provoquer des blessures corporelles graves.
• Utilisez des équipements de protection individuelle.
Portez toujours des lunettes de protection. L’utilisation
d’équipements de protection adaptés aux conditions de
travail (masque anti-poussières, chaussures de sécurité
antidérapantes, casque et protections auditives etc.)
permet de réduire les risques de blessures corporelles.
• Évitez tout démarrage accidentel. Assurez-vous que
l'interrupteur est en position d'arrêt avant de
brancher à la source d’alimentation et/ou le bloc-
batterie et quand vous soulevez ou transportez
l'appareil. Transporter un outil électrique avec un doigt
13
Français
FR

sur l’interrupteur ou le brancher sur une alimentation
électrique alors que son interrupteur est en position
marche favorise les accidents.
• Retirez les clefs de réglage et de serrage avant de
mettre l’outil en marche. Une clef de réglage ou de
serrage restée sur une pièce en rotation de l’outil
électrique peut entraîner des blessures corporelles.
• Ne vous penchez pas trop en avant. Gardez un bon
équilibre en tout temps. Ceci permet un meilleur
contrôle de l'outil électrique dans des situations
inattendues.
• Habillez-vous correctement. Ne portez pas de
vêtements amples ou de bijoux. Veillez à ne pas
approcher vos cheveux, vos vêtements et vos gants des
pièces en mouvement. Les vêtements amples, les bijoux
et les cheveux longs peuvent se prendre dans les pièces en
mouvement.
• Si un appareil est conçu pour être utilisé avec des
dispositifs d’extraction et de récupération des
poussières, veillez à ce que ces dispositifs soient bien
raccordés et correctement utilisés. L’utilisation de
dispositifs de récupération des poussières permet de
réduire les risques liés aux poussières.
2.4 PERSONAL SAFETY
• Stay alert, watch what you are doing and use common
sense when operating a power tool. Do not use a
power tool while you are tired or under the influence
of drugs, alcohol or medication. A lapse of attention
while operating power tools may result in serious
personal injury.
• Use personal protection. Always wear eye protection.
Protective products such as dust mask, non-skid safety
shoes, hard hat or hearing protection used appropriately
will reduce personal injuries.
• Prevent unintentional starting. Ensure the switch is in
the off position before connecting to power source
and/or battery pack and when picking up or carrying
the tool. Carrying power tools with your finger on the
switch or energizing power tools that have the switch on
invites accidents.
• Remove any adjusting key or wrench before turning
the power tool on. A wrench or a key left attached to a
rotating part of the power tool may result in personal
injury.
• Do not over-reach. Keep proper footing and balance
at all times. This enables better control of the power tool
in unexpected situations.
• Dress properly. Do not wear loose clothing or jewelry.
Keep your hair, clothing and gloves away from
moving parts. Loose clothes, jewelry or long hair can be
caught in moving parts.
• If devices are provided for the connection of dust
extraction and collection facilities, ensure these are
connected and properly used. Use of dust collection can
reduce dust related hazards.
•
Do not let familiarity gained from frequent use of tools
allow you to become complacent and ignore tool safety
principles. A careless action can cause severe injury
within a fraction of a second.
2.5 UTILISATION ET ENTRETIEN DES
OUTILS ÉLECTRIQUES
• Ne forcez pas l’outil électrique. Utilisez l'outil
l’électrique adapté à votre application. L'outil
électrique approprié fera mieux le travail et sera plus
sécuritaire au rythme pour lequel il a été conçu.
• N’utilisez pas l'outil électrique si l'interrupteur ne le
met pas en marche ou à l'arrêt. Tout outil électrique qui
ne peut pas être contrôlé avec l'interrupteur est
dangereux et doit être réparé.
• Débranchez la prise de la source d’alimentation et/ou
de la batterie avant d'effectuer des réglages, de
changer des accessoires ou de ranger l'outil électrique.
De telles mesures de sécurité préventives réduisent le
risque d'un démarrage accidentel de l'outil électrique.
• Rangez les outils électriques inutilisés hors de portée
des enfants et ne laissez pas des personnes qui se sont
familiarisées avec l'outil électrique ou ces instructions
l’utiliser. Les outils électriques sont dangereux entre les
mains des utilisateurs non formés.
• Entretenez les outils électriques et les accessoires.
Vérifiez le désalignement des pièces mobiles ou la
fixation des pièces mobiles, la cassure des pièces et
toute autre condition qui pourrait affecter le
fonctionnement de l’outil électrique. Si il est
endommagé, faites réparer l'outil électrique avant de
l'utiliser. De nombreux accidents sont causés par des
outils électriques mal entretenus.
• Garder les outils de coupe propres et tranchants. Les
outils de coupe bien entretenus avec des bords tranchants
sont moins susceptibles de se coincer et sont plus faciles
à contrôler.
• Utilisez l'outil électrique, les accessoires, les mèches,
etc. conformément à ces instructions, en tenant
compte des conditions de travail et des travaux à
effectuer. L'utilisation de l'outil motorisé pour des
opérations différentes de celles prévues pourrait
entraîner une situation dangereuse.
• Veillez à ce que les poignées restent propres, sèches et
exemptes d’huile et de graisse. Les poignées et surfaces
de prise glissantes ne permettent pas de manipuler et de
contrôler l'outil dans des situations inattendues.
2.6 UTILISATION ET ENTRETIEN DE
L’OUTIL SUR BATTERIE
• Rechargez uniquement avec le chargeur spécifié par le
fabricant. Un chargeur adapté à un type de batterie peut
créer un risque d'incendie lorsqu'il est utilisé avec une
autre batterie.
• Utilisez les outils électriques uniquement avec des
batteries spécialement conçues à cet effet. L'utilisation
14
Français
FR

de toutes autres batteries peut créer un risque de blessure
et d'incendie.
• Lorsque la batterie n'est pas utilisée, éloignez-la des
autres objets métalliques tels qu’attaches trombones,
pièces de monnaie, clés, clous, vis ou autres petits
objets métalliques qui peuvent établir une connexion
d'une borne à une autre. Le court-circuitage des bornes
de la batterie peut provoquer des brûlures ou un incendie.
• Dans des conditions abusives, du liquide peut être
éjecté de la batterie ; évitez tout contact. En cas de
contact accidentel, rincez abondamment avec du
savon et de l’eau. En cas de contact du liquide avec les
yeux, consultez immédiatement un médecin. Le liquide
s'échappant des batteries peut causer des irritations ou
des brûlures.
• N'utilisez pas une batterie ou un outil endommagé ou
modifié. Les batteries endommagées ou modifiées
peuvent présenter un fonctionnement imprévisible et
provoquer un incendie, une explosion ou un risque de
blessure.
• N'exposez pas un bloc-batterie ou un outil au feu ou à
une température excessive. L'exposition au feu ou une
température supérieure à 130 °C peut provoquer une
explosion.
• Suivez toutes les instructions de recharge et ne
rechargez pas la batterie ou l'outil en dehors de la
plage de température spécifiée dans ces instructions.
Un rechargement incorrect ou à des températures en
dehors de la plage spécifiée peut endommager la batterie
et augmenter le risque d'incendie.
2.7 SERVICE
• Faites effectuer l'entretien de votre outil électrique
par un réparateur qualifié en n'utilisant que des
pièces de rechange identiques. Cela garantira le
maintien de la sécurité de l’outil électrique.
• Ne réparez jamais un bloc-batterie endommagé.
L'entretien d’un bloc-batterie ne doit être effectué que par
le fabricant ou des fournisseurs de service agréés.
3 AVERTISSEMENTS DE
SÉCURITÉ DE LA PERCEUSE-
VISSEUSE
• Maintenez l’outil par ses surfaces isolées lorsque vous
accomplissez une tâche où l’accessoire de coupe
pourrait entrer en contact avec un câblage invisible ou
son propre câble. Les accessoires de coupe ou les
fixations en contact avec un câble sous tension peuvent
exposer des parties métalliques de l’outil et pourraient
causer un choc électrique.
• Ne faites jamais fonctionner l’outil à une vitesse
supérieure à la vitesse de rotation maximale de la
mèche. À des vitesses plus élevées, la mèche risque de se
plier si on la laisse tourner librement sans toucher la
pièce à usiner, ce qui pourrait entraîner des blessures
corporelles.
• Portez une protection auditive lorsque vous utilisez
une perceuse à percussion. L’exposition au bruit peut
causer une perte auditive.
• Appliquez une pression en ligne directe avec la mèche
seulement; évitez d’appliquer une pression excessive.
Les mèches peuvent se plier et causer des bris ou une
perte de contrôle, entraînant ainsi des blessures
corporelles.
• Commencez toujours le perçage à basse vitesse en
vous assurant que la pointe de la mèche est en contact
avec la pièce à usiner. À des vitesses plus élevées, la
mèche risque de se plier si on la laisse tourner librement
sans toucher la pièce à usiner, ce qui pourrait entraîner
des blessures corporelles.
• Connaissez bien votre outil. Lisez attentivement le
manuel de l’opérateur. Apprenez les applications et les
limites de cet outil électrique, ainsi que les risques
potentiels qui y sont associés. Suivre les instructions
réduit le risque de choc électrique, d'incendie ou de
blessures graves.
• Portez toujours des lunettes de sécurité dont les écrans
latéraux sont conformes à la norme ANSI Z87.1.
Suivre cette instruction réduit le risque de blessure grave.
• Protégez vos poumons. Utilisez un masque facial ou
un masque anti-poussière si l’opération est
poussiéreuse. Suivre cette instruction réduit le risque de
blessure grave.
• Protégez vos oreilles. Portez un dispositif de protection
anti-bruit pendant les périodes d’utilisation
prolongées. Suivre cette instruction réduit le risque de
blessure grave.
4 SYMBOLES FIGURANT SUR
LA MACHINE
Certains des symboles suivants peuvent être utilisés sur cet
outil. Veuillez les étudier et apprendre leur signification. Une
bonne interprétation de ces symboles vous permettra de
mieux utiliser l'outil et de manière plus sécuritaire.
Symbole Explication
V Voltage
Courant direct
Lisez tous les avertissements de sécurité
et toutes les instructions.
Alerte de sécurité
Portez des protections oculaires
Portez des protections auditives
Vitesse faible
15
Français
FR
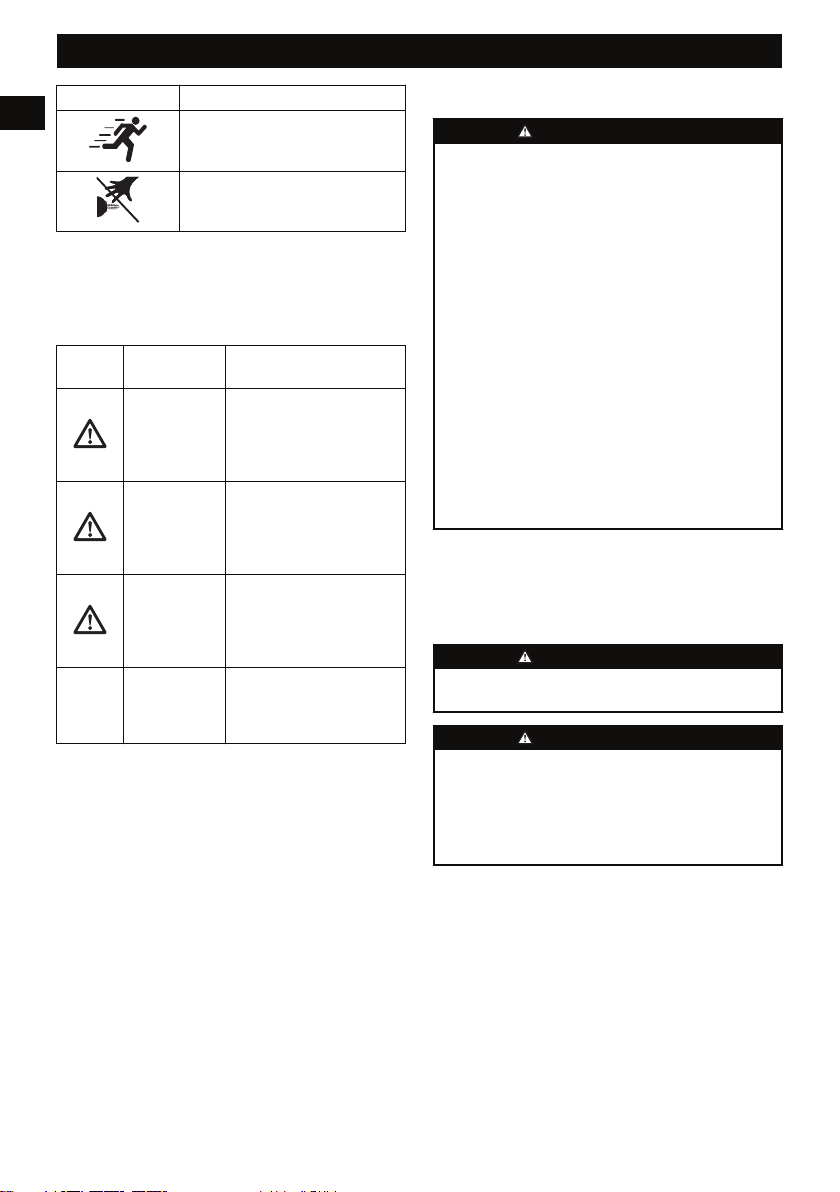
Symbole Explication
Vitesse forte
Ne touchez pas les parties rotatives.
5 NIVEAUX DE RISQUES
Les termes de mise en garde suivants et leur signification ont
pour but d'expliquer les niveaux de risques associés à
l'utilisation de ce produit.
SYM-
BOLE
SIGNAL SIGNIFICATION
DANGER Indique une situation danger-
euse imminente qui, si elle
n'est pas évitée, peut entraîner
la mort ou des blessures
graves.
AVERTISSE-
MENT
Indique une situation poten-
tiellement dangereuse qui, si
elle n'est pas évitée, peut en-
traîner la mort ou des bles-
sures graves.
MISE EN
GARDE
Indique une situation poten-
tiellement dangereuse qui, si
elle n'est pas évitée, pourrait
causer des blessures mineures
ou modérées.
MISE EN
GARDE
(Sans symbole d'alerte de sé-
curité) Indique une situation
pouvant entraîner des dom-
mages matériels.
6 PROPOSITION 65
AVERTISSEMENT
Ce produit contient un produit chimique connu dans l'état
de Californie comme étant une cause de cancer, de
malformations congénitales ou d'autres problèmes de
reproduction. Certaines poussières produites par le ponçage
mécanique, le sciage, le meulage, le perçage et d'autres
activités de construction contiennent des produits chimiques
connus pour causer le cancer, des malformations
congénitales ou d'autres problèmes de reproduction. Voici
quelques exemples de ces produits chimiques :
• Plomb provenant de peintures à base de plomb;
• Silice cristalline provenant de briques, de ciment et
d'autres produits de maçonnerie;
• Arsenic et chrome provenant de bois traité
chimiquement.
Votre risque d'exposition à ces produits chimiques varie
selon la fréquence à laquelle vous faites ce type de travail.
Pour réduire votre exposition à ces produits chimiques,
travaillez dans un endroit bien ventilé et utilisez un
équipement de sécurité approuvé, comme des masques anti-
poussière spécialement conçus pour filtrer les particules
microscopiques.
Conservez ces instructions
7 INSTALLATION
7.1 DÉBALLEZ LA MACHINE
AVERTISSEMENT
Assurez-vous d'assembler correctement la machine avant de
l'utiliser.
AVERTISSEMENT
• Si les pièces sont endommagées, n'utilisez pas la
machine.
• Si vous n'avez pas toutes les pièces, n'utilisez pas la
machine.
• Si les pièces sont endommagées ou manquantes,
communiquez avec le centre de service.
1. Ouvrez l’emballage.
2. Lisez la documentation contenue dans la boîte.
3. Retirez toutes les pièces non assemblées de la boîte.
4. Retirez la machine de sa boîte.
5. Jetez la boîte et l'emballage en respectant les règlements
locaux.
16
Français
FR
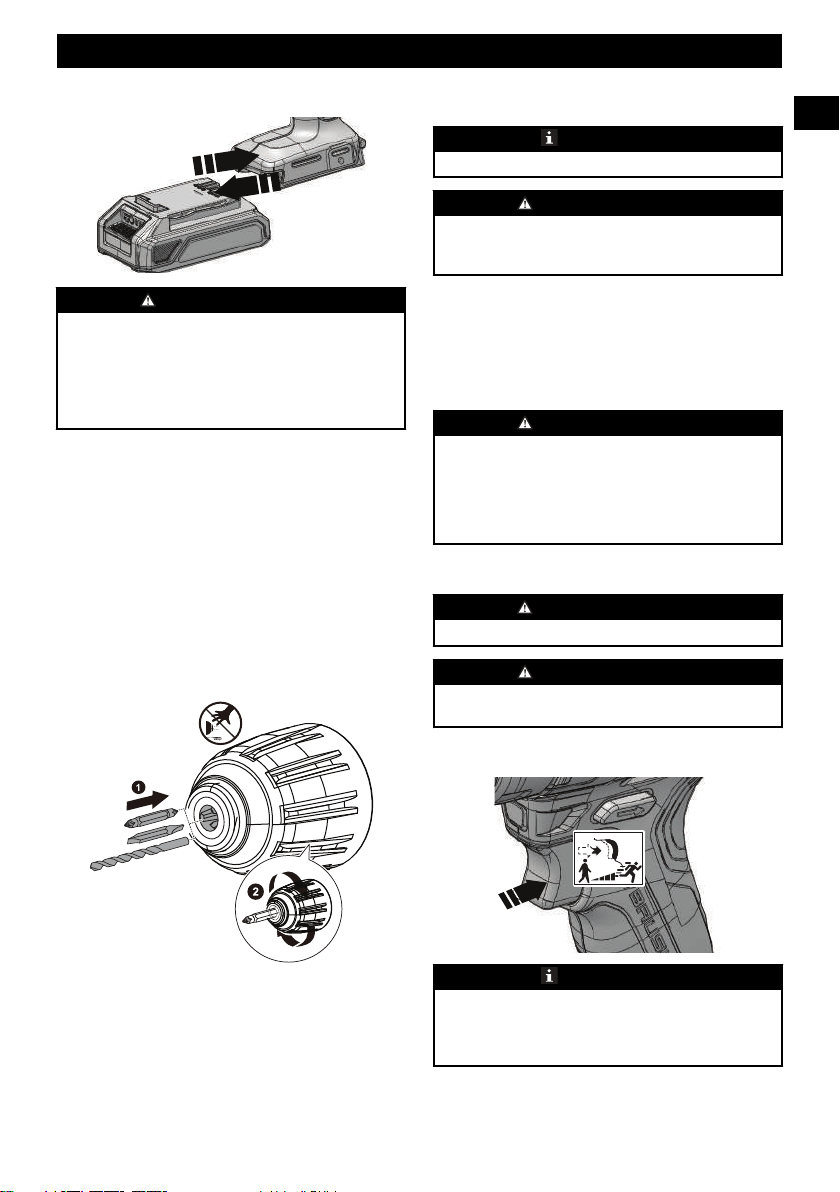
7.2 INSTALLEZ LA BATTERIE
AVERTISSEMENT
• Si la batterie ou le chargeur est endommagé, remplacez-
le, au besoin.
• Arrêtez la machine et attendez que le moteur s'arrête
avant d'installer ou de retirer la batterie.
• Lisez, comprenez et suivez les instructions du manuel
de la batterie et du chargeur.
1. Alignez les languettes de la batterie avec les rainures du
compartiment de batterie.
2. Poussez la batterie dans le compartiment de batterie
jusqu'à ce qu'elle soit bien encliquetée.
3. Vous devriez entendre un clic lorsque la batterie sera
insérée correctement.
7.3 RETIREZ LA BATTERIE
1. Poussez et maintenez enfoncé le bouton de déblocage de
la batterie.
2. Retirez la batterie de la machine.
7.4 INSTALLEZ LA MÈCHE
1. Poussez l'interrupteur marche avant/arrière en position
« neutre » pour verrouiller la gâchette.
2. Tournez le mandrin dans le sens antihoraire pour ouvrir.
3. Inclinez la machine vers le haut pour éviter que la mèche
ne tombe
4. Placez la mèche dans l’ouverture du mandrin.
5. Assurez-vous que la mèche est centrée, puis tournez le
mandrin dans le sens horaire pour serrer.
REMARQUE
N'utilisez pas de clé pour serrer ou desserrer le mandrin.
AVERTISSEMENT
Placez la mèche bien droite dans le mandrin. Ne mettez pas
la mèche en position inclinée dans le mandrin avant de
serrer.
7.5 RETIREZ LA MÈCHE
1. Poussez l'interrupteur marche avant/arrière en position
« neutre » pour verrouiller la gâchette.
2. Tournez le mandrin dans le sens antihoraire pour ouvrir.
3. Retirez la mèche.
AVERTISSEMENT
Préparez-vous à la butée lors de la perforation. Lorsque cela
se produit, la perceuse a tendance à accrocher et cogner
dans le sens inverse de la rotation ce qui peut provoquer une
perte de contrôle lors de la perforation d'un matériau. Si
vous n'y êtes pas préparé, cette perte de contrôle peut
provoquer de graves blessures.
8 UTILISATION
AVERTISSEMENT
Portez toujours des lunettes de protection.
AVERTISSEMENT
N'utilisez pas d'autres pièces ou d'accessoires non
recommandés par le fabricant de ce produit.
8.1 DÉMARREZ LA MACHINE
REMARQUE
L'appareil ne peut fonctionner qu'une fois que le bouton
marche avant/arrière est entièrement poussé vers la gauche
ou la droite. Ne faites pas fonctionner l'appareil à vitesse
lente durant de longues périodes de temps.
1. Tirez sur la gâchette pour démarrer la perceuse.
17
Français
FR
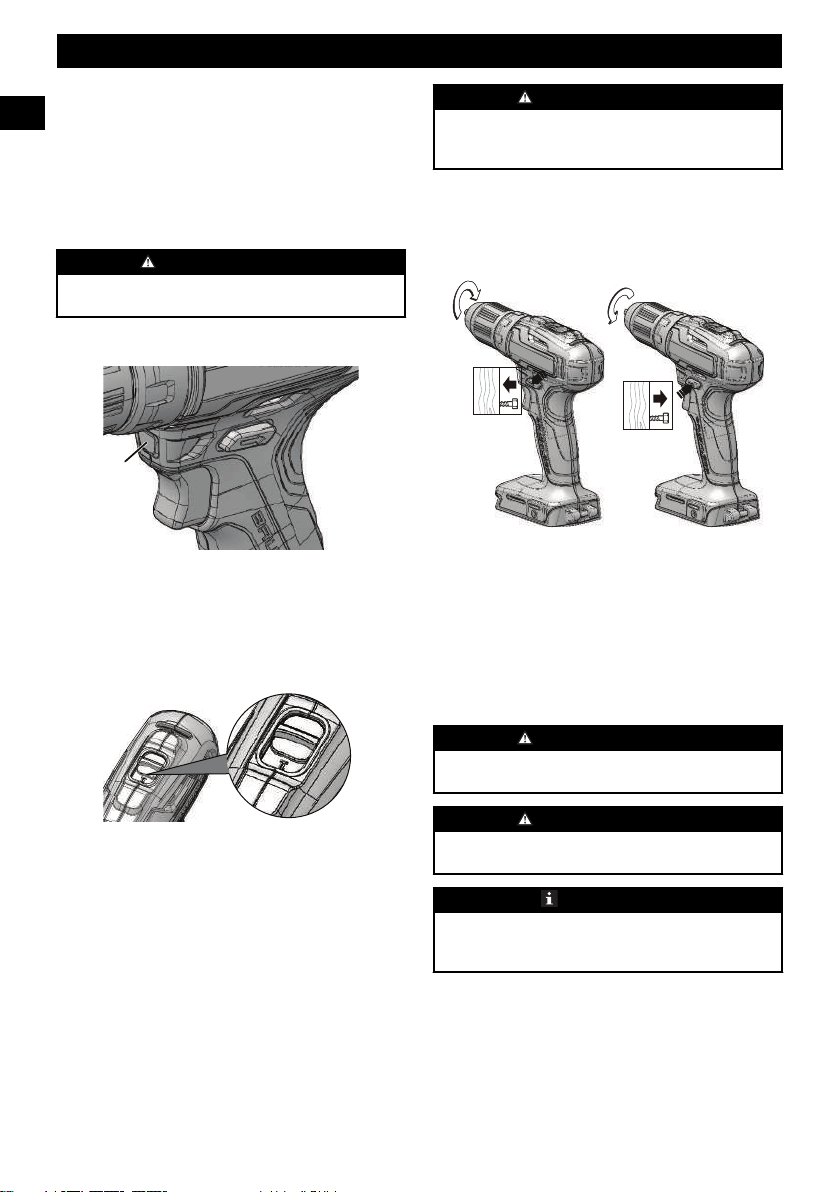
Vitesse variable
La machine est équipée d'un commutateur à vitesse variable
qui produit une vitesse plus élevée avec une pression de
déclenchement plus élevée et une vitesse plus basse avec une
pression de déclenchement réduite.
8.2 ARRÊTEZ LA MACHINE
1. Relâchez la gâchette pour arrêter la machine.
AVERTISSEMENT
Relâchez la gâchette et laissez la machine s’arrêter
complétement.
8.3 LUMIÈRE DEL
4
Le voyant DEL s'allume lorsque la gâchette est enfoncée.
Il fournit une lumière supplémentaire pour une meilleure
visibilité.
8.4 INTERRUPTEUR À DEUX
VITESSES
La machine est munie d'un interrupteur à deux vitesses conçu
pour percer ou visser à basse (LO) vitesse (1) ou haute (HI)
(2). Un interrupteur coulissant se trouve sur le dessus de
l'appareil.
1. Lorsque vous utilisez l'appareil à la vitesse LO (1), la
vitesse se réduit et l'appareil a plus de puissance et de
couple.
2. Lorsque vous utilisez l'appareil à la vitesse HI (2), la
vitesse augmente et l'appareil a moins de puissance et de
couple.
AVERTISSEMENT
Utilisez la vitesse LO (1) pour des applications de puissance
et de couple élevées et HI (2) pour un perçage rapide ou du
vissage.
8.5 INTERRUPTEUR AVANT /
ARRIÈRE
La machine possède l’interrupteur (avant/arrière) au-dessus
de la gâchette pour changer la rotation.
1. Lorsque l’interrupteur marche arrière se trouve à gauche
du bouton marche/arrêt, la direction de la mèche est vers
l'avant (serrage).
2. Lorsque l’interrupteur marche arrière se trouve à gauche
du bouton marche/arrêt, la direction de la mèche est vers
l'arrière (desserrage).
3. Placez l’interrupteur dans la position OFF (verrou
central) pour permettre de réduire les risques de
démarrage accidentel lorsque vous n'utilisez pas
l'appareil.
AVERTISSEMENT
Relâchez la gâchette et attendez que le mandrin s'arrête
complètement.
AVERTISSEMENT
Attendez que le mandrin s'arrête complètement avant de
changer le sens de rotation.
REMARQUE
La machine ne peut fonctionner qu'une fois que
l’interrupteur marche avant/arrière est entièrement poussé
vers la gauche ou la droite.
18
Français
FR
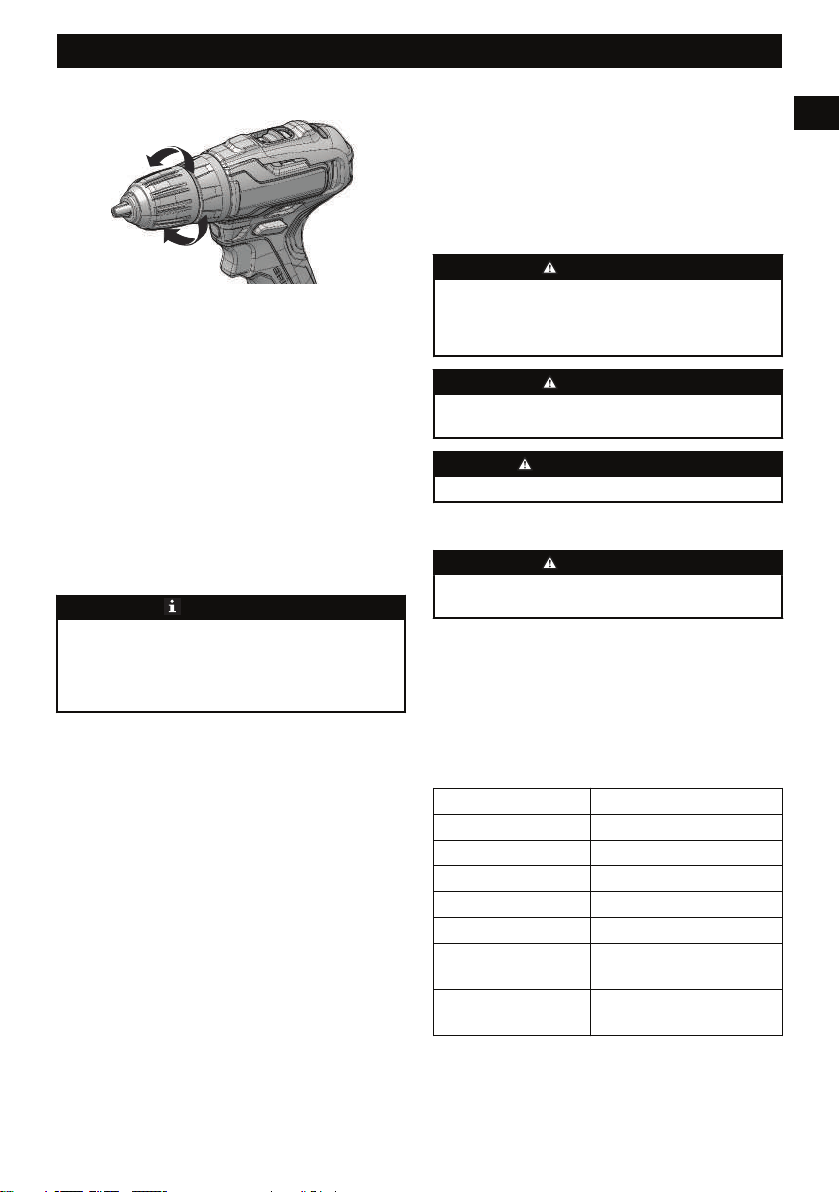
8.6 RÉGLAGES DU COUPLAGE
A
B
1. A. La direction pour diminuer le couple.
2. B. La direction pour augmenter le couple.
8.7 MATÉRIAUX DE PERÇAGE
• Lorsque vous percez des surfaces dures, molles, utilisez
un poinçon pour marquer l'endroit où vous souhaitez faire
le trou. Cela permet d'éviter que la perceuse-visseuse ne
glisse du centre alors que le trou est déjà à moitié percé.
• Lorsque vous percez du métal, mettez une huile légère sur
la mèche de la perceuse pour éviter que celle-ci chauffe.
L'huile peut prolonger la vie de la mèche et augmenter la
capacité de perçage.
• Si la mèche se coince dans la pièce à percer ou si la
perceuse tombe, stoppez immédiatement l'utilisation de
l'appareil. Retirez la mèche de la pièce et analysez les
causes du blocage.
REMARQUE
Cette perceuse est munie d'un frein électrique. Lorsque la
gâchette est relâchée, le mandrin arrête de tourner. Lorsque
le frein fonctionne correctement, des étincelles peuvent
apparaître à travers les fentes d'aération du boîtier. Ce
phénomène est normal et correspond à l'action du frein.
PERÇAGE DU BOIS
Pour un rendement maximum, utilisez des mèches en acier
spéciales bois et grande vitesse.
1. Utilisez l'appareil à une vitesse très faible pour éviter que
la mèche ne glisse du point de départ. Augmentez la
vitesse au fur et à mesure que la perceuse perfore le
matériau.
2. Lorsque vous percez des trous, placez un morceau de bois
derrière la pièce de perçage pour éviter des bords
déchiquetés ou fissurés derrière le trou.
PERÇAGE DU MÉTAL
Pour un rendement maximum, utilisez des mèches spéciales
bois, en acier et pour grande vitesse.
1. Utilisez l'appareil à une vitesse très faible pour éviter que
la mèche ne glisse du point de départ.
2. Maintenez une vitesse et une pression constantes pour
éviter de surchauffer la mèche. Une pression trop forte
peut: Surchauffer la perceuse; abîmer les roulements,
tordre ou faire fondre les mèches et faire des trous
excentrés ou de formes irrégulières.
3. Lorsque vous faites de grands trous dans le métal,
commencez avec une petite mèche puis finissez avec une
grande. De plus, lubrifiez la mèche avec de l'huile pour
améliorer son action et augmenter la durée de vie de la
mèche.
9 ENTRETIEN
ATTENTION
Évitez que les liquides de freins, l'essence et les matériaux à
base de pétrole ne viennent en contact avec les pièces en
plastique. Les produits chimiques peuvent endommager le
plastique et le rendre inutilisable.
ATTENTION
N'utilisez pas de solvants ou de détergents puissants sur le
boîtier ou les composants en plastique.
AVERTISSEMENT
Retirez le bloc-batterie de la machine avant l’entretien.
9.1 NETTOYEZ LA MACHINE
ATTENTION
La machine doit être sèche. L'humidité peut provoquer des
risques de chocs électriques.
• Enlevez les matières indésirables de l'évent d'air à l'aide
d'un aspirateur.
• Ne vaporisez pas l'évent d'air et ne le plongez pas dans
des solvants.
• Nettoyez le boîtier et les composants en plastique avec un
chiffon doux et humide.
10 DONNÉES TECHNIQUES
Voltage 24 V
Moteur Sans balais
Vitesse à vide 0-380 / 0-1450 RPM
Réglages du couplage 18 Positions + Perceuse
Clé de serrage 310 po-lb. / 35 N.m.
Poids sans batterie 2.27 lb (1.03 kg)
Batterie modèle BAG708, BAG709, BAG710 et
autres séries BAG
Chargeur modèle 29862, 29972, CAG817 et autres
séries CAG
La plage de température ambiante recommandée :
19
Français
FR

Article Température
Plage de température d’en-
treposage de l'appareil
32°F (0°C) - 158°F (70°C)
Plage de température de
fonctionnement de l'appareil
32°F (0°C) - 104°F (40°C)
Plage de température de re-
chargement de la batterie
39°F (4°C) - 104°F (40°C)
Plage de température de
fonctionnement du chargeur
39°F (4°C) - 104°F (40°C)
Plage de température d’en-
treposage de la batterie
32°F (0°C) - 73°F (23°C)
Plage de température de dé-
chargement de la batterie
32°F (0°C) - 113°F (45°C)
11 GARANTIE LIMITÉE
YEAR
ANS
AÑOS
LIMITED WARRANTY
GARANTIE LIMITÉE
GARANTÍA
LIMITADA
3
Greenworks garantit par la présente ce produit, à l'acheteur
original avec preuve d'achat, pour une période de trois (3) ans
contre tout défaut de matériaux, de pièces ou de main-
d'œuvre. Greenworks, à sa propre discrétion, réparera ou
remplacera toutes les pièces défectueuses, dans des conditions
normales d'utilisation, sans frais pour le client. Cette garantie
n'est valable que pour les appareils qui ont été utilisés à des
fins personnelles, qui n'ont pas été loués à des fins
industrielles ou commerciales et qui ont été entretenus
conformément aux instructions du manuel du propriétaire
fourni avec le produit neuf.
ARTICLES NON COUVERTS PAR LA GARANTIE :
1. Toute pièce qui est devenue inopérante en raison d'une
mauvaise utilisation, d'une utilisation commerciale, d'un
abus, d'une négligence, d'un accident, d'un entretien
inapproprié ou d'une modification ; ou
2. L'appareil, s'il n'a pas été utilisé et/ou entretenu
conformément au manuel du propriétaire ; ou
3. Usure normale, sauf comme indiqué ci-dessous ;
4. Articles d'entretien courant tels que lubrifiants, affûtage
des lames ;
5. Détérioration normale du fini extérieur due à l'utilisation
ou à l'exposition.
ASSISTANCE TÉLÉPHONIQUE :
Le service de garantie est disponible en appelant notre ligne
d'assistance téléphonique sans frais, au 1-888-909-6757.
FRAIS DE TRANSPORT :
Les frais de transport pour le déplacement de tout équipement
motorisé ou accessoire sont à la charge de l'acheteur. Il
incombe à l'acheteur de payer les frais de transport pour toute
pièce retournée pour remplacement en vertu de la présente
garantie, à moins qu'un tel retour soit demandé par écrit par
Greenworks.
Adresse aux Etats-Unis : Adresse au Canada :
Greenworks Tools Greenworks Tools Canada Inc.
P.O. Box 1238 P.O. Box 93095, Newmarket, Ontario
Mooresville, NC 28115 L3Y 8K3
12 VUE ÉCLATÉES
1
2
No. Qté Description
1 1 Embout Double Face
2. 1 Clip de ceinture
20
Français
FR

1 Descripción.......................................22
1.1 Finalidad.......................................................... 22
1.2 Perspectiva general..........................................22
2 Advertencias generales de
seguridad para herramientas
eléctricas...........................................22
2.1 Seguridad de la zona de trabajo.......................22
2.2 Seguridad eléctrica.......................................... 22
2.3 Seguridad personal.......................................... 22
2.4 Seguridad personal.......................................... 23
2.5 Utilización y cuidado de herramientas
eléctricas.......................................................... 23
2.6 Utilización y cuidado de herramientas a
batería.............................................................. 24
2.7 Servicio............................................................24
3 Advertencias de seguridad para
taladros.............................................24
4 Símbolos en el producto..................24
5 Niveles de riesgo.............................. 25
6 Propuesta 65.....................................25
7 Instalación........................................25
7.1 Desembalaje de la máquina............................. 25
7.2 Instalación de la batería................................... 26
7.3 Retirada de la batería....................................... 26
7.4 Instalación de la broca..................................... 26
7.5 Retirada de la broca......................................... 26
8 Funcionamiento...............................26
8.1 Puesta en marcha de la máquina......................26
8.2 Detención de la máquina................................. 27
8.3 Luz LED.......................................................... 27
8.4 Interruptor de dos velocidades.........................27
8.5 Interruptor de avance / retroceso..................... 27
8.6 Ajustes de embrague........................................27
8.7 Perforación de materiales................................ 28
9 Mantenimiento.................................28
9.1 Limpieza de la máquina...................................28
10 Datos técnicos.................................. 28
11 Garantía limitada............................29
12 Vista despiezada.............................29
21
Español
ES
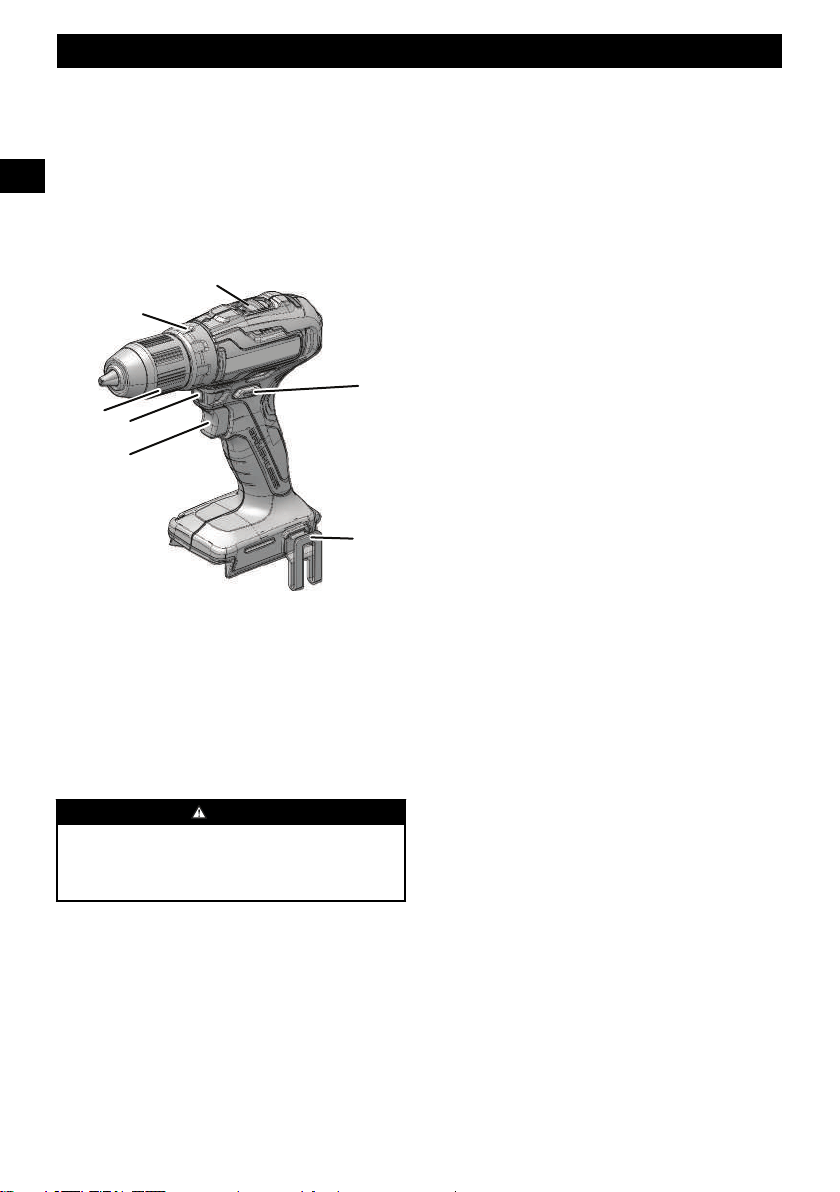
1 DESCRIPCIÓN
1.1 FINALIDAD
Esta máquina se utiliza para perforar todo tipo de materiales
de madera (tablas, contrachapado, planchas, aglomerado y
tablero duro), cerámica, plásticos, fibra de vidrio, laminados y
metales.
1.2 PERSPECTIVA GENERAL
1
2
3
5
7
6
4
1
Velocidad alta /
Velocidad baja
2
Ajuste de par
3
Portabrocas sin llave
de 1/2"
4
Luz LED
5
Gatillo
6
Pinza para cinturón
7
Avance / retroceso
2 ADVERTENCIAS GENERALES
DE SEGURIDAD PARA
HERRAMIENTAS
ELÉCTRICAS
AVISO
Lea todas las advertencias de seguridad y todas las
instrucciones. El incumplimiento de las advertencias e
instrucciones puede provocar descargas eléctricas,
incendios o lesiones graves.
Guarde todas las advertencias e instrucciones para su consulta
posterior.
El término “herramienta eléctrica” empleado en las
advertencias se refiere a su herramienta eléctrica con
funcionamiento a batería (inalámbrica).
2.1 SEGURIDAD DE LA ZONA DE
TRABAJO
• Mantenga limpia y bien iluminada la zona de trabajo.
Las zonas desordenadas u oscuras fomentan los
accidentes.
• No utilice herramientas eléctricas en atmósferas
explosivas, como en la presencia de líquidos, gases o
polvo que puedan inflamarse. Las herramientas
eléctricas generan chispas que pueden encender el polvo
o los gases.
• Mantenga alejados a los niños y los transeúntes
mientras utilice una herramienta eléctrica. Las
distracciones pueden hacer que pierda el control.
2.2 SEGURIDAD ELÉCTRICA
• Los enchufes de las herramientas eléctricas deben
corresponder con la toma de corriente. Nunca
modifique el enchufe en modo alguno. No utilice
enchufes adaptadores con herramientas eléctricas
conectadas a tierra. La utilización de enchufes no
modificados y de tomas de corriente adecuadas reducirá
el riesgo de descarga eléctrica.
• Evite el contacto del cuerpo con superficies conectadas
a tierra, como tuberías, radiadores, estufas y
refrigeradores. Existe un riesgo aumentado de descarga
eléctrica si su cuerpo está conectado a tierra.
• No exponga las herramientas eléctricas a la lluvia o a
condiciones de humedad. Si penetra agua en una
herramienta eléctrica, aumentará el riesgo de descarga
eléctrica.
• No abuse del cable. Nunca utilice el cable para
transportar, tirar o desenchufar la herramienta
eléctrica. Mantenga el cable alejado del calor, el aceite,
los bordes afilados y las piezas móviles. Los cables
dañados o enredados aumentan el riesgo de descarga
eléctrica.
• Cuando utilice una herramienta eléctrica en
exteriores, use un cable alargador adecuado para uso
en exterior. La utilización de un cable adecuado para
uso en exterior reduce el riesgo de descarga eléctrica.
• Si no es inevitable el uso de una herramienta eléctrica
en un lugar húmedo, utilice un suministro protegido
por un dispositivo de corriente residual (RCD). La
utilización de un RCD reduce el riesgo de descarga
eléctrica.
2.3 SEGURIDAD PERSONAL
• Manténgase alerta, observe lo que está haciendo y
emplee el sentido común cuando utilice una
herramienta eléctrica. No utilice una herramienta
eléctrica mientras esté cansado o bajo la influencia de
drogas, alcohol o medicamentos. Una falta de atención
durante el uso de herramientas eléctricas puede provocar
lesiones personales graves.
• Utilice protección personal. Lleve siempre protección
ocular. Si se utilizan correctamente productos de
22
Español
ES

protección como máscaras antipolvo, zapatos de
seguridad antideslizantes, cascos o protecciones
auditivas, se reducirán las lesiones personales.
• Evite el arranque accidental. Asegúrese de que el
interruptor esté en la posición de apagado antes de
conectar a la fuente de alimentación o a la batería y al
coger o transportar la herramienta. El transporte de
herramientas eléctricas con el dedo en el interruptor o la
conexión de herramientas eléctricas que tienen el
interruptor activado fomenta los accidentes.
• Retire cualquier llave de ajuste antes de encender la
herramienta eléctrica. Una llave que se quede fijada a
una pieza giratoria de la herramienta eléctrica puede
provocar lesiones personales.
• No se estire. Mantenga en todo momento una postura
adecuada y el equilibrio. Esto permite un mejor control
de la herramienta eléctrica en situaciones inesperadas.
• Lleve indumentaria adecuada. No lleve ropa o joyas
sueltas. Mantenga el cabello, la ropa y los guantes
lejos de las piezas móviles. La ropa suelta, las joyas o el
cabello largo pueden quedar atrapados en las piezas
móviles.
• Si se utilizan dispositivos para la conexión de sistemas
de extracción y recogida de polvo, asegúrese de que
estén conectados y se utilicen correctamente. La
utilización de sistemas de recogida de polvo puede
reducir los riesgos relacionados con el polvo.
2.4 SEGURIDAD PERSONAL
• Manténgase alerta, observe lo que está haciendo y
emplee el sentido común cuando utilice una
herramienta eléctrica. No utilice una herramienta
eléctrica mientras esté cansado o bajo la influencia de
drogas, alcohol o medicamentos. Una falta de atención
durante el uso de herramientas eléctricas puede provocar
lesiones personales graves.
• Utilice protección personal. Lleve siempre protección
ocular. Si se utilizan correctamente productos de
protección como máscaras antipolvo, zapatos de
seguridad antideslizantes, cascos o protecciones
auditivas, se reducirán las lesiones personales.
• Evite el arranque accidental. Asegúrese de que el
interruptor esté en la posición de apagado antes de
conectar a la fuente de alimentación o a la batería y al
coger o transportar la herramienta. El transporte de
herramientas eléctricas con el dedo en el interruptor o la
conexión de herramientas eléctricas que tienen el
interruptor activado fomenta los accidentes.
• Retire cualquier llave de ajuste antes de encender la
herramienta eléctrica. Una llave que se quede fijada a
una pieza giratoria de la herramienta eléctrica puede
provocar lesiones personales.
• No se estire. Mantenga en todo momento una postura
adecuada y el equilibrio. Esto permite un mejor control
de la herramienta eléctrica en situaciones inesperadas.
• Lleve indumentaria adecuada. No lleve ropa o joyas
sueltas. Mantenga el cabello, la ropa y los guantes
lejos de las piezas móviles. La ropa suelta, las joyas o el
cabello largo pueden quedar atrapados en las piezas
móviles.
• Si se utilizan dispositivos para la conexión de sistemas
de extracción y recogida de polvo, asegúrese de que
estén conectados y se utilicen correctamente. La
utilización de sistemas de recogida de polvo puede
reducir los riesgos relacionados con el polvo.
• No permita que la familiaridad adquirida con el uso
frecuente de las herramientas le permita sentirse
autocomplaciente e ignorar los principios de
seguridad de la herramienta. Una acción descuidada
puede provocar lesiones graves en una fracción de
segundo.
2.5 UTILIZACIÓN Y CUIDADO DE
HERRAMIENTAS ELÉCTRICAS
• No fuerce la herramienta eléctrica. Utilice la
herramienta eléctrica correcta para su aplicación. La
herramienta eléctrica correcta hará el trabajo mejor y
con mayor seguridad a la velocidad para la que se
diseñó.
• No utilice la herramienta eléctrica si el interruptor no
la enciende y la apaga. Cualquier herramienta eléctrica
que no pueda controlarse con el interruptor es peligrosa
y debe repararse.
• Desconecte el enchufe de la fuente de alimentación o la
batería de la herramienta eléctrica antes de realizar
ajustes, cambiar accesorios o almacenar herramientas
eléctricas. Estas medidas de seguridad preventivas
reducen el riesgo de que la herramienta eléctrica se
arranque accidentalmente.
• Almacene las herramientas eléctricas inactivas fuera
del alcance de los niños y no permita que personas que
no estén familiarizadas con la herramienta eléctrica o
estas instrucciones puedan utilizarla. Las herramientas
eléctricas son peligrosas en manos de usuarios
inexpertos.
• Mantenga las herramientas eléctricas y los accesorios.
Compruebe si hay desalineación o unión de las piezas
móviles, rotura de piezas y cualquier otra condición
que pueda afectar al funcionamiento de la
herramienta eléctrica. Si ha sufrido daños, lleve a
reparar la herramienta eléctrica antes del uso.
Numerosos accidentes se deben a herramientas eléctricas
mal mantenidas.
• Mantenga limpias y afiladas las herramientas de
corte. Las herramientas de corte mantenidas
correctamente con filos cortantes tienen menos
probabilidades de atascarse y son más fáciles de
controlar.
• Utilice la herramienta eléctrica, los accesorios, las
brocas, etc. de acuerdo con estas instrucciones,
teniendo en cuenta las condiciones de trabajo y el
trabajo a realizar. El uso de la herramienta eléctrica
para operaciones distintas de las previstas podría dar
lugar a una situación peligrosa.
• Mantenga las asas y las superficies de agarre secas,
limpias y sin restos de aceite y grasa. Las asas y las
23
Español
ES

superficies de agarre resbaladizas no permiten un manejo
y control seguros de la herramienta en situaciones
inesperadas.
2.6 UTILIZACIÓN Y CUIDADO DE
HERRAMIENTAS A BATERÍA
• Recargue solo con el cargador especificado por el
fabricante. Un cargador adecuado para un tipo de
batería puede dar lugar a un riesgo de incendio cuando
se usa con otra batería.
• Utilice las herramientas eléctricas únicamente con las
baterías designadas específicamente. El uso de
cualquier otra batería puede dar lugar a un riesgo de
lesiones e incendio.
• Cuando la batería no esté en uso, manténgala alejada
de otros objetos metálicos como clips, monedas, llaves,
clavos, tornillos u otros objetos metálicos pequeños
que puedan hacer una conexión entre los terminales.
El cortocircuito de los terminales de la batería puede
provocar quemaduras o incendios.
• Bajo condiciones abusivas, es posible que salga líquido
despedido de la batería; evite el contacto. Si se
produce un contacto accidental, aclare con abundante
agua y jabón. Si el líquido entra en contacto con los
ojos, acuda al médico inmediatamente. El líquido
despedido de la batería puede provocar irritación o
quemaduras.
• No utilice una batería o una herramienta que haya
sufrido daños o modificaciones. Las baterías dañadas o
modificadas pueden exhibir un comportamiento
impredecible que puede dar lugar a un incendio, una
explosión o un riesgo de lesiones.
• No exponga una batería o una herramienta al fuego ni
a temperatura excesiva. La exposición al fuego o a una
temperatura superior a 130 °C puede provocar una
explosión.
• Siga todas las instrucciones de carga y no cargue la
batería o la herramienta fuera del intervalo de
temperatura especificado en las instrucciones. La
carga incorrecta o a temperaturas fuera del intervalo
especificado puede dañar la batería y aumentar el riesgo
de incendio.
2.7 SERVICIO
• Solicite a un técnico de reparación cualificado que
realice las tareas de servicio de su herramienta
eléctrica utilizando únicamente piezas de repuesto
idénticas. Esto garantizará el mantenimiento de la
seguridad de la herramienta eléctrica.
• Nunca repare las baterías dañadas. La reparación de
las baterías únicamente debe ser realizada por el
fabricante o los proveedores de servicio técnico
autorizados.
3 ADVERTENCIAS DE
SEGURIDAD PARA TALADROS
• Sujete la herramienta eléctrica solo por las superficies
de agarre aisladas, antes de realizar una operación en
la que el accesorio de corte pueda entrar en contacto
con cableado oculto. Si el accesorio de corte o los
elementos de fijación entran en contacto con un cable
"con corriente", esto puede hacer que las piezas
metálicas expuestas de la herramienta eléctrica "tengan
corriente" y podrían producir una descarga eléctrica al
operario.
• Nunca trabaje a una velocidad mayor que la velocidad
nominal máxima de la broca. A velocidades más altas,
es probable que la broca se doble si se permite que gire
libremente sin tocar la pieza de trabajo, lo que provocará
lesiones personales.
• Lleve protectores auditivos cuando realice una
perforación con impacto.La exposición al ruido puede
provocar la pérdida auditiva.
• Aplique presión únicamente en línea directa con la
broca y no aplique una presión excesiva. Las brocas
pueden doblarse y provocar una rotura o pérdida de
control, lo que dará lugar a lesiones personales.
• Empiece siempre a perforar a baja velocidad y con la
punta de la broca en contacto con la pieza de trabajo.
A velocidades más altas, es probable que la broca se
doble si se permite que gire libremente sin tocar la pieza
de trabajo, lo que provocará lesiones personales.
• Debe conocer su herramienta eléctrica. Lea
detenidamente el manual del operario. Aprenda sus
aplicaciones y limitaciones, así como los riegos
potenciales específicos relacionados con esta
herramienta eléctrica. Si respeta esta instrucción
reducirá el riesgo de descargas, incendios o lesiones
graves.
• Lleve siempre gafas de seguridad con protectores
laterales marcadas para cumplir la ANSI Z87.1. Si
respeta esta instrucción reducirá el riesgo de lesiones
graves.
• Proteja sus pulmones. Lleve una máscara facial o
antipolvo si se levanta polvo durante el
funcionamiento. Si respeta esta instrucción reducirá el
riesgo de lesiones graves.
• Proteja sus oídos. Lleve protección auditiva durante
periodos prolongados de funcionamiento. Si respeta
esta instrucción reducirá el riesgo de lesiones graves.
4 SÍMBOLOS EN EL PRODUCTO
En esta herramienta pueden utilizarse algunos de los
siguientes símbolos. Le rogamos que los estudie y aprenda su
significado. La interpretación correcta de estos símbolos le
permitirá manejar la herramienta mejor y de manera más
segura.
Símbolo
Explicación
V Tensión
24
Español
ES
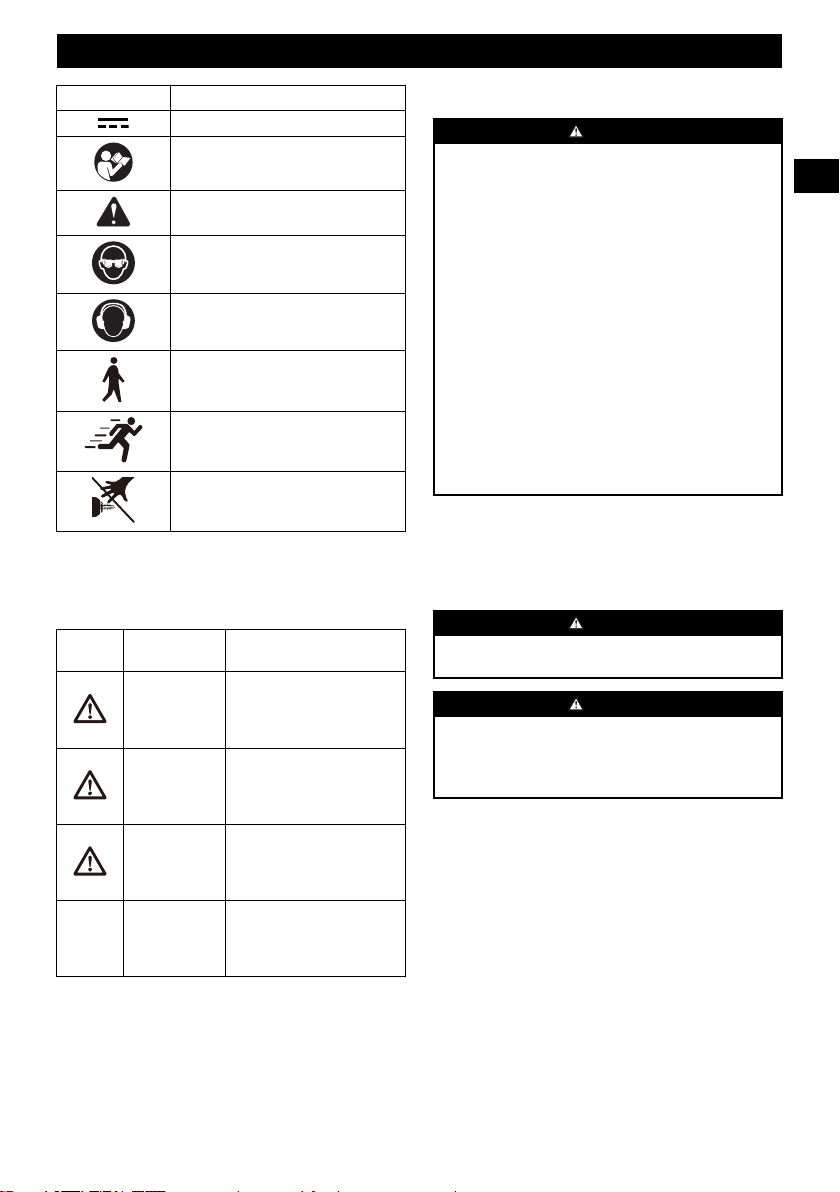
Símbolo Explicación
Corriente continua
Lea todas las advertencias de seguridad
y todas las instrucciones.
Alerta de seguridad
Lleve protección ocular
Lleve protección auditiva
Velocidad baja
Velocidad alta
No toque la pieza giratoria.
5 NIVELES DE RIESGO
Las siguientes indicaciones y significados tienen como fin
explicar los niveles de riesgo asociados a este producto.
SÍMBO-
LO
INDICACIÓN SIGNIFICADO
PELIGRO Indica una situación de peli-
gro inminente que, de no evi-
tarse, provocará lesiones
graves o incluso la muerte.
ADVERTEN-
CIA
Indica una situación de peli-
gro potencial que, de no evita-
rse, podría provocar lesiones
graves o incluso la muerte.
PRECAUCIÓN Indica una situación de peli-
gro potencial que, de no evita-
rse, puede provocar lesiones
leves o moderadas.
PRECAUCIÓN (Sin símbolo de alerta sobre
seguridad) Indica una situa-
ción que puede provocar da-
ños materiales.
6 PROPUESTA 65
AVISO
Este producto contiene una sustancia química conocida en
el estado de California como causante de cáncer, defectos
de nacimiento u otros daños reproductivos. El polvo
generado por el lijado eléctrico, el serrado, el esmerilado, la
perforación y otras actividades de construcción contiene
sustancias químicas que se sabe que son causantes de
cáncer, defectos de nacimiento u otros daños reproductivos.
Algunos ejemplos de estas sustancias químicas son:
• Plomo de pinturas con base de plomo;
• Sílice cristalina de ladrillos y cemento y otros productos
de albañilería;
• Arsénico y cromo de la madera tratada químicamente.
El riesgo de exposición a estas sustancias químicas varía
según la frecuencia con la que realice este tipo de trabajo.
Para reducir su exposición a estas sustancias químicas,
trabaje en una zona bien ventilada y trabaje con equipos de
seguridad aprobados, como máscaras antipolvo, que estén
especialmente diseñadas para filtrar partículas
microscópicas.
Conserve estas instrucciones.
7 INSTALACIÓN
7.1 DESEMBALAJE DE LA MÁQUINA
AVISO
Asegúrese de montar correctamente la máquina antes del
uso.
AVISO
• Si las piezas presentan daños, no utilice la máquina.
• Si no tiene todas las piezas, no utilice la máquina.
• Si faltan piezas o hay piezas dañadas, hable con el
centro de servicio.
1. Abra el embalaje.
2. Lea la documentación que se encuentra en la caja.
3. Retire todas las piezas sin montar de la caja.
4. Retire la máquina de la caja.
5. Deseche la caja y el embalaje de conformidad con los
reglamentos locales.
25
Español
ES
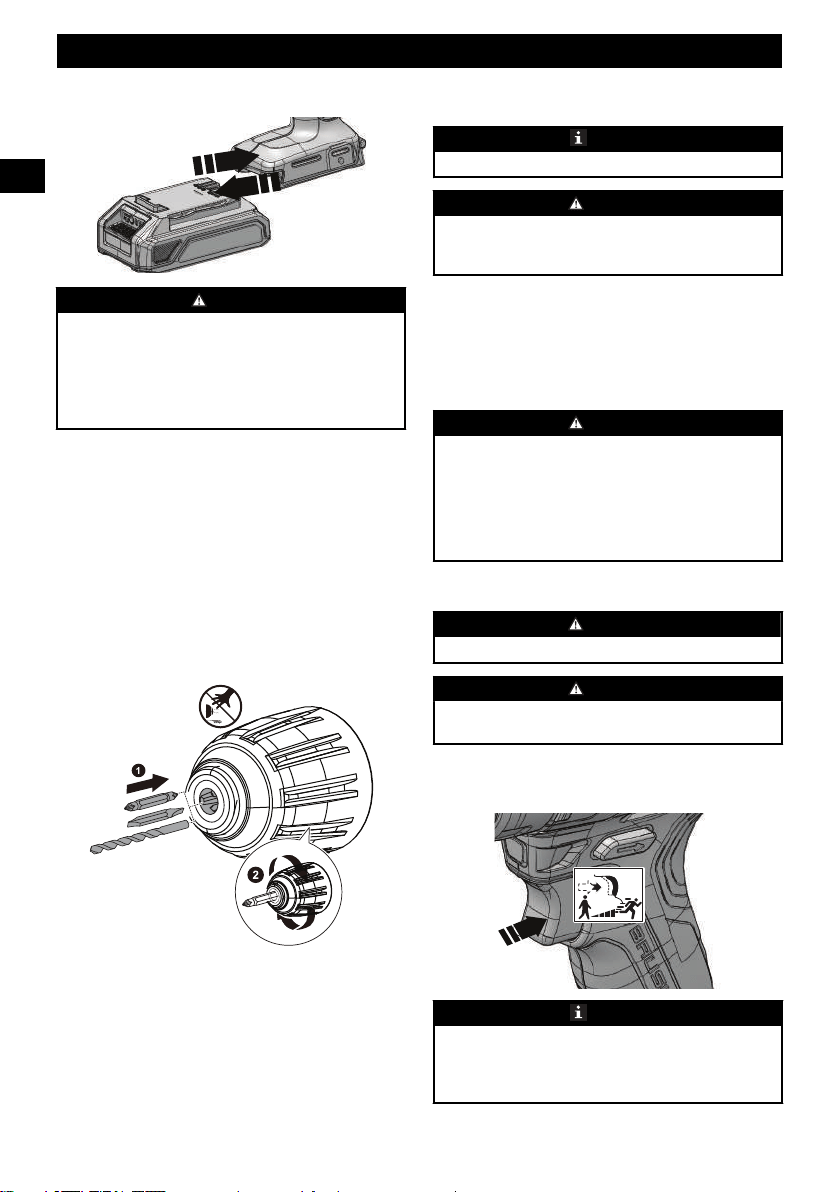
7.2 INSTALACIÓN DE LA BATERÍA
AVISO
• Si la batería o el cargador ha sufrido daños, sustituya la
batería o el cargador.
• Detenga la máquina y espere hasta que el motor se pare
antes de instalar o retirar la batería.
• Debe leer, conocer y seguir las instrucciones del manual
de la batería y el cargador.
1. Alinee las nervaduras de elevación de la batería con las
ranuras del compartimento de la batería.
2. Introduzca la batería en el compartimento de la batería
hasta que encaje en su posición.
3. Cuando escuche un clic, la batería está instalada.
7.3 RETIRADA DE LA BATERÍA
1. Pulse y mantenga pulsado el botón de desbloqueo de la
batería.
2. Retire la batería de la máquina.
7.4 INSTALACIÓN DE LA BROCA
1. Empuje el interruptor de avance/retroceso a la posición
"neutra" para bloquear el gatillo.
2. Gire el portabrocas en sentido antihorario para abrir.
3. Incline la máquina hacia arriba para evitar que la broca se
caiga
4. Ponga la broca en la ranura del portabrocas.
5. Asegúrese de que la broca esté centrada, posteriormente,
gire el portabrocas en sentido horario para apretarlo.
NOTA
No utilice una llave para apretar o aflojar el portabrocas.
AVISO
Ponga la broca directamente en las mordazas del
portabrocas. No ponga la broca en las mordazas del
portabrocas en ángulo, a continuación, apriete.
7.5 RETIRADA DE LA BROCA
1. Empuje el interruptor de avance/retroceso a la posición
"neutra" para bloquear el gatillo.
2. Gire el portabrocas en sentido antihorario para abrir.
3. Retire la broca.
AVISO
Esté preparado para posibles atascos a medida que avanza la
broca. Cuando se producen estas situaciones, el taladro
tiene una tendencia a atascarse y retroceder en dirección
contraria a la dirección de rotación y podría provocar la
pérdida de control al romper el material. Si no está
preparado, esta pérdida de control puede producir posibles
lesiones graves.
8 FUNCIONAMIENTO
AVISO
Lleve siempre protección ocular.
AVISO
No utilice ningún accesorio no recomendado por el
fabricante de este producto.
8.1 PUESTA EN MARCHA DE LA
MÁQUINA
NOTA
La máquina no puede funcionar hasta que el interruptor de
avance / retroceso se empuje totalmente hacia la izquierda o
la derecha. No utilice la máquina a bajas velocidades
durante periodos prolongados de tiempo.
26
Español
ES
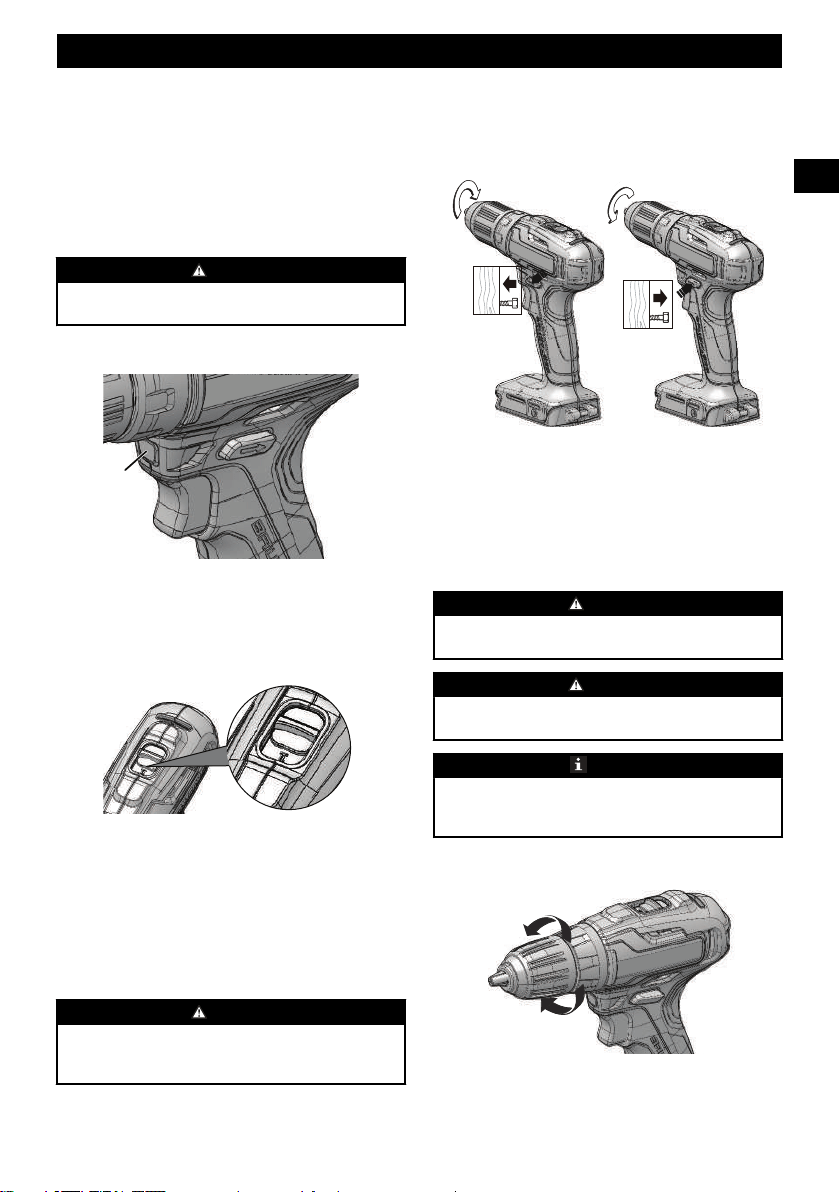
1. Apriete el gatillo para encender el taladro.
Velocidad variable
La máquina tiene un interruptor de velocidad variable que
ofrece mayor velocidad con mayor presión del gatillo y
menor velocidad con menor presión de gatillo.
8.2 DETENCIÓN DE LA MÁQUINA
1. Suelte el gatillo para apagar la máquina.
AVISO
Suelte el gatillo y deje que la máquina se detenga por
completo.
8.3 LUZ LED
4
La luz LED se ilumina cuando se aprieta el gatillo.
Ofrece luz adicional para una mayor visibilidad.
8.4 INTERRUPTOR DE DOS
VELOCIDADES
La máquina tiene un interruptor de dos velocidades diseñado
para perforar o atornillar a velocidades LO (1) o HI (2). En la
parte superior de la máquina hay un interruptor deslizante.
1. Cuando utiliza la máquina en la velocidad LO (1), la
velocidad disminuye y la máquina tiene más potencia y
par.
2. Cuando utiliza la máquina en la velocidad HI (2), la
velocidad aumenta y la máquina tiene menos potencia y
par.
AVISO
Utilice la velocidad LO (1) para aplicaciones de alta
potencia y par y la velocidad HI (2) para aplicaciones de
perforación rápida o atornillado.
8.5 INTERRUPTOR DE AVANCE /
RETROCESO
La máquina tiene el interruptor (avance / retroceso) sobre el
gatillo para cambiar la rotación.
1. Cuando el interruptor está en el lado izquierdo del gatillo,
la dirección de la broca es hacia delante (apriete).
2. Cuando el interruptor está en el lado derecho del gatillo,
la dirección de la broca se invierte (afloje).
3. Sitúe el interruptor en la posición de apagado (bloqueo
central) para ayudar a disminuir la posibilidad de una
puesta en marcha accidental cuando no esté en
funcionamiento.
AVISO
Suelte el gatillo y deje que el portabrocas se detenga por
completo.
AVISO
Deje que el portabrocas se pare por completo antes de
cambiar la dirección de rotación.
NOTA
La máquina no funciona hasta que el interruptor de avance /
retroceso se empuje totalmente hacia la izquierda o la
derecha.
8.6 AJUSTES DE EMBRAGUE
A
B
1. A. La dirección para disminuir el par.
2. B. La dirección para aumentar el par.
27
Español
ES
8.7 PERFORACIÓN DE MATERIALES
• Cuando taladre sobre superficies duras o lisas, utilice un
punzón para marcar el lugar donde desea taladrar el
orificio. Esto puede evitar que la broca se salga del centro
cuando se inicia el orificio.
• Al taladrar metales, utilice un aceite ligero en la broca
para evitar que se sobrecaliente. El aceite puede
prolongar la vida útil de la broca y aumentar la acción de
perforación.
• Si la broca se atasca en la pieza de trabajo o si el taladro
se cae, deje de utilizar la máquina inmediatamente. Retire
la broca de la pieza de trabajo y analice la causa del
atasco.
NOTA
Este taladro tiene un freno eléctrico. Cuando se suelta el
gatillo interruptor, el portabrocas deja de girar. Cuando el
freno funciona correctamente, pueden verse chispas a través
de las ranuras de ventilación en la carcasa. Esto es normal y
es la acción del freno.
PERFORACIÓN EN MADERA
Para obtener el máximo rendimiento, utilice brocas de acero
de alta velocidad para taladrar madera.
1. Utilice la máquina a una velocidad muy baja para evitar
que la broca se deslice del punto de inicio. Aumente la
velocidad a medida que la broca penetra en el material.
2. Cuando taladre orificios, coloque un trozo de madera
detrás de la pieza de trabajo para evitar los bordes
rasgados o astillados en la parte posterior del orificio.
PERFORACIÓN EN METAL
Para obtener el máximo rendimiento, utilice brocas de acero
de alta velocidad para taladrar en metal o acero.
1. Utilice la máquina a una velocidad muy baja para evitar
que la broca se deslice del punto de inicio.
2. Mantenga una velocidad y una presión constantes para
evitar el sobrecalentamiento de la broca. Aplicar
demasiada presión puede: Sobrecalentar el taladro,
desgastar los rodamientos, doblar o quemar las brocas y
producir orificios descentrados o de forma irregular.
3. Cuando taladre orificios grandes en metal, comience con
una broca pequeña, posteriormente termine con una broca
grande. Asimismo, lubrique la broca con aceite para
mejorar la acción de perforación y aumentar la vida útil
de la broca.
9 MANTENIMIENTO
PRECAUCIÓN
No permita que líquidos de frenos, gasolina y otros
derivados del petróleo toquen las piezas de plástico. Las
sustancias químicas pueden dañar el plástico y hacer que
quede inservible.
PRECAUCIÓN
No utilice disolventes o detergentes fuertes en la carcasa o
los componentes de plástico.
AVISO
Retire la batería de la máquina antes de realizar tareas de
mantenimiento.
9.1 LIMPIEZA DE LA MÁQUINA
PRECAUCIÓN
La máquina debe estar seca. La humedad supone un riesgo
de descargas eléctricas.
• Quite el material no deseado del respiradero con un
aspirador.
• No pulverice el respiradero ni lo introduzca en
disolventes.
• Limpie la carcasa y los componentes de plástico con un
paño húmedo y suave.
10 DATOS TÉCNICOS
Tensión 24 V
Motor Sin escobillas
Velocidad sin carga 0-380 / 0-1450 RPM
Ajustes de embrague 18 posiciones + taladro
Par 310 In-lbs. / 35 N.m.
Peso sin batería 2.27 lbs (1.03 kg)
Modelo de batería BAG708, BAG709, BAG710 y
otras series BAG
Modelo de cargador 29862, 29972, CAG817 y otras
series CAG
El intervalo de temperatura ambiente recomendado:
Elemento Temperatura
Intervalo de temperatura de
almacenamiento del aparato
32°F (0°C) - 158°F (70°C)
Intervalo de temperatura de
funcionamiento del aparato
32°F (0°C) - 104°F (40°C)
Intervalo de temperatura de
carga de la batería
39°F (4°C) - 104°F (40°C)
Intervalo de temperatura de
funcionamiento del cargador
39°F (4°C) - 104°F (40°C)
Intervalo de temperatura de
almacenamiento de la batería
32°F (0°C) - 73°F (23°C)
Intervalo de temperatura de
descarga de la batería
32°F (0°C) - 113°F (45°C)
28
Español
ES
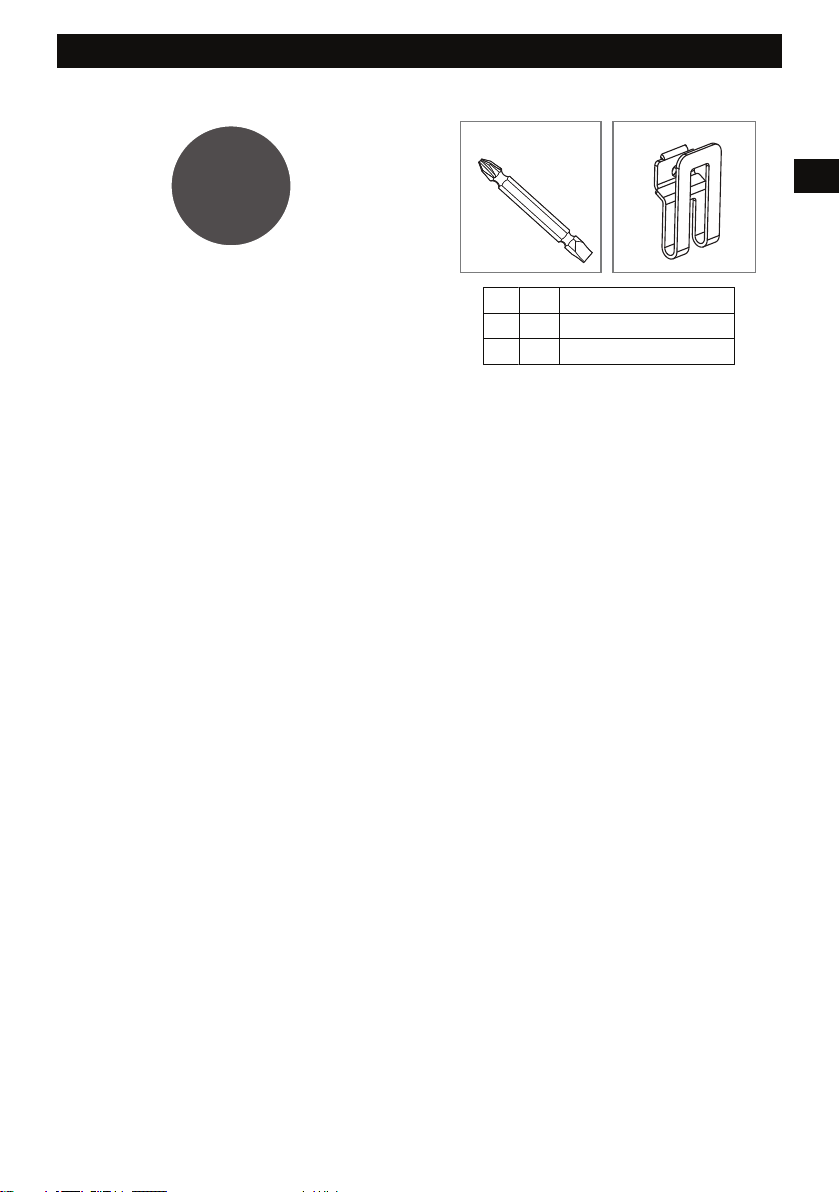
11 GARANTÍA LIMITADA
YEAR
ANS
AÑOS
LIMITED WARRANTY
GARANTIE LIMITÉE
GARANTÍA
LIMITADA
3
Greenworks Por la presente, se garantiza este producto al
comprador original en posesión de la prueba de compra por
un periodo de tres (3) años contra defectos de material, piezas
o mano de obra. Greenworks, a su propia discreción, reparará
o reemplazará todas y cada una de las piezas que se
encuentren defectuosas, en base a un uso normal, sin costo
alguno para el cliente. Esta garantía es válida para aparatos de
los que se ha realizado un uso personal y no han sido
alquilados para aplicaciones comerciales/industriales, y que
han sido sometidos a un mantenimiento tal y como se indica
en las instrucciones del manual del usuario suministrado con
el producto nuevo.
LO QUE NO CUBRE LA GARANTÍA:
1. Cualquier pieza que no funcione debido al uso incorrecto,
uso comercial, abusivo, negligencia, accidente,
mantenimiento inadecuado, o alteración; o
2. La unidad, si no ha sido utilizada y/o mantenida
siguiendo el manual del propietario; o
3. El desgaste normal, excepto según se indica a
continuación.
4. Piezas que requieren un mantenimiento rutinario como
lubricantes, afilar la cuchilla;
5. El deterioro normal del acabado exterior debido al uso o
exposición.
ASISTENCIA AL USUARIO:
El servicio de garantía está disponible llamando a nuestra
línea de asistencia gratuita al 1-888-909-6757.
GASTOS DE TRANSPORTE:
Los gastos de transporte del traslado de cualquier herramienta
eléctrica o accesorio será responsabilidad del comprado. Es
responsabilidad del comprador pagar los gastos de transporte
de cualquier pieza enviada para su reemplazo bajo esta
garantía, salvo que dicha devolución sea solicitada por escrito
por Greenworks.
Dirección en EE.UU.: Dirección en Canadá:
Greenworks Tools Greenworks Tools Canada Inc.
P.O. Box 1238 P.O. Box 93095, Newmarket, Ontario
Mooresville, NC 28115 L3Y 8K3
12 VISTA DESPIEZADA
1
2
Nº Cant. Descripción
1 1 Punta Doble
2. 1 Pinza para cinturón
29
Español
ES