7bp Mount
Welcome ....................... 2
Safety lnatruc ions ............ 3
/
/
!
Espa5o: ........... 23
Frangais ........... 45
installation - I,d,desco,,eot_,g
Optional raceMakerTo Water Supply ..... 4- - 5
Door
Removam & Reversal ....... 6 - 9
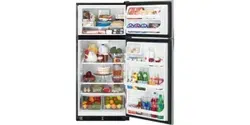
Features at a Glance ........ .10
Temperature Controls ....... 11
Looking inside .......... 12 o 14
ice Service .................... 15
Food Storage
& Energy Saving Tips ....... 16
Normal Operating Sounds .. 17
Care & Cleaning .......... 18- 19
Warranty ...................... 20
8eforeYouCali ............... 21
READ AND SAVE THESE INSTRUCTIONS p!N240400103Iolo4)
Congratulations on your purchase of a new refrigerator! We
here at EmectromuxHome Products are very proud of our
product and we are completly cornmitted to providing you
with the best service possible. Your satisfaction is our #1
priority.
Please readthis Use & Care Manual very carefully. It contains
valuable information on how to properly maintain your new
refrigerator.
We know you'll enjoy your new refrigerator and Thank You
for choosing our product. We hope you consider us for future
purchases.
PLEASE READ AND SAVE THESE mNSTRUCTIONS
This Use & Care Manual provides specific operating
instructions for your model. Use your refrigerator only as
instructed in this manual. These instructions are not meant
to cover every possible condition and situation that may
occur. Common sense and caution must be practiced when
installing, operating and maintaining any appliance.
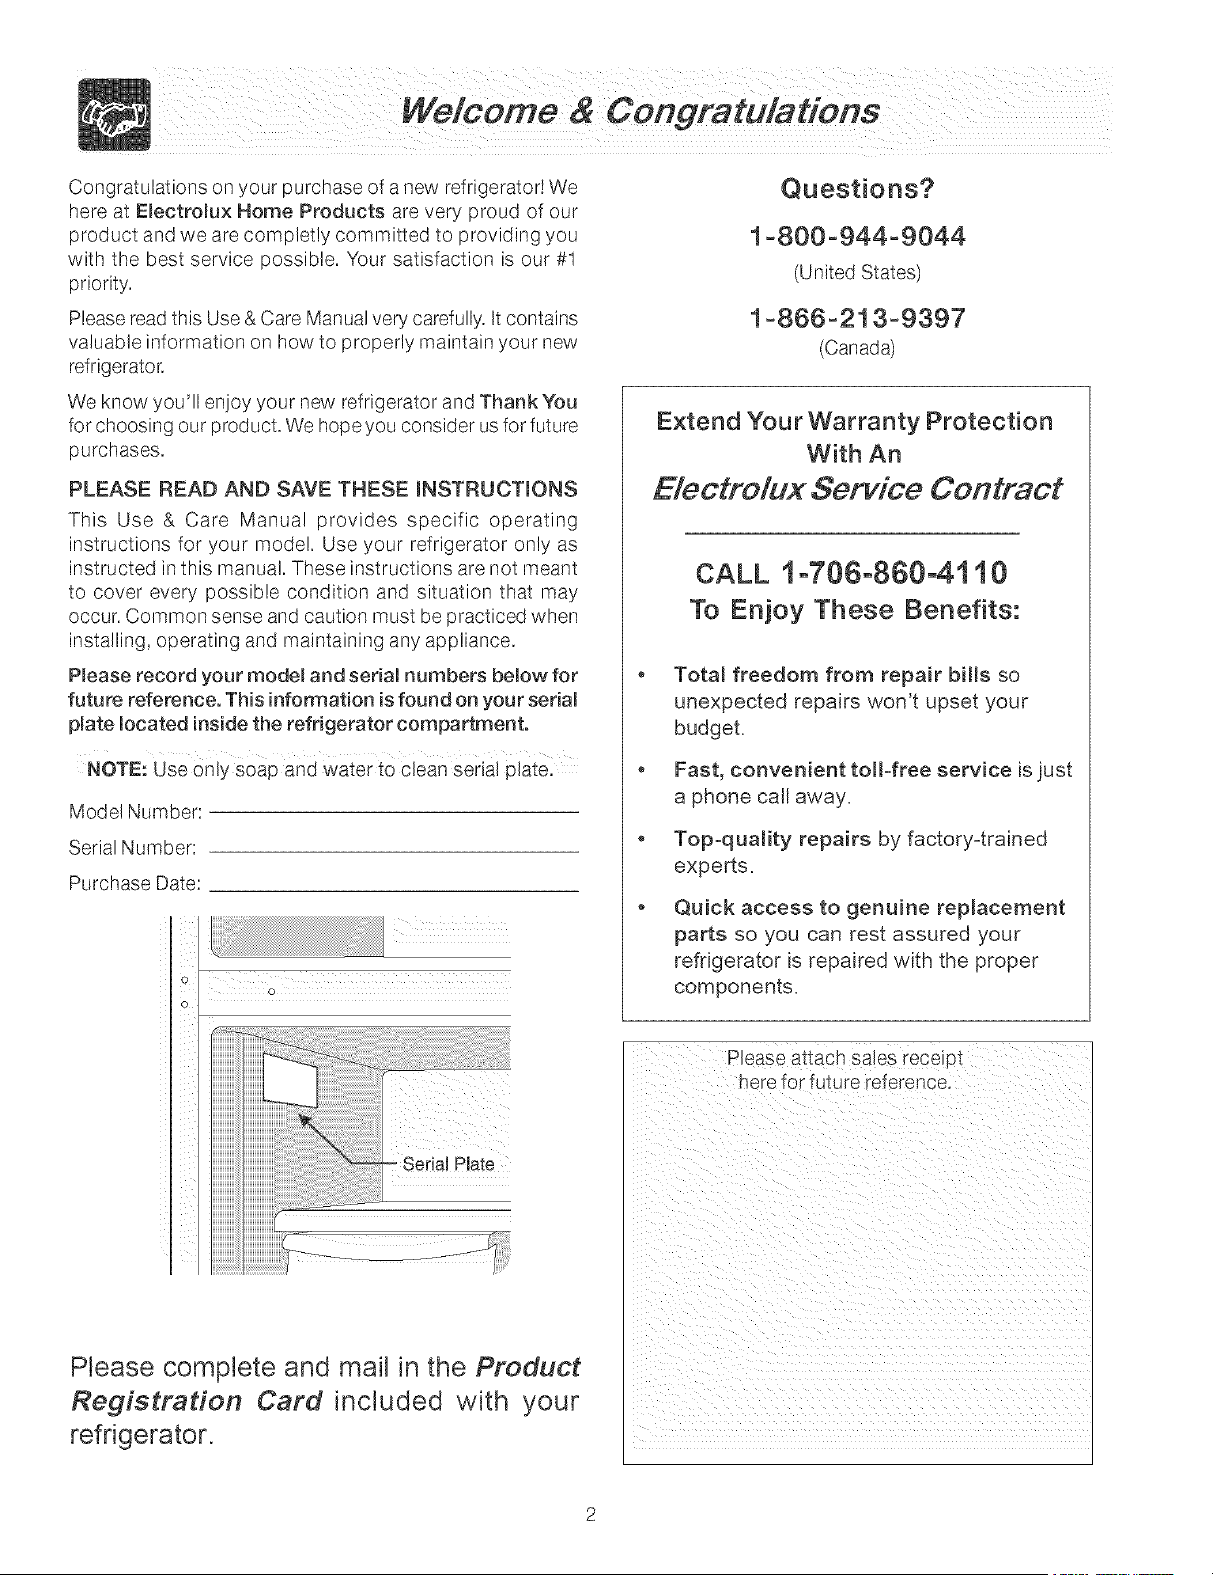
Please record your model and seriamnumbers below for
future reference. This information is found on your serial
plate mocated inside the refrigerator compartment.
Mode! Number:
Serial Number:
Purchase Date:
o
r--
Please complete and mail in the Product
Registration Card included with your
refrigerator.
Questions?
1-800-944-9044
(United States)
1-866-213-9397
(Canada)
Extend Your Warranty Protection
With An
Eiectro/ux Service Contract
CALL 1°706°860°4110
To Enjoy These Benefits:
Total freedom from repair bills so
unexpected repairs won't upset your
budget,
Fast, convenient toH4ree service is just
a phone call away.
Top-quality repairs by factory-trained
experts,
Quick access to genuine replacement
parts so you can rest assured your
refrigerator is repaired with the proper
components,
Please al:l:acnsales receipt
here for future reference.
FORYOURSAFETY
,, Do not store or use gasoline, or other flammable liquids
in the vicinity of this or any other appliance. Read pro-
duct labels for warnings regarding flammability and other
hazards.
• Do not operate the refrigerator in the presense of
explosive fumes.
,, Avoid contact with any moving parts of automatic ice
maker.
Remove all stables from the carton. Staples can cause
severe cuts, and also destroy finishes if they come in
contact with other appliances or furniture.
CHmLD SAFETY
Destroy or recycle the carton, plastic bags, and any exterior
wrapping material immediately after the refrigerator is
unpacked. Children should NEVER use these items to play.
Cartons covered with rugs, bedspreads, plastic sheets or
stretch wrap may become airtight chambers, and can
quickly cause suffocation.
PROPER DISPOSAL OF YOUR REFRIGERATOR
OR FREEZER
Risk of child entrapment
Child entrapment and
suffocation are not problems of
the past. Junked or abondoned
refrigerators or freezers are still
dangerous- even if they will sit
for "just a few days." If you are
getting rid of your old refrigerator
or freezer, please follow the t
instructions below to help
prevent accidents.
Before you throw away your omdrefrigerator/freezer:
Remove doors.
,, Leave shelves in place so children may not easily climb
inside.
,, Have refrigerant removed by a qualified service
technician.
These Guidelines Must Be Followed To Ensure That Safety Mechanisms In This Refrigerator
Wi!! Operate Proper!y.
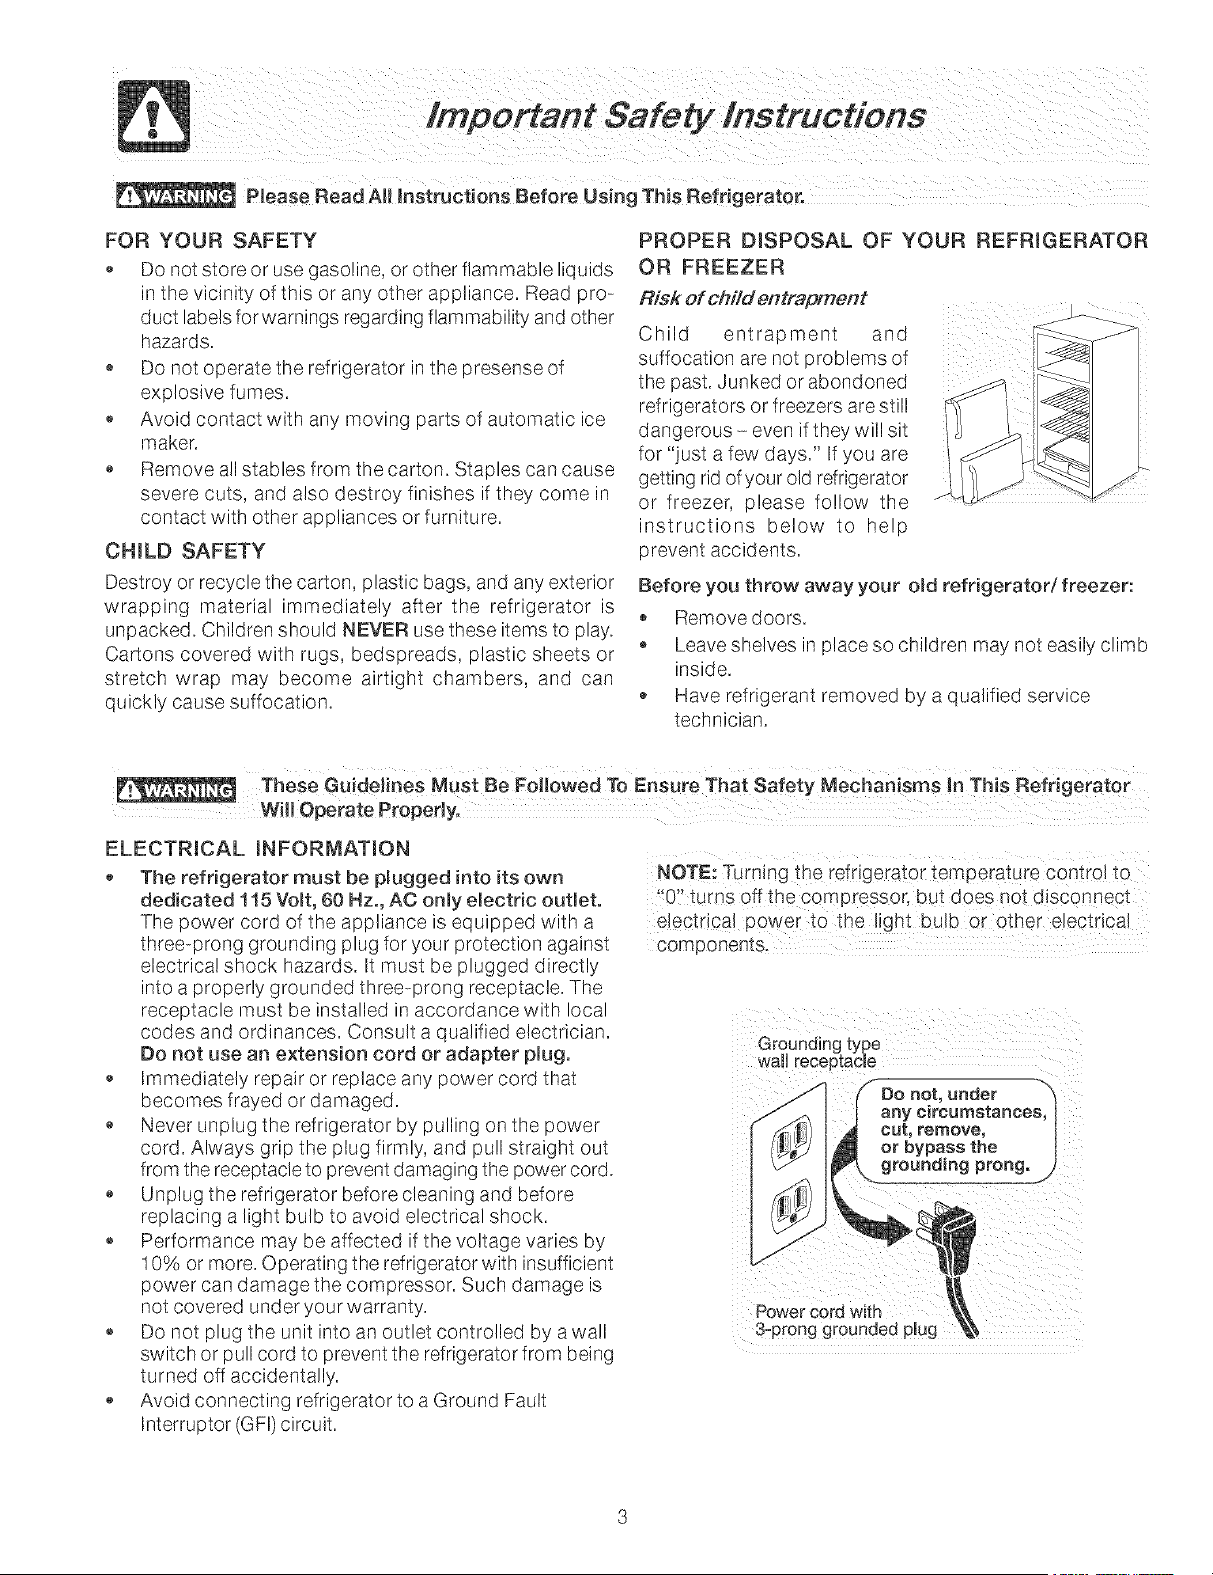
ELECTRICAL INFORMATION
The refrigerator must be plugged into its own
dedicated 115 Volt, 60 Hz., AC onmyelectric outlet.
The power cord of the appliance is equipped with a
three-prong grounding plug for your protection against
electrical shock hazards. It must be plugged directly
into a properly grounded three-prong receptacle. The
receptacle must be installed in accordance with local
codes and ordinances. Consult a qualified electrician.
Do not use an extension cord or adapter plug.
,, Immediately repair or replace any power cord that
becomes frayed or damaged.
Never unplug the refrigerator by pulling on the power
cord. Always grip the plug firmly, and pull straight out
from the receptacle to prevent damaging the power cord.
Unplug the refrigerator before cleaning and before
replacing a light bulb to avoid electrical shock.
,, Performance may be affected if the voltage varies by
10% or more. Operating the refrigerator with insufficient
power can damage the compressor. Such damage is
not covered under your warranty.
,, Do not plug the unit into an outlet controlled by a wa!l
switch or pull cord to prevent the refrigerator from being
turned off accidentally.
Avoid connecting refrigerator to a Ground Fault
Interruptor (GFI)circuit.
NOTE: Turning the refrigerator temperature control to
"0" turns off the compressor, but does not disconnect
electrical power to the light bulb or other electrica!
Componentsl
Power cord With
3,prong grounded p!ug
This Use & Care Manual provides specific operating
instructions for your model. Use the refrigerator only as
instructed in this Use & Care Manual. Before starting the
refrigerator, fommowthese important first steps.
LOCATmON
• Choose a place that is near a grounded electrical outlet,
Do Not use an extension cord or an adapter plug.
If possible, place the refrigerator out of direct sunlight
and away from the range, dishwasher or other heat
sources.
The refrigerator must be installed on a floor that is level
and strong enough to support a fully loaded refrigerator.
Consider water supply availability for models equipped
with an automatic ice maker.
mNSTALLATION
• Do Not install the refrigerator where the temperature
will drop below 55°F (13°C) or rise above 110°F (43°C).
The compressor will not be able to maintain proper
temperatures inside the refrigerator.
LEVELING
All four corners of your refrigerator must rest firmly on a
solid floor. Your refrigerator isequipped with adjustable front
rollers to help level your unit.
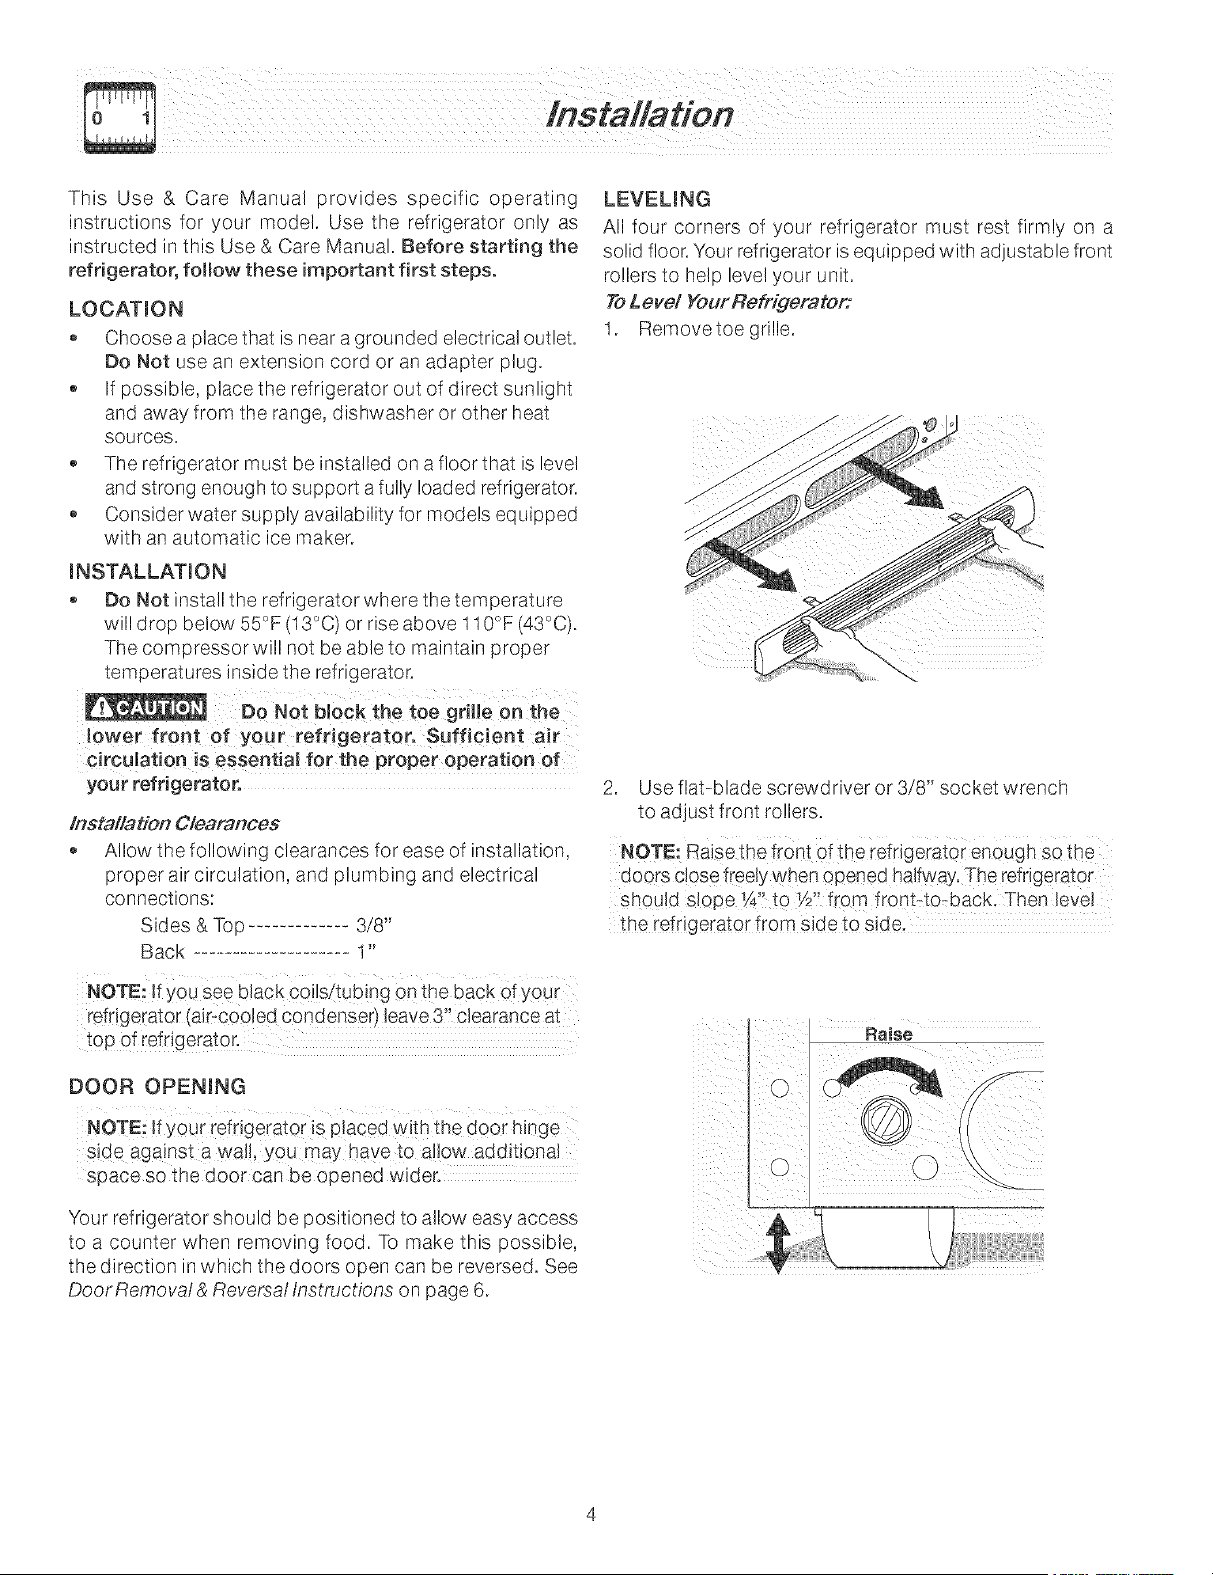
ToLove/YourRefrigerator:
1. Remove toe grille.
lower front of your refrigerator, Suff!c!ent air
circulation is essential for the proper operation of
your refrigerator.
Installation Cfearances
Allow the following clearances for ease of installation,
proper air circulation, and plumbing and electrical
connections:
Sides & Top 3/8"
Back ...................................1"
NOTE: !fYOUsee b!ack COil!!tu!ing Onthe back of YOUr
refrigerator (ai[_cooled condenser) leave 3'! clearance at
t0P 0f rdrigerat0r.
DOOR OPENING
NOTE: IfYOUrrefrigerator iS placed with the door hinge
side against a wal!,, you may have to allow additiona!
space so the door can be opened wider.
Your refrigerator should be positioned to allow easy access
to a counter when removing food. To make this possible,
the direction in which the doors open can be reversed. See
DoorRemovaf& Reversa/Instructions on page 6.
2. Use flat-blade screwdriver or 3/8" socket wrench
to adjust front rollers.
doors Closefreely when opened halfway, The refrigerator
the refrigerator from side to side.
/nsta//adon - Connecting Optional tee Maker To Water Supply
To avoid electric shock, which can cause death or severe personal injury, disconnect the
refrigerator from electrical power before connecting a water supply line to the refrigerator.
To Avoid Property Damage:
• Copper tubing is recommended for the water suppJy line. Water supply tubing made of 1/4"plastic is not
recommended since it greatly increases the potential for water leaks. Manufacturer will not be responsible for
any damage if plastic tubing is osedfor supply line.
• DO NOT install water supply tubing in areas where temperatures fa_l below freezing.
• Chemicals from a malfunctioning softener can damage the ice maker. If the ice maker is connected to soft
wate5 ensure that the softener }s maintained and working properly.
IMPORTANT: Ensure ma_your water suppl,.' J_neconnections comply wltr] a!l _oca!plumbing codes.
Before installing The Water Supp/y Line, You Will Need
• Basic Tooms:adjustable wrench, flat-blade screwdriver, and Phillips TM screwdriver
Access to a household cold water line with water pressure between 20 and 120 psi.
A water supply line made of _Ainch (6.4 rnrn) OD, copper tubing. To determine the length of copper tubing needed,
you will need to measure the distance from the ice maker inlet valve at the back of the refrigerator to your cold water
pipe. Then add approximately 7 feet (2.1 meters), so the refrigerator can be moved out for cleaning (as shown).
A shutoff valve to connect the water supply line to your household water system. DO NOT use aself-piercing type
shutoff valve.
,, A compression nut and ferrule (sleeve) for connecting the water supply line to the ice maker inlet valve.
NOTE: Water line kit number 53039179501 available fiom your appliance dealer at additional cost, contains 25 feet
nuts, (2) ferrules/sleeves, and instructions for instal%g a water supply line.
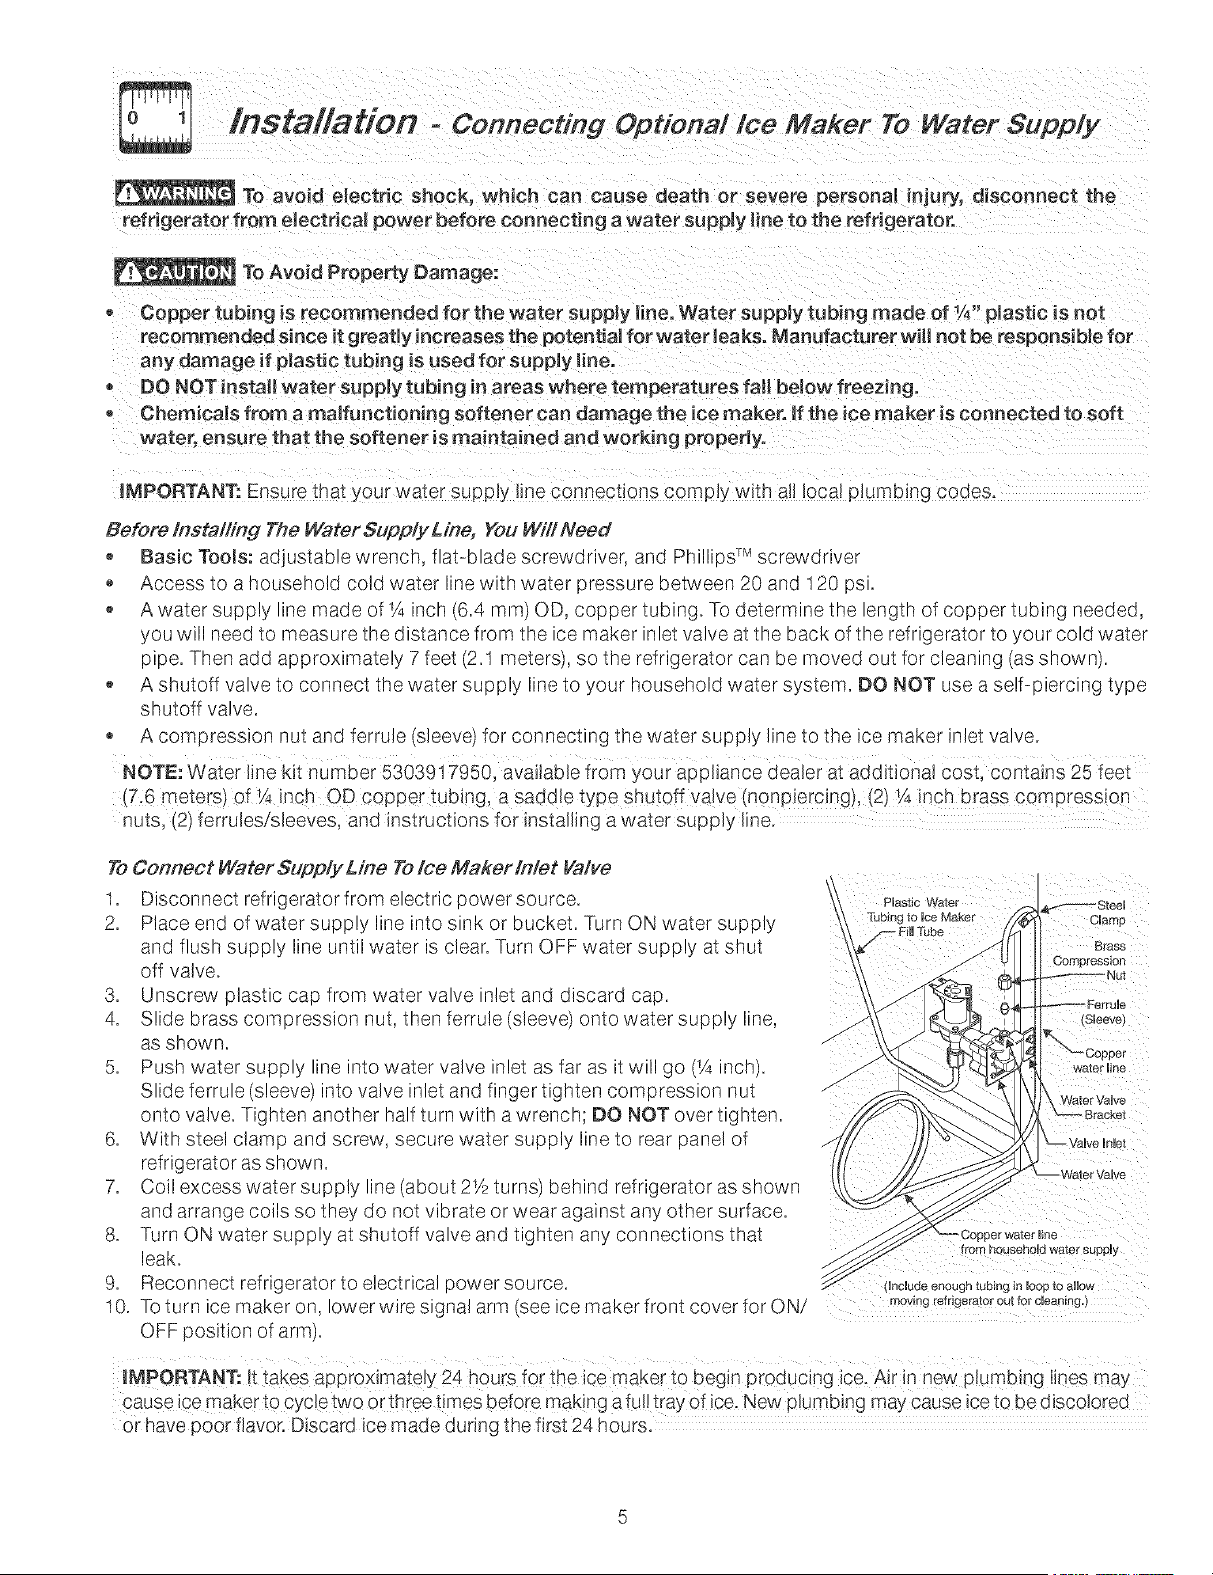
ToConnect Water Supp/y Line Toice Maker /n/et Valve
1. Disconnect refrigerator from electric power source.
2. Place end of water supply line into sink or bucket. Turn ON water supply
and flush supply line until water is clear. Turn OFF water supply at shut
off valve.
3. Unscrew plastic cap from water valve inlet and discard cap.
4. Slide brass compression nut, then ferrule (sleeve) onto water supply line,
as shown.
5. Push water supply line into water valve inlet as far as it will go (_Ainch).
Slide ferrule (sleeve) into valve inlet and finger tighten compression nut
onto valve. Tighten another half turn with a wrench; DO NOT over tighten.
With steel clamp and screw, secure water supply line to rear panel of
refrigerator as shown.
Coil excess water supply line (about 2_/2turns) behind refrigerator as shown
Plastic Water
CUamp
B_ass
Compression
6.
7.
and arrange coils so they do not vibrate or wear against any other surface.
8. Turn ON water supply at shutoff valve and tighten any connections that
leak, househoUd water suppJy
9. Reconnect refrigerator to electrical power source. (!ncludeenoughtubinginlooptoaHow
10. TOturn ice maker on, lower wire signa! an'n (see ice rnaker front cover for ON/ moyingrefrigerato(outforcueaning.)
OFF position of arm).
iMPORTANT: It takes approximately 24 hours for the ice maker to begin p_oducing ice. Airin new p!umbing lines may
Cause ice maker to cyc!e two or three times before rnak!ng a fu!!tray of ice. New p!umbing may cause ice to be disco!ored
or have poor flavor. Discard ice made during the first 24 hours.
Door Removal and Reversal Instructions
ToolsNecessal .
Ph as neoa
or
@uadre neaa
screwanver Wlonch Sot
/_aUSTa_ e
vvroncn
Cabinet Hole
Pmugs
Hinge Home
Door Sto
Screw
DoorStop
SCFeW_
Top Hinge
Covet
Top Hinge
Handle Hole
Plug
J
Doo_
Washe_
Hinge
Hinge
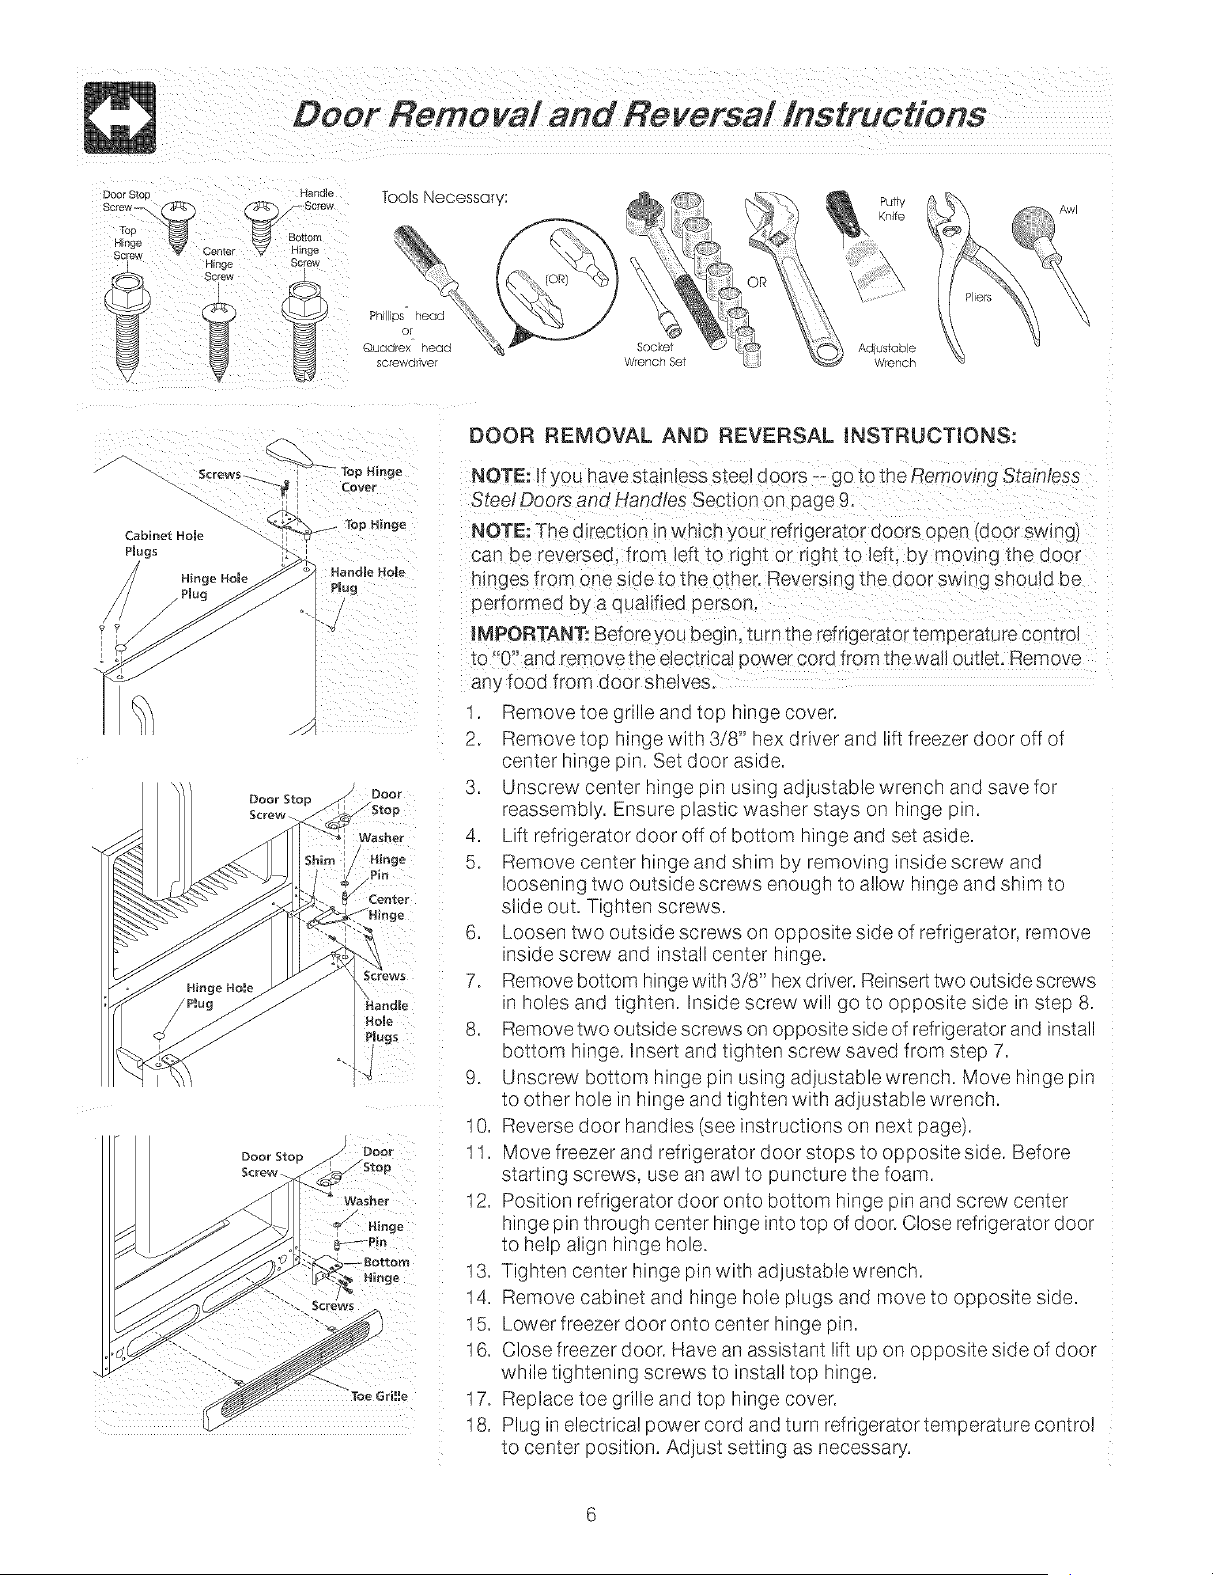
DOOR REMOVAL AND REVERSAL iNSTRUCTiONS:
NOTE: if you nave stainless stee_doors --go to the Removing Stainless
SteeIDoors and Handles Section on page 9,
NOTE: The direction in which your refngerator doors open tdoor swing
can de reversed, from left zDngnt or nght to left, by moving the door
hinges from one side to the other, Reverslnq me door swing ShOUldbe
oerformed oy a aualifiea person,
iMPORTANT: Beforeyou oegJn,turn me refrigerator temperature control
to "0" and re _qovethe electrical dower COrdfrom thewall outletoRemove
any food from door shelves.
q. Remove toe grme aria _o_ nnge cover,
2. Remove to[} hinge wire 3/8" nex driver and lift freezer door 3ff 3f
center nmge pin. Set door astae.
3. Unscrew cemer hinge pin usln ] aa useable wrencr and save for
reassembly. Ensure old:tic washer stays on ntnge pin
4. Lift refrigerator aoor off of bottom hinge and set aside.
5. Remove cen_er nlnge and shim ey removing inside screw ana
loosening _wo OUtSidescrews enoug q_oallOW range ana Snlm [o
Slide OUL -- gnTen screws,
6. Loosen two ou_s!ae screws on oooosite side of refrigerator,remove
nsldescrew and ns_8 center nlnge.
7. Remove bottom hinge with 3/8" hex driver. Reinsert two outside screws
"-holes anc _gn_en Inside scre_ wm go _o opposite sloe _ s_eu 8.
8. Remove two OUtSidescrews on o_oosite side of refrigerator and ns_a
DO1ZOmnlnge, insert and tighten screw saved from s_eD7.
9. Unscrew DO1ZOmhinge uir using adj JS[aDlewrench. Move n_ngepin
[o diner nole _nn_ngeand ughten with aclustable wrench.
10, Reverse door handles see _nstruc_ons or nex_page/.
11 Move freezer and refrigerator aoor s_oos to oooosl_e s_de. Before
starting screws. Jse an aw! 1:oouncture the foam
12, Position refrigerator door onto bottom _'_ge u_nand screw cen_er
n_ngeD_nmrougn center hinge into top of door. Close refrigerator door
[o ne u augr n_nge no{e,
13, Tigmen cen_er ntnge Dinwith adJJs_aDlewrencn.
14, Remove cabinet and -'-ge nole plugs and "hove _ooooos!_e side.
15, Lower freezer door onto cen_er nnge din.
16, Close freezer door. Have an assistant ft uDon oooos_e s_ae _tdoor
wn __lgn_enlng screws _o nsta _ou nlnge.
17, Reolace _oe grille and too hin]e :over,
I8, Plug - elec_nca dower cord and turn refrig _rator _emDeramre con_ro_
[o cen_er DOSI_!OR.Ad;us_ se_ung as necessar}.
Door Removal and Reversal instructions (continued)
NOTE: Some modeJs na_e "pOCKEt" handles, which are recessed into the sides Dftne door. On these mode_s, only
the hinges wm need to de reversed.
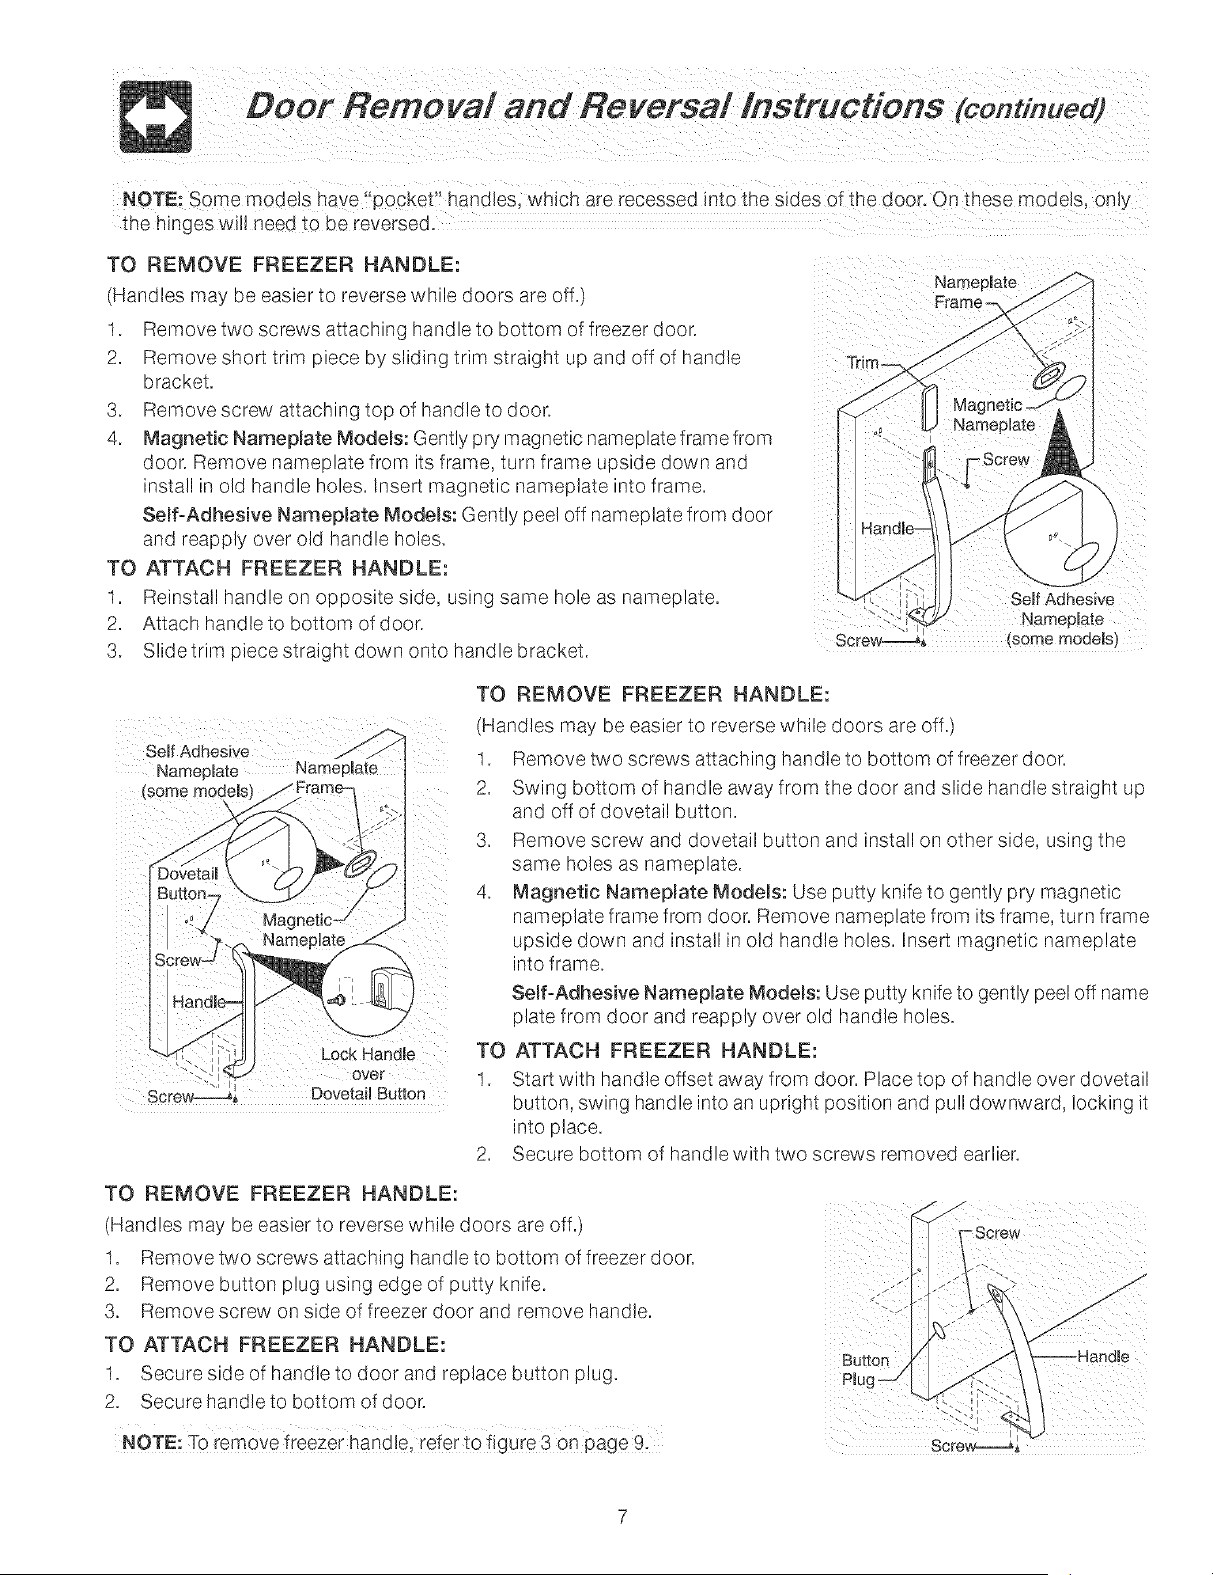
TO REMOVE FREEZER HANDLE:
Handles -nay be easier ic reverse While doors are off.
q Remove _wo screws a_acn_ng handle [o bottom of freezer door.
2 Remove snor_ trim 8iece oy sliding trim s_ralgnt up and off 3f nandle
DracKet.
3, Remove screw attaching too of handle _odoor
4 Magnetic Namepmate Modems:Gently pry magnetic nameolate frame from
dOOr Remove nameplate from is frame, turn frame osloe Gown and
nsta - o!o handle noles. Insert magnetic nameslate hid frame.
Serf-Adhesive Narnepmate Modems:Gently pee! 3ffnameolate from door
and reapply over old qandle holes.
TO ATTACH FREEZER HANDLE:
q Reinsta nandle on coooslte side using same hole as nameDta_e.
2 AttaCh handle to bottom of door.
3, Slide trim oiece straight Gown onto handle bracket.
14_ _' Namepmal:e
Screw-==_ _some models',
iii i i i
soBf AdhesiVe
Namepmate Namepmate 1
(some models
Lock Handle
over
TO REMOVE FREEZER HANDLE:
(Handles may be easier to reverse while doors are off.)
1. Remove two screws attaching handle to bottom of freezer door.
2. Swing bottom of handle away from the door and slide handle straight up
and off of dovetail button.
3. Remove screw and dovetail button and install on other side, using the
same holes as nameplate.
4. Magnetic Nameplate Modems: Use putty knife to gently pry magnetic
nameplate frame from door. Remove nameplate from its frame, turn frame
upside down and install in old handle holes. Insert magnetic nameplate
into frame.
Serf-Adhesive Nameplate Modems:Use putty knife to gently peel off name
plate from door and reapply over old handle holes.
TO ATTACH FREEZER HANDLE:
1. Start with handle offset away from door. Place top of handle over dovetail
button, swing handle into an upright position and pull downward, locking it
into place.
2. Secure bottom of handle with two screws removed earlier.
TO REMOVE FREEZER HANDLE:
(Handles may be easier to reverse while doors are off.)
1. Remove two screws attaching handle to bottom of freezer door.
2. Remove button plug using edge of putty knife.
3. Remove screw on side of freezer door and remove handle.
TO ATTACH FREEZER HANDLE:
1. Secure side of handle to door and replace button plug.
2. Secure handle to bottom of door.
NOTE: To remove freezer handle, refer to figure 3 on page 9,
Button
Plug-
Door Removal and Reversal Instructions (continued]
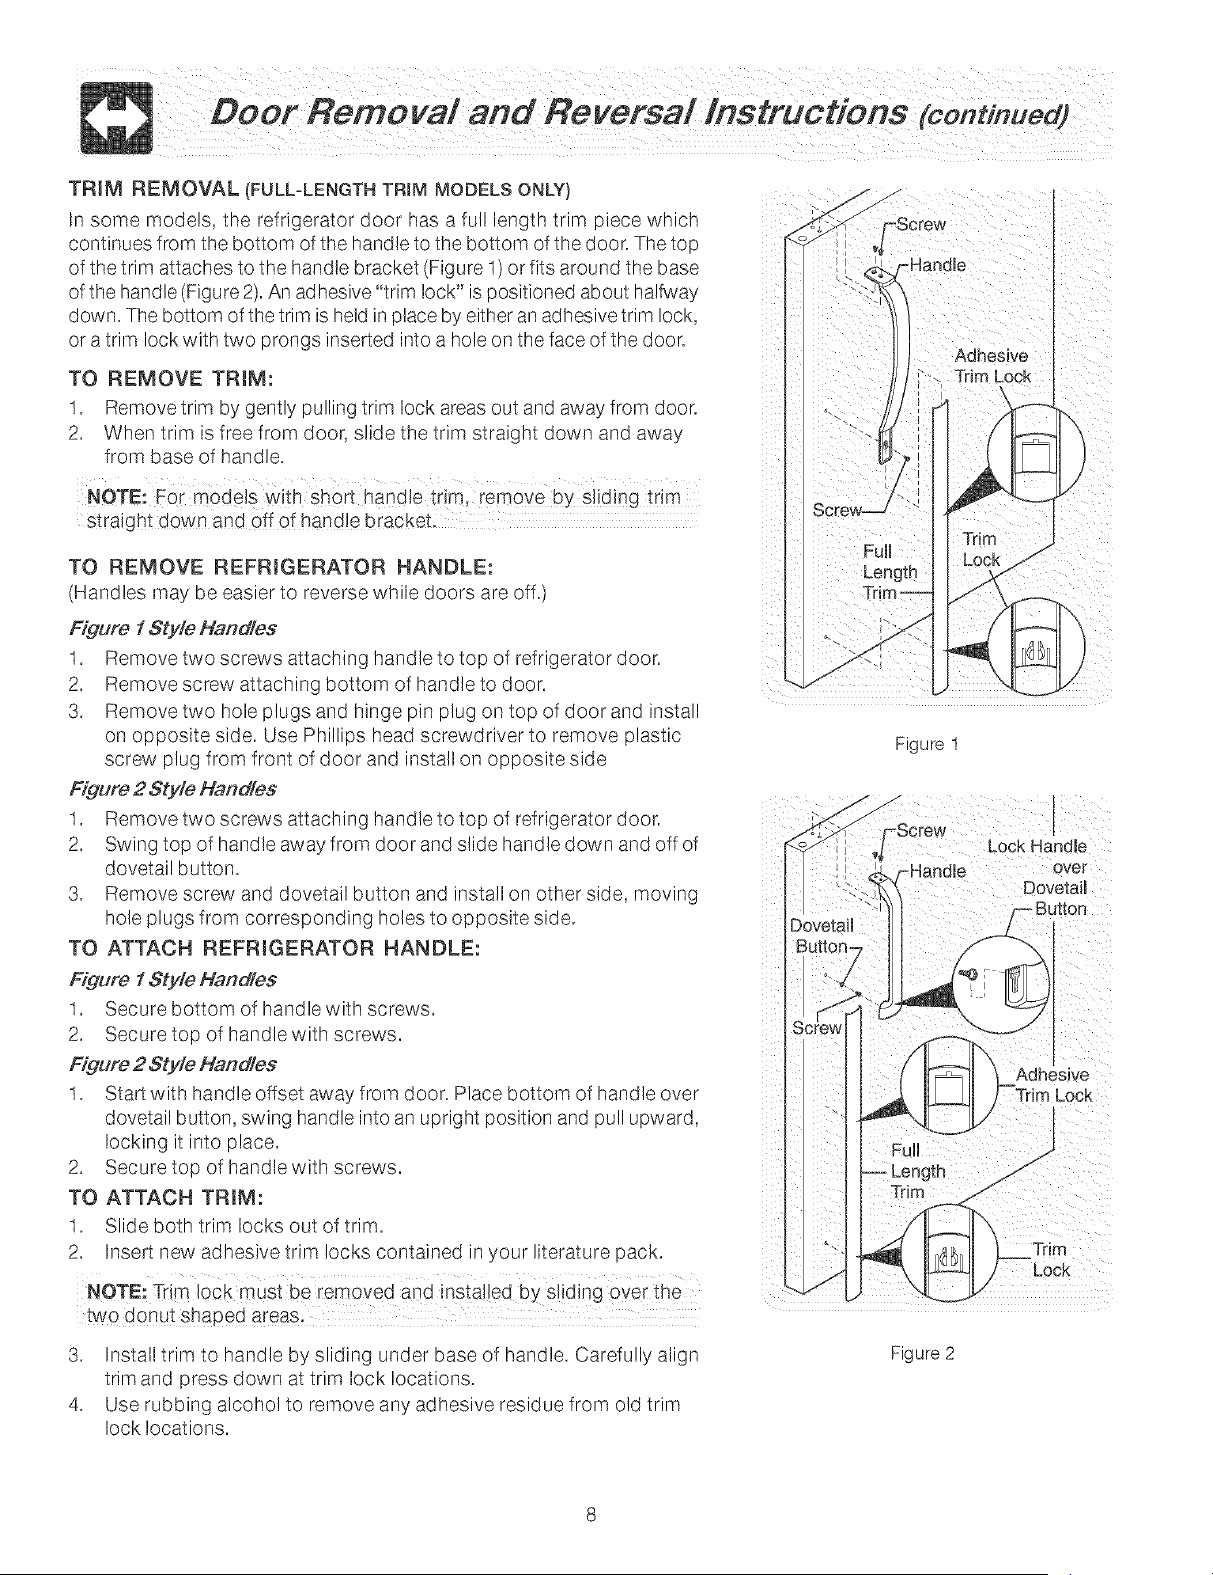
TRIM REMOVAL (FULL-LENGTH TRIM MODELS ONLY)
In some moae_s. _ne refrigerator door nas a ful eng_r _nrn piece wnlcn
continues from the bottom of the handle to the bottom of the door. The toD
of the trim attaches to _nenandle uracKe_ Figure - or fits around the base
of the handle (Figure2). An adhesive "tnrn ock" is dosmoned about halfway
down. The bottom of the trim is held'- place Dy either an adhesive trim tOOK.
or a trim OCKw_n _wo prongs inserted into a nole on _neface of the door.
TO REMOVE TRIM:
1. Remove trim Ey genw pumng_nrn lOCKareas ou_and away from aoor.
2. When _nm s free from door. shoe _ne_nm s_ra_gn_down and away
from base of nanaJe.
NOTE: For models with short handle _nm. remove by slidln? trim
straign_ Down and off of handle oracKet.
TO REMOVE REFRIGERATOR HANDLE:
(Handles "nayDe eas_er_o reverse wnHe doors are off.
Figure i Style Handles
1. Remove two screws attaching nandle _o_ODof refrigerator door.
2. Remove screw a_acnlng oottom of handle to door,
3. Remove two hole p_ugs and hinge p_np_ugon _ODof door and insta
on opposite side. Use Phillips head screwdriver to remove plastic
screw plug from front of door and install on opposite side
Figure 2 Style Handles
1. Remove two screws attaching handle to top of refrigerator door.
2. Swing top of handle away from door and slide handle down and off of
dovetail button.
3. Remove screw and dovetail button and install on other side, moving
hole plugs from corresponding holes to opposite side.
TO ATTACH REFRmGERATOR HANDLE:
Figure 1Style Handles
1. Secure bottom of handle with screws.
2. Secure top of handle with screws.
Figure 2 Style Handles
1. Start with handle offset away from door. Place bottom of handle over
dovetail button, swing handle into an upright position and pull upward,
locking it into place.
2. Secure top of handlewith screws.
TO ATTACH TRmM:
1. Slide both trim locke out of trim,
2. Insert new adhesive trim locks contained in your literature pack.
3. Install trim to handle by sliding under base of handle. Carefully align
trim and press down at trim lock locations.
4. Use rubbing alcohol to remove any adhesive residue from old trim
lock locations.
Handme
Adhesive
Fume
Length
Trin
--,\
/'
Figure 1
DovetaiB
Lock Handle
over
Dovetail
Adhesive
Lock
Trim
Lock
Figure 2
Door Removal and Reversal Instructions (continued]
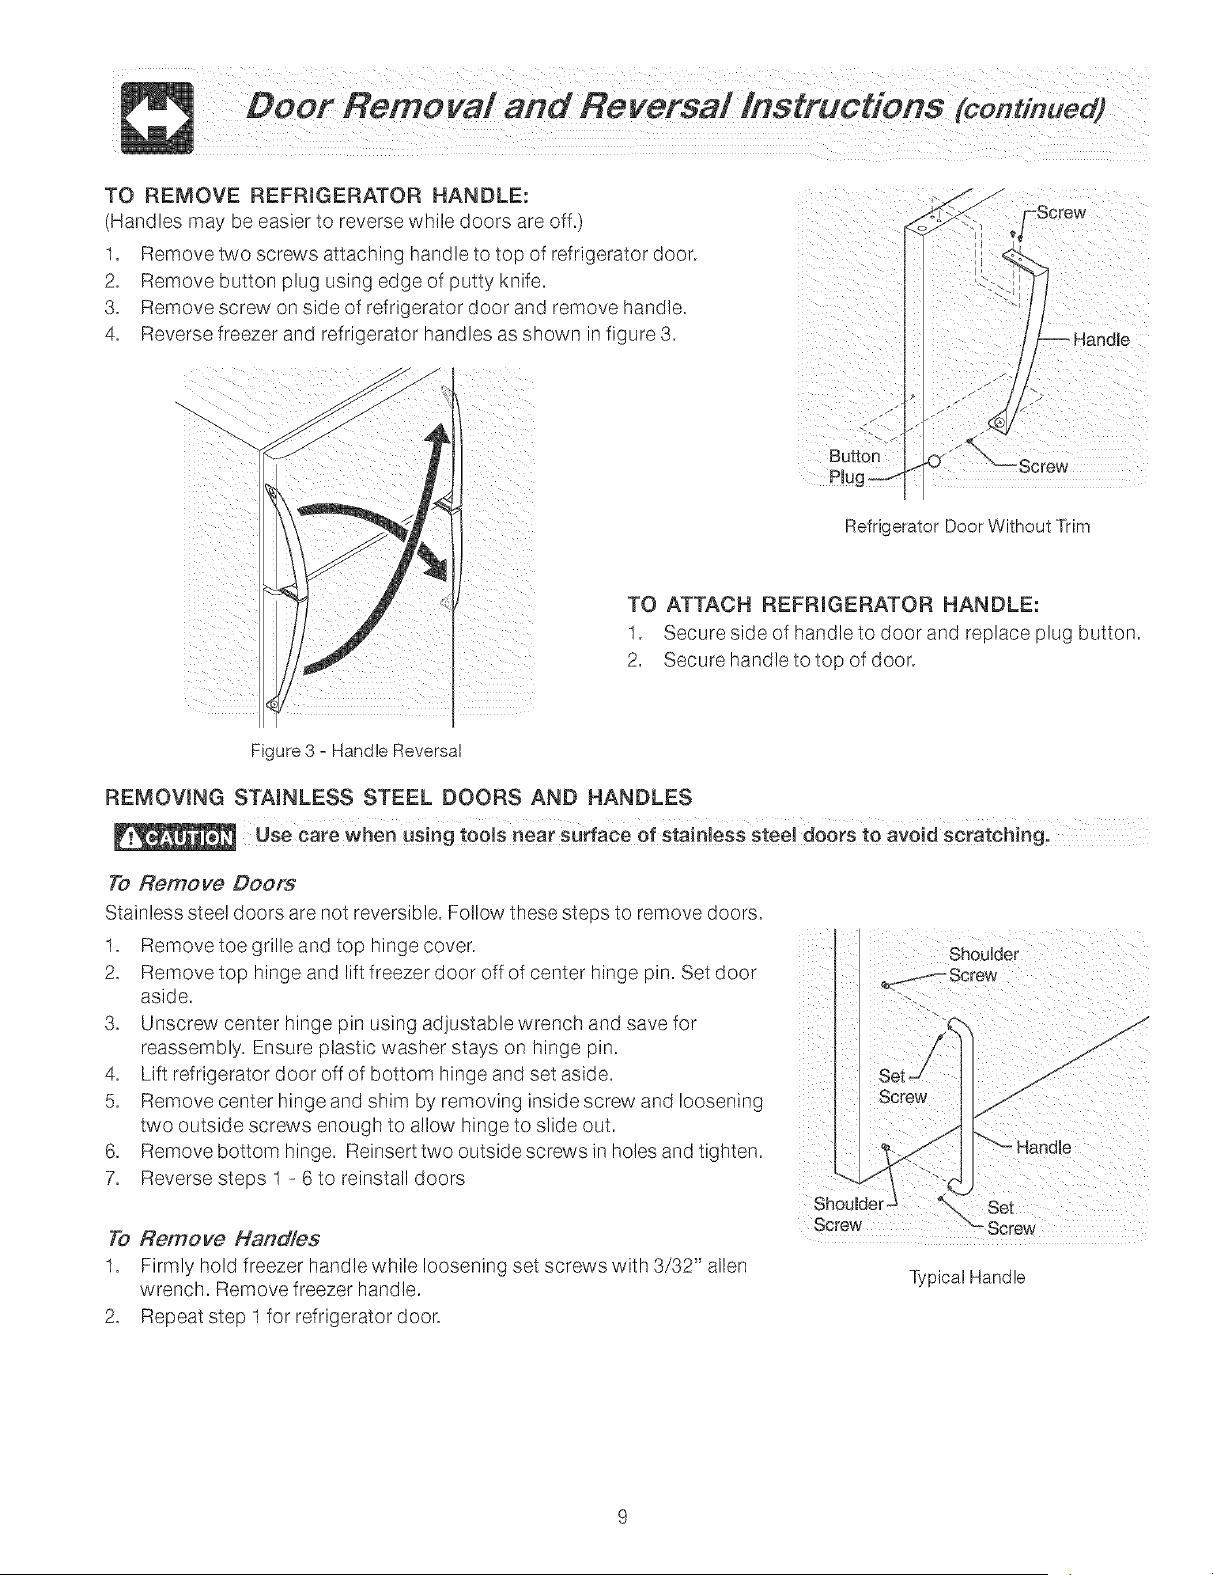
TO REMOVE REFRIGERATOR HANDLE:
(Handles may be easier to reverse while doors are off.)
1. Remove two screws attaching handle to top of refrigerator door.
2. Remove button plug using edge of putty knife.
3. Remove screw on side of refrigerator door and remove handle.
4. Reverse freezer and refrigerator handles as shown in figure 3.
,-Screw
Button
Plu
Refrigerator Door Without Trirr
]die
TO ATTACH REFRIGERATOR HANDLE:
1, Secure side of nana_eto Goor an(] replace plug DLITTon
2, Secure handle to _oD DfGoor,
Figure3 - HandleReversal
REMOVING STAINLESS STEEL DOORS AND HANDLES
To Remove Deers
Stainless steel doors are not reversible. Follow these steps to remove doors.
1. Remove toe grille and top hinge cover.
2. Remove top hinge and lift freezer door off of center hinge pin. Set door
aside.
3. Unscrew center hinge pin using adjustable wrench and save for
reassembly. Ensure plastic washer stays on hinge pin.
4. Lift refrigerator door off of bottom hinge and set aside,
5. Remove center hinge and shim by removing inside screw and loosening
two outside screws enough to allow hinge to slide out.
6. Remove bottom hinge. Reinsert two outside screws in holes and tighten,
7. Reverse steps 1 - 6to reinstall doors
To Remove Hand/es
1. Firmly hold freezer handle while loosening set screws with 3/32" allen
wrench. Remove freezer handle.
2. Repeat step 1 for refrigerator door,
Shoulder Set
Screw Screw
Typical Handle

Toe GriHe
Fixed Door Bin
Door Rack
Dairy Door
=[aimBottle
Retainer
Snugger
Door Bin
Fixed Door Bin
Features may vary according to model
10
COOL DOWN PERIOD
Toensure safe food storage, allow the refrigerator to operate with the doors closed for at least 8 to 12 hours before loading
it with food.
REFRIGERATOR & FREEZER CONTROLS
NOTE: When first setting the controls or when changing a setting, wait 24 hours for the _ernpera_ure_Dstabilize before
making additional changes.
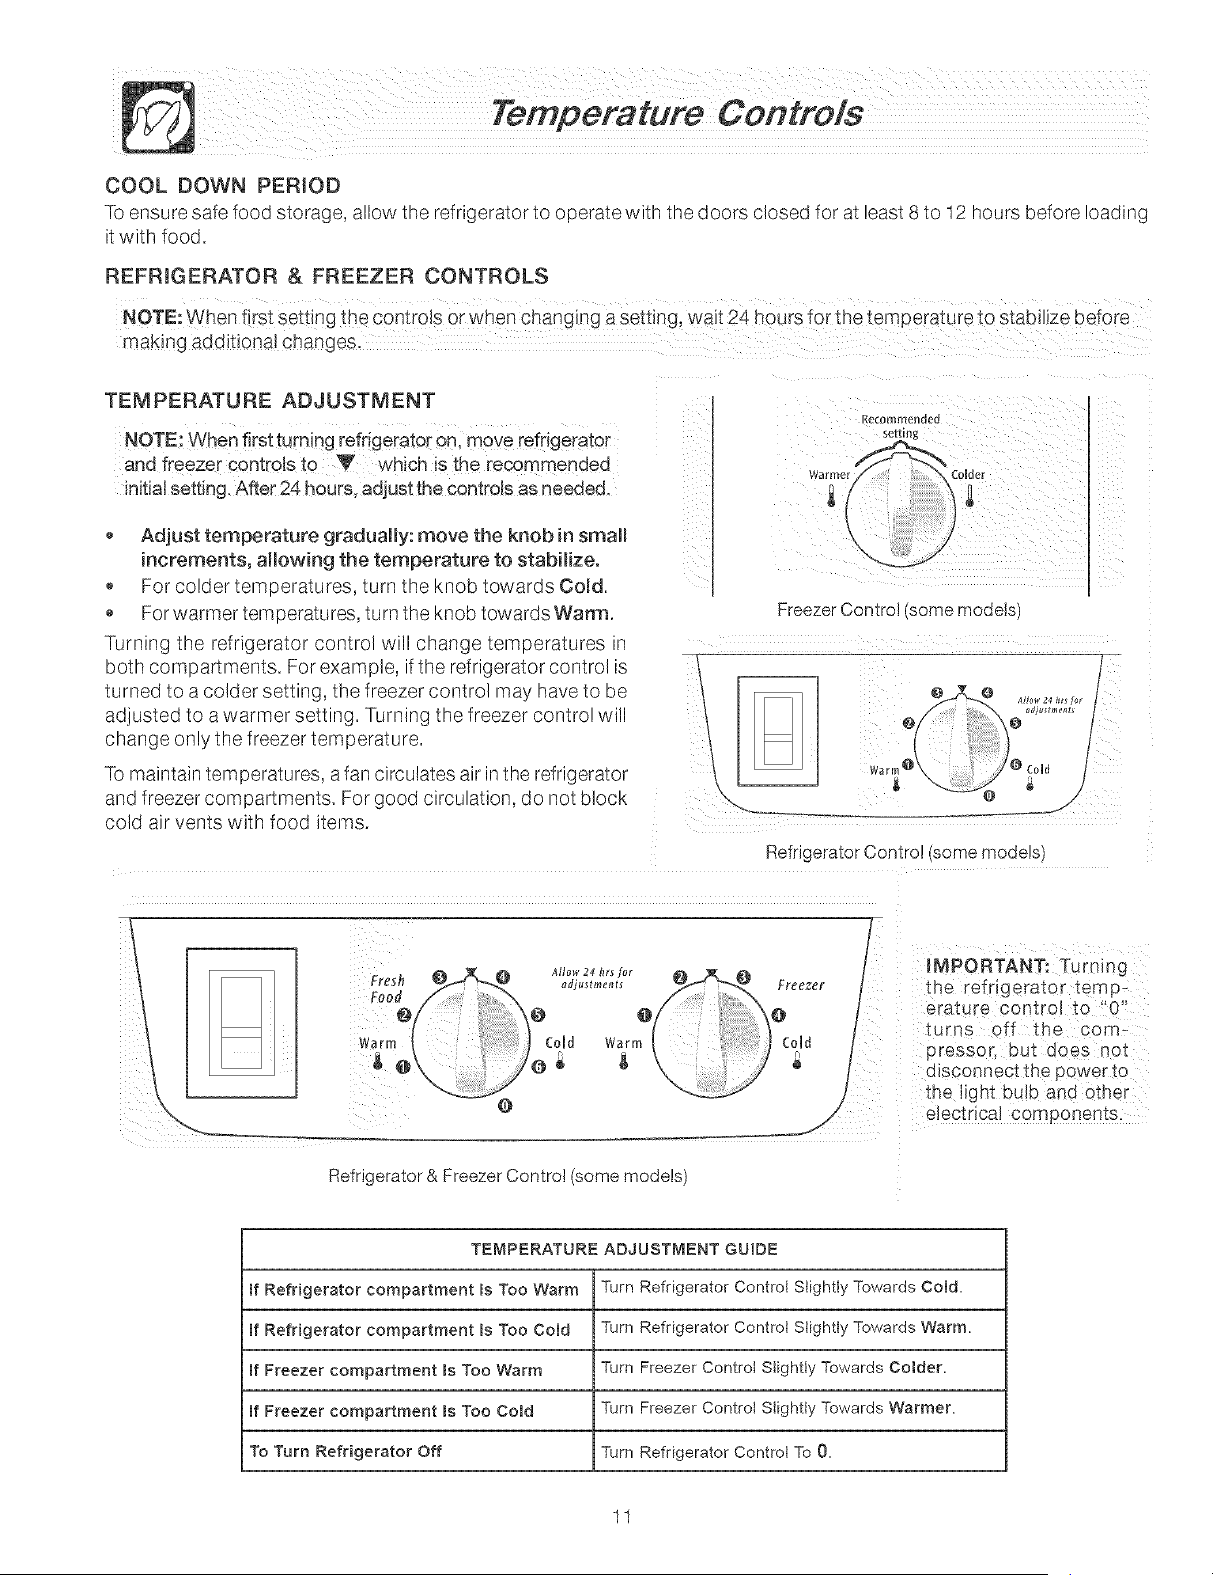
TEMPERATURE ADJUSTMENT
NOTE: When first turning refrigerator on, move refrigerator
and freezer controls to V which is the recommended
initiaJsetting. After 24 hours, adjust the controls as needed.
,, Adjust temperature gradually: move the knob in smaJ_
increments, allowing the temperature to stabilize.
,, For colder temperatures, turn the knob towards Cored.
• Forwarmer temperatures, turn the knob towards Warm.
Turning the refrigerator control will change temperatures
both compartments. For example, if the refrigerator comro s
turned to a colder setting, the freezer control may nave _oDe
adjusted to a warmer setting. Turning the freezer contr¢ w
change only the freezer temperature.
To maintain temperatures, afan circulates air in the refrigerator
and freezer compartments. For good circulation, do not DIOCK
cold air vents with food items.
Recomme_ded
SeUlng
Warme_ Colder
Freezer Control some moae]s
Refrigerator Control some moaeJs
@
\ /
Refrigerator & Freezer Control (some moaeis
Freezer
/
/
!
/
/
jr//
IMPORTANT: Turninc
the refrigerator temp
erature conwol to "0
[urns off 1he com-
pressor out aoes not
d_sconnect _nepower _o
the Iignt DUD aria omer
.............. aonents.
TEMPERATURE ADJUSTMENT GUIDE
_f Refrigerator compartment _s Too Warm Turn Refrigerator Controi Slightly Towards Cold.
_f Refrigerator compartment _s Too Cold Turn Refrigerator Control Stightty Towards Warm.
_f Freezer compartment _s Too Warm Turn Freezer Control Slightly Towards Comder.
_f Freezer compartment _s Too Cored Turn Freezer Control Stightty Towards Warmer.
To Turn Refrigerator Off Turn Refrigerator Controt To 0.
1I
Toavoidperse.a .jUtyotprope ydamage'ha"d e
tempered giass shelves carefui!y. Shelves may break sudden!y if
nicked, scratched, or exposed to sudden temperature change.
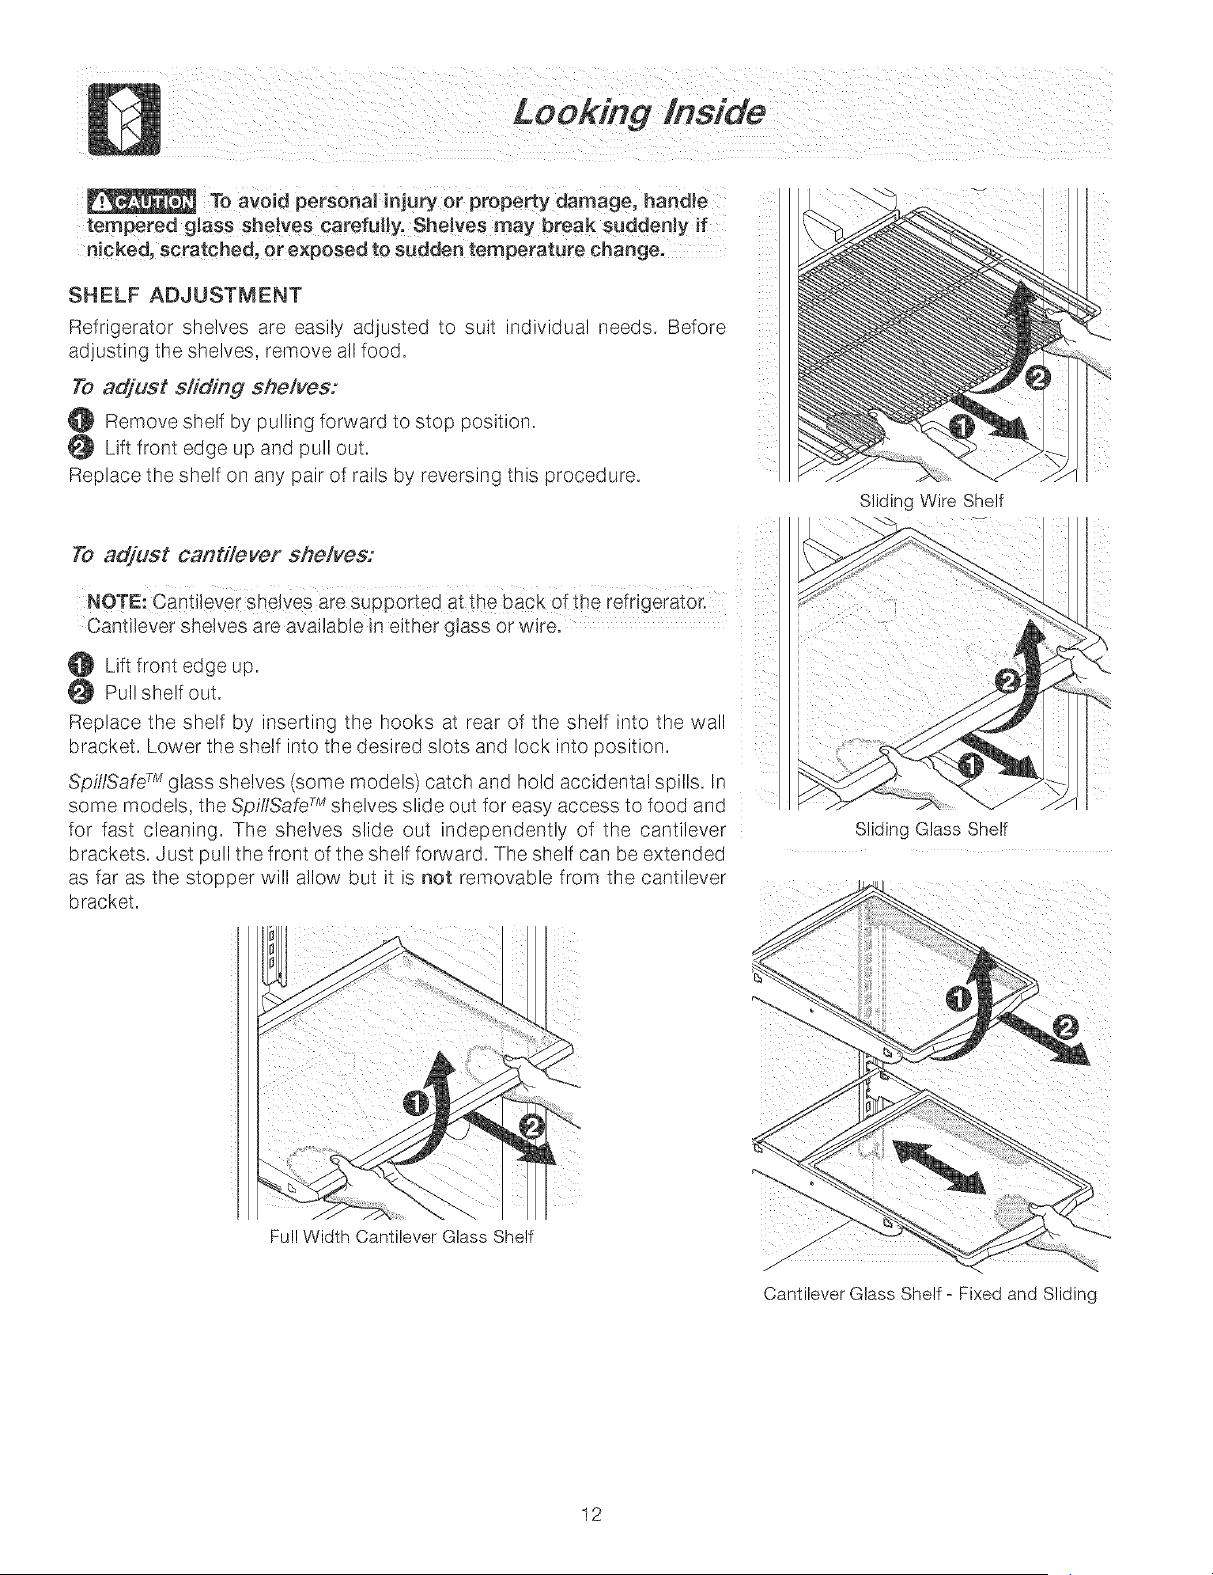
SHELF ADJUSTMENT
Refrigerator shelves are easily adjusted to suit individual needs. Before
adjusting the shelves, remove all food.
To adjust s/iding she/yes:
Remove shelf by pulling forward to stop position.
Lift front edge up and pull out.
Replace the shelf on any pair of rails by reversing this }rocedure.
iill
Sliding Wire Shelf
To adjust cantilever she/yes:
NOTE: Cantilevershelves aresUPported at the back of the refrigerator.
Cantilever shelves are available in either glass or wire.
Lift front edge up.
Pul! shelf out.
Replace the shelf by inserting the hooks at rear of the shelf into the wall
bracket. Lower the shelf into the desired slots and lock into position.
SpillSafe TM glass shelves (some models) catch and hold accidental spills. In
some models, the Spi//Safe TM shelves slide out for easy access to food and
for fast cleaning. The shelves slide out independently of the cantilever
brackets. Just pull the front of the shelf forward. The shelf can be extended
as far as the stopper will allow but it is not removable from the cantilever .......
bracket.
Sliding Glass Shelf
Full Width Cantilever Glass Shelf
Cantilever Glass Shelf - Fixed and Sliding
12

DOORSTORAGE
Doorbins,shelves,andracksareprovidedforconvenient
storageofjars,bottles,andcans.Frequentlyuseditems
canbequicklyselected.
Some models have door racks or bins that can
accommodategallomsizedplasticdrinkcontainersand
economy-sizedjarsandcontainers.Someracksare
adjustableformaximumstoragecapacity.
TALLBOTTLERETAINER(SOMEMODELS}
TheTallBottleRetainerkeepstallcontainersinthebinfrom
fallingforwardwhenopeningorclosingtherefrigeratordoor.
Toinstall,holdtheretaineratthetop,andslideit overthe
outsidewallofthebin,asshowninthediagram.TheTall
BottleRetainerworksbestwithaBinSnugger.
The dairy compartment, which is wan_ner than the general
food storage section, is intended for short term storage of
cheese, spreads_ or butter.
Door Rack
Tall Bottle Retainer (left) and Bin Snugger (right)
SPECIAL ITEM RACK (SOME MODELS)
The innovative design of the Special Item Rack allows you
to store a six-pack of 12 ounce drink cans, a bottle of wine,
a two-liter soft drink bottle, or a carton of eggs. The Special
Item Rack mounts on the left side of your refrigerator. To
install, just slide the Special Item Rack onto any shelf as
shown in the drawing.
ADJUSTABLE DOOR BINS
Some models have adjustable door bins that can be moved
to suit individual needs.
To move door bins
I. Lift bin straight up.
2. Remove bin.
3. Place bin in desired position.
4. Lower bin onto supports until locked in place.
v
/
_ , if!:
SpecialItemRack
Adjustable Door Bin
13
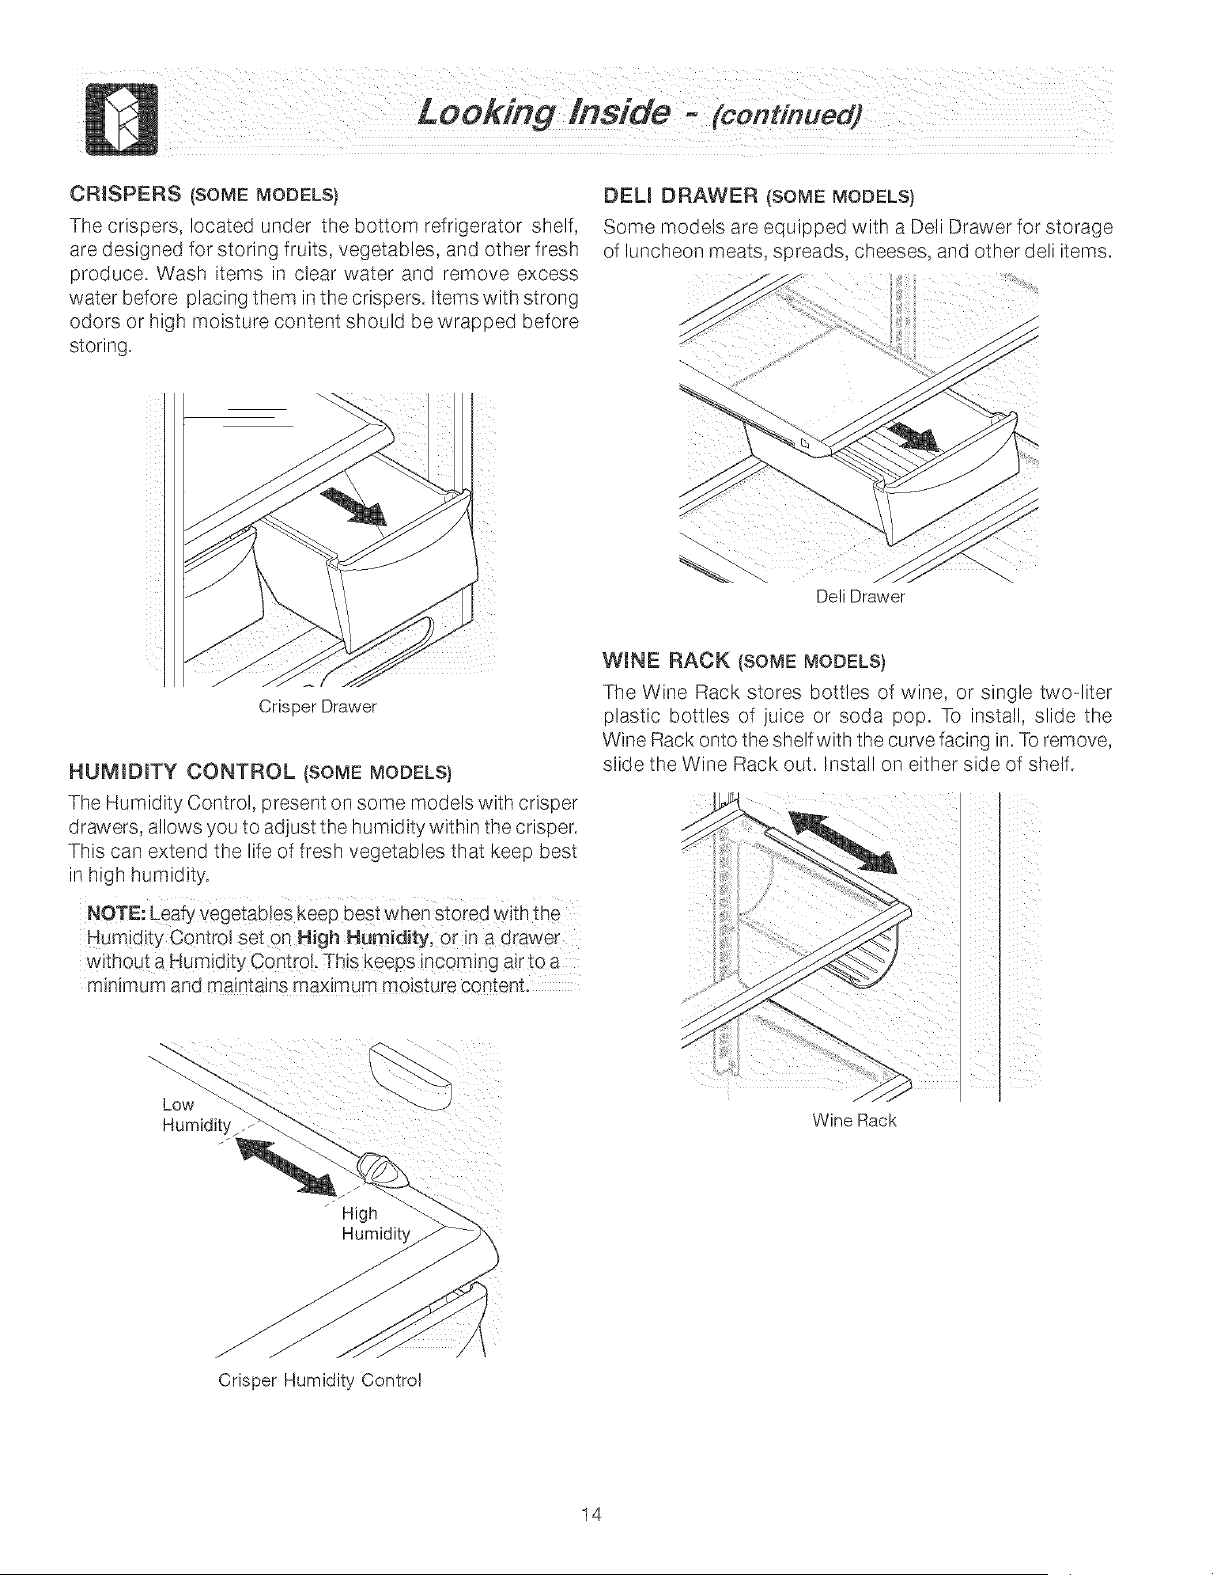
CRISPERS(SOMEMODELS}
Thecrispers,locatedunderthebottomrefrigeratorshelf,
aredesignedforstoringfruits,vegetables,andotherfresh
produce.Washitemsinclearwaterandremoveexcess
waterbeforeplacingtheminthecrispers.Itemswithstrong
odorsorhighmoisturecontentshouldbewrappedbefore
storing.
Crisper Drawer
HUMmDITY CONTROL (SOME MODELS)
The Humidity Control, present on some models with crisper
drawers, allows you to adjust the humidity within the crisper.
This can extend the life of fresh vegetables that keep best
in high humidity.
Hum!dity Control set OnHigh Humidity, or in a drawer
without a Humidity Contro!. This keeps incoming airto a
minimum and maintains maximum moisture content.
High
DELl DRAWER (SOME MODELS)
Some models are equipped with a Dell Drawer for storage
of luncheon meats, spreads, cheeses, and other dell items.
DellDrawer
WINE RACK (SOME MODELS)
The Wine Rack stores bottles of wine, or single twoqiter
plastic bottles of juice or soda pop. To install, slide the
Wine Rack onto the shelf with the curve facing in. Toremove,
slide the Wine Rack out. Install on either side of shelf.
iiiq
ii¸
ig
Wine Rack
Crisper Humidity Control
14

If your refrigerator nas an automatic ce n-]aKe_ _Twill orOvlde a sufficient
supply of ce for normal use. During _ne nlTlal s_artuD _f your refrigerator.
however, qo ce w De OrOduCed Gurlng _ne first 24 qours Df ooeratlon.
Automatic ice makers are also outional accessories that "nay De ns_allea
mos_ moaels at any ume Ca your local dealer for nformatio_
TURNING YOUR raCEMAKER ON
After _ne D!UmDIn _ connections have been cornoleTeo. The wa_er SL pp!_ ValVe
mus_ De obeneo. Place _ne ice container unaer _ne ce `naKer.pushing t as
Jarback as oosslble. Lower the wire s gna arm tots "down" or ON OOSl_lOn.
New blurnDIn J connect!ons "nabcause the first broduction of ce cubes _oDe
olscolorea or nave an odd flavor. These first cubes should be discarded unt_
me cubes 9roouced are free of discoloration and _as_e,
TURNING YOUR ICE MAKER OFF
To stop the ice maker, lift the wire signal arm until it clicks and locks in the
"up" or OFF position. The ice maker also turns off automatically when the ice
container isfull. If your model has an adjustable freezer shelf, place the shelf
in the lower position, so that the wire signal arm will hit the ice when the
container is full.
ON
to soft water, ensure that the softener is maintained and working properly.
ICE MAKER TIPS
,, Ice cubes stored too long may develop an odd flavor. Empty the ice container and ensure that the wire signal arm is
in its "down" or ON position. The ice maker will then produce more ice.
,, Occasionally shake the ice container to keep ice separated.
• Keep thewiresignalarm in its"up" orOFF position until therefdgeratorisconnectedtothewatersupplyorwhenever
the water supply is turned off.
The following sounds are normal when the ice maker is operating:
,, Motor running
,, Iceloosening from tray
Ice dropping into ice container
,, Running water
,, Watervalve opening or closing
Do Not place the ice container in y0ur dishwasher.
Wash the ice container in warm water with mild detergent. Rinse well and dry.
,, Stop the ice maker when cleaning the freezer and during vacations.
If the ice maker will be turned off for a long period of time, turn the water supply valve to the closed position.
15
FOODSTORAGEIDEAS
Fresh Food Storage
,, The fresh food compartment should be kept between 34° Fand 40° Fwith an optimum temperature of 37" R
* Avoid overcrowding the refrigerator shelves. This reduces the circulation of air around the food and results in uneven
cooling.
Fruits and Yegetab/es
o Storage in the crisper drawers traps moisture to help preserve the fruit and vegetable quality for longer time periods.
Meat
Raw meat and poultry, should be wrapped securely so leakage and contamination of other foods or surfaces does not
OCCUR
Frozen Food Storage
,, The freezer compartment should be kept at 0° F or lower.
,, A freezer operates most efficiently when it is at least 2/3 full.
Packaging Foods for Freezing
To minimize dehydration and quality, deterioration, use aluminum foil, freezer wrap, freezer bags or airtight containers.
Force as much air out of the packages as possible and seal them tightly. Trapped air can cause food to dry,out,
change color, and develop an off-flavor (freezer burn).
,, Wrap fresh meats and poultry with suitable freezer wrap prior to freezing.
,, Do not refreeze meat that has completely thawed.
Loading the Freezer
,, Avoid adding too much warm food to the freezer at one time. This overloads the freezer, slows the rate of freezing,
and can raise the temperature of frozen foods.
,, Leave a space between the packages, so cold air can circulate freely, allowing food to freeze as quickly as possible.
,, Avoid storing hard-to-freeze foods such as ice cream and orange juice on the freezer door shelves. These foods are
best stored in the freezer interior where the temperature varies less.
ENERGY SAVING IDEAS
Locate the refrigerator in the coolest part ofthe room, out of direct sunlight,
and away from heating ducts or registers. Do not place the refrigerator
nex__onea_-oroducing 8ODilancessuch as a range, oven. or dishwasher.
If th s is no_OOSSIDle.a section of caD_ne_ryor an added ayer of insulation
between _ne_wo aoonances w ne o _ne refrigerator operate -here
efficiently.
Level the refrigerator so _na__ne odors close ngnuy.
Refer to this Use & Care Manual for the suggested _emoera_ure centre
se_mgs.
Periodic cleanmg of the condenser w ne_D_nerefrigerator run more
efficiently. See the Care and Cleaning Chart or page 18.
Dc not overcrowd the refrigerator or block COldawvems. Doino so causes
the refrigerator _orun longer anc use more energy.
Cover foods and w De con_aners dry before placing them - _ne
refrigerator. This cuts down on moisture build-up nslde _ne unto
Organize the refrigerator _o reduce door opemngs. Remove as many
IIems 8S needed a_ Dnetime an(] 3!ose _nedoor as soon as OOSSID!B.
16
UNDERSTANDINGTHESOUNDSYOUMAYHEAR
Yournewhigh-efficiencyrefrigeratormaymakeunfamiliar
sounds.Don'tbealarmed,theseareallnormalsounds.
Hardsurfaces,suchasvinylorwoodfloors,walls,and
kitchencabinetsmaymakesoundsmorenoticeable.Listed
belowaredescriptionsofsomeofthemostcommonsounds
youmayhear,andwhatiscausingthem.
NOTE:R!gidf0am!nsulationiSveryenergyefflc!ent_
but isnotasoundinsulator.
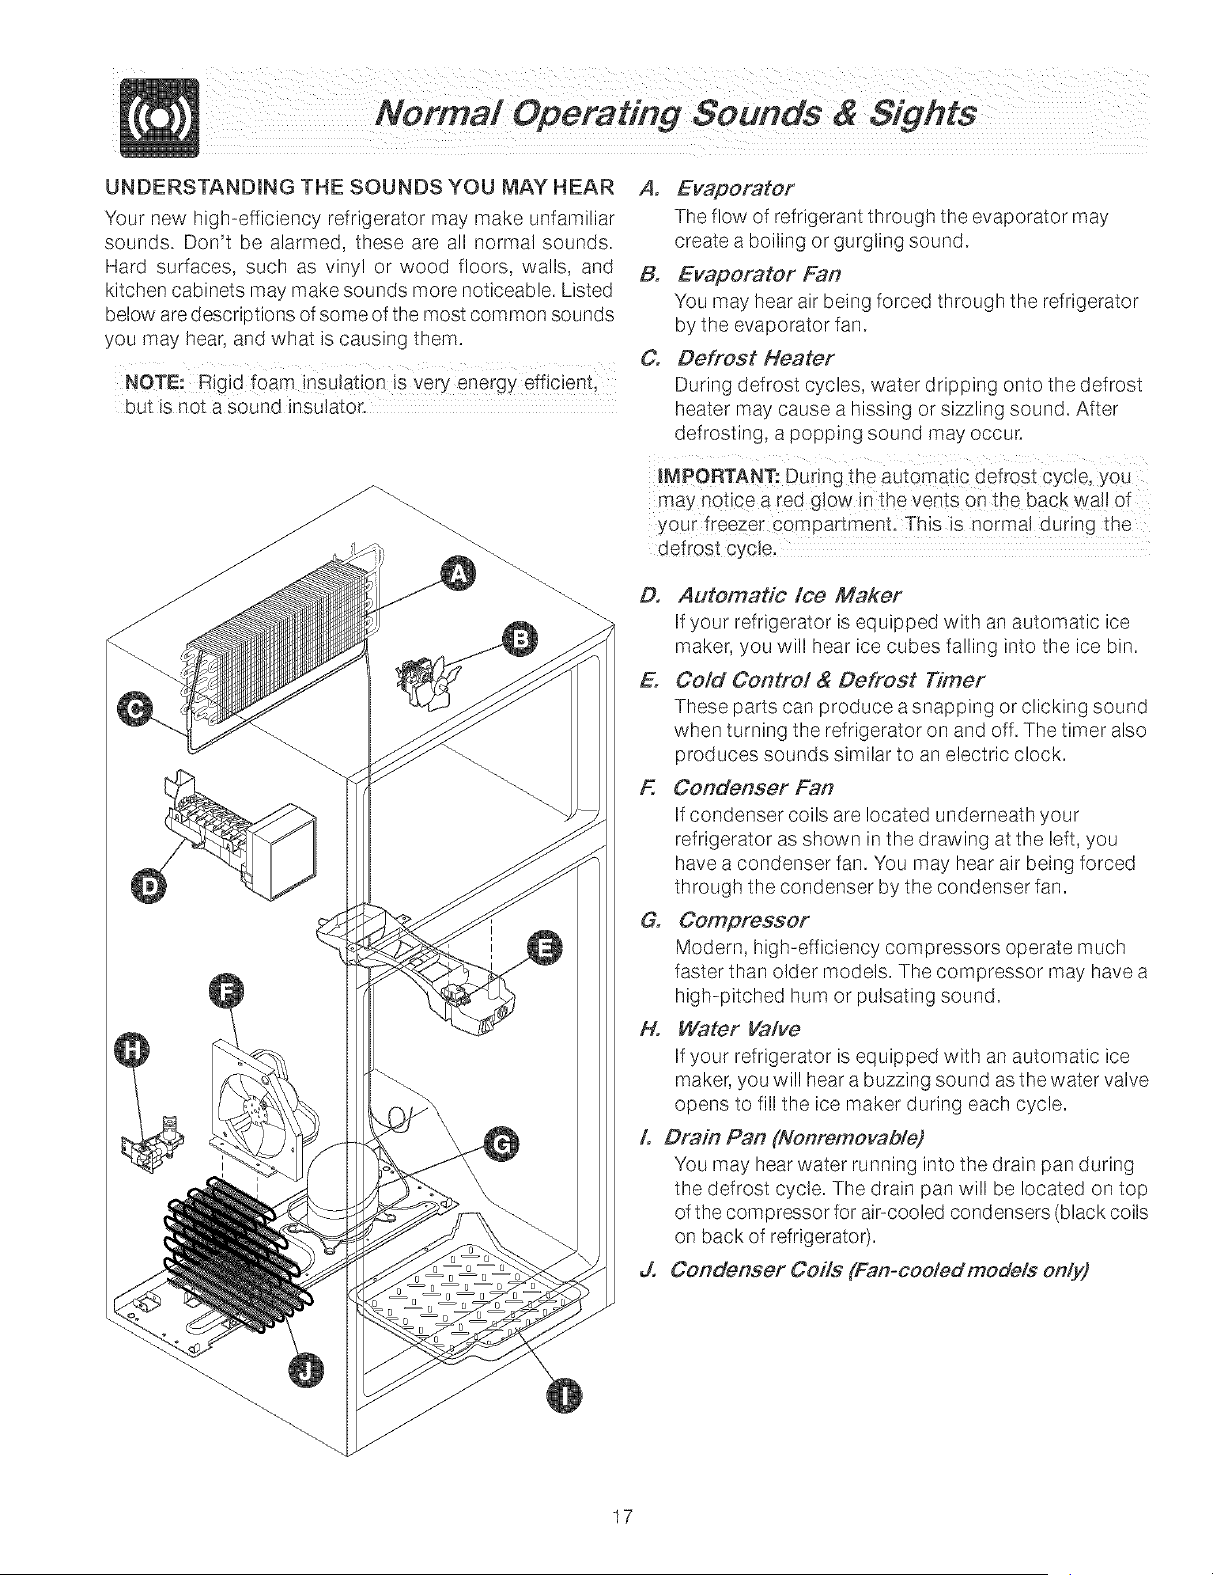
A. Evaporator
The flow of refrigerant through the evaporator may
create a boiling or gurgling sound.
B. Evaporator Fan
You may hear air being forced through the refrigerator
by the evaporator fan.
C. Defrost Heater
During defrost cycles, water dripping onto the defrost
heater may cause a hissing or sizzling sound. After
defrosting, a popping sound may occur.
iMPORTANT: During the automatic defrost cycle, you
may notice a red g!ow in the vents onthe bacKwal! of
your freez÷r compartment. This is normal during the
defrost oyc!e,
Do Automatic ice Maker
If your refrigerator is equipped with an automatic ice
maker, you will hear ice cubes falling into the ice bin.
Eo Cold Centre/_ Defrost Timer
These parts can produce a snapping or clicking sound
when turning the refrigerator on and off. The timer also
produces sounds similar to an electric clock.
F. Condenser Fan
If condenser coils are located underneath your
refrigerator as shown in the drawing at the left, you
have a condenser fan. You may hear air being forced
through the condenser by the condenser fan.
Go Compressor
Modern, high-efficiency compressors operate much
faster than older models. The compressor may have a
high-pitched hum or pulsating sound.
H. Water Valve
If your refrigerator is equipped with an automatic ice
maker, you will hear a buzzing sound as the water valve
opens to fill the ice maker during each cycle.
L Drain Pan (Nonremovable)
You may hear water running into the drain pan during
the defrost cycle. The drain pan will be located on top
of the compressor for air-cooled condensers (black coils
on back of refrigerator).
Jo Condenser Coils (Fan-coofedmodels only)
17
Keepyourrefrigeratorandfreezercleantopreventodorbuild-up.Wipeupanyspillsimmediatelyandcleanbothsections
atleasttwiceayear.Neverusemetallicscouringpads,brushes,abrasivecleanersorstrongalkalinesolutionsonany
surface.DonotwashanyremovablepartsinadishwashenAlways unplug the electr/ca/power cord from the wall
outlet before cleaning.
® When moving the refrigerator, pull straight out. Do not shift the refrigerator from side to side as this may
tear or gouge the floor covering, if the refrigerator has an automatic ice maker, be careful not to move the
refrigerator beyond the plumbing connections.
- Damp objects stick to cold metal surfaces. Do not touch refrigerated surfaces with wet or damp hands.
- To avoid damage and help the refrigerator run as efficiently as possible, clean the condenser periodically.
NOTES:
® Turning _ne refrigerator _emp_ra_ure control to "0" turns off the corr_oressor. _u-_does no_ a_sconnec_e_ec_nca_
power _o _neIign_DUDor o[ner eJec_nca_components.
* Do no_use razor O_adesO[ o_nershard inst[umen_s whtch can sora_cnthe aleol_ancesurface when removw g
adhesive abels. Any g_Le left from tape or labels can be removea w_n a mixture of warm wa_er and mild
_e_erg_n_.oR_[oucRthe g_ueresidue w_n _neS_cKy side of tape y Duhave already removed. Do not remove the
serial plate.
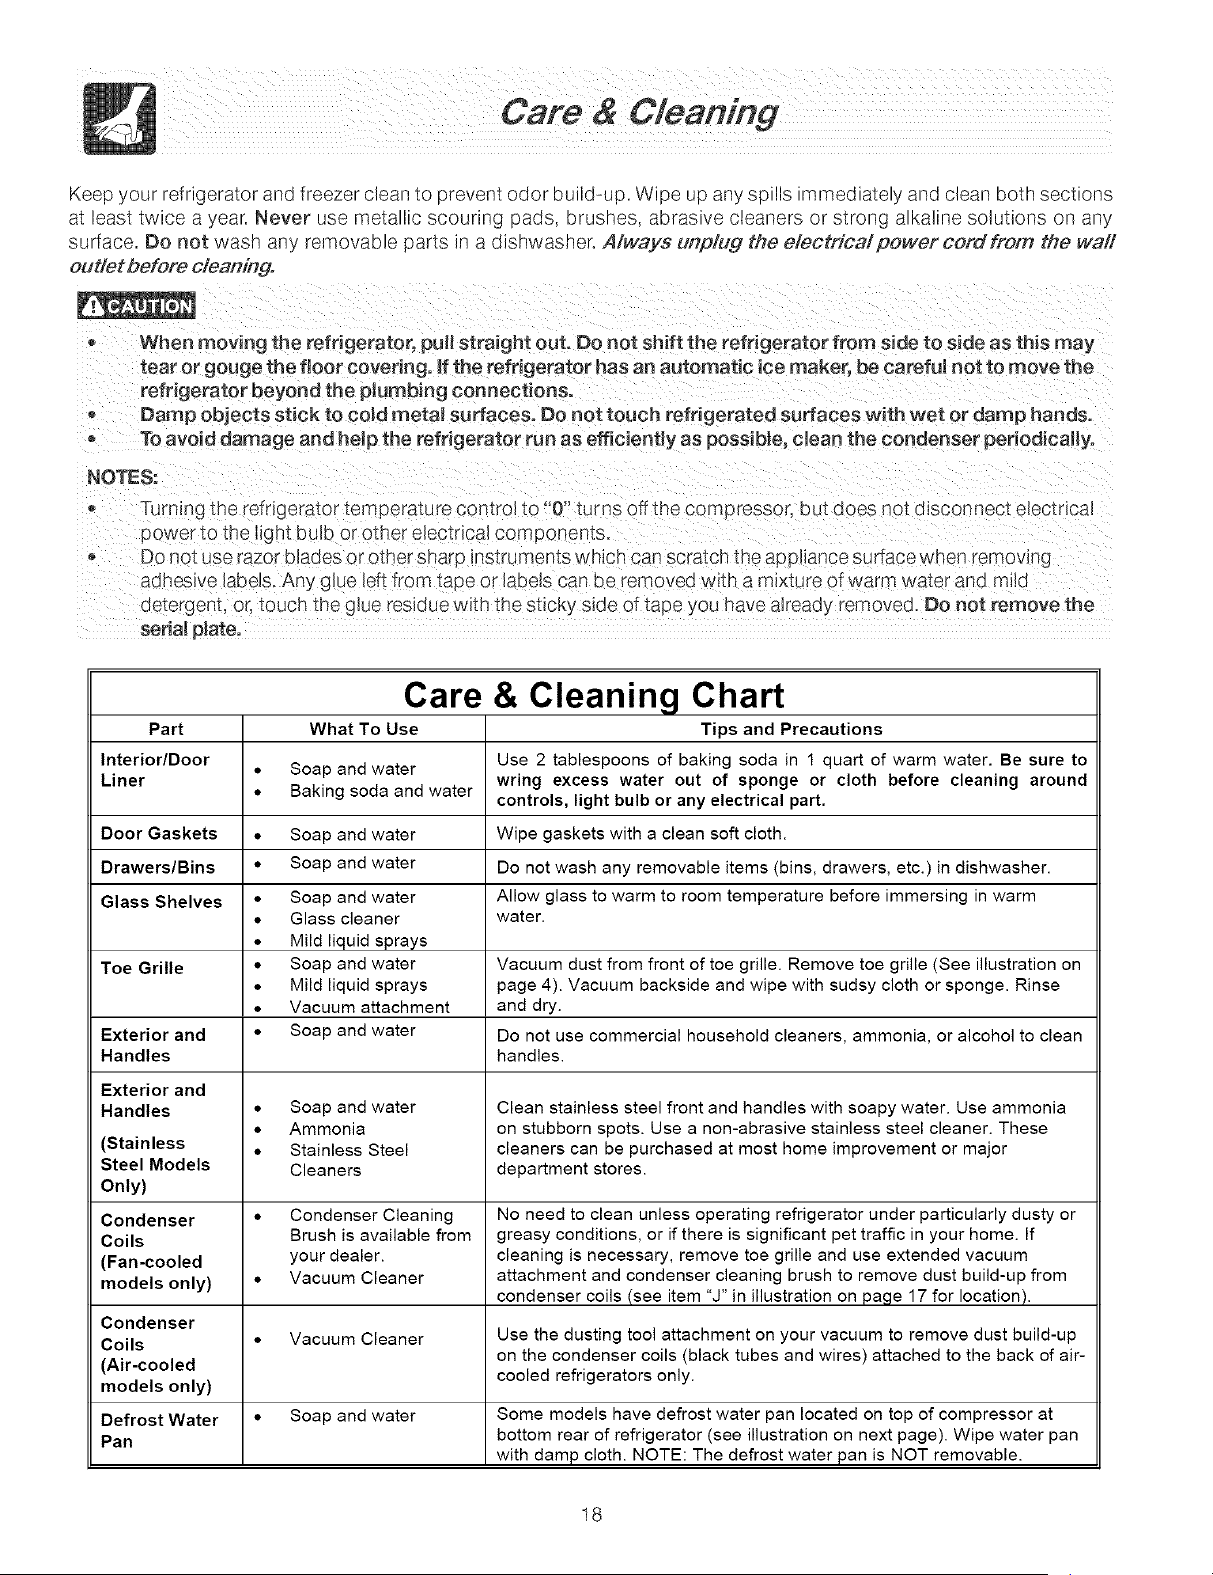
Part
Interior/Door
Liner
Door Gaskets •
Drawers/Bins •
Glass Shelves •
Toe Grille •
Exterior and •
Handles
Exterior and
Handles •
(Stainless
Steel Models
Only)
Condenser •
Coils
(Fan-cooled
models only) •
Condenser
Coils •
(Air-cooled
models only)
Defrost Water •
Pan
Care
What To Use
Soap and water
Baking soda and water
Soap and water
Soap and water
Soap and water
Glass cleaner
Mild liquid sprays
Soap and water
Mild liquid sprays
Vacuum attachment
Soap and water
Soap and water
Ammonia
Stainless Steel
Cleaners
Condenser Cleaning
Brush is available from
your dealer.
Vacuum Cleaner
Vacuum Cleaner
& Cleaning Chart
Tips and Precautions
Use 2 tablespoons of baking soda in 1 quart of warm water. Be sure to
wring excess water out of sponge or cloth before cleaning around
controls, light bulb or any electrical part.
Wipe gaskets with a clean soft cloth.
Do not wash any removable items (bins, drawers, etc.) in dishwasher.
Allow glass to warm to room temperature before immersing in warm
water.
Vacuum dust from front of toe grille. Remove toe grille (See illustration on
page 4). Vacuum backside and wipe with sudsy cloth or sponge. Rinse
and dry.
Do not use commercial household cleaners, ammonia, or alcohol to clean
handles.
Clean stainless steel front and handles with soapy water. Use ammonia
on stubborn spots. Use a non-abrasive stainless steel cleaner. These
cleaners can be purchased at most home improvement or major
department stores.
No need to clean unless operating refrigerator under particularly dusty or
greasy conditions, or if there is significant pet traffic in your home. If
cleaning is necessary, remove toe grille and use extended vacuum
attachment and condenser cleaning brush to remove dust build-up from
condenser coils (see item "J" in illustration on page 17 for location).
Use the dusting tool attachment on your vacuum to remove dust build-up
on the condenser coils (black tubes and wires) attached to the back of air-
cooled refrigerators only.
Soap and water Some models have defrost water pan located on top of compressor at
bottom rear of refrigerator (see illustration on next page). Wipe water pan
with damp cloth. NOTE: The defrost water pan is NOT removable.
18
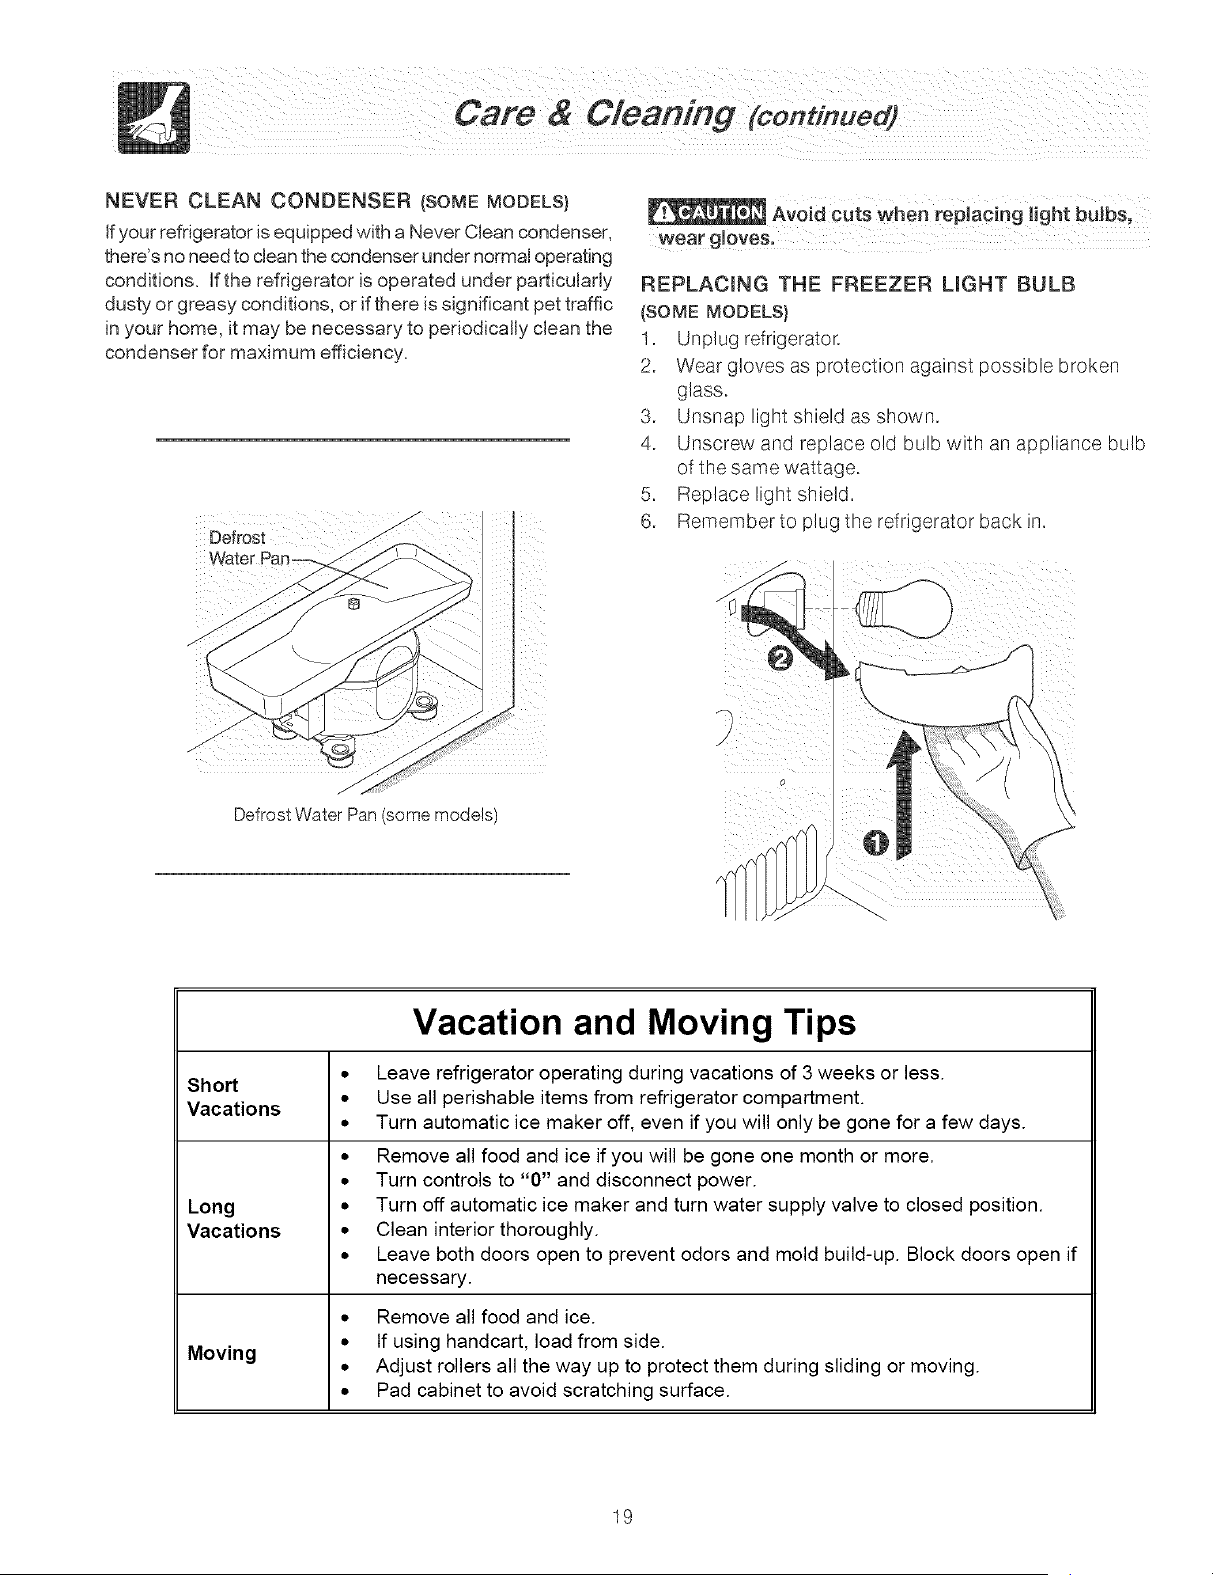
NEVERCLEANCONDENSER(SOMEMODELS)
ifyourrefrigeratorisequipped with a Never Clean condenser,
there's no need to clean the condenser under normal operating
conditions. If the refrigerator is operated under particularly
dusty or greasy conditions, or if there is significant pet traffic
in your home, it may be necessary to periodically clean the
condenser for maximum efficiency.
/
Defrost //
Water Pan_
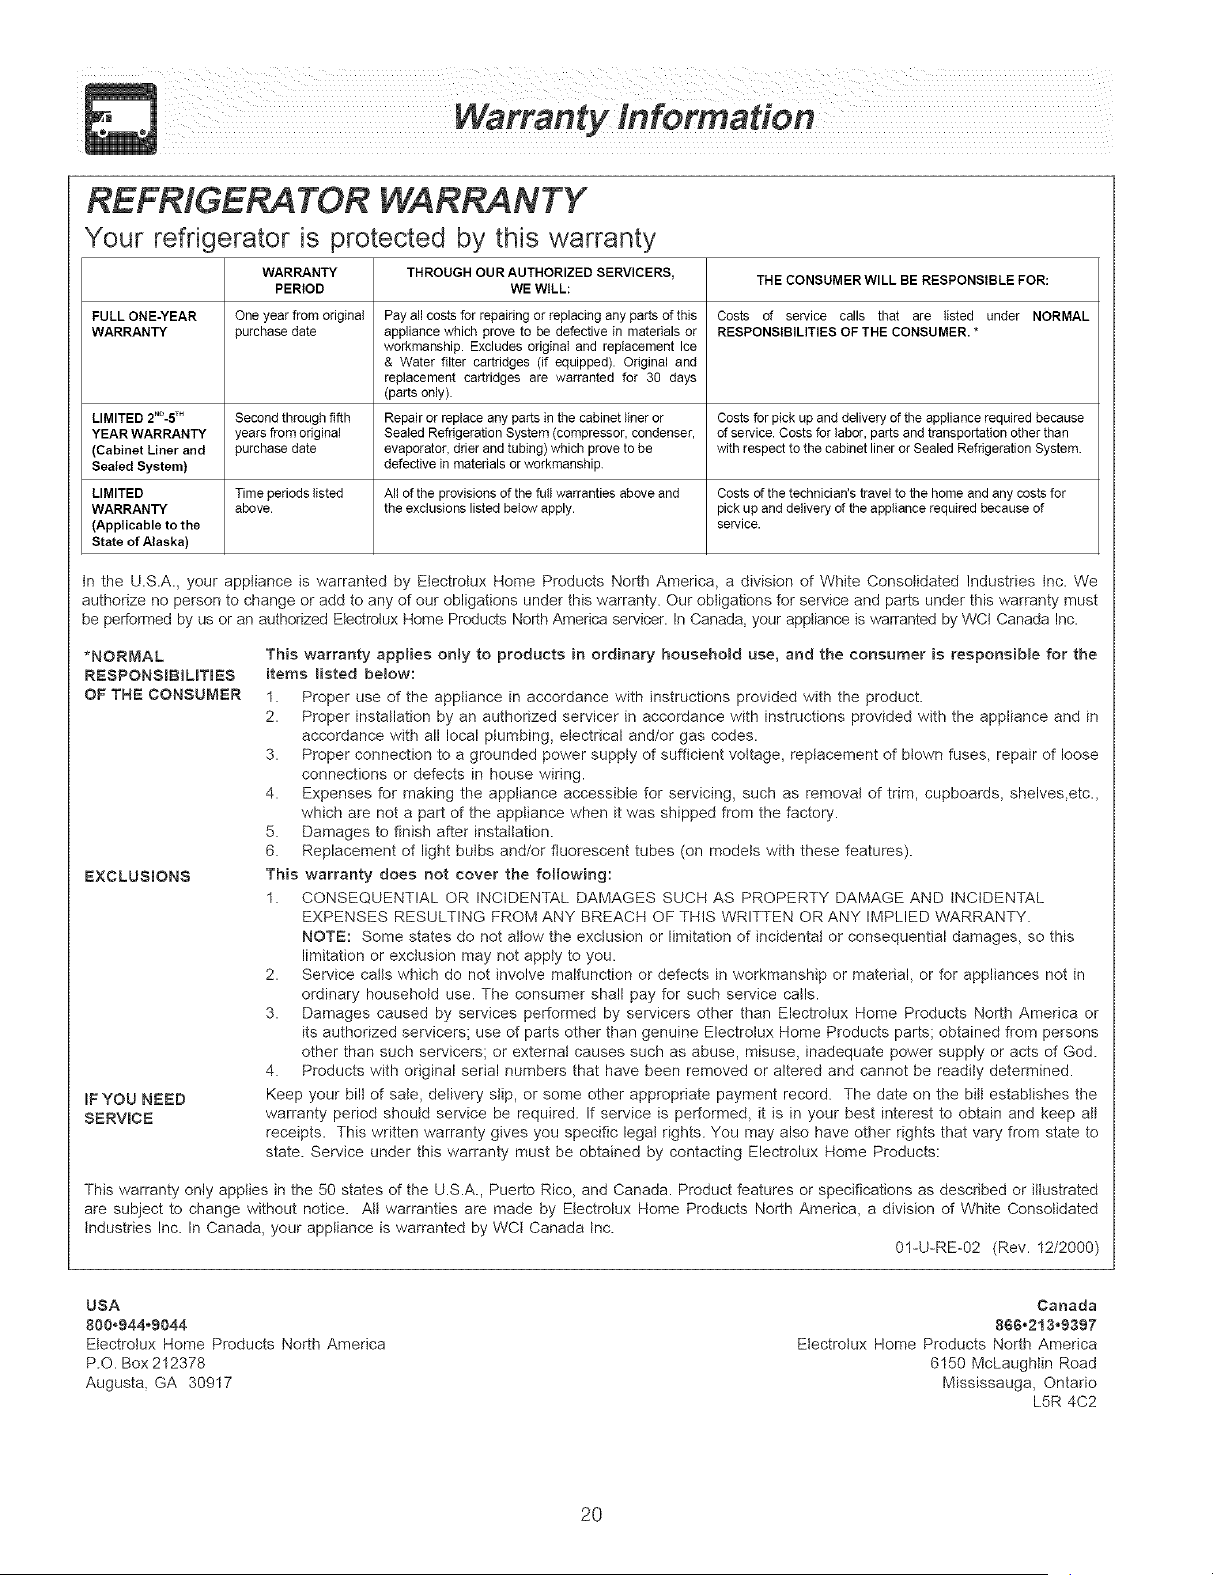
REPLACING THE FREEZER HGHT BULB
(SOME MODELS)
1. Unplug refrigerator.
2, Wear gloves as protection against possible broken
glass.
3, Unsnap light shield as shown.
4, Unscrew and replace old bulb with an appliance bulb
of the same wattage.
5. Replace light shield.
6. Remember _c D_Lg _nerefrigerator DaCKin,
Defrost Water Par some mooe_s
Vacation and Moving Tips
Short
Vacations
Long
Vacations
• Leave refrigerator operating during vacations of 3weeks or less.
• Use all perishable items from refrigerator compartment.
• Turn automatic ice maker off, even if you will only be gone for a few days.
• Remove all food and ice if you will be gone one month or more.
• Turn controls to "0" and disconnect power.
• Turn off automatic ice maker and turn water supply valve to closed position,
• Clean interior thoroughly,
• Leave both doors open to prevent odors and mold build-up. Block doors open if
necessary.
• Remove all food and ice.
• If using handcart, load from side.
Moving
• Adjust rollers all the way up to protect them during sliding or moving.
• Pad cabinet to avoid scratching surface.
19
REFRIGERATOR WARRANTY
Your refrigerator is protected by this warranty
WARRANTY THROUGHOURAUTHORIZEDSERVICERS, THECONSUMERWILL BERESPONSIBLEFOR:
PERIOD WEWILL:
FULLONE-YEAR Oneyearfromoriginal Payallcostsforrepairingor replacinganypartsof this Costs of service calls that are tisted under NORMAL
WARRANTY purchasedate appliancewhichproveto bedefectivein materialsor RESPONSIBILITIESOFTHECONSUMER.*
workmanship.Excludesoriginal and replacementIce
& Water filter cartridges(if equipped).Original and
replacementcartridges are warranted for 30 days
(partsonly).
LIMITED2"°-5TM Secondthroughfifth Repairor replaceanypartsin thecabinetlineror Costsforpick upanddeliveryoftheappliancerequiredbecause
YEARWARRANTY yearsfromoriginal SealedRefrigerationSystem(compressor,condenser, ofservice.Costsfor labor,partsandtransportationotherthan
(CabinetLiner and purchasedate evaporator,drierandtubing)whichprovetobe withrespecttothecabinetlineror SealedRefrigerationSystem.
Sealed System) defectiveinmaterialsor workmanship.
LIMITED Timeperiodslisted Alloftheprovisionsof thefullwarrantiesaboveand Costsofthetechnician'straveltothehomeandany costsfor
WARRANTY above, theexclusionslistedbelowapply, pickupanddeliveryoftheappliancerequiredbecauseof
(Applicable to the service.
Stateof Alaska)
tn the U.S.A., your appliance is warranted by EIectrotux Home Products North America, a division of White Consolidated Industries Inc. We
authorize no person to change or add to any of our obligations under this warranty. Our obligations for service and parts under this warranty must
be performed by us or an authorized Etectroiux Home Products North America servicer. In Canada, your appliance is warranted by WCt Canada Inc.
*NORMAL
RESPONSBBJUT[ES
OF THE CONSUMER
EXCLUSIONS
iF YOU NEED
SERVICE
This warranty applies only to products in ordinary household use, and the consumer is responsible for the
items Hsted below:
1. Proper use of the appliance in accordance with instructions provided with the product.
2. Proper installation by an authorized servicer in accordance with instructions provided with the appliance and in
accordance with all local plumbing, electrical and/or gas codes.
3. Proper connection to a grounded power supply of sufficient voltage, replacement of biown fuses, repair of loose
connections or defects in house wiring.
4. Expenses for making the appliance accessible for servicing, such as removal of trim, cupboards, shelves,etc.,
which are not a part of the appliance when it was shipped from the factory.
5. Damages to finish after installation.
6. Replacement of light bulbs and/or fluorescent tubes (on models with these features).
This warranty does not cover the following:
1. CONSEQUENTIAL OR INCIDENTAL DAMAGES SUCH AS PROPERTY DAMAGE AND INCIDENTAL
EXPENSES RESULTING FROM ANY BREACH OF THIS WRITTEN ORANY IMPLIED WARRANTY.
NOTE: Some states do not allow the exclusion or limitation of incidental or consequential damages, so this
limitation or exclusion may not appty to you.
2. Service catls which do not involve malfunction or defects in workmanship or material, or for appliances not in
ordinary household use. The consumer shall pay for such service catls.
3. Damages caused by services performed by servicers other than Electrotux Home Products North America or
its authorized servicers; use of parts other than genuine Electrolux Home Products parts; obtained from persons
other than such serwcers; or external causes such as abuse, misuse, inadequate power supply or acts of God.
4. Products with original serial numbers that have been removed or altered and cannot be readity determined.
Keep your bill of sale, delivery slip, or some other appropriate payment record. The date on the bitt establishes the
warranty period shoutd service be required. If service is performed, it is in your best interest to obtain and keep att
receipts. This written warranty gives you specific legal rights. You may also have other rights that vary from state to
state. Service under this warranty must be obtained by contacting Electrolux Home Products:
This warranty only applies in the 50 states of the U.S.A. Puerto Rico, and Canada. Product features or specifications as described or illustrated
are subject to change without notice. Att warranties are made by Etectrolux Home Products North America, a division of White Consolidated
Industries Inc. In Canada, your appliance is warranted by WC[ Canada Inc.
01=U=RE=02 (Rev. 12/2000)
USA
800.944.9044
Etectrolux Home Products North America
P.O. Box 212378
Augusta, GA 30917
Canada
866.213.9397
Etectrolux Home Products North America
6150 McLaugNin Road
Mississauga, Ontario
L5R 4C2
20
See
ATTENTI
To Property Install Your Refrigerator
See "Installation" Section On Pages 4-5
OR
To Reverse The Doors
"Door Removal & Reversal" Section On Pages 6-9
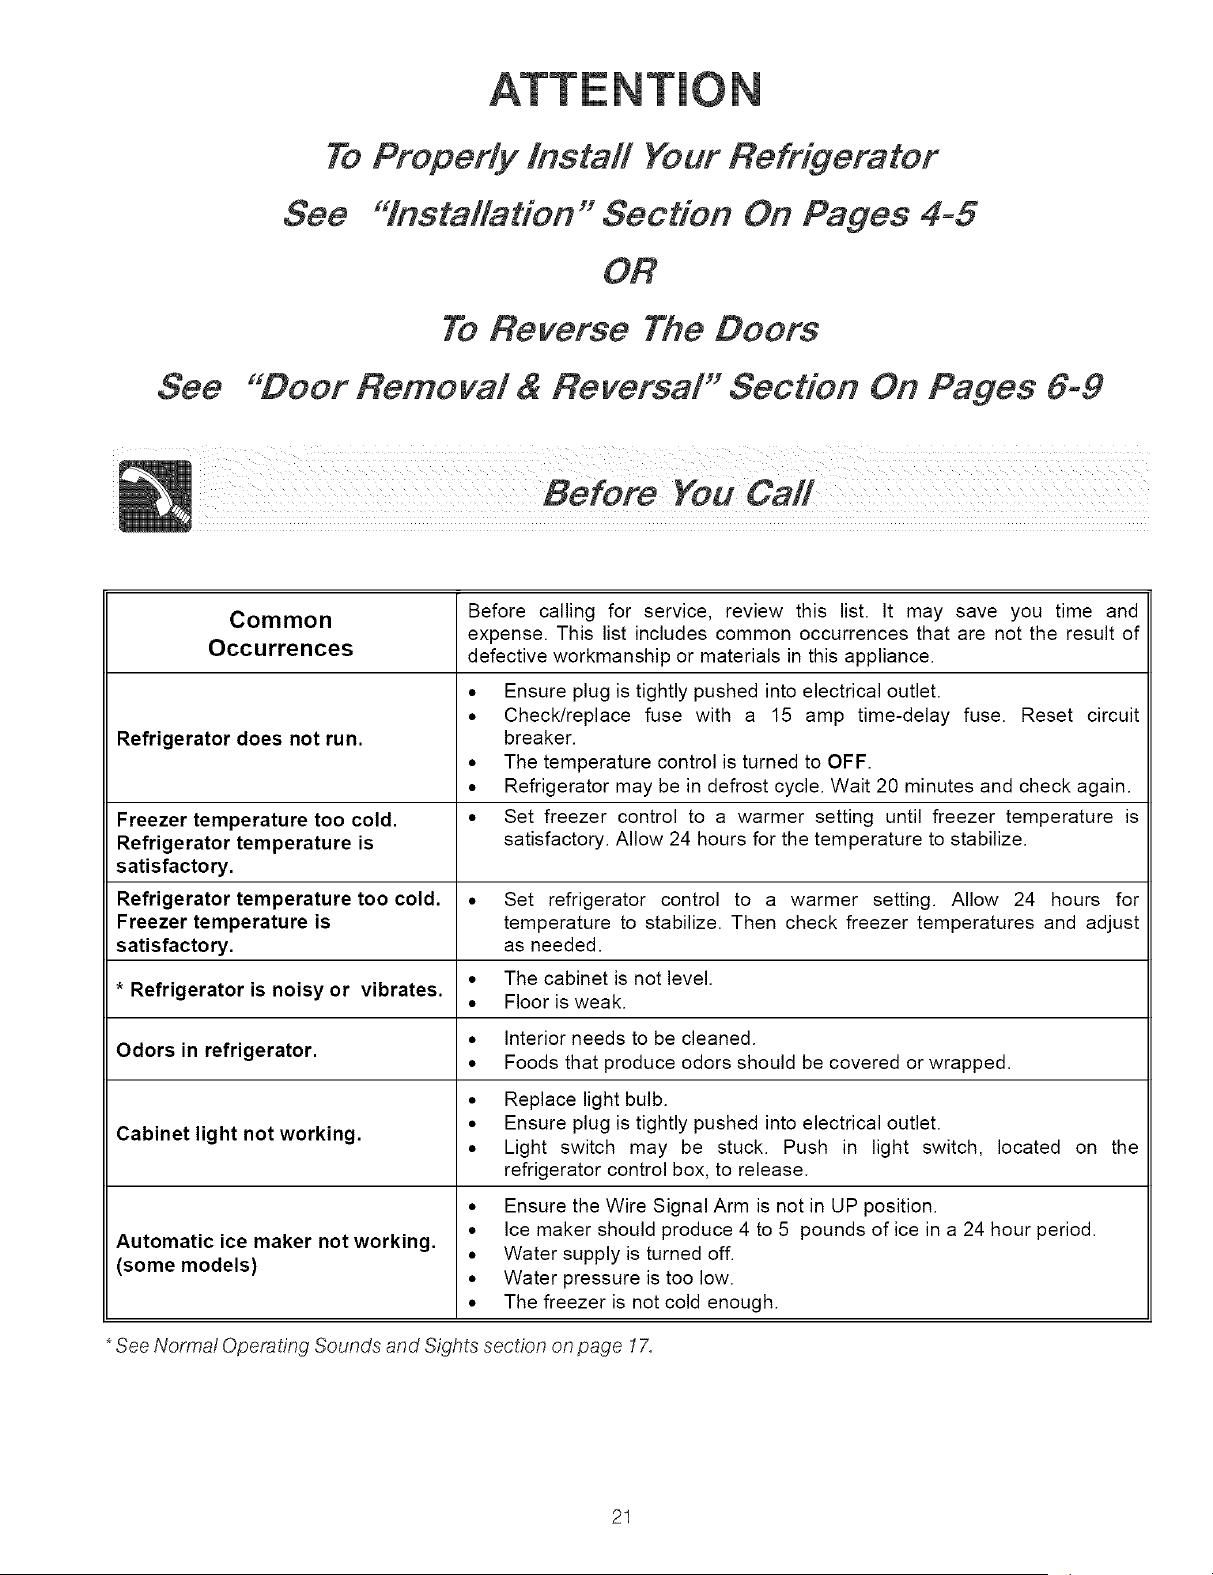
Common Before calling for service, review this list. It may save you time and
expense. This list includes common occurrences that are not the result of
Occurrences defective workmanship or materials in this appliance.
• Ensure plug is tightly pushed into electrical outlet.
• Check/replace fuse with a 15 amp time-delay fuse. Reset circuit
Refrigerator does not run. breaker.
• The temperature control is turned to OFF.
• Refrigerator may be in defrost cycle. Wait 20 minutes and check again.
Freezer temperature too cold. • Set freezer control to a warmer setting until freezer temperature is
Refrigerator temperature is satisfactory. Allow 24 hours for the temperature to stabilize.
satisfactory.
Refrigerator temperaturetoo cold. • Set refrigerator control to a warmer setting. Allow 24 hours for
Freezer temperature is temperature to stabilize. Then check freezer temperatures and adjust
satisfactory, as needed.
• The cabinet is not level.
• Refrigerator is noisy or vibrates.
• Floor is weak.
• Interior needs to be cleaned.
Odors in refrigerator.
• Foods that produce odors should be covered or wrapped.
• Replace light bulb.
• Ensure plug is tightly pushed into electrical outlet.
Cabinet light not working.
• Light switch may be stuck. Push in light switch, located on the
refrigerator control box, to release.
• Ensure the Wire Signal Arm is not in UP position.
Automatic ice maker not working.
(some models)
• Ice maker should produce 4 to 5 pounds of ice in a 24 hour period.
• Water supply is turned off.
• Water pressure is too low.
• The freezer is not cold enough.
*See Normaf Operating Sounds and Sights section on page 17.
21