Owner's Manual
Manual Del Propietario
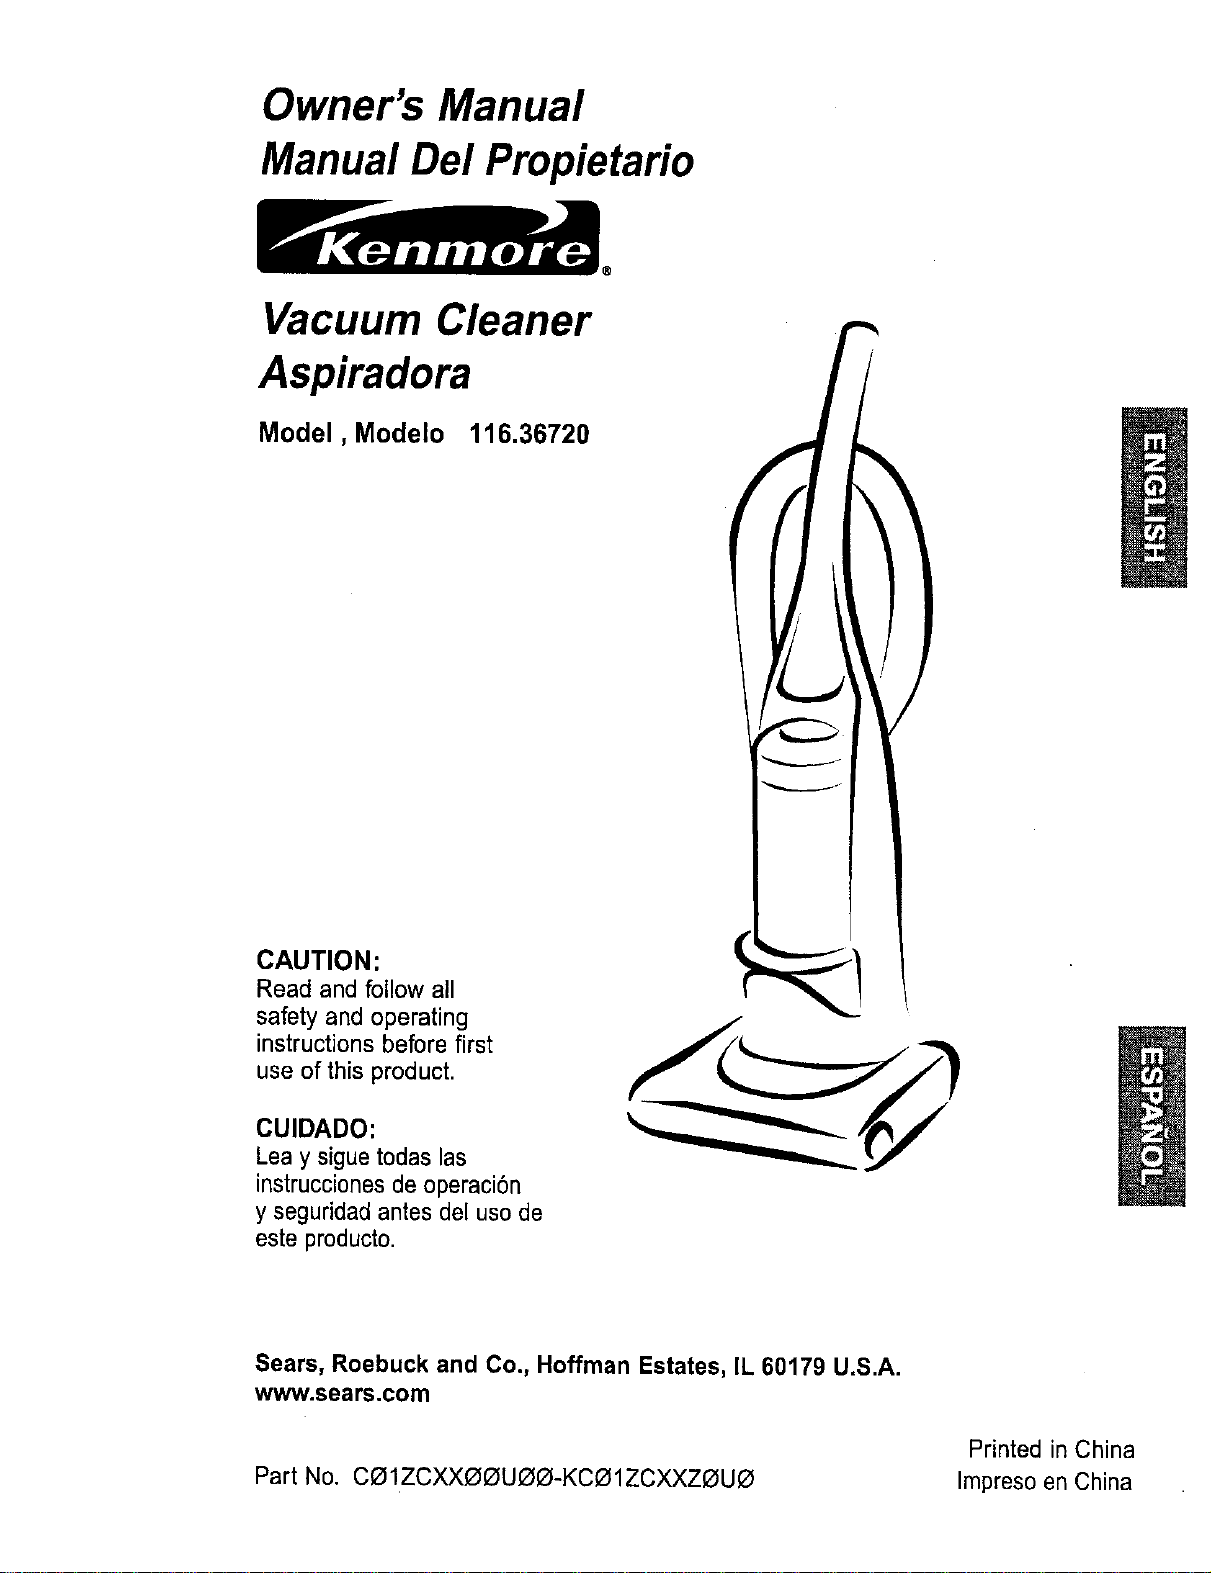
Vacuum Cleaner
Aspiradora
Model, Modelo 116.36720
CAUTION:
Read and follow all
safety and operating
instructionsbefore first
use of this product.
CUIDADO:
Leay sigue todaslas
instrucciones de operaci6n
y seguridad antes del uso de
este producto.
Sears, Roebuck and Co., Hoffman Estates, IL 60179 U.S.A.
www.sears.com
Printed in China
Part No. CO1ZCXXOOUOO-KCO1ZCXXZOUO Impreso en China
Before UsingYour NewVacuum
Cleaner ............................ 2
Kenmore Vacuum Cleaner Warranty ... 2
Important Safety Instructions ......... 3
Parts and Features .................. 4
Assembly Instructions ............. 5-6
Operating Instructions ............... 7
Releasing the Handle ................. 8
ON/OFF Switch ..................... 8
Attachments ...................... 8-9
Attachment Use Chart ................ 9
Vacuuming Tips ..................... 9
Performance Features ............... 10
Vacuum Cleaner Care ............... 11
Vacuum Cleaner Storage ............. 11
Cleaning Exterior and Attachments ..... 11
Dust Bin Cleaning ................ 12-13
Secondary Filter Cleaning ............ 13
Filter Changing/Cleaning ............. 14
Belt Changing and Agitator Cleaning .. 15-16
Clog Removal ..................... 17
Motor Protector ..................... 17
Agitator Servicing ................... 18
Light Bulb Changing ................. 19
Troubleshooting .................... 20
Notes ............................ 21, 22
Please read this guide. It will help you assemble and operate your new Kenmore vacuum
cleaner in the safest and most effective way.
For more information about vacuum cleaner care and operation, call your nearest Sears store.
You will need the complete model and serial numbers when requesting information. Your vacu-
um's model and serial numbers are located on the Model and Serial Number Plate.
Use the space below to record the model number and serial number of your new Kenmora
vacuum cleaner.
Model No.
Serial No.
Date of Purchase
Keep this book and your sales check (receipt) in a safe place for future reference.
LIMITED ONE YEAR WARRANTY ON KENMORE VACUUM CLEANER
This warranty is for one year from the date of purchase, and includes only private household
vacuum cleaner use. During the warranty year, when this vacuum cleaner is operated and
maintained according to the owner's manual instructions, Sears will repair any defects in
material or workmanship free of charge.
This warranty excludes vacuum cleaner bags, belts, light bulbs, and filters, which are
expendable parts and become worn during normal use.
For warranty service, return this vacuum cleaner to the nearest Sears Service Center in
the United States.
This warranty applies only while this product is in use in the United States. This warranty gives
you specific legal rights, and you may also have other rights which vary from state to state.
Sears, Roebuck and Co., D/817 WA, Hoffman Estates, IL 60179
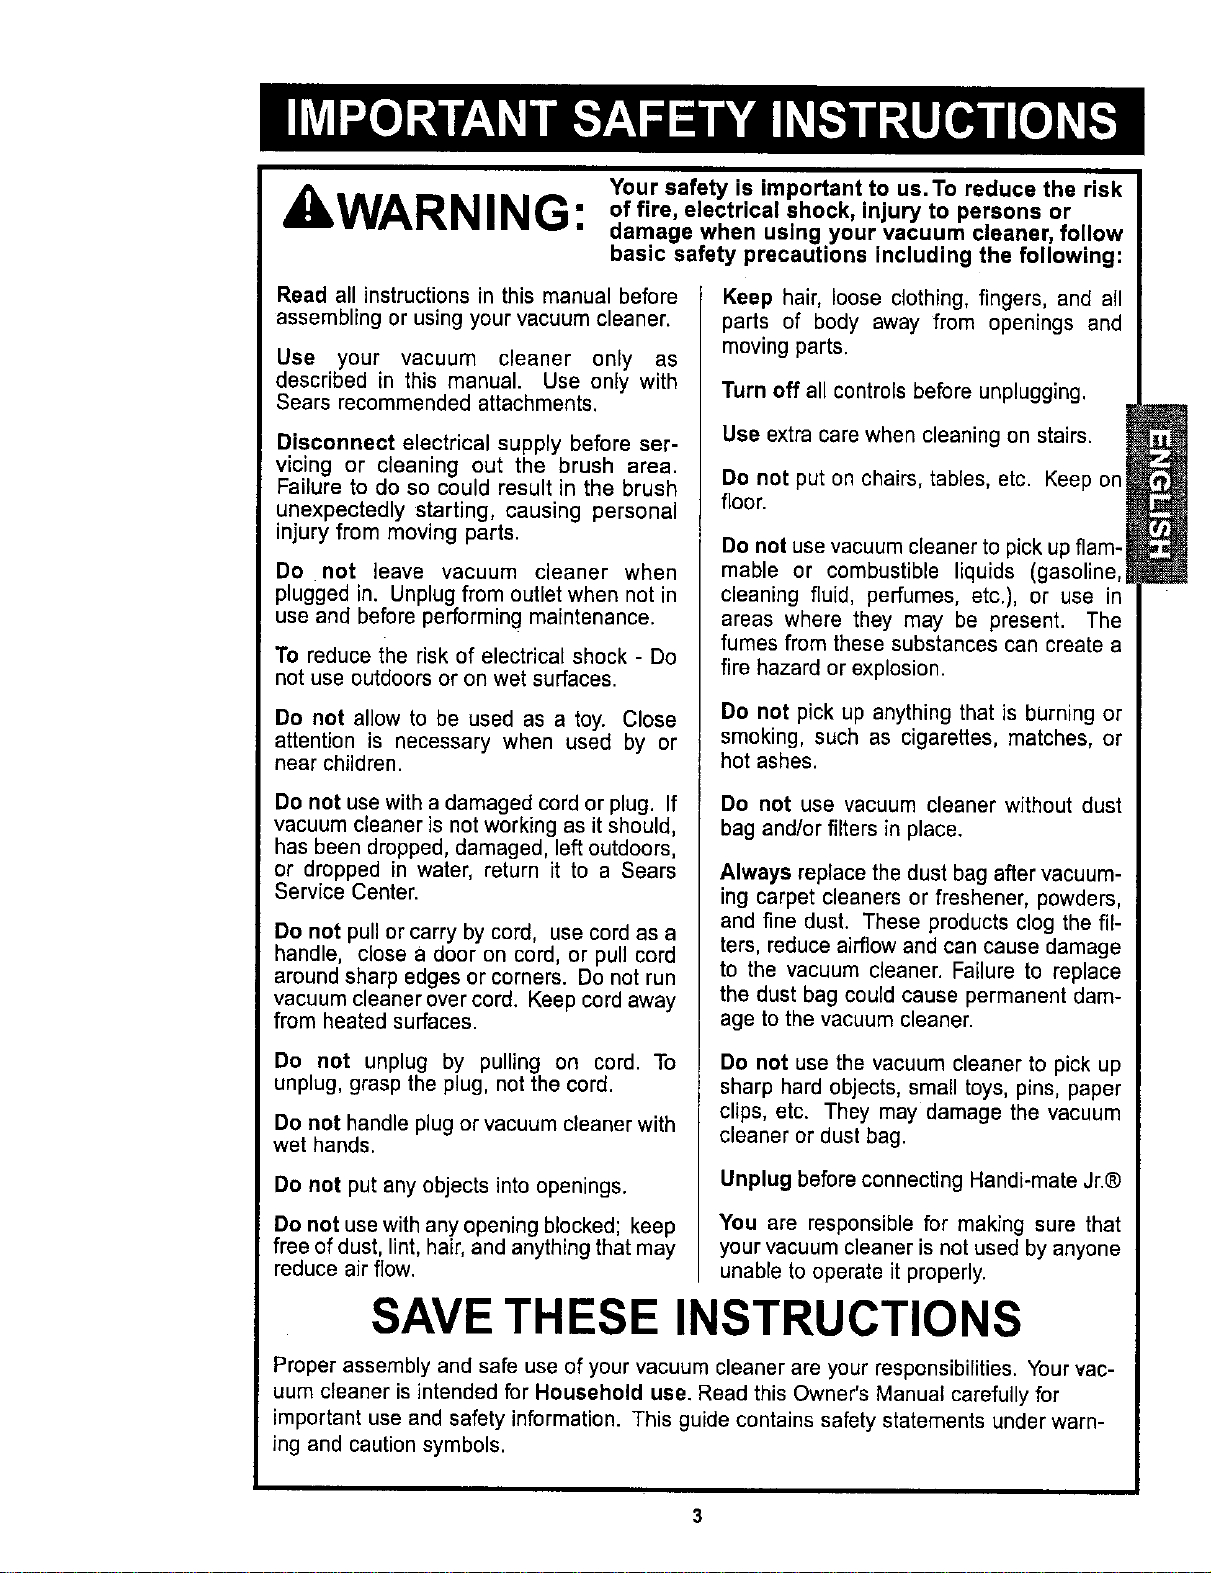
,WARNING:
Your safety is important to us.To reduce the risk
of fire, electrical shock, injury to persons or
damage when using your vacuum cleaner, follow
basic safety precautions including the following:
Read all instructions in this manual before
assembling or using your vacuum cleaner.
Use your vacuum cleaner only as
described in this manual. Use only with
Sears recommended attachments.
Disconnect electrical supply before ser-
vicing or cleaning out the brush area.
Failure to do so could result in the brush
unexpectedly starting, causing personal
injury from moving parts.
Do not leave vacuum cleaner when
plugged in. Unplug from outlet when not in
use and before performing maintenance.
To reduce the risk of electrical shock - Do
not use outdoors or on wet surfaces.
Do not allow to be used as a toy. Close
attention is necessary when used by or
near children.
Do not use with a damaged cord or plug. If
vacuum cleaner is not working as it should,
has been dropped, damaged, left outdoors,
or dropped in water, return it to a Sears
Service Center.
Do not pull or carry by cord, use cord as a
handle, close a door on cord, or pull cord
around sharp edges or corners. Do not run
vacuum cleaner over cord. Keep cord away
from heated surfaces.
De not unplug by pulling on cord. To
unplug, grasp the plug, not the cord.
Do not handle plug or vacuum cleaner with
wet hands.
Do not put any objects into openings.
Do not use with any opening blocked; keep
free of dust, lint, hair, and anything that may
reduce air flow.
Keep hair, loose clothing, fingers, and all
parts of body away from openings and
moving parts.
Turn off all controls before unplugging.
Use extra care when cleaning on stairs.
Do not put on chairs, tables, etc. Keep on
floor.
Do not use vacuum cleaner to pick up flam-
mable or combustible liquids (gasoline,
cleaning fluid, perfumes, etc.), or use in
areas where they may be present. The
fumes from these substances can create a
fire hazard or explosion.
Do not pick up anything that is bUrning or
smoking, such as cigarettes, matches, or
hot ashes.
Do not use vacuum cleaner without dust
bag and/or filters in place.
Always replace the dust bag after vacuum-
ing carpet cleaners or freshener, powders,
and fine dust. These products clog the fil-
ters, reduce airflow and can cause damage
to the vacuum cleaner. Failure to replace
the dust bag could cause permanent dam-
age to the vacuum cleaner.
Do not use the vacuum cleaner to pick up
sharp hard objects, small toys, pins, paper
clips, etc. They may damage the vacuum
cleaner or dust bag.
Unplug before connecting Handi-mate Jr.®
You are responsible for making sure that
your vacuum cleaner is not used by anyone
unable to operate it properly.
SAVE THESE INSTRUCTIONS
Proper assembly and safe use of your vacuum cleaner are your responsibilities. Your vac-
uum cleaner is intended for Household use. Read this Owner's Manual carefully for
important use and safety information. This guide contains safety statements under warn-
ing and caution symbols.
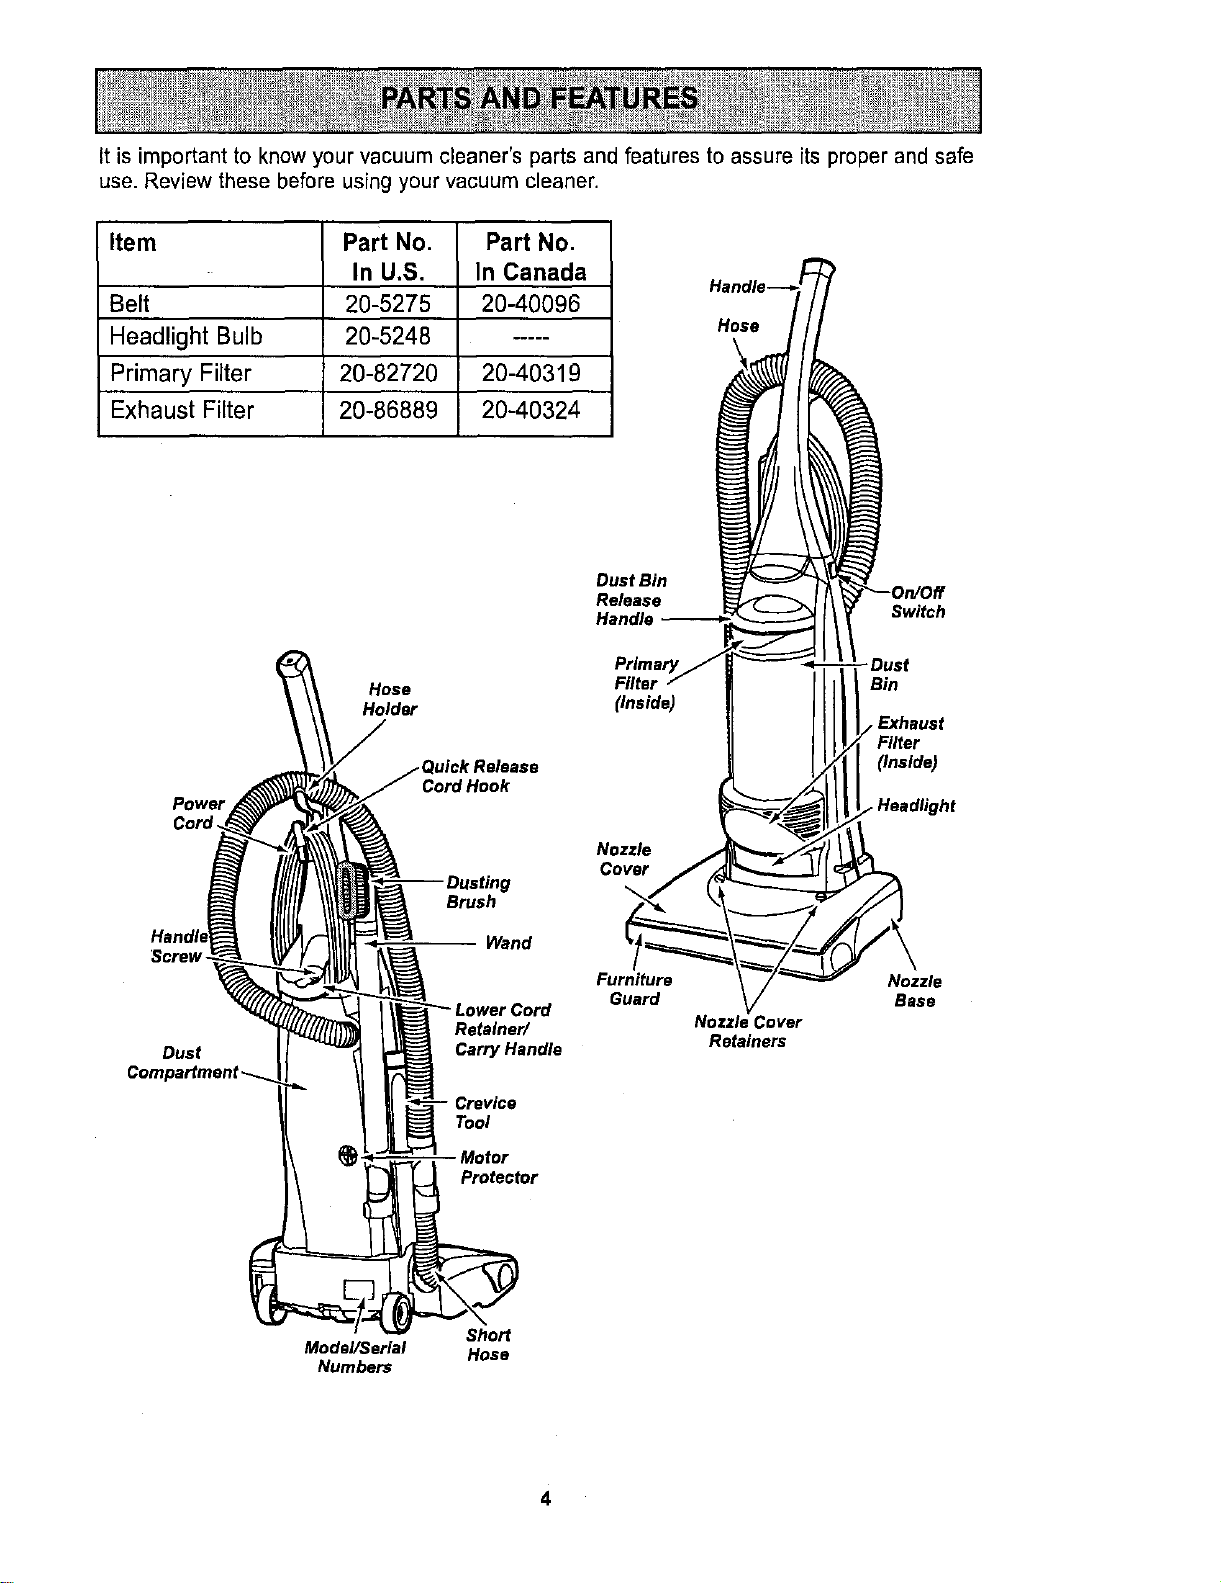
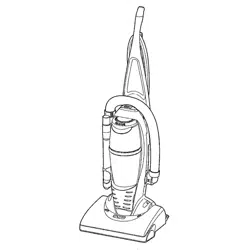
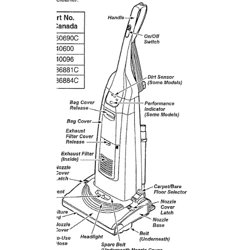
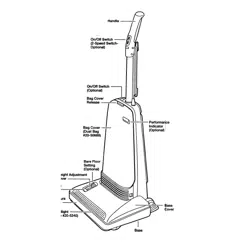
it isimportanttoknowyourvacuumcleaner'spartsandfeaturestoassureitsproperandsafe
use.Reviewthesebeforeusingyourvacuumcleaner.
Item Part No. Part No.
In U,S. In Canada
Belt 20-5275 20-40096
Headlight Bulb 20-5248 .....
Primary Filter 20-82720 20-40319
Exhaust Filter 20-86889 20-40324
Dust Bin
Release
Switch
Power
Cord.
Screw,
Hose
Holder
Cord Hook
Brush
Wend
Flits
(inside)
Nozzle
Cover
Furniture
Guard
Retainer/ Nozzle Cover
Dust Carry Handle Retainers
-Dust
Bin
Filter
(Inside)
.Headlight
Nozzle
Base
Crevice
Tool
Motor
Protector
Sho_
ModeYSer_l Hose
Numbers
4
I Please pay special attention to these hazard alert boxes, and follow any instructions given.
WARNING statements alert you to such hazards as fire, electric shock, burns and personal
injury. CAUTION statements alert you to such hazards as personal injury and/or property
damage.
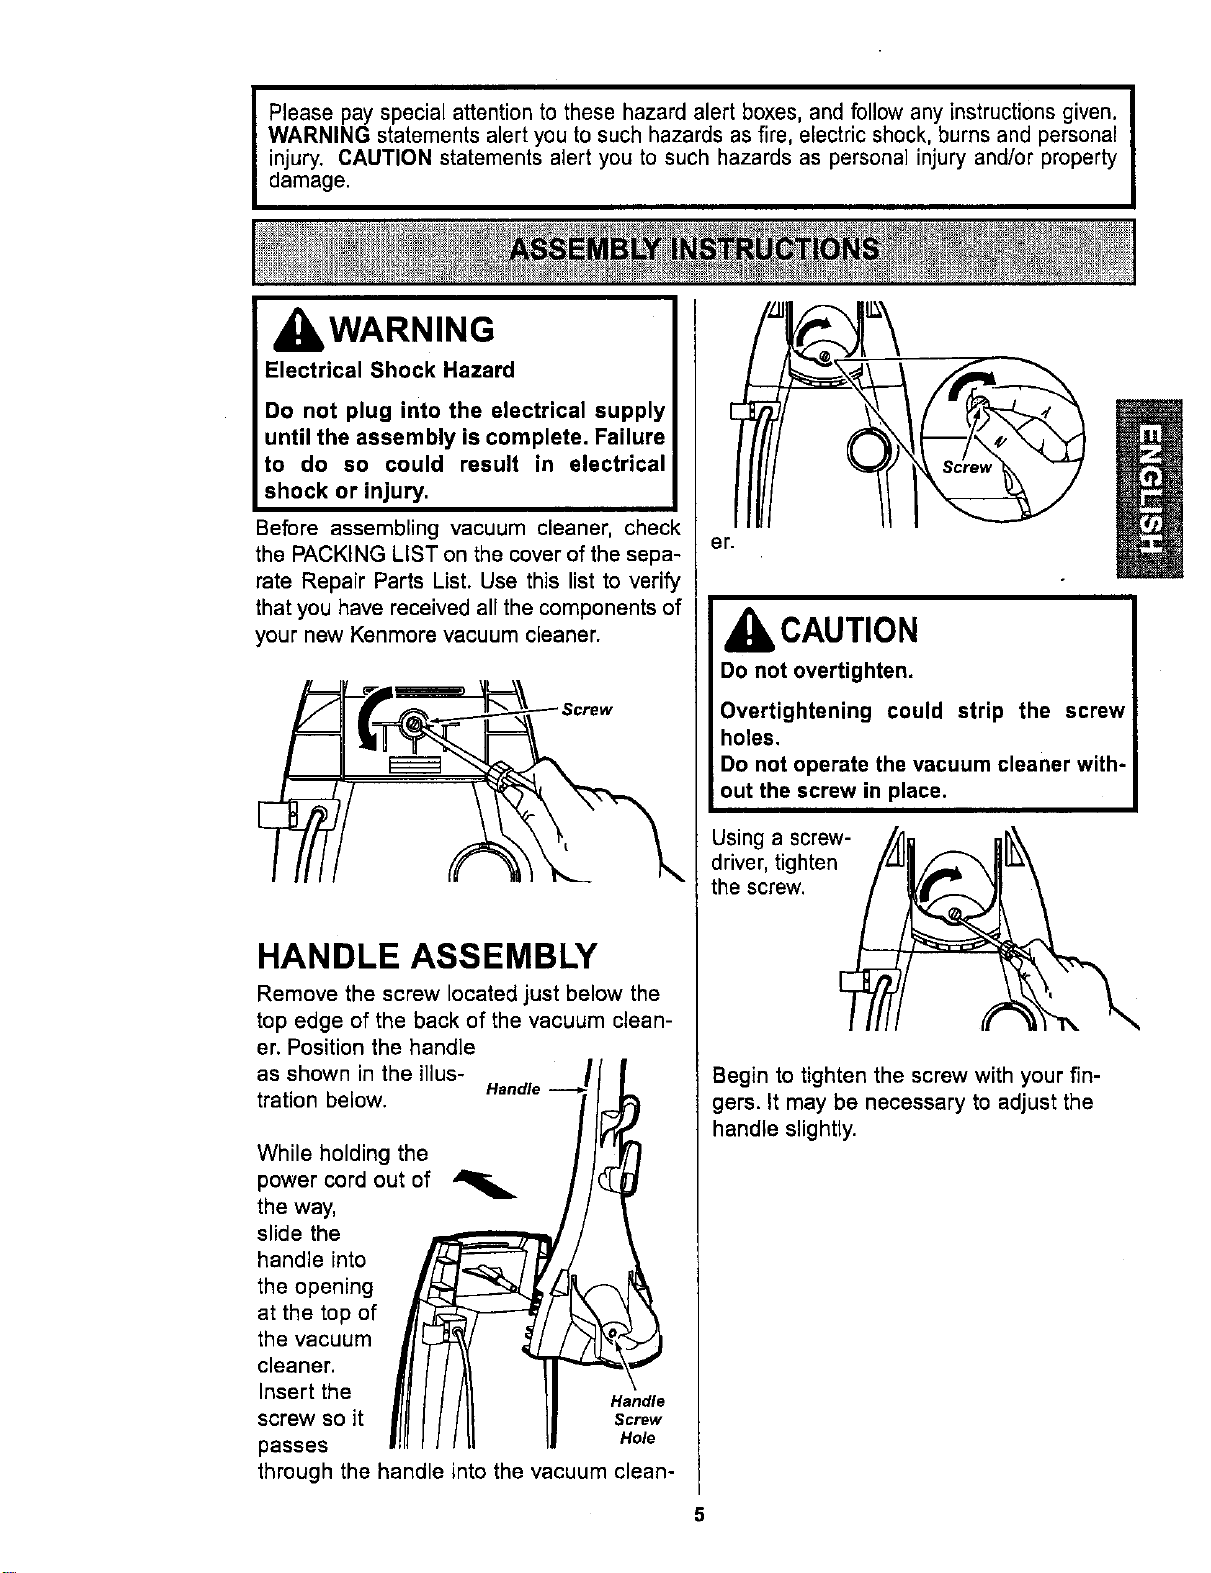
kWARNING
Electrical Shock Hazard
Do not plug into the electrical supply
until the assembly is complete. Failure
to do so could result in electrical
shock or injury,
Before assembling vacuum cleaner, check
the PACKING LIST on the cover of the sepa-
rate Repair Parts List. Use this list to verify
that you have received all the components of
your new Kenmore vacuum cleaner.
HANDLE ASSEMBLY
Remove the screw located just below the
top edge of the back of the vacuum clean-
er. Position the handle
as shown in the illus- .__.J /
tration below. Handle _
the opening :__ _J_lkF
at the top of _ _1_'/ _..',_.
the vacuum J _/ _' HI
cleaner. 1/
Insert the /11 tl H,ndl,
screwso,t/ll LI so, .
passes Hole
through the handle into the vacuum clean-
er.
kCAUTION
Do not overtighten.
Overtightening could strip the screw
holes,
Do not operate the vacuum cleaner with-
out the screw in place.
Using a screw-
driver, tighten
the screw.
Begin to tighten the screw with your fin-
gers. It may be necessary to adjust the
handle slightly.
5
CORD ASSEMBLY
Make sure the quick release cord hook is in
the upright position. Remove the wire tie
from the power cord.
Lock the cord into
place by forcing it
into the locking
notch on the body
of the quick Notch
release cord hook (,' \
as shown. This
helps keep the
power cord out
fromunderthe POcord_i
vacuum cleaner
agitator.
Quick
Release
Cord
Power
Lower
Cord
Wrap the
power cord
around the
quick release
cord hook
and lower
cord retainer,
then lock the
power cord
plug onto the
Jower cord.
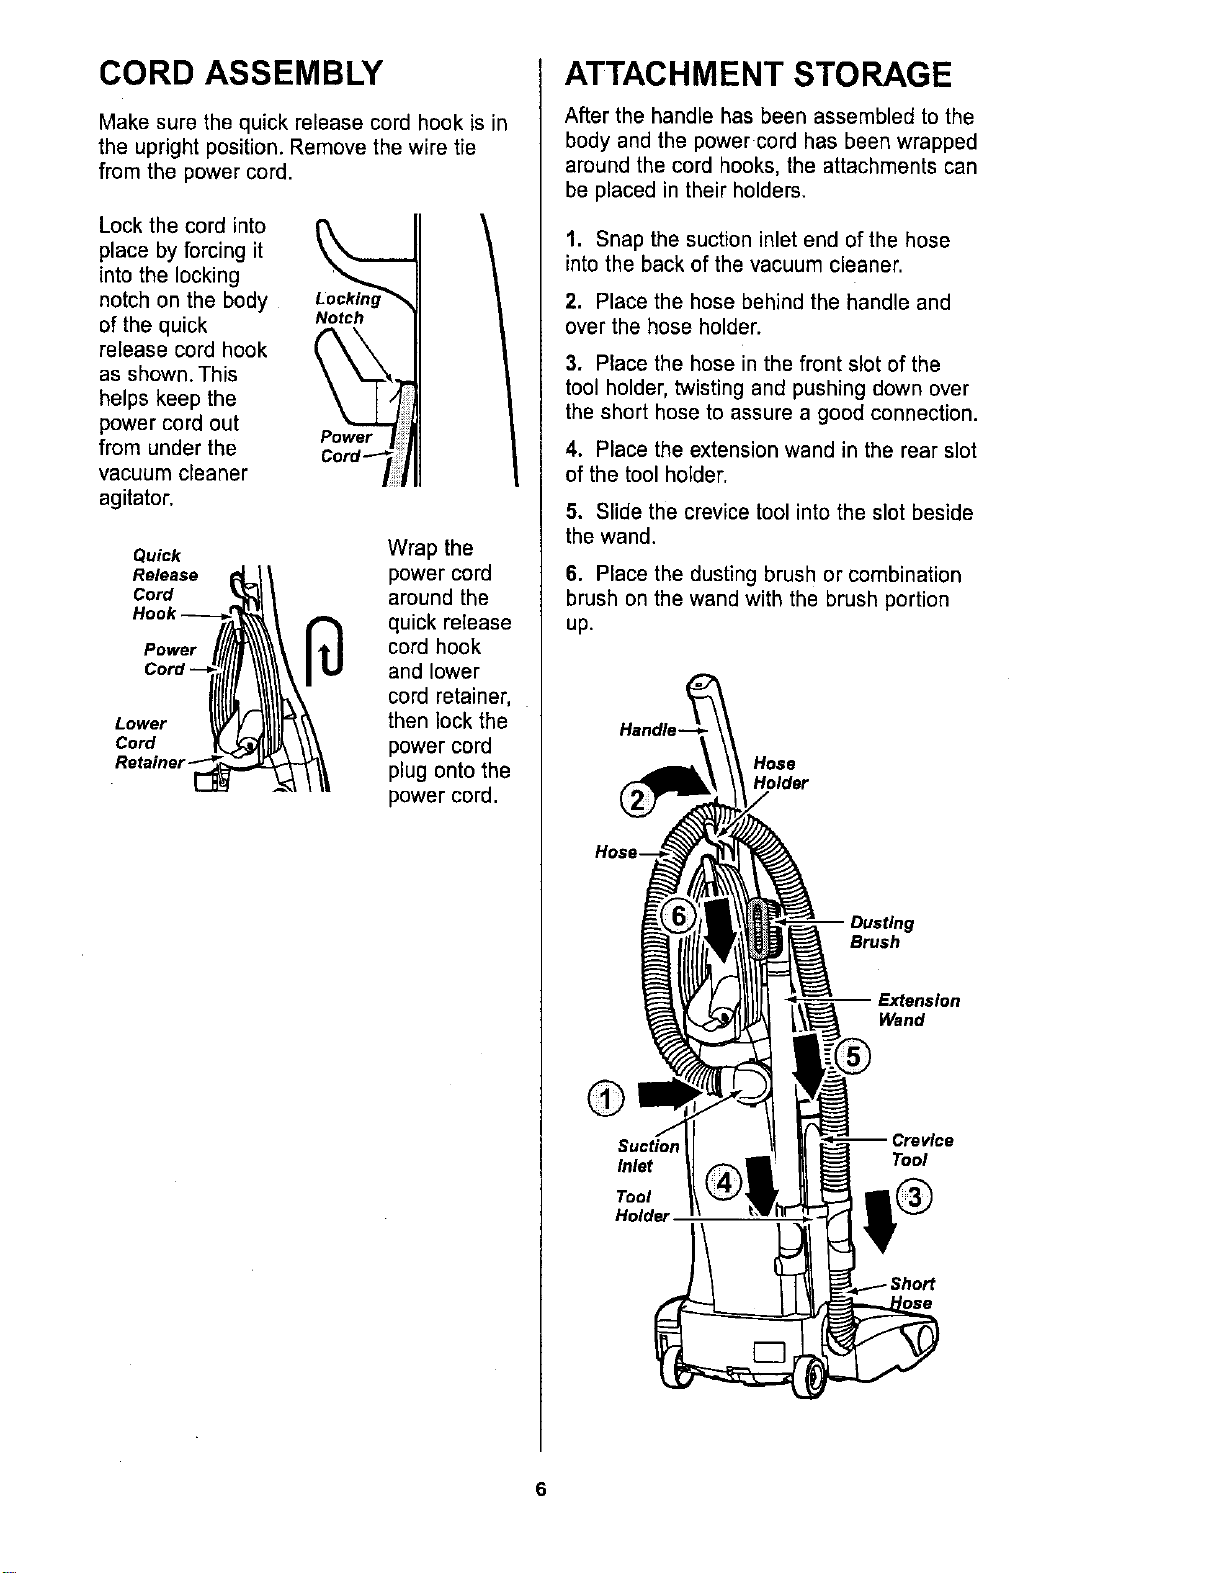
ATTACHMENT STORAGE
After the handle has been assembled to the
body and the power cord has been wrapped
around the cord hooks, the attachments can
be placed in their holders.
1. Snap the suction inletend of the hose
intothe back of thevacuum cleaner.
2. Place the hose behind the handle and
over the hose holder.
3. Place the hose in the front slot of the
tool holder, twisting and pushing down over
the short hose to assure a good connection.
4. Place the extension wand in the rear slot
of the tool holder.
5. Slide the crevice tool into the slot beside
the wand.
6. Place the dusting brush or combination
brush on the wand with the brush portion
up.
Handle-
Hose
Holder
Brush
Wand
0
Inlet
Tool
Holder,
Tool
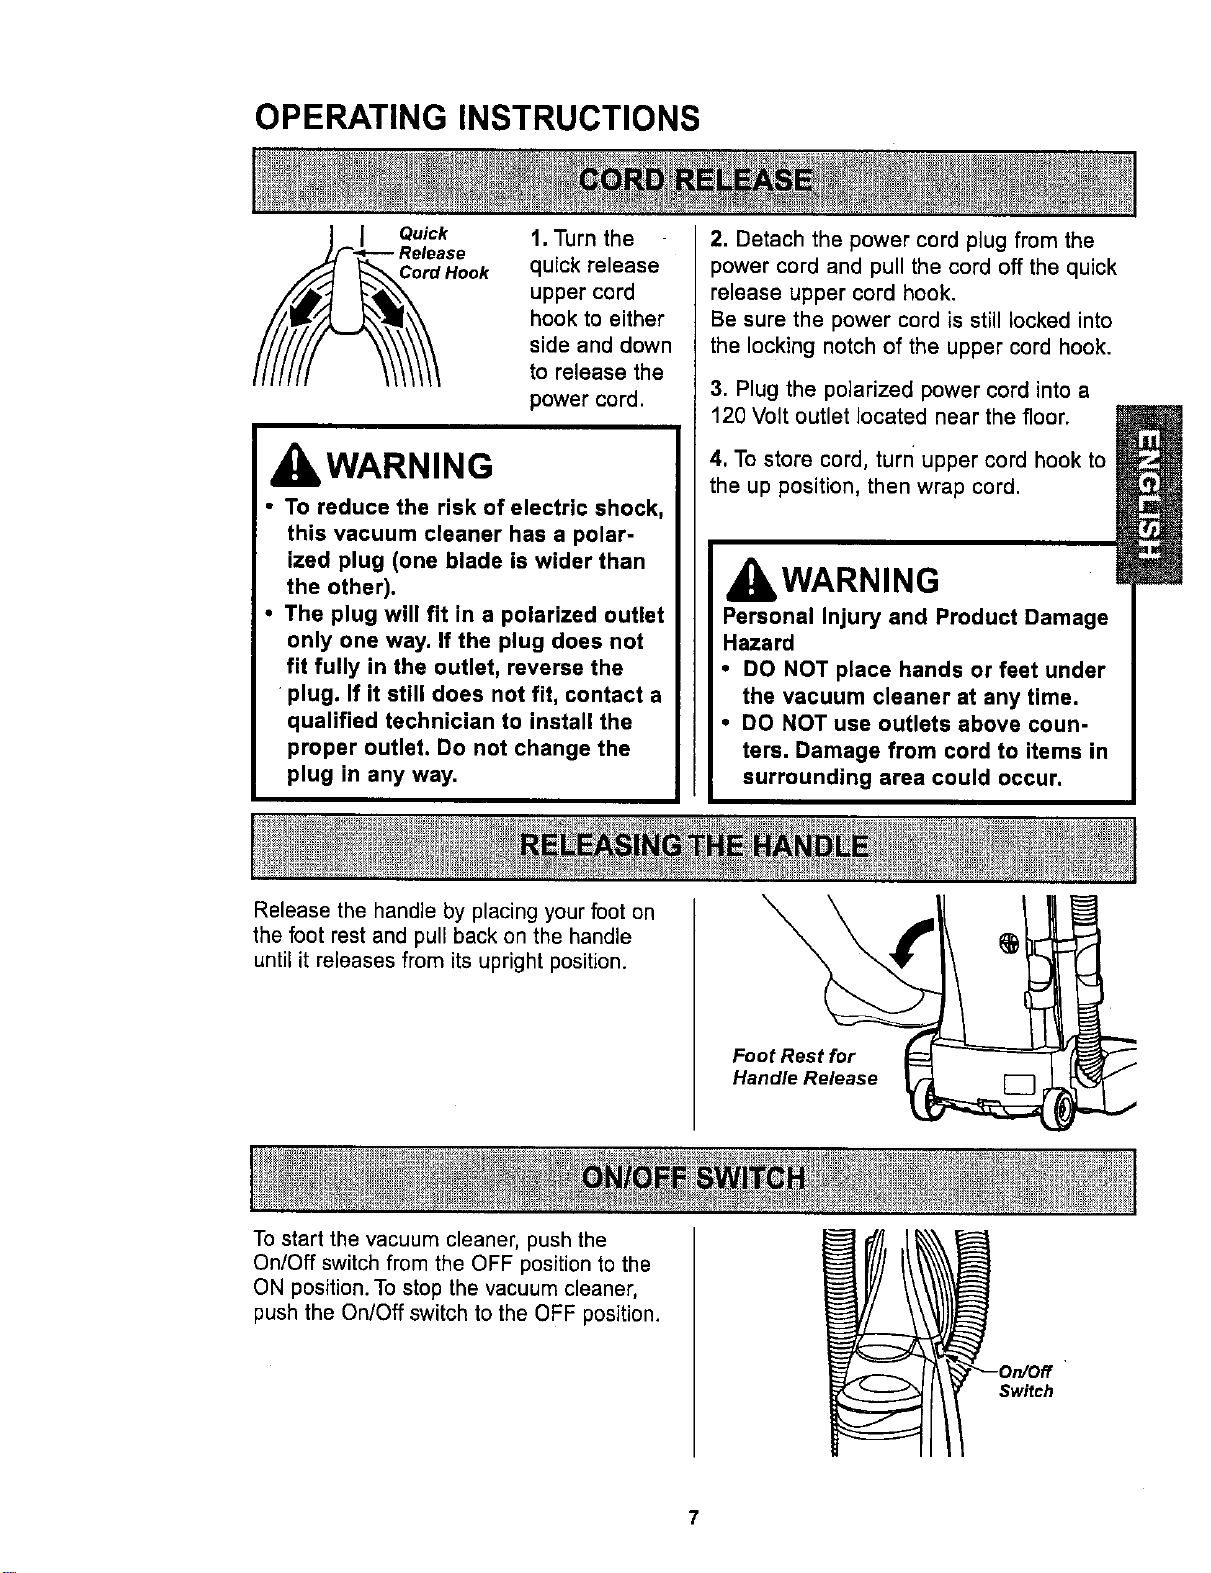
OPERATING INSTRUCTIONS
Quick 1. Turn the
Cord Hook quick release
upper cord
hook to either
side and down
to release the
power cord.
WARNING
• To reduce the risk of electric shock,
this vacuum cleaner has a polar-
ized plug (one blade is wider than
the other).
• The plug will fit in a polarized outlet
only one way. If the plug does not
fit fully in the outlet, reverse the
plug. If it still does not fit, contact a
qualified technician to install the
proper outlet. Do not change the
plug in any way.
2. Detach the power cord plug from the
)ower cord and pull the cord off the quick
release upper cord hook.
Be sure the power cord is still locked into
the locking notch of the upper cord hook.
3. Plug the polarized power cord into a
120 Volt outlet located near the floor.
4. To store cord, turn upper cord hook to
the up position, then wrap cord.
I IbWARNING
Personal Injury and Product Damage
Hazard
• DO NOT place hands or feet under
the vacuum cleaner at any time.
• DO NOT use outlets above coun-
ters. Damage from cord to items in
surrounding area could occur.
Release the handle by placing your foot on
the foot rest and pull back on the handle
until it releases from its upright position.
\
Foot Rest for
Handle Release
To start the vacuum cleaner, push the
On/Off switch from the OFF position to the
ON position. To stop the vacuum cleaner,
push the On/Off switch to the OFF position.
7
WARNING
Personal Injury Hazard and Property
Hazard
DO NOT place hands or feet under-
neath the vacuum cleaner at any time.
When using attachments, the agitator
continues rotating. Do not allow the
ceaner to remain in just one place for
a period of time as the agitator may
damage the floor surface. Avoid plac-
ing the vacuum cleaner on furniture,
the fringed area of rugs, deep pile car-
peting, or carpeted stairs. The ideal
position for the vacuum cleaner when
using attachements is for the vacuum
cleaner to be on a level area with the
handle in the full upriqht position.
TO USE ATTACHMENTS
CAUTION
DO NOT tip vacuum cleaner forwards
or sideways when using attachments.
The attachments will fit on the hose or the
wand. In addition, the dusting brush or
combination brush will also fit on the
crevice tool.
The hose and wand can be pulled off the
short hose by grasping the cuff and twist-
ing while pulling up.
CAUTION
DO NOT pull the vacuum cleaner
around the room by the hose.
Property damage could result.
The attachments can be added to the hose
if the item to be cleaned is not far from the
vacuum cleaner. The hose on some mod-
els will expand.
NOTE: When vacuum cleaner is turned on,
the hose on some models will have a
tendency to coltapse due to suction of the
vacuum cleaner.
CAUTION
When using attachments, be careful
not to overextend the stretch hose
when reaching. Trying to reach beyond
the hose stretch capability could
cause the vacuum cleaner to tip over.
If more reach is needed, the wand can be
attached to the hose and the attachments
can be added to the wand.
An extra wand, without tabs, is included.
This extra wand can be added to the wand
with tabs for extra reach. Insert wand and
twist a quarter of a turn to secure fit.
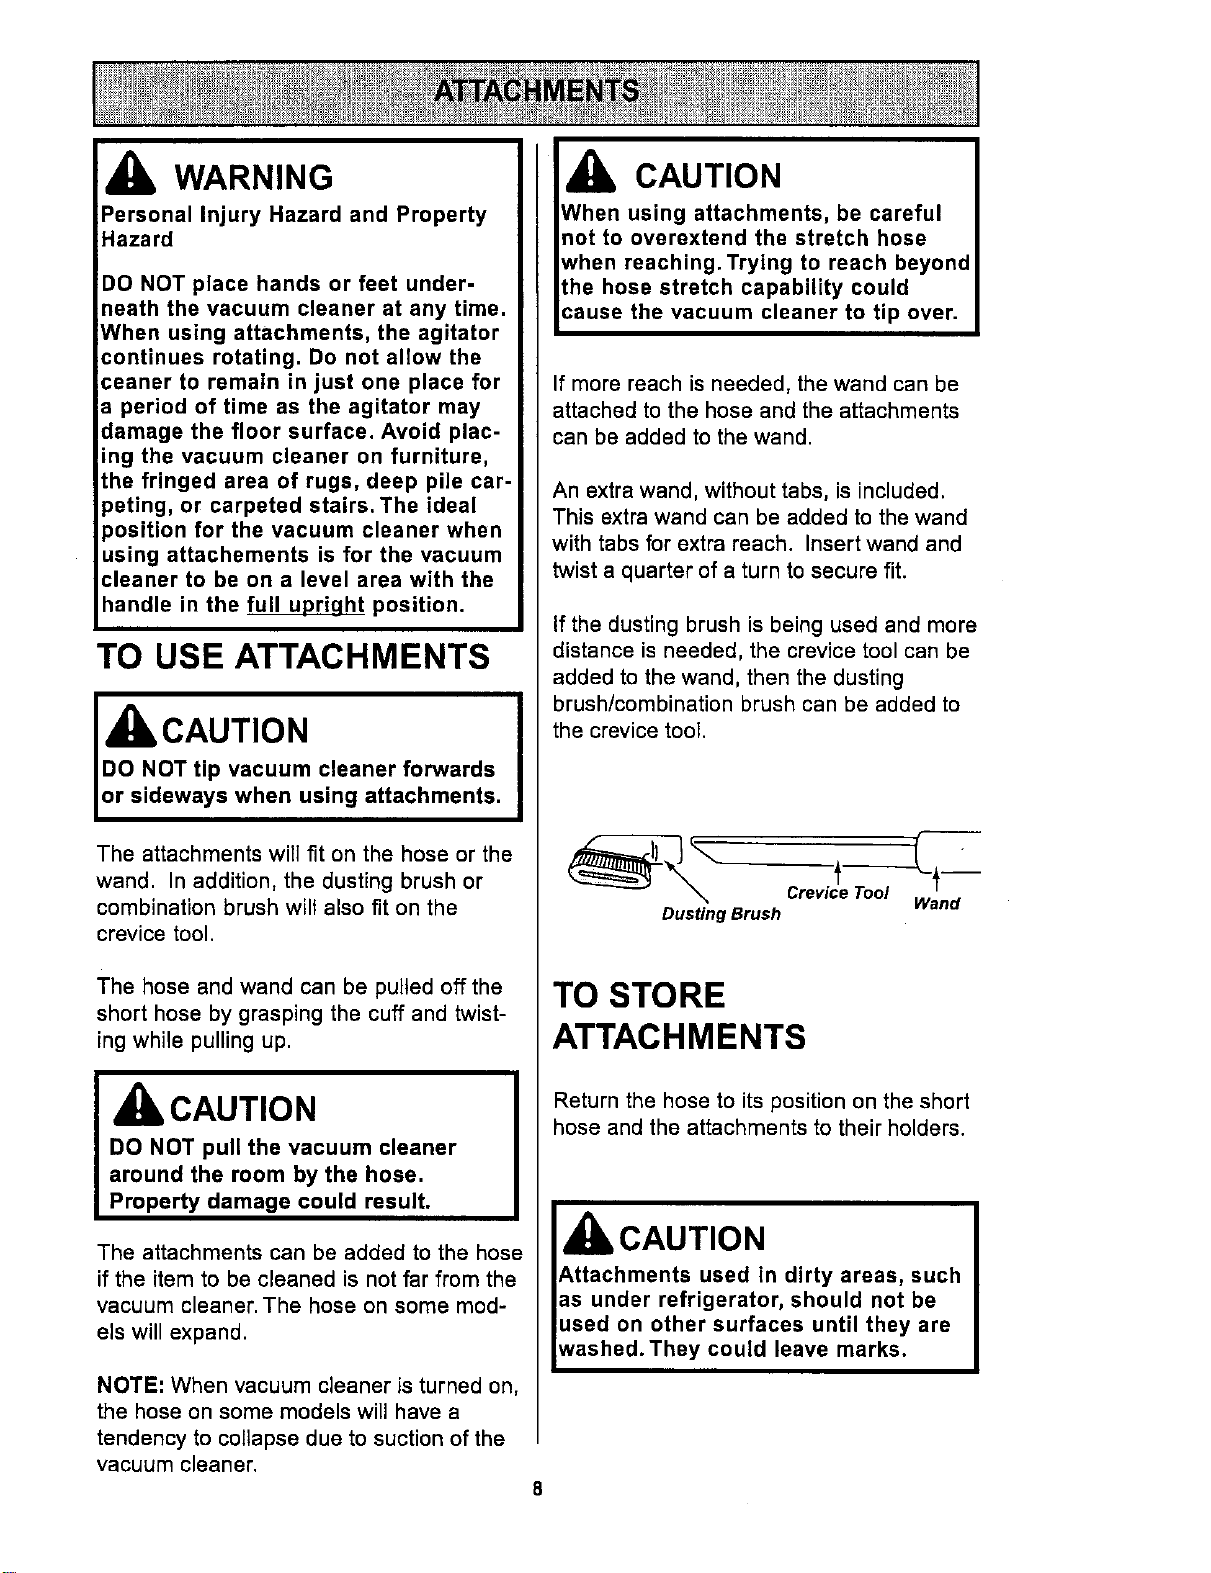
if the dusting brush is being used and more
distance is needed, the crevice tool can be
added to the wand, then the dusting
brush/combination brush can be added to
the crevice tool.
Dusting Brush
TO STORE
ATTACHMENTS
Return the hose to its position on the short
hose and the attachments to their holders.
CAUTION
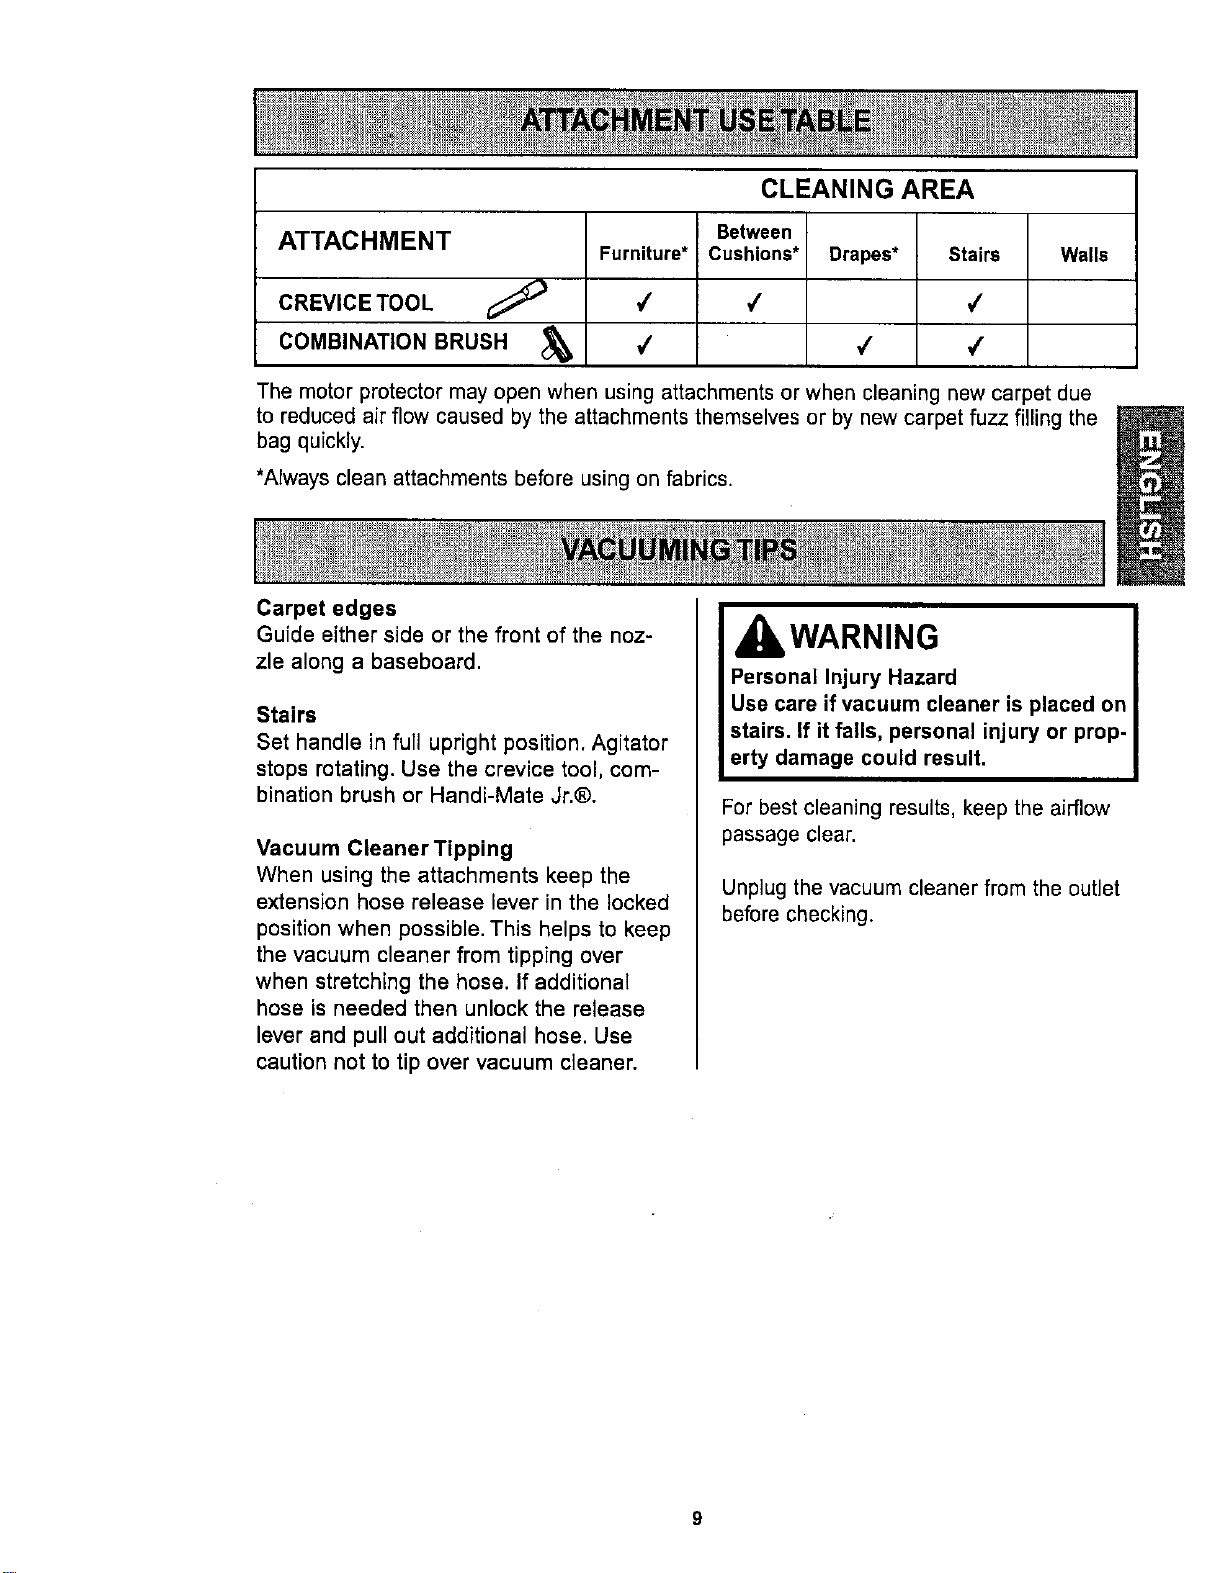
ATTACHMENT
CREVICE TOOL
COMBINATION BRUSH
Furniture*
#
#
CLEANING AREA
Between
Cushions*
Drapes*
Stairs
4
Y
Walls
The motor protector may open when using attachments or when cleaning new carpet due
to reduced air flow caused by the attachments themselves or by new carpet fuzz filling the
bag quickly.
*Always clean attachments before using on fabrics.
Carpet edges
Guide either side or the front of the noz-
zle along a baseboard.
Stairs
Set handle in full upright position. Agitator
stops rotating. Use the crevice tool, com-
bination brush or Handi-Mate Jr.®.
Vacuum Cleaner Tipping
When using the attachments keep the
extension hose release lever in the locked
position when possible. This helps to keep
the vacuum cleaner from tipping over
when stretching the hose. If additional
hose is needed then unlock the release
lever and pull out additional hose. Use
caution not to tip over vacuum cleaner.
WARNING
Personal Injury Hazard
Use care if vacuum cleaner is placed on
stairs. If it falls, personal injury or prop-
erty damage could result.
For best cleaning results, keep the airflow
passage clear.
Unplug the vacuum cleaner from the outlet
before checking.
MOTOR PROTECTION
SYSTEM
Thermal Protector
This vacuum cleaner has a thermal
protector which automatically trips to
protect the vacuum cleaner from
overheating. If a clog prevents the normal
flow of air to the motor, the thermal
protector turns the motor off automatically
to allow the motor to cool in order to
prevent possible damage to the vacuum
cleaner.
To correct problem: If this occurs, turn the
vacuum cleaner off and unplug the power
cord from the outlet to allow the vacuum
cleaner to cool and the thermal protector to
reset. Check for and remove clogs, if
necessary. Also check and
clean/replace any clogged filters. Wait
approximately thirty (30) minutes and
plug the vacuum cleaner in and turn
back on to see if the motor protector
has reset.The motor protector will not
reset if the vacuum cleaner is not turned
off even if the vacuum has cooled down,
10
VACUUM CLEANER CARE
Always follow all safety precautions when
performing maintenance to the vacuum
cleaner.
IbWARNING
Electrical Shock And Personal Injury
Hazard
Disconnect electrical supply before
servicing or cleaning the vacuum
cleaner. Failure to do so could result in
electrical shock or personal injury from
vacuum cleaner suddenly starting.
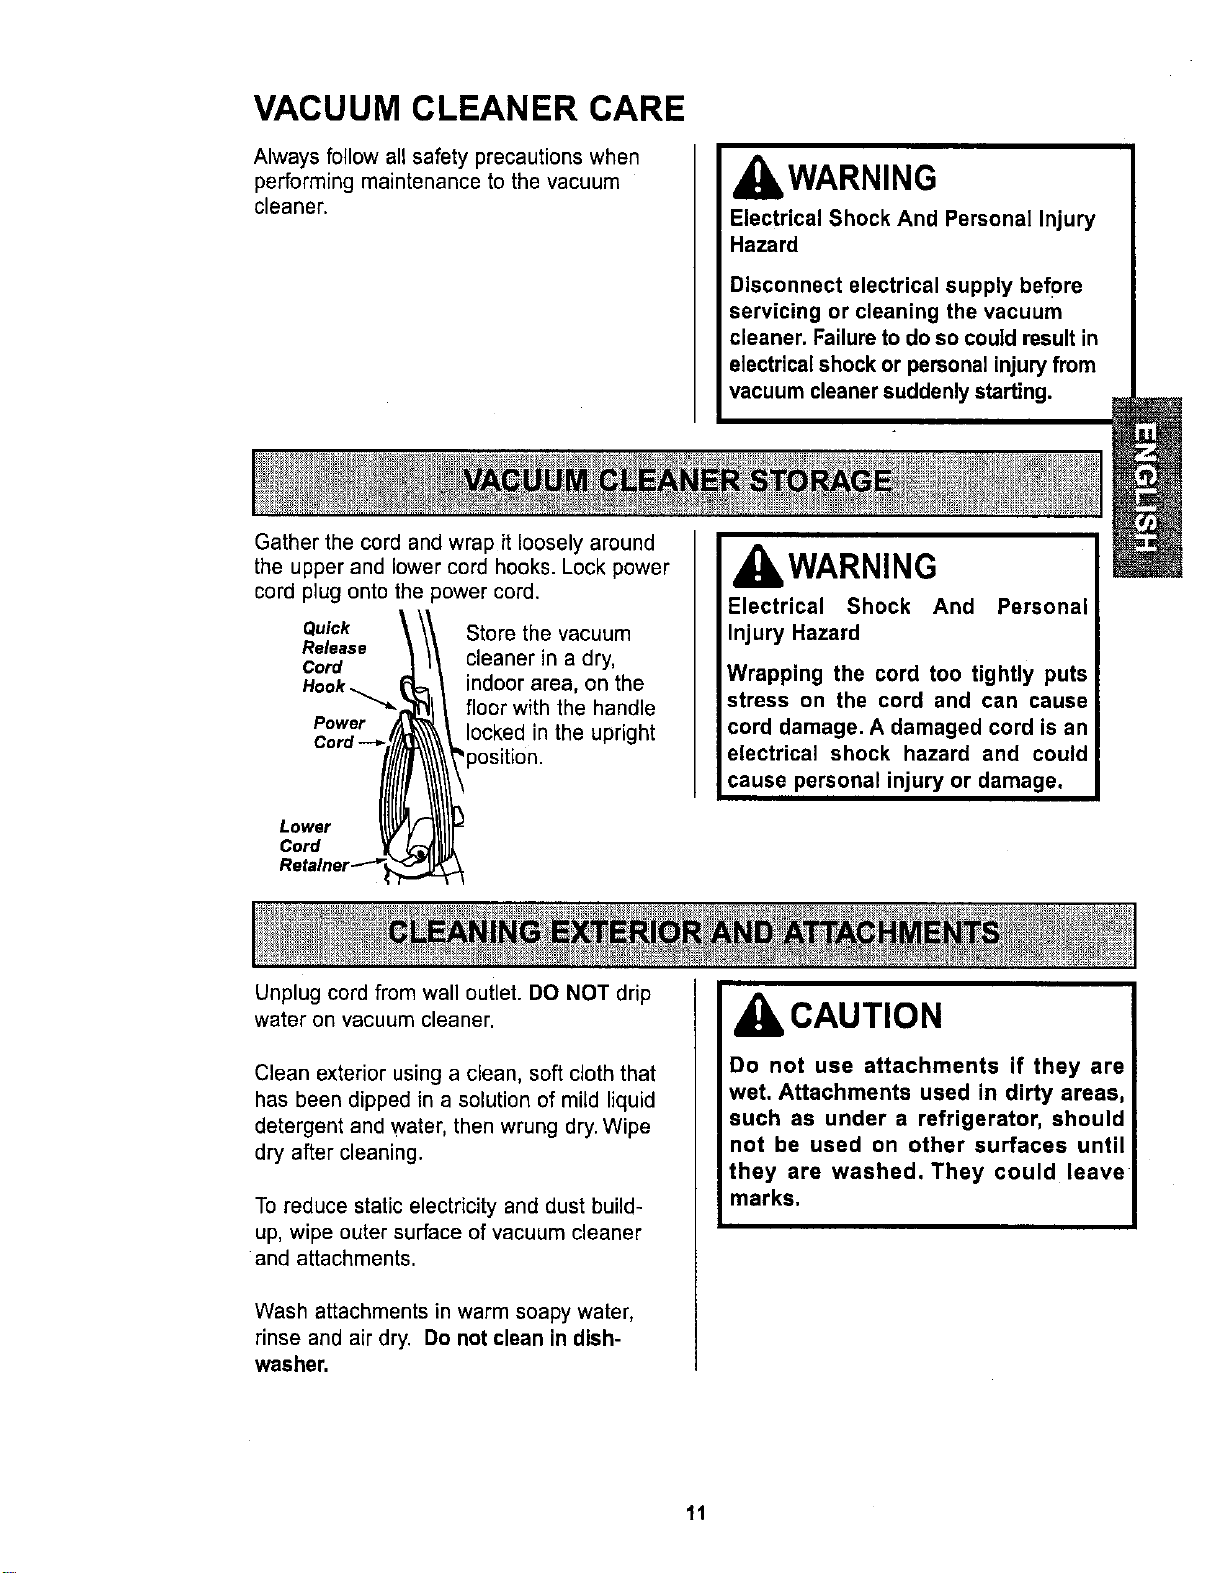
Gather the cord and wrap it loosely around
the upper and lower cord hooks. Lock power
cord plug onto the power cord.
Quick
Release
Cord
Power
Store the vacuum
cleaner in a dry,
indoor area, on the
floor with the handle
locked in the upright
Lower
Cord
Unplug cord from wall outlet. DO NOT drip
water on vacuum cleaner.
IbWARNING
Electrical Shock And Personal
Injury Hazard
Wrapping the cord too tightly puts
stress on the cord and can cause
cord damage. A damaged cord is an
electrical shock hazard and could
cause personal injury or damage,
Clean exterior using a clean, soft cloth that
has been dipped in a solution of mild liquid
detergent and water, then wrung dry. Wipe
dry after cleaning.
To reduce static electricity and dust build-
up, wipe outer surface of vacuum cleaner
and attachments.
Wash attachments in warm soapy water,
rinse and air dry. Do not clean in dish-
washer.
CAUTION
Do not use attachments if they are
wet. Attachments used in dirty areas,
such as under a refrigerator, should
not be used on other surfaces until
they are washed. They could leave
marks.
11
Alwaysemptythedust binwhendirt
levelreachesthe"MAX FILL" line.
, WARNING
Always unplug power cord from elec-
trical outlet before performing any
service on vacuum.
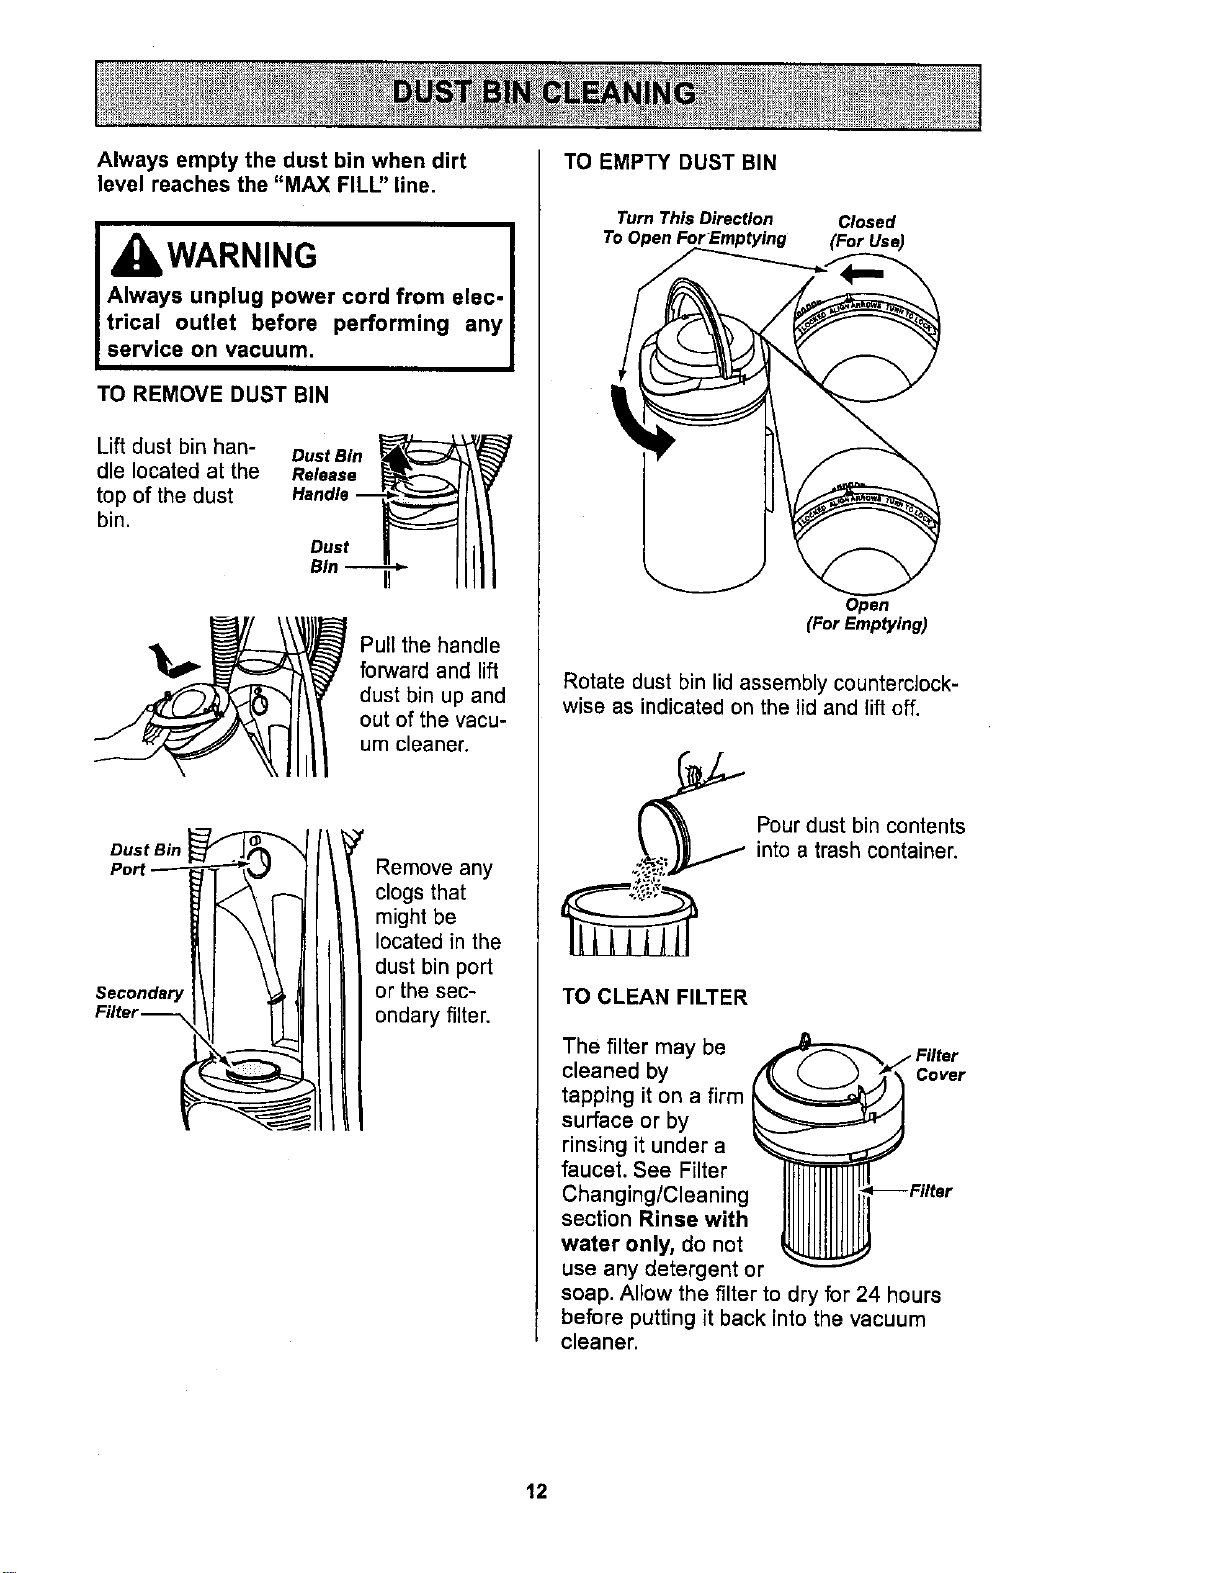
TO REMOVE DUST BiN
Lift dust bin han-
dle located at the
top of the dust
bin.
Dust Bin
Dust F
Bin
I ullthe handle
forward and lift
dust bin up and
out of the vacu-
um cleaner.
Dust Bin
Port
Secondary
Filter--
Remove any
clogs that
might be
located in the
dust bin port
or the sec-
ondary filter,
TO EMPTY DUST BIN
Turn This Direction Closed
To Open ForEmptying (For Use)
Open
(For Emptying)
Rotate dust bin lid assembly counterclock-
wise as indicated on the lid and lift off.
Pour dust bin contents
into a trash container.
TO CLEAN FILTER
The filter may be
cleaned by cover
tapping it on a firm
surface or by
rinsing it under a
faucet. See Filter
Changing/Cleaning
section Rinse with
water only, do not
use any detergent or
soap. Allow the filter to dry for 24 hours
before putting it back into the vacuum
cleaner.
12
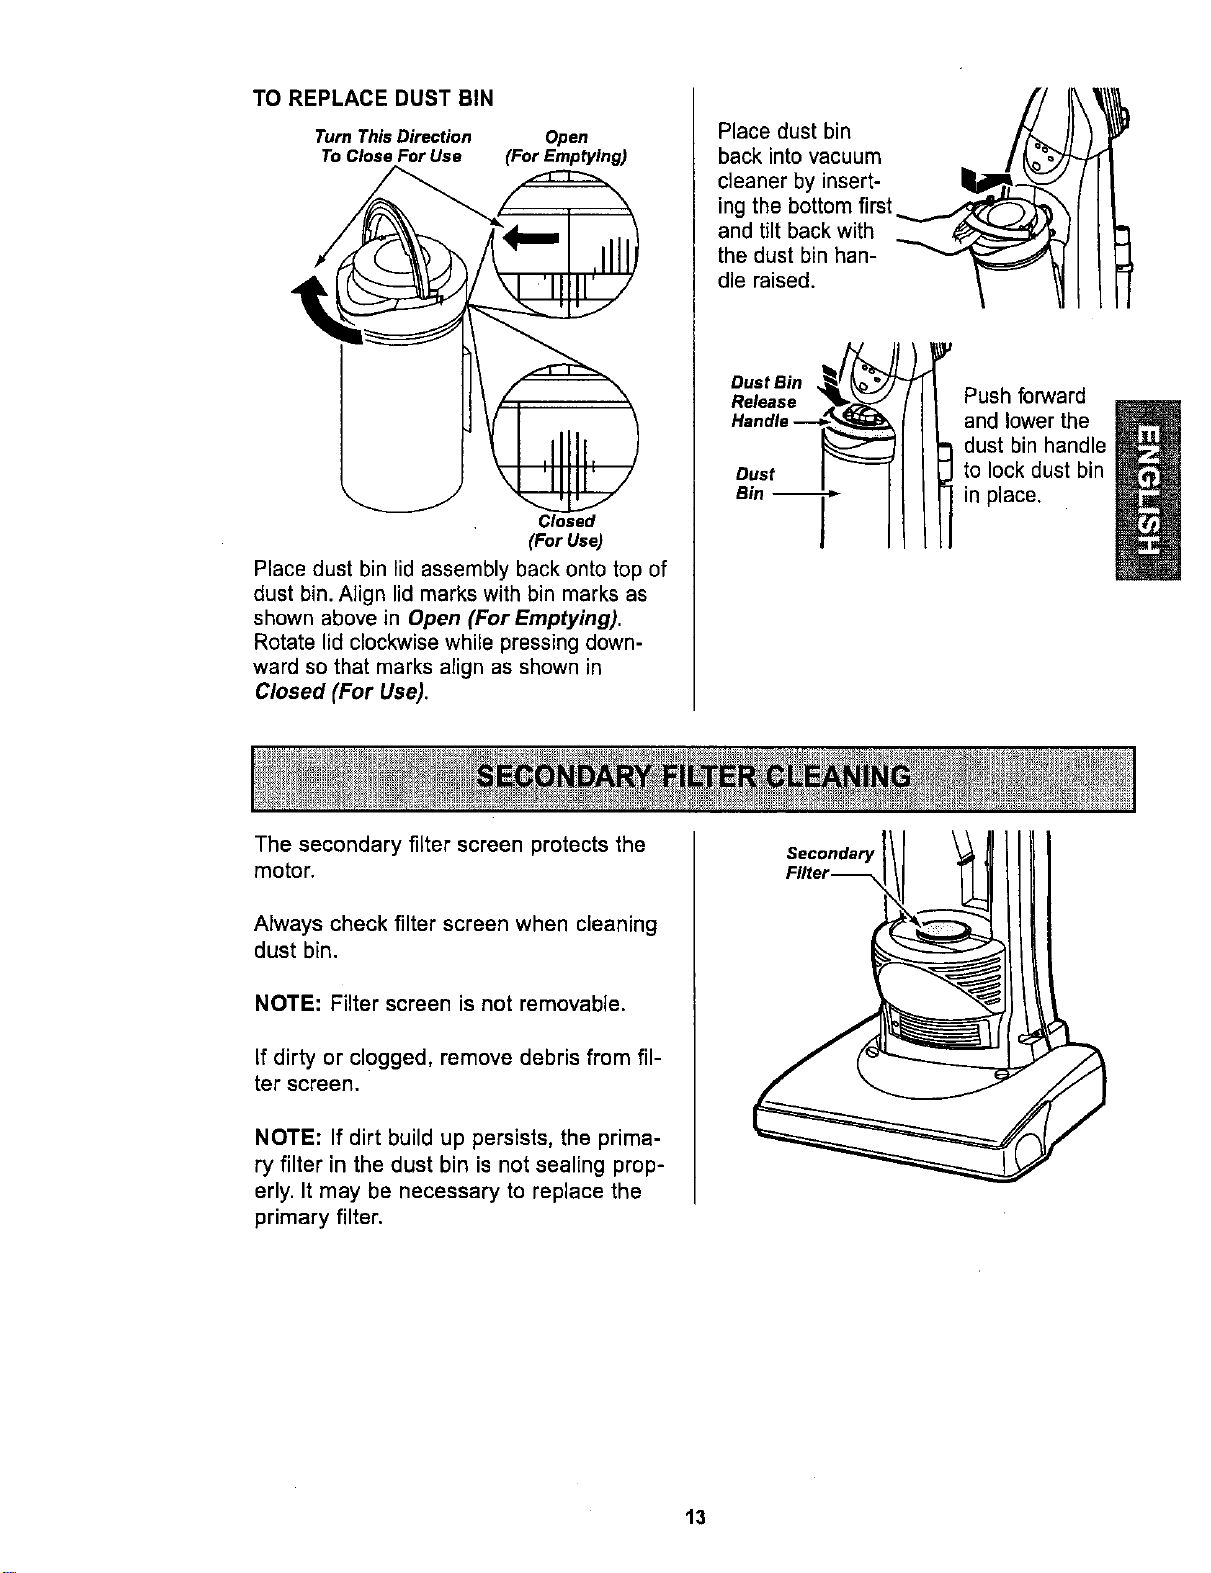
TOREPLACEDUSTBIN
Turn This Direction Open
To Close For Use (For Emptying)
Closed
(For Use)
Place dust bin lid assembly back onto top of
dust bin. Align lid marks with bin marks as
shown above in Open (For Emptying).
Rotate lid clockwise while pressing down-
ward so that marks aEignas shown in
Closed (For Use).
[/
Place dust bin
back into vacuum =/_
cleaner by insert- _1__ _-__
ing the bottom first
and tilt backwith _
the dust bin han-
dle raised.
Dust Bin
Release
Dust
Bin I
Push forward
and lower the
dust bin handle
to lock dust bin
in place,
The secondary filter screen protects the
motor.
Always check filter screen when cleaning
dust bin.
NOTE: Filter screen is not removable.
If dirty or clogged, remove debris from fil-
ter screen,
NOTE: If dirt build up persists, the prima-
ry filter in the dust bin is not sealing prop-
erly. It may be necessary to replace the
primary filter.
Secondary
13
kWARNING
Electrical Shock Hazard
Unplug power cord from electrical out-
let. Do not operate the vacuum clean-
er without the primary or exhaust fil-
ters. Be sure the filters are properly
installed to prevent motor failure
and/or electrical shock.
PRIMARY FILTER
Check primary filter frequently and clean
when dirty.
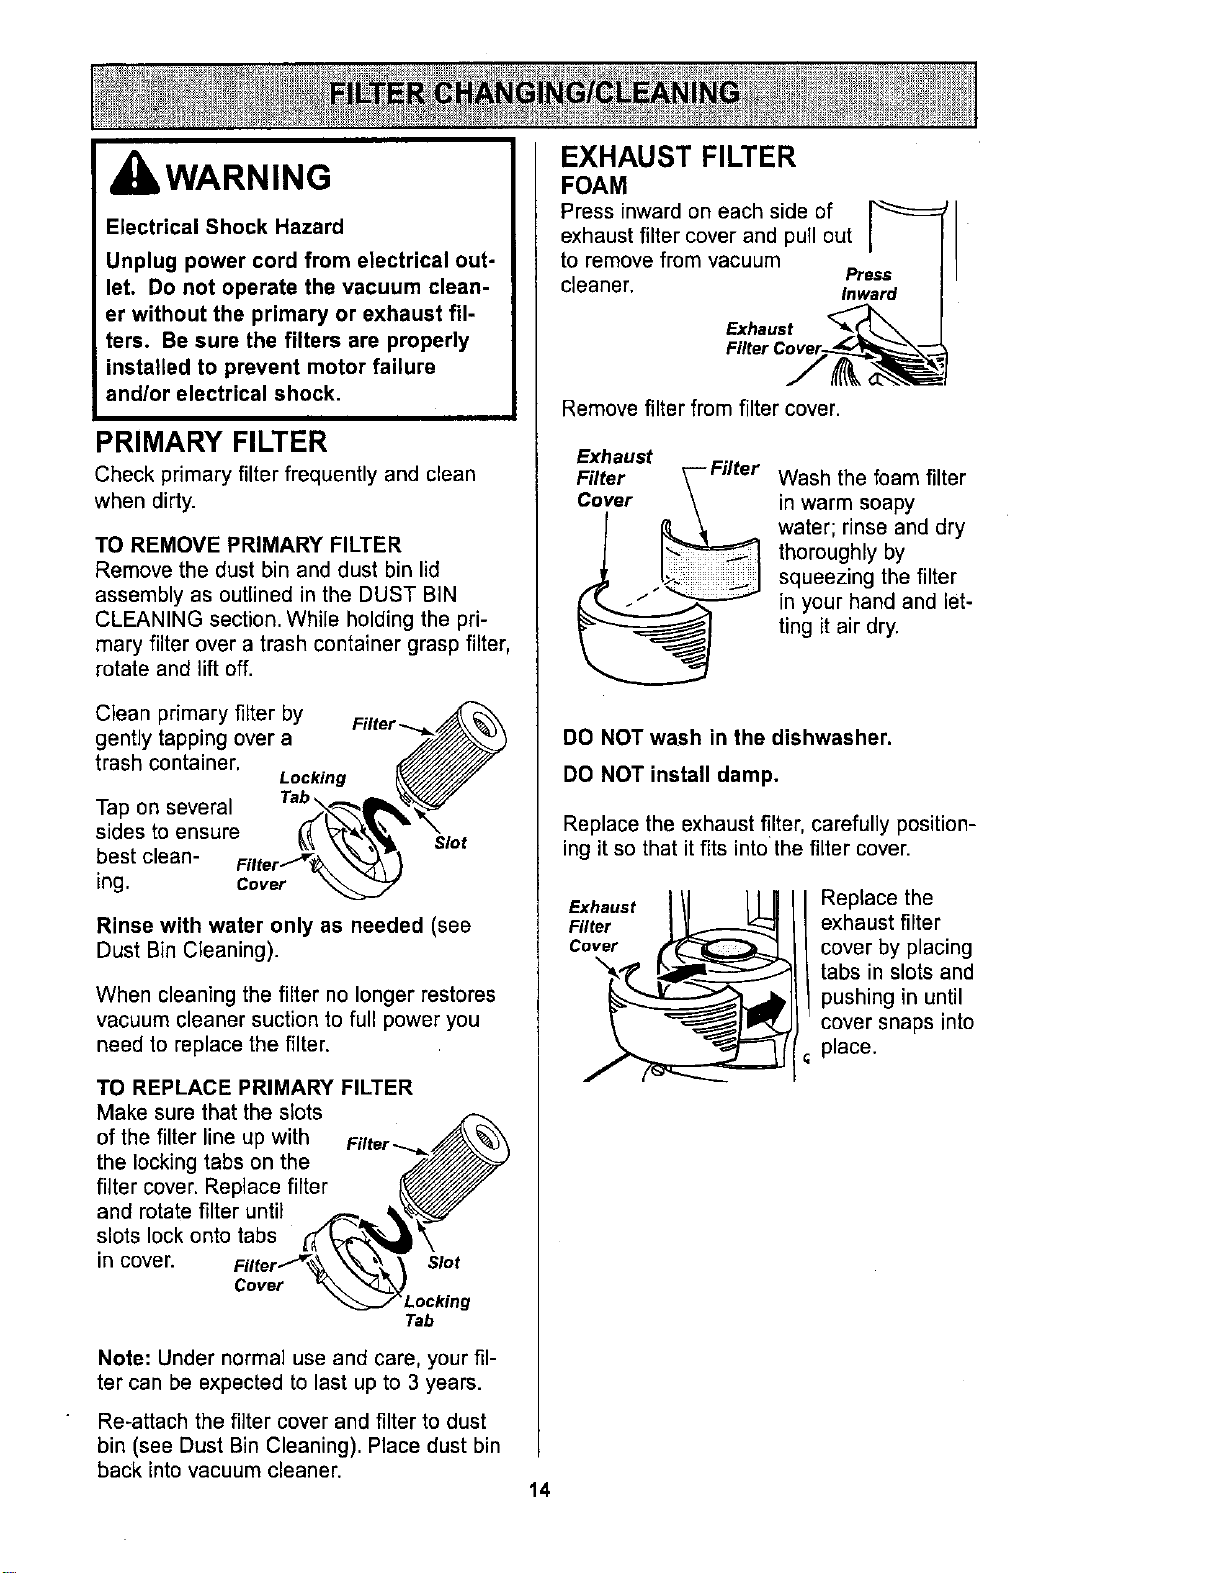
TO REMOVE PRIMARY FILTER
Remove the dust bin and dust bin lid
assembly as outlined in the DUST BIN
CLEANING section. While holding the pri-
mary filter over a trash container grasp filter,
rotate and lift off.
Clean primary filter by
gently tapping over a
trash container.
Locking
Tap on several
sides to ensure
best clean-
ing. Cover
Slot
Rinse with water only as needed (see
Dust Bin Cleaning).
When cleaning the filter no longer restores
vacuum cleaner suction to full power you
need to replace the filter.
TO REPLACE PRIMARY FILTER
Make sure that the slots
of the filter line up with
the locking tabs on the
filter cover. Replace filter
and rotate filter until
slots lock onto tabs
in covet.
Cover
Slot
Tab
Note: Under normal use and care, your fil-
ter can be expected to last up to 3 years.
Re-attach the filter cover and filter to dust
bin (see Dust Bin Cleaning). Place dust bin
back into vacuum cleaner.
EXHAUST FILTER
FOAM
Press inward on each side of
exhaust filter cover and pull out
to remove from vacuum
Press
cleaner. Inward
Exhaust
Remove filter from filter cover.
Exhaust
Filer
Cover
Wash the foam filter
in warm soapy
water; rinse and dry
thoroughly by
squeezing the filter
in your hand and let-
ting it air dry.
DO NOT wash in the dishwasher.
DO NOT install damp.
Replace the exhaust filter, carefully position-
ing it so that it fits into the filter cover.
Exhaust Replace the
Filter exhaust filter
Cover cover by placing
" tabs in slots and
pushing in until
cover snaps into
place.
14
kWARNING
Electrical Shock Or Personal Injury
Hazard
Disconnect electrical supply before
servicing or cleaning the vacuum
cleaner. Failure to do so could result
in electrical shock or personal injury
from vacuum cleaner suddenly start-
ing.
Frequently check and remove hair, string
and lint build-up in the brush area. If build-
up becomes excessive, follow the steps
below. Should the belt become loose or
should it break, follow the Be_t Removal
Instructions.
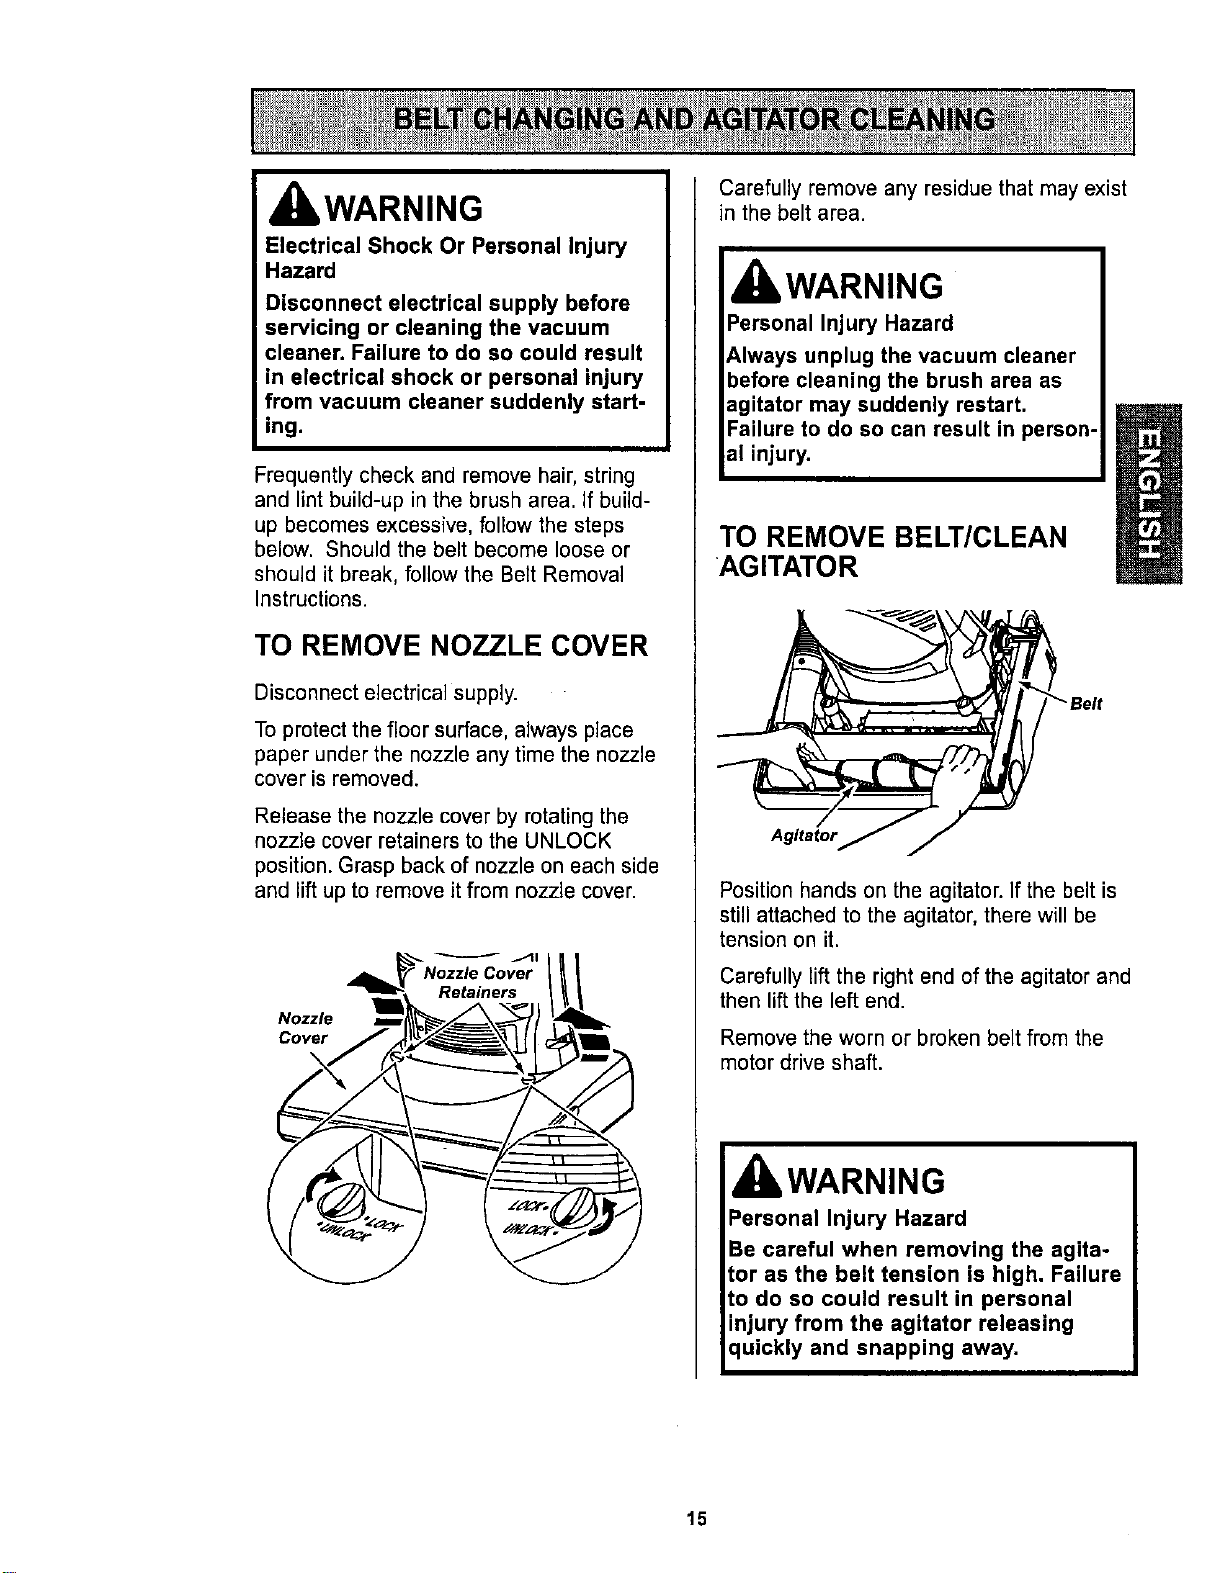
TO REMOVE NOZZLE COVER
Disconnect electrical supply.
To protect the floor surface, always place
paper under the nozzle any time the nozzle
cover is removed.
Release the nozzle cover by rotating the
nozzle cover retainers to the UNLOCK
position. Grasp back of nozzle on each side
and lift up to remove it from nozzle cover.
....-11
Nozzle
Cover
Carefully remove any residue that may exist
in the belt area.
IbWARNING
Personal Injury Hazard
Always unplug the vacuum cleaner
before cleaning the brush area as
agitator may suddenly restart.
Failure to do so can result in person-
al injury.
TO REMOVE BELT/CLEAN
AG ITATOR
Belt
Position hands on the agitator. If the belt is
still attached to the agitator, there will be
tension on it.
Carefully tilt the right end of the agitator and
then lift the left end.
Remove the worn or broken belt from the
motor drive shaft.
, WARNING
Personal Injury Hazard
Be careful when removing the agita-
tor as the belt tension is high, Failure
to do so could result in personal
injury from the agitator releasing
quickly and snapping away.
15
Remove the agitator to check for string and
hair build-up.
NOTE: In order to keep cleaning efficiency
high and to prevent damage to your vacuum
cleaner, the agitator must be cleaned every
time the belt is changed.
The agitator must also be cleaned accord-
ing to the following schedule:
Vacuum Cleaner Use
HEAVY -
(used daily)
MODERATE -
(used 2-3 times/week)
LIGHT -
(used 1time/week)
Clean Agitator
every week
every month
every 2 months
Cap
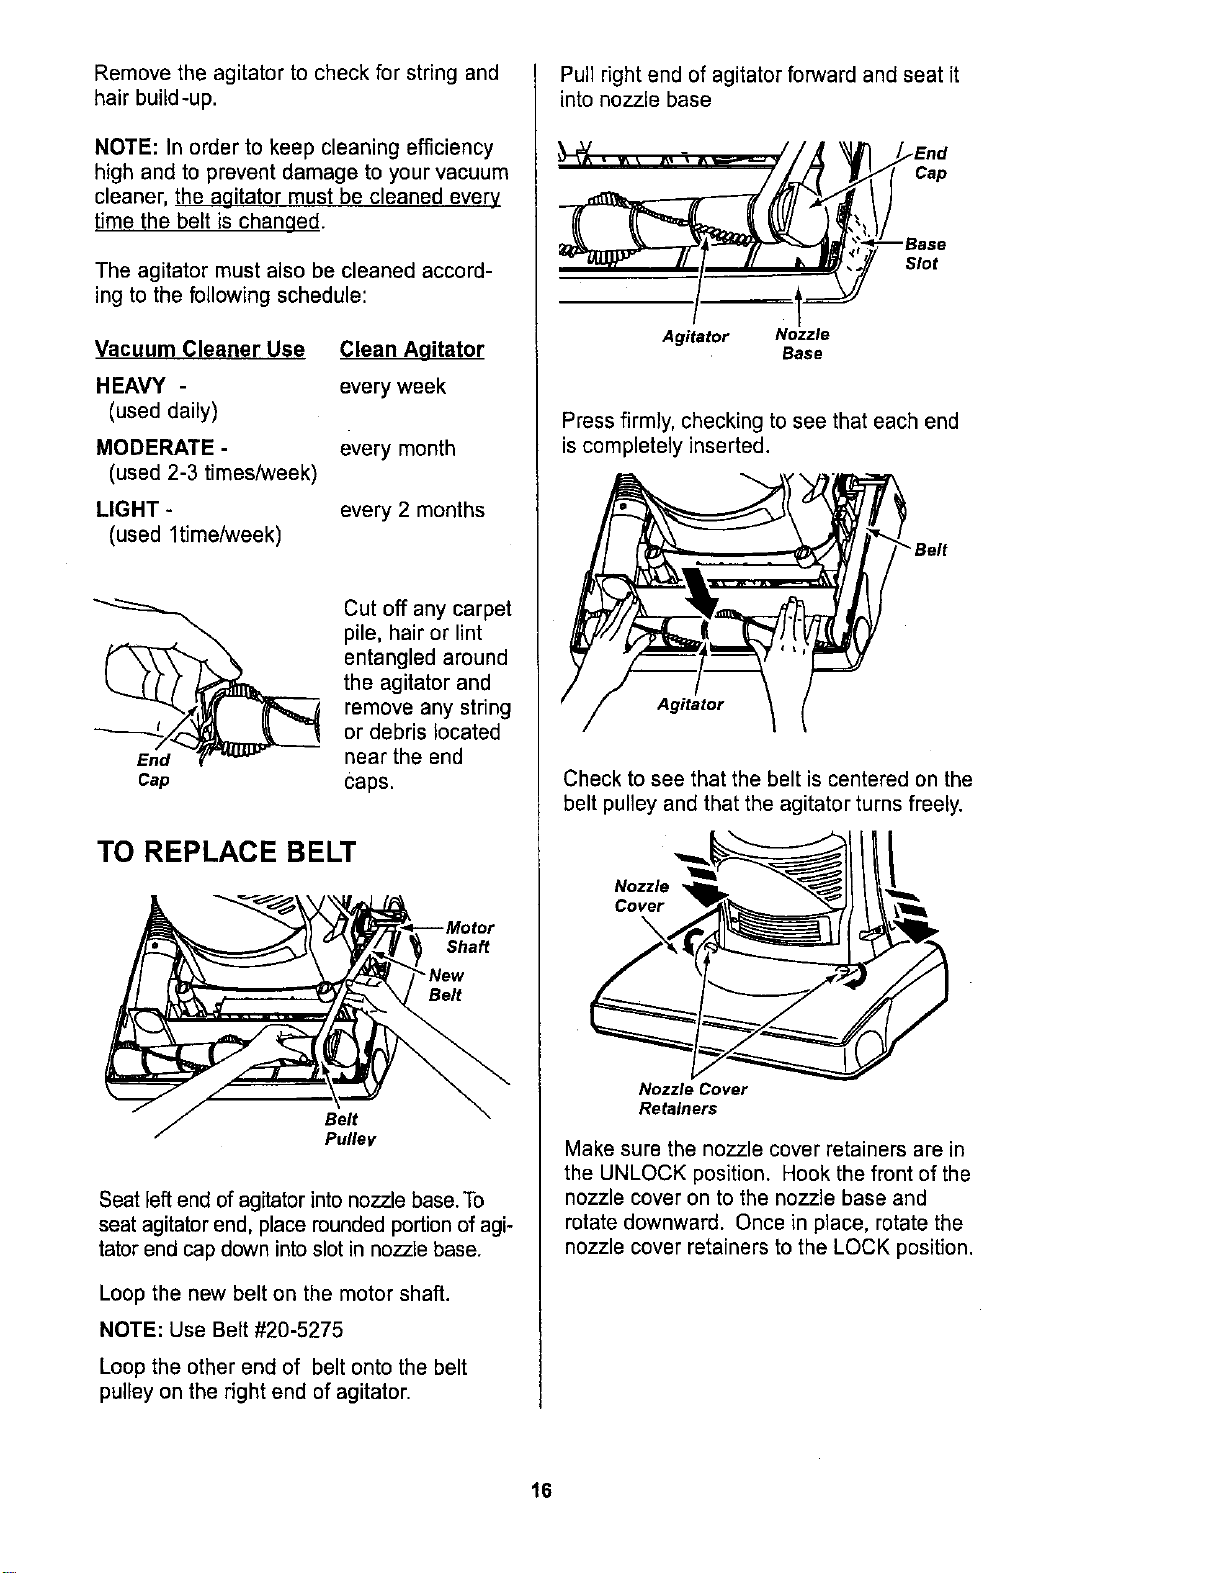
Cut off any carpet
pile, hair or lint
entangled around
the agitator and
remove any string
or debris located
near the end
caps.
TO REPLACE BELT
Sha_
Belt
Belt
Pulley
Seat left end of agitator into nozzle base. To
seat agitator end, place rounded portion of agi-
tator end cap down into slot in nozzle base.
Loop the new belt on the motor shaft.
NOTE: Use Belt #20-5275
Loop the other end of belt onto the belt
pulley on the right end of agitator.
Pull right end of agitator forward and seat it
into nozzle base
Cap
Slot
Agitator Nozzle
Base
Press firmly, checking to see that each end
is completely inserted.
Belt
Agitator
Check to see that the belt is centered on the
belt pulley and that the agitator turns freely.
Nozzle
Cover
\
Nozzle Cover
Retainers
Make sure the nozzle cover retainers are in
the UNLOCK position. Hook the front of the
nozzle cover on to the nozzle base and
rotate downward. Once in place, rotate the
nozzle cover retainers to the LOCK position.
16
ElectricalShockOr PersonalInjury
Hazard
Disconnectelectricalsupply before
servicing or cleaningthevacuum
cleaner.Failureto doso couldresult
in electricalshock or personalinjury
fromvacuumcleanersuddenly
starting.
Always follow all safety precautions when
cleaning and servicing the vacuum cleaner.
If the vacuum cleaner does not seem to
have adequate suction, first check if the
dust bin is full or if a filter is clogged. See
DUST BiN CLEANING and FILTER CLEAN-
ING/CHANGING.
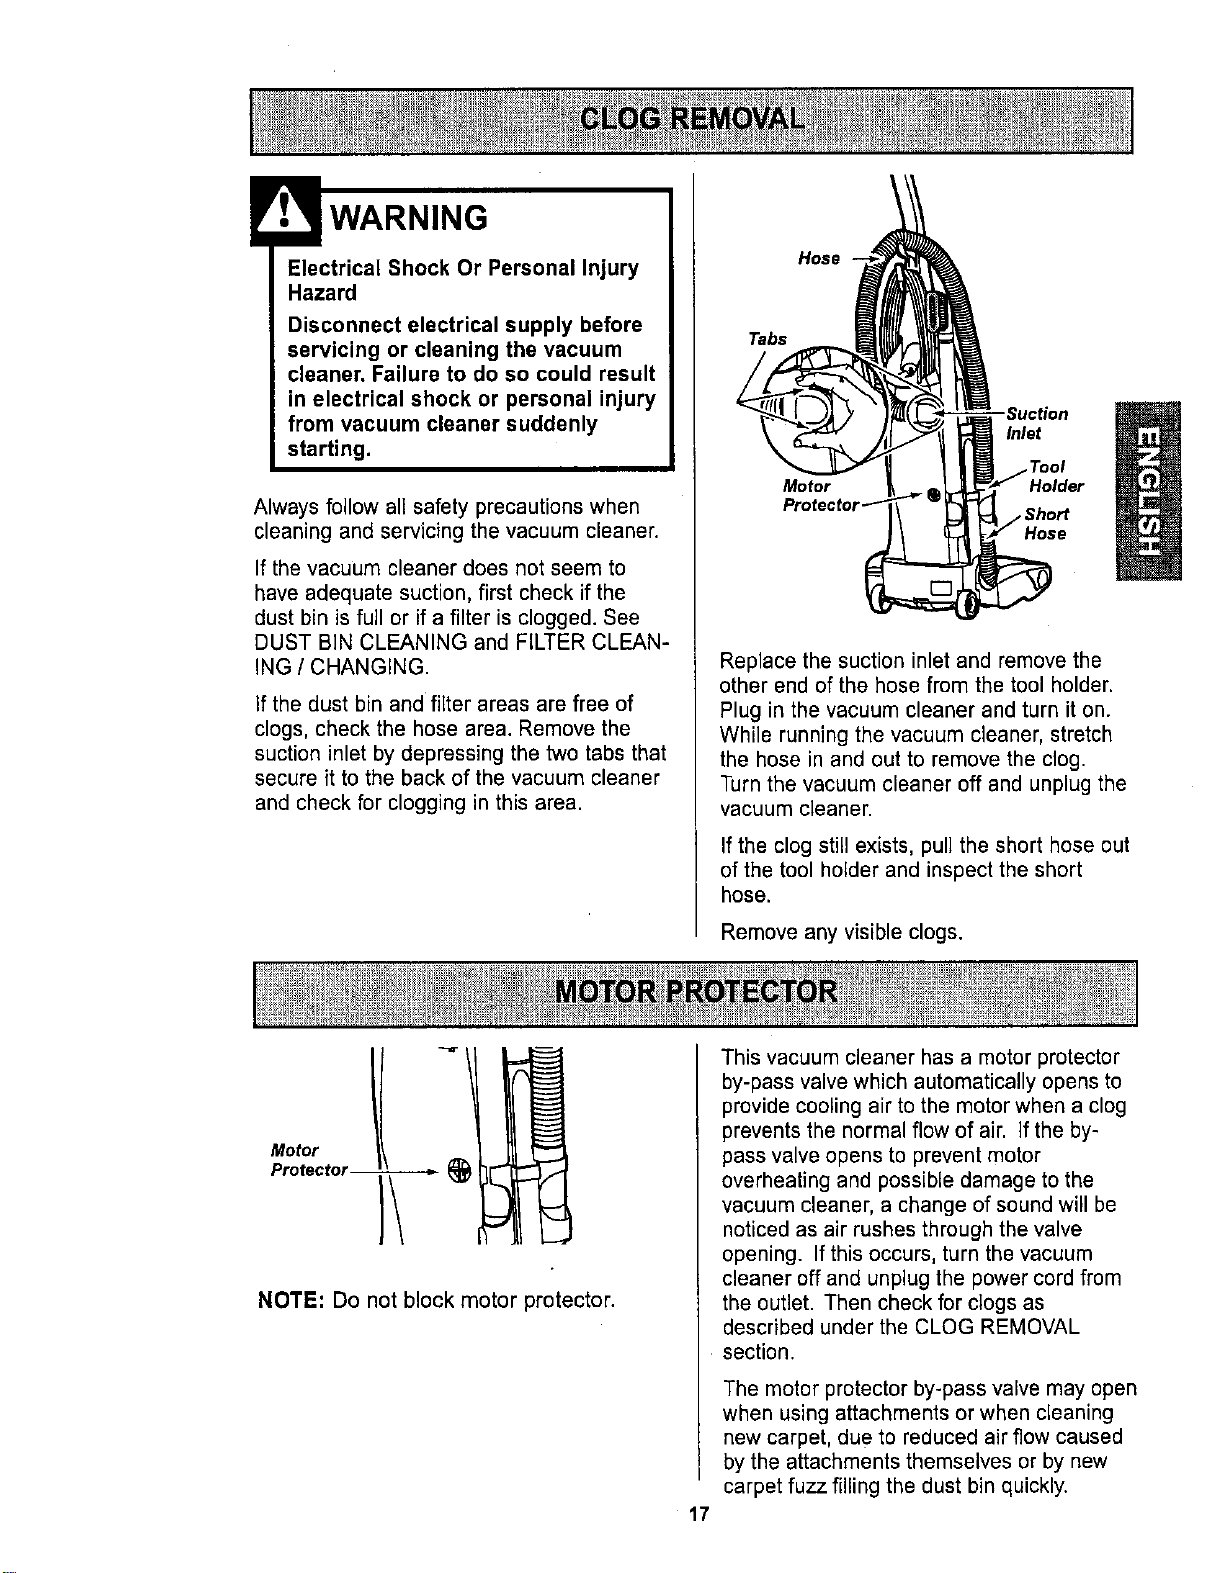
if the dust bin and filter areas are free of
clogs, check the hose area. Remove the
suction inlet by depressing the two tabs that
secure it to the back of the vacuum cleaner
and check for clogging in this area.
Hose
Tabs
Motor
Inlet
Tool
Hose
Replace the suction inlet and remove the
other end of the hose from the tool holder.
Plug in the vacuum cleaner and turn it on.
While running the vacuum cleaner, stretch
the hose in and out to remove the clog.
Turn the vacuum cleaner off and unplug the
vacuum cleaner.
If the clog still exists, pull the short hose out
of the tool holder and inspect the short
hose.
Remove any visible clogs.
MotOrprotector.II _.
NOTE: Do not block motor protector.
17
This vacuum cleaner has a motor protector
by-pass valve which automatically opens to
provide cooling air to the motor when a clog
prevents the normal flow of air. If the by-
pass valve opens to prevent motor
overheating and possible damage to the
vacuum cleaner, a change of sound will be
noticed as air rushes through the valve
opening. If this occurs, turn the vacuum
cleaner off and unplug the power cord from
the outlet. Then check for clogs as
described under the CLOG REMOVAL
section.
The motor protector by-pass valve may open
when using attachments or when cleaning
new carpet, due to reduced air flow caused
by the attachments themselves or by new
carpet fuzz filling the dust bin quickly.
_IbWARNING
Electrical Shock Or Personal Injury
Hazard
Disconnect electrical supply before
performing maintenance to the
vacuum cleaner. Failure to do so
could result in electrical shock or
personal injury from the vacuum
vacuum cleaner suddenly starting.
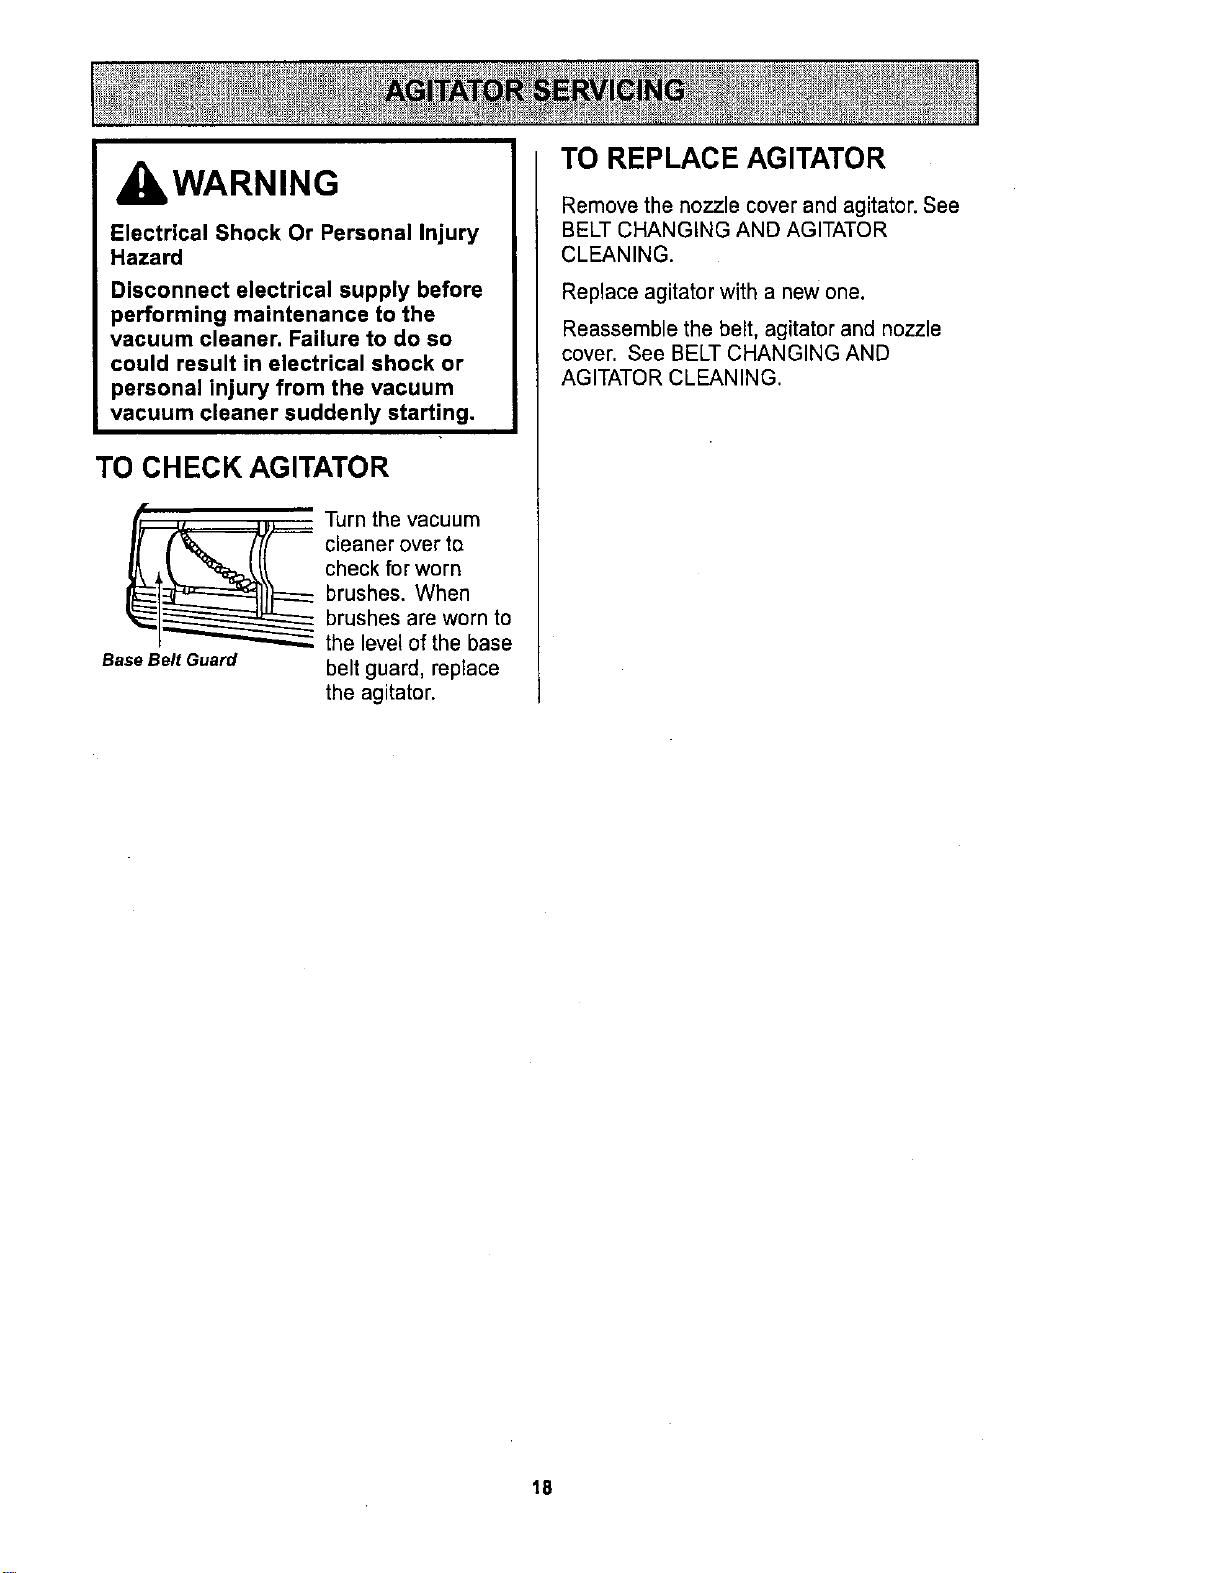
TO CHECK AGITATOR
Turn the vacuum
cleaner over to
check for worn
brushes. When
brushes are worn to
the level of the base
Base Belt Guard belt guard, replace
the agitator.
TO REPLACE AGITATOR
Remove the nozzle cover and agitator. See
BELT CHANGING AND AGITATOR
CLEANING.
Replace agitator with a new one.
Reassemble the belt, agitator and nozzle
cover. See BELT CHANGING AND
AGITATOR CLEANING.
18
kWARNING
Electrical Shock Or Personal Injury
Hazard
Disconnect electrical supply before
performing maintenance to the
vacuum cleaner. Failure to do so
could result in electrical shock or
personal injury from the vacuum
cleaner suddenly starting.
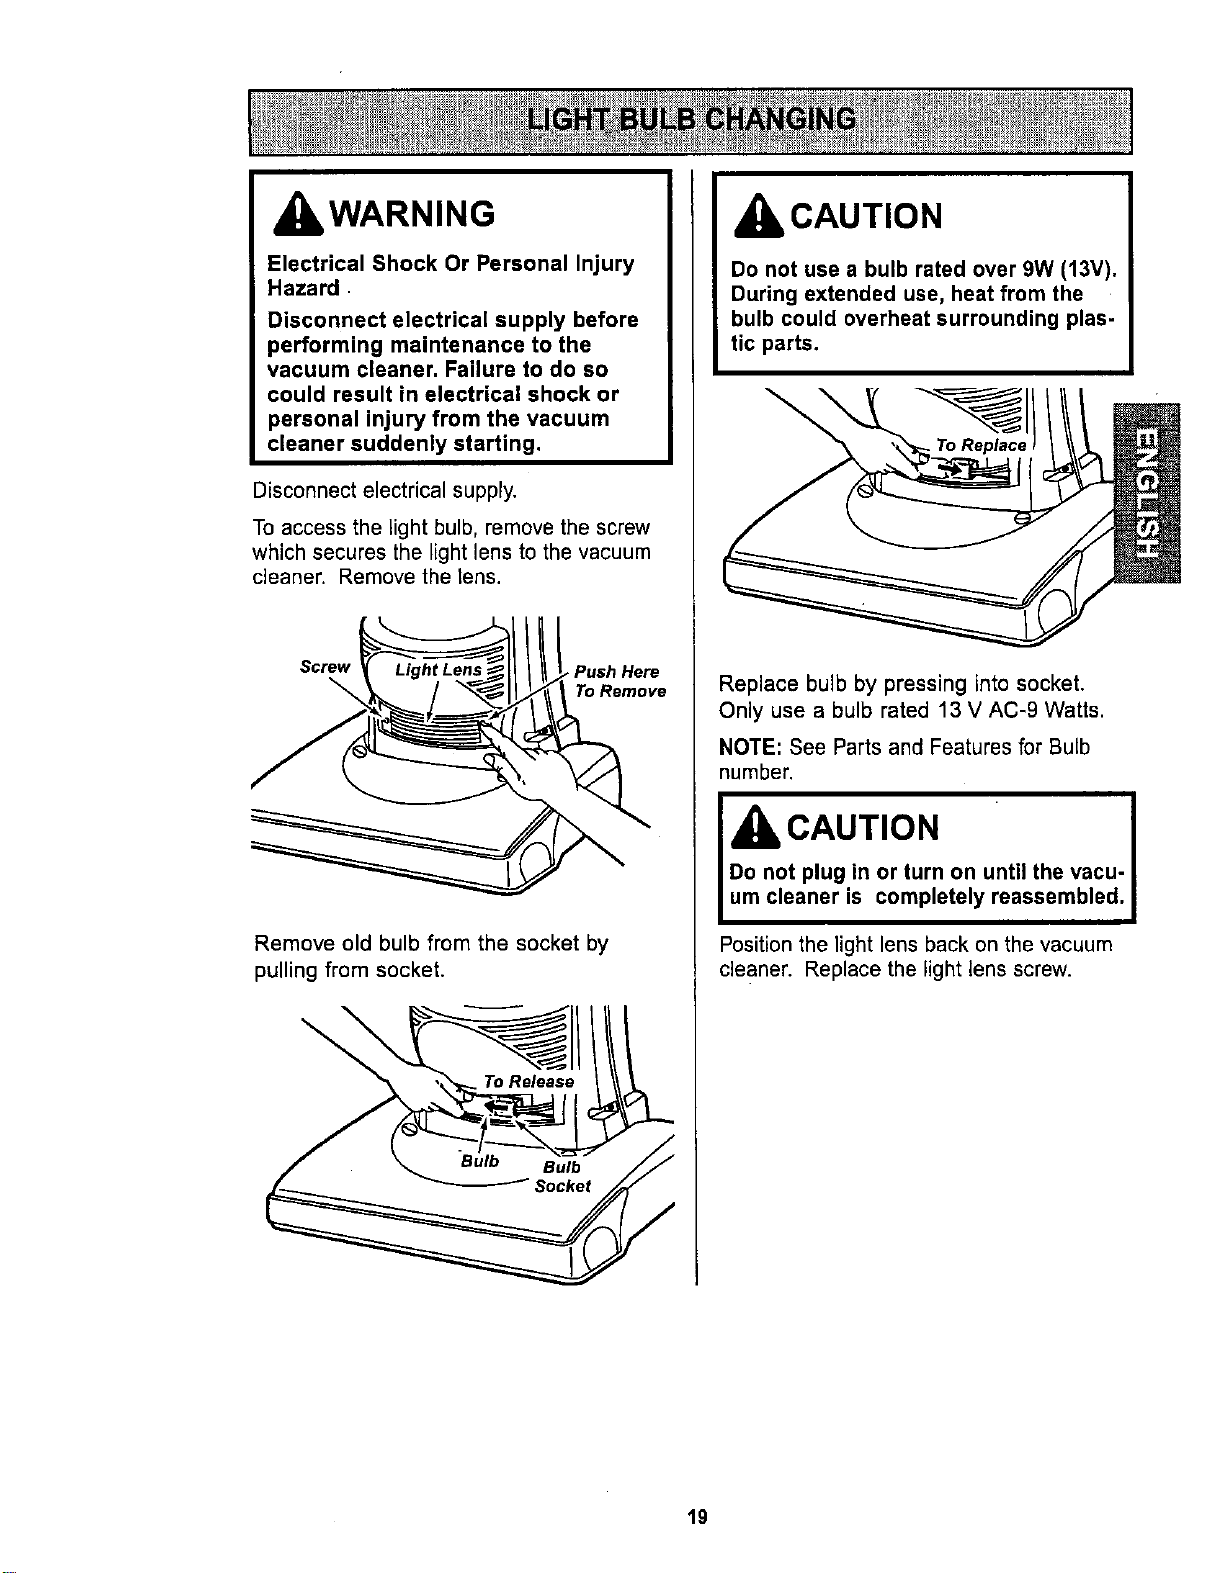
Disconnect electrical supply,
To access the light bulb, remove the screw
which secures the light lens to the vacuum
cleaner. Remove the lens.
Screw , Push Here
To Remove
Remove old bulb from the socket by
pulling from socket.
\
CAUTION
Do not use a bulb rated over 9W (13V).
During extended use, heat from the
bulb could overheat surrounding plas-
tic parts.
Replace bulb by pressing into socket.
Only use a bulb rated 13 V AC-9 Watts.
NOTE: See Parts and Features for Bulb
number.
CAUTION
Position the light lens back on the vacuum
cleaner. Replace the light lens screw.
19
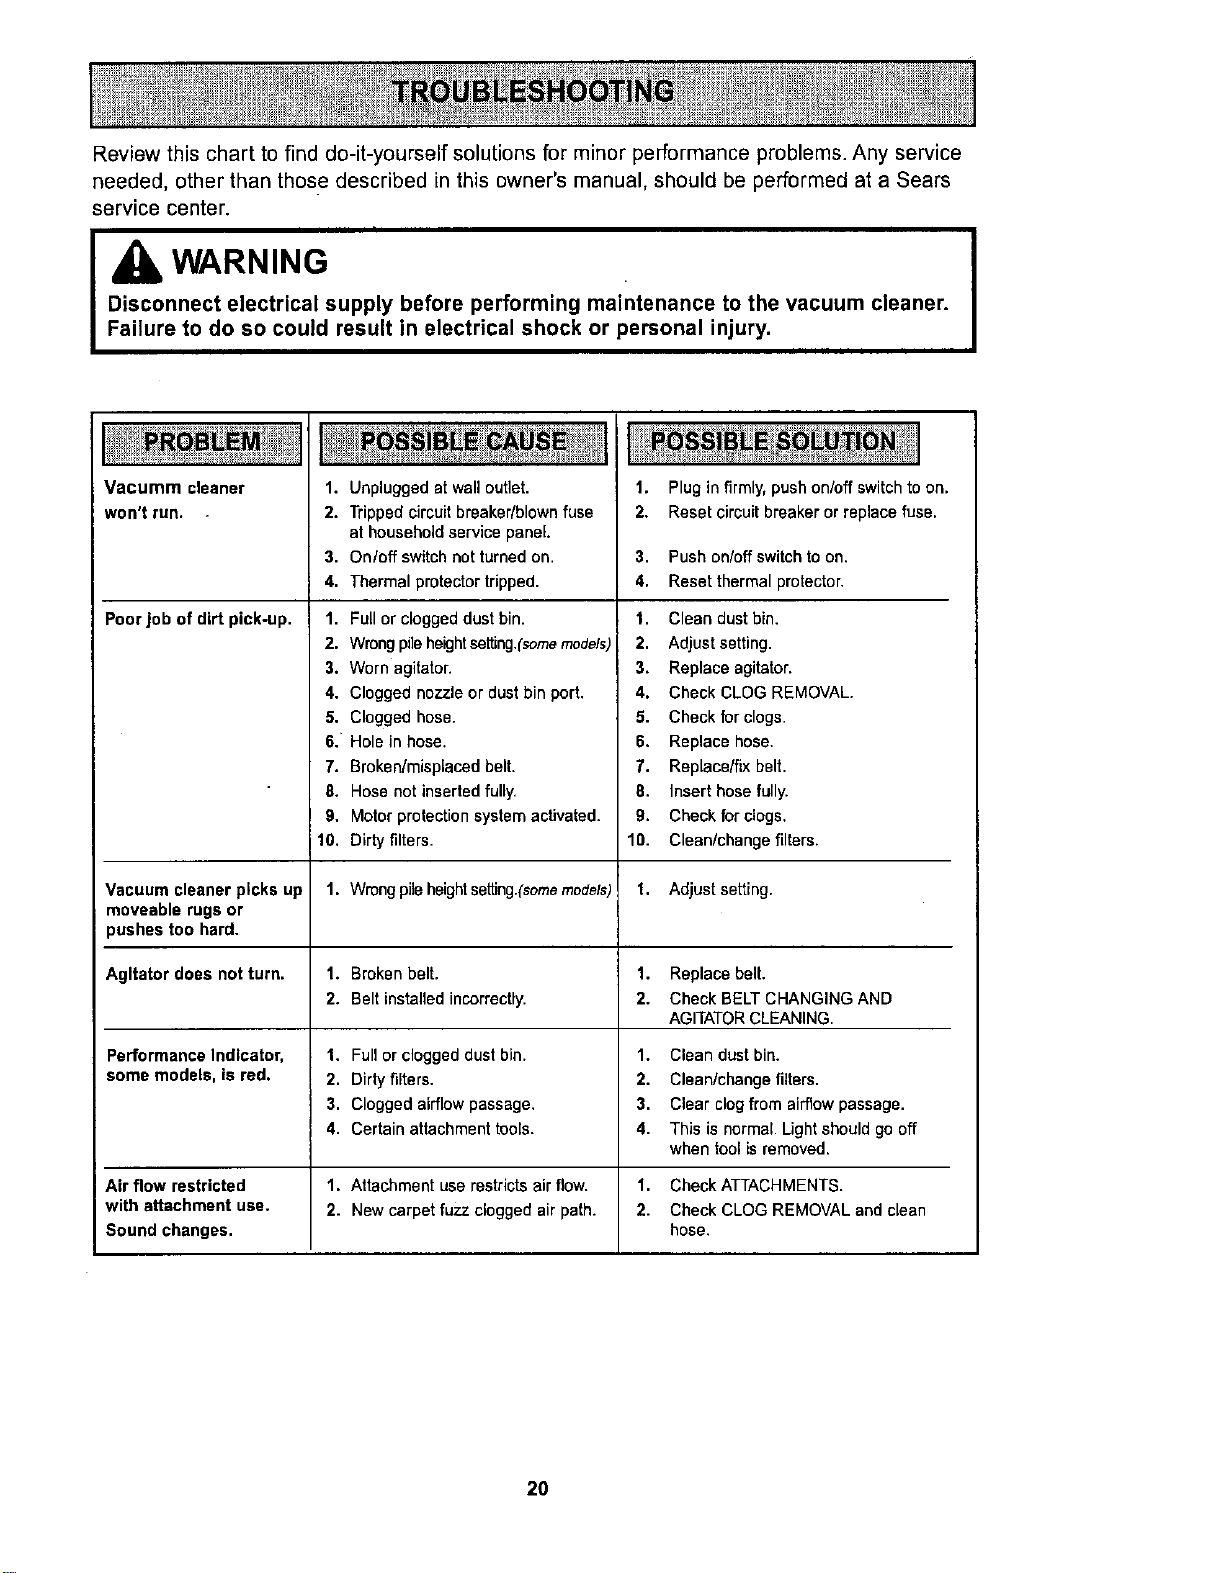
Review this chart to find do-it-yourself solutions for minor performance problems. Any service
needed, other than those described in this owner's manual, should be performed at a Sears
service center.
I
IbWARNING
Disconnect electrical supply before performing maintenance to the vacuum cleaner.
Failure to do so could result in electrical shock or personal injury.
Vacumm cleaner
won'trun.
Poor job of dirt pick-up.
1. Unpluggedat walloutlet.
2. Tripped circuit breaker/blown fuse
at household service panel.
3. On/off switch not turned on.
4. Thermal protector tripped.
1. Full or clogged dust bin.
2. Wrongpileheightse_ng,(somemodels)I
I
3. Worn agitator.
4. Clogged nozzle or dust bin port.
5. Clogged hose.
6. Hole in hose.
7. Broken/misplaced belt.
8, Hose not inserted fully,
9, Motor protection system activated.
10. Dirty filters.
1. Plug infirmly, push on/off switch to on.
2. Reset circuit breaker or replace fuss.
3. Push on/off switchtoon.
4. Reset thermal protector,
1. Clean dust bin,
2. Adjust setting.
3. Replace agitator.
4. Check CLOG REMOVAL.
5. Check for clogs.
6. Replaca hose.
7. Replace/fix belt.
8. Insert hose fully.
9. Check for clogs.
10. Clean/change filters.
Vacuum cleaner picks up 1. Wrongpileheightsetting.(somemodels t. Adjust setting.
moveable rugs or
pushes too hard.
Agitator does not turn. 1. Brokenbelt. 1. Replacebelt.
2. Belt installedincormcfiy. 2. Check BELT CHANGING AND
AGITATORCLEANING.
Performance Indicator, 1. Fullor cloggeddustbin. 1. Clean dustbin.
some models, is red. 2. Dirtyfilters. 2. Clean/change filters.
3. Cloggedairflowpassage. 3. Clear clogfrom airflowpassage.
4. Certain attachmenttools. 4. This isnormal.Lightshouldgooff
when toolis removed.
Air flow restricted 1. Attachment use restricts air flow. 1. Check ATTACHMENTS.
with attachment use. 2. New carpetfuzz cloggedair path. 2. Check CLOG REMOVALand clean
Sound changes, hose.
2O
21
22
Antes de usar su aspiradora nueva ..... 1
Garantia de la aspiradora de Kenmore... 1
Instrucciones importantes de
seguridad ............................ 2
Piezas y caracteristicas ................ 3
Instrucciones de ensamble ........... 4-5
Instrucciones de operacibn ............. 6
Desprendimiento del mango .............. 7
Interruptorde encendido/apagado......... 7
Accesorios ......................... 8-9
Cuadro de usodelosaccesorios.......... 9
Sugerencias para aspirar ................ 9
Caracteristicas de rendimiento........... 10
Cuidado de la aspiradora .............. 11
Almacenamiento de laaspiradora ........ 11
Limpiezadel exteriory de losaccesorios ... 11
Limpiandoelcubode la basura........ 12-13
Limpiezadel filtro secundario ........... 13
Cambio/limpiezadel filtros ............. 14
Cambie de la correay limpiezadel
egitador ......................... 15-16
C6moeliminar]us residuosde basura
enloscenductos..................... 17
Protectorde motor .................... 17
Cuidadodelagitador .................. 18
Cambie labombilla .................... 19
Reconocimiento de problemas ......... 20
Notes ................................. 21
Porfavor lea estaguia que le ayudaraa assemblary operar su aspiradoranuevade Kenmoreenuna manera
m_s seguray effectiva.
Para mas informaci6nacercadel cuidado y operaci6ndeesta aspirador,Ilameasu tienda Sears mas cercana.
Cuando prequnteporinformaci6nusted necisitar_ el n_merocompleto de serie y modelode la aspiradoraque
est_ Iocado en laplaca de los nemerosde modelo y serie.
Use elespacio de abajopara registrar el n_merode modelo y serie pare sunuevaaspiradorade Kenmore.
N,_merode Modelo
NI]mero de Serie
Fecha de Compra
Matenga este libro y su reciboen u lugar seguro para referenciasfuturas.
GARANTiA LIMITADADEUN A_IO DE LAASPIRADORA KENMORE
Esta garantiaes potunargodesde lafecha de compra,e ineluyesolamenteel usede la aspiradoraen
hogaresprivados.Duranteelafiodegarantia,cuandolaaspiradoraesoperaday mantenidadeecuerdoal
manualde instruccionesdel duefie,Searsrepararacualquierdefectoen materialesofabricaciSnlibrede
cargo.
Estagarantiaexcluyelas bolsasde coleceibn,correas,lamparil]as,y filtros, lascualessonpartesgastables
que se deterioranconel usanormal.
Parael servicio de garantia,retorne esta aspiradora alCentro de Servicio Searsmbs cercanoen los
Estados Unidos.
Esta garantiase aplica solamentemientraseste producto est&en usoen los EstadosUnidos.Esta garantia
le da a usted derachos legalesespecificos, y usted puede tenet tambi_n otros derechos los cualesvarian de
estado a estado.
Sears, Roebuckand Co., D/617WA,HoffmanEstates, IL 60179
IADVERTENCIA
Suseguridades muyimportanteparanosotres.Para
reducirelriesgode incendio,choqueeldctdco,lesibncor-
poralodaSosalutilizarsuaspiradora,activedeacuerdo
conprecaucionesb_sicasdeseguridad,entreelias:
Lea todas las instrucciones en este manual
antesde armar o usar suaspiradora.
Use su aspiradora solamente come se describe
en este manual. Use aolameate con accesorios
Sears recomendados.
Desconecte la provisi6n de electricidad antes
de hacer el servicio o limpiar el area del cepillo.
La falla de hacer esto puede resultar en choque
el_ctricoo en el sl3bitoarranque del cepillo.
No deje la aspiradora cuando est_ enchufada.
Desenchufe del temacorriente cuando no est_
en usa y antes de hacer el servicio.
Pare reducir el riesgo de choque el6ctrico- No
la use afuera o sabre superficies mojadas.
No permita que se la usa coma un jugueta. Gran
atenci6n as necesaria cuando es usada par a
cerca de nifios.
No la use con un cord6n o ficha dafiados. Si la
aspiradora no trabaja coma debe, se la ha
dejado caer, dafiado, dejada afuera, o volteada
en el agua, ret6rnela a un Centro de Servicio
Sears.
No la tire o arrastre del cord6n, use el cord6n
coma una manija, cierre una puerta sabre el
cord6n, a tire del cord6n alrededor de bordes
afilados o esquinas. No pase la aspiradora sabre
el cord6n. Mantenga el cord6n lejos de
superficies calientes.
No la desenchufe tirando del cord6n. Para
desenchufar, tome la ficha, no el cord6n.
No tome la ficha o la aspiradora con las manos
mojadas.
No ponga ningL_nobjeto en las aberturas.
No la use con ninguna abertura bloqueada;
mant*_ngala libre de polvo, hilachas, pelo, y
cualquier cosa que pueda reducir la circulaci6n
de aire.
Mantenga los cabellos, ropas sueltas, dedos, y
todas las partes del cuerpo lejos de aberturas y
partes movibles.
Apague todos los controles antes de
desenchufar.
GUARDE ESTAS
Use cuidado extra cuando limpie escaleras. No
la ponga sabre sillas, mesas, etc: Mant6ngala
sabre el piso.
No use la aspiradora, para levantar liquidos
inflamables o combustibles (gasolina, fluido de
limpiar, perfumes, etc.), o use en _reas donde
puedan estar presentes. Los vapores de estas
substancias pueden crear un peligro de incendio
o explosi6n.
No levante nada qua est6 ardiendo o echando
humo, tal coma cigarrilos, f6sforos, o cenizas
calientes.
No use la aspiradora sin la balsa para el polvo
y/o filtros en su lugar.
Siempre cambie la balsa del polvo despu_s
de levantar limpiadoras de alfombras o
refrescantes, polvos, y polvo fino. Estos
productos atascan la balsa, reducen la
circulaci6n de aire y pueden causar que reviente
la balsa. La falla de cambiar la balsa puede
causar dafio permaneate a la aspiradora.
No use la aspiradora para levantar objetos
duros y afilados, pequenos juguetes, alfileras,
sujetapapeles, etc. Elias pueden dafiar la
aspiradora o la balsa del polvo.
No opera la aspiradora sin la puerta de acceso
a la correa propiamente instalada (si es
aplicable).
Desenchufe antes de conectar el Handi-mate
Jr.(si es aplicable).
Uatad es responsablepar estar seguro de qua
su aspiradora no es usada par alguien incapaz
de operada correctamente.
NSTRUCCIONES
Elarmaday usasegurode suaspiradora sonsu responsabilidad.Esta aspiradoraha side disefiada
exclusivamenteparause dom6stico.La aspiradoradeber_ almacenarseen un lugarseco yen el interior.Lea
este Manual del propietario detenidamente,puas contiene informaci6nimportantasabra seguridady usa.
Esta guia contiene informaci6n sabreseguridad debajo de simbolosde advertienciao cuidado.
2
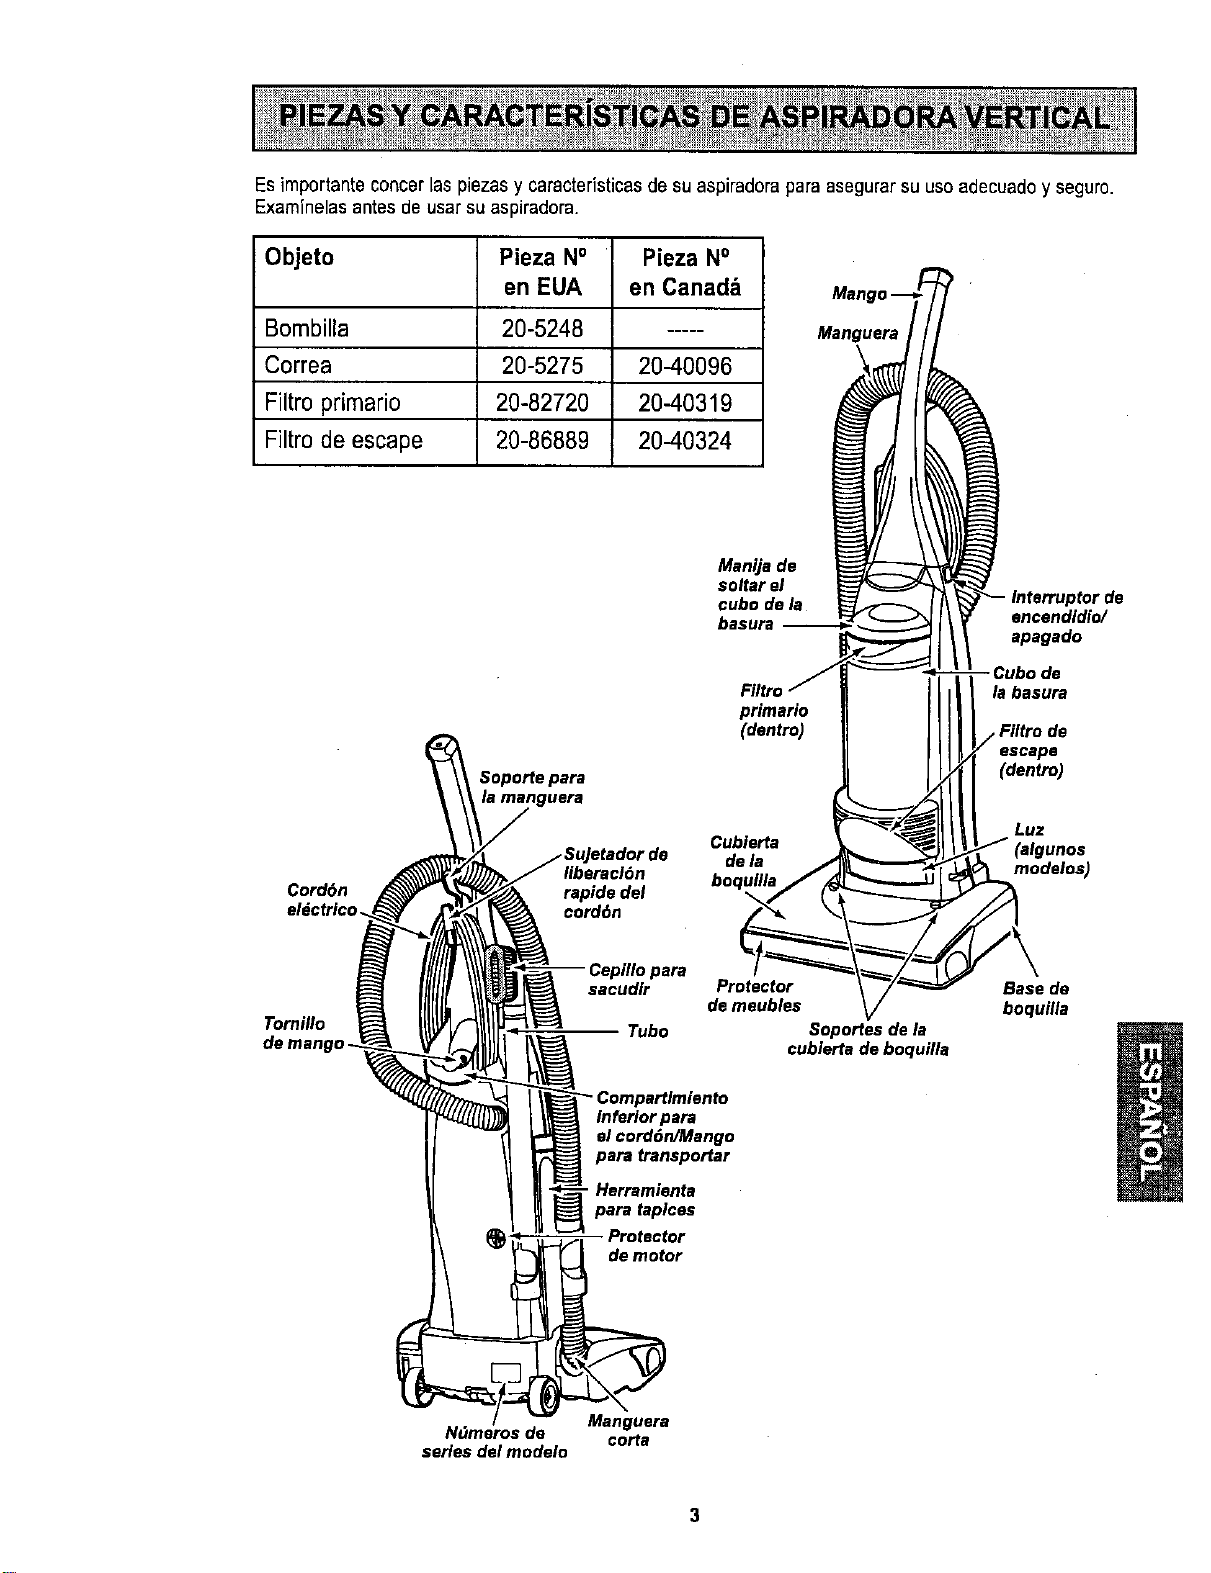
Es importante concerlas piezasy caracteristicasde su aspiradorapara asegurar su uso adecuadoy seguro.
Examinelas antes de usarsu aspiradora.
Objeto Pieza No Pieza No
en EUA en Canad_
Bombilla 20-5248 .....
Correa 20-5275 20-40096
Filtro primario 20-82720 20-40319
Filtro de escape 20-86889 20-40324
Manguera
Ccrd6n
el_ctri¢o.
Soporte para
uera
liberac/6n
rapide del
oord6n
Manija de
soltar el
cubo de la
primario
(dentro)
Cubierta
dela
boqullla
encendldio/
apagado
-Cubode
basura
escape
(dentro)
Luz
_unos
modelos
Tornillo
de mango-
para
sacudlr
Tubo
Protector
de meubles
Soportes de la
cublerta de boquilla
Base de
boquilla
InfeHor para
el cord6n/Mango
para transportar
Herramianta
pare taplces
Protector
de motor
Manguera
co_a
series del mode_
3
I
A
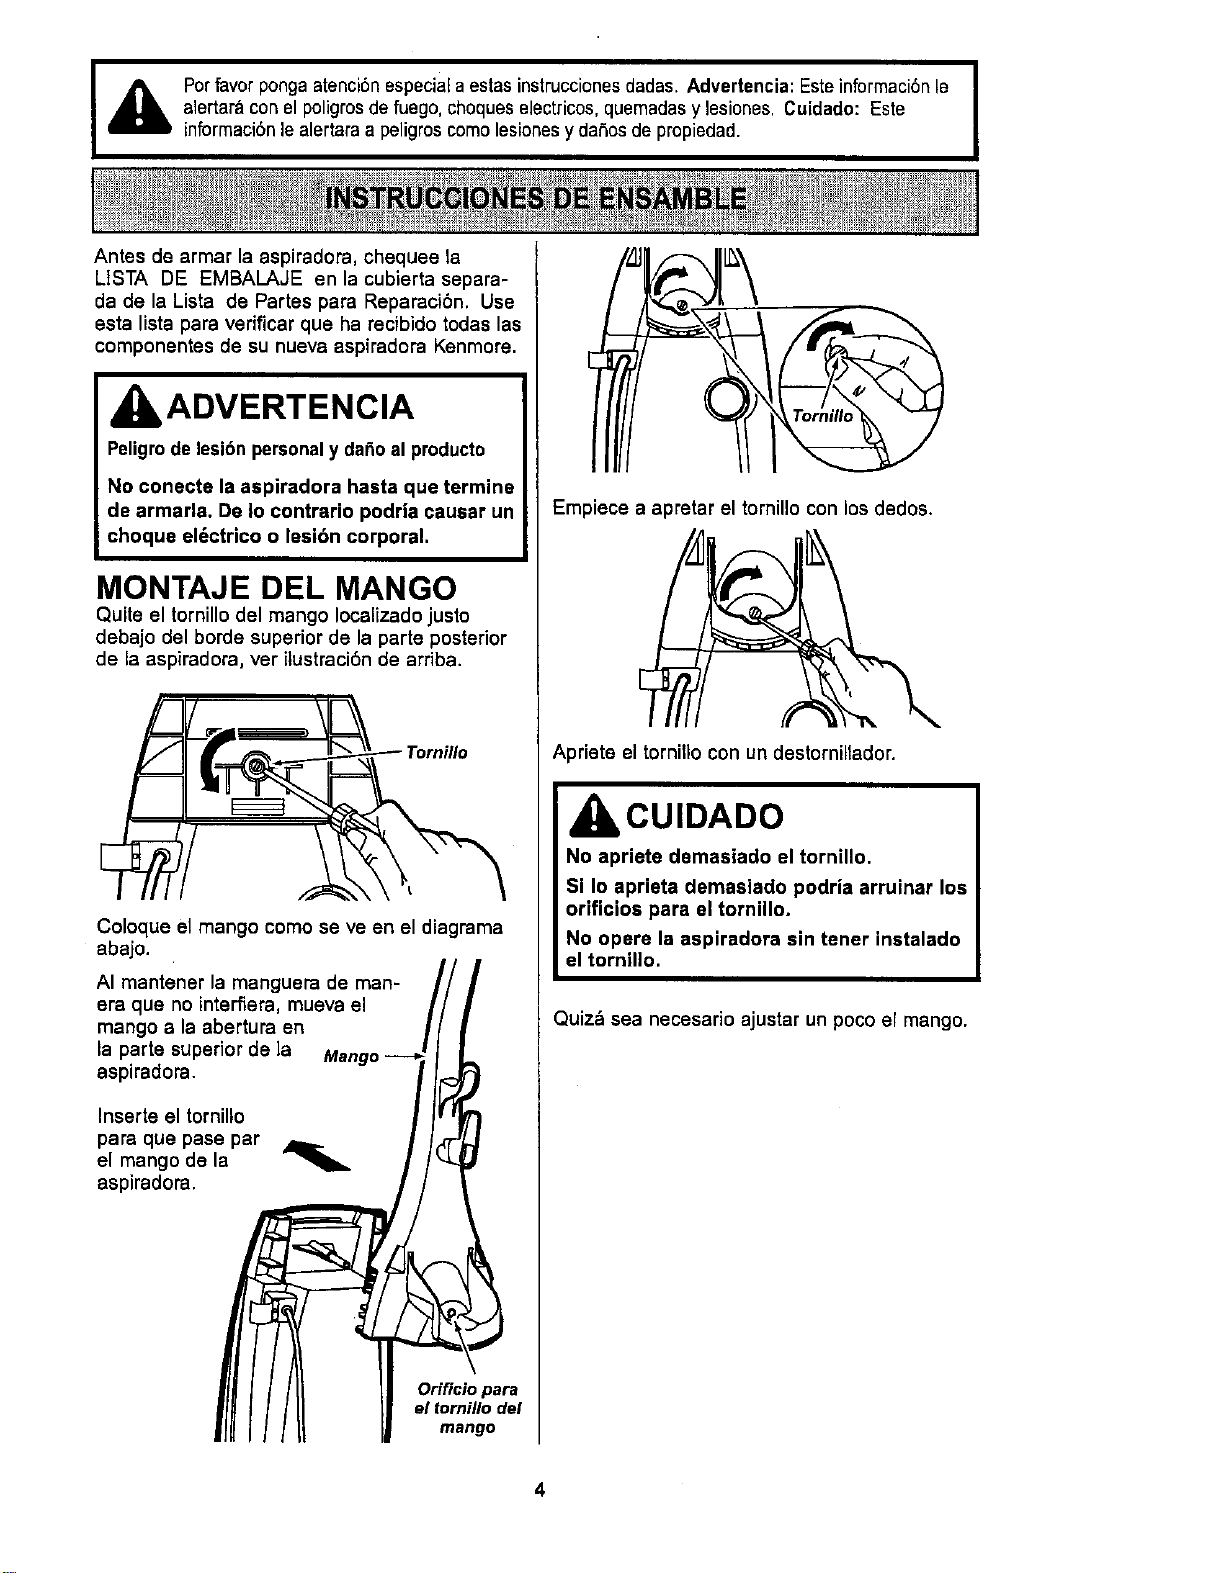
Porfavorponga atenci6n especiala estas instruccionesdadas. Advertencia:Este informaci6nle
alertara con el poligrosde fuego, choqueselectricos, quemadasy lesiones.Cuidado: Este
informaci6nle alertara a peligroscomo lesiones y daSosde propiedad.
I
Antes de armar la aspiradora, chequee la
LtSTA DE EMBALAJE en la cubierta separa-
da de la Lista de Partes para Reparaci6n. Use
esta lista para verificar que ha recibido todas las
componentes de su nueva aspiradora Kenmore.
IbADVERTENCIA
Peligrode lesibn personaly dafioal producto
No conecte la aspiradora hasta qua termine
de armada. De Io contrario podria cauaar un
choque el_ctrico o lesibn corporal.
MONTAJE DEL MANGO
Quite el tornillodel mango Iocalizado justo
debajo del borde superior de la parte posterior
de la aspiradora, ver ilustraci6n de arriba.
! \
Coloque el mango como seve en el diagrama
abajo.
,1'/
AI mantener la manguera de man- ///
era que no interfiera, mueva el //n
mango a la abertura en I/ _
la parte superior de la Mango _lf--_|
asp,radora. //_
Inserte el tornillo r Ir fit_
para que pase par _ /,_t-'_
el mango de la r _ /
i Orificio para
I| el tornillo del
I| mango
Empiece a apretar el tornillo con los dedos.
Apriete el tornillo con un destornillador.
CUIDADO
No apriete demaslado el tornillo.
Si Io aprieta demasiado podria arruinar los
orificios para el tornillo.
No opere la aspiradora sin tener instalado
el tornillo.
Quiz_l sea necesario ajustar un poco el mango.
4
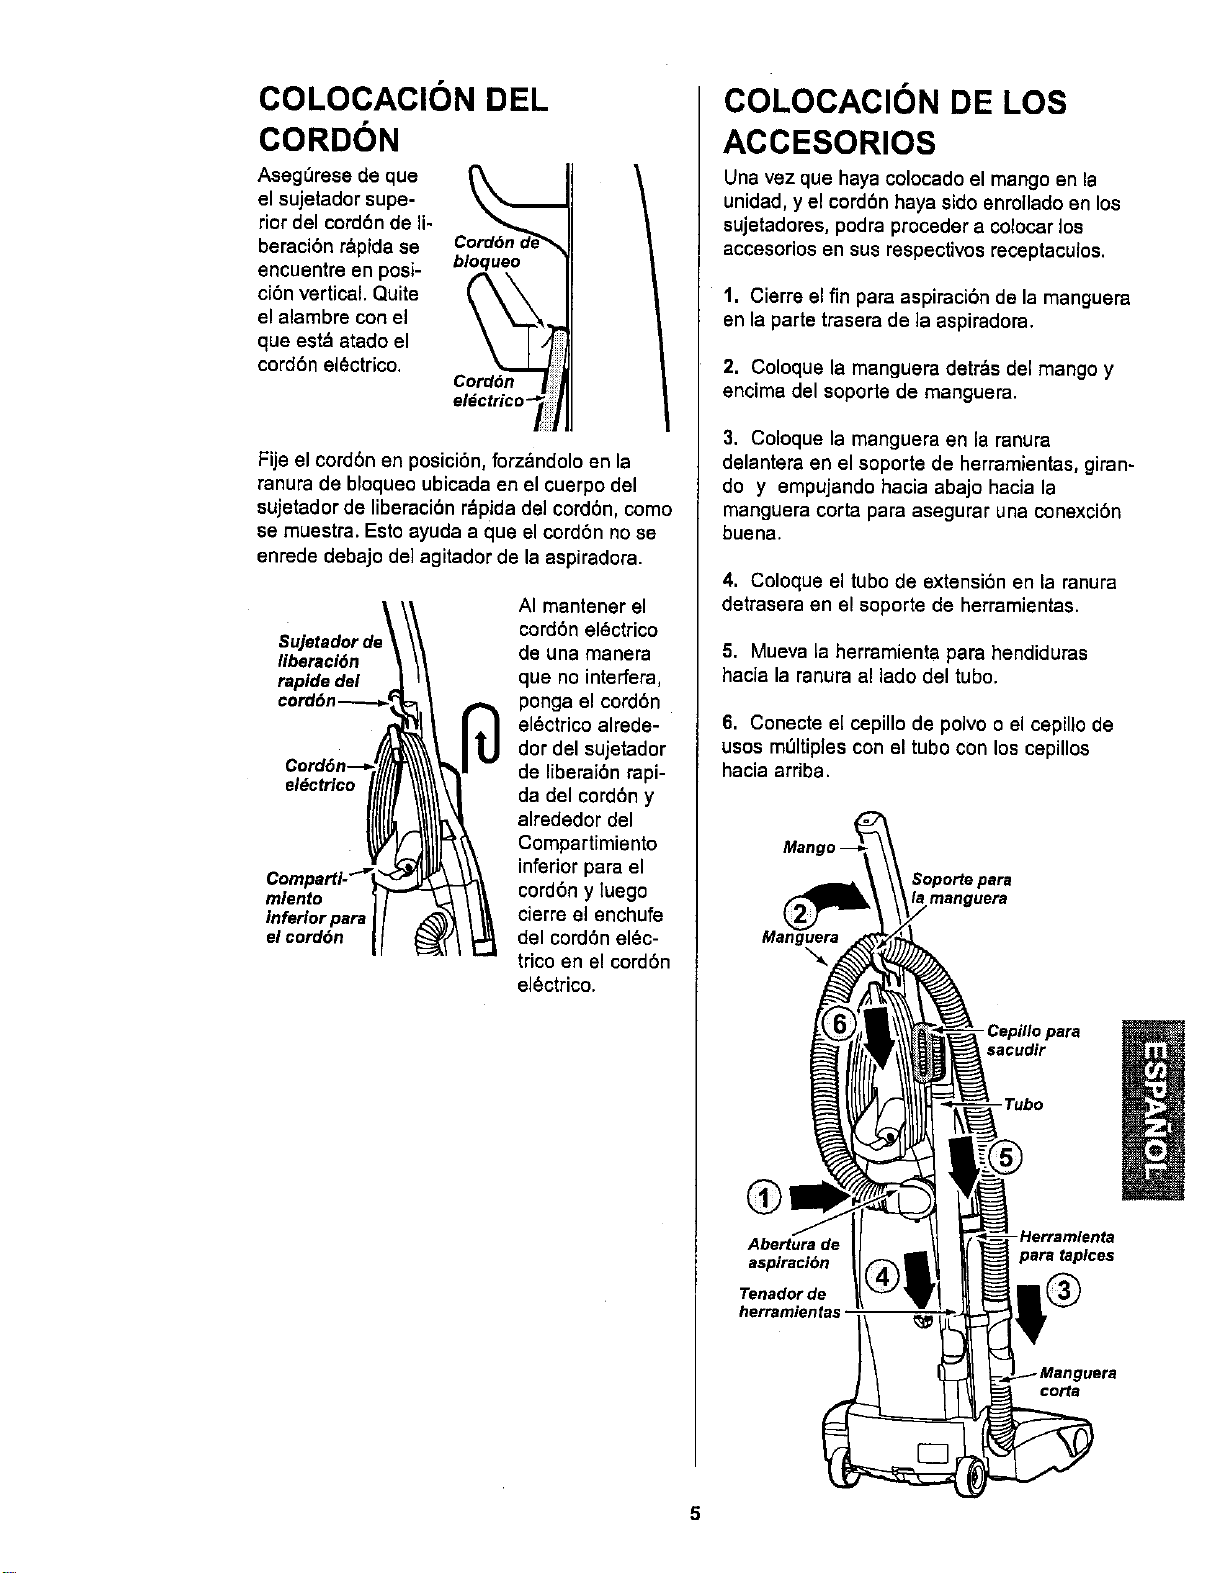
COLOCACION DEL
CORDON
AsegQrese de que
el sujetador supe-
rior del cordonde li-
beraciOn r&pida se
encuentre en posi-
ciOn vertical. Quite
el alambre con el
que est& atado el
cord6n el0ctrico.
CordOn 1311
Fije el cord6n en posicibn, forz_ndolo en la
ranura de bloqueo ubicada en el cuerpo del
sujetador de liberaci0n r&pida del cordon, como
se muestra. Esto ayuda a que el cordon no se
enrede debajo de] agitador de la aspiradora.
Sujetador ds
liberaciOn
rapide del
el_ctrico
mlento
inferior para
el cordon
AI mantener el
cordon el0ctrico
de una manera
que no interfera,
ponga el cordon
el0ctrico alrede-
dor del sujetador
de liberaibn rapi-
da del cordony
alrededor del
Compartimiento
inferiorpara el
cordony luego
cierre el enchufe
del cordonel_c-
trico en el cordon
el0ctrico.
COLOCACION DE LOS
ACCESORIOS
Una vez que haya coIocado el mango en la
unidad, y el cordon haya sJdo enronado en los
sujetadores, podra proceder a colocar los
accesorios en sus respectivos receptacuJos,
1. Cierre el fin para aspiraci6n de la manguera
en la parte trasera de la aspiradora.
2. Coloque la manguera detr&s del mango y
encima del soporte de manguera.
3. Coloque la manguera en la ranura
delantera en el soporte de herramientas, giran-
do y empujando hacia abajo hacia la
manguera corta para asegurar una conexci6n
buena.
4. Coloque el tubo de extension en la ranura
detrasera en el soporte de herramientas.
5. Mueva la herramienta para hendiduras
hacia la ranura al lade del tubo.
6. Conecte e[ cepillo de polvo o el cepillo de
usos meltiples con el tubo con los cepillos
hacia arriba.
Manl
Soporte para
manguera
Manguera
Abertura de
aspiration
Tenador de
herramientas
-Cepillopara
sacudir
- Herramlenta
para taplces
5
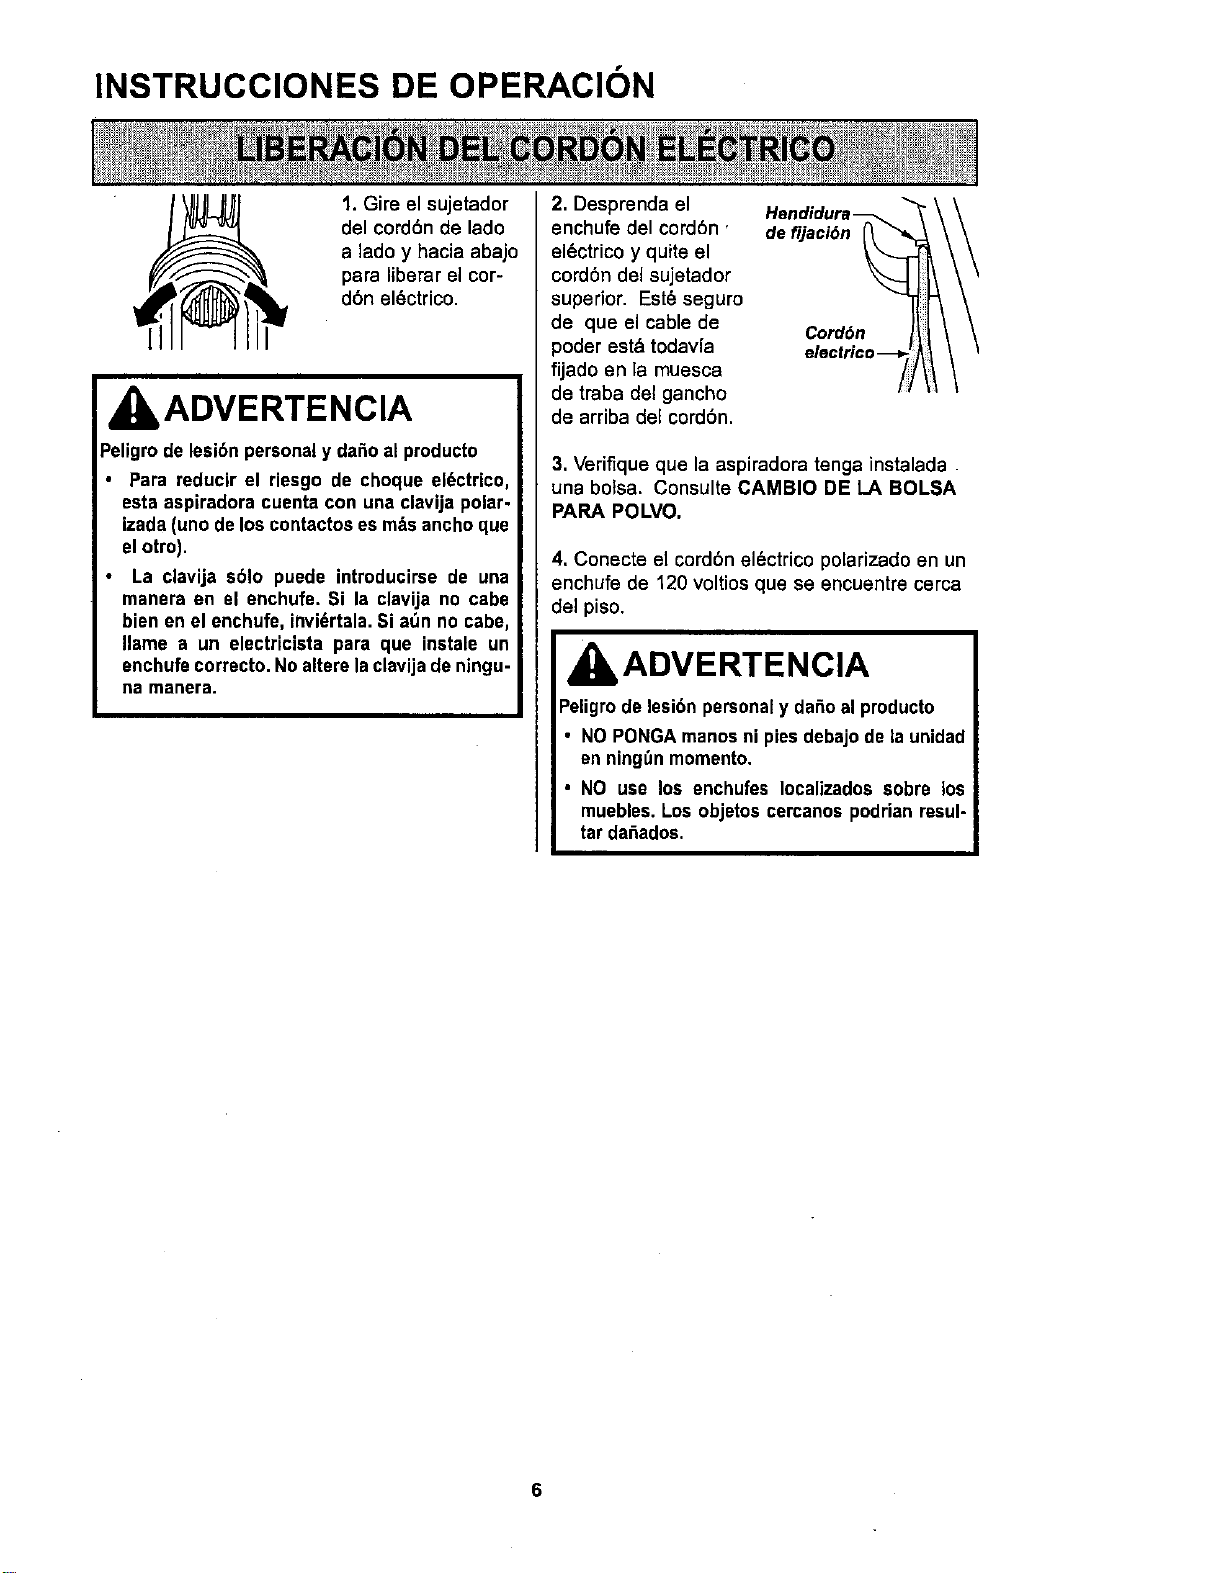
INSTRUCCIONES DE OPERACION
1. Gire el sujetador
del cord6n de lado
a lado y hacia abajo
para liberar ei cor-
d6n el_ctrico.
kADVERTENCIA
Peligrode lesi6n personaly da_o al producto
• Para reducir el riesgo de choque eldctrico,
esta aspiradora cuenta con una clavija polar-
izada(uno delos contactoses m&sancho que
elotro).
La clavija s61o puede introducirse de una
manera en el enchufe. Si la clavija no cabe
bien en el enchufe, invi_rtala.Si a,',nno cabe,
Ilame a un electricista para que instale un
enchufecorrecto.No altere laclavijadeningu-
na manera.
2. Desprenda el
enchufe del cord6n,
el6ctrico y quite el
cord6n del sujetador
superior. Est_ seguro
de que el cable de
poder estd todav{a
fijado en la muesca
de traba del gancho
de arriba dee cord6n.
Hendidura_ "_
de fijaci6n
co, 6n I
\
\
3. Verifique que la aspiradora tenga instalada
una botsa. Consulte CAMBIO DE LA BOLSA
PARA POLVO.
4. Conecte el cord6n el6ctrico polarizado en un
enchufe de 120 voltios que se encuentre cerca
del piso.
IbADVERTENCIA
Peligrode lesi6n personaly daSoal producto
• NO PONGAmanos ni pies debajo dela unidad
en ning6nmomento.
• NO use los enchufes Iocalizados sobre los
muebles.Los objetos cercanospodrian rasul-
tarda_ados.
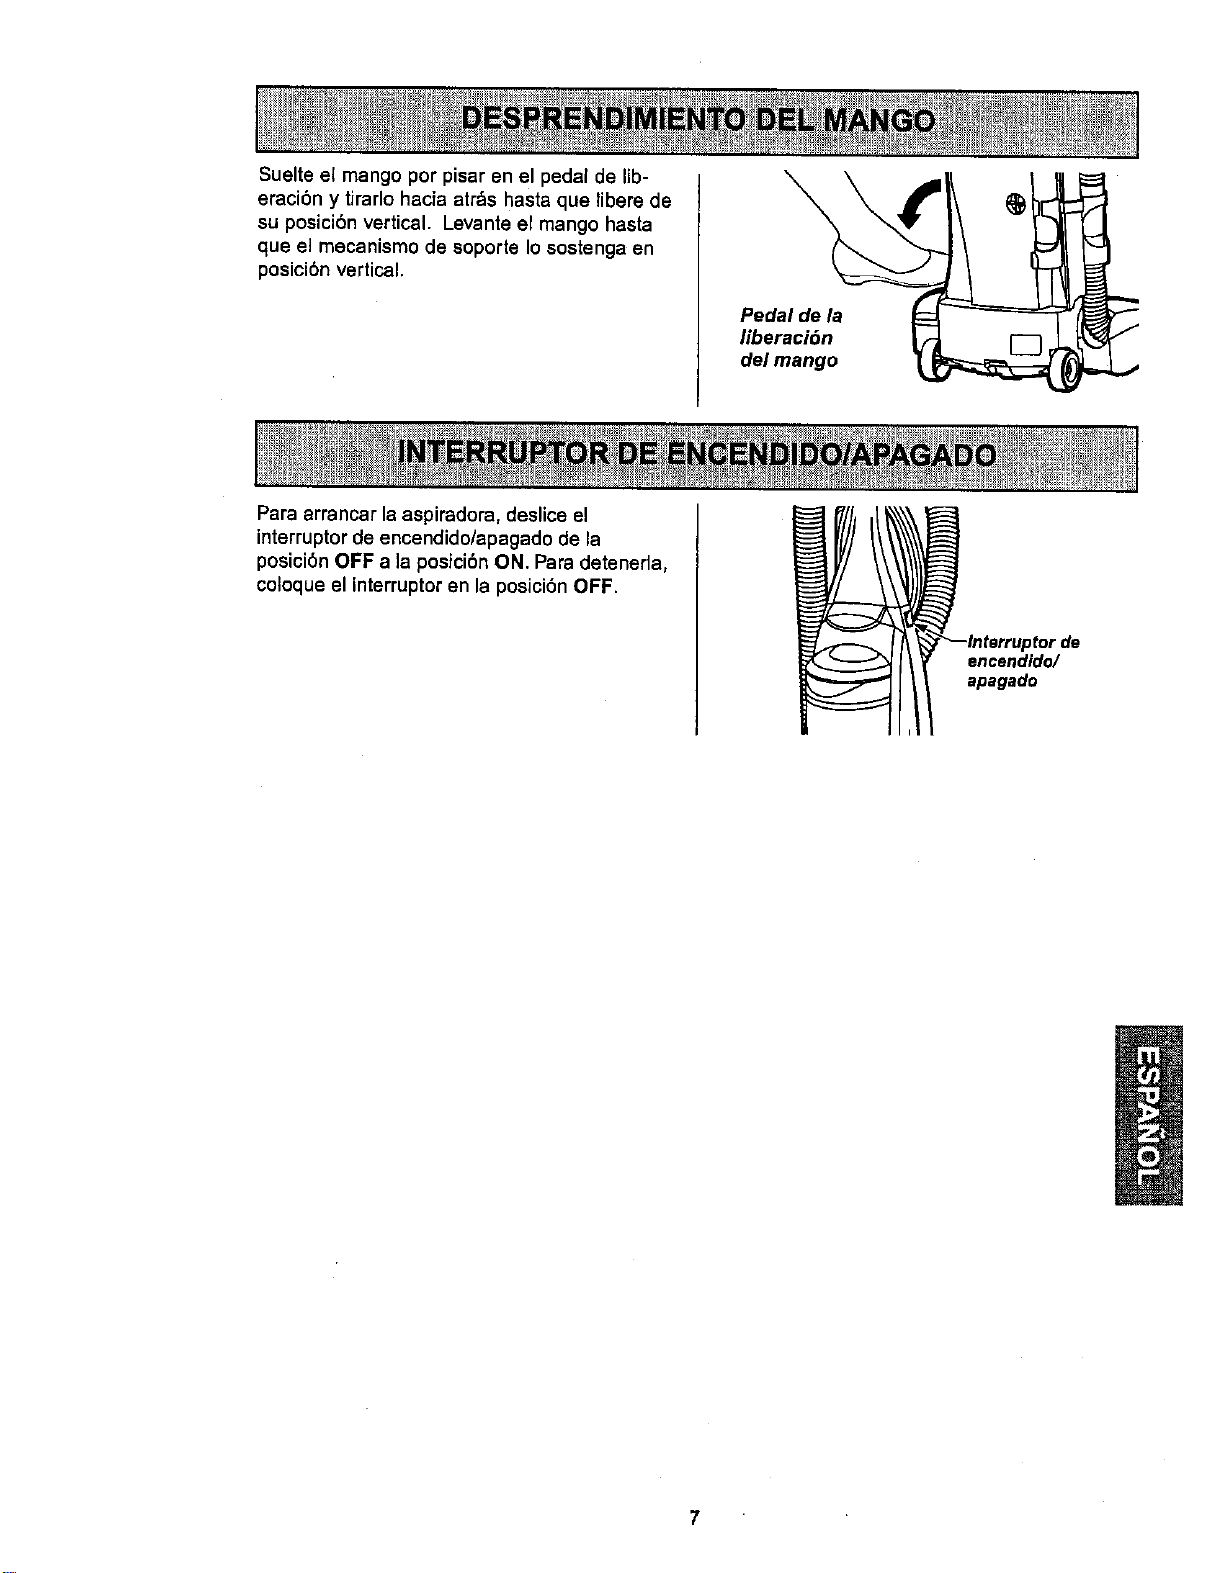
Suelte el mango por pisar en el pedal de Iib-
eracibn y tirarlo hacia atr_ls hasta que libere de
su posici6n vertical. Levante el mango hasta
que eJmecanismo de soporte Io sostenga en
posicibn vertical.
Para arrancar la aspiradora, deslice el
interruptor de encendido/apagado de la
posici6n OFF a la postci6n ON. Para detenerla,
coloque el interruptor en la posici6n OFF.
_te_uptorde
encendido/
apagado
7
ADVERTENCIA
Peligro dechoque eldctricoo
lesi6n corporal.
No ponga lasmanos o los pies debajo de la
m_quina cuando afiade lamanguera.Mientras
se usan los accesorios,la agitadorempieza a
girar.No deje que laaspiradora se quedeen
un s61olugarpot un periodo extendido,
porque la agitadorpuedehacer da_o a la
superficiedel suelo. No ponga la aspiradora
encima de muebles, en el fieco de la alfombra,
en una alfombra de pelo largo,ni en escalerae
alfombradas. Laposicibn ideal para la
aspiradora cuando se usan los accesorios
est_ en un_,reaplana con el mango en la
posici6n vertical.
COMO UTILIZAR LOS
ACCESORIOS
Coloque la aspiradora en una superficie plana
y ponga el graduador de altura en HIGH.
Los accesorios podr&n colocarse en la man-
guera o en el tubo. Ademds, el cepillo para pol-
vo tambi&n podr&coiocarse en la boquilla para
huecos reducidos.
CUIDADO
NO tire de la aspiradora por la manguera
en la habitaci6n. Podrian ocurrir dafios a
sus pertenencias.
La manguera y el tubo pueden sacarse de la
manguera corta tom&ndolos por el extremo y ti-
rando hacia arriba.
Los accesorios se pueden conectar a la man-
guera siel objeto que se desea limpiar no est&
lejos de la aspiradora. La manguera, en
algunos modelos, se expandir&.
NOTA: Cuando la aspiradora est6 prendida, la
manguera, en algunos modelos, tender& a
caerse debido a la succi6n de la aspiradora.
Si desea m&s extensi6n, puede conectar el
tubo a la manguera y los accesorios al tubo.
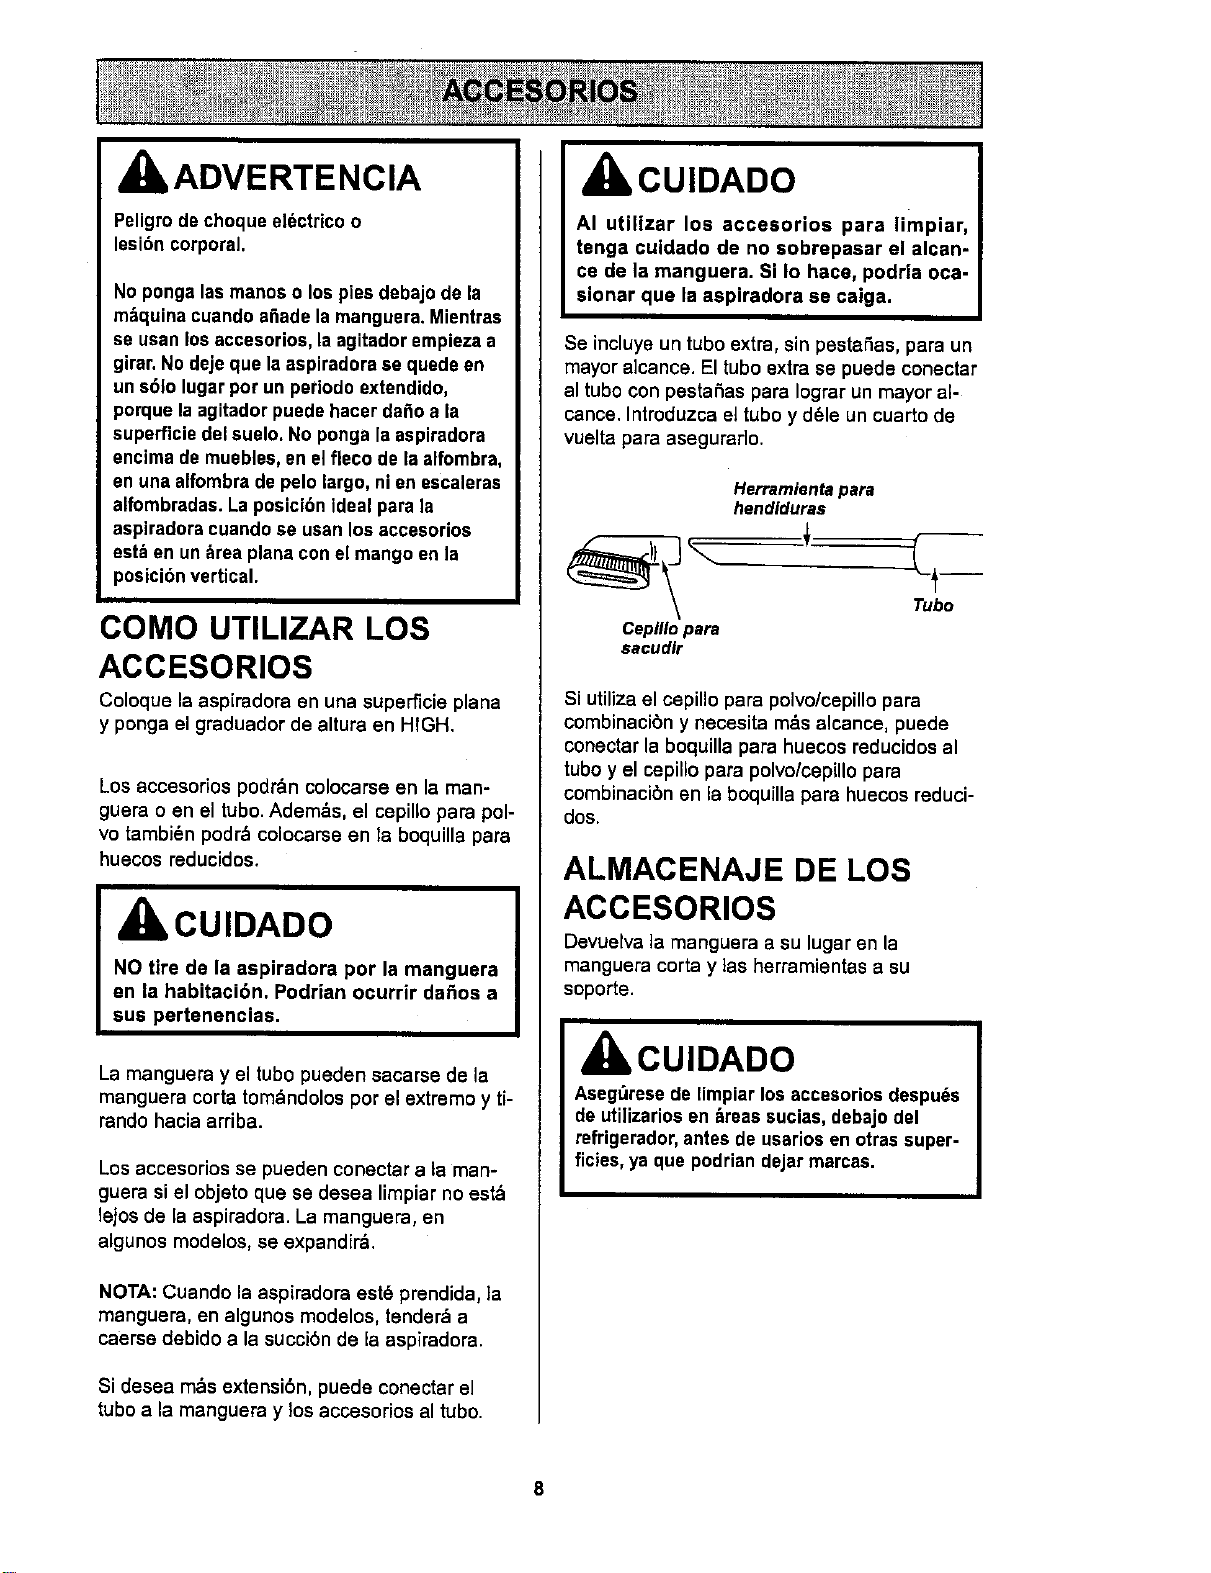
CUIDADO
AI utilizar los accesorios para limpiar,
tenga cuidado de no sobrepasar el alcan-
ce de la manguera. Si Io hace, podrla oca-
sionar que la aspiradora se csiga.
Se incluye un tubo extra, sin pestaSas, para un
mayor aicance. El tubo extra se puede conectar
al tubo con pestaSas para Iograr un mayor al-
cance. Introduzca el tubo y d&le un cuarto de
vuelta para asegurar]o.
Herramlentapara
hendiduras
Ceplllopara
sacudlr
Si utilizael cepillo para polvo/cepillo para
combinacibn y necesita m,_salcance, puede
conectar la boquilla para huecos reducidosal
tubo y el cepillo para polvo/cepillo para
combinaci6n en la boquilla para huecos reduci-
dos.
ALMACENAJE DE LOS
ACCESORIOS
Devuelva la manguera a su lugar en la
manguera corta y las herramientas a su
soporte.
CUIDADO
Aseg_rese de limpiar los accesorios despu_s
de utilizarios en _reas sucias,debajo del
refrigerador, antes de usarios en otras super-
ficies,ya que podrian dejar marcas.
8
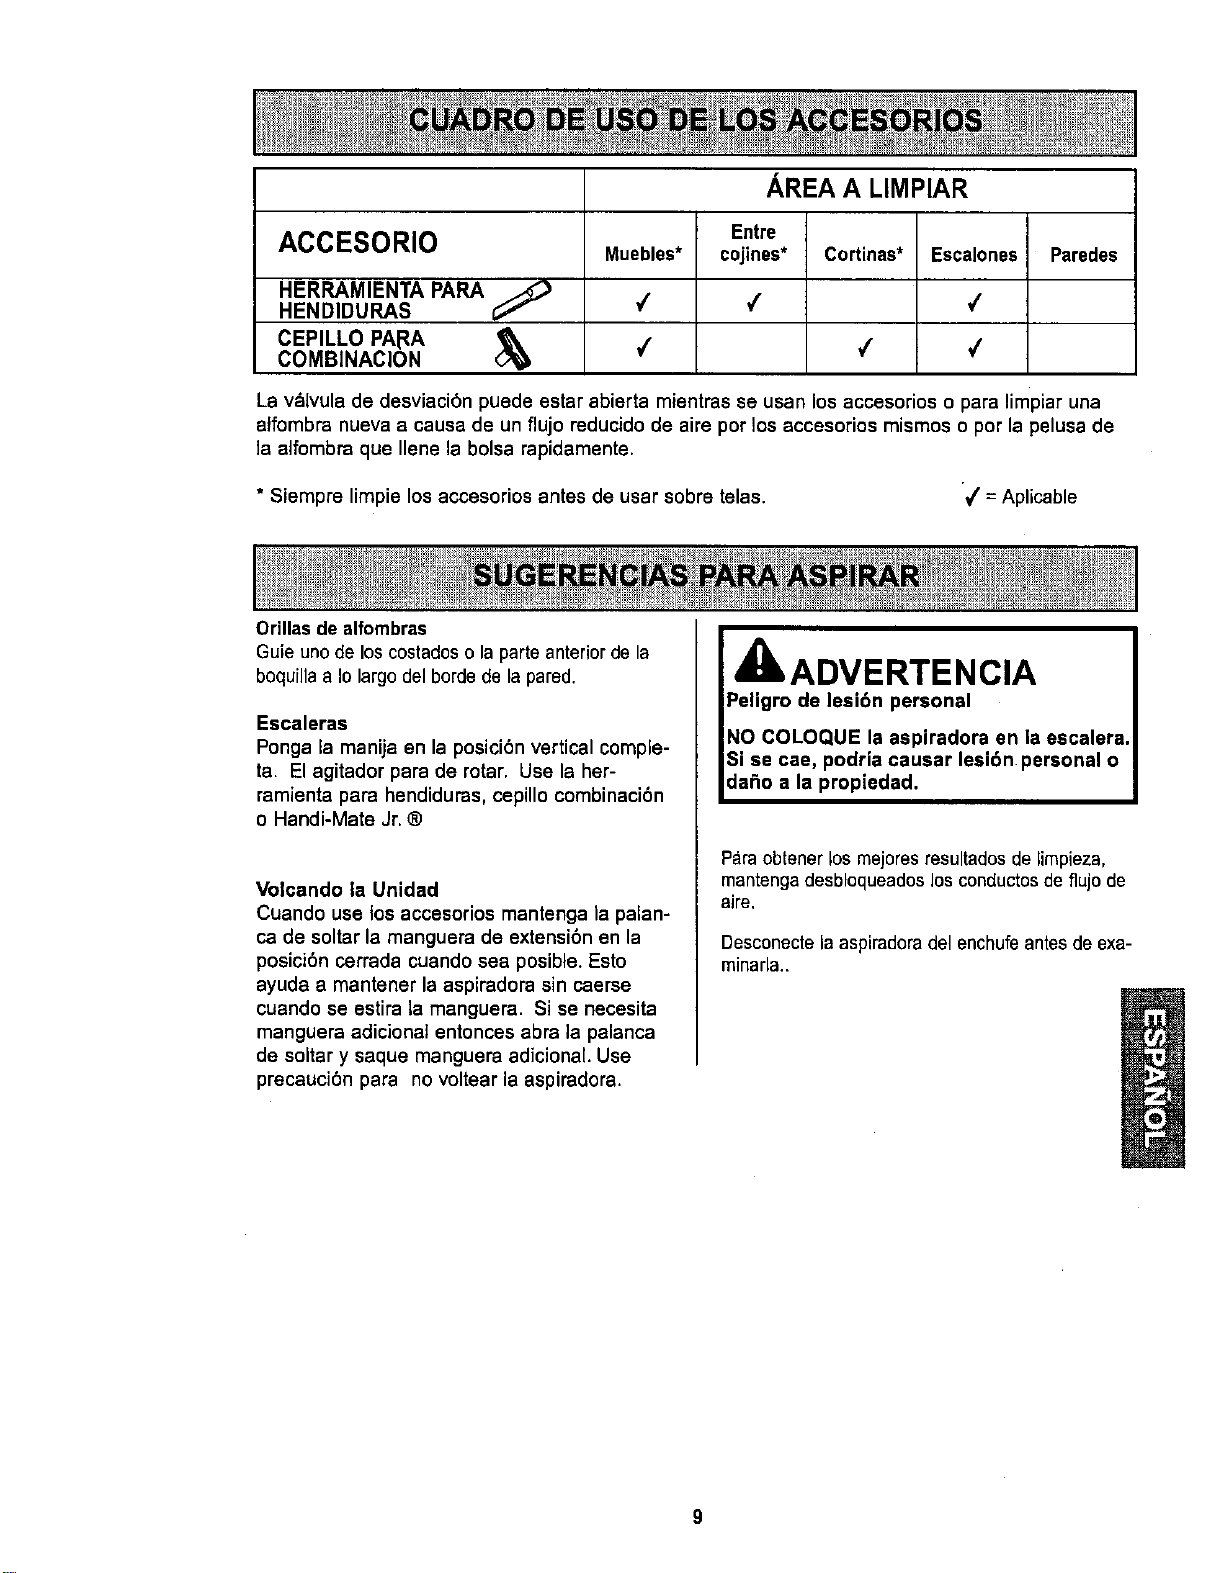
ACCESORIO
HERRAMIENTA PARA
HENDIDURAS
CEPILLO PARA
COMBINACION
Muebles*
,/
/
AREA A LIMPIAR
Entre
cojines*
Cortinas*
Escalones
,/
,/
Paredes
La vdlvula de desviaci6n puede estar abierta mientras se usan los accesorios o para limpiar una
atfombra nueva a causa de un flujo reducido de aire por los accesorios mismos o por la pelusa de
la alfombra que Ilene la bolsa rapidamente.
* Siempre limpie los accesorios antes de usar sobre telas.
"_ = Aplicable
Orillas de alfombras
Guie uno de los costados o laparte anterior de la
boquilla a Iolargo del borde de la pared.
Escaleras
Ponga la manila en la posici6n vertical comple-
ta. El agitador para de rotar. Use la her-
ramienta para hendiduras, cepillo combinaci6n
o Handi-Mate Jr. ®
Volcando la Unidad
Cuando use los accesorios mantenga la palan-
ca de soltar la manguera de extensibn en la
posici6n cerrada cuando sea posible. Esto
ayuda a mantener la aspiradora sin caerse
cuando se estira la manguera. Si se necesita
manguera adicional entonces abra la palanca
de soltar y saque manguera adicional. Use
precaucibn para no voltear la aspiradora.
kADVERTENCIA
Peligro de lesibn personal
NO COLOQUE la aspiradora en la escalera,
Si se cae, podria causar lesi6n personal o
da_o a la propiedad.
Para obtenerlos mejores resultadosde limpieza,
mantenga desbloqueados los conductosde flujo de
aire.
Desconectela aspiradoradel enchufeantes deexa-
minarla..
SISTEMA DE PROTECTION
DE MOTOR
Protector Termal
Esta aspiradora tiene un protector termal que se
ajusta autom_,ticamentepara proteger a la
aspiradora del sobrecalentamiento. Si una
obstrucci6n impide el flujo normal de aire al
motor, el protectortermal apaga el motor
autom&ticamente para permitir que el motor se
enfrie a fin de evitar posibies daSos a la
aspiradora.
Para corregir el problema: Si esto ocurra,
apague la aspiradora y desenchufe el cord6n del
tomacorriente para permitirque la aspiradora sa
enfde y que el protectortermal se reajuste.
Busque y saque las obstrucciones, si es
necesario, Examine tambi_n y
reemplace/limpie cualquier filtro obstruido.
Espere aproximadamente treinta (30)
minutos y enchufe la aspiradora y volt_ela
para ver si el protector del motor se ha
reajuetado. El protector del motor no se
reajustar=t si no se ha apagado la aspiradora
aun cuando la aspiradora se haya enfriado.
10
CUIDADO DE LA ASPIRADORA
Siga siempre todaslas instruccionesdeseguridad
antes de efectuar el mantenimientoa su aspiradora.
IbADVERTENCIA
Peligro de choque eldctrico o lesi6n corporal
Desconecta la unidad antes de efectuar el
mantenimiento a su aepiradora. Desconecte
la unidad antes de efectuar el mantenimientoa
su aspiradora. DeIc contrariopodriaproducirse
un choque eldctricoo causar lesi6n corporal si
la aspiradora arranca de manera imprevista.
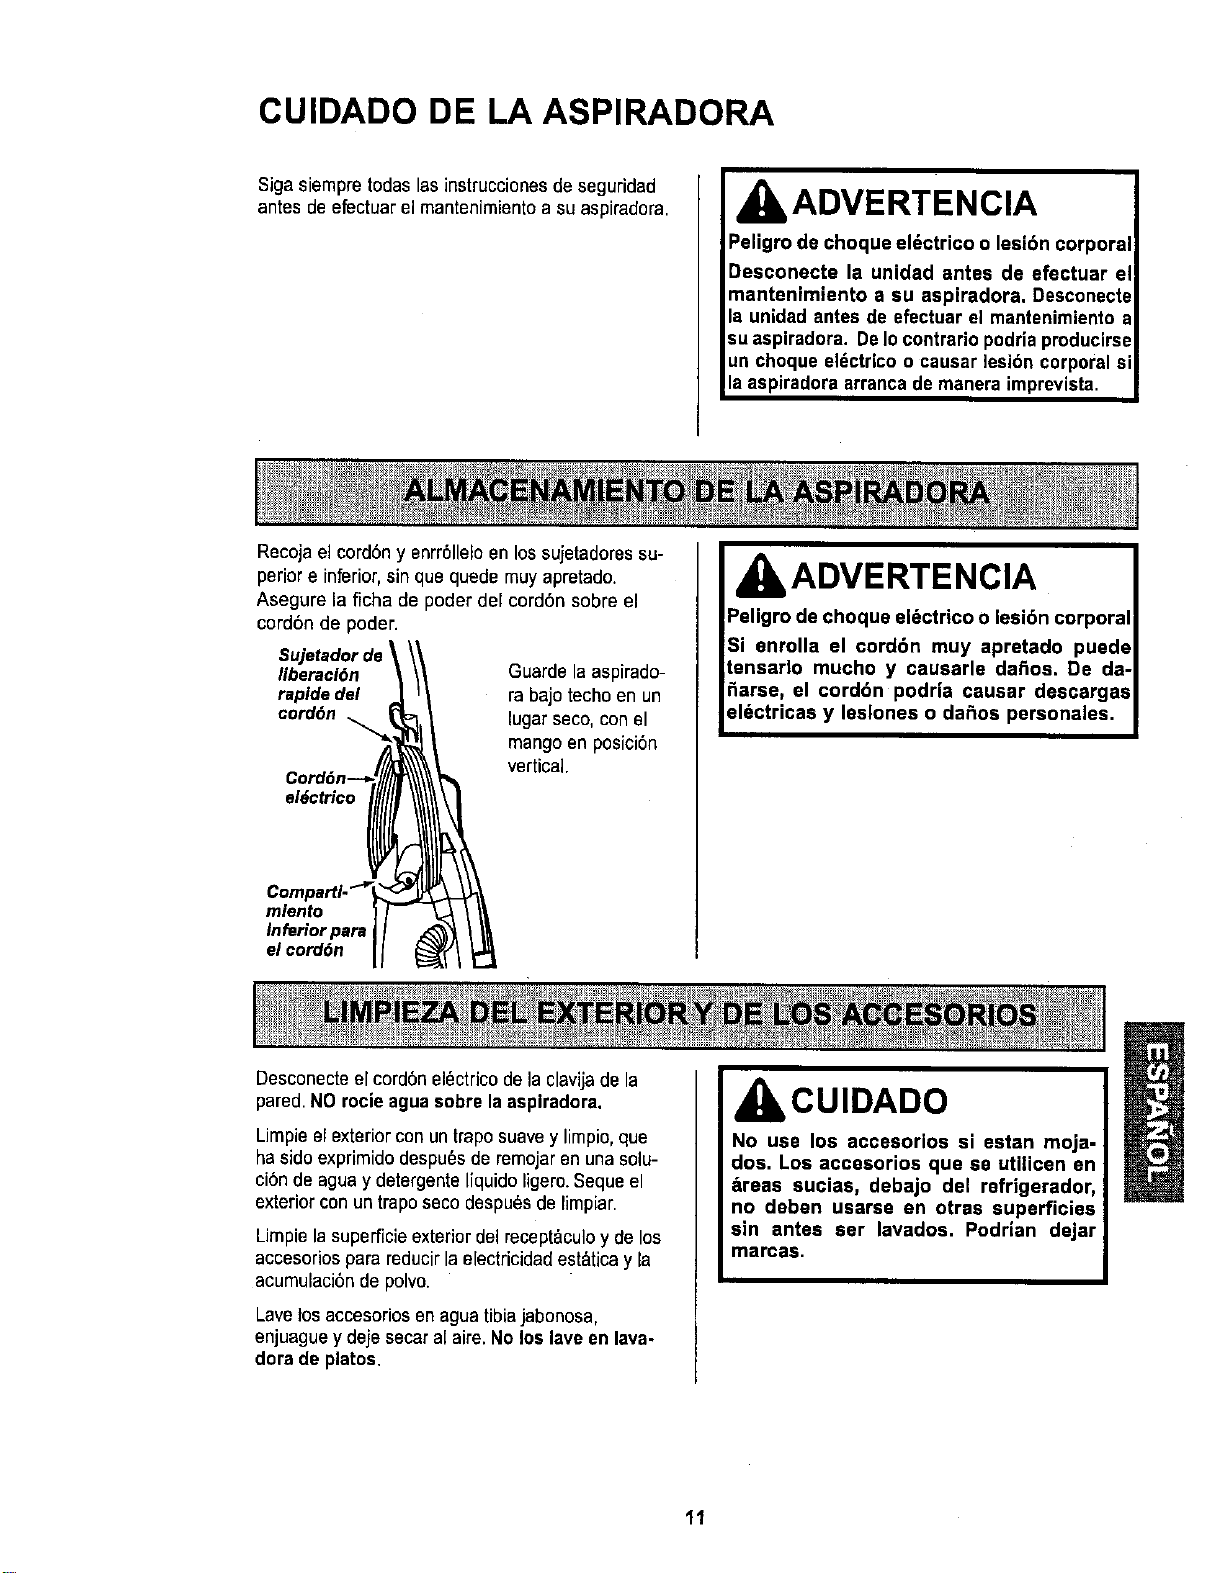
Recoja el cord6ny enrr611eloen lossujetadores su-
perior e inferior,sin quequede muy apretado.
Asegure la ficha de poder del cord6n sobre el
cordbn de poder.
Sujetadorde
liberaci6n Guardelaaapirado-
rapide de/ rabajotechoen un
cord6n
lugarseco,con el
mangoen posici6n
vertical.
el6ctrico
mlento
InfeHor para
el cord6n
, ADVERTENCIA
Peligro de choque el&ctrico o lesi6n corporal
Si enrolla el cord6n muy apretado puede
tansarlo mucho y causarla da_os. De da-
_arse, el cord6n podria causar descargas
el_ctricas y leslonas o dafms personales.
Desconecteelcord6n el_ctricodela clavijade la
pared.NO rocie agua sobre la aspiradora.
Limpieel exteriorconun traposuavey limpio, que
ha sidoexprimido despu_s de remojaren unasolu-
ci6n de aguay detergenteliquido ligero.Seque el
exterior con un traposeco despu_sde limpiar.
Limpiela superficieexterior del recept&culoy de los
accesorios para reducirla electricidadest&ticay la
acumulaci6n de polvo.
Lavelosaccesoriosenagua tibiajabonosa,
enjuague y deje secar al aire.No los lave en lava-
dora de platos,
IbCUIDADO I
I No use los accesorios si estan moja-
dos. Los accesorios que se utilicen en
_raas sucias, debajo del refrigerador,
no deban uearee en otras superficies
sin antes ser lavados. Podrian dejar
mamas.
11
I d I, ADVERTENCIA
Siempre desconecte el corddn _lectrico antes
de reparar alguna parte de la aspiradora,
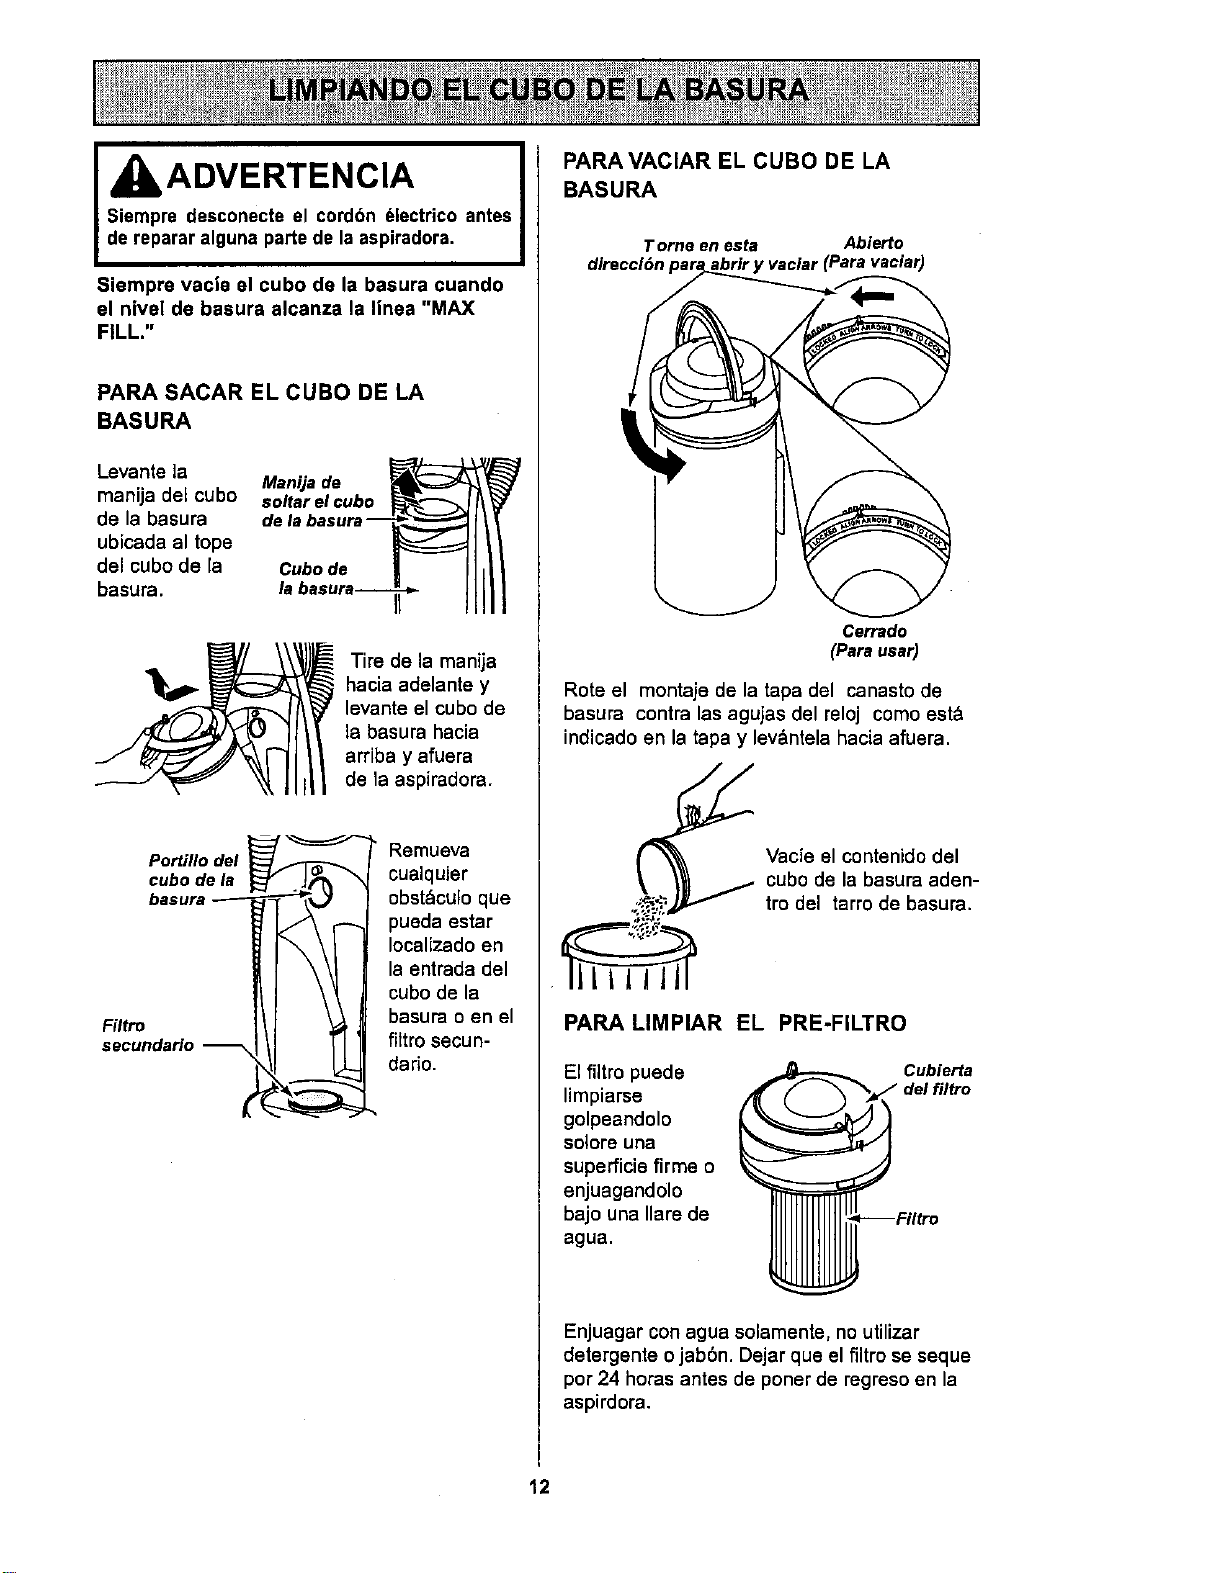
Siempre vacie el cubo de la basura cuando
el nivel de basura alcanza la linea "MAX
FILL."
PARA SACAR EL CUBO DE LA
BASURA
Levante la Manijade
manija del cubo soltarelcubo _'_l\_
ubicada al tope
del cubo de [a Cubo de | I11| I
baou ,,b.ur°--? Illll
Tire de la manija
hacia adelante y
levante el cubo de
la basura hacia
arriba y afuera
de la aspiradora.
basuraT_
Filtro Ill _
secundarlo _.
Remueva
cualquJer
obst_lcula que
pueda estar
Iocalizado en
la entrada del
cubo de la
basura o en el
filtro secun-
dario.
PARA VACIAR EL CUBO DE LA
BAS URA
Tome enesta Abierto
dlreccl6n_ara vaciar)
Cerra_
(Parausa0
Rote el montaje de la tapa del canasta de
basura contra las agujas del reloj como est&
indicado en la tapa y levdntela hacia afuera.
Vacie el contenido del
cubo de la basura aden-
tro del tarra de basura.
PARA LIMPIAR EL PRE-FILTRO
El filtro puede
limpiarse
golpeandalo
so]ore una
superficia firme o
enjuagandolo
bajo una Ilare de
agua.
Enjuagar con agua solamente, no utilizar
detergente a jab6n. Dajar qua el filtro se seque
pot 24 horas antes de poner de regreso en la
aspirdora.
12
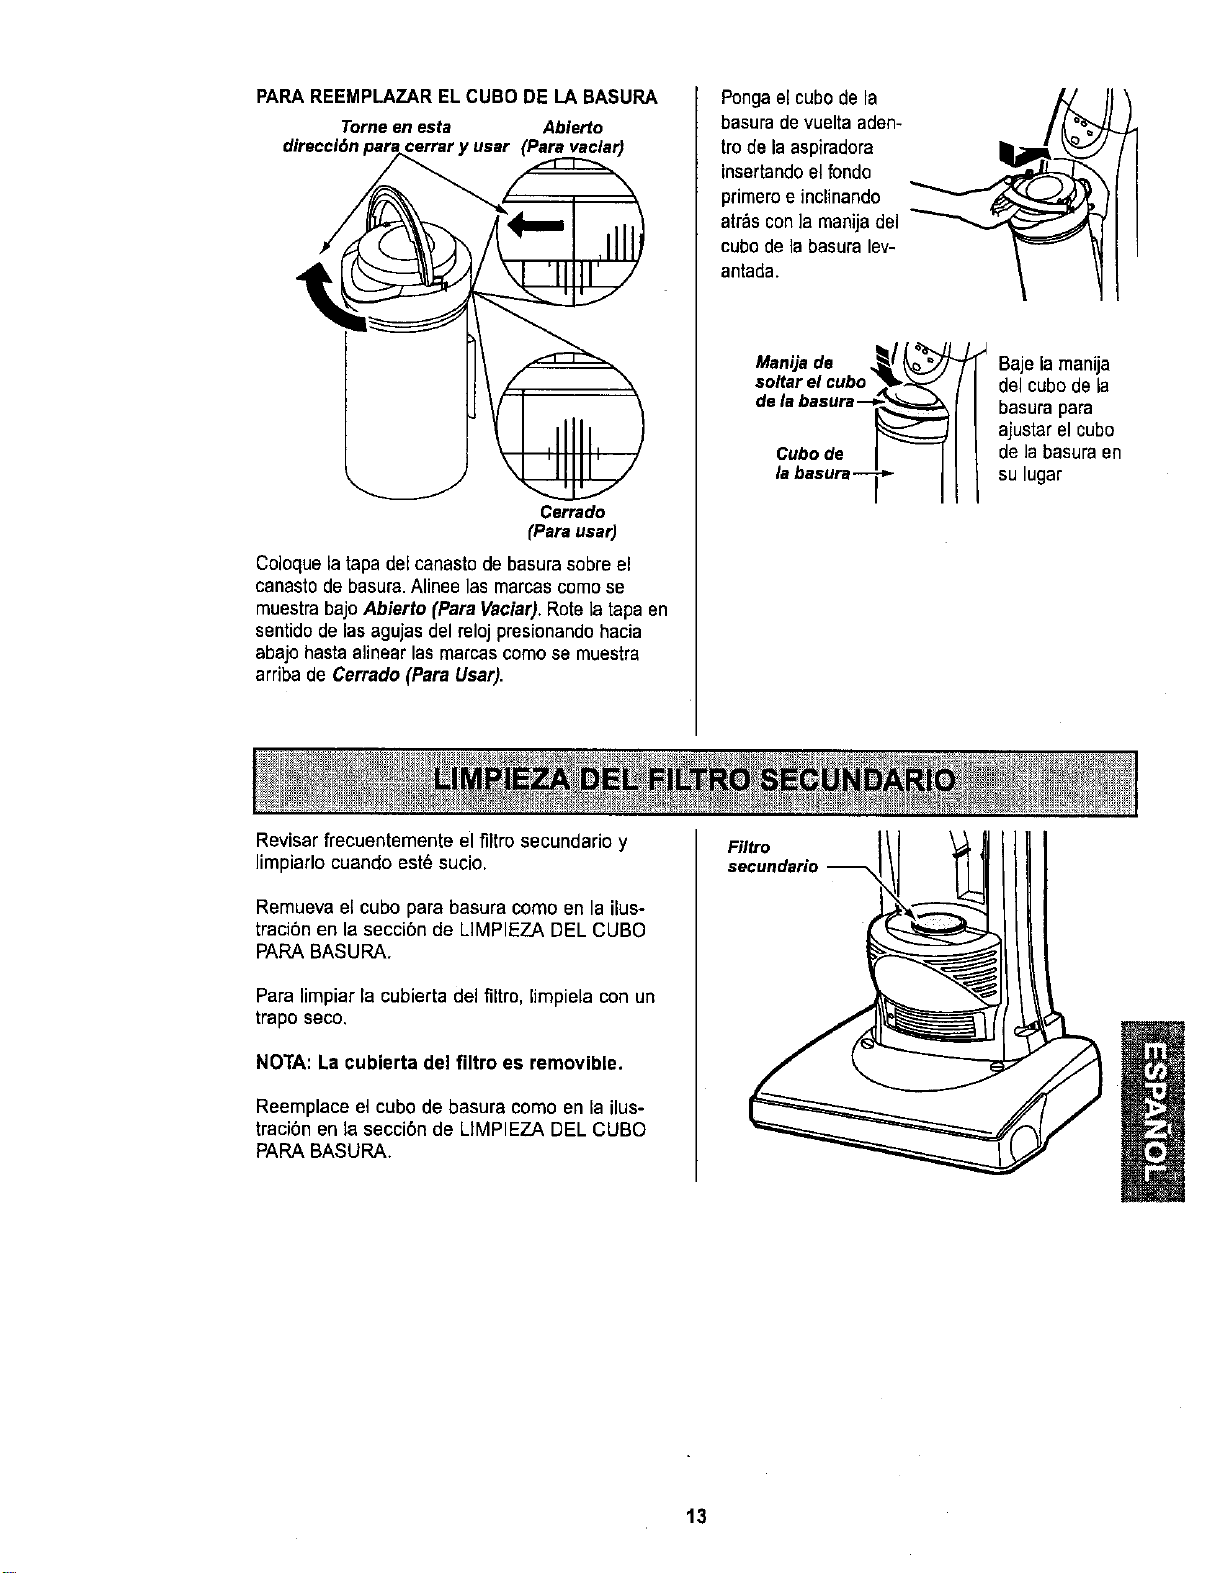
PARA REEMPLAZAR EL CUBO DE LA BASURA
Tome en esta Ablerto
direcci6n (Para vaclar)
Cerrado
(Para usar)
Coloquela tapa del canasto de basura sobre el
canasto de basura.Alineelas marcascome se
muestrabaje Abierto (Para Vaciar). Rote latapa en
sentido de las agujas del reloj presionandohacia
abaje basraalinear las marcas como se muestra
arriba de Cerrado (Para Usar).
Ponga elcubo de la _ j
basurade vuelta aden- / _ =_-_L
trodela aspiradora llll_/_
insertando el fondo _ z_lJ_----_
primeroe inclinando v-_l
atr_lscon ]amanija del _"-,_,______j_'
cubede labasura lev- \_
antada. / 1
Cubode
labasura-_
Baje la manija
del cube de la
basura para
ajustar el cubo
de la basuraen
su lugar
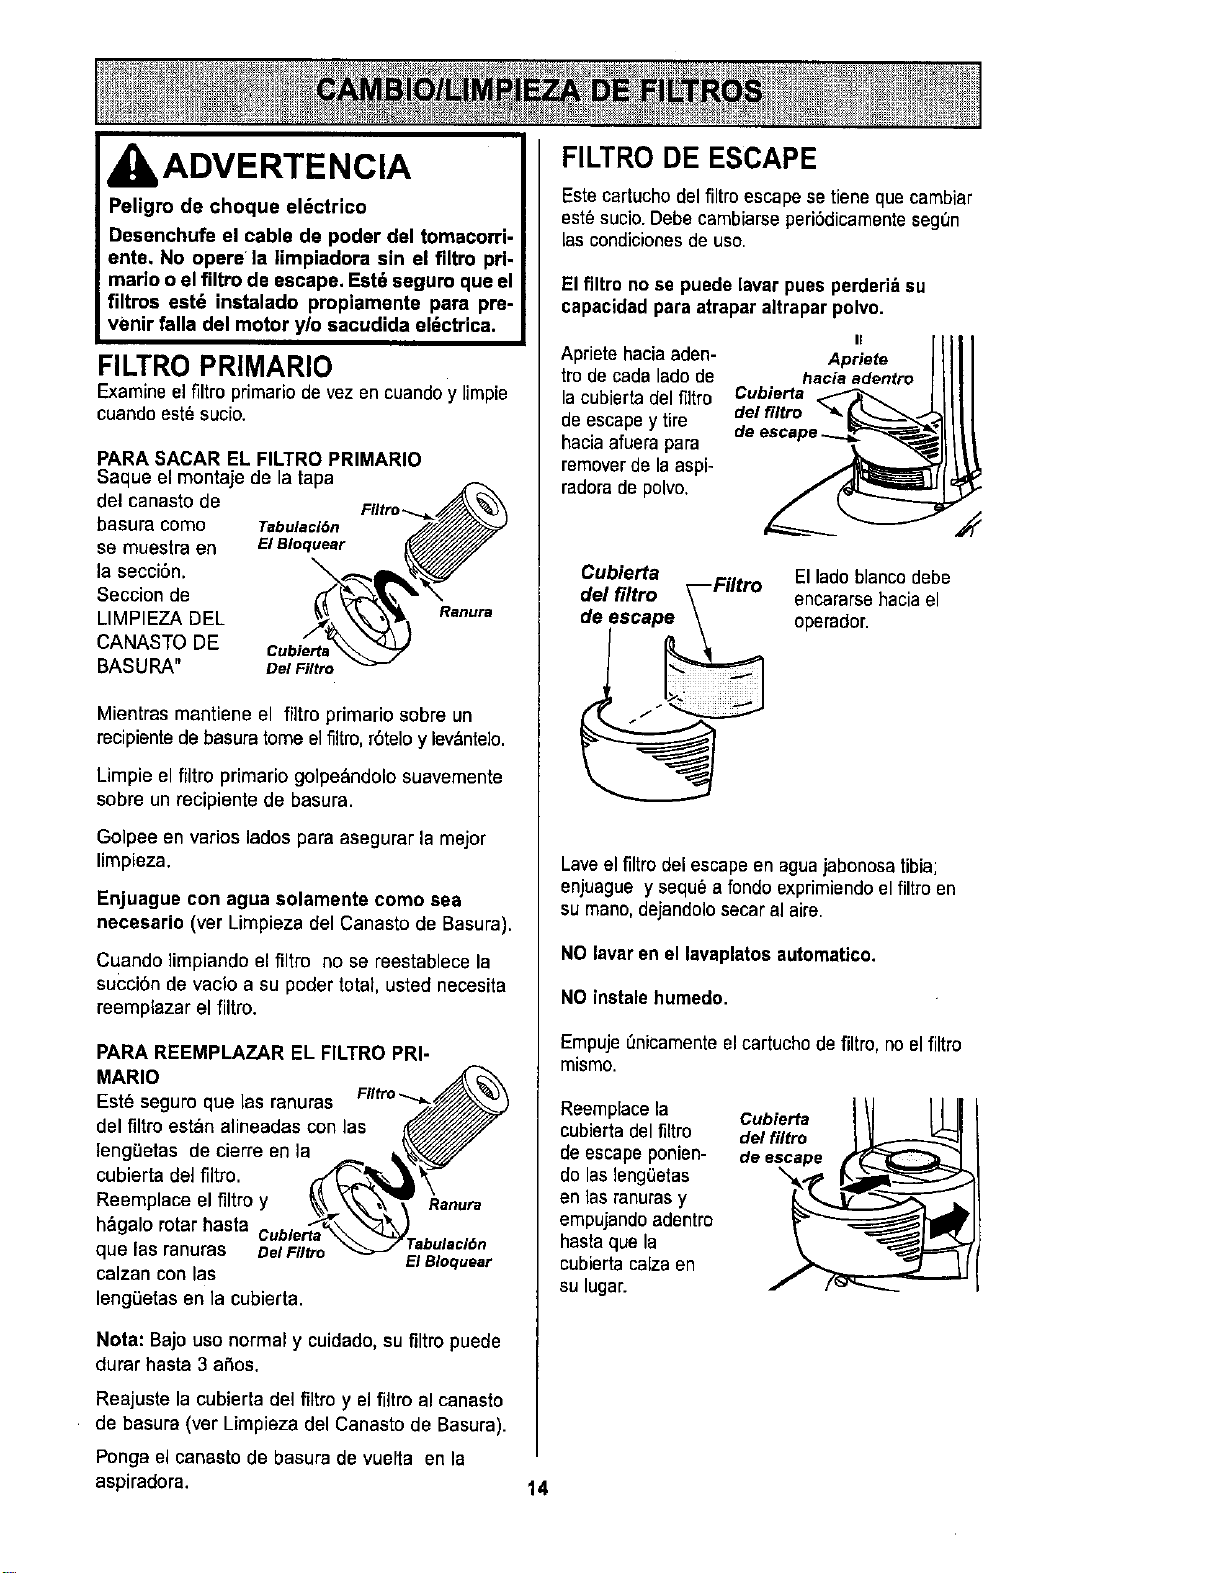
Revisar frecuentemente el filtro secundario y
limpiarlo cuando est6 sucio.
Remuevaet cubo para basura como en la ilus-
traci6n en la seccion de LIMPIEZA DEL CUBO
PAPA BASUPA.
Para limpiar la cubierta del filtro, [impiela con un
trapo seco.
NOTA: La cubierta del filtro es removible.
Reemplaceel cubode basura como en la ilus-
traci6n en la secci6n de LIMPIEZA DEL CUBO
PAPA BASURA.
Filtro
secundario
13
kADVERTENCIA
Peligro de choque el6ctrico
Desenchufe el cable de poder del tomacorri-
ente, No opere la limpiadora sin el filtro pri-
mario o el filtro de escape. Est6 segum que el
filtros estd instalado propiamente para pre-
venir falla del motor y/o sacudida eldctrica.
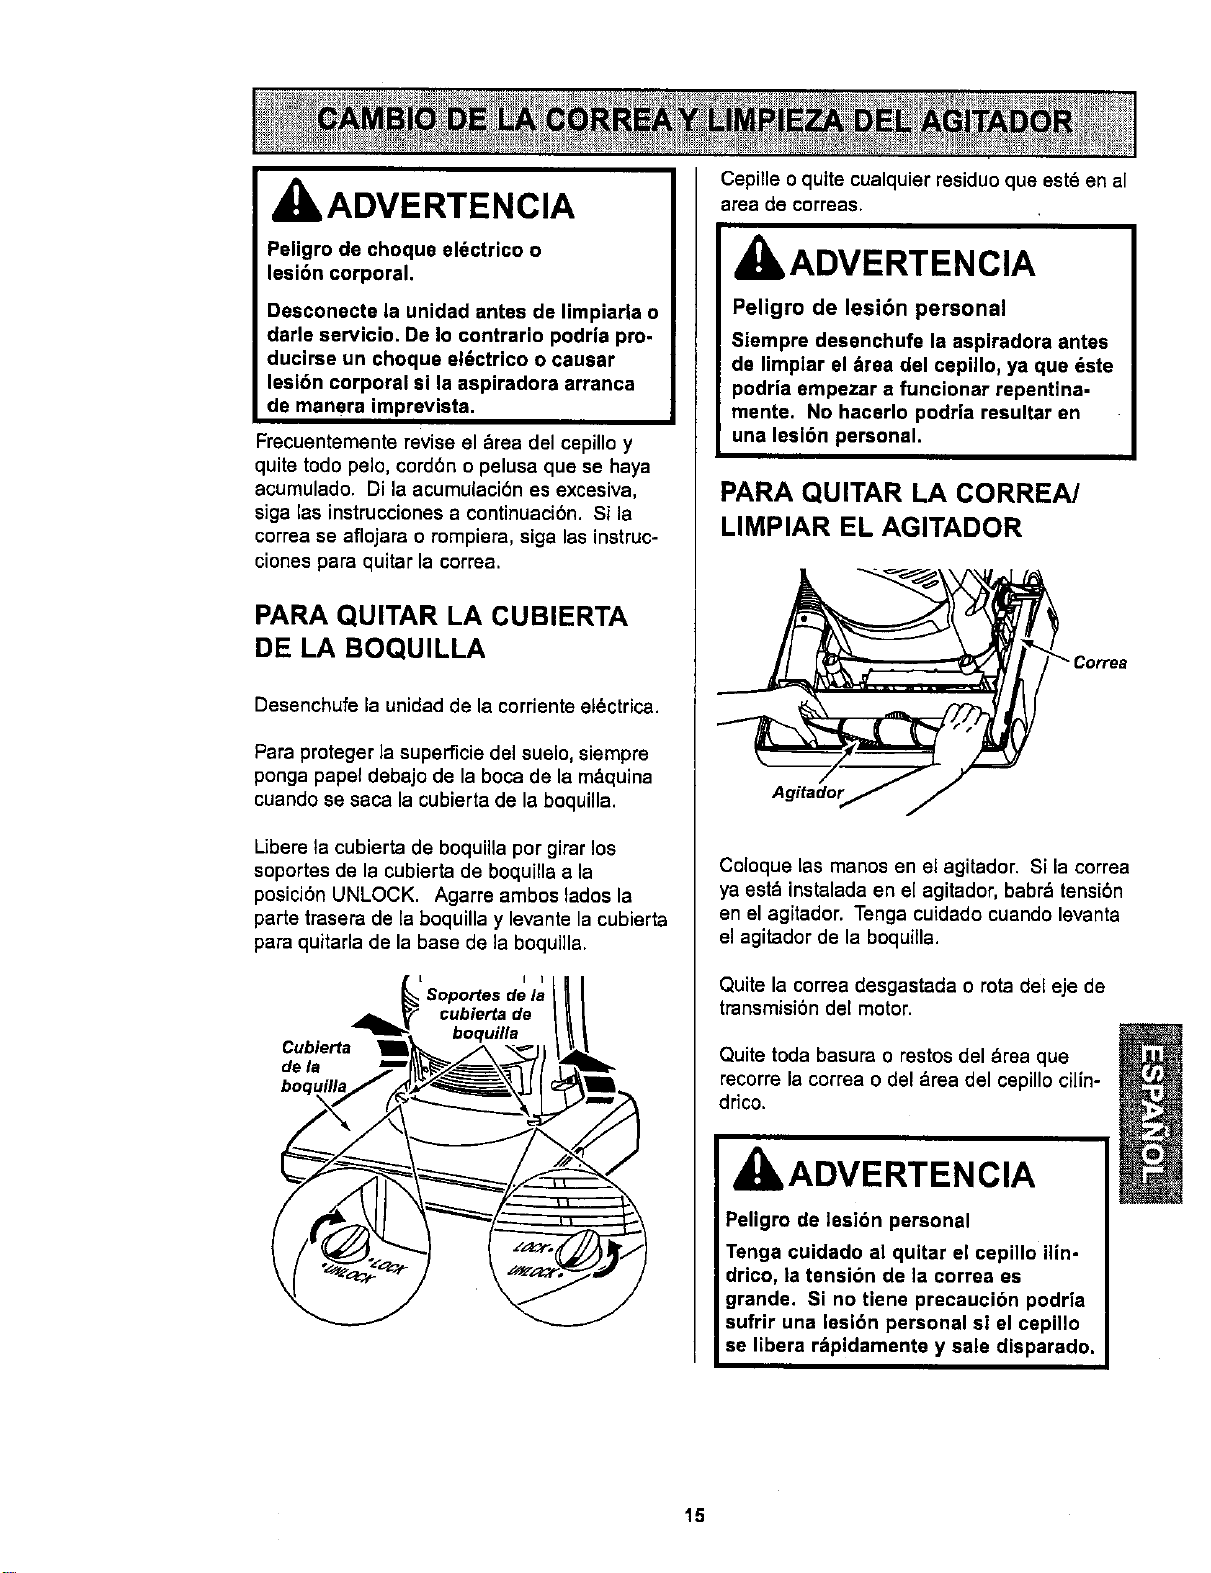
FILTRO PRIMARIO
Examine elfiltro primario de vez en cuandoy limpie
cuando est_ sucio.
PARA SACAR EL FILTRO PRIMARIO
Saque el montaje de la tapa
del canastode
basura como Tabulaci6n
se muestra en EIBIoquear
la secci6n.
Seccionde
LIMPIEZA DEL
CANASTO DE Cubierta
BASURA" Oel Filtro
Ranura
Mientras mantiene el filtroprimario sobre un
recipiente de basura tomeel filtro,r6teloy lev&nte]o.
Limpie el filtro primario golpe_ndolo suavemente
sobre un recipiente de basura.
Golpee en varios lados para asegurar la mejor
limpieza.
Enjuague con agua solamente como sea
necesario (ver Limpiezadel Canastode Basura).
Cuando limpiando el filtro no se reestablece la
su(:ci6nde vacio a su poder total,usted necesita
reemplazar el filtro.
PARA REEMPLAZAR EL FILTRO PRI-
MARIO
Est6 seguroque las ranuras
del filtm est_n alineadas con las
leng'[ietas de cierre en la
cubierta del filtro.
Reemplace el filtro y
h&galo rotar haata
que las ranuras DelFIItro
calzan con las
leng(_etasen la cubierta.
Ranura
abulaci6n
El Bloquear
Nota: Bajo uso normal y cuidado,su filtro puede
durar hasta3 alias.
Reajuste la cubierta del filtro y el filtro al canasto
de basura (ver Limpieza del Canasto de Basura).
FILTRO DE ESCAPE
Estecartucho delfiltro escape sa tiene que cambiar
est8 sucio. Debecambiarse peri6dicamentesegQn
lascondiciones de uso.
El filtro no se puede lavar pues perderi_eu
capacidad para atraparaltrapar polvo.
II
Apriete hacia aden- Apriete
tro de cada lado de haciaadentro
la cubierta del filtro Cubierta
de escape y tire delfiltro
hacia afuera para
remover de la aspi-
radora de polvo.
Cubierta
del filtro _-- Filtro
El lado blancodebe
encararse haciael
operador.
Laveel filtro del escape en aguajabonosatibia;
enjuague y seque a fondo exprimiendo el filtro en
su mano, dejandolo secar al aire.
NO lavar en el lavaplatos automatico.
NO instalehumedo.
Empuje_nicamenteelcartucho de filtro, no elfiltro
mismo.
Reemplacela Cubierta
cubiertadel filtro de/filtro
deescapeponien-
do lasleng0etas \
en ]as ranurasy
empujando adentro
hasta que la
cubierta calza en
su lugar.
Ponga el canasto de basura de vuerta en la
aspiradora. 14
ADVERTENCIA
Peligro de choque el6ctrico o
lesi6n corporal.
Desconecte la unidad antes de limpiarla o
darle servicio. De Io contrario podria pro-
ducirse un choqua el6ctrico o causar
lesibn corporal si la aspiradora arranca
de manera imprevista.
Frecuentemente revise el drea del cepillo y
quite todo pelo, cord6n o pelusa que se haya
acumulado. Di la acumulaci6n es excesiva,
siga las instrucciones a continuaci6n. Si la
correa se aflojara o rompiera, siga las instruc-
ciones para quitar la correa.
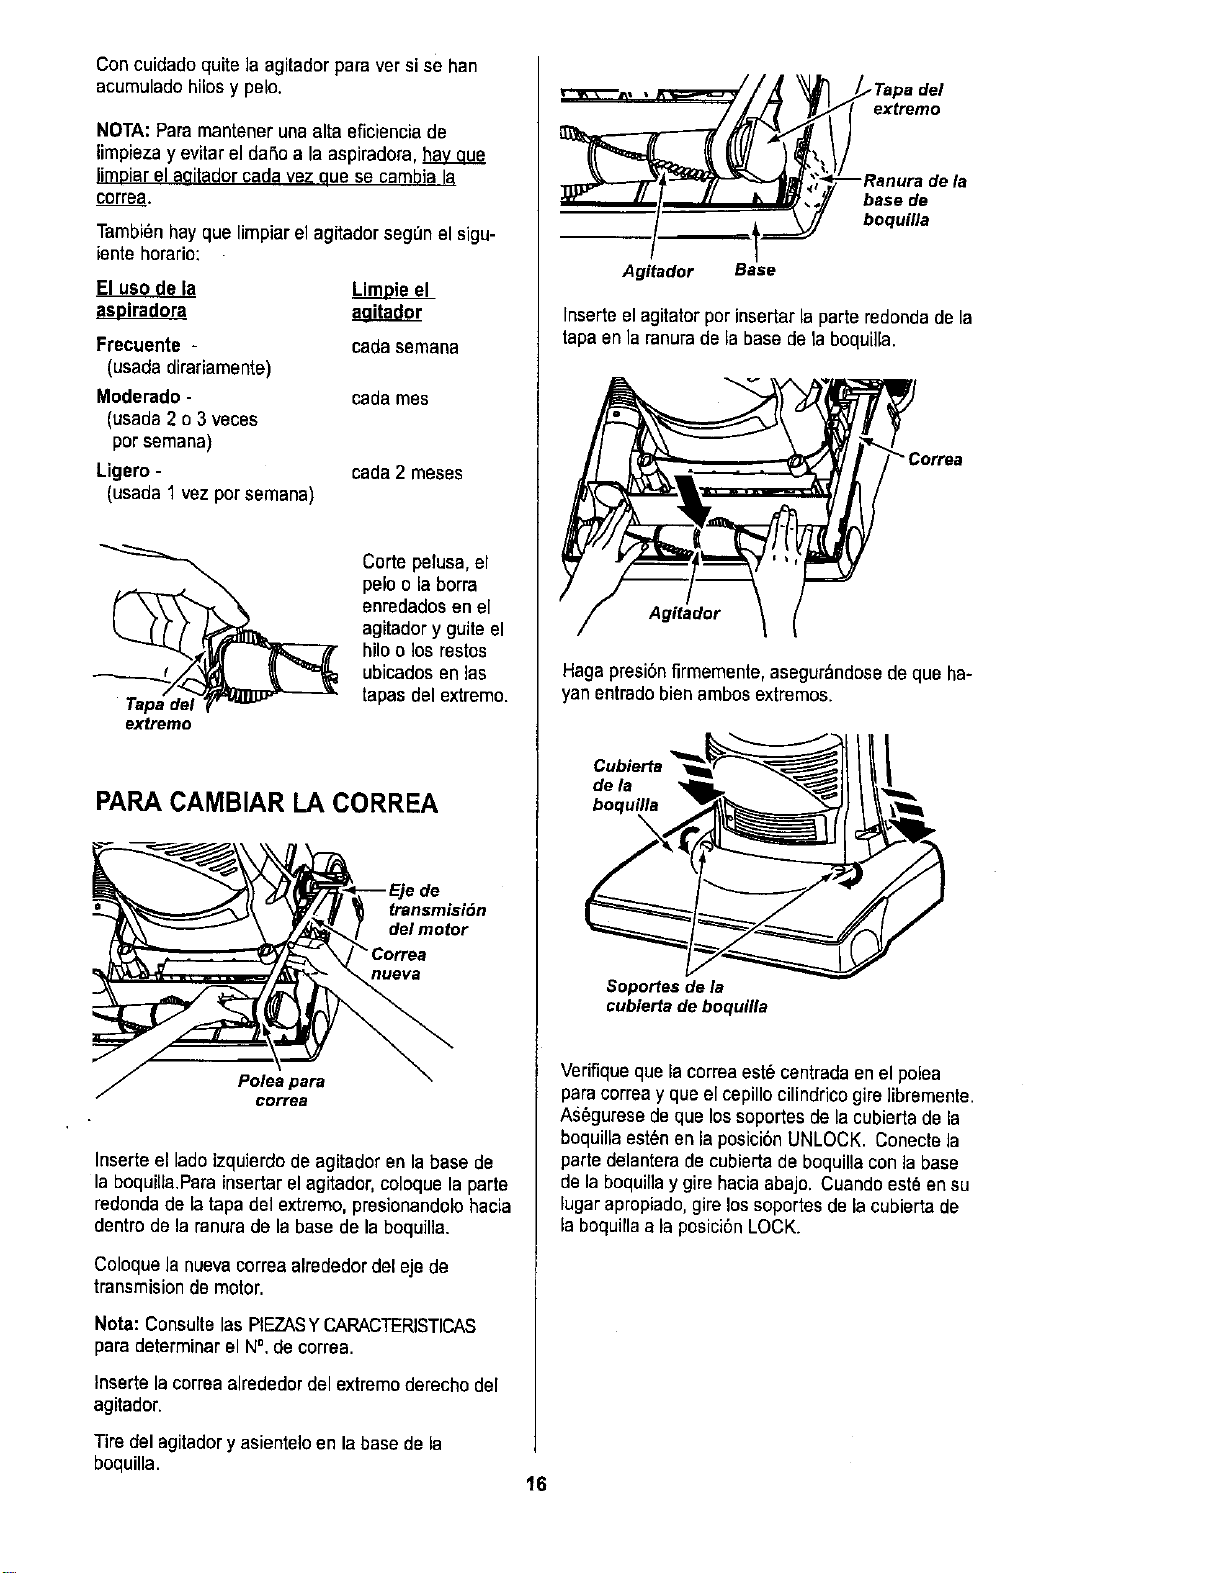
PARA QUITAR LA CUBIERTA
DE LA BOQUILLA
Desenchufe la unidad de la corriente el6ctrica.
Para proteger ]a superficie del suelo, siempre
ponga papel debajo de la boca de la mdquina
cuando se saca la cubierta de la boquille.
Libere ta cubierta de boquilla por girar los
soportes de la cubierta de boquilla a la
posici6n UNLOCK. Agarre ambos lados la
parte trasera de la boquilla y levante la cubierta
para quitarla de la base de la boquiila.
L ,1 I
Soportes de la
cubierta de
boquilla
Cubierta
de la
Cepille o quite cualquier residuo que estd enal
area de correas,
IbADVERTENCIA
Peligro de lesi6n personal
Siempre desenchufe la aspiradora antes
de limplar el _rea del cepillo, ya que _ste
podria empezar a funcionar repentina-
mente. No hacerlo podria reeultar en
una lesl6n personal.
PARA QUITAR LA CORREA/
LIMPIAR EL AGITADOR
Correa
Coloque [as manos en el agitador. Si la correa
ya est_ instalada en e[ agitador, babrd tensi6n
en el agitador. Tenga cuidado cuando levanta
el agitador de la boquilla.
Quite la correa desgastada o rota del eje de
transmisi6n de[ motor.
Quite toda basura o restos del &rea que
recorre la correa o del drea del cepillo cilin-
drico.
IbADVERTENCIA
Peligro de lesi6n personal
Tenga cuidado al quitar el cepillo ilin-
drico, la tensi6n de la correa es
grands. Si no tiene precauci6n podria
sufrir una lesi6n personal si el cepillo
se libera r_pidamente y sale disparado.
15
Concuidado quite ]a agitador para ver si se han
acumulado hilosy pelo.
NOTA:Paramantener unaalta eficienciade
limpieza y evitar el daSoa la aspiradora,hay aue
limoiar el aoitador cadavez aue se cambia la
correa.
Tambienhay quelimpiar el agitador segen el sigu-
iente horario:
El uso_d___
Frecuente - cadasemana
(usadadirariamente)
Moderado - cadarues
(usada2 o 3 veces
parsemana)
Ligero- cada2 mesas
(usada 1 vez par semana)
extreme
Carte petusa,el
pelo o la borra
enredadosen el
agitador y guite el
hilo o los restas
ubicados en las
tapas del extremo.
PARACAMBIAR LA CORREA
)'_:<-"-- Ejede
_._1/ _ transmisiSn
correa
Inserte el ladoizquierdo de agitador en labase de
la boquilla.Parainsertarel agitador, coloque la parte
redonda de la tapadel extremo, presionandolohacia
dentro de la ranura de la base de la boquilla.
Coloquela nuevacorreaalrededor del eje de
transmision de motor.
Nota: Consulte las PIEZASYCARACTERISTICAS
para determinar el N°. de correa.
Insertelacarreaalrededor del extremoderecho del
agitador.
Agitador Base
Tapa del
extremo
--Ranura de la
base de
boquilla
Inserte el agitator par insertar la parte redondade la
tapaen la ranurade la base de la boquii[a.
Ag_ador
Hagapresi6nfirmemente,asegur_lndosede que ha-
yan entradobien ambos extremos.
Cubierta
dela
Soportea de la
cubierta de boquilla
Verifiqueque la correaest6 centradaen el polea
para correay que el cepillocilindrico gire ]ibremente.
As6gurese dequa lossoportes dela cubierta de la
boquilla est_nen la posicibn UNLOCK. Conecte la
parte delanterade cubierta de boquillacon la base
de la boquiliay gire haciaabajo. Cuandoest_ an su
lugar apropiado,gire lossoportes de la cubierta de
la boquiBaa la posici6n LOCK.
Tire del agitadory asientelo an la basede la
boquilla.
16
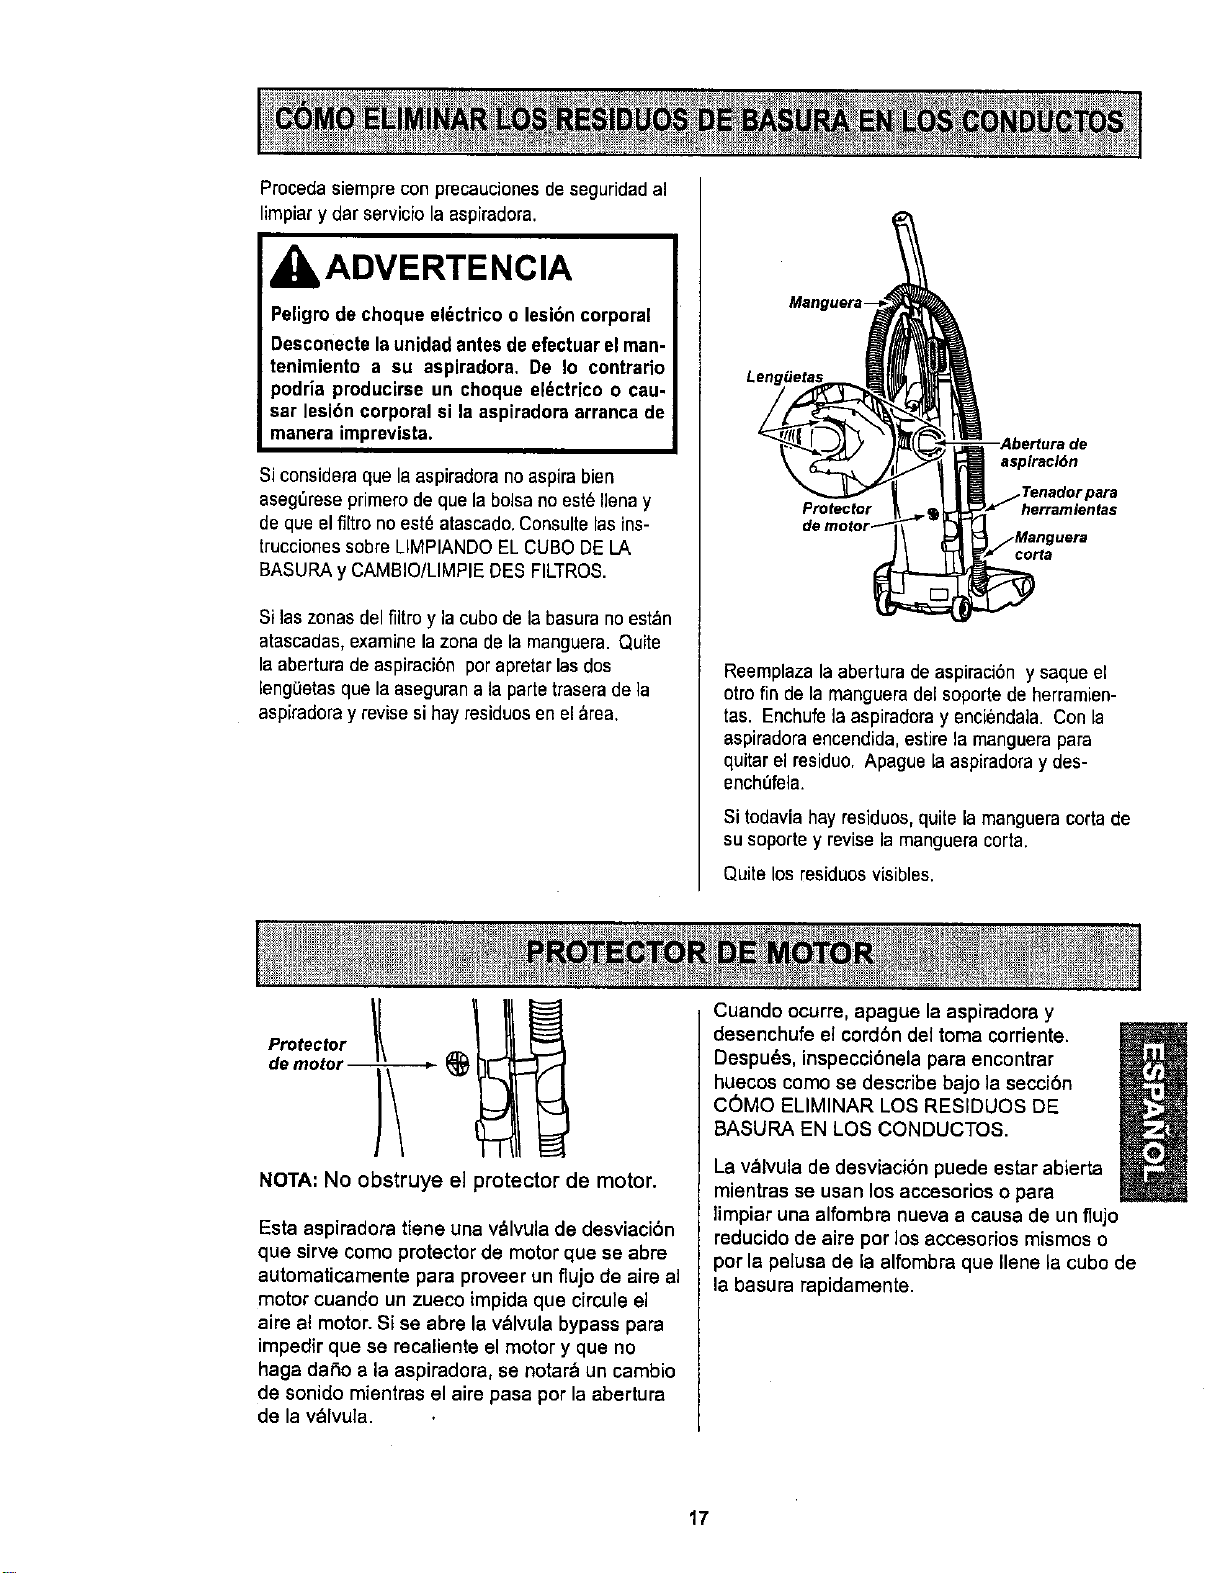
Procedasiempre con precaucionesde seguridad al
limpiary dar servicio la aspiradora.
kADVERTENCIA
Peligrode choque el_ctrico o lesibn corporal
Desconectelaunidad antesdeefectuar elman-
tenimiento a su aspiradora. De Io contrado
podria producirse un choque eldctrico o cau-
sar lesibn corporal si la aspiradora arranca de
manera imprevista.
Si consideraque laaspiradora no aspirabien
aseg6rese primero de que la bolsano est_ilena y
de que el filtro no est6 atascado.Consulte lasins-
trucciones sobre LIMPIANDOEL CUBO DELA
BASURA y CAMBIO/LIMPIEDES FILTROS.
Si laszonasdel filtro y la cubo dela basura noest&n
atascadas,examine la zona de lamanguera. Quite
la abertura de aspiraci6n por apretar lasdos
lengOetasque la asegurana la partetrasera de la
aspiradoray revise si hay residuosen el &rea.
Protector
asplracl6n
herrarnientas
corta
Reemplazala abertura de aspiraci6n y saque el
otro fin de la mangueradal soporte de herramien-
tas. Enchufela aspiradoray enciendala. Con la
aspiradora encendida, estire la manguerapara
quitar el residuo. Apague la aspiradoray des-
enchi_fela.
Si todaviahay residues, quite la mangueracorta de
su soporte y revise la mangueracorta.
Quite los residuos visibles.
NOTA: No obstruye e] protector de motor.
Esta aspiradora tiene una v&lvula de desviacibn
que sirve como protectorde motor que se abre
automaticamente para proveer un flujo de aire a]
motor cuando un zueco impida que circule el
aire al motor. Si se abre la v_lvula bypass para
impedir que se recaliente el motor y que no
haga dai_o a la aspiradora, se notar_ un cambio
de sonido mientras el airo pasa pot la abertura
de la v._,lvula.
Cuando ocurre, apague la aspiradora y
desenchufe el cord6n del toma corriente.
Despu_s, inspecci6nela para encontrar
huecos como se describe bajo la secci6n
COMO ELIMINAR LOS RESIDUOS DE
BASURA EN LOS CONDUCTOS.
La v_lvula de desviacibn puede estar abierta
mientras se usan los accesorios o para
limpiar una alfombra nueva a causa de un flujo
reducido de aire por los accesorios mismos o
por la pelusa de la alfombra que Ilene la cubode
la basura rapidamente.
17
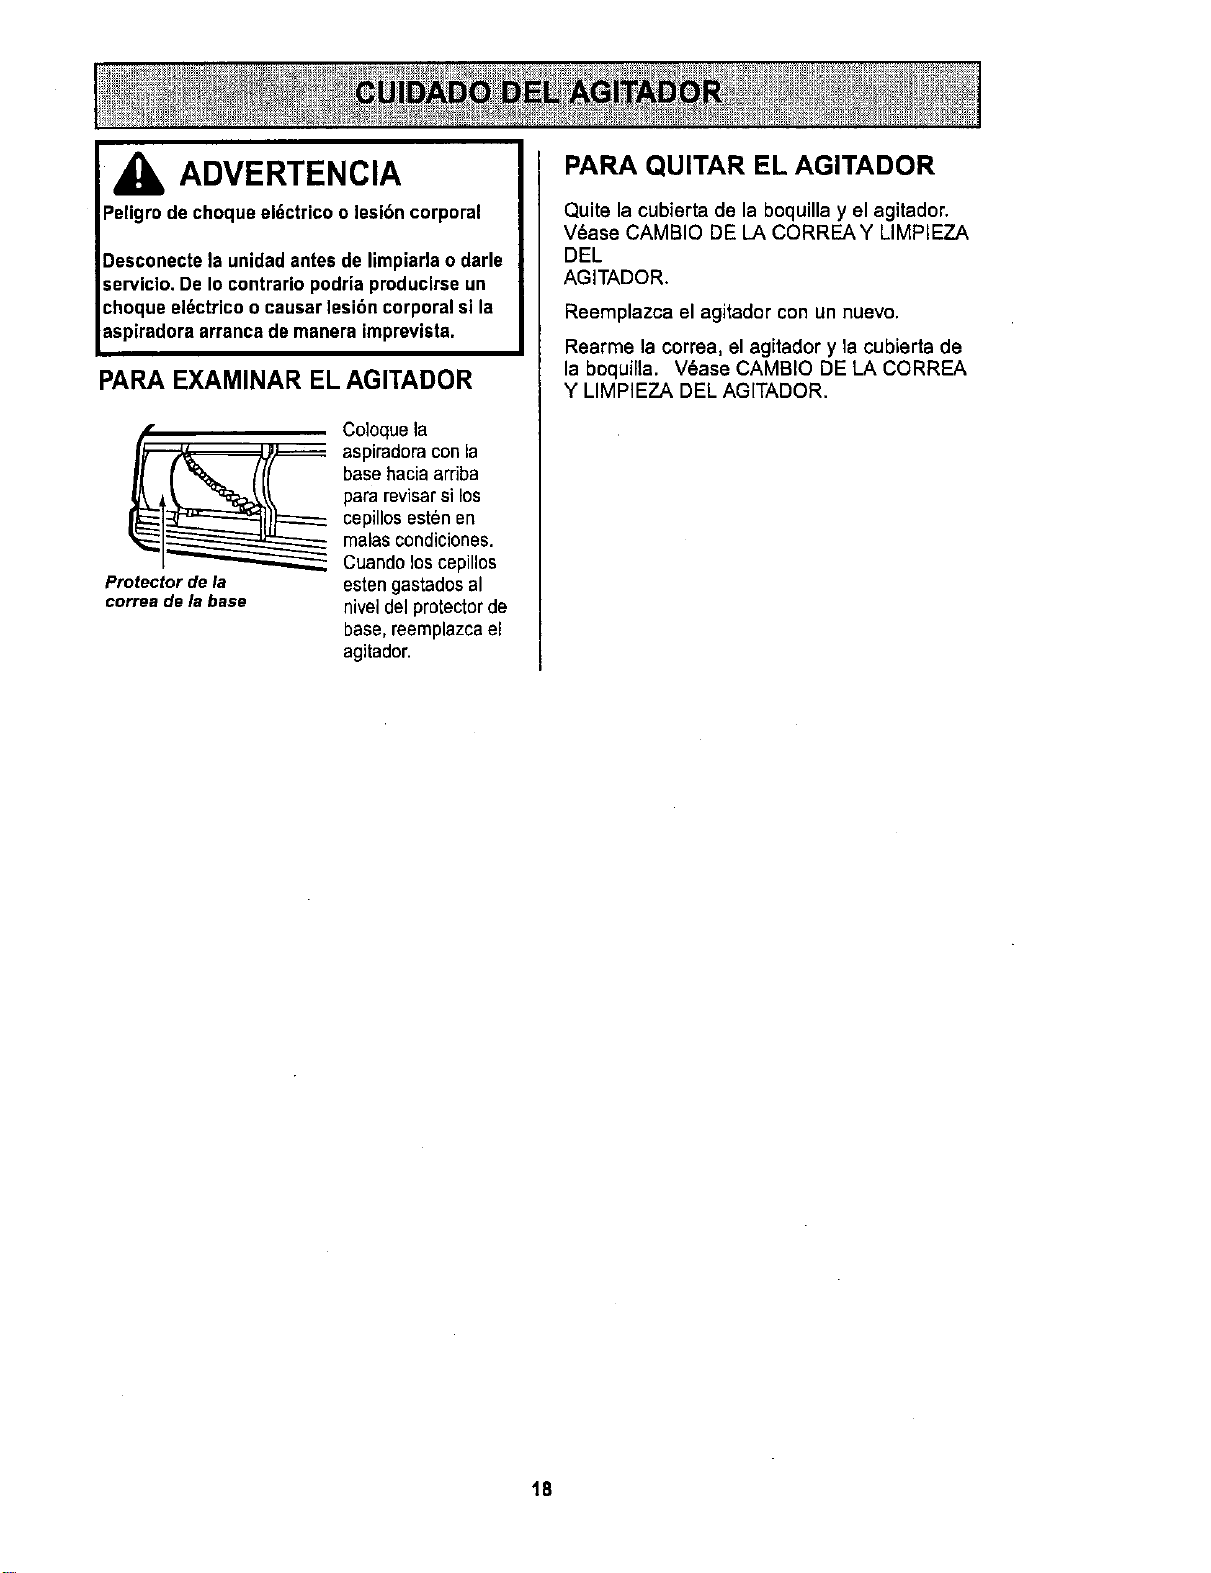
IbADVERTENCIA
Peligrode choque el_ctrico o lesi6ncorporal
Desconecte Is unidadantesde limpiarla o darle
servicio. De Io contrario podriaproduclrseun
choque el_ctrico o causar lesibn corporal si la
aspiradora arrancade manera imprevista,
PARA EXAMINAR ELAGITADOR
Protector de la
correa de la base
Coloque la
aspiradoraconla
base haciaarriba
para revisar si los
cepillos esten en
malas condiciones.
Cuando loscepillos
esten gastados al
nivel del protectorde
base,reemplazcael
agitador.
PARA QUITAR EL AGITADOR
Quite la cubierta de la boquilla y el agitador.
V_ase CAMBIO DE LA CORREAY LIMPIEZA
DEL
AGITADOR.
Reemplazca el agitador con un nuevo.
Rearme la correa, el agitador y ta cubierta de
la boquilla. V6ase CAMBIO DE LA CORREA
Y LIMPIEZA DEL AG[TADOR.
18

ADVERTENCIA
Paligro de choque eldctrico o lesi6n corpo-
ral
Desconecte la unidad antes de limp!aria o
darle servicio. De Io contrario podria pro-
ducirse un choque eldctrico o causar
lesi6n corporal si la aspiradora arranca de
manera imprevista.
Desenchufelaunidad de lacorriente el_ctrica.
\
Empuje aqul
Paraalzar labombilla, quitee] tornilloque asegurael
lentea la aspiradora. Quiteel lente.
\
Remover el foco jalandolo de la base.
CUIDADO
No use una bombilla de m_s de 9 vatios (13
volts). Cuando se use la aspiradora por un
largo periodo de tiempo, el calor de la bom-
billa puede calentar las partes de plastico
ceroa.
Ensamble foco presionandolo en la base. Use
solamente una bombilla de 13 V AC- 9 vatios o
de menos voltios.
\
Nota: Mire PLEZASY CARACTERISTICASpara el
numerode la bombilla.
CUIDADO
Coloqueotravez el lenteen la aspiradora.Coloque
otravez el torni]lo.
19
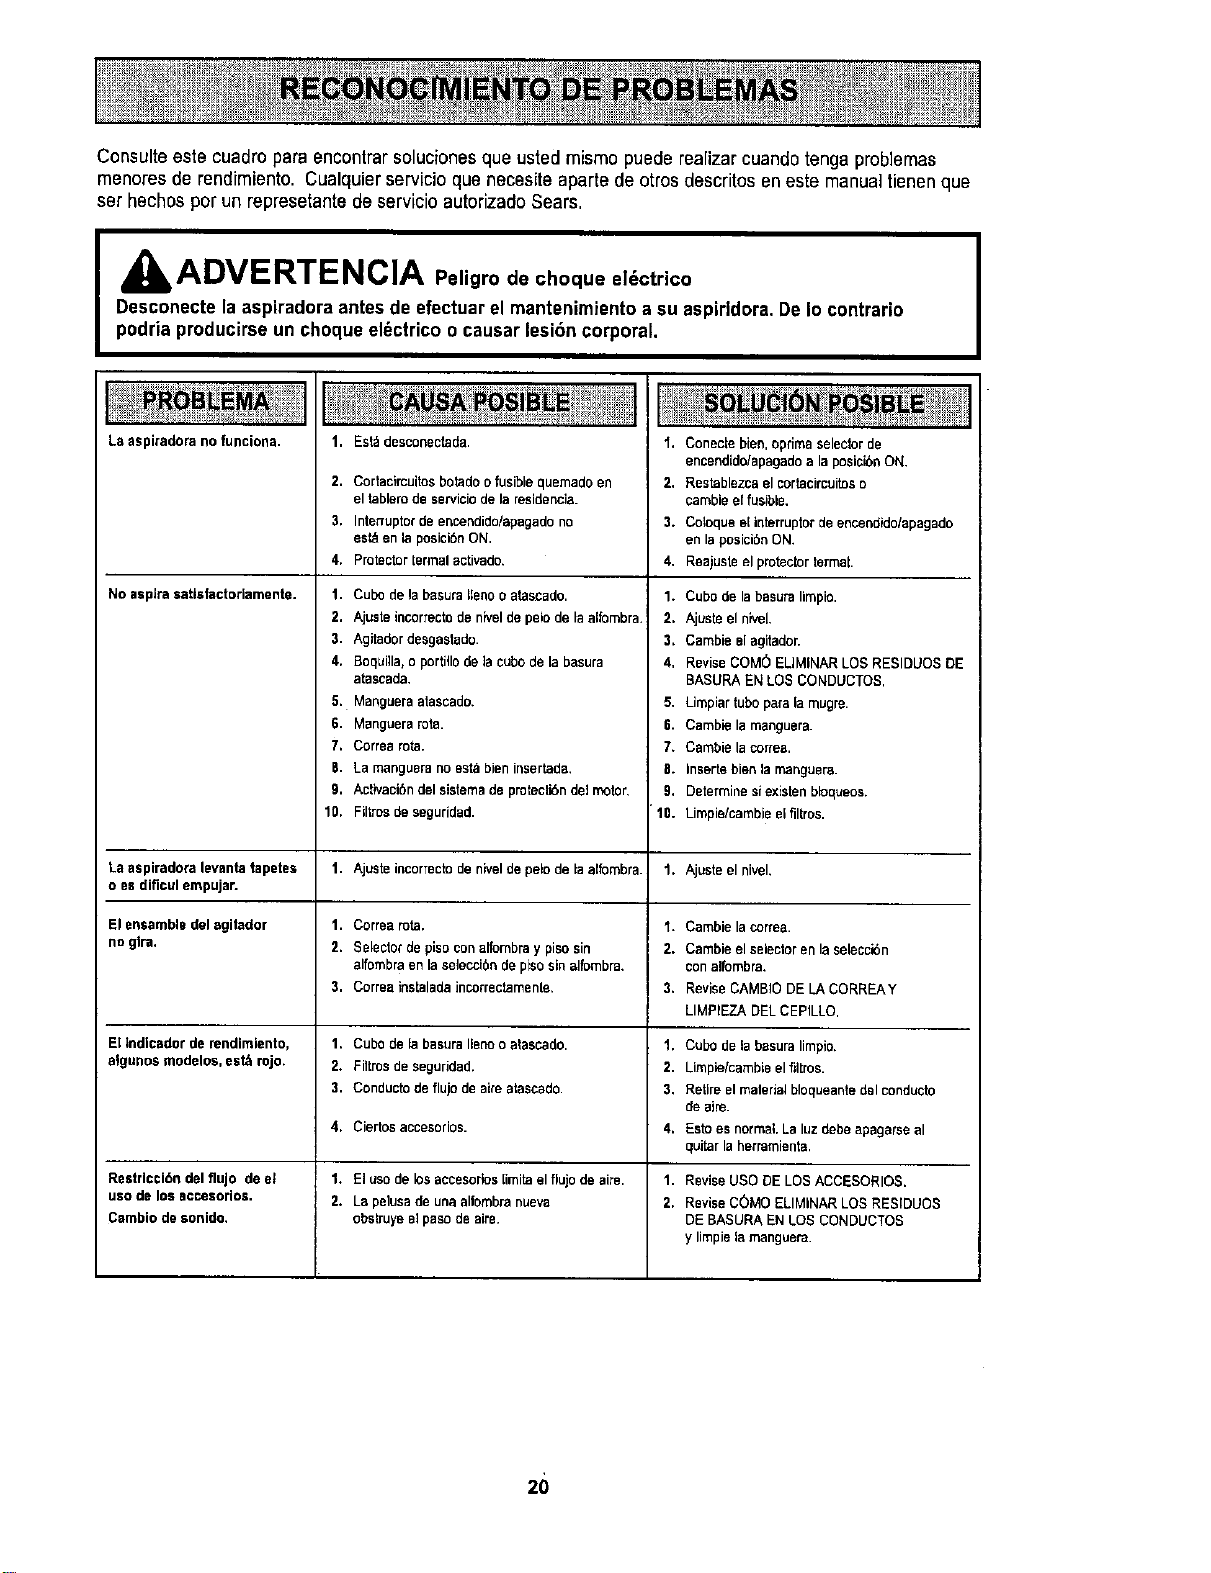
Consults este cuadro para encontrar solucionesque usted mismo puede rea[izarcuando tenga problemas
menores de rendimiento. Cualquierservicio que necesite aparte de otros descritos en este manualtienen que
set hechas par un represetante de servicio autorizado Sears,
AallADVERTENCIA Peligro de choque el6ctrico
Desconecte laaspiradora antesde efectuarel mantenimientoa su aspiddora. De Io contrario
podria producirseun choque el_ctrico o causar lesi6n corporal.
La aspiradorano funciona.
No aspJra satJsfactoriamente.
La aspiradora levanta tapetes
o es dificul empujan
Elensamblsdelagitador
no glra.
E[lndlcador de rendimiento,
algunosmodelos,est_ rojo.
Restrlcci6ndel fluJode el
use de losaccesorios.
Cambio de sonido,
1. Est_desconeclada.
2. Cortacircuites botado o fusible quemado en
el teblero de servicio de la residencia.
3. Interrupter de encendido/apagado no
eat& en la posici0n ON.
4. Protector termal activado.
1. Cube de la basura fleno o atascado.
2, Ajuste incorrecto de nivel de pele de la alfombra.
3. Agitedor desgastado
4. Soqugla, o portillode la cuba de la basura
atascada,
5. Manguera atascado.
6. Manguera rata
7. Correa rote.
B. La manguera no est_ bien inserteda,
9. Actfvaei6n del sistema de pmtectibn del motor,
10. Filtrosde seguridad
1. Ajusteincorrectodenivel depelodelaalfombra.
1. Correa rote.
2. Selector de piso con alfombra y piso sin
alfombra en la selecci6n de piso sin alfombra,
3. Correa instalada incorrectemenle.
1, Cuba de la basura Ileno o atascado.
2. FJltrosde seguridad.
3. Conducto de flujo de aire atescado
4. Ciertos aeeesorios.
1. El usade losaccesortosfimiteel flujode airs.
2. La pelusade unaallombranueva
obstruyeel pasode airs.
I. Conectebien,optimaselectorde
encendido/apagadoa la posicibnON.
2. Resteblezcaelcortacircuitoso
cambiee[fusible,
3. Coloquee[interrupterde encendidolapagado
en la posici_)nON,
4, Reajusteel protectortermat.
1. Cubede la basuralimpio.
2. Ajusteelnlvel.
3. Cambieel agitador.
4. ReviseCaM6 EUMINARLOSRESIDUESDE
BASURAEN LOSCONDUCTOS.
5, Limpiartubaparalamugre
6, Cambiela manguera.
7, Cambiela correa.
8, Insertebien lamanguera
9. Determinesiexlstenbtoqueos,
10. Limpie/cambieelfiltros.
1. Ajusteel nivel.
1. Cambielacorrea
2. Cambieelselectoren la seleeci6n
conalfombra,
3. ReviseCAMBIODELACORREAY
LIMPIEZADELCEPILLO.
1. Cuba de la basura limpio.
2. Limpte/cambie el flltros.
3, Retire el malerial bloqueante dal eonducto
de airs.
4, Esto es normal La luz debe apagarse al
quitar la herramienta.
1. Reviseuse DE LOSACCESORIOS.
2. ReviseC(SMOELIMINARLOSRESIDUES
DEBASURAEN LOSCONDUCTOS
y limpiela manguera
20
21
!1 ii"O
iiiii ii!ii!i_ii
i/_ _ii_ _
iii!i_iiiiii!_il
_!ii!!ii!!ii_
Your Home
For repair - in your home - of all major brand appliances,
lawn and garden equipment, or heating and cooling systems,
no matter who made it, no matter who sold it_
For the replacement parts, accessories and
owner's manuals that you need to do-it-yourself.
For Sears professional installation of home appliances
and items like garage door openers and water heaters.
1-800-4-MY-HOME ® Anytime, day or night
(1-800-469-4663) (U.S_,. and Canada)
www.sears.com www.sears.ca
Our Home
For repair of carry-in products like vacuums, lawn equipment,
and electronics, call or go on-line for the nearest
Sears Parts and Repair Center.
1-800-488-1222 Anytime, day or night (U.S.A. only)
iiiiiiiii
!iiiiiii_!ii!!i !
ii_!iiiiiiiiii!i!
ii!iiiiii!iiiiiiii
!!_i_i_iiiiiill
www,sears.com
........... To purchase protection agreement (U S A)
or maintenance agreement (Canada) on a product serviced by Sears:
ii ili iil ii_
1-800-827-6655 (U.S.A.) 1-800-361-6665 (Canada) .......
Para pedir serviciode reparacibn
a domicilio,y para ordenar piezas:
1-888-SU-HOGAR ®
iiiiiii
(1-888-784-6427)
¸Seats
Au Canada pour service en francois:
1-800-LE-FOYER Mc
(1-800-533-8937) ......
y_Nv.sears,ca ..........
© Sears, Roebuck and Co.
® Registered Trademark / TMTrademark / SMService Mark of Sears Brand, LLC
® Marca Registrada / TMMarca de F_brica / SMMama de Servicio de Sears Bra Roebuckands, LLC
MCMarque de commerce / MDMarque ddpos_e de Sears Brands, LLC