ELECTRONICS
Owner's
Instructions
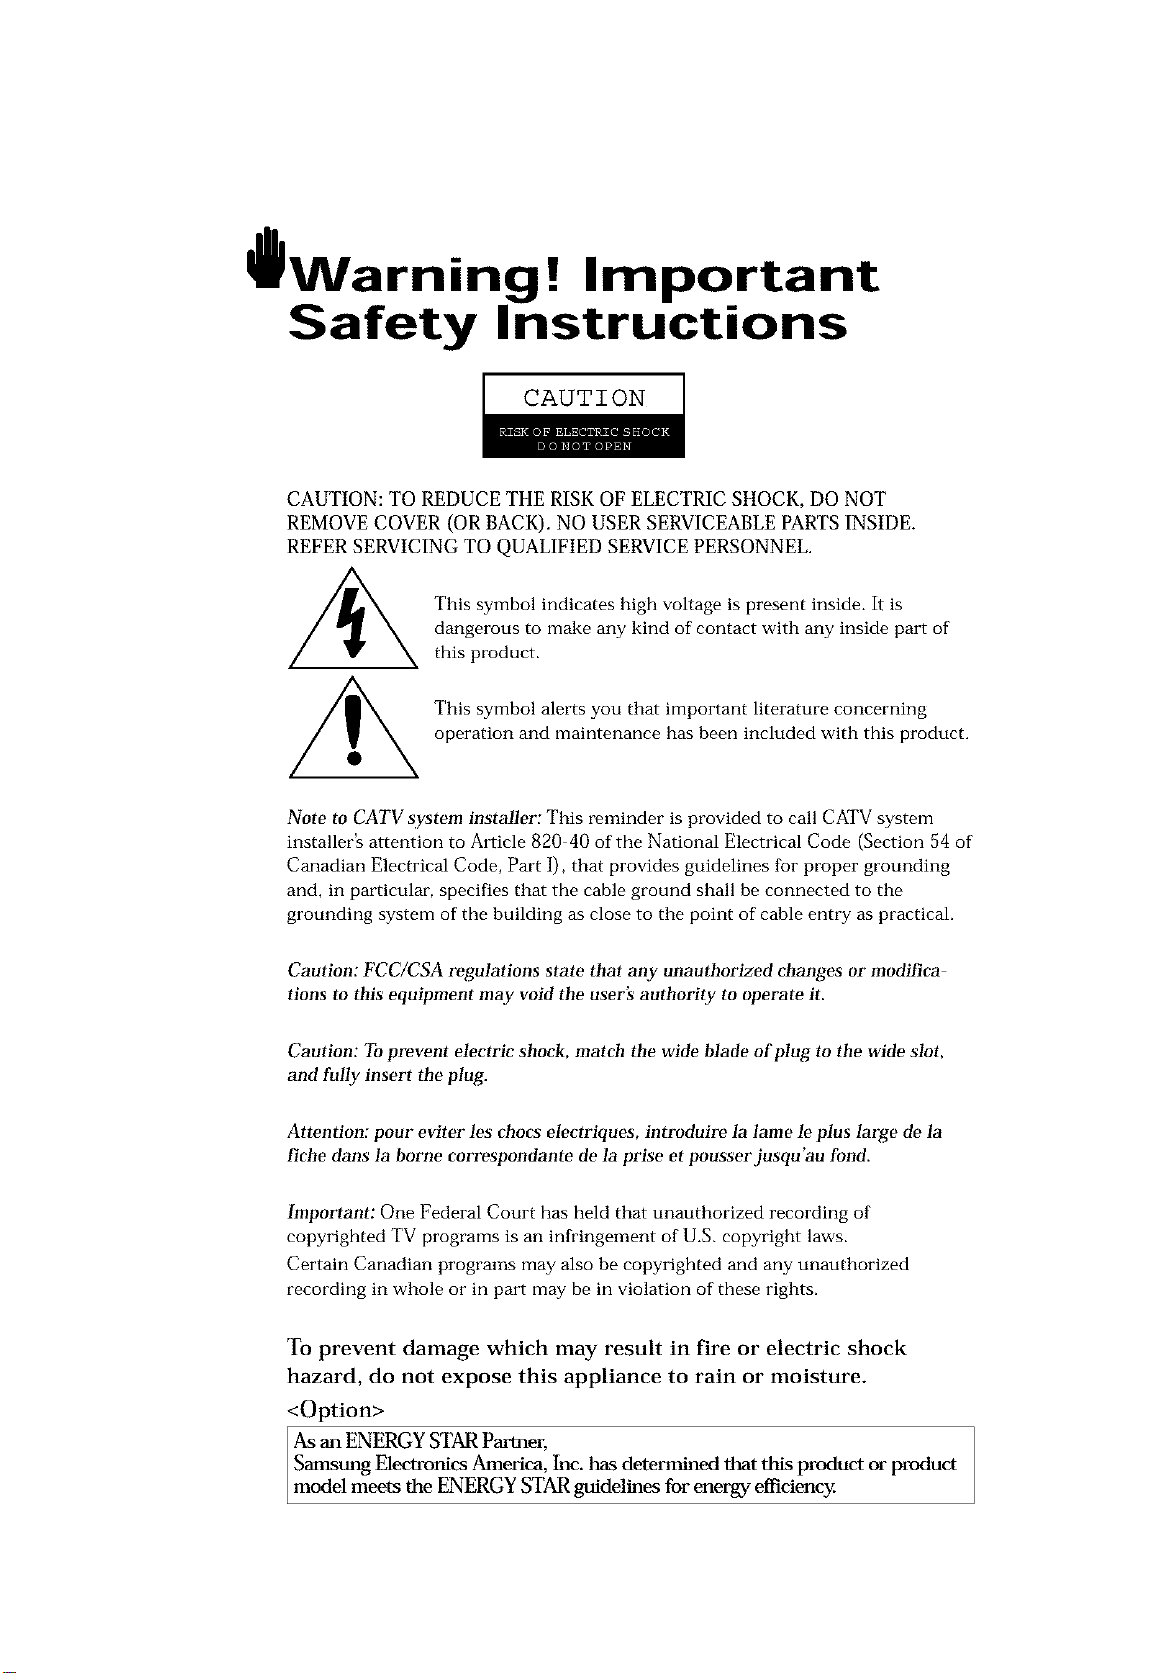
l Warninq ! Important
Safety Instructions
CAUTION
CAUTION: TO REDUCE THE RISK OF ELECTRIC SHOCK, DO NOT
REMOVE COVER (OR BACK). NO USER SERVICEABLE PARTS INSIDE.
REFER SERVICING TO QUALIFIED SERVICE PERSONNEL.
This symbol indicates high voltage is present inside, It is
dangerous to make any kind of contact with any inside part of
this product.
This symbol alerts you that important literature concerning
operation and maintenance has been included with this producL
Note to CATV system installer: This reminder is provided to call CATV system
installer's attention to Article 820 40 of the National Electrical Code (Section 54 of
Canadian Electrical Code, Part I), that provides guidelines for proper grounding
and, in particular, specifies that the cable ground shall be connected to the
grounding system of the building as close to the point of cable entry as practical.
Caution: FCC/CSA regulations state that any unauthorized ehanges or modillca
tlons to this equipment may void the user's authority to operate it.
Caution: To prevent etectric shoek, match the wide Made of plug to the wide slot,
and fully insert the plug.
Attention: pour eviter les chocs electriques, introduire la lame le ptus large de la
fiche dans la borne correspondante de la prise et pousserjusqu'au fond.
Important: One Federal Court has held that unauthorized recording of
copyrighted TV programs is an infringement of U.S. copyright laws.
Certain Canadian programs may also be copyrighted and any unauthorized
recording in whole or in part may be in violation of these rights.
To prevent damage which may result in fire or electric shock
hazard, do not expose this appliance to rain or moisture.
<Option>
As an ENERGY STAR Partner,
Samstmg Electronics America, Inc. has determined that this product or product
model meets the ENERGY STAR guidelines for energy efficiency
Thank You for Choosing Samsung
Thank you for choosing Samsung! Your new Samsung TV represents the latest in television
technology, We designed it with easy to use on screen menus and closed captioning capabili
ties, makhlg it one of the best products in its class. We are proud to offbr you a product that
will provide convenient, dependable service and enjoyment fur years to come.
Important Safety Information
Always be careful when using your TV receiver. To reduce the risk of fire, electrical shock,
and other injuries, keep these safety precautions in mind when installing, using, and
maintaining your machine.
• Read all safety and operating instructions before operating your T_
• Keep the safety and operating instructions for future re%fence.
• Heed all warnings on the TV receiver and in the operating instructions.
• Follow all operating and use instructions.
• Unplug the TV receiver from the wall outlet befure cleaning. Use a damp cloth; do not use
liquid or aerosol cleaners.
• Never add any attachments and/or equipment without approval of the manufacturer. Such
additions can increase the risk of fire, electric shock, or other personal injury,
• Do not use the TV receiver where contact with or immersion in water is a possibility, such as
near bath tubs, sinks, washing machines, swimming pools, etc.
• Do not place the TV on an unstable cart, stand, tripod, bracket, or
table where it can fail. A falling TV can cause serious injury to a
child or adult, and serious damage to the appliance. Use only with
a cart, stand, tripod, bracket, or table recommended by the manu
facturer or sold with the TV[ Pollow the manufacturer_ instruc
tions when mounting the unit, and use a mounting accessory rec
ommended by the manufacturer. Move the TV and cart with care.
Quick stops, excessive force, and uneven surfaces can make the
unit and cart unsteady and likely to overturn.
• Provide ventilation fur the TV receiver. The unit is designed with
slots in the cabinet for ventilation to protect it from overheating. Do not block these openings
with any object, and do not place the TV receiver on a bed, sofa, rug, or other similar sur
face. Do not place it near a radiator or heat register. If you place the TV receiver on a rack or
bookcase, ensure that there is adequate ventilation and that you've followed the manufactur
er_ instructions fur mounting.
• Operate your TV receiver only from the type of power source indicated on the marking label.
If you are not sure of the type of power supplied to your home, consult your appliance dealer
or local power company
• Use only a grounded or polarized outlet. For your safety, this TV is equipped with a polarized
alternating current line plug having one blade wider than the other. This plug will fit into the
power outlet only one way If you are unable to insert the plug fully into the outlet, try
reversing the plug. If the plug still does not fit, contact your electrician to replace your outlet.
SAFELY

• Protect the power cord. Power supply cords should be routed so that they won't be walked on
or pinched by objects placed on or against them. Pay particular attention to cords at plugs, con
venience receptacles, and the point where they exit from the unit.
• Unplug the TV from the wall outlet and disconnect the antenna or cable system during a light
ning storm or when left unattended and unused for long periods of time. This will prevent dam
age to the unit due to lightning and power line surges.
• Avoid overhead power lines. An outside antenna system should not be placed in the vich]ity of
overhead power lines or other electric light or power circuits or where it can fail into such
power lines or circuits. When installing an outside antenna system, be extremely careful to keep
from touching the power lines or circuits. Contact with such lines can be fatal.
• Do not overload the wall outlet or extension cords. Overloading can result in fire or electric
shock.
• Do not insert anything through the openings in the unit, where they can touch dangerous volt
age points or damage parts. Never spill liquid of any kind on the TV
• Ground outdoor antennas. If an outside antenna or cable
system is connected to the TV_be sure the antenna or
cable system is grounded so as to provide some
protection against voltage surges and built up static
charges. Section 810 of the National Electrical Code,
ANSI/NFPA No.70 1984, provides infurmation about
proper grounding of the mast and supporting structure,
grounding of the lead in wire to an antenna discharge
unit, size of grounding conductors, location of antenna
discharge unit, connection to grounding electrodes, and
requirements for the grounding electrode.
EXAMPLEQF
ANTENNAGROUNDING
• Do not attempt to service the TV yourself. Refer all servicing to qualified service personnei.
Unplug the unit from the wall outIet and refer servicing to qualified service personnel under the
fullowing conditions:
when the power supply cord or plug is damaged
if liquid has been spilIed on the unit or if objects have fallen into the unit
if the TV has been exposed to rain or water
if the TV does not operate normally by following the operating instructions
if the TV has been dropped or the cabinet has been damaged
when the TV exhibits a distinct change in performance
• If you make adjustments yourself, adjust only those controls that are covered by the operating
instructions. Adjusting other controls may result in damage and will often require extensive
work by a qualified technician to restore the TV to normal.
• When replacement parts are required, be sure the service technician uses replacement parts
specified by the manufacturer or those that have the same characteristics as the original part.
Unauthorized substitutions may result in additional damage to the unit.
• Upon completion of any service or repairs to this TV] ask the service technician to
perform safety checks to determine that the TV is in a safe operating condition.
This device complies with part 15 of the FCC Rules. Operation is subject to the following
two conditions:
(1) This device may not cause harmful interference, and
(2) This device must accept any interference that may cause undesired operation.
This television receiver provides display of television closed captioning in accordance with
2 s_._ 15.119 of the FCC rules.
CONTENTS ]
Chapter 1: Your New TV ............... 1.1
List of Featuzes ......................................... 1,1
Familiarizing Yuursetf with Yuuz New TV ..................... 1,2
Front Pane[ Buttons .............................. 1,2
Side Panet Jacks ................................. 1,3
Rear Pane[ .Jacks ................................. 1.4
Remote Control ................................. 1.5
Chapter 2: Installation ................ 2.1
Connecting VHF and UHF Antennas ........................ 2.1
Antennas with 300 ohm Flat %vin Leads .............. 2.1
Antennas with 75 ohm Round Leads ................. 2.2
Separate VHF and UHF Antennas .................... 2.2
Connecting Cable TV .................................... 2.2
Cabte without a Cable Box ......................... 2.2
Connecting to a Cable Box that Desci-amb[es
All Channels .................................... 2.3
Connecting to a Cable Box that Desczamb[es
some Channels .................................. 2.3
Connecting a VCR ...................................... 2.,5
Connecting an S VHS VCR......................... 2.6
Connecting a Second VCRto Record from Yuur TV ...... 2.8
Connecting a DVD Player ................................. 2.7
Connecting a Digital TV Set Tup Box ........................ 2.7
Connecting a Surzound Speakers ........................... 2.8
Connecting a Speakezs (Vaziable Autio output) ................. 2.8
Connecting a Camcorder ................................. 2.9
Installing Battezies in the Remote Control ..................... 2.10
1 (]ON] EN] S
Chapter 3: Operation .................. 3.1
Turning the TV On and Off................................ 3.1
Plug & Play Featuze ..................................... 3.1
Viewing the Menus and On Sczeen Displays ................... 3.3
Viewing the Menus ............................... 3.3
Viewing the Display .............................. 3.3
Selecting a Menu Language ................................ 3.4
Memozizing the Channels ................................. 3.5
Selecting the Video Signal source .................... 3.5
Stozing Channels in Memozy (Automatic Method) ....... 3.6
Adding and Ezasing Channels (Manual Method) ........ 3.7
Changing Channels ..................................... 3.7
Using the Channel Buttons ......................... 3.7
Dii-ectly Accessing Channels ........................ 3.7
Using the Pre CH Button to select the PIevious Channel . . 3.7
Adjusting the Vdume .................................... 3.8
Using Mute ..................................... 3.8
Labeling the Channels ................................... 3.9
Setting the Clock ....................................... 3.10
Customizing the Picture .................................. 3.13
Using Automatic Picture Settings ........................... 3. ] 4
Customizing the Sound .................................. 3. ] 5
Using Automatic Sound Settings ............................ 3.16
Viewing a VCR or Camcozdez '.Cape.......................... 3.17
CONTENTS
Chapter 4: Special Features ............ 4.1
Customizing Yuuz Remote ContzoI .......................... 4.1
Setting Up Youz Remote Contzol to Opezate Yuur
VCR (or DVD) .................................. 4.1
Setting Up Youz Remote Contzol to Opezate Yuur
Cable Box...................................... 4.3
Fine Tuning Channels .................................... 4.4
LNA(Low Noise Amplfftez) ................................ 4.5
Digital Noise Reduction .................................. 4.@
Tilt .................................................. 4.7
Changing the Sczeen Size ................................. 4.8
Freezing the Picture ..................................... 4.9
Using the R.surf ........................................ 4.9
Special Sound Options: Dolby Surround, MTS, Auto Vdume and
Headphone ............................................ 4. l0
Dolby Pzo Logic ................................. 4.10
Choosing a Mutti Channel Sound (MTS) Soundtrack ..... 4.11
Adjusting the Headphone Sound .................... 4.12
Auto Volume ..................................... 4.13
Switching the Internal Speakezs On/Off ........................ 4.14
Setting the On/Off Timez ................................. 4.15
Setting the Steep Timer ................................... 4. l@
Viewing Ctosed Captions ................................. 4.17
Viewing Picture in Pictuze ................................ 4.18
Activating Pictuze in Picture ........................ 4.18
Selecting a Signal Source (External A/V) for PIP ......... 4.19
Swapping the Contents of the PIP image and Main image . 4.19
Changing the PIP Charmer ......................... 4.19
Changing the Location (Rotating) the PIP Window ...... 4.19
Changing the Size of the PIP Window ................ 4.19
Scanning the Avaitable Channels .................... 4.19
Using the VChip (Option) ................................ 4.20
Setting Up Youz Pezsonal ID Number (PIN) ............ 4.20
How to Enabte/Disabte the VChip ................... 4.21
How to Set up Restzictions Using the "TV guidelines" . . .. 4.21
How to Set up Restzictions using the MP/\A Ratings:
G, PG, PG 13, R, NC 17, X ........................ 4.23
How to Reset the TV after the VChip Blocks
a Channel ("Emergency Escape") .................... 4.24
Chapter 5: Troubleshooting ............ 5.1
Identifying Pi-oblems .................................... 5.1
Appendix ........................... A.1
Cteaning and Maintaining Yuuz TV.......................... A.1
Using Yuuz TV in Anothez Countzy ......................... A.1
Specifications .......................................... A.1
( _H_H_s 2
YOUR NEW TV
List of Features
Your TV was designed with the latest technology. This TV is a high performance unit that
includes the following special features:
• Easy to use remote control
• Easy tO use on screen _]erlu system
• Automatic timer to turn the TV on and off
• Adjustable picture and sound settings that can be stored in the TV_ memory
• Automatic channel tuning for up to 181 channels
• A special filter to reduce or eliminate reception problems
• Fine tuning control fur the sharpest picture possible
• A built in multi channel sound decoder foF stereo and bilingual listening
• Built in dual channel speakers
• A special sleep timer
• Double screen
• Headphone jack fur private listening
• 16:9 letter box furmat available depending upon sourc
(2HAP] k ON YOll NEW ]V _ .
I Your NEw TV
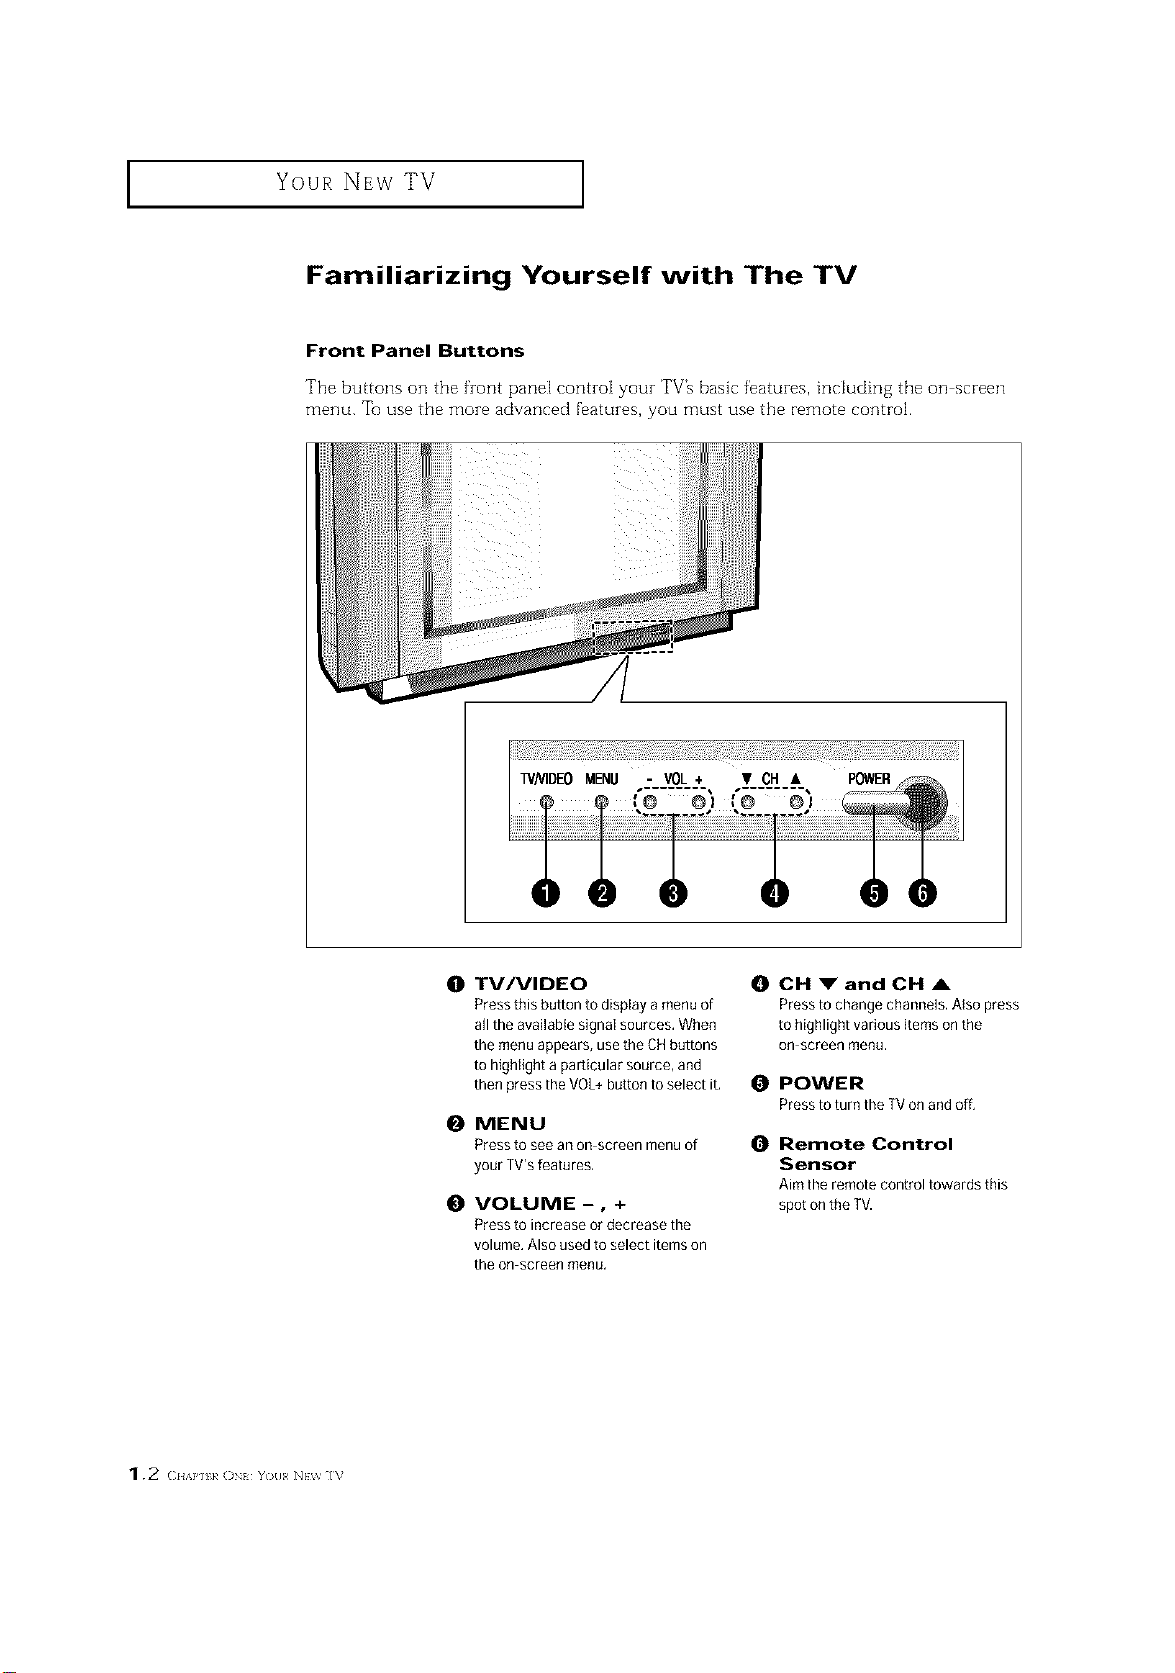
Familiarizing Yourself with The TV
Front Panel Buttons
The buttons on the front pane[ corm-o[ your TV% basic features, includin 8 the on screen
menu. Tu use the more advanced f'eatures, you must use the remote control.
0 TV/VIDEO
Press this button to display a menu of
all the available signal sources, When
the menu appears, use the CHbuttons
to highlight a particular source, and
then press the VOL+button to select it,
0 MENU
Press to see an on screen menu of
your TVrsfeatures,
0 VOLUME-, +
Press to increase or decrease the
volume, Also used to select items on
the on screen menu.
0 CH _" and CH ,&
Pressto change channels. Atso press
to highlight various items onthe
On screen menu,
0 POWER
Pressto turn the TVon and off,
0 Remote Control
Sensor
Aim the remote control towards this
spot onthe TV.
1.2 (2HAP] k ()N YO{I NEV_ IV
YOUR NEW TV ]
Side Panel Jacks
Yuu can use the side panel jacks to connect an A/V component that is used only
occasionally, such as a camcorder or video game. (For in%rmation on connecting
equipment, see pages 2.1 2.9.)
The TV illustration shown does not necessary match the design of your TV set.
@
O AUDIO IN jacks
Usedto connect the audio
signals from acamcorder or video
game,
O VIDEO IN jack
Usedto connect a video signal from a
camcorder or a video game.
SUPER VIDEO IN jack
Used to connect an S Video signal from
a camcorder or a video game,
O HEADPHONE JACK
Connect aset of external headphones
to thisjack for private listening.
(]HAP] h ON YOll NEV_ IV 1.3

Your NEw TV ]
Rear Panel Jacks
Use the rear pane[jacks to connect an A/V component that will be connected
continuously, such as a VCR or a lasezdisc playen
Because there are two sets of input jacks, you can connect two different AA/
components (i.e., a VCR and a lasezdisc, 2 VCRs, etc.)
For more infomlation on connecting equipment, see pages 2.1 2.9.
O, OVIDEO INPUTS
Video signals from VCRs,laserdisc
players and similar devices (Three sets
are availaMe: AVl, AV2 andAV3),
_, _ AUDIO INPUTS
Audio signals from VCRs,laserdisc
players and similar devices.
O AUDIO-VIDEO
MONITOR OUTPUTS
Connect to the audio/video inputjacks of a
recording VCR,
Note:The monitor out does not operate in DVDor
DTVmode,
0 SURROUND OUTPUTS
Connects to a rear surround amp: Surround Left,
Surround Right and Center.
Hereare two ways to connect an audio amplifier:
1,TV amp- speaker
2.TV speaker(amp built in)
SUPER VIDEO IN
S Video signal from an S VHS
VCRor DVDplayer,
O DVD & DTV VIDEO INPUTS
Connects component video from a DVDplayer &
Set-TopBox,
DVD & DTV AUDIO INPUTS
Connect to the audio outputjacks of
a DVD player or SETTOP BOX.
@ VHF/UHF
Connecttoanantennaorto acableTVsystem.
1.4 (2HAP] k ON You NEV_ ]V
Your NEw TV ]
Remote Control
You can use the remote control up to about 23 feet from the TE When using the remote,
always point it directly at the T_
You can also use your remote control to operate your VCR and cable box. See page 4.1
for details.
O Power
Turnsthe TVon and off.
0 +100
Pressto select channels over 100.
For example, to select channel
121,press" +100: then press "2"
and"1 ,"
0 Mute
Pressto temporarily cut off
the sound.
0 OH& and OHm"
(Channel Up/Down)
PressCHA or CHV to change
channels. (Also used to highlight
selections on the on screen
menus,)
VOL -, VOL +
Press increase or decrease the
volume, (Also used to make selec
tions onthe on screen menus.)
0 Still picture
Pressto stop the action during a
particular scene. Press again to
resume normal video.
0 P. Mode
Adjust the TVpicture by
selecting oneof the preset
factory settings (or select your
personal, customized picture
settings).
S.Mode
Adjust the TVsound by selecting
oneof the preset factory settings
(orselect your personal
customized sound settings).
0 VCR controls
Stop
Pressto stop a tape in your VCR.
Pressto rewind a tape,
Pla_/Pause
Pressto playor pause the tape.
FF (Fast Forward)
Pressto fast forward a tape.
iiiilililililililililil
0
@
@
@
@
MODE
Selects a target device to be con
trolled by the Samsung remote
control (i,e,,TV,VCR,
Cablebox, or DVD).
Pre-CH
Tunestothepreviouschannel
TV/Video
Pressto display all of the
available video sources (i.e.,
Antenna/cable, VCR,DVD,Video
1-4 andS Video 1-2).
Menu
Displays the main on screen
menu.
BOSurround
Selects one of Phantom modes
(Off,Normal, Phantom or Wide).
@ PIP
Activatespicturein picture,
(:I{A}'][}/ ()N{ Y()[I N}W ]V 1.5
I Your NEw TV
Remote Control (continued)
@ Display
Presstodisp]aythecurrent
channel and the audio video
settings.
@ Sleep
Pressto select a preset time
interval for automatic shutoff,
Aspect
Presstochangethescreensize,
@ V.chip (Option)
Pressto set up and activate the
parental locks,
_) PiP Controls
Locate
Pressto movethe PIPwindow to
any of the four corners of the TV
screen,
Scan
Pressto memorize(scan) the
available channels,
Source
Pressto select one ofthe
avai{able signal sources for the
PIPwindow.
Exchangesthe video
signal that is currently
displayed on the main
screen with the signal
in the PIP window.
Size
Pressto makethe PIPwindow
double, large or small.
OH
Displays the available channels
in sequence. (These buttons
change channels in the PIP win
dow only).
il
':....... =.... =-:==J il
1_ R.surf
Press the R,surf button to auto-
matically return to a preferred
channel after a useepreset time
delay,
Set
Used during set upof this
Samsungremote control, so that
it will work compatibly with
other devices (VCR,cabie box,
etc.)
1_ MTS (Multichannel
Television Stereo)
Press to choose stereo, mono or
Separate Audio Program (SAP
broadcast).
Add/Erase
Press to add or erase channels
in the TV'smemory.
1.6 <:.,,},,._ (]N{ Y(_II N}w ]V
INSTALLATION
Connecting VHF and UHF Antennas
If your antenna has a set of leads that
look like this, see "Antennas with
300 ohm Flat _vin Leads," below.
If your antenna has one lead that looks
like this, see "Antennas with 75 ohm
Round Leads," oil page 2.2.
If you have two antennas, see "Separate
VHF and UHF Antennas," ollpage 2.2.
Antennas with 300-ohm Flat Twin Leads
If"you are using an offair antenna (such as a roof antenna or "rabbit ears") that has
300-ohm twin flat leads, follow the directions below.
1
r ace the wires from the
[wJn eads under the
screws on the 300_75
ohm aeautor mot su[
ledl Use ascreworlv-
er to tighten the screws.
Plug the adaptor into the
bottom of the back
INSTALLATION ]
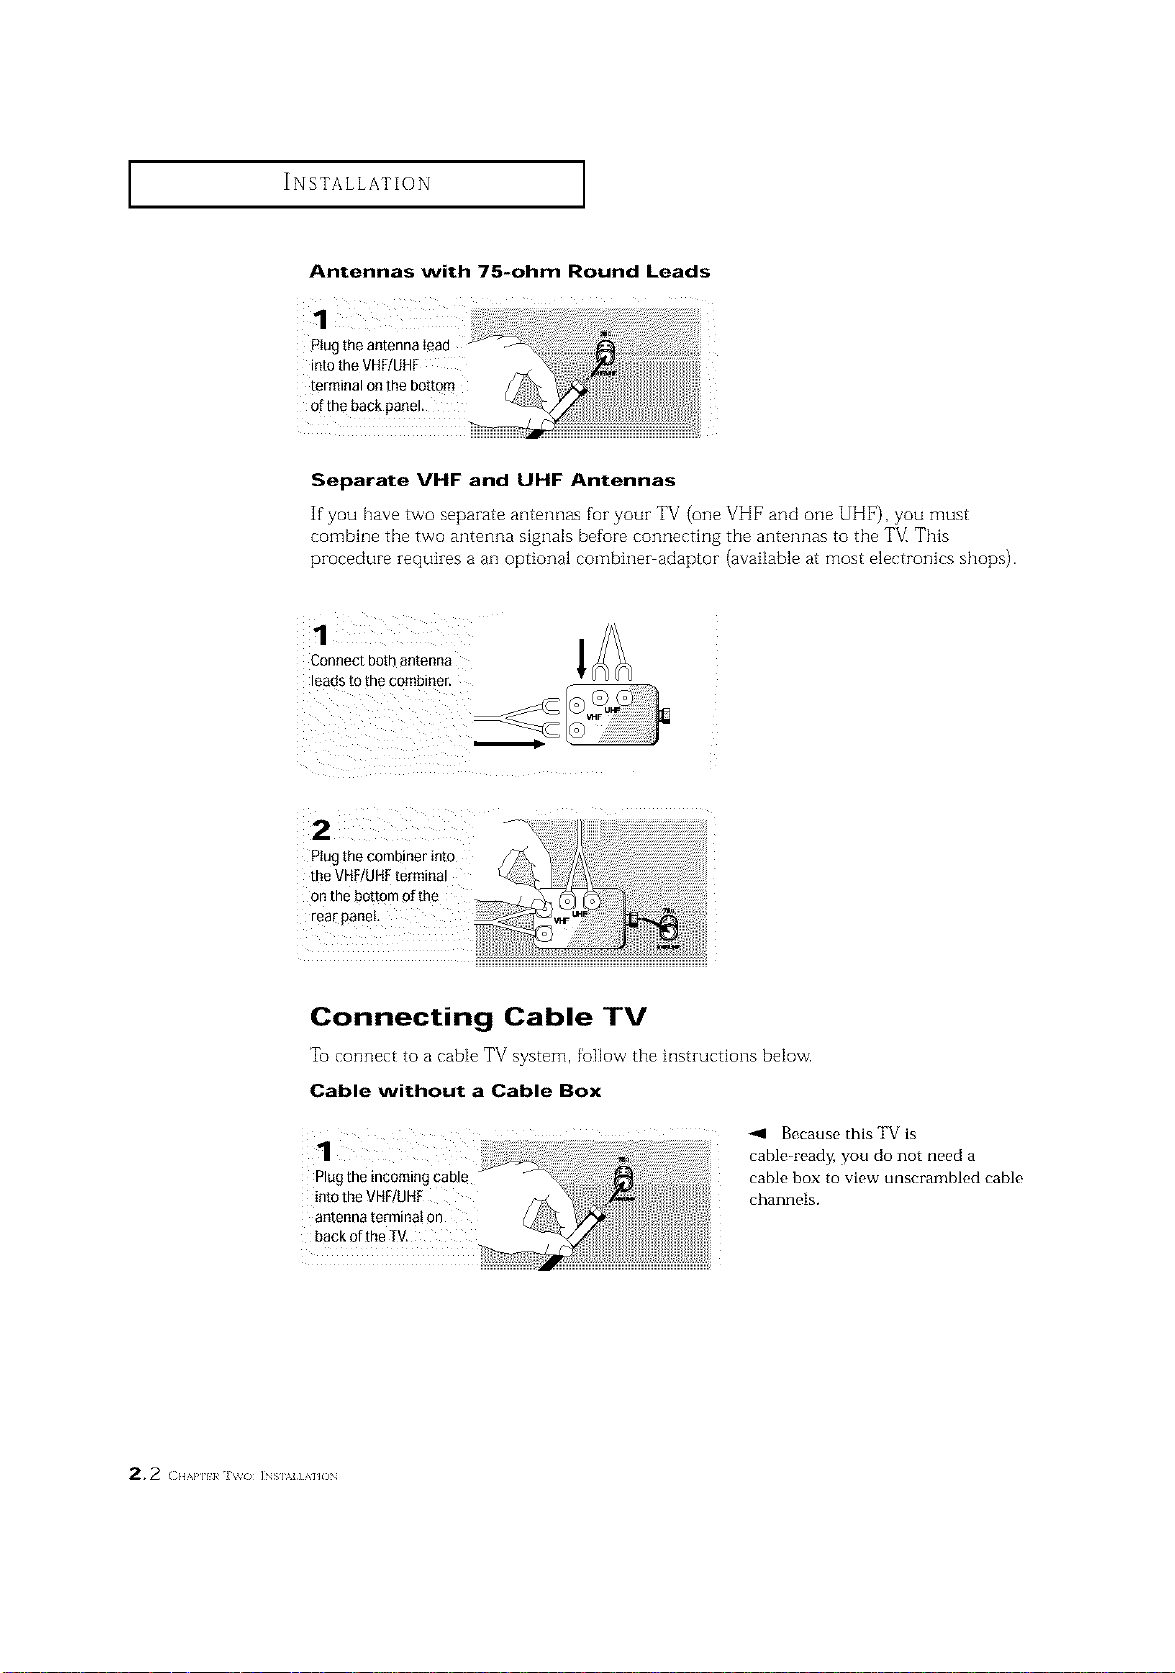
Antennas with 75-ohm Round Leads
1 i
Plugtheantennalead
intotheVHF/UHF
terminalonthebottom
of the back panel.
Separate VHF and UHF Antennas
If you have tvvo separate antennas for your TV (one VHF and one UHF), you must
combine tile two antenna signals before connecting the antennas to tile T_/_This
procedure requiresa an optional combiner adaptor (available at most electronics shops).
Connectbothantenna
leadstothecombiner.
Plugthecombinerinto
theVHF/UHFtermina!
on thebottomofthe
rearpanel
l
Connecting Cable TV
To connect to a cable TV system, foBow tbe instructions below.
Cable without a Cable Box
Because this TV is
cable_ready, you do not need a
Plug the incoming cable cable box to view unscrambled cable
intotheVHF/UHF channels.
antenna terminat 0n
back ofthe IV.
2, 2 < H,',a']l}a J\_o INs],_J] AnON
INSTALLATION ]
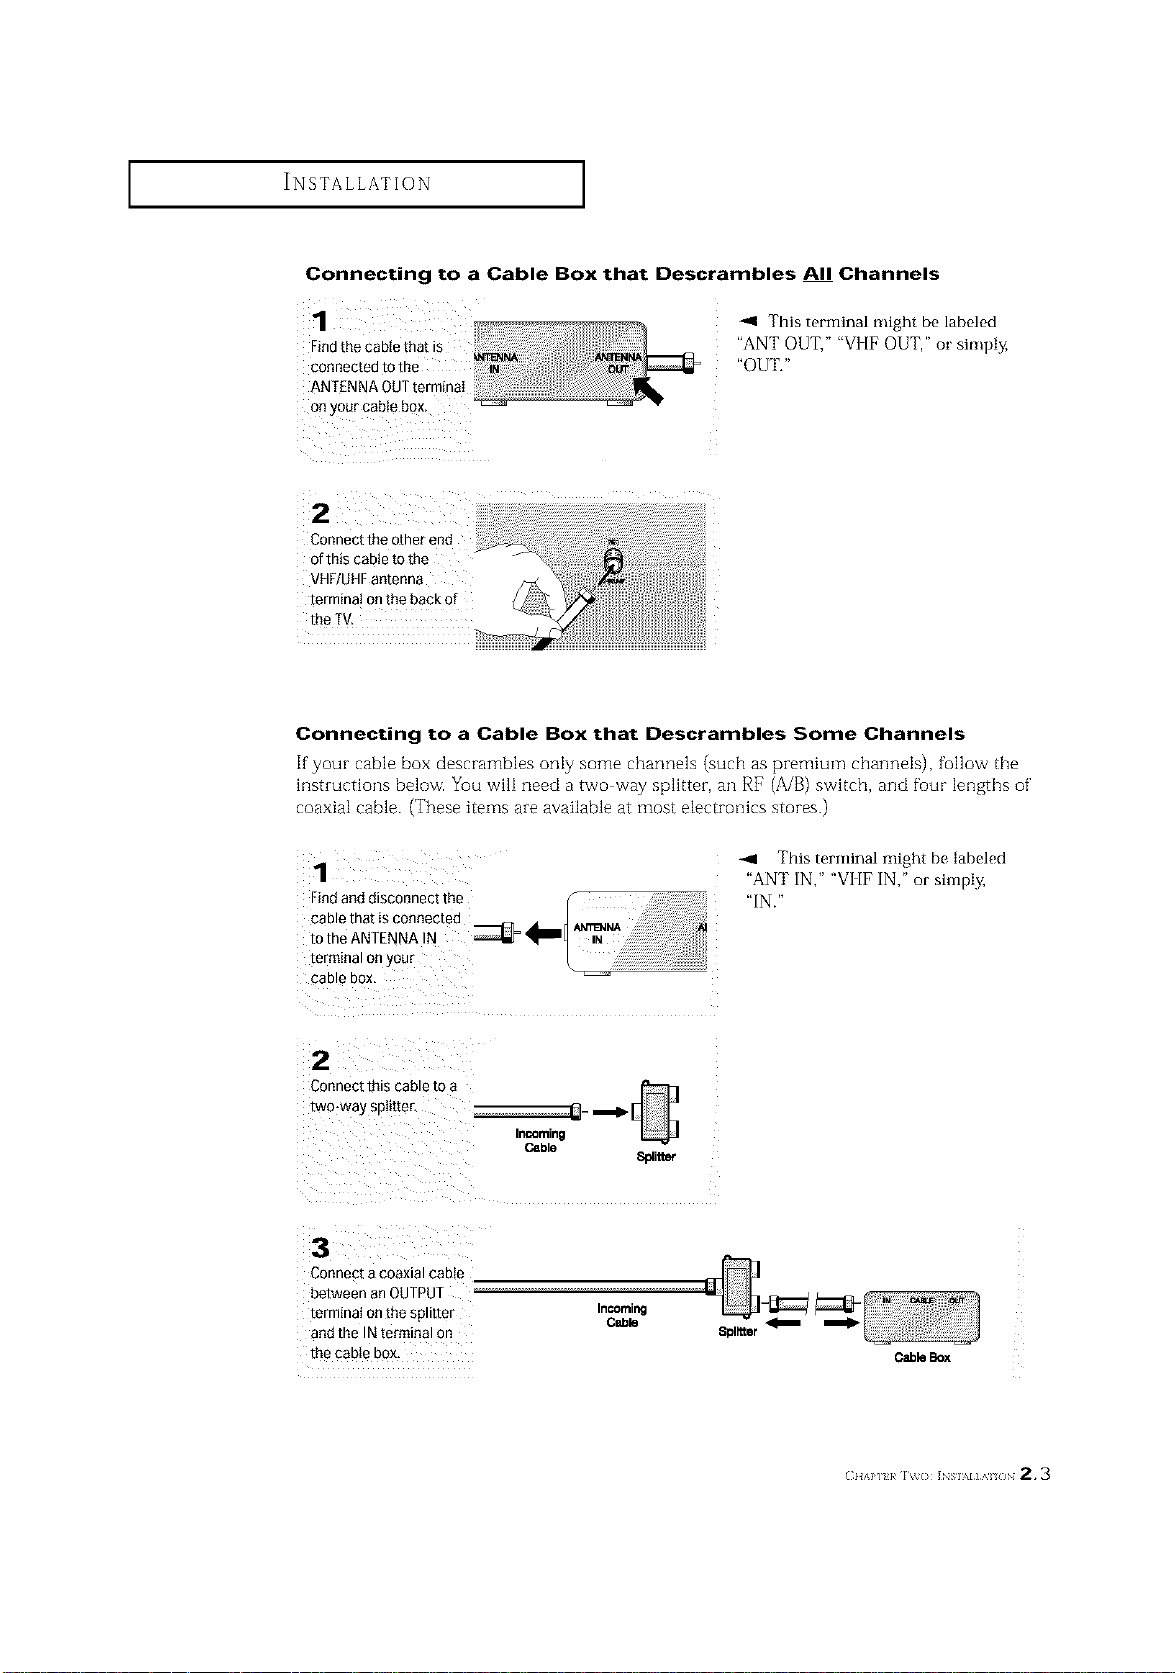
Connecting to a Cable Box that Descrambles All Channels
H
1
Findthe cable that is
connected to the _ _
ANTENNA OUTterminaI
Onyour cable box, ..................' _
-.9 This terminal might be labeled
"ANT OUT," "VI[F OUT," or simply,
"OUT."
Connect the other end
of this cable to the
VHF/UHFantenna
terminal onthe back of
the TV.
Connecting to a Cable Box that Descrambles Some Channels
If"your cable box descrambles only some channels (such as premium channels), fullow the
hlstructions below. You wilI need a two way splitter, an RF (A/B) switch, and fuur lengths of'
coaxial cable. (These items are available at most electronics stores.)
1
Findand disconnect the f
cable that is connected d'totheANTENNA N _ _
IN
terminal or your L _ '
CaD _ DOX
--4 This terminal might be labeled
"ANT IN," "VI [F IN," or simply,
"IN."
2
Connect this cable [o
two-way spit[tel
Cable
8platmr
3
Connect a coaxial cable
between an OUTPUT
termtnat onthe spmter
and the IN terminal on
the cable box,
InCOming
Cable
m
CableBox
(:IIAP] }/ IV() ]NSI%I]AI /IN 2.3
INSTALLATION ]
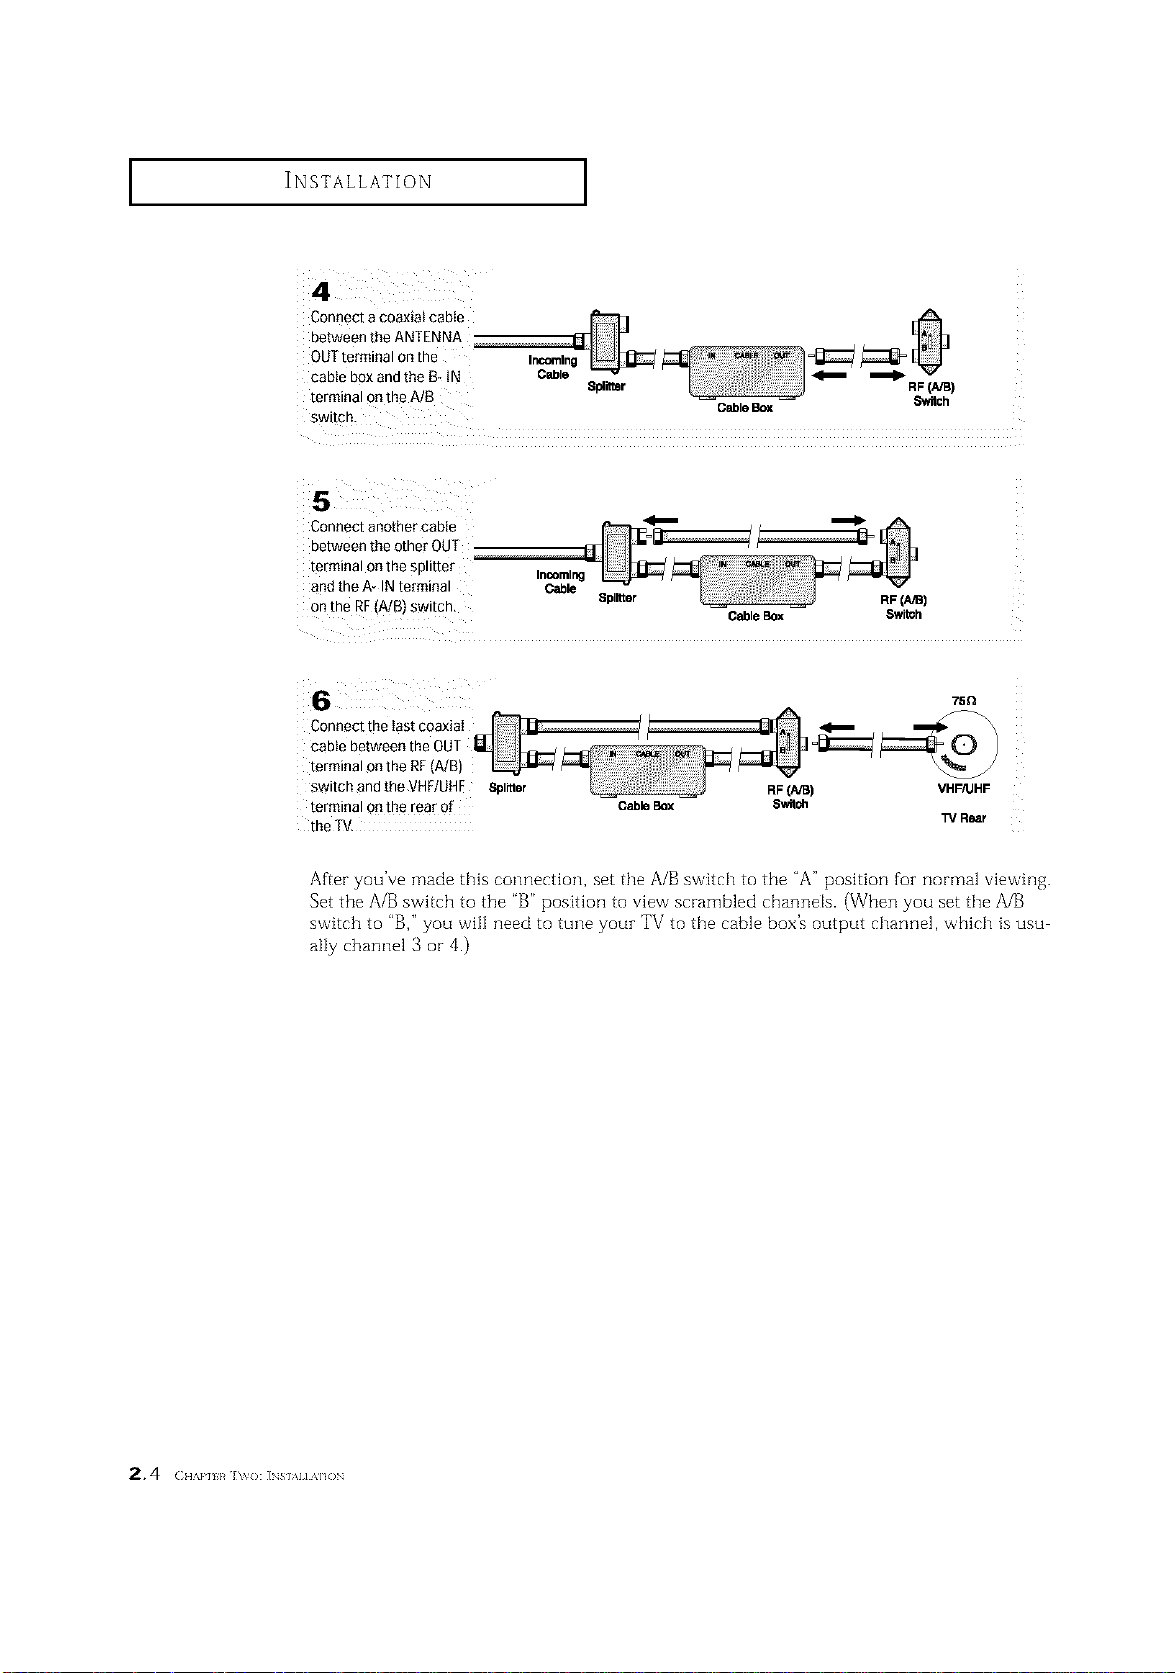
Connect a coaxial cable
between the ANTENNA
OUTterminal 0nthe
cable box andthe B- tN Cable _
terminal onthe A/B Splitter RF(NB)
GableBox Switch
switch.
Connect another cable
between the other OUT
terminal onthe splitter
and the A* IN terminal
on the RF(A/B) switch,
Incoming
Cable
Splitter
CableBox Switoh
Connect the Iast coaxiaI
cable between the OUT
terminal onthe RF(A/B)
switch and the VHF/UHE Spinier
terminal onthe rear of
the TV.
75Q
RF(A/B) VHF/UHF
Cable Box
13/Rear
After you've made this connection, set the A/B switch to the "A" position foz normal viewing.
Set the A/B switch to the "B" position to view scrambled channels. (When you set the A/B
switch to "B," you will need to tune youz TV to the cable box's output channel, which is usu
ally channel 3 or 4.)
2.4 ( ,,A,.,,,_h,o: ]NS,.,,,A,,ON
INSTALLATION ]
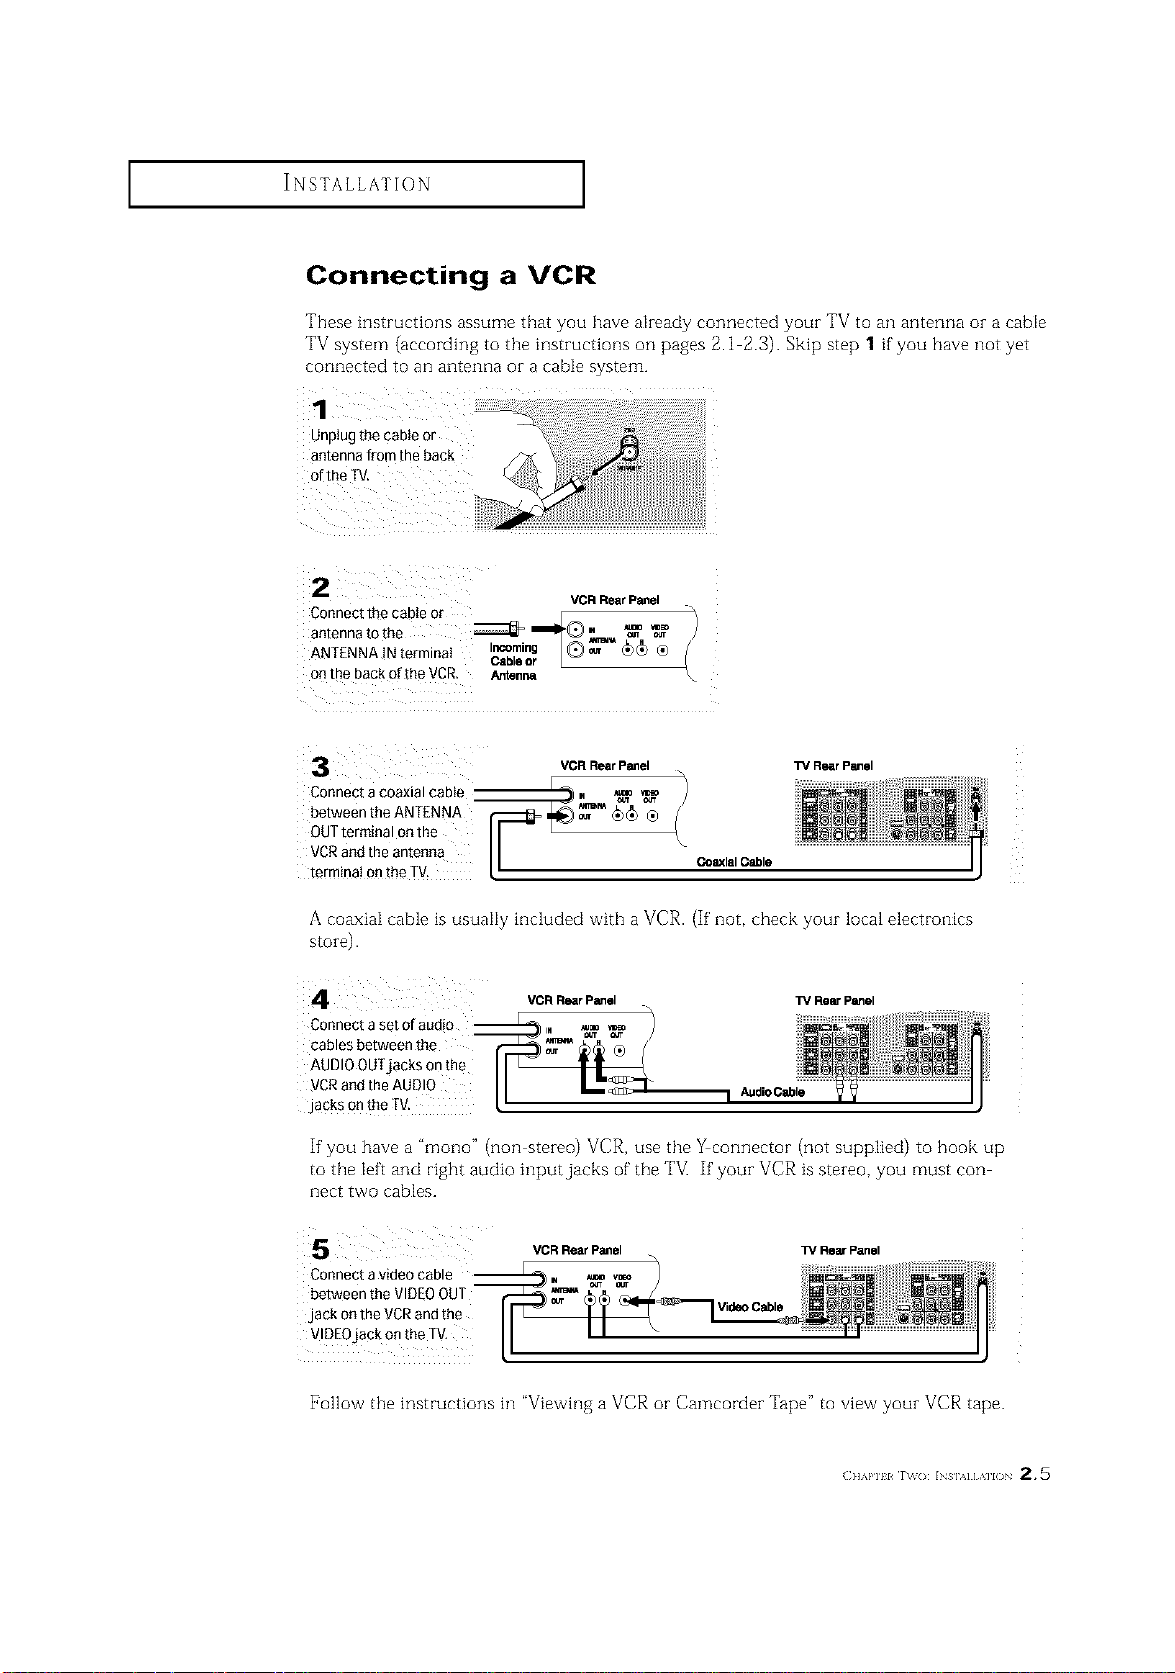
Connecting a VCR
These instructions assume that you have akeady connected youz TV to an antenna oz a cable
TV system (according to the instructions on pages 2.1 2.3). Skip step 1 if you have not yet
connected to an antenna or a cable system.
VCR Rear Panel
Connectthecableor / E
antennatothe _ _II_Q. _ _
ANTENNAINterminat I_ab_, @_ _)_ ®
r L
onthe backoftheVCR. Arr_n_
l_/RearPanelVCR RearPanel
%
CoaxialCable
Connect a coaxial cable
between theANTENNA
OUTterminal onthe
VCRand the antenna
terminai onthe TM.
A coaxiaI cable is usuaIiy included with a VCR. (If' not, check your local electronics
s[oie).
Connect a set of audio __
cables between the
AUDIOOUTjacks onthe
VCRand the AUDI0
jacks onthe fV.
VCR Rear Panel TV Rear Panel
If'you have a "mono" (non stereo) VCR, use the _connector (not supplied) to hook up
to the left and right audio input jacks of the TV] If'your VCR is stereo, you must con
nect two cables.
Connect a video cable
between the VIDEOOUT
jack on the VCRand the
VIDEOjack on the TV,
VCR Rear Panel TV Rear Panel
Video Cable
[_ollow the instructions in "Viewing a VCR or Camcorder Tape" to view your VCR tape.
(]]]'kl'll l r\_(): INs],_] [,\]l() 2,5
I I
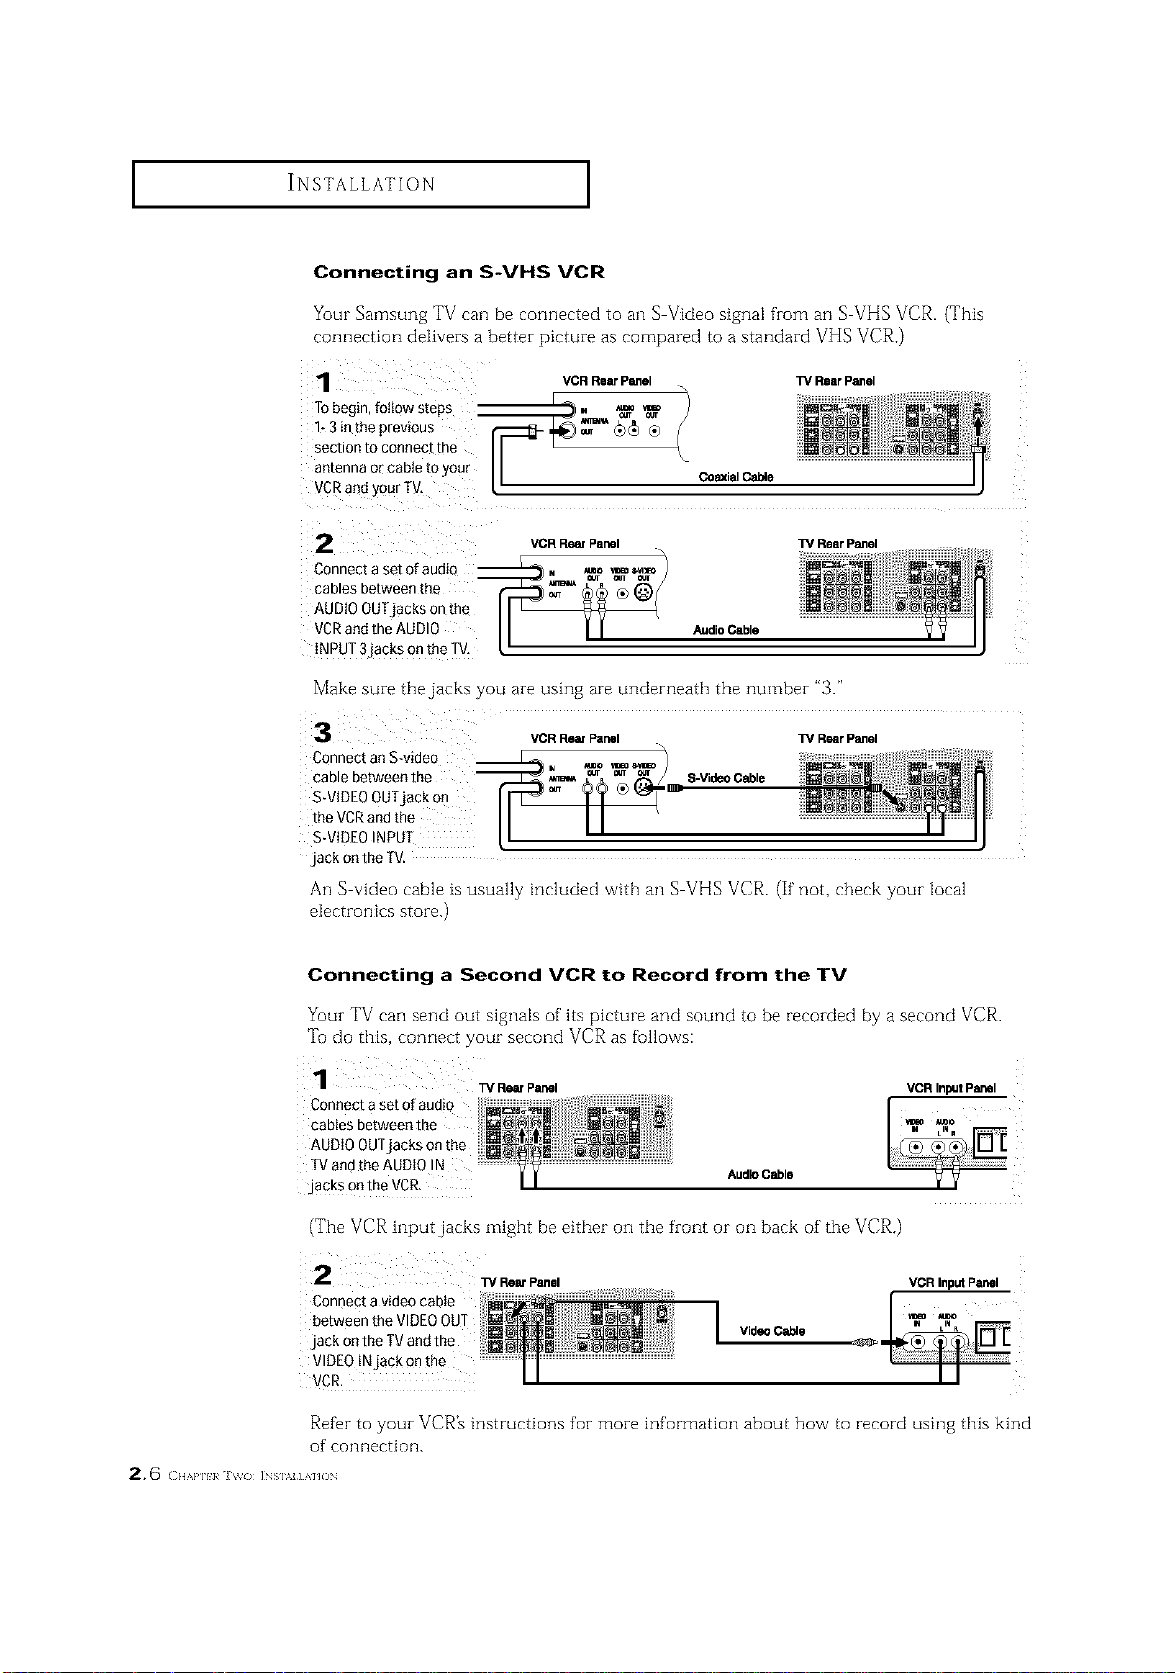
Connecting an S-VHS VCR
Your Samsung TV can be connected to an S Video signal from an S VHS VCR. (This
connection delivers a better picture as compared to a standard VHS VCR.)
VCR Rear Panel ]_ Rear Panel
2
Connect a set ofaudiQ
cables between the
AUDIO OUTjacks on th_
VCRand the AUDIO
iNPUT 3`jackson the TV,
VCR RemPanel TV Rear Panel
Audio Cable
Make sure the jacks you are using are underneath the number "3."
VCRRearPanel W RearPanel
Connect anS-video
cable between the S-VideoCable
S-VIDEOOUTjack on _:
the VCRand the
S-VIDEOINPUT
`jackon the TV.
An S video cable ts usually included vvithall S VHS VCR. (If not, check your Mcal
electronics store.)
Connecting a Second VCR to Record from the TV
Your TV can send out signals of its picture and sound to be recorded by a second VCP,.
Tu do this, connect your second VCR as fullows:
Connecta set ofaudio
cablesbetweenthe
AUDIO OUTjacks on the
TVand the AUDIO !N AudioCable
,jacksontheVCR.
(The VCR input jacks might be either on the front or on back of the VCR.)
i 2 w RearPanel
Connectavideocable
betweentheVIDEOOUT
.jackontheTVandthe
VIDEOtNjack onthe
VCR.
VideoCable
VCR InputPanel
_" !i i
I I ii
Refbr to your VCR_ instructions for more information about how to record using this kind
of connection.
2, 6 ( H,,,aq_}_ i_s],v] AHO_
INSTALLATION ]
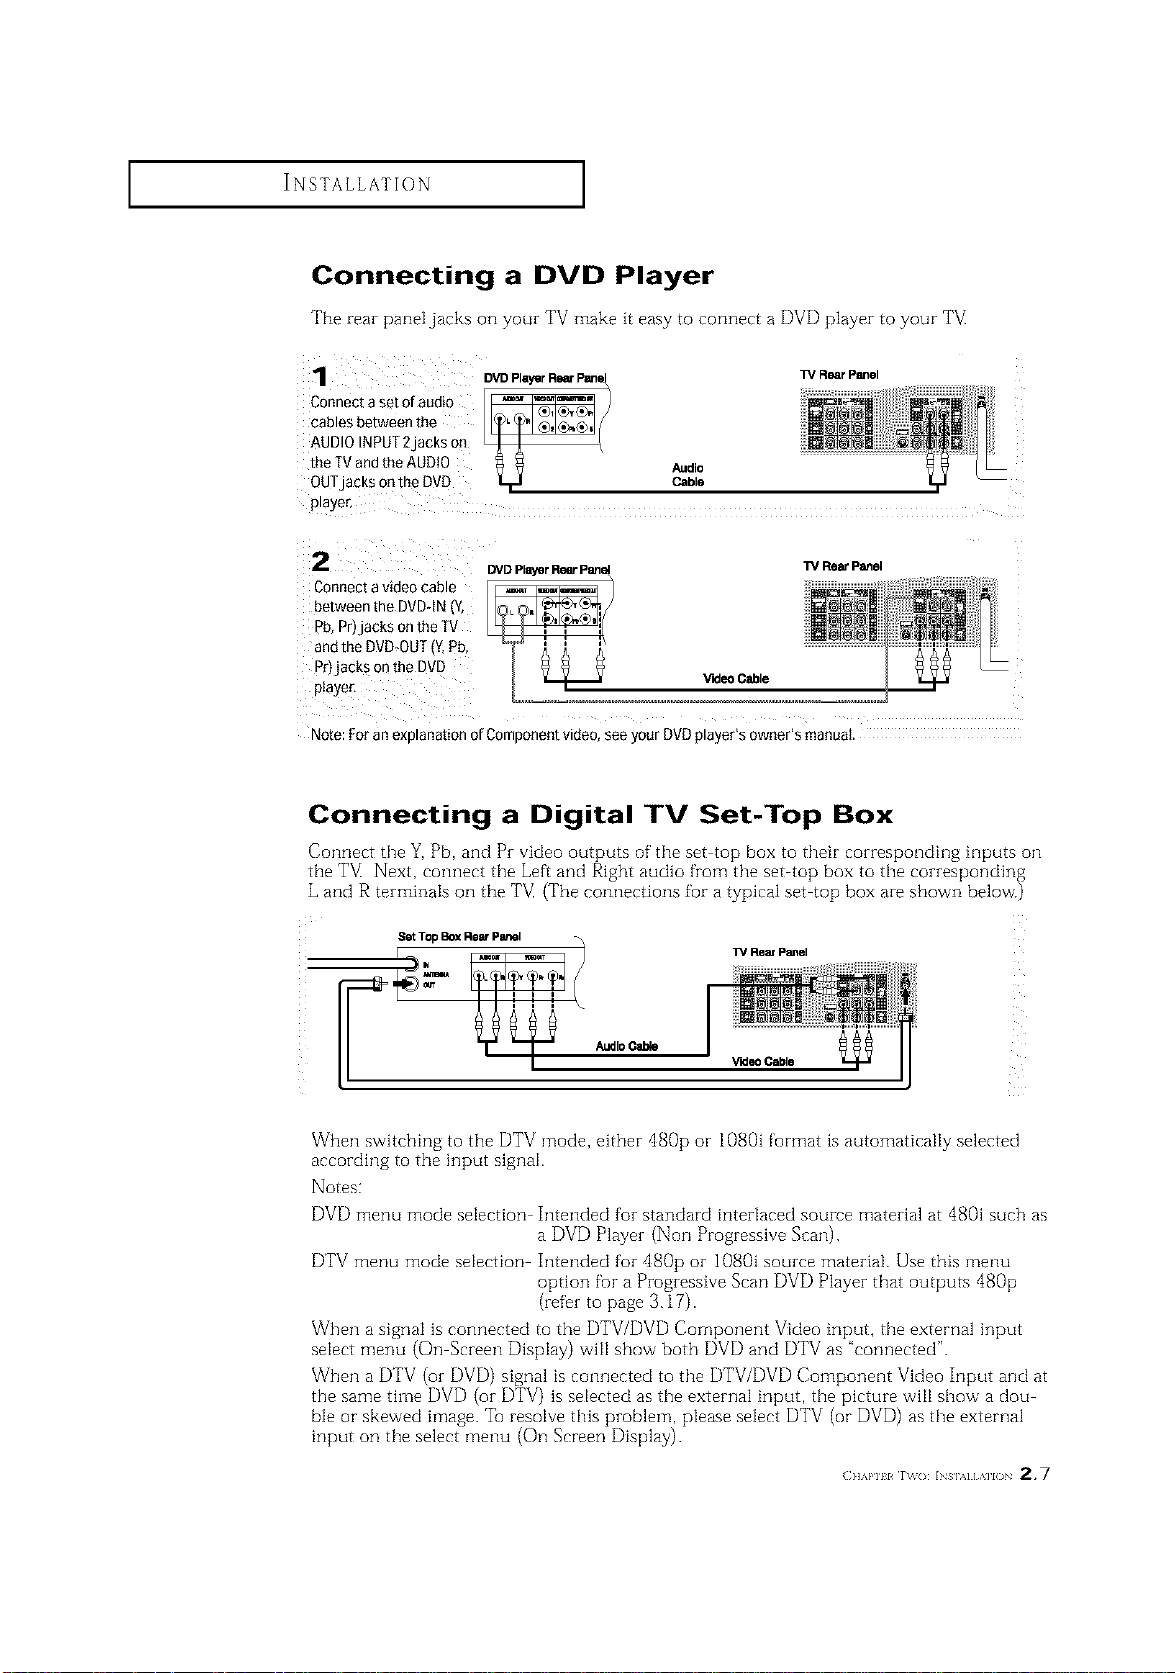
Connecting a DVD Player
The rear paneljacks on your TV make it easy to connect a DVD player to your TM
1
Connect a set of audio
cables between the
AUDIO INPUT2 laCKSon
the TVand the AUDIO
OUTjacKs on the DVD
p_aye_
Audio
Cable
W R_rP_el
2
Connect a video cable
between the DVD-tN _v
_b,Pri acksonthe IV
andthe DVD-OUT{Y.Pb
_r)jacks on the DVD
piayer,
_DPlayerRearP_
Rear Panel
V'KleoCable
Note: For an exD anation of Comoonent VlCteo,see your DVDplayer's owner's manual.
Connecting a Digital TV Set-Top Box
Connect the Y, Pb, and Pr video outputs of' the set top box to their corresponding inputs on
the TV_Next, connect the Left and Right audio from the set top box to the corresponding
L and R terminaIs on the TM (The connections for a typical set top box are shown below.)
Set Top Box Rear Panel
AudioCable
TV Rear Panel
_rldeo Cable
When switching to the DTV mode, either dg0p or 1080i format is automatically selected
according to the input signal.
Notes:
DVD menu mode selection Intended for standard interlaced source material at 480i such as
a DVD Player (Non Progressive Scan).
DTV menu mode selection Intended for 480p or 1080i source material. Use this menu
option fur a Progressive Scan DVD Player that outputs 480p
(refer to page 3.17).
When a signal is connected to the DTV/DVD Component Video input, the external input
select menu (On Screen Display) will show both DVD and DTV as "connected".
When a DTV (or DVD) signal is connected to the DTV/DVD Component Video Input and at
the same time DVD (or DTV) is selected as the external input, the picture will show a dou
ble or skewed image. Tel resolve this problem, please select DTV (or DVD) as the external
input on the select menu (On Screen Display).
(]]]'kPlll r\_o: INs],,][,\]lO 2,7
INSTALLATION ]
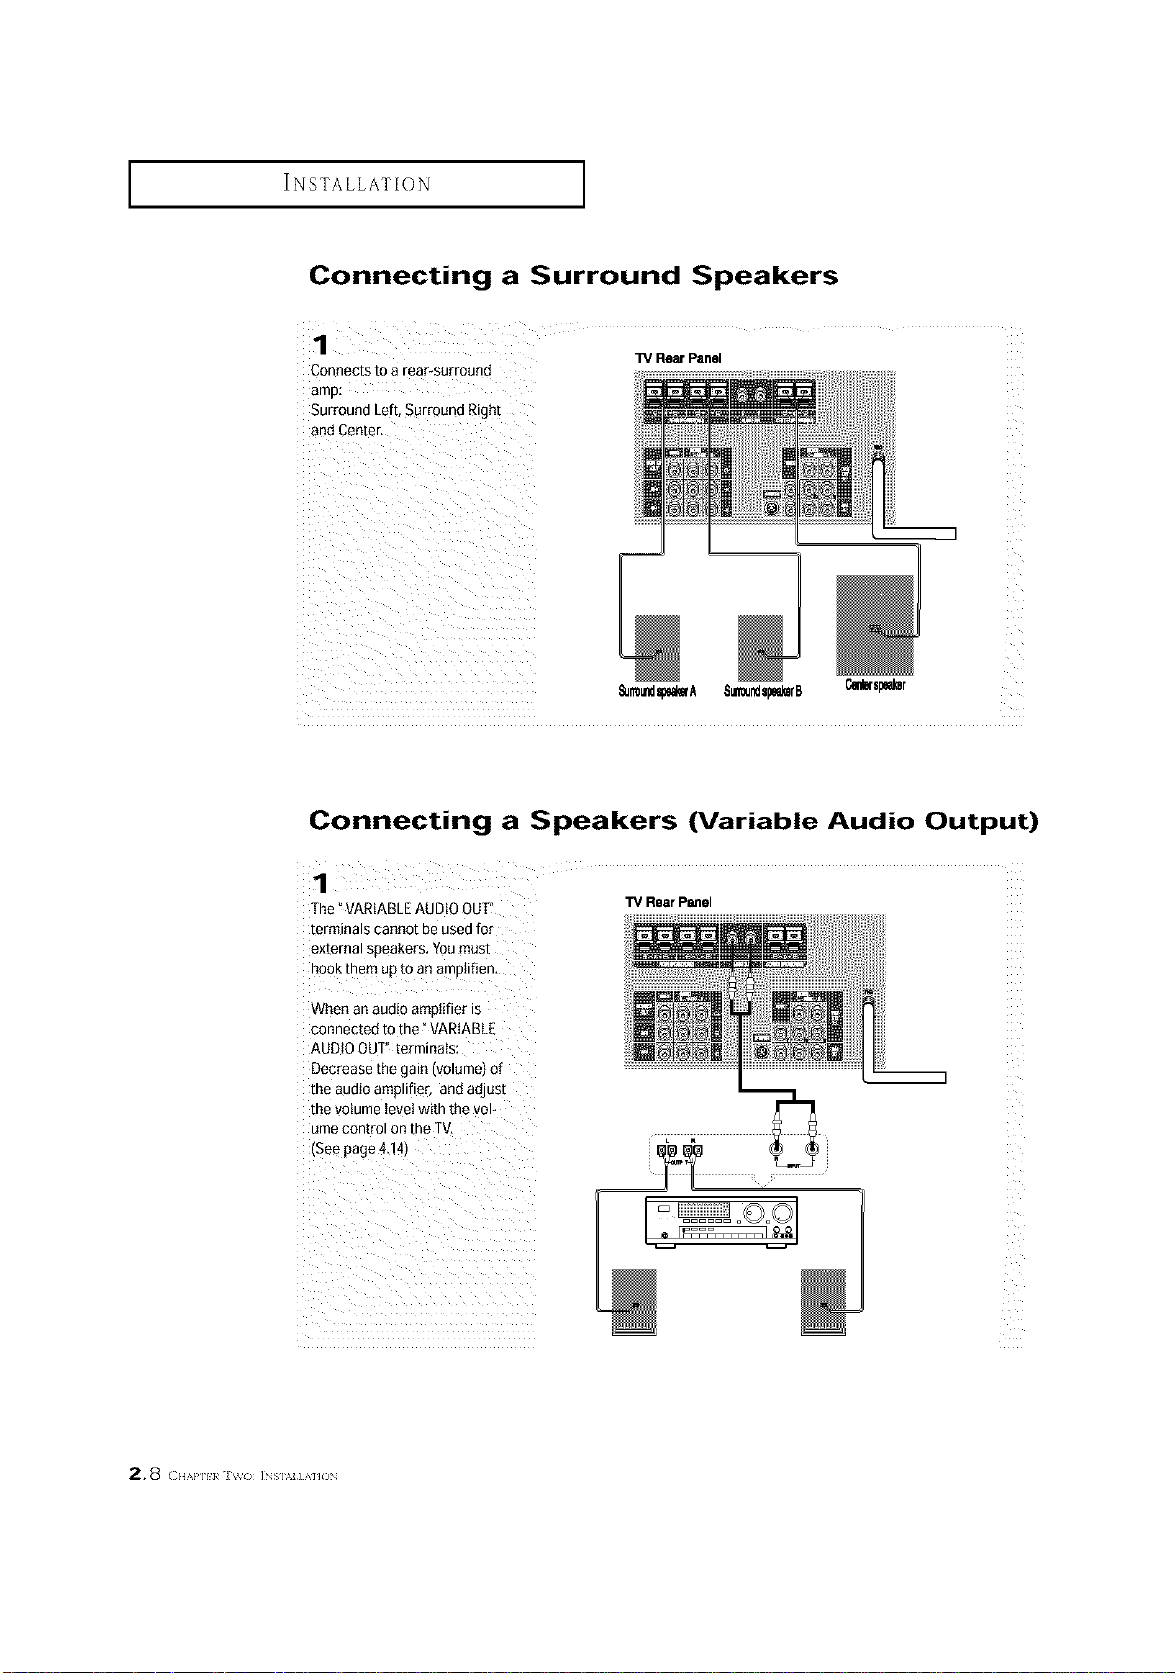
Connecting a Surround Speakers
Connects to a rear-surround
W Rear Panel
Surround Left, SurrQund Right
_Jrmundspem'A 8_Jsp_rB
Connecting a Speakers (Variable Audio Output)
1
The °VARIABLEAUDIO OUT
terminals cannot be usedfor
external soeakers. Youmust
nOOKmere up to an amo(if(en,
When an auo(oamotifier is
connected to the" VARIABLE
AUDIOOUT" terminals
Decrease the _aln IVOlumetOl
me auo(o amolifier, and adjust
me volume level with the vol-
ume con[romon the TV,
(See page4.141
TV Rear Panel
2.8 ( ,,,.,.,.,,,, iNs].%_]AH(3N
INSTALLATION ]
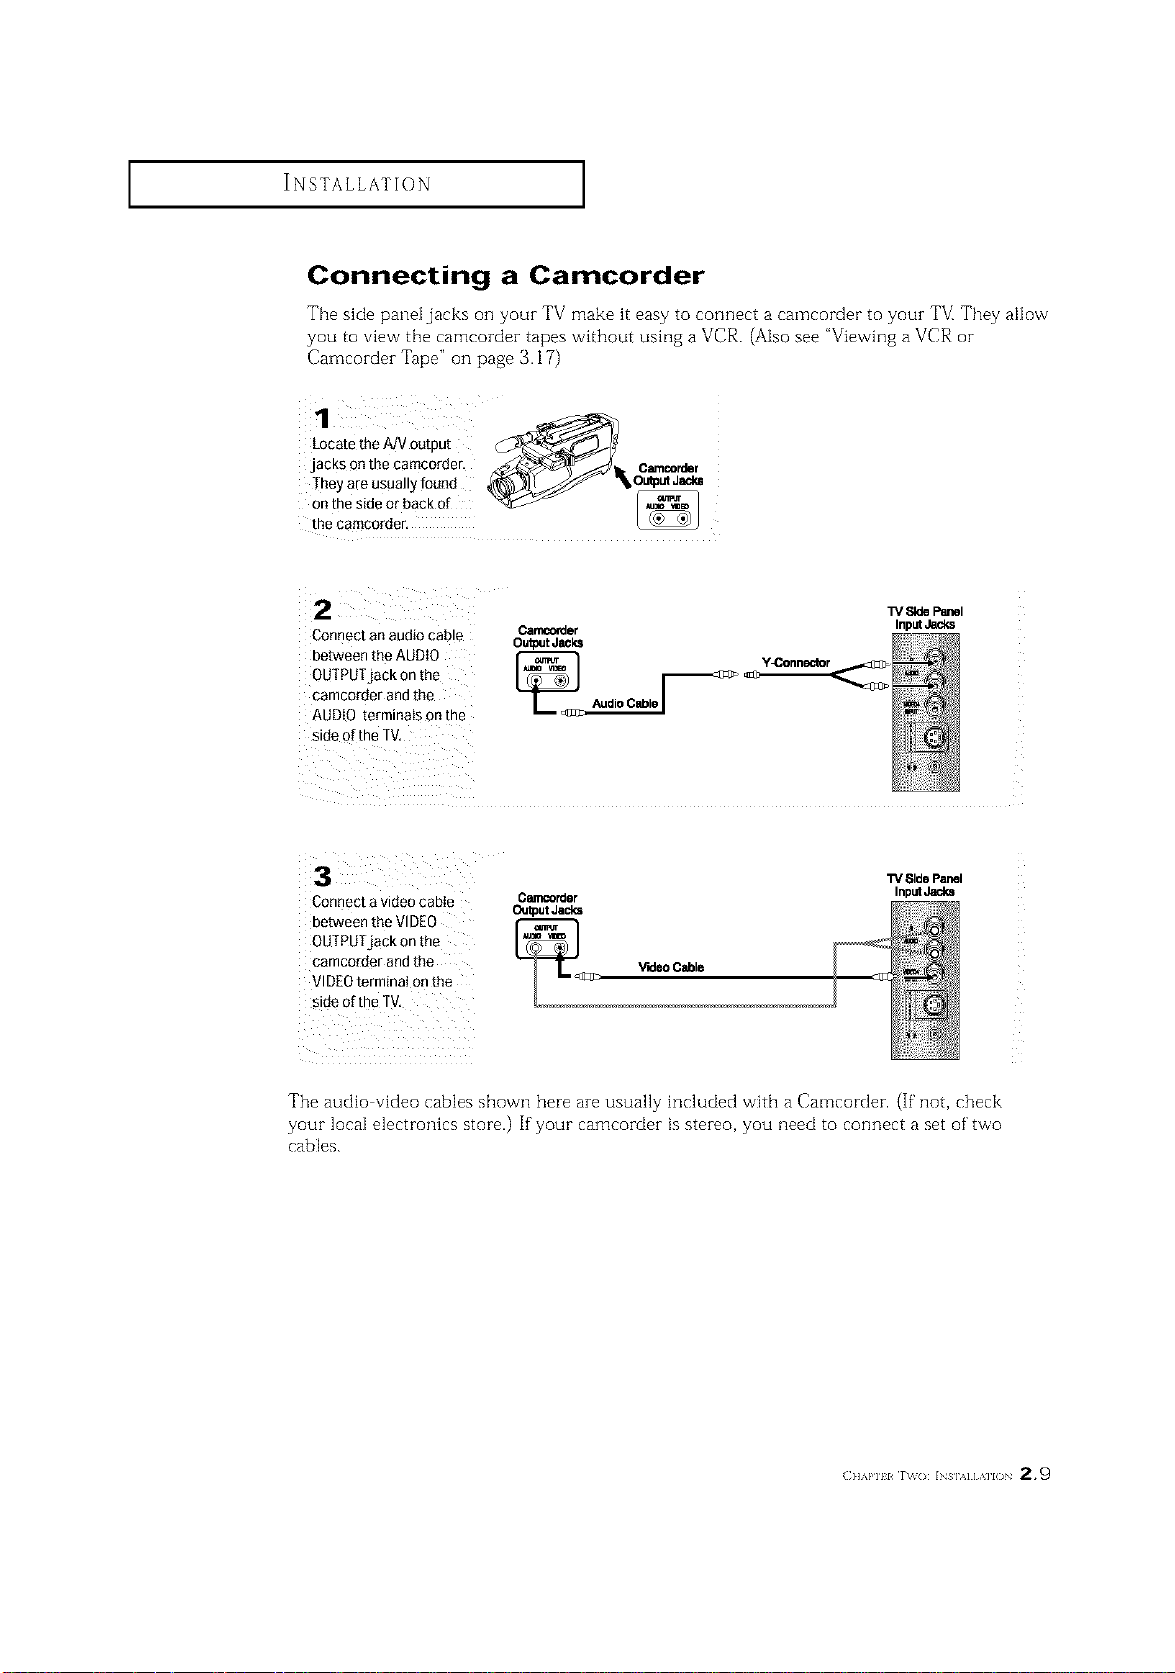
Connecting a Camcorder
The side panel jacks on your TV make it easy to connect a camcorder to your TVI They allow
yOU to vie_v the camcorder tapes without using a VCR. (Also see "Viewing aVCR or
Camcorder Tape" on page 3.17)
1
Locate the AJV output
jacks on the camcorder, _/_1 O_rde
,.e.teos0o,,y,aood
_tat_:siderdrabaCk of _
Connect an audio cable
between the AUDIO
OUTPUTjack onthe
camcorder and the
AUDIO terminals onthe
side of the TV,
Carncorder Input_
OutputJacks
Audio Cable /
Connect a video cabie
between the VIDEO
OUTPUTjack onthe
camco[der andthe
VIDEOterminai on the
side of the TV,
C_rder
Output Jacks
_<_[_ V'Kle0 Cable
Side Panel
Input Jacks
The audio video cables shown here are usually included with a Camcorder. (If not, check
your local electronics store.) If your camcorder is stereo, you need to connect a set of' two
cables.
(]]'kl'll l r\_o: INs],,][,\]l() 2.9
INSTALLATION ]
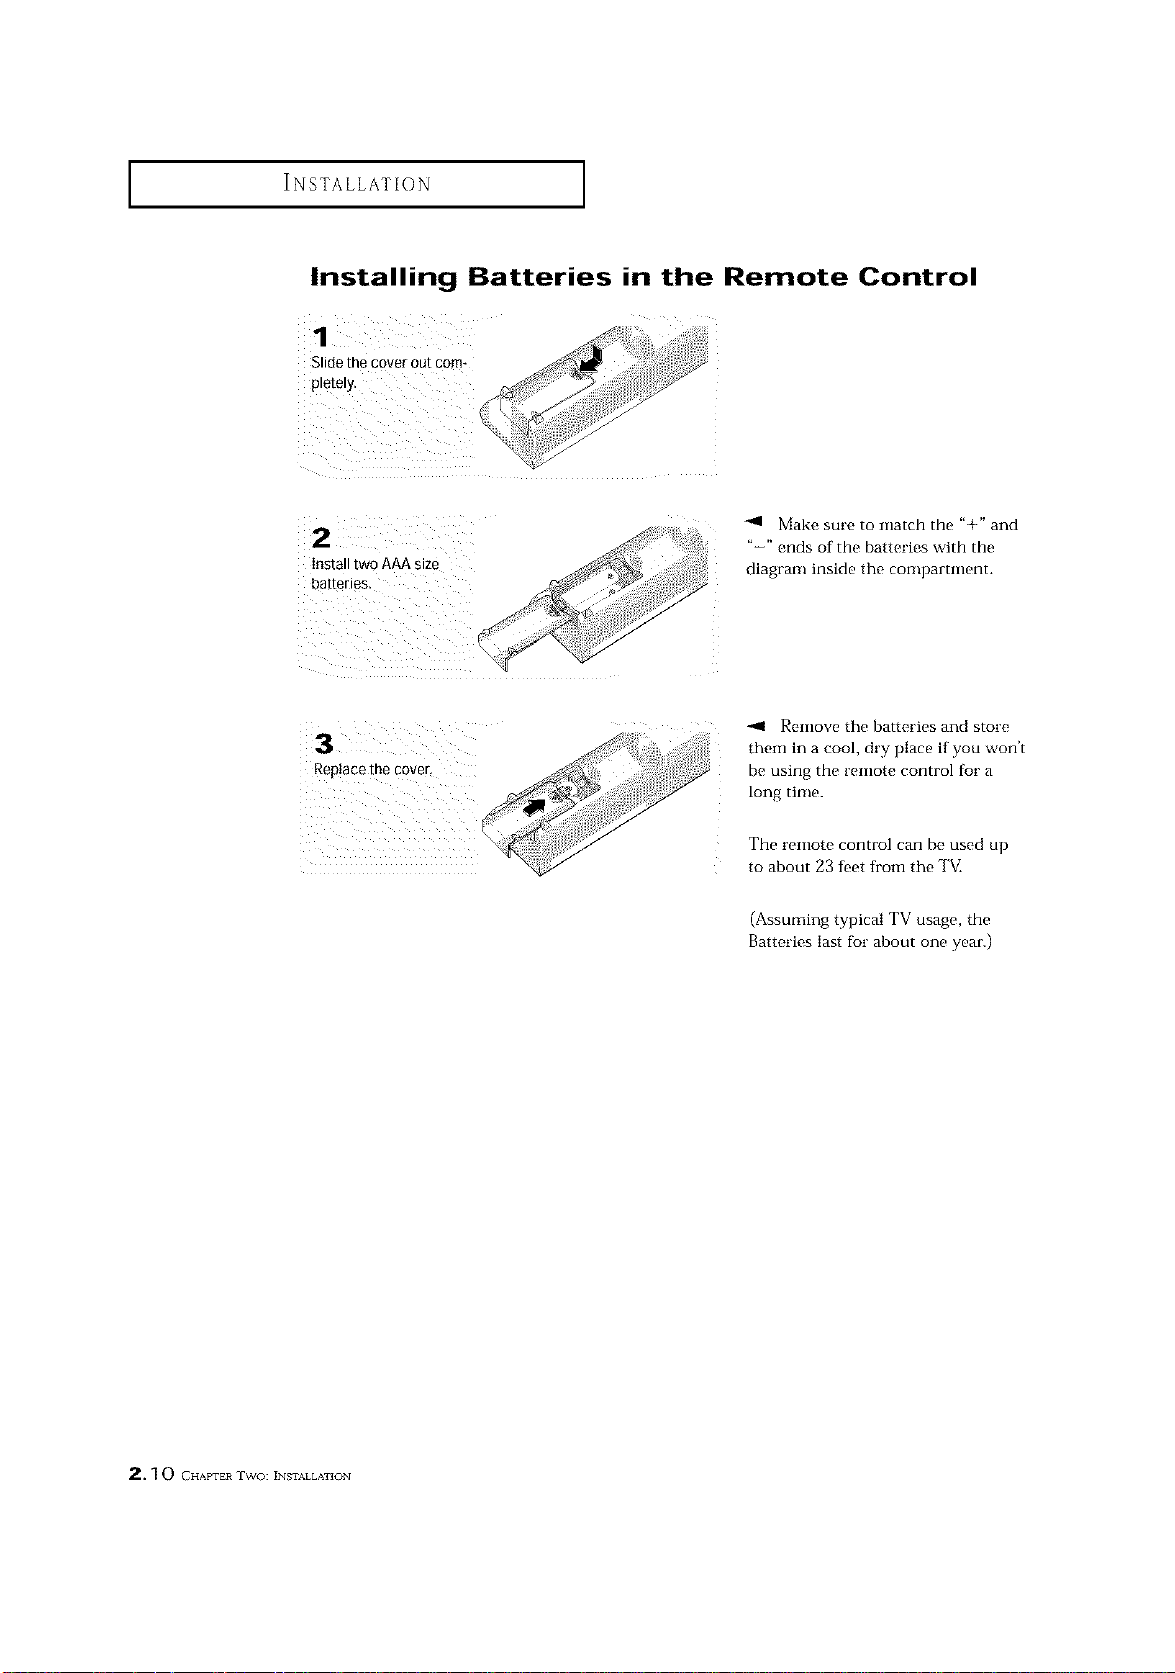
Installing Batteries in the Remote Control
Make sure to match the "+" and
"-" ends of the batteries with the
diagram inside the compamnent.
Rep!acethe €over,
-,11 Remove the batteries and store
them in a cool, dry place if you won't
be using the remote control for a
long time.
The remote control can be used up
to about 23 feet from the TM
(Assuming typical TV usage, the
Batteries last for about one year.)
2. ] 0 CHAPTER TWO: INSTALLATION
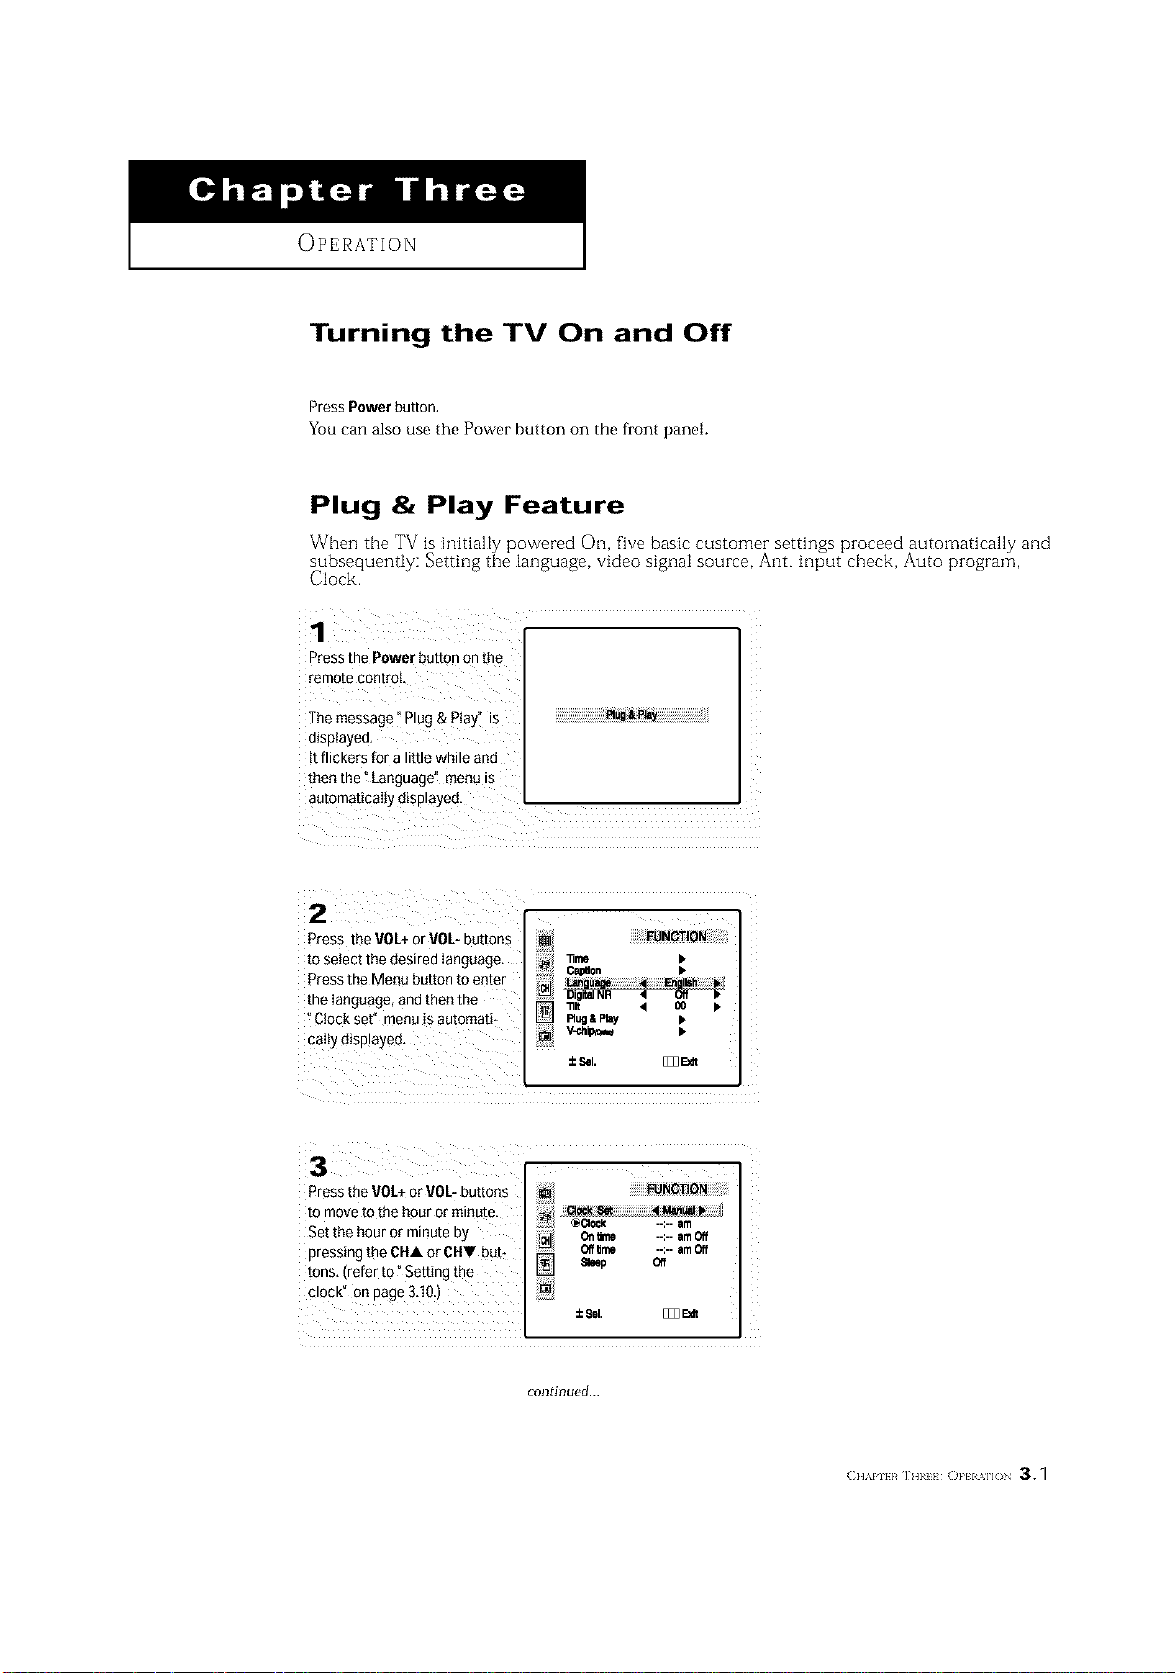
OPERATION
Turning the TV On and Off
Press Power button,
You can also use the Power button on the front panel.
Plug & Play Feature
When the TV is hlitial[y powered 01-1,five basic customer settings proceed automatically and
subsequently: Setting the language, video signal source, Ant. input cheek, Auto program,
Clock.
Press the Power button on the
remote control,
The message _Plug & Play" is
displayed,
tt flickers for a little while and
then the t Language" menu is
automatically displayed .
Press the VOL+or VOL- buttons
to select the desired language,
Pressthe Menu button to enter
the Ianguage, andthen the
"Clock sef' menuis automati_
paltydisplayed,
±_L B33_
Oalo_on •
Pressthe VOL+or VOL-buttons _ ........_BOI-ION
to move to the hour or minute.
:7 _1;1_ --:-- am
Set the hour or minute by ,ml_ on_ --:--am_
pressing the CHA or C1-11but: _ O_ --:--amCe
tons, (refer to °Setting the _ e_ep oe
clock" on page 3,10:)
continued...
(:]]'_PI}R IHIII O}'H %11( 3.1
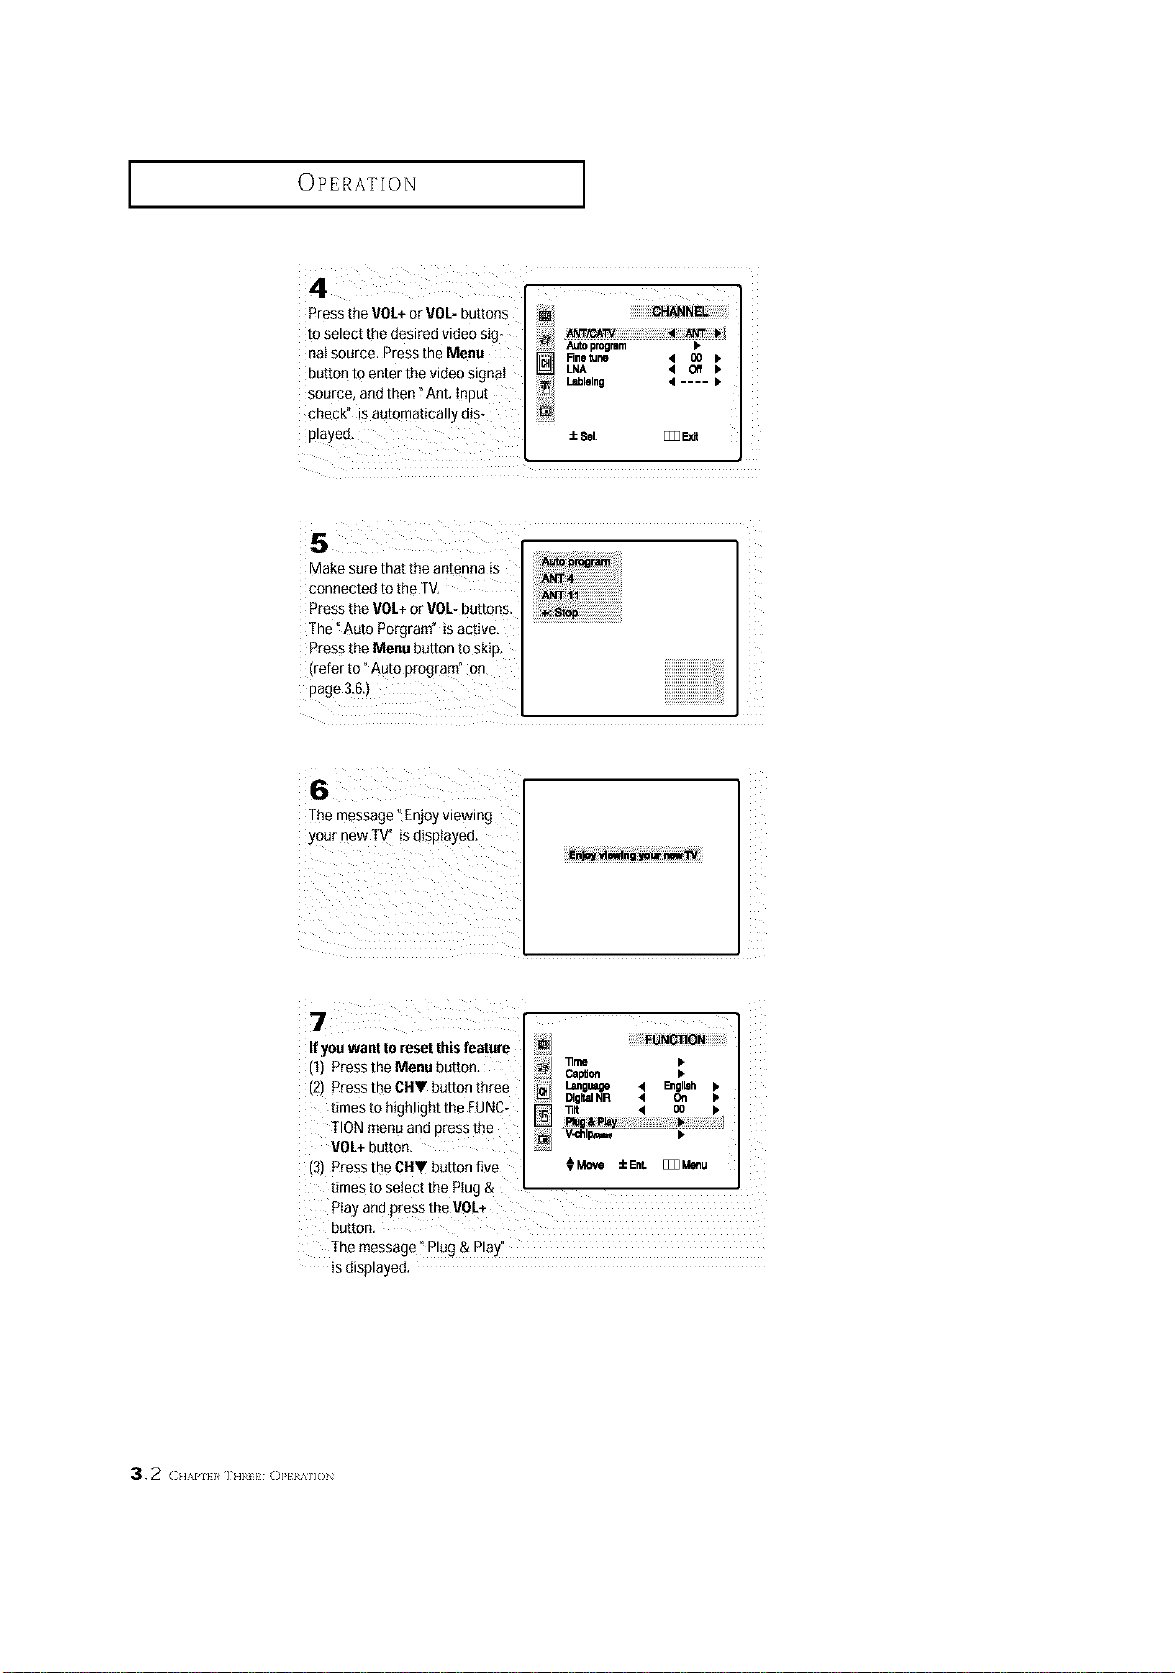
OPERATION ]
Pressthe VOL+or 90L- buttons
to select the desired video sig*
aai source. Press the Menu
button to enter the video signal
source, andthen _Ant, input
check" is automatically d!s*
played,
Autoprogmm >
Rnetune 4 O0 b
] LNA 4 Off b
LJblolno 4 .... •
:to8el, [_ F:_dt
connected to the TV,
Press the VOL+or VOL-buttons.
The _Auto Porgram" is active,
Press the Menu button to skip,
The message °Enjoy viewing
YOUrnew T_ is displayed,
_i iiiii i i i
If you want to reset this feature
(1) Press the Menu button,
(2) Press the CHV button three
fimes to highlight the EUNC-
TIONmenu and press the
VOL+button.
(3) Press the CIIV button five
Z
CalVert •
Language 41 E_olleh I_
DigitalNR • On •
_lt < O0 k
_Move :EEre. [_Meeu
times to select the Plug &
Ptay and press the VOL+
button.
The message" Plug & Play"
is displayed,
3.2 (H/,.PI}}# IHII_ ()]'tIM]()
OPERATION ]
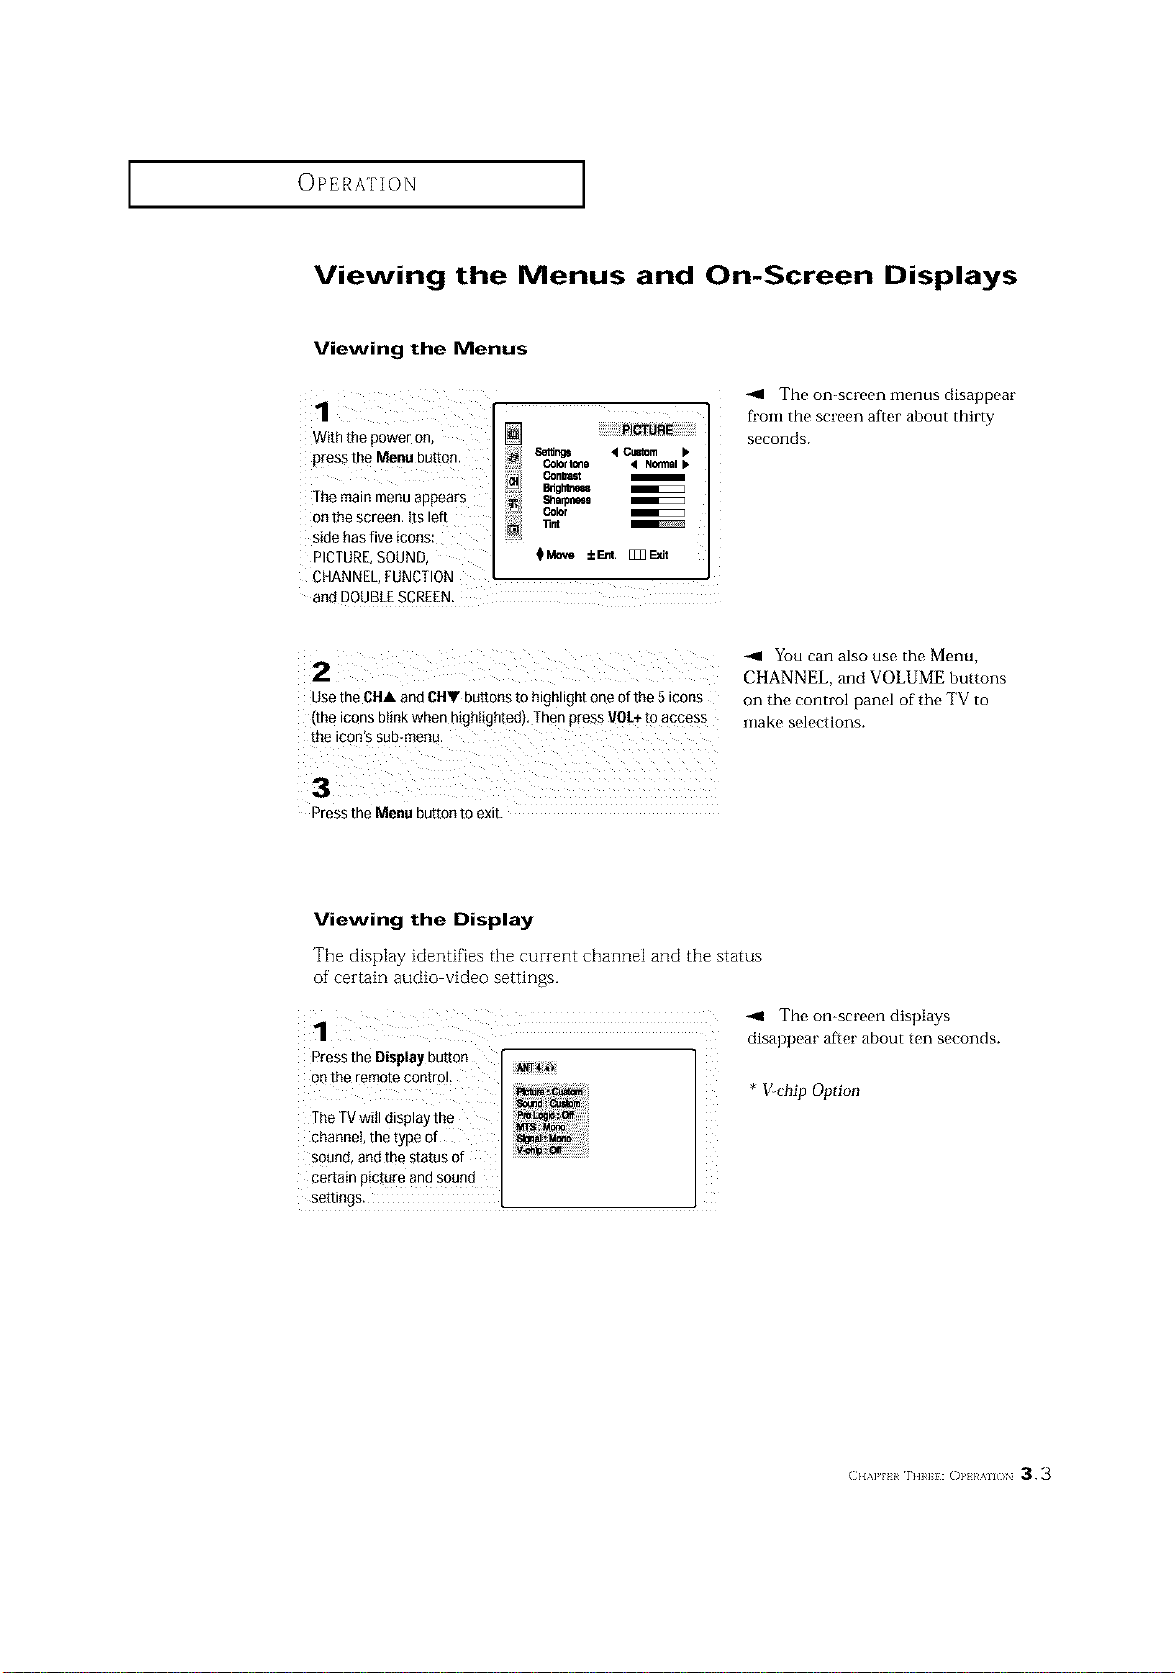
Viewing the Menus and On-Screen Displays
Viewing the Menus
1
With the power on, []
Set_ng8 < CuStom b
press the Menu button, color_, _ N_at
...... Bdgl_e_
The main menu appears 8a.mr_m
Color
onthe screen.Itsleft
side has five ic0ns:
PICTURE,SOUND $_ ±_. []]]Exit
CHANNEL,FUNCTION
and DOUBLESCREEN.
-_ The on-screen menus disappear
from the screen after about thirty
seconds.
2
use tne CHA and CHY buttons to hignttgn[ one ofthe 5icons
•me tconsDttrlKwner --gntighted), [hen press VOL+to access
the ICOn S SUB-menu
You can also use the Menu,
CHANNEL, and VOLUME buttons
on the control panel of the TV to
make selections.
3
Dressthe Menu button to exit
Viewing the Display
The display identifies the current channel and the status
of' certain audio video settings.
The on-screen displays
disappear after about ten seconds.
Pressthe Display button
o_ the remote control.
The TVwill display the
channel, thetype of
sound, and the status of
certain picture and sound
settings.
* >chip Option
(;}I,W,[ r] m]}: ()1,} }/_%ll( )N 3.3
OPERATION ]
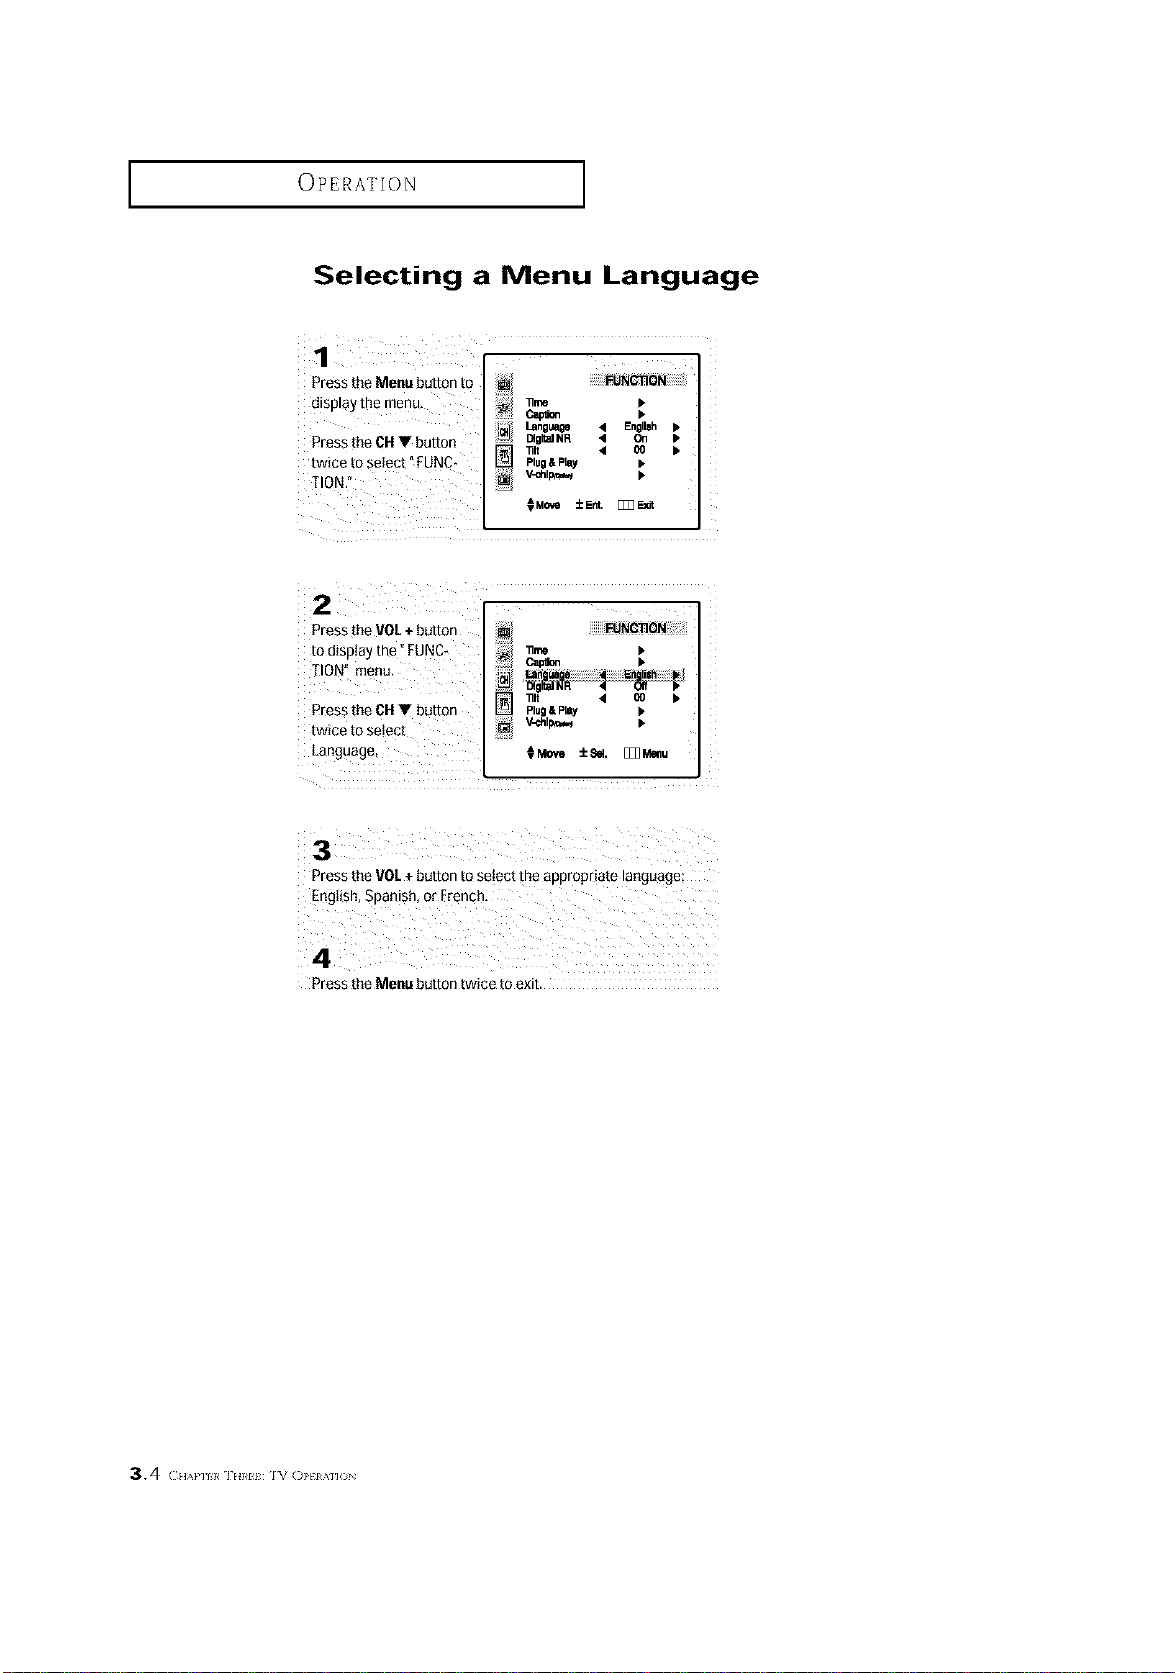
Selecting a Menu Language
Pressthe Menu button to
display the menu,
Pressthe CH V button
twice to select" FUNC
_ilON."
_me •
c_pe_ •
Language • Englleh •
C4gltalNR • On •
_lt • O0 •
Plug& PIw •
_chll_ •
Press_he VOL+ button
to disptay the" FUNC-
TION" menu.
Press the CH V button
twice to setect
Language
Pressthe VOL+ button to select the appropriate language:
Pressthe Menu button twice to exit.
34 {:.,,1,111_ ]EIRll IV ()Ptl '_]]ON
OPERATION ]
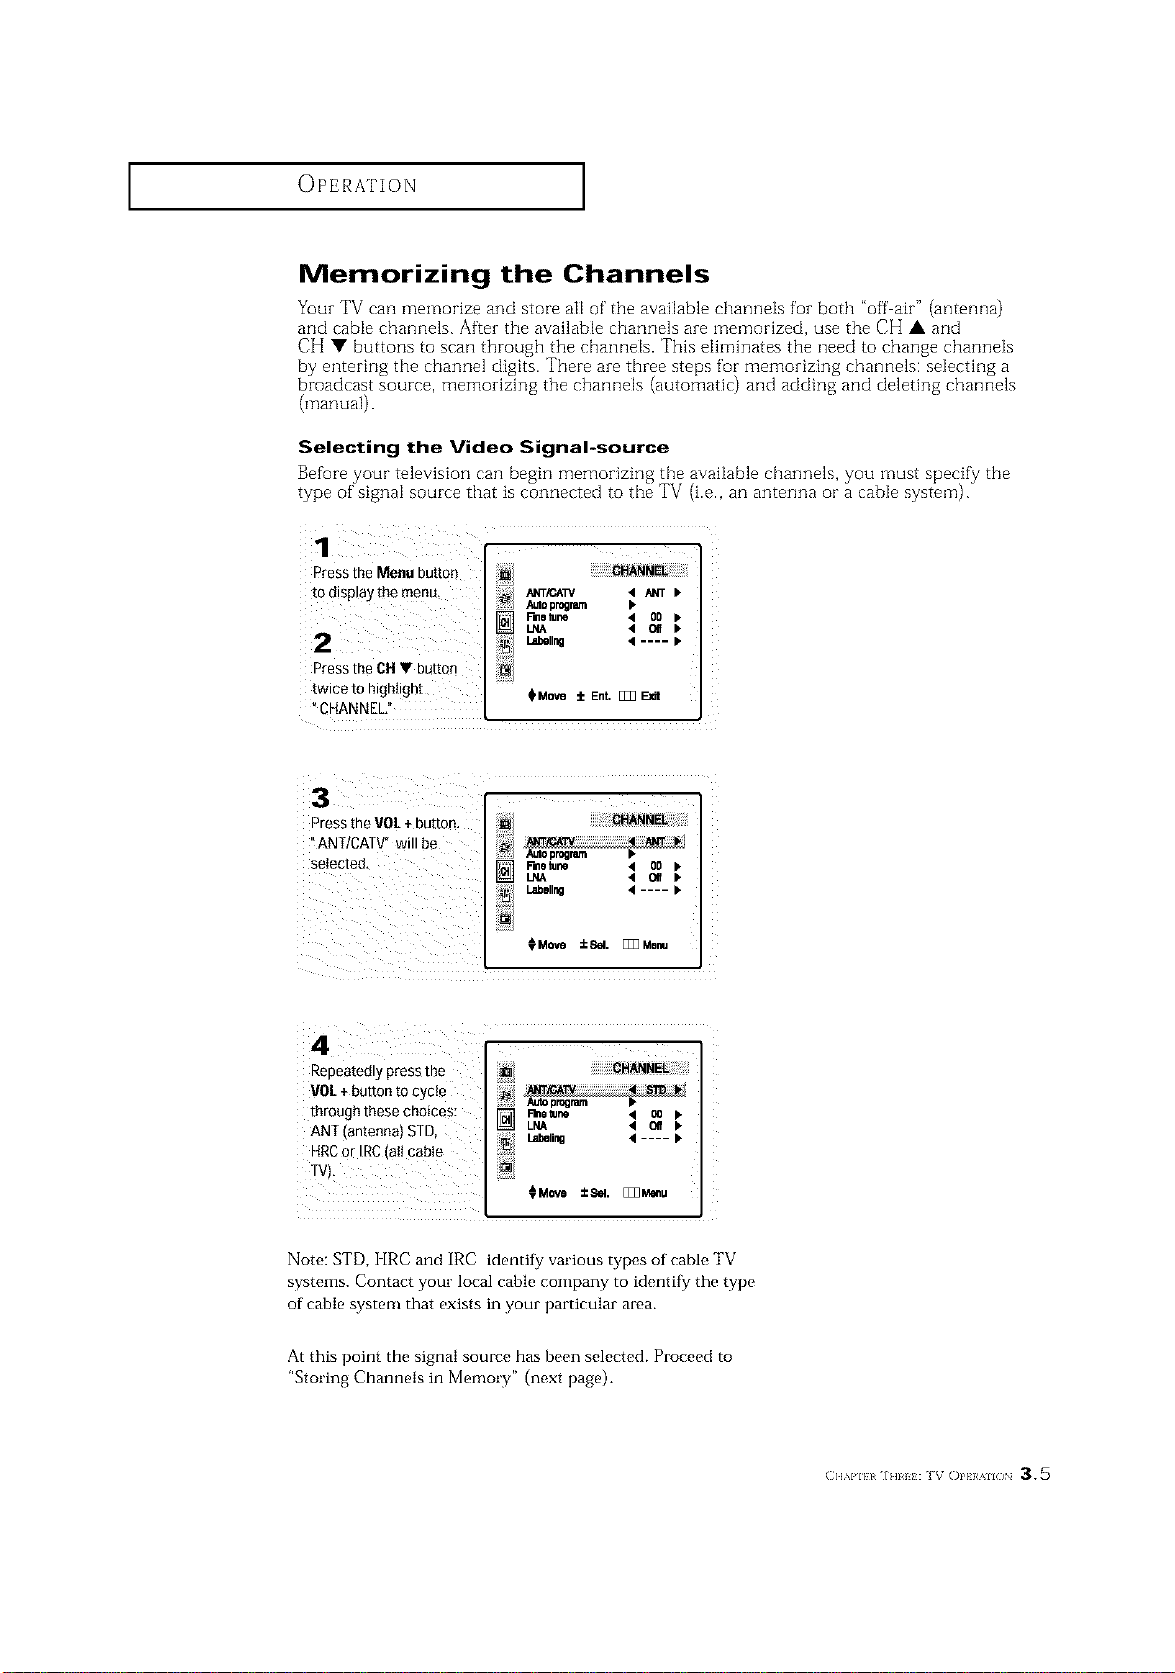
Memorizing the Channels
Your TV can memorize and store air of the available charmers for both "off air" (antenna)
and cable channels. After the available channels are memorized, use the CH • and
CH • buttons to scan through the channels. This eliminates the need to change channels
by entering the channel digits. There are three steps for memorizing channels: selecting a
broadcast source, memorizing the channels (automatic) and adding and deleting channels
(manual).
Selecting the Video Signal-source
Before your television can begin memorizing the available channels, you must specify tile
type of signal source that is connected to the TV (i.e., an antenna or a cable system).
Press the Menu button
tO display the men u
Press the CH• button
twice to highlight
CHANNEL/'
i!!_/ ANTiC_TV 4 ANT
Autoprogram
F'metune 4 O0
I,ebell_ 4 .... _"
_M0ve i Ent. [_ FJdt
ZZZZZ ZZZZ
Press the VOL+buttoo.
tANT/CATV" will be
selected,
,I o_
4
Repeatedly press tbe
VOL+ button to cycle
through these choices:
ANT (antenna) STD,
HRCor IRC(att cable
iii_!/
LNA 4 I_ P.
Note: STD, l [RC and IRC identiiy various types of cable TV
systems. Contact your local cable company to identi(y the type
of cable system that exists in your particular area.
At this point the signal source has been selected. Proceed to
"Storing Channels in Memory" (next page).
(]U_I'I} I IHII}: I V ()l'} }/_SII( ;N a.5
I OPERATION [
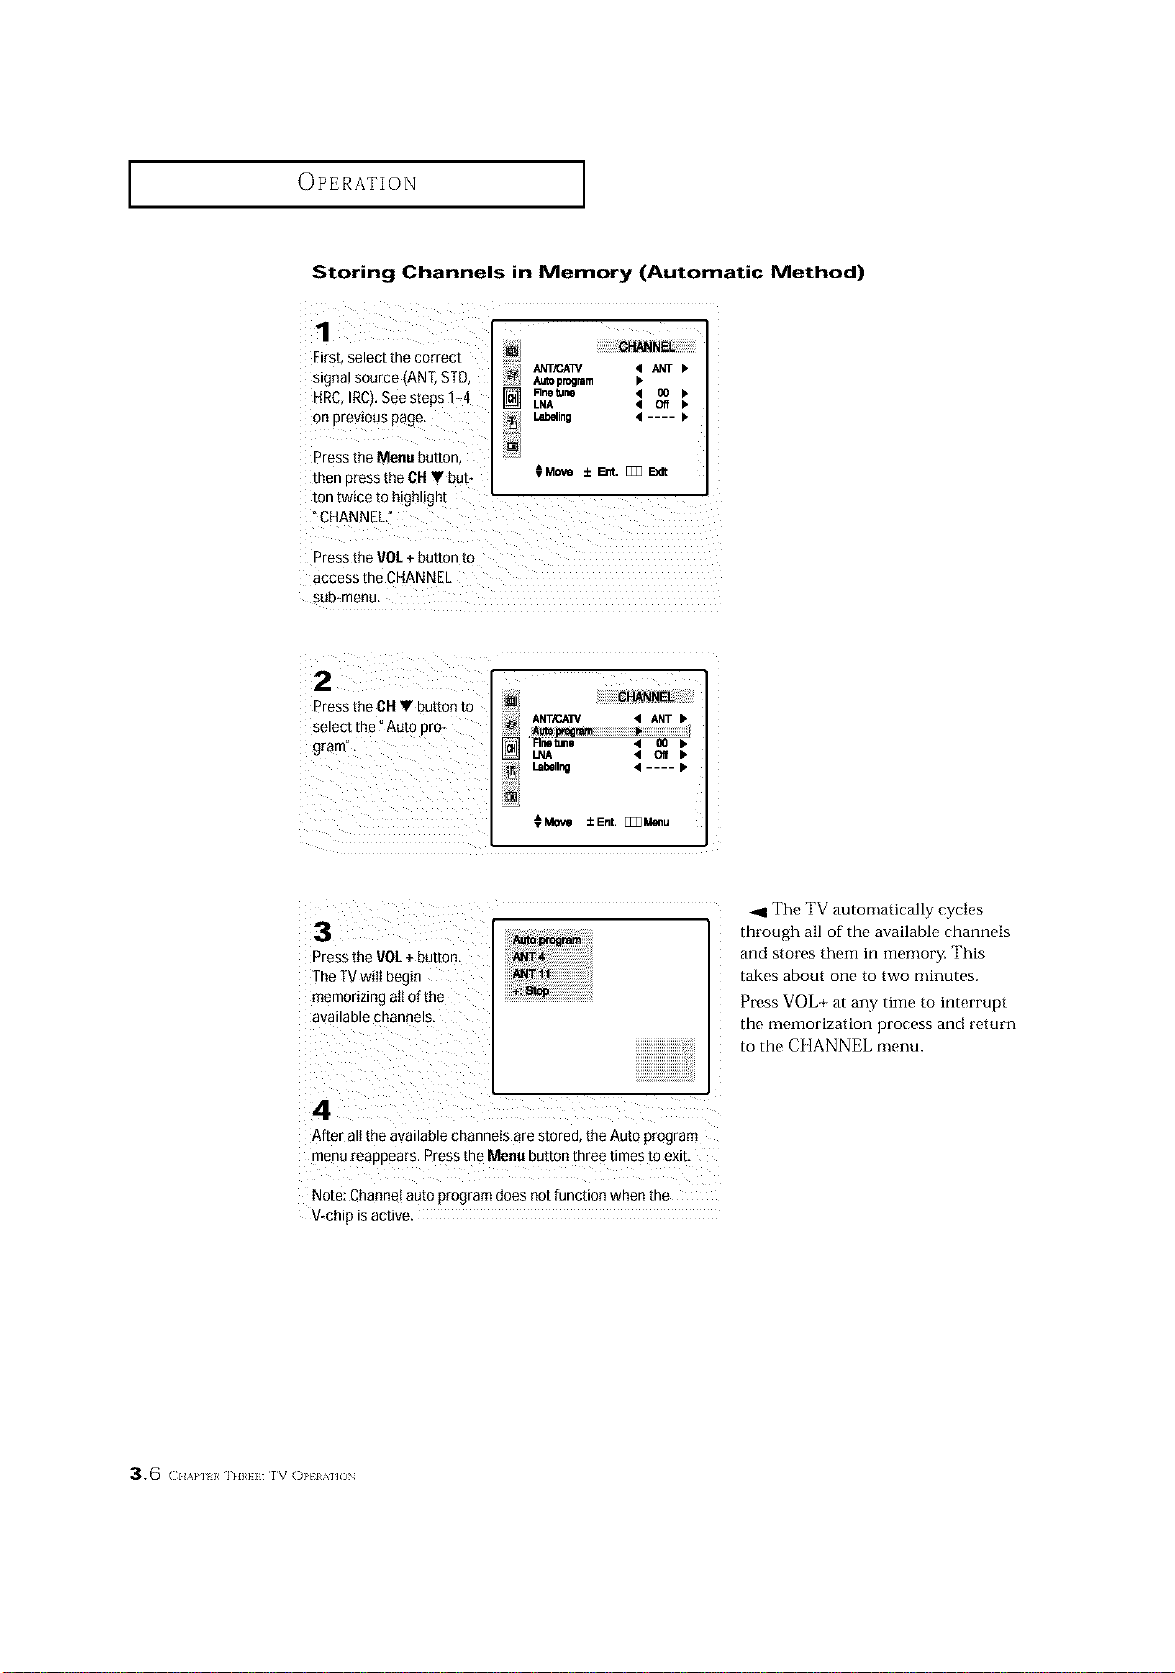
Storing Channels in Memory (Automatic Method)
_ksb select the correct
signa! source (AN[, STD,
: NRC,IRC).See steps _4
: On previous pagel
Press the Monu button,
then press the CHT but-
ton twice to highlight
J_T/P.AT_
] Rt_ tur_
LNA
4 ....
OMove±E_._EXR
Press the VOL+ button to
access the CHANNEL
sub,menu, ....
z
: Press the CHY button to
select the YAuto pro-
gram"
-_1 The TV automattca/ty cycles
through all of the available channels
and stores them in memory. "_'his
takes about one to two minutes.
Press VOL+ at any time to interrupt
the memorization process and return
to the CI]ANNEL menu.
A ter alt the available chaonOs are stored, the Auto p_ogram
menu reappears, Press the Menu button three times to exJb
Note: Channelauto program does notfunction when the
V.chip is active. .....
3 6 £ AI, L1 , t/ [V )_ MJON
OPERATION ]
Adding and Erasing Channels (Manual Method)
Usethe number buttons to directly select the channel that wi!lbeadded or erased.
Repeatedly pressing this button will alternate between _Channel added'i and
Channel erased."
You can view any channel (including an erased channel) by using the nulnber
buttons on the remote control.
Changing Channels
Using the Channel Buttons
1
PresstheCH• orCH• buttonstochangechannels.
When you press the CH • or CH • buttons, the TV changes channels in
sequence. You will see all the channels that the TV has memorized. (The TV
nmst have nmmorized at least three channels.) You will not see channels that
were either erased or not illel]lorized.
Directly Accessing Channels
Use the number buttons to quickly tune to any channel.
Press the number
buttons to go directly to achannel. Forexample, to select channel 27, press "2,"
then" 7." The TVwitl change channels when you press the second number,
When you use the number buttons, you can directly select channels that were
either erased or not melnorized.
To select a channel over 100, press the +100 button. (For channel 122, press
"+100," then "2," then "2.")
To change to single-digit channels (0 9) faster, press "0" before the
single digit. (For channel "4," press "0," then "4.")
Using the Pre-CH Button to select the Previous Channel
1
PressthePre-CHbutton.
TheTVwill switchtothelastchannelviewed,
To quickly switch between two channels that are far apart, tune to one channel,
then use the number button to select the second channel. Then, use the Pre-Cl [
button to quicMy alternate between thenL
(;H,v,_z_r._H: I_ fi)l,I}a'k/_ 3.7
OPERATION ]
Adjusting the Volume
PresstheVOL+or- VOLbuttonstoincreaseordecreasethevoiume,
Using Mute
At any time, you can temporarily cut off"the sound using the Mute button.
The word _Mute! will appear in the lower-left comer o[ the scteen_
to turn mute off, press the Mute button again, or simply
press either the VOL- or VOL+ button.
3.8 (2H/,,Pll }a ][I1¢11 l V ()PII M]ON
OPERATION ]
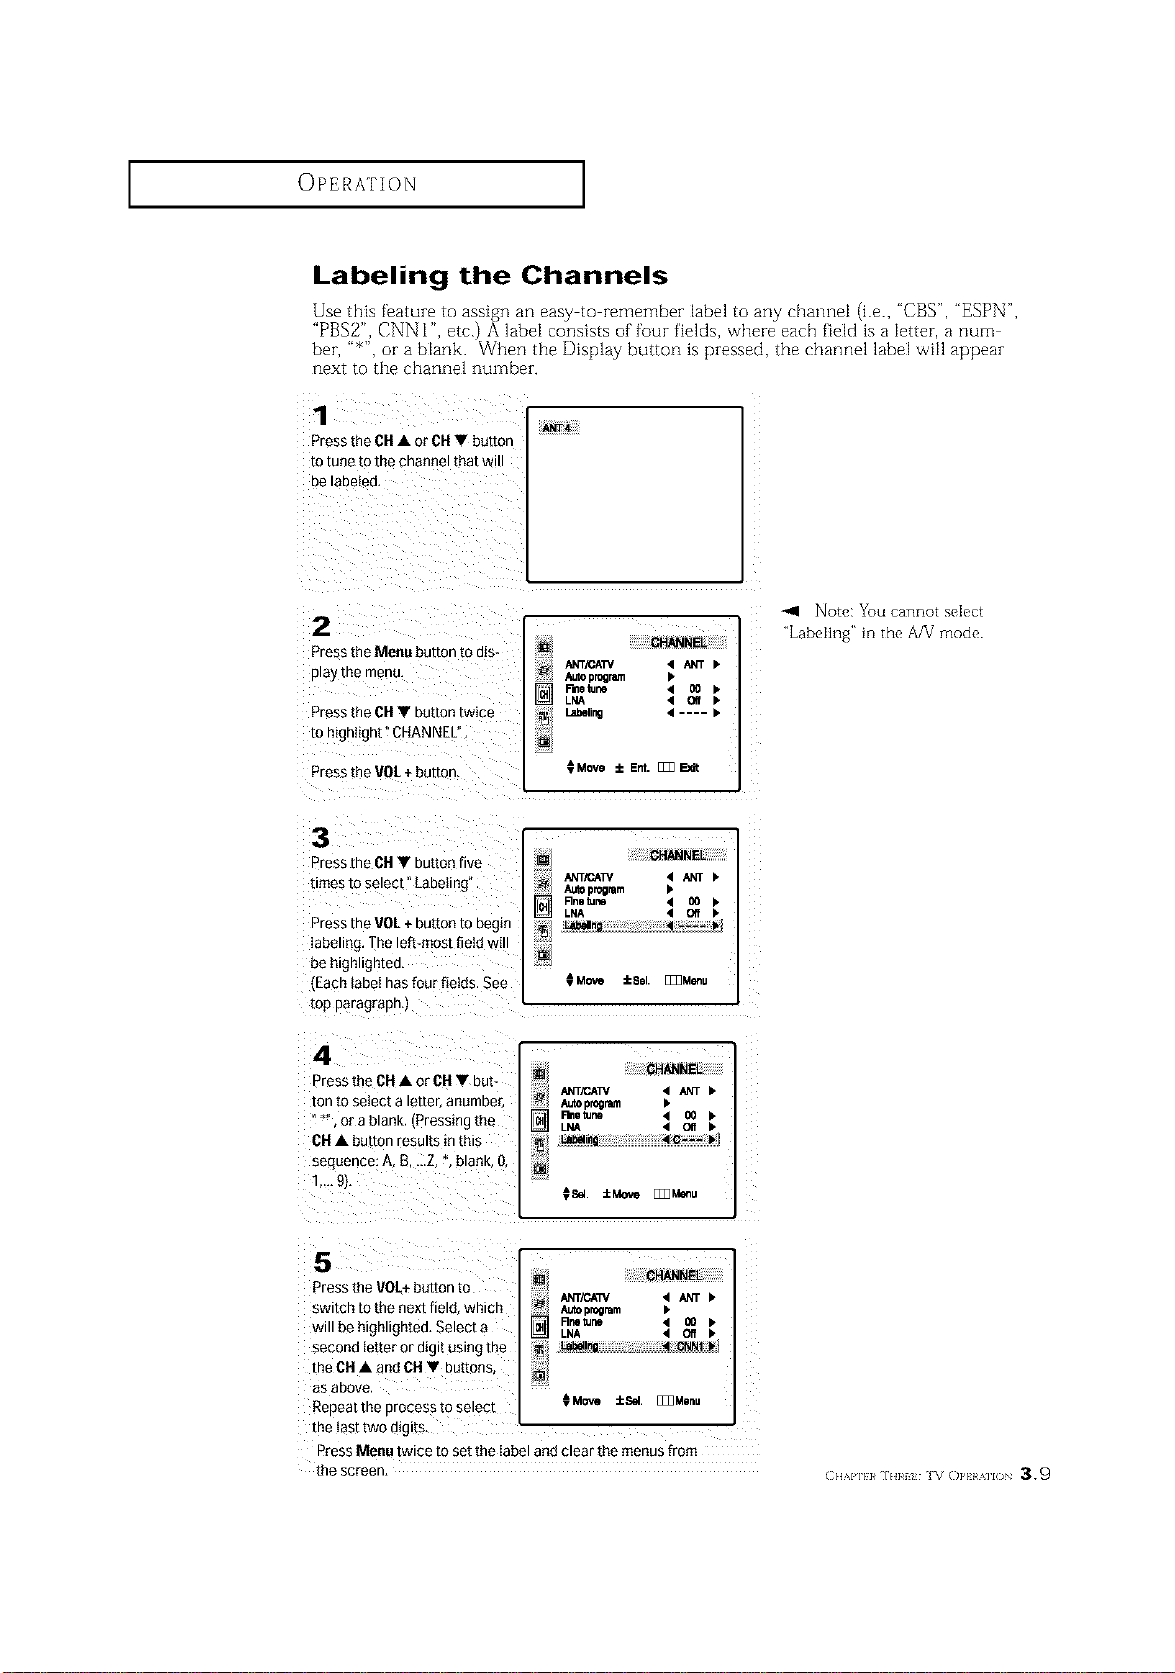
Labeling the Channels
Use this feature to assign an easy to remember label to any channel (i.e., "CBS", "ESPN",
"PBS2", CNN 12 etc.) A 1abet consists of four fields, where each fietd is a letter, a num
ber, "_", or a blank. When the Display button is pressed, the channel labeJ will appear
next to the channel number.
1
ANT4
Press the CH• or CH• button
10 tune [o Ine cn_lnnel ira[ Wl
Be laDetea,
2
Press the Menu button to dis-
play me menu,
Press the CH• button twice
to mgnught" CHANNEL"
Press the VOL+ button.
CHANNEL
ANT/CAW 4 _T •
Auto program I*
P-metune 4 O0 •
LNA 4 QIf •
Labeling 4 .... •
0 Move i Ent. [_ _dt
Note: You cannot seIect
_LabeIing '_in the A/V mode.
3
D'ess the CH • button five
times io select La Detlng
Press the VOL+ button to begin
labeling The left-most field wl
be ntgn,gntea.
.Each label has four fields. See
mp paragrapn,J
4
Press the CH• or CH• but-
ton to select a etter, anumbe£
or a blank Pressing me
CH• bLtton results in mls
seauence: A, B,...Z,*. blank. &
1..- £h
CHANNEL
_; A_O program
_--_ Rnetun • O0
LNA • Off
Ll_lng 4 .... I*
Move iSe []Z]Menu
[] CHANNEL
ANT/CAW 4 _ •
Rmle_ne 4 {10 •
LNA < C¢ •
L_t_e_mg 4 C--- I,
[]
¢SeL ::LMove []_Meeu
5
Press the VOLt button to
swncn to the next fiele wntcn
will be hign.gnted, Select a
secona iet[er or aigl[ OSlt3gthe
the CH • and OH • buttons,
aS aBOVe,
Repeat The process m select
[] CHANNEL
ANT/C_/ 4 ANT •
Autopr_lmm •
Rnsturin 4 _ •
LNA 4 Off •
[]
_Move _cSd [_Monu
the last two utglts
Press Menu twice to set the label and clear the menus from
me screen
CHAPll}¢ IH}¢i IV ()P} AII()N 39

OPERATION ]
Setting the Clock
Setting the clock is neccessary in order to use the various timer features of the TM Also,
you can check the time while watching the TM (Just press Display.)
Option 1: Setting the Clock Manually
1
i ¸h_/
Pressthe Menu button _;_i
to display the On-screen
me+. +!
Press the CH Y button
three times to select
_FUNCTION,"
lime Ib
Lw_J_ 4 E_ ),
Di_ NR '_ On
•nit 4 oo ).
Pl_ & Ray b
V_hlp_
_l_ iEnt. [_FJdl
Pressthe VOL+ button.
2
Pressthe VOL+ button:
The Timemenu will
appear onthe screen,
and "Clock set" will be
selected,
Pressthe CH V button
/
iii / Onlfm¢ -:- _¢aOff
M OIf dine -:- amOff
8loop 0If
±Sol. [_ Exit
to select" Clock"
3
Press the VOL+ button
agair the nou/smgits
wt Demgn++gntedL
'ml'
Press the OH• or CH•
BUttOnSrepeateoly u[]
me correct hour appears, []
After the hour is entereu,
cress the VOL+bJton.
at this point me minutes
d+gitswill bemgn++ghtedl
FUNCTION
_ Clock 6:- am
Oe fine -:- 8mOff
Offime -:- amOff
8lee€ Oil
_ ± Mm.e _ Menu
When seIecting the hours, be sute
to select the proper time of day (AM
ot PM).
You can change the hours by pressing
the CH • or CH • buttons repeated
ly (or by holding down either of these
buttons)
4
Press the CH • or CH •
Buttons to select the
correct mlnufes
After selecTingme
correct MinuTes,press
the VOL _-button
FUNCTION
Clock ,Set • ManualI_
_ Clock 6:30ee.
Ongme -:- amOff
Of[]me -:- amOff
Sleep Off
CAdJ iM_ [_ Menu
Press the Menu button
three times to exit,
The tbwe will appear every time
you press the Display button
3.1 o (:++,,,,1,111++.1+1++v()}'HAllON

OPERATION ]
Option 2: Using the Local PBS Channel to Automatically Set the
TV Clock
Pressthe Menu button
todisplay the menu_
Press the CH • button
three times to highlight
FUNCTION."
_UN_ON
"ill I_
Capdon I,
l,,l_guaoe 4 _gliah Ip
Dlgl_lNR 4 On IP
_It 4 O0 I*
Rug&Play I,
Pressthe VOL+ button,
Press the VO/+ button ......_ !!!!!!!iE_R_ OB!i!i!i!i!i!i!ii!i
to select Ctockset
@
11mozone • An-
• No I.
Pressthe CH • button
to select" Auto clock
set" and press the VOL+
button to seIect Auto
clock set "On".
@Auto¢le_et • On _.
PBechBnrmel • 08 •
limezone • ATL
• NO P"
_Move ±Sel. [_Z_Menu
Press the ON• button to ?
se ect _PBSchanne"
- @PBSchann_ • 08 I_
While PBSchannel is
_mo z_le • ATL
selected, presstheVOL+ [] DST • No
button,
Press the 01-1• button to _:
selectyourloPatPB S 08_. _Me._ _,_u
channel.
Press _heVOL+ button to
set,
continued...
CH/,a']H_ ]EmH IVOPt A]]( 3.q q
OPERATION ]
5
Press the CH• button to
select" lime zone"
Nhile "Time zone" is
selectee, press either
the VOL+or VOL-buttons
to change theTime zone.
Seeuence: ATL,,EAS[
CEN MTN.. PAC..ALAS
HAW.
Autoclo_eet • On I.
PBSrJ_annel • _ •
_11mez_e • ATL _.
DeT • NO I"
€Move ±Adj. [_Menu
Press the CH• button to
select ?DST!'(Oaylight
Saving Time), White
"DST" is selected, press
VOL_or VOL-buttons to
indicate "Yes" or _No".
The cIock is set. €Move ±Adl. [_3_u
Press the Menu button i i i
three times to exit.
Autocl_kaet • On )*
PBSChannel • 08 b
33mezo_ • ATL b"
@Db'T • No I.
3.1 2 (2HAl,l} }¢ ] H}¢I} IV ()PHAIION
OPERATION ]
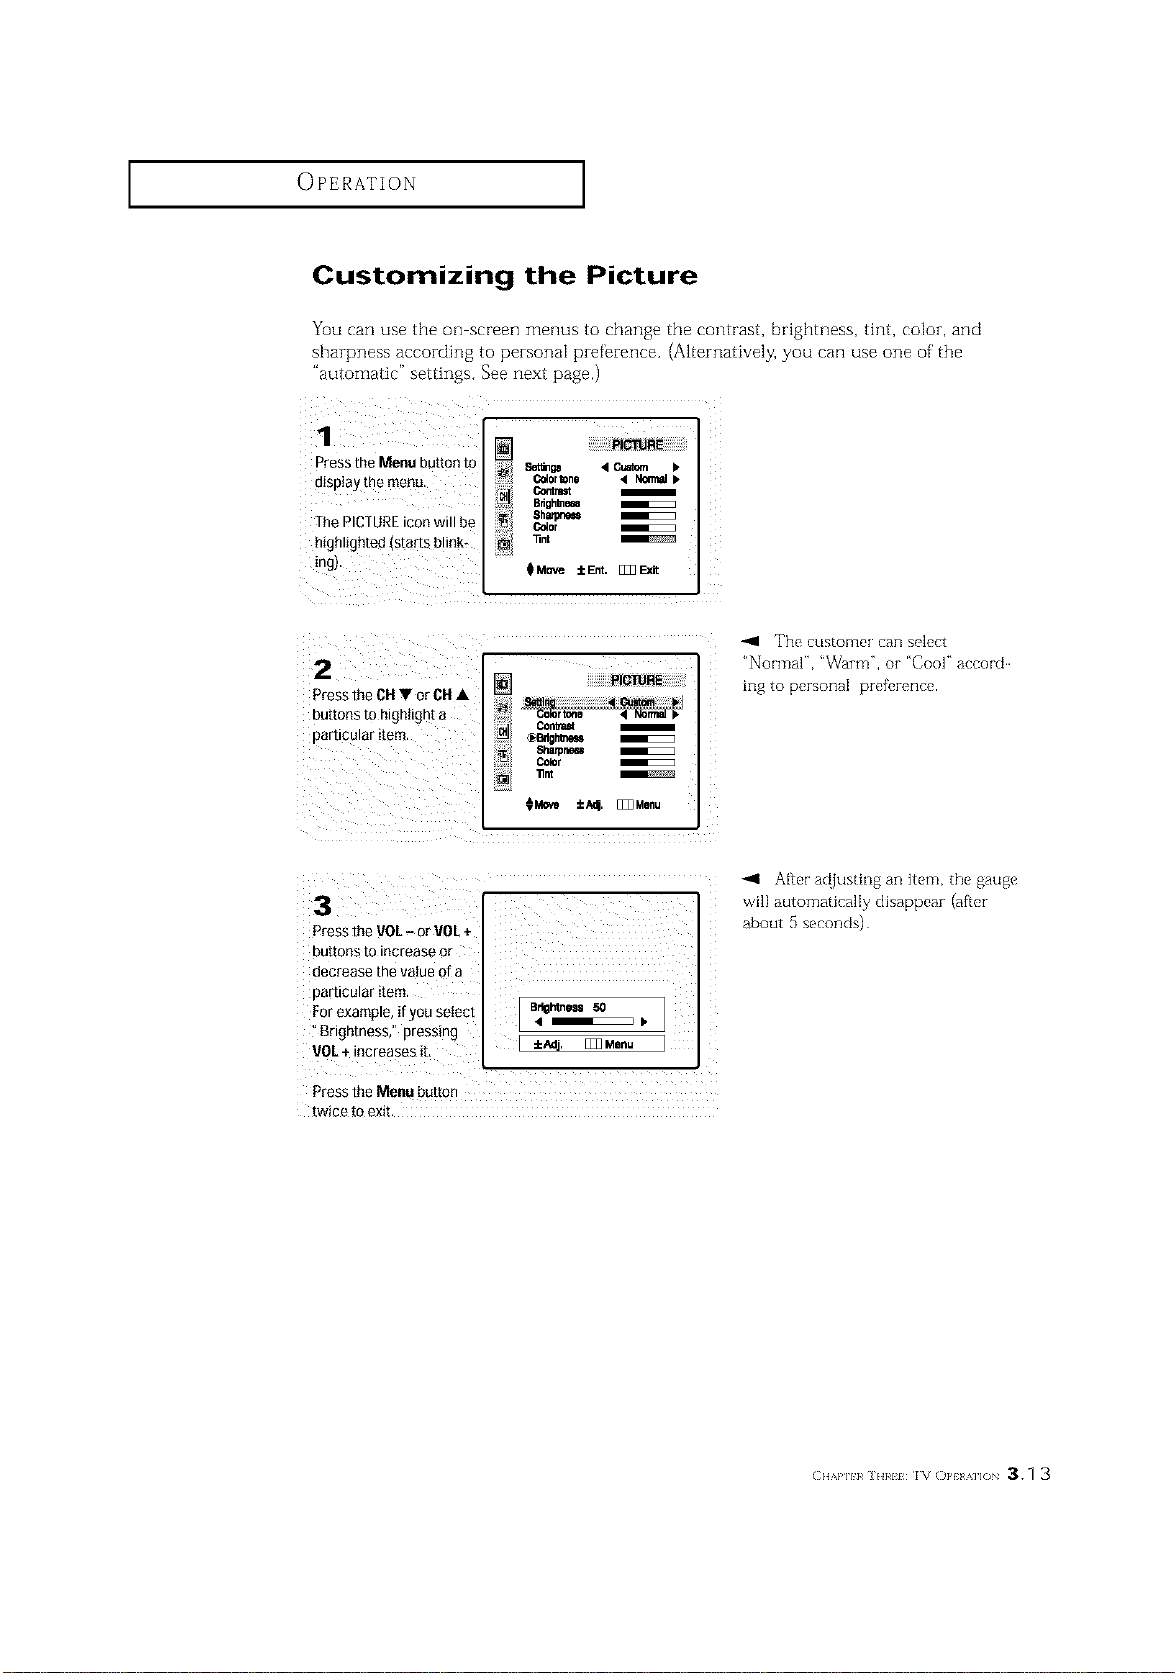
Customizing the Picture
You can use the on screen menus to change the contrast, brightness, tint, color, and
sharpness according to personal preference. (Alternatively, you can use one of' the
"automatic" settings. See next page,)
Press the Menu bu[mn To
msplay the menu.
The PICTURE icon will be
highlighted (starts bl nk*
ng
PICTURE
_or_ne • _ •
Bdg_e_
8h_
Color
_Move iEnt. _
2
Press the CH • or CH •
DU[[ONS_0 riigllllgllt a
[]articular ItelT
_--] PICTURE
_Bdghi_
_lamneM
Color
[]/ 11nt
_Move ±/_4 []]] Menu
-41 The customer can select
"NormaP', 'Warm", or "Cool" accord
ing to personal prefk,rence.
3
Press the VOl- or VOl +
buttons to increase or
decrease the value of a
particular item.
Brightness," pressing
VOL+
Press the ien_ button
twice to exit.
After ac{justing an item, the gauge
will automaticalIy disappear (after
about 5 seconds)
CHAP]H_ ]H}_H IVOPt a]]O 3.q 3
OPERATION ]
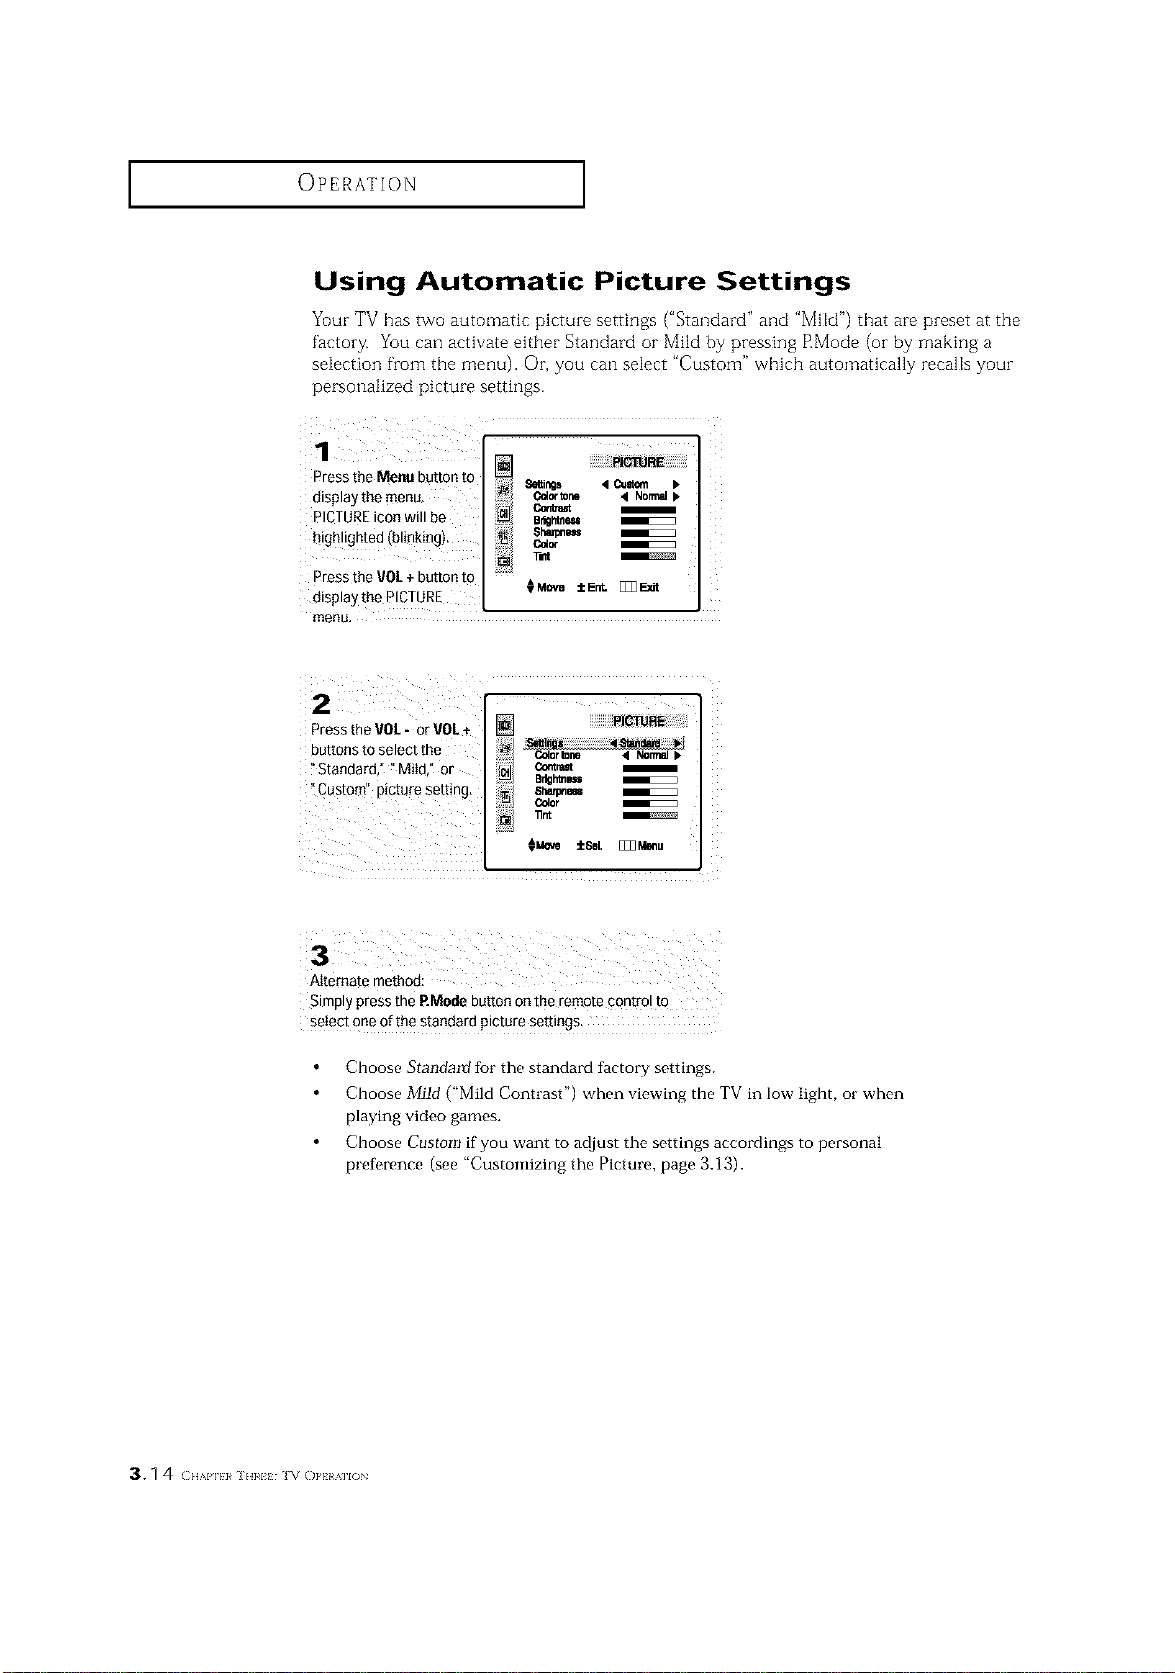
Using Automatic Picture Settings
Yuur TV has two automatic picture settings ("Standard" and "MHd") that are preset at the
factory. You can activate either Standard or Mild by pressing RMode (or by making a
selection from the menu). Or, you can select "Custom" which automatically recalls your
personalized picture settings.
1 ............
Press the Menu button to
8etlings 4 Cusk_l
display the merm_ _r_ 41N0nml
PICTUREicon will be _ er_mnm
.... ] ahmpem
hlohhohted (bmkma)..... _ -.
q o ._ i.acr
Press the VOL+ button to
displaythePlCTURE OMOva±E_ []]3_dl
menu,
2
Press the VOL- or VOL+
buttons to select the
"Standard," "Mild," or ¢orawt
B_tfmm
Alternate method:
Simply press the P.Modebutton on the remote cont[ol to
setect one of the standard picture settings.
Choose Standartf for the standard factory settings.
Choose Mild ("Mild Contrast") when viewing the TV in low light, or when
playing video games.
Choose Custom if you want to adjust the settings accordings to personal
preference (see "Customizing the Picture, page 3.13).
3. q4 (2HAI']} 1¢ ] H}¢I} ]V ()PHAII()N
OPERATION ]
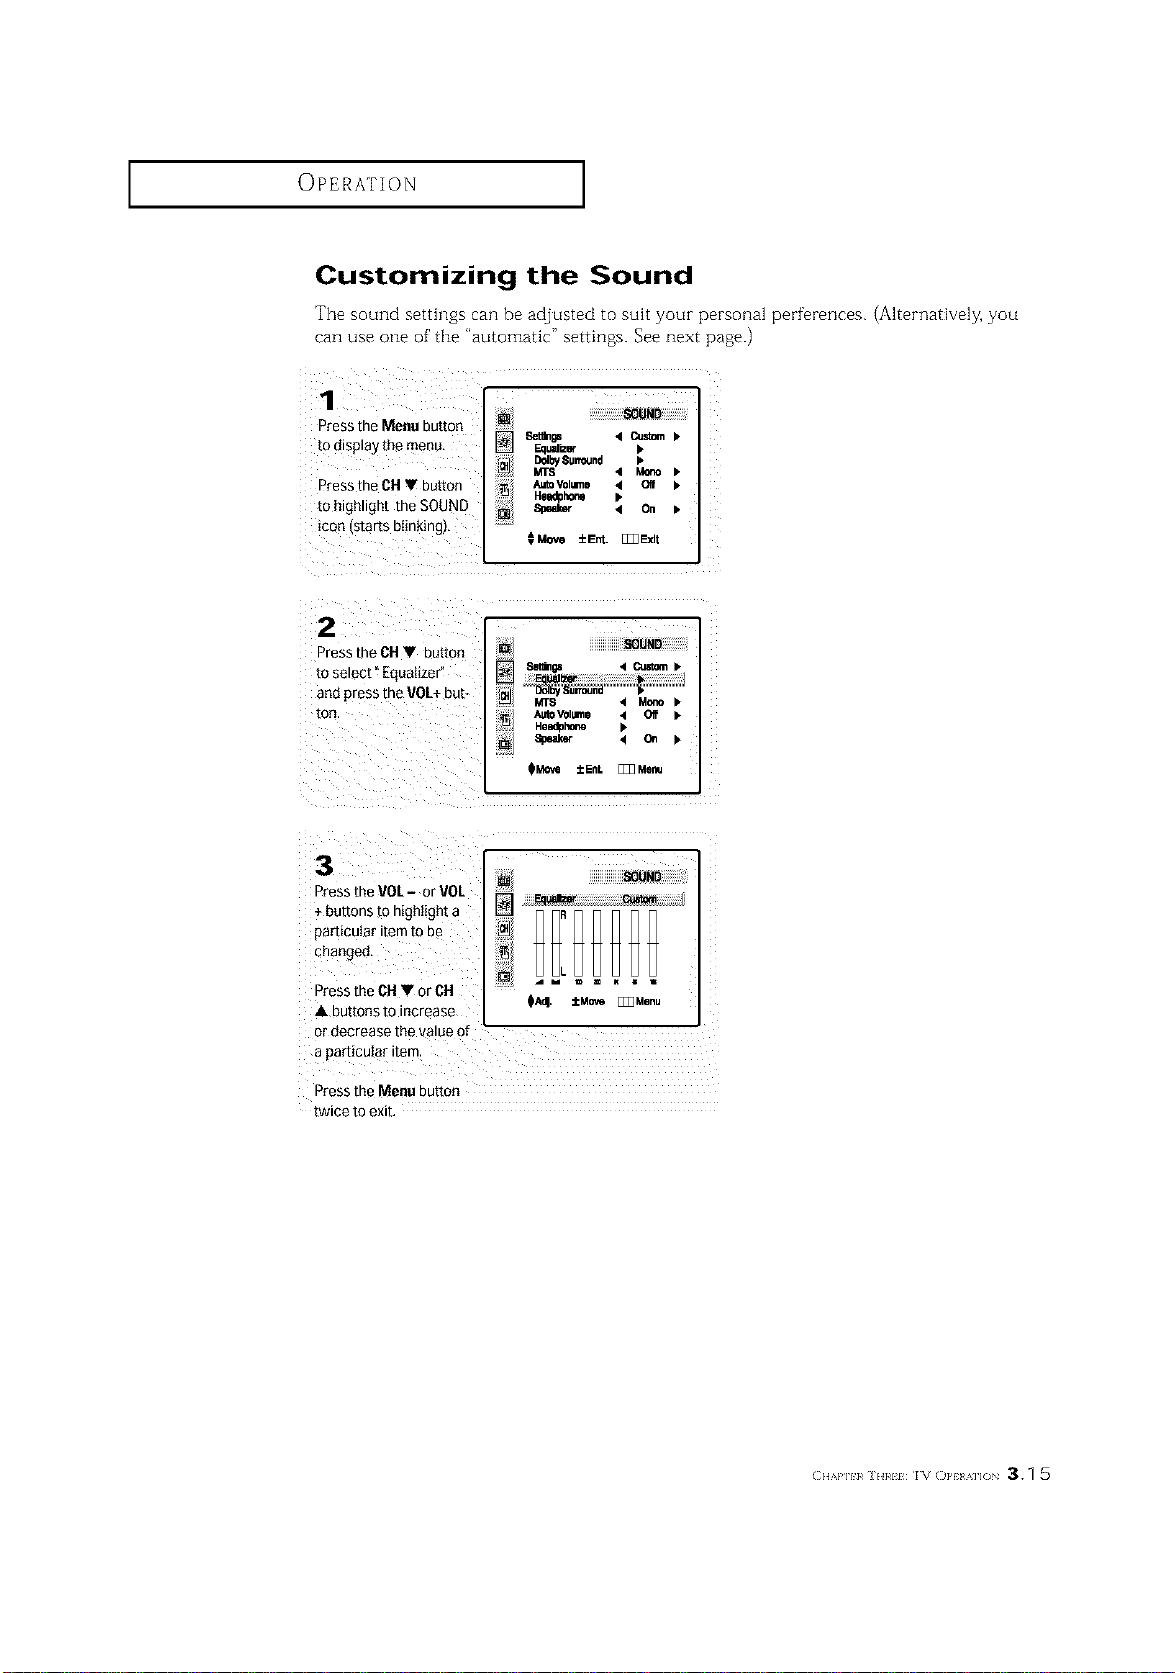
Customizing the Sound
The sound settings can be adjusted to suit your personal perferences. (Alternatively, you
can use one of'the "automatic" settings. See next page.)
1
Pressthe Menu button
to d_sp_ayme menu
Pressthe CH • button
to hgn.gnt the SOUND
icon starts blinking).
Setilnp • Custom •
Eaual_er b
AutoVolume 4 Oif I_
He.hone •
Speal_ • On •
€Move ±Ent. []]]Ebdt
2
D'ess the DH • button
[o select _Equalizer _
an{] aress the VOL+ DU[_
[]
MTS • Mo_ •
AUtoVOl_nll • Off •
HIladl}hofle
Speaker • C_ •
-_ressthe VOL- or VOL
+ [}utTonsm ntghtigh_a
oarticularitem to be
cbanget],
_ress the CH • or CH
A 3u_[ot2s TO increase
_r decrease the .alue of "
a particuIsr item
L
_A_. ±Move []]] Menu
_ress the Menu DU[[On
l_wlee 10 eXll
CH/,a']H_ ]H}_H IV OPt A]]( 3.q 5
OPERATION ]
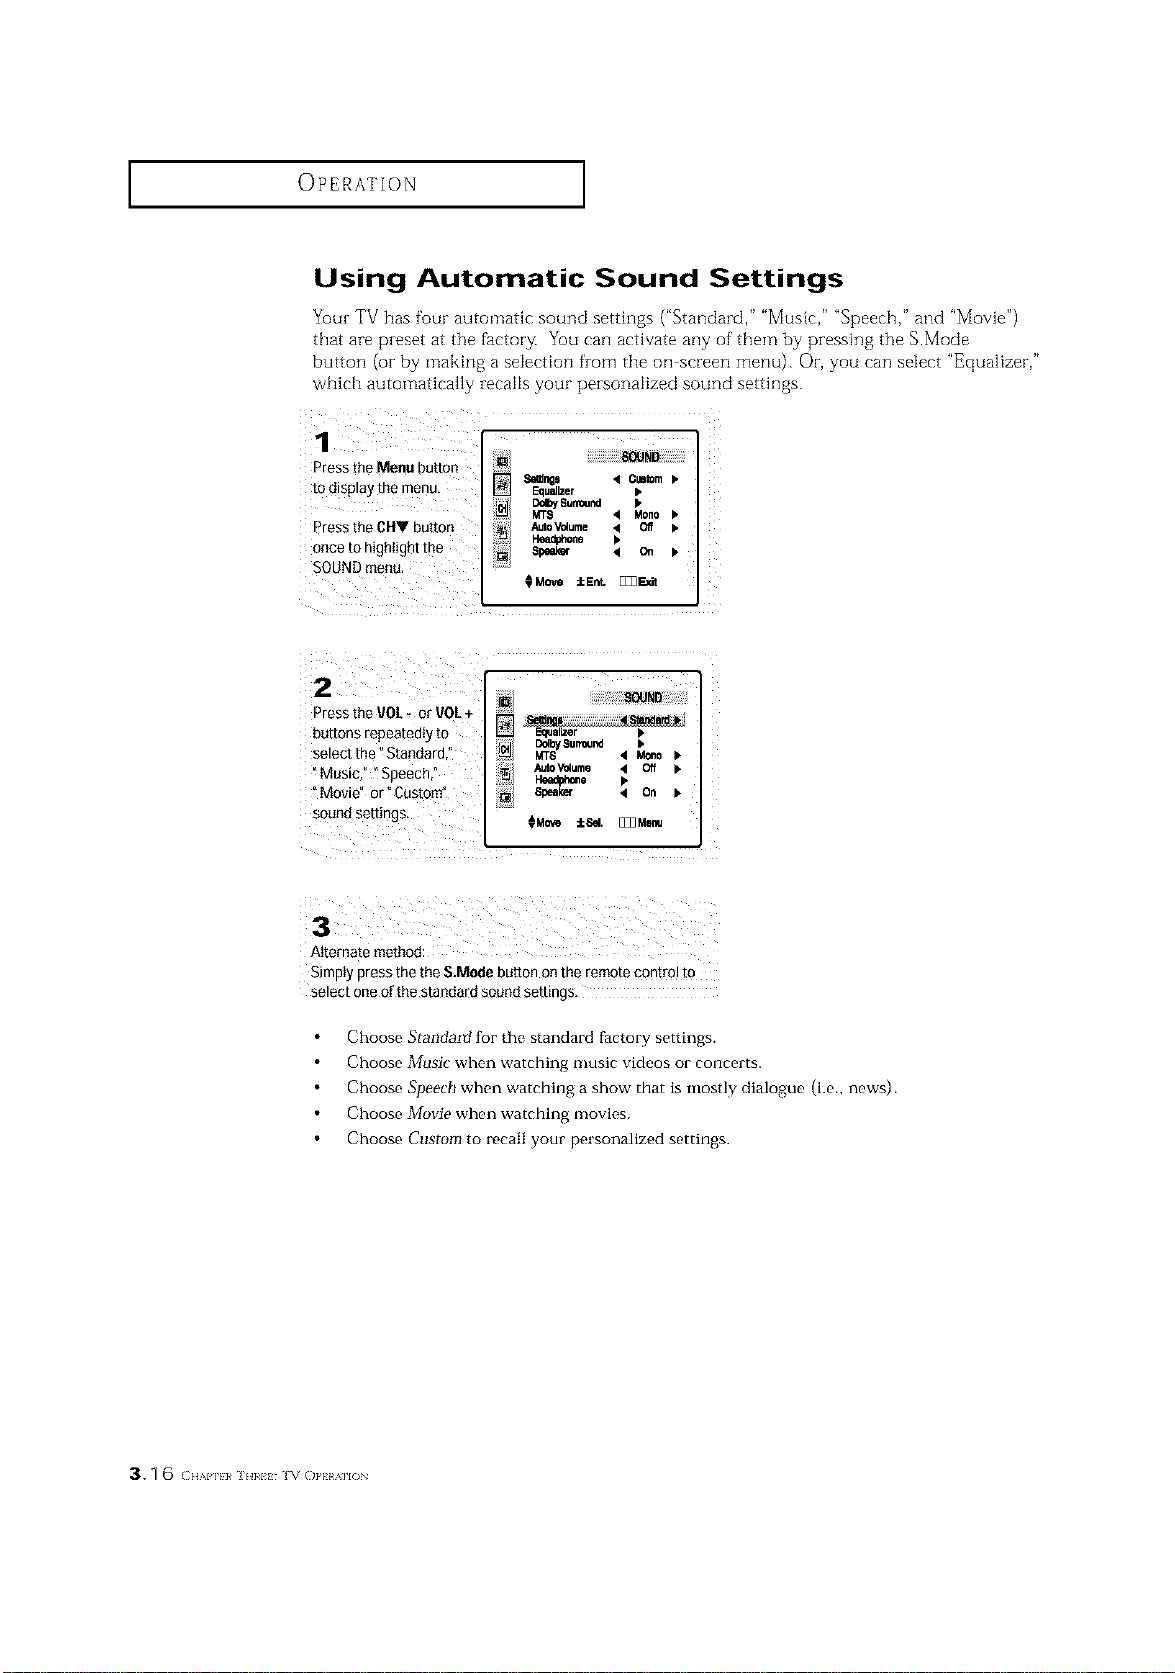
Using Automatic Sound Settings
Your TV has four automatic sound settings ("Standard," "Music," "Speech," and "Movie")
that are preset at the factor_ You can activate any of them by pressing the S.Mode
button (oi- by making a selection from the oil screen menu). Or, you can select "Equalizer,"
which automatically recalls your personalized sound settings.
1 iL JL :
Press the Menu button
to display the menu,
Press the CHV button
once to highlight the
SOUNQmenu
Sires _ Cmtom b
Equalizer •
"_'"1_,s._nd
MT8 '4 Mono
AutoV_ume _ Off
Headphone D,
8peek_ < on b
CMeve :[cEnt. []]3E_t
2 J ......
Press the VOL, er VOL+
buttons repeated y to _ Equalizer b
DdbySurround I.
selectthe Standard, _ MTS '4 Mono_.
_Music," iSpeech," AutoV_4ume 4 Off ).
Iteedpi,',o.e I.
i Movie" or _Custom" 81_al_ < On b
s°undsettings CMo,_ ::[c6el,[]]]Menu
Simply press thethe S.Mode button onthe remote control tO
select one of the standard soued settings_
Choose Standartf for the standard factory settings.
Choose Music when watching music videos or concerts.
Choose Speech when watching a show that is mostly dialogue (i.e., news).
Choose Movie when watching movies.
Choose Custom to recall your personalized settings.
3.1 6 (:.,,,,HI}¢].1¢. iv ()PHAllON
OPERATION ]
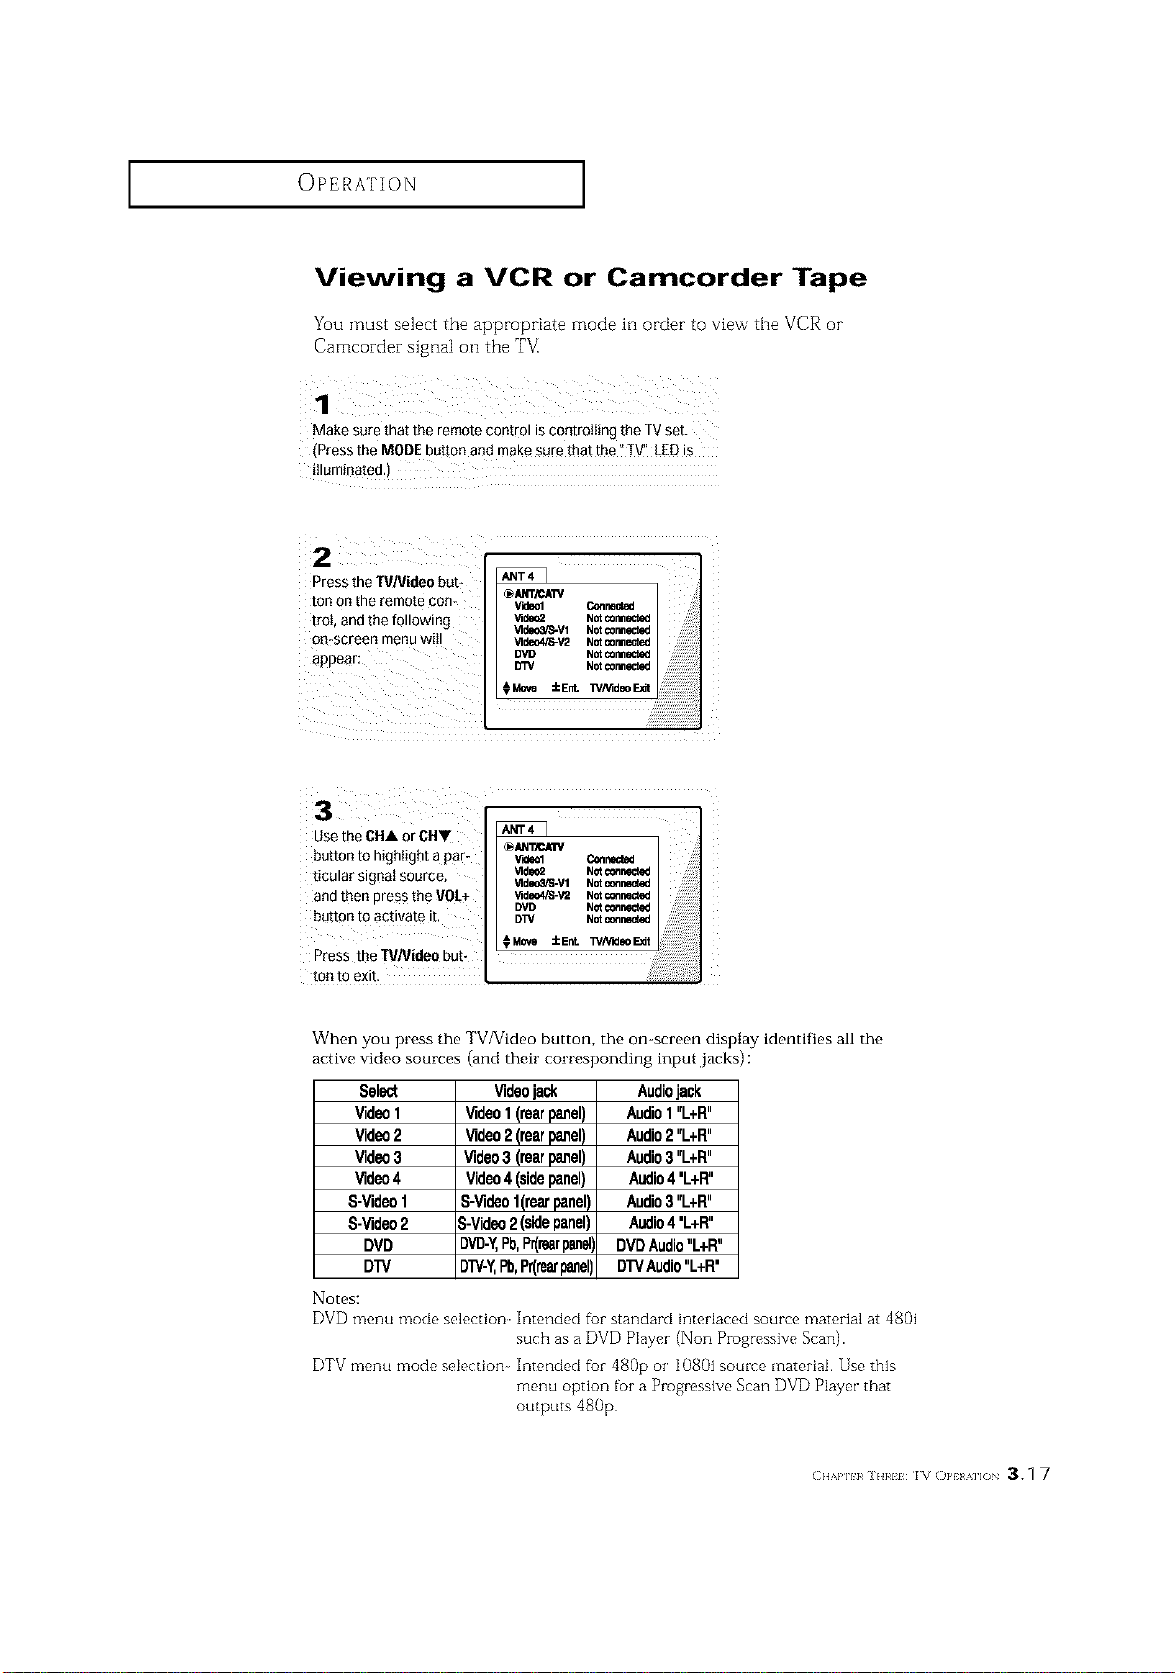
Viewing a VCR or Camcorder Tape
YO_ I_St _e]e_t t_e _[_e _ode _] o_de_ _ to vie_ r title V_ _
Camcorder signal on the T_
Make sure that the remote control is controlIing the TVset.
(Press the MODE button and makesara that the"TV_'LEDis
Press theTVNideo burr
ton Onthe remote con-
trot, andthe following
oo-screen menu will
appear:
Videol Connected
_deo2 Not _rmected
_deo_R_-Vl Not¢omlmct_J
_ldeo4/8-V'2 Notcormected
DVI} NOt_rmected
D3%' Notconnected
iEnt. WNideo FJdt
n arUse the CHA °iCH"
burro to highlight a p - _ _llCAIIVV'_eolConnec_
ticular signal source, _ld_Z Not_r_
_'lde_3,'S-V1Notcc,nnlmcted
and then press the VOL÷ _deo4/S-v= NotconrecWd
DVD Notc_r_cted
batton to activate it, DW Notconnected
Press theTVJVideobut-
ton to exit.
When you press the TV/Video button, the on-screen display identifies all the
active video sources (and their corresponding input,jacks) :
Select
Video1
Video2
Video3
Video4
S-Video1
S-Video2
DVD
DTV
Notes:
Videojack
Video1(rearpanel)
Video2(rearpanel)
Video3 (rearpanel)
Video4 (sidepanel)
S-Videol(reorpanel)
3-Video2 (sidepanel)
DVD-Y,Pb,Pr(rearpanel],
DTV-Y,Pb,Pr(rearpanel)
Audiojack
Audio1"L+R"
Audio2"L+R"
Audio3"L+R"
Audio4'L+R"
Audio3"L+R"
Audio4'L+R"
DVDAudio"L+R"
DTVAudio"L+R'
DVD menu mode selection Intended fbr standard interlaced source material at 4801
such as a DVD Player (Non Progressive Scan).
DTV menu mode selection Intended fbr 480p or 1080i source material. Use this
menu option for a Progressive Scan DVD P]ayer that
outputs 480p
(:H/,P]H_]H}_HIV OPt A]]( 3.1 7
SPECIALFEATURES
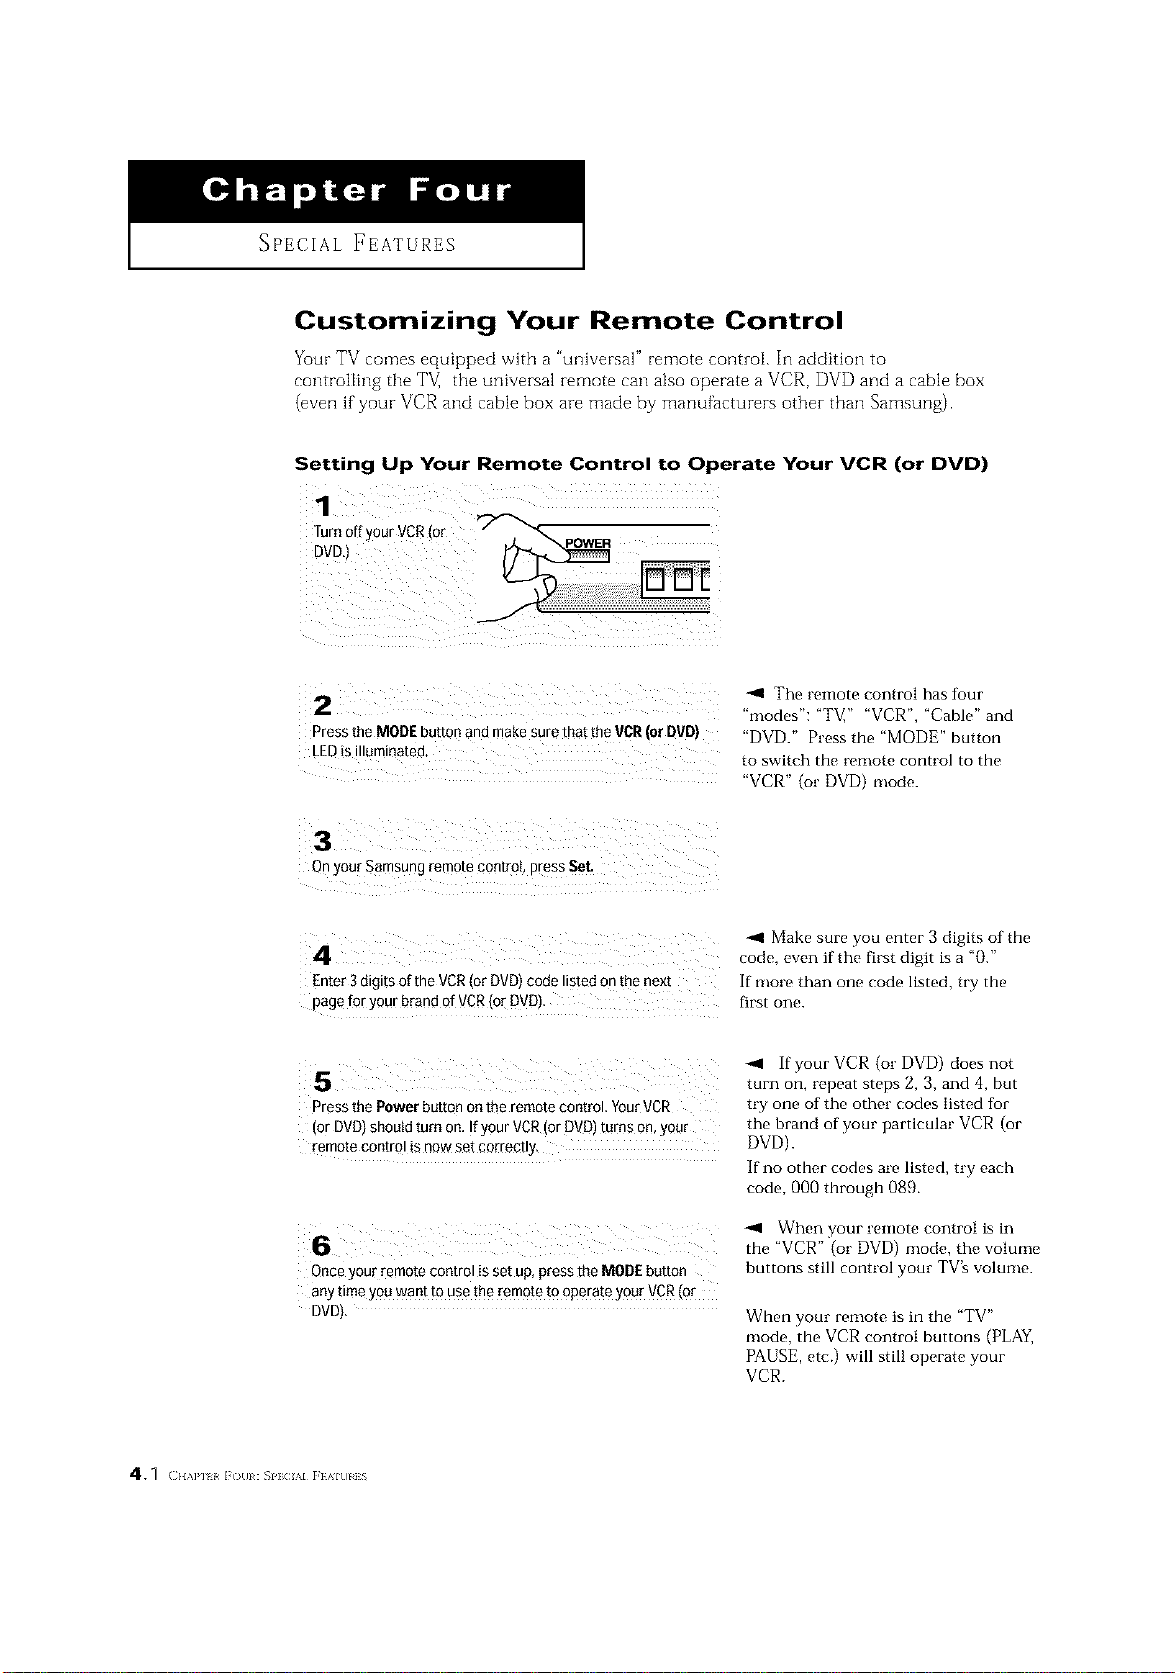
Customizing Your Remote Control
Your TV comes equipped with a "universal" remote control In addition to
controRing the TV, the universal remote can also operate a VCR, DVD and a cable box
(even if your VCR and cable box are made by manufacturers other than Samsunz).
Setting Up Your Remote Control to Operate Your VCR (or DVD)
zzil i z i _ ii i
Press the MODEbuEo _ and make sure that the VCR(or DVD)
-,11 The remote control has tour
"modes": "T_;" "VCR", "Cable" and
"DVD." Press the "MODE" button
to switch the remote control to the
"VCR" (or DVD) mode.
Onyour Samsung remote control, press SeL
Enter 3digits of the VCR(or DVD)code liated onthe next
pagefor your brand of VCR(or DVD).
-.9 Make sure you enter 3 digits of the
code, even if the first digit is a "0."
If more than one code listed, try the
first one.
if your VCR (or DVD) does not
turn on, repeat steps 2, 3, and 4, but
Press the Power button on the remote control. YourVCR try one of the other codes listed tot
(or DVO)should turn on. Ifyour VCR (orDVD)turns on, your the brand of your particular VCR (or
remote con!rol !s now set c0rrectly. DVD).
If no other codes are listed, try each
code, 000 through 089.
-,11 When your remote control is in
the "VCR" (or DVD) mode, the volume
Once your remote control is set up, press the MODE button buttons still control your TV's volume.
any time you want to use the remote to operate your VCR(or
DVD). When your remote is in the "TV"
mode, the VCR control buttons (PLAY,
PAUSE, etc.) will still operate your
VCR.
4.1 (ll,\]'] I l(}_ll:SPlCI/,,l rIAltlliS
SPECIAL FEATURES I
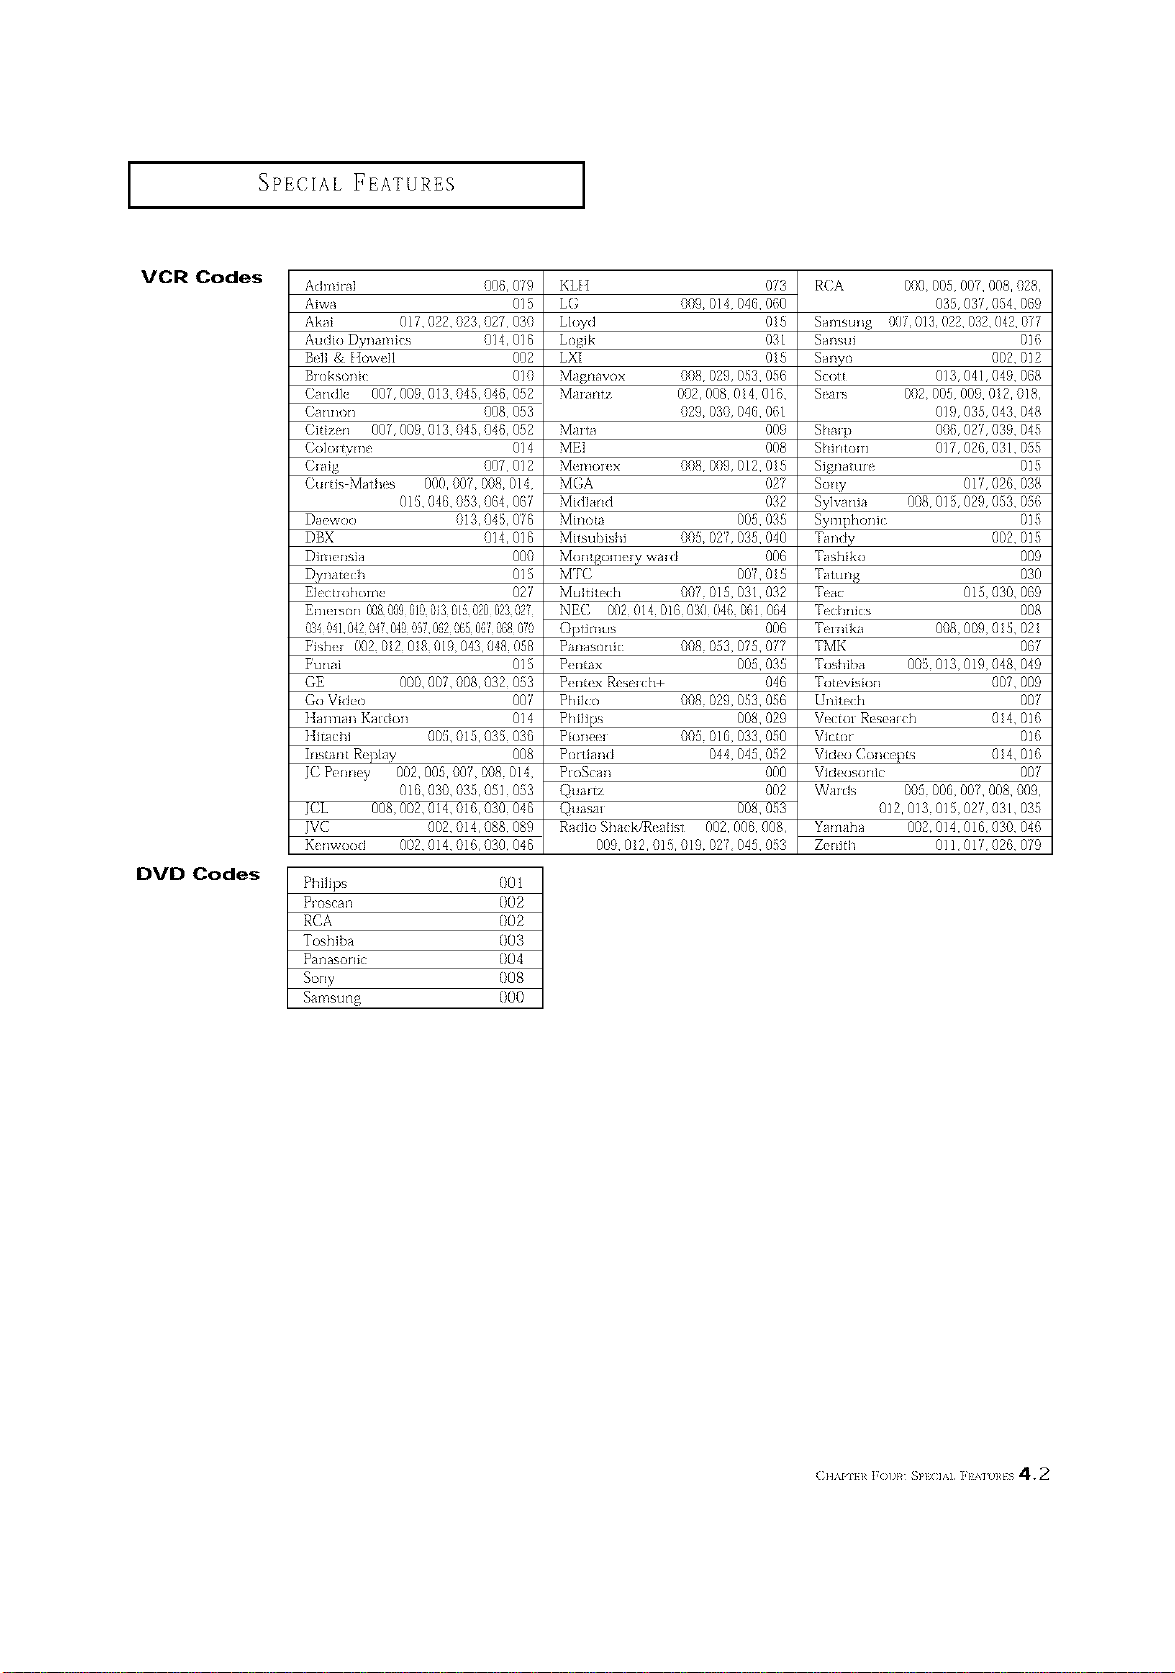
VCR Codes
DVD Codes
Admiral 000 0f9
Aiwa 015
Akai 017,022,023,027 030
Audio Du]amics 014 016
Be1] & [ IowtIl 002
Sr oksonh: 010
Candk 007 009, 0 3, 048,040 052
Cannon 008 053
Cifi en 007 009, 03,048,040 052
Colo_ Wm_ 014
Gaig 007 012
Cultis Mathl s 000,007,008,014,
015,046,053,064 067
Da_x_,oo 013,045 076
DBX 014016
Dirnl rlsia 000
Dyr]ate( h 015
E]I( trohome 02_
Enll rsorl 05829901503 01502002302_
234541042547049557062 56506_568075
_ishe_ 002 02 08 019043045055
*%mai 015
GE 000, 007,008,032 053
Go Vkteo 007
Harma]/](ardor] 014
Hitachi 00[}, 015,035 036
Instam Replay 008
]C PHm_y 002,005,001,008,014,
016,030,035,051 03
JCL 008 002,0 4,016,030 046
JVC 002,014,088 089
K_ nwood 002,014,016,030 046
KLII 073
LG 009 014,048,060
Lloyd 015
LogJk 031
LXI 015
Magnavox 008 029,053,056
Mar ,ultz 002,008, 04, 06,
029 030, 046,061
Marta 009
MEI 008
Mer:lor( x 008 009,012,015
MGA 027
MidI,_nd 032
Minota 005,035
Mitsubis[IJ 005 027,035,040
Momgom{ __ wmd 006
MTC 00L 05
Mu]titech 007 015,031,032
NEC 002 014 016 030 040 061 064
OptJmus 006
PanasonJc 008 03 0£5,0H
PH_tax 00,035
PH_t* x Rese_ oh+ 046
Phflco 008 029 053, 0{}6
PhflJps 008,029
Pior]_<'_ 005 016,033,050
Portland 044,045,082
ProScan 000
Qu,_tz 002
Quasar 008,053
Radio Shack/R_ alist 002,006, 008,
009,012,015,019,027 04 ,053
RCA 000 005,007,008,028,
035, 03L 054,009
Sm/isullg 007 013 022 032 042 077
Sal/sui 016
Santo 002,012
Scott 013 041 049,068
Slars 002 00,009, 012,018,
019,035,043, 048
Shmp 000, 02L 039, 045
SHJH[(}HI 017,020,031,055
SJgllattl_ e 018
Sony 01L 026, 038
Sylvania 008 015,029,053, 056
Symphonic 015
Tar]d_ 002,018
Tashiko 009
WatuIlg 030
Tea{ 015 030, 009
Technic s 008
Ternika 008 009 0 5, 02
TMK 00/
Toshib,_ 005 013 019 048,049
Totevision 007,009
Urfitech 00/
Vector RIslalch 014,016
Vh:tor 016
Video ( on{x pts 014,016
Vh]{ osorfic 00/
Wards 005 006,007,008, 009,
012,013,015 027 031,035
Yalnaha 002 014,016,030, 046
Z{n£h 011,01L 026, 079
Phi]Jps O01
Pmscan 002
RCA 002
Toshiba 003
Panasonic 004
Sony 008
Samsurlg 000
(}]]APIEI ]7OUR SPI (]]A] ]?EK] )}/gS 4.2
SPECIAL FEATURES ]
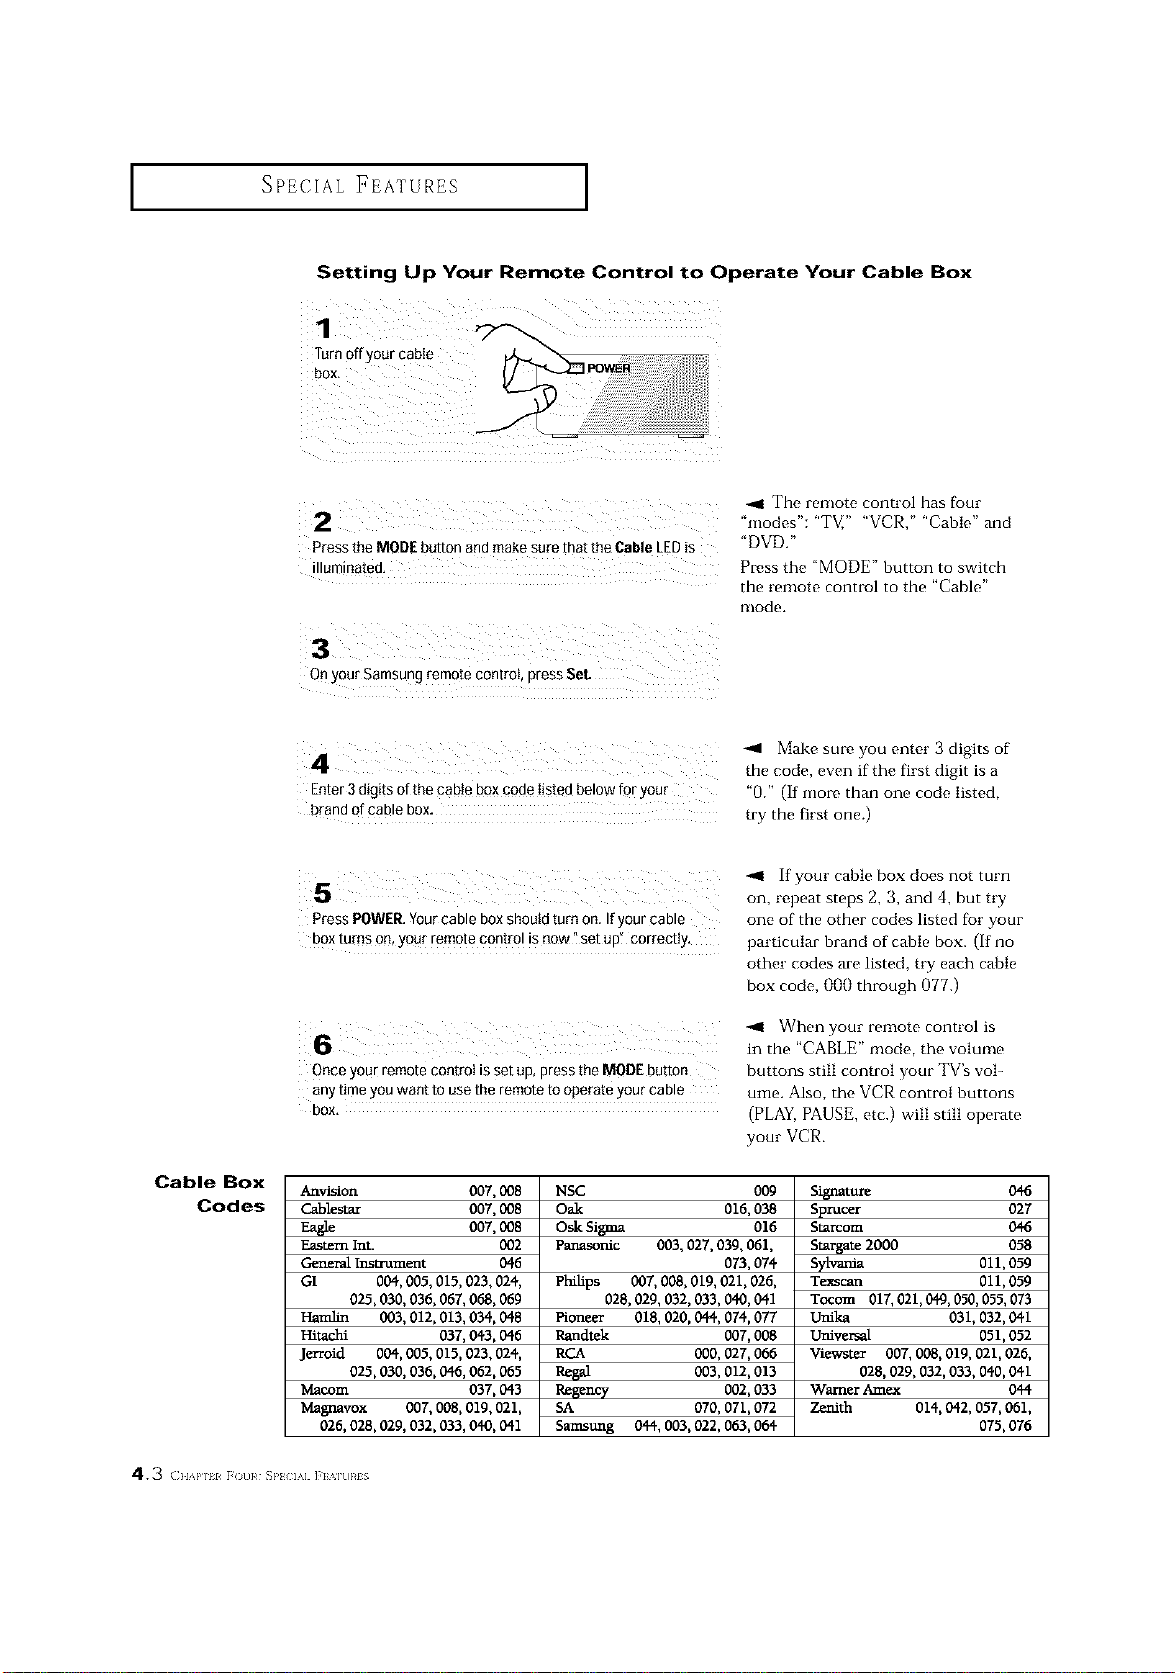
Setting Up Your Remote Control to Operate Your Cable Box
Turn off your cable
-_1 The remote control has four
"modes": "TV," "VCR," "Cable" and
Press the MODEbutton and make sure that the Cable LEDis "DVD."
illuminated: Press the "MODE" button to switcll
the remote control to the "Cable"
mode.
On your Samsung remote control, press Set.
-,91 Make sm_ you enter 3 digits of
the code, even if the first digit is a
Enter 3digits of the cab!e box code !!sted below for your "0." (If more than one code iisted,
try tbe first one.)
Cable Box
Codes
Press POWER.Yourcable box should turn on. Ifyour cable
bOx turns on, Yoffrremote contro Iis now "set up" correctly,
if your cable box does not turn
on, repeat steps 2, 3, and 4, but try
one of the other codes listed for your
particular brand of cable box. (if no
other codes are listed, try each cable
box code, 000 through 077.)
When your remote control is
6 intbe "CABLE" mode, tlae volume
Onceyour remote control isset up, press the MODEbutton buttons still control your TV's voi-
anytime youwant to use the remote to operate your cable ume. Also, the VCR control buttons
bOX, (PLAY,PAUSE, etc.) will still operate
your VCR.
Anvision 007,008
Cablestar 007,008
007,008
Eastern Int. 002
General Ir_nmment 046
GI 004, 005, 015, 023, 024,
025,030, 036, 067, 068, 069
Haralin 003,012, 013, 034, 048
Hitachi 037, 0q3, 046
Jerroid 004, 005, 015,023, 024,
025,030, 036, 046, 062, 065
Macom 037, 043
Magnavox 007,008,019, 021,
026, 028, 029, 032, 033, 040,041
NSC 009
Oak 016, 038
Osk Sigma 016
Panasonic 003, 027, 039, 061,
073, 074
Philips 007,008, 019, 021,026,
028,029, 032, 033, 040,041
Pioneer 018, 020, 044, 074, 077
Rendtek 007, 008
RCA 000, 027,066
Regal 003,012, 013
Re_ncy 002, 033
5A 070, 071,072
Samstmg 044, 003, 022, 063, 064
8i_ature 046
Sprucer 027
8tarcom 046
Stargate 2000 058
Sylvania 011,059
Te_can 011,059
Tccom 017,021,049,050,055,073
unika 031, 032, 041
Universal 051,052
Viewster 007, 008, 019, 021,026,
028, 029, 032, 033, 040, 041
Warner Amex 044
Zenith 014, 042, 057, 061,
075,076
43 (}l,%Plll r()u}¢ _p} IA] ]'1 g]U}¢IS
SPECIAL FEATURES ]
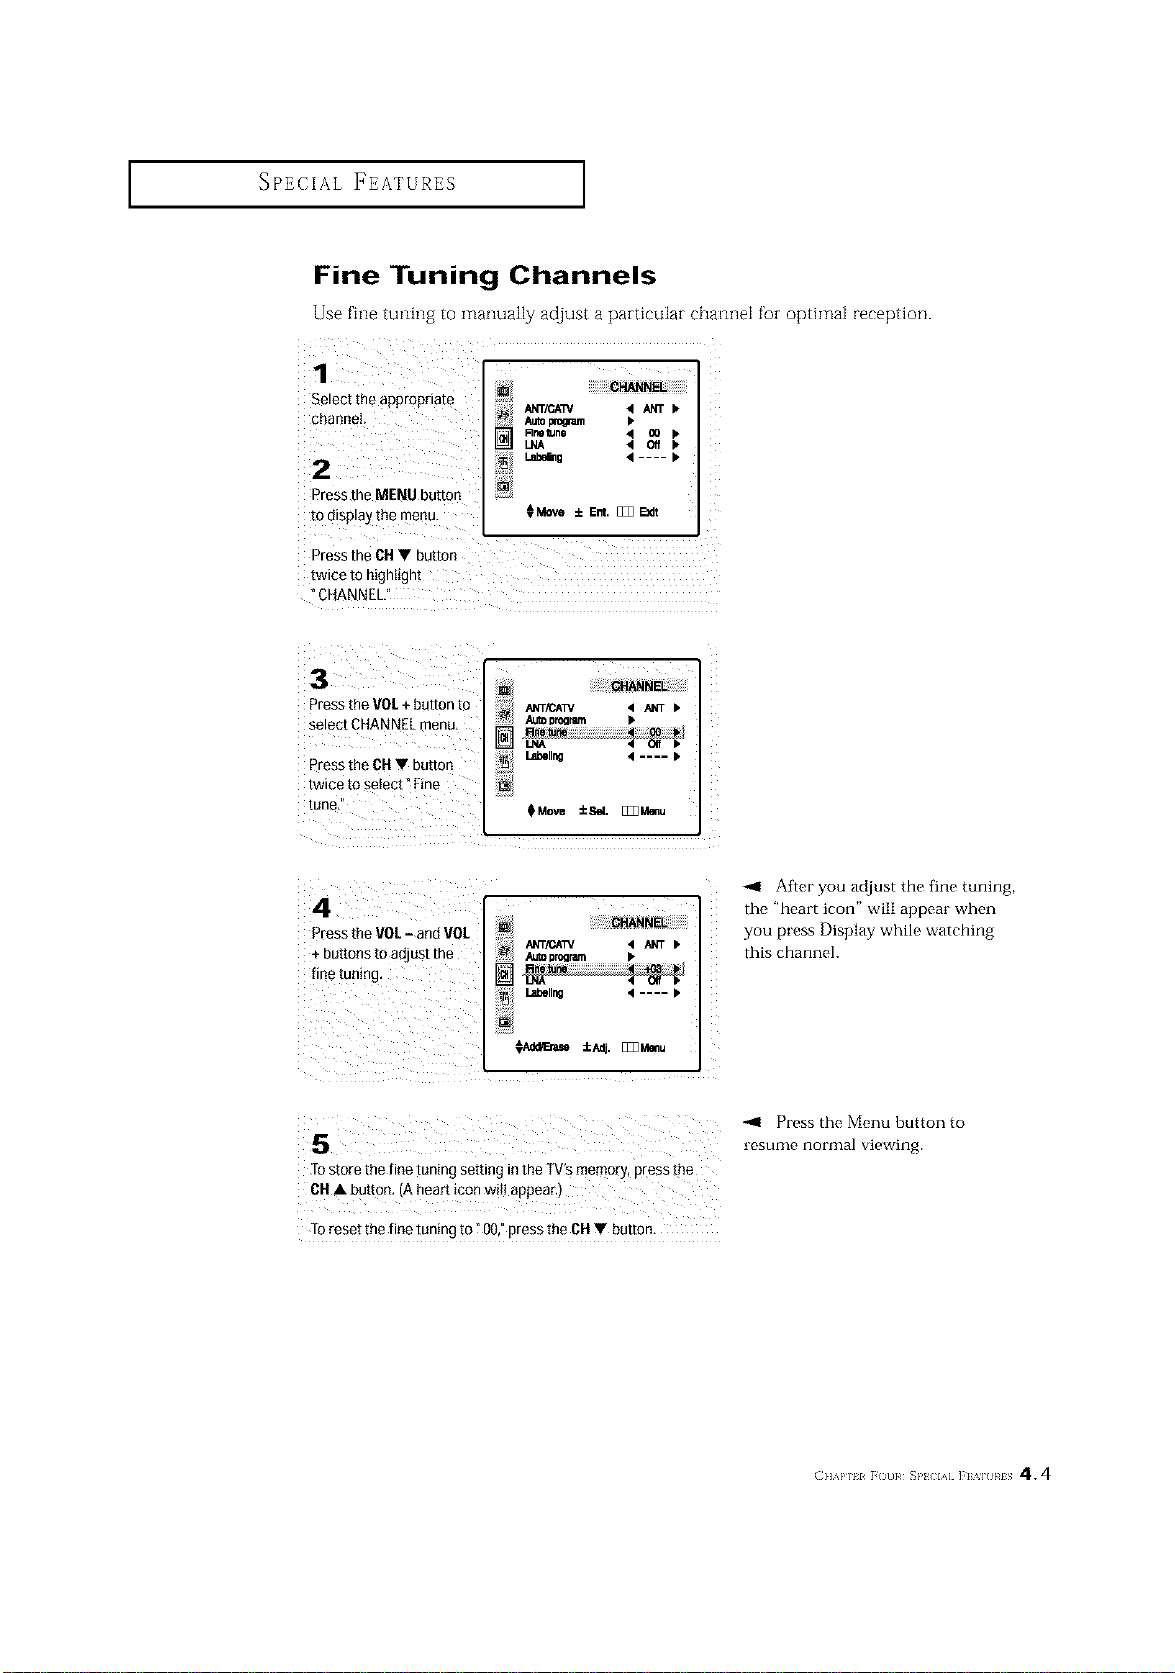
Fine Tuning Channels
Use fine tuning to manually adjust a particular channel for optima[ reception.
1
Select the appropnam
channel
2
DreS_the MENU button
to display me menu.
CHANNEL
ANT/CA3V 4 _NT •
Au_ pro_um •
Rne tun0 • 00
LNA 4 Off
I.abe_g • .... •
€Move ±Ent. [_ E_I
DreSS me CH • buttor
twice lo ntgnttgni
CHANNEL,
3
3ress the VOL+ button [o
select CHANNEl. menu,
3ress he CH • button
twmemselect°Fme
tune,
[] CHANNEL
J_NT/CATV • _ >
AU_10rogram •
] Rnetune 4 [] b
Lnboll_ • .... I*
_Move _Se/. [Z_M_u
4
Pressthe VOL- and VOL
+ buttons to adjust the
!i iii i iiiiiill
@ i!!i!!!!I__H_ NE_!iiiiiiiiiiiiiiii
i;_ Auto program •
Labeling 4 .... >
Afmr you ad.just the fine tuning,
the "heart icon" will appear when
you press Display while watching
this channel.
s "'° u"'ePres theM°nUn°rmalvie"ing.bUtt°nt°
TOstole the fine tuning setting in the TV'smemory, press the
6H • button. A hear_icon will appear.
Toreset the fine tuning to?00,"press the 6H • button,
(11'_}' ii _()[)}# _P} D&] ]'1 '_1 }#IS 4.4
SPECIAL FEATURES ]
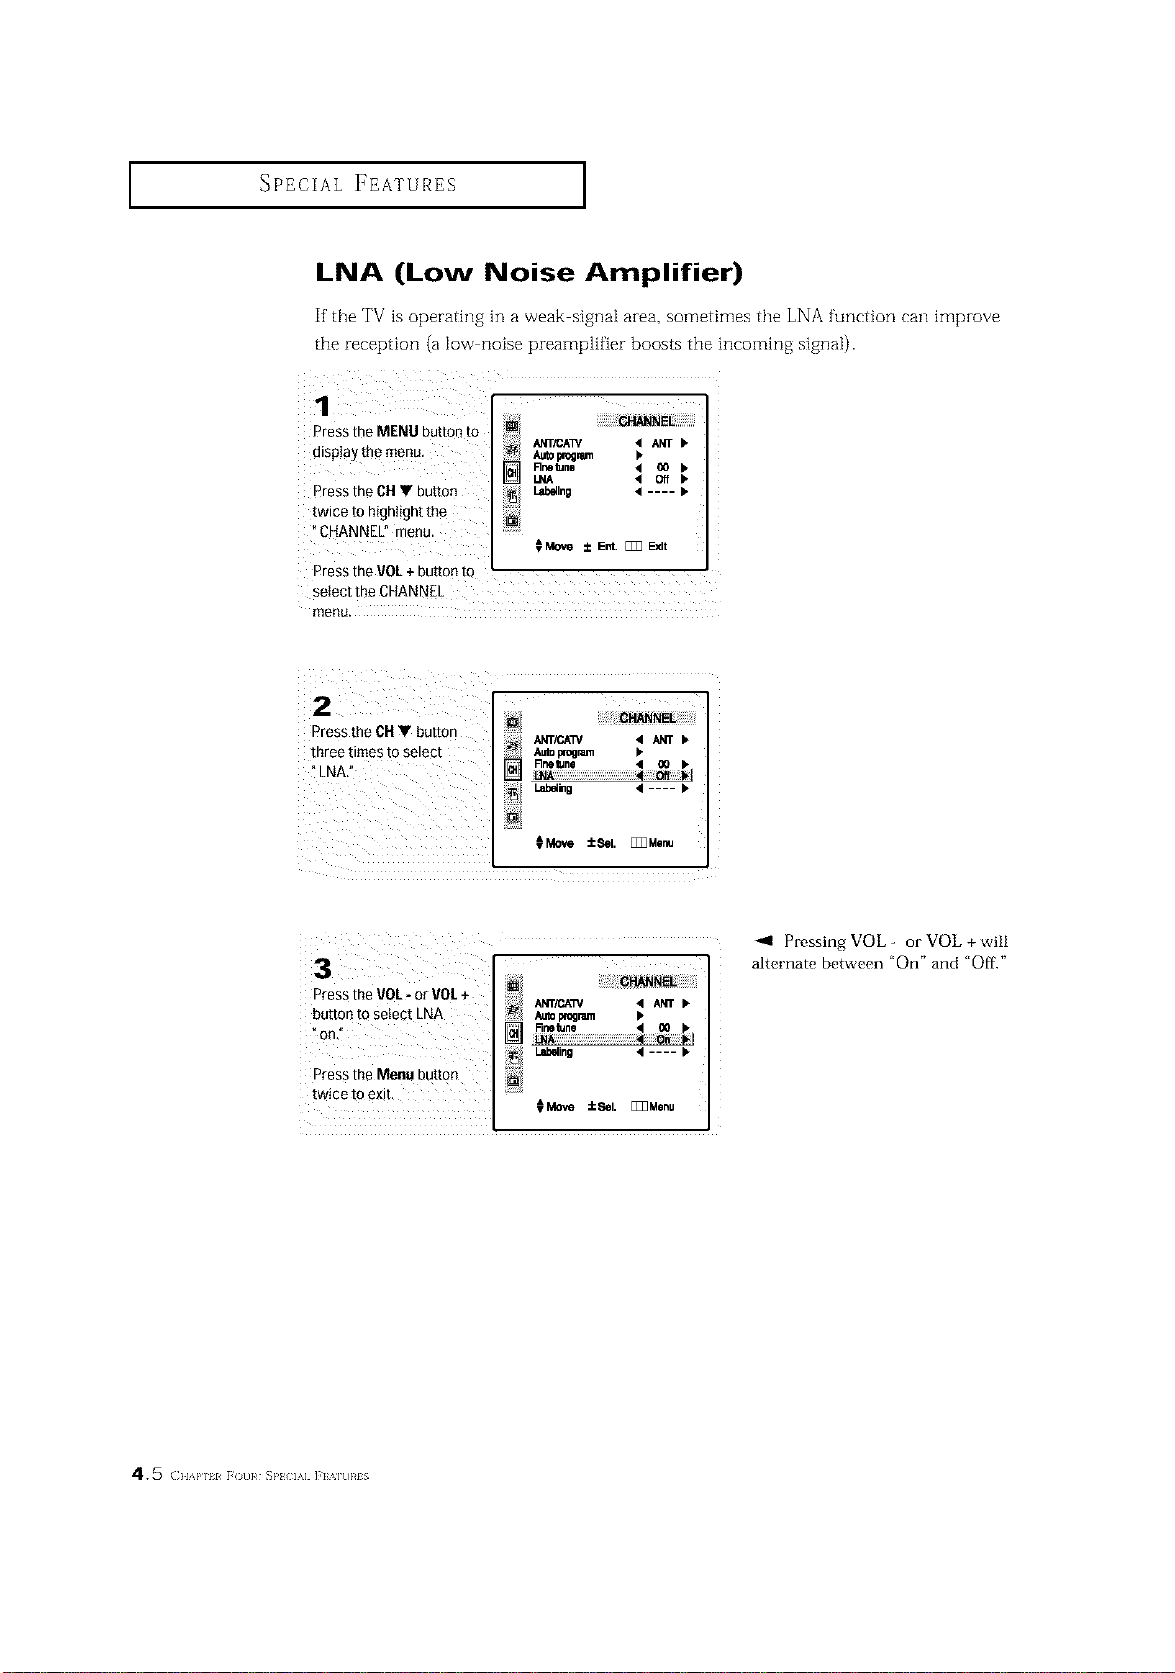
LNA (Low Noise Amplifier)
If'the TV is operating in a weak signal area, sometimes the LNA function can improve
tee reception (a low noise preamplifier boosts the incomFlg signal).
%
Press the MENU button to
ANT/CA_ 4 ANT •
dispiay the menu. A_o_ i,
Flne_na < _ •
I.NA < Off •
Press the CHV button L_Ing 4 .... •
twice to highlight the
CHANNEL" menu.
Press the VOL+ button to
setect the CHANNEL
menu.
Press the CH V button
three times to select
%NA." ] A_o program k
_,,_-o , .... •
_Move :_1. []Z]MIInu
Press the VOL--or VOL+
button tQselect LNA
_on:
Press the Menu button
twice to exit.
program IP
_Move iSel. []Z]Menu
_1 Pressing VOL - or VOL + will
alternate between "On" and "Off."
45 (}lAP 11 [()t)}¢ SP} IA] ]'] Mt)}¢IS
SPECIAL FEATURES ]
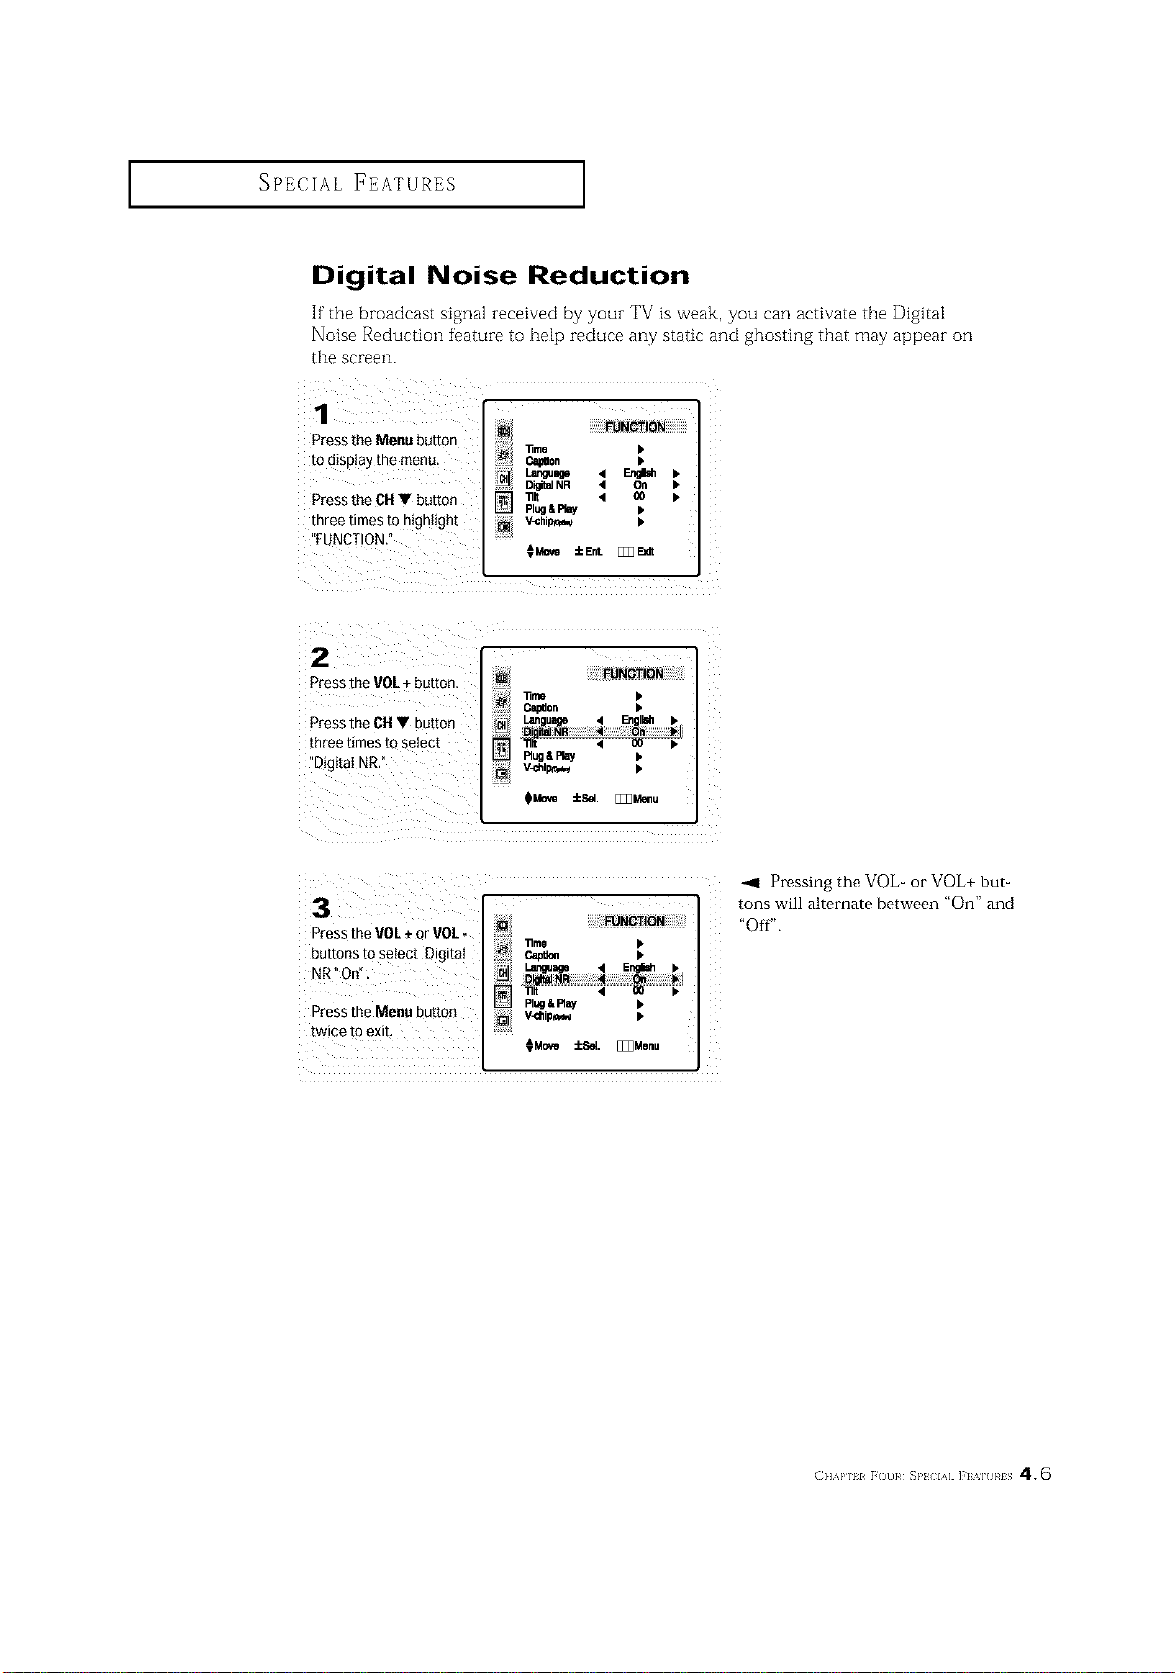
Digital Noise Reduction
If the broadcast signal zece[ved by your TV is weak, you can activate the Digital
Noise Reduction feature to help reduce any static and ghosting that may appear on
the screen.
1
Pressthe Menu buttor
to display me menu
Pressthe CH • buttor
mree times to mgntign[
FUNCTION
lime b
C_0. b
Lan_age 4 _ •
DigitalNR 4 On •
111t 4 _0 •
Plug&Play •
V-Chi_,=_ •
HMo_ iEnL [_E_
2
Pressthe VOL+ button
Pressthe OH • button
mree times m setect
"Digi[aI NR.
FUNCTION
_me •
i C_0n •
Language l EqgIsh_
Di ita]NR '4 Or= il_
Rug&Play •
3
Pressthe VOL+ or VOL-
_uttons to semct Digital
"_R°O_
Press the Menu bu[[o_
[wEe [o exit,
FUNCTION
11me •
PI_ & Ray
HMo_e _cSel. [_Z]Menu
_1 Pressing the VOb or VOL+ but-
tons will alternate between "On" and
"Off".
(]]'kP 11 r ()t]}¢ SP}{ IA] ]'] '_H }¢1S 4.6

SPECIAL FEATURES ]
131t
Due to the Earth% magnetic field theze may be some minor hnage tilt depending oil the
TV_ location. When this occuzs, follow the steps below.
Press the MENU button _NOTiO_
]]me •
tOdisplay the menu. _ •
DigitalNR 4 On •
Pressthe CHV button _ _ < co •
three times to highlight _ Pl_&FIBy •
the _FUNCTION" menu, _i V_ilip_ •
CMov_±E_L _E_dt
Pressthe VOL+button.
lime •
Press the CNV four e_t_ •
times to select _Tilt".
PlUg& Fla_ •
_M_ ±Sel. [_3Menu
Press the VOL- or
VOL÷ buttons to adjust
the Tilt,
Press the Menu bub
ton to exit,
i
_OTiO_
D@ta]NR 4 OWl •
Plugl Ray •
V-dllpr_,_ •
N
_Mc_m ±Sal. _Menu
4.7 (}lAP 11 F(t]}# SP} IA] ]'] %]t]}#lS
SPECIAL FEATURES ]
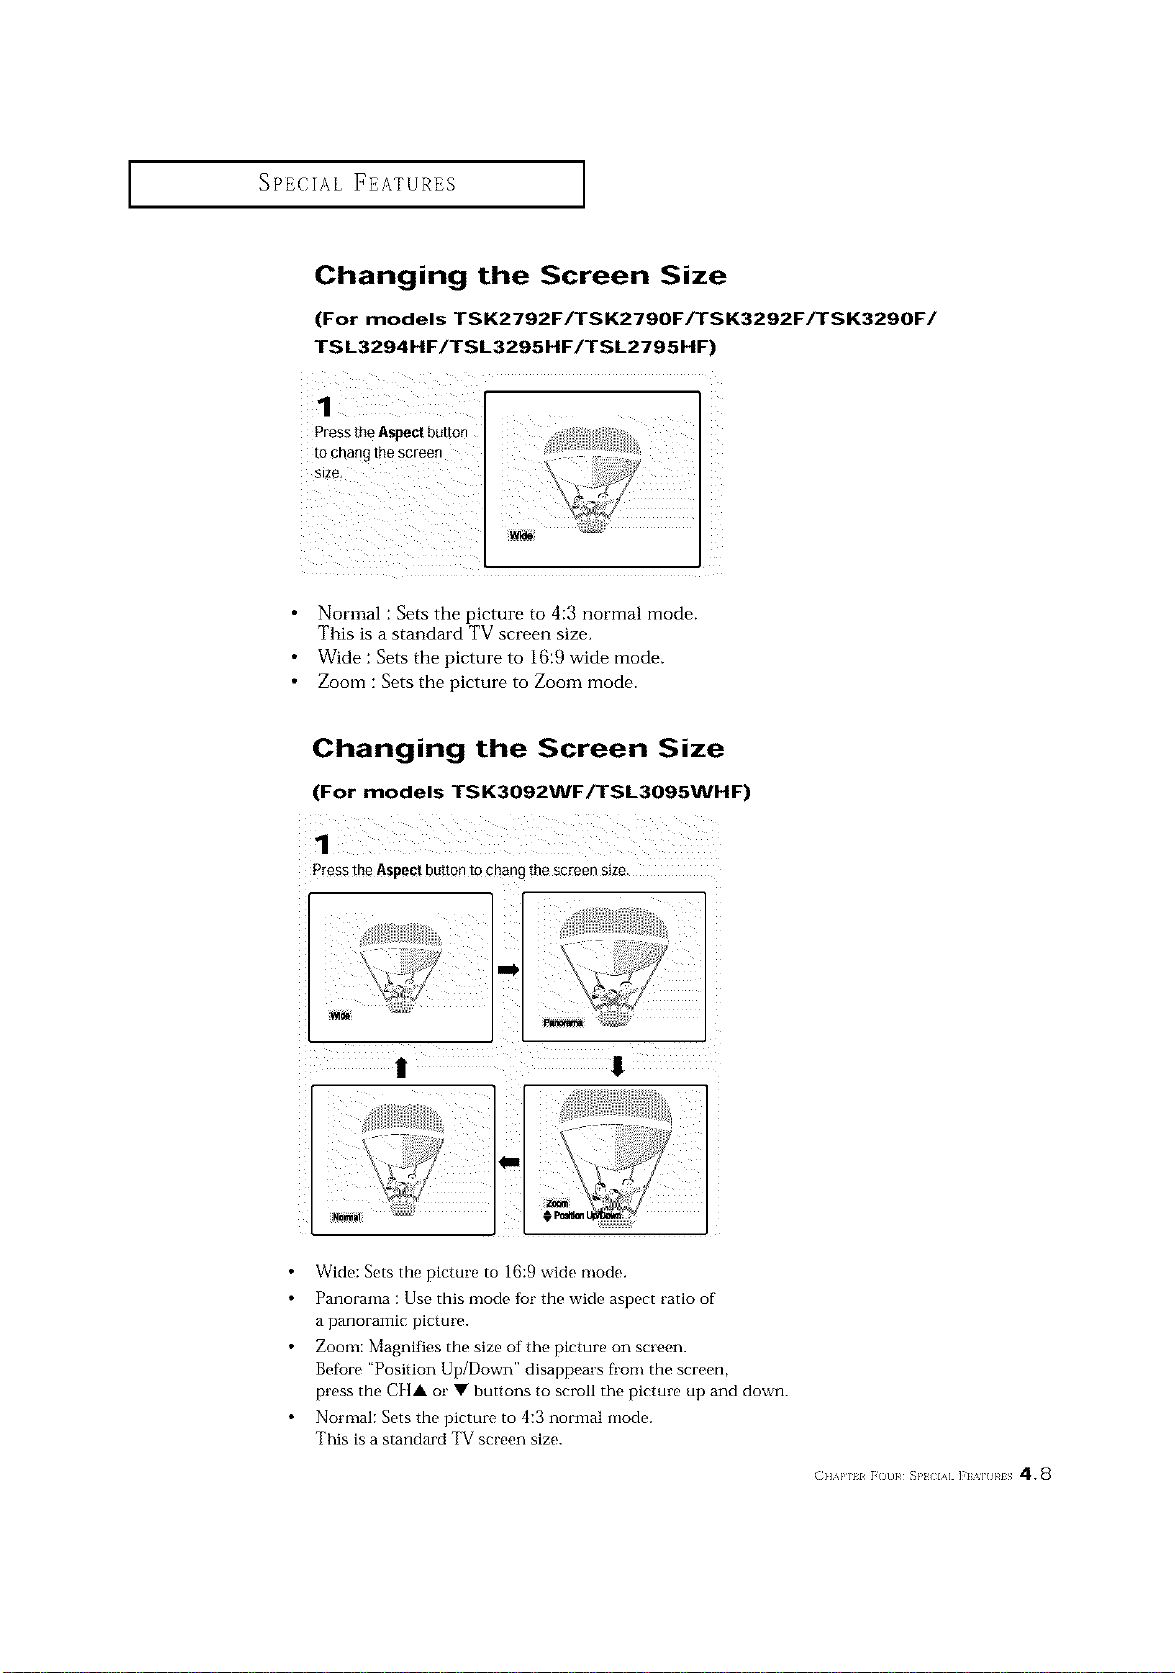
Changing the Screen Size
(For models TSK2792F/TSK2790F/TSK3292F/TSK3290F/
TS L3294HF/TSL3295HF/TSL2795HF)
1
Normal : Sets the picture to 4:3 normal mode.
This is a standard TV screen size.
Wide : Sets the picture to 16:9 wide mode.
Zoom : Sets the picture to Zoom mode.
Changing the Screen Size
(For models TSK3092WF/TSL3095WHF)
1
Press the Aspect buttonto chang me screen s_ze
Wide: Sets the picture to 16:9 wide mode.
Panorama : Use this mode for the wide aspect ratio of
a panoramic picture.
Zoom: Magnifies the size of the picture on screen.
Before "Position Up/Down" disappears fi'om the screen,
press the C][]A or • buttons to scroll the picture up and down.
Normal: Sets the picture to 4:3 normal mode.
This is a standard TV screen size.
(]]&P 11 r ()t]}¢ _}'l IA] ]'] %] }¢IS 4.8
SPECIAL FEATURES ]
Freezing the Picture
Press the Still picture button to freeze a moving picture.
(Normal sound wilt still beheard,)
Press again t0 canceJ_
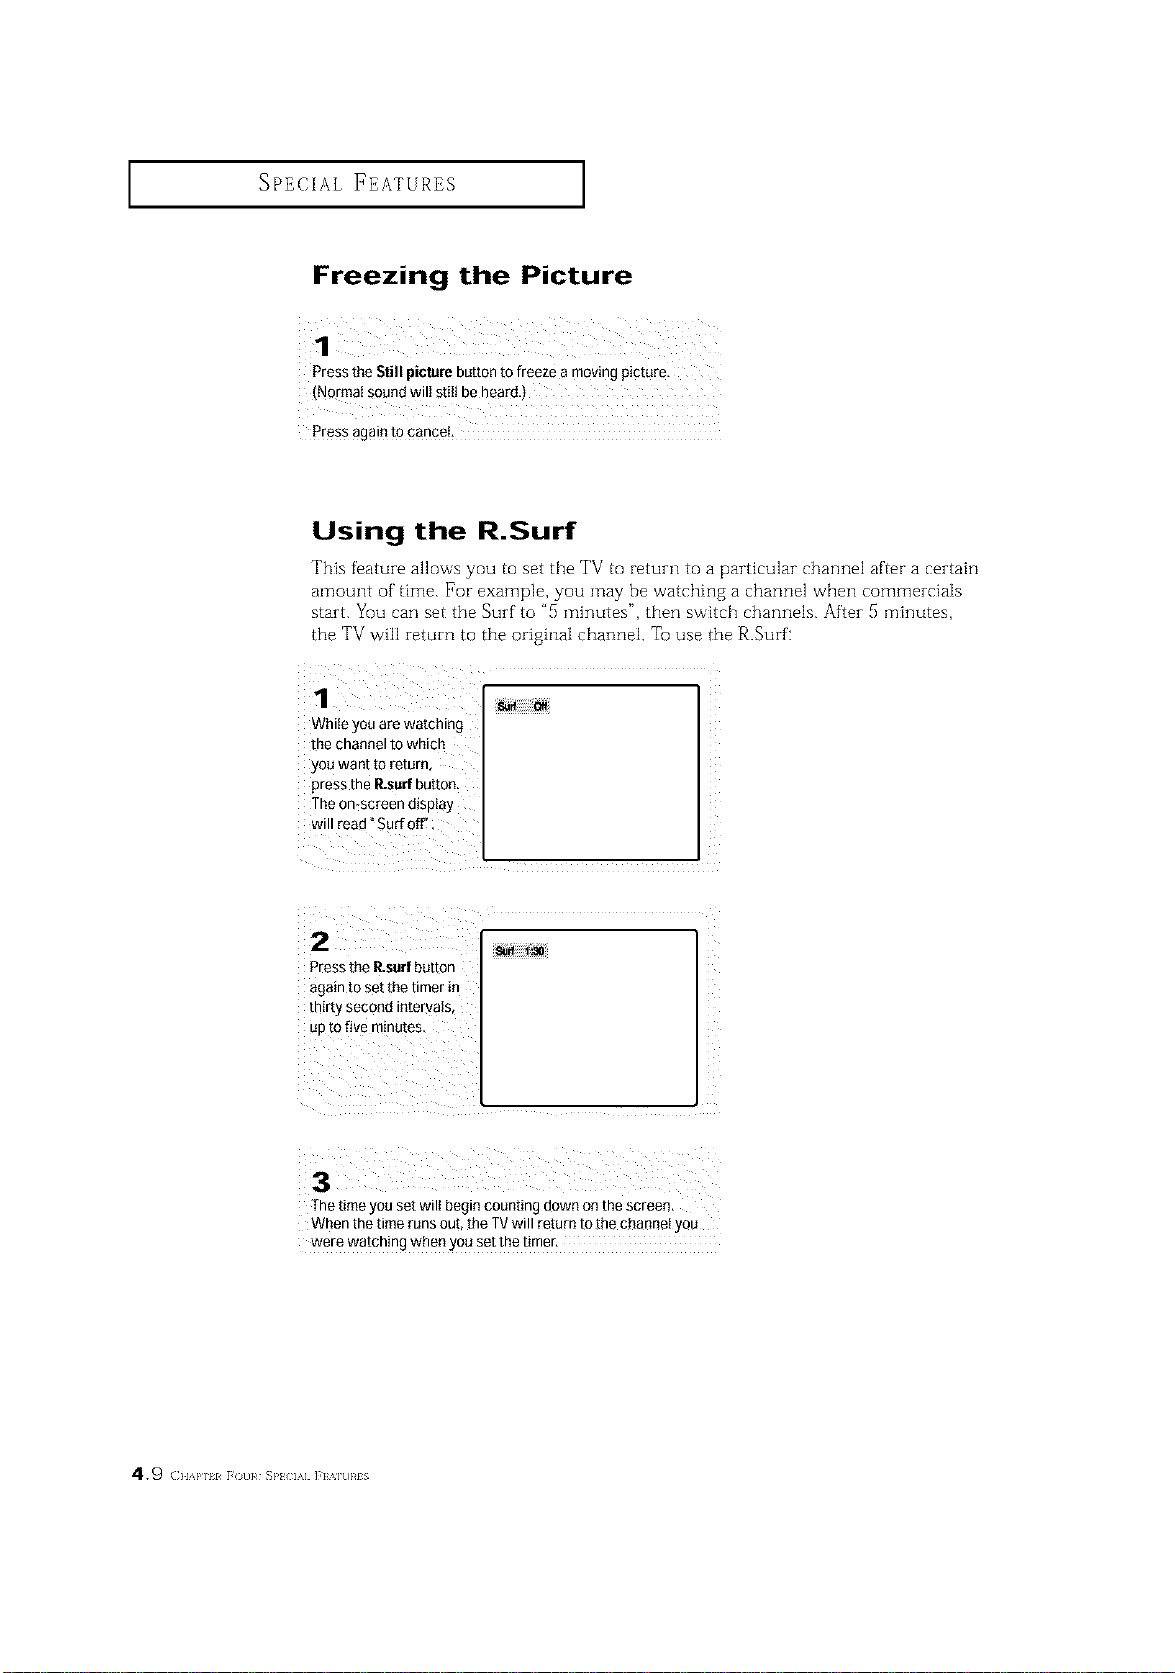
Using the R.Surf
This feature allows you to set the TV to return to a particular channel after a certain
amount of time. For example, you may be watching a channel when commercials
start. Yuu can set the Surf to "5 minutes", then switch channels. After 5 minutes,
the TV will return to the original channel. Tu use the R.Surf:
1
While you are watching
the channel to which
you want to return,
press the P_surfbutton.
The on*screen display
will read °Sad off'
Pressthe P_surfbutton
again to set the timer in
thirty second intervats_
uptOfive m!nu!es,
The time you set wilt begin counting down on the screen,
When the time runsout, the TVwill return to [he channel you
were watching when you set the tirner,
4.9 (}lAP ii F( t]}# SP} IA] ]'] %]t]}#lS

SPECIAL FEATURES ]
Special Sound Options:
Dolby Surround, MTS, Auto Volume, and
Headphone
Depending on the particular type of audio that [s being broadcast, you can listen to any of
three modes: Mono, Stereo and SAP (Secondary Audio Programming, which is typically a
foreign language transJation).
The Dolby Surround Pro Logic option atlows you to enjoy programs in surround sound.
The headphone option is especially useful when simultaneously watching the main screen
and the PIP window.
Dolby Pro Logic
Dolby Pro Logic wilt provide you with fuli surround sound from Dolby Surround encod
ed program sources. For best results, look for programs and movies that are marked with
the following logo: D_I[DOLBYSURROUND]
1
Pressth_ Menu button to d splay
[he menu. Pressthe CHV button
m highlight"SOUND" and press
[he gOL+ button.
m
S_s 4 Custom •
Equalizer b
MTS • Mono •
Aut0V_ume • Off •
Pl_Jph0ne •
Sp_kDr • On •
€Move ±EnL [_lt
2
Pressthe CHV button twice m
select °Dolb, Surrounc ant
Pressthe VOL+button,
Mode • Oil •
< 00 •
Tunedelay • 20_ •
T_m < Off •
CM0ve ±Sal. [_Menu
Z
Select tbe mode: Press the press VOL+ button repeatedly until tbe appropriate mode appears
("Wide," 'Phantom, _ or 'Normal') Some recommended settings:
Phantom : Selected when tbe center speaker is either not present or not used.
In Phantom Mode, tbe center sound is output through both left and rigbt speakers.
Normal : Selected when tbe center speaker is smaller than tbe left and right speakers and can not
reproduce bass sounds effectively In Normal Mode, the bass frequencies of the center
channel are reproduced by the left and right speakers
Wide : Selected wben tbe center speaker can accurately reproduce bass frequencies. In wide
Mode, all center cbannel sounds are reproduced by tbe center speaker
After selecting tbe mode, press the CHY button, and highlight "Center" Next, press the VOL+ or
V©L- buttons and, depending on personal preference, select any value between 12 and +12
After entering values for "Center, "Rear, and "Time delay," use the CI I_' and VOL+ buttons to
activate "Test tone" During "'it,st tone," a tone will cycle through the speakers so you can hear the
surround efff_ct and make additional changes as needed
Press the Menu three tffnes to exit
Manl#_ctumd under license firoraDolby Laboratories. _Dotby", "Pm Logic", and the double D symbol al_
trademarks of Dolby Laboratories.
(]]'_PIII _()/ }_ SPL IA] ],] '_] }_IS 4. _ O
SPECIAL FEATURES ]
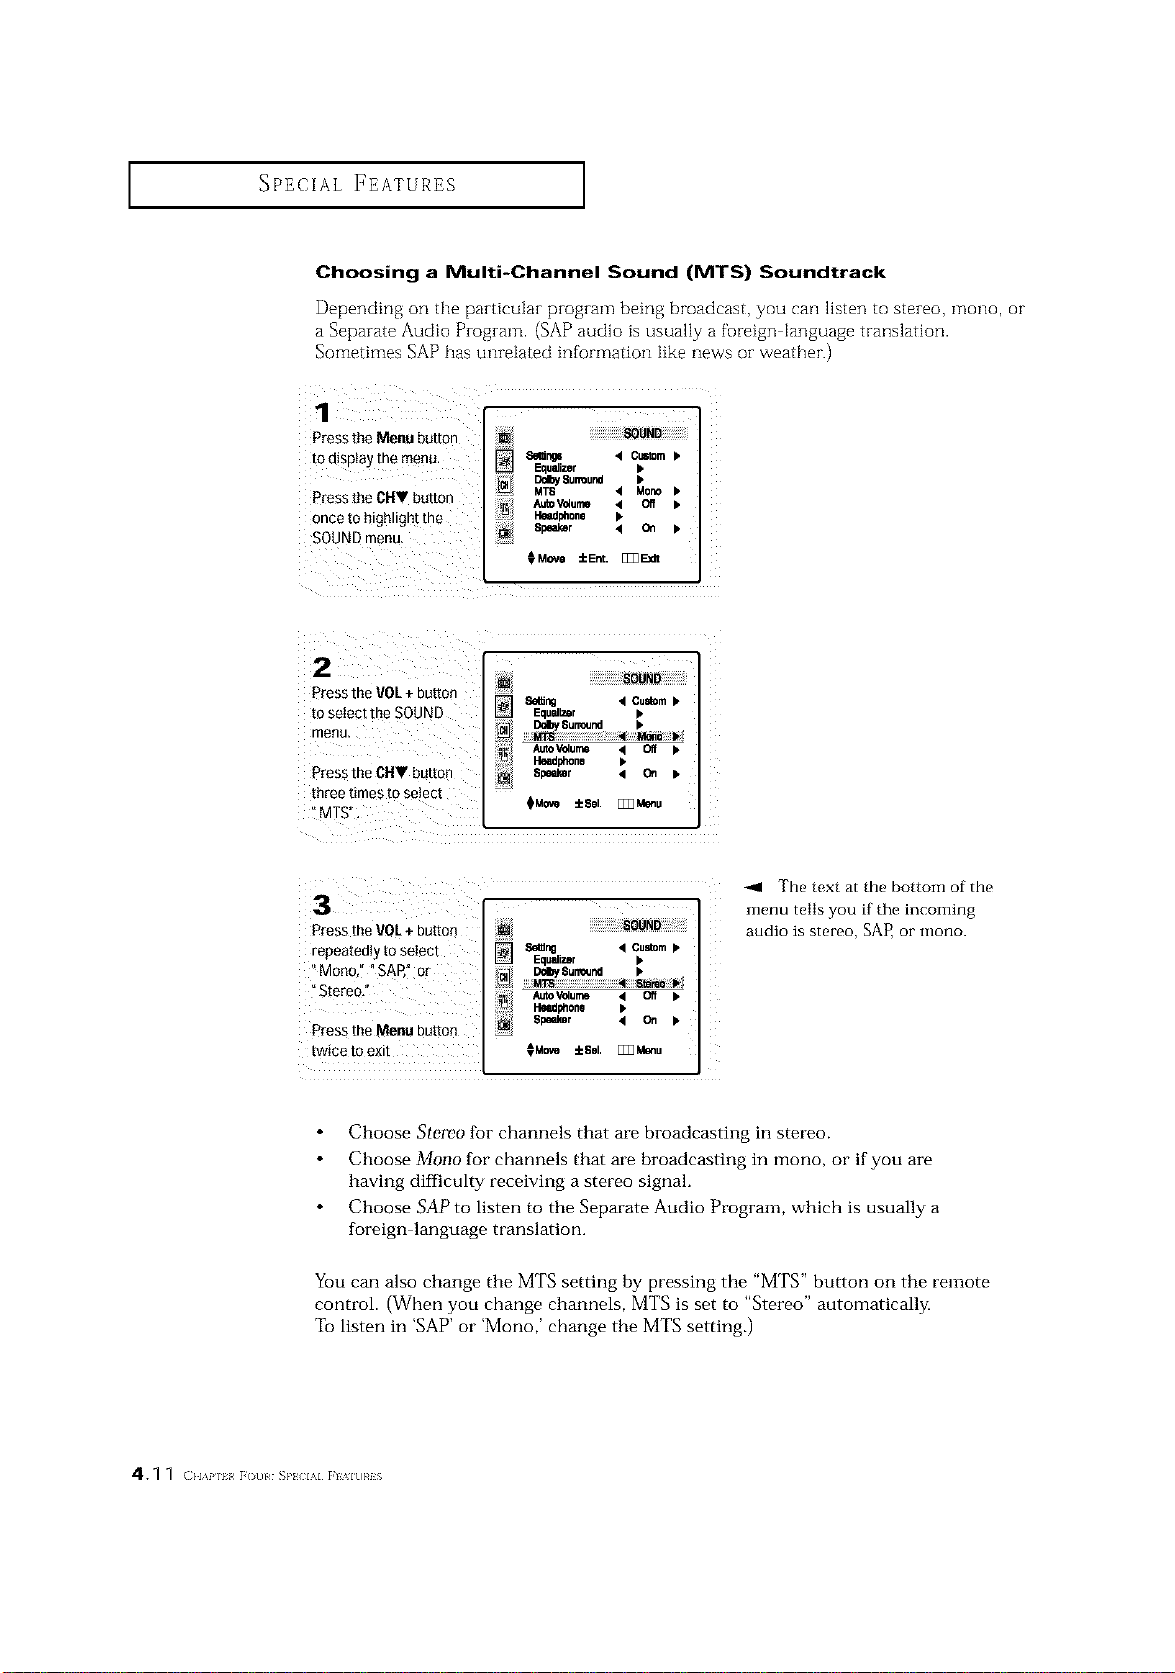
Choosing a Multi-Channel Sound (MTS) Soundtrack
Depending on the particular program being broadcast, you can listen to stereo, mono, or
a Separate Audio Program. (SAP audio is usually a foreign language translation.
Sometimes SAPhas unrelated information like news or weather.)
1
Press the Menu button
to disptay the menu.
P[ess the CHV button
once to highlight the
SOUNDmenu,
_UND
Setir_s '4 Custom
Equalizer •
DelbySurround
M_8 < Mono •
AutoV_urne < O_
Heedphone •
Speaker • 01 •
OMove iEmt. []]]Exlt
Press the VOL+ button SetUrm < Cumin
tO seiec! !he SOUND Equall_r ,
AutoV_ume ,< Off k
lleadnne •
pres_theCHYbutton Sprier • on •
threetimestose!ect @Me,O:kSol. [_M_.
:MTS"
ZZZZZZZZZZZZZZZZZZZZZZZZZZZZZZZZ
Press theVOI + button
repeatedly to select
'_Mono, +"SAP," or
Press theMenu button
twice to exit
_ '4 Cuslom•
Equalizer •
I_lby Surround •
M ee_ Ib/
/lutoV_ume • off •
P,O_Jl_One •
Sl_akDr 4 On •
€Move ±Ssl. [_M_lu
-_1 The text at the bottom of the
menu tells you if the incoming
audio is stereo, SAP, or mono.
Choose Stereo for channels that are broadcasting in stereo.
Choose Mono for channels that are broadcasting in mono, or if you are
having difficulty receiving a stereo signal.
Choose SAP to listen to the Separate Audio Program, which is usually a
foreign language translation.
You can also change the MTS setting by pressing the "MTS" button on the remote
control. (When you change channels, MTS is set to "Stereo" automatically.
To listen in 'SAP'or 'Mono,' change the MTS setting.)
4.1 1 (}l,\P 1[ [ouI SP} IAI }I_IU}¢iS
J SPECIAL FEATURES J
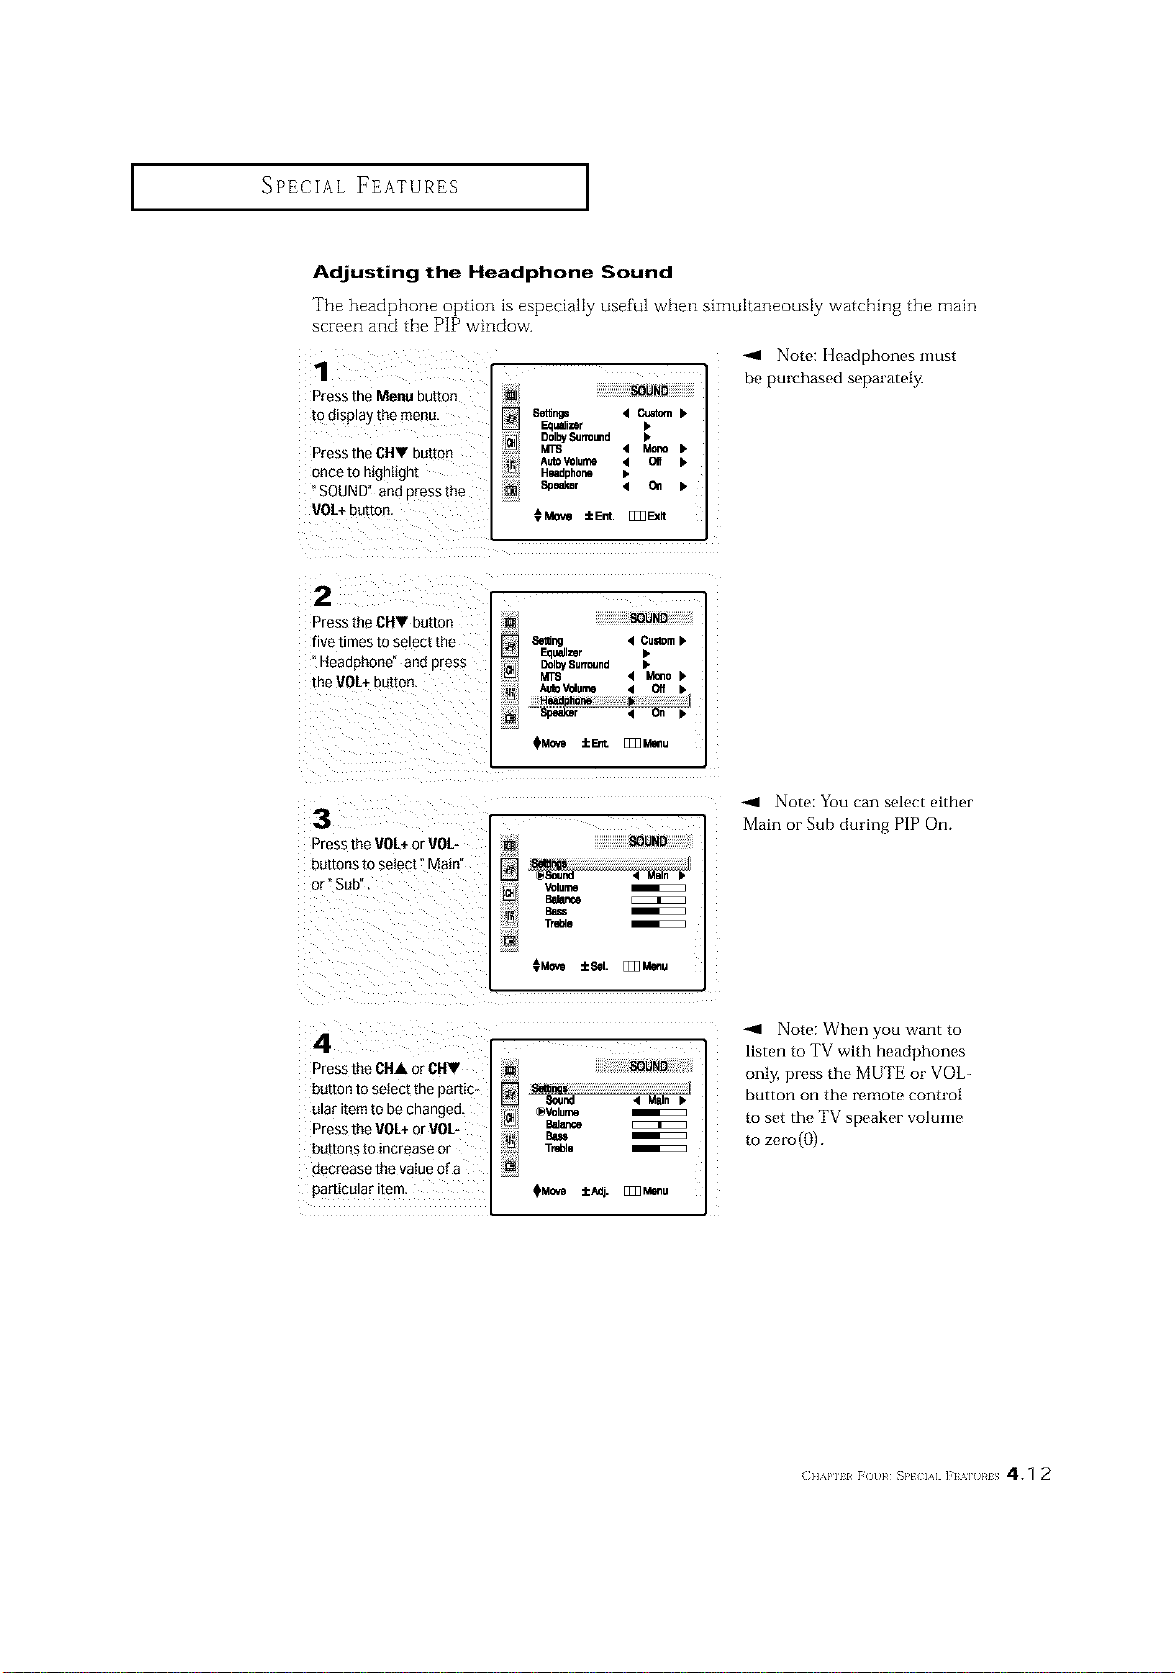
Adjusting the Headphone Sound
The headphone option is especially useful when simultaneously watching the main
screen and the PIP window.
1
Press the Menu button
to d_sp_ay the menu
Press theCHY butto_
once to highlight
SOUND" and Dressme
VO/+ button
[] SOUND
8etlr_ 4_•
_1 DoI_Su_u.d •
_L_
M_ 4 Mc_o •
AutoVOlume ,t Off •
Headoho_ •
Soeaker '4 011 •
€Mow IEnt. []_Ex_
-_1 Note: Headphones must
be purchased separately,
2
_'gss theCHV button
five times TOSeleCtme
Heaoonone ana Dress
the VOL+ouuon
Seting 4 Cu=tom•
[][]lzer •
I_I DclbySurround •
MTS 4 M_o•
_MOvO iErit. [ZZ_Mmlu
3
Dress the VOL+or VOL-
buttons to select" Main'
or" Sub"
_gHg
Volume
B_ence
TrdDle
¢Movo :_1. [_Z_Menu
-_ Note: You can select either
Main or Sub during PIP On.
4
r_'ess the CHA or CHV
bUTTOnto setect me oartic
[tlaF Item [o De changeD.
°_ess the VO[+ or VOL-
button_ to increase or
clecre_Ise the value Qf_l
particular ire-
[]
OVolume
Balar_e
Ba_
Treblo
OMOVe :tc/_]j. [_Menu
-_ Note: When you want to
listen to TV with headphones
only, press the MUTE or VOL-
button on the remote control
to set the TV speaker volume
to zero(()).
(]l'kl'lll _()t 1¢ SP[ IA] ]'F%] }¢IS 4.7 2
SPECIAL FEATURES ]
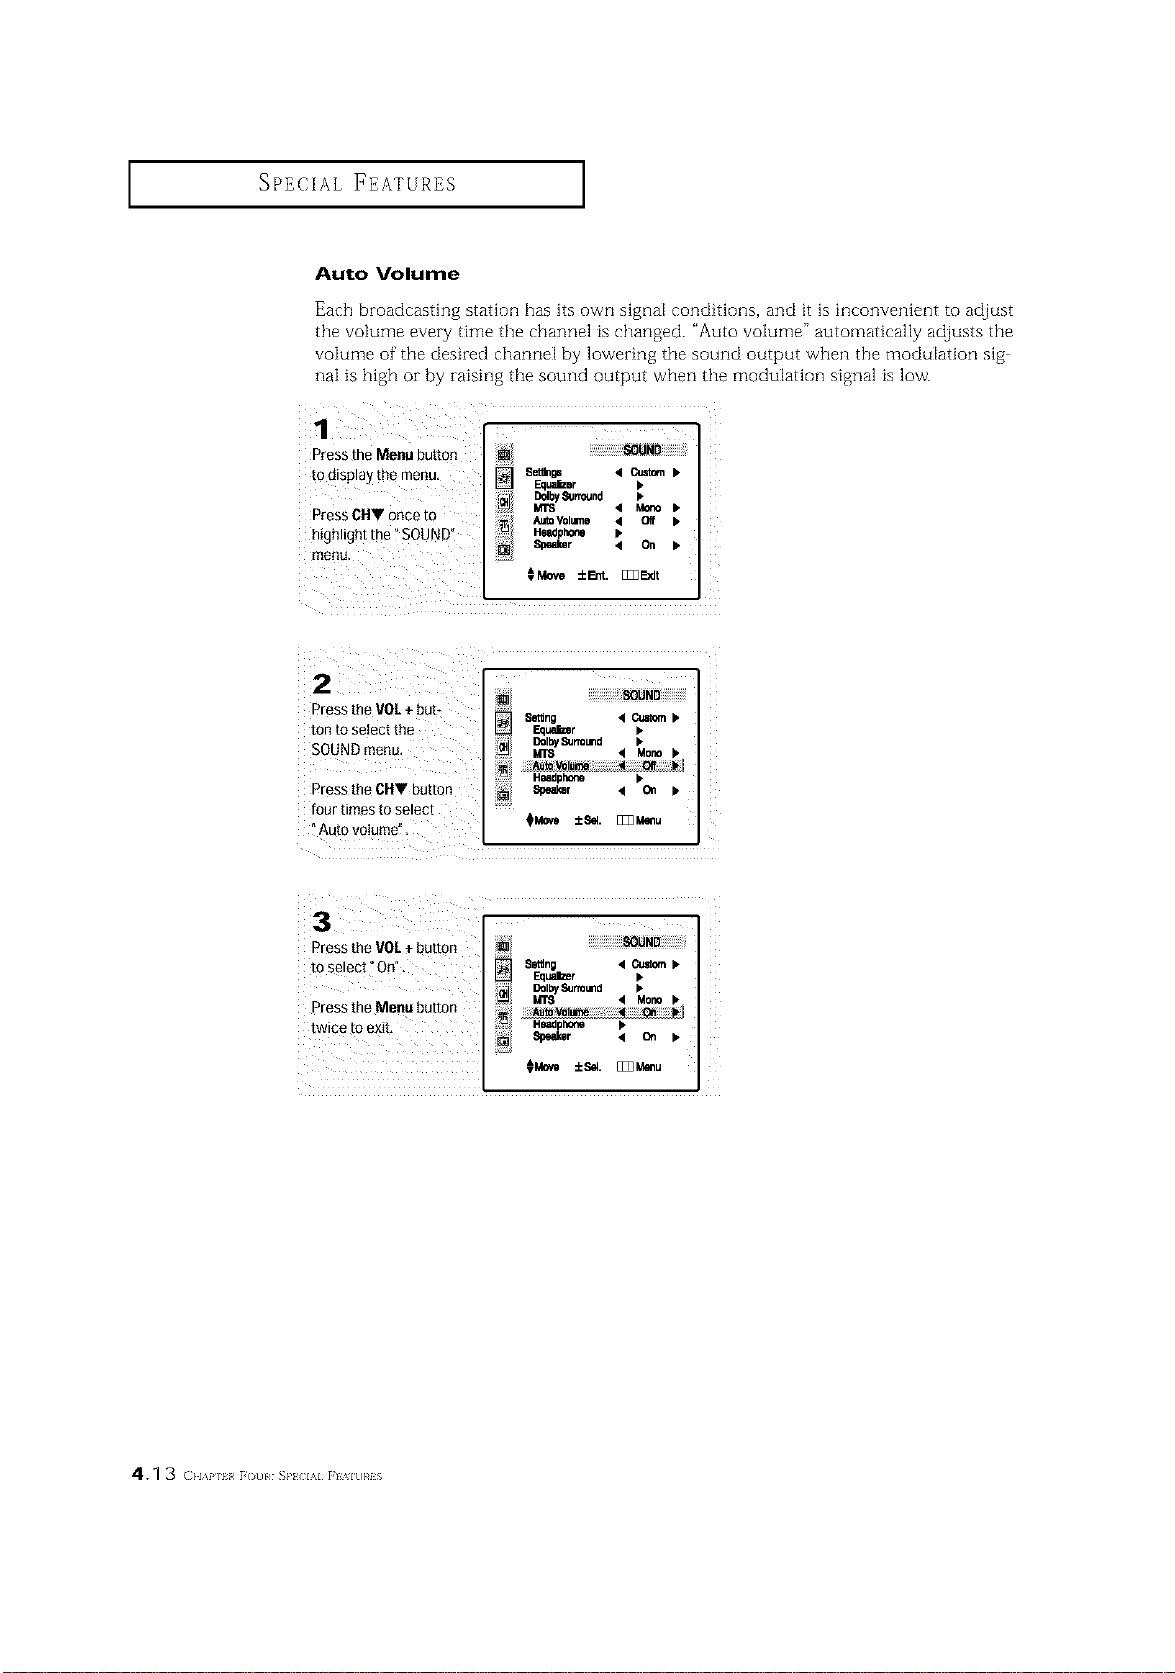
Auto Volume
Each broadcasting station has its own Mgnal conditions, and it is inconvenient to adjust
the volume every time the channel is changed. "Auto volume" automatically adjusts the
volume of"the desired channel by lowering the sound output when the modulation sig
naI is high or by raising the sound output when the modulation signal is low.
1
Press the Menu button
tO disp!ay the menu,
Press CI-IV once to
highlight the" SOUND"
menu,
Setlbgs • Custm.•
EquarBer _.
l_bySu.ound •
Mrs • Mono •
AutoVolume • 01f •
Headphone p
Speaker < On •
€Move ±Er.. [I_E_dt
Pressthe VOL + but-
ton to select the
SOUND menu.
Press the CHV button
four times to select
Auto volume"
8etlng < Custom b
DolbyS..omd I,
MTS < Mor_ I.
:NI Speaker ,_ 0,1 I*
I I
Press the VOL ÷ button
to select" On".
Press the Menu button
twice to exit,
S_itJng 4 Custom•
Equalizer •
DOlI_ISurrOund b
MT8 4 MonO•
Headphone _.
Speaker < On •
€_ ±s_. [_u
4.1 3 (]}l,\i' 1_ F(3uI SP} L\I FI%IU}_IS

SPECIAL FEATURES ]
Switching the Internal Speakers On/Off
speakers.
1
Pressthe Menu buttor
[o (]lsB_ay[ne menu
Pressthe CHT button
once to highlight
SOUND" and Dresstne
VOL+ outran
SetUr_gs < Custom •
Eoua]izer b
[_lby Surround •
MTS • Mono •
AutoV_ume 4 Off b
Head_hone I,
Soe_r < O. b
€Move iErlt. [Z_Exlt
Press the CHV button
six times to select
"Speaker".
Pressthe VOL+or VOL-
button to select" On" or
Setlng • Custom b
F._JallZe¢ b
DdbySurround b
MTS 4 Mono b
AutoVclume • Of{ k
(]]'_PIII _()t }# _}'[ IA] ]'] '_] }#IS 4.1 4
I _PECIAL FEATURES 1
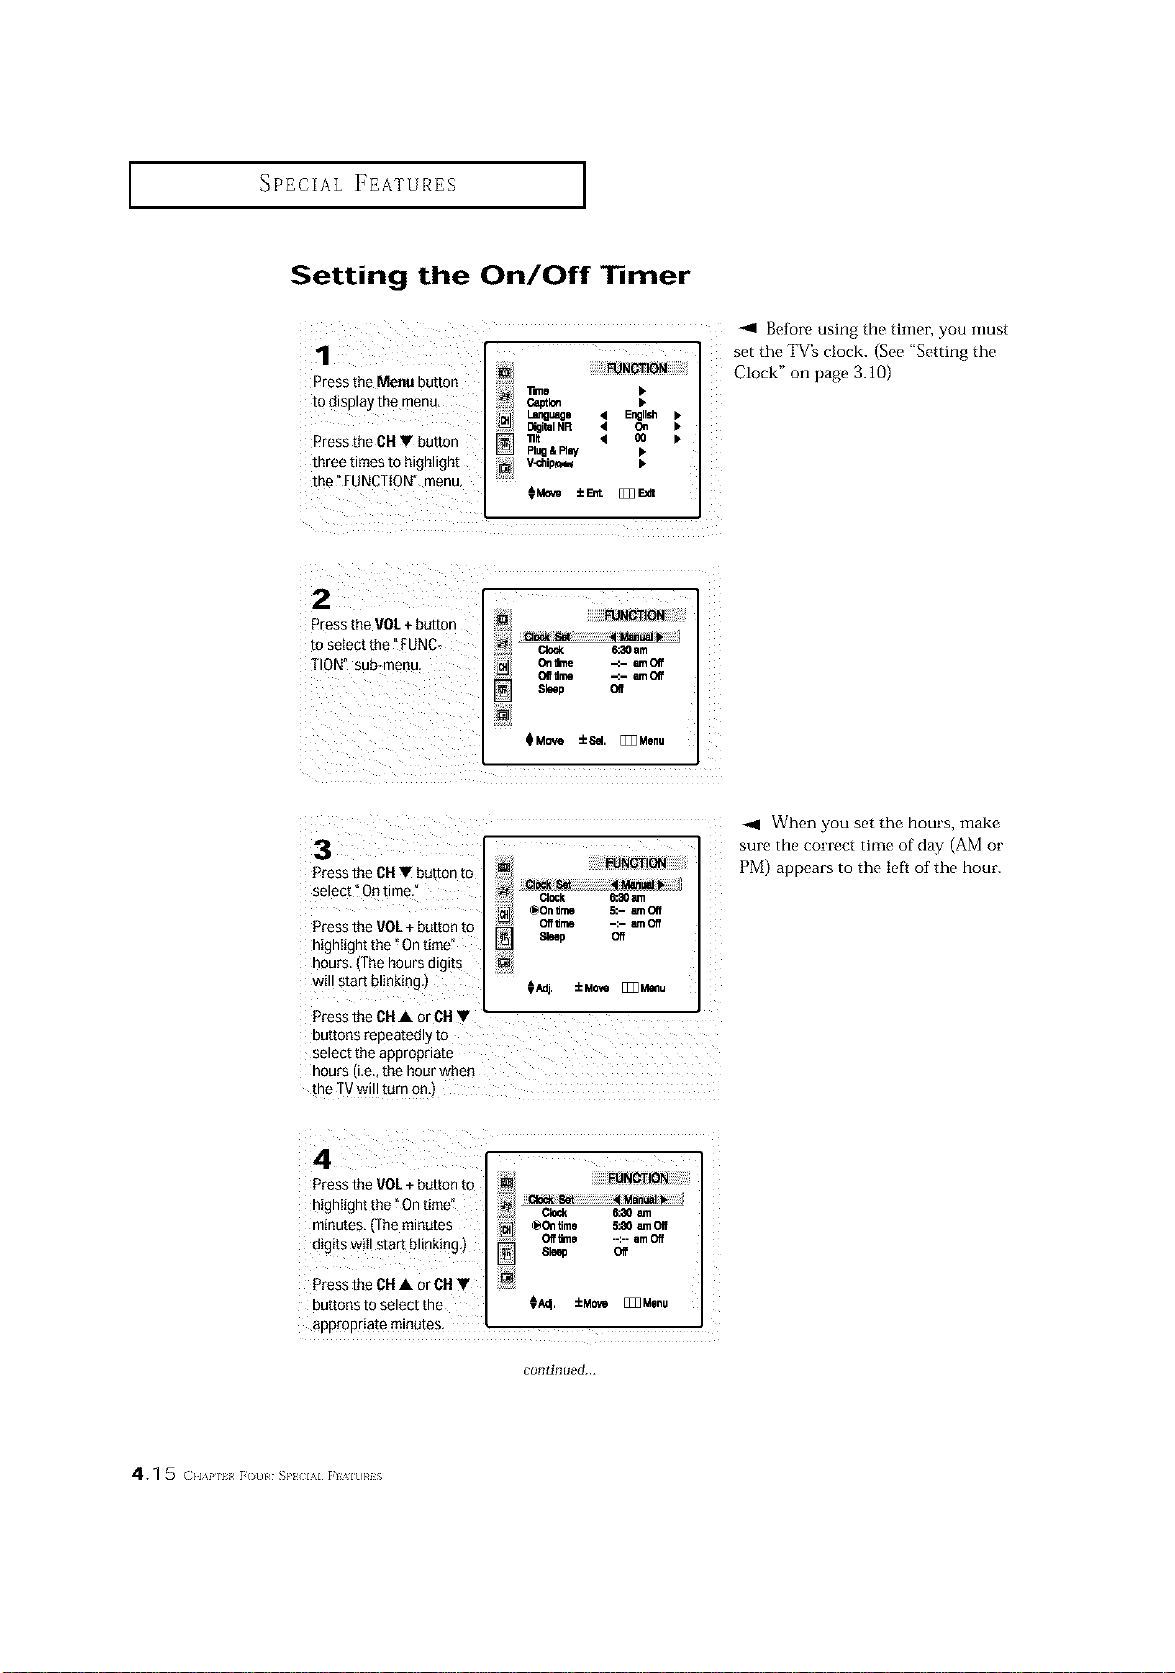
Setting the On/Off l mer
1 I __m_T=_OL_gUagO41_NGTI_DNE_glI_•
Press the Menu BUtton e,_lm •
to _llSpla_ the men{], _ •
k
DigitalNR 4 C_
Press the CH V button I-_ "_ q _ •
tllree times to highlight _/ V_hio_
the"FUNCTION" menu,
CMe_ ±l_t [_3E_t
-ql Before using the timer, you inust
set the TV's clock. (See "Setting the
CLock" on page 3.10)
2 I FUNCTION
Press me VOL + button
to setect the :UNC- c_ Ham
TION" sub*menu On_rne -_- _-noff
elf Hme _.- _-tlOil
Sleeo elf
m_
QMQve _Sal
I
[1_M0nu
3
Press the CHT button to
se!ect _Ontim_,_ :
_On _me &- amOIf
Pressthe VO_.÷b_tten to off_m -:- moff
Sleep Off
highIight the "On time!
hours (The hours digits
WillStart blinking.) [ €_. ±_ _l_,u
Press the CIt• OrcIt •
buttons repeatedly to i
select the appropriate
hours (i.e., the hour wheO
the TVwi!! turn one)
When you set the hours, make
sure the correct time of day (AM or
PM) appears to the Ie[_ of the hour.
Pressthe VOL+ button to
highIight the "On time"
minutes, (the minutes _o_ time 5_0 _ Off
digits wi !start bl nking,) oe_o --:--am_
61e_ Off
Press the CH• or CH•
buttonsto select the €_. ±MO'*__Menu
appropriate minutes
continued...
4.1 5 (:,_,,,,_?,_[(_L,,_s,,, ,,,i
I _PECIAL FEATURES I
Pressthe VOL+ button
to highlight "On/OfL"
Pressthe CH• or CH•
buttons to turn the om
fimer" On." (Repeatedly
pressing the CH• or
CH• buttons will alter.
elock 6:30 t_n
@011time 5:30 am On
Of_ime -:- amOIf
Sleep Oft
_Sd. ±Mov_ E_Menu
To deactivate the "On time,"
select "Off" during this step.
When finished, press the VOL+ button.
7
TOset the Off time, press
the CH• button to high-
light _Off time
Press the VOL+ button
and set the hours and
minutes. (Follow the
same procedure as in
2i _ _aoam
N 01rune _30amOn
f-_]- @011lnle -:- mOff
] Sleep O_
s_eps1_6above.)
When finished setting the timer, press the Meau button three
times to exib
Setting the Sleep ] mer
The sleep timer automatically shuts off the TV after a preset time
(from 10 to 360 minutes).
After about 5 seconds, the sleep
display will disappear h'on, the
screen, and the tinm interval will be
press the Sleep button on the remote contro!.
set.
Press Sleep repeatedly uetil the appropriate time intervaI
appears (any of the preset vatues from "Off" to _360"):
(_I{A}'I }/ i ¢}{11 : _PIC AI i }AIUIIS 4.1 6
SPECIAL FEATURES 1
Viewing Closed Captions
Yuur TV decodes and displays the closed captions that are broadcast with certain TV shows.
These captions are usually subtitles fur the hearing impaired or foreign language trans
lations. Ai1 VCRs record the closed caption signal from television programs, so home recorded
vkteo tapes also provide closed captions. Most pre recorded commercial vkteo tapes provide
dosed captions as well. Check for the closed caption symbol in your television schedule and
oil the tape_ packaging: _.
Note: The Caption feature does not work with DVD or DTV signals.
1
Press the Menu button to display
the menu.
Pressthe CN • button three
times to select the" FUNCTION"
i!!!!!ii__]_ Niiiiiiiii
Tale I,
Cepllon _"
_lt 4 00 _.
Plug&Fl_ I"
menu. ¸Pressth_ VOL+button. ;Mo_ ±Er_ _ F._
_i_iiiiiiiiii ii__ ii i:iii mmm
-411 Quick way to access captions
menu: Simply press the Caption but-
ton on the remote control:
Press the CH• button once to
select °Caption".
P
the Caption menu.
1lind
D_al NR 4 Off •
"nit 4 O0 •
I_ug&I_ay k
_Mo_ :k_4, []]]Menu
3
Press the VOL+or VOL buttons ._
to turn c osed cap onng on/off .c_e_ _ _
Im "'1
:N
Misspellings and unusual
characters sometimes occur during
closed caption transmissions, especial-
ly those of live events. There may be a
small delay befiare captions appear
when you change channels. These are
not malfianctions of the TV.
4
Press the CH• butt0n to
highlight" Mode."
Press the"JOL -- or VOL+ buttons
to select" Capti0n_ or" Text.i'
_N_ION
_ klode _1Ctlp6_ _Field '1 1 k
0Mm,_ /=_=I. [Iff]k
In caption mode, captions
appear at the bottom of the screen,
and they usually cover only a small
portion of the picture.
In text mode, intormation unrelated
to the program, such as news or
weather, is displayed. Text ofien
covers a IreNe portion of the screen.
Depending onthe particular broadcast, it might benecessary to
make changes to "Channels" and "Field" :
Usethe ON_, OH•, VOL+ and VOL- buttons to make the
changes. (Follow the same procedure as in steps 3+4above,)
Prossthe Menu button three times to exit.
Dittbrent channels and fields
display diflk, rent information: Field 2
carries additional information that
supplements the information in
Field 1. (For example, Channel 1
may have subtitles in English, while
Channel 2 has subtitles in Spanish.)
4.1 7 (}l,\P 1_ [()tll S}'_ IAI [l%ltl}¢iS

SPECIAL FEATURES I
Viewing Picture-in-Picture
Activating Picture-in-Picture
Pressthe Menu button tO
display the menu,
Pressthe CHV four times
to highlight the PIp menu. []
Pressthe VOL+ buttori to ±eel. [_Z3Menu
select the PIP menu,
2
Pressthe VOL+ button
to seiec[ PIP°On.
[] DOUBLE SCREEN
PIP • On ''r
IVNtdeo < TV •
Size • Doubl8•
ANT/CA_ • ANT •
Chann_ • ANT4•
_Move iSel. [_Menu
Quick way to access the PIP
menu: Simply press the PIP button
on the l'elllote control:
-_1 If you turn TV off while watching
and turn it on again, the PiP window
will disappear.
3
Press the Menu button twice to exit
Note: Plcture4n*Picture does not function when the V-chip _s
acllve
(]]%'111 r()/ }¢ _P[ IA] ]'] %] RIS 41 8
SPECIAL FEATURES ]
Selecting a Signal Source (External A/V) for PIP
For more information about
Press the Source button repeatedly to cycte through atI of the external A/V components and sig-
available signal sources:
"TV," _Video1," _Video2," "Video 3,""Video 4,""S-Video 1," rials, see "Viewing a VCR oi"
?S.Video 2" andYDVD!, Camcorder Tape" on page 3.17.
If you select "TV', the PIP image is
the same as the main image.
Swapping the Contents of the PIP image and Main image
Wheoyou press the Swap button:
The image in the PiPwindow wiUappear on the main
screen, and vice versa.
Changing the PiP Channel
Press the PIP CHA or CHV button to change the channel
that appears inthe PiPwindow.
Changing the Location (Rotating) the PIP Window
When you press the Locatebutton repeatedly, the PIp win-
dow moves from corner to corner on the TV screen,
Changing the Size of the PiP Window
Z
Pressthe Size button to alternate between asmat!er and !arg_
er PIP window,
Scanning the Available Channels
This procedure scans all of the
available channels and then stores them in memory_
Pressthe Scan button, andthe memorized channels will
appear in sequence for 2 to 3 seconds per channel.
Press the Scan butteo again to stop the eoanning process.
When the Scan button stops, the viewing mode will return to
its original setting.
4.1 9 ( }l,\p 1_ [Ot)l SP} IAI rl _l[)}¢iS

SPECIAL FEATURES I
Using the V-Chip (Option)
The VChip feature automatically locks out programming that is deemed inappropriate for
children. The user must fh-st enter a PIN (personal ID number) before any of the VChip
restrictions can be set up oi- changed.
Note : When the Vchip feature is active, the PIP and channel auto program features does
not function.
Setting Up Your Personal ID Number (PIN)
1
Press the Menu button
to (]lsplay ire menu,
Press the CH• button
three times to select the
FUNCTION"menu,
Press the VOL + button.
[] FUNOTIOI_
"ilme
Language
Rug &Rny
_ql Quick way to access the V-Chip
menu: Simply press the V.C][IlP
button on the remote control:
2
Press the CH • buttor
six times to selec[ [De
V-chi[ menu.
Pressthe VOL+button
FUNCTION
m;
[]
The"Enterpin"screenwillappear,Enteryour4-digitPIN
number.Note:ThedefaultPINnumberfor anewTVsetis
O-O-O-&"
3
Alter enmrmg a valid PIN
numoer,the "V-chip mode
screen will appear. Press
the CH • button three
limes ann nlgnllgn[
]hange p l,
FUNCTION
V_hlo Iod( '1 NO I*
TV guloellnel I,
MI_A r=Ur_ I.
_Ohangopin =.
4
While the "Change pm
field isselectee. Dress me
VOL+butto n
TheChange pmscreen
Wilt appear,Choose anx
4*dlgits for your PIN and
enTerthem
FUNOTION
m
_DIn
As soon as the 4d gis are enterec the" Confirm pin" screen
aBE}ears.Re-enter the same 4d_g_ts.When the Confirm
screen d_sappears,your PINhas Beenmemorized
Press the Menu button to exit
-_1 Note: if you tblget the PIN,
press the remote-control buttons in
the tollowing sequence, which resets
the pin to 0-()-0-0:
POWER OFF -I, MUTE -,l, 8 -I, 2 -,l,
4 -1, POWER ON.
(]]'Will _O1}¢ _P[ IA] ]'] '_] }¢1S 4.20
SPECIAL FEATURES ]
How to Enable/Disable the V-Chip
Press the Menu button.
PresstheOH • button
three times to select t_e
_FUNCTION"menu,
Press theVOL+ button.
2
Pressthe CH T butt0n
six times to highlightthe _ E_n
"V-chip" menu,
Pressthe VO/+ button.
The" Ente[ pin" screen
will appear. Enteryour
[_3Monu
4_digitPiN number.
Z
The" V-Chip mode" screen
will appear,aad "V-Chip lock"
will be highlighted turns biue
color),
Toenable the V Chip feature,
presstheVOL+buttonsothat 0M_ ±_, [_Bdt
the"V,ChJplock" field is YES. m m
IPressing the VOL+button wilt
alternate between YESand
NO.)
How to Set up Restrictions Using the "TV guidelines"
First, set up a personal identification number (PIN), and enable tile V Chip. (See previous
section.) Parental restrictions can be set up using either of two methods: The TV guide
lines or the MPAA rating.
Press the Menu button _ "nr_ •
todisplaytbemenu _ • F._ •
i_ Digi_lNR '4 On •
Pressthe CH • button [] _"u0,m=l.y • _ •
two times to highlight _! wh_,_ •
the"FUNCTION menu, ¢M_ ±_. [_3r=_
Press the VOL+ button,
4.21 (:}i,\p iI [([)l SP} l,\l [I%I[)RIS
SPECIAL FEATURES I
2
Press the CH• button six times to mghl_ghtthe
V-chip menu.
PresstheVOL÷ button,
]'he ' Enter gin" screen w appear, Enteryour 4-
o_g_tPINnumber
I I_ FUNC_ON
@Entf_n
[]
[_Menu
3
The, V_chiu moee screen wl. appear, Pressthe
• button, and ntg_light the [ield for" TV
Guidelines.'
BJNCfflON
Chltlge pin •
(pMovI ±FJ_ _E_dl
4
_tess theVOL÷ bu_ton."[he _[V
guidelines" screen will apeear. Press
[n_the b_lA, _ • buttons to h_gh_
ght one of the six age_baseOcate-
gories:
TV-Y Young childrer
TV-ff7 Children 7 andover
[V-G General auo_ence
W-PG Pate_t_t gu_oa_ce
]`V-14 v_ewers 14and over
EV-MA Mature au_{ence
1_ GUID_IJNES
/_1F_" V S L D
_W-Y
W-Y7
W_
l'V-_i LIUU
TV-14 LI U U IJ
TV_IA LI U UlJ
El=Bloded LI:I.r_ o(_,_1
yr_ngahldmn
Note: These categorms consist ot
two separate grouos: TV-Y and TV-Y?
ioung children through age 7L and
T¥-G througn TV_MA {evm" bod_
else ).
The restrictions for mese two grouos
work independently: It a household
includes very young children a_ well
as young adults, the T_4"guidelines
lilt.IS[be set uh separam'lv tot each age
group. See next step,
5
Atthis eeiot, one of the TV-Ratings is nlgnugnmd
Press me Vet+ button: Depending on your existint setup, a letter u or B" will start blinking
(U= Unblocked, B=Blocked)
Whi_ethe U _r B" is bt_nk_ng,press the CH• or CH• buttons to uIoC_or UnDIOCKtile category.
3tess me Menu button once to save the TVguidelines. A TWRating Will ee n_gn.gntee, and no otters Nilt blink, TO
axitthe screen, Dressthe Menu aga 1,]`o select a different 1V-Rating press the OH• or CH • buttoos end men
*eueatthe process
Note 1:The TV-YT,[V*PG TVq 4 andTV-MA have aod_eona_options. Seethe next step to change
any 6fthe fot_ov£ngsub-ratings:
FV:_a_tasy violence
D: Dialog
L
S: Sexual sauatio_
l!loleece
Note 2:]`he V_ChipNillautomahcatlyb_ockCertamcategonesmatare :qore restrictive." Forexample, ifyou block
"]'V?P category, men ]'V-W witt aotomaticeky be 3_seked.Similarly, if you c OCKthe TV-G category, mena. the cam-
gones mthe young adult group wilt Beblocked {TV-G,]'V_PG.TV-14and TV-MA}. The sub_rabng_(D, L,S, V} _ort
together similarly fSee next section 1
" (]IM, IIR [tAR S}t<'IA] ] I Mt }d_ 4.22
SPECIAL FEATURES ]
6
How to set the F\ D,L,Sand V sub-ratmgs.
First,n_ghlight oneof these TV-Ratings:TV-YT.TV-PG TV*14or TV-MA See Step 4,on prevtous paget
Nexb while the T%Rating is highlighted, repeatedly press the VOL+button This will cycle through the avatl*
abteSUb-ratings tFV.LS. D or Vl.
A bunking letter £ U° or" B"1will be disptayed for each sub-rating. Wh ethe °U or" B" is DrinKing,press me
OH• or OH• buttons to change the sub-rating.
Press Menu once to save the TVguidelines. A [V-Rating wdI behighlighted, and no letters _villblink. Toexit
this screen. DreSsme Menu button again. To select a different TV-Rating,press me CH• or CH• buttons
aRCmen reueatme 3/ocess.
Note: [he V-chto will automatic_ ,x u_oc_certain categories that are "More restrictive", Forexample, if you
block" L" sub-rabng n TV-PG then the" L" sub-ratings in TV-14and1V*MA wilt automaticatty BeDtOCKea.
7
Press the Menu button three times to clear all the screens fO_Droceea TOme next sectto_ anuset uu ace
tionat restrictions based on the MPAA codes,,
How to Set up Restrictions using the MPAA Ratings: G, PG, PG-
13, R, NC-17, X
The MPAA rating system uses the Motion Picture Association of America (MPAA) system,
and its main app]ication is fbr movies. (Eventua]]y, movie videocassettes will be encoded
with MPAA ratings.) When the VChip lock is on, the TV wfl] automatically b]ock any
programs that are coded with objectionable ratings (either MPAA or TV Ratings).
Pressthe Menu button tOdisplay
the menu. _ •
um_e 4 En¢_ •
DigitalNR • Oil •
£ress the CH • button three _, < oo •
times to highlight the _FUNC_ Ptug&_ •
TtON" menu,
PresstheVOE+button. OMo_ ±_. [E3_t
Pressthe CH• button six times to
select the _V-chip" menu.
Pressthe VOL+button,
[]
The_Enter pin" screen wilI appear.
Enteryour 4-digit PIN number,
[]33_u
4.23 (}l,\i' l_ [(t]l S}'_ l,\l [I'_lt]}#is
SPECIAL FEATURES ]
Z
¸¸¸¸3¸¸
i_ ¸ iiiiiiii_;;;;;_i!ii_i;
The "V_chip mode" screen will appear.
Press the OHV button twice, and hgh ight _i TVgutd_N •
_MpAA ratingi" _ _ MPAArating •
C_langepin •
O_ve ±Ent [_E_t
4 ¸
While" MPAArating" is highlighted,
press the VO/+ button. The t MPAA rat-
ing" screen witI appear.
i
_J
_G_ uu
PC--13 U
R U
NC-17 U
X U
N/ NR U
B:_ U:Unbl_
MCe_ iEnt. _ Menu
5
Repeatedly press the CH V
button to highlight a
particular MPAA category.
(Whena category is
highlighted, its color change#
to blue,) Pressing the OH •
button wiIl cycle through tb_
MPAA categories:
MPAA RATING
_G U
FG U
PG-13 U
R U
N0.17 U
X U
NR U
B:Blocked U:Unblocked
OM0_ ±E_ [_Menu
.G Generalaudience (norestrictions), .
PG Parenta!gg!dapce_ygge_ed: .
.P#:13 PG:13!Parentss!ro%!ycaut!oned!: .
R R(Restricted.Childrenunder 17should
. beaccompaniedb_a0ad_!t): .
X X (Adultsonly).
NR Not rated.
While a particular category is highlighted, press the VOL+ button to activate it.
A blinking letter ("U" or "B') will be displayed. Press the CH • or CH • buttons to
select "U" or'B".
Press the Menu button three times to save the settings and to clear all screens.
Note: The V_Chip will automatically block any category that is "more restrictive."
For example, if you block the "PG-13" category, then "R," "NCdT," and "X" will auto-
matically be blocked also.
How to Reset the TV after the V-Chip
Blocks a Channel ("Emergency Escape")
Ifthe TV Stuned to a restricted channel, the V-Chip w tJbl0ck iLThe screen wiii go btank andthe f0i!owing
message will appear "Excessive rating,"
TOresume normal viewing, tune to adifferent channel using the number buttons. Under certain conditions
(depedding on the rating of the Ioca_TV programs) the V_Chipmight Iock out atIthe Phanne!s,
Inthis case, use the V,Chip button for an" emergency escape" :
Press the V.chip button Onthe remote control, Enter your PiN number,and press the VOL÷ button to temporat_
itYdisable the vtChiP LOCK
( II,\P] I i (/(11: SP]CIAI F}AI(IIIS 424
TROUBLES}lOOTING
If the TV seems to have a problem, first try this list of possible problems and solutions.
If none of these troubleshooting tips apply, then call your nearest service center.
Identifying Problems
Problem Possible Solution
Poor picture Try another channel.
Adjust the antenna.
Check all wire connections.
Poor sound quality. Try another channel.
Adjust the antenna.
No picture or sound. Try another channel.
Press the TV/VIDEO button.
Make sure the TV is plugged in.
Check the antenna connections.
No color, wrong colors oi tints. Make sure the program is broadcast in color.
Adjustthepicture settings.
Picture roils vertically. Adjust the antenna.
Check all wire connections.
The TV operates eratically Unplug the TV for SO seconds, then try
operating it again.
Your remote control does not Press the "MODE" button to put your remote
operate your TV[ control in the "TV" mode.
The TV won't turn on. Make sure the wall outlet is working.
5.1 ( HAP] I i VE ]R((IB] ISIR)OIiNG
APPENDIX
Cleaning and Maintaining Your TV
With proper care, your TV unit will give you many years of"service. Please follo_ Vthese
guidelines to get the maximum performance from your T_/_
Placement
Do not place the TV near extremely hot, cold, humid oi- dusty places.
Do not place the TV near appliances with electric motors that create magnetic fields,
such asvacuum cleaners.
Keep the ventilation openings clear; do not place the TV on a soft surface, such as
cloth or paper.
Place the TV in a vertical position only.
Liquids
Do not handle liquids near or on the TV Liquids that spill into it can cause serious
damage.
Cabinet
Never open the cabinet or touch the parts inside.
Wipe your TV with a clean, dry cloth. Never use water, cleaning fluids, wax, or
chemicals.
Do not put heavy objects on top of the cabinet
Temperature
If'your TV is suddenly moved from a cold to a warn] place, unplug the power cord,
and allow at least two hours for moisture that may have formed inside the unit to dry
completel_
Using Your TV in Another Country
If you plan to take your TV with you to a foreign country, please be aware of the diflbrent
television systems that are in use around the worM. A TV designed for one system may
not work properly with another system due to diff'erences in the TV channel frequencies
Specifications
TSKE7%E/TSK27901¢ TSKS292P/TSKS290E TSKS092WE
Model
TSL2795HF TSL3294HFFfSL3295HE T%3095WHF
ACI2(]V
60Hz
180watls ]80/',arts ]80/',arts
Dimension 862x55x585mm:3)3xX2"Tx238nd/cs)1x8h'@_m:3587x23]lx2685Jr@,9_x54h@_m:3677x242x2232J**@s