Use & Care Guide Dishwasher
PARTS AND FEATURES
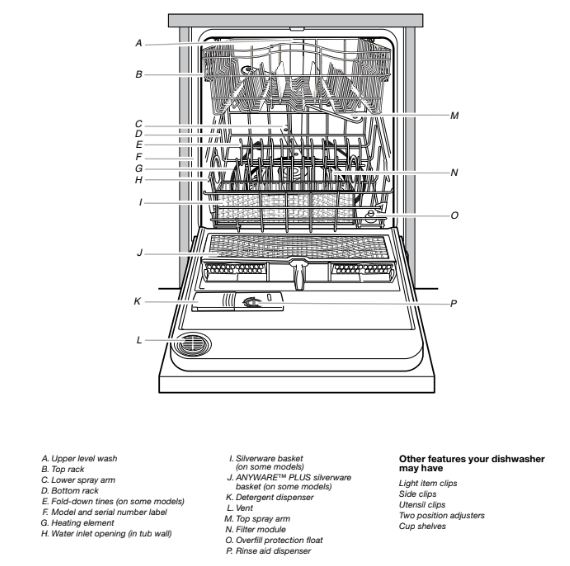
This manual covers several different models. The dishwasher you have purchased may have some or all of the parts and features listed below.
START-UP GUIDE
Using Your New Dishwasher
- Scrape large food soil and hard items (toothpicks or bones) from dishes.
- Properly load the dishwasher. (See “Dishwasher Loading.”). Make sure nothing keeps the spray arm(s) from spinning freely.
- Add detergent and check the rinse aid dispenser. Add rinse aid if needed. (See “Dishwasher Use.”)
- Push door firmly closed. The door latches automatically. Run hot water at the sink nearest your dishwasher until the water is hot. (See “Dishwasher Efficiency Tips.”) Turn off water.
- Press the desired cycle and option selections.

NOTE: If the door is opened during a cycle or the power is interrupted, the Start/Resume indicator flashes. The cycle will not resume until the door is closed, and Start/Resume is pressed.
Stopping Your Dishwasher
You can stop your dishwasher anytime during a cycle.
- Open the door slightly.
- Wait for the spraying action to stop. Then open the door all the way, if needed.
Close the door and press START/RESUME to continue the cycle. OR Press CANCEL/DRAIN. A 2-minute drain starts.
DISHWASHER LOADING
Loading Suggestions
- Remove leftover food, bones, toothpicks and other hard items from the dishes. It is not necessary to rinse the dishes before putting them into the dishwasher. The wash module removes food particles from the water. The module contains a chopping device which will reduce the size of food items. NOTE: If hard items such as fruit seeds, nuts, and eggshells enter the wash module, you might hear chopping, grinding, crunching, or buzzing sounds. These sounds are normal when hard items enter the module. Do not let metallic items (such as pot handle screws) get into the wash module. Damage can occur.
- It is important for the water spray to reach all soiled surfaces.
- Load dishes so they are not stacked or overlapping, if possible. For best drying, water must be able to drain from all surfaces.
- Make sure pot lids and handles, pizza pans, cookie sheets, etc., do not interfere with the spray arm rotation.
- Run a rinse cycle to keep dishes moist if you do not plan to wash them soon. Foods such as eggs, rice, pasta, spinach, and cooked cereals may be hard to remove if they are left to dry over a period of time.
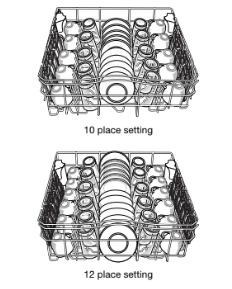
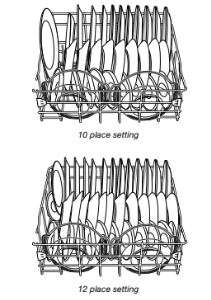
Loading Top Rack
The top rack is designed for cups, glasses, and smaller items. Many items, up to 9" (22 cm), fit in the top rack. (See recommended loading patterns shown.)
NOTE: The features on your dishwasher rack may vary from the drawings shown.
- Place items so open ends face down for cleaning and draining.
- Load glasses in top rack only. The bottom rack is not designed for glasses. Damage can occur.
- Place cups and glasses in the rows between tines. Placing them over the tines can lead to breakage and water spots.
- China, crystal, and other delicate items must not touch each other during dishwasher operation. Damage may occur.
- Load lightweight plastic items in the top rack only. Only plastic items marked “dishwasher safe” are recommended.
- Load plastic items so the force of the spray does not move them during the cycle.
- To avoid chipping, do not let stemware touch other items.
- Small bowls, pans, and other utensils can be placed in the top rack. Load bowls in the center section for best stability.
Cup shelves (on some models)
- Fold down the extra shelf on the left-hand or right-hand side of the top rack to hold additional cups, stemware or long items such as utensils and spatulas.
- NOTE: The features on your dishwasher may vary from those shown below.
Light item clips (on some models)
The light item clips hold lightweight plastic items such as cups, lids, or bowls in place during washing.
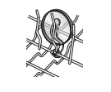
To move a clip
- Pull the clip up and off the tine.
- Reposition the clip on another tine.
Adjustable 2-position top rack (on some models)
You can raise or lower the top rack to fit tall items in either the top or bottom rack. Raise the top rack to accommodate items up to 9" (22 cm) in the top rack and 13" (33 cm) in the bottom rack, or lower the top rack to accommodate items up to 11" (28 cm) in both the top and bottom racks. Two adjusters are located on each side of the top rack. Each adjuster has 2 preset positions. The high and low positions are marked on the adjuster.
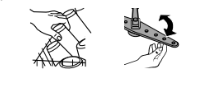
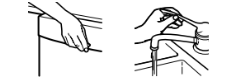
To adjust the top rack
- Hold the top rack with one hand near the adjuster.
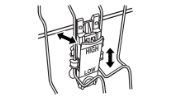
- With the other hand, pull out the top of the adjuster.
- Raise or lower the rack to one of the preset positions.
- Release the adjuster.
- Repeat the steps for the remaining adjusters.
NOTE: The top rack must be level.
Loading Bottom Rack
The bottom rack is designed for plates, pans, casseroles, and utensils. Many items, up to 13" (33 cm) tall, fit in the bottom rack. (See recommended loading patterns shown.)
NOTE: The features on your dishwasher rack may vary from the drawings shown.
- Do not load glasses, cups, or plastic items in the bottom rack. Load small items in the bottom rack only if they are secured in place.
- Load plates, soup bowls, etc., between tines.
- Overlap the edges of plates for large loads.
- Load soup, cereal, and serving bowls in the rack in a variety of ways depending upon their size and shape. Load bowls securely between the rows of tines. Do not nest bowls because the spray will not reach all surfaces.
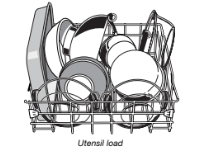
- Load cookie sheets, cake pans, and other large items at the sides and back. Loading such items in front can keep the water spray from reaching the detergent dispenser.
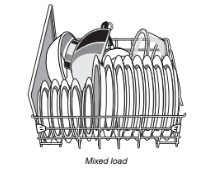
- Secure heavily soiled cookware face down in the rack.
- Make sure pot handles and other items do not stop rotation of the spray arm(s). The spray arm(s) must move freely.
- Do not load items between the bottom rack and the side of the dishwasher tub because they might block the water inlet opening.
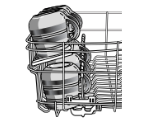
Fold-down tines (on some models)
You can fold down one row of tines at the back of the bottom rack.
- Grasp the tip of the tine that is in the tine holder.
- Gently pull the tine out of the tine holder.
- Lay the row of tines down in the rack to make room for larger dishes, bowls, pots, pans or roasters.
DISHWASHER USE
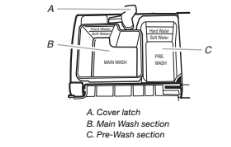
Detergent Dispenser
The detergent dispenser has two sections. The smaller Pre-Wash section empties detergent into the dishwasher when you close the door. The larger Main Wash section automatically empties detergent into the dishwasher during the wash. (See the “Cycle Selection Charts.”)
- Use automatic dishwashing detergent only. Other detergents can produce excessive suds that can overflow out of the dishwasher and reduce washing performance.
- Add detergent just before starting cycle.
- Store tightly closed detergent in a cool, dry place. Fresh automatic dishwasher detergent results in better cleaning.
NOTE: Do not use detergent with a rinse cycle.
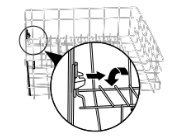
Filling the dispenser
- If the dispenser cover is closed, open the cover by moving the cover latch to the right.
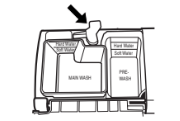
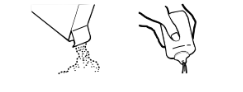
- Add the correct amount of detergent to the Main Wash section of the dispenser according to the chart below. If you are using a tablet detergent, it must be placed in the Main Wash section. (See “How much detergent to use.”)
- Add the correct amount of detergent to the Pre-Wash section of the dispenser, if needed, according to the chart below.
- Close the dispenser cover. It is normal for the cover to open partially when dispensing detergent.
NOTE: See the “Cycle Selection Charts” for which section to fill depending on the cycle selected.
How much detergent to use
- The amount of detergent to use depends on the soil level of your dishes, hardness of your water, and the type of detergent. If you use too little, dishes will not be clean. If you use too much in soft water, glassware will etch.
- Water hardness can change over a period of time. Find out your water’s hardness by asking your local water department, water softener company, or county extension agent.
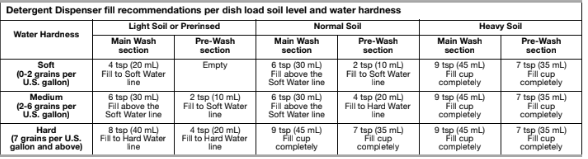
NOTE: Fill amounts shown are for standard powdered detergent. Amounts may vary if you use liquid or concentrated powdered detergent. Tablet detergents should be placed in the main wash section of the detergent dispenser with the cover closed. Follow instructions on the package when using liquid dishwasher detergent, concentrated powdered detergent or tablet detergent.
Rinse Aid Dispenser
IMPORTANT: Your dishwasher is designed to use a liquid rinse aid. The use of rinse aids greatly improves drying by allowing water to drain from the dishes after the final rinse. They also keep water from forming droplets that can dry as spots or streaks. Do not use a solid or bar-type rinse aid.
Filling the dispenser
The rinse aid dispenser holds 5 oz (150 mL) of rinse aid. Under normal conditions, this will last for about 1 to 3 months.
- Make sure the dishwasher door is fully open.
- Turn the dispenser knob to “Open” and lift it out.
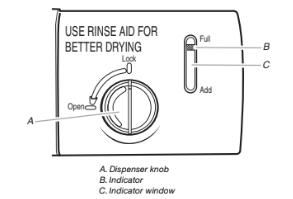
- Pour rinse aid into the opening until the indicator points to “Full.” Take care not to overfill. (When the rinse aid indicator drops to the “Add” level, add more rinse aid.)

- Clean up any spilled rinse aid with a damp cloth.
- Place the knob back into the opening and turn to the “Lock” position.
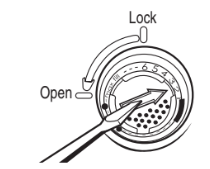
Rinse aid setting
The amount of rinse aid released into the final rinse can be adjusted. For most water conditions, the factory setting of 2 will give good results. If you have hard water or notice rings or calcium spots on your glasses or dishes, try a higher setting.
To adjust the setting
- Remove the dispenser knob.
- Turn the arrow adjuster inside the dispenser to the desired setting by either using your fingers or inserting a flat-blade screwdriver into the center of the arrow and turning.
- Replace the dispenser knob.
Dishwasher Efficiency Tips
Hot water dissolves and activates the dishwashing detergent. Hot water also dissolves grease on dishes and helps glasses dry spot- free. For best dishwashing results, water should be 120°F (49°C) as it enters the dishwasher. Loads may not wash as well if the water temperature is too low. Water that is too hot can make some soils harder to remove and cause certain detergent ingredients not to function. If your water heater is located far from the dishwasher, it may be necessary to run the hot water at the faucet closest to the dishwasher to minimize the amount of cold water in the water line.
To check water temperature
- Run hot water at the faucet closest to your dishwasher for at least 1 minute.
- Place a candy or meat thermometer in a glass measuring cup.
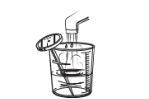
- Check the temperature on the thermometer as the water is running into the cup.
Additional efficiency tips
- To save water and energy and time, do not rinse dishes before putting them into the dishwasher.
- Use a low energy, quick, or short cycle whenever possible. These cycles use less hot water and energy than a normal cycle.
- Use a delay feature (on some models) to run your dishwasher during off-peak hours. Local utilities recommend avoiding heavy usage of energy at certain times of day.
- During the summer, run your dishwasher at night. This reduces daytime heat buildup in the kitchen.
- Use the energy-saving dry option whenever possible. Allow longer drying times (overnight) when using these options. Use a rinse aid to improve drying.
- Use cycles or options that add extra heat to the wash or rinse portion of the cycle only when needed.
- Run your dishwasher with full loads. Run a rinse cycle after meals until the dishwasher is full.
- If your home is equipped with a water softener, you may want to avoid starting the dishwasher during the regeneration of the softener, since this may contribute to poor wash performance.
Cycle Selection Charts
- Select the wash cycle and options desired and press START/ RESUME. The dishwasher starts filling once you press START/ RESUME, unless you select a delay wash. You can change cycles and options as the machine is filling.
- After completing a wash cycle, the dishwasher remembers the cycle and options. It uses the same cycle and options again in the next wash cycle, if you press only START/RESUME.
- NOTE: If the door is opened during a cycle or the power is interrupted, the Start/Resume indicator flashes. The cycle will not resume until the door is closed and Start/Resume is pressed.
Changing a Cycle or Setting
During the first fill of a cycle
- Press a new cycle and/or options.
- Check the detergent dispensers. They must be filled properly for the new cycle.
- Press START/RESUME.
After the first fill of a cycle
- Press CANCEL/DRAIN. Your dishwasher starts a 2-minute drain, if needed, and clears all indicators. NOTE: If your dishwasher does not need draining, the dishwasher stops and clears all indicators.
- Check the detergent dispensers. They must be filled properly for the new cycle.
- Press a new cycle and/or options.
- Press START/RESUME. (The door must be closed.)
Adding Items During a Cycle
You can add an item anytime before the main wash starts. Open the door and check the detergent dispenser. If the cover is still closed, you can add items.
To add items
- Lift up the door latch to stop the cycle. Wait for the spraying action to stop before opening the door.
- Open the door. If the detergent dispenser cover is still closed, add the item.
- Close the door firmly until it latches.
- Press START/RESUME. The dishwasher resumes the cycle after a 5-second pause.
Option Selections
Hi-Temp Wash
- Select this option to increase the target water temperature during the wash portions of the cycle. Hi-Temp Wash raises the target water temperature to 145oF (63oC) in the main wash. Heating the water helps improve washing results. Hi-Temp Wash is useful when loads contain baked-on food.
- This option adds heat, wash time and water to the cycle.
- NOTE: Hi-Temp Wash is an option with Pots & Pans and Normal cycles. Selecting Hi-Temp Wash with the SANI RINSETM option has no effect, as it already raises the main wash to 145°F (63°C).
SANI RINSETM Option
- Select this option to raise the water temperature in the final rinse to approximately 155°F (68°C). The SANI RINSETM option adds heat and time to the cycle. The Main Wash heating time will be extended to reach 145°F (63°C). In the Pots & Pans and Normal cycles, this high-temperature rinse sanitizes your dishes and glassware in accordance with NSF/ANSI Standard 184 for Residential Dishwashers. Certified residential dishwashers are not intended for licensed food establishments.
- NOTE: Use the SANI RINSETM option with Pots & Pans and Normal cycles. Only these sanitization cycles have been designed to meet the NSF/ANSI requirements.
Heated Dry
- Select this option to dry dishes with heat.
- Switching off Heated Dry skips the dry period. This is useful when loads contain plastic dinnerware that may be sensitive to high temperatures. The dishes take longer to dry and some spotting may occur. Some items (such as plastics) may need towel drying.
- For best drying, use a liquid rinse aid.
- NOTE: Heated Dry is an option with all cycles, except GLASS XPRESSTM and Rinse Only cycles. Heated Dry begins automatically with all cycles unless you switch it off.
DISHWASHER CARE
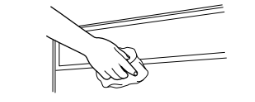
Cleaning the exterior
In most cases, regular use of a soft, damp cloth or sponge and a mild detergent is all that is necessary to keep the outside of your dishwasher looking nice and clean. If your dishwasher has a stainless steel exterior, a stainless steel cleaner is recommended.
Cleaning the interior
Hard water minerals can cause a white film to build up on the inside surfaces, especially just beneath the door area.
Do not clean the dishwasher interior until it has cooled. Wear rubber gloves. Do not use any type of cleanser other than dishwasher detergent because it may cause foaming or sudsing.
To clean interior
- Make a paste with powdered dishwasher detergent on a damp sponge and clean. OR Use liquid automatic dishwasher detergent and clean with a damp sponge. OR See the vinegar rinse procedure in “Spotting and filming on dishes” in “Troubleshooting.”
- NOTE: Run a normal cycle with detergent after cleaning the interior.
Drain Air Gap
- Check the drain air gap anytime your dishwasher isn’t draining well.
- Some state or local plumbing codes require the addition of a drain air gap between a built-in dishwasher and the home drain system. If a drain is clogged, the drain air gap protects your dishwasher from water backing up into it.
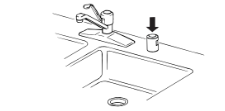
- The drain air gap is usually located on top of the sink or countertop near the dishwasher. To order a drain air gap, contact your local dealer; or call us or your designated service center and ask for Part Number 300096. For more information, see “Assistance or Service.”
- NOTE: The drain air gap is an external plumbing device that is not part of your dishwasher. The warranty provided with your dishwasher does not cover service costs directly associated with the cleaning or repair of the external drain air gap.
To clean the drain air gap
Clean the drain air gap periodically to ensure proper drainage of your dishwasher. Follow the cleaning instructions provided by the manufacturer. With most types, you lift off the chrome cover. Unscrew the plastic cap. Then check for any soil buildup. Clean if necessary.
TROUBLESHOOTING
Dishwasher is not operating properly
- Is the Start/Resume indicator flashing? Opening the door or interrupting the power stopped the cycle. Close the door and press START/RESUME.
- Does the Start/Resume indicator flash 3 times when you press START/RESUME? The dishwasher is waiting for you to open the door after the last cycle. Open and close the door, then press START/RESUME.
- Is the door closed tightly and latched?
- (NOTE: On models with a dual-digit display, the control displays “- -” during a cycle if it believes the door is not latched.)
- Is the right cycle selected? Refer to the “Cycle Selection Charts.”
- Is there power to the dishwasher? Has a household fuse blown, or has a circuit breaker tripped? Replace the fuse or reset the circuit breaker. If the problem continues, call an electrician.
- Has the motor stopped due to an overload? The motor automatically resets itself within a few minutes. If it does not restart, call for service.
- Is the water shutoff valve (if installed) turned on?
- It is normal for certain cycles to repeatedly pause for several seconds during the main wash.
Clean light is flashing
- The dishwasher has malfunctioned. Call for service to check heater circuit.
Dishwasher will not fill
- Is the overfill protection float able to move up and down freely? Press down to release.
Dishwasher seems to run too long
- Is the water supplied to the dishwasher hot enough? The dishwasher runs longer while heating water. Refer to the “Dishwasher Efficiency Tips” section.
- A delay automatically occurs in some wash and rinse cycles until the water reaches the proper temperature.
Water remains in the dishwasher
Detergent remains in the covered section of the dispenser
- Is the cycle complete?
- Is the detergent lump-free? Replace detergent if necessary.
White residue on the front of the access panel
- Was too much detergent used? Refer to the “Detergent Dispenser” section.
- Is the brand of detergent making excess foam? Try a different brand to reduce foaming and eliminate buildup.
Odor in the dishwasher
- Are dishes washed only every 2 or 3 days? Run a rinse cycle once or twice a day until you have a full load.
- Does the dishwasher have a new plastic smell? Run a vinegar rinse as described in “Spotting and filming on dishes” later in this Troubleshooting guide.
Condensation on the kitchen counter (built-in models)
- Is the dishwasher aligned with the countertop? Moisture from the vent in the dishwasher console can form on the counter. Refer to the Installation Instructions for more information.
Dishes are not dry
- Did you load your dishwasher to allow proper water drainage? Do not overload. Refer to the “Dishwasher Loading” section. Use a liquid rinse aid to speed drying.
- Are the plastics wet? Plastics often need towel drying.
- Is the rinse aid dispenser empty? Refer to the “Rinse Aid Dispenser” section.
- Did you use an air-dry or energy-saving dry option? Use a heated drying option for dryer dishes.
Chipping of dishes
- Did you load the dishwasher properly? Load the dishes and glasses so they are stable and do not strike together from washing action. Minimize chipping by moving the rack in and out slowly.
- NOTE: Antiques, feather-edged crystal, and similar types of china and glassware might be too delicate for automatic dishwashing. Wash by hand.
Noises
- Grinding, grating, crunching or buzzing sounds A hard object has entered the wash module (on some models). When the object is ground up, the sound should stop. If the noise persists after a complete cycle, call for service.