Loading ...
Loading ...
Loading ...
10°
continuedfrompaget0
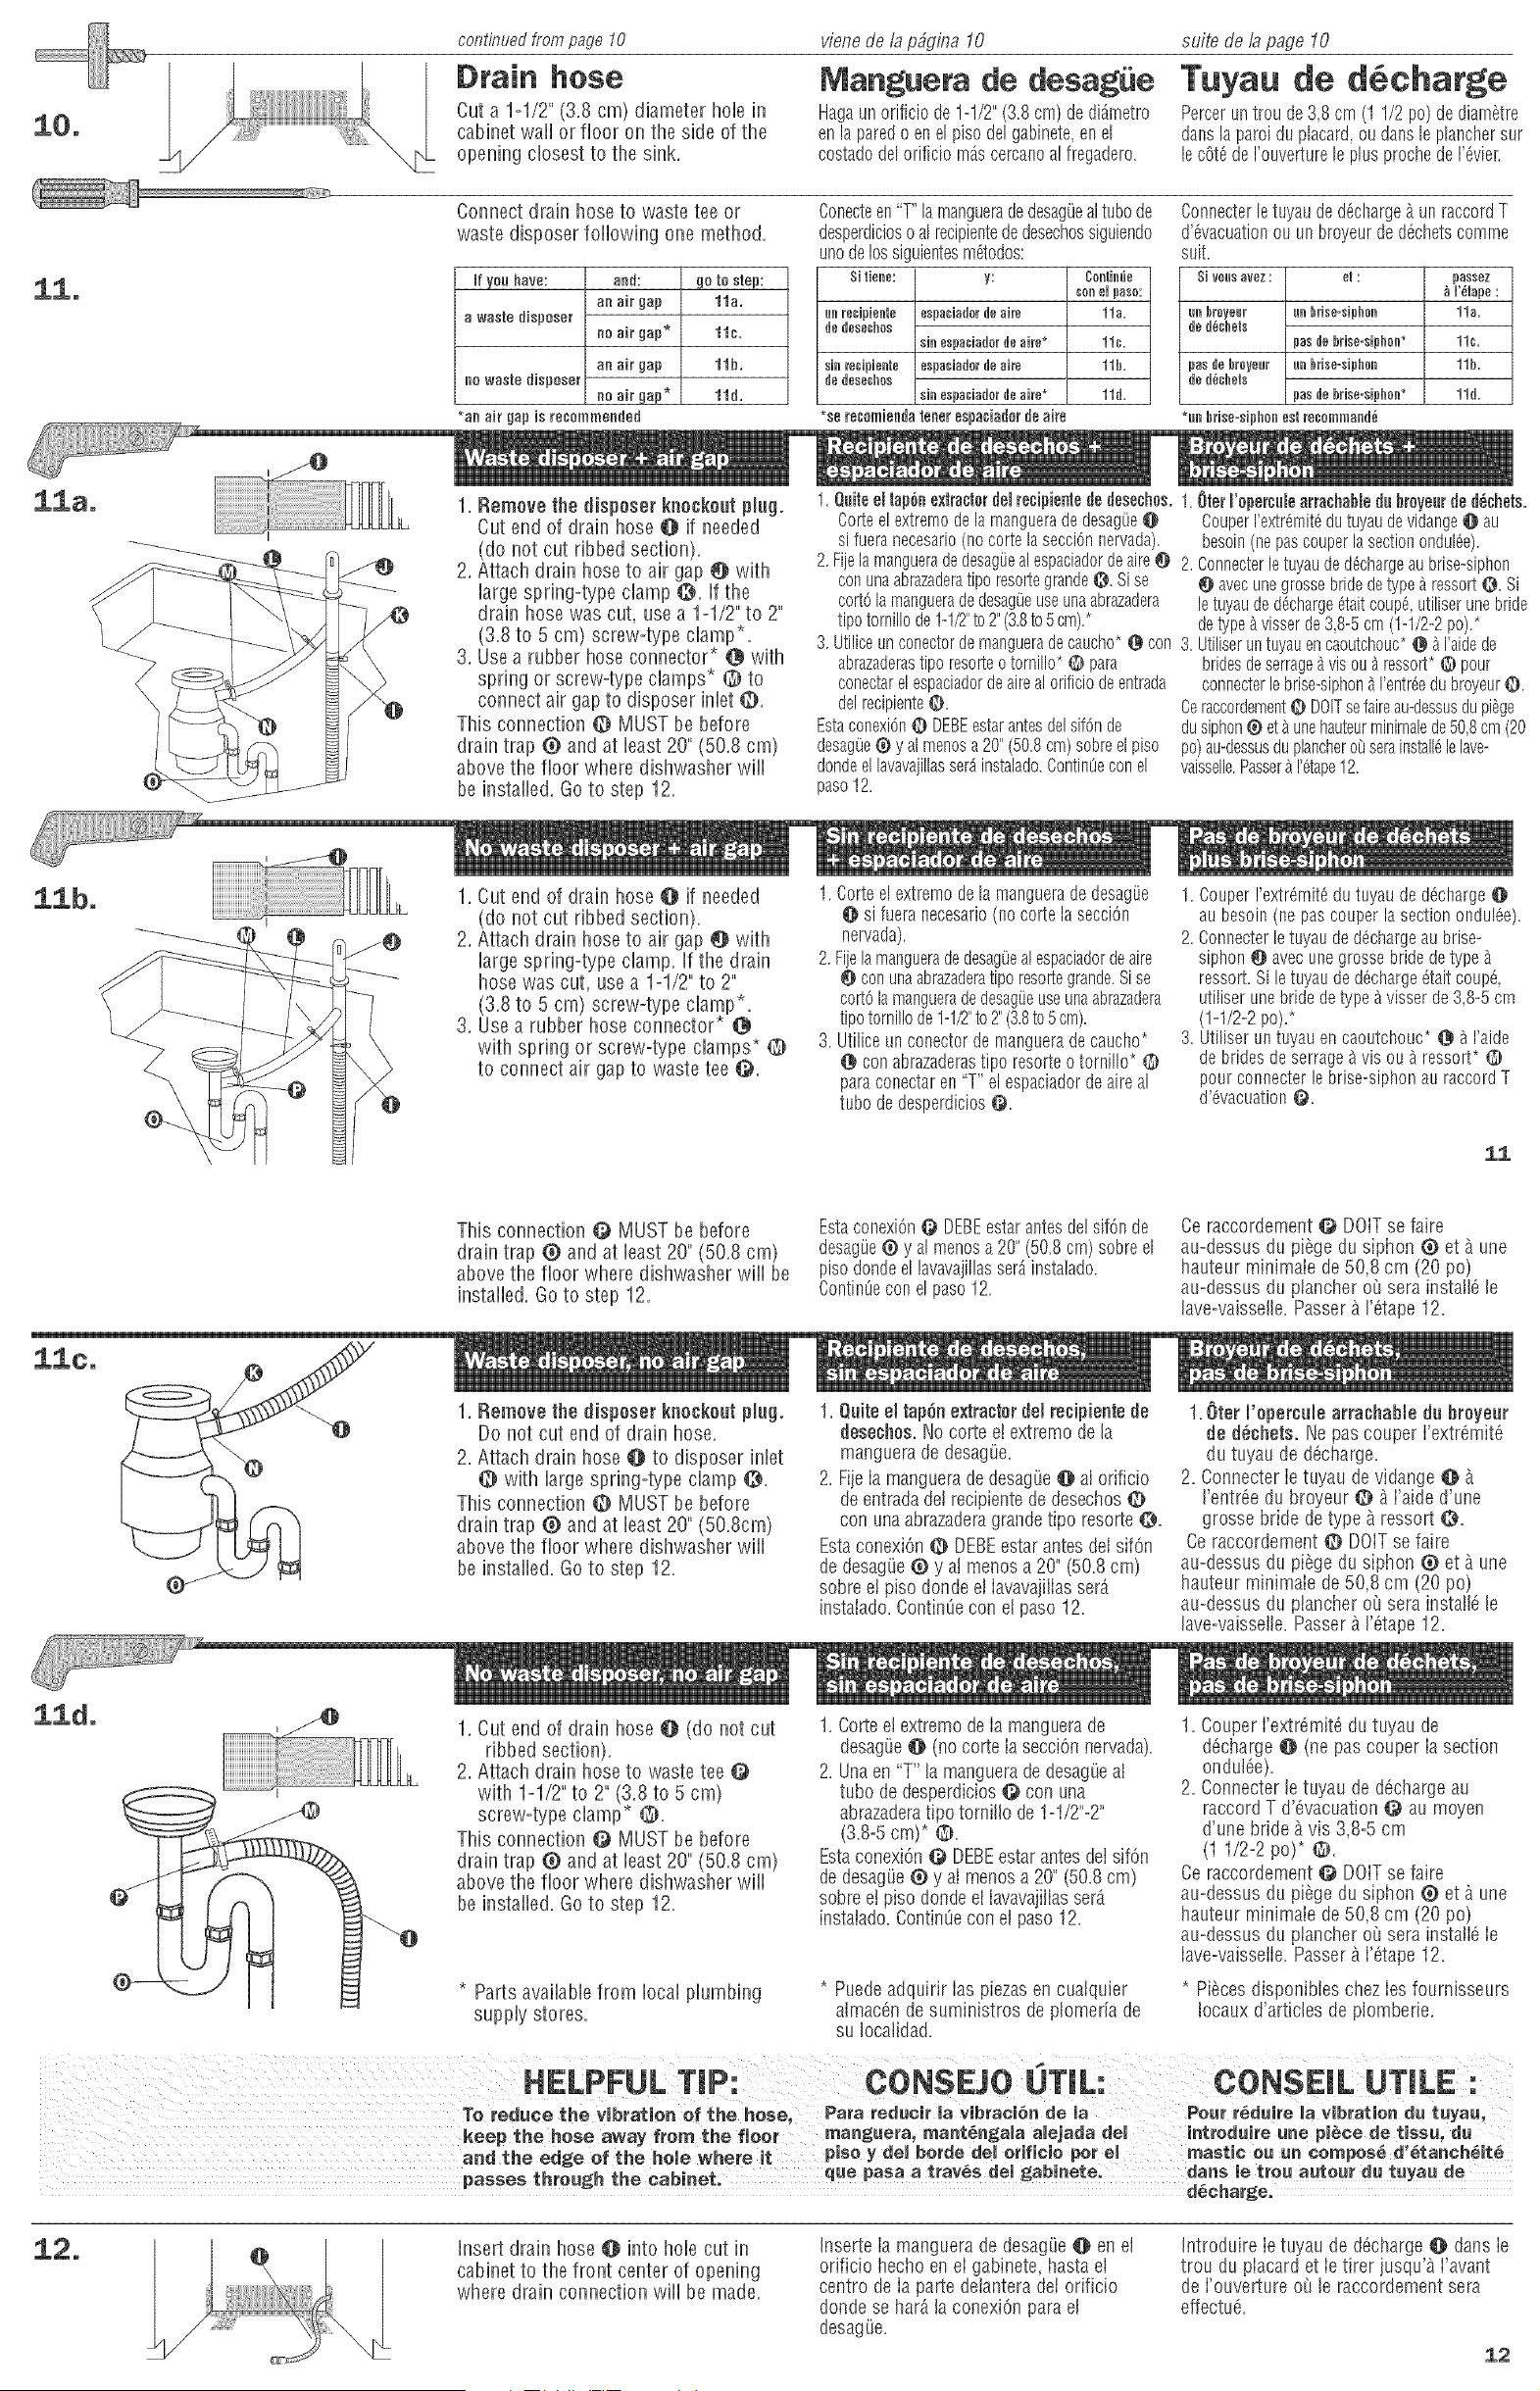
l rain hose
Cut a 1=1/2" (3.8 cm) diameter hole in
cabinet wall or floor on the side of the
opening closest to the sink.
vienede ia pdgina 10
Manguera de desag e
Hagaun orificio de !-1/2" (3.8 ore)dedi_metro
en laparedoen el pisodd gabinete,enel
costadodel orifMo m_scercanoal fregadero.
suite de fa page I0
Tuyau de d6eharge
Percerun trou de3,8 cm (1 1/2 pc) dediarn_tre
dartsla paroiduplacard,ou dartsle planchersur
lec6t_de I'ouverturele plusprochede 1'6vier.
Connect drain hose to waste tee or
waste disposer following one method,
if you have: and:
an air gap
a waste dUspaser
no air gap*
an air gap
no waste dUsposer
no air gap*
*an ao gap Usrecommended
go to step:
11a,
11s.
11h,
11d,
Conecteen"T"lapnangueradedesagOeal tubade
desperdicioso alrecipientededesechossiguiendo
unodelossiguientesm6todos:
Sifieee: y:
uere¢ipieele espaciaderdeairs
dedose@has
sin espa¢iaderdeairs*
isis recipieele espaciaderdeairs
dedeseches
sin espaciaderdeairs*
*so re@emiendatenet espadader de aire
Ceelie_e
Cee el pase:
11a.
11¢.
11b.
11d.
Connecterletuyauded_charge_ un raccordT
d'6vacuationouun broyeurded6chetscompne
ee hreyeur
de dbchels
pande beyeer
de d_chels
el:
ee hrise=siphee
pande brise=siphee*
ee hrise=siphee
pande brise=siphee*
*unbfise=siphaeest recalnmaed_
pasuez
r_lape:
11a=
11c=
11b=
11d=
z@
1, Remove the disposer kneckoet plug,
Cut end of drain hose @ if needed
(do not cut ribbed section),
2, Attach drain hose to air gap O with
large spring=type clamp _, If the
drain hose was cut, use a 1=1/2" to 2"
(3,8 to 5 cm) screw=type clamp*,
3, Usea rubber hose connector* @ with
spring or screw=type clamps* O to
connect air gap to disposer inlet @,
This connection @ MUST be before
drain trap @ and at least 20" (50,8 cm)
above the floor where dishwasher will
be installed, Go to step 12,
1. Quiieel lap_$11exlraderdelreeipieniededesechos.1.
Carteelextremedela mangueradedesagOe@
si fueranecesario(nocartelasessionnervada).
2.Fijela mangueradedesagOealespaciadordeaire0 2.
conunaabrazaderatiporesorLegrandeQ. Sise
cortOlamangueradedesagOeuseunaabrazadera
tipotomillode1-1/2"to2"(3.8to5cm).*
3.Utiliceunconectordemangueradecaucho*@ con 3.
abrazaderastiporesorteotomillo*0 para
conectarelespaciadordeairealorificiodeentrada
delrecipiente@.
EstaconexiOn@ DEBEestarantesdelsifOnde
desagOe@ y almenosa 20"(50.8crn)sabreel piso
dondeellavavajillasser_iinstalado.ContinOeconel
paso12.
0tarI'eperculearrachaNedehreyeurded_chets.
CouperI'extr_rnit6dutuyaudevidange@ au
besoin(nepascouperlasectionondul6e).
Connecterletuyauded_chargeaubrise-siphon
Oavec unegrossebridedetype_ressort@. Si
letuyauded6charge6taitcoup6,utiliserunebride
detype_visserde3,8-5cm (1-1/2-2pc).*
Utiliseruntuyauencaoutchouc*@ _I'aidede
bridesdeserrage_ visou _ ressort*O pour
connecterlebrise-siphon_ I'entreedubroyeur@.
Ceraccordement@ DOlTsefaireau-dessusdupi_ge
dusiphon@et_unehauteurminimalede50,8cm(20
pc)au-dessusduplanchero_serainstall_lelave-
vaisselle.Passer_I'_tape12.
1, Cut end of drain hose @ if needed
(do not cut ribbed section),
2, Attach drain hose to air gap d) with
large spring=type clamp, If the drain
hose was cut, use a 1=1/2"to 2"
(3,8 to 5 cm) screw=type clamp*,
3, Use a rubber hose connector* @
with spring or screw=type clamps*
to connect air gap to waste tee @,
1. Carteel extremedela mangueradedesagi_e
@ si fueranecesario(no carte la secci6n
nervada).
2.Fijela mangueradedesagOealespaciadordeaire
conunaabrazaderatiporesortegrande.Sise
cart6lamangueradedesag8euseunaabrazadera
tipotornillodelq/2" to 2"(3.8to5am).
3. Utiliceunconectorde mangueradecaucho*
@ conabrazaderastipo resorteo torni%* @
paraconectaren "T" el espaciadordeaireal
tuba de desperdicios@.
1=Couper!'extr_mit_du tuyau de d_charge@
aubesoin(no pascouperla sectionondul_e).
2. Connecterle tuyaudedechargeaubrise-
siphon_ avecunegrossebridedetype
ressort.Sile tuyaudedecharge_taitcoupS,
utiliserunebridedetype&visserde3,8-5crn
(1-1/2-2pc).*
3. Utiiiseruntuyauen caoutchouc*@ _ I'aide
debridesde serrage&vis ca _ ressort*O
pourconnecterle brise-siphonau raccordT
d'_vacuation@.
11
This connection @ MUST be before
drain trap @ and at least 20" (50,8 cm)
above the floor where dishwasher will be
installed, Go to step 12,
Estaconexi6n@ DEBEestarantesde!sif6nde
desag_e@ y al menosa 20"(50.8crn) sabreel
pisodondeel lavavajillasser_instalado.
ContinOeconel paso12.
Ce raccordement @ DOlT se faire
au=dessusdu pi_ge du siphon @ et & une
hauteur minimaie de 50,8 cm (20 pc)
au-dessus du piancher o_l sara instatl_ le
lave-vaissefle.Passer& %tape 12.
1, Remove the disposer keockoot pieg,
Do not cut end of drain hose,
2, Attach drain hose @ to disposer inlet
@ with large spring=type clamp _,
This connection O MUST be before
drain trap @ and at least 20" (50,8cm)
above the floor where dishwasher will
be installed, Go to step 12,
1. Quite el tapdo extractor del recipiente de
desechos.No carte e! extreme de la
manguerade desagOe.
2. Fijeia mangueradedesagOe@ aI orificio
deentradade! recipientededesechos0
con unaabrazaderagrandetipo rosette _.
EstaconexiOn@ DEBEestar antes dei sifOn
de desagOe@ y at manes a 20" (50.8 cm)
sabre ei piso donde eJiavavajiliasser_l
instalado.ContinOecon et paso 12.
1. Oter J'epercaie attachable da breyeur
de d_chets. Nepas couper I'extr_mit_
du tuyau de d_charge.
2. Connecter ie tuyau devidange @
I'entr_e du broyeur 0 &i'aide d'une
grosse bride detype & ressort _.
Ce raccordement 0 DOiT se faire
au-dessus du pi_ge du siphon @ et & une
hauteur minimaie de 50,8 cm (20 pc)
au-dessus du piancher o_l sara instatl_ le
lave=vaissefle.Passer_ %tape 12.
1, Cut end of drain hose @ (do not cut
ribbed section),
2, Attach drain hose to waste tee @
with 1=1/2"to 2" (3,8 to 5 am)
screw=type clamp* _,
This connection @ MUST be before
drain trap @ and at least 20" (50,8 cm)
above the floor where dishwasher will
be installed, Go to step 12,
* Parts available from local plumbing
supply stores,
1. Cartee! extreme de ia manguerade
desagOe@ (no carte ia secciOnnervada).
2. Unaen "T" la manguerade desagOeai
tuba de desperdicios@ con una
abrazaderatipo tomillo de 1oi/2"o2"
(3.8-5 ore)* _.
Estaconexi6n @ DEBEestar antesdeIsif6n
dedesag(_e@ y aI menosa 20" (50.8 ore)
sabre ei piso dondeeI Iavavajillasser_l
instaiado.ContinUecon el paso 12.
* Puedeadquirir Ias plazas en cuatquier
aimac_n de suministros de plomeria de
su Iocatidad.
1. Couper i'extr_mit_ du tuyau de
d_charge@ (no pas couper Ia section
ondul_e).
2. Connecter le tuyau de d_chargeau
raccordT d'_vacuation 0 au moyen
d'une bride _ vis 3,8°5 cm
(I 1/2-2 pc)* 0
Ce raccordement @ DOiT se faire
au-dessus du pi_ge du siphon @ et _ une
hauteur minimaie de 50,8 cm (20 pc)
au-dessus du piancher o_l sara instali_ ie
iave-vaisselie.Passer _ i'_tape 12.
* Pi_ces disponibies chez Iesfournisseurs
Jocauxd'articies de plomberie.
To reduce the vibration of the hose, Para reducir ia vibracJ6a de la Pour rbduire la vJbratiorldu tuyau_
keep the hose away fro_ the fleo_ manguera, mant_agala aiejada del introduire une p!Sce de tissu, da
arid the edge of the hole where it plso y del horde dei orJfJeJopar el _astJc o_ _l_compes_ d'etanch_ite
Insert drain hose @ into hole cut in
cabinet to the front center of opening
where drain connection will be made,
Inserte Ia manguera de desagOe@ en el
orificio hecho en eI gabinete, hastaeI
centre de ia parte detanteradot orificio
deride se har_ la conexi6n para et
desagOe.
Introduire Ie tuyau de d_charge @ darts Ie
trou du piacard et ie tirer jusqu'_/i'avant
de I'ouverture o_ le raccordement sera
effectu&
12
Loading ...
Loading ...
Loading ...