Loading ...
Loading ...
Loading ...
18
V-BELTS
Check V-belts for deterioration and wear after
100 hours of operation and replace if neces-
sary. The belts are not ad just able. Re place
belts if they begin to slip from wear.
TO CLEAN BATTERY AND TER MI NALS
Corrosion and dirt on the battery and termi-
nals can cause the battery to “leak” power.
1. Remove terminal guard.
2. Disconnect BLACK battery cable first
then RED bat tery cable and remove
battery from tractor.
3. Rinse the battery with plain water and
dry.
4. Clean terminals and battery cable ends
with wire brush until bright.
5. Coat terminals with grease or pe tro leum
jelly.
6. Reinstall battery (See “REPLACING
BATTERY" in the Service and Ad just-
ments section of this manual).
TEMPERATURE RANGE ANTICIPATED BEFORE NEXT OIL CHANGE
SAE VISCOSITY GRADES
-20 0 30 40
80
100
-30
-20 0
20 30 40
F
C
32
-10
10
60
5W-30
SAE 30
ENGINE
LUBRICATION
Only use high quality detergent oil rated with
API service classification SG-SL. Select the
oil’s SAE viscosity grade according to your
expected operating temperature.
NOTE: Although multi-viscosity oils (5W30,
10W30 etc.) improve starting in cold weather,
they will result in increased oil consumption
when used above 32°F/0°C. Check your engine
oil level more frequently to avoid possible
engine damage from running low on oil.
Change the oil after every 50 hours of
operation or at least once a year if the tractor
is not used for 50 hours in one year.
Check the crankcase oil level before starting
the engine and after each eight (8) hours
of operation. Tighten oil fill cap/dipstick
securely each time you check the oil level.
TO CHANGE ENGINE OIL
Determine temperature range expected
before oil change. All oil must meet API
service classification SG-SL.
• Ensure tractor is on level surface.
• Oil will drain more freely when warm.
• Catch oil in a suitable container.
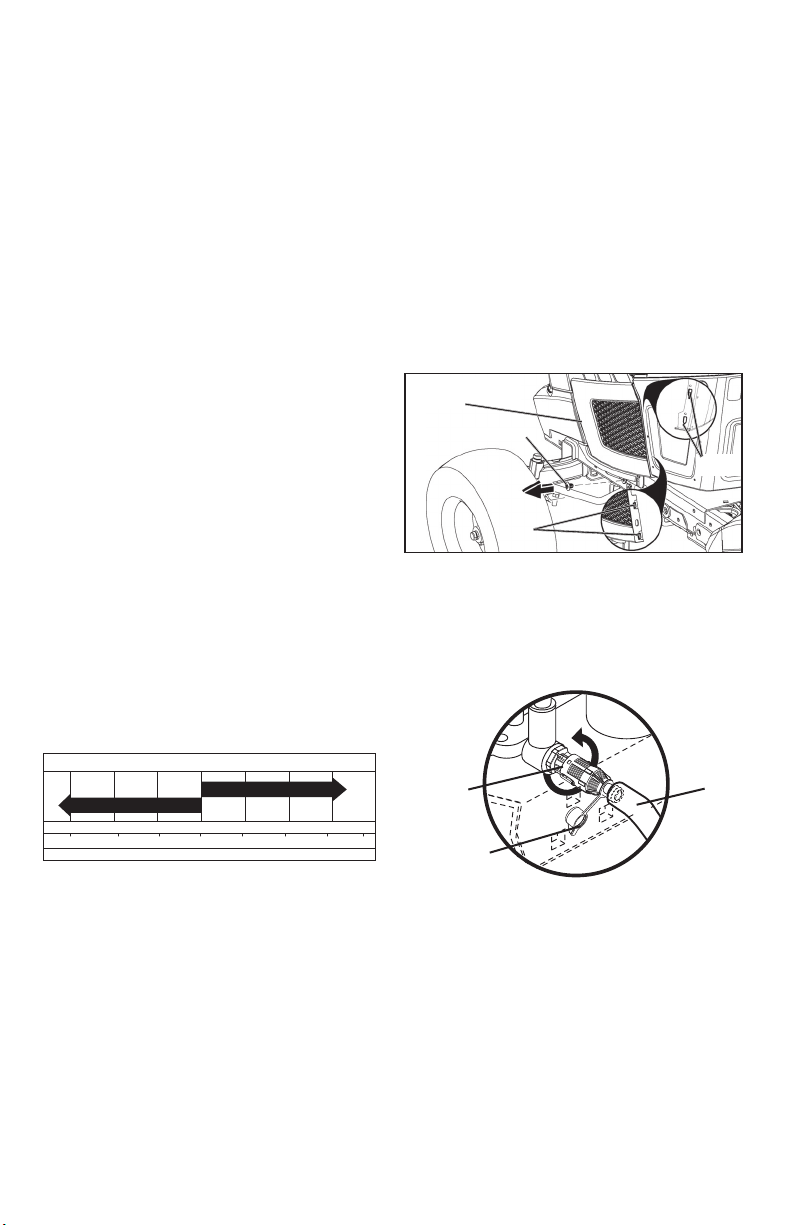
LOWER DASH COVER REMOVAL
1. Raise hood.
2. Remove fastener from lower dash cover.
CAUTION: Remove lower dash cover care-
fully to ensure cover tabs are not broken.
3. Slide lower dash cover up to release
cover tabs from tapered slots in lower
dash and remove.
4. Remove oil fill cap/dipstick. Be careful
not to allow dirt to enter the engine when
changing oil.
5. Remove yellow cap from end of drain valve
and install the drain tube onto the fitting.
6. Unlock drain valve by pushing inward
and turning coun ter clock wise.
7. To open, pull out on the drain valve.
8. After oil has drained completely, close and
lock the drain valve by pushing inward
and turning clockwise until the pin is in
the locked position as shown.
9. Remove the drain tube and replace the cap
onto to the bottom fitting of the drain valve.
10. Refill engine with oil through oil fill dipstick
tube. Pour slowly. Do not overfill. For
approximate capacity see “PRODUCT
SPECIFICATIONS” section of this man u al.
Tabs
Slots
Lower Dash
Cover
Fastener
02463
Closed
and
Locked
Position
Oil Drain Valve
Yellow Cap
Drain
Tube
TRANSAXLE MAINTENANCE
The transaxle was sealed at the factory and
fluid main te nance is not required for the life
of the transaxle. Should the transaxle ever
leak or require servicing, contact your near-
est Sears or other qualified service center.
47
MANTENIMENTO
RECOMENDACIONES GENERALES
La garantía de este tractor no cubre los artículos
que han estado sujetos al abuso o a la negligen-
cia del operador. Para recibir todo el valor de
la garantía, el operador tiene que mantener la
se ga do ra según las instrucciones descritas en
este manual.
Hay algunos ajustes que se tienen que hacer en
forma periódica para poder mantener su trac tor
adecuadamente.
Al menos una vez cada estación comprobar si es
necesario efectuar los adjustes descritos en las
secciones de Servicio y Ajustes de este manual.
• Una vez al año, cambie la bujía, limpie o cam-
bie el filtro de aire y revise si las cuchillas y las
correas están desgastadas. Una bujía nueva
y un filtro de aire limpio aseguran una mezcla
de aire-combustible adecuada y le ayudan a
que su motor funcione mejor y que dure más.
ANTES DE CADA USO
1. Revise el nivel del aceite del motor.
2. Revise la operación de los frenos.
3. Revise la presión de las llantas.
4. Verifique que el sistema de presencia del
operado y ROS funcionen adecuatamente.
5. Revise si hay sujetadores sueltos.
TABLA DE LUBRICACIÓN
IMPORTANTE: No aceite o engrase los puntos
pivotes, los que tienen rodamientos de nilón
especiales. Los lubricantes viscosos atraerán
polvo y mugre, lo que acortara la duración de
los rodamientos. Si cree que lubricarse, use
solamente un lubricante tipo grafito de polvo seco
en forma moderada.
➀ Aceite de motor SAE 30 or 10W30
➁ Refiérase a la sección del “MOTOR” en Man
tenimiento
01965
➁ Motor
➀ Accesorio
de Grasa del
Rodamiento de
la Rueda
Delantera
➀ Accesorio
de Grasa del
Arbol
➀ Accesorio
de Grasa del
Arbol
➀ Accesorio
de Grasa del
Rodamiento
de la Rueda
Delantera
➀ Plancha
del engranaje
de Sec tor de
Dirección
3
2
2
6
1,2
2
21
,
2
4
5
1,2
ANTES
DE CADA
USO
CADA
25
HORAS
CADA
8
HORAS
CADA
100
HORAS
CADA
TEMP-
ORADA
ALMACEN-
AMIENTO
CADA
50
HORAS
Limpiar el filtro de aire
Cambiar el aceite del motor (Modelos con filtro de aceite)
Limpiar las aletas de enfriamiento
Limpiar la rejilla de aire
Cambiar el filtro de aceite (si equipado)
Cambiar el filtro de combustible
Cambiar el aceite del motor (Modelos sin filtro de aceite)
PROGRAMA DE MANTENIMIENTO
Revisar el nivel de bateria
Limpiar la batería y los tereminales
Tabla de lubricación
Afilar/cambiar las cuchillas de la segadora
Revisar si hay sujetadores sueltos
Verificar la sistemas presencia del operador y sistemas "ROS"
Revisar la presión de las llantas
Revisar la operación del freno
Cambiar el cartucho de papel del filtro de aire
Cambiar la bujia
Inspeccionar el silenciador/amortiguador de chispas
Revisar el nivel del aceite del motor
Inspeccione las correas trapezoidales
Compruebe la nivelación del cortacéspedes
Limpie los residuos de la placa de dirección.
4- No requerido si equipado con una batería libre de mantenimiento.
5- Vea “LIMPIEZA” en la sección de Mantenimento de este manual.
M
O
T
O
R
T
R
A
C
T
O
R
2- Dar servicio más a menudo cuando se opere en condiciones sucias o polvorosas.
3- Cambiar las cuchillas más a menudo cuando se siegue en suelo arenoso.
1- Cambiar más a menudo cuando se opere bajo carga pesada o en ambientes con
altas temperaturas
Inspeccione el silenciador cada 50 horas de funcionamiento o
seis meses en búsqueda de daños. Si se encuentra algún
daño, consulte el listado de piezas de reparacion o
comuniquese con su concesionario local para solicitar un
reemplazo.
6-
Loading ...
Loading ...
Loading ...