H@F°$
WashingMachine
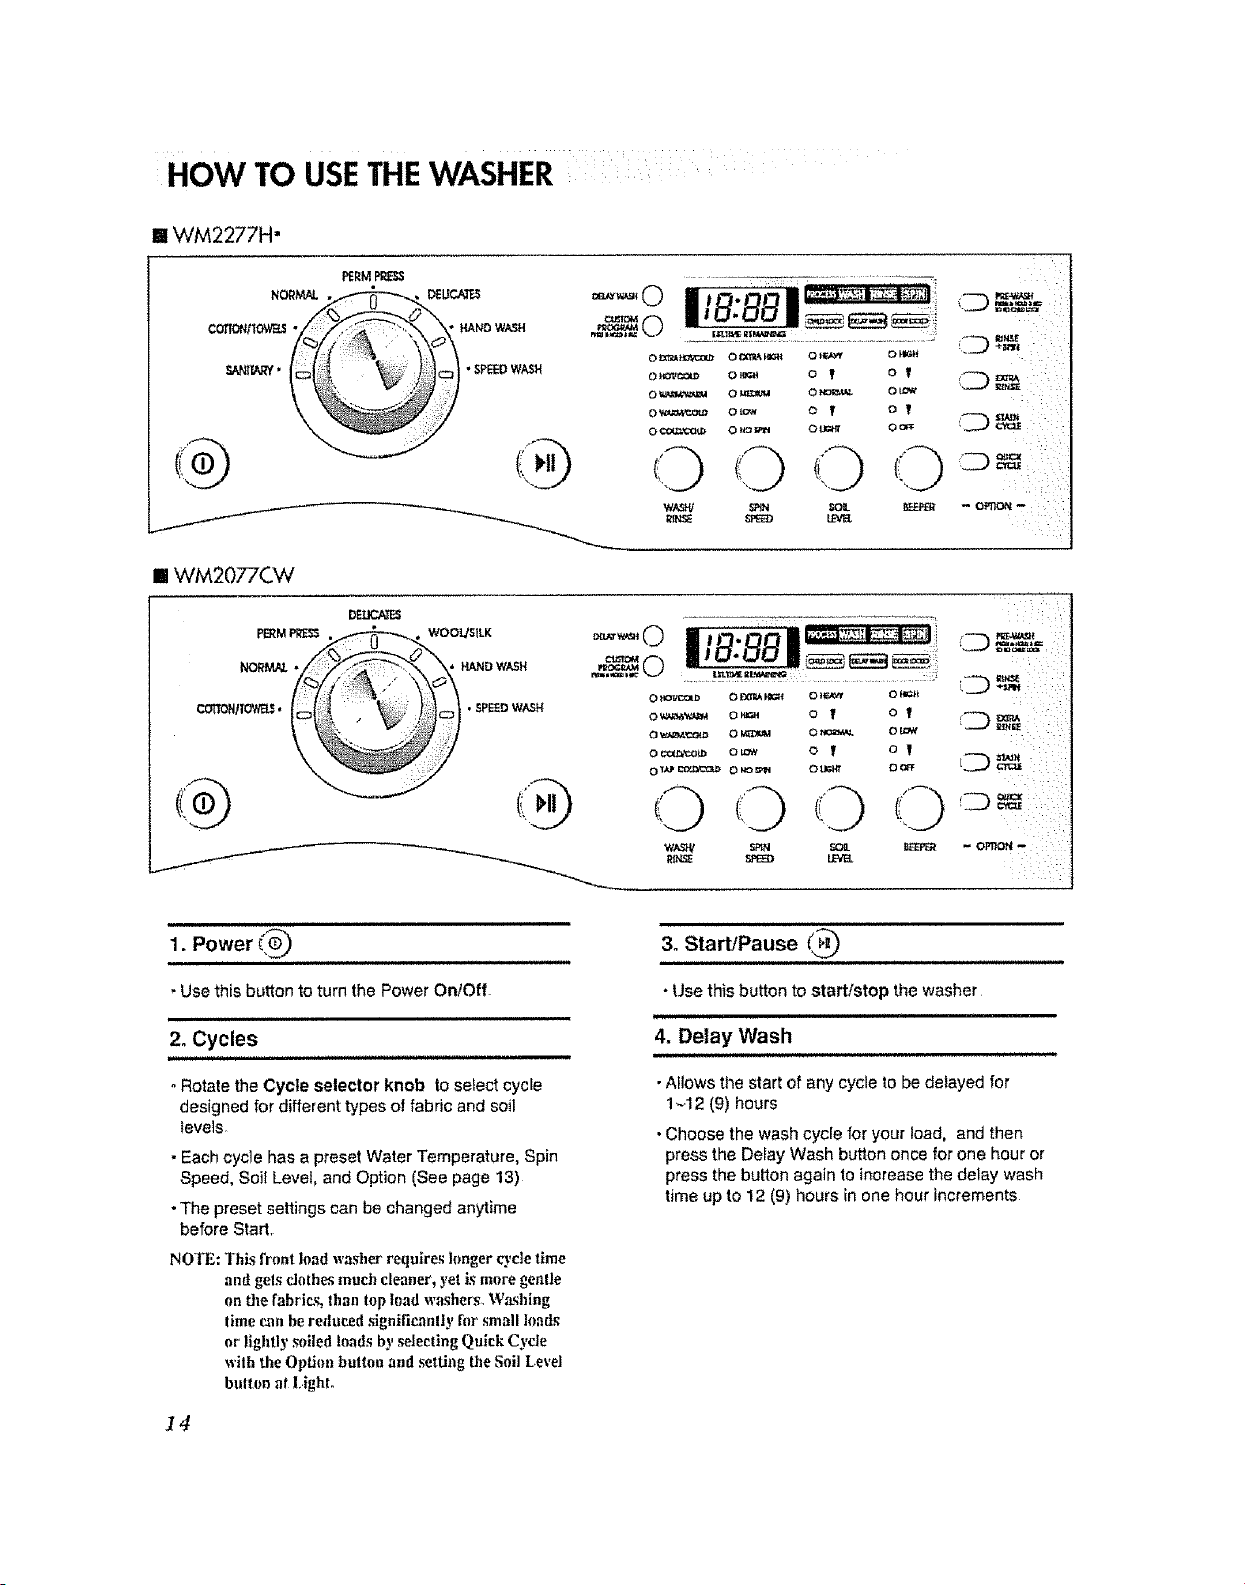
WM2277H*
WM2077CW
Pleaseread this manual carefully..It provides
instructions on safe installation, use,and maintenance°
Retain it for future rebrence.
Record the model and serial numbers of your machine
and report this information to your dealer if your machine
requires service.
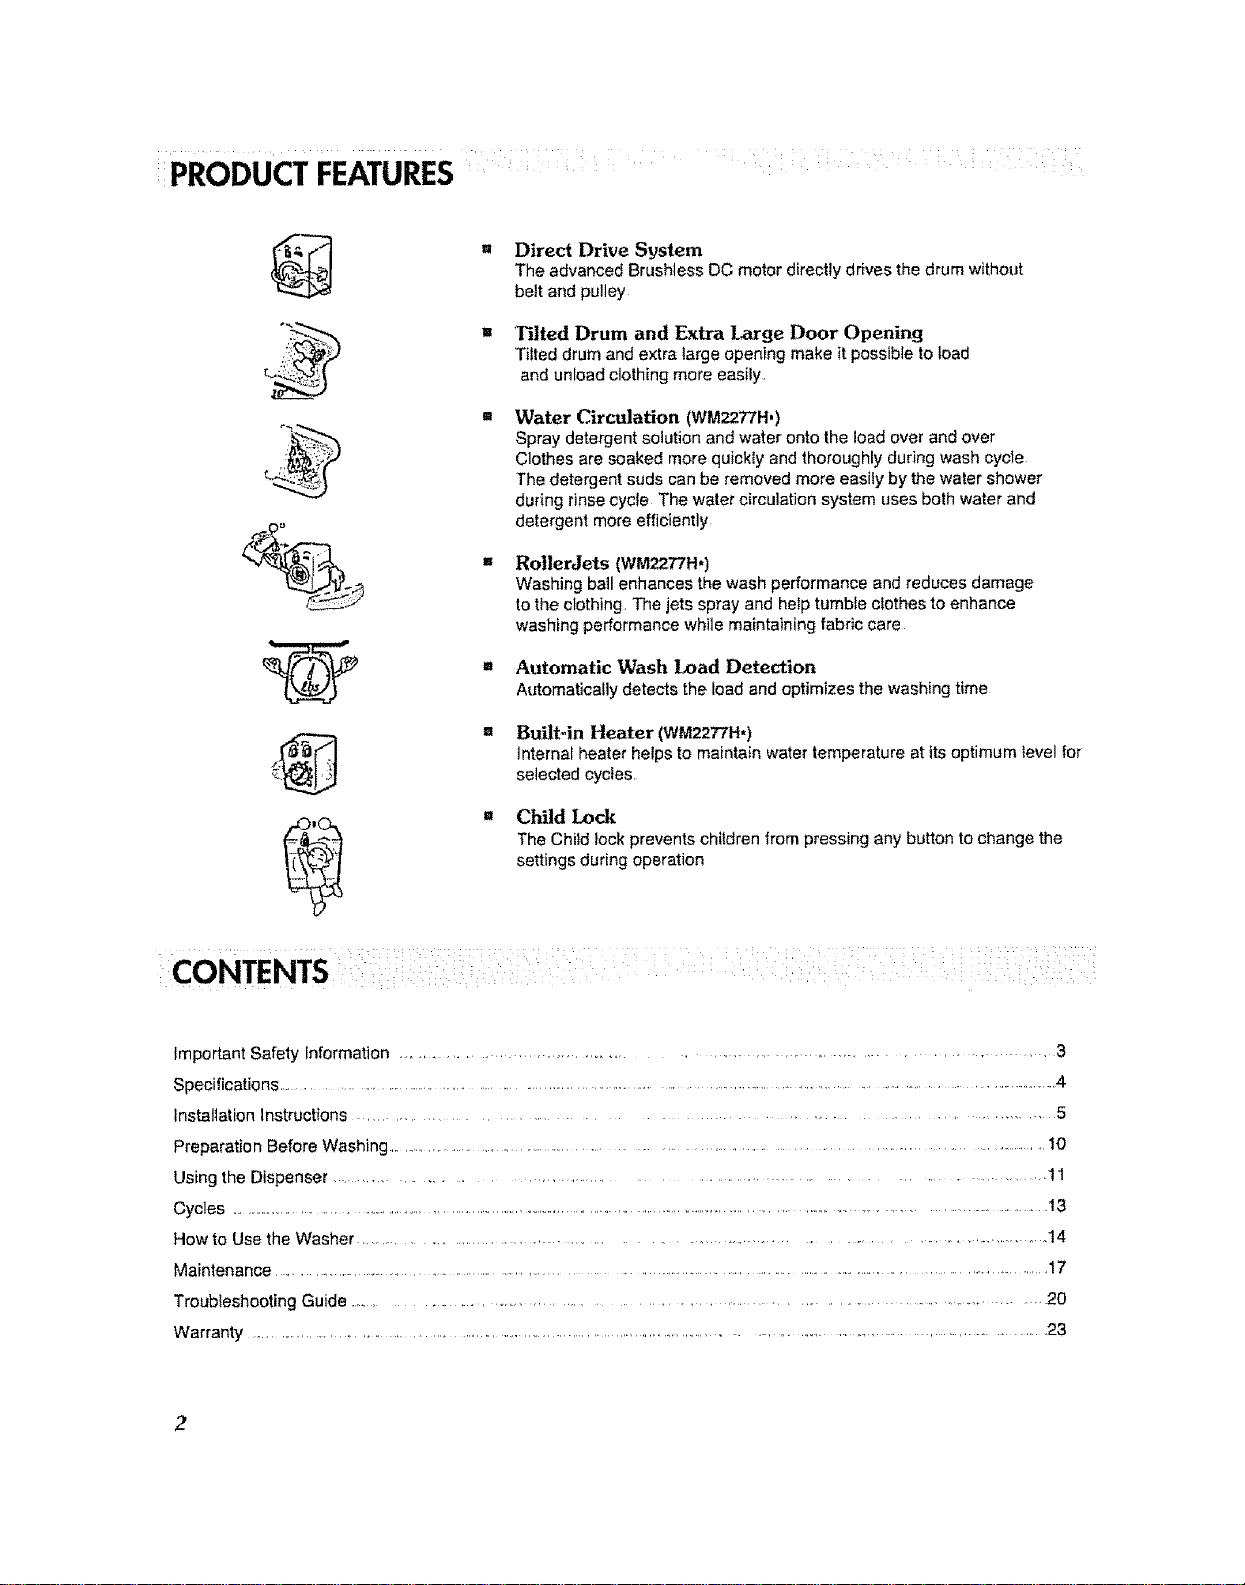
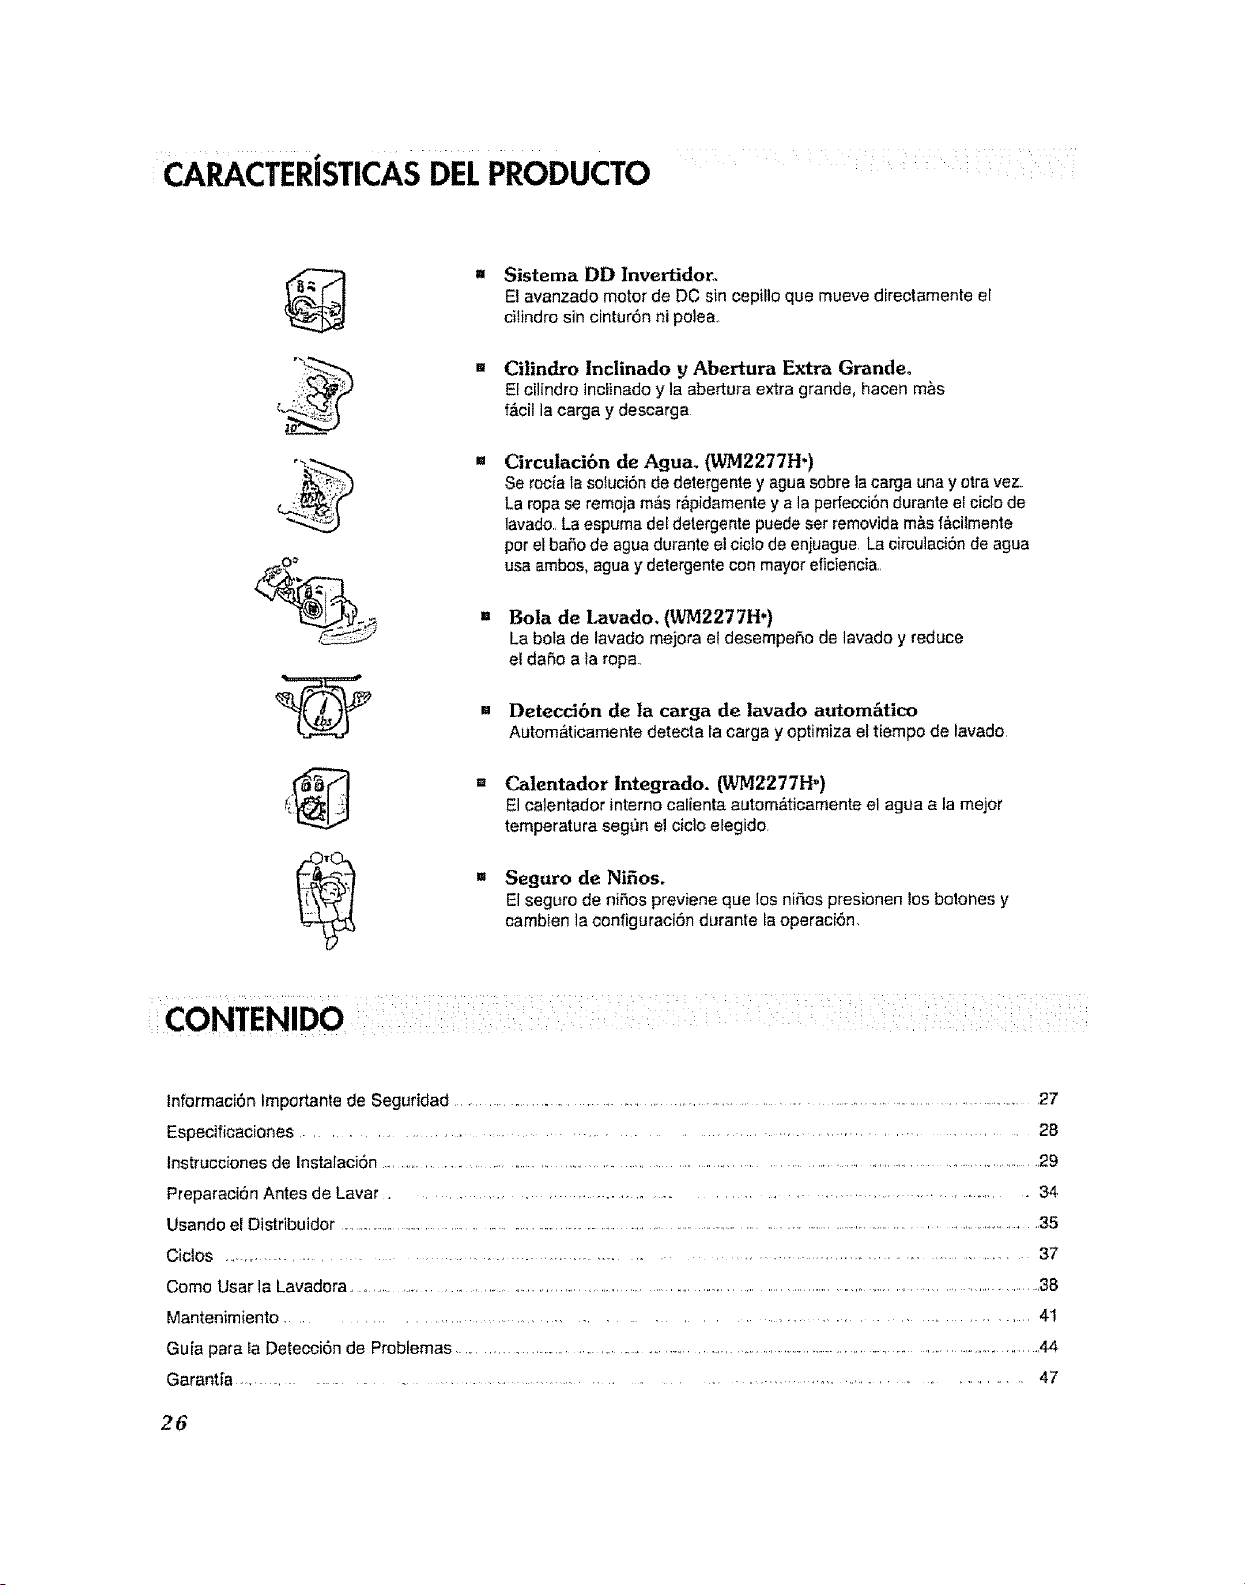
::PRODUCT FEATURES
@
u Direct Drive System
The advanced Brushless DC motor directty drives the drum without
bett and pulley
w Tilted Drum and Extra [_rge Door Opening
Tilted drum and extra large opening make it possible to load
and unload clothing more easily,
Water Circulation (WM22T/'H,)
Spray detergent solution and water onto the load over and over
Clothes are soaked more quickly and thoroughly during wash cycle
The detergent suds can be removed more easily by the water shower
duping rinse cycle The water circulation system uses both water and
detergent more efficiently
Ro!lerJets (WM22"n'H*)
Washing bali enhances the wash performance and reduces damage
to the clothing, The jets spray and help tumble clothes to enhance
washing performance while maintaining fabric care
I Automatic Wash I,x)ad Detection
Aatomaticallydetectstheload andoptimizesthewashingtime
•' Built-in Heater (WM2277H*)
Internal heater helps to maintain water temperature at Its optimum level for
selected cycles,
a Child Lock
The Child lock prevents chitdren from pressing any button to change the
settings during operation
...... : .........
Important Safety Information ........................................................................... 3
Specifications ............................................................................................................................................................ 4
Installation Instructions .................................................................. 5
Preparation Before Washing .............................................................................................................................. 10
Using the Dispenser .................................................................................... 11
Cycles ........................................................................................................................................................................................13
How to Use the Washer ................................................................................................. 14
Maintenance .................................................................................................................................................................. 17
Troubleshooting Guide ......... .................................................................................... 20
Warranty .................................................................................................................................................................... 23
2
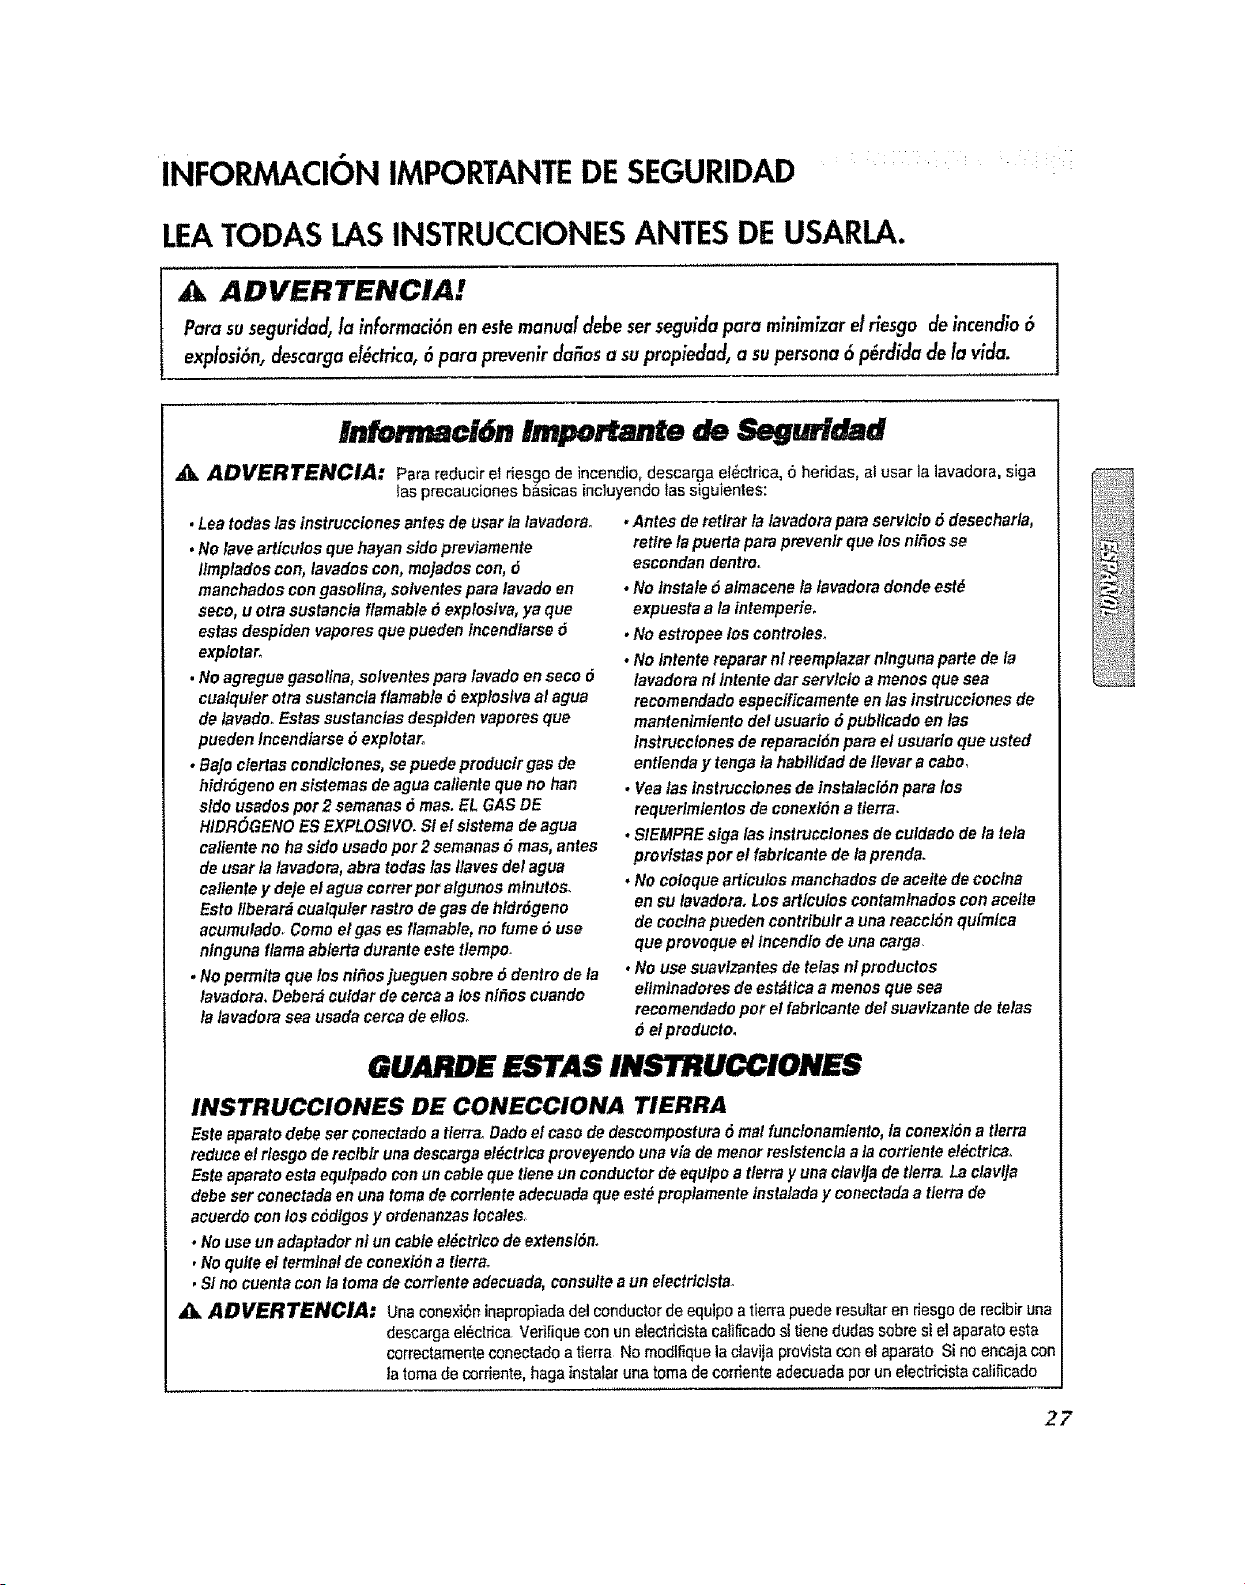
IMPORTANT SAFETYINFORMATION
READALL INSTRUCTIONS BEFOREUSE
,A, WARNING!
Foryour safety, the information in this manual mustbe followed to minimize the risk of fire or
explosion, electric shock, or to prevent property damage, personal injury, or loss of life.
IMPORTANT SJ FY INSTRUCTIONS
,_k WARNING: To reduce the risk of tire, electric shock, or injury to persons when using the washer, fotlow basic
precautions, including the following:
, Read aft instructions before using the washer.
.Do not wash articles that have been previously
cleaned in, washed in, soaked in, or spotted with
gasoline, dry cleaning solvents, or other
flammable or explosive substances, as they give
off vapors that could ignite or explode.
• Do not add gasoline, dry cleaning solvents, or
other flammable or explosive substances to the
wash water. These substances give off vapors that
could ignite or explode.
• Under certain conditions, hydrogen gas may be
produced in a hot water system that has notbeen
used for 2 weeks or more. HYDROGEN GAS IS
EXPLOSIVE. ff the hot water system has not been
used for such a period, before using the washing
machine, turn on all hot water faucets and let the
water flow from each for several minutes. This will
release any accumulated hydrogen gas. As the gas
is tlammable_ do not smoke or usean open flame
during this time.
• Do not allow children toplay on or in the washer.
Close supervision of children is necessary when
the washer Is used near children.
• Before the washer is removed from service or
discarded, remove the door to prevent children
from hiding inside,,
• Do not install or store the washer where it will be
exposed to the weather_
• Do not tamper with controls.
• Do not repair or replace any part of the washer or
attempt any servicing unless specifically
recommended in the user-maintenance
instructions or published user-repair instructions
that you understand and have the skills to carry
ouL
• See Installation Instructions for grounding
requirements.
° ALWAYS follow the fabric care instructions
supplied by the garment manufacturer,
• Do not place Items exposed to cooking otlin your
washer. Items contaminated with cooking oils may
contribute to a chemical reaction that could cause
a load to catch fire,,
. Do not use fabric softeners or products to
eliminate static unless recommended by the
manufacturer of the fabric softener or product,
SAVE THESE INSTRUCTIONS
GROUNDING INSTRUCTIONS
This appliance must begrounded, in the event of malfunction or breakdown, grounding will reduce the risk
of electric shock byproviding a path of least resistance for electric current° This appliance is equipped with
a cord having an equipment-grounding conductor and grounding plug. The plug must be plugged into an
appropriate outlet that is properly installed and grounded in accordance with all local codes and ordinances°
. Do not use an adapter or extension cord,
• Do not remove ground prong.
• If you don't have the proper outlet, consult an electrician°
A WARNING: Improperconnection of the equipment-grounding conductor can resutt inrisk ofelectric shock
Check wfth a quaEitiedelectrician or serviceman it you are in doubt as to whether the appliance is
properly grounded Donot modify the plug provided with the appliance- ifil does not fitthe outlet,
have a proper outlet installedby a qualilied electrician
3
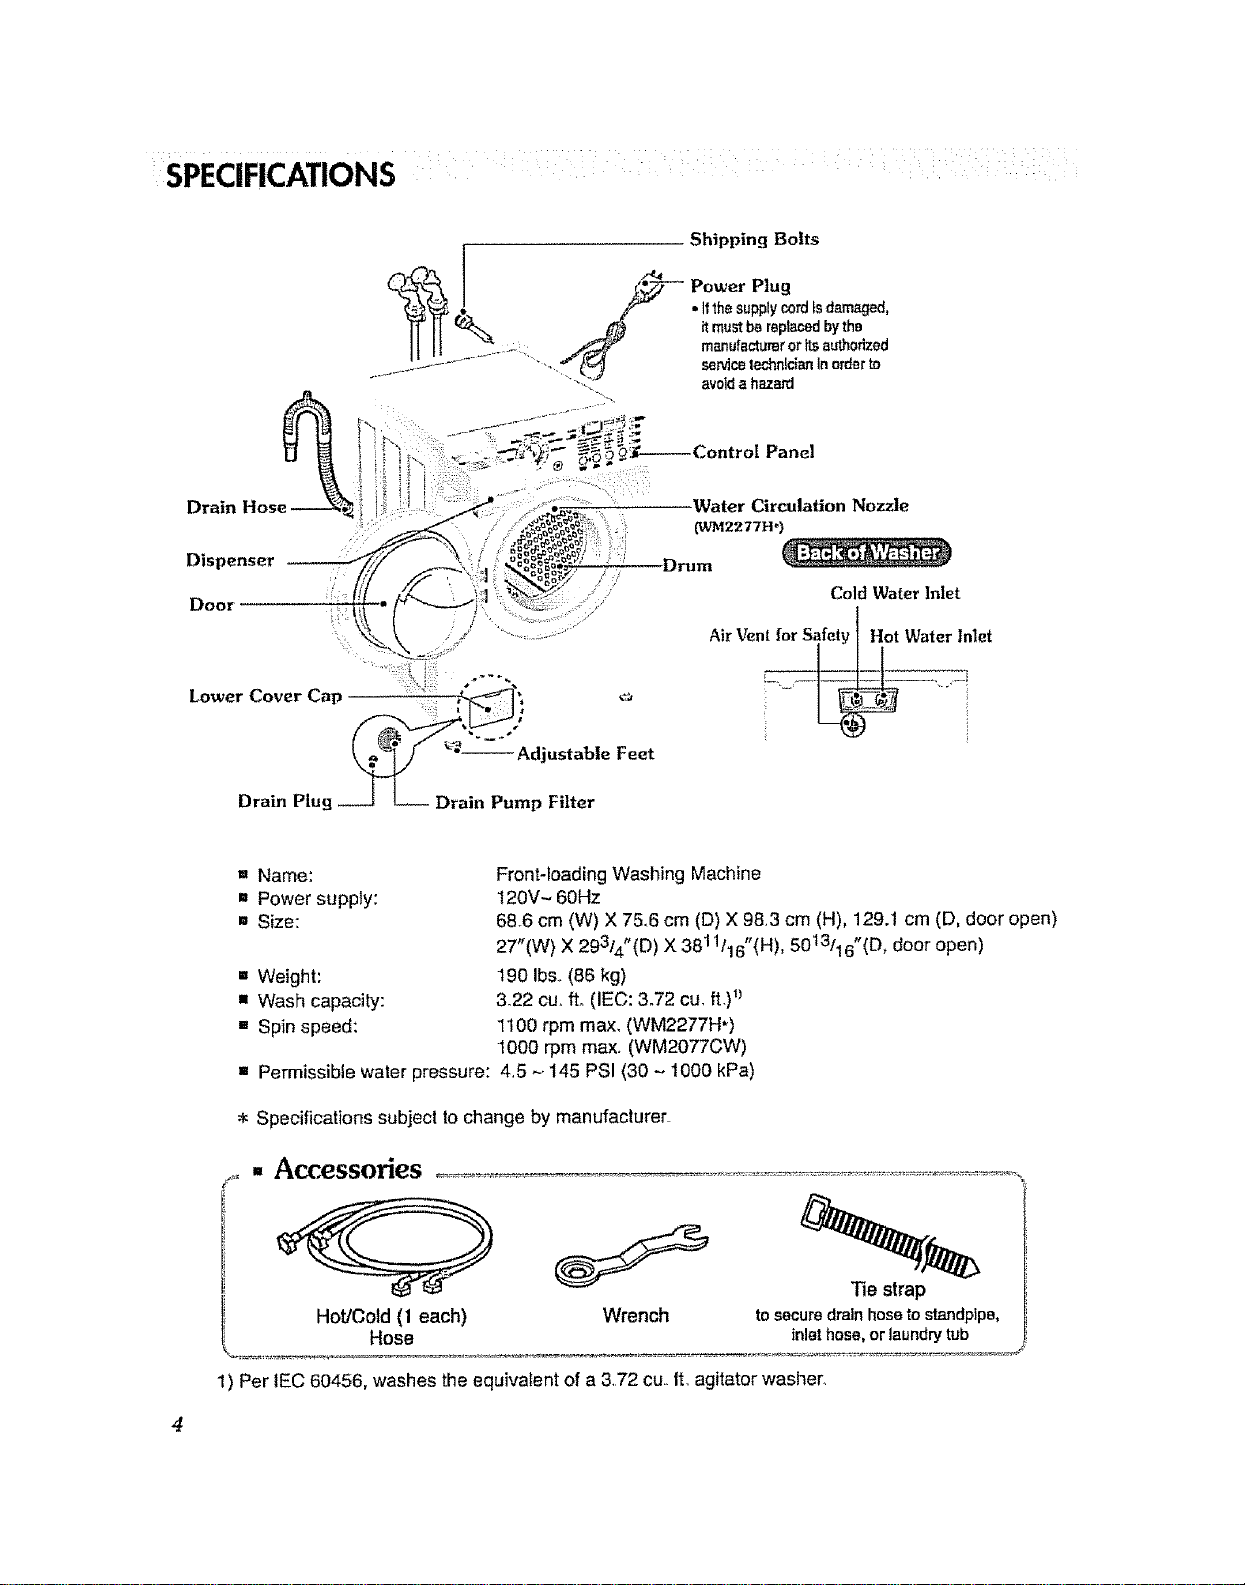
SPECIFICATIONS :
Shipping Bolts
Drain Hose
Dispenser
Door ,
_'_/_--" Power Plug
• It1hesupply cord_sdamaged,
t_ it must ba replacedbylho
.......=:, /_ manufactureror itsauthorized
.................,_ _ ge_ce technician Inorder to
......... "_ ..... avoida hazard
Lower Cover Cap ,::
Adjustable Feet
Cold WaterInlet
AirVent?_.__:_forSafety Hot WaterInlet
Drain Plug
Drain Pump Filter
= Name:
= Power supply:
mSize:
= Weight:
• Wash capacity:
• Spin speed:
Front-loading Washing Machine
120V- 60Hz
68.6 cm (W) X 7&6 cm (D) X 98.3 cm (H), 129.1 cm (D, door open)
27"(W) X 29314"(D)X 36111!6"(H), 50t3116"(D, door open)
190 Ibs,,(86 kg)
&22 cu,,fL (IEC: 3.72 cu. ft.)_)
1100 rpm max, (WM2277HQ
1000 rpm max. (WM2077CW)
• Permissible water pressure: 4.5 ~.145 PSI (30 ~ t000 kPa)
* Specifications subject tochange by manufacturer
- Accessories .............
Hot/Cold (1 each) Wrench
Hose
Tie strap
to secure drain hose to standpipe,
inlet hose, or taundry tub
1) Per IEC 60456, washes the equivalent of a 3.72 cu, It. agitator washer.

INSTALLATION INSTRUCTIONS
Install or sitore unit where it will nut be exposed to temperatures below freezing _r
exposed to outside weatl_er conditions.
Properly ground washer to conform with all governing codes and ordinances_
To reduce the risk of elecff'ic shock, (Io nut install the washer in humid spaces.
The base opening must nut be obstructed by carpeting when tile washing machine is installed (m a carpeted floor_
In countries where there are areas which may be subject to in[estalion by cockrnaches or other vermin, pay
particular attention to keeping the appliance anti its surroundings in clean condition at all times.
Damage caused by cockroaches or other vermin will n(btbe covered by the appliance warrant3_
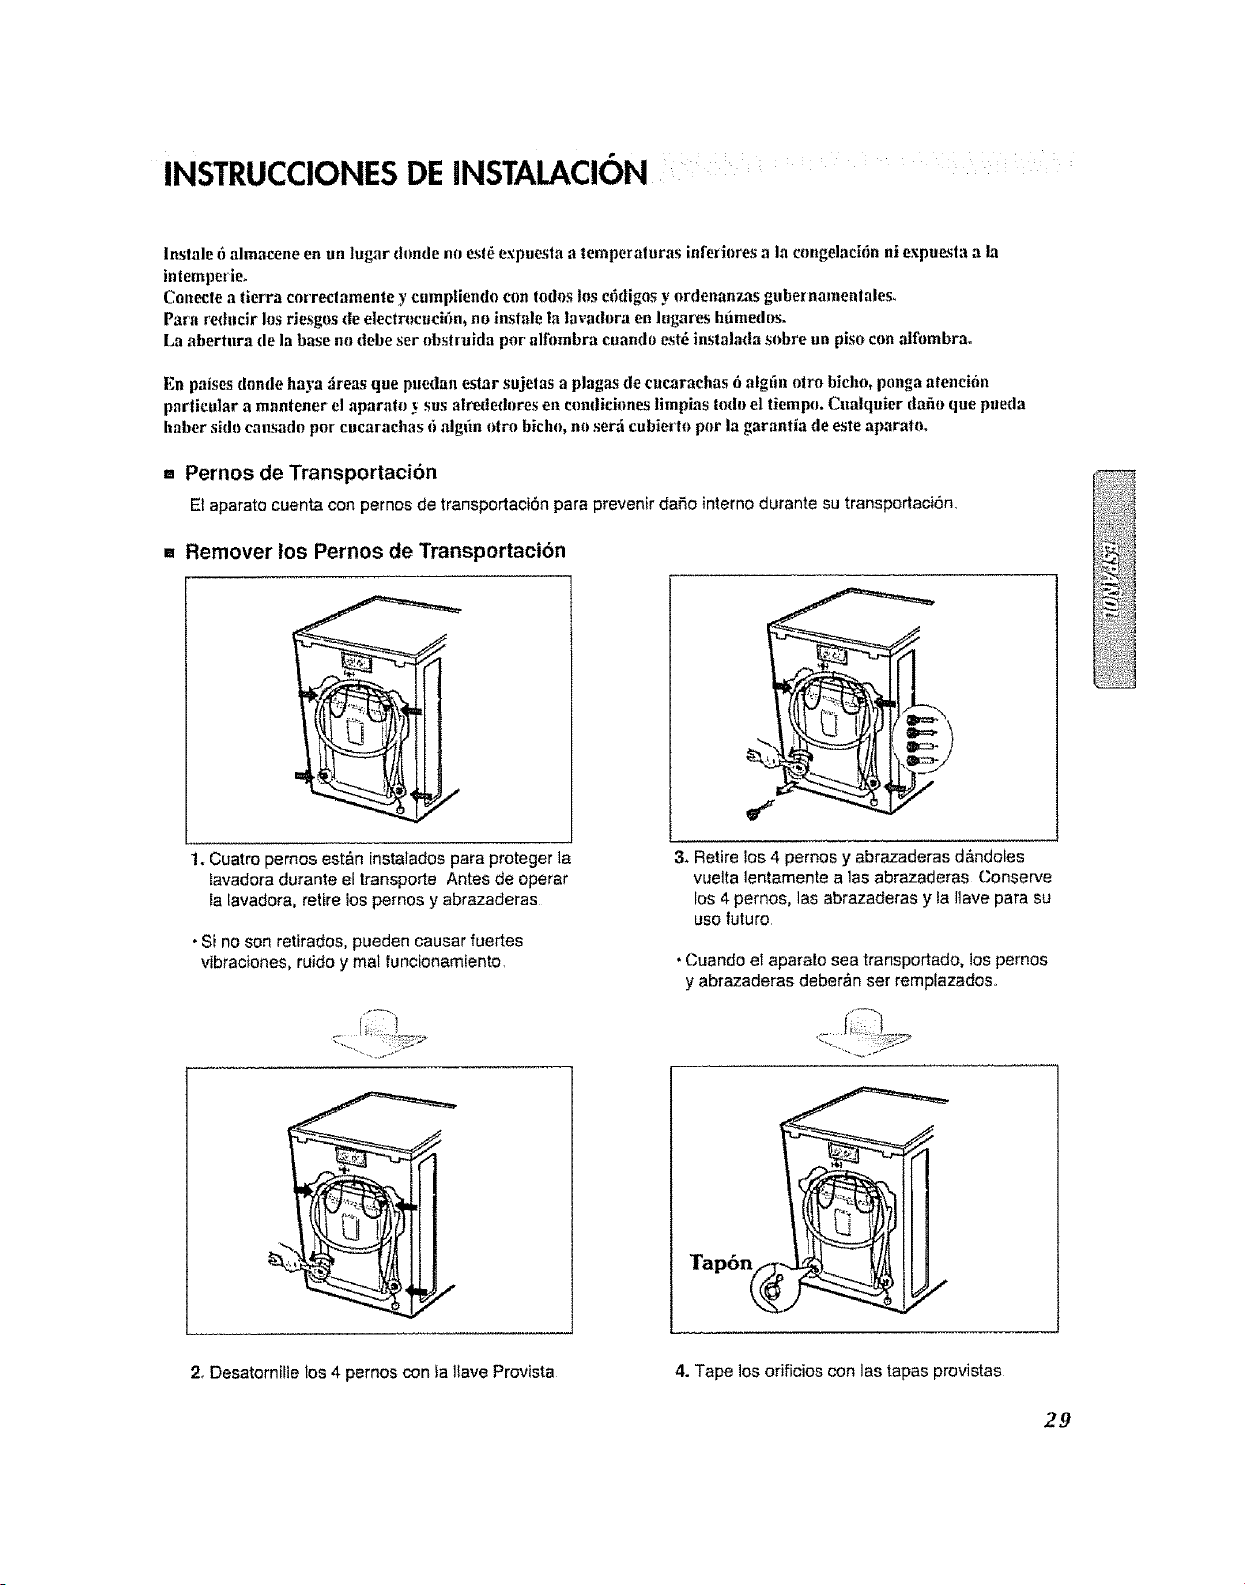
==Shipping bolts
The appliance is fitted with shipping bolts to prevent internaldamage during transport,.
= Removing shipping bolts
1. To preventinternal damage during transport,
4 locking bolls are installed Before operating
the washer, remove the boils and braces
• ifthey are not removed, it may cause severe
vibration, noise, and malfunction,
3. Take out the 4 bolts and braces by twisting
the braces sligl_tly..Keep the 4 bolts, braces
and the wrench for future use,
• Whenever the appliance is transported,the
shipping bolts and braces must be repfaced
2. Unscrew the 4 bolts with the wrench supplied
4. Close the ho_eswith the caps supplied
INSTALLATIONINSTRUCTIONS
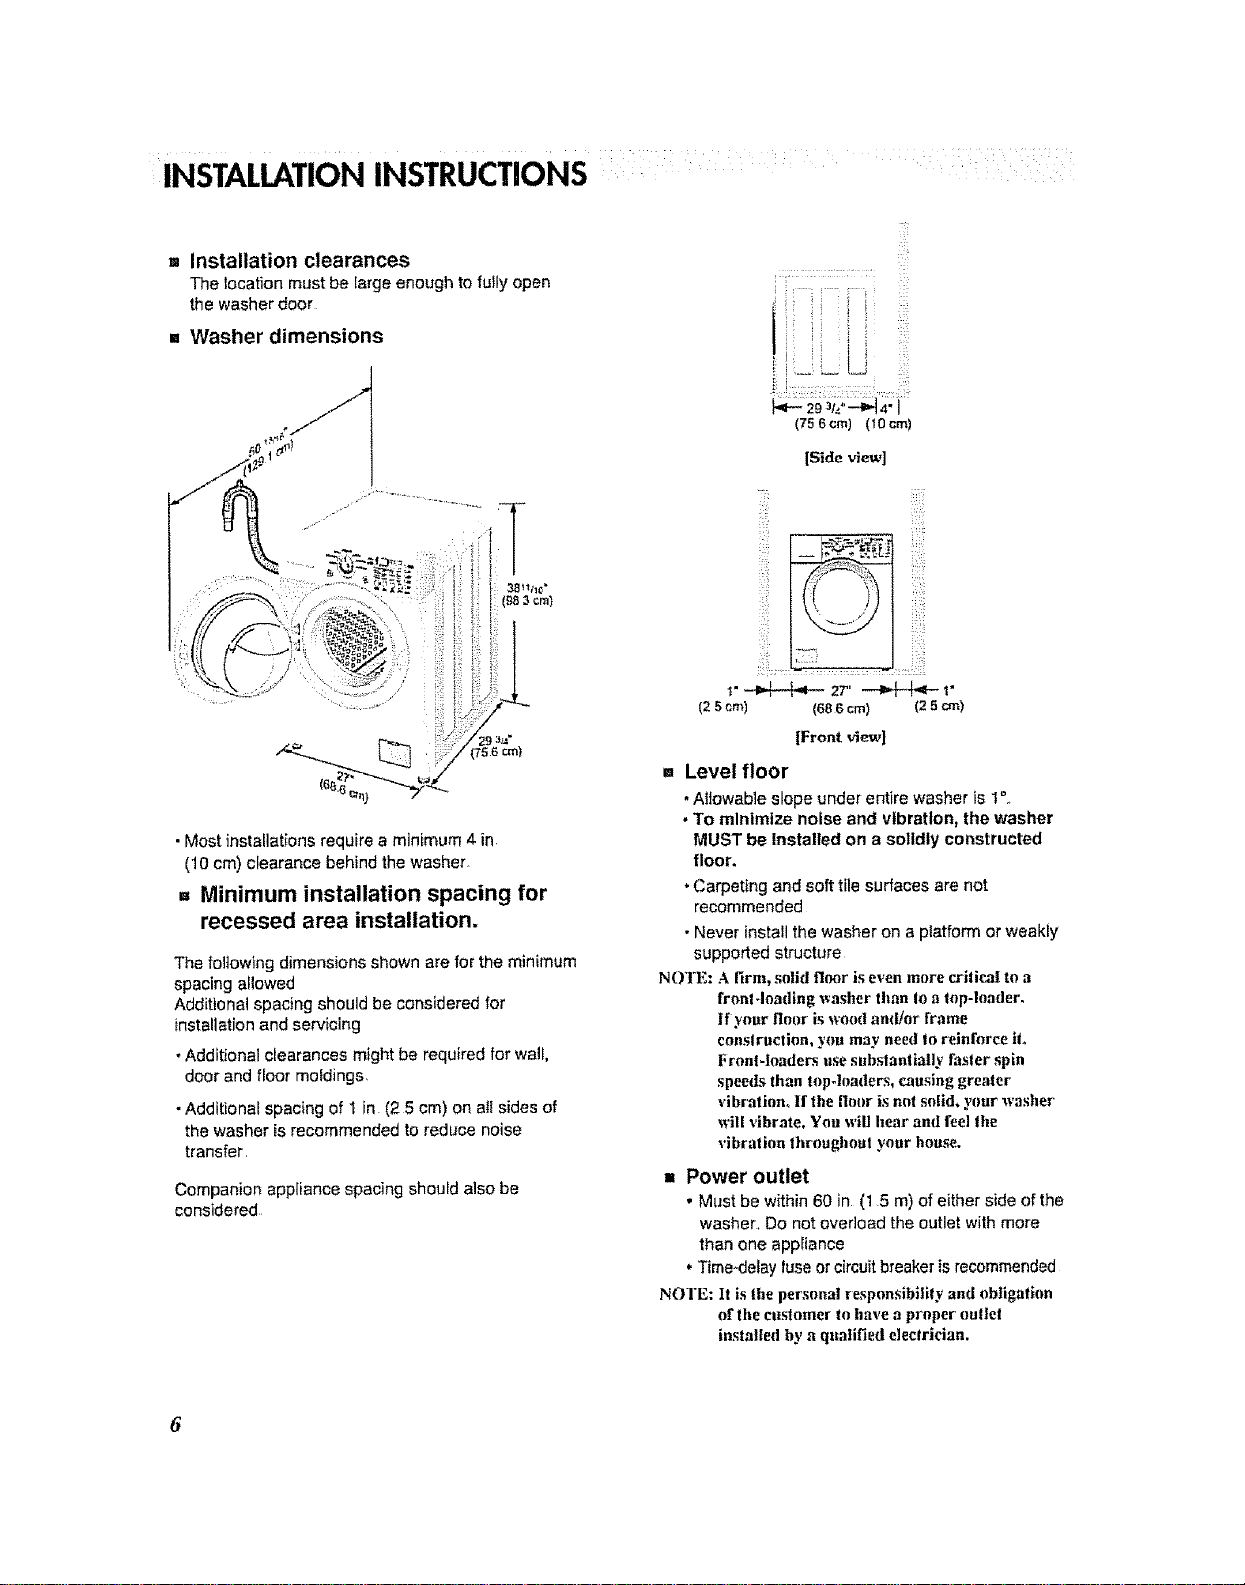
= installation clearances
The location must be largeenough to fully open
the washer door
•' Washer dimensions
• Most installationsrequire a mimmum 4 in.
(10 cm) clearance behind the washer.
= Minimum installation spacing for
recessed area installation.
The following dimensions shown are for the minimum
spacing allowed
Additional spacing should be considered for
installation and servicing
•Additional clearances might be required for wall,
door and floor moldings.
-Additional spacing of 1 in (2 5 cm) on all sides of
the washer is recommended to reduce noise
transfer.
Companion appliance spacing should also be
considered
(75 6cm) (10cm)
[Side vi_]
::_ i:)i!:•
"=i _ _ _ :::
!" -_b-b-- =T' -_F+_- I"
(25cm) (686 cm) (25cm)
iFront view]
= Level floor
• Allowable slope under entire washer is 1°.,
. To mlnlmtze noise and vibration, the washer
MUST be Installed on a solidly constructed
floor.
. Carpeting and soft tile surfaces are not
recommended
• Never install the washer on a platform or weakly
supported structure
NOTE: A lirm, solid floor is even more crilical to a
front Joading _vasher than Io a top-loader.
If your floor is wo(_l aml!or frame
conslrnclion, y_m may need to reinforce iL
Front-loaders use substantially fas|er spin
speeds than top-loaders, causing greater
vibration, If the floor is md solid, your washer
will vibrate. Yon will hear and feel the
vibration lhroaghoul your Imuse.
•' Power outlet
• Must be within 60 in (1 5 m) of either side of the
washer, Do not overload the cutlet with more
than one appliance
• Time-delay fuseor circuit breaker is recommended
NOTE: It is the personal responsibility and obligation
of the customer to have a proper outtel
installed by a qualified eleelrician.
6
INSTALLATION INSTRUCTIONS
= Electrical connection
•Do not use an extension cord or double adapter
•If the supply cord is damaged, itmust be replaced by a qualified person in order to avoid a hazard
•If the machine will not be used for an extended time, unplug it and shut off the water supply
•Connect the machine to a grounded outlet in accordance with current wiring regulations
•The appffance must be positioned so that the plug is easily accessible
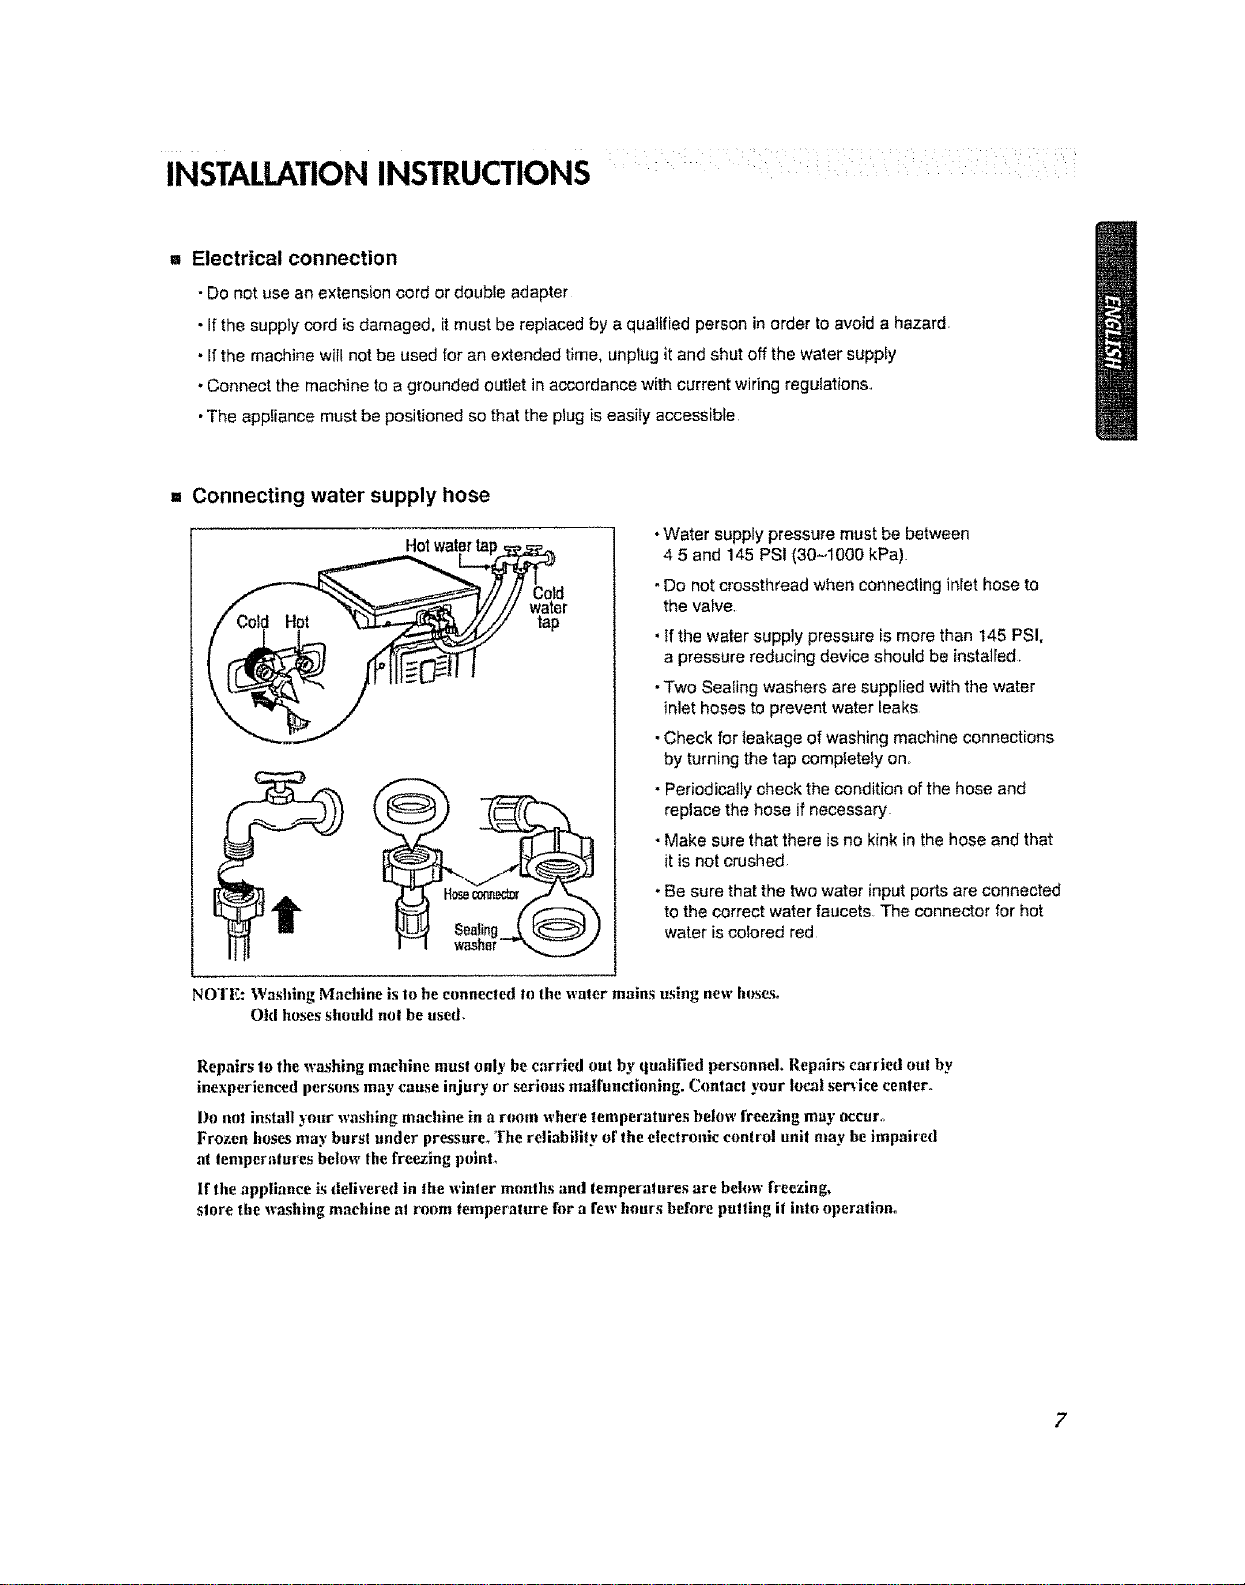
= Connecting water supply hose
Hot watertap_..__,_
/ "_'__ V/// water
•Water supply pressure must be between
4 5 and 145 PSI (30-1000 kPa).
-Do not crossthread when connecting inlet hose to
the valve.
• tfthe water supply pressure is more than 145 PSI,
a pressure reducing device should be installed.
•Two Sealing washers are supplied withthe water
inlet hoses to prevent water leaks
•Check forleakage of washing machine connections
by turning the tap completely on.
• Periodicafly check the condition of the hose and
replace the hose if necessary
• Make sure thatthere isno kink in the hose and that
itis not crushed
. Be sure that the two water input ports are connected
to the correct water faucets. The connector for hot
water is colored red
_0"1 E: Washing Machine is to be connected te the water mains using new heseso
O|d hoses should not be used.
Repairs to the washing machine most only be carried out by qualified personnel, Repairs carried out by
inexperienced persons may cause injury or serinus maffunctionlng. Contact your local service center.
Do not install your washing machine in a room where temperatnres below freezing may occur.
Frozen hoses may burst under pressure_ The reliability of the electronic control unit may he impaired
at temperatures below the freezing polnL
If the appliance is delivered in the winter months aml temperatures are below freezing,
store the washing machine at room temperature fnr a few hours before putting it into operation.
7
INSTALLATION iNSTRUCTIONS
i ':¸
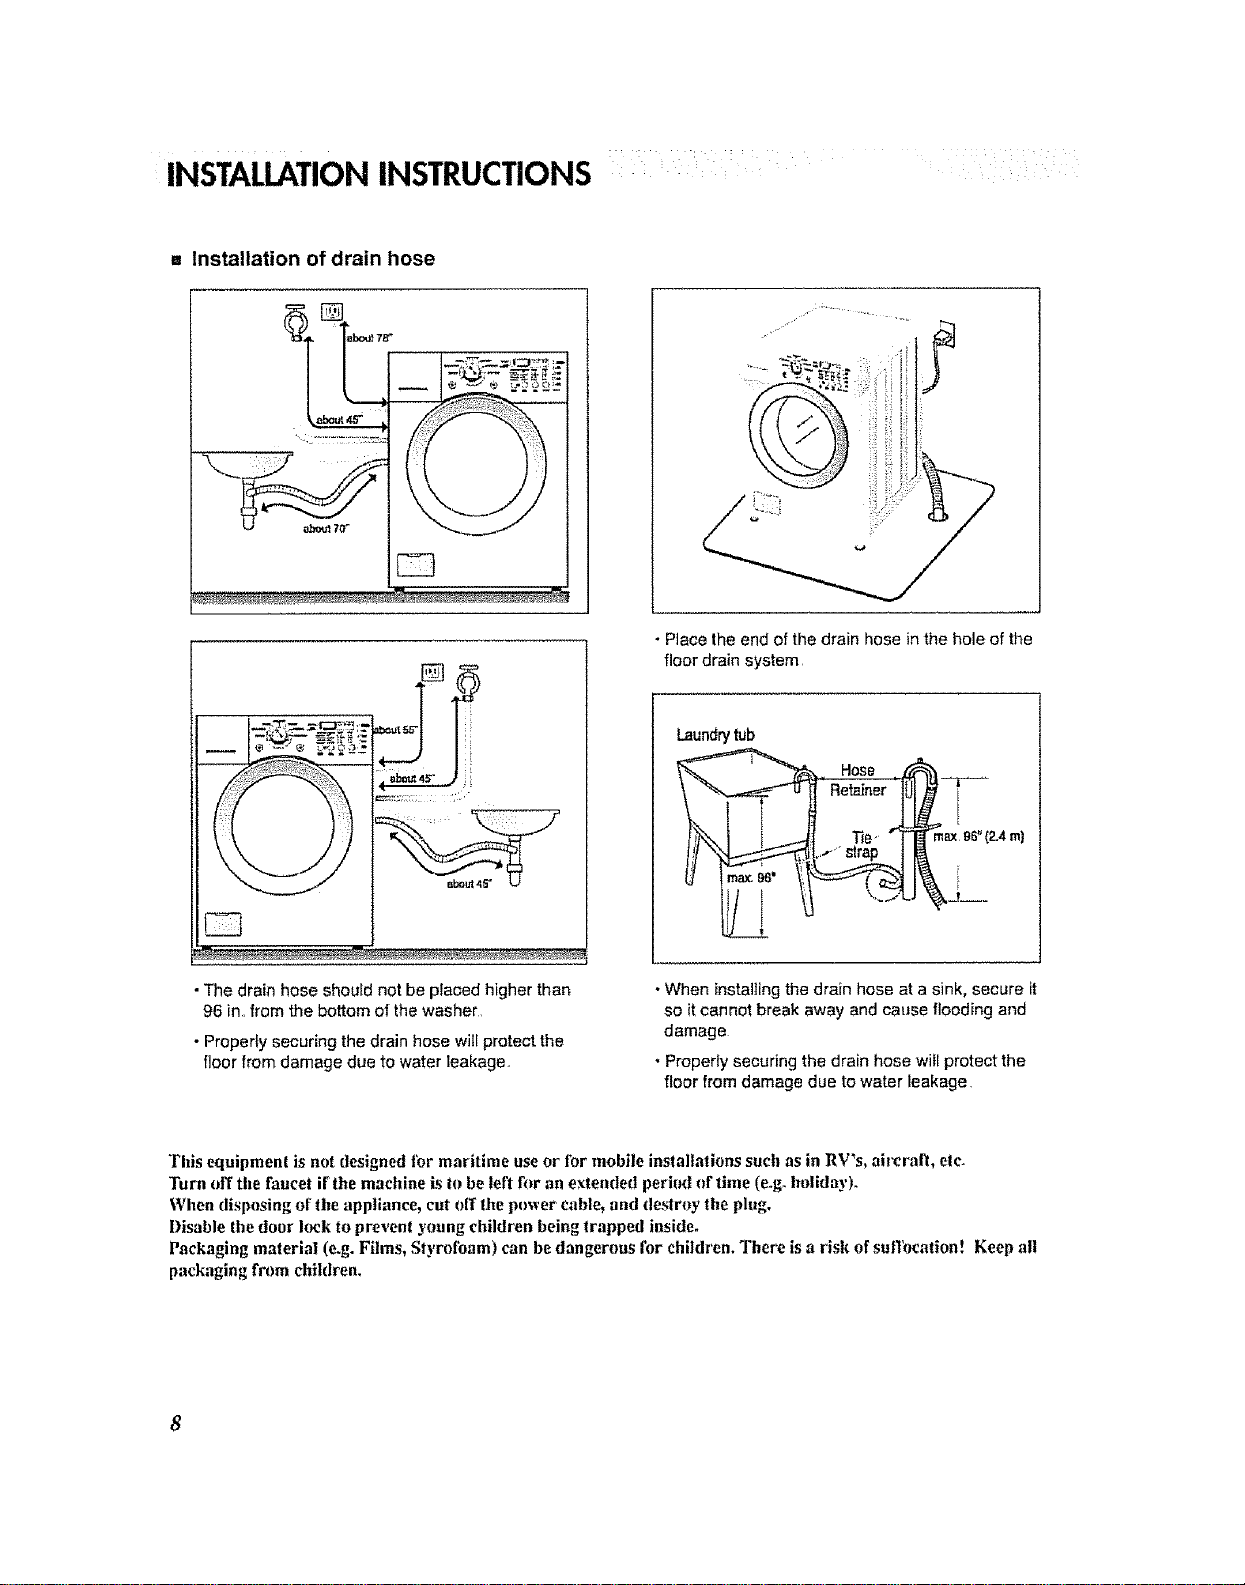
,, Installation of drain hose
•The drain hose should not be p_aced higher than
96 in, from the bottom of the washer,
• Property securing the drain hose will protect the
floor from damage due to water leakage.
• Place the end of the drain hose inthe hole of the
floor drain system
Laundrytub
HOS_ /_
T_e_ " _I_ rnax'B6"(?_4ml
• When installing the drain hose at a sink, secure it
so it cannot break away and cause flooding and
damage
• Property securing the drain hose will protect the
floor from damage due to water leakage
This equipment is not designed for maritime use or for mobile installations such as in RV's, airerall, el¢_
Turn off tile faucet if the machine is to be left f_wan extended peri_)d of lime (e@ holiday).
When disposing of the appliance, cut off the power cable_ and destroy the plug.
Disable the door lock to prevent young children being trapped inside.
Packaging material (e.g. Films, Styrofoam) can be dangerous i'or children. There is a risk of suffocation! Keep all
packaging from children.
8
INSTALLATIONINSTRUCTIONS
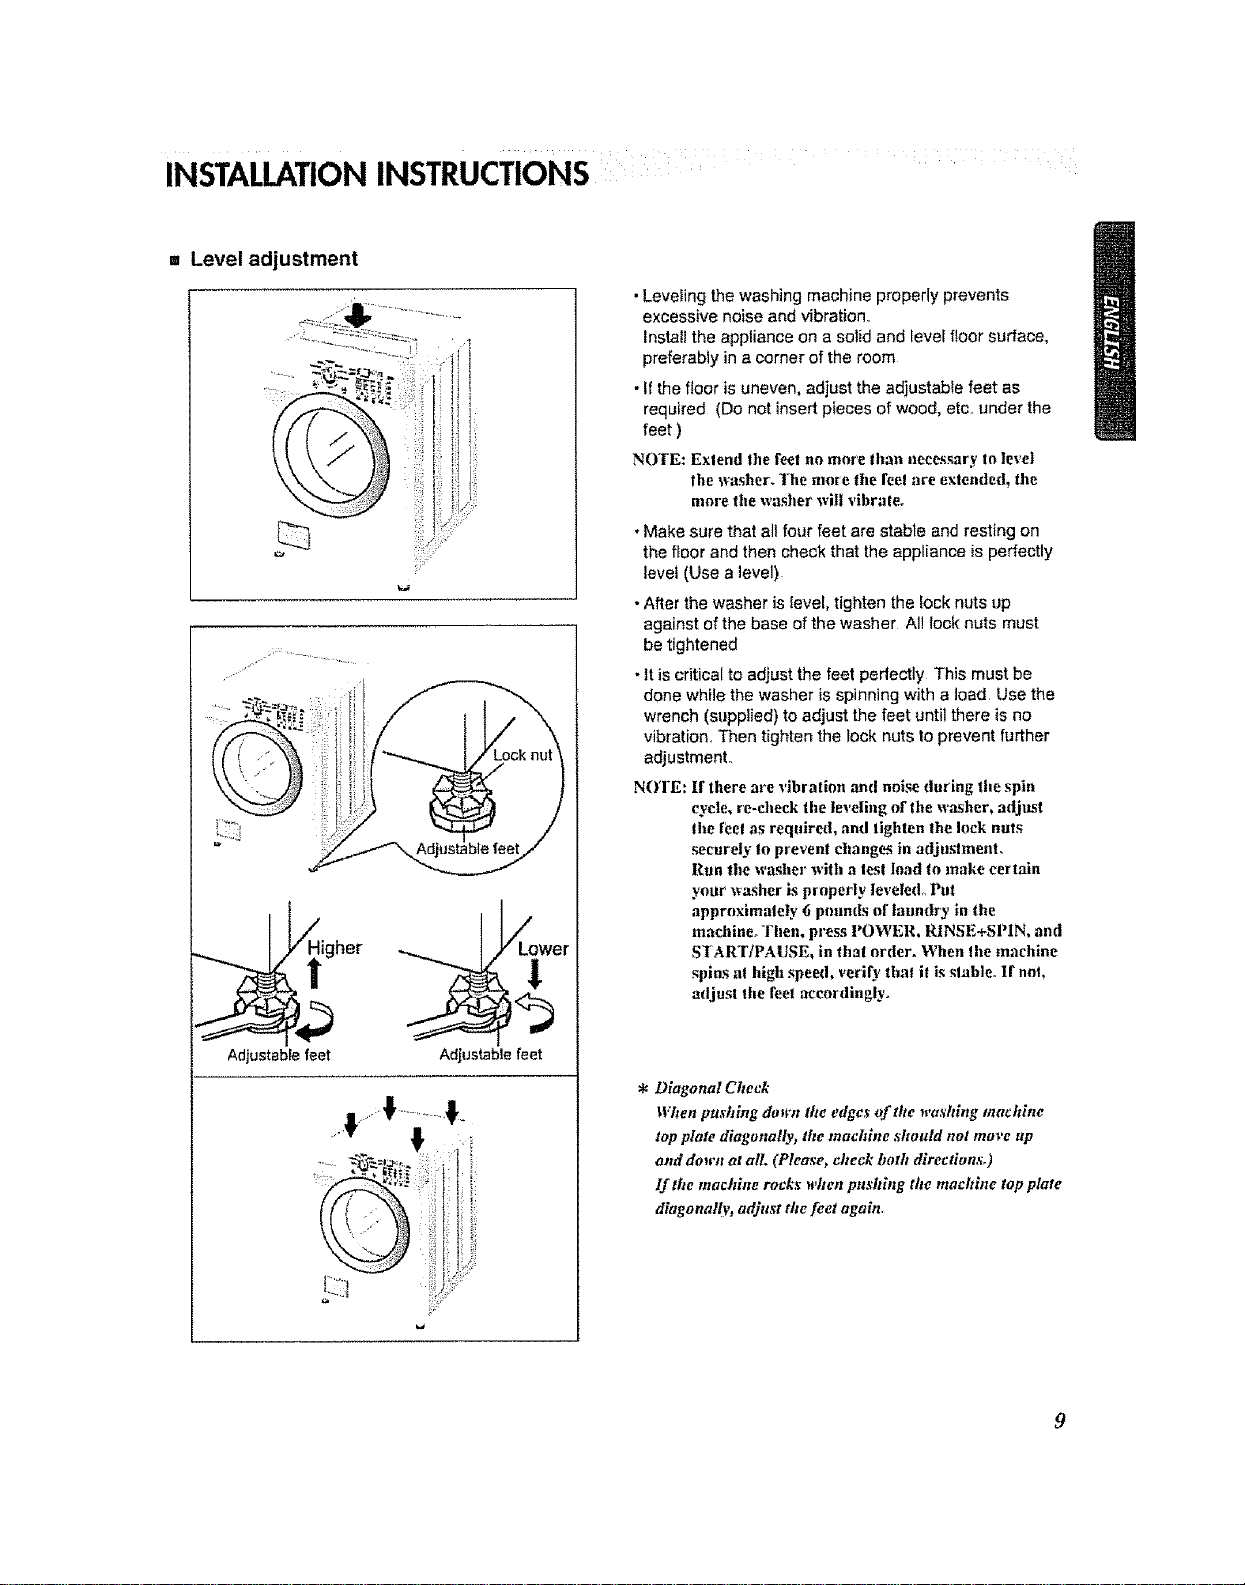
= Level adjustment
i i
_iiiii_i_
i?
_ /_igher
Adjustable feet Adjustable feet
hi"
• Leveling the washing machine properly prevents
excessive noise and vibration,
Install the appliance on a solid and level floor surface,
preferably in a corner of the room
• If the floor is uneven, adjust the adjustable feet as
required (Do not insert pieces of wood, etc., under the
feet )
NOTE: Exfend the feel no more than necessary to level
the washer. The more the feel are exleoded, the
more the washer will vibrale_
*Make sure that all four feet are stable and resting on
the floor and then check that the appliance is perfectly
levet (Use a level)
•After the washer is level, tighten the lock nuts up
against of the base of the washer Al! lock nuts must
be tightened
, tt is critical to adjust the feet pedectly This must be
done while the washer is spinning with a load Use the
wrench (supplied) to adjust the feet until there is no
vibration, Then tighten the lock nuts to prevent further
adjustment.,
NOTE: If there are vibration andnoise (luring the spin
cycle, re-check the leveling of the washer, adjust
the [eel as required, anti tighten the lock nuts
securely to prevent changes in adjustment,
Run the washer with a lesl load to make certain
your washer is properly leveled,, Put
approximately 6 poamts of tanmlrLyin the
machine. Then, press POWER. RINSE+SPIN, and
START!PAUSE, in tha! order. When Ihe machine
spins al high speed, verify that it is slable° If nnl,
adjust tile feel accordingly.
* Diagonal Check
When pushing do_lw the edges of lhe washing machine
top plate diagonally, the machine should nol move up
and down at all. (Please, check both directions.)
If lhe machine rocks n,hcn pushlog the machine top plate
diagonal(€, adjust the feet agaia,
PREPARATIONBEFOREWASHING
To reduce the risk of fire, electric shock, or injury to persons, read the IMPORTANT SAFETY
INSTRUCTIONS before operating this appliance.
1. Fabric Care Labels
Look for acare label on your etothes This wilt tell you about the fabric content of your garment and how it should
be washed,
2, Sorting
To get the best results, sort clothes into loads that can be washed withthe same wash cycle
Different fabrics need to be washed in different ways
Atways sort dark colors from pate colors and whites Wash separately as dye and lint transfer can occur causing
discoloration of white cIothing If possible, do not wash heavily soiled items with lightty soiled ones
Soil (Heavy, Normal_ l.lght)
C{dor {While, Light.%Darks)
l..int (Lint Producers_ Collec|ors)
Separale clothes according 1o amoun! of soilo
Separate white fabric_,_from ct_hwed fabrics°
Wash lint producer's and lint cotlc_ctors separately,
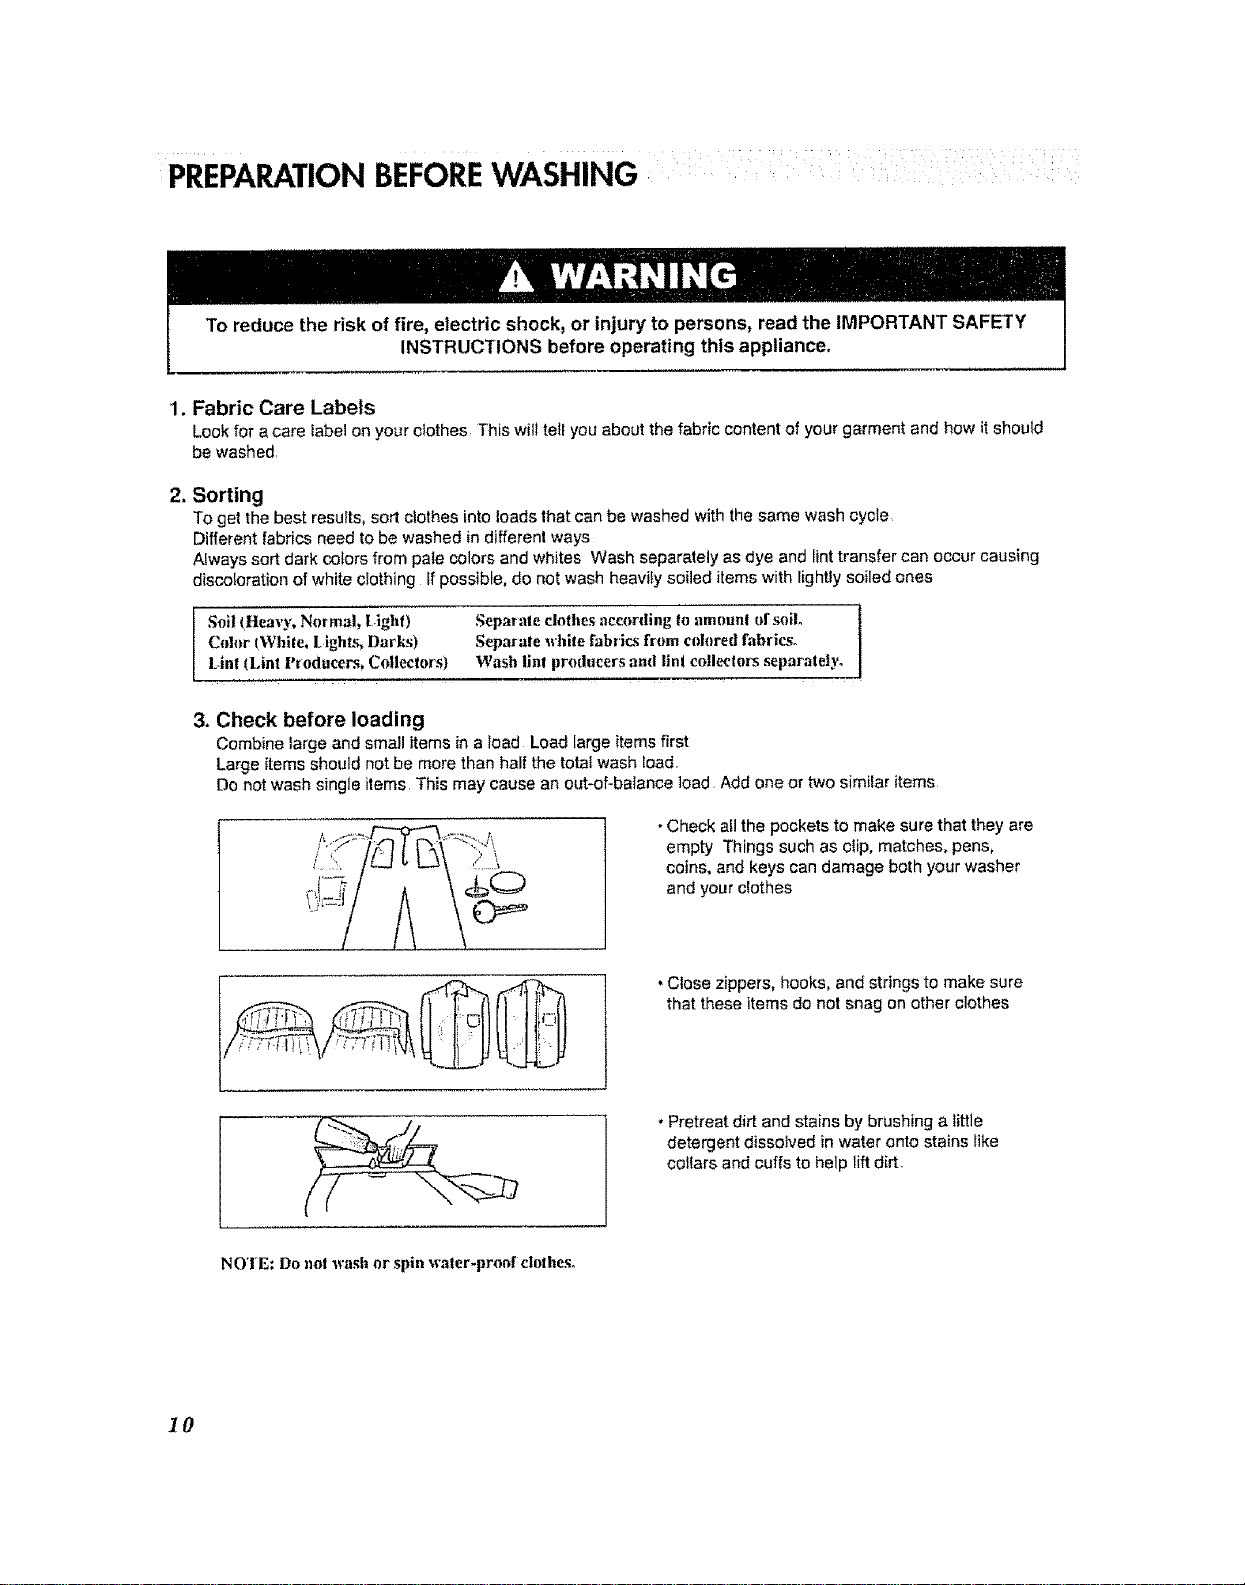
3. Check before loading
Combine large and small items in a load Load large items first
Large items should not be more than half the total wash toad
Do not wash single items This may cause an o_Jt-of-balance load Add one or two similar items
- Check all the pocketsto make sure that they are
empty Things such as ctip, matches, pens,
coins, and keys can damage both your washer
and your ctothes
• Close zippers, hooks,and strings to make sure
that these items do not snag on other clothes
• Pretreat dirt and stains by brushing a tittle
detergent dissolved in water onto stains like
collars and cuffs to help lift dirt
NOTE: Do no! wash or spin water-proof clothes_
I0
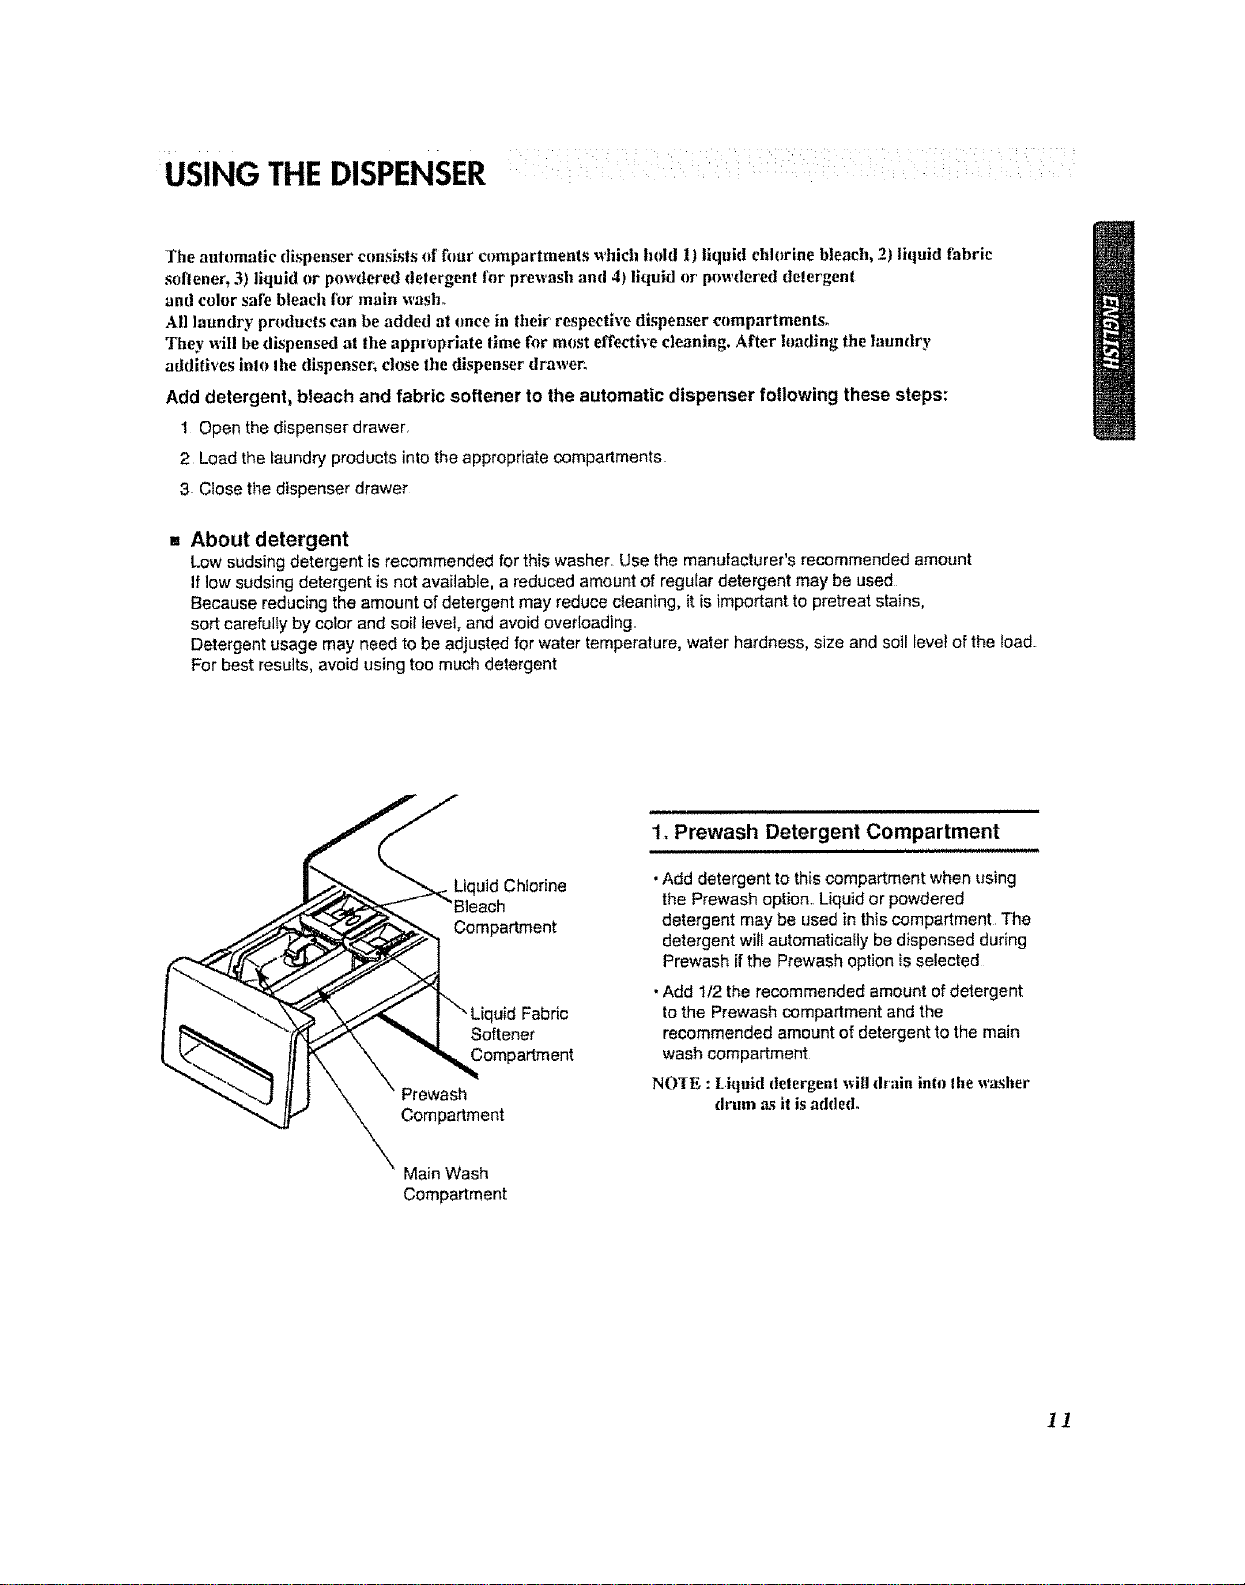
USING THE DISPENSER : i:
]'he aulumatic dispenser consists of four compartments wtnictnhold 1) liquid ehlurine bleach, 2) liquid fabric
soflener_ 3) liquid or powdered delergent I'or prewash and 4) liquid or powdered delergen|
and color safe bleach fi_r main wash_
All laundry products can be added at _mce in their respective dispenser compartments°
They will be dispensed at the appropriate time for most effective cleaning. After loading the laundry
additives inlo the dispenser_ close the dispenser drawer.
Add detergent, bleach and fabric softener to the automatic dispenser following these steps:
1 Open the dispenser drawer,
2 Load the laundry products into the appropriate compartments
3 Close the dispenser drawer
,, About detergent
Low sudsing detergent is recommended for this washer Use the manufacturer's recommended amount
If low sudsing detergent is not available, a reduced amount of regular detergent may be used
Because reducing the amount of detergent may reduce cleaning, itis important to pretreat stains,
sort carefuffy by color and soil level, and avoid overloading
Detergent usage may need to be adjusted for water temperature, water hardness, size and soil level of the toad.
For best results, avoid using too much detergent
_ i hi nn
I _ I "-uquidFab,c
-"_'d II J \ " Prewash
X Compartment
Main Wash
Compartment
1, Prewash Detergent Compartment
• Add detergent to this compartment when using
the Prewash option, Liquid or powdered
detergent may be used in this compartment The
detergent will automaticafly be dispensed during
Prewash if the Prewash option is selected
• Add 1/2 the recommended amount of detergent
to the Prewash compartment and the
recommended amount of detergent to the main
wash compartment
NO'IE : tiquid detergent will drain into Ihe washer
drum as it is added,
11
USING THE DISPENSER ......
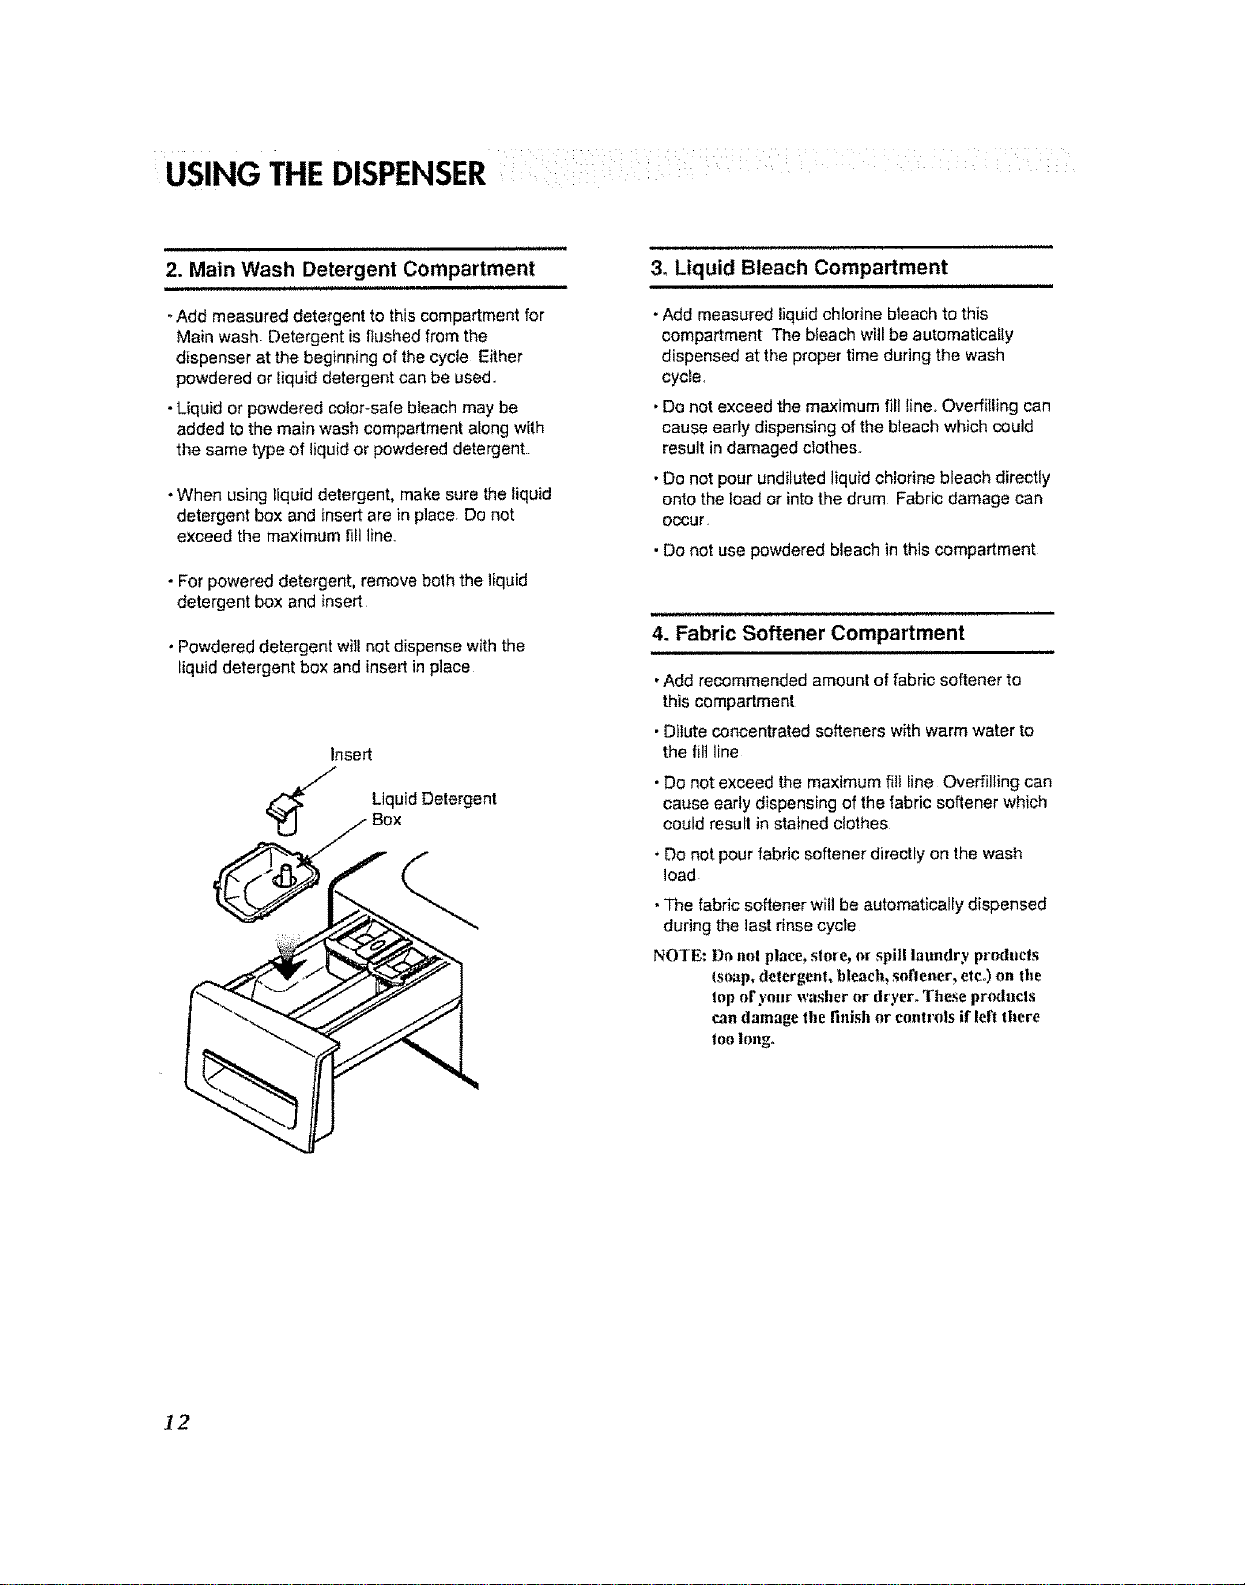
2. Main Wash Detergent Compartment
=LLU, ill
-Add measured detergent to this compartment for
Main wash. Detergent isflushedfrom the
dispenserat the beginning of the cycle Either
powdered or liquid detergent can be used,
• Liquid or powdered color-safe b_eachmay be
added to the main wash compartment along with
the same type of liqu{d or powdered detergent.
•When using liquid detergent, make sure the liquid
detergent box and insert are in place Do not
exceed the maximum fill line,
- For powered detergent, remove both the liquid
detergent box and insert
• Powdered detergent will not dispense with the
liquid detergent box and inseJt in place
Insert
Liquid Detergent
3, Liquid Bleach Compartment
- Add measured liquid chlorine bleach to this
compartment The bleach will be automatically
dispensed at the proper time during the wash
cycle,
• Do not exceed the maximum fill line, Overfilling can
cause early dispensing of the bleach which could
result in damaged clothes.
• Do not pour undiluted liquid chlorine bleach directly
onto the load or into the drum Fabric damage can
occur
• Do not use powdered bleach in this compartment
4. Fabric Softener Compartment
•Add recommended amount of fabric softener to
this compartment
•Dilute concentrated softeners with warm water to
the fill line
•Do not exceed the maximum fill line Overfilling can
cause early dispensing of the fabric softener which
could resu[l in stained ctothes
"Do not pour fabric softener directly on the wash
load
• The fabric softener will be automatically dispensed
during the last rinse cycle
NOTE: Do ant place, store, or spill laundry prndncts
{soap, detergent, hleach_ sohener, ere°) on the
lop or your washer or dryer_ These producls
can damage the finish or controls if left there
too Iong_
]2
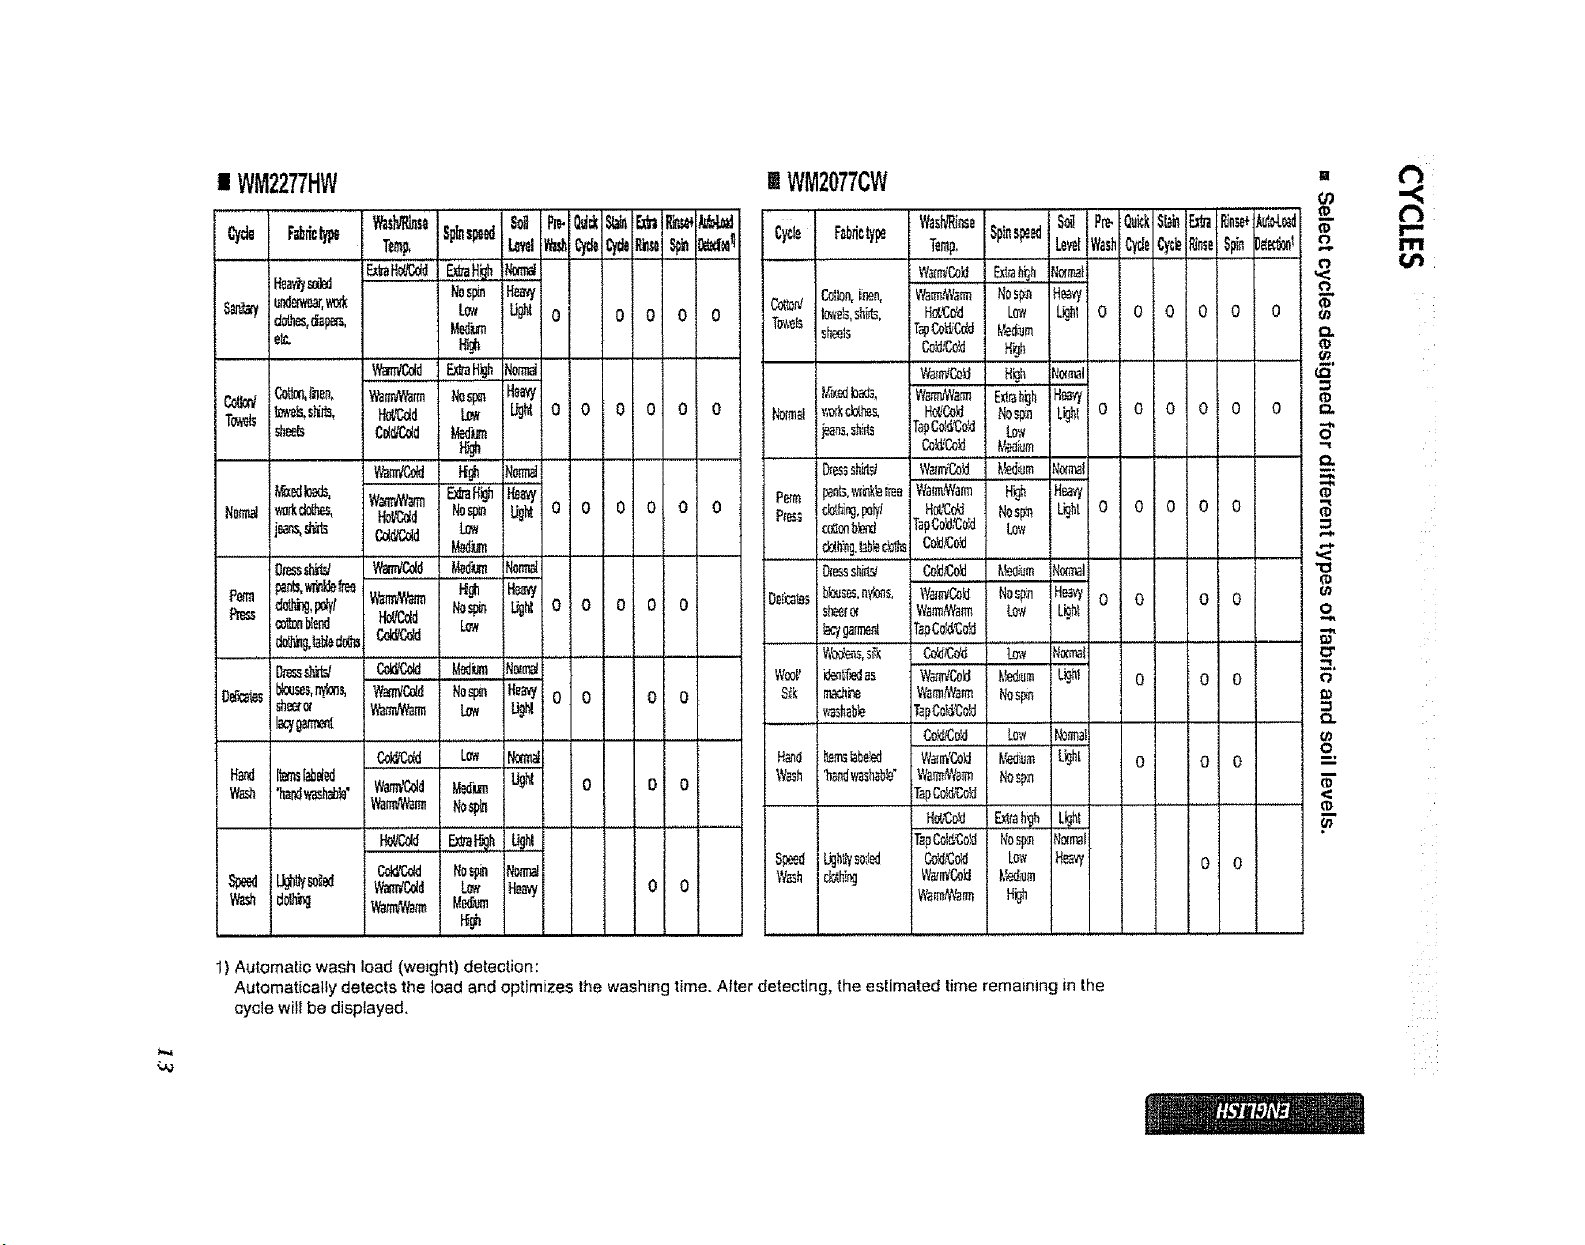
mWM2277HW mWM2077CW .<
....................0 0
0 t O 0
1°°
o o o
1) Automatic wash load (weight) detection:
Automatically detects the load and optimizes the washing time. Alter detecting, the estimated time remaining in the
cycle will be displayed,
HOW TO USETHE WASHER
m WM2277H •
- ORLON -- /:
INWM2077CW
DELIPJCE:S
®
',_..__k_
_ _ :::
- o_o_-
1. Power ('_
, Use this button to turn the Power OntOff
2. Cycles
oRotate the Cycle selector knob tosefect cycle
designed for different types of fabric and soil
tevels.
• Each cyc]e has a preset Water Temperature, Spin
Speed, Soil Level, and Option (See page 13)
-The preset settings can be changed anytime
before Start.
NOTE: ThL_frunt load washer requires longer cycle time
and gels cJolhes much cleaner, yet is more genlle
on the [abri_% than top toad washers_ Washing
time CUDbe reduced significantly [hr small toads
or lightly _)iled loads by selecting Quick Cycle
wilh the Option button and setting the Soll Level
button at l..ighL
3. Start/Pause ('_
•Use this button to starttstop the washer
4. Delay Wash
•Allows the start of any cycle to be delayed for
1-.12 (9) hours
•Choose the wash cycle for your !oad, and then
press the Delay Wash button once for one hour or
press the button again to inoreasethe delay wash
time up to 12 (9) hours in one hour increments
14
HOW TO USE .....: THEWASHER :
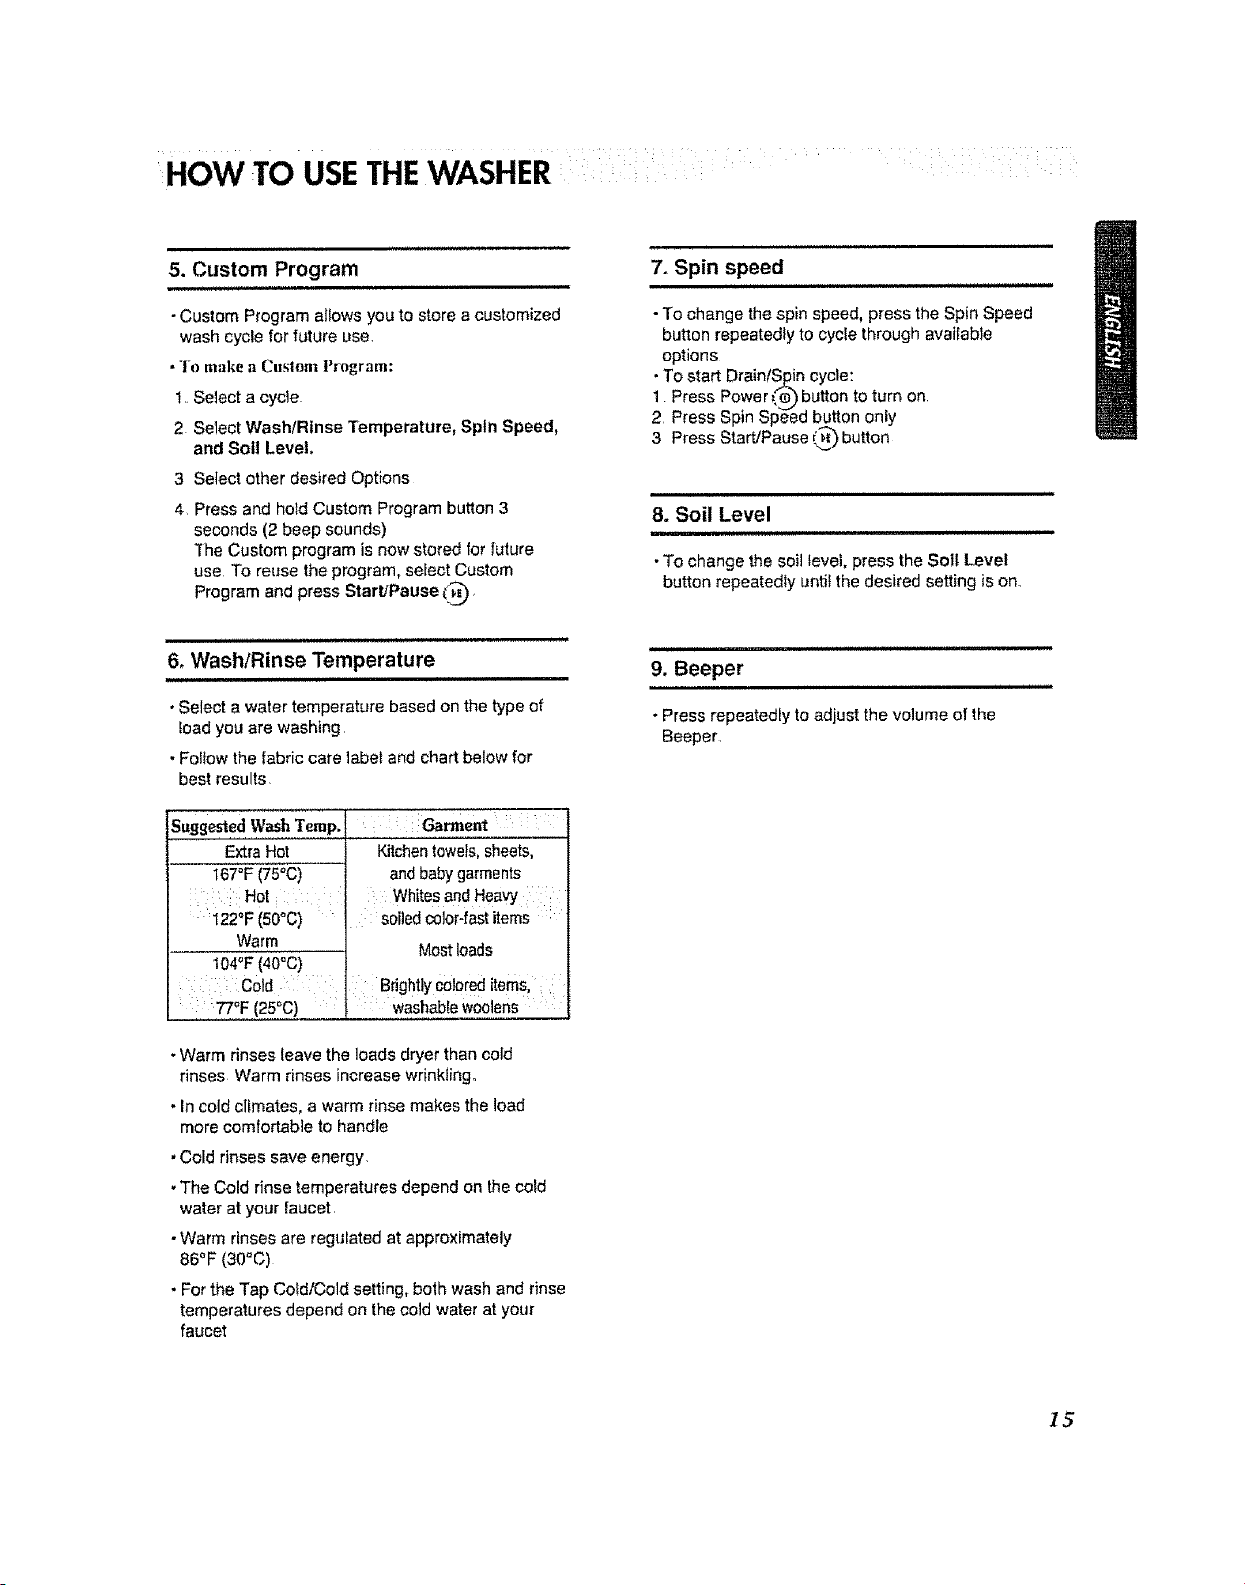
5. Custom Program
i itll,
•Custom Program allows you to store a customized
wash cycle for future use,
• ]-0 itlake a _lt,qtOlll Program:
1. Select a cycle
2 Select Wash/Rinse Temperature, Spin Speed,
and Suit Level.
3 Select other desired Options
4 Press and hold Custom Program button 3
seconds (2 beep sounds)
"TheCustom program is now stored for future
use To reuse the program, select Custom
Program and press Start/Pause (?_,
i ii iilllllllllllllllllll ii,,i,
6. Wash/Rinse Temperature
• Select a water temperature based on the type of
load you are washing
. Fo{tow the fabric care label and chart below for
best results,
S.ggo,tedW h emp.,
ExtraHot Kitchentowels, sheets,
;67°F (75°C) andbaby garments
..... Hot • Whitesand HeaVY
:I22°F (50°C) ' : suitedcolor-fastitems
Warm Most loads
104°F(40°C)
: :: :Cod Bdgbtlycol0reditems,
: : 77OF(25°C) washabtewoolens
-Warm rinses leave the loads dryer than cold
rinses Warm rinses increasewfinklingo
. In cold climates, a warm rinse makes the load
more comfortable to handle
. Cold rinses save energy.
•The Cold rinse temperatures depend on the cold
water at your faucet
•Warm rinses are regulated at approximately
86°F (3O°C)
• For the Tap CoSd/Coldsetting, both wash and rinse
temperatures depend on the cold water at your
faucet
7. Spin speed
-To change the spin speed, press the Spin Speed
button repeatedly to cycle through available
options
• To start DrainlS£in cycle:
1 Press Power _,'e)button to turn on
2 Press Spin Sl_ed button only
3 Press Start/Pause r_.'_)button
8. Soil Level
L J JH J Ull ,uJJ_
• To change the soil level, press the Soil Level
button repeatedly until the desired setting is on,
9. Beeper
ill i i,ml,
• Press repeatedly to adjust the volume of the
Beeper
I5
HOW TO USETHEWASHER
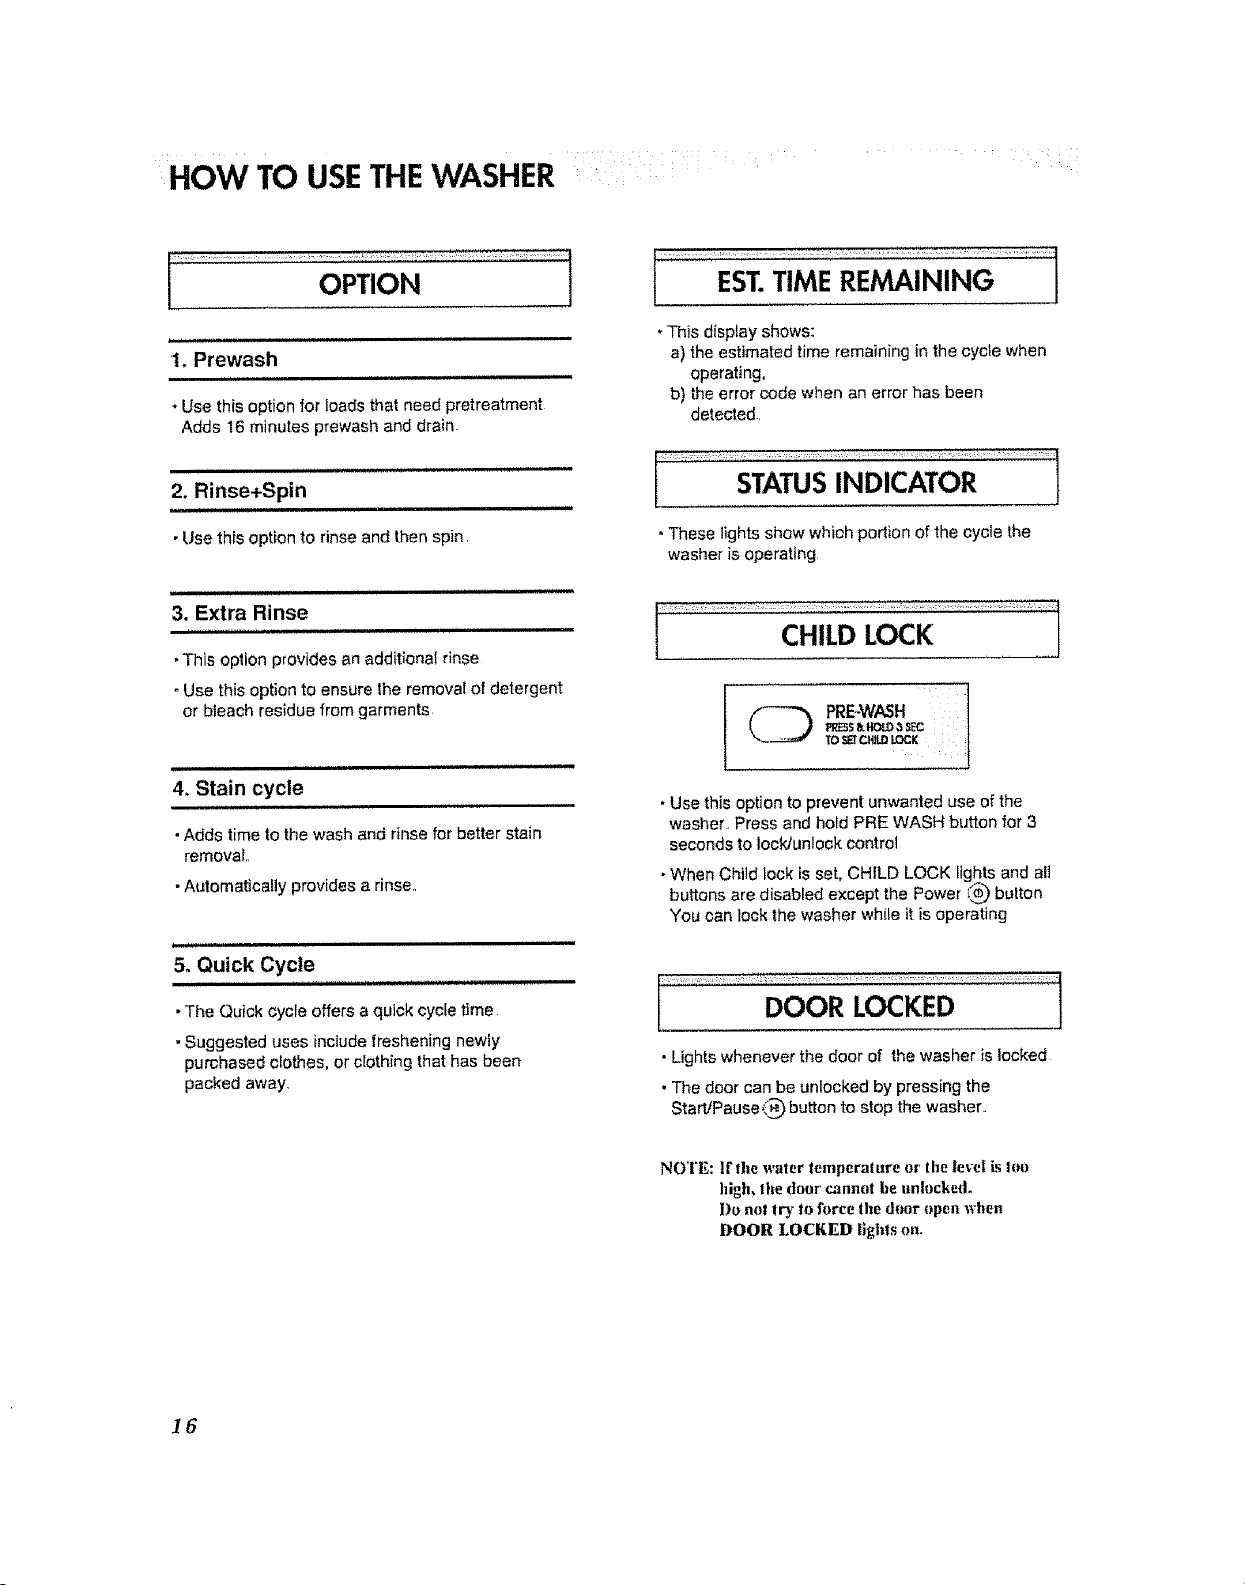
OPTION
_UHL'JJ,
1. Prewash
, , ,,,,, ,,, ,,,,,,,,,,,,,
• Use this option for loads that need pretreatment
Adds 16 minutes prewash and drain.
11,,, ,, ,, ,,,,, ,L ,,,,,,
2. Rinse+Spin
• Use this option to rinse and then sp}n
This display shows:
a) the estimated time remaining in the cycle when
operating,
b) the error code when an error has been
detected
•These lights show which portionof the cycle the
washer is operating
3. Extra Rinse
• This option provides an additional rinse
. Use this option to ensure lhe removal of detergent
or bleach residue from garments
4. Stain cycle
• Adds time to the wash and rinse for better stain
removal.,
• Automatica!ly provides a rinse,
5. Quick Cycle
, , ,,, ,,=,,, ,,,,,
• The Quick cycle offers a quick cycle time
• Suggested uses include freshening newly
purchased clothes, or clothing that has been
packed away,
PRE-WASH 1
tO_I'CI,LOIOCI_ !
• Use this option to prevent unwanted use of the
washer, Press and hold PRE WASH button for 3
seconds to lock/unlock control
•When Child lock is set, CHILD LOCK lights and all
buttons are disabled except the Power I_ button
You can lock the washer while it is operating
• Lights whenever the door of the washer is locked
• The door can be unlocked by pressing the
StartJPause_ button to stop the washer.
NOTE: ll'the waler temperalure or the level is IoO
high, tile door cannot be unlocked°
Do not lr3,"to force the d{_r open when
DOOR LOCKED lights on.
]6
htAINTENANCE '
Bel'ere cleaning tlne washer inlerhw_ unplug lhe eleclrical power cord to avoid electrical shock hazards°
When disposing of the appliance, cut olT the power' cable, destroy the plug_and disable the door lock to prevent
young children from being trapped inside.
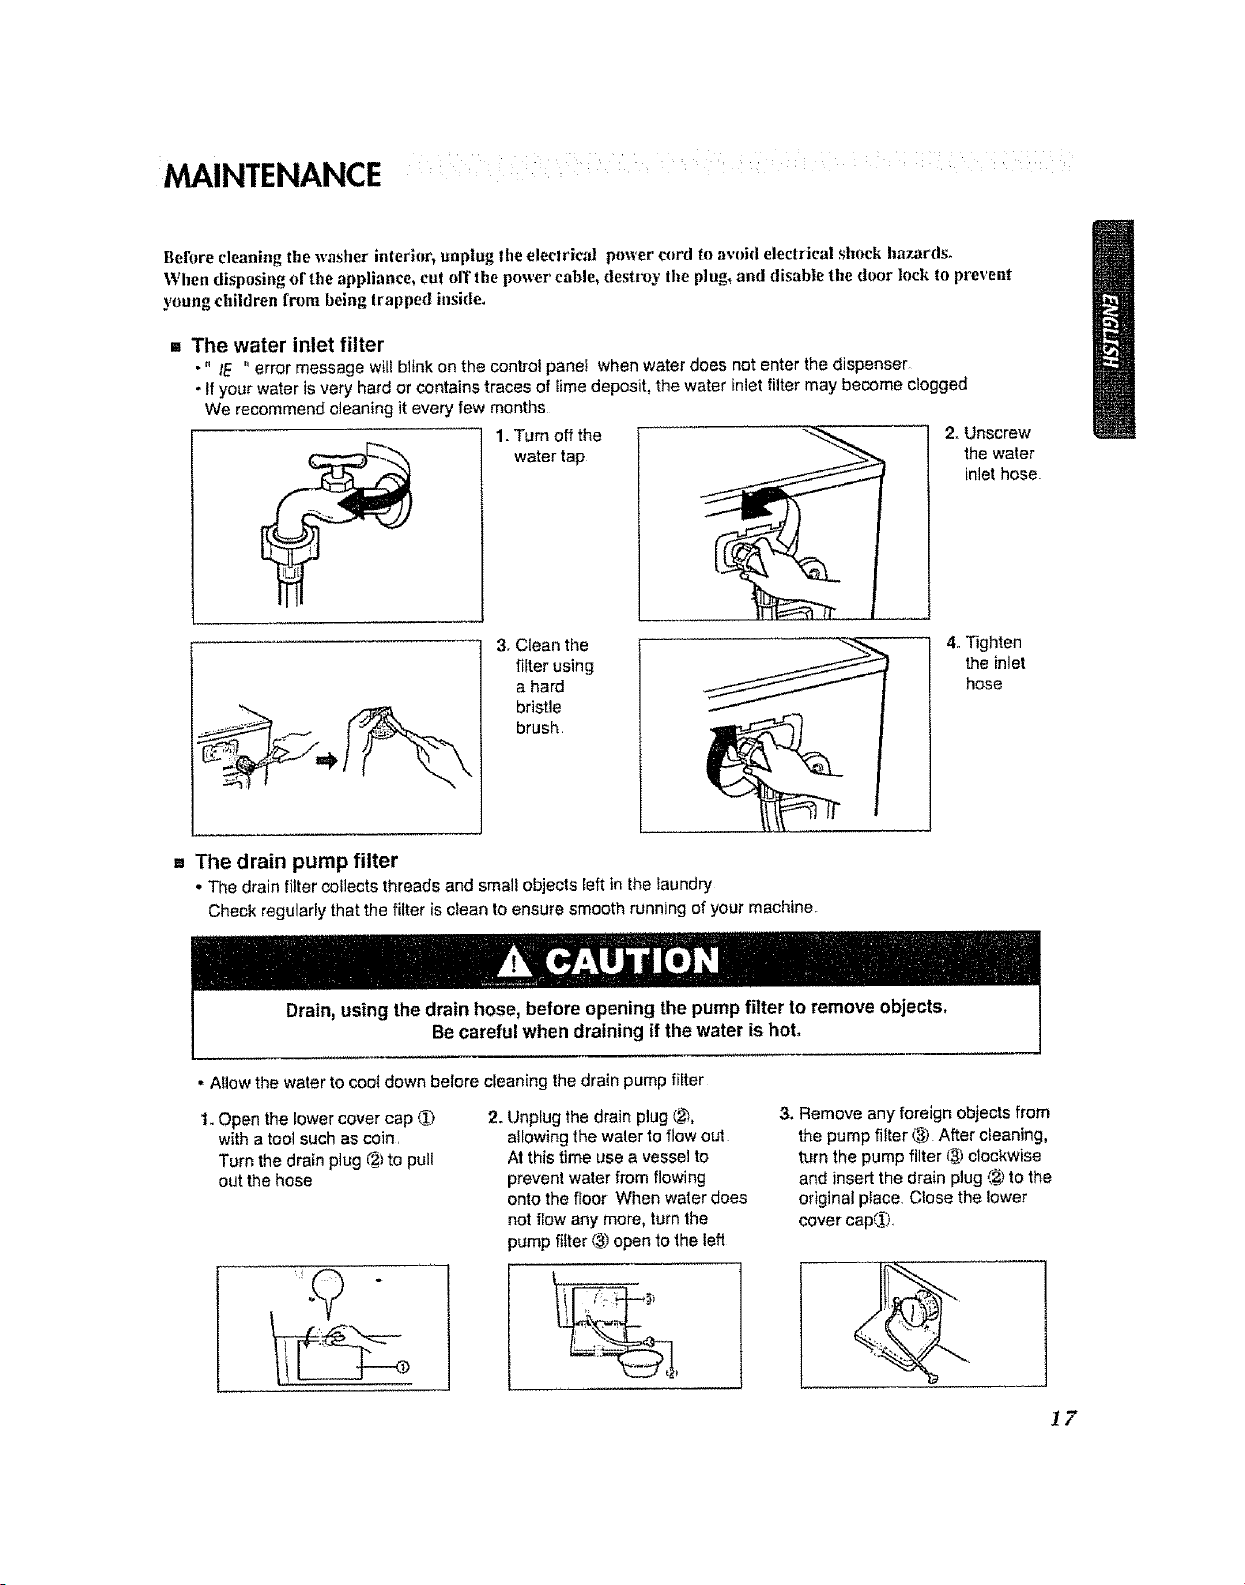
= The water inlet filter
•" IE "error message will blink on the controt panei when water does net enter the dispenser
- If your water is very hard or contains traces of lime deposit, the water inlet filter may become clogged
We recommend cleaning it every few months
1. Turn off the 2. Unscrew
water tap the water
inlet hose
3. Clean the
filter using
a hard
bristle
brush
-- 4. Tighten
the inlet
hose
= The drain pump filter
• Thedrainfiltercollectsthreadsand smallobjects[eftinthe laundry
Checkregularlythatthe filter iscleantoensuresmoothrunningofyour machine,
Drain,using the drain hose, before opening thepump filter to remove objects,
Be carefulwhen draining if thewater ishot,
• Allow the water to coot down belore cleaning the drain pump lifter
1. Open the lower cover cap _)
with atool such as coin.
Turn the drain plug (_}to pull
out the hose
2. Unplug the drain plug _,
allowingthe waler toflow out
At this time use a vessel to
prevent water from flowing
onto the floor When water does
not flow any more, turn the
)ump fiffer (_ open to the left
3. Remove any foreign objects from
the pump filter (_&)After cleaning,
turn the pump filter (_ clockwise
and insertthe drain plug (__to the
original place. Close the lower
cover cap,_
i7
MAINTENANCE : : i
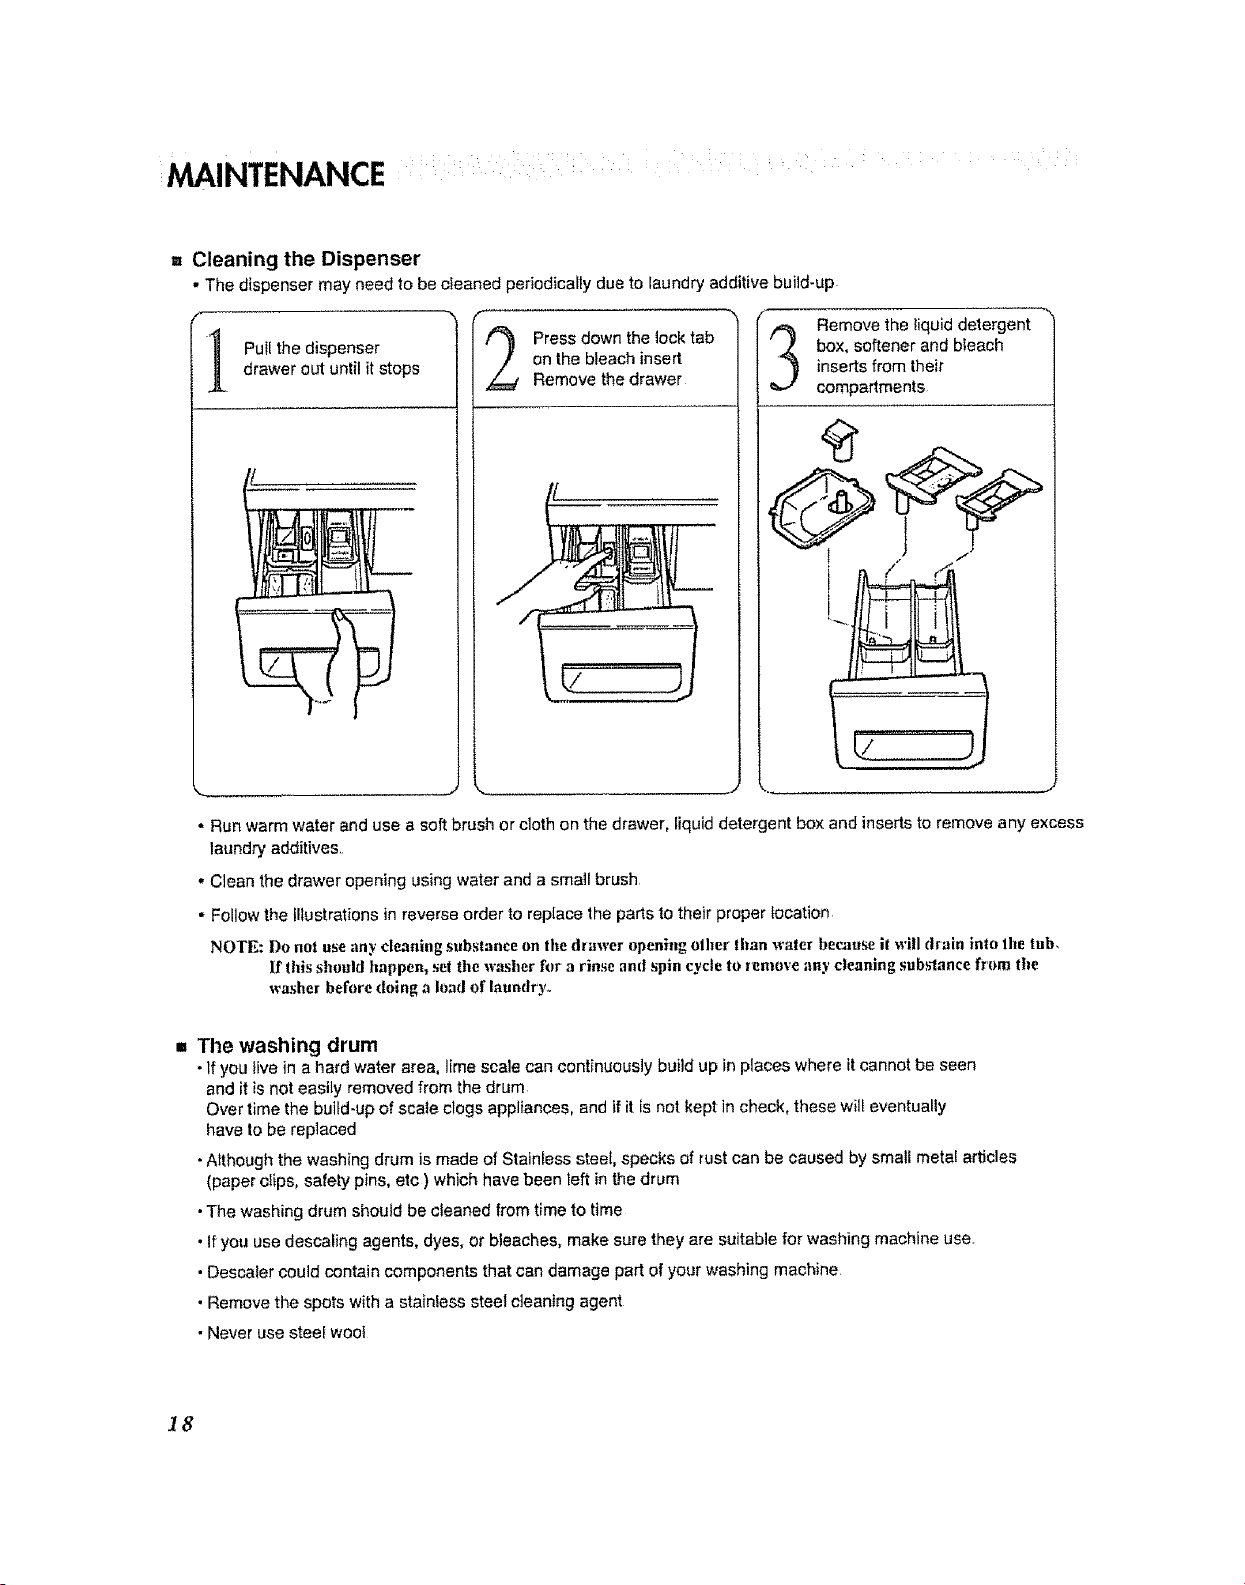
m Cleaning the Dispenser
• The dispenser may need to be cleaned periodically due to laundry additive build-up
f
Remove the liquid detergent
1] Puff the dispenser O Press down the tocktab box, softener and bleach
drawer out until it stops on the bieach insert inserts from their
1
Remove the drawer compartments
• Run warm water and use a soft brush or cloth on the drawer, liquid detergent box and inserts to remove any excess
laundry additives,
* Clean the drawer opening using water and a small brush
* Follow the illustrations in reverse order to replace the parts to their proper location
NOTE: Do not use any cleaning substance on the drawer opening olher titan water because it will drain into the tub,
If this should happen, set the washer for a rinse anti spin cycle to remove :my cleaning subslance from tire
washer befnre doing a load of laundry°
,. The washing drum
• If you tivein a hard water area, lime scale can continuously build up in places where itcannot be seen
and it isnot easily removed from the drum
Over time the build-up of scale clogs appliances, and if it is not kept in check, these wilt eventually
have to be replaced
•Afthough the washing drum is made of Stainless steel, specks of rustcan be caused by small metal articles
(paper clips, safety pins, etc ) which have been left inthe drum
•The washing drum should be cleaned from time to time
•If you use descaling agents, dyes, or bleaches, make sure they are suitable for washing machine use.
•Descaler could contain components that can damage part of your washing machine
•Remove the spots with a stainless steel cleaning agent
•Never use steel wool
18
MAINTENANCE :
,. The water circulation nozzle
•Cleanthewatercirculationnozzle,ifclogged
= Cleaning your washer
1. Exterior
Proper care of your washer can extend its life
The outside of the machine can be cIeaned with warm water and a neutral, non-abrasive
household detergent,,
Immediately wipe off any spills Wipe with a damp cloth
Try not to damage the surface with sharp objects
* IMPORTANT: Do not use methylated spirit, sofvents or similar products
2. Interior
Dry around the washer door opening, flexible gasket and door glass These areas should always be clean to
ensure a water-tight sea!
Run washer through a complete cycie using hot water,
Repeat process if necessary,
NOTE: Remove hard _ater depnsits using nnly cleaners labeled as safe hw _a._hing machines,
= Winterizing instructions
if the washer is stored in an area where freezing can occur or moved in freezing temperatures, follow these
winterizing instructionsto prevent damage to the washer:
1. Turn off water suppty tap
2, Disconnect hoses from water supply and drain water from hoses
3, Plug electrical cord intoa properly grounded electrical outlet
4_Add l gaffon (3 8 _) nontoxic recreational vehicle (RV) antifreeze to empty wash drum. Close door
5oSet spin cycle and let washer spin for 1 minute to drain out all the water
Not all of the RV antifreeze will be expelled
6. Unplug electrical power cord, dry drum interior, and close door
7. Remove the two-compartment container from the Dispenser Drain any water incompartments and dry the
compartments
8. Store washer in an upright position
9, To remove antifreeze from washer after storage, run empty washer through a complete cycle using detergent
Do not add laundry.
19
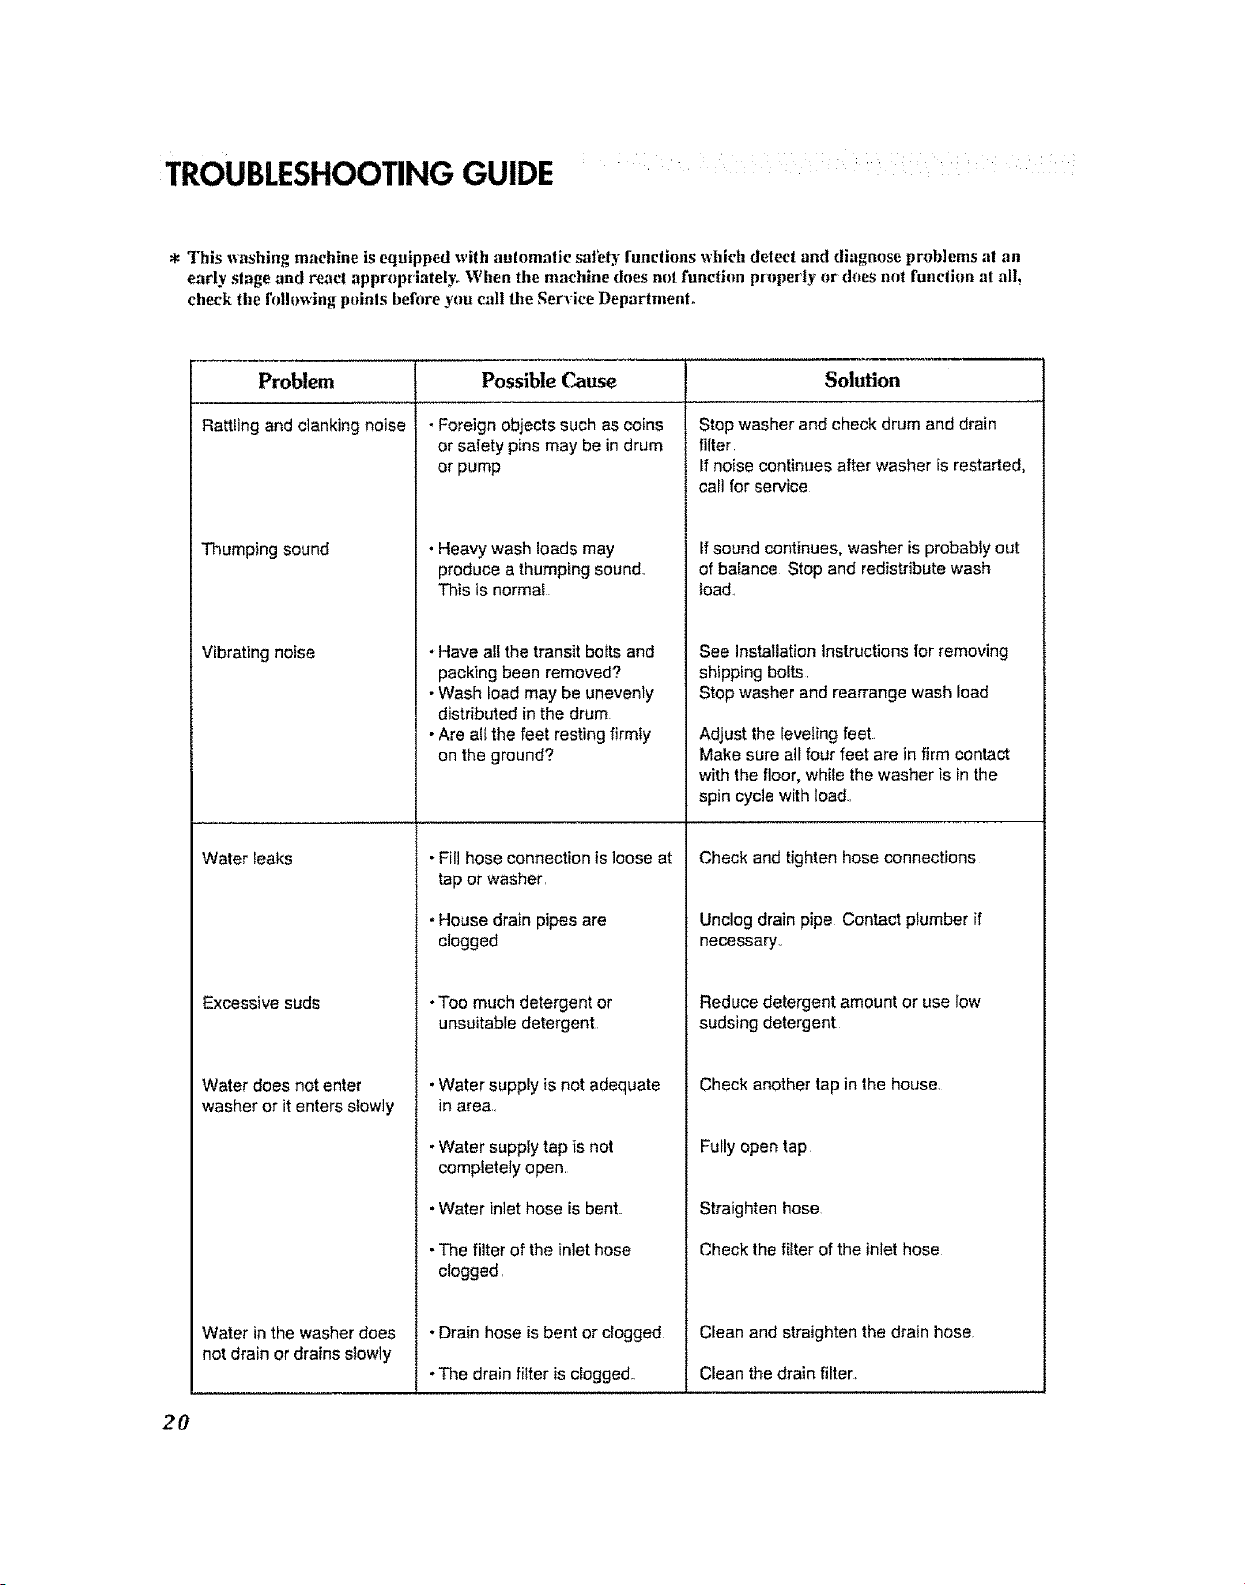
TROUBLESHOOTING GUIDE .... .......
* This _vashing machine is equipped with automatic safety [unctions which detect and diagnnse problems at an
early stage and react appropriately° When the machine dees not functhm pr{_pecty or does nnt function al all,
check the fullowing puinls before ytm call lhe Service Department°
Problem
Rattting and clanking noise
Thumping sound
Vibrating noise
Water leaks
Excessive suds
Water does not enter
washer or it enters slowly
Water in the washer does
not drain or drains slowly
Possible Cause
• Foreign objects such as coins
or salety pins may be in drum
or pump
• Heavy wash loads may
produce a thumping sound
This is normal
* Have all the transit bolts and
packing been removed?
•Wash load may be unevenly
distributed in the drum
• Are all the feet resting firmly
on the ground?
• Fill hose connection is loose at
Solution
Stop washer and check drum and drain
filter
Ifnoise continues after washer is restarted,
call for service
If sound continues, washer is probably ot_t
of balance Stop and redistribute wash
toad,
See Installation Instructions for removing
shipping bolts
Stop washer and rearrange wash load
Adjust the leveling feet..
Make sure atl four feet are in firm contact
with the floor, whi_ethe washer is in the
spin cycle with load.
Check and tighten hose connections
tap or washer,
• House drain pipes are
clogged
•Too much detergent or
unsuitable detergent
Unclog drain pipe Contact plumber if
necessary..
Reduce detergent amount or use low
sudsing detergent
. Water supply is not adequate
in area.
* Water supply tap is not
completely open
, Water inlet hose [s bent.
• The filter of the inlet hose
clogged.
• Drain hose is bent or clogged
•The drain fifter is c[oggedM
Check another tap in the house
Fully open tap
Straighten hose
Check the filter of the inlet hose
Clean and straighten the drain hose
Clean the drain filter.
2O
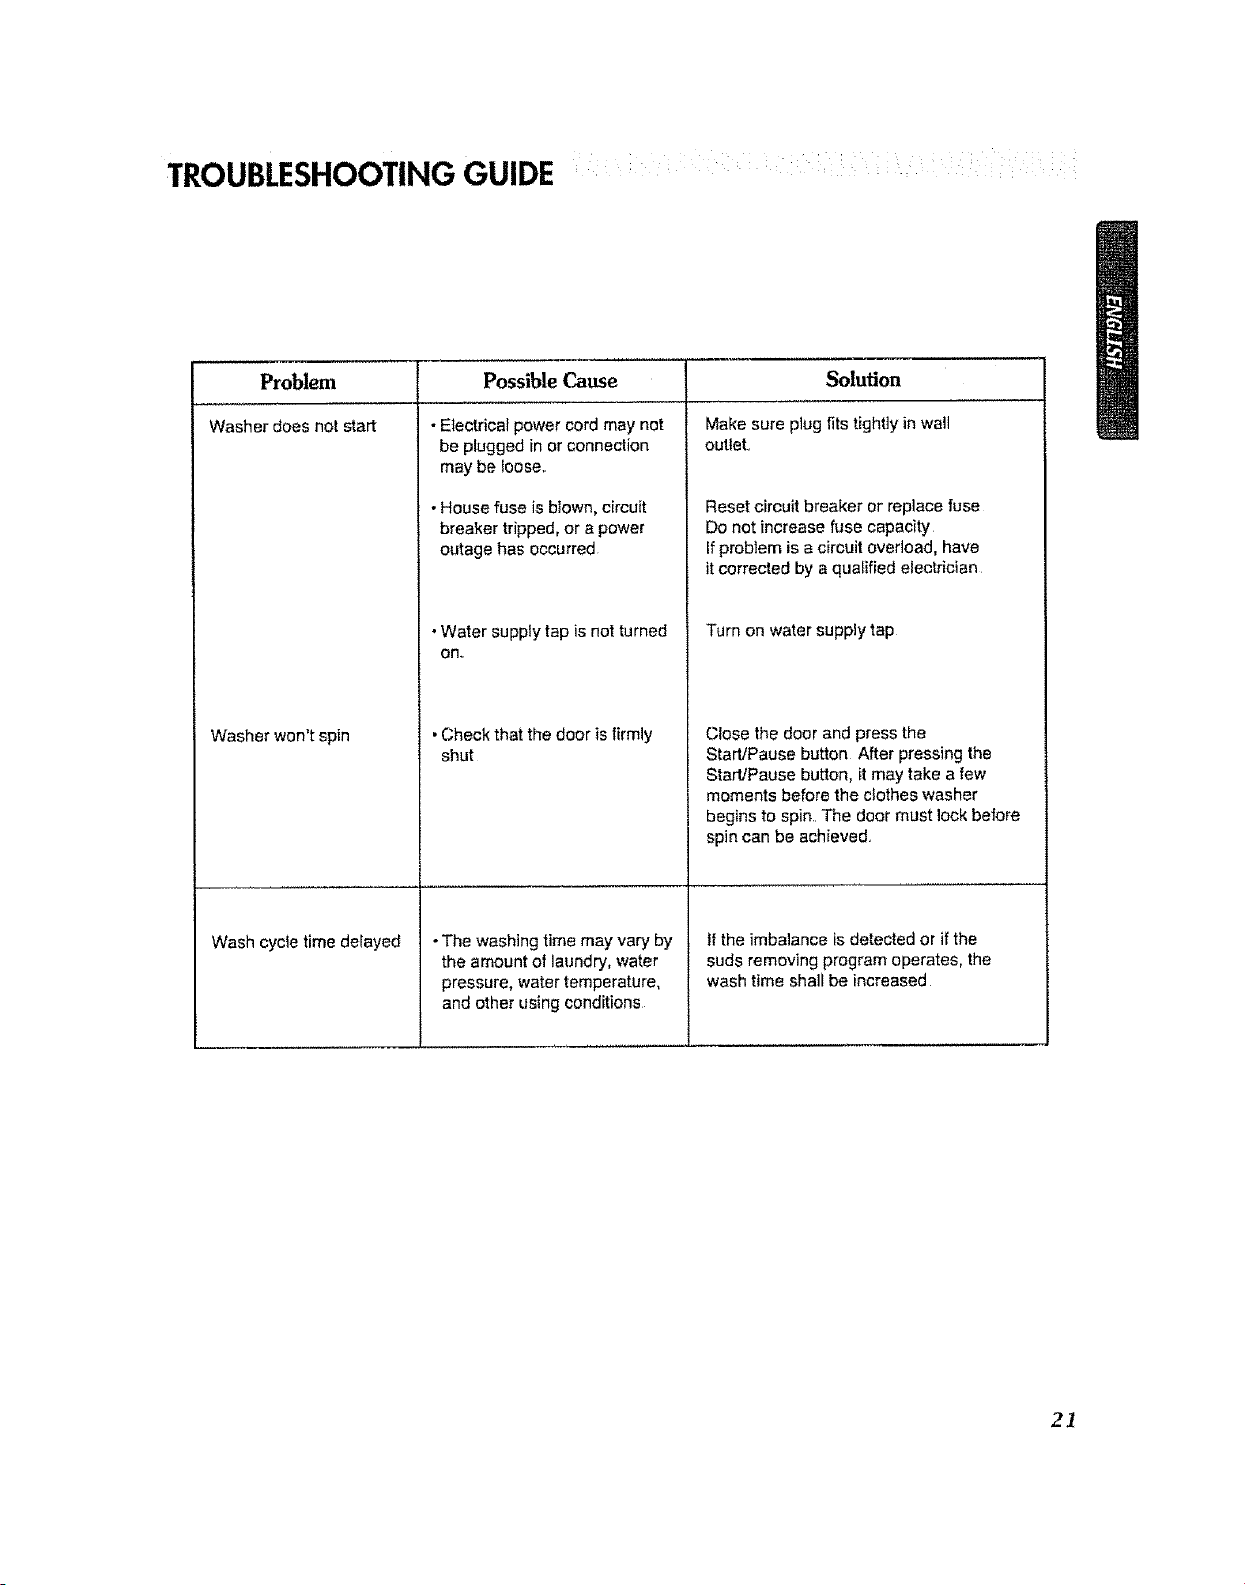
TROUBLESHOOTING GUIDE i :i : ,
Problem Possible Cause
Washer does not start
Washer won't spin
Wash cycle time delayed
• Electrical power cord may not
be plugged in or connection
may be foose,
• House fuse is blown, circuit
breaker tripped,or a power
outage has occurred
• Water supply tap is not turned
on..
•Check that the door is firmly
shut
•The washing time may vary by
the amount of laundry, water
pressure, water temperature,
and other using conditions
Solution
Make sure plug fits tightJy in wall
outlet.,
Reset circuit breaker or replace fuse
Do not increase fuse capacity
Ifproblem is a circuit overload, have
it corrected by a qualified electrician
Turn on water supply tap
Close the door and press the
Start/Pause button After pressing the
StaWPause button, it may take a few
moments before the clothes washer
begins to spin,.The door must lock before
spin can be achieved,
If the imbalance isdetected or ifthe
suds removing program operates, the
wash time shall be increased
21
TROUBLESHOOTING GUIDE ....
Problem Possible Cause
•Water suppty is not adequate
in area_
• Water supply taps are not
completely open,,
•Water inlet hose is bent
•The filter of the inlet hose
clogged
• Drain hose is bent
or clogged,,
•The drain filter is clogged
, Load is too small.
• Load is out of balance.
•The appliance has an imbalance
detection and correction system
i_individual heavy aMiclesare
loaded (bath mat, bath robe,
etc.) andthe imbalance is too
great, after severat atlempts to
restart the spin cycle the
machine will stop and the error
code will be displayed
• Is the door opened or not
completely closed?
Solution
Check another tap in the house
Fully open tap.
Straighten hose
Check the filter o[ the inlet hose,
Clean and straighten the drain hose
CIean the drain fi]ter
Add 1or 2 similar items to help
balance the load
Rearrange load to allow proper
spinning
Close the door completely
* If dE is not released, call for service
•The water overfills due to the
faulty water valve.
• The water level sensor
malfunction.
• Overload in motor.
• Overload in motor,
Unplug the power plug and ca]l for service
Close the water tap,
Unplug the power plug
Call for service
• The washer experienced a Restart the cycle
power failure
22
Your LG Washing Machine will be repaired or mp{aced, at LG's option, if it proves to be defective in materiel or
workmanship under normal use, during the warranty period (=Warranty Period") set forth below, effective from the
date (=Date of Pumhase') of original consumer purchase of the product. This warranty is good only to the odgInal
purchaser of the product and effective only when used in the Untied States, Including Alaska, Hawaii, and U.S.
Teniteries
WARRANTY PERIOD:
LABOR: One Year fromtheDateofPumhoce
PARTS (except as listedbe}ow): One Year fromthe
DateofPurchase.
Electronic Control Board: 2 Years fromtheDateof
Pumhase.
Drum Motor: 7'Years fromtheDoteofPurchase
Stainless Steel Drum; Lifetime
ReplacementUnits and Repair Parts may be new or
factoryremenufactured.
ReplacementUnitsendRepairPartsorewarrantedfor the
remainingportionoftheodginalunit'swarrantyperiod.
HOW SERVICE IS HANDLED:
In-Home Service: Please retain dealer's dated bill
of sole or delivery ticket as evidence of the Date of
Purchase for proof of warranty, and submit a copy of
the bill of se)a to the service pemon at the time
warranty service isprovided.
Please call 1-877-714-7486 and choose the
appropriate option to locate your nearest LG
Authorized Service Centers
Or visitourwebstteat: http:llwwwJgserV!ce,com
THIS WARRANTY IS IN LIEU OF ANY OTHER WARRANTY, EXPRESS OR IMPLIED, INCLUDING WITHOUT
LIMITATION, ANY WARRANTY" OF MERCHANTABILITY OR FITNESS FOR A PAR'IIGULAR PURPOSE. TO THE
EXTENT ANY IMPLIED WARRANTY IS REQUIRED BY LAW, IT IS LIMITED IN DURATION TO THE EXPRESS
WARRANTY PERIOD ABOVE. NErn-IER THE MANUFACTURER NOR ITS U.S_ DISTRIBUTOR SHALL BE
UABLE FOR ANY INCIDENTAL, CONSEQUENTIAL, INDIRECT, SPECIAL, OR PUNITIVE DAMAGES OF ANY
NATURE, INCLUDING WITHOUT LIMITATION, LOST REVENUES OR PROFITS, OR ANY OTHER DAMAGE
WHETHER BASED IN CONTRACT, TORT, OR OTHERWISE. Some states do not atfow the exclusion or limitation
of Inctdentaf or consequential damages or limitations on how long an tmpJiodwarranty lasts, so the above exclusion
or limitation may not apply to you. This warranty gives you specific legal r_ghtsand you may atso have other rights
that vary from state to state°
THIS LIMITED WARRANTY DOES NOT APPLY TO:
• Service trips to your home to deliver, pick up, and/or fnstell the product, instrJct, or repface house fuses or
correct whing, or correction of unauthorized rape}m,
= Damages or operating problems that resu{t from misuse, abuse, operation outside environmental
sper.3tlca'-Jonsor contrary to the requirements of precautions in the Operating Guide, accident, vermin, fire,
flood, improper inst_flation,acts of God, unauthorized modtflca_-3onor alteration, incorrect electrica{ current or
voltage, or commerc{a} use, or use for other than intended purpose.
The cost of repair or rep{acement under these excluded circumstances shaft be borne by the consumer
CUSTOMER INTERACTIVE CENTER NUMBERS
To obtain Customer Assistance, Product infor-
mation, el* Dealer or Authorized Service Center
ocat on;
TO CONTACT LG ELECTRONICS BY MAIL:
LG Customer Interactive Center
P. OoBox 240007
201 James Record Road
Huntsville, Alabama 35824
ATTN; CIC
Call 1-87Z_714_7486(24 hours aday, 365 daysper year)
and select the appropriate option from the menu,
Or visit our webstta aic http://www_Igservtce.com
23
UAL
P IP E
Lavadora
WM2277H*
WM2077CW
Lea estemanual cuidadosamente. Leproveer6
instrucciones para una instalaci6n, usoy mantenimiento
seguros. Cons_rvelo para futuras referencias..Cite esta
informaci6n a su proveedor si requiere de servicio.
CARACTERISTICASDELPRODUCTO
@
@
u Sistema DD Inverfidoro
El avanzado motor de DC sin cepillo que mueve directamente el
citindro sin cintur6n ni polea,
m Cilindro Inclinado y Abertura Extra Grande.
El cilindro inclinado y la abertura extra grande, hacen m,_s
fficit la carga y descarga
Circulaci6n de Agua_ (WM2277H,)
Se recia fa so_uciSnde detergente y agua sobre tacarga unay otra vez,
La ropa se remoja mils rfipidamente y a la perfecci6n durante etc}clo de
lavado.,La espuma del detergente puede set removida mils f_cifmente
per el base de agua durante el ciclo de enjuague, La circulaci6n de agua
usa ambos, agua y detergente con mayor eficiencia
i Bola de Lavado, (WM2277H*)
La bola de lavado mejora el desempefio de lavado y reduce
el daSo a ia ropa.
a Detecci6n de la carga de lavado autom&tico
Automiticamente detectaIacargay optimiza el tiempo de lavado
n C_lentador integrado. (WM2277H_)
El calentador interne calienta automiticamente el agua a la meier
temperatura seg_'Jnel ciclo efegido
i Seguro de Nifios.
El seguro de ni_os previene que los nifios presionen los bolones y
cambien la eonfiguraci6n durante la operaci6n,
Informaci6n lmportante de Seguridad .......................................................................................................... 27
Especificaciones ............................................................ 28
Instrucc{ones de Instalaci6n ..................................................................................................................... 29
Preparaci6n Antes de Lavar ............................................................ 34
Usando el Distribuidor ....................................................................................................................................................... 35
Cictos ..................................................................................................... 37
Come Usar _aLavadora .............................................................................................................................................. 38
Mantenlmiento .................................................................................................................... 41
Guia para EaDetecci6n de Problemas ....................................................................................................................... 44
Garant[a ......................................................................................... 47
26
INFORMACION IMPORTANTE DE SEGURIDAD
LEATODAS LAS INSTRUCCIONES ANTES DEUSARLA.
ADVERTENCIA!
Parasuseguridad,la informaci6nenestemanualdebeserseguidapara minimizaret rlesgo deincendio6
explosi6n,descargae/_ctrica,6 para prevenirdafiosa supropiedad,a supersona6 p_rdidade la vida.
Infomm©i6n lmportanto de Seguridad
,A ADVERTENCIA: Para reducir el riesgo de incendio, descarga el_ctrica, 6 heridas, al usar la lavadora, siga
tasprecauciones basicas incluyendolas siguientes:
• Leatodaa lostnstruoclonesantes de usar/a lavadorao
• Nolavearticu/os quahayan sideprevtamente
Ilmpladoscon, lavados con,mojados con,d
manchados congasolina, solventespare lavado en
seco,u otra sustancta flamable 6 exploslva, ya qua
estas despiden vapores qua pueden tncendfaree6
expiator.
•Noagreguegasollna,so/ventespare/avado en seco 6
cua/qulerotre sustancfaf/amab/ed exp/osJvaa/ agua
de tavado_Estassustanclasdespldenvapores qua
pueden Incendiarse 6 explotaro
•Bajo clef/as condlclones, sepuede produclr gas de
hidr6geno en sis/areasde aguacol/antequano ban
side usadosper2 semanas6 mas. EL GASDE
HIDROGENOESEXPLOSIVO.SIe! slstemadeagua
col/anteno haside usadoper 2 semanas6 mas, antes
de usar la /avadora,abre todas /as /lavesdel agua
ca#entey deJeel aguacarter per algunos minutes.
Esto Ilberer_cualquierrostrade gas de hldr6geno
acumulado Comae! gases flamable, nofume 6 use
nlnguna flama ablertaduranleeste tlempe.
, No permita qua los nl_osjueguen sabre 6 dantrode ta
lavadora,Deber_ cufdarde cercaa los nl_oscuando
la lavadore sea usada cerca de atlas,
•Antes deretirar/a/avadora paraservlcto 6 desecharla,
retire/a puerla patapreven/rqua los nl_os se
escondandent/co
• No Instale 6almacene la tavadore donde est_
expuesta a la lntemperieo
• No estmpee los controleso
• No In/anterepararnlreemplazar nlnguna porte de la
lavadore nl Intente dar servlclo a manes qua sea
recomendadoespeeificamente en losInstruct/ones de
mantenlmiento delusuarlo d publicadoen los
instrucolenesde reparaci6npara et usuarioqua usted
entlenda y tonga/a habl/ldadde//evar a cabo,
• Vea/as instruccienesde insta/aci6npara los
requerlmientosde conext6na tlerra.
•S/EMPREslga/as lnstrucclonesde culdadade/a te/a
pmvlstasper el fabrlcantede taprenda.
• No coloquearticulos manchades deacelte de coclna
en sulavadora. Losartlculos contamlnadoscon ace/to
de coclnapuedencontdbulr auna reaccl6n quimlca
quapmvoque elincend/o deuna carga_
• Nouse suavlzantesde/alas nlpmductes
ellmlnadoresde est_t/ca a manes quasea
recomendadoper el fabrlcantedelsuavlzante de/alas
6 e/producto.
GUARDE ESTAS INSTRUCCIONES
INSTRUCCIONES DE CONECCIONA TIERRA
Esteapareto debeserconectadoatlerra_Dadoelcase de descomposture6real funclonamlento,/a conexl6na tlerre
reduceelriesgoderecib/r unadeseargael_ctrlca proveyendounavia demanor reslstenclaa la corrfenteel_ctrica,
Esteaparetoesta equfpadoconun cablequatleneunconductor de equtpoatlerrayuna ctavlJade t/erre..La clavlJa
debeser conectadaen una tomsdecorr/enteadecuada queest_proplamentelnstataday conectadaa t/errade
acuerdo con los c6dtgos y ordenanzaslocales,
• Nouseunadaptador nfun cablee!_ctrlco de extensl6n.
, Noquite el termtnalde conexf6na tlerreo
, SInocuentacon la tomade eorrlenteadecuada, consulte a un electrtctsta.
,d_ ADUERTENCIIA: una conexi6ninapropiadadelconductorde equipoatierra puederesuitaren riesgode recibiruna
descargael_ctfica Veri[iqueconun electricistacatificadost tienedudas sabresiel aparatoesta
correctamenteconectadoa tierra No modifiquelaclavija previstaconel aparato Si no encajacon
la tomadecorriente,hagainstalarurtatomadecorfienteadecuadaperun etect]-fcistacalificade
27
Perno pare Transportaci6n
Clavija de Energia
- SI el cable de suministro es_
dahado, debe se_ reemptazado
pot el fabdcante 5 sus agentes
de se_ieio, 6 alguna persona
calificada en orden a eviter
cualquier riesgo
de Con_ol
Manguera de Desagiie ............
%
Distribuidor
Puerta , .
" Nombre:
= Suministro de Energia:
" Dimensiones:
M_quina Lavadora de Carga pot el Frontal
120V - 60Hz
68.6cm(Anch0)X75.6cm(Profundidad)X98 3cm (Nlura), 129,1cm (P,puetia abierta)
27"(A) X 29314"(P) X 3811116-(A), 5013t16"(P, pue_1a abierta)
" Peso: 86 kg
i Capacidad de Lavado: 3.22 pies cubicos (1EC: 372 pies cubicos) 1}
[] Velocidad de la RevoluciOn:1100 rpm max. (WM2277H*)
1000 rpm max, (WM2077CW)
[] Presi6n de Agua Permitida: 4_5_ 145 psi (30 .- 1000 kPa)
* Especificaciones sujetas a cambio pore] fabricante,.
S. ACCESORIOS
v
Manguera de Agua Catiente
Llave
Cinta Sujetadora de Manguera [
I Fria de de Desag0e
t
(1 c/u)
1) Pot cada 60456 IEC lava e! equivalente de una agitador de 3,72 pies c0bicos.
28
INSTRUCCIONES DE INSTALACION :
lnstale 6 almaeene en un lugar donde no e.st_ exp_;esta a temperaturas inferiores a la eongelaciOn ni expu_la a la
intemperie.
Conecte a tierra eorrectamente y eumpliendo con redes los efidiges y ordenanT_s gube[namenlales_
Para re{|ucir h_sriesges de eleetr_cuci6n, no insfale la lavadora en lugares h_imedos.
La abertura de la base no debe ser obstrulda per alfornbra cuando est_ instalada st_bre un piso ton alfombra.
En paises d.nde haya fireas que puedan estar sujetas a plagas de cucaraehas 6 algfin otto bicho, ponga a{eneifn
particular a mantener el aparat{; _ sus ah_ledores en condieiones limpias to(h)el tiemp(J. Cuakluier dafio que pueda
haber side causado per cuear'achas 6 alg_n etro bicho, ne ser,'i cubierte per la garantia de _te aparato.
[] Pernos de Transportacion
Etaparato cuenta con pernos de transportaci6npara prevenir da_o interno durante su transportaci6n
= Remover los Pernos de Transportacion
1. Cuatro pernos est_n [nstaladospara proteger la
[avadora durante el transporte Antes de operar
[a lavadora, retire los pernosy abrazaderas
•Si no son retirados, pueden causar fuertes
vibraciones, ruido y real funeionamiento
3. Retire los 4 pernos y abrazaderas d&ndoles
w_elta lentamente alas abrazaderas Conserve
los 4 pernos, las abrazaderas y la llave para su
uso futuro
•Cuando el aparato sea transportado, lospernos
y abrazaderas deber_n ser remplazados
2, Desatornille los 4 pernos con la Ilave Provista
4. Tape los orificioscon las tapas provistas
29
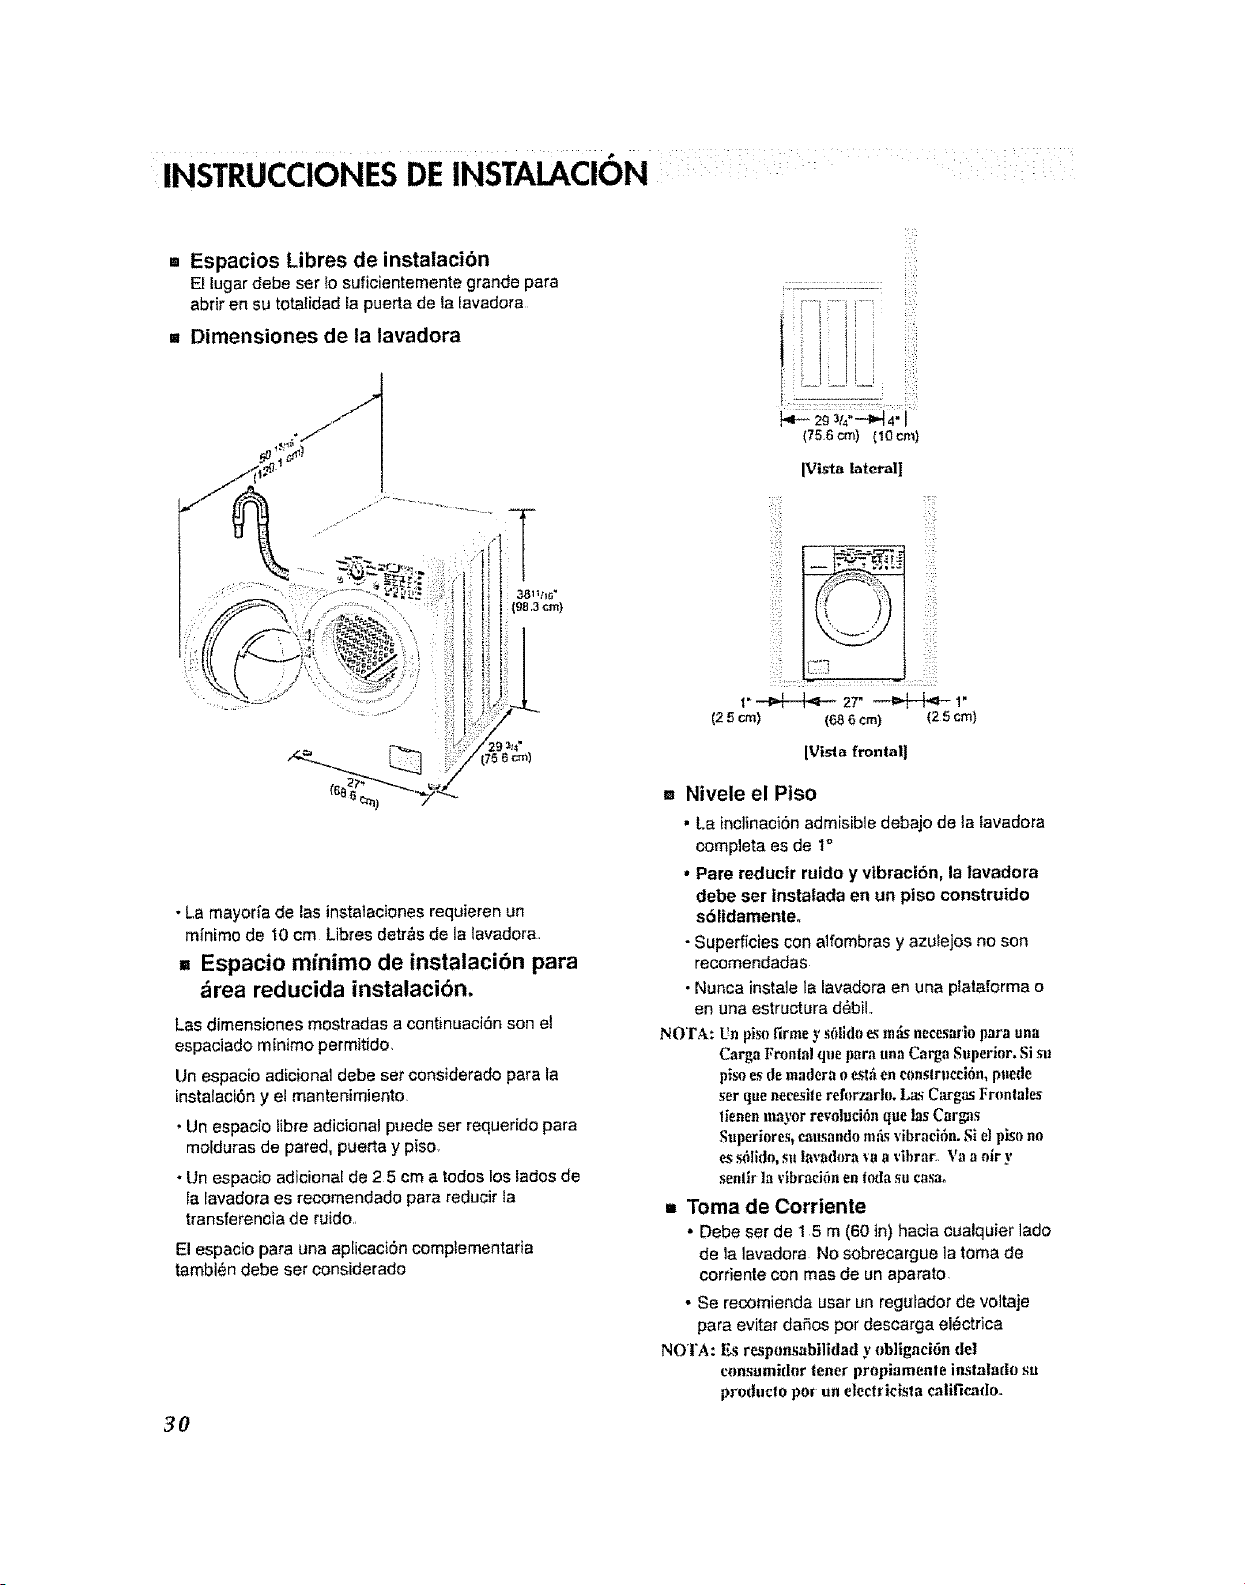
INSTRUCCIONES DE INSTALACION ......
= Espacios Libres de instalacibn
EI lugardebe ser tosuficientemente grande para
abfir en su totalidad [a puerta de la lavadora
=. Dimensiones de la lavadora
• La mayoria de las instalacionesrequieren un
minimo de 10 cm Libres detr_s de la lavadora
= Espacio minimo de instalacion para
,Srea reducida instalaci6n,
Las dimensiones mostradas a continuaci6nson el
espaciado minimo permitido,
Un espacio adicional debe set considerado para ta
instalaci6n y el mantenimiento
• Un espacio tibreadicienal puede ser requerido para
molduras de pared, puerta y piso,
• Un espacio adicionai de 2 5 cm a tedos los lades de
la lavadora es recomendado para reducir ta
transfereneia de ruido,
El espacio para una aplicaci6n complementaria
tambi6n debe set eonsiderado
3O
. !iii:_i:
•_ZI-T_TT :
L ..........,
(75 6 cm) (!0 cm}
[Vista lateral]
IVisla frontal]
= Nivele el Piso
, La incltnaci6n admisible debajo de la lavadora
completa es de 1°
• Pare reductr rutdo y vibraci6n, la lavadora
debe ser instalada en un piso construido
s61idamente.
• Superficies con alfombras y azulejos no son
recomendadas
• Nunca instale la lavadora en una ptataforma o
en una estructura d6bil.,
NOTA: Un pisofirme y s611do_ nffLsnecesaHopara una
CargaFrontal que parauna CargaSuperior.Sisu
plsoes demaderao _tfi en construcci6n, puede
ser que aece_silereforzarlo. LasCargas Frontales
tienen mayorrevolud6n que lasCar_s
Superiores,causandom,_svibraci6n. Si elpiso no
es_lido, sit lavadora _a a vibrar',, Va a off y
senllr la vibraci6n entodasu casa,
= Toma de Corriente
• Debe ser de 15 m (60 in) hacia cualquierlade
de la lavadora No sobrecargue la toma de
corriente con mas de un aparato.
• Se recomienda usar un regulador de voltaje
para evitar dafios per desearga el6ctrica
NOTA: Es responsabilidad y ebligaci6n de!
consumidor tenet propiamenle instatado su
produclo po_ un elecfficista calificado_
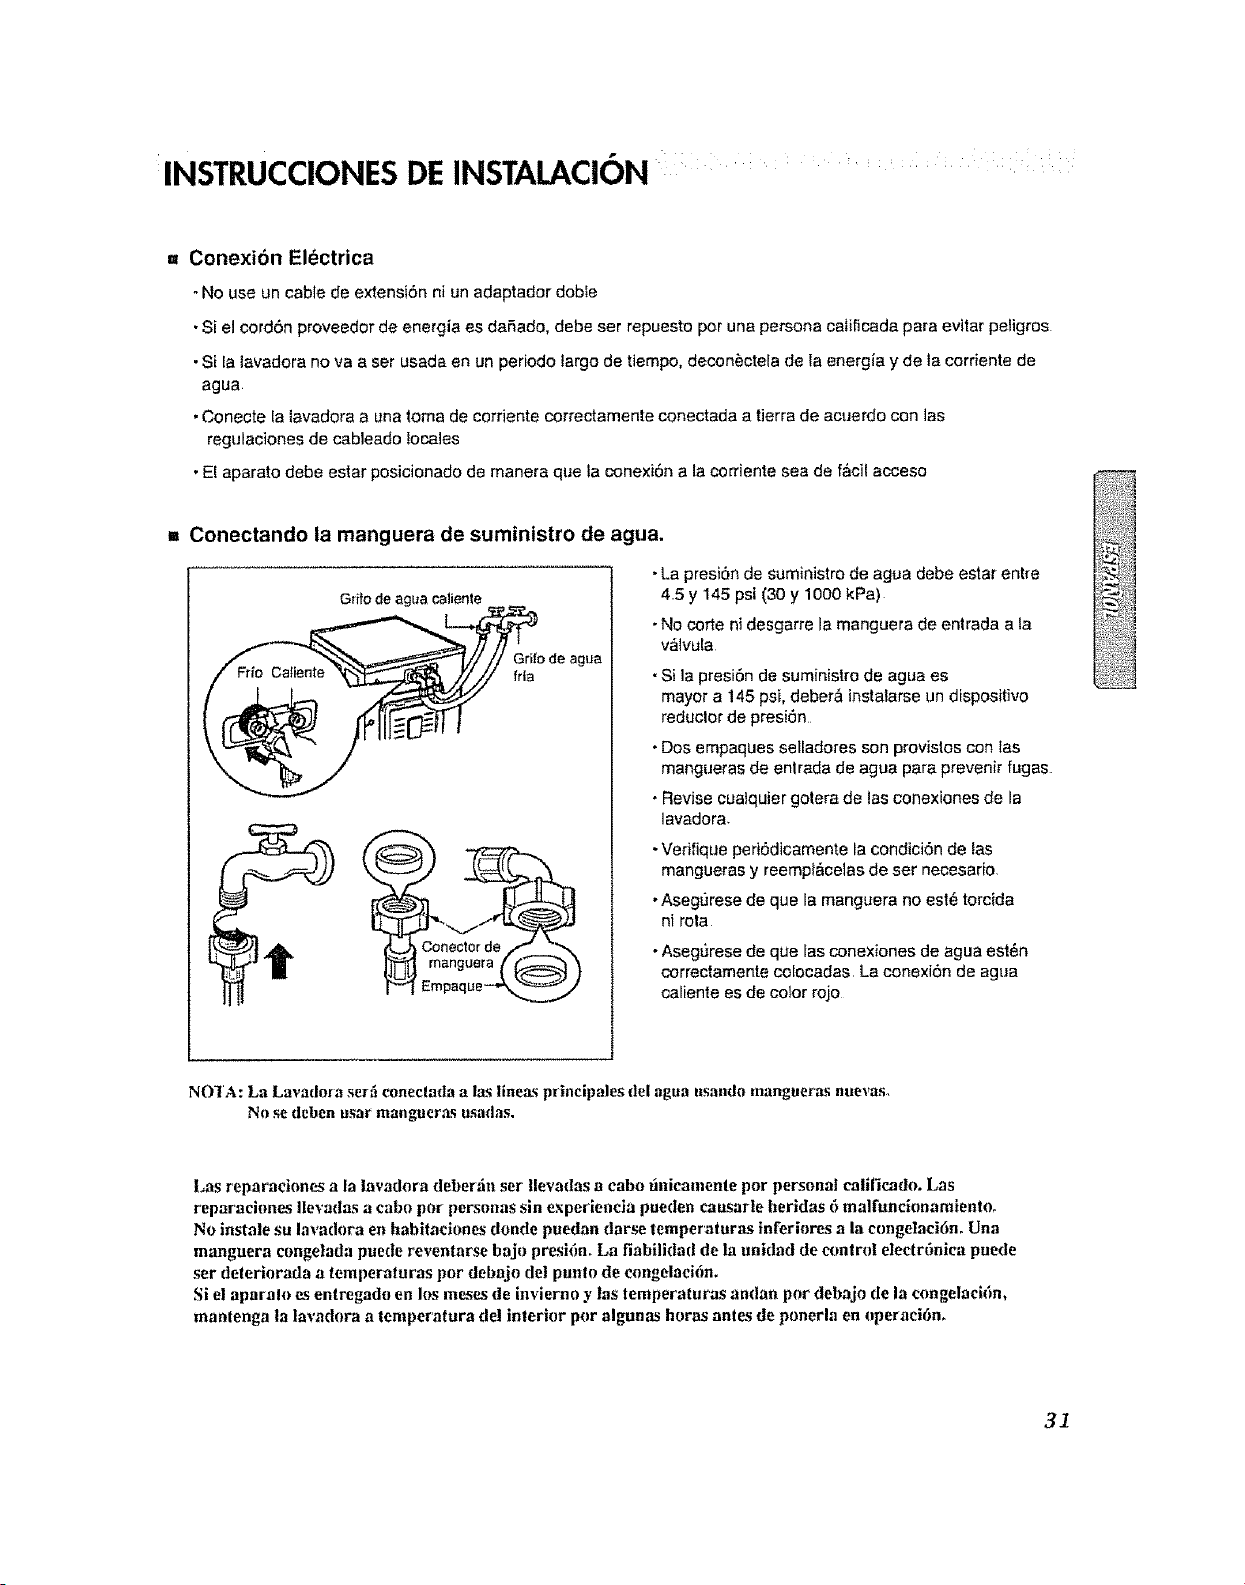
INSTRUCCIONES DE INSTALACION i
a Conexion Electrica
- No use un cable de extensi6n ni un adaptador doble
• Si el cord6n proveedor de energia es daSado, debe ser repuesto per una persona catificada para evitar peligros
• Si la lavadora no vaa set usada en un periodo largo de tiempo, decon_ctela de la energfa y de la corriente de
agua
• Conecte la lavadora a una toma de cordente correctamente conectada a tierra de acuerdo con las
regulaciones de cableado locales
• E! aparato debe estar posicionadode manera qtJe la conexiSn a la corriente sea de f&cil acceso
= Conectando ta manguera de suministro de agua.
Grffo de agua caliente
Conector de
manguera
Grifo de agua
frta
•La presi6n de suministro de agua debe estar entre
45 y 145 psi (30 y 1000 kPa)
•No corte ni desgarre la manguera de entrada a ta
v_lvula
•Si la presi6n de suministro de agua es
mayor a 145 psi, deber& instalarse un dispositivo
reductor de presi6n
*Dos empaques selladores son provistos con las
mangueras de enlrada de agua para prevenir fugas
. Revise cualquier gotera de las conexienes de la
lavadora
-Verifique peri6dicamente ta condici6n de las
mangueras y reempl_calas de ser necesario,
•Asegurese de que la mangaera no est_ torcida
ni rola
•AsegSrese de qua fas conexiones de agua est6n
correctamente colocadas, La conexiOn de agua
ealiente esde color rojo
NO]A: La Lavadora ser_ coneclada alas |inea.s p_ineipales del agua usando manguera_,; nuevas.
No se deben usar mangueras usadas.
Las reparaciones a la lavadora deberdn ser llevadas a cabo finicamente por personal calificado. Las
reparaciones Ilevadas a cabo par personas sin experiencia puedea causarle heridas 6 malfuncionamieeto_
No instale su lavadora en habitaciones donde puedan darse temperaturas inferiores a la congelaci6no Una
manguera eongelada puede reventarse bajo presi{_m La fiabilidad de la unidad de control eleetr6niea puede
ser deteriorada a temperalnras pot debajo del pultto de cengelaei6n.
Si el aparalo es entregado en los moses de invierno y las temperaturas andan por debajo de la eongelaci6n,
mantenga la lavadora a temperalura del interior pot algunas horas anles de ponerla en nperaci6no
31
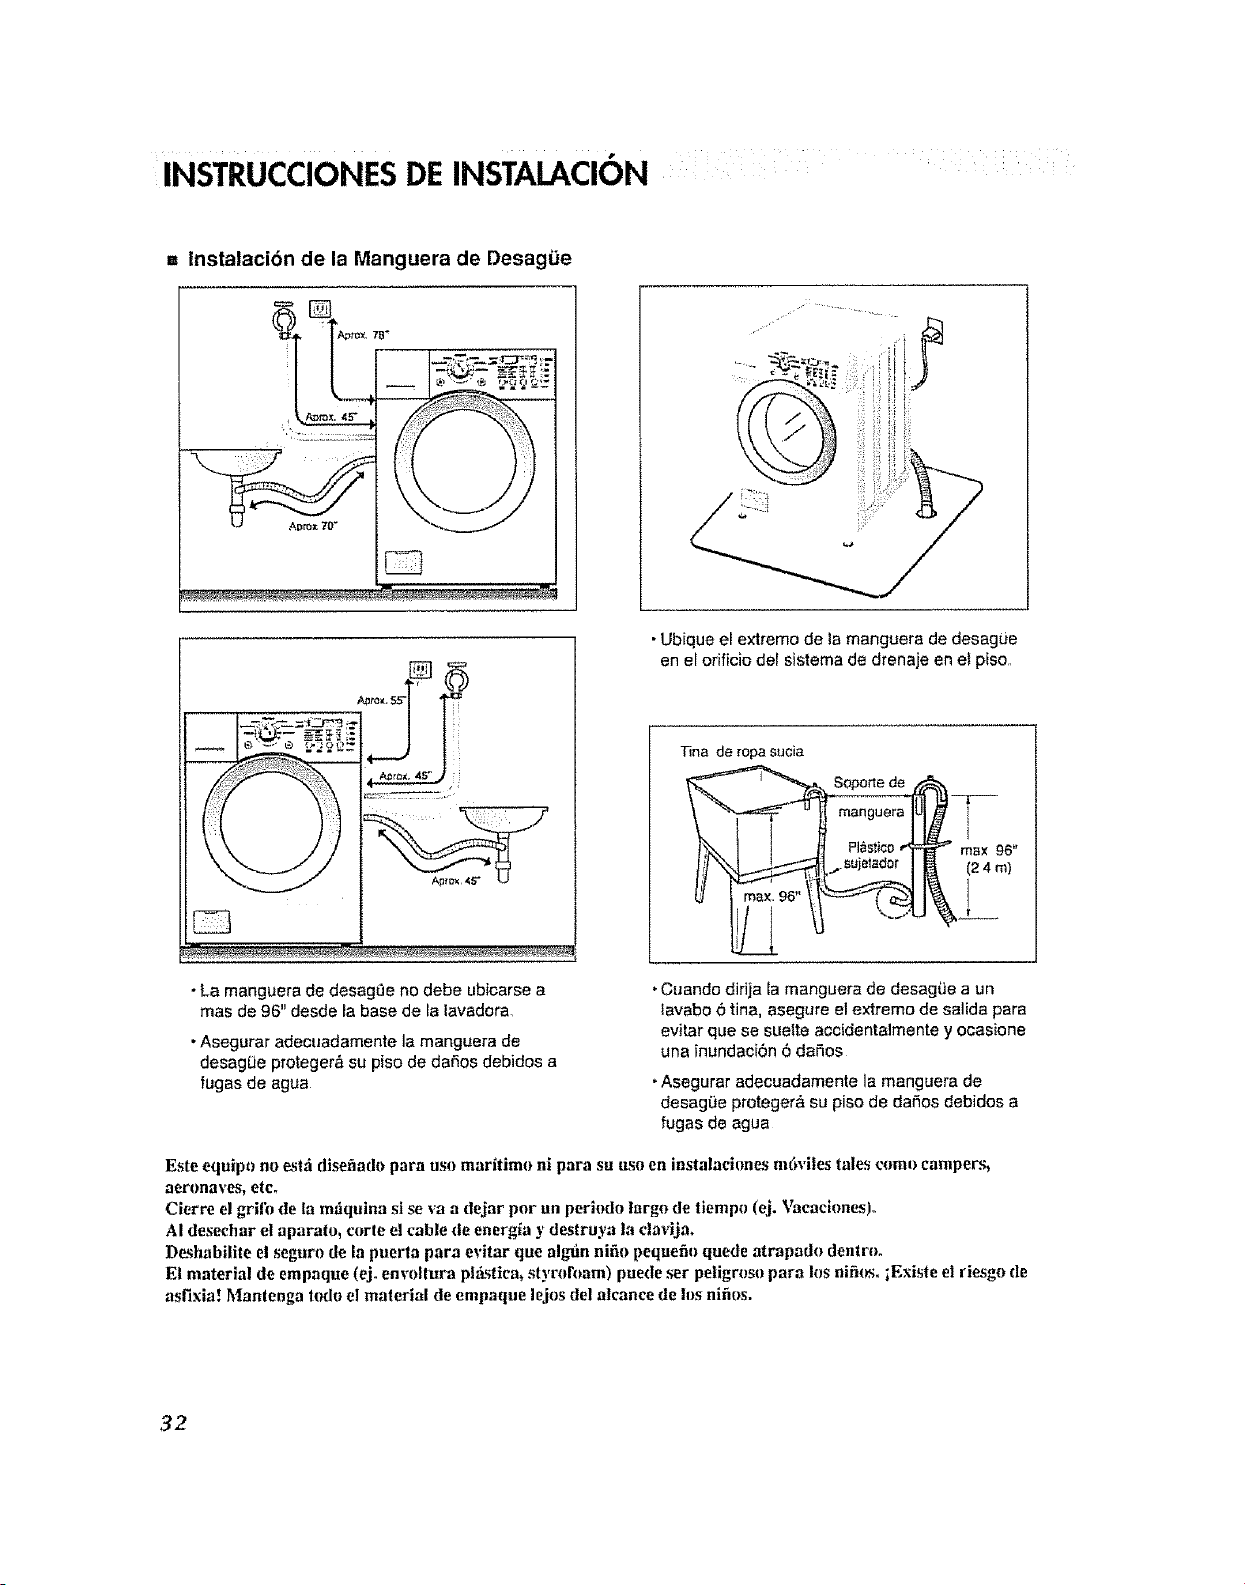
INSTRUCCIONES DE INSTALACION
-. lnstalaci6n de la Manguera de Desagfie
_
• Ubique el extremo de la manguera de desague
en el orificiode[ sistema de drenaje en el piso.
Tina de ropa sucia
___L
Soportede
Pl_stico _ max 96"
•La manguera de desag0e no debe ubicarse a
mas de 96" desde ia base de Ia Iavadora
• Asegurar adectladamente la manguera de
desagUe proteger& su piso de daSos debidos a
fugas de agua
•Cuando didja [a manguera de desagiJe a un
lavabo 6 tina, asegure elextremo de salida para
evitar que se suefte accidentalmente y ocasione
una inundaci6n 6 daSos
•Asegurar adecuadamente la manguera de
desagDe proteger& su piso de daSos debidos a
fugas de agua
Este equipo no esld disefiado para uso maritimo ni para su uso en inslalaciones m6viles tales como campers,
aeronaves, etc.
Cierre el grifo de la mdquina si se va a dejar por an periodo largo de tiempo (ej. Vaeaclones),.
AI desechar el aparalo, corte el cable de energia y destraya la clavija.
Deshabilite el seguro de la puerta para evitar que algun nifio pequefio quede atrapade dentroo
El material de empaque (ej. envoltura plfistiea_ styrohmm) puede set peligroso para los nifios, iExiste el riesgo de
asfixia! Mantenga todo el malerial de empaque lejos del alcanee de los nifios.
32
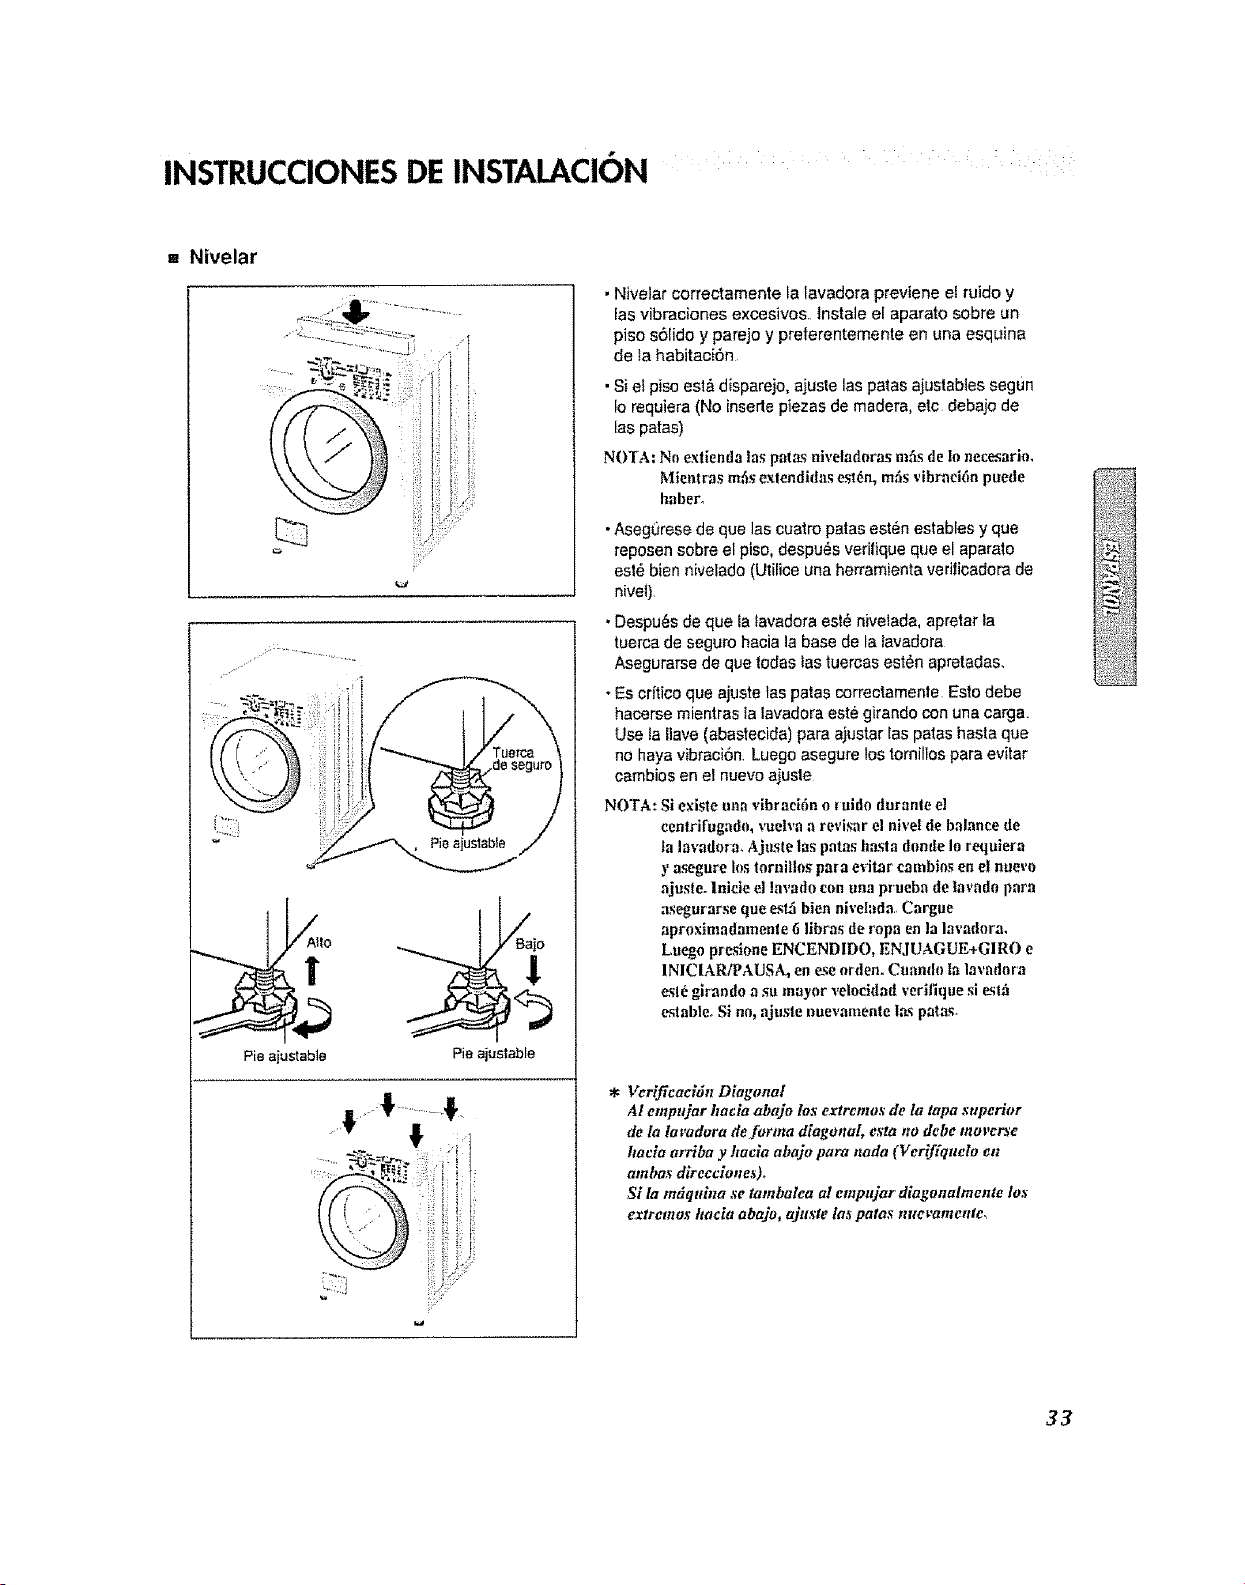
INSTRUCCIONES DE INSTALACION : :
•. Nivelar
Pie a
Ale
1
astable
i/Baio
Pie a ustable
0•! ............!
• Nivelar correctamente la lavadora previene elruido y
[asvibraciones excesivos, tnstale el aparato sobre un
piso s6[ido y parejo y prelerentemente en una esquina
de ta habitaciOn
• Si et piso esl& disparejo, ajusle las paras ajustables segun
Io requiera (No inserle piezas de madera, etc debajo de
Ins pains)
NOTA: No extienda Ins paras niveladoras ross de !o necesario,
Mientras re{is exlendidas est6n, mils vibraei6n puede
babero
•Aseg0rese de que las cuatro patas est6n estables y que
reposensobre el piso, despu_s verilique que el apara_o
est_ bien nivelado (Utilice unaherramienta verifioadora de
nivet)
• Despu_s de que la {avadoraest6 nivetada, apretar la
tuerca de seguro hacia la base de la tavadora
Asegurarse de quetodas las tuercas est6n apretadas,
- Es critico que ajuste las parascorrectamenle EsIo debe
hacerse mientras ta iavadora este girando con una carga,
Use ia llave (abastecida) para ajustar las palas hasta que
no haya vibraci6n, Luego asegure los ternillespara evitar
eatables en el nuevoaiusle
NO'I'A: Si e×i_;le una vibraci6n o _uido daranle el
eentrifugado, vuelva a revisar el nivel de balance de
ta lavadora_ Ajuste las patas h_,_la dende Io requlera
y asegure Ins tornillos pma evilar eambins en el nuevo
ajuste, lnide el lavado con una prueba de lavado para
asegurarse que est:i bien nivelada. Cargue
aproximadamenle 6 libras de ropa en la lavadora.
Luego pre_ene ENCENDIDO, ENJUAGUE+GIRO e
1NICIAR/PAUSA, en ese arden. Cuandn la lavadara
&sl_glrando a su mayor velocidatI verifique si e_slh
estableo Si no, ajusle nuevamente t_ patna,
* Verificacldn Diagonal
AI emptl]ar hacia abajo los extrcmo._ de la tapa superior
de la Ire'adorn de forma diagonal, esta no debe mover.re
hacla ardba y hacla abajo para nada (Ver_ffqnelo en
ambas dlrecciones).
SI la mdqtdna se tambalea a! empnjar dlagonnhnente 1o._
extremos hacia abajo, ajuste Ins patas nuevamente,
33
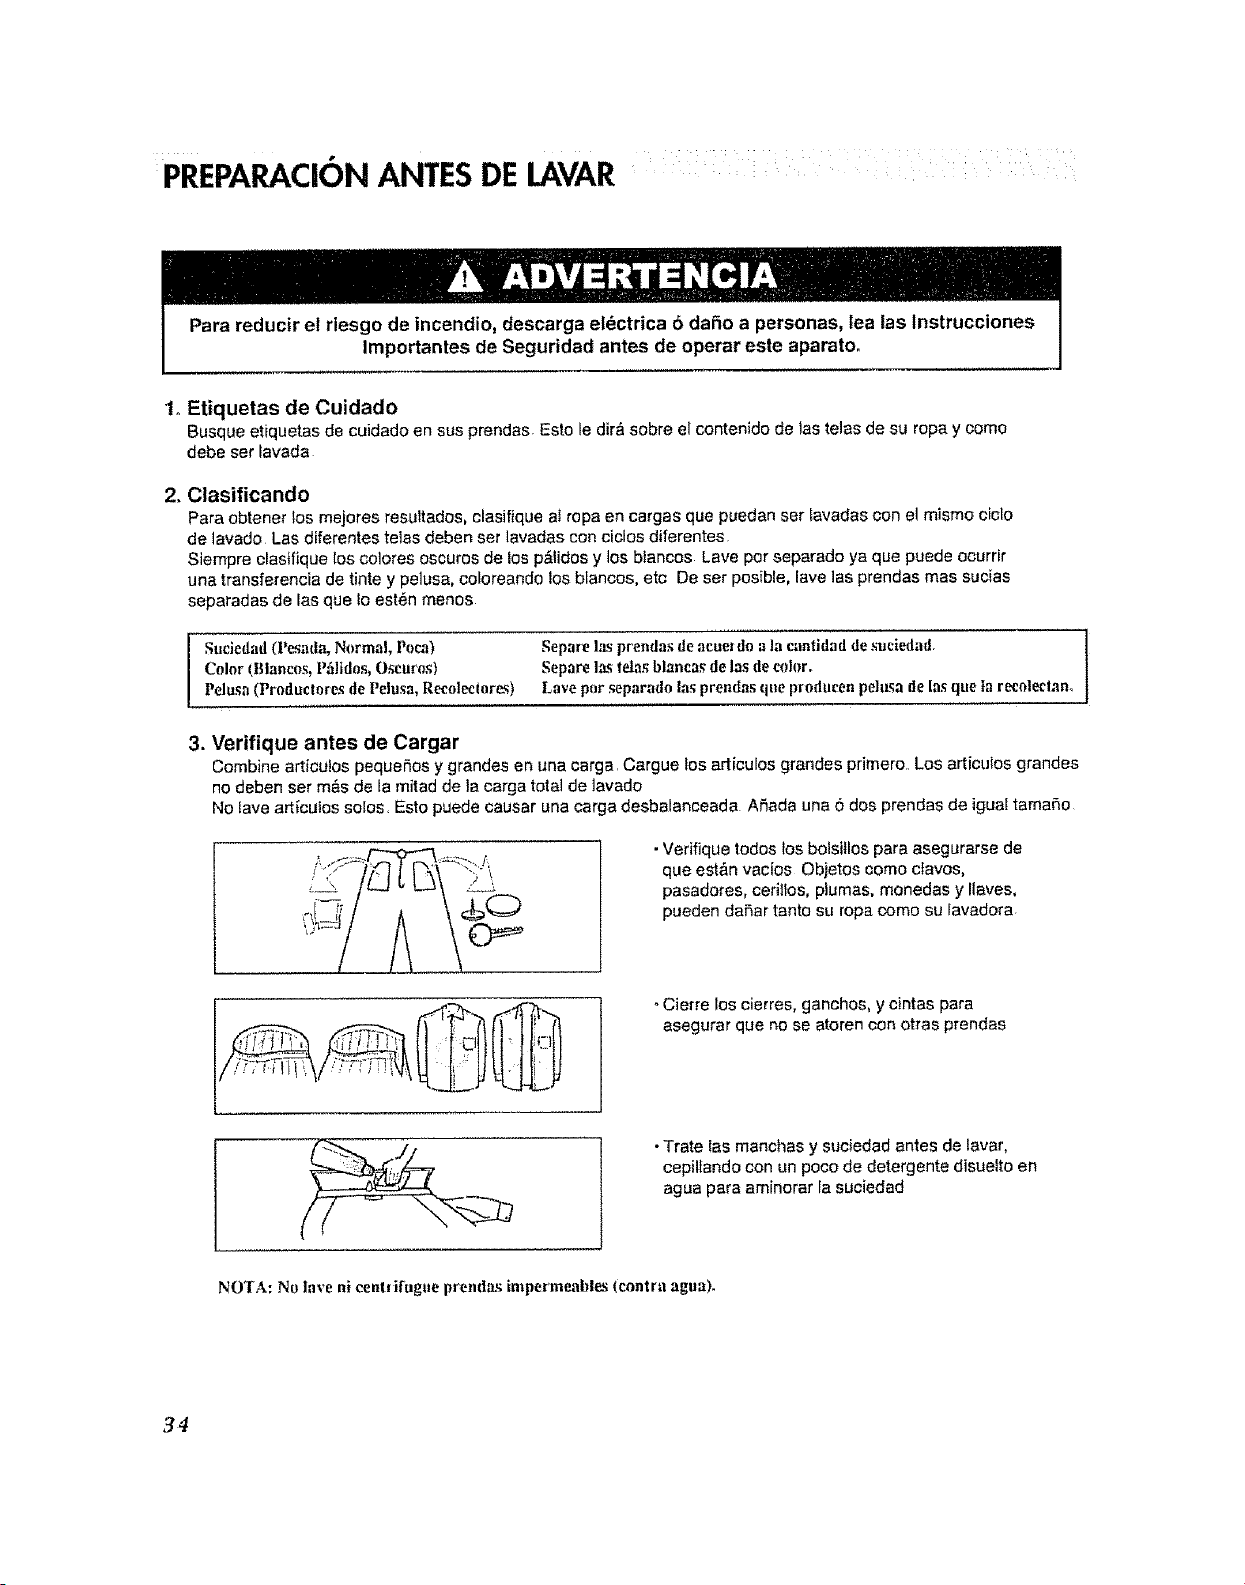
PREPARACION ANTES DE LAVAR ' ::
Pare reducir el riesgo de incendio, descarga el_ctrica 6 dale a personas, lea las lnstrucciones
Importantes de Seguridad antes de operar este aparato.
1,, Etiquetas de Cuidado
Busque etiquetas de cuidado en sus prendas Esto le dir_ sabre ei contenido de las telas de su ropay come
debe ser iavada
2. Clasificando
Pare obtener los mejores resultados, clasifique a_rope en cargas que puedan ser _avadascon el mismo cielo
de lavado Las diferentes telas deben set lavadas con ciclos diferentes
Siempre clasifique los colores assures de los p&lidos y los btancos Lave per separado ya que puede ecurrir
una transferencia de tinte y pelusa, coloreando los blancos, etc De ser pesible, lave las prendas mas sucias
separadas de las que io est_n menos
1
Suciedad (l'_ada, Normal, Pace) Separe las prendas de acue_do :1la cantidad de s'ucledad. ]
Color (Blancos, Pfilidos_Oscuros) Separe las |des blanca,_de las de cohere
Pelusa (Productores de Pelusa, Recoleclorc-_) Lave per separado las prendas que producen pelusa de las que]a recoleclano
3. Verifique antes de Cargar
Combine artfcuios pequefios y grandes en t_nacarge, Cargue los articulos grandes primero. Los articulos grandes
no deben set m&s de la mitad de la carga total de ]evade
No tave art_culossolos, Esto puede causer una carga desbalanceada Afiada una 5 dos prendas de igual tamafio
• Verifique redes losboisillos pare asegurarse de
que est&n vacios Objetos come ctavos,
pasadores, cedllos, plumes, monedas y Ilaves,
pueden dafter tanto su ropa come su [avadora
i
oCierre los cierres, ganchos, y cintas pare
asegurar que no se atoren con arras prendas
•Trate [asmanchas y suciedad antes de laver,
cepillando con un pace de detergente disuelto en
agua pare aminorar [a suciedad
NO'IrA- No lave ni cenlfifugue prendtL_ impermeahles (cent ra ague).
34

USANDO ELDISTRIBUIDOR : : ....
El distribttidor aut_mtitico consiste de ceatr_ compartimentos que refienen 1} cl(wo liquido blanqueador, 2)
suavizanle de lelas liquido, 3) delergente Iiquido 6 en polvo para el prelavado y 4) deter genie en polvo (_liquklo y
blanqueador seguro para los colores para el lavado principal.
Todos It,s productos tie lavanderia pueden see afiadittos at mismo tlempo en su cc_mpartimiento distrlbuldor. Est_)sse
distribuirfin a su debido tiempo para lograr la limpieza mas efectiva. Despufis €lecargar los aditiw_s de lavanderla en
el distribuidor, cierre la tapa.
Afiada detergente, blanqueador y suavizante de telas al distribuidor autom6tico de
acuerdo con los siguientes pasos:
1. Abra el caj6n distribuidor
2, Cargue los productosde tavado en los compartimentos correspondientes
3, Cierre el caj6n distribuidor
•, Acerca del Detergente
Para esta lavadora se recomienda un detergenlede baja espuma Usela cantidad recomendadaporel |abr[cante_
Si no hay detergente de baja espuma dispoaibie, use una cantidad reducida de detergente,, Debido a que la reducci6n
en tacantidad de detergente puede reducir ta iimpieza,es imporlanLeque trate con anlerioridad la suciedad, clasifique
cuidadosamente por el nivet de color y de suciedad, y evite la sobrecarga
El uso de detergente debe ser ajustado a [atemperalura del agua, dureza det agua, y el nivel de suciedad en la carga,.
Para mejores resu]tados, evite usar demasiado detergente.,
_ _"/ rt_ _nt
b[anqueador
_j_,_ [ \ Compartimiento
]__ttdme:i?il:qViu:_onte de
de lavado
principal,.
1.CompartimientodeDetergenteparaPrelavado
• A_ada detergente a este compartimiento cuando
use la opci6n de Prelavado, En este
compartimiento se puede usar detergente tanto
liquido como en polvo E[detergente serf
distribtlido automfiticamente durante el
Prelavado si este rue seleccionado en las
opciones,
. Afiada ia mitad de la cantidad recomendada para
el Prelavado y [a canfidad completa
recomendada para el Lavado Principal
NO'I'A:El delergenle liqui¢loserfi dx'enadoal
eillndro de la lavadora al set afiadldo al
tlisffibuidor.
35
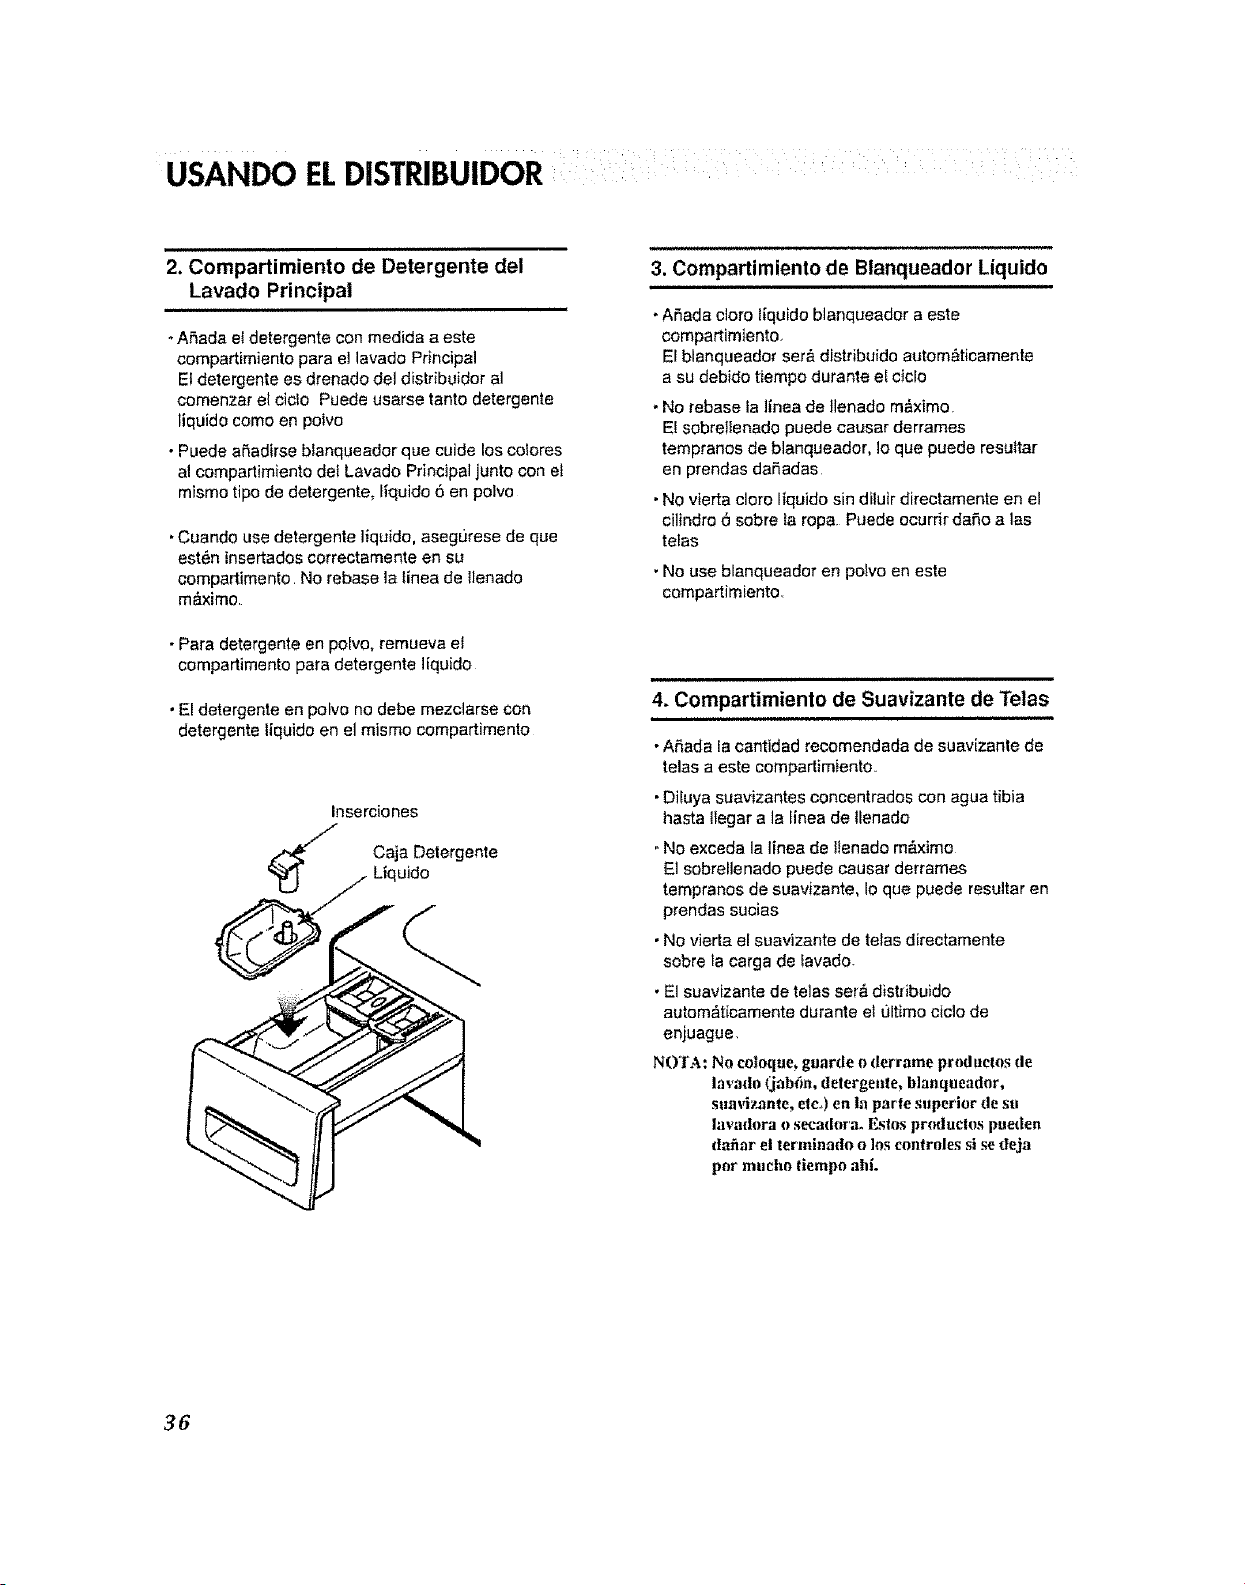
USANDO ELDISTRIBUIDOR
2. Compartimiento de Detergente del
Lavado Principal
i
*AP,ada e[ detergente con medida a este
compartimiento para el lavado Principal
El detergente es drenado del distribuidor al
comenzar el ciclo Puede usarse tanto detergente
[iquido como en polvo
• Puede aSadirse blanqueador qua cuide los colores
al compartimiento def Lavado Principal junto con el
mismo tipo de detergente, [iquido 6 en polvo
•Cuando use detergente llquido, asegurese de que
est6n [nsertados correctamente en su
compartimento No rebase la tinea de llenado
m6ximo.
• Para detergente en polvo, remueva el
compartimento para detergente ffquido
. El detergente en polvo no debe mezclarse con
detergente liquido en el mismo compartimento
Inserciones
Caja Detergente
Liquido
3. Compartimiento de Blanqueador Liquido
-ASada cloro tlquldo blanqueador a este
compartimiento.
El blanqueador set& distribuidoautom&ticamente
asu debido tiempo durante el c]clo
. No rebase [a linea de Ilenado m6xlmo
El sobreIIenado puede causar derrames
tempranos de blanqueador, Ioqua puede resuttar
en prendas dafiadas
• No vierta cloro [iquido sin diluir directamente en el
cilindro 6 sobre fa ropa Puede ocurdr da5o a 1as
telas
• No use blanqueador en polvo en este
compartimiento.
4. Compartimiento de Suavizante de Telas
• ASada la cantidad recomendada de suavizante de
telas a este compartimiento.
• Diiuya suavizantes concentrados con agua tibia
hasta Itegar a la ffnea de llenado
"No exceda la linea de lienado mdximo
El sobrellenado puede causar derrame-s
tempranos de suavizante, Io qua puede resultar en
prendas sucias
• No vierta el suavizante de telas directamente
sobre la carga de _avado.
• El suavizante de telas ser_ distribuido
autom_ticamente durante et ultimo ciclo de
enjuague.
NOTA: No coloque_ guarde o derrame prod Ltetos de
lavado (jab(m, delergente, blanqueador,
suavi?.qnte, etc_) en In parle superior de su
lavadora o secadora. F_stos pr_ductos puedeo
dafiar el tenninado o los controles si se deja
pot mucho |iempo ahi.
36
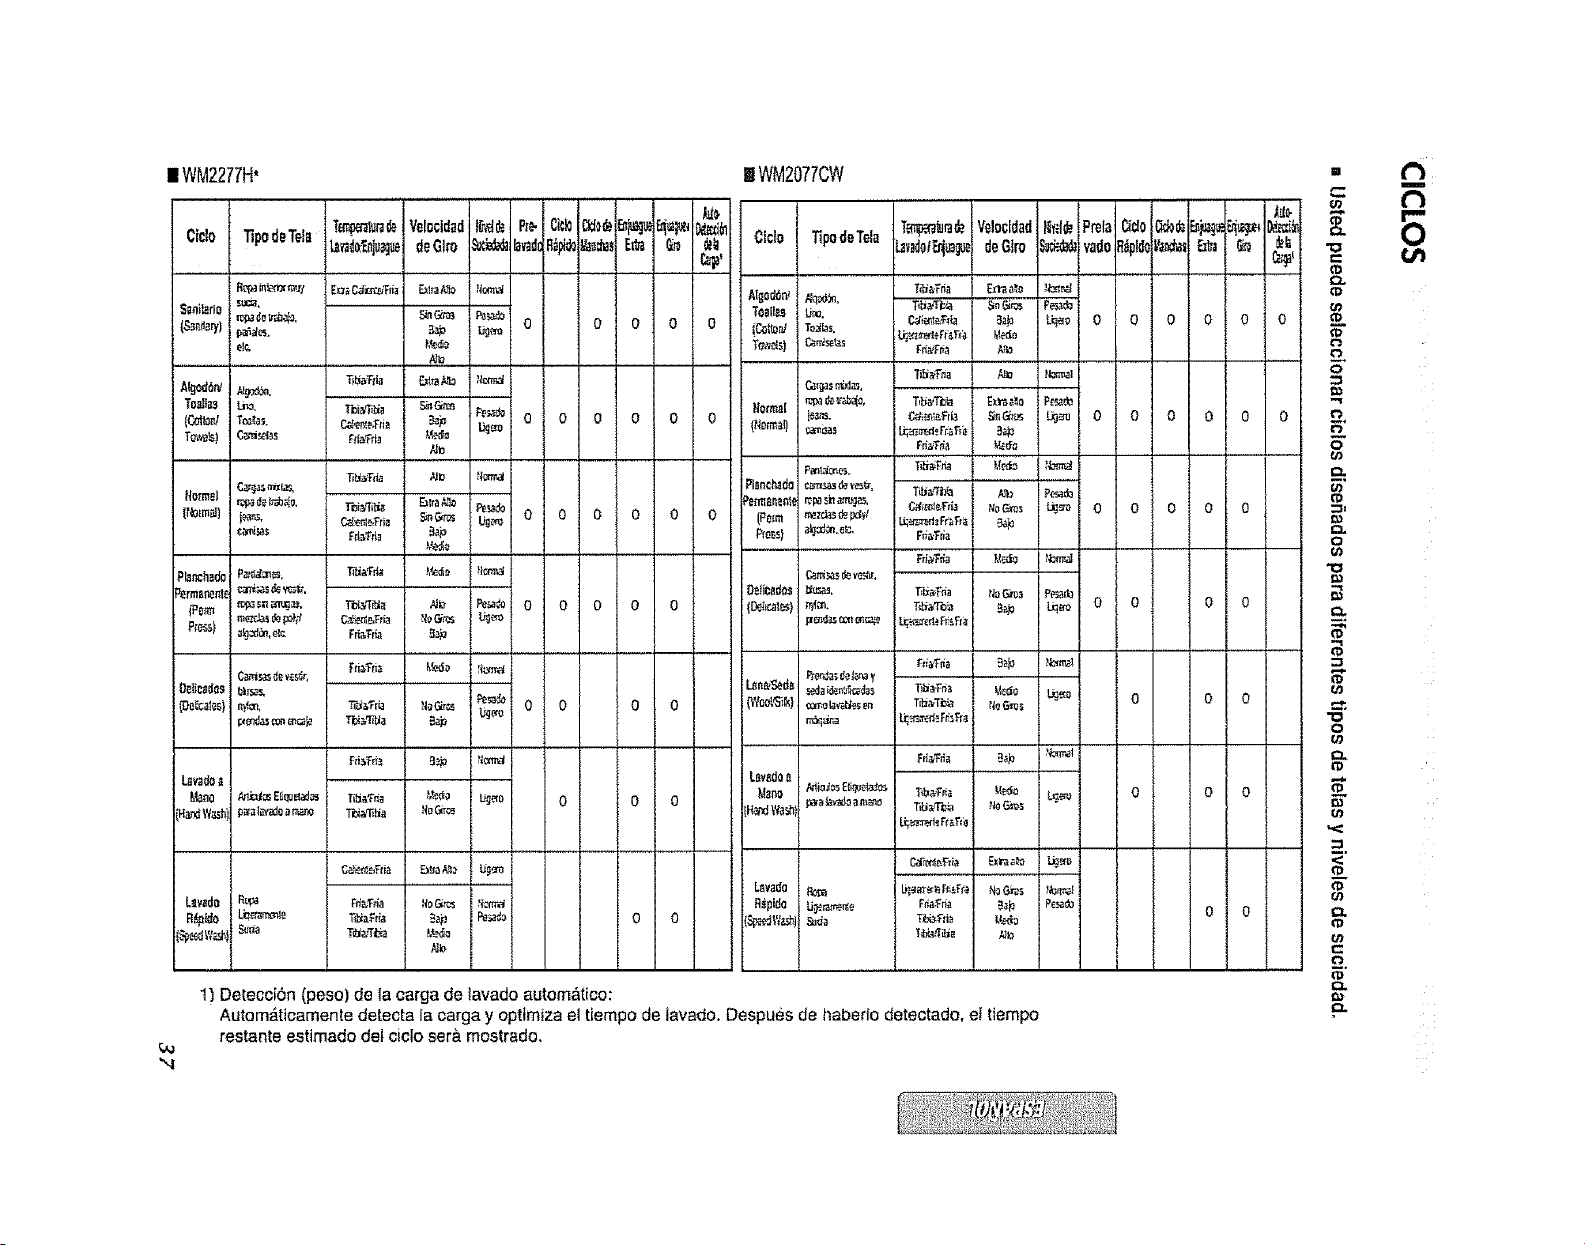
II WM2277H* I WM2077CW
Tem_ura_ Ydocidad i_ P_ Cid0
Ciclo TipodeTda L_dc_N_# deGim _i_,_ lavad(B_pi_
suez,
(CoIImV Tin,as. _er_;F;ia B_p
_o
0 0 0 0
_'_ O 0 0 0 0 0
T_bi_,T(_a A_io _orm,Y
It,b_m_)i._' C._,_r,L..fti__C-_ Ugem 0 O 0 0 0 0
(P_m_ _pas_m'ug_, I'_T_ _ iP_ 0 0 0 0 0
iH_W_h)I
Levedo j
Cido
ngm, "_,_a N_'_ L_ea 0 0
0 0
I
o 0
I
Lb_rramle T_._d_. B_N
t_b
o o
Totlllt
!CollmV
Noted
Pl_n¢_do
Pe_ane_
(Pmm
Oelicl_dol
Lene_ed_
M_p;,
BspidQ
tipodeTd_
; _re.
Can_s_L_s
T_Fs_lur_d_Velocldad1t,,1_
Lai_dot_m_deGlro
I
'[i_a'Fna Jllo fton_al
Cda._da _do
T_a.rr#a /a_ Pc_do
C_i_'FHa _o_s L_-o
F_fa,Tda _ _m'A
retire+ T_'ll_a
fda,T_a
_a _av_dlatlla_ li{il_
ix_ L,I+_a__F_ i
NoG,k_
B_
B_N
rioG;ros
No_s
Fe_b
"4
1) Detecci6n (peso) de la carga de lavado automatico:
Autom_[icamente detecta la carga y opttmiza el tiempo de tavado. Despues de habedo detectado, ei tiempo
restante estimado det ciclo set& mostrado.
v'adolt@llkt_Zbaltl G_ tt
0 0 0 0 0 0
0 0 0 0 0 0
0 0 0 0 0
0 0 0 0
0 0 0
0 0 0
o o
II
"o
0
o
m_
o
0
Q.
o
ffl
N"
o
o
i'D
-.t
__.
5
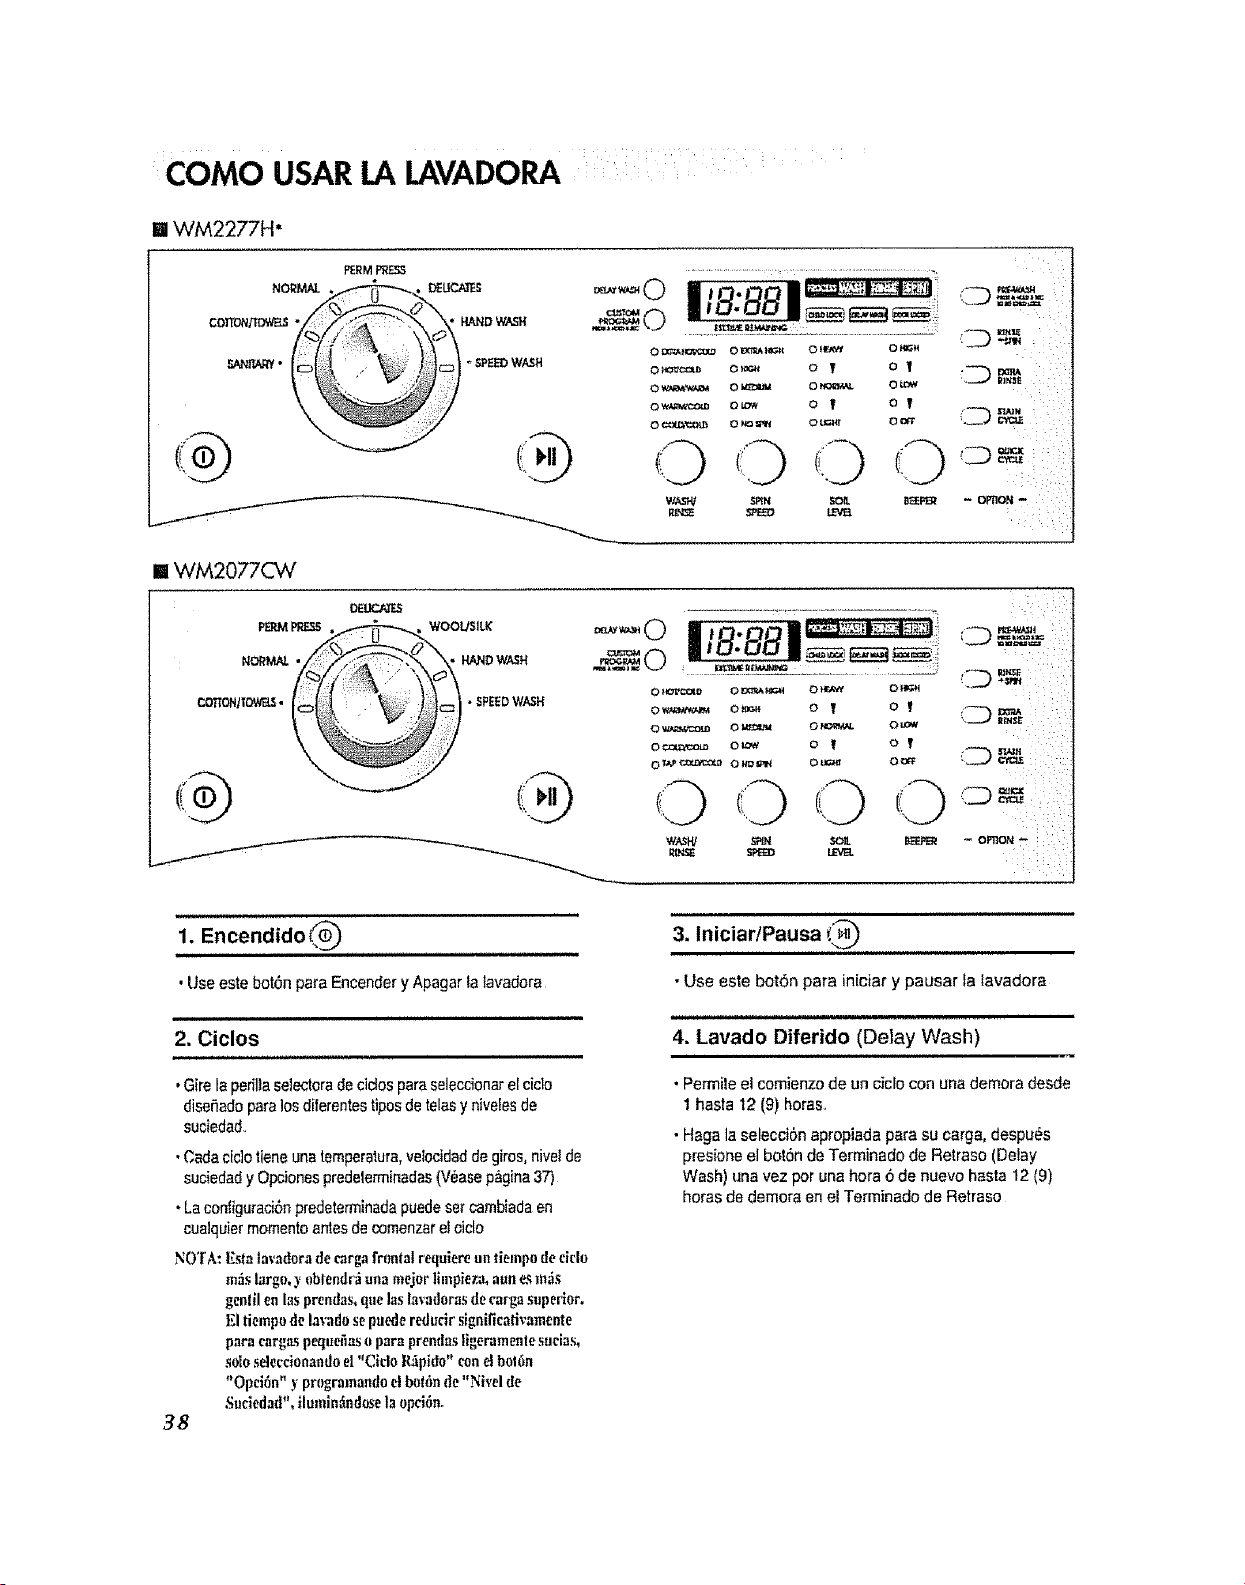
COMO USARLA LAVADORA
I WM2277H"
PERMPP_
HAHDWASH
* SPEEDW/_H
:._,,,_, i i¸
Z) =*"
i
o_ O_ 0 y 0
O "_¢J_,'_ O },er41e,l O N_'e_L OU3W
0 COf_/C_U} OtoW
o ! of
L
(..._j ,.=,,.===
1. Encendido _-_
,Useestebot6nparaEncenderyApagartalavadora
2. Ciclos
•Girelaperillasetectoradecidosparaseleccionarel ciclo
disefiadoparalos dilerentestiposdetelasy nivelesde
suciedad,
.Cadacic]otieneunatemperatura,velocidaddegiros,nivelde
suciedady Opcionespredelermirmdas(V_asep&gina37)
•Lacontiguraci6npredeterrninadapuedesercambiadaen
cualquiermomentoantesdecomenzarelciclo
NOTA:E_a lovadorade cargafrontal r'equiereunfiempode¢ido
m_islarge,y oblendr.'iunameier limpieza,aune._;m_is
genfflen lasprendas,que lastavadorasde ¢argasuperior,
El tiempode lavadoseput,de reduclrsignificalivamente
paracargospequefiasoparapren{lasllger._menlesueias,
sOlOsdeccionando el"Cido R:ipido"conel5o16n
"Opci6n" y programandoelbot6nde"Nivd de
Sucledad",ilumln_ntleselaopei6n°
38
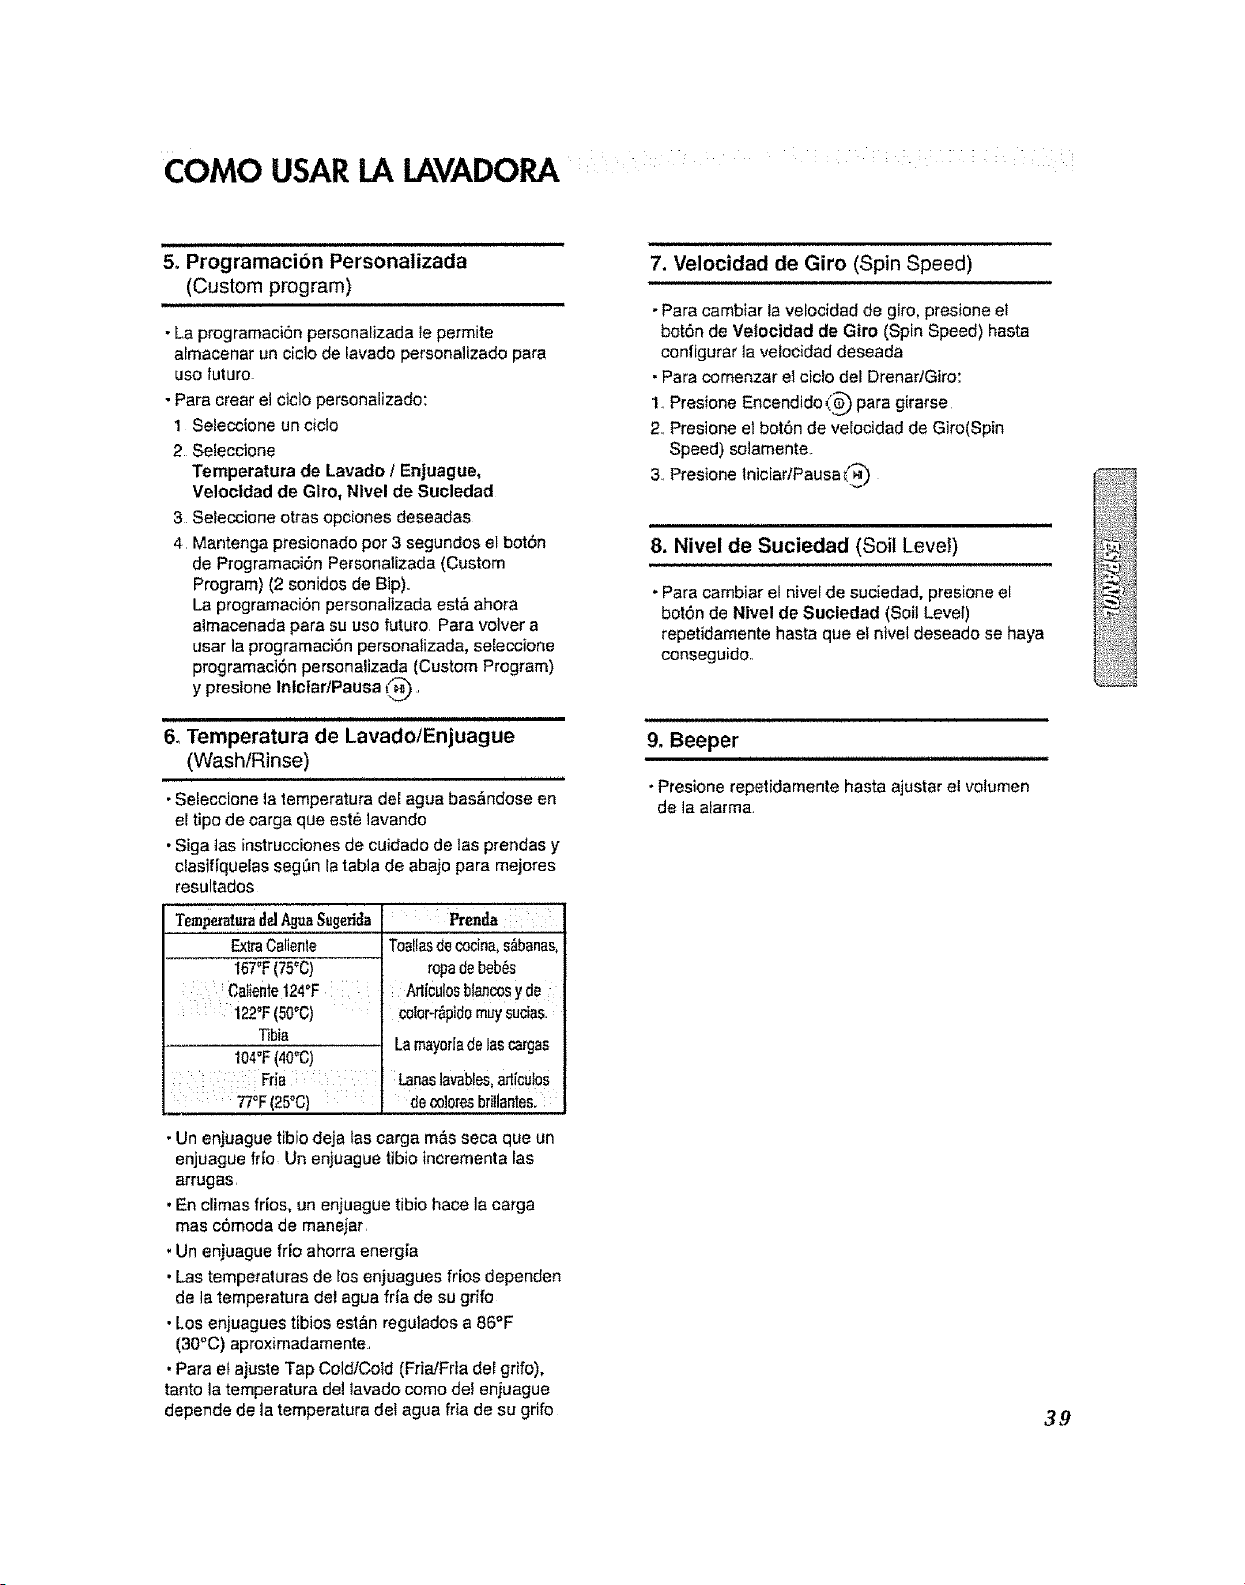
3. IniciarlPausa i_
•Use estebot6npara iniciary pausarfatavadora
4. Lavado Diferido (Delay Wash)
• Pan'nile el comienzo de un ciclo con una demora desde
1 hasla 12 (9) horas,
• Haga la selecciSn apropiada para su carga, despu#s
presione el bot6n de Terminado de Retraso (Delay
Wash) una vez per una hora 6 de nuevo hasta 12 (9)
horas de demora en el Terminado de Retraso
COMO USAR LA LAMADORA :
i it,iu,,,,ll,,i,,,,i,,i
5, Programacion Personalizada
(Custom program)
t
• La programaci6n personalizada le permite
armacenar an ciclo de lavado personalizado para
use future
• Para crear el ciclo personalizado:
1 Seleccione un cido
2 Seleccione
Temperatura de Lavado ! Enjuague,
Velocldad de Glro, Nlvel de Sucledad
3 Seleccione otras opciones deseadas
4 Mantenga presionado per 3 segundos el botbn
de Programaci6n Personalizada (Custom
Program) (2 sonidos de Bip).
La programaciSn personalizada est& ahora
almacenada para su use future Para velvet a
usar la programaciSn personalizada, seEeccione
programaciSn personalizada (Custom Program)
y presione Intelar/Pausa (e)
& Temperatura de Lavado/Enjuague
(Wash/Rinse)
i ii i i i
•Seleccione la temperatura de[ agua bas&ndose en
el tipo de carga que est_ lavando
•Siga _asinstrucciones de cuidado de las prendas y
clasif{quelas seg_n la tabla de abaio para mejores
resultados
Temperaturad_lh_a Sugefida
ExtraCallenle
167"F(75_C)
: Caliente124°F i
: i22°F (50"0)
Tibia
104_F(40°0)
: i; Fda :
77OF(25o0)
Pre.da
Toallasdecocina,sfibanas,
ropadebeb6s
Arliculosbiancosyde
cobr-r'&pidomuysucias.
Lamayoriadelascargas
:Lanas]arables,arlicuiOs
de oo]oresbrSantes,
•Un enjuague tibio deja las oarga m&s seca que un
enjuague fifo Un enjuague tiblo tncrementa las
arrugas.
• En climas fries, un enjuague tibia hace la carga
mas cSmoda do manejar.
•Un enjuague fr[o ahorra energla
• Las temperaturas de los enjuagues fries dependen
do la temperatura del agua frla de su grifo
• Los enjuagues tibios est_n regulados a 86°F
(30°C) aproximadamente.
• Para et ajuste Tap ColdlCold (Fria!Fda del grifo),
tanto la temperatura det lavado come del eniuague
depende de la temperatura deI agua fria de su grifo
7. Velocidad de Giro (Spin Speed)
-Para cambiar la velocidad de giro, presione el
botSn do Vetocidad de Giro (Spin Speed) hasta
configurar la velocidad deseada
•Para comenzar el ciclo del Drenar/Giro:
1 Presione Eneendido(_ para girarse
2..Presione el botSn de veIocidad de Giro(Spin
Speed) selamente.
3. Presione tniciar/Pausa('_
8. Nivel de Suciedad (Soil Level)
"Para cambiar el nivel de sueiedad, presione el
botSn de Nivel de Sucledad (Soil Level)
repetidamente hasta queet nivel deseado se haya
conseguido,
9. Beeper
•Presione repetidamente hasta ajustar el volumen
de la alarma.
39
:COMe USAR LA LAVADORA
1, Prelavado (Prewash)
, Use esta opci6n para cargas qua requieran
tratamientoprev[o ASade 16 minutes de prelavado
y desag5e.
2. Enjuague+Giro (Rinse+Spin)
• Use esta opci6n para enjuagar y luegogirar.
& Enjuague Extra (Extra Rinse)
• Esta opci6n provee un enjuague adicianal
• Use esta opci6n para asegurar la eliminaci6n de
residues de detargente 6 blanqueador de 1as
prendas
4. Ciclo de Manchas (Stain Cycle)
• ASade tiempo ai lavado y enjuague para majorar [a
eliminaci6n de manchas
* Provee un enjuague autam_ticamente
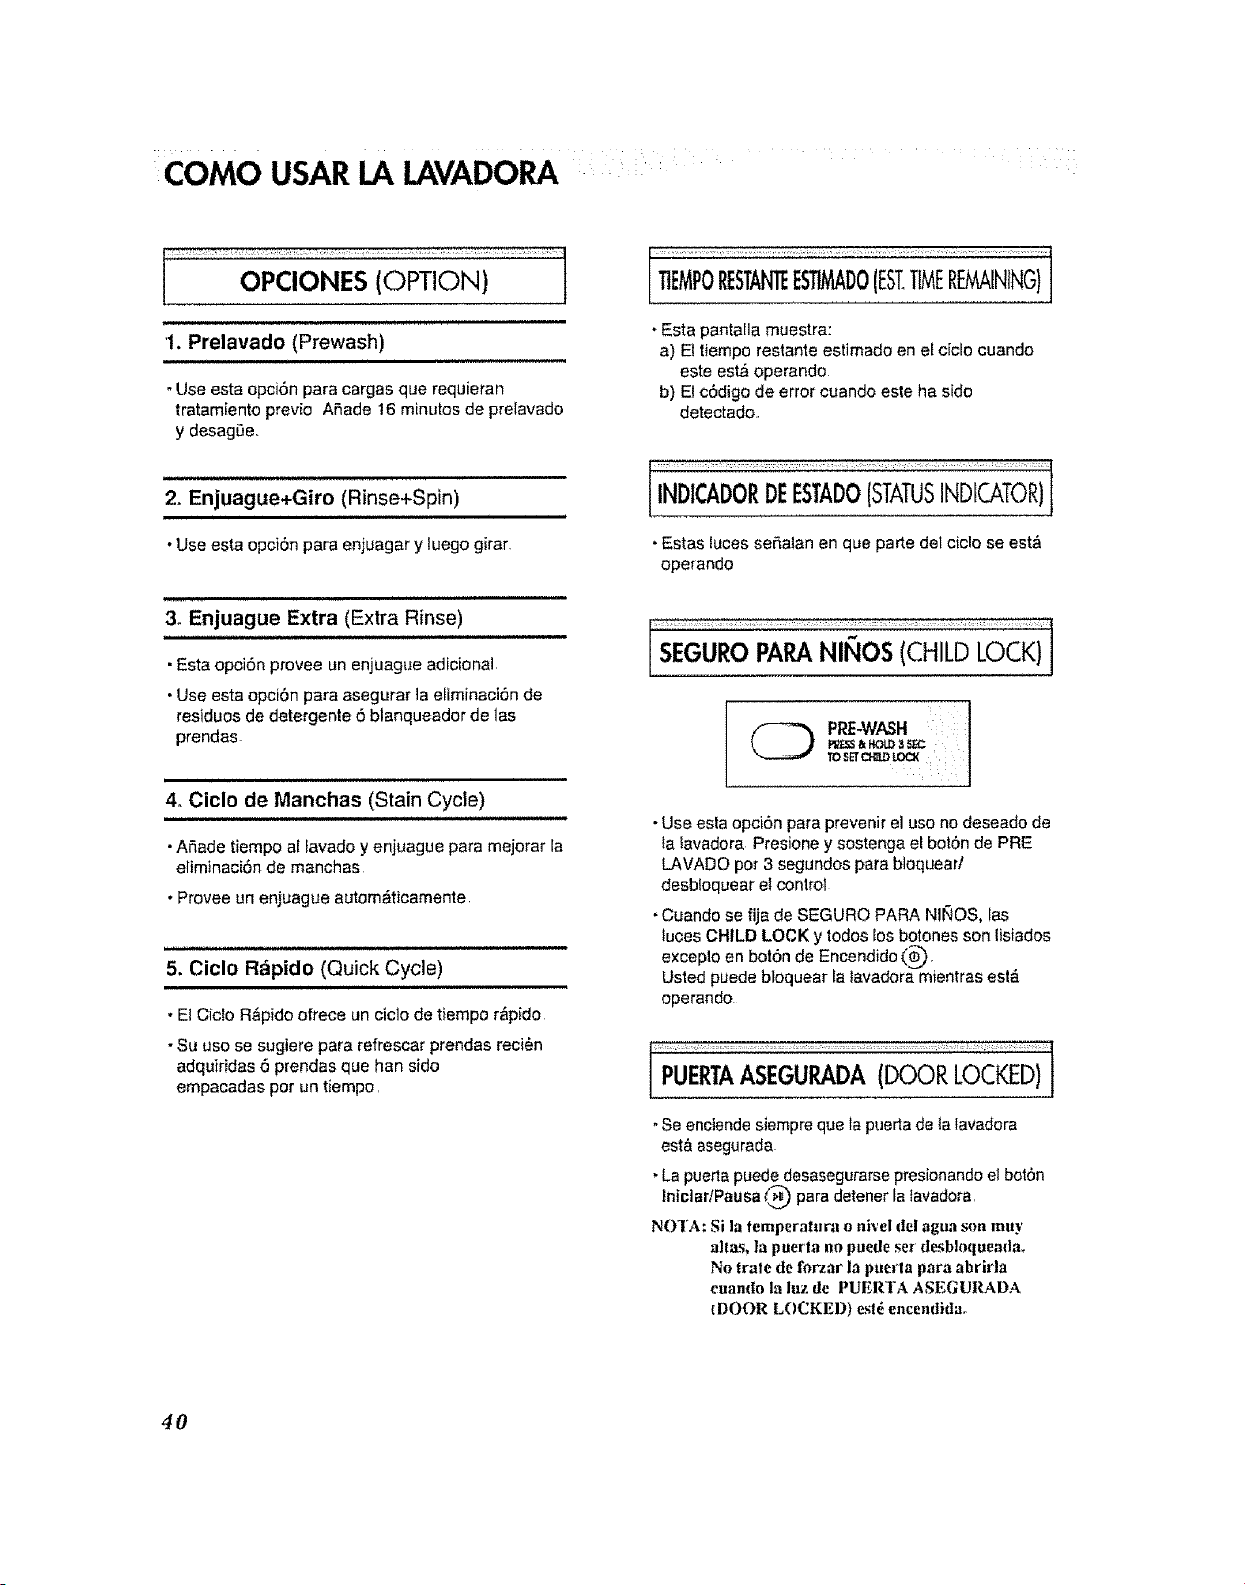
_I_11_ULUJLILIL
5, Ciclo Rapido (Quick Cycle)
• El Cic[o R&pido ofrece un ciclo de tiempo r&pido
• Su use se sugiere para refrescar prendas raci6n
adquiridas 6 prendas qua han side
empacadas per un tiempo.
, Esta pantaIla muestra:
a) El tiempa restante estimado en e[ ciclo cuando
este est& operando
b) El c6digo de error cuando este ha side
detectado.
INDiCADORDEESTADO(STATUiNDCA,TORiI
•Estas luces seSalan an que parte del ciclo se est&
operando
PRE-WA3H
•Use esta opci6n para prevanir el use no deseado de
{a lavadora Presione y sastenga el bot6n de PRE
LAVADO per 3 segundas para bloquearl
desbtoquear e!control
•Cuando se fija de SEGURO PARA NINES, [as
luoes CHILD LOCK y lodes [os belches son lisiados
exceplo an bot6n de Encendido (_).
Usted puede bloquear IaIavadora mientras est&
operando
, Se enciende siempre que la pueria de la lavadora
estA asegurada-
, La puerta puede desasegurarse presionando el bot6n
Iniclar/Pausa (_._ para detener [a tavadora.
NOI'A: Si la temperatlwa o ni_'el del agua son muy
altas, Ia puerta no puede se_ desbloqueadm
No trale de ferzar la puerla para abrirla
cuando la luz de PUERTA ASEGURADA
{DOOR LOCKED) eslg encendida.
4O
MANTENIMIENTO
Antes de limpiar el interior de la lavadora, descon_ctela del snmlnistro e!_clrico para evilar recibir nna descarga el_drlca.
Cuando deseche el aparalo, corle el cable de eorriente 3 deslrnya la clavija.
I)eshabilite el segm'o de la puerla para e_,ilar que algihl nifin pequefio quede atrapado denlro_
= El Filtro de Entrada de Agua,
• El mensaje de error" _'E"parpadearb.en el panel de control cuando no entre agua alcompartimiento de detergente
•Si su agua es muy dura 5 confiene residues de cal, el fittro de entrada de agua puede obstruirse De tat mode que
resulla bueno I[mpiar[o de vez en cuando
1..Cierre ta 2. Desatornille
Ilave del la manguera
agua de la entrada
de agtJa
3. Limpie et
fittro
usando un
cepiffo de
cerdas
duras
4, Apriete
fuerte fa
manguera
a ta
entrada,
= El Filtro de La Bomba de Drenaje
• E1fiitro dedrenaje recolectaflbrasyobjetospequeSosotvidadosenla ropasucia Verifique
regularmenteque el ffftroest_ limpiopara asegurarun funcionamientosuavede su lavadora
, Permita que el agua se enfde antes de limpiar la bomba de drenaje
1.Abra la cubierta inferior O con
alguna herramienta come una
moneda Gire la conexi6n de la
manguera de drenaje
_'_para sacada
2. Desconecte la conexiSn del
drenaje (_)permitiendo que el
agua salga AI mismo tiempouse
un recipiente paraevitarque e!
agua caiga al piso Cuando deje
de cotter el agua, abra el filtro de
la bomba ($)hacia ta izquierda
3. Retirecualquier material extrafio
de! filtrode la bomba _j DesptJ_s
de limpiarel fittro(_),girelo segOn
las manecillasdel reloj einsertela
conexi6n del desagGe_) a su [ugar
originalCierre la tapade [a
cubierta inferior
4]
h. NTENIMIENTO
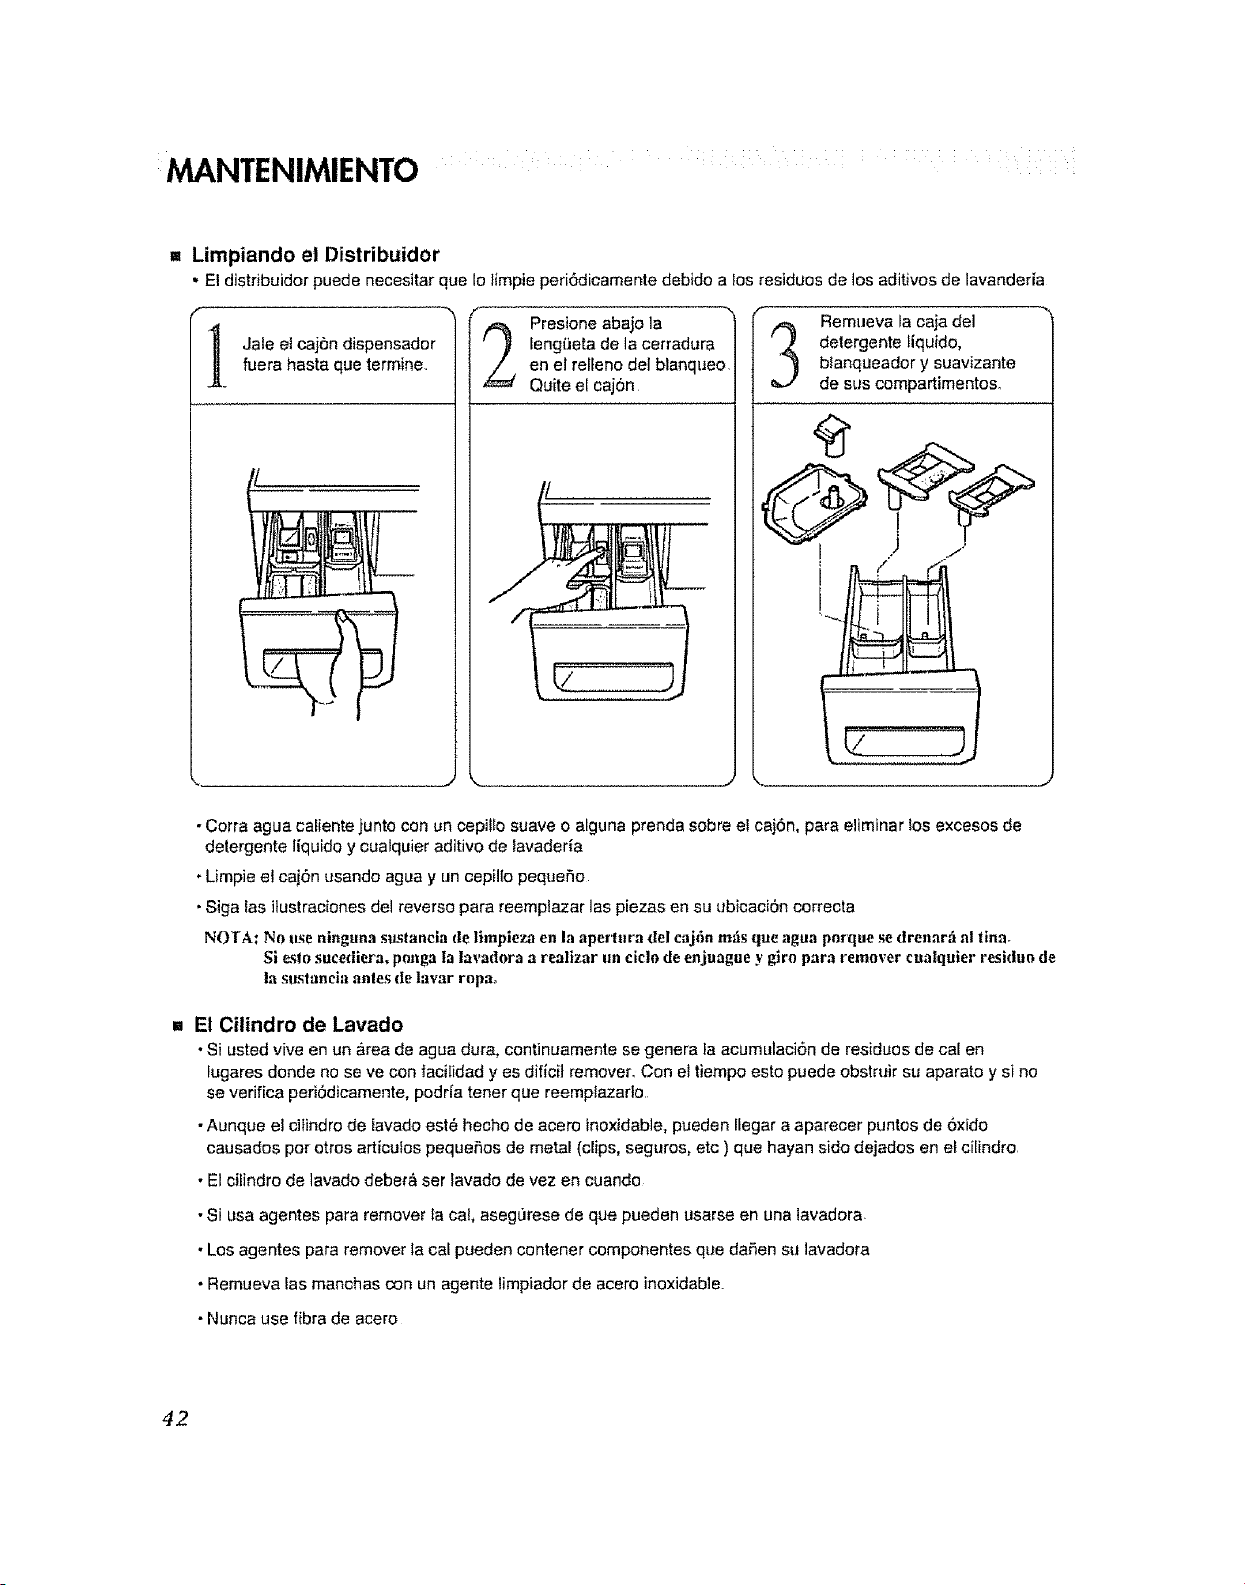
,, Limpiando el Distribuidor
', El distribuidor puede necesitar que 1olimpie peri6dicamante debido a Ios residues de los aditivos de lavander[a
,_ Presione abajo la
leng(]eta de la cerradura
en el relfeno del blanqueo
Quite el cajon
J
Jale el caj_Sndispensador
fuera hasta que termine Remueva la caja del
detergente liquido,
b[anqueador y suavizante
de sus compartimentos.,
,. J
•Corra agua caiiente junto con un cepil!o suave o alguna prenda sobre ei caj6n, para eliminar los excesos de
detergente liquido y cuatquier aditivo de favader_a
, Limpie el caj6n usando agua y un cepillo pequeSo
•Siga [asitustraciones del reverse para reemplazar las plazas en su ubicaci6n correcta
NOTA: No use ninguna sustancia de limpieza en la aper'tura del caj6n mils que agua pnrque se drenar;f al tlna.
Si _to sucedlera, ponga la lavadora a realizar un cic!o de enjuague y girn para remover cualquier residu{_ de
la sustancia antes de lavar rnpm
,. El Cilindro de Lavado
•Si usted viva en un area de agua dura, continuamente se genera la acumulaci_n de residues de cal en
lugares deride no se ve con facilidad yes difici] remover., Con el tiempo esto puede obstruir su aparato y si no
se verifica peri6dicamente, podria tener que reemptazarlo
•Aunque el citindro de iavado est_ hecho de acero inoxidable, pueden llegar aaparecer puntes de 6×ido
causados per otros articulos pequeSos de metal (clips, seguros, etc ) qua hayan side dejados en e{ cilindro
•El cilindro de lavado deber& set lavado de vez en cuando
•S[ usa agentes para remover la ca!, asegt]rese de que pueden usarse en una lavadora
•Los agentes para remover la cal pueden contener componentes qua daSen su lavadora
•Remueva [asmanchas con un agente limpiador de acero inoxidable.
• Nunca use libra de acero
42
h' NTENIMIENTO :....
= El inyector de la circulacion del agua
. Limpie el inyector de lacircuIaciSn de[ agua, si est_ estorbando
,, Limpiando su Lavadora
1, Exterior
El cuidado adecuado de su [avadora puede extender su vida
El exterior de ia m&quina puede set limpiado con agua tibia y un detergente casero neutrat, no-abrasive.
Limpie inmediatamente cualquier derrame. Limpie con un trapo h_medo
Trate de no golpear lasuperficie con objetos filosos 6 puntiagudos.
. IMPORTANTE: No use esencia de meti[o, solventes 6 productos simi[ares
2o Interior
Seque alrededor de la abertura de [apuerta de la iavadora, la junta flexible y el vidrio de [a puerta
Estas areas deben eetar siempre timpias para asegurar un setlado herm_tico
Opere la lavadora per un cicTocompietousando agua caliente
Repita el procedimiento de ser necesario
NO]A: Remneva dep_,_it_)s dc agua du ra usando tinicamente pn_ductos queen la etiqueta digan que e,_
seguro su uso en lavadoras_
= Instrucciones de Invierno
Si [a favadora es almacenada en un [ugardonde pueda ocurrir congelaci6n, 6 es movida a un iugar con
temperaturas de congeiaci6n, siga las siguientes instruccionesde inviernopara preven}rdaSes a su lavadora:
1. Cierre fa llave de suministro de agua
2. Desconecte las mangueras detsuministro de agua y det dtenaje
3_Conecte el cable de suministro de energia a una toma de corriente propiamente conectada a tierra
4. ASada 1 galSn (3 8 _) de anticongelante na-t6xico para vehlc[_lo de recreo para vaciar el cilindro de
[avado Cierre la puerta
5. Configure el ciclo de giro y deje girar a la tavadora per 1 minute para drenar toda el agua No todo el
anticongeiante ser& exputsado
6 Desconecte el cable de suministro de energia, seque el interior del cilindro ycierre ta puerta
7. Retire el contenedor de! distribuidor, Drene el agua que haya en los compartimientos y seque !os
componentes,
8. Nmacene la lavadora en posici6nparada derecha,
9. Para remover el anticongelante de talavadora despuCs de almacenada, op_rela vacta per un ciclo
complete de lavado usando detergente. No afiada ropa.
43
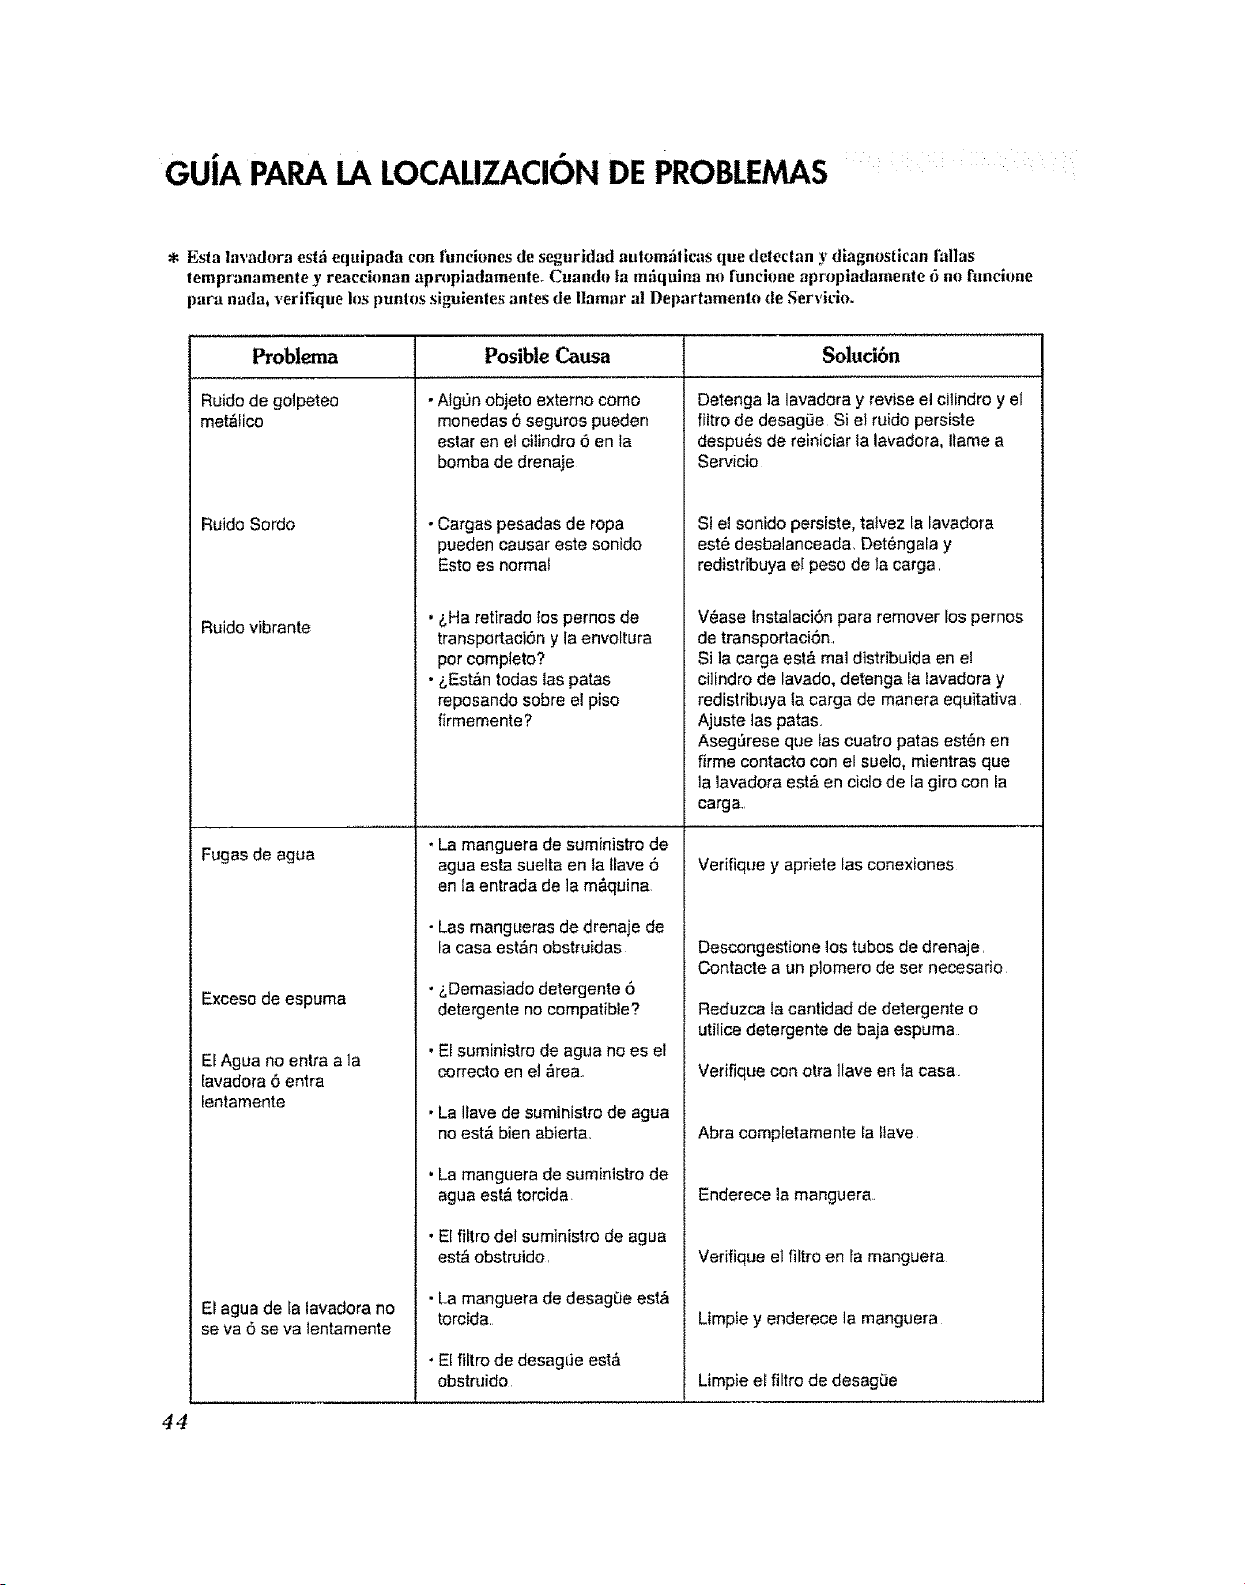
GUiA PARALALOCALIZACIONDEPROBLEMAS
* Esta lavadora est_ equipada con funciones de seguridad aulem,'ificas que detec|an y diagnostican I'allas
tempranamente y reaccionan apropiadamente. Cuaade la mfiqulna no [Uncione aprropladamente 6 no fimcinne
para nada, verifique Ins puntos siguienles antes de Ilamar al Departamento de Servicin.
Problema
Ruido de gotpeteo
met&{ico
Ruido Sordo
Ruido vibrante
Fugas de agua
Exceso de espuma
E[Agua no entre ala
lavadora 6 entra
lentamente
El agua de la lavadora no
se va 6 se va tentamente
Posible Cause Soiuci6n
• Alg0n objeto externo como
monedas 6 seguros pueden
ester an et ci[indro 6 en la
bomba de drenaie
• Cargas pesadas de rope
pueden causer este sonido
Esto es normat
• i,Ha retirado tospernos de
transportaeiSn y la envoltura
por completo?
• &Estfin todas las pates
reposando sobre el piso
firmemente ?
•La manguera de suministre de
agua esta suelta en la Ilave 6
en ta entrada de la m_quina
• Las mangueras de drenaje de
la casa estfn obstruidas
• i,Demasiado detergente 6
detergente no compatible?
• E[suministro de ague no es el
correcto en et _rea
• La Ilave de suministro de agua
no estfi bien abierta
.La manguera de suminisLro de
ague est_ torcida
• El fi[tro del suministro de agua
estf obstruido
•La manguera de desag_e estf
torcida
• E[filtro de desagLJeestf
obstruido
Detenga la lavadora y revise el cilindro y e
filtro de desag_e Si e! ruido persiste
despu_s de reiniciar la lavadora, Ilame a
Servicio
Si el sonido persiste, tatvez [alavadora
este desbalanceada Det4ngala y
redistfibuya e! peso de la carga
V_ase Instalaci6n para remover Insperno.'
de transportaci6n
Si la carga estfi mal distribuida en el
cilindro de lavado, detenga _atavadoray
redistribuya la carga de manera equitativa
Ajuste tas pates
Asegfirese que Ias cuatro pates est6n en
firme contacto con el suelo, mientras que
la ]avadora est& en ciclo de [agiro con la
carga
Verifique y apriete [as conexiones
Descongestione los tubos de drenaje
Contacte a un plomero de set necesario
Reduzca la cantidad de detergente o
utilice detergente de baja espuma
Verifique con otra Have en la casa
Abra eomp[etamente [a ttave
Enderece ta manguer&
VerifiqtJe el filtro en [a manguera
Limpie y enderece la manguera
Limpie el fiitro de desagOe
44
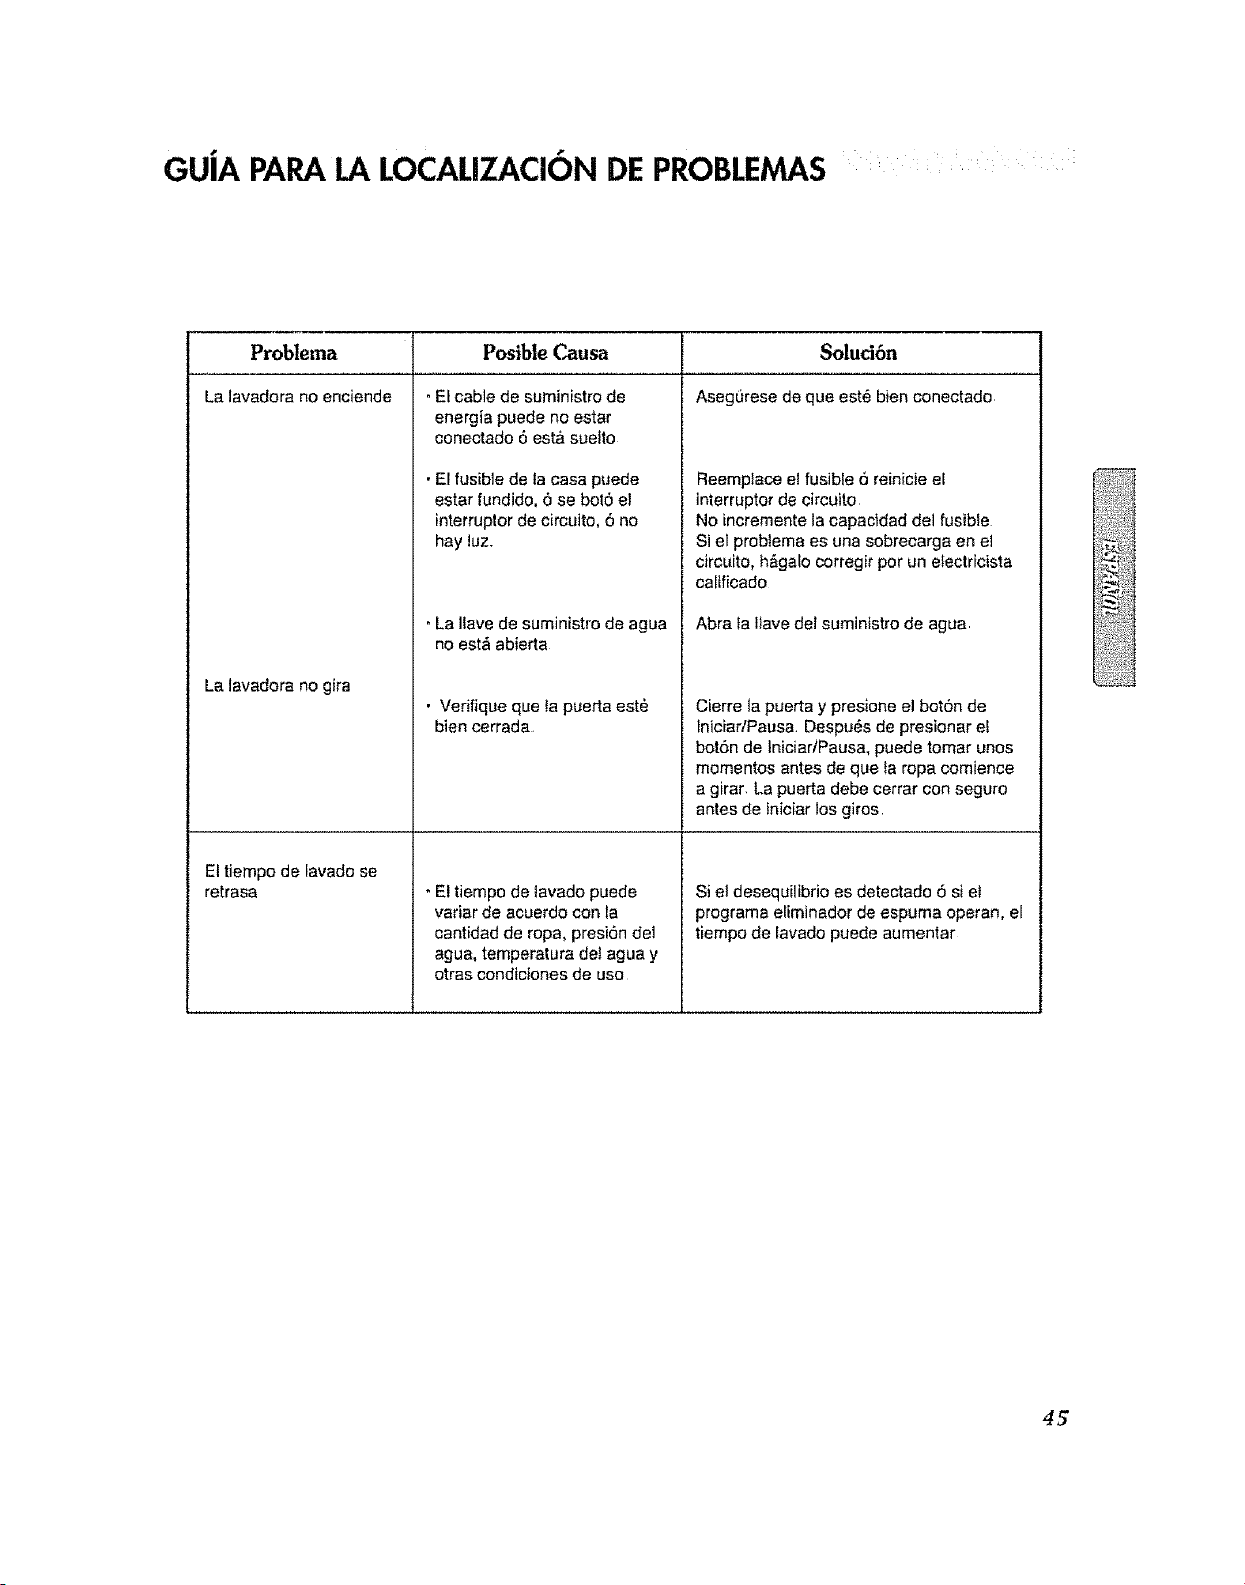
GUiA PARALA LOCALIZACIONDEPROBLEMAS ....
Problema
La lavadora no enciende
La lavadora no gira
El tiempo de lavade se
retrasa
Poslble C_ausa
"Etcable de suministro de
energia puede no estar
conectado 6 est& suelto
•El fusible de la casa puede
estar fundide, 6 se bet6 el
interrupter de circuito, 6 no
hay tuz,
La Ilave de suministro de agua
no est& abierta
• Verifique que la puerta est_
bien cerrada
, El tiempo de tavado puede
variar de acuerdo con la
cantidad de ropa, presiSn del
agua, temperatura det agua y
otras condiciones de use
Soluci6n
Aseg0rese de qua est6 bien conectado
Reemptace e! fusibte 6 reinicie el
interrupter de circuito,
No incremente la capacldad del fusibte
Si el probtema es una sobrecarga en el
circuito, h&galo corregir per un etectricista
caltficado
Abra ta Ilave del sumintstro de agua
Cierre _apuerta y presione el bot6n de
tniciadPausa Despu#s de preslonar el
botSn de IniciariPausa, puede tomar unos
mementos antes de que ta ropa comience
a girar, La puerta debe cerrar con seguro
antes de inieiar los giros
Si el desequilibrio es detectado 6 si el
programa eliminador de espuma operan, el
tiempo de lavado puede aumentar
45

GuJA PARA LA LOCALIZACION DE PROBLEMAS i
Problema Posible Causa
• Efsuministro de agua no es
adecuado en el firea
• Las Ilaves del agua no esI_n
completamente abiertas
• Las mangueras de entrada de
ague est&n torcidas
• El filtro de la manguera de
entrada est& obstruido.
• La manguera de desag0e est_
torcida uobstruida.
• El filtro de desag_e est&
obstruido
•La carga es muy pequeSa
• La carga est& desbalanceada
, El aparato tiene un sistema de
detecci6n de desequilibrio y
correcci6n Si son cargades
artfculos individualespesados
(ej. Bate de baSo, colchas,
etc ) este sistema puede
detener ei ciclo si e_
desequilibrio es muy grande
aun despu_s de un rato.
• E!agua sobreltena haste la
v&lvula de falla de agua
*Hey una faffa en el sensor de
nivet de ague
, Sobrecarga en el Motor.
•Sobrecarga en el Motor.
*La lavadora estuvo sometida a
una falia de alimentaci6n
ei_ctrica,
Soluci6n
Verifique con otra ilave de agua en la case.
Abra bien tas llaves del ague.
Enderece ]as mangueras
Verifique el filtro de las mangueras de
entrada de ague.
Limpie y enderece ta manguera
LJmpieel filtro de desagiJe
ASada 1 6 2 prendas simila_es ala carga,
Reacomode la carga pare balancearla
• &Est& la puerta abierta 6 no Cierre bien la puerta
esl& bien cerrada? • Si e! mensaje persiste Ilame a Servicio
Desconecte el suministro de energia
y flamea Servicio.
Cierre la Itave de[ ague
Desconecte la clavija de energia.
Lfame a servicio
Vuelva a comenzar el cicto
46
GARANTIA .... :
, i :
Sulavadora LG set6 reporada o reemplazada, a constderacl6n de LG, sipnJeba se_-defectuosa en material o en ejecuci6r_ de¢_l_'ode
un usa norma_ dentro de! perlodo de garanfia Cperlodo de garanl[a') descrlto en la pade inferior, eteclivo desde la fecha ("[echa de
compra") de la cornpra dei producto par el consurnidor Esta garanl_a timtlada es efecliva Onlcamente para el comprador original del
producto, y efeclivo 0nicamente s[ ha sido usado en los Esiados Unidos JncIuyendo AJaska,Hawal y ler[itorio norteameflcano
PER[ODO DEGARANTIA:
_,'lgencla; 1 aria desde la fecha de compra
PARTES(e.xct_Dtuando la siauiente li_lo'_:
1aria desde la fecha de compra
Plazaspapa el panel de conhai eleclr6nlco:
2 arias desde ta fecha de compra
Plazaspara el molar de tlna Drum:
7 a._osdesde ]a fecha de compra
Piezaspara la lina Drum de ace_o inoxidable: Lavlda
Losunidodes reemplazadas y reparada_ pueden ser
nuevas o retabrtcada_ pot la t6brlca
LosunJdades reemplazadas y repa[adas tienen la mtsma
porci6n de garant_a qua la garanffa originaI de la compra
del producto duranle e! mismo pefiodo
COMa SE MANFJA ELSERVIClO:
Serviclo a domicifie: Per favor conserve e! reclbo del lugar
donde reaiiz6 su compra coma evidenda de _afecha en
qua el producto rue adqulddo para volidar el periodo de
goranllo, y tenga una copla del reclbo para la persona de
servlcio que fa oJienda an el momenlo en qua necesite
aplicar su garaniia
Parlaver flame al 1-877-714-7486 y escela la epcl6n
aproplada para locatlzar el Can|to de Servlcie Aulodzado LG
m_.scercano a usled_
O visile nuestra p6gina de internal en
hllp://www tgservice cam
ESTAGARANTIA REEMPLAZACUALQUIER OTRA GARANT[A, EXPRESAO IMPLICITA, INCLUYENDO SIN UMffAC]6N CUALQUIER
GARANT[A DE VENTADEMERCANC[A O CONVENIENCIA PARA PROPOSffOSPARTICULARE&ENELEXTENDIDOCUALQUIER GARANT[A
IMPLiCITA ESREQUERIDAPaR LEY,ES LIMffADA EN DURACION AL PERIODO DEGARANT{A EXPRESAENLA PARTEINFERIOR.
NI EL FABRICANTENI SUSDISTRUBUIDORESEN LOSEUAPUEDENSERRESPONSABLESDE NINGUN DAfiO INCIDENTAL, CONSECUENCIAL,
INDIRECTO, ESPECIALO PUNITIVO DE NINGUNA NATURALEZA,INCLUYENDO SIN t;]MffACION, PERDIDASDEGANANCIAS O
CUALQUIER OTRODAI_O AUNQUE ESTEBASADO EN CONTRATO O AGRAVIO. Algunos estados no permlten la exclusi6n o [tmtlacl6n
de da_os tnctdentales o ¢onsecuenctates en el liempo v6iido de la garanffa as_que Ia exclusl6n menclonada en la parle de
arrlba puede qua no apilque para _.sted Esta garanlia te da derechos fegales especfflcos y puede qua usred tenga altos
derechos adem0s de los mendonados qua vat[an de estado en estado
ESTAGARANTiA UMITADA NO APUCA A:
•VtaJes de ServIclo a su casa para l[evar, recoge_' y/o Insfalar et producto, insffulr o reponer fusIbles o conectar correctamente
cables, o la correccl6n de piezas desaulorizadas; y
• DaSos o problemas operaclonales coma resulfado de un real usa, abuso, operaci6n denh'o de un amblente no espe,dficado o
conlrarlo a los requerimienfos o precauc!ones en la Guia Operac[onaL accidente, plagas° Incendios.. inundactones, Instaiacl6n
lnaproplada, actos de Dtos, alteraclones o modi{Icadones desautortzadas, vottaje Incorrecto. usa comerctal, o para ei usa de
arras fines qua no sean los prop6sttos intencionados.
Elcosta de reparaciones o reemplazos que son excluidos de estas circunstancias, deben set asumidos par el consumtdor
NUMEROS CENTRALESINTERACTWOS PARA El, CLIENTE
Para obtener Aslslencla al Consumldor,
Infonnact6n de Preducto, O cenlros de Serciclo
Au]or_ados:
Uame o! 1-877,.714-7486 (24 horas per dia, 365 dios pot a_o) y
seleccione la opci6n aproptada del menO
o vlsile nuestra p6gina de Internal en htlp:llwww,lgserviceocom.
PARACON'fACTARA LG ElectronicsPaR MAIL
LG Customer inleractive Centei
P.O. Box 2,_0007
201James Record Read
Hunl_iUe, Alabama 3582.4
AT[N: CIC
47

LG Sle©tmni©s In©.
P/No,: 3828E R3024W