C
Operatin
instructions
$
CW2079CWD / CW2079CWN
Jlly. It provides
Jse,and maintenance.
of your machine
if your machine
Designed specially to use only
HE (High Efficiency) detergent
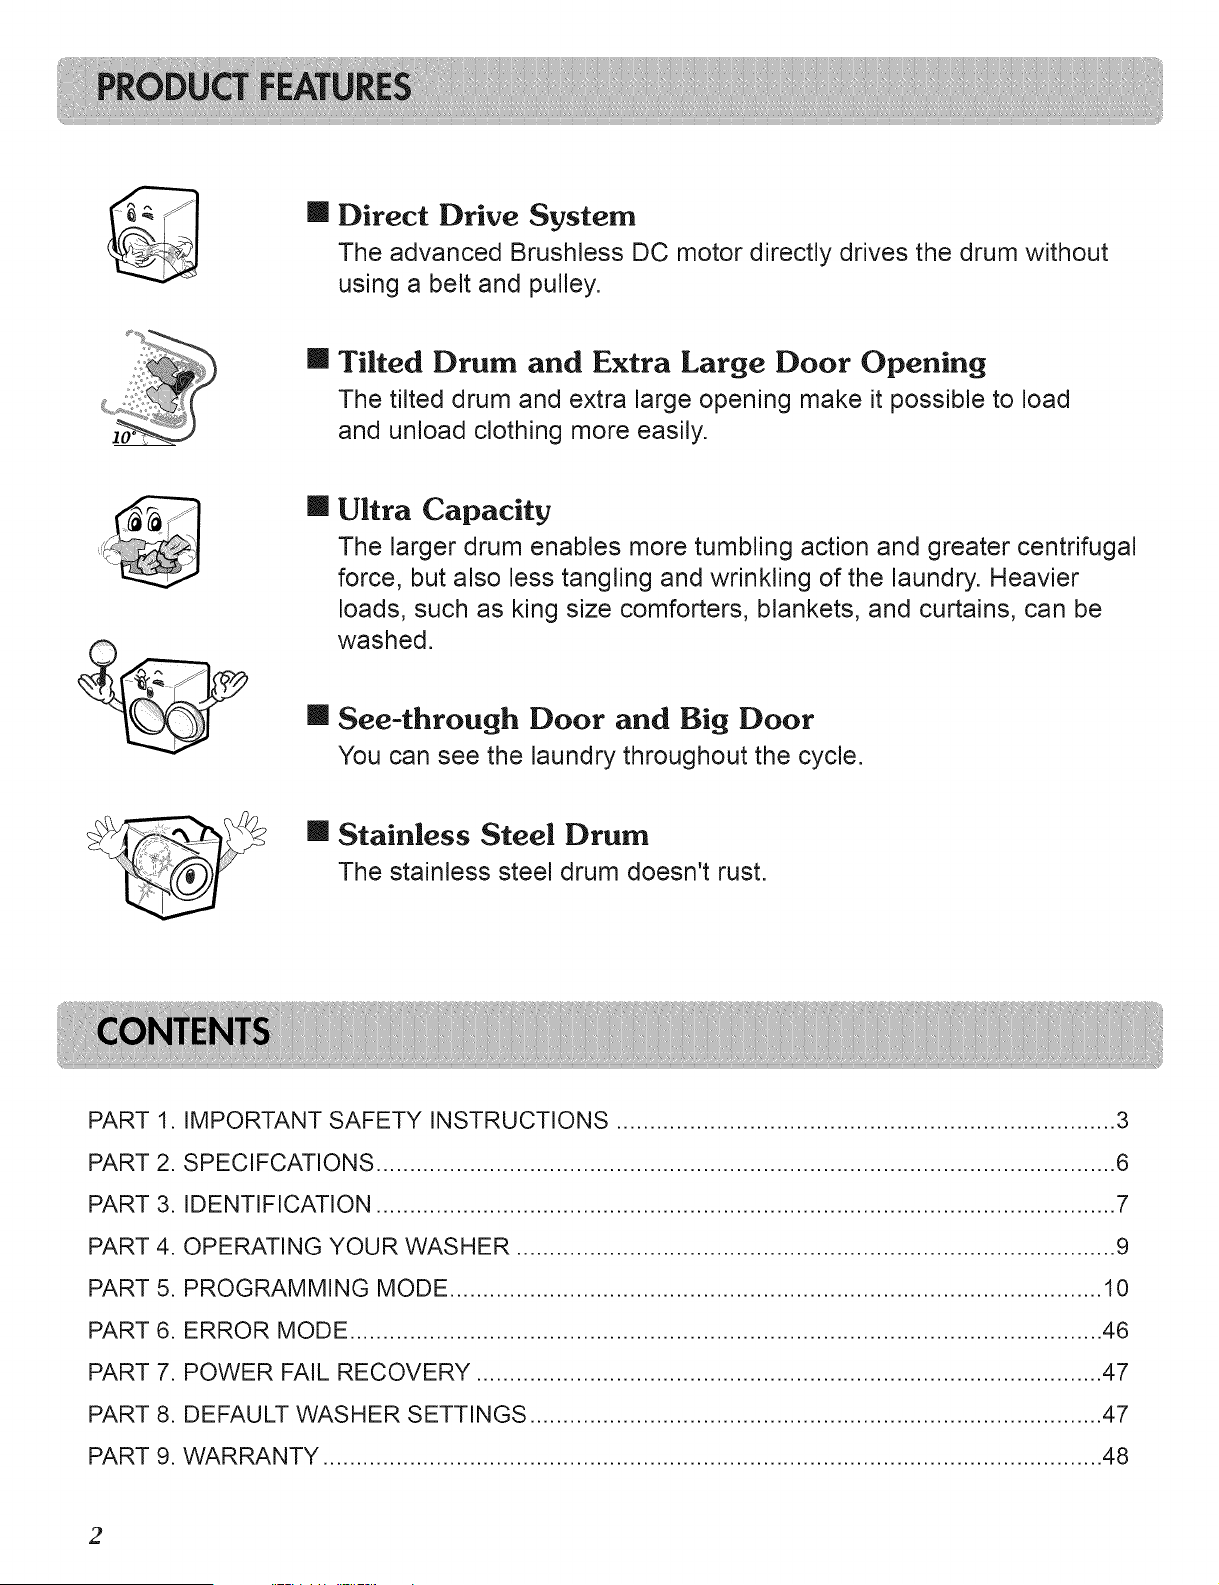
m Direct Drive System
The advanced Brushless DC motor directly drives the drum without
using a belt and pulley.
m Tilted Drum and Extra Large Door Opening
The tilted drum and extra large opening make it possible to load
and unload clothing more easily.
II Ultra Capacity
The larger drum enables more tumbling action and greater centrifugal
force, but also less tangling and wrinkling of the laundry. Heavier
loads, such as king size comforters, blankets, and curtains, can be
washed.
m See-through Door and Big Door
You can see the laundry throughout the cycle.
II Stainless Steel Drum
The stainless steel drum doesn't rust.
PART 1. IMPORTANT SAFETY INSTRUCTIONS ........................................................................... 3
PART 2. SPECIFCATIONS ............................................................................................................... 6
PART 3. IDENTIFICATION ............................................................................................................... 7
PART 4. OPERATING YOUR WASHER .......................................................................................... 9
PART 5. PROGRAMMING MODE .................................................................................................. 10
PART 6. ERROR MODE ................................................................................................................. 46
PART 7. POWER FAIL RECOVERY .............................................................................................. 47
PART 8. DEFAULT WASHER SETTINGS ...................................................................................... 47
PART 9. WARRANTY ..................................................................................................................... 48
2
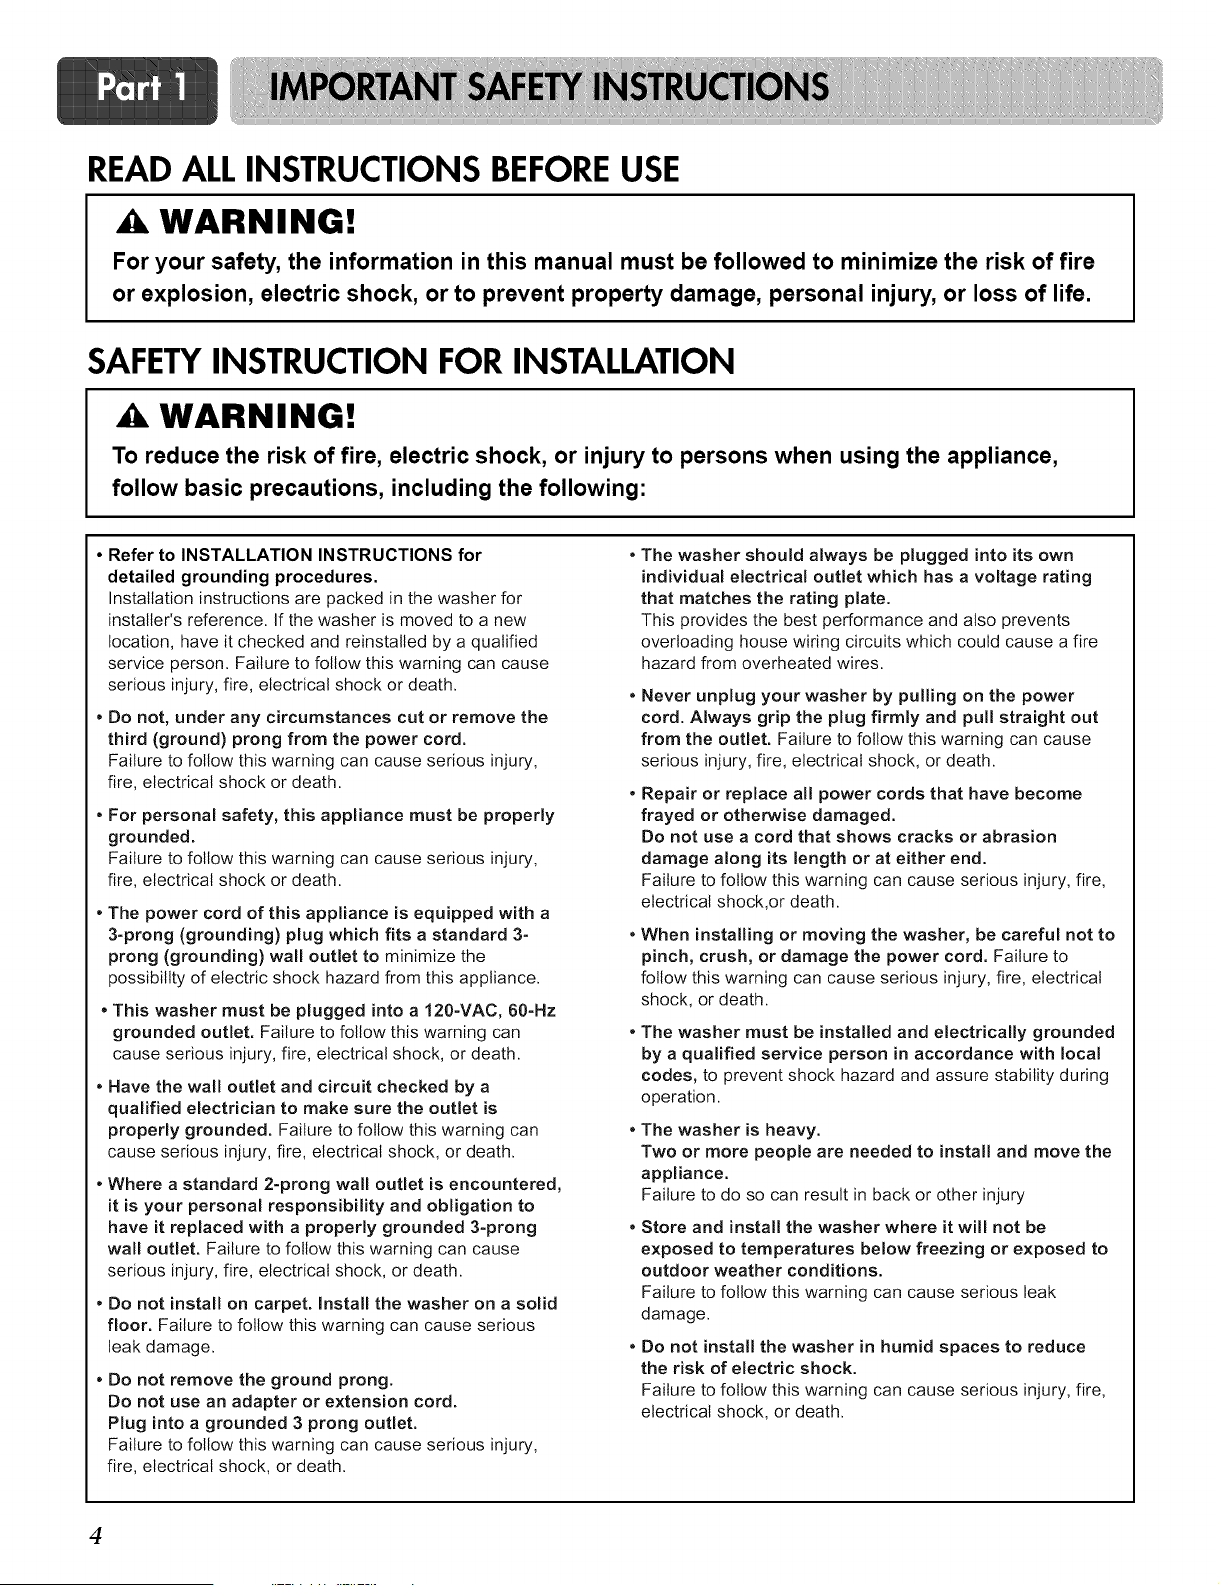
READALLINSTRUCTIONS BEFOREUSE
A WARNING!
For your safety, the information in this manual must be followed to minimize the risk of fire or e×plosion,
electric shock, or to prevent property damage, personal injury, or loss of life.
Your safety and the safety of others are very important.
We have provided many important safety messages in this manual and on your appliance. Always read and obey all safety messages.
A his is the safety alert symbol.
This symbol alerts you to potential hazards that can kill or hurt you and others.
All safety messages will follow the safety alert symbol and either the word DANGER or WARNING.
These words mean:
,_ DANGleR: You can be killed or seriously injured if you don't follow instructions.
,4_ WARNING: You can be killed or seriously injured if you don't follow instructions.
All safety messages will tell you what the potential hazard is, tell you how to reduce the chance of injury, and tell you what can
happen if the instructions are not followed.
iMPORTANT SAFETY iNSTRUCTiONS
WARNING: To reduce the risk of fire, electric shock, or injury to persons when using the washer, follow basic
precautions, including the following:
* Read all instructions before using the washer.
* Do not wash articles that have been previously cleaned
in, washed in, soaked in, or spotted with gasoline, dry
cleaning solvents, or other flammable or explosive
substances, as they give off vapors that could ignite or
explode.
, Do not add gasoline, dry cleaning solvents, or other
flammable or explosive substances to the wash water.
These substances give off vapors that could ignite or
explode.
* Under certain conditions, hydrogen gas may be
produced in a hot water system that has not been used
for 2 weeks or more. HYDROGEN GAS IS EXPLOSIVE.
If the hot water system has not been used for such a
period, before using the washing machine, turn on all
hot water faucets and let the water flow from each for
several minutes. This will release any accumulated
hydrogen gas. As the gas is flammable, do not smoke
or use an open flame during this time.
* Do not allow children to play on or in the washer.
Close supervision of children is necessary when the
washer is used near children.
* Before the washer is removed from service or
discarded, remove the door to prevent children from
hiding inside.
* Do not install or store the washer where it will be
exposed to the weather.
* Do not tamper with the controls.
* Do not repair or replace any part of the washer or
attempt any servicing unless specifically
recommended in the user-maintenance instructions or
published user-repair instructions that you understand
and have the skills to carry out.
* See Installation Instructions for grounding
requirements.
* ALWAYS follow the fabric care instructions supplied by
the garment manufacturer.
* Do not place items exposed to cooking oil in your
washer. Items contaminated with cooking oils may
contribute to a chemical reaction that could cause a
load to catch fire.
* Do not use fabric softeners or products to eliminate
static unless recommended by the manufacturer of the
fabric softener or product.
SAVE THESE INSTRUCTIONS
GROUNDING iNSTRUCTiONS
This appliance must be grounded. In the event of malfunction or breakdown, grounding will reduce the risk of
electric shock by providing a path of least resistance for electric current. This appliance is equipped with a cord
having an equipment-grounding conductor and grounding plug. The plug must be plugged into an appropriate
outlet that is properly installed and grounded in accordance with all local codes and ordinances.
* Do not use an adapter or extension cord.
* Do not remove ground prong.
* If you don't have the proper outlet, consult an electrician.
WARNING: Improper connection of the equipment-grounding conductor can result in risk of electric shock. Consult a
qualified electrician or serviceman if you are in doubt as to whether the appliance is properly grounded.
Do not modify the plug provided with the appliance - if it does not fit the outlet, have a proper outlet installed
by a qualified electrician.
3
READALLINSTRUCTIONS BEFOREUSE
WARNING!
For your safety, the information in this manual must be followed to minimize the risk of fire
or explosion, electric shock, or to prevent property damage, personal injury, or loss of life.
SAFETYINSTRUCTION FOR INSTALLATION
,A WARNING!
To reduce the risk of fire, electric shock, or injury to persons when using the appliance,
follow basic precautions, including the following:
• Refer to INSTALLATION INSTRUCTIONS for
detailed grounding procedures
Installation instructions are packed in the washer for
instalter's reference. If the washer is moved to a new
location, have it checked and reinstalled by a qualified
service person. Failure to follow this warning can cause
serious injury, fire, electrical shock or death.
• Do not, under any circumstances cut or remove the
third (ground) prong from the power cord.
Failure to follow this warning can cause serious injury,
fire, electrical shock or death.
• For personal safety, this appliance must be properly
grounded.
Failure to follow this warning can cause serious injury,
fire, electrical shock or death.
• The power cord of this appliance is equipped with a
3-prong (grounding) plug which fits a standard 3-
prong (grounding) wall outlet to minimize the
possibility of electric shock hazard from this appliance.
• This washer must be plugged into a 120-VAC, 60-Hz
grounded outlet. Failure to follow this warning can
cause serious injury, fire, electrical shock, or death.
• Have the wall outlet and circuit checked by a
qualified electrician to make sure the outlet is
properly grounded. Failure to follow this warning can
cause serious injury, fire, electrical shock, or death.
• Where a standard 2-prong wall outlet is encountered,
it is your personal responsibility and obligation to
have it replaced with a properly grounded 3-prong
wall outlet. Failure to follow this warning can cause
serious injury, fire, electrical shock, or death.
• Do not install on carpet. Install the washer on a solid
floor. Failure to follow this warning can cause serious
beakdamage.
• Do not remove the ground prong.
Do not use an adapter or extension cord.
Plug into a grounded 3 prong outlet.
Failure to follow this warning can cause serious injury,
fire, electrical shock, or death.
• The washer should always be plugged into its own
individual electrical outlet which has a voltage rating
that matches the rating plate.
This provides the best performance and also prevents
overloading house wiring circuits which could cause a fire
hazard from overheated wires.
• Never unplug your washer by pulling on the power
cord. Always grip the plug firmly and pull straight out
from the outlet. Failure to follow this warning can cause
serious injury, fire, electrical shock, or death.
• Repair or replace all power cords that have become
frayed or otherwise damaged.
Do not use a cord that shows cracks or abrasion
damage along its length or at either end.
Failure to follow this warning can cause serious injury, fire,
electrical shock,or death.
• When installing or moving the washer, be careful not to
pinch, crush, or damage the power cord. Failure to
follow this warning can cause serious injury, fire, electrical
shock, or death.
• The washer must be installed and electrically grounded
by a qualified service person in accordance with local
codes, to prevent shock hazard and assure stability during
operation.
• The washer is heavy.
Two or more people are needed to install and move the
appliance.
Failure to do so can result in back or other injury
* Store and install the washer where it will not be
exposed to temperatures below freezing or exposed to
outdoor weather conditions.
Failure to follow this warning can cause serious beak
damage.
• Do not install the washer in humid spaces to reduce
the risk of electric shock.
Failure to follow this warning can cause serious injury, fire,
electrical shock, or death.
4
READALLINSTRUCTIONS BEFOREUSE
A. WARNING!
For your safety, the information in this manual must be followed to minimize the risk of fire
or explosion, electric shock, or to prevent property damage, personal injury, or loss of life.
SAFETYINSTRUCTION FOR SAFETYUSE/CLEANING/CARE/DISCARD
WARNING!
To reduce the risk of fire, electric shock or injury to persons when using the appliance,
follow basic precautions, including the following:
• Unplug the washer before cleaning to avoid the risk
of electric shock.
• Never use harsh chemicals, abrasive cleaners, or
solvents to clean the washer.
They will damage the finish.
• Do not put oily or greasy rags or clothing on top of
the washer. These substances give off vapors that
could ignite the materials.
• Do not wash items that are soiled with vegetable or
cooking oil. These items may contain some oil after
laundering. Due to the remaining oil, the fabric may
smoke or catch fire by itself.
• Disconnect this appliance from the power supply
before attempting any user maintenance.
Turning the controls to the OFF position does not
disconnect this appliance from the power supply.
Failure to follow this warning can cause serious injury,
fire, electrical shock, or death.
• Do not combine laundry products for use in 1 load
unless specified on the label. Do not mix chlorine
bleach with ammonia or acids such as vinegar.
Follow package directions when using laundry
products. Incorrect usage can produce poisonous gas-
resulting in serious injury or death.
• Do not reach into the washer while parts are
moving. Before loading, unloading, or adding items,
push in the cycle selector knob and allow the drum
to coast to a complete stop before reaching inside.
Failure to follow this warning can cause serious injury,
fire, electrical shock, or death.
Do not allow children to play on or in the washer.
Close supervision of children is necessary when the
washer is used near children. As children grow, teach
them the proper, safe use of all appliances.
Failure to comply with these warnings could result in
serious personal injuries.
Destroy the carton, plastic bag, and other packing
materials after the washer is unpacked.
Children might use them for play.
Cartons covered with rugs, bedspreads or plastic sheets
can become airtight chambers. Failure to comply with
these warnings could result in serious personal injuries.
Keep laundry products out of children's reach.
To prevent personal injury, observe all warnings on
product labels. Failure to comply with these warnings
could result in serious personal injuries.
Remove the door to the washing compartment to
avoid the danger of children or small animals getting
trapped inside before your washer is removed from
service or discarded.
Failure to do so can result injury or death.
Before the washer is removed from service or
discarded, remove the washer door to prevent
accidental entrapment.
Failure to comply with these warnings could result in
serious personal injuries.
t;
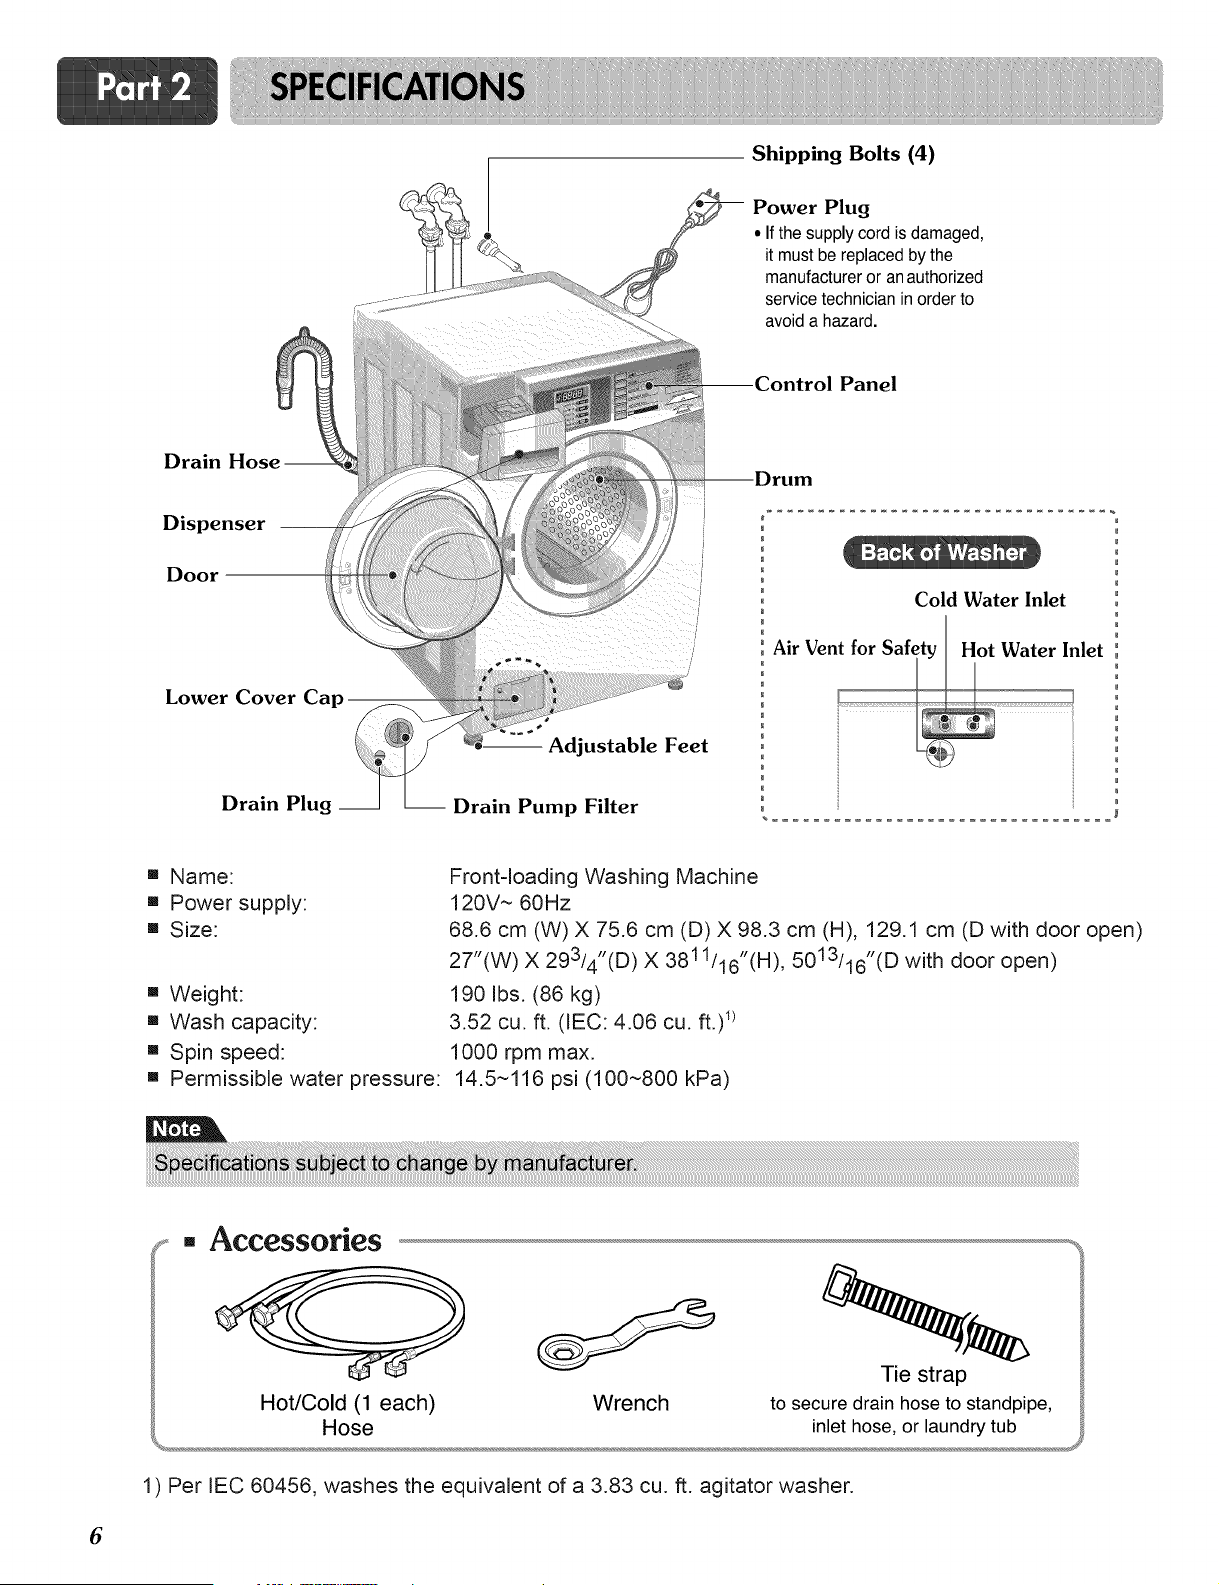
Shipping Bolts (4)
Power Plug
• If the supply cord is damaged,
it must be replaced by the
manufacturer or an authorized
service technician in order to
avoid a hazard.
Panel
Drain Hose-
Dispenser
Door
Lower Cover Cap
Drain Plug __
-- Adjustable Feet
-- Drain Pump Filter
Cold Water Inlet
Air Vent for Safety Hot Water Inlet
[] Name:
[] Power supply:
[] Size:
[] Weight:
[] Wash capacity:
[] Spin speed:
Front-loading Washing Machine
120V ~ 60Hz
68.6 cm (W) X 75.6 cm (D) X 98.3 cm (H), 129.1 cm (D with door open)
27"(W) X 29314"(D) X 3811116"(H), 5013116"(D with door open)
190 Ibs. (86 kg)
3.52 cu. ft. (IEC: 4.06 cu. ft.) _)
1000 rpm max.
[] Permissible water pressure: 14.5~116 psi (100~800 kPa)
[] Accessories
Hot/Cold (1 each)
Hose
Wrench
Tie strap
to secure drain hose to standpipe,
inlet hose, or laundry tub
1) Per IEC 60456, washes the equivalent of a 3.83 cu. ft. agitator washer.
6
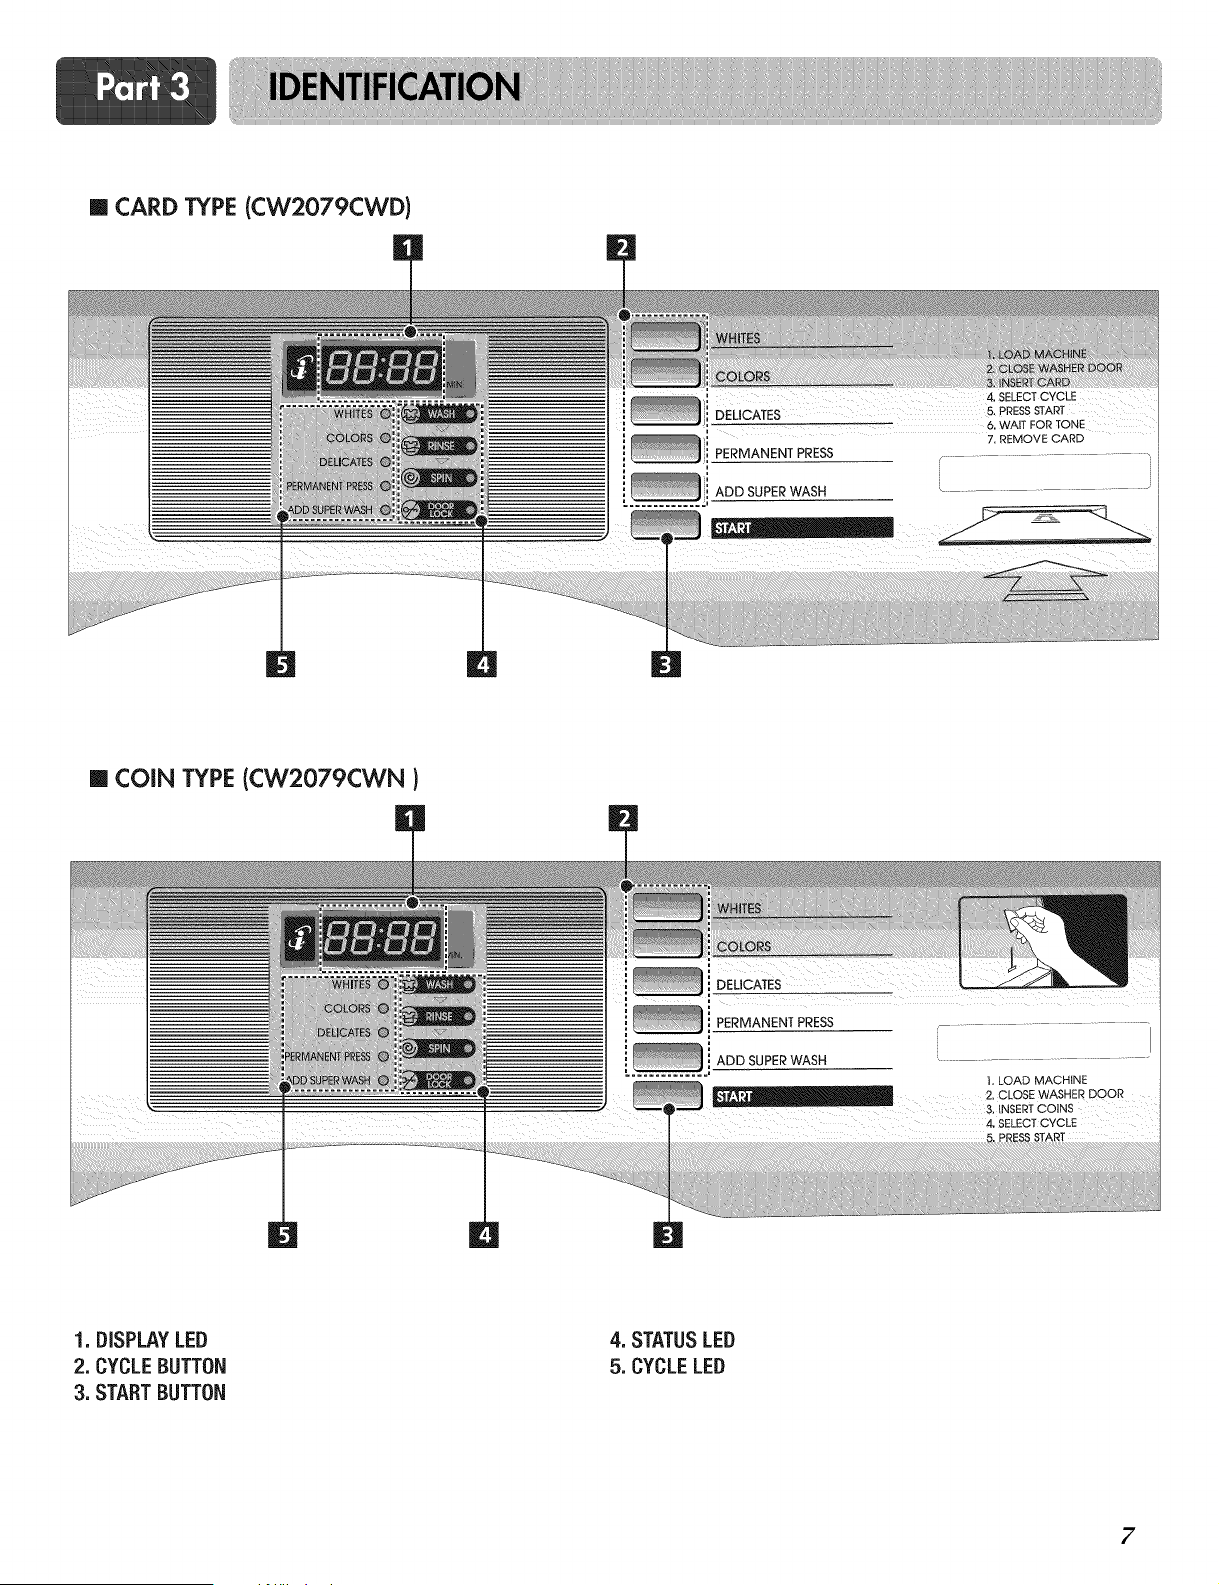
m CARD TYPE (CW2079CWD)
_, , 4, SELECTCYCLE
DEUCATES 5, pRESSSTART
_:::::_ 6. WAITFORTONE
' I 7.REMOVECARD
PERMANENT PRESS
u
ADD SUPERWASH
L.......................................
|
m COIN TYPE(CW2079CWN)
OELiOA ES
_ PERMANENT PRESS
ADD SUPERWASH " ......................................
1,LOAD MACHINE
2. CLOSEWASHERDOOR
3 NSERTCOINS
4, SELECTCYCLE
1. DISPLAYLED
2. CYCLEBUTTON
3. STARTBUTTON
4. STATUSLED
5. CYCLELED
7
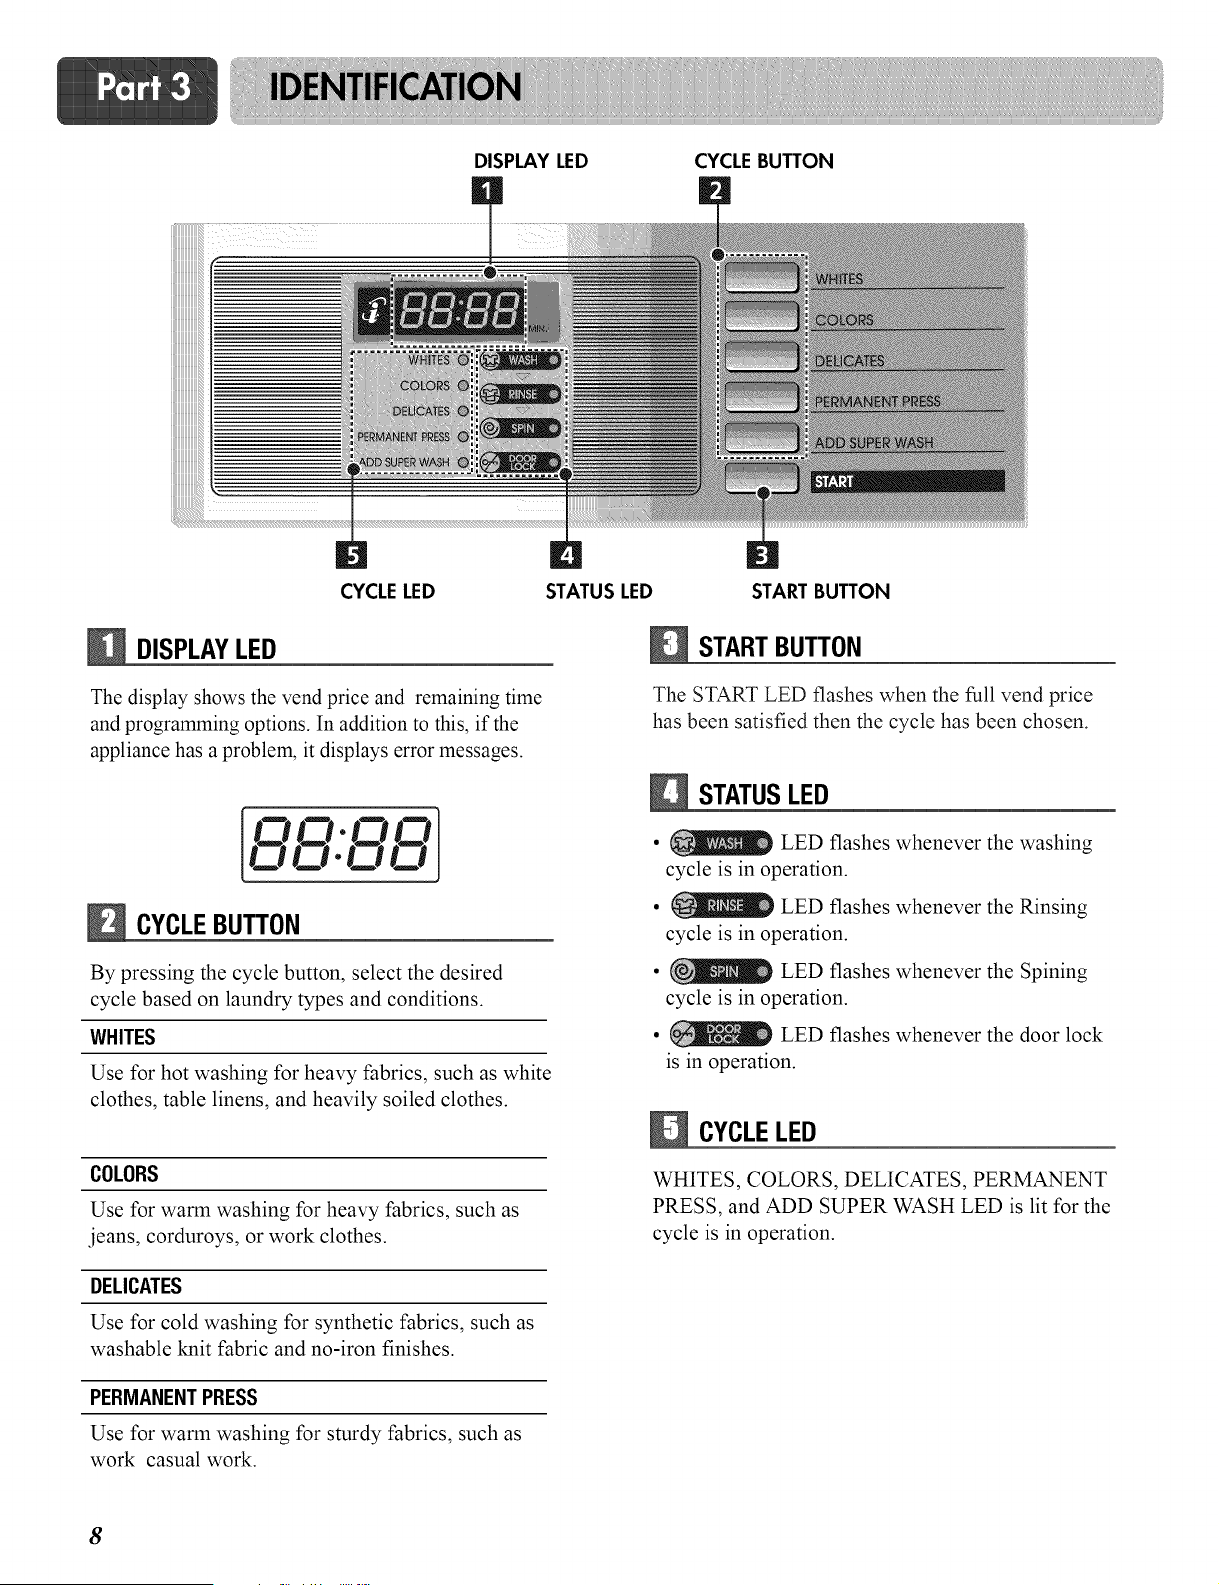
DISPLAY LED CYCLEBUTTON
CYCLELED
DISPLAYLED
The display shows the vend price and remaining time
and programming options. In addition to this, if the
appliance has a problem, it displays error messages.
CYCLEBUTTON
By pressing the cycle button, select the desired
cycle based on laundry types and conditions.
WHITES
Use for hot washing for heavy fabrics, such as white
clothes, table linens, and heavily soiled clothes.
COLORS
Use for warm washing for heavy fabrics, such as
jeans, corduroys, or work clothes.
DELICATES
Use for cold washing for synthetic fabrics, such as
washable knit fabric and no-iron finishes.
PERMANENTPRESS
Use for warm washing for sturdy fabrics, such as
work casual work.
STATUS LED START BUTTON
STARTBUTTON
The START LED flashes when the full vend price
has been satisfied then the cycle has been chosen.
STATUSLED
• LED flashes whenever the washing
cycle is in operation.
• LED flashes whenever the Rinsing
cycle is in operation.
• _ LED flashes whenever the Spining
cycle is in operation.
• LED flashes whenever the door lock
is in operation.
CYCLELED
WHITES, COLORS, DELICATES, PERMANENT
PRESS, and ADD SUPER WASH LED is lit for the
cycle is in operation.
8
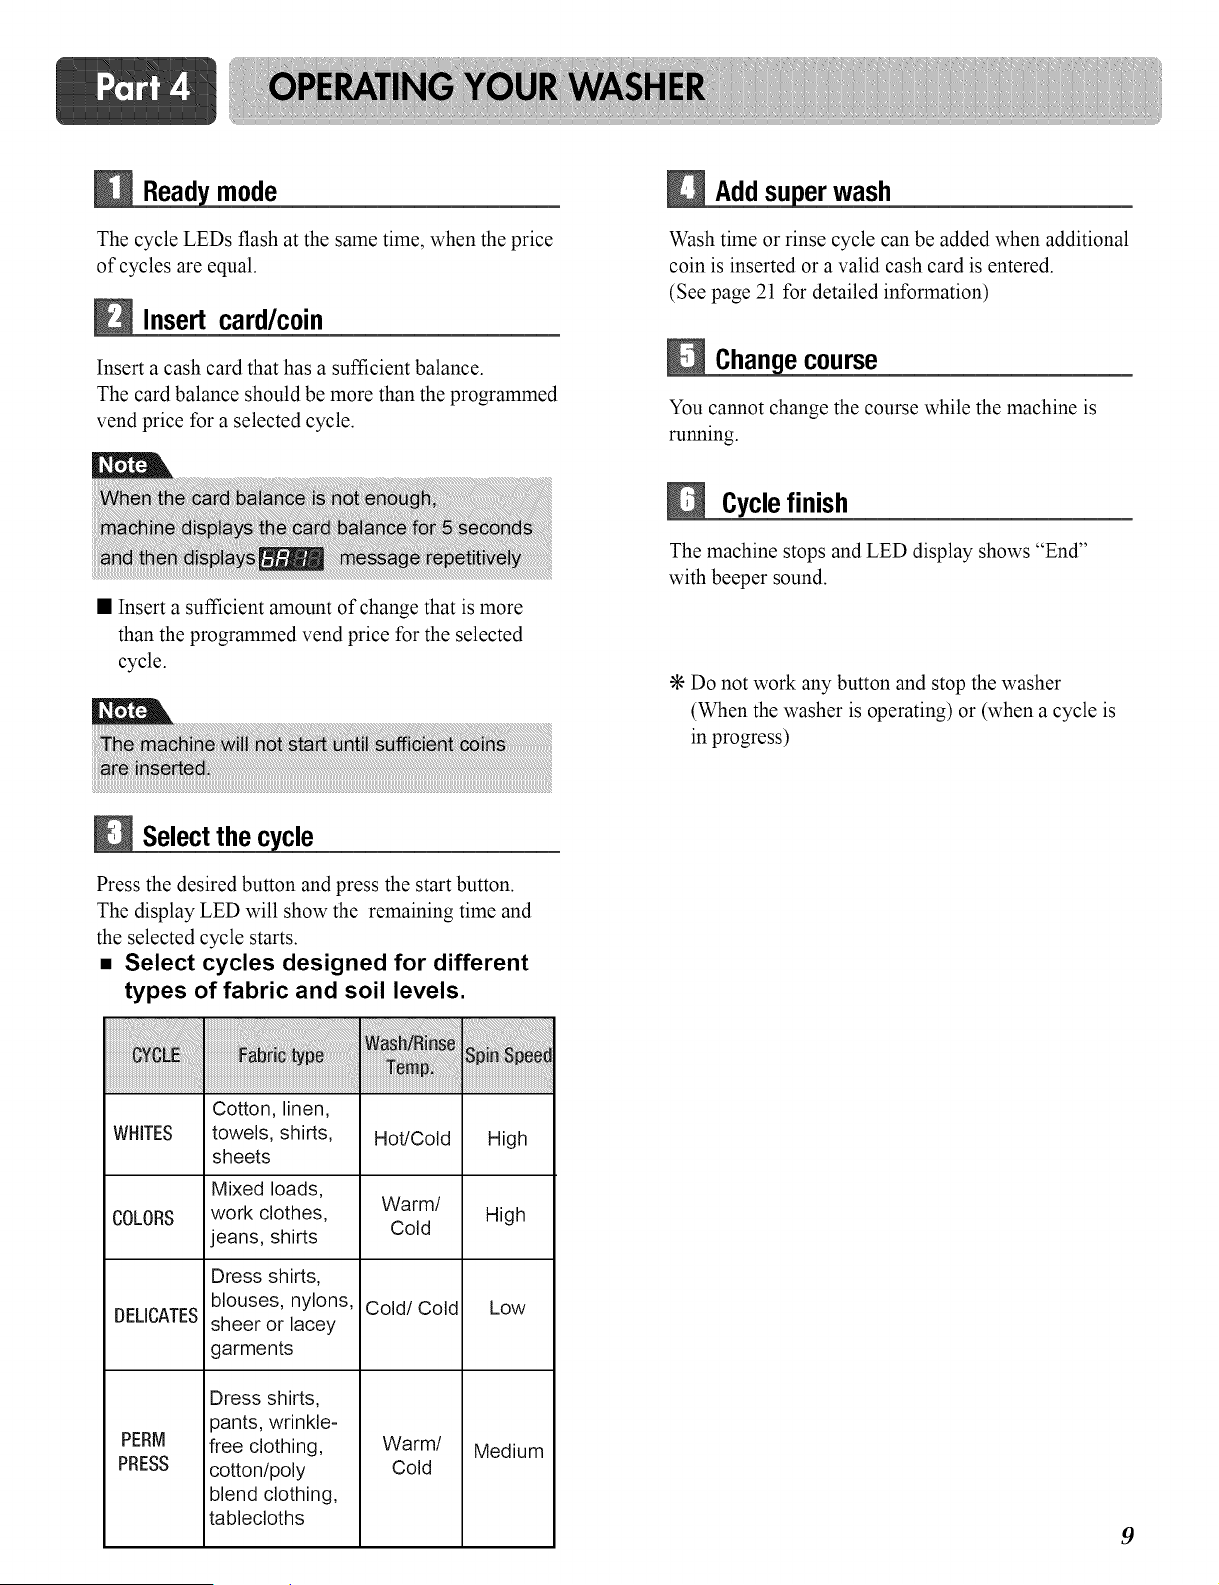
mode
The cycle LEDs flash at the same time, when the price
of cycles are equal.
Insert card/c0in
Insert a cash card that has a sufficient balance.
The card balance should be more than the programmed
vend price for a selected cycle.
• Insert a sufficient amount of change that is more
than the programmed vend price for the selected
cycle.
Select the cycle
iiiiiiiiiiiiiiiiiiiiiiii_;_!_:;i:i_i_i_i_!i_i_iiiii!_!ii_ii!i!!_!!i!!i!!i!_i!_!i_i_iiiiii_!_i_iiiiiiiiiiii_i_iiiiiii!i!!!!_!_!i
WHITES
Press the desired button and press the start button.
The display LED will show the remaining time and
the selected cycle starts.
• Select cycles designed for different
types of fabric and soil levels.
COLORS
DELICATES
PERM
PRESS
Cotton, linen,
towels, shirts,
sheets
Mixed loads,
work clothes,
jeans, shirts
Dress shirts,
blouses, nylons,
sheer or lacey
garments
Dress shirts,
pants, wrinkle-
free clothing,
cotton/poly
blend clothing,
tablecloths
Hot/Cold High
Warm/
Cold High
Cold/Cold Low
Warm/ Medium
Cold
Addsuperwash
Wash time or rinse cycle can be added when additional
coin is inserted or a valid cash card is entered.
(See page 21 for detailed information)
e course
You cannot change the course while the machine is
running.
Cyclefinish
The machine stops and LED display shows "End"
with beeper sound.
÷ Do not work any button and stop the washer
(When the washer is operating) or (when a cycle is
in progress)
9
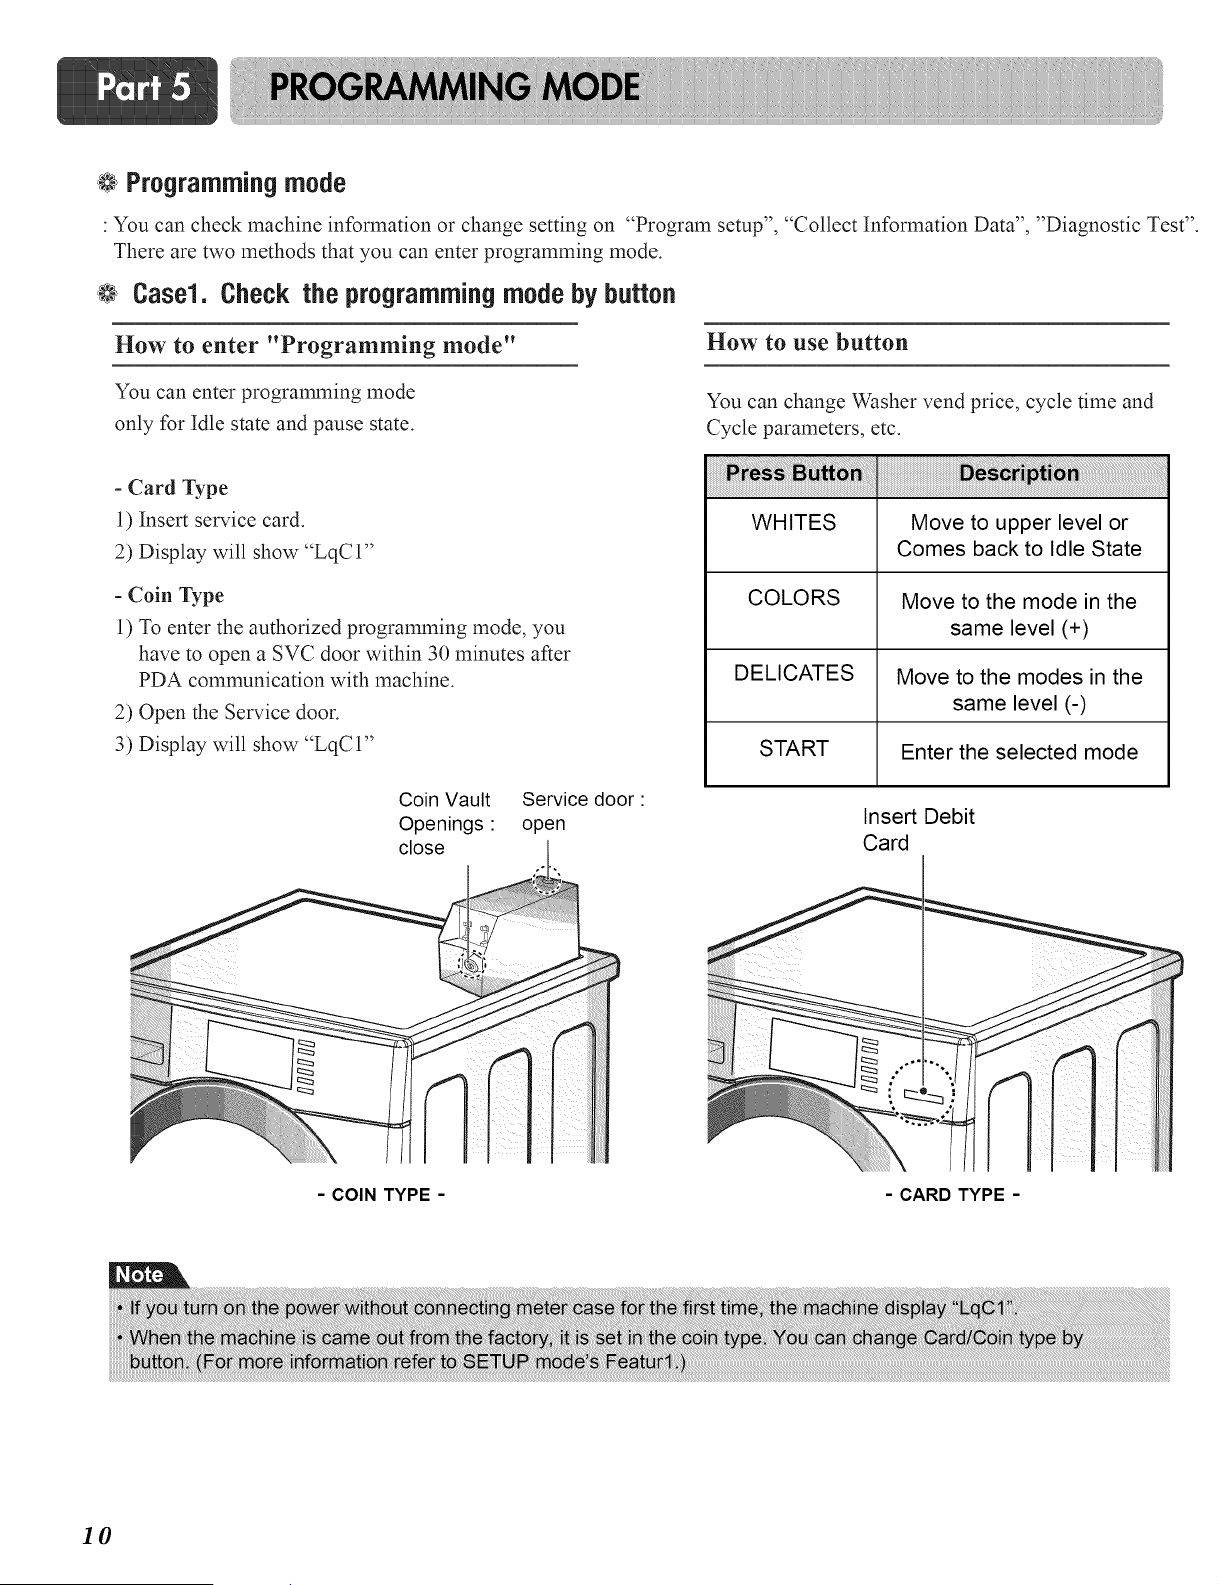
@ Programmingmode
: You can check machine information or change setting on "Program setup", "Collect Information Data", "Diagnostic Test".
There are two methods that you can enter programming mode.
@ Case1. Check the programmingmode by button
How to enter "Programming mode"
How to use button
You can enter programming mode
only for Idle state and pause state.
- Card Type
1) Insert service card.
2) Display will show "LqC 1"
- Coin Type
1) To enter the authorized programming mode, you
have to open a SVC door within 30 minutes after
PDA communication with machine.
2) Open the Service door.
3) Display will show "LqCI"
You can change Washer vend price, cycle time and
Cycle parameters, etc.
WHITES Move to upper level or
Comes back to Idle State
COLORS Move to the mode in the
same level (+)
DELICATES Move to the modes in the
same level (-)
START Enter the selected mode
Coin Vault
Openings:
close
Service door:
open
Insert Debit
Card
- COIN TYPE - -CARD TYPE-
10
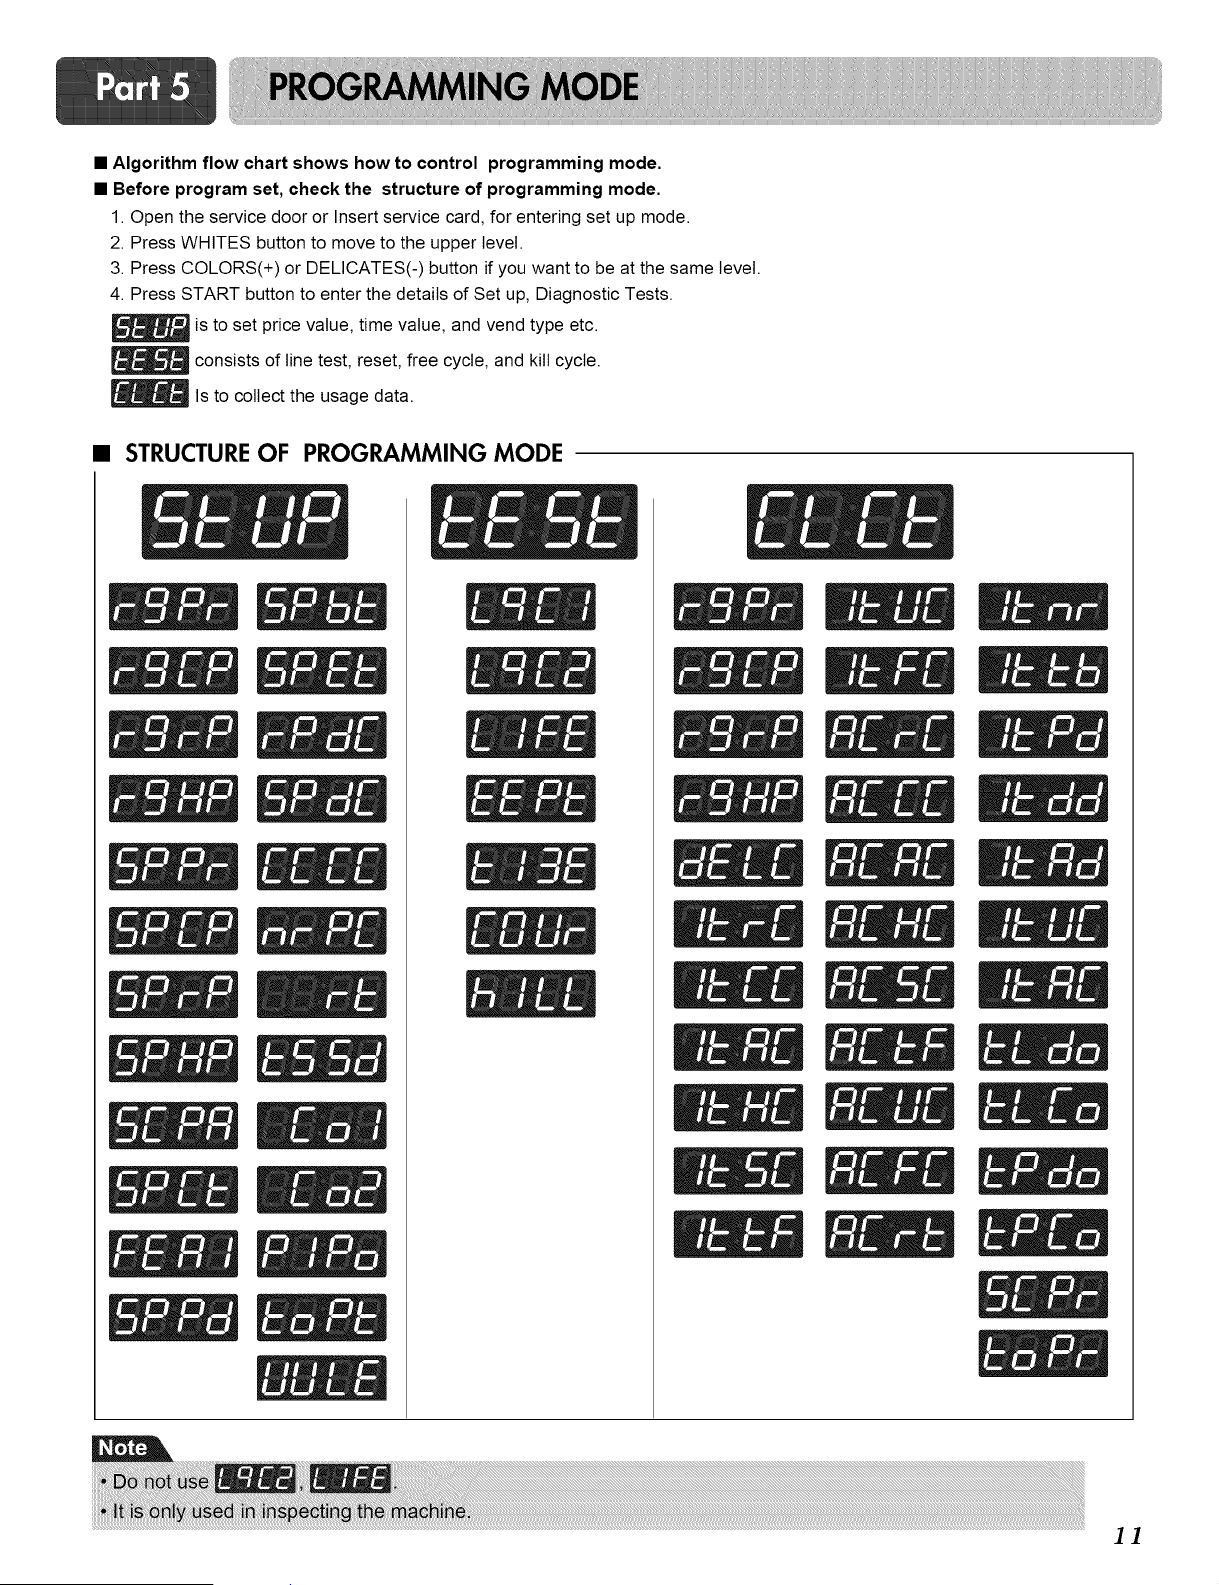
• Algorithm flow chart shows how to control programming mode.
• Before program set, check the structure of programming mode.
1. Open the service door or Insert service card, for entering set up mode.
2. Press WHITES button to move to the upper level.
3. Press COLORS(+) or DELICATES(-) button if you want to be at the same level.
4. Press START button to enter the details of Set up, Diagnostic Tests.
is to set price value, time value, and vend type etc.
_ consists of line test, reset, free cycle, and kill cycle.
_ls to collect the usage data.
• STRUCTURE OF PROGRAMMING MODE
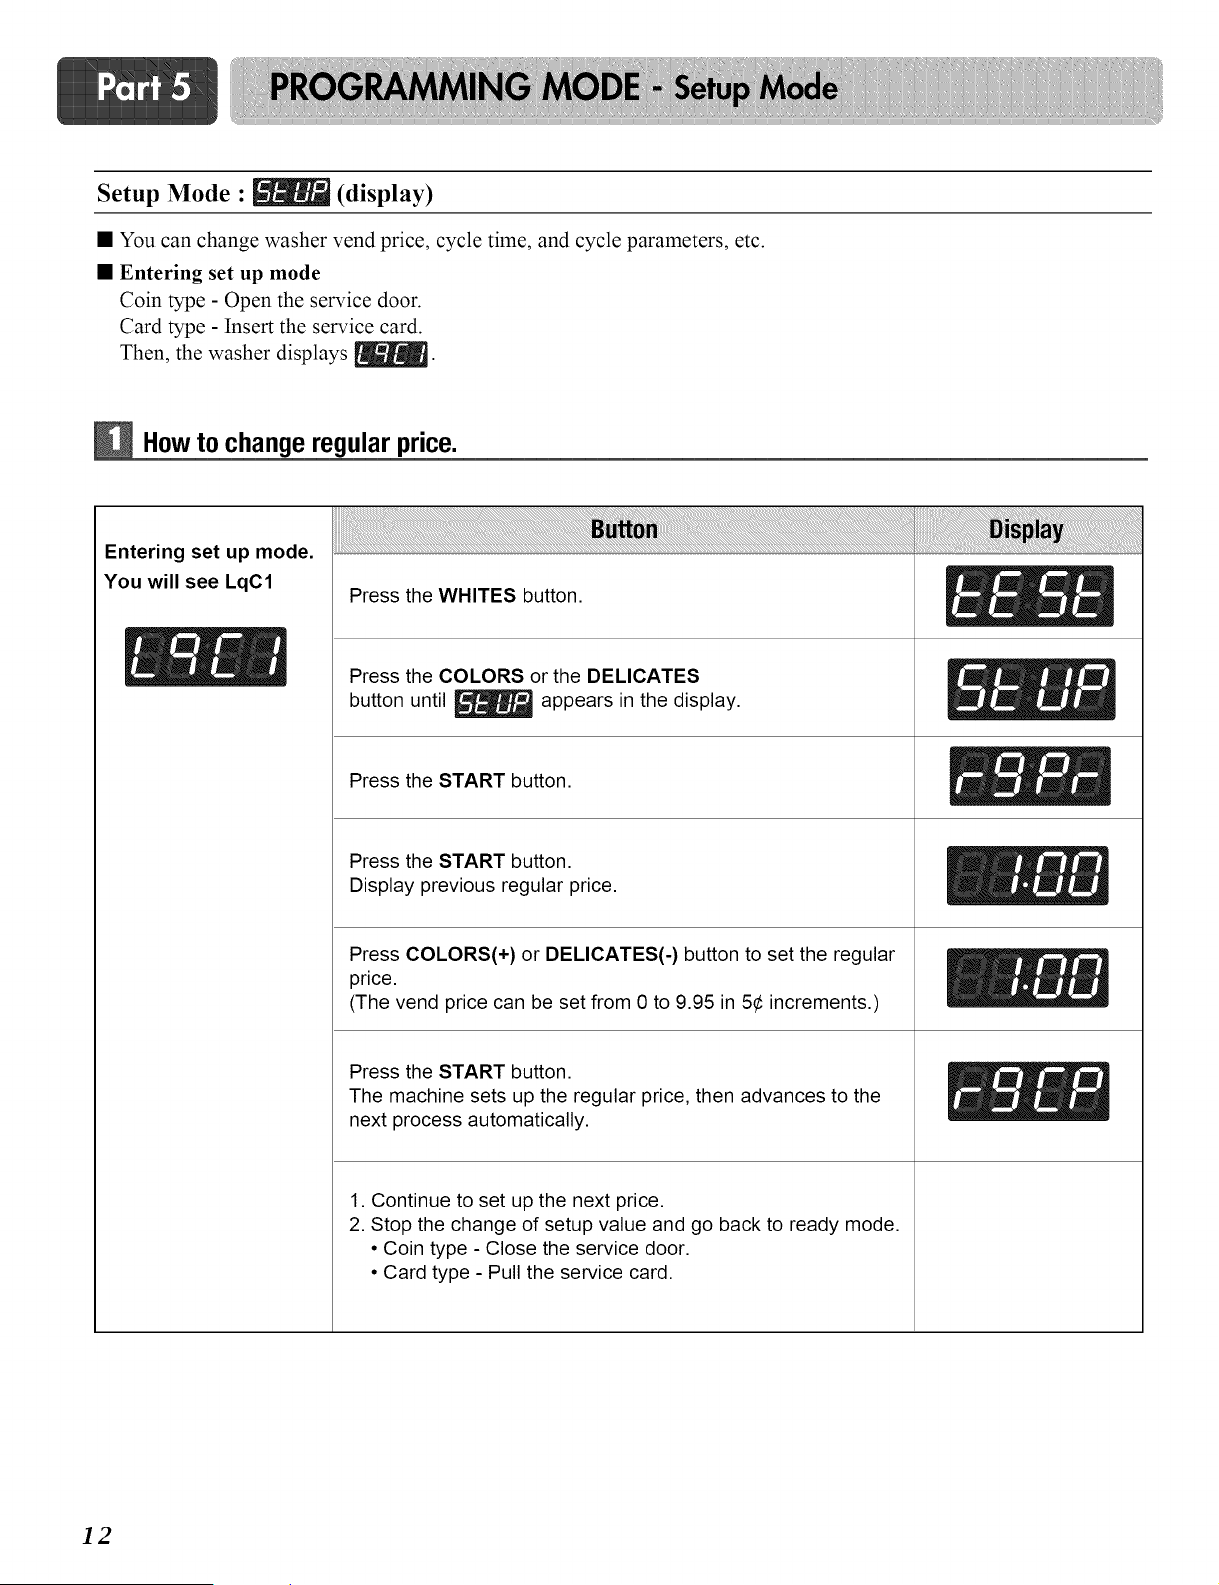
Setup Mode : [_ (display)
• You can change washer vend price, cycle time, and cycle parameters, etc.
• Entering set up mode
Coin type - Open the service door.
Card type - Insert the service card.
Then, the washer displays [_.
Howto change regularprice.
Entering set up mode.
You will see LqC1
Press the WHITES button.
_ _ Press the COLORS or the DELICATES
button until _ appears in the display.
Press the START button.
Press the START button.
Display previous regular price.
Press COLORS(+) or DELICATES(-) button to set the regular
price.
(The vend price can be set from 0 to 9.95 in 5¢ increments.)
Press the START button.
The machine sets up the regular price, then advances to the
next process automatically.
1. Continue to set up the next price.
2. Stop the change of setup value and go back to ready mode.
• Coin type - Close the service door.
• Card type - Pull the service card.
i
i
ii
12
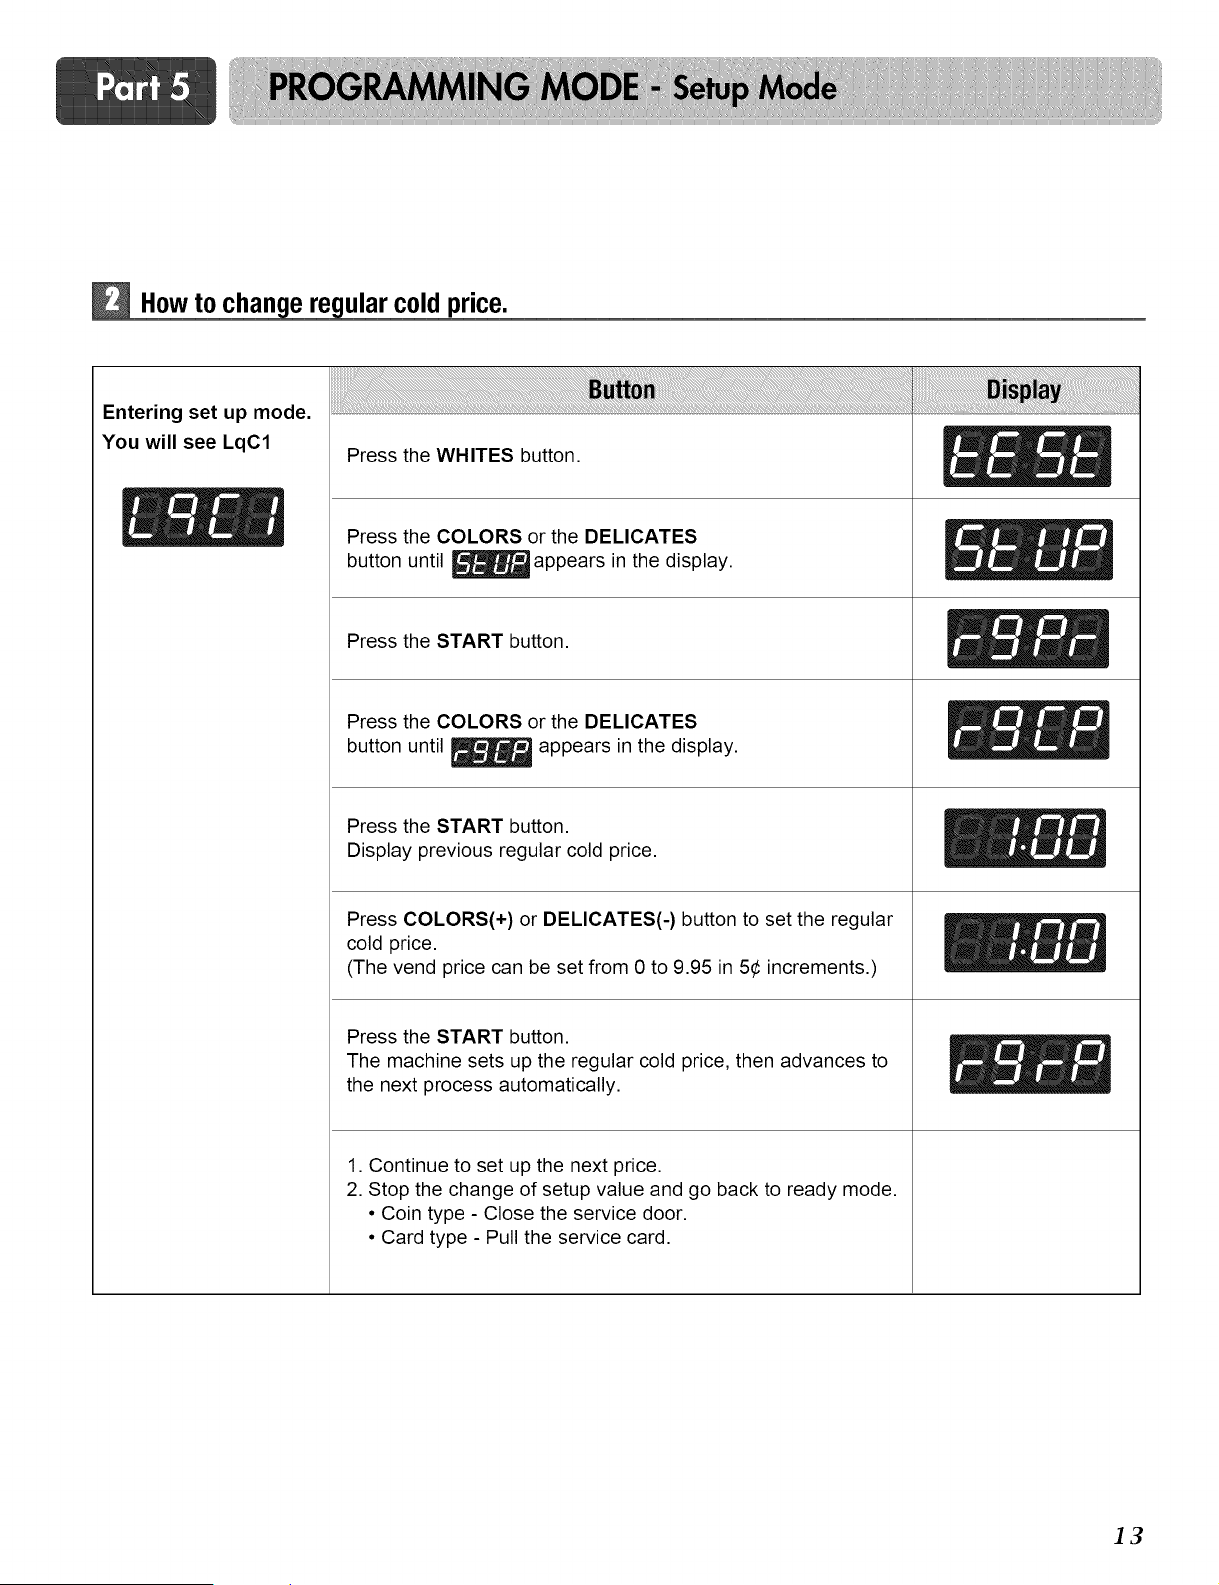
How to ular coldprice.
Entering set up mode.
You will see LqC1 Press the WHITES button.
_ _ Press the COLORS or the DELICATES
button until _ appears in the display.
Press the START button.
Press the COLORS or the DELICATES
button until _ appears in the display.
Press the START button.
Display previous regular cold price.
Press COLORS(+) or DELICATES(-) button to set the regular
cold price.
(The vend price can be set from 0 to 9.95 in 5¢ increments.)
Press the START button.
The machine sets up the regular cold price, then advances to
the next process automatically.
1. Continue to set up the next price.
2. Stop the change of setup value and go back to ready mode.
• Coin type - Close the service door.
• Card type - Pull the service card.
]3

Howto change regularwarm price
Entering set up mode.
You will see LqC1
Press the WHITES button.
_ / Press the COLORS or the "DELICATES
button until _ appears in the display.
Press the START button.
Press the COLORS or the DELICATES
button until _ appears in the display.
Press the START button.
Display previous regular warm price.
Press COLORS(+) or DELICATES(-) button to set the regular
warm price.
(The vend price can be set from 0 to 9.95 in 5¢ increments.)
Press the START button.
The machine sets up the regular warm price, then advances to
the next process automatically.
1. Continue to set up the next price.
2. Stop the change of setup value and go back to ready mode.
• Coin type - Close the service door.
• Card type - Pull the service card.
14
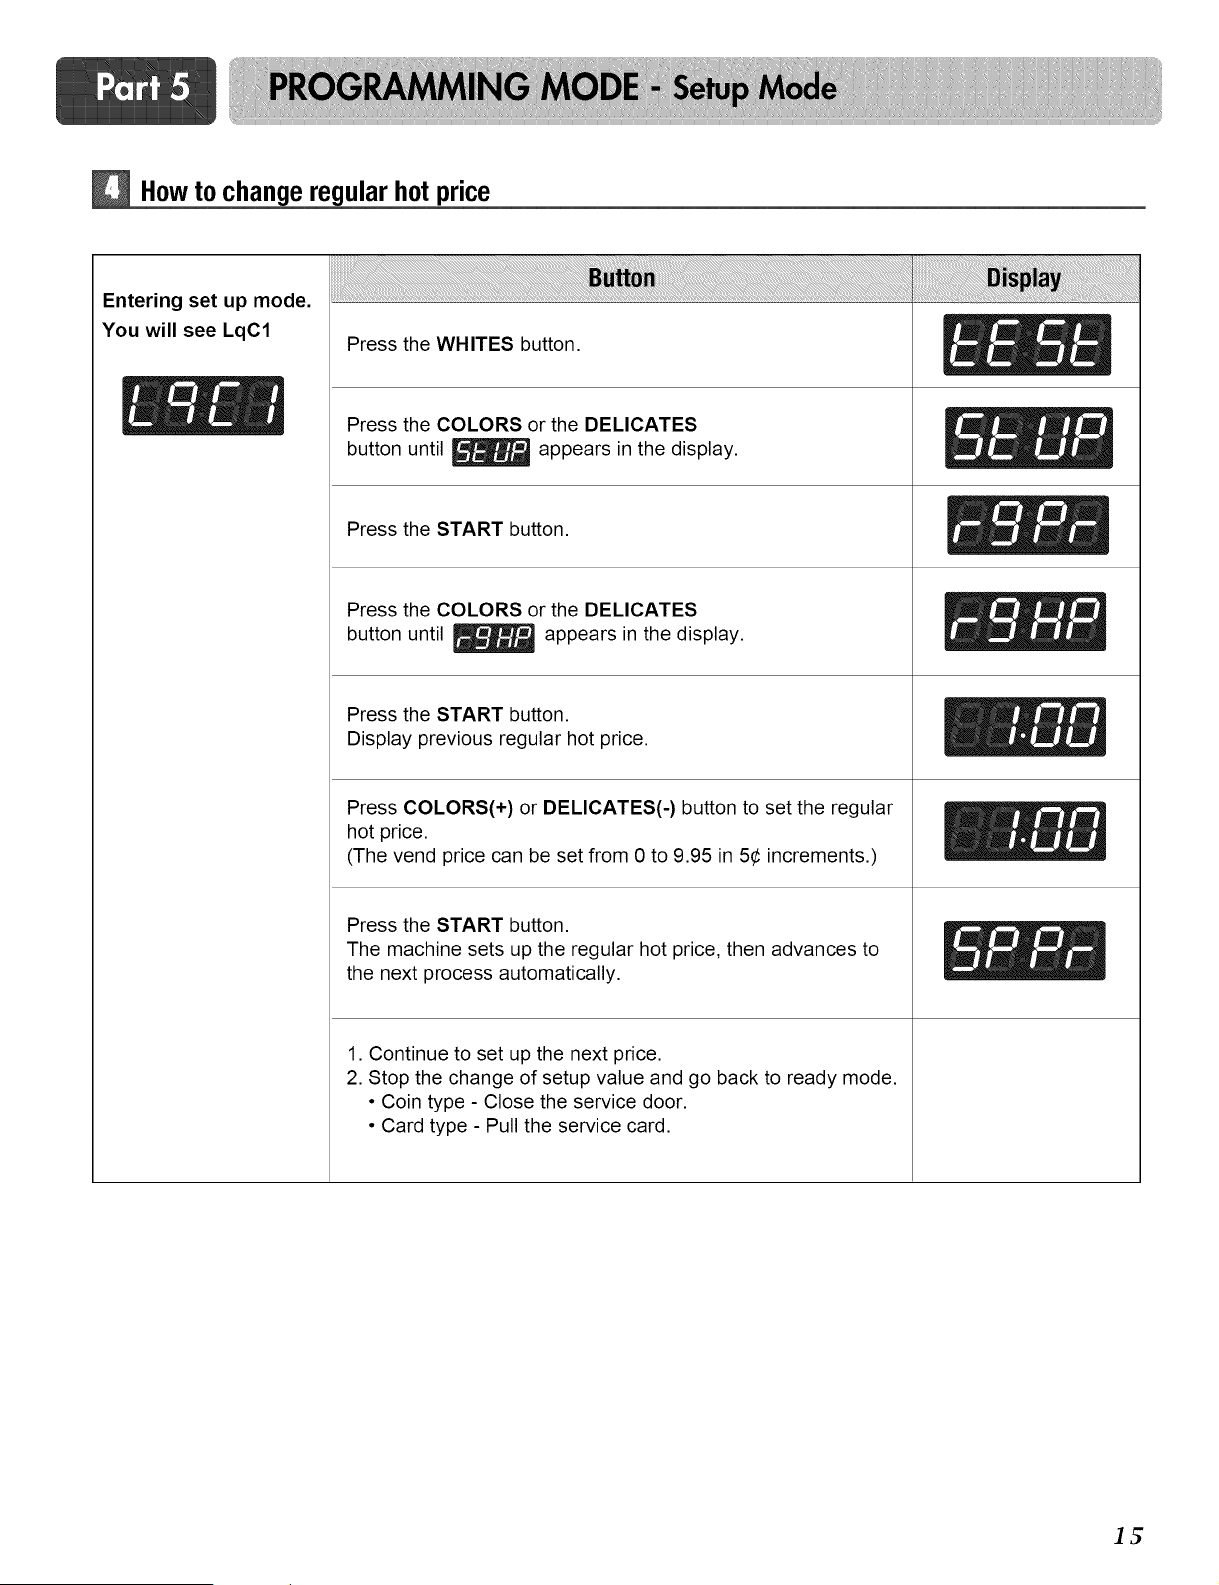
How to change regular hot price
Entering set up mode.
You will see LqC1
Press the WHITES button.
_ _ Press the COLORS or the DELICATES
button until _ appears in the display.
Press the START button.
Press the COLORS or the DELICATES
button until _ appears in the display.
Press the START button.
Display previous regular hot price.
Press COLORS(+) or DELICATES(-) button to set the regular
hot price.
(The vend price can be set from 0 to 9.95 in 5¢ increments.)
Press the START button.
The machine sets up the regular hot price, then advances to
the next process automatically.
1. Continue to set up the next price.
2. Stop the change of setup value and go back to ready mode.
• Coin type - Close the service door.
• Card type - Pull the service card.
It;
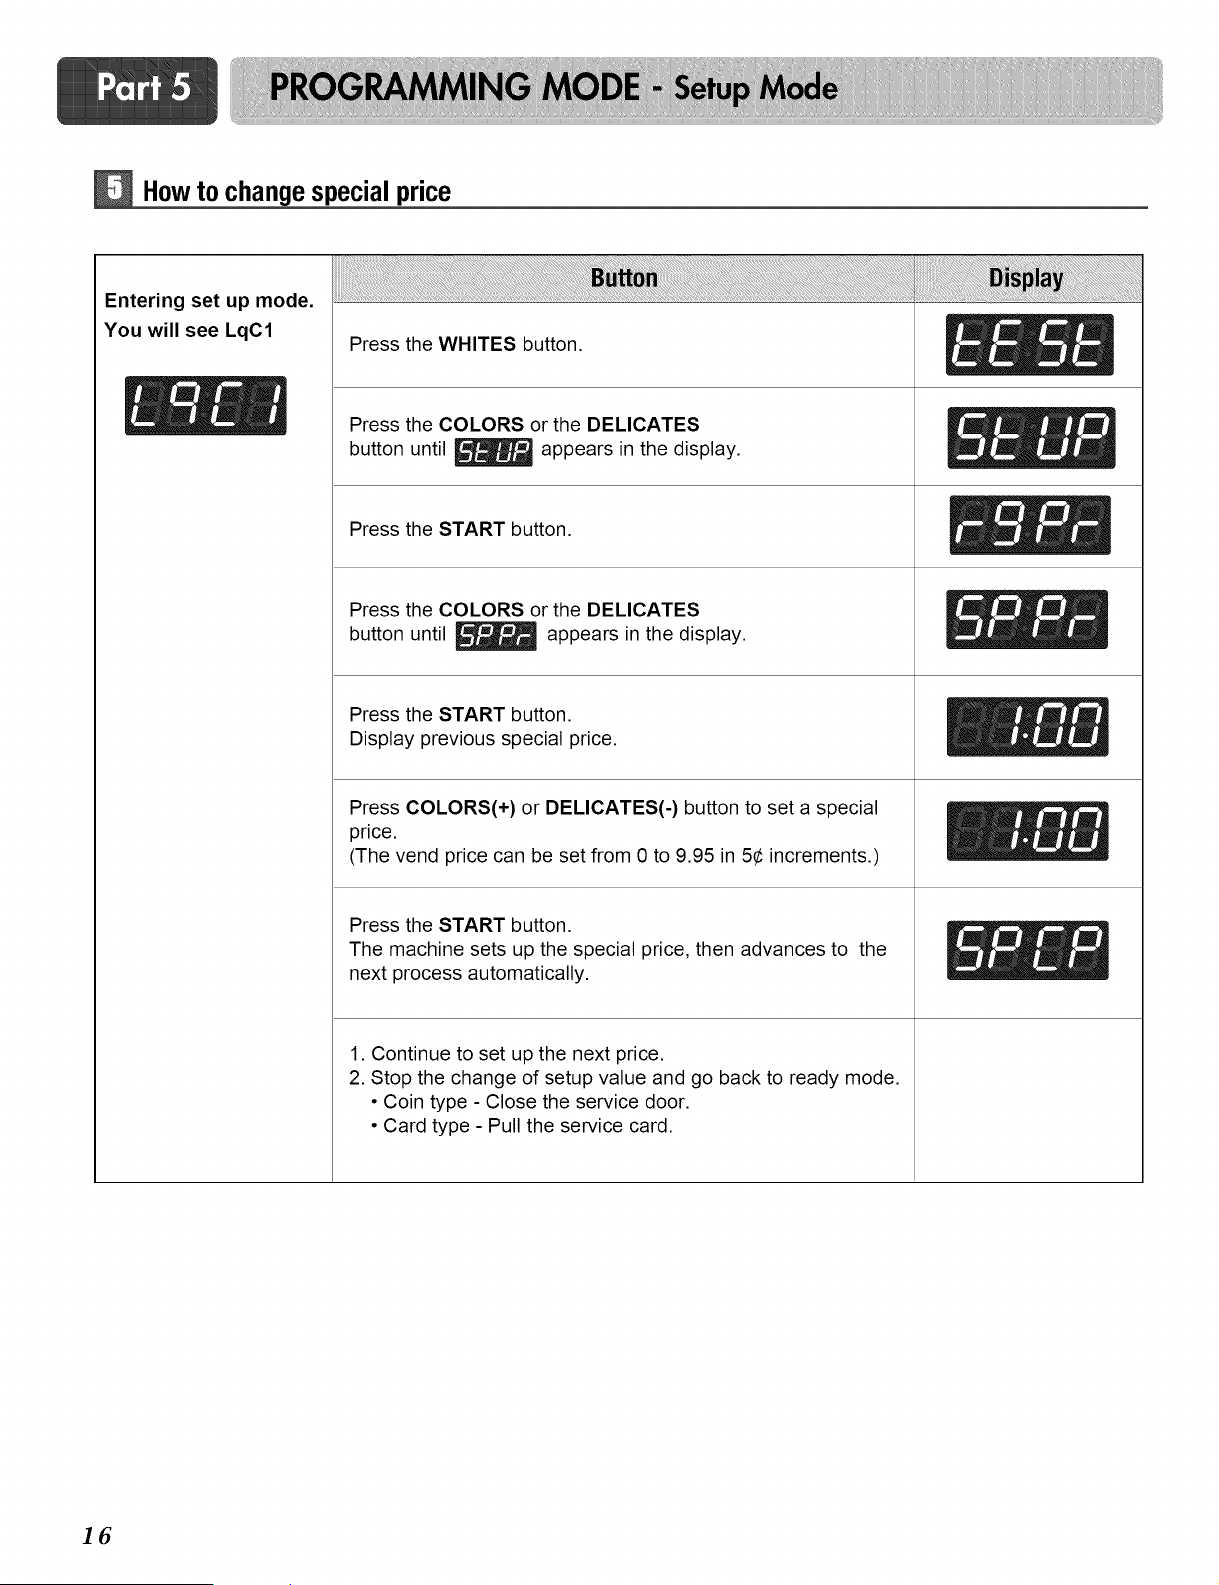
Howto changespecial price
Entering set up mode.
You will see LqC1
Press the WHITES button.
_ / Press the COLORS or the DELICATES
button until _ appears in the display.
Press the START button.
Press the COLORS or the DELICATES
button until _ appears in the display.
Press the START button.
Display previous special price.
Press COLORS(+) or DELICATES(-) button to set a special
price.
(The vend price can be set from 0 to 9.95 in 5¢ increments.)
Press the START button.
The machine sets up the special price, then advances to the
next process automatically.
1. Continue to set up the next price.
2. Stop the change of setup value and go back to ready mode.
• Coin type - Close the service door.
• Card type - Pull the service card.
16
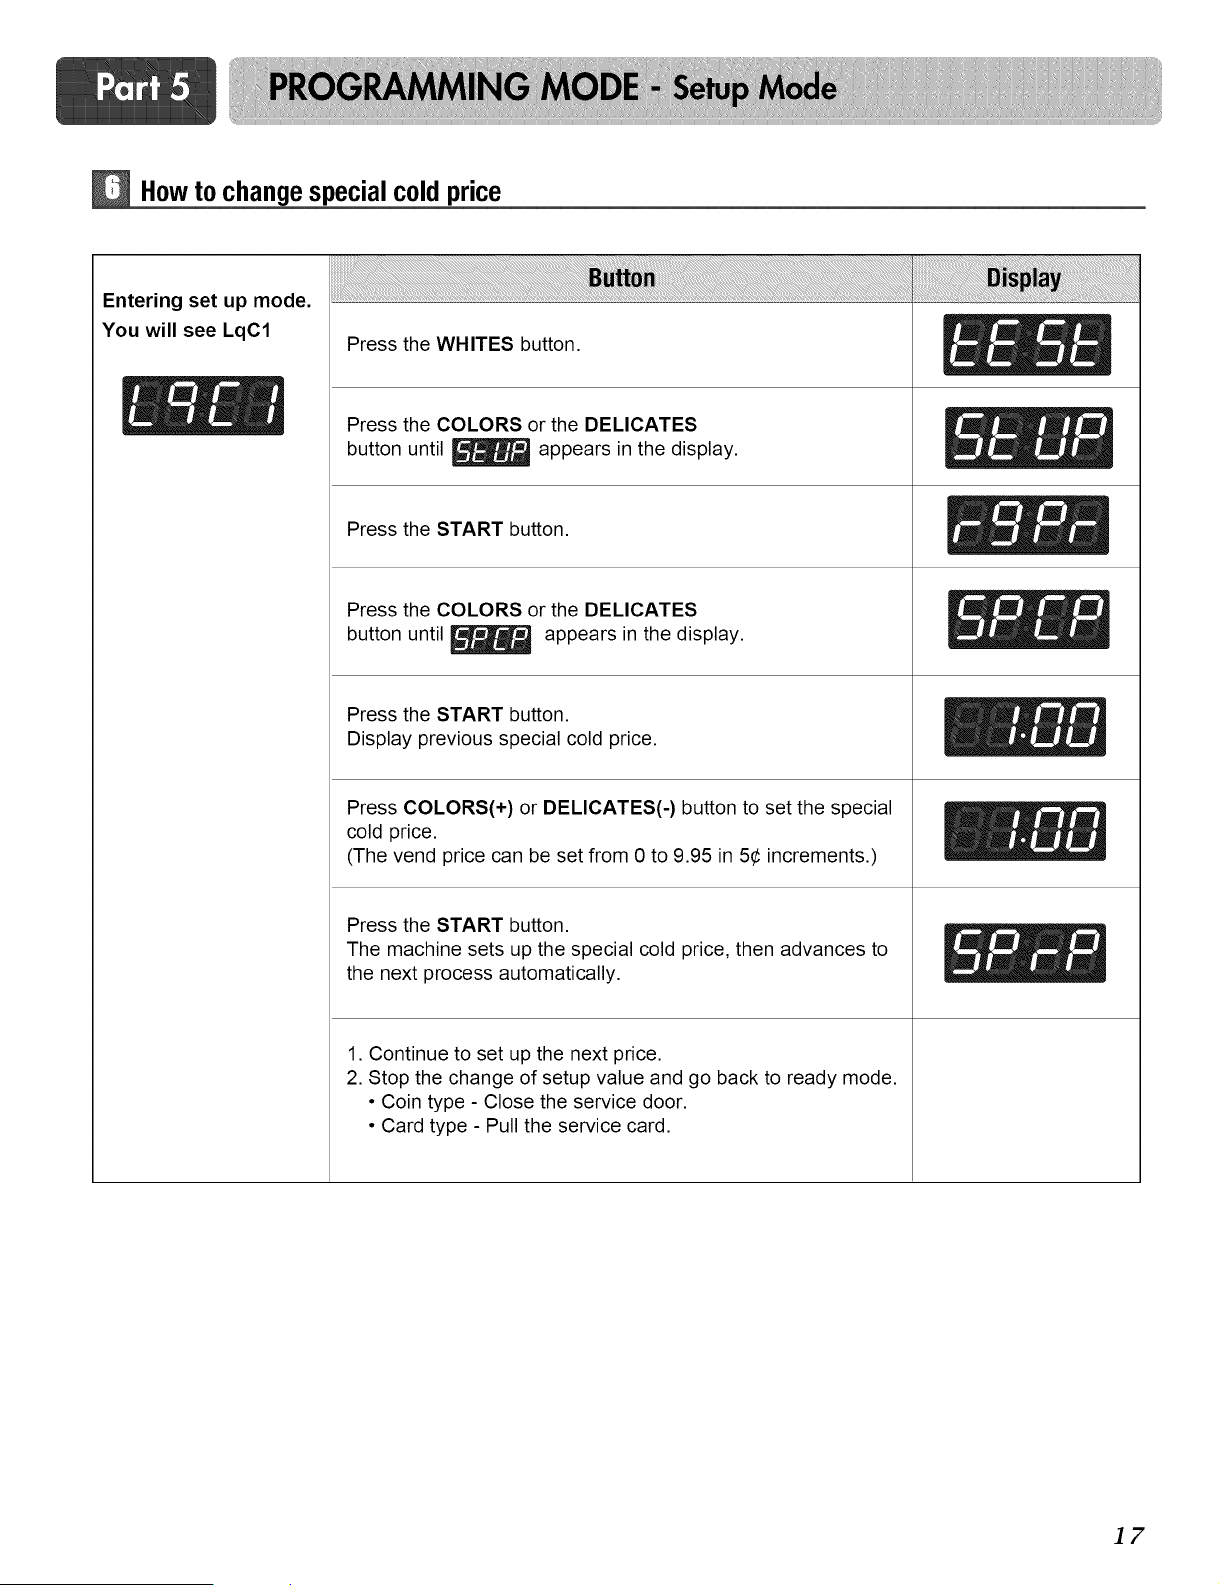
How to changespecialcold price
Entering set up mode.
You will see LqC1
Press the WHITES button.
_ _ Press the COLORS or the DELICATES
button until _ appears in the display.
Press the START button.
Press the COLORS or the DELICATES
button until _ appears in the display.
Press the START button.
Display previous special cold price.
Press COLORS(+) or DELICATES(-) button to set the special
cold price.
(The vend price can be set from 0 to 9.95 in 5¢ increments.)
Press the START button.
The machine sets up the special cold price, then advances to
the next process automatically.
1. Continue to set up the next price.
2. Stop the change of setup value and go back to ready mode.
• Coin type - Close the service door.
• Card type - Pull the service card.
]7

Howto changespecial warm price
Entering set up mode.
You will see LqC1
Press the WHITES button.
_ / Press the COLORS or the DELICATES
button until _ appears in the display.
Press the START button.
Press the COLORS or the DELICATES
button until _ appears in the display.
Press the START button.
Display previous special warm price.
Press COLORS(+) or DELICATES(-) button to set the special
warm price.
(The vend price can be set from 0 to 9.95 in 5¢ increments.)
Press the START button.
The machine sets up the special warm price, then advances to
the next process automatically.
1. Continue to set up the next price.
2. Stop the change of setup value and go back to ready mode.
• Coin type - Close the service door.
• Card type - Pull the service card.
18

How to changespecial hot price
Entering set up mode.
You will see LqC1
Press the WHITES button.
_ _ Press the COLORS or the DELICATES
button until _ appears in the display.
Press the START button.
Press the COLORS or the DELICATES
button until Lr_ appears in the display.
I_==dtdlmRJUllm
Press the START button.
Display previous special hot price.
Press COLORS(+) or DELICATES(-) button to set the special
hot price.
(The vend price can be set from 0 to 9.95 in 5¢ increments.)
Press the START button.
The machine sets up the special hot price, then advances to
the next process automatically.
1. Continue to set up the next price.
2. Stop the change of setup value and go back to ready mode.
• Coin type - Close the service door.
• Card type - Pull the service card.
]9
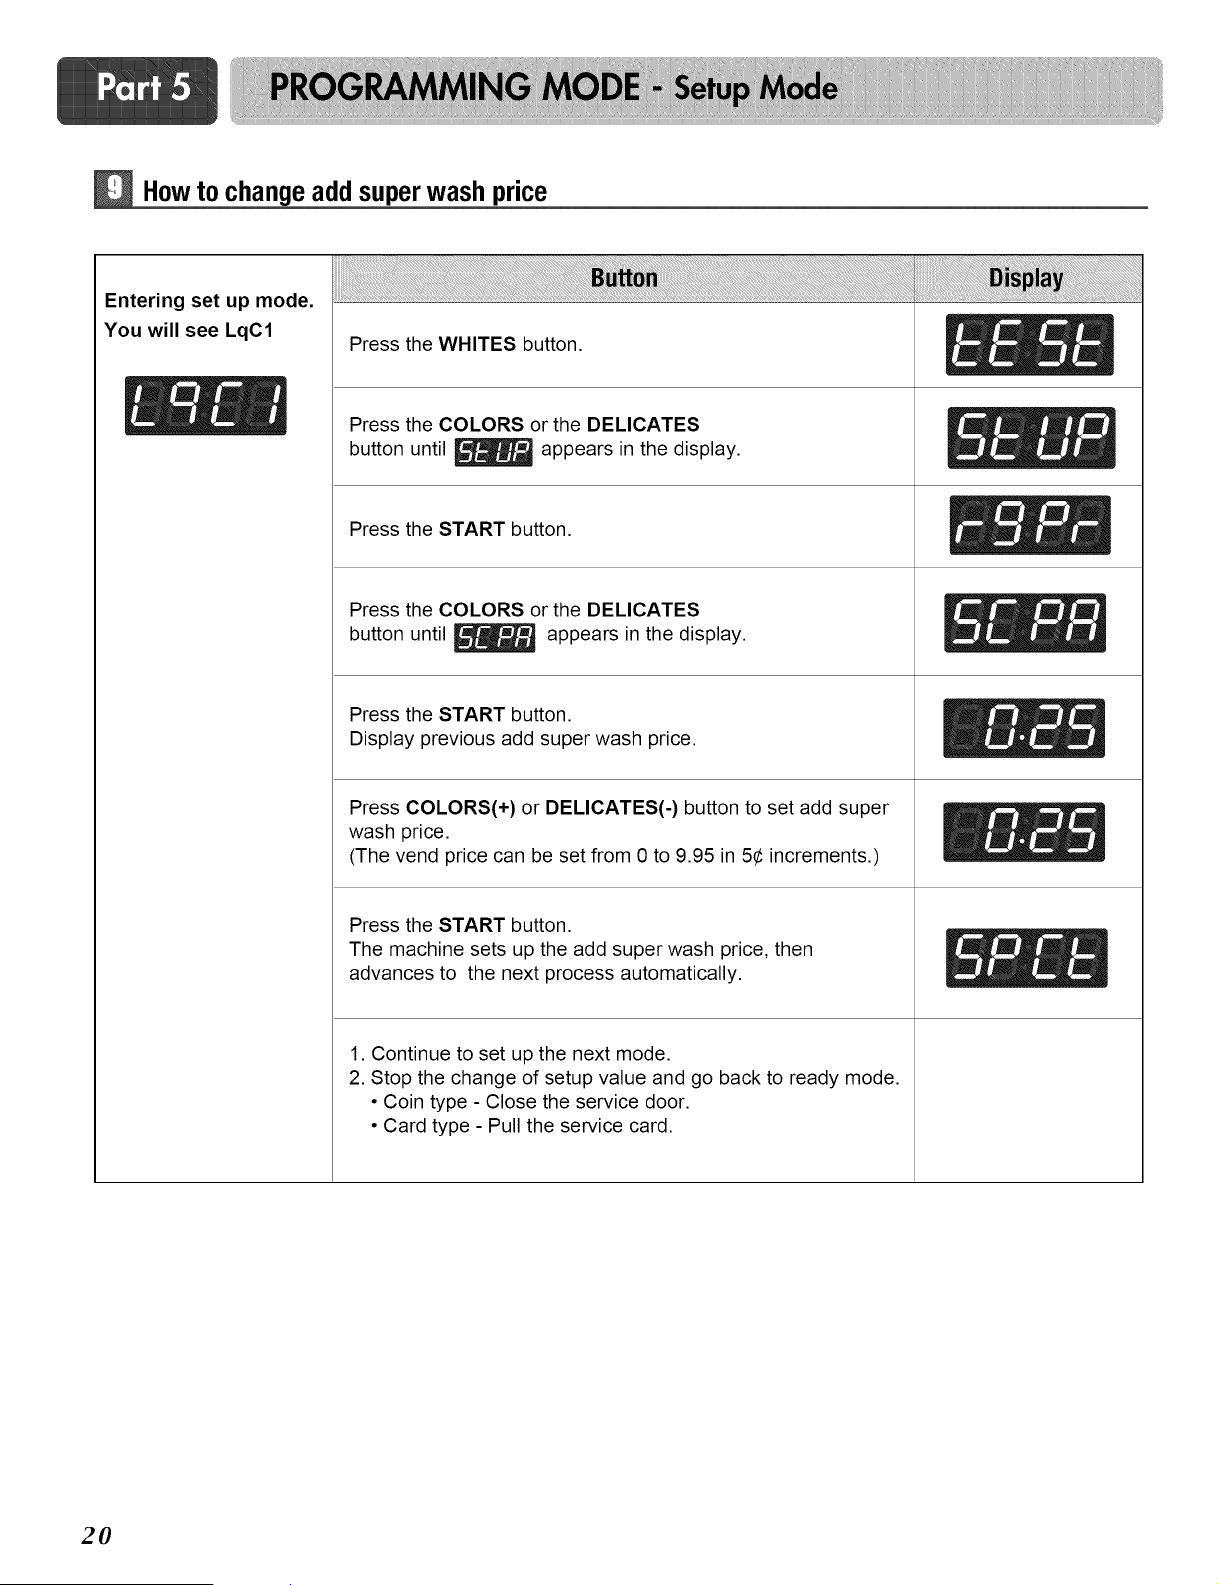
Howto change add superwash price
Entering set up mode.
You will see LqC1
Press the WHITES button.
_ / Press the COLORS or the DELICATES
button until _ appears in the display.
Press the START button.
Press the COLORS or the DELICATES
button until _ appears in the display.
Press the START button.
Display previous add super wash price.
Press COLORS(+) or DELICATES(-) button to set add super
wash price.
(The vend price can be set from 0 to 9.95 in 5¢ increments.)
Press the START button.
The machine sets up the add super wash price, then
advances to the next process automatically.
1. Continue to set up the next mode.
2. Stop the change of setup value and go back to ready mode.
• Coin type - Close the service door.
• Card type - Pull the service card.
2O
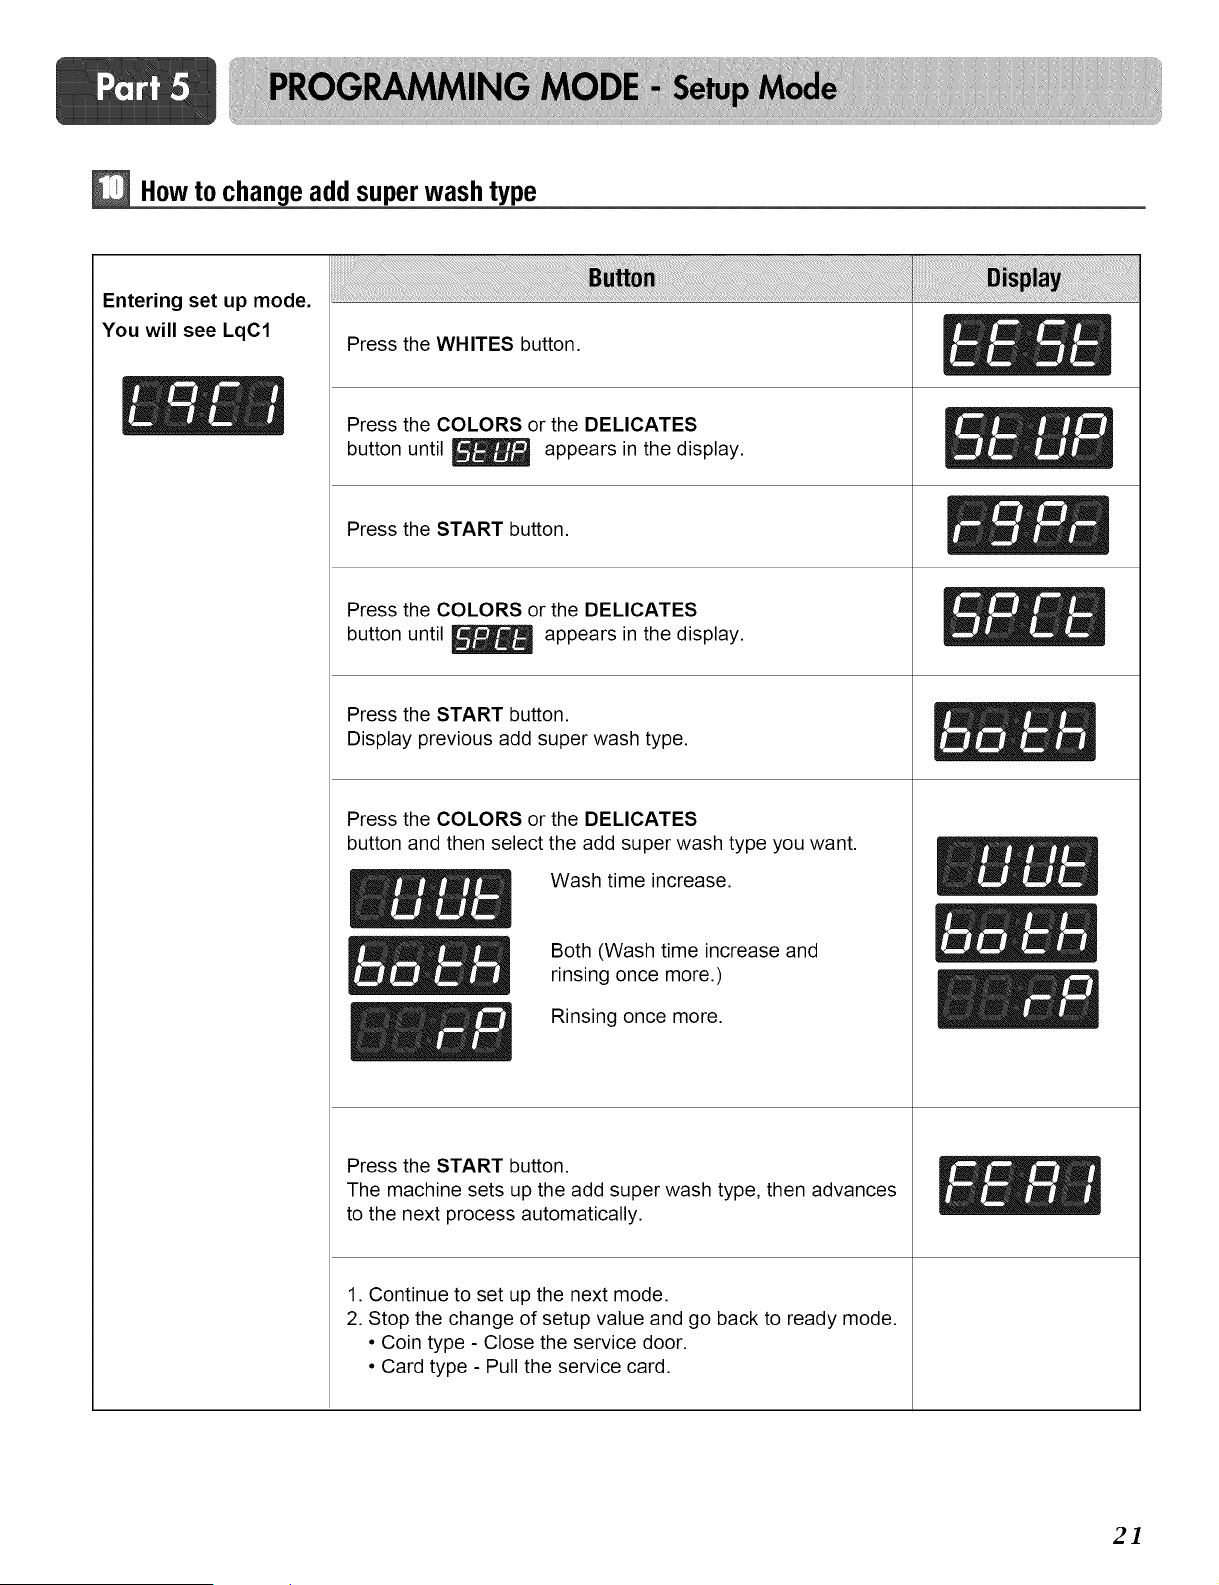
How to changeadd super wash type
Entering set up mode.
You will see LqC1
Press the WHITES button.
_ _ Press the COLORS or the DELICATES
button until _ appears in the display.
Press the START button.
Press the COLORS or the DELICATES
button until _ appears in the display.
Press the START button.
Display previous add super wash type.
Press the COLORS or the DELICATES
button and then select the add super wash type you want.
E _f_ Wash time increase.
_ _ _ Both (Wash time increase andrinsing once more.)
E_ _ Rinsing once more.
Press the START button.
The machine sets up the add super wash type, then advances
to the next process automatically.
1. Continue to set up the next mode.
2. Stop the change of setup value and go back to ready mode.
• Coin type - Close the service door.
• Card type - Pull the service card.
2]
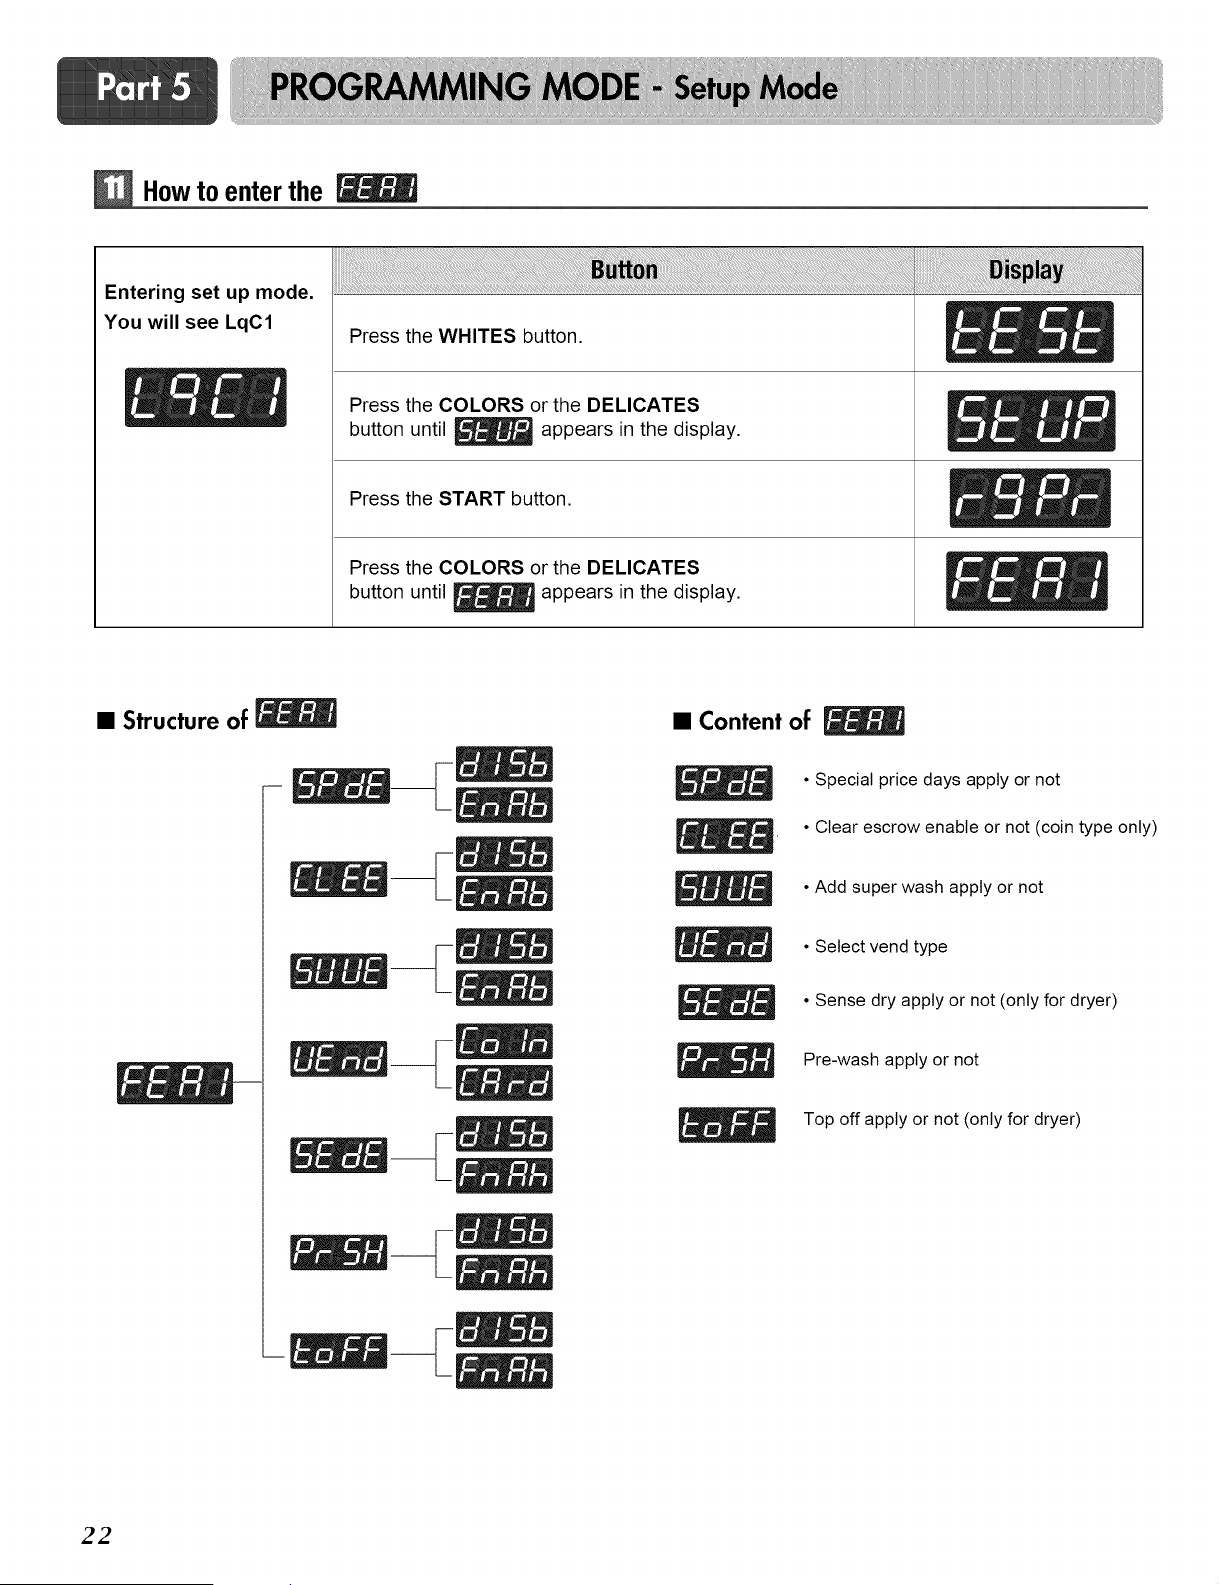
Howto enter the
Entering set up mode.
You will see LqC1
Press the WHITES button.
Press the COLORS or the DELICATES
button until _ appears in the display.
Press the START button.
Press the COLORS or the DELICATES
button until _ appears in the display.
• Structure of
• Content of
• Special price days apply or not
• Clear escrow enable or not (coin type only)
• Add super wash apply or not
• Select vend type
• Sense dry apply or not (only for dryer)
Pre-wash apply or not
Top off apply or not (only for dryer)
22
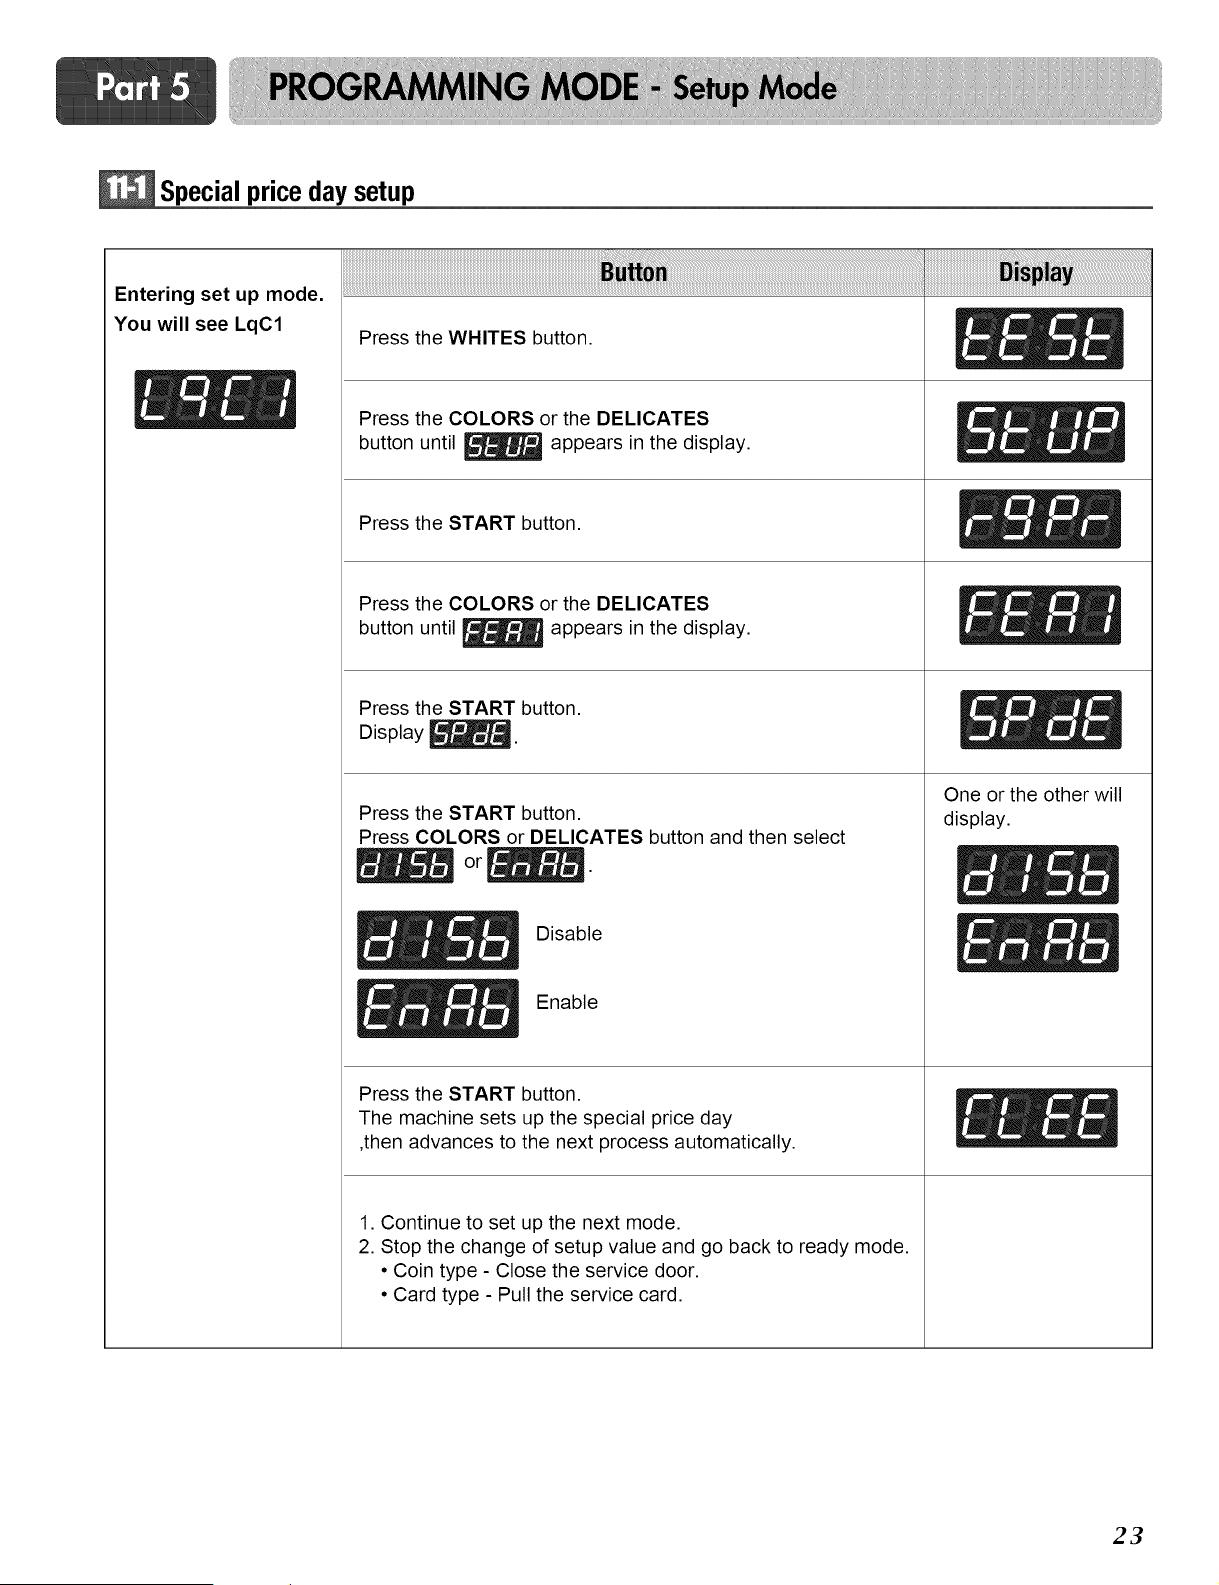
Specialprice day setup
Entering set up mode.
You will see LqC1
i ! ii ! iiiiiiiiiiiiiiiiiiiiiiiiiiiiiiiiiiiiiiiiiiiiiiiiiiiiiiiiiiiiiiiiiiiiiiiiiiiiiiiiiiiiiiiiiiiiiiiiiiiiiiiiiiiiiiiiiiiiiiiiiiiiiiiiiiiiiiiiiiiiiiiiiiiiiiiiiiiiiiiiiiiiiiiiiiiiii !1ii
Press the WHITES button.
Press the COLORS or the DELICATES
button until _ appears in the display.
Press the START button.
Press the COLORS or the DELICATES
button until _ appears in the display.
Press the START button.
Display _.
Press the START button.
Press COLORS or DELICATES button and then select
Disable
Enable
Press the START button.
The machine sets up the special price day
,then advances to the next process automatically.
One or the other will
display.
1. Continue to set up the next mode.
2. Stop the change of setup value and go back to ready mode.
• Coin type - Close the service door.
• Card type - Pull the service card.
23
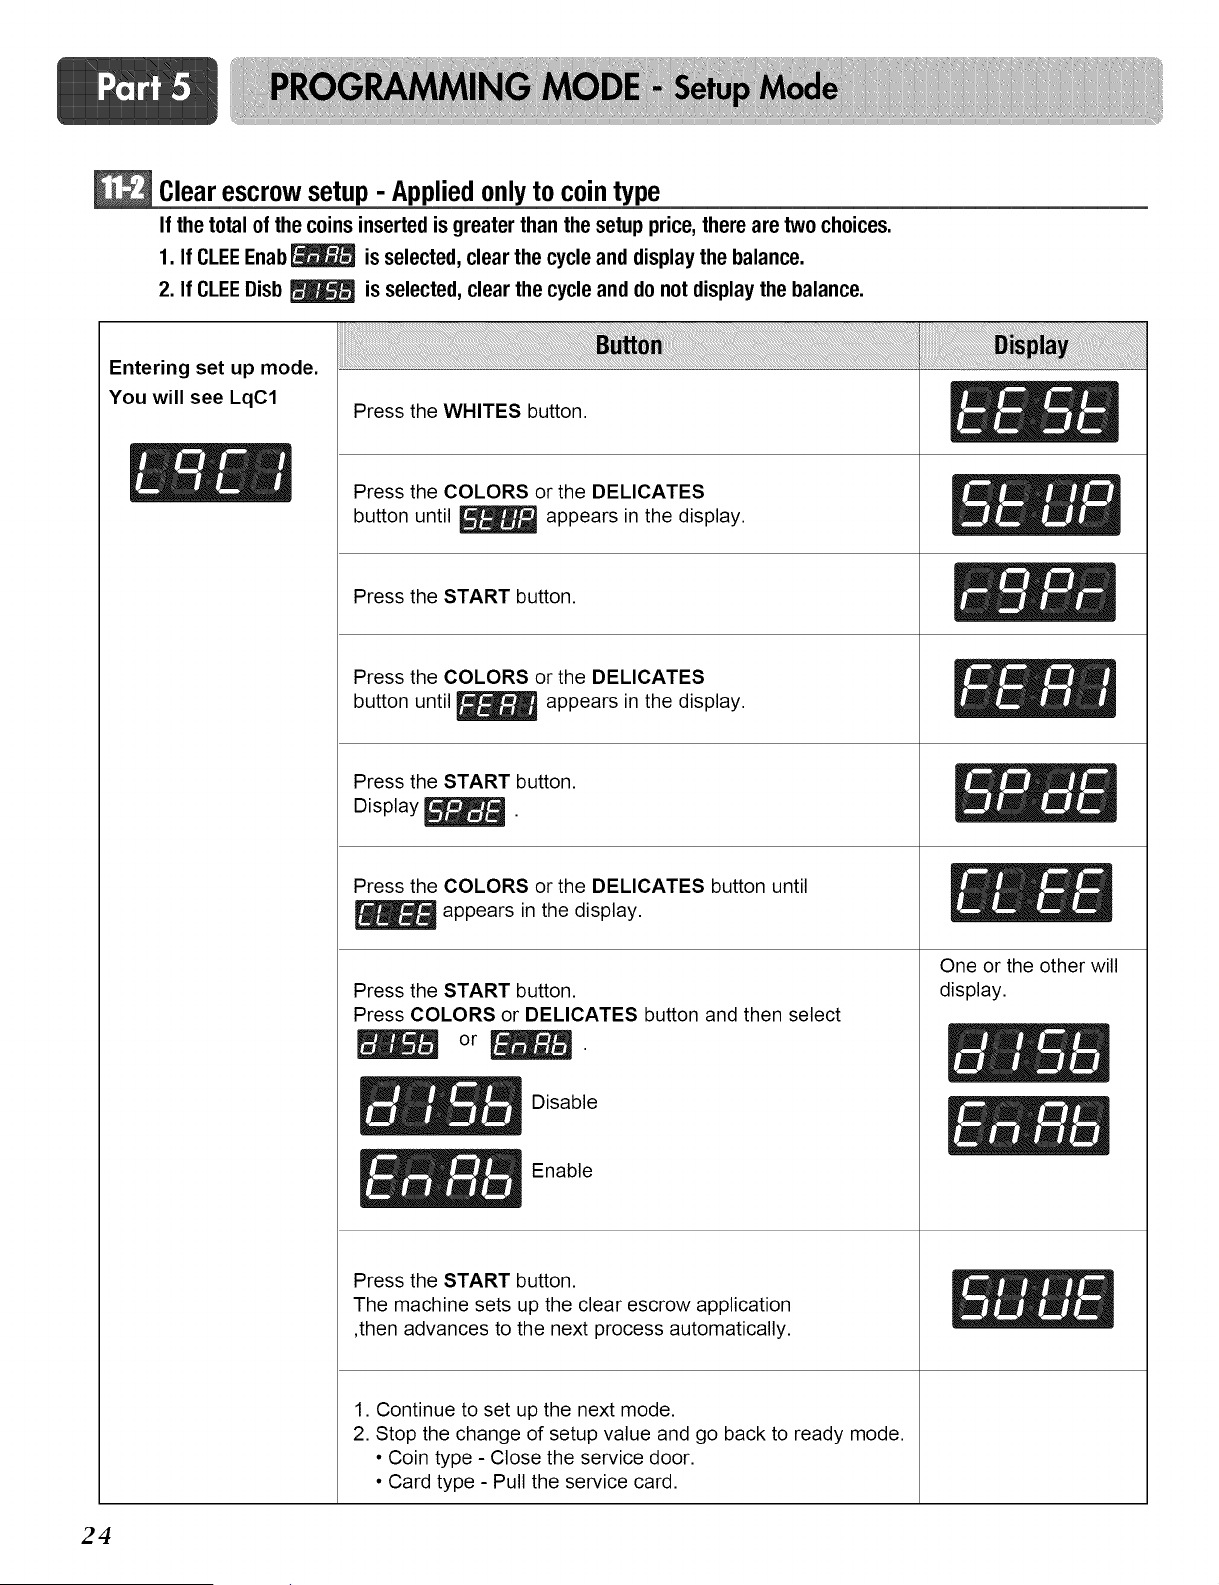
Clear escrow setup - Appliedonlyto cointype
If thetotalof thecoinsinsertedis greaterthanthesetupprice, therearetwo choices.
1. If CLEEEnab_ is selected, clear the cycle and display the balance.
2. If CLEEDisb _ is selected, clear the cycle and do not display the balance.
Entering set up mode.
You will see LqC1
Press the WHITES button.
Press the COLORS or the DELICATES
button until _ appears in the display.
Press the START button.
Press the COLORS or the DELICATES
button until _ appears in the display.
Press the START button.
Display _.
Press the COLORS or the DELICATES button until
appears in the display.
Press the START button.
Press COLORS or DELICATES button and then select
_ _ Disable
_ _ Enable
Press the START button.
The machine sets up the clear escrow application
,then advances to the next process automatically.
1. Continue to set up the next mode.
2. Stop the change of setup value and go back to ready mode.
• Coin type - Close the service door.
• Card type - Pull the service card.
One or the other will
display.
24
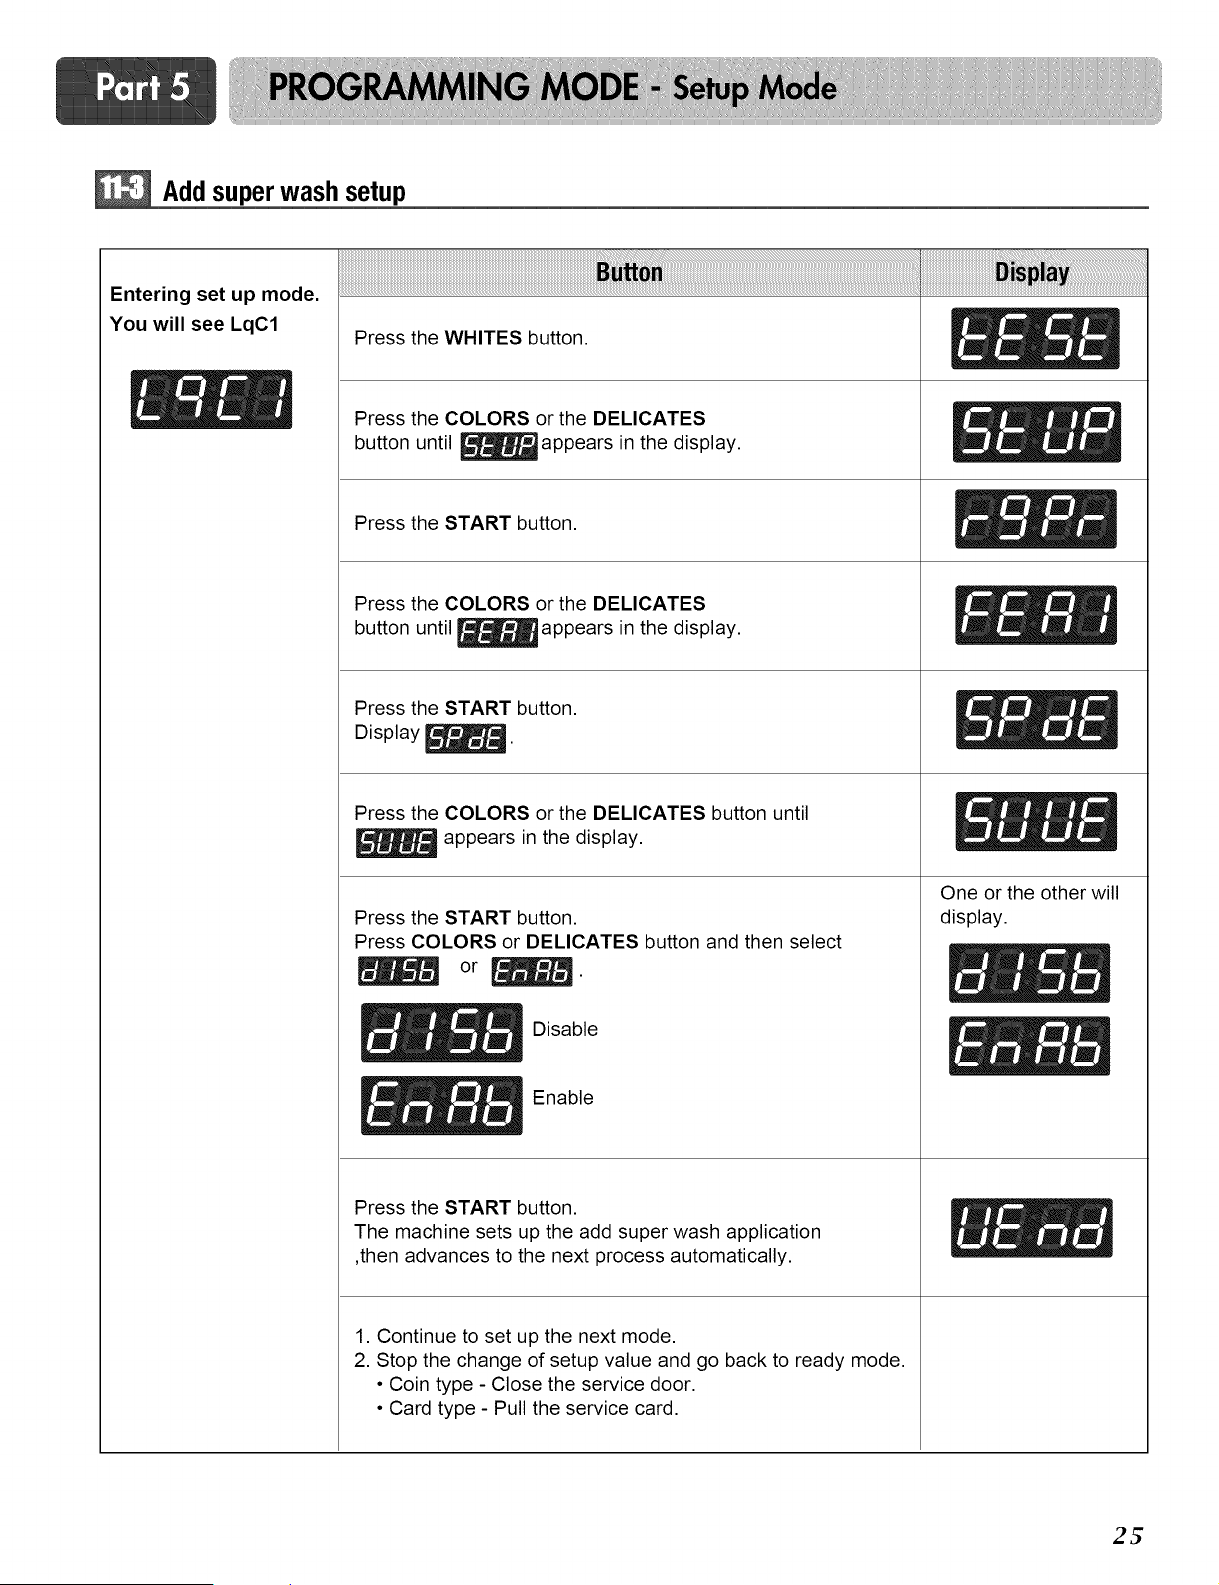
Add superwash setup
Entering set up mode.
You will see LqC1
Press the WHITES button.
Press the COLORS or the DELICATES
button until _appears in the display.
Press the START button.
Press the COLORS or the DELICATES
button until _appears in the display.
Press the START button.
Display _.
Press the COLORS or the DELICATES button until
appears in the display.
Press the START button.
Press COLORS or DELICATES button and then select
_ _ Disable
_!_ _ Enable
Press the START button.
The machine sets up the add super wash application
,then advances to the next process automatically.
1. Continue to set up the next mode.
2. Stop the change of setup value and go back to ready mode.
• Coin type - Close the service door.
• Card type - Pull the service card.
One or the other will
display.
2_
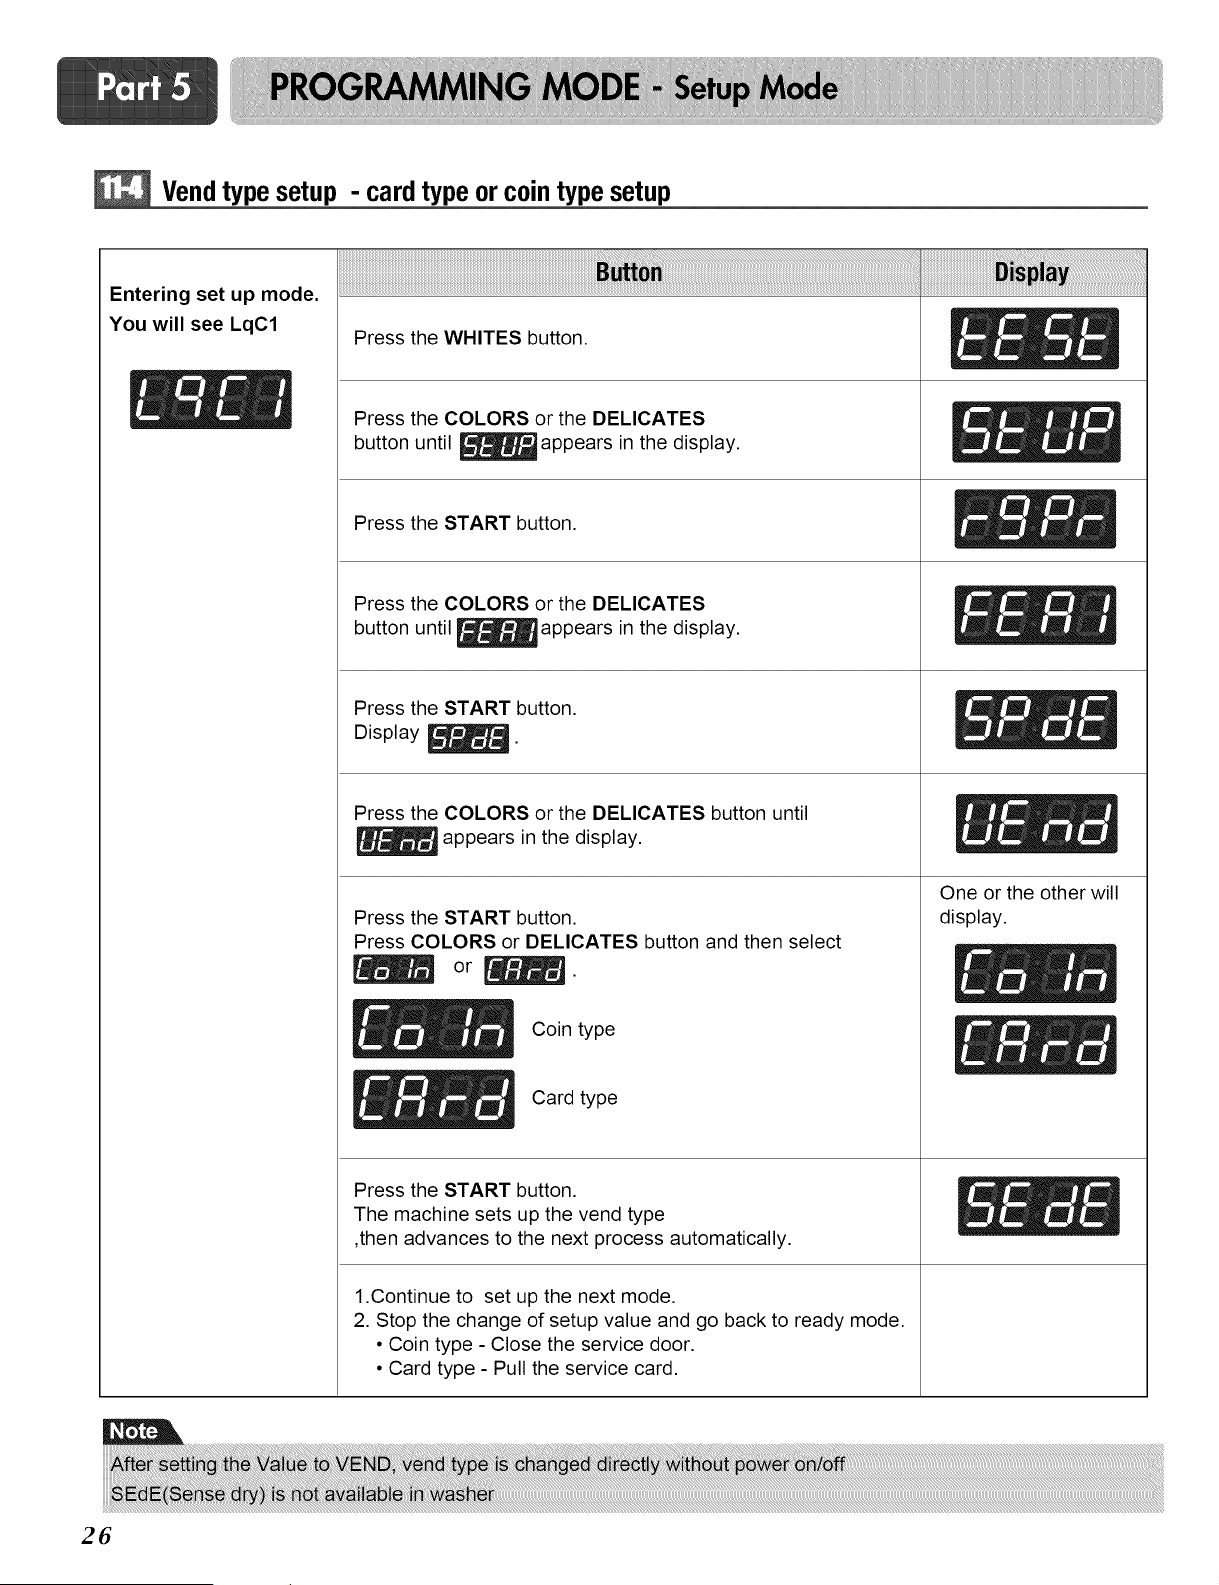
Vendtypesetup - cardtypeor cointypesetup
Entering set up mode.
You will see LqC1
Press the WHITES button.
Press the COLORS or the DELICATES
button until _appears in the display.
Press the START button.
Press the COLORS or the DELICATES
button until _appears in the display.
Press the START button.
Display _.
Press the COLORS or the DELICATES button until
appears in the display.
Press the START button.
Press COLORS or DELICATES button and then select
Coin type
Card type
Press the START button.
The machine sets up the vend type
,then advances to the next process automatically.
1.Continue to set up the next mode.
2. Stop the change of setup value and go back to ready mode.
• Coin type - Close the service door.
• Card type - Pull the service card.
One or the other will
display.
Jml
26
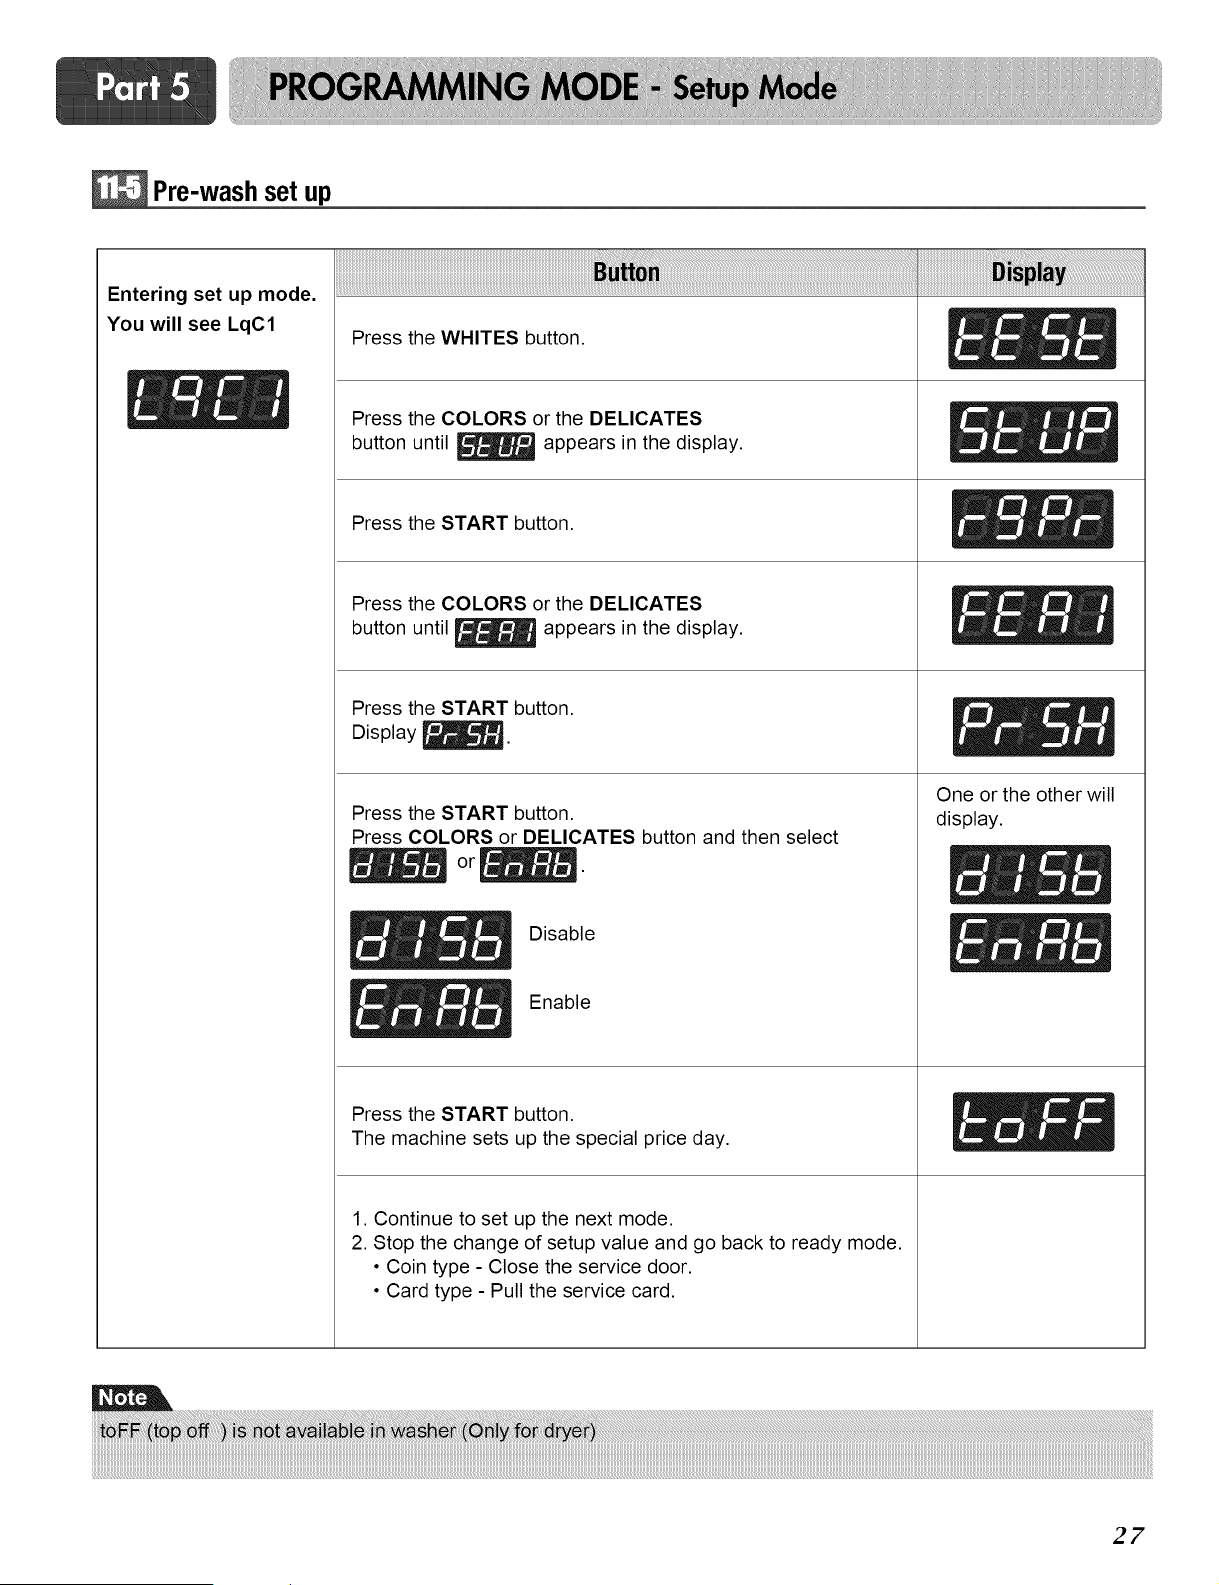
Pre-wash set up
Entering set up mode.
You will see LqC1
Press the WHITES button.
Press the COLORS or the DELICATES
button until _ appears in the display.
Press the START button.
Press the COLORS or the DELICATES
button until _ appears in the display.
Press the START button.
Display _.
Press the START button.
Press COLORS or DELICATES button and then select
Press the START button.
The machine sets up the special price day.
1. Continue to set up the next mode.
2. Stop the change of setup value and go back to ready mode.
• Coin type - Close the service door.
• Card type - Pull the service card.
One or the other will
display.
i
27
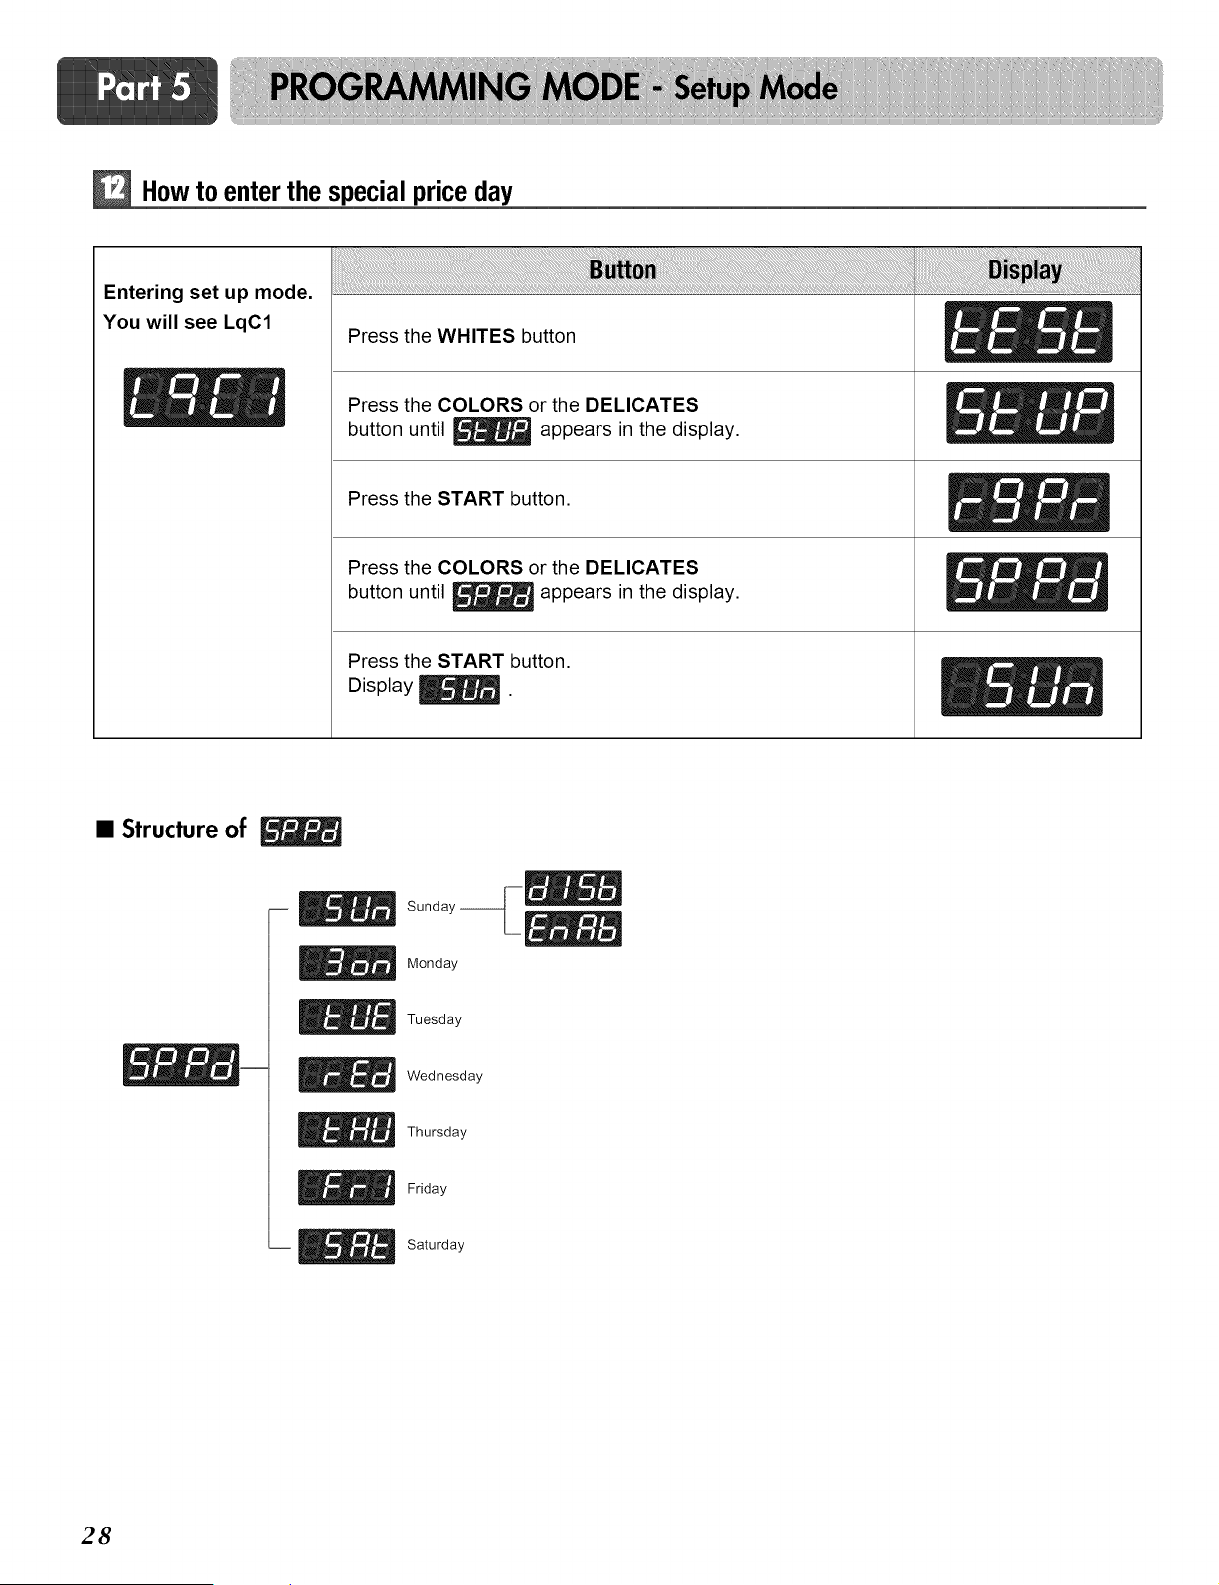
Howto enter the specialprice day
Entering set up mode.
You will see LqC1
Press the WHITES button
Press the COLORS or the DELICATES
button until _ appears in the display.
Press the START button.
Press the COLORS or the DELICATES
button until _ appears in the display.
Press the START button.
Display _.
• Structure of
Sunday-__
Monday
Tuesday
Wednesday
Thursday
Friday
Saturday
28

How to changeto Sunday
Entering set up mode.
You will see LqC1
Press the WHITES button.
Press the COLORS or the DELICATES
button until _ appears in the display.
Press the START button.
Press the COLORS or the DELICATES
button until _ appears in the display.
Press the START button.
Display _.
Press the START button.
Press COLORS or DELICATES button and then select
Disable
Enable
Press the START button.
The machine sets up the special price day (Sunday)
,then advances to the next process automatically.
1. Continue to set up the next mode.
2. Stop the change of setup value and go back to ready mode.
• Coin type - Close the service door.
• Card type - Pull the service card.
One or the other will
display.
29

Special price beginningtime setup
Entering set up mode.
You will see LqC1
Press the WHITES button.
_- _ _ Press the COLORS or the DELICATES
button until _ appears in the display.
Press the START button.
Press the COLORS or the DELICATES
button until _ appears in the display.
Press the START button.
Display previous special price beginning time.
Press COLORS(+) or DELICATES(-) button to select time
between 0 and 23.
Press the START button.
The machine sets up the special price beginning time, then
advances to the next process automatically.
1. Continue to set up the next mode.
2. Stop the change of setup value and go back to ready mode.
• Coin type - Close the service door.
• Card type - Pull the service card.
30
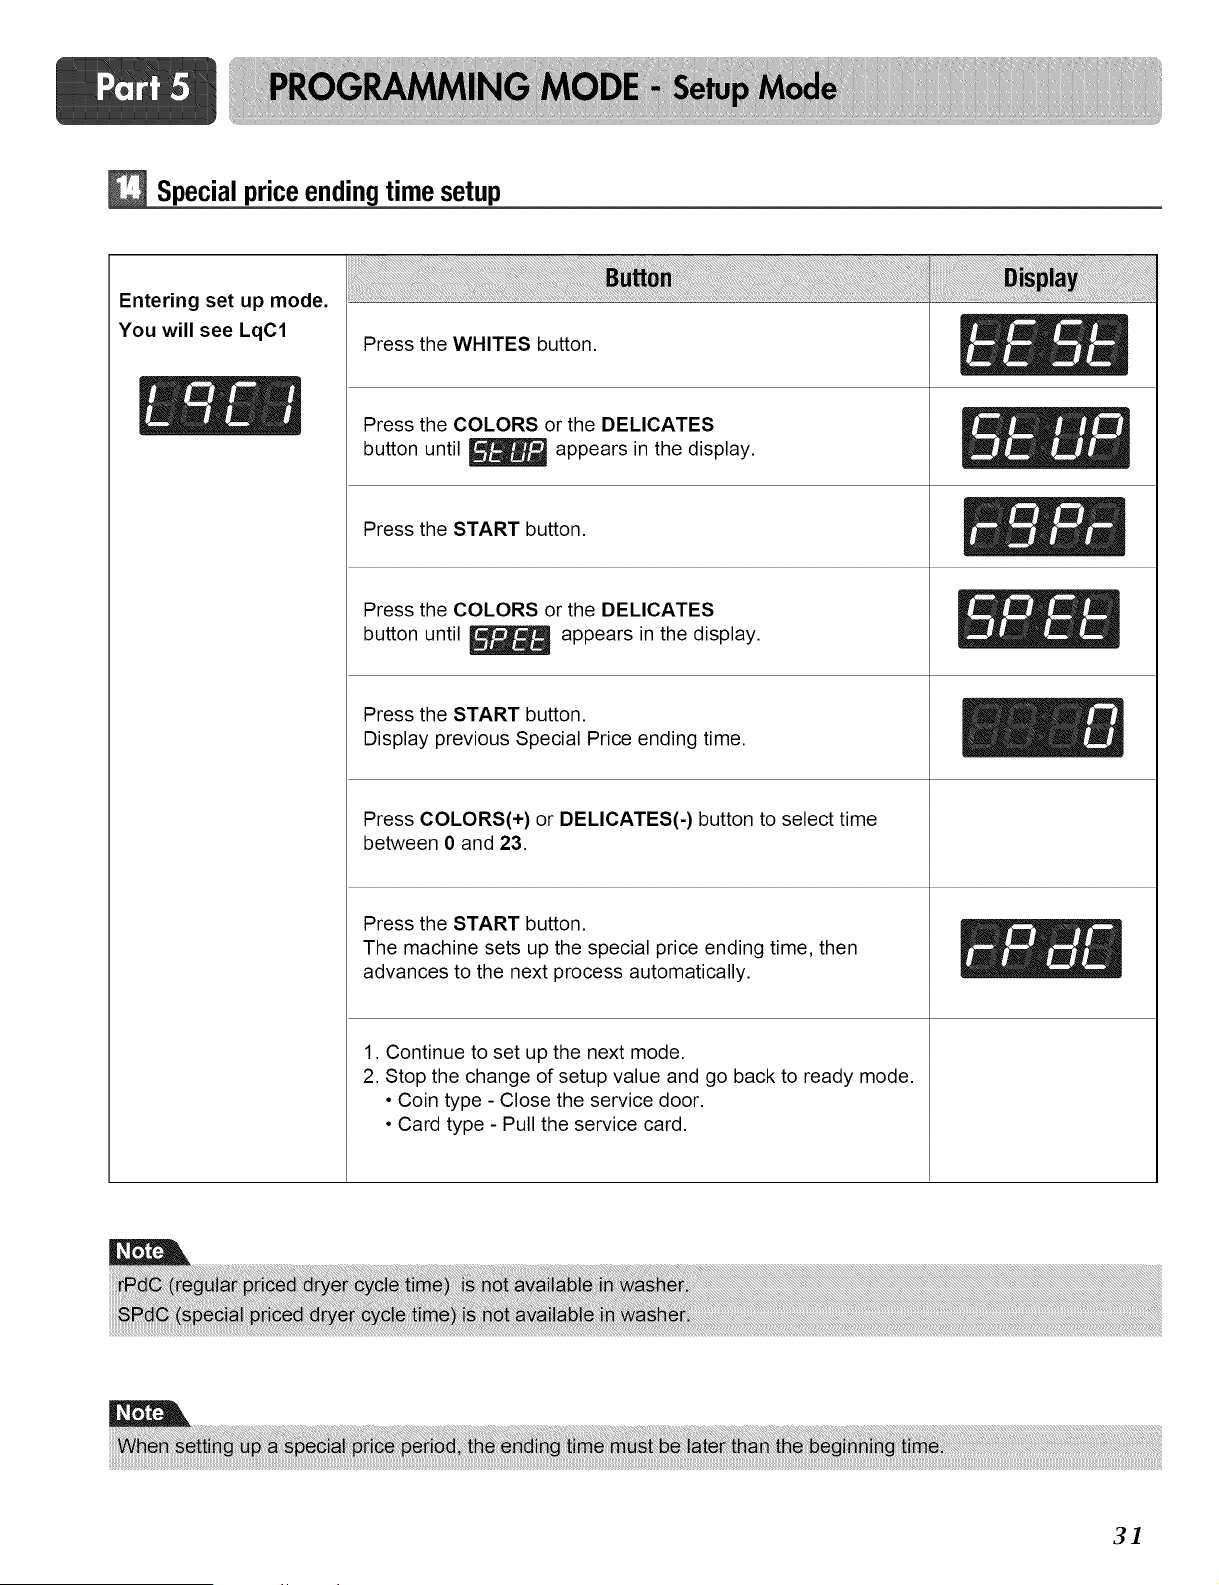
Special priceendingtime setup
Entering set up mode.
You will see LqC1
Press the WHITES button.
Press the COLORS or the DELICATES
button until _ appears in the display.
Press the START button.
Press the COLORS or the DELICATES
button until _ appears in the display.
Press the START button.
Display previous Special Price ending time.
Press COLORS(+) or DELICATES(-) button to select time
between 0 and 23.
Press the START button.
The machine sets up the special price ending time, then
advances to the next process automatically.
1. Continue to set up the next mode.
2. Stop the change of setup value and go back to ready mode.
• Coin type - Close the service door.
• Card type - Pull the service card.
3]
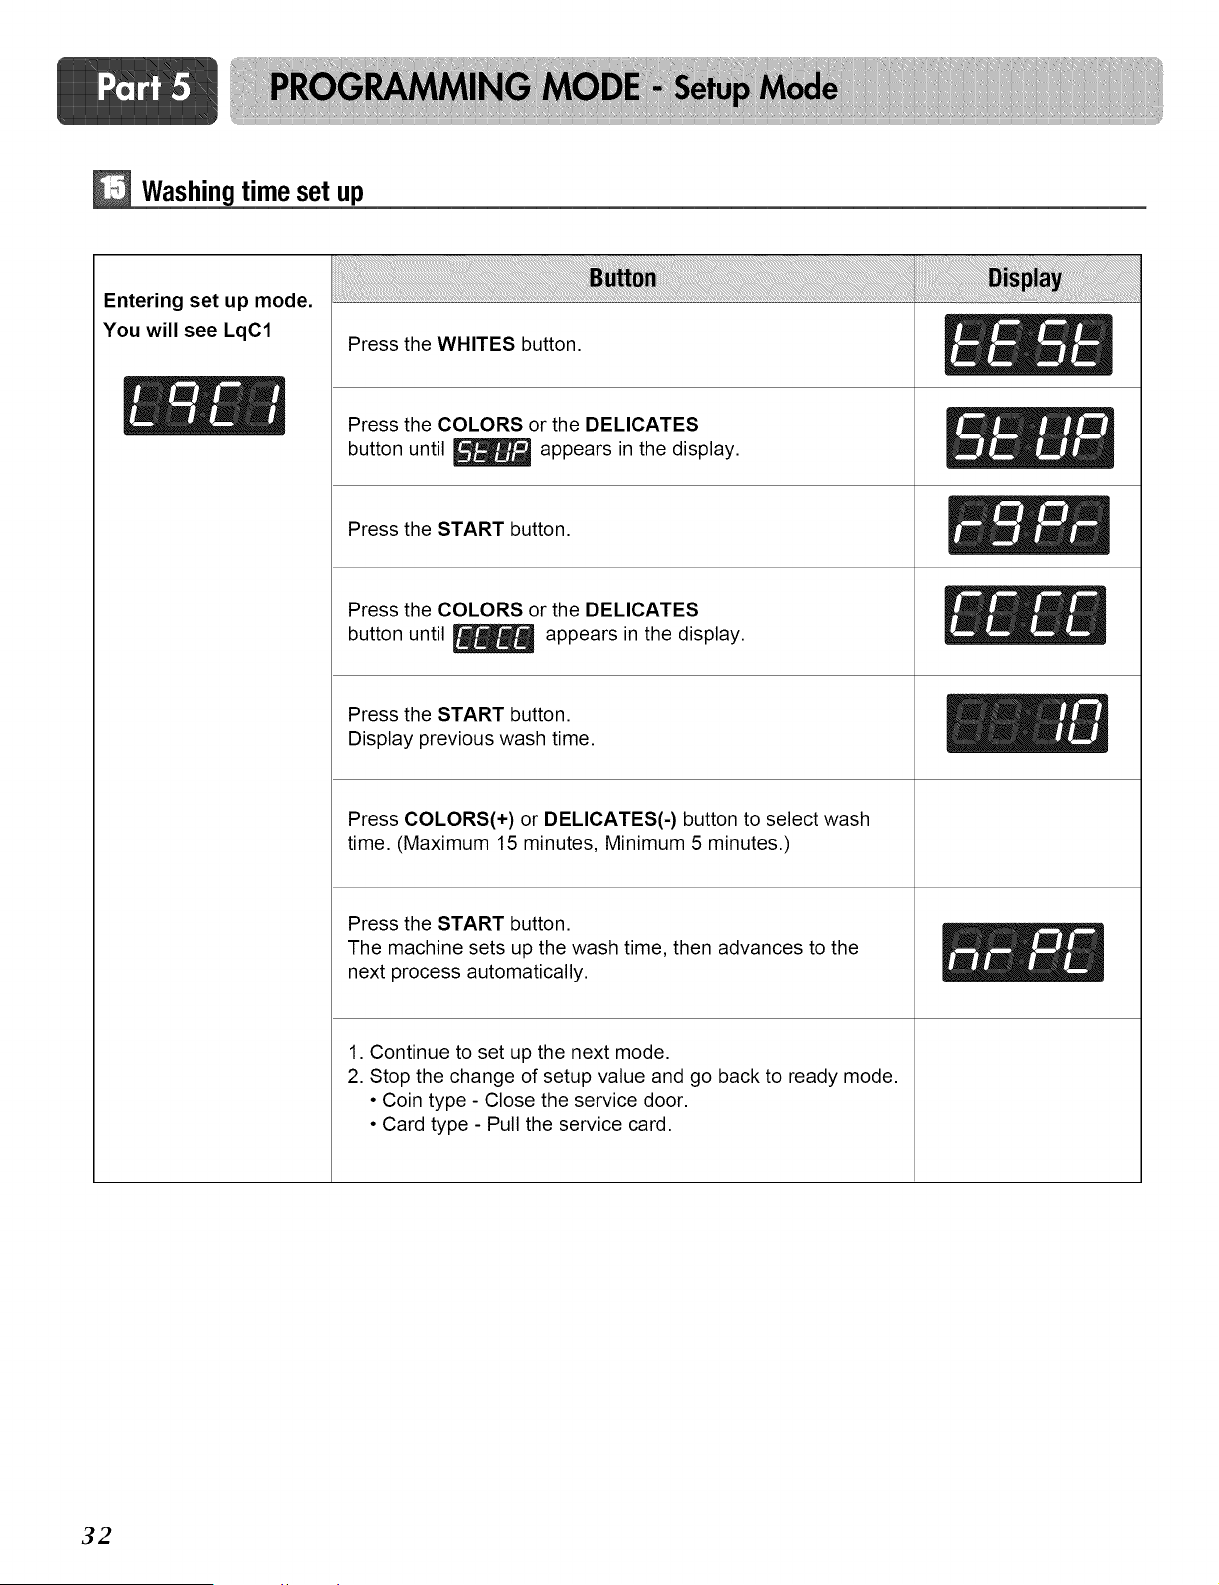
Washingtime set up
Entering set up mode,
You will see LqC1
Press the WHITES button.
_- _ _ Press the COLORS or the DELICATES
button until _ appears in the display.
Press the START button.
Press the COLORS or the DELICATES
button until _ appears in the display.
Press the START button.
Display previous wash time.
Press COLORS(+) or DELICATES(-) button to select wash
time. (Maximum 15 minutes, Minimum 5 minutes.)
Press the START button.
The machine sets up the wash time, then advances to the
next process automatically.
1. Continue to set up the next mode.
2. Stop the change of setup value and go back to ready mode.
• Coin type - Close the service door.
• Card type - Pull the service card.
32

Rinsingtimes per cycle
Entering set up mode.
You will see LqC1
Press the WHITES button.
Press the COLORS or the DELICATES
button until _ appears in the display.
Press the START button.
Press the COLORS or the DELICATES
button until _ appears in the display.
Press the START button.
Display previous rinsing times per cycle.
Press COLORS(+) or DELICATES(-) button to select rinsing
times per cycle.( Max 5, Min 1)
Press the START button.
The machine sets up the rinsing times per cycle, then
advances to the next process automatically.
1. Continue to set up the next mode.
2. Stop the change of setup value and go back to ready mode.
• Coin type - Close the service door.
• Card type - Pull the service card.
33
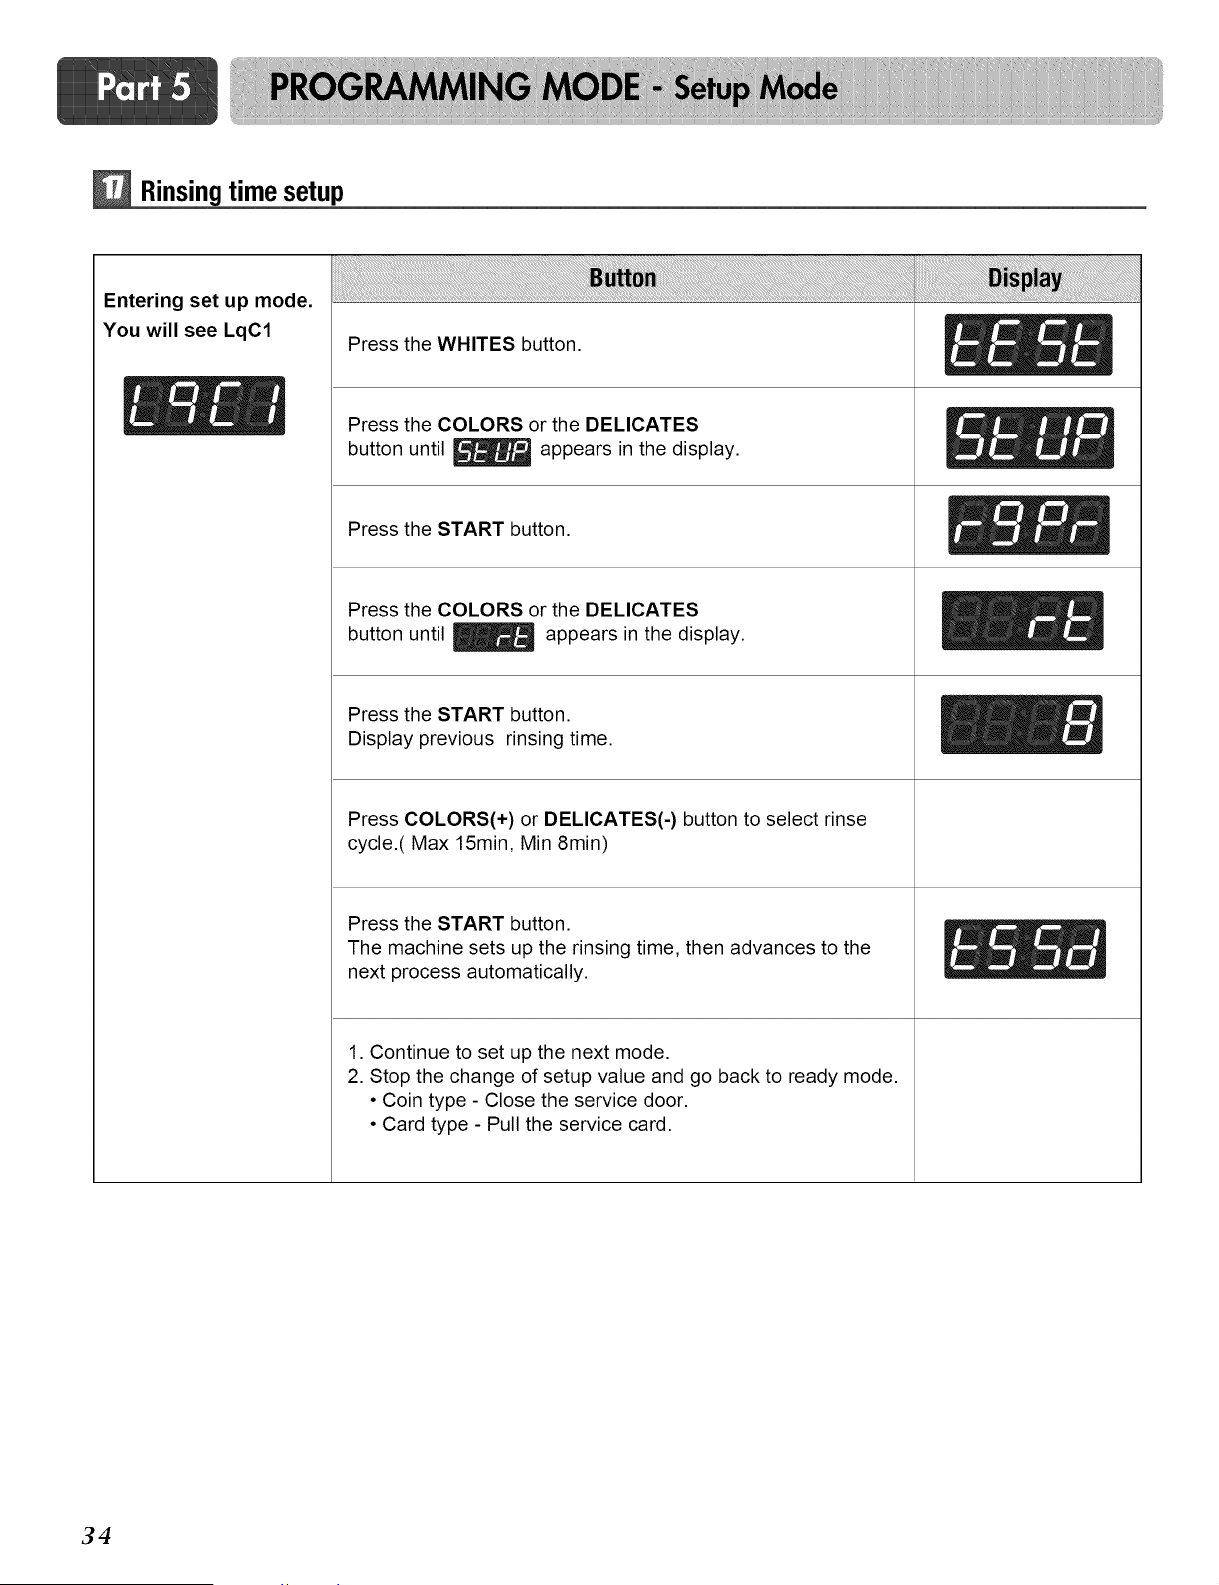
Rinsingtime setup
Entering set up mode,
You will see LqC1
Press the WHITES button.
[_- _ _ Press the COLORS or the DELICATES
button until _ appears in the display.
Press the START button.
Press the COLORS or the DELICATES
button until _ appears in the display.
Press the START button.
Display previous rinsing time.
Press COLORS(+) or DELICATES(-) button to select rinse
cycle.( Max 15min, Min 8min)
Press the START button.
The machine sets up the rinsing time, then advances to the
next process automatically.
1. Continue to set up the next mode.
2. Stop the change of setup value and go back to ready mode.
• Coin type - Close the service door.
• Card type - Pull the service card.
34
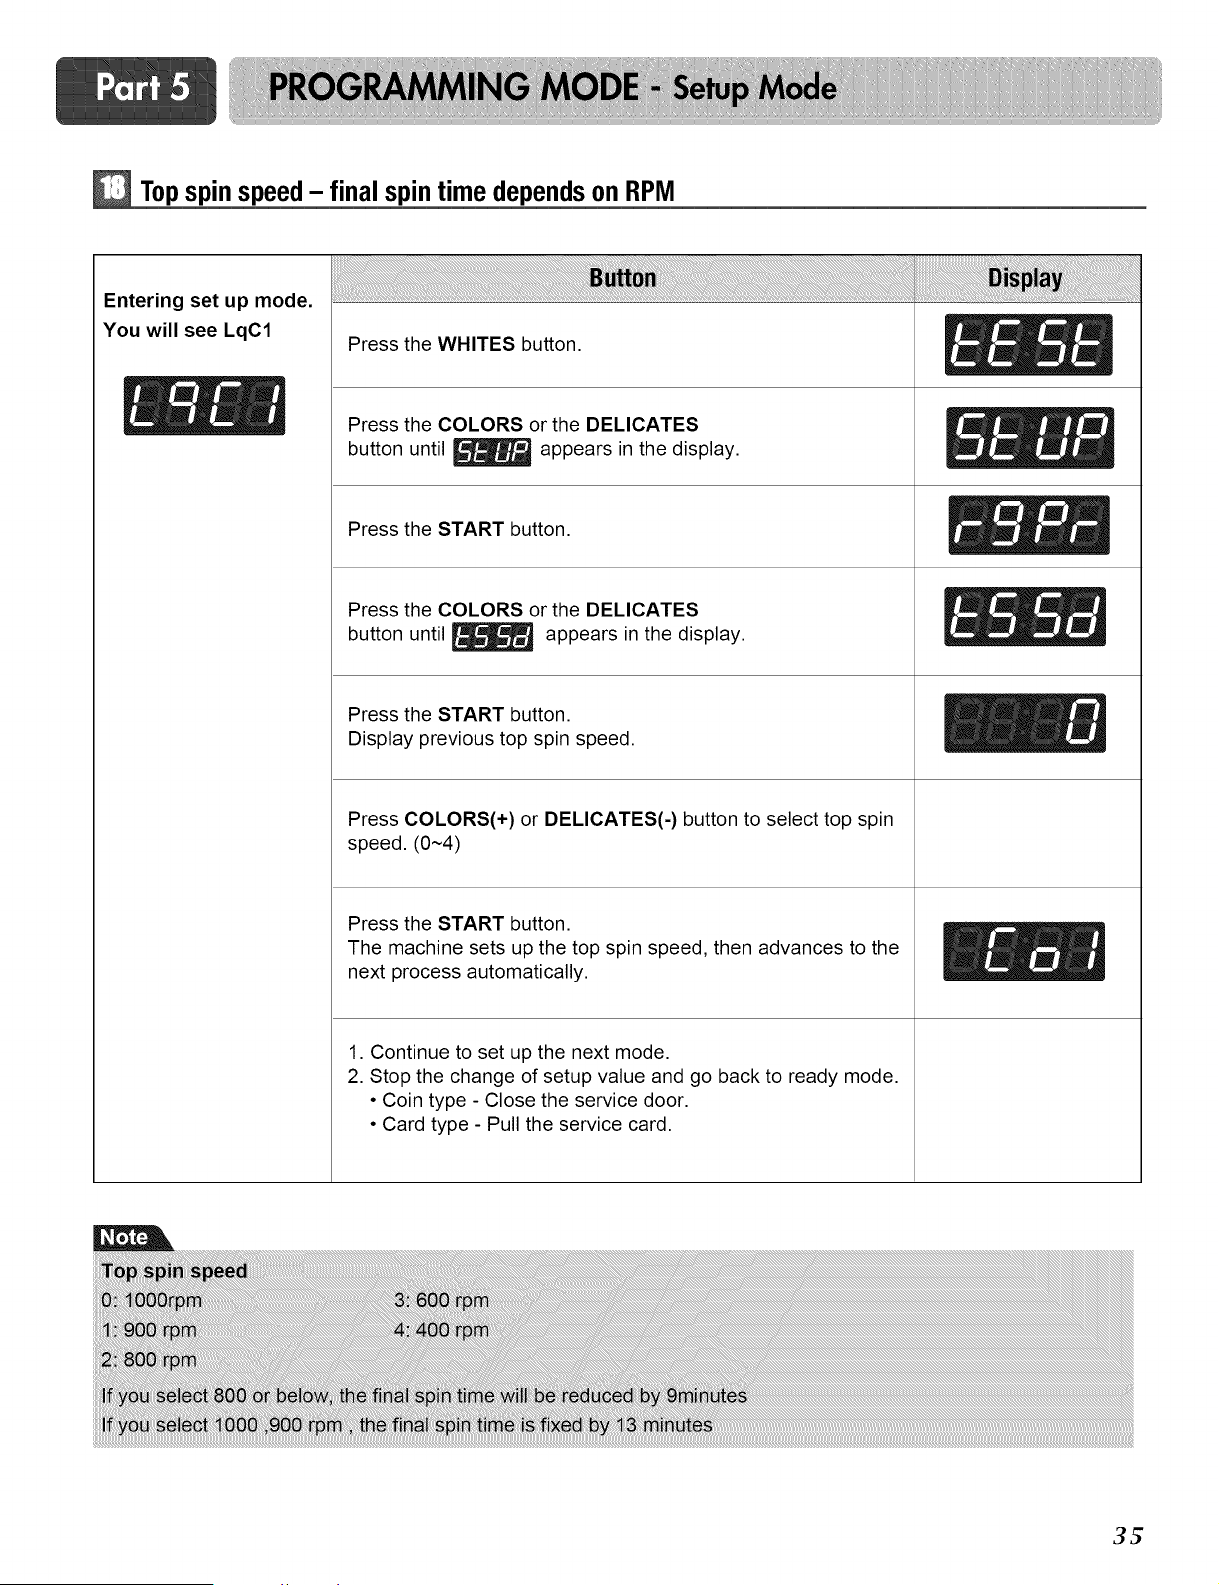
Topspin speed- final spintime dependson RPM
Entering set up mode.
You will see LqC1
Press the WHITES button.
Press the COLORS or the DELICATES
button until _ appears in the display.
Press the START button.
Press the COLORS or the DELICATES
button until _ appears in the display.
Press the START button.
Display previous top spin speed.
Press COLORS(+) or DELICATES(-) button to select top spin
speed. (0~4)
Press the START button.
The machine sets up the top spin speed, then advances to the
next process automatically.
1. Continue to set up the next mode.
2. Stop the change of setup value and go back to ready mode.
• Coin type - Close the service door.
• Card type - Pull the service card.
3t_
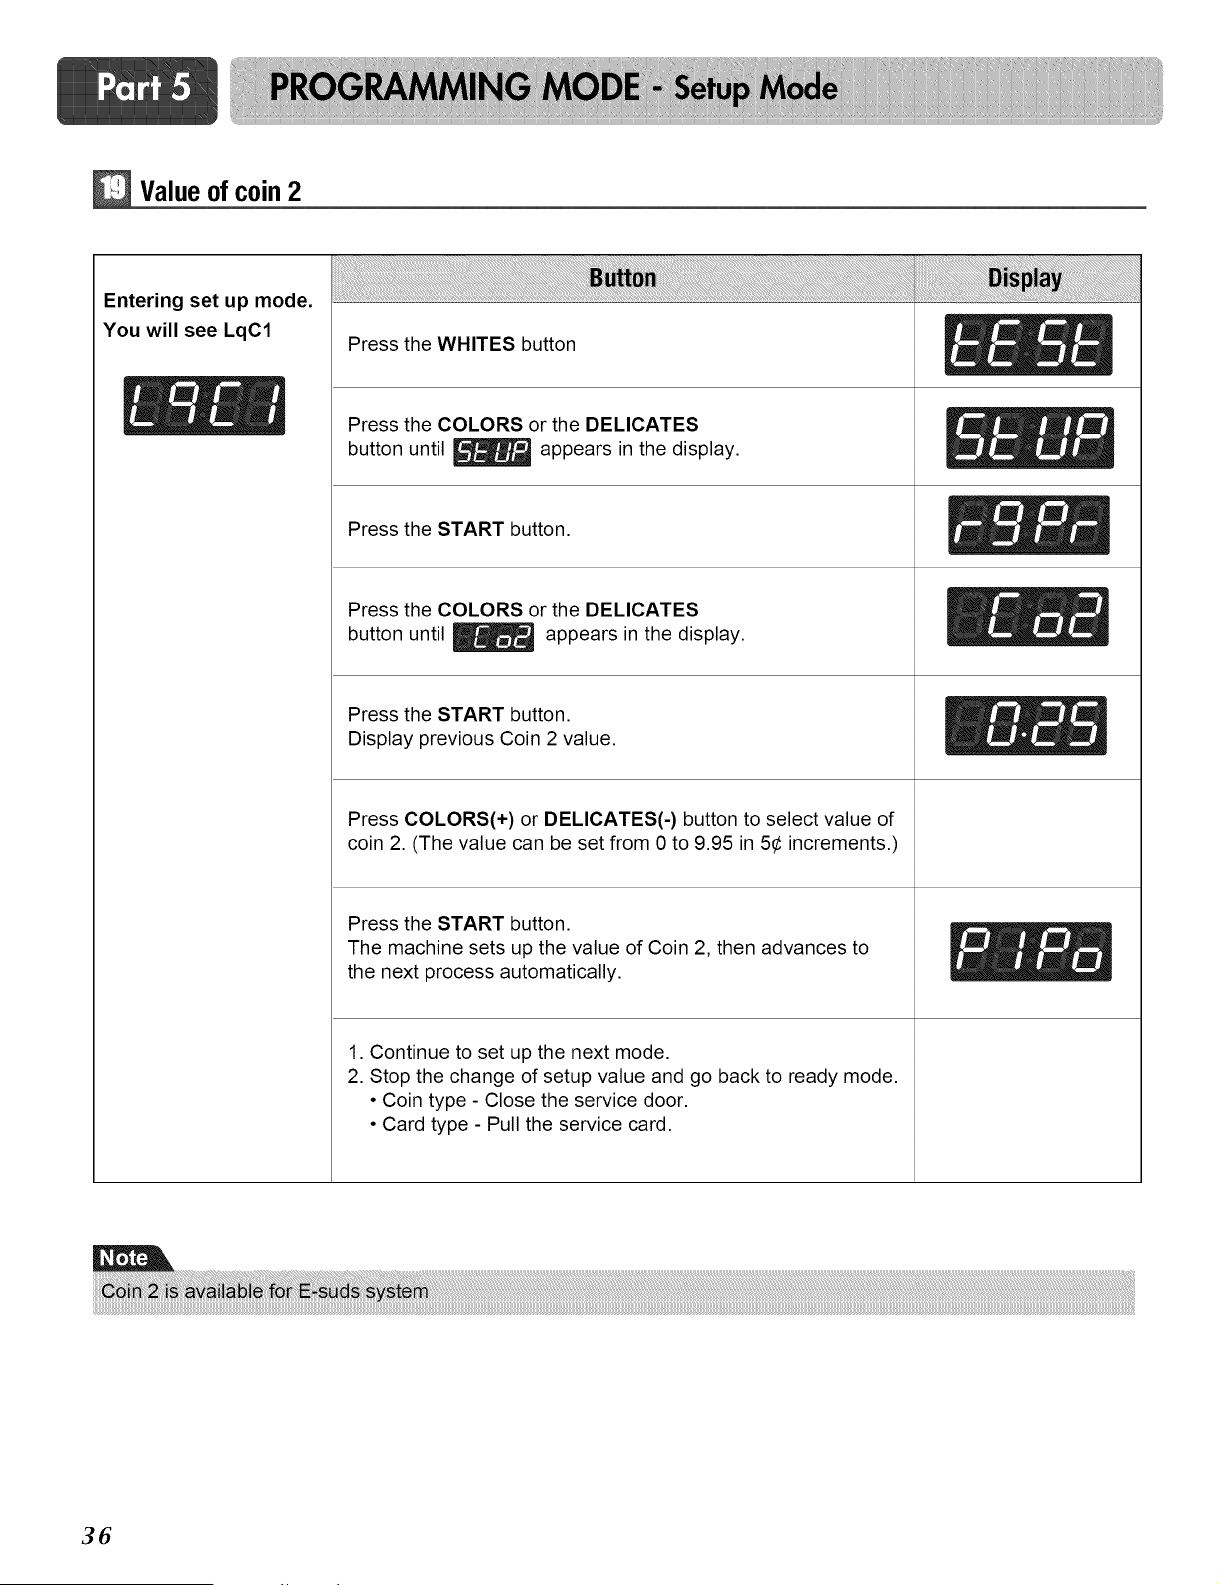
Valueof coin 2
Entering set up mode.
You will see LqC1
Press the WHITES button
_- _ _ Press the COLORS or the DELICATES
button until _ appears in the display.
Press the START button.
Press the COLORS or the DELICATES
button until _ appears in the display.
Press the START button.
Display previous Coin 2 value.
Press COLORS(+) or DELICATES(-) button to select value of
coin 2. (The value can be set from 0 to 9.95 in 5¢ increments.)
Press the START button.
The machine sets up the value of Coin 2, then advances to
the next process automatically.
1. Continue to set up the next mode.
2. Stop the change of setup value and go back to ready mode.
• Coin type - Close the service door.
• Card type - Pull the service card.
36
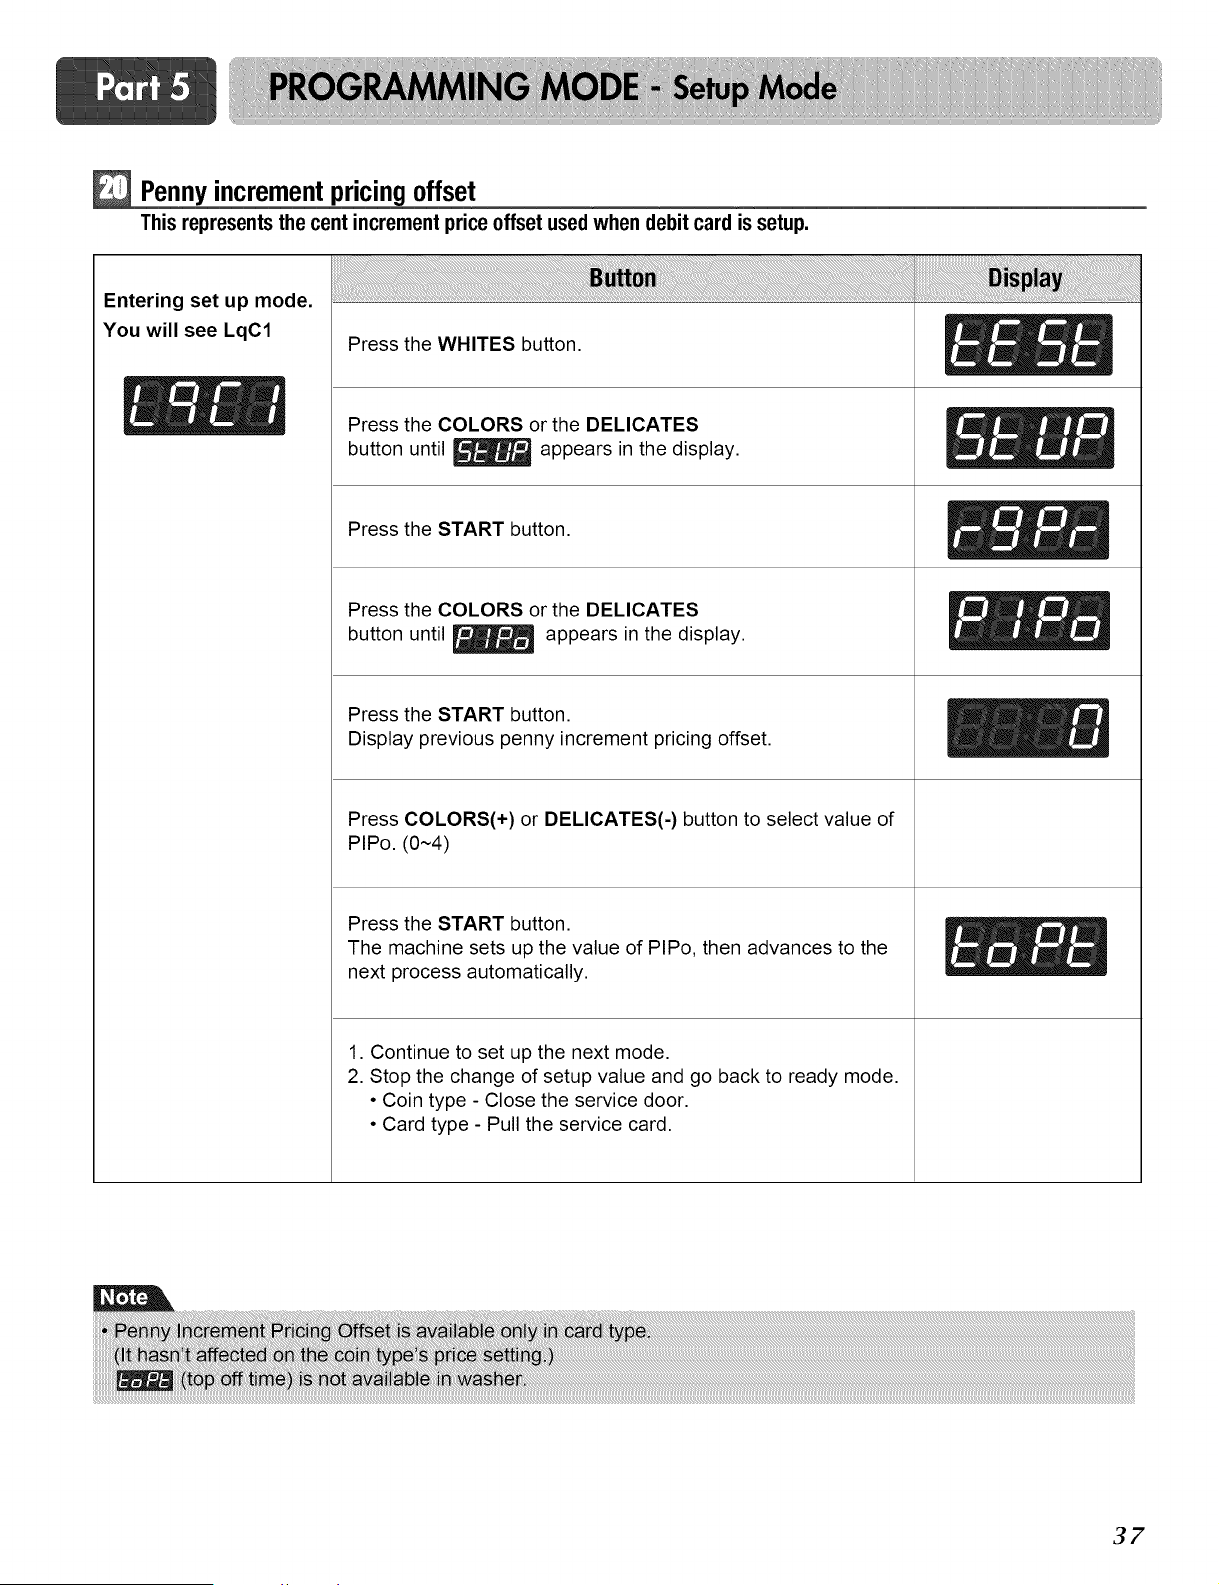
Pennyincrementpricingoffset
Thisrepresentsthecentincrementprice offsetusedwhendebitcardis setup.
Entering set up mode.
You will see LqC1
Press the WHITES button.
Press the COLORS or the DELICATES
button until _ appears in the display.
Press the START button.
Press the COLORS or the DELICATES
button until _ appears in the display.
Press the START button.
Display previous penny increment pricing offset.
Press COLORS(+) or DELICATES(-) button to select value of
PIPo. (0~4)
Press the START button.
The machine sets up the value of PIPo, then advances to the
next process automatically.
1. Continue to set up the next mode.
2. Stop the change of setup value and go back to ready mode.
• Coin type - Close the service door.
• Card type - Pull the service card.
37
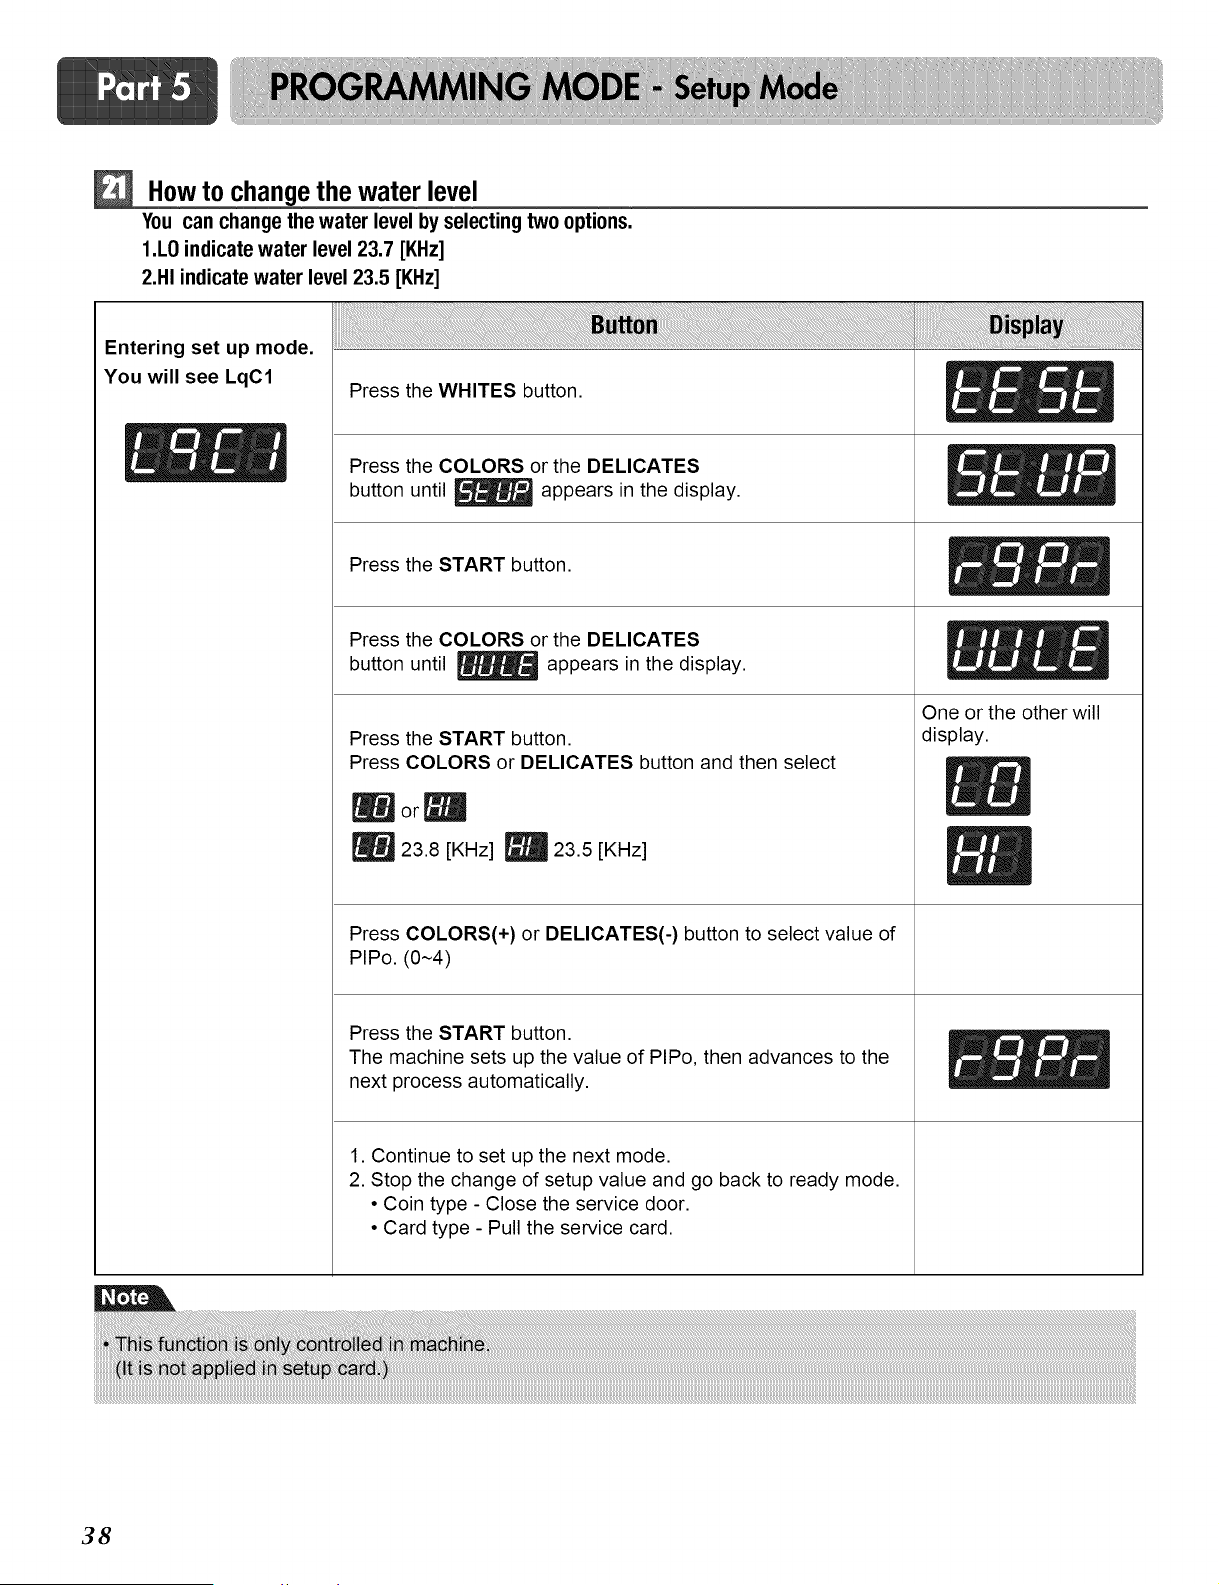
How to changethe water level
Youcanchangethewaterlevelbyselectingtwo options.
I.L0 indicatewater level23.7 [KHz]
2.HI indicate water level 23.5 [KHz]
Entering set up mode.
You will see LqC1 Press the WHITES button. _ __
esstheco.o so theO .,C T S
button until _ appears in the display.
Press the START button. _ _ _t
Press the COLORS or the DELICATES _f _ _
button until _ appears in the display.
Press the START button.
Press COLORS or DELICATES button and then select
|or_
23.8 [KHz] _ 23.5 [KHz]
Press COLORS(+) or DELICATES(-) button to select value of
PIPo. (0~4)
Press the START button.
The machine sets up the value of PIPo, then advances to the
next process automatically.
1. Continue to set up the next mode.
2. Stop the change of setup value and go back to ready mode.
• Coin type - Close the service door.
• Card type - Pull the service card.
One or the other will
display.
38

Diagnostic tests: [_ (display)
This program has been added for testing the washer and detecting errors.
iiiiiiiiiilii!....
Entering
the test mode
!
1
....!!!!!!!!,i!! !!!!!!!!!!!!!!!!!!! ....
1. Entering programming mode _ Insert service card (card type), open the service door (coin type).
2. WHITES _ Press the WHITES button. Then _ appears in the display.
3. START _ Enter the diagnostic test mode.
According to pressing STARTbutton, test move to the next step.
_;_N_lJ_;_ _ _iii__ iliiii4 _i_i_i_iiiiiiiiiiiiiiiiiiiiiiiiiiiiiiiiiiiiiiiiiiiiiiiiiiiiiiiiiiiiiiiiiiiiiiiiiiiiiiiiiiiiiiiiiiiiiiiiiiiiiiiiiiiiiiiiiiiiiiiiiiiiiiiiiiiiiiiiiiiiiiiiiiiiiiii_
None
1time Turns on all lamps and locks the door Displayed EU XX and US XX alternately
(Version)
2 times Tumble Clockwise. rpm (40~50)
3 times Low Speed Spin rpm (600)
4 times High Speed Spin rpm (1000)
5 times Inlet valve for main water turns on. Water level frequency (261~)
6 times Inlet valve for hot wash turns on. Water level frequency (261~)
7 times Inlet valve for softener turns on. Water level frequency (261~)
8 times Inlet valve for bleach turns on. Water level frequency (261~)
9 times Tumble counter clockwise, rpm (40~50)
10 times Drain Pump turns on Water level frequency (261~)
11 times Turns on all lamps. Displayed EU XX and US XX alternately
12 times Button Checks. Displayed EU XX and US XX alternately
13 times High Speed Spin rpm(1000)
PDA Signal Check _ this function is not applied in this machine
14 times
15 times
39
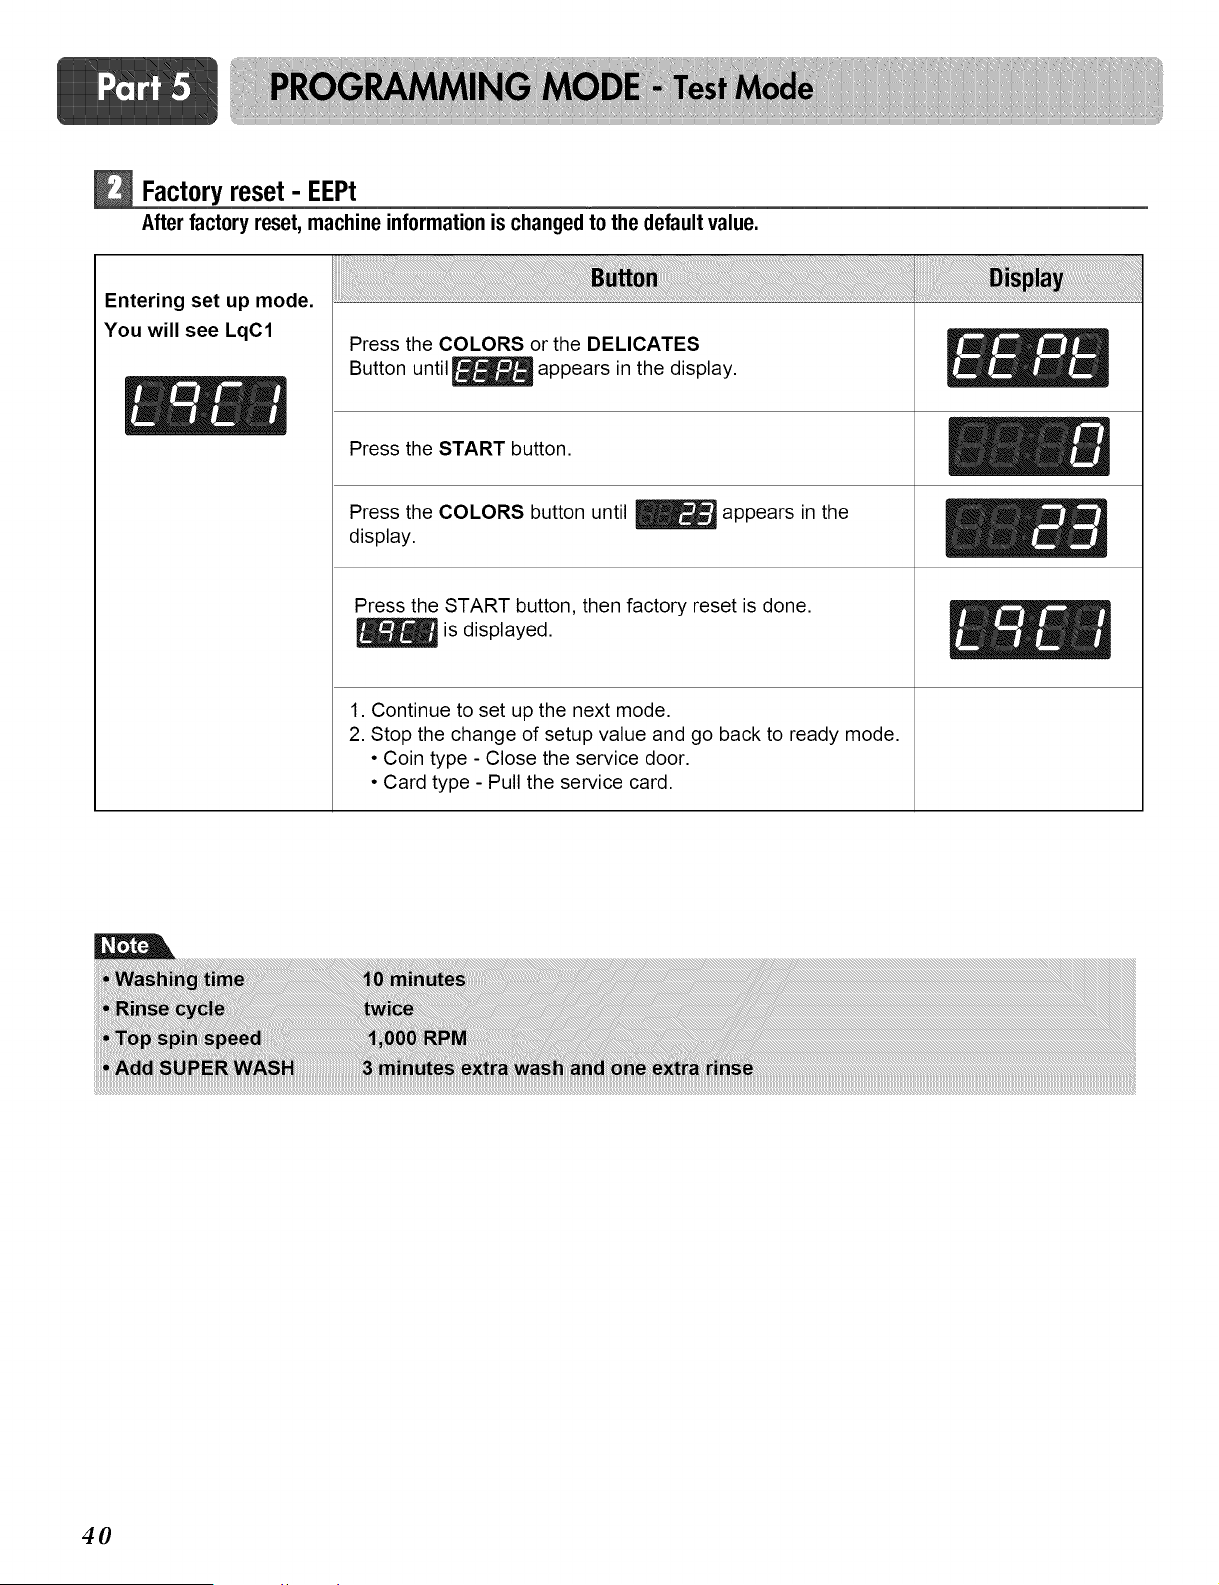
Factoryreset - EEPt
Afterfactory reset,machineinformationis changedto thedefaultvalue.
Entering set up mode.
You will see LqC1
Press the COLORS or the DELICATES
Button until _ appears in the display.
Press the START button.
Press the COLORS button until _ appears in the
display.
Press the START button, then factory reset is done.
is displayed.
1. Continue to set up the next mode.
2. Stop the change of setup value and go back to ready mode.
• Coin type - Close the service door.
• Card type - Pull the service card.
40
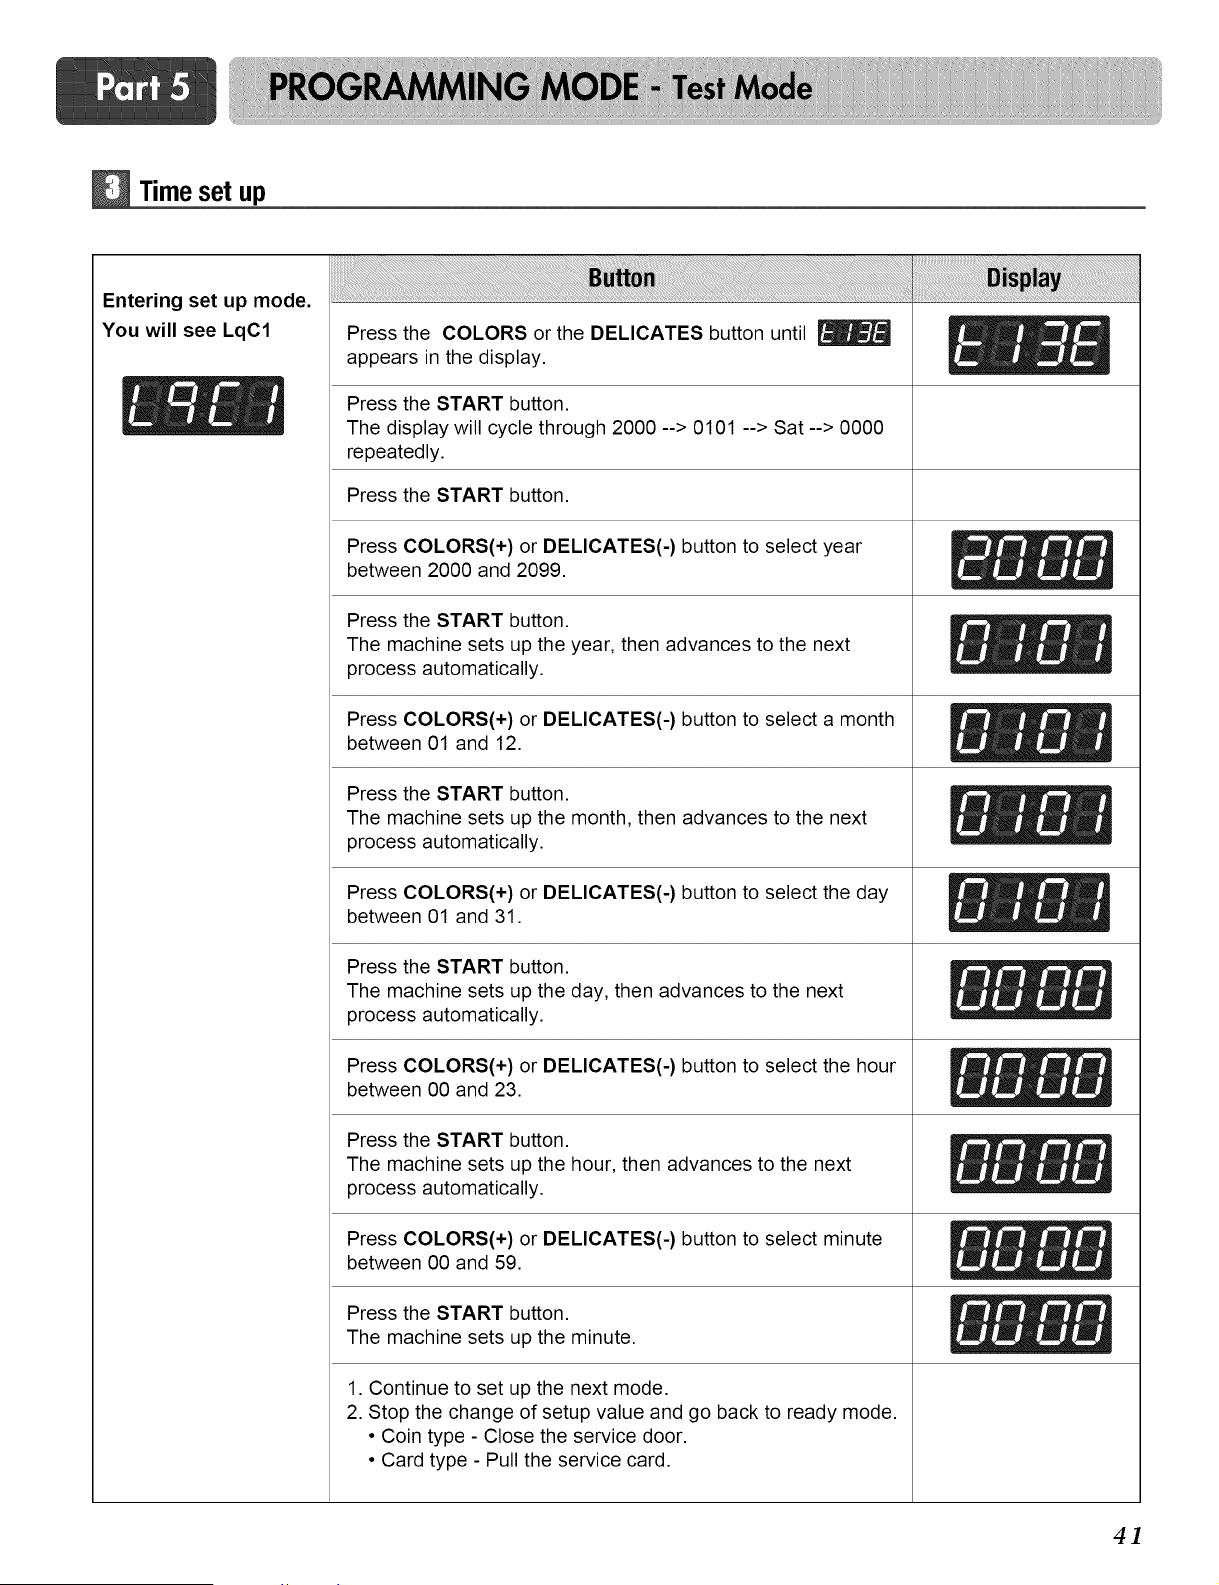
Time set up
Entering set up mode.
You will see LqC1
Press the COLORS or the DELICATES button until
appears in the display.
Press the START button.
The display will cycle through 2000 --> 0101 --> Sat--> 0000
repeatedly.
Press the START button.
Press COLORS(+) or DELICATES(-) button to select year
between 2000 and 2099.
Press the START button.
The machine sets up the year, then advances to the next
process automatically.
Press COLORS(+) or DELICATES(-) button to select a month
between 01 and 12.
Press the START button.
The machine sets up the month, then advances to the next
process automatically.
Press COLORS(+) or DELICATES(-) button to select the day
between 01 and 31.
Press the START button.
The machine sets up the day, then advances to the next
process automatically.
Press COLORS(+) or DELICATES(-) button to select the hour
between 00 and 23.
Press the START button.
The machine sets up the hour, then advances to the next
process automatically.
Press COLORS(+) or DELICATES(-) button to select minute
between 00 and 59.
Press the START button.
The machine sets up the minute.
1. Continue to set up the next mode.
2. Stop the change of setup value and go back to ready mode.
• Coin type - Close the service door.
• Card type - Pull the service card.
4]
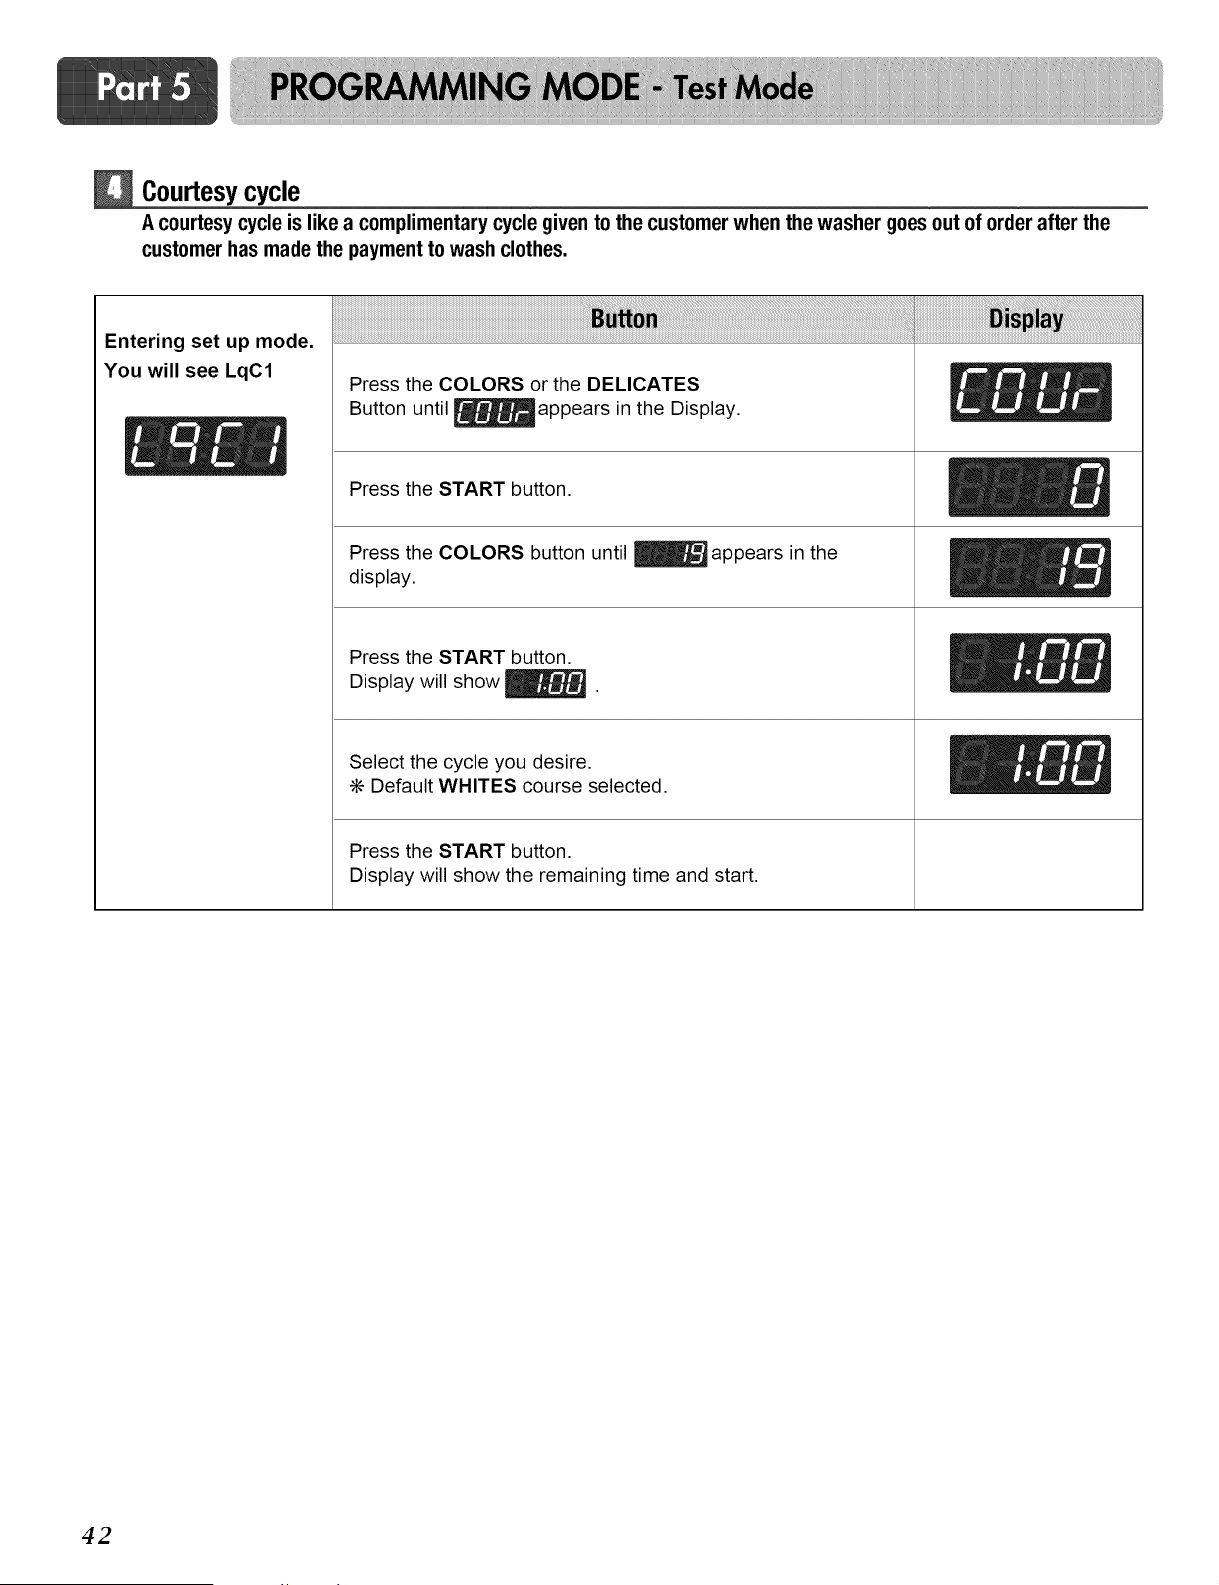
Courtesycycle
A courtesy cycle is like a complimentary cycle given to the customer when the washer goesout of order after the
customer has made the payment to wash clothes.
Entering set up mode.
You will see LqC1
Press the COLORS or the DELICATES
Button until _appears in the Display.
Press the START button.
Press the COLORS button until _ appears in the
display.
Press the START button.
Display will show _.
Select the cycle you desire.
÷ Default WHITES course selected.
Press the START button.
Display will show the remaining time and start.
E()X
42
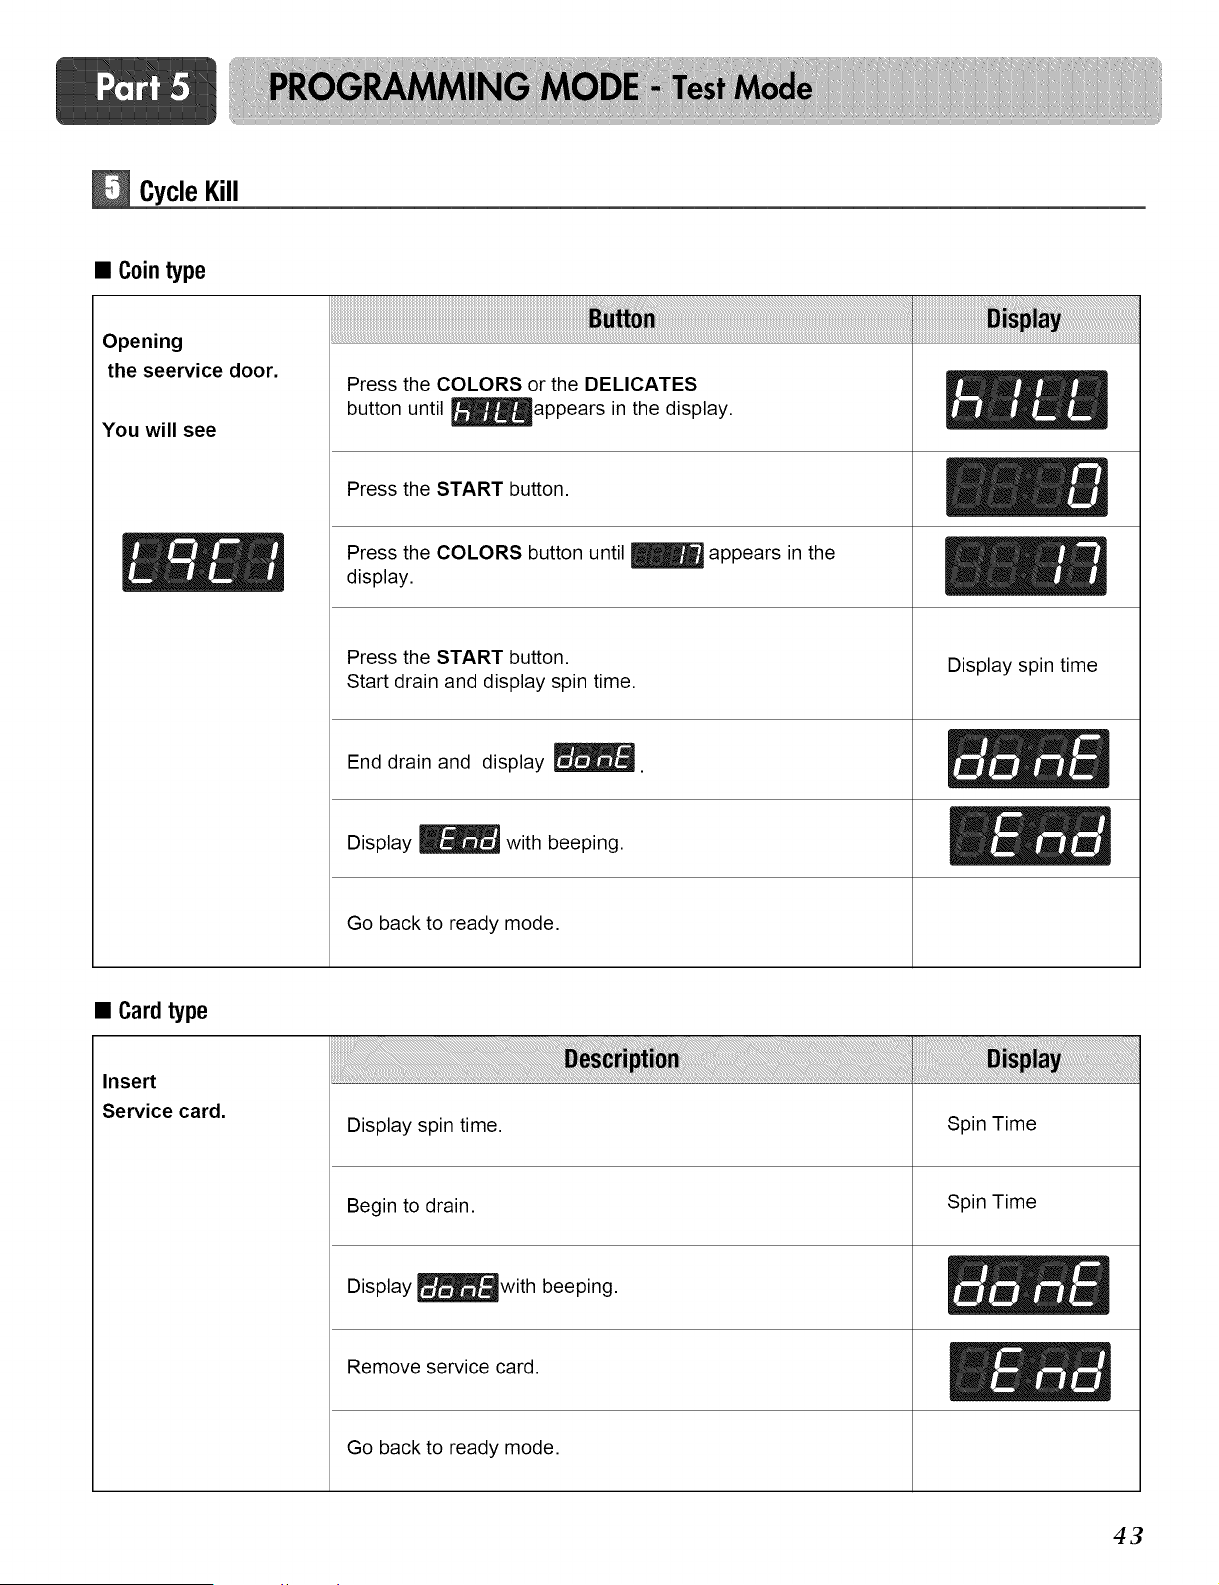
CycleKill
• Cointype
Opening
the seervice door.
You will see
Press the COLORS or the DELICATES
button until _appears in the display.
Press the START button.
Press the COLORS button until _ appears in the
display.
Press the START button.
Start drain and display spin time.
End drain and display _.
Display _ with beeping.
Go back to ready mode.
Display spin time
• Cardtype
Insert
Service card.
Display spin time. Spin Time
Begin to drain.
Display _with beeping.
Remove service card.
Go back to ready mode.
Spin Time
ElZ
43
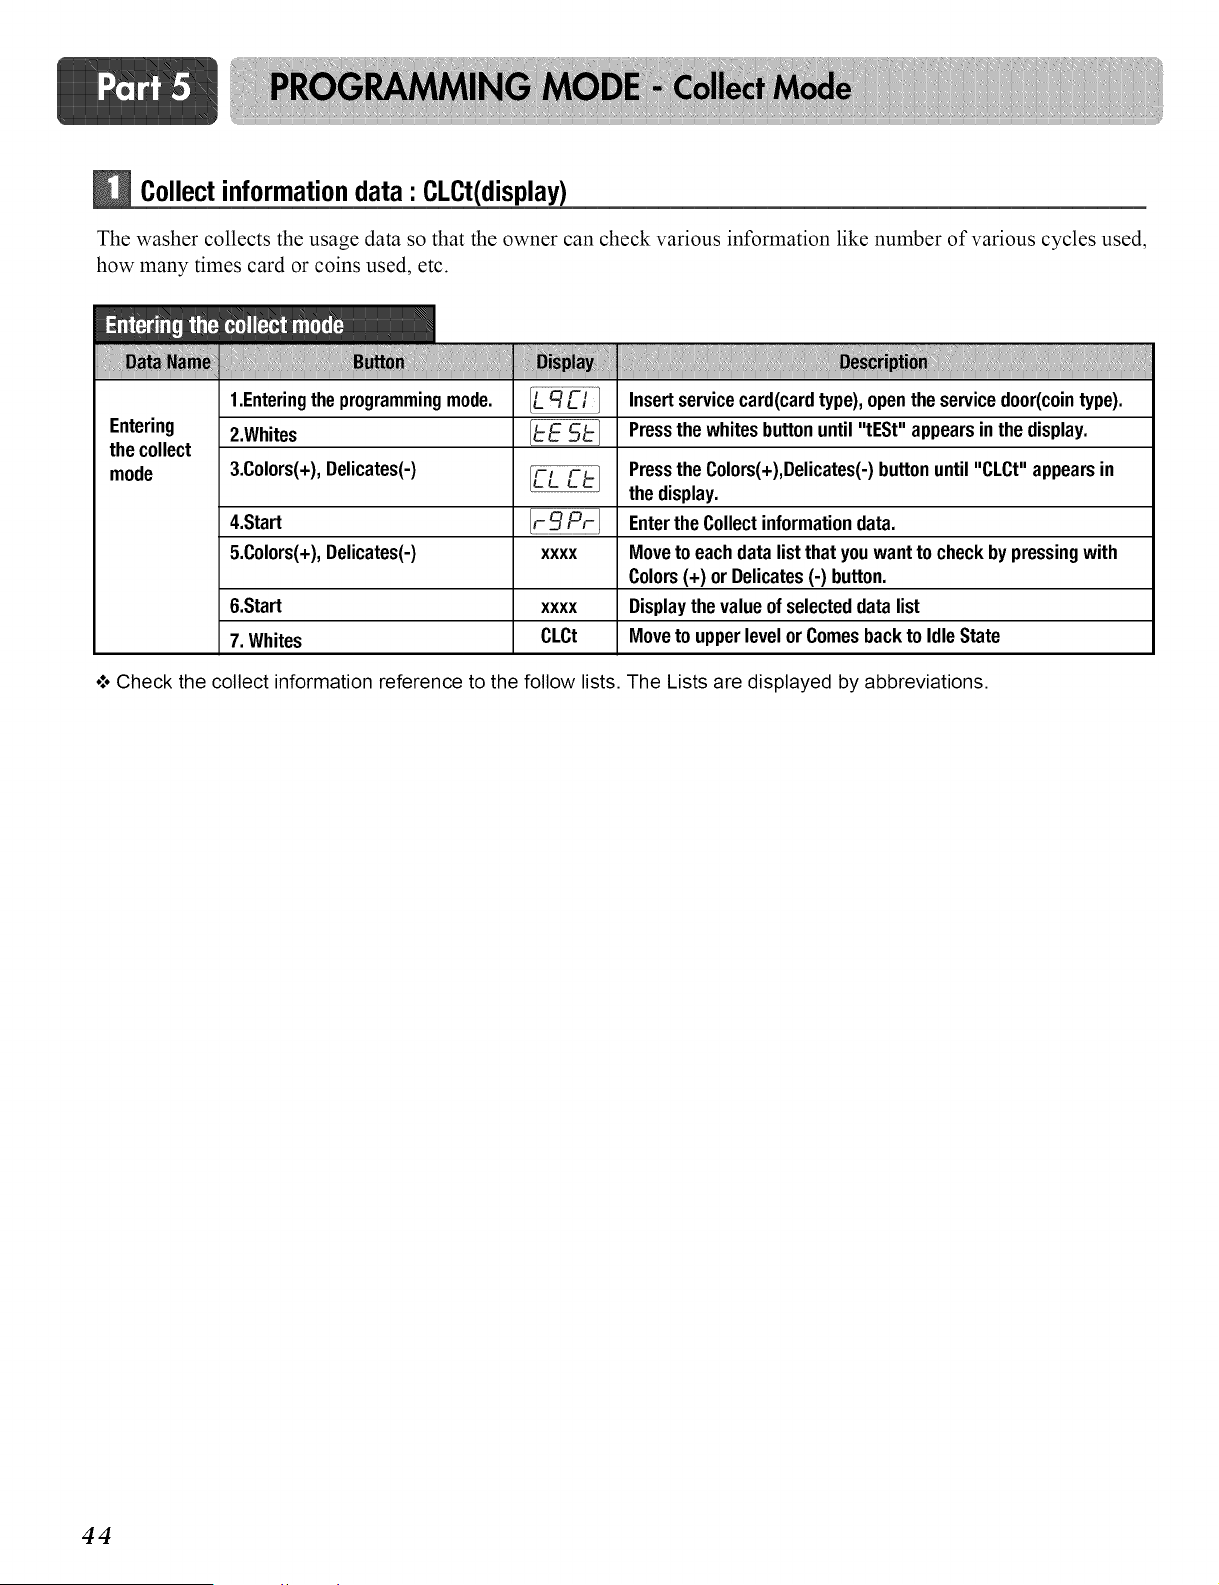
Collectinformationdata' CLCt(display)
The washer collects the usage data so that the owner can check various information like number of various cycles used,
how many times card or coins used, etc.
Entering
the collect
mode
....i !!!!!!i ....
1.Enteringtheprogrammingmode.
2.Whites
3.Colors(+),Delicates(-)
4.Start
5.Colors(+),Delicates(-)
6.Start
7. Whites
XXXX
XXXX
CLCt
Insertservicecard(cardtype),opentheservicedoor(cointype).
Pressthe whites buttonuntil "tESt" appearsin the display.
Pressthe Colors(+),Delicates(-)buttonuntil"CLCt" appearsin
the display.
Enterthe Collectinformationdata.
Moveto eachdata listthat youwantto checkbypressing with
Colors(+) or Delicates(-) button.
Displaythe valueof selecteddata list
Moveto upperlevelor Comesbackto IdleState
o**oCheck the collect information reference to the follow lists. The Lists are displayed by abbreviations.
44
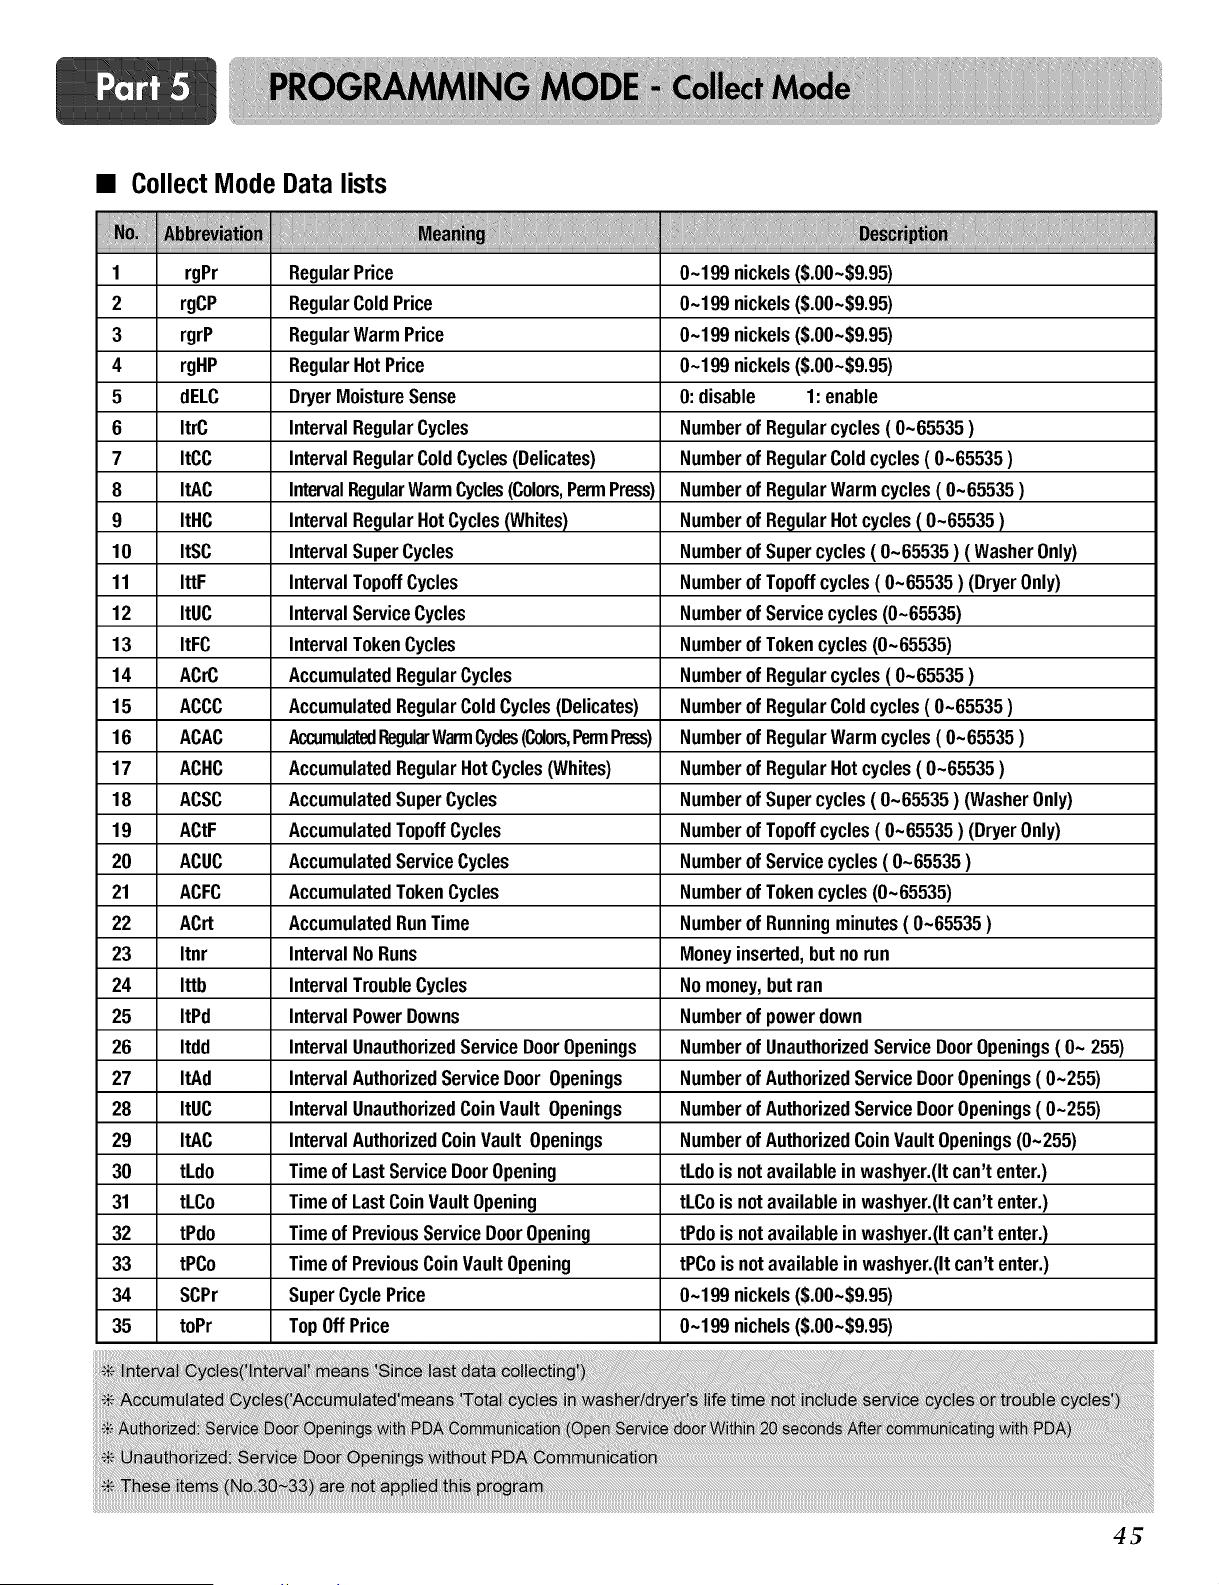
• CollectMode Data lists
1 rgPr
2 rgCP
3 rgrP
4 rgHP
5 dELC
6 ItrC
7 ItCC
8 ItAC
9 ItHC
10 ItSC
11 IttF
12 ItUC
13 ItFC
14 ACrC
15 ACCC
16 ACAC
17 ACHC
18 ACSC
19 ACtF
2O ACUC
21 ACFC
22 ACrt
23 Itnr
24 Ittb
25 ItPd
26 Itdd
27 ItAd
28 ItUC
29 ItAC
30 tLdo
31 tLCo
32 tPdo
33 tPCo
34 SCPr
35 toPr
RegularPrice
RegularColdPrice
RegularWarm Price
RegularHotPrice
DryerMoistureSense
IntervalRegularCycles Number
IntervalRegularColdCycles(Delicates) Number
IntervalRegularWarmCycles(Colors,PermPress) Number
IntervalRegularHotCycles(Whites) Number
IntervalSuperCycles Number
IntervalTopoffCycles Number
IntervalServiceCycles Number
IntervalTokenCycles Number
AccumulatedRegularCycles Number
AccumulatedRegularColdCycles(Delicates) Number
AccumulatedRegularWarmCycles(Colors,PermPress) Number
AccumulatedRegularHotCycles(Whites) Number
AccumulatedSuperCycles Number
AccumulatedTopoffCycles Number
AccumulatedServiceCycles Number
AccumulatedTokenCycles
AccumulatedRunTime
IntervalNoRuns
IntervalTroubleCycles
IntervalPowerDowns
IntervalUnauthorizedServiceDoorOpenings
IntervalAuthorizedServiceDoorOpenings
IntervalUnauthorizedCoinVault Openings
IntervalAuthorizedCoinVault Openings
Timeof LastServiceDoorOpening
Timeof LastCoinVaultOpening
Timeof PreviousServiceDoorOpening
Timeof PreviousCoinVaultOpening
SuperCyclePrice
TopOffPrice
0-199 nickels($.00-$9.95)
0-199 nickels($.00-$9.95)
0-199 nickels($.00-$9.95)
0-199 nickels($.00-$9.95)
O:disable 1:enable
of Regularcycles( 0-65535 )
of RegularColdcycles( 0-65535 )
of RegularWarmcycles( 0-65535 )
of RegularHotcycles( 0-65535 )
of Super cycles( 0-65535 ) ( WasherOnly)
of Topoffcycles( 0-65535 ) (DryerOnly)
of Service cycles(0-65535)
of Tokencycles(0-65535)
of Regularcycles( 0-65535 )
of RegularColdcycles( 0-65535 )
of RegularWarmcycles( 0-65535 )
of RegularHotcycles( 0-65535 )
of Super cycles( 0-65535 ) (WasherOnly)
of Topoffcycles( 0-65535 ) (DryerOnly)
of Service cycles( 0-65535 )
Numberof Tokencycles(0-65535)
Numberof Runningminutes( 0-65535 )
Moneyinserted,but norun
Nomoney,but ran
Numberof power down
Numberof UnauthorizedService DoorOpenings( O- 255)
Numberof AuthorizedService DoorOpenings(0-255)
Numberof AuthorizedService DoorOpenings(0-255)
Numberof AuthorizedCoinVaultOpenings(0-255)
tLdois notavailablein washyer.(Itcan't enter.)
tLCois notavailableinwashyer.(Itcan't enter.)
tPdois notavailableinwashyer.(Itcan't enter.)
tPCois not availableinwashyer.(Itcan'tenter.)
0-199 nickels($.00-$9.95)
0-199 nichels($.00-$9.95)
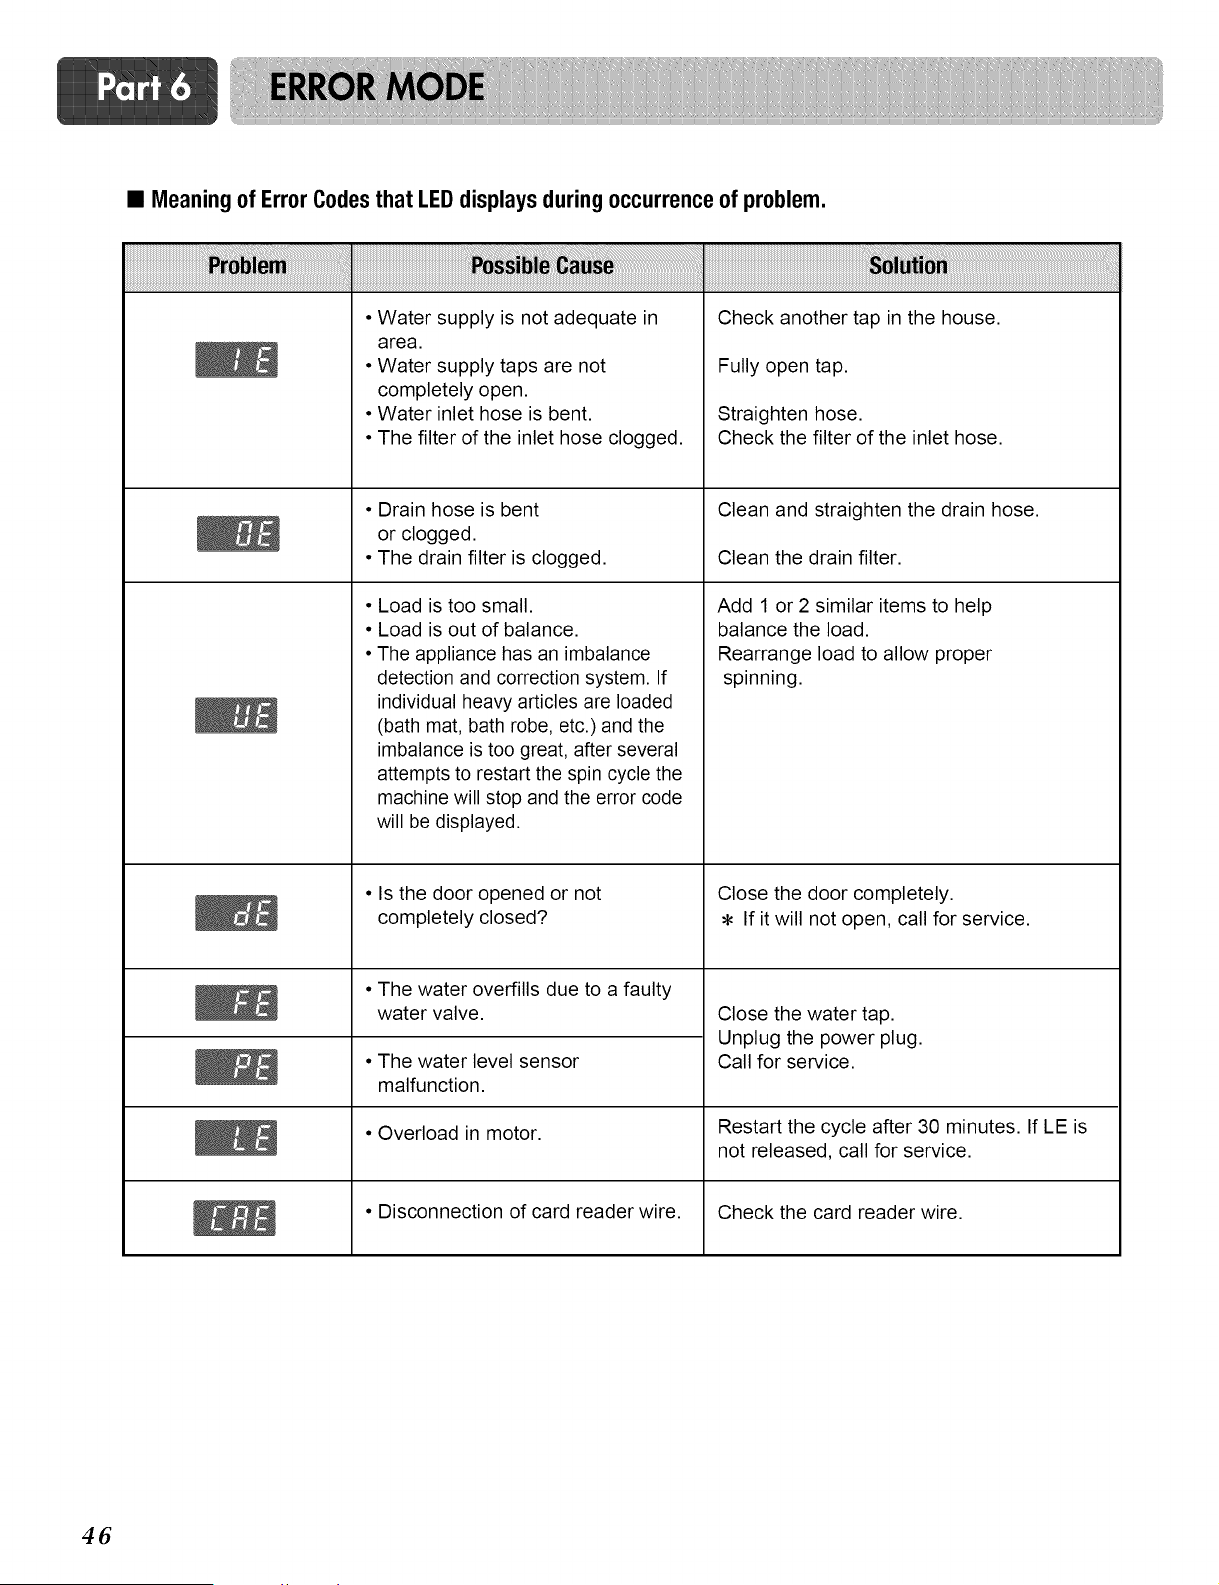
• Meaning of Error Codesthat LEDdisplays during occurrenceof problem.
• Water supply is not adequate in
area.
• Water supply taps are not
completely open.
• Water inlet hose is bent.
• The filter of the inlet hose clogged.
• Drain hose is bent
or clogged.
• The drain filter is clogged.
• Load is too small.
• Load is out of balance.
• The appliance has an imbalance
detection and correction system. If
individual heavy articles are loaded
(bath mat, bath robe, etc.) and the
imbalance is too great, after several
attempts to restart the spin cycle the
machine will stop and the error code
will be displayed.
• Is the door opened or not
completely closed?
• The water overfills due to a faulty
water valve.
• The water level sensor
malfunction.
• Overload in motor.
• Disconnection of card reader wire.
Check another tap in the house.
Fully open tap.
Straighten hose.
Check the filter of the inlet hose.
Clean and straighten the drain hose.
Clean the drain filter.
Add 1 or 2 similar items to help
balance the load.
Rearrange load to allow proper
spinning.
Close the door completely.
If it will not open, call for service.
Close the water tap.
Unplug the power plug.
Call for service.
Restart the cycle after 30 minutes. If LE is
not released, call for service.
Check the card reader wire.
46
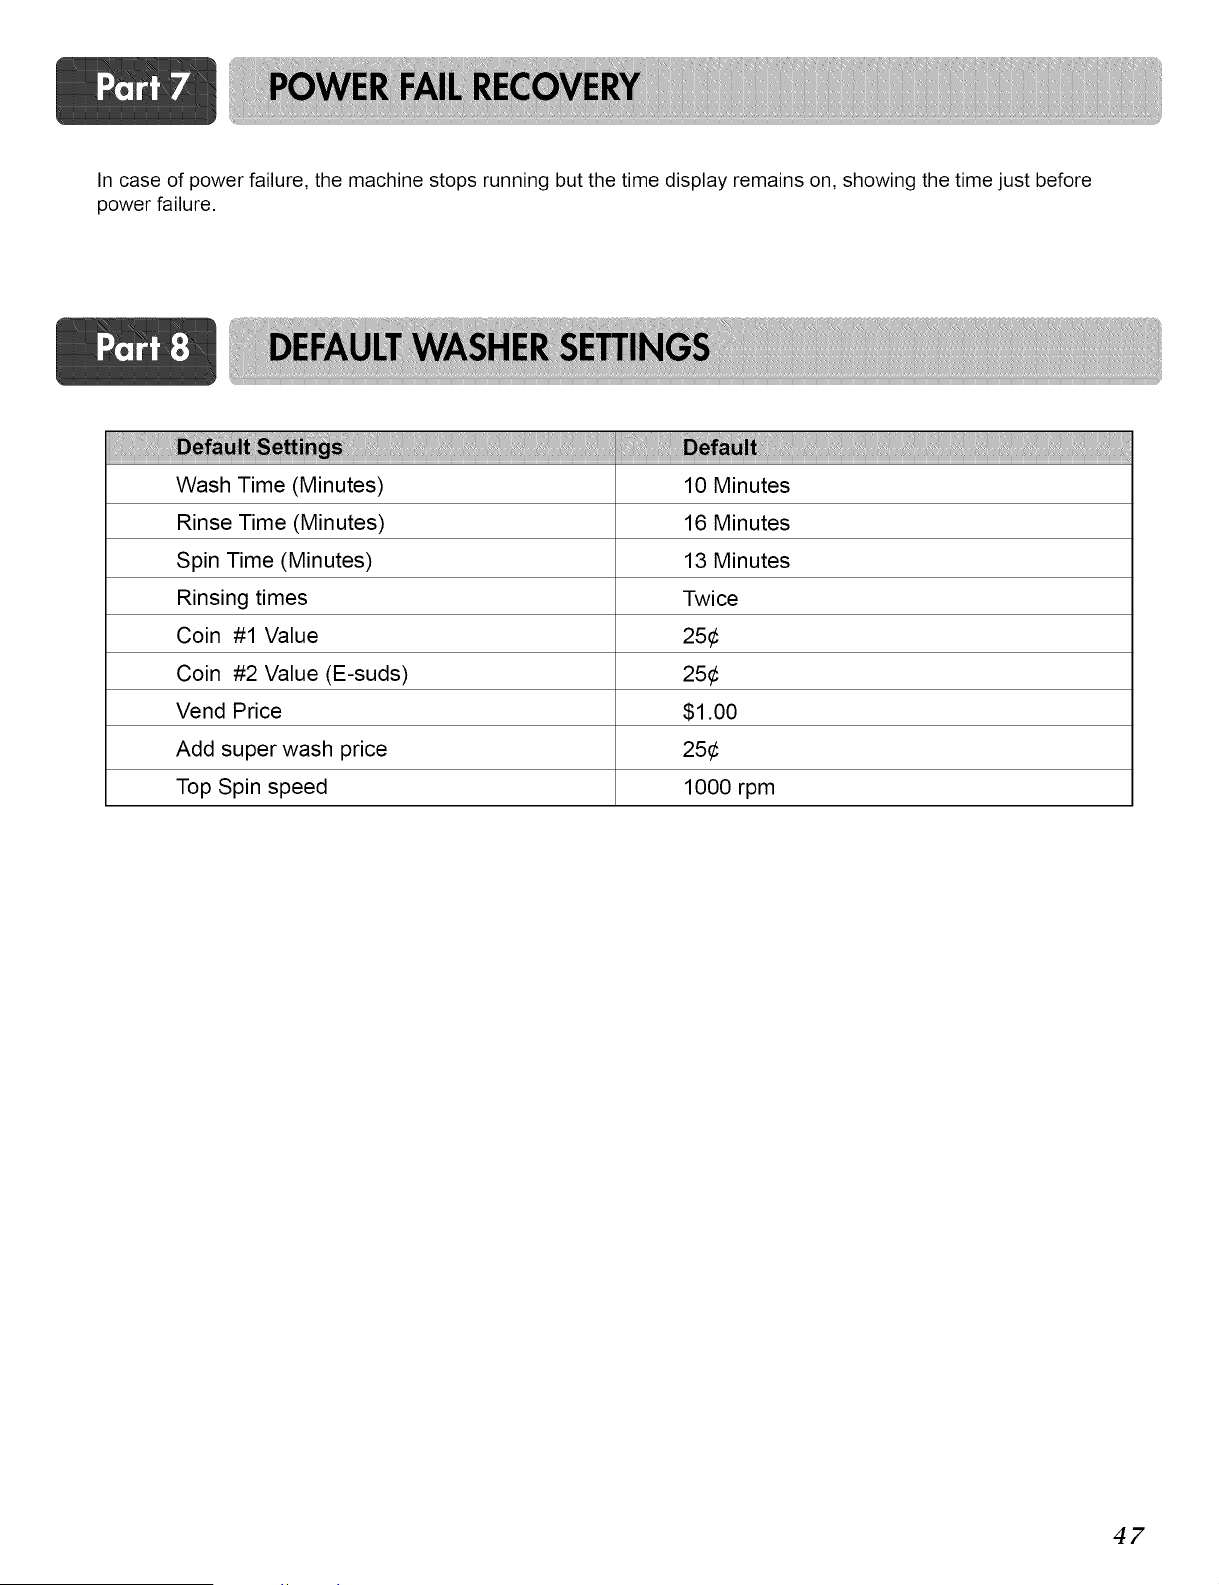
In case of power failure, the machine stops running but the time display remains on, showing the time just before
power failure.
i!iiiiiiiiii!i!i!!i!!i
Wash Time (Minutes) 10 Minutes
Rinse Time (Minutes) 16 Minutes
Spin Time (Minutes) 13 Minutes
Rinsing times Twice
Coin #1 Value 25¢
Coin #2 Value (E-suds) 25¢
Vend Price $1.00
Add super wash price 25¢
Top Spin speed 1000 rpm
47
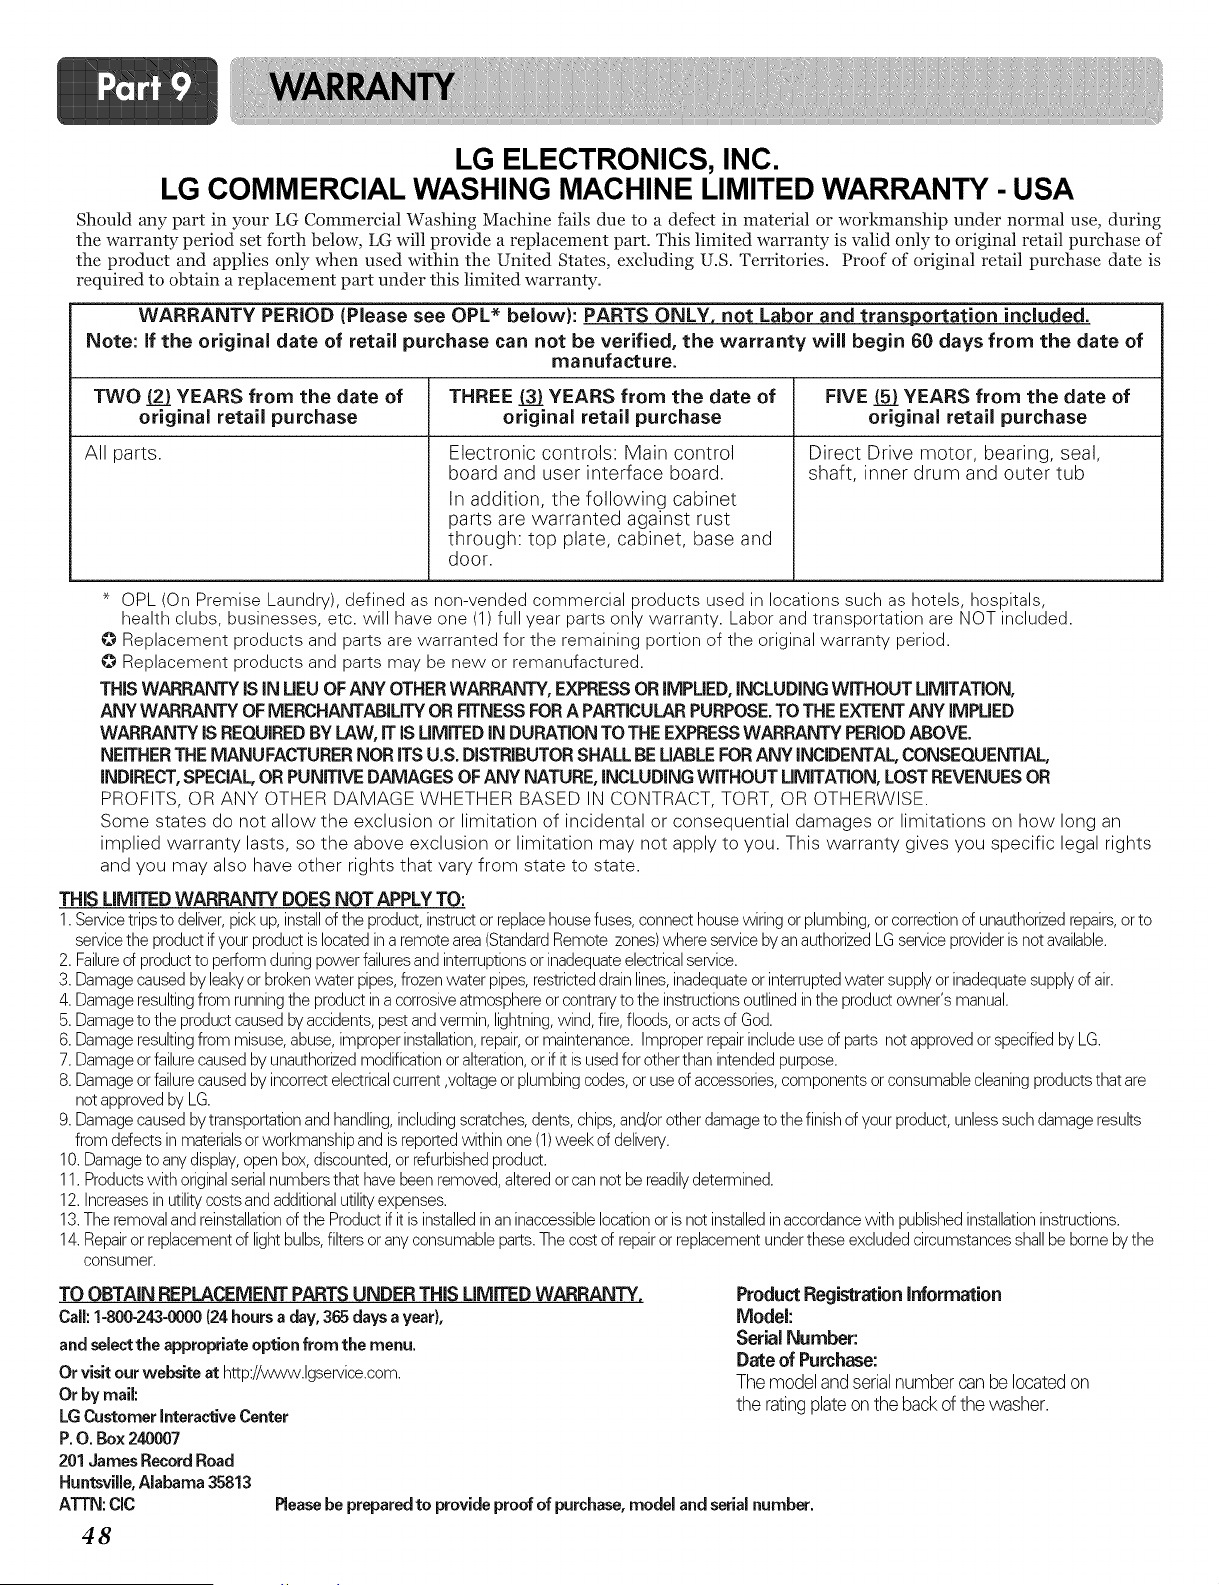
LG ELECTRONICS, INC.
LG COMMERCIAL WASHING MACHINE LIMITED WARRANTY - USA
Should any part in your LG Commercial Washing Machine fails due to a defect in material or workmanship under normal use, during
the warranty period set forth below, LG will provide a replacement part. This limited warranty is valid only to original retail purchase of
the product and applies only when used within the United States, excluding U.S. Territories. Proof of original retail purchase date is
required to obtain a replacement part under this limited warranty.
WARRANTY PERIOD (Please see OPL* below): PARTS ONLY, not Labor and transportation included.
Note: if the original date of retail purchase can not be verified, the warranty will begin 60 days from the date of
manufacture.
TWO (2} YEARS from the date of THREE (3} YEARS from the date of FiVE 51_YEARS from the date of
original retail purchase original retail purchase original retail purchase
All parts.
Electronic controls: Main control
board and user interface board.
In addition, the following cabinet
parts are warranted against rust
through: top plate, cabinet, base and
door.
Direct Drive motor, bearing, seal,
shaft, inner drum and outer tub
OPL (On Premise Laundry), defined as non-vended commercial products used in locations such as hotels, hospitals,
health clubs, businesses, etc. will have one (1) full year parts only warranty. Labor and transportation are NOT included.
Replacement products and parts are warranted for the remaining portion of the original warranty period.
Replacement products and parts may be new or remanufactured.
THIS WARRANTY IS IN LIEUOF ANY OTHER WARRANTY, EXPRESS OR IMPLIED, INCLUDING WITHOUT LIMITATION,
ANY WARRANTY OF MERCHANTABILITY OR FITNESS FOR A PARTICULARPURPOSE. TO THE EXTENT ANY IMPLIED
WARRANTY iS REQUIRED BY LAW, IT iS UMITED iN DURATION TO THE EXPRESS WARRANTY PERIOD ABOVE.
NEITHER THE MANUFACTURER NOR iTS U.S. DiSTRiBUTOR SHALL BE LIABLE FOR ANY iNCiDENTAL, CONSEQUENTIAL,
iNDiRECT, SPECIAL OR PUNiTiVE DAMAGES OF ANY NATURE, iNCLUDiNG WITHOUT LiMiTATiON, LOST REVENUES OR
PROFITS, OR ANY OTHER DAMAGE WHETHER BASED IN CONTRACT, TORT, OR OTHERWISE.
Some states do net allow the exclusion or limitation of incidental or consequential damages or limitations on hew long an
implied warranty lasts, so the above exclusion or limitation may not apply to you. This warranty gives you specific legal rights
and you may also have other rights that vary from state to state.
THiS LIMITED WARRANTY DOES NOT APPLY TO:
1.Servicetrips to deliver,pick up,installof the product,instructor replacehousefuses, connect house wiring or plumbing,orcorrectionof unauthorizedrepairs,orto
servicethe productif your productis locatedin a remote area(StandardRemote zones)where serviceby an authorizedLG serviceprovideris not available.
2. Failureof productto perform duringpower failuresand interruptionsor inadequateelectricalservice.
3. Damagecaused byleakyor brokenwater pipes,frozenwater pipes,restricteddrainlines,inadequateor interruptedwater supplyor inadequatesupplyof air.
4. Damageresultingfrom runningthe productina corrosiveatmosphereor contraryto the instructionsoutlined inthe product owner's manual.
5. Damageto the productcaused byaccidents,pestandvermin, lightning,wind, fire,floods,oracts of God.
6. Damageresultingfrom misuse,abuse,improper installation,repair,or maintenance.Improperrepairincludeuseof parts not approvedor specifiedby LG.
7. Damageor failurecausedby unauthorizedmodificationor alteration,or if itis usedfor other than intendedpurpose.
8. Damageor failurecausedby incorrectelectricalcurrent ,voltageorplumbing codes,or use of accessories,components orconsumablecleaningproductsthat are
notapprovedby LG.
9. Damagecaused bytransportationand handling,includingscratches,dents, chips,and/orother damageto thefinish of your product, unlesssuchdamage results
from defects inmaterialsor workmanshipand is reportedwithin one (1)week of delivery.
10.Damageto anydisplay,open box,discounted,or refurbishedproduct.
11.Productswith originalserialnumbersthat havebeen removed,alteredorcan notbe readilydetermined.
12.Increasesin utilitycosts andadditionalutilityexpenses.
13.The removaland reinstallationof the Productif it isinstalledinan inaccessiblelocationor is not installedinaccordancewith publishedinstallationinstructions.
14.Repairor replacementof light bulbs,filtersor any consumableparts.The cost of repairor replacementunderthese excludedcircumstancesshallbe borne bythe
consumer.
TO OBTAIN REPLACEMENT PARTS UNDER THiS LIMITED WARRANTY,
Call: 1-800-243-0000(24hours a day, 365 days a year),
and select the appropriate optionfrom the menu.
Or visit our website at http://www.lgservice.com.
Or by mail:
LG Customer interactiveCenter
P.O. Box 240007
201 James Record Road
Huntsville, Alabama 35813
ATTN: CIC
Product Registrationinformation
Model:
SerialNumber:
Date of Purchase:
The model andserialnumber canbe locatedon
the ratingplateonthe backof the washer.
Please be prepared to provide proof of purchase, model and serial number.
48

LG Electronics Inc.
P/No.: MFL31245111