WashingMachine
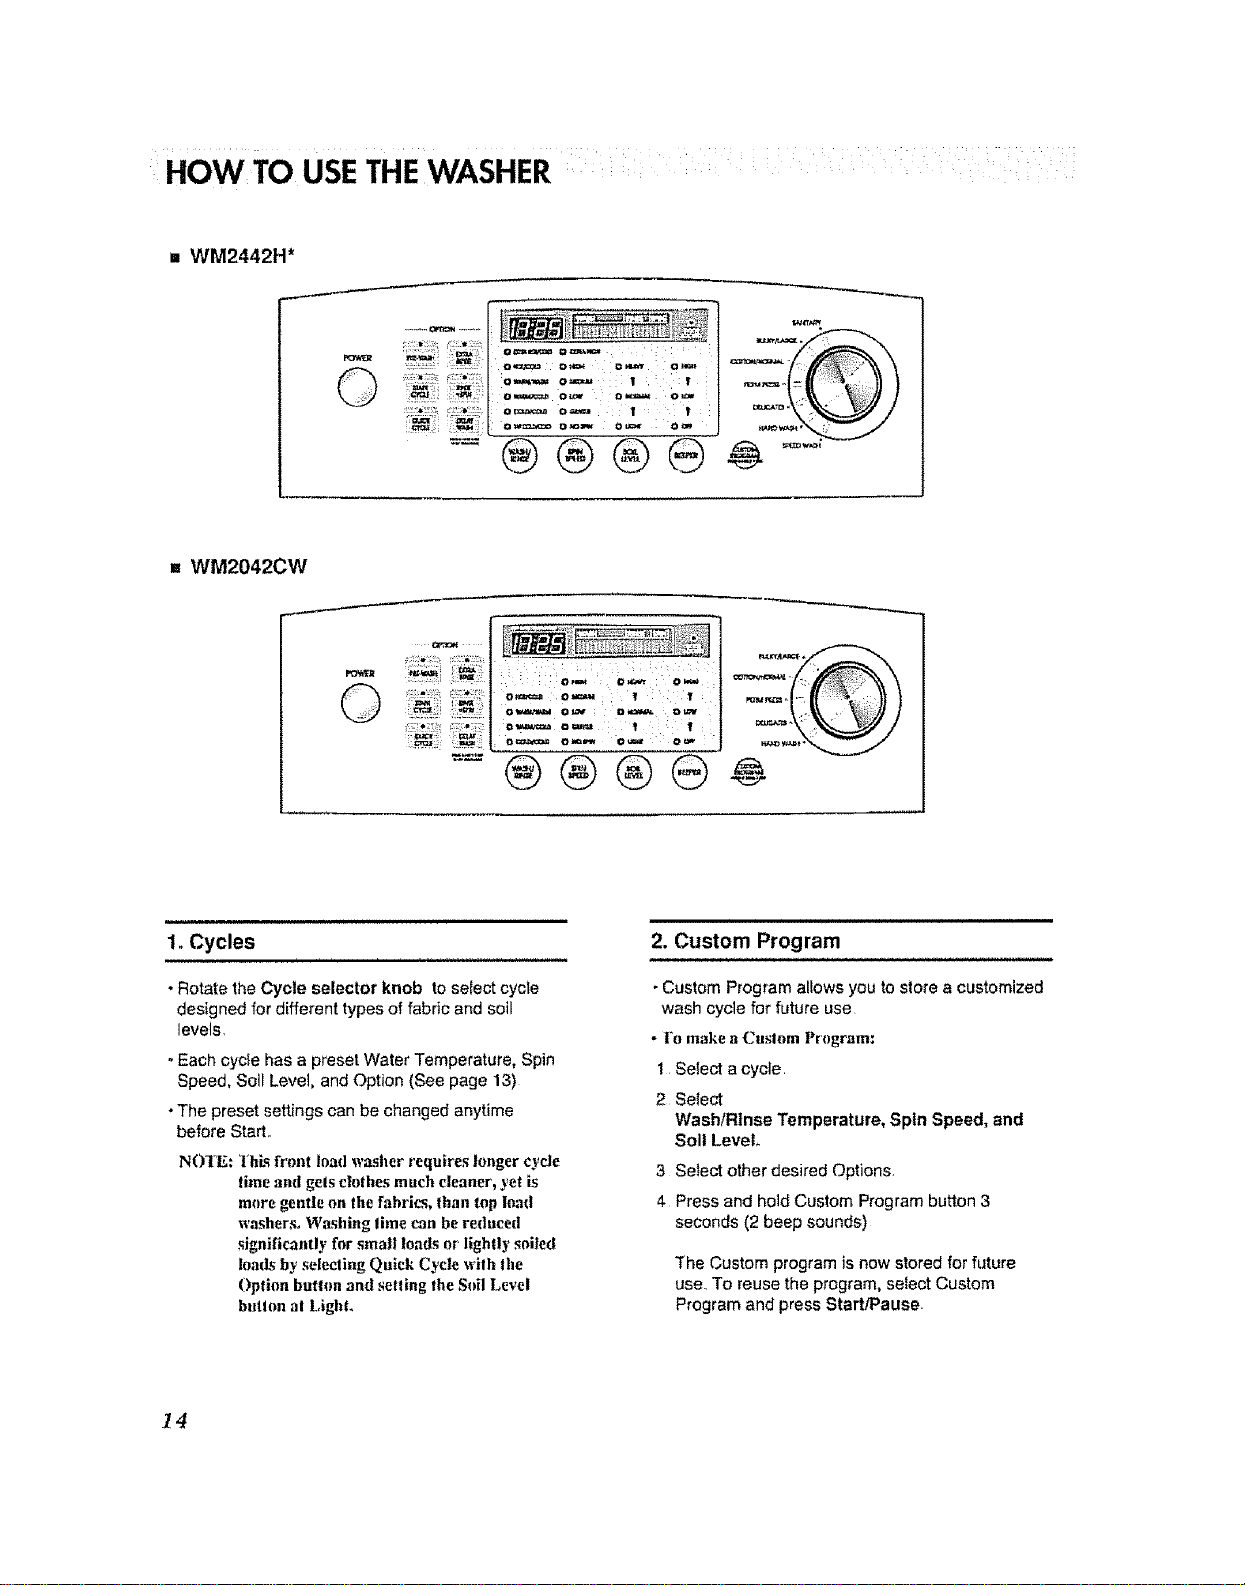
WM2442H*
WM2042CW
Pleaseread this manual carefuly. It provides
instructions on safe installation, use,and maintenance°
Retainit for future reference.
Recordthe model and serial numbers of your machine
and report this informalion to your dealer iFyour machine
requires service.
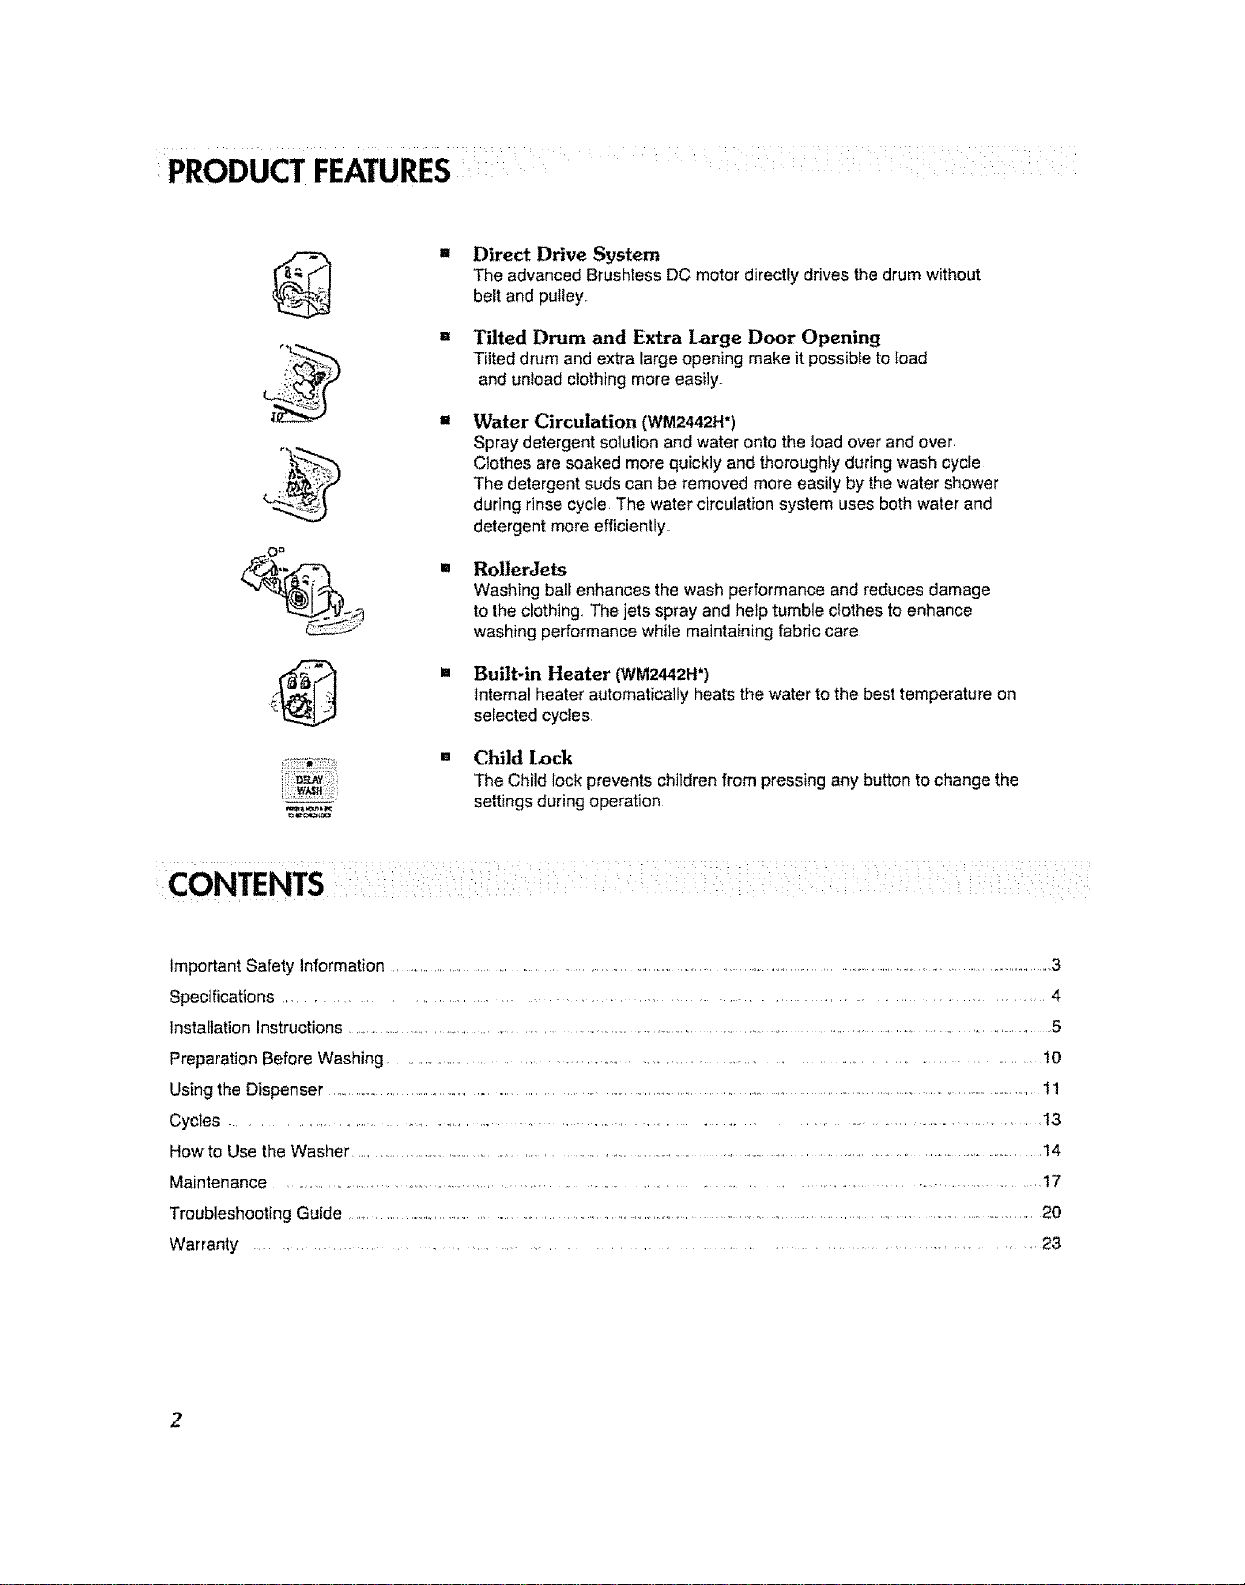
PRODUCT FEATURESi:
El
r* t
Direct Drive System
The advanced Brushless DC motor directly drives the drum without
belt and pulley,
Tilted Drum and Extra ]Large Door Opening
Tilted drum and extra large opening make it possible to Ioad
and un!oad clothing more easily
Water Circulation (WM2442H')
Spray detergent sotution and water onto the load over and over
Clothes are soaked more quickly and thoroughly during wash cycle
The detergent suds can be removed more easily by the water shower
during rinse cycle, The water circulation system uses both water and
detergent more efficiently
Roller Jets
Washing bali enhances the wash performance and reduces damage
to the clothing, The jets spray and help tumble clothes to enhance
washing performance while maintaining fabric care
Bui]t-ln Heater (WM2442H*)
internalheater automatically heats the water to the best temperatt_re on
selected cycies
Child lock
The Child lock prevents children from pressing any button to change the
settings during operation
Important Safety Information .............................................................................................................................................. 3
Specifications ..................................................................... 4
installation Instructions............................................................................................................................ 5
Preparation Before Washing ............................................................................... 10
Using the Dispenser ..........................................................................................................................................................................11
Cycles .................................................................................................................................................................. 13
Howto Use the Washer ....................................................................................................................................... 14
Maintenance ................................................................................................................... 17
Troubleshooting Guide ........................................................................................................................................................ 20
Warranty ................................................................... 23
2

IMPORTANTSAFETYINFORMATION
READALL INSTRUCTIONS BEFOREUSE
,A WARNING!
Foryour safe_ the information in this manual mustbe followed to minimize the risk of fire or
explosion, eleclTicshock, or to prevent property damage, personal injury, or loss of tife.
IMPORTANT SAFETY INSI UCTIONS
,A WARNING: To reduce the risk of fire, electric shock, or injury to persons when using the washer, follow basic
precautions, including the following:
•Read all Instructions before using the washer.
•Do not wash articles that have beenpreviously
cleaned in, washed in, soaked In, or spotted with
gasoline, dry cleaning solvents, or other
flammable or explosive substances, as they give
off vapors that could ignite or explode,
•Do not add gasoline, dry cleaning solvents, or
other flammable or explosive substances to the
wash water.. These substances give off vapors that
could ignite or explode.
• Under certain conditions, hydrogen gas may be
produced In a hot water system that has not been
used for2 weeks or more, HYDROGEN GAS tS
EXPLOSIVE, ff the hot water system has not been
used for such a period, before using the washing
machine, turn on all hot water faucets and let the
water flow from each for several minutes, This will
release any accumulated hydrogen gas_As the gas
is flammable, do not smoke or use an open flame
during this time.
. Do not allow children toplay onor in the washer.
Close supervision of children isnecessary when
the washer is used near children.
. Before the washer is removed from service or
discarded, remove the door to prevent children
from hiding inside.
• Do not install or store the washer where it will be
exposed to the weather.
• Do not tamper with controls.
. Do not repair or replace anypart of the washer or
attempt any servicing unless specifically
recommended in the user-maintenance
instructions or published user-repair instructions
that you understand and have the skills to carry
out,
• See Installation Instructions for grounding
requirements,
• ALWAYS follow the fabric cure instructions
supplied by the garment manufacturer,
• Do not place items exposed to cooking oil in your
washer. Items contaminated with cooking oils may
contribute to a chemical reaction that could cause
a load to catch fire°
. Do not use fabric softeners orproducta to
eliminate static unless recommended by the
manufacturer of the fabric softener or producL
SAVE THESE INSTRUCTIONS
GROUNDING INSTRUCTIONS
This appliance must be grounded, tn the event of malfunction or breakdownj grounding will reduce the risk of
electric shock by providing a path of least resistance for electric current, This appliance Is equipped with a
cord having an equipment-grounding conductor and grounding plug, Theplug must be plugged into an
appropriate outlet that is properly installed and grounded in accordance with all local codes and ordinances,.
• Do not use an adapter or extension cord,
. Do not remove ground prong.
• ff you don't have the proper outlet, consult an electrician.
,_ WARNING: Improper connection of the equipment-grounding condt_ctorcan result in riskofelectric shock
Check with a qualified electrician or serviceman if you are indoubtas towhether theapplianceis
properly grounded Donot modily the plug providedwilhthe appliance- if _1doesnot fit the outlet.
havea properoutlet installed bya qualified electrician
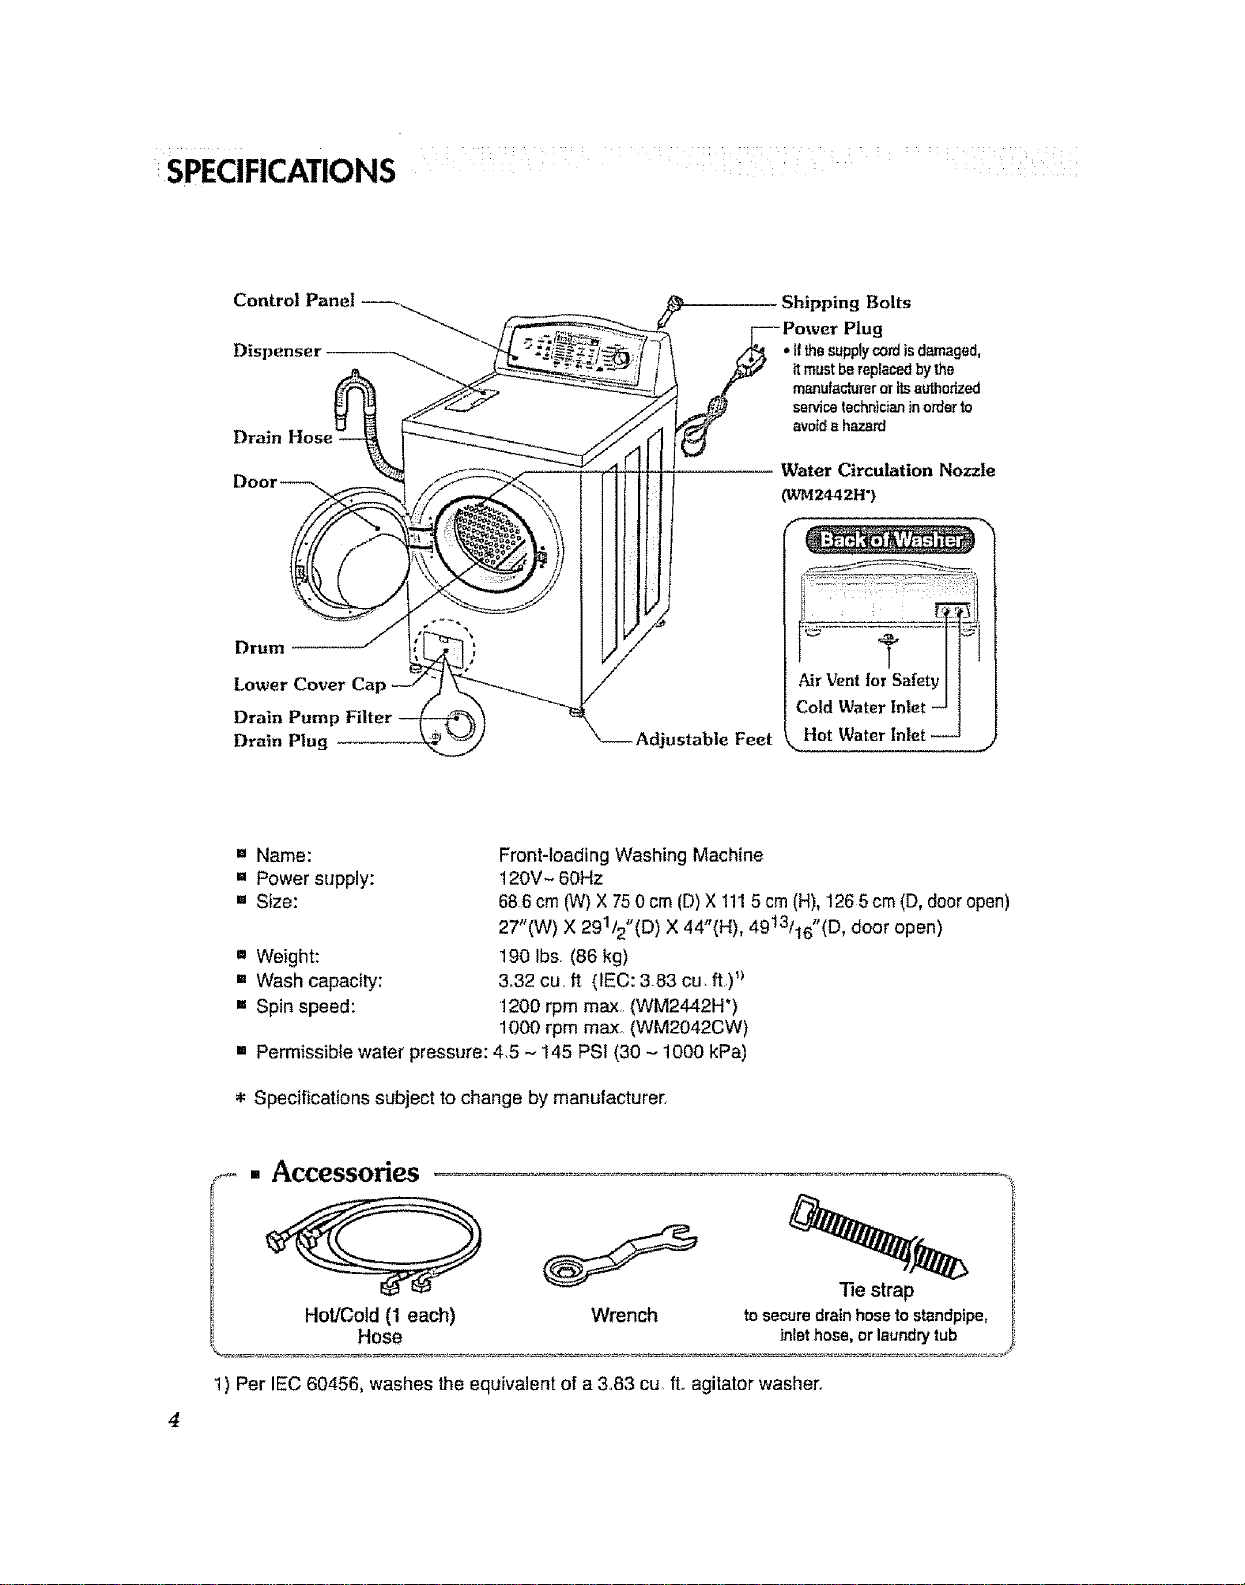
SPECIFICATIONS
Control Panel
Dispenser
Shipping Bolts
Plug
• if _hesupply cord is dm°naged,
itmust bereplacedbythe
manufacturer or itsauthorized
servicetechnicianin orderto
avoid s hazard
Water Circulation Nozzle
(WMZ442H')
Drum
Lower Cover
Drain Pump Filter
Drain Plug Adjustable Feet
N Name:
= Power supply:
= Size:
= Weight:
[] Wash capacity:
[] Spin speed:
Front-loading Washing Machine
120V- 60Hz
686 cm (W)X 750 cm (D)X 1115 cm (H),126 5cm (D, dooropen)
27"(W) X 291/2"(D) X 44"(H), 49t3/16"(D, door open)
190 Ibs, (86 kg)
3,32 cu, ft (IEC: 3.83 cu, ft) _>
1200 rpm max, (WM2442H*)
1000 rpm max° (WM2042CW)
[] Permissible water pressure: 4,5 - 145 PSI (30 - 1000 kPa)
* Specifications subject to change by manufacturer,
....[] Accessories
-fie strap
Hot/Cold (1 each) Wrench to secure drain hoseto standpipe,
Hose inlet hose, or laundry tub
I
1) Per IEC 60456, washes the equivalent of a 3,83 cu, ft. agitator washeL

INSTALLATIONINSTRUCTIONS :::
Install or store unit where it will not be exposed to temperatures below ff'eezing or
exposed In outside weather ¢onditious_
Properly ground washer to cmfform with all governing codes and errdinanceso
]_) reduce tlne risk or elecffic shock_ do not install the washer in humid spaces.
The base opening must not be obstructed by carpeting when the washing machine is installed on n carpeted f[ooro
In countries wlnere there are areas which may be suhject to in[eslalion by cockroaches or other vermin, pay
parlicular attention to keeping the appliance and ils surroundings in clean condition at all times,
Any damage which may be cause by cuckroaches or other vermin will not be c_wered by the appliance guaran|ee.
= Shipping bolts
The appliance isfitted with shipping bolts to prevent internal damage during transport
,. Removing shipping bolts
1oTo prevent internal damage during transport,
4 locking bolts are installed Before operating
the washer, remove the bolts and braces
•tf they are not removed, it may cause severe
vibration, noise, and malfunction,
3_Take out the 4 bolts and braces by twisting
the braces slightly. Keep the 4 bolts, braces
and the wrench for future use,
• Whenever the appliance is transported, the
shipping bolts and braces must be replaced
2, Unscrew the 4 bolts with the wrench supplied 4, Close the holes with the caps supplied
INSTALLATION INSTRUCTIONS
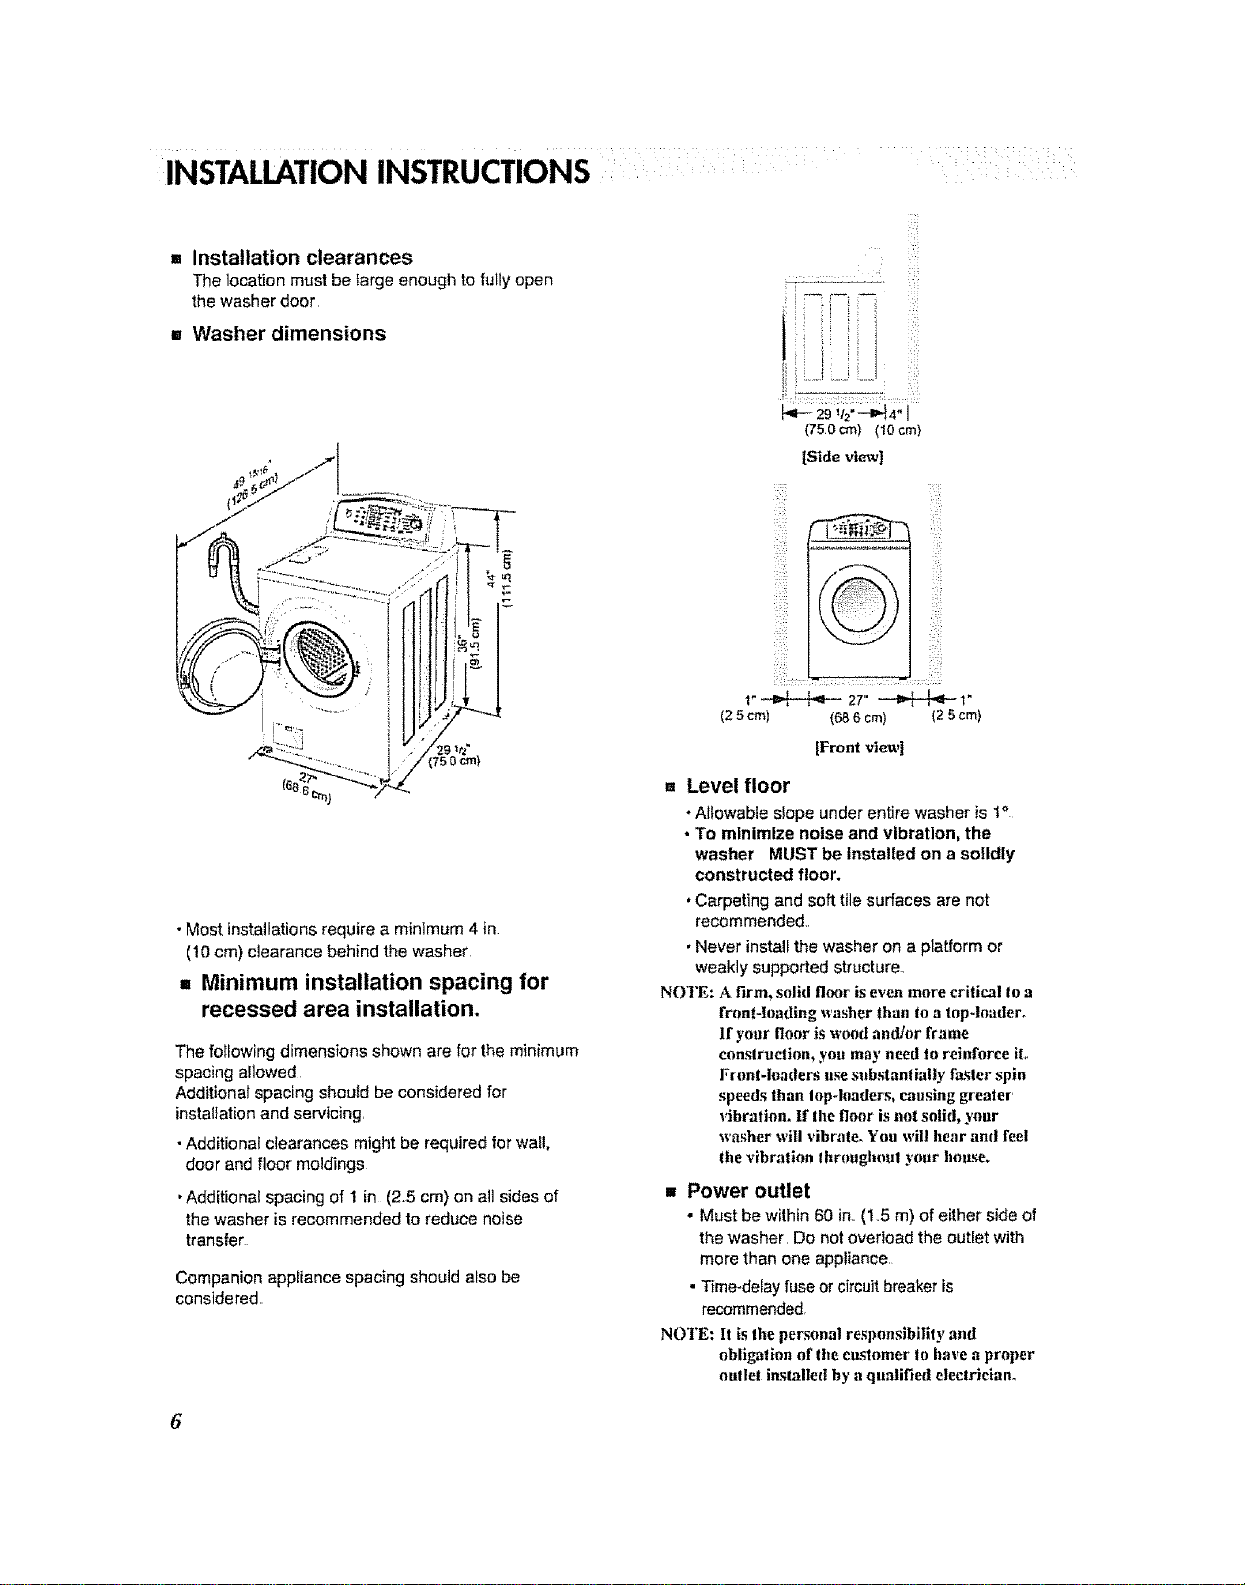
= Installation clearances
The location must be large enough to fully open
the washer door
= Washer dimensions
• Most installations require a minimum 4 in
(10 cm) clearance behind the washer
,, Minimum installation spacing for
recessed area installation.
The following dimensions shown are for the minimum
spacing allowed
Additional spacing shoutd be considered for
installation and servicing,
•Additional clearances might be required for wa!!,
door and floor moldings
• Additional spacing of I in (25 cm) on all sides of
the washer is recommended to reduce noise
transfer
Companion appliance spacing should also be
considered
(750cm) (10cm}
[Side view]
_!ili
_! :iii:
::_i :::ii
(25 cm) (686 cm)
[Front vtm_,]
(2 5cm}
- Level floor
• Allowable slope under entire washer is t*
• To minimize noise and Vibration, the
washer MUST be Installed on a sotldly
constructed floor.
•Carpeting and soft tile surfaces are not
recommended,r
• Never install the washer on a platform or
weakly supported structure.,
NOTE: A firm, solid floor is even more critical In a
front-loading washer than to a top-loader_
If your floor is wood andtor frame
conslractioa_ you may need to reinforce it.
Front-hhadcrs use substantially faster spin
speeds than lop-loaders, causing greater'
vibration, If the floor is not solid, your
washer will vibrate. You will hear and feel
the vibration throughout y(mr house.
•, Power outlet
• Must be within 60 in. (1,.5 m) of either side of
the washer, Do not overload the outlet with
more than one appliance,
• T_me-delay fuse or circuit breaker is
recommended_
NOTE: It is the personal re._ponsibilily ant[
obligation of tlte customer to have a proper
outlet installed by a qualified electrician.
6
INSTALLATION INSTRUCTIONS
[] Electrical connection
- Do not use an extension cord or double adapter
- [f the supply cord is damaged, it must be replaced by a qualified person in order to avoid a hazard
- if the machine will not be used for an extended time. unplug it and shut off the water supply
- Connect the machine to a grounded outlet in accordance with current wiring regulations
• The appliance must be positioned so that the plug is easily accessible
CAUTIONJ Concerning the Power Cord
Most appffances recommend they be placed upon a dedicated circuit;that is, a single outMt circuitwhich powers only that
applMnce and has no additional outfets or branch circu_ Check the specificaffon page of this owner's manual to be
certaln r
Do not overload wall outlets Overloaded wail outlets, loose or damaged walt outlets, extension cords, frayed power cords,
or damaged or cracked wire insulation are dangerous. Any of these conditions could result in electric shock or fire.
Periodically examine the cord of your appliance, and ifits appearance indicates damage or deterioration, unplug it.
discontinue use of the appliance, and have the cord replaced with an exact replacement part by an authorized servicer
Protect the power cord from physical or mechanical abuse, such as being twisted, kinked, pinched, closed in a door, or
walked upon Pay particular attention to plugs, wall outIets, and the pointwhere the cord exits the appliance,
m=Connecting water supply hose
• Water supply pressure must be between
45 and 145 PS! (30.-1000 kPa)
•Do not crossthread when connecting inlet hose to
the valve
• Ifthe water supply pressure is more than 145 PSI,
a pressure reducing device shouM be instaffed
. Two Sealing washers are supplied with the water
inlet hoses to prevent water leaks
•Check for leakage of washing machine connections
by tt,rning the tap compMtely on
• Periodically check the condition of the hose and
replace the hose if necessary
. Make sure that there Is no kink inthe hose and that
it isnot crushed
. Be sure that the two water input ports are connected
to the correct water faucets The connector for hot
water is co_ored red
NOTE: Washing Machine is to be connected to the water mains using new hoses.
Old hoses shouhl not be used.
Repairs to 1he washing machine must (rely he carried out by qualified personneL Repairs carried out by
inexperienced persons may cause iejtiry or serious malfunctioning. Contact your local service center.
Do not install your washing maddne in a reem where temperatures below freezing may occur.
Frozen lnxses may burst under pressure. The reliability of the electronic control trait may be impaired
at temperatures below the freezing point.
If the appliance is delivered in the winter monllLs and temperatures are belnw freezing,
store the washing machine at room temperature for a few hours before putting it into operation°
7
INSTALLATION INSTRUCTIONS .......
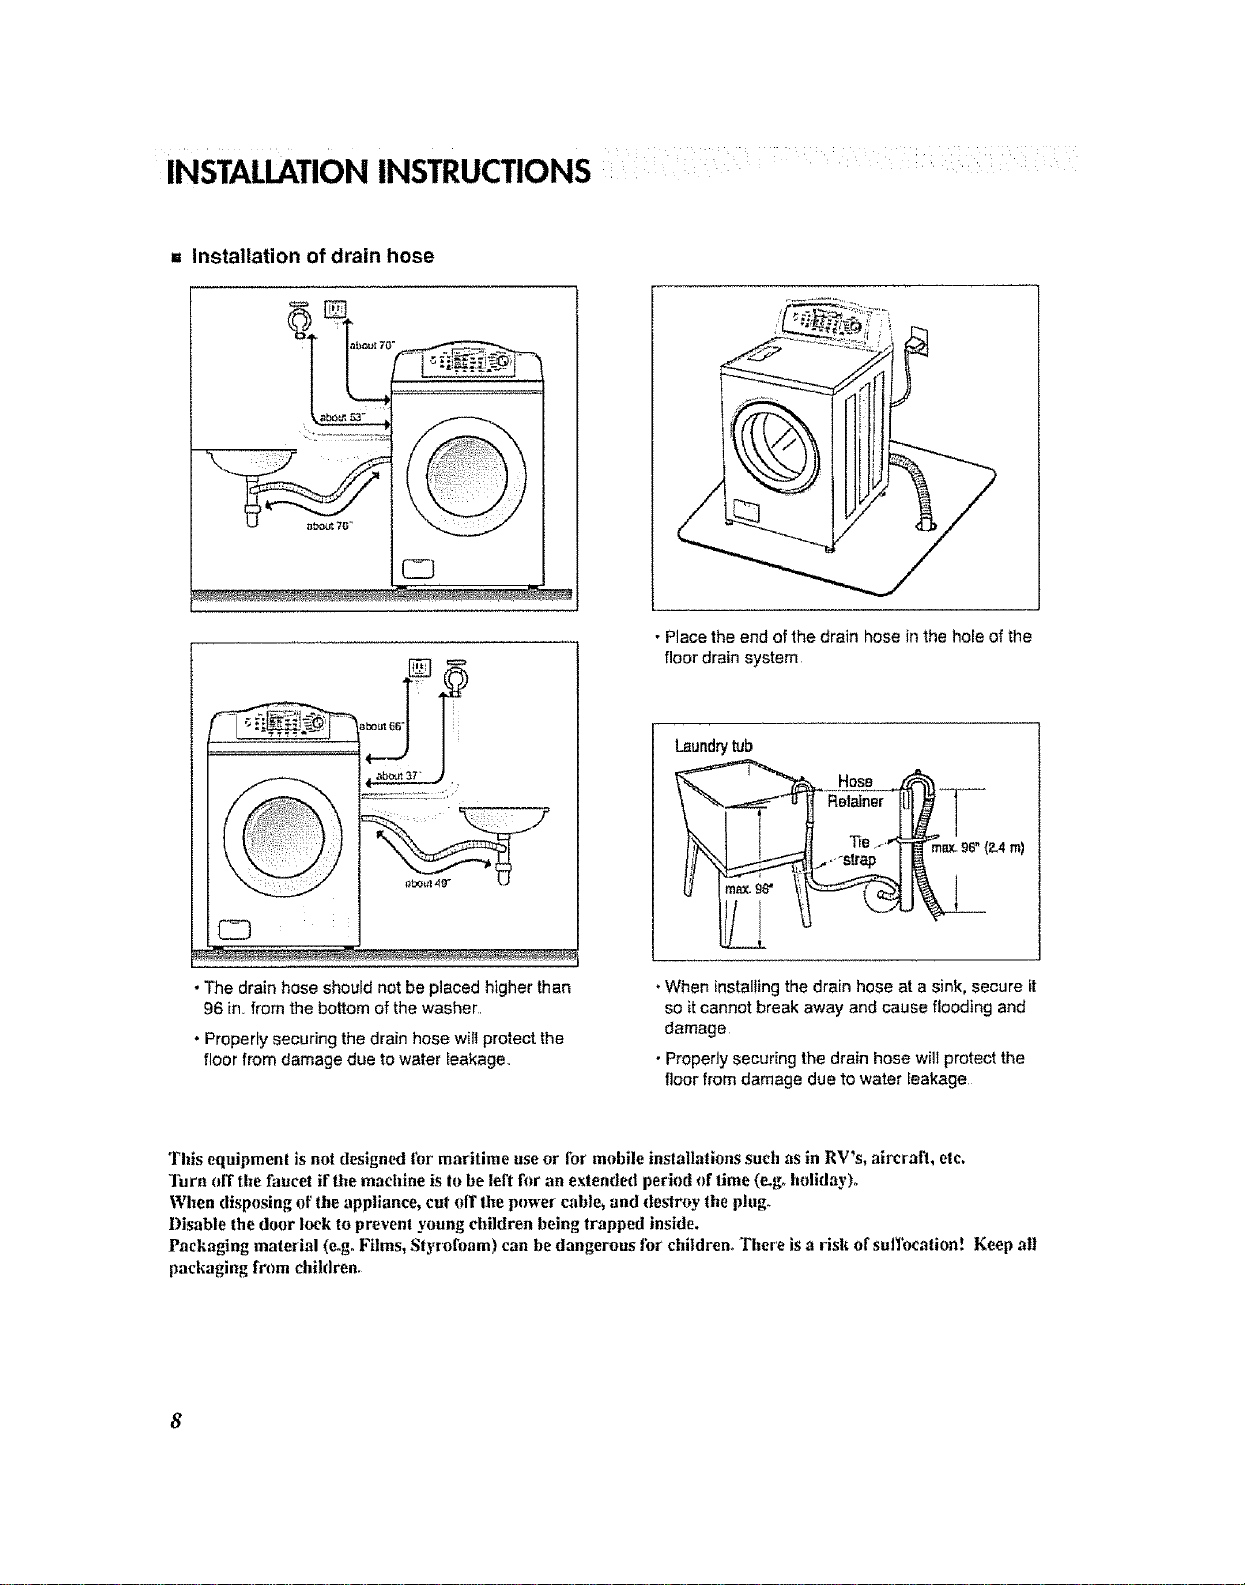
,, Installation of drain hose
\
[ 7 _
•The drain hose should not be placed higher than
96 in. from the bottom of the washer.
oProperly securing the drain hose will protect the
floor from damage due to water leakage.
• Place the end of the drain hose in the hole of the
floor drain system
Laundrytub
. Hose
• When installing the drain hose at a sink, secure it
so it cannot break away and cause flooding and
damage
• Properly securing the drain hose willprotect the
floor from damage due to water leakage
This equipment is not designed for maritime use or Ibr mobile installations such as in RV's, aircrah, etc.
]'urn off the faucet if the machine is to be tort for an extended period of time (e_goholiday)°
When disposing of the appliance, cut off the power cable, and destroy the plug.
Disable the door lock to prevent young children being trapped inside.
Packaging material (e@ Films, Styrofoam) can be dangerous t_r children. There is a risk o1"sulTocation! Keep all
packaging from children.
8
INSTALLATION INSTRUCTIONS
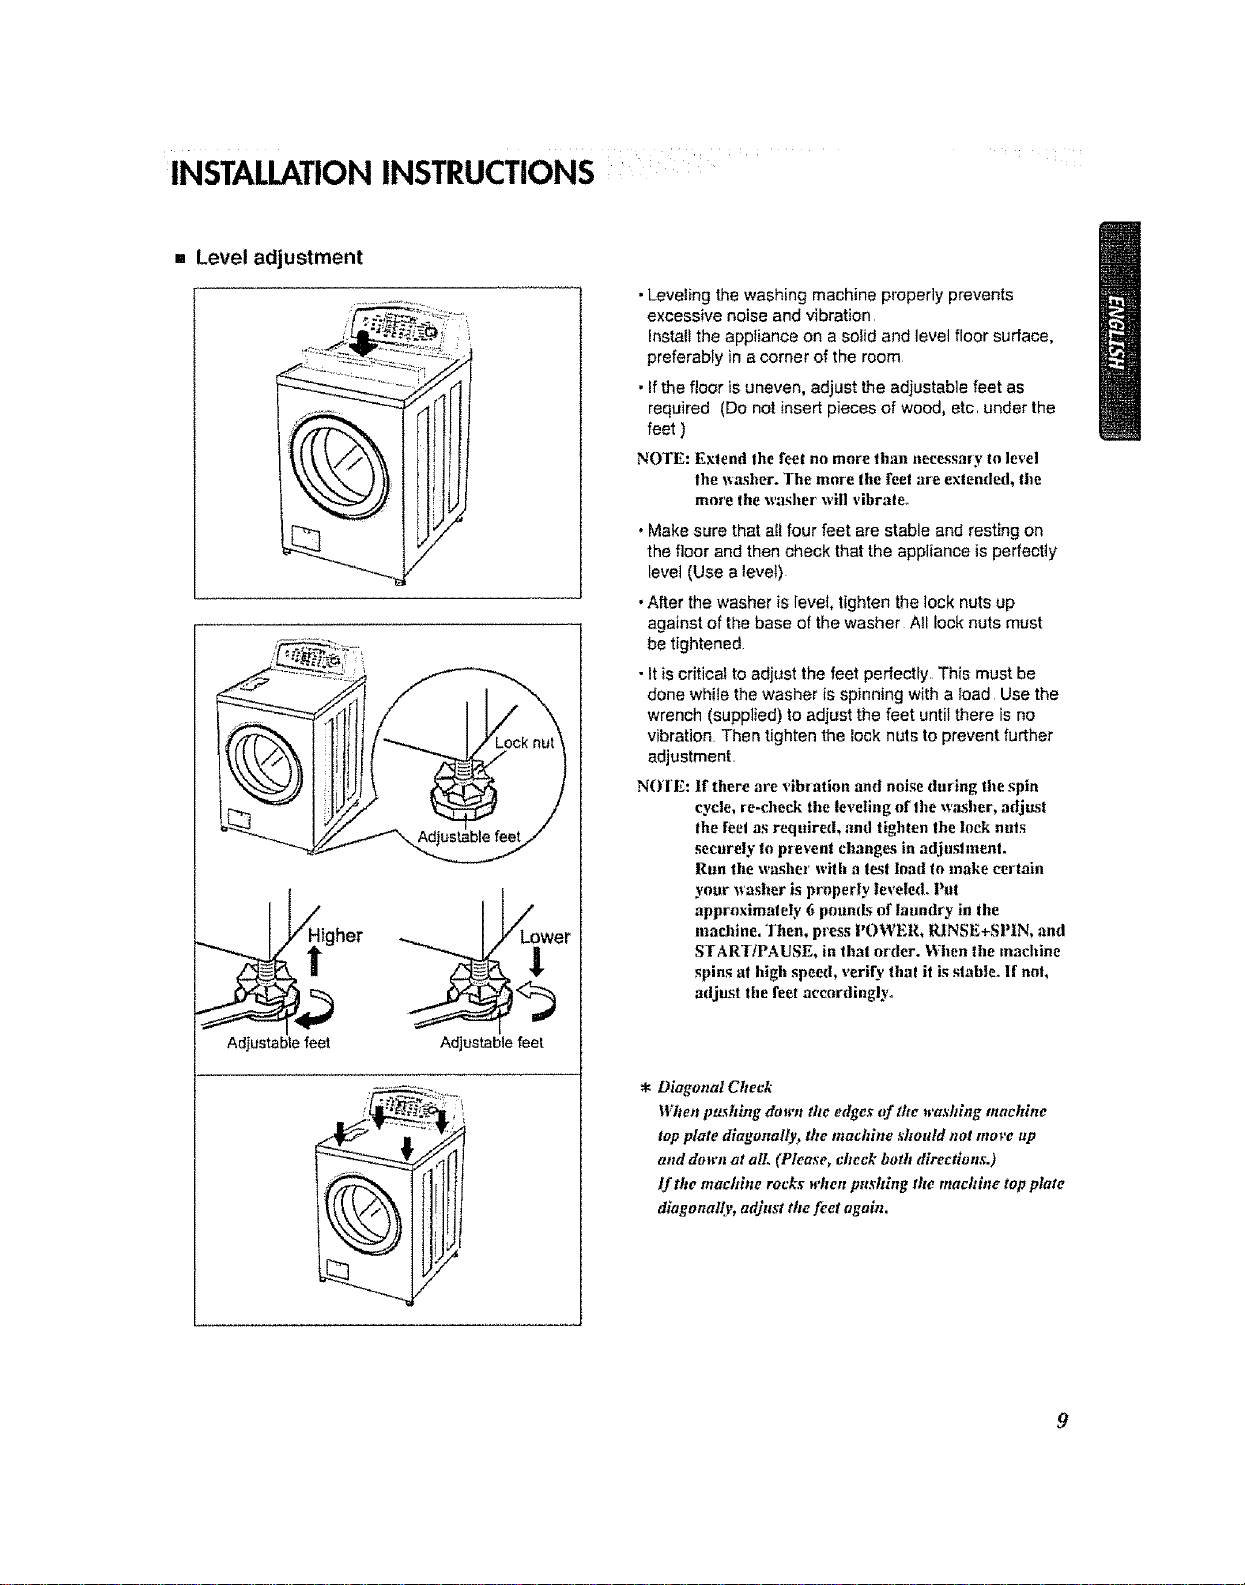
[] Level adjustment
/_gher
Adjustable feet Adjustable feet
•Leveling the washing machine properly prevents
excessive noise and vibration
Installthe appliance on a solid and level floor surface,
preferably in acorner of the room
• If the floor is uneven, adjust the adjustable feet as
required (Do not insert pieces of wood, etc, under the
feet )
NOTE: Extend the feet no more than necessary to level
the _xasher. The mine the feet are extended, file
more the washer will vibrate°
• Make sure that all four feet are stable and resting on
the floor and then check that the appliance is perfectly
level (Use a level)
• After the washer is level, tighten the lock nuts up
against of the base of the washer All lock nuts must
be tightened
• It is critical to adjust the feet perfectly, This must be
dene while the washer is spinning with a load Use the
wrench (supplied) to adjust the feet until there is no
vibration Then tighten the lock nuts to prevent further
adjustmenL
N(Yl E: If there are vibration and noise during the spin
cycle, re-cheek the leveling *ff the w=L,cber, adjust
the feet as required, and tighten the lock nuts
securely to prevent changes in adjust merit.
Run tile washer with a test toad to make certain
your washer is properly leveled. Put
approximately 6 potlmls nf laundry in the
machine. Then, press POWER, RINSE+SPIN, alto
START!PAUSE, in that order. When the macbine
spins at high speed, verify thai it is stable, if not,
adjust tile feet accordingly°
* Diagonal Check
When pushing down ate edges of the washing mocldne
top plate diagonally, the machine should not move up
and down at all (Please, cbcek both tb_rectlons.)
If the machine rocks when pusblng the machine top plate
diagonally, adjust the feet ogaln.
PREPARATIONBEFOREWASHING
To reduce the risk of fire, electric shock, or injury to persons, read the IMPORTANT SAFETY
INSTRUCTIONS before operating this appliance.
1. Fabric Care Labels
Look for a care label on your clothes. This will tell you about the fabric content of your garment and how it should
be washed.
2. Sorting
To get the best results, sort clothes into loads that can be washed with the same wash cycle
Different fabrics need to be washed in different ways
Always sort dark colors from pale colors and whites Wash separately as dye and lint transfer can occur causing
discoloration of white clothing If possible, do not wash heavily soiled items with lightly soiled ones
Soil {Heavy, Norma!, Lighl) Separate ch_thes according Io amount of soil.
Color IWhite, [.ights, Darks) Separale white fabric._ h'_m colored fabric._.
Lint (Lint Prodttee_, Collectors) Wash lint producers and lint colleclors separately°
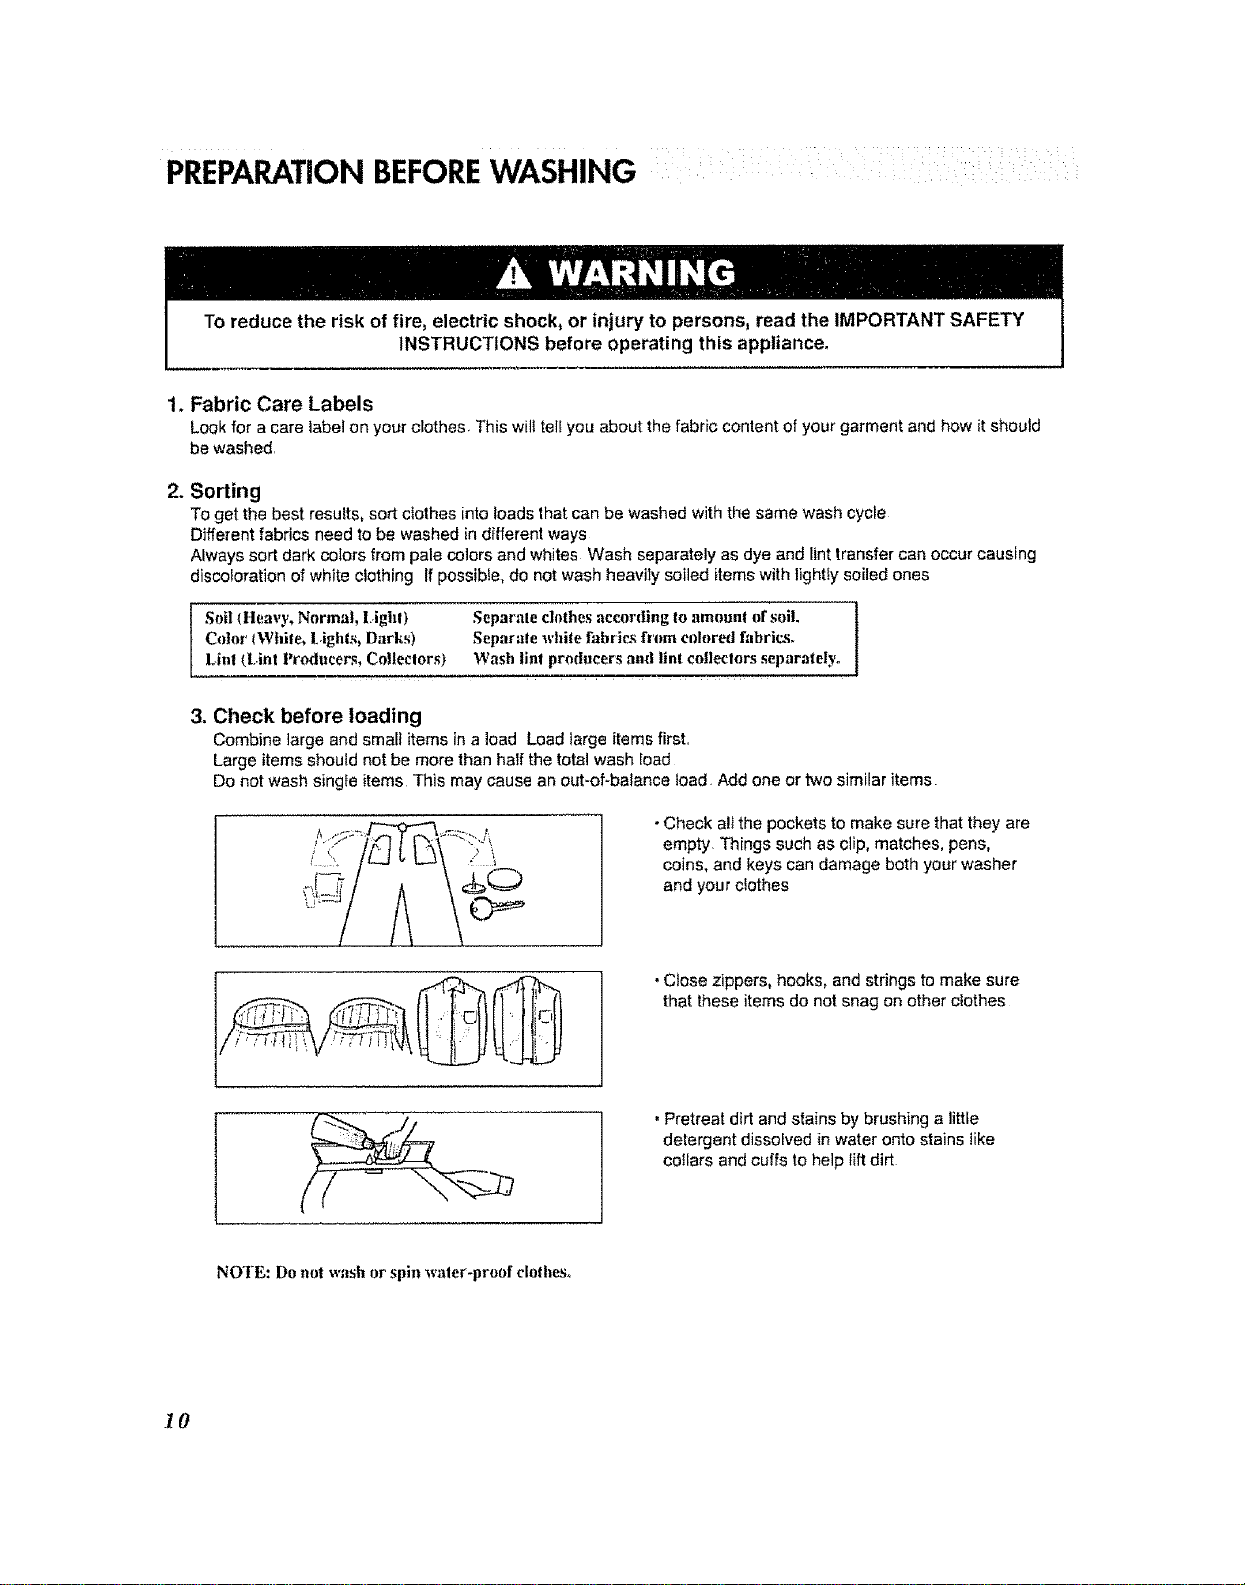
3. Check before loading
Combine large and small items in a load Load large items first,
Large items should not be more than half the total wash load
Do not wash singfe items This may cause an out-of-balance load Add one or two similar items
•Check a!tthe pockets to make sure that they are
empty Things such as clip, matches, pens,
coins, and keys can damage both your washer
and your clothes
•Close zippers, hooks, and strings to make sure
that these items do not snag on other clothes
, Pretreat dirt and stains by brushing a little
detergent dissolved in water onto stains like
collars and cuffs to help lift dirt
NOTE: Do not wash or spin water-proof clothes.
10
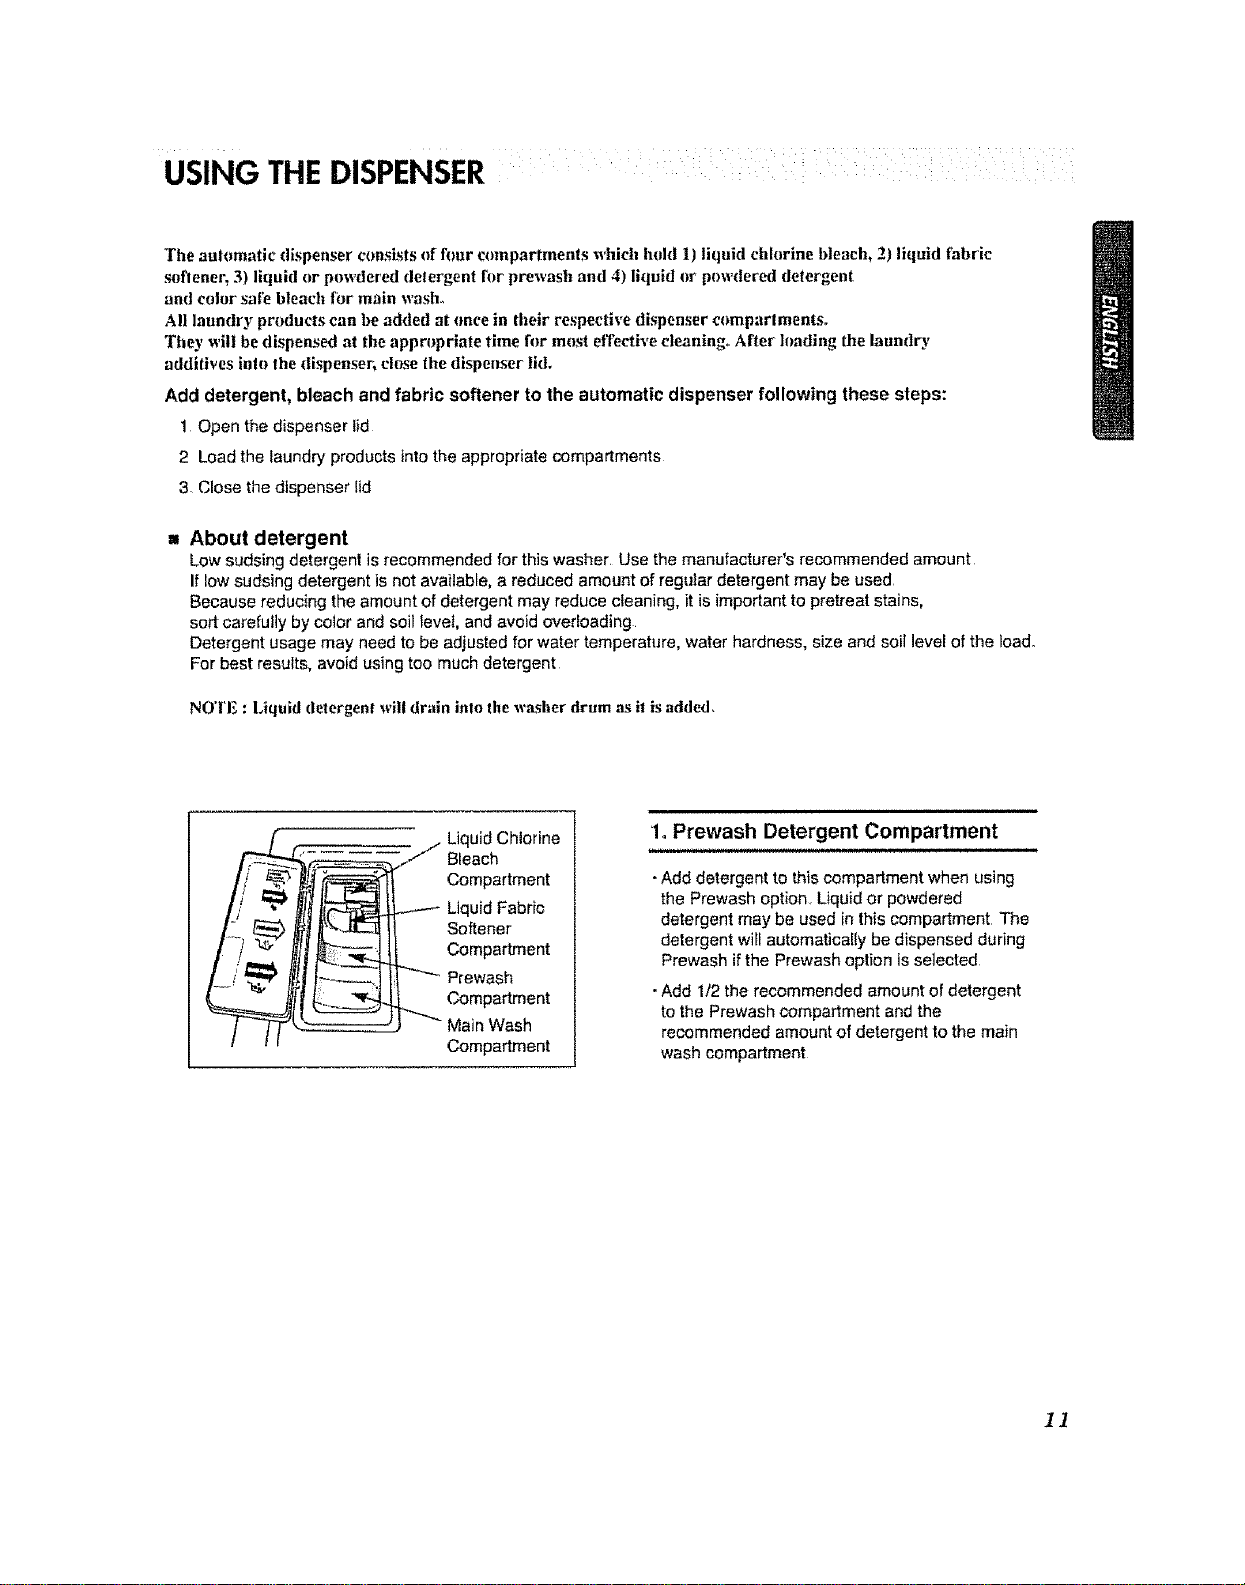
USING THE DISPENSER
The automatic dispenser consists of four compartments which httld 1) liqukl chlorine bleach, 2) liquid fabric
soflener, 3) liquid or powdered delergent h)r prewash and 4) liquid or powdered detergent
and color sate blead_ h_r main wash.,
All laundry products can be added at once in their respective dispenser compartments.
Tho' will be dispensed at the appropriate lime fiw most effective cleaning, After loading the laundo'
additives inte the dispenser; close the dispenser lld,
Add detergent, bleach and fabric softener to the automatic dispenser following these steps:
1 Open the dispenser lid
2 Load the laundry products into the appropriate compartments
3, Close the dispenser lid
= About detergent
Lowsudsing detergent is recommended for this washer, Use the manufactureCs recommended amount
If low sudsing detergent is not available, a reduced amount of regular detergent may be used
Because reducing the amount of detergent may reduce cleaning, it isimportant to pretreat stains,
sort carefully by cotor and soil level, and avoid overloading
Detergent usage may need to be adjusted for water temperature, water hardness, size and soil level of the load.,
For best results, avoid using too much detergent
NOTE : Liquid detergent will drain into the washer drum as it is added,
_ .. Liquid Chlorine
//" Bleach
Compartment
Liquid Fabric
Softener
Compartment
Prewash
Compartment
Main Wash
Compartment
1oPrewash Detergent Compartment
•Add detergent tothis compartment when using
the Prewash optiOnr Liquid or powdered
detergent may be used in this compartment The
detergent will automatically be dispensed during
Prewash ifthe Prewash option is selected
•Add 1/2 the recommended amount of detergent
to the Prewash compartment and the
recommended amount of detergent to the main
wash compartment
11
USING THE DISPENSER
2_ Main Wash Detergent Compartment
•Add measured detergent to this compartment for
Main wash. Detergent is flushed from the
dispenser at the beginning of the cyc}e, Either
powdered or liquid detergent can be used.,
• Liquid or powdered color-safe bleach may be
added to the main wash compartment along with
the same type of liquid or powdered detergent,
NOT E: If you are usin B the Prewash option,
powdered detergent must he used in Ihe
main wash eomparlmenl.
liquid detergen! will drain into the w=lsher
drum as it is addecL
3. Liquid Bleach Compartment
-Add measured liquid chlorine bleach to this
compartment The bleach will be automatically
dispensed at the proper time during the wash
cycle.
•Do not exceed the maximum fill line Overfilling can
cause early dispensing ofthe bleach which could
result in damaged clothes.,
• Do not pour undiluted liquid chlorine bleach directly
onto the load or into the drum Fabric damage can
OCCur
•Do not use powdered bleach in this compartment
4. Fabric Softener Compartment
• Add recommended amount of fabric softener to
this compartment
, Dilute concentrated softeners with warm water to
the fill !ine
• Do not exceed the maximum fill line Overfilling can
cause early dispensing of the fabric softener which
could result in stained clothes
• Do not pour fabric softener directly on the wash
load
• The fabric softener will be automatically dispensed
during the last rinse cycle
NOTE: Do not place, ._tore, or spill lauml_y products
(soup, detergent, blcach, softener, etc.) on
the top of your washer or dryer. These
products can damage the finish or controls if
left there tno long.
12
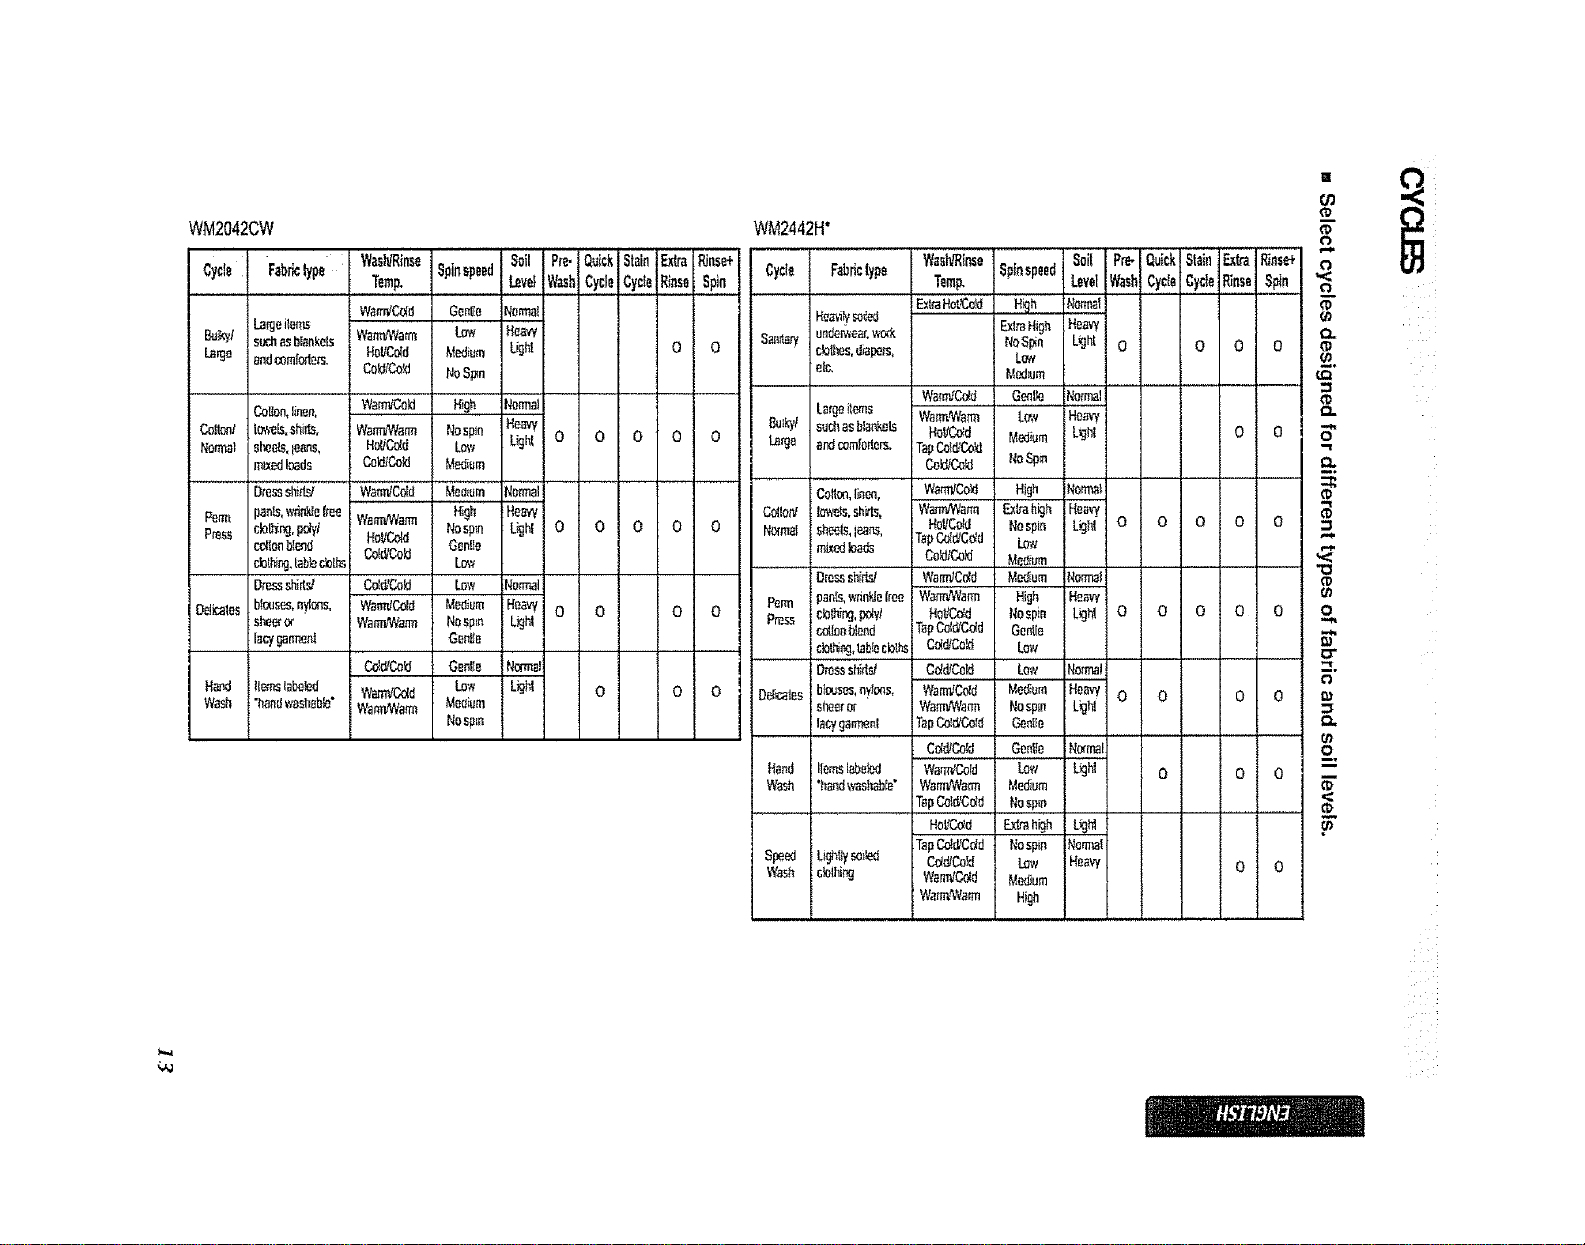
WM2042CW WM2442H"
Cycle F_br_lype
LorgeH_r_
Butyl s_ _sbiankeLs
_je endoomt_ers.
Co,on,linen, WB_'Cokt
Coitont b'_'eLS,shi_. WarmMann
Normal ahead,leans, H#JC_d
m_ lads Cold/CokJ
Dressshidd Wem_Co_d
Pemt panls,,atri_e(me
press cbP_r_,pdyI Wa_Narm
r,_onbI_nd Hot!Co{_
Coi_Co_d
cblhi_j,[ab_clo_
j Dressshi_ CQId,'CokJ
i[_imles blmsss,nylons, Wam_r_._l
sl'_r_or Warr_#a_
lacygarmen!
C_CoU
H_m,d liemslabeg-_d War_ZCdd
Wash ;"t_a_dwasheb_"WamCCCa_
W_h,_nse Spinspeed Soil Pre. Quick
Temp. LevelWashCycle
WanT_CC_ Go_e Normal
W_mlMatm LOw Heavy
HeI!Cdd Medium lkjL4
Cok_fCo_d N_S_n
H_gh Normal
Nospin HeB_
Lmv L_h_
M_um
Mnmum Normal
High He_W
Nospln Lkjhl
O_nlb
L_V
Low _om_l
MediUm He_.,y
No_,pm L_jh_
Gen_e
GenlIe Normal
Low Li_bl
M_oium
Nospm
0 0
O O O O O
O O O O O
O O O O
O O O
Cycle Fabrktype
cb_es,d_pers,
elf..
Lar_items
Bu_kT/su_asblar_ts
Large andcorNorte__
i
i Coflm,lmen,
C_IoN Io'e,_s.shirls,
N_m,_ sh_tS,leans,
_ed k_ds
OmssshirL_
Pem_ pan_s,,,,rankle_ree
Pm.ss _bthbg,_vt
cot_anblend
clolh_Aabln_btt,s
Drossahi_
Dm_s blouses,nylo,qs,
a_r e.r
l_cygam'_nl
Hand llerr_labe_I
W_sfl "hand'_._able"
Speed Lig',1_yssi_
Wash ;_o_hi_
l
O3
0
$-
Wash,'RinseSpinspeedSoil Pre- QuickStain _tra _n_e+
TemF Level_sh Cycl_ Cycle_nse Spin
F_mHigh Heavy
,t,toSp_n L,ghl 0 0 0 0
L_',x
Med,,urn
Wam';C_d GenlIe Nom_al
Warm_Narm L(t,v Hem_, _I.
HoPC-._d M_iam L_JhI 0 0
TapCo1_Cokl
Cok_Co_d I,ioSpin O.
Wam_Co_ High Nom'_I
Wa.m_Varm ExL_hL3h He_w
Hotigoki I_ospir_ L_hl 0 0 0 0 0
TapCe_dCdd LO',_ "_
Cok_Coid Medium
Wan_Cdd Mc_um f,_orrn_I
Warmt_garm High Heaw
Hol;Cdd fiespin L_ghl O O O O O O
TBpC_l_Cdd Genie _..
Cdd/C_ Lmv Or
C_C_ Low Normal "_
F;
Waml/Co_d Me,urn Ho_H 0 0 0 0
Wann_a_ Nospm L_]hI _r
tapColc_'Co_d OenI_e t'_
Cd_Co_ GenlIe ffermal 0
Wam'.,tCold Low Li._ O 0 O --
W_mv_%rm Medium _"
TepCo_'Co_d Nospin ..............................
TapCc_d,'Cddt'_ospin Nomml
C_Co_d Lmv Heavy O O
WarmJCdd Medium
WarmMann High
• i
HOWTO USETHE WASHER
" WM2442H*
..... oPm,_ .....
Q ;: :_F_:: L::_::o
= WM2042CW
©
==: o-- o==, o=- ._
=®®®@÷
Io Cycles
•Rotate the Cycle selector knob to se[ect cycle
designed for different typesof fabric and soil
levels.
-Each cycle has a preset Water Temperature, Spin
Speed, Soil Level, and Option (See page 13)
. The preset settings can be changed anytime
before Start,.
NOTE: l'hL_ front load washer requires longer cycle
time and gels clothes much cleaner, yet is
more gentle on the fahrim, than top Inad
washers, Washing lime can be reduced
significantly for small loads or lightly soiled
loads by selecting Quick Cycle with the
Option butlnn and setting the Soil Level
button at LighL
2. Custom Program
• Custom Program allows you to store a customized
wash cycle for future use
• ro make a Custom Program:
1 Select a cycle
2 SeIect
Wash/Rinse Temperature, Spin Speed, and
Soil Level
3 Select other desired Options,
4 Press and hold Custom Program button 3
seconds (2 beep sounds)
The Custom program is now stored for future
usel To reuse the program, select Custom
Program and press Start/Pause.
14
HOW TO USE THEWASHER
3, Beeper
* Press repeatedly to adjustthe volume of the
Beeper
4. Wash!Rinse Temperature
• Select a water temperature based onthe type of
load you are washing
• Follow the fabric care fabel and chart below for
best results
ExtraHot Kitchentowels, sheets,
andbaby garmenLs
...... :t Whitesand Heavy iii
Hot soiledcolor-fastitems :
Warm Mostloads
: : :: Brightlycoiored items
:: Cod::::: :;washabewooens :
•Warm rinses leave the loads dryerthan cold
rinses Warm rinses increasewrinkling.
•In cold climates, a warm rinse makes the load
more comfortable to handle
•Cotd rinses save energy
•The Cold rinse temperatures depend on the cold
water at your faucet
•For the Tap ColdlCo_d setting, both wash and rinse
temperatures depend on the cold water at your
faucet
5. Spin speed
*To change the spin speed, press the Spin Speed
button repeatedly to cycle through available
options
- To start DraintSpin cycle:
1 Press Power button to turn on
2 Press Spin Speed button only
3 Press Start/Pause button
6. Soil Level
•TO change the soil level, press the Soil Level
button repeatedly until the desired setting is on.
I3
HOW TO USETHE WASHER ....
1, Prewash
• Use this option for loads that need pretreatment
Adds 16 minutes prewash and drain
. When using Prewash option, do net use liquid
detergent in the Main Wash Compartment.
Use powdered for the main wash.
2oStain cycle
-Adds time to the wash and rinse for better stain
removal
•Automatically provides a rinse
3. Quick Cycle
i i i ii ii ii Hll,lll H ,,
•The Quick cycle offers a quick cycle time
. Suggested uses include freshening new_y
purchased clothes, or clothing that has been
packed away
4. Extra Rinse
•This option provides an additional rinse
• Use this option to ensure the removal of detergent
or bleach residue from garments
5. Rinse+Spin
• Use this option to rinseand then spin
6. Delay Wash
.................................. iiiiii
• A!lows the start of any cycte to be detayed for
1_12 (9) hours
• Choose the wash cycle for your load, and then
press the Delay Wash button once for one hour or
press the button again to increase the delay wash
time up to 12 (9) hours in one hour increments
pT,_.,J,h f_.9 3 IFJ3
"t_[k30_.C, LO¢_
• Use this option to prevent unwanted use of the
washer Press and hold DELAY WASH button for 3
seconds to lock/unlockcontrol
•When Chffd lock isset, _ EL "bIinks and at[ buttons
are disabled except the Power button
You can lock the washer while it isoperating
• Lights whenever the door of the washer is locked
• The door can be unlocked by pressing the
StarttPause button to stop the washer
NO'rE: Ifthe waler temperature or the level is too
high, the duet cannot he unh)cked.
De not try to force the deer open when
DOOR LOCKED lights on,
STATUSINDICATOR
•These lightsshow elapsed time of the cycle the
washer isoperating
EST.TIME REMAINING
•This display shows:
a) the estimated time remaining in the cycle when
operating,
b) the error code when an error has been
detected
START/PAUSE
• Use thisbutton to start/stop the washer
POWER
• Use this button to turn the Power On!Off
16
MAIN'iENANCE : :
Before cleaning the washer interior_ unplug the electrical power cord to avoid electTical shock ha7_ards.
When dispasing _f the appliance, cu! .iT the power cable, destroy the plug. and disable the door lock to pr_venA
yuung children fr_m being trapped inside.
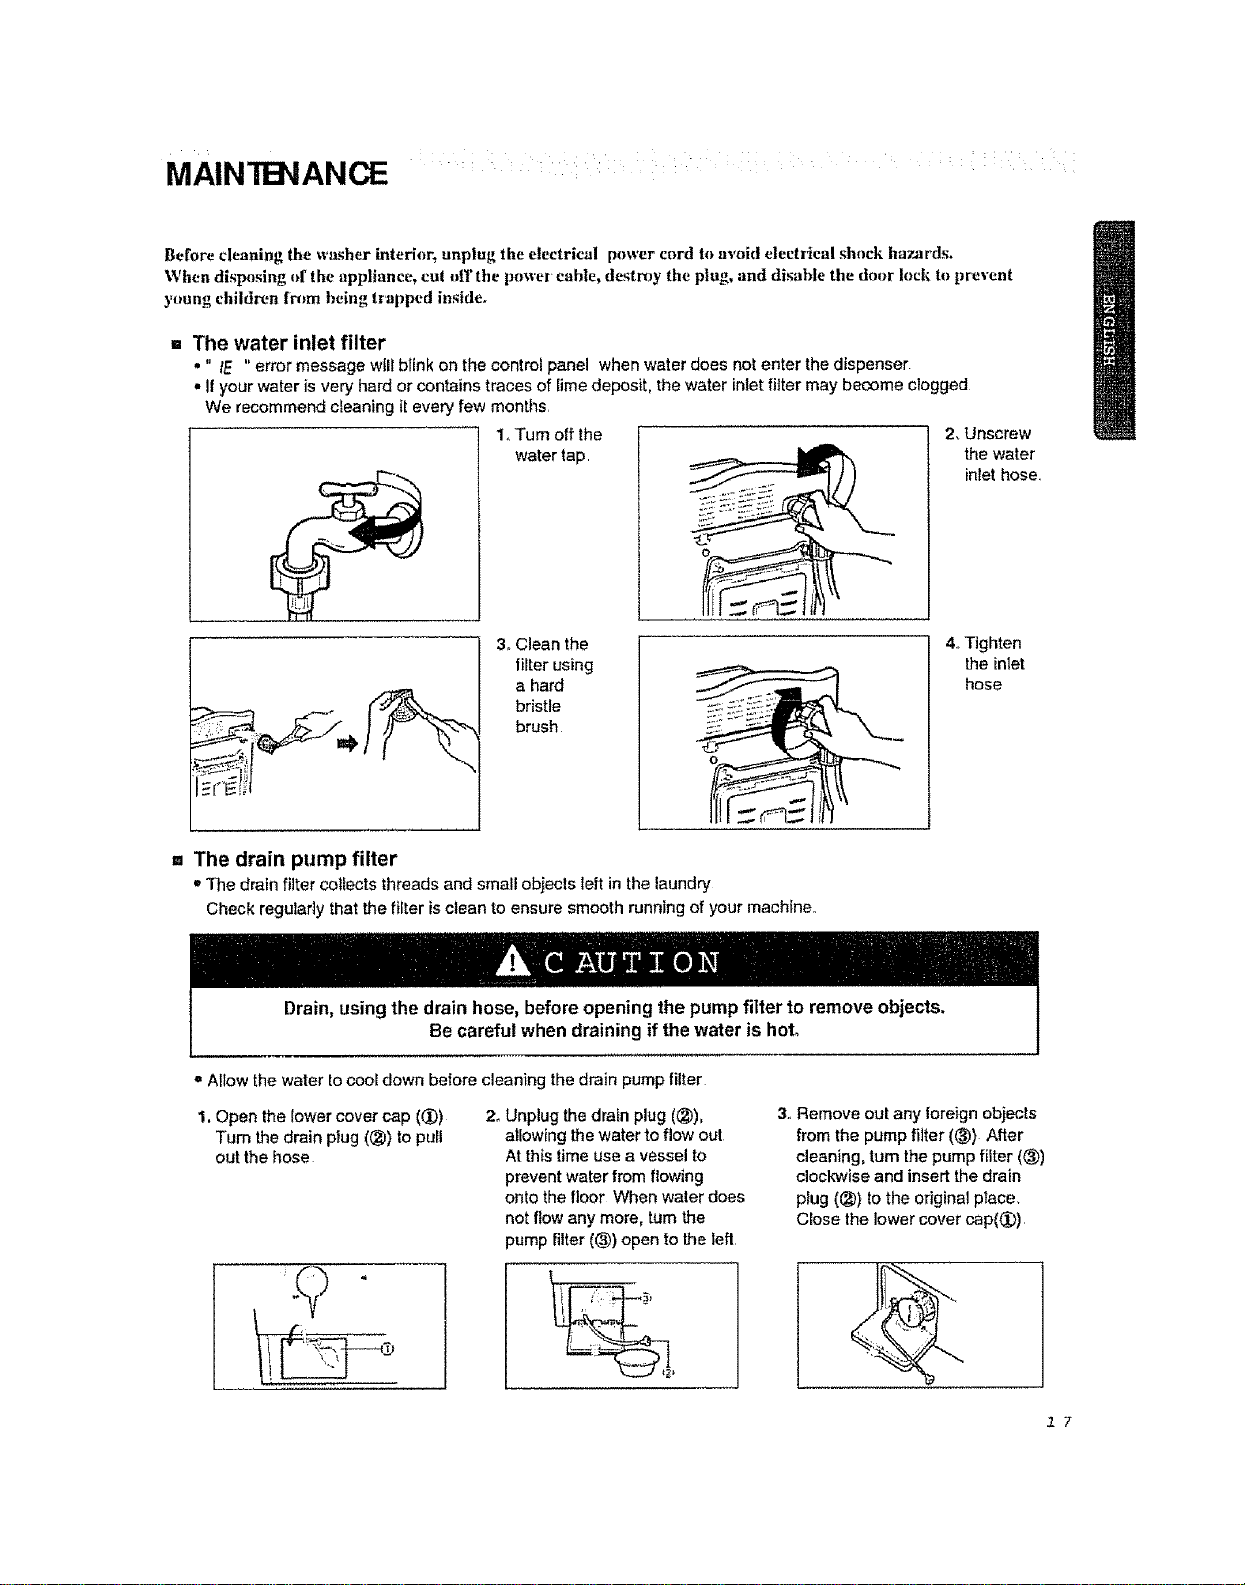
- The water inlet filter
•" fE "error message will blink onthe control panel when water does not enter the dispenser
• If your water is very hard or contains traces of lime deposit the water inletfilter may become clogged
We recommend cleaning tt every few months
1 Turn off the
water tap
2 Unscrew
the water
inlethose
3 Clean the
liiter using
a hard
bristle
brush
4 Tighten
the inlet
hose
= The drain pump filter
,'Thedrain filtercoliectsthreadsand smallobjeclsleftinthelaundry
Checkregularlythat theliederiscleanto ensuresmoothrunningofyourmachine.
Drain, using the drain hose, beforeopening the pump filter to remove objects
Be careful when draining if thewater is hot
= Allow the water to cool down belore cleaning the drain pump filter
1 Open the lower cover cap (_)
Turn the drain plug ((_) topull
out the hose
2 Unplug the drain plug (_))
allowing the water to flow out
At this time use a vessel to
prevent water from flowing
onto the floor When water does
not flow any more, turn the
pump filter((_) open to the left
3 Remove out any Ioreign obiects
from the pump filter (_)) After
cleaning turn the pump filter (_)
clockwise and insert the drain
plug (_)) tothe original place
Close the lower cover cap((_)
27
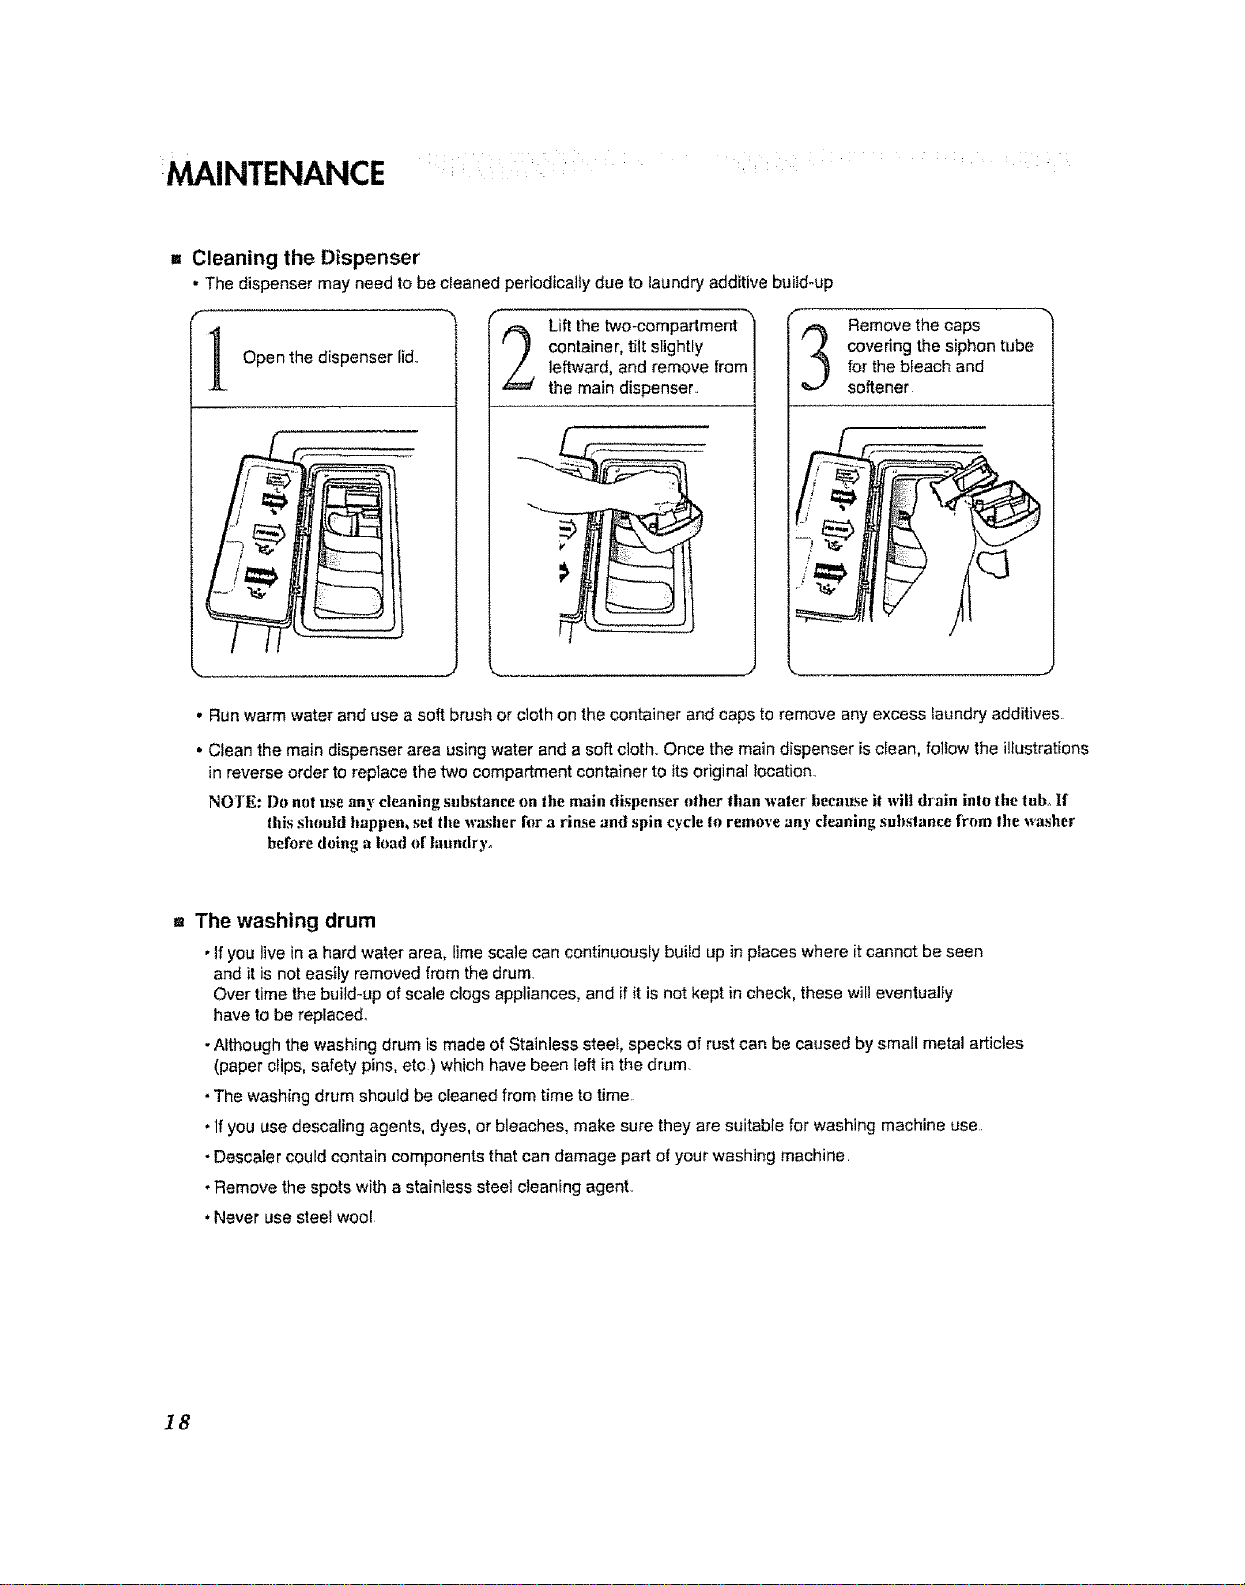
MAINTENANCE
= Cleaning the Dispenser
• The dispenser may need to be cleaned periodically due to laundry additive build-up
r
Open the dispenser lid..
Lift the two-compartment
container, IJtt slightly
leftward, and remove from
the main dispenser
Remove the caps
covering the siphon tube
for the bleach and
softener
• Run warm water and use a soft brush or cloth on the container and caps to remove any excess laundry additives.
• Clean the main dispenser area using water and a soft cloth. Once the main dispenser is clean, follow the illustrations
in reverse order to replace the two compartment container to its original location.
NOTE: I)o not use any cleaning substance on the main dispenser other than waler beemzse it will drain thin tire tub, If
lids slmuld happen, set |he washer for a rinse and spin cycle Io remove any cleaning suhslance from Ihe washer
before doing a load of laundry=
= The washing drum
• tf you live in a hard water area. lime scale can continuously build up in places where it cannot be seen
and it is not easily removed from the drum,
Over time the build-up of scale clogs appliances, and if it is not kept in check, these will eventually
have to be replaced,
• Although the washing drum is made of Stainless steel, specks of rust can be caused by small metal articles
(paper clips, safety pins, eto ) which have been left in the drum.
• The washing drum should be cleaned from time to time
. If you use descaiing agents, dyes, or bleaches, make sure they are suitable for washing machine use.
• Descaler could contain components that can damage part of your washing machine
. Remove the spots with a stainless steel cleaning agent,,
. Never use steel wool
]8
MAINTENANCE :......
a The water circulation nozzle
•Cleanthewatercirculationnozzle,ifclogged
= Cleaning your washer
1. Exterior
Proper care ofyour washer can extend its life
The outside of the machine can be cleaned with warm water and a neutrat,non-abrasive
household detergent
immediately wipe off any spills Wipe witha damp cioth
Try not to damage the surface with sharp objects
, IMPORTANT: Do not use methylated spidt, solvents or similar products
2. Interior
Dry around the washer door opening, flexible gasket and door glass These areas should always be clean to
ensure a water-tight seal
Run washer through a complete cycle using hot water,
Repeat process if necessary
NOTE: Remove hard waler deposits using only cleaners labeled as safe h)r w_hing machines°
,, Winterizing instructions
If the washer is stored in an area where freezing can occur or moved in freezing temperatures, folIow these
winterizing instructions to prevent damage to the washer:
1. Turn off water suppty tap
2. Disconnect hoses from water supply and drain water from hoses.
3, Plug electrical cord into a properly grounded electrical outlet,
4. Add l gallon (381) nontoxic recreational vehicle (RV) antifreeze to empty wash drum Close door
5,,Set spin cycle and let washer spin for 1 minute to drain out all the water
Not atI of the RV antifreeze will be expelled.,
6. Unplug electrical power cord, dry drum interior, and close door,
7, Remove the two-compartment container from the Dispenser Drain any water in compartments and dry ihe
compartments
8. Store washer in an upright position,.
9. To remove antifreeze from washer after storage, run empty washer through a complete cycle using detergent
Do not add laundry
19
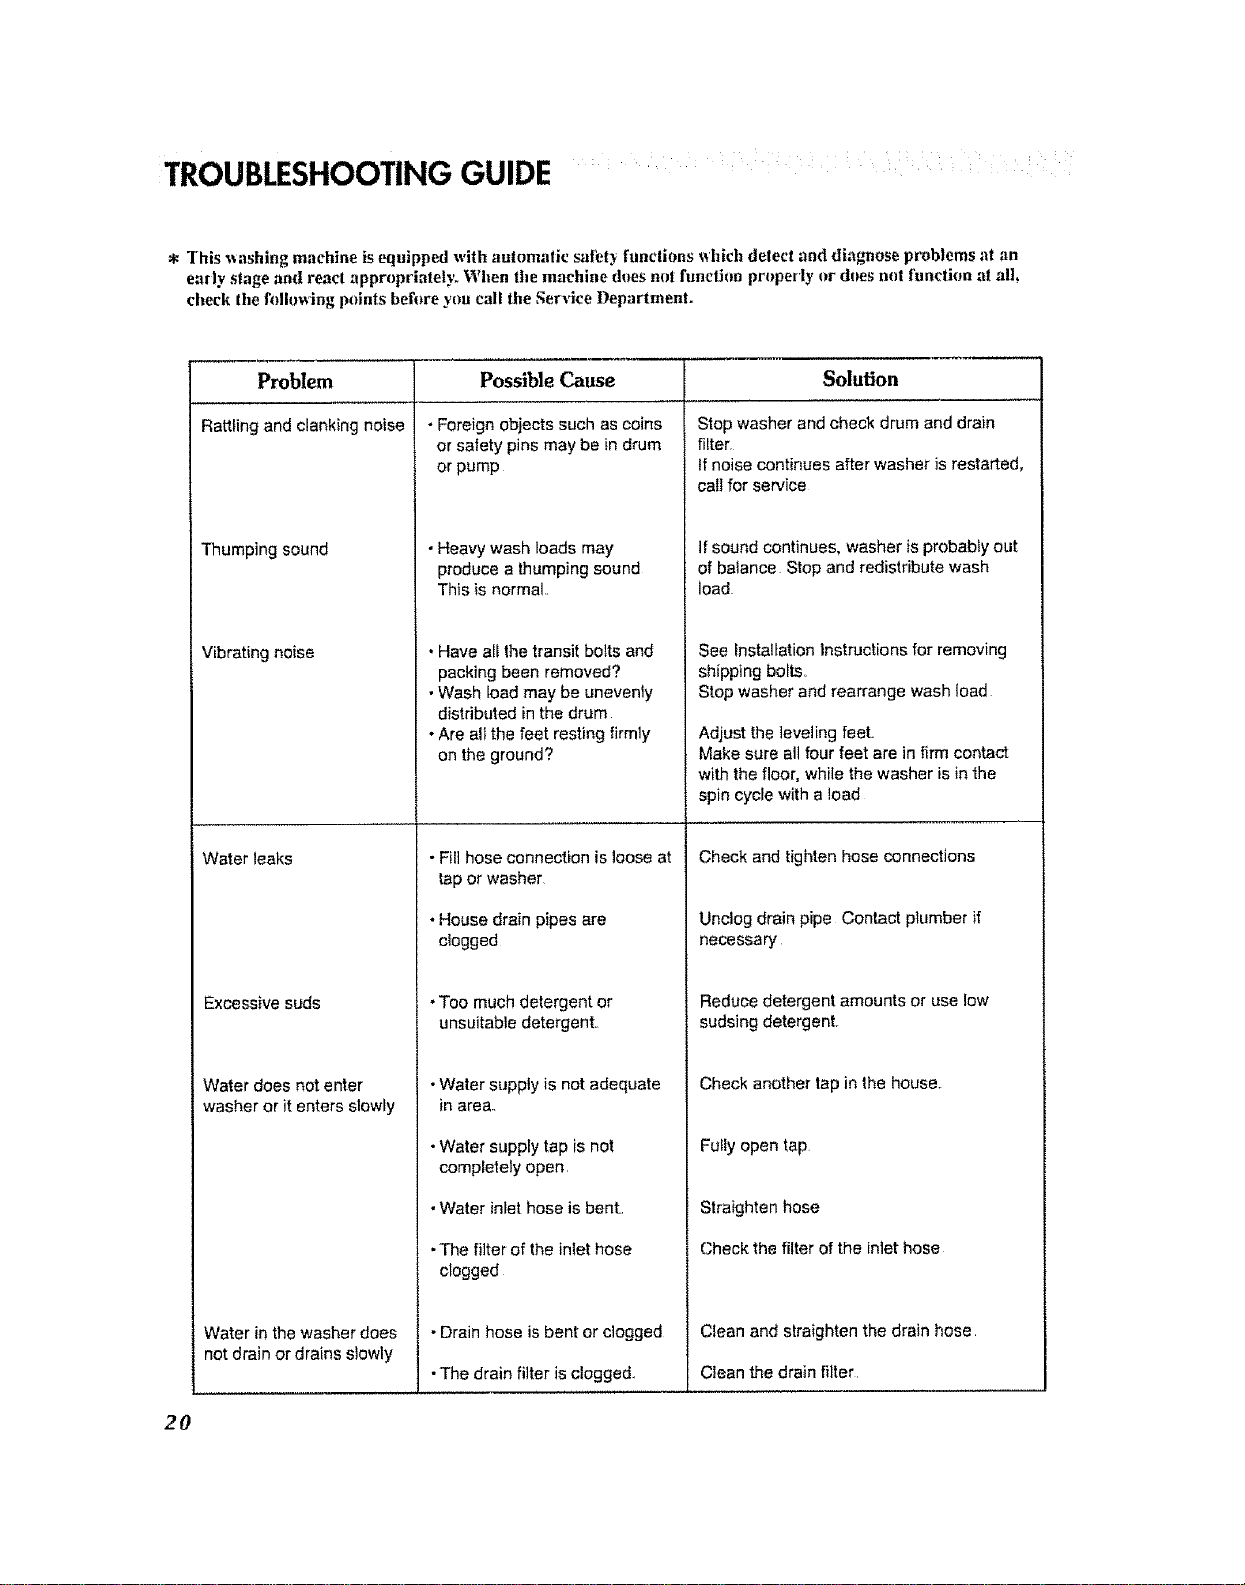
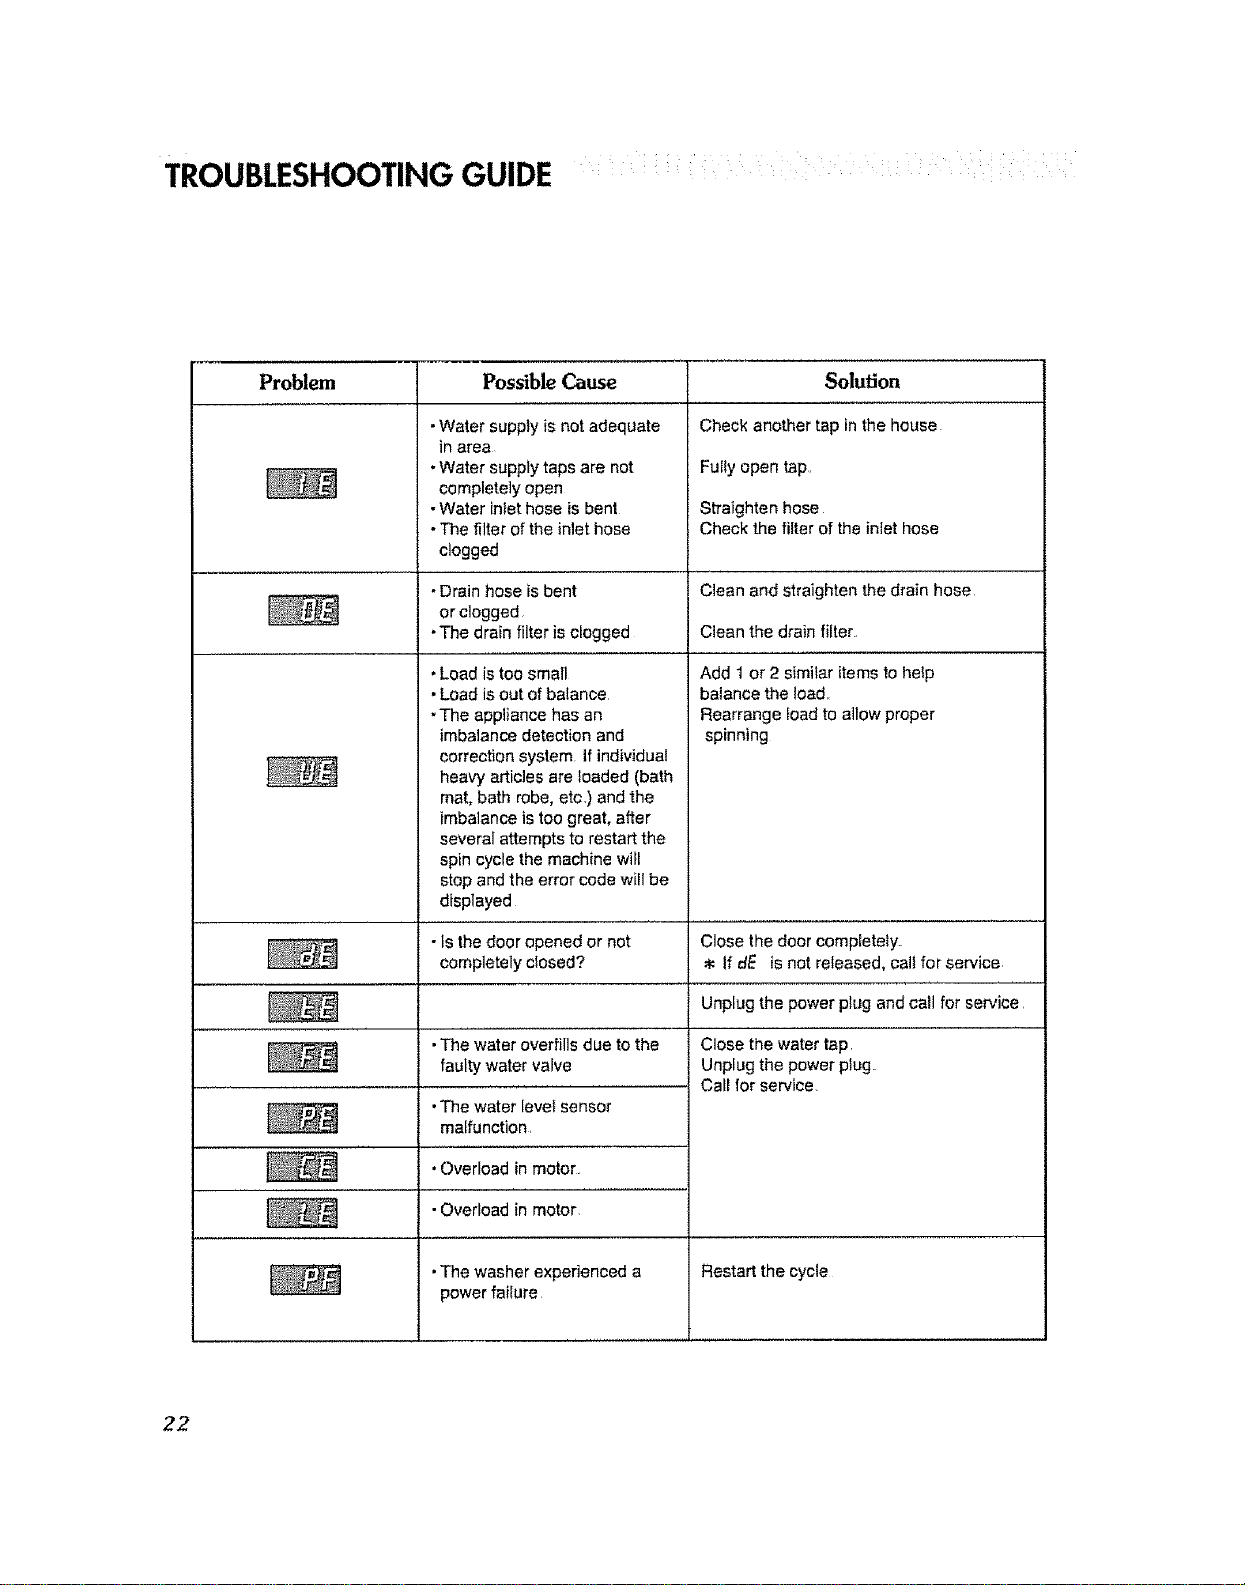
TROUBLESHOOTING GUIDE
* This _ashing machine is equipped with automatic safety functions _qzich detect and diagnose problems at an
early stage and react appropriately. When tile machine dues not funethm properly or does net function at all,
check the following points before yon call the Service Department.
Problem Solution
Rattting and clanking noise
Thumping sound
Vibrating noise
Water leaks
Possible Cause
- Foreign objects such as coins
or safety pins may be in drum
or pump
• Heavy wash loads may
produce a thumping sound
This is normal
•Have a[[the transit bolts and
packing been removed?
•Wash load may be unevenly
distributed in the drum
• Are all the feet resting firmly
on the ground?
• Fill hose connection is loose at
Stop washer and check drum and drain
filter
Ifnoise continues after washer isrestarted,
call for service
Ifsound continues, washer isprobabty out
of batance Stop and redistribute wash
load
See Installation|nstructions for removing
shipping bolts,
Stop washer and rearrange wash load
Adjust the leveling feet,
Make sure all four feet are in firm contact
with the floor, whilethe washer is inthe
spin cycle with a load
Check and tighten hose connections
Excessive suds
tap or washer
• House drain pipes are
clogged
- Too much detergent or
unsuitable detergent.
Unclog drain pipe Contact plumber if
necessary
Reduce detergent amounts or use low
sudsing detergent.
Water does not enter
washer or it enters slowly
Water inthe washer does
not drain or drains slowly
•Water supply is not adequate
in area.
•Water supply tap is not
completely open,
• Water inlet hose is bent.
-The filter of the inlet hose
clogged
• Drain hose is bent or clogged
•The drain filter is clogged,
Check another tap in the house,
Futly open tap
Straighten hose
Check the filter of the inlet hose
Clean and straighten the drain hose,
Clean the drain filter
2O
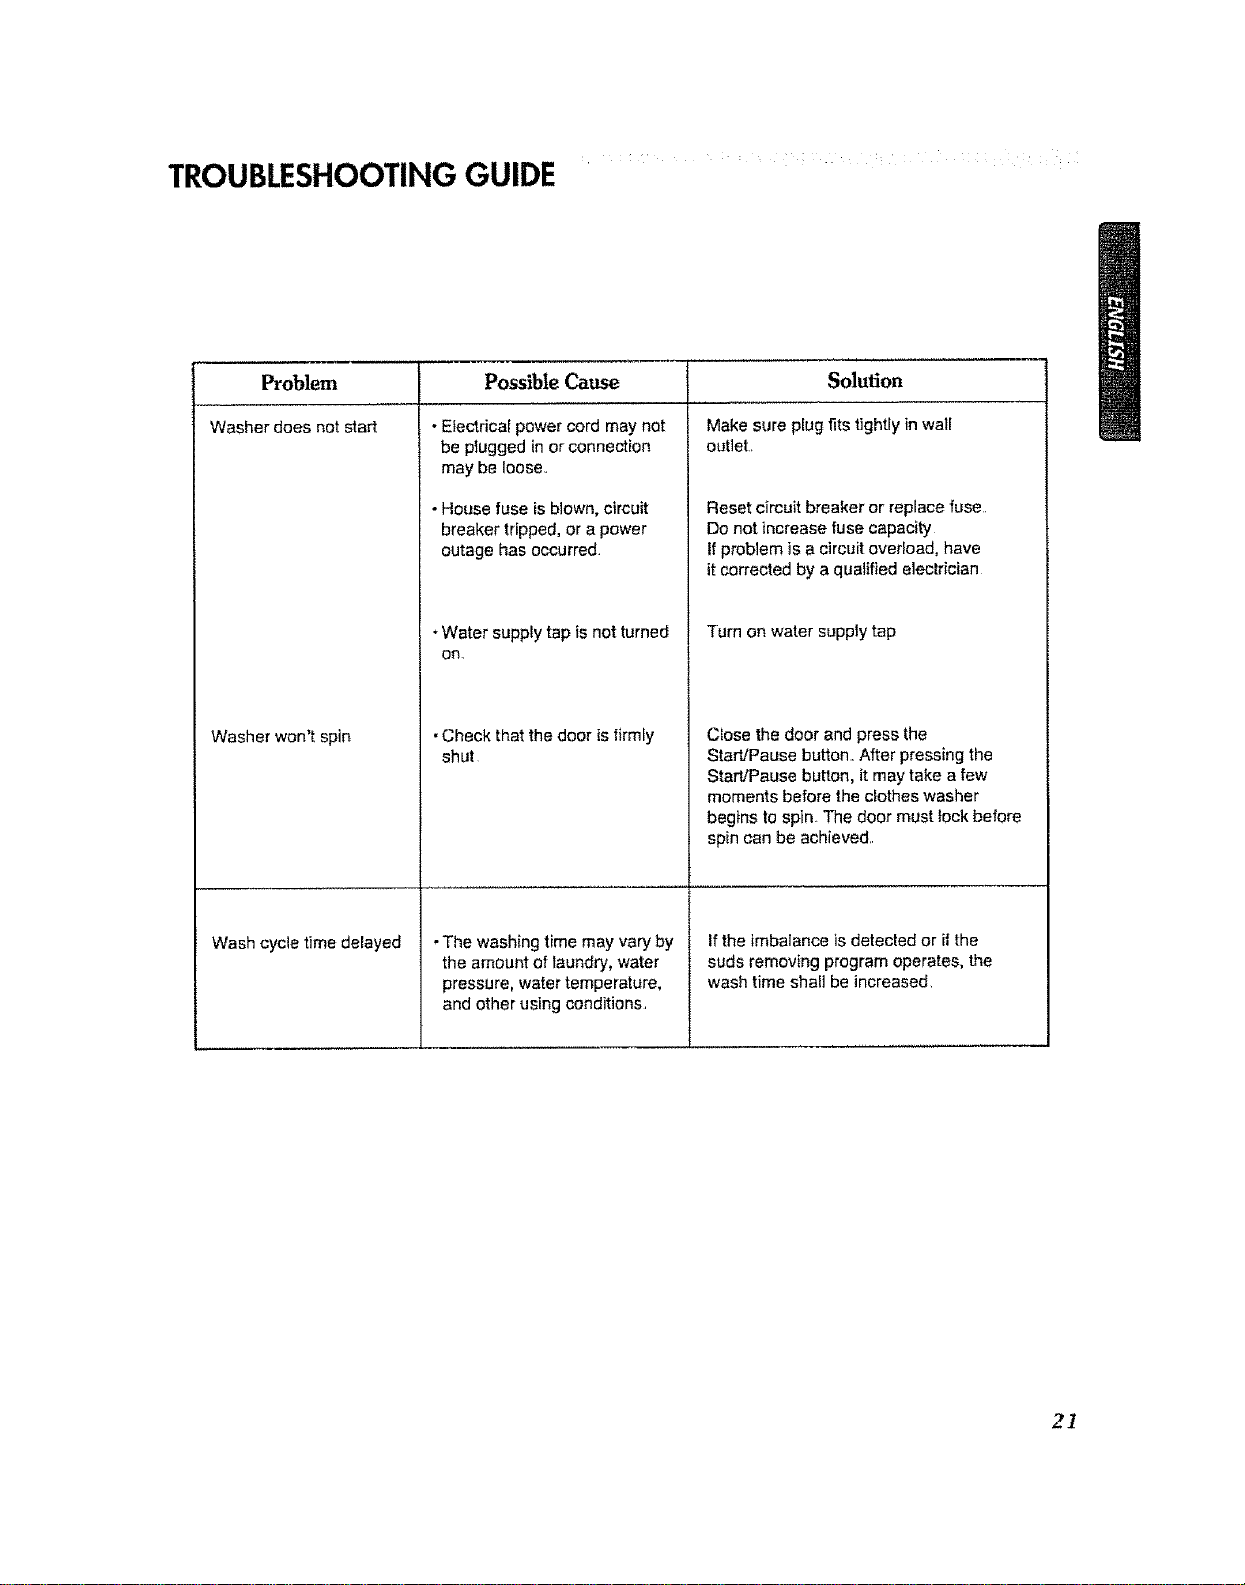
TROUBLESHOOTING GUIDE .... :
Problem Possible Cause
Washer does not start
Washer won't spin
Wash cycle time delayed
• Electrica{ power cord may not
be pfugged in or connection
may be loose
• House fuse is blown, circuit
breaker tripped, or a power
outage has occurred
. Water supply tap is not turned
On
•Check that the door isfirmly
shut
. The washing time may vary by
the amount of laundry, water
pressure, water temperature,
and other using conditions
Solution
Make sure plug fits tightly in wall
out]eL
Reset circuit breaker or replace fuse
Do not increase fuse capacity
tf problem is a circuit overload, have
it corrected by a qualified electrician
Turn on water suppty tap
Close the door and press the
Start!Pause button. After pressing the
Start!Pause button, it may take a few
moments before the clothes washer
begins to spin The door must }ock before
spin can be achieved
Ifthe imbalance is detected or if the
suds removing program operates, the
wash time shall be increased
2]
TROUBLESHOOTING GUIDE ....
Problem Possible Cause
•Water supply is not adequate
in area
. Water supply taps are not
completely open
•Water inlethose is bent
• The filter of the inlet hose
clogged
•Drain hose is bent
or clogged
•The drain filter isclogged
•Load is too small
•Load is out of balance
. The appliance has an
imbalancedetection and
correction system If individual
heavy articlesare loaded (bath
mat. bath robe, etc,) and the
imbalance is too great, after
severai attempts to restart the
spin cycle the machine wi[[
stop and the error code will be
displayed
•Is the door opened or not
completely cIosed?
• The water overfills due to the
faulty water valve
•The water level sensor
malfunction,
• Overload in motor.
• Overload in motor,
•The washer experienced a
power failure
Solution
Check another tap in the house
Fully open tap,
Straighten hose
Check the fiffer of the inlet hose
Clean and straighten the drain hose
Clean the drain filter.
Add 1 or 2 similar itemsto help
balance the toad,,
Rearrange ;oadto allow proper
spinning
Close the door completely
* If dE is net released, cal} for service
Unplug the power plug and call for service
Close the water tap.
Unplug the power plug
Call for service
Restart the cycle
22

Your LG Washing Machine wil! be repaired or replaced, at LG's option, tf It proves to be defec'dve In material or
workmanship under normal use, during the warranty period ("Warranty Period") set forth below, effective from the
date ("Date of Purchase") of origtnat consumer purchase of the product. This warranty is good only to the odgtnal
purchaser of the product end effective octy when used in the United States, {nr-JudingAlaska, Hawaii, and U.S.
Territories
WARRANTY PERIOD:
LABOR: One Year fromthe Date ofPurchase.
PARTS (except as listedbelow): One Year from the
DateofPurchase,
Electronic Control Board: 2 Years fremthe Dateof
Purchase,
Drum Moton 7 Years from theDateof Purchase,
Stainless Steel Drum: Lifetime
Replacement Units and Repair Pa_ts may be new or
factory remanufactured.
ReplacementUnitsand RepairParts arewarrantedfor the
remaining portionof theodginalunit'swarrantypedod,
HOW SERVICE IS HANDLED:
In-Home Service: Please retain dealer's dated bffl
of sate or delivery ticket as evidence of the Date of
Purchase for proof of warranty, and submit e copy of
the bliI of sale to the service person at the time
warranty service Is provided..
Please call 1-877-7"14-7486and choose the
appropriate option to locate your nearest LG
Authorized Service Center.
Or visit our websita at: http:l/wwwJgservice.com
THIS WARRANTY IS IN UEU OF ANY OTHER WARRANTY', EXPRESS OR IMPLIED, INCLUDING WITHOUT
UMITATION, ANY WARRANTY OF MERCHANTABILITY OR FITNESS FOR A PARTICULAR PURPOSE. TO THE
EXTENT ANY IMPLIED WARRANTY IS REQUIRED BY LAW, IT IS LIMITED IN DURATION TO THE EXPRESS
WARRANTY PERIOD ABOVE NEITHER THE MANUFACTURER NOR ITS U_S. DISTRISUTOR SHALL BE
LIABLE FOR ANY INCIDENTAL, CONSEQUENTIAL, INDIRECT, SPECIAL, OR PUNITIVE DAMAGES OF ANy
NATURE, INCLUDING WITHOUT UMiTATION, LOST REVENUES OR PROFITS, OR ANY OTHER DAMAGE
WHETHER BASED IN CONTRACT, TORT, OR OTHERWISE Some states do not allow the exclusion or limitation
of incidental or consequential damages or lImltaUons on how long an impffedwarranty Iasts, so the above exclusion
or limitation may not appiy to you. This warranty gives you specific iegai rights and you may also have other dghls
that vary from state to state
THIS LIMITED WARRANTY DOES NOT APPLY TO:
* Service flips to your home to deliver, pick up, and/or install the product, Instruct, or replace house fuses or
correctwidag, or correction of unauthorized repairs.
,, Damages or operaitng problems that result from misuse, abuse, operation outside environmental
specificaUons or contrary to the requirements of precautions in the Operating Guide, accident, vermin, tim,
flood, improper installalton, acts of God, unauthorized modification or alteration, incorrect electrical current or
voltage, or commercial use, or use for other than intended purpose
The cost of repair or replacement under these excluded circumstances shall be borne by the consumer
CUSTOMER INTERACTIVE CENTER NUMBERS
I To obtain Customer Assistance, Product Infer- Call 1-877-714-7486 (available24/7t365)
Service Center and select the appropriate option from the menu_
iocation:mati°n'or Dealer or Authorized Or v sit our webslte at: http://www.tgserv)ce.com
TO CONTACT LG ELECTRONICS BY MAIL:
LG Customer fntaracfJve Center
P. CoBox 240007
201 James Record Road
Huntsville, Alabama 35824
ATTN: CIC
23
NOTES _ _ i_
¸
U
P P ETA
Lavadora
WM2442H*
WM20420,/V
Lea este manual cuidadosamente. Leproveer6
instrucciones pare una instalaci6n, uso y mantenimiento
seguros. Cons6rvelo paro Futurasreferencias Cite esta
informaci6n a su proveedor si requiere de servicio.
CARACTERJSTICASDELPRODUCTO
@
O_
@
m Sistema DD lnvertidor.
El avanzado motor de DC sin cepillo que mueve directamente el
eUindre sin eintur6n ni pelea
= Cilindro Inclinado y Abertura Extra Grande°
E_eilindro incffnade y ta abertura extra grande, hacen m&s
fficil la carga y descarga,
Circutaci6n de Agua_ (WM2442H*)
Se roc[a la setuci6n de detergente y agua sebre la carga una y otra vez
La ropa se remoja m_s rfpidamente y a la pedecciOndurante el ciele de
lavade La espuma del detergente puede ser remevida mils l&cilmenle
peret bare de agua duranle el cicle de enjuague La circulaei6n de agua
usa ambos, agua y detergente cen mayer eliclencta
= Bola de [avado.
La bola de [avado mejora el desempe_o de lavado y reduce
el dafio a la ropa
= Calen_ador lntegrado. (WM2442H')
El calentador interne calienta autom,_tioamente el agua a la meier
temperatura segSn el ciclo elegido
g Seguro de Nifioso
El seguro de nif_es previene que los nifios presionen losbetones y
oambien la configuraei6n durante la operaciOn
Informaci6n Importante de Seguridad ............................................................................................................................. 27
Especificaciones ........................................................................................................... 28
Instrucciones de Instalaci6n ....................................................................................................................................................................... 29
Preparaoi6n Antes de Lavar ......................................................................................................................... 34
Usande el Distribuidor ..................................................................................................................................................... 35
Ciclos ..................................................................................................................................... 37
Come Usar la Lavadora ................................................................................................................................................... 38
Mantentmiento ...................................................................... 41
Guia para la Detecci6n de Problemas .................................................................................................................................. 44
Garantia ............................................................................................................ 47
26
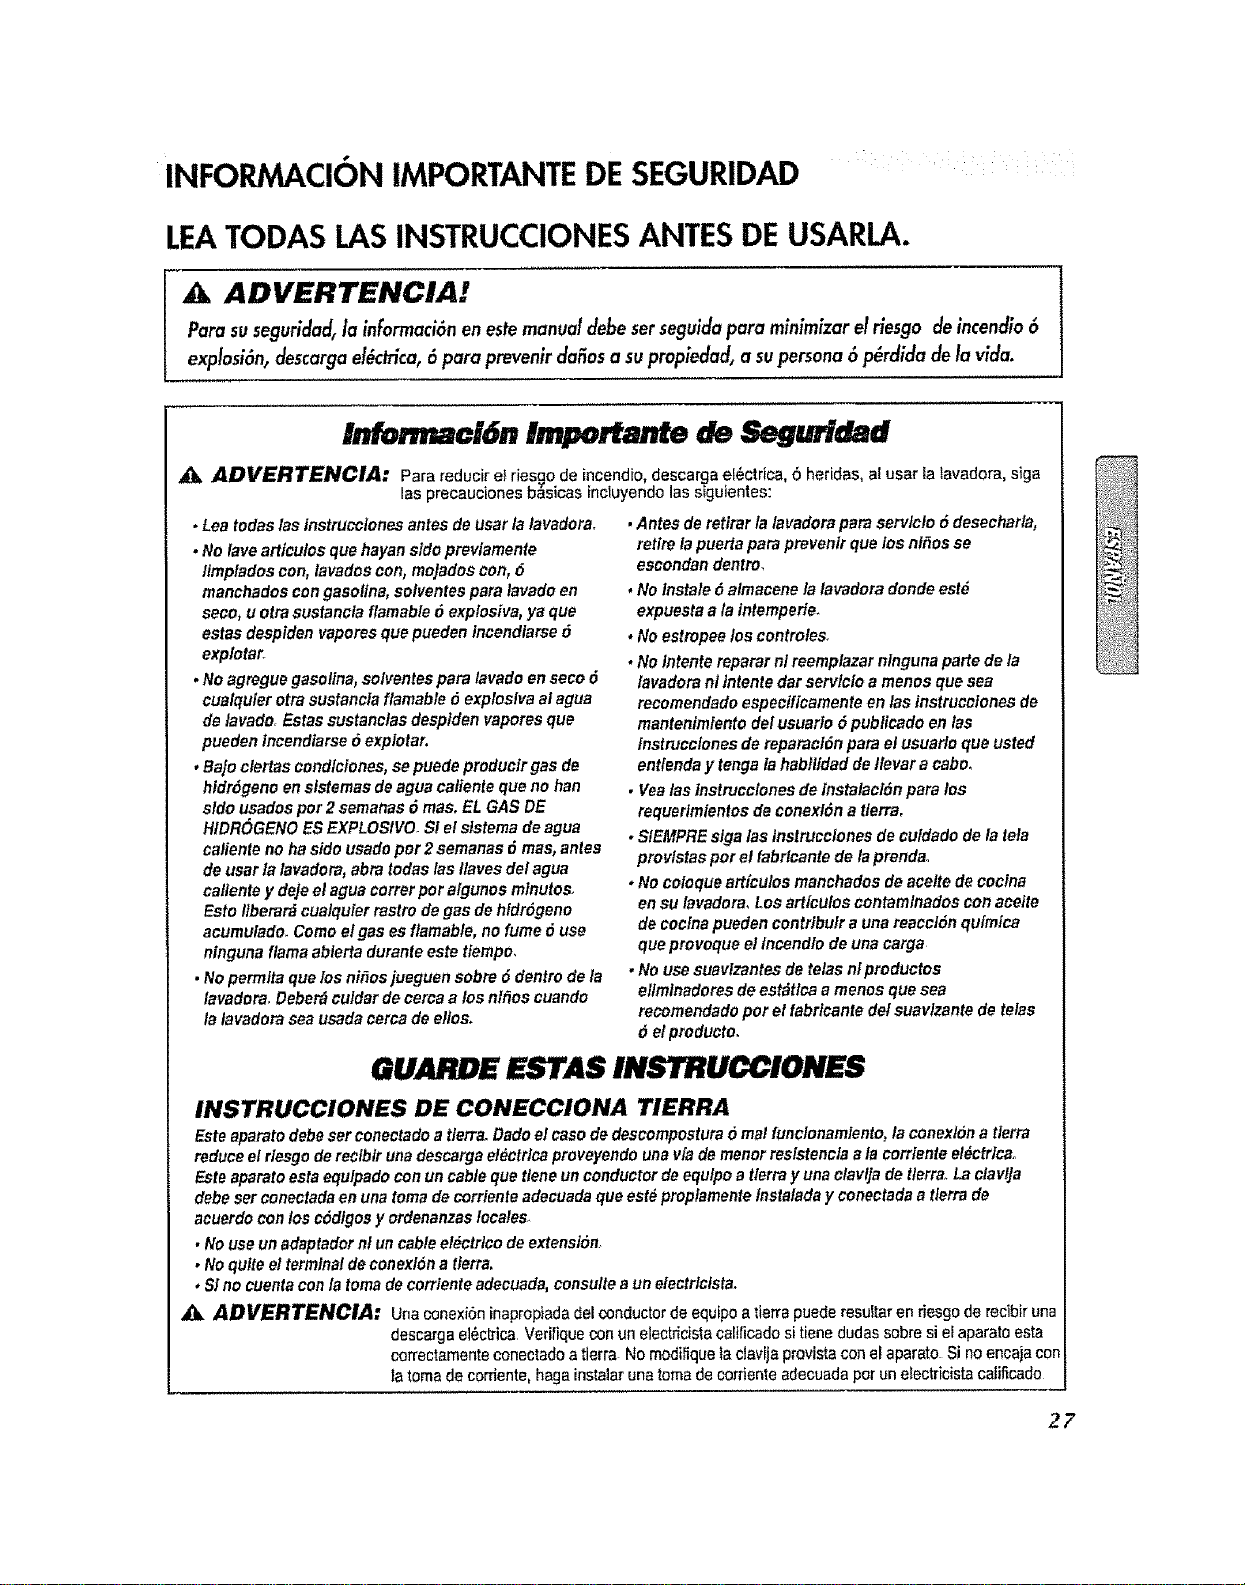
INFORMACION IMPORTANTE DE SEGURIDAD
LEATODAS LAS INSTRUCCIONES ANTES DE USARLA.
A ADVERTENCIA!
Para suseguridad,la informacidnenestemanua!debeserseguidapara minimizarel riesgo de incendio6
explosion,descargae!&trica, 6 para prevenirdafiosa supropiedad,a supersona6 p_rdida deta vidao
Informaci6n lmportanto de Seguridad
_, ADVERTENCIA: Para reducir el ries_o de incendio, descarga el6ctri_, 6 heridas, al usar ta tavadora, siga
las precauciones basicas incluyendo las siguientes:
• Lealodes las instrucctonesantes deuser la lavadore.
• Nolave articulos que hayan side previamente
limpiados con, lavados con, moJadoscon, d
manchados con gacollna,solventespare lavado en
seco,u otra sustanciaflamable6 explosive,ya que
estas despiden vapores quepueden lncendiarsed
explotar
. Noagregue gasoline,soiventespare lavado en seco d
cualquler otra suatancia flamable d explosive alague
de lavado.Estas sustanelas despldenvapores que
pueden incendiarse6 explotar.
, Ba]o clertascandlctones, se puedeproducirgas de
hldrdgenoen sistemasdeague callenie quano hen
side usadospar 2 semanas(_mas. EL GAS DE
HIDROGENOESEXPLOSIVO SI e! ststemadeague
calienteno haside usadepar 2 semanas6 rues,antes
de usar la lavadore, abra lodes las !laves delague
callente y deje etague terror pot algunos mlnutos,
Esto Itbera_ cualquler rastro de gas dehldrdgeno
acumulado. Come elgas es flamable,no fume6 use
ninguna flameablerta duranteeste tlempe,
•Nopermits quelos ni_os jueguensabre 6 dentrode la
lavadora,Debe_ culdar deceres a los nl_os cuando
la lavadoraseausada ceres de ellos.
•Antes de retirar la lavadora pareservtclod desecharla,
retirela puerla pare prevenlrque los nt_os se
escondsn dentro.
, Nolnstale 6 almacene la lavadora deride eat6
expuesta ala intemperie.
* No estmpee los controtes.
• No Intente reparar nl reemplazar nlngunaparle de la
lavadora nllntente dar servlclo a menos que sea
recomendadoespecificamente en las tnstruccfonesde
mantenimfento del usuario6 pubticadoen las
instrucclonesde repsractdnpate el usuarle que usted
entfenda y tonga la habllidad de tlevar acabc.
• Vealas instrucclonesde instalacldnpare los
requerlmlentos de conexldn a tterra.
•SIEMPREslgalas InstrtJcClonesde cufdado de la tela
provlstaspar el fabrlcantede la prenda
, No coloquearticulos manchados de acelte de coclna
en su lavadora. Los articulos contamlnados con aceite
de cocfnapuedencontrlbulr a una reaceldn quimfca
que provoqueel Incendlo de uns carga
, No usesuavlzantesde telas nlproductos
ellmlnadores de est_tica amenos que sea
recomendado par el fabric.antedel suavlzantede telas
6 etproducto.
GUARDE ESTAS INSTWlJCCiONES
INSTRUCCIONES DE CONECCIONA TIERRA
Esteaparato debeset conectadoa tierraoDadoel case de descompostura 6 real funclonamlento,la conexldnatlerra
reduceel riesgoderecibfruna descargael_ctrlca proveyendounevia demenor resistencla ata corrienteeldctrlca,
Este aparatoeatsequlpadocon uncable quetleneunconductor de equlpo a tlerrey unaclavljade tlerre.,La clavlJa
debeset conectadaen unatomede corrlente adecuada que est_ propfamentefnstalada y conectada a tlerrade
aeuerdocon los codtgos y ordenanzasIocales_
• Nouseunadaptadornt uncableetectrico de extensidn
• No quiteel terminal de conexlona tierra,
• S!no cuenta con latomede corrienteadecuada,consutteaun electrfclsta.
A ADVERTENCIA: u,a conexidninapropiadadelconductorde equipoatierrapuede resulJ:aren riesgode recibiruna
descargaeidckica Veriliqueconun electddstacailticadosi tiene dudessabresi el aparatoesta
correct_u'nenteconectadoa tierra No modi_quetaclavija provistacon el aparato Si noencajacon
_atomede corriente,hagainstalaruna tomede corrienteadecuadaparunetectricistacalificado
27

ESPECIFICACIONES
Panel de Control
Distribuidor
Manguera de Desagiie
Puerta ._
Cilindro
Tapa Inferior de Cubierta
Filtro de Bomba
Conexi6n de Desagiie
Pemo para Transportaci6n
Clavija de Energia
- Si et cable de suminisiro est_
dafiedo, debe set reemplazado
pot el fabriCante 6 sus agentes
de servi_o, 6alguna persona
caliticada en orden a evilar
cualquier riesgo
lnyector de la Circulaci6n de] Agua
(WM2q4ZH')
Patas Ajustables
Ventilad6npotSeg_fidadJ
EntradadeAguaFrla
Eatr_dad_AgaaCalieate-
m Nombre:
Suministro de Energla:
Dimensiones:
" Peso:
m Capacidad de I.avado:
m Velocidad de Giros:
M&quina Lavadora de Carga por e! Frente
120V - 60Hz
686 crn(Ancho)X750 cm(Profundidacl)X 111.5cm(Altura),1265cm(P,puertaabierto)
27"(A) X 29tt2"(P) X 44"(A), 4913/16"(P, puerta abierto)
86 kg
332 pies cubicos (IEC: &83 pies cubicos)_l
1200 rpm max. (WM2442H*)
I000 rpm max. (WM2042CW)
Presi6n de Agua Permitida: 4.5 *, 145 psi (30 _ 1000 kPa)
* Especificactones sujetas a cambto por el fabricante.
28
,- . ACCESORIOS ............................................................................................................
Manguera de Agua Caliente Ltave Cinta Sujetadora de Manguera
/ Fda(1 de c!u) de DesagSe
1) Por cada 60456 IEC lava el equivalenle de una agitador de 3,83 pies c0bicos,
INSTRUCCIONES DE INSTALACION i
Instale 6 almaceae en un lugar doude uo _t_ expuesta a temperalaras inferlores a la congelaci6n ni expuesta a Ia
iatemperie.
Conecte a lierra correctamenle y cumpliendo con redes los c6digos y ordenan_,as gubernameulateso
Para reducir los riesgos de electrocuci6n, no instale la lavadora en tugares hfimedos.
La abertura de la b,'L_eno debe set abstruida put alfombra cuando est_ inslalada sobre un piso con alfombra.
En pulses donde haya fireas que puedan es|ar sujetas a ptagas de cucarachas f)algfin olra biche, ponga ateuci6a
particular a mantener el aparatu y sus alrededores en condiciones ]imptas lode el tiempu, Cualquier dafio que pueda
haber side causado per euearach_s 6 algfin otto bieho, no serfi cubierlo put |a garantla de este aparato.
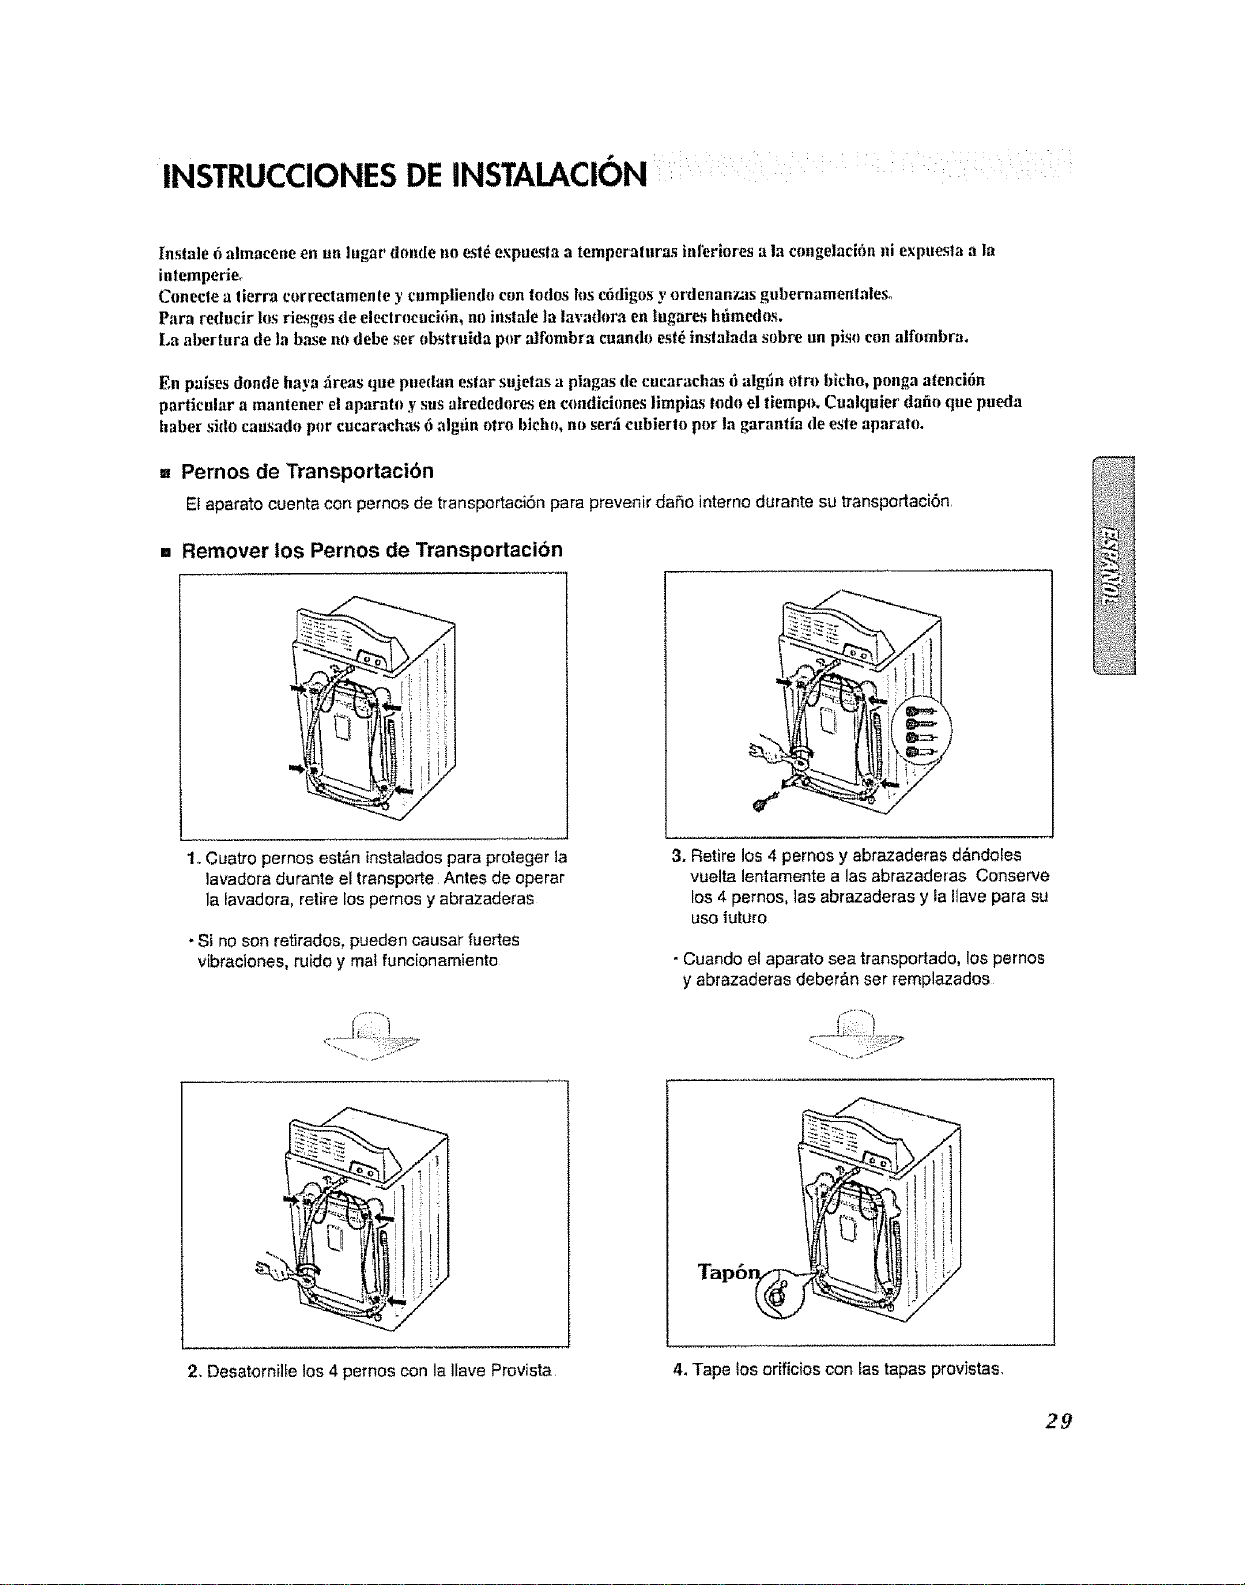
= Pernos de Transportacibn
El aparato cuenta con pernos de transportaci6npara prevenir dafio interne durante su transportaci6n
= Remover los Pernos de Transportacion
1..Cuatro pernos est_n instaladospara proteger la
]avadora durante el transporte Antes de operar
la lavadora, retire los pernos y abrazaderas
. Si no son retirados, pueden causar fuertes
vibraciones, ruide y mat funcionamiento
3. Retire los 4 pernos y abrazaderas d&ndoles
vuelta lentamente a las abrazaderas Conserve
los 4 pernos, ]as abrazaderas y la ilave para su
use |uturo
• Cuando el aparato sea transportado,los pernos
y abrazaderas deber_n ser remplazados
2. Desatornille los 4 pernos con la HaveProvista
4. Tape los orificios con las tapas provistas,
29
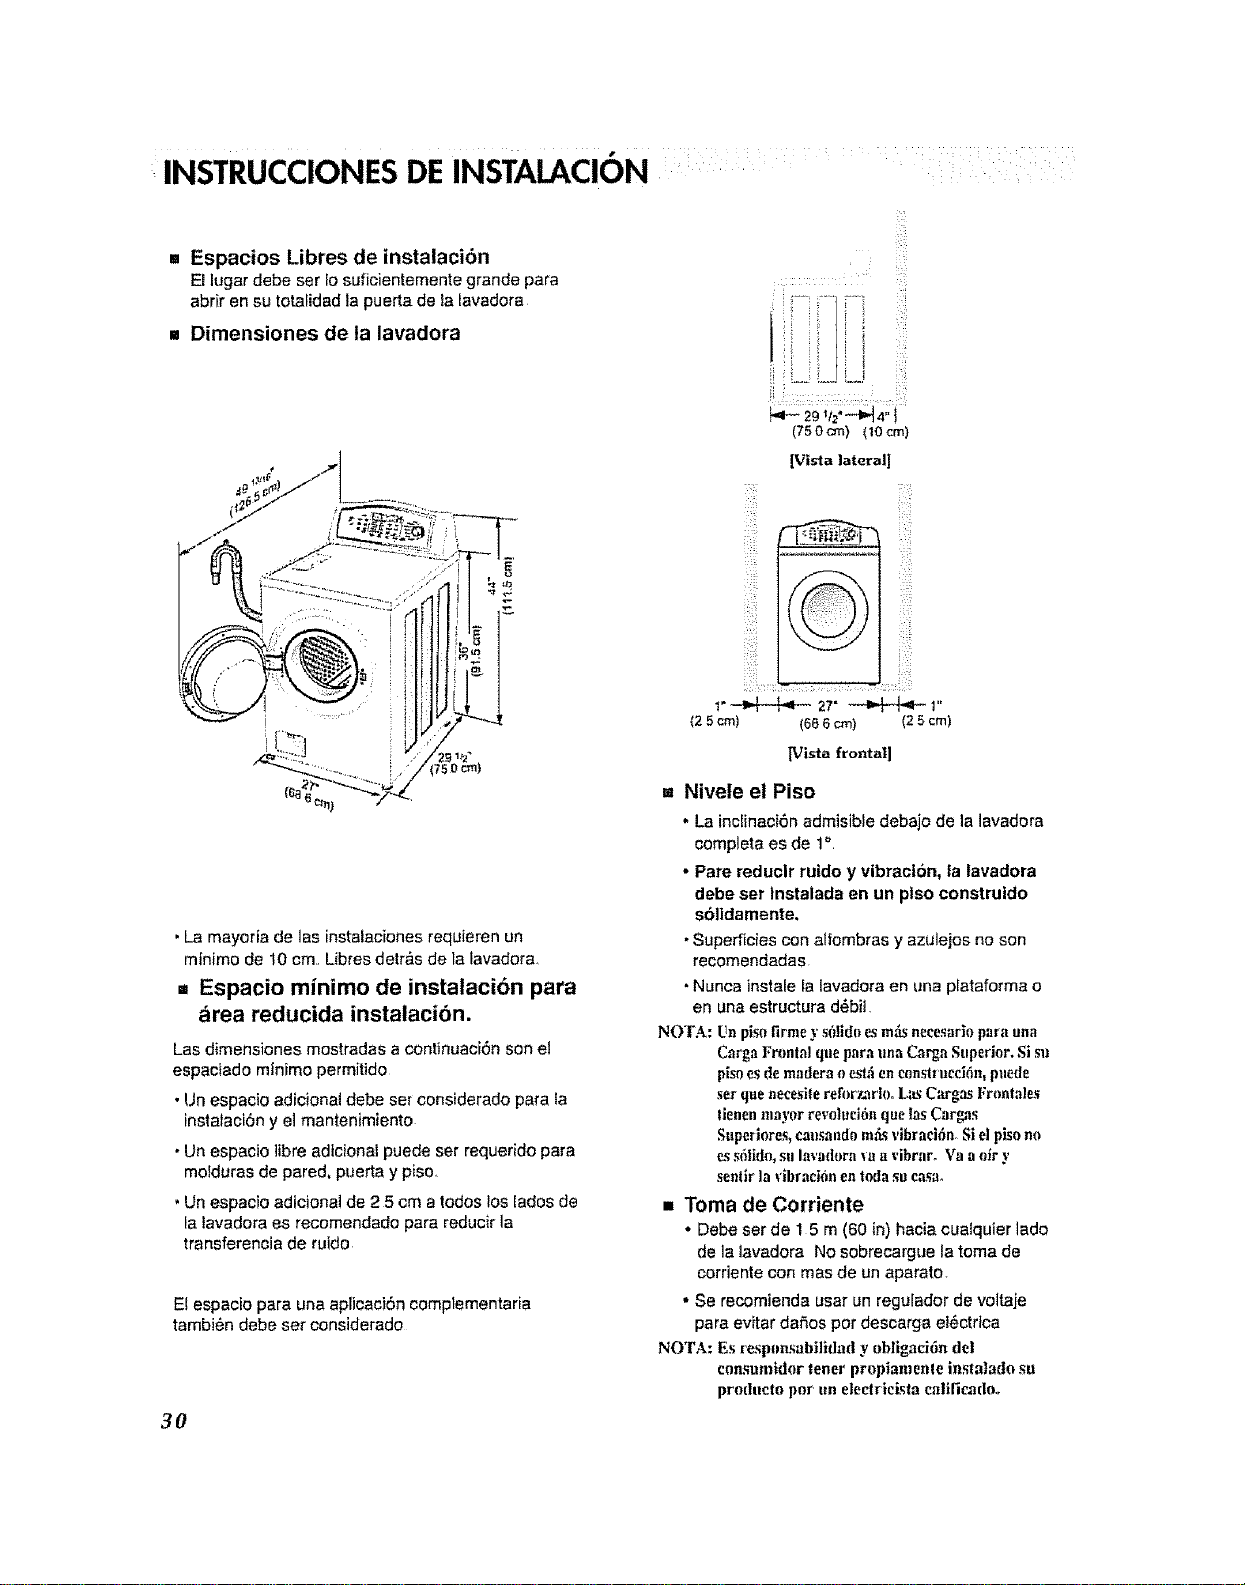
INSTRUCCIONES DE INSTALACION
,= Espacios Libres de instalaci6n
FJlugardebe ser[osuficientementegrande para
abrirensutotalidadla puertade talavadora
" Dimensiones de la lavadora
, La mayoria de las instalacionesrequieren un
minimo de 10 crn Libresdetr&s de la lavadora
= Espacio mfnimo de instalaci6n para
area reducida instalacion.
Las dimensiones mostradas a continuaci6n son el
espaciado minimo permitido
• Un espacio adicionai debe set considerado para ta
instalaci6n y el mantenimiento
• Un espacio libreadtcional puede ser requerido para
molduras de pared, puerta y pisoo
. Un espacio adicionai de 2 5 cm atodos los [ados de
la tavadora es recomendado para reducir la
transferencia de raido
E! espacio para una aplJcaeJSncomplementaria
tambi6n debe ser considerado
3O
_*- 29v2"-,N.' t
(75 0 cm) (10 cm}
[Vista lateral|
©
_:=i_ ,ili_
_--_-F,,-- 2z" _r'
(2 5 cm) (6B 6 cm) (2 5 cm)
[Vista frontal]
., Nivele el Piso
• La inc[inaci6n admisible debajo de la lavadora
completa es de 1°
• Pare reduclr ruldo y vibracion, la lavadora
debe ser instalada en un p|so construido
sblldamente.
• Superficies con alfombras y azulejos no son
recomendadas
• Nunca instale la tavadora en una plataforma o
en una estructura d_bit
NO FA: Un pisofirmey s(didoe_milsnecesariopara una
CargaFrontal que pnra una CargaSuperior.Sisu
pisoesde madera oest,'ienconsttucci6n,puede
ser que necesile refi)r_,.arh)oL_L,_Carg,'_Frontale._
tienenmayor revoluci6nque I_ Cargas
Supcrlores,ca,sando mfi._vibracifn_Si elpiso no
es sSlido,sulavadora_a a vibrar_ Va a oiry
sentir la vibration ca todasu casao
• Toma de Corriente
- Debe ser de 1 5 m (60 in) hacia cualquierlado
de la lavadora No sobrecargue la toma de
corrientecon mas de un aparato,
• Se recomienda usar un reguladorde voltaic
para evitar daffos pot descarga el_ctrlca
NOTA: Es resporL,_abilidad y obligaci6n dei
eonsumldor tener propiamenle instalado su
producto por un eleetrieista ealilleado.
INSTRUCOONES DE INSTALACION .....
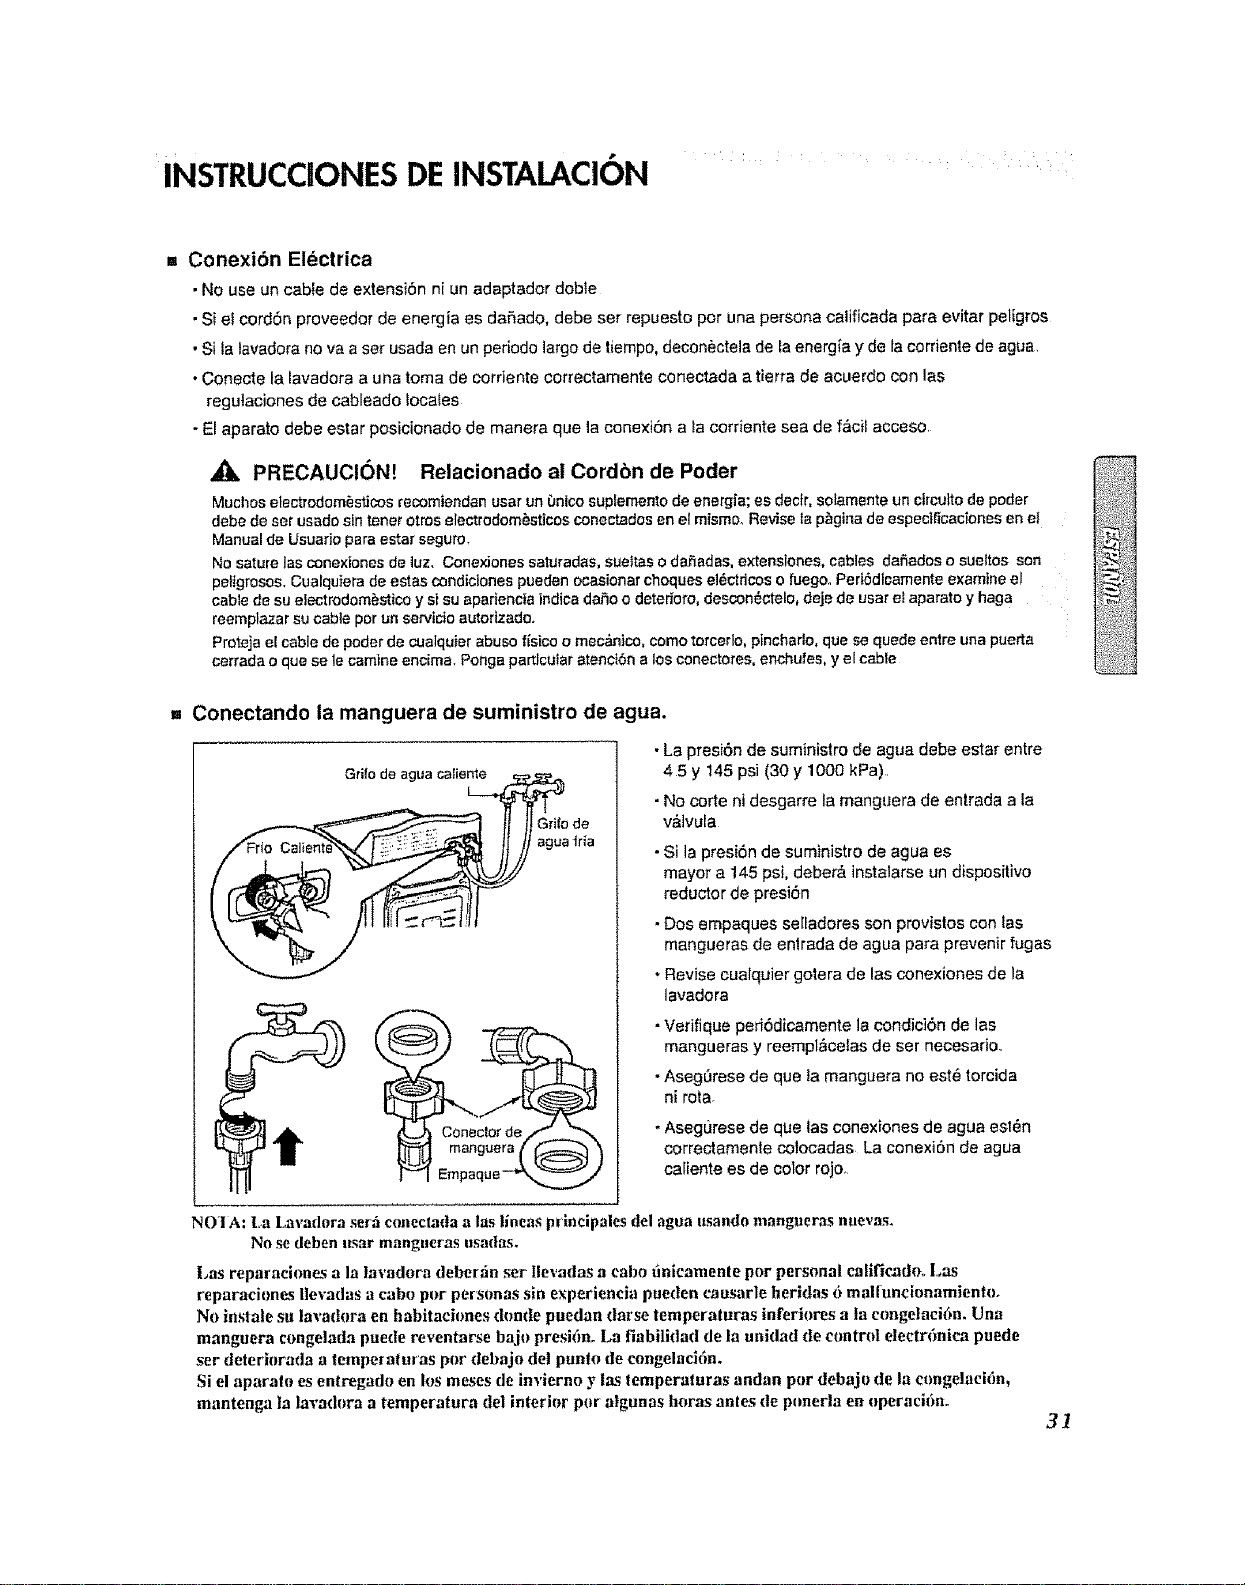
= Conexi6n Electrica
• No use un cable de extensi6n ni an adaptador dobte
• Si ei cordSn proveedor de energia es dafiado, debe set repuesto per una persona calificada para evitar peligros
• Si ia lavadora no va a ser usada en un periodo largo de tiempe, decon_ctela de fa energia y de la cordenle de agua
• Conecte la lavadora a una toma de corriente correctamente conectada a tierra de aeuerdo con las
regutaciones de cableado focafes
• El aparato debe estar posicionado de manera qua la conexi6n a la corriente sea de f&ci[ acceso
_k. PRECAUCl6N! Relacionado al Cordbn de Poder
Muchos electrodom_sticos recomiendan usar un 0nice supIemento de energfa; es dectr, solamente un cffculto de poder
debe de ser usado sin toner otros electrodom_sticos conectados en el mismo. Revise ta p_gina de espectt_icac[ones en et
Manual de Usuario para estar seguro.
No sature las conexiones de luz. Conexiones saturadas, sueitas o daSadas, extenslones, cables dafiados o sueltos son
pe_tgrosos. Cualquiera de estas condiclones pueden ocasionar cheques el_ctdcos o fuegoo Peri6dlcamente examine e!
cable de su electrodom_stico y si su aparienc|a indica daSo o deteriore, deecon_ctelo, deje de usar et aparato y haga
reemplazar su cable par un servicio autorizade.
Proteja el cable de poder de cualquier abuse fisico o mec&nico, come torcerlo, pincharlo, que se quede entre una puerta
cerrada o que sele camine encima. Ponga particular atenet6n a los conectores, enchutes, y el cable
t Conectando la manguera de suministro de agua.
Grilo de agua caiienL__
agua irma
Conector de
msngusra
•La presi6n de suministro de agua debe estar entre
45 y 145psi (30 y 1000 kPa).
-No corte ni desgarre la manguera de entrada a ta
v&lvula
•Si la presiSn de suministro de agua es
mayor a 145 psi, deber& instalarse un dispositivo
reductor de presi6n
•Dos empaques seIladores son provislos con las
mangueras de enlrada de agua para prevenir fugas
* Revise cualquier gotera de las conexiones de la
lavadora
•Verifique peri6dicamente la condici6n de las
mangueras y reempl_celas de set necesario
•Aseg_rese de que la manguera no est_ _,orcida
ni rota.
- Asegurese de qua las conexiones de agua asian
correctamenle colocadas La conexi6n de agua
caliente es de color rojo,
NOI A: La Lavadora serfi coneclada alas lineas principales del agua usando manguerms nnevas.
No _ deben nsar mangaeras itsadas.
Las reparaeiones a la lavadora deberfin ser llevadas a cabo finieamenle per personal calificado., Las
reparaciones Ilevadas a cabo per persnnas sin experiencia pueden caasarle heridas 6 mal[uncionamientoo
No instale su lavadora en habitaehmes €ltmde puedan darse temperaturas inferiores a fa cengetacifn. Una
manguera congelada puede reventarse bait) presi(m. La fiabilidad de la unidad tie control eleetr6niea puede
ser deteriorada a temperaluras per debajo del punto de eongelaci6n.
Si el aparato es entregado en los moses de invierne y las temperaturas andan per debaje de la eongelaci{in,
mantenga la lavadora a temperatura del interior per algunas heras antes de pcmerla en operaci6no
31
INSTRUCCIONES DE INSTALACION ,
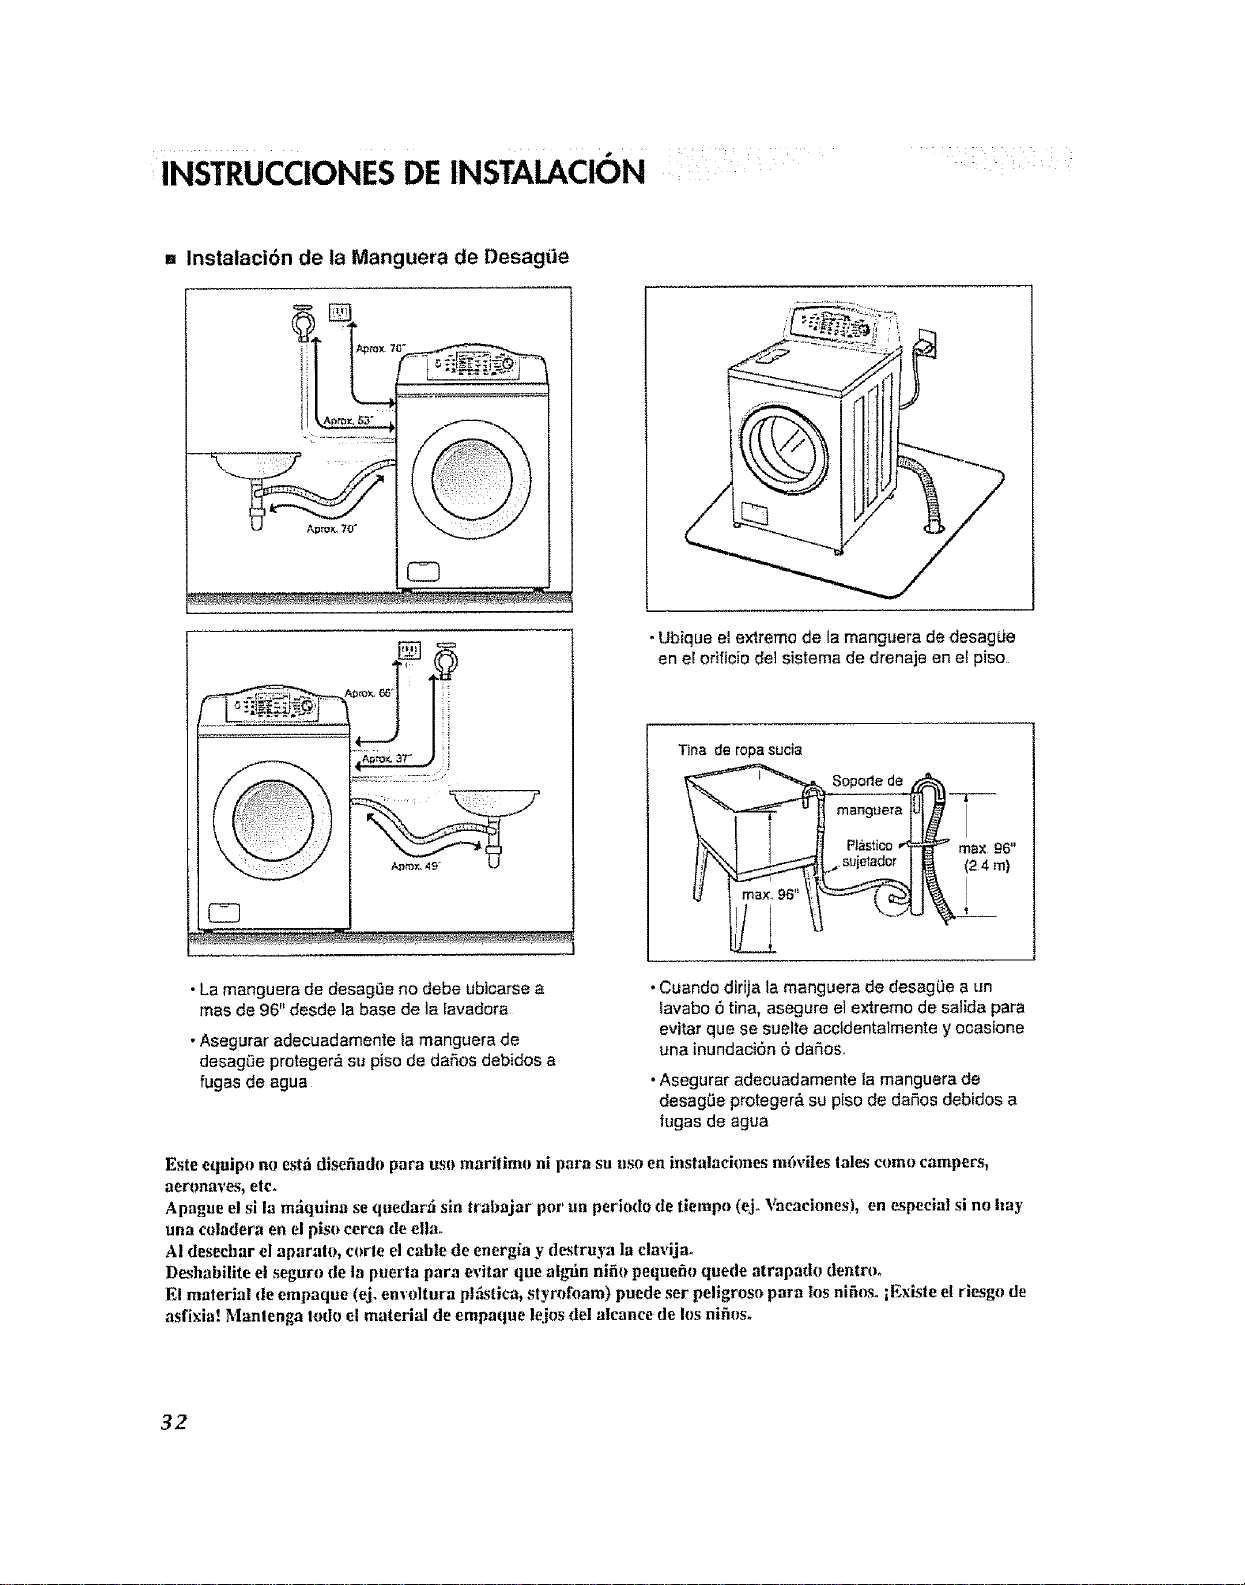
m Instalacibn de la Manguera de Desagfie
•Ubique el extreme de la manguera de desague
en er orfficiodel sistema de drenaje en el piso
Tina deropasucia
__ Sopode de I_'-T---
VtU_I
Plas_ico_ max 96"
124,.I
• La manguera de desagOe no debe ubioarse a
mas de 96" desde ]a base de la favadora
, Asegurar adecuadamente la manguera de
desag_e proteger& su piso de dales debidos a
fugas de agua
•Cuando dirija ta manguera de desag(Je a un
lavabo 6 tina, asegure el extreme de salida para
evitar que se suelte accldentalmente y ocasione
una inundaciSn 6 daf_es,
•Asegurar adecuadamente {amanguera de
desagSe proteger& su piso de daSos debidos a
fugas de agua
Este equipo no estfi disefiado para usq_maritime ni para su use en instalaci(mes m6viles tales c_)mo campers,
aeronaves, etc.
Apague el si la m_iquina se quedarfi sin trabajar per un perio(lo de tiempo (ejo Vacaciones), en _special si no hay
una cc)ladera en el pis()eerca de ella.
AI deseehar el aparat{_, c(_rle el cable de energia y destruya la clavijao
Deshabilite el seguro de la puerta para evitar que algnin nifi{) pequefie quede atrapade dentro.
E! material de empaque (ej. envoltura plfisflca, styrol'oam) puede set peligroso para los nifiOSo;Existe el rlesgo de
asfixia! Manlenga lode el material de empaque le.ios del alcance de los nific_s.
32
INSTRUCCIONES DE INSTALACION
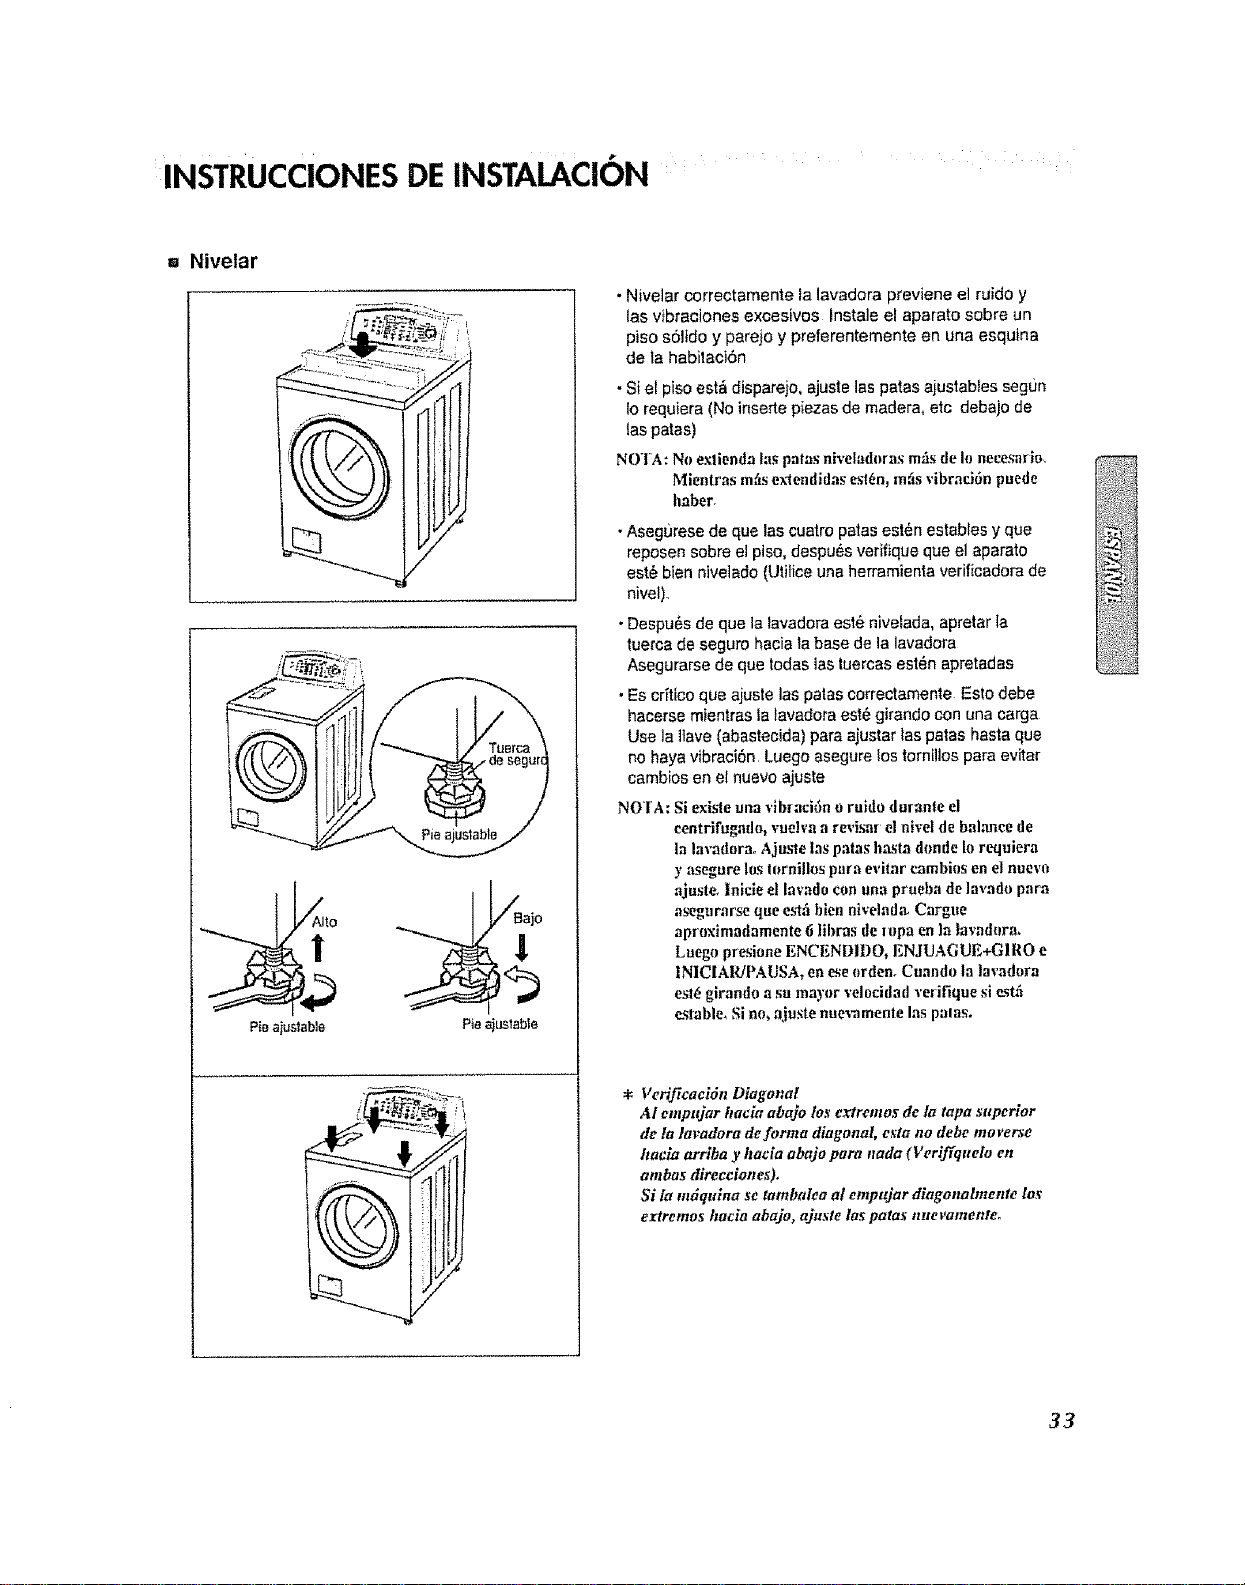
m Nivelar
Pie
_ajo
!
Pie t _table
• Nivelar correctamente la lavadora previene el ruido y
las vibraciones excesivos Instale el aparato sabre un
piso soltdo y parejo y preferentemente en una esquina
de ta habilaci6n
• SI el piso est& disparejo, ajuste Ins paras ajustables segun
Io requiera (No inserte piezas de madera, etc debajo de
las pales)
NOTA: No exlienda los palos niveladoras mils de Io necesnrlo,
Mientras mils extendidas est(m, mils vibraci6n puede
haber.
. Asegurese de que las cuatro pates est6n estables y que
reposen sabre el plso, despu6s verifique que el aparato
est6 bien nivelado (Utilice una herramienta verificadora de
nivel),
. Despu6s de que la lavadora esl6 nivelada, apretar la
tuerca de seguro hacia la base de la lavadora
Asegurarse de qua todas tas tuercas est6n apretadas
. Es c6tico qua ajuste las pates correctamente Eslo debe
hacerse mientras la tavadora esl6 girando con una carga
Use Ia Itave (abastecida) pare ejustar tas pales hasta qua
no haya vibraci6n Luege asegure los torniltos para eviler
cambios en el nuevo ajuste
NOTA: Si exisle una vibraci6n o ruido duranle el
centrifugado, vuelva a revisor el nlvel de balance de
la lavadorao Ajaste los palos hasta donde la requiera
y asegare los toraillos para evitar cambios en el nuevo
ajuste+ lnicie d Invade con una prueba de Invade para
asegurarse que eslfi blen nivelad;L Cargue
aproximadamente 6 libras de liJpa en la lavad_lra,
Luego presione ENCENDII)O, ENJUAGUE+GI ROe
INICIAIUPAUSA, en c.-searden. Canada la lavad{_ra
esl6 girando a su mayor velocidad verifique si _t,5
eslable, Si no, ajuste nuex,-amente los pains.
* VerijTcacidn Diagonal
AI empnyar hacla abajo los extremos de la tapa sltperior
de ta lavadora de forma diagonal, csta no debe moverse
hacin arriba y hacia abajo para nada (Veriffquelo en
ambas direcciones).
Si/a mdqtdna se tombalea al empajar diagonalmente los
e_:tremos hacla abajo, ajnste los paras nuevamenteo
33
PREPARACIONANTES DE LAVAR
Para reducir el riesgo de incendio, descarga eldctrica 6 dafio a personas, lea las lnstrucciones
Importantes de Seguridad antes de operar este aparatoo
1, Etiquetas de Cuidado
Busque etiquetas de cuidado en sus prendas Esto le dir_ sobre et contenido de las tetasde su ropa y come
debe set lavada
2. Clasificando
Para obtener Ios mejores resultados,clasifique al rope en cargas qua puedan set tavadas con el mismo cicio
de lavado Los diferentes telas deben set lavadas con ciclos diferentes.
Siempre clasifique {os colores oscuros de los p_,lidos y los blancos. Lave per separado ya que puede oourrir
una transferencia de tinte y pelusa, coloreando los blancos, eta De ser posible, iave los prendas mas sucias
separadas de las que Io est_n menes,
Suciedad (l'e_ad.'t, Normal, Poca) Separe I_,;prendas de acuerdo a ]a cantidad de suciedad_
Color (Blancos, P,51idos,Oscuros) Separela_ tela_ blancas de las de color_
Pelusa (Productares tie Pelusa, Recoleclor_) [ave pot"separado las prendas que protiucen pelusa de las que la recolectano
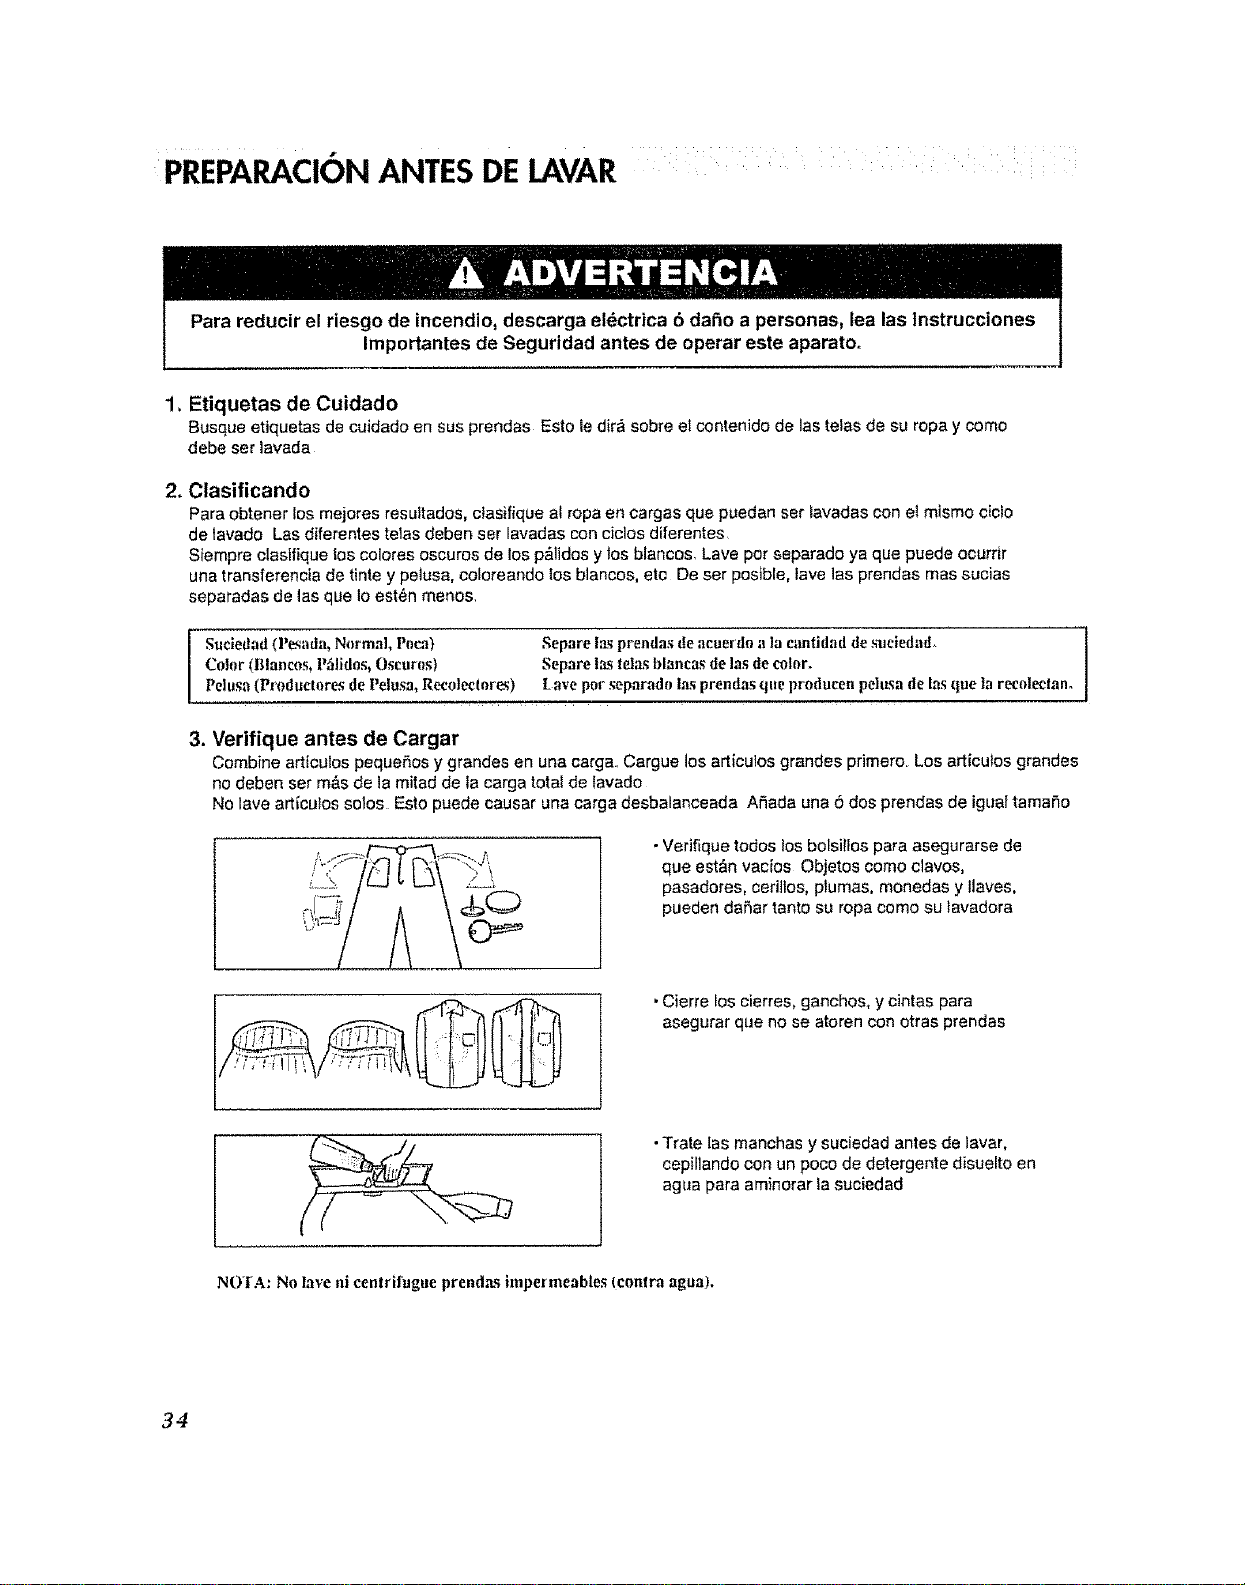
3. Verifique antes de Cargar
Combfne artfculos peque,5os y grandes en una carga.,Cargue los articulos grandes primero. Los articulos grancies
no deben set m&s de la mitad de Ia carga totalde lavado
No lave articutos solos Esto puede causer una carga desbalanceada ASada una 6 dos prendas de igual tamaho
• Verifique todos tosbolsilfos para asegurarse de
que est&n vacios Objetos come clavos,
pasadores, cerillos, plumas, monedas y tlaves,
pueden dafter tanto su ropa come su tavadora
. Cierre los cierres, ganchos, y cintas pare
asegurar que no se atoren con otras prendas
•Trate los manchas y suciedad antes de lavar.
cepillando con un poco de detergente disuelto en
agua para aminorar tasuciedad
NOTA: No lave ni cenlrifugue prendas impermeables (conlra agua).
34

USANDO ELDNSTRIBUIDOR ....
El distribuidor automfitico consiste de cuatro compartimentos que refienen l) cloro liquido blanqueador, 2)
suavizante de lelas liquido, 3) detergente liquido 6 en polvo para el prelavado y 4) detergente en polvo 6 liquido y
blanqueador seguro para los colores para el lavado principal
Todos los productos de lavanderia puedea set afiaditlos al mismo fiempo en su compartimiento distribuidor. Estos se
distribuirfin a su debido tiempo para iograr la llmpieza mas efectivm Despu6s tle cargar los aditivos de lavanderia en
el dlstribuktor; clerre la tapa,
Afiada detergente, blanqueador y suavizante de telas al distribuidor automdtfco de
acuerdo con los siguientes pasos:
1 Abra la tapa del clistribuidor
2 Cargue los productos de lavanderia en el distribuidor.
3 Cierre la tapa del distribuidor
" Acerca del Detergente
Para esta lavadora se recomienda un detergente de baja espuma. Use la canlidad recomendada pot el fabricante
Si no hay detergente de baja espuma disponible, use una cantidad reducida de detergente Debido a que la reducciSn
en ta cantidad de detergente puede reducir la ffmpieza, es imporlante que trale con anterioridad ia suciedad, clasifique
cuidadosamente pot el nive[ de color y de suciedad, y evite la sobrecarga.
El uso de detergente debe ser ajustado a la temperatura del agua, dureza del agua, y eI nivel de suciedad en la carga.
Para mejores resultados, evite usar demasiado detergente
NOTA: El detergeate liquido serfi drenada al cilimlro de la lavadora at set afiadida al distribuidor,
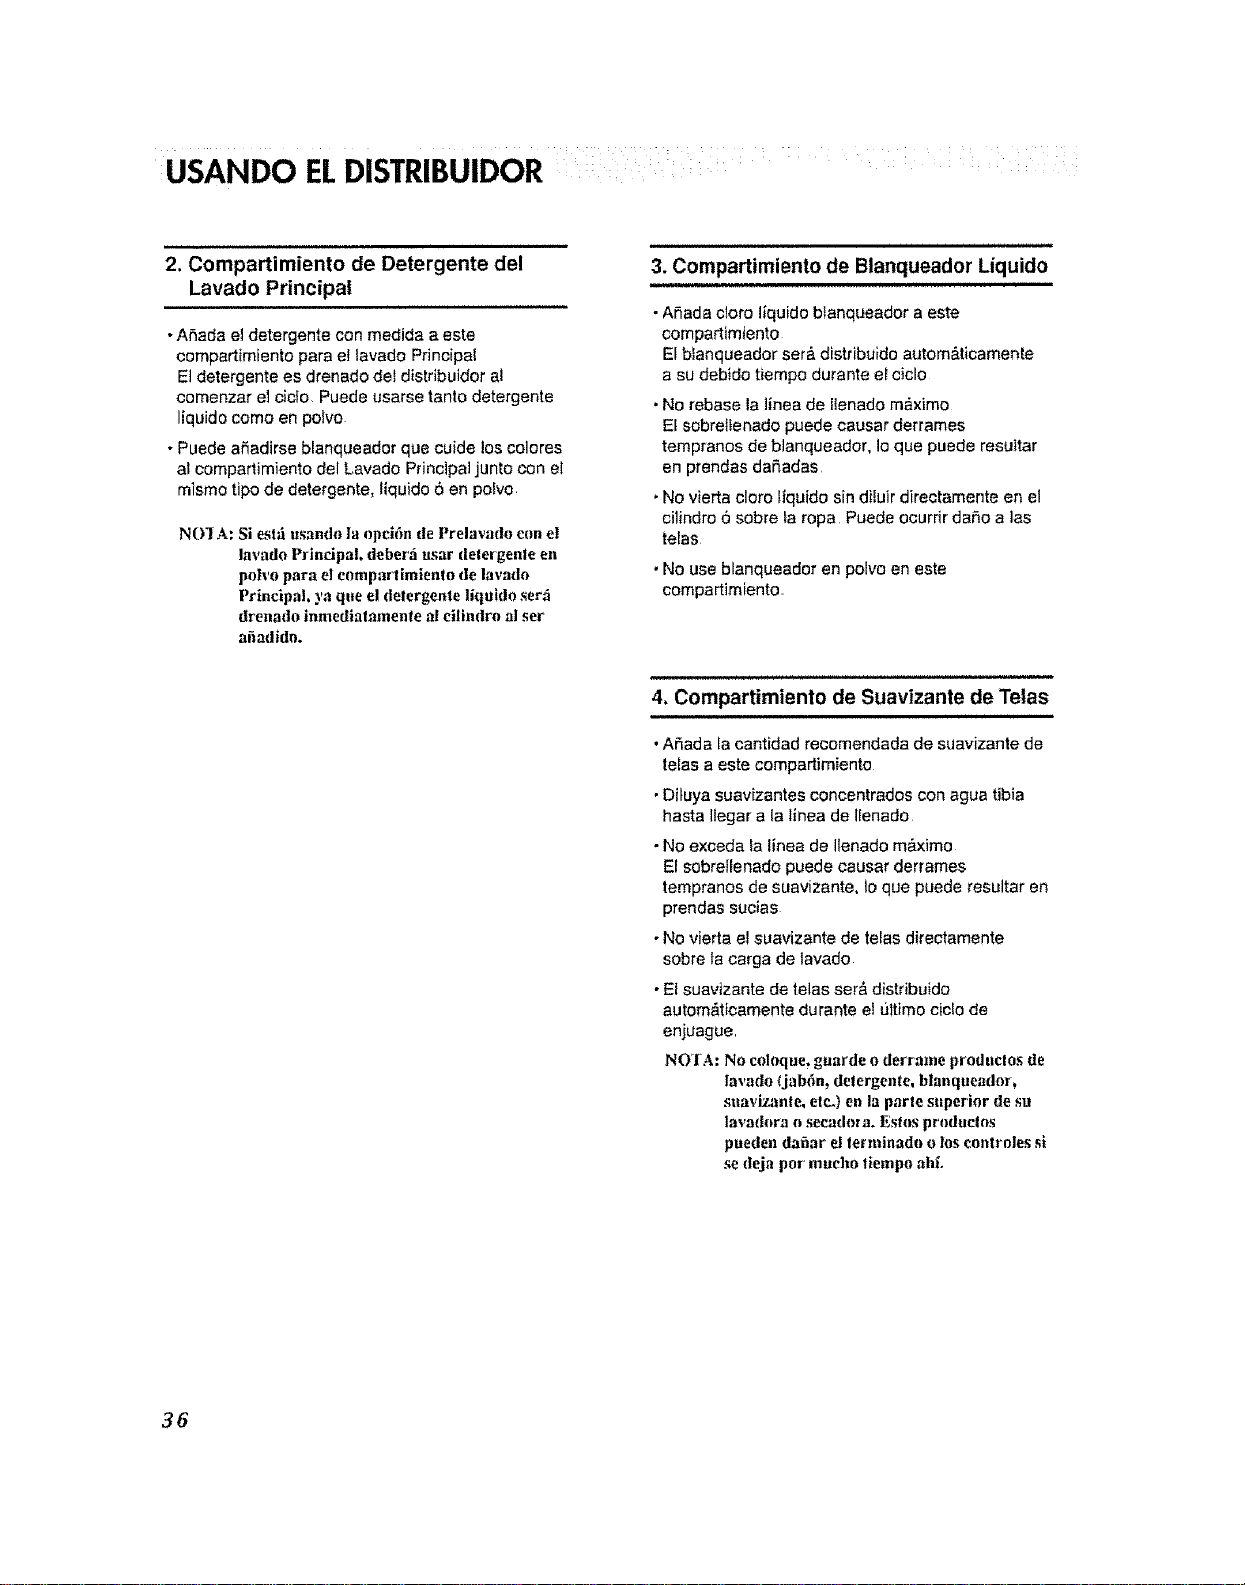
. Compartimiento
/.//de cloro
liquMo
btanqueador
.j/ Compartimiento
de suav[zante
de telas liquido.
Compartimiento
de prelavado
Compartimiento
de lavado
principal
t. CompartimientodeDetergenteparaPrelavado
•ASada detergente a este compartimiento c_Jando
use la opci6n de Pretavado. En este
compartimiento sa puede usar detergente tanto
liquido como en polvo El detergente ser,_
distdbuido automfiticamente durante el
Prelavado si este fue seleccionado en las
opciones
• Afiada la mitad de la cantidad recomendada para
el Prelavado y la cantidad completa
recomendada para el Lavado Principal
35
USANDO ELDISTRIBUIDOR
2. Compartimiento de Detergente del
Lavado Principal
• Afiada el detergente con medida a este
compartimiento para el tavado Principal
E] detergente es drenado dei distribuidor al
comenzar e] cicto Puede usarse tanto detergente
liquido como en poivo
• Puede afiadirse blanqueador que cuide loscolores
at compartimiento dei Lavado Principal junto con el
mismo tipo de detergente, I{quido 6 en polvo
NO]A: Si estfi usand_) la opci6n de Prelavado con el
lavado Principal, deber_i u:_ar detergen|e en
polvo para el comparlimienlo de lavado
Principal, .va que el delergente liquido ser_
drenado inmedialamente al eilindro al set
aiiadldm
3. Compartimiento de Blanqueador Liquido
• Afiada cloro liquidc blanqueador a este
compartimtento
El blanqueador ser_.distribuido autom&ticamente
a su debido tiempo durante e[ ciclo
. No rebase ia linea de ilenadom_ximo
E[ sobretienado puede causar derrames
tempranos de blanqueador, Ioque puede resuttar
en prendas da£_adas
. No vierta cloro [iquido sin diluir directamente en el
cilindro 6 sobre [a ropa Puede ocurdr da_o a ]as
telas
. No use blanqueador en poivo en este
compartimiento.
4. Compartimiento de Suavizante de Telas
• Afiada [a cantidad recomendada de suavizante de
telas a este compartimiento
• Dituya suavizantes concentrados con agua tibia
basra Ilegar a la llnEa de ilenado
• No exceda _alinea de Itenado m_.ximo
El sobrellenado puede causar derrames
tempranos de suavizante, Io que puede resultar en
prendas sucias
• No vierta el suavizante de telas directamente
sobre ta carga de lavado
• EI suavizante de telas set& distribu{do
autom_ticamente durante eI 01timo ciclo de
enjuague,
NO]A: No coloque, guarde o derrame produclo,_ de
lavado (jabdn, delergcntc, blanqueador,
suavizanle, elc.) en la parle superior de su
lavadora o seeadora. Estos produelns
pueden dafiar el let minado o los ¢ontroles si
se deja po_"mueho tiempo ahL
36
WM20A2CW
C]clo TipodeTefa
P.,a_ja P_ m'_k_
Grand_s rr_v
AIgodbd
Nm_I
{Co_V
NofmaJl
WM2442H'
Te_p_mdeVeZoc]dad_ PrejaCicloCE_ _ E_ Clclo "fipodeTela
La_dolE_s_{deGlro_ed_ vadoR_pdo_ Exba
_a Bajo PB_ado
Ce_enle#ria i',_ed_ Ug_ 0 0
FrIa,'Fria S_Gl_
m.'@_ rK,L_B,_ C_enlm_da B@ I L_em 0 0 0 0 0
FtWFr_ _"m
0 0 0 0 0
Rop__tu_ mw
Se_t_r_o
et,r..
pe,s_d_f g_nde$como
Grandes _y
Normal _s_L_je_,
Norm_
Rancl_adoP_m_mes,
0 0 0 0 F_ente ¢_,_s d_,_m,
mpar_ _
(Pe_m _ dopoiy!
0 0 J 0 O¢lcados _r_,
It
(p
m
o o
o
o o B_"
o
i::i,,
1o
:;:h
0 co
o
0 _
ID
0 0 m
0
0 0 r_
0 0 <
Ol
Aim Nmm_
G_ U_em 0 0 0 0
Bm
P_o
l,lB_o Nmm;_
Aim P_s,_d_
SinG_'_ U_m 0 0 0 0
Gent_
Lave_loa
_o ht_m,E_q_e{_
pzzl_ ar_mo
Lavado p_p_
R_pldo Ug_n_or_
T_'ib_a _nG_os Ugem
T_#Ri_ B_o lJg_m
L'_e t_T-_ NoGims
C_mlo,/RI_ Extr_m'Io U_m
Fr[s.Tda B_ Pe._do
o o
"4
C_r_JF_a
"F_NFda
C6_ad_Tda
L_,_,_r_.= I
_l,uTtla
Atlo Nom_l
E_a_ Pe_
Ge_ Nmm_
B_o Pe._
I',_o U_em
S_G_os
COMO USAR LA LAVADORA :
= WM2442H*
I
©
,. WM2042CW
ffOV¢l_
©
o _==,= _=-=:,= : 1 f
E_%I o=,-',_ o.o,,, o_=. o-, _,,
1. Ciclos
•Gire ta perilla selectora de cictos para se[eccionar
el ciclo disefiado para los diferentes tipos de telas
y niveles de suciedad
•Cada ciclo tiene una temperatura, velocidad de
giros, nivel de sucledad y Opciones
predeterminadas (V_ase p_gina 37) r
• La configuraci6n predeterminada puede set
cambfada en cualq[Jier memento antes de
comenzar el cic|o.,
NOI_A: l':,;la tavadora de carga frontal requlere un
{iempo tie clclo mds largo, y obtendrfi una
meier limpieza, nun es m,fs gentil en las
prendas, que las lavadoras de carga
superior. El liempo de lava(lo se puede
reducir signillcativamente para cargas
pequefias o para prendas ligeramente sucias,
solo seleccionando el "Ciclo Rfipido" con el
hoffm "Opci(_n" y pragramando el b_tdn de
"Nivel de Suciedad", iluminiia(Iose la
opci6n.
38
COMO USAR LA LKVADORA :
2. Programacion Personalizada
(Custom program)
• La programaciSn personatizada le permite
atmacenar un ciclo de lavado personalizado para
uso futuro.
• Para crear el cic{o personalizado:
1 Seleccione un ciclo.
2 Seleccione
Temperatura de Lavado/EnJuague, Velocldad
de Glro, Nlvel de Sucledad
3 Seleccione otras opciones deseadas
4 Mantenga presionado por 3 segundos el bot6n
de Programaci6n Personaltzada (Custom
Program) (2 sonidos de Bip)
La programacion personalizada est_ ahora
atmacenada para su uso iuturo Para volver a
usar la programaciSn personaltzada, seteccione
programaci6n personalizada (Custom Program)
y presione lnlciarlPausa
3. Beeper
• Presione repetidamente hasta ajustar el volumen
de la alarma
4, Temperatura de Lavado/Enjuague
(Wash/Rinse)
• Seleccione la temperatura del agua bas_ndose en
ettipo de carga que est6 lavando
•Siga tas instrucciones de cuidado de las prendas y
clasifiquelas seg0n la tabla de abajo para mejores
resultados
Temperaf_rade!AguaSugerida
Extra Catiente
Caliente
Tibia
Frta i
Pren(]a
ToaJlasdecocina,s_banas,
ropadebeb_s
Arttculosblancosyde
color-_pidomuysucias.
Larnayoriadelascargas
Lanaslavables,articubs
decolo_b_l!anles.
, Unenjuaguetibiodeja lascarga rn&sseca queun
enjuaguefrio Unenjuaguetibio inerementalas arrugas
•Encffmasfr{os,un enjuaguef_biohate la cargarnas
cbrnodade manejar
•Unenjuaguefdo ahorraenerg{a
Lasternperaturasde _osenjuagues(dosdependendela
tempera_Jradel aguafria de sugrifo
•Parael a}usteTapColdtCold(FdaiFfiadel gdlo), tantola
temperaturadel favadocornodel enjuaguedependede
la temperaturadel agua#ia de sugriIo
5, Velocidad de Giro (Spin Speed)
•Para cambiar la velocidad de giro, presione etbotSn
de Velocldad de Giro (Spin Speed) hasta conligurar
la vetocidad deseada
•Para cornenzar el ciclo del Drenar/Giro:
I Presione Eneendido para girarse
2..Presione el bot6n de velocidad de Giro(Spin Speed)
soiamente
3. Presione tniciar/Pausa.
i i i llUl inlul ilnlllllUll
6, Nivel de Suciedad (Soil Level)
•Para cambiar el nivel de suctedad, presione el bot6n
de Nlvel de Suciedad (Soil Level) repetidamente
hasta qL_eel nivei deseado se haya conseguido
39

COMe USAR LA L/WADORA :i ::i
OPCIONES (OPTION)
1. Prelavado (Prewash)
° Use esta opci6n para cargos que requieran
tratamiento previo ASade 16 minutes de prelavado
y desagi3e
• Cuando use la opci_n (le Prelavado, n_ use
delergenle l/(lulcl_ en el c_Jmparlimiento (le
Lavado Principal.
Use deter genie en polvo.
u,lu , J
2. Ciclo de Manchas (Stain Cycle)
• Afiade tiempo a[ lavado y enjuague para mejorar la
eliminaci6n de manchas
. Provee un eniuague autom&ticamente
3o Ciclo Rapido (Quick Cycle)
•El Cic$o R&pido ofrece un ciclo de tiempo r_pido
. Su use se sugiere para refrescar prendas reci,_n
adquiridas 6 prendas que han side
empacadas per un tiempo
4. Enjuague Extra (Extra Rinse)
•Esta opci6n provee un enjuague adicional
. Use esta opci6n para asegurar la eliminaci6n de
residues de detergente 6 blanqueador de tas
prendas
n,,i i,,, , It i ll,,t
5. Enjuague+Giro (Rinse+Spin)
•use esta opci6n para enjuagar y luego gIrar
6, Lavado Diferido (Delay Wash)
•Permiteetcornienzode un cictocon unademora desde
1 hasta12 (9)heros
•Haga laselecci6napropiadapara su cargo, despu_s
presioneel baton de Terrninadode Retraso (Delay
Wash) una vezpar una hera 6 de nuevohasla 12 (9)
heros dedemora en el Terminado de Retraso
;,; , ,,;;,;;;;;;, ...... ............ ........ ............ ............ ........ .......
SEGUROPAPANINOS (CHILDLOCK)
- Use esta opci6n para prevenir el use no deseado de
lalavadora_ Mantenga presionado el bolSn de
DELAY WASH per tres segundos para poner 6
quitar el seguro que btoquea los conlroles
. Cuando est_ puesto el SEGURO PARA NINES,
parpadean los letras" [L" Ytodos los botones son
lisiados excepto en bot6n de Encendido(Power)
Usted puede bloquear la lavadora mientras est&
operando
• Se enciende siempre que la puerta de la lavadora est&
asegurada,
La puerta puede desasegurarse presionando el bol6n
InlclartPausa para delener la tavadora,
NOTA: Si tn temperatarn ohive! del agua son muy al|.'lx,la
puerta no puede set de_bloqueadao
No trale de forz.ar|a puerla para abrirl_ cuan{lo la
luz de PUERTA ASEGURADA (DOOR
LOCKED) e_l_encendida.
INDICADORDEESTADO(STATUSINDICATOR)
. Estas luces muest'ran eltiempo transcurrido del
ciclo que est& operando la lavadora
. Esta pantalta muestra:
a) El tiempo restante estimado en el cicto cuando
este estfi operando
b) El c6dige de error cuando este ha side
detectado
• Use este bot6n para iniciar y pausar INiavadora
4 0 *Useeste bet6npara Encendery Apagar]alavadora
MANTENIMIENTO :: i :: ....
Anles de limpiar el interior de la lavadora, descon_clela del suministr_ elicit ico para evi|ar reciblr una descarga el_ctrica.
Cuando deseche el aparalm eerie el cable de corr'ienle y deslruya la c|avija,
Deshabilite el seguro de la puerla para evilar que algfin nifin pequefin quede atrapado denlrm
,, El Filtro de Entrada de Agua.
• EImensaje de error" IE "parpadear_ten e[ pane_de control cuando no entre agua al compartimiento de detergente
•Si su agua es muy dura b centiene residuos de ca!, et fiitro de entrada de agua puede obstruirse. De tal modo que
resulta bueno timpiar{o de vezen cuando.
1..Cierre la
Ilave dee
agua
3,,Limpie e[
filtro
usando un
cepillo de
cerdas
duras
2..DesatorniIle
la manguera
de la entrada
de agua
4. Apriete
fuerte la
manguera
a la
entrada,
= E! Filtro de La Bomba de Drenaje
• El filtro de drenaje recolecta fibras y objetos pequefios oividados en la ropa sucia. Verifique
regularmente qua et filtro est_ limpiopara asegurar un funcionamiento suave de su lavadora
Primero drene usando la manguera de desag(]e y despu_s abra el filtro de la bomba para
retirar fibras u objetos.
• Permita qua el agua se enfrEeantes de timpiar la bomba de drenaje.
1oAbra tatapa de la cubierta
inferior((_) Gire {aconexi6n
de [amanguera de drenaje
(_)) para sacada
2. Desconecte laconexiOndel
drenaje ((_) permitiendoque el
agua salga AImismo ttempo use
un racipiente para evitar qua el
agua caiga at peso.Cuando deje
de correrel agua, abra el _ire de
la bomba ((_) hacia la izquierda
3 Retirecualquier materiat extra_e
del filtrode la bomba (_)). Despu_s
de limpiar el filtro (_), g[relo segfin
las manecillasdet reiojeinserte la
conexi6n de[desagOe(_) a su
lugar originat Cierre lalapa de la
cubiedainferior(_).
4/
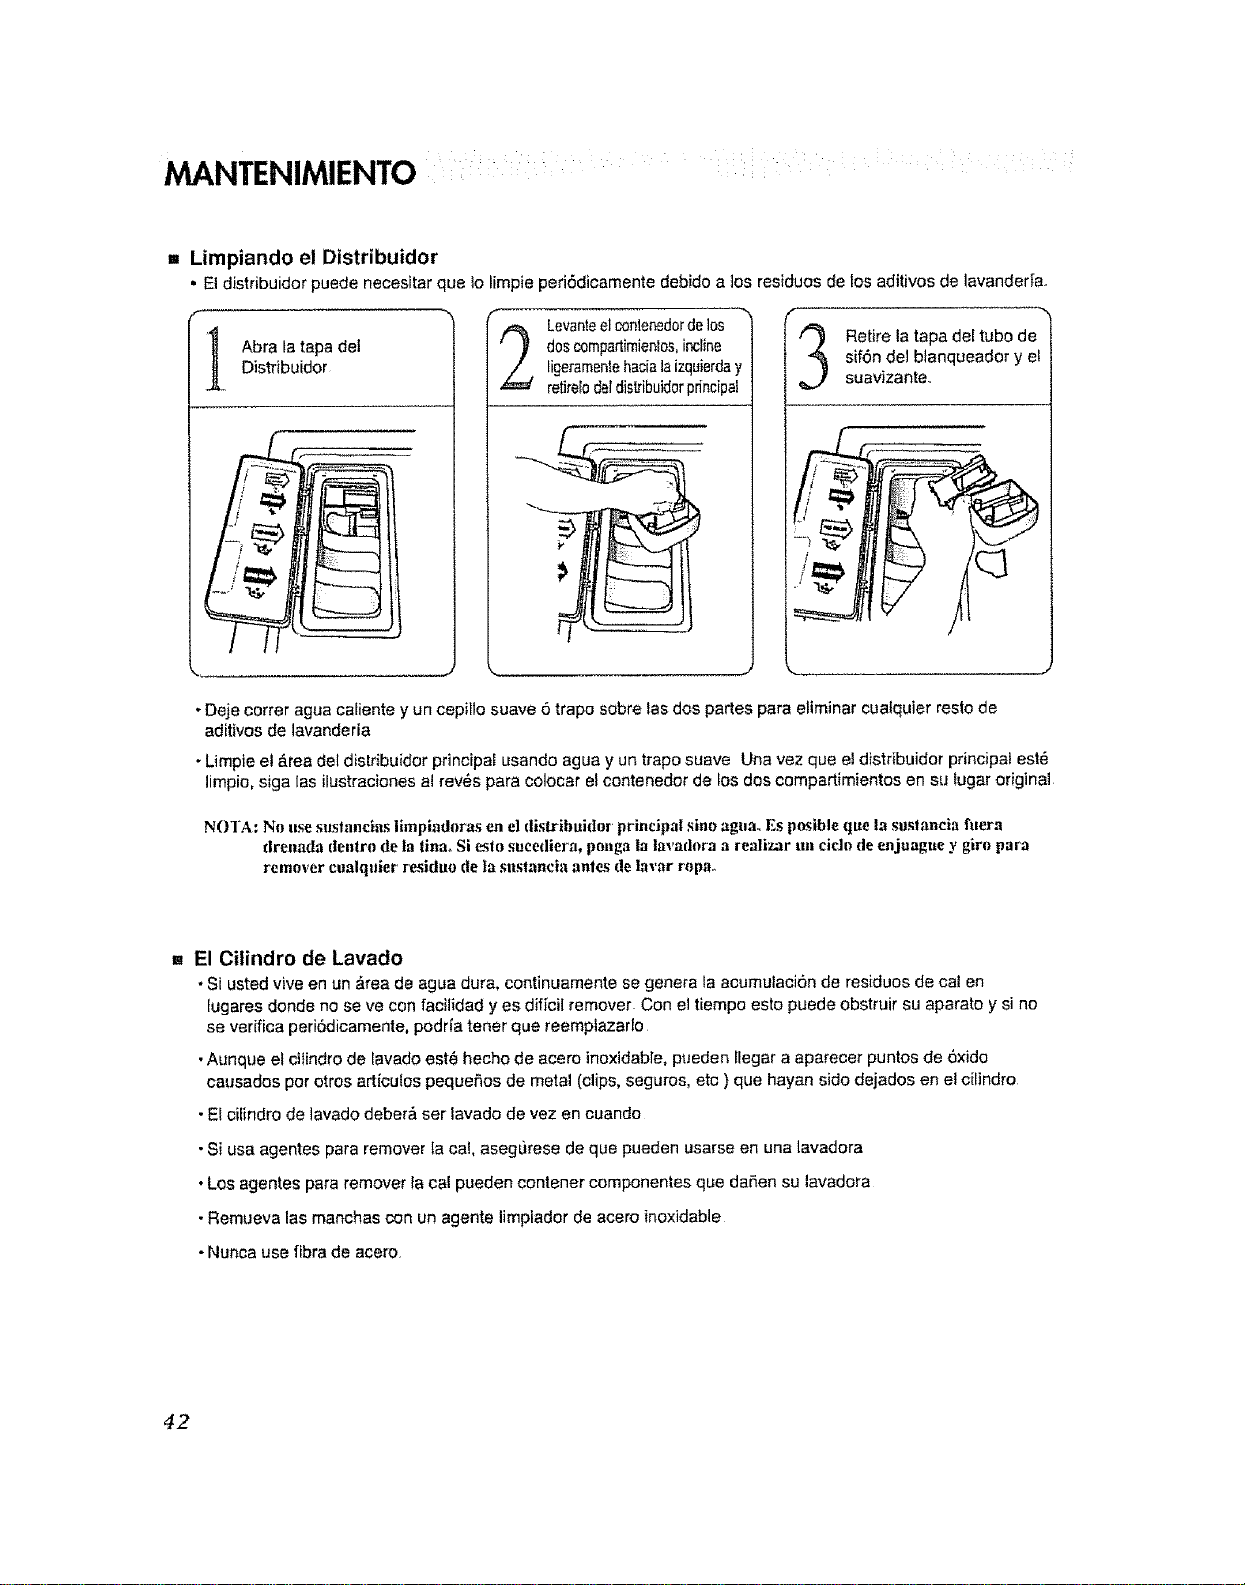
M A N1 I'NIMIi'N/[ } i
I I _ II l/il _ll I ilIH/i
,. Limpiando el Distribuidor
• El distribuidor puede necesitar que 1olimpie peri6dicamente debido a]os residues de los aditivos de lavander[ao
Abra la tapa de[
Distribuidor
Levanteelconle_dordelos
doscompartirnientos,incline
ligeramentehacialaizquierday
relJreI0deldistribuid0rprincipal
-.. %_
Retire la tapa de[ tube de
sif6n del btanqueador y et
suavizante,,
/
. Deje correr agua ca[iente y un cepillo suave 6 trapo sobre tas dos partes para eliminar cuatquier resto de
aditives de lavanderia
• Limpieel &rea del distribuidor principal usando agua y un trapo suave Una vez qua et distribuidor principal est_
limpio, siga [as ilustracionesat rev@spara colecar el contenedor de los dos compartimientos en su [ugar original
NOTA: No use sustancias iimpiadoras en el (|istribuidor principal sino agua. Es p_ible que la sustancia fllexa
drenada denlro de la tinm Si esto sucediera, ponga |a lava[h)ra a realizar un cic][) de enjuague y giro par'a
remover cualquier r_iduo de Ia sttstancia anl_ de tavar ropm
,. El Citindro de Lavado
•Si usted viva en un &rea de ague dura, continuamente se genera la acumulaci6n de residues de cai en
[ugares deride no seve con facilidad yes dif[ci[ remover Con el tiempo esto puede obstruir su aparato y si no
se verifica peri6dicamente, podrfa tener qua reempiazarlo
•Aunque el ciiindro de [evade est_ hecho de acero inoxidable, pueden [lagera aparecer puntos de 6xido
causados per otros articulos pequefios de metal (clips, segures, etc ) qua hayan side dejados en el c{lindro
•E! cilindro de ]avado deber_ ser lavado de vez en cuando
•Si usa agentes para remover la ca!, asegurese de qua pueden usarse en una lavadora
•Los agentes para remover Iaca{ pueden contener componentes qua daSen su lavadora
•Remueva las manchas con un agente limpiadorde acero inoxidable
•Nunca use fibre de acero
#2
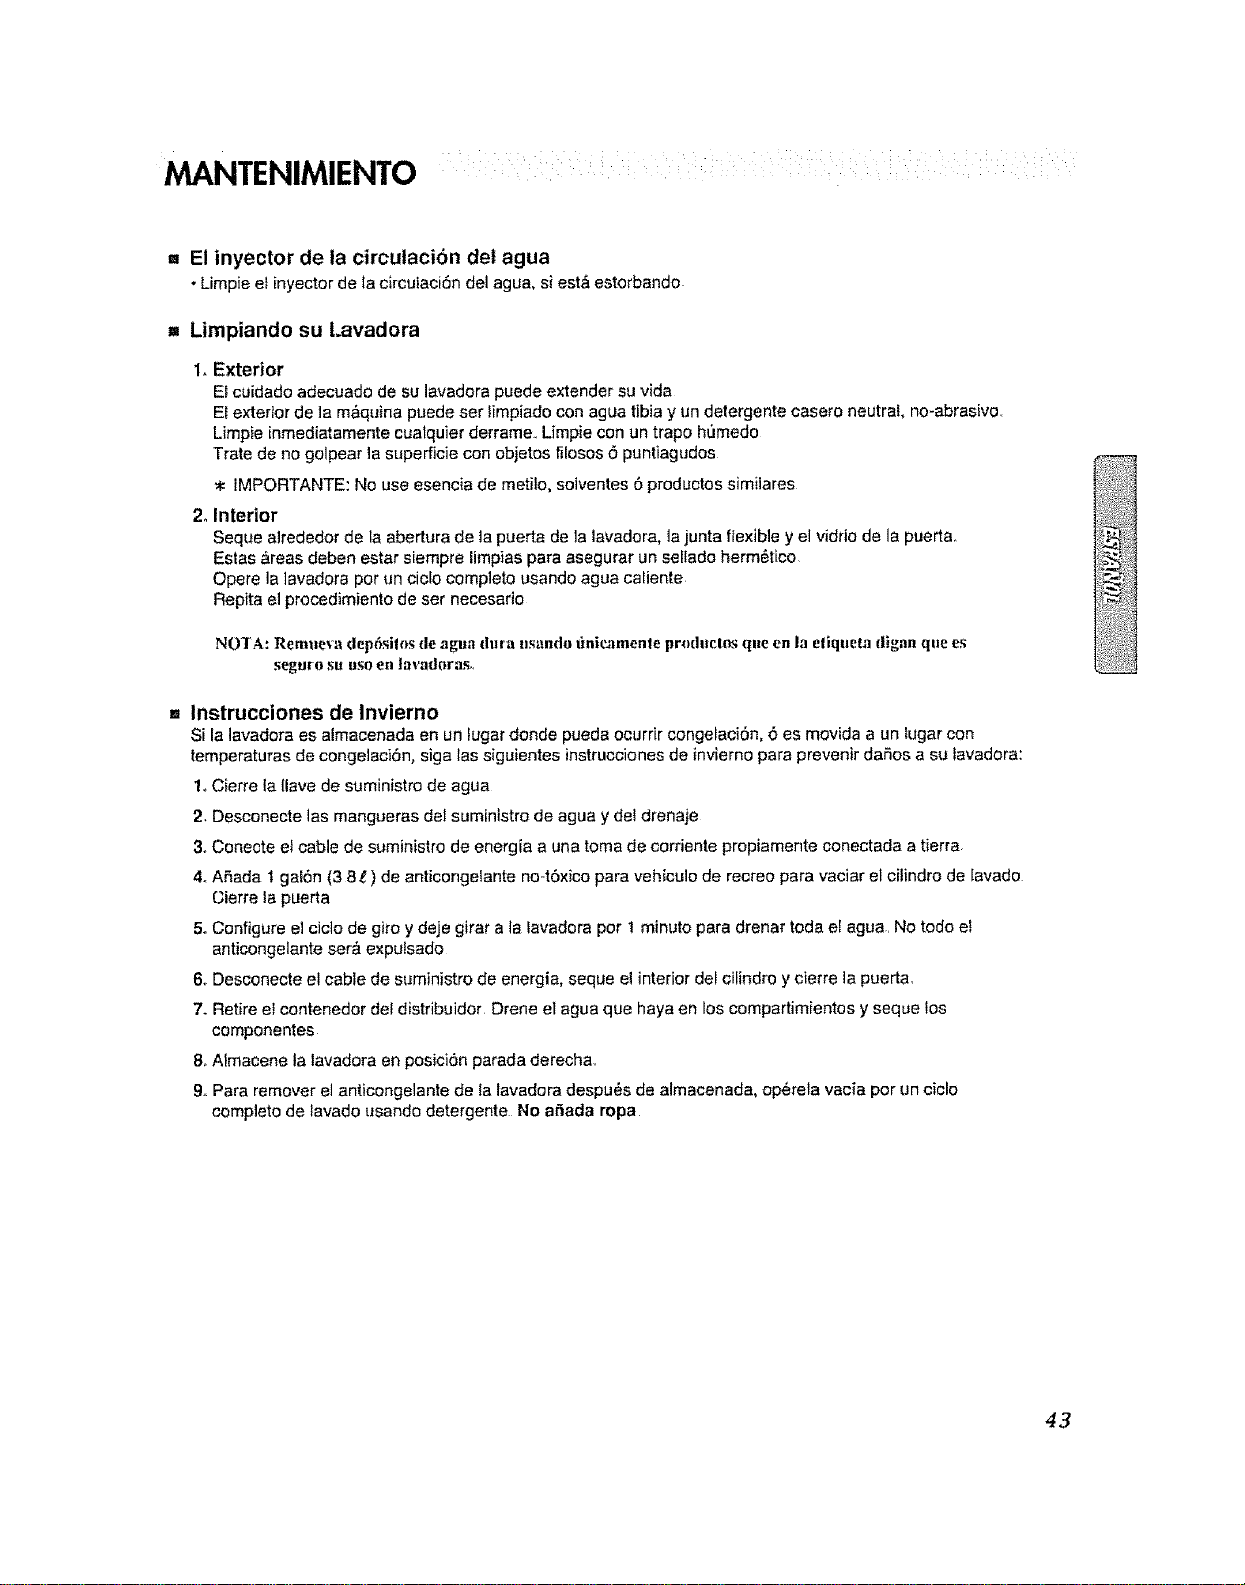
MANTENIMIENTO
: i
= El inyector de la circulacion det agua
. Limpie et inyector de _aclrcuiaci6n del agua, si est_ estorbando
m Limpiando su t.avadora
1. Exterior
Ei cuidada adecuado de su lavadora puede extender su vida
El exterior de la m&qvina puede set timpiadocon agua tibia y un detergente casero neutral, no-abrasive.
Limpie inmediatamente cuatquier derrame, Lirnpie con un trapo h6medo
Trate de no golpear la superf]cie con objetos filosos6 puntiagudos
* IMPORTANTE: No use esencia de metito, solventes 6 productos similares
2. Interior
Seque airededor de la abertura de la puerta de la lavadora, lajunta flexible y el vidrio de la puerta
Estas ,_reas deben estar siempre limpias para asegurar un sellado herm6t_co
Opere la ]avadora per un cie[o complete usando agua caHente
Repita e] procedimiento de set necesario
NOTA: Remueva dep6sitos de agua dura usando finicamente produclos queen la eliqueta digan que es
segu_o su uso en lavadoraso
,. Instrucciones de Invierno
Si la lavadora es aimacenada en un Iugar donde pueda ocurrir congelaci6n, 6 es movida a un _ugarcon
temperaturas de congelaci6n, siga las siguientes instruccionesde invierno para prevenir daSos a s_._tavadora:
1_Cierre la flare de suministro de agua
2, Desconecte 1asmangueras del suminlstro de agua y det drena]e
3oCeneete et cable de suministro de energia a una toma de corrientepropiamente conectada atierra
4oASada t gai6n (3 8t ) de anticongetante no_t6xico para vehiculo de recreo para vaciar el cilindro de [avado
Cierre ta puerta
5. Configure el ciclo de giro y deje girar a la favadora per 1 minute para drenar toda e[ agua, No todo el
anticongelante ser& expulsado
6. Desconecte el cable de suministro de energia, seque el interiordel cilindro y cierre la puerta,
7. Retire el contenedor del distribuidor Drene el agua que haya en los compartimientos y seque fos
componentes
8. Almacene la lavadora en posici6n parada derecha,
9,,Para remover el anticongelante de $alavadara despu_s de almacenada, op6rela vacia per un ciclo
complete de _avado usando detergente No afiada ropa
43
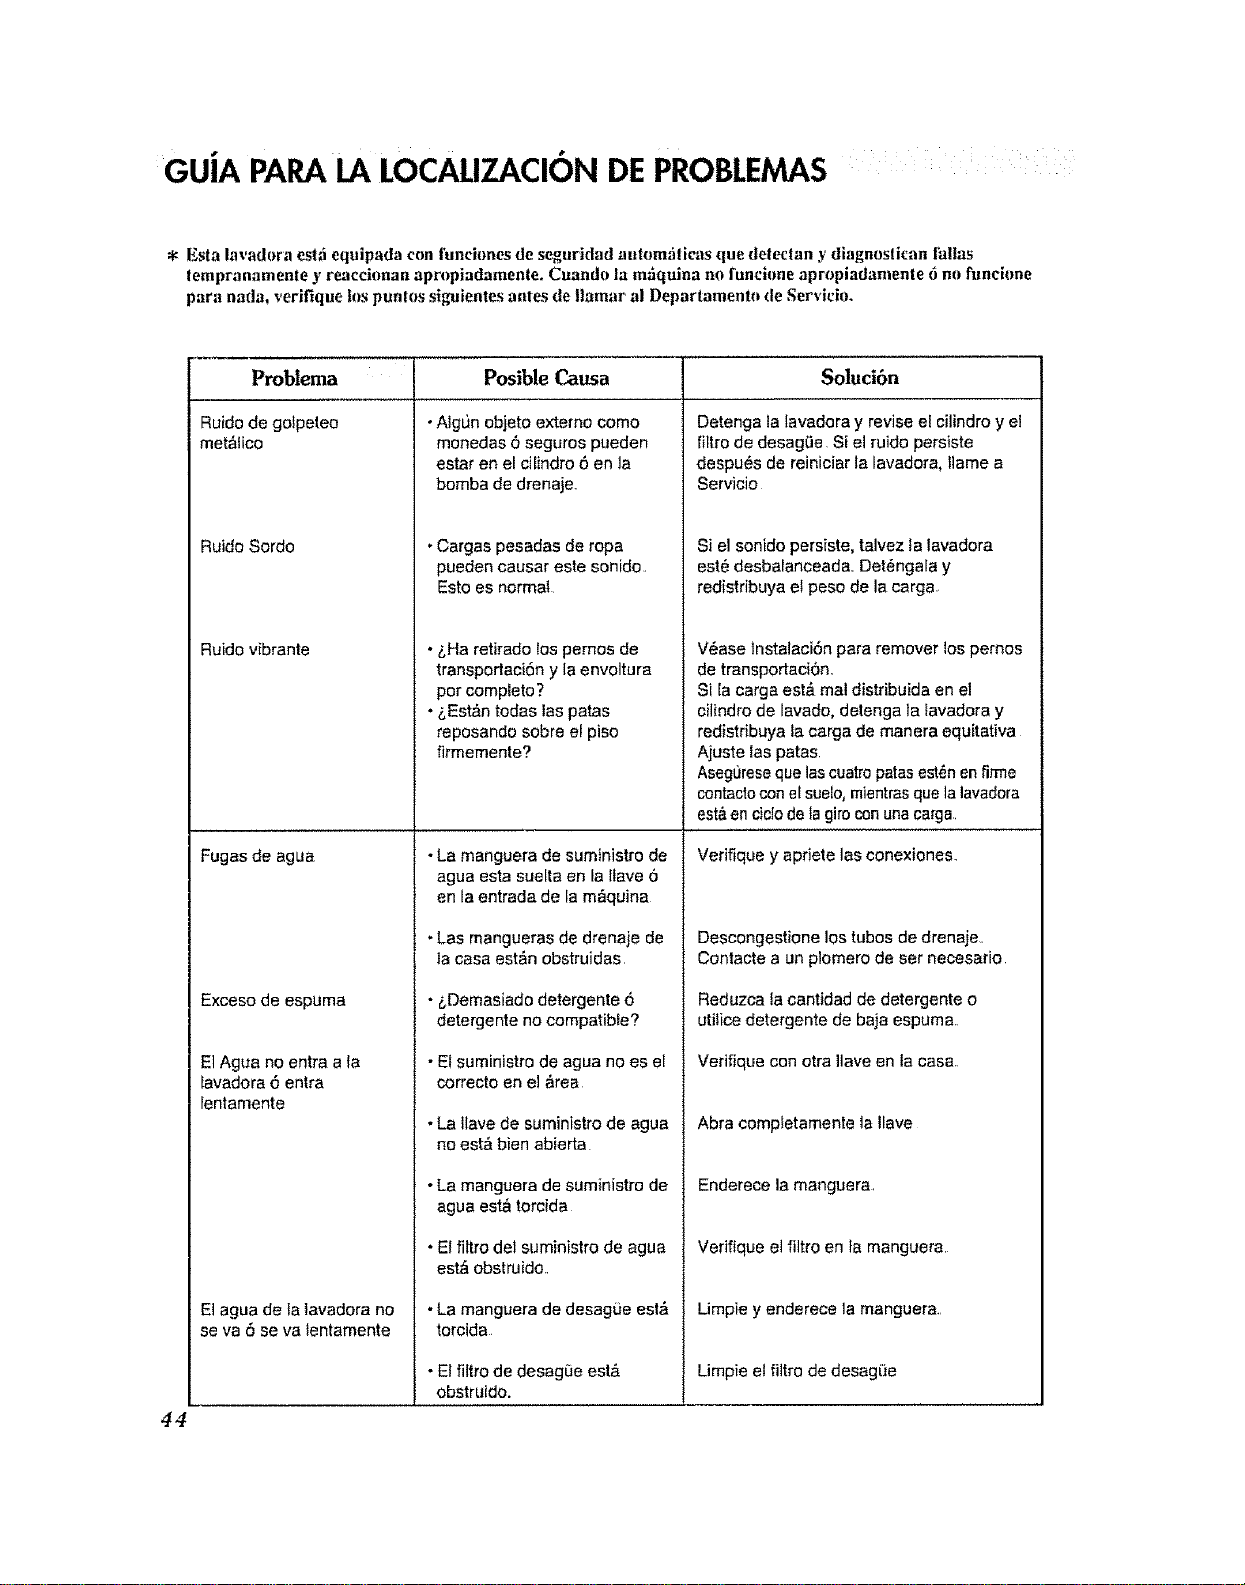
GUJA PARA LA LOCALIZAC ON DE PROBLEMAS ....
* Esta lavadora est_i equipada con |unciones de seguridad aLttomfilicas que delecfan y diagnosiican fal|as
tempranamente y reaccionan apropiadamente. Cuando la mfiquina no funci{me apropiadamenlLe 6 n{) hmcione
para nada, verifique los punlos sigulentes antes de ||amar al Departamento de Servlcio_
44
Problema
Ruido de golpeteo
metfitico
Ruido Sordo
Ruido vibrante
Fugas de agua
Exceso de espuma
E1Agua no entra a la
[avadora6 entra
lenlamente
El agua de {a lavadora no
se va 6 se va tentamente
Posible Causa Soluci6n
• AlgLJnobjeto extemo come
monedas 6 seguros pueden
estar en el ciIindro 6 en la
bomba de drenaje.
. Cargas pesadas de ropa
pueden causar este sonido
Esto es normal
. _,Haretkado los pernos de
transportaci6n y la envoltura
per complete ?
• &Est&n todas las paras
reposando sobre el piso
firmemente?
• La manguera de suministro de
agua esta sue[ta en la Itave 0
en la entrada de la m_quina
. Las mangueras de drenaje de
la casa est&n obstruidas
• &Demasiado detergente 6
detergente no compatible?
• El suministro de agua no es e[
correcto en el firea
. La llave de suministro de agua
no estfi bien abierta
• La manguera de suministro de
agua estf torcida
• El fittro del suministro de agua
est& obstruido.
.La manguera de desag0e esh_
torcida
•El filtro de desag0e est&
obstruido.
Detenga la lavadora y revise e[ cilindro y et
filtro de desag0e S[ el ruido persiste
despu6s de reiniciar la lavadora, Ilame a
Servicio
Si el sonido persiste, talvez ta lavadora
est,. desbalanceada Detengala y
redisiribuya el peso de la carga
V_ase Instalaci6n para remover los pemos
de tmnsportaci6n.
S[ [a carga est,. real d[stribuida en el
cilindro de [avado,detenga la [avadora y
redistribuya la carga de manera equitativa
Ajuste las patas.
Aseg0resequelas cuatroparasest_nen firms
tentacle cone[ sue[o,mientrasquela lavadora
est&en ciclo de la giroconuna ea_ga
Verifique y apriete las conexiones.
Descongestione los tubes de drenaje.
Conlacte a un plomero de ser necesario
Reduzca la cantidad de detergente o
uti]ice detergente de baja espuma.
Verifique con otra ]lave en la casa
Abra comp_etamente ta tlave
Enderece ]a manguera,
Verifique el filtro en ta manguera
Limpie y enderece la manguera
Limpie et filtro de desagi_e
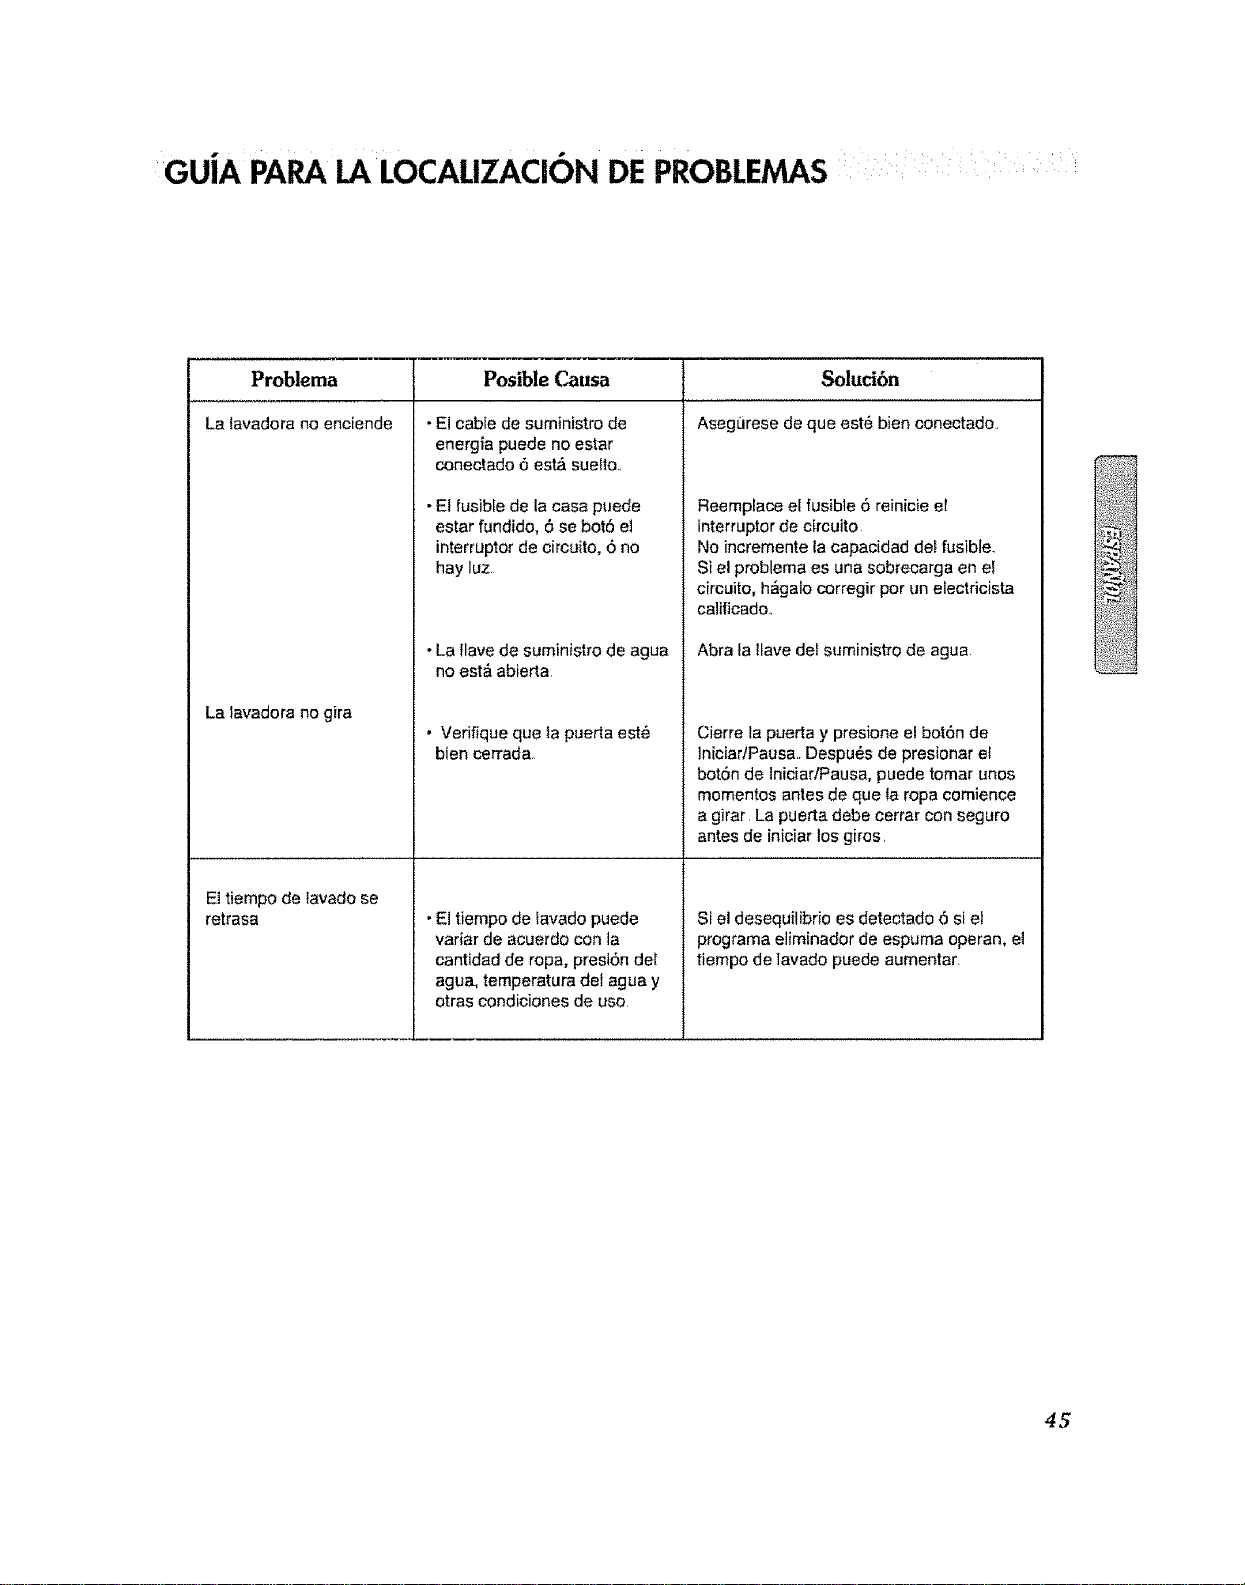
GUJAPAPALA LOCALIZACIONDEPROBLE AS .........
Problema Posible Causa Soluci6n
La lavadora no enciende AsegLirese de que est_ bien coneetado
La lavadora no gira
El tiempo de lavade se
retrasa
• El cable de suministro de
energ_a puede no estar
conectado 6 estfi sueffo
• El fusible de la casa puede
estar fundido, 6 se bet6 el
interrupter de circuito, 6 no
hay luz
• La flave de suministro de agua
no estfi abierta
• Verifique que la puerta est6
bien cerrada
• El tiempo de tavado puede
variar de acuerdo con la
cantidad de ropa, prest6n dei
agua, temperatura del agua y
otras condiciones de use
Reemplace el fusible 6 reinicie el
interrupter de circuito
No incremente ta capacidad del fusible
Si el problema es una sobrecarga en el
circuito, hfigalo corregir per un electricista
calificado
Abra la llave dei suministro de agua
Cierre la puertay presione el bot6n de
]niciar/Pausa Despu_s de presionar e_
bot6n de IniciarlPausa, puede tomar unos
mementos antes de que la ropa comience
a girar La puerta debe cerrar con seguro
antes de iniciar los giros
Si el desequilibrio es detectado 6 si e!
programa eliminador de espuma operan, el
tiempo de lavado puede aumentar
45
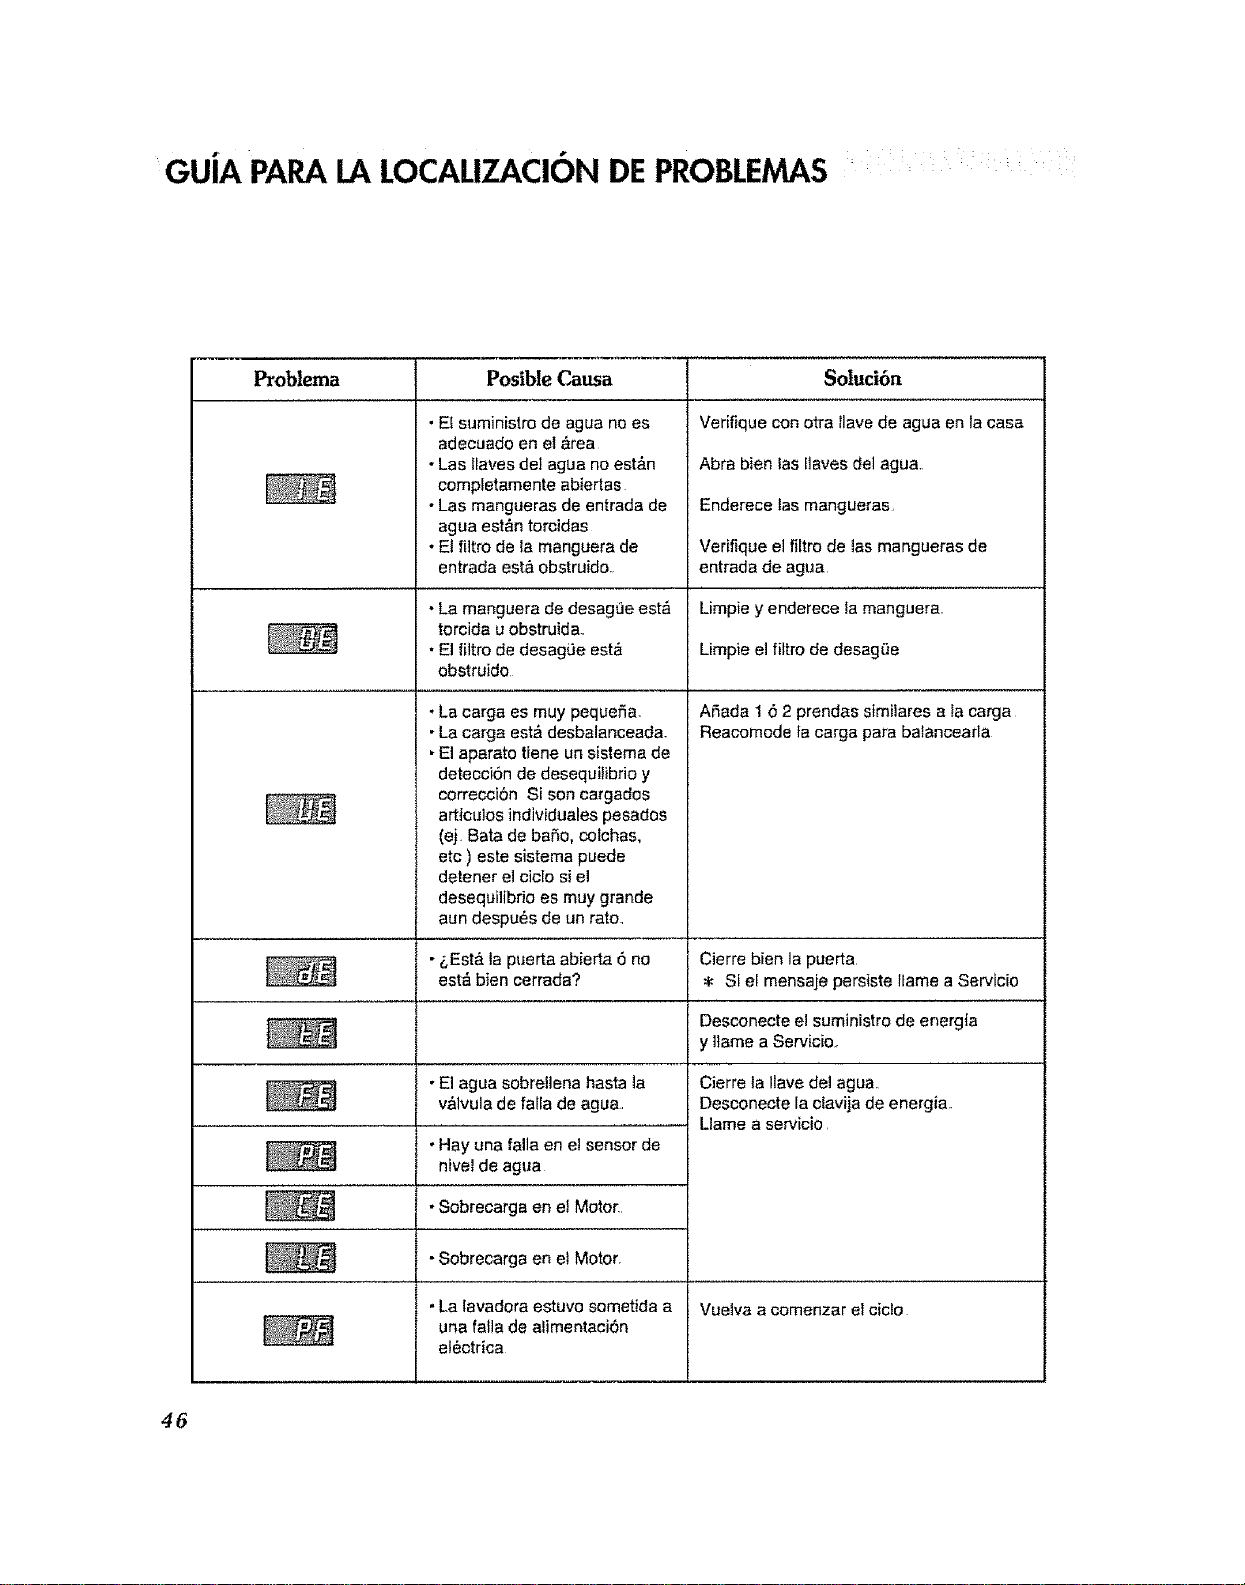
GuJA PAPA LA LOCALIZACION DE PROBLEMAS ,
Problema Poslble Causa
• Ef suministro de agua no es
adecuado en el &rea
* Las flares del agua no est&n
compfetamente abiertas
• Las mangueras de entrada de
agua est_n torcidas
• El fiitro de la manguera de
entrada est& obstruido.
• La manguera de desag_e est_
torcida u obstruida
• El filtro de desagOe est&
obstruido
• La carga es muy pequefia
• La carga estfi desbalanceada
• El aparato tiene un sistema de
detecci6n de desequitibrio y
correcci6n Si son cargados
arttculos individualespesados
(ej Bata de ba5o, coichas,
etc ) este sistema puede
detener el cic|o si el
desequilibrio es muy grande
aun despu_s de un rato
• _,Esta la puerta abierta 6 no
estfi bien cerrada? I
I
• El agua sobrellena hasta ta
valvula de falla de agua
. Hay una falla en el sensor de
nivel de agua
• Sobrecarga en e! Motor
• Sobrecarga en et Motor
• La lavadora estuvo sometida a
una falla de afimentaciOn
el_ctrica
Soluci6n
Verifique con otra llave de agua en la casa
Abra bien las liaves del agua
Enderece las mangueras
Verifique el filtro de las mangueras de
entrada de agua
Limpie y enderece la manguera
Limpie el filtro de desag(_e
ASada 16 2 prendas similares a la carga
Reacomode tacarga para balancearla
Cierre bien la puerta
=_ SI el mensate perstste ttame a Servicio
Desconecte el suministro de energfa
y llame a Servicior
Cierre ta Ilave del agua
Desconecte la olavija de energia
Llame a servicio
Vuelva a comenzar el ciclo
46

GA TJA :
Sulavadora LG ser6 reparada o reemplazada, a eons_deraci6n de LG_stprueba set defecluosa en material o en ejecuci6n deniro de
un usa normal, denfro de1perlodo de garan'ti'a ("pedodo de garanfia'_ desedto en la parle inferior, eteclivo desde la fecha ("fecha de
compra') de ta compra de! producio per et consumidor Estogatanffa liml_ada es elective enicamente pare el compradot original de!
preduclo, y efecfivo unicamenie slha side usado en los BJados Unldos, tnmluyendo Alaska. Hawai y terrtto_io nodeameficano
PERIODO DE GARANTiA:
Vlgencla: 1aria desde la fecha de eompra
PAR"IES_exceD_uando ]a slaulenfe }}_a_
i al_odesde ta fecha de compra
Piezaspare el panel de conlrol eleclt6nico:
2 amosdesde la fecha de compra
Piezaspata el molar de |Ina DnJm:
7 ai_osdesde la fecha de compra
Piezaspare la fine DnJmde acero Inoxldable: La vlda
Lasunldades reemplazadas y reparadas ptJeden set
nuevas o re_abrieadas per ia t6brica
Laxunldades reernplazadas y reparadas flenen la misma
perci6n de garanl_a que la garan"i_a ariglnat de la cempra
dei preducto duranle el mismo peflodo
COMO SEMANEJA ELSERV!ClO;
Serv|clo a domic|lio: Par favor conserve ei tecibe de_ !_Jgar
donde realiz6 su compra coma evidencia de _afecha en
que el producto rue adquirtdo pare validar el periodo de
garan_fa, y Jenga one copla de! reclbo pare la persona de
ser_4cioque la aJienda en el momenlo en que neeesite
apltcar su gatantia
Par favor flame al 1-877-714-7486 y esco]o la opci6n
aproplada pare localizar el Centre de Sen/Ic|o Auloilzado LG
m_s cercano a usled,.
O vistle nuestra p6gina de inJetnef en
htfp:llwww lgservice cam
ESTAGARANTiA REEMPLAZACUALQUIER OTRA GARANTIA. EXPRESAO IMPLiCITA, INCLUYENDO SIN UMITACION CUALQUIER
GARANTIA DEVENTA DEMERCANdA O CONVENIENCIA PARA PROPOSITOSPARTICULARE&EN ELEXTENDIDOCUALQUIER GARANTIA
IMPLICITA ESREQUERIDAPeR LEY,ESLIMITADA ENDURACI6N AL PERIODO DEGARANTIA EXPRESAENLA PARTEINFERIOR.
HI ELFABRICANTENI SUSDiSTRUBUIDORESEN !.OSEUAPUEDEN5ERRESPONSABLESDENINGUN DAI_O INCIDENTAL, CONSECUENCIAL,
INDIRECTO, ESPECIALO PUNn'IVO DE NINGUNA NATURALEZA,INCLUYENDO SIN UMITACIC)N, PI_RDIDASDEGANANCIAS O
CUALQUIEROTRO DANa AUNQUE ESTEBASADO ENCONTRATO O AGRAVIO_ Algunos estados no permlten la exclust6n o timltacl6n
de daSos inclden/ales o consecuenclales en el lIempo v61ido de la garan|_a as_"que la exclusi6n menctonada en la parle de
arriba puede que no aplique pare us|ed Esla garanlfa te da derechos legales especi'flcos y puede que usled lenga altos
derechos adem6s de los menclonados que varian de estado en eslado
ESTAGARANT[A UMITADA NO APLICA A:
* Vlajes de Servicio a su case para Ilevar. tecoger y/o instalar et producto, lnstrulr o reponer iusibtes o coneclar correclamente
¢abfes, o ia corteccl6n de piezas desautoslzadas; y
* Da_,os o probiemas operacionales coma resullado de un n'zalu_. abuse, operacl6n denl[o de un amblente no especlficado o
conlrado a los requerlmlentos o precauelones en la Guia Operaclonal, accidenle, plagas, incendios, Inundaciones, lnslalact6n
lnaproplada, acres de Dies, alleraciones o modlflcaciones desautorizadas, voilaje Inca[recto, usa comerclal, o pafa et usa de
ot_'osfines que no seen los pi'op6sltos intenctonados.
E!coslo de repc_actones o reemplazos que son exciuldos de estas ct[cunstanclas, deben ser asumtdos par el eonsumldor.
N[]MEROS CENTRALES INTERACTIVO$ PARA ELCLIENTE
Pata oblener AsMeneta al Consumldor, Llame al 1-877_714.,7486(dlsponible 24171365)y se_eccione la opd6n
Informaci6n de Produclo, O centros de Sen,iclo apropfoda del menti
Aulofizades: o visile nuesfra p6gina de Iniernet en hffP:llwww Igsewice cam
_APUkCONTACTARA LGElectronics PaR MAIL
LG Cu_omer Interactive Cenfer
P.O Box 24(X,307
20t James Record Road
Huntsville, Atabama 35824
A1"[N:CIC
47

O LG Electronics into
PINo :3828ER3020X