DIGITAL CAMERA
User's Manual
En
Nikon Manual Viewer 2
Install the Nikon Manual Viewer 2 app on your smartphone or tablet
to view Nikon digital camera manuals, anytime, anywhere.
Nikon Manual Viewer 2 can be downloaded free of charge from the App Store
and Google Play.

Touch Controls..............................................................................iv
About This Manual ........................................................................ v
The Reference Manual................................................................. vi
For Your Safety.............................................................................vii
Notices............................................................................................. x
Wireless ........................................................................................xvi
Introduction 1
The Camera and Accessories.......................................................1
Parts of the Camera.......................................................................2
Using the Touch Screen..............................................................13
First Steps......................................................................................18
Taking and Viewing Photographs 25
Point-and-Shoot Photography (Auto Mode) .........................25
Viewing Photographs.........................................................................28
Deleting Pictures ..................................................................................29
Recording and Viewing Movies 32
Recording Movies........................................................................32
Taking Photographs During Movie Recording..........................35
Viewing Movies............................................................................36
Deleting Movies....................................................................................37
v Advanced Movie Options ....................................................38
Table of Contents
1 J5
Model Name: N1407

i
Other Shooting Modes 41
w Choosing a Creative Mode.................................................41
Choosing a Mode That Matches the Subject or Situation .... 42
HDR........................................................................................................... 44
Easy Panorama...................................................................................... 45
Selective Color ...................................................................................... 48
Taking Photos in P, S, A, and M Modes...................................... 49
P Programmed Auto ........................................................................... 49
S Shutter-Priority Auto ....................................................................... 50
A Aperture-Priority Auto.................................................................... 51
M Manual................................................................................................. 52
a Photographing Subjects in Motion (Sports Mode) ..........53
u Choosing the Moment (Best Moment Capture) ...............55
Choosing a Shot Manually (Active Selection)............................ 55
Choosing Your Moment (Slow View)............................................ 59
Letting the Camera Choose the Moment (Smart Photo
Selector).............................................................................................. 61
z Combining Photos with Brief Movie Vignettes (Motion
Snapshot Mode).....................................................................65
Viewing Motion Snapshots.............................................................. 69
Deleting Motion Snapshots............................................................. 69

ii
More on Photography 70
Live Image Control ......................................................................70
Continuous Mode........................................................................73
Self-Timer Modes.........................................................................75
The Built-in Flash .........................................................................77
Auto Pop-up Modes ............................................................................77
Manual Pop-up Modes.......................................................................79
Self-Portraits.................................................................................83
Tap Shooting Options.................................................................86
C Auto, w Creative, and Self-Portrait Modes........................86
a Sports Mode......................................................................................86
P, S, A, and M Modes..............................................................................87
v Advanced Movie Mode...............................................................88
Wi-Fi 89
What Wi-Fi Can Do for You ........................................................89
Wireless Security..........................................................................90
Connecting via Wi-Fi...................................................................93
Android and iOS: Connecting via SSID.........................................93
Android: Connecting via NFC ..........................................................94
Uploading Photos to a Smart Device.......................................96
Uploading Photos One at a Time ...................................................96
Uploading Multiple Selected Photos ............................................97
Uploading Photos via NFC................................................................98
Downloading Selected Pictures to the Smart Device...........99
Menu Options 100
Connecting to a Computer 104
Copying Pictures to a Computer ........................................... 104
Installing ViewNX-i............................................................................ 104
Copying Pictures to the Computer............................................. 105

iii
Technical Notes 108
Optional Accessories ................................................................108
Approved Memory Cards................................................................109
Storage and Cleaning...............................................................110
Storage ..................................................................................................110
Cleaning................................................................................................110
Caring for the Camera and Battery: Cautions......................111
Troubleshooting........................................................................116
Battery/Display ...................................................................................116
Shooting (All Modes)........................................................................116
Movies....................................................................................................117
Tap Shooting Options......................................................................117
Playback................................................................................................118
Wi-Fi (Wireless Networks) ...............................................................118
Miscellaneous .....................................................................................118
Error Messages...........................................................................119
Specifications.............................................................................121
Nikon 1 J5 Digital Camera ..............................................................121
Battery Life ...........................................................................................132
Index ............................................................................................133

v
For a complete guide to using your digital camera, see the Refer-
ence Manual (page vi). To get the most from your camera, please
be sure to read this User’s Manual thoroughly and keep it where
it will be read by all who use the product.
Camera Settings
The explanations in this manual assume that default settings are used.
Symbols and Conventions
To make it easier to find the information you need, the following sym-
bols and conventions are used:
The lens generally used in this manual for illustrative purposes is a
1 NIKKOR VR 10–30mm f/3.5–5.6 PD-ZOOM.
About This Manual
D
This icon marks cautions; information that should be read before
use to prevent damage to the camera.
A
This icon marks notes; information that should be read before
using the camera.
0
This icon marks references to other pages in this manual.
A For Your Safety
Before using the camera for the first time, read the safety instructions in
“For Your Safety” (0 vii–ix) and “Caring for the Camera and Battery:
Cautions” (0 111).

vi
For more information on using your Nikon camera, download a
pdf copy of the camera Reference Manual from the website listed
below. The Reference Manual can be viewed using Adobe Reader
or Adobe Acrobat Reader 5.0 or later.
1 On your computer, launch a web browser and visit
http://downloadcenter.nikonimglib.com/
2 Navigate to the page for the desired product and download
the manual.
The Reference Manual

vii
To prevent damage to your Nikon product or injury to yourself or to others,
read the following safety precautions in their entirety before using this equip-
ment. Keep these safety instructions where all those who use the product will
read them.
The consequences that could result from failure to observe the precautions
listed in this section are indicated by the following symbol:
❚❚WARNINGS
For Your Safety
A
This icon marks warnings. To prevent possible injury, read all warn-
ings before using this Nikon product.
A
Keep the sun out of the frame. Keep the
sun well out of the frame when
shooting backlit subjects. Sunlight
focused into the camera when the
sun is in or close to the frame could
cause a fire.
A
Turn off immediately in the event of mal-
function. Should you notice smoke or
an unusual smell coming from the
equipment or AC adapter (available
separately), unplug the AC adapter
and remove the battery immediately,
taking care to avoid burns. Continued
operation could result in injury. After
removing the battery, take the equip-
ment to a Nikon-authorized service
center for inspection.
A
Do not use in the presence of flammable
gas. Do not use electronic equipment
in the presence of flammable gas, as
this could result in explosion or fire.
A
Keep dry. Do not immerse in or expose
to water or handle with wet hands.
Failure to keep the product dry could
result in damage to the product, fire,
or electric shock, while handling the
product with wet hands could result
in electric shock.
A
Do not disassemble. Touching the prod-
uct’s internal parts could result in
injury. In the event of malfunction,
the product should be repaired only
by a qualified technician. Should the
product break open as the result of a
fall or other accident, remove the bat-
tery and/or AC adapter and then take
the product to a Nikon-authorized
service center for inspection.
A
Keep out of reach of children. Failure to
observe this precaution could result
in injury. In addition, note that small
parts constitute a choking hazard.
Should a child swallow any part of
this equipment, consult a physician
immediately.
A
Do not place the strap around the neck of
an infant or child. Placing the camera
strap around the neck of an infant or
child could result in strangulation.
A
Follow the instructions of airline and hos-
pital personnel.

viii
A
Do not remain in contact with the camera,
battery, or charger for extended periods
while the devices are on or in use. Parts of
the device become hot. Leaving the
device in direct contact with the skin
for extended periods may result in
low-temperature burns.
A
Do not leave the product where it will be
exposed to extremely high temperatures,
such as in an enclosed automobile or in
direct sunlight. Failure to observe this
precaution could cause damage or
fire.
A
Do not aim the flash at the operator of a
motor vehicle. Failure to observe this
precaution could result in accidents.
A
Observe caution when using a flash.
• Using the camera with the flash in
close contact with the skin or other
objects could cause burns.
• Using a flash close to the subject’s
eyes could cause temporary visual
impairment. The flash should be no
less than one meter (3 ft 4 in.) from
the subject. Particular care should
be observed when photographing
infants.
A
Avoid contact with liquid crystal. Should
the display break, care should be
taken to avoid injury due to broken
glass and to prevent the liquid crystal
from the display touching the skin or
entering the eyes or mouth.
A
Do not carry tripods with a lens or camera
attached. You could trip or accidentally
strike others, resulting in injury.
A
Do not touch the moving parts of the lens.
Failure to observe this precaution
could result in injury.
A
Observe proper precautions when handling
batteries. Batteries may leak, overheat,
rupture, or catch fire if improperly
handled. Observe the following pre-
cautions when handling batteries for
use in this product:
• Use only batteries approved for use
in this equipment.
• Do not short or disassemble the
battery.
• Do not expose the battery or the
camera in which it is inserted to
powerful physical shocks.
• Be sure the product is off before
replacing the battery. If you are
using an AC adapter, be sure it is
unplugged.
• Do not attempt to insert the battery
upside down or backwards.
• Do not expose the battery to flame
or to excessive heat.
• Do not immerse in or expose to
water.
• Replace the terminal cover when
transporting the battery. Do not
transport or store the battery with
metal objects such as necklaces or
hairpins.
• Batteries are prone to leakage when
fully discharged. To avoid damage
to the product, be sure to remove
the battery when no charge
remains.
• When the battery is not in use,
attach the terminal cover and store
in a cool, dry place.

ix
• The battery may be hot immedi-
ately after use or when the product
has been used on battery power for
an extended period. Before remov-
ing the battery turn the camera off
and allow the battery to cool.
• Discontinue use immediately
should you notice any changes in
the battery, such as discoloration or
deformation.
A
Observe proper precautions when handling
the charger:
• Keep dry. Failure to observe this pre-
caution could result in injury or
product malfunction due to fire or
electric shock.
• Do not short the charger terminals.
Failure to observe this precaution
could result in overheating and
damage to the charger.
• Dust on or near the metal parts of
the plug should be removed with a
dry cloth. Continued use could
result in fire.
• Do not go near the charger during
thunderstorms. Failure to observe
this precaution could result in elec-
tric shock.
• Do not handle the plug or charger
with wet hands. Failure to observe
this precaution could result in injury
or product malfunction due to fire
or electric shock.
• Do not use with travel converters or
adapters designed to convert from
one voltage to another or with DC-
to-AC inverters. Failure to observe
this precaution could damage the
product or cause overheating or fire.
A
Use appropriate cables. When connect-
ing cables to the input and output
jacks, use only the cables provided or
sold by Nikon for the purpose to
maintain compliance with product
regulations.
x
• No part of the manuals included
with this product may be repro-
duced, transmitted, transcribed,
stored in a retrieval system, or trans-
lated into any language in any form,
by any means, without Nikon’s prior
written permission.
• Nikon reserves the right to change
the specifications of the hardware
and software described in these
manuals at any time and without
prior notice.
• Nikon will not be held liable for any
damages resulting from the use of
this product.
• While every effort has been made to
ensure that the information in these
manuals is accurate and complete,
we would appreciate it were you to
bring any errors or omissions to the
attention of the Nikon representa-
tive in your area (address provided
separately).
Notice for Customers in Canada
CAN ICES-3 (B) / NMB-3 (B)
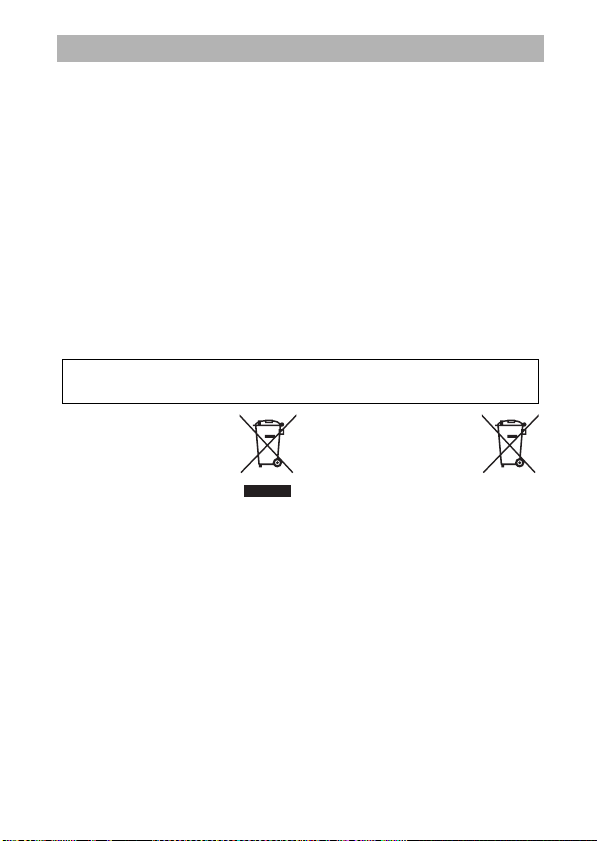
Notice for Customers in Europe
This symbol indicates that
electrical and electronic
equipment is to be col-
lected separately.
The following apply only to
users in European countries:
• This product is designated for sepa-
rate collection at an appropriate col-
lection point. Do not dispose of as
household waste.
• Separate collection and recycling
helps conserve natural resources
and prevent negative consequences
for human health and the environ-
ment that might result from incor-
rect disposal.
• For more information, contact the
retailer or the local authorities in
charge of waste management.
This symbol on the battery
indicates that the battery is
to be collected separately.
The following apply only to
users in European countries:
• All batteries, whether marked with
this symbol or not, are designated
for separate collection at an appro-
priate collection point. Do not dis-
pose of as household waste.
• For more information, contact the
retailer or the local authorities in
charge of waste management.
Notices
CAUTION: RISK OF EXPLOSION IF BATTERY IS REPLACED BY AN INCORRECT
TYPE. DISPOSE OF USED BATTERIES ACCORDING TO THE INSTRUCTIONS.

xi
Notice for Customers in the U.S.A.
Federal Communications Commission (FCC) Radio Frequency Interference Statement
This equipment has been tested and
found to comply with the limits for a
Class B digital device, pursuant to Part
15 of the FCC rules. These limits are
designed to provide reasonable pro-
tection against harmful interference in
a residential installation. This equip-
ment generates, uses, and can radiate
radio frequency energy and, if not
installed and used in accordance with
the instructions, may cause harmful
interference to radio communications.
However, there is no guarantee that
interference will not occur in a particu-
lar installation. If this equipment does
cause harmful interference to radio or
television reception, which can be
determined by turning the equipment
off and on, the user is encouraged to
try to correct the interference by one
or more of the following measures:
• Reorient or relocate the receiving
antenna.
• Increase the separation between the
equipment and receiver.
• Connect the equipment into an out-
let on a circuit different from that to
which the receiver is connected.
• Consult the dealer or an experienced
radio/television technician for help.
CAUTIONS
Modifications
The FCC requires the user be notified
that any changes or modifications
made to this device that are not
expressly approved by Nikon Corpo-
ration may void the user’s authority to
operate the equipment.
Interface Cables
Use the interface cables sold or pro-
vided by Nikon for your equipment.
Using other interface cables may
exceed the limits of Class B Part 15 of
the FCC rules.
Notice for Customers in the State of California
WARNING: Handling the cord on this
product may expose you to lead, a
chemical known to the State of Cali-
fornia to cause birth defects or other
reproductive harm. Wash hands after
handling.
Nikon Inc., 1300 Walt Whitman Road,
Melville, New York 11747-3064, U.S.A.
Tel.: 631-547-4200
The Battery Charger
IMPORTANT SAFETY INSTRUCTIONS—SAVE THESE
INSTRUCTIONS
DANGER—TO REDUCE THE RISK OF FIRE OR ELECTRIC
SHOCK, CAREFULLY FOLLOW THESE INSTRUCTIONS
For connection to a supply not in the U.S.A., use an attachment plug adapter
of the proper configuration for the power outlet if needed. This power unit
is intended to be correctly oriented in a vertical or floor mount position.

xii
Notice Concerning Prohibition of Copying or Reproduction
Note that simply being in possession of material that has been digitally cop-
ied or reproduced by means of a scanner, digital camera, or other device may
be punishable by law.
• Items prohibited by law from being copied
or reproduced
Do not copy or reproduce paper
money, coins, securities, govern-
ment bonds, or local government
bonds, even if such copies or repro-
ductions are stamped “Sample.”
The copying or reproduction of
paper money, coins, or securities
which are circulated in a foreign
country is prohibited.
Unless the prior permission of the
government has been obtained, the
copying or reproduction of unused
postage stamps or post cards issued
by the government is prohibited.
The copying or reproduction of
stamps issued by the government
and of certified documents stipu-
lated by law is prohibited.
• Cautions on certain copies and reproduc-
tions
The government has issued cautions
on copies or reproductions of securi-
ties issued by private companies
(shares, bills, checks, gift certificates,
etc.), commuter passes, or coupon
tickets, except when a minimum of
necessary copies are to be provided
for business use by a company. Also,
do not copy or reproduce passports
issued by the government, licenses
issued by public agencies and pri-
vate groups, ID cards, and tickets,
such as passes and meal coupons.
• Comply with copyright notices
The copying or reproduction of
copyrighted creative works such as
books, music, paintings, woodcuts,
prints, maps, drawings, movies, and
photographs is governed by
national and international copyright
laws. Do not use this product for the
purpose of making illegal copies or
to infringe copyright laws.

xiii
Disposing of Data Storage Devices
Please note that deleting images or formatting memory cards or other data
storage devices does not completely erase the original image data. Deleted
files can sometimes be recovered from discarded storage devices using com-
mercially available software, potentially resulting in the malicious use of per-
sonal image data. Ensuring the privacy of such data is the user’s responsibility.
Before discarding a data storage device or transferring ownership to another
person, erase all data using commercial deletion software, or format the
device and then completely refill it with images containing no private infor-
mation (for example, pictures of empty sky). Wi-Fi settings can be reset to
default values by selecting Reset Wi-Fi settings for Wi-Fi connection type in
the Wi-Fi menu (0 92). Care should be taken to avoid injury when physically
destroying data storage devices.
AVC Patent Portfolio License
THIS PRODUCT IS LICENSED UNDER THE AVC PATENT PORTFOLIO LICENSE FOR THE PERSONAL
AND NON-COMMERCIAL USE OF A CONSUMER TO (i) ENCODE VIDEO IN COMPLIANCE WITH
THE AVC STANDARD (“AVC VIDEO”) AND/OR (ii) DECODE AVC VIDEO THAT WAS ENCODED
BY A CONSUMER ENGAGED IN A PERSONAL AND NON-COMMERCIAL ACTIVITY AND/OR WAS
OBTAINED FROM A VIDEO PROVIDER LICENSED TO PROVIDE AVC VIDEO. NO LICENSE IS
GRANTED OR SHALL BE IMPLIED FOR ANY OTHER USE. ADDITIONAL INFORMATION MAY BE
OBTAINED FROM MPEG LA, L.L.C. SEE http://www.mpegla.com
Temperature Warnings
The camera may become warm to the touch during use; this is normal and
does not indicate a malfunction. At high ambient temperatures, after
extended periods of continuous use, or after several photographs have been
taken in quick succession, a temperature warning may be displayed, follow-
ing which the camera will turn off automatically to minimize damage to its
internal circuits. Wait for the camera to cool before resuming use.

xiv
Use Only Nikon Brand Electronic Accessories
Nikon cameras are designed to the highest standards and include complex
electronic circuitry. Only Nikon brand electronic accessories (including char-
gers, batteries, AC adapters, and lens accessories) certified by Nikon specifi-
cally for use with this Nikon digital camera are engineered and proven to
operate within the operational and safety requirements of this electronic cir-
cuitry.
The use of non-Nikon electronic accessories could damage the
camera and may void your Nikon warranty. The use of third-
party rechargeable Li-ion batteries not bearing the Nikon holo-
graphic seal shown at right could interfere with normal operation of the cam-
era or result in the batteries overheating, igniting, rupturing, or leaking.
For more information about Nikon brand accessories, contact a local autho-
rized Nikon dealer.

xv
D
Use Only Nikon Brand Accessories
Only Nikon brand accessories certified by Nikon specifically for use
with your Nikon digital camera are engineered and proven to operate
within its operational and safety requirements. THE USE OF NON-NIKON
ACCESSORIES
COULD DAMAGE YOUR CAMERA AND MAY VOID YOUR NIKON WAR-
RANTY.
D
Servicing the Camera and Accessories
The camera is a precision device and requires regular servicing. Nikon
recommends that the camera be inspected by the original retailer or a
Nikon-authorized service representative once every one to two years,
and that it be serviced once every three to five years (note that fees
apply to these services). Frequent inspection and servicing are partic-
ularly recommended if the camera is used professionally. Any accesso-
ries regularly used with the camera, such as lenses, should be included
when the camera is inspected or serviced.
A
Before Taking Important Pictures
Before taking pictures on important occasions (such as at weddings or
before taking the camera on a trip), take a test shot to ensure that the
camera is functioning normally. Nikon will not be held liable for dam-
ages or lost profits that may result from product malfunction.
A
Life-Long Learning
As part of Nikon’s “Life-Long Learning” commitment to ongoing prod-
uct support and education, continually-updated information is avail-
able on-line at the following sites:
• For users in the U.S. A.: http://www.nikonusa.com/
• For users in Europe and Africa: http://www.europe-nikon.com/support/
• For users in Asia, Oceania, and the Middle East: http://www.nikon-asia.com/
Visit these sites to keep up-to-date with the latest product informa-
tion, tips, answers to frequently-asked questions (FAQs), and general
advice on digital imaging and photography. Additional information
may be available from the Nikon representative in your area. For con-
tact information, visit http://imaging.nikon.com/

xvi
This product, which contains encryption software developed in the United
States, is controlled by the United States Export Administration Regulations
and may not be exported or re-exported to any country to which the United
States embargoes goods.
The following countries are currently subject to
embargo: Cuba, Iran, North Korea, Sudan, and Syria.
The use of wireless devices may be prohibited in some countries or regions.
Contact a Nikon-authorized service representative before using the wireless
features of this product outside the country of purchase.
Notices for Customers in the U. S. A.
This device complies with Part 15 of FCC Rules and Industry Canada licence-
exempt RSS standard(s). Operation is subject to the following two conditions:
(1) this device may not cause interference, and (2) this device must accept any
interference, including interference that may cause undesired operation of
the device.
FCC WARNING
The FCC requires the user to be notified that any changes or modifications
made to this device that are not expressly approved by Nikon Corporation
may void the user’s authority to operate the equipment.
FCC Radio Frequency Interference Statement
Note: This equipment has been tested and found to comply with the limits for
a Class B digital device, pursuant to part 15 of the FCC Rules.
These limits are
designed to provide reasonable protection against harmful interference in a
residential installation.
This equipment generates, uses and can radiate radio
frequency energy and, if not installed and used in accordance with the
instructions, may cause harmful interference to radio communications.
How-
ever, there is no guarantee that interference will not occur in a particular
installation.
If this equipment does cause harmful interference to radio or
television reception, which can be determined by turning the equipment off
and on, the user is encouraged to try to correct the interference by one or
more of the following measures:
• Reorient or relocate the receiving antenna.
• Increase the separation between the equipment and receiver.
• Connect the equipment into an outlet on a circuit different from that to
which the receiver is connected.
• Consult the dealer or an experienced radio/TV technician for help.
Co-location
This transmitter must not be co-located or operated in conjunction with any
other antenna or transmitter.
Nikon Inc., 1300 Walt Whitman Road, Melville, New York 11747-3064, U.S.A.
Tel.: 631-547-4200
Wireless

xvii
Notices for Customers in Canada
This device complies with Part 15 of FCC Rules and Industry Canada licence-
exempt RSS standard(s). Operation is subject to the following two conditions:
(1) this device may not cause interference, and (2) this device must accept any
interference, including interference that may cause undesired operation of
the device.
FCC/IC RF Exposure Statement
The available scientific evidence does not show that any health problems are
associated with using low power wireless devices.
There is no proof, however,
that these low power wireless devices are absolutely safe.
Low power Wire-
less devices emit low levels of radio frequency energy (RF) in the microwave
range while being used.
Whereas high levels of RF can produce health effects
(by heating tissue), exposure of low-level RF that does not produce heating
effects causes no known adverse health effects.
Many studies of low-level RF
exposures have not found any biological effects.
Some studies have sug-
gested that some biological effects might occur, but such findings have not
been confirmed by additional research.
The 1 J5, which is equipped with a
DW092 (FCC ID:EW4DW092 / IC ID:4634A-3149EC) wireless LAN module, has
been tested and found to comply with FCC/IC radiation exposure limits set
forth for an uncontrolled environment and meets the FCC radio frequency
(RF) Exposure Guidelines in Supplement C to OET65 and RSS-102 of the IC
radio frequency (RF) Exposure rules.
Please refer to the SAR test report that
was uploaded to FCC website.
Notices for Customers in Europe
Hereby, Nikon Corporation, declares that the 1 J5 is in compliance
with the essential requirements and other relevant provisions of
Directive 1999/5/EC.
The declaration of conformity may be con-
sulted at http://imaging.nikon.com/support/pdf/DoC_1J5.pdf
Notice for Customers in Singapore
This device complies with radio-frequency regulations. The content of certifi-
cation labels not affixed to the device is given below.
Trade Name:
Model: 1 J5
Complies with
IDA Standards
DA103423

xviii
Notice for Customers in Algeria
This device complies with Part 15 of FCC Rules and Industry Canada licence-
exempt RSS standard(s). Operation is subject to the following two conditions:
(1) this device may not cause interference, and (2) this device must accept any
interference, including interference that may cause undesired operation of
the device.
Co-location
This transmitter must not be co-located or operated in conjunction with any
other antenna or transmitter.
FCC/IC RF Exposure Statement
The available scientific evidence does not show that any health problems are
associated with using low power wireless devices.
There is no proof, however,
that these low power wireless devices are absolutely safe.
Low power Wire-
less devices emit low levels of radio frequency energy (RF) in the microwave
range while being used.
Whereas high levels of RF can produce health effects
(by heating tissue), exposure of low-level RF that does not produce heating
effects causes no known adverse health effects.
Many studies of low-level RF
exposures have not found any biological effects.
Some studies have sug-
gested that some biological effects might occur, but such findings have not
been confirmed by additional research.
The 1 J5, which is equipped with a
DW092 (FCC ID:EW4DW092 / IC ID:4634A-3149EC) wireless LAN module, has
been tested and found to comply with FCC/IC radiation exposure limits set
forth for an uncontrolled environment and meets the FCC radio frequency
(RF) Exposure Guidelines in Supplement C to OET65 and RSS-102 of the IC
radio frequency (RF) Exposure rules.
Please refer to the SAR test report that
was uploaded to FCC website.
Security
Although one of the benefits of this product is that it allows others to freely
connect for the wireless exchange of data anywhere within its range, the fol-
lowing may occur if security is not enabled:
• Data theft: Malicious third-parties may intercept wireless transmissions to
steal user IDs, passwords, and other personal information.
• Unauthorized access: Unauthorized users may gain access to the network
and alter data or perform other malicious actions.
Note that due the design
of wireless networks, specialized attacks may allow unauthorized access
even when security is enabled.
1
s
s
Introduction
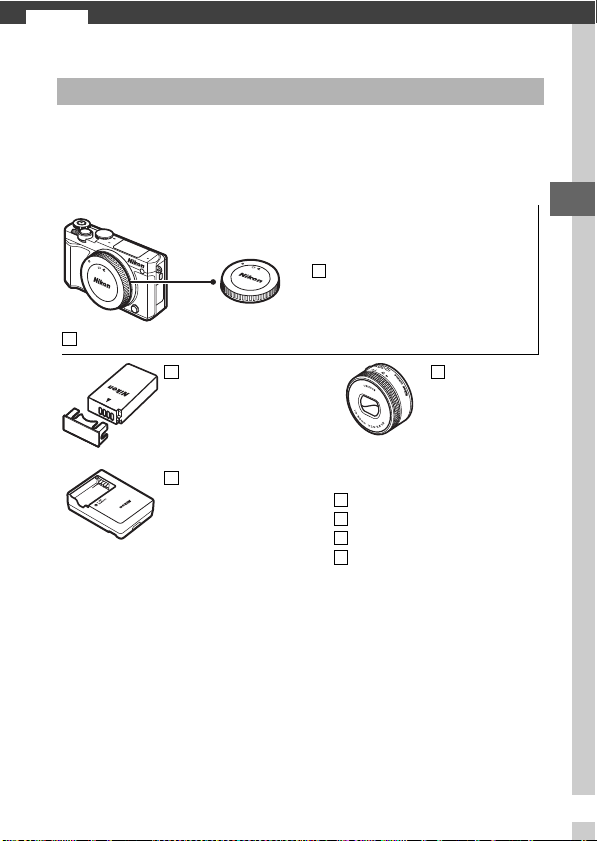
The following items are included with purchase of this product
or are available separately. Confirm that the package contains all
items listed as included. For a complete list of the accessories
available for separate purchase, see page 108.
Memory cards are sold separately.
The Camera and Accessories
Body Cap BF-N1000 (included)
Digital Camera Nikon 1 J5 (included)
Rechargeable Li-ion
Battery EN-EL24
(included with terminal
cover)
Lens
(supplied only if
lens kit is
purchased with
camera)
Battery Charger
MH-31 (included; plug
adapter supplied in
countries or regions where
required; shape depends on
country of sale)
Also included:
Strap AN-N1000
USB Cable UC-E20
Warranty
User’s Manual (this manual)
2
s
Take a few moments to familiarize yourself with camera controls
and displays. You may find it helpful to bookmark this section
and refer to it as you read through the rest of the manual.
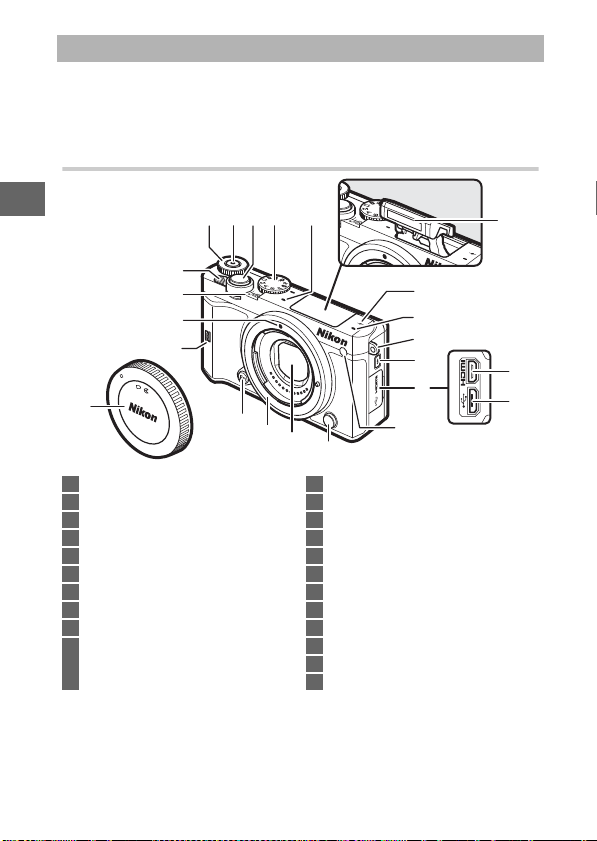
The Camera Body
Parts of the Camera
2 4 531
17
11
18
22
16
15
19
9
8
7
5
6
10
14
12
13
20
21
1 Command dial .....................................28
2 Movie-record button .........................33
3 Shutter-release button ............... 30, 35
4 Mode dial ................................................ 6
5 Microphone....................................... 101
6 Focal plane mark (E)
7 Eyelet for camera strap......................18
8 Flash pop-up button..........................79
9 Connector cover
10 AF-assist illuminator ....................... 102
Self-timer lamp....................................76
Red-eye reduction lamp ............ 78, 80
11 Lens release button
12 Dust shield.................................110, 111
13 Lens mount ..........................................20
14 Fn button
15 N-Mark (NFC antenna).......................94
16 Mounting mark ...................................20
17 Power lamp ..........................................22
18 Power switch........................................22
19 Built-in flash .........................................77
20 HDMI connector
21 USB connector...................................105
22 Body cap .............................................108
3
s
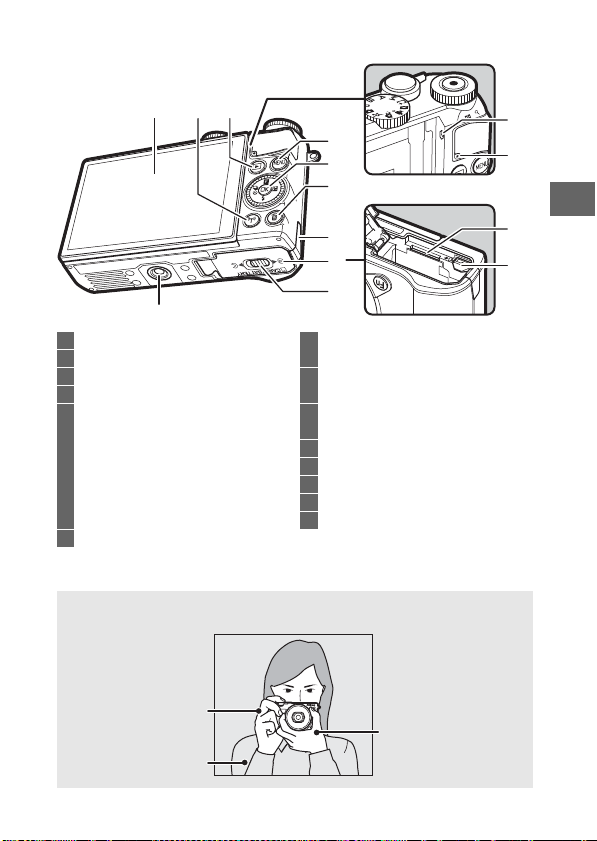
The Camera Body (Continued)
* Camera does not support TA-N100 tripod mounting spacer.
1
32
10
4
5
12
14
13
11
6
7
9
8
1 Tilting monitor .................. 4, 11, 13, 83
2 F (Wi-Fi) button ......................... 93, 96
3 K (playback) button .........................28
4 G (menu) button .......................... 8
5 Multi selector......................................... 9
J (OK) button....................................... 9
& (feature) ...........................................10
E (exposure compensation)
M (flash mode).....................................77
C (continuous shooting/
self-timer)..................................... 73, 75
6 O (delete) button................................29
7 Power connector cover
for optional power connector
8 Battery-chamber/
memory card slot cover................... 19
9 Battery-chamber/
memory card slot cover latch......... 19
10 Tripod socket
*
11 Speaker
12 Memory card access lamp................ 27
13 Memory card slot................................19
14 Battery latch......................................... 19
A
Holding the Camera
When framing photographs, hold the camera as shown below.
Hold the camera in
your right hand.
Keep your elbows
propped lightly
against your torso.
Cradle the lens with
your left hand.
4
s
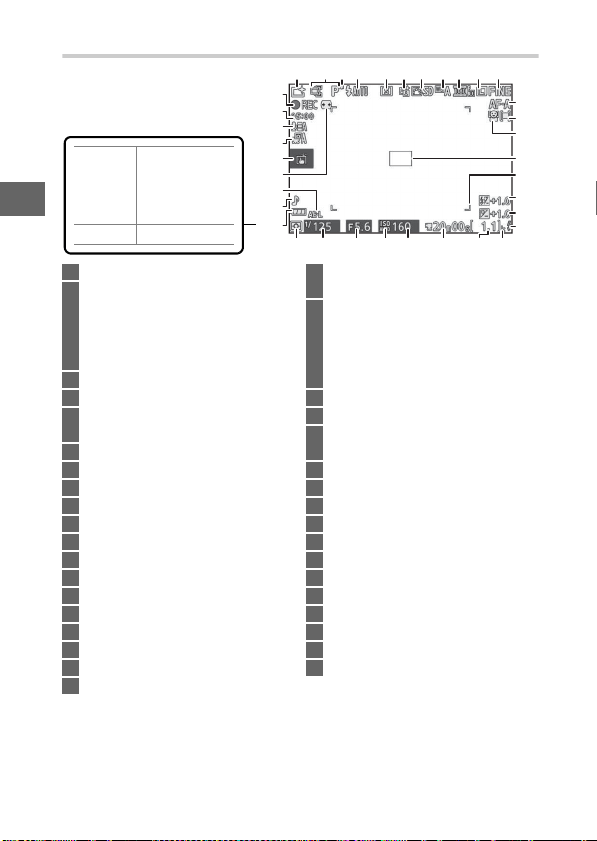
The Monitor
* Available only when Detailed is selected for Display > Shooting in the
setup menu (0 102).
Note: Display shown with all indicators lit for illustrative purposes.
421 3 5 6 7 8 9 1011
17
12
13
14
18
2127
222325 2426 20
15
16
19
29
28
33
30
34
32
31
35
36
NO ICON
Battery fully
charged or
partially
discharged.
H Low battery.
1 Shooting mode ..................................... 6
2 Live image control..............................70
Creative mode ....................................41
Best moment capture selection......55
Advanced movie selection ...............38
Exposure mode ................................ 101
3 Flexible program indicator...............49
4 Flash mode.................................... 78, 80
5 Self-timer ..............................................75
Continuous mode
*
...................... 53, 73
6 Active D-Lighting
*
.......................... 101
7 Picture Control
*
............................... 101
8 White balance
*
................................ 101
9 Frame size/frame rate
*
................... 101
10 Image size
*
....................................... 101
11 Image quality
*
................................. 101
12 Focus mode
*
..................................... 102
13 AF-area mode
*
................................. 102
14 Face-priority
*
..............................31, 102
15 Focus area....................................26, 102
16 AF-area brackets
*
17 Flash compensation ........................ 102
18 Exposure compensation
19 Flash-ready indicator .........................81
20 “k” (appears when memory remains
for over 1000 exposures)
21 Number of exposures remaining....24
Number of shots remaining
before memory buffer fills
White balance recording indicator
Card warning indicator....................119
22 Time available......................................33
23 ISO sensitivity ....................................101
24 ISO sensitivity indicator...................101
Auto ISO sensitivity indicator
25 Aperture......................................... 51, 52
26 Shutter speed ............................... 50, 52
27 Metering .............................................101
28 Battery indicator
*
29 Sound settings
*
................................102
30 Autoexposure (AE) lock indicator
31 Auto distortion control....................101
32 Tap shooting options.........................86
33 Auto image capture .........................101
34 Microphone sensitivity
*
35 Time elapsed........................................33
36 Recording indicator............................ 33

6
s
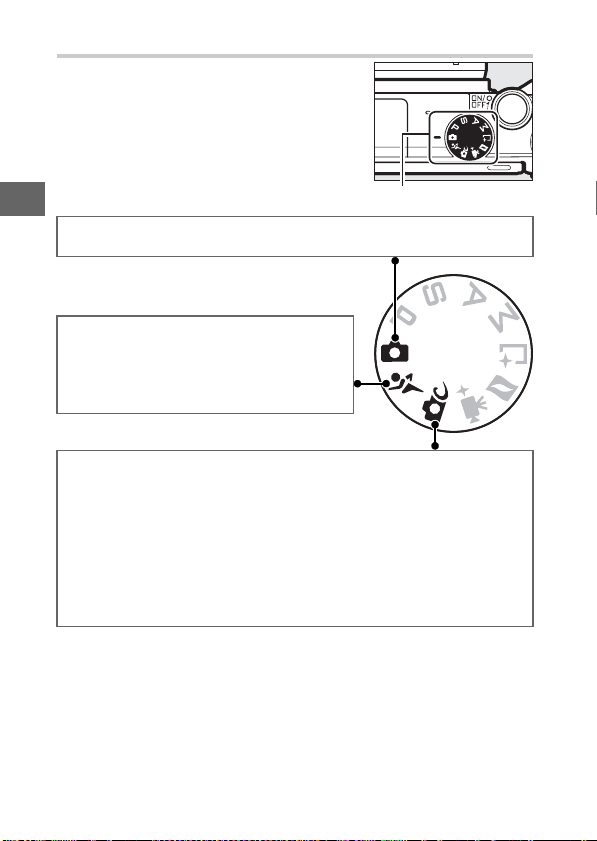
The Mode Dial
The camera offers a choice of the follow-
ing shooting modes:
Mode dial
C Auto mode (0 25): Let the camera pick the settings for photographs
and movies.
a Sports mode (0 53): The camera takes pic-
tures continuously while the shutter-release
button is pressed. Choose for sporting
events and other scenes with fast-moving
subjects.
w Creative mode (0 41): Use special effects or match settings to the
scene.
P Pop
Q Retro
R High-contrast
monochrome
S Nostalgic sepia
5 HDR
q Soft
p Easy panorama
r Miniature effect
s Selective color
6 Cross process
7 Toy camera effect
T Cross screen
U Fisheye
V Skin softening
j Night landscape
o Night portrait
l Landscape
n Close-up
k Portrait
7
s
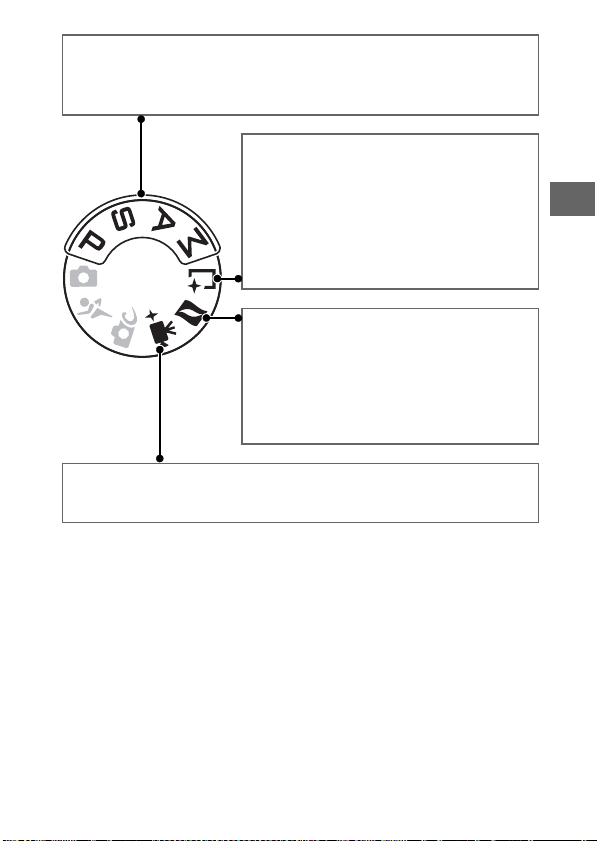
t, u, v, and w modes (0 49): Control shutter speed and aperture for
advanced photographic effects.
• P: Programmed auto (0 49)
• S: Shutter-priority auto (0 50)
• A: Aperture-priority auto (0 51)
• M: Manual (0 52)
u Best moment capture mode (0 55): Choose
Active Selection to select the best picture
from 20 shots in temporary storage, Slow
view to choose the best timing for the shot
while the scene plays back in slow motion,
or Smart Photo Selector to let the camera
pick the best shot based on composition
and movement.
z Motion Snapshot mode (0 65): Each time the
shutter is released, the camera records a still
image and about 1.6 s of movie footage.
When the resulting “Motion Snapshot” is
viewed on the camera, the movie will play
back in slow motion over approximately 4 s,
followed by the still image.
v Advanced movie mode (0 38): Choose an exposure mode and adjust
shutter-speed or aperture or record movies in slow or fast motion or
with other special effects.
8
s
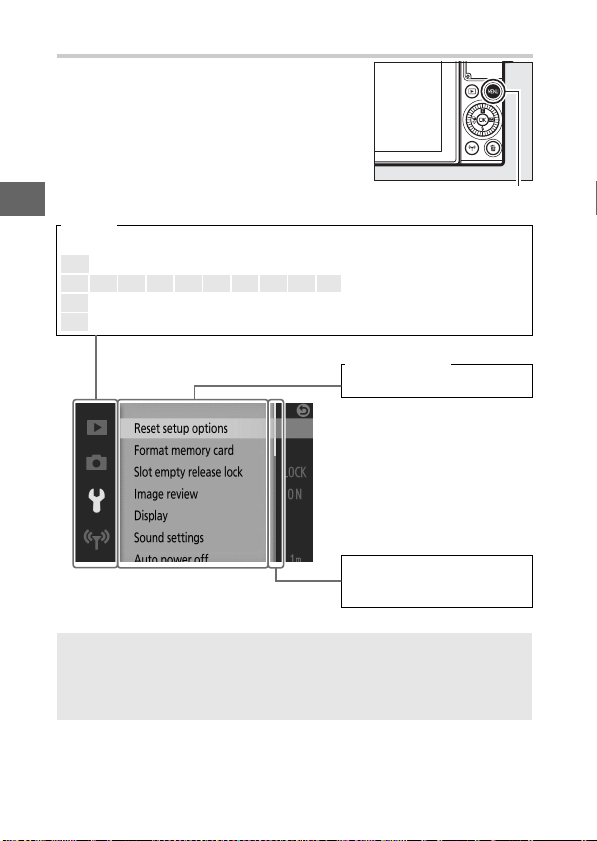
The G Button
Most shooting, playback, setup, and Wi-Fi
options can be accessed from the camera
menus. To view the menus, press the
G button.
G button
Ta bs
Choose from the following menus:
D Playback menu (0 100)
C w P S A M a v u z Shooting menu (0 101)
B Setup menu (0 102)
v Wi-Fi menu (0 89, 103)
Menu options
Options in current menu.
Slider shows position in
current menu.
A
Using the Menus
The items listed may vary with camera settings. Items displayed in gray
are not currently available. To exit the menus and return to shooting
mode, press the shutter-release button halfway (0 30).
9
s
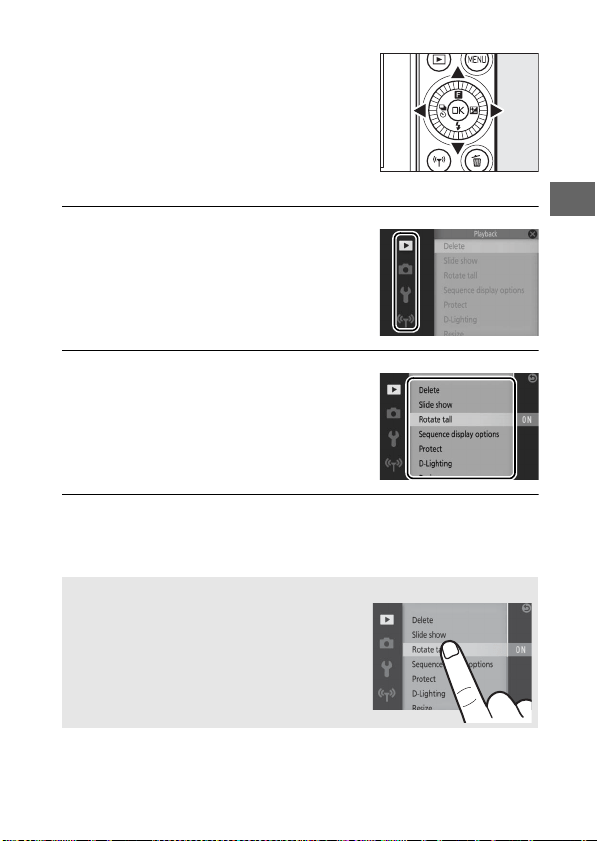
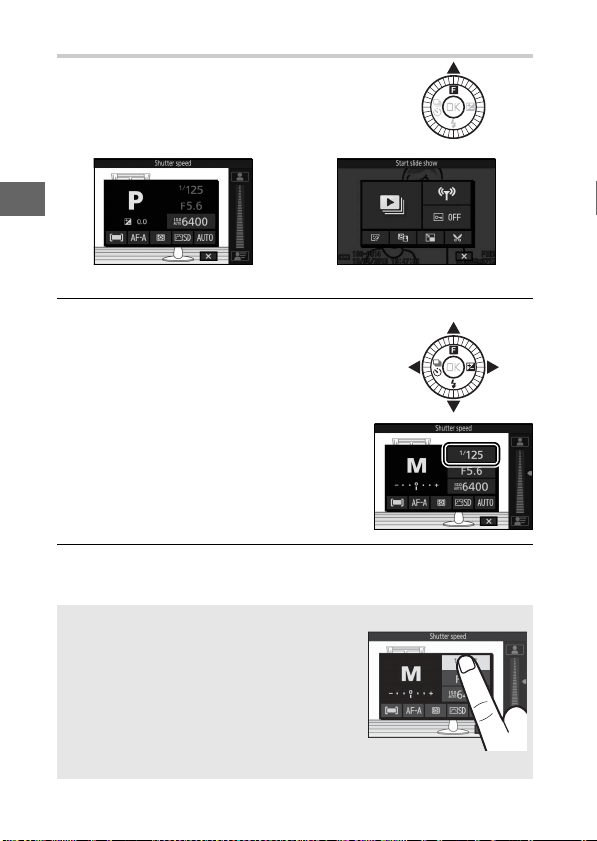
❚❚ Using the Menus
1
Select a menu.
2
Select an item.
3
Select an option.
Press 1 or 3 to highlight the desired option and press J to
select.
Use the multi selector to navigate the
playback, shooting, setup, and Wi-Fi
menus.
Multi selector
Press 1 or 3 to highlight tabs and
press 2 to position the cursor in the
highlighted menu.
Press 1 or 3 to highlight menu items
and press 2 to view options for the
highlighted item.
A
Touch Controls
Slide up or down to scroll and tap menu
items or icons to select options or adjust set-
tings (0 16).
10
s
The & (Feature) Menu
1
Select an item.
2
Select an option.
Highlight the desired option or value and press J to select.
To display the feature menu and adjust
camera settings or access playback
options, press & (feature) on the multi
selector.
& menu (shooting mode) & menu (playback)
Use the multi selector to highlight an
item and press J to display options
(to exit the & menu, press the shutter-
release button halfway as described
on page 30 or highlight 1 and press
J).
A
The & Menu
The & menu is context-sensitive: its contents
vary with camera settings or the type of
image displayed; options that are currently
unavailable are shown in gray. The & menu
is not available in auto or sports mode.
Items in the & menu can also be selected by
tapping the monitor.
11
s
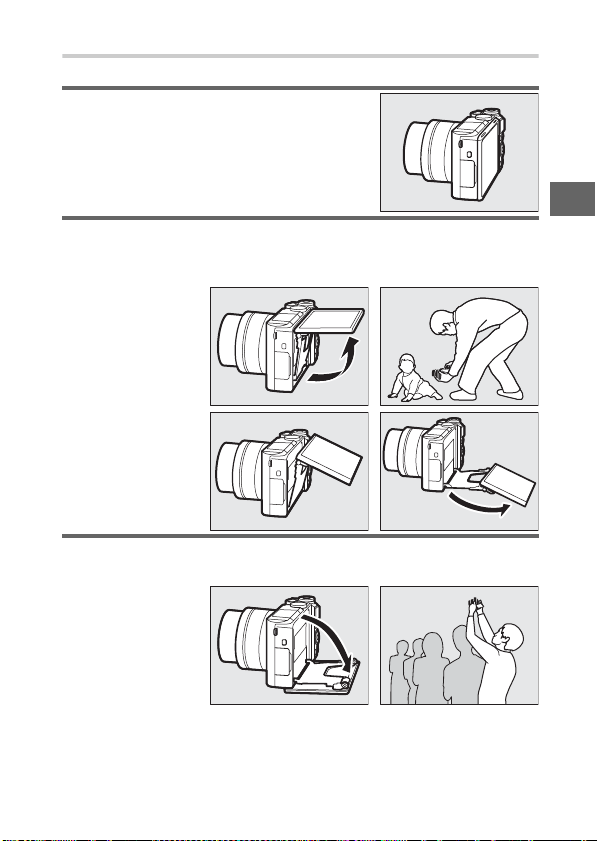
Tilting the Monitor
The monitor can be angled and rotated as shown below.
Normal use: The monitor is normally used in
storage position.
Low-angle shots: Tilt the monitor up to frame shots with the camera close
to the ground. Once in the low-angle position, the monitor can be fur-
ther lowered.
High-angle shots: Tilt the monitor down to frame shots while holding the
camera over your head.
12
s
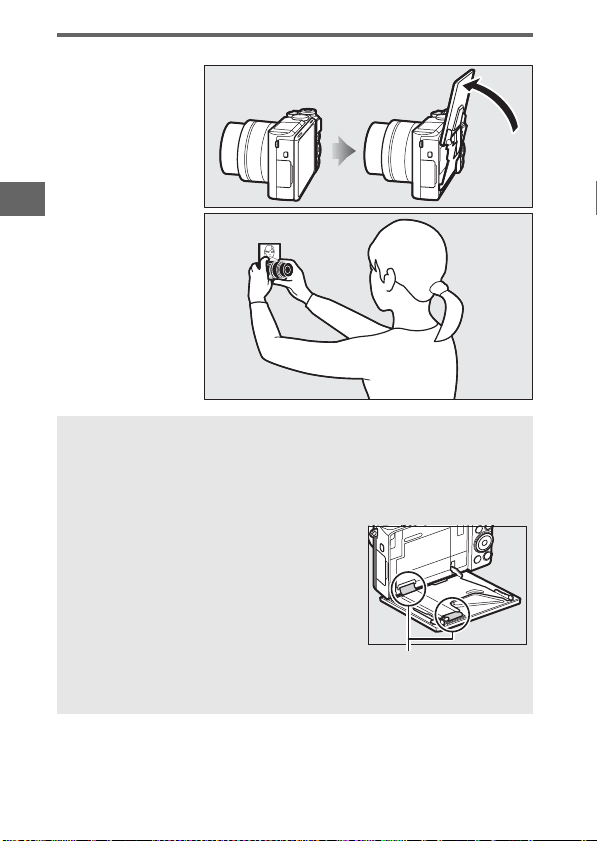
Self-portraits (0 83): Reverse the monitor to select self-portrait mode.
D
Using the Monitor
Rotate the monitor gently within the limits of the hinges. Do not use
force. Failure to observe these precautions could damage the camera
or monitor. If the camera is mounted on a tripod, care should be taken
to ensure that the monitor does not contact the tripod.
Do not touch the area to the rear of the
monitor. Failure to observe this precaution
could cause product malfunction.
Be particularly careful
not to touch these
areas.
13
s
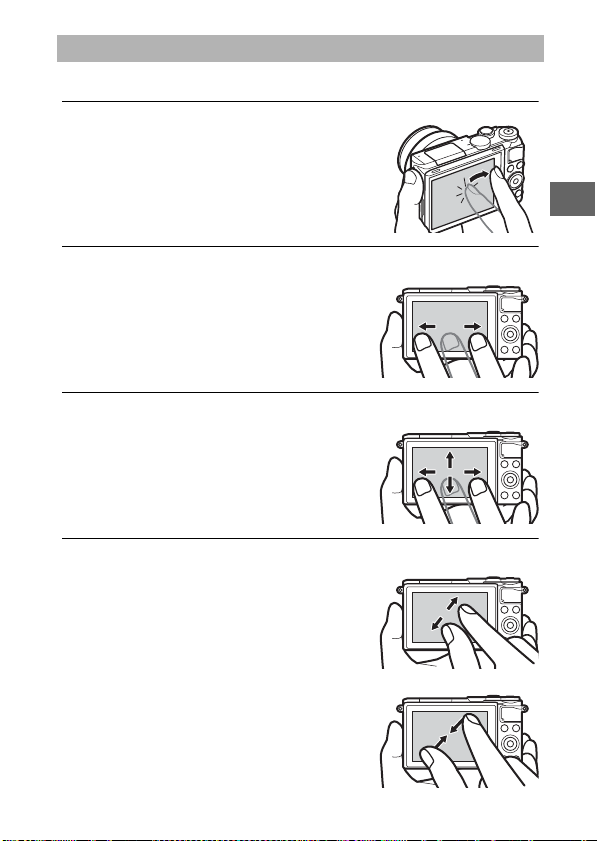
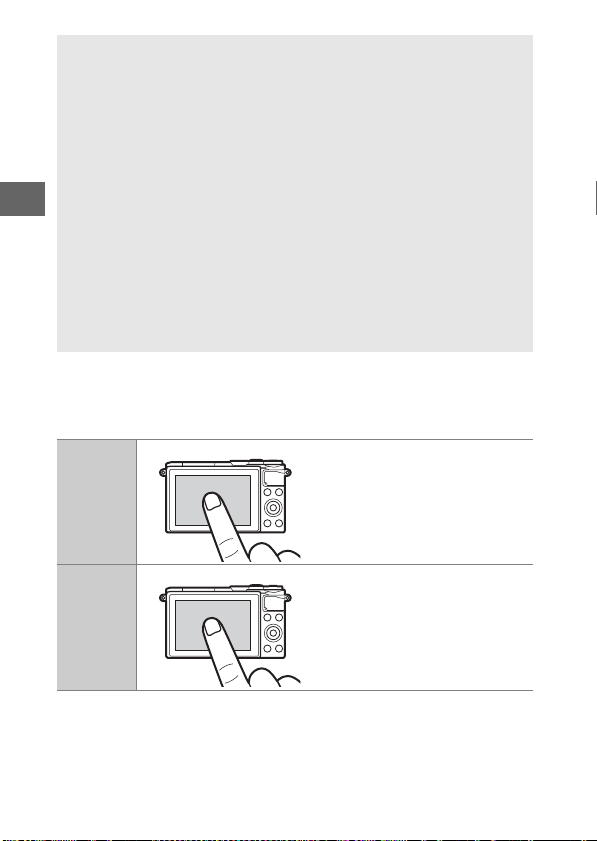
The touch-sensitive monitor supports the following operations:
Tap
Flick
Slide
Stretch/Pinch
Using the Touch Screen
Tap the monitor.
Flick a finger a short distance across the
monitor.
Slide a finger over the monitor.
Place two fingers on the monitor and
move them apart or pinch them together.
14
s
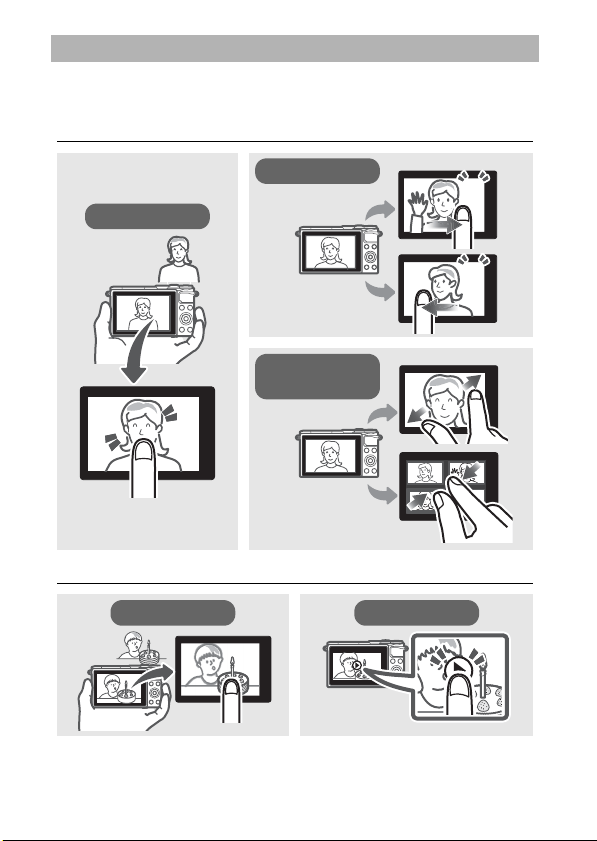
❚❚ Taking Pictures
The touch screen can be used for the following shooting opera-
tions.
D
The Touch Screen
The touch screen responds to static electricity and may not respond
when covered with third-party protective films or when touched with
fingernails or gloved hands. Do not use excessive force or touch the
screen with sharp objects.
D
Using the Touch Screen
The touch screen may not respond as expected if you attempt to oper-
ate it while leaving your palm or another finger resting on it in second
location. It may not recognize other gestures if your touch is too soft,
your fingers are moved too quickly or too short a distance or do not
remain in contact with the screen, or if the movement of the two fin-
gers in a pinch or stretch is not correctly coordinated.
A
Enabling or Disabling Touch-screen Controls
Touch controls can be enabled or disabled using the Touch-screen
controls option in the setup menu (0 103).
Take a
picture (tap
shooting)
In auto, creative, P, S, A, M, and self-
portrait modes, you can focus and
take a picture by tapping your
subject in the display.
Focus (tap
shooting)
In advanced movie mode, you
can focus by tapping your subject
in the display.
15
s
❚❚ Viewing Pictures
The touch screen can be used for the following playback opera-
tions.
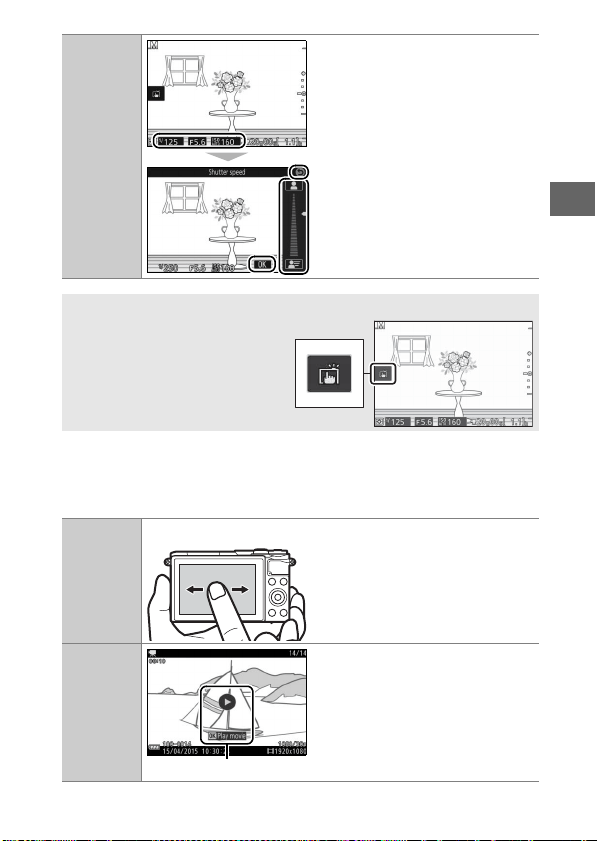
Adjust
settings
Tap highlighted icons to view set-
tings and tap icons or sliders to
change (the items available vary
with camera settings). Tap 0 to
save changes and exit, or tap 2 to
exit to the previous display with-
out saving changes.
A
Tap Shooting Options
Tap shooting options can be
adjusted by tapping the icon
shown at right (0 86).
View other
images
Flick left or right to view other
images.
View movies
or panoramas
Tap the on-screen guide to start
movie or panorama playback
(movies are indicated by a 1
icon). Tap the display to pause or
resume.
Guide
16
s
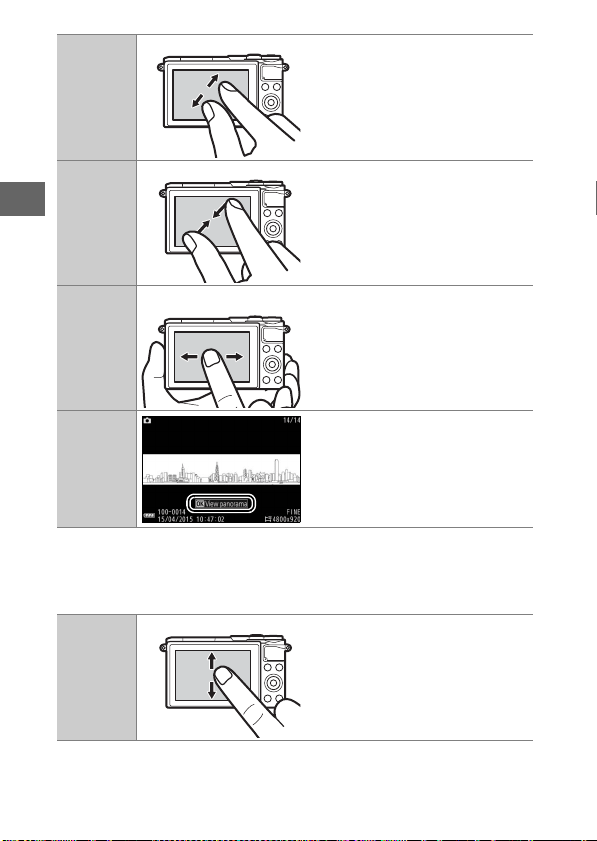
❚❚ Using the Menus
The touch screen can be used for the following menu opera-
tions.
Zoom in
Use stretch and pinch gestures to
zoom in and out and slide to
scroll. You can also double-tap a
picture in full-frame playback to
zoom in and double-tap again to
exit zoom.
View
thumbnails
To “zoom out ” to a thumbnail
view, use a pinch gesture in full-
frame playback. Use pinch and
stretch to choose the number of
images displayed from 4, 9, or 16
frames.
View other
months
Flick left or right to view other
months in the calendar display.
Use
on-screen
guides
Various operations can be per-
formed by tapping on-screen
guides.
Scroll Slide up or down to scroll.
17
s
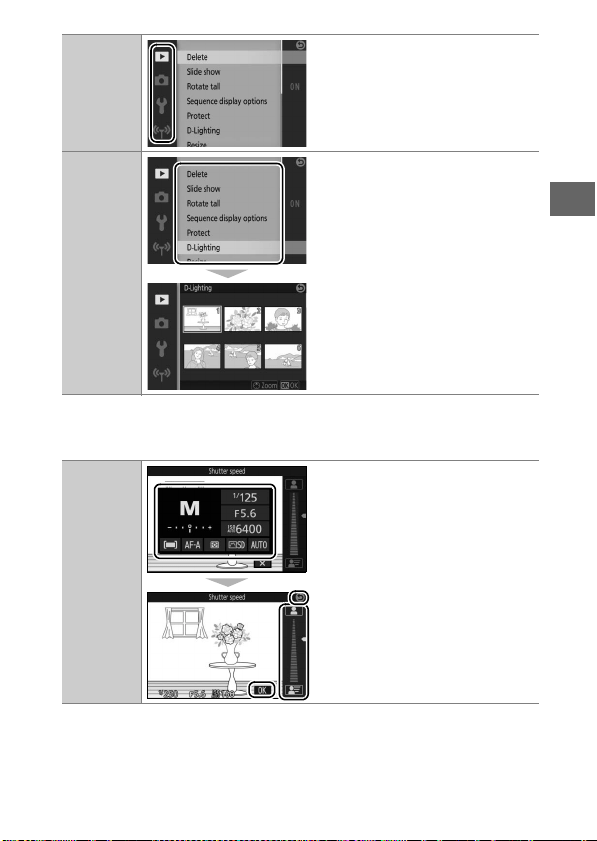
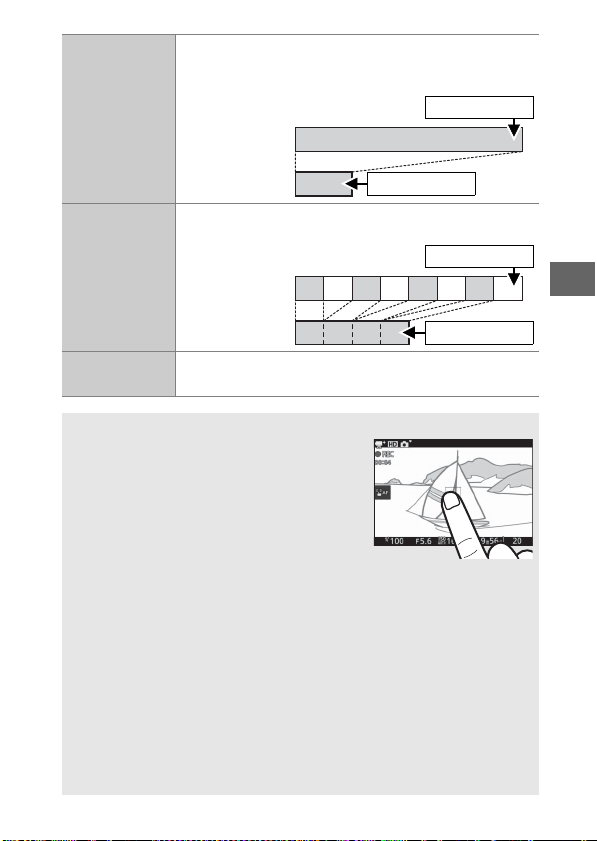
❚❚ The & Menu
The touch screen can be used to adjust settings in the & menu.
Choose a
menu
Tap a menu icon to choose a
menu.
Select items/
adjust
settings
Tap menu items to display
options and tap icons or sliders to
change. Tap 2 to exit to the previ-
ous display without changing set-
tings.
Select items/
adjust
settings
Tap menu items to display
options and tap icons or sliders to
change. Tap 0 to save changes
and exit, or tap 2 to exit to the
previous display without chang-
ing settings.
18
s
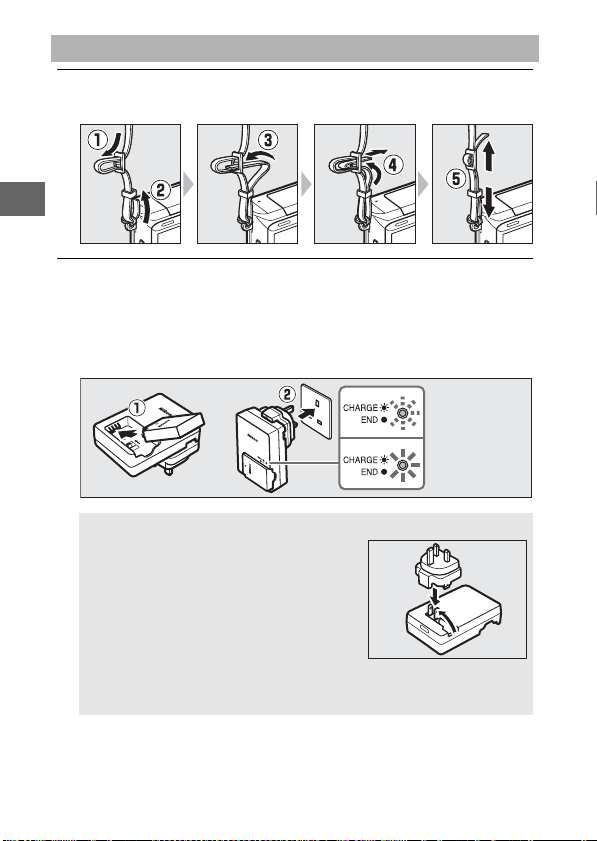
1
Attach the camera strap.
Attach the strap securely to the two camera eyelets.
2
Charge the battery.
Insert the battery into the charger q and plug the charger in
w. An exhausted battery fully charges in about two hours and
30 minutes. Unplug the charger and remove the battery
when charging is complete.
First Steps
A
The Plug Adapter
Depending on the country or region of
purchase, a plug adapter may be sup-
plied with the charger. The shape of the
adapter varies with the country or region
of purchase. If a plug adapter is supplied,
raise the wall plug and connect the plug
adapter as shown at right, making sure
the plug is fully inserted. Attempting to forcibly remove the plug
adapter could damage the product.
Battery
charging
Charging
complete
19
s
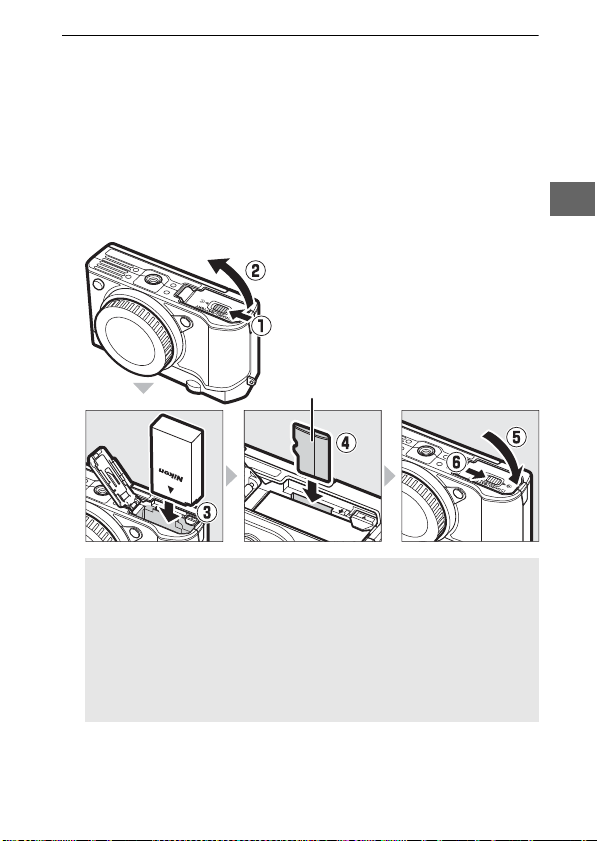
3
Insert the battery and a memory card.
The camera stores pictures on microSD, microSDHC, and
microSDXC memory cards (available separately; 0 109).
Before inserting the battery or memory cards, check that they
are in the correct orientation. Using the battery to keep the
orange battery latch pressed to one side, slide the battery in
until it latches, and then slide in the memory card until it
clicks into place. Do not attempt to insert the card at an angle;
failure to observe this precaution could damage the product.
A
Formatting Memory Cards
If this is the first time the memory card will be used in the camera or
if the card has been formatted in another device, select Format
memory card in the setup menu and follow the on-screen instruc-
tions to format the card (0 102). Note that this permanently deletes
any data the card may contain. Be sure to copy any photographs
and other data you wish to keep to a computer before proceeding
(0 104).
16GB
Front
20
s
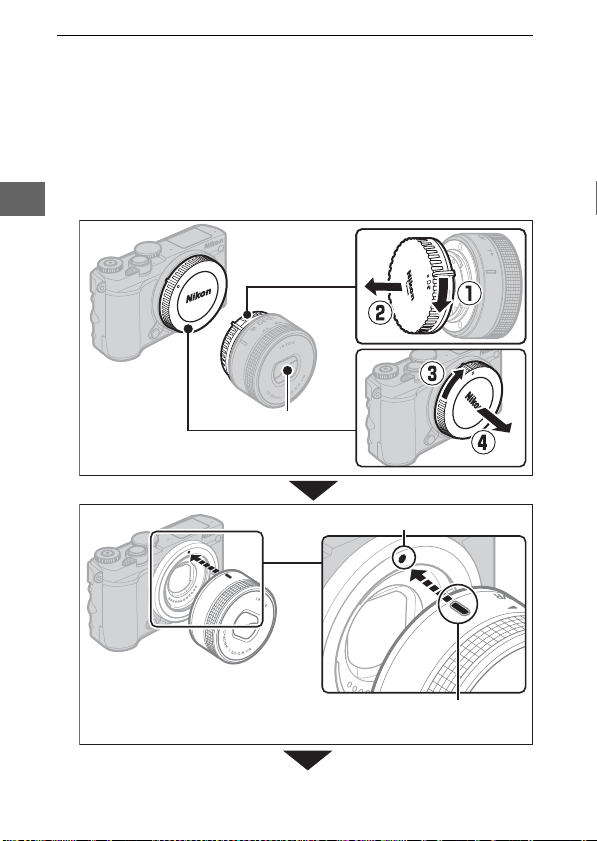
4
Attach a lens.
Be careful to prevent dust from entering the camera when the
lens or body cap is removed. The lens generally used in this
manual for illustrative purposes is a 1 NIKKOR VR 10–30mm
f/3.5–5.6 PD-ZOOM. When using the 1 NIKKOR VR 10–30mm
f/3.5–5.6 PD-ZOOM, be sure not touch the lens cover; failure
to observe this precaution could result in product malfunc-
tion.
Remove the
rear lens cap
Remove the camera body cap
Lens cover
Mounting mark (camera)
Mounting mark (lens)
Keeping the mounting marks
aligned, position the lens on
the camera
21
s
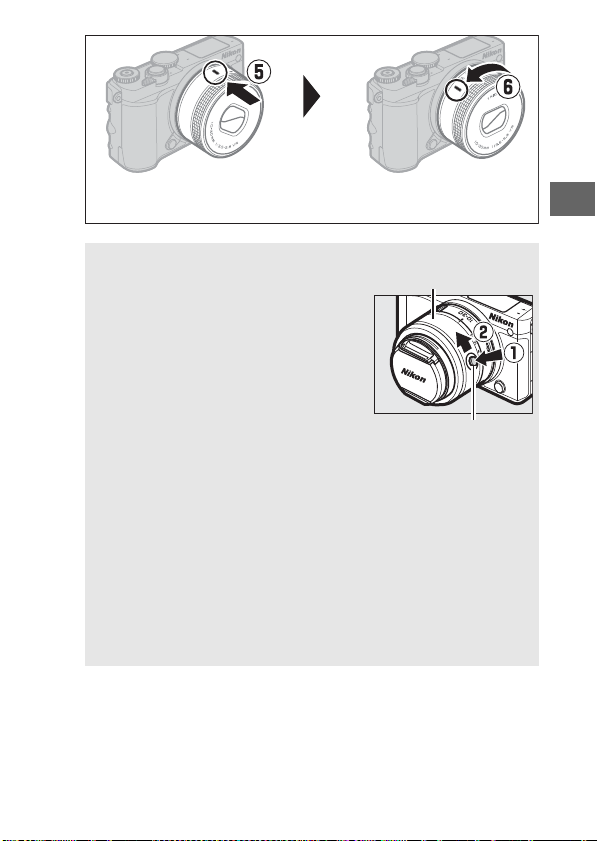
A
Lenses with Retractable Lens Barrel Buttons
Lenses with retractable lens barrel but-
tons can not be used when retracted. To
unlock and extend the lens, readying the
camera for use, keep the retractable lens
barrel button pressed (q) while rotating
the zoom ring as shown (w). The lens can
be retracted and the zoom ring locked by
pressing the button and rotating the ring
in the opposite direction. Retract the lens
before removal, and be careful not to
press the retractable lens barrel button
while attaching or removing the lens.
The camera will turn on automatically when the retractable lens
barrel lock is released; in addition, if the view through the lens is
displayed or the monitor is off, the camera will turn off when the
lens barrel is locked (in the case of 1 NIKKOR VR 10–30mm f/3.5–5.6
and 1 NIKKOR VR 30–110mm f/3.8–5.6 lenses, firmware version 1.10
or later is required if locking the lens barrel is to turn the camera off
when the monitor is off; for information on updating lens firmware,
visit the Nikon website for your area).
Rotate the lens as shown until it clicks into place.
Zoom ring
Retractable lens barrel
button
22
s
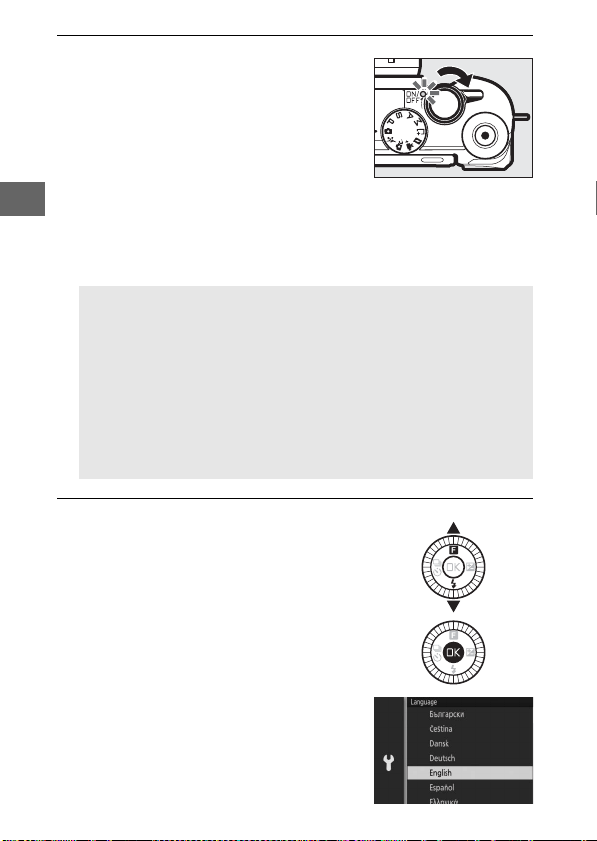
5
Turn the camera on.
6
Choose a language.
Rotate the power switch to turn the
camera on. The power lamp will
briefly light green and the monitor will
turn on. If the lens is equipped with a
front lens cap, remove the cap before
shooting. If a 1 NIKKOR VR 10–30mm
f/3.5–5.6 PD-ZOOM lens is attached,
the lens will automatically extend
when the camera is turned on and
retract when the camera is turned off.
A
Turning the Camera Off
To turn the camera off, rotate the power switch again. The monitor
will turn off.
A
Auto Power Off
If no operations are performed for about a minute, the display will
turn off and the power lamp will start to flash. The camera can be
reactivated by operating the shutter-release button. If no opera-
tions are performed for about three minutes after the display has
turned off, the camera will turn off automatically.
A language-selection dialog will be
displayed the first time the camera is
turned on. Use the multi selector and
J button to choose a language.
23
s
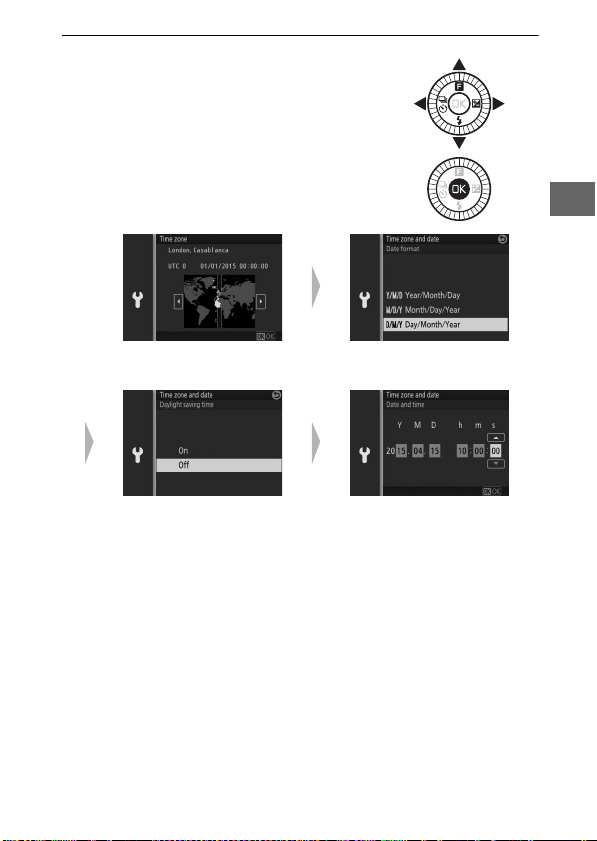
7
Set the clock.
Use the multi selector and J button
to set the time and date. Note that the
camera uses a 24-hour clock.
Press 4 or 2 to highlight time
zone and press J.
Press 1 or 3 to highlight date
format and press J.
Press 1 or 3 to highlight daylight
saving time option and press J.
Press 4 or 2 to highlight items
and press 1 or 3 to change. Press
J to exit to shooting display when
setup is complete.
Note: Language and clock can be changed at any time using Language
(0 103) and Time zone and date (0 103) options in setup menu.


25
z
z
Taking and Viewing Photographs
This chapter describes how to take, view, and delete photo-
graphs in auto and creative mode.
Follow the steps below to take photographs in auto mode, a
“point-and-shoot” mode in which the camera automatically
detects the subject type and adjusts settings according to the
subject and situation.
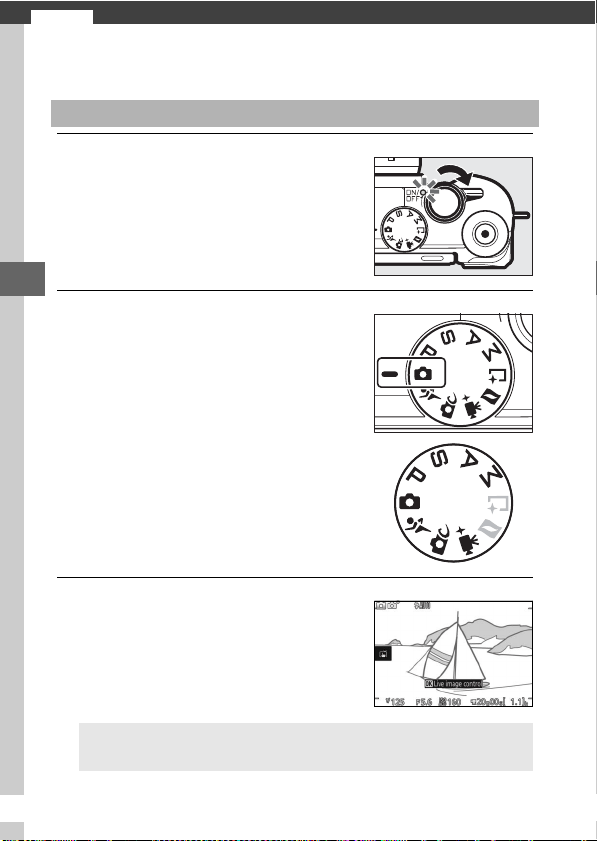
1
Turn the camera on.
2
Select C mode.
Point-and-Shoot Photography (Auto Mode)
Rotate the power switch to turn the
camera on.
Rotate the mode dial to C (auto).
26
z
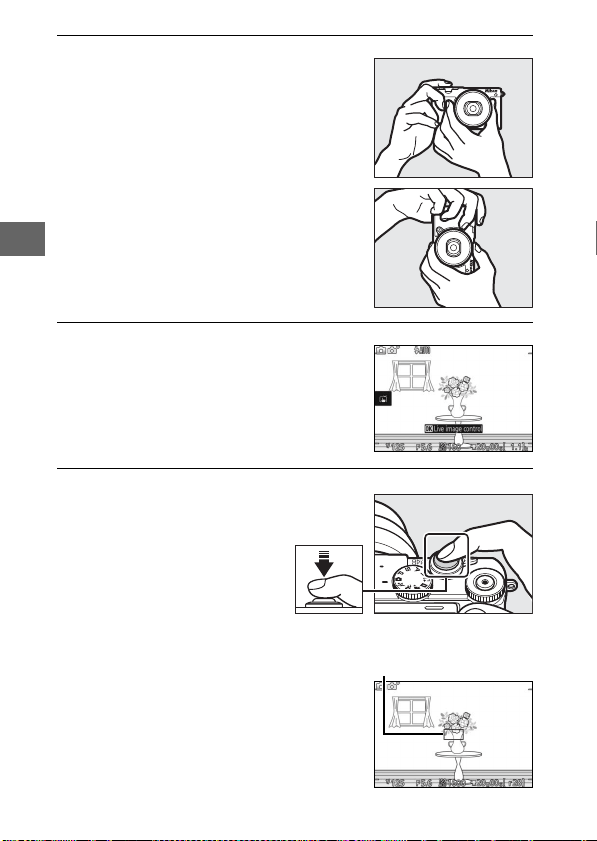
3
Ready the camera.
4
Frame the photograph.
5
Focus.
Press the shutter-release
button halfway to focus. If
the subject is poorly lit, the
flash may pop up (0 77)
and the AF-assist illumina-
tor (0 2) may light to assist
the focus operation.
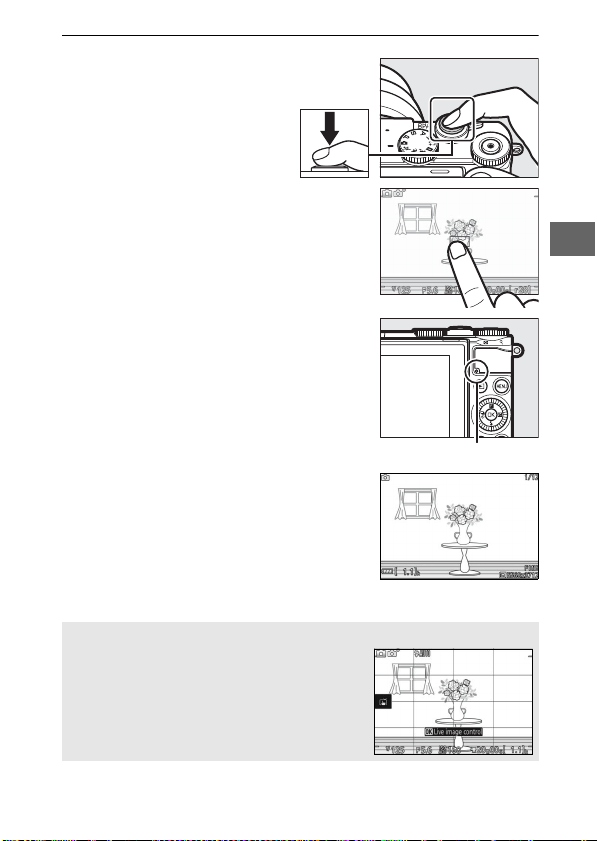
If the camera is able to focus, the selected
focus area will be highlighted in green
and a beep will sound (a beep may not
sound if the subject is moving).
If the camera is unable to focus, the focus
area will be displayed in red.
Hold the camera securely with both
hands, being careful not to obstruct
the lens, AF-assist illuminator, or
microphone. Rotate the camera as
shown at lower right when taking pic-
tures in “tall” (portrait) orientation.
Shutter speeds slow when lighting is
poor; use of the built-in flash (0 77) or
a tripod is recommended.
Position your subject in the center of
the frame. At default settings, the
camera will automatically detect por-
trait subjects and position the focus
point accordingly (0 31).
Focus area
27
z
6
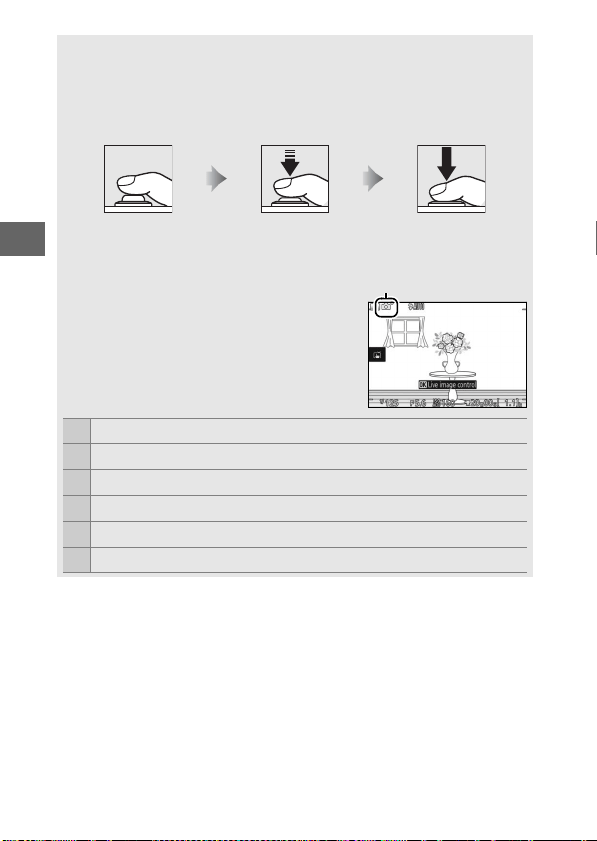
Shoot.
Smoothly press the shutter-
release button the rest of
the way down to release
the shutter and record the
photograph.
Pictures can also be taken
using touch controls. Tap a
subject anywhere in the
frame to focus and release
the shutter.
After the shutter is
released, the memory card
access lamp will light and
the photograph will be dis-
played in the monitor for a
few seconds (the photo will
automatically clear from
the display when the shut-
ter-release button is
pressed halfway). Do not
eject the memory card or
remove the battery until the
lamp has gone out and
recording is complete.
Memory card access lamp
A
The Framing Grid
A framing grid can be displayed by selecting
On for Display > Grid display in the setup
menu (0 102).
28
z
Viewing Photographs
To end playback and return to shooting mode, press the shutter-
release button halfway.
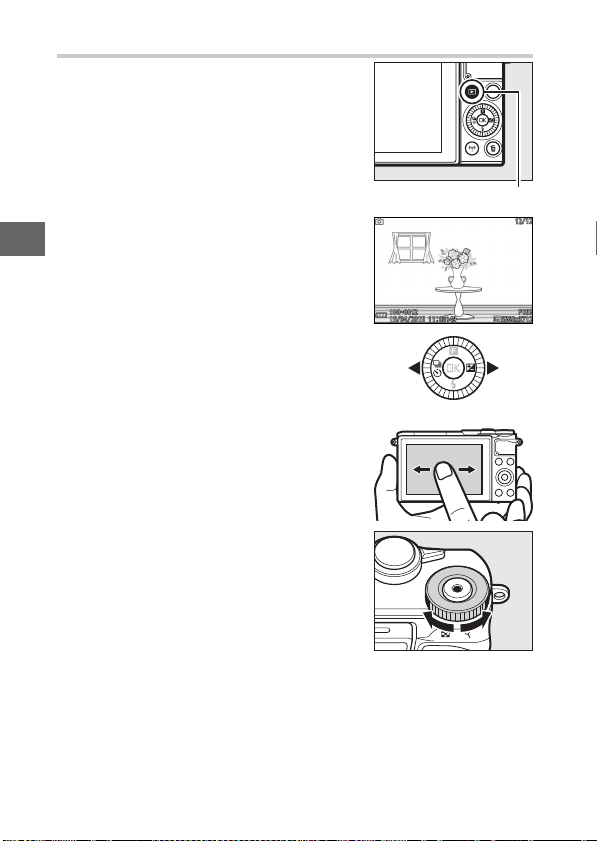
Press K to display your most recent pho-
tograph full frame in the monitor (full-
frame playback).
K button
Press 4 or 2 or rotate the multi selector
to view additional pictures. You can also
scroll through pictures by flicking left or
right (0 15).
To zoom in on the center of the current
image, rotate the command dial to the
right. Rotate left to zoom out (you can
also zoom in or out using touch controls:
place two fingers on the monitor and
spread them apart to zoom in or pinch
them together to zoom out). To view mul-
tiple images, rotate the dial left when the
picture is displayed full frame.
Command dial

29
z
Deleting Pictures
To delete the current picture, press O. Note that once deleted, pic-
tures can not be recovered.
1
Display the photograph.
Display the photograph you wish to delete as described on
the preceding page.
2
Press O.
3
Delete the photograph.
A confirmation dialog will be dis-
played.
O button
Press O again to delete the picture and
return to playback, or press K to exit
without deleting the picture.
A
Deleting Multiple Pictures
The Delete option in the playback menu (0 100) can be used to delete
all or selected pictures.
30
z
A
The Shutter-Release Button
The camera has a two-stage shutter-release button. The camera
focuses when the shutter-release button is pressed halfway. To take
the photograph, press the shutter-release button the rest of the way
down.
Focus: Press halfway Shoot: Press the rest
of the way down
A
Automatic Scene Selection
In auto mode, the camera automatically ana-
lyzes the subject and selects the appropriate
scene. The selected scene is shown in the
monitor.
Scene icon
c
Portrait: Human portrait subjects.
d
Landscape: Landscapes and cityscapes.
f
Night portrait: Portrait subjects framed against dark backgrounds.
e
Close-up: Subjects close to the camera.
g
Night landscape: Poorly-lit landscapes and cityscapes.
Z
Auto: Subjects that do not fall into the categories listed above.
31
z
A
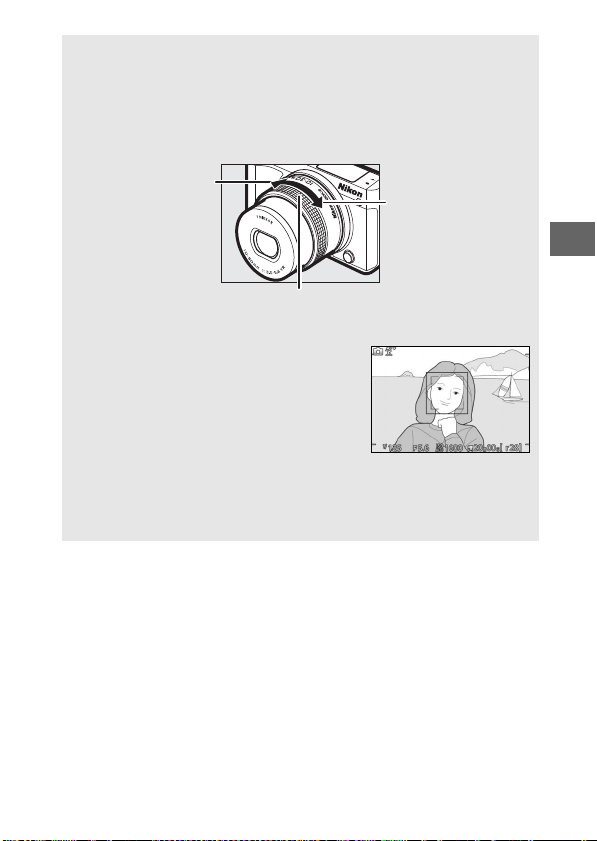
Using a Zoom Lens
Use the zoom ring to zoom in on the subject so that it fills a larger area
of the frame, or zoom out to increase the area visible in the final photo-
graph. During movie recording with the 1 NIKKOR VR 10–30mm f/3.5–
5.6 PD-ZOOM, the zoom rate is unaffected by the speed with which the
ring is rotated.
Zoom in
Zoom out
Zoom ring
A
Face Priority
The camera detects and focuses on portrait
subjects (face priority). A double yellow bor-
der will be displayed if a portrait subject is
detected facing the camera (if multiple
faces, up to a maximum of five, are detected,
the camera will select the closest subject).
Press the shutter-release button halfway to
focus on the subject in the double yellow border. The border will clear
from the display if the camera can no longer detect the subject
(because, for example, the subject has looked away).
y
32
y
Recording and Viewing Movies
1
Turn the camera on.
2
Choose a shooting mode.
3
Frame the opening shot.
Recording Movies
Rotate the power switch to turn the
camera on.
Rotate the mode dial to any of the
positions shown at right.
Frame the opening shot with your
subject in the center of the display.
A
The 0 Icon
A 0 icon indicates that movies can not be recorded.
33
y
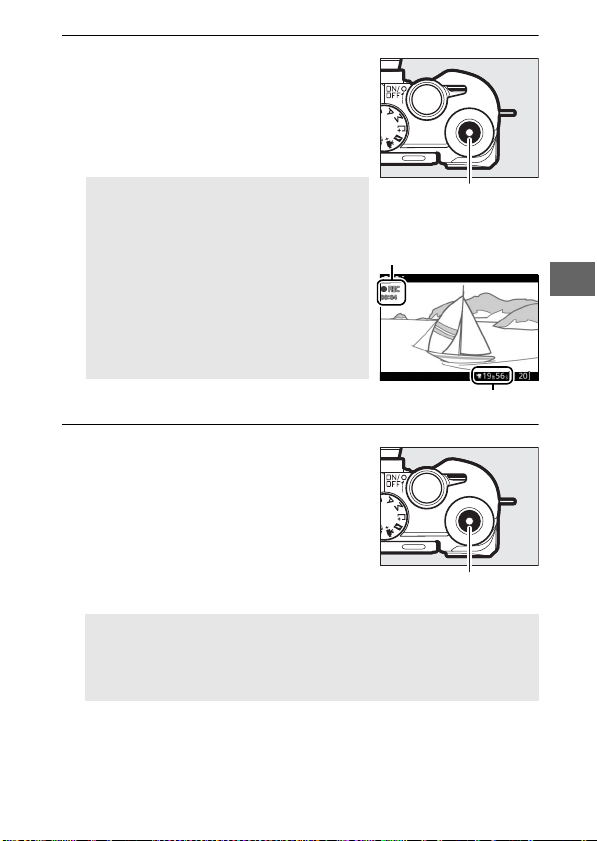
4
Start recording.
5
End recording.
Press the movie-record button to
begin recording. A recording indica-
tor, the time elapsed, and the time
available are displayed while record-
ing is in progress.
A
Audio Recording
Be careful not to cover the microphone
and note that the built-in microphone
may record sounds made by the camera
or lens. Except when recording time-
lapse or slow-motion movies in advanced
movie mode, the camera focuses contin-
uously; to avoid recording focus noise,
select
Single AF
for
Focus mode
in the
movie menu (
0
102).
Movie-record button
Recording indicator/
Time elapsed
Time available
Press the movie-record button again
to end recording. Recording will end
automatically when the maximum
length is reached (0 40), the memory
card is full, another mode is selected,
the lens is removed, or the camera
becomes hot (0 xiii).
Movie-record button
A
Maximum Length
The camera can record movies up to 4 GB in size; note that depend-
ing on memory card write speed, shooting may end before this
length is reached (0 109).

34
y
❚❚ Choosing a Shooting Mode
The features available in each mode are listed below.
C
Auto mode (0 25)
Choose this mode to record HD movies
while leaving the camera in charge of
choosing settings. The camera automati-
cally adjusts settings according to the sub-
ject and situation.
w
Creative mode (0 41)
Record HD movies with the selected effect.
Note, however, that the selected effect is
not applied in the cases of 5 HDR, q Soft,
p Easy panorama, r Miniature effect,
7 Toy camera effec t, T Cross screen, and
V Skin softening.
a
Sports mode (0 53)
Record HD movies in exposure mode P.
P S
P, S, A, and M modes
(0 49)
A M
v
Advanced movie mode
(0 38)
Choose an exposure mode (0 101) and
record HD movies at a selected shutter
speed or aperture, or record movies in slow
or fast motion or with other special effects.

35
y
Taking Photographs During Movie Recording
Press the shutter-release button all the
way down to take a photograph without
interrupting movie recording. Photo-
graphs taken during movie recording
have an aspect ratio of 3 : 2.
A
Taking Photographs During Movie Recording
Up to 20 photographs can be taken with each movie shot. Please note
that photographs can not be taken with slow-motion, 4K, or time-
lapse movies in advanced movie mode.
36
y
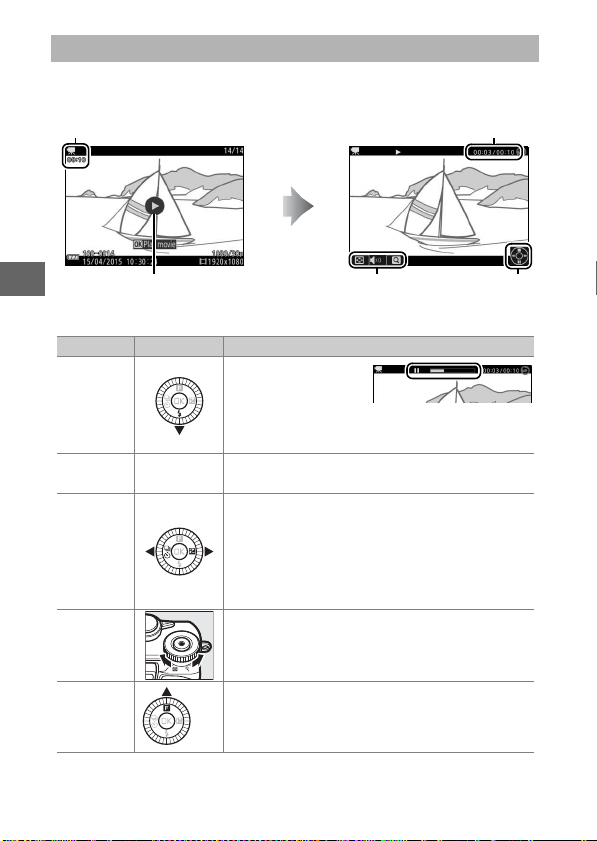
Movies are indicated by a 1 icon in full-frame playback (0 28).
Press the J button or tap the M icon to start playback.
The following operations can be performed:
Viewing Movies
1 icon/Length Current position/total length
M icon Volume Guide
To Use Description
Pause
Pause playback; the
current position is
shown at the top of
the display. Playback can also be paused by
tapping the monitor.
Play
J
Resume playback when the movie is paused
or during rewind/advance.
Advance/
rewind
Press 4 to rewind, 2 to advance. Speed
increases with each press, from 2× to 4× to 8×
to 16×. If playback is paused, the movie
rewinds or advances one frame at a time; keep
the button pressed for continuous rewind or
advance.
Adjust
volume
Rotate the command dial to adjust volume.
Return to
full-frame
playback
/K
Press 1 or K to exit to full-frame playback.
37
y
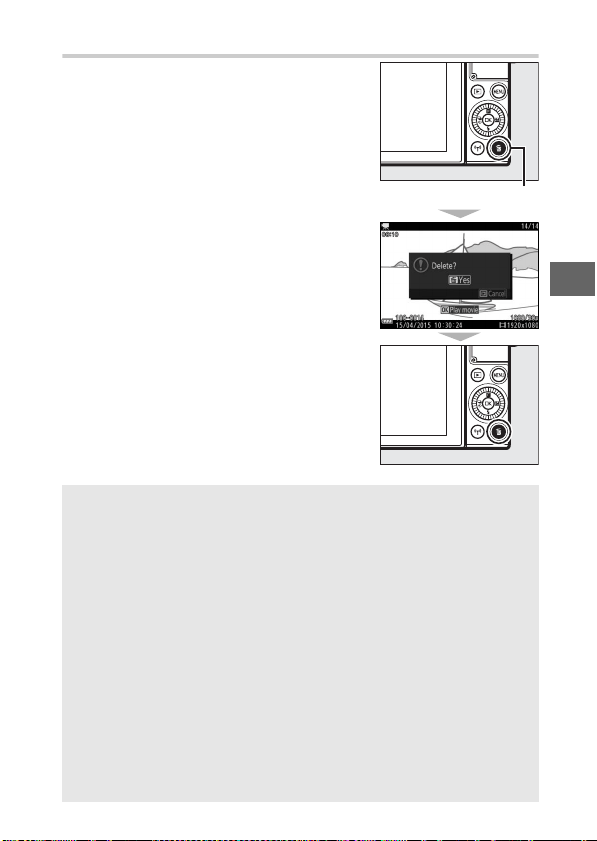
Deleting Movies
To delete the current movie, press O. A
confirmation dialog will be displayed;
press O again to delete the movie and
return to playback, or press K to exit
without deleting the movie. Note that
once deleted, movies can not be recovered.
D
Recording Movies
Flicker, banding, or distortion may be visible in the display and in the
final movie under fluorescent, mercury vapor, or sodium lamps or with
subjects that are in motion, particularly if the camera is panned hori-
zontally or an objects moves horizontally at high speed through frame
(flicker and banding can be reduced by choosing a Flicker reduction
option that matches the frequency of the local AC power supply, but
note that the slowest shutter speed available is
1
/
100 s at 50 Hz,
1
/
60 s at
60 Hz; flicker reduction is not available with slow-motion movies).
Bright light sources may leave after-images when the camera is
panned. Jagged edges, color fringing, moiré, and bright spots may also
appear. When recording movies, avoid pointing the camera at the sun
or other strong light sources. Failure to observe this precaution could
result in damage to the camera’s internal circuitry. The built-in flash will
not fire during movie recording or when the camera is in advanced
movie mode.
O button
38
y
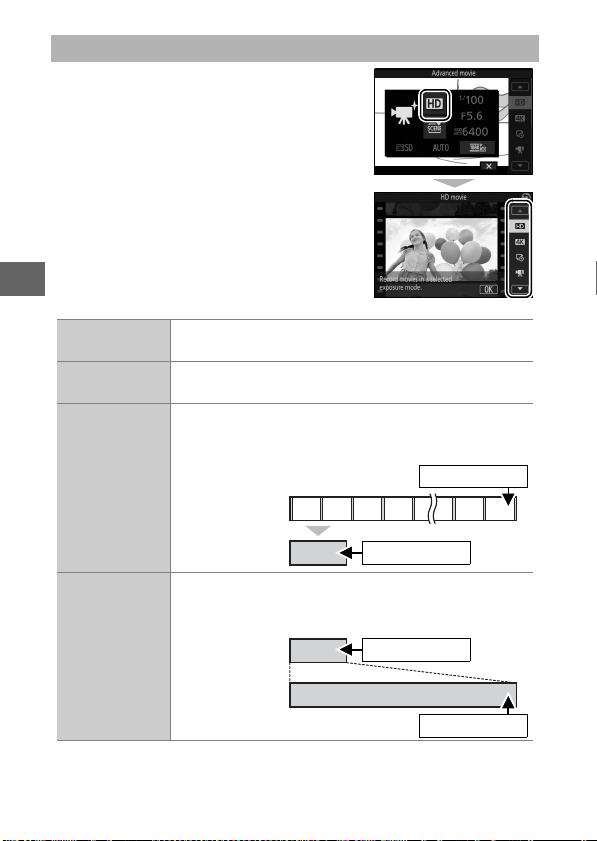
Advanced movie mode can be used not
only to shoot HD movies, but also to
record movies with a variety of effects.
The following options can be accessed by
pressing & and selecting Advanced
movie in the & (feature) menu.
v Advanced Movie Options
0
HD movie
Record HD movies in the exposure mode of your
choice (0 101).
z
4K movie
Record movies at a frame size of 3840 × 2160 pixels
and a frame rate of 15 fps.
8
Time-lapse
movie
The camera automatically takes photographs at
selected intervals and joins them together in a silent
time-lapse movie.
y
Slow motion
Record up to about three seconds of silent slow-
motion footage. Slow-motion movies are recorded at
400 fps and play back at about 30 fps.
Recording
Playback
Approx. 25 min
Approx. 10 s
Recording
Playback
Approx. 40 s
Approx. 3 s
39
y
1
Fast motion
Record silent fast-motion footage that plays back at
about four times normal speed. Playback time is one
quarter the recording time.
2
Jump cut
Record silent jump-cut movies. Recording pauses
every other second for a drop-frame effect.
3
4-second
movie
Record a 4-second movie clip.
A
Adjusting Focus During Recording
To change focus during recording, tap the
desired subject in the display. The camera
will display the new focus area and adjust
focus.
A
4K Movies
4K movies can be viewed on a computer and edited using ViewNX-i,
the latest version of which is available for download from the website
listed below. Note that a high-performance system is required; for
information, see the website below.
http://downloadcenter.nikonimglib.com/
When the camera is connected to a 4K-movie compatible television
using an HDMI cable, 4K movies will play back in Full HD (1920 ×
1080 pixels, 30p). Even if the television is 4K-movie compatible, 4K
movies can not be viewed by inserting the camera memory card in a
television microSD card slot.
Recording
Playback
Approx. 20 min
Approx. 5 min
Recording
Playback
Approx. 20 min
Approx. 10 min

40
y
A
Recording Time
The following table lists the approximate maximum recording times
for individual movies shot at the default frame rate in each shooting
mode.
Auto, creative, P, S, A, M, sports modes 17 minutes
Advanced movie mode
HD movie 17 minutes
4K movie 10 minutes
Time-lapse movie 25 minutes
Slow motion 3 seconds
Fast motion 20 minutes (0 39)
Jump cut 20 minutes (0 39)
4-second movie 4 seconds
41
R
R
Other Shooting Modes
The camera offers a choice of modes that can be used to match
settings to the subject or situation, take photos using special
effects, control shutter speed and aperture, help with hard-to-
time shots, or combine photos with brief movie vignettes.
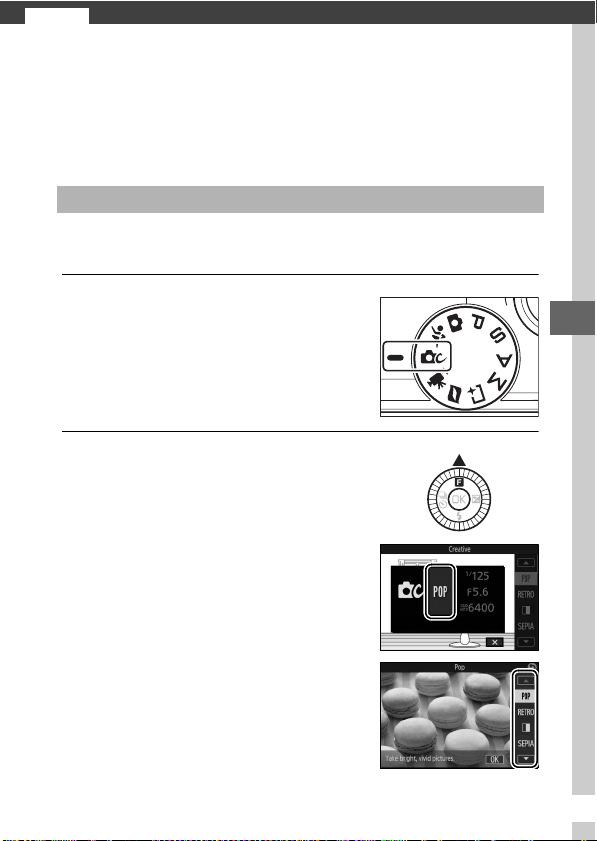
Choose creative mode to match settings to the subject or situa-
tion or take photos using special effects.
1
Select w mode.
2
Choose an option.
w Choosing a Creative Mode
Rotate the mode dial to w (creative).
Press & (feature) on the multi selector
to display the & menu, then highlight
Creative and press J. Highlight an
option suited to your subject and cre-
ative intent (0 42) and press J.

42
R
Choosing a Mode That Matches the Subject or Situation
Choose a creative mode according to the subject or situation:
Option Description
Pop (P) Shoot bright, vivid pictures.
Retro (Q)
Choose for a faded, retro effect. Use the & (feature)
menu (0 10) to choose a hue from red and yellow.
High-contrast
monochrome (R)
Shoot in high-contrast black-and-white.
Nostalgic sepia
(S)
Shoot in sepia for an antique look.
HDR (5) Photograph high-contrast scenes (0 44).
Soft (q)
Shoot photographs with a soft filter effect. Use the &
menu to select the amount of softening and to
choose how softening applies when a portrait sub-
ject is detected:
• Filter strength: Choose from I (high), J (normal),
and K (low).
• Portrait: If L is selected and the camera detects
portrait subjects (up to three), softening will be
adjusted to make them stand out. If M is
selected, softening will be applied equally to the
portrait subject and the background.
Easy panorama (p)
Shoot panoramas for later viewing on the camera
(0 45).
Miniature effect (r)
The top and bottom of each photo is blurred so that
the subject appears to have been a diorama photo-
graphed at short range. Works best when shooting
from a high vantage point.
Selective color (s)
Take photos in which only a selected hue appears in
color (0 48).
Cross process (6)
Choose a base color to create photographs with dif-
ferent hues. Use the & menu to choose a base color
from red, green, blue, and yellow.

43
R
Toy camera effect (7)
Alter color saturation and reduce peripheral illumi-
nation for a toy camera effect. The following options
are available in the & menu (0 10):
• Saturation: Choose from H (high), I (normal), and
J (low).
• Vignetting: Choose the amount of vignetting from
U (high), V (normal), and W (low).
Cross screen (T) Add starburst effects to light sources.
Fisheye (U)
Create the effect of a fisheye lens. The following
option is available in the & menu:
• Filter strength: The level of the fisheye effect. Choose
from p (high), q (normal), and r (low).
Skin softening (V)
Soften the look of skin for up to three portrait sub-
jects at a time. The amount of softening can be
selected using the
Filter strength
option in the
&
menu; choose from
P
(high),
Q
(normal), and
R
(low).
Night landscape (j) Capture poorly-lit landscapes and cityscapes.
Night portrait (o)
Choose for portraits taken against a poorly-lit back-
drop.
Landscape (l) Choose for vibrant landscapes and cityscapes.
Close-up (n)
Use for close-up shots of flowers, insects, and other
small objects.
Portrait (k) Use for portraits with soft, natural-looking skin tones.
Option Description

44
R
HDR
Details in highlights and shadows are preserved using HDR (high
dynamic range). Each time the shutter-release button is fully
pressed, the camera takes two shots in quick succession and
combines them to preserve details in highlights and shadows in
high-contrast scenes; the built-in flash does not fire. Some time
may be required to process the pictures; the final photograph
will be displayed when processing is complete.
+
First exposure
(darker)
Second exposure
(brighter)
Combined HDR
image
D
Framing HDR Photographs
The edges of the image will be cropped out. The desired results may
not be achieved if the camera or subject moves during shooting.
Depending on the scene, shading may be uneven and shadows may
appear around bright objects or halos around dark objects.
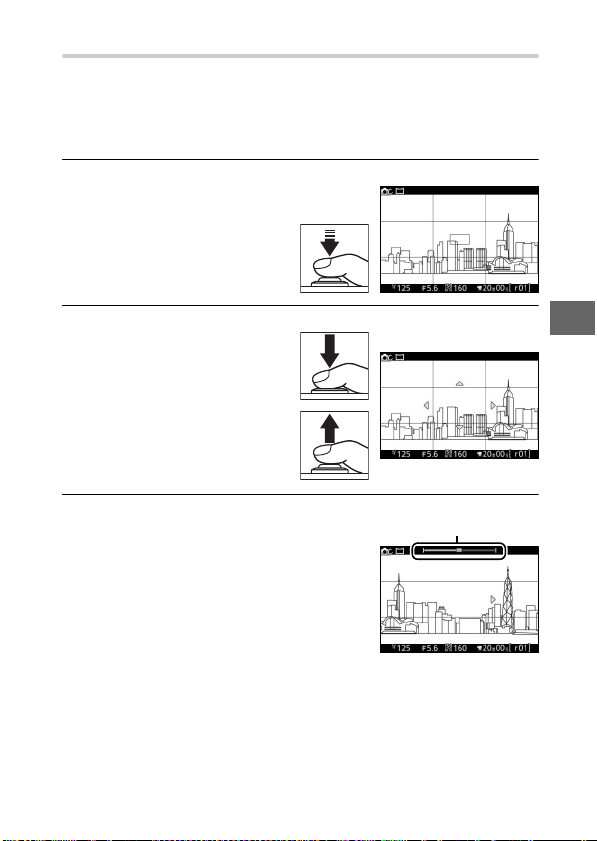
45
R
Easy Panorama
Follow the steps below to shoot panoramas. During shooting,
the camera focuses using auto-area AF (0 102); face detection
(0 31) is not available. Exposure compensation can be used, but
the built-in flash will not fire.
1
Set focus and exposure.
Frame the start of the pan-
orama and press the shut-
ter-release button halfway.
Guides will appear in the
display.
2
Start shooting.
Press the shutter-release
button the rest of the way
down and then lift your fin-
ger from the button. 1, 3,
4, and 2 icons will appear
in the display to indicate
the possible pan directions.
3
Pan the camera.
Slowly pan the camera up, down, left,
or right as shown below. Shooting will
start when the camera detects the pan
direction and a progress indicator will
appear in the display. Shooting ends
automatically when the end of the
panorama is reached.
Progress indicator
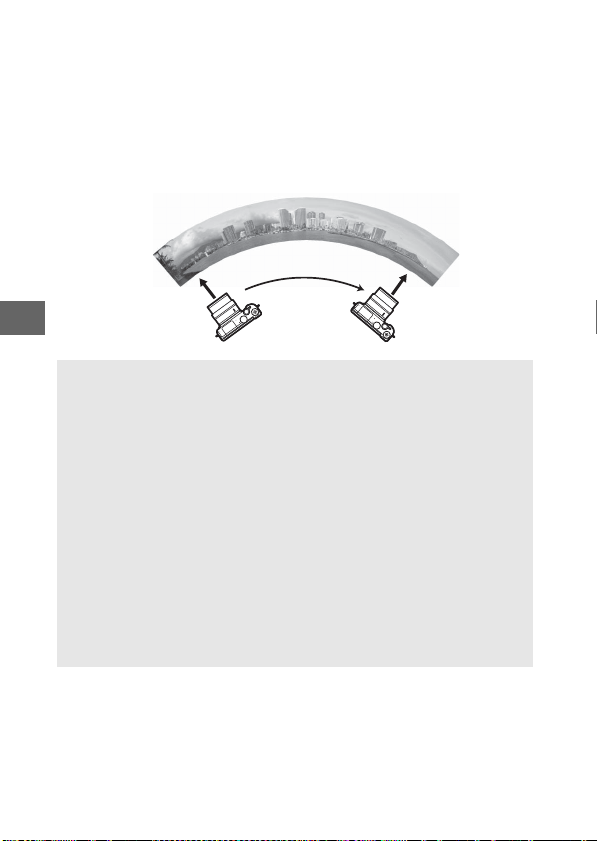
46
R
An example of how to pan the camera is shown below. With-
out changing your position, pan the camera in a steady curve
either horizontally or vertically. Time the pan according to the
option selected for Image size in the shooting menu: about
15 seconds are needed to complete the pan when
A Normal panorama is selected, about 30 seconds when
B Wide panorama is selected.
A
Panoramas
High-distortion wide-angle lenses may fail to produce the desired
results. An error message will be displayed if the camera is panned too
quickly or unsteadily. Note that because panoramas are composed of
multiple images, the joins between images may be visible and the
desired results may not be achieved with moving subjects or with
neon lights or other subjects that exhibit rapid changes in color or
brightness, subjects that are too close to the camera, poorly-lit sub-
jects, and subjects such as the sky or sea that are a solid color or con-
tain simple repeating patterns.
The completed panorama will be slightly smaller than the area visible
in the display during shooting. No panorama will be recorded if shoot-
ing ends before the halfway point; if shooting ends after the halfway
point but before the panorama is complete, the unrecorded portion
will be shown in gray.
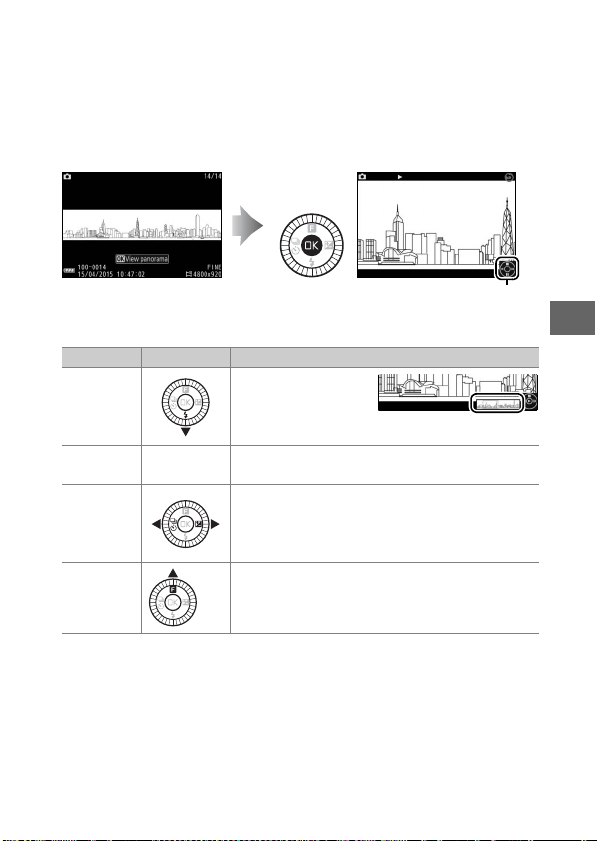
47
R
❚❚ Viewing Panoramas
Panoramas can be viewed by pressing J when a panorama is
displayed full frame (0 28). The start of the panorama will be
displayed with the smallest dimension filling the display and the
camera will then scroll through the picture in the original pan
direction.
The following operations can be performed:
Guide
To Use Description
Pause
Pause playback. A
navigation window
will appear at the
bottom of the display.
Play
J
Resume playback when the panorama is
paused or during rewind/advance.
Advance/
rewind
Press 4 to rewind, 2 to advance. If playback is
paused, the panorama rewinds or advances a
segment at a time; keep the button pressed
for continuous rewind or advance.
Return to
full-frame
playback
/K
Press 1 or K to exit to full-frame playback.
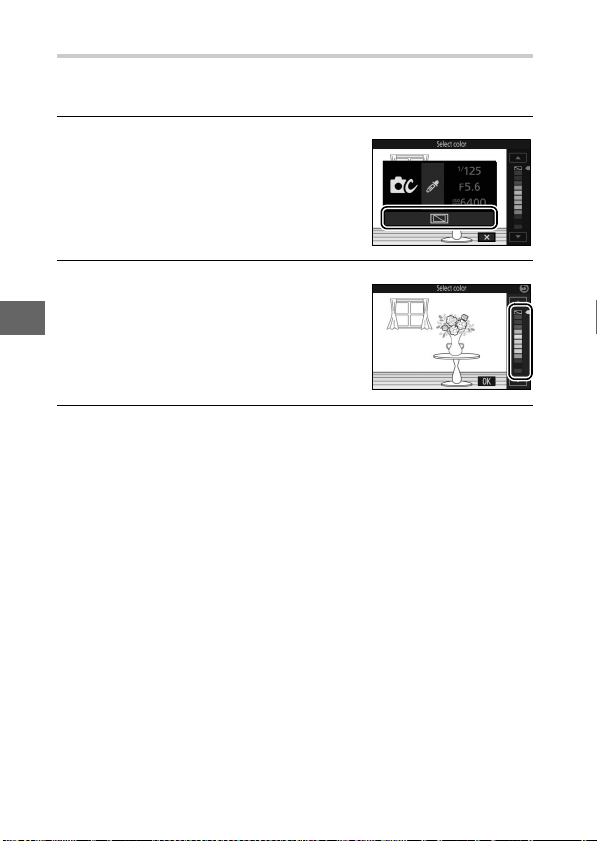
48
R
Selective Color
Take black-and-white pictures in which one hue appears in a
color.
1
Choose Select color.
2
Choose a color.
3
Take pictures.
Press the shutter-release button all the way down to take pic-
tures. Only the selected hue will appear in color; all other
hues will be recorded in shades of gray.
Press & to display the & (feature)
menu, then highlight Select color
and press J.
Use the multi selector to choose a
color and press J.

49
R
P Programmed Auto
In this mode, the camera automatically adjusts shutter speed
and aperture for optimal exposure in most situations. This mode
is recommended for snapshots and other situations in which
you want to leave the camera in charge of shutter speed and
aperture.
Taking Photos in P, S, A, and M Modes
P, S, A, and M modes offer varying degrees of
control over shutter speed and aperture.
Choose a mode and adjust settings according
to your creative intent.
A
Choosing a Combination of Shutter Speed and Aperture
Although the shutter speed and aperture
chosen by the camera will produce optimal
results, you can also rotate the command
dial to choose other combinations that will
produce the same exposure (“flexible pro-
gram”). U is displayed while flexible program
is in effect.
A
ISO Sensitivity (P, S, A, and M Modes)
When an “auto” option is selected for ISO sensitivity (0 101), the cam-
era will automatically adjust sensitivity within the selected range if
optimal exposure can not be achieved at the selected shutter speed or
aperture.
Command dial
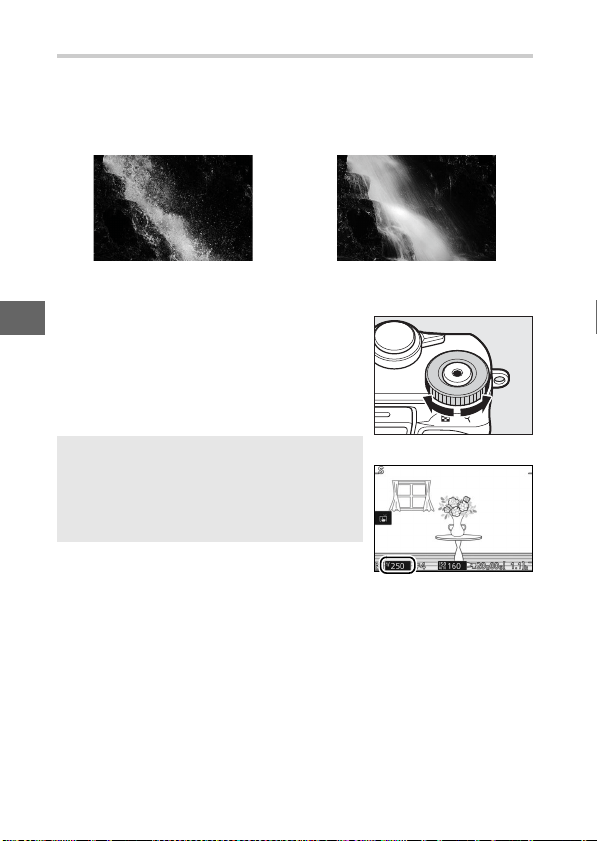
50
R
S Shutter-Priority Auto
In shutter-priority auto, you choose the shutter speed while the
camera automatically selects the aperture that will produce the
optimal exposure. Use slow shutter speeds to suggest motion by
blurring moving subjects, fast shutter speeds to “freeze” motion.
❚❚ Choosing a Shutter Speed
Rotate the command dial to choose from
shutter speeds between 30 s and
1
/
16,000 s.
Rotate the dial to the right for faster shut-
ter speeds, to the left for slower shutter
speeds.
Fast shutter speed (
1
/
16 0 0 s) Slow shutter speed (1 s)
A
Continuous Shooting
The selected shutter speed may change
when a frame rate of 10 fps or faster is
selected in continuous shooting mode
(0 73).
Command dial

51
R
A Aperture-Priority Auto
In aperture-priority auto, you choose the aperture while the
camera automatically selects the shutter speed that will produce
the optimal exposure. Large apertures (low f-numbers) reduce
depth of field, blurring objects behind and in front of the main
subject. Small apertures (high f-numbers) increase depth of
field, bringing out details in the background and foreground.
Short field depths are generally used in portraits to blur back-
ground details, long field depths in landscape photographs to
bring the foreground and background into focus.
❚❚ Choosing an Aperture
Rotate the multi selector counterclock-
wise for larger apertures (lower f-num-
bers), clockwise for smaller apertures
(higher f-numbers). The minimum and
maximum values depend on the lens cur-
rently in use.
Large aperture (f/5.6) Small aperture (f/16)
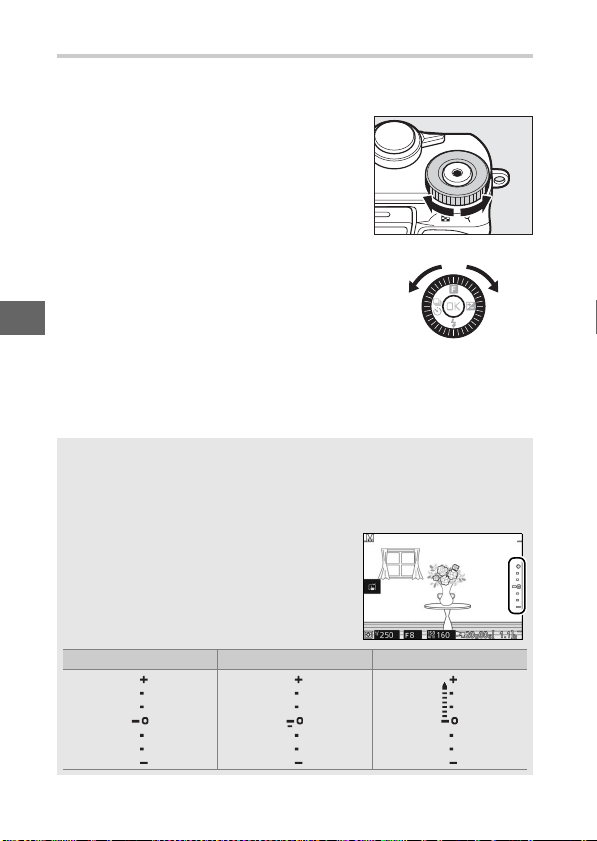
52
R
M Manual
In manual mode, you control both shutter speed and aperture.
❚❚ Choosing Shutter Speed and Aperture
Adjust shutter speed and aperture with
reference to the exposure indicator
(0 52). Rotate the command dial to
adjust shutter speed and the multi selec-
tor to adjust aperture: rotate the control
to the right for faster shutter speeds or
smaller apertures (higher f-numbers), to
the left for slower shutter speeds and
larger apertures (lower f-numbers). Shut-
ter speeds can be set to values as fast as
1
/
16,000 s or as slow as 30 s, or to “Bulb” to
hold the shutter open indefinitely for a
long time-exposure. Aperture can be set to values between the
minimum and maximum for the lens.
A
Continuous Shooting
The selected shutter speed may change when a frame rate of 10 fps or
faster is selected in continuous shooting mode (0 73).
A
The Exposure Indicator
When shutter speeds other than “Bulb” are
selected, the exposure indicator shows
whether the photograph would be under-
or over-exposed at current settings.
Optimal exposure Underexposed by
1
/
3 EV Overexposed by over 2 EV
Command dial
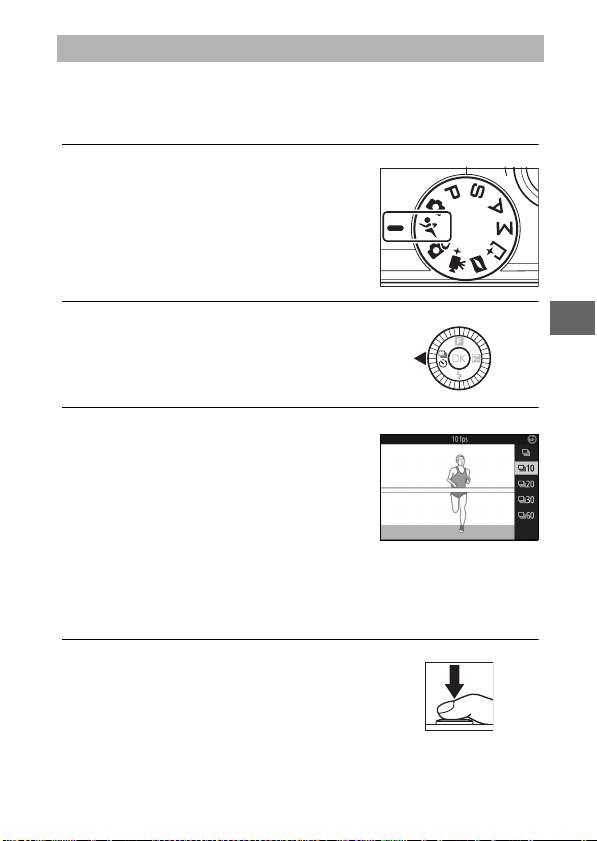
53
R
Choose a (sports) mode for sporting events and other scenes
with fast-moving subjects. The camera takes pictures continu-
ously while the shutter-release button is pressed (0 73).
1
Select sports mode.
2
Display release mode options.
3
Select a frame rate.
Highlight the desired frame rate and
press J. Frame rate is expressed in
terms of the number of frames
recorded per second (fps); choose
from frame rates of approximately 5,
10, 20, 30, and 60 fps (I, Q, R,
S, and T, respectively). Except when I is selected, the
maximum number of shots that can be recorded in a single
burst is 20.
4
Compose the shot and start shooting.
a Photographing Subjects in Motion (Sports Mode)
Rotate the mode dial to a.
Press 4 (C) to display release mode
options.
The camera takes pictures while the
shutter-release button is held all the
way down.

54
R
A
Sports Mode
The camera uses single-point, continuous-servo autofocus. The flash,
AF-assist illuminator, face priority (0 102), and image review (0 102)
turn off automatically.
D
Burst Photography
While photographs are being recorded to the memory card, the mem-
ory card access lamp will light (0 27). Depending on shooting condi-
tions and memory card write speed, recording may continue for some
time after shooting ends. If the battery is exhausted before all photo-
graphs are recorded, the shutter-release will be disabled and the
remaining images transferred to the memory card.
A
Viewing Photographs
Each burst plays back as a group. This can be changed using the
Sequence display options item in the playback menu (0 100).
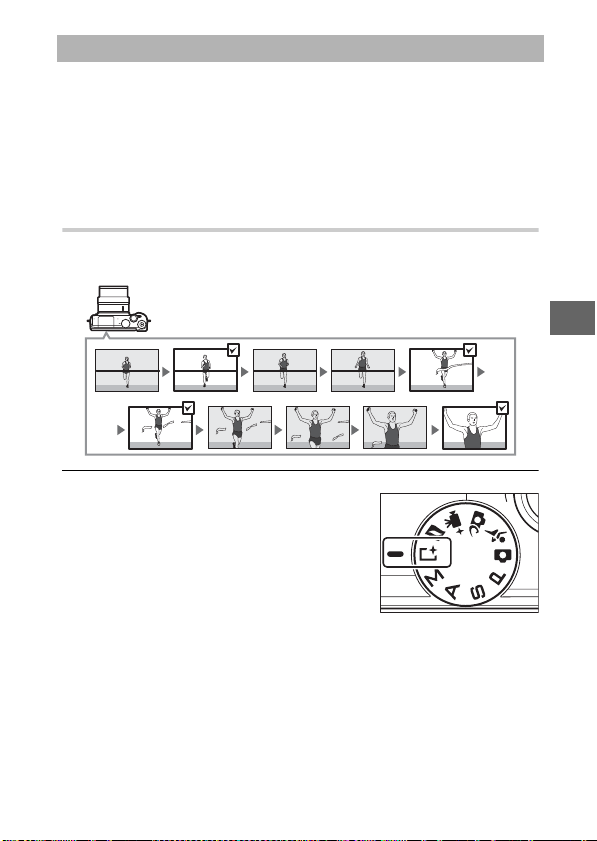
55
R
Choose a shot from 20 frames recorded to temporary storage
shortly before or after the shutter is released (Active Selection),
choose the moment to release the shutter as the scene plays
back in slow motion (slow view), or let the camera choose the
best shot based on composition and movement (Smart Photo
Selector).
Choosing a Shot Manually (Active Selection)
Choose up to 20 shots from 20 frames recorded shortly before or
after the shutter-release button is pressed all the way down.
1
Select u mode.
u Choosing the Moment (Best Moment Capture)
Rotate the mode dial to u (best
moment capture).
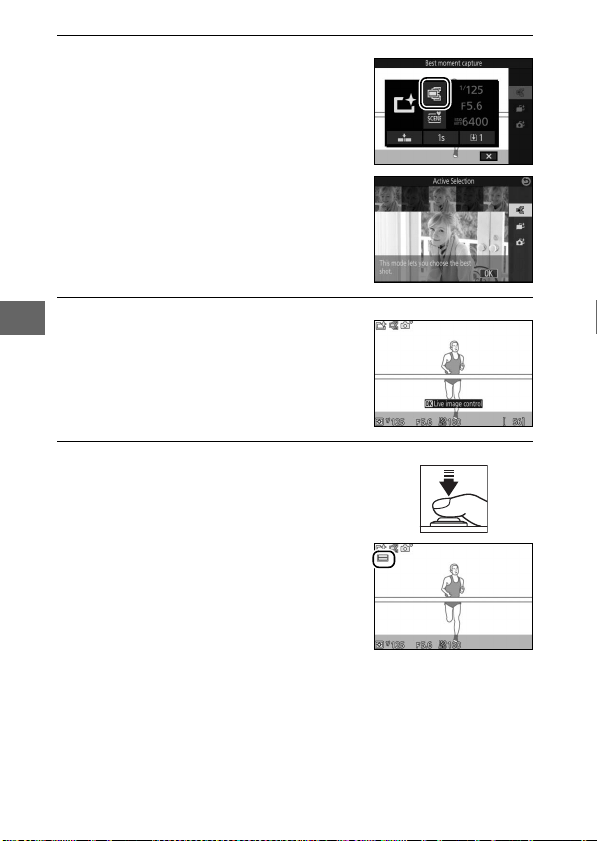
56
R
2
Choose Active Selection.
3
Frame the photograph.
4
Begin buffering photographs.
Press & (feature) to display the &
menu. Highlight Best moment cap-
ture and press J, then highlight
Active Selection and press J.
Compose the photograph with your
subject in the center of the frame.
Press the shutter-release button half-
way to focus (0 26). A & icon will be
displayed as the camera begins
recording images to the memory buf-
fer.
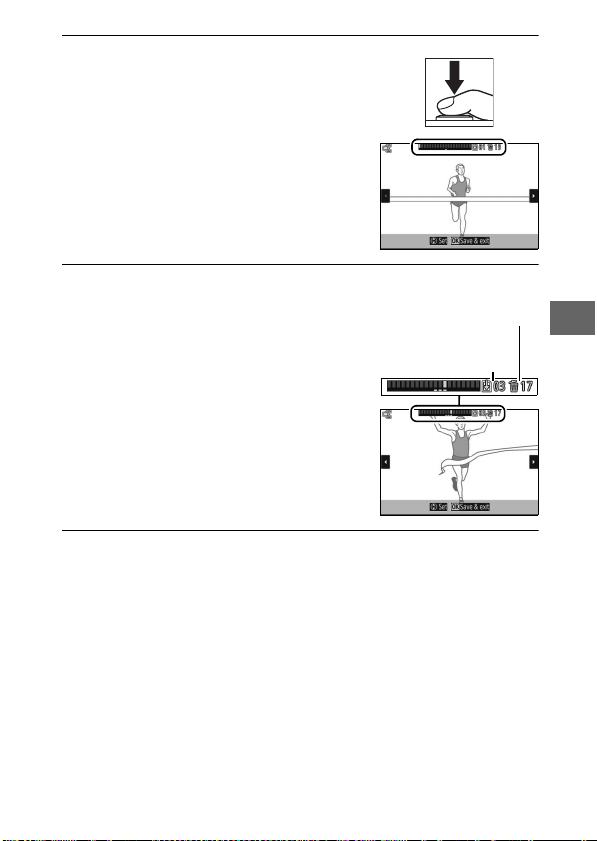
57
R
5
Shoot.
6
Select up to 20 frames.
7
Save the selected frames.
Press J to save the selected frames to the memory card. The
memory card access lamp will light while recording is in prog-
ress; note that depending on shooting conditions and mem-
ory card write speed, some time may be required to save the
selected frames. Once recorded, the frames will be treated as
a single group during playback.
Smoothly press the shutter-release
button the rest of the way down. The
20 frames recorded to the buffer in the
moments before and after the shutter-
release button was pressed all the way
down will be copied to temporary
storage, and an indicator will appear
at the top of the display.
Press 4 or 2 to scroll through the
frames and press 1 or 3 to select or
deselect (the number of frames
selected by default varies with the
option selected for Frames saved
(default) in the & (feature) menu).
Selected images are shown by dots in
the indicator.
Number of frames
discarded
Number of frames
saved

58
R
A
Best Moment Capture Mode
Movies can not be recorded, and pressing the movie-record button
has no effect. The flash can not be used.
A
Active Selection
At default settings, the frame recorded at the moment the shutter-
release button was pressed all the way down is automatically marked
with a p icon in Step 6.
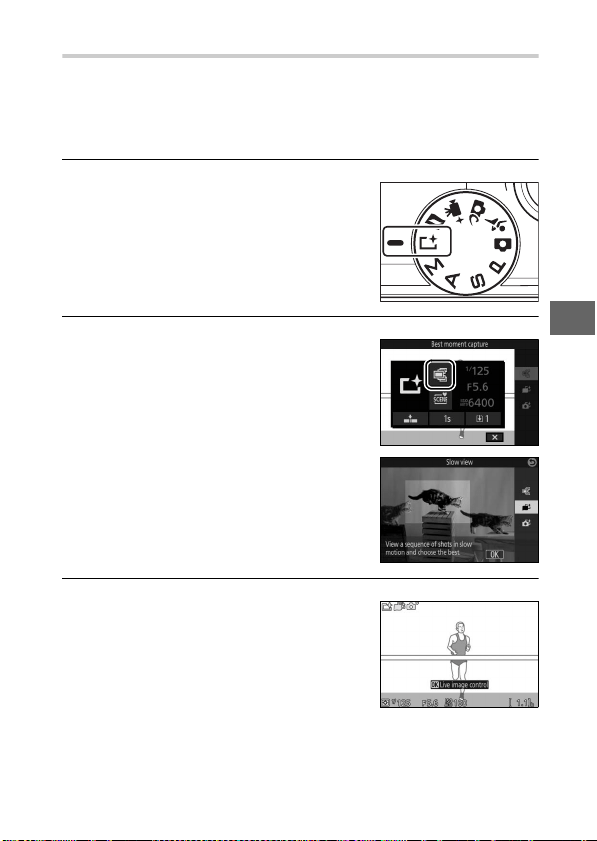
59
R
Choosing Your Moment (Slow View)
When slow view is selected in u (best moment capture) mode,
the camera captures a short sequence of still images and plays
them back in slow motion so that you can choose the precise
moment for a photograph.
1
Select u mode.
2
Select Slow view.
3
Frame the photograph.
Rotate the mode dial to u (best
moment capture).
Press & (feature) to display the &
menu. Highlight Best moment cap-
ture and press J, then highlight Slow
view and press J.
Compose the photograph with your
subject in the center of the frame.
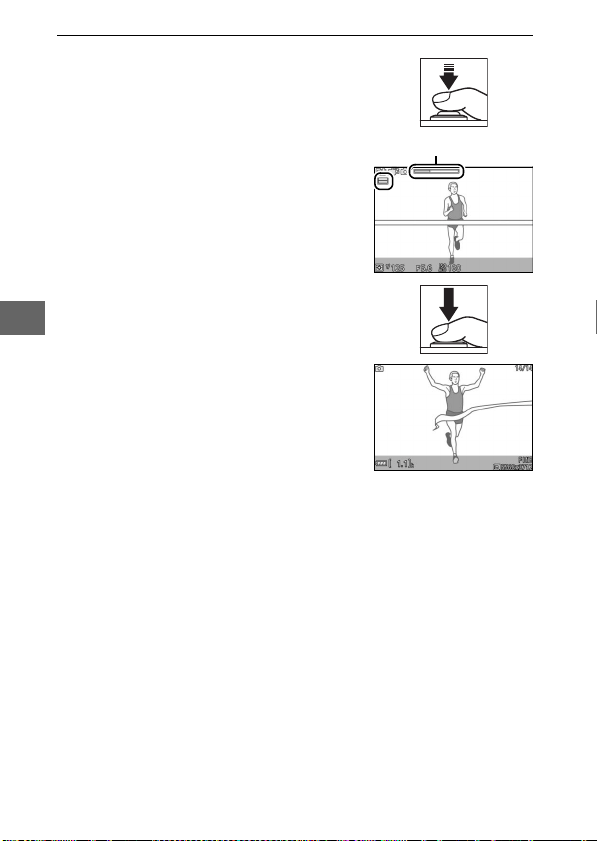
60
R
4
Press the shutter-release button halfway.
After focusing, the camera will record
20 frames to a temporary memory
buffer. It will then slowly play them
back in a continuous loop while the
shutter-release button is kept pressed
halfway. A & icon is displayed in the
monitor.
Progress indicator
When the desired frame is displayed,
press the shutter-release button the
rest of the way down to record the cur-
rent frame and discard the remaining
images. The selected frame will be dis-
played for a few seconds when record-
ing is complete. To delete the buffer
contents and exit without recording a
photograph, release the button with-
out pressing it the rest of the way
down.
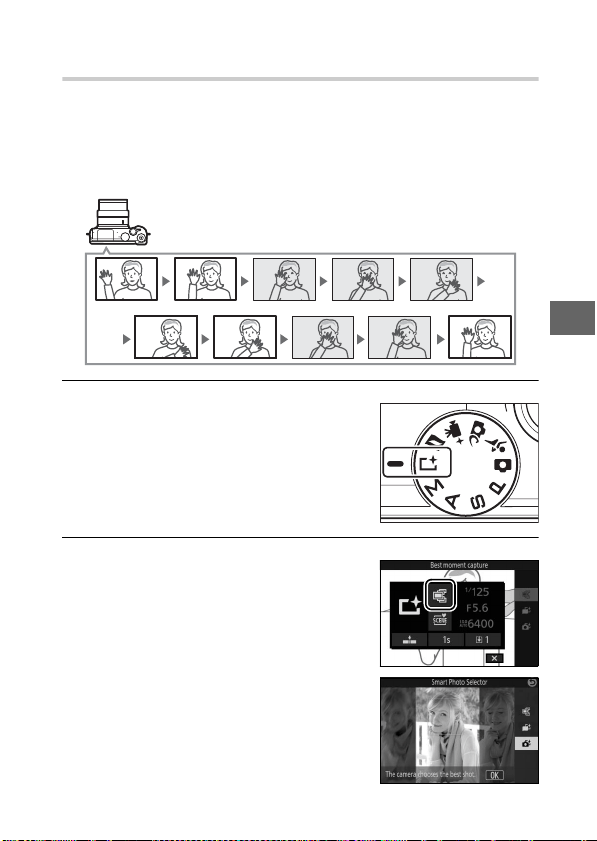
61
R
Letting the Camera Choose the Moment
(Smart Photo Selector)
The Smart Photo Selector helps you capture a fleeting expres-
sion on the face of a portrait subject or other hard-to-time shots
such as group photos in party scenes. Each time the shutter is
released, the camera automatically selects the best shot and four
best shot candidates based on composition and motion.
1
Select u mode.
2
Choose Smart Photo Selector.
Rotate the mode dial to u (best
moment capture).
Press & (feature) to display the &
menu. Highlight Best moment cap-
ture and press J, then highlight
Smart Photo Selector and press J.
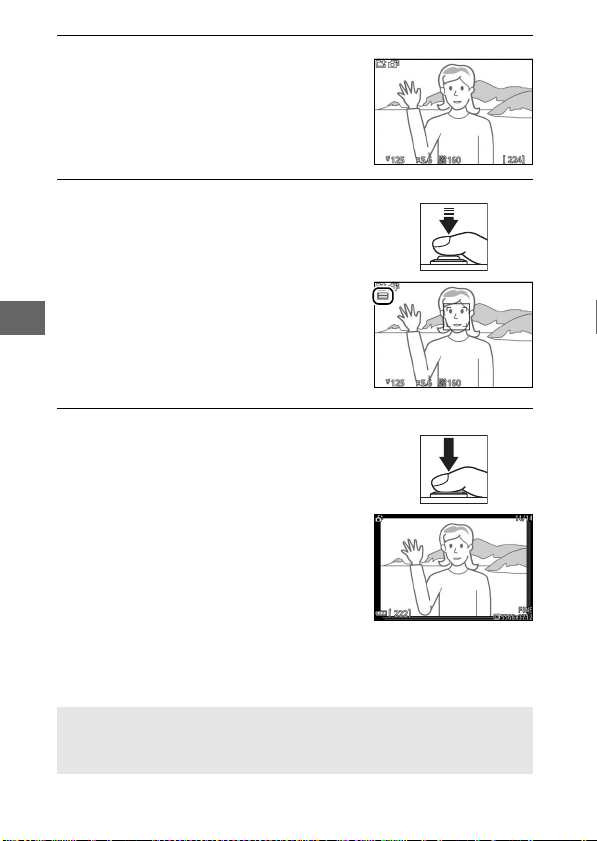
62
R
3
Frame the photograph.
4
Begin buffering photographs.
5
Shoot.
Smoothly press the shutter-release
button the rest of the way down. The
camera will compare shots recorded
to the buffer both before and after the
shutter-release button was pressed all
the way down, and select the best
shot and four best shot candidates to
the memory card; during playback,
these frames will be treated as a single
group. The best shot is displayed in
the monitor when recording is complete; note that some
time may be required.
Compose the photograph with your
subject in the center of the frame.
Press the shutter-release button half-
way to focus (0 26). A & icon will be
displayed as the camera begins
recording images to the memory buf-
fer. The camera continuously adjusts
focus to account for changes in the
distance to the subject while the shut-
ter-release button is pressed halfway.
A
Smart Photo Selector
The camera automatically chooses a scene mode appropriate to the
subject.
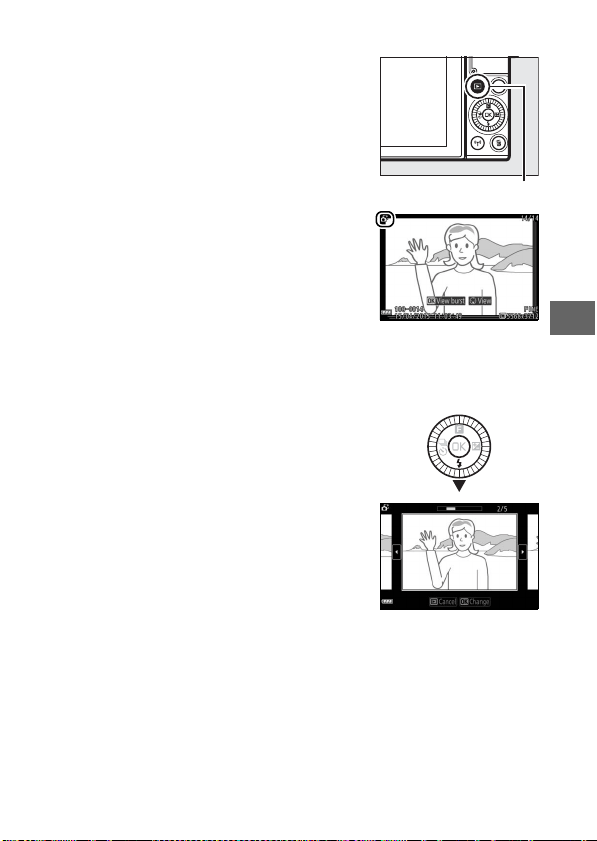
63
R
❚❚ Viewing Photos Taken with the Smart Photo Selector
Choosing the Best Shot
Press K and use the multi selector to dis-
play photographs taken with the Smart
Photo Selector (0 28; pictures taken with
the Smart Photo Selector are indicated by
a y icon). Of the photographs recorded
by the Smart Photo Selector, only the
best shot will be displayed (when you
press 2 to view the next picture, the
camera will skip over the best shot candi-
dates, with the result that the next pic-
ture displayed will not have a file number
that immediately follows that of the cur-
rent picture). To end playback and return
to shooting mode, press the shutter-
release button halfway.
K button
When a photograph taken with the Smart
Photo Selector is displayed, you can
choose the best shot by pressing 3. Press
4 or 2 to view the other pictures in the
sequence and press J to select the cur-
rent picture as the best shot. To return to
normal playback, press D.
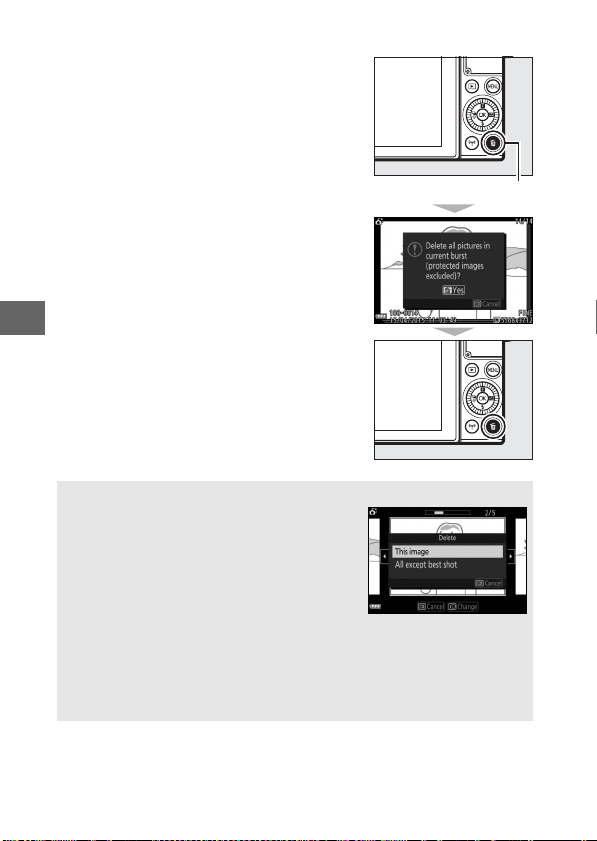
64
R
❚❚ Deleting Pictures
Pressing O when a picture taken with the
Smart Photo Selector is selected displays
a confirmation dialog; press O again to
delete the best shot and the best shot
candidates, or press K to exit without
deleting the pictures. Note that once
deleted, pictures can not be recovered.
A
Deleting Individual Photographs
Pressing the O button in the best shot selec-
tion dialog displays the following options;
highlight an option using the multi selector
and press J to select.
• This image: Delete the current photo (note
that the picture currently selected as the
best shot can not be deleted).
• All except best shot: Delete the best shot candidates, but not picture cur-
rently selected as the best shot.
A confirmation dialog will be displayed; to delete the selected image
or images, highlight Ye s and press J.
O button

65
R
Record brief movie vignettes with your photographs. Each time
the shutter is released, the camera records a still image and
about 1.6 s of movie footage. When the resulting “Motion Snap-
shot” is viewed on the camera, the movie will play back in slow
motion over approximately 4 s, followed by the still image.
1
Select z mode.
2
Frame the picture.
z Combining Photos with Brief Movie Vignettes
(Motion Snapshot Mode)
Rotate the mode dial to z (Motion
Snapshot).
Compose the photograph with your
subject in the center of the frame.
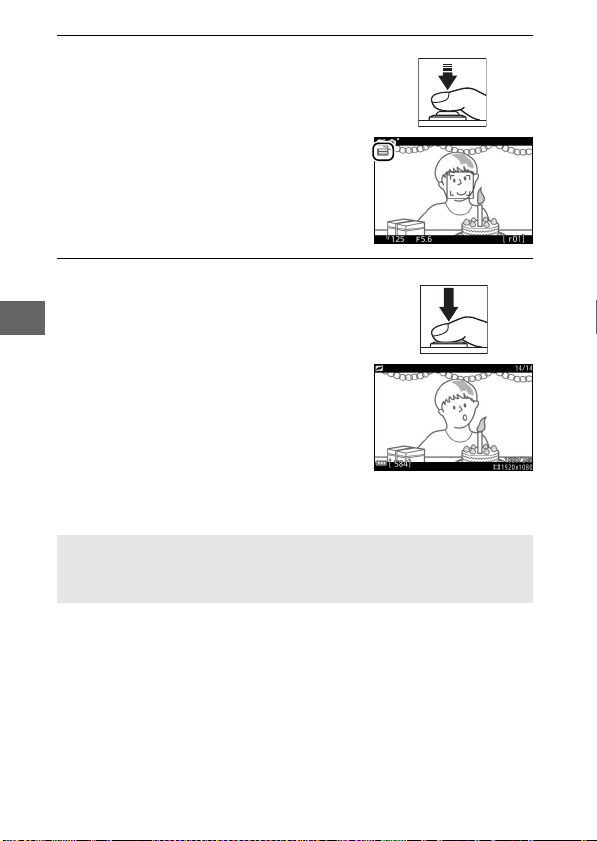
66
R
3
Begin buffering.
4
Shoot.
Smoothly press the shutter-release
button the rest of the way down. The
camera will record a photograph,
together with about 1.6 s of movie
footage beginning before and ending
after the time the shutter-release but-
ton was pressed all the way down.
Note that some time may be required.
When recording is complete, the pho-
tograph will be displayed for a few
seconds.
Press the shutter-release button half-
way to focus (0 26). A & icon will be
displayed as the camera begins
recording footage to the memory buf-
fer.
A
Motion Snapshot Mode
Movies can not be recorded using the movie-record button and the
flash can not be used.
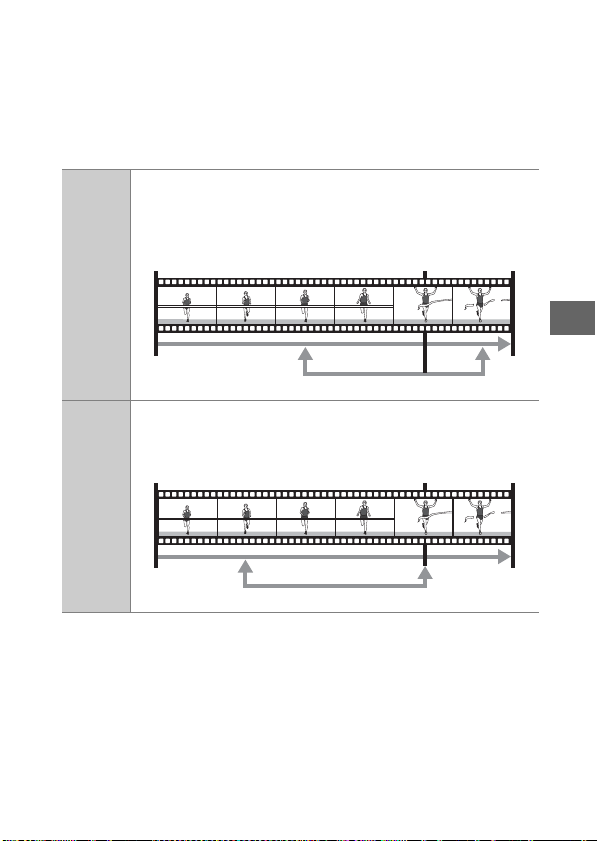
67
R
❚❚ Movie Before/After
Use the Movie before/after option in the & (feature) menu to
choose whether the movie portions of Motion Snapshots end
when the shutter-release button is pressed all the way or about
0.6 s after (0 65). If 1.6 s : 0 s is selected, the photograph used
for the Motion Snapshot will feature the last frame of the movie.
1.0 s : 0.6 s
Movie footage starts about a second before the shutter-
release button is pressed all the way down and ends about
0.6 s after.
1.6 s : 0 s
The camera records about 1.6 s of movie footage, ending
when the shutter-release button is pressed all the way down.
Shutter-release button
pressed halfway
Shutter-release button
pressed all the way down
1.0 s 0.6 s
Movie footage
Shutter-release button
pressed halfway
Shutter-release button
pressed all the way down
1.6 s
Movie footage

68
R
❚❚ File Format
The File format option in the & menu can be used to choose the
file format for Motion Snapshots.
❚❚ Audio
NMS files
Motion Snapshots are recorded as a MOV file about 4 s long
and a JPEG image. Motion Snapshots can only be viewed on
the camera or using ViewNX-i (0 104).
MOV file
Motion Snapshots are recorded as a MOV file about 10 s
long that can be viewed in a variety of computer applica-
tions. The Motion Snapshot is not displayed automatically
when shooting ends (0 66, 102); for information on view-
ing Motion Snapshot movies, see page 36.
To record about four seconds of sound
with Motion Snapshots beginning at the
start of movie recording, use the multi
selector and J button to select Ambient
for Audio in the & (feature) menu.
Motion Snapshots can also be recorded
with background music (Background
music) or no sound (None).
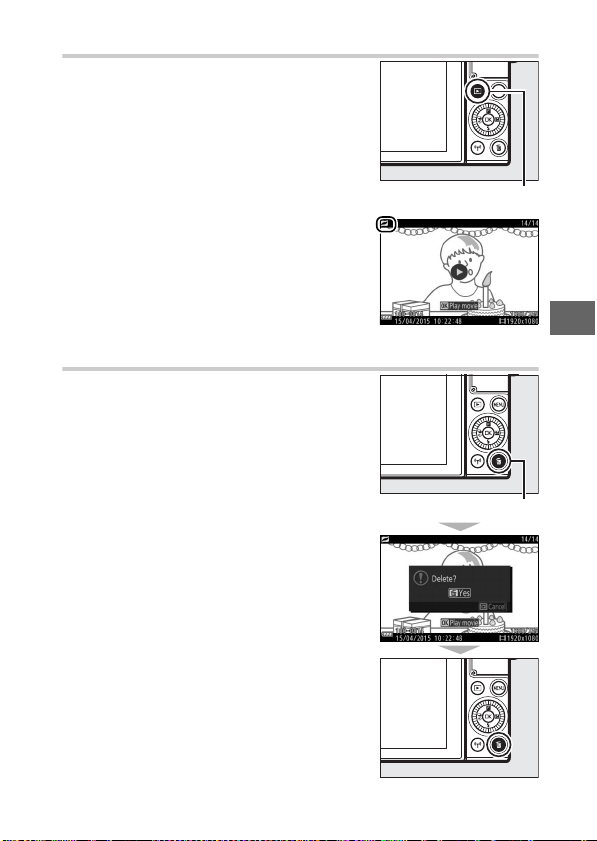
69
R
Viewing Motion Snapshots
Deleting Motion Snapshots
To delete the current Motion Snapshot,
press O. A confirmation dialog will be dis-
played; press O again to delete the photo
and movie and return to playback, or
press K to exit without deleting the file.
Note that once deleted, Motion Snapshots
can not be recovered.
Press K and use the multi selector to dis-
play a Motion Snapshot (0 28; Motion
Snapshots are indicated by a z icon).
Pressing the J button or tapping the M
icon when a Motion Snapshot is dis-
played plays back the movie portion in
slow motion over a period of about 4 s,
followed by the photo; playback is
accompanied by the audio track selected
using the Audio option (0 68). To end
playback and return to shooting mode,
press the shutter-release button halfway.
K button
O button
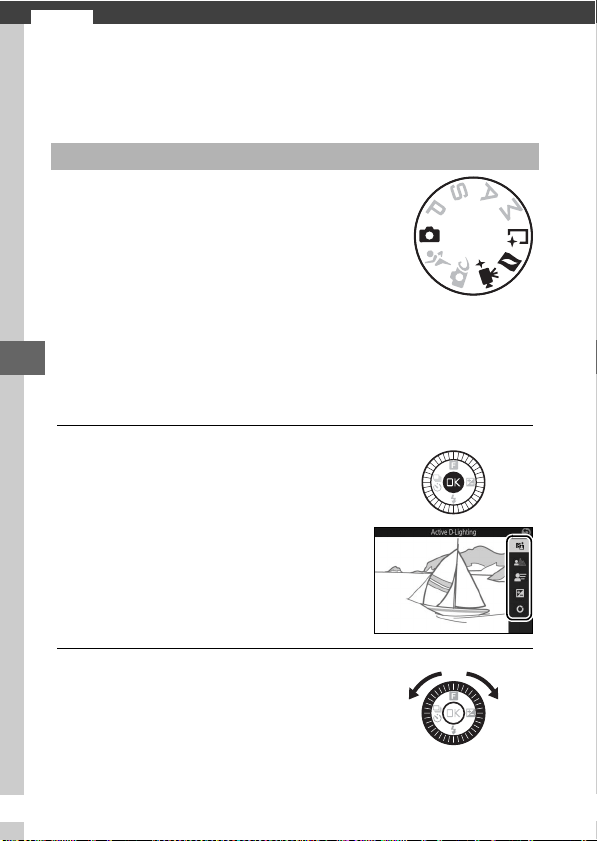
t
70
t
More on Photography
This section describes the other features you can use when tak-
ing pictures.
Live image control lets you preview how
changes to each control will affect the final
photography. Live image controls are available
in the modes shown at right (in modes other
than auto, live image controls are available
only when h Scene auto selector is selected
for exposure mode, 0 101). In advanced
movie mode, live image controls apply to HD, fast-motion, jump-
cut, and 4-second movies. In best moment capture mode, live
image controls apply to Active Selection and slow view, but the
Y Active D-Lighting control is not available.
1
Choose a live image control.
2
Choose a setting.
Live Image Control
Press J in the shooting display, then
highlight an option and press J to
view the selected control. For more
information, see page 71.
Rotate the multi selector to adjust the
control, using the preview in the mon-
itor as your guide. Press J when the
control is adjusted to your satisfaction.
For information on using the creative
palette, see page 72.
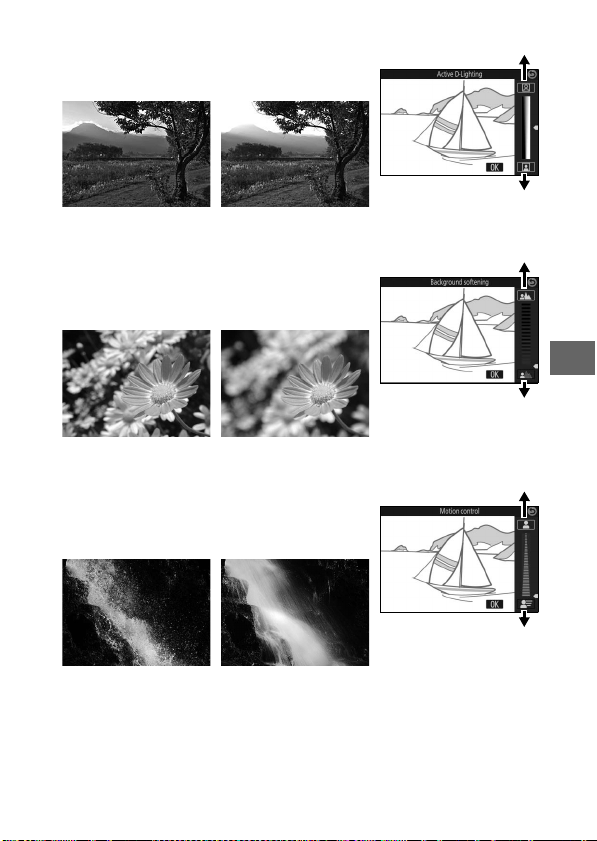
71
t
Y Active D-Lighting: Preserve details in
highlights and shadows for natural con-
trast.
Increase effect
Reduce effect
Active D-Lighting: High Active D-Lighting: Low
5 Background softening: Soften back-
ground details to make your subject
stand out, or bring both background and
foreground into focus.
Sharpen background
Soften background
Background sharp Background softened
6 Motion control (auto mode only): Sug-
gest motion by blurring moving objects,
or “freeze” motion to capture moving
objects clearly.
Freeze motion
Blur motion
Freeze motion Blur motion
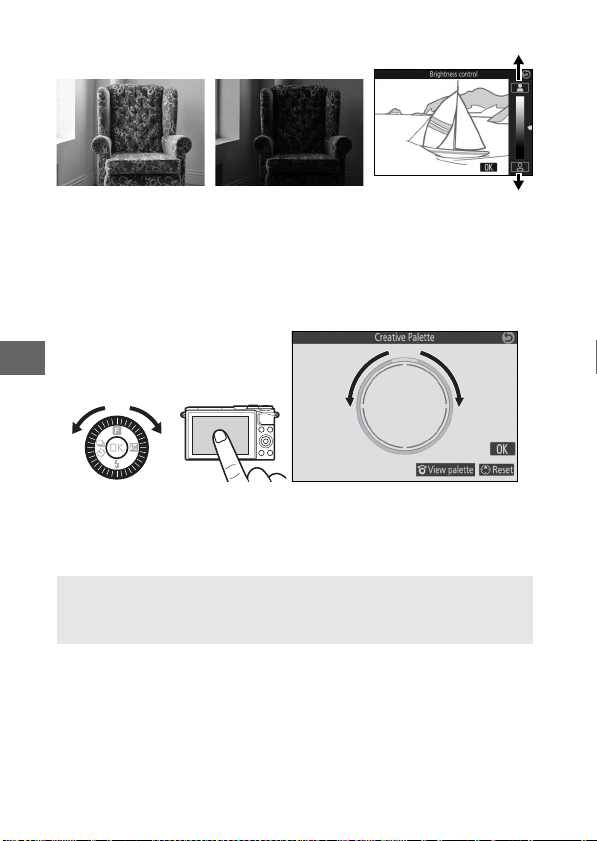
72
t
E Brightness control: Make pictures brighter
or darker.
Brighter
DarkerBrighter Darker
4 Creative palette: To choose a creative effect, rotate the multi
selector or use a finger to rotate the creative palette in the mon-
itor. The selected effect is visible in the monitor and changes
gradually as the palette is rotated (to reset the palette, tap Reset
while the creative palette cursor is displayed).
Photographs and movies will be recorded with the selected
effect, but note that tap shooting options are not available when
the creative palette is displayed (0 86).
D
Live Image Control
Continuous shooting is not available (0 73) and the built-in flash can
not be used when live image control is in effect.
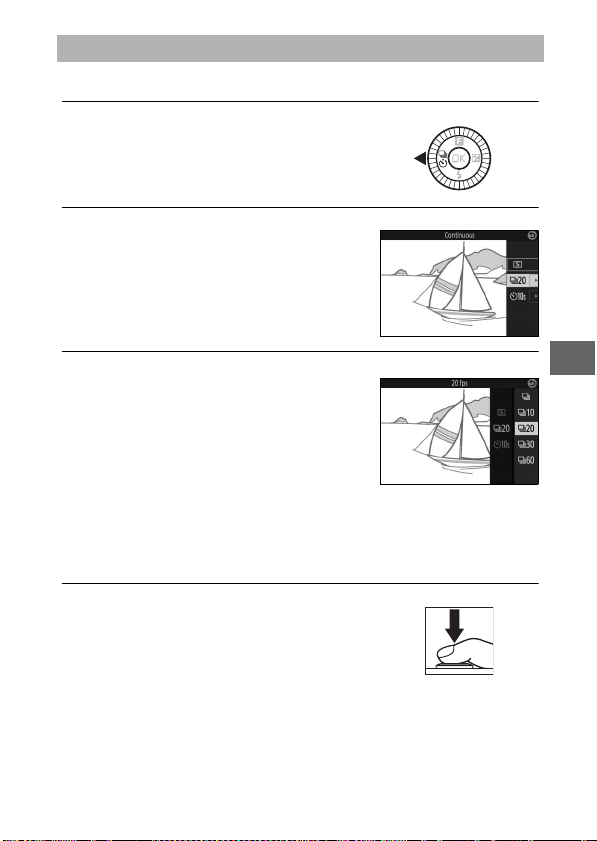
73
t
Shoot a continuous series (burst) of photographs.
1
Display release mode options.
2
Select I.
3
Select a frame rate.
Highlight the desired frame rate and
press J. Frame rate is expressed in
terms of the number of frames
recorded per second (fps); choose
from frame rates of approximately 5,
10, 20, 30, and 60 fps (I, Q, R,
S, and T, respectively). Except when I is selected, the
maximum number of shots that can be recorded in a single
burst is 20.
4
Frame your subject and shoot.
Continuous Mode
Press 4 (C) to display release mode
options.
Highlight I (continuous) and press 2
to display frame rate options.
Press the shutter-release button all
the way down to shoot the burst.

74
t
D
Continuous Mode
Only one picture will be taken if the flash fires when I is selected; at
settings of 10, 20, 30, and 60 fps, the built-in flash will not fire.
While photographs are being recorded to the memory card, the mem-
ory card access lamp will light. Depending on shooting conditions and
memory card write speed, recording may take some time. If the battery
is exhausted before all photographs are recorded, the shutter release
will be disabled and the remaining images transferred to the memory
card.
Continuous shooting is not available with live image controls (0 70) or
in self-portrait, creative, best moment capture, advanced movie, or
Motion Snapshot mode.
A
Viewing Pictures Taken in Continuous Mode
Each burst plays back as a group. This can be changed using the
Sequence display options item in the playback menu (0 100).
A
Single Frame
To take only one picture each time the shutter-release button is
pressed all the way down, select 8 (single frame) for release mode.
Single frame is not available in sports mode.
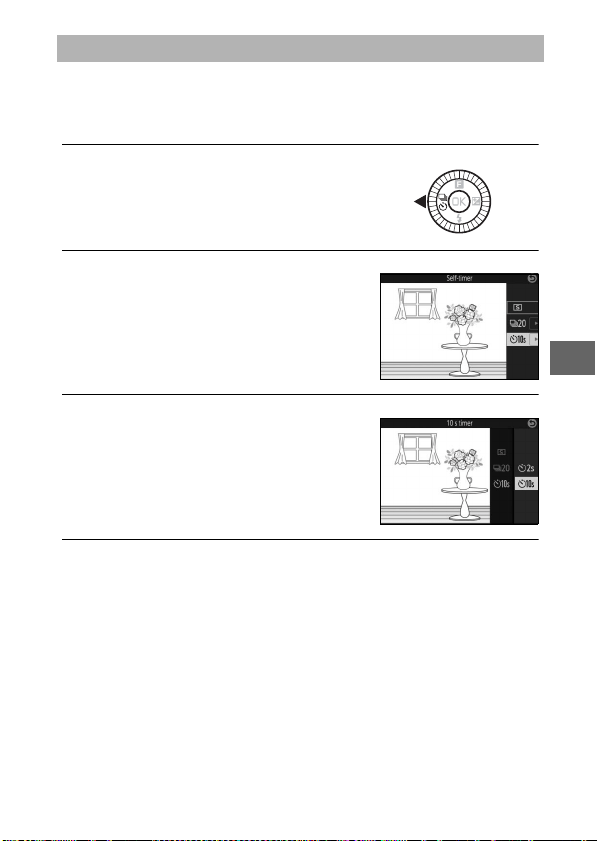
75
t
The self-timer is used to delay shutter release until 10 or 2 sec-
onds after the shutter-release button is pressed all the way
down.
1
Display release mode options.
2
Select E.
3
Select the desired self-timer option.
4
Mount the camera on a tripod.
Mount the camera on a tripod or place the camera on a sta-
ble, level surface.
Self-Timer Modes
Press 4 (C) to display release mode
options.
Highlight E (self-timer) and press 2
to display self-timer options.
Use the multi selector to highlight c
or a and press J.

76
t
5
Frame the photograph and shoot.
Note that the timer may not start or a photograph may not be
taken if the camera is unable to focus or in other situations in
which the shutter can not be released. Turning the camera off
cancels the self-timer.
Press the shutter-release button half-
way to focus, and then press the but-
ton the rest of the way down. The self-
timer lamp will start to flash and a
beep will begin to sound. Two sec-
onds before the photo is taken, the
lamp will stop flashing and the beep-
ing will become more rapid.
A
Movie Mode
To record movies using the self-timer, select advanced movie mode
and use the movie-record button to start the timer. Movie recording
ends when the movie-record button is pressed a second time.
A
Raising the Flash
In P, S, A, or M mode, press the flash pop-up button to raise the flash
before shooting. Shooting will be interrupted if the flash is raised while
the timer is counting down.
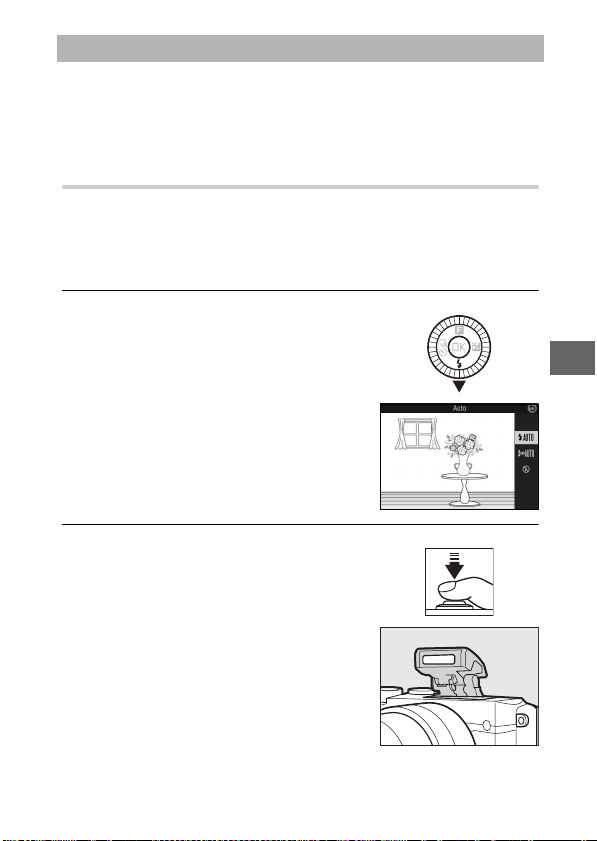
77
t
Use the built-in flash for additional lighting when the subject is
poorly lit or to “fill-in” (illuminate) back-lit subjects. The built-in
flash is available in the following shooting modes, but note that
some camera settings automatically disable the built-in flash:
Auto Pop-up Modes
In C (auto) mode and when an option other than HDR (5), easy
panorama (p), night landscape (j), or landscape (l) is selected
in w (creative) mode, the flash will pop-up automatically and
fire when required.
1
Choose a flash mode.
2
Take pictures.
The Built-in Flash
Press 3 (N) on the multi selector to
display a list of flash modes, then use
the multi selector to highlight the
desired mode and press J to select.
Press the shutter-release button half-
way to focus and the rest of the way
down to shoot. The flash will pop up
and fire when required.

78
t
❚❚ Flash Modes
The following flash modes are available:
• o (auto flash): When lighting is poor or the subject is backlit,
the flash pops up automatically when the shutter-release but-
ton is pressed halfway and fires as required.
• n (auto with red-eye reduction): Use for portraits. The flash
pops up and fires as required, but before it fires, the red-eye
reduction lamp lights to help reduce “red-eye.”
• s (off): The flash does not fire.
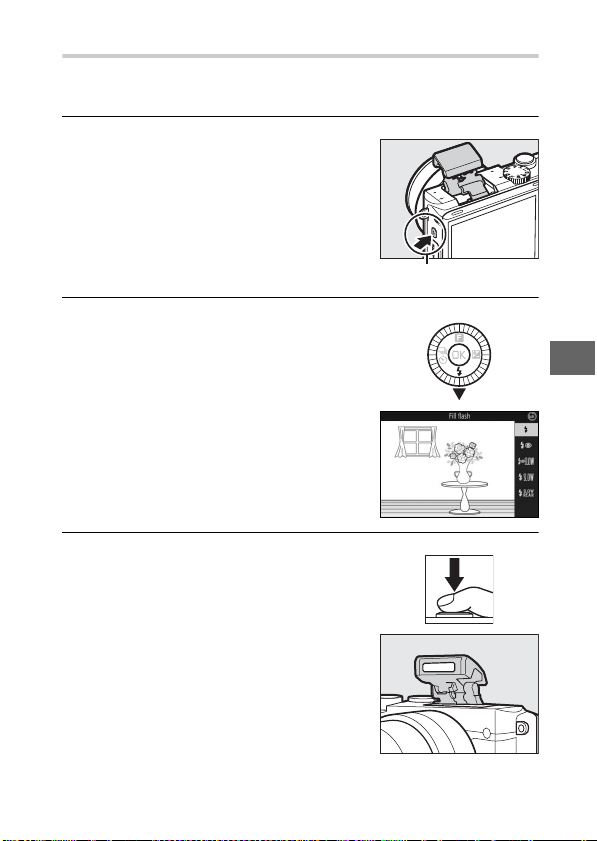
79
t
Manual Pop-up Modes
In P, S, A, M, and self-portrait modes, the flash must be raised man-
ually. The flash will not fire if it is not raised.
1
Raise the flash.
2
Choose a flash mode.
3
Take pictures.
Press the flash pop-up button to raise
the flash.
Flash pop-up button
Press 3 (N) on the multi selector to
display a list of flash modes, then use
the multi selector to highlight the
desired mode and press J to select.
The flash will fire with every shot. To
disable the flash, press it gently down-
ward until it latches.

80
t
❚❚ Flash Modes
The following flash modes are available:
• N (fill flash): The flash fires with every shot.
• NY (red-eye reduction): Use for portraits. The flash fires with
every shot, but before it fires, the red-eye reduction lamp lights
to help reduce “red-eye.”
• NYp (red-eye reduction with slow sync): As for “red-eye
reduction”, above, except that shutter speed slows automati-
cally to capture background lighting at night or under low
light. Use when you want to include background lighting in
portraits. Available only in modes P and A.
• Np (fill flash + slow sync): As for “fill flash”, above, except that
shutter speed slows automatically to capture background
lighting at night or under low light. Use when you want to cap-
ture both subject and background. Available only in modes P
and A.
• Nr (rear curtain + slow sync): As for “rear-curtain sync”, below,
except that shutter speed slows automatically to capture back-
ground lighting at night or under low light. Use when you want
to capture both subject and background. Available only in
modes P and A.
• Nq (rear-curtain sync): The flash fires just before the shutter
closes, creating a stream of light behind moving light sources
as shown below at right. Available only in modes S and M.
Front-curtain sync Rear-curtain sync
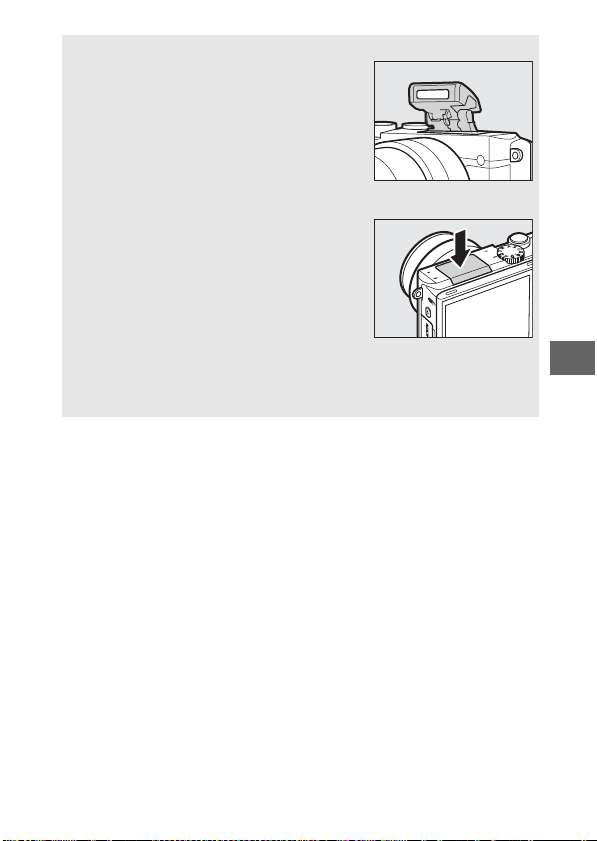
81
t
D
Raising the Flash
When using the flash, be sure it is fully raised
as shown at right. Do not touch the flash
during shooting.
A
Lowering the Built-in Flash
To save power when the flash is not in use,
press it gently downward until the latch
clicks into place. Do not use force. Failure to
observe this precaution could result in prod-
uct malfunction.
A
The Flash-Ready Indicator
The flash-ready indicator (N) lights to show that the flash is fully
charged when the shutter-release button is pressed halfway.
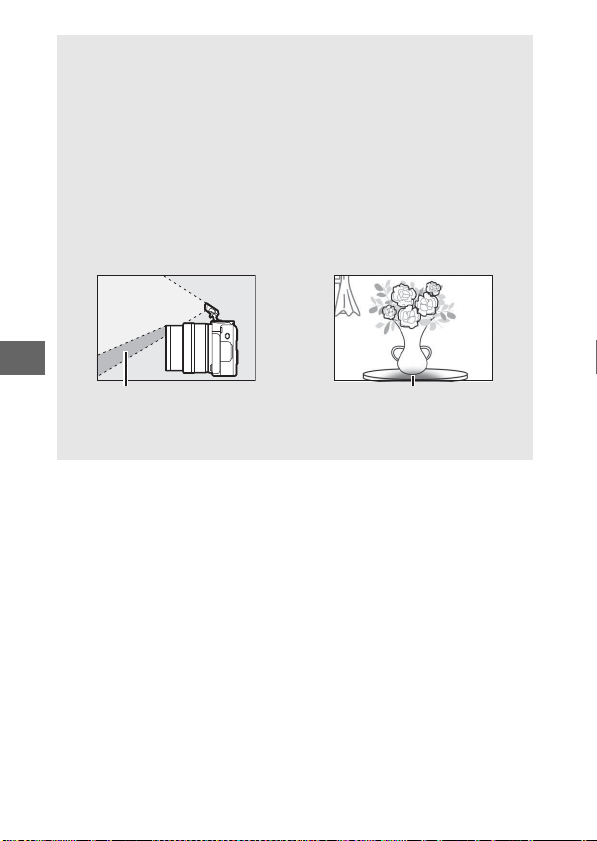
82
t
A
Using the Built-in Flash
If the flash is fired multiple times in quick succession, the flash and
shutter may be temporarily disabled to protect the flash. Shooting can
be resumed after a brief pause.
Objects close to the camera may be overexposed in photographs
taken with the flash at high ISO sensitivities.
To avoid vignetting, remove lens hoods and shoot at ranges of at least
0.6 m (2 ft). Some lenses may cause vignetting at greater distances or
obstruct the red-eye reduction lamp, interfering with red-eye reduc-
tion. The following illustrations show the effect of vignetting caused by
shadows cast by the lens when the built-in flash is used.
Shadow Vignetting
A
Aperture, Sensitivity, and Flash Range
Flash range varies with sensitivity (ISO equivalency) and aperture.
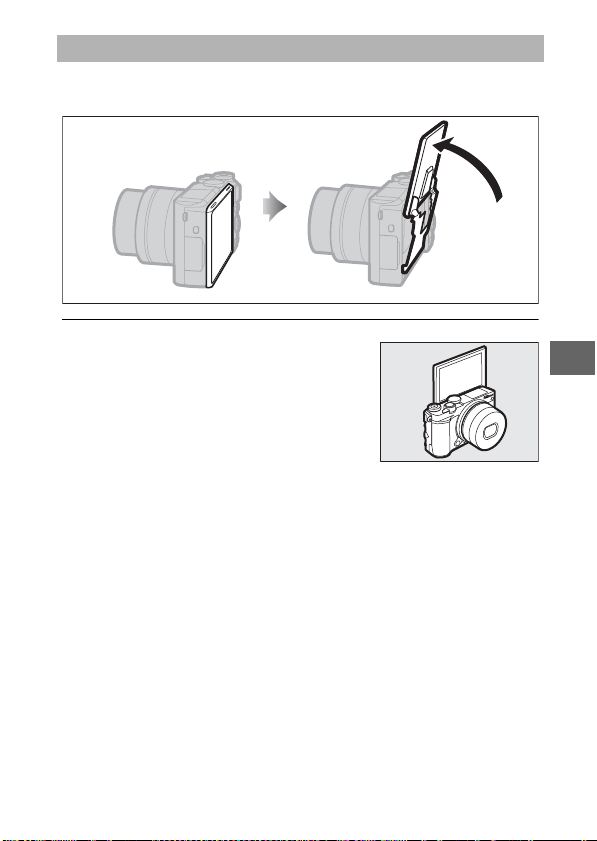
83
t
To frame self-portraits in the monitor, reverse it as shown and fol-
low the steps below.
1
Reverse the monitor.
Self-Portraits
The camera will select self-portrait
mode.
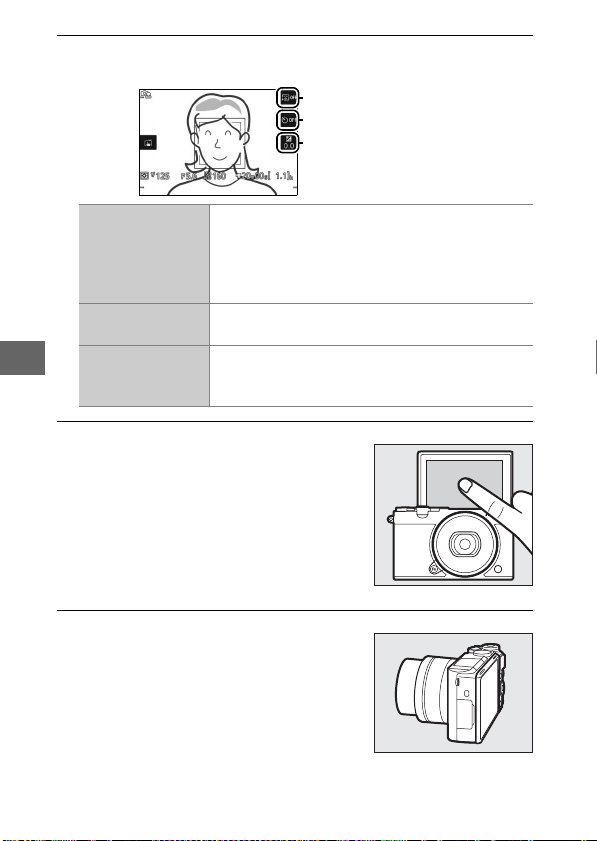
84
t
2
Adjust settings.
The following settings can be adjusted using touch controls:
3
Shoot.
4
Exit self-portrait mode.
Skin softening
Self-timer
Exposure compensation
V
Skin softening
Tap to enable or disable skin softening. Enabling
skin softening softens the look of skin for por-
trait subjects detected by the camera (up to a
maximum of three), but note that the effect can
not be previewed in the monitor.
E
Self-timer
Tap to cycle through self-timer settings as fol-
lows: 2 s timer, 10 s timer, and self-timer off.
E
Exposure
compensation
Tap the exposure indicator to adjust exposure
compensation and tap 0 to exit when adjust-
ments are complete.
Tap the monitor to focus on the
selected subject and shoot, or press
the shutter-release button halfway to
focus and all the way down to take
photographs. Use the movie-record
button to shoot movies. Movies are
recorded at 1080/30p.
Moving the monitor out of the self-
portrait position ends self-portrait
mode.

85
t
A
Self-Portrait Mode
Touch-screen controls are always available in self-portrait mode
regardless of the option selected for Touch-screen controls in the
setup menu (0 103). All other controls except the power switch and
the shutter-release, movie-record, and flash pop-up buttons are dis-
abled; use the flash pop-up button to raise the flash as required. The
flash fires in n (auto + red-eye reduction) mode. Photographs taken
in self-portrait mode with NEF (RAW) or NEF (RAW) + JPEG fine
selected for image quality will be recorded as fine-quality JPEG images.
If Off is selected for Self-portrait mode in the setup menu (0 103),
the camera will not enter self-portrait mode when the monitor is
reversed, and pictures will instead be taken in the mode selected with
the mode dial.

86
t
C Auto, w Creative, and Self-Portrait Modes
Choose from the following options.
a Sports Mode
Tap Shooting Options
Tap the icon shown at right to choose the
operation performed by tapping the
monitor in shooting mode. The options
available vary with the shooting and
focus mode.
3
When you tap a subject in the display, the camera will focus and
take a picture.
4
Tap the monitor to position the focus area when Night land-
scape, Landscape, or Close-up is selected in creative mode
(0 41). To focus, press the shutter-release button halfway.
7
Tapping the display during shooting has no effect.
4
Tap the monitor to position the focus area. To focus, press the
shutter-release button halfway.
7
Tapping the display during shooting has no effect.

87
t
P, S, A, and M Modes
The operation performed by tapping the display depends on
whether the camera is in autofocus or manual focus mode.
❚❚ Autofocus Modes
The following options are available in autofocus modes (AF-A,
AF-S, and AF-C).
❚❚ Manual Focus Mode
The following options are available in manual focus mode.
3
When you tap a subject in the display, the camera will focus and
take a picture.
4
Tap the display to position the focus area when single-point AF
is selected for AF-area mode (0 102). To focus, press the shutter-
release button halfway.
6
Tap a subject to start tracking when subject tracking is selected
for AF-area mode (0 102).
7
Tapping the display during shooting has no effect.
3
When you tap the display, the camera will take a picture without
first adjusting focus.
5
Tap a subject to display it at a higher magnification in the moni-
tor.
7
Tapping the display during shooting has no effect.

88
t
v Advanced Movie Mode
The operation performed by tapping the display depends on
whether the camera is in autofocus or manual focus mode.
❚❚ Autofocus Modes
The following options are available in autofocus modes (AF-F
and AF-S).
❚❚ Manual Focus Mode
The following options are available in manual focus mode.
8
To focus when auto-area AF or single-point AF is selected for AF-
area mode (0 102), tap your subject in the display.
6
Tap a subject to start tracking when subject tracking is selected
for AF-area mode (0 102).
9
Tapping the display during shooting has no effect.
5
Tap a subject to display it at a higher magnification in the moni-
tor.
9
Tapping the display during shooting has no effect.
D
Unsupported Modes
Tap shooting options are not available in best moment capture and
Motion Snapshot modes or when 4K movie is selected in advanced
movie mode.
D
Taking Pictures Using Tap Shooting Options
Avoid tapping too hard. The camera may move when the shutter is
released, blurring photographs.
The shutter-release button can be used to focus and take pictures even
when the 3 icon is displayed to show that tap shooting options are
active. Use the shutter-release button to take photographs in continu-
ous shooting mode (0 73) and during movie recording. Tap shooting
options can be used only to take pictures one at a time in continuous
shooting mode and can not be used to take photographs during
movie recording. In self-timer mode (0 75), tapping the monitor locks
focus and starts the timer; the photograph will be taken after ten or
two seconds.
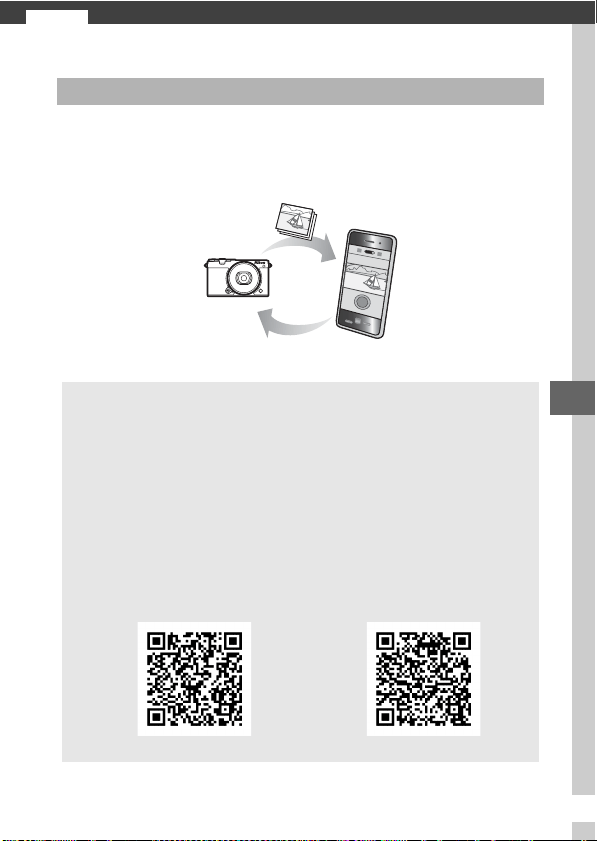
89
T
T
Wi-Fi
The camera can connect via Wi-Fi wireless networks to a smart
device (smartphone or tablet) running Nikon’s dedicated Wire-
less Mobile Utility app (0 93).
What Wi-Fi Can Do for You
Download pictures
Remote control
A
Installing the Wireless Mobile Utility App
1 Find the app.
On the smart device, connect to the Google Play service, the App
Store, or another app marketplace and search for “Wireless Mobile
Utility”.
For more information, see the instructions provided with
the smart device.
2 Install the app.
Read the app description and install the app.
A pdf manual for the
Wireless Mobile Utility is available for download at the following
URLs:
• Android: http://nikonimglib.com/ManDL/WMAU/
• iOS: http://nikonimglib.com/ManDL/WMAU-ios/
Android iOS

90
T
At default settings, wireless security is not enabled. Enable wire-
less security on the camera before connecting.
❚❚ Enabling Wireless Security
Follow the steps below to enable wireless security.
1
Select Wi-Fi connection type.
2
Enable encryption.
Wireless Security
Select Wi-Fi connection type in the
Wi-Fi menu.
Select Authentication/encryption to
display encryption options. Highlight
WPA2-PSK-AES and press J to
enable wireless security. A password
will now be required when connect-
ing to the camera; the default pass-
word is “NIKON_J5” (the current
password can be viewed at any time
by selecting Current settings in the
Wi-Fi menu). To allow connection
without a password, select Open for
Authentication/encryption.
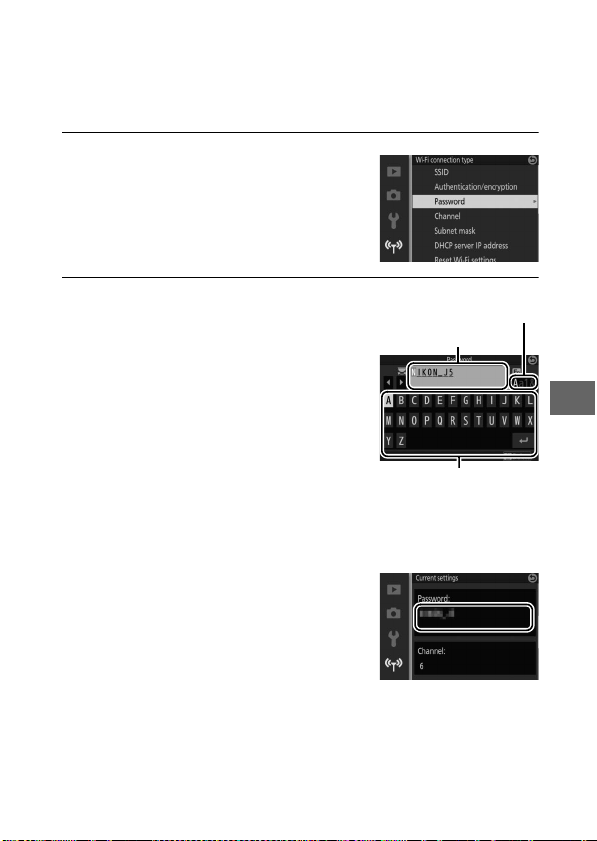
91
T
❚❚ Changing the Password
The password can be changed as described below. The pass-
word can only be changed when WPA2-PSK-AES is selected for
Authentication/encryption in the Wi-Fi menu.
1
Select Wi-Fi connection type > Password.
2
Enter a password.
The text-entry dialog shown at right
will be displayed with the current pass-
word (by default, “NIKON_J5”) in the
password area. Tap to highlight char-
acters in the password area or rotate
the command dial to move the cursor.
To enter a new character at the current
cursor position, tap the keys in the key-
board area or highlight characters
using the multi selector and press
J
.
To switch between lower and upper case, numbers, and sym-
bols, press the
Fn
button or tap the shift key.
Passwords can be from 8 to 36 charac-
ters long. After entering the password,
tap N. The password can be viewed
at any time by selecting Current set-
tings in the Wi-Fi menu.
Select Wi-Fi connection type in the
Wi-Fi menu, then highlight Password
and press J.
Shift key
Password area
Keyboard area
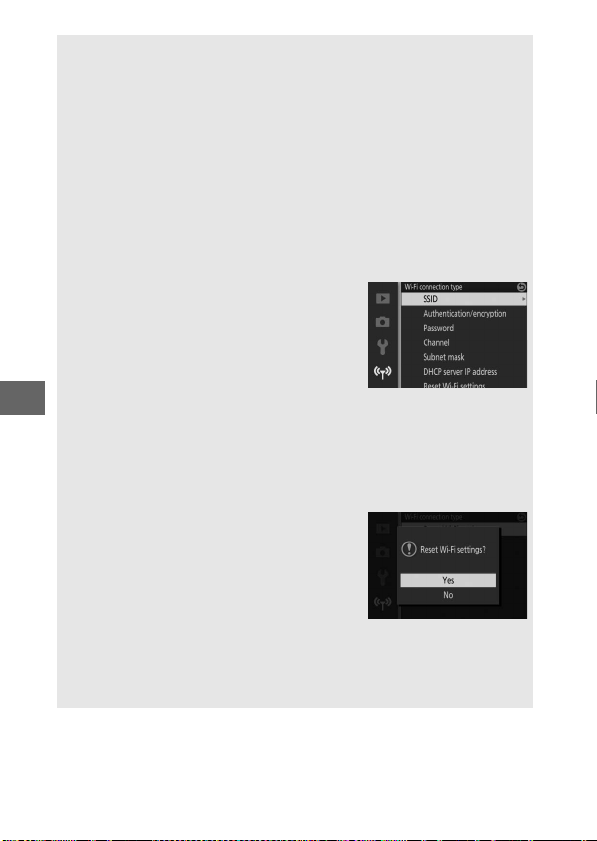
92
T
D
Security
Although one of the benefits of a wireless-enabled device is that it
allows others to freely connect for the wireless exchange of data any-
where within its range, the following may occur if security is not
enabled:
• Data theft: Malicious third-parties may intercept wireless transmis-
sions to steal user IDs, passwords, and other personal information.
• Unauthorized access: Unauthorized users may gain access to the net-
work and alter data or perform other malicious actions. Note that due
to the design of wireless networks, specialized attacks may allow
unauthorized access even when security is enabled.
A
Wi-Fi Connection Type
In addition to authentication/encryption
and password options, the Wi-Fi connec-
tion type menu contains the following
items:
• SSID: Choose the camera SSID (network
name). The process for entering the SSID is
the same as that for editing the password.
• Channel: The wireless channel used for wireless connections. Press 1
or 3 to choose from channels 1 through 11 and press J to select.
• Subnet mask/DHCP server IP address: We recommend that you use the
default sub-net mask (255.255.255.0) and DHCP server IP address
(192.168.0.1).
• Reset Wi-Fi settings: Select Ye s to reset wire-
less settings to their default values.
A
Current Settings
Select Current settings to view the current SSID, authentication/
encryption settings, password, channel, subnet mask, and DHCP
server IP address.

93
T
Before connecting via Wi-Fi (wireless LAN), install the Wireless
Mobile Utility on your compatible Android or iOS smart device.
Android and iOS: Connecting via SSID
Enable Wi-Fi on the smart device before connecting. For details,
see the documentation provided with the smart device.
1
Press the F (Wi-Fi) button.
2
Select the camera SSID.
On the smart device, select Settings > Wi-Fi and select the
camera SSID to connect via Wi-Fi. If this is the first time you
have connected since changing password settings (0 91),
enter the new password when prompted.
3
Launch the Wireless Mobile Utility.
Launch the copy of Wireless Mobile Utility installed on the
smart device. See Wireless Mobile Utility manual for details
(0 89).
Connecting via Wi-Fi
The camera SSID will be displayed (the
camera SSID can also be displayed by
highlighting
Connect to smart device
in the Wi-Fi menu and pressing
2
).
F (Wi-Fi) button
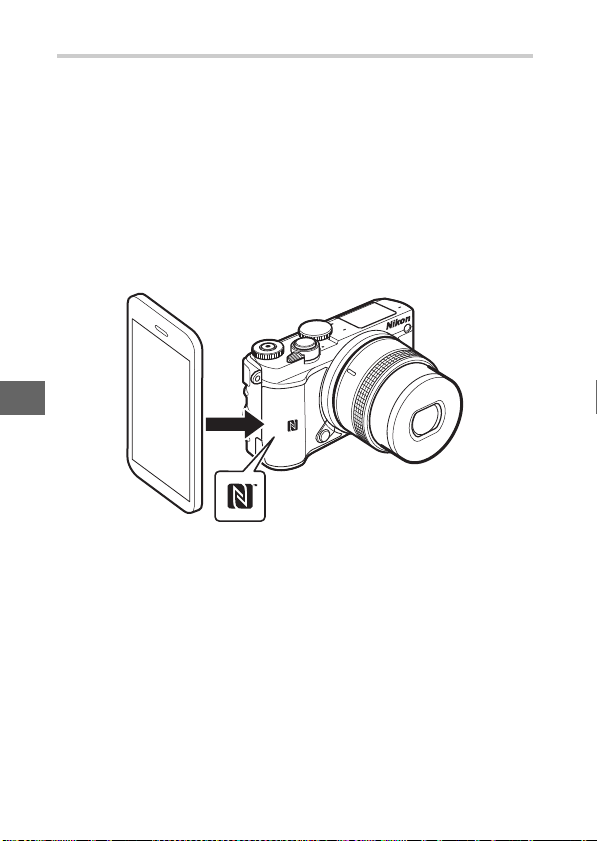
94
T
Android: Connecting via NFC
If the smart device supports NFC (Near Field Communication), a
Wi-Fi connection can be established simply by touching the
camera H (N-Mark) logo to the smart device NFC antenna.
Before connecting, enable NFC and Wi-Fi on the smart device as
described in the documentation provided with the smart device.
To connect via NFC, touch the camera H (N-Mark) logo to the
smart device NFC antenna (for the location of the NFC antenna,
see the documentation provided with the smart device). Main-
tain contact until the camera displays a message stating that an
NFC device has been detected.
Once the smart device has been detected, a Wi-Fi connection
will be established and the Wireless Mobile Utility will launch
automatically. See the Wireless Mobile Utility manual for more
information (0 89).

95
T
A
NFC
NFC (Near Field Communication) is an international standard for short-
range wireless communications technology.
A
No Connection
If you are unable to establish a connection using NFC as described
above, connect by manually selecting the camera SSID (0 93).
D
Wi-Fi
Before using the Wi-Fi function, read the warnings on pages xvi to xviii;
to prevent loss of power while connected, you should also charge the
camera battery. Do not use Wi-Fi in settings in which its use is prohib-
ited.
Note that the camera Wi-Fi function can not be used when a USB
cable is connected.
A
Terminating Wi-Fi Connections
Wi-Fi will terminate automatically if the smart device does not initiate
a connection within five minutes. To terminate Wi-Fi manually, press
the G button to exit the Wi-Fi standby or connection display.
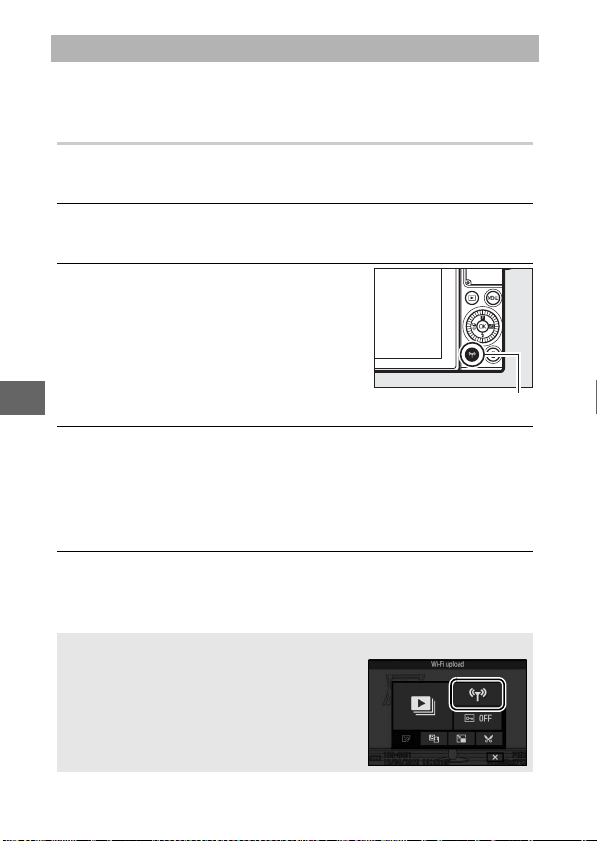
96
T
Follow the steps below to upload photos from the camera to a
smart device. Movies can not be selected for upload.
Uploading Photos One at a Time
Use the F (Wi-Fi) button to upload the photo currently dis-
played in full-frame playback.
1
Display the photo on the camera.
Display the desired photo in full-frame playback.
2
Press the F (Wi-Fi) button.
Pressing the F (Wi-Fi) button initiates
a Wi-Fi connection; the camera SSID
will be displayed in the monitor.
3
Select the camera SSID.
On the smart device, select Settings > Wi-Fi and select the
camera SSID to connect via Wi-Fi. If this is the first time you
have connected since changing password settings (0 91),
enter the new password when prompted.
4
Download the photo to the smart device.
Launch the Wireless Mobile Utility on the smart device and
follow the instructions on page 99 to download the photo.
Uploading Photos to a Smart Device
A
The & (Feature) Menu
Photos can also be uploaded by pressing &
in full-frame playback and then highlighting
Wi-Fi upload and pressing J.
F (Wi-Fi) button
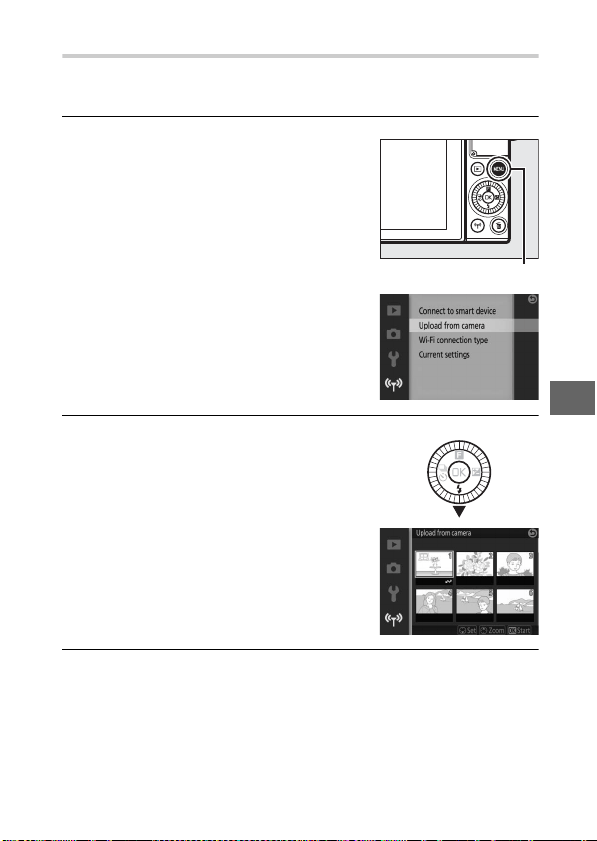
97
T
Uploading Multiple Selected Photos
To upload multiple selected photos, use the Upload from cam-
era option in the Wi-Fi menu.
1
Choose Upload from camera.
2
Select photos.
3
Press J.
Press J to complete the operation. The camera SSID will be
displayed in the monitor.
Press the G button to display the
menus. Highlight Upload from cam-
era in the Wi-Fi menu and press 2.
G button
Press 4 or 2 to scroll through pic-
tures and press 3 to select or dese-
lect. You can also tap the monitor to
select or deselect photos. Selected
photos are indicated by a & icon.

98
T
4
Select the camera SSID.
On the smart device, select Settings > Wi-Fi and select the
camera SSID to connect via Wi-Fi. If this is the first time you
have connected since changing password settings (0 91),
enter the new password when prompted.
5
Download the photos to the smart device.
Launch the Wireless Mobile Utility on the smart device and
follow the instructions on page 99 to download the selected
photos.
Uploading Photos via NFC
Photos displayed full frame or highlighted in the thumbnail list
can be uploaded via NFC (0 94).
1
Display or highlight the desired photo.
Display the photo full frame or highlight it in the thumbnail
list.
2
Connect.
Touch the camera H (N-Mark) logo to the smart device NFC
antenna until the camera displays a message stating that an
NFC device has been detected.
3
Download the photos to the smart device.
The Wireless Mobile Utility will launch automatically on the
smart device; follow the instructions on page 99 to download
the selected photos.
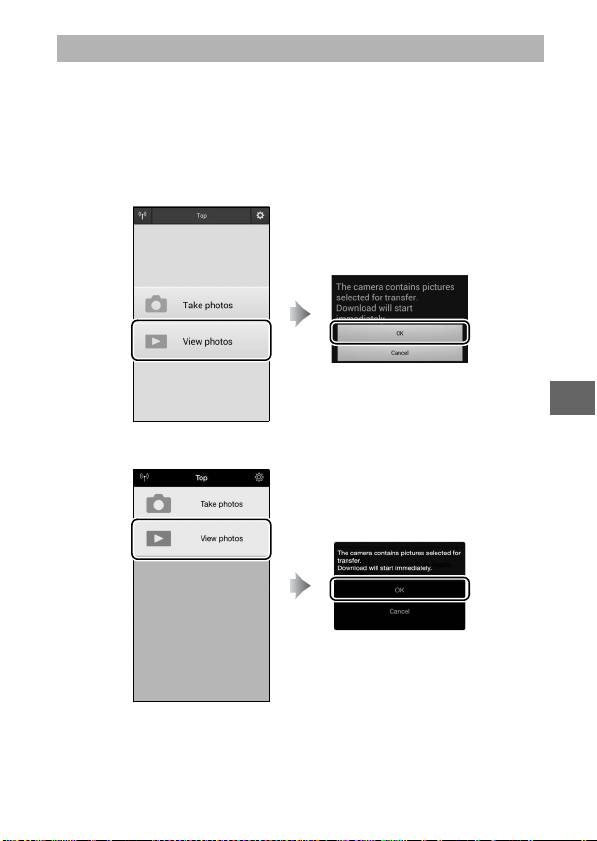
99
T
To download the selected pictures to the smart device, establish
a Wi-Fi connection with the camera (0 93, 94) and select View
photos in the Wireless Mobile Utility. A confirmation dialog will
be displayed; select OK to download the pictures selected with
the camera.
Android OS
iOS
Downloading Selected Pictures to the Smart Device
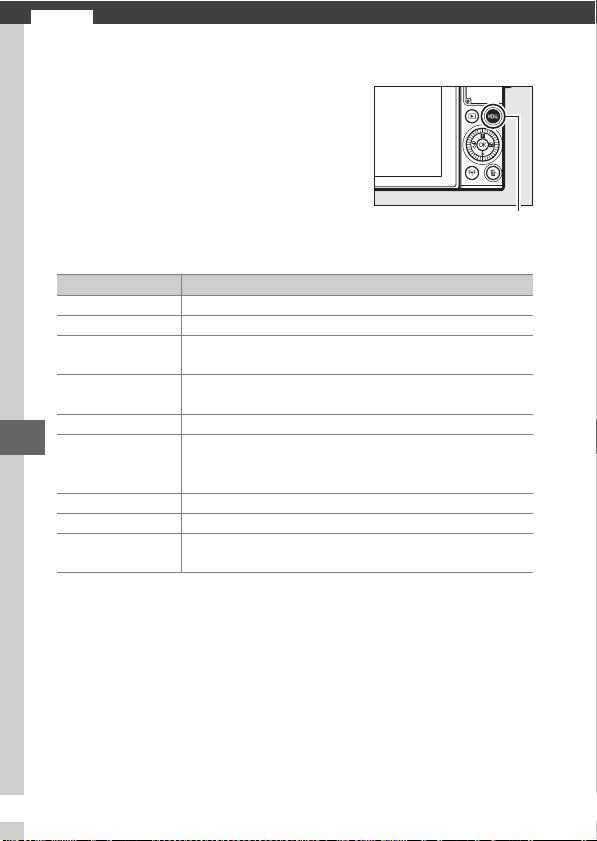
U
100
U
Menu Options
❚❚ Playback Menu Options
To display the playback, shooting, setup,
and Wi-Fi menus, press the G button.
Following menu options are available:
G button
Option Description
Delete Delete multiple images.
Slide show View movies and photos in a slide show.
Rotate tall
Rotate “tall” (portrait-orientation) pictures for
display during playback.
Sequence display
options
Choose how bursts are displayed.
Protect Protect pictures from accidental deletion.
D-Lighting
Brighten shadows in dark or back-lit photos, creating
a retouched copy that is saved separately from the
unmodified original.
Resize Create small copies of selected pictures.
Crop Create cropped copies of selected pictures.
Edit movie
Create copies of movies from which unwanted
footage has been trimmed.

101
U
❚❚ Shooting Menu Options
Option Description
Reset shooting
options
Reset shooting options to default values.
Creative Choose a creative mode.
Best moment capture
Choose from Active Selection, Slow view, and
Smart Photo Selector.
Advanced movie Choose a movie type for advanced movie mode.
Exposure mode
Choose how the camera sets shutter speed and
aperture in Motion Snapshot mode (0 65), when an
option other than Time-lapse movie is selected in
advanced movie mode (0 38), and when Active
Selection (0 55) or Slow view (0 59) is chosen in
best moment capture mode.
Image quality Choose a file format and compression ratio.
Image size Choose a size for new photos.
Frame size/frame
rate
Choose a frame size and rate for movies recorded in
auto, P, S, A, M, and sports modes and when HD movie
is selected in advanced movie mode (0 38).
Metering Choose how the camera meters exposure.
White balance Adjust settings for different types of lighting.
ISO sensitivity Control the camera’s sensitivity to light.
Picture Control Choose how the camera processes pictures.
Auto distortion
control
Choose whether the camera corrects barrel and pin-
cushion distortion.
Color space Choose a color space for new pictures.
Active D-Lighting Avoid loss of detail in highlights and shadows.
Long exposure NR Reduce noise in long time-exposures.
High ISO noise
reduction
Reduce noise at high ISO sensitivities.
Movie sound options Choose sound recording options.
Auto image capture
Choose whether the camera takes photos
automatically during movie recording and select the
number of pictures taken per minute.

102
U
❚❚ Setup Menu Options
Interval timer
shooting
Take photos at a pre-selected interval.
Optical VR
Choose whether to use optical vibration reduction
with compatible 1 NIKKOR lenses.
Electronic VR
(movies)
Choose whether to use electronic vibration
reduction with Motion Snapshots or movies. In
advanced movie mode, electronic VR applies only to
movies recorded using the HD movie option (0 38).
Focus mode Choose how the camera focuses.
AF-area mode Choose how the focus area is selected.
Face-priority Turn face priority on or off.
Built-in AF assist Control the built-in AF-assist illuminator.
Flash control Choose a flash mode for the built-in flash.
Flash compensation Control flash output.
Option Description
Reset setup options
Reset setup menu options other than Flicker reduc-
tion, Time zone and date, and Language to default
values.
Format memory card
Format the memory card.
Slot empty release
lock
Allow the shutter to be released when no memory
card is inserted in the camera.
Image review
Choose whether pictures are displayed after
shooting.
Display
Adjust display brightness, view or hide a framing
grid, and choose the information displayed in the
monitor.
Sound settings Choose the beeps made by the camera.
Auto power off Choose the auto power off delay.
Option Description

103
U
❚❚ Wi-Fi Menu Options
Self-portrait mode
Choose whether reversing the monitor causes the
camera to enter self-portrait mode (0 83).
Touch-screen controls Enable or disable touch-screen controls.
Assign Fn button Choose the role played by the Fn button.
Shutter button AE
lock
Choose whether exposure locks when the shutter-
release button is pressed halfway.
Flicker reduction Reduce flicker or banding.
Reset file numbering Reset file numbering.
Time zone and date Set the camera clock.
Language Choose a language for the camera displays.
Auto image rotation Record camera orientation with pictures.
Pixel mapping
Check and optimize the camera image sensor and
image processors.
Firmware version Display the current firmware version.
Option Description
Connect to smart
device
Display the camera SSID for connection to a smart
device.
Upload from camera
Upload images from the camera to the smart device.
Wi-Fi connection type
Edit the camera SSID, password, and other connec-
tion settings.
Current settings
View the camera SSID, password, and other
connection settings.
Option Description

Q
104
Q
Connecting to a Computer
Pictures can be copied to a computer using ViewNX-i.
Installing ViewNX-i
To upload and view pictures, download the latest version of the
ViewNX-i installer from the following website and follow the on-
screen instructions to complete installation. An Internet connec-
tion is required. For system requirements and other information,
see the Nikon website for your region (0 xv).
http://downloadcenter.nikonimglib.com/
Copying Pictures to a Computer
A
Capture NX-D
Use Nikon’s Capture NX-D software to fine-tune photos or to change
settings for NEF (RAW) pictures and save them in other formats.
Capture NX-D is available for download from:
http://downloadcenter.nikonimglib.com/
A
Motion Snapshots
ViewNX-i is required to view Motion Snapshots saved using the File
format > NMS files option (0 68).
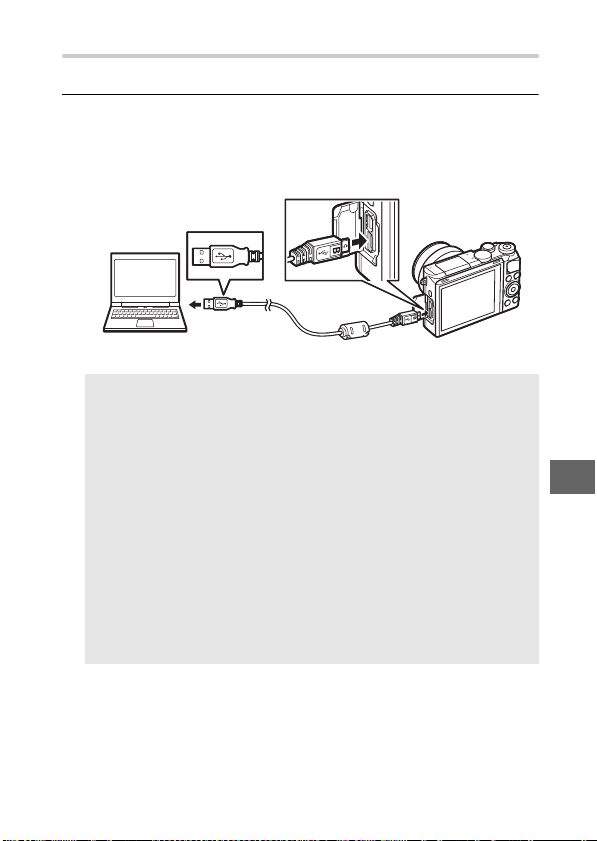
105
Q
Copying Pictures to the Computer
Before proceeding, be sure you have installed ViewNX-i (0 104).
1
Connect the USB cable.
After turning the camera off and ensuring that a memory
card is inserted, connect the supplied USB cable as shown
and then turn the camera on.
A
Use a Reliable Power Source
To ensure that data transfer is not interrupted, be sure the camera
battery is fully charged.
A
Connecting Cables
Be sure the camera is off when connecting or disconnecting inter-
face cables.
Do not use force or attempt to insert the connectors at
an angle.
D
During Transfer
Do not turn the camera off or disconnect the USB cable while trans-
fer is in progress.
D
USB Hubs
Transfer may not proceed as expected if the camera is connected
via a USB hub or keyboard.
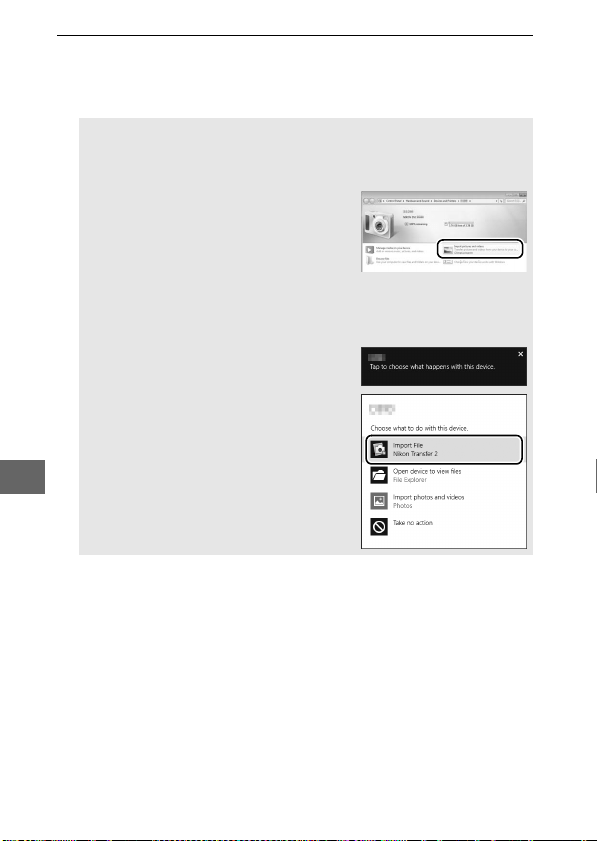
106
Q
2
Start Nikon Transfer 2 component of ViewNX-i.
If a message is displayed prompting you to choose a pro-
gram, select Nikon Transfer 2.
A
Windows 7
If the following dialog is displayed, select Nikon Transfer 2 as
described below.
1 Under Import pictures and videos,
click Change program.
A program
selection dialog will be displayed;
select Import File using Nikon
Transfer 2 and click OK.
2 Double-click Import File.
A
Windows 8.1
Windows 8.1 may display an AutoPlay
prompt when the camera is connected.
Tap or click the dialog and then tap or
click Import File/Nikon Transfer 2 to
select Nikon Transfer 2.

107
Q
3
Click Start Transfer.
At default settings, pictures on the memory card will be cop-
ied to the computer.
4
Terminate the connection.
When transfer is complete, turn the camera off and discon-
nect the USB cable.
Start Transfer
A
For More Information
Consult online help for more information on using ViewNX-i.

n
108
n
Technical Notes
Read this chapter for information on compatible accessories,
cleaning and storing the camera, and what to do if an error mes-
sage is displayed or you encounter problems using the camera.
At the time of writing, the following accessories were available
for your camera.
Optional Accessories
Lenses 1 mount lenses
Mount
adapters
Mount Adapter FT1
Note: Some long telephoto lenses can not be used. See the Refer-
ence Manual for more information.
Power
sources
• Rechargeable Li-ion Battery EN-EL24 (0 18–19): Additional
EN-EL24 batteries are available from local retailers and
Nikon-authorized service representatives.
• Battery Charger MH-31 (0 18): Recharge EN-EL24 batteries.
• Power Connector EP-5F, AC Adapter EH-5b: These accessories can
be used to power the camera for extended periods (EH-5a
and EH-5 AC adapters can also be used). An EP-5F power
connector is required to connect the camera to the EH-5b,
EH-5a, or EH-5.
Body caps Body Cap BF-N1000: The body cap keeps the dust shield free of
dust when a lens is not in place.
Nikon
software for
digital
cameras
• Capture NX-D: Fine-tune pictures taken with the camera and
convert NEF (RAW) images to other formats.
• ViewNX-i: Copy pictures to the computer for viewing.
A
Optional Accessories
Availability may vary with country or region. See our website or bro-
chures for the latest information.

109
n
Approved Memory Cards
The following cards have been tested and approved for use in
the camera. Cards with class 6 or faster write speeds are recom-
mended for movie recording. Recording may end unexpectedly
when cards with slower write speeds are used.
1 Check that any card readers or other devices with which the card will be
used are SDHC-compliant. The camera supports UHS-I.
2 Check that any card readers or other devices with
which the card will be used are SDXC-compliant. The
camera supports UHS-I.
Other cards have not been tested. For more details on the above
cards, please contact the manufacturer.
microSDHC cards
1
microSDXC cards
2
SanDisk
4 GB, 8 GB, 16 GB, 32 GB
64 GB, 128 GB
Toshiba
—
Panasonic
Lexar Media 8 GB, 16 GB, 32 GB 64 GB

110
n
Storage
If the camera will not be used for an extended period, remove
the battery and store it in a cool, dry area with the terminal cover
in place. To prevent mold or mildew, store the camera in a dry,
well-ventilated area. Do not store your camera with naphtha or
camphor moth balls or in locations that:
• are poorly ventilated or subject to humidities of over 60%
• are next to equipment that produces strong electromagnetic
fields, such as televisions or radios
• are exposed to temperatures above +50 °C (122 °F) or below –10 °C
(14 °F)
Cleaning
Do not use alcohol, thinner, or other volatile chemicals.
Storage and Cleaning
Camera body
Use a blower to remove dust and lint, then wipe gently with
a soft, dry cloth. After using the camera at the beach or sea-
side, wipe off sand or salt with a cloth lightly dampened in
distilled water and dry thoroughly. Important: Dust or other
foreign matter inside the camera may cause damage not cov-
ered under warranty.
Lens
Lenses are easily damaged. Remove dust and lint with a
blower. If using an aerosol blower, keep the can vertical to
prevent the discharge of liquid. To remove fingerprints and
other stains, apply a small amount of lens cleaner to a soft
cloth and clean with care.
Monitor
Remove dust and lint with a blower. When removing finger-
prints and other stains, wipe the surface lightly with a soft
cloth or chamois leather. Do not apply pressure, as this
could result in damage or malfunction.
Dust shield
The dust shield is easily damaged. Remove dust and lint
with a blower.

111
n
Do not drop: The product may mal-
function if subjected to strong
shocks or vibration.
Keep dry: This product is not water-
proof, and may malfunction if
immersed in water or exposed to
high levels of humidity. Rusting of
the internal mechanism can cause
irreparable damage.
Avoid sudden changes in temperature:
Sudden changes in temperature,
such as those that occur when
entering or leaving a heated build-
ing on a cold day, can cause con-
densation inside the device. To
prevent condensation, place the
device in a carrying case or plastic
bag before exposing it to sudden
changes in temperature.
Keep away from strong magnetic fields:
Do not use or store this device in
the vicinity of equipment that gen-
erates strong electromagnetic radi-
ation or magnetic fields. Strong
static charges or the magnetic
fields produced by equipment
such as radio transmitters could
interfere with the display, damage
data stored on the memory card, or
affect the product’s internal cir-
cuitry.
Keep the lens mount covered: Be sure to
attach the body cap if the camera is
without a lens.
Do not touch the dust shield: The dust
shield covering the image sensor is
easily damaged. Under no circum-
stances should you exert pressure
on the shield or poke it with clean-
ing tools. These actions could
scratch or otherwise damage the
shield.
Turn the product off before removing or
disconnecting the power source: Do not
unplug the product or remove the
battery while the product is on or
while images are being recorded or
deleted. Forcibly cutting power in
these circumstances could result in
loss of data or in damage to prod-
uct memory or internal circuitry. To
prevent an accidental interruption
of power, avoid carrying the prod-
uct from one location to another
while the AC adapter is connected.
Caring for the Camera and Battery: Cautions

112
n
Cleaning: When cleaning the camera
body, use a blower to gently
remove dust and lint, then wipe
gently with a soft, dry cloth. After
using the camera at the beach or
seaside, wipe off any sand or salt
using a cloth lightly dampened in
pure water and then dry the cam-
era thoroughly.
Lenses are easily damaged. Dust
and lint should be gently removed
with a blower. When using an aero-
sol blower, keep the can vertical to
prevent discharge of liquid. To
remove fingerprints and other
stains from the lens, apply a small
amount of lens cleaner to a clean,
soft cloth and wipe the lens care-
fully.
Storage: To prevent mold or mildew,
store the camera in a cool, dry,
well-ventilated area. If you are
using an AC adapter, unplug the
adapter to prevent fire. If the prod-
uct will not be used for an
extended period, remove the bat-
tery to prevent leakage and store
the camera in a plastic bag contain-
ing a desiccant. Do not, however,
store the camera case in a plastic
bag, as this may cause the material
to deteriorate. Note that desiccant
gradually loses its capacity to
absorb moisture and should be
replaced at regular intervals.
To prevent mold or mildew, take
the camera out of storage at least
once a month. Turn the camera on
and release the shutter a few times
before putting it away.
Store the battery in a cool, dry
place. Replace the terminal cover
before putting the battery away.
Notes on the monitor: The monitor is
constructed with extremely high
precision; at least 99.99% of pixels
are effective, with no more than
0.01% being missing or defective.
Hence while these displays may
contain pixels that are always lit
(white, red, blue, or green) or
always off (black), this is not a mal-
function and has no effect on
images recorded with the device.
Images in the monitor may be diffi-
cult to see in a bright light.
Do not apply pressure to the dis-
play, as this could cause damage or
malfunction. Dust or lint on the dis-
play can be removed with a blower.
Stains can be removed by wiping
lightly with a soft cloth or chamois
leather. Should the monitor break,
care should be taken to avoid
injury from broken glass and to
prevent liquid crystal from the dis-
play touching the skin or entering
the eyes and mouth.

113
n
Do not leave the lens pointed at the sun:
Do not leave the lens pointed at
the sun or other strong light source
for an extended period. Intense
light may cause the image sensor
to deteriorate or produce a white
blur effect in photographs.
Moiré: Moiré is an interference pat-
tern created by the interaction of
an image containing a regular,
repeating grid, such as the pattern
of weave in cloth or windows in a
building, with the camera image
sensor grid. In some cases, it may
appear in the form of lines. If you
notice moiré in your photographs,
try changing the distance to the
subject, zooming in and out, or
changing the angle between the
subject and the camera.
Lines: Noise in the form of lines may
in rare cases appear in pictures of
extremely bright or backlit sub-
jects.
Batteries: Batteries may leak or
explode if improperly handled.
Observe the following precautions
when handling batteries:
• Use only batteries approved for
use in this equipment.
• Do not expose the battery to
flame or excessive heat.
• Keep the battery terminals clean.
• Turn the product off before
replacing the battery.
• Do not use the battery at ambient
temperatures below 0°C (32°F) or
above 40°C (104°F); failure to
observe this precaution could
damage the battery or impair its
performance. Capacity may be
reduced and charging times may
increase at battery temperatures
from 0°C (32°F) to 10°C (50°F)
and from 45°C (113°F) to 60°C
(140°F); the battery will not
charge if its temperature is below
0°C (32°F) or above 60°C (140°F).
• Remove the battery from the
camera or charger when not in
use and replace the terminal
cover. These devices draw minute
amounts of charge even when off
and could draw the battery down
to the point that it will no longer
function. If the battery will not be
used for some time, insert it in the
camera and run it flat before
removing it and storing it in a
location with an ambient tem-
perature of 15 °C to 25 °C (59 °F to
77 °F; avoid hot or extremely cold
locations). Repeat this process at
least once every six months.
• Turning the camera on and off
repeatedly when the battery is
fully discharged will shorten bat-
tery life. Batteries that have been
fully discharged must be charged
before use.

114
n
• The internal temperature of the
battery may rise while the battery
is in use. Attempting to charge
the battery while the internal
temperature is elevated will
impair battery performance, and
the battery may not charge or
charge only partially. Wait for the
battery to cool before charging.
• Continuing to charge the battery
after it is fully charged can impair
battery performance.
• A marked drop in the time a fully
charged battery retains its charge
when used at room temperature
indicates that it requires replace-
ment. Purchase a new EN-EL24
battery.
• Charge the battery before use.
When taking photographs on
important occasions, ready a
spare EN-EL24 battery and keep it
fully charged. Depending on your
location, it may be difficult to pur-
chase replacement batteries on
short notice. Note that on cold
days, the capacity of batteries
tends to decrease. Be sure the
battery is fully charged before
taking photographs outside in
cold weather. Keep a spare bat-
tery in a warm place and
exchange the two as necessary.
Once warmed, a cold battery may
recover some of its charge.
• Used batteries are a valuable
resource; recycle in accord with
local regulations.
The battery charger: Charge the bat-
tery at ambient temperatures
between 5°C (41°F) and 35°C
(95°F). If the CHARGE lamp flashes
quickly during charging, cease use
immediately and take battery and
charger to your retailer or a Nikon-
authorized service representative.
Do not move the charger or touch
the battery during charging. Fail-
ure to observe this precaution
could in very rare instances result
in the charger showing that
charging is complete when the
battery is only partially charged.
Remove and reinsert the battery to
begin charging again.
Use the charger with compatible
batteries only. Unplug when not in
use.
Memory Cards:
• Do not remove memory cards
from the camera, turn the camera
off, or remove or disconnect the
power source during formatting
or while data are being recorded,
deleted, or copied to a computer.
Failure to observe these precau-
tions could result in loss of data or
in damage to the camera or card.
• Do not touch the card terminals
with your fingers or metal
objects.

115
n
• Do not bend, drop, or subject to
strong physical shocks.
• Do not apply force to the card
casing. Failure to observe this pre-
caution could damage the card.
• Do not expose to water, heat,
high levels of humidity, or direct
sunlight.
• Do not format memory cards in a
computer.
D
Servicing the Camera and Accessories
The camera is a precision device and requires regular servicing. Nikon
recommends that the camera be inspected by the original retailer or
Nikon-authorized service representative once every one to two years,
and that it be serviced once every three to five years (note that fees
apply to these services). Frequent inspection and servicing are particu-
larly recommended if the camera is used professionally. Any accesso-
ries regularly used with the camera, such as lenses, should be included
when the camera is inspected or serviced.

116
n
If the camera fails to function as expected, check this list of com-
mon problems before consulting your retailer or Nikon repre-
sentative.
Battery/Display
Shooting (All Modes)
Troubleshooting
The camera is on but does not respond: Wait for recording or any other process-
ing to end. If the problem persists, turn the camera off. If the camera still
does not respond, remove and replace the battery or disconnect and
reconnect the AC adapter, but note that this will delete any data not yet
saved. Data already saved to the memory card are unaffected.
The display is off:
• The camera is off (0 22) or the battery is exhausted (0 4, 18).
• The display has turned off automatically to save power (0 22). The dis-
play can be reactivated by pressing the shutter-release button.
• The camera is connected to a computer (0 105) or television.
The camera turns off without warning:
• The battery is low (0 4, 18).
• The display has turned off automatically to save power (0 22). The dis-
play can be reactivated by pressing the shutter-release button.
• The camera’s internal temperature is high (0 xiii, 120). Wait for the
camera to cool before turning it on again.
Indicators are not displayed: Use the Display > Shooting and Display >
Playback options in the setup menu to choose the information dis-
played (0 102).
The camera takes time to turn on: Delete files or format the memory card.
The shutter-release is disabled:
• The battery is exhausted (0 4, 18).
• The memory card is full (0 24).
• The flash is charging (0 81).
• The camera is not in focus (0 26).
•
You are currently filming a slow-motion, 4K, or time-lapse movie (
0
35).

117
n
Movies
Tap Shooting Options
Only one picture is taken each time the shutter-release button is pressed in continuous
release mode: I is selected in continuous mode (0 73) and the built-in
flash is raised.
Smudges appear in photographs: Clean the front and rear lens elements or the
dust shield (0 110).
Flicker or banding appears in movies or in the display: Choose a Flicker reduc-
tion setting that matches the local AC power supply (0 103).
No flash: See page 82. The flash will not fire when off (0 78); in P, S, A, M,
and self-portrait modes, the flash will not fire when lowered.
Menu items are grayed out and unavailable: Some options are only available in
particular shooting or exposure modes.
Cannot record movies: The movie-record button can not be used to record
movies in best moment capture or Motion Snapshot mode (0 58, 66).
No sound is recorded for movies:
• Microphone off is selected for Movie sound options > Microphone
(0 101).
• Live audio is not recorded with time-lapse, slow-motion, fast-motion,
or jump-cut movies (0 38) or with Motion Snapshots recorded with
None selected for Audio (0 68).
The touch screen can not be used for shooting or focus:
• Touch shooting options are not available in best moment capture or
Motion Snapshot mode.
• The edges of the display can not be used for shooting or focus. Tap
closer to the center of the display.
Pictures are blurred: The camera may move when the display is tapped,
which may under some conditions result in blurred pictures. Use both
hands to hold the camera steady.

118
n
Playback
Wi-Fi (Wireless Networks)
Miscellaneous
“Tall” (portrait) orientation photos are displayed in “wide” (landscape) orientation:
• Select On for Rotate tall (0 100).
• The photos were taken with Auto image rotation off (0 103).
• Camera was pointed up or down when the photo was taken.
• Photo is displayed in image review.
Cannot hear movie sound:
• Rotate the command dial right to raise the volume (0 36). If the cam-
era is connected to a television, use the controls for the TV to adjust the
volume.
• Live audio is not recorded with time-lapse, slow-motion, fast-motion,
or jump-cut movies (0 38) or with Motion Snapshots recorded with
None selected for Audio (0 68).
Cannot delete images: Remove protection from the files before deletion
(0 100).
Smart devices do not display the camera SSID (network name):
• Confirm that camera Wi-Fi is enabled (0 93).
• Try turning the smart device Wi-Fi off and then on again.
Can not connect to smart devices using NFC (0 94): Connect using the camera
SSID (0 95).
The date of recording is not correct: Set the camera clock.
Menu items are grayed out and unavailable: Some options are only available at
particular settings or when a memory card is inserted.

119
n
This section lists the error messages that appear in the display.
Error Messages
Message Solution
(Shutter-speed or
aperture display
flashes)
If the subject is too bright, lower ISO sensitivity
or choose a faster shutter speed or smaller aper-
ture (higher f-number).
If the subject is too dark, raise ISO sensitivity, use
the flash, or choose a slower shutter speed or
larger aperture (lower f-number).
Keeping the zoom ring
button pressed, rotate
the zoom ring to
extend the lens.
A lens with a retractable lens barrel button is
attached with the lens barrel retracted. Keeping
the retractable lens barrel button pressed,
rotate the zoom ring to extend the lens.
Check lens. Pictures
can only be taken
when a lens is
attached.
Attach a lens.
Lens error.
Try again after turning
the camera off and on.
Turn the camera off and then on again. If the
problem persists or reoccurs frequently, contact
a Nikon-authorized service representative.
The clock has been
reset.
Set the camera clock.
No memory card.
Turn the camera off and confirm that the card is
correctly inserted.
This memory card
cannot be used. Card
may be damaged;
insert a different card.
• Use an approved card.
• Format the card. If the problem persists, the
card may be damaged. Contact a Nikon-autho-
rized service representative.
• Insert a new memory card.

120
n
This memory card is
not formatted. Format
the memory card?
Select Ye s to format the card, or turn the camera
off and insert another memory card.
Memory card is full.
• You may be able to record additional images if
you reduce image quality or size.
• Delete unwanted images.
• Insert another memory card.
Cannot create
additional folders on
memory card.
If the current folder is numbered 999 and contains
either 999 photographs or a photograph num-
bered 9999, the shutter-release button will be dis-
abled and no further photographs can be taken.
Choose
Ye s
for
Reset file numbering
and then
either format the current memory card or insert a
new memory card.
The movie-record
button cannot be used
in this mode.
The movie-record button can not be used in
best moment capture or Motion Snapshot
modes.
Photographs cannot
be recorded in this
mode.
The shutter-release button can not be used to
take photographs while a slow-motion, 4K, or
time-lapse movie is being recorded.
The camera’s internal
temperature is high.
The camera will now
turn off.
Wait for the camera to cool.
Memory card contains
no images.
To view pictures, insert a memory card contain-
ing images.
Cannot display this file.
The file has been created or modified on a com-
puter or different make of camera, or is corrupt.
Message Solution

121
n
Nikon 1 J5 Digital Camera
Specifications
Type
Type Digital camera with support for interchangeable
lenses
Lens mount Nikon 1 mount
Effective angle of view Approx. 2.7× lens focal length (35 mm format
equivalent)
Effective pixels
20.8 million
Image sensor
Image sensor 13.2 mm × 8.8 mm CMOS sensor (Nikon CX for-
mat)
Total pixels 23.01 million
Storage
Image size (pixels) Still images taken in auto, P, S, A, M, sports, best moment
capture, and all creative modes other than easy panorama
(aspect ratio 3 : 2)
• 5568 × 3712 • 4176 × 2784
• 2784 × 1856
Still images taken in normal panorama mode with camera
panned horizontally (aspect ratio 120 : 23)
4800 × 920
Still images taken in normal panorama mode with camera
panned vertically (aspect ratio 8 : 25)
1536 × 4800
Still images taken in wide panorama mode with camera
panned horizontally (aspect ratio 240 : 23)
9600 × 920
Still images taken in wide panorama mode with camera
panned vertically (aspect ratio 4 : 25)
1536 × 9600
Still images taken during movie recording (aspect ratio 3 : 2)
5568 × 3712
Motion Snapshots (photo portion, aspect ratio 16 : 9)
5568 × 3136

122
n
Storage
File format • NEF (RAW): 12-bit, compressed
• JPEG: JPEG-Baseline compliant with fine (approx.
1 : 4), normal (approx. 1 : 8) compression
• NEF (RAW) + JPEG: Single photograph recorded in
both NEF (RAW) and JPEG formats
Picture Control system Standard, Neutral, Vivid, Monochrome, Portrait,
Landscape; selected Picture Control can be mod-
ified
Media microSD (micro Secure Digital), microSDHC, and
microSDXC memory cards
File system DCF 2.0, Exif 2.3, PictBridge
Shooting modes
C
auto;
a
sports;
w
creative, with a choice of the
following options:
P
pop,
Q
retro,
R
high-con-
trast monochrome,
S
nostalgic sepia,
5
HDR,
p
easy panorama,
q
soft,
r
miniature effect,
s
selective color,
6
cross process,
7
toy camera
effect,
T
cross screen,
U
fisheye,
V
skin softening,
j
night landscape,
o
night portrait,
l
landscape,
n
close-up, and
k
portrait;
P
programmed auto
with flexible program,
S
shutter-priority auto,
A
aperture-priority auto, and
M
manual;
u
best
moment capture (
s
Active Selection,
t
slow view
and
y
Smart Photo Selector);
v
advanced movie
(
0
HD movie,
z
4K movie,
8
time-lapse movie,
y
slow motion,
2
jump cut,
1
fast motion and
3
4-second movie);
z
Motion Snapshot;
S
self-
portrait
Shutter
Type Electronic shutter
Speed
1
/
16,000 –30 s in steps of
1
/
3 EV; Bulb
Note: Bulb ends automatically after approximately 2 minutes
Flash sync speed Synchronizes with shutter at X=
1
/
60 s or slower

123
n
Release
Mode • Single frame, continuous
• Self-timer
• Interval timer shooting
Frame advance rate Approx. 5, 10, 20, 30, or 60 fps
Self-timer 2 s, 10 s
Exposure
Metering TTL metering using image sensor
Metering method • Matrix
• Center-weighted: Meters 4.5 mm circle in center of
frame
• Spot: Meters 2 mm circle centered on selected
focus area
Mode P programmed auto with flexible program;
S shutter-priority auto; A aperture-priority auto;
M manual; h scene auto selector
Exposure compensation –3–+3 EV in increments of
1
/
3 EV
Exposure lock Luminosity locked at metered value when shut-
ter-release button is pressed halfway
ISO sensitivity
(Recommended Exposure
Index)
ISO 160; ISO 200–12800 in steps of 1 EV; 6400
(NR); 12800 (NR); auto ISO sensitivity control
(ISO 160–6400, 160–3200, 160–800) available
(user controlled in exposure modes P, S, A, and M)
Active D-Lighting On, off

124
n
Focus
Autofocus Hybrid autofocus (phase-detection/contrast-
detect AF); AF-assist illuminator
Lens servo • Autofocus (AF): Single AF (AF-S); continuous AF
(AF-C); auto AF-S/AF-C selection (AF-A); full-
time AF (AF-F)
• Manual focus (MF)
AF-area mode Single-point, auto-area, subject tracking
Focus area • Single-point AF: 171 focus areas; the center 105
areas support phase-detection AF
• Auto-area AF: 41 focus areas
Focus lock Focus can be locked by pressing shutter-release
button halfway (single AF)
Face priority On, off
Flash
Built-in flash • Auto and all creative modes other than HDR, easy pan-
orama, landscape, and night landscape: Flash pops up
automatically and fires as required
• P, S, A, M, and self-portrait: Manual
Guide Number (GN)
Approx. 5/16 (m/ft, ISO 100, 20 °C/68 °F; at ISO 160,
Guide Number is approx. 6.3/20.7)
Control i-TTL flash control using image sensor
Mode Auto, auto + red-eye reduction, fill flash, fill flash
+ slow sync, red-eye reduction, red-eye reduction
+ slow sync, rear-curtain sync, rear curtain + slow
sync, off
Flash compensation –3–+1 EV in increments of
1
/
3 EV
Flash-ready indicator Lights when built-in flash unit is fully charged
White balance
Auto, incandescent, fluorescent, direct sunlight,
flash, cloudy, shade, preset manual, all except
preset manual with fine tuning

125
n
Movie
Metering TTL metering using image sensor
Metering method • Matrix
• Center-weighted: Meters 4.5 mm circle in center of
frame
• Spot: Meters 2mm circle centered on selected
focus area
Frame size (pixels)/
recording rate
HD movies (aspect ratio 16 : 9)
• 1920 × 1080/60p (59.94 fps)
• 1920 × 1080/30p (29.97 fps)
• 1280 × 720/60p (59.94 fps)
• 1280 × 720/30p (29.97 fps)
4K movies (aspect ratio 16 : 9)
3840 × 2160/15p (14.99 fps)
Slow-motion movies
• 1280 × 720/120 fps
(aspect ratio 16 : 9; plays at 30p/29.97 fps)
• 800 × 296/400 fps
(aspect ratio 8 : 3; plays at 30p/29.97 fps)
• 400 × 144/1200 fps
(aspect ratio 8 : 3; plays at 30p/29.97 fps)
Time-lapse, fast-motion, jump-cut, and 4-second movies
(aspect ratio 16 : 9)
1920 × 1080/30p (29.97 fps)
Motion Snapshots (movie portion, aspect ratio 16 : 9)
1920 × 1080/60p (59.94 fps) (plays at 24p/
23.976 fps)
File format MOV
Video compression H.264/MPEG-4 Advanced Video Coding
Audio recording format PCM
Audio recording device Built-in stereo microphone; sensitivity adjustable
Monitor
7.5 cm (3-in.), approx. 1037k-dot, tilting TFT LCD
touch screen with brightness adjustment

126
n
Playback
Full-frame and thumbnail (4, 9, or 16 images or
calendar) playback with playback zoom, bursts
shown as key frames or as consecutive pictures,
movie and panorama playback, slide show, histo-
gram display, and auto image rotation
Interface
USB Hi-Speed USB
HDMI output Type D HDMI connector
Wireless
Standards IEEE 802.11b, IEEE 802.11g
Operating frequency 2412–2462 MHz (channels 1–11)
Range (line of sight) Approximately 10 m/33 ft (assumes no interfer-
ence; range may vary with signal strength and
presence or absence of obstacles)
Data rate 54 Mbps
Maximum logical data rates according to IEEE
standard. Actual rates may differ.
Authentication Open system, WPA2-PSK
Access protocols Infrastructure
NFC
Operation NFC Forum Type 3 Tag
Supported languages
Arabic, Bulgarian, Chinese (Simplified and Tradi-
tional), Czech, Danish, Dutch, English, Finnish,
French, German, Greek, Hindi, Hungarian, Indo-
nesian, Italian, Japanese, Korean, Norwegian, Per-
sian, Polish, Portuguese (European and Brazilian),
Romanian, Russian, Serbian, Spanish, Swedish,
Thai, Turkish, Ukrainian, Vietnamese
Power source
Battery One rechargeable Li-ion EN-EL24 battery
AC adapter EH-5b AC adapter; requires EP-5F power connec-
tor (available separately)
Tripod socket
1
/
4-in. (ISO 1222)

127
n
• Unless otherwise stated, all measurements are performed in conformity
with Camera and Imaging Products Association (CIPA) guidelines.
• All figures are for a camera with a fully-charged battery.
• Nikon reserves the right to change the specifications of the hardware and
software described in this manual at any time and without prior notice.
Nikon will not be held liable for damages that may result from any mistakes
that this manual may contain.
Dimensions/weight
Dimensions (W × H × D) Approx. 98.3 × 59.7 × 31.5 mm (3.9 × 2.4 × 1.3 in.),
excluding projections
Weight Approx. 265 g (9.4 oz) with battery and memory
card but without body cap; approx. 231 g (8.2 oz),
camera body only
Operating environment
Temp erature 0 °C –40 °C (+32 °F–104 °F)
Humidity 85% or less (no condensation)
MH-31 battery charger
Rated input AC 100–240 V, 50–60 Hz, 0.2 A
Rated output DC 8.4 V/0.6 A
Supported batteries Nikon EN-EL24 rechargeable Li-ion batteries
Charging time Approx. 2 hours and 30 minutes at an ambient
temperature of 25 °C (77 °F) when no charge
remains
Operating temperature 0 °C–40 °C (+32 °F–104 °F)
Dimensions (W × H × D) Approx. 67 × 28 × 94 mm (2.7 × 1.2 × 3.8 in.),
excluding plug adapter
Weight Approx. 83 g (3.0 oz), excluding plug adapter
EN-EL24 rechargeable Li-ion battery
Type Rechargeable lithium-ion battery
Rated capacity 7.2 V, 850 mAh
Operating temperature 0 °C–40 °C (+32 °F–104 °F)
Dimensions (W × H × D) Approx. 29 × 47 × 13 mm (1.2 × 1.9 × 0.6 in.)
Weight Approx. 34 g (1.2 oz), excluding terminal cover

128
n
1 NIKKOR VR 10–30mm f/3.5–5.6 PD-ZOOM
Type 1 mount lens
Focal length 10–30 mm
Maximum aperture f/3.5–5.6
Construction 9 elements in 7 groups (including 4 aspherical
lens elements, 1 ED lens element, and HRI lens
elements)
Angle of view 77°–29° 40
Vibration reduction Lens shift using voice coil motors (VCMs)
Minimum focus distance 0.2 m (0.7 ft) from focal plane at all zoom positions
Diaphragm blades 7 (rounded diaphragm opening)
Diaphragm Fully automatic
Aperture range • 10 mm focal length: f/3.5–16
• 30 mm focal length: f/5.6–16
Dimensions Approx. 58 mm diameter × 28 mm (distance from
camera lens mount flange when lens is retracted)
Weight Approx. 85 g (3.0 oz)
1 NIKKOR VR 30–110mm f/3.8–5.6
Type 1 mount lens
Focal length 30–110 mm
Maximum aperture f/3.8–5.6
Construction 18 elements in 12 groups (including 2 ED lens ele-
ments)
Angle of view 29° 40–8° 20
Vibration reduction Lens shift using voice coil motors (VCMs)
Minimum focus distance 1.0 m (3.3 ft) from focal plane at all zoom positions
Diaphragm blades 7 (rounded diaphragm opening)
Diaphragm Fully automatic
Aperture range • 30 mm focal length: f/3.8–16
• 110 mm focal length: f/5.6–16
Filter-attachment size 40.5 mm (P=0.5 mm)
Dimensions Approx. 60 mm diameter × 61 mm (distance from
camera lens mount flange when lens is retracted)
Weight Approx. 180 g (6.3 oz)

129
n
Specifications subject to change without notice. Nikon will not be held liable
for damages that may result from any mistakes that this manual may contain.
1 NIKKOR VR 10–100mm f/4–5.6
Type 1 mount lens
Focal length 10–100 mm
Maximum aperture f/4–5.6
Construction 19 elements in 12 groups (including 3 aspherical
lens elements, 2 ED lens elements, and HRI lens
elements)
Angle of view 77°–9° 10
Vibration reduction Lens shift using voice coil motors (VCMs)
Minimum focus distance • 10 mm focal length: 0.35 m (1.1 ft) from focal plane
• 60 mm focal length: 1.0 m (3.3 ft) from focal plane
• 100 mm focal length: 0.65 m (2.1 ft) from focal plane
Diaphragm blades 7 (rounded diaphragm opening)
Diaphragm Fully automatic
Aperture range • 10 mm focal length: f/4–16
• 100 mm focal length: f/5.6–16
Filter-attachment size 55 mm (P=0.75 mm)
Dimensions Approx. 60.5 mm diameter × 70.5 mm (distance
from camera lens mount flange when lens is
retracted)
Weight Approx. 298 g (10.5 oz)

130
n
A
Trademark Information
IOS is a trademark or registered trademark of Cisco Systems, Inc., in the
United States and/or other countries and is used under license.
Windows is either a registered trademark or a trademark of Microsoft
Corporation in the United States and/or other countries. PictBridge
logo is a trademark. The microSD, microSDHC, and microSDXC logos
are trademarks of the SD-3C, LLC. HDMI, the HDMI logo and High-Defi-
nition Multimedia Interface are trademarks or registered trademarks of
HDMI Licensing, LLC.
Wi-Fi and the Wi-Fi logo are trademarks or registered trademarks of the
Wi-Fi Alliance. N-Mark is a trademark or registered trademark of NFC
Forum, Inc., in the United States and/or other countries. All other trade
names mentioned in this manual or the other documentation pro-
vided with your Nikon product are trademarks or registered trade-
marks of their respective holders.

131
n
A
Certificates
A
FreeType License (FreeType2)
Portions of this software are copyright © 2012 The FreeType Project
(http://www.freetype.org). All rights reserved.
A
MIT License (HarfBuzz)
Portions of this software are copyright © 2015 The HarfBuzz Project
(http://www.freedesktop.org/wiki/Software/HarfBuzz). All rights
reserved.

132
n
Battery Life
The number of shots or movie footage that can be recorded with
fully-charged batteries varies with the condition of the battery,
temperature, the interval between shots, and the length of time
menus are displayed. Sample figures for EN-EL24 (850 mAh) bat-
teries are given below.
• Still images: Approximately 250 shots
• Movies: Approximately 60 minutes at 1080/30p
Measured according to CIPA standards at 23 ±2 °C (73.4 ±3.6 °F)
with the camera at default settings, a fully-charged battery, a
1 NIKKOR VR 10–30mm f/3.5–5.6 PD-ZOOM lens, and a 16 GB
SanDisk SDSDQXP-016G-J35A UHS-I microSDHC card. Value for
still images obtained under the following test conditions: pho-
tographs taken at intervals of 30 s with the built-in flash fired
with every other shot and the camera turned off and then on
after every ten shots. Value for movies obtained under the fol-
lowing test conditions: a series of 17 minute movies with a file
size of up to 4 GB were recorded; recording was only inter-
rupted when temperature warning was displayed.
The following can reduce battery life:
• Keeping the shutter-release button pressed halfway
• Repeated autofocus operations
• Taking NEF (RAW) photographs
• Slow shutter speeds
• Using Wi-Fi
• Using vibration reduction mode with VR lenses
• Using zoom with power zoom lenses
To ensure that you get the most from rechargeable Nikon
EN-EL24 batteries:
• Keep the battery contacts clean. Soiled contacts can reduce
battery performance.
• Use batteries immediately after charging. Batteries will lose
their charge if left unused.

133
n
Symbols
C (Auto mode) ............................. 6, 25
v (Advanced movie mode) .... 7, 38
w (Creative mode) .................... 6, 41
P (Programmed auto) .......................49
S (Shutter-priority auto) ..................50
A (Aperture-priority auto) ...............51
M (Manual) ...........................................52
a (Sports mode) ........................... 6, 53
u (Best moment capture mode) . 7,
55
z (Motion Snapshot mode) ..... 7, 65
0 (HD movie) .............................34, 38
z (4K movie) .....................................38
8 (Time-lapse movie) ......................38
y (Slow motion) ................................38
1 (Fast motion) .................................39
2 (Jump cut) .......................................39
3 (4-second movie) .........................39
P (Pop) .................................................42
Q (Retro) ..........................................42
R (High-contrast monochrome) .42
S (Nostalgic sepia) ......................42
5 (HDR) ........................................42, 44
q (Soft) ..................................................42
p (Easy panorama) ...................42, 45
r (Miniature effect) .........................42
s (Selective color) .....................42, 48
6 (Cross process) .............................42
7 (Toy camera effect) .......................43
T (Cross screen) ................................43
U (Fisheye) ..........................................43
V (Skin softening) ............................43
j (Night landscape) ..................30, 43
o (Night portrait) .......................30, 43
l (Landscape) .............................30, 43
n (Close-up) .................................30, 43
k (Portrait) ....................................30, 43
Z (Auto) ..............................................30
U (flexible program) .........................49
G (menu) button ................ 8, 100
K (playback) button ......... 28, 63, 69
O (delete) button ......... 29, 37, 64, 69
F (Wi-Fi) button ........................ 93, 96
& (feature) ........................................... 10
C (continuous shooting/self-timer) .
53, 73, 75
I (continuous) .................................73
E (self-timer) ...................................... 75
N (flash mode) ............................. 78, 80
Y (red-eye reduction) ............. 78, 80
p (slow sync) .................................... 80
q (rear-curtain sync) ...................... 80
N (flash-ready indicator) ................. 81
4 (Creative palette) ......................... 72
8 (Single frame) ...............................74
Numerics
4K movie .............................................. 38
4-second movie .................................39
A
AC adapter .........................................108
Accessories ........................................108
Active selection ................................. 55
Advanced movie mode ..............7, 38
Aperture ........................................ 51, 52
Aperture-priority auto .................... 51
Attaching the lens ............................20
Audio ..................................................... 68
Auto mode ......................................6, 25
Auto power off ................................... 22
Automatic scene selection ............ 30
B
Battery .....................4, 18, 19, 108, 127
Beep ................................................ 26, 76
Best moment capture mode .....7, 55
Best shot ........................................61, 63
Body cap ...................................1, 2, 108
Buffering ................................ 56, 62, 66
Index

134
n
Built-in flash ........................................ 77
C
Capture NX-D ....................................104
Charging a battery ............................18
Clock ......................................................23
Close-up ........................................30, 43
Command dial ...........2, 28, 49, 50, 52
Connect to smart device ................93
Continuous ...................................53, 73
Creative mode ................................6, 41
Creative palette .................................72
Cross process ......................................42
Cross screen ........................................43
Current settings .................................92
D
Date and time .....................................23
Date format .........................................23
Daylight saving time ........................23
Delete ............................... 29, 37, 64, 69
Detailed display ................................... 4
Dust shield ...........................2, 110, 111
E
Easy panorama ............................42, 45
Exposure compensation (self-
portraits) .............................................84
Exposure indicator ............................52
F
Face priority ........................................31
Fast motion .........................................39
File format ............................................68
Fill flash .................................................80
Filter strength (Fisheye) ..................43
Filter strength (Skin softening) .... 43
Filter strength (Soft) .........................42
Firmware version .............................103
Fisheye ..................................................43
Flash .......................................................77
Flash mode ...................................78, 80
Flash range ..........................................82
Flash-ready indicator ....................... 81
Flexible program ............................... 49
Focal plane mark ..................................2
Focus area ............................................ 26
Format memory card ....................... 19
Full-frame playback .......................... 28
G
Grid display ......................................... 27
H
H.264 ...................................................125
HD movies .................................... 34, 38
HDR ................................................. 42, 44
High-contrast monochrome ......... 42
Hue (Cross process) .......................... 42
Hue (Retro) .......................................... 42
J
Jump cut .............................................. 39
L
Landscape .................................... 30, 43
Language ............................................. 23
Lens .....................20, 31, 108, 128, 129
Live image control ............................ 70
M
Manual .................................................. 52
Maximum aperture .............. 128, 129
Memory card .............................19, 109
Memory card access lamp ............. 27
Microphone ........................................ 33
Miniature effect ................................. 42
Monitor ......................................4, 11, 83
Motion Snapshot mode .............7, 65
Mount adapter .................................108
MOV ..............................................68, 125
Movie before/after ........................... 67
Movie-record button ...................2, 33
Movies ................................................... 32
N
NFC .................................................. 94, 98

135
n
Night landscape .................................43
Night portrait ......................................43
Nikon Transfer 2 .............................. 106
N-Mark .............................................. 2, 94
NMS ........................................................68
Nostalgic sepia ...................................42
P
Playback ................................................28
Pop ..........................................................42
Portrait ...........................................30, 43
Portrait (Soft) ......................................42
Power connector ............................ 108
Power drive zoom .............................31
Power switch .......................................22
Press the shutter-release button all
the way down ............................27, 30
Press the shutter-release button
halfway .........................................26, 30
Programmed auto .............................49
R
Rear-curtain sync ...............................80
Red-eye reduction .....................78, 80
Reset setup options ....................... 102
Retro .......................................................42
S
Saturation (Toy camera effect) .....43
Scene selection ..................................42
Select color ..........................................48
Select to send to smart device .....97
Selective color .............................42, 48
Self-portrait mode .....................12, 83
Self-timer ..............................................75
Self-timer (self-portraits) ................84
Shutter speed ..............................50, 52
Shutter-priority auto ........................50
Shutter-release button .....26, 30, 56,
60, 62, 66
Single frame ........................................74
Size .............................................121, 125
Skin softening .....................................43
Skin softening (self-portraits) ....... 84
Slow motion (advanced movie
mode) .................................................. 38
Slow sync ............................................. 80
Slow view ............................................. 59
Smart device ....................................... 89
Smart Photo Selector ...................... 61
Soft ......................................................... 42
Speaker ....................................................3
Sports mode ...................................6, 53
SSID ........................................................ 93
Strap ...................................................... 18
T
Tap shooting options ......................86
Temperature warnings ....................xiii
Tilting monitor ............................ 11, 83
Time ....................................................... 23
Time-lapse movie ............................. 38
Timer ...................................................... 75
Touch screen ....................................... 13
Toy camera effect .............................. 43
U
Upload from camera ........................ 97
USB .......................................................105
USB cable ...........................................105
V
ViewNX-i .............................................104
Vignetting ............................................ 43
Volume .................................................. 36
W
Wi-Fi ............................................... xvi, 89
Wi-Fi connection type .............. 90, 92
Wi-Fi menu ................................... 90, 97
Wi-Fi upload ........................................96
Wireless ......................................... xvi, 89
Wireless Mobile Utility .............89, 99
Wireless network ............................... 89
Wireless security ................................ 90


137

138


Printed in China
SB5G03(11)
6MVA9311-03
No reproduction in any form of this manual, in whole or in part (except
for brief quotation in critical articles or reviews), may be made without
written authorization from NIKON CORPORATION.