. Use & Care Guide
Manual de Uso y Culclado
Kenmore_
V rnCI÷ r
As_radora
Mod_J/_odeio:
t16.31069
Vacuum Cleaner Help Line:
1-877-531-7321
8:00am-5:00pm EST,M-F
(U.S.A. and Canada)
Sears Brands Management Corporation
Hoffman Estates, IL 60179 USA
www, kenmore.com
W'_'_W, SG a t_.com
www.kmart.com
Before Using Your New
Vacuum Cleaner .................... 2
Kenmore Vacuum Cleaner Warranty . 3
Important Safety instructions .......... 4
Parts and Features .................. 5
Assembly Instructions .............. 6-7
Operating Instructions............... 7
CordRelease .................... 7
PileHeight Selection and Setting .... 8
Carpet/Bare Floor Selector ......... 9
Releasingthe Handle .............. 9
On!Off Switch................... 9
Attachments .................. 10-11
Attachment UseTable ............ 12
Vacuuming Tips ................. 12
Performance/Safety Features.... t3-14
Vacuum Cleaner Care ............... 15
Vacuum Cleaner Storage .......... 15
Cleaning Exterior and Attachments . ,15
Dust Bag Replacement ............ 16
Motor Safety Filter Cleaning ........ 17
Exhaust Filter Replacement ......... 17
Belt Changing and Agitator
Cleaning ..................... 18-20
Light Bulb Replacement ........... 2t
Clog Removal ................... 22
Troubleshooting .................... 23
Notes ............................ 24
Requesting Assistance Or
Service .................. Back page
Please read this guide, it will help you assemble and operate your new Kenmore vacuum
cleaner in the safest and most effective way.
For more information about vacuum cleaner care and operation, call the Vacuum Cleaner
Help Line at 1-877-531-7321. You will need the complete model and serial numbers when
requesting information. Your vacuum cleaner's model and serial numbers are located on the
Model and Serial Number Plate.
Use the space below to record the model number and serial number of your new Kenmore
vacuum cleaner.
Model No.
Seriai No.
Date of Purchase
Keep this book and your sales check (receipt) in a safe place for future reference.
PACKING LIST
Your I(ENMORE VACUUM CLEANERis packaged with the following parts and
Components assembled separately in the carton:
1 Vacuum Cleaner 1 PetHandi Mate TM
1 Handle Assembly 1 Telescoping Wand
1 Combo Brush 1 Use & Care Guide
1 Crevice Tool 1 Repair Parts List
Each of the above assemblies are shown in detail in the Repair Parts list.

KENMORE LIMITED WARRANTY
FOR ONE YEAR from the date of sale this appliance is warranted against defects in
material or workmanship when it is correctly installed, operated and maintained
according to all supplied instructions.
WITH PROOF OF SALE, a defective appliance will be replaced free of charge.
For warranty coverage details to obtain free repair or replacement, visit the web page:
www.ken more.co m/warranty.
This warranty does not cover filters, belts, bags, or bulbs, which are expendable parts
that can wear out from normal use within the warranty period.
This warranty is void if this product is ever used for other than private household
purposes.
This warranty gives you specific legal rights, and you may also have other rights which
vary from state to state.
Sears Brands Management Corporation, Hoffman Estates, IL 60179

iii i,iiiii i ii i i i i ii iiii iiiHIIIIIIIIIHI,,,H
Read all instructions in this guide before assembling or using your vacuum cleaner.
AWARNING:
Your safety is important to us. To reduce the risk of fire_ electrical shock, injury to
persons or damage when using your vacuum cleaner, follow basic safety precau-
tions including the following:
Use your vacuum cleaner only as
described in this guide. Use only with
Sears recommended attachments.
Disconnect electrical supply before
servicing or cleaning out the brush area.
Failure to do so could result Tnthe brush
unexpectedly starting, causing personal
injury from moving parts.
Do not leave vacuum cleaner when
plugged in. Unplug from outlet when not
in useand before performing maintenance.
To reduce the risk of electrical shock - Do
not use outdoors or on wet surfaces.
Do not allow to be used as a toy. Close
attention isnecessary when used by or
near children.
Do not use with a damaged cord or plug.
If vacuum cleaner is not working as it
should, has been dropped, damaged, left
outdoors, or droppedin water, return it to
a Sears Service Center.
Do not pull or carry by cord, usecord as
a handle, close a door on cord, or pull
cord around sharp edges or corners. Do
not run vacuum cleaner over cord. Keep
cord away from heated surfaces.
Do not unplug by pulling on cord. To
unplug, grasp the plug, not the cord.
Do not handle plug or vacuum cleaner with
wet hands.
Do not put any objects into openings.
Do not usewith any opening blocked;
keep free of dust, lint, hair, and anything
that may reduce air flow.
Keep hair, loose clothing, fingers, and all
parts of body away from openings and
moving parts.
Turn off all controls before unplugging.
Use extra care when cleaning on stairs.
Do not put on chairs, tables, etc. Keep on
floor.
Do not usevacuum cleaner to pick up
flammable or combustible liquids
(gasoline, cleaning fluid, perfumes, etc.), or
use in areas where they may be present.
The fumes from these substances can
create a fire hazard or explosion.
Do not pick up anything that is burning or
smoking, such as cigarettes, matches, or
hot ashes.
Do not usevacuum cleaner without dust
bag and/or filters in place.
Always replace the dust bag after
vacuuming carpet cleaners or freshener,
powders, and fine dust. These products
clog the filters, reduce airflow and can
cause damage to the vacuum cleaner.
Failure to replace the dust bag could
cause permanent damage to the vacuum
cleaner.
Do not use the vacuum cleaner to pick up
sharp hard objects, small toys, pins, paper
clips, etc. They may damage the vacuum
cleaner or dust bag.
Unplug before connecting Pet Handi
Mate TM.
You are responsible for making surethat
your vacuum cleaner is not used by anyone
unable to operate it properly.
SAVETHESEINSTRUCTIONS
Proper assembly and safe use of your vacuum cleaner are your responsibilities. Your
vacuum cleaner is intended for Household use. Read this Use & Care Guide carefully for
important use and safety information. This guide contains safety statements under
warning and caution symbols.
4
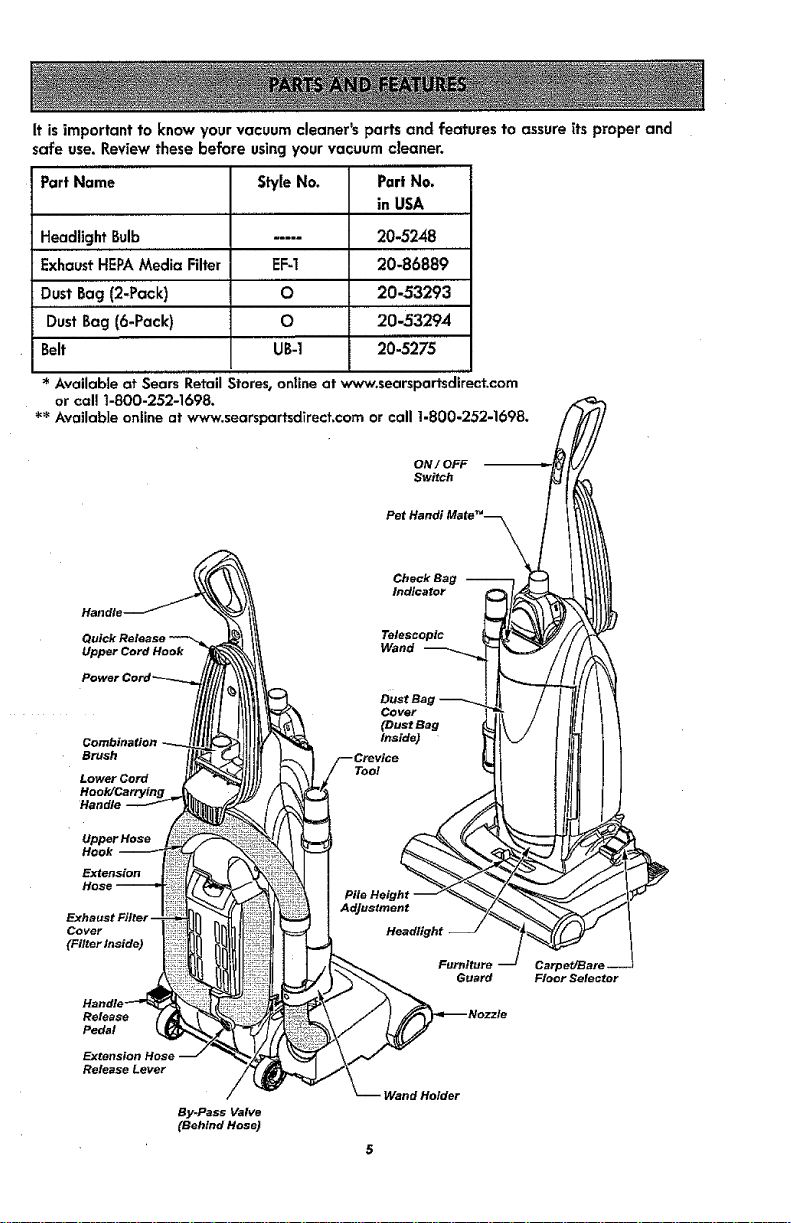
It isimportant to know your vacuum cleaner's parts and features to assure its proper and
ate use. Review these before usingyour vacuum cleaner.
Part Name Style No. Par| No.
in USA
Headlight Bulb ..... 20-5248
Exhaust HEPAMedia Filter EF-1 20-86889
Dust Bag (2-Pack) O 20-53293
Dust Bag (6-Pack) O 20-.53294
Belt UB-1 :20-5275
,, , ,J,_,,J
* Available at Sears Retail Stores,online at www.searspartsdlrect.com
or call 1-800-252-1698.
*_ Available online at www.searspartsdirect.com or call 1-800-252-1698.
ON / OFF __ _//
Checksag _ _ I l\_|_il
Quick Reiesse _ _ I_ Telescopic _ _" / /
Upper Cord Haok _ Wsnd __ii ///_,
t/i/111imli_t_-, co,,=,- _ / I 1I/t I t
ItltlIL l!tll_k_\ (OustBag tkli_ t I1tll I 1
B_s. /1_tltlII !--.3 Fc,o,ioe U1 t!//_ I
owo,Co,d 11t!) tlt!11!
HooeZCsr_ing_,_. All/7 / \ \_ _ I I III11 I
AdJustmen¢ "_Z _ "-,_'"_ //'
Exhaust /_ ,'_'_ _,/'_-_ F
Hart A
Pedal k I_P___ J___ ./ I #! .,_
By-Pass Valve
(Behind Hose}
}
ii,i i i i
Please pay special attention to these hazard alert boxes, and follow any
instructions given. WARNING statements alert you to such hazards as fire, electric
shock, burns and personal injury. CAUTION statements alert you to such hazards
as personal injury and/or property damage.
ill ii
_IbWARNING
Electrical Shock Hazard
Do not plug into the electrical supply
until the assembly is complete, Failure
to do so could result in electrical shock
or injury.
Before assembling the vacuum cleaner_
check the PACKING LIST (page 2). Use
this list to verify that you have received
all the components of your new Kenmore
vacuum cleaner.
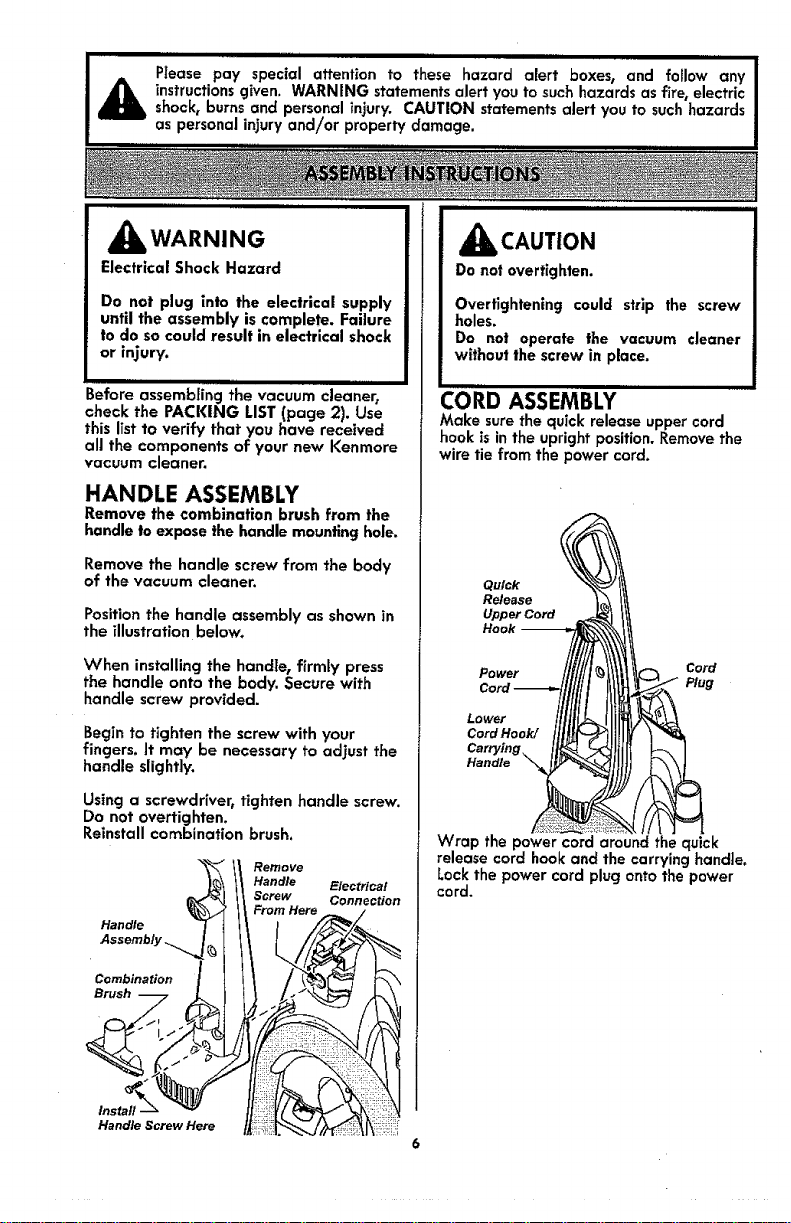
HANDLE ASSEMBLY
Remove the combination brush from the
handle to expose the handle mounting hole.
Remove the handle screw from the body
of the vacuum cleaner.
Position the handle assembly as shown in
the illustration below.
When installing the handle, firmly press
the handle onto the body. Secure with
handle screw provided,
Begin to tighten the screw with your
fingers. It may be necessary to adjust the
handle slightly.
Using a screwdriver, tighten handle screw.
Do not overtighten.
Reinstall combination brush.
Handle Electrical
Screw Connection
tom Here --
:;2biy
Combination |
Brush -_7 |
Handle Screw Here
_kCAUTION
Do no| overtighten.
Overtightenlng could strip the screw
holes.
Do not operate the vacuum cleaner
without the screw in place.
CORD ASSEMBLY
Make sure the quick release upper cord
hook is in the upright position. Remove the
wire tie from the power cord.
Quick
Release
Upper Cord
Power Cord
Plug
Lower
Cord Hook!
Carrying
Handle
Wrap the power cord around the quick
release cord hook and the carrying handle.
Lock the power cord plug onto the power
cord.
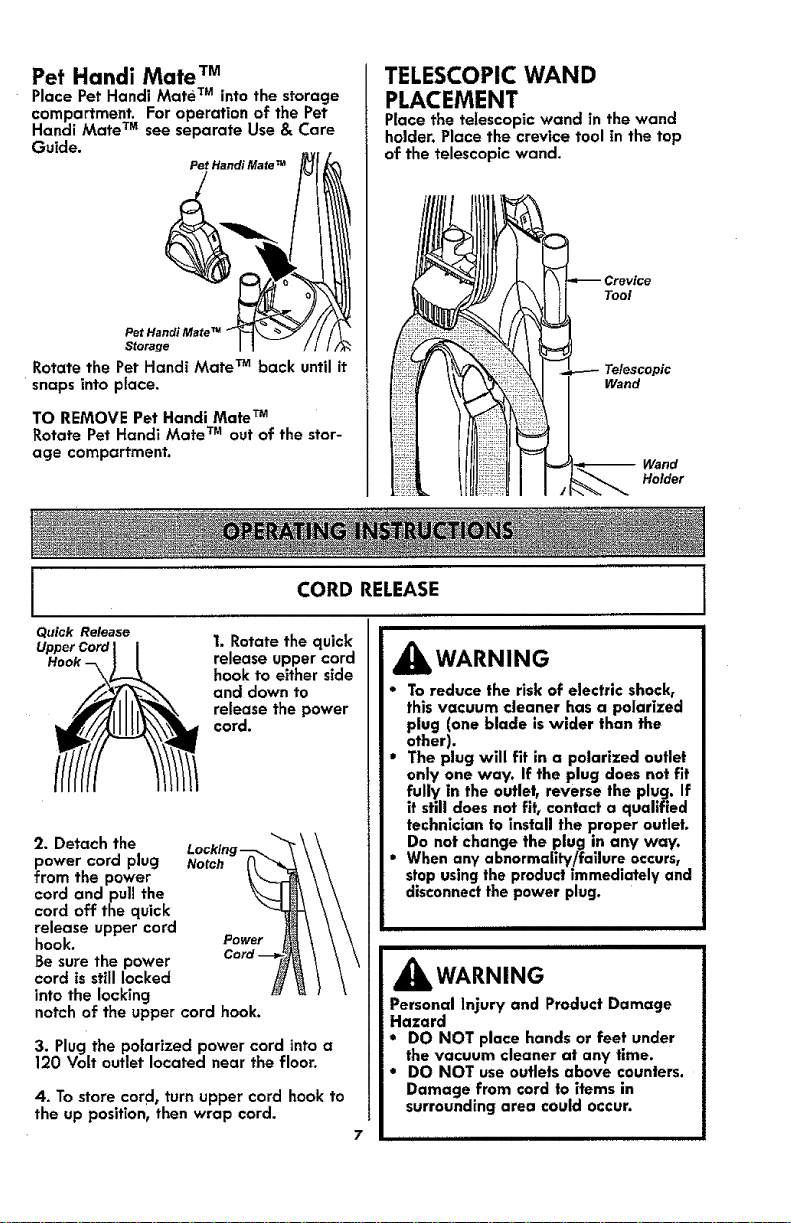
Pet Handi Mate TM
Place Pet Handi Mate TM into the storage
compartment. For operation of the Pet
Handi Mate TM see separate Use & Care
Guide.
Pet Handi Mate TM
Storage
Rotate the Pet Handi Mate TM back until it
snaps into place.
TO REMOVE Pet Handi Mate TM
Rotate Pet Handi Mate TM out of the stor-
age compartment.
TELESCOPIC WAND
PLACEMENT
Place the telescopic wand in the wand
holder, Place the crevice tool in the top
of the telescopic wand.
Tool
Telescopic
Wand
Wand
Holder
CORD RELEASE
II IIII
Quick Release
UpperCordI I
Hook --,\___
1. Rotate the quick
release upper cord
hook to either side
and down to
release the power
cord.
2. Detach the
power cord plug Notch
from the power
cord and pull the
cord off the quick
release upper cord
hook. Power
Be sure the power
cord is still locked
into the locking
notch of the upper cord hook.
3. Plug the polarized power cord into a
120 Volt outlet located near the floor.
4. To store cord, turn upper cord hook to
the up position, then wrap cord.
d_ls WARNING
* To reduce the risk of electric shock,
this vacuum cleaner has a polarized
plug (one blade is wider than the
other).
* The plug will fit in a polarized outlet
only one way. If the plug does not fit
fully in the outlet, reverse the plug. If
it still does not fit, contact a qualified
technician to install the proper outlet.
Do not change the plug in any way.
m When any abnormality/failure occurs,
stop using the product immediately and
disconnect the power plug.
|WARNING
Personal Injury and Product Damage
Hazard
* DO NOT place hands or feet under
the vacuum cleaner at any time.
. DO NOT use outlets above counters.
Damage from cord to items in
surrounding area could occur.
I
PILE HEIGHT SELECTION AND SETTING I
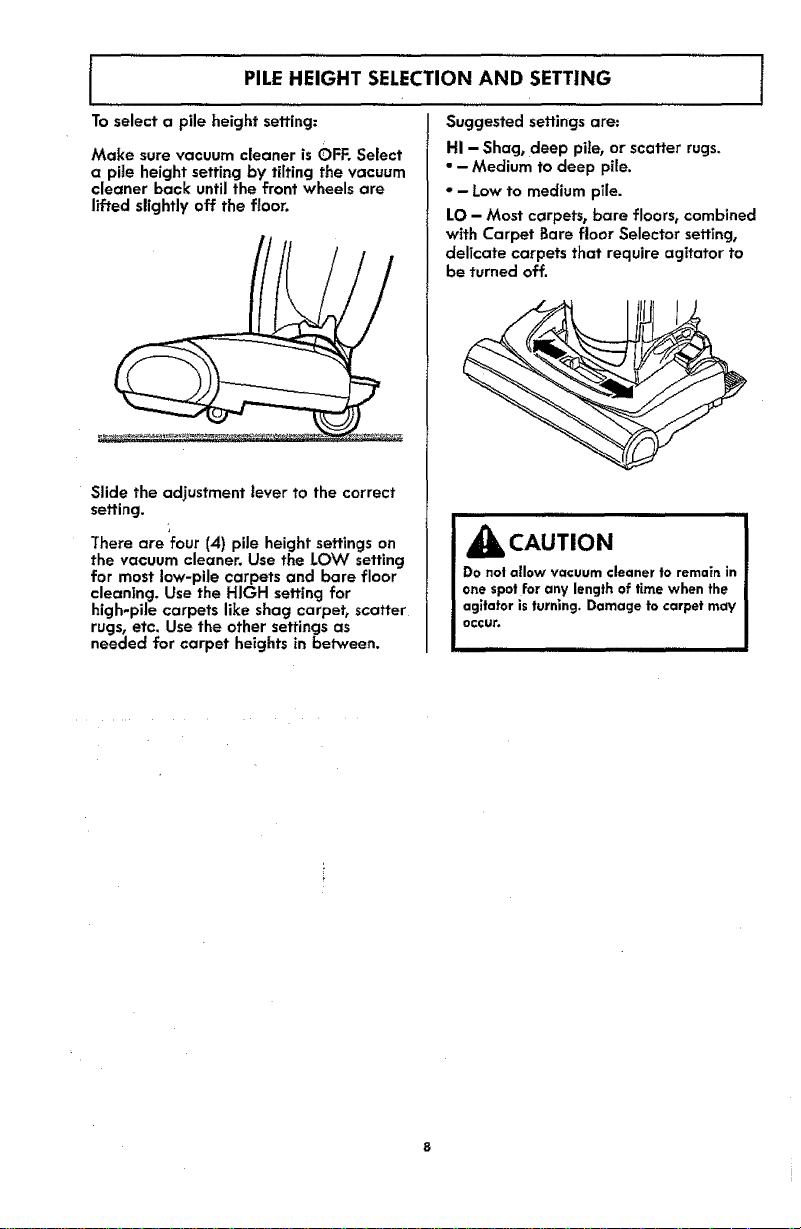
To select a pile height setting:
Make sure vacuum cleaner is OFF. Select
a pile height setting by tilting the vacuum
cleaner back until the front wheels are
lifted slightly off the floor.
Slide the adjustment lever to the correct
setting.
There are four (4) pile height settings on
the vacuum cleaner. Use the LOW setting
for most low-pile carpets and bare floor
cleaning. Use the HIGH setting for
high-pile carpets like shag carpet, scatter
rugs, etc. Use the other settings as
needed for carpet heights in between.
Suggested settings are:
HI - Shag, deep pile, or scatter rugs.
* - Medium to deep pile.
* - Low to medium plle.
LO - Most carpets, bare floors, combined
with Carpet Bare floor Selector setting,
delicate carpets that require agitator to
be turned off.
A CAUTION
Do not allow vacuum €leaner to remain in
one spot For any length of time when the
agitator is turning. Damage to carpet may
occur.
I CARPET/BARE FLOOR SELECTOR
Make sure vacuum cleaner isoff:
For longer belt life, turn vacuum cleaner off
before moving selector. Failure to do so
can cause the belt to rub on the selector
shaft and may result in the belt becoming
hot and creating a burning rubber smell.
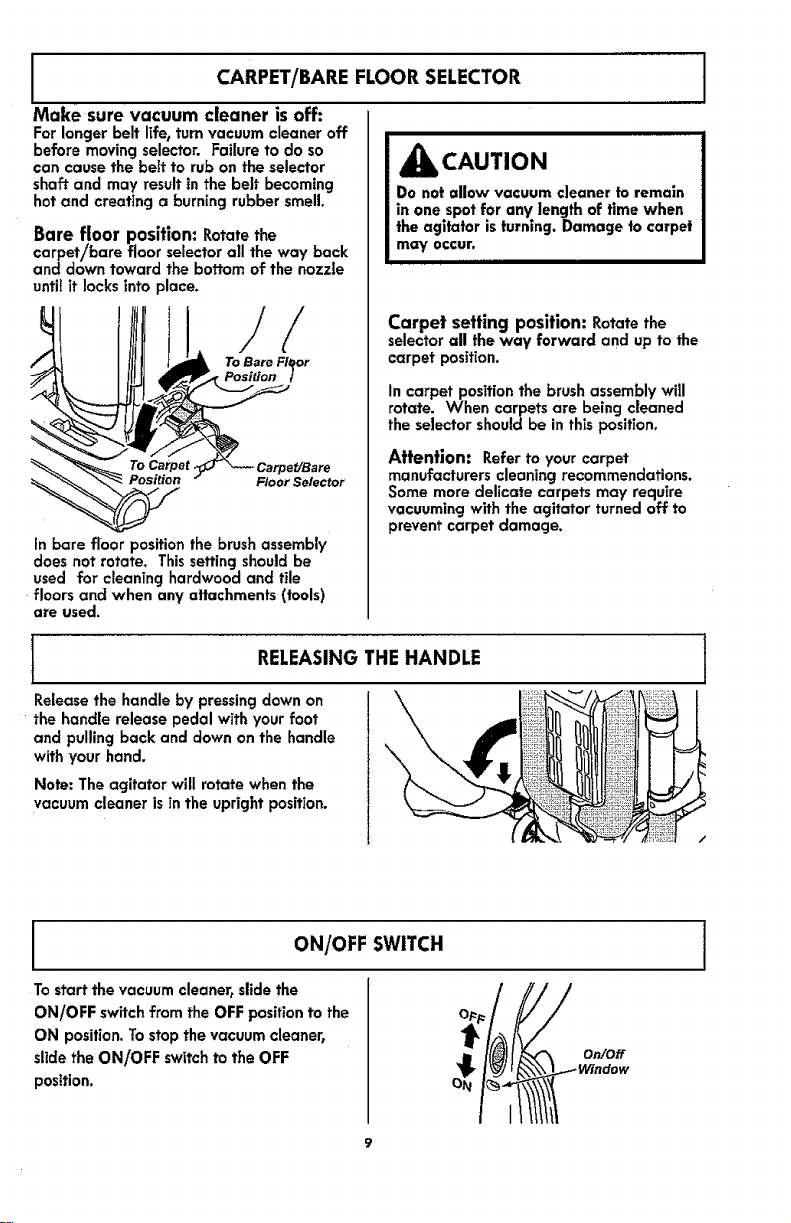
Bare floor position:Rotatethe
carpet/bare floor selector all the way back
and down toward the bottom of the nozzle
until it locks into place.
ToBare Fl_or
Position I
Carpet/Bare
Floor Selector
in bare floor position the brush assembly
does not rotate. This setting should be
used for cleaning hardwood and tile
floors and when any attachments (tools)
are used.
J
_k CAUTION
Do not allow vacuum cleaner to remain
in one spat for any length of time when
the agitator is turning. Damage to carpet
mac occur.
i
Carpet setting position: Rotate the
selector all the way forward and up to the
carpet position.
In carpet position the brush assembly will
rotate. When carpets are being cleaned
the selector should be in this position.
Attention: Refer to your carpet
manufacturers cleaning recommendations,
Some more delicate carpets may require
vacuuming with the agitator turned off to
prevent carpet damage.
RELEASINGTHE HANDLE
Release the handle by pressing down on
the handle release pedal with your foot
and pulling back and down on the handle
with your hand.
Note: The agitator will rotate when the
vacuum cleaner is in the upright position.
ON/OFF SWITCH
To start the vacuum cleaner, slide the
ON/OFF switch from the OFF position to the
ON position. Tostop the vacuum cleaner,
slide the ON/OFF switch to the OFF
position.
o_
o_ _
I
Combination
Crevice
Toot
Handle 2. Telescopic
Wand
Extension
Extension
Release Lever
ATTACHMENTS
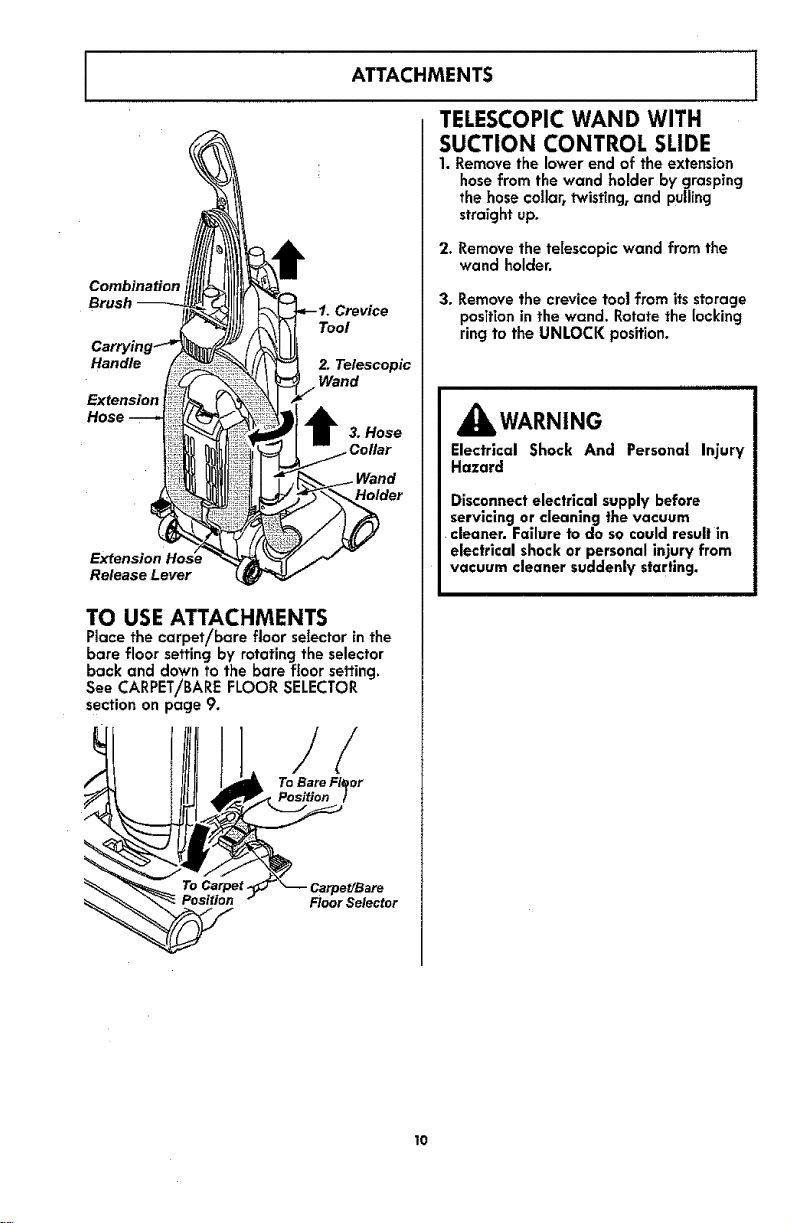
TO USE ATTACHMENTS
3. Hose
Place the carpet/bare floor selector in the
bare floor setting by rotating the selector
back and down to the bare floor seffing.
See CARPET/BARE FLOOR SELECTOR
section on page 9.
ToBareFloor
Position I
Floor Selector
TELESCOPIC WAND WITH
SUCTION CONTROL SLIDE
1. Remove the lower end of the extension
hose from the wand holder by grasping
the hose collar, twisting, and pulling
straight up,
2. Remove the telescopic wand from the
wand holder.
3. Remove the crevice tool from its storage
position in the wand. Rotate the locking
ring to the UNLOCK position.
,_WARNING
Electrical Shock And Personal Injury
Hazard
Disconnect electrical supply before
servicing or cleaning the vacuum
cleaner. Failure to do so could result in
electrical shock or personal injury from
vacuum cleaner suddenly starting.
I0
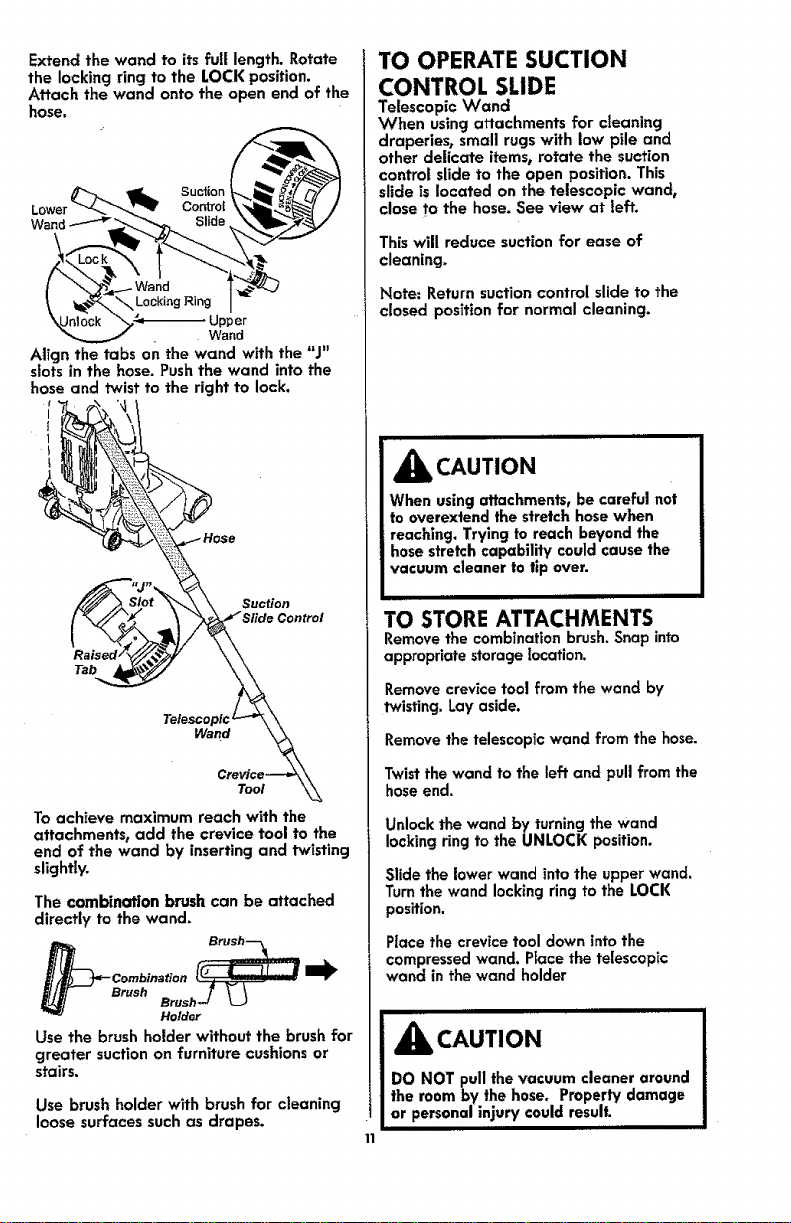
Extend the wand to its full length. Rotate
the locking ring to the LOCK position.
Attach the wand onto the open end of the
hose,
1
/P_ _r. Suction_ _ _//r-_Z I
,q_.,¢W.,.,"_,,LockingRing /
\-_Unlock "_,-,_,_ Upper
"_..._._ _ Wand
Align the tabs on the wand with the "J"
slots in the hose. Pushthe wand into the
hose and twist to the right to lock,
Suction
Te_scop_ i
Wand
Tool
To achieve maximum reach with the
attachments, add the crevice tool to the
end of the wand by inserting and twisting
slightly.
The combination brushcan be attached
directly to the wand.
Com.,oo .
o.-° t_J
Use the brush holder without the brush for
greater suction on furniture cushions or
stairs.
Use brush holder with brush for cleaning
loose surfaces such as drapes.
TO OPERATE SUCTION
CONTROL SLIDE
Telescopic Wand
When using attachments for cleaning
draperies, small rugs with low pile and
other delicate items, rotate the suction
control slide to the open position. This
slide is located on the telescopic wand,
close to the hose. See view at left.
This will reduce suction for ease of
cleaning.
Note: Return suction control slide to the
closed position for normal cleaning.
_1_ CAUTION
When using attachments, be careful not
to overextend the stretch hose when
reaching. Trying to reach beyond the
hose stretch capability could cause the
vacuum cleaner to tip over.
TO STORE ATTACHMENTS
Remove the combination brush. Snap into
appropriate storage location.
Remove crevice tool from the wand by
twisting. Lay aside.
Remove the telescopic wand from the hose.
Twistthe wandto the left and pull fromthe
hoseend.
Unlockthe wand by turning the wand
locking ring tothe UNLOCK position.
Slide the lower wand into the upper wand.
Turn the wand locking ring to the LOCK
position.
Place the crevice tool down into the
compressed wand. Place the teEescopic
wand in the wand holder
_ICAUTION
DO NOT pull the vacuum cleaner around
the room by the hose. Properly damage
or personal injury could result.
,i iiill i
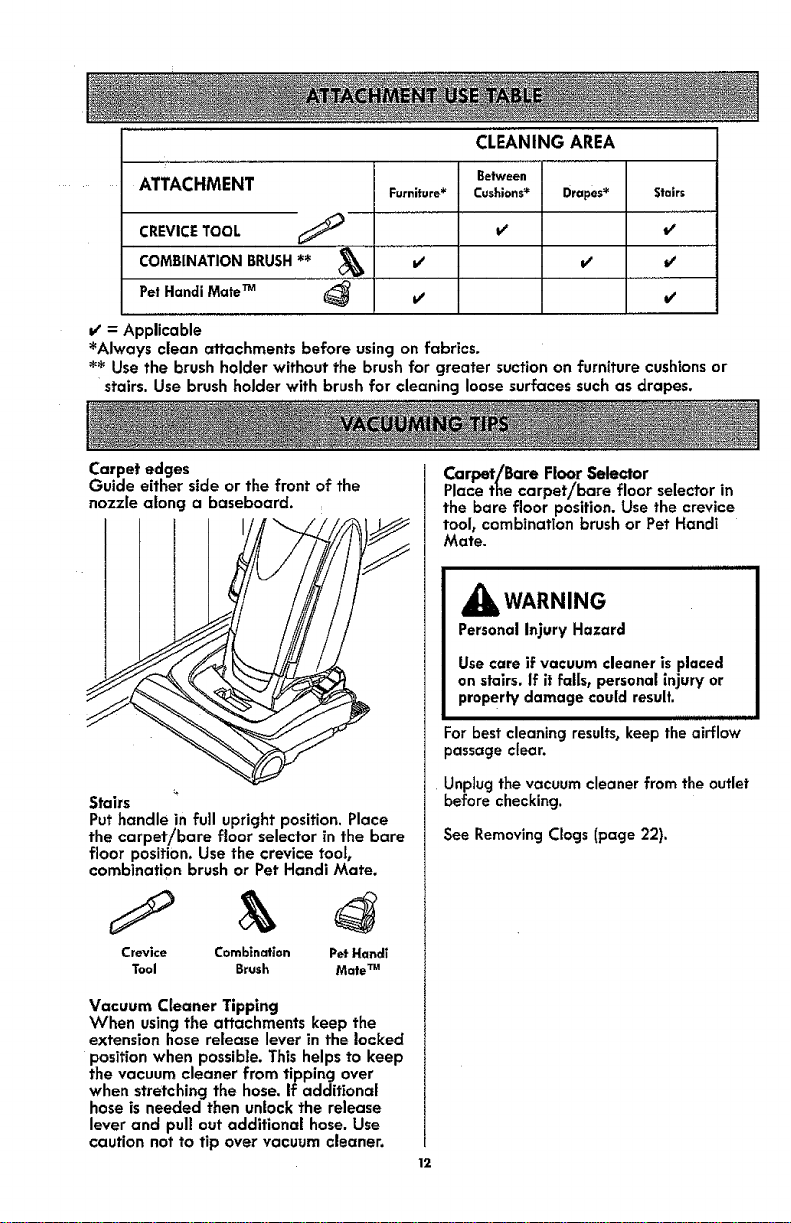
ATTACHMENT
CREVICETOOL
COMBINATION BRUSH**
Pet Handi MateTM
CI EANINGAREA
Between
Furniture* Cushions* Drapes* Stairs
V' v"
v'
I,"
= Applicable
*Always clean attachments before using on fabrics.
=_ Use the brush holder without the brush for greater suction on furniture cushions or
stairs. Use brush holder with brush for cleaning loose surfaces such as drapes.
Carpet edges
Guide either side or the front of the
nozzle along a baseboard.
Stairs
Put handle !n full upright position. Place
the carpet/bare floor selector in the bare
floor position. Use the crevice toot,
combination brush or Pet Handi Mate.
Crevice Combination Pet Hand|
Tool Brush Mate TM
Vacuum Cleaner Tipping
When using the attachments keep the
extension hose release lever in the locked
position when possible. This helps to keep
the vacuum cleaner from tipping over
when stretching the hose. If additional
hose is needed then unlock the release
lever and pull out additional hose. Use
caution not to tip over vacuum cleaner.
Carpet/Bare Floor Selector
Place the carpet/bare floor selector in
the bare floor position. Use the crevice
tool, combination brush or Pet Handi
Mate.
_WARNING
Personal injury Hazard
Use care if vacuum cleaner is placed
on stairs, if it fails, personal injury or
property damage could result.
For best cleaning results, keep the airflow
passage clear.
Unplug the vacuum cleaner from the outlet
before checking.
See Removing Clogs (page 22).
12
PERFORMANCE!SAFETY FEATURES
MOTOR PROTECTION
SYSTEM
By-Pass Valve
This vacuum cleaner has a by-pass valve
which automatically opens to provide
cooling air to the vacuum cleaner motor
when a clog prevents the normal flow of
air to the motor. The by-pass valve opens
to prevent motor overheating and possible
damage to the vacuum cleaner. You will
notice a change of sound as air rushes
through the valve opening.
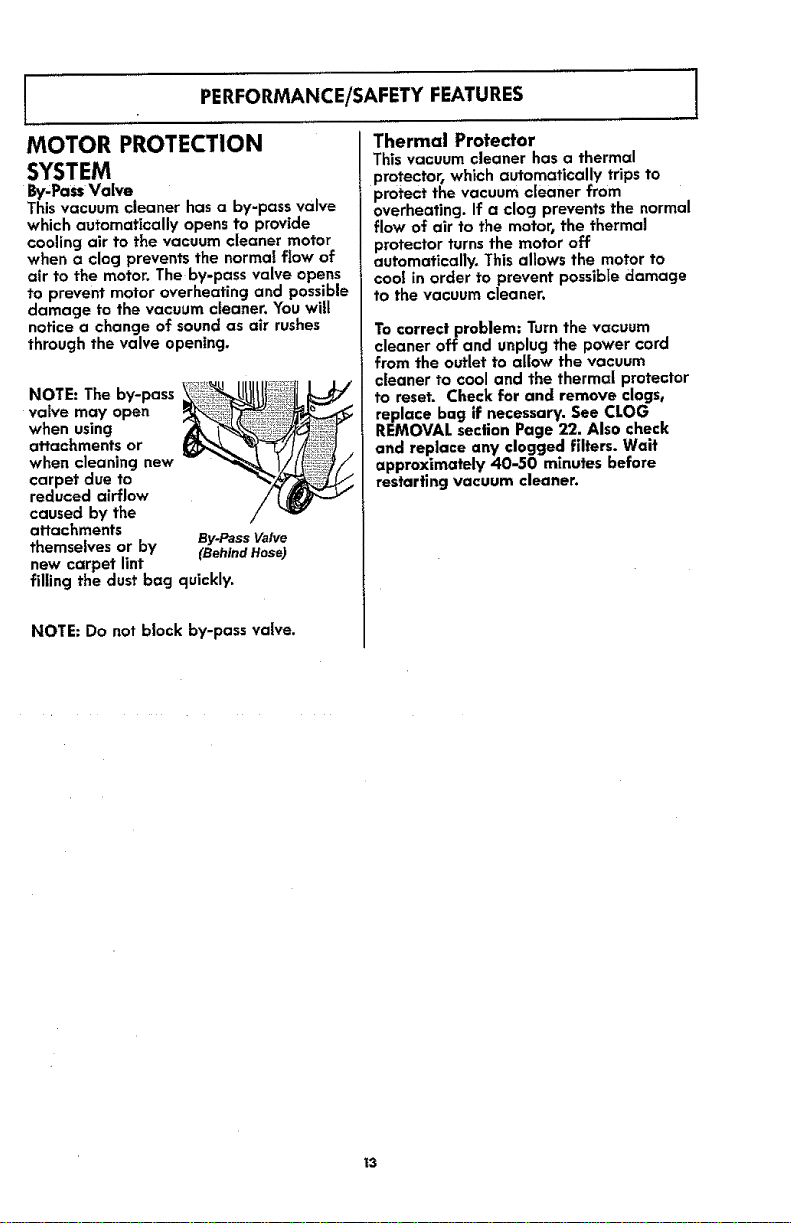
NOTE: The by-pass
valve may open
when using
attachments or
when cleaning new
carpet due to
reduced airflow
caused by the
attachments
themselves or by
By-Pass Valve
(BehindHose)
new carpet lint
filling the dust bag quickly.
NOTE: Do not block by-pass valve.
r
Thermal Protector
This vacuum cleaner has a thermal
protector, which automatically trips to
protect the vacuum cleaner from
overheating. If a clog prevents the normal
flow of air to the motor, the thermal
protector turns the motor off
automatically. This allows the motor to
cool in order to prevent possible damage
to the "vacuum cleaner.
To correct problem: Turn the vacuum
cleaner off and unplug the power cord
from the outlet to allow the vacuum
cleaner to cool and the thermal protector
to reset. Check for and remove clogs,
replace bag if necessary. See CLOG
REMOVAL section Page 22. Also check
and replace any clogged filters. Wait
approximately 40..50 minutes before
restarting vacuum cleaner.
_3
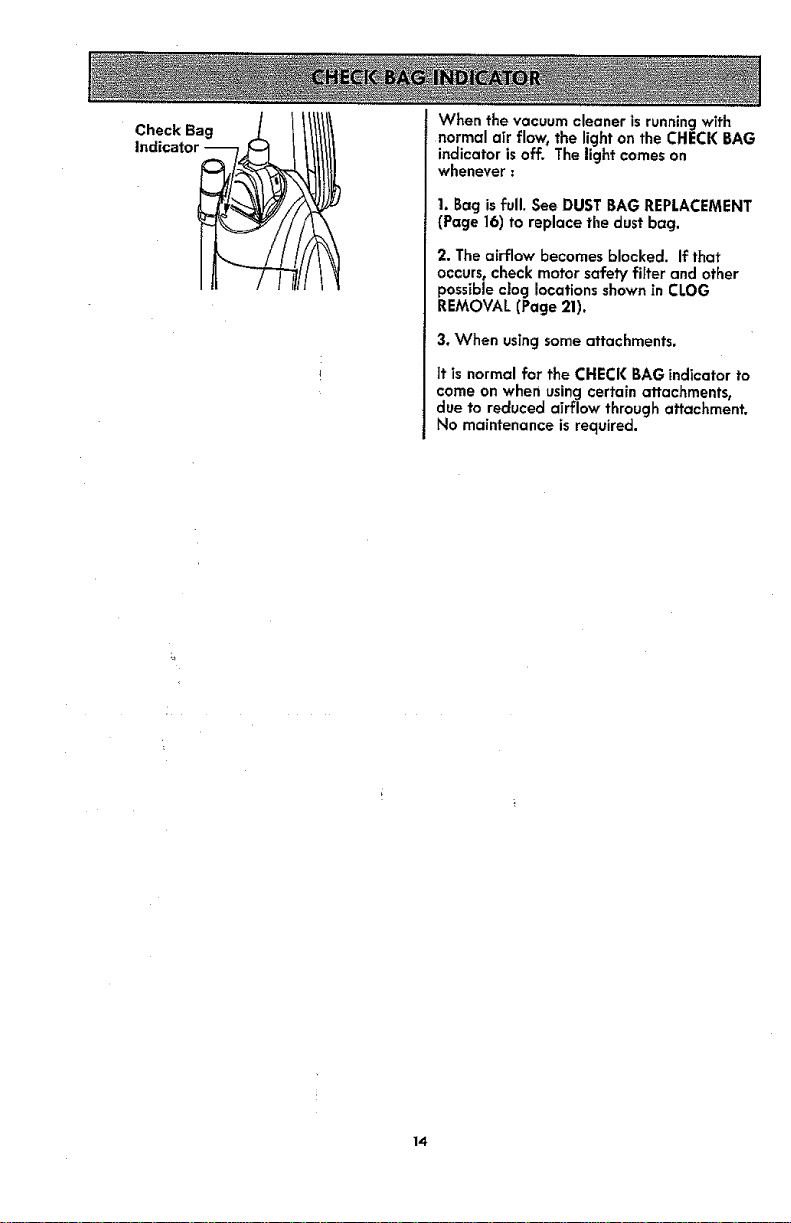
Check
indicator --
When the vacuum cleaner is running with
normal air flow, the light on the CHECK BAG
indicator is off. The light comes on
whenever
1. Bag is full. See DUST BAG REPLACEMENT
(Page 16) to replace the dust bag.
2. The airflow becomes blocked. If that
occurs, check motor safety filter and other
possible clog locations shown in CLOG
REMOVAL (Page 21).
3. When using some attachments.
It is normal for the CHECK BAG indicator to
come on when using certain attachments,
due to reduced airflow through attachment.
No maintenance is required.
14
Always follow aII safety precautions when
performing maintenance to the vacuum
cleaner.
AWARNING
Electrical Shock And Personal Injury
Hazard
Disconnect electrical supply before
servicing or cleaning the vacuum
cleaner. Failureto do socouldresultin
electrical shockor personalinjury from
vacuum cleaner suddenly starting.
I
CLEANING EXTERIOR AND ATTACHMENTS
1. Unplug cord from wall outlet. DO NOT
drip water on vacuum cleaner.
2. To clean exterior, or to reduce static
electricity and dust build-up, wipe outer
surface of vacuum cleaner and attach-
ments. Use a clean, soft cloth that has
been dipped in a solution of mild liquid
detergent and water, then wrung dry. Wipe
dry after cleaning.
Wash attachments in warm soapy water,
rinse and air dry. Do not clean in
dishwasher.
_l_ CAUTION
Do not use attachments if they are
wet. Attachments used in dirty areas,
such as under a refrigerator, should
not be used on other surfaces until
they are washed. They could leave
marks.
t
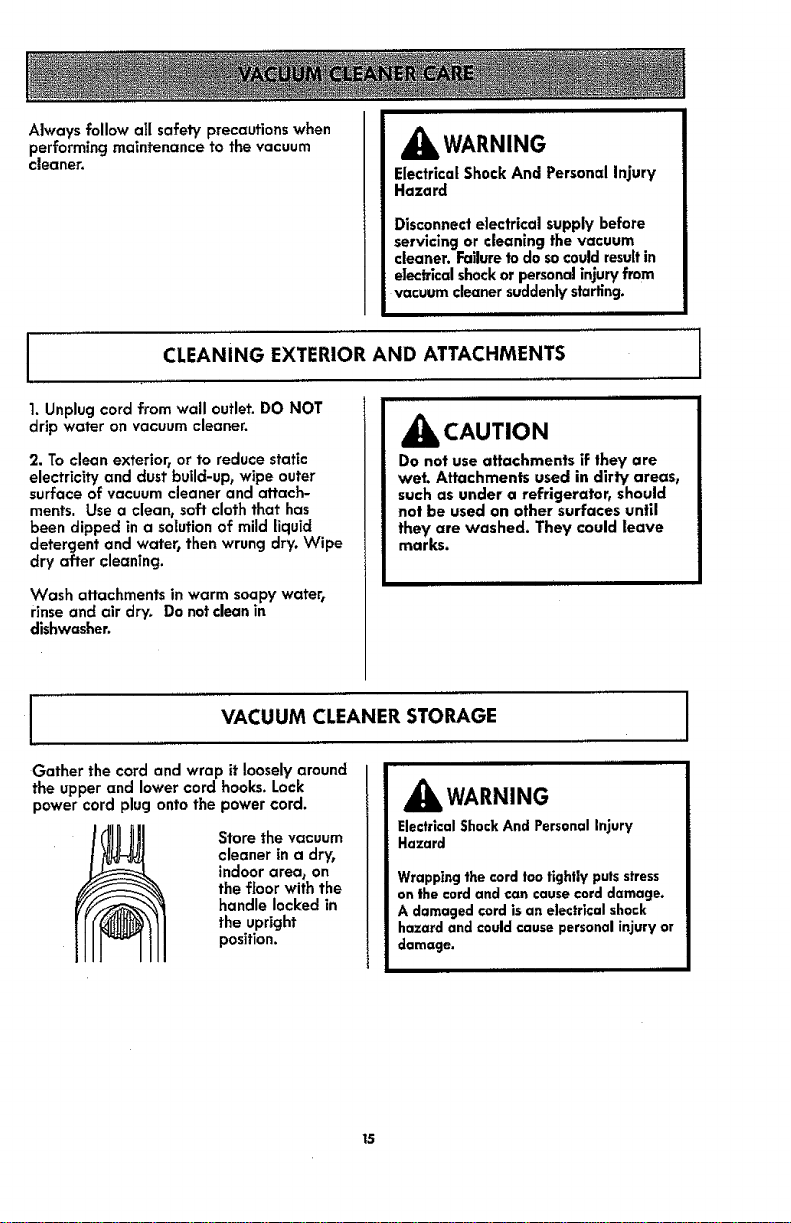
VACUUM CLEANER STORAGE
Gather the cord and wrap it loosely around
the upper and lower cord hooks. Lock
power cord plug onto the power cord.
Store the vacuum
cleaner in a dry,
indoor area, on
the ffoor with the
handle locked in
the upright
position.
iiiiiiii
_jlb WARNING
ElectricalShockAnd PersonalInjury
Hazard
Wrapping the card too tightly putsstress
on the cordand can causecord damage.
A damaged cordisan electricalshock
hazard and could causepersonalinjury or
damage.
I
15
DUST BAG REPLACEMENT J
WARNING
Always unplug power cord from
electrical outlet before performing
maintenance to the vacuum cleaner.
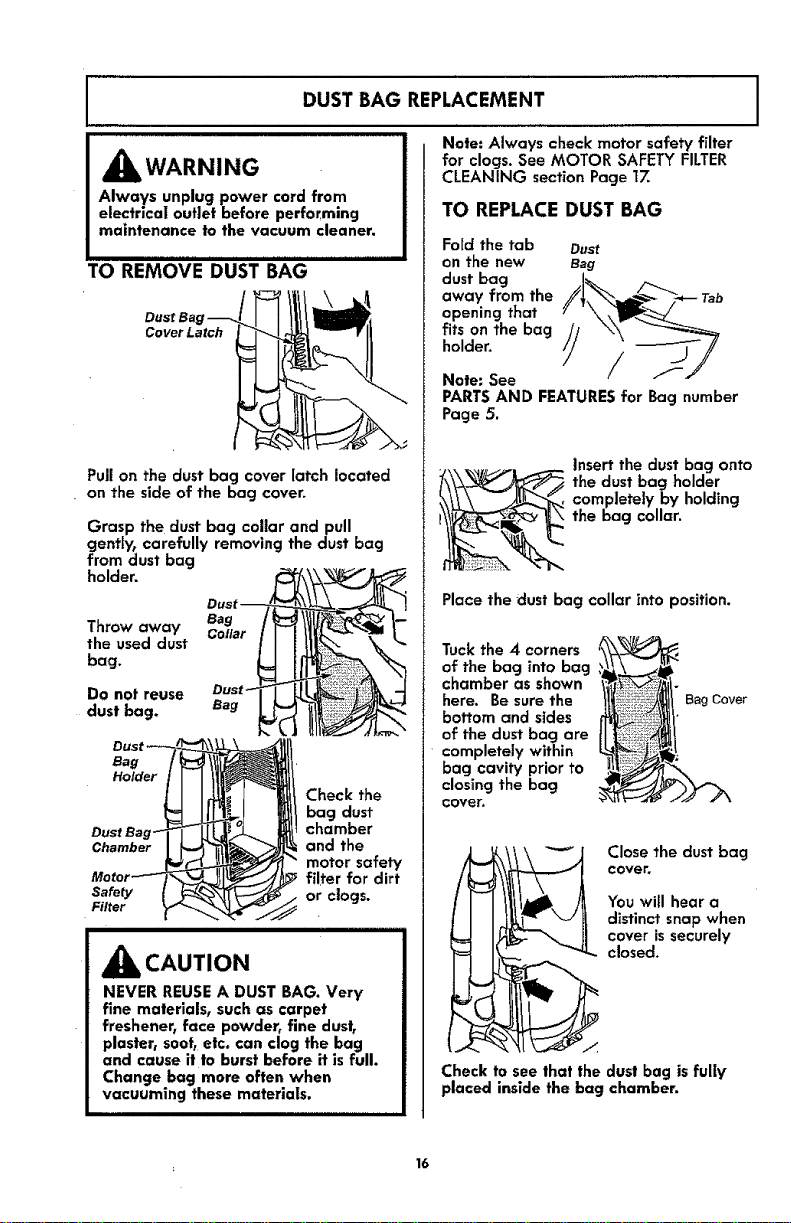
TO REMOVE DUST BAG
Dust Bag
Cover Latch
Pull on the dust bag cover latch located
on the side of the bag cover.
Grasp the dUSt bag collar and pull
gently, carefully removing the dust bag
from dust bag
o,0er.
Throw away
the used dust
bag.
Do not reuse
dust bag.
Bag
Holder
Chamber
Safety
Filter
_i_ CAUTION
Check the
bag dust
chamber
and the
motor safety
filter for dirt
or clogs.
NEVER REUSE A DUST BAG. Very
fine materials, such as carpet
freshener, face powder, fine dust,
plaster, soot, etc. can clog the bag
and cause it to burst before it is full.
Change bag more often when
vacuuming these materials.
Note: Always check motor safety filter
for clogs. See MOTOR SAFETY FILTER
CLEANING section Page 1Z
TO REPLACEDUST BAG
Fold the tab Dust
on the new Bag
dust bag
away from the /__.,=_-_- Tab
opening that _" '\\x!_:_ ....
Note: See
PARTS AND FEATURES for Bag number
Page 5.
Insert the dust bag onto
the dust bag holder
completely by holding
the bag coliar_
Place the dust bag collar into position.
Tuck the 4 corners __
of the bag into bag
chamber as shown _"_il-
here. Be sure the _!/' BagCover
bottom and sides _i i_
of the dust bag are _!!__ ..
completely within
bag cavity prior to
closing the bag
cover,
Close the dust bag
cover.
You will hear a
distinct snap when
cover is securely
closed.
Check to see that the dust bag is fully
placed inside the bag chamber.
16
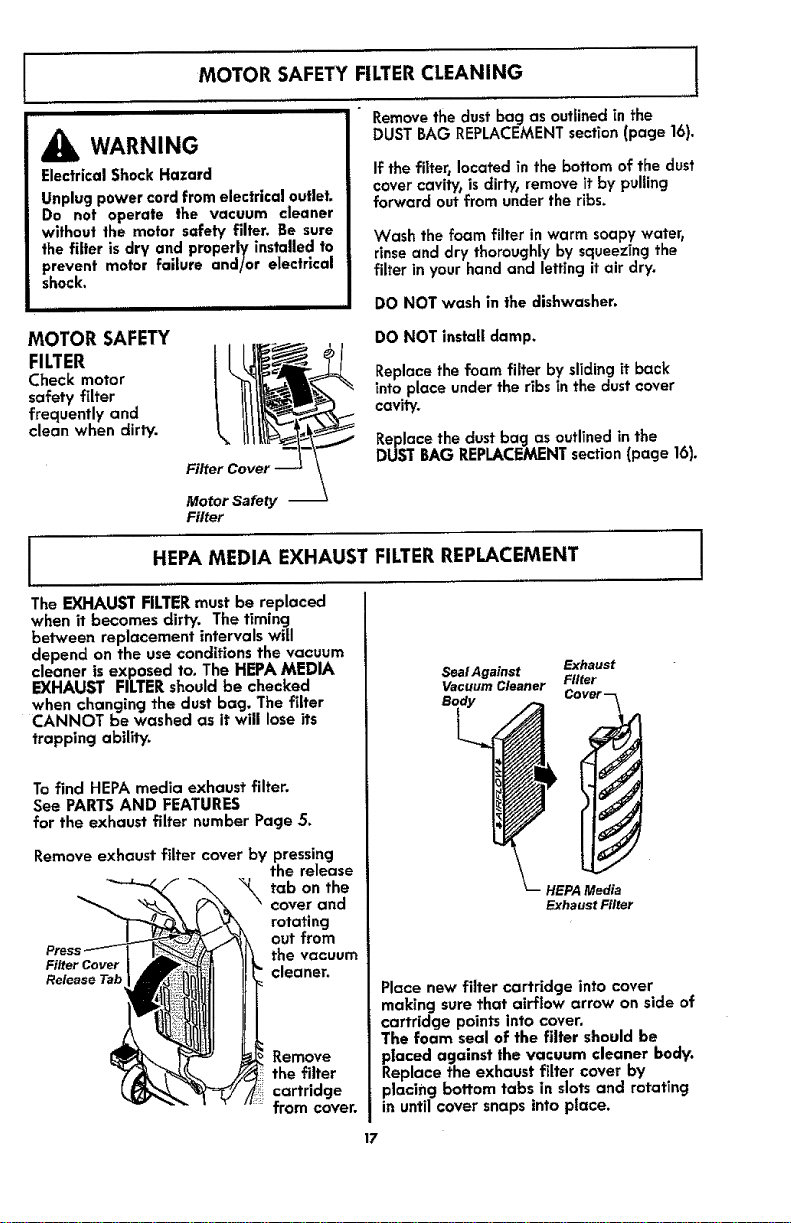
MOTOR SAFETY FILTERCLEANING
I IIIIIIIIIIIIIIII IIII IIIIIII
,_ WARNING
Electrical Shock Hazard
Unplug power cord from electrical outlet.
Do not operate the vacuum cleaner
without the motor safety filter, Be sure
the filter is dry and properly installed to
prevent motor failure and/or electrical
shock.
1
Remove the dust bag as outlined in the
DUST BAG REPLACEMENT section (page 16).
If the filter, located in the bottom of the dust
cover cavity, is dirty, remove it by pulling
forward out from under the ribs,
Wash the foam filter in warm soapy water,
rinse and dry thoroughly by squeezing the
filter in your hand and letting it air dry.
DO NOT wash in the dishwasher.
MOTOR SAFETY
FILTER
Check motor
safety fffter
frequently and
clean when dirty.
DO NOT install damp,
Replace the foam filter by sliding it back
into place under the ribs in the dust cover
cavity.
Replace the dust bag as outlined in the
DUST BAG REPLACEMENT section (page 16).
Motor Safety
Filter
HEPA MEDIA EXHAUST FILTERREPLACEMENT
The EXHAUST FILTER must be replaced
when it becomes dirty. The timing
between replacement intervals will
depend on the use conditions the vacuum
cleaner is exposed to. The HEPA MEDIA
EXHAUST FILTER should be checked
when changing the dust bag. The filter
CANNOT be washed as it will lose its
trapping ability.
To find HEPA media exhaust filter.
See PARTS AND FEATURES
for the exhaust filter number Page 5,
Remove exhaust filter cover by pressing
the release
_'_\ tab on the
cover and
rotafi ng
out from
cleaner.
Remove
the filter
cartridge
from cover.
SealAgainst
VacuumCleaner
Exhaust
Filter
Cover "-_t
HEPAMedia
ExhaustFilter
Place new filter cartridge into cover
making sure that airflow arrow on side of
cartridge points into cover.
The foam seal of the filter should be
placed against the vacuum cleaner body.
Replace the exhaust filter cover by
placing bottom tabs in slots and rotating
in until cover snaps into place.
17
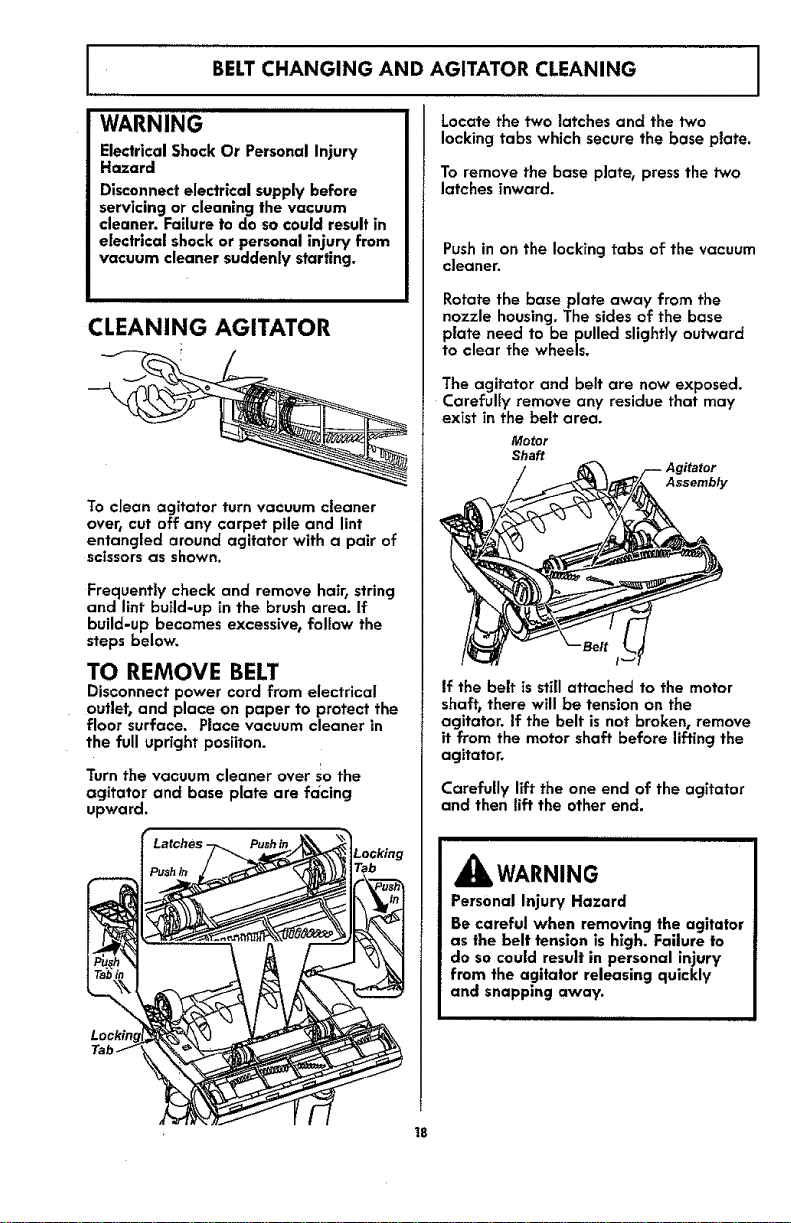
BELTCHANGING AND AGITATOR CLEANING
WARNING
Electrical Shock Or Personal Injury
Hazard
Disconnect electrical supply before
servicing or cleaning the vacuum
cleaner. Failure to do so could result in
eiectrlcal shock or personal injury from
vacuum cleaner suddenly starting.
CLEANING AGITATOR
To cleon agitator turn vacuum cleaner
overt cut off any carpet pile and lint
entangled around agitator with a pair of
scissors as shown.
Frequently check and remove hair, string
and lint build-up in the brush area. If
build-up becomes excessive, follow the
steps below.
TO REMOVE BELT
Disconnect power cord from electrical
outlet, and place on paper to protect the
floor surface. Place vacuum cleaner in
the full upright posiiton.
Turn the vacuum cleaner over so the
agitator and base plate are fa_cing
upward.
Locate the two latches and the two
locking tabs which secure the base plate.
To remove the base plate, press the two
latches inward.
Push in on the locking tabs of the vacuum
cleaner.
Rotate the base plate away from the
nozzle housing. The sides of the base
plate need to be pulled slightly outward
to clear the wheels.
The agitator and belt are now exposed.
Carefully remove any residue that may
exist in the belt area.
Motor
Shaft
/ _ F-- Agitator
/ _ _A Assembly
If the belt is still attached to the motor
shaft, there will be tension on the
agitator, if the belt is not broken, remove
it from the motor shaft before lifting the
agitator.
Carefully lift the one end of the agitator
and then lift the other end.
iiiilll,i ii illl i
,_ WARNING
Personal Injury Hazard
Be careful when removing the agitator
as the belt tension is high. Failure to
do so could result in personal injury
from the agitator releasing quickly
and snapping away.
18
TO CLEAN AGITATOR
NOTE: In order to keep cleaning efficiency
high and to prevent damage to your
vacuum cleaner, the _aitator must be
cleaned every time thebe t is chanqed.
The agitator must also be cleaned
according to the following schedule or as
necessary:
Vacuum Cleaqer Use Clean Aaitator
HEAVY - every week
(used daily)
MODERATE _ every month
(used 2-3 times/week)
LIGHT - every 2 months
(used 1 time/week)
Remove any dirt or debris in the belt path
area or in the agitator area.
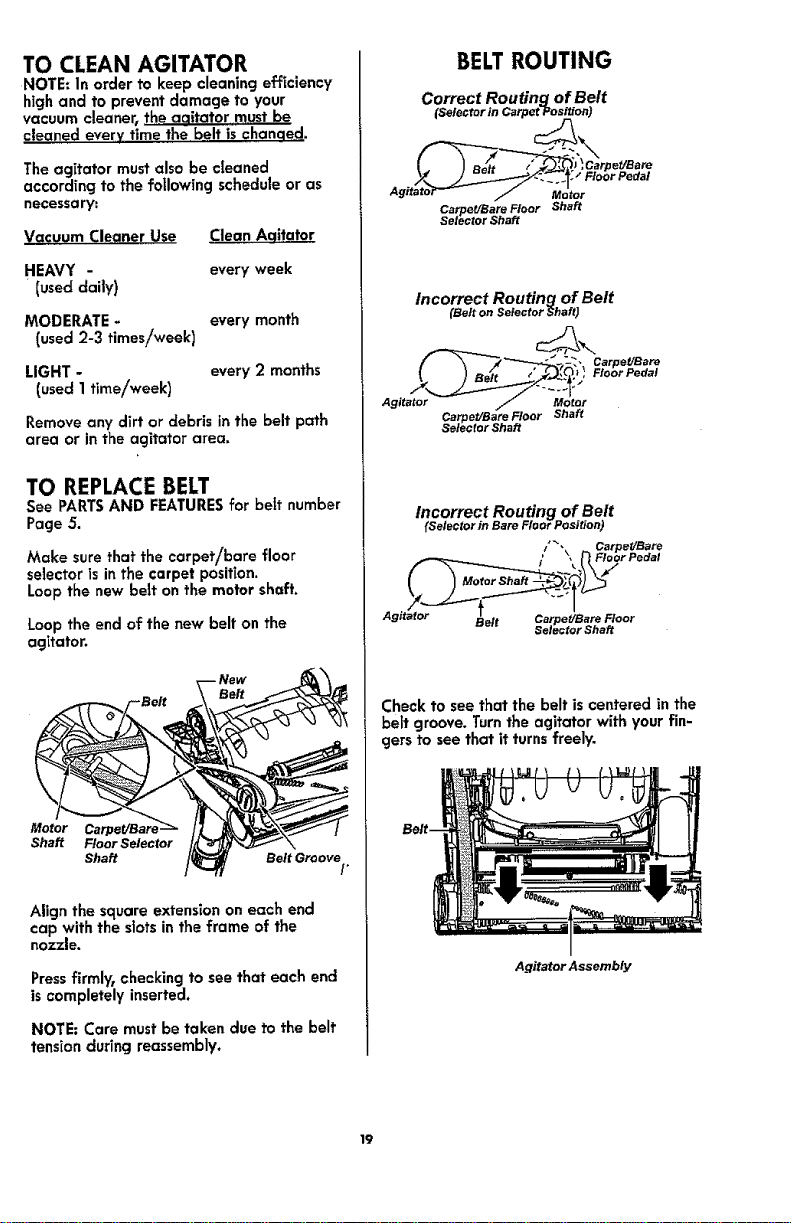
TO REPLACE BELT
See PARTSAND FEATURESfor belt number
Page 5.
Make sure that the carpet/bare floor
selector Is in the carpet position.
Loop the new belt on the motor shaft.
Loop the end of the new belt on the
agitator.
Carpet/Bare
Floor Selector
Shaft
Align the square extension on each end
cap with the slots in the frame of the
nozzle.
Press firmlyt checking to see that each end
is completely inserted.
NOTE: Care must be taken due to the belt
tension during reassembly.
BELTROUTING
Correct Routing of Belt
(Selector in CarpetPosition)
I,_ ) Belt /_ ",_'_.J,Carpet/Bare
y._/-:_'._: , Flooree_at
AgitatoF'--- / Motor
Co,pet/Bare Floor Shaft
Selector Shaft
Incorrect Routing of Belt
(Belt on Selector Shaft)
Carpet/Bare Floor Shaft
Selector Shaft
Incorrect Routing of Belt
(Selector in Bare Floor Position)
Belt Carpe_lBare Floor
Selector Shaft
Check to see that the belt is centered in the
belt groove. Turnthe agitator with your fin-
gers to see that it turns freely.
Belt.
Agitator Assembly
19
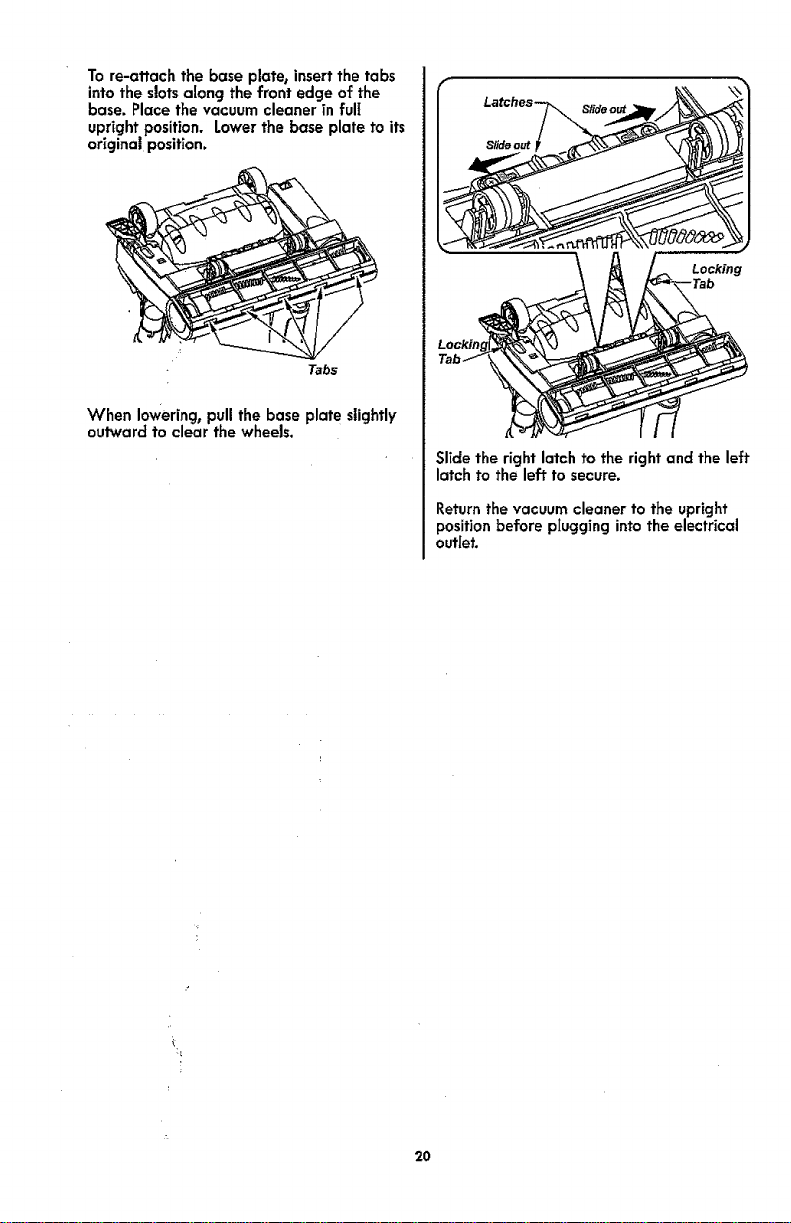
To re-attach the base plates insert the tabs
into the slots along the front edge of the
base. Place the vacuum cleaner in full
upright position. Lower the base plate to its
original position.
Tabs
Vv'hen lowering, pull the base plat e slightly
outward to clear the wheels.
Locking
Slide the right latch to the right and the left
latch to the left to secure.
Return the vacuum cleaner to the upright
position before plugging into the electrical
outlet.
2O
I
WARN ING
LIGHT BULB REPLACEMENT
Electrical Shock Or Personal Injury
Hazard
Disconnect electrical supply before
performing maintenance to the vacuum
cleaner. Failure to do so could result in
electrical shock or personal injury from
the vacuum cleaner suddenly starting.
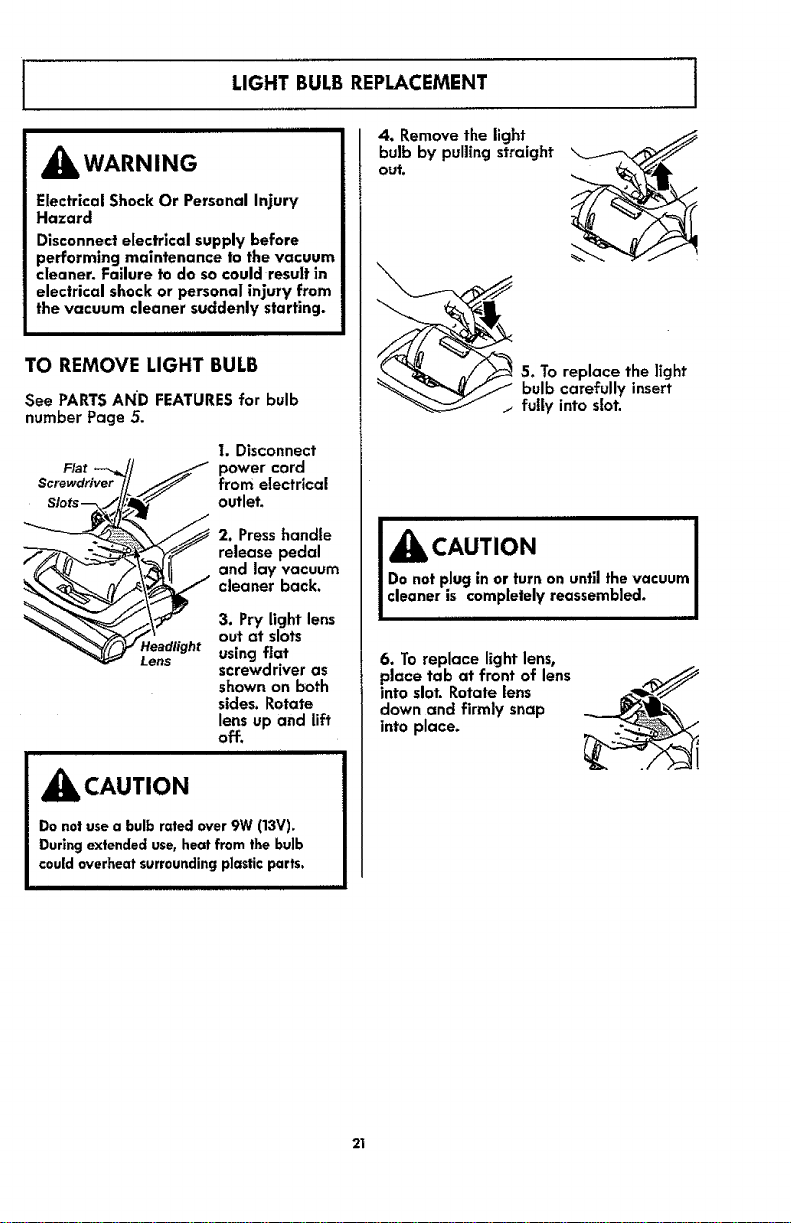
TO REMOVE LIGHT BULB
4. Remove the light
bulb by pulling straight
out.
5. To replace the light
bulb carefully insert
See PARTS AND FEATURES for bulb
number Page 5.
I. Disconnect
Flat power cord
Screwdriver from electrical
outlet.
Headfight
Lens
,&_ CAUTION
2. Press handle
release pedal
and lay vacuum
cleaner back.
3. Pry light lens
out at slots
using fiat
screwdriver as
shown on both
sides. Rotate
lens up and lift
off.
I I I II I IIIIIIIII/
Do not usea bulb rated over 9W (13V),
During extendeduse,heat from the bulb
couldoverheatsurroundingplasticparts.
_is CAUTION
Do notplugin or turnonuntilthe vacuum
cleaneris completelyreassembled.
6. To replace light lens,
place tab at front of lens
into slot. Rotate lens
down and firmly snap
into place.
21
CLOG REMOVAL
Always follow all safety precautionswhen
performingmaintenanceto the vacuum
cleaner.
_illl WARNING
Electrical Shock Or Personal InJury
Hazard
Disconnect electrical supply before
performing maintenance to the
vacuum cleaner. Failure to do so
could result in electrical shock or
personal injury from the vacuum
cleaner suddenly starting.
If the vacuum cleaner does not seem to have
adequate suction, first check if the dust bag
is full or if a filter is clogged. See DUST BAG
REPLACEMENT Page 16 or motor filter,
exhaust filter Page 1Z
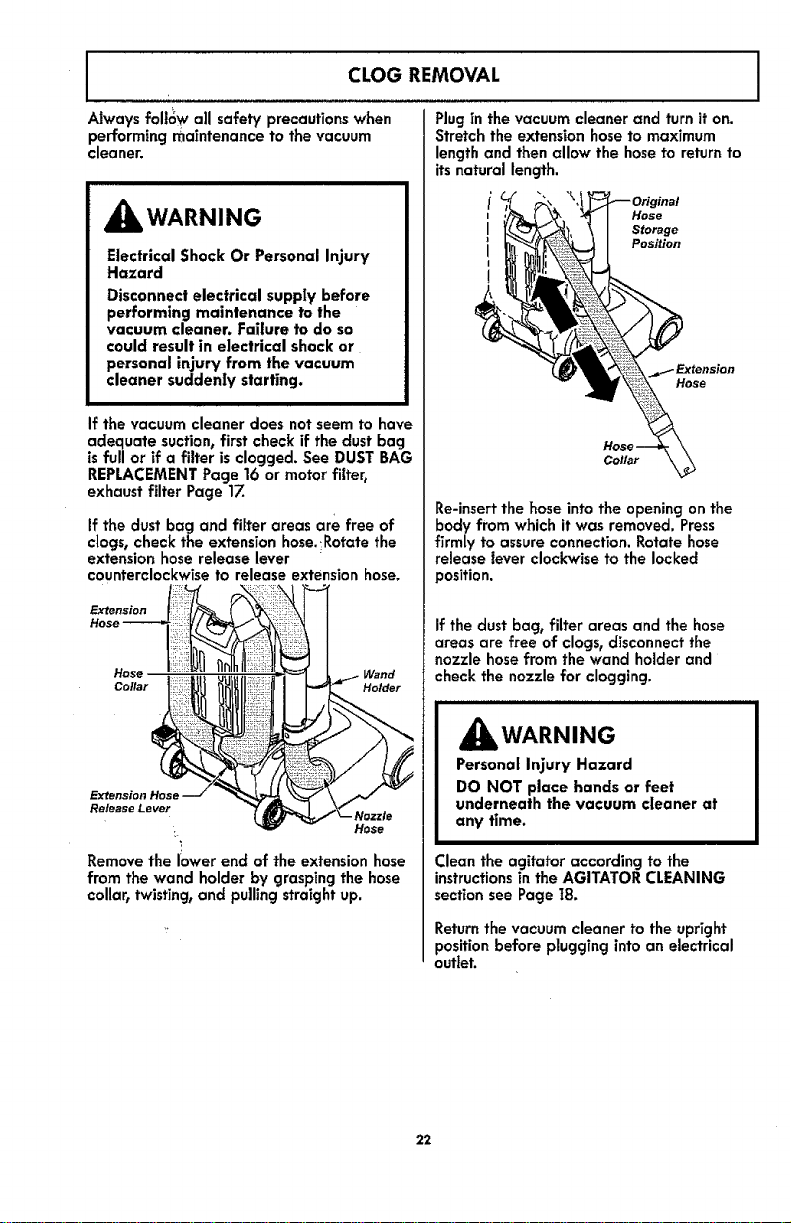
If the dust bag and filter areas are free of
clogs, check the extension hose.Rotate the
extension hose release lever
counterclockwise to release extension hose.
Extension
Hose
Wand
Holder
Release Lever
_-- Nozzle
Hose
Remove the lower end of the extension hose
from the wand holder by grasping the hose
collar, twistingF and pulling straight up,
Plug in the vacuum cleaner and turn it on.
Stretch the extension hose to maximum
length and then allow the hose to return to
its natural length,
I LL_'S_, _1 storage
'g; °,o°
Re-insert the hose into the opening on the
body from which it was removed. Press
firmly to assure connection. Rotate hose
release lever clockwise to the locked
position.
If the dust bag, filter areas and the hose
areas are free of clogs, disconnect the
nozzle hose from the wand holder and
check the nozzle for clogging.
_I_ WARNING
Personal Injury Hazard
DO NOT place hands or feet
underneath the vacuum cleaner at
any time.
Clean the agitator according to the
instructionsin the AGITATOR CLEANING
section see Page 18.
Return the vacuum cleaner to the upright
position before plugging into an electrical
outlet.
22
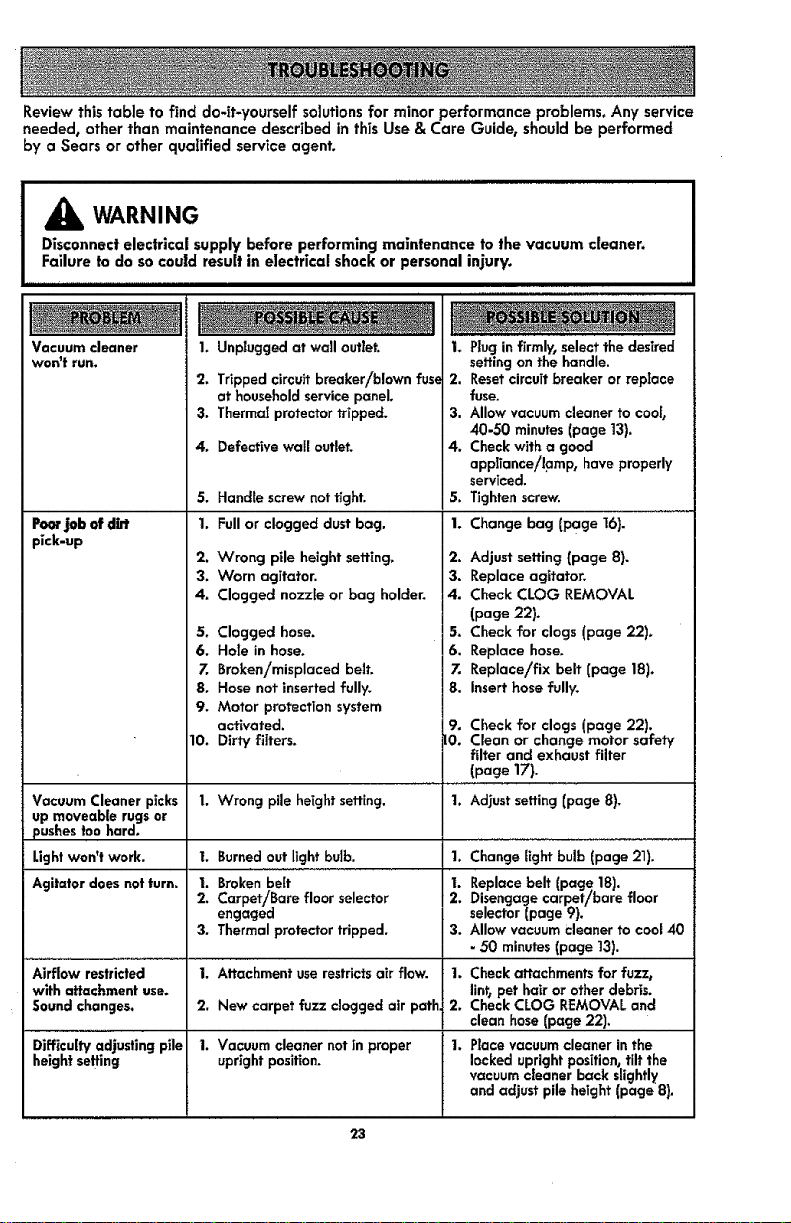
Review this table to find do-it-yourself solutionsfor minor performance problems. Any service
needed, other than maintenance described in this Use & Care Guide, should be performed
by a Sears or other qualified service agent.
WARNING
Disconnect electrical supply before performing maintenance to the vacuum cleaner,
Failure to do so could result in electrical shock or personal injury.
Vacuum cleaner
WOnlt run,
Poorjob of dirt
pick-up
Vacuum Cleanerpicks
up moveable rugsor
pushestoohard.
Lightwon't work,
Agitatordoes not turn.
Airflow restricted
with affachment use.
Sound changes.
Difficultyadjusting pile
heightsetting
1. Unplugged at wall outlet.
2.
3.
4.
S.
1.
2.
3.
4.
5.
6.
7.
8.
9.
Trippedcircuitbreaker/blown fuse 2.
at householdservicepanel,
Thermal protectortripped. 3,
Defective wall outlet. 4,
Handle screw nottight. 5.
Full or clogged dustbag. 1.
Wrong pile heightsetting, 2.
Worn agitator. 3.
Clogged nozzle or bag holder. 4.
Clogged hose. 5,
Hole in hose. 6,
Broken/misplaced be|t. 7.
Hose not insertedfully. 8.
Motor protection system
activated. 9,
Dirty fiiters, O.
Wrong pile heightsetting.
I. Burnedout lightbulb, 1.
I. Brokenbelt I.
2, Carpet/Bare floor selector 2,
engaged
3. Thermal protectortripped. 3.
1. Attachment userestricts aft flow.
2. New carpet fuzz cloggedair pathi
1, Vacuum cleaner notin proper
upright position.
10.
1.
1. Plug in firmly,selectthe desired
settingon the handle.
Resetcircuitbreaker or replace
fuse.
Allow vacuumcleaner to cool,
40-50 minutes (page 13).
Check witha good
appliance!lamp, have properly
serviced.
Tightenscrew.
Change bag (page 16).
Adjust setting (page 8).
RepJaceagitator.
Check CLOG REMOVAL
(page 22).
Check for clogs (page 22).
Replace hose.
Replace/fix belt (page 18).
Insert hose fully.
Check for clogs (page 22).
Clean or change motor safety
filter and exhaust filter
(page 17).
1. Adjustsetting(page 8).
Change light bulb (page 21).
Replacebelt (page 18).
Disengage carpet/bare floor
selector(page 9).
Allow vacuum Cleaner to cool 40
- 50 minutes (page 13).
1, Check attachmentsfor fuzz_
lint_pet hairor other debris.
2. Check CLOG REMOVALand
clean hose(page 22).
1, Placevacuumcleaner inthe
locked uprightposition,tilt the
vacuumcleaner back slightly
and adjustpile height(page 8).
23

24
Antes de usar su aspiradora nueva ....... ]
Garanffa de la aspiradora de Kenmore ... 2
lnstrucclones importantes de
segurldad ........................... 3
Piezas y caracteHsficasde aspiradora
vertical ...... _...................... 4
Instrucclones de ensamble ............ 5-6
Instrucciones de operaci6n ............. 6
Uberaci6n del cord6n el_ctrico ...... 6
DesprendJm[entodel mango .......... 7
Pulsadorde control ................. 7
Ajuste y selecci6n de nivel de pelo de la
alfombra ......................... 7
Selector de pisoscon a|fombra y sin
alfombra .......................... 8
Accesorios...................... 9-10
Cuadro de uso de los accesorios ...... 11
Sugerendas para aspirar ............ 11
Carecter_isticasde
rendimientoiseguridad ........... 12-13
Cuidado de la asplradora .............. 1,4
Alrnacenamiento de la aspiradora .... 14
Umpieza de| exterior y de los
accesorios ........................ 14
Cambio de la boisa para polvo ...... 15
Filtro de protecci6n al motor ......... 16
Filtro de escape .................... ]6
Cambio de la correa y
limpieza del agitador ............. 17-t9
Cambio de la bombilla ............. 20
C6mo eliminar losresiduos de basura
en los conductos ................... 21
Reconocimlento de problemas .......... 22
Notas ............................. 23
|nformaci6n de assistancia
o servicio ............... Pagina posterior
Porfavor lea esta gu|a que le ayudara a ensamblar y operar su aspiradora nueva de Kenmore
en una manera m6s segura y efectiva.
Para mas [nformaci6n acerca del cuidado y operaci6n de esta aspiradora, Ilame a la L[nea de
Ayuda de Aspiradoras ai 1-877-531-7321, Cuando pregunte por informaci6n usted necesitar6 el
nOmerocompleto de serie y modelo de la aspiradora que est6 Iocalizado en la plata de los
n_merosde modelo y serie.
Use el espacio de abajo para registrar el n_mero de modelo y serie para su nueva aspiradora de
Kenmore. ,-
N_mero de Modelo
N_mero de Serie
Fecha de Compra
Mantenga estelibro y su recibo en un lugar seguro para futuras referencias,
l LISTA DE EMBALAJE ]
Su ASPIRADOItA KENMOI_E se empaca con las siguientespiezas y componentes por
separado:
1Aspiradora vertical 1Pet Handi Mate TM
1Mango 1Tubotelesc6pico
1Cepilto para comblnaci6n 1Manual de UsaY Cuidado
1 Herramienta para hendlduras 1 Listade partes y servicio
Cada uno de estosensamb|es es mostrado detatladamente en la ITstade pTezaspara reparaci6n,
Garant[alimitadadeI(enmore
DURANTEunafioapartirdelafechadecompraesteaparatoest6garantizado contra
defectos de mater[ales o mano de obra cuando se es instalado correctamente, operado
y mantenido segOn las instruccTonessuministradas.
CON LA PRUEBA DE COMPRA, el aparato defectuoso ser6 remplazado sin costa.
Para los detalles de la cobertura de garanffa0 para obtener la reparaci6n o reemplazo
gratuito, visite la p6gina web: www.kenmore.com!warranty.
Esta garanffa no cubre filtros_ correas, bolsas, o focos, los cuales son partes gastables
las cuales se deterioran con el uso normal en el periodo de garanffa.
Esta garanffa queda anulada si este producto se utiliza para otros prop6sltos que no
sean de uso dom_sticos.
Esta garantla le otorga derechos legales especfficos, y usted podria tenet otros
derechos que varfan en funci6n de cada estado.
Sears Brands Management Corporation, Hoffman Estates, IL 60179
z
J kADVERTENCIA
iiiiiiiiiiiiiii
Susegurldadesmuy importantepare nosotros.Para
reducir elrlesgode incendio,choqueel_--trico,iesi6n
corporalo dafiosel utilizarsuaspimdora,ad_ de acuerdo
conprecaucionesi_sicas deseguridad,entreelias:
Lea todas las instruccionesen este manual
antes de armar o usarsu aspiradora.
Use soaspiradora solamente coma se
describe en este manual. Use solamente
can losaccesorios Sears recomendados.
Desconecte la fuente de electricldad antes
de hacer e| servicio o limpiar el 6rea del
cepillo. La fal?a de hacer esto puede
resultar en choque el_ctrico o en el s6bito
arranque del cepfflo.
No deje la asptradora cuando est6
enchufada. Desenchufedel tomacorriente
cuando no est6 en usay antes de hacer el
servicio.
Para reduclr el riesgo de choque el_ctrica
- No la use afuera o sabre superficies
mojadas.
No permiia que se la use coma un
juguete, Gran atenci6n es necesaria
cuando es usada par o cerca de n|_as.
No la use con uncord6n o clavUa
dafiados. Si la aspiradora no est6
trabajando coma debe, se la ha dejado
caer, dafiado, dejada afuera, o volteada
en el agua, ret6rnela a un Centro de
Servicia Sears.
No la tire o arrastre del cordbn_ use el
cord6n coma una manijat cierre una
puerta sabre e! cord6n, o fire del cord6n
alrededor de bordes afilados o esquTnas.
No pase la aspiradora sabre el cord6n.
Mantenga el cord6n lejos de superficies
caffentes.
No desenchufe firando del cordbn, Para
desenchufar, tome la clavija, no el cord6n.
No tome la clavija o la aspiradora con las
manos mojadas.
No ponga ningOn objeto en las aberturas.
No {a use con ninguna abertura
bloqueada; mant_ngala liE)re de polvo,
hilachas, pelo, y cualquier cosa que
pueda redudr la circulaci6n del abe.
Mantenga los cabellos, ropas sueltas,
dedost y todas las partes del cuerpo lejos
de aberturas y partes movibles.
Apague todos los contrales antes de
desenchufar.
Use cuidado extra cuando limpie
escaleras. No la ponga sabre sillas,
mesas,etc. Mant6ngala sabre el piso.
No usela aspiradora para levantar
Ifquidosinflamables o combustibles
(gasolina_fluido de Iimpiar,perfumest
etc.)_o la useen 6reas donde puedan
estar presentes.Losvapores de estas
substanciaspueden crear un pel[gro de
incendloo explosi6n.
No levante nada que est_ ardiendo o
echando humo,tal coma cigarrilios,
f6sforos, o cenizas calientes.
No usela aspiradora sin la balsa de polvo
Yio filtros en su lugar.
Siempre cambie la balsa de padre
despu_s de limplar la alfombra,
[impiadoreso refrescantes, polvos, y po[vo
fino. Estosproductos obstruyenlos filtros,
reducen la circulacI6n del aire y pueden
causar dafio a la aspiradom. La falla en
cambiar la balsa de polvo puede causar
dafio permanente a la aspiradora.
No use la asplradora para levantar
objetos duros afilados, pequefiosJuguetes_
alfileres, sujetapapeles, etc. Eliaspueden
dafiar la aspiradora o |a balsa de polvo.
Desenchufe antes de conectar el Pet
Handi Mate TM
Usted es responsable de estar seguro de
que suasp[radora no es usada par
alguien incapaz de operaria
correctamente.
GUARDEESTASINSTRUCCIONES
Elarmaday usasegurode suaspiradorasonsuresponsabilidad.Estaaspiradoraha sidodise_ada
exclusivamentepara usedom_stico.Laasp[radoradeber6almacenarseenun lugarseooyen el interior.
LeaesteManual del propietariodetenidamente,puesconfieneinformaci6nimportantesabreseguridady
usa.Estagulaconfiene informaci6nsabresegurldaddebajo desimbolosde adverfiencta o cuidado.
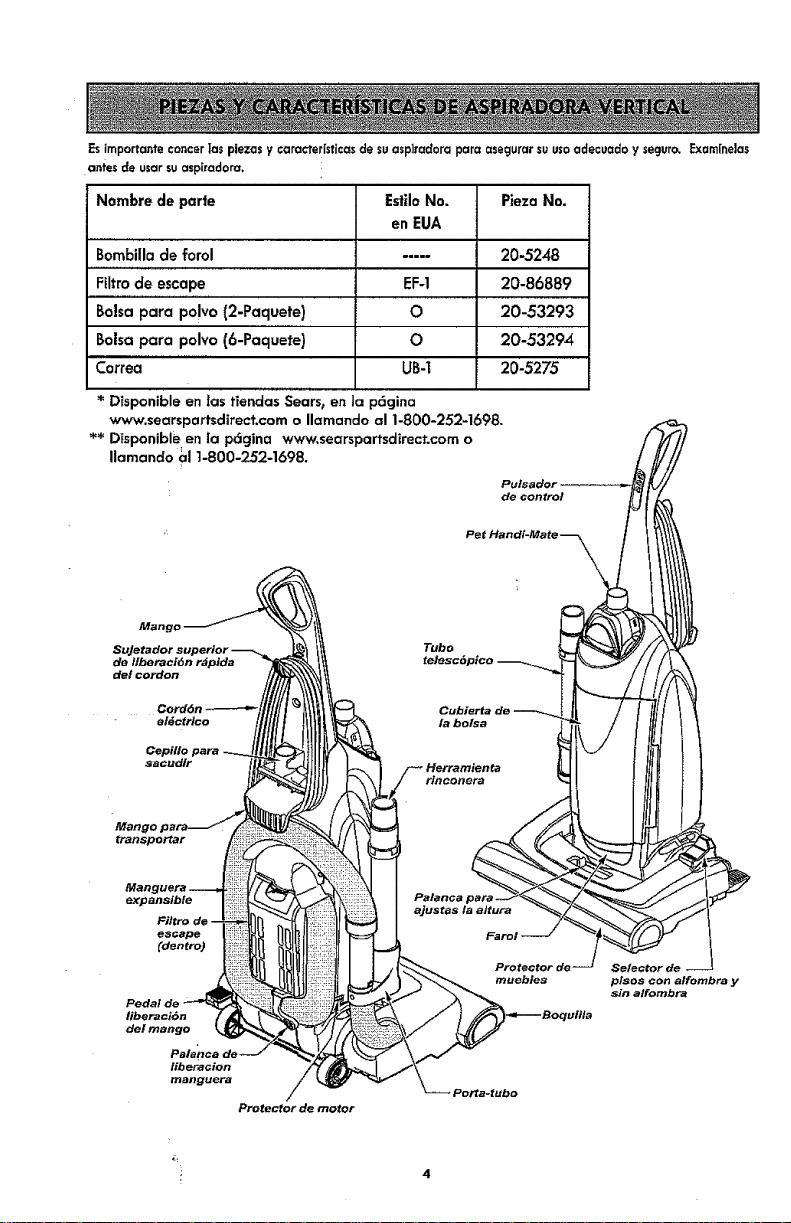
Es importante ¢oncer ]as piezas y caracterfsticas de su aspiraclora pare czsegurar su uso aclecuacfo y seguro. Examfne]as
antes de usar su aspiradora,
Nombre de parle EstiloNo. Pieza No.
en EUA
Bombilla de forol ..... 20-5248
Filtro de escape EF-1 20-86889
Bolsapara po!vo(2-Paquete) O 20-53293
Boise pare polvo (6-Paquete) O 20-53294
Correa UB-i 20-5275
* Disponible en [as tiendas Searst en ]a p6gina
www.searspartsdirect.com o Ilamando al 1-800-252-1698.
** Disponible,en la p6gina www,searspartsdirect.como /_[7/
,,°mondo,,t-,00-_2-1o,,. /_//ii
Pulsa dor __ _.//
.°o°.o,
{ Pet Handi-Me te _i_._111
SuJetedor superior _ _ _ _ I/
de Ilberacl6n rdplda telesc@ico --_ T_-_'% _ / / / _ \
Cord6n _ Cubierta de ___ _ I1 / I Ill / I I
- el6ctrico /a boise -T_ i I Itf I i t
oo.,,,o.°.o 1 t /1
s=,.,,sir ,- _<'_"der[te LJI i I! t
Manguera -
expansible Patance para--_ _/_ _ _/'/
Protector de Selector de --
rnuebles
p/sos con alfombra y
sin alfornbra
liberaci6n
del mango
Protector de motor
: 4
i iiii iiii ii1,11iiii1,111 iiiiii i iiiiiiiiiiiiiiiiiiii
Porfavor ponga atenci6n especial a estas tnstrucciones dadas. Advertencla: Este
informaci6n le alertar6 de peligro de fuego, chequeselectricos,quemadas y lesiones.
Cuidado: Esteinformaei6n le alertara de peligroscoma lesionesy dafios de
propiedad.
III I III II IIIIIIIIIIIIII IIIIIIIIIIIIIIIIIIIIIIIIIII
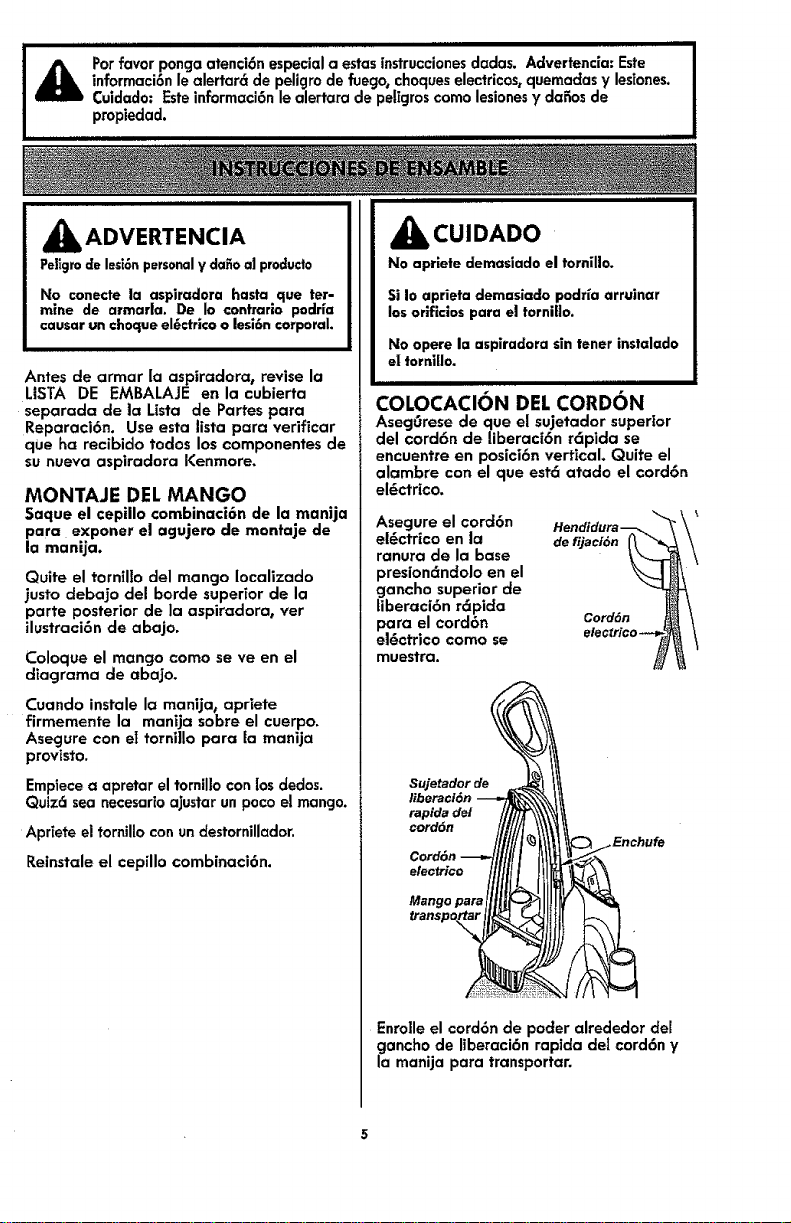
_IbADVERTENCIA
Pe]igrode lesi6npersonaly dafioal producto
No conecte la aspiradora hasta que ter-
mine de armarla. De Io €ontrarlo podrla
causar un choque el6ctrlcoo lesi6ncorporal.
Antes de armar la aspiradora, revise la
LISTA DE EMBALAJE en la cubierta
separada de la Lista de Partes para
Reparaci6n. Use esta lista pare verificar
que ha recibido todos los componentes de
su nueva aspiradora Kenmore.
MONTAJE DEL MANGO
5aque el cepillo combinaci6n de la manlja
para exponer el agujero de montaje de
la manija.
Quite el tornillo del mango Iocalizado
justo debajo del borde superior de la
parte posterior de la aspiradora0 ver
ilustraci6n de abajo.
Coloque el mango coma seve en el
diagrama de abajo.
Cuando instale la manija, apriete
firmemente la manija sabre el cuerpo.
Asegure con e! torni]lo para la manija
provisto.
Emplecea apretar el tornillo con ios dedos.
Quiz6 sea necesarioajustar unpace el mango.
Apriete el torniUo con un destornillador,
Reinstale el cepillo combinaci6n.
ii, iiii
_kCUIDADO
No apriete demasiado el tornillo.
Si Io aprieta demasi_,do podrfa arruinar
los orlficios para el tornillo.
No opere la aspiradora sin toner instalado
e| tornillo.
IH i
COLOCACION DEL CORDON
AsegOrese de que el sujetador superior
del cord6n de liberaci6n r6pida se
encuentre en posici6n vertical. Quite el
alambre con el que est6 atado el cord6n
el_ctrico.
Asegure el cord6n
e|_ctrico en la
ranura de la base
)resion8ndolo en el
gancho superior de
liberaci6n r6pida
_ara el cord6n
el_ctrico coma se
muestra.
de fijaci6n
Cord6n
Sujetadorde_
liberaci6n-_7_
rapidadel //[_
Co_d6.---_11/!!1Ilt
electrice IlIItlLilt
_anspo__
Enrolle el cord6n de poder alrededor del
gancho de liberaci6n rapida del cord6n y
la manija para transportar.
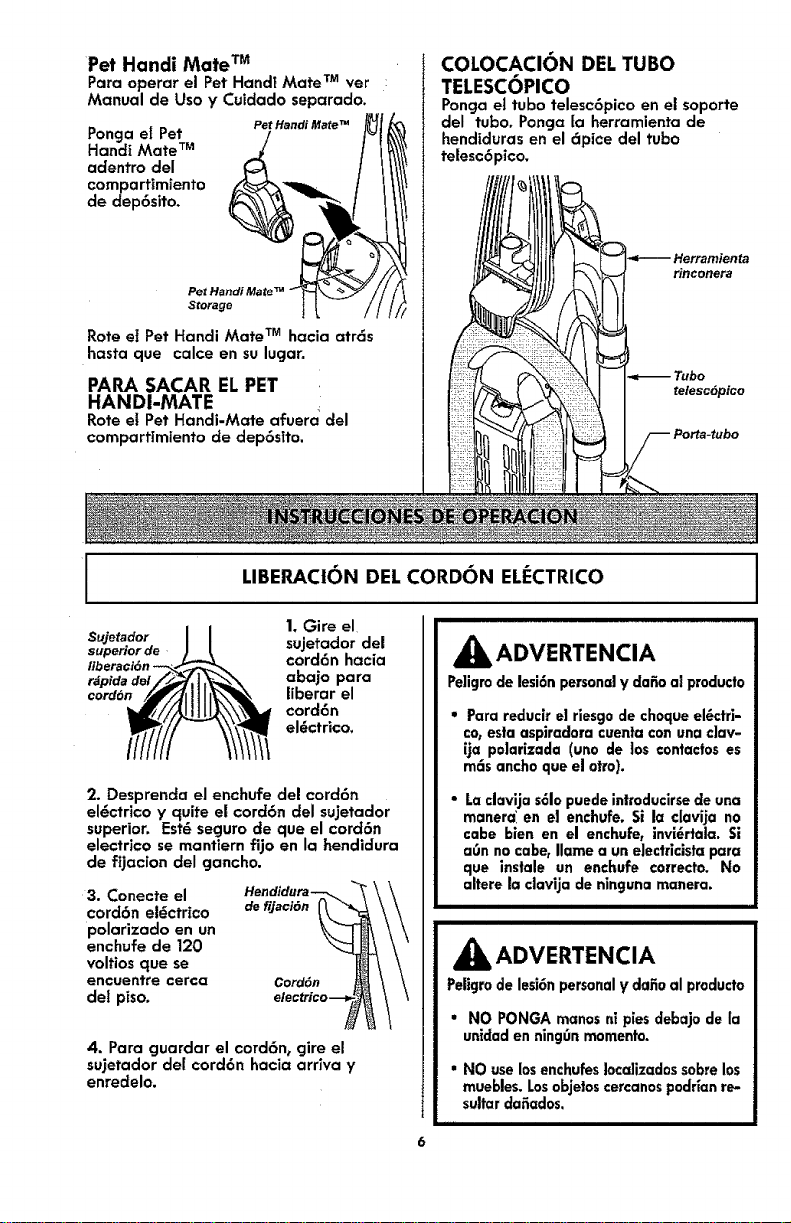
Pet Handi Mate TM
Para operar el Pet Hand! Mate TMvet
Manual de Uso y Cuidado separado.
Ponga el Pet
Handi Mate TM
adentro del
compartimiento
de dep6sito.
Pet Handi Mate _
Pet Handi Mate _
Storage
Rote el Pet Handi Mate TM hacia atr6s
hasta que calce en su lugar.
PARA SACAR EL PET
HANDI-MATE
Roteel Pet Handi-Mate afuera_del
comparttmientode dep6sffo.
COLOCACION DEL TUBO
TELESCOPICO
Ponga et tubo telesc6pico en el soporte
del tubo. Ponga ta herramienta de
hendiduras en el dpice del tubo
telesc6p_co.
rinconera
telesc6pico
I
LIBERACI()N DEL CORDON ELECTRICO
Sujetador
superior de
r_pida
cord6n
1. Gire el
sujetador del
cord6n hacia
abajo para
liberor el
cord6n
el6ctrico.
2. Desprenda el enchufe del cord6n
el_ctrico y quite el cord6n del sujetador
superior. Est_ seguro de que el cord6n
electrico se mantiern fijo en la hendidura
de fijacion del gancho.
3. Conecte el
cord6n el_ctrico defijaci6n
polarizado en un
enchufe de 120
voltios que se
encuentre cerca Cord6n
de! piso.
4. Para guardar el cord6n, gire el
su]etador del cord6n hacia arriva y
enredelo.
_IbADVERTENCIA
Peligrode lesi6n personaly clafioal producto
Para reduclr el riesgo de choque el_ctri-
co, esta aspiradora cuenta con una ciav-
ija polarizada (uno de los contactos es
m6s ancho que el otto).
La clavija s61opuede introducirsede una
manet= en et enchufe. Si la davija no
cabe bien en el enchuFe, invi_rtala. Si
a0n no cabe, Ilame a un electricista para
que instale un enchufe correcto. No
altere la clavija de ninguna manera.
_k ADVERTENCIA
Peligrode lesi6npersonaly dafioal producto
* NO PONGA manos ni pies debajo de la
unlcladen ning_nmomento.
* NO use InsenchufesIocalizadossobrelos
muebles. Losobjetoscercanospodrtan re-
sultar da_ados,
I
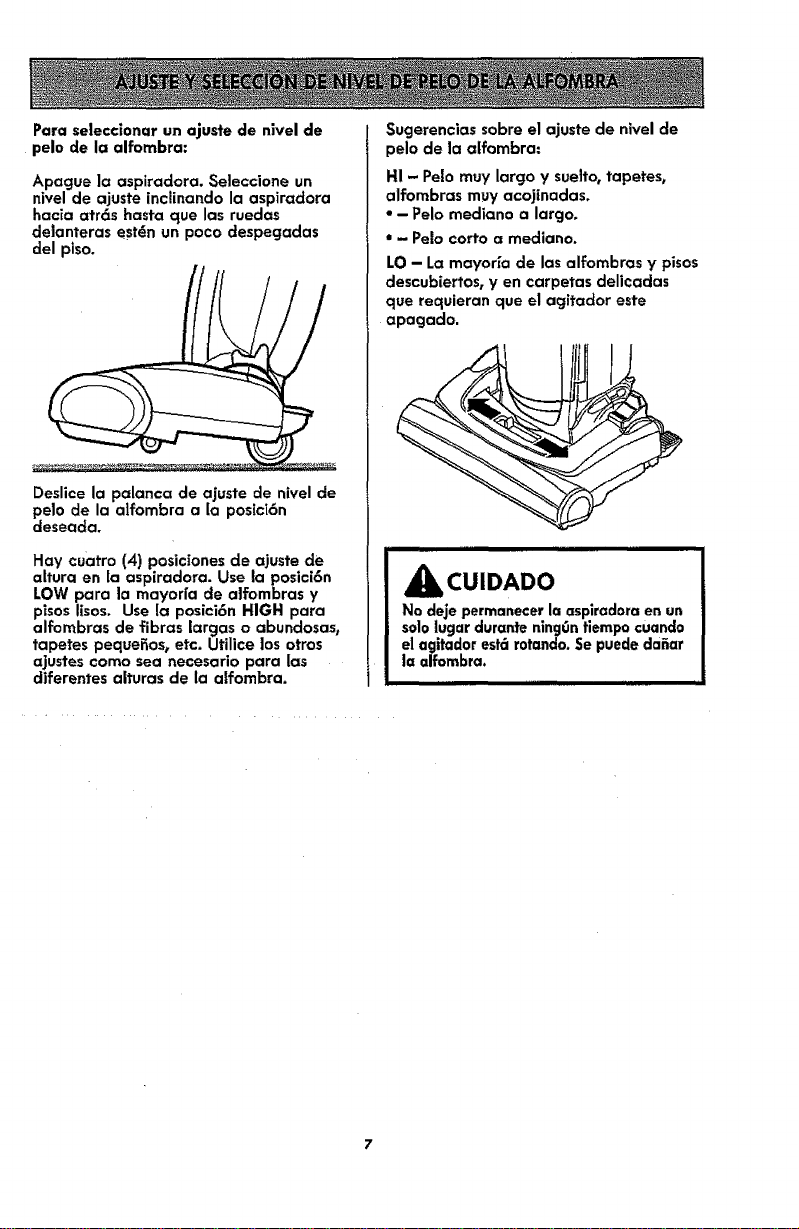
Para seleccionar un ajuste de nivel de
pelo de la alfombra:
Apague la aspiradora. $eleccione un
nivel de ajuste inclinando la aspiradora
hac_a atr6s hasta que las ruedas
delanteras est_n un poco despegadas
del piso.
Deslice la palanca de ajuste de nivel de
pelo de la alfoml0ra a la posici6n
deseada.
Hay cuatro (4) posiciones de ajuste de
ahura en [a aspiradora. Use la posici6n
LOW para la mayarfa de alfombras y
pisos lisos. Use [a posici6n HIGH para
alfombras de fibras [argas o abundosas,
tapetes pequefios, etc. Utilice los otros
ajustes como sea necesario para las
diferentes alturas de la alfombra.
$ugerenciassobreel ajustede nivel de
pelo de la aifombra:
HI - Pelo muy largo y sueho, tapetes,
alfombras muy acojinadas.
• - Pelo mediano a largo.
• - Pe[o corto a mediano.
LO - La mayor[a de las alfombras y pisos
descutoiertos, yen carpetas delicadas
que requieran que el agitador este
apagado.
_CUIDADO
No deje permanecer la aspiradora en un
solo lugar durante ning6n tiempo cuando
el agitador est6 rotando. Se puede dafiar
ta alfombra.
i HH,,,,,,,,,,, i,
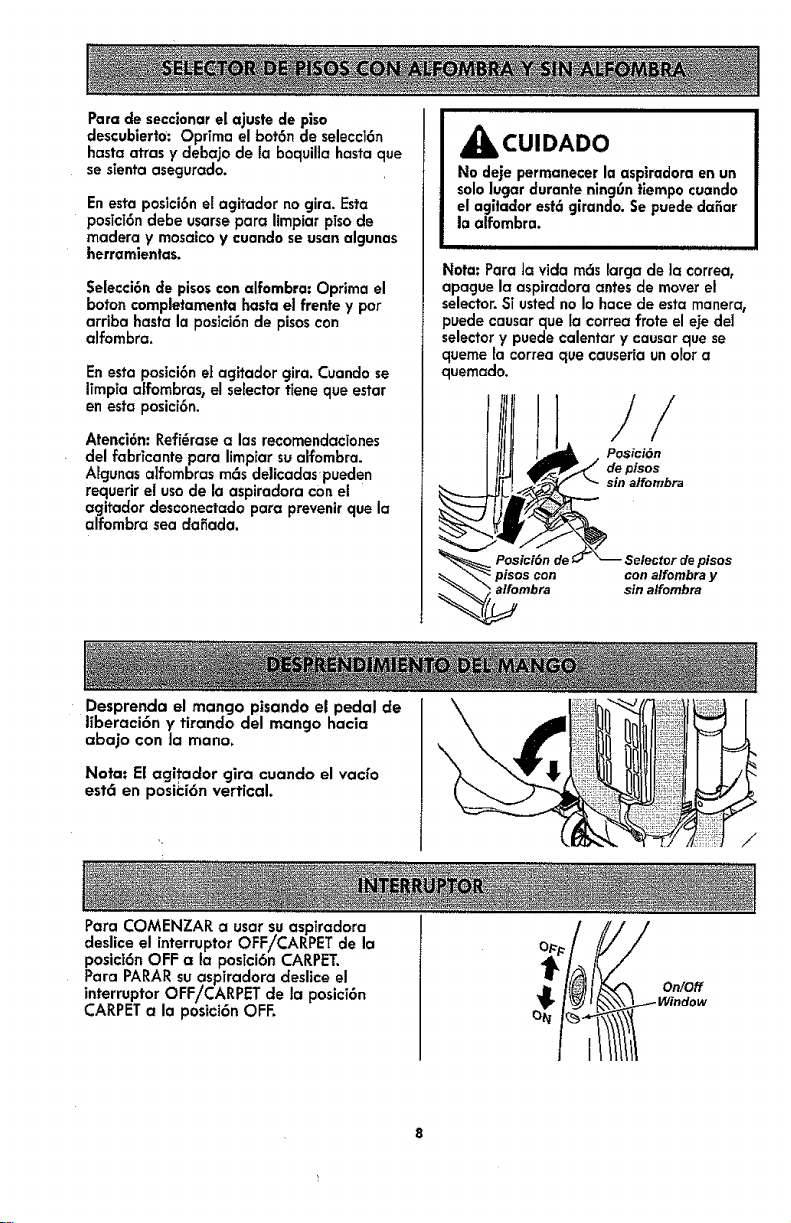
Pare de seccionar el ajuste de piso
descublerto: Opdma el bot6n de selecci6n
haste atras y debajo de la boquil]a hasta que
se sTentaasegurado.
En esta posici6n el agitador no gira. Esta
posici6n debe usarse pare limpiar piso de
madera y mosaico y cuando seusen algunas
herramientas.
Selecci6n de pisos conelfombra: Optima el
baton ¢ompletamenta haste et frente y par
arriba haste la postci6nde pisoscon
alfombra.
En esta posici6n et agitador gira. Cuando se
I[mpia alfombras, el selector tiene que estar
en esta posici6no
Atenci6n: Refi_rase alas recomendaciones
del fabrTcantepara limpiar su alfombra.
Algunas alfombras m6s delicadaspueden
requerir ei usa de la aspiradora con el
agitador desconectado pare prevenir que la
alfombra sea dafiada.
Desprenda el mango pisando et pedal de
tiberaci6n y tirando del mango hacia
_IbCUIDADO
No deje permanecer la aspiradora en un
solo lugar durante nlng0n tlempo cuando
el agitador est¢igirando. Se puecledafiar
la alfombra.
Note: Para Ja vida mcls large de la correa,
apague la aspiradora antes de mover el
selector.STusted no Io hace de esta manera,
puede causar que Eacorrea frote el eje de1
selectory puede calentar y causer que se
queme _acorrea que causeria un olaf a
quemado.
/
Posici6n
depisos
sina/fombra
alfombra
pisos
con alfombra y
sin alfombra
abajo con la mano.
Note, EEagitador gira cuando el vacua
est6 en posi_:i6n vertical.
\
Para COMENZAR a usar su aspiradora
deslice el interruptor OFF/CARPET de la
posici6n OFF ala posTci6n CARPET.
Para PARAR su aspiradora deslice el
interruptor OFF/CARPET de la posicT6n
CARPETala posici6n OFF.
CepiftopQra
sacudlr
Mangu
Cuello
manguera
Tubo
liberaci6n
ma_guercl
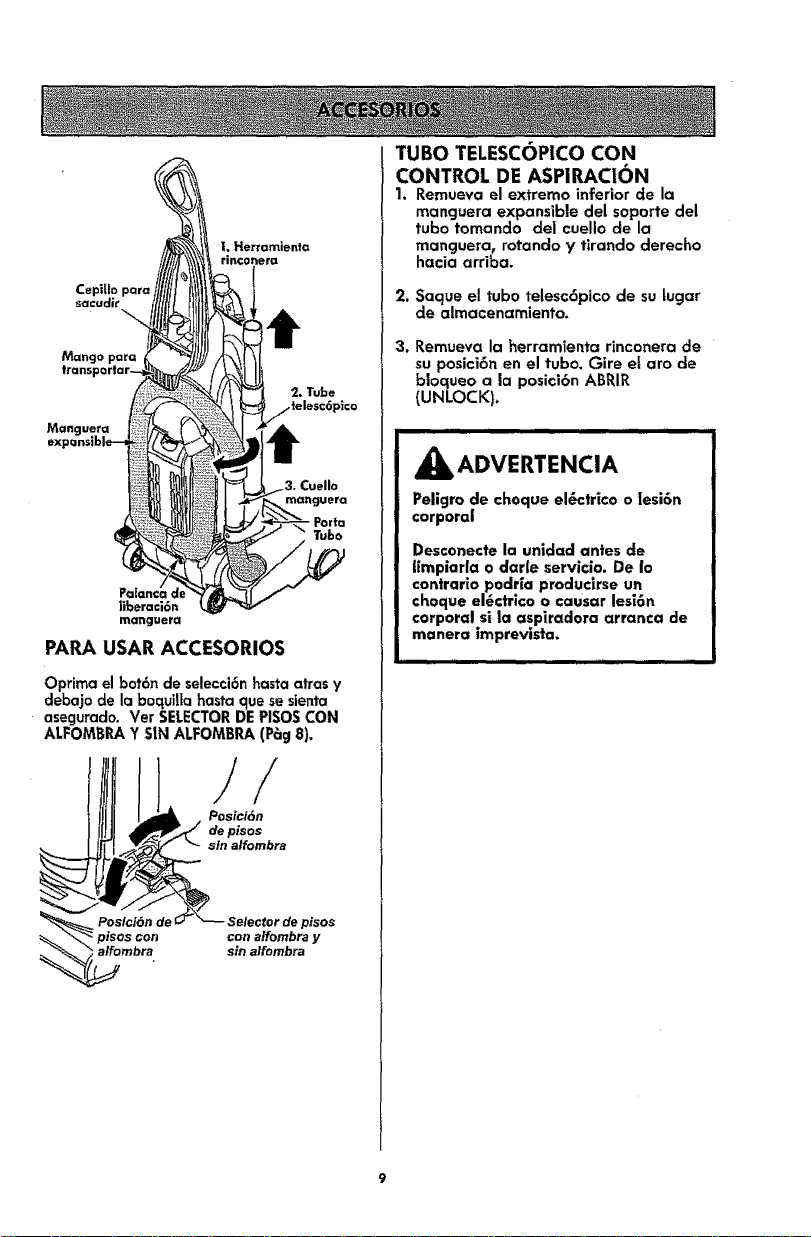
PAPA USAR ACCESORIOS
Optima el bot6n de selecci6n basra atras y
deba.io de la boquilla hasta que se sienta
asegurado. Ver SELECTORDE PISOS CON
ALFOMBRA Y S1NALFOMBRA (P_g 8).
/
Posi¢i6n
depisos
sin alfombra
:alfombra
pisos
con alfombra y
sin alfombra
TUBO TELESCOPICO CON
CONTROL DE ASPIRAC|ON
1. Remueva el extremo inferior de la
manguera expansible del soporte del
tubo tomando del cuello de la
manguera, rotando y tirando derecho
hacia arriba.
2, Saque el tubo telesc6pico de su lugar
de almacenamiento.
3. Remueva la herramienta rinconera de
su posici6n en el tubo. Gire el aro de
bloqueo a la posici6n ABRIR
(UNLOCK).
AADVERTENCIA
Peligro de cheque el_ctrico o lesi6n
corporal
Desconecte la unidad antes de
Iimplarla o darle servicio. De Io
contrario podria producirse un
choque el6ctrico o causar lesE6n
corporal si la aspiradora arranca de
manera |mprevista.
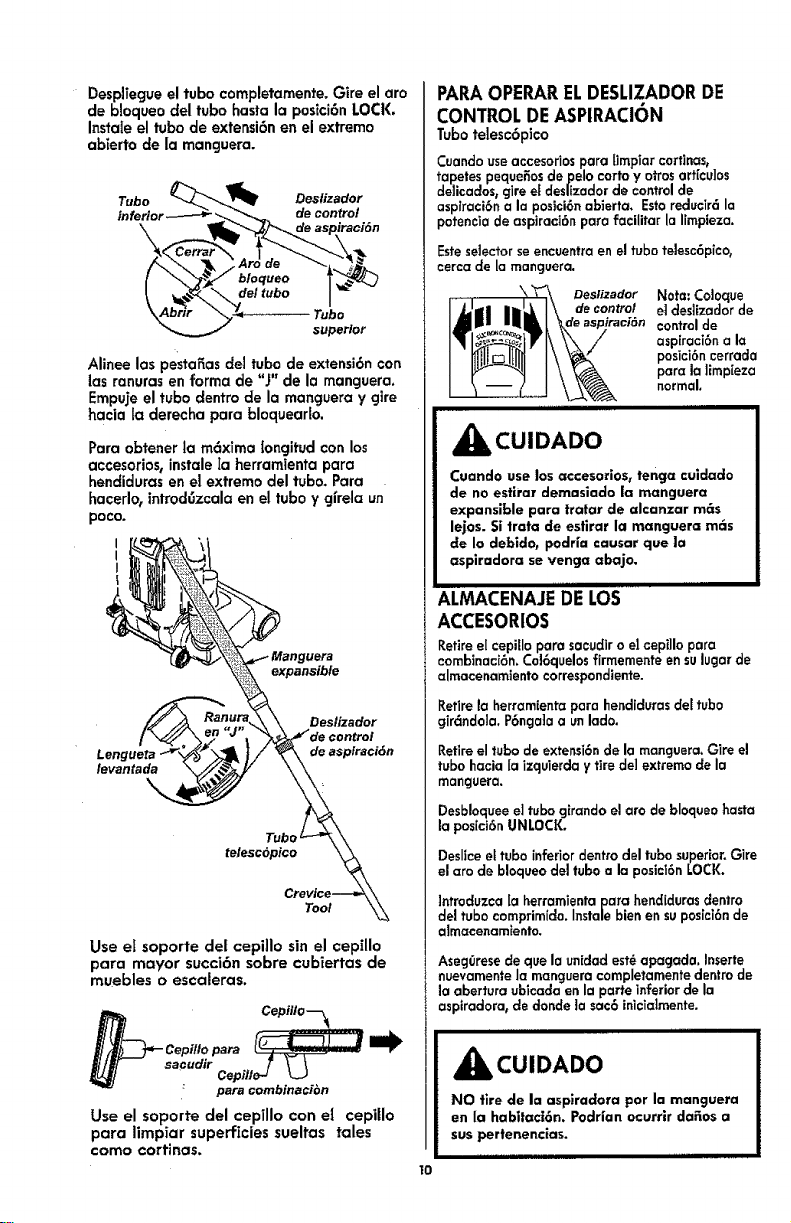
Desp]iegueeltubocompletamente.Gire el aro
de bioqueo del tubo hasta la posici6nLOCK.
InstaIe el tubo de extensi6n en el extremo
abierto de la manguera.
galor
Alinee las pesta_as del tubo de extensi6n con
las ranuras en forma de "J" de la manguera.
Empuje el tubo dentro de la manguera y gire
hacia ta derecha para bloqueado.
Para obtener la m6xima longitud conlos
accesorios, instale Ia herramienta para
hendiduras en el extremo del tubo. Para
hacerlo, introd6zcala en el tubo y glrela un
poco.
I
I
I
levantada
Oeslizador
de asptraci6n
telesc6pico
Tool
Use el soporte det cepillo sin el cepillo
para mayor succi6n sobre cubiertas de
muebles o escaleras.
Cepillopara _
sacudir }' V \
Cepillo_ _J
: para combinaci_n
Use el soporte del cepillo con e{ cepillo
para limpiar superficies sueltas tales
como cortinas.
PARAOPERARELDESLIZADORDE
CONTROLDEASPIRACI6N
Tubotelesc6pico
Cuandouseaccesoriospara timpiar cortinas,
tapetespeque_osdepelo cortoy otrosart[cubs
ddicados,gired deslizadorde controlde
asptraci6na laposici6nabierto. Estoreducir6la
potenciade aspiraci6nparafacilitarla llmpleza.
Este se3ector se encuentra en el tubo tdesc6pico,
cerca de Ja manguera.
Deslizador
de control
Nora:Coloque
etdeslizadorde
controlde
aspiraci6na la
posici6ncerrada
parola limpleza
normal.
_CUIDADO
Cuando use los accesorlos_ tenga culdado
de no estlrar demasiado la manguera
expansible para tratar de =lcanzar m_s
lejos. $i trata de esfirar la manguera mcls
de Io debldo, podrla causar que lo
asplradora se venga abajo,
ALMACENAJEDELOS
ACCESORIOS
Retireelcepilloparosacudiro elcepi]lopara
combinaci6n+Cd6quelosfirmementeen sulugarde
almacenamiento correspondiente.
Retirela herramientaparahendidurasdel tubo
gir6ndola.P6nga]aa unlado.
Retireeltubo de extensi6nde la manguera.Gireel
tubohaciaIa izquierdaytire delextremode la
manguera.
Desbloqueeeltubogirandoelarode bloqueobasra
laposici6n UNLOCK.
Desliceettubo inferiordentrodeltubosuperior.Gire
el oro de bloqueodeltuboa la posict6nLOCK.
tntroduzcala herramlenta para hendidurasdentro
dd tubo comprimido.Instalebienensuposici6nde
almaeenamlento.
Aseg0resede quelaunidadest_apagada. Inserte
nuevamenteia mangueracompletamentedentrode
la aberturaubicadaenla porteinferior de la
aspiradora,dedondela sac6 inicia]mente.
II IIIIIII
4_kCUIDADO
NO fire de la asplradora por la manguera
en la habi|aci6n. Podrlan ocurrir da_os a
suspertenencias.
I IIIII
1o
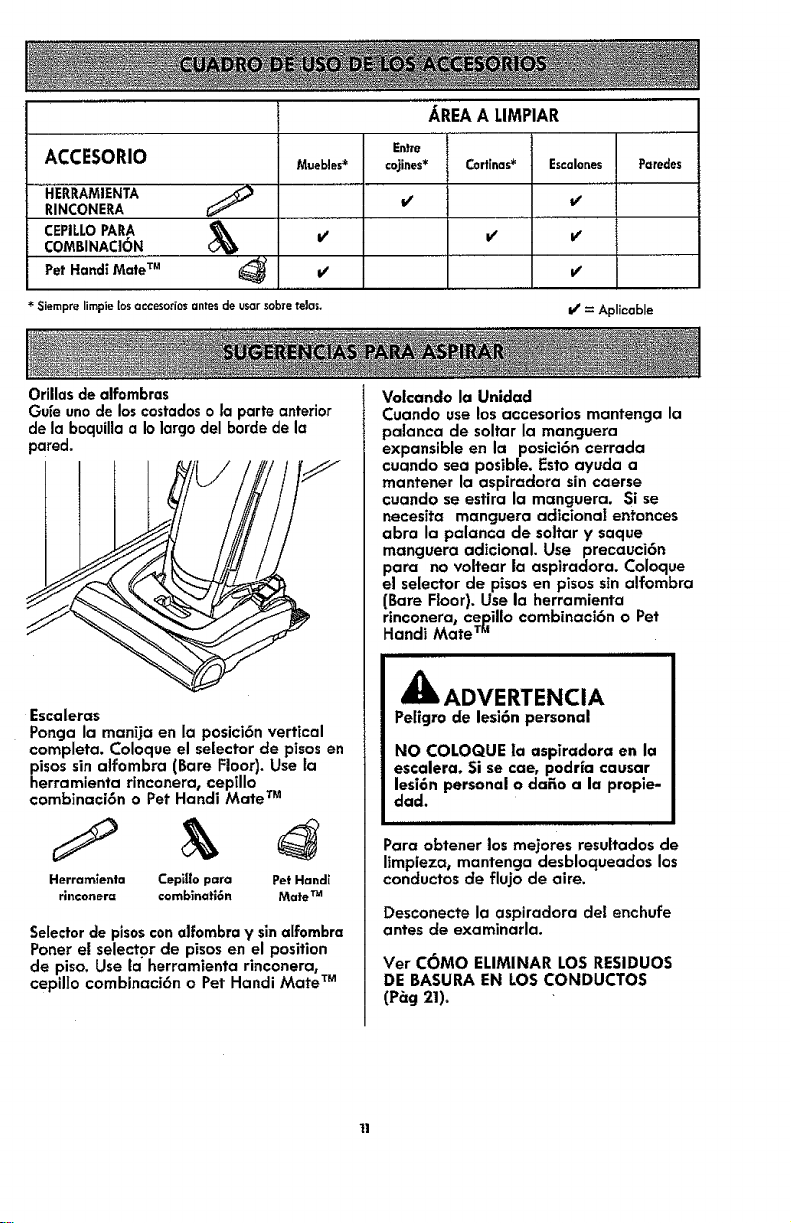
ACCESORIO
..........HERRAMIENTA
RINCONERA
CEPILLOPARA
COMBINACI(_N
Pet Hand_MateTM
Muebles*
AREA A LIMPIAR
Entre
€ojines*
Cortinas*
Escalones
* Siempre limple los accesodos antes de usar sabre telas,
v'
If
=/
= Aplicable
_cti'e_es
Orillasdealfombras
Gufeunode loscostadoso |a parteanterior
de la boquillaa Iolargodel hordede la
pared.
Escaleras
Ponga la manija en la posici6n vertical
completa. Coloque el selector de pisos en
pisos sin alfombra (Bare Floor). Use la
herramienta rinconera, cepillo
combinaci6n o Pet Handi Mate TM
Herramlent= Cepiffo para Pet Handl
rln¢onera €ombinati6n Mate TM
Selectorde pisoscon alfombra y sin alfombra
Poner el selector de pisos en el position
de piso. Use la herramienta rinconera,
cepillo combinaci6n o Pet Hand| Mate TM
Volcando la Unidad
Cuando use los accesorios mantenga la
palanca de soltar la manguera
expansible en la posici6n cerrada
cuando sea posible. Esto ayuda a
mantener la asp[raclora sin caerse
cuando se estira la manguera. Si se
necesita manguera adlcional entonces
abra la palanca de soltar y saque
manguera adicionaL Use precauci6n
para no voitear |a aspiradora. Coloque
el selector de pisos en pisos sin alfombra
(Bare Floor). Use la herramienta
rinconera, cepillo combinacibn o Pet
Handi Mate TM
& ADVERTENCIA
Peligro de lesi6n personal
NO COLOQUE ]a aspiradora en la
escalera. Si se cae, podHa causar
lesi6n personal o daEo a la propie-
dad.
Para obtener los me]ores resu|tados de
limpieza, mantencja desbloqueados los
conductos de flujo de aire.
Desconecte la aspiradora del enchufe
antes de examinarla.
Ver COMOELIMINAR LOS RESIDUOS
DE BASURA EN LOS CONDUCTOS
(P_'g 21).
CARACTERJSTICAS DE RENDIMIENTO/SEGURIDAD I
SISTEMA DE PROTECTION
DE MOTOR
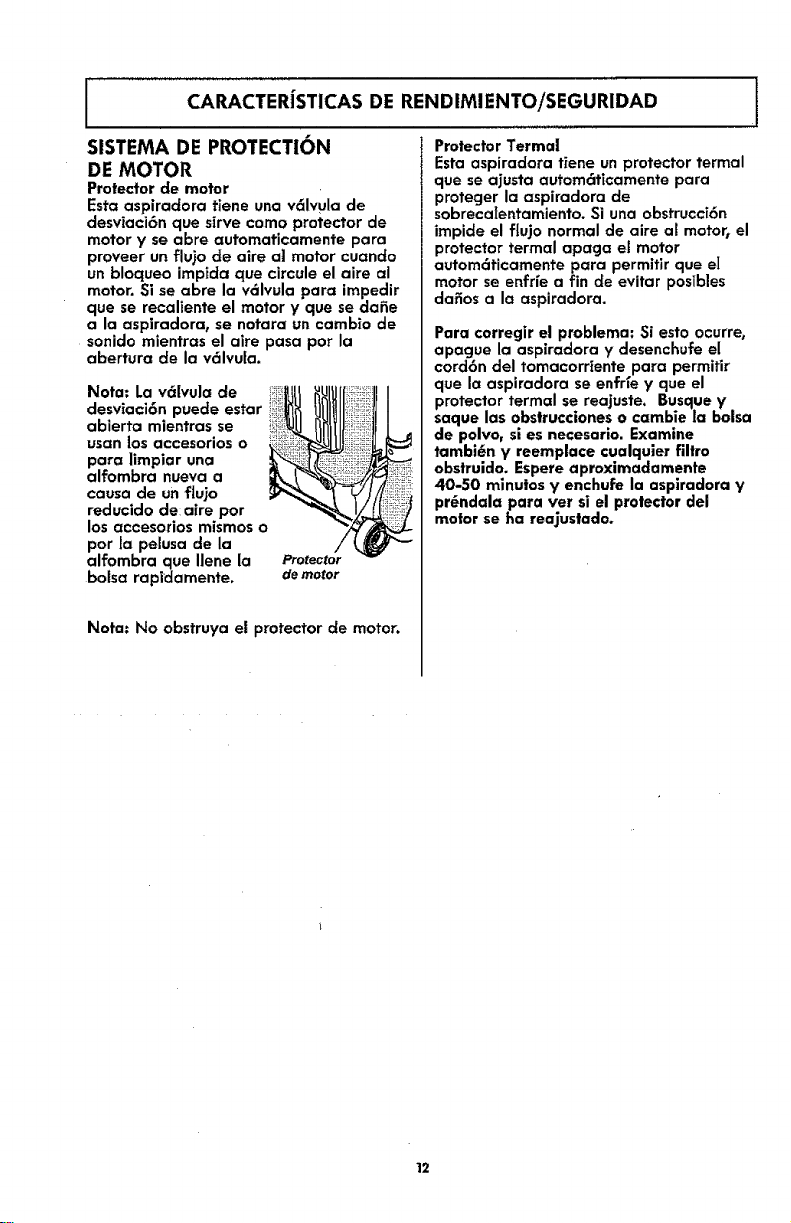
Protector de motor
Esta aspiradora fiene una v61vula de
desviaci6n que sirve como protector de
motor y se abre automaficamente para
proveer un flu_o de aire al motor cuando
un bloqueo impida que circule el aire ai
motor. Si se abre la v_Ivula para impedir
que se recaliente el motor y que se dafie
a {a aspiradora, se notara un carabao de
sonido mientras el aire pasa pot la
abertura de la v61vu{a.
Nota= La v6{vula de
desviaci6n puede estar
abierta mientras se
usan los accesorios o
para limpiar una
aifombra nueva a
causa de un flujo
reducido de: aire por
los accesorios mismos o
por ta pelusa de la
alfombra que llene {a
bolsa rapidamente.
Protector
de motor
Nora: No obstruya el protector de motor.
Protector Terma|
Esta aspiradora tiene un protector termal
que se ajusta autom6ticamente para
proteger la aspiradora de
sobrecatentamiento. Si una obstrucci6n
impide el flujo normal de aire al motor, el
protector termal apaga el motor
autom6ticamente para permifir que e]
motor se enfrie a fin de evitar posibles
dafios a la aspiradora.
Para corregir el problema: Si esto ocurre,
apague la aspiradora y desenchufe el
cord6n del tomacorriente para permitir
que la aspiradora se enfrfe y que el
protector termal se reajuste. Busque y
saque las obstrucciones o cambie |a boisa
de polvo, si es necesario. Examine
tambi_n y reemplace cualquier filtro
obstruido. Espere aproximadamente
40-50 minutos y enchufe la asplradora ¥
pr6ndala para vet si el protector del
motor se ha reajustado°
12
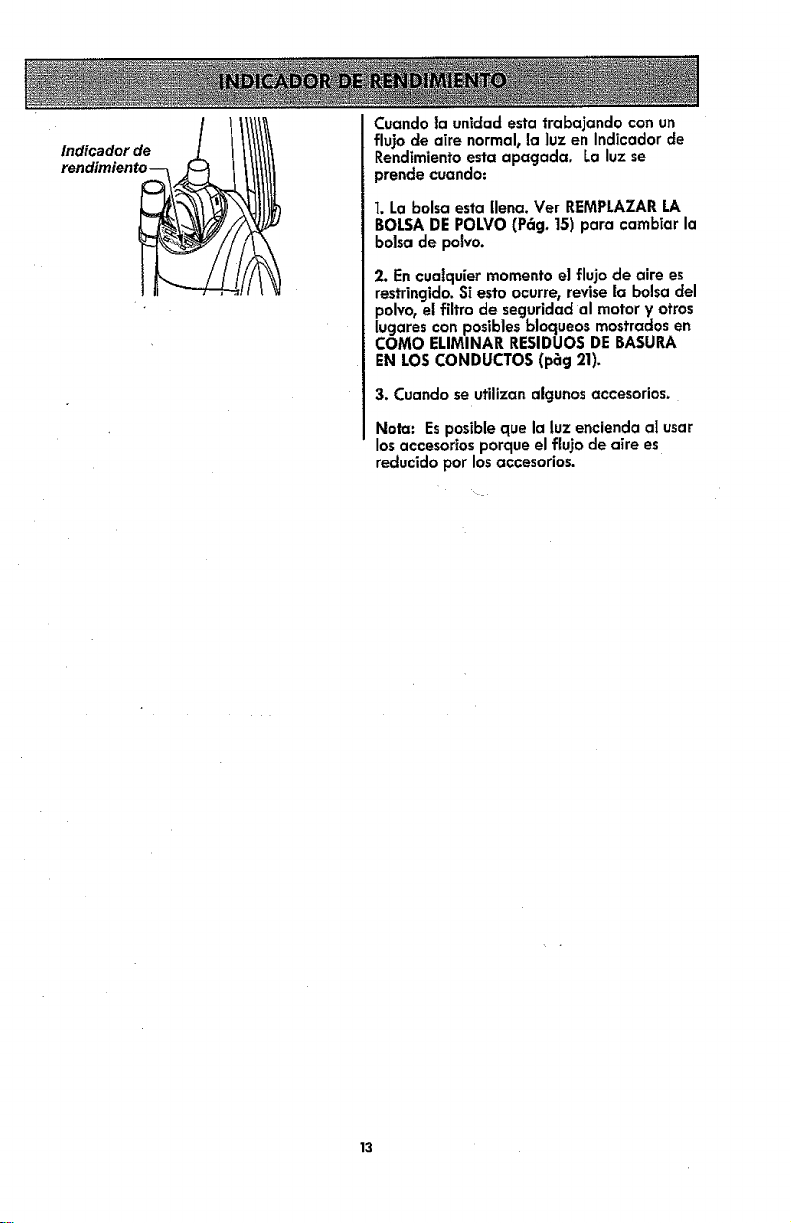
lndicador de
rend[mien[o--
Cuando ta unidad esta trabajando con un
flujo de aire normal, la luz en Indicador de
Rendimiento esta apagada, La luz se
prende cuando:
1. La bolsa esta [lena. Ver REMPLAZAR LA
BOLSA DE POLVO (Pcig. 15) para cambiar la
bolsa de poivo.
2. En cualquier momento el flujo de aire es
restrincjido. Si esto ocurre, revise [a bolsa del
polvo, el filtro de seguridad al motor y otros
[ugares con posibles btoqueos mostrados en
COMO ELIMINAR RESIDUO$ DE BASURA
EN LOS CONDUCTO$ (pbg 21).
3. Cuandose ufilizanalgunosaccesorios.
Nora: Es posibie que la luz encienda al usar
los accesorios porque el flujo de aire es
reducido por losaccesorios.
13

Siga siempre todas |as instrucciones de
seguridad antes de efectuar el
mantenimienfo a su aspiradora.
ADVERTENCIA
Pe|igro de cheque el6ctrico o |esi6n
corporal
Desconecte la unidad antes de
efectuar el manten|mlento a su
asplradora. De io contrario podr_a
produclrse un choque el_ctrico o
causar lesi6n corporal st ia aspiradora
arranca de manera lmprevista.
IIII IIIII I II I
ALMACENAMIENTO DE LA ASPIRADORA
III III II
Recoja el cord6n y enrr6Ilelo en los
sujetadores superior e inferior, sinque quede
muy apretado, Asegure la clavlja sobre el
cord6n de poder.
Guarde la
aspiradora bajo
techo en un tugar
sece, con el
mango en
posici6n vertical
,_ ADVERTENCIA
Pellgro de choque el_ctrico o lesi6n
corporal
Si enrolla el cord6n muy apretado
puede tensarlo mucho y causar[e
dafios° De dafiarse, el cord6n podHa
causar descargas el6ctricas y lesiones
o dafios personaJes.
i i iiiii ii iiiiiiiiiiii i ii
J LIMPIEZA DEL EXTERIOR Y DE LOS ACCESORIOS
Desconecte el cord6n el_ctrico de la davUa
,de la pared. NO rocfe agua sobre la
aspiradora.
Limple el exterior con un trapo suave y limpio,
que ha sido exprimtdo despu_s de remojar en
una_soluci6nde agua y detergente Ifquido
ligero. Seque ef exterior con un trapo seco
despu_sde limp|at.
Limpie la superficie exterior del recept6cufo y
de losaccesorios para reducir la electricidad
est6tJcay ta acumulacT6n de polvo.
Lave Ios accesorios en agua tibia jabonosat
enjuague y deje secar al aire. No los lave en
iavadora de plates.
_IbCUIDADO
No use los accesorlos sl estan
mojados. Los accesorios que se
utilJcen en 6teas sucias_ debajo del
refrigerador_ no deben usarse en
otras superficies sin antes set
lavados. PodHan dejar marcas.
t4
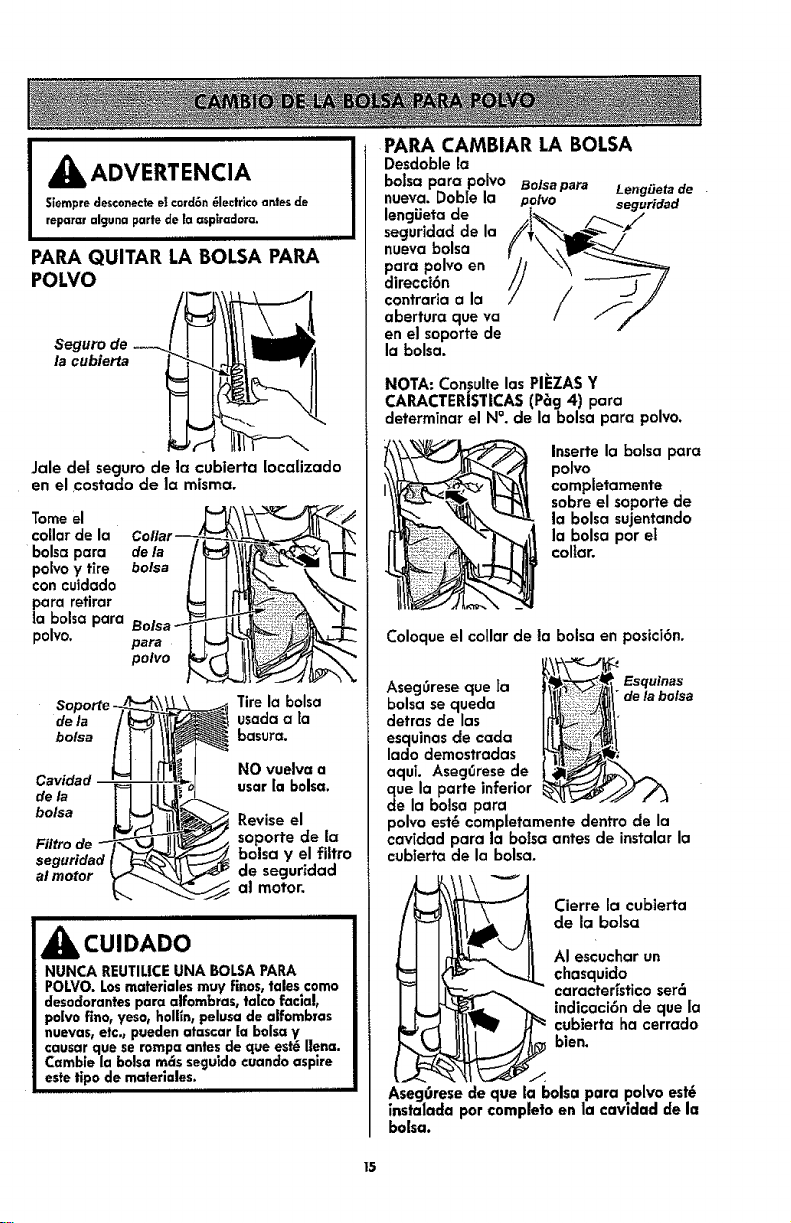
,_k ADVERTENCIA
5iempredesconectee!€ord6n_lectricoantesde
repararalguna parte de la aspiradora.
PARA QUITAR LA BALSA PARA
POLVO
Seguro de
la cubierta _ ....,
Jale del seguro de la cubierta Iocalizacio
en el .costado de la misma.
omoo,
balsa para de la ;i_;,
parac°nP°IV°ytirecuidadOretirarbo,sa _iiiii_ii_ii!i_
la balsa para BalsamS,_'___t_-J_"
Soporte _._==_ Tire la balsa
dela / h9 \I_ usadaato
CarlOad "_ J NO vuelva a
o,o 'n
Filtro de "--F-",,.__.._III_4 soporte de la
seguridad I _{_'_---_ balsa y el filtro
almotor _-..._._,'_/ desegur_dad
b-, -,,-.._J_ al motor.
,_ CUIDADO
NUNCA REUTIUCEUNA BALSAPARA
POLVO. Losmaterialesmuy finos,talescoma
desoclorantespara alfambras, talco facial,
pelvo fino,yeso,holffn,pelusa de alfombras
nuevas,etc., puedenatascar [a balsay
causar que seromp= antes de que est6lien,,.
Cambie la balsam6s segutdacuanda aspire
estetipo de materlales.
PARA CAMBIAR LA BALSA
Desdoble la
balsa para polvo Boisepara Leng{Jetade .
nueva. DobIe la polvo seguridad
seguridad de la
nueva balsa
direcci6n
contraria a la
abertura que va
en el soporte de
la 10olsa.
NOTA: Consulte las PI_:ZAS Y
CARACTERJSTiCAS (P_=g4) para
determTnar el N°. de la balsa para polvo.
Inserte la balsa para
polva
completamente
sabre el soporte de
la balsa sujentando
la balsa par e|
collar.
Coloque el collar de ?a balsa en posici6n.
Aseg0rese que ia Esquinas
balsa sequeda de la botsa
detras de los
esquinas de coda
lado demostradas
aqui. Aseg_rese de
que la parte inferior
de Jabalsa para
polvo est_ completamente dentro de la
cavidad para la botsa antes de instalar la
cubterta de la balsa.
Cierre la cubierta
de la balsa
AI escuchar un
chasquido
caracterrstico set6
indicaci6n de que la
cubierta ha cerrado
bien.
Aseg6rese de que la balsa para polvo est6
instalada par €ompleto en la cavidad tie I=
balsa.
15
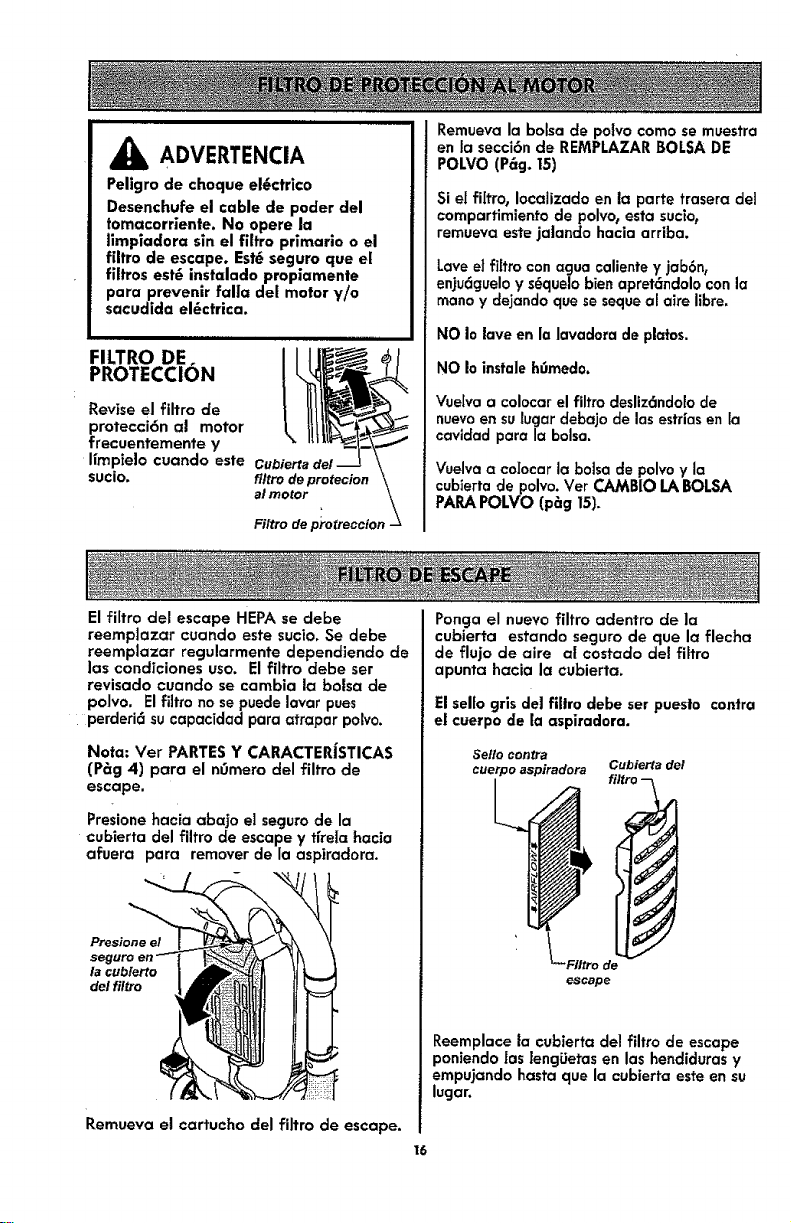
......&A0VE.TE.a,
Peligro de cheque el6ctrico
Desenchufe el cable de pealer del
tomacorrlente. No opere la
Jimpiaclora sin el fi|tro primario o el
filtro de escape. Est6 seguro que el
filtros est6 instalado propiamente
para prevenir falla del motor y/o
sacudlda el_ctrica.
FILTRO DE.
PROTECCION
Revise el filtro de
protecci6n al motor
frecuentemente y
Ifmpielo cuando este
sucio.
flltro de protecion
al motor
Filtro de protreccion -
Remueva la bolsa de po_vo como se muestra
en la secci6n de REMPLAZAR BOLSA DE
POLVO (P6g. 15)
Si el flit|o, Iocalizado en la parte trasera dei
comparfimiento de polvo, esta sucio,
remueva este jalando hacia arriba.
Lave et filtro con agua caliente y jab6n,
enju6guelo y s(_quelobien apret6ndolo con la
mano y dejando que se seque al ake libre.
NO Io lave en la lavadora de platos.
NO Io instale h0medo.
Vue[va a colocar el filtro desliz6ndolo de
nuevoen sulugar debajo de las estdas en la
cavidad paro la bolsa.
Vuelva a colocar la bolsa de polvo y la
cubierta de polvo. Ver CAMBIO I.,6,BOLSA
PARA POLVO (p_g 15).
Elfiltro del escape HEPAse debe
reemplazar cuando este sucio,Se debe
reemplazar regularmente dependiendo de
las condiciones uso. El filtro debe ser
revisado cuando se cambia la balsa de
polvo. Elfiitro no sepuedelavar pues
i perderi6 sucapacidad para atrapar polvo.
Nota: Ver PARTES Y CARACTERJSTICAS
(P_g 4) para el n0mero del filtro de
escape.
Presione hacia abajo e| seguro de la
cubierta del filtro de escape y tfrela hacia
afuera para remover de la aspiradora.
Presione e!
la cubterto
de! filtro
Remueva el cartucho del filtro de escape.
t6
Ponga el nuevo filtro adentro de la
cubierta estando seguro de que la flecha
de flujo de aire al costado del filtro
apunta hacia la cubierta.
El sello gris de| filiro debe set puesto contra
el cuerpo de la aspiradora.
Sel/o contra
cuerpo aspiradora Cubierta del
escape
Reemplace la cubierta del filtro de escape
poniendo los leng_Jetas en las hendiduras y
empujando hasta que la cubierta este en su
lugar.
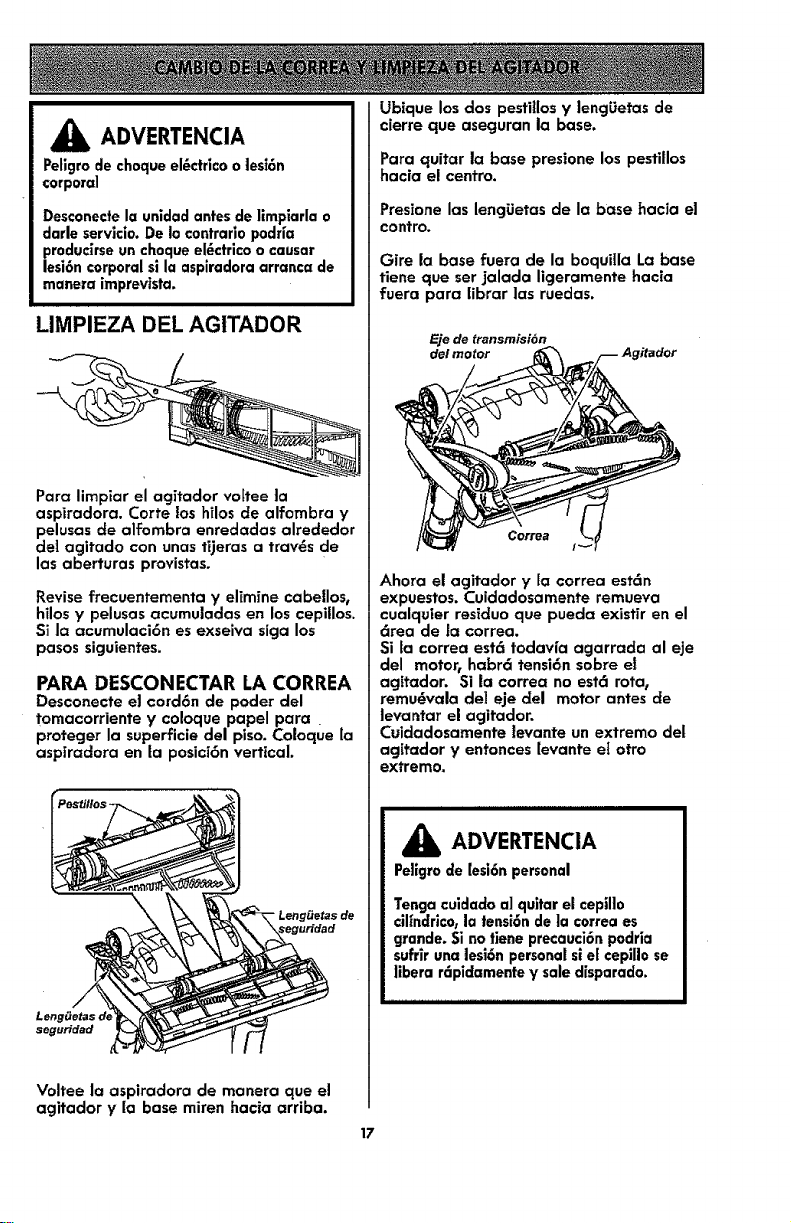
_k ADVERTENCIA
Peligrode choqueel6ctricoo lesi6n
corporal
Desconecte Io unidad antes de limpiarla o
darle serv]cio. De Io contrario podrfo
produclrse un choque el6ctricoo causar
lesi6n €orporal si la aspiradoro arranco de
manero imprevisto.
LIMPIEZA DEL AGITADOR
Para limpiar el agitador vo[tee la
aspiradora. Corte los hilos de alfombra y
pelusas de alfombra enredadas alrededor
de] agitado con unas tijeras a trav6s de
las oberturas provistas.
Revise frecuentementa y elimine cabellos,
hilos y pelusas acumuladas en los cepillos.
Si la acumulaci6n es exseiva siga los
pasos siguientes.
PARA DESCONECTAR LA CORREA
Desconecte el cord6n de poder del
tomaoorriente y coloque papel para
proteger la superficie del piso. Coloque la
aspiraclora en la posici6n vertical.
• LengOetas de
LengOetas d_
seguridad
Voltee la aspiradora de manera que el
agitador y la base miren hacia arriba.
17
Ubique los dos pestfilos y lengUetas de
cierre que aseguran la base.
Para quitar la base presione los pestitlos
hacia el centro.
Presione las lengUetas de la base hacia el
contro.
Gire la base fuera de la boquilla La base
tiene que ser jalada ligeramente hacia
fuera para librar las ruedas.
Eje de transmisi6n
del motor Agitador
Ahora el agitador y lacorrea est6n
expuestos. Cuidadosamente remueva
cualquier residuo que pueda existir en el
6rea de la correa.
Si la correa est6 todavfa agarrada al eje
del motor, habr6 tensi6n sobre el
agitador. Si la correa no est6 rota,
remu6vala del eje del motor antes cie
levantar el agitador.
Cuidadosamente levante un extremo del
agttador y entonces levante e! otto
extremo.
_k ADVERTENCIA
Peligrode lesi6n personal
Tengaculdadoalqultorelcepillo
ciffncirico,la |ensi6ndela €orreaes
grande.Sinotieneprecauci6npodrio
sufrirunoiesi6npersonalsielcepillose
libera r6pidamentey saledisparado.
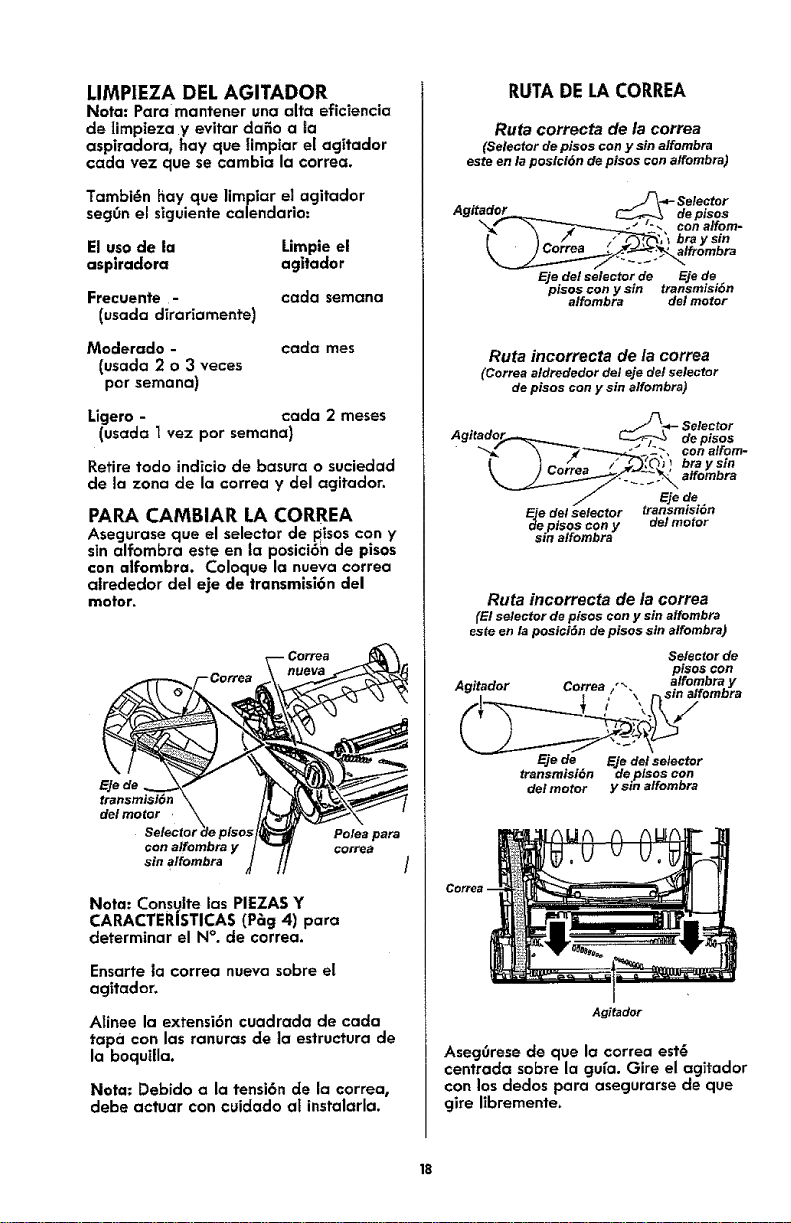
LIMPIEZA DEL AGITADOR
Note: Para mantener una alta eficiencia
de lirnpieza y evitar clafio ala
aspiradora, hay que lirnpiar el acjitador
cada vez que se cambia la coffee.
Tambi_n hay que limpiar el agitador
seg0n el siguiente calendario:
El uso de |a Limpie el
asplradora agitador
Frecuente - cada semana
(usada d[rariarnente)
Moderado -
(usada 2 o 3 veces
por semana)
cada mes
Ligero - cada 2 meses
(usada I vez por sernana}
Retire todo indicio de basura o suciedad
de la zona de la correa y del agitador.
PARA CANtBIAR LA CORREA
Asegurase que el selector de l_isoscon y
sin alfombra este en la posici6n de plsos
con aifombra. Coloque la nueva correa
airededor del eje de transmisi6n del
motor.
EJe de
transmlsl6n
del motor
pisos
¢on a!fombra y
sin aifombra
Polea para
correa
Note: Consuite las PIEZAS Y
CARACTERiSTICA$ (Pbg 4) pare
determiner el N°. de correa.
Ensarte la correa nueva sobre el
agffador.
Aiinee la extensi6n cuadrada de cada
tape con las ranuras de la estructura de
la boquilla.
Note: Debiclo ala tensi6n de la correa,
debe actuar con cuidado a[ instalarla.
RUTADELACORREA
Ruta correcta de la correa
(Selectordepisos conysin alfombra
este en la poslci6n de pisos con alfombra)
Eje del selector de Eje de
pisos con y sin transmisi6n
alfombra de! motor
Ruta incorrecta de la correa
(Correaa/drededorde/eje de/selector
depisos conysin alfombra)
../F_.__ Selector
Agitado_,,_ _ de pisos
i/ Ejede
Eiedelselector transmisi6n
_episos con de/motor
sin affombnray
Ruta incorrecta de ta correa
(El selector de pisos con y sin alfombra
este en la posici6n de pisos sin alfombra)
Selector de
Eje de Eje del selector
transmisi6n de plsos con
del motor y sin alfombra
Correa ,
Agitador
Ase96rese de que la correa est_
centrada sobre la cjufa. Gire el agitador
con los dedos para asecjurarse de que
gire ffbremente.
18

Para reinstalar la base, inserte las cuatro
pestafias dentro de las cuatro ranuras
ubicadas a Io largo del borde frontal de
la base. Coloque la aspiradora en la
posici6n vertical. Coioque la base en su
posici6n original.
Lengfietas/
Ranuras
Cuando este bajandot jale la base del
plato inferior un poco hacia afuera hasta
dejar libresa ias Ilantas.
Desliar hacia i
Precione la base del plato para abajo
hasta que las lengiJetas de seguridad
estdn en su lugar.
Deslize el pestiI[o de la izquierda a la
izquierda y el pestillo derecho a la
derecha para asegurarlos.
Coioque la aspiradora en la posici6n
vertical antes de conectarla en el
tomacorriente.
19
_IbADVERTENCIA
Peligro de choque el6clrico o lesi6n
corporal
Desconecte la unidad antes de
limpiarla o darle servicio. De 1o
contrarlo podHa producirse un choque
el6ctrico o causar lesi6n corporal si la
aspiradora arranca de manera
imprevista.
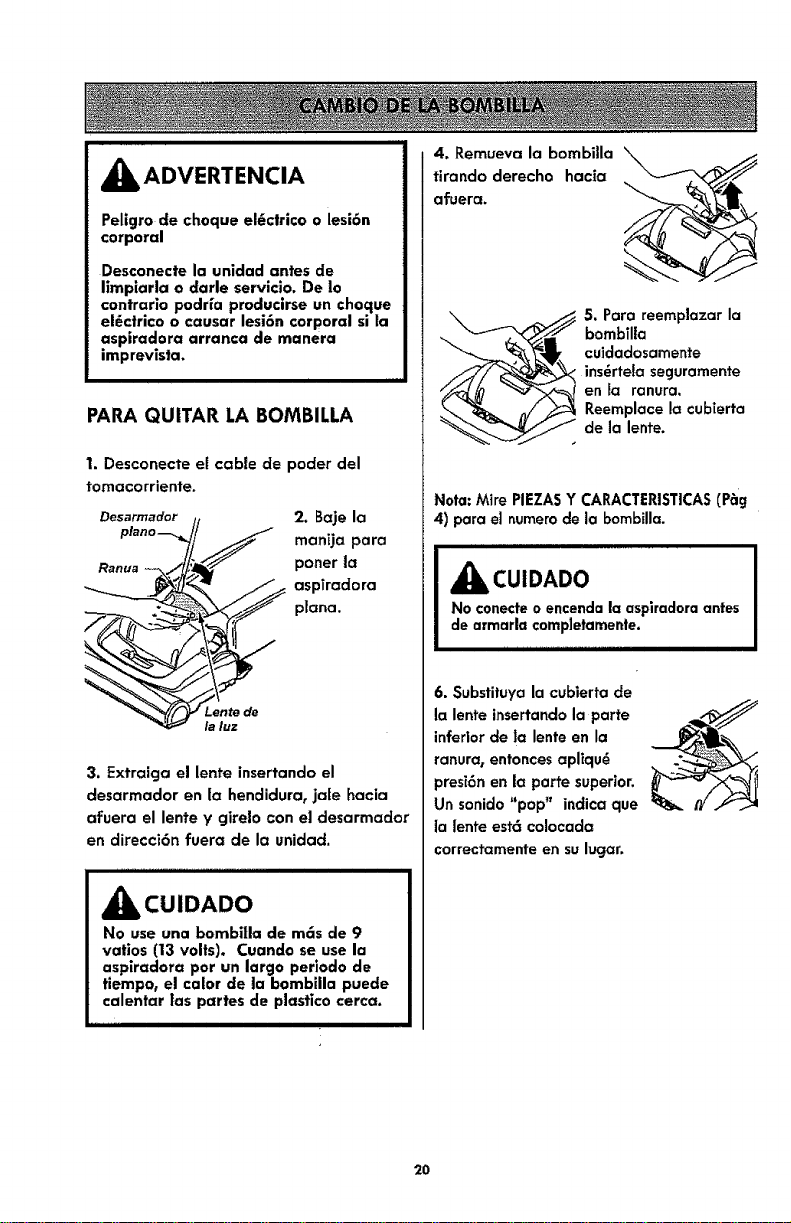
PARA QUITAR LA BOMBILLA
1. Desconecte et cable de poder del
tomacorriente.
Desarmador 2. Baje la
manija para
Ranua porter ta
aspiradora
plana.
la luz
3. Extraiga el lente insertando el
desarmador en la hendidura, ja|e hacia
afuera el lente y girelo con el desarmador
en direcci6n fuera de la unidad.
_ibCUIDADO
No use una bombi|la de m6s de 9
vatlos (13 volts). Cuando se use la
aspiradora pot un largo periodo de
tiempo, el calor de ta bombilla puecle
calentar |as partes de plastlco cerca.
4. Remueva la bombi|la \ _
tirando derecho hacia _///
afuera. ,
"_\_'_ 5. Para reemplazar la
bombllia
,__ cuidadosamente
ins6rtela secjuramente
en la ranura.
Reemplace la cubierta
de la lente.
Nota: Mire PIEZASY CARACTERISTICAS(P_ig
4) para el numero de ia bombilla.
,, ,, ,,,,,,, ,,,,,,,,,,,,,,,,,,,,,,,,,,,,,,,,,
_IIL CUIDADO
No conecte o encenda la aspiradora antes
de armarla completamente.
6. Substituya la cubierta de
la lente insertando la parte
inferior de |a lente en la
ranura, entonces apliqu6
_resZ6nen la parte superior.
Un sonido S_pop" indica que
a lente est6 co!ocada
correctamente en su lugar.
2O
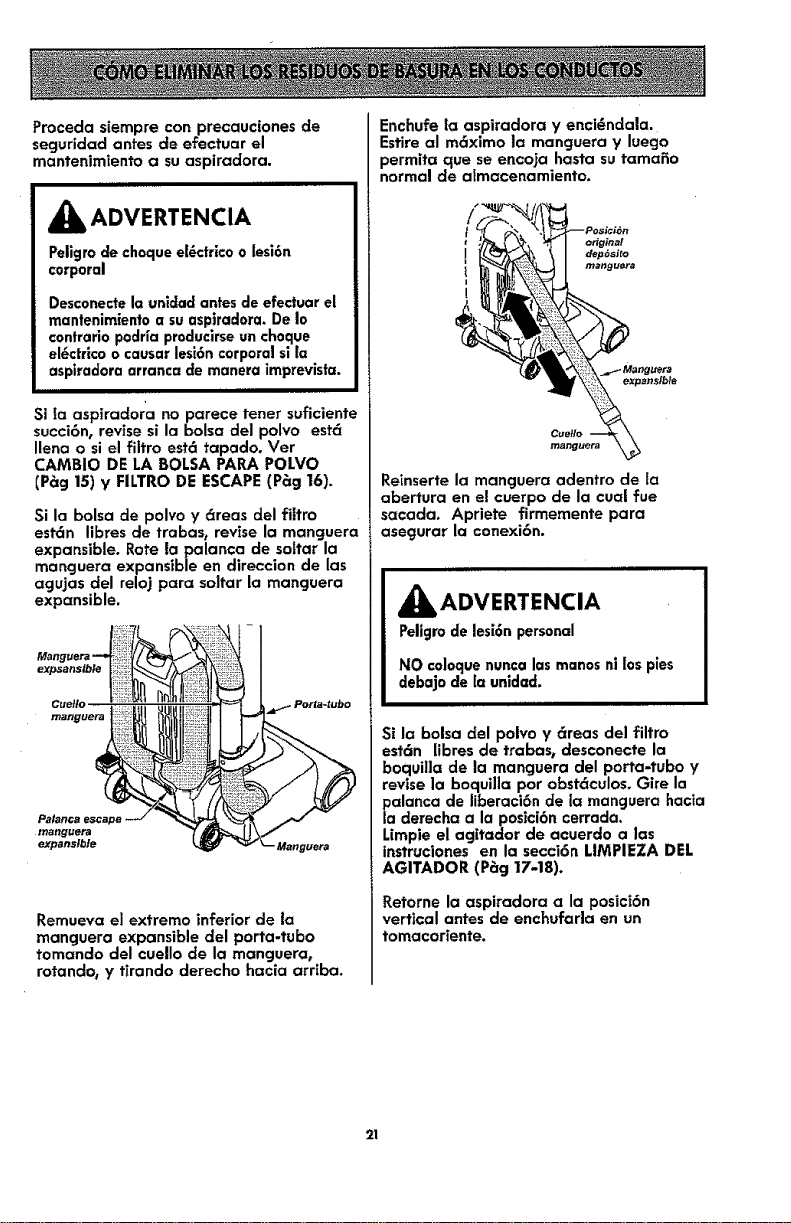
Proceda siempre con precaucJones de
secjuridad antes de efectuar el
mantenimiento a su aspiradora.
_k ADVERTENCIA
Peligro de choque el_ctrico o lesi6n
corporal
Desconecte la uniclad antes de efectuar el
mantenimiento a su aspkadora. De Io
contrario podHa produclrseun choque
el_ctrica o causer lesi6ncorporal si la
asplradora arranca de manera imprevlsta.
II IIIII
Si la aspirac{ora no parece tenet suficiente
succi6n, revise si la balsa del polvo est6
Ilena o si el filtro est6 tapado. Vet
CAMBIO DE LA BOLSA PARA POLVO
(P_=g15) y FILTRO DE ESCAPE (P_g 16).
Sila balsa de polvo y 6reas del filtro
est6n libresde trabas, revisela manguera
expansible. Rote !a palanca de softar la
manguera expansible en direccionde las
agujas del reloj para soltar la manguera
expansible.
ezpsanslble
Remuevael extremo inferiorde la
manguera expansibledel porta-tubo
tomanclo del cuellode la manguera,
rotando, y tirando derecho hacia arr[ba.
Enchufela aspiradora y enci_ndala.
Estireal m6ximo la manguera y luego
permita que se encoja hasta sutamafio
normal de almacenamiento.
original
dep6sito
manguera
i
Reinserte la manguera adentro de la
abertura en el cuerpo de la cuai rue
sacada. Apriete firmemente para
asegurar la conexi6n.
_ADVERTENCIA
Peligro de les[6n personal
NO caloque nunca las manos ni los pies
debajo de la unldad.
Ill, Illl IIII
Si la balsa ciel polvo y 6reas del filtro
estdn libres de trabas, clesconecte la
boquilla de la manguera del parta-tubo y
revise la boquilla par obst6culos. Gire la
palanca de liberaci6n de la manguera hacia
la derecha ala posici6n cerrada.
Limpie el agttador de acuerdo alas
instruciones en la secci6n MMPIEZA DEL
AGITADOR (Pbg 17-18).
Retorne la aspiradara ala posici6n
vertical antes de enchufarla en un
tomacoriente.
2t
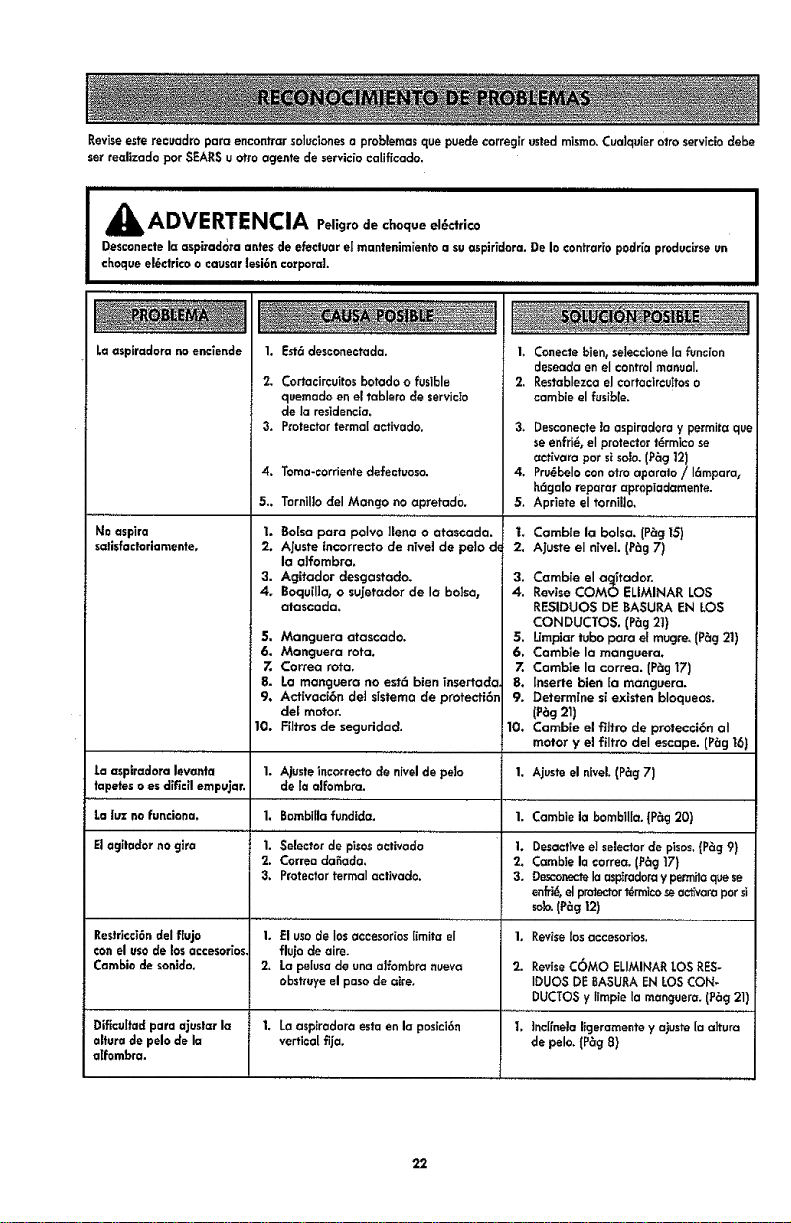
Reviseesterecuadro pare encontrarsoIuciones a probternas que puedecorreglr ustedmismn,Cua]quierotto serviciodebe
set realizadopar SEARSu otto agentede servicio calificado.
iiiiiiii i1,1111iiii
A ADVERTE NCIA Pe.grodeohoqueo]_r_co
Desconectela asp]fedora antesde efeetuarel roantenim[ento a su aspifidora.De la contrafio podr[e produclrseun
chequeel6ctrlco o causer|esi6nco_po_aL
IIIII I III I
Laaspiradorano enciende 1. Est_desconeotada,
No aspire
salisfactorlamente0
Laosplradara levanta
tapeteso es dificll eropu,|ar.
La|uz no funclona.
El agltador no gira
Restricci6ndel ffuja
ton el usede losaccesoHos
Camble de sonido.
Dificuitadpare ajus!ar la
eltura de pelo de la
a[fembra.
2. Cortacircuitos batado o fuslble
quemado en el _blero de servicla
de la residencia,
3. P_otecter terrnal activado.
4, Torna.corriente defectuoso,
5. Tornillo del Mango no apretad0,
1. Boise pare polvo ]lena o atascada.
2. Ajuste fnaorrecto de niveI de peIo d*
la alfombra.
3. Agitador desgastado.
4o Boqu[I]at o sujetador de la balsa,
otascada,
5, Manguera atascado.
6. Manguera rata.
Z Correa rata.
8. La manguera no est6 bien insertada
9, Activaci6n clel sisteroa de protecti6n
det motor.
10. F[Itros de seguriclad.
1. Ajuste incorrecto de nivel de pelo
de [a alfombra,
I, Bambilla fundlda.
1. Selector de pisas aotivado
2. Correa da_ada.
3. Protector terrnaI activadc.
L El usa de los accesorios ffrnita el
flujo de aire.
2. La pelusa de una a]forobra nueva
obstruye el paso de aire.
1. La aspiradora esta en la posici6n
vertical fija,
1, Conectebien,selecctoneIa fUnclon
deseadaenel controlmanual.
2. Restablezcael cortaclrcuttoso
cambie el fusible,
3, DesconecteIn aspirad<_ray perrnitaqua
se enfri_ el protectort_rrnico se
act_vam per sisoJo.(P_gt2)
4, Pru_beloconotra operate / 16rnpara,
h_gale reparar apropiadaroente.
5, Apriete el tornillo,
1, Cambie la balsa. [P_g15)
2. Ajuste el nlveL (P_g7)
3. Corobie el aqffodor.
4. Revise coma ELIMINAR LOS
RESIDUOS DE BASURA EN LOS
CONDUCI"OS. (P_9 21)
5. Limp|ortuba pare el rougre, (P_g21)
6, Caroble la manguera,
Z Camb|e la correa. {Peg17)
8. lnserte bien [a manguera,
9, Determine siextsten bloqueos,
(P_g21)
10. Camb[e el fiJtrode protecci6n aI
motor y el filtro deI escape. (P_g16)
I. Ajusteel ntveL (P_g71
1. Carnbiela barnbllla,{P_g20)
I. Desacttveelselectordepisos.{P_g9)
2, Carobtela coffee. (P_g17)
3. Dm_onectela aspiradorayper:hirequase
enffi_0elprotector_rrnicoseac_voroparsi
solo.(P_g12)
1. Reviselosoccesorios.
2. ReviseCOMa ELIMINARLOSRES-
IDUOS DEBASUEAENLOSCON-
DUCTOSy Iimpie la manguera.(P_g21)
I. tneffnela ligeramente y ajuste[aa]tura
de pelo. (P_g 8)
22

23

Your Home
For troubleshooting, product manuals and expert advice:
managemylife
www.managemylife.com
For repair - in your home - of all major brand appliances,
lawn and garden equipment, or heating and coolingsystems,
no matter who made it, no matter who sold it!
For the replacement parts,accessories and
owner's manuals that you need to do-it-yourself.
For Sears professional installation of home appliances
and items like garage doer openers and water heaters.
1-800-4-MY-HOME ® Call anytime, day or night
(1-800-469-4663) (U.S.A. and Canada)
www.sears.com www.sears.ca
Our Home
For repair of "carry-ins" like handheld lawn equipment or
home electronics items, call anytime for the location of the nearest
Sears Parts & Repair Service Center
1-800-488-1222 (U.S.A.) 1-800-469-4663 (Canada)
www.sears.com www,sears.ca
To purchase a protection agreement on a product serviced by Sears:
1-800-827-6655 (u.s._J 1-800-361-6665 (Canada)
Parepedirserviciodereparacihn
a domicilio,y paraordenarpiezas:
1-888-SU-HOGAR®
(_.888-784_o_7)
www.sears.com
Au Canadapourserviceen frangais:
1-800-LE-FOYERMc
www.sears.ca
]M
® Registered Trademark / Trademark of KGD IP, LLC in the United States, or Sears Brands, LLG in other countries
® Marca Registrada 1TM Marca de F_bdca de KGD IP, LLC en Estados Unides, o Sears Brands, LLC in otros paises
u; Marque de commerce IaD Marque ddpos_e de Sears Brands, LLC
PiN C01ZDTD10UO0 - KC01ZDTDZOU0