
OWNER’S MANUAL
MANUEL DU PROPRIÉTAIRE
Danby Products Limited, Guelph, Ontario Canada N1H 6Z9
Danby Products Inc., Findla y, Ohio US A 45840
2018.08.13
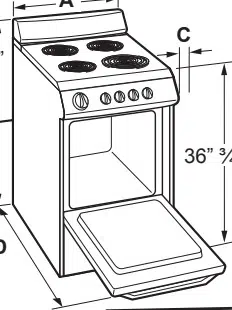
ELECTRIC RANGE
Owner’s Manual.............................1 - 15
CUISINIÈRE ÉLECTRIQUE
Manuel du propriétaire.................16 - 30
MODEL * MODÈLE
SER244WC

1
Welcome
Welcome to the Danby family. We are proud of our quality products and we believe in
dependable service. We suggest that you read this owner’s manual before plugging in your new
appliance as it contains important operation information, safety information, troubleshooting and
maintenance tips to ensure the reliability and longevity of your appliance.
Visit www.Danby.com to access self service tools, FAQs and much more. For additional assistance
call 1-800-263-2629.
Note the information below; you will need this information to obtain service under warranty.
You must provide the original purchase receipt to validate your warranty and receive service.
Model Number: _________________________________________________
Serial Number: _________________________________________________
Date of Purchase: _______________________________________________
Need Help?
Before you call for service, here are a few things you can do to help us serve you better.
Read this owner’s manual:
It contains instructions to help you use and maintain your appliance properly.
If you receive a damaged appliance:
Immediately contact the retailer or builder that sold you the appliance.
Save time and money:
Check the troubleshooting section at the end of this manual before calling. This section
will help you solve common problems that may occur.
1-800-26- Danby
(1-800-263-2629)
2
Important Safety Information
READ AND FOLLOW ALL SAFETY INSTRUCTIONS
SAVE THESE INSTRUCTIONS!
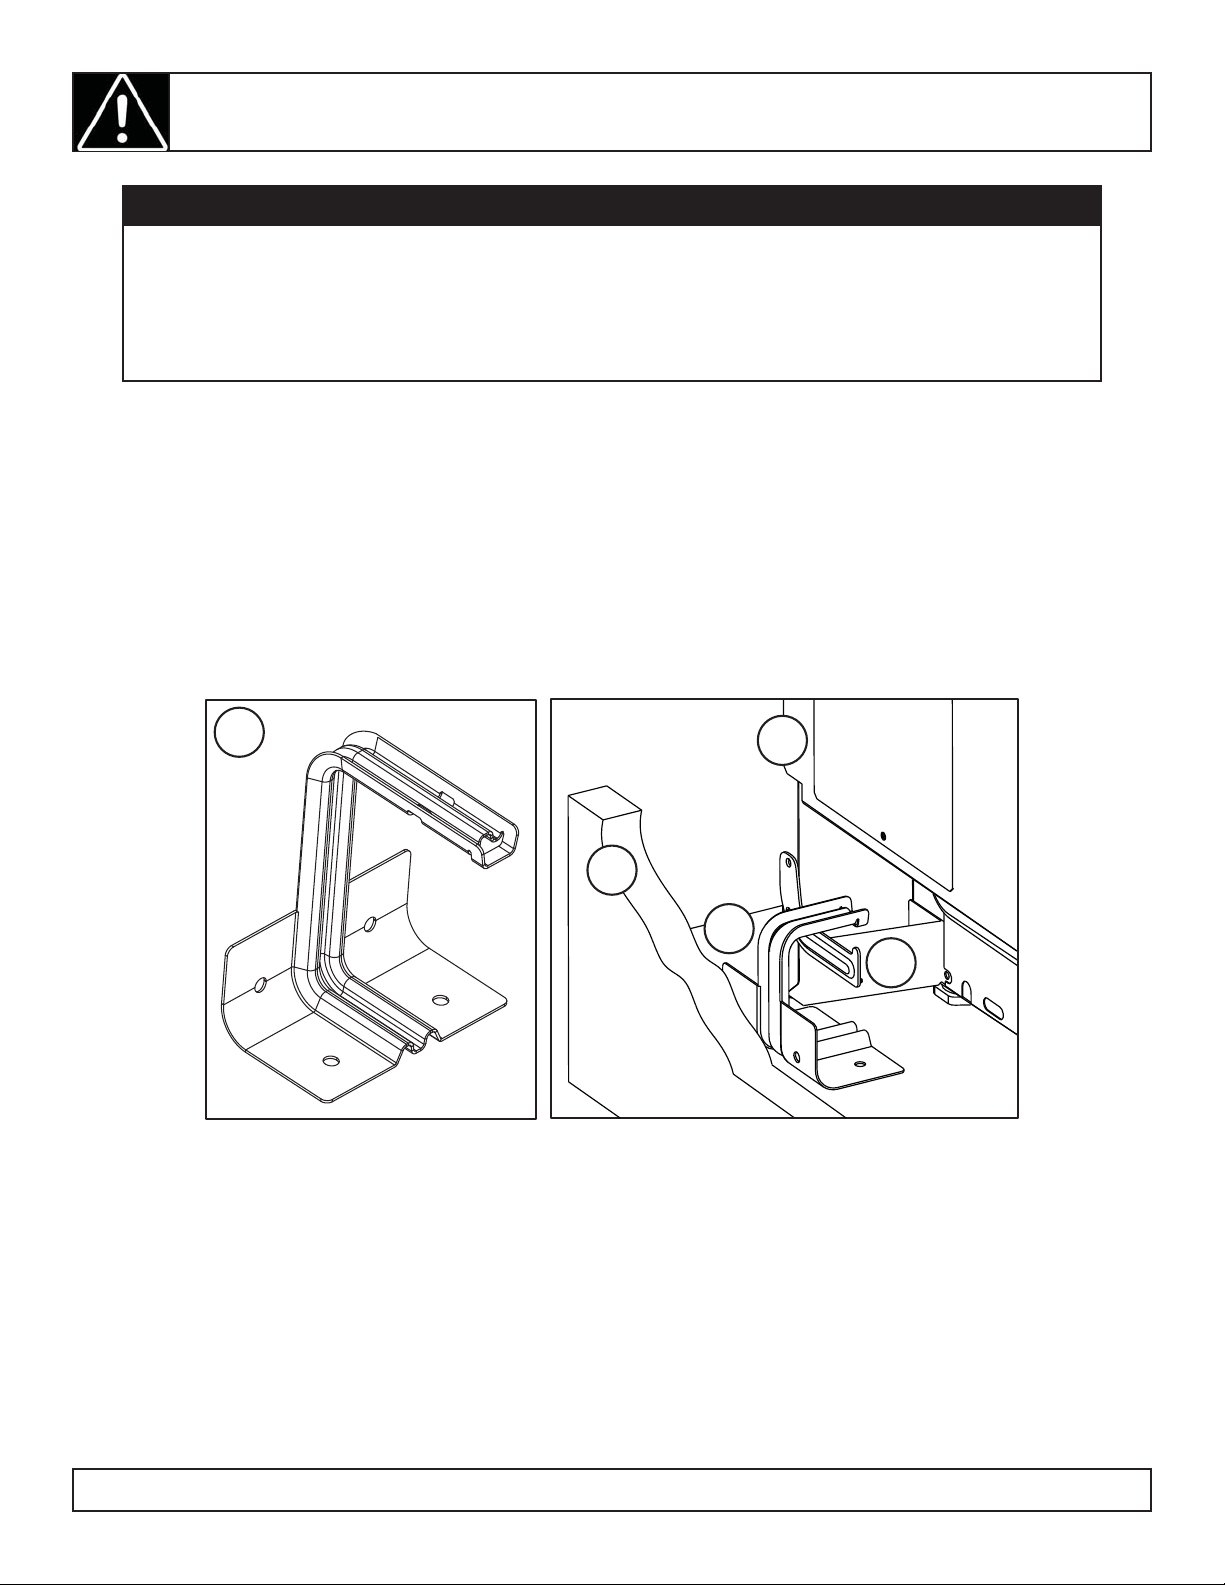
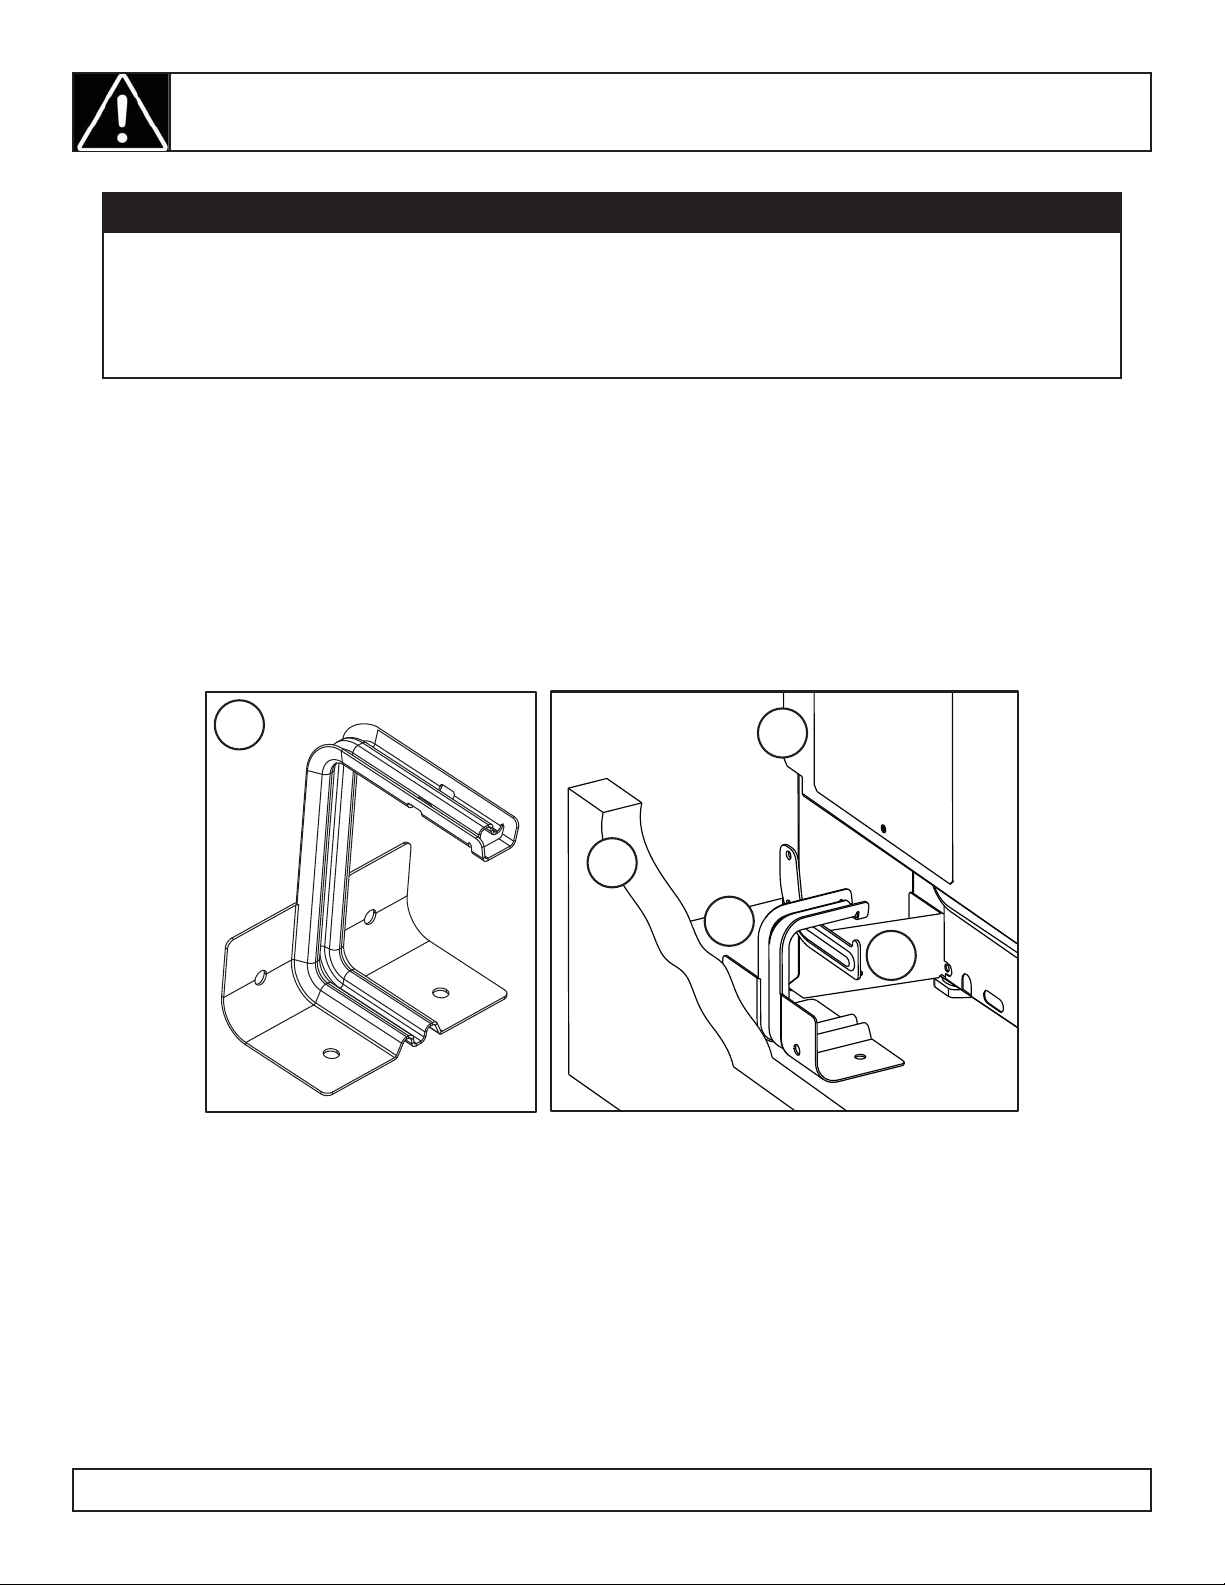
ANTI-TIP BRACKET
To reduce the risk of the appliance tipping over, an anti-tip bracket is provided that must be installed before
operating the appliance. See installation instructions shipped with the bracket for complete details.
1. Anti-tip bracket
2. Right side panel
3. Rear wall
4. Anti-tip bracket
5. Anti-tip arm
3
1
4
2
5
WARNING - TIP OVER HAZARD
• A child or adult can tip the appliance and be killed.
• Verify the anti-tip bracket has been properly installed and engaged to the fl oor or wall.
• Ensure the anti-tip bracket is re-engaged when the range is moved by sliding the anti-tip
arm under the bracket.
• Do not operate the range without the anti-tip bracket in place and engaged.
• Failure to follow these instructions can result in death or serious burns to children or adults.
To check if the bracket is installed and engaged properly, look underneath the range to see that the anti-tip
arm attached to the right side panel is engaged on the bracket. On some models, the storage drawer or
kick panel can be removed for easier inspection.
If visual inspection is not possible, slide the range forward, confi rm the anti-tip bracket is securely attached
to the fl oor or wall and slide the range back so the anti-tip arm slides under the anti-tip bracket. If the
range is pulled from the wall for any reason, always repeat this procedure to verify that the range is
properly secured by the anti-tip bracket.

3
Important Safety Information
READ AND FOLLOW ALL SAFETY INSTRUCTIONS
SAVE THESE INSTRUCTIONS!
GENERAL SAFETY REQUIREMENTS
Ensure the appliance is properly installed and
grounded by a qualifi ed technician.
Never use the appliance for warming or heating the
room.
Children should not be left alone or unattended in
the area where the appliance is in use. Children
should never be allowed to sit or stand on any part
of the appliance.
Do not store items of interest to children in cabinets
above a range or on the back guard of a range.
Children climbing on the range to reach items could
be seriously injured.
Loose fi tting or hanging garments should never be
worn while using the appliance.
Do not repair or replace any part of the appliance
unless specifi cally recommended in the manual. All
other servicing should be referred to a qualifi ed
technician.
Flammable materials should not be stored in or near
the appliance.
Do not use water on grease fi res. Smother fi re
or fl ame or use dry chemical or foam-type
extinguisher.
Use only dry pot holders. Moist or damp pot holders
on hot surfaces may result in burns from steam. Do
not let the pot holder touch hot heating elements. Do
not use a towel or other bulky cloth.
If power is lost to an electric cooktop while a surface
element is ON, the surface element will turn back on
as soon as power is restored. In the event of power
loss, failure to turn all surface element knobs to the
OFF position may result in ignition of items on or
near the cooktop, leading to serious injury or death.
To avoid the possibility of a burn or an electric
shock, always be certain that the controls for all
surface elements are at the OFF position, and that
all coils are cool before attempting to lift or remove
a coil cooking element.
COOK TOP SAFETY REQUIREMENTS
Use the proper pan size. This appliance is equipped
with four burners of different sizes. Select utensils
that have fl at bottoms large enough to cover
the surface of the heating element. The use of
undersized utensils will expose a portion of the
heating element to direct contact and may result in
ignition of clothing. Proper relationship of utensil to
burner will also improve effi ciency.
Never leave the appliance unattended while in use.
Boil over causes smoking and greasy spills can
ignite.
Never leave oil unattended while frying. If allowed
to heat beyond its smoking point, oil may ignite
resulting in fi re that may spread to surrounding
cabinets. Use a deep fat thermometer whenever
possible to monitor oil temperature.
To avoid oil spillover and fi re, use a minimum
amount of oil when shallow pan-frying and avoid
cooking frozen foods with excessive amounts of ice.
Ensure that refl ector pans or drip bowls are in
place. Absence of these pans or bowls during
cooking may subject wiring or components
underneath to damage.
Do not use aluminum foil to line drip bowls or
oven bottoms, except as suggested in the manual.
Improper installation of these liners may result in a
risk of electric shock or fi re.
Only certain types of glass, ceramic, earthenware
or other glazed utensils are suitable for range top
service without breaking due to sudden change in
temperature.
To reduce risk of burns, ignition of fl ammable
materials and spillage due to unintentional contact,
the handle of a utensil should be positioned so
that it is turned inward and does not extend over
adjacent burners.
Removable heating elements should never be
immersed in water.
4
Important Safety Information
READ AND FOLLOW ALL SAFETY INSTRUCTIONS
SAVE THESE INSTRUCTIONS!
WARNING - IN CASE OF FIRE
In the event of a fi re, never pick up a fl aming pot
or pan. Turn the burner off if it is safe to do so.
Extinguish the fi re with a dry chemical or foam-type
extinguisher.
Do not use water on grease fi res. Water will spread
the grease and will not extinguish the fi re. Smother
the fi re with a tight fi tting pot lid, cookie sheet or fl at
tray or use dry chemical or foam-type extinguisher.
If there is a fi re in the oven during baking, smother
the fi re by closing the oven door and turning
the oven off or use dry chemical or foam-type
extinguisher.
OVEN SAFETY REQUIREMENTS
Use care when opening the door. Allow hot air or
steam to escape before removing or replacing food.
Do not heat unopened food containers. Build up of
pressure may cause the container to burst and result
in injury.
Keep oven vents unobstructed.
Always place oven racks in the desired location
while the oven is cool. If the rack must be moved
while the oven is hot, do not let the pot holder
contact the hot heating element in the oven.
Pull the oven rack to the stop-lock position when
loading and unloading food from the oven. This
helps prevent burns from touching hot surfaces of
the door and oven walls.
Do not use the oven if a heating element develops
a glowing spot during use or shows other signs
of damage. A glowing spot indicates the heating
element may fail and present a potential burn, fi re,
or shock hazard. Turn the oven off immediately and
have the heating element replaced by a qualifi ed
service technician.
WARNING
To reduce the risk of burns, do not move this
appliance while it is hot. To reduce the risk of
injury due to tipping of the appliance, verify
the re-installation of this appliance into the anti-
tipping device provided and lock the casters after
returning the appliance to the original installed
position.
DO NOT TOUCH HEATING ELEMENTS OR
AREAS NEAR THEM
Heating elements on the surface or in the interior
of the appliance may be hot even though they are
dark in colour. Areas near the heating elements
may become hot enough to cause burns. During
and after use do not touch or let clothing or other
fl ammable materials contact the heating elements
or areas near them until they have had suffi cient
time to cool. Surfaces of the appliance may
become hot enough to cause burns, among them
are the oven vent openings and surfaces near
these openings, oven doors and oven windows.
INSTALLATION INSTRUCTIONS
5
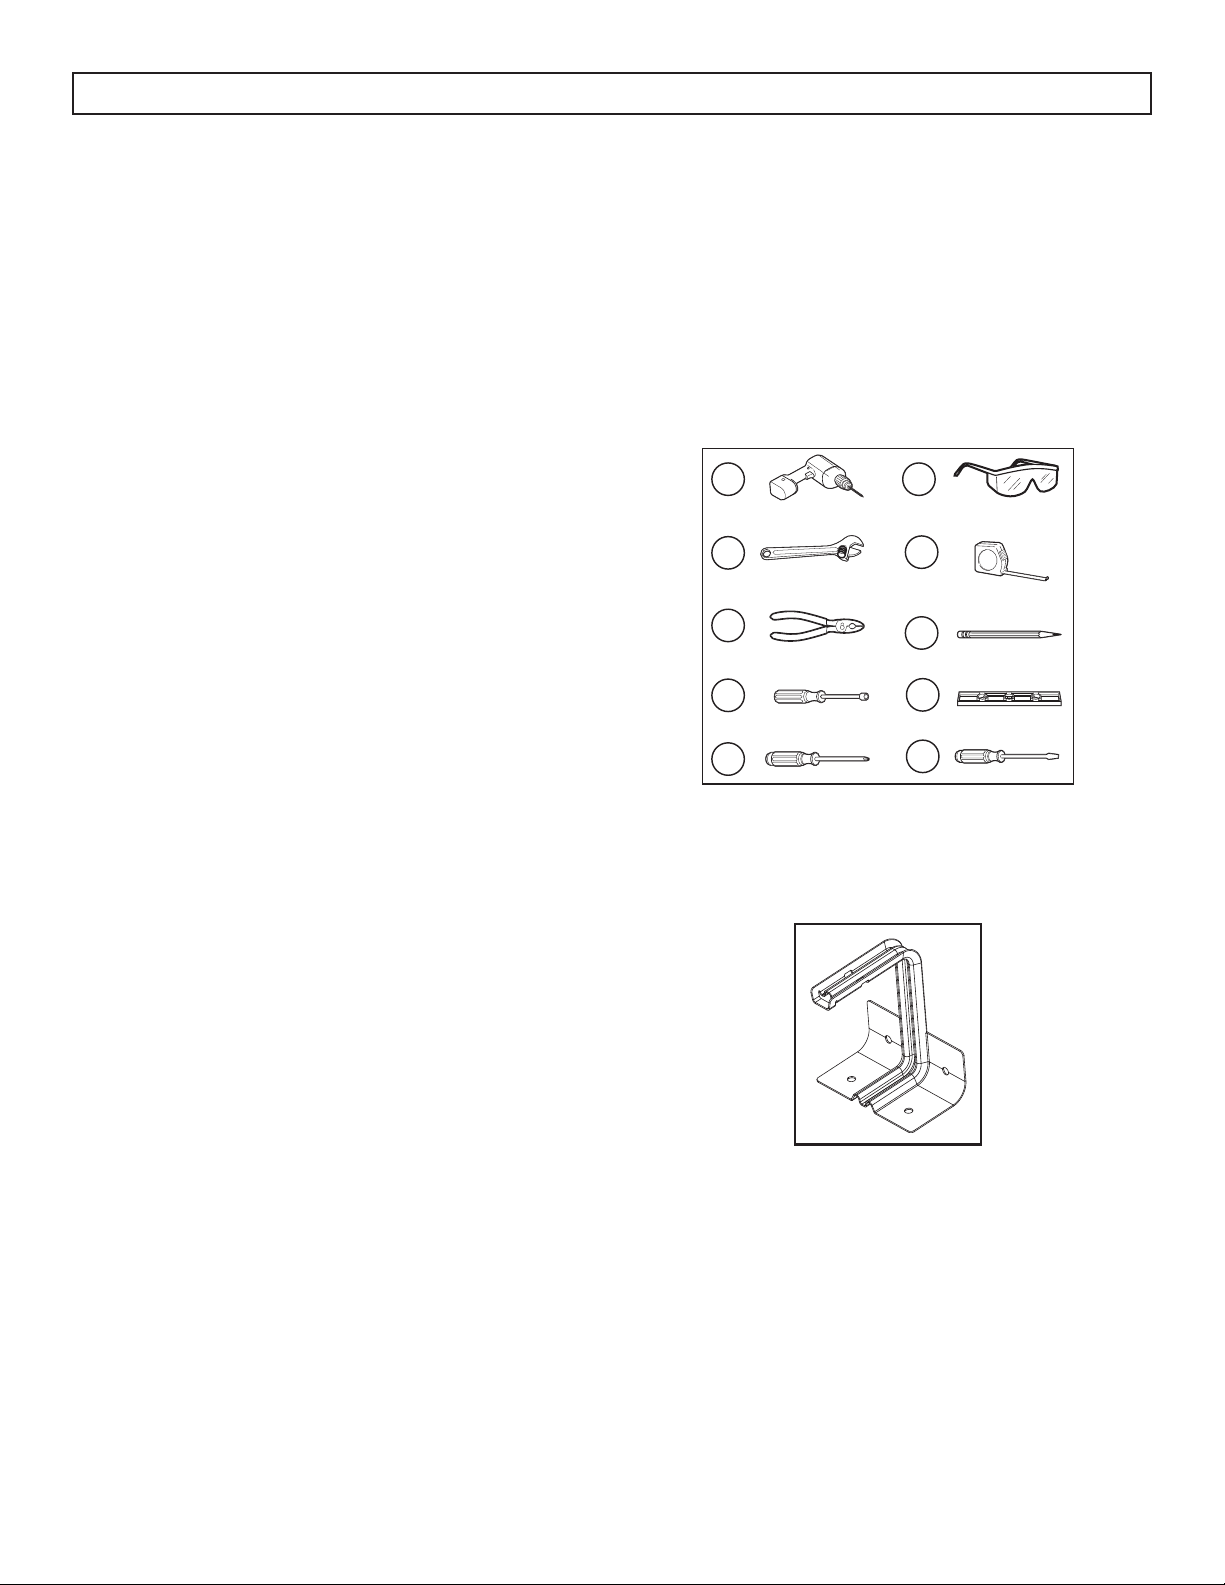
REQUIRED TOOLS
1. Drill with a 1/8” bit
2. Adjustable wrench
3. Pliers
4. 1/4” nut driver
5. Phillips screwdriver
6. Safety glasses
7. Tape measure
8. Pencil
9. Level
10. Flat blade screwdriver
1
2
3
4
5
6
7
8
9
10
PARTS INCLUDED
1. Anti-tip bracket
LEVEL THE APPLIANCE
Make sure that the appliance is properly leveled to
ensure even cooking. Leveling legs are located at
each corner of the appliance.
1. Turn the legs counterclockwise as far as they
will go until they are touching the bottom of the
cabinet.
2. Slowly turn the legs clockwise until the appliance
is level.
3. Use a spirit level or a measuring cup half fi lled
with water to check if the appliance is level.
BEFORE BEGINNING
Keep these instructions for future reference.
Installation of this appliance requires basic
mechanical skills and roughly 1 to 3 hours of time.
Proper installation is the responsibility of the
installer. Product failure due to improper installation
is nor covered under the warranty.
Before beginning the installation, switch power
off at the service panel and lock the service
disconnecting means to prevent power from being
switched on accidentally. If the service disconnecting
means cannot be locked, securely fasten a warning
device such as a tag to the service panel.
Make sure the appliance and the outlet it will use
is properly installed and grounded by a qualifi ed
technician.
WARNING - Improper use of the grounding
plug can result in a risk of electric shock.
Consult a qualifi ed electrician or service agent
if the grounding instructions are not completely
understood, or if doubt exists as to whether the
appliance is properly grounded.
Do not connect your appliance to extension
cords or together with another appliance in the
same wall outlet. Do not splice the power cord.
Do not under any circumstances cut or remove the
third ground prong from the power cord. Do not
use extension cords or ungrounded (two prongs)
adapters.
If the power supply cord is damaged, it must be
replaced by the manufacturer, its service agent or
similar qualifi ed person in order to avoid hazard.
Remove all packing materials before installation.
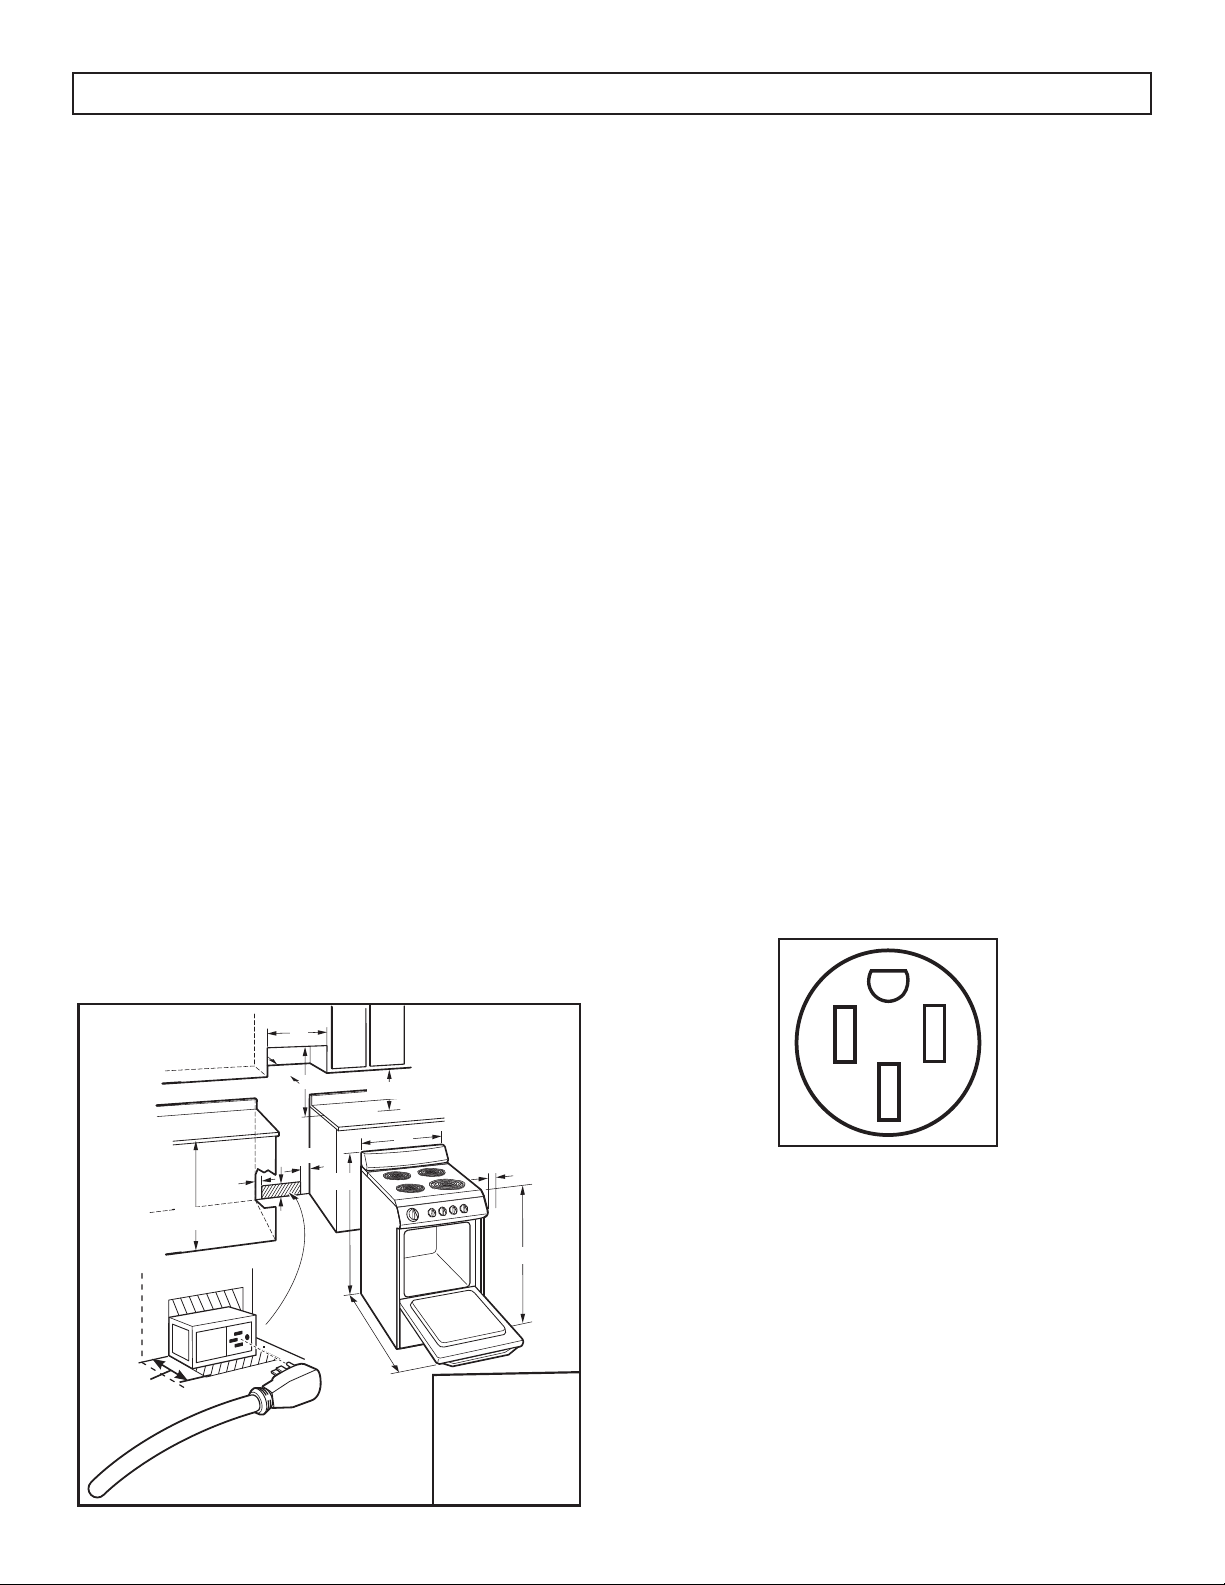
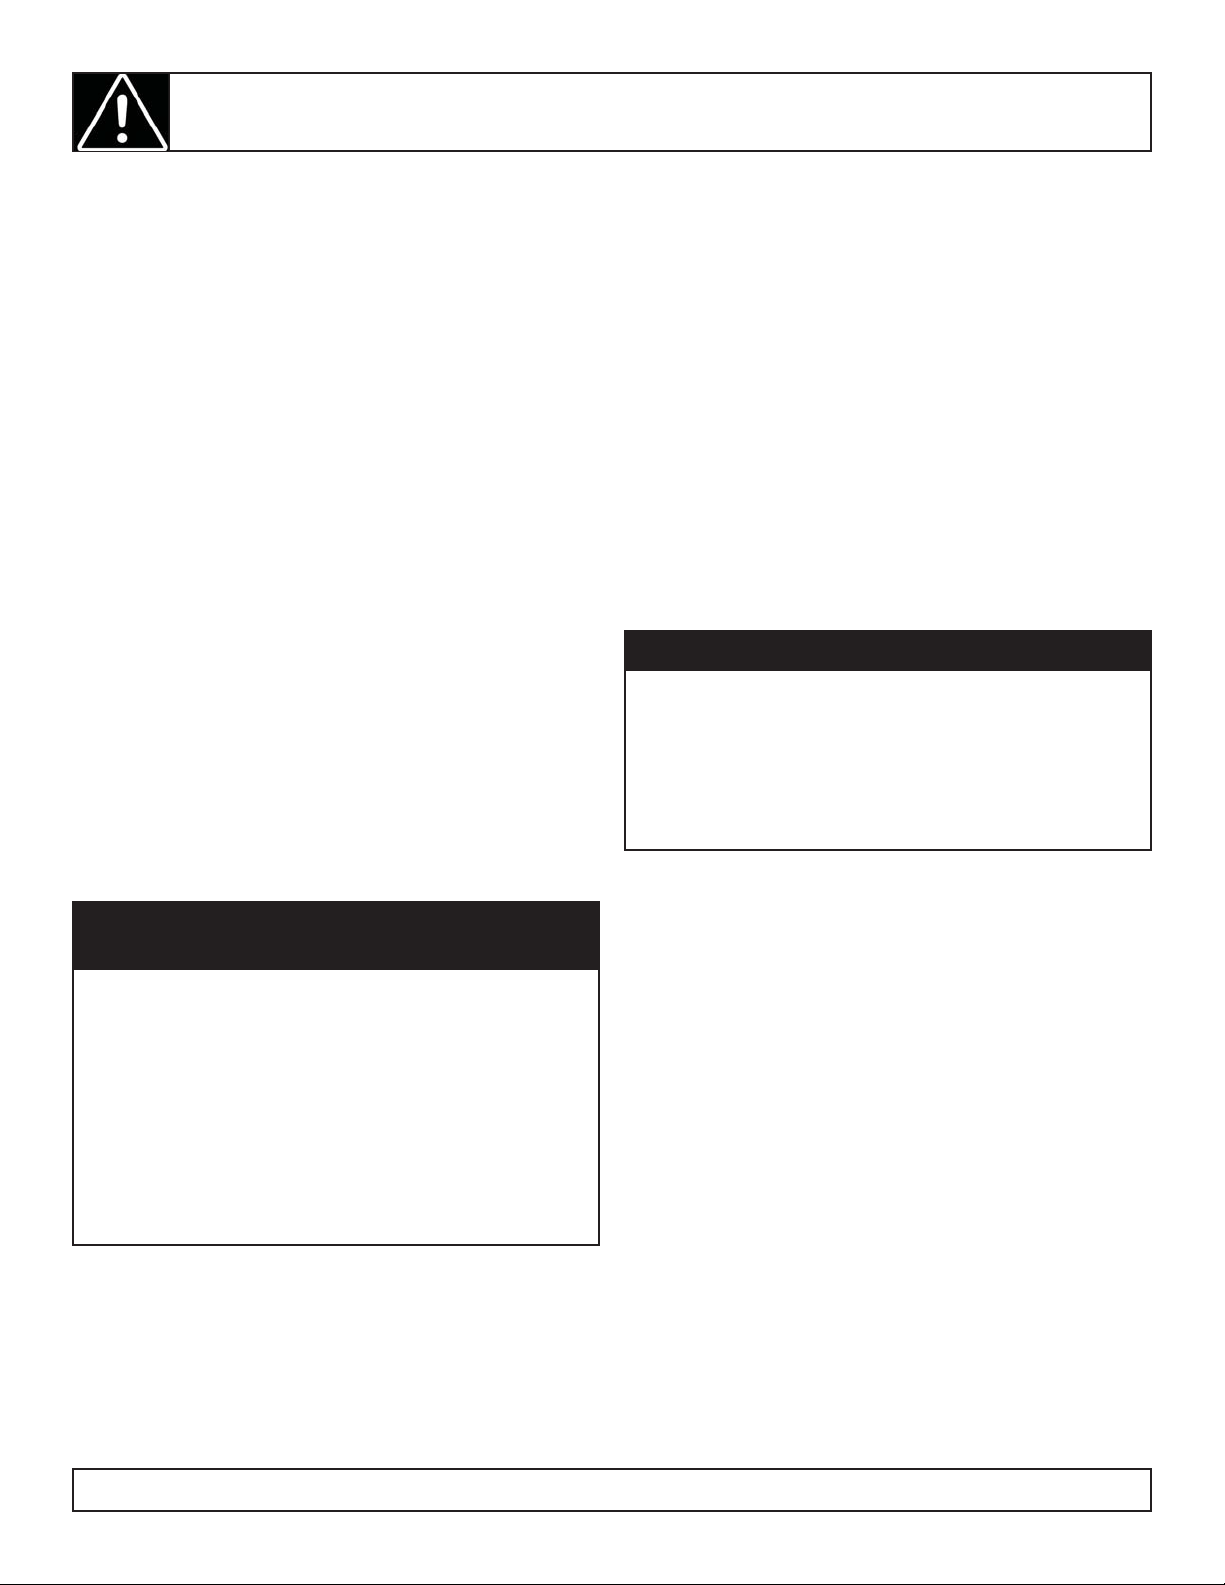
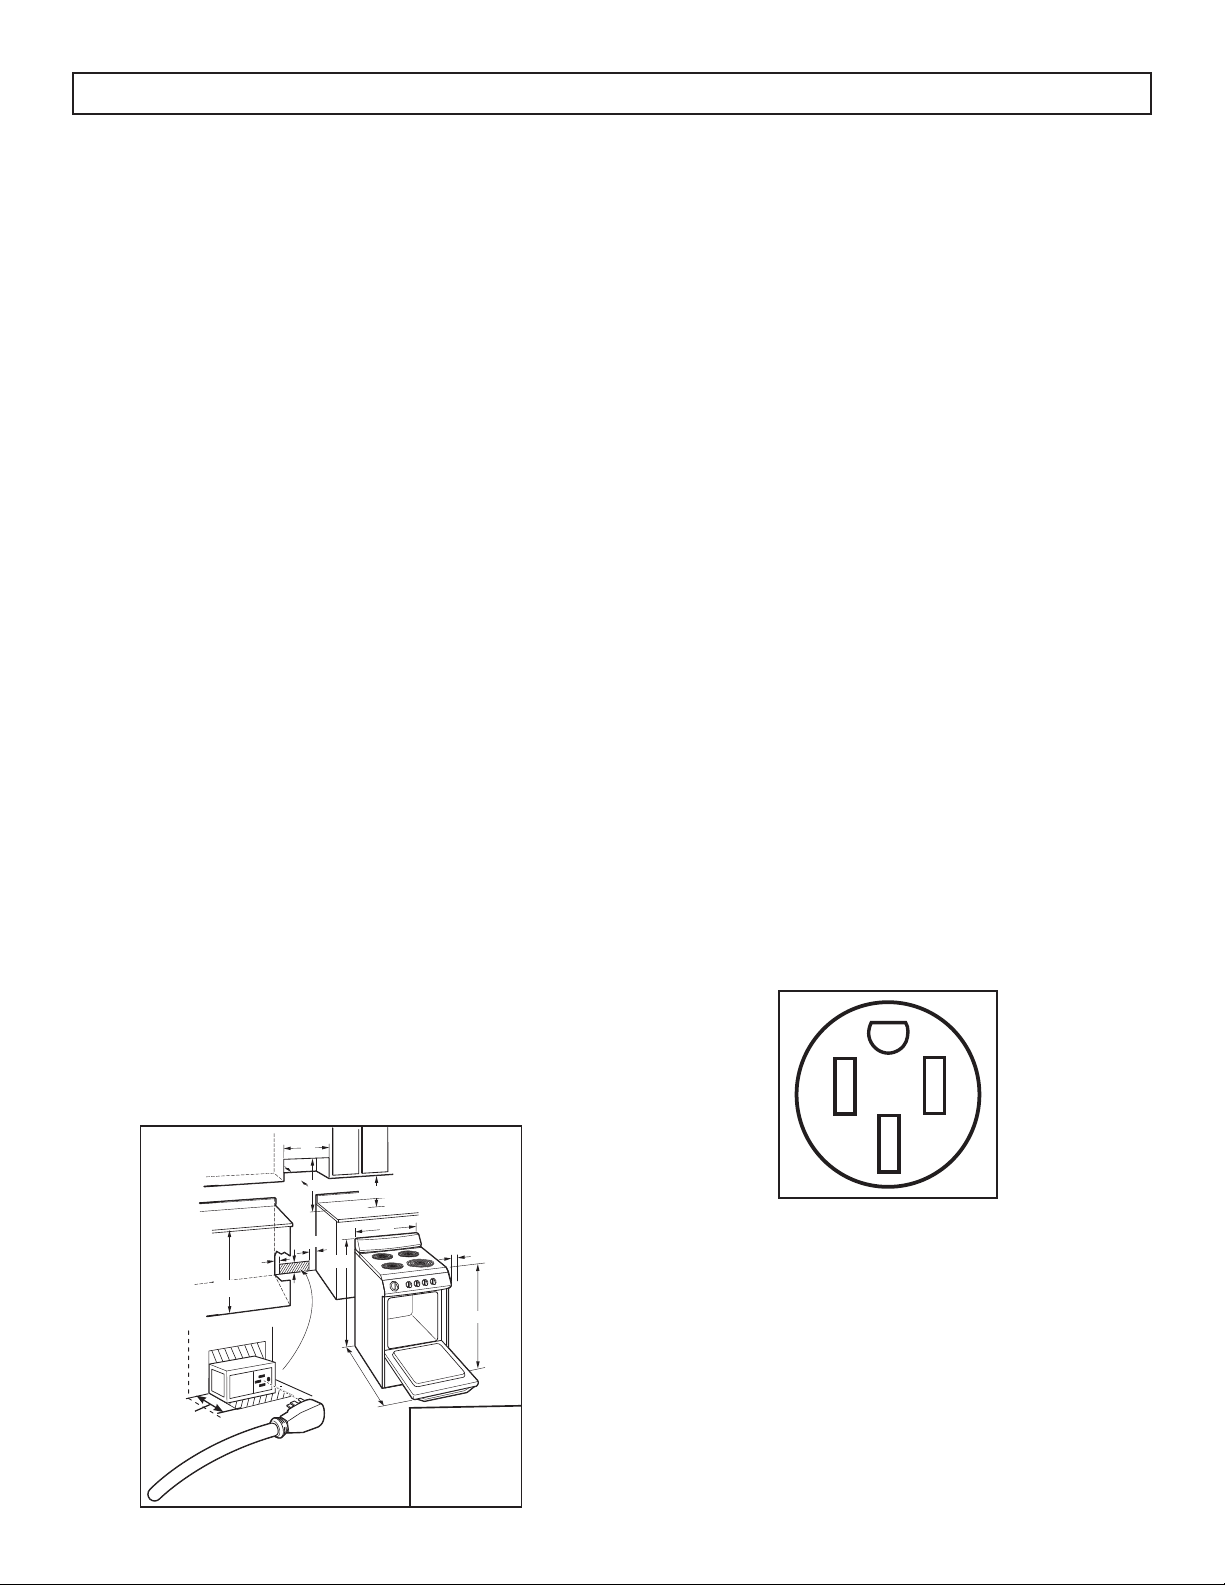
PREPARE THE OPENING
All rough-in and spacing dimensions must be met
for safe use of the appliance. Electricity to the range
can be disconnected at the outlet without moving the
range by removing the lower drawer if the outlet is
in the preferred location.
To reduce the risk of burns or fi re when reaching
over hot surface elements, cabinet storage space
above the cooktop should be avoided. If cabinetry
is present above the range, risk can be reduced
by installing a range hood that sticks out at least 5
inches beyond the front of the cabinets. Cabinets
installed above a cook top must be no deeper than
13 inches.
Make sure the cabinets and wall coverings around
the range can withstand temperatures generated by
the range.
Allow 2 inches of space from the range to the
adjacent vertical walls above the cooktop surface.
Allow 30 inches minimum clearance between the
surface elements and the bottom of unprotected
wood or metal top cabinets and 15 inches minimum
between the counter top and the adjacent cabinet
bottom.
The range is heavy and can settle into soft fl oor
coverings such as vinyl or carpeting. When
installing the range on this type of fl ooring, it should
be installed on a 1/4 inch thick sheet of plywood or
similar material.
2¼”
36” max.
2”
36” ¾ ± ¼”
15” min.
5”
2½”
41¾”
A
C
B
13”
30” min.
max.
D
A: 23 3/4”
B: 23 3/4”
C: 2”
D: 44 3/8”
INSTALLATION INSTRUCTIONS
6
ELECTRICAL REQUIREMENTS
This appliance must be supplied with the proper
voltage and frequency, and connected to an
individual properly grounded branch circuit,
protected by a circuit breaker or fuse having
amperage as specifi ed on the rating plate. The
rating plate is located under the cooktop.
We recommend you have the electrical wiring and
hookup of your range connected by a qualifi ed
electrician. After installation, have the electrician
show you where your main range disconnect is
located.
Check with your local utilities for electrical codes
which apply in your area. Failure to wire your
oven according to governing codes could result
in a hazardous condition. If there are no local
codes, your range must be wired and fused to
meet the requirements of the CSA Standard C22.1,
Canadian Electrical Code, Part 1 - latest edition.
You can get a copy from: Canadian Standards
Association, 178 Rexdale Blvd., Toronto, ON, M9W
1R3, CANADA.
This range is equipped with a CSA International
Certifi ed Power Cord intended to be plugged into
a standard 14-50R wall receptacle. Be sure the
wall receptacle is within reach of the range’s fi nal
location.
INSTALLATION INSTRUCTIONS
7
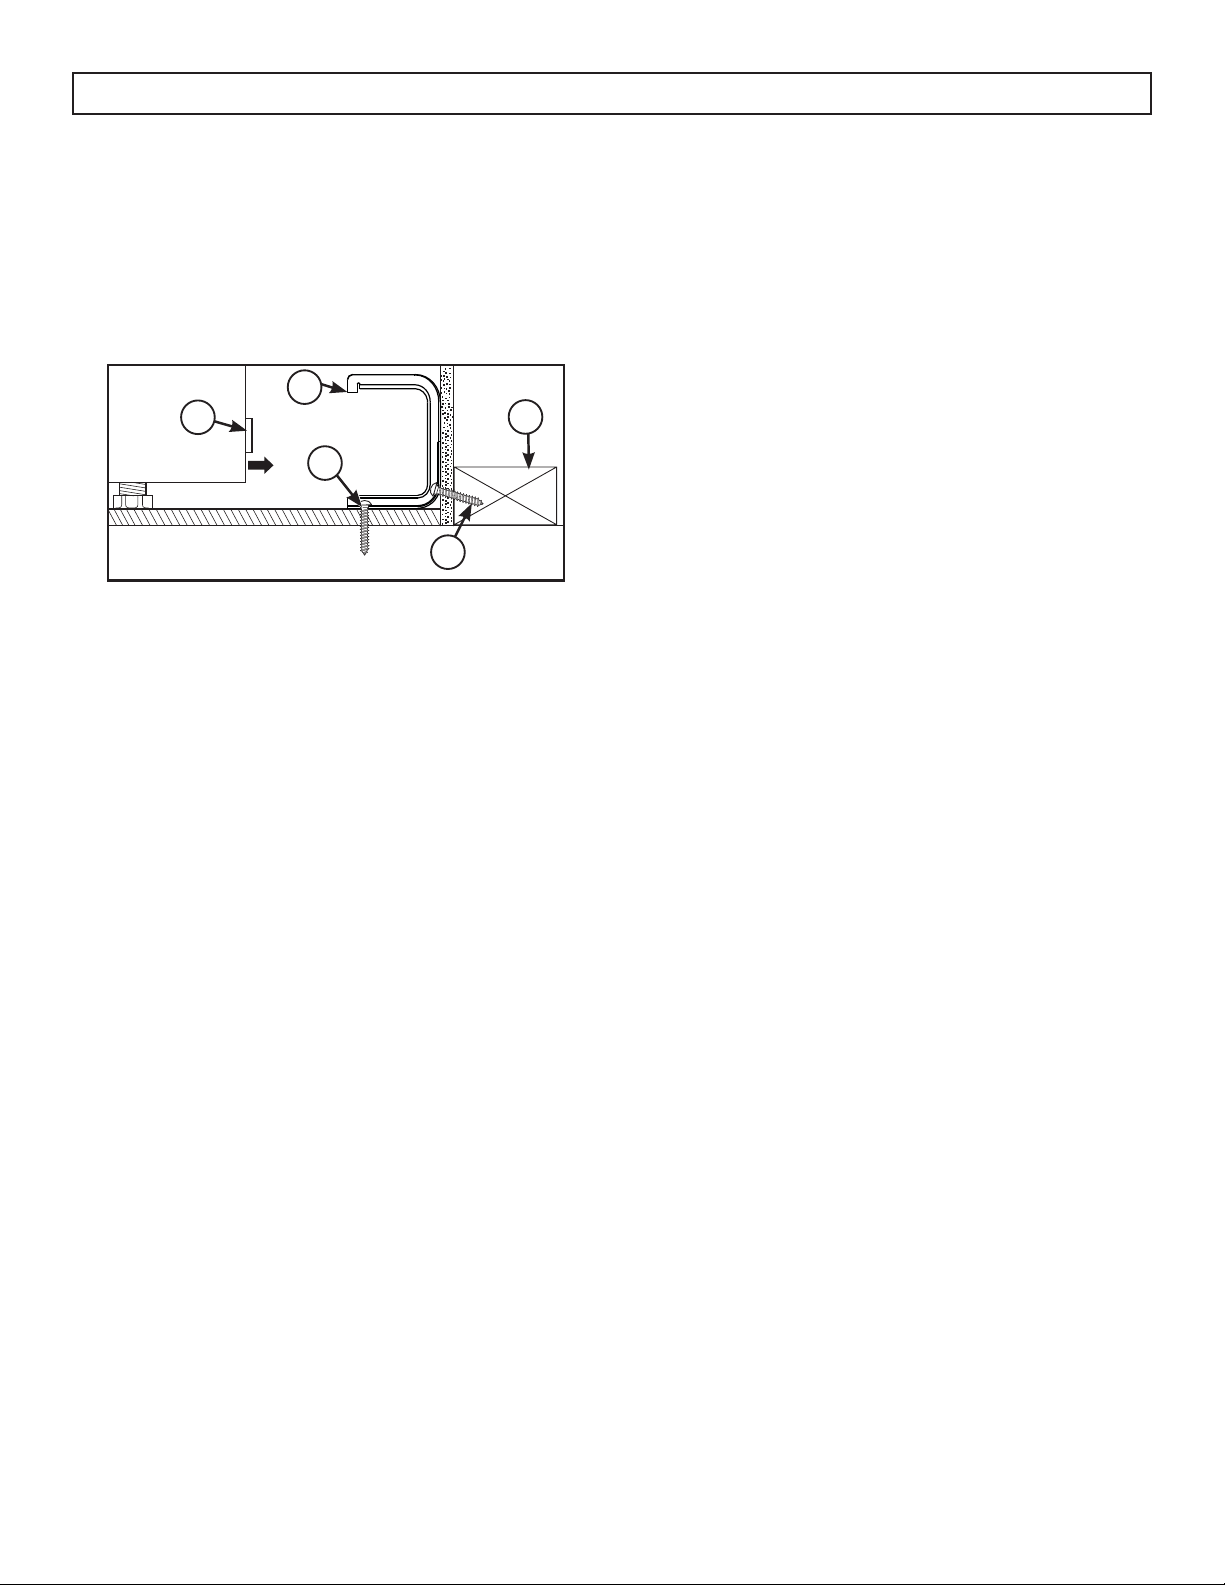
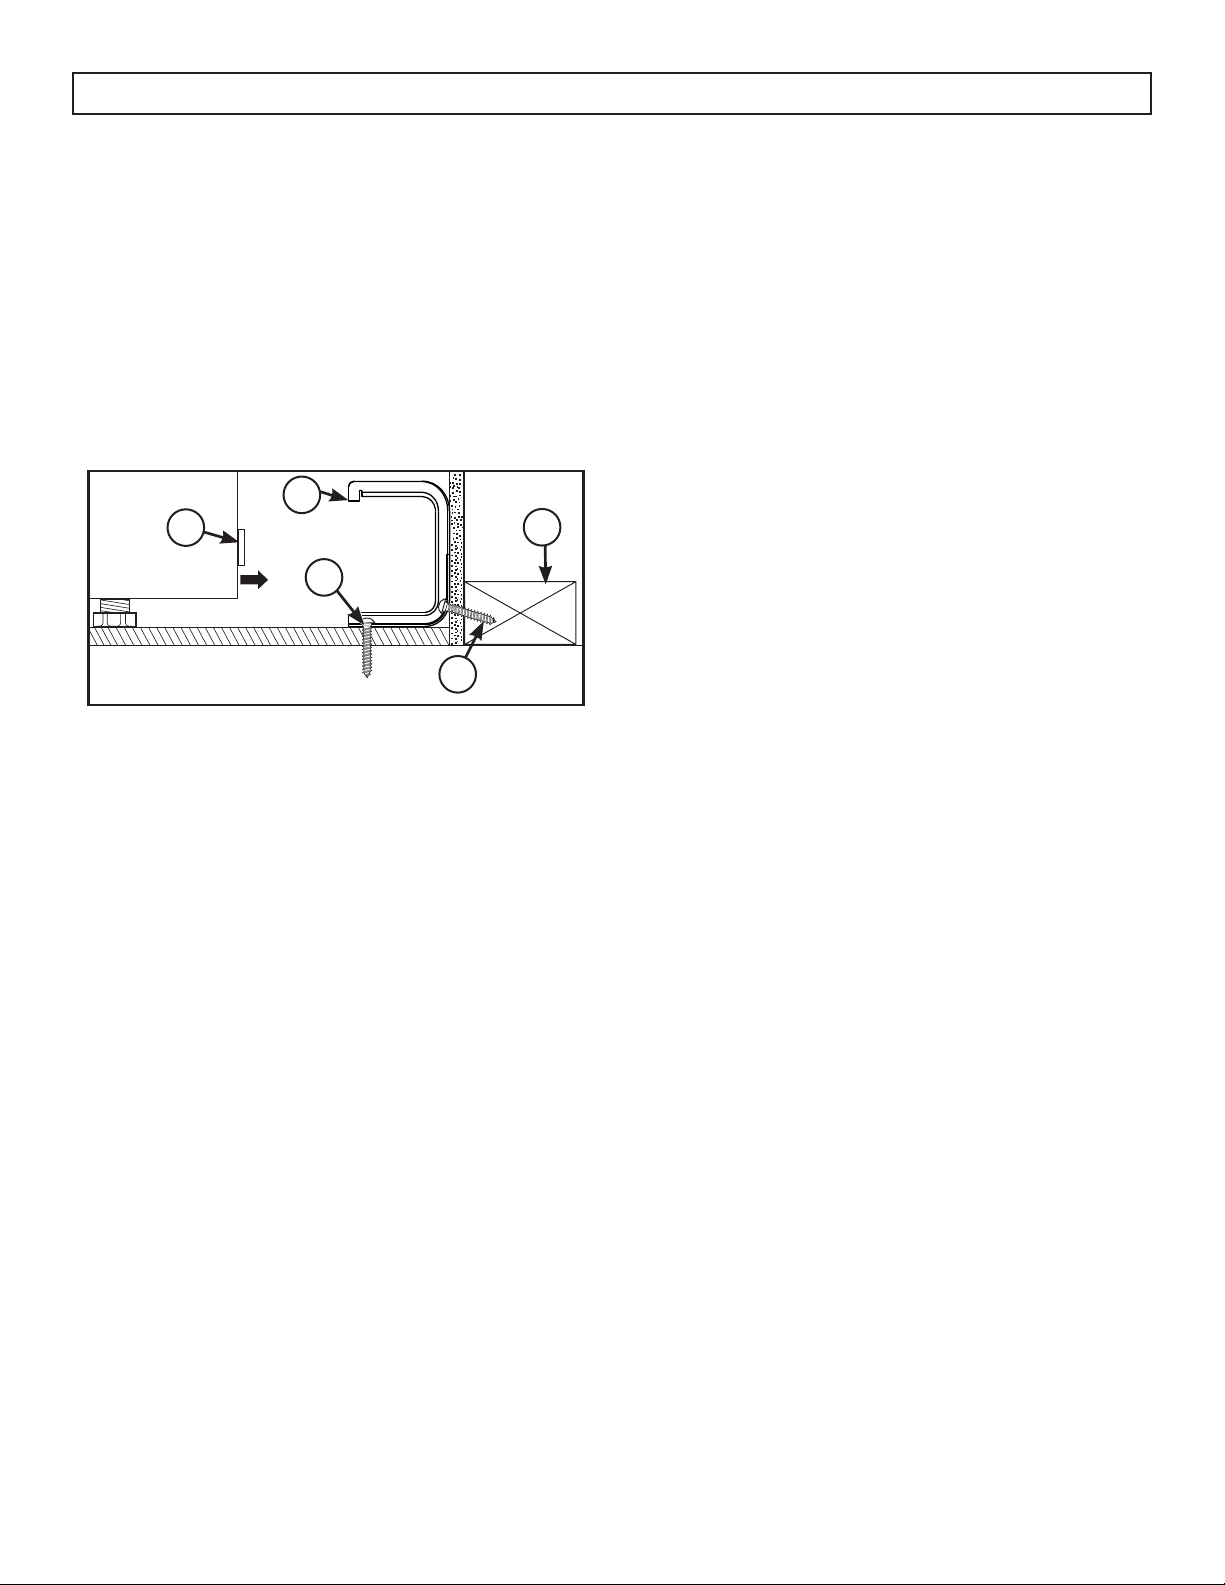
Rear wall installation
Use the two screws provided to secure the bracket
to the rear wall. The screws must enter a wood sill
plate. If the wall contains any metal studs or similar
materials, or if the back of the appliance cannot
reach the rear wall, the fl oor installation should be
used.
Floor installation
Wood fl oor: Use the two screws provided to secure
the bracket to the fl oor.
Concrete fl oor:
1. Mark the location where the screws need to be
installed.
2. Use a power drill and a concrete bit to drill a
5/32” pilot hole 2” deep into the concrete at the
center of each of the marked locations.
3. Use the two screws provided to secure the
bracket to the fl oor.
Double check the installation
After installing the bracket, slide the appliance into
its fi nal location. Look underneath the appliance
and ensure that the anti-tip arm attached to the side
panel of the appliance is engaging the bracket.
ANTI-TIP BRACKET INSTALLATION
1. Anti-tip arm on the back of the appliance
2. Anti-tip bracket
3. Screw must enter wood or concrete
4. Wall sill plate
5. Screw must enter wood
1
2
3
4
5
To reduce the risk of the appliance tipping, the anti-
tip bracket must be installed before operation.
Note: The installation of the anti-tip bracket must
meet all local codes for securing the appliance.
The anti-tip bracket must be secured to either the
rear wall or the fl oor and must be positioned in such
a way that it will overhang the anti-tip arm on the
rear of the appliance.
8
OPERATING INSTRUCTIONS
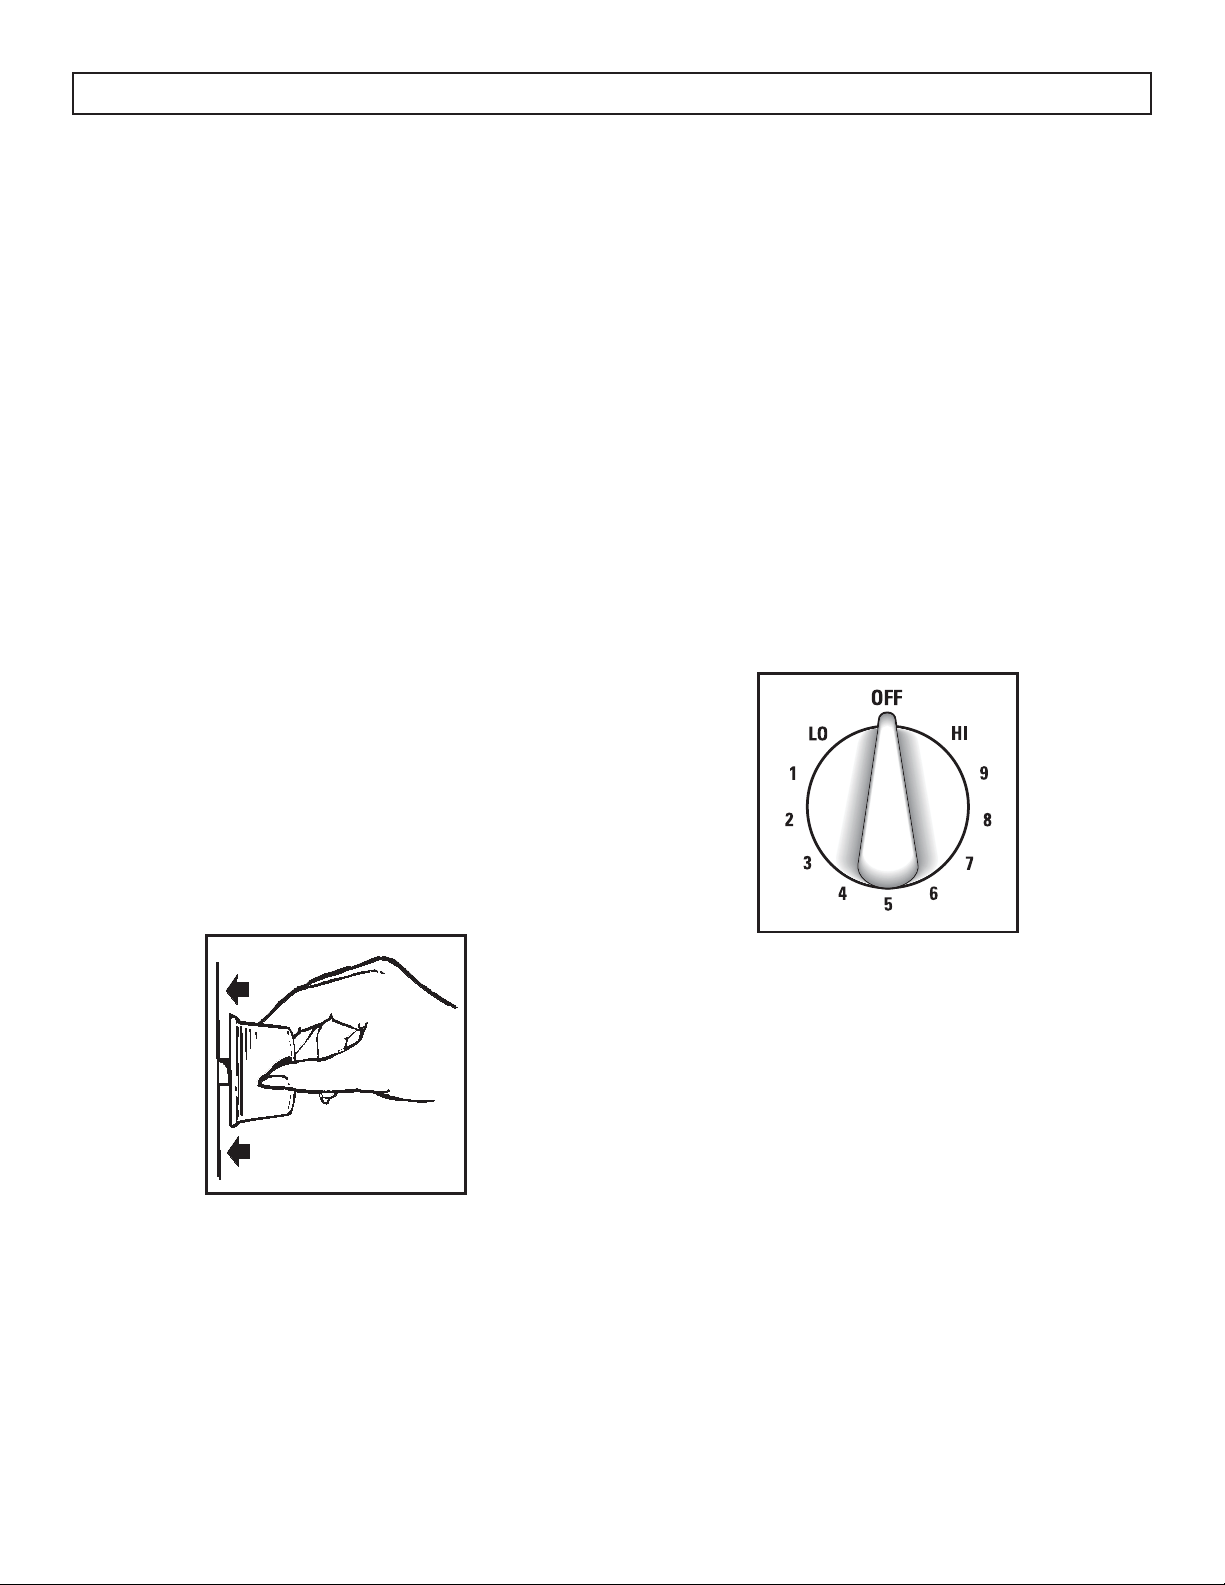
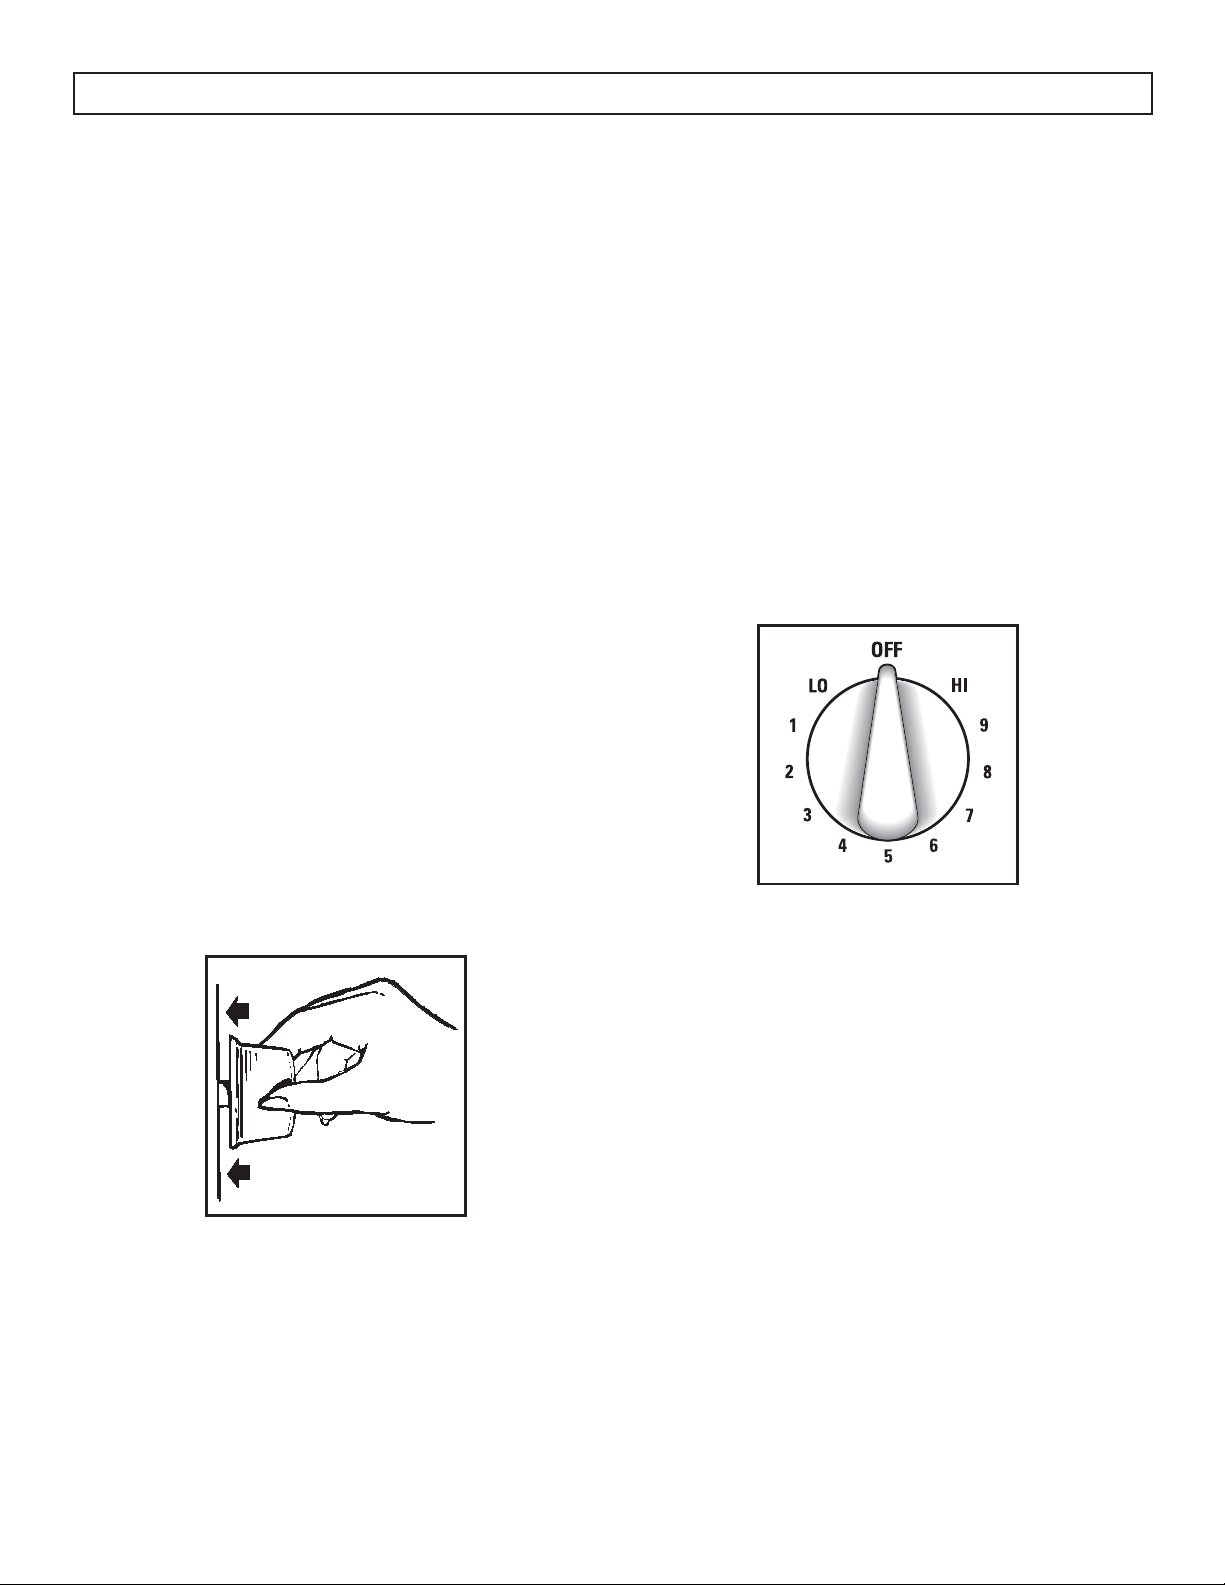
SURFACE COOKING CONTROLS
The surface heating elements of the appliance are
designed for a variety of heat settings.
At both the HI and LO positions, there are slight
indents and the knob will click into place in these
positions. HI indicates the highest setting. LO
indicates the lowest setting.
A sound of clicking may be heard from the
appliance during use. This is normal and indicates
that the heat setting selected is being maintained.
Changing to a higher heat setting will happen faster
than changing to a lower heat setting as it will take
time for the heat to dissipate.
SETTING THE CONTROLS
1. Push the control knob in.
2. Turn to the desired heat setting.
The knob only needs to be pushed in when moving
out of the “OFF” position. When the knob is in any
position other than “OFF”, it can be turned without
pushing in.
Ensure that the element is turned off when cooking
is fi nished. An indicator light will glow when any
heating element is turned on.
HEAT SETTING GUIDE
• HI - quick start for cooking; bringing water to a
boil
• MEDIUM HIGH - Fast fry; pan broil; maintain a
fast boil on a large amount of food
• MED - Sauté and brown; maintain a slow boil
on a large amount of food
• MEDIUM LOW - Cereal; maintain the serving
temperature of most foods
• LO - Cook after starting at HI; cook with little
water in a covered pan; use to steam rice; melt
chocolate or butter
Never leave food unattended while cooking. Boil
overs cause smoking. Greasy spill overs may catch
fi re.
SURFACE COOKING TIPS
Use medium or heavyweight cookware. Aluminum
cookware conducts heat faster than other metals.
Cast-iron and coated cast-iron cookware is slow to
absorb heat, but generally cooks evenly at low or
medium heat settings. Steel pans may cook unevenly
if not combined with other metals.
Do not overfi ll cookware with fat that may spill over
when adding food. Frosty foods bubble vigorously.
Watch foods frying at high temperatures. Keep
range and hood clean from accumulated grease.
To conserve the most cooking energy, pans should
be fl at on the bottom, have straight sides and tight-
fi tting lids. Match the size of the saucepan to the
size of the surface element. A pan that extends more
than an inch beyond the edge of the drip pan traps
heat, which causes “crazing” (fi ne hairline cracks)
on porcelain, and discoloration ranging from blue
to dark gray on chrome drip pans.
9
OPERATING INSTRUCTIONS
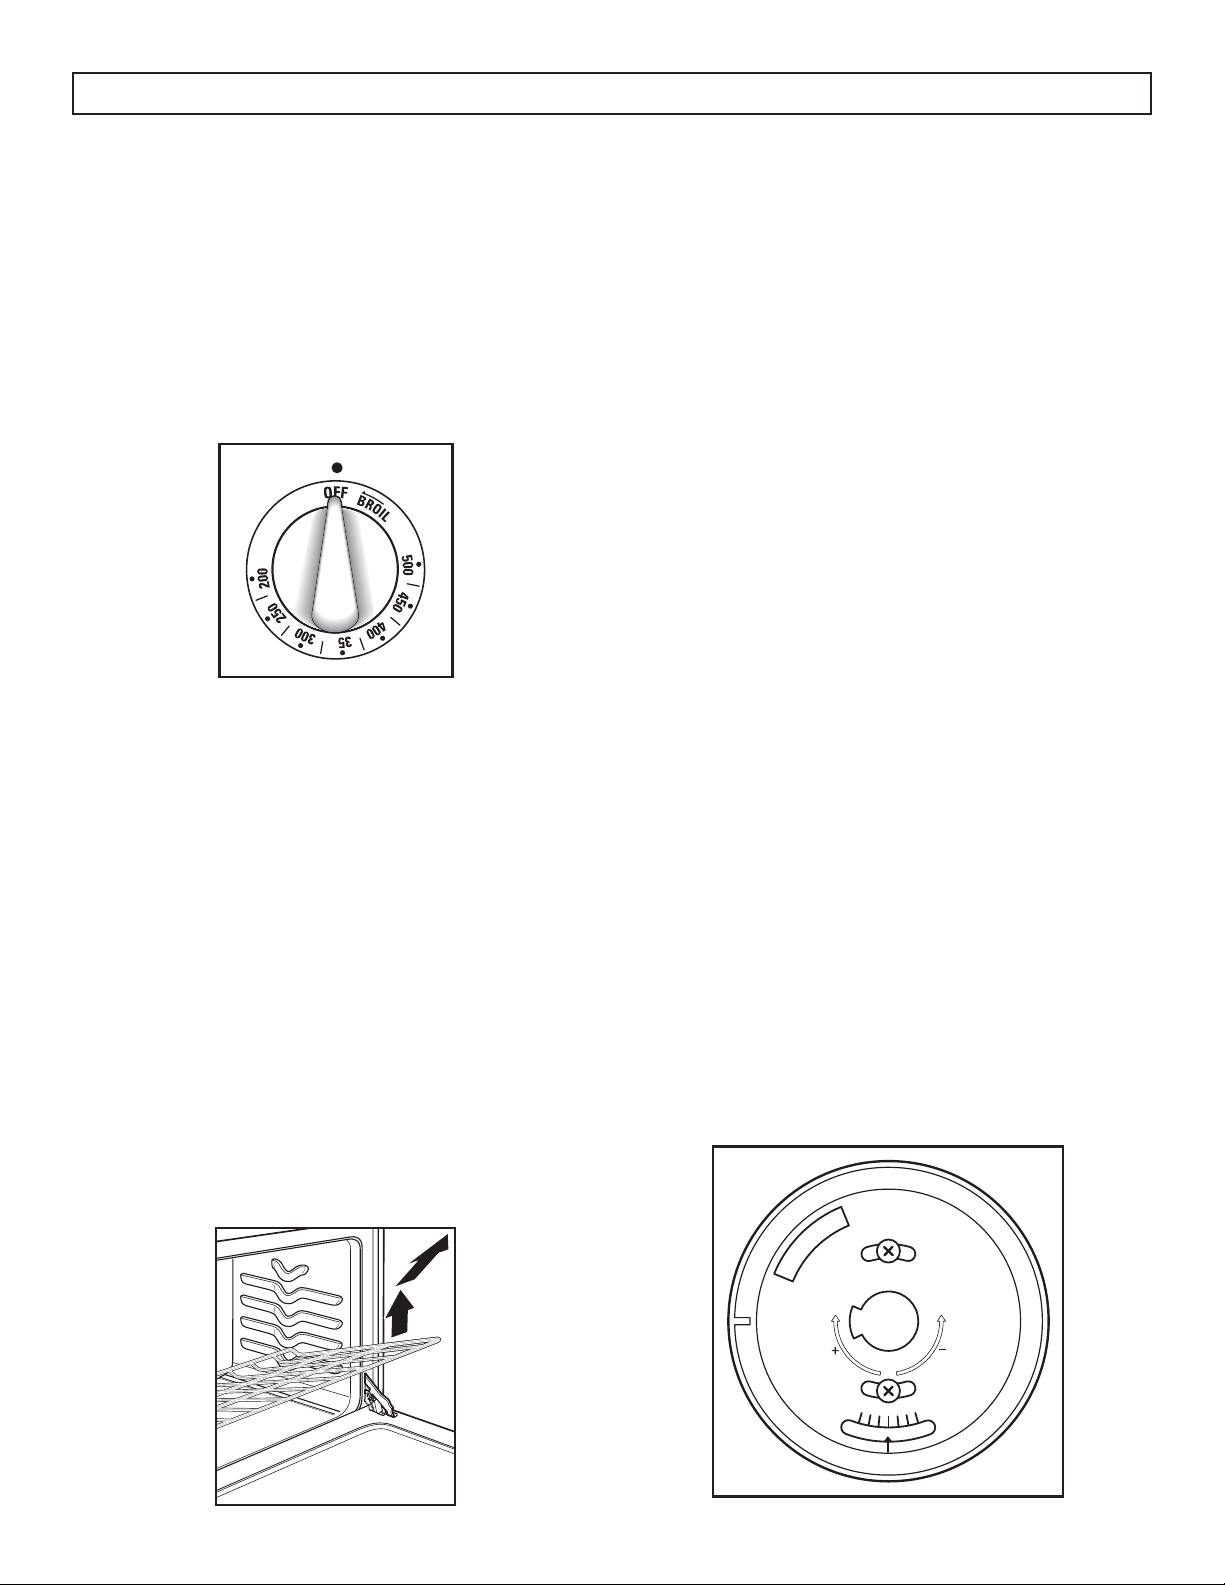
OVEN COOKING CONTROLS
To use the oven, turn the oven temperature knob to
the desired cooking temperature. The oven knob
is marked in 25 degree increments, from 200°F to
BROIL.
The oven light glows until the oven reaches the
selected temperature and then will turn off. During
cooking, the light will turn on any time the oven
needs to add more heat to maintain the selected
temperature.
OVEN SHELVES
The oven shelves are designed with stop-locks so
that when they are placed correctly on the shelf
supports, they will stop before coming completely
out of the oven and will not tilt when food is being
removed or added.
To remove the shelves from the oven, pull the shelf
outward, tilt the front end upward and pull it out.
To replace the shelves, place the shelf on the support
with the stop locks facing up and toward the back of
the oven. Tilt up the front and push the shelf toward
the back of the oven until it goes past the bump on
the shelf support, then lower the front of the shelf
and push it all the way into the oven.
The oven has four different shelf support positions to
accommodate different cooking requirements.
ADJUST THE OVEN THERMOSTAT
You may fi nd that the new oven cooks differently
than the one it replaced. Use the new oven for a
few weeks to become familiar with it. If you still fi nd
the oven is too hot or too cold, you can adjust the
thermostat.
Do not use thermometers, such as those found in
grocery stores to check the temperature of the oven.
They are not calibrated for high temperatures and
can vary from 20 - 40 degrees.
This adjustment will not affect the broiling
temperatures. The adjustment will be retained after
a power failure.
1. Pull the oven temperature knob off the
range and look at the back of it. To make an
adjustment, loosen by one turn the two screws
on the back of the knob. Do not completely
remove the screws.
2. With the back of the knob facing you, hold the
outer edge of the knob with one hand and turn
the front of the knob with the other hand.
3. To increase the oven temperature, move the top
screw toward the right.
4. To decrease the oven temperature, move the top
screw toward the left.
5. You will hear a click for each notch you move
the knob. Each click will change the oven
temperature approximately 10°F. The range is
plus or minus 60°F from the arrow. We suggest
that you adjust the temperature by one click and
then test the oven performance before adjusting
further.
6. After the adjustment is made, retighten the
screws so they are snug. Be careful not to over-
tighten.
7. Replace the knob, matching the fl at area of the
knob to the shaft.
L
O
O
S
E
N
R
E
S
C
W
T
S
R
O
O
T
E
A
T
K
E
O
M
A
C
E
O
L
R
K
M
A
E
T
H
O
T
E
R

OPERATING INSTRUCTIONS
OVEN BOILING
Broiling involves cooking food by intense radiant
heat from the upper element in the oven. Most fi sh
and tender cuts of meat can be boiled. Follow these
steps to keep spattering and smoking to a minimum.
1. If the meat has fat or gristle around the edge,
cut vertical slashes through both about 2” apart.
If desired, fat may be trimmed, leaving a layer
about 1/8” thick.
2. Place the meat on a broiler grid in a broiler pan
designed for broiling. Always use the grid so
the fat drips into the broiler pan; otherwise the
juices may become hot enough to catch fi re.
3. Place the shelf in one of the top two positions for
most broiling.
4. Place the food in the oven and close the door.
Always broil with the door closed.
5. Turn the oven temperature knob to BROIL.
6. Food can be turned during broiling if necessary.
Be cautious of hot air or steam when opening
the oven door.
7. Make sure to turn the oven temperature knob to
OFF once broiling is complete.
BROILING TIPS
• If desired, marinate meats or chicken before
broiling or brush with barbecue sauce in the last
5 - 10 minutes of cooking.
• When arranging food on a pan, do not let fatty
edges hang over the sides as the dripping fat
will soil the oven as it cooks.
10
OVEN BAKING AND ROASTING
1. Position the shelves in the oven. If cooking on
two shelves at the same time, stagger the pans
for the best heat circulation.
2. Close the oven door. Turn oven temperature
knob to the desired temperature.
3. Place the food on the center of the oven shelf.
Allow at least 2 inches between the end of the
pan and the oven wall or any adjacent pans.
4. Check the food regularly. Remove once done
and ensure the oven is turned off.
SHELF POSITIONS
• Most baking is done on the second or third shelf
position from the bottom of the oven.
• When baking multiple items, use two shelves
positioned on the second and fourth shelf
supports from the bottom of the oven.
• Bake angel food cakes on the fi rst shelf position
from the bottom of the oven.
• Roasting is usually done on the bottom shelf
position.
• If preheating is necessary, watch the oven light
and place food in the oven once the light goes
out. The oven light will cycle on and off with the
oven thermostat as it cycles to maintain an even
temperature.
BAKING AND ROASTING TIPS
• Follow a tested recipe and measure the
ingredients carefully. If you are using a package
mix, follow label directions.
• Do not open the oven door while baking or
roasting. Heat will be lost and the cook time
might need to be extended. If you must open the
door, open it partially and close it as quickly as
possible.
• Roasting is cooking by dry heat. Tender meat
or poultry can be roasted uncovered. Roasting
temperatures, which should be low and steady,
keep spattering to a minimum. When roasting,
it is not necessary to sear, baste, cover, or add
water to the meat.
• Frozen roasts of meat can be cooked without
thawing, but allow 10 to 25 minutes of
additional time per pound of meat (10 minutes
per pound for roasts under 5 pounds, more time
for larger roasts).
• Thaw frozen poultry before roasting to ensure
even cooking. Some commercial frozen poultry
can be cooked successfully without thawing.
Follow directions given on package label.
11
CARE & MAINTENANCE
SURFACE ELEMENTS
To clean the surface heating elements, turn the
temperature control knob to the highest setting for
one minute; this will burn off any food residue. Note
that this could cause smoke, it is advisable to open
a window or turn on a fan to avoid smoke build up.
Do not immerse the heating elements in liquids
of any kind. Do not put heating elements into a
dishwasher.
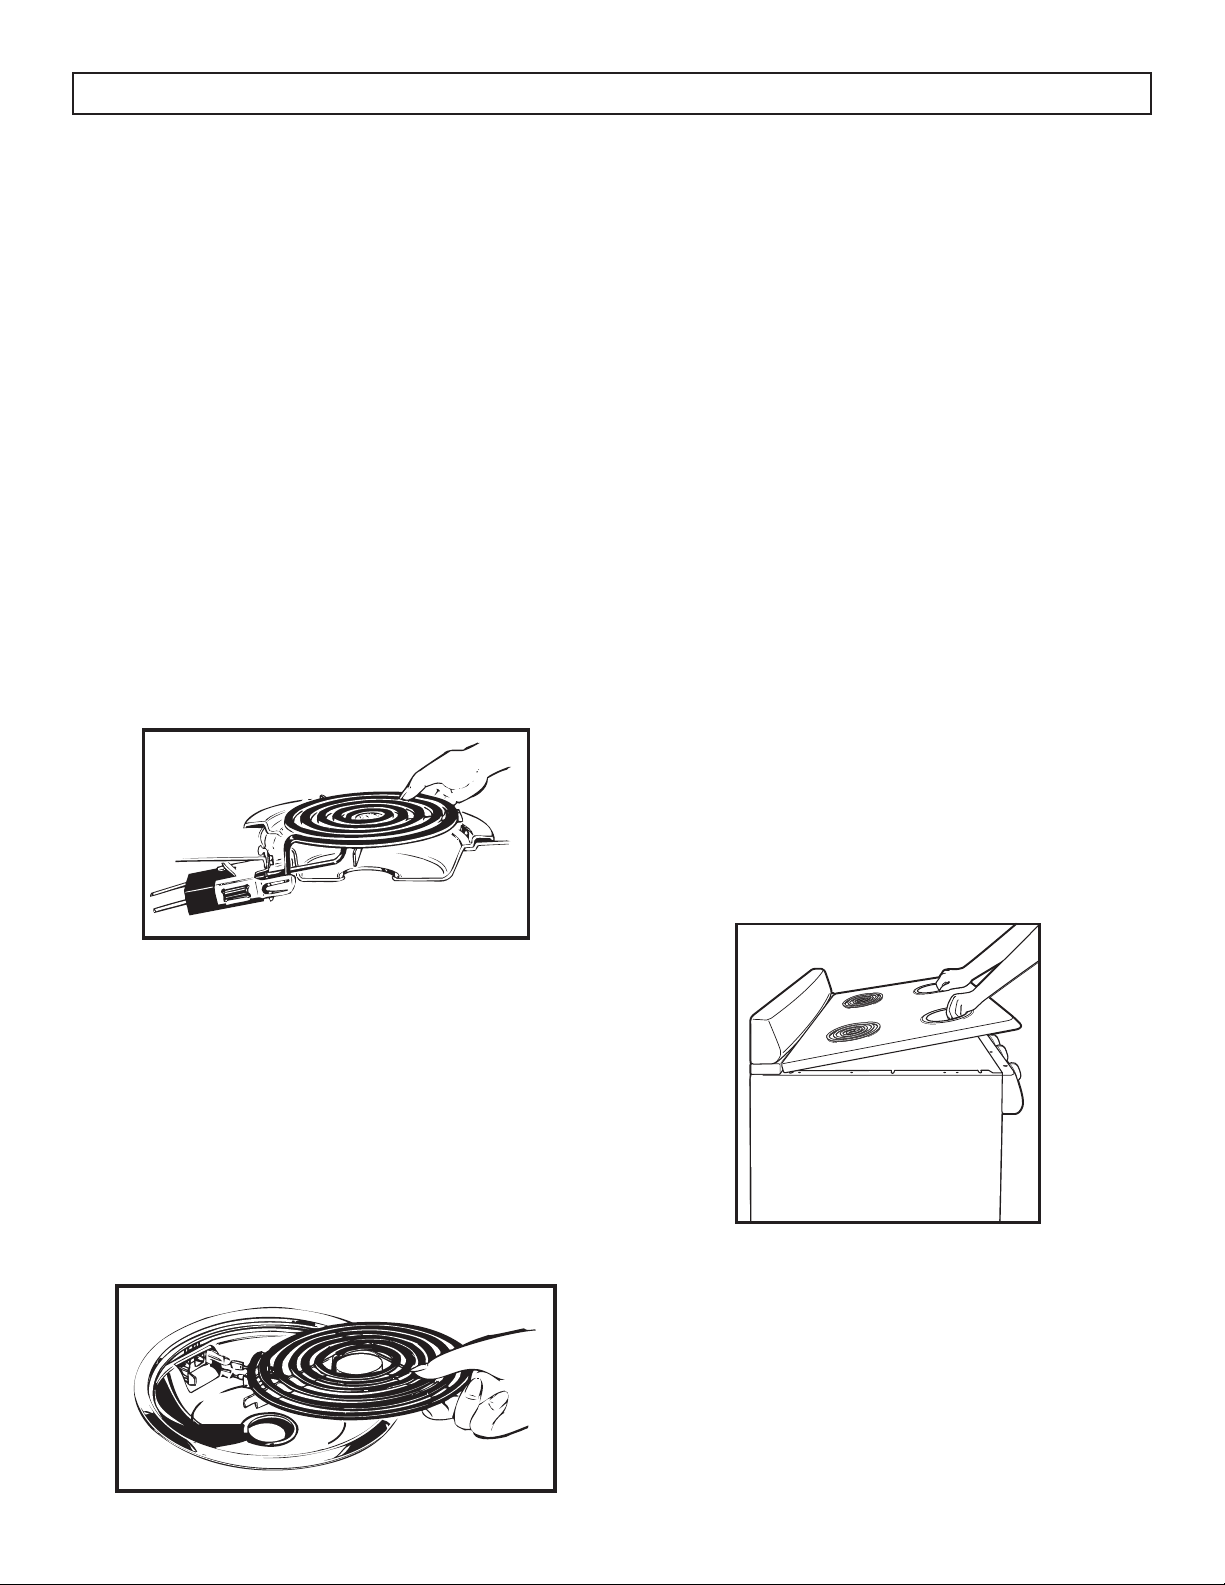
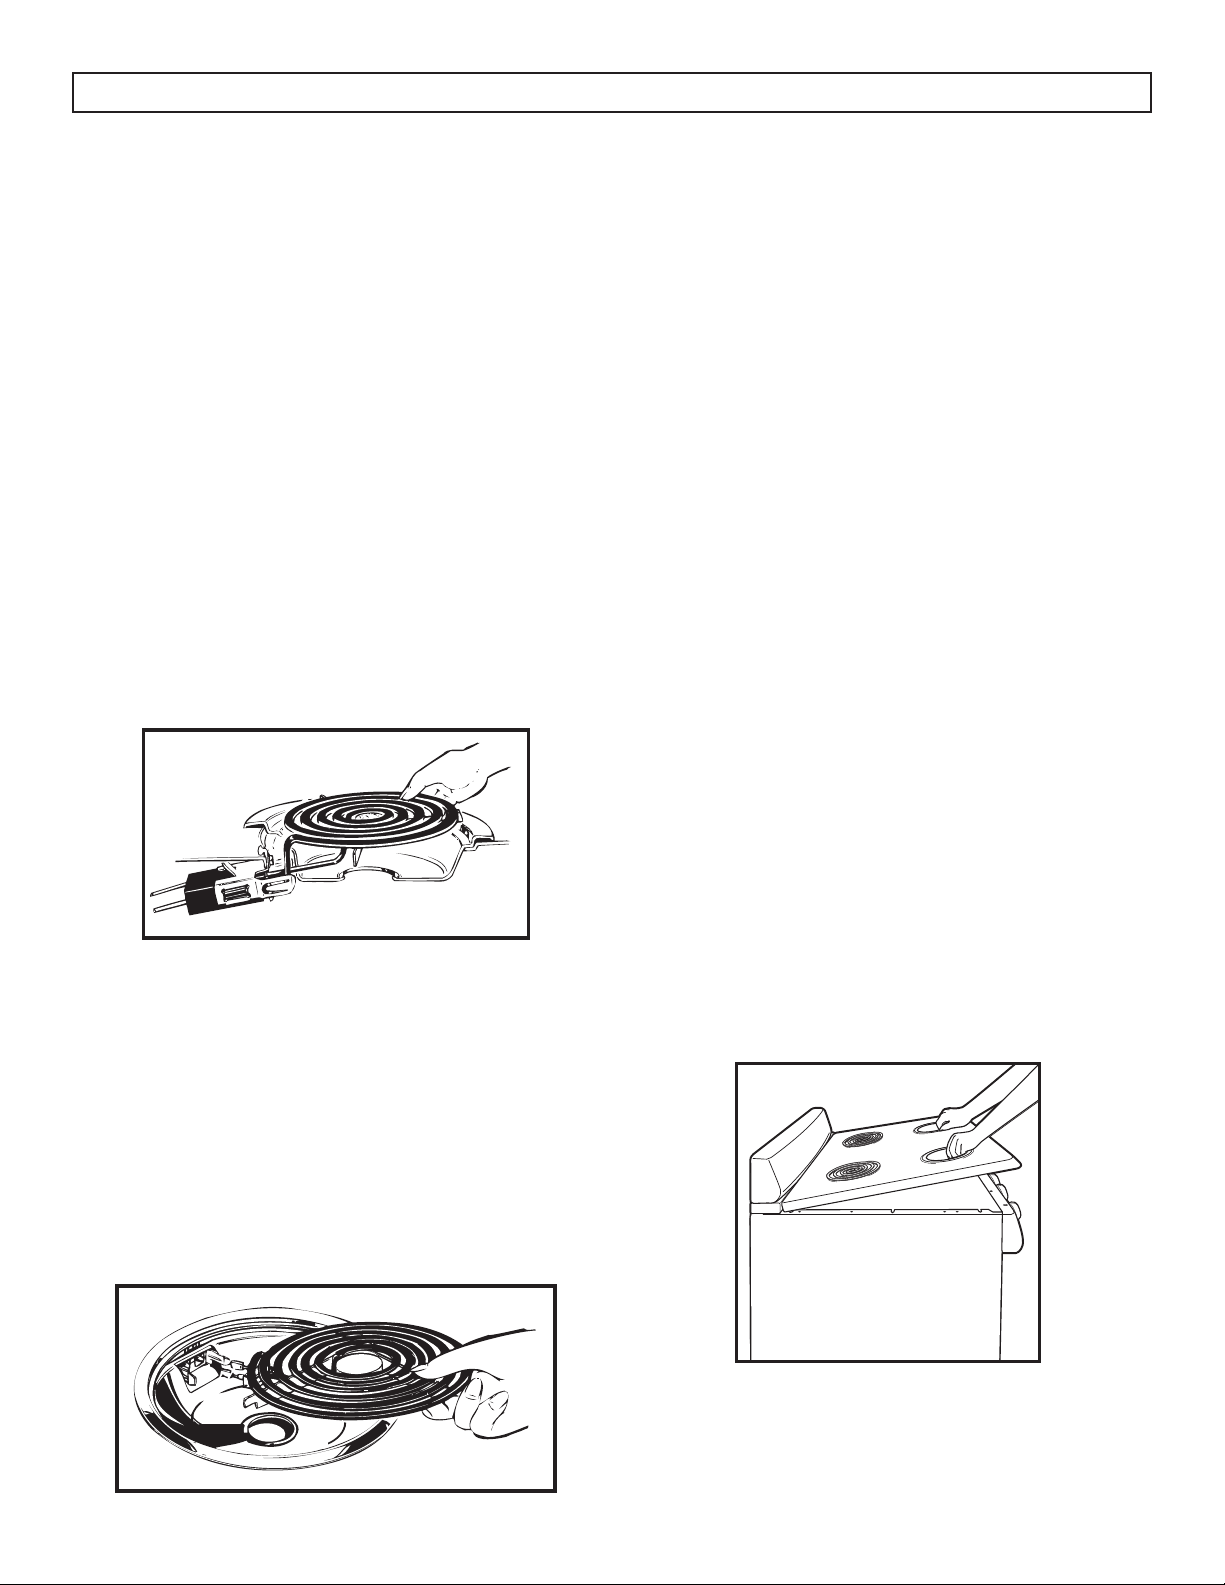
To remove the drip pans for cleaning, fi rst remove
the heating elements. Make sure the elements are
cool before touching them.
Lift the element about 1” above the drip pan and
pull to remove. Do not lift the element more than
1” as this can bend internal components and the
element may not lie fl at when it is replaced.
Remove the drip pan and clean as necessary. Drip
pans can be cleaned in a dishwasher or by hand.
Once cleaning is complete, replace the drip pan in
the recess in the cook top. Make sure the opening in
the pan lines up with the receptacle.
Insert the terminals on the heating element through
the opening in the drip pan and into the receptacle.
Guide the element into place gently so that is rests
evenly.
Do not attempt to clean, adjust or repair the
receptacles in any way.
CLEANING
Porcelain enamel cook top
The porcelain enamel fi nish on the cook top is
sturdy but can be damaged if misused. Any acidic
foods such as fruit juices, tomato or vinegar, should
not be permitted to remain on the fi nish for any
length of time.
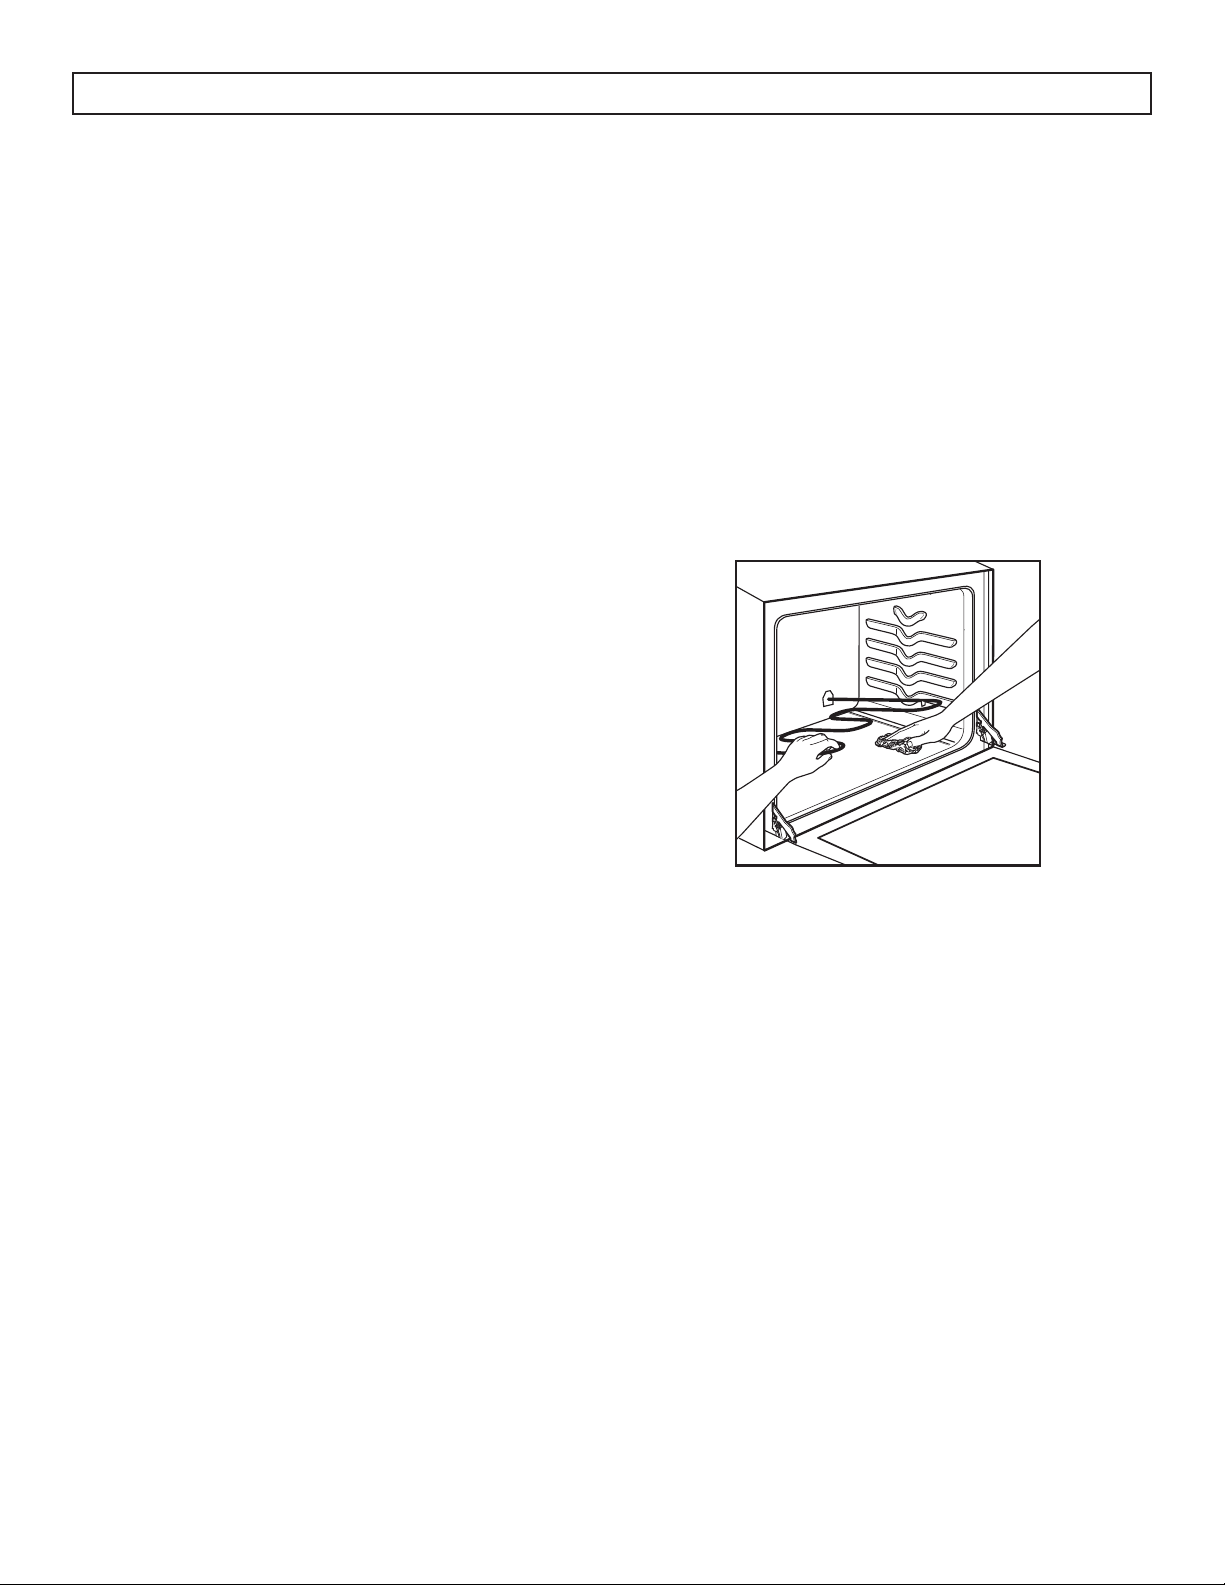
Lift up cook top
The cook top can be lifted so the area underneath
can be cleaned. Spills that over fl ow the drip pans,
especially grease, should be cleaned to avoid build
up and possible smoking or ignition.
Ensure the heating elements are turned off and cool
before lifting the cook top.
Remove the heating elements and the drip pans.
Lift the cook top and prop open with the internal rod
for easier cleaning. This area can be cleaned with
hot, soapy water and a clean cloth.
Once complete, return the internal prop rod to its
initial position and lower the cook top until it snaps
into position. Be careful not to pinch your fi ngers.
Replace the drip pans and heating elements.
CARE & MAINTENANCE
12
Oven shelves
Clean the shelves with an abrasive cleaner or steel
wool. After cleaning, rinse the shelves with clean
water and dry with a clean cloth.
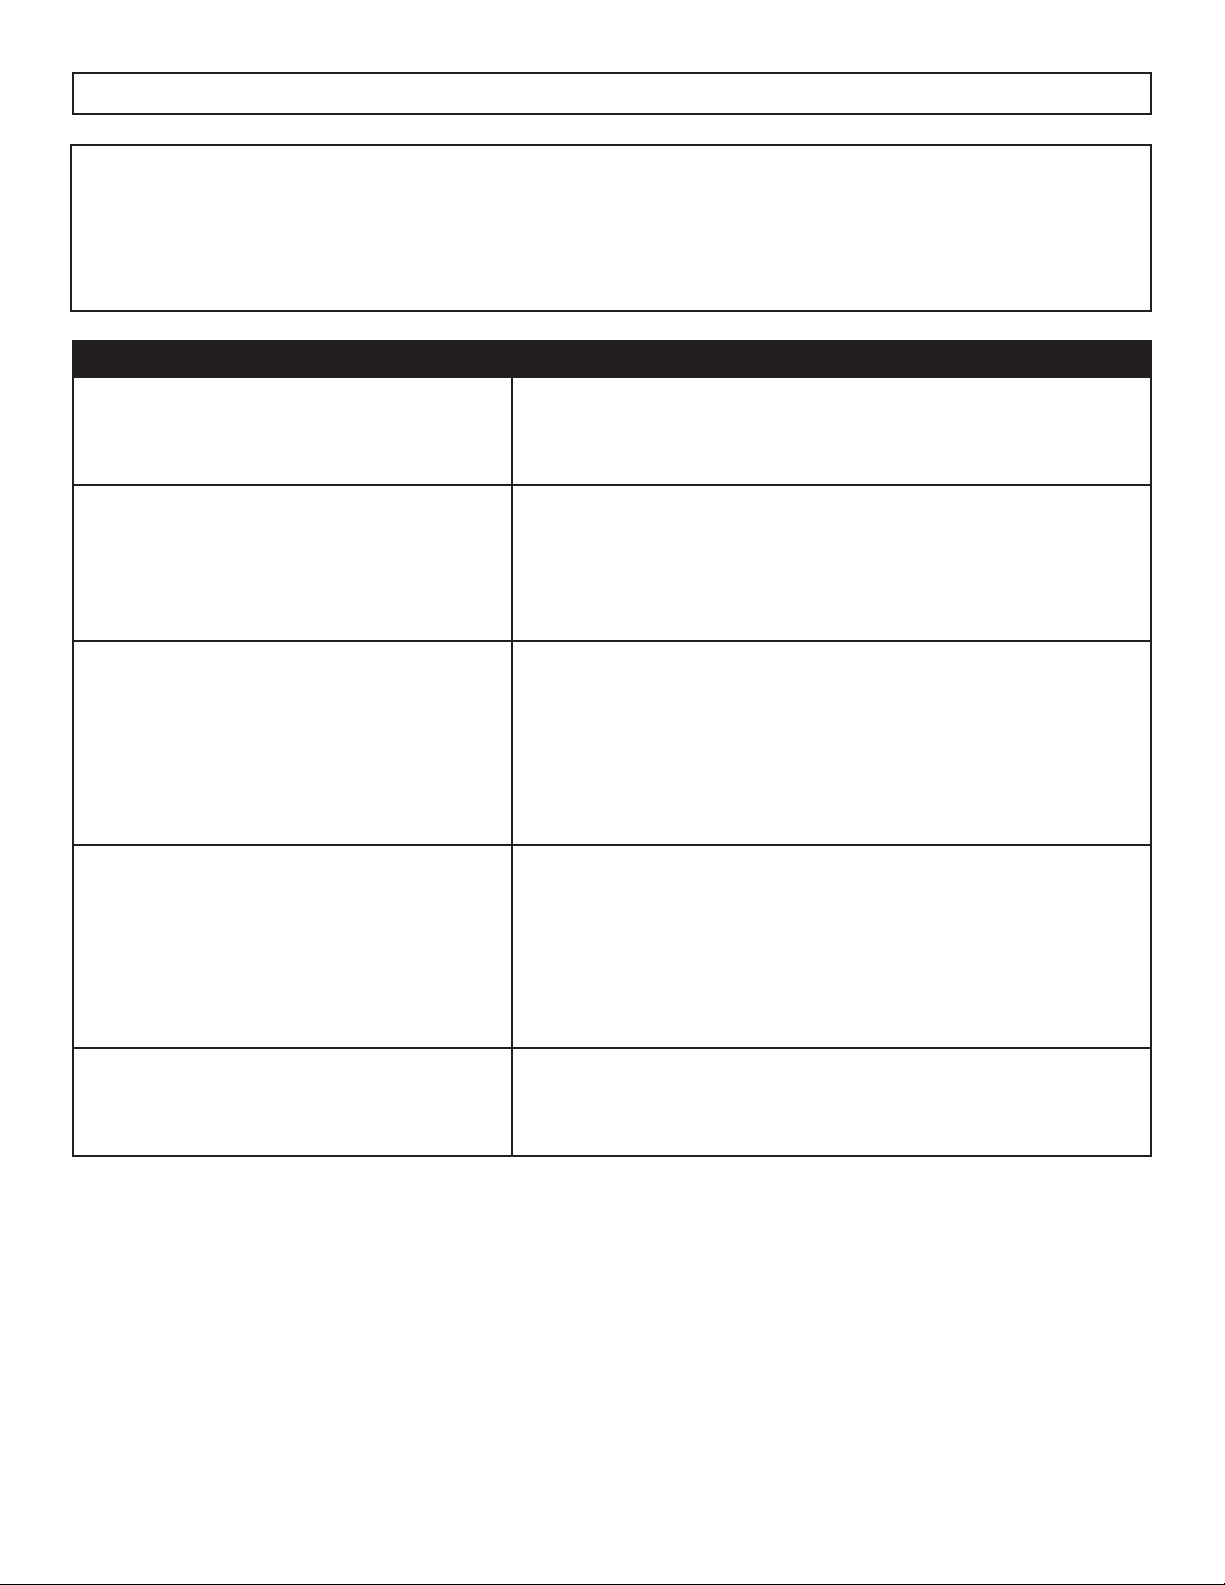
Oven heating elements
Do not clean the bake element or the broil element.
Any food residue will burn off when the elements
are heated.
The bake element can be gently lifted to clean
the oven fl oor. Ensure the element is cool before
cleaning.
Control knobs
The control knobs may be removed for easier
cleaning. Make sure the knobs are in the “OFF”
position and then pull straight off the stems for
cleaning.
The knobs can be cleaned in a dishwasher or by
hand. Make sure the insides of the knobs are dry
before replacing on the appliance.
Painted surfaces
The painted surfaces include the sides, the control
panel, the door and the kick plate. Clean these with
soap and water or a vinegar and water solution.
Do not use commercial oven cleaners, cleansing
powders, steel wool or harsh abrasives on any
painted surface.
Porcelain oven interior
With proper care, the porcelain enamel interior will
retain its fi nish for many years.
Soap and water can be used to clean the interior.
Heavy splattering or spills may require cleaning
with a mild abrasive cleaner.
Do not allow spills with high acid content such as
milk, tomatoes, fruit juices or pie fi lling, to remain
on the surface. They may cause dull spots even after
cleaning.
Household ammonia may make cleaning easier.
Place 1/2 cup of ammonia in a shallow glass pan
and leave in a cold oven over night. The ammonia
fumes will help loosen burned on grease and food.
Cautions about using spray-on oven cleaners
Do not spray oven cleaner on the electrical controls
and switches as it could cause a short circuit and
result in sparking or fi re.
Do not spray oven cleaner directly onto the oven
heating elements.
Do not allow a fi lm from the oven cleaner to remain
on the temperature sensor as it could cause the oven
to heat improperly. The sensor is located on the top
of the oven. Carefully wipe the bulb clean after each
oven cleaning, being careful not to move the sensor
since a change in its position could affect how the
oven bakes.
Do not spray oven cleaner on the outside of the
oven door, handles or any exterior surface of the
oven, cabinet or painted surfaces. The cleaner can
damage these surfaces.

CARE & MAINTENANCE
13
Removable oven door
The oven door is removable but it is heavy. It
is recommended that at least two people work
together to remove it.
To remove the door:
1. Open the door to the full open position.
2. Pull the hinge locks up over the hinge hooks on
both sides.
3. Grasp the door fi rmly on both sides, lift slightly
and pull it straight out and away from the oven.
To replace the door:
1. Firmly grasp both sides of the door at the top.
2. Insert and seat the upper and lower hinge arms
into the oven slots.
3. Push the hinge locks down from the hinge hooks.
4. Close the oven door and make sure it is working
properly. If it seems uneven or does not close
completely, remove it again and repeat the steps
to replace it.
Note: Do not attempt to close the door until it is
properly installed. The hinges could be damaged.
Glass door window
To clean the outside of the glass door window, use a
glass cleaner. Rinse and polish with a dry cloth.
Avoid scratching or impacting the glass window.
Doing so may cause the glass to break.
OVEN LIGHT REPLACEMENT
Important: Before replacing the oven light bulb,
make sure the electrical power is disconnected from
the appliance. Failure to do so may result in electric
shock or burn. Be sure to let the light cover and bulb
cool completely before replacing.
The oven light bulb is covered with a removable
glass cover that is held in place with a bail-shaped
wire. Removing the oven door can make this
process easier.
To remove the light cover:
1. Hold a hand under the light cover so it does not
fall when released.
2. With the fi ngers of the same hand, fi rmly push
back the wire cover holder. Lift off the cover. Do
not remove any screws to remove the cover.
3. Do not touch the light bulb with a wet cloth.
Replace the bulb with a 40 watt appliance light
bulb.
To replace the light cover:
1. Place the light cover into the groove of the light
receptacle.
2. Pull the wire forward to the center of the cover
until it snaps into place. Ensure that the wire is in
the depression in the center of the light cover.
PROBLEM POSSIBLE CAUSE
No power • A fuse may be blown or the circuit breaker tripped
• Plug not fully inserted into the wall outlet
Surface elements not working properly • The elements are not properly installed
• The controls are not set correctly
• The drip pans are not set securely in the cook top
Food does not broil properly • Oven temperature is not properly set
• Shelf position is too low
• Cookware is not suited for broiling
• Aluminum foil is being used and is blocking air fl ow
Food does not bake or roast properly • Oven temperature is not properly set
• Shelf position is incorrect
• Oven was not pre-heated
• Cookware is not suited for baking or roasting
Oven light does not work • Light bulb is loose
• Light switch is not operating correctly
TROUBLESHOOTING
Danby Consumer Care: 1-800-263-2629
Hours of operation:
Monday to Thursday 8:30 am - 6:00 pm Eastern Standard Time
Friday 8:30 am - 4:00 pm Eastern Standard Time
Information in this manual is subject to change without notice.
14
LIMITED IN-HOME APPLIANCE WARRANTY
This quality product is warranted to be free from manufacturer’s defects in material and workmanship, provided that the unit is used under the normal operating
conditions intended by the manufacturer.
This warranty is available only to the person to whom the unit was originally sold by Danby Products Limited (Canada) or Danby Products Inc. (U.S.A.) (hereafter
“Danby”) or by an authorized distributor of Danby, and is non-transferable.
TERMS OF WARRANTY
Plastic parts, are warranted for thirty (30) days only from purchase date, with no extensions provided.
First Year
During the rst twelve (12) months, any functional parts of this product found to be defective, will be repaired or replaced, at warrantor’s
option, at no charge to the ORIGINAL purchaser.
To obtain
Danby reserves the right to limit the boundaries of “In Home Service” to the proximity of an Authorized Service Depot. Any app liance
Service
requiring service outside the limited boundaries of “In Home Service” , it will be the consumer’s responsibility to transport the appliance (at
their own expense) to the original retailer (point of purchase) or a service depot for repair. See “Boundaries of In Home Serv ice” below.
Contact your dealer from whom your unit was purchased, or contact your nearest authorized Danby service depot, where service
must be performed by a qualied service technician.
If service is performed on the units by anyone other than an authorized service depot, or the unit is used for commercial appli cation, all
obligations of Danby under this warranty shall be void.
Boundaries of
If the appliance is installed in a location that is 100 kilometers (62 miles) or more from the nearest service center your unit must be
In Home Service
delivered to the nearest authorized Danby Service Depot, as service must only be performed by a technician qualied and certif ied for
warranty service by Danby. Transportation charges to and from the service location are not protected by this warranty and are t he
responsibility of the purchaser.
Nothing within this warranty shall imply that Danby will be responsible or liable for any spoilage or damage to food or other c ontents of this appliance, whether due
to any defect of the appliance, or its use, whether proper or improper.
EXCLUSIONS
Save as herein provided, Danby, there are no other warranties, conditions, representations or guarantees, express or implied, m ade or intended by Danby or its
authorized distributors and all other warranties, conditions, representations or guarantees, including any warranties, conditio ns, representations or guarantees
under any Sale of Goods Act or like legislation or statue is hereby expressly excluded. Save as herein provided, Danby shall no t be responsible for any damages
to persons or property, including the unit itself, howsoever caused or any consequential damages arising from the malfunction o f the unit and by the purchase of
the unit, the purchaser does hereby agree to indemnify and hold harmless Danby from any claim for damages to persons or propert y caused by the unit.
GENERAL PROVISIONS
No warranty or insurance herein contained or set out shall apply when damage or repair is caused by any of the following:
1) Power failure.
2) Damage in transit or when moving the appliance.
3) Improper power supply such as low voltage, defective house wiring or inadequate fuses.
4) Accident, alteration, abuse or misuse of the appliance such as inadequate air circulation in the room or abnormal operating con ditions
(extremely high or low room temperature).
5) Use for commercial or industrial purposes (ie. If the appliance is not installed in a domestic residence).
6) Fire, water damage, theft, war, riot, hostility, acts of God such as hurricanes, oods etc.
7) Service calls resulting in customer education.
8) Improper Installation (ie. Building-in of a free standing appliance or using an appliance outdoors that is not approved for out door application).
Proof of purchase date will be required for warranty claims; so, please retain bills of sale. In the event warranty service is required, present this document to our
AUTHORIZED SERVICE DEPOT.
Danby Products Limited
PO Box 1778, Guelph, Ontario, Canada N1H 6Z9
Telephone: (519) 837-0920 FAX: (519) 837-0449
Danby Products Inc.
PO Box 669, Findlay, Ohio, U.S.A. 45840
Telephone: (419) 425-8627 FAX: (419) 425-8629
04/09
1-800-263-2629
Warranty Service
In-home
Danby reserves the right to limit the boundaries of “In Home Service” to the proximity of an authorized service
depot. Any appliance requiring service outside the limited boundaries of “In Home Service”, will be the consumer’s
responsibility to transport at their own expense to the original point of purchase or a service depot for repair. If the
appliance is installed in a location that is 100 kilometers (62 miles) or more from the nearest service center, it must
be delivered to the nearest authorized Danby Service Depot by the purchaser.
Transportation charges to and from the service location are not protected by this warranty and are the
responsibility of the purchaser.
During the first twenty four (24) months, any functional parts of this product found to be defective, will be repaired
or replaced, at warrantor’s option, at no charge to the original purchaser.
Contact the dealer where the unit was purchased, or contact the nearest authorized Danby service depot, where
service must be performed by a qualified service technician. If service is performed on the unit by anyone other
than an authorized service depot, all obligations of Danby under this warranty shall be void.
First 24 months
To obtain service
Boundaries of
in-home service
LIMITED “IN HOME” WARRANTY
This quality product is warranted to be free from manufacturer’s defects in material and workmanship, provided that the unit is used
under the normal operating conditions intended by the manufacturer.
This warranty is available only to the person to whom the unit was originally sold by Danby Products Limited (Canada) or Danby
Products Inc. (U.S.A.) (hereafter “Danby”) or by an authorized distributor of Danby, and is non-transferable.
TERMS OF WARRANTY
Plastic parts are warranted for thirty (30) days from the date of purchase, with no extensions provided.
Nothing within this warranty shall imply that Danby will be responsible or liable for any spoilage or damage to food or other
contents of this appliance, whether due to any defect of the appliance, or its use, whether proper or improper.
EXCLUSIONS
Save as herein provided, by Danby, there are no other warranties, conditions, representations or guarantees, express or implied, made
or intended by Danby or its authorized distributors and all other warranties, conditions, representations or guarantees, including any
warranties, conditions, representations or guarantees under any Sale of Goods Act or like legislation or statute is hereby expressly
excluded. Save as herein provided, Danby shall not be responsible for any damages to persons or property, including the unit itself,
howsoever caused or any consequential damages arising from the malfunction of the unit and by the purchase of the unit, the
purchaser does hereby agree to indemnify and hold harmless Danby from any claim for damages to persons or property caused by
the unit.
GENERAL PROVISIONS
No warranty or insurance herein contained or set out shall apply when damage or repair is caused by any of the following:
1) Power failure.
2) Damage in transit or when moving the appliance.
3) Improper power supply such as low voltage, defective house wiring or inadequate fuses.
4) Accident, alteration, abuse or misuse of the appliance such as inadequate air circulation in the room or abnormal operating
conditions (ie. extremely high or low room temperature).
5) Use for commercial or industrial purposes (ie. If the appliance is not installed in a domestic residence).
6) Fire, water damage, theft, war, riot, hostility, acts of God such as hurricanes, floods etc.
7) Service calls resulting in customer education.
8) Improper Installation (ie. Building-in of a free standing appliance or using an appliance outdoors that is not approved for outdoor
application, including but not limited to: garages, patios, porches or anywhere that is not properly insulated or climate controlled).
Proof of purchase date will be required for warranty claims; retain bills of sale. In the event that warranty service is required, present
the proof of purchase to our authorized service depot.
Warranty Service
In Home
Danby Products Limited
PO Box 1778, Guelph, Ontario, Canada N1H 6Z9
Telephone: (519) 837-0920 FAX: (519) 837-0449
Danby Products Inc.
PO Box 669, Findlay, Ohio, U.S.A. 45840
Telephone: (419) 425-8627 FAX: (419) 425-8629
1-800-263-2629
04/17

Bienvenue
Bienvenue à la famille Danby. Nous sommes fi ers de la qualité de nos produits et nous croyons au
service fi able. Nous vous suggérons de lire ce manual d’utilisation avant de brancher votre nouvel
appareil, car il contient des informations inportantes sur l’utilisation, la sécurité, le dépannage et
la maintenance, afi n d’assurer la fi abilité et la longévité de votre appareil.
Visitez www.Danby.com pour accéder aux outils d’autoservice, aux FAQ et bien plus encore. Pour
obtenir de l’aide supplémentaire, composez le 1-800-263-2629.
Notez les informations ci-dessous; Vous aurez besoin de cette information pour obtenir un
service sous garantie.
Vous devez fournir le reçu d’achat original pour valider votre garantie et recevoir le service.
Numéro de modèle : _____________________________________________
Numéro de serie : _______________________________________________
Date d’achat : __________________________________________________
Besoin d’assistance?
Avant d’appeler pour le service, voici quelques choses que vous pouvez faire pour nous
aider à mieux vous servir.
Lire ce manuel du propriétaire :
Il contient des instructions pour vous aider à utiliser et à entretenir votre appareil
correctement.
Si vous recevez un appareil endommagé :
Contactez immédiatement le revendeur ou l’entrepreneur qui vous a vendu l’appareil.
Gagnez du temps et de l’argent :
Avant d’appeler pour le service, consultez la section de dépannage à la fi n de ce
manuel. Cette section vous aidera à résoudre les problèmes courants pouvant survenir.
1-800-26- Danby
(1-800-263-2629)
16
17
SUPPORT ANTI-BASCULEMENT
Pour réduire le risque de basculement de l’appareil, un support anti-basculement doit être installé avant de
faire fonctionner l’appareil. Voir les instructions d’installation livrées avec le support pour plus de détails.
1. Support anti-bascule
2. Panneau latéral droit
3. Paroi arrière
4. Support anti-bascule
5. Bras anti-bascule
AVERTISSEMENT - RISQUE DE BASCULEMENT
Un enfant ou un adulte peut faire basculer l’appareil et être tué. Vérifi ez que le support anti-
renversement a été correctement installé et engagé sur le sol ou le mur. Assurez-vous que le support
anti-bascule est réengagé lorsque vous déplacez la cuisinière en faisant glisser le bras anti-
basculement sous le support. Ne pas utiliser la cuisinière sans le support anti-basculement en place
et engagé. Le non-respect de ces instructions peut entraîner la mort ou de graves brûlures chez les
enfants ou les adultes.
Pour vérifi er si le support est installé et engagé correctement, regardez sous la cuisinière pour voir que le
bras anti-basculement attaché au panneau latéral droit est engagé sur le support. Sur certains modèles, le
tiroir de rangement ou le panneau de protection peut être retiré pour faciliter l’inspection.
Si l’inspection visuelle n’est pas possible, faites glisser la cuisinière vers l’avant, vérifi ez que le support
anti-renversement est fermement fi xé au sol ou au mur et faites glisser la cuisinière pour que le bras
anti-basculement glisse sous le support anti-bascule. Si la portée est retirée du mur pour une raison
quelconque, répétez toujours cette procédure pour vérifi er que la portée est correctement fi xée par le
support anti-basculement.
Consignes de sécurité importantes
LIRE ET SUIVRE TOUTES LES INSTRUCTIONS DE SÉCURITÉ
GARDEZ CES INSTRUCTIONS!
3
1
4
2
5

18
EXIGENCES GÉNÉRALES DE SÉCURITÉ
Assurez-vous que l’appareil est correctement installé
et mis à la terre par un technicien qualifi é.
N’utilisez jamais l’appareil pour chauffer ou
chauffer la pièce.
Les enfants ne doivent pas être laissés seuls ou sans
surveillance dans la zone d’utilisation de l’appareil.
Les enfants ne doivent jamais être autorisés à
s’asseoir ou à se tenir debout sur une partie
quelconque de l’appareil.
Ne rangez pas d’objets présentant un intérêt pour
les enfants dans des armoires situées au-dessus
d’une cuisinière ou sur la protection arrière d’une
cuisinière. Les enfants grimpant sur la plage pour
atteindre des objets pourraient être gravement
blessés.
Des vêtements amples ou suspendus ne doivent
jamais être portés lors de l’utilisation de l’appareil.
Ne réparez ou ne remplacez aucune pièce de
l’appareil à moins que cela ne soit spécifi quement
recommandé dans le manuel. Tout autre service doit
être confi é à un technicien qualifi é.
Les matériaux infl ammables ne doivent pas être
stockés dans ou à proximité de l’appareil.
N’utilisez pas d’eau sur les feux de graisse. Étouffez
le feu ou les fl ammes ou utilisez un extincteur à
poudre ou à mousse.
Utilisez uniquement des porte-pots secs. Des
manchons humides ou humides sur des surfaces
chaudes peuvent provoquer des brûlures dues à la
vapeur. Ne laissez pas le support de pot toucher
les éléments chauffants chauds. N’utilisez pas une
serviette ou un autre chiffon volumineux.
En cas de coupure de courant sur une table de
cuisson électrique alors qu’un élément de surface
est activé, l’élément de surface se rallume dès que
le courant est rétabli. En cas de panne de courant,
le fait de ne pas mettre tous les boutons de surface
en position OFF peut provoquer l’infl ammation des
objets sur la table de cuisson ou à proximité de
celle-ci, entraînant des blessures graves ou la mort.
Pour éviter le risque de brûlure ou de choc
électrique, assurez-vous toujours que les
commandes de tous les éléments de surface sont en
position OFF et que toutes les bobines sont froides
avant d’essayer de soulever ou de retirer un élément
de cuisson.
EXIGENCES DE SÉCURITÉ POUR LA TABLE
DE CUISSON
Utilisez la taille de casserole appropriée. Cet
appareil est équipé de quatre brûleurs de tailles
différentes. Sélectionnez des ustensiles dont le fond
plat est suffi samment large pour couvrir la surface
de l’élément chauffant. L’utilisation d’ustensiles
trop petits exposera une partie de l’élément
chauffant à un contact direct et pourrait provoquer
l’infl ammation des vêtements. Une bonne relation
entre l’ustensile et le brûleur améliorera également
l’effi cacité.
Ne laissez jamais l’appareil sans surveillance
pendant son utilisation. Faire bouillir provoque le
tabagisme et les déversements de graisse peuvent
s’enfl ammer.
Ne laissez jamais d’huile sans surveillance pendant
la friture. Si on la laisse chauffer au-delà de son
point de consommation, l’huile peut s’enfl ammer et
provoquer un incendie pouvant se propager aux
armoires environnantes. Utilisez un thermomètre
à graisse profonde chaque fois que possible pour
surveiller la température de l’huile.
Pour éviter les débordements d’huile et les
incendies, utilisez une quantité minimale d’huile
lorsque vous faites frire des aliments peu profonds
et évitez de cuire des aliments surgelés avec des
quantités excessives de glace.
Assurez-vous que les casseroles à réfl ecteur ou les
cuvettes sont en place. L’absence de ces casseroles
ou de ces cuvettes pendant la cuisson peut
endommager le câblage ou les composants.
N’utilisez pas de papier d’aluminium pour recouvrir
les cuvettes ou les fonds de cuisson, sauf si cela est
suggéré dans le manuel. Une installation incorrecte
de ces revêtements peut entraîner un risque
d’électrocution ou d’incendie.
Seuls certains types de verre, de céramique, de
faïence ou d’autres ustensiles émaillés conviennent
à un service haut de gamme sans rupture en raison
d’un changement soudain de température.
Pour réduire les risques de brûlures, d’infl ammation
de matériaux infl ammables et de déversement dû
à un contact involontaire, le manche d’un ustensile
doit être placé de manière à ce qu’il soit tourné
vers l’intérieur et ne s’étende pas sur les brûleurs
adjacents.
Les éléments chauffants amovibles ne doivent jamais
être immergés dans l’eau.
Consignes de sécurité importantes
LIRE ET SUIVRE TOUTES LES INSTRUCTIONS DE SÉCURITÉ
GARDEZ CES INSTRUCTIONS!
19
AVERTISSEMENT - EN CAS D’INCENDIE
En cas d’incendie, ne ramassez jamais une
casserole ou une casserole enfl ammée. Éteignez
le brûleur si vous pouvez le faire en toute sécurité.
Éteindre le feu avec un extincteur à poudre ou à
mousse.
N’utilisez pas d’eau sur les feux de graisse. L’eau
va répandre la graisse et n’éteindra pas le feu.
Étouffez le feu avec un couvercle à couvercle
étanche, une plaque à biscuits ou un plateau plat ou
utilisez un extincteur à poudre ou à mousse.
S’il y a un feu dans le four pendant la cuisson,
étouffez le feu en fermant la porte du four et en
éteignant le four ou utilisez un extincteur à poudre
ou à mousse.
EXIGENCES DE SÉCURITÉ DU FOUR
Faites attention lorsque vous ouvrez la porte. Laissez
l’air chaud ou la vapeur s’échapper avant de retirer
ou de remplacer les aliments.
Ne pas chauffer les contenants alimentaires non
ouverts. L’accumulation de pression peut faire
éclater le contenant et causer des blessures.
Gardez les évents de four sans obstruction.
Placez toujours les grilles du four à l’endroit
désiré lorsque le four est froid. Si la grille doit
être déplacée pendant que le four est chaud, ne
laissez pas le support de pot entrer en contact avec
l’élément chauffant chaud du four.
Tirez la grille du four en position d’arrêt lors du
chargement et du déchargement des aliments du
four. Cela permet d’éviter les brûlures en touchant
les surfaces chaudes de la porte et des parois du
four.
Ne pas utiliser le four si un élément chauffant
développe un point lumineux pendant l’utilisation
ou montre d’autres signes de dommages. Un point
lumineux indique que l’élément chauffant peut
tomber en panne et présenter un risque potentiel
de brûlure, d’incendie ou de choc. Éteignez
immédiatement le four et faites remplacer l’élément
chauffant par un technicien qualifi é.
ATTENTION
Pour réduire les risques de brûlures, ne déplacez
pas cet appareil lorsqu’il est chaud. Pour réduire
le risque de blessure dû au basculement de
l’appareil, vérifi ez la réinstallation de cet appareil
dans le dispositif anti-bascule fourni et verrouillez
les roulettes après avoir remis l’appareil dans sa
position d’origine.
NE TOUCHEZ PAS LES ÉLÉMENTS
CHAUFFANTS OU LES ZONES À
PROXIMITÉ
Les éléments chauffants à la surface ou à
l’intérieur de l’appareil peuvent être chauds
même s’ils sont de couleur sombre. Les zones
proches des éléments chauffants peuvent
devenir suffi samment chaudes pour provoquer
des brûlures. Pendant et après utilisation, ne
pas toucher ou laisser les vêtements ou autres
matériaux infl ammables entrer en contact avec
les éléments chauffants ou les zones proches
de ceux-ci jusqu’à ce qu’ils aient suffi samment
refroidi. Les surfaces de l’appareil peuvent devenir
suffi samment chaudes pour causer des brûlures,
notamment les ouvertures et les surfaces de
ventilation situées à proximité de ces ouvertures,
les portes du four et les fenêtres du four.
Consignes de sécurité importantes
LIRE ET SUIVRE TOUTES LES INSTRUCTIONS DE SÉCURITÉ
GARDEZ CES INSTRUCTIONS!

INSTRUCTIONS D’INSTALLATION
20
OUTILS REQUIS
1. Percer avec une mèche de 1/8“
2. Clé à molette
3. Pinces
4. 1/4“ écrou conducteur
5. Tournevis cruciforme
6. Lunettes de protection
7. Mètre à ruban
8. Crayon
9. Niveau
10. Tournevis à lame plate
1
2
3
4
5
6
7
8
9
10
PIÈCES INCLUSES
1. Support anti-bascule
NIVEAU DE L’APPAREIL
Assurez-vous que l’appareil est correctement nivelé
pour assurer une cuisson uniforme. Les pieds de
nivellement sont situés à chaque coin de l’appareil.
1. Tournez les jambes dans le sens contraire
des aiguilles d’une montre jusqu’à ce qu’elles
touchent le fond de l’armoire.
2. Tournez lentement les jambes dans le sens des
aiguilles d’une montre jusqu’à ce que l’appareil
soit à niveau.
3. Utilisez un niveau à bulle ou une tasse à mesurer
à moitié remplie d’eau pour vérifi er si l’appareil
est à niveau.
AVANT DE COMMENCER
Conservez ces instructions pour référence ultérieure.
L’installation de cet appareil nécessite des
compétences mécaniques de base et environ 1 à 3
heures de temps.
L’installation est la responsabilité de l’installateur.
Une défaillance du produit due à une installation
incorrecte est couverte par la garantie.
Avant de commencer l’installation, éteignez le
panneau de service et verrouillez les moyens de
déconnexion du service pour empêcher toute
mise sous tension accidentelle. Si le dispositif
de déconnexion de service ne peut pas être
verrouillé, fi xez de manière sécurisée un dispositif
d’avertissement tel qu’une étiquette au panneau de
service.
Assurez-vous que l’appareil et la prise qu’il utilisera
sont correctement installés et mis à la terre par un
technicien qualifi é.
AVERTISSEMENT - Une mauvaise utilisation de la
prise de terre peut entraîner un risque de choc
électrique. Consulter un électricien qualifi é ou un
agent de service si les instructions de mise à la terre
ne sont pas complètement comprises ou en cas de
doute sur la mise à la terre de l’appareil.
Ne connectez pas votre appareil à des rallonges
ou à un autre appareil dans la même prise
murale. Ne pas épisser le cordon d’alimentation.
Ne coupez ou ne retirez en aucun cas la troisième
broche de terre du cordon d’alimentation. N’utilisez
pas de rallonges ou d’adaptateurs non mis à la
terre (deux broches).
Si le cordon d’alimentation est endommagé, il doit
être remplacé par le fabricant, son agent de service
ou une personne qualifi ée similaire afi n d’éviter tout
danger.
Retirez tous les matériaux d’emballage avant
l’installation.
INSTRUCTIONS D'INSTALLATION
21
PREPARER L’OUVERTURE
Toutes les dimensions brutes et d’espacement
doivent être respectées pour une utilisation en toute
sécurité de l’appareil. L’électricité de la cuisinière
peut être débranchée à la prise sans déplacer la
cuisinière en retirant le tiroir inférieur si la prise se
trouve à l’endroit souhaité.
Pour réduire le risque de brûlure ou d’incendie
en atteignant des éléments de surface chauds, il
convient d’éviter l’espace de rangement au-dessus
de la table de cuisson. Si les armoires sont présentes
au-dessus de la fourchette, il est possible de réduire
les risques en installant une hotte de cuisinière
qui dépasse d’au moins 5 pouces de l’avant des
armoires. Les armoires installées au-dessus d’une
table de cuisson ne doivent pas dépasser 13
pouces.
Assurez-vous que les armoires et les revêtements
muraux autour de la cuisinière peuvent résister aux
températures générées par la cuisinière.
Laissez 2 pouces d’espace entre la cuisinière et les
murs verticaux adjacents au-dessus de la surface de
la table de cuisson.
Prévoyez un espace minimum de 30 pouces entre
les éléments de surface et le fond des armoires
supérieures non protégées en bois ou en métal et de
15 pouces minimum entre le comptoir et le fond de
l’armoire adjacent.
La gamme est lourde et peut s’installer dans des
revêtements de sol souples tels que le vinyle ou
la moquette. Lors de l’installation de la cuisinière
sur ce type de revêtement de sol, il convient de
l’installer sur une feuille de contreplaqué de 1/4
pouce d’épaisseur ou d’un matériau similaire.
2¼”
36” max.
2”
36” ¾ ± ¼”
15” min.
5”
2½”
41¾”
A
C
B
13”
30” min.
max.
D
A: 23 3/4”
B: 23 3/4”
C: 2”
D: 44 3/8”
EXIGENCES ÉLECTRIQUES
Cet appareil doit être alimenté avec la tension et la
fréquence appropriées et raccordé à un circuit de
dérivation individuel correctement mis à la terre,
protégé par un disjoncteur ou un fusible présentant
un ampérage, comme indiqué sur la plaque
signalétique. La plaque signalétique est située sous
la table de cuisson.
Nous vous recommandons de connecter le câblage
électrique et le raccordement de votre gamme à un
électricien qualifi é. Après l’installation, demandez
à l’électricien de vous montrer où se trouve votre
sectionneur principal.
Consultez les services publics locaux pour connaître
les codes électriques applicables dans votre
région. Ne pas câbler votre four conformément
aux codes en vigueur peut entraîner des conditions
dangereuses. S’il n’y a pas de codes locaux, votre
gamme doit être câblée et fusionnée pour répondre
aux exigences de la norme CSA C22.1, Code
canadien de l’électricité, partie 1 - dernière édition.
Vous pouvez en obtenir une copie auprès de:
Association canadienne de normalisation, 178,
boul. Rexdale, Toronto, ON, M9W 1R3, CANADA.
Cette gamme est équipée d’un cordon
d’alimentation certifi é CSA International destiné
à être branché dans une prise murale standard
14-50R. Assurez-vous que la prise murale est à la
portée de l’emplacement fi nal de la cuisinière.
22
INSTRUCTIONS D’INSTALLATION
Pour réduire le risque de basculement de l’appareil,
le support anti-bascule doit être installé avant le
fonctionnement.
Remarque: L’installation du support anti-
renversement doit respecter tous les codes locaux
pour la sécurité de l’appareil.
Le support anti-bascule doit être fi xé à la paroi
arrière ou au sol et doit être placé de manière à ce
qu’il surplombe le bras anti-bascule à l’arrière de
l’appareil.
Installation du mur arrière
Utilisez les deux vis fournies pour fi xer le support au
mur arrière. Les vis doivent entrer dans une plaque
de seuil en bois. Si le mur contient des goujons
métalliques ou des matériaux similaires, ou si
l’arrière de l’appareil ne peut pas atteindre le mur
arrière, l’installation du sol doit être utilisée.
Installation au plancher
Plancher de bois: Utilisez les deux vis fournies pour
fi xer le support au sol.
Plancher en béton:
1. Marquez l’emplacement où les vis doivent être
installées.
2. Utilisez une perceuse électrique et une mèche de
béton pour percer un trou pilote de 5/32 pouce
de 2 pouces de profondeur dans le béton au
centre de chacun des emplacements marqués.
3. Utilisez les deux vis fournies pour fi xer le
support au sol.
Vérifi ez l’installation
Après avoir installé le support, faites glisser
l’appareil dans son emplacement fi nal. Regardez
sous l’appareil et assurez-vous que le bras anti-
renversement attaché au panneau latéral de
l’appareil est en prise avec le support.
INSTALLATION DE SUPPORT
ANTIBASCULEMENT
1. Bras anti-bascule à l’arrière de l’appareil
2. Support anti-bascule
3. La vis doit entrer dans le bois ou le béton
4. Seuil de mur
5. La vis doit entrer dans le bois
1
2
3
4
5
23
COMMANDES DE CUISSON DE SURFACE
Les éléments chauffants de surface de l’appareil
sont conçus pour différents réglages de chaleur.
Aux positions HI et LO, il y a de légères indentations
et le bouton cliquera en place dans ces positions.
HI indique le réglage le plus élevé. LO indique le
réglage le plus bas.
Un bruit de cliquetis peut être entendu par l’appareil
pendant son utilisation. Ceci est normal et indique
que le réglage de chaleur sélectionné est maintenu.
Le passage à un réglage de chaleur plus élevé se
fera plus rapidement que le passage à un réglage
de chaleur plus faible car il faudra du temps pour
que la chaleur se dissipe.
REGLAGE DES COMMANDES
1. Poussez le bouton de commande vers l’intérieur.
2. Tournez au réglage de chaleur désiré.
Il suffi t d’appuyer sur le bouton pour sortir de la
position “OFF”. Lorsque le bouton est dans une
position autre que “OFF”, il peut être tourné sans
pousser.
Assurez-vous que l’élément est éteint lorsque la
cuisson est terminée. Un voyant s’allume lorsqu’un
élément chauffant est activé.
GUIDE DE RÉGLAGE DE LA CHALEUR
• HI - Démarrage rapide pour la cuisine; amener
de l’eau à ébullition
• HAUT MOYEN - Friture rapide; griller le plat;
maintenir une ébullition rapide sur une grande
quantité de nourriture
• MED - Sauté et brun; maintenir une ébullition
lente sur une grande quantité de nourriture
• MOYEN BAS - Céréales; maintenir la
température de service de la plupart des
aliments
• LO - Faire cuire après avoir commencé à HI;
cuire avec un peu d’eau dans une casserole
couverte; utiliser pour cuire du riz à la vapeur;
faire fondre du chocolat ou du beurre
Ne laissez jamais des aliments sans surveillance
pendant la cuisson. Les débordements provoquent
le tabagisme. Les déversements de graisse peuvent
prendre feu.
CONSEILS DE CUISSON DE SURFACE
Utilisez des ustensiles de cuisine moyens ou lourds. Les
ustensiles de cuisson en aluminium conduisent la chaleur
plus rapidement que les autres métaux. Les ustensiles de
cuisson en fonte et en fonte revêtus sont lents à absorber
la chaleur, mais cuisent généralement uniformément à
des températures faibles ou moyennes. Les casseroles en
acier peuvent cuire de manière inégale si elles ne sont
pas combinées avec d’autres métaux.
Ne remplissez pas trop les ustensiles de cuisine avec
des matières grasses qui pourraient se renverser lors
de l’ajout d’aliments. Les aliments givrés bouillonnent
vigoureusement. Regardez des aliments frire à haute
température. Gardez la cuisinière et la hotte propres de
la graisse accumulée.
Pour conserver la plus grande énergie de cuisson, les
casseroles doivent être à plat sur le fond, avoir des côtés
droits et des couvercles bien ajustés. Faites correspondre
la taille de la casserole à la taille de l’élément de surface.
Une casserole dépassant de plus de 2 cm le bord du
bac collecteur retient la chaleur, ce qui provoque des
“craquelures” (fi nes fi ssures) sur la porcelaine et une
décoloration allant du bleu au gris foncé sur les bacs
d’égouttement en chrome.
INSTRUCTIONS D’INSTALLATION

24
COMMANDES DE CUISSON AU FOUR
Pour utiliser le four, tournez le bouton de
température du four sur la température de cuisson
souhaitée. Le bouton du four est marqué par
incréments de 25 degrés, de 200 ° F à BROIL.
La lumière du four s’allume jusqu’à ce que le four
atteigne la température sélectionnée puis s’éteint.
Pendant la cuisson, la lumière s’allume chaque
fois que le four doit ajouter plus de chaleur pour
maintenir la température sélectionnée.
ÉTAGÈRES DU FOUR
Les tablettes du four sont conçues avec des butées
d’arrêt de sorte qu’elles s’arrêtent correctement
lorsqu’elles sont placées sur les supports des
tablettes et qu’elles ne s’inclinent pas lorsque les
aliments sont retirés ou ajoutés.
Pour retirer les étagères du four, tirez l’étagère vers
l’extérieur, inclinez l’extrémité avant vers le haut et
retirez-la.
Pour remplacer les étagères, placez l’étagère sur
le support, les butées étant orientées vers le haut
et vers l’arrière du four. Inclinez la partie avant et
poussez la tablette vers l’arrière du four jusqu’à ce
qu’elle dépasse la bosse sur le support d’étagère,
puis abaissez l’avant de la tablette et poussez-la
complètement dans le four.
Le four dispose de quatre positions de support
différentes pour répondre aux différentes exigences
de cuisson.
RÉGLER LE THERMOSTAT DU FOUR
Vous pouvez constater que le nouveau four cuit
différemment de celui qu’il a remplacé. Utilisez le
nouveau four pendant quelques semaines pour vous
familiariser avec celui-ci. Si vous trouvez toujours
que le four est trop chaud ou trop froid, vous
pouvez régler le thermostat.
N’utilisez pas de thermomètres, comme ceux
que l’on trouve dans les épiceries pour vérifi er la
température du four. Ils ne sont pas calibrés pour
des températures élevées et peuvent varier de 20 à
40 degrés.
Ce réglage n’affecte pas les températures de
grillage. Le réglage sera conservé après une panne
de courant.
1. Retirez le bouton de température du four de
la cuisinière et regardez-le à l’arrière. Pour
effectuer un réglage, desserrez d’un tour les
deux vis à l’arrière du bouton. Ne pas enlever
complètement les vis.
2. Avec le dos du bouton face à vous, tenez le
bord extérieur du bouton avec une main et
tournez le devant du bouton avec l’autre main.
3. Pour augmenter la température du four,
déplacez la vis supérieure vers la droite.
4. Pour diminuer la température du four, déplacez
la vis supérieure vers la gauche.
5. Vous entendrez un clic pour chaque encoche
que vous déplacez le bouton. Chaque clic
changera la température du four d’environ 10
° F. La plage est de plus ou moins 60 ° F par
rapport à la fl èche. Nous vous suggérons de
régler la température en un clic, puis de tester
les performances du four avant de procéder à
un ajustement supplémentaire.
6. Une fois le réglage effectué, resserrez les vis afi n
qu’elles soient bien serrées. Veillez à ne pas trop
serrer.
7. Replacez le bouton en faisant correspondre la
surface plate du bouton à l’arbre.
L
O
O
S
E
N
R
E
S
C
W
T
S
R
O
O
T
E
A
T
K
E
O
M
A
C
E
O
L
R
K
M
A
E
T
H
O
T
E
R
CONSIGNES D’UTILISATION

CUISSON AU FOUR
La cuisson au gril implique la cuisson des aliments
par la chaleur radiante intense de l’élément
supérieur du four. La plupart des poissons et des
coupes tendres de viande peuvent être bouillies.
Suivez ces étapes pour minimiser les éclaboussures
et le tabagisme.
1. Si la viande a de la graisse ou du cartilage
autour du bord, coupez les barres verticales à
environ 2 po d’intervalle. Si désiré, le gras peut
être coupé, laissant une couche d’environ 1/8
“d’épaisseur.
2. Placez la viande sur une grille de gril dans une
lèchefrite conçue pour la cuisson au gril. Utilisez
toujours la grille pour que la graisse tombe dans
la lèchefrite; sinon les jus peuvent devenir assez
chauds pour prendre feu.
3. Placez l’étagère dans l’une des deux positions
supérieures pour la plupart des grils.
4. Placez la nourriture dans le four et fermez la
porte. Toujours griller avec la porte fermée.
5. Tournez le bouton de température du four sur
BROIL.
6. Si nécessaire, les aliments peuvent être retournés
pendant la cuisson au gril. Faites attention à
l’air chaud ou à la vapeur lors de l’ouverture de
la porte du four.
7. Assurez-vous que le bouton de température du
four est sur OFF une fois la cuisson terminée.
CONSEILS DE CUISSON
• Si désiré, faire mariner les viandes ou le poulet
avant de les faire griller ou les badigeonner de
sauce barbecue au cours des 5 à 10 dernières
minutes de cuisson.
• Lors de la préparation des aliments sur une
casserole, ne laissez pas les bords gras
pendre sur les côtés, car la graisse qui tombe
dégouttera le four pendant la cuisson.
25
FOUR CUISSON ET RÔTISSAGE
1. Placez les étagères dans le four. Si vous cuisinez
sur deux étagères en même temps, échelonnez
les casseroles pour une meilleure circulation de
la chaleur.
2. Fermez la porte du four. Tournez le bouton de
température du four à la température souhaitée.
3. Placez la nourriture au centre de l’étagère du
four. Laisser au moins 2 pouces entre l’extrémité
de la casserole et la paroi du four ou des
casseroles adjacentes.
4. Vérifi ez la nourriture régulièrement. Retirez
une fois terminé et assurez-vous que le four est
éteint.
POSITIONS DE TABLETTE
• La plus grande partie de la cuisson se fait à la
deuxième ou à la troisième position depuis le
bas du four.
• Lors de la cuisson de plusieurs articles, utilisez
deux étagères placées sur le deuxième et le
quatrième support du bas du four.
• Cuire les gâteaux de nourriture pour anges sur
la première position du bas du four.
• La torréfaction se fait généralement en position
basse.
• Si le préchauffage est nécessaire, observez la
lumière du four et placez les aliments dans le
four une fois la lumière éteinte. La lampe du four
s’allume et s’éteint avec le thermostat du four
pour maintenir une température constante.
CONSEILS DE CUISSON ET DE RÔTISSAGE
• Suivez une recette testée et mesurez
soigneusement les ingrédients. Si vous utilisez un
emballage, suivez les instructions de l’étiquette.
• N’ouvrez pas la porte du four pendant la
cuisson ou le rôtissage. La chaleur sera perdue
et le temps de cuisson devra être prolongé.
Si vous devez ouvrir la porte, ouvrez-la
partiellement et fermez-la le plus rapidement
possible.
• La torréfaction est la cuisson à la chaleur sèche.
Des viandes tendres ou de la volaille peuvent
être grillées à découvert. Les températures de
rôtissage, qui doivent être faibles et stables,
permettent de minimiser les éclaboussures. Lors
de la torréfaction, il n’est pas nécessaire de
saisir, arroser, couvrir ou ajouter de l’eau à la
viande.
• Les rôtis de viande congelés peuvent être cuits
sans décongélation, mais prévoir 10 à 25
minutes de temps supplémentaire par livre de
viande (10 minutes par livre pour les rôtis de
moins de 5 livres, plus de temps pour les gros
rôtis).
• Décongeler les volailles congelées avant de les
faire rôtir pour assurer une cuisson uniforme.
Certaines volailles congelées commerciales
peuvent être cuites avec succès sans
décongélation. Suivez les instructions données
sur l’étiquette de l’emballage.
INSTRUCTIONS D’INSTALLATION
26
ELEMENTS DE SURFACE
Pour nettoyer les éléments chauffants de surface, tournez
le bouton de réglage de la température au maximum
pendant une minute; Cela va brûler tous les résidus
alimentaires. Notez que cela pourrait provoquer de la
fumée, il est conseillé d’ouvrir une fenêtre ou d’allumer
un ventilateur pour éviter la formation de fumée.
Ne pas immerger les éléments chauffants dans des
liquides d’aucune sorte. Ne mettez pas d’éléments
chauffants dans un lave-vaisselle.
Pour retirer les égouttoirs pour les nettoyer, commencez
par retirer les éléments chauffants. Assurez-vous que les
éléments sont froids avant de les toucher.
Soulevez l’élément d’environ 1 pouce au-dessus du bac
d’égouttage et tirez pour le retirer. Ne pas soulever
l’élément de plus de 1 pouce car cela pourrait tordre les
composants internes et l’élément pourrait ne pas rester à
plat lorsqu’il est remplacé.
Retirez le bac d’égouttage et nettoyez-le si nécessaire.
Les égouttoirs peuvent être nettoyés au lave-vaisselle ou
à la main.
Une fois le nettoyage terminé, replacez le bac
d’égouttage dans le renfoncement de la table de cuisson.
Assurez-vous que l’ouverture de la casserole est alignée
avec le réceptacle.
Insérez les bornes sur l’élément chauffant à travers
l’ouverture du bac d’égouttage et dans le réceptacle.
Guidez l’élément en place doucement afi n qu’il repose
uniformément.
N’essayez pas de nettoyer, d’ajuster ou de réparer les
réceptacles de quelque manière que ce soit.
NETTOYAGE
Table de cuisson en porcelaine émaillée
La fi nition en émail de porcelaine sur la table de
cuisson est robuste mais peut être endommagée si
elle est mal utilisée. Tous les aliments acides, tels
que les jus de fruits, les tomates ou le vinaigre, ne
doivent pas rester sur le fi ni pendant un certain
temps.
Soulever la table de cuisson
La table de cuisson peut être soulevée pour que
la zone en dessous puisse être nettoyée. Les
déversements qui débordent les bacs d’égouttement,
en particulier la graisse, doivent être nettoyés pour
éviter l’accumulation et la possibilité de fumer ou
d’infl ammer.
Assurez-vous que les éléments chauffants sont
éteints et refroidissent avant de soulever la table de
cuisson.
Retirez les éléments chauffants et les égouttoirs.
Soulevez la table de cuisson et maintenez-la ouverte
avec la tige interne pour faciliter le nettoyage.
Cette zone peut être nettoyée avec de l’eau chaude
savonneuse et un chiffon propre.
Une fois terminé, replacez la tige de propulsion
interne dans sa position initiale et abaissez la table
de cuisson jusqu’à ce qu’elle se mette en place.
Veillez à ne pas vous pincer les doigts. Remplacez
les bacs d’égouttage et les éléments chauffants.
SOINS ET ENTRETIEN
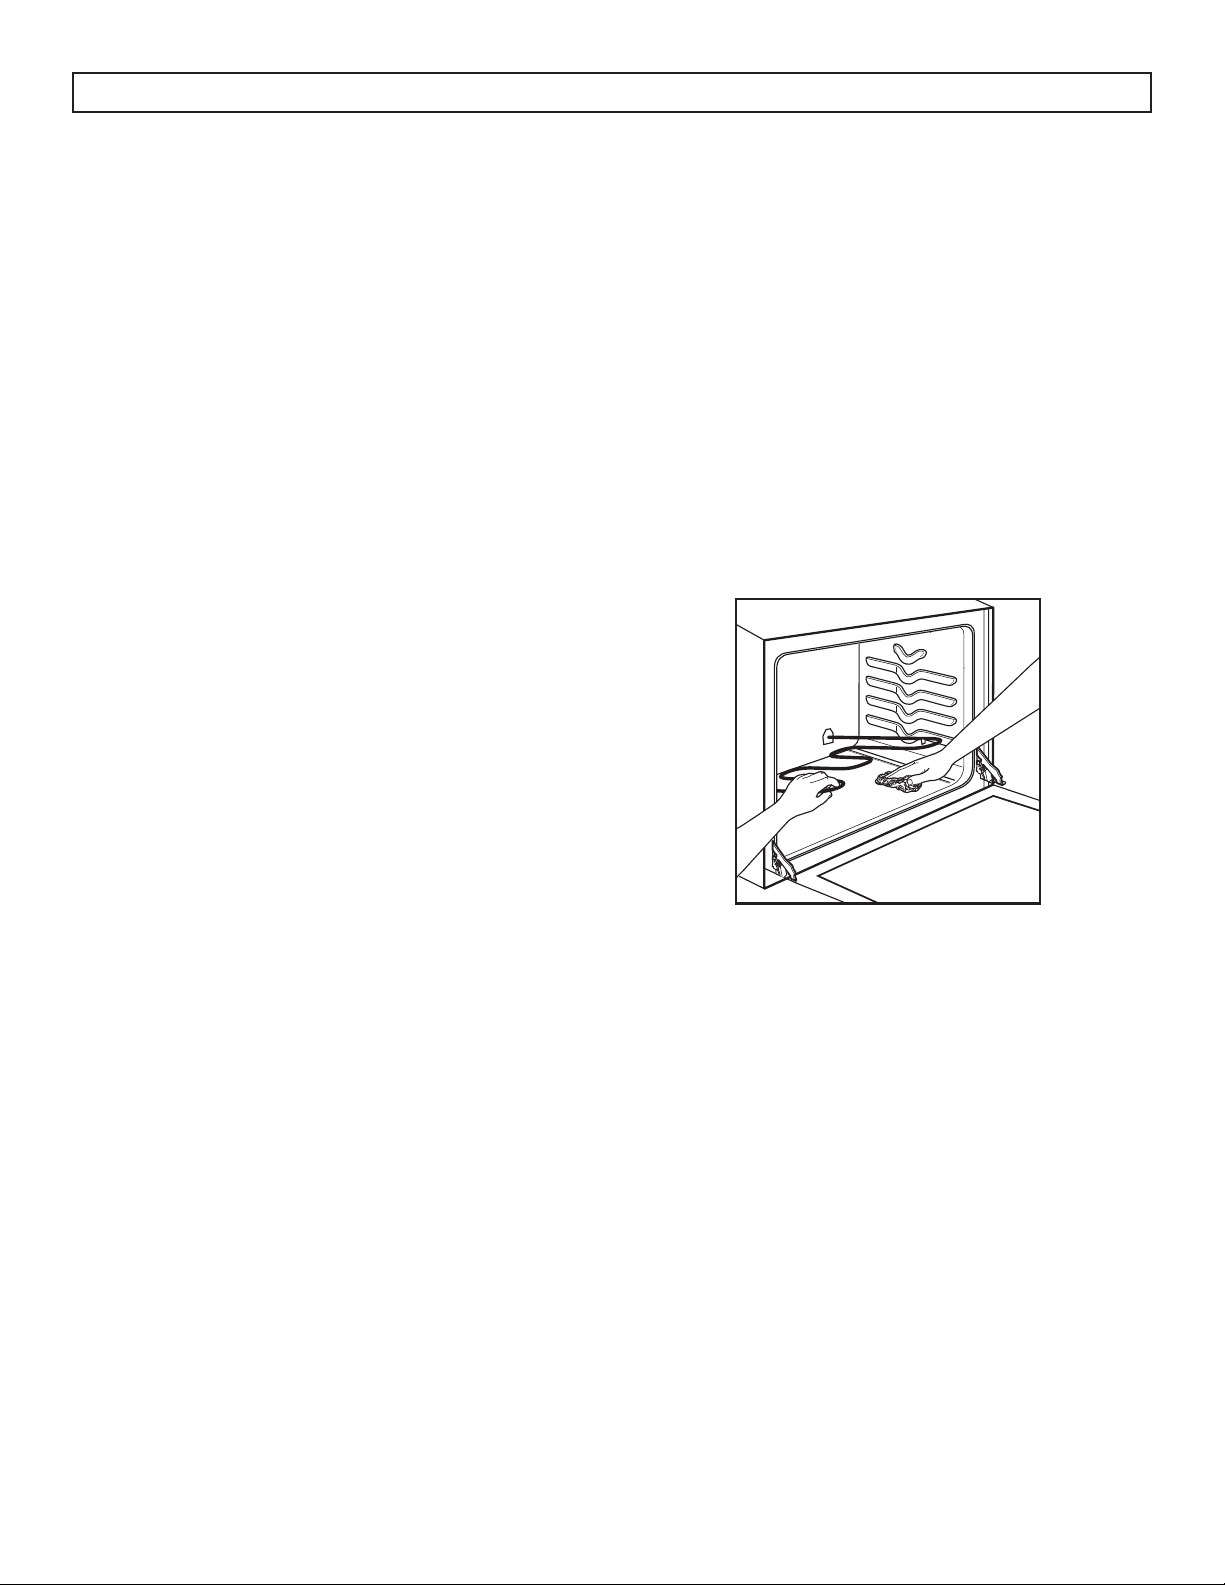
27
Étagères de four
Nettoyez les étagères avec un nettoyant abrasif ou
de la laine d’acier. Après le nettoyage, rincez les
étagères avec de l’eau propre et séchez avec un
chiffon propre.
Éléments chauffants du four
Ne nettoyez pas l’élément de cuisson ou l’élément
de gril. Tout résidu de nourriture va brûler lorsque
les éléments sont chauffés.
L’élément de cuisson peut être doucement soulevé
pour nettoyer le plancher du four. Assurez-vous que
l’élément est froid avant de le nettoyer.
Boutons de commande
Les boutons de commande peuvent être retirés pour
faciliter le nettoyage. Assurez-vous que les boutons
sont en position “OFF” et retirez-les directement des
tiges pour les nettoyer.
Les boutons peuvent être nettoyés au lave-vaisselle
ou à la main. Assurez-vous que l’intérieur des
boutons est sec avant de le replacer sur l’appareil.
Surfaces peintes
Les surfaces peintes comprennent les côtés, le
panneau de commande, la porte et la plaque de
protection. Nettoyez-les avec du savon et de l’eau
ou une solution de vinaigre et d’eau.
N’utilisez pas de produits de nettoyage
commerciaux, de poudres nettoyantes, de laine
d’acier ou de produits abrasifs sur les surfaces
peintes.
Intérieur du four en porcelaine
Avec un entretien approprié, l’intérieur en émail
de porcelaine conservera son fi ni pendant de
nombreuses années.
Le savon et l’eau peuvent être utilisés pour
nettoyer l’intérieur. De fortes éclaboussures ou des
déversements peuvent nécessiter un nettoyage avec
un nettoyant abrasif doux.
Ne laissez pas les déversements à forte teneur en
acide tels que le lait, les tomates, les jus de fruits
ou les garnitures de tarte sur la surface. Ils peuvent
causer des taches ternes, même après le nettoyage.
L’ammoniac domestique peut faciliter le nettoyage.
Placer 1/2 tasse d’ammoniaque dans une casserole
en verre peu profonde et laisser dans un four froid
pendant la nuit. Les vapeurs d’ammoniac aideront à
desserrer les graisses et les aliments.
Précautions à prendre lors de l’utilisation de
nettoyants à four pulvérisés
Ne pulvérisez pas de nettoyant pour four sur les
commandes électriques et les interrupteurs, car cela
pourrait causer un court-circuit et provoquer des
étincelles ou un incendie.
Ne pas vaporiser le nettoyant pour four directement
sur les éléments chauffants du four.
Ne laissez pas un fi lm du nettoyant du four rester
sur le capteur de température car cela pourrait
provoquer une chaleur incorrecte du four. Le
capteur est situé sur le dessus du four. Essuyez
soigneusement l’ampoule après chaque nettoyage
du four, en veillant à ne pas déplacer le capteur
car un changement de position pourrait affecter la
cuisson du four.
Ne vaporisez pas de nettoyant pour four à
l’extérieur de la porte du four, des poignées ou de
toute surface extérieure du four, de l’armoire ou des
surfaces peintes. Le nettoyeur peut endommager ces
surfaces.
SOINS ET ENTRETIEN

28
La porte du four amovible
La porte du four est amovible mais lourde. Il
est recommandé qu’au moins deux personnes
travaillent ensemble pour le supprimer.
Pour enlever la porte:
1. Ouvrez la porte en position complètement
ouverte.
2. Tirez sur les charnières des deux côtés pour les
verrouiller.
3. Saisissez fermement la porte des deux côtés,
soulevez-la légèrement et retirez-la directement
du four.
Pour remplacer la porte:
1. Saisissez fermement les deux côtés de la porte
en haut.
2. Insérez et placez les bras de charnière supérieur
et inférieur dans les fentes du four.
3. Poussez les charnières des charnières.
4. Fermez la porte du four et assurez-vous qu’elle
fonctionne correctement. S’il semble irrégulier
ou ne se ferme pas complètement, retirez-le à
nouveau et répétez les étapes pour le remplacer.
Remarque: N’essayez pas de fermer la porte
tant qu’elle n’est pas correctement installée. Les
charnières pourraient être endommagées.
Fenêtre en verre dans la porte
Pour nettoyer l’extérieur de la vitre, utilisez un
nettoyant à vitre. Rincer et polir avec un chiffon sec.
Évitez de rayer ou de heurter la vitre. Cela
risquerait de casser le verre.
SOINS ET ENTRETIEN
REMPLACEMENT DE LA LUMIÈRE DU FOUR
Important: Avant de remplacer l’ampoule du
four, assurez-vous que l’alimentation électrique
est débranchée de l’appareil. Ne pas le faire
peut entraîner un choc électrique ou une brûlure.
Veillez à laisser le couvercle et l’ampoule refroidir
complètement avant de les remplacer.
L’ampoule du four est recouverte d’un couvercle en
verre amovible qui est maintenu en place par un fi l
en forme de bélière. Retirer la porte du four peut
faciliter ce processus.
Pour enlever le cache lumière:
1. Tenez une main sous le couvercle de la lampe
pour qu’elle ne tombe pas lorsqu’elle est
relâchée.
2. Avec les doigts de la même main, repoussez
fermement le porte-cache-fi l. Soulevez le
couvercle. Ne retirez aucune vis pour retirer le
couvercle.
3. Ne touchez pas l’ampoule avec un chiffon
humide. Remplacez l’ampoule par une ampoule
de 40 watts.
Pour remplacer le couvercle de la lumière:
1. Placez le couvercle de la lampe dans la rainure
du réceptacle de la lumière.
2. Tirez le fi l vers le centre du couvercle jusqu’à
ce qu’il s’enclenche. Assurez-vous que le fi l est
dans la dépression au centre du couvercle de la
lampe.
PROBLÈME CAUSE POSSIBLE
Aucune puissance • Un fusible peut être grillé ou le disjoncteur déclenché
• Fiche pas complètement insérée dans la prise murale
Les éléments de surface ne fonctionnent
pas correctement
• Les éléments ne sont pas correctement installés
• Les contrôles ne sont pas défi nis correctement
• Les égouttoirs ne sont pas bien fi xés dans la table de
cuisson
Les aliments ne grilent pas correctement • La température du four n’est pas correctement réglée
• La position de la tablette est trop basse
• La batterie de cuisine ne convient pas pour la cuisson au
gril
• Une feuille d’aluminium est utilisée et bloque le fl ux d’air
La nourriture ne cuit pas ou ne rôtit pas
correctement
• La température du four n’est pas correctement réglée
• La position de la tablette est incorrecte
• Le four n’était pas préchauffé
• La batterie de cuisine ne convient pas à la cuisson ou à la
torréfaction
La lumière du four ne fonctionne pas • L’ampoule est lâche
• L’interrupteur d’éclairage ne fonctionne pas correctement
29
DÉPANNAGE
Danby soins du consommateur : 1-800-263-2629
Heures d’ouverture :
Du lundi au jeudi, de 8 h 30 à 18 h, heure de l’Est
Vendredi, de 8 h 30 à 16 h, heure de l’Est
Les informations contenues dans ce manuel sont sujettes à modifi cation sans préavis.
LIMITED IN-HOME APPLIANCE WARRANTY
This quality product is warranted to be free from manufacturer’s defects in material and workmanship, provided that the unit is used under the normal operating
conditions intended by the manufacturer.
This warranty is available only to the person to whom the unit was originally sold by Danby Products Limited (Canada) or Danby Products Inc. (U.S.A.) (hereafter
“Danby”) or by an authorized distributor of Danby, and is non-transferable.
TERMS OF WARRANTY
Plastic parts, are warranted for thirty (30) days only from purchase date, with no extensions provided.
First Year
During the rst twelve (12) months, any functional parts of this product found to be defective, will be repaired or replaced, at warrantor’s
option, at no charge to the ORIGINAL purchaser.
To obtain
Danby reserves the right to limit the boundaries of “In Home Service” to the proximity of an Authorized Service Depot. Any app liance
Service
requiring service outside the limited boundaries of “In Home Service” , it will be the consumer’s responsibility to transport the appliance (at
their own expense) to the original retailer (point of purchase) or a service depot for repair. See “Boundaries of In Home Serv ice” below.
Contact your dealer from whom your unit was purchased, or contact your nearest authorized Danby service depot, where service
must be performed by a qualied service technician.
If service is performed on the units by anyone other than an authorized service depot, or the unit is used for commercial appli cation, all
obligations of Danby under this warranty shall be void.
Boundaries of
If the appliance is installed in a location that is 100 kilometers (62 miles) or more from the nearest service center your unit must be
In Home Service
delivered to the nearest authorized Danby Service Depot, as service must only be performed by a technician qualied and certif ied for
warranty service by Danby. Transportation charges to and from the service location are not protected by this warranty and are t he
responsibility of the purchaser.
Nothing within this warranty shall imply that Danby will be responsible or liable for any spoilage or damage to food or other c ontents of this appliance, whether due
to any defect of the appliance, or its use, whether proper or improper.
EXCLUSIONS
Save as herein provided, Danby, there are no other warranties, conditions, representations or guarantees, express or implied, m ade or intended by Danby or its
authorized distributors and all other warranties, conditions, representations or guarantees, including any warranties, conditio ns, representations or guarantees
under any Sale of Goods Act or like legislation or statue is hereby expressly excluded. Save as herein provided, Danby shall no t be responsible for any damages
to persons or property, including the unit itself, howsoever caused or any consequential damages arising from the malfunction o f the unit and by the purchase of
the unit, the purchaser does hereby agree to indemnify and hold harmless Danby from any claim for damages to persons or propert y caused by the unit.
GENERAL PROVISIONS
No warranty or insurance herein contained or set out shall apply when damage or repair is caused by any of the following:
1) Power failure.
2) Damage in transit or when moving the appliance.
3) Improper power supply such as low voltage, defective house wiring or inadequate fuses.
4) Accident, alteration, abuse or misuse of the appliance such as inadequate air circulation in the room or abnormal operating con ditions
(extremely high or low room temperature).
5) Use for commercial or industrial purposes (ie. If the appliance is not installed in a domestic residence).
6) Fire, water damage, theft, war, riot, hostility, acts of God such as hurricanes, oods etc.
7) Service calls resulting in customer education.
8) Improper Installation (ie. Building-in of a free standing appliance or using an appliance outdoors that is not approved for out door application).
Proof of purchase date will be required for warranty claims; so, please retain bills of sale. In the event warranty service is required, present this document to our
AUTHORIZED SERVICE DEPOT.
Danby Products Limited
PO Box 1778, Guelph, Ontario, Canada N1H 6Z9
Telephone: (519) 837-0920 FAX: (519) 837-0449
Danby Products Inc.
PO Box 669, Findlay, Ohio, U.S.A. 45840
Telephone: (419) 425-8627 FAX: (419) 425-8629
04/09
1-800-263-2629
Warranty Service
In-home
S’adresser au détaillant qui a vendu l’appareil, ou à la station technique agréée de service la plus proche, où
les réparations doivent être effectuées par un technicien qualifié. Si les réparations sont effectuées par
quiconque autre que la station de service agréée où à des fins commerciales, toutes les obligations de Danby
en vertu de cette garantie seront annulées.
Pendant les premiers vingt quatre (24) mois, toutes les pièces fonctionnelles de ce produit qui s’avèrent
défectueuses seront réparées ou remplacées, selon le choix du garant, sans frais à l’acheteur initial.
Danby se réserve le droit de limiter les limites de « Service au domicile » à proximité d'un dépôt de service
agréé. Pour tout appareil nécessitant le service hors des limites de "Service à domicile" il sera la responsabilité
du consommateur de transporter à ses frais au point d'achat d’origine ou un dépôt de service pour la réparation.
Si l'appareil est installé à plus de 100 kilomètres (62 milles) du centre de service le plus proche, il doit être livré
à l'atelier de réparation autorisé par Danby le plus proche, car l'entretien doit uniquement être réalisé par un
technicien qualifié et certifié pour effectuer un entretien couvert par la garantie de Danby.
Les frais de transport entre votre domicile et le lieu de l'entretien ne sont pas couverts par la présente garantie
et doivent être acquittés par l'acheteur.
Pour bénéficier
du service
Limites de l’entretien
à domicile
GARANTIE LIMITÉE « À DOMICILE »
Cet appareil de qualité est garanti exempt de tout vice de matière première et de fabrication, s’il est utilisé dans les conditions
normales recommandées par le fabricant.
Cette garantie n’est offerte qu’à l’acheteur initial de l’appareil vendu par Danby Products Limited (Canada) ou Danby Products Inc.
(É.-U.) (ci-après « Danby ») ou par l’un de ses distributeurs agréés et elle ne peut être transférée.
CONDITIONS
Les pièces en plastique sont garanties pendant trente (30) jours seulement à partir de la date de l’achat, sans aucune prolongation
prévue.
Aucune partie de la garantie ne prévoit implicitement que le fabricant sera tenu responsable des dommages subis par les aliments ou
d’autres types de contenu, qu’ils soient causés par la défectuosité de l’appareil ou par son usage adéquat ou inadéquat.
EXCLUSIONS
En vertu de la présente, il n’existe aucune autre garantie, condition ou représentation, qu’elle soit exprimée ou tacite, de façon
manifeste ou intentionnelle, par Danby ou ses distributeurs agréés. De même, sont exclues toutes les autres garanties, conditions ou
représentations, y compris les garanties, conditions ou représentations en vertu de toute loi régissant la vente de produits ou de toute
autre législation ou règlement semblable. En vertu de la présente, Danby ne peut être tenue responsable en cas de blessures
corporelles ou de dégâts matériels, y compris à l’appareil, quelle qu’en soit les causes. Danby ne peut pas être tenue responsable
des dommages indirects dus au fonctionnement défectueux de l’appareil. En achetant l’appareil, l’acheteur accepte de tenir sans
reproche et de dégager Danby de toute responsabilité en cas de réclamation pour toute blessure corporelle ou tout dégât matériel
causé par cet appareil.
CONDITIONS GÉNÉRALES
La garantie ou assurance ci-dessus ne s’applique pas si les dégâts ou réparations sont dus aux cas suivants :
1) Panne de courant.
2) Dommages subis pendant le transport ou le déplacement de l’appareil.
3) Alimentation électrique incorrecte (tension faible, câblage défectueux, fusibles incorrects).
4) Accident, modification, emploi abusif ou incorrect de l’appareil tel qu'une circulation d'air inadéquate dans la pièce ou des
conditions de fonctionnement anormales (température extrêmement élevée ou basse).
5) Utilisation dans un but commercial ou industriel (à savoir, si l'appareil n'est pas installé dans un domicile résidentiel).
6) Incendie, dommages causés par l’eau, le vol, la guerre, une émeute, des hostilités, ou en cas de force majeure (ouragan,
inondation, etc.).
7) Visites d’un technicien pour expliquer le fonctionnement de l’appareil au propriétaire.
8) Installation inappropriée (par exemple, encastrement d'un appareil autoportant, ou utilisation extérieure d'un appareil non conçu à
cet effet, y compris, mais sans s'y limiter : les garages, les patios, les porches ou ailleurs, qui ne sont pas correctement isolés ou
climatisés).
La preuve de la date d'achat sera requise pour les réclamations de garantie; conserver la facture de vente. Dans le cas où un service
de garantie est requis, présentez la preuve d'achat à notre dépôt de service agréé.
Service sous garantie
Service au domicile
Danby Products Limited
PO Box 1778, Guelph, Ontario, Canada N1H 6Z9
Téléphone : (519) 837-0920 Télécopieur : (519) 837-0449
Danby Products Inc.
PO Box 669, Findlay, Ohio, U.S.A. 45840
Téléphone : (419) 425-8627 Télécopieur : (419) 425-8629
1-800-263-2629
02/18
Premiers 24 mois

Danby Products Limited, Guelph, Ontario Canada N1H 6Z9
Danby Products Inc., Findla y, Ohio US A 45840
Printed in China
Imprimé en Chine