+7
-- + ....
This manual contains information for:
, Important Safeguards
• Installation
• Use and Care
Certain ranges come equipped with special features.+ Determine from a study of
your range which of the instructions given in this booklet pertain to your range.
This booklet gyves valuable instructions covering the installation, adjustment and
use of your range,
HOW TO OBTAIN SERVICE AND!OR PARTS
When your range does not operate in accordance with the instructions in the
manual, you should contact the dealer in the immediate vicinity for service. Or,
the purchaser may contact the service organization noted on the warranty,
IMPORTANT
'TO THE OWNEROFTHE RANGE: Retain IhJs owner's manual for futumreference.
TO THE INSTALLER: Leave this owner's maauat with Ike range,
Read and Save These Instructions
Range
Record in the space provided b_]ow the Model No+ and Seria! No. of this a,pptiance. These
numbers are found oct the serial plate located below the 1)ft-up cgokto _.
Model No+ Ty?e_Number
Serial No+
Record these n_mhers foE future use.
Purchase Date+
IMPORTANT: Keep a copy of your bill of sate, The date on the b_][ establishes the
warranty period should se_ice be required. If service is performed, it is in youc best
interest to obtain and keep all receipts,
PLEASE DO THIS NOW!
1he PRODUCT REGISTRATION CARD should be filled in completely, signed and
returned+ This infom'mtion (viii register your product and help us to serve you quickly in
the future, if necessat3'.
Contents
Importmtt Safeguards .................................................... 3-6
Energy Saving Ideas ..................................................... 7
Installation Instructions .................................................. $-9
Wall Clearances ........................................................ Ii
Alignments and Adjustments .......................................... 12-17
Oven Operation ................................................... ! 8-19
Broifiag ........................................................... 120
Optional Equipmem ................................................ 21-22
Cleaning Ihe Range ....................................................... 23++24
Li ft.-Off Doors ........................................................ 25
Trouble Shooting Guide ................................................. 26
Wiring D_agmm ..................................................... 28
Nolo: For warranty and sen, ice information, p_ease see attachments packaged with range.
[I kWAR+ +""°'+m"+°"'""' +"°"++°=+""l
a fire or explosion may result causing property damag+_
personal m]m'y or de_th,
Do not store or use gasoline or other flammable vapors and liquids in
the vicinity of this or any other appliance,
WHAT TO DO IFYOU SMELL GAS:
• Do not try to light any appliance.
• Do not touch any electrical switch; do not use any phone in your
building.
• Immediately call your gas supplier from a neighbor's phone. Follow
the gas supplier's instructions,
• 1£you cannot reach your gas supplier, call the fire department.
Installation and service must be performed by a qualified installer,
semqce agency or the gas supplier.
READ ALL IMPORTANT SAFEGUARDS AND ALL
INSTRUCTIONS BEFORE USING THE APPLIANCE.
Remove all tape and packaging wrap before using the oven. If any glue remains, touch
the residue with the stgcky s_de of the tape akeady removed, or use a cloth soaked with
robbing alcohol Use caution because rubbing alcohol is ftammab[e_ Rinse with warm
water an6 wipe d_.
Destroy the carton and plastic bags after the range is unp_tcked. Children should not
use packaging material for play. Cartons coveied with rugs, bedspreads, or plastic sheets
can become air-tight chambers. Remove all staples from the carton. Staples can cause
seve;_ cut_ and destroy finishes if ttmy come in contact with other appliances or fmniture.
Be safety conscious. The preparation of food in an oven r_,qukes temperatures that could
cause severe burns, Bet'ore using this new appliance, carefully read and follow all
i_strucfions.
ZkWARNING_,s pr_ttet contains a chemJc_ or chmn[cals known to the state of
California to cause cancer, as wel| as birth defects or o_et reproductive harm.
PROPER _STALI.A_ON: Be sure your appliance is properly iastaJled a,td grounded by
a qualified techniciart in accordance with the National Fuel Gaa Code ANSI Z223,1-1atest
e,dition, and the National Elec_ca_ Code ._.SI/NF]_A No. 70-Incest edition. Install only pec
installation instmcdbns pro_id_ in _e literature pack_e for this range. Be sure ]eveling legs
are in place at the bottom corners of the range. If necessa_; raise or lower the leveling legs
at the base of the range by turning clockwise or counterclockwise to insure a level r_nge.
Ask your dealer to recommend a qualified technician and art authorized repair set'vice.
Have the technician familiarize you with the locations of _e manual gas shut off valve
and gas meter in the event it is nece.ssary to shut off gas supply to the unit during an
emergency.
GI
"file followiug situations may cause serious bodily harm, death or
preperty damage,
• TO REDUCE _UE RISK O17TIPPING OFTHE RANGEj THE ILzkNGEMUST BE SECURED
BY A PROPERLY INSIALLED AN_-IIP BI",,.,_CKETPROVIDED W[IH THE RA'tNGE_'IO
CHECK IF '[1tI_ DEVICE _ I!'tSTALLED AND ENGAGED PROPERLY, CAREFULLY TiP
THERANGE FOR_ARD,THEANTI-IIP DEVICE SHOULD ENGAGE AND PREVENT THE
RANGE FROM _PING OVEIL REFER TO THE I,NSTAI,LATION INSTRUCIIONS
PACKAGED WITH THE ANTI:TIP BRACKEI FOR PROPER ANTI.TIP BRACKET
INSTALLATION_
* Never leave children alone or unattended in the area where an appliance is in ltse_
They should never be allowed to sit or stand on any part of the appliance. Ne_,'er leave
the oven door open whert the range is unattended.
÷ Do not store items of interest to children in the cabinets above a range or on the
backguard of a range, Children climbing on .the range to reach the items could he
seriously injured
IMPORTANT SAFEGUARDS, Continued
• Do not allow children to climb or play around the range, The weight of a child oft an
open overt door may cause the range to tip, resulting Jn serious burrts oz other iajuD:
• USER SERVICING: De not repair or replace any part of the appliance un/ess
specifically recommeztded in this owner's guide. All other servicing should be done
only by a qualified technicJan_ This wil! reduce the dsk of personal _ajuLv and damage
to the range.
, Storage in or on appliance: Flammable ma[edals should not be ston_ in an overt, near
surface burners or in the brMler section, This includes paper, plastic and cloth items,
such as cookbooks, plast]cware and towels, as welt a_ flammable tiquids_ Do ant use the
oven for storage. Do not store explosives, such as aerosol cans, on or near the range.
• Remove the oven door from any unused range if _t is to be stored or discarded.
, Stepping, leaning or sitting on lhe doors sr broiler section of th[_ range can result
in ser|ous injuries and cause damage to tile range.
damage.
= DO NOT TOUCH SURFACE BURNERS, AREAS NEAR THESE BURNERS,
OVEN BURNERS OR INTERIOR SURFACES OF THE OVEN . Both surface
buttters and oven burners may be hot even Ihoo.gh the flame is not visible. Ateas near
surface burners may become hot enough to cause bums. During and after use, do not
touch, of ]el clothing or other flammable materials touch these areas until they have had
sufficient time to cool. Among _hese areas are the cooktop, surfaces facing the cooktop,
lhe oven vertt openings and surfaces near these openings, oven door and wiado_vs_
, Never use your appliance to warm or heat the room. Operating your rang_ without
utensils oz'pans to absorb the unit's heat risks damaging the suff_ee, knobs and c0_trols.
• Wear proper apparel. Loose fitting or hanging garments should ne,,er be worn while
using the appliance. Do not let clotlfing or other flammabJe materials contact surface
burners or :interior surfaces of the oven until they have had stff13ci,'nt time to cool,
, Never modi_- or alter the constructloa of the range, Do not remove ]evelin_ legs,
panels, ',vim covers, anti-tip brackets or any other permanent part of the product.
, When heathlg fat or grease, watch it closely. Fat or grease may catch fire if a]]owed
to become toohot.
• Do not use wa[er or flour on grease fires. Smother the rise with a pan lid, baking soda
or use a dry chemical or foam-type extinguisher.
IMPORTANT SAFEGUARDS, Continued
• Use only dry potholders, Wet or damp pothoiders on hot surfaces could result in burns
fi'om steam. Do not tot the potholde.r touch hot heatin_ areas. Do not use a towel or other
bulky cloth instead of a potholder,
, Use proper flame size, Adjust flame size so it does not extend beyond the edge of the
utensil The use of undersized utensils wi|] expose a poltion of the burner flame and may
result in severe bums or direct contact and ignition ot' clothing. Also, proper relationship
of utensil to burner wit] improve efficiency.
. Do not use aluminum fall to line the oven bottom except as suggested in the cleaning
sectiun o17this manual° Improper use of" aluminum foil may _suit in a fir hazard. Fall
may also imelfere with heat circulation and damage the range.
. Plaeemen_ of oven racks: Ah_ays place an oven rack in tile desired location while
lhe oven is cool, If a rack must be moved when the oven is hot, use potholders and gi_p
the rock with both hands to reposition, Do not let potho]ders contact hot oven wails.
Remove al! utensils from the rack before moving.
• Do not heat unopened food containers, Build-up of pressure may cause the container
to burst and result in iaju_',
- Keep the oven vent duct unobstructed, The oven vent is loca(ed along the bottom of
the backguald. Touching the surfaces in the vent area wllen the oven J.s being operated
m_, cause severe bums. Also, do not pl_ce plastic or heat-sensitive items on or near tke
oven vents. These items could melt or ignite.
The range requires fresh air for proper burner combustion. Do not block the flow of air
around the base m beneath the lower front panel of the range.
• Use care when opening oven dr)or: Stand tn the side of the oven when opening the
oven dear, Slowly open the door to allow hot air or steam to escape before remo_ing or
replacing food.
- Kno_t" wMch knob controls eael= burner. Place a pan of food on the burner before
turning it on, and turn the burner oft'before removing the pan,.
Always tom to the ful! LITE position when igniting top burners+ Then adjust the flame
size so [t does not extend beyond the edge of the ute_isil.
• Utensil handles should be turned inward and 1rot extend over adjacent sur:[aee
burners. To reduce the iisk of bums, ignition of flammable materials, and spillage due
to unintentional contact with the utettsil, the handle of a utensil should be positioned so
that it is turned inward, and does not extend over adjacent surface burners
• Never leave the surface burners unattended, Boilovers may cause smoking, greasy
spillov_rs may catch fire or a par_which has boiled d_, may melt.
• Do not place hands between the spring tension hinge and the oven door frame when
you ate removing the oven door. You could piacit your fingers.
5
IMPORTANT SAFEGUARDS, Continued
• Do not use the broiler pan wilhout its insert. The broiler pan and its in_ert aIlow
dripping fat oi' grease to drain and be kept away fro.m the high heat of the broiler° Do not
cover the insert with foil. Exposed Fat or _rease could Jgnhe.
, Do not louch a hot oven light bulb with a damp clofll. A hot oven light bulb could
bn_ak it touched with a damp cloth. Disconnect the electrical service cord m shu! off the
power Io the oven before removing and replacing the bulb.
• Allmv paris ta cool to room temperature before touching or L_emo_&,gthem from file range.
When a surface burrer is first turned off, the burner and grate arehot enough to cause bums.
• Clean the range regularly to keep all paris free of fat or grease whicl_ could catch
fire, Pay particular attention to the azea underneath, each surface bttrner_ Exhaust fort
ventilating hoods and giease filters should be clean. Do not allow fat or gI_ase to
accumulate. Greasy deposits in the fan could catch fire. Refer _o the hood
manufilcturer's instructions for clean, aS.
• Glazed cooking utensils: Oa[y certain types of _lass. glass/ceramic, ceramic, earthenware,
or other glaz_ utensils are suitable for rangetop service without breaking, due to the sudden
change Jn temperaO_u:e. Check the manufactmer's recommendations for range:top u_
• Do not place plastic salt and pepper shakers, spoon holders or plastic wrappings on
top of the range. These items could mett or ignite. Potholde_, towel s or wooden spoons
could catch fire if place too close to the flame.
. Do not use a wok equipped with a metal ring that extends beyond the burner.
Beeaus_ _:hisring traps heat, the burner and grate could be damaged.Also, the burner may
not work properly; creating a carbon monoxide level above current health standards.
• Do not clean the oven door gasket. The door gasket is essential for a _ood seal. Care
_hould be taken not to rub, damage or move the gasket.
*Flexible Connector.s: If the gas _nge/oven is connected to a gas supply with a metal
flexible connector, move the range/oven with CAUTION for service or cleaning.
Flexible connectors are not intended for repeated bending. Do not allow eleane_ to
make contact with flexible connectot_.
The connector and its fittings are designed for use onty on fl_e original installation
and are not to be reused for another appliance or at another location. Connectors
nmst comply with ANSI Z21.24.
- It's good practice for each household to have an appropriate fire extinguisher for
use in the event of a hou_ fire,
• Disconnect tim range from electrical supply before attempting _o set vice or move it.
NOTE: The instructions appealing in this owner's guide are not meant 1o cover e'_'ery
possible condition and situation that may occur. Common sense and caution must be
practiced when operating and maintaining any appliance.
6
ENERGY-SAVING IDEAS
Surface Cooking
Use lids when sudace cooking A lid traps steam and uses it to speed up the cooking
process. If you have a pressure cooker or vegetabte steamer, use it, You'll waste fewer
v[lanfin5, save time and cut energy cosls,
Use medium-weight, flat bottomed pans that match the flame size, Choose pans made of
metals that conduct heat well
When cooking on a surface burner, use as little _,,'ater as possihIe to reduce cooking time
Oven Cooking
Preheat the o,,en only when a recipe tells you. Put roasqts and casseroles into acold oven',
then turn on the oven,
Opening the oven door o['tea io check on foods wastes energy.
Use the oven to prepare complete meals, For instance, start a ro_st, add vegelables when
the meat is half-cooked, and then wanu rolls or desert after the main dishes are cooked.
'l'haw frozen foods betore cooking. Thav,'ed food requires less cooking energy than frozen
food,
Make it a habit to turn the o's,on off before you removing the cooked food.
7
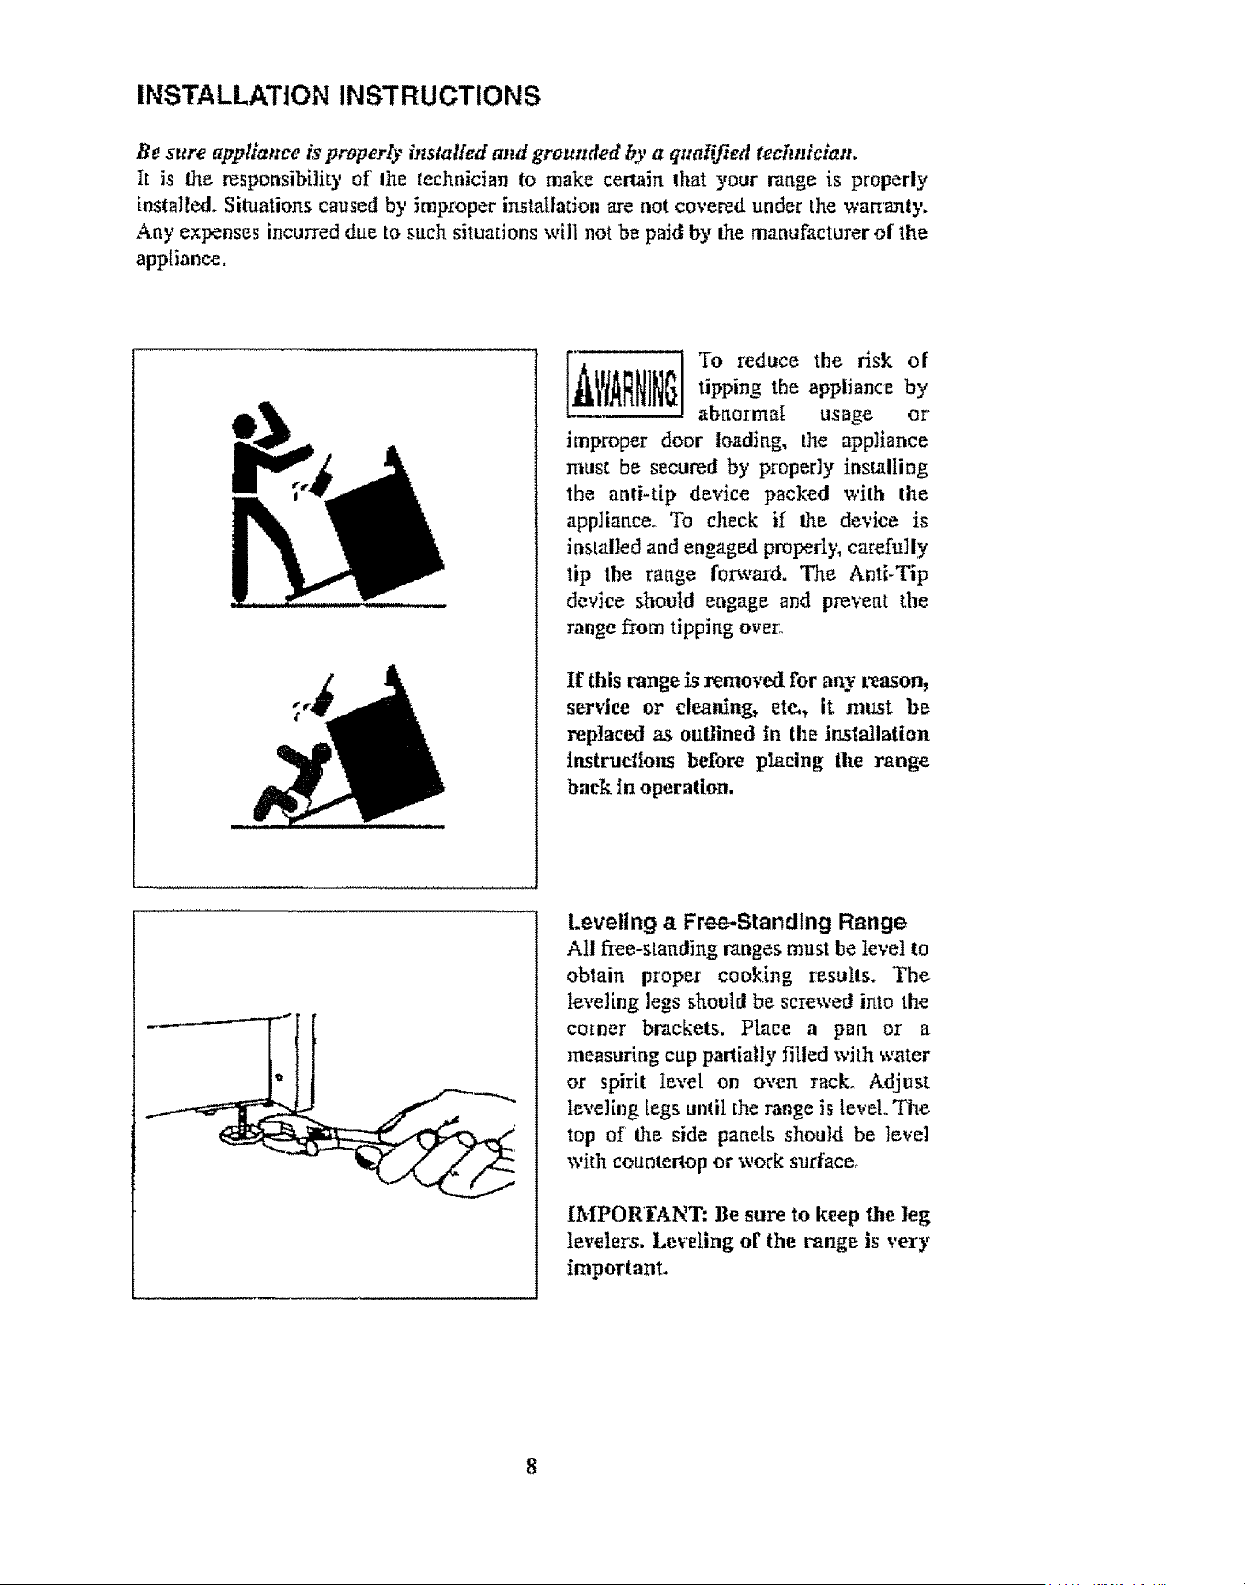
INSTALLATION INSTRUCTIONS
Be sure appliance is properly installed m_d grounded by a qualified teel_niclau.
It is the responsibility of Ihe technician to make certain lhat your raage is properly
installed. Situations caused by improper installation are not covered under the wart'artty.
Aay expenses incurred due to such situations will not be paid by the manufacturer of lhe
apptianee.
G_Jr'IftARN1N Tore, uce o,"
tipping the appliance by
abrtoima[ usage or"
improper door loadirtg, the appliance
must be secured by properly installing
the anti-tip device packed wilh the
appliaace. To check if the device is
installed and engaged proped}; carefully
lip the raage forwar6. The AntE-Tip
device should engage and preveat tile
range from tippiag over'.
If this range _s remo_'ed for any reason_
s_rvice or cleaning_ ete,_ it mtlst be
rep]aced as outlined in the Jn.sta!latioll
instructions before placing the rang_
back tn operation,
Leveling a Free-.Standing Range
All fiee-staudirtg ranges must he level to
obtaiu proper cooking results. The
leveling legs should be screwed into the
comer brackets. Place a part or a
measuring cup partially filled with water
or spirit Ie',,el on o_'en rack° Adjust
le_,eling legs umil the range is [e_,'eL'Yhe
top of the side paaets should be level
with eounter_op or work surface,
[MPORI?ANT: Be sure to keep the leg
levelers. Leveling of the range is very
important.
GAS CONNECTIONS (All Units)
Have the dealer where you purchase _,our new range install it or have him recommend a
qualified installer, InstaJLation must confom't with local codes, in the absence of local
codes, the installation must conform with the National Fuel Gas Code, ANSI Z223.1.
Latest Edition in the U.S,A. or the CAN/CGA B 149.1 or .2 Installation Codes Jn Canada.
The range should he connected to the supply line with l!2-ineh black iron pipe or a
certified fle;dble type stove connector, To prevem gas leaks, put an approved sealing
compou rid, which is resistant to liquefied petroleum gases, o!i all threaded con nection_.
tmporta_l: Do not apply pressure dilect]y to the range manifold pipe when tightening
supply com_ections. The manifold pipe should he held securely at the pressure regulator
to prevent twJstingo Hold the pressure regulator with a wrench dui[ng the tightening of the
comtectlon, or the manifold pipe may he twisted and split, and cause a dangerous leak.
The insinuation of ranges designed for manut_actmed (mobile) home inslallatiort must
conform w_th tl'te Manufactured Construction and Safety, Title 24 CFR, Part 3280,
!formerly the Federal standard for Mobile Home Construction and Safet3_; "l'itte 24, HUD
(Pint 280)] in the U.S,A. or CS,A. Standard CANICGA Z240,-1.2 in Canada or, when
such standards are not applicable with local codes.
'lhe instaIlation of ranges designed for lecreadonal vehicle installation must conform wlth
state or other codes o_ in the absence olr such codes, with the standard for recreational
vehicles. ANSI A119.2.2-!982 in the I[I.S.A. or CAN/CGA Z240_4.2 in Canada.
Note: Check all piping connections in the unit for leaks. Never use an open flame to check
for gas leaks. Use a soap solution. It is ant _mposs]ble for connections made at the factor'
to leak, due to vibration encountered in transportation. Make certain you have checked
them all, and repair _y connections that leak.
The appliance and its individual shut-off valve must be disconrtected from the gas supply
piping system during any pressure testing of that system at test pressures in excess of I12
psig.
The app]iance must he isotmed Ii'om Ole gas supply piping system by closing its ittdi vidual
manual shut-off valve during any pressure te_ting of the _as supply piping system at test
pressures equal to or less than !t2 psig.
Electrical Connections
All electrical wirin_ and attachments are 60-cycle, 120 volts, t5 amp max. Your range is
_ounded with a dtree-conduc_or (three-prong plug) supply cord wNch wilt ground the
range when plugged into a GROUNDED wall receptacle. If the backguard of the range
has a clock or light, connect the cord from the baekguard into the special terminal block
located at the top of the main back directly under the backguard supply cord°
lhe appliance must be electrically grounded when installed in accordance with local
codes, or in the absence of local codes, _,ith the National Electrical Code, ANSI!NFPA
No. 70 Latest Edition irt the U.S,A, or the Canadian Electrical Code, C2Z1; Part 1 in
Canada, if an external electrical source is utilized.
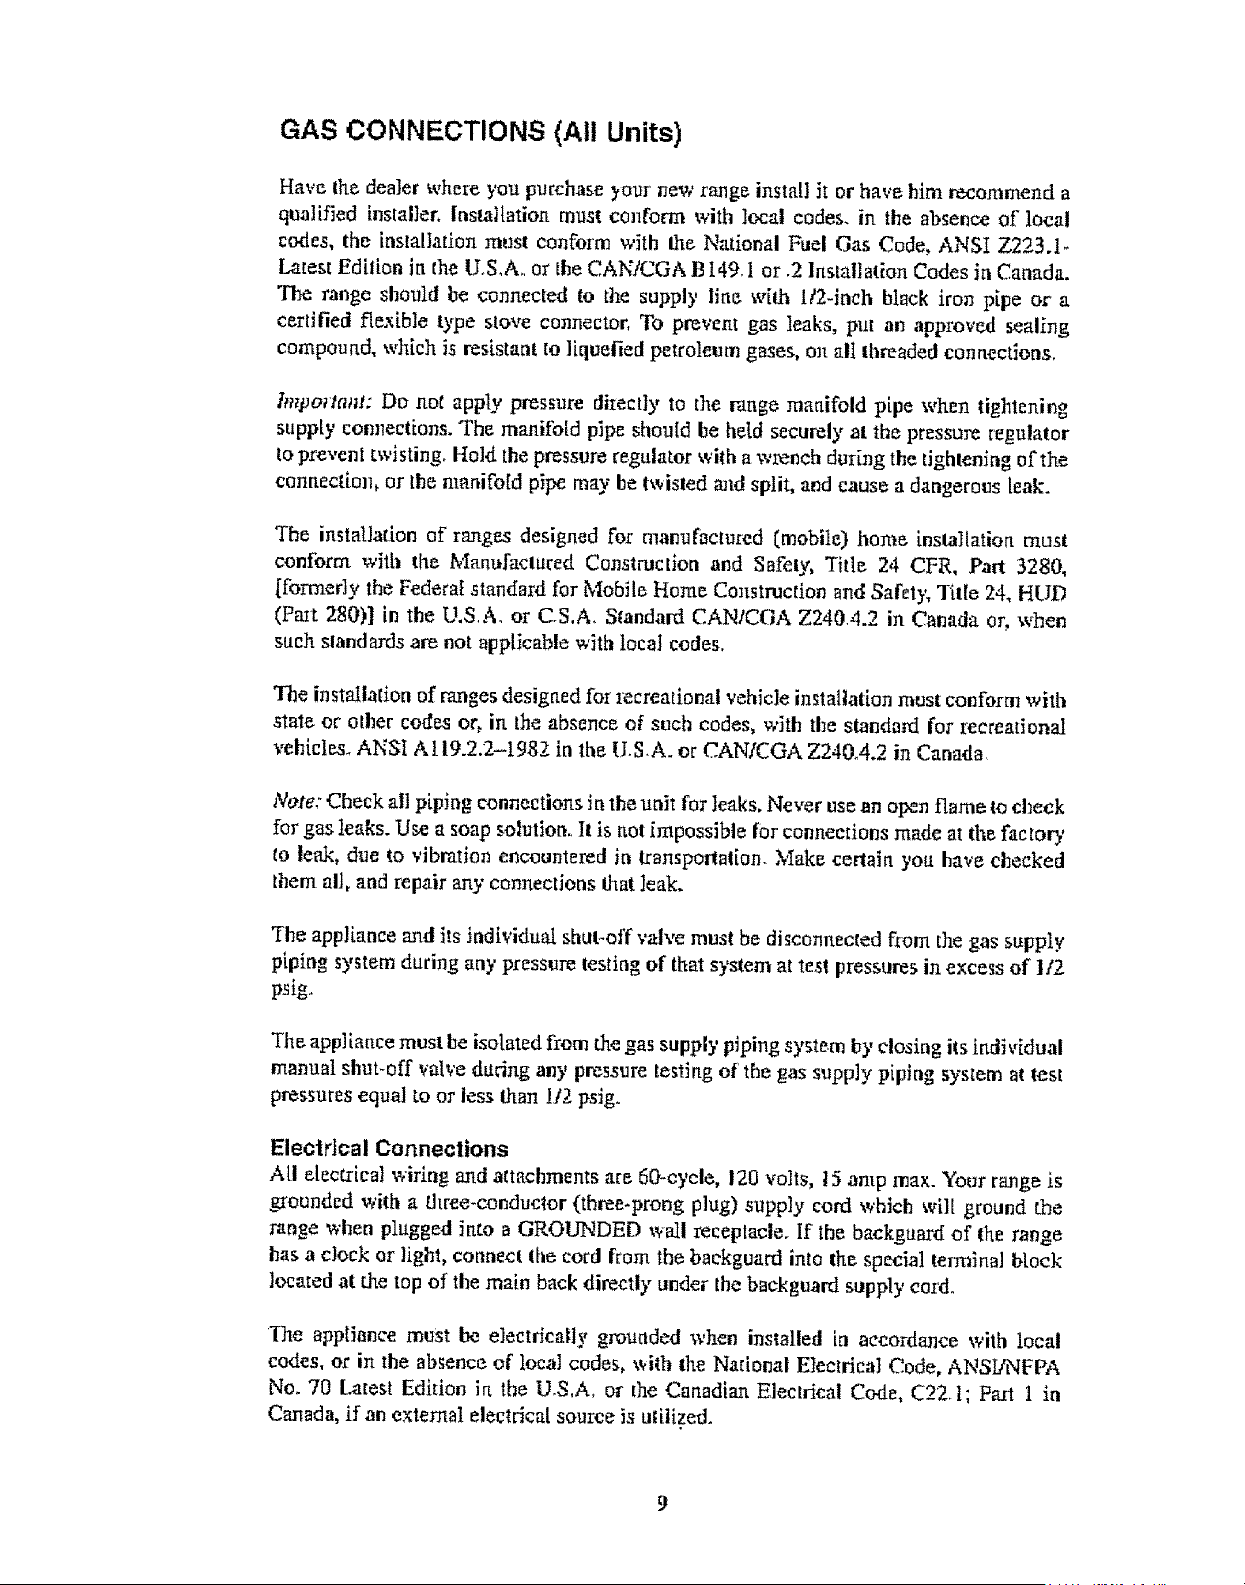
BACKGLIARD INSTALLATION INSTRUCTIONS
Gas Ranges
A. Remove main top.
B. Prace the backguard on top of end panels at lhe rear of range
C, Conttect the "disconne, ct plug", for power to backguard if equipped _ith electrical
features, See No, 1,
D. lttsert machine screws through lowec inside flange of end caps and end panels, Secure
with the hex nuts provide, (See No, 2),
E. Insert machine screws through elongated holes (See No, 3) at bottom of backguard and
side flanges of burner box, Secure with the hex rtuts proY_ded.
_', Attach tower edge of backguard to vettl outlet with two sheet met_] _erews. [See No,4)
L
0
10
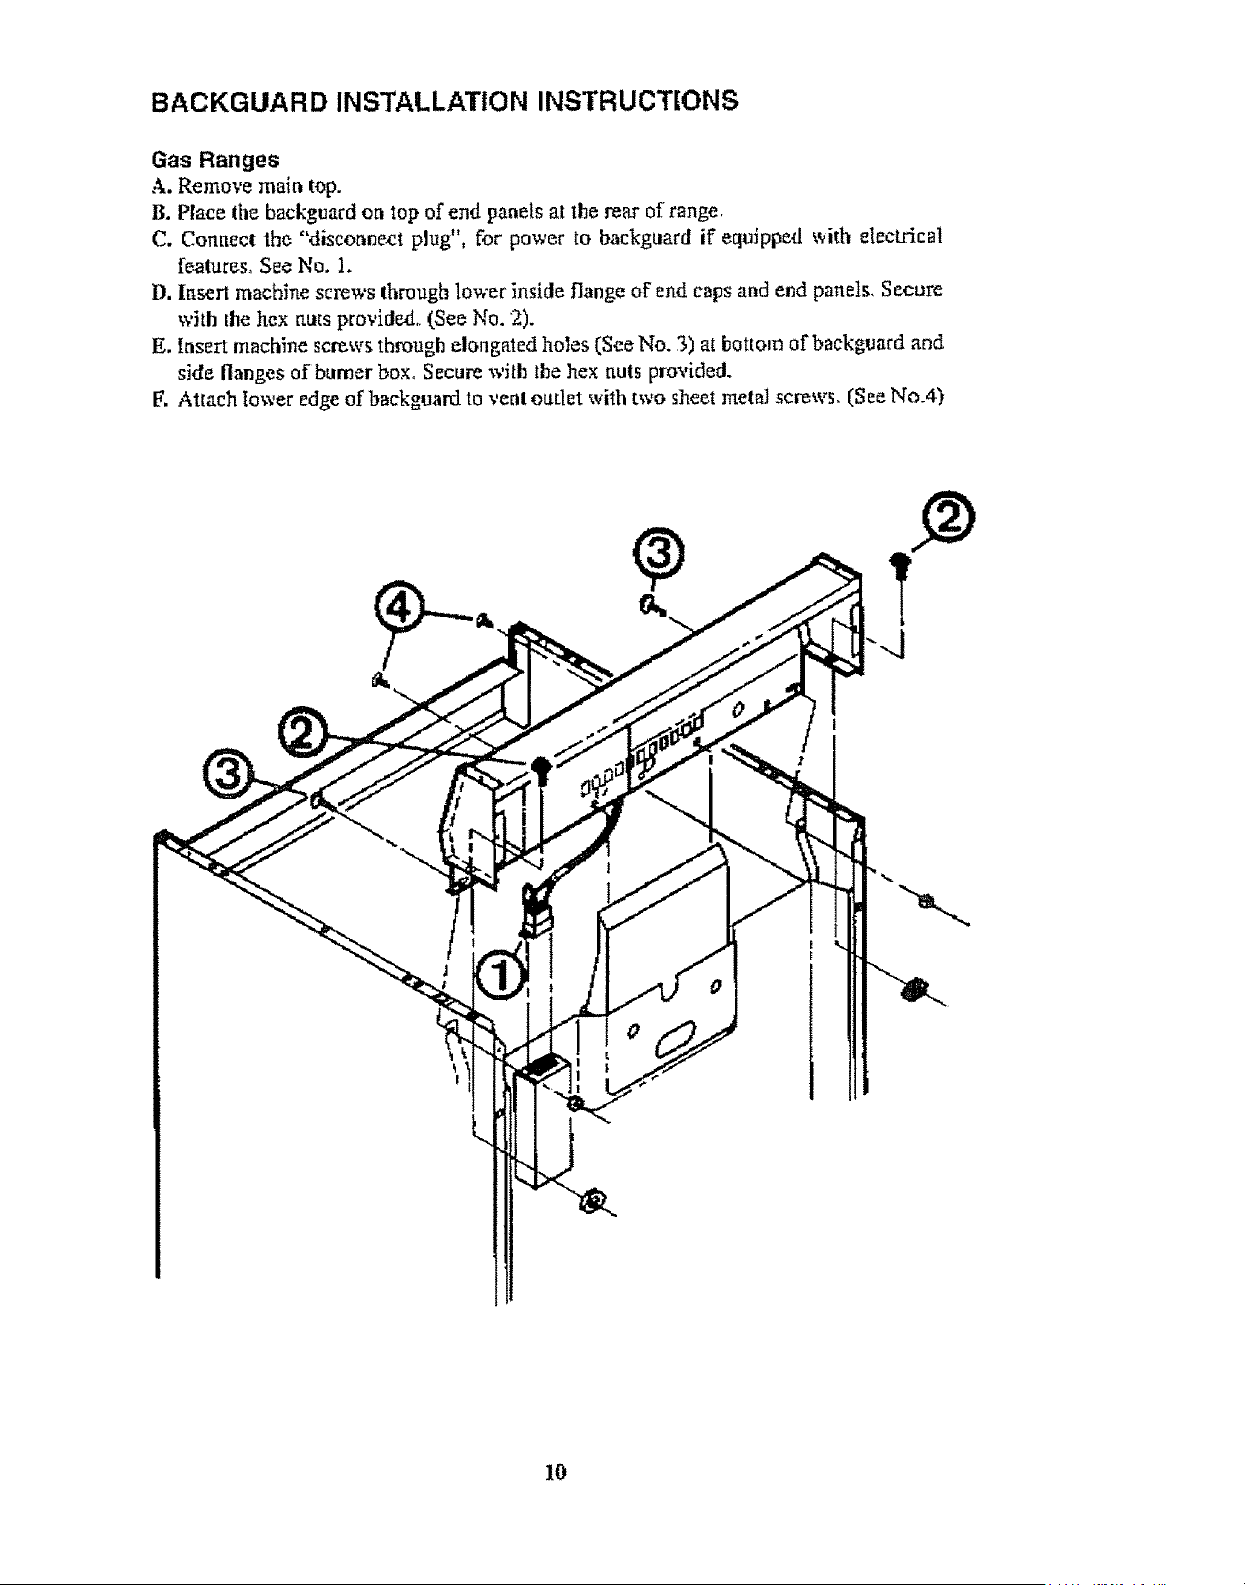
WALL CLEARANCES
All units m_st be installed in accordance to mintmum rear and side wall clearance
and clearances extended vertically above cooking top which are stated on tile serial
plate. (The serial plate is tocaled below the cooktopJ
ANY OPE/_INGS IN 7HE WALL BEHIND THE UNIT AND IN THE FLOOR UNDER
THE UNIT MUST BE SEALED,
Note, Due to potential hazards it is recommended that storage cabinets not be
installed abo,,e tile cooking surface.
IN THE EVENT OVERHEAD CABINETS ARE INSTALLED, THE MAXIMU.M
DEPTH OF CABINETS INSTALLED ABOVE COOKING TOPS SHOULD BE 13".
GAS HOOKUP
AREA
CONNECT!ON_
I1
ALIGNMENTS AND ADJUSTMENTS
Installation
tl is the respousibility of the i_sta]ter to make ee_in that the range, is properly adjusted
at the time of installation. Situalions caused by imlPml_r adjustments or improper
installation are. not covered under the warranty. Any expenses incurred due to such
situations will not be paid by the manufacturer o1"the appliartce.
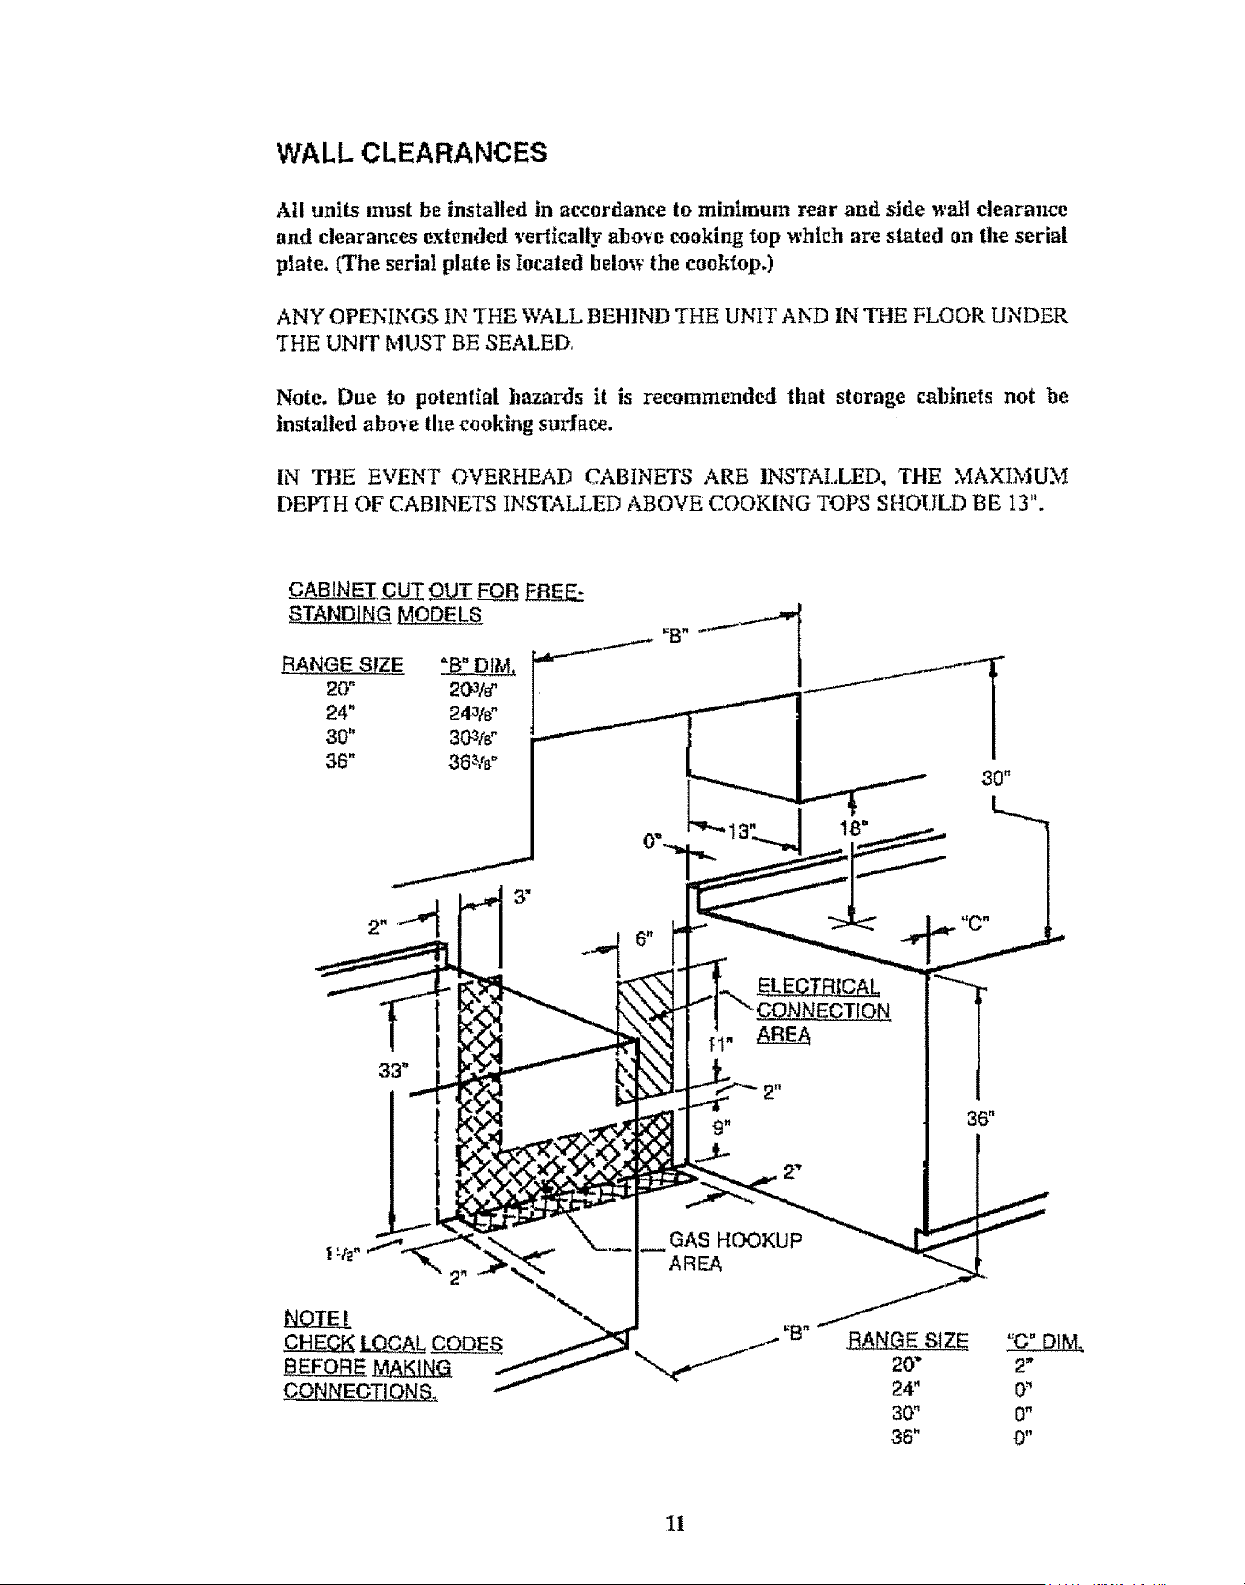
Gas Range Conversion and Adjustment Guide
The range will either be set for L=sewith Liquefied Petroleum (LP) or Natulal Gas. The
facto O, setting is indicated on the serial plate, When set for Natural Gas operation, file
pressure regulator will regulate the pressure to 4 inches water column. When set for LP
Gas o_pemtion, the pressure regulator will regulate the gas to 10 inches water column
p_ssure.
"lo Convert and/or Adjust
1, Convertible Pressure rRegulator
The tale( pressure of the gas supply shall be [n accordance with the nominal inlet
pressure of the regulator used oft the rang_ or I/2 psig maximum. The range should he
tested by pressurizing the t_gulator with an inlet pressure at least t inch water column
above the manufactuzeds specified manifold pressure shown on the serial plate,. The
range wiU be equipped with one of the two types of regulators shown.
For a Harper-Wyman
regulalor, remove
converter cap by inserting
a coin into slot in top and
twisting, Turn cap over
and re-instalL
On the SCP regulator.
unscrew file converter
using a 5/8" wrench, Turn
the cap over and reinstall,
LPG_
('t_'_,. _ Harper-Wyman
\_7 Regulator
LPG@ _ N'AT
Note: What you read on the converter cap or plunger is thetype of gas for which the regulator
is set, If yours reads NAT, the regulator is set for" natural gas. tf yours reads LP, th_ regulator
]s set for LP,
12
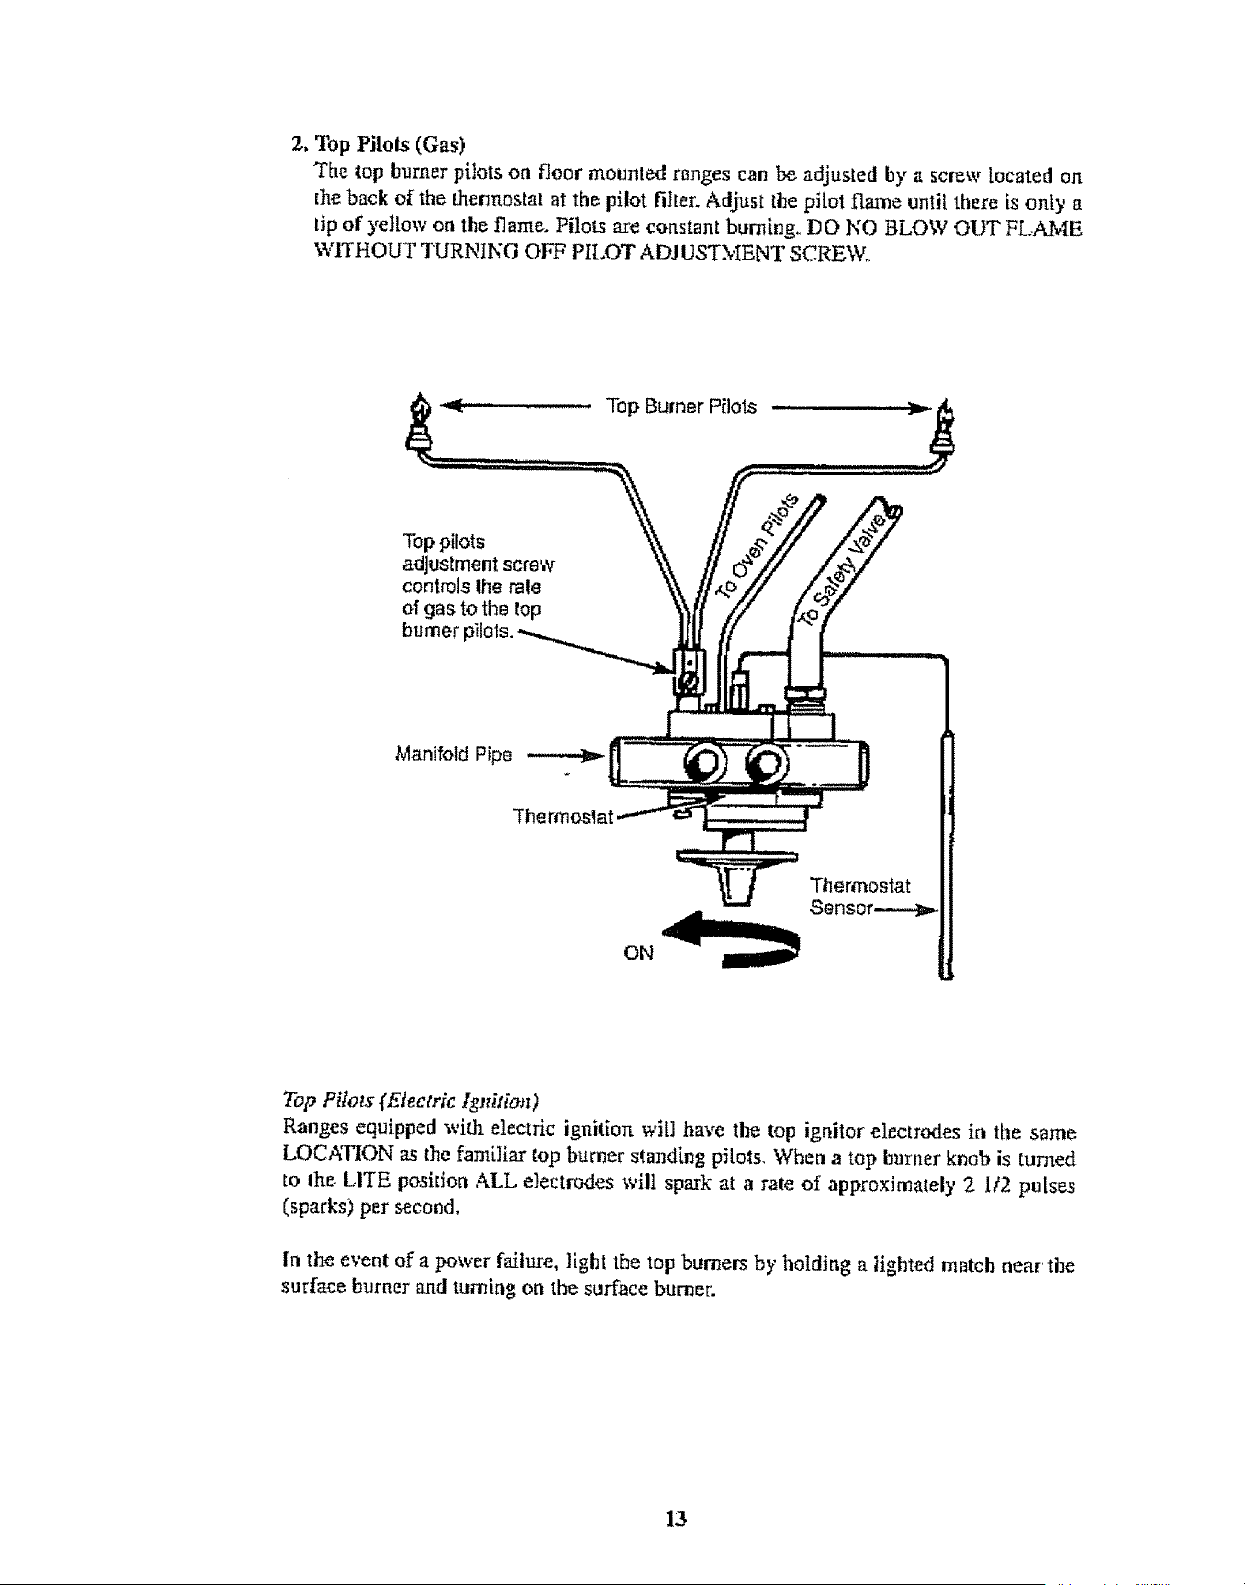
2. Top Pilot, (Gas)
The top burner punts on floor mounted rQnges can be adjusted by a screw located on
the back of' the thennDstal at the pilot filter. Adjust the pilol flame until there is only a
tip of yellow on the flame. Pilots are constant bur_[ng.. DO NO BLOW OUT FLAME
WITHOUT TURNING OFF PILOT ADJUSTMENT SCREW.
Top pilots
adjustment screw
controls Ihe rale
of gas to the top
Manifold Pipe
Ther
Thermostat
ON
Top Pilots (Electric Ignition)
Ranges equipped with electric igniliort wStl have the top ignitor electrodes in the same
LOCATION as the familiar (op burner standing pilots, When a top burner knob is turned
to tt_e LITE position .aLL electrodes will spark at a rate of approximately 2 112 purses
(sparks) per second,
In the event of a power failure, light the top burners by holding a lighted mntch near the
surface burner and turning on the surface burner.
13
ALIGNMENTS AN D ADJUSTMENT, Continued
Keep appliance area dear and free from combustible materials,
gastflhle, and other tlammable vapors and liquids.
Do not obstruct the flow of air tlmt is necessary for combustion and
ventilation.
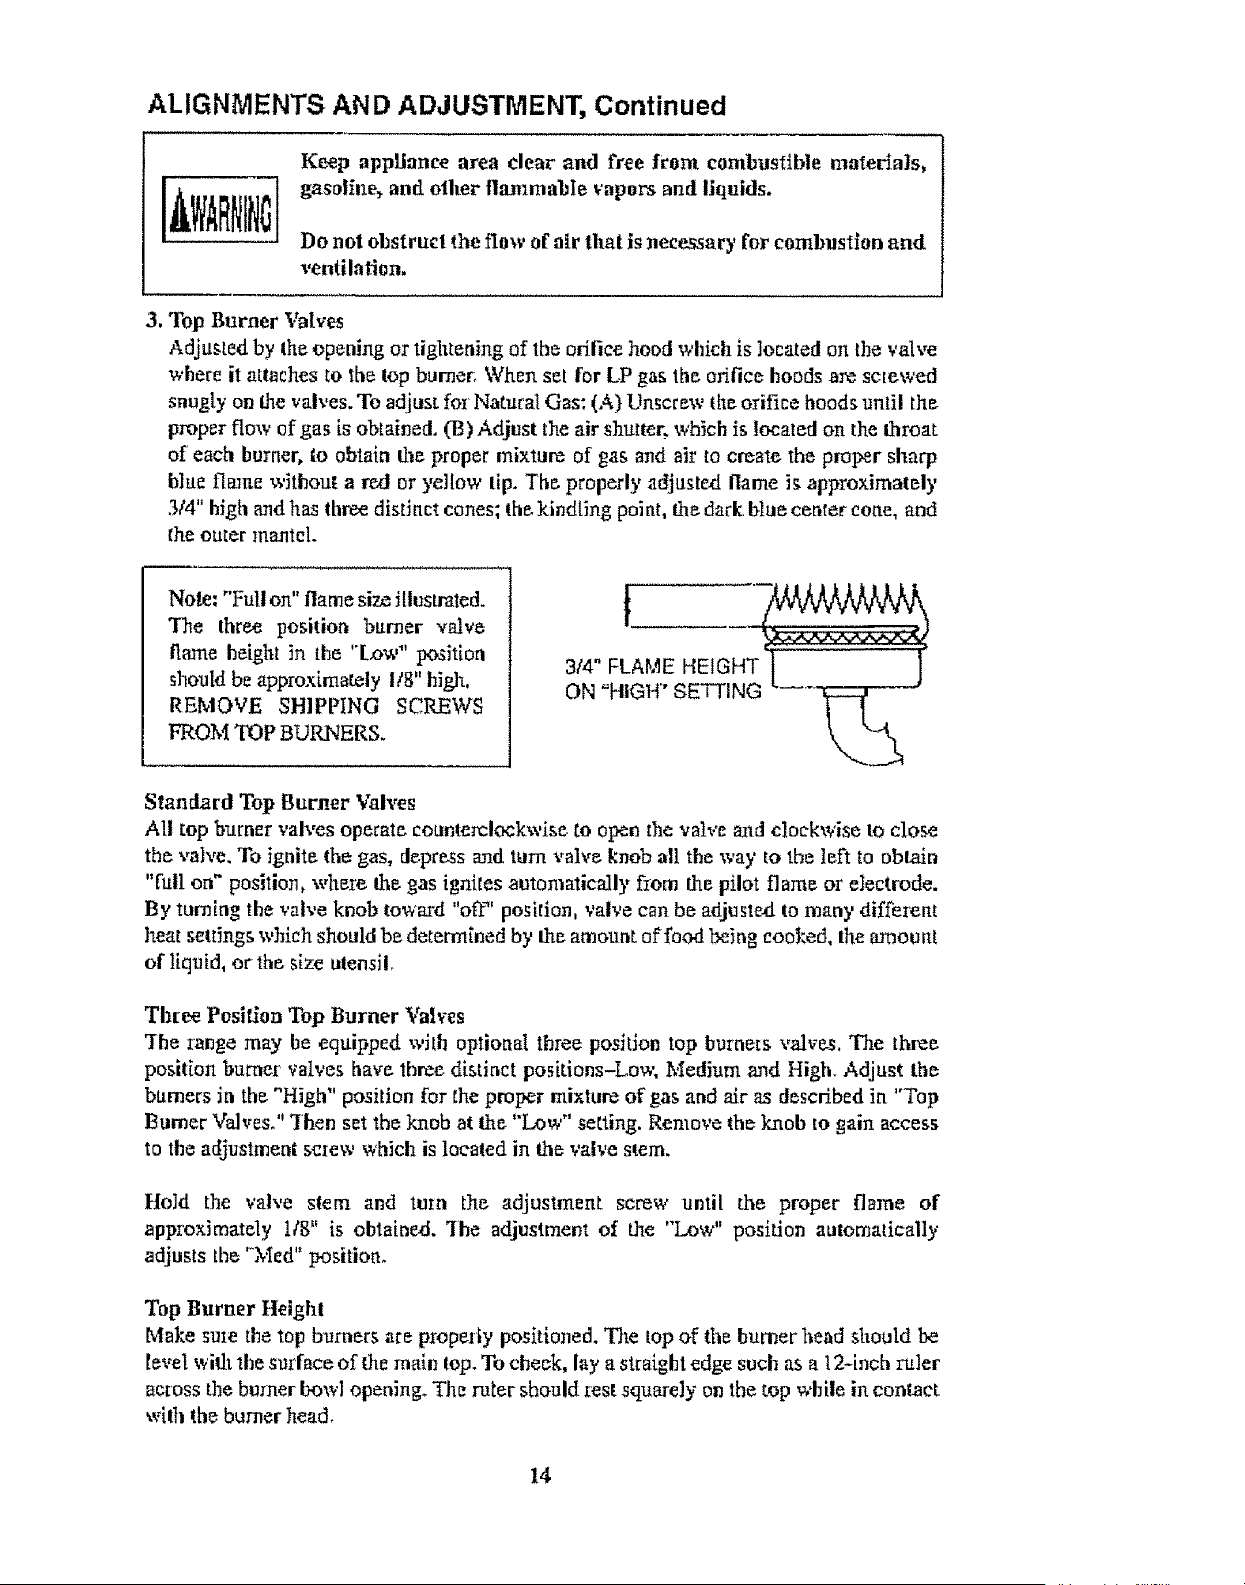
3. Top Burner Valves
Adjusted by Ihe opening o: tightening of the orifice hood which is located on the valve
where it attaches to the top burner: \Vhensel for L.Pgas the. orifice hoods are screwed
snugly on the valves. To adjust for Natural Gas: (A) Unscrew the orifice hoods until the
properflow of gas is obtained. (B) Adjust the air shutter., which is !ocated on the throat
of each burner, m obtain the. proper mixture of gas and a_r to create the proper sharp
blue flame without a red or yellow tip. The. properly adjuste,d flame i_ approximately
3/4" high andhas threedistinct cones; the.kindting point, the dark blue center cone, and
the outer mantel
Note: "Full on" flame siz_ illustrated.
The Ihr_ position burner valve
flame height inthe "Low" position
should be approximately 118"hlgh,
REMOVE SHIPPING SCREWS
FROM TOP BURNERS.
314" FLAME HEIGHT
ON "HIGH " SETTING .....
Standard Top Burner Vah0es
All top burner vah'es operate, counterclockwise to open the valve and clockwise to close
the valve. To ignite the gas, depress and turn valve knob all the way to the left to obtain
"full off" position, where _e. gas igrlifes automatically fiom the pilot flame or electrode.
By turning the valve knob toward "o_' position, valve can be adjusted to many different
heat settings which should be. determined by the amount of food being eoot:ed, the amount
of liquid, or" 1he size utensil
Three Position Top Burner Valves
"Ihe range may he equipped with optional three position top burners valve.s. The three.
position burner valve_ have lhree distinct posidons-Lov,; Medium and High. Adjust the
bttmers in the "High" position for the proper mixture of gas and air as described in "Top
Burner Valves." 3hen set the knob at Ihe "Low" setting. Remove (he knob to gain access
to the a_justmeat screw which is located in the valve s_em.
Hold the valve stem and turn the adjustment screw until the proper flame of
approximately 1/8" is obtained. 'Ihe adjustment of the "Low" position automatically
adjusts the '_Med" position.
Top Burner Height
Make sine the top burners are properiy positioned. Tim top of the burner head should be
level _,idl the surface of the main fop. To cheek, lay a straight edge such as a l2-inch ruler
across the burner bowl opening. The rater should test squarely on the top while in contact
wilh the burner head.
14
ALIGNMENTS AND ADJUSTMENTS, Continued
If lhe humor is too high (make sur_ burner is coo]), push it down. Supply enough force
with the palm o[ your hand to accomplish this adjustment. To raise, pull up on the bun_er
support at the center of the support.
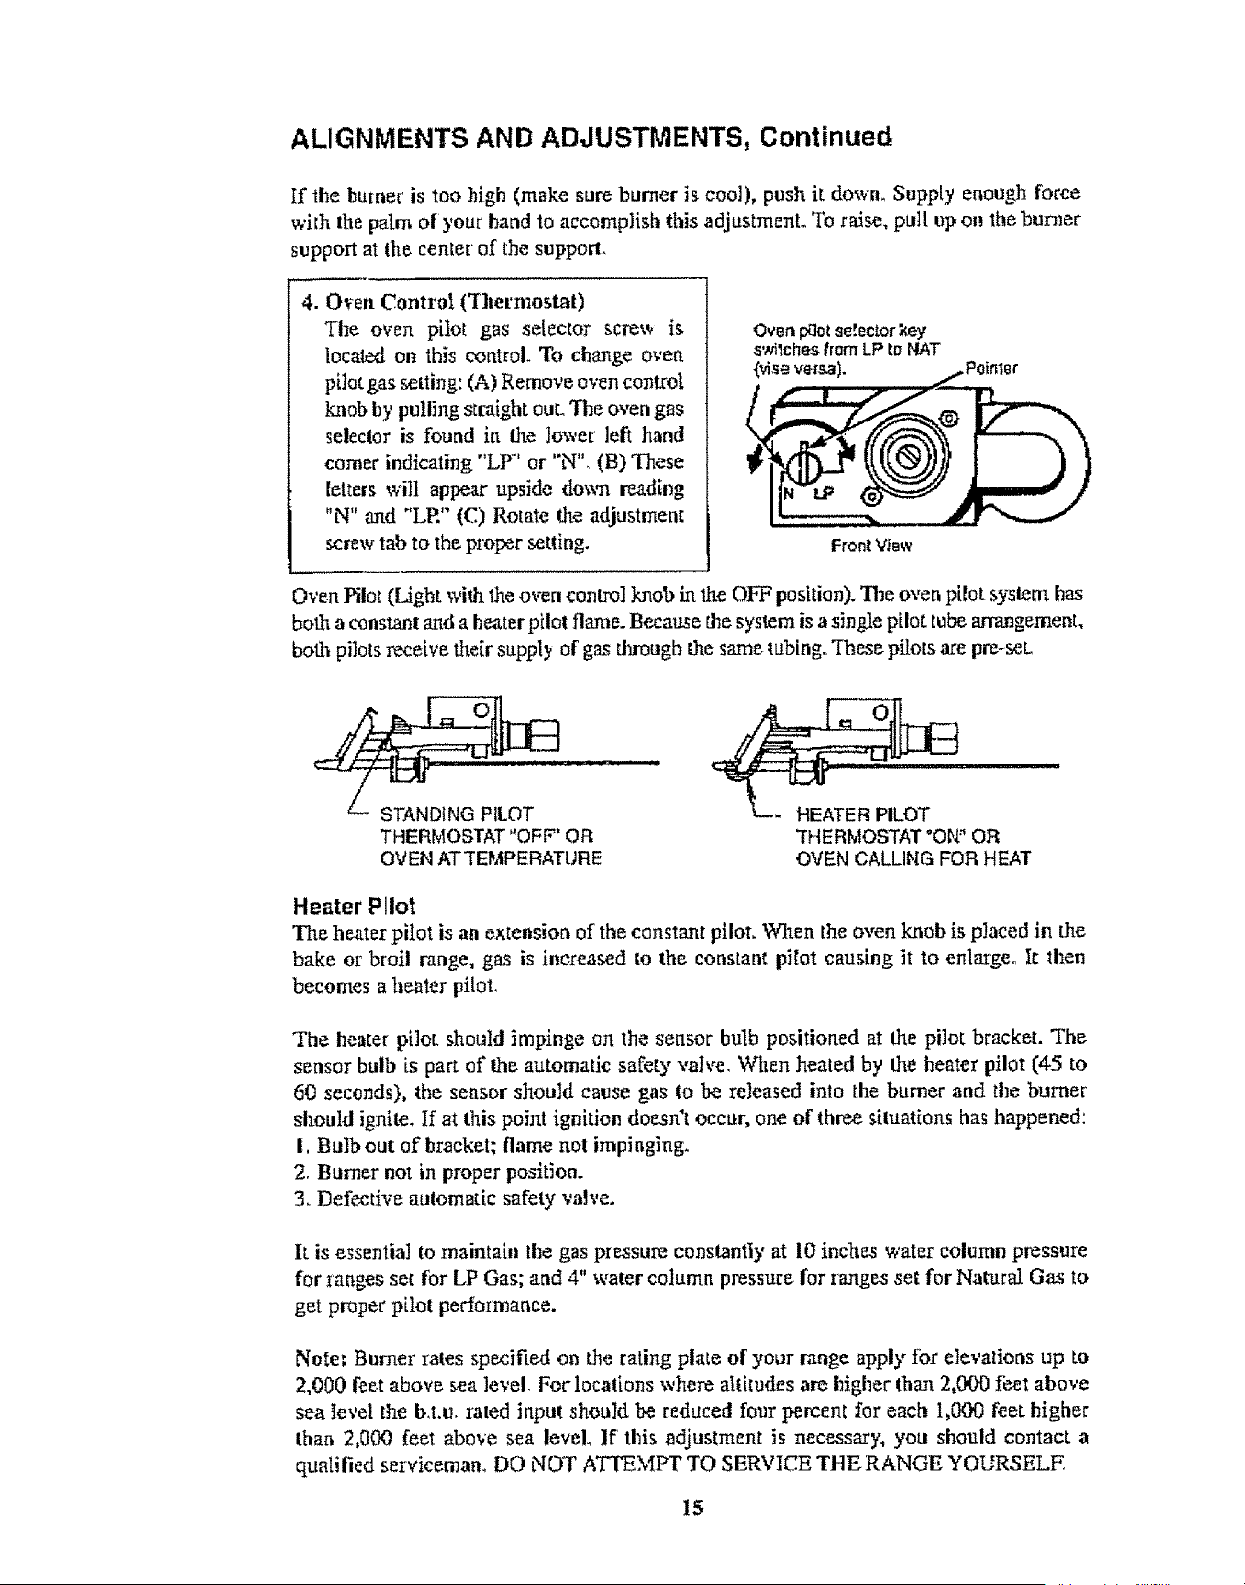
4. Oven Control ('Ihermostat)
The oven piiot gas selector screx,, is
located on this control. To change oven
pilot gas setting: (A) Remove oven coztrol
"knob by pulling strai_ttt out. The oven gas
selector is found in the lower left hand
comer indicating "LP" or "N", (B)These
[etter_ will appe_ upside down reading
"N" and "LP." (C) Rotate the adjustment
screw tab to the pIx>1_r setting.
Oven I_ot so!actor ;coy
s'_Iches from LP to N._T
(_Aseversa). /poinler
/ _l:_ .r/ EL..,..=
FrontV,[e,,v
Oven Pilot (Light with Lheoven control bob in the OFF position). The oven pitot system has
botha constant and a heater pilot flame. Because the system is a single pilot, tube arrangement,
boil1 pilots receive their supply of gas through file same tubing. 'These pilots are pro-soL
STANDING PILOT
THERMOSTAT "OFF' OR
OVENATTEMPERATURE
'THERMOSTAT=ON"OR
OVEN CALLING FOR HEAT
Heater Pilot
The heater pilot is an extension of the constant pilm, When the oven knob is placed in the
bake or broil range, gas is increased to the constant pRot causing it to enlalgeo It lhen
becomes a heater pilot.
The heater pi]ot should impinge on the sensor buIb positioned at the pilot bracket. "The
sensor bulb is part of the automatic safety valve. When heated by the heater pilot (,$5 to
60 seconds), the sensor should cause gas to be released into the burner and the burner
should ignite. If at this poiJlt ignition doesn't occur, one of (hre_ situations has happened:
I, Bulb out of bracket; flame not impinging.
2. Burner not in proper position.
3. Defective automatic safety vMve.
It.is essential to maintabl the gas pressure constantly at 10 incl_e_s water column pressure
for ranges set for LP Gas; and 4" water column pressure for ranges set for Natural Gas to
get proper p[tot perfolmaace.
Note: Burner rates specified on the rating plate of your range apply for elevations up to
2_000 feet above sea level For'locations where altitudes are higher than 2,000 f_t above
sea ]eve[ the b.t.u, rated irtput should be reduced four percent for each 1,000 fe_t higher
than 2,000 feet above sea level. If this _adjustment is necessary, you should contact a
qualified serviceman. DO NOT ATTEMPT TO SERVICE THE RANGE ¥GURSELE
15
ALIGNMENTS AND ADJUSTMENTS, Continued
Ovens with Pilotless Electric Ignition: Free-Standing Ranges
Ranges equipped with the spark ignition system will ba_'e an oven pilot ignitor that has a
"flame sensing" feature (hat automatically stops the sparking once the ovet_ pilot gas is
ignited. Turning the overt control dial on will activate an electronic module and send
pulses (sparks) to all electrodes (including the top h'_mer eleclrodes) at a ra_e o["
appmximalely 1 1f2 pulses (sparks) per second.
MOISTURE: Moislure can)ave 1he same effect on the overt ignitor as the pilot flame, tf
sparking does not occur when the overt thermostat knob [s turned on during the initial
altempt to use {he oven or aRer several days of non-use, it COULD BE the result of
moisture bu_ld-up irt the ceramic sleeve of theoven electrode. Tl_s may happen in areas
with Mgh humidity or if food having high water content is cooked. "]'his moisture cap be
driven out of the ignitor by lighting the pilot and operating theoven for a few minutes,
Po]low the instructions below tbr lighting thepitot,
NEVER I,EAVE THE CONTROL KNOBS IN ANY POSITION OTHER THAN
"OFF" IF THE IGNITORS OR BURNERS AREN'T WORKING PROPERIA'.
• With the oven control O_gF open the broiler door and poshion yourself so you can see
theoven pilot a! theback ofthe oven burner.
= Next turn any lop burner knob to the "LITE" position while watching the oven pilot.
Turn the oven control pop If the overt p[]ot doesn't ignite within five seconds
immediately turn the oven control off. If the oven pilot does ignite, the oven burner
should ignite '" '
_,_tbmg 60 seconds_ If not, immediately turn the oven control off and call
a serviceman,
If the oven is worMng, to determine if moisture was the problem wait a few minutes and
attempt to light the oven by turning the overt control dM on. tf sparking occurs at the overt
electrode to ignite the oven pilot and within sixty seconds ignites the oven burner then
moisture build+,up was the problem. If the oven bonier doesn't ignite within 60 seconds
tom the oven conuot off and call the serviceman.
* ]f for some reason there isn't sparking, indicating the module [sift working, or there is a power
failureand oven eookSngis necessaryyou may manuallylight theoven.
lAcAorr0nl.
• Open broiler door, Oven pilot is located on the left side of the oven burner at the back
of the bomer.
" Hold a llghled match and teach through the broSler compartment to the ween pilot.
• While holding file lighted match neaz the tip of the pilot assembly, turn the oven
contto] dia! to art ON position. Immediately remove your hand from !he broiler
compartment afler the pilot gas ignkes, From 20 to 60 seconds after the pffot ignites, gas
wli] flow to the oven burner and the burner w_]l ignite,
- Close the broiler door.
• Set desired temperature_
• When cooking Is finished, turn lhe Oven Temperature Control to Oil. This will shut
off a!l gas In the oven.
16
ALIGNMENTS AND ADJUSTMENTS, Continued
IF THE OVEN BURNER DOES NO]" IGNITE WITHIN 20 TO 60
SECONDS AFTER THE PILOT IS LIGHTED, TURN THE OVEN
TEMPERATURE CONTROL TO OFF AND WAlT FOR POWER TO BE
RESTORED, DO N(Yl" ATTEMPTTO RELIGHT THE PILOTAGAtN.
If the oven does not function properly when the power is re_tored, or at any oflter lime,
call a serviceman to determine the source of the problem, DO NOT ATTEMPT TO
SERVICE THE RANGE YOURSELE
5, A.ul_matic Oven Safely Valve
The orifice hood on the oven safety valve regulates file flow of gas to the oven burner.
This valve adjusts in The same manlier as the top burner valves and is located at the base
of the oven burner in the broiler compartment of the range. To gain access, simply
remove the bioitez section. When set for LP, the orifice hood is scmveed snugly on lhe
valve. To adjust for use on Natural Gas, unscrew the orifice hood until the proper flow
of gas is obtained.
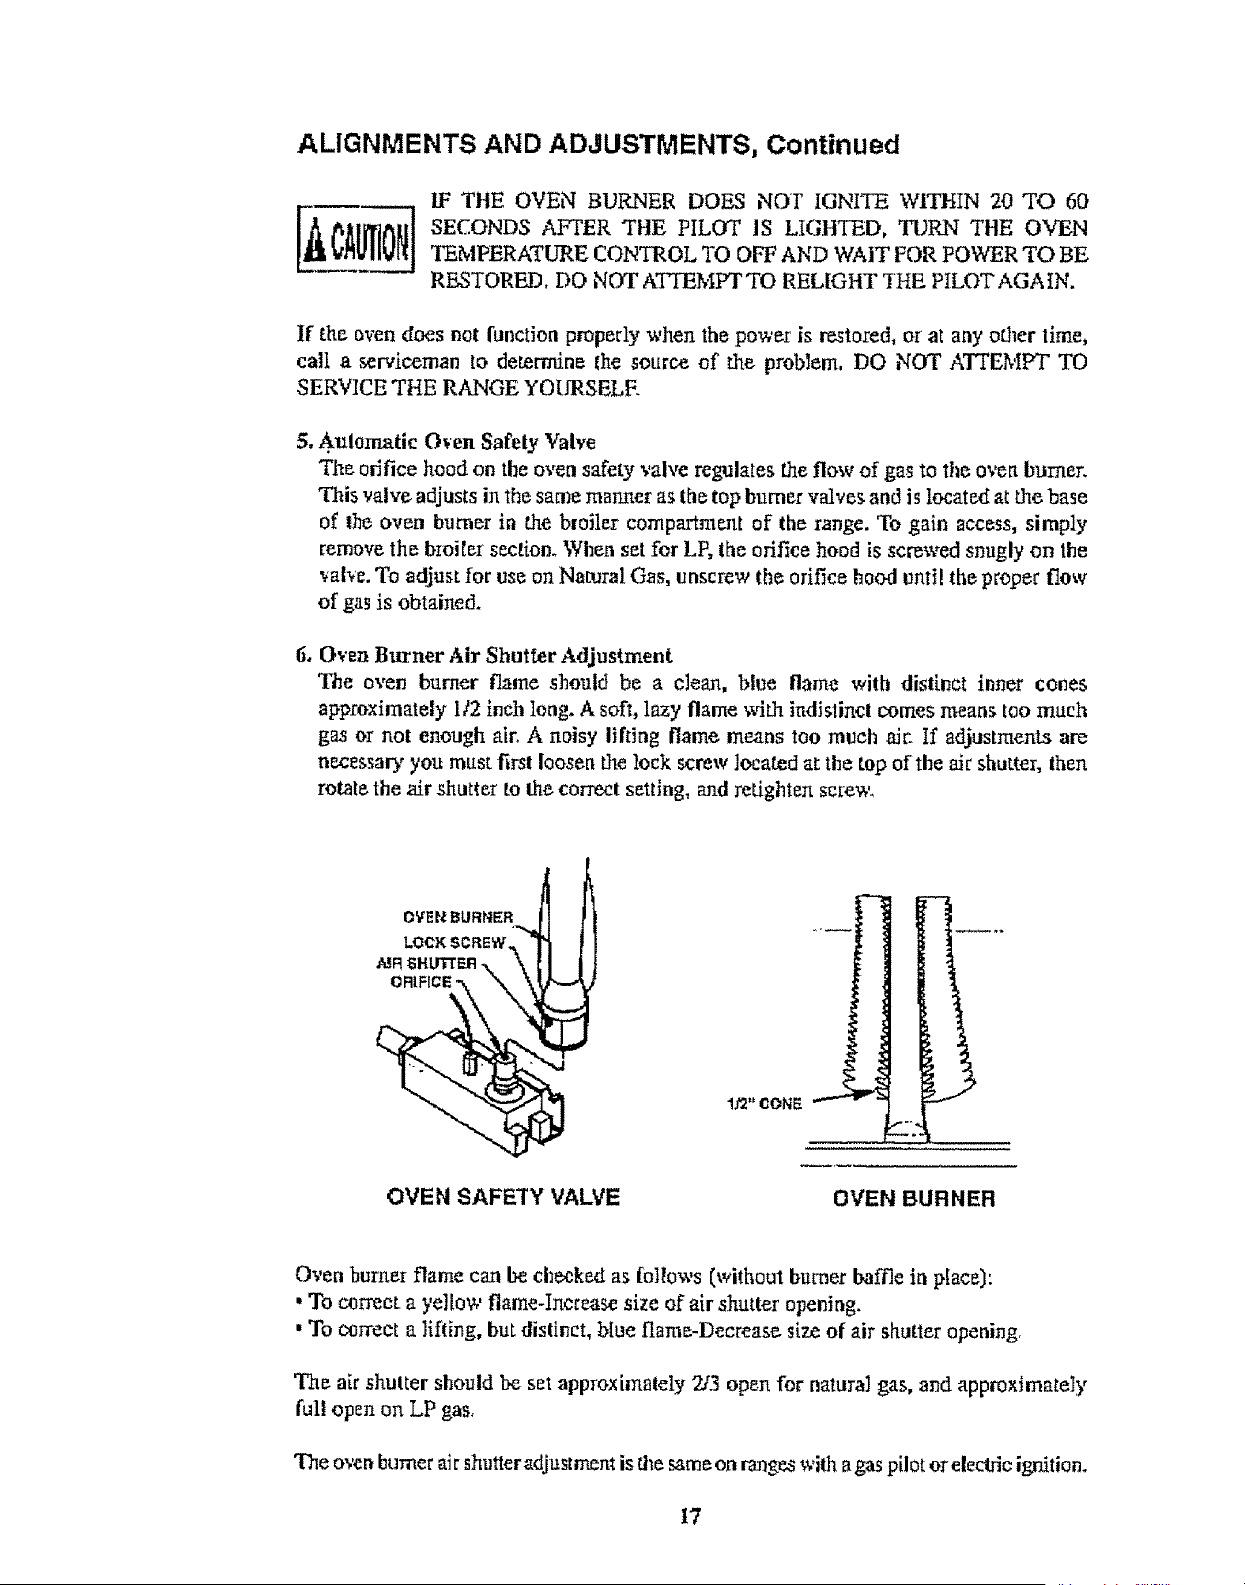
6, Oven Burner Air Shutter Adjustment
The oven btlrner flame should be a clean, blue flame with distinct inner cones
approximately It2 inch long. A soft, lazy flame ',_dth ]udistinct comes mean_ too much
g_ or not enough air. A noisy lifting flam_ means too much Mc tf adjustments am
ue..cesmry you must first loosen the lock screw located at the top ofthe _fi_shutter, then
rotate the air shutter to the correct setting, and retighten screw,
OVENBURNER
LOCKSCREW.
_MR_HiJr_ER N k
OVE N SAFETY VALVE
1/2" CONE
______J
OVEN BURNER
Oven burneI flame can be checked as follows (without burner baffle in place):
, To cermet a yellow flame-Increase size of air _hutter opening.
, To correct a lifting, but distinct, biue flame-Decrease size of air shutter opening,
The air shutter should be set approximntely 2/.3 open for naluraJ gas, and approximately
ful!lopen on LP gas.
The oven burner air shutter adjustmem is the same on ran_ with agas pilot or elecldc ignition.
17
OPERATION OF RANGE
Using Your Range
The range may have only part of the features described within this martt_aL If ),our range
has some features which me not covered in this manual, _b_e features _ili be covered in
other enclosed ][teratu_.
Top Burner Operallon
Note: When belling food, the highest lempe_ture that can be r_ched is the boiling point
_en the liquid starts to boil decrease the size of the _ame unit1 you reach the minimum
flame that will hold the boil This will sa_,e gas° It will also lessen the possibility of
bu_ing food or boiling food over, and help to keep your kitchen cooler. Use stable
utensils _,i_h fl _! bottoms and always place the utensil on the burner grate before llght[ng
the burner, Unstable or iounded bottom utensils wilt riot contact properly with the grate
and will affect the cooking efficiency° Select utensils large enough to avoid spitlovers, but
remember, over-sized utensils (diameters exceeding 8 1F2") cart cause the range finish to
discolor, craze or chip. Damage caused by oversized utensils, such as those sometimes
used in cabining, are not covered by the wan'anb', The finish has _ea manufactured to a
commercially _cceptable standard and it_ condition is dependent upon the care of the user.
Top Burner Valves
The top burrter flame size should be adjusted so tha_is de,es not extend beyond _he edge
of the cooking utensil, As a matter of sa_eU, it's urged ttmt you comply with these
instructions.
A high flame on a surface burner is bolh inefficient and unsafe. The flame should always
be adjusted so that it is no larger than the bottom of the pan, Fluctuations in flame size
could be caused by pressure vadatlons_ improperly positioned burners, damage or debris_
Preheating
Heat the overt to the desired temperature before placing the food irt the oven. Preheat for
10 to 12 minutes.
Opening Oven Door
Let hot air or steam escape before removing or replacing food.
Arr_anging Oven Racks
The overt racks should be arranged before the oven is turned "ON." Place the zacks so the
food is centered in the oven,,
Temperature Selection
It is important to select to proper lemperature setting, Never set the d_a! to a higher degree
th_n needed with the intention of ]owering the setting at a later lime, This will not speed
up the action, It can cause the oven to _'cle slower and cause the temperatures to vary so
that cooking results may be unsa_isfaetoi_; Imagine that the control has three sections:
Low Temperature_ Bake and Broil.
The Low Temperature setting has a temperature range of 14tY'Fto 200°F. 'Yhis setting is
used to keep food at serving temperamre_ The bake cycle is from 250_ to 550"E This cart
be termed as the very low rauge (250_F to 275"F) to extremely hot (500" to 525"F).. The
moderate baking range is 350"1: to 4:25°E
18
Baking
When baking follow the recipe i_structions. Use correct ingredients, measure them
carefufl:r; and use Ihe correct type and size _tensil suggestect [n the recipe, Remember to
preheat properly, Avoid frequetlt opening of the oven door during preheating and baking.
+,\_en baking cakes in _lass baking dishes, lower the oven temperature 25°F to prevent
browning oF the bottom and sides before lt_e top becomes brown,
Also when using glass bakeware it would be better to increase the preheat time to have
exact stabilization of the oven's temperature, To do so _dlow 20 minutes time for
temperatures up to 350T and 30 minutes for temperatures up to 425°F, Avoid opening the
door as much as possible,
Oven Racks
The oven racks should be arranged before the oven knob is turned to an "ON" position.
Place the racks so tl0e foo_ Js centered in the oven, not the rack.
"_Vtteu more than one utensil is used, be sure to stagger them ailowing space between each
one. Dt_ not allow the utensil to touch arty part of'the oven, especially the glass window.
It is best to use two racks nud place food so one utensi! is not directly over another
Rack Removal
Pull t_',eoven rack fozward and lift up on the front of the rack so it w_]l clear the rack
keeper,
To reptace the oven rack, guide the attg]ed rear portion of the rack under the rack keeper
and sJide the rack to the rear.
N_ver cover the ove_aracks with aluminum foil. Such practices will trap heat and cause
intense heat in spots which usually give poor results. It cart damage the porcelain finish
as welt as.glass windows in oven doors (if equipped). 11-97
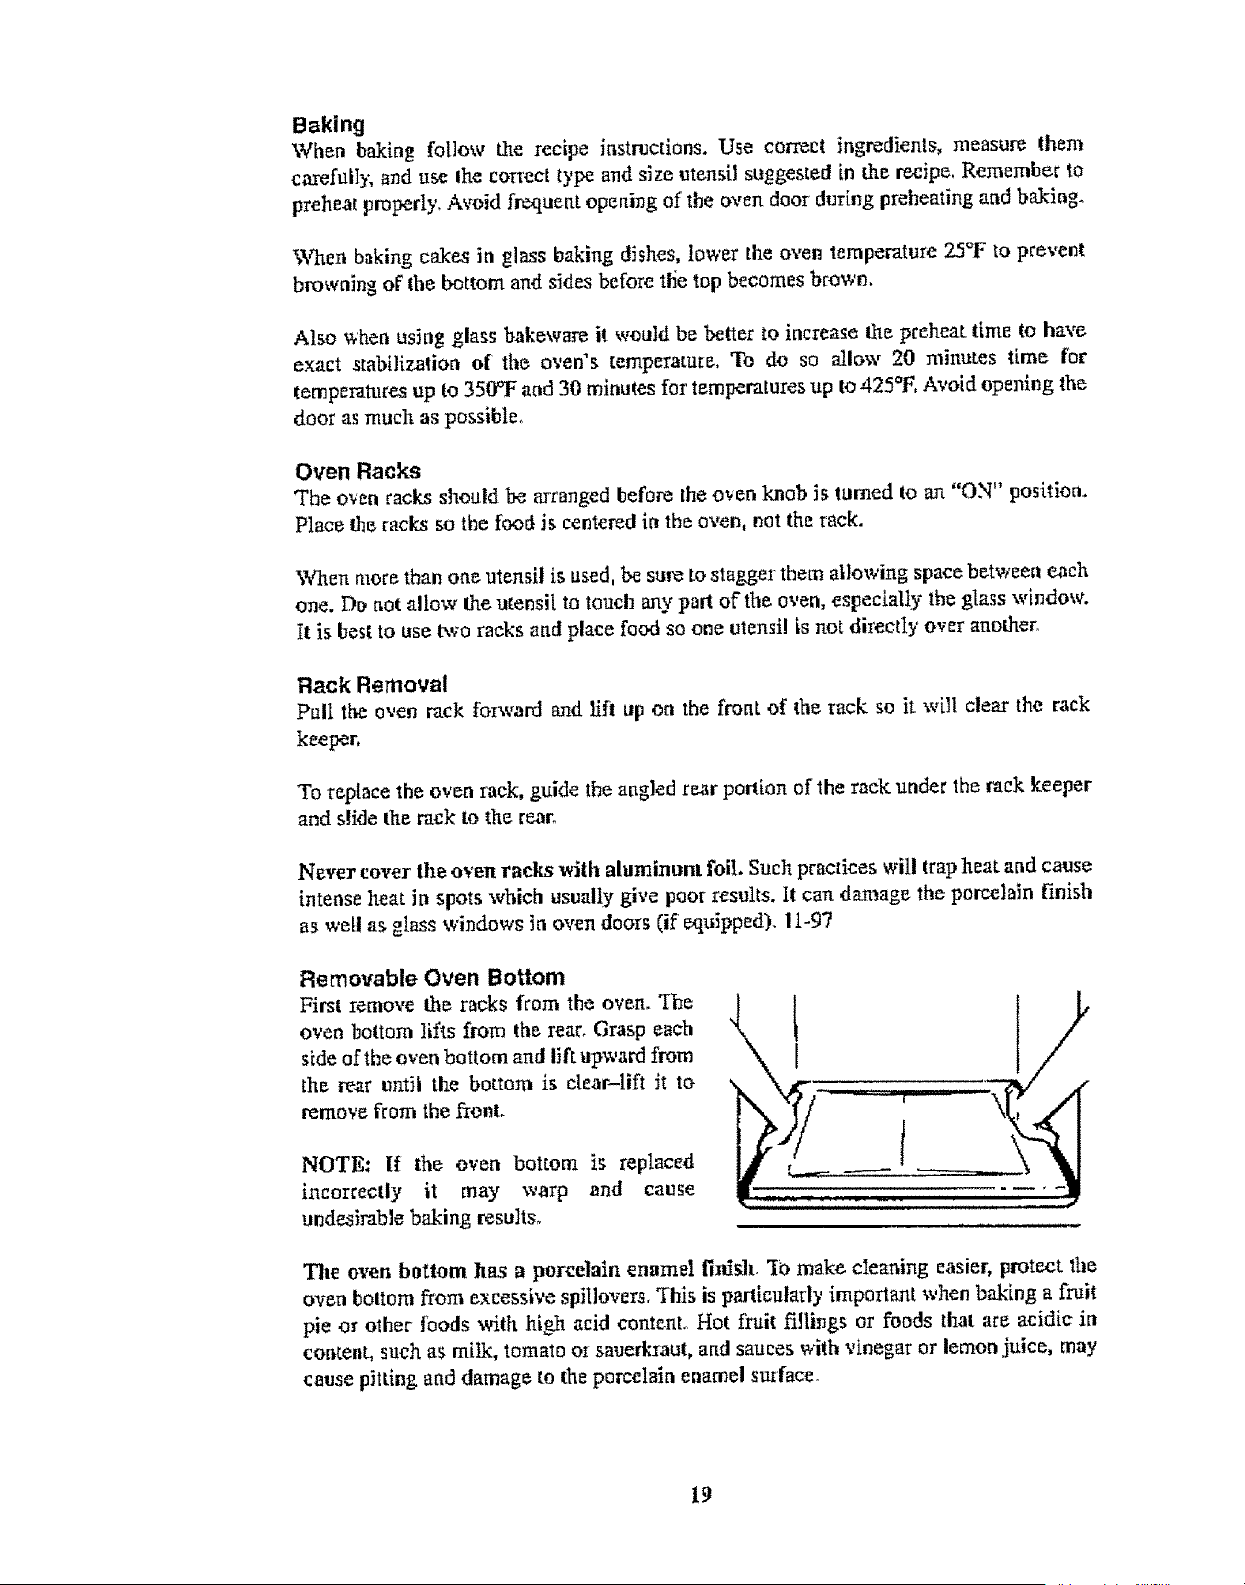
Removable Oven Bottom
First remove the racks from the oven. The
oven boltom lifts from the rear_ Grasp e_ch
side of the oven bottom and lift +tp,,vardfrom
the rear until the bottom is clear-lift it to
remove from the front+
NOTE: It the oven bottom is replaced
incorrectly it may warp and cause
undezirable baking results°
The oven bottom has n porcelain enamel finish. 'I_ make cleaning Easier, protect file
oven bottom from excessive spitlovers, This is particularly importartt when baking a fruit
pie or other foods with hLo_ acid corttenL Hot f_ruit fillings or foods that are acidic in
content, such as milk, tomato o_ sauerkraut, and sauces with vinegar or lemon juice, may
cause pitting and damage to the porcelain enamel smface+
19
Toprotocttheovenboltomsurface,place, a piece of aluminum foil slightly larger than the
baking dish on the rack below to catch any boilovers. It should not con_pletely cover the
rack as this would cause uneven heat in the oven, Aluminum fall should not be placed on
theo'¢en bottom.
If a spillover dD_ actor on the oven bott_m_ allow the oven to coot tint° You can clean
the bottom with soap and water, a mild abrasive cleanser, s0ap-filler abrasive pads or an
oven cleaner following package directions.
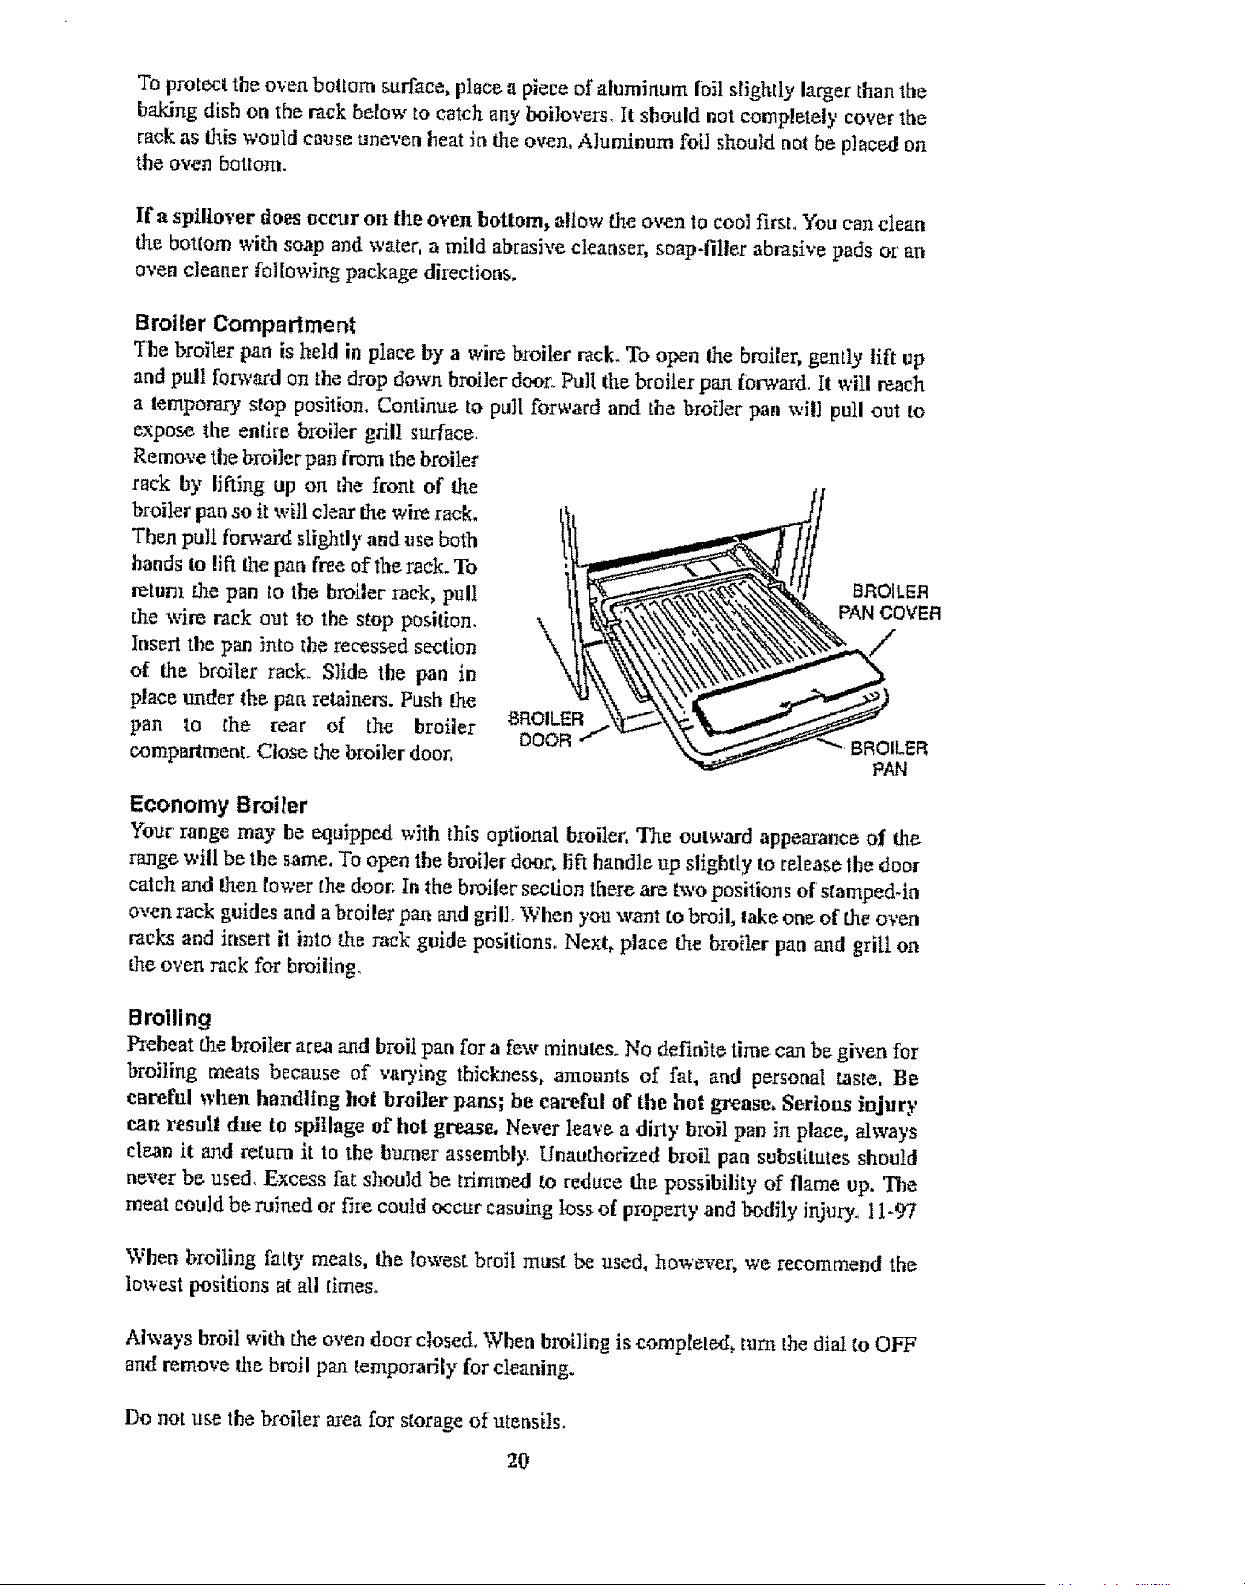
Broiler Comparlmen_
The broiler pan is held in place by a wire broiler rack. To open the broiler, gently lift t_p
and pull forward on the drop down broiler door. Pul!.tke broiler pan (brward. I1will reach
a tempomr'ys_op position. Continue to pull forward and the broiler pan will pull out to
expose the entire broiler grill surface+
R.emo'_,e the broilecpan from the broiler
rack by lif6ng up on the front of the
broiler pan so it will clear the wire rack.
Then pull forward slightly and use both
hands to lift the pan free of the rack.To
return the pBn to the broJ.ler rack, pull
the wke rack out to the stop position.
Insert the pan _nto the recessed section
of the broiler rack+ Slide the pan in
place under thepan retainers. Push the
pan to the rear of the broiler
compartment° Close the broiler door,
BROILER
Economy Broiler
Your range may be equipped with this optional broiler, The outward appearance of the
rm_ge will be the same, To open the broiler do_r, I_ft handle up slightly to release the door
catch and then lower the door; In the broiler section there are two position s of stamped-in
ox,en rack guides and a broiler pan _ytd gfi 11.W hen you want 1o broil, lake one of the oven
racks and insert it into the rack gnide positions. Next, place the broiler pan and grill am
the oven rack for broiling,
Broiling
Preheat the broiler area and broil pan for a few minutes+ No definite time can be given for
broiling meats because of va_'ing thickness, amount_ of fat, and personal taste, Be
careful when handling hot broiler pans; be careful of the hot grease, Serious injury
e.an result due to spitlage of hot grea_ Never leave a dirty broil pan in place, ahvays
clean it and re_um it tothe humor assembly+ Unauthorized bruit pan substitutes should
never be used. Excess fat should be trimmed to reduce thepossibility of flame up. The
meat could be ruined or fhe could occur ensuing loss of piopeny and bodily inju_. 11-97
When broiling fatty meats, the lowest broil mast be used, however, we recommend the
lowest positions at al.l times+
Always broil with the oven door closed. When broiling is completed, turn the dial to OFF
and remove rite broil pan temporadfy for cleaning.
Do not u_e lhe broiler m'ea for storage of utensils+
2O
OPTIONAL EQUIPMENT
Continuous Cleaning Feature
If your o_,erthas the continuous cleaning fealute, it will ha_e adull gtay finish with white
speckles thai has l_en b|erLdextw_th a special catalyt[c material (]f file oven has a glossy
finish, Jtis standard pon:e]aia enamel without the continuous cleaning featu_.)
Bejbre Using }bur Oven-Read These hzstruetions Carefidty.
Using "[he Continuous Cteaning Oven
The catalytic finish will keep your oven p_entably clean with some eflbtt on your part.
An}' time lhe oven is in use, the catalytic action wit] be working to eliminate normal
cooking spattets.. Simply cook as you usually do. Average overt spatters should fade away
If a great deal of spattering occurs during cooking, a small amount may remain on the
surfhce o[ the oven interior at the end of the cooking time. This is particularly true during
a short cooking cycle "I'he longer the cooking cycle, the better the catalytlc action.
C]eanin8 time depends on the type, size and amount of soil, m_d oven temperature, The
cleaning time wi!i vat)' from a few minutes to _veral hour_, The oven will never get
comp]elely clean-it will appear "presentably clean," even though some stains or spatter_
may be present.
Heavy Spillovers-Unusuai Stains
The continuous cleaning oven feature will make cleanups easy, However; some spills or
food types are harder for tile oven to clean without, a [ittie ass istanee, For heavy spiltovers,
such as from art overfilled fruit pie or casserole, put a cookie sheet or aluminum foil oa
the oven bottom. Be sure the foil does not cover the air openings, so do not extend fair
beyond oven bottom
If you should get a heavy, spillowr on ihe oven bottom:
1, Brush off heavy soil with a nylon brush or p[asd¢ pad. DO NOT USE pape_ toweling,
cloths or sponge. Oven walls are porous and particles of these materials will rub offvn
walls. Rinse area well wilk clean water only. Do not allow insulation under oven
bottom to become wet.
2. If spi]iovers haiden before they can be wiped away, they may become either a brittle
crust or a varnish-type coating. The brittle crusts will loosen and flake off kt time, This
process can be speeded up by GENTLY tapping crust with a wooden or plastic utensil
and fllen brushing crust away;
3. Any remaining soil will gradua]ty reduce with continued o','en use at nonnal baking
temperatures.
DO NOT USE ANY TYPE OF OVEN CLEANER, POWERED CLEANSERS, SOAP,
DETERGENT OR PASTE ON ANY CONTINUOUS CLE_NtNG SURFACE. ALSO,
DO NOT USE ANY ABRASIVE MATERIALS, STEEL WOOL, SHARP
INSTRUMENTS OR SCRAPERS. 7HEY WiLL DAMAGE THE FINISH.
Note: Over a period of time, v,ear marks may appear on the embossed rack suppolts. This
is normal and _esults from _liding the oven racks, in and out of the oven Wear _arks will
not interfere 'with the overall cleaning action of die oven.
21
OPTIONAL EQUIPMENT, Continued
Backguard and Control Panel Features
Electrical Grounding lnstractions: 3his appliance, whert equipped with
I 01 " '
electdcal equipment, has a thtee-pron_, gI"oundmg ping for your protection
and should be plugged directly into a properfy grounded receptable, Do not
cut or remove ground prong,
The backguard equipment is optional, depettding on mode! se]eetioa, Tl_e range yon have
purchased may or may not be equipped with the I[eatures that a_ illustrated in _his section.
The c]oc_ have been placed into separate groups,
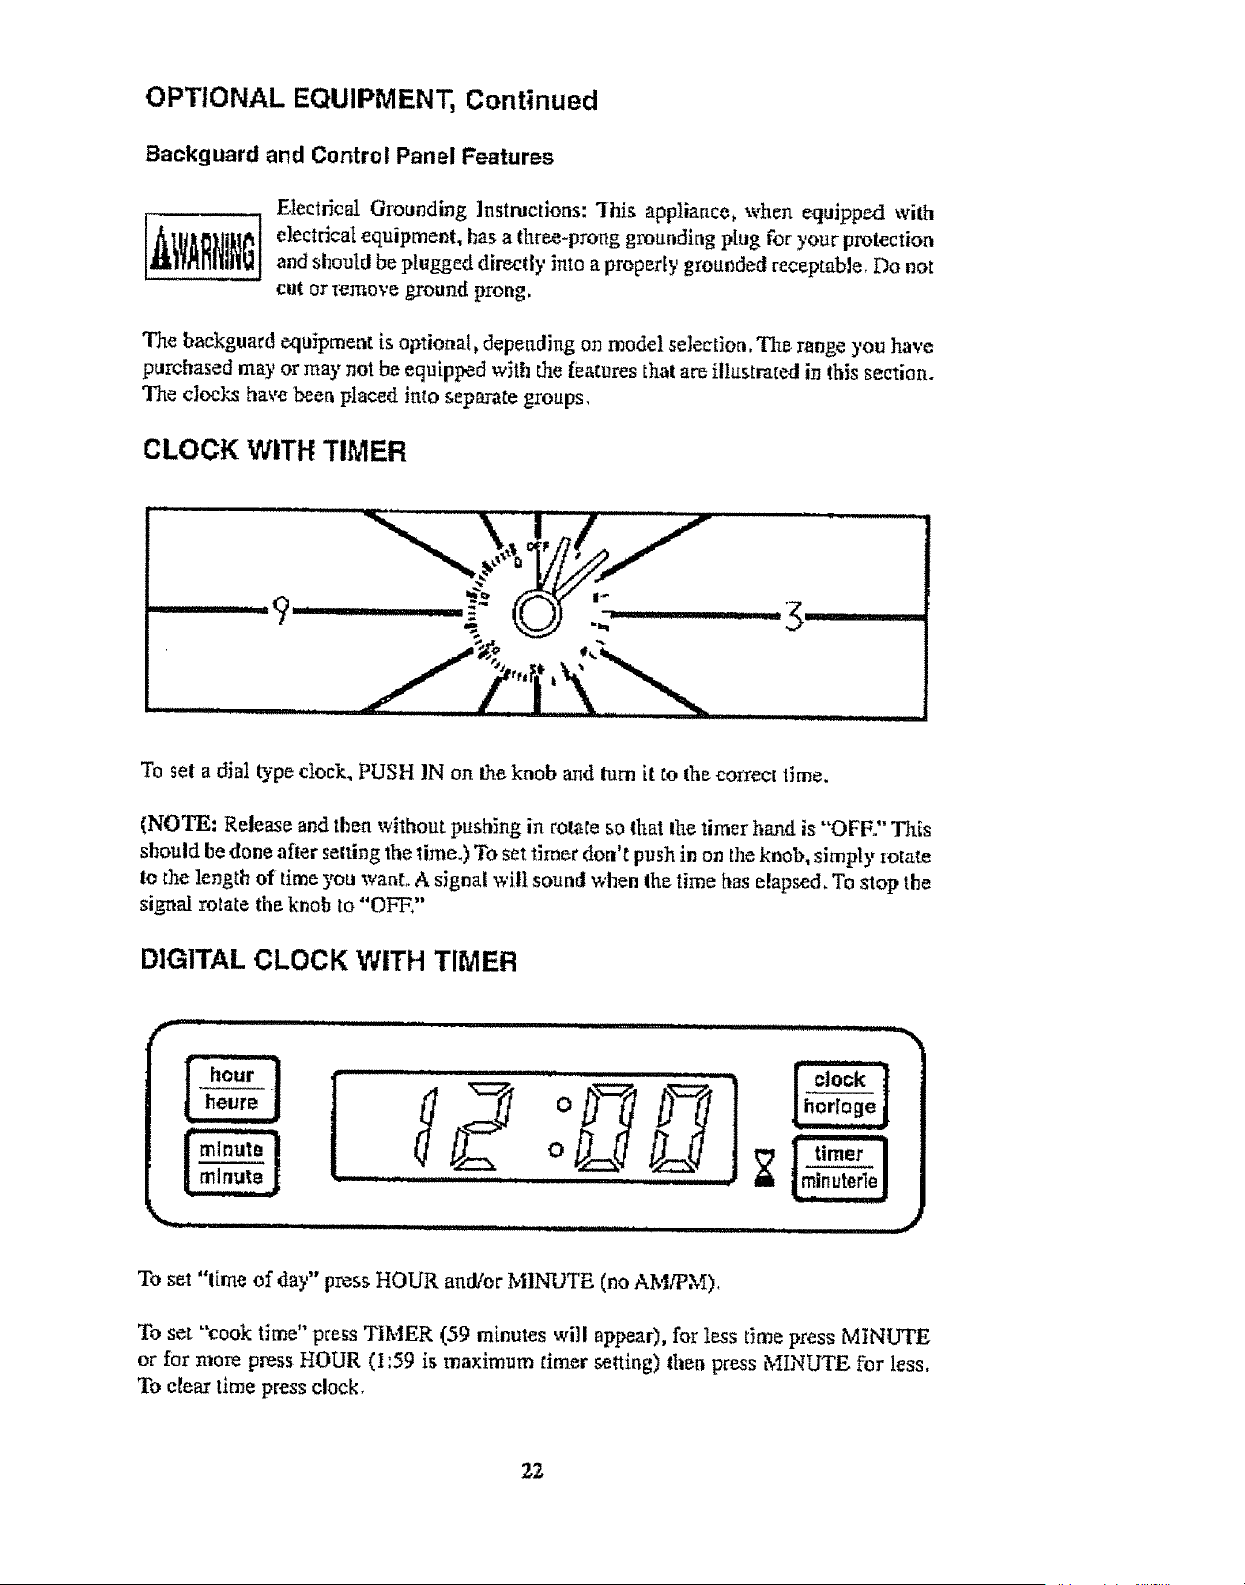
CLOCK WITH TIMER
To set a dial type clock. PUSH IN oft the knob and turn it to the coI_ect time.
(NOTE= Release and then without pushing in rotate so that lhe timer hand is "OFF." This
should he done afler setting 'the time.) To set _]mer don't push in on the knob, simply zotate
to the length of time yon wahl A signal will sound when the time has elapsed. To stop the
signal rotate the knob to "OFF,"
DIGITAL CLOCK WITH TIMER
I "i°
o
, ,,, ................... ,
....................
To set "lime of day" press HOUR and!or MINUTE (no AM/PM),
To set "'cook time" press TIMER (59 minutes will ap_ar), for less time press MINUTE
or for more press HOUR (I:59 is maximum timer setting) then press MINUTE for less,
To e{ear time press clock,
CLEANING THE RANGE
Always keep cleaning materials mad chemicals in a safe place and away from children.
Know what you m'e using. Make sure all parts of the range are COOL before cleaning, Be
sure to replace the parts correctly_
Knobs
Pull for, yard on the knobs Io remove them, Wash _n a water solution with a mild detergent
mix. Do not use art abrasive cleaner ot any abrasive action. Abrasive action will scratch
away lhe knob markings.
if the knobs become loose on the valve stem, spread the valve stem s]ight}y with a small
sciewdriver,
Using Commercia! Oven Cleaners
Commercial oven cleaners may be used on porcelain lined ovens; however, many cleaners
are vet3' strong, and it's essential to follow instructions c_refu]ly.Be sure to wear rubber
gloves to protect your hands.
After using such cleaners, thoroughly rinse the oven with a solution of t tablespoon
vinegar to I cup of wa{er,
Oven cleaners can coat or damage the thermostat sensing device (the long tube in the
oven) so that it will not respond to temperature accurately, t[ you use an oyen cleaner, do
not let it contact the sensing bulb, or any chrome, aluminum, or plastic part of the range.
Do not apl_Iy or allow the cleaner to come in contact with any paris or surfaces other
than the oven interior.
Grates, Main Tops and Surface Burners
The grates are made of porcelain coated steel. These materials can be cleaned at the sink
with detergent or' soap-filled scouring pads. Do not be alarmed when the grate loses its
shining finish. The heat from the homers will cause the grates to lose their shining finish.
i
NOTE: Top burner grates must be seated in the proper position with the retainer lug in
the hole provided fer it. This will prevent the burner grate from rotating or tilting_
To remove the range top, first remove the grates, L.ift up the front of lhe main top, then
grasp the top at each side and pul! it toward you.
The porcelain finish top can be cleaned with delergent and warm water, A mild glass wax
can be used {o shine the top.
Range tops finished in brushed chrome should be wiped clean of spatters or soiling alter
each use. Clean with a paper towel or a damp eloth_ For heavy spatters, use a mild
detergent and water. Wipe dry with a so_t cloth,
A light eoa_ of oil or thin cooking oil should be applied periodically to the chrome top
surface and undersid_ 'this wl]! help pre,,_ent moisture from penetrating the chrome
surface,
23
CLEANING THE RANGE, Continued
Products of combustion from the top pilots as well as certain atmospheric conditions can
create an oxidation reaclion on the uttdetside of the top. This ,.viii appear as rust or in the
form of a reddish brown deposit. '!his will NOT AtZFECT THE LIFE OF THE TOP in
compa:ison to the _eneza] life expectancy of the range itself.
The grate and main top should be removed to gain access 4o the surface burners. Remove
the burner and let it soak in hot sudsy water. Most stains wi|] flten wipe off; if not, scrub
with a strong but non-abrasive cleaning pad. Rinse the burner thoroughly;
It is ve_' important that the burner be dO, befo:e replacing it in the range. A wet burner
will rtot allow the gas to ignite property. This could resMt in a bultd-up of gas which could
_esu]t in an explosion or rite.
Aluminum Foil in Oven and Broiler
Aluminum foil when used improperly is a cause of many range rites. Make certain that
vents or ak openings aren't covered by the foil. If the vents located along the sides of the
oven bottom are blocked, poor cooking _vi][resuh.
Never covet a rack completely. A piece of Foil sliBhtly larger than the utensil can be placed
on the rack beneath the utensiL.
Cleaners and Cleaning Materials
Do not use hm+,_hcleaners or degteasers on or around functiona! parts ('_'a]ves, controls,
etc., or alaminum tubing). This win damage or drastically reduce the life of the p_tt.
Use only a mild solution of soap and water on backguards, aluminum control panels
and painted surfaces, Never use harsh abI_si',,es or cleaning powdem that may scratch oz'
mar the surface+ Make sure the cleaners and cleaning materials are suitable for use on the
area to be cleaned. Always keep cleaning mateiials in a safe place.
Repalr Parts
When repair parts are needed, contact the dealer fi_m whom the range wa_ purchased. In
case your range was purebred from a source other than an appliance dealer you may
prefer to conlaet the manufacturer at the address shown in this manual.
Moisture
During the initial heat-up of your range, the heat mixing with the cooler air in the oven
cavity may produce fogging of the door glass or a collection of water on the door, To
pre\,ent this, open the o',_ea door for the first few seconds ofiMtla] oven heat-up. This wilI
a_low the moist air within the oven to escape without tile forming of visibt_ moisture on
the range. The amount of moisture will depend upon the humidity of the air and water
content of the fo_d being cooked. F0gging and even dripping water wilt usually occur in
geo_'aphie locations of high humidity.
24
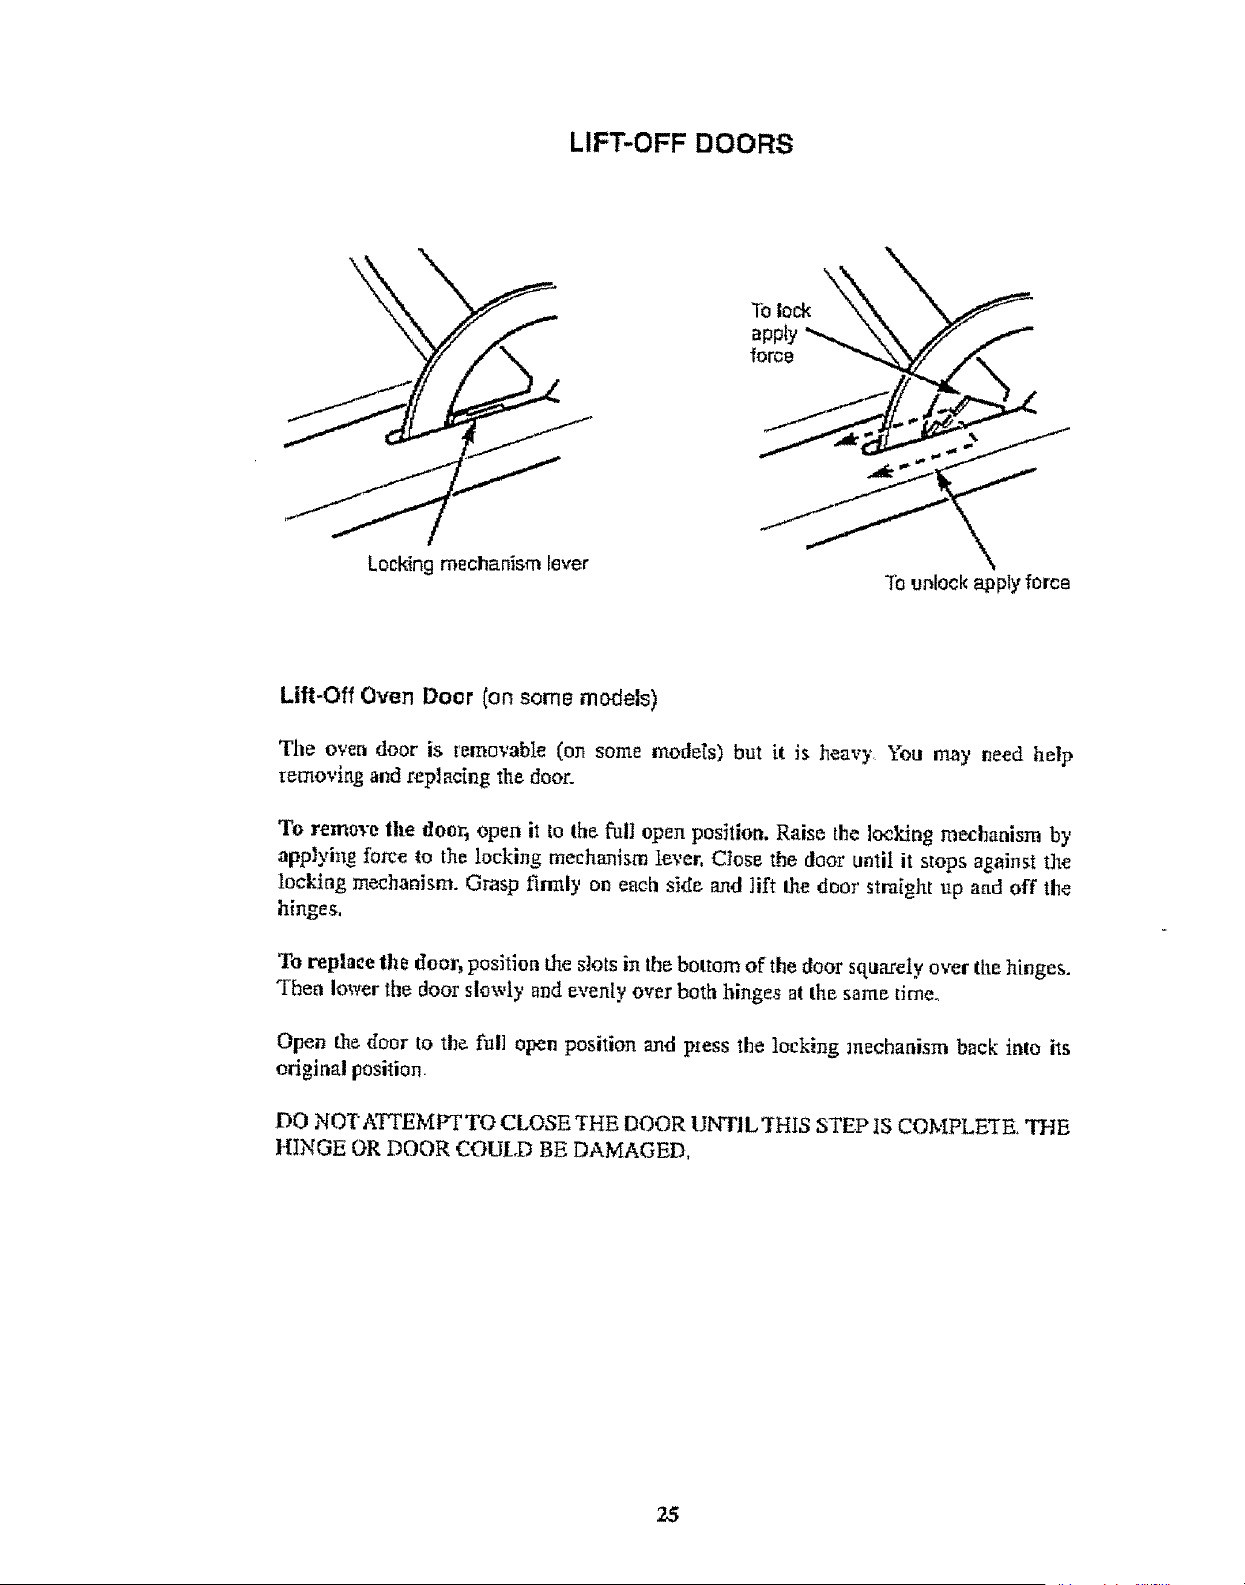
LIFT-OFF DOORS
Locking rnechan_sm lever
To unlock apply force
Lift-Off Oven Door (onsome models)
The OVen door iS ['emo'_,'flbie (On some modets) but it Jsheavy. You may need help
removing and repl acing the door.
To remove the tloo_ open it to the full open position. Raise the locking mechanism by
app]yin_ fo_e to the locking mechanism lever, Close the door until it stops against the
locking mechanism. Grasp firmly on each sid_ mid lift the door straight lip at_d off the
hinges,
To replace the door, position file slots in the bottom of the floor squarely over the hinges.
"Then lower the door slowly _nd evenly over both hinges at the same time_
Open the door to the full open position and press the locking mechanism back into its
original position
DO ;_[O'fATrEMI_ TO CLOSE THE DOOR UNTIL XrHIS STEP IS COMPLE'rE. THE
HINGE OR DOOR COULD BE DAMAGED,
25

TROUBLE SHOOTING GUIDE
PROBleM
CAIJSE CORRECTION
]. fiurfarebsraerfallsIolight.
2, U_leven flame.
3. Surfa_ burnerllam=
•Lift_o_'pom
•_%]]owincolor,
•Rainy_b_nturnedoil
4.Pilol go_sool.
5.O'_'end_s n_tli_d.
6 Oven T_:m_mtune
seemslnRCcurate,
•Fend lakes too[eng.
.Fco_cooks1oofast.
•Foe4 pale in co]oro
.Overbrowning
•Overdonr on olttside
and undwdane ir_c_ler
7 l_nge dock and/or lights
do not woTk.
_.Pilot3sore,
b_ Raog_ not oonn_cted to
powersltppty (Solid Slate
IgnilJ_t),
c:,Burr Jnc_rfecffyrated
d Cloggedbar_erports.
_.,Topburner not p_d,v
poddonrd
a_Cloggedburnerpo_s.
beUnevenburner_lignm¢nt,
a.]myqoperair gas mi,_aure.
Burner a_or pilot
incou_tly _djusced,
a Pilot isout.
b Rmge not connecled to
po,er sopply (ShEdS_ate
c. Moishue build-up in c_am_c
sleev_ ofoven ele_ro,_.
d. Gas sdeclor screw
ir_conectly _t
L
Oven _otsetco_ct[.y,
Oven calibrationorbm'nu
out of _djustment.
a.Oven was not Frehealed.
b. Io¢orrext rack r,osBJwt
e, It_cort_et useof p]uminum foil.
d. Oven imttom ]ncotTectly _n
place. .
e.Used incorrect _ype ofu_r_si].
f: Oven Callbmfioaor'burner
out of adjustment
a Range not conntx:ted 1o
l:ow_r supply.
b Burned o_1buJb.
c,, DsfectNe switcl:_,starter_o_
Ix_lt_t, (Fluorescent bulbJ
d. Clockdefective,
]oo_e wiring or connection.
a,Re%hipilot.
b. Compeer_angeto wall o_tIet,
check cb.cukbreakeror [use
boy
C. Have se_icem_n rat_ burner.
d Clean ports_nproperposkion
on vMveand burner hanger.
¢,Repositionb_mer_
a. Clean paris 'wilbsttaSgblpin
h, Atign borneo
a. H_ve servicem_nadjust burner
....Or- Remove pan from burner.
[P&'Io_mtcts free ak flov,_
a. Has'e s_rviceman adjus_
burner
a, Relight pi]o_.
b.Connect_r_g¢towallo_tleL
C'i'..zck€_rcu[tb_e_er_ fus_
box.
c,See Moisture Lr_AL3ONMEN"f_
AND ADIUS IMENq$ _etion,
d, Cbe_ck_lector sc_ew_Se_ step 4
in ALIONMI_NrI:S AND
ADJU$]'MEN'I'S section.
e Set indiealor in MANUAL
(MAN) _ OFF position.
f,Have st_,icer a4j,zt briner.
a_ Pse_eztoven 10 ralnules.
b Refer to Use of Oven S_ffort
c, Refer to sectioncotaluminam Ioil.
d- Rep]aceove_tbottom cerrecl]y
e. Useshlrtypans [orc,'&es,caokleg
_d biscutts. Use dull or _lass
utensi]_[orpies and breads.D_k
pa_sabsorb}teat_d ea_tse
over-bm_n]ag,
f Haveserv]¢eman calibrat_
ovenand_j_t burner.
a Coune,;t r'an=oe (0 Out|el, con:net.-'t
bzcI<g_lardplug, eh_k ci_'cuit
breaker orlusebox
b Replace both..
e. Replace _-ta_erorb_l_t, Have
serdecmoa'trep!ne s_itch.
d Haves_c_m_ cb_ckclock
assemb}_or looseconnection.
26

NOTES
27
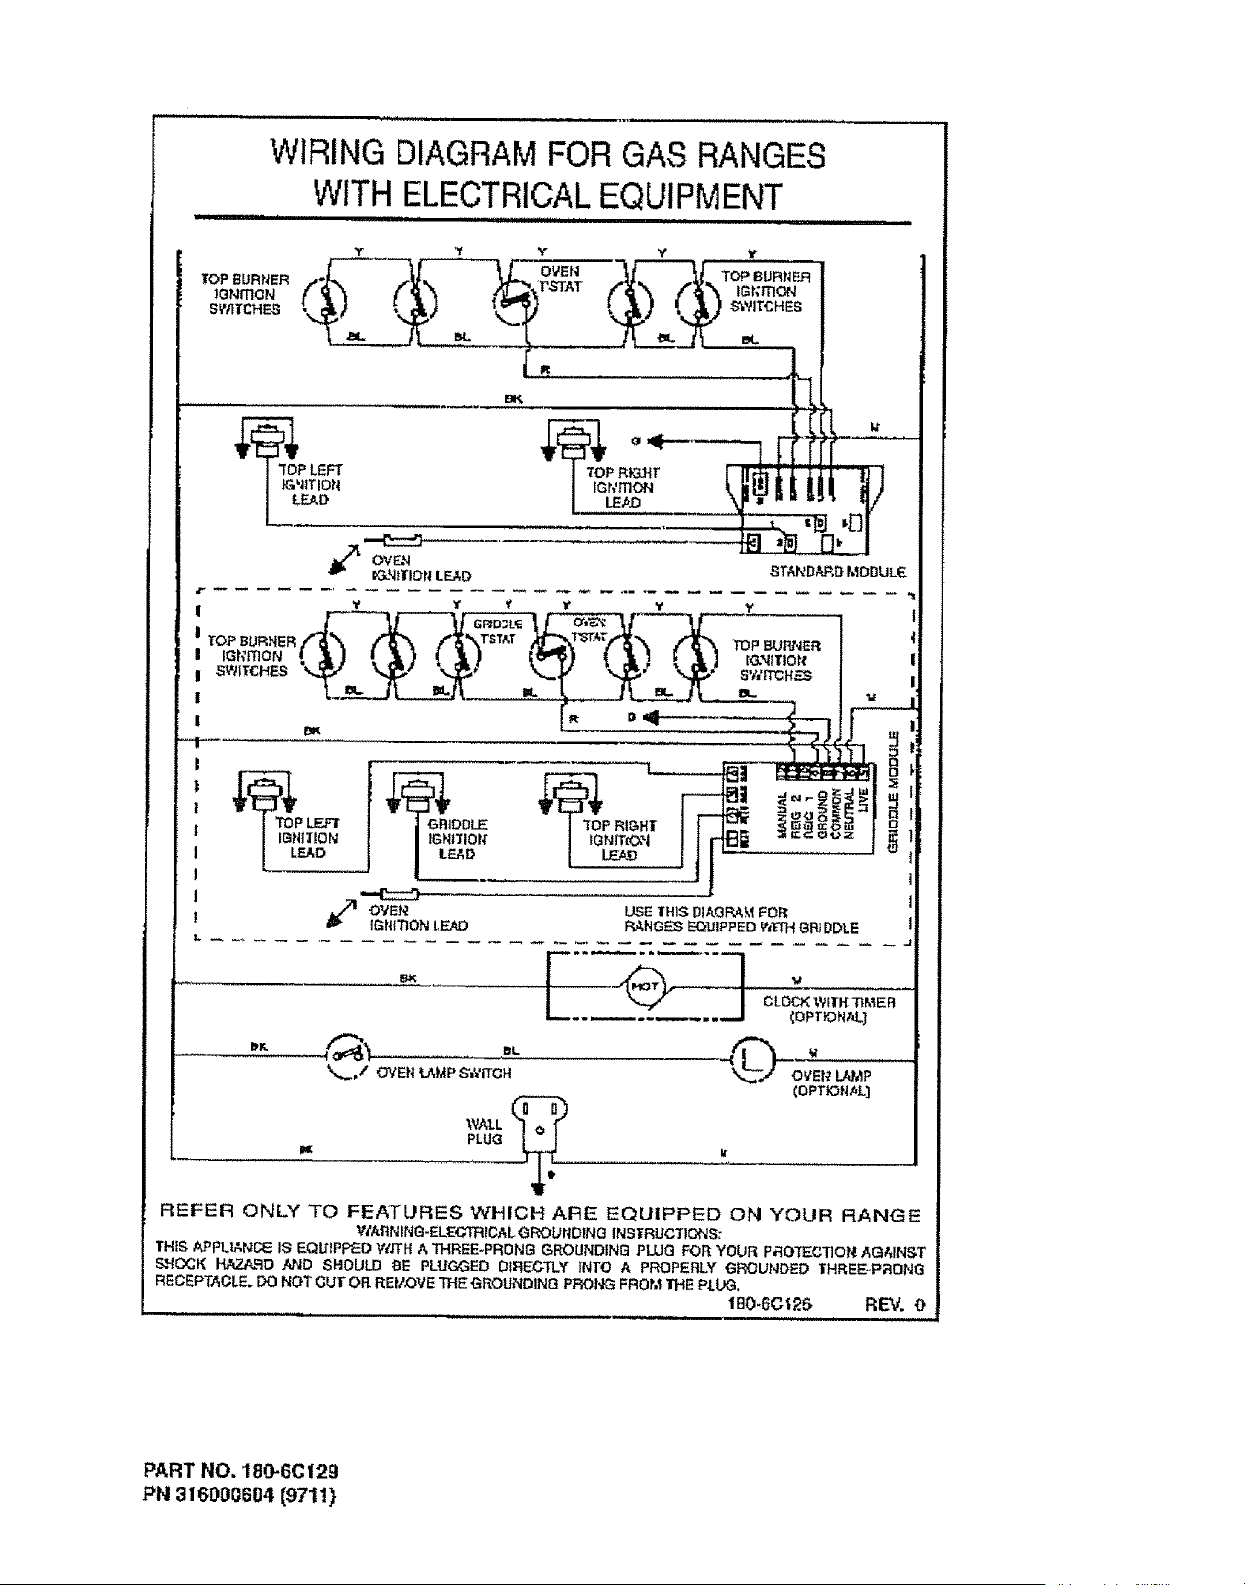
WIRING DIAGRAM FOR GAS RANGES
WITH ELECTRICALEQUIPMENT
I i ii iiiiiiiiiiiiii i i! _ illlllllllll i i ii
I Y Y Y Y , Y ¥
, s_,TcHEs,._ "1P" ".P" "--¥ "gP" _4_"_ s'_;_H-_
OVEN USE IHI_; DIAt3F_M FOR
IGtlITION LEAD RANGES EQ'UIPPED W'ETHGPJDOlE
WA1.L
PLUG
REFER ONLY TO FEATURES WHICH AIRE EQUIPPED ON YOUR RANGE
WAft N IN8 -EU'E,OTRtCA L GROU tlDIN O INSIRUCTICNS:
THIS APPLIANCE iS EQUIPPED w.rrH A THREE*PRON8 GROUNDING PLUG FOR YOUR P_IO'T_C'I]OM AG&fNST
SHOCK HAZarD AND SHOULD BE PLUGGED DIRE_CTLY INTO A PROPERLY GROUNDED IHREE,PREING
RECEPTACLE. DO NOT CUE OR REtZOVE THE GffOUNOING PROI,_I FROM ]HE PI.L_.
IB0-6C125, REV. O
PART NO. 180-6C129
PN 316090604 [971!)