User Manual 3 Multi-Cooker
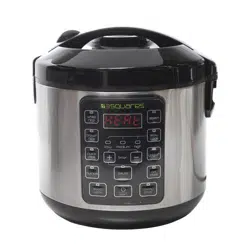
Parts identification
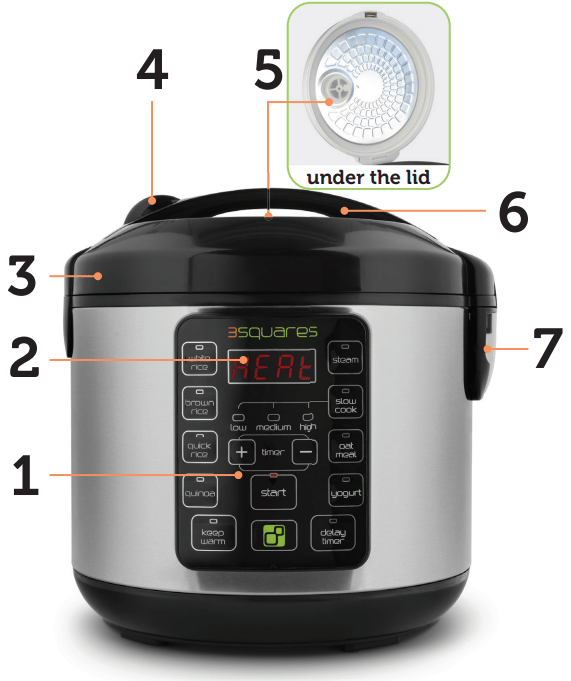

- Control Panel
-
Digital Display
-
Lid
-
Lid Release
-
Steam Vent (Includes Silicone Gasket)
-
Handle
-
Condensation Collector
-
Cooking Pot
-
Steam Tray
-
paddl3™ Silicone Utensil
what do all these buttons do?
white rice
Uses 3 Squares’ advanced Fuzzy Logic 2.0™ to cook perfect rice every time.
brown rice
Specially programmed Fuzzy Logic 2.0™ softens this hard-to-cook whole grain.
quick rice
Short on time? This setting cooks rice as fast as possible.
quinoa
Tired of bland, mushy quinoa? This toasts it first to bring out a delicious nutty flavor.
keep warm
Well it keeps things warm… automatically switches to this mode when cooking is done.
steam
Program the time for your food to steam. It won’t countdown until the water boils.
slow cook
Low, medium or high settings work the same as an advanced digital slow cooker.
oatmeal
Steel cut, rolled or quick, this will do the trick.
yogurt
Smoothest way to make yogurt at home. Heats milk. Holds it. Cools it. Tells you when to add culture. Cooks it.
delay timer
Program when your rice or oatmeal will be done cooking– leaving you with one less thing to worry about.
+ Adds more time for steam and delay timer.
- Subtracts time for steam and delay timer.
start
The blast-off button to get your meal cooking.
before first use
01. Read all instructions and important safeguards.
02. Remove all packaging materials and check that all items have been received in good condition.
03. Tear up all plastic bags. They can pose a risk to children.
04. Wash the steam vent, cooking pot and all accessories in warm, soapy water. Dry thoroughly before adding back to rice cooker.
what’s the deal with the lines in the pot?
We know, usually there are a bunch of little lines in rice cooker cooking pots. They’ve always bugged us. They’re tough to see. They can be confusing. They’re pretty one dimensional. Our tim3 machin3™ does so much, we didn’t want to bog things down with lines all over the place. So we’ve added simple quart measurement lines. The 4 quart line is the maximum capacity while cooking.
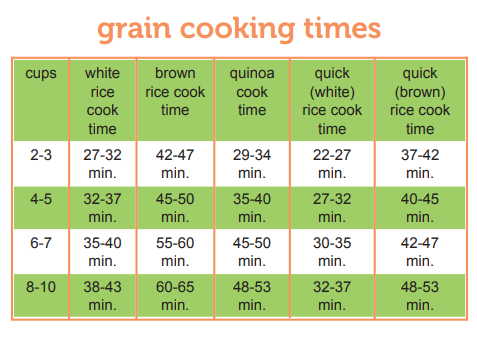
So how much water do I use for rice (or quinoa)?
Whether you’re cooking white rice, brown rice or quinoa, the water used should be the same.
One cup water for every one cup grain; then top with an additional half cup of water.
Cooking 2 cups brown rice? Add 2 and a half cups water. 10 cups white rice? Add 10 and a half cups water. 6 cups quinoa? Add 6 and a half cups water. There’s also a nifty chart that goes over this in more detail.
Getting started
There are a few steps you’ll go through to turn your rice cooker on. We could list them each time, but that gets really boring and manuals are already boring enough. So here’s what you’ll do no matter what function you use.
- Connect the power cord to the rice cooker. Plug it into an available outlet. It won’t do you much good with out power.
- Make sure the condensation collector is attached (the little clear plastic thingy on the right side). If it’s not, it should snap right into place. Check that the steam vent and silicone gasket are in place on the underside of the lid as well.
- Once the ingredients are all added to the cooking pot, put it in the rice cooker.
- Close the lid so it snaps securely shut.
- Turn the rice cooker on by pressing the
 button. It’ll beep and the screen will blink until you select a function.
White, brown and quick rice
- Measure out the rice to be cooked using the included measuring cup. Cook between 2 and 10 cups of rice. It will roughly double once cooked.
- Rinse the rice. This is super important, so RINSE THE RICE. You’ll want to remove all the excess starch from your rice before cooking or you’ll never get the best taste. You can do this directly in the cooking pot by swirling water around and pouring it out. Or you can use a mesh colander. Or you can even get a specialized rice rinser.
- With rinsed rice in the cooking pot, add water. Our formula is one cup water for every one cup grain, then top with an additional half cup of water. So 3 cups rice, 3-1/2 cups water.
- Assuming your machine is now on and ready to go, press the white rice, brown rice or quick rice button, based on what you’re cooking. It won’t start cooking yet.
- Press the start button to begin cooking. The display will show a “chasing” pattern while it cooks.
- The digital display will countdown the final 10 minutes of cook time.
- When rice is ready, the machine will “beep” and automatically switch to keep warm. The display will show how long it has been on keep warm, we don’t recommend keeping food warm longer than 12 hours.
- When done serving, turn the machine off by pressing the
 button. Unplug it.
quinoa
- Measure out the quinoa to be cooked with the included measuring cup, between 2 and 10 cups.
- RINSE IT! There’s a bitter coating on the outside of quinoa that needs to be rinsed away. Don’t skip this step or you’ll regret it. You can rinse it using the cooking pot or a fine mesh strainer.
- Have the rinsed quinoa in the cooking pot, in the tim3 machin3™ and have it on and ready to go.
- Press the quinoa button. It won’t start cooking yet.
- Press the start button to begin toasting. The first step in quality quinoa is toasting it. The display will show “heat” during this phase.
- Stir the quinoa continuously with the included paddl3™ as it toasts.
- Once the moisture is evaporated, the machine will “beep” and the display will change to “add.” It’s now time to add the water to cook.
- Add water. Our formula is one cup water for every one cup quinoa, then top with an additional half cup of water. So 5 cups quinoa, 5-1/2 cups water.
- Close the lid and press the start button to begin cooking. The digital display will show a chasing pattern while it cooks.
- The digital display will countdown the final 10 minutes of cook time.
- When quinoa is ready, the machine will “beep” and automatically switch to keep warm. The display will show how long it has been on keep warm. We don’t recommend keeping food warm longer than 12 hours.
- When done serving, turn the machine off by pressing the
 button. Unplug it.
Steam
- Fill the cooking pot with water to the “steam water line.”
- Add food into the steam tray.
- Put the cooking pot into the machine. Set the steam tray into the cooking pot (it rests at the top).
- Assuming your machine is now on and ready to go, press the steam button. It won’t start cooking yet.
- The digital display will show a flashing “0:10” for ten minutes of steam time. Adjust the time up (+) and down (-) based on the recipe. It won’t start counting down until water boils, so it’s the real time for steaming versus a general countdown.
- When the steaming time is set, press the start button to begin steaming. The display will stop flashing.
- Once water reaches a boil, the display will countdown the cooking time.
- When the cooking time has elapsed, the machine will “beep” and switch to keep warm. The display will now show how long it’s been on keep warm.
- Remove the food as soon as possible and serve. Turn off the machine by pressing the
 button and unplug it.
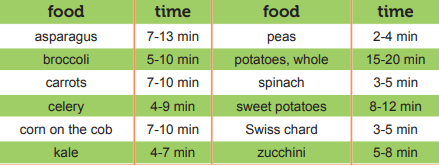
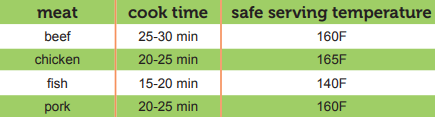
steaming time suggestions
veggies
meat
slow cook
- Add food to be cooked to the cooking pot. Do not fill past the 4 quart line of the pot.
- Assuming your machine is now on and ready to go, press the slow cook button. It won’t start cooking yet. A flashing “8:00” will show on the screen for the low setting.
- Toggle between the low (8 hours), medium (6 hours) and high (4 hours) settings by pressing the slow cook button.
- Press the start button to begin cooking. The machine will “beep” and the display will turn solid.
- The machine will countdown the cooking time in minutes.
- When the cooking time is finished, the machine will “beep” and automatically switch to keep warm. The display will now show how long it has been on keep warm.
- When finished serving, turn the machine off by pressing the
 button and unplug it.
oatmeal
- Add oatmeal to the cooking pot, between 2 and 8 cups.
- Add water to the cooking pot. Follow the package instructions on your oatmeal for suggested water to oatmeal ratio. We suggest a bit less water than their recommendation, but we all know it’s all about your personal preference.
- Assuming your machine is now on and ready to go, press the oatmeal button. It won’t start cooking yet.
- Press the start button to begin cooking. The machine oatmeal will “beep” and the display will change to its chasing pattern to show it’s cooking.
- The display will countdown the final 10 minutes before the oatmeal is done.
- When oatmeal is ready, the machine will “beep” and automatically switch to keep warm. The display will show how long it has been on keep warm, we don’t recommend keeping it warm longer than 3-5 hours.
- When done serving, turn the machine off by pressing the
 button. Unplug it.
Yogurt
- Fill the cooking pot with milk, between the 1 quart and 4 quart lines.
- Assuming your machine is now on and ready to go, press the yogurt button. It won’t start cooking yet.
- Press the start button. The machine will “beep” and the display will now show “heat.” This is the first stage of making yogurt, heating the milk.
- Once the milk has reached the optimal heating temperature, it will hold it there for ten minutes.
- After the milk is done heating, it will “beep,” the display will change to “cool” and the milk will begin to cool.
- Once the milk has properly cooled, the machine will “beep” and the display will show “add.” It is now time to add the yogurt culture. The machine will continue to “beep” until the culture is added.
- The easiest way to add live yogurt culture is by mixing in a tablespoon per quart of store-bought or previously made yogurt. You can also use yogurt culture (available at health food stores). Follow manufacturer’s instructions for proper ratio.
- Once the culture has been added, close the lid and press the yogurt button. The display will now flash an “8:00” for eight hours of cooking time.
- Adjust the cooking time with the + and – buttons, from 8 to 12 hours.
- Once the desired time is selected, press the start button to begin cooking. The display will countdown the cooking time.
- After the selected time has elapsed, the machine will “beep” and stop heating. The digital display will show “done.” The machine will continue to “beep” until it is shut off.
- Remove yogurt from the machine. Stir vigorously or blend with processor. Pour into containers. Glass jars are ideal, preferably fresh from the dishwasher. Cover and refrigerate yogurt for 8 hours.
Delay timer
The delay timer will only work with some functions (leaving chicken in your machine for 10 hours before steaming would just be gross).
The white rice, brown rice and oatmeal functions will work with the delay timer. Follow the instructions for each function, but BEFORE YOU PRESS THE FUNCTION’S BUTTON:
- Press the delay timer button. The display will show a flashing “2:00” for 2 hours of delayed cook time. This means food will be ready 2 hours from now.
- Adjust the delay time with the (+) and (–) buttons, between 2 and 15 hours.
- Once the right time is displayed, press the function’s button then press start.
The machine will not cook right away. It will begin cooking to finish once the selected time has elapsed.
Cleaning
Be sure to allow the tim3 machin3 ™ and all parts to cool completely before cleaning.
- Remove the steam vent by twisting it to the left. Clean the silicone gasket carefully, and make sure it is reassembled and installed prior to next use.
- Remove the condensation collector. Discard any water and rinse thoroughly.
- Wash the cooking pot, condensation collector, steam vent and all accessories in warm, soapy water or wash them in the top rack of the dishwasher.
- Wipe the rice cooker body with a clean, damp cloth. Dry cooking pot and all accessories thoroughly before reassembly.