
SANTA ELENA
Deckenventilator
Ceiling Fan
Ventilateur de plafond
Ventilador de techo
Ventilatore a sotto
www.klarstein.com
10035789


3
DE
Sehr geehrter Kunde,
wir gratulieren Ihnen zum Erwerb Ihres Gerätes. Lesen Sie
die folgenden Hinweise sorgfältig durch und befolgen Sie
diese, um möglichen Schäden vorzubeugen. Für Schäden,
die durch Missachtung der Hinweise und unsachgemäßen
Gebrauch entstehen, übernehmen wir keine Haftung. Scannen
Sie den folgenden QR-Code, um Zugriff auf die aktuellste
Bedienungsanleitung und weitere Informationen rund um das
Produkt zu erhalten.
INHALTSVERZEICHNIS
Sicherheitshinweise4
Installation5
Fernbedienungstasten9
Reinigung und Pege11
Fehlerbehebung11
Hinweise zur Entsorgung12
Hersteller & Importeur (UK)12
TECHNISCHE DATEN
Artikelnummer 10035789
Stromversorgung 220-240 V ~ 50-60 Hz
Leistung 120-150 W
Maximaler Volumenstrom 151 m
3
/min
English 13
Español 23
Français 33
Italiano 43
4
DE
SICHERHEITSHINWEISE
• Befestigen Sie den Ventilator niemals an einer Steckdose, sondern an der Decke
selbst.
• Achten Sie darauf, dass Sie einen allpoligen Trennschalter mit einem
Kontaktabstand von mindestens 3 mm zwischen den Polen in der Zuleitung zum
Deckenventilator installieren.
• Schalten Sie vor dem Anschließen die Stromversorgung aus.
• Die elektrische Verkabelung muss den örtlichen Vorschriften entsprechen.
• Der Lüfter muss ordnungsgemäß geerdet sein, um die Gefahr von Stromschlägen zu
vermeiden.
• Montieren Sie den Ventilator niemals in einem feuchten oder nassen Raum.
• Seien Sie vorsichtig, wenn Sie sich in der Nähe der rotierenden Blätter aufhalten.
• Kinder ab 8 Jahren, psychisch, sensorisch und körperlich eingeschränkte Menschen
dürfen das Gerät nur benutzen, wenn sie vorher von einer für sie verantwortlichen
Aufsichtsperson ausführlich mit den Funktionen und den Sicherheitsvorkehrungen
vertraut gemacht wurden und die damit verbundenen Risiken verstehen.
Hinweis: Lassen Sie den Ventilator immer von jemandem installieren, der sich mit der
elektrischen Verkabelung auskennt.
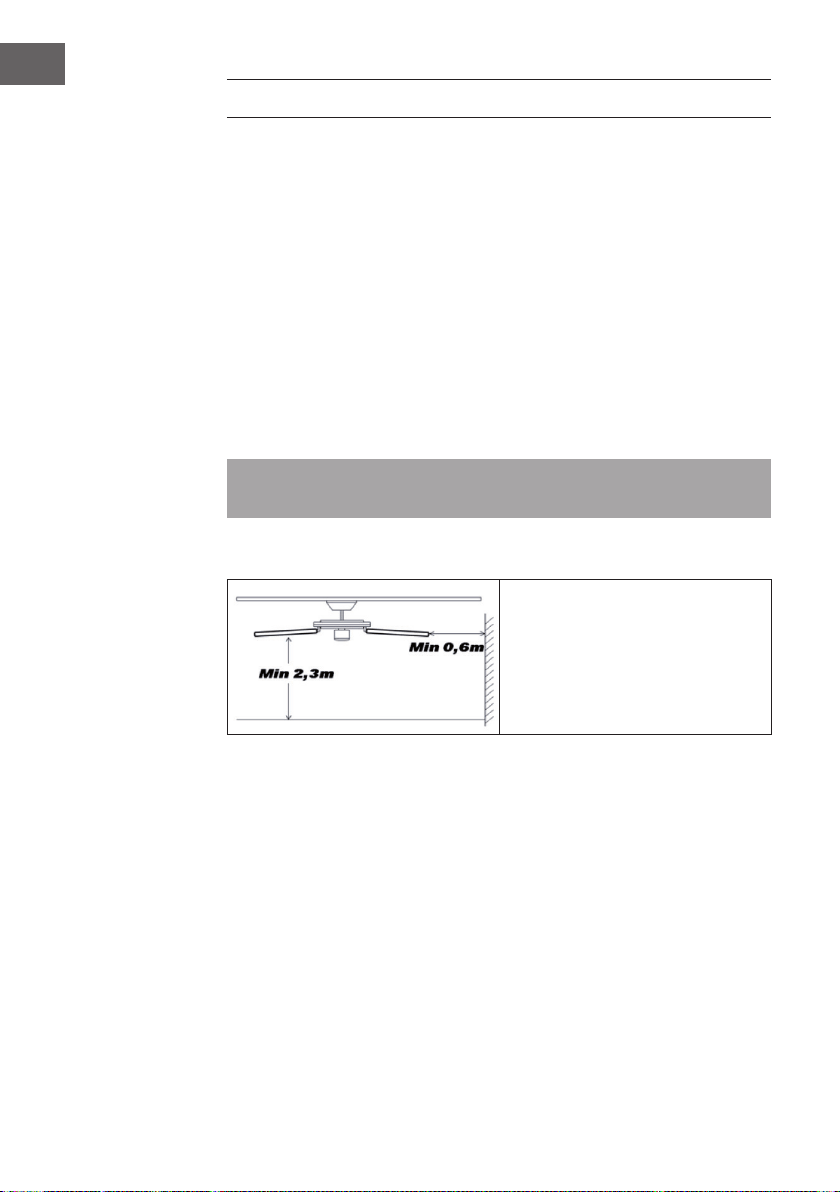
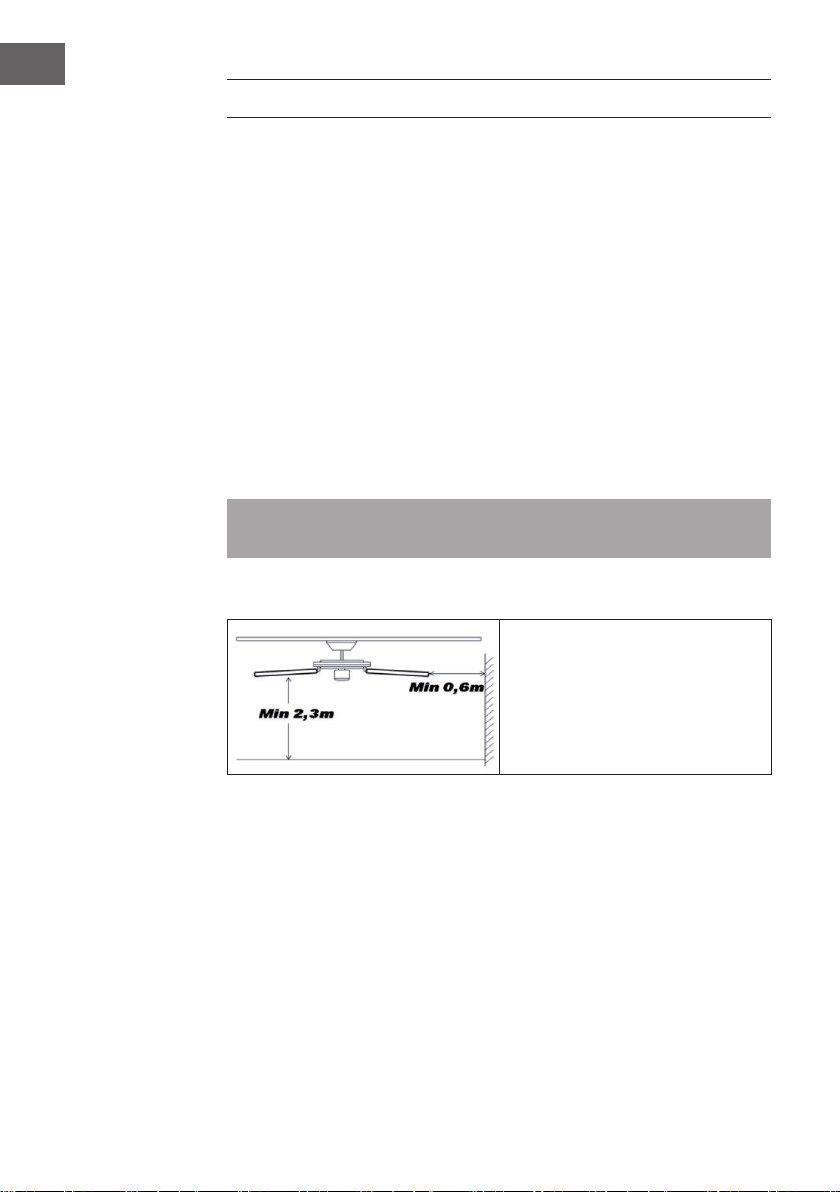
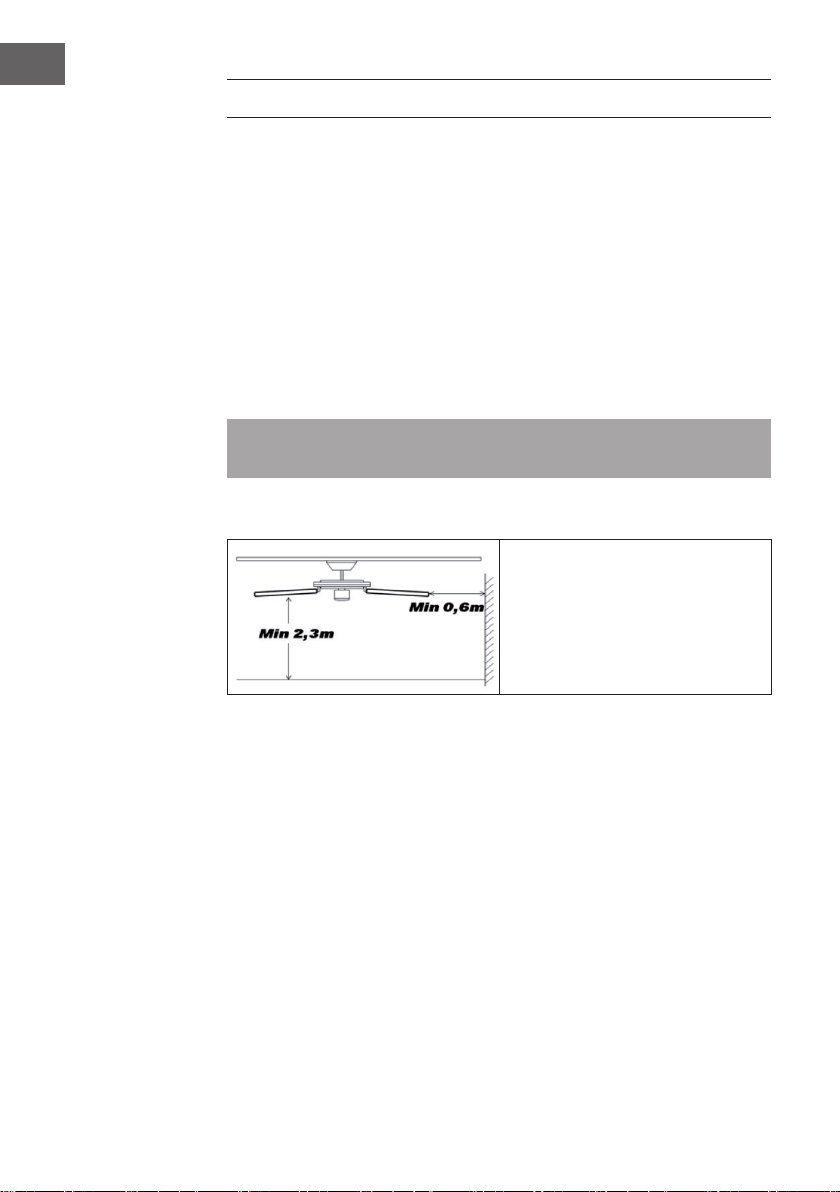
Hinweise zu Tragfähigkeit und Mindestabständen
Der Mindestabstand zwischen den
Ventilatorblättern und dem Boden
muss mehr als 2,3 m betragen. Die
Mindesttragfähigkeit des Hakens, an
dem der Ventilator aufgehängt wird,
muss 100 kg betragen.
5
DE
INSTALLATION
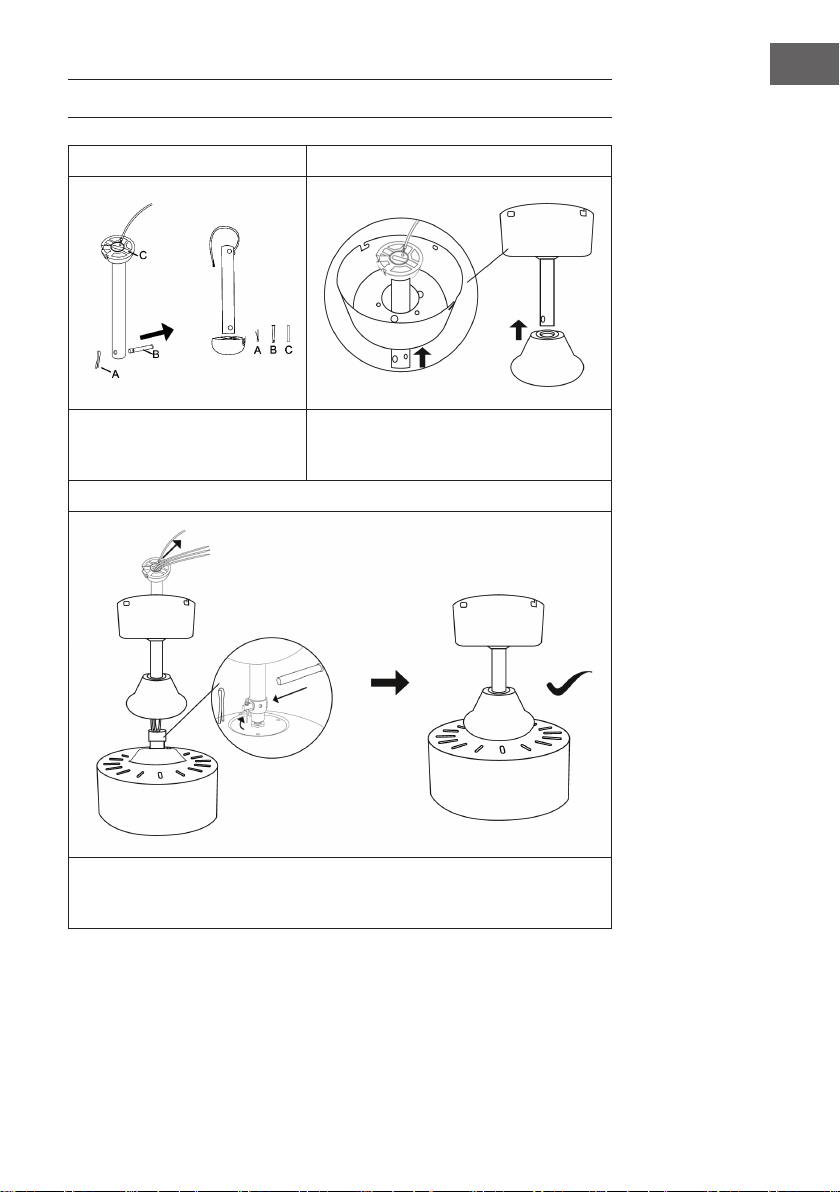
1 2
Entfernen Sie die Klammer (A), den
Bolzen (B) und den Tragbolzen (C)
aus der Hängestange.
Stecken Sie die Hängestange durch die obere
und untere Kappe.
3
Führen Sie die Motordrähte durch die Hängestange. Setzen Sie den Tragbolzen
wieder ein. Befestigen Sie die Stange und den Motor, wie abgebildet, mit dem
Bolzen (B), einer Unterlegscheiben und der Klammer (A).

6
DE
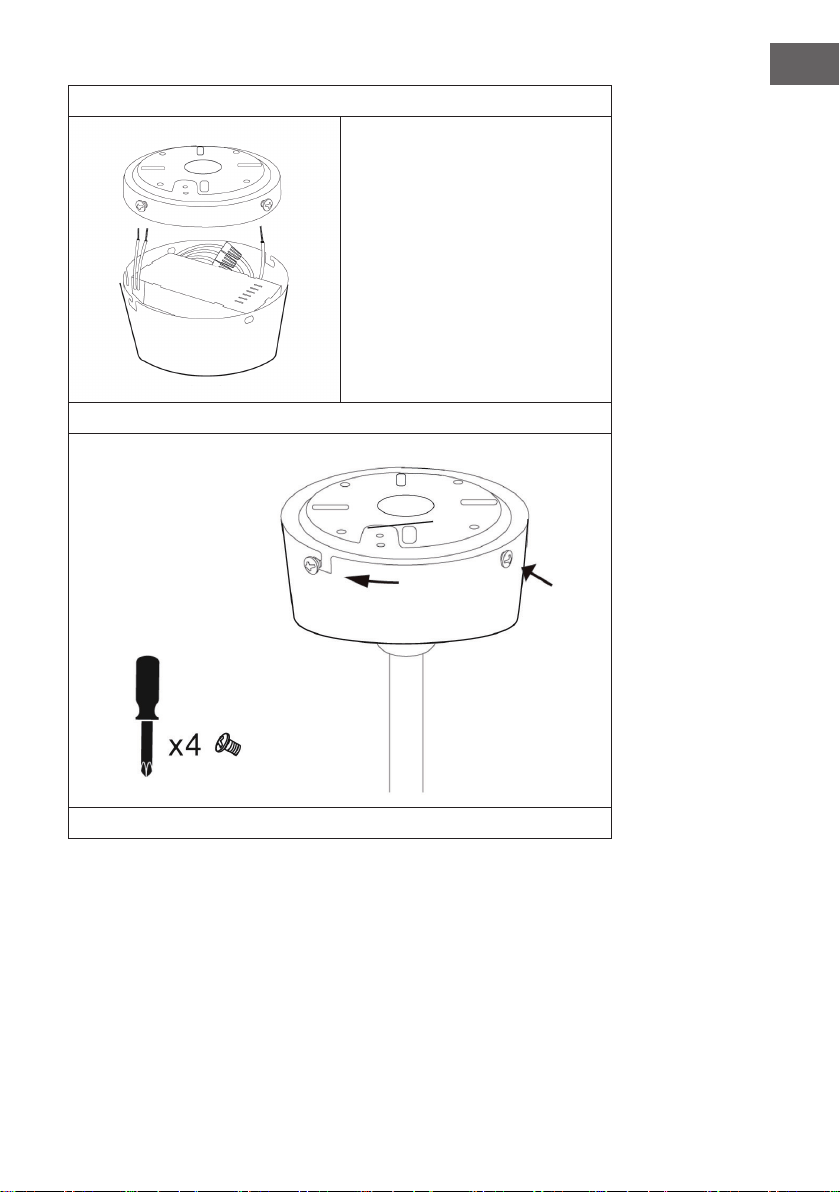
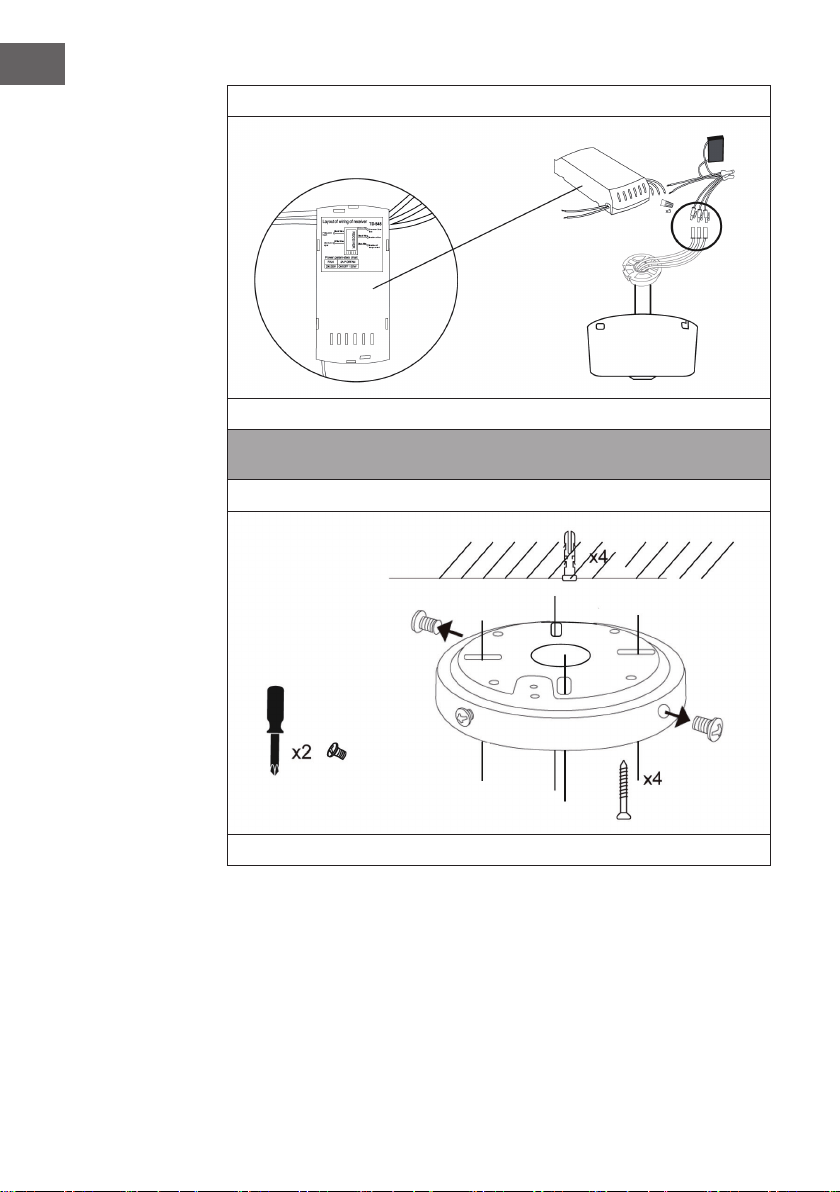
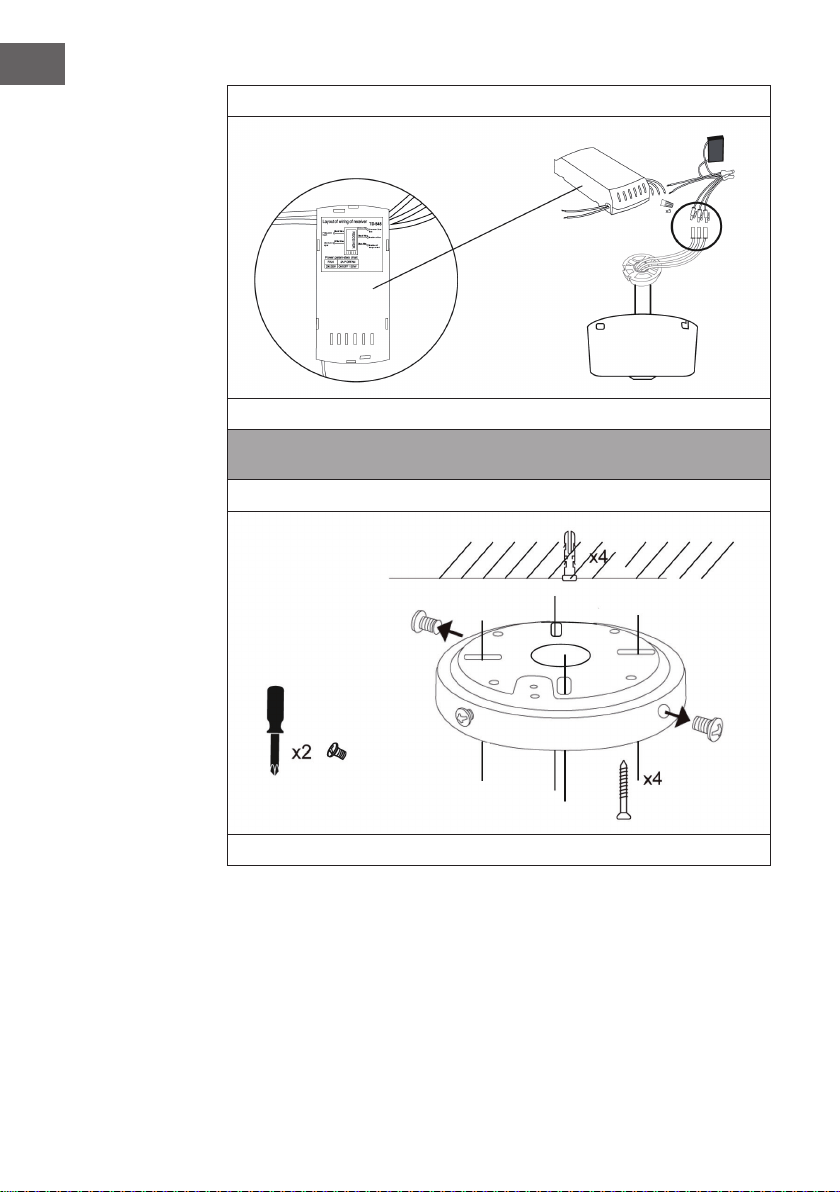
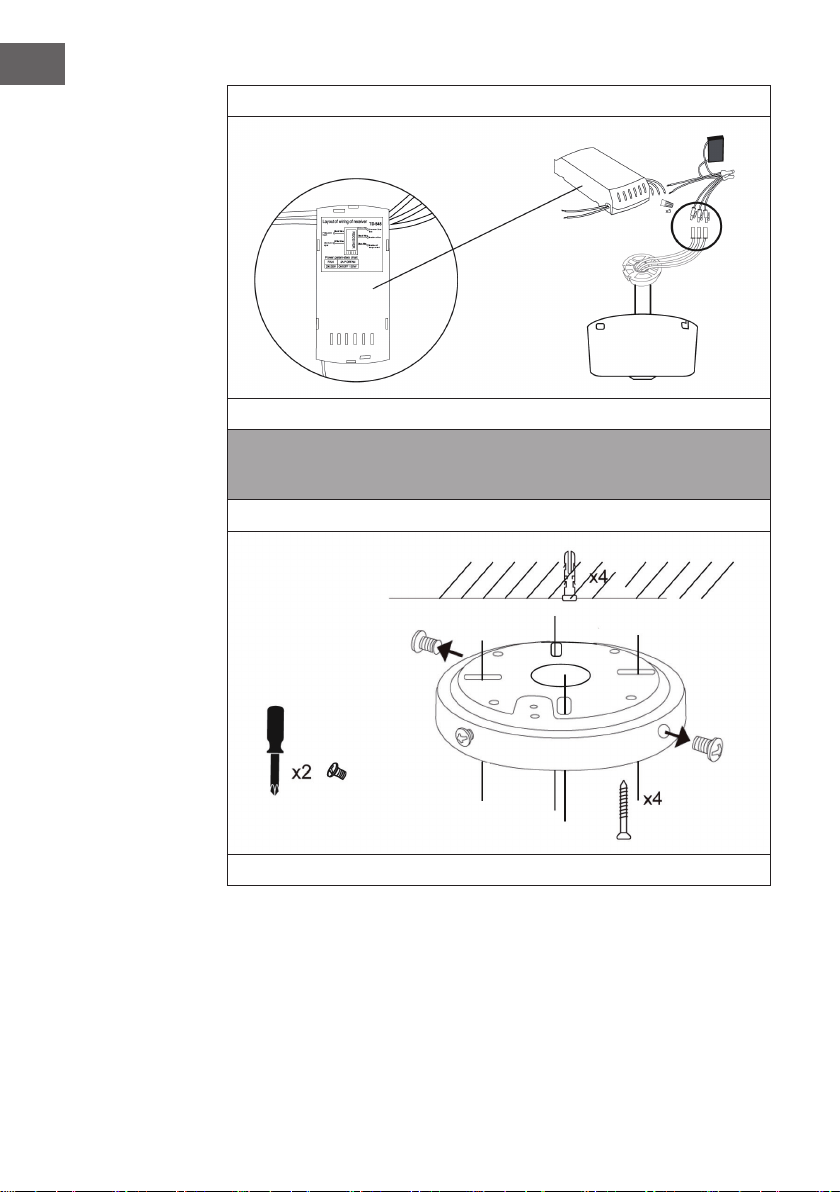
4
Verbinden Sie die Drähte von Empfänger und Motor.
Hinweis: Es gibt kein Licht für dieses Gerät. Der (blaue) Lichtdraht am Empfänger muss
nicht verbunden werden. Bitte umwickeln Sie ihn mit Isolierband.
5
Befestigen Sie die Deckenplatte mit 4 Dübeln und Schrauben an der Decke.
7
DE
6
Stecken Sie den Empfänger und die
Drähte in die obere Kappe.
7
Befestigen Sie die obere Kappe und die Deckenplatte mit 4 Schrauben.
8
DE
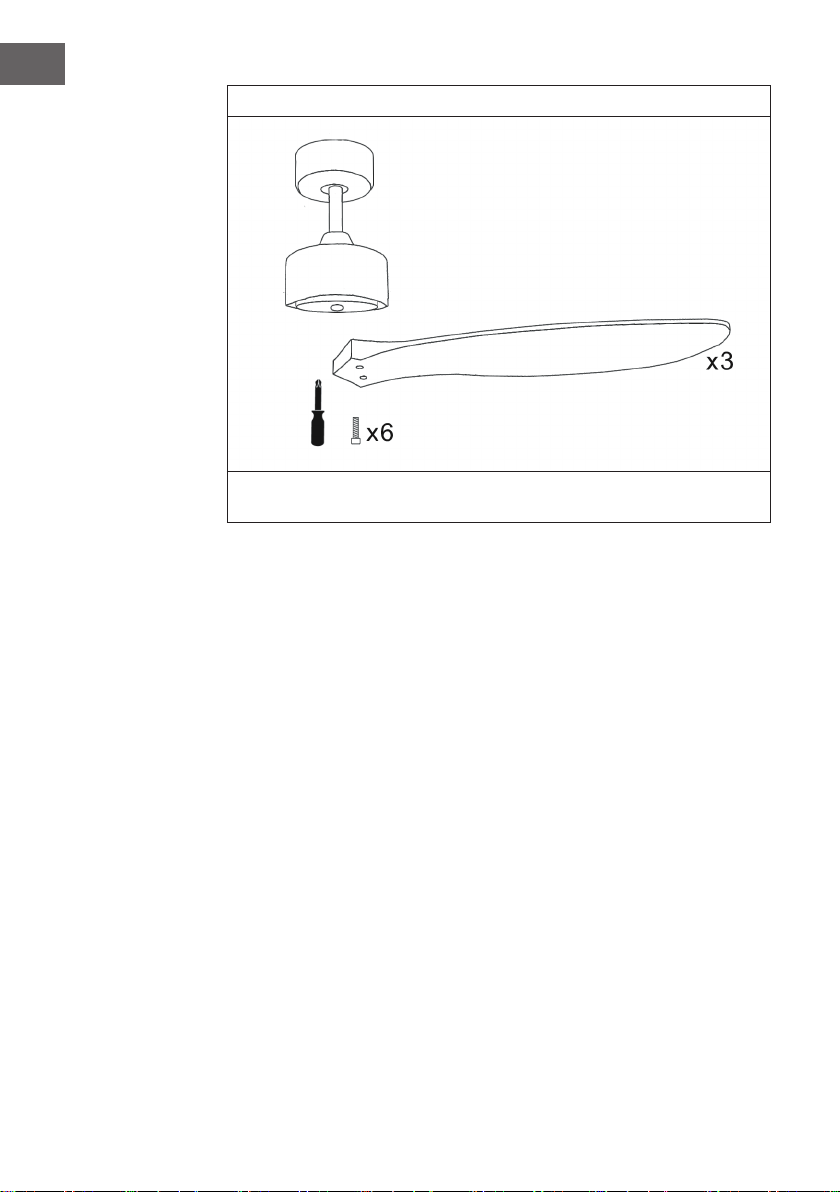
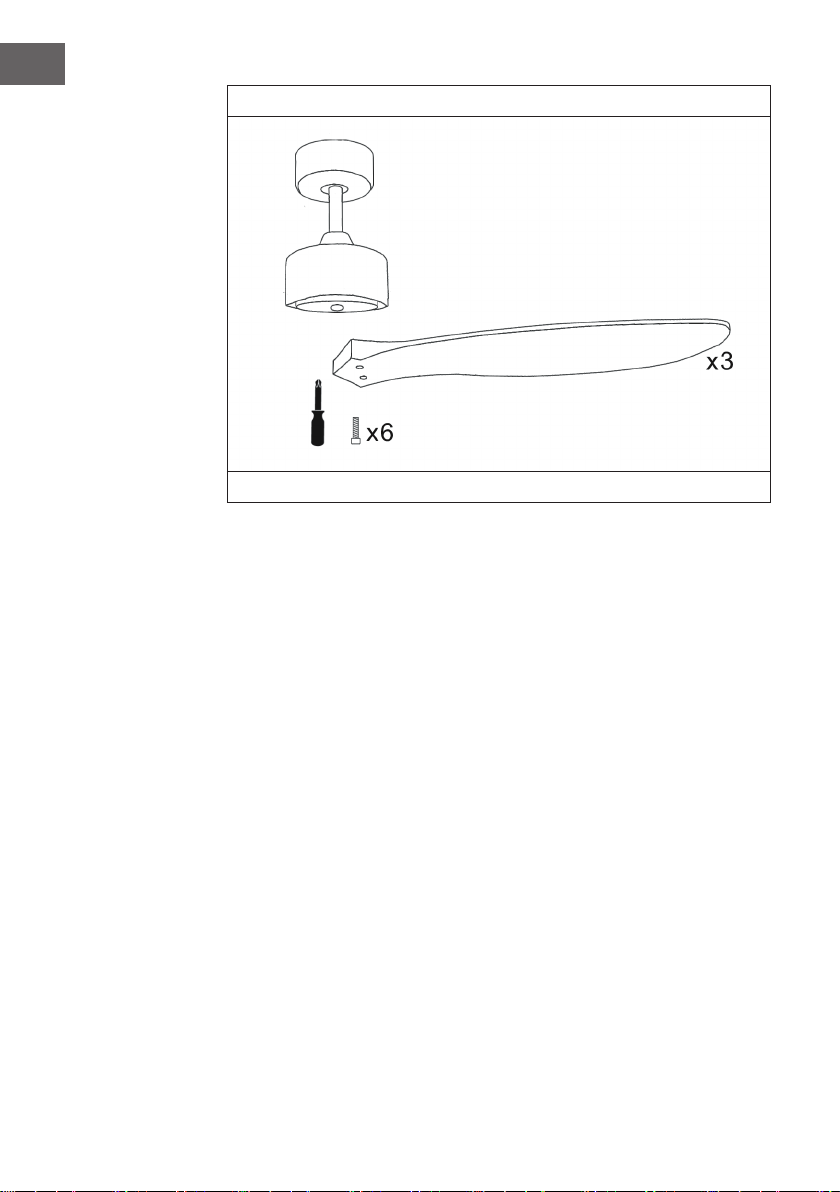
8
Befestigen Sie die Rotorblätter mit jeweils 2 Schrauben. Der Ventilator ist nun fertig
zusammengebaut und kann benutzt werden.

9
DE
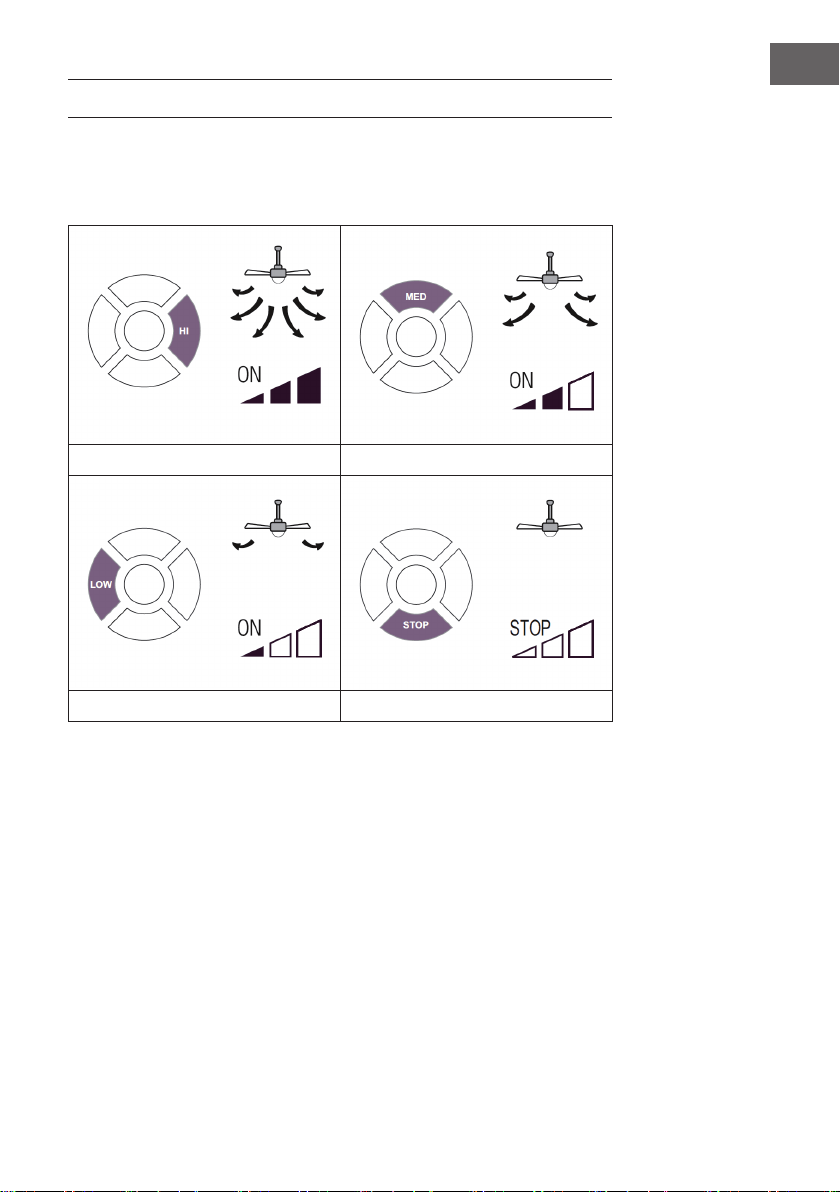
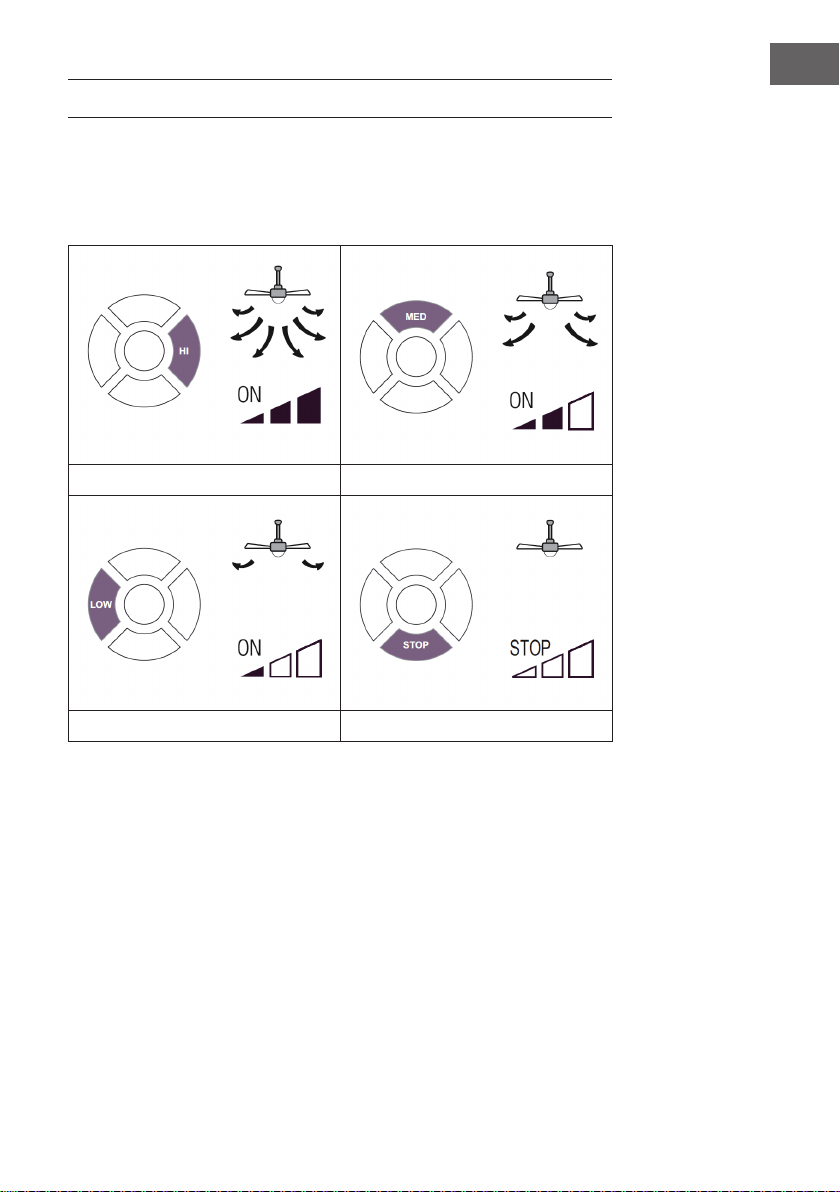
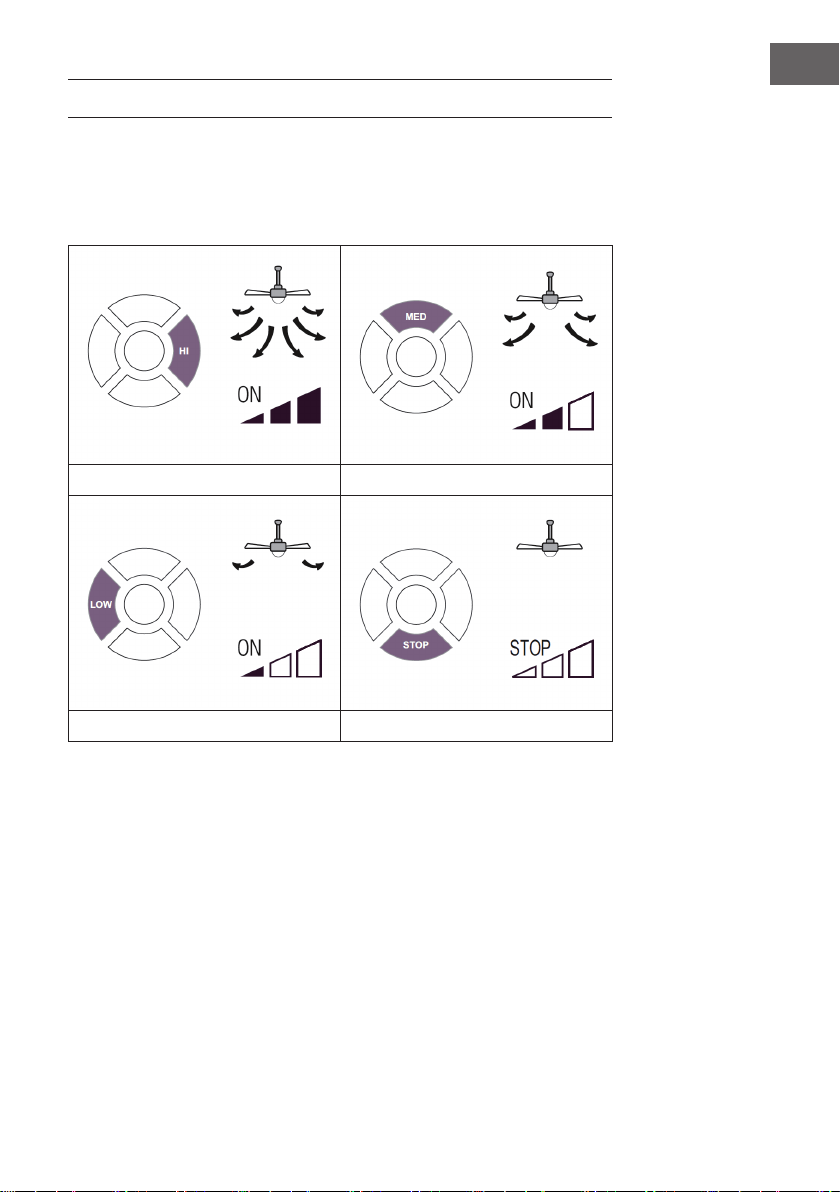
FERNBEDIENUNGSTASTEN
Geschwindigkeit und Licht
Drücken Sie auf eine der Tasten im oberen Kreis, um die Geschwindigkeit einzustellen
und das Licht ein- oder auszuschalten.
Hohe Geschwindigkeit Mittlere Geschwindigkeit
Niedrige Geschwindigkeit Ventilator ist aus

10
DE
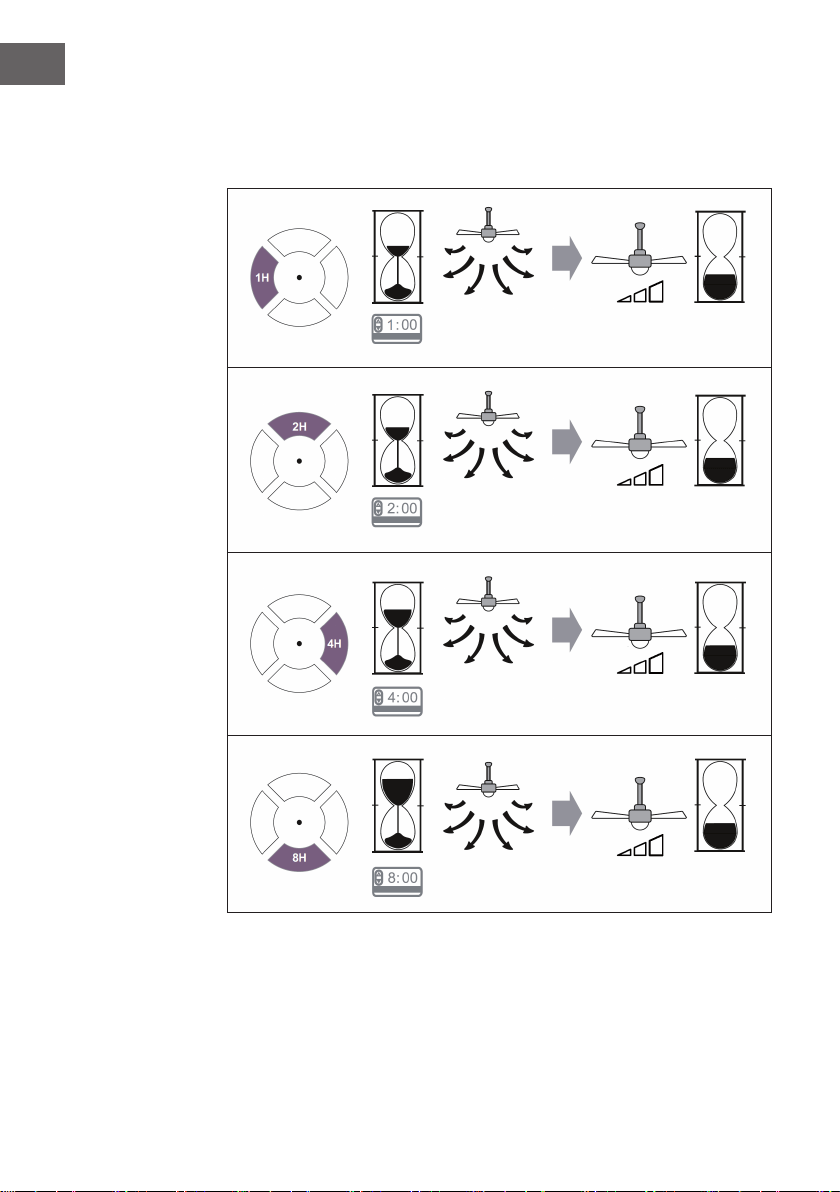
Timer
Drücken Sie auf eine der Tasten im unteren Kreis, um den Timer einzustellen. Nachdem
die eingestellte Zeit abgelaufen ist, geht der Ventilator automatisch aus.

11
DE
REINIGUNG UND PFLEGE
• Trennen Sie das Gerät immer vom Netz, bevor Sie das Gerät reinigen oder
Wartungsarbeiten durchführen.
• Verwenden Sie zum Reinigen des Geräts niemals einen nassen Schwamm.
• Um das Produkt nicht zu beschädigen, ist es ratsam, eine den empndlichen
Oberächen und Produkten angepasste Ausrüstung zu verwenden, die den
Verschleiß des Geräts verlangsamt.
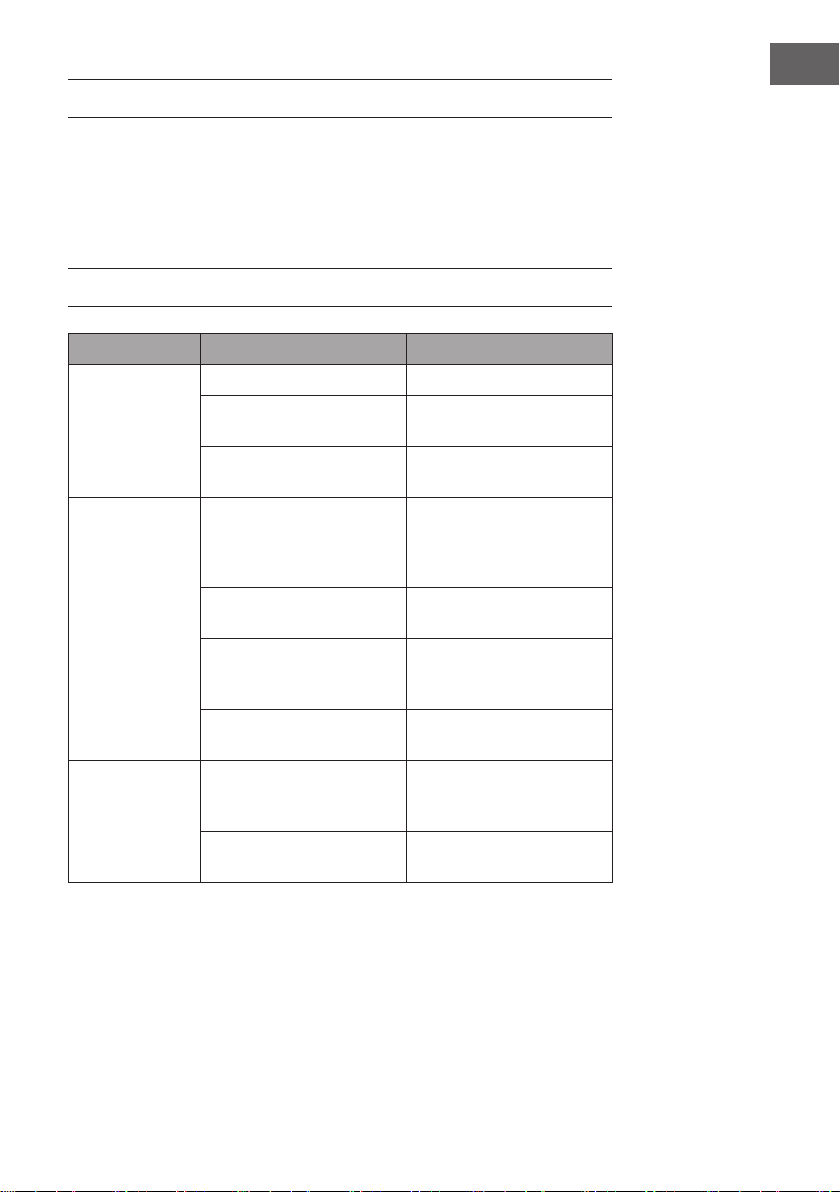
FEHLERBEHEBUNG
Problem Mögliche Ursache Lösungsansatz
Der Ventilator
startet nicht.
Sicherung oder Schutzschalter
durchgebrannt.
Überprüfen Ihre Sicherungen.
Lose Kabelverbindungen. Überprüfen Sie alle
Verbindungen auf lose Kabel.
Geschwindigkeits wurde nicht
korrekt eingestellt.
Wählen Sie eine
Geschwindigkeit.
Der Ventilator
macht Geräusche.
Der obere Kappe berührt die
Decke.
Achten Sie darauf, dass
zwischen der oberen
Kappe und der Decke ein
Mindestabstand von 3mm
eingehalten wird.
Schrauben der Rotorblätter
sind lose.
Ziehen Sie alle Schrauben fest.
Deckenventilator ist nicht
richtig an der Decke befestigt.
Ziehen Sie alle Schrauben in
der Aufhängeplatte fest.
Geschwindigkeits wurde nicht
korrekt eingestellt.
Wählen Sie eine
Geschwindigkeit.
Der Ventilator
wackelt.
Rotorblätter wurden nicht
horizontal zur Decke
eingestellt
Bewegen Sie den Ventilator,
so dass alle Flügel auf gleiche
Höhe zur Decke sind.
Schrauben der Rotorblätter
sind lose.
Ziehen Sie alle Schrauben fest.

12
DE
HINWEISE ZUR ENTSORGUNG
Wenn es in Ihrem Land eine gesetzliche Regelung zur
Entsorgung von elektrischen und elektronischen Geräten
gibt, weist dieses Symbol auf dem Produkt oder auf der
Verpackung darauf hin, dass dieses Produkt nicht im
Hausmüll entsorgt werden darf. Stattdessen muss es zu
einer Sammelstelle für das Recycling von elektrischen
und elektronischen Geräten gebracht werden. Durch
regelkonforme Entsorgung schützen Sie die Umwelt und die
Gesundheit Ihrer Mitmenschen vor negativen Konsequenzen.
Informationen zum Recycling und zur Entsorgung dieses
Produkts, erhalten Sie von Ihrer örtlichen Verwaltung oder
Ihrem Hausmüllentsorgungsdienst.
Dieses Produkt enthält Batterien. Wenn es in Ihrem Land
eine gesetzliche Regelung zur Entsorgung von Batterien
gibt, dürfen die Batterien nicht im Hausmüll entsorgt werden.
Informieren Sie sich über die örtlichen Bestimmungen zur
Entsorgung von Batterien. Durch regelkonforme Entsorgung
schützen Sie die Umwelt und die Gesundheit Ihrer
Mitmenschen vor negativen Konsequenzen.
HERSTELLER & IMPORTEUR (UK)
Hersteller:
Chal-Tec GmbH, Wallstraße 16, 10179 Berlin, Deutschland.
Importeur für Großbritannien:
Chal-Tec UK limited
Unit 6 Riverside Business Centre
Brighton Road
Shoreham-by-Sea
BN43 6RE
United Kingdom
13
EN
Dear Customer,
Congratulations on purchasing this device. Please read the
following instructions carefully and follow them to prevent
possible damages. We assume no liability for damage caused
by disregard of the instructions and improper use. Scan the QR
code to get access to the latest user manual and more product
information.
CONTENT
Safety Instructions14
Installation15
Remote Control Buttons19
Cleaning and Care21
Troubleshooting21
Disposal Considerations22
Manufacturer & Importer (UK)22
TECHNICAL DATA
Item number 10035789
Power supply 220-240 V ~ 50-60 Hz
Performance 120-150 W
Maximum volume ow 151 m
3
/min
14
EN
SAFETY INSTRUCTIONS
• Never attach the fan to a power point,but to the ceiling itself.
• The minimum distance between the blades of the fan and the oor must be more
than 2.3 m. The minimum carrying capacity of the hook from which the fan is hung
must be 100 kg.
• Make sure to install all poles disconnection switch having a contact separation of at
least 3 mm between poles in the supply wiring to the ceiling fan.
• The model or type reference of luminaries which may be installed in fans which are
constructed for his purpose.
• Switch off the power before connecting.
• The electrical wiring must be in accordance with the local regulation.
• The fan must be properly earthed to avoid the risk of electric shocks.
• Never mount the fan in a moist or wet room.
• Be careful when working near the rotating blades.
• This device may be only used by children 8 years old or older and persons with
limited physical, sensory and mental capabilities and / or lack of experience
and knowledge, provided that they have been instructed in use of the device by a
responsible person who understands the associated risks.
Note: Always have your fan installed by someone who is knowledgeable about
electrical wiring.
Notes on load capacity and minimum distances
The minimum distance between the fan
blades and the oor must be more than
2.3 m. The minimum load capacity of
the hook on which the fan is suspended
must be 100 kg.

15
EN
INSTALLATION
1 2
Remove the clamp (A), the bolt (B)
and the carrier bolt (C) from the
hanging rod.
Put the hanging rod through the upper and
lower cap.
3
Feed the motor wires through the hanging rod. Reinsert the carrier bolt. Secure the rod
and motor with the bolt (B), a washer and clamp (A) as shown.
16
EN
4
Connect the wires from receiver and motor.
Note: There is no light for this device. The (blue) light wire on the receiver does not
need to be connected. Please wrap it with insulating tape.
5
Fasten the ceiling plate to the ceiling with 4 dowels and screws.

17
EN
6
Insert the receiver and wires into the top
cap.
7
Fasten the upper cap and the ceiling plate with 4 screws.

18
EN
8
Fasten the rotor blades with 2 screws each. The fan is now completely assembled and
ready for use.
19
EN
REMOTE CONTROL BUTTONS
Speed and light
Press one of the buttons in the upper circle to adjust the speed and switch the light on or off.
High speed Medium speed
Low speed Fan is off

20
EN
Timer
Press one of the buttons in the lower circle to set the timer. After the set time has elapsed,
the fan will turn off automatically.

21
EN
CLEANING AND CARE
• Always disconnect the appliance from the power supply before cleaning the
appliance or carrying out maintenance work.
• Never use a wet sponge to clean the appliance.
• In order not to damage the product, it is advisable to use equipment adapted to the
sensitive surfaces and products, which will slow down the wear of the device.
TROUBLESHOOTING
Problem Possible cause Approach
The fan does not
start.
Fuse or circuit breaker blown. Check your fuses.
Loose cable connections. Check all connections for
loose cables.
Speed was not set correctly. Select a speed.
The fan makes
noise.
The upper cap touches the
ceiling.
Make sure there is a minimum
distance of 3 mm between the
top cap and the ceiling.
Screws of rotor blades are
loose.
Tighten all screws.
Ceiling fan is not properly
attached to the ceiling.
Tighten all screws in the
suspension plate.
Speed is not adjusted
correctly.
Select a speed.
The fan is
wobbling.
Rotor blades are not adjusted
horizontally to the ceiling.
Move the fan so that all
blades are at the same height
to the ceiling.
Screws of the rotor blades are
loose.
Tighten all screws.

22
EN
DISPOSAL CONSIDERATIONS
If there is a legal regulation for the disposal of electrical
and electronic devices in your country, this symbol on the
product or on the packaging indicates that this product must
not be disposed of with household waste. Instead, it must be
taken to a collection point for the recycling of electrical and
electronic equipment. By disposing of it in accordance with
the rules, you are protecting the environment and the health of
your fellow human beings from negative consequences. For
information about the recycling and disposal of this product,
please contact your local authority or your household waste
disposal service.
This product contains batteries. If there is a legal regulation
for the disposal of batteries in your country, the batteries must
not be disposed of with household waste. Find out about local
regulations for disposing of batteries. By disposing of them in
accordance with the rules, you are protecting the environment
and the health of your fellow human beings from negative
consequences.
MANUFACTURER & IMPORTER (UK)
Manufacturer:
Chal-Tec GmbH, Wallstrasse 16, 10179 Berlin, Germany.
Importer for Great Britain:
Chal-Tec UK limited
Unit 6 Riverside Business Centre
Brighton Road
Shoreham-by-Sea
BN43 6RE
United Kingdom

23
ES
Estimado cliente,
Le felicitamos por la adquisición de este producto. Lea
atentamente el siguiente manual y siga cuidadosamente las
instrucciones de uso con el n de evitar posibles daños. La
empresa no se responsabiliza de los daños ocasionados por
un uso indebido del producto o por haber desatendido las
indicaciones de seguridad. Escanee el siguiente código QR
para tener acceso al manual de instrucciones más actualizado
y a información adicional sobre el producto.
ÍNDICE
Indicaciones de seguridad24
Instalación25
Teclas del mando a distancia29
Limpieza y cuidado31
Resolución de problemas31
Indicaciones sobre la retirada del aparato32
Fabricante e importador (Reino Unido)32
DATOS TÉCNICOS
Número de artículo 10035789
Suministro eléctrico 220-240 V ~ 50-60 Hz
Potencia 120-150 W
Caudal volumétrico máximo 151 m
3
/min

24
ES
INDICACIONES DE SEGURIDAD
• Nunca je el ventilador a una toma de corriente, sino al propio techo.
• Asegúrese de instalar un disyuntor bipolar con una distancia de contacto de al
menos 3 mm entre los polos en el cableado del ventilador de techo.
• Antes de conectar el suministro eléctrico, apague el ventilador.
• El cableado eléctrico debe cumplir con las disposiciones legales de su país.
• El ventilador debe contar con una toma a tierra para evitar el riesgo de descargas
eléctricas.
• Nunca monte el ventilador en una estancia húmeda o mojada.
• Tenga cuidado cuando se sitúe cerca de las aspas en movimiento.
• Los niños mayores de 8 años y las personas con discapacidades sensoriales,
físicas o psíquicas solamente podrán utilizar el aparato si han sido previamente
instruidas sobre su uso y conocen las indicaciones de seguridad y los riesgos
asociados.
Nota: Deje que el ventilador sea instalado por una persona que conozca el
cableado eléctrico.
Observaciones sobre la capacidad de carga y las distancias mínimas
La distancia mínima entre las hojas
del ventilador y el suelo debe ser de
más de 2,3 m. La capacidad de carga
mínima del gancho que sostenga el
ventilador debe ser de al menos 100
kg.

25
ES
INSTALACIÓN
1 2
Retire las pinzas (A), los pernos (B)
y los pernos de soporte (C) de la
barra de instalación.
Introduzca la barra de instalación por la tapa
superior e inferior.
3
Introduzca los cables del motor por la barra de instalación. Vuelva a colocar los
pernos de soporte. Fije la barra y el motor, como se indica en la imagen, con el
tornillo (B), una arandelas y la pinza (A).
26
ES
4
Conecte los cables del receptor y motor.
Nota: Este aparato no dispone de luz. El cable de luz (azul) del receptor no debe
conectarse. Cúbralo con cinta aislante.
5
Fije la placa del techo con 4 tacos y tornillos al techo.

27
ES
6
Conecte el receptor y los cables a la
tapa superior.
7
Fije la tapa superior y la placa para el techo con 4 tornillos.

28
ES
8
Fije con 2 tornillos las hojas del rotor. Ha nalizado el montaje del ventilador y
puede utilizarlo.
29
ES
TECLAS DEL MANDO A DISTANCIA
Velocidad y luz
Pulse una de las teclas del círculo superior para regular la velocidad y encender o
apagar la luz.
Velocidad alta Velocidad media
Velocidad baja Ventilador apagado

30
ES
Temporizador
Pulse una de las teclas del círculo inferior para programar el temporizador. Cuando
haya transcurrido el tiempo seleccionado, el aparato se apaga automáticamente.

31
ES
LIMPIEZA Y CUIDADO
• Desconecte el aparato de la red eléctrica antes de limpiarlo o de realizar trabajos
de mantenimiento.
• Para limpiar el aparato, nunca utilice una esponja mojada.
• Para no dañar el producto, se recomienda utilizar utensilios apropiados para las
supercies y productos sensibles que minimicen el desgaste del aparato.
RESOLUCIÓN DE PROBLEMAS
Problema Posible causa Solución propuesta
El ventilador no se
pone en marcha.
El fusible o el disyuntor se han
averiado.
Compruebe los fusibles.
Conexiones sueltas Compruebe todas las
conexiones para ver si hay
cables sueltos.
La velocidad no se ha
seleccionado correctamente.
Seleccione una velocidad.
El ventilador hace
ruidos.
La tapa superior está tocando
el techo.
Asegúrese de que entre la
tapa superior y el techo exista
una distancia mínima de 3
mm.
Los tornillos y las aspas del
rotor están sueltas.
Apriete bien todos los tornillos.
El ventilador de techo no se
ha jado bien a la pared.
Apriete bien todos los tornillos
de la placa de suspensión.
La velocidad no se ha
seleccionado correctamente.
Seleccione una velocidad.
El ventilador se
tambalea.
Las aspas del rotor no se
han colocado en posición
horizontal con el techo.
Mueva el ventilador para que
todas las aspas se sitúen a la
misma altura con respecto al
techo.
Los tornillos y las aspas del
rotor están sueltas.
Apriete bien todos los tornillos.
32
ES
INDICACIONES SOBRE LA RETIRADA DEL
APARATO
Si en su país existe una disposición legal relativa a la
eliminación de aparatos eléctricos y electrónicos, este
símbolo estampado en el producto o en el embalaje
advierte que no debe eliminarse como residuo doméstico.
En lugar de ello, debe depositarse en un punto de recogida
de reciclaje de aparatos eléctricos y electrónicos. Una
gestión adecuada de estos residuos previene consecuencias
potencialmente negativas para el medio ambiente y la salud
de las personas. Puede consultar más información sobre el
reciclaje y la eliminación de este producto contactando con
su administración local o con su servicio de recogida de
residuos.
Este producto contiene baterías. Si en su país existe una
disposición legal relativa a la eliminación de baterías, estas
no deben eliminarse como residuo doméstico. Infórmese
sobre la normativa vigente relacionada con la eliminación de
baterías. Una gestión adecuada de estos residuos previene
consecuencias potencialmente negativas para el medio
ambiente y la salud de las personas.
FABRICANTE E IMPORTADOR (REINO UNIDO)
Fabricante:
Chal-Tec GmbH, Wallstraße 16, 10179 Berlín, Alemania.
Importador para Gran Bretaña:
Chal-Tec UK limited
Unit 6 Riverside Business Centre
Brighton Road
Shoreham-by-Sea
BN43 6RE
United Kingdom

33
FR
Chère cliente, cher client,
Toutes nos félicitations pour l’acquisition de ce nouvel appareil.
Veuillez lire attentivement et respecter les instructions de ce mode
d’emploi an d’éviter d’éventuels dommages. Nous ne saurions
être tenus pour responsables des dommages dus au non-respect
des consignes et à la mauvaise utilisation de l’appareil. Scannez
le QR-Code pour obtenir la dernière version du mode d‘emploi
et des informations supplémentaires concernant le produit
SOMMAIRE
Consignes de sécurité34
Installation35
Touches de commande à distance39
Nettoyage et entretien41
Résolution des problèmes41
Informations sur le recyclage42
Fabricant et importateur (UK)42
FICHE TECHNIQUE
Numéro d'article 10035789
Alimentation 220-240 V ~ 50-60 Hz
Puissance 120-150 W
Débit d'air maximal 151 m
3
/min
34
FR
CONSIGNES DE SÉCURITÉ
• Ne connectez jamais le ventilateur à une prise, mais plutôt au plafond lui-même.
• Veillez à installer un disjoncteur omnipolaire avec une distance de contact d‘au
moins 3 mm entre les pôles du câble d‘alimentation du ventilateur de plafond.
• Coupez l‘alimentation électrique avant la connexion.
• Le câblage électrique doit être conforme aux réglementations locales.
• Le ventilateur doit être correctement mis à la terre pour éviter tout risque de choc
électrique.
• N‘installez jamais le ventilateur dans une pièce humide ou mouillée.
• Soyez prudent autour des lames rotatives.
• Les enfants à partir de 8 ans, les personnes handicapées mentales, sensorielles et
physiques ne peuvent utiliser l‘appareil que s‘ils ont été parfaitement familiarisés
avec les fonctions et les précautions de sécurité par un responsable et s‘ils
comprennent les risques associés.
Remarque : Faites toujours installer le ventilateur par une personne ayant de bonnes
connaissances en électricité pour avec le câblage.
Remarques sur la capacité de charge et les dégagements minimaux
La distance minimale entre les pales
du ventilateur et le sol doit être
supérieure à 2,3 m. La capacité de
charge minimale du crochet sur lequel
le ventilateur est suspendu doit être de
100 kg.

35
FR
INSTALLATION
1 2
Retirez le support (A), le boulon (B)
et le boulon de support (C) de la
tige de suspension.
Insérez la tige de suspension à travers les
capuchons supérieur et inférieur.
3
Faites passer les ls du moteur à travers la tige de suspension. Réinstaller le boulon de
support. Fixez la tige et le moteur comme indiqué avec le boulon (B), une rondelle et
le support (A).
36
FR
4
Connectez les ls du récepteur et du moteur.
Remarque : Cet appareil ne possède pas d'éclairage. Vous n'avez pas besoin de
brancher le l lumineux (bleu) sur le récepteur. Veuillez enrouler du ruban électrique
autour.
5
Fixez la platine de plafond au plafond avec 4 chevilles et vis.

37
FR
6
Branchez le récepteur et les ls dans le
capuchon supérieur.
7
Fixez le capuchon supérieur et la platine de plafond avec 4 vis.

38
FR
8
Fixez les pales du rotor avec 2 vis chacune. Le ventilateur est maintenant
complètement assemblé et peut être utilisé.

39
FR
TOUCHES DE COMMANDE À DISTANCE
Vitesse et éclairage
Appuyez sur l‘un des boutons dans le cercle supérieur pour régler la vitesse et allumer
ou éteindre l‘éclairage.
Grande vitesse Vitesse moyenne
Vitesse lente Ventilateur éteint
40
FR
Minuterie
Appuyez sur l‘un des boutons du cercle inférieur pour régler la minuterie. Une fois la
durée dénie écoulée, le ventilateur s‘arrête automatiquement.
41
FR
NETTOYAGE ET ENTRETIEN
• Débranchez toujours l‘appareil du secteur avant de le nettoyer ou d‘effectuer des
travaux de maintenance.
• N‘utilisez jamais d‘éponge humide pour nettoyer l‘appareil.
• An de ne pas endommager le produit, il est conseillé d‘utiliser des équipements
adaptés aux surfaces sensibles et des produits qui ralentissent l‘usure de l‘appareil.
RÉSOLUTION DES PROBLÈMES
Problème Cause possible Solution
Le ventilateur ne
démarre pas.
Fusible ou disjoncteur grillé. Vériez les fusibles.
Câblage desserré. Vériez toutes les connexions
et resserrez-les.
La vitesse n'a pas été réglée
correctement.
Choisissez une vitesse.
Le ventilateur est
bruyant.
Le capot supérieur touche le
plafond.
Assurez-vous qu'il y a un
espace minimum de 3 mm
entre le capot supérieur et le
plafond.
Les vis des pales de rotor sont
desserrées.
Serrez toutes les vis.
Le ventilateur de plafond
n'est pas correctement xé au
plafond.
Serrez toutes les vis de la
platine de suspension.
La vitesse n'a pas été réglée
correctement.
Choisissez une vitesse.
Le ventilateur
tremble.
Les pales du rotor ne sont pas
ajustées horizontalement au
plafond
Déplacez le ventilateur pour
que toutes les pales soient au
niveau du plafond.
Les vis des pales de rotor sont
desserrées.
Serrez toutes les vis.

42
FR
INFORMATIONS SUR LE RECYCLAGE
S‘il existe une réglementation pour l‘élimination ou le
recyclage des appareils électriques et électroniques dans
votre pays, ce symbole sur le produit ou sur l‘emballage
indique que cet appareil ne doit pas être jeté avec les
ordures ménagères. Vous devez le déposer dans un point
de collecte pour le recyclage des équipements électriques
et électroniques. La mise au rebut conforme aux règles
protège l‘environnement et la santé de vos semblables des
conséquences négatives. Pour plus d‘informations sur le
recyclage et l‘élimination de ce produit, veuillez contacter
votre autorité locale ou votre service de recyclage des
déchets ménagers.
Ce produit contient des piles. S‘il existe une réglementation
pour l‘élimination ou le recyclage des piles dans votre pays,
vous ne devez pas les jeter avec les ordures ménagères.
Renseignez-vous sur les dispositions locales relatives à la
collecte des piles usagées. La mise au rebut conforme aux
règles protège l‘environnement et la santé de vos semblables
des conséquences négatives.
FABRICANT ET IMPORTATEUR (UK)
Fabricant :
Chal-Tec GmbH, Wallstraße 16, 10179 Berlin, Allemagne.
Importateur pour la Grande Bretagne :
Chal-Tec UK limited
Unit 6 Riverside Business Centre
Brighton Road
Shoreham-by-Sea
BN43 6RE
United Kingdom

43
IT
Gentile Cliente,
La ringraziamo per aver acquistato il dispositivo. La preghiamo
di leggere attentamente le seguenti istruzioni per l’uso e di
seguirle per evitare possibili danni tecnici. Non ci assumiamo
alcuna responsabilità per danni scaturiti da una mancata
osservazione delle avvertenze di sicurezza e da un uso
improprio del dispositivo. Scansionare il codice QR seguente,
per accedere al manuale d’uso più attuale e per ricevere
informazioni sul prodotto.
INDICE
Avvertenze di sicurezza44
Installazione45
Tasti del telecomando49
Pulizia e manutenzione51
Correzione degli errori51
Avviso di smaltimento52
Produttore e importatore (UK)52
DATI TECNICI
Codice articolo 10035789
Alimentazione 220-240 V ~ 50-60 Hz
Potenza 120-150 W
Max. portata volumetrica 151 m
3
/min

44
IT
AVVERTENZE DI SICUREZZA
• Non collegare il ventilatore alla presa di corrente, bensì al softto.
• Collegare il cavo d’alimentazione a un interruttore bipolare con distanza tra i
contatti di apertura di almeno 3 mm.
• Staccare la corrente prima di installare il ventilatore.
• L’allacciamento elettrico deve rispettare le normative locali.
• Il ventilatore deve essere messo a terra correttamente per evitare il pericolo di
folgorazioni.
• Non montare il ventilatore in un locale umido o bagnato.
• Prestare attenzione quando ci si trova in prossimità delle pale in movimento.
• Questo dispositivo può essere utilizzato dai bambini maggiori di 8 anni e dalle
persone con limitate capacità siche, sensoriali o mentali o da persone con
esperienza e conoscenze insufcienti, solo se sono stati informati sulle funzioni del
dispositivo e sono consapevoli dei rischi e dei pericoli connessi.
Nota: lasciare che il ventilatore venga installato da una persona esperta di
cablaggio elettrico.
Avvertenze sulla capacità di carico e sulle distanze minime
La distanza minima tra le pale del
ventilatore e il pavimento deve essere
maggiore di 2,3 m. La capacità di
carico del gancio, al quale appendere
il ventilatore, deve essere di almeno
100 kg.

45
IT
INSTALLAZIONE
1 2
Rimuovere il morsetto (A), il perno
(B) e il perno di sollevamento (C)
dall’asta di sospensione.
Inserire l’asta di sospensione nel cappuccio
superiore e inferiore.
3
Far passare i li del motore attraverso l’asta di sospensione e reinserire il perno di
sollevamento. Fissare l’asta e il motore con il perno (B), la rondella e il morsetto (A)
come da gura.

46
IT
4
Collegare i li del ricevitore e del motore.
Nota: per questo dispositivo non c’è la lampada. Il lo (blu) per la luce del ricevitore
non va collegato. Avvolgerlo con del nastro isolante.
5
Fissare il pannello al softto con 4 tasselli e viti.

47
IT
6
Inserire il ricevitore e i li nel cappuccio
superiore.
7
Fissare il pannello e il cappuccio superiore con 4 viti.
48
IT
8
Fissare ogni pala con 2 viti. Ora il ventilatore è montato e pronto per essere usato.
49
IT
TASTI DEL TELECOMANDO
Velocità e luce
Premere uno dei tasti nel cerchio superiore per impostare la velocità e per accendere o
spegnere la luce.
Velocità elevata Velocità media
Velocità bassa Il ventilatore è spento

50
IT
Timer
Premere uno dei tasti nel cerchio sottostante per impostare il timer. Allo scadere del
tempo il ventilatore si spegne automaticamente.

51
IT
PULIZIA E MANUTENZIONE
• Scollegare sempre il dispositivo dall’alimentazione prima di eseguire lavori di
manutenzione e di pulizia.
• Non utilizzare mai una spugna bagnata per pulire il dispositivo.
• Per non danneggiare il dispositivo si consiglia di utilizzare prodotti appositi per
rallentare il deterioramento delle superci e dei prodotti.
CORREZIONE DEGLI ERRORI
Problema Possibile causa Soluzione consigliata
Il ventilatore non
parte.
Il fusibile o l’interruttore è
bruciato.
Controllare i fusibili.
I cavi sono allentati. Controllare tutti i cavi.
La velocità non è stata
impostata correttamente.
Selezionare una velocità.
Il ventilatore è
rumoroso.
Il cappuccio superiore tocca
il softto.
Assicurarsi che ci sia una
distanza minima di 3 mm tra
il cappuccio superiore e il
softto.
Le viti delle pale sono
allentate.
Stringere bene tutte le viti.
Il ventilatore non è ssato
bene al softto.
Stringere le viti del pannello di
sospensione.
La velocità non è stata
impostata correttamente.
Selezionare una velocità.
Il ventilatore vibra. Le pale non sono parallele al
softto.
Muovere il ventilatore in modo
tale che tutte le pale abbiano
la stessa distanza dal softto.
Le viti delle pale sono
allentate.
Stringere tutte le viti.
52
IT
AVVISO DI SMALTIMENTO
Se nel proprio paese si applicano le regolamentazioni
inerenti lo smaltimento di dispositivi elettrici ed elettronici,
questo simbolo sul prodotto o sulla confezione segnala che
questi prodotti non possono essere smaltiti con i riuti normali
e devono essere portati a un punto di raccolta di dispositivi
elettrici ed elettronici. Grazie al corretto smaltimento dei
vecchi dispositivi si tutela il pianeta e la salute delle persone
da possibili conseguenze negative. Informazioni riguardanti il
riciclo e lo smaltimento di questi prodotti si ottengono presso
l’amministrazione locale oppure il servizio di gestione dei
riuti domestici.
Il prodotto contiene batterie. Se nel proprio paese si
applicano le regolamentazioni inerenti lo smaltimento di
batterie, non possono essere smaltite con i normali riuti
domestici. Preghiamo di informarvi sulle regolamentazioni
vigenti sullo smaltimento delle batterie. Grazie al corretto
smaltimento dei vecchi dispositivi si tutela l’ambiente e la
salute delle persone da conseguenze negative.
PRODUTTORE E IMPORTATORE (UK)
Produttore:
Chal-Tec GmbH, Wallstraße 16, 10179 Berlino, Germania.
Importatore per la Gran Bretagna:
Chal-Tec UK limited
Unit 6 Riverside Business Centre
Brighton Road
Shoreham-by-Sea
BN43 6RE
United Kingdom