
Loading ...
Loading ...
Loading ...
12
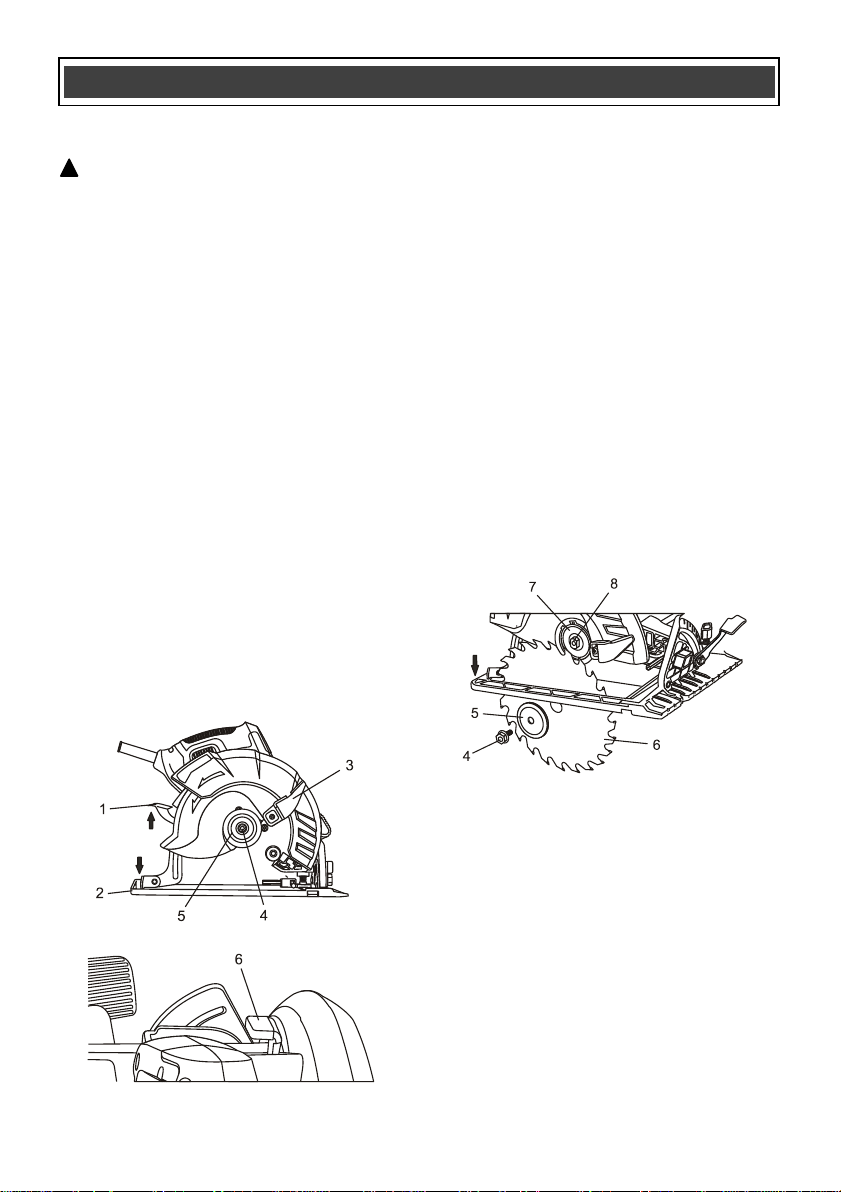
Fig. 2
Fig. 3
Fig. 1
INSTALLING THE BLADE
WARNING: Always remove the plug from
the power source before installing or
removing a blade or adjusting the saw in any
way.
1. Place a clean piece of cardboard on a
workbench to protect the blade and the
workbench.
2. Lift the depth adjustment lever (1) and
lower the sole plate (2) as far as it will go
(Fig. 1). Press down on the depth
adjustment lever to lock the sole plate in its
lower position.
3. Rotate the lower blade guard lever (3)
clockwise toward the front of the saw and
carefully place the saw on the cardboard.
4. Insert the 6 MM blade hex key into the
blade screw (4).
5. Rotate the blade hex screw counter
clockwise and remove both the blade
screw and the outer blade flange (5).
NOTE: If the arbor turns with the blade screw,
press on the blade locking lever (6) and slowly
rotate the blade screw until the locking lever
engages the spindle (Fig. 1).
NOTE: Do NOT remove the inner blade flange
(7) from the arbor (8). If it should fall off, make
sure the THICKER boss on the washer is facing
the motor (Fig. 3).
6. Slide the blade upward through the slot in
the sole plate and place the blade hole
onto the arbor.
NOTE: Make sure the blade teeth are pointing
toward the front of the saw.
7. Place the outer blade flange (5) onto the
arbor and thread the blade screw (4) into
the arbor.
8. Tighten the blade screw.
NOTE: Press on the blade locking lever
(6 Fig. 2) and slowly rotate the blade screw
clockwise until the locking lever engages the
spindle. Continue to turn the blade screw
clockwise until the blade is firmly tightened onto
the spindle.
When installing a new blade, make sure you
follow these precautions:
a) Make sure the teeth at the bottom of the
blade are pointing toward the front of the saw.
b) Check the inner flange washer to make sure
the thicker boss is pointing toward the motor.
c) Place the outer flange washer so the flat
surface is against the blade and the rectangular
hole properly mated with the arbor.
d) Make sure the flanged blade screw is NOT
cross threaded and is fully tightened with the
wrench provided.
e) Before turning the saw ON, carefully rotate
the blade by hand to make sure it does not
wobble.
ASSEMBLY AND OPERATING
!
Loading ...
Loading ...
Loading ...