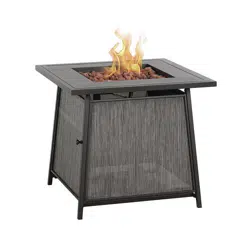
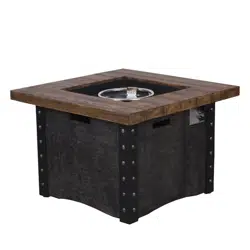
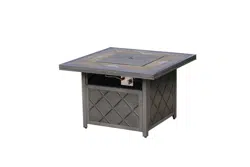
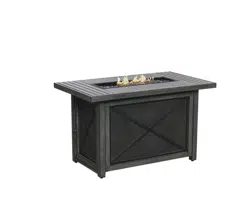
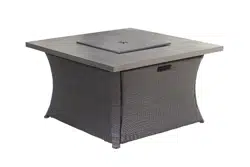
INSTRUCTION MANUAL Gas Fire Pit Table
EXPLODED VIEW
Please check the contents of the packaging to ensure all parts are included. If missing parts please contact customer service.

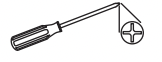
TOOLS NEEDED: (NOT INCLUDED)
Philips screwdriver
Estimated time for assembly: 30-45 minutes.
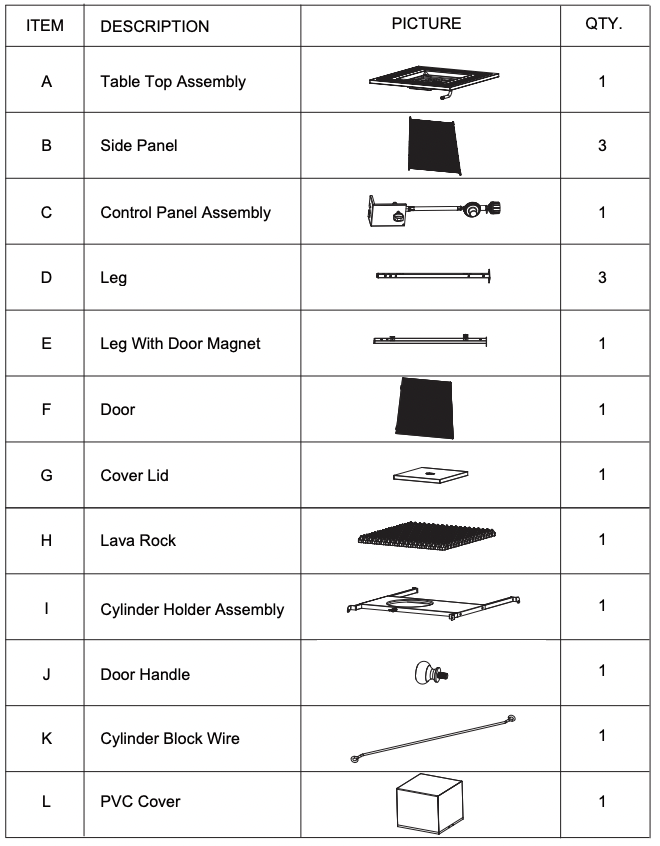
HARDWARE CONTENTS
 M5 x 12 Bolt - Qty. 33
 M4 x 10 Bolt - Qty. 4
Assembly Instructions
Choose a good, cleared assembly area and get a friend to help you put your gas fire pit together. Lay cardboard down to protect gas fire pit finish and assembly area.
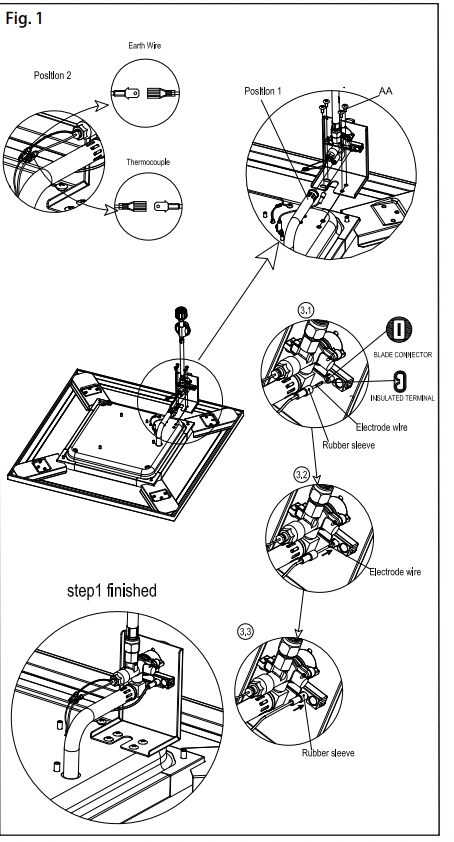
Step 1
Place the table top assembly (A) upside down to the soft, level surface. Insert valve into the injection pipe of burner as position 1. Attach control panel assembly (C) to the table top assembly (A) with (4) M5 x 12 bolts (AA) as illustrated.
Then install the thermocouple and the earth wire as position 2.
Then connect the electrode wire as position 3, confirm the rubber sleeve is placed on the electrode wire first as position 3.1, then connect the electrode wire to the valve by forcefully inserting the electrode wire terminal into the valve terminal connector as position 3.2, finally, connect the rubber sleeve to the valve as position 3.3.
Hardware Used
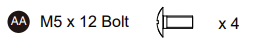
Step 2
Attach the leg with door magnet (E) and three legs (D) to the table top assembly (A) with (12) M5x12 bolts (AA) as illustrated.
Hardware Used

Step 3
Attach the cylinder holder (I) to the leg with door magnet (E) and three legs (D) with (4) M5x12 bolts (AA) as illustrated.

Hardware Used

Step 4
Attach the side panel (B) to the leg (D) and the leg with door magnet (E) with (3) M5x12 bolts (AA) as illustrated.
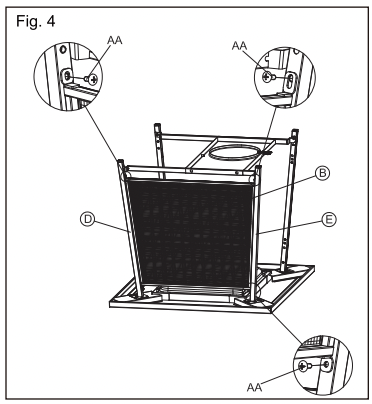
Hardware Used

Step 5
Attach the cylinder block wire (K) to the cylinder holder assembly (I) and through the side panel (B) to the leg (D) with (2) M5 x 12 bolts (AA) as illustrated.
Note: Please attach the cylinder block wire (K) in correct direction, make sure both the upper and lower holes are aligned.
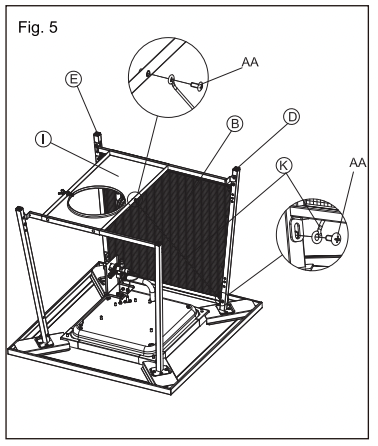
Hardware Used

Step 6
Attach (2) side panels (B) to legs (D) with (8) M5x12 bolts (AA) as illustrated.
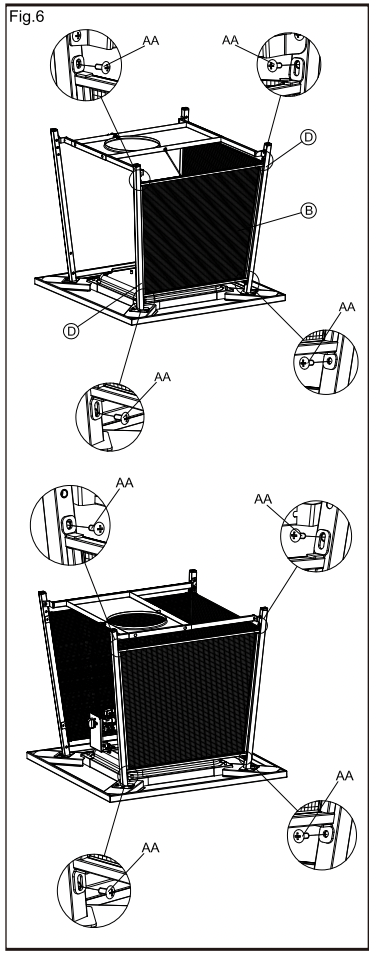
Hardware Used

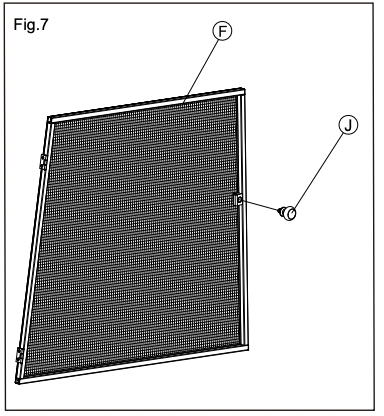
Step 7
Screw the door handle (J) to the door (F) as illustrated.
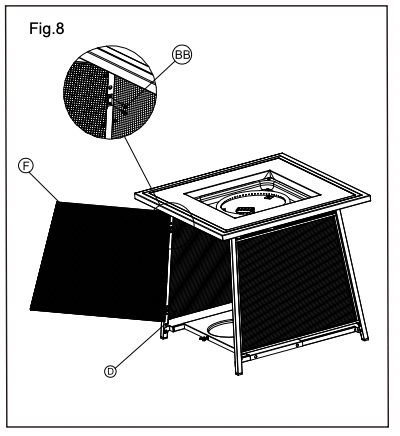
Step 8
Attach the door (F) to the leg (D) with (4) M4 X 10 bolts (BB) as illustrated.
Note: With the help of a friend, turn the gas fire pit into upright position after this step finished.
Hardware Used

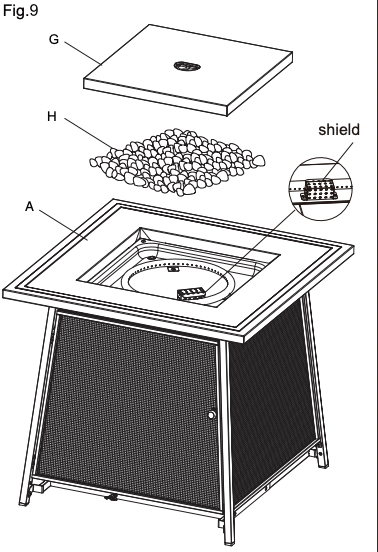
Step 9
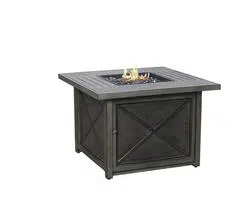
Put the lava rocks (H) into the burning area. middle of table top assembly (A). Place the cover lid (G) onto the table top assembly (A) when the gas fire pit not use.
Note: To avoid ignition failure. do not cover the shield with lava rocks.
WARNING: Failure to position the parts in accordance with these diagrams or failure to use only parts specifically approved with this appliance may result in property damage or personal injury.
INSTALLATION INSTRUCTIONS
INSTALLATION
Two or more people are helpful for an easier installation.
LOCATION
Your fire pit must be installed on flat. stable surface. away from any combustible materials or construction.
SET-UP
1. Place fire pit on any level. outdoor. non-combustible surface.
NOTE: Do not place the appliance on grass or dirt. This may prevent proper safety venting.
2. Pour the lava rocks (max 6.6 Ibs) _ onto the fire pit.
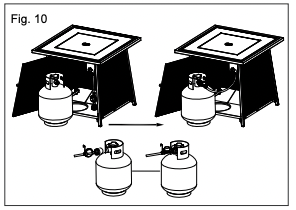
3. Open the door (F) and place the cylinder next to the cylinder holder assembly (Fig.10). Attach the regulator to the cylinder and turn clockwise by hand.
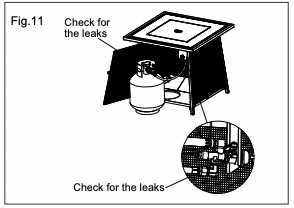
4. Make leakage solution by mixing 1 part liquid dish soap and 3 parts water. Please do the Leak Test with leakage solution before use. (Fig. 11).
5. Place the cylinder into the cylinder holder assembly. Make sure the valve outlet of cylinder is facing outward. Turn the cylinder locking bolt clockwise to secure the gas cylinder. (Fig.12)
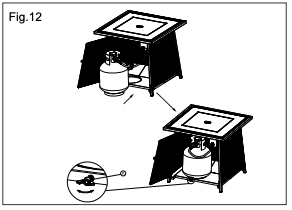
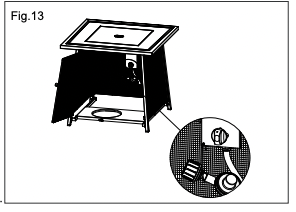
Hang up the regulator as Fig.13 when the gas cylinder takes out.
Your gas fire pit has been checked at all connections at the factory for leakage.
In transportation and handling some connections may have loosened.
Follow these steps to check the hose/regulator/cylinder connections:
1)Make leakage solution by mixing part liquid dish soap and 3parts water.
2)Spoon or brush several drops (or use squirt bottle) of thesolution onto hose/regulator/cylinder connection.
3)Turn on gas cylinder. Inspect the connections and look forbubbles.
4)If no bubbles appear. the connection is safe.
5)If bubbles appear. there is leakage. Loosen and re-tighten this connection. If there is still a leak. please please call our customer service department at 1-888-909-3888 or e-mail to [email protected].
Note:
1)The cylinder supply system must be arranged for vapor withdrawal.
2)The cylinder used must include a collar to protect the cylinder valve.
The hose assembly must be replaced prior to the appliance being put into operation if there is evidence of excessive abrasion or wear. or if the hose is damaged.
At least once a year. a complete inspection of the entire gas path components should be performed.
If there is need to replace parts. proceed to leak test after reassembly (These procedures should be performed by a profes-sional technician).
OPERATION
WARNING: DO NOT ATTEMPT TO OPERATE THE APPLIANCE UNTIL YOU HAVE READ AND UNDERSTAND ALL PRECAUTIONS. FAILURE TO DO SO CAN RESULT IN PROPERTY DAMAGE, SERIOUS INJURY, OR DEATH.
WARNING!!!
- Do not use an open flame to check for leakage.
- Do not smoke during testing.
- Do not test indoors.
- A leak check must be performed whenever the gas cylinder is replaced.
NOTE: Use only the pressure regulator supplied with this fire pit. Replace them with those specified by the manufacturer only.
Before turning gas supply ON
Your fire pit was designed and approved for OUTDOOR USE ONLY. DO NOT use it inside a building or any other enclosed area.
Make sure surrounding areas are free of combustible materials, gasoline, and other flammable vapors or liquids.
Ensure that there is no obstruction to air ventilation.
Be sure all gas connections are tight and there are no leaks.
Be sure the access panel is clear of debris.
Be sure any component removed during assembly or servicing is replaced and fastened prior to starting.
WARNING FOR YOUR SAFETY:
If at any time you are unable to light burner and smell gas, wait 5 minutes to allow gas to dissipate before attempting to light gas appliance. If after 1 minute, you are unable to light burner, wait 5 minutes and allow flammable vapors to dissipate before attempting to light gas appliance.
WARNING FOR YOUR SAFETY: DO NOT touch or move gas appliance for at least 45 minutes after use.
WARNING Lighting operations should comply with Lighting Instruction section. Improper lighting operations will cause serious injury and explosion.
Before Lighting
The gas fire pit should be thoroughly inspected before each use, and by a qualified service person at least annually.
If relighting a hot gas fire pit, always wait at least 5 minutes.
Lighting Instructions
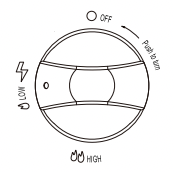
- Make sure control knob is in the “OFF” position.
- Turn LP cylinder gas valve to fully open position.
- Press down control knob and turn it counter clockwise to "LOW" position, this will light the burner. (You will hear 1 clicking noise.)
- If the burner is not lit immediately (within 5 seconds), press down the control knob and turn clockwise to "OFF" position, repeat from step 3 after 5 minutes.
- When burner is lit, turn the control knob to desired heat output position between "LOW" and "HIGH".
- Press down and turn the control knob clockwise to "OFF" position to shut down the appliance. Turn off cylinder gas valve.

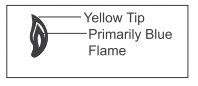
Flame Characteristic
Normally the burner flame is yellow.
If the burner flame is blue and very small, please check the gas cylinder, as it may be low gas pressure or empty. If there is enough gas in the cylinder, please contact customer service to change the burner of the gas fire pit.
If flames lift away from burner or backfire happens, or produce thick black smoke, the fire pit should be turned off immediately. The fire pit should not be operated again until the unit is serviced and/or repaired by a qualified service technician.
CAUTION: AVOID INHALING FUMES EMITTED FROM THE GAS APPLIANCE'S FIRST USE. SMOKE AND ODOR FROM THE BURNING OF OILS USED IN MANUFACTURING WILL APPEAR. BOTH SMOKE AND ODOR WILL DISSIPATE AFTER APPROXIMATELY 30 MINUTES. THE GAS APPLIANCE SHOULD NOT PRODUCE THICK BLACK SMOKE.
NOTE: The burner may be noisy when initially turned on. To eliminate excessive noise from the burner, turn the control knob to the “LOW” position. Then, turn the knob to the level of heat desired.
Operation pressure checked:
If the flame is very small, this is because the supply pressure is not enough. Please refill gas cylinder.
Re-light:
- Turn the control knob to "OFF" position.
- Wait five (5) minutes before attempting to relight appliance.
- Repeat steps beginning with step 3 of the lighting instruction.
Shut down instructions:
- Push in and turn control knob clockwise to "OFF" position.
- Turn LP cylinder gas valve clockwise to "OFF" position when appliance is not in use.
The Event of Gas Leakage:
- Turn the control knob to "OFF" position.
- Turn LP cylinder valve to "OFF" position.
- Wait 5 minutes to allow gas to dissipate.
- If odor continues, immediately call gas supplier.
WARNING : Gas appliance will be hot after use. Handle with extreme care.
LOCATING HEATER FOR USE
CAUTION: WHEN CERTAIN MATERIALS OR ITEMS ARE LEFT ABOVE, BESIDE OR UNDER THIS HEATER WHILE IN USE, THEY WILL BE SUBJECT TO RADIANT HEAT AND COULD BE SERIOUSLY DAMAGED.
This gas fire pit is primarily used for the heating of outdoor patios, decks, spas, pools and open working areas.
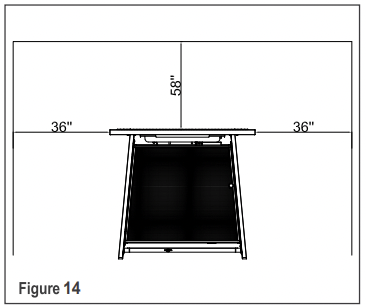
Always make sure that adequate fresh air ventilation is provided. Follow the spacing tolerances shown in Figure 14 at all times.
This gas fire pit must be placed on level, firm ground.
Never operate in an explosive atmosphere. Keep away from areas where gasoline or other flammable liquids or vapors are stored or used.
MAINTENANCE AND STORAGE
CLEANING AND MAINTENANCE
To enjoy years of outstanding performance from your gas fire pit, make sure you perform the following maintenance activities on a regular basis:
WARNING: FOR YOUR SAFETY ; DO NOT touch or move gas appliance for at least 45 minutes after use. Allow all burner elements to cool before touching.
- Keep exterior surfaces clean.
- Use warm soapy water for cleaning. Never use flammable of corrosive cleaning agents.
- While washing your unit, be sure to keep the area around the burner dry at all times. If the gas control is exposed to water in any way, do NOT try to use it. It must be replaced.
- Keep the appliance area free and clean from combustible materials, gasoline and other flammable vapors and liquids; not obstructing the flow of combustion and ventilation air; keeping the ventilation opening(s) of the cylinder enclosure free and clear from debris.
- Check if there are cracks or worn sections on the hose. If yes, please call our customer service to replace hose.
- At least once a year, the unit should be inspected for the presence of spiders, spider webs or other insects.
- Air flow must be unobstructed. Keep controls, burner, and circulating air passageways clean. Signs of possible blockage include:
Gas fire pit does NOT reach the desired temperature.
Gas fire pit glow is excessively uneven.
Gas fire pit makes popping noises.
- Spiders and insects can nest in burner or orifices. This dangerous condition can damage gas fire pit and render it unsafe for use. Clean burner holes by using a heavy-duty pipe cleaner. Compressed air may help clear away smaller particles.
NOTE: In a salt-air environment such as near an ocean, corrosion occurs more quickly than normal. Frequently check for corroded areas and repair them promptly
NOTE: Wait until gas appliance is cool before covering.
- Store the fire pit indoors during the winter if it will be subjected to freezing temperatures.
- Disconnect and remove the cylinder from the appliance before the appliance can be stored indoors.
NOTE: Wait until the appliance is cool before covering.
STORAGE
- Turn the control knob to "OFF" position.
- Turn LP cylinder to OFF position.
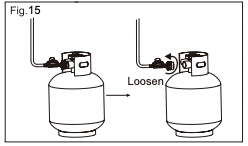
- Allow at least 45 minutes for the fire pit to cool down after use, and then turn regulator counterclockwise to disconnect the regulator from cylinder, turn the cylinder locking bolt counterclockwise to loose the cylinder and remove the cylinder.
- Cylinder must be stored outdoors in a well-ventilated area out of the reach of children. When the cylinder is disconnected, tightly install the threaded valve plugs, and do not store it in a building, garage or any other closed area.
- You may store product indoors ONLY if the cylinder is disconnected and removed.
- Keep the fire pit area clear and free from combustible materials, gasoline and other flammable vapors and liquids.
- Store gas fire pit in an area sheltered from direct contact with inclement weather (such as rain, sleet, hail, snow, dust and debris).
- A qualified service person should install and repair the fire pit and inspect it annually.
- It might be necessary to clean this fire pit frequently. You must keep the control compartment, burner and circulating air passageways clean.
TROUBLE SHOOTING
| PROBLEM OBSERVED |
POSSIBLE CAUSE |
CORRECTIVE MEASURES |
| Gas odor |
Gas leak |
Check all gas connections |
| Delayed ignition |
Low gas pressure
Clogged or dirty burner ports
|
Check gas supply pressure
Clean burner parts--see manual "CLEANING AND MAINTENANCE" section
|
| Incorrect burner flame |
Incorrect gas supply or pressure
Clogged or dirty burner ports
|
Check gas supply pressure
Clean burner parts
|
| Ignition failure |
The distance between electrode ignition pin and flame orifice is too far |
Adjust the distance to 0.16”-0.2”

|