
IMPORTANT SAFETY
INSTRUCTIONS
When using an electrical appliance, basic precautions should
always be observed, including the following. Read all instruc-
tions before using this appliance.
WARNING
To reduce the risk of burns, fire, electric shock or injury
to persons:
■ Do not use this appliance with a damaged or broken
cutting unit, as injury may occur.
■ Close supervision is necessary when this appliance is used
by, on, or near children and persons with special needs or
certain disabilities.
■ This trimmer is designed for household use only.
■ Do not use attachments not recommended or authorized
by manufacturer.
■ Always store your trimmer in a moisture-free environment.
Do not store trimmer in temperatures exceeding 130°F/54°C.
■ Always remember to turn on the trimmer before you insert
it into your nose or ear to avoid painfully snagging hairs.
■ Never insert the trimmer more than 1/4" (6mm) into
nose or ear. Foreign objects should not come into contact
with eardrum.
SAVE THESE INSTRUCTIONS
MPT-5000
Use and
Care Guide
Before Use
Test a small area on an arm or leg before using your trimmer.
Discontinue use immediately if any sensitivity or allergic reac-
tion occurs. Do not use on sensitive or irritated skin.
How to Use
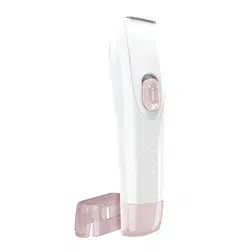
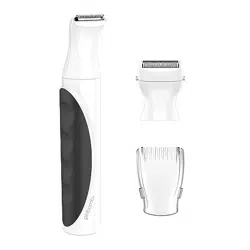
This trimmer comes with two trimming blades. The larger
blade can be used for trimming facial hair, body hair, neck and
sideburns. The smaller blade is ideal for detailing nose/ear hair
and eyebrow trimming.
To operate the trimmer, rotate the battery cap (clockwise) until
both dashes align.
To turn off, rotate the battery cap (counterclockwise) until the
battery cap dash aligns with the O.
Using the trimmer in the shower
■ This appliance can be used in or out of the shower.
■ The trimmer should not be submerged in water, bath or sink.
■ It is recommended to dry off excess water and moisture
after use.
How To Use
All Remington
®
detail trimmers run on one AAA ALKALINE battery.
Inserting the Battery
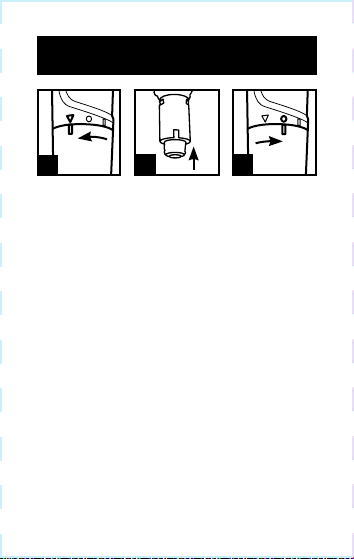
1. Make sure the trimmer is OFF.
2. Hold the unit in middle at the rubber grip and rotate battery
cap counterclockwise until the indication dash lines up with
the triangle. (A)
3. Gently slide battery cap off.
4. Insert one AAA battery, with the positive end first, into the
main unit. (B)
5. Slide battery cap back on, lining up the dash and the
triangle.
6. Rotate battery cap (clockwise) to the OFF position, with the
dash lined up with the O. (C)
Use of any batteries other than alkaline will negatively affect
the unit’s operating performance. Batteries should not be left
in the unit if the unit is not in use for long periods. To prevent
battery corrosion the unit should be kept in a dry environment.
Dead batteries should be removed immediately and disposed of
properly. Do not use rechargeable batteries. The lower voltage in
recharged batteries impairs the performance of the cutting unit.
Replacing the Battery
Register Your New Product Today!
By registering your new Remington
®
product you will receive these important benefits:
Proof of ownership • Product protection • Product registration • Special offers
Register online at:
RemingtonProducts.com
A
CB
1. Place the trimmer at a slight angle to the skin, and trim in the
direction of hair growth.
2. Continue trimming in the direction of growth. Be careful not
to apply excess pressure to the blade. This may damage the
blade, and can result in injury to the skin during trimming.
3. Pull the skin taut with one hand during the trimming process
to ensure the closest possible cut.
Using the Comb
This trimmer includes an attachment comb that helps you
achieve an even cut without completely removing the hair.
1. To use the attachment comb, be sure the unit is in the
Off position.
2. Slide the comb over the trimming blades until it locks into
place, making sure the teeth of the comb are facing the
same direction as the trimming blade.
Trimming Tips

IMPORTANT SAFETY
INSTRUCTIONS
When using an electrical appliance, basic precautions should
always be observed, including the following. Read all instruc-
tions before using this appliance.
WARNING
To reduce the risk of burns, fire, electric shock or injury
to persons:
■ Do not use this appliance with a damaged or broken
cutting unit, as injury may occur.
■ Close supervision is necessary when this appliance is used
by, on, or near children and persons with special needs or
certain disabilities.
■ This trimmer is designed for household use only.
■ Do not use attachments not recommended or authorized
by manufacturer.
■ Always store your trimmer in a moisture-free environment.
Do not store trimmer in temperatures exceeding 130°F/54°C.
■ Always remember to turn on the trimmer before you insert
it into your nose or ear to avoid painfully snagging hairs.
■ Never insert the trimmer more than 1/4" (6mm) into
nose or ear. Foreign objects should not come into contact
with eardrum.
SAVE THESE INSTRUCTIONS
MPT-5000
Use and
Care Guide
Before Use
Test a small area on an arm or leg before using your trimmer.
Discontinue use immediately if any sensitivity or allergic reac-
tion occurs. Do not use on sensitive or irritated skin.
How to Use
This trimmer comes with two trimming blades. The larger
blade can be used for trimming facial hair, body hair, neck and
sideburns. The smaller blade is ideal for detailing nose/ear hair
and eyebrow trimming.
To operate the trimmer, rotate the battery cap (clockwise) until
both dashes align.
To turn off, rotate the battery cap (counterclockwise) until the
battery cap dash aligns with the O.
Using the trimmer in the shower
■ This appliance can be used in or out of the shower.
■ The trimmer should not be submerged in water, bath or sink.
■ It is recommended to dry off excess water and moisture
after use.
How To Use
All Remington
®
detail trimmers run on one AAA ALKALINE battery.
Inserting the Battery
1. Make sure the trimmer is OFF.
2. Hold the unit in middle at the rubber grip and rotate battery
cap counterclockwise until the indication dash lines up with
the triangle. (A)
3. Gently slide battery cap off.
4. Insert one AAA battery, with the positive end first, into the
main unit. (B)
5. Slide battery cap back on, lining up the dash and the
triangle.
6. Rotate battery cap (clockwise) to the OFF position, with the
dash lined up with the O. (C)
Use of any batteries other than alkaline will negatively affect
the unit’s operating performance. Batteries should not be left
in the unit if the unit is not in use for long periods. To prevent
battery corrosion the unit should be kept in a dry environment.
Dead batteries should be removed immediately and disposed of
properly. Do not use rechargeable batteries. The lower voltage in
recharged batteries impairs the performance of the cutting unit.
Replacing the Battery
Register Your New Product Today!
By registering your new Remington
®
product you will receive these important benefits:
Proof of ownership • Product protection • Product registration • Special offers
Register online at:
RemingtonProducts.com
A
CB
1. Place the trimmer at a slight angle to the skin, and trim in the
direction of hair growth.
2. Continue trimming in the direction of growth. Be careful not
to apply excess pressure to the blade. This may damage the
blade, and can result in injury to the skin during trimming.
3. Pull the skin taut with one hand during the trimming process
to ensure the closest possible cut.
Using the Comb
This trimmer includes an attachment comb that helps you
achieve an even cut without completely removing the hair.
1. To use the attachment comb, be sure the unit is in the
Off position.
2. Slide the comb over the trimming blades until it locks into
place, making sure the teeth of the comb are facing the
same direction as the trimming blade.
Trimming Tips

Cleaning inside the trimmer head
■ For a more thorough cleaning, remove hairs from inside
the trimmer head.
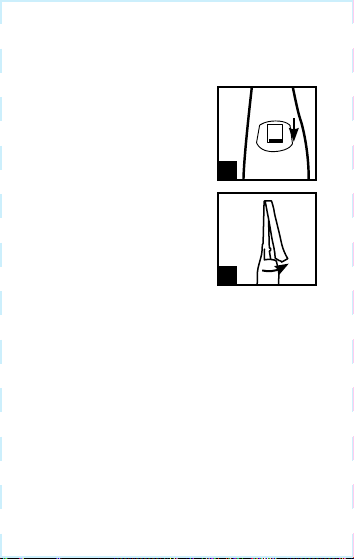
1. Make sure the trimmer is OFF and
push down the lock tab to release
the trimmer head. (D)
2. Remove trimmer head. First swing
the lower portion away from the
body (E) and then the tip. Clean
both head and handle with a soft
brush or under water.
3. Dry thoroughly. Apply a drop of
mineral oil or baby oil to the top of
the cutting blades.
4. Replace trimmer head, tip first.
Then lock into place by pushing the
lock tab back up.
Performance Guarantee
Limited Two-Year Warranty
Spectrum Brands, Inc. warrants this product against any defects
that are due to faulty material or workmanship for a two-year
period from the original date of consumer purchase. If the
product should become defective within the warranty period,
we will replace it free of charge. Return your product and
sales receipt with your name, address and day time phone
number to: Remington Returns Center, 507 Stokely Dr.,
P.O. Box 1, Deforest, WI 53532. For more information call
800-736-4648.
KEEP ORIGINAL SALES RECEIPT AS PROOF OF PURCHASE
FOR OR WARRANTY PURPOSES.
This warranty does not cover products damaged by the following:
■ Accident, misuse, abuse or alteration of the product
■ Servicing by unauthorized persons
■ Use with unauthorized accessories
■ Any other conditions beyond our control
SPECTRUM BRANDS, INC. SHALL NOT BE RESPONSIBLE FOR
ANY INCIDENTAL, SPECIAL OR CONSEQUENTIAL DAMAGES
RESULTING FROM THE USE OF THIS PRODUCT. ALL IMPLIED
WARRANTIES, INCLUDING BUT NOT LIMITED TO IM PLIED
WARRANTIES OF FITNESS AND MERCHANTABILITY, ARE
LIMITED IN DURATION TO TWO YEARS FROM DATE OF
ORIGINAL PURCHASE.
This warranty gives you specific legal rights and you may also
have other rights which vary from state to state or province to
province. Some states do not allow the exclusion or limitation
of incidental, special or consequential damages.
Spectrum Brands, Inc. Money-back Offer
If within 30 days after you have purchased your Remington
®
branded product, you are not satisfied and would like a refund,
return it with the sales slip indicating purchase price and
date of purchase to the retailer from whom it was purchased.
Spectrum Brands, Inc. will reimburse all retailers who accept
the product within 30 days from the date of purchase. If you
have any questions concerning the money-back guarantee,
please call 800-736-4648 in the U.S. or Canada, or visit
RemingtonProducts.com.
Remington Guarantees Satisfaction After 30 Days!
Remington 60-Day Money Back Guarantee*
If within 60 days after purchasing any Remington
®
product,
you are not completely satisfied and would like a refund,
return it with the original dated sales receipt directly to
Remington and receive a full refund.** For questions concern-
ing the money-back guarantee, please call 800-736-4648 in
the U.S. and Canada.
*Applies to U.S. and Canadian customers’ returns only.
**Terms and conditions apply.
Terms and Conditions
1. Refund will be in the form of a check issued in U.S. Dollars
and will be provided only if all Terms and Conditions are met.
2. The following items must be returned to Remington and
postmarked no later than 60 days after purchase of the
Remington
®
product:
a. The Remington
®
product;
b. The original sales receipt indicating price and date
purchased; and
c. The completed 60-day money back guarantee form located
at RemingtonProducts.com/60day.
D
E
Note: This product does not contain any user-serviceable parts.
Your detail trimmer is designed to give you years of comfortable
use. To ensure that you get optimal performance from it, follow
these simple cleaning and lubrication tips:
Cleaning Your Trimmer
■ After each use, brush or blow accumulated hair from the
cutting unit.
Rinsing Your Trimmer
■ Your trimmer can be rinsed with cool or warm water. For
best results, turn trimmer on while rinsing under water.
Shake off excess water from trimmer and pat dry with cloth.
Cleaning/Maintenance
3. In addition, Remington, in its discretion, must determine that
the returned product was used in accordance with the instruc-
tion booklet (included with the product at the time of purchase).
4. Returns should be mailed prepaid (no collect returns
accepted) to:
Remington 60-Day MBG
507 Stokely Drive, Box 1
DeForest, WI 53532
5. Refund does not include postage costs for the return of the
product, but will include applicable taxes paid by customer,
if any.
6. No responsibility will be accepted for late, lost, stolen,
misdirected or damaged product.
7. Please allow 4–6 weeks to receive your refund by check.
Questions or comments:
Call 800-736-4648 in the U.S. or Canada, or visit
RemingtonProducts.com.
Dist. by: Spectrum Brands, Inc., Middleton, WI 53562
® Registered Trademark of Spectrum Brands, Inc.
© 2017 Spectrum Brands, Inc. 6/17 18262-00
Made in China.
T22-0004671-B
Cleaning inside the trimmer head
■ For a more thorough cleaning, remove hairs from inside
the trimmer head.
1. Make sure the trimmer is OFF and
push down the lock tab to release
the trimmer head. (D)
2. Remove trimmer head. First swing
the lower portion away from the
body (E) and then the tip. Clean
both head and handle with a soft
brush or under water.
3. Dry thoroughly. Apply a drop of
mineral oil or baby oil to the top of
the cutting blades.
4. Replace trimmer head, tip first.
Then lock into place by pushing the
lock tab back up.
Performance Guarantee
Limited Two-Year Warranty
Spectrum Brands, Inc. warrants this product against any defects
that are due to faulty material or workmanship for a two-year
period from the original date of consumer purchase. If the
product should become defective within the warranty period,
we will replace it free of charge. Return your product and
sales receipt with your name, address and day time phone
number to: Remington Returns Center, 507 Stokely Dr.,
P.O. Box 1, Deforest, WI 53532. For more information call
800-736-4648.
KEEP ORIGINAL SALES RECEIPT AS PROOF OF PURCHASE
FOR OR WARRANTY PURPOSES.
This warranty does not cover products damaged by the following:
■ Accident, misuse, abuse or alteration of the product
■ Servicing by unauthorized persons
■ Use with unauthorized accessories
■ Any other conditions beyond our control
SPECTRUM BRANDS, INC. SHALL NOT BE RESPONSIBLE FOR
ANY INCIDENTAL, SPECIAL OR CONSEQUENTIAL DAMAGES
RESULTING FROM THE USE OF THIS PRODUCT. ALL IMPLIED
WARRANTIES, INCLUDING BUT NOT LIMITED TO IM PLIED
WARRANTIES OF FITNESS AND MERCHANTABILITY, ARE
LIMITED IN DURATION TO TWO YEARS FROM DATE OF
ORIGINAL PURCHASE.
This warranty gives you specific legal rights and you may also
have other rights which vary from state to state or province to
province. Some states do not allow the exclusion or limitation
of incidental, special or consequential damages.
Spectrum Brands, Inc. Money-back Offer
If within 30 days after you have purchased your Remington
®
branded product, you are not satisfied and would like a refund,
return it with the sales slip indicating purchase price and
date of purchase to the retailer from whom it was purchased.
Spectrum Brands, Inc. will reimburse all retailers who accept
the product within 30 days from the date of purchase. If you
have any questions concerning the money-back guarantee,
please call 800-736-4648 in the U.S. or Canada, or visit
RemingtonProducts.com.
Remington Guarantees Satisfaction After 30 Days!
Remington 60-Day Money Back Guarantee*
If within 60 days after purchasing any Remington
®
product,
you are not completely satisfied and would like a refund,
return it with the original dated sales receipt directly to
Remington and receive a full refund.** For questions concern-
ing the money-back guarantee, please call 800-736-4648 in
the U.S. and Canada.
*Applies to U.S. and Canadian customers’ returns only.
**Terms and conditions apply.
Terms and Conditions
1. Refund will be in the form of a check issued in U.S. Dollars
and will be provided only if all Terms and Conditions are met.
2. The following items must be returned to Remington and
postmarked no later than 60 days after purchase of the
Remington
®
product:
a. The Remington
®
product;
b. The original sales receipt indicating price and date
purchased; and
c. The completed 60-day money back guarantee form located
at RemingtonProducts.com/60day.
D
E
Note: This product does not contain any user-serviceable parts.
Your detail trimmer is designed to give you years of comfortable
use. To ensure that you get optimal performance from it, follow
these simple cleaning and lubrication tips:
Cleaning Your Trimmer
■ After each use, brush or blow accumulated hair from the
cutting unit.
Rinsing Your Trimmer
■ Your trimmer can be rinsed with cool or warm water. For
best results, turn trimmer on while rinsing under water.
Shake off excess water from trimmer and pat dry with cloth.
Cleaning/Maintenance
3. In addition, Remington, in its discretion, must determine that
the returned product was used in accordance with the instruc-
tion booklet (included with the product at the time of purchase).
4. Returns should be mailed prepaid (no collect returns
accepted) to:
Remington 60-Day MBG
507 Stokely Drive, Box 1
DeForest, WI 53532
5. Refund does not include postage costs for the return of the
product, but will include applicable taxes paid by customer,
if any.
6. No responsibility will be accepted for late, lost, stolen,
misdirected or damaged product.
7. Please allow 4–6 weeks to receive your refund by check.
Questions or comments:
Call 800-736-4648 in the U.S. or Canada, or visit
RemingtonProducts.com.
Dist. by: Spectrum Brands, Inc., Middleton, WI 53562
® Registered Trademark of Spectrum Brands, Inc.
© 2017 Spectrum Brands, Inc. 6/17 18262-00
Made in China.
T22-0004671-B