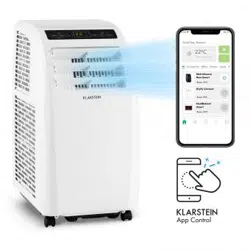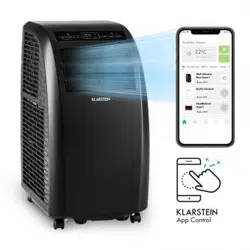

METROBREEZE
ROM SMART
Klimaanlage
Air Conditioner
Aire acondicionado
Climatiseur
Condizionatore d’aria
www.klarstein.com
10035803 10035804


3
DE
Sehr geehrter Kunde,
wir gratulieren Ihnen zum Erwerb Ihres Gerätes. Lesen Sie
die folgenden Hinweise sorgfältig durch und befolgen Sie
diese, um möglichen Schäden vorzubeugen. Für Schäden,
die durch Missachtung der Hinweise und unsachgemäßen
Gebrauch entstehen, übernehmen wir keine Haftung. Scannen
Sie den folgenden QR-Code, um Zugriff auf die aktuellste
Bedienungsanleitung und weitere Informationen rund um das
Produkt zu erhalten.
INHALTSVERZEICHNIS
Hinweise zum Kältemittel R2904
Sicherheitshinweise5
Geräteübersicht7
Bedienfeld8
Fernbedienung9
Inbetriebnahme und Bedienung10
Gerätesteuerung per Smartphone12
Installation14
Fensterdichtung anbringen15
Wasser ablassen18
Reinigung und Pege19
Fehlerbehebung20
Produktdatenblatt22
Hinweise zur Entsorgung24
Konformitätserklärung24
TECHNISCHE DATEN
Artikelnummer 10035803, 10035804
Stromversorgung 220-240 V ~ 50/60 Hz
Kühlleistung 10.000 BTU
WiFi-Standard
802.11 b/g/n
WiFi-Frequenz
2,4 GHz
WiFi-Sendeleistung (max.)
20 dBm
English 25
Español 47
Français 69
Italiano 91

4
DE
HINWEISE ZUM KÄLTEMITTEL R290
Warnhinweise
• Die Klimaanlage muss aufrecht aufbewahrt und transportiert werden. Andernfalls
können irreparable Kompressorschäden entstehen. Lassen Sie das Gerät im
mindestens 24 Stunden stehen, bevor Sie es in Betrieb nehmen.
• Schalten Sie den das Gerät vor der Reinigung aus und trennen Sie es von der
Stromversorgung.
• Stellen sie sicher, dass das Produkt einen ständigen Luftstrom erzeugt! Stellen Sie
sicher, dass die Lufteinlässe und -auslässe nicht blockiert sind.
• Betreiben Sie dieses Gerät zur Vermeidung von Lecks auf einem horizontalen
Untergrund.
• Jede Person, die Arbeiten an einen Kältemittelkreislauf vornimmt, sollte über ein
aktuell gültiges Zerti kat einer von der Industrie akkreditierten Bewertungsstelle
verfügen. Damit wird die Kompetenz zum sicheren Umgang mit Kältemitteln gemäß
einer branchenweit anerkannten Bewertungsspezi kation sichergestellt.
• Wenn das Gerät nicht mehr funktioniert, entsorgen Sie es fachgerecht.
• Bewahren Sie das Gerät bei Nichtgebrauch an einem gut belüfteten Ort auf.
• Bewahren Sie das Gerät so auf, dass es nicht beschädigt wird.
• Reparaturen dürfen nur vom Hersteller oder einem autorisierten Fachbetrieb
durchgeführt werden.
• Beschädigen Sie keine der Komponenten des Kältemittelkreislaufs. Ausströmendes
Kältemittel wird unter Umständen nicht wahrgenommen, da es geruchlos ist.
• Wartung und Reparaturen müssen unter der Aufsicht von Spezialisten für den
Einsatz von brennbaren Kältemitteln durchgeführt werden.
Informationen für Räume mit Kältemittelleitungen
• Beschränken Sie die Rohrleitungen auf ein Minimum.
• Achten Sie darauf die Rohrleitungen nicht zu beschädigen.
• Geräte mit brennbaren Kältemitteln dürfen nur in gut belüfteten Raum installiert
werden.
• Halten Sie die nationalen Gasvorschriften ein.
• Alle mechanischen Verbindungen müssen für Wartungszwecke frei zugänglich sein.
VORSICHT
Brandgefahr! Dieses Gerät enthält das brennbares Kältemittel R290.
Wenn das Kältemittel austritt und einer externen Zündquelle ausgesetzt
ist, besteht Brandgefahr.
5
DE
SICHERHEITSHINWEISE
Spezielle Hinweise
• Verwenden Sie zum Entfrosten oder zum Reinigen ausschließlich vom Hersteller
empfohlene Mittel.
• Lagern Sie das Gerät keinesfalls in einem Raum, in welchem sich permanent
Zündquellen benden (beispielsweise: offene Flammen, ein eingeschaltetes
Gasgerät oder ein eingeschaltetes elektrisches Heizgerät).
• Durchstechen oder verbrennen Sie das Gerät keinesfalls.
• Beachten Sie, dass Kühlmittel geruchlos sein können.
Hinweis: Verwenden Sie das Gerät ausschließlich in Räumen, welche größer sind als
Xm² (siehe Tabelle):
Modell X (m²)
5000 BTU/h, 7000 BTU/h, 8000 BTU/h 10 m²
9000 BTU/h, 10000 BTU/h, 10500 BTU/h 13 m²
12000 BTU/h, 14000 BTU/h, 16000 BTU/h,18000 BTU/h 18 m²
Allgemeine Sicherheitshinweise
• Das Gerät ist ausschließlich für die Verwendung im Innenbereich geeignet.
• Verwenden Sie das Gerät nicht, wenn es repariert werden muss oder nicht richtig
installiert wurde.
• Verwenden Sie das Gerät nicht in den folgenden Bereichen:
- in der Nähe von Wärmequellen,
- in Bereichen, in welchen Öl spritzen kann,
- in Bereichen, welche direktem Sonnenlicht ausgesetzt sind,
- in Bereichen, in welchen Spritzwasser auftreten kann,
- in der Nähe von Badewannen, in Waschräumen, in der Nähe von Duschen oder
Swimmingpools.
• Stecken Sie Ihre Finger oder sonstige Objekte niemals in die Belüftungsöffnungen.
Warnen Sie insbesondere Kinder vor der davon ausgehenden Gefahr.
• Achten Sie darauf, dass das Gerät während des Transports und der Lagerung
senkrecht gehalten wird, damit der Kompressor richtig positioniert wird.
• Schalten Sie das Gerät vor der Reinigung immer aus und ziehen Sie den
Netzstecker aus der Steckdose.
• Schalten Sie das Gerät, bevor Sie es an einen anderen Ort stellen, aus und ziehen
Sie den Netzstecker aus der Steckdose. Bewegen Sie das Gerät langsam und
vorsichtig.

6
DE
• Decken Sie das Gerät, zur Vermeidung von Brandgefahr, nicht ab.
• Alle Anschlüsse des Lüfters müssen den lokalen Vorschriften für elektrische Sicherheit
entsprechen. Falls notwendig, informieren Sie sich über diese Vorschriften.
• Beaufsichtigen Sie Kinder, damit diese nicht mit dem Gerät spielen.
• Wenn das Netzkabel beschädigt ist, muss es vom Hersteller, dem Kundendienst
oder einer in ähnlicher Weise quali zierten Person ersetzt werden, um Gefahren zu
vermeiden.
• Dieses Gerät kann von Kindern ab 8 Jahren und von Personen (Kinder
eingeschlossen) mit eingeschränkten physischen, sensorischen oder mentalen
Fähigkeiten und/oder mangelnder Erfahrung und Wissen verwendet werden,
insofern diese von einer für ihre Sicherheit verantwortlichen Person in das Gerät
eingewiesen wurden und die mit der Verwendung des Geräts einhergehenden
Gefahren begreifen. Die Reinigung und Wartung des Geräts darf von Kindern nur
unter Aufsicht durchgeführt werden.
• Das Gerät muss gemäß der nationalen Verkabelungsvorschriften installiert werden.
• Art und Spannung der Sicherungen: T, 250 V AC, 2 A oder höher.
• Kontaktieren Sie für die Reinigung und Wartung des Geräts den Kundendienst.
• Ziehen Sie nicht am Netzkabel und deformieren oder modi zieren Sie dieses
nicht und tauschen Sie es keinesfalls in Wasser ein. Ein falscher Umgang mit dem
Netzkabel kann zu Schäden am Gerät und/ oder Stromschlägen führen.
• Die nationalen Gasvorschriften müssen eingehalten werden.
• Blockieren Sie keinesfalls die Belüftungsöffnungen.
• Bedienen Sie das Gerät nicht ausschließlich durch hineinstecken oder herausziehen
des Netzsteckers, da es dadurch zu Stromschlägen oder zu Bränden durch
Hitzeentwicklung kommen kann.
• Ziehen Sie sofort den Netzstecker aus der Steckdose, wenn seltsame Geräusche,
ein seltsamer Geruch oder Rauch aus dem Gerät austreten.
Hinweise zum Umgang mit Schäden
• Kontaktieren Sie bei Schäden am Gerät den Hersteller, den Kundendienst oder eine
in ähnlicher Weise quali zierte Person.
• Schalten Sie beim Auftreten von Schäden das Gerät aus und ziehen Sie
den Netzstecker aus der Steckdose und kontaktieren Sie den Hersteller, den
Kundendienst oder eine in ähnlicher Weise quali zierte Person.
• Das Netzkabel muss unbedingt sicher geerdet werden.
• Wenn das Netzkabel beschädigt ist muss das Gerät zur Gefahrenvermeidung
ausgeschaltet werden und der Netzstecker aus der Steckdose gezogen werden.
Das Netzkabel muss vom Hersteller, dem Kundendienst oder einer in ähnlicher
Weise quali zierten Person ersetzt werden.
WARNUNG
Verletzungsgefahr! Reparaturen am Kühlmittelkreislauf dürfen nur von
geschulten Fachpersonal ausgeführt werden. Versuchen Sie niemals das
Gerät selbst zu reparieren!
7
DE
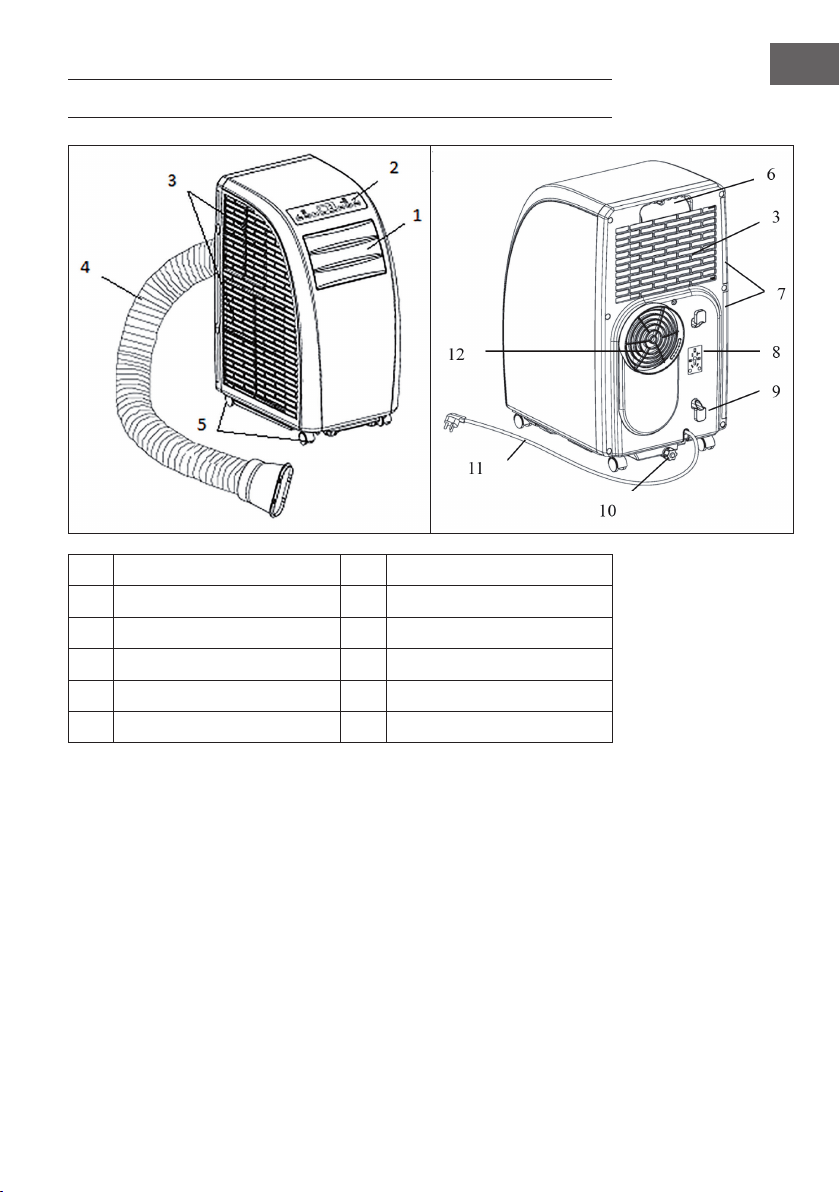
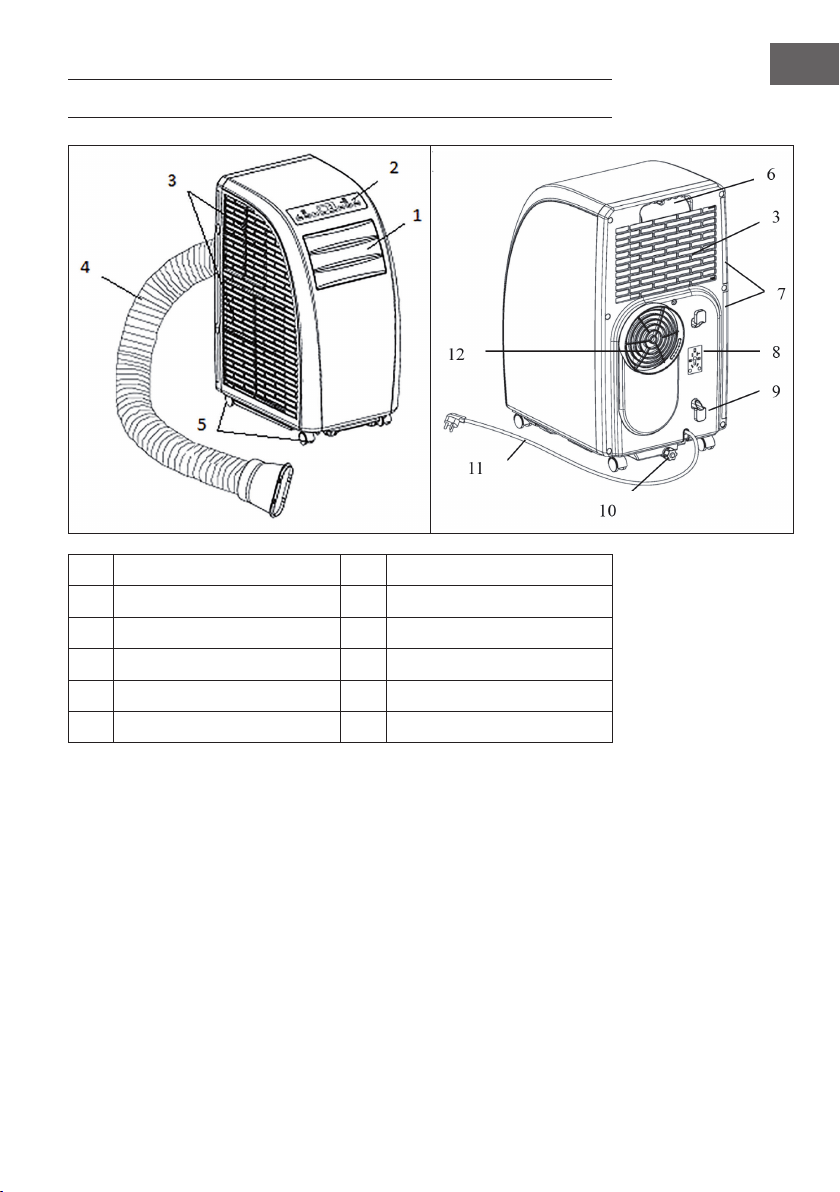
GERÄTEÜBERSICHT
1
Luftauslass-Lamelle
7
Filter
2
Bedienfeld
8
Halterung für den Stecker
3
Lufteinlass
9
Kabelhalterung
4
Abluftschlauch
10
Wasserauslass
5
Räder
11
Netzkabel und Stecker
6
Handgriff
12
Abluftauslass
8
DE
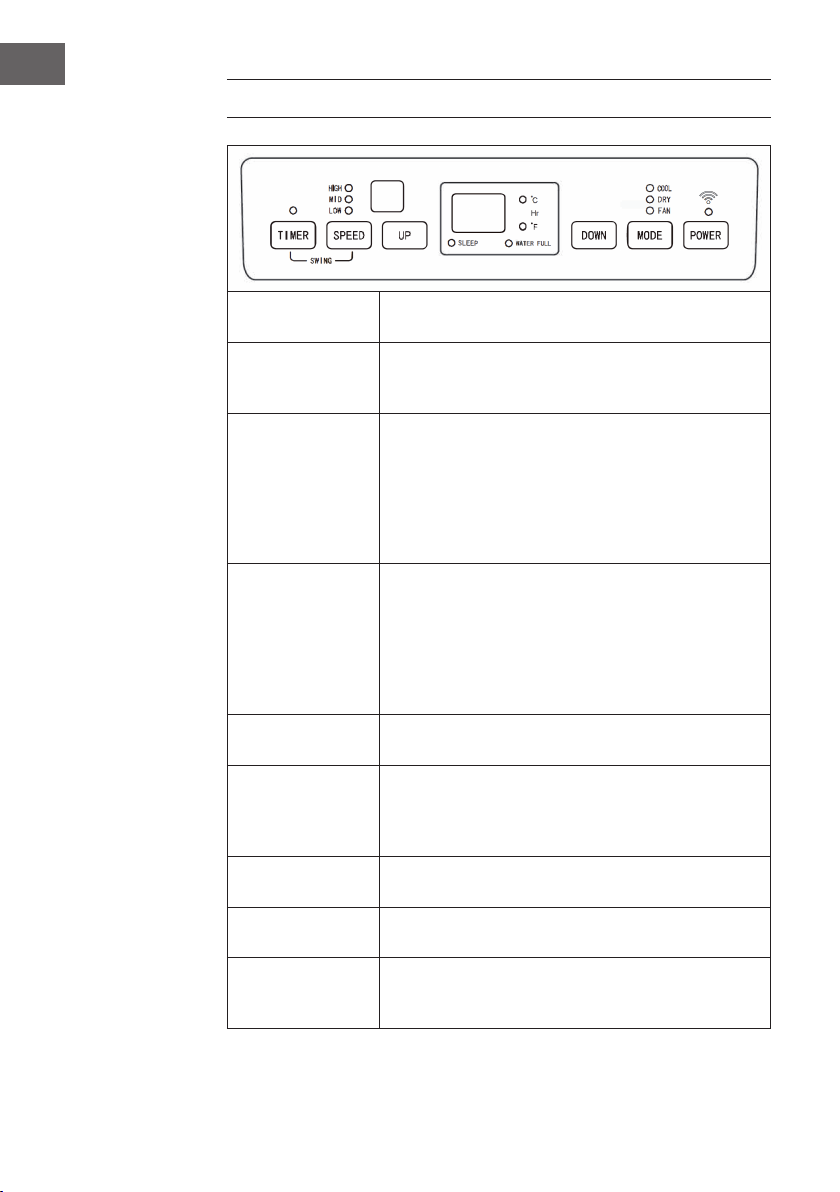
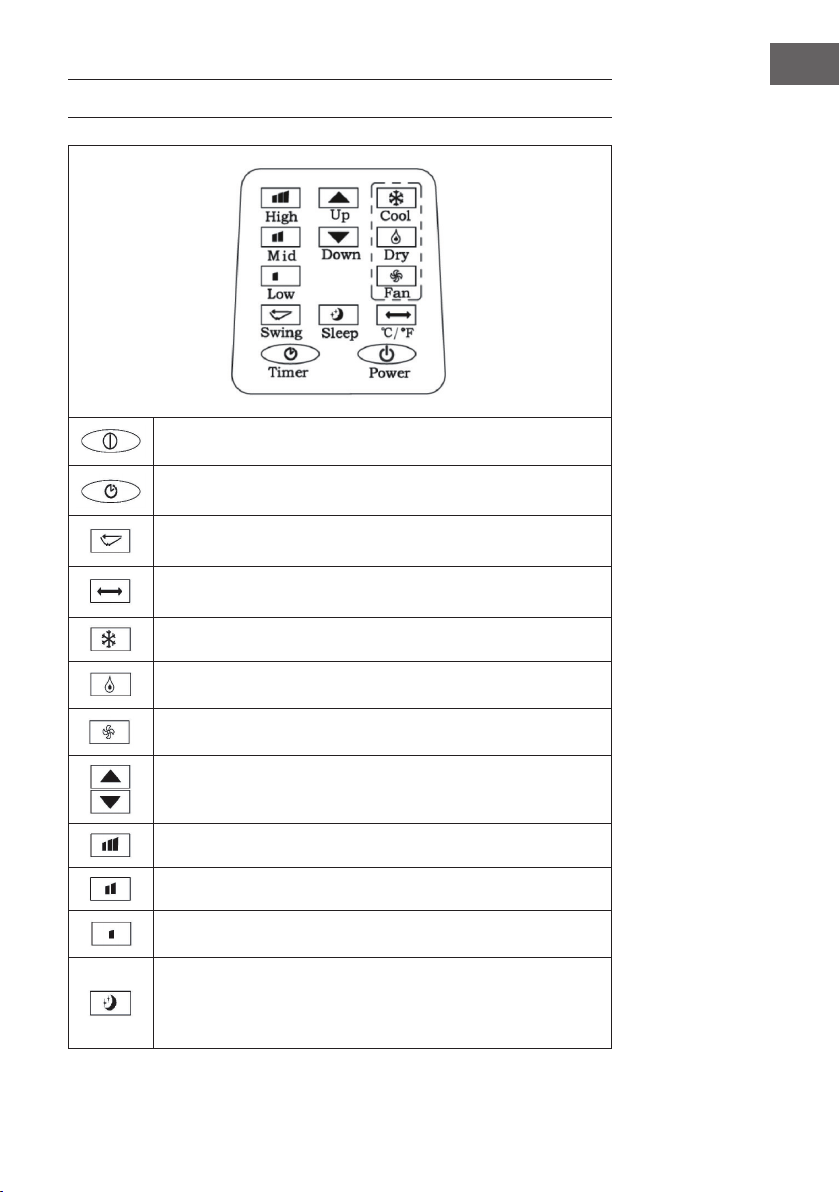
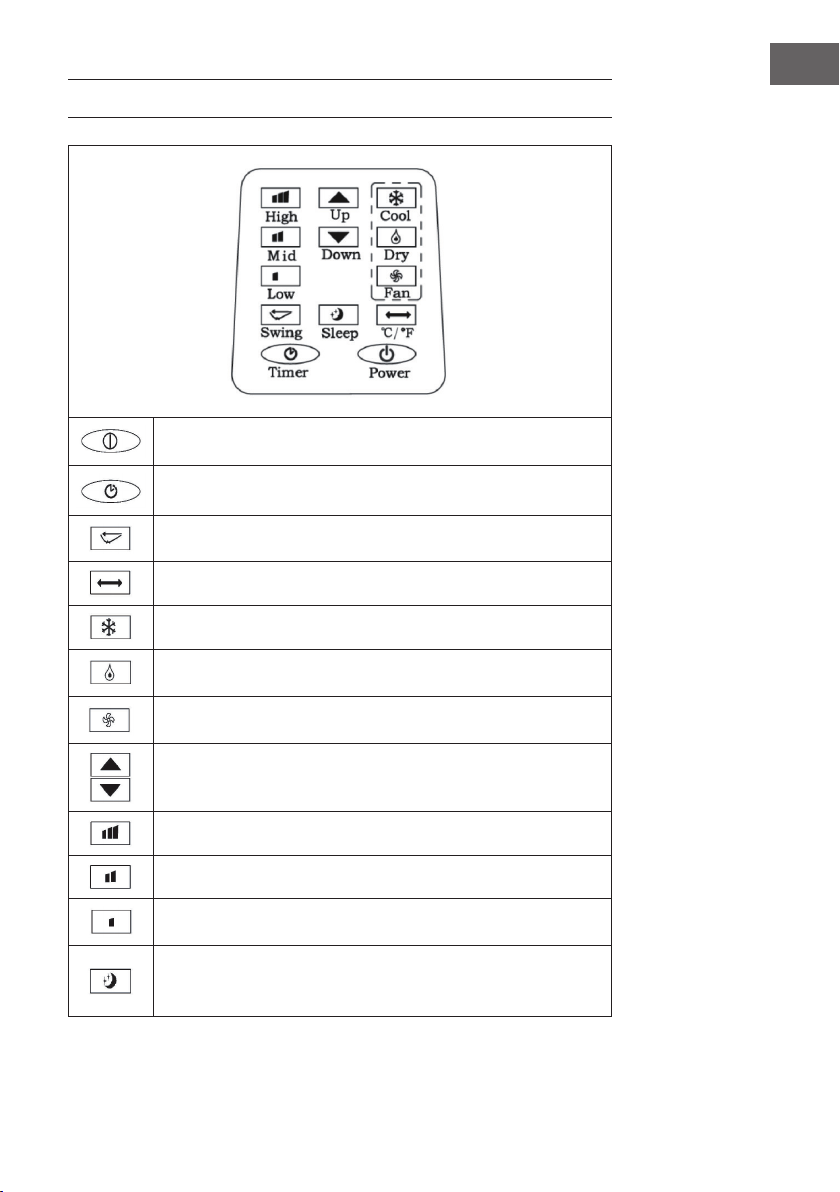
BEDIENFELD
POWER
Drücken Sie diese Taste um das Gerät einzuschalten. Die
Betriebsanzeige beginnt zu leuchten.
MODE
Drücken Sie diese Taste während das Gerät eingeschaltet
oder der Timer gestellt ist, um einen Modus, wie Kühlung,
Entfeuchtung oder Ventilator zu wählen.
UP/DOWN
Falls der Timer aus oder an ist können Sie mit diesen Tasten
die Zeit einstellen, nach deren Ablauf das Gerät automatisch
ein- oder ausgeschaltet wird. Die entsprechende
Kontrollleuchte am Display geht an. Falls sich das Gerät
im Kühlmodus bendet können Sie mit diesen Tasten die
Temperatur einstellen. Drücken Sie beide tasten gleichzeitig,
um zwischen von °C nach °F und zurück zu wechseln.
SPEED
Drücken Sie auf diese Taste, um die Geschwindigkeit des
Ventilators einzustellen: hoch > mittel > niedrig. Halten Sie
die tasten im Ventilator-Modus 5 Sekunden lang gedrückt,
um die interne Trocknungsfunktion zu starten. Halten Sie die
Tasten erneut 5 Sekunden lang gedrückt, um die Funktion
wieder auszuschalten. Die entsprechende Kontrollleuchte
erlischt dann wieder.
TIMER
Drücken Sie auf diese Taste, um den Timer zustellen. Die
entsprechende Kontrollleuchte geht an.
88
Die Zahlen im großen Display zeigen die eingestellte
Temperatur im Kühl- und Heizmodus an. Im Ventilator- und
Entfeuchtungsmodus wird die Raumtemperatur in °C oder °F
angezeigt.
SLEEP
Wird der Nachtmodus gestartet, leuchtet im Display die
zugehörige Kontrollleuchte auf.
WATER FULL
Ist der Wassertank voll, blinkt die zugehörige Kontrollleuchte
während ein Warnton er- tönt.
TIMER + SPEED
Halten Sie die Ventilator- und die Timer-Taste gleichzeitig
2 Sekunden lang gedrückt um die Schwing-Funktion der
Lamellen zu aktivieren.

9
DE
FERNBEDIENUNG
POWER: Gerät ein- und ausschalten.
TIMER: Timer einstellen.
SWING: Horizontale Schwingung der Lamellen.
TEMPERATUR: Von °C zu °F wechseln
COOL: Kühlmodus starten.
DRY: Entfeuchtungsmodus starten.
FAN: Ventilator einschalten.
UP/DOWN: Temperatur und Timer einstellen.
HIGH: Hohe Geschwindigkeit.
MID: Mittlere Geschwindigkeit.
LOW: Niedrige Geschwindigkeit.
SLEEP: Nachtmodus starten. Sollte die Geschwindigkeit hoch oder mittel
sein, wechselt sie zu langsam. Im Nachtmodus können Temperatur und
Geschwindigkeit nicht gerändert werden.

10
DE
INBETRIEBNAHME UND BEDIENUNG
Aus-Timer einstellen
Drücken Sie die Timer-Taste während das Gerät läuft. Die Timer-Kontrollleuchte geht
an und im Display blinkt 5 Mal hintereinander die Anzeige „00“. Drücken Sie in dieser
Zeit auf eine der Pfeiltasten, um den Timer auf eine Zeit zwischen 1 und 24 Stunden
zu stellen. Zwischen 1 und 24 Stunden verstellen Sie die Zeit in 1-Stunden-Schritten.
Sobald die eingestellte Zeit abgelaufen ist, geht das Gerät automatisch aus.
Ein-Timer einstellen
Drücken Sie im Standby-Modus auf die Timer-Taste. Die Timer-Kontrollleuchte geht an
und im Display blinkt 5 Mal hintereinander die Anzeige „00“. Drücken Sie in dieser
Zeit auf eine der Pfeiltasten, um die gewünschte Zeit, genau so wie beim Aus-Timer
einzustellen. Während Sie den Timer stellen können sie auch den ge- wünschten Modus
einstellen, in dem der Timer nach dem Einschalten laufen soll. Falls sie Kühlung wählen
können Sie zusätzlich die gewünschte Temperatur eingeben. Falls Sie Entfeuchtung
wählen, können Sie die gewünschte Luftfeuchtigkeit eingeben. Nachdem die
eingegebene Zeit abgelaufen ist startet das Gerät automatisch und läuft im eingestellten
Modus.
Eingegebene Timer-Zeit ändern / Timer ausschalten
Drücken sie während der Timer bereits läuft auf die Timer-Taste. Das Display blinkt
und zeigt die Restzeit an. Benutzen Sie die Pfeiltasten, um die Zeit wie gewünscht
anzupassen. Drücken sie während das Display blinkt erneut auf die Timer-Taste, um den
auszuschalten.
Kühlmodus
• Drücken Sie im Ein-Zustand auf die Mode-Taste und wählen Sie den Kühlmodus
(COOL).
• Drücken Sie auf die Pfeiltasten, um die Temperatur zwischen 18 °C - 30 °C
einzustellen. Mit jedem Tasten- druck steigt oder sinkt die eingestellte Temperatur
um 1 °C.
• Drücken Sie auf die Taste für die Geschwindigkeit (SPEED), um die Geschwindigkeit
in der folgenden Reihen- folge auszuwählen: hoch (HIGH) > mittel (MID) > niedrig
(LOW).

11
DE
• Drücken Sie im Kühlmodus (COOL) auf die SLEEP-Taste (Nachtmodus) an der
Fernbedienung oder gleichzeitig auf die Tasten UP (Pfeil nach oben) und TIMER
am Bedienfeld, um den Nachtmodus zu starten. Falls der Ventilator mit hoher
oder mittlerer Geschwindigkeit läuft wird die Geschwindigkeit auf niedrig gesetzt.
Nach 7 Stunden geht das Gerät automatisch aus. Um den Nachtmodus zu
beenden, drücken Sie erneut auf die SLEEP-Taste an der Fernbedienung, oder die
Temperaturwechsel-Taste am Bedienfeld.
• Drücken Sie auf die SWING-Taste, um die Schwingung der Lamellen zu starten.
Drücken Sie die Taste erneut, um die Funktion wieder anzuschalten.
Entfeuchtungsmodus
• Drücken Sie im Ein-Zustand auf die Mode-Taste und wählen Sie Entfeuchtung
(DEHUMIDIFY). Die entsprechende Kontrollleuchte geht an.
• Die Temperatur kann in diesem Modus nicht eingestellt werden.
• Drücken Sie auf die SWING-Taste, um die Schwingfunktion zu starten.
Ventilatormodus
• Drücken Sie im Ein-Zustand auf die FAN-Taste, um den Ventilator zu starten. Die
entsprechende Kontrollleuchte geht an.
• Drücken Sie auf die SPEED-Taste, um die Geschwindigkeit in der folgenden
Reihenfolge auszuwählen: hoch (HIGH) > mittel (MID) > niedrig (LOW). Halten Sie
die SPEED-Taste 5 Sekunden lang gedrückt, um die interne Trocknungsfunktion zu
starten. Der obere und untere Ventilator laufen daraufhin gemeinsam. Drücken sie
die SPEED-Taste erneut 5 Sekunden lang, um die Funktion auszuschalten.
• Die Temperatur lässt sich in diesem Modus nicht einstellen.
• Drücken Sie auf die SWING-Taste, um die Schwingfunktion zu starten.
Wichtige Hinweise zur Bedienung
• Wenn im Display „FL“ aueuchtet und die Leuchte für den Wasserstand blinkt hält
das Gerät an, bis sie das Wasser entleert haben. Sobald das Wasser abgelassen
wurde fährt das Gerät automatisch fort.
• Im Entfeuchtungs- und Ventilatormodus (eingeschlossen der Trocknungsfunktion),
brauchen Sie den Abluftschlauch nicht benutzen.
• Falls die Sonne direkt in Ihr Zimmer scheint, ziehen Sie die Vorhänge zu.
12
DE
GERÄTESTEUERUNG PER SMARTPHONE
Wenn Sie Ihr Klarstein-Gerät in Ihr heimisches WLAN einbinden, können Sie es ganz
bequem über die dazugehörige Klarstein-App bedienen. Die App ermöglicht es Ihnen,
nicht nur das Gerät über Ihr Smartphone fernzusteuern, sondern bietet Ihnen zudem
Zugang zu Rezepten und weiterführenden Informationen.
Gehen Sie folgendermaßen vor, um Ihr Smartphone mit Ihrem Klarstein-Gerät zu
verbinden:
1. Laden Sie zuerst die Klarstein-App herunter, indem Sie mit Ihrem Smartphone den
QR-Code scannen (siehe unten) oder laden Sie diese direkt aus dem App Store
oder bei Google Play herunter.
2. Versichern Sie sich, dass Ihr Smartphone mit demselben WLAN-Netzwerk
verbunden ist, mit dem Ihr Klarstein-Gerät verbunden werden soll.
3. Öffnen Sie die Klarstein-App.
4. Melden Sie sich mit Ihrem Konto an. Wenn Sie noch keinen Account haben,
registrieren Sie sich in der Klarstein-App.
5. Folgen Sie den Anweisungen der App.
App-Download
Verwenden Sie die Scan-Funktion Ihres Handys, um den QR-Code zu scannen, und
speichern Sie die App auf Ihrem Smartphone.
Hinweis: Weitere Hinweise zur Bedienung der App und Hilfestellungen zur
Herstellung der Verbindung mit Ihrem Gerät liefert Ihnen die App, sobald Sie sie das
erste Mal öffnen.
iOS Android

13
DE
Fehlerbehebung bei Verbindungsproblemen
Wenn Ihr Klarstein-Gerät im WLAN nicht gefunden werden kann, überprüfen Sie
Folgendes:
• Ist das Gerät eingesteckt?
• Ist die WLAN-Funktion des Smartphones aktiviert?
• Ist die WLAN-Funktion des Klarstein-Gerätes aktiviert? (Befolgen Sie die
Anweisungen in der App.)
• Ist das WLAN-Passwort korrekt eingegeben worden?
• Benden sich Router, Klarstein-Gerät und Smartphone während des
Kopplungsversuches in unmittelbarer Nähe? (Idealerweise nicht mehr als 5 m
voneinander entfernt.)
• Falls Sie in den Einstellungen ihres WLAN-Routers das 2,4-GHz-Band deaktiviert
haben, aktivieren Sie dieses in Ihren Routereinstellungen.
Hinweis: Für weitere Hilfestellungen folgen Sie den Anweisungen der App beim
Verbindungsaufbau.

14
DE
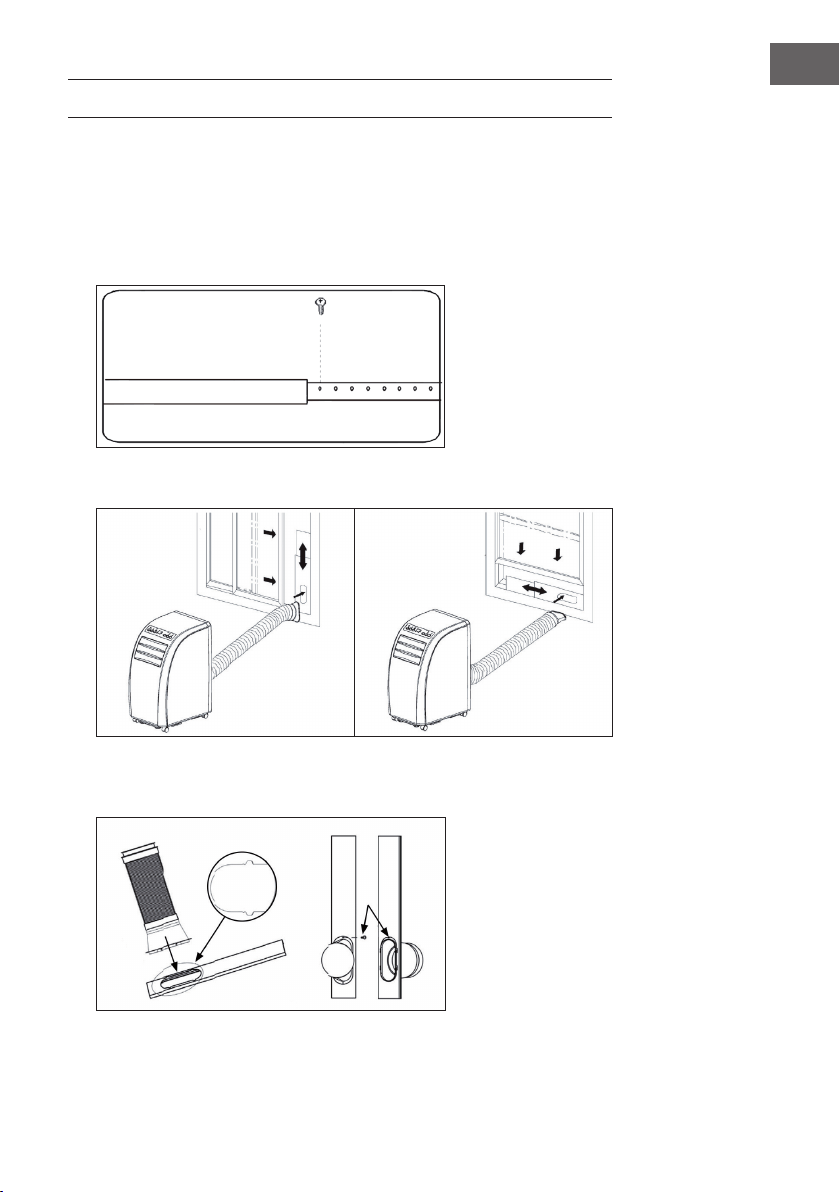
INSTALLATION
Standort
Stellen Sie das Gerät auf einen trockenen, ebenen Untergrund. Las- sen Sie um das
Gerät herum mindestens 50 cm Platz, damit die Luft ausreichend zirkulieren kann.
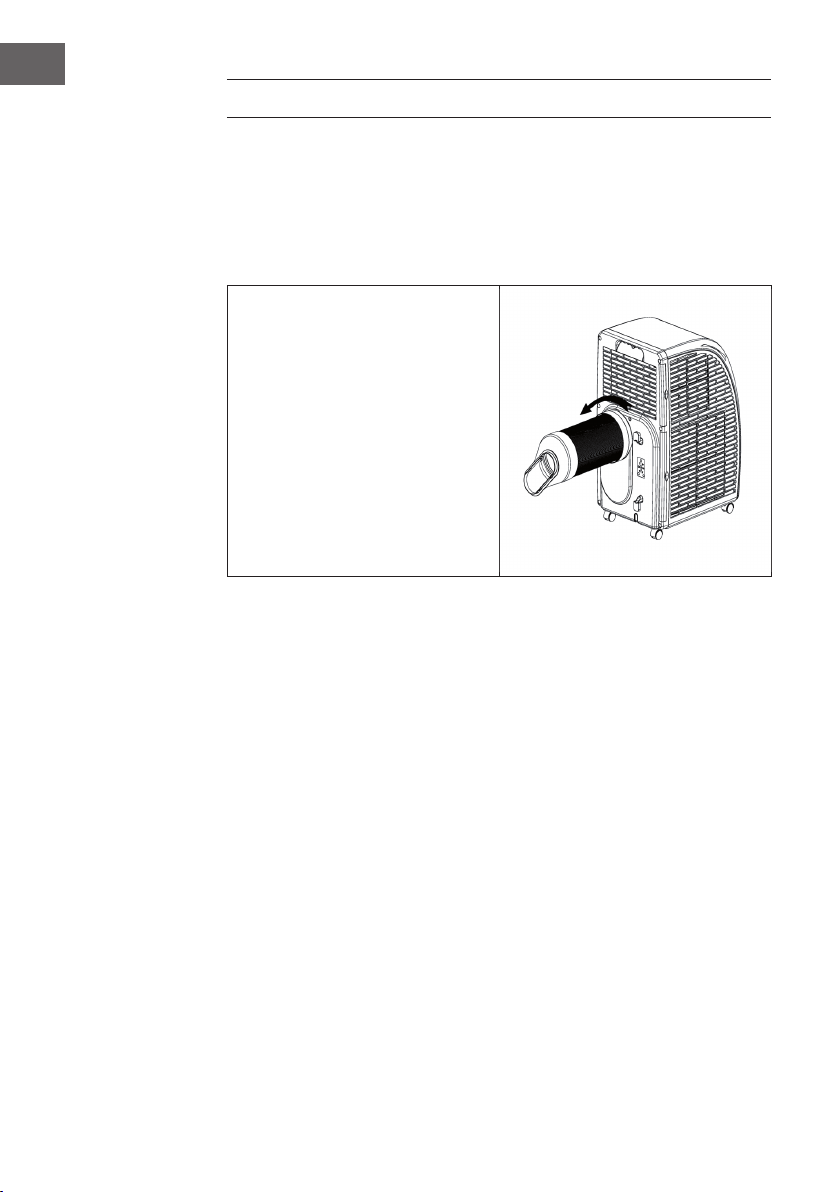
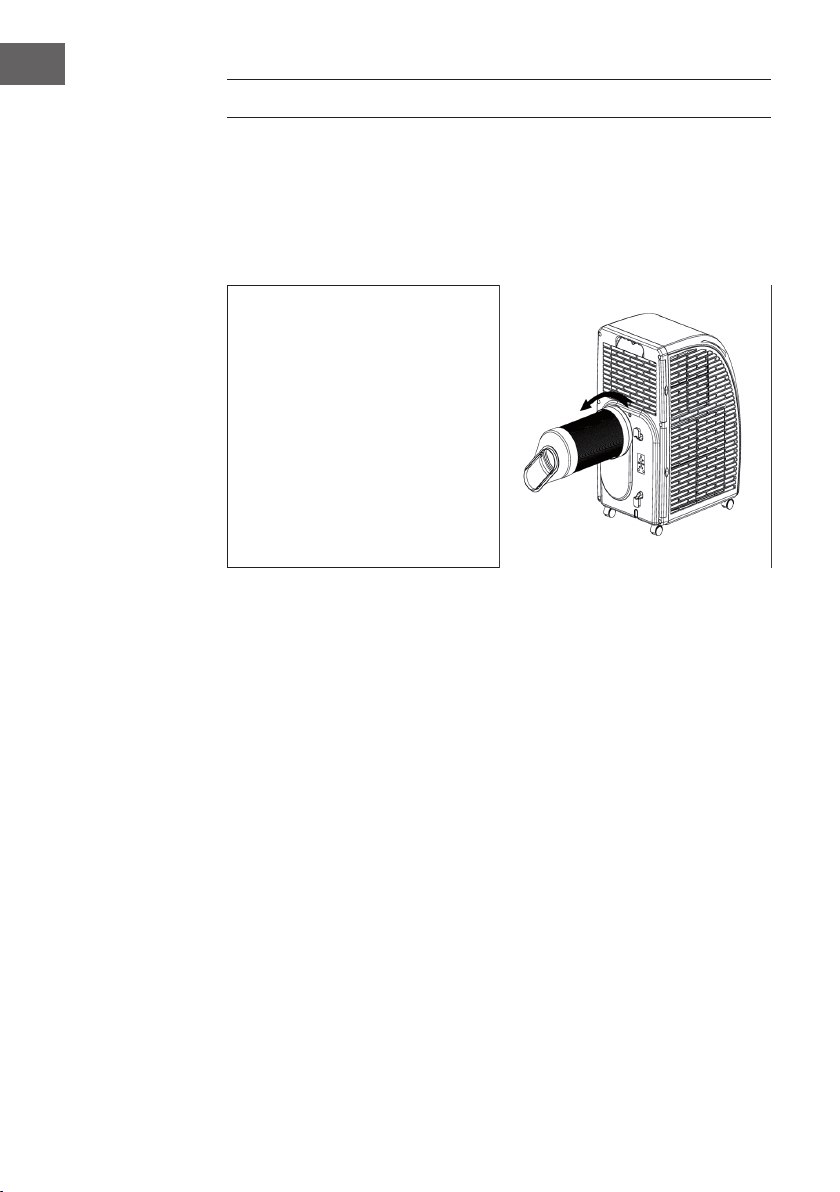
Abluftschlauch anbringen
• Befestigen Sie den Schlauch mit dem
runden Ende am Gerät.
• Befestigen Sie dazu das Runde
Ende am Gerät, wie auf dem Bild
dargestellt.
• Verbinden Sie das Flache Ende mit
der Fensterdichtung. Installieren
Sie die Dichtung dazu am
nächstgelegen Fenster. In einem
Umkreis von 50 cm um das Fenster
sollten sich keine Hindernisse
benden, damit die Luft ungehindert
ießen kann.
Wichtige Hinweise zum Abluftschlauch
• Der Schlauch ist zwischen 60 cm - 170 cm lang (inklusive Adapter). Wir empfehlen
Ihnen die minimale Länge zu verwenden, um Energie zu sparen.
• Der Abluftschlauch wurde speziell für dieses Gerät hergestellt. Verwenden Sie
keinen anderen Schlauch, der länger ist oder aus anderen Materialien besteht.
Andernfalls könnte das Gerät beschädigt werden.
15
DE
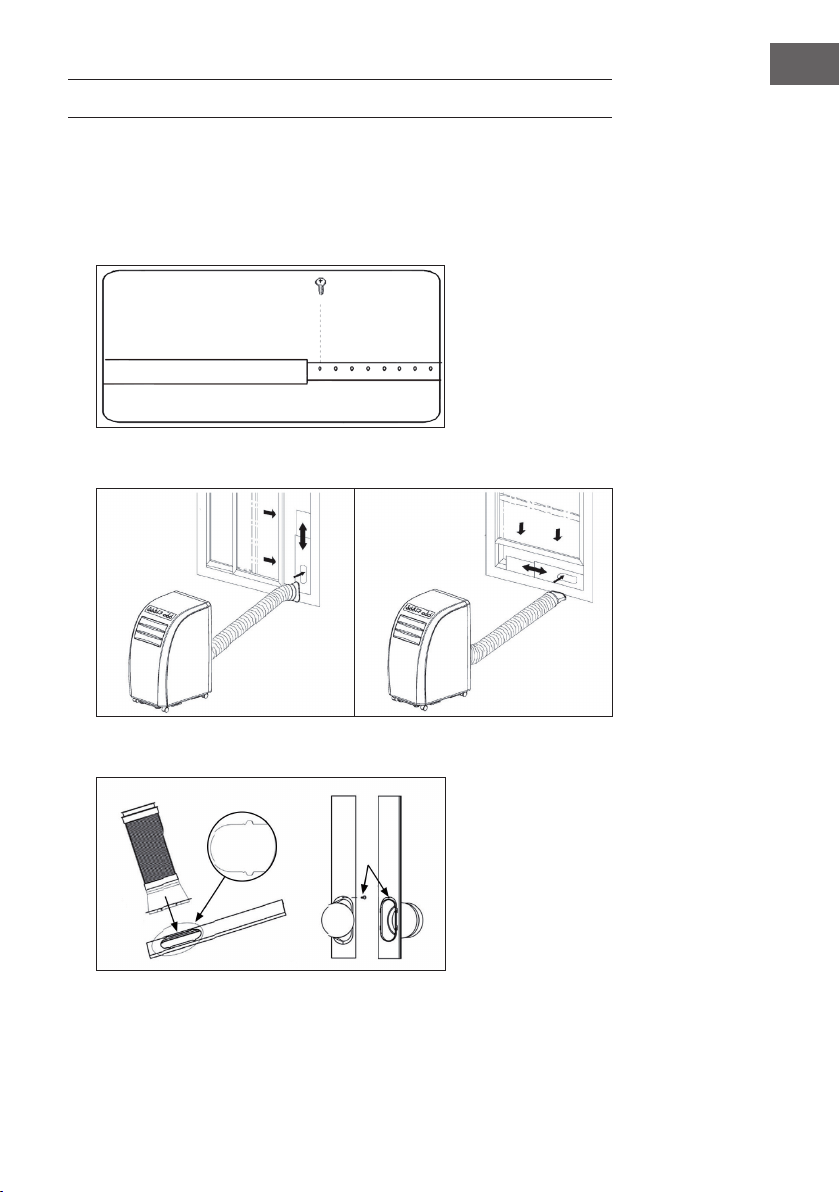
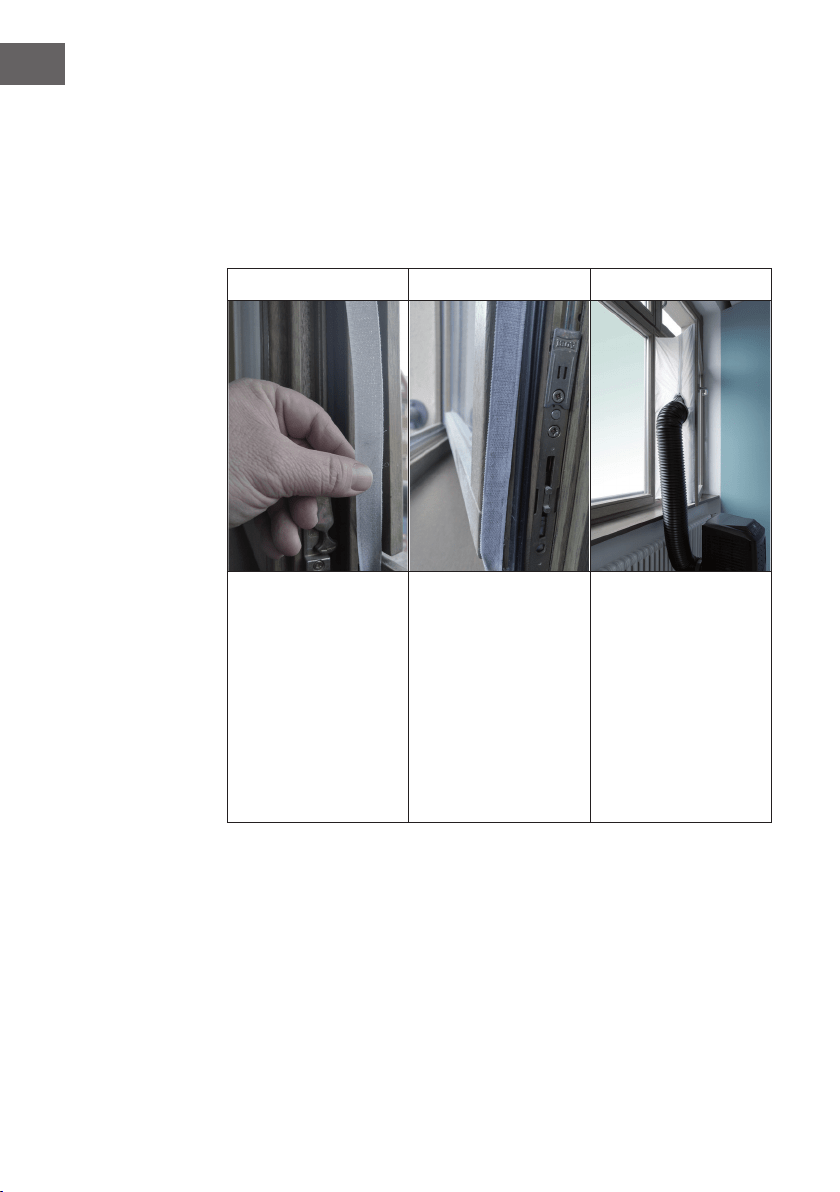
FENSTERDICHTUNG ANBRINGEN
Schiebefenster
1. Messen Sie zuerst die Fensterhöhe bzw. -breite aus, je nachdem wie sie die
Dichtung installieren möchten.
2. Passen Sie die Länge der Dichtungsplatte (siehe Bild) entsprechend an und xieren
Sie die Platte mit Schrauben.
3. Befestigen Sie die Dichtungsplatte in Ihrem Fenster (siehe Bilder).
4. Befestigen Sie den Abluftschlauch an der Dichtungsplatte. Fixieren Sie ihn mit
Schrauben.
16
DE
Kippfenster
Die Montage der Fensterdichtung ist einfach. Sie können die Dichtung an ein gekipptes
Fenster, ein seitlich geöffnetes Fenster oder ein Dachfenster anbringen. Wir haben hier
zur Demonstration ein seitlich geöffnetes Fenster gewählt. Es eignet sich besonders gut,
weil sich der Abluftschlauch seitlich weit nach unten anbringen lässt.
Das Klettband wird an den drei offenen Seiten angebracht. Die Seite, an der das Fenster
am Rahmen anliegt, wird ausgelassen. Den Fensterrahmen vorher reinigen und trocknen,
damit das Band haftet.
1 2 3
Kleben Sie das Klettband
links, oben und unten am
Fensterrahmen an.
Am besten schneiden
Sie für jede Seite einen
Streifen zu.
Kleben Sie das Klettband
nun auch an die Innenseite
des Fensters.
Kletten Sie die
Fensterdichtung
an das Klettband
im Fensterrahmen
(oben beginnen) und
anschließend an das
Klettband im Fenster.
Führen Sie den
Abluft- schlauch des
Klimagerätes durch das
Loch, welches Sie durch
die Reißverschlüsse in
der Höhe und Größe
anpassen können.
17
DE
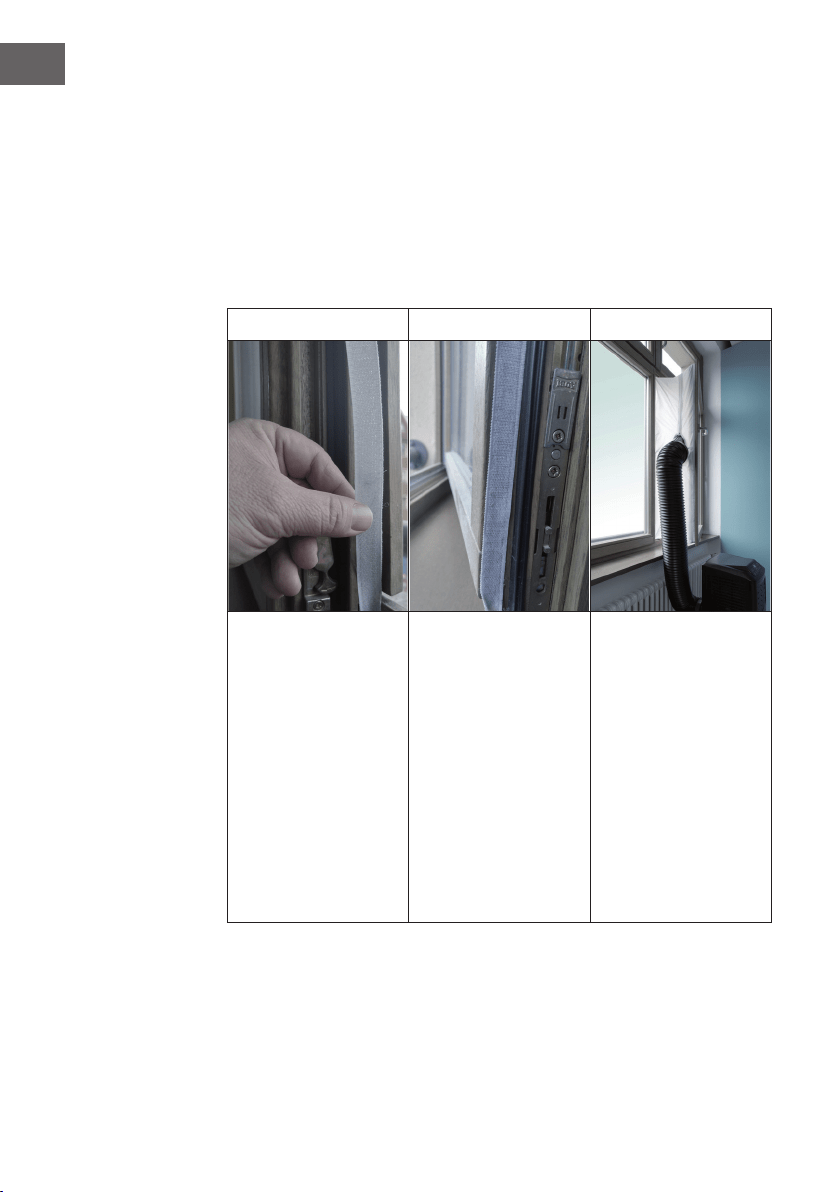
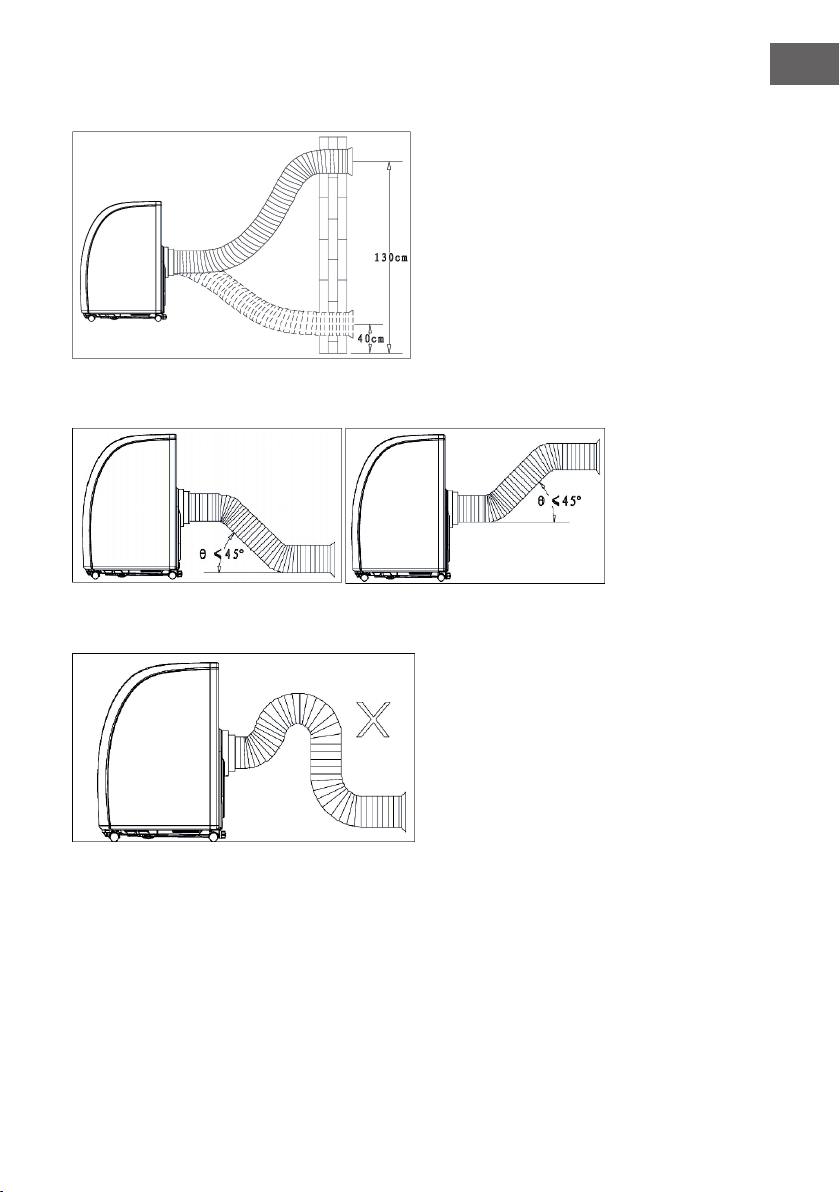
Wandanbringung
Richtige Schlauchverlegung
Falsche Schlauchverlegung
18
DE
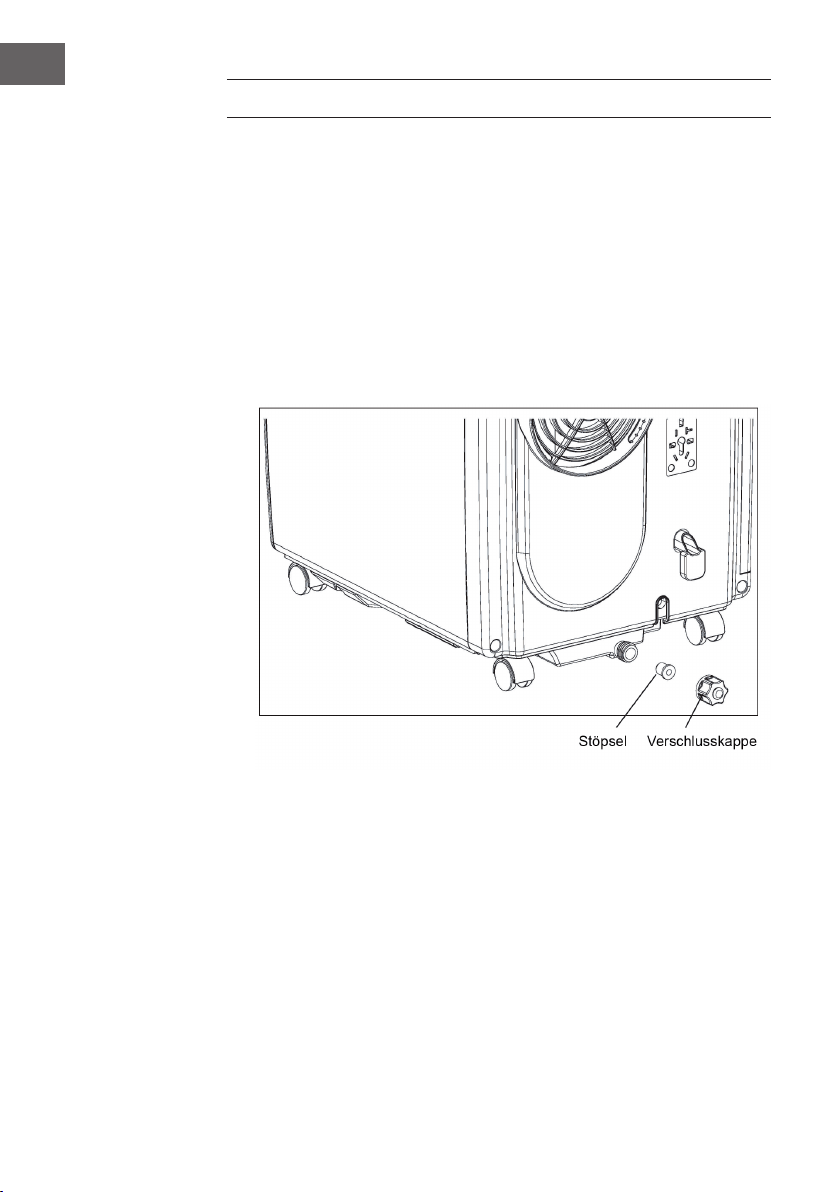
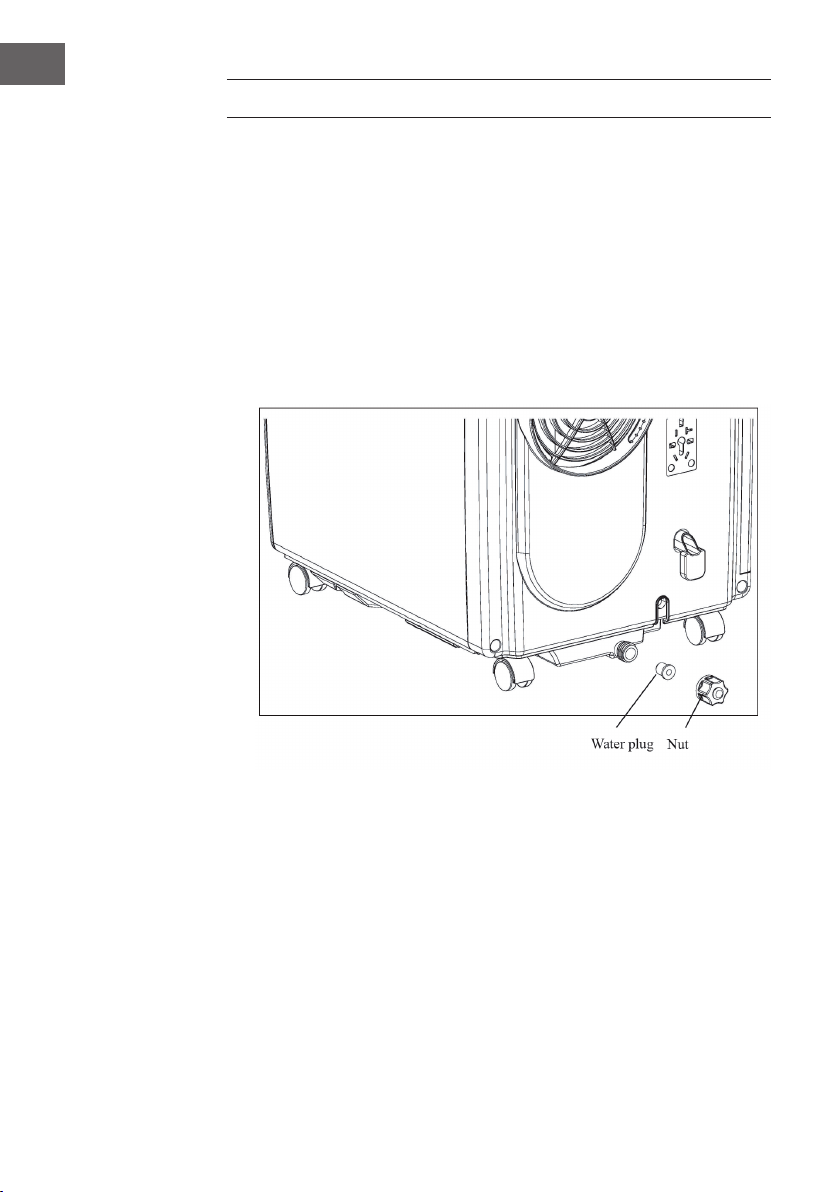
WASSER ABLASSEN
• Wenn Sie den Kühl- oder Entfeuchtungsmodus benutzen sammelt sich mehr
Kondenswasser an. Sobald der Tank voll ist wird der Wasser-voll Alarm ausgelöst
und das Gerät stoppt. Die Anzeige für den vollen Tank leuchtet auf. Ein Alarmton
ertönt, bis der Wasserstand im Tank unterhalb des Sensors ist oder der Tank manuell
geleert wurde. Sobald der Alarm ausgeht fährt das Gerät automatisch mit dem
Betrieb fort.
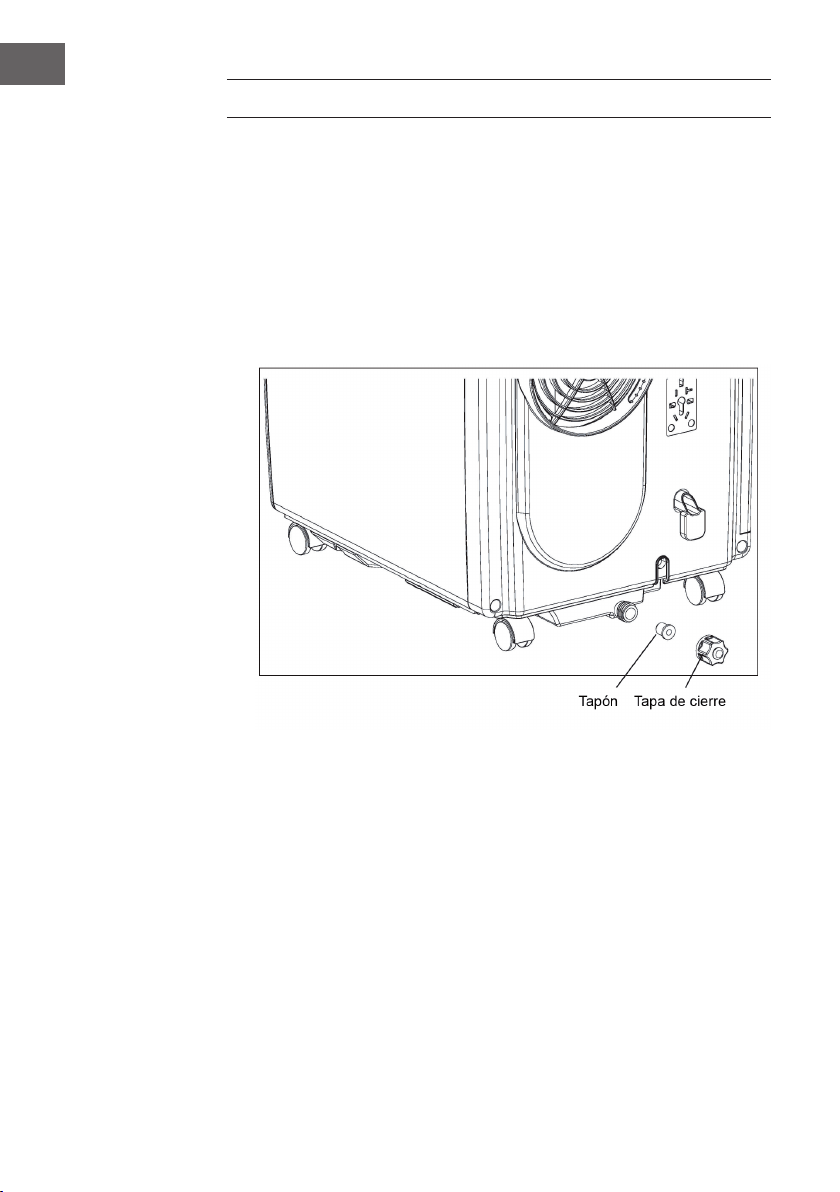
• Wenn der Alarm ertönt, entleeren Sie das Wasser zeitnah. Bewegen Sie das Gerät
zu einem Abuss, schrauben Sie die Verschlusskappe heraus und entfernen Sie
den Stöpsel. Lassen Sie das Wasser komplett abießen. Stecken Sie den Stöpsel
wieder rein und drehen Sie die Verschlusskappe zu. Wenn der Wassertank voll ist,
bewegen Sie das Gerät sehr vorsichtig, damit das Wasser nicht überschwappt und
ausießt.
19
DE
REINIGUNG UND PFLEGE
Bevor Sie das Gerät reinigen, schalten Sie es aus und ziehen Sie den Stecker aus der
Steckdose.
Reinigung der Oberäche
Reinigen Sie die Oberäche mit einem Staubwedel oder einem feuchten Lappen.
Benutzen Sie keine chemischen Reiniger, wie Benzin, Alkohol oder Benzol. Andernfalls
könnte die Oberächenbeschichtung oder das Gerät beschädigt werden.
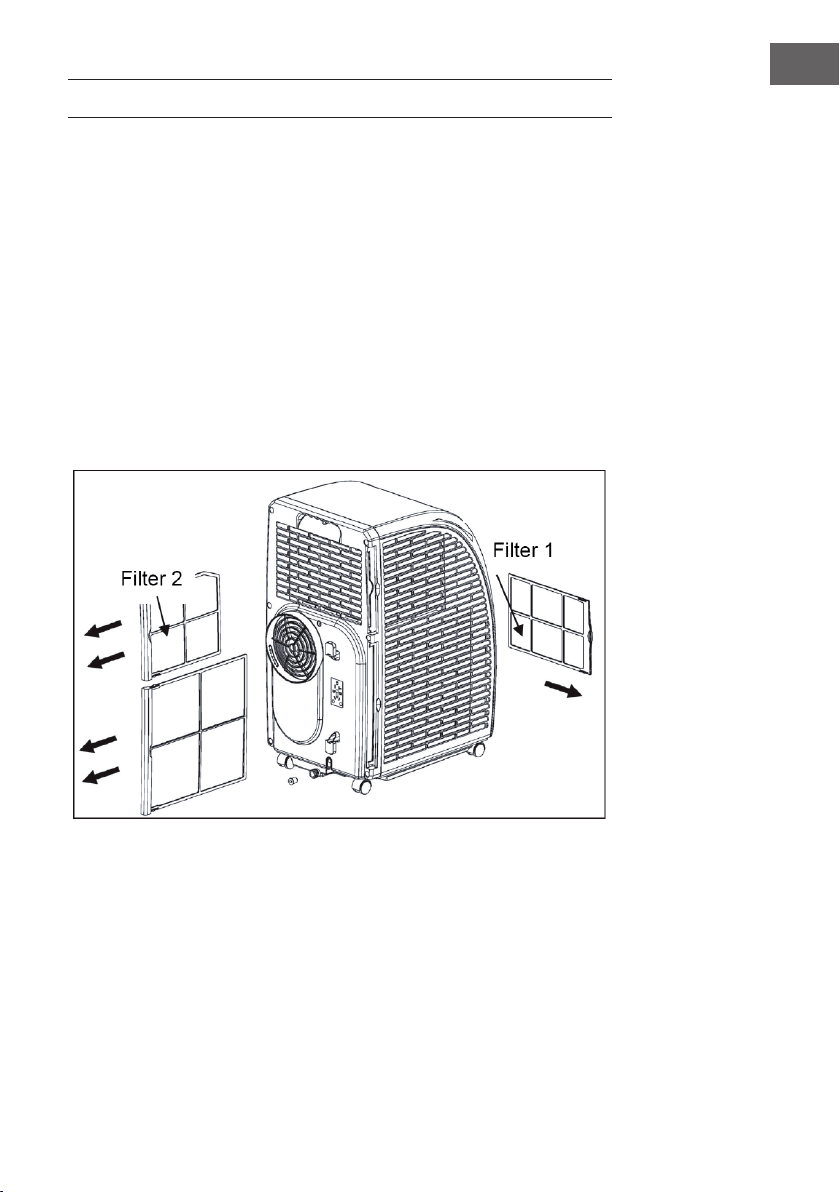
Filterreinigung
Falls die Filter mit Staub zugesetzt sind, kann die Luft nur noch unzureichend zirkulieren
und die Efzienz des Geräts lässt deutlich nach. Wenn Sie das Gerät über einen
längeren Zeitraum benutzen, empfehlen wir Ihnen die Filter alle zwei Wochen zu
reinigen.
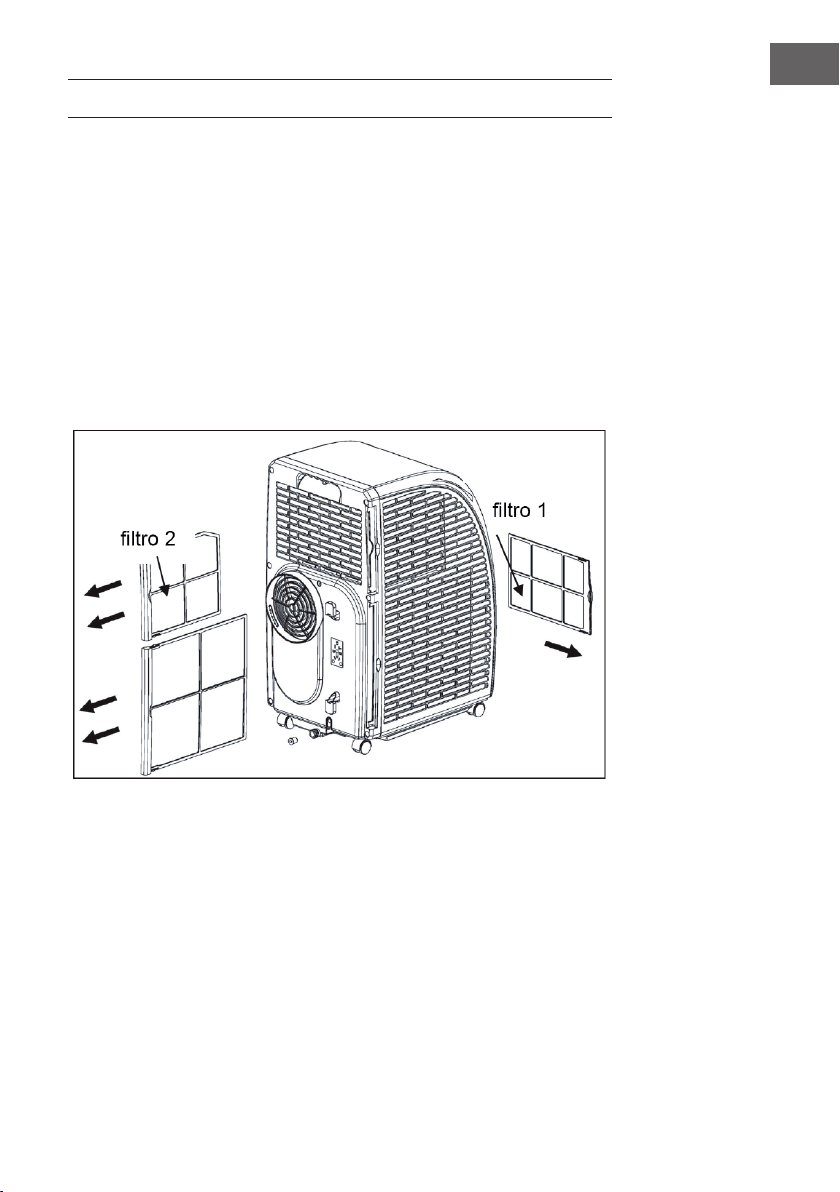
1. Ziehen Sie die Filter wie abgebildet aus dem Gerät.
2. Reinigen Sie die Filter in 40 °C warmem Wasser mit etwas Neutralreiniger. Lassen
Sie sie da- nach an einem schattigen Platz trocknen.
3. Schieben Sie die Filter wieder ins Gerät.
4. Reihenfolge der Filterentfernung: Ziehen Sie zuerst Filter 2 aus dem Gerät und dann
Filter 1. Installieren Sie nach der Reinigung zuerst Filter 1, dann Filter 2.
20
DE
Gerät nach dem Saisonende verstauen
Wenn Sie das Gerät länger nicht benutzen, befolgen Sie die folgenden Schritte:
• Lassen Sie das Wasser aus dem Tank ab. Das geht am leichtesten, wenn Sie das
Gerät leicht zurücklehnen. Schalten Sie dann den Ventilatormodus ein und drücken
Sie 5 Sekunden lang auf SPEED, um den internen Lüfter zu starten. Lassen Sie das
Gerät 2-3 Stunden lang laufen. In dieser Zeit kann das Gerät von innen trocknen.
• Schalten Sie das Gerät danach aus und ziehen Sie den Stecker aus der Steckdose.
• Wickeln Sie das Kabel an der Rückseite auf und befestigen Sie den Stecker.
• Entfernen Sie den Abluftschlauch und verstauen Sie ihn.
• Ziehen Sie einen Plastiksack über das Gerät und verstauen Sie es an einem
trockenen Ort.
• Nahmen Sie die Batterien aus der Fernbedienung und bewahren Sie sie an einem
sicheren Ort auf.
FEHLERBEHEBUNG
Problem Mögliche Ursache Lösungsansatz
Das Gerät läuft
nicht.
Das Gerät ist ausgeschaltet. Schalten Sie das Gerät ein.
Stecker nicht eingesteckt. Stecken Sie den Stecker fest
ein.
Sicherung raus oder kaputt. Tauschen Sie die Sicherung
aus.
Timer falsch eingestellt. Ändern Sie die eingestellte Zeit.
Wassertank ist voll. Leeren Sie den Tank.
Die Kühlung ist
mangelhaft.
Die Luftein- oder -auslässe sind
blockiert.
Entfernen Sie alle Hindernisse.
Es benden sich Wärmequellen
im Raum.
Entfernen Sie alle
Wärmequellen.
Die Filter sind zugesetzt. Reinigen Sie die Filter.
Die Temperatur ist falsch
eingestellt.
Ändern Sie die
Temperatureinstellung.
Der Ventilator läuft zu langsam. Erhöhen Sie die
Geschwindigkeit.
Das Gerät ist
laut und wackelt.
Der Boden ist geneigt oder das
Gerät steht nicht eben.
Stellen Sie das Gerät auf einen
ebenen Untergrund.
21
DE
Wichtig: Falls das Gerät nicht ordnungsgemäß funktioniert, schalten Sie es aus
und ziehen Sie den Stecker. Lassen Sie das Gerät ebenfalls von einem Fachbetrieb
überprüfen, falls folgendes auftritt:
• Sicherung und Schalter sind oft kaputt.
• Das Netzkabel überhitzt sich oder ist beschädigt.
• Das Gerät riecht merkwürdig.
Fehlermeldungen
E1: Die Sensorspule funktioniert nicht
richtig.
Hinweis: Wenn die Heizanzeige angeht,
bendet sich das Gerät im Anti-Frost-
Modus oder im Abtaumodus. Das ist
normal und stellt keinen Fehler dar.
E2: Fehler am Raumtemperatur-Sensor
E4: Anti-Frost-Schutz
FL: Der Wassertank ist voll und muss
geleert werden.
PRODUKTDATENBLATT
Angaben nach Verordnung (EU) Nr. 626/2011
Warenzeichen des Lieferanten:
Klarstein
Modellkennung des Lieferanten:
10035803, 10035804
Schallleistungspegel in lnnenräumen bei Norm-
Nennbedingungen im Kühlbetrieb in dB:
63 dB
Der Austritt von Kältemittel (R290) trägt zum Klimawandel bei. Kältemittel
mit geringerem Treibhauspotenzial tragen im Fall eines Austretens weniger
zur Erderwärmung bei als solche mit höherem Treibhauspotenzial. Dieses
Gerät enthält Kältemittel mit einem Treibhauspotenzial von 3. Somit hätte
ein Austreten von 1 kg dieses Kältemittels 3 Mal größere Auswirkungen
auf die Erderwärmung als 1 kg CO
2
, bezogen auf hundert Jahre. Keine
Arbeiten am Kältekreislauf vornehmen oder das Gerät zerlegen – stets
Fachpersonal hinzuziehen.
Leistungszahl im Kühlbetrieb (EER
rated
)
: 3,1
Energieefzienzklasse:
A
Energieverbrauch 0,9 kWh je 60 Minuten, auf der Grundlage von
Ergebnissen der Normprüfung. Der tatsächliche Verbrauch hängt von der
Nutzung und vom Standort des Geräts ab.
Kühlleistung P
rated
in kW:
2,9 kW
Angaben nach Verordnung (EU) Nr. 206/2012
Modellkennung(en) 10035803, 10035804
Bezeichnung Symbol Wert Einheit
Nenn-Leistung im Kühlbetrieb P
rated
im Kühlbetrieb 2,9 kW
Nenn-Leistung im Heizbetrieb P
rated
im Heizbetrieb - kW
Nenn-Leistungsaufnahme im
Kühlbetrieb
P
EER
0,9 kW
Nenn-Leistungsaufnahme im
Heizbetrieb
P
COP
- kW
Nenn-Leistungszahl im Kühlbetrieb EERd 3,1 -
Nenn-Leistungszahl im Heizbetrieb COPd - -
Leistungsaufnahme im Betriebszustand
„Temperaturregler aus“
P
TO
- W
Leistungsaufnahme im
Bereitschaftszustand
P
SB
0,5 W
Stromverbrauch von Einkanal-/
Zweikanal- Raumklimageräten
(getrennte Angabe für Kühlbetrieb und
Heizbetrieb)
Zweikanal: Q
DD
Einkanal: Q
SD
0,9 Zweikanal:
kWh/a
Einkanal:
kWh/h
Schallleistungspegel L
WA
63 dB(A)
Treibhauspotenzial GWP 3 kg CO
2
Äq.
Kontaktadresse
für weitere Informationen
Chal-Tec GmbH,
Wallstraße 16, 10179 Berlin, Deutschland.

24
DE
HINWEISE ZUR ENTSORGUNG
Wenn es in Ihrem Land eine gesetzliche Regelung zur
Entsorgung von elektrischen und elektronischen Geräten
gibt, weist dieses Symbol auf dem Produkt oder auf der
Verpackung darauf hin, dass dieses Produkt nicht im
Hausmüll entsorgt werden darf. Stattdessen muss es zu
einer Sammelstelle für das Recycling von elektrischen
und elektronischen Geräten gebracht werden. Durch
regelkonforme Entsorgung schützen Sie die Umwelt und die
Gesundheit Ihrer Mitmenschen vor negativen Konsequenzen.
Informationen zum Recycling und zur Entsorgung dieses
Produkts, erhalten Sie von Ihrer örtlichen Verwaltung oder
Ihrem Hausmüllentsorgungsdienst.
Dieses Produkt enthält Batterien. Wenn es in Ihrem Land
eine gesetzliche Regelung zur Entsorgung von Batterien
gibt, dürfen die Batterien nicht im Hausmüll entsorgt werden.
Informieren Sie sich über die örtlichen Bestimmungen zur
Entsorgung von Batterien. Durch regelkonforme Entsorgung
schützen Sie die Umwelt und die Gesundheit Ihrer
Mitmenschen vor negativen Konsequenzen.
KONFORMITÄTSERKLÄRUNG
Hersteller:
Chal-Tec GmbH, Wallstraße 16, 10179 Berlin, Deutschland.
Importeur für Großbritannien:
Chal-Tec UK limited
Unit 6 Riverside Business Centre
Brighton Road
Shoreham-by-Sea
BN43 6RE
United Kingdom
Die vollständige Konformitätserklärung des Herstellers nden
Sie unter folgendem Link: use.berlin/10035804

25
EN
Dear Customer,
Congratulations on purchasing this device. Please read the
following instructions carefully and follow them to prevent
possible damages. We assume no liability for damage caused
by disregard of the instructions and improper use. Scan the QR
code to get access to the latest user manual and more product
information.
CONTENT
Technical Data25
Notes on Refrigerant R29026
Safety Instructions27
Product Description29
Control Panel30
Remote Control31
Commissioning and Operation32
Device Control by Smartphone34
Installation36
Attaching the window seal37
Drainage Operation 40
Cleaning and Care 41
Troubleshooting42
Product Data Sheet44
Disposal Considerations46
Declaration of Conformity46
TECHNICAL DATA
Item number 10035803, 10035804
Power supply 220-240 V ~ 50/60 Hz
Cooling capacity 10.000 BTU
WiFi standard
802.11 b/g/n
WiFi frequency
2,4 GHz
WiFi radio-frequency power (max.)
20 dBm

26
EN
NOTES ON REFRIGERANT R290
Warnings
• The air conditioning system must be kept and transported upright. Otherwise,
irreparable compressor damage may occur. Leave the unit for at least 24 hours
before putting it into operation.
• Switch off the device and disconnect it from the power supply before cleaning.
• Make sure that the product creates a steady stream of air. Ensure the air inlets and
outlets are not blocked.
• To prevent leaks, operate this unit on a horizontal surface.
• Any person performing work on a refrigerant circuit should have a current
certi cate from an industry-accredited assessment body. This ensures competence
for the safe handling of refrigerants according to an industry-recognised assessment
speci cation.
• If the device stops working, dispose of it properly.
• Store the device in a well-ventilated place when not in use.
• Store the device so that it is not damaged.
• Repairs may only be carried out by the manufacturer or an authorised specialist
company.
• Do not damage any components of the refrigerant circuit. Escaping refrigerant may
not be noticed because it is odourless.
• Maintenance and repairs must be carried out under the supervision of specialists in
the use of ammable refrigerants.
Information for rooms with refrigerant pipes
• Limit the piping to a minimum.
• Be careful not to damage the piping.
• Appliances with ammable refrigerants may only be installed in a well-ventilated
room.
• Comply with national gas regulations.
• All mechanical connections must be freely accessible for maintenance purposes.
CAUTION
Risk of re! This device contains the ammable refrigerant R290. If the
refrigerant escapes and is exposed to an external ignition source, there
is a risk of re.

27
EN
SAFETY INSTRUCTIONS
Special notes
• Only use agents recommended by the manufacturer for defrosting or cleaning.
• Never store the appliance in a room in which there are permanent sources of
ignition (e.g. open ames, a switched on gas appliance or a switched on electric
heater).
• Do not puncture or burn the appliance.
• Note that coolant may be odourless.
Note: Only use the unit in rooms larger than X m² (see table):
Model X (m²)
5000 BTU/h, 7000 BTU/h, 8000 BTU/h 10 m²
9000 BTU/h, 10000 BTU/h, 10500 BTU/h 13 m²
12000 BTU/h, 14000 BTU/h, 16000 BTU/h,18000 BTU/h 18 m²
General safety instructions
• The device is only suitable for indoor use.
• Do not use the product if it needs to be repaired or if it has not been installed
properly.
• Do not use the product in the following areas:
- near heat sources,
- in areas where oil can splash,
- in areas exposed to direct sunlight,
- in areas where splash water can occur,
- near bathtubs, in washrooms, near showers or swimming pools.
• Never insert your ngers or other objects into the ventilation openings. In particular,
warn children of the dangers this may cause.
• Ensure that the unit is held vertically during transport and storage so that the
compressor is correctly positioned.
• Always turn off the appliance before cleaning and unplug it from the wall outlet.
• Switch off the appliance before moving it and unplug it from the wall outlet. Move
the appliance slowly and carefully.

28
EN
• To avoid the risk of re, do not cover the unit.
• All fan connections must comply with local electrical safety regulations. If
necessary, refer to these regulations.
• Supervise children so that they do not play with the unit.
• If the power cord is damaged, it must be replaced by the manufacturer, customer
service or a similarly quali ed person to avoid danger.
• This equipment may be used by children over the age of 8 and by persons
(including children) with limited physical, sensory or mental capabilities and/
or lack of experience and knowledge, provided they have been instructed in the
use of this equipment by a person responsible for their safety and understand the
hazards associated with the use of this equipment. Cleaning and maintenance of
the appliance may only be carried out by children under supervision.
• The appliance must be installed in accordance with national wiring regulations.
• Type and voltage of fuses: T, 250 V AC, 2 A or higher.
• Contact customer service for cleaning and maintenance.
• Do not pull the power cord, deform or modify it, or immerse it in water. Incorrect
handling of the power cord may result in damage to the equipment and/or electric
shock.
• National gas regulations must be observed.
• Do not block the ventilation openings.
• Do not operate the appliance solely by inserting or removing the power plug, as
this may result in electric shock or re due to heat.
• Immediately unplug the appliance from the wall outlet if it emits strange noises,
odours or smoke.
Instructions for Handling Damage
• In case of damage to the device, contact the manufacturer, customer service or a
similarly quali ed person.
• If damage occurs, turn off the power, unplug the power cord, and contact the
manufacturer, the service representative, or a similarly quali ed person.
• The power cord must be securely earthed.
• If the power cord is damaged, turn off the power to avoid danger and unplug
the power cord from the wall outlet. The power cord must be replaced by the
manufacturer, customer service or a similarly quali ed person.
WARNING
Risk of injury! Repairs to the coolant circuit may only be carried out by
trained specialist personnel. Never attempt to repair the unit yourself!
29
EN
PRODUCT DESCRIPTION
1
Guide strip
7
Strainer
2
Control panel
8
For installation of power line plug
3
Inlet grid
9
Buckle of power line
4
Exhaust pipe
10
Drainage outlet
5
Corner wheel
11
Power line with plug
6
Handle
12
Exhaust outlet

30
EN
CONTROL PANEL
POWER
Press this button to turn on or off the air conditioner, and the
powered indicator lamp is normally on.
MODE
During on or timer on pressing this button can select COOL,
DEHUMIDIFY, FAN etc. The corresponding indicator lamp to
the selected mode is on.
UP/DOWN
If the timer on or timer off is set, pressing UP or DOWN can
adjust on/off time; in running state of COOL or timer state,
pressing UP or DOWN can adjust the set temperature;
and pressing UP and DOWN simultaneously can realize
conversion between ℃ and ℃, and ℃ is displayed in default.
SPEED
Pressing this button can select different speeds in cycle of
HIGH, MID and LOW; in FAN mode press this button for 5s
to run the internal dry function, press this button for another
5s to cancel, the corresponding indicator lamp to the
selected speed is on.
TIMER
Press this button to enter timer setting state, and the indicator
lamp is on.
88
This pattern displays the set temperature in COOL and
HEAT modes, and displays room temperature in FAN
and DEHUMIDIFY modes; display of °C shows current
centigrade temperature, and display of °F shows current
Fahrenheit temperature.
SLEEP
This indicator lamp is normally on when SLEEP state is
started.
WATER FULL
In water full state this indicator lamp ickers with buzzer to
prompt drainage.
TIMER + SPEED
Press and hold the fan and timer buttons simultaneously for 2
seconds to activate the swing function of the slats.
31
EN
REMOTE CONTROL
POWER: Press this button to turn on/off the air conditioner.
TIMER: Press this button to set timer.
SWING: Press this button, and the horizontal guide vane rotates
automatically.
TEMPERATURE CONVERSION: Temperature is converted from °C to
°F.
COOL: Press this button to select COOL mode.
DEHUMIDIFY: Press this button to select DEHUMIDIFY mode.
FAN: Press this button to select FAN mode.
UP/DOWN: Press UP or DOWN to set tempe- rature or adjust timer.
HIGH: Press this button to select HIGH speed.
MID: Press this button to select MID speed.
LOW: Press this button to select LOW speed.
SLEEP: Press this button to set SLEEP mode. At the moment the speed
of upper and lo- wer fans is xed at LOW speed, in SLEEP mode
temperature and speed cannot be changed. Press this button again to
cancel.

32
EN
COMMISSIONING AND OPERATION
Setting of timer off
When the air conditioner is running, press this button, the timer LED lamp is on, and
meanwhile 88 Nixie tube will icker “00” for 5 times, at the moment, press UP and
DOWN to adjust time from 1h to 24h. Between 1~24h of timer, up/down adjustment
once changes 1h. When the set time expires, the air conditioner turns off automatically.
Setting timer on
When the air conditioner is in standby state, press TIMER, the timer LED lamp is on, and
meanwhile the display will icker “00” for 5 times, at the moment press UP/DOWN to
adjust the desired time, and the method of adjustment is the same as that during timer off.
During setting of timer, the operating modes after start can be selected, if COOL mode
is selected, the set temperature can be adjusted simultaneously; if DEHUMIDIFY mode is
selected, the set humidity can be adjusted simultaneously. After the set time expires, the
air conditio- ner starts automatically and runs in the selected operating mode.
Change of the set time / Turning the timer off
In the running process of timer, if you are intended to change the existing timer, you can
press TIMER once, at the moment 88 Nixie tube will icker and display the remaining
time, during icker pressing UP/DOWN can increase/decrease time on the basis of
the original time. If you press TIMER again during icker, the set time will be cancelled,
namely timer quits.
COOL mode
• In on or timer on state press MODE to select COOL mode. At the moment the
corresponding LED on panel displays.
• Press UP/DOWN to set appropriate temperature in a range of 18~30°C (64-
86°F). When UP or DOWN is pressed once, temperature will go up or down by
1°C or 1°F every time.
• Press SPEED to select appropriate speed, and LOW, MID and HIGH speeds can be
circularly selected.

33
EN
• After selecting COOL mode, press SLEEP on remote control (or press UP and TIMER
on operating panel simultaneously) to enter SLEEP mode, both upper and lower
fans are forcibly set at LOW speed. In approximate 7h the air conditioner turns off
automatically. If SLEEP is to be cancelled, press SLEEP again or conversion mode to
cancel the sleep function.
• Press SWING to turn off or turn on the swing function.
DEHUMIDIFY mode
• In on or timer on state press MODE to select DEHUMIDIFY mode. At the moment
the corresponding indi- cator lamp is on.
• Temperature and speed are not adjustable.
• Press SWING to turn off or turn on the up/down swing function.
FAN mode
• In on or timer on state press MODE to select FAN mode. At the moment the
corresponding indicator lamp is on.
• Press SPEED to select appropriate speed, and LOW, MID and HIGH speeds can
be circularly selected. In this mode press SPEED for “5s” to run the internal dry
function, i.e. both upper and lower fans work simultane- ously. Press SPEED for
another “℃s” to cancel the internal dry function.
• Temperature is not adjustable.
• Press SWING to turn off or turn on the up/down swing function.
Important Hints on Use
• When full water indication is displayed, the air conditioner will stop work, you
should drain water in time. After drainage the air conditioner will start automatically.
• In DEHUMIDIFY and FAN (including the internal dry function) modes, you need not
use exhaust pipe.
• If your room faces the sun directly, please draw the curtains.
34
EN
DEVICE CONTROL BY SMARTPHONE
If you integrate the device into your home WiFi, you can conveniently operate it via the
associated Klarstein app. The app not only allows you to remotely control the device via
your smartphone, but also gives you access to recipes and additional information.
Follow these steps to connect your smartphone to your Klarstein device:
1. Download the Klarstein app rst by scanning the QR code with your smartphone
(see below), or download it directly from App Store or Google Play.
2. Make sure your smartphone is connected to the same WiFi network that your
Klarstein device is to be connected to.
3. Open the Klarstein app.
4. Sign in to your account. If you do not have an account, sign up in the Klarstein app.
5. Follow the instructions from the app.
App Download
Use the scan function of your smartphone to scan the QR code and save the app on
your smartphone.
Note: The app provides further information on how to use the app and help on how
to connect to your device as soon as you open it for the rst time.
iOS Android

35
EN
Troubleshooting connection problems
If your Klarstein device cannot be found in the WLAN, check the following:
• Is the device plugged in?
• Is the WiFi feature of my phone enabled?
• Is the WiFi function of the Klarstein device activated? (Follow the instructions in the
app)
• Has the WLAN password been entered correctly?
• Are the router, Klarstein device and smartphone in the immediate vicinity during the
connection attempt? (Ideally no more than 5 m apart)
• If you have deactivated the 2.4 GHz band in the settings of your wireless router,
activate it in your router settings.
Note: For further help, follow the instructions in the app when setting up the
connection.
36
EN
INSTALLATION
Location
Install in a at and dry place, and 50cm must be left around the air conditioner to
enable smooth circulation of air, as shown in Fig.5 (before connection of exhaust pipe).
Assembly method of exhaust pipe
• Connect exhaust pipe assembly with
round joint.
• Fix the round end of the connected
exhaust pipe assembly at air outlet
of the air conditioner as shown in
gure.
• Connect the oblate joint of the
connected exhaust pipe assembly
with sealplate of window.
• Install sealplate on the nearest
window. No Obstacles at a dis-
tance of 50cm around the Window
should be ensured to guaran- tee
unimpeded air exhaust.
Cautions
• Exhaust pipe is 60cm~170cm long (including adapter). We recommend using the
minimum length so as to save energy for you.
• The length of exhaust pipe is especially designed in accordance with the
specication of the air conditioner. Please do not use other exhaust pipes of
different lengths or materials, in such way failure may be caused.
37
EN
ATTACHING THE WINDOW SEAL
Sliding window
1. Measure the size of window.
2. Adjust the length of the window sealing plate to t the size of the window. After
adjusting the window sealing plate, x it with screws (see picture).
3. Install the xed window sealing plate on the window (see pictures).
4. Insert the air exhaust hose into the window sealing plate, x it with screws.
38
EN
Tilted window
Installing the window sealing is easy. You can attach it to a tilted window or to a laterally
opened window. Our demonstration is performed on a laterally opened window. It is
especially suitable for low positions of the exhaust pipe.
The velcro tape must be attached on three sides. Leave out the side with the window
being connected to the frame. Clean the frame and dry it rst, so that the tape sticks.
1 2 3
Attach the velcro tape on
the left, on the top and on
the bottom of the window
frame.
We recommend that you
cut the tape into strips for
each window side rst.
Now attach the velcro
tape to the inner window
sides.
Stick the window sealing
to the velcro strips on
the window frame rst
(starting with the top), then
on the velcro strips on the
window.
Push the exhaust air tube
of the air conditioner
through the hole, which
can be adjusted in height
and size.

39
EN
Wall mounted
Bow alignment
Incorrect bending
40
EN
DRAINAGE OPERATION
• When COOL or DEHUMIDIFY is run in humid weather, more condensate is
produced, water full alarm will be issued as he level in water pan reaches a certain
location, compressor stops operation. Water full indica- tion on display screen will
light up and an audible alarm will be issued simultaneously till the level in water
pan is lower than alarm level or water in water pan has been drained manually.
When the alarm is relieved, the air conditioner will resume normal operation
automatically.
• When the air conditioner issues water full alarm, please drain water in time. You
can move the air conditioner to the site where water can be drained directly (such
as toilet or sewer), unscrew nut and pull out water plug to drain all water. Install
water plug and nut before use. When water is full, please move the air conditioner
steadily, otherwise, water may overow from inside.

41
EN
CLEANING AND CARE
Before cleaning turn off the air conditioner and pull out the plug.
Cleaning surface
Clean surface of the air conditioner with duster or semi-wet soft cloth. Do not use
chemical reagents, such as benzene, alcohol and gasoline, etc. Otherwise surface of
the air conditioner will be damaged, and even the whole air conditioner is damaged.
Cleaning of strainers
If strainers are blocked by dust, air circulation will be impeded to reduce efciency of
the air conditioner. On condition that the air conditioner is used for long time, cleaning
strainers once per two weeks is recommended.
1. Pull out strainers in the direction as shown in Figure.
2. Put strainers into warm water with neutral de- tergent (about 40 °C) and clean up,
and after that dry in shade place.
3. Install strainers to the original position in the direction as shown in Figure.
4. Process of taking out strainers: rst take out strainer 2 and then strainer 1; process of
ins- talling strainers: rst install strainer 1 and then strainer 2.
42
EN
Postseason storage
When the air conditioner is out of season or not used for long time, corresponding
maintenance measures should be taken.
• Drain all water in water pan from outlet (water can be poured out by slowly leaning
the body backward during drainage), and adjust operating mode to FAN mode,
and then press SPEED for 5s till fan works, keep this operating mode for 2~3h. This
method can dry inside of the body and prevent mildew.
• Turn off the air conditioner and pull out power plug.
• Wind up, fasten and put away power line.
• Remove exhaust pipe and keep properly.
• Set the air conditioner into plastic bag and put it in a dry place.
• Take out of cells of remote control and keep properly.
TROUBLESHOOTING
Fault Possible Cause Solution
The air
conditioner does
not work.
Power off? Normal phenomenon.
Plug not inserted? Insert power plug steadily.
Fuse burnt out or power supply
turned off?
Replace fuse or turn on power
supply.
Time set properly? Change time setting.
Water full alarm? Pour water.
COOL effect not
good.
Air inlet/outlet blocked? Remove blocking.
Other heating sources
available in room?
Remove other heat sources.
Strainers too dirty? Clean strainers.
Temperature setting
appropriate?
Change temperature.
Fan speed set at LOW? Select appropriate speed.
Noise too large
and shake.
Body inclined? Ground
uneven?
Put the air conditioner on even
ground.
43
EN
Caution: when the following abnormalities occur to the air conditioner, shut down
and pull out the plug, and then contact a professional electrician.
• Fuse and switch are often broken.
• Power line is overheating or its coat is naked.
• The body produces abnormal odour.
Error Codes
E1: Abnormal sense of coil pipe sensor
Note: When heating indicator is
displayed, the air conditioner is in anti-
freezing or defrosting state, and this is a
normal phenomenon.
E2: Abnormal sense of room temperature
sensor
E4: Anti-frost protection
FL: The air conditioner is in water full
alarm state

PRODUCT DATA SHEET
Information according to regulation (EU) No. 626/2011
Supplier‘s trademark:
Klarstein
Supplier‘s model identier:
10035803, 10035804
Inside sound power levels at standard
rating conditions on cooling mode in dB:
63 dB
Refrigerant (R290) leakage contributes to climate change. Refrigerant
with lower global warming potential (GWP) would contribute less to
global warming than a refrigerant with higher GWP, if leaked to the
atmosphere. This appliance contains a refrigerant uid with a GWP equal
to 3. This means that if 1 kg of this refrigerant uid would be leaked to the
atmosphere, the impact on global warming would be 3 times higher than
1 kg of CO
2
, over a period of 100years. Never try to interfere with the
refrigerant circuit yourself or disassemble the product yourself and always
ask a professional.
Energy efciency ratio (EER
rated
): 3,1
Energy efciency class:
A
Energy consumption 0,9 kWh per 60 minutes, based on standard test
results. Actual energy consumption will depend on how the appliance is
used and where it is located.
Cooling capacity P
rated
in kW:
2,9 kW
Information according to regulation (EU) No. 206/2012
Model identier(s) 10035803, 10035804
Description Symbol Value Unit
Rated capacity for cooling P
rated
for cooling 2,9 kW
Rated capacity for heating P
rated
for heating - kW
Rated power input for cooling P
EER
0,9 kW
Rated power input for heating P
COP
- kW
Rated Energy efciency ratio EERd 3,1 -
Rated Coefcient of performance COPd - -
Power consumption in thermostat-off mode P
TO
- W
Power consumption in standby mode P
SB
0,5 W
Electricity consumption of single/double
duct appliances
(indicate for cooling and heating
separately)
DD: Q
DD
SD: Q
SD
0,9 DD: kWh/a
SD: kWh/h
Sound power level L
WA
63 dB(A)
Global warming potential GWP 3 kgCO
2
eq.
Contact details
for obtaining more information
Chal-Tec GmbH,
Wallstraße 16, 10179 Berlin, Germany.

46
EN
DISPOSAL CONSIDERATIONS
If there is a legal regulation for the disposal of electrical
and electronic devices in your country, this symbol on the
product or on the packaging indicates that this product must
not be disposed of with household waste. Instead, it must be
taken to a collection point for the recycling of electrical and
electronic equipment. By disposing of it in accordance with
the rules, you are protecting the environment and the health of
your fellow human beings from negative consequences. For
information about the recycling and disposal of this product,
please contact your local authority or your household waste
disposal service.
This product contains batteries. If there is a legal regulation
for the disposal of batteries in your country, the batteries must
not be disposed of with household waste. Find out about local
regulations for disposing of batteries. By disposing of them in
accordance with the rules, you are protecting the environment
and the health of your fellow human beings from negative
consequences.
DECLARATION OF CONFORMITY
Manufacturer:
Chal-Tec GmbH, Wallstrasse 16, 10179 Berlin, Germany.
Importer for Great Britain:
Chal-Tec UK limited
Unit 6 Riverside Business Centre
Brighton Road
Shoreham-by-Sea
BN43 6RE
United Kingdom
The complete declaration of conformity of the manufacturer
can be found at the following link: use.berlin/10035804
47
ES
Estimado cliente,
Le felicitamos por la adquisición de este producto. Lea
atentamente las siguientes instrucciones y sígalas para evitar
posibles daños. No asumimos ninguna responsabilidad por los
daños causados por el incumplimiento de las instrucciones y el
uso inadecuado. Escanee el siguiente código QR para obtener
acceso a la última guía del usuario y más información sobre el
producto.
ÍNDICE
Indicaciones sobre el refrigerante R29048
Indicaciones de seguridad49
Descripción del aparato51
Panel de control52
Mando a distancia53
Puesta en marcha y uso54
Control del dispositivo por smartphone56
Instalación58
Montaje de la junta de la ventana59
Drenar el agua62
Limpieza y cuidado63
Resolución de problemas64
Hoja de datos del producto66
Indicaciones sobre la retirada del aparato68
Declaración de conformidad68
DATOS TÉCNICOS
Número de artículo 10035803, 10035804
Fuente de alimentación 220-240 V ~ 50/60 Hz
Capacidad de enfriamiento 10.000 BTU
WiFi estándar
802.11 b/g/n
WiFi frecuencia
2,4 GHz
WiFi potencia de radiofrecuencia (max.)
20 dBm
48
ES
INDICACIONES SOBRE EL REFRIGERANTE R290
Advertencias
• Transporte y guarde el aparato en posición vertical. De lo contrario, podría dañar
de forma irreparable el compresor. Deje el aparato en posición vertical durante al
menos 24 horas antes de ponerlo en marcha.
• Apague y desenchufe el aparato antes de limpiarlo.
• Compruebe que el aparato genera un ujo de aire constante. Asegúrese de que
las entradas y salidas de aire no se obstruyen.
• Instale el aparato sobre una super cie horizontal para evitar cualquier fuga.
• Toda persona que trabaja con el refrigerante debe tener un certi cado válido
actual de una autoridad reguladora acreditada por la industria, que autoriza su
competencia para manejar los refrigerantes de manera segura.
• Deseche correctamente el aparato cuando deje de funcionar.
• Si no va a utilizar el aparato, guárdelo en un lugar bien ventilado.
• Guarde el aparato de manera que no se dañe.
• Las reparaciones deben ser realizadas por el fabricante o una empresa
autorizada.
• No dañe ningún componente del circuito refrigerante. El refrigerante puede
rezumar y no percibirse porque es inodoro.
• El mantenimiento y las reparaciones de refrigerantes in amables deben llevarse a
cabo bajo la supervisión de especialistas.
Indicaciones acerca de los espacios con conductos de refrigerante
• La instalación de conductos debe limitarse al mínimo.
• Asegúrese de no dañar el circuito de refrigeración.
• Los aparatos con refrigerantes in amables no deben instalarse en una estancia no
ventilada.
• Respete las regulaciones nacionales de gas.
• Las conexiones mecánicas deben ser fácilmente accesibles para poder realizar
trabajos de mantenimiento.
ATENCIÓN
¡Riesgo de incendio! Este aparato contiene el refrigerante in amable
R290. Si el refrigerante rezuma y está expuesto a una fuente de
ignición externa, existe el riesgo de incendio.

49
ES
INDICACIONES DE SEGURIDAD
Indicaciones especiales
• Para descongelar o limpiar, utilice solamente los productos recomendados por el
fabricante.
• En ningún caso almacene el aparato en una estancia donde se encuentren fuentes
de ignición de manera permanente (por ejemplo: llamas abiertas, un aparato a
gas conectado o un radiador eléctrico encendido).
• En ningún caso perfore ni queme el aparato.
• Recuerde que el refrigerante puede ser inodoro.
Nota: Utilice el aparato solamente en estancias con un tamaño superior a X m²
(véase tabla):
Modelo X (m²)
5000 BTU/h, 7000 BTU/h, 8000 BTU/h 10 m²
9000 BTU/h, 10000 BTU/h, 10500 BTU/h 13 m²
12000 BTU/h, 14000 BTU/h, 16000 BTU/h,18000 BTU/h 18 m²
Advertencias generales de seguridad
• El aparato se ha concebido para un uso en interiores.
• No utilice el aparato si debe repararse o si no se ha instalado correctamente.
• No utilice el aparato en las siguientes circunstancias:
- cerca de fuentes de calor
- en zonas donde se pueda salpicar aceite
- en zonas expuestas a la luz directa del sol
- en zonas donde puedan existir salpicaduras de agua
- cerca de bañeras, en salas de lavandería, cerca de duchas o piscinas.
• No encaje los dedos ni objetos en los oricios de ventilación. Advierta
especialmente a los niños de los peligros derivados.
• Asegúrese de que el aparato se mantenga en posición vertical durante el
transporte y el almacenamiento para que el compresor se posicione correctamente.
• Apague el aparato y desconecte el enchufe de la toma de corriente antes de
limpiarlo.
• Apague el aparato antes de reubicarlo y desconecte el enchufe de la toma de
corriente. Mueva el aparato lentamente y con cuidado.

50
ES
• No tape el aparato para evitar peligro de incendio.
• Todas las conexiones del ventilador deben cumplir con la normativa local de
seguridad eléctrica. Si fuera necesario, infórmese sobre dicha normativa.
• Los niños no deben jugar con el aparato.
• Si el cable de alimentación está dañado, deberá ser reparado por el fabricante,
el servicio de atención al cliente o por una persona igualmente cuali cada para
evitar riesgos.
• Este aparato puede ser utilizado por niños mayores de 8 años y personas con
discapacidades físicas, sensoriales o mentales o con falta de experiencia y
conocimiento siempre que hayan sido instruidos acerca del uso del aparato y
hayan entendido su manipulación y los riesgos y peligros que este entraña. Los
niños solo podrán limpiar el aparato y realizar labores de mantenimiento bajo
supervisión.
• El aparato debe instalarse teniendo en cuenta las disposiciones nacionales de
cableado.
• Tipo y tensión de los fusibles: T, 250 V CA, 2 A o superior.
• Contacte con el servicio de atención al cliente para la limpieza y mantenimiento
del aparato.
• No tire del cable de alimentación y no lo deforme ni modi que ni lo sumerja en
agua en ningún caso. Un manejo inadecuado de cable de alimentación puede
suponer daños en el aparato y/o descargas eléctricas.
• Debe cumplirse la normativa nacional sobre gas.
• No bloquee en ningún caso los ori cios de ventilación.
• No controle el aparato exclusivamente enchufándolo y desenchufándolo, pues
pueden generarse descargas eléctricas o incendios por la generación de calor.
• Desconecte inmediatamente el enchufe de la toma de corriente si el aparato emite
ruidos u olores extraños o sale humo.
Indicaciones para gestionar los daños
• En caso de daños en el aparato, contacte con el fabricante, con el servicio de
atención al cliente o con una persona con una cuali cación similar.
• Si detecta daños en el aparato, apáguelo y desconecte el enchufe de la toma de
corriente; a continuación, contacte con el fabricante, el servicio de atención al
cliente o una persona con una cuali cación similar.
• El cable de alimentación debe contar con una toma a tierra.
• Si el cable de alimentación está dañado, el aparato debe apagarse para evitar
daños y el enchufe debe desconectarse. El cable de alimentación deberá ser
reparado por el fabricante, el servicio de atención al cliente o por una persona
igualmente cuali cada.
ADVERTENCIA
Riesgo de lesiones. Las reparaciones en el circuito del refrigerante
solamente deben ser realizadas por personal especializado. No
intente reparar el aparato usted mismo.

51
ES
DESCRIPCIÓN DEL APARATO
1
Lamas de salida del aire
7
Filtro
2
Panel de control
8
Soporte para el enchufe
3
Entrada de aire
9
Soporte para el cable
4
Tubo de extracción de aire
10
Desagüe
5
Ruedas
11
Cable de alimentación y enchufe
6
Asa
12
Salida de extracción del aire

52
ES
PANEL DE CONTROL
POWER
Pulse el botón para encender el aparato. El indicador de
funcionamiento se iluminará.
MODE
Pulse el botón con el aparato en marcha o con el
temporizador programado para elegir entre uno de los
modos: refrigeración, deshumidicación o ventilación.
UP/DOWN
Si el temporizador está activado o desactivado, puede
programar con estos botones el tiempo tras el cual el
aparato ha de encenderse o apagarse automáticamente.
Las luces correspondientes se encenderán en el display. Si
el aparato se encuentra en modo refri- geración, puede
ajustar la temperatura con estos botones. Pulse ambos
botones a la vez para elegir entre °C y °F.
SPEED
Pulse este botón para ajustar la velocidad del ventilador:
Alta > media > baja. Mantenga el botón pulsado durante
cinco segundos en el modo ventilación para iniciar la
función de secado interno. Mantenga de nuevo el botón
pulsado durante 5 segundos para desactivar la función. El
indicador luminoso correspondiente se apaga.
TIMER
Pulse el botón para ajustar el temporizador. La luz
correspondiente se enciende en el display.
88
Los números en el display grande muestran la temperatura
seleccionada en modo refri- geración y calefacción.
En modo ventilación y deshumidicación se visualiza la
tempera- tura ambiente en °C o °F.
SLEEP
Si se inicia el modo noche, se encenderá el piloto
correspondiente en el display.
WATER FULL
Si el depósito de agua está lleno, se iluminará el piloto
correspondiente en el display a la vez que se emite un
pitido.
TIMER + SPEED
Mantenga pulsados los botones del ventilador y del
temporizador simultáneamente durante 2 segundos para
activar la función de balanceo de las lamas.
53
ES
MANDO A DISTANCIA
POWER: Encender y apagar el aparato.
TIMER: Ajustar el temporizador.
SWING: Oscilación horizontal de las lamas.
Temperatura: Elegir entre °C y °F.
COOL: Iniciar modo refrigeración.
DRY: Iniciar modo deshumidicación.
FAN: Encender ventilador.
UP/DOWN: Ajustar la temperatura y el tempo- rizador.
HIGH: Velocidad alta.
MID: Velocidad media.
LOW: Velocidad baja.
SLEEP: Iniciar modo noche. Si la velocidad es alta o media, pasará al
nivel bajo. En el modo noche no podrá modicar la temperatura ni la
velocidad.

54
ES
PUESTA EN MARCHA Y USO
Ajustar el temporizador de apagado.
Pulse el botón del temporizador con el aparato en marcha. El indicador del
temporizador se enciende y en el display parpadea 5 veces consecutivas el símbolo
„00“. En ese momento, pulse los botones de dirección para congurar el temporizador
entre un rango de tiempo de 1 y 24 horas. Entre 1 y 24 horas, cada vez que pulse el
botón el tiempo se modicará en intervalos de una hora. Cuando haya transcurrido el
tiempo seleccionado, el aparato se apaga automáticamente.
Ajustar el temporizador de encendido
Pulse el botón del temporizador con el aparato en modo standby. El indicador del
temporizador se enciende y en el display parpadea 5 veces consecutivas el símbolo
„00“. En ese momento, pulse los botones de direc- ción para ajustar el tiempo deseado
tal y como se ha indicado en el apartado anterior. Mientras congura el temporizador,
también puede seleccionar uno de los modos en que desee que se ponga en marcha el
aparato. Si selecciona el modo refrigeración, deberá además introducir la temperatura
deseada. Si selecciona el modo deshumidicación, puede introducir la humedad
deseada. Cuando haya transcurrido el tiempo seleccionado, el aparato se iniciará
automáticamente en el modo seleccionado.
Modicar el tiempo del temporizador / desactivar temporizador
Pulse el botón del temporizador cuando este se encuentre activado. El display
parpadea y muestra el tiempo restante. Utilice los botones de dirección para ajustar el
tiempo como desee. Pulse de nuevo el botón cuando el display parpadee para apagar
el temporizador.
Modo refrigeración
• Pulse el botón Mode con el aparato encendido y elija el modo refrigeración
(COOL). La luz correspondiente se enciende en el display.
• Pulse los botones de dirección para congurar la temperatura en el rango entre
18 °C y 30 °C. Cada vez que pulse el botón, la temperatura aumentará o
disminuirá 1 °C.
• Pulse el botón SPEED para seleccionar uno de los siguientes niveles de velocidad:
Alto (HIGH) > medio (MID) > bajo (LOW).

55
ES
• En modo refrigeración, pulse el botón SLEEP (modo noche) del mando a distancia
o los botones UP (echa hacia arriba) y TIMER simultáneamente en el panel de
control para activar el modo noche. Si el ventilador está funcionando a velocidad
alta o media, pasará al nivel bajo. Transcurridas 7 horas, el aparato se apaga
automáticamente. Para nalizar el modo noche, pulse de nuevo el botón SLEEP del
mando a distancia o el botón de cambio de temperatura en el panel de control.
• Pulse el botón SWING para iniciar la oscilación de las lamas. Pulse de nuevo el
botón para desactivar la función.
Modo ventilador
• Con el aparato encendido, pulse el botón FAN para encender el ventilador. La luz
correspondiente se enciende en el display.
• Pulse el botón SPEED para seleccionar uno de los siguientes niveles de velocidad:
Alto (HIGH) > medio (MID) > bajo (LOW). Mantenga el botón SPEED pulsado
durante cinco segundos para iniciar la función de secado interno. Los ventiladores
superior e interior funcionarán simultáneamente. Pulse el botón SPEED de nuevo
durante cinco segundos para desactivar la función.
• En este modo, no podrá modicar la temperatura.
• Pulse el botón SWING para iniciar la oscilación de las lamas.
Indicaciones de uso importantes
• Si en el display se ilumina „FL“ y la luz del nivel de agua parpadea, el aparato
se detiene hasta que vacíe el agua. Cuando haya vaciado el agua, el aparato se
reiniciará automáticamente.
• En el modo deshumidicación y ventilación (excepto la función de secado) no
necesita el conducto de ext- racción de aire.
• Si la luz del sol reeja directamente en la estancia, corra las cortinas.
56
ES
CONTROL DEL DISPOSITIVO POR SMARTPHONE
Si conecta el aparato a su red WLAN doméstica, podrá controlarlo cómodamente
mediante la App correspondiente de Klarstein. La App le permite no solo controlar el
aparato mediante su smartphone, sino que también le ofrece acceso a recetas y otra
información adicional.
Proceda del siguiente modo para conectar su smartphone al dispositivo Klarstein.
1. Descargue primero la App de Klarstein escaneando el código QR con su
smartphone (véase más abajo) o descárguelo directamente de la App Store o de
Google Play.
2. Asegúrese de que su smartphone esté conectado a la misma red WiFi a la que
debe conectarse su dispositivo Klarstein.
3. Abra la App de Klarstein.
4. Inicie sesión con su cuenta. Si aún no tiene una cuenta, regístrese en la aplicación
Klarstein.
5. Siga las instrucciones que aparecerán en la app.
Descarga la aplicación
Utilice la función de escaneado de su teléfono para escanear el código QR y guarde
la app en su smartphone.
Nota: La aplicación proporciona más información sobre cómo usar la aplicación y
ayuda sobre cómo conectarse al dispositivo tan pronto como se abre por primera
vez.
iOS Android

57
ES
Solución de problemas de conexión
Si su dispositivo Klarstein no se encuentra en la WLAN, compruebe lo siguiente:
• ¿Está enchufado el dispositivo?
• ¿Está activada la función WiFi de mi teléfono?
• ¿Está activada la función WiFi del dispositivo Klarstein? (Sigue las instrucciones de
la aplicación)
• ¿Se ha introducido correctamente la contraseña WLAN?
• ¿Están el router, el dispositivo Klarstein y el smartphone en las inmediaciones
durante el intento de conexión? (Idealmente no más de 5 m de separación)
• Si ha desactivado la banda de 2,4 GHz en la conguración de su encaminador
inalámbrico, actívela en la conguración de su encaminador.
Nota: Para obtener más ayuda, sigue las instrucciones de la aplicación al congurar
la conexión.
58
ES
INSTALACIÓN
Lugar de instalación
Coloque el aparato en una supercie plana y estable. Deje al menos 50 cm de
distancia alrededor del aparato para que el aire pueda cir- cular correctamente.
Montaje del conducto de extracción
• Fije el extremo circular del conducto
al aparato.
• Fije el extremo circular al aparato
como se representa en la imagen.
• Conecte el extremo plano a la junta
para la ventana. Instale la jun- ta
en la ventana más cercana. No
deberán existir obstáculos en un
perímetro de 50 cm en torno a la
ventana para que el aire pueda
circular libremente.
Indicaciones importantes sobre el conducto de extracción
• El conducto tiene una longitud de entre 60 cm y 170 cm (adaptador incluido). Le
recomendamos utilizar la menor longitud posible para ahorrar energía.
• El conducto de extracción se ha creado especialmente para este aparato. No
utilice ningún otro conducto con otra longitud o de otro material. De lo contrario,
podría averiar el aparato.

59
ES
MONTAJE DE LA JUNTA DE LA VENTANA
Ventana corrediza
1. Mida primero el alto o ancho de la ventana dependiendo de cómo desee instalar
la junta.
2. Ajuste la longitud de la junta (véase imagen) como corresponda y je la placa con
tornillos.
3. Fije la junta a su ventana (véase imagen)
4. Fije el conducto de evacuación a la junta con tornillos.

60
ES
Ventana de corredera
El montaje de la junta para ventana es sencillo. Puede montarla en una ventana de
corredera o en una ventana abatible o una ventana de techo. Para la demostración,
hemos seleccionado una ventana de corredera. Es especialmente apropiada para
instalar el conducto de evacuación en una posición inferior.
El velcro se monta en tres de los lados abiertos. Se deja libre el lado que da al marco
de la ventana. Limpiar y secar previamente el marco de la ventana para que el velcro
se adhiera.
1 2 3
Pegue el velcro a la
izquierda, en la parte
superior e inferior del
marco de la ventana.
Se recomienda cortar el
velcro en tiras para cada
lado.
Pegue el velcro también
en el lado interior de la
ventana.
Pegue la junta para la
ventana en el velcro del
marco de la ventana
(comenzar por arriba) y
nalmente al velcro de la
ventana.
Introduzca el conducto
de evacuación del
climatizador en el oricio,
cuyo ancho y alto puede
ajustar con el cierre de
cremallera.

61
ES
Montaje en pared
Colocación correcta del conducto
Colocación incorrecta del conducto
62
ES
DRENAR EL AGUA
• Si utiliza el modo refrigeración o deshumidicación, se acumulará más agua
condensada. Cuando el depó- sito se llene, saltará la alarma del depósito lleno y
el climatizador se detendrá. El indicador del depósito lleno se ilumina. El tono de
alarma suena cada hasta que el nivel de agua haya descendido o haya vaciado
el depósito manualmente.
• Cuando la alarma se apague, el aparato se reiniciará automáticamente. Si suena
la alarma, vacíe el agua cuanto antes. Desplace el aparato hasta un desagüe,
desenrosque la tapa y retire el tapón. Deje que toda el agua salga. Vuelva a
colocar el tapón y enrosque la tapa de cierre. Si el depósito de agua está lleno,
mueva el aparato con cuidado para evitar que el agua rebose.
63
ES
LIMPIEZA Y CUIDADO
Antes de limpiar el aparato, apáguelo y desconecte el enchufe de la toma de corriente.
Limpieza de la supercie
Limpie la supercie con un plumero o con un paño húmedo. No utilice productos
químicos, como gasolina, alcohol o benzol. De lo contrario, podría dañar el aparato y
su recubrimiento.
Limpieza del ltro
Si el ltro está obstruido por el polvo, el aire no podrá circular correctamente y la
eciencia del aparato se re- duce notablemente. Si utiliza el aparato durante un
periodo prolongado de tiempo, le recomendamos limpiar el ltro cada dos semanas.
1. Extraiga el ltro tal y como se indica en la ilus- tración.
2. Limpie el ltro con agua a una temperatura de 40 °C y un poco de limpiador
neutro. A conti- nuación, deje que se seque a la sombra.
3. Vuelva a introducir el ltro en el aparato.
4. Orden de extracción del ltro: primero, extraiga el ltro 2 del aparato y a
continuación el ltro 1. Instale primero el ltro 1 y a continuación el 2.

64
ES
Guardar el aparato tras el nal de la estación de uso
Si no utiliza el aparato durante un periodo prolongado de tiempo, siga estos pasos:
• Drene toda el agua del depósito. Si inclina el aparato levemente facilitará el
drenaje. Encienda el modo ven- tilación y pulse el botón SPEED durante cinco
segundos para iniciar el secado interno. Deje que el aparato funcione durante 2-3
horas. En este tiempo, su interior se secará.
• Apague el aparato y desconecte el enchufe de la toma de corriente.
• Enrolle el cable en la parte trasera y encaje el enchufe.
• Retire el conducto de extracción y embálelo.
• Cubra el aparato con una bolsa plástica y almacénelo en un lugar seco.
• Extraiga las pilas del mando a distancia y consérvelas en un lugar seguro.
RESOLUCIÓN DE PROBLEMAS
Problema Posible causa Solución
El aparato no
funciona.
El aparato está apagado. Encienda el aparato.
El enchufe no está conectado. Conecte el enchufe.
El fusible se ha extraído o está
averiado.
Sustituya el fusible.
El temporizador se ha
congurado erróneamente.
Modique el tiempo del
tempo- rizador.
El depósito de agua está lleno. Vacíe el depósito.
La refrigeración
es deciente.
Las entradas o salidas de aire
están obstruidas.
Retire todos los obstáculos.
Existen fuentes de calor en la
estancia.
Retire todas las fuentes de
calor.
Los ltros están obstruidos. Limpie los ltros.
La temperatura no se ha
congurado correctamente.
Compruebe la conguración
de temperatura.
El ventilador funciona
demasiado lento.
Aumente la velocidad.
El aparato emite
sonidos fuertes y
vibra.
La supercie de apoyo es
inestable o el aparato no
se encuentra colocado
verticalmente.
Coloque el aparato en una
super- cie plana y estable.
65
ES
Importante: Si el aparato no funciona correctamente, apáguelo y desconecte el
enchufe.
• Contacte con un servicio técnico si ocurre alguna de las siguientes situaciones:
• Los fusibles y el interruptor se averían con frecuencia.
• El cable de alimentación se sobrecalienta o está dañado.
• El aparato genera un olor extraño.
Avisos de error
E1: la bobina del sensor no funciona
correctamente
Advertencia: cuando se encienda el
indicador de la calefacción, el aparato
se encontrará en modo anti-escarcha o
en modo descongelación. Se trata de un
fenómeno normal y no implica ningún
error.
E2: fallo en el sensor de temperatura
E4: protección anti-escarcha
FL: El depósito de agua está lleno y debe
vaciarse
HOJA DE DATOS DEL PRODUCTO
Informaciones de conformidad con el reglamento (UE) No 626/2011
Marca comercial del proveedor:
Klarstein
Identicador del modelo del proveedor:
10035803, 10035804
Nivel de potencia acústica interior en
condiciones estándar, en los modos de
refrigeración en dB: 63 dB
Las fugas de refrigerante (R290) contribuyen al cambio climático. Cuanto
mayor sea el potencial de calentamiento global (GWP) de un refrigerante,
más contribuirá a dicho calentamiento su vertido a la atmósfera. Este
aparato contiene un líquido refrigerante con un GWP igual a 3. Esto
signica que, si pasara a la atmósfera 1 kg de este líquido refrigerante,
el impacto en el calentamiento global sería, a lo largo de un periodo de
100años, 3veces mayor que si se vertiera 1 kg de CO
2
. Nunca intente
intervenir en el circuito del refrigerante ni desmontar el aparato usted
mismo; consulte siempre a un profesional.
Factor de eciencia energética (EER
rated
): 3,1
Clase de eciencia energética:
A
Consumo de energía 0,9 kWh/60 minutos, según los resultados obtenidos
en ensayos estándar. El consumo de energía real depende de las
condiciones de uso del aparato y del lugar en el que esté instalado.
Potencia de refrigeración P
rated
en kW:
2,9 kW
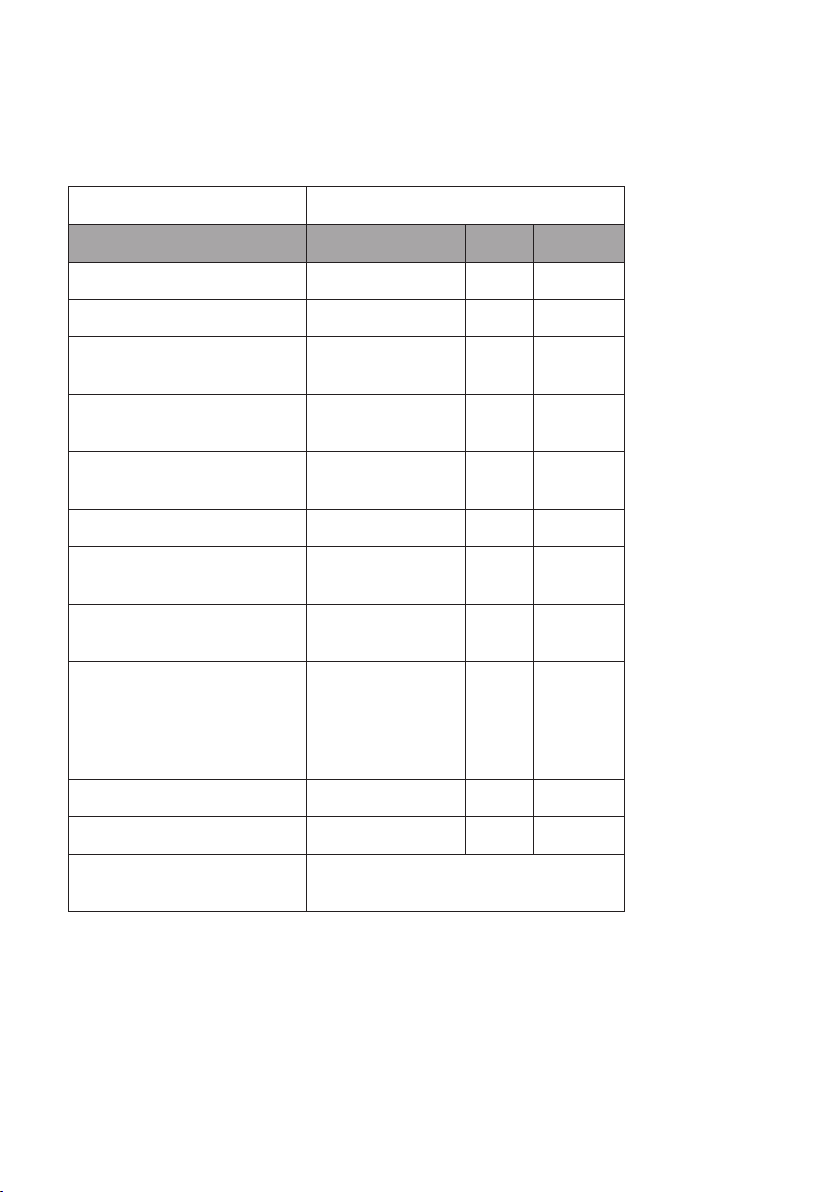
Informaciones de conformidad con el reglamento (UE) No 206/2012
Denominación del modelo 10035803, 10035804
Descripción Símbolo Valor Unidad
Potencia nominal de refrigeración P
rated
para refrigeración 2,9 kW
Potencia nominal de calefacción P
rated
para calefacción - kW
Potencia nominal utilizada para
refrigeración
P
EER
0,9 kW
Potencia nominal utilizada para
calefacción
P
COP
- kW
Factor de eciencia energética
nominal
EERd 3,1 -
Coeciente de rendimiento nominal COPd - -
Consumo de energía en modo
desactivado por termostato
P
TO
- W
Consumo de energía en modo de
espera
P
SB
0,5 W
Consumo de electricidad de los
aparatos de conducto único/
conducto doble
(indicar por separado para
refrigeración y calefacción)
DD: Q
DD
SD: Q
SD
0,9 DD: kWh/a
SD: kWh/h
Nivel de potencia acústica L
WA
63 dB(A)
Potencial de calentamiento global GWP 3 kgCO
2
eq.
Datos de las personas de contacto
para obtener más información
Chal-Tec GmbH,
Wallstraße 16, 10179 Berlin, Alemania.

68
ES
INDICACIONES SOBRE LA RETIRADA DEL
APARATO
Si en su país existe una disposición legal relativa a la
eliminación de aparatos eléctricos y electrónicos, este
símbolo estampado en el producto o en el embalaje
advierte que no debe eliminarse como residuo doméstico.
En lugar de ello, debe depositarse en un punto de recogida
de reciclaje de aparatos eléctricos y electrónicos. Una
gestión adecuada de estos residuos previene consecuencias
potencialmente negativas para el medio ambiente y la salud
de las personas. Puede consultar más información sobre el
reciclaje y la eliminación de este producto contactando con
su administración local o con su servicio de recogida de
residuos.
Este producto contiene baterías. Si en su país existe una
disposición legal relativa a la eliminación de baterías, estas
no deben eliminarse como residuo doméstico. Infórmese
sobre la normativa vigente relacionada con la eliminación de
baterías. Una gestión adecuada de estos residuos previene
consecuencias potencialmente negativas para el medio
ambiente y la salud de las personas.
DECLARACIÓN DE CONFORMIDAD
Fabricante:
Chal-Tec GmbH, Wallstraße 16, 10179 Berlín, Alemania.
Importador para Gran Bretaña:
Chal-Tec UK limited
Unit 6 Riverside Business Centre
Brighton Road
Shoreham-by-Sea
BN43 6RE
United Kingdom
Puede descargar la declaración de conformidad completa del
fabricante en el siguiente enlace: use.berlin/10035804
69
FR
Chère cliente, cher client,
Toutes nos félicitations pour l’acquisition de ce nouvel appareil.
Veuillez lire attentivement et respecter les instructions de ce mode
d’emploi an d’éviter d’éventuels dommages. Nous ne saurions
être tenus pour responsables des dommages dus au non-respect
des consignes et à la mauvaise utilisation de l’appareil. Scannez
le QR-Code pour obtenir la dernière version du mode d‘emploi
et des informations supplémentaires concernant le produit.
SOMMAIRE
Remarques concernant le
réfrigérant R29070
Consignes de sécurité71
Aperçu de l’appareil73
Panneau de commande74
Télécommande75
Mise en marche et utilisation76
Contrôle de l‘appareil par smartphone78
Installation80
Fixation du joint de fenêtre81
Vidange 84
Nettoyage et entretien85
Résolution des problèmes86
Fiche de données produit88
Informations sur le recyclage90
Déclaration de conformité90
FICHE TECHNIQUE
Numéro de poste 10035803, 10035804
Alimentation électrique 220-240 V ~ 50/60 Hz
Capacité de refroidissement 10.000 BTU
WiFi standard
802.11 b/g/n
WiFi fréquence
2,4 GHz
WiFi puissance de radiofréquence (max.)
20 dBm

70
FR
REMARQUES CONCERNANT LE
RÉFRIGÉRANT R290
Mises en garde
• Le climatiseur doit être entreposé et transporté à la verticale. Faute de quoi, le
compresseur pourrait être endommagé de façon irréparable. En cas de doute,
laissez l‘appareil reposer pendant au moins 24 heures avant de le mettre en
service.
• Éteignez l‘appareil avant de le nettoyer et débranchez-le de l‘alimentation
électrique.
• Véri ez que l‘appareil produit un ux d‘air continu ! Assurez-vous que les entrées et
sorties d‘air ne soient pas obstruées.
• Pour éviter les fuites, utilisez l‘appareil sur un support horizontal uniquement.
• Toute personne effectuant des travaux sur un circuit de uide frigorigène doit être
titulaire du certi cat à jour d‘un organisme d‘évaluation accrédité par l‘industrie.
Cela garantit sa compétence pour la manipulation des réfrigérants en toute sécurité
selon une spéci cation d‘évaluation reconnue par la branche d‘activité.
• Si l‘appareil ne fonctionne plus, éliminez-le en respectant les règles d‘usage.
• En cas de non-utilisation, conservez l‘appareil dans un endroit bien ventilé.
• Rangez l‘appareil de façon à ne pas l‘endommager.
• Les réparations ne doivent être effectuées que par le fabricant ou par un spécialiste
agréé.
• N‘endommagez aucun des composants du circuit réfrigérant. La fuite de réfrigérant
peut passer inaperçue car le produit est inodore.
• La maintenance et les réparations doivent être effectuées sous la surveillance de
spécialistes de l‘utilisation des réfrigérants in ammables.
Informations pour les pièces contenant des conduites de réfrigérant
• Encastrez le moins possible les conduites de réfrigérant.
• Veillez à ne pas endommager les conduites.
• Les appareils contenant du réfrigérant in ammable ne doivent être installés que
dans des pièces bien ventilées.
• Conformez-vous à la réglementation nationale sur le gaz.
• Toutes les connexions mécaniques doivent rester librement accessibles pour la
maintenance.
ATTENTION
Risque d‘incendie ! cet appareil contient du liquide réfrigérant
in ammable R290. S‘il y a une fuite de réfrigérant et que le gaz est
exposé à une source d‘ignition externe, il y a risque d‘incendie.

71
FR
CONSIGNES DE SÉCURITÉ
Consignes particulières
• Pour le dégivrage ou le nettoyage, utilisez uniquement les produits recommandés
par le fabricant.
• Ne rangez jamais l‘appareil dans une pièce avec des sources d‘inammation
présentes en permanence (par exemple : ammes nues, appareil à gaz allumé ou
chauffage électrique allumé).
• Ne perforez jamais l‘appareil et ne le brûlez pas.
• Notez que les liquides réfrigérants peuvent être inodores.
Remarques : Utilisez l‘appareil uniquement dans des pièces supérieures à X m² (voir
le tableau):
Modèle X (m²)
5000 BTU/h, 7000 BTU/h, 8000 BTU/h 10 m²
9000 BTU/h, 10000 BTU/h, 10500 BTU/h 13 m²
12000 BTU/h, 14000 BTU/h, 16000 BTU/h,18000 BTU/h 18 m²
Consignes générales de sécurité
• L‘appareil ne convient que pour une utilisation en intérieur.
• N‘utilisez pas l‘appareil s‘il doit être réparé ou n‘a pas été installé incorrectement.
• N‘utilisez pas l‘appareil dans les zones suivantes:
- A proximité de sources de chaleur,
- Dans les zones où il peut y avoir des éclaboussures d‘huile,
- Dans les zones directement exposées au rayonnement du soleil,
- Dans les zones où il peut y avoir des éclaboussures d‘eau,
- A proximité d‘une baignoire, dans une buanderie, à proximité d‘une piscine ou
d‘une douche.
• Ne mettez jamais vos doigts ou d‘autres objets dans les ouvertures de ventilation.
En particulier, avertissez les enfants du danger qu’elles représentent.
• Maintenez l‘appareil en position verticale pendant le transport et le stockage an
de positionner correctement le compresseur.
• Éteignez toujours l‘appareil avant de le nettoyer et débranchez la che de la prise.
• Éteignez l’appareil avant de le débrancher et débranchez la che de la prise.
Déplacez l‘appareil lentement et avec précaution.

72
FR
• Ne couvrez pas l‘appareil pour éviter tout risque d‘incendie.
• Tous les raccordements du ventilateur doivent être conformes à la réglementation
de sécurité électrique locale. Si nécessaire, informez-vous sur ces réglementations.
• Surveillez les enfants pour qu‘ils ne jouent pas avec l‘appareil.
• Si le cordon d’alimentation est endommagé, il doit être remplacé par le fabricant,
le service après-vente ou une personne de quali cation similaire pour éviter tout
danger.
• Cet appareil peut être utilisé par des enfants de 8 ans et plus et par des personnes
(enfants compris) ayant des capacités physiques, sensorielles ou mentales limitées
et / ou dénuées d‘expérience et de connaissances, à condition que l‘appareil
leur ait été présenté par une personne responsable de leur sécurité et qu‘elles
puissent comprendre les risques liés à l‘utilisation de l‘appareil. Le nettoyage et
la maintenance de l‘appareil ne peuvent être effectués par des enfants que sous
surveillance.
• L‘appareil doit être installé conformément aux réglementations de câblage
nationales.
• Type et tension des fusibles : T, 250 V CA, 2 A ou plus.
• Contactez le service clientèle pour le nettoyage et l’entretien de l’appareil.
• Ne tirez pas sur le cordon d‘alimentation, ne le déformez pas, ne le modi ez pas et
ne le plongez jamais dans l‘eau. Une mauvaise utilisation du cordon d‘alimentation
peut endommager l‘appareil et / ou provoquer un choc électrique.
• Respectez la réglementation nationale sur le gaz.
• Ne bloquez pas les ouvertures de ventilation.
• Ne faites pas fonctionner l’appareil uniquement en insérant ou en débranchant la
che secteur. Cela pourrait provoquer une décharge électrique ou un incendie dû à
la chaleur.
• Débranchez immédiatement le cordon d‘alimentation en cas de bruits, d‘odeurs ou
de fumée étranges venant de l‘appareil.
Consignes pour réagir en cas de dommages
• En cas de dommage sur l‘appareil, contactez le fabricant, le service clientèle ou
une personne de quali cation similaire.
• En cas de dommage, éteignez l‘appareil, débranchez la che et contactez le
fabricant, le service clientèle ou une personne de quali cation similaire.
• Le cordon d‘alimentation doit être correctement mis à la terre.
• Si le câble secteur est endommagé, éteignez l‘appareil pour éviter tout danger et
débranchez la che de la prise. Le cordon d’alimentation doit être remplacé par le
fabricant, le service après-vente ou une personne de quali cation similaire.
MISE EN GARDE
Risque de blessure ! Les réparations sur le circuit de refroidissement ne
doivent être effectuées que par du personnel quali é et formé.
N‘essayez jamais de réparer l‘appareil vous-même !
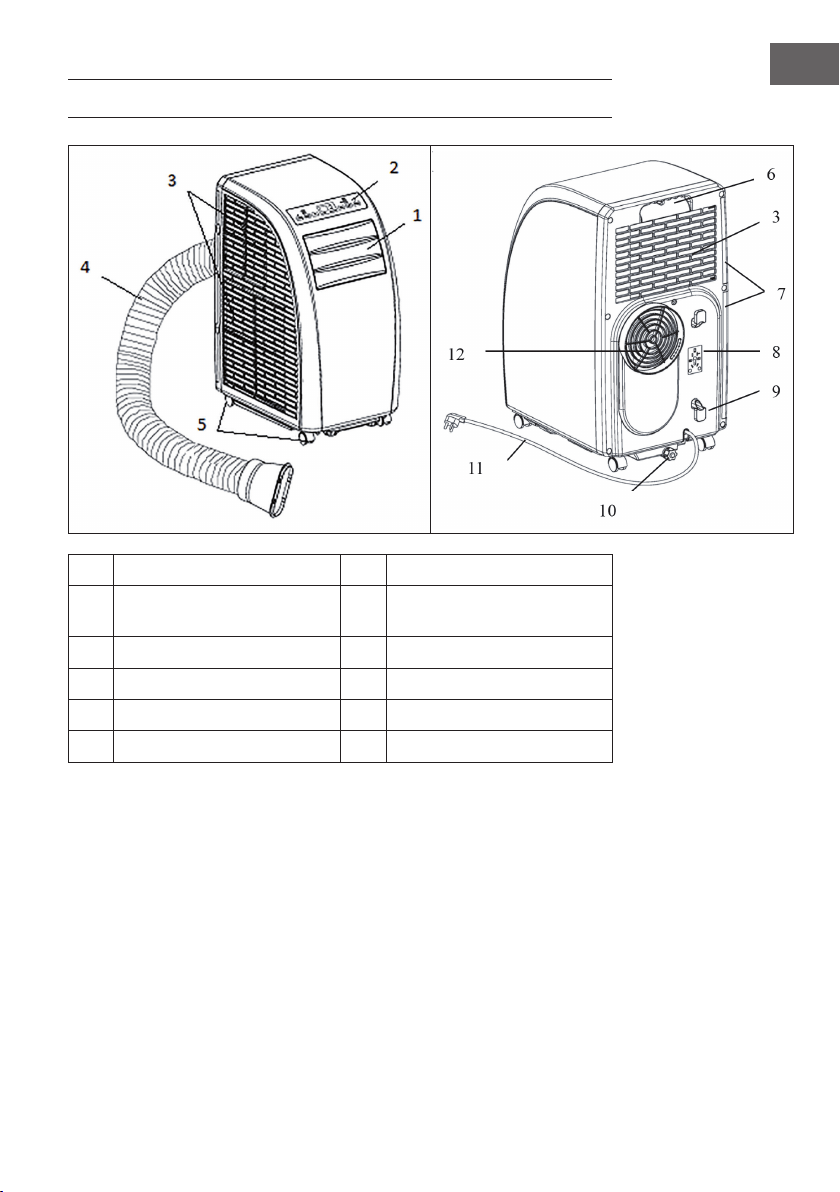
73
FR
APERÇU DE L’APPAREIL
1
Lamelles d’évacuation de l’air
7
Filtre
2
Panneau de commande
8
Fixation pour la che
d’alimentation
3
Entrée d’air
9
Enrouleur de câble
4
Tuyau d’évacuation de l’air
10
Sortie d’eau
5
Roulettes
11
Cordon et che d’alimentation
6
Poignée
12
Évacuation de l’air
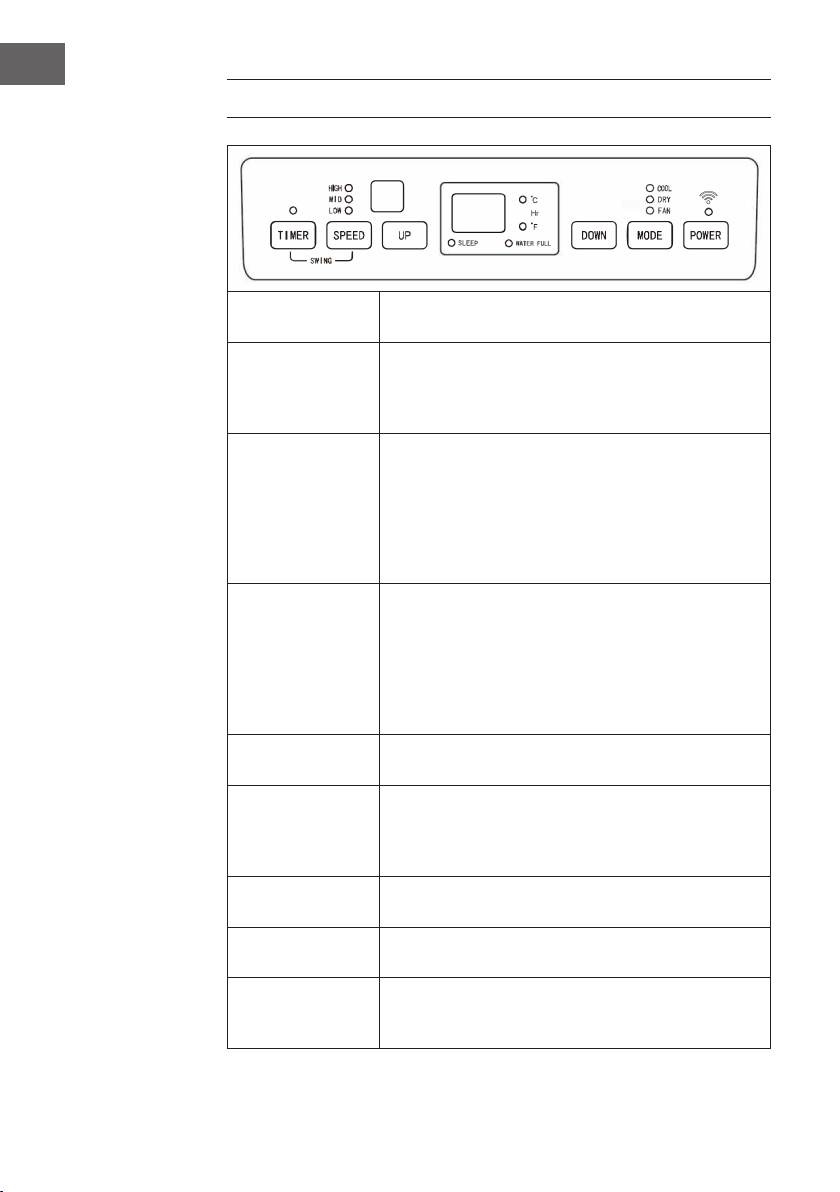
74
FR
PANNEAU DE COMMANDE
POWER
Appuyer sur cette touche pour allumer l’appareil. Le témoin
lumineux de marche s’allume.
MODE
Appuyer sur cette touche lorsque l’appareil est allumé ou
lorsque le minuteur est activé pour sélectionner un mode,
comme par exemple les modes rafraîchissement, déshumi-
dication ou ventilation.
UP/DOWN
Si le minuteur de démarrage ou d’éteinte sont activés, il est
possible de modier le temps préprogrammé. Les voyants
lumineux correspondants s’afchent sur l’afchage. Si
l’appareil se trouve en mode rafraîchissement, il est possible
d’ajuster la température avec ces touches. Appuyer sur
les deux touches simultanément pour basculer entre un
afchage en °C ou °F.
SPEED
Appuyer sur cette touche pour régler la vitesse du ventilateur
: élevée > intermédiaire > basse. En mode ventilation,
rester appuyer sur cette touche pendant 5 secondes pour
dé- marrer la fonction de séchage interne. De nouveau,
rester appuyer sur cette touche pen- dant 5 secondes
pour désactiver cette fonction. Les voyants lumineux
correspondants s’éteignent de nouveau.
TIMER
Appuyer sur cette touche pour régler le minuteur. Le voyant
lumineux correspondant s’allume.
88
Les chiffres sur le grand écran indiquent la température
programmée en mode climatiseur ou chauffage. En mode
ventilateur ou déshumidicateur, la température est afchée
en °C ou en °F.
SLEEP
Si le mode nuit est activé, le voyant lumineux correspondant
s’allume sur l’afchage.
WATER FULL
Si le réservoir est plein, le témoin lumineux correspondant
clignote et un signal sonore se fait entendre.
TIMER + SPEED
Appuyez sur les boutons du ventilateur et de la minuterie et
maintenez-les enfoncés simultanément pendant 2 secondes
pour activer la fonction de balancement des lamelles.

75
FR
TÉLÉCOMMANDE
POWER : allumer et éteindre l’appareil.
TIMER : régler le minuteur.
SWING : balayage horizontal des lamelles.
TEMPÉRATURE : basculer entre °C et °F.
COOL : démarrer le mode rafraîchissement.
DRY : démarrer la déshumidication.
FAN : activer la ventilation.
UP/DOWN : régler la température et le minuteur.
HIGH : vitesse élevée.
MID : vitesse intermédiaire.
LOW : vitesse basse
SLEEP : démarrer le mode nuit. La vitesse des ventilateurs est alors
automatiquement réglée sur LOW. En mode nuit, il n’est pas possible de
modier la température ou la vitesse.

76
FR
MISE EN MARCHE ET UTILISATION
Minuteur d’éteinte automatique
Appuyer sur la touche du minuteur pendant le fonctionnement de l’appareil. Le témoin
lumineux de marche s’allume et l’indication « 00 » clignote 5 fois de suite sur l’afchage.
Pendant ce temps, appuyer sur une des touches échées pour régler le temps du
minuteur entre 1 et 24 heures. Entre 1 et 24 heures, il l’est par paliers d’une heure. Une
fois que le temps est écoulé, l’appareil s’éteint automatiquement.
Minuteur de démarrage automatique
Lorsque l’appareil est en mode veille, appuyer sur la touche Timer. Le témoin lumineux
du minuteur s’allume et l’indication « 00 » clignote 5 fois de suite sur l’afchage.
Pendant ce temps, appuyer sur une des touches échées pour régler le temps souhaité,
de la même manière qu’avec le minuter d’éteinte automatique. Pendant le réglage
du minuteur, il est également possible de sélectionner le mode dans lequel l’appareil
doit démarrer après la n du décompte. Si le mode sélectionné est rafraîchissement,
il est possible de sélectionner la tem- pérature souhaitée. Si le mode choisi est
déshumidication, il est possible de régler le taux d’humidité. Une fois le temps de
décompte écoulé, l’appareil démarre automatiquement dans le mode sélectionné.
Modier le temps paramétré sur le minuteur / désactiver le minuteur
Appuyer sur la touche Timer pendant que le minuteur est activé. L’afchage clignote
et indique le temps re- stant. Utiliser les touches échées pour ajuster le temps à sa
convenance. Pendant que l’afchage clignote, appuyer de nouveau sur la touche Timer
pour désactiver le minuteur.
Mode rafraîchissement
• En mode marche, appuyer sur la touche mode et sélectionner le mode
rafraîchissement (COOL). Le témoin lumineux correspondant s’allume sur
l’afchage.
• Appuyer sur les touches échées pour sélectionner une température comprise entre
18 °C et 30 °C. Chaque pression de touche permet d’augmenter ou de diminuer la
température de 1 °C.
• Appuyer sur la touche de réglage de la vitesse (SPEED) pour sélectionner parmi les
vitesses suivantes, afchées dans cet ordre : élevée (HIGH) > intermédiaire (MID)>
basse (LOW).

77
FR
• En mode rafraîchissement, appuyer sur la touche SLEEP (mode nuit) de la
télécommande ou simultanément sur les touches UP (èche vers le haut) et
TIMER sur le panneau de commande pour démarrer le mode nuit. Si la vitesse
du ventilateur est à ce moment élevée ou intermédiaire, elle basculera en vitesse
basse. L’appareil s’éteint automatiquement après 7 heures. Pour terminer le mode
nuit, appuyer de nouveau sur la touche SLEEP de la télécommande ou sur la touche
de température du panneau de commande.
• Appuyer sur la touche SWING pour démarrer l’oscillation des lamelles. Appuyer
de nouveau sur la touche pour désactiver de nouveau la fonction.
Mode déshumidication
• En mode marche, appuyer sur la touche mode et sélectionner déshumidication
(DEHUMIDIFY). Le voyant lumineux correspondant s’allume.
• Ce mode ne permet pas de régler la température.
• Appuyer sur la touche SWING pour démarrer la fonction d’oscillation.
Mode ventilation
• En mode marche, appuyer sur la touche FAN pour démarrer la ventilation. Le
voyant lumineux correspon- dant s’allume.
• Appuyer sur la touche SPEE pour sélectionner la vitesse souhaitée dans l’ordre
suivant : élevée (HIGH) > in- termédiaire (MID) > basse (LOW). Maintenir la
touche SPEED enfoncée pendant 5 secondes pour démarrer la fonction de séchage
interne. Les ventilateurs du haut et du bas se mettent à fonctionner simultanément.
Appuyer de nouveau sur la touche SPEED pendant 5 secondes pour désactiver la
fonction.
• Ce mode ne permet pas de régler la température
• Appuyer sur la touche SWING pour démarrer la fonction d’oscillation.
Consignes importantes d’utilisation
• Si l’indication « FL » s’afche à l’écran et que le voyant du niveau d’eau clignote,
l’appareil s’arrête tant que le réservoir n’aura pas été vidé d’eau. Une fois que l’eau
a été vidée, l’appareil se remet en marche.
• En mode déshumidication et ventilation (hormis la fonction de séchage), le tuyau
d’évacuation de l’air n’est pas nécessaire.
• Si les rayons du soleil entrent directement dans la pièce, tirer les rideaux.

78
FR
CONTRÔLE DE L‘APPAREIL PAR SMARTPHONE
Si vous connectez l‘appareil à votre réseau Wi-Fi domestique, vous pouvez l‘utiliser
facilement via l‘application Klarstein associée. L‘application vous permet non seulement
de contrôler à distance l‘appareil via votre smartphone, mais vous donne également
accès à des recettes et à des informations supplémentaires.
Procédez comme suit pour connecter votre smartphone avec votre appareil Klarstein :
1. Téléchargez d‘abord l‘application Klarstein en scannant le code QR avec votre
smartphone (voir ci-dessous) ou téléchargez-le directement depuis l‘App Store ou
Google Play.
2. Assurez-vous que votre smartphone est connecté au même réseau WiFi que votre
appareil Klarstein.
3. Ouvrez l‘application Klarstein.
4. Connectez-vous avec votre compte. Si vous n‘avez pas encore de compte,
inscrivez-vous dans l‘application Klarstein.
5. Suivez les indications de l‘application.
Téléchargement de l‘application
Utilisez la fonction de scan de votre téléphone portable pour scanner le QR Code et
télécharger l‘application sur votre smartphone.
Remarque : L‘application fournit des informations supplémentaires sur la façon
d‘utiliser l‘application et de l‘aide sur la façon de se connecter à votre appareil dès
que vous l‘ouvrez pour la première fois.
iOS Android

79
FR
Dépannage des problèmes de connexion
Si votre appareil Klarstein ne se trouve pas dans le WLAN, vériez les points suivants :
• L‘appareil est-il branché ?
• La fonction WiFi de mon téléphone est-elle activée ?
• La fonction WiFi de l‘appareil Klarstein est-elle activée ? (Suivez les instructions
dans l‘application)
• Le mot de passe WLAN a-t-il été saisi correctement ?
• Le routeur, l‘appareil Klarstein et le smartphone se trouvent-ils à proximité
immédiate pendant la tentative de connexion ? (Idéalement, pas plus de 5 m de
distance)
• Si vous avez désactivé la bande des 2,4 GHz dans les paramètres de votre routeur
sans l, activez-la dans les paramètres de votre routeur.
Remarque : Pour plus d‘aide, suivez les instructions de l‘application lors de la
conguration de la connexion.

80
FR
INSTALLATION
Emplacement
Placer l’appareil sur une surface sèche et plane. Laisser 50 cm tout autour de l’appareil
pour permettre une bonne circulation de l’air.
Monter le tuyau d’évacuation de l’air
• Fixer le tuyau à extrémité ronde à
l’appareil.
• Fixer l’extrémité ronde à l’appareil,
comme illustré ci-contre.
• Raccorder l’extrémité plate à la
bâche isolante de fenêtre. Installer
la bâche isolante à la fenêtre la plus
proche. Aucun obstacle ne doit se
trouver dans un périmètre de 50
cm autour de la fenêtre pour ne pas
entraver les ux d’air.
Consignes importantes sur le tuyau d’évacuation
• La longueur du tuyau est comprise entre 60 cm et 170 cm (adaptateur inclus). Il est
recommandé d’utiliser une longueur courte pour économiser de l’énergie.
• Le tuyau d’évacuation de l’air a été conçu spécialement pour cet appareil. Ne pas
utiliser un autre tuyau de longueur ou de matière différente. Sinon, cela pourrait
endommager l’appareil.
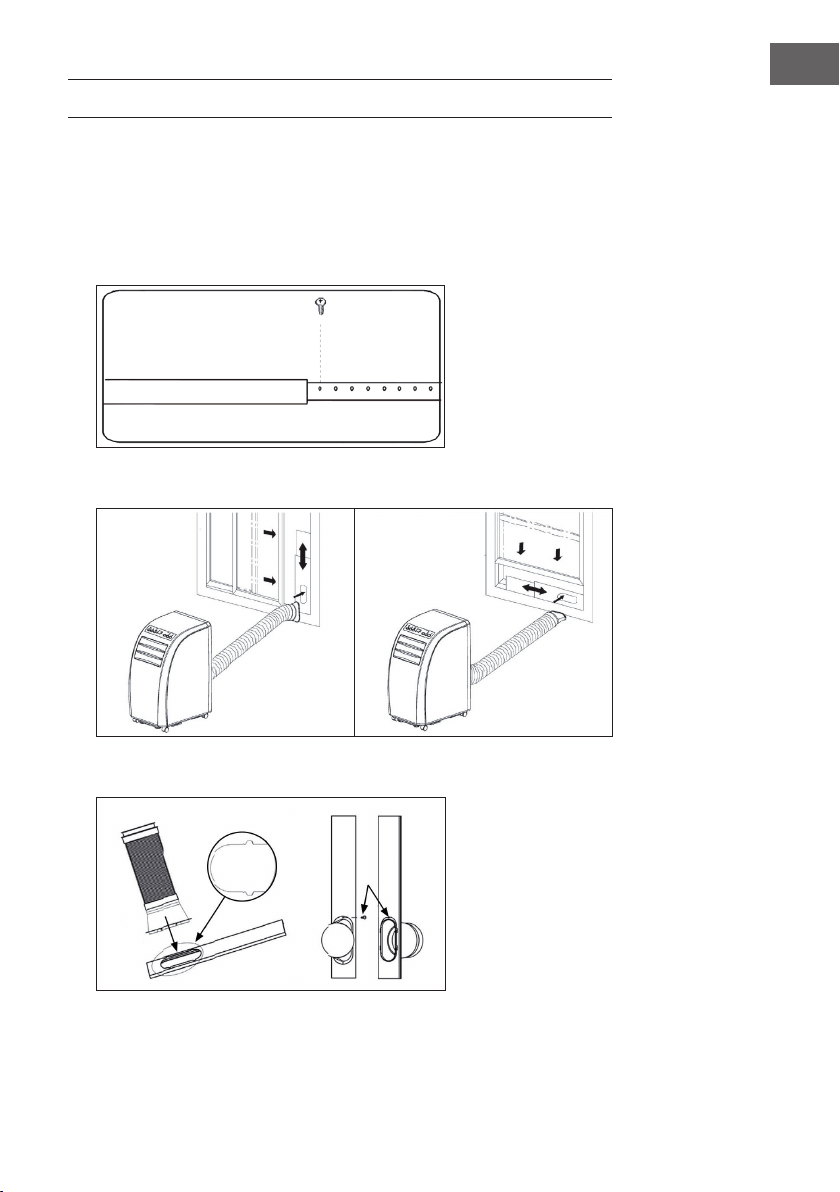
81
FR
FIXATION DU JOINT DE FENÊTRE
Fenêtre coulissante
1. Mesurez d‘abord la hauteur ou la largeur de la fenêtre, en fonction de la façon
dont vous souhaitez installer le joint.
2. Ajustez la longueur de la plaque d‘étanchéité en conséquence (voir schéma) et
xez la plaque à l‘aide de vis.
3. Fixez la plaque d‘étanchéité sur votre fenêtre (voir schémas).
4. Fixez le tuyau d‘évacuation sur la plaque d‘étanchéité. Fixez-le à l‘aide de vis.

82
FR
Fenêtre inclinée
L‘installation du joint de fenêtre est simple. Vous pouvez xer le joint à une fenêtre
inclinée, à une fenêtre coulissante ou à une lucarne. Nous avons choisi une fenêtre
coulissante à des ns de démonstration. Ce type de fenêtre convient spécialement car le
tuyau d‘échappement peut être xé latéralement très bas.
La bande adhésive se xe aux trois côtés ouverts. Le côté de la fenêtre qui repose contre
le cadre est omis. Nettoyez et séchez d‘abord le cadre de la fenêtre pour permettre à la
bande d‘adhérer.
1 2 3
Collez la bande adhésive
à gauche, en haut et
en bas du cadre de la
fenêtre.
Il est préférable de couper
une bande pour chaque
côté.
Collez maintenant
la bande adhésive à
l‘intérieur de la fenêtre
également.
Fixez le joint de fenêtre à
la bande adhésive dans
le cadre de la fenêtre
(commencez en haut),
puis à la bande adhésive
dans la fenêtre.
Faites passer le tuyau
d’air venant du climatiseur
par le trou que vous
pouvez régler en hauteur
et en taille à l’aide des
fermetures à glissière.

83
FR
Installation murale
Disposition correcte du tuyau
Mauvaise disposition du tuyau
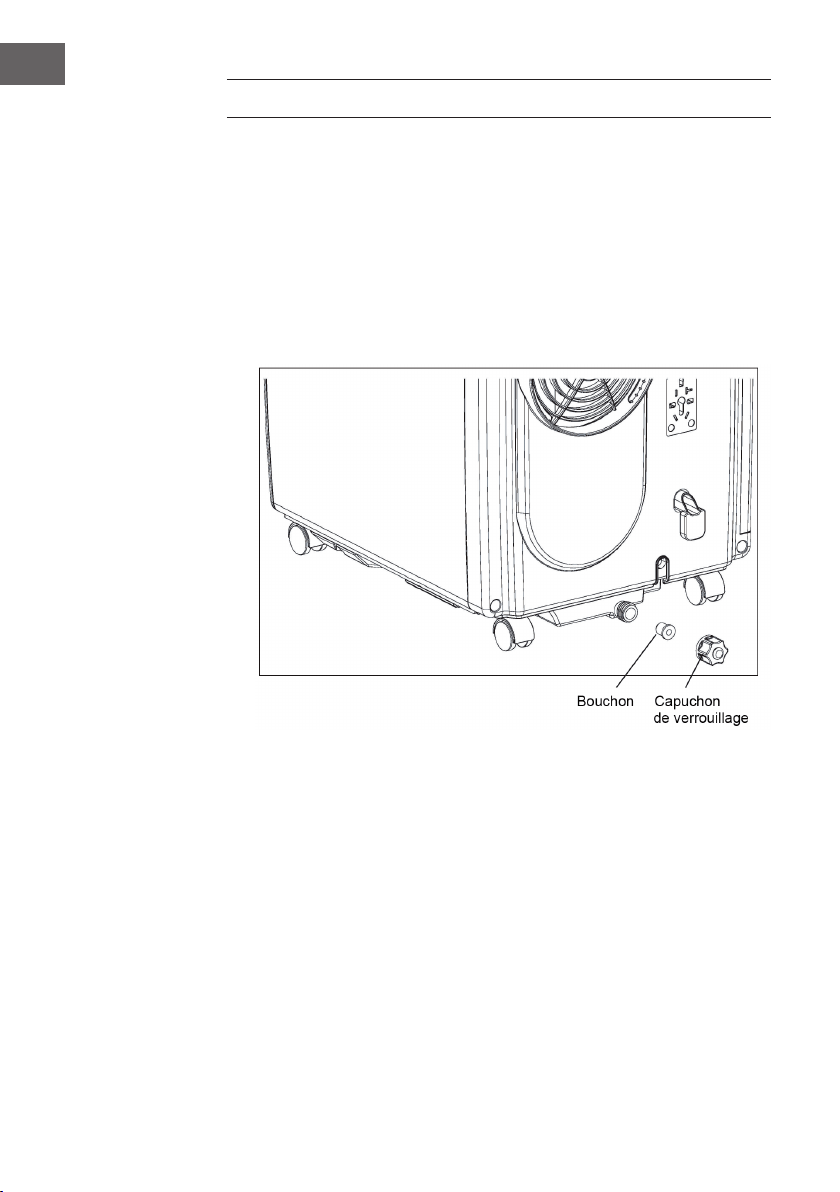
84
FR
VIDANGE
• De l’eau de condensation s’accumule lors du fonctionnement en mode
rafraîchissement ou déshumidica- tion. Lorsque le réservoir est plein, le signal
de surplus d’eau se déclenche et l’appareil s’arrête. L’afchage de réservoir plein
s’allume. Un signal d’alarme retentit jusqu’à ce que le niveau d’eau du réservoir
repasse sous le capteur ou que le réservoir soit vidé manuellement.
• Lorsque l’alarme se déclenche, vider rapidement le réservoir. Approcher l’appareil
vers une sortie d’eau, dé- visser le capuchon de verrouillage et retirer le bouchon.
Laisser l’eau s’écouler entièrement. Enfoncer de nou- veau le bouchon et revisser le
capuchon. Lorsque le réservoir est plein, déplacer l’appareil avec précaution an
que l’eau ne déborde pas.
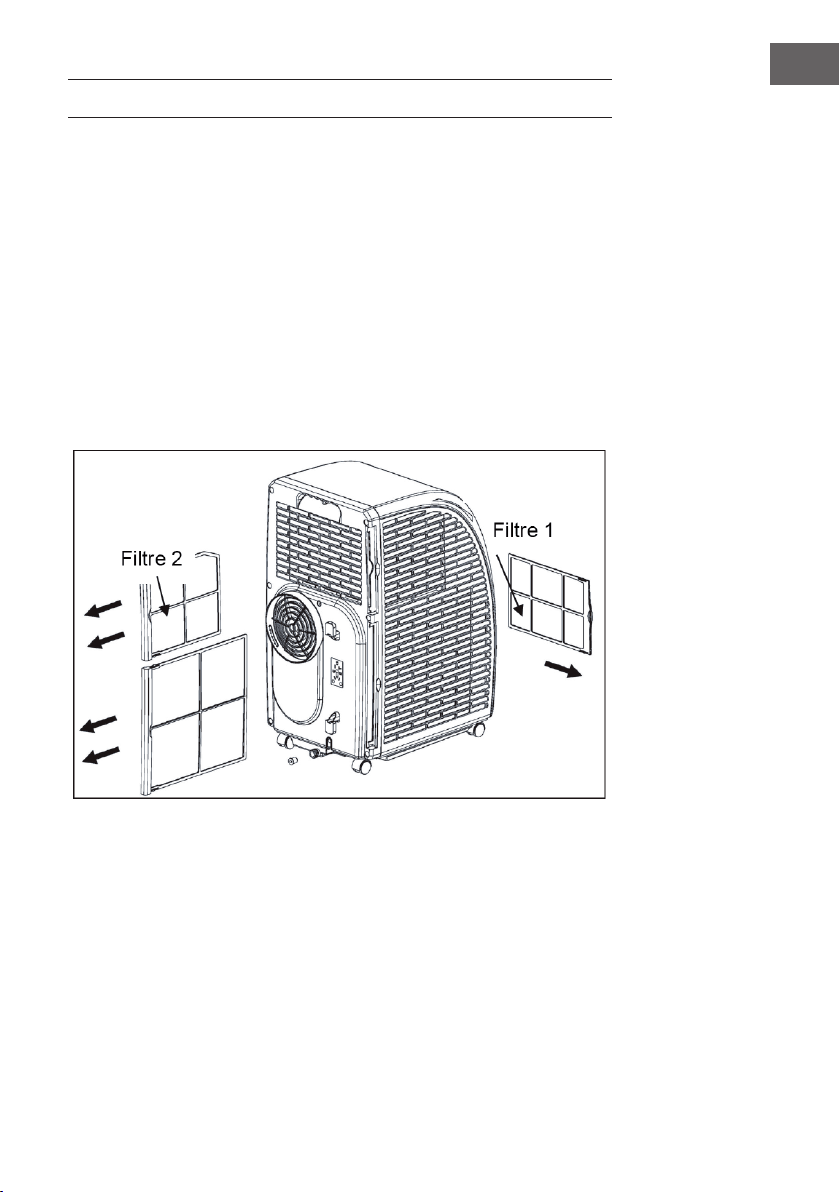
85
FR
NETTOYAGE ET ENTRETIEN
Éteindre l’appareil et le débrancher avant de le nettoyer.
Nettoyage des surfaces
Nettoyer les surfaces de l’appareil au plumeau ou avec une éponge humide. Ne pas
utiliser de nettoyant chi- mique comme de l’essence, de l’alcool ou du benzène. Cela
pourrait endommager le revêtement de l’appareil et l’appareil lui-même.
Nettoyage des ltres
Si les ltres sont empoussiérés, il est possible que l’air ne puisse pas circuler
convenablement et que les per- formances de l’appareil soient signicativement
amoindries. En cas d’utilisation prolongée de l’appareil, il est recommandé de nettoyer
les ltres toutes les deux semaines.
1. Retirer les ltres comme illustré ci-contre
2. Nettoyer les ltres avec de l’eau à 40 °C et un peu de produit d’entretien neutre.
Puis laisser sécher dans un endroit sec.
3. Replacer les ltres dans l’appareil.
4. Étapes à suivre pour le retrait des ltres : retirer tout d’abord le ltre 2 de l’appareil
puis le ltre 1. Après le nettoyage, réinstaller d’abord le ltre 1 puis le ltre 2.

86
FR
Ranger l’appareil en n de saison
Après utilisation de l’appareil ou en cas d’inutilisation prolongée, respecter les étapes
suivantes :
• Vider l’eau du réservoir. L’eau s’écoule plus facilement lorsque l’appareil est
légèrement incliné. Puis activer le mode ventilation et appuyer pendant 5 secondes
sur SPEED pour activer le ventilateur interne. Laisser l’appareil fonctionner pendant
2-3 heures. L’appareil sèche pendant ce laps de temps.
• Puis éteindre l’appareil et le débrancher.
• Enrouler le câble à l’arrière de l’appareil et attacher la che.
• Retirer le tuyau d’évacuation de l’air et le ranger.
• Mettre un sac ou une bâche en plastique sur l’appareil et ranger celui-ci dans un
endroit sec.
• Retirer les piles de la télécommande et les ranger en lieu sûr.
RÉSOLUTION DES PROBLÈMES
Problème Cause possible Solution
L’appareil ne
fonctionne pas.
L’appareil est éteint. Mettre l’appareil en marche.
L’appareil est débranché. Brancher l’appareil à une prise.
Fusible sorti ou défectueux. Remplacer le fusible.
Mauvais réglage du minuteur. Modier le réglage du temps.
Le réservoir est plein. Vider le réservoir.
Le
refroidissement
est décient.
L’entrée et la sortie d’air sont
encombrées.
Éloigner les obstacles.
La pièce comporte des sources
de chaleur.
Éloigner les sources de chaleur.
Les ltres sont encrassés. Nettoyer les ltres.
Mauvais réglage de
température.
Modier les réglages de
température.
Le ventilateur fonctionne trop
lentement.
Augmenter la vitesse.
L’appareil est
bruyant et
bancal.
Le sol est incliné ou l’appareil
n’est pas d’aplomb.
Placer l’appareil sur une
surface plane.

87
FR
Important : si l’appareil présente des dysfonctionnements, l’éteindre et le
débrancher. Faire réviser l’appareil par une entreprise spécialisée dans les cas
suivants :
• Le fusible ou l’interrupteur sautent souvent.
• Le cordon d’alimentation surchauffe ou est endommagé.
• L’appareil dégage une mauvaise odeur.
Messages d’erreur
E1 : la bobine capteur ne fonctionne pas
correctement
Remarque : lorsque le témoin de
chauffage s‘allume, l‘appareil se trouve
en mode anti gel ou décongélation.
Ceci est normal et n‘est pas un message
d‘erreur.
E2 : erreur de capteur de température
ambiante
E4 : protection anti gel
FL : le réservoir d'eau est plein et doit
être vidé

FICHE DE DONNÉES PRODUIT
Informations conformément au règlement (UE) n° 626/2011
Marque du fournisseur :
Klarstein
Référence du modèle donnée par le fournisseur:
10035803,
10035804
Niveaux de puissance acoustique intérieur dans
les conditions nominales, pour les fonctions de
refroidissement en dB : 63 dB
Les fuites de réfrigérants (R290) accentuent le changement climatique. En
cas de fuite, l‘impact sur le réchauffement de la planète sera d‘autant plus
limité que le potentiel de réchauffement planétaire (PRP) du réfrigérant
est faible. Cet appareil utilise un réfrigérant dont le PRP est égal à 3. En
d‘autres termes, si 1 kg de ce réfrigérant est relâché dans l‘atmosphère,
son impact sur le réchauffement de la planète sera 3 fois supérieur à celui
d‘1 kg de CO
2
, sur une période de 100 ans. Ne tentez jamais d‘intervenir
dans le circuit frigorique et de démonter les pièces vous-même et
adressez-vous systématiquement à un professionnel.
Coefcient d’efcacité énergétique (EER
rated
)
: 3,1
Classe d’efcacité énergétique :
A
Consommation d’énergie de 0,9 kWh pour 60 minutes, déterminée sur
la base des résultats obtenus dans des conditions d’essai normalisées. La
consommation d’énergie réelle dépend des conditions d’utilisation et de
l’emplacement de l’appareil.
Puissance frigorique nominale P
rated
en kW :
2,9 kW

Informations conformément au règlement (UE) n° 206/2012
Référence (s) du produit 10035803, 10035804
Description Symbole Valeur Unité
Puissance frigorique nominale P
rated
frigorique 2,9 kW
Puissance calorique nominale P
rated
calorique - kW
Puissance frigorique absorbée
nominale
P
EER
0,9 kW
Puissance calorique absorbée
nominale
P
COP
- kW
Coefcient d‘efcacité énergétique
nominal
EERd 3,1 -
Coefcient de performance nominal COPd - -
Consommation d‘électricité en «arrêt
par thermostat»
P
TO
- W
Consommation d’électricité en mode
«veille»
P
SB
0,5 W
Consommation d‘électricité des
appareils simple/double conduit
(SD/DD) (indiquer séparément les
informations relatives au refroidissement
et au chauffage)
DD : Q
DD
SD : Q
SD
0,9 SD : kWh/a
SD : kWh/h
Niveau de puissance acoustique L
WA
63 dB(A)
Potentiel de réchauffement planétaire PRP 3 kg éq. CO
2
Coordonnées de contact
pour tout complément d‘information
Chal-Tec GmbH,
Wallstraße 16, 10179 Berlin, Allemagne.

90
FR
INFORMATIONS SUR LE RECYCLAGE
S‘il existe une réglementation pour l‘élimination ou le
recyclage des appareils électriques et électroniques dans
votre pays, ce symbole sur le produit ou sur l‘emballage
indique que cet appareil ne doit pas être jeté avec les
ordures ménagères. Vous devez le déposer dans un point
de collecte pour le recyclage des équipements électriques
et électroniques. La mise au rebut conforme aux règles
protège l‘environnement et la santé de vos semblables des
conséquences négatives. Pour plus d‘informations sur le
recyclage et l‘élimination de ce produit, veuillez contacter
votre autorité locale ou votre service de recyclage des
déchets ménagers.
Ce produit contient des piles. S‘il existe une réglementation
pour l‘élimination ou le recyclage des piles dans votre pays,
vous ne devez pas les jeter avec les ordures ménagères.
Renseignez-vous sur les dispositions locales relatives à la
collecte des piles usagées. La mise au rebut conforme aux
règles protège l‘environnement et la santé de vos semblables
des conséquences négatives.
DÉCLARATION DE CONFORMITÉ
Fabricant :
Chal-Tec GmbH, Wallstraße 16, 10179 Berlin, Allemagne.
Importateur pour la Grande Bretagne :
Chal-Tec UK limited
Unit 6 Riverside Business Centre
Brighton Road
Shoreham-by-Sea
BN43 6RE
United Kingdom
La déclaration complète de conformité du fabricant est
accessible par le lien suivant : use.berlin/10035804

91
IT
Gentile cliente,
La ringraziamo per aver acquistato il dispositivo. La preghiamo
di leggere attentamente le seguenti istruzioni per l’uso e di
seguirle per evitare possibili danni. Non ci assumiamo alcuna
responsabilità per danni scaturiti da una mancata osservazione
delle avvertenze di sicurezza e da un uso improprio del
dispositivo. Scansionare il codice QR seguente, per accedere
al manuale d’uso più attuale e per ricevere informazioni sul
prodotto.
INDICE
Avvertenze sul refrigerante R29092
Avvertenze di sicurezza93
Descrizione del prodotto95
Pannello dei comandi96
Telecomando97
Messa in funzione e utilizzo98
Gestione tramite smartphone100
Installazione102
Fissaggio della guarnizione della nestra103
Far deuire l’acqua 106
Pulizia e manutenzione 107
Risoluzione degli errori108
Scheda informativa del prodotto110
Avviso di smaltimento112
Dichiarazione di conformità112
DATI TECNICI
Numero dell'articolo 10035803, 10035804
Alimentazione elettrica 220-240 V ~ 50/60 Hz
Capacità di raffreddamento 10.000 BTU
WiFi standard
802.11 b/g/n
WiFi frequenza
2,4 GHz
WiFi potenza a radiofrequenza (max.)
20 dBm

92
IT
AVVERTENZE SUL REFRIGERANTE R290
Avvertenze
• Il climatizzatore deve essere conservato e trasportato in verticale, altrimenti
possono risultare danni irreparabili al compressore. Lasciare il dispositivo in
posizione verticale per almeno 24 ore prima di metterlo in funzione.
• Spegnere il dispositivo e staccare la spina prima di pulirlo.
• Assicurarsi che il dispositivo generi un usso d’aria costante e che i punti d’ingresso
e uscita dell’aria non siano bloccati!
• Utilizzare il dispositivo su un fondo orizzontale per evitare perdite.
• Ogni persona che opera sul circuito del refrigerante deve essere provvista di un
certi cato attualmente valido, ottenuto da un’autorità di valutazione accreditata
dall’industria. Questo garantisce la loro competenza e la sicurezza nella gestione
dei refrigeranti in accordo con speci che di valutazione riconosciute dall’intero
settore.
• Quando il dispositivo smette di funzionare, smaltirlo in modo adeguato.
• Se non viene utilizzato, conservare il dispositivo in un luogo ben ventilato.
• Stoccare il dispositivo in modo tale da non danneggiarlo.
• Le riparazioni devono essere eseguite dal produttore o da un’azienda tecnica
autorizzata.
• Non danneggiare componenti del circuito del refrigerante. La fuoriuscita di
refrigerante potrebbe non essere notata, dato che è inodore.
• Manutenzione e riparazioni devono essere realizzate con l’ausilio di specialisti
nell’utilizzo di refrigeranti in ammabili.
Informazioni per locali con condotti di refrigerante
• Ridurre al minimo le tubature.
• Assicurarsi di non danneggiare le tubature.
• I dispositivi con refrigeranti in ammabili devono essere installati solo in ambienti
ben ventilati.
• Rispettare le normative nazionali relative al gas.
• Tutti i collegamenti meccanici devono essere accessibili per scopi di manutenzione.
ATTENZIONE
Pericolo d’incendio! Questo dispositivo contiene il refrigerante
in ammabile R290. Se fuoriesce refrigerante e viene esposto a una
fonte d’ignizione, potrebbe esserci il rischio d’incendio.

93
IT
AVVERTENZE DI SICUREZZA
Avvertenze speciali
• Utilizzare solo il prodotto consigliato dal produttore per pulire o sbrinare.
• Non riporre assolutamente il dispositivo in un locale in cui ci sono fonti di ignizione
(ad es. amme libere, un dispositivo a gas acceso o un dispositivo elettrico di
riscaldamento acceso).
• Non inlzare o bruciare il dispositivo.
• Tenere presente che il refrigerante potrebbe essere inodore.
Nota: utilizzare il dispositivo solo in locali con supercie maggiore di X m2 (v.
tabella).
Modell X (m²)
5000 BTU/h, 7000 BTU/h, 8000 BTU/h 10 m²
9000 BTU/h, 10000 BTU/h, 10500 BTU/h 13 m²
12000 BTU/h, 14000 BTU/h, 16000 BTU/h,18000 BTU/h 18 m²
Allgemeine Sicherheitshinweise
• Il dispositivo è adatto solo all’uso in locali al chiuso.
• Non utilizzare il dispositivo se deve essere riparato o se non è stato installato
correttamente.
• Non utilizzare il dispositivo nelle seguenti aree:
- Vicino a fonti di calore
- In aree dove possono esserci schizzi di olio
- In aree esposte direttamente al sole
- In aree dove possono esserci schizzi d’acqua
- Vicino a vasche, in lavanderie, vicino a docce o piscine.
• Non inserire dita o oggetti nelle aperture di ingresso e uscita dell’aria. Avvertire in
particolare i bambini del pericolo.
• Assicurarsi che il dispositivo sia in verticale quando lo si sposta e lo si ripone, in
modo che il compressore sia posizionato correttamente.
• Spegnere il dispositivo e staccare la spina prima della pulizia.
• Spegnere il dispositivo e spegnere la spina prima di spostarlo. Muovere il
dispositivo lentamente e con cura.

94
IT
• Per evitare incendi, non coprire il dispositivo.
• Tutti i collegamenti del dispositivo devono essere conformi alle normative locali per
la sicurezza elettrica. Se necessario, informarsi su queste normative.
• Tenere sotto controllo i bambini, in modo che non giochino con il dispositivo.
• Se il cavo di alimentazione è danneggiato, deve essere riparato dal produttore,
dal servizio di assistenza ai clienti o da una persona con quali ca equivalente, in
modo da evitare danni.
• Il dispositivo può essere utilizzato da bambini a partire da 8 anni e persone con
limitate capacità siche, psichiche e percettive o con esperienza e conoscenza
insuf cienti solo se sono stati istruiti in precedenza sulle modalità di utilizzo sicuro
da parte di una persona responsabile del loro controllo e comprendono i rischi
connessi. La pulizia e la manutenzione del dispositivo possono essere realizzate da
bambini solo con il dovuto controllo.
• Il dispositivo deve essere installato conformemente alle normative nazionali di
cablaggio.
• Tipologia e tensione dei fusibili: T, 250 v AC, 2 A o più
• Per la pulizia e la manutenzione del dispositivo, contattare il servizio di assistenza
ai clienti.
• Non tirare il cavo di alimentazione, non deformarlo o modi carlo e non
immergerlo assolutamente in acqua. Una gestione errata del cavo può causare
danni al dispositivo e/o folgorazioni.
• Devono essere rispettate le normative nazionali relative al gas.
• Non bloccare assolutamente le aperture di ventilazione.
• Non utilizzare il dispositivo esclusivamente attaccando e staccando la spina,
altrimenti possono risultare folgorazioni o incendi a causa della produzione di
calore.
• Staccare subito la spina se compaiono rumori insoliti, strani odori o fumo.
Avvertenze sulla gestione di eventuali danni
• In caso di danni, contattare il produttore, il servizio di assistenza ai clienti o una
persona con quali ca equivalente.
• Se ci sono danni, spegnere il dispositivo, staccare la spina e contattare il
produttore, il servizio di assistenza ai clienti o una persona con quali ca
equivalente.
• Il cavo deve essere dotato di una messa a terra sicura.
• Per evitare danni, se il cavo di alimentazione è danneggiato, è necessario
spegnere il dispositivo, staccare la spina e Il cavo deve essere sostituito dal
produttore, dal servizio di assistenza ai clienti o da una persona con quali ca
equivalente.
AVVERTENZA
Pericolo di lesione! Le riparazioni al circuito del refrigerante possono
essere realizzate solo da personale tecnico quali cato. Non cercare
assolutamente di effettuare riparazioni in modo autonomo!

95
IT
DESCRIZIONE DEL PRODOTTO
1
Lamelle uscita aria
7
Filtro
2
Pannello dei comandi
8
Supporto spina
3
Ingresso aria
9
Porta cavo
4
Tubo di scarico
10
Uscita acqua
5
Rotelline
11
Cavo di alimentazione e spina
6
Impugnatura
12
Scarico aria

96
IT
PANNELLO DEI COMANDI
POWER
Premere questo tasto per accendere il dispositivo. La spia di
operatività si accende.
MODE
Premere questo tasto mentre si accende il dispositivo oppure
mentre si imposta il timer per selezionare una modalità
(raffreddamento, deumidicazione, ventilazione).
UP/DOWN
Impostare con questi tasti il tempo di spegnimento o di
accensione automatico del dis- positivo. Sul display si
accende la spia di controllo automatica. Se il dispositivo
si trova in modalità di raffreddamento, impostare la
temperatura con questi tasti. Premere entrambi i tasti
contemporaneamente per passare da °C a °F e viceversa.
SPEED
Premere questo tasto per impostare la velocità della ventola:
alta > media > bassa. In mo- dalità di ventilazione, tenere
premuto il tasto per 5 secondi per avviare la funzione
interna di asciugatura. Tenere premuto di nuovo il tasto
per 5 secondi per spegnere di nuovo la funzione. La spia
corrispondente si spegne.
TIMER
Premere questo tasto per impostare il timer. La spia
corrispondente si accende.
88
Le cifre sul display grande indicano la temperatura
impostata in modalità di raffredda- mento e di
riscaldamento. In modalità ventilatore e deumidicazione la
temperatura am- biente è indicata in °C o °F
SLEEP
Se si avvia la modalità notturna, sul display si accende la
spia corrispondente.
WATER FULL
Se il serbatoio è pieno, la spia corrispondente lampeggia e
nel mentre viene emesso un segnale acustico.
TIMER + SPEED
Tenere premuti contemporaneamente per 2 secondi i
pulsanti del ventilatore e del timer per attivare la funzione di
oscillazione delle lamelle.

97
IT
TELECOMANDO
POWER: accendere e spegnere il dispositivo.
TIMER: impostare il timer.
SWING: oscillazione orizzontale delle lamelle.
TEMPERATURA: passare da °C a °F.
COOL: avviare la modalità di raffreddamen- to.
DRY: avviare la modalità di deumidicazio- ne.
FAN: accendere la modalità di ventilazione.
UP/DOWN: impostare la temperatura e il timer.
HIGH: velocità alta
MID: velocità media
LOW: velocità bassa
SLEEP: avviare la modalità notturna. Se la ve- locità è impostata sul
livello alto o medio, in modalità notturna la velocità passa al livello
basso. In modalità notturna, la temperatura e la velocità non possono
essere modicate.

98
IT
MESSA IN FUNZIONE E UTILIZZO
Impostare lo spegnimento del timer
Premere il tasto del timer mentre il dispositivo è in funzione. La spia di controllo del timer
si accende e sul display lampeggia 5 volte consecutive il simbolo “00“. Premere uno
dei tasti freccia per impostare il timer tra le 1 e le 24 ore. Tra le 1 e le 24 ore, il tempo si
modica a intervalli di 1 ora. Allo scadere del tempo impostato, il dispositivo si spegne
automaticamente.
Impostare l’accensione del timer
In modalità standby, premere il tasto timer. La spia del timer si accende e sul display
il simbolo “00“ lampeggia 5 volte consecutive. Premere uno dei tasti direzionali
per impostare il tempo desiderato, come per il timer di spegnimento. Oltre al timer,
è possibile impostare anche la modalità di funzionamento all’accensione del
dispositivo. Se si seleziona la modalità di raffreddamento, è possibile impostare
anche la temperatura desiderata. Se si seleziona la modalità di deumidicazione, è
possibile impostare l’umidità desiderata. Allo scadere del tempo, il dispositivo si avvia
automaticamente nella modalità impostata.
Modicare il timer impostato/spegnere il timer
Premere il tasto del timer quando il timer è già in funzione. Il display lampeggia e
indica il tempo rimanente. Utilizzare i tasti direzionali per impostare il tempo desiderato.
Premere di nuovo il tasto del timer mentre il display lampeggia per cancellare il tempo
impostato ed uscire.
Modalità di raffreddamento
• Premere il tasto Mode quando il dispositivo è acceso e selezionare la modalità di
raffreddamento (COOL). Sul display si accende la spia corrispondente.
• Premere i tasti direzionali per impostare una temperatura compresa tra i 18°C e i
30°C. Ad ogni pressione di tasto, la temperatura impostata aumenta o diminuisce
di 1°C.
• Premere il tasto della velocità (SPEED) per selezionare la velocità nella sequenza
seguente: alta (HIGH) > media (MID) > (LOW).

99
IT
• Per attivare la modalità notturna, premere in modalità di raffreddamento
il tasto SLEEP (modalità notturna) posto sul telecomando oppure premere
contemporaneamente i tasti UP (freccia rivolta verso l’alto) e il tasto TIMER posto
sul pannello dei comandi. Se la ventola è in funzione a velocità alta o media, la
velocità viene impostata sul livello basso. Dopo 7 ore, il dispositivo si spegne auto-
maticamente. Per uscire dalla modalità notturna, premere di nuovo il tasto SLEEP sul
telecomando oppure il tasto per modicare la temperatura posto sul pannello dei
comandi.
• Premere il tasto SWING per avviare l’oscillazione delle lamelle. Premere di nuovo il
tasto per disattivare di nuovo la funzione.
Modalità di deumidicazione
• Premere il tasto Mode quando il dispositivo è acceso e selezionare la modalità di
deumicazione (DEHUMI- DIFY). La spia corrispondente si accende.
• In questa modalità, la temperatura non può essere impostata.
• Premere il tasto SWING per avviare la funzione di oscillazione delle lamelle.
Modalità di ventilazione
• Premere il tasto FAN quando il dispositivo è acceso per avviare la modalità di
ventilazione. La spia corrispon- dente si accende.
• Premere il tasto SPEED per selezionare la velocità nella sequenza seguente: alta
(HIGH) > media (MID) > bassa (LOW). Tenere premuto per 5 secondi il tasto
SPEED per avviare la funzione di asciugatura interna. La ventola superiore e
inferiore si mettono in funzione contemporaneamente. Premere di nuovo il tasto
SPEED per 5 secondi per disattivare la funzione.
• In questa modalità, la temperatura non può essere impostata.
• Premere il tasto SWING per avviare la funzione di oscillazione delle lamelle.
Indicazioni importanti per l’utilizzo
• Se sul display compare “FL” e la spia del livello dell’acqua lampeggia, il dispositivo
si arresta no a quando non si svuota l’acqua. Appena l’acqua è stata scaricata, il
dispositivo riprende a funzionare automaticamente.
• Nelle modalità di deumidicazione e di ventilazione (inclusa la funzione di
asciugatura) non è necessario utilizzare il tubo di scarico.
• Se la stanza è esposta alla luce diretta del sole, tirare le tende.
100
IT
GESTIONE TRAMITE SMARTPHONE
Se si collega l‘apparecchio al WiFi, è possibile gestirlo comodamente con la relativa
applicazione Klarstein. L‘app non solo consente di controllare l´apparecchio da
remoto dal proprio smartphone, ma consente anche di accedere a ricette e ad altre
informazioni.
Per collegare il telefono al dispositivo Klarstein, procedere come segue:
1. Per prima cosa scaricare l‘app Klarstein scansionando il codice QR con lo
smartphone (vedere sotto) o scaricarla direttamente dall‘App Store o da Google
Play.
2. Accertarsi che lo smartphone sia connesso alla stessa rete WiFi a cui deve
collegarsi il dispositivo Klarstein.
3. Aprire l‘applicazione Klarstein.
4. Accedere con il proprio account. Se non si possiede ancora un account, registrarsi
nell‘app Klarstein.
5. Seguire le istruzioni contenute nell‘App.
App-Download
Utilizzare la funzione di scansione del telefono per eseguire la scansione del codice
QR e salvare l‘applicazione sullo smartphone.
Nota: L‘applicazione fornisce ulteriori informazioni su come utilizzarla e su come
connettersi al dispositivo non appena viene aperta per la prima volta.
iOS Android

101
IT
Risoluzione dei problemi di connessione
Se il dispositivo Klarstein non si trova nella WLAN, controllare quanto segue:
• Il dispositivo è collegato?
• La funzione WiFi del telefono è abilitata?
• La funzione WiFi del dispositivo Klarstein è attivata? (Seguire le istruzioni nell‘app)
• La password WLAN è stata immessa correttamente?
• Il router, il dispositivo Klarstein e lo smartphone sono nelle immediate vicinanze
durante il tentativo di connessione? (Idealmente a non più di 5 m di distanza)
• Se la banda da 2,4 GHz è stata disattivata nelle impostazioni del router wireless,
attivarla nelle impostazioni del router.
Nota: Per ulteriori informazioni, seguire le istruzioni nell‘app quando si congura la
connessione.

102
IT
INSTALLAZIONE
Collocazione
Posizionare il dispositivo su una supercie asciutta e piana. Lasciare almeno 50 cm di
spazio libero intorno al dispositivo afnché l’aria possa circolare.
Installare il tubo di scarico dell’aria
• Assemblare il tubo all’estremità
tonda.
• Fissare allo scarico dell’aria
l’estremità tonda del tubo come
mostrato nella gura.
• Fissare l’estremità piatta alla
guarnizione per la nestra. Installare
la guarnizione alla nestra.
Assicurarsi che non ci siano ostacoli
nel raggio di 50 cm afnché l’aria
possa circolare.
Indicazioni importanti per il tubo di scarico dell’aria
• La lunghezza del tubo è compresa tra i 60 cm e i 170 cm (adattatore incluso). Si
consiglia di utilizzare la lunghezza minima per risparmiare energia.
• Il tubo di scarico dell’aria è stato prodotto specicatamente per questo dispositivo.
Non utilizzare un altro tubo più lungo o di un materiale differente. In caso contrario,
il dispositivo potrebbe danneggiarsi.
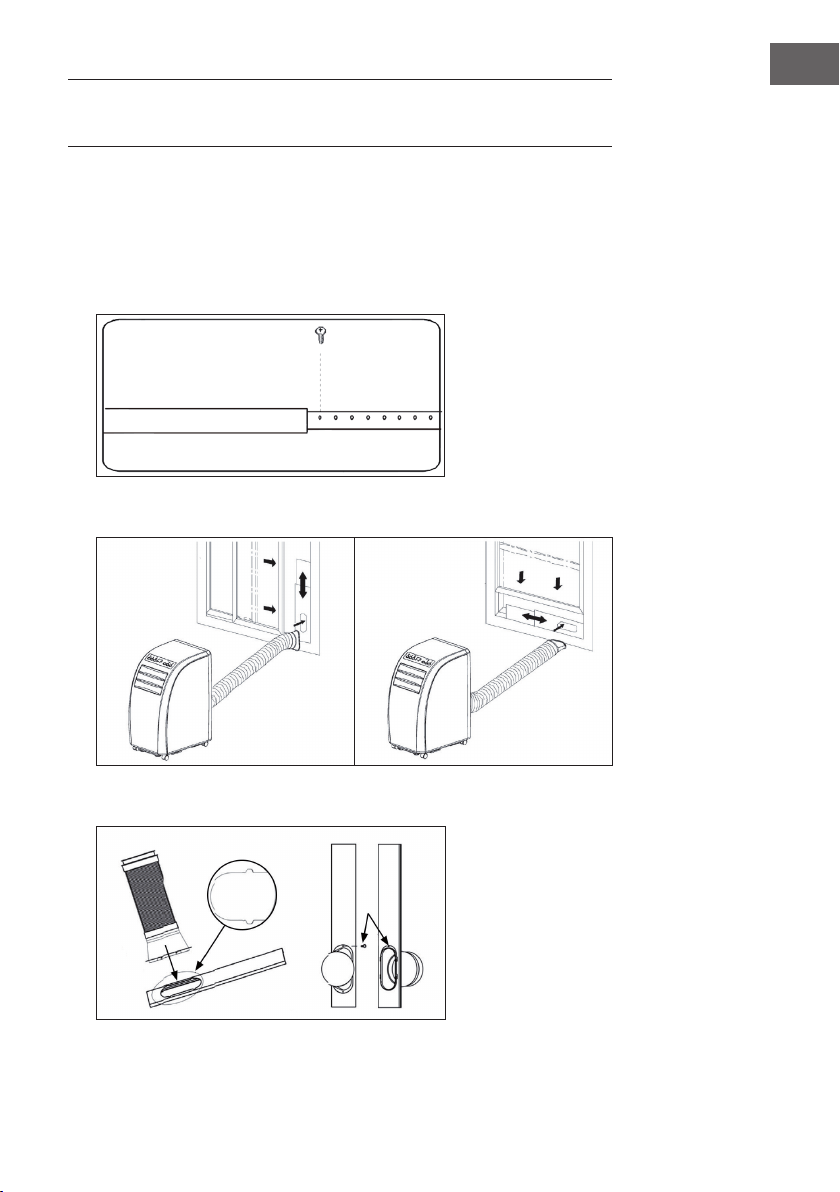
103
IT
FISSAGGIO DELLA GUARNIZIONE DELLA
FINESTRA
Finestra scorrevole
1. Per prima cosa misurare l‘altezza o la larghezza della nestra in base a come si
desidera installare la guarnizione.
2. Regolare la lunghezza della piastra di sigillatura (vedere la gura) e ssare la
piastra con le viti.
3. Fissare la piastra di sigillatura nella nestra (vedere le gure).
4. Fissare il tubo di scarico alla piastra di sigillatura. Fissarlo utilizzando le viti.
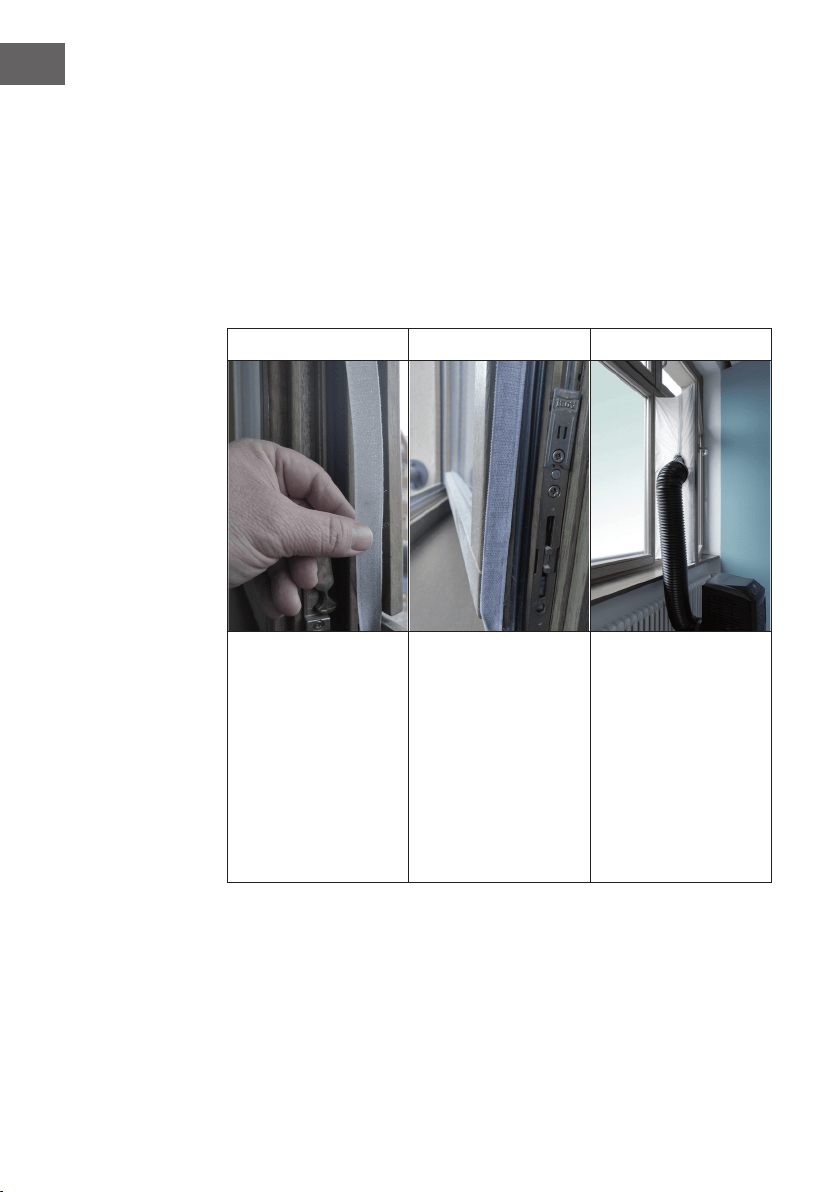
104
IT
Finestra,ad apertura inclinata
Installare la guarnizione per la nestra è semplice. E´ possibile installare la guarnizione
ad una nestra, ad apertura inclinata, ad una nestra ad apertura laterale oppure
ad un lucernario. La dimostrazione in basso è eseguita con una nestra ad apertura
laterale. Questo tipo di nestra è particolarmente adatto poiché si può installare il tubo
di scarico in basso.
Il nastro di velcro adesivo deve essere installato su tre lati. Lasciare libero il lato nel
quale la nestra è connessa al telaio. Il telaio della nestra deve essere prima pulito ed
asciugato afnché il nastro possa incollarsi.
1 2 3
Incollare il nastro di velcro
adesivo a sinistra, a destra
e nella parte superiore del
telaio della nestra.
Si consiglia di tagliare a
strisce il nastro di velcro
adesivo per ogni lato
della nestra.
Incollare il nastro di velcro
adesivo anche nella parte
interna della nestra.
Fissare la guarnizione alle
strisce in velcro poste sul
telaio (iniziare in alto al
centro) e poi alle strisce in
velcro poste sulla nestra.
Inserire il tubo di scarico
del climatizzatore
nell´apertura, la quale è
regolabile in altezza e in
grandezza attraverso la
cerniera.

105
IT
Installazione alla parete
Installazione corretta del tubo
Installazione errata del tubo
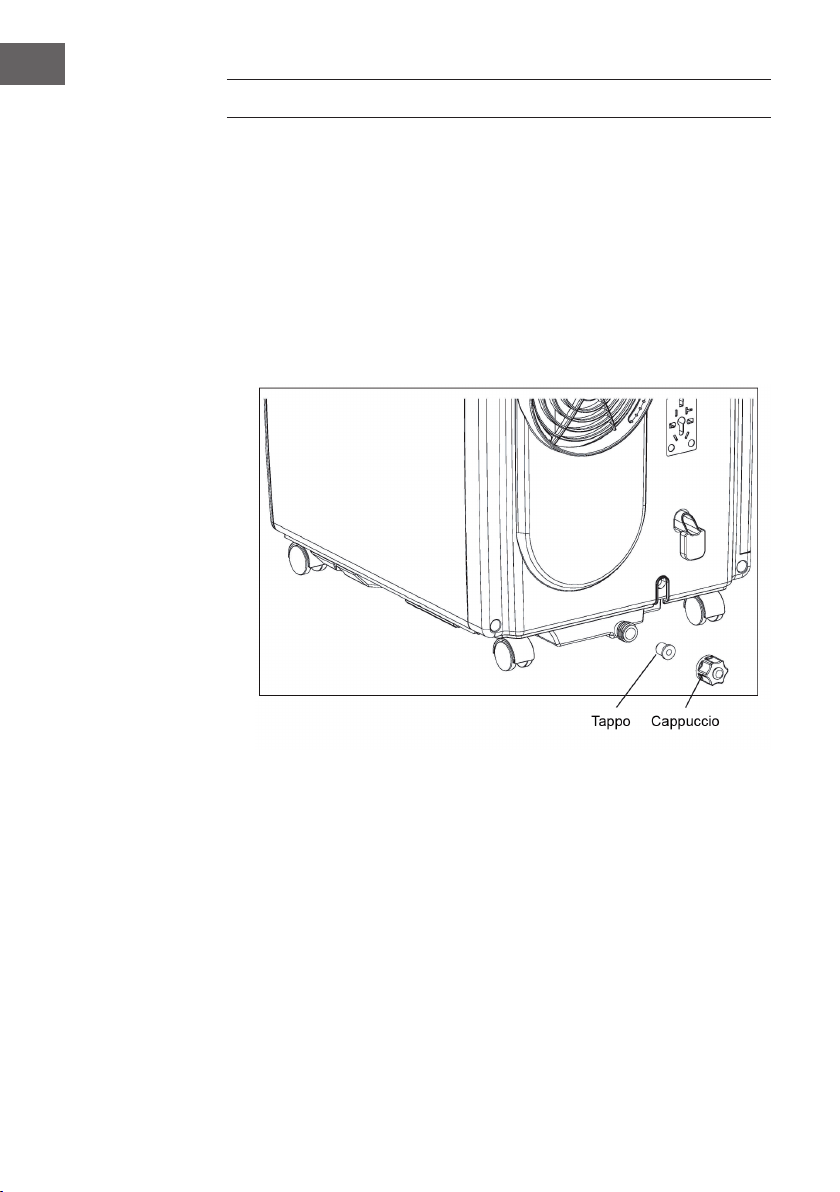
106
IT
FAR DEFLUIRE L’ACQUA
• In modalità di raffreddamento o di deumidicazione, viene raccolta più acqua di
condensa. Appena il ser- batoio è pieno, viene emesso un segnale acustico e il
dispositivo si arresta. La spia del serbatoio pieno si accende. Un segnale acustico
viene a che il livello dell’acqua si trova di nuovo al di sotto del sensore oppure no
a che non si svuota il serbatoio. Appena l’allarme si spegne, il dispositivo riprende
a funzionare.
• Quando il dispositivo emette il segnale acustico, svuotare subito l’acqua. Spostare
il dispositivo verso uno scarico, svitare il cappuccio e rimuovere il tappo. Far
deuire completamente l’acqua. Inserire di nuovo il tappo e il cappuccio. Quando
il serbatoio è pieno, spostare il dispositivo con cautela prestando attenzione a non
far traboccare l’acqua all’interno.

107
IT
PULIZIA E MANUTENZIONE
Prima di pulire il dispositivo, spegnerlo e staccare la spina dalla presa di corrente.
Pulizia delle superci
Pulire le superci utilizzando uno spolverino o un panno umido. Non usare prodotti
chimici, benzina, alcool o benzene. In caso contrario, le superci o il dispositivo stesso
potrebbe danneggiarsi.
Pulizia dei ltri
Se i ltri sono impolverati, l‘aria non può circolare a sufcienza e ciò inuisce
negativamente sulle prestazioni del dispositivo. In caso di utilizzo prolungato del
dispositivo, si consiglia di pulire i ltri ogni due settimane.
1. Estrarre i ltri come mostrato nella gura.
2. Pulire i ltri a 40°C in acqua calda con un deter- gente neutro. Al termina di questa
operazione, far asciugare i ltri all’ombra.
3. Inserire di nuovo il ltro nel dispositivo.
4. Rimozione del ltro: estrarre per primo il ltro 2 dal dispositivo e poi il ltro 1. Al
termine della pulizia, installare prima il ltro 1 e poi il ltro 2.
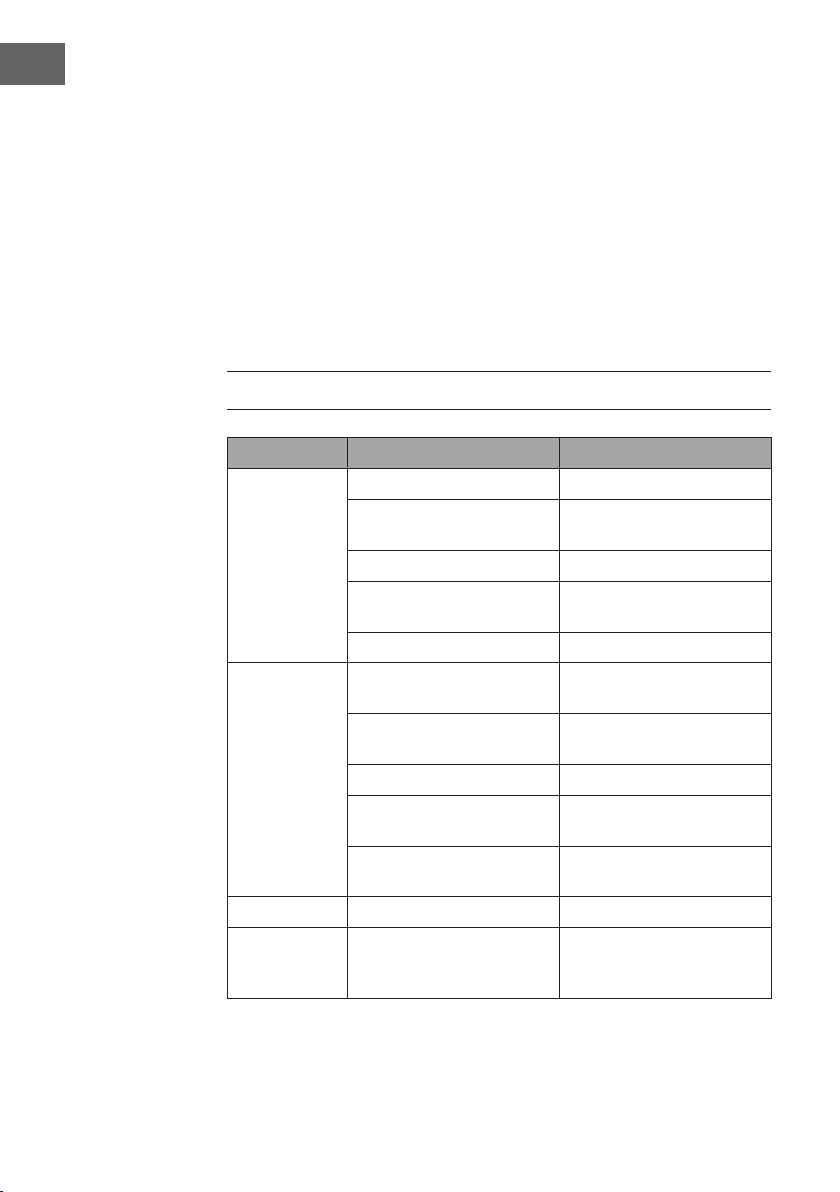
108
IT
Conservare il dispositivo a ne stagione
In caso di inutilizzo prolungato del dispositivo, attenersi alla seguente procedura:
• Far deuire l‘acqua dal serbatoio. Per fare ciò, inclinare il dispositivo leggermente
all’indietro. Ora attivare la modalità di ventilazione e premere 5 secondi il tasto
SPEED per avviare la ventola interna. Lasciare il dispo- sitivo in funzione per 2-3
ore. Durante questo lasso di tempo, la parte interna del dispositivo si asciuga.
• Spegnere il dispositivo e staccare la spina dalla presa di corrente.
• Avvolgere il cavo sul retro e ssare la spina.
• Togliere il tubo di scarico.
• Proteggere il dispositivo con un involucro e conservarlo in un luogo asciutto.
• Rimuovere le batterie dal telecomando e conservarle in un luogo sicuro.
RISOLUZIONE DEGLI ERRORI
Errore Causa possibile Soluzione
Il dispositivo non
funziona.
Il dispositivo è spento. Accendere il dispositivo.
La spina non è inserita nella
presa.
Inserire la spina nella presa.
Il fusibile è guasto. Sostituire il fusibile.
Il timer non è impostato
correttamente.
Modicare il tempo impostato.
Il serbatoio è pieno. Svuotare il serbatoio.
Il dispositivo
non raffredda
correttamente.
Le prese d’aria sono ostruite. Rimuovere ciò che ostruisce le
prese d’aria.
Ci sono fonti di calore nella
stanza.
Rimuovere tutte le fonti di
calore.
I ltri sono sporchi. Pulire i ltri.
La temperatura non è impostata
corretta- mente.
Modicare le impostazioni
della tempera- tura.
Der Ventilator läuft zu langsam. Erhöhen Sie die
Geschwindigkeit.
La ventola è troppo lenta. Aumentare la velocità.
Il dispositivo è
troppo rumo-
roso e vibra.
Il dispositivo non è collocato su
una super- cie piana e stabile.
Collocare il dispositivo su una
supercie piana e stabile.
109
IT
Importante: se il dispositivo non funziona correttamente, spegnerlo e staccare la
spina dalla presa. Far control- lare il dispositivo da un centro assistenza specializzato
nei seguenti casi:
• Il fusibile oppure l’interruttore è guasto.
• Il cavo di alimentazione si surriscalda oppure è danneggiato.
• Il dispositivo emette strani odori.
Messaggi di errore
E1: la bobina del sensore non funziona
correttamente
Nota: quando la spia di riscaldamento
si accende, il dispositivo si trova in
modalità antigelo o in modalità di
scongelamento. Non si tratta di un
malfunziona- mento.
E2: errore del sensore della temperatura
ambiente
E3: protezione antigelo
FL: il serbatoio dell´acqua è pieno ed è
necessario svuotarlo.
SCHEDA INFORMATIVA DEL PRODOTTO
Indicazioni conformi al regolamento (UE) n. 626/2011
Marchio del fornitore:
Klarstein
Identicazione del modello del fornitore:
10035803,
10035804
Livelli di potenza sonora interna alle
condizioni nominali standard per le funzioni di
raffreddamento in dB: 63 dB
La perdita di refrigerante contribuisce al cambiamento climatico. In caso
di rilascio nell‘atmosfera, i refrigeranti con un potenziale di riscaldamento
globale (GWP) più basso contribuiscono in misura minore al riscaldamento
globale rispetto a quelli con un GWP più elevato. Questo apparecchio
contiene un uido refrigerante con un GWP di 3. Se 1 kg di questo
uido refrigerante fosse rilasciato nell‘atmosfera, quindi, l‘impatto sul
riscaldamento globale sarebbe 3 volte più elevato rispetto a 1 kg di
CO
2
, per un periodo di 100 anni. In nessun caso l‘utente deve cercare di
intervenire sul circuito refrigerante o di disassemblare il prodotto. In caso
di necessità occorre sempre rivolgersi a personale qualicato.
Coefciente di efcienza energetica (EER
nominale
): 3,1
Classe di efcienza energetica:
A
Consumo di energia 0,9 kWh/60 min. in base ai risultati di prove
standard. Il consumo effettivo dipende dalle modalità di utilizzo
dell’apparecchio e dal luogo in cui è installato.
Capacità di raffreddament P
nominale
in kW:
2,9 kW
Indicazioni conformi al regolamento (UE) n. 206/2012
Identicazione del modello (i) 10035803, 10035804
Descrizione Simbolo Valore Unità
Capacità nominale di
raffreddamento
P
nominale
per il
raffreddamento
2,9 kW
Capacità nominale di
riscaldamento
P
nominale
per il
riscaldamento
- kW
Potenza nominale assorbita per il
raffreddamento
P
EER
0,9 kW
Potenza nominale assorbita per il
riscaldamento
P
COP
- kW
Indice di efcienza energetica
nominale
EERd 3,1 -
Coefciente di efcienza nominale COPd - -
Consumo di energia in modo
«termostato spento»
P
TO
- W
Consumo di energia in modo
«attesa»
P
SB
0,5 W
Consumo di energia per
apparecchiature a singolo/
doppio condotto
(indicare separatamente
raffreddamento e riscaldamento)
DD: Q
DD
SD: Q
SD
0,9 DD: kWh/a
SD: kWh/h
Livello di potenza sonora L
WA
63 dB(A)
Potenziale di riscaldamento
globale
GWP 3 kgCO
2
eq.
Referente per ulteriori informazioni Chal-Tec GmbH,
Wallstraße 16, 10179 Berlin, Germania.

112
IT
AVVISO DI SMALTIMENTO
Se nel proprio paese si applicano le regolamentazioni
inerenti lo smaltimento di dispositivi elettrici ed elettronici,
questo simbolo sul prodotto o sulla confezione segnala che
questi prodotti non possono essere smaltiti con i ri uti normali
e devono essere portati a un punto di raccolta di dispositivi
elettrici ed elettronici. Grazie al corretto smaltimento dei
vecchi dispositivi si tutela il pianeta e la salute delle persone
da possibili conseguenze negative. Informazioni riguardanti il
riciclo e lo smaltimento di questi prodotti si ottengono presso
l’amministrazione locale oppure il servizio di gestione dei
ri uti domestici.
Il prodotto contiene batterie. Se nel proprio paese si
applicano le regolamentazioni inerenti lo smaltimento di
batterie, non possono essere smaltite con i normali ri uti
domestici. Preghiamo di informarvi sulle regolamentazioni
vigenti sullo smaltimento delle batterie. Grazie al corretto
smaltimento dei vecchi dispositivi si tutela l’ambiente e la
salute delle persone da conseguenze negative.
DICHIARAZIONE DI CONFORMITÀ
Produttore:
Chal-Tec GmbH, Wallstraße 16, 10179 Berlino, Germania.
Importatore per la Gran Bretagna:
Chal-Tec UK limited
Unit 6 Riverside Business Centre
Brighton Road
Shoreham-by-Sea
BN43 6RE
United Kingdom
La dichiarazione di conformità completa del produttore è
disponibile al seguente link: use.berlin/10035804