Loading ...
Loading ...
Loading ...
14
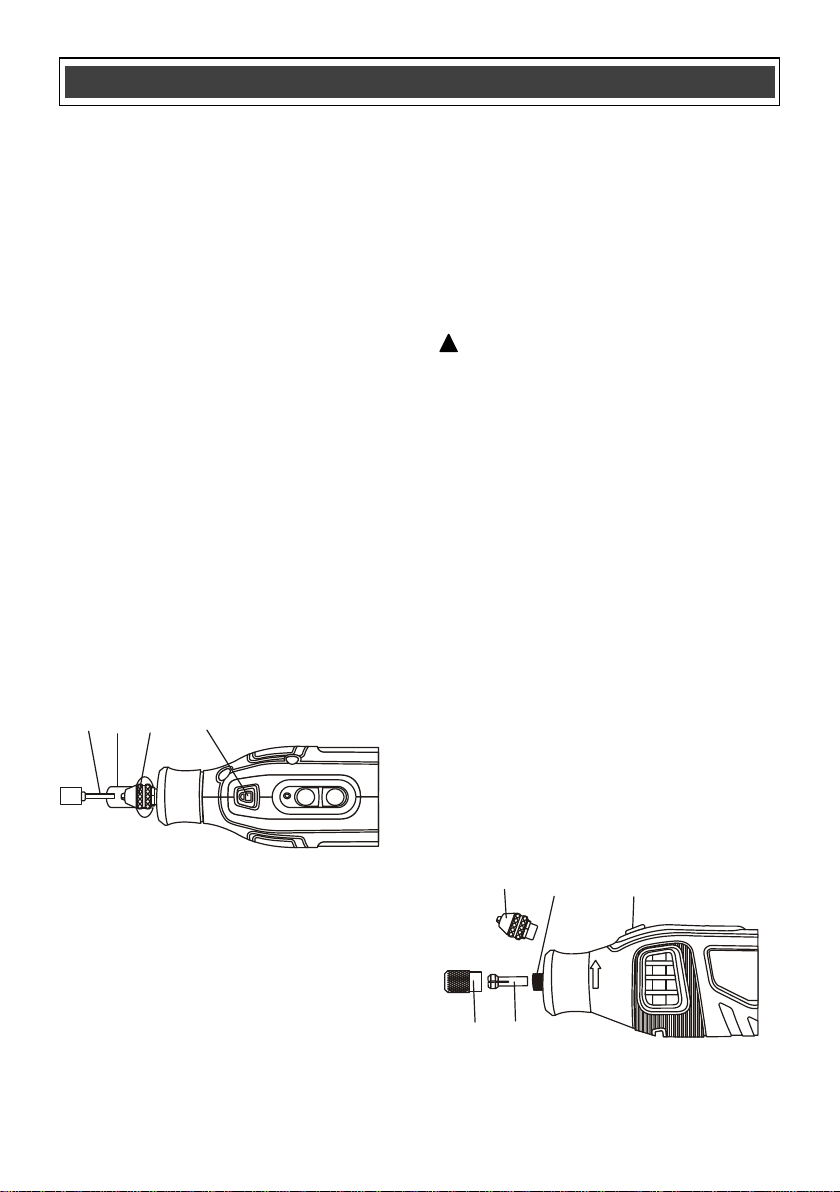
INSTALLING ACCESSORY BITS
1. Turn the switch OFF and disconnect the tool
from the power source.
2. Depress the spindle lock button (1) and
slowly turn the 3-jaw chuck collet nut (2) until
the spindle lock button locks the spindle
(Fig. 1).
3. While holding the spindle lock button down,
turn the 3-jaw chuck collet nut counter
clockwise until the 3-jaw chuck jaws open far
enough to allow the accessory bit shank (3) to
be inserted into the 3-jaw chuck.
4. Insert accessory shank into the 3-jaw chuck.
NOTE: Insert accessory shank at least 3/4"
into the 3-jaw chuck.
5. Press the spindle lock button and engage it in
the spindle. While holding the spindle lock
button down, hand-tighten the 3-jaw chuck by
turning it clockwise.
NOTE: Do not use pliers to tighten the collet
nut. Use the small wrench (4) supplied. Over
tightening will cause damage to the tool.
6. Pull on the accessory to ensure it is securely
in place.
REMOVING THE 3-JAW CHUCK AND
INSTALLING A COLLET
In some instances you may wish to remove the
3-jaw chuck and use the collet nut system to
hold the accessory bit. Collet sizes can be 1/8",
3/32" and 1/16". It is important to ensure that the
collet size matches the accessory.
NOTE: This tool includes the most commonly
used collets: 1/8", 3/32" and 1/16".
WARNING: Using a collet that is too
large for the accessory will result in the
accessory possibly being thrown from the
tool causing serious injury.
1. Turn the tool switch OFF and remove the plug
from the power source.
2. Depress the spindle lock button (1) and
slowly turn the 3-jaw chuck (2) until the
spindle lock button locks the spindle (3) (Fig.
2).
3. While holding the spindle lock button down,
turn the 3-jaw chuck counter clockwise until
both the 3-jaw chuck collet nut and the jaw
assembly are removed from the spindle.
4. Insert the appropriate sized collet (4) into the
spindle and thread the collet nut (5) onto the
spindle by turning it clockwise while holding
the spindle lock button down.
NOTES:
a) The collet nut is supplied with the tool.
b) Do not tighten the collet nut without an
accessory bit installed in the collet. You will
damage the collet.
ASSEMBLY AND OPERATING ASSEMBLY AND OPERATING
!
Fig. 1
1
23
4
1
2
3
4
5
Fig. 2
Loading ...
Loading ...
Loading ...