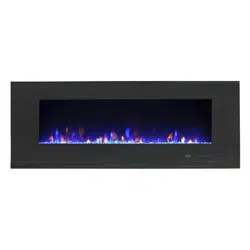
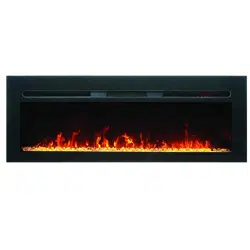
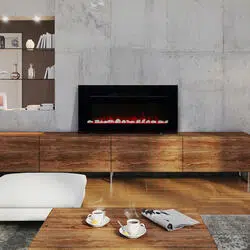
Paramount EF-WM407 Wall Electric
Product's Documents
Below are documents related to this product, you can read online or download:
- Owner's manual - (English) Read Online | Download pdf
USER MANUAL ELECTRIC FIREPLACE
CLEARANCE: PLEASE ALLOW A MINIMUM OF 1/2” SPACE FROM THE REAR OF THE UNIT TO A WALL.
Wall opening dimensions:
NOTE: Before installing the fireplace, please confirm the opeing size of the wall.


1. Remove the front cover
|  |
2. Securing the fireplace
 |  |
3. Place Decorative Media
 |  |
4. Replace Front Cover
|  |
1. Wall location preparation
|  |
2. Pre-drill screw
 |  |
3. Attach the bracket
 |  |
4. Mounting the fireplace
|  |
5. Secure mounting bracket
 |  |
1. Attach stands
 |  |
After reading all the instructions, make sure that all the fireplace controls are in the OFF position. Plug the fireplace into a 15A/120V outlet.
The controls are located at the right of the heater outlet.

 | Press this button to turn ON the fireplace. Press again to turn off the fireplace and the fan will continue to work for 60 seconds without heat. |
 | Press this button to change the flame effect. By default, the flame color is yellow. Press again to change flame color. There are ten groups of flame colors including four primary colors: yellow, blue, green and red and six different combinations of mixed primary colors. Hold the button 3 seconds and longer, the background light will turn on and change its colors in turn : Blue, green, red ,purple, yellow ,white and cyan. The color will stop changing when you release the button. |
 | Press this button to change flame intensity. Press again to decrease the flame intensity. There are 6 light intensities for your selection. The flame optics will go lower under the sequence of 6,5,4,3,2 and 1. Pressing the button again will stop the flame effect. |
 | Press this button to set the desired temperature. When desired ambient temperature is reached, the heater will automatically stop heating. When the ambient temperature drops below the desired temperature 2°C, the heater will resume heating. |
 | Press this button to turn ON the fireplace and the fan will continue to work for 60 seconds without heat. |  |
 | Press this button for timer function. The letters ‘0H’ to ‘8H’ will appear on the LED screen. ‘0H’ means there is no set running time and heater will run continuously. The letters ‘1H’ to ‘8H’ mean the number of hours that the heater will operate before shutting off. | |
 | Press this button to toggle between the two temperature scales. The corresponding Celsius (C) or Fahrenheit (F) LED indicates the current setting. | |
 | For heat function - Press this button to turn on the heat function. Press again to turn off. | |
| Press this button to change flame intensity. Press again to decrease the flame intensity. There are 6 light intensities for your selection. The flame optics will go lower under the sequence of 6,5,4,3,2 and 1. Pressing the button again will stop the flame effect. | |
 | Press this button to change flame effect. The unit will beep. By default, the flame color is yellow. Press again to change flame color. There are ten groups of flame colors. Including four primary colors: yellow, blue, green and red and six different combinations of mixed colors. | |
 | Press to change backlight effect. There are seven types of backlight effect, consisting of blue, green, red, purple, yellow, white and cyan. Press this button until the desired color is set. | |
 | Press up or down button to the desired temperature. When desired ambient temperature is reached, the heater will automatically stop heating. When the ambient temperature drops below the desired temperature 2°C, the heater will resume heating. | |
 | Press the I /O switch to turn on/turn off the power for heating system.When the switch is turned off, you still can control the flame and background light, but the power for heating system. If you want to open the heating function, pls make sure the switch is turned on. |
Maintenance
WARNING: Completely disconnect power before attempting any maintenance or cleaning, to reduce the risk of fire or electric shock. Maintenance should only be performed by a certified technician.
Cleaning
Anti-frost function
| PROBLEM | POSSIBLE CAUSE | CORRECTIVE ACTION |
| Fireplace doesn’t work. | Fireplace inner components are overheating or the home circuit breaker has tripped. | Reset switch by turning master switch off and waiting for 5mins, then turning it back on. |
| Flame is not moving. | Wiring may be loose or the flame motor may be defective | Call customer service for instructions. |
| Dim or poorly visible flame or crystals aren’t glowing. | LED lights are burnt out or the wiring is loose. | Call customer service for instructions. |
| Flame sputters. | Flame motor is defective. | Call customer service for instructions. |
| Remote control does not work. | Low battery. Master switch is in “OFF” position. | Change the battery for remote control. Check to make sure the master switch is turned on. |
| Circuit breaker trips or fuse blows when the unit is on. | Improper circuit current rating. | Turn off electrical equipment sharing the circuit. Call customer service for instructions. |
| Heater does not provide heat when turned on. | Thermal switch has been tripped. Circuit breaker has been tripped. | Turn the unit off and unplug the unit for 5mins. Plug back in and turn on the unit. Turn off circuit breaker that supplies electricity to the unit, wait 5 minutes, then flip circuit breaker back on |
| Appliance turns off and will not turn on. | Appliance has overheated and its safety device has caused the thermal switch to disconnect. | Unplug the appliance, allow to cool for 15mins, then plug back in. |
| House circuit breaker has tripped | Reset the house circuit breaker. |
Reference file: Paramount EF-WM407 Wall Electric
Additionally, the document applies to other Paramount models: EF-WM395