
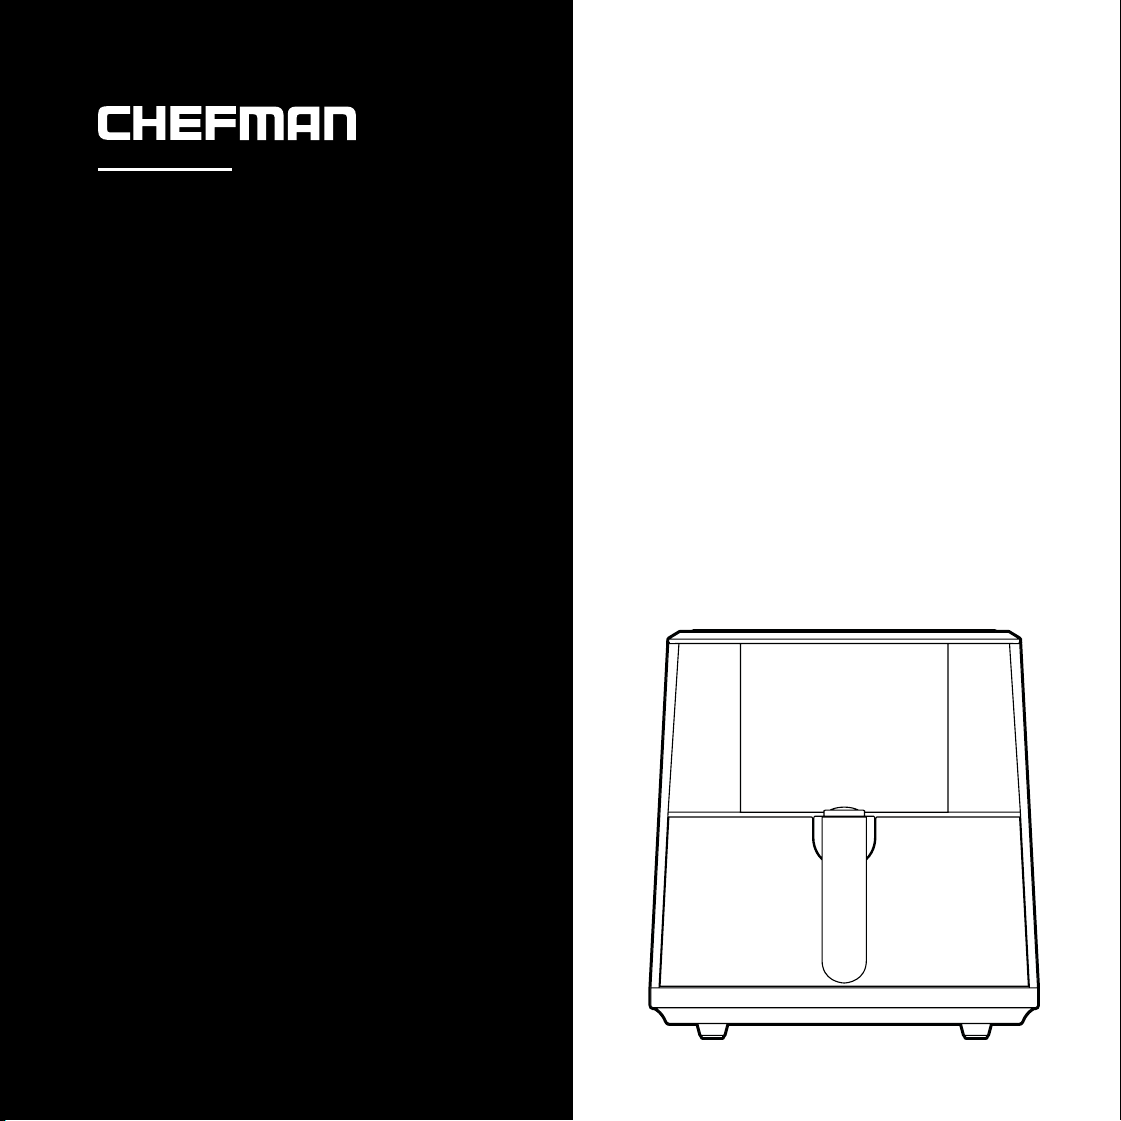
®
TurboFry
®
Touch
AIR Fryer
with Basket Divider
USER GUIDE
• Safety Instructions
• Features
• Operating Instructions
• Air Frying Chart
• Air Fryer Cooking Tips
• Troubleshooting/FAQs
• Cleaning and Maintenance
• Notes
• Terms and Conditions
• Warranty Registration
RJ38-SQSS-8T-D

READ ALL INSTRUCTIONS BEFORE USE
For your safety and continued enjoyment of this product, always
read the instruction manual before using.
COOKING FORWARD™
Welcome!
Whether this is your rst Chefman
®
appliance or you’re already part of our family,
we’re happy to be cooking with you! With your new TurboFry
®
Touch Air Fryer
with Basket Divider, you can air fry foods to crisp perfection with little to no oil for
healthier eating. With its extra-large 8-quart basket capacity, this air fryer lets you
make meals for the whole family. Plus, the bonus removable basket divider allows
for cooking two different foods at one time without mixing them.
We know you’re excited to get cooking, but please take a few minutes to read our
directions, safety instructions, and warranty information.
From our kitchen to yours,
The Chefman
®
Team
1 Safety Instructions
5 Features
8 Operating Instructions
10 Air Frying Chart
12 Air Fryer Cooking Tips
13 Troubleshooting/FAQs
14 Cleaning and Maintenance
15 Notes
17 Terms and Conditions
19 Warranty Registration
CONTENTS

1 2
SAFETY INSTRUCTIONSSAFETY INSTRUCTIONS
IMPORTANT SAFEGUARDSIMPORTANT SAFEGUARDS
WARNING: When using electrical appliances, basic safety precautions should always be
followed, including:
1. Read all instructions.
2. Do not touch hot surfaces. Use handles or knobs.
3. To protect against electrical shock, do not immerse the cord or plug in water or
other liquids.
4. Close supervision is necessary when any appliance is used by or near children.
5. Unplug from the outlet when not in use and before cleaning. Allow to cool before
putting on or taking off parts.
6. Do not operate any appliance with a damaged cord or plug, or after the appliance
malfunctions or has been damaged in any manner. Contact Chefman
®
Customer
Support.
7. The use of accessory attachments not recommended by the appliance manufacturer
may cause injuries.
8. Do not use outdoors.
9. Do not let the cord hang over the edge of a table or counter or touch hot surfaces.
10. Do not place on or near a hot gas or electric burner or in a heated oven.
11. Extreme caution must be used when moving an appliance containing hot oil or other
hot liquids.
12. To disconnect, turn any control to “off,” then remove the plug from the wall outlet.
13. Do not use the appliance for other than intended use.
14. Place the unit on a at, sturdy, heat-resistant surface. Do not place the unit near or on
any type of heat source, such as a gas or electric burner, stove, or oven, even if not on.
Do not use near an open ame or ammable materials.
15. The unit will emit some heat. Allow sufcient space around the unit when in use, and
do not place near other items or appliances.
16. Check that your home power supply corresponds with the intended voltage of the
TurboFry
®
Touch Air Fryer.
17. Never wrap the cord tightly around the appliance during use or storage; this may
cause the wire to fray and break.
18. This product is not a deep fryer. It is NOT meant to be lled with oil. Never ll any parts
of the air fryer with oil. If you choose to use oil, toss food with oil in a separate bowl
and then transfer food to the removable rack or basket.
19. Do not leave uncooked ingredients in the air fryer for more than a short period of time
before cooking; raw meat, poultry, sh, fruits, and vegetables can spoil.
20. Do not move the air fryer while it is full of food.
21. Do not move the unit during use. During initial use, you may notice some smoke and/
or a slight odor. This is normal and should quickly dissipate. It should not happen after
the appliance has been used a few more times.
22. Do not leave the air fryer unattended during use.
23. Some areas do get HOT during use, and the touch screen may get warm. Do not touch
the heating elements. Do not place hands or other body parts near the air vents while
the air fryer is in use; burns may result. Take caution when handling the hot air fryer
rack and all removable parts.
24. Use protective mitts and/or tongs to remove hot food from the air fryer.
25. Store the air fryer in a cool, dry place.
SAVE THESE INSTRUCTIONS

3 4
WARNING: This appliance has a polarized plug (one blade is wider than the other). This
plug is intended to t into a polarized outlet only one way. If the plug does not t fully
into the outlet, reverse the plug. If it still does not t, contact a qualied electrician. Do not
attempt to modify the plug in any way or force it into the outlet. This could result in injury
or electric shock.
SHORT-CORD INSTRUCTIONS
A short power-supply cord is provided to reduce the hazards of entanglement or tripping
over a longer cord. Longer detachable power-supply cords or extension cords are
available and may be used if care is exercised in their use. If a longer detachable power-
supply extension cord is used:
1. The marked electrical rating of the extension cord should be at least as great as the
electrical rating of the appliance.
2. The cord should be arranged so that it will not drape over the countertop or tabletop
where it can be pulled on by children or tripped over.
POWER-CORD SAFETY TIPS
1. Never pull or yank on the cord or the appliance.
2. To insert the plug, grasp it rmly and guide it into the outlet.
3. To disconnect the appliance, grasp the plug and remove it from the outlet.
4. Before each use, inspect the power cord for cuts and/or abrasion marks.
If any are found, please contact Chefman
®
Customer Support for assistance.
5. Never wrap the cord tightly around the appliance, as this could place
undue stress on the cord where it enters the appliance and cause it to fray
and break.
DO NOT OPERATE APPLIANCE IF THE POWER CORD SHOWS
ANY DAMAGE OR IF APPLIANCE WORKS INTERMITTENTLY
OR STOPS WORKING ENTIRELY.
Do not place the appliance
on a stovetop or any other
heatable surface, even if
stovetop is not on. Doing
so is a re hazard.
SAFETY INSTRUCTIONSSAFETY INSTRUCTIONS
IMPORTANT SAFEGUARDSIMPORTANT SAFEGUARDS
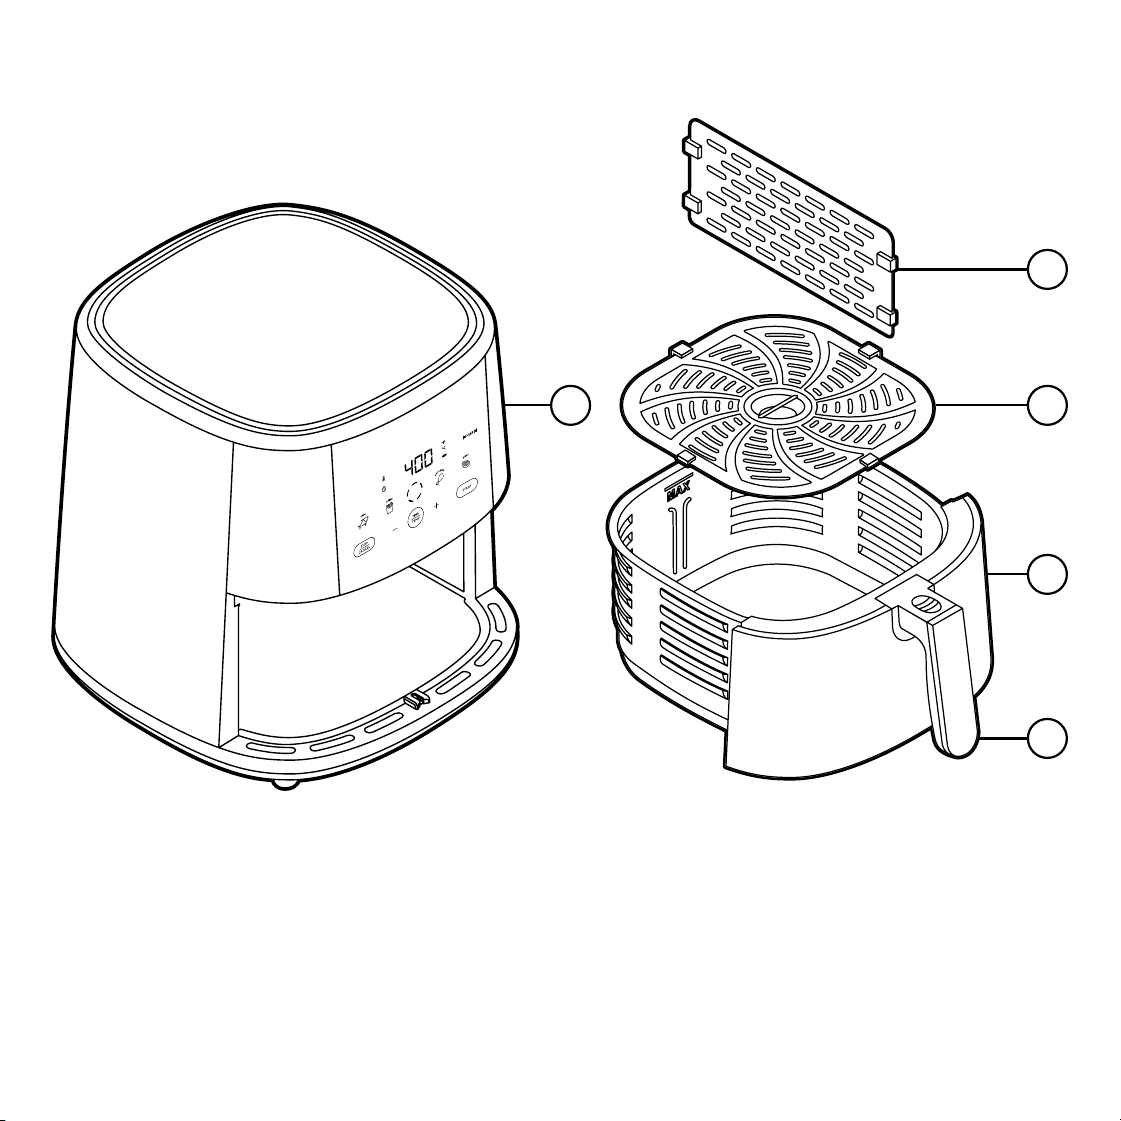
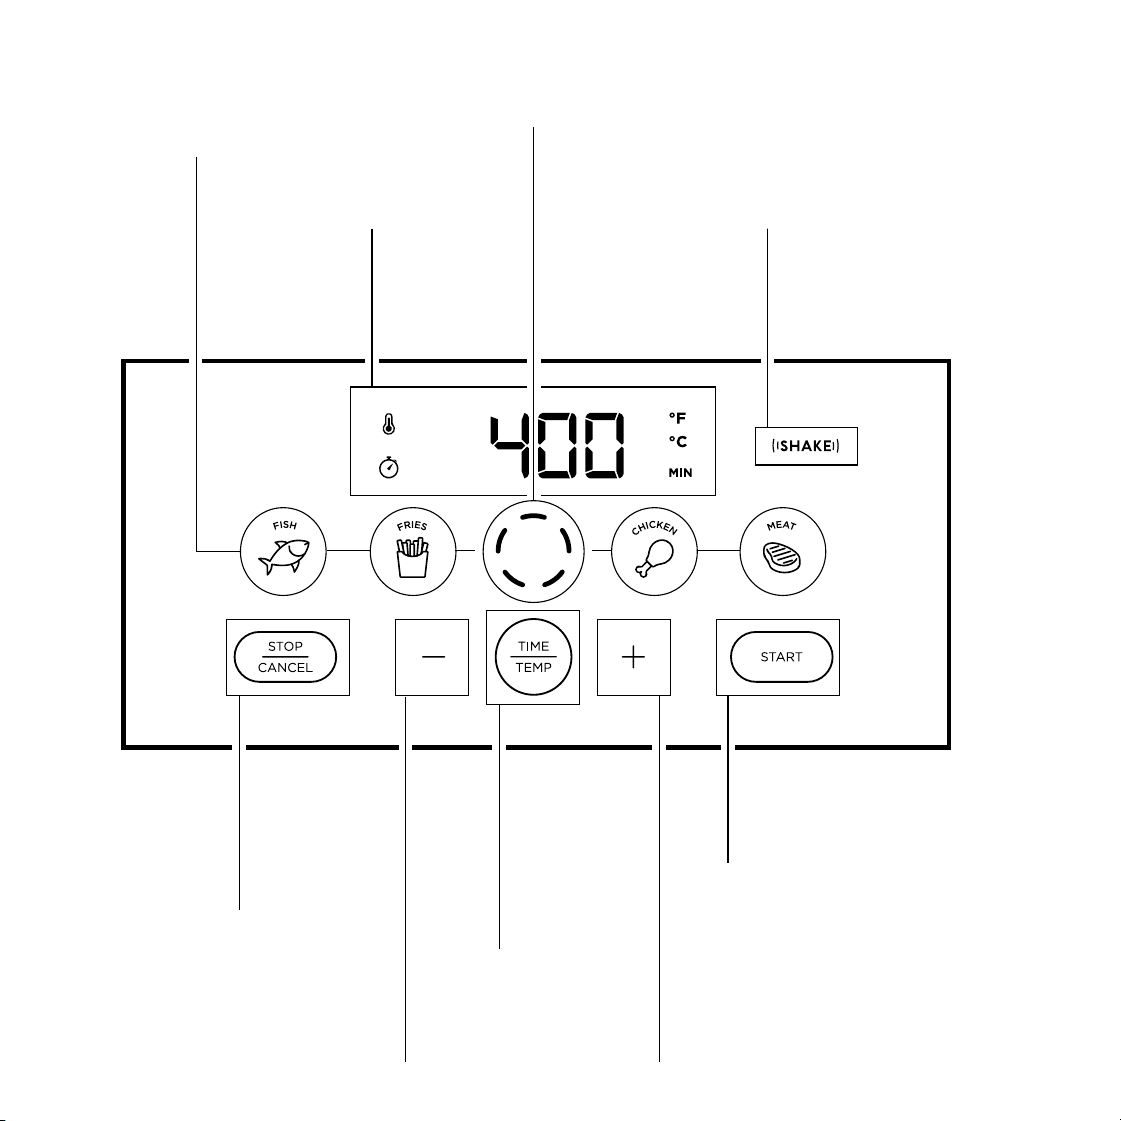
5 6
1. Control panel
2. Basket rack
3. Basket
4. Basket handle
5. Basket divider
FEATURES FEATURES
1
Temp/Time
LED Display
Toggles between
time and
temperature
Dash Display
Pulses when
unit is cooking
Shake Indicator
Lights to remind
to shake basket
Cooking
Preset Buttons
Automatically
suggests time
and temperature
(see Chart on p. 7)
Stop/Cancel
Button
Stops/cancels
current setting
or cooking
cycle
Start Button
Starts cooking
cycle
Minus Sign
Button
Decreases time
or temperature
Plus Sign
Button
Increases time
or temperature
Time/Temp
Button
Selects time or
temperature to
set (press and
hold to change
between °F
and °C)
2
5
3
4

7 8
FEATURES OPERATING INSTRUCTIONS
FUNCTION Default Time Default Temp Shake Light Reminder
(NOTE: If time is set for more than 30 minutes, "Shake" light will come
on every 15 minutes.)
Default 15 min. 400°F Comes on halfway through default time.
Meat 18 min. 375°F Comes on halfway through cook time.
Chicken 22 min. 375°F Comes on halfway through cook time.
Fish 10 min. 350°F
Comes on halfway through cook time.
Flip, don't shake, delicate llets.
Fries 20 min. 400°F
Comes on every 5 minutes.
To cook evenly, shake every 5 minutes.
BEFORE FIRST USE
For best results, follow these steps before using your air fryer for the rst time.
1. Remove all packaging materials, such as plastic bags and foam inserts. Check to ensure
that all parts and accessories are accounted for.
2. Read and remove any stickers on the unit except for the rating label on the bottom, which
should remain on the unit.
3. Wipe down the interior and exterior with a damp cloth. Wash the basket, basket rack, and
divider with warm, soapy water. Dry thoroughly.
HOW TO COOK IN THE TURBOFRY
®
TOUCH AIR FRYER
The air fryer’s high-speed fan cooks your favorite foods quickly. The rack in the basket allows
air to circulate around foods for even cooking and crisping, and lets excess fat drip down and
away from foods for healthier eating.
CAUTION: Never ll the basket with oil. Unlike deep fryers, air fryers require little to no oil to
produce a crisp texture. If you choose to use oil, toss foods with just a little in a separate bowl
before cooking in the air fryer.
1. Prepare the food(s) you plan to air fry.
2. Place the air fryer on a hard, at surface with at least 6 inches of clearance on top and in
back for proper air ow, then plug the unit in. The control panel will illuminate, and the
default temperature and time will alternate on the display.
3. Lower the rack into the basket with the arrows pointing to the front (the handle side) and
back of the basket. Press down on the rack to ensure it is secure and level. There should
be a small amount of space between the rack and the bottom of the basket. (For easiest
handling of the basket rack, pinch the center grip bar with your thumb and index nger.)
CAUTION: Never use aerosol cooking spray on the air fryer's nonstick parts as it can cause
the coating to chip.
PRESET FUNCTION CHART
These presets represent an average time and temp. To set the air fryer manually, see the
chart beginning on p. 10. NOTE: If you are using the divider, you may need to add a few extra
minutes at the end of the cook time. Be sure to check all foods for doneness before serving.

9 10
4. If using the divider, slide it into the basket front to back over the rack. You can divide
the basket evenly using the grooves in its center as a guide or portion it as you like.
The rubber stoppers will keep the divider in place. Press down on the divider, and
ensure it's level for a secure t. To remove the divider, hold the basket down with
one hand, then grab the divider with the other. Twist it to tilt to one side as shown on
p. 14, then pull it out.
5. Put the food on the rack. To allow for good air circulation, do not ll the basket past
the MAX line. Slide the basket into the air fryer.
6. Set the time and temperature as desired, or use cooking preset functions. To set the
temperature manually, press the TIME/TEMP button until temperature displays, and
then press the plus or minus sign. To set the time, press the TIME/TEMP button until
the time displays, and then press the plus or minus sign. If cooking with presets, choose
the icon that best represents the food you’re cooking and press the icon (see Chart on
p. 7 for details).
7. Press Start. The fan will come on and circular dashes on the display will animate.
NOTE: During cooking, you can remove the basket to check on, turn, or shake foods. When
you return the basket to the unit, the timer and heating will resume where they left off.
8. During cooking, the Shake light on the control panel will turn on, and the air fryer will beep
as a reminder to shake (or ip) food, as necessary. (See Chart, p. 7, for more details on
timing.) The Shake light will turn off immediately when the basket is removed and will go
off automatically after about 15 seconds if basket is not pulled out. (If your food does not
need to be shaken, ipped, or turned, simply ignore the warning.)
9. When the timer is done, the air fryer will turn off automatically. Remove the basket
from the air fryer. Check food for doneness, then carefully transfer food to plates or
a platter and serve. NOTE: On rst use, the unit may emit a slight odor, which is normal and
will dissipate with use.
AIR FRYING CHARTOPERATING INSTRUCTIONS
Use this chart to help you cook some of your favorite foods. Note that the times reect
a 5-minute preheat. If not preheating, please add a few minutes to the cook time. The
amounts listed are for the full basket; reduce amounts when using the divider. You may
also need to cook foods a little longer when using the divider.
Vegetables Amount/Prep Toss with oil? Time (min) Temp (˚F) Shake/Flip
Asparagus 1 bunch, tough ends trimmed Yes 6-9 400 Flip once
Broccoli 1 head, cut into orets Yes 7-9 375 Shake once
Brussels sprouts 10 oz (about 20), halved Yes 15 380 Shake once
Carrots 1 lb, peeled, cut into 1" pieces Yes 11-13 400 Shake once
Cauliower ½ head, cut into orets Yes 15-17 400 Shake once
Corn on the cob 4 whole ears, husked
Brush w/a little
oil or butter
15 400 Flip once
Green beans 1 lb, trimmed Yes 7-9 400 Shake once
Potatoes (red/yellow) 1 lb, cut into 1-inch chunks Yes 15 400 Shake once
Potatoes (baking) 3 whole potatoes Yes 30-38 400 No
Sweet potatoes 1 lb, peeled, cut into 1" chunks Yes 15 400 Shake once
Zucchini 1 lb, cut into 1" chunks Yes 15-16 400
Shake every
5 minutes
Seafood Amount/Prep Toss with oil? Time (min) Temp (˚F) Shake/Flip
Crab cakes 4 cakes (about 4 oz each) Brush lightly 12-15 375 No
Salmon 2 llets (about 6 oz each)
Brush skin
lightly
10-12
(medium)
400 Flip once
Shrimp 1 lb, peeled Yes 5-6 400 Shake once
Thin sh llet
(e.g. ounder)
2 4-oz llets Brush lightly 6-8 350 No

12
Preheat the air fryer for 5 minutes before cooking. While not necessary, preheating
the unit will cook foods faster and promote crisp results. If the unit is cold, add a few
minutes to your expected cooking time. CAUTION: Be careful when adding food after
preheating as the inside of the fryer will be hot.
For a crisp exterior, oil foods lightly. Some foods, especially if fresh, benet from
being tossed with a little oil in a separate bowl before frying.
Avoid wet batters. Loose batters, such as those used for deep frying, do not work in
air fryers, as the batter simply slides off. Adapt such recipes to give foods a thicker
coating, preferably including breadcrumbs to help the coating adhere.
Use medium-high to high heat for most cooking. Most foods will air fry best between
325°F and 400°F. For gentler cooking and reheating, use a lower temperature to
avoid overcooking.
Don’t overcrowd the basket. Too much food, especially if tightly packed, can inhibit
browning and crisping. A better bet: Fry food in batches.
Shake the basket during cooking for even cooking. A good shake is especially
benecial for smaller items like french fries, onion rings, and chicken wings. For larger
or more fragile foods, consider gently tossing or ipping for even results.
Check on foods early. Check foods on the earlier side of cooking time; you can always
slide the basket back in to continue cooking. If using the divider, you may need to
remove quicker cooking foods before longer cooking foods are done.
Follow food safety guidelines for doneness. Because air fryer temperatures and food
sizes can vary, do not rely solely on recipe timing when cooking food. Check foods for
doneness against current safety guidelines before serving.
AIR FRYER COOKING TIPS
NOTE: The times and temperatures offered in these charts are suggestions and may vary.
Please follow current food safety guidelines when determining doneness.
*For cheeseburgers, top with cheese after time is up. Let melt in still-hot fryer.
Meat Amount/Prep Toss with oil? Time (min) Temp (˚F) Shake/Flip
Bacon 4 slices No 10 400
No, but check
bacon isn’t touching
Chicken breast
(boneless, skinless)
3 halves (6-8 oz each),
seasoned as desired
Brush lightly 18-22 375 Flip once
Chicken wings
(ats and drumettes)
15 pieces, seasoned
as desired
Yes 30-32 375 Shake once
Hamburgers/
Cheeseburgers*
4 4-oz patties
(80% lean)
No 9 (medium) 380 Flip once
Pork chops (bone-in)
2 chops (1" thick),
seasoned as desired
No 15-18 400 Flip once
Steak
2 steaks (¾" thick),
seasoned as desired
No 11 (medium) 400 Flip once
Frozen foods Amount/Prep Toss with oil? Time (min) Temp (˚F) Shake/Flip
Apple turnovers 4 No 16-18 350 No
Chicken tenders 7 pieces No 11-13 375 Flip once
Chicken nuggets 20 pieces No 10 400 Gently ip once
Fish sticks 18 pieces No 8-9 400 Gently ip once
French fries (thin) 1½ lb Yes 17-19 400
Shake every
5 minutes
French fries (thick) 1½ lb Yes 20-22 400
Shake every
5 minutes
Mozzarella sticks 16 pieces No 7 380 Flip once
Tater tots 1 lb No 15 400
Shake every
5 minutes
AIR FRYING CHART

13 14
Why is there white smoke coming from my unit?
White smoke can be a sign that there’s too much fat in the fryer. Avoid cooking very
fatty foods, such as sausages, in the air fryer, and be sure the basket, the rack, and the
interior of the air fryer are clean before cooking.
Why has my food cooked unevenly?
Two culprits are likely: overcrowding and not shaking. Fill the air fryer basket loosely
with food to let air circulate, and shake, toss, or ip foods at least once during
cooking for more even results.
Why isn’t my food crisp?
Though you can air fry with no added oil, coating foods very lightly with oil (usually
just ½ teaspoon per batch for most recipes) helps guarantee crisp results. Preheating
the fryer also helps.
Why is the unit displaying an error code?
If your air fryer displays E1 or E2 on its control panel, it means there is a loose wire
contact or a short circuit, and the unit will not function. Should this occur, please
contact Chefman
®
Customer Support for a replacement.
TROUBLESHOOTING/FAQS CLEANING AND MAINTENANCE
The nonstick coating on the basket, rack, and divider makes the air fryer easy to
clean following the steps below.
1. Unplug the unit and let cool completely before cleaning. (For faster cooling,
take the hot basket out of the unit.)
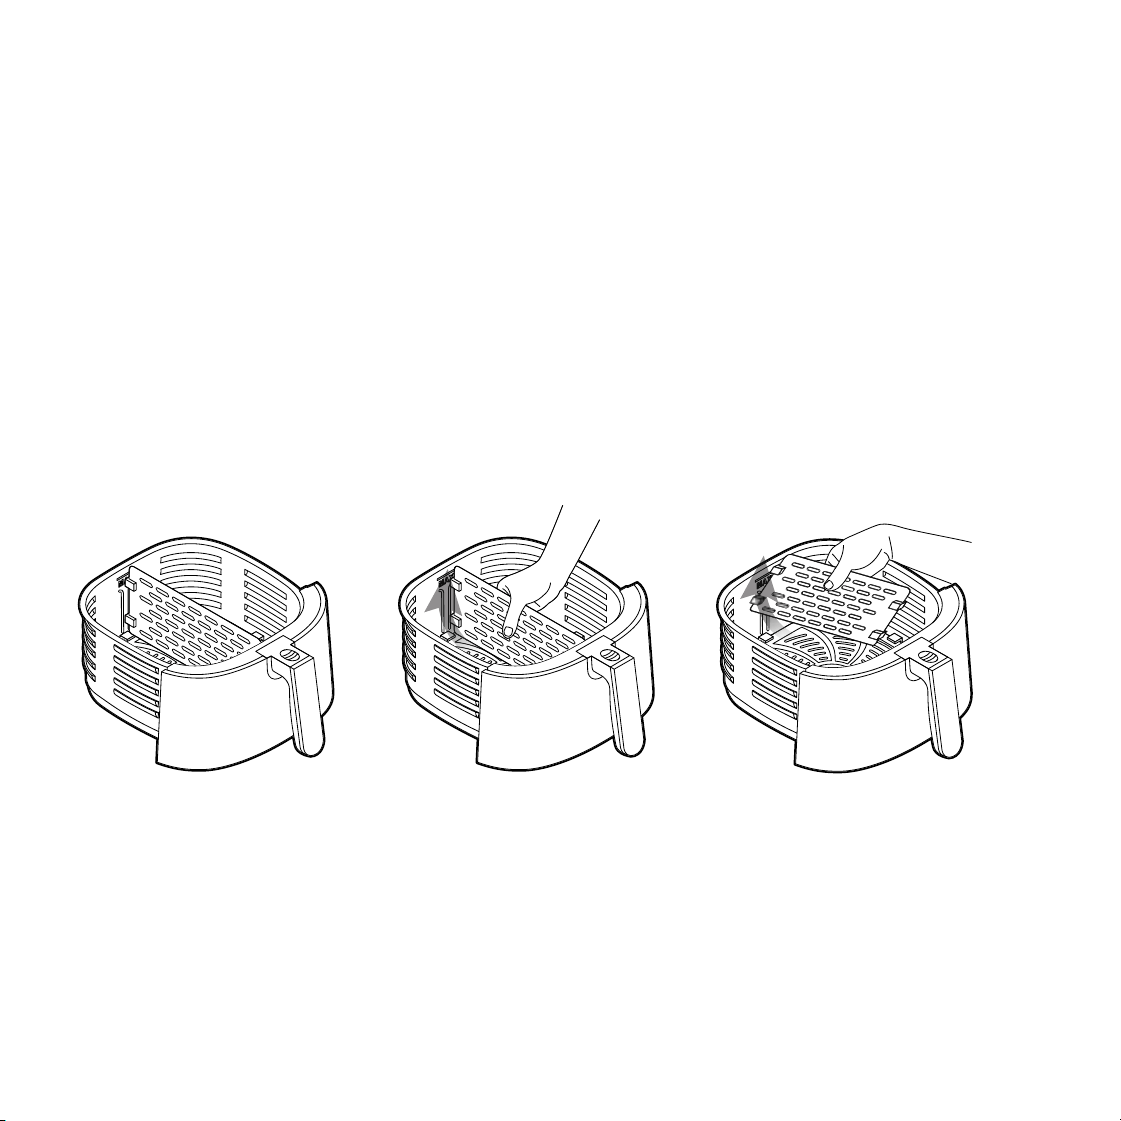
2. Remove the cooled divider from the basket, if necessary. To remove the
divider, hold the basket with one hand, then grab the divider with the other.
Twist the divider to tilt it to one side as shown below, then pull it out. To
remove the rack from the basket, pinch the center grip bar at the bottom of
the basket, and pull the rack straight up and out of the basket. WARNING:
Do not lift the rack out of the basket when hot, or injury can occur.
Wash the basket, rack, and divider with warm, soapy water, rinse, and dry
well with a towel for best results. The basket, rack, and divider are also top-
rack dishwasher-safe.
3. Wipe down the outside and the inside of the unit with a damp cloth as
needed. Do not put the unit in the dishwasher or submerge in water or any
other liquids.
4. Do not use abrasive cleansers, or you could damage the nishes.
13 14
Why is there white smoke coming from my unit?
White smoke can be a sign that there’s too much fat in the fryer. Avoid cooking very
fatty foods, such as sausages, in the air fryer, and be sure the basket, the rack, and the
interior of the air fryer are clean before cooking.
Why has my food cooked unevenly?
Two culprits are likely: overcrowding and not shaking. Fill the air fryer basket loosely
with food to let air circulate, and shake, toss, or ip foods at least once during
cooking for more even results.
Why isn’t my food crisp?
Though you can air fry with no added oil, coating foods very lightly with oil (usually
just ½ teaspoon per batch for most recipes) helps guarantee crisp results. Preheating
the fryer also helps.
Why is the unit displaying an error code?
If your air fryer displays E1 or E2 on its control panel, it means there is a loose wire
contact or a short circuit, and the unit will not function. Should this occur, please
contact Chefman
®
Customer Support for a replacement.
TROUBLESHOOTING/FAQS CLEANING AND MAINTENANCE
The nonstick coating on the basket, rack, and divider makes the air fryer easy to
clean following the steps below.
1. Unplug the unit and let cool completely before cleaning. (For faster cooling,
take the hot basket out of the unit.)
2. Remove the cooled divider from the basket, if necessary. To remove the
divider, hold the basket with one hand, then grab the divider with the other.
Twist the divider to tilt it to one side as shown below, then pull it out. To
remove the rack from the basket, pinch the center grip bar at the bottom of
the basket, and pull the rack straight up and out of the basket. WARNING:
Do not lift the rack out of the basket when hot, or injury can occur.
Wash the basket, rack, and divider with warm, soapy water, rinse, and dry
well with a towel for best results. The basket, rack, and divider are also top-
rack dishwasher-safe.
3. Wipe down the outside and the inside of the unit with a damp cloth as
needed. Do not put the unit in the dishwasher or submerge in water or any
other liquids.
4. Do not use abrasive cleansers, or you could damage the nishes.

15 16
NOTESNOTES

15 16
NOTESNOTES

17 18
TERMS AND CONDITIONS
Limited Warranty
TERMS AND CONDITIONS
Limited Warranty
RJ Brands, LLC d/b/a Chefman
®
offers a limited 1-year Warranty (the “Warranty”)
available on sales through authorized distributors and retailers only. Please note
that this Warranty becomes valid from the date of initial retail purchase and that the
Warranty is non-transferable and applies only to the original purchaser.
This Warranty is void without proof of purchase within the United States and Canada.
Please be aware that this Warranty supersedes all other warranties and constitutes
the entire agreement between the consumer and Chefman
®
. Any changes to the
Terms and Conditions of this Warranty must be in writing, signed by a representative
of Chefman
®
. No other party has the right or ability to alter or change the Terms and
Conditions of this Warranty.
We may ask you to please submit, via email, photos and/or video of the issue you are
experiencing. This is to help us better assess the matter and possibly offer a quick x.
Photos and/or video may also be required to determine warranty eligibility.
We encourage you to register your product. Registering can make the Warranty
process easier and can keep you informed of any updates or recalls on your product.
To register, follow the directions on the Chefman
®
Warranty Registration page in the
Chefman
®
User Guide. Please retain your proof of purchase even after registering. In
the event that you do not have proof of your purchase date, we may declare your
Warranty void or we may, at our sole discretion, apply the date of manufacture as the
purchase date for purposes of this Warranty.
WHAT THE WARRANTY COVERS
• Manufacturer Defects – Chefman
®
products are warranted against defects in material
and workmanship, under normal household use, for a period of 1 year from the date
of purchase when used in accordance with the directions listed in the Chefman
®
User
Guide. If your product does not work as it should, please contact Customer Support
at [email protected] so that we may assist you.
THIS WARRANTY DOES NOT COVER
• Misuse – Damage that occurs from neglectful or improper use of products, including,
but not limited to, damage that occurs as a result of usage with incompatible voltage,
regardless of whether the product was used with a converter or adapter. See Safety
Instructions in the Chefman
®
User Guide for information on proper use of product;
• Poor Maintenance – General lack of proper care. We encourage you to take care of your
Chefman
®
products so that you may continue to enjoy them. Please see Cleaning and
Maintenance directions in the Chefman
®
User Guide for information on proper maintenance;
• Commercial Use – Damage that occurs from commercial use;
• Normal Wear and Tear – Damage or degradation expected to occur due to normal
use over time;
• Altered Products – Damage that occurs from alterations or modications by any entity
other than Chefman
®
such as the removal of the rating label afxed to the product;
• Catastrophic Events – Damage that occurs from re, oods, or natural disasters;
• Loss of Interest – Claims of loss of interest or enjoyment.
19 20
MADE IN CHINA/FABRIQUE EN CHINE
AC ONLY/ AC SEULEMENT
DATE CODE:
ACCESS CODE:
Model/Modele: RJ25-C
Conveyor toaer
120v~60hz 1800W
CONFORMS TO UL STD. 1026
CERTIFIED TO CSA STD.C22.2 No.64
CAUTION: DO NOT IMMERSE IN WATER
ATTENTION: NE PAS PLONGER DANS L’EAU
WARNING: TO PREVENT ELECTRIC SHOCK,
UNPLUG BEFORE CLEANING
PRÉAVIS: POUR ÉVITER LES CHOCS ÉLECTRIQUES,
DÉBRANCHEZ L’APPAREIL AVANT DE L’UTILISER
READ INSTRUCTIONS BEFORE USING
LISEZ LES INSTRUCTIONS AVANT DE L’UTILISER
HOUSEHOLD USE ONLY
POUR USAGE DOMESTIQUE SEULEMENT
0000000
0000
XXXXXXXX
What do I need to register my product?
•Contact Information
•Model Number
•Proof of Purchase (online
conrmation, receipt, gift receipt)
•Date Code
•Access Code
How do I register my product?
All you need to do is ll out a simple Chefman
®
registration form. You can easily
access the form in one of the two ways listed below:
1. Visit chefman.com/register.
2. Scan the QR code to the right to access site:
CHEFMAN
®
WARRANTY REGISTRATION CHEFMAN
®
WARRANTY REGISTRATION
For product information, visit chefman.com
EXCEPT WHERE SUCH LIABILITY IS REQUIRED BY LAW, THIS
WARRANTY DOES NOT COVER, AND CHEFMAN
®
SHALL NOT BE
LIABLE FOR, INCIDENTAL, INDIRECT, SPECIAL, OR CONSEQUENTIAL
DAMAGES, INCLUDING WITHOUT LIMITATION, DAMAGE TO, OR LOSS
OF USE OF THE PRODUCT, OR LOST SALES OR PROFITS OR DELAY OR
FAILURE TO PERFORM THIS WARRANTY OBLIGATION. THE REMEDIES
PROVIDED HEREIN ARE THE EXCLUSIVE REMEDIES UNDER THIS
WARRANTY, WHETHER BASED ON CONTRACT, TORT OR OTHERWISE.
Chefman
®
is a registered trademark of RJ BRANDS, LLC.
TurboFry
®
is a registered trademark of RJ BRANDS, LLC.
Cooking Forward™ is a trademark of RJ Brands, LLC.
Intertek
®
is a registered trademark of Intertek Group, PLC.
NOTE: Label depicted here is an example.

21
®
©CHEFMAN 2021
