Loading ...
Loading ...
www.waynepumps.com
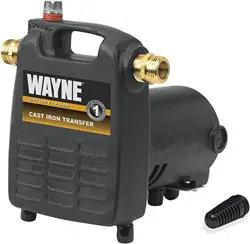
PC4
3
MAINTENANCE
Let pump cool for at least 20 minutes before
attempting to service. Motor MAY be extremely
hot. Personal injury MAY result.
1. Pump should be checked periodically for proper operation.
ALWAYS disconnect the electrical supply before
attempting to operate, service, or perform any
maintenance. If the power source is out of sight, lock and tag in the open
(off) position to prevent unexpected power application. Failure to do so
WILL result in fatal electrical shock. Only qualified electricians SHOULD
repair this unit. Improper repair WILL result in fatal electrical shock.
BRUSH REPLACEMENT
Brushes for this pump SHOULD be inspected
after 100 hours of operation.
Pumps with excess of 100 hours of operation may stop operating
or fail to start. This could be due to worn brushes or carbon build-
up. The brushes should be removed and carbon removed. Worn
brushes are not covered under warranty. Replacement brushes may
be available from WAYNE Pumps. Call 1-800-237-0987 to order.
1) Disconnect electrical cord from power supply.
2) Remove brush caps with screwdriver.
3) Remove old brush assembly.
4) Insert new brush assembly.
5) Replace brush caps.
For other problems, consult troubleshooting chart.
ADDITIONAL REPAIRS
To replace bearings, shaft seal, or gaskets, follow the instructions
listed below.
1. Disconnect electrical cord from power supply.
2. Relieve pressure in system.
3. Disconnect inlet and outlet lines.
4. Empty water from pump housing.
5. Place pump on bench with motor end up and remove brushes
as described in BRUSH REPLACEMENT instructions. If
brushes are to be reused, mark the location from which each
came. Replace brushes in original orientation upon completion
of repair.
6. Remove the four cap screws holding motor housing and
pump housing together. Motor housing is now free and can
be removed. Take care not to lose commutator bearing finger
spring.
7. With a screwdriver, pry the rotor-backhead assembly out of the
pump housing.
8. Remove the impeller by turning counter clockwise (righthand
thread on shaft).
9. Remove backhead (the bearing is press fit into the backhead).
10. Place backhead on flat surface with impeller side down and
press out shaft seal.
11. Place impeller on flat surface with vane side down and with
screwdriver and hammer break ceramic seal ring into several
pieces and remove. Next, remove rubber seal ring cup from
impeller.
12. Remove bearing from armature shaft (press-fit on shaft).
(Impeller side bearing is the only serviceable bearing).
13. Inspect the armature commutator bars. The environment
in which the unit has been operating will have influence on
the condition of the commutator. Airborne dust an dirt will
accelerate wear. A rough or scarred appearance may dictate
having commutator reconditioned before reassembly.
14. To reassemble, install new bearing on the shaft. Always press
against the inner race to prevent bearing damage. Make sure
bearing is tight against the shaft shoulders.
15. Press shaft seal into backhead. When pressing shaft seal
into place, apply force to the cup flange. Avoid touching the
polished seal surface; oil or scratches on this surface may
cause premature failure of the seal.
16. Press ceramic side of seal into impeller, ceramic side out. Avoid
touching ceramic with hands as oil may cause premature failure
of the seal. Wipe oil off both sides of seal with a soft, lint-free
cloth.
17. Reassemble unit in reverse order, beginning with Step 9.
18. After reassembly check shaft for free rotation with screwdriver in
fan through air exit openings.
Loading ...
Loading ...
Loading ...