LOW BATTERY - Once it appears which means battery power is low. Replace batteries in 2 weeks.
TIMER – Indicates time remaining before system shuts OFF. Maximum 9-hour setting for timer programming.
MODE – Indicates system operation modes. ON means the system is manually ON. OFF means the entire system is OFF. THERMO*2 means the system will automatically cycle ON/OFF, with the desired set temperature.
SET – Indicates desired set room temperature of THERMO*2 mode. (works with ROOM)
FLAME – Indicates burner / valve is at ON position.
CLOCK – Indicates the current time.
ROOM – Indicates CURRENT room temperature.
°F / °C – Indicates degrees in Fahrenheit or Celsius (convertible).
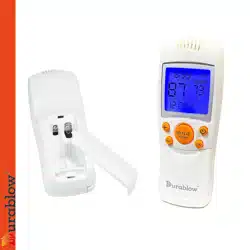
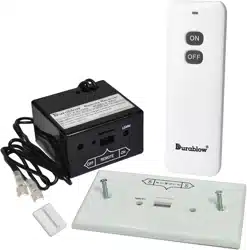
BASIC TRANSMITTER
IMPORTANT: The transmitter requires two AAA-size 1.5V batteries (excluded). New (fully charged) batteries are required for proper functionality of the system. Insert batteries into the transmitter battery compartment on the back, positioning the (+) and (-) ends of the batteries as indicated on the casing. When the batteries are inserted properly, LCD will display initial numbers.
CAUTION: Due to the temperature-monitoring components in the transmitter, it is important to allow the transmitter to detect the room temperature before accurately displaying room temperatures on the screen. Normally it takes 5 to 15 minutes for every first time placing this transmitter in a new location / environment.
To begin the mode cycle , press and release the MODE button until the LCD screen reads OFF.
Step 1: Press the MODE button to manually turn ON the receiver. Timer is available in this mode. The receiver will make sounds of quick BEEP X 2 (♫, ♫).
Step 2: Press the MODE button again to enter the THERMO mode. Timer and Thermostat are both available in this mode.
NOTE: The Thermostat has the priority to turn OFF when the room temperature reach desired set temperature, and it will turn ON again when the room temperature go below desired set temperature, at the meantime, Timer will keep countdown. However, once the set time ends, the Timer will turn OFF the entire system and go back to OFF mode.
Step 3: Press the MODE button a third time to turn the appliance back OFF again. The receiver will make sound of continuous BEEP for one second (♫~~~~).
Mode sticker is located under the flip cover of transmitter
SETTING UP THE TRANSMITTER
Any blinking numbers on the LCD screen indicate the system is awaiting user’s input. Using the “+” and “-” buttons to increase or decrease the numbers, and press “OK” button to set / confirm. If no change / action is madewithin15-seconds, the system will accept the numbers and finish the procedure.
SETTING THE CLOCK
Press and hold the TIMER button on the transmitter for three seconds. The hour digit(s) will become blinking.
Press the “+” and “-” button to set.
After setting the desired hour, press and release the TIMER button again to set the minutes.
Press and hold the TIMER button again for three seconds to finish setting. You can also press the OK button to finish setting.
CONVERTING ºF / ºC SCALE
The default setting for temperature is ºF. To change the setting from ºFto ºC (or ºC to ºF), first press and holdthe“+”and “-” buttons on the transmitter simultaneously. The highest set temperature is 99º Fahrenheit =37º Celsius.
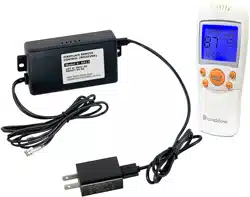
REMOTE RECEIVER BOX
The remote receiver box requires four AA-size 1.5V batteries (excluded). When LOW battery icon appears on the screen, please replace batteries.
The remote receiver box equips the microprocessor that receives the signals/commands from the transmitter in order to control system operations/functions. It makes sounds of quick BEEP X 2 (♫, ♫) when it receives an “ON” command, and makes sound of continuous BEEP for one second (♫~~~) when it receives an “OFF” command manually(or when timer ends automatically). But no beep when cycling ON / OFF automatically in THERMO mode.
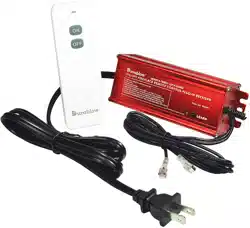
The remote receiver box has a 3-position slide switch (OFF/REMOTE/ON) and a LEARN button on the front panel.
Slide Switch: OFF/REMOTE/ON Modes
ON mode: Slide the switch to the ON position (toward the LEARN button), the system will remain ON all the time. Remote transmitter is disabled.
REMOTE mode: Slide the switch to the REMOTE position (middle), the system will ONLY operate with receiving commands from the remote transmitter.
OFF mode: Slide the switch to the OFF position, the system will remain OFF all the time. Remote transmitter and receiver box are both disabled.
NOTE: The OFF mode is strongly recommended if house is unattended for a long time. For safety, placing the slide switch in the OFF position also functions as a safety “LOCK-OUT” by both turning the system off and disable the remote receiver.
PRE - INSTALLATION
Decide where to install the receiver box before proceeding. The receiver is designed to be wall-mounted into standard wall switch box (STRONGLY SUGGESTED).
Otherwise, you can place it under or near the fireplace hearth (IMPORTANT: Keep away from high heat of exceeding130°F. Additional protection is required for no exposure to the heat).
Make sure the receiver box’s slide switch is in the OFF position before installation.
The receiver is connected with 18-inches of black wire. If additional length of wire is required, for the best results, 18 gauge stranded or solid wire are recommended. Splicewiththe original black wires of the receiver box. Or, remove the black wires and insert new wires directly into the slots at back of receiver box. Wires are NOT longer than20-feet. Please allow some wire/space to remove the receiver for battery replacement or check.
WALL MOUNTING
1. Install four AA-size 1.5V batteries into the remote receiver box. The system operates well withall batteries’ total output voltage is greater than 5.2V. Generally, four NEW AA-size batteries should output voltageof 6.0 to 6.2 volts if installed in series.
2. Attach wall mount cover plate to receiver box. Press the receiver and have it snap into top&bottomtabs of cover plate.
3. Position the cover plate to have words facing up. Install the remote receiver box into the wall switchbox with two provided switch box long screws.
NOTE: The remote receiver box will only receive signal from the transmitter in the REMOTE position (middle). Theremote receiver box code must be matched to the transmitter prior to initial use.
HEARTH MOUNT
The remote receiver box can be placed on the fireplace, under the fireplace, behind the control panel or louvers....etc.Keep away from high-heat of exceeding 130°F. Additional protection is required for no exposure to the heat. The Slide switch button should be installed on the receiver box for Hearth Mount
LEARNING TRANSMITTER TO RECEIVER
Each transmitter has a unique RF code. To have the receiver box to accept the transmitter’s signal (code), be sure the slide switch button on the receiver is in the REMOTE mode.
Find the LEARN button on the front face of the receiver. Use a small screw-driver gently press the black LEARN button inside the hole. Then the receiver box will sounds of quick BEEP X 2 ( ♫ , ♫ ). And press the MODE button on transmitter. The receiver box will sounds of quick BEEP X 3 (♫, ♫, ♫) to indicate that the transmitter’s code has been captured by the receiver.
If you fail the LEARNING of matching the security code, please wait 2 minutes before another try. The interval allows the microprocessor in the receiver box to reset itself and available for accepting new code.
ADDITIONAL INFORMATION
THERMO SAFETY PROTECTION AT RECEIVER
In order to protect the receiver box, batteries, and receiver’s microprocessors, the Durablow remote control system equips a THERMISTOR, a safety feature in receiver box.
The THERMISTOR will automatically shut the system and appliance down, & begin making BEEP X 3 (♫, ♫, ♫), every 4 seconds, when the temperature inside the receiver box is higher than 130°F (54°C). User can re-activate the system by pressing the MODE button on the transmitter when the receiver temperature drops between 120°F (48°C) and130°F(54°C).
However, the BEEPING will NOT stop if the temperature remains between 120°F and 130°F until the temperature drops below 120°F. The beeping is to alert user that the receiver should be re-located at a cooler position.
To completely reset the beeping and THERMISTOR, please press the MODE button to make a mode cycle(OFF-ON-OFF). Please make sure & allow some time for the receiver box to cool down below 120°F.
TRANSMITTER
1. TRANSMITTER OPERATING DISTANCE
The transmitter uses RF radio frequency to send signal to receiver. It is strongly recommended to use the transmitter within 20-foot distance from receiver box in the same room / space (no wall partition).
2. THERMO DETECTING INTERVAL IN TRANSMITTER
The transmitter normally detects the ROOM temperature every 2 minutes against the SET temperature by sending a signal to the receiver.
3. OUT-OF-RANGE SAFETY ALERT IN RECEIVER
This Durablow remote control system have a OUT-OF-RANGE SAFETY ALERT function which alerts when the transmitter is out of the normal 20-foot operating range of the receiver for all operation modes. The transmitter sends an RF signal every fifteen minutes to the receiver box to indicate that the transmitter is within the normal operatingrangeof20-foot.
If the receiver does NOT receive a signal every 15 minutes from transmitter, the receiver will begin a 120-minute countdown. If during this period, the receiver does NOT receive a signal from the transmitter, the receiver will shut down the system (OFF). Then the receiver will beeps rapidly for 10 seconds, and after that, the receiver will continue to beep(single beep) every 4 seconds until a transmitter signal is again received. Press the MODE button on the transmitter to reset the receiver and the system will be back to normal operation.
The OUT-OF-RANGE SAFETY ALERT will be triggered when the transmitter is out of range again or the transmitter’s low battery, batteries fail, batteries removed.
SETTING THE DESIRED ROOM TEMPERATURE
To set the DESIRED room temperature, press the MODE button to place transmitter into THERMO mode, the“THERMO” must be displayed on the LCD screen. Then press the “+” and “-” buttons to increase or decrease desire droom temperature. The MAX. set temperature is 99° F (32° C), MIN. is 45° F (6° C). REMINDING: To extend battery lifespan, the changes of ROOM temperature are detected and updated (send) to transmitter automatically every two minutes only.
TEMPERATURE DIFFERENTIAL (variation “SWING”)
The THERMO mode on the transmitter operates with TEMPERATURE DIFFERENTIAL (also called variation“SWING”). A smaller SWING increases the number of cycles so the room temperature is updated more often which consumes more battery power. A larger SWING decreases the number of cycles, so the tolerance of ROOM temperature is larger, but can save some battery. The factory default setting for the SWING is 2 which means a temperature variation of +/-2°F(1°C) between SET temperature and ROOM temperature, which determines when the system will be ON or OFF. Thereare three SWING numbers for user’s choice: +/- 1°F (0.5°C), +/- 2°F (1°C) , and +/- 3°F (1.6°C).
SETTING THE SWING
1. To change the temperature SWING setting, press the TIMER and “-” buttons at the same time to display the current SWING setting. The letter “S” (looks like Arabic number “5”) means you are currently in theSWINGsetting,
2. Press the “+” and “-” buttons to change the SWING (1, 2 , 3).
3. To store the desired SWING number, press the OK button or wait for 15 seconds without any actions, the transmitter will accept the setting and become programmed.
SETTING THE COUNTDOWN TIMER
The TIMER is available in the ON or THERMO modes on transmitter (THERMO or ON must be displayed on the screen).
1. Press the TIMER button on the transmitter. The word TIMER will be displayed and “0:15” minutes(factory default setting) will be blinking on the screen.
2. Press the “+” and “-” buttons on the transmitter to set the countdown time. Available countdown time optionsare15minutes, 30 minutes, 1 hour (1:00), 1:30, 2:00, 2:30, 3:00, 3:30 ............. 8:30, 9:00.
3. To confirm the TIMER, press the OK button or wait for 15 seconds without any actions, then transmitter will accept the setting and become programmed. If the system is cycling in the THERMO mode + TIMER feature, it will cycle on and off,as the room temperature requires until the “time” has expired.
CHILDPROOF FEATURE & SETTING
A safety LOCK feature is available from the TRANSMITTER.
1. To activate the LOCK, press and hold the “+” and TIMER buttons together for 5-7 seconds. The “CP” will appear in the ROOM temperature on the screen. CP word will disappear in one second but the CP lock is activated.
2. To deactivate the LOCK, press and hold the “+” and TIMER buttons together for at least 7 seconds. The“CP” will disappear and the transmitter will be unlocked and back to normal operating condition.
NOTE: The CHILDPROOF FEATURE (CP-LOCK) will NOT cancel the operating and cycling of ON, TIMER, THERMO. In order to “TOTAL” lock-out the system, please activate CP-LOCK in OFF mode on transmitter.
TROUBLESHOOTING
OBSERVED PROBLEM
POSSIBLE CAUSE
REMEDY
Fireplace fire shuts off in use. (If equips ODS - Oxygen Depletion Sensing)
1. No enough fresh air in room, the ODS pilot shuts off the entire system.
2. ODS/pilot is partially clogged.
1. Open window and/or door for ventilation.
2. Clean ODS/pilot.
Fireplace fire shuts off in use.
1. Timer is up or schedule is triggered.
2. Receiver box is overheated.
3. *Set Temperature is reached. (if use a Thermostat remote control model)
4. Power outage or battery low.
1. Check Timer or Schedulesettings.
2. Relocate receiver away from heat.
3. *Check thermostat setting.
4. Check power source, power cord or replace batteries.
Main fire does not light after pilot is lit.
1. Inlet gas pressure is too low.
2. Thermopile leads disconnected or improperly connected.
3. Thermopile damaged.
4. Remote control receiver box wires disconnected or improperly connected.
5. Pilot fire is OFF accidentally or clogged.
1. Contact local nature gas company.
2. Reconnect thermopile leads.
3. Replace thermopile.
4. Reconnect the wires to TH, TH/TPterminals of Millivolt valve properly.
5. Ignite pilot fire again, or clean pilot.
No voltage output from Durablow remote control receiver box when control is ON.
The remote control receiver box does NOT output a micro-volt voltage by itself (for no danger of gas leakage). It passes or no- pass the voltage that is generated by thermopile (heated by pilot fire).
1. Turn ON the pilot fire.
2. Reconnect thermopile leads.
3. Replace thermopile.
4. Switch the receiver box to“REMOTE” mode.
5. Allow more time to have thermopile heated to generate voltage.
Durablow remote control does not function.
1. No battery or battery is low.
2. Weak signal. Receiver is obstructed or covered by metal objects / housing.
3. Out of use distance.
4. Weak Wi-Fi (smart home remote only)
5. Defective device.
1. Replace batteries in transmitter and receiver.
2. Relocate receiver.
3. Relocate receiver and transmitter.
4. Relocate receiver or Wi-Fi router.
5. Contact seller for replacement.
Fireplace fire is ON and OFF too often or too slow. (Thermostat remote control model only)
1. Temperature “SWING” setting is too small or too big
1. Find “SWING” setting on transmitter handset, or Smart Life APP(Smart Home remote control models), and reselect appropriate Swinglevels: 2°F(1°C), 4°F(2°C), 6°F(3°C)
Pilot fire can NOT be ignited by Durablow remote control.
Durablow remote control is not a ignitor, it acts like a main gas fire ON/OFF switch. Not used for igniting pilot fire or main fire.
1. Ignitor is damaged or battery low.
2. Millivolt valve is not at INGITE mode.
3. Fireplace IPI control is not working.
1. Ignite pilot fire by built-in fireplace spark ignitor, or manual torch lighter.
2. Turn/press knob on Millivolt valve to release gas for pilot fire.