Loading ...
Loading ...
Loading ...
5
BEFOrE uSINg FOr ThE FIrST TImE
The Juice Extractor comes almost completely assembled in the box.
1. Your Extractor may be shipped with a protective cardboard insert between
the clear cover and the blade basket. Remove this and any other protective
packaging before using your Juice Extractor.
2. Following the Disassembly Instructions, remove the food pusher from
the feed tube, then the cover, juice bowl with stainless steel blade basket.
3. Wash all removable parts (food pusher, clear cover, juice bowl, blade basket,
pulp basket, and juice pitcher with lid) in warm water with a biodegradable,
non-abrasive liquid detergent. Rinse well and air-dry. This will eliminate any traces
of dust or residue from manufacturing or shipping.
CAUTION: Use care when handling the blade basket. Hold the basket’s rim only.
DO NOT TOUCH the cutter blades on the bottom of the basket. The cutter blades
are very sharp!
CAUTION: Never rinse or immerse the Motor Base in water or any other liquid.
ASSEmBLY INSTruCTIONS
WARNING: ALWAYS MAKE SURE THE JUICE EXTRACTOR IS UNPLUGGED BEFORE
STARTING ASSEMBLY.
IMPORTANT: The Juice Extractor is equipped with a safety system that prevents the
Extractor from being turned ON unless the unit is completely and properly assembled.
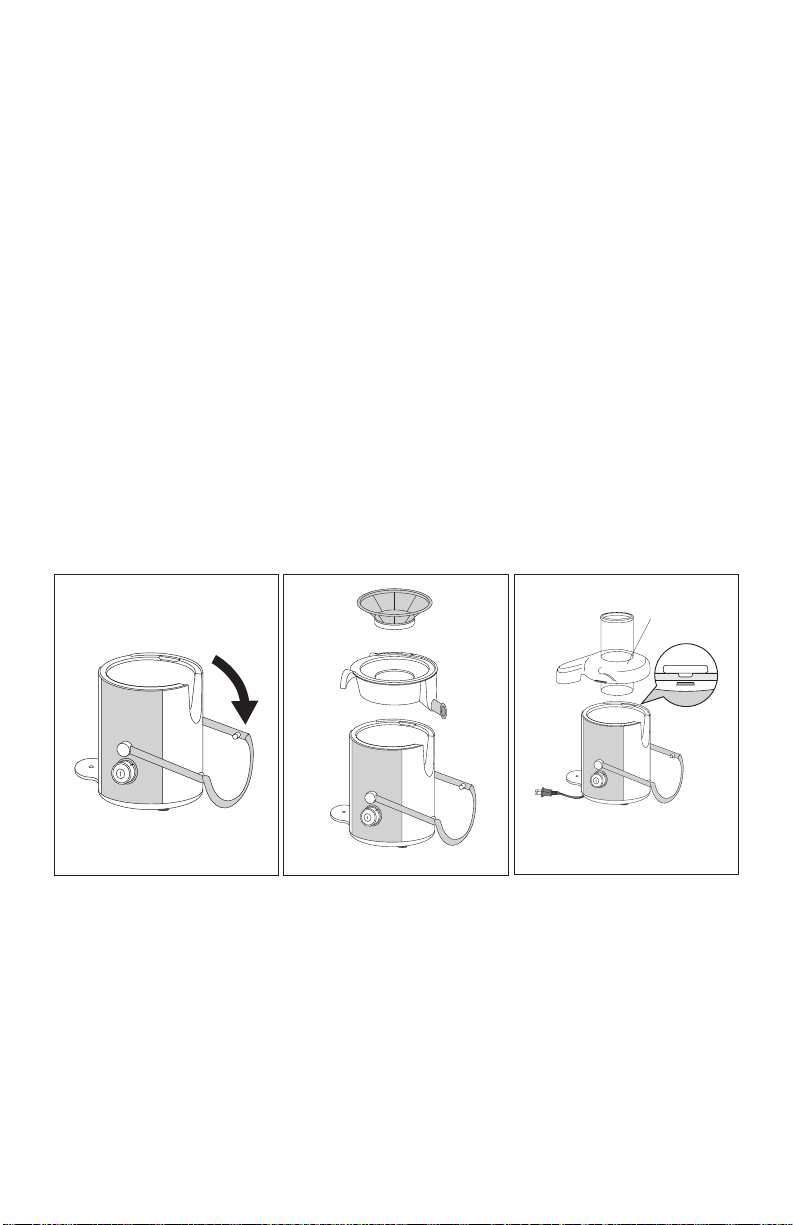
1. Rotate the locking clamp so that it sits at the front of the base. (See Figure 2.)
2. Place the juice bowl on top of the motor base so that the juice spout fits
into the cut out at the front of the base. (See Figure 3.)
CAUTION: Use care when handling the stainless steel blade basket.
Hold the basket’s rim only. DO NOT TOUCH the cutter blades on the bottom
of the basket. The cutter blades are very sharp!
3. Set the stainless steel blade basket onto the motor hub in the center of the juice
bowl. (See Figure 3.) Press down on the blade basket’s outer rim until it drops into
place and is securely seated. Gently rotate the blade basket to ensure that
it turns freely. If initially it fails to seat, this should slip it into place.
Double check by pressing down on the rim and spinning it again.
Figure 2
Figure 3
Figure 4
Cover Tab
Juice Pitcher
Juice Pitcher
Lid
Pulp Basket
Loading ...
Loading ...
Loading ...