
10033060 10033062
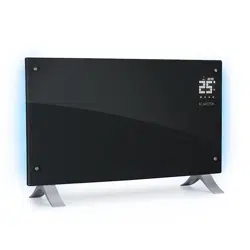
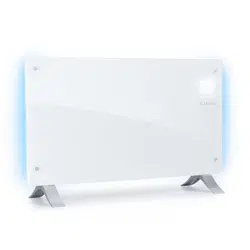
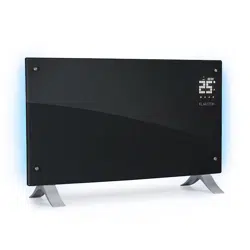
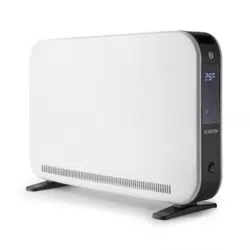
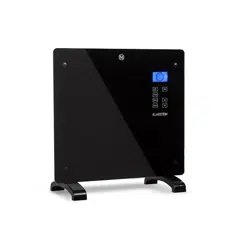
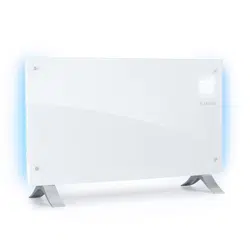
Bornholm Curved
Ambient
Konvektionsheizgerät
Convection Heater
Radiateur convecteur
Radiador convector
Stufa a convezione
Hinweis: Dieses Produkt ist nur für gut isolierte
Räume oder für den gelegentlichen Gebrauch
geeignet.
Note: This product is only suitable for well
insulated spaces or occasional use.
Nota: Este producto está indicado únicamente en
lugares abrigados o para una utilización punctual.
Remarque : Ce produit ne peut être utilisé que
dans des locaux bien isolés ou de manière
occasionnelle.
Advertencia: Questo prodotto è adatto solo per
spazi ben isolati o uso occasionale.

3
INHALT
TECHNISCHE DATEN
Sehr geehrter Kunde,
wir gratulieren Ihnen zum Erwerb Ihres Klarstein Gerätes. Lesen Sie die
folgenden Anschluss- und Anwendungshinweise sorgfältig durch und
befolgen Sie diese, um möglichen technischen Schäden vorzubeugen.
Für Schäden, die durch Missachtung der Sicherheitshinweise und un-
sachgemäßen Gebrauch entstehen, übernehmen wir keine Haftung.
Scannen Sie den QR-Code, um Zugriff auf die aktuellste Bedienungs-
anleitung und weitere Informationen rund um das Produkt zu erhalten.
Artikelnummer 10033060 10033062
Stromversorgung 220-240 V~ 50 Hz
Leistungsaufnahme max. 2000 W
Maße 82 x 10 x 45 cm
Inhalt . . . . . . . . . . . . . . . . . . . . . . . . . . . . . . . . . . . . . . . . . . . . . . . . . . . . . . .3
Technische Daten . . . . . . . . . . . . . . . . . . . . . . . . . . . . . . . . . . . . . . . . . . . . . . .3
Sicherheitshinweise . . . . . . . . . . . . . . . . . . . . . . . . . . . . . . . . . . . . . . . . . . . . . .5
Geräteübersicht . . . . . . . . . . . . . . . . . . . . . . . . . . . . . . . . . . . . . . . . . . . . . . . . .7
Montage . . . . . . . . . . . . . . . . . . . . . . . . . . . . . . . . . . . . . . . . . . . . . . . . . . . . .8
Bedienfeld . . . . . . . . . . . . . . . . . . . . . . . . . . . . . . . . . . . . . . . . . . . . . . . . . . . 10
Bedienfeld . . . . . . . . . . . . . . . . . . . . . . . . . . . . . . . . . . . . . . . . . . . . . . . . . . . 10
Bedienung . . . . . . . . . . . . . . . . . . . . . . . . . . . . . . . . . . . . . . . . . . . . . . . . . . . 11
Reinigung . . . . . . . . . . . . . . . . . . . . . . . . . . . . . . . . . . . . . . . . . . . . . . . . . . . 13
Hinweise zur Entsorgung . . . . . . . . . . . . . . . . . . . . . . . . . . . . . . . . . . . . . . . . . . 13
Konformitätserklärung . . . . . . . . . . . . . . . . . . . . . . . . . . . . . . . . . . . . . . . . . . . 13
4
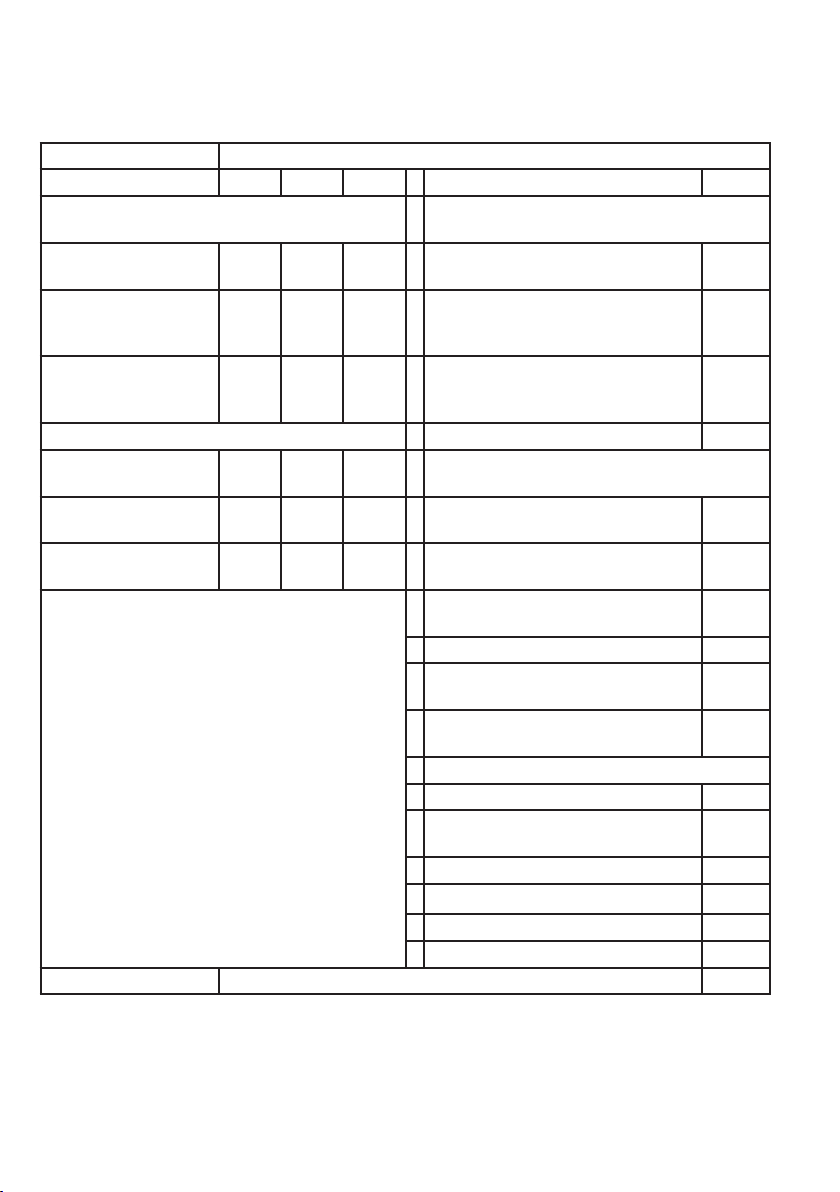
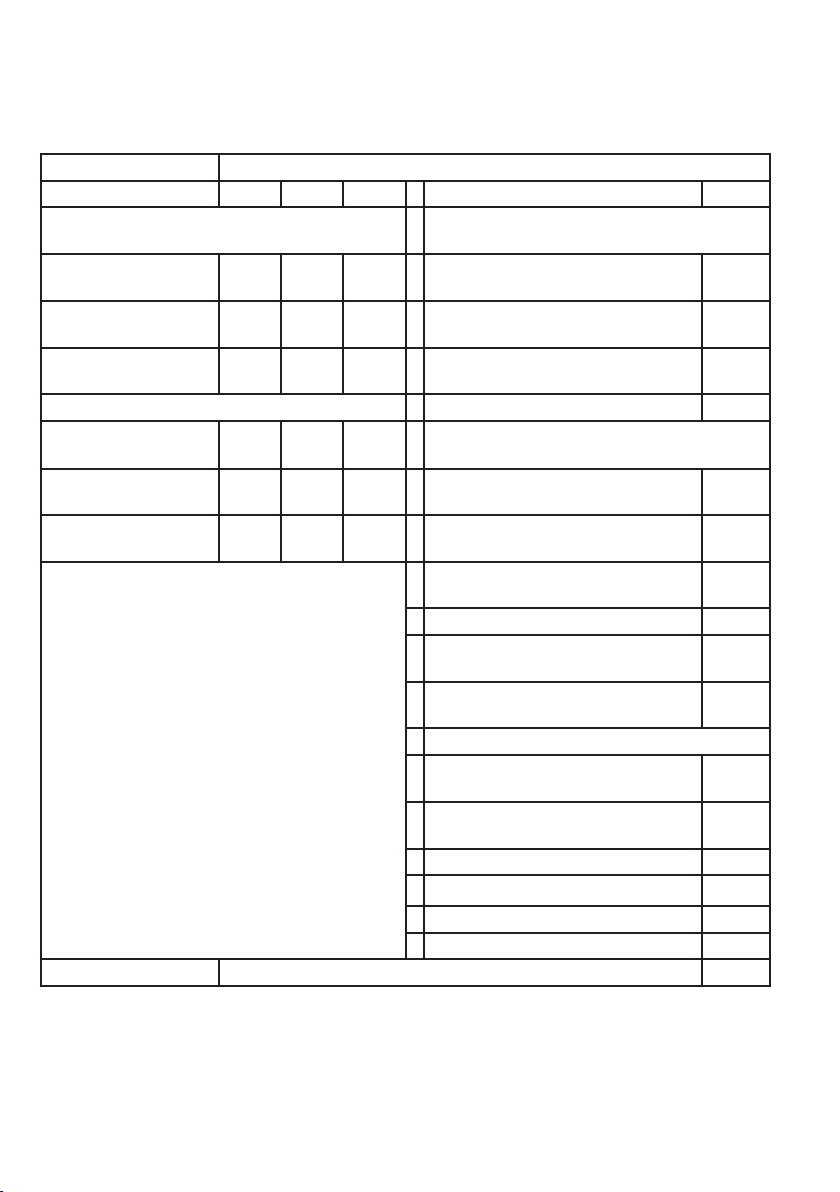
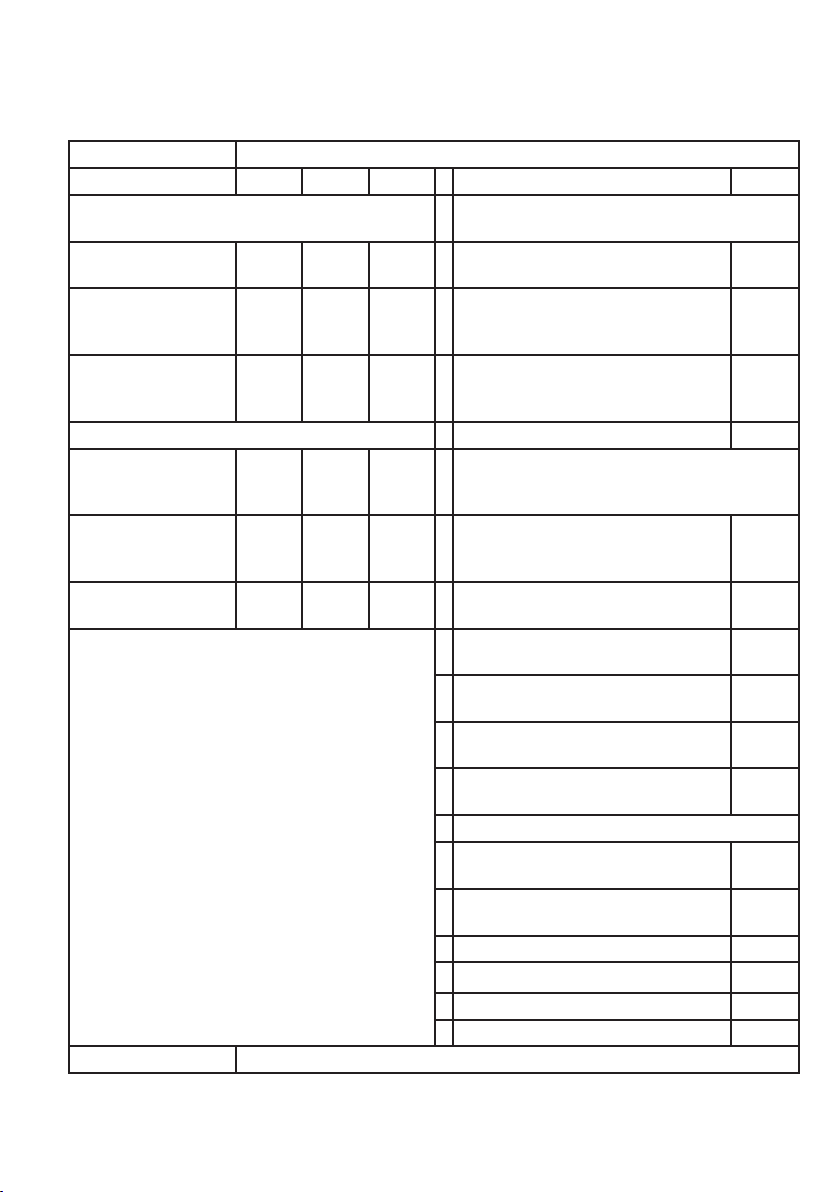
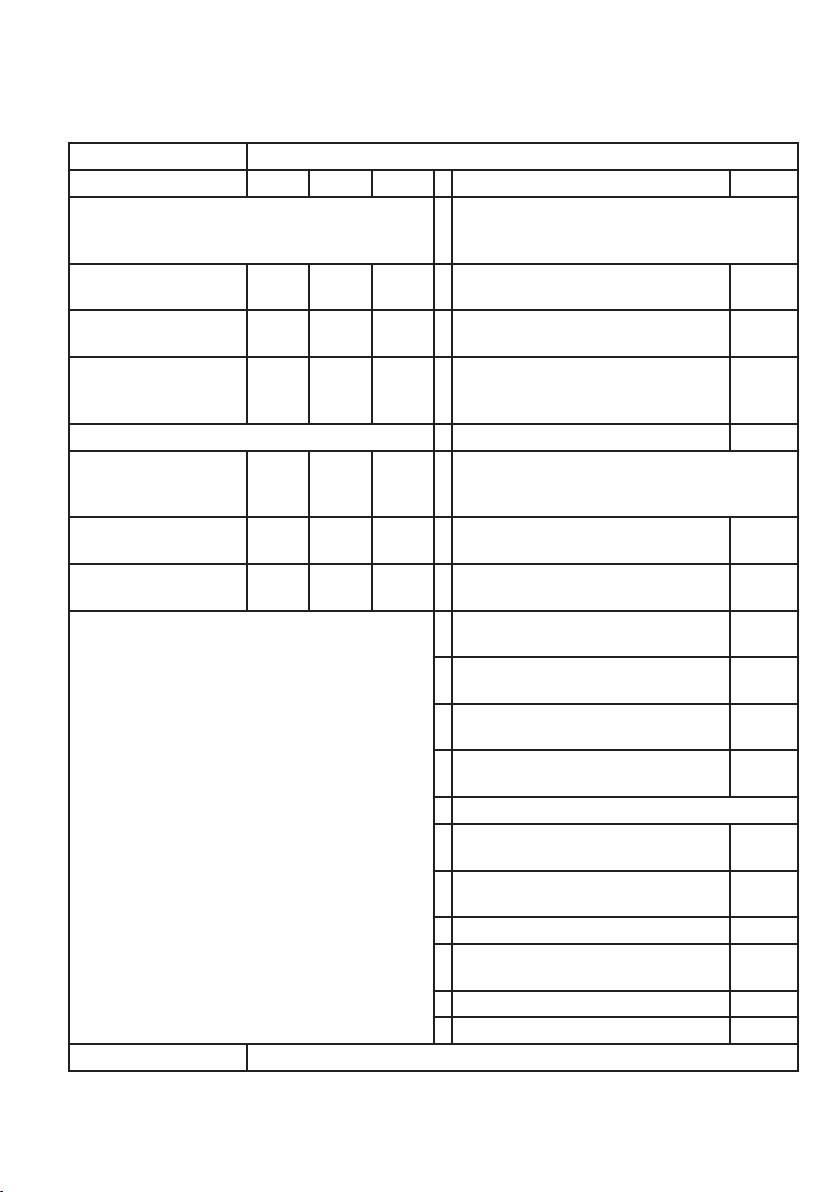
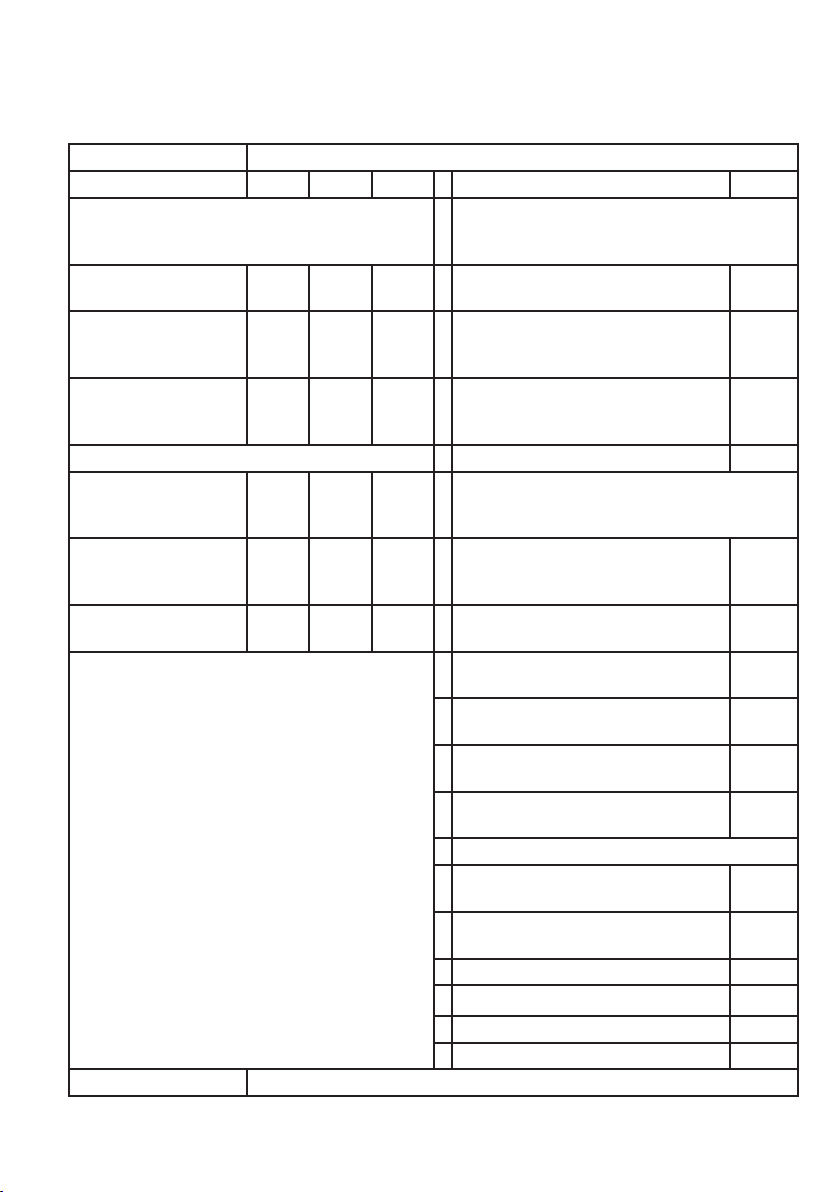
Modellkennung(en) 10033060, 10033062
Angabe Symbol Wert Einheit Angabe Einheit
Wärmeleistung Nur bei elektrischen Speicher-Einzelraumheizgeräten:
Art der Regelung der Wärmezufuhr
Nennwärmeleistung Pnom 2,0 kW Manuelle Regelung der Wärmezufuhr mit
integriertem Thermostat
Nein
Mindestwärmeleistung
(Richtwert)
Pmin 1,0 kW Manuelle Regelung der Wärmezufuhr
mit Rückmeldung der Raum- und/oder
Außentemperatur
Nein
Maximale kontinuierliche
Wärmeleistung
Pmax,c 2,0 kW Elektronische Regelung der Wärmezufuhr
mit Rückmeldung der Raum- und/oder
Außentemperatur
Nein
Hilfsstromverbrauch
Wärmeabgabe mit Gebläseunterstützung Nein
Bei Nennwärmeleistung
(Ventilator-Motor)
elmax 1,875 kW
Art der Wärmeleistung/Raumtemperaturkontrolle
Bei Mindestwärmeleistung
(Ventilator-Motor)
elmin 0,936 kW Einstuge Wärmeleistung, keine
Raumtemperaturkontrolle
Nein
Im Bereitschaftszustand elSB 0,24 kW Zwei oder mehr manuell einstellbare Stufen,
keine Raumtemperaturkontrolle
Nein
Raumtemperaturkontrolle mit mechanischem
Thermostat
Nein
Mit elektronischer Raumtemperaturkontrolle Nein
Mit elektronischer Raumtemperaturkontrolle und
Tageszeitregelung
Nein
Mit elektronischer Raumtemperaturkontrolle und
Wochentagsregelung
Ja
Sonstige Regelungsoptionen
Raumtemperaturkontrolle mit Präsenzerkennung Nein
Raumtemperaturkontrolle mit Erkennung offener
Fenster
Ja
Mit Fernbedienungsoption Nein
Mit adaptiver Regelung des Heizbeginns Nein
Mit Betriebszeitbegrenzung Nein
Mit Schwarzkugelsensor Nein
Kontaktangaben Chal-Tec GmbH, Wallstraße 16, 10179, Berlin, Deutschland
Pflichtangaben nach Verordnung (EU) 2015/1188

5
SICHERHEITSHINWEISE
Lesen und befolgen Sie die folgenden Sicherheitshinweise, selbst wenn Sie sich mit dem Gerät vertraut
fühlen. Bewahren Sie die Bedienungsanleitung zum künftigen Nachschlagen auf.
Bei der Verwendung eines elektrischen Gerätes müssen die Sicherheitshinweise befolgt werden, einschließ-
lich der Folgenden:
• Verwenden Sie ausschließlich die Spannung, die auf dem Typenschild des Gerätes angegeben ist.
• Behindern Sie den Luftstrom am Luftein- oder –auslass in keiner Weise, da das Gerät überhitzen und zu
einer Brandgefahr werden kann.
• Decken Sie die Lüftungsschlitze und die Luftein- und - ausgänge nicht ab, indem Sie das Gerät an einer
Fläche anbringen. Alle Gegenstände müssen mindestens 1 Meter Abstand nach vorne, zu den Seiten und
nach hinten haben.
• Stellen Sie das Gerät nicht in der Nähe einer Wärmequelle auf.
• Betreiben Sie das Gerät nicht in einer Umgebung, in der Benzin, Farbe oder andere brennbare Stoffe ge-
lagert werden.
• Dieses Gerät wird während der Benutzung heiß. Lassen Sie nackte Haut nicht die heißen Oberfläche be-
rühren. Vor dem Bewegen ausschalten und abkühlen lassen.
• Verwenden Sie das Gerät nicht, um Wäsche zu trocknen.
• Führen Sie keine Fremdkörper und Metallgegenstände in das Innere des Gerätes oder die Lüftungsschlitze
ein, da dies zu einem Stromschlag, Brand oder einer Gerätebeschädigung kommen kann.
• Das Gerät nicht in Flüssigkeiten tauchen oder in das Geräteinnere Wasser laufen lassen, da dies zu einer
Stromschlaggefahr führt.
• Greifen Sie nicht nach einem Gerät, dass ins Wasser gefallen ist. Strom im Haushalt ausschalten und den
Netzstecker unmittelbar ziehen.
• Betreiben Sie das Gerät nicht mit einem beschädigten Netzkabel, Netzstecker, nachdem das Gerät eine
Fehlfunktion hatte, fallen gelassen wurde oder in irgendeiner Weise beschädigt wurde. Geben Sie das
Gerät dem Elektrofachmann zur Untersuchung, elektrischen oder mechanischen Justierung, Wartung oder
Reparatur.
• Bedienen Sie das Gerät nicht mit nassen Händen.
• Der häufigste Grund für eine Überhitzung ist die Ablagerung von Staub und Fusseln am Gerät. Gewährleis-
ten Sie, dass diese Ablagerungen regelmäßig entfernt werden, indem Sie den Netzstecker ziehen und die
Luftöffnungen und den Grill saugen.
• Vor dem Reinigen immer den Netzstecker ziehen. Zur Reinigung keine Scheuermittel verwenden. Mit ei-
nem feuchten (nicht nassen) Tuch, das nur in eine Seifenlauge getaucht wurde, reinigen.
• Schließen Sie das Gerät nicht an die Stromversorgung an, bevor es vollständig zusammengebaut und
montiert wurde.
• Das Gerät ist nicht für den Außengebrauch bestimmt.
• Dieses Gerät ist nach IP24 gegen Spritzwasser geschützt und somit auch für die Aufstellung in Badezim-
mern/Feuchträumen geeignet. Verwenden Sie das Gerät aber nicht in der unmittelbaren Umgebung einer
Badewanne, einer Dusche, eines Schwimmbeckens oder anderen Flüssigkeiten und stellen Sie sicher, dass
keine stromführenden Teile mit Wasser in Kontakt treten können.

6
• Immer in der aufrechten Lage betreiben.
• Vor dem Bewegen ausschalten und abkühlen lassen.
• Nicht mit einem aufgewickelten Kabel betreiben, da die Bildung von Wärme wahrscheinlich ist und aus-
reicht, um eine Gefahr darzustellen.
• Die Verwendung eines Verlängerungskabels wird bei diesem Gerät nicht empfohlen.
• Entfernen Sie nicht den Netzstecker aus der Steckdose, bevor das Gerät ausgeschaltet ist.
• Ziehen Sie nicht den Netzstecker aus der Steckdose, indem Sie am Netzkabel ziehen. Immer am Stecker
anfassen.
• Ziehen Sie den Netzstecker, wenn das Gerät nicht in Benutzung ist.
• Dieses Gerät eignet sich nicht zur Benutzung auf Langhaarteppichen oder Flokativorlegern.
• Lassen Sie das Netzkabel während des Betriebs nicht mit heißen Oberflächen in Berührung kommen.
• Verlegen Sie das Netzkabel nicht unter Teppichen, Vorlegern, Läufern usw. Legen Sie das Netzkabel außer-
halb von Gehbereichen, so dass niemand darüber stolpert.
• Das Netzkabel nicht verdrehen, verbiegen oder um das Gerät wickeln, da dies dazu führt, dass die Ka-
belisolierung schwächer wird und bricht. Achten Sie immer darauf, dass das gesamte Netzkabel von der
Kabelaufwicklung abgewickelt ist.
• Nicht im Freien oder auf einem nassen Untergrund stehend verwenden.
• Nicht einlagern, solange das Gerät noch warm ist.
• Dieses Gerät eignet sich nicht zur Benutzung durch kleine Kinder oder gebrechliche Personen ohne Be-
treuung.
• Kleine Kinder müssen beaufsichtigt werden, so dass sie mit dem Gerät nicht spielen.
• Das Gerät darf nicht unter Wandsteckdosenanschlüssen betrieben werden.
• Verwenden Sie das Gerät nicht mit einer Programmierung, Zeitschaltuhr oder einem anderen Gerät, das
die Heizung ein- oder ausschaltet. Denn es besteht eine Brandgefahr, wenn die Heizung abgedeckt wurde
oder falsch aufgestellt wurde.
• Alle Gehäuseabdeckungen dieses Gerätes haben den Zweck, den direkten Zugang zu den Heizelementen
zu verhindern und müssen angebracht sein, wenn das Gerät eingeschaltet ist.
• Die Heizung nicht abdecken! Überlastungsgefahr!
• Um die Gefahr eines Stromschlags zu vermeiden, das Gerät und das Netzkabel nicht in Wasser tauchen,
dem Regen, der Feuchtigkeit oder anderen Flüssigkeit aussetzen, als der, die zum Betrieb des Geräts not-
wendig sind.
• Das Schutzgitter gewährt kleinen Kindern und gebrechlichen Personen keinen vollständigen Schutz.
• Wenn das Netzkabel beschädigt ist, muss es von einem qualifizierten Elektriker ersetzt werden, um Ge-
fahren abzuwenden.
• Verwenden Sie das Gerät nur zu dem vorbestimmten Zweck, wie in der Bedienungsanleitung beschrieben.
Jeder andere Gebrauch wird nicht empfohlen und kann zu einem Brand, einem Stromschlag oder einer
anderen Personenverletzung führen.
• Das Gerät ist nur für den Hausgebrauch und nicht für geschäftliche oder industrielle Zwecke bestimmt.
7
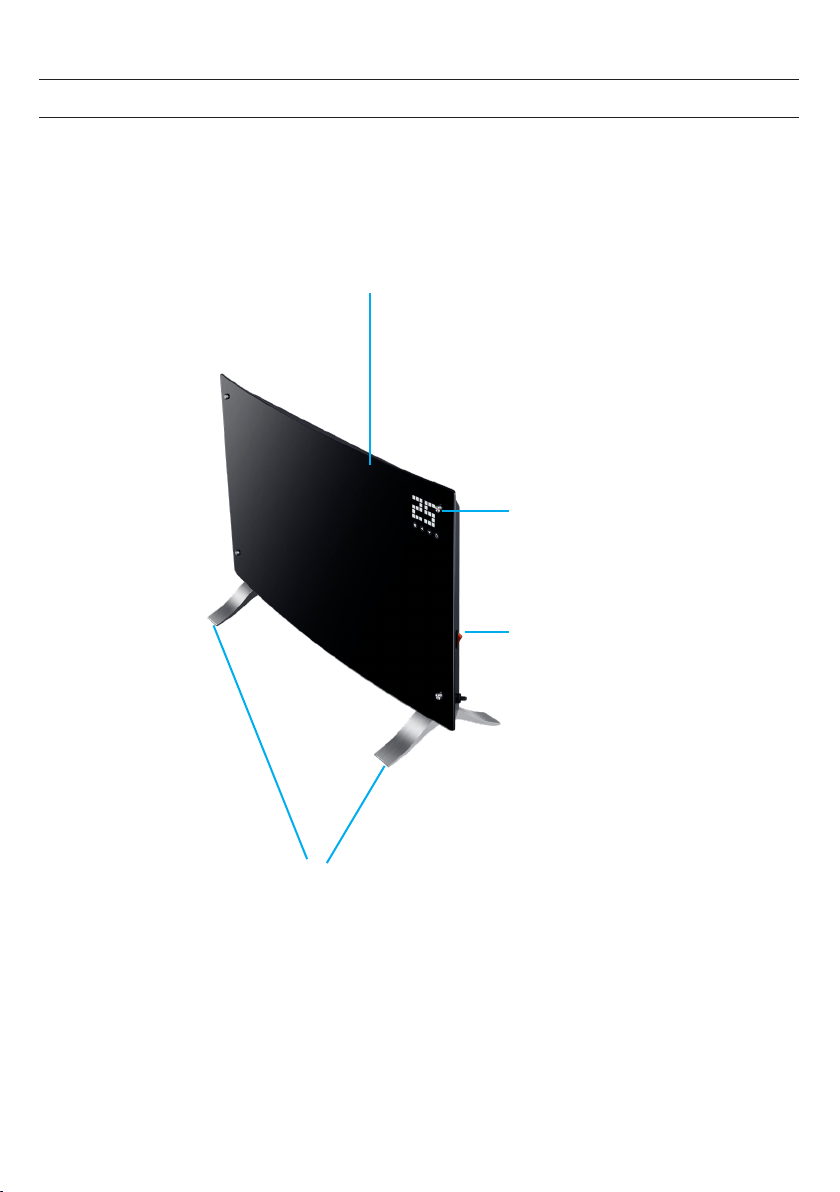
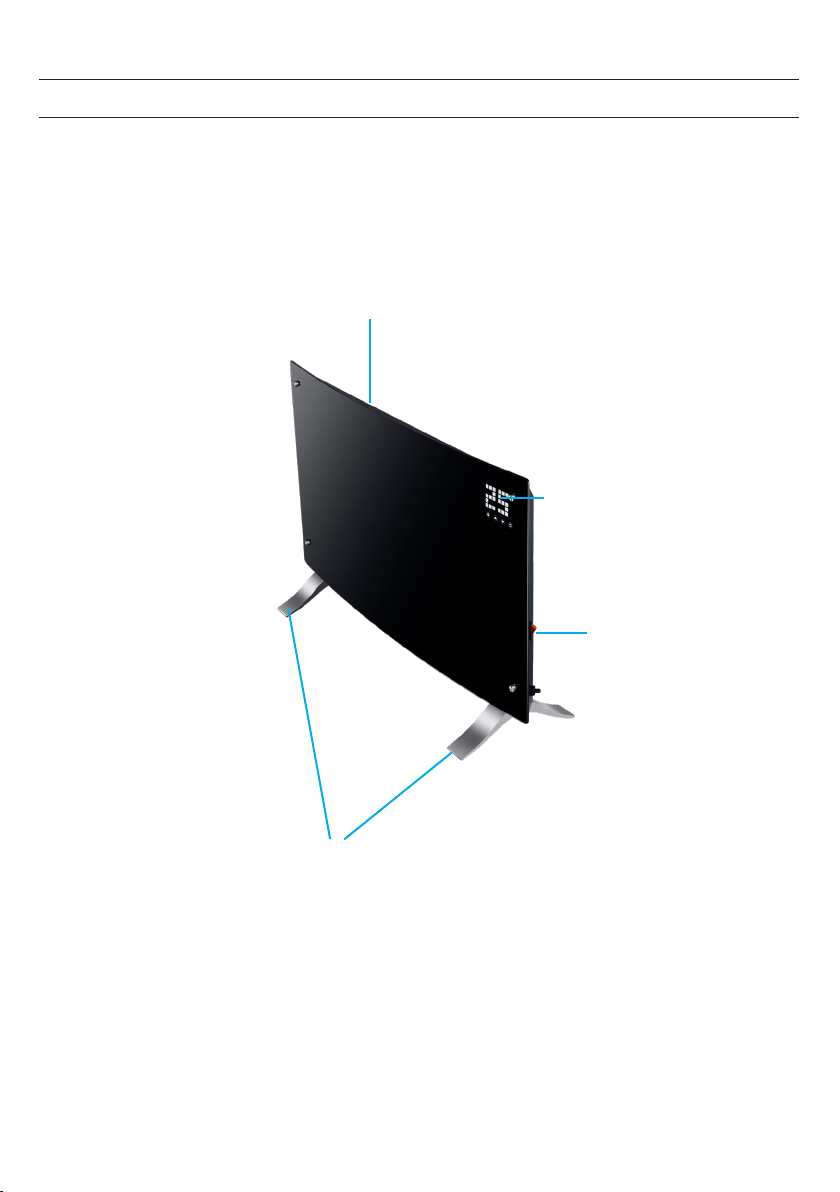
GERÄTEÜBERSICHT
Luftauslass
Schalter
Bedienfeld
Füße

8
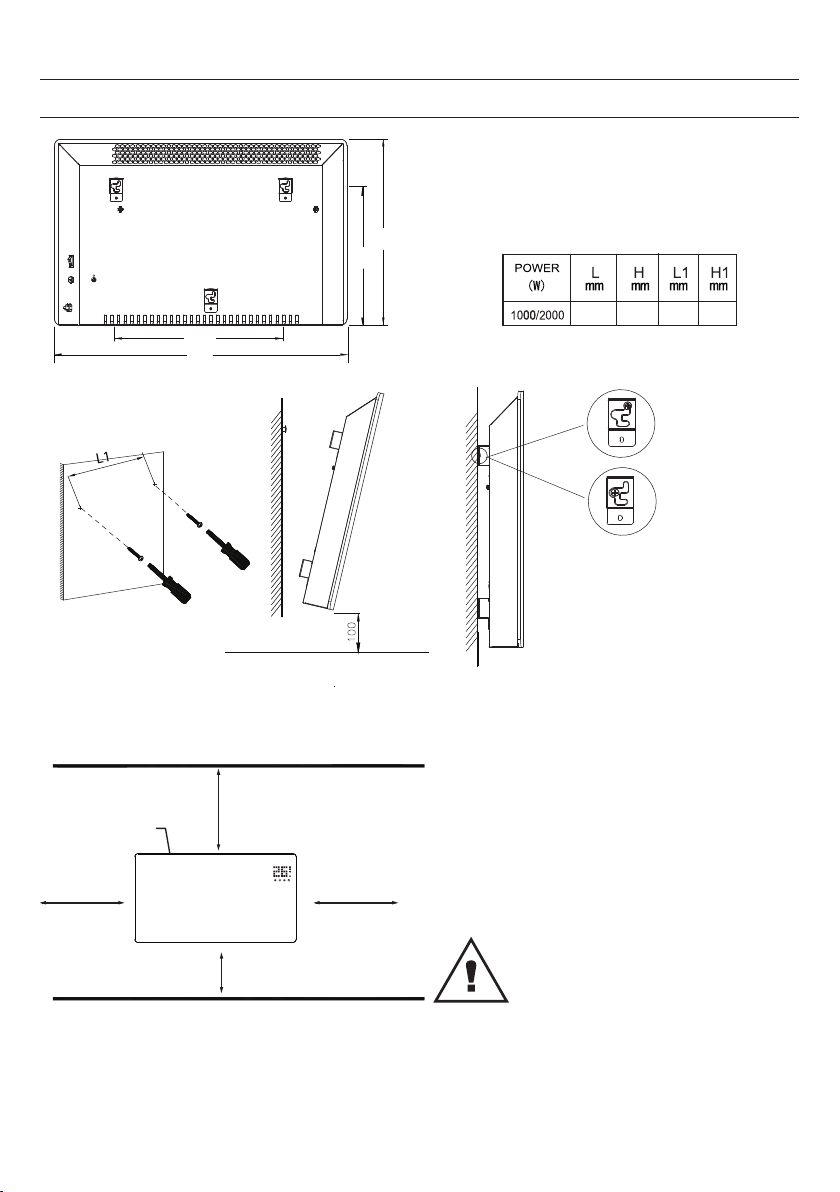
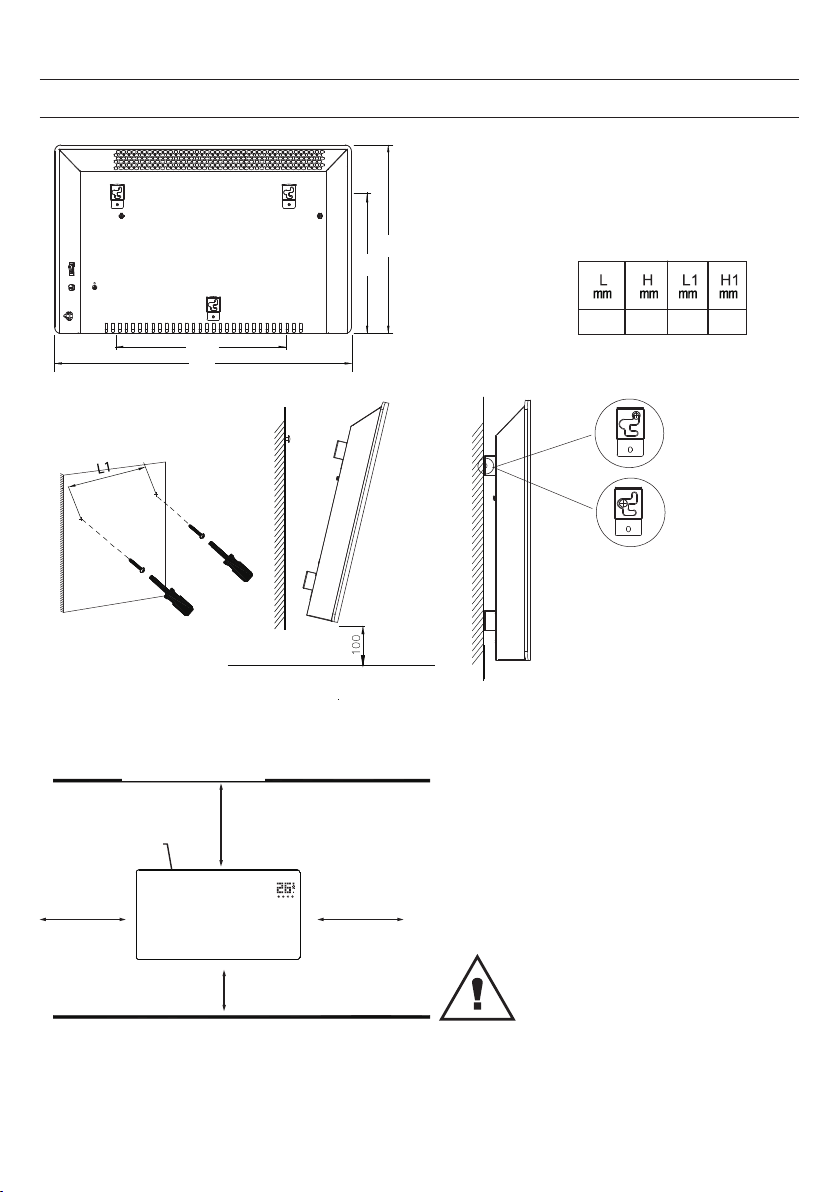
MONTAGE
Wandmontage
Den Heizkörper von der Wand nehmen
Heizkörper
5 mm herunterziehen
dann10mm nach links bewegen,
um den Heizkörper abzusenken.
Boden
Min. 100 mm
Minimum 1000mm
Min.
100 mm
Min.
100 mm
Luftauslass
Decke
820
Maße
450 538
344
H
H1
L
L1
Der Heizkörper muss
zu allen Seiten hin mit
diesen Mindestabständen
montiert werden

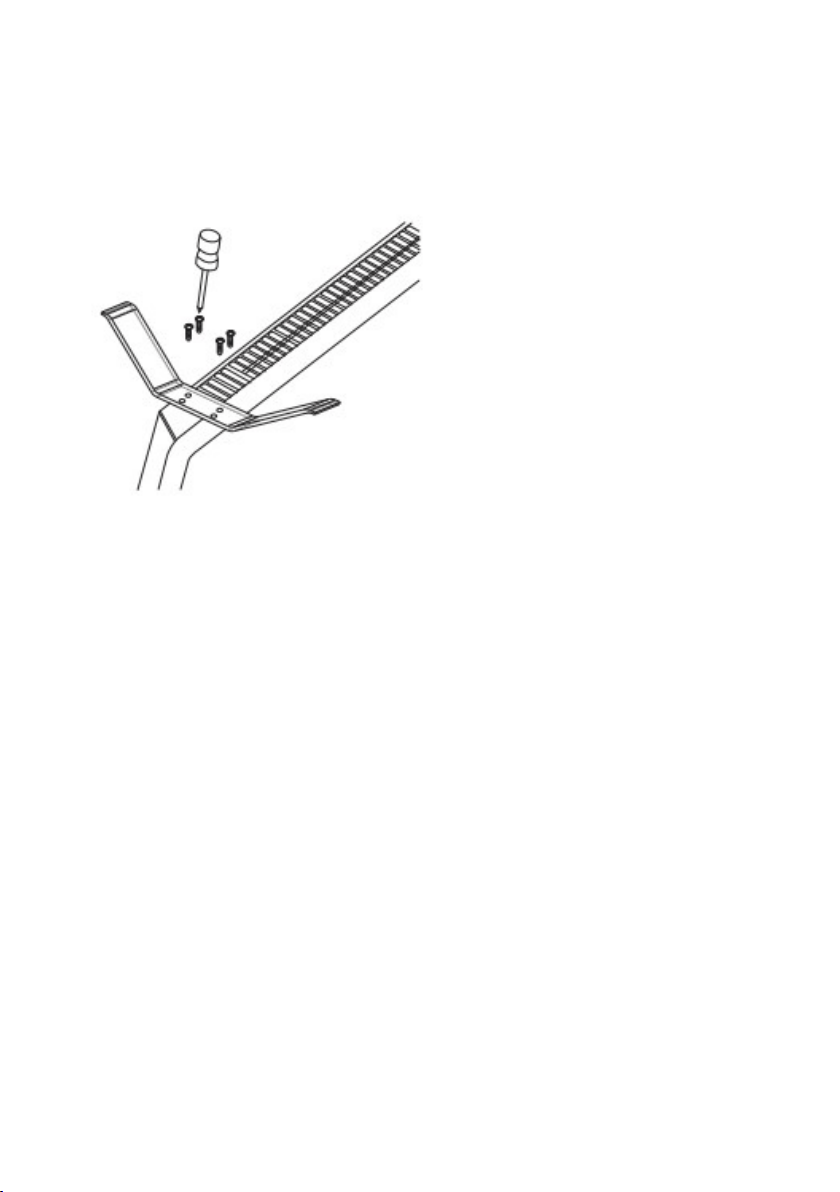
9
Freistehende Montage (Standfüße)
10
BEDIENFELD
BEDIENFELD
�示
S
e
e
t
t
IEOCNO
W/24H
13
19
15
22
20
21
18
1
4
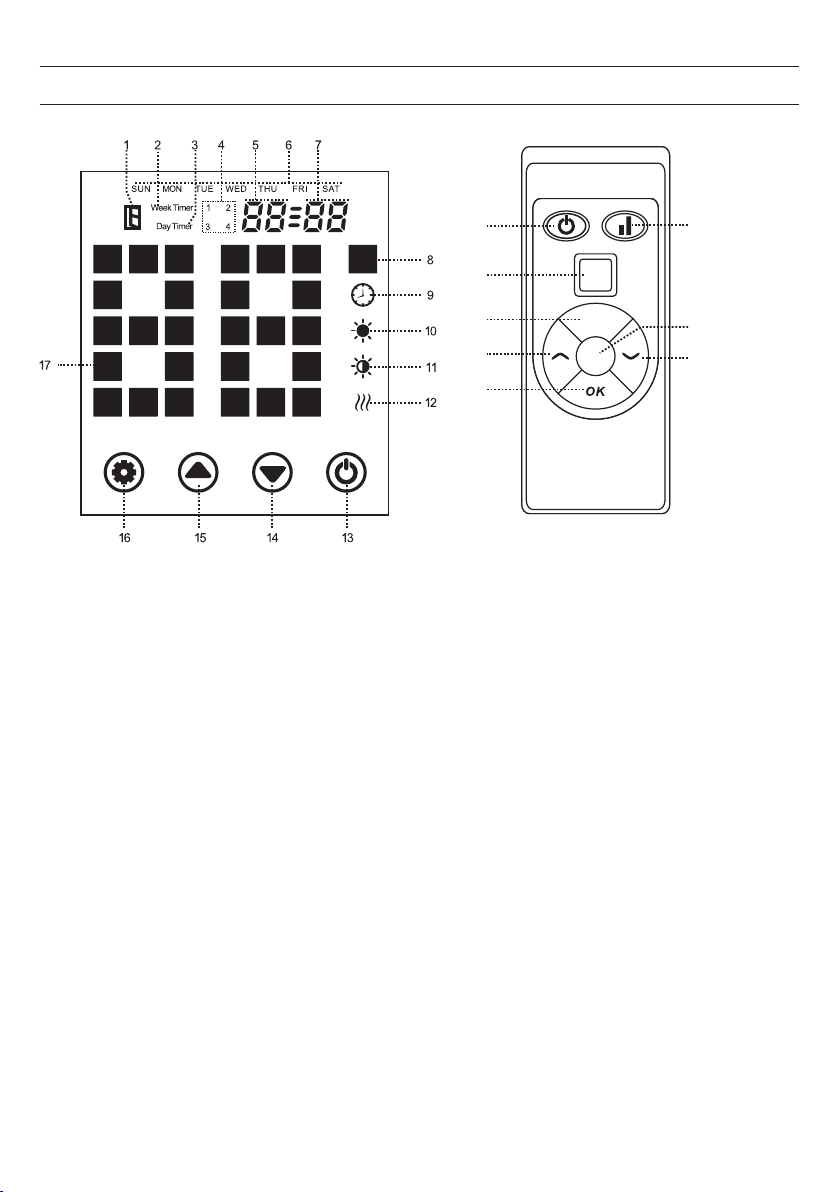
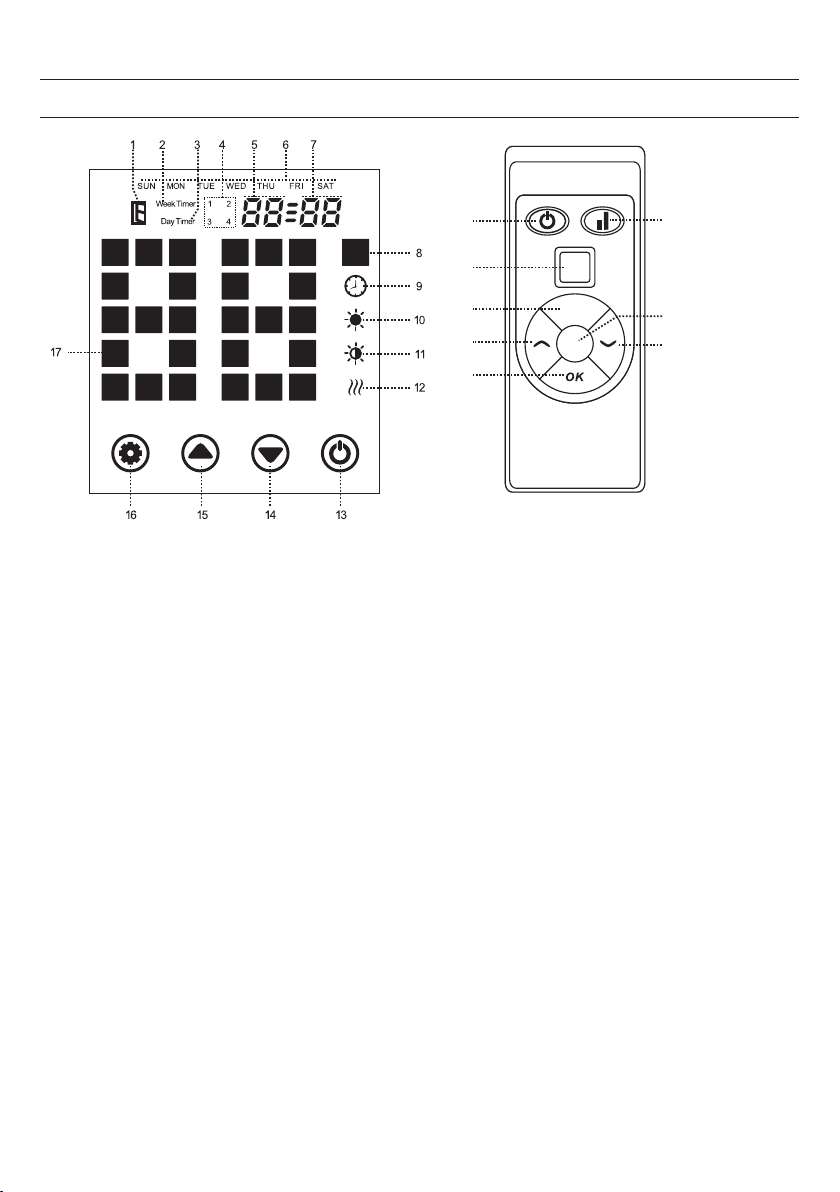
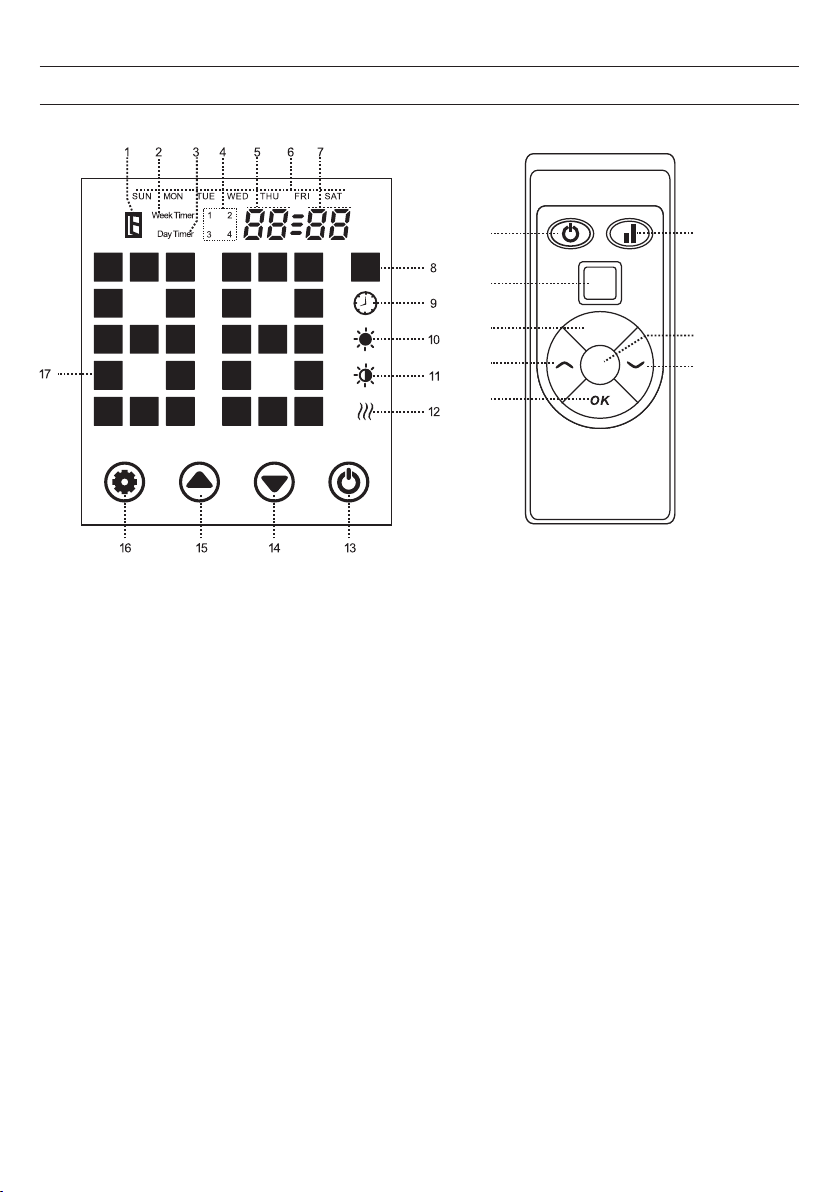
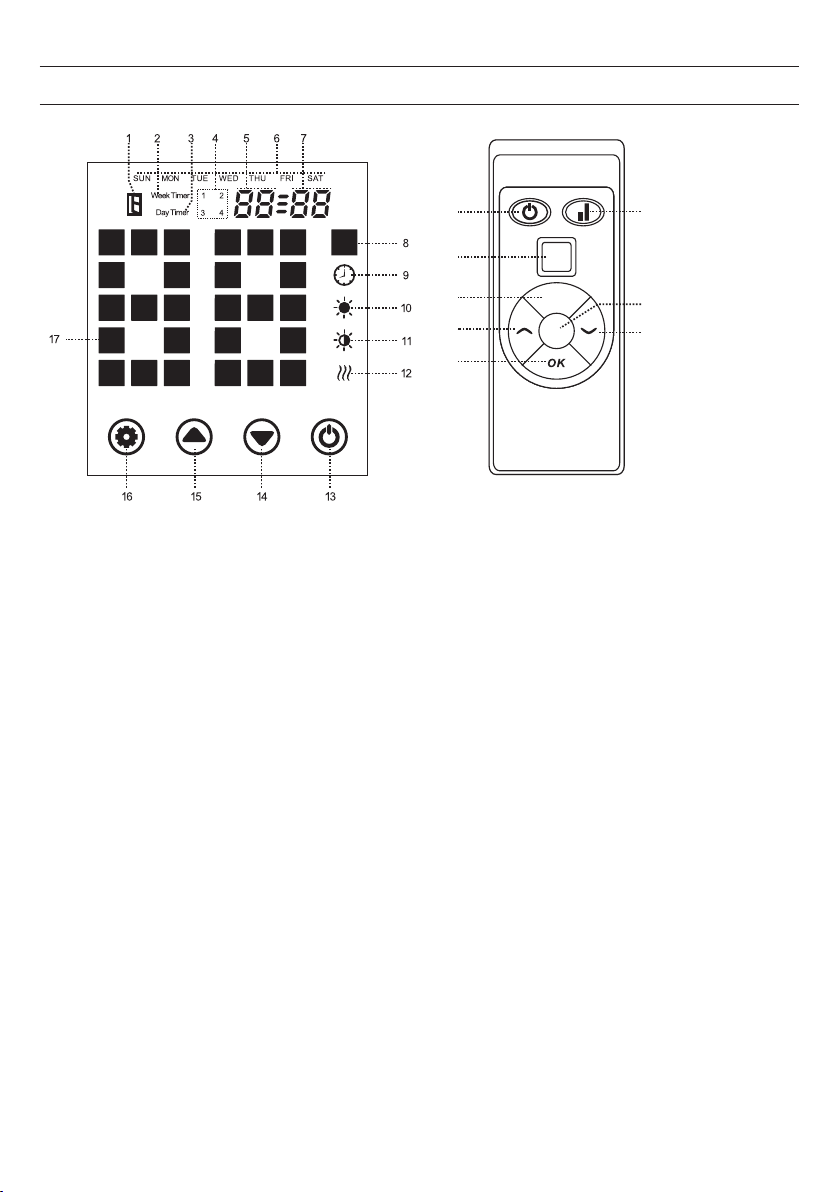
Anzeige
1 Fenster offen"
2 Wochentimer
3 Tagestimer
4 Timerperiode
5 Stunden
6 Woche
7 Minute
8 Temperatureinheit
9 Timer
10 hohe Heizstufe
11 niedrige Heizstufe
12 Betriebsstatus Heizelement
Tasten
13. Ein/Aus-Schalter
14. Wert runter
15. Wert hoch
16. Einstellungen (Bedienfeld)
17. Temperaturanzeige
18. Einstellungen (Fernbedienung)
19. ECO-Modus ein/aus
20. Wechseltaste Tag/Woche
21. hohe/niedrige Heizstufe
22. 0K-Taste
11
BEDIENUNG
Inbetriebnahme
1. Nehmen Sie das Gerät vorsichtig aus dem Karton. Heben Sie den Karton für die Lagerung außerhalb der
Saison auf.
2. Achten Sie darauf, dass die Ein/Aus-Taste ausgeschaltet ist, bevor Sie das Gerät anschließen.
3. Die Heizung muss nach der Montageanleitung vollständig zusammengebaut und montiert sein.
4. Es ist besser, denselben elektrischen Anschluss nicht mit anderen leistungshungrigen Geräten zu nutzen,
um eine Überlastung des Stromkreislaufs zu vermeiden.
Einschalten
Das Gerät an die Stromversorgung anschließen. Die Betriebslampe geht an einem kurzen Brummen an. Das
Gerät mit der Ein/Aus-Taste (13) einschalten.
Nun erscheint in der Anzeige die aktuelle Raumtemperatur.
Zeiteinstellung
Halten Sie die Einstellungen (16) und die Pfeiltaste hoch (15) drei Sekunden lang gleichzeitig gedrückt. Die
Wochenanzeige (6) blinkt und die Zeiteinstellung ist aktiv. Wählen Sie mit den Pfeiltasten einen Wochentag
aus. Drücken Sie die Einstellungen (16) und die Stundenanzeige (5) blinkt. Wählen Sie erneut mit den Pfeil-
tasten (14, 15) die Stunde aus. Die Einstellungen (16) drücken, um zur Einstellung der Minuten zu gelangen.
Mit den Pfeiltasten (14, 15) die Minute wählen und die gestellte Zeit mit der Einstellungen (16) bestätigen.
Temperatureinstellung
Drücken Sie Einstellungen (16). Die Temperaturanzeige (17) blinkt.
Dann die Temperatur mit den Pfeiltasten (14,15) wählen. Mit der Einstellungen (16) bestätigen oder 5 Sekun-
den keine weitere Eingabe vornehmen, so dass die Einstellungen automatisch übernommen werden.
Leistungsstufe wählen
Mit der Pfeiltaste runter (14) die niedrige Heizstufe wählen. Im Display erscheint das Symbol
.
Mit der Pfeiltaste hoch (15) die hohe Heizstufe wählen. Im Display erscheint das Symbol .
Alternativ drücken Sie die Taste (21) für den Wechsel zwischen hoher und niedriger Heizstufe.
Kindersicherung
Halten Sie beide Pfeiltasten (14,15) drei Sekunden lang gedrückt. Das Symbol für die Kindersicherung ([ ])
erscheint in der Anzeige. Das System ist gesperrt, es können keine Einstellungen vorgenommen werden.
Nach 2 Sekunden zeigt das Display die Umgebungstemperatur an. In diesem Modus erscheint bei jedem
Tastendruck lediglich das Symbol für die Kindersicherung.
Entsperrung: Halten Sie die beiden Pfeiltasten (14,15) 3 Sekunden lang gedrückt. Das Gerät wird entsperrt.
Nun können wieder beliebige Einstellungen vorgenommen werden.

12
Aktivierung der berührungsempfindlichen Displaytasten
Im Betrieb gehen die Displaytasten normalerweise aus. Berühren den Bereich unter der Temperaturanzeige,
um die Displaytasten zu aktivieren.
ECO-Modus (Sparbetrieb)
Einstellungen (16) und die Pfeiltaste runter (14) drei Sekunden lang gedrückt halten (oder die ECO-Taste auf
der Fernbedienung drücken, damit das Gerät in den Sparbetrieb gesetzt wird. In diesem Betriebsmodus er-
scheinen im Display nur einige Anzeigen (je nach den Einstellungen, die Sie vor dem ECO-Modus vorge-
nommen haben.)
Ruhezustand
Wenn 10 Sekunden keine Tasten gedrückt werden, wenn das Gerät heizt, geht das Display in einen Ruhezu-
stand über und nur Umgebungstemperatur an.
Detektor für offenes Fenster
Wenn die Umgebungstemperatur innerhalb von 2 Minuten um 3 °C absinkt, aktiviert die Heizung den De-
tektor für offenes Fenster. In der Anzeige erscheint das Symbol und es summt. Die Heizung schaltet sich ab.
Tag-/Wochen-Zeitschaltuhr
Die Taste „W/24H“ drücken, um zwischen den Einstellungen für die Tageszeitschaltuhr und die Wochenzeit-
schaltuhr zu wechseln. In der Anzeige erscheint entsprechend „DayTimer“ und „Weektimer“
Tageszeitschaltuhr: Bei dieser Einstellung erscheint in der Anzeige „DayTimer“. Zur Einstellung der Stunden
auf der Fernbedienung „Weektimer“ drücken. Mit den Pfeiltasten (13,14) eine Stunde wählen. Mit der Einstel-
lungen (16) zur Einstellung der Minuten wechseln. Die Minuten mit den Pfeiltasten einstellen. Bestätigen Sie
mit der OK-Taste und speichern Sie die vorgenommenen Einstellungen.
Wochenzeitschaltuhr: Die Wochenzeitschaltuhr ermöglicht vier Betriebszyklen am Tag und sieben Tage in
einer Woche. In der Anzeige erscheint „Weektimer“. Drücken Sie auf der Fernbedienung Einstellungen (16),
um einen Tag aufzurufen (Anzeige (6) blinkt). Mit den Pfeiltasten (13,14) den ersten Betriebszyklus auswählen.
Mit Einstellungen (16) zur Wahl einer Startzeit übergehen, die Sie mit den Pfeiltasten auswählen.
Wieder Einstellungen (16) drücken, um eine Abschaltzeit einzustellen.
Fahren Sie auf dieselbe Weise mit der Einstellung.
Programmabbruch
Zum Löschen aller vorherigen Einstellungen (Tag-Zeitschaltuhr oder Wochen-Zeitschaltuhr, halten Sie die
Taste (16) für 10 Sekunden gedrückt.
Hintergrunbeleuchtung
Drücken Sie im Heizbetrieb die OK-Taste auf der Fernbedienung. Der Hintergrund leuchtet in verschiedenen
Farben. Mit jedem Druck auf OK wechseln Sie die Farben. Es gibt insgesamt 6 Farben. Nachdem Sie die letzte
Farbe durchgegangen sind, drücken Sie OK, um die Hintergrundbeleuchtung abzuschalten.

13
Hintergrundbeleuchtung
Drücken Sie im Heizbetrieb die OK-Taste auf der Fernbedienung. Der Hintergrund leuchtet in verschiedenen
Farben. Mit jedem Druck auf OK wechseln Sie die Farben. Es gibt insgesamt 6 Farben. Nachdem Sie die letzte
Farbe durchgegangen sind, drücken Sie OK, um die Hintergrundbeleuchtung abzuschalten.
Ausschalten
Zum Ausschalten den Ein/Aus-Schalter betätigen. Das Heizgerät stellt den Betrieb ein. Das Heizgerät wird
ausgeschaltet.

14
REINIGUNG
HINWEISE ZUR ENTSORGUNG
Befindet sich die linke Abbildung (durchgestrichene Mülltonne auf Rädern) auf dem Pro-
dukt, gilt die Europäische Richtlinie 2012/19/EU. Diese Produkte dürfen nicht mit dem
normalen Hausmüll entsorgt werden. Informieren Sie sich über die örtlichen Regelungen
zur getrennten Sammlung elektrischer und elektronischer Gerätschaften. Richten Sie sich
nach den örtlichen Regelungen und entsorgen Sie Altgeräte nicht über den Hausmüll.
Durch die regelkonforme Entsorgung der Altgeräte werden Umwelt und die Gesundheit
ihrer Mitmenschen vor möglichen negativen Konsequenzen geschützt. Materialrecycling
hilft, den Verbrauch von Rohstoffen zu verringern.
Das Produkt enthält Batterien, die der Europäischen Richtlinie 2006/66/EG unterliegen
und nicht mit dem normalen Hausmüll entsorgt werden dürfen. Bitte informieren Sie sich
über die örtlichen Bestimmungen zur gesonderten Entsorgung von Batterien. Durch re-
gelkonforme Entsorgung schützen Sie die Umwelt und die Gesundheit Ihrer Mitmenschen
vor negativen Konsequenzen.
KONFORMITÄTSERKLÄRUNG
Hersteller: Chal-Tec GmbH, Wallstraße 16, 10179 Berlin, Deutschland
Dieses Produkt entspricht den folgenden Europäischen Richtlinien:
2009/125/EG (ErP)
2014/30/EU (EMV)
2014/35/EU (LVD)
2011/65/EU (RoHS)
Es ist sehr einfach, das Gerät hinten zu reinigen. Zum Reinigen der Rückseite halten Sie die Konvektorhei-
zung mit beiden Händen an den Seiten fest und ziehen ihn nach vorn.
Nach der Reinigung stellen Sie den Heizer wieder an den Platz zurück.
Lagerung
Wenn Sie das Gerät für längere Zeit nicht nutzen, wird empfohlen, zu reinigen und es (vorzugsweise im
Originalkarton) an einem kühlen und trockenen Ort zu lagern.

15
CONTENTS
TECHNICAL DATA
Dear Customer,
Congratulations on purchasing this equipment. Please read this manual
carefully and take care of the following hints on installation and use to
avoid technical damages. Any failure caused by ignoring the items and
cautions mentioned in the operation and installation instructions are
not covered by our warranty and any liability. Scan the QR code to get
access to the latest user manual and more product information.
Item number 10033060 10033062
Power supply 220-240 V~, 50 Hz
Power max. 2000 W
Dimensions 82 x 10 x 45 cm
Contents . . . . . . . . . . . . . . . . . . . . . . . . . . . . . . . . . . . . . . . . . . . . . . . . . . . . 14
Technical Data . . . . . . . . . . . . . . . . . . . . . . . . . . . . . . . . . . . . . . . . . . . . . . . . 14
Safety Instructions . . . . . . . . . . . . . . . . . . . . . . . . . . . . . . . . . . . . . . . . . . . . . . 16
Product Overview . . . . . . . . . . . . . . . . . . . . . . . . . . . . . . . . . . . . . . . . . . . . . .18
Installation . . . . . . . . . . . . . . . . . . . . . . . . . . . . . . . . . . . . . . . . . . . . . . . . . . . 19
Control Panel . . . . . . . . . . . . . . . . . . . . . . . . . . . . . . . . . . . . . . . . . . . . . . . . . 21
Operation . . . . . . . . . . . . . . . . . . . . . . . . . . . . . . . . . . . . . . . . . . . . . . . . . . .22
Cleaning . . . . . . . . . . . . . . . . . . . . . . . . . . . . . . . . . . . . . . . . . . . . . . . . . . . .24
Disposal Considerations . . . . . . . . . . . . . . . . . . . . . . . . . . . . . . . . . . . . . . . . . .24
Declaration of Conformity . . . . . . . . . . . . . . . . . . . . . . . . . . . . . . . . . . . . . . . . . 24
16
Model identier(s): 10033060, 10033062
Item Symbol Value Unit Item Unit
Heat output Type of heat input, for electric storage local space
heaters only
Nominal heat output Pnom 2.0 kW manual heat charge control, with integrated
thermostat
NO
Minimum heat output
(indicative)
Pmin 1.0 kW manual heat charge control with room and/or
outdoor temperature feedback
NO
Maximum continuous heat
output
Pmax,c 2.0 kW electronic heat charge control with room and/or
outdoor temperature feedback
NO
Auxiliary electricity consumption
fan assisted heat output NO
At nominal heat output
(fan motor)
elmax 1.875 kW
Type of heat output/room temperature control (select
one)
At minimum heat output
(fan motor)
elmin 0.936 kW single stage heat output and no room
temperature control
NO
In standby mode elSB 0.24 W Two or more manual stages, no room
temperature control
NO
with mechanic thermostat room temperature
control
NO
with electronic room temperature control NO
electronic room temperature control plus day
timer
NO
electronic room temperature control plus week
timer
YES
Other control options (multiple selections possible)
room temperature control, with presence
detection
NO
room temperature control, with open window
detection
YES
with distance control option NO
with adaptive start control NO
with working time limitation NO
with black bulb sensor NO
Contact details Chal-Tec GmbH, Wallstraße 16, 10179, Berlin, Germany
Mandatory statement according to Regulation (EU) 2015/1188

17
SAFETY INSTRUCTIONS
Read and follow all the instructions in this manual even if you feel you are familiar with the product, and find
a place to keep it handy for future reference. Read all instructions before using this appliance and keep them
for future reference.
When using any electrically powered product, basic safety precautions should always be followed, including
the following:
• Use only the voltage specified on the rating plate of the heater.
• Do not cover or restrict airflow to the inlet or exhaust grilles in any manner as the appliance may overheat
and become a fire risk.
• Do not cover grilles, block entry or exhaust of airflow by placing appliance against any surface. Keep all
object at least 1 meter from the front, side and rear of the appliance.
• Do not place the appliance close to a radiant heat source.
• Do not operate in areas where gasoline, paint or other flammable liquids are used or stored.
• This appliance heats up when in use. To avoid burns, do not let bare skin touch hot surface.
• Switch off and let cooling before moving.
• Do not use the appliance to dry clothes.
• Do not insert or allow foreign object or metal utensils to enter any ventilation or exhaust opening, as this
may cause an electric shock, fire or damage to the appliance.
• Do not immerse in liquid or allow running into the interior of the appliance, as this could create an electrical
shock hazard.
• Do not reach for an appliance that has fallen into water. Switch of at supply and unplug immediately.
• Do not operate any appliance with a damaged cord, plug or after the appliance malfunctions or has been
dropped or damaged in any manner. Return to a qualified electrical person for examination, electrical or
mechanical adjustment, service or repair.
• Do not operate appliance with wet hands.
• The most common cause of overheating is deposits of dust or fluff in the appliance. Ensure these deposits
are removed regularly by unplugging the appliance and vacuum cleaning air vents and grilles.
• Do not use this appliance in a window as rain may cause electric shock.
• Do not use a abrasive cleaning products on this appliance. Clean with a damp cloth (not wet) rinsed in hot
soapy water only. Always remove plug from the mains supply before cleaning.
• Do not connect the appliance to the mains voltage until completely assembled and adjusted..
• This appliance is not intended for use in outdoor locations.
• This device is protected against splash water according to IP24, and therefore also suitable for installation
in bathrooms / wet rooms. However, do not use the device in the immediate vicinity of a bathtub, shower,
swimming pool or other fluids, and ensure that no live parts can come into contact with water.
• Always operate upright.
• Switch off and let cooling before moving.
• Do not operate with cord set coiled up as a build up of heat is likely, which could be sufficient to become
a hazard.

18
• The use of an extension cord with this appliance is not recommended.
• Do not remove plug from power socket until the appliance has been switched off.
• Do not remove plug from power socket by pulling the supply cord-always grip plug.
• Always unplug appliance when not in use.
• CAUTION: This product is NOT suitable to be used on long pile carpets or Flokati rugs.
• Do not allow cord to come in contact with heated surface during operation.
• Do not run cord under carpeting, throw rugs or runners etc. Arrange cord away from traffic areas so that it
will not be tripped over.
• Do not twist, kink or wrap the cord around the appliance, as this may cause the insulation to weaken and
split. Always ensure that all cord has been removed from any cord storage area.
• Do not use outdoors or whilst standing on a damp floor.
• Do not store appliance while it is still hot.
• This appliance is not intended for use by young children or infirm persons without supervision.
• Young children should be supervised to ensure they do not play with the appliance.
• The appliance must not be located immediately below a socket-outlet.
• Do not use this appliance with another programmer, timer or any other device that switches the heater on
automatically, since a fire risk exists if the appliance is covered or positioned incorrectly.
• All covers of this appliance is intended to prevent direct access to the heating elements and must be in
place when the appliance is in use.
• WARNING: In order to avoid overloading, do not cover the heater.”
• To reduce the risk of electric shock, do not immerse or expose the product or flexible cord to rain, moisture
or any liquid other than those necessary for correct operation of the product.
• The fireguard does not give full protection for young children and for infirm persons.
• If the supply cord is damaged, it must be replaced by a qualified electrical persons in order to avoid a
hazard.
• Do not use this appliance outdoors or on wet surfaces Avoid spilling liquid on the appliance
• CAUTION: In order to avoid a hazard due to inadvertent resetting of the thermal cutout, this appliance
must not be supplied through an external switching device, such a timer, or
• connected to a circuit that is regularly on and off by the utility.”
• Use this appliance only as described in this manual. Any other use is not recommended by the manufac-
turer and may cause fire, electric shock or injury.
• This appliance is intended for household use only and not for commercial or industrial use.
19
PRODUCT OVERVIEW
air outlet
control panel
switch
feet
20
INSTALLATION
Wall mounted mode
Take down the heater from wall
Pull up the heater 5mm,
then move to left 10mm
to take down the heater.
Floor
Minimum 100mm
Minimum 1000mm
Minimum
100mm
Minimum
100mm
This heater MUST be installed
to the minimum required
distances at the four sides of
the heater.
Air outlet
Ceiling/Picture frame
820
Specification
450 538
344
H
H1
L
L1
21
Freestanding installation (Feet installation and removal)
22
CONTROL PANEL
�示
S
e
e
t
t
IEOCNO
W/24H
13
19
15
22
20
2
1
1
8
1
4
Display
1. Open Window Indicator
2. Week Timer Indicator
3. Day Timer Indicator
4. Timer Period Indicator
5. Hour Indicator
6. Week Indicator
7. Minute Indicator
8. Temp. Unit
9. Timer Indicator
10. High Heat Indicator
11. Low Heat Indicator
12. Heating Element Working Indicator
Buttons
13. ON/ OFF Power Switch
14. Decrease Button
15. Increase Button
16. Setting Button (in display)
17. Temperature Indicator
18. Setting (in RC)
19. ECO on/off Switch
20. Day/ Week Timer Shifting Button
21. High/Low Heating Selection
22. OK Button
23
Starting
1. Take out the heater from the carton carefully. Please save the carton for off-season storage.
2. Make sure the power switch is in the OFF position before plugging it in.
3. Ensure the heater is fully assembled according to the Mounting Guide .
4. It is better not to use the same electric outlet with other high wattage electrical appliances in order to
avoid overloading your circuit.
Turn on
Plug in the unit and turn on its power switch, it is in standby mode and shows current time, with button light
(13) and (14) / (15) and (16) on. But then button light (14) and (15) / (16) will disappear after 10s.
Time setting
Press buttons of setting (16) and (15) together for 3s, week indicator flashes and time setting is activated.
Select a day by (14) or (15); press (16) then Hour Indicator (5) flashes, again by (14) or (15) buttons to set Hour.
Again press (16) for minute setting ( minute indicator (7) flashes ). set the desired minute by buttons (14) or
(15), after that press button (16) and save all setting .
Temperature setting
Press button (16). Temp indicator (17) flashes and its setting is activated.
Press (14) or (15) to set the temperature and (16) to save it, or just leave it 5s, setting is saved automatically.
Select heating level
(14) button runs low heat setting ( indicator
light on), button runs high heat setting (indicator light
on), or through shifting button ( on the remote control to choose high or low heat.
Child-lock setting
Press both (14) and (15) for 3s, child lock indicator “[]“ is on, system is locked and no setting could be done.
After 2 s, display shows again area temperature. In this mode, it only shows child lock indicator when any
button is pressed.
Methods to unlock: Press both (14) and (15) for 3s, the unit is unlocked and any setting could be done again.
Display buttons activation
Normally display buttons light are off when unit is working, touch the panel area below temperature, they
are on again.
OPERATION

24
ECO function
Press both setting button (16) and (14) for 3s ( or press button (8) on remote control), ECO function runs.
In this mode, display shows only some indicators ( depending on what settings have been done before ECO
mode).
Asleep
In 10 seconds, if no button is pressed when unit is heating, it enters to asleep mode and only shows area
temperature.
Open window function
When area temperature decreases by 3 °C or more in 2 mins, heater activates open window detection and
displays indicator with a buzz sound, then stops heating. .
Day/Week timer shifting
Press button „W/24H“ do shift between day timer & week timer settings. In week timer mode, indicator
“WeekTimer” is on; in week timer mode, indicator “Day Timer” is on.
Day timer: Display shows indicator “DayTime,” in this mode. First for Hour, press (16) on remote controller,
(14) and (15) buttons for concise one. Then for Minute, press (16) again and (14) and (15) buttons for concise
one, press OK button and save them.
Week timer: Week timer mode enables “4” periods a day, and “7” days a week. Display shows indicator
“Week Timer” in this mode; press (16) on remote controller for a day first (indicator (6) flashes) , by (14) and
(15) ; then the 1st period: press button (16) for a start time, same through (14) or (15). Then press button (16)
for a stop time and again through buttons of (14) or (15) . After setting the first period, then second period
third period...4th period etc.
When all needed setting is completed, press OK button and save them.
Instant cancelling
To delete all former settings (day timer or week timer), you just need to press button (16) on the display for
10 seconds.
Background light
In heating mode, pressing the OK button on the remote control will activate backlight colours. With each
press on the OK button the colour changes. There are 6 colours. If you have reached the last colour and press
OK again, the backlight will be turned off.
Turn off
Press the turn off switch. The heater stops working. Turn off power supply, heater is powered off.
25
CLEANING
DISPOSAL CONSIDERATIONS
DECLARATION OF CONFORMITY
Producer: Chal-Tec GmbH, Wallstraße 16, 10179 Berlin. Germany
This product is conform to the following European Directives:
2009/125/EG (ErP)
2011/65/EU (RoHS)
2014/30/EU (EMC)
2014/35/EU (LVD)
Cleaning
It is very easy to clean behind it. Hold two sides of the heater ,after upwards pull the heater forwards. then
you can clean behind. After cleaning, the heater must be fixed in the normal position.
Storage
If you do not plan to use the heater for extended periods of time, it is recommended that the heater is
cleaned and then stored (preferably in its original packaging) in a cool dry place.
According to the European waste regulation 2012/19/EU this symbol on the product or
on its packaging indicates that this product may not be treated as household waste. In-
stead it should be taken to the appropriate collection point for the recycling of electrical
and electronic equipment. By ensuring this product is disposed of correctly, you will help
prevent potential negative consequences for the environment and human health, which
could otherwise be caused by inappropriate waste handling of this product. For more de-
tailed information about recycling of this product, please contact your local council or your
household waste disposal service.
Your product contains batteries covered by the European Directive. 2006/66/EC, which
cannot be disposed of with normal household waste. Please check local rules on separate
collection of batteries. The correct disposal of batteries helps prevent potentially negative
consequences on the environment and human health.

26
27
SOMMAIRE
FICHE TECHNIQUE
Chère cliente, cher client,
Toutes nos félicitations pour l’acquisition de ce nouvel appareil. Veuillez
lire attentivement et respecter les instructions de ce mode d’emploi
afin d’éviter d’éventuels dommages. Nous ne saurions être tenus pour
responsables des dommages dus au non-respect des consignes et à la
mauvaise utilisation de l’appareil. Scannez le QR-Code pour obtenir la
dernière version du mode d‘emploi et des informations supplémen-
taires concernant le produit.
Numéro d'article 10033060 10033062
Alimentation 220-240 V~ 50 Hz
Puissance consommée max. 2000 W
Dimensions 82 x 10 x 45 cm
Sommaire . . . . . . . . . . . . . . . . . . . . . . . . . . . . . . . . . . . . . . . . . . . . . . . . . . . 27
Fiche technique . . . . . . . . . . . . . . . . . . . . . . . . . . . . . . . . . . . . . . . . . . . . . . . . 27
Consignes de sécurité . . . . . . . . . . . . . . . . . . . . . . . . . . . . . . . . . . . . . . . . . . . . 29
Aperçu de l‘appareil . . . . . . . . . . . . . . . . . . . . . . . . . . . . . . . . . . . . . . . . . . . . . 31
Montage . . . . . . . . . . . . . . . . . . . . . . . . . . . . . . . . . . . . . . . . . . . . . . . . . . . . 32
Panneau de commande . . . . . . . . . . . . . . . . . . . . . . . . . . . . . . . . . . . . . . . . . .34
Utilisation . . . . . . . . . . . . . . . . . . . . . . . . . . . . . . . . . . . . . . . . . . . . . . . . . . .35
Nettoyage . . . . . . . . . . . . . . . . . . . . . . . . . . . . . . . . . . . . . . . . . . . . . . . . . . . 37
Informations sur le recyclage . . . . . . . . . . . . . . . . . . . . . . . . . . . . . . . . . . . . . . .37
Déclaration de conformité . . . . . . . . . . . . . . . . . . . . . . . . . . . . . . . . . . . . . . . . . 37
28
Informations obligatoires selon l‘ordonnance (UE) 2015/1188
Référence (s) du produit 10033060, 10033062
Donnée Symbole Valeur Unité Donnée Unité
Puissance calorique Uniquement pour les radiateurs électriques à
accumulation : Type de régulation de l'apport de chaleur
Puissance calorique
nominale
Pnom 2,0 kW Régulation manuelle de l'apport de chaleur
avec thermostat intégré
non
Puissance calorique
minimale (indicative)
Pmin 1,0 kW Régulation manuelle de l'apport de chaleur
avec indication de la température de la pièce
et/ou de l'extérieur
non
Puissance maximale
continue de chauffage
Pmax,c 2,0 kW Régulation électronique de l'apport de chaleur
avec indication de la température de la pièce
et/ou de l'extérieur
non
Consommation de courant auxiliaire
Apport de chaleur assisté par ventilateur non
A puissance calorique
nominale (moteur de
ventilateur)
elmax 1,875 kW
Type de chauffage/contrôle de la température de la
pièce
A puissance calorique
minimale (moteur de
ventilateur)
elmin 0,936 kW Chauffage à une seule vitesse, pas de contrôle
de la température ambiante
non
En mode veille elSB 0,24 kW Deux vitesses ou plus réglables manuellement,
pas de contrôle de la température ambiante
non
Contrôle de la température ambiante par
thermostat mécanique
non
Contrôle électronique de la température
ambiante
non
Contrôle électronique de la température
ambiante et régulation par jour
non
Contrôle électronique de la température
ambiante et régulation par semaine
oui
Autres options de régulation
Contrôle de la température ambiante avec
détection de présence
non
Contrôle de la température ambiante avec
détection de fenêtre ouverte
oui
Avec option télécommande non
Avec contrôle du démarrage du chauffage non
Avec limitation de la durée de fonctionnement non
Avec globe noir capteur de température non
Coordonnées de contact Chal-Tec GmbH, Wallstraße 16, 10179, Berlin, Allemagne

29
CONSIGNES DE SÉCURITÉ
Lisez et suivez les instructions de sécurité ci-dessous, même si vous êtes familiarisé avec l‘appareil. Conser-
vez le mode d‘emploi pour référence ultérieure.
Lors de l‘utilisation d‘un appareil électrique, les consignes de sécurité doivent être respectées, y compris les
suivantes.
• Utilisez uniquement la tension indiquée sur la plaque signalétique de l‘appareil.
• Ne bloquez pas le flux d‘air à l‘entrée ou à la sortie d‘air, car l‘appareil pourrait surchauffer et présenter un
risque d‘incendie.
• Ne couvrez pas les fentes de ventilation et les entrées et sorties d‘air en fixant l‘appareil à une surface. Tous
les objets doivent être à au moins 1 mètre du devant, des côtés et du dos.
• Ne placez pas l‘appareil près d‘une source de chaleur.
• N‘utilisez pas l‘appareil dans un environnement où de l‘essence, de la peinture ou d‘autres substances in-
flammables sont stockées.
• Cet appareil devient chaud pendant son utilisation. Ne laissez pas la peau nue entrer en contact avec la
surface chaude. Eteignez et laissez refroidir l‘appareil avant de le déplacer.
• N‘utilisez pas la machine pour sécher le linge.
• N‘insérez pas de corps étrangers ou d‘objets métalliques à l‘intérieur de l‘appareil ou des évents, car cela
pourrait provoquer un choc électrique, un incendie ou des dommages matériels.
• Ne plongez pas l‘appareil dans des liquides et n‘en laissez pas pénétrer à l‘intérieur de l‘appareil, car cela
pourrait entraîner un risque d‘électrocution.
• Ne touchez pas à un appareil qui est tombé dans l‘eau. Coupez le courant chez vous et débranchez immé-
diatement le cordon d‘alimentation.
• Ne faites pas fonctionner l‘appareil avec un cordon d‘alimentation ou une fiche secteur endommagés ap-
rès un dysfonctionnement, une chute ou un endommagement quelconque de l‘appareil. Confiez l‘appareil
à l‘électricien pour examen, réglage électrique ou mécanique, entretien ou réparation.
• N‘utilisez pas l‘appareil avec les mains mouillées.
• La cause la plus courante de surchauffe est le dépôt de poussière et de peluches sur l‘appareil. Assurez-
vous que ces dépôts sont éliminés régulièrement en débranchant la fiche et en aspirant les ouvertures et
grilles d‘aération.
• Débranchez toujours l‘appareil avant de le nettoyer. N‘utilisez pas de produits abrasifs pour le nettoyage.
Nettoyez avec un chiffon humide (non mouillé) trempé dans une solution savonneuse.
• Ne connectez pas l‘appareil à l‘alimentation électrique avant d‘‘avoir terminé l‘assemblage.
• L‘appareil n‘est pas conçu pour être utilisé à l‘extérieur.
• Cet appareil est protégé contre les projections d’eau selon IP24 et convient donc également pour une
installation dans des salles de bains / pièces humides. Cependant, n‘utilisez pas l‘appareil à proximité im-
médiate d‘une baignoire, d‘une douche, d‘une piscine ou d‘autres liquides, et assurez-vous qu‘aucune partie
sous tension ne puisse entrer en contact avec de l‘eau

30
• Utilisez toujours l‘appareil en position verticale.
• Eteignez l‘appareil et laissez-le refroidir avant de le déplacer.
• Ne pas utiliser un câble enroulé, car la formation de chaleur est probable et serait suffisante pour présenter
un danger.
• L‘utilisation d‘une rallonge n‘est pas recommandée pour cet appareil.
• Ne retirez pas la fiche de la prise avant que l‘appareil ne soit éteint.
• Ne débranchez pas le cordon d‘alimentation en tirant sur le cordon d‘alimentation. Prenez toujours la fiche.
• Débranchez la fiche d‘alimentation lorsque l‘appareil n‘est pas utilisé.
• Cet appareil ne convient pas pour une utilisation sur des tapis ou flokati à poils longs.
• Ne laissez pas le cordon d‘alimentation entrer en contact avec des surfaces chaudes pendant le fonction-
nement.
• Ne faites pas passer le cordon d‘alimentation sous des tapis, moquettes, glissières, etc.
• Ne pas tordre, plier ou enrouler le cordon d‘alimentation autour de l‘appareil, car cela pourrait affaiblir
l‘isolation du câble et le casser. Assurez-vous toujours que le cordon d‘alimentation est entièrement dérou-
lé du rembobinage du câble.
• Ne pas utiliser à l‘extérieur ou sur une surface humide.
• Ne pas stocker pendant que l‘appareil est encore chaud.
• Cet appareil ne convient pas aux petits enfants ou aux personnes infirmes non accompagnés.
• Les petits enfants doivent être surveillés afin qu‘ils ne jouent pas avec l‘appareil.
• L‘appareil ne doit pas être utilisé immédiatement sous une prise.
• N‘utilisez pas l‘appareil avec un programmateur, une minuterie ou tout autre appareil qui allume ou éteint
le chauffage. Il y a un risque d‘incendie si l‘appareil de chauffage a été recouvert ou mal placé.
• Tous les couvercles de boîtier de cet appareil sont destinés à empêcher l‘accès direct aux éléments chauf-
fants et doivent être installés lors de la mise en marche de l‘appareil.
• Ne couvrez pas le radiateur ! Risque de surcharge !
• Pour éviter tout risque d‘électrocution, ne pas immerger l‘appareil et le cordon d‘alimentation dans l‘eau
ni les exposer à la pluie, à l‘humidité ou à tout autre liquide que ceux nécessaires pour faire fonctionner
l‘appareil.
• La grille de protection n‘offre pas une protection complète aux nourrissons et aux personnes handicapées.
• Si le cordon d‘alimentation est endommagé, il doit être remplacé par un électricien qualifié pour éviter tout
danger.
• N‘utilisez l‘appareil qu‘aux fins prévues dans le mode d‘emploi. Toute autre utilisation n‘est pas recomman-
dée et peut provoquer un incendie, une électrocution ou d‘autres blessures.
• L‘appareil est destiné à un usage domestique uniquement et non à des fins professionnelles ou industriel-
les.

31
APERÇU DE L‘APPAREIL
Sortie d‘air
Interrupteur
Panneau de commande
Pieds

32
MONTAGE
Wandmontage
Den Heizkörper von der Wand nehmen
Heizkörper
5 mm herunterziehen
dann10mm nach links bewegen,
um den Heizkörper abzusenken.
Boden
Min. 100 mm
Minimum 1000mm
Min.
100 mm
Min.
100 mm
Luftauslass
Decke
820
Maße
450 538
344
H
H1
L
L1
Der Heizkörper muss
zu allen Seiten hin mit
diesen Mindestabständen
montiert werden
Dimensions
Abaissez le radiateur de 5 mm puis
déplacez-le de 10 mm vers la gauche
pour ensuite l’abaisser.
Démontez le radiateur du mur
Montage mural
Pland
Le radiateur doit être monté en
respectant les distances minimales
suivantes sur tous les côtés
Sortie d’air
Sol

33
Montage en pose libre (pieds de support)
34
PANNEAU DE COMMANDE
�示
S
e
e
t
t
IEOCNO
W/24H
13
19
15
22
20
2
1
1
8
1
4
Témoins
1. "Fenêtre ouverte "
2. Minuterie hebdomadaire
3. Minuterie quotidienne
4. Période de minuterie
5. Heures
6. Semaine
7. Minutes
8. Unité de température
9. Minuterie
10. Forte puissance de chauffage
11. Faible puissance de chauffage
12. Témoin d'état de l'élément chauffant
Touches
13. Interrupteur de marche/arrêt
14. Réduire la valeur
15. Augmenter la valeur
16. Paramètres (panneau de commande)
17. Indicateur de température
18. Paramètres (de la télécommande)
19. Mode ECO marche/arrêt
20. Touche de basculement jour/semaine
21. Puissance de chauffage forte/faible
22. Bouton OK
35
UTILISATION
Mise en service
1. Retirez délicatement l’appareil de la boîte. Gardez le carton hors saison pour le stockage.
2. Assurez-vous que le bouton d’alimentation est éteint avant de connecter l’appareil.
3. Le chauffage doit être entièrement assemblé et installé conformément aux instructions d’installation.
4. Il est préférable de ne pas utiliser la même connexion électrique que d’autres appareils très consommateurs
d’énergie pour éviter de surcharger le circuit.
Démarrage
Branchez l‘appareil à l‘alimentation. Le témoin de fonctionnement émet un bref bourdonnement. Allumez
l‘appareil avec le bouton marche / arrêt (13).
L‘écran affiche maintenant la température ambiante actuelle.
Réglage de la durée
Maintenez simultanément la touche des paramètres (16) et la flèche haut (15) pendant trois secondes.
L‘indicateur de semaine (6) clignote et le réglage de l‘heure est actif. Utilisez les touches fléchées pour sé-
lectionner un jour de la semaine. Appuyez sur la touche paramètres (16), l‘affichage des heures (5) clignote.
Sélectionnez à nouveau l‘heure avec les touches fléchées (14, 15). Appuyez sur paramètres (16) pour accéder
au réglage des minutes. Utilisez les touches fléchées (14, 15) pour sélectionner les minutes puis confirmez
l’heure réglée avec la touche paramètres (16).
Réglage de la température
Appuyez sur Paramètres (16). L‘affichage de température (17) clignote.
Sélectionnez la température avec les touches fléchées (14,15). Confirmez avec la touche Paramètres (16), ou
ne faites aucune autre entrée pendant 5 secondes, afin que les paramètres soient automatiquement pris en
compte.
Choix du niveau de puissance
Utilisez la touche fléchée (14) pour sélectionner le niveau de chauffage bas. L‘écran affiche le symbole
.
Utilisez la touche fléchée haut (15) pour sélectionner le niveau de chauffage élevé. Le symbole .apparaît à
l‘écran. Sinon, appuyez sur la touche (21) pour basculer entre les réglages de chauffage fort ou faible.
Verrouillage parental
Maintenez les deux touches fléchées (14,15) pendant trois secondes. Le symbole du contrôle parental ([]) ap-
paraît à l‘écran. Le système est verrouillé, aucun réglage ne peut être effectué. Au bout de 2 secondes, l‘écran
affiche la température ambiante. Dans ce mode, seul le symbole de contrôle parental apparaît à chaque
pression sur le bouton.
Déverrouillage : Appuyez sur les deux touches fléchées (14,15) et maintenez-les pendant 3 secondes.
L‘appareil est déverrouillé. Vous pouvez à nouveau modifier tous les paramètres.
Activation des touches tactiles
Pendant le fonctionnement, les touches d‘affichage sont normalement désactivées. Touchez la zone située
sous l‘affichage de la température pour activer les boutons d‘affichage.

36
Mode ECO (économie d‘énergie)
Maintenez la touche Paramètres (16) et la flèche vers le bas (14) pendant trois secondes (ou appuyez sur la
touche ECO de la télécommande pour mettre l’appareil en mode veille). Dans ce mode, seuls les quelques
affichages que vous avez réglés avant de passer en mode ECO apparaissent).
Veille
Si vous n‘appuyez sur aucune touche pendant 10 secondes pendant que l‘appareil chauffe, l‘écran passe en
mode veille et affiche seulement la température ambiante.
Détection de fenêtre ouverte
Lorsque la température ambiante chute de 3 °C en 2 minutes, le chauffage active le détecteur de fenêtre
ouverte. Le symbole apparaît à l‘écran et bourdonne. Le radiateur s‘éteint.
Minuterie jour/semaine
Appuyez sur la touche „W / 24H“ pour basculer entre les réglages de la minuterie quotidienne et de la minu-
terie hebdomadaire. L’écran affiche „DayTimer“ et „WeekTimer“.
Minuterie quotidienne: Avec ce réglage, l‘écran affiche „DayTimer“. Pour régler les heures sur la télécom-
mande, appuyez sur „WeekTimer“. Utilisez les touches fléchées (13,14) pour sélectionner une heure. Utilisez la
touche Paramètres (16) pour modifier les minutes. Définissez les minutes avec les touches fléchées. Confir-
mez avec la touche OK et enregistrez les réglages effectués.
Minuterie hebdomadaire: La minuterie hebdomadaire permet de régler quatre cycles de fonctionnement
par jour pendant sept jours par semaine. L‘écran affichera „WeekTimer“. Appuyez sur Paramètres (16) sur la
télécommande pour entrer un jour (l‘indicateur (6) clignote). Utilisez les touches fléchées (13,14) pour sélec-
tionner le premier cycle de fonctionnement.
Utilisez Paramètres (16) pour sélectionner une heure de début que vous pouvez définir avec les touches flé-
chées. Appuyez à nouveau sur Settings (16) pour définir une heure d‘arrêt. Continuez le réglage de la même
manière.
Interruption de programme
Pour effacer tous les réglages précédents (minuterie de jour ou minuterie hebdomadaire, appuyez sur le
bouton (16) et maintenez-le pendant 10 secondes.
Rétroéclairage
En mode chauffage, appuyez sur le bouton OK de la télécommande. L‘arrière-plan s‘illumine de différentes
couleurs. Chaque fois que vous appuyez sur OK, vous changez la couleur de fond. 6 couleurs sont disponibles.
Après avoir parcouru la dernière couleur, appuyez sur OK pour éteindre le rétroéclairage.
Pour éteindre l‘appareil
Pour éteindre, appuyez sur le bouton marche / arrêt. Le radiateur cesse de fonctionner. Le chauffage est
éteint.
37
NETTOYAGE
INFORMATIONS SUR LE RECYCLAGE
Vous trouverez sur le produit l’image ci-contre (une poubelle sur roues, barrée d‘une croix),
ce qui indique que le produit se trouve soumis à la directive européenne 2012/19/UE.
Renseignez-vous sur les dispositions en vigueur dans votre région concernant la collecte
séparée des appareils électriques et électroniques. Respectez-les et ne jetez pas les ap-
pareils usagés avec les ordures ménagères. La mise en rebut correcte du produit usagé
permet de préserver l’environnement et la santé. Le recyclage des matériaux contribue à
la préservation des ressources naturelles.
Ce produit contient des piles qui sont soumises à la directive européenne 2006/66/CE
selon laquelle elles ne doivent pas être éliminées avec les ordures ménagères. Rensei-
gnez-vous sur les dispositions en vigueur concernant la mise en rebut séparée des piles. La
mise en rebut correcte du produit usagé permet de préserver l’environnement et la santé.
DÉCLARATION DE CONFORMITÉ
Fabricant : Chal-Tec GmbH, Wallstraße 16, 10179 Berlin, Allemagne.
Ce produit est conforme aux directives européennes suivantes :
2009/125/CE (ErP)
2014/30/UE (CEM)
2014/35/UE (LVD)
2011/65/UE (RoHS)
Il est très facile de nettoyer l’arrière de l’appareil à. Pour nettoyer l‘arrière de l‘appareil, tenez le convecteur
par les côtés avec les deux mains et tirez-le vers l‘avant. Après le nettoyage, remettez le radiateur en place.
Rangement
Si vous n‘utilisez pas l‘appareil pendant une longue période, il est recommandé de le nettoyer et de le ranger
(de préférence dans son emballage d‘origine) dans un endroit frais et sec.


41
ÍNDICE
DATOS TÉCNICOS
Estimado cliente:
Le felicitamos por la adquisición de este producto Klarstein. Lea aten-
tamente el siguiente manual y siga cuidadosamente las instrucciones
de uso con el fin de evitar posibles daños técnicos. La empresa no se
responsabiliza de los daños ocasionados por un uso indebido del pro-
ducto o por haber desatendido las indicaciones de seguridad. Escanee
el siguiente código QR para obtener acceso a la última guía del usuario
y más información sobre el producto.
Número de artículo 10033060 10033062
Fuente de alimentación 220-240 V~ 50 Hz
Potencia absorbida max. 2000 W
Dimensiones 82 x 10 x 45 cm
Índice . . . . . . . . . . . . . . . . . . . . . . . . . . . . . . . . . . . . . . . . . . . . . . . . . . . . . . 39
Datos técnicos . . . . . . . . . . . . . . . . . . . . . . . . . . . . . . . . . . . . . . . . . . . . . . . .39
Indicaciones de seguridad . . . . . . . . . . . . . . . . . . . . . . . . . . . . . . . . . . . . . . . . . 41
Vista general del aparato . . . . . . . . . . . . . . . . . . . . . . . . . . . . . . . . . . . . . . . . . . 43
Montaje . . . . . . . . . . . . . . . . . . . . . . . . . . . . . . . . . . . . . . . . . . . . . . . . . . . . . 44
Panel de control . . . . . . . . . . . . . . . . . . . . . . . . . . . . . . . . . . . . . . . . . . . . . . .46
Funcionamiento . . . . . . . . . . . . . . . . . . . . . . . . . . . . . . . . . . . . . . . . . . . . . . .47
Limpieza . . . . . . . . . . . . . . . . . . . . . . . . . . . . . . . . . . . . . . . . . . . . . . . . . . . . 49
Indicaciones sobre la retirada del aparato . . . . . . . . . . . . . . . . . . . . . . . . . . . . . . . . 49
Declaración de conformidad . . . . . . . . . . . . . . . . . . . . . . . . . . . . . . . . . . . . . . . . 49
42
Datos obligatorios según el reglamento (UE) 2015/1188
Denominación del modelo 10033060, 10033062
Dato Símbolo Valor Unidad Dato Unidad
Potencia térmica Solo con disposítivos de acumulación de calor
eléctricos para abastecimiento local: Tipo de regulación
del abastecimiento de calor
Potencia térmica nominal Pnom 2,0 kW Regulación manual del abastecimiento de calor
con termostato integrado:
no
Potencia térmica mínima
(valor orientativo)
Pmin 1,0 kW Regulación manual de abastecimiento de calor
con aviso de temperatura ambiente y/o exterior
no
Potencia térmica continua
máxima
Pmax,c 2,0 kW Regulación electrónica de abastecimiento de
calor con aviso de temperatura ambiente y/o
exterior
no
Consumo de corriente auxiliar
Disípación de calor con ventilación auxiliar no
Con potencia térmica
nominal (Motor del
ventilador)
elmax 1,875 kW
Tipo de potencia térmica/control de temperatura
ambiente
Con potencia térmica mínima
(Motor del ventilador)
elmin 0,936 kW Potencia térmica de un solo nivel, sín control de
temperatura ambiente
no
En modo de espera elSB 0,24 kW Dos o más niveles regulables manualmente, sín
control de temperatura ambiente
no
Control de temperatura ambiente con termostato
mecánico
no
Con control electrónico de temperatura
ambiente
no
Con control de temperatura ambiente y
regulación del momento del día
no
Con control de temperatura ambiente y
regulación del día de la semana
sí
Otras opciones de regulación
Control de temperatura ambiente con detección
de presencia
no
Control de temperatura ambiente con detección
de ventanas abiertas
sí
Con opción de control remoto no
Con regulación adaptable del comienzo de la
calefacción
no
Con limitación de tiempo de funcionamiento no
Con sensor de bulbo negro no
Información de contacto Chal-Tec GmbH, Wallstraße 16, 10179, Berlín (Alemania)

43
INDICACIONES DE SEGURIDAD
Lea y siga las siguientes indicaciones de seguridad, incluso cuando ya se haya familiarizado con el aparato.
Conserve este manual de instrucciones para futuras consultas.
Cuando utilice dispositivos eléctricos, debe seguir las indicaciones de seguridad, incluidas las siguientes:
• Utilice exclusivamente la tensión que aparece especificada en la placa técnica del aparato.
• No obstruya la corriente de aire en las salidas y entradas de aire de ningún modo, ya que el aparato puede
sobrecalentarse y provocar un incendio.
• Cuando coloque el aparato en una superficie, no cubra las ranuras de ventilación ni las salidas y entradas de
aire. Todos los objetos deben situarse como mínimo a 1 metro de distancia hacia los lados y hacia delante
y atrás.
• No coloque el aparato cerca de fuentes de calor.
• No ponga el aparato en marcha en un entorno donde se almacene gasolina, pintura u otras sustancias
inflamables.
• El aparato alcanza temperaturas elevadas durante su uso. No toque las superficies calientes con la piel
desnuda. Antes de transportar el aparato, apáguelo y deje que se enfríe.
• No utilice el aparato para secar ropa.
• No introduzca ningún objeto extraño ni metálico en el interior del aparato ni en las ranuras de ventilación,
ya que podría provocar una descarga eléctrica, un incendio o una avería del aparato.
• No sumerja el aparato en líquidos ni introduzca líquidos en el interior del aparato, ya que podría provocar
una descarga eléctrica.
• No toque el aparato eléctrico si se ha caído al agua. Desconecte el suministro eléctrico de su hogar y el
enchufe.
• No utilice el aparato si el cable de alimentación o el enchufe está dañado, si el aparato presenta algún fallo
en el funcionamiento o avería, o si se ha dejado caer el aparato. En ese caso, contacte con un electricista
para que realice un ajuste, mantenimiento o reparación eléctrica o mecánica.
• No manipule el aparato con las manos mojadas.
• El motivo más frecuente de sobrecalentamiento es el almacenamiento de polvo y pelusas en el aparato.
Asegúrese de retirar con frecuencia los sedimentos desconectando el enchufe y aspirando las ranuras de
ventilación y la rejilla.
• Desconecte siempre el enchufe antes de limpiar el aparato. No utilice productos abrasivos para la limpieza.
Limpie el aparato con un paño húmedo (no mojado) empapado solo en agua con jabón.
• Conecte el aparato a una fuente de alimentación una vez que esté completamente montado.
• El aparato no es apto para un uso en exteriores.
• Este aparato cuenta con el grado de protección IP24, por lo que está protegido contra las salpicaduras de
agua y puede instalarse en cuartos de baño/espacios húmedos. Sin embargo, no utilice el aparato en el
entorno más inmediato de una bañera, ducha, piscina o cualquier líquido, y asegúrese de que las partes
conductoras de corriente no entran en contacto con el agua.

44
• Ponga el aparato en marcha solo en un lugar estable.
• Antes de transportar el aparato, apáguelo y deje que se enfríe.
• No ponga el aparato en marcha con el cable enrollado, pues puede producirse acumulación de calor y eso
representaría un riesgo.
• No se recomienda utilizar un cable alargador con este aparato.
• No desconecte el enchufe de la toma de corriente sin antes apagar el aparato.
• Nunca desconecte el enchufe tirando el cable de alimentación, sino del cuerpo del enchufe.
• Cuando no utilice el aparato, desconecte el enchufe de la toma de corriente.
• El aparato no es apto para su uso sobre alfombras de pelo ni felpudos.
• No deje que el cable de alimentación entre en contacto con superficies calientes.
• No coloque el cable de alimentación bajo alfombras ni mantas. Mantenga el cable de alimentación alejado
de zonas de paso para evitar que alguien se tropiece.
• No doble, gire ni enrolle el cable alrededor del aparato, podría provocar una debilitación del aislamiento del
cable y su posterior rotura. Asegúrese de desenrollar completamente el cable de alimentación.
• No utilice el aparato al aire libre ni sobre una superficie húmeda.
• No guarde el aparato mientras esté caliente.
• Los niños y las personas con discapacidad no pueden utilizar el aparato, salvo que estén bajo supervisión.
• Los niños pequeños deberán estar vigilados para evitar que jueguen con el aparato.
• No instale el aparato debajo de una toma de corriente.
• No utilice el aparato con un dispositivo de programación, temporizador, control remoto o cualquier otro
dispositivo que encienda o apague automáticamente el radiador. De lo contrario, existe riesgo de incendio
si cubre o instala incorrectamente el convector.
• Todas las carcasas del aparato tienen como fin evitar el contacto directo con los componentes que emiten
calor y deberán estar colocadas cuando el aparato se encuentre en funcionamiento.
• No cubra el calefactor. ¡Existe riesgo de sobrecarga!
• Para evitar el riesgo de una descarga eléctrica, no sumerja el aparato ni el cable de alimentación en agua,
no lo exponga a la lluvia, a la humedad ni a otros líquidos excepto que estos sean necesarios para el fun-
cionamiento del aparato.
• La rejilla de protección no garantiza protección completa para niños pequeños y personas ancianas.
• Si el cable de alimentación está dañado, deberá ser reparado por un electricista cualificado para evitar
riesgos.
• Utilice el aparato solamente según se describe en estas instrucciones. Cualquier otro uso no está reco-
mendado y puede provocar un incendio, una descarga eléctrica y daños personales.
• El aparato solamente es apto para un uso doméstico, no para un uso comercio o industrial

45
VISTA GENERAL DEL APARATO
Salida de aire
Interruptor
Panel de control
Patas
46
MONTAJE
Wandmontage
Den Heizkörper von der Wand nehmen
Heizkörper
5 mm herunterziehen
dann10mm nach links bewegen,
um den Heizkörper abzusenken.
Boden
Min. 100 mm
Minimum 1000mm
Min.
100 mm
Min.
100 mm
Luftauslass
Decke
820
Maße
450 538
344
H
H1
L
L1
Der Heizkörper muss
zu allen Seiten hin mit
diesen Mindestabständen
montiert werden
Dimensiones
Para retirar el aparato, súbalo 5 mm y
luego muévalo hacia la izquierda unos
10 mm.
Retirar el aparato de la pared
Montar en la pared
Techo
Respete las distancias mínimas
indicadas a la hora de instalar el
aparato.
Salida de aire
Suelo

47
Montaje libre (pies de soporte)
48
PANEL DE CONTROL
�示
S
e
e
t
t
IEOCNO
W/24H
13
19
15
22
20
2
1
1
8
1
4
Display
1 Indicador de «Ventana abierta»
2 Indicador de temporizador semanal
3 Indicador de temporizador diario
4 Indicador de periodo de temporizador
5 Indicador de horas
6 Indicador de semana
7 Indicador de minutos
8 Indicador de temperatura
9 Temporizador
10 Indicador «Nivel de potencia alto»
11 Indicador «Nivel de potencia bajo»
12 Indicador de funcionamiento de resistencia
Botones
13 Botón de encendido/apagado
14 Botón «Disminuir valor»
15 Botón «Aumentar valor»
16 Ajustes (panel de control)
17 Indicador de temperatura
18 Ajustes (mando a distancia)
19 Botón de encendido/apagado del modo ECO
20 Botón de cambio «Día/Semana»
21 Botón de selección de potencia alta/baja
22 Botón OK
49
FUNCIONAMIENTO
Puesta en funcionamiento
1. Retire con cuidado el aparato de la caja de cartón. Conserve la caja para guardar el aparato cuando no lo
utilice.
2. Asegúrese de que el interruptor de encendido/apagado esté desactivado antes de encender el aparato.
3. El convector debe montarse por completo e instalarse según se indica en el manual de montaje.
4. No se recomienda utilizar la misma conexión eléctrica que con otros dispositivos con alto consumo
eléctrico para evitar una sobrecarga del circuito.
Encender
Conecte el aparato al suministro eléctrico. El indicador luminoso se enciende. Encienda el aparato con el
botón de encendido/apagado (13).
A continuación, se ilumina en el display la temperatura ambiente actual.
Ajuste de hora
Mantenga pulsados a la vez el botón Ajustes (16) y el botón «Aumentar valor» (15) durante 3 segundos. El
indicador de semana (6) parpadea. El modo de ajuste de hora está activo. Seleccione el día de la semana con
la ayuda de los botones de flecha. Pulse el botón Ajustes (16). El indicador de horas (5) parpadea. Seleccione
la hora con la ayuda de los botones de flecha (14, 15). Pulse el botón Ajustes (16) para configurar los minutos.
Seleccione los minutos con los botones de flecha (14, 15). Confirme la hora introducida pulsando otra vez el
botón Ajustes (16).
Ajuste de temperatura
Pulse el botón Ajustes (16). El indicador de temperatura (17) parpadea.
Seleccione la temperatura con los botones de flecha (14, 15). Pulse el botón Ajustes (16) para confirmar la
selección o no realice ninguna acción en los siguientes 5 segundos para que el sistema guarde automática-
mente los ajustes.
Seleccionar nivel de potencia
Pulse el botón «Disminuir valor» (14) para seleccionar la potencia baja. En el display aparece el símbolo
.
Pulse el botón «Aumentar valor» (15) para seleccionar la potencia alta. En el display aparece el símbolo .
De forma alternativa, puede pulsar el botón (21) para cambiar entre la potencia alta y baja
Mecanismo de bloqueo
Mantenga pulsados los botones de flechas (14, 15) durante 3 segundos. A continuación, aparece en el display
un cuadrado ([ ]). El sistema está bloqueado, por lo que no se puede realizar ningún ajuste. Después de 2
segundos, el display muestra la temperatura ambiente. Al pulsar cualquier botón, solamente se visualiza en
el display el símbolo de bloqueo.
Desbloquear: mantenga pulsados los botones de flechas (14, 15) durante 3 segundos. El aparato se desblo-
quea.
Ya puede volver a realizar diferentes ajustes
50
Activar los botones del display sensibles al tacto
Normalmente, los botones del display están desactivados cuando el aparato está en marcha. Toque el área
debajo del indicador de temperatura para activar los botones del display.
Modo ECO (Modo de ahorro)
Mantenga pulsados el botón Ajustes (16) y el botón «Disminuir valor» (14) durante 3 segundos (o pulse el
botón Eco en el mando a distancia) para que el aparato entre en modo Ahorro. En este modo, el display
muestra sólo algunos indicadores (según los ajustes que ha realizado antes del modo ECO).
Modo reposo
Cuando el aparato está caliente, si no realiza ningún ajuste durante 10 segundos, el display entra en modo
Reposo y sólo muestra la temperatura ambiente.
Detector de ventanas abiertas
Cuando la temperatura ambiente disminuye 3 °C en 2 minutos, el calefactor activa el detector de ventanas
abiertas. En el display aparece el símbolo
y se emite un zumbido. El calefactor se apaga.
Temporizador diario/semanal
Pulse el botón «W/24H» para cambiar entre el temporizador diario y el temporizador semanal. En el display
se indica «DayTimer» o «Weektimer» según el temporizador elegido.
Temporizador diario: el display muestra «DayTimer» en este modo. Para ajustar la hora, pulse «Weektimer»
en el mando a distancia. Seleccione una hora con los botones de flecha (13,14). Pulse el botón Ajustes (16)
para configurar los minutos. Seleccione los minutos con los botones de flecha. Pulse el botón OK para con-
firmar y guardar los ajustes realizados.
Temporizador semanal: el temporizador semanal permite configurar 4 ciclos de funcionamiento al día y 7
días de la semana. El display muestra «Weektimer» en este modo. Pulse el botón Ajustes (16) en el mando
a distancia para seleccionar un día (parpadea el indicador (6)). Con los botones de flecha (13,14) seleccione el
primer ciclo de funcionamiento. Pulse el botón Ajustes (16) para seleccionar la hora de inicio. Elíjela con los
botones de flecha. Vuelva a pulsar el botón Ajustes (16) para elegir una hora de apagado.Repita este paso con
todos los ciclos.
Cancelar ajustes
Para eliminar todos los ajustes realizados previamente (temporizador diario o temporizador semanal), man-
tenga pulsado el botón (16) durante 10 segundos.
Retroiluminación
Cuando el aparato está marcha, pulse el botón OK en el mando a distancia. La retroiluminación cuenta con
diferentes colores. Cada vez que pulsa el botón OK, la iluminación cambia de color. Hay 6 colores en total. Si
ha llegado al último color y ha pulsado OK, la retroiluminación se apaga.

51
LIMPIEZA
INDICACIONES SOBRE LA RETIRADA DEL APARATO
Si el aparato lleva adherida la ilustración de la izquierda (el contenedor de basura tachado),
entonces rige la directiva europea 2012/19/UE. Este producto no debe arrojarse a un con-
tenedor de basura común. Infórmese sobre las leyes territoriales que regulan la recogida
separada de aparatos eléctricos y electrónicos. Respete las leyes territoriales y no arroje
aparatos viejos al cubo de la basura doméstica. Una retirada de aparatos conforme a las
leyes contribuye a proteger el medio ambiente y a las personas a su alrededor frente a
posibles consecuencias perjudiciales para la salud. El reciclaje ayuda a reducir el consumo
de materias primas.
Este producto contiene pilas que según la Normativa europea 2006/66/CE no deben ser
arrojadas al cubo de la basura común. Infórmese sobre la legislación de su país que regula
la retirada y eliminación de las pilas y baterías. Una gestión adecuada de estos residuos
previene consecuencias potencialmente negativas para el medio ambiente y la salud de
las personas.
DECLARACIÓN DE CONFORMIDAD
Fabricante: Chal-Tec GmbH, Wallstraße 16, 10179 Berlín, Alemania.
Este producto cumple con las siguientes directivas europeas:
2009/125/CE (ErP)
2014/30/UE (EMC)
2014/35/UE (baja tensión)
2011/65/UE (refundición RoHS)
Es muy sencillo limpiar el aparato. Para limpiar la parte posterior, sujete el convector con ambas manos por
los laterales y empújelo hacia adelante. Tras la limpieza, vuelva a colocar el aparato en su sitio.
Almacenamiento
Si no utiliza el aparato durante un periodo prolongado de tiempo, recomendamos limpiarlo y guardarlo en
un lugar fresco y seco (preferentemente en la caja original).
Apagar
Pulse el interruptor de encendido/apagado para apagar el aparato. El calefactor deja de funcionar. El aparato
se apaga.

53
INDICE
DATI TECNICI
Gentile Cliente,
La ringraziamo per aver acquistato il dispositivo. La preghiamo di leg-
gere attentamente le seguenti istruzioni per l’uso e di seguirle per evi-
tare possibili danni tecnici. Non ci assumiamo alcuna responsabilità
per danni scaturiti da una mancata osservazione delle avvertenze di
sicurezza e da un uso improprio del dispositivo. Scansionare il codice
QR seguente, per accedere al manuale d’uso più attuale e per ricevere
informazioni sul prodotto.
Numero articolo 10033060 10033062
Alimentazione 220-240 V~ 50 Hz
Potenza assorbita max. 2000 W
Dimensioni 82 x 10 x 45 cm
Indice . . . . . . . . . . . . . . . . . . . . . . . . . . . . . . . . . . . . . . . . . . . . . . . . . . . . . . 51
Dati tecnici . . . . . . . . . . . . . . . . . . . . . . . . . . . . . . . . . . . . . . . . . . . . . . . . . . . 51
Avvertenze di sicurezza . . . . . . . . . . . . . . . . . . . . . . . . . . . . . . . . . . . . . . . . . . . 53
Descrizione del dispositivo . . . . . . . . . . . . . . . . . . . . . . . . . . . . . . . . . . . . . . . . . 55
Montaggio . . . . . . . . . . . . . . . . . . . . . . . . . . . . . . . . . . . . . . . . . . . . . . . . . . . 56
Pannello di controllo . . . . . . . . . . . . . . . . . . . . . . . . . . . . . . . . . . . . . . . . . . . . . 58
Utilizzo . . . . . . . . . . . . . . . . . . . . . . . . . . . . . . . . . . . . . . . . . . . . . . . . . . . . . 59
Pulizia . . . . . . . . . . . . . . . . . . . . . . . . . . . . . . . . . . . . . . . . . . . . . . . . . . . . . . 61
Smaltimento . . . . . . . . . . . . . . . . . . . . . . . . . . . . . . . . . . . . . . . . . . . . . . . . . 61
Dichiarazione di conformità . . . . . . . . . . . . . . . . . . . . . . . . . . . . . . . . . . . . . . . . 61
54
Informazioni obbligatorie secondo l’ordinamento (UE) 2015/1188
Identicazione del modello (i) 10033060, 10033062
Indicazione Simbolo Valore Unità Indicazione Unità
Potenza termica Solo per gli apparecchi per il riscaldamento d'ambiente
locale elettrici ad accumulo: Tipo di controllo
dell´apporto termico
Potenza termica nominale Pnom
2,0
kW Controllo manuale del carico termico con
termostato integrato
no
Potenza termica minima
(valore indicativo)
Pmin
1,0
kW Controllo manuale del carico termico con
riscontro della temperatura ambiente e/o
esterna
no
Potenza termica massima
continua
Pmax,c
2,0
kW Controllo elettronico del carico termico con
riscontro della temperatura ambiente e/o
esterna
no
Consumo di elettricità ausiliaria
Potenza termica con supporto del ventilatore no
Per la potenza termica
nominale (Motore del
ventilatore)
elmax 1,875 kW
Tipo di potenza termica / controllo della temperatura
ambiente
Per la potenza termica
minima (Motore del
ventilatore)
elmin 0,936 kW Potenza termica di un solo livello, senza
controllo della temperatura ambiente
no
In modalità di attesa elSB 0,24 W Due o più livelli impostabili manualmente, senza
controllo della temperatura ambiente
no
Con controllo della temperatura ambiente
tramite termostato meccanico
no
Con controllo elettronico della temperatura
ambiente
no
Controllo elettronico della temperatura
ambiente e timer giornaliero
no
Controllo elettronico della temperatura
ambiente e timer settimanale
si
Altre opzioni di controllo
Controllo della temperatura ambiente con
rilevamento di presenza
no
Controllo della temperatura ambiente con
rilevamento di nestre aperte
sì
Con opzione telecomando no
Con controllo di avvio adattabile no
Con limitazione del tempo di funzionamento no
Con sensore lampada nero no
Informazioni di contatto Chal-Tec GmbH, Wallstraße 16, 10179, Berlino, Germania

55
AVVERTENZE DI SICUREZZA
Leggere e rispettare le seguenti avvertenze di sicurezza, anche se si ha confidenza con il dispositivo. Con-
servare il manuale d’uso per future consultazioni. Durante l’utilizzo di un dispositivo elettrico devono essere
seguite le avvertenze di sicurezza, incluso quanto segue:
• Utilizzare solo tensione corrispondente a quella indicata sulla targhetta del dispositivo.
• Non bloccare le fessure di ventilazione, le aperture di aspirazione e fuoriuscita dell’aria in nessun modo, in
quanto ciò potrebbe causare il surriscaldamento del dispositivo e pericolo d’incendio.
• Non coprire le fessure di ventilazione, le aperture di aspirazione e fuoriuscita dell’aria, posizionandolo su
una superficie piana. Tutti gli oggetti devono trovarsi ad almeno 1 metro di distanza su tutti i lati.
• Non posizionare il dispositivo vicino a fonti di calore.
• Non utilizzare il dispositivo in ambienti in cui vengono stoccati benzina, vernici o altri materiali infiamma-
bili.
• Questo dispositivo diventa estremamente caldo durante il funzionamento. Non lasciare che la pelle entri
in contatto con le superfici bollenti. Spegnere il dispositivo e farlo raffreddare prima di spostarlo.
• Non utilizzare il dispositivo per asciugare biancheria.
• Non inserire corpi estranei e oggetti metallici all’interno del dispositivo o nelle fessure di ventilazione, in
quanto potrebbero risultare folgorazioni, incendi o danneggiamenti al dispositivo.
• Non immergere il dispositivo in liquidi e non lasciare penetrare liquidi al suo interno, in quanto potrebbero
risultare folgorazioni.
• Non toccare il dispositivo se è caduto in acqua. Spegnere la corrente di tutta la casa e staccare immediata-
mente la spina.
• Non utilizzare il dispositivo con cavo o spina danneggiati, dopo un malfunzionamento, dopo che è stato
fatto cadere o è stato danneggiato in qualunque modo. Far ispezionare il dispositivo a un elettricista per
eseguire eventuali regolazioni elettriche o meccaniche, manutenzione o riparazioni.
• Non utilizzare il dispositivo con le mani bagnate.
• La causa principale di surriscaldamento è l’accumulo di polvere e peluzzi sul dispositivo. Assicurarsi di ri-
muovere regolarmente questi depositi staccando la spina e aspirando le aperture di ventilazione e la gri-
glia.
• Staccare sempre la spina prima di pulire il dispositivo. Non utilizzare prodotti abrasivi per la pulizia. Pulire
con un panno inumidito (non bagnato) con una soluzione a base di sapone.
• Non collegare il dispositivo alla rete elettrica prima di averlo montato e assemblato completamente.
• Il dispositivo non è adatto all’uso all’aperto.
• Questo dispositivo è dotato di protezione IP24 dagli spruzzi d’acqua ed è quindi adatto al posizionamento
in bagni/stanze umide. Non utilizzare però il dispositivo nelle immediate vicinanze di vasche, docce, pi-
scine o altri liquidi e assicurarsi che nessuno dei componenti che trasmettono corrente entrino in contatto
con l’acqua.

56
• Utilizzarlo sempre in verticale.
• Spegnere il dispositivo e farlo raffreddare prima di spostarlo.
• Non utilizzare il dispositivo con il cavo arrotolato, in quanto potrebbe accumularsi calore e ciò è sufficiente
a rappresentare un pericolo.
• Non si consiglia l’utilizzo di una prolunga.
• Non staccare la spina prima di spegnere il dispositivo.
• Non scollegare la spina tirando dal cavo, ma impugnando sempre la spina stessa.
• Staccare la spina se il dispositivo non viene utilizzato
• Questo dispositivo non è adatto all’utilizzo su tappeti a pelo lungo e superfici in floccato.
• Non lasciare che durante il funzionamento il cavo di alimentazione entri in contatto con superfici bollenti.
• Non far passare il cavo di alimentazione sotto a tappeti, passatoie, ecc. Posizionare il cavo al di fuori di zone
di passaggio, in modo che non ci si possa inciampare.
• Non arrotolare, piegare o avvolgere il cavo di alimentazione intorno al dispositivo, in quanto ciò comporta
l’indebolimento dell’isolamento e una possibile rottura. Assicurarsi di srotolare sempre completamente il
cavo.
• Non utilizzare all’aperto o su fondi bagnati.
• Non stoccare il dispositivo finché è caldo.
• Questo dispositivo non deve essere utilizzato da bambini o persone che necessitano tutela senza il dovuto
controllo.
• Tenere sotto controllo i bambini piccoli, in modo che non giochino con il dispositivo.
• Non utilizzare il dispositivo sotto a prese di corrente a parete.
• Non utilizzare il dispositivo con una programmazione, un timer o altri dispositivi che attivano e spengono
il dispositivo. Si corre il rischio di incendi, se il dispositivo è stato coperto o posizionato erroneamente.
• Tutte le coperture dell’alloggiamento servono a impedire l’accesso agli elementi riscaldanti e devono sem-
pre essere installate durante l’utilizzo.
• Non coprire il dispositivo! Pericolo di sovraccarico!
• Per evitare il rischio di folgorazioni, non immergere dispositivo e cavo di alimentazione in acqua, non
esporli a pioggia, umidità o altri liquidi, escluso quello necessario per il funzionamento.
• La griglia protettiva non è sufficiente alla protezione di bambini e persone che necessitano di tutela.
• Se il cavo di alimentazione è danneggiato, deve essere sostituito da un elettricista, in modo da evitare
pericoli.
• Utilizzare il dispositivo solo secondo gli scopi previsti, come indicato nel manuale d’uso. Si sconsiglia ogni
tipo di utilizzo diverso, in quanto potrebbero risultare incendi, folgorazioni o lesioni di altro tipo.
• Il dispositivo è adatto solo all’uso casalingo e non commerciale o industriale

57
DESCRIZIONE DEL DISPOSITIVO
Uscita dell’aria
Interruttore
Pannello di controllo
Piedi d’appoggio

58
MONTAGGIO
Wandmontage
Den Heizkörper von der Wand nehmen
Heizkörper
5 mm herunterziehen
dann10mm nach links bewegen,
um den Heizkörper abzusenken.
Boden
Min. 100 mm
Minimum 1000mm
Min.
100 mm
Min.
100 mm
Luftauslass
Decke
820
Maße
450 538
344
H
H1
L
L1
Der Heizkörper muss
zu allen Seiten hin mit
diesen Mindestabständen
montiert werden
Dimensioni
Abbassare la stufa di 5 mm e muoverla
verso sinistra di 10 mm, in modo da
abbassarla.
Rimuovere il dispositivo dalla parete.
Montaggio a parete
Sotto
Il dispositivo deve essere montato-
mantenendo queste distanze.
Uscita dell’aria
Pavimento

59
Montaggio libero (piedi d’appoggio)

60
PANNELLO DI CONTROLLO
�示
S
e
e
t
t
IEOCNO
W/24H
13
19
15
22
20
21
18
1
4
Display
1 “Finestra aperta”
2 Timer settimanale
3 Timer giornaliero
4 Periodo del timer
5 Ore
6 Settimana
7 Minuti
8 Unità di temperatura
9 Timer
10 Livello di riscaldamento alto
11 Livello di riscaldamento basso
12 Stato di funzionamento dell’elemento
riscaldante
Tasti
13 Interruttore On/Off
14 Abbassare valore
15 Aumentare valore
16 Impostazioni (pannello di controllo)
17 Indicazione temperatura
18 Impostazioni (telecomando)
19 Modalità ECO On/Off
20 Tasto per cambiare giorno/settimana
21 Livello di riscaldamento alto/basso
22 Tasto OK
61
UTILIZZO
Messa in funzione
1. Togliere il dispositivo dal cartone facendo attenzione. Conservare il cartone per riporre il dispositivo
durante lunghi periodi di non utilizzo.
2. Prima di collegare il dispositivo alla rete elettrica, assicurarsi che l’interruttore On/Off sia spento.
3. La stufa deve essere assemblata e montata secondo le indicazioni del manuale.
4. Si consiglia di non utilizzare lo stesso collegamento elettrico con altri dispositivi che assorbono molta
energia, in modo da non sovraccaricare il circuito elettrico.
Accensione
Collegare il dispositivo all’alimentazione elettrica. La spia di funzionamento si accende. Accendere il disposi-
tivo con il tasto On/Off (13). Viene mostrata la temperatura corrente della stanza.
Impostare il tempo
Tenere premuti contemporaneamente per 3 secondi le impostazioni (16) e il tasto freccia verso l’alto (15).
L’indicazione della settimana (6) lampeggia e l’impostazione del tempo è attiva. Selezionare un giorno della
settimana con i tasti freccia. Premere impostazioni (6) e l’indicazione dell’ora (5) lampeggia. Selezionare l’ora
con i tasti freccia (14, 15). Premere impostazioni (16) per raggiungere la regolazione dei minuti. Selezionare i
minuti con i tasti freccia (14, 15) e confermare il tempo inserito con impostazioni (16).
Impostare la temperatura.
Premere impostazioni (16). L’indicazione della temperatura (17) lampeggia.
Selezionare la temperatura con i tasti freccia (14, 15). Confermare con impostazioni (16) o non inserire alcun
valore per 5 secondi, in modo che l’impostazione venga salvata automaticamente.
Selezionare il livello di potenza
Selezionare il livello di riscaldamento basso con il tasto freccia verso il basso (14). Sul display compare il
simbolo
.
Selezionare il livello di riscaldamento alto con il tasto freccia verso l’alto (15). Sul display compare il simbolo
. In alternativa, premere il tasto (21) per passare da livello alto a basso.
Protezione per i bambini
Tenere premuti i tasti freccia (14, 15) per tre secondi. Il simbolo della sicura per i bambini ([ ]) compare sullo
schermo. Il sistema è bloccato e non è possibile effettuare impostazioni. Dopo 2 secondi compare la tem-
peratura ambiente sullo schermo. In questa modalità, alla pressione di ogni tasto viene mostrato il simbolo
della sicura per i bambini.
Sbloccaggio: tenere premuti i tasti freccia (14, 15) per 3 secondi. Il dispositivo viene sbloccato ed è possibile
effettuare impostazioni.
62
Attivare i tasti touch del display.
Durante il funzionamento, i tasti del display si disattivano. Toccare l’area sotto all’indicazione della tempera-
tura per riattivarli.
Modalità Eco (a risparmio energetico)
Tenere premuti per tre secondi impostazioni (16) e tasto freccia verso il basso (14) oppure premere il tasto
ECO sul telecomando, in modo da passare alla modalità a risparmio. In questa modalità il display mostra solo
alcuni valori (in base alle impostazioni effettuate prima del passaggio alla modalità ECO).
Standby
Se non vengono premuti tasti per 10 secondi e il dispositivo sta riscaldando, il display passa in modalità
standby e mostra solo la temperatura ambiente.
Rilevatore finestra aperta
Se la temperatura scende di 3 °C nel giro di 2 minuti, la stufa attiva il rilevatore per finestra aperta. Sul display
compare
e viene emesso un segnale acustico. La stufa si spegne.
Timer giornaliero/settimanale
Premere il tasto “W/24H” per passare dalle impostazioni del timer giornaliero a quelle del timer settimanale.
Sul display compare rispettivamente “DayTimer” o “WeekTimer”.
Timer giornaliero: in questa impostazione sullo schermo compare “DayTimer”. Per impostare le ore, premere
“WeekTimer” sul telecomando. Selezionare l’ora con i tasti freccia (13, 14). Passare alla regolazione dei minuti
con impostazioni (16). Impostare i minuti con i tasti freccia. Confermare con OK e salvare le impostazioni.
Timer settimanale: il timer settimanale permette quattro cicli di funzionamento al giorno, sette giorni alla
settimana. Sullo schermo compare “WeekTimer”. Premere impostazioni (16) sul telecomando per selezionare
un giorno (lampeggia l’indicazione (6)). Selezionare il primo ciclo di funzionamento con i tasti freccia (13,
14). Passare alla selezione dell’ora di avvio con impostazioni (16). Procedere alla selezione con i tasti freccia.
Premere nuovamente impostazioni (16) per selezionare l’ora di spegnimento. Procedere allo stesso modo per
impostare altri giorni.
Interrompere il programma
Per cancellare tutte le impostazioni (timer giornaliero o settimanale), tenere premuto il tasto (16) per 10 se-
condi.
Retroilluminazione
Cuando el aparato está marcha, pulse el botón OK en el mando a distancia. La retroiluminación cuenta con
diferentes colores. Cada vez que pulsa el botón OK, la iluminación cambia de color. Hay 6 colores en total. Si
ha llegado al último color y ha pulsado OK, la retroiluminación se apaga.
63
SMALTIMENTO
Se sul prodotto è presente la figura a sinistra (il bidone dei rifiuti con le ruote), si applica
la direttiva europea 2012/19/UE. Questi prodotti non possono essere smaltiti con i rifiuti
normali. Informarsi sulle disposizioni vigenti per la raccolta di dispositivi elettrici ed elet-
tronici. Attenersi alle disposizioni vigenti e non smaltire i vecchi dispositivi con i rifiuti do-
mestici. Grazie al corretto smaltimento dei vecchi dispositivi si tutela il pianeta e la salute
delle disposizioni vigenti e non smaltire i vecchi dispositivi con i rifiuti domestici. Grazie al
corretto smaltimento dei vecchi dispositivi si tutela il pianeta e la salute delle persone da
possibili conseguenze negative. Il riciclo di materiali aiuta a diminuire il consumo di materie
prime.
Il prodotto contiene batterie che sono soggette alla direttiva europea 2006/66/CE e non
possono essere smaltite con i normali rifiuti domestici. Preghiamo di informarvi sulle rego-
lamentazioni vigenti sullo smaltimento delle batterie. Grazie al corretto smaltimento dei
vecchi dispositivi si tutela l’ambiente e la salute delle persone da conseguenze negative.
DICHIARAZIONE DI CONFORMITÀ
Produttore: Chal-Tec GmbH, Wallstraße 16, 10179 Berlino, Germania.
Questo prodotto è conforme alle seguenti direttive europee:
2009/125/CE (ErP)
2014/30/UE (EMC)
2014/35/UE (LVD)
2011/65/UE (RoHS)
Pulire il retro del dispositivo è semplicissimo: basta tenere la stufa saldamente con entrambe le mani e tirarla
in avanti. Dopo la pulizia, riposizionare la stufa.
Conservazione
Se il dispositivo non viene utilizzato per periodi prolungati, si consiglia di pulirlo e di conservarlo in un luogo
fresco e asciutto (idealmente nel cartone originale).
Spegnimento
Premere l’interruttore On/Off per spegnere il dispositivo. Il dispositivo smette di funzionare e si spegne.
PULIZIA