I-LC23Q1 23” LCD TV Display
I-LC26Q1 26” LCD TV Display
IMPORTANT:
Read this guide thoroughly before using the unit.
USER’S GUIDE
April 2004

This page is intentionally left blank.

Contents
SAFETY PRECAUTIONS ...................................................................................................... 5
1 BEFORE YOU START...................................................................................................... 7
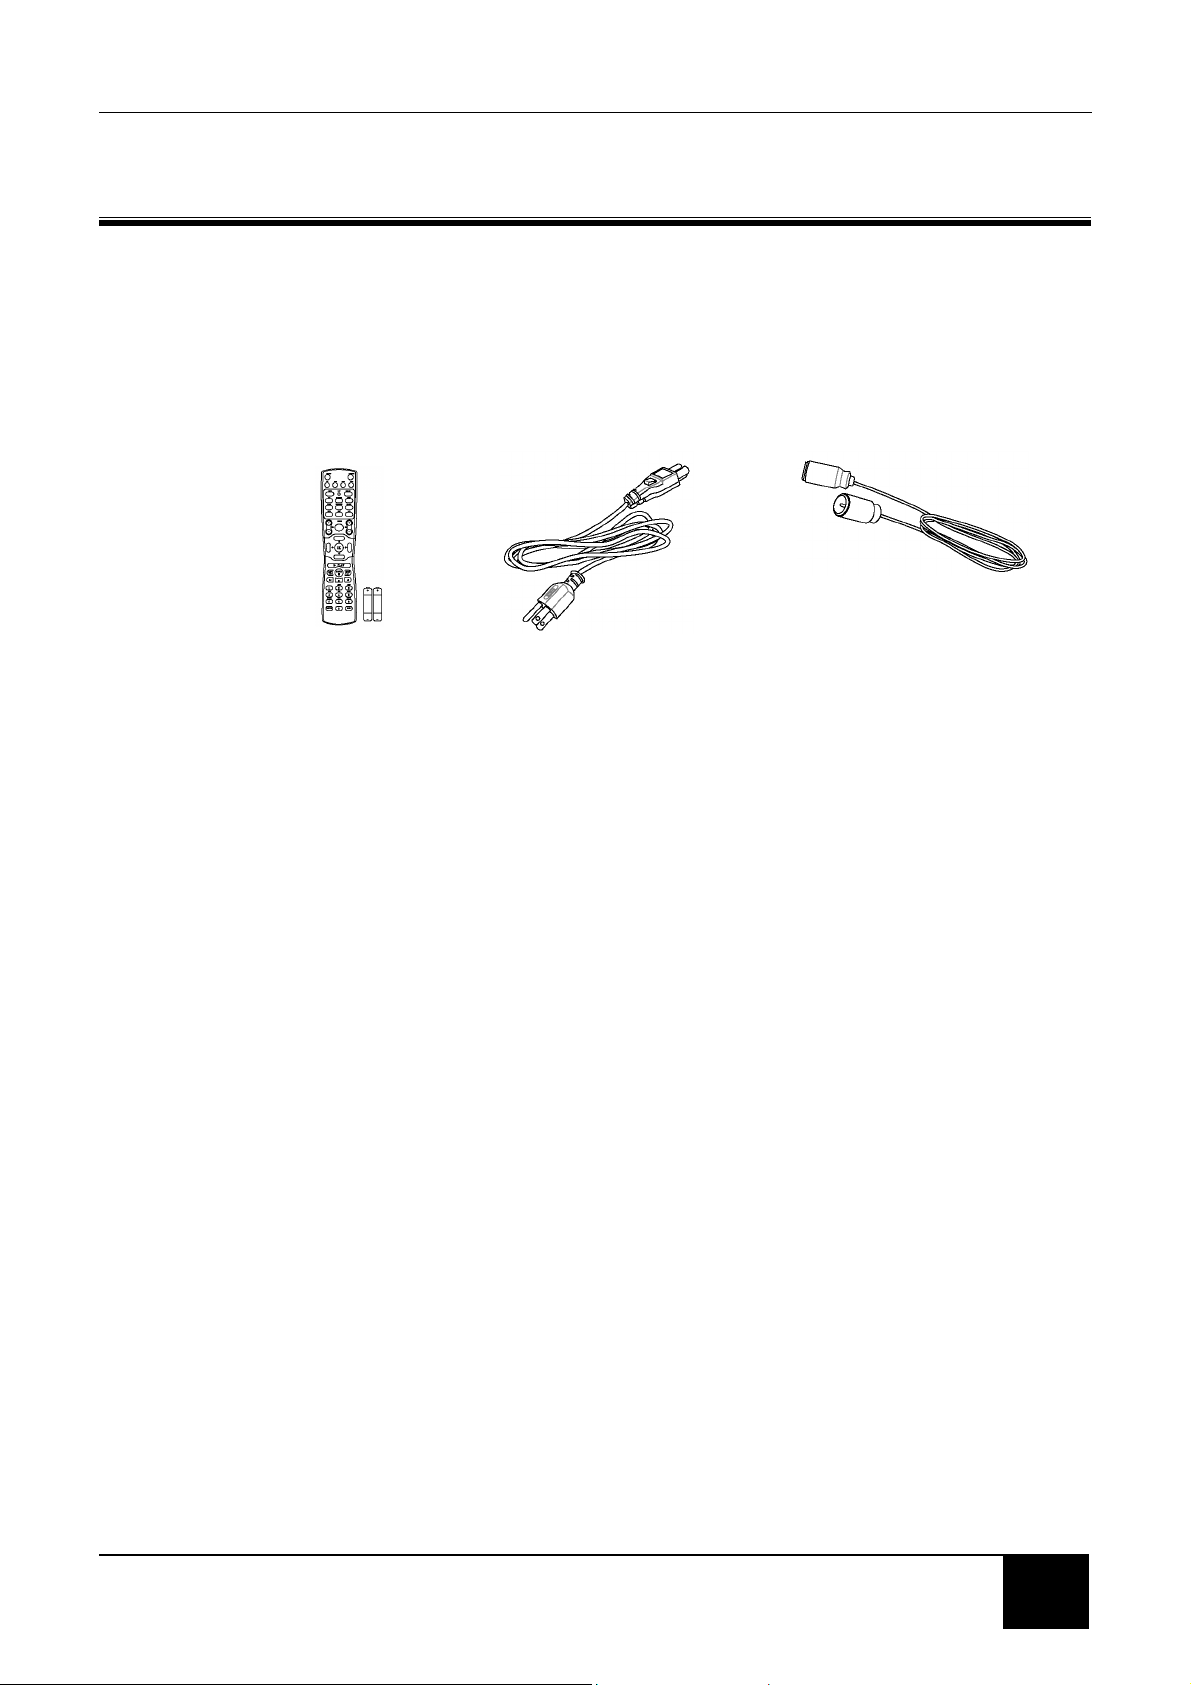
1-1 What’s in the Box ...................................................................................................... 7
1-2 Optional Accessories ................................................................................................ 7
1-3 Inserting Batteries into the Remote Control .............................................................. 8
1-4 Turning ON the Power .............................................................................................. 8
2 YOUR LCD TV AT A GLANCE ........................................................................................ 9
2-1 Front Panel Controls ................................................................................................. 9
2-2 Right-side Connectors ............................................................................................ 10
2-3 Back Connectors......................................................................................................11
3 YOUR REMOTE CONTROL AT A GLANCE ................................................................. 15
3-1 Remote Control Buttons.......................................................................................... 15
3-2 Using the Remote Control (Basic Operation).......................................................... 16
4 CONNECTING DEVICES ............................................................................................... 17
4-1 Connecting Your DVD Player.................................................................................. 17
4-2 Connecting Your HDTV Set-top Box....................................................................... 18
4-3 Connecting Your VCR or Video Camera................................................................. 19
4-4 Connecting Broadcast TV or Cable TV ................................................................... 21
4-5 Connecting a Computer .......................................................................................... 21
5 GETTING STARTED ...................................................................................................... 23
5-1 Plugging In Your LCD TV ........................................................................................ 23
5-2 Turning On the LCD TV .......................................................................................... 23
6 ADJUSTING SETTINGS ................................................................................................ 25
6-1 Basic Operations..................................................................................................... 25
6-2 Using the On-screen Display (OSD) ....................................................................... 26
6-3 OSD Menus and Options ........................................................................................ 26
6-4 Choosing Your Language (LANGUAGE) ................................................................ 30
6-5 Adjusting Picture Settings ....................................................................................... 30

7 Setting the Channel ...................................................................................................... 31
7-1 Setting Channels Automatically (AUTO SEARCH) ................................................. 31
7-2 Setting Channels Manually (MANUAL SEARCH) ................................................... 31
7-3 Removing Unwanted Channels (MANUAL SEARCH) ............................................ 32
8 ADVANCED SETTINGS ................................................................................................. 33
8-1 Setting the Sleep Timer........................................................................................... 33
8-2 Blocking Channels .................................................................................................. 33
8-3 Setting a Password ................................................................................................. 34
8-4 Displaying Closed Caption Subtitles ....................................................................... 35
8-5 Displaying the Serial Number.................................................................................. 36
8-6 Resetting to Factory Settings.................................................................................. 36
9 PROGRAMMING THE REMOTE CONTROL................................................................. 37
9-1 Programming to Control Other Devices .................................................................. 37
9-2 Component Program Codes ................................................................................... 37
TROUBLESHOOTING AND SUPPORT .............................................................................. 45

5
SAFETY PRECAUTIONS
WARNING! DO NOT OPEN! RISK OF ELECTRIC SHOCK
To reduce the risk of electric shock, do not remove the back
cover. There are no user-serviceable parts inside. Removing the
back cover voids the warranty. Have your LCD TV repaired by
qualified service personnel only.
Do not place your hands, face, or objects close to the ventilation openings of
your LCD TV. The top of your LCD TV gets very hot from exhaust air that is
released through the ventilation openings. Burns or personal injuries may occur if
you are too close to the LCD TV. Damage may occur if you place any object near
the top of your LCD TV.
Disconnect all cables before moving your LCD TV. Moving your LCD TV with its
cables attached may damage the cables and cause fire or electric shock danger.
Do not expose your LCD TV to rain or moisture.
Keep your LCD TV away from excessive dust, high temperatures, moisture, or
direct sunlight.
Use your LCD TV in a well-ventilated area and do not cover the ventilation
openings.
Do not modify your LCD TV or use an unshielded power cord or video input
source cable, or you may experience excessive interference.
Disconnect your LCD TV and unplug the power cord when the TV is not used for
a long period of time.
If the picture displayed is in any way abnormal, turn off your LCD TV, then
disconnect it from the electrical outlet. Make sure that your video input source
cable is connected correctly, then reconnect your LCD TV to the electrical outlet.
Disconnect your LCD TV from the electrical outlet before cleaning or performing
maintenance. Do not use liquid or aerosol cleaners. Use only a slightly damp
cloth for cleaning.
Do not place your LCD TV on an unstable cart, stand, or table. Your LCD TV
may fall, causing serious damage.

6
This page is intentionally left blank.
Chapter 1 Before You Start
7
7
1 BEFORE YOU START
1-1 What’s in the Box
When you receive your LCD TV, unpack it carefully, and check to make sure you
have all the items below.
1 REMOTE CONTROL
AND two AAA BATTERIES
2 POWER CORD
3 RF CABLE
1-2 Optional Accessories
The following are optional accessories you may purchase for your LCD TV:
CABLE KITS
Cable kits consist of high-quality cables with gold-plated connectors of various
lengths for connecting audio and video devices to your LCD TV. Below are some
examples:
DVI-D video cable
RCA audio cable
RCA component video cable
RCA composite video cable
S-Video cable
VGA video cable
WALL MOUNT KIT
The wall mount kit contains all of the required hardware for mounting your LCD TV
on your wall. It is highly recommended that you find a qualified installer to do this.

Chapter 1 Before You Start
8
1-3 Inserting Batteries into the Remote Control
Before using the LCD TV set for the first time, insert two AAA batteries (supplied).
When the batteries become depleted and the remote control fails to operate,
replace the batteries with new batteries.
TO INSERT BATTERIES
1. Remove the battery cover on the back of the remote
control.
2. Insert two AAA batteries into the remote control. Make
sure that you match the + and - on the batteries with the
+ and - symbols inside the battery compartment.
3. Close the battery cover by aligning it with the base of
the remote control and sliding it back into place.
1-4 Turning ON the Power
1. Connect the power cord to the power cord connector on the back of your LCD
TV (see 2-3 Back Connectors), and then plug the other end of the power cord
into a correctly grounded electrical outlet or surge protector.
2. Press the Main Power switch next to the power
cord connector on the LCD TV. The Status LED on
the front turns orange and your LCD TV is ready to
turn on.
3. Press the POWER button on the front of your LCD
TV or on your remote control. The Status LED on
the front turns green, and the unit turns on.
WARNING! If you will be away for an extended period of time, turn off your
LCD TV with the Main Power switch instead of using the remote
control or front POWER button. For added protection during a
lightning storm or when it is left unattended or unused for long
periods of time, unplug your LCD TV from the wall outlet and
disconnect the antenna or cable system.
Chapter 2 Your LCD TV At A Glance
9
9
2 YOUR LCD TV AT A GLANCE
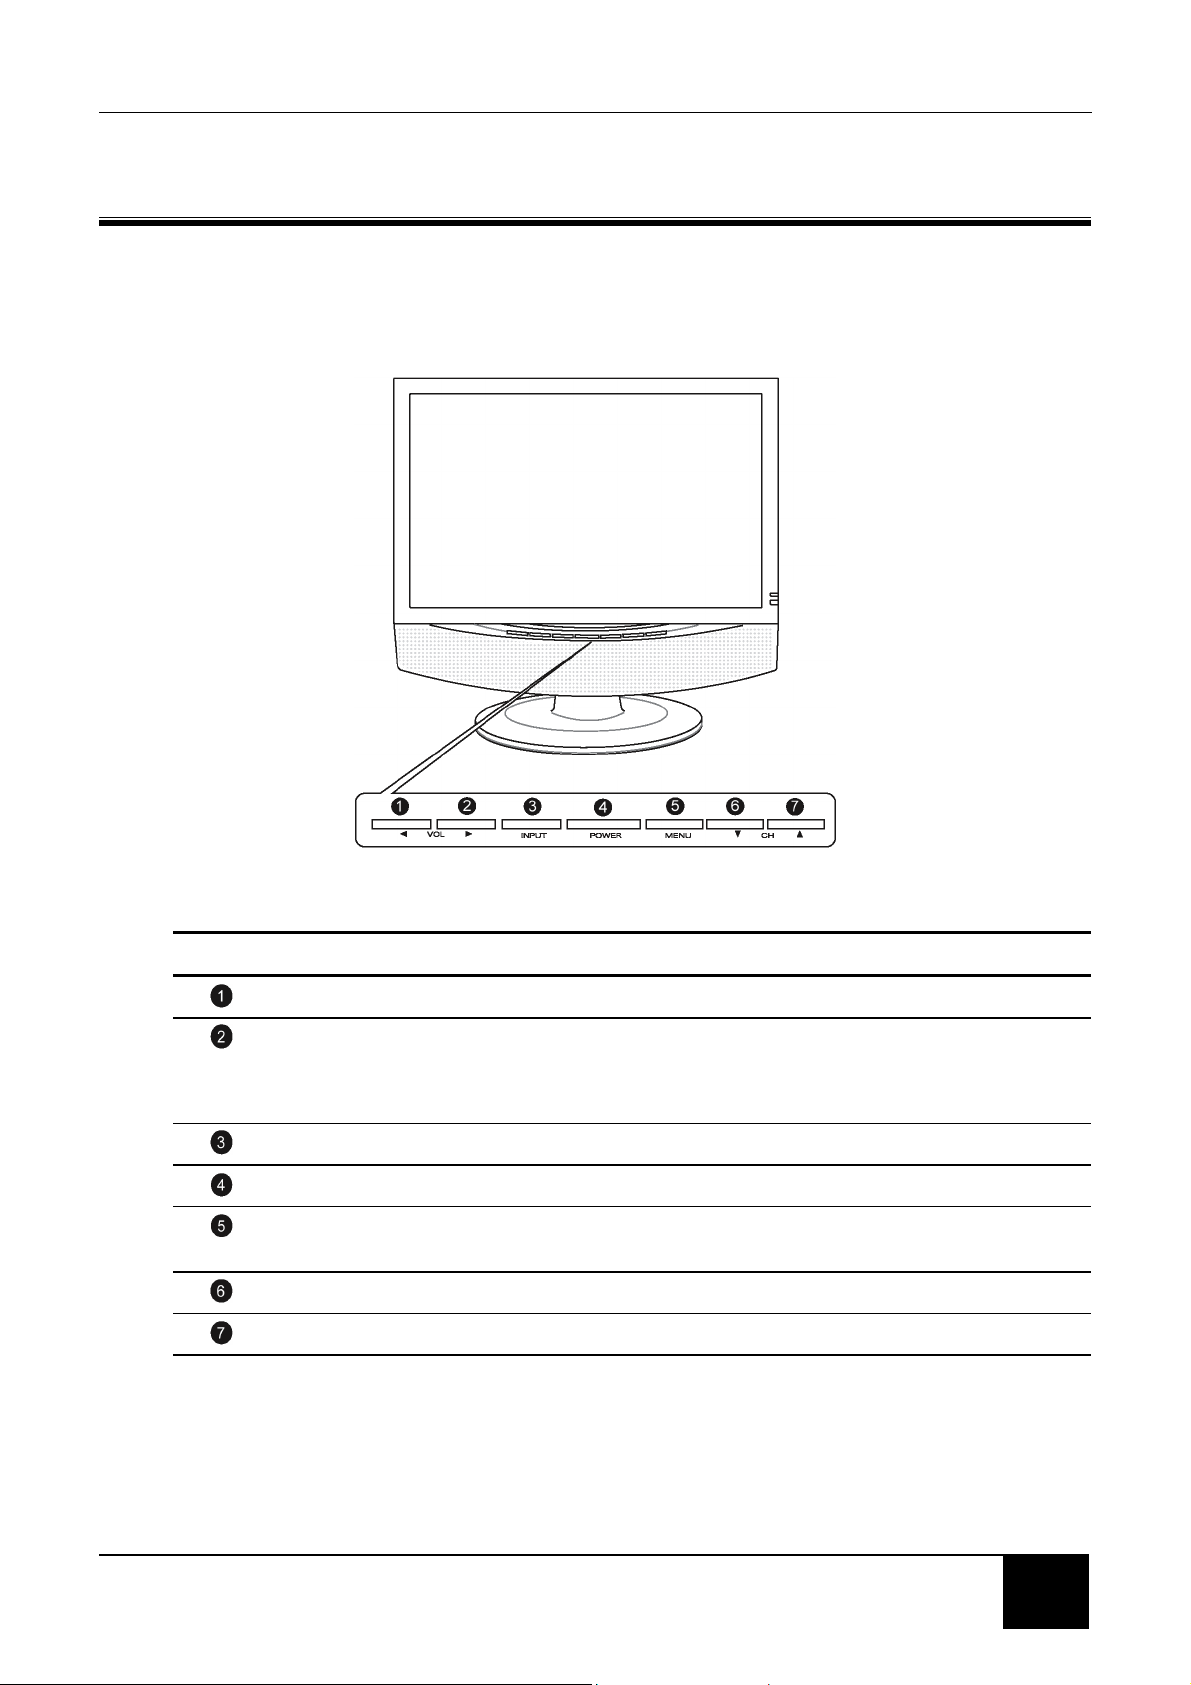
2-1 Front Panel Controls
BUTTON VIEWING FUNCTION (OSD OFF) MENU FUNCTION (OSD ON)
Lowers the sound level Reduces a menu option value.
Increases the sound level. Displays a submenu with selections for the
current menu option.
Increases a menu option value.
Selects the input source. N/A
Turns the LCD TV ON/OFF. N/A
Activates the OSD main menu. Returns to the previous menu or to normal
viewing.
Displays the previous stored channel. Selects the next menu option.
Displays the next stored channel. Selects the previous menu option.
Chapter 2 Your LCD TV At A Glance
10
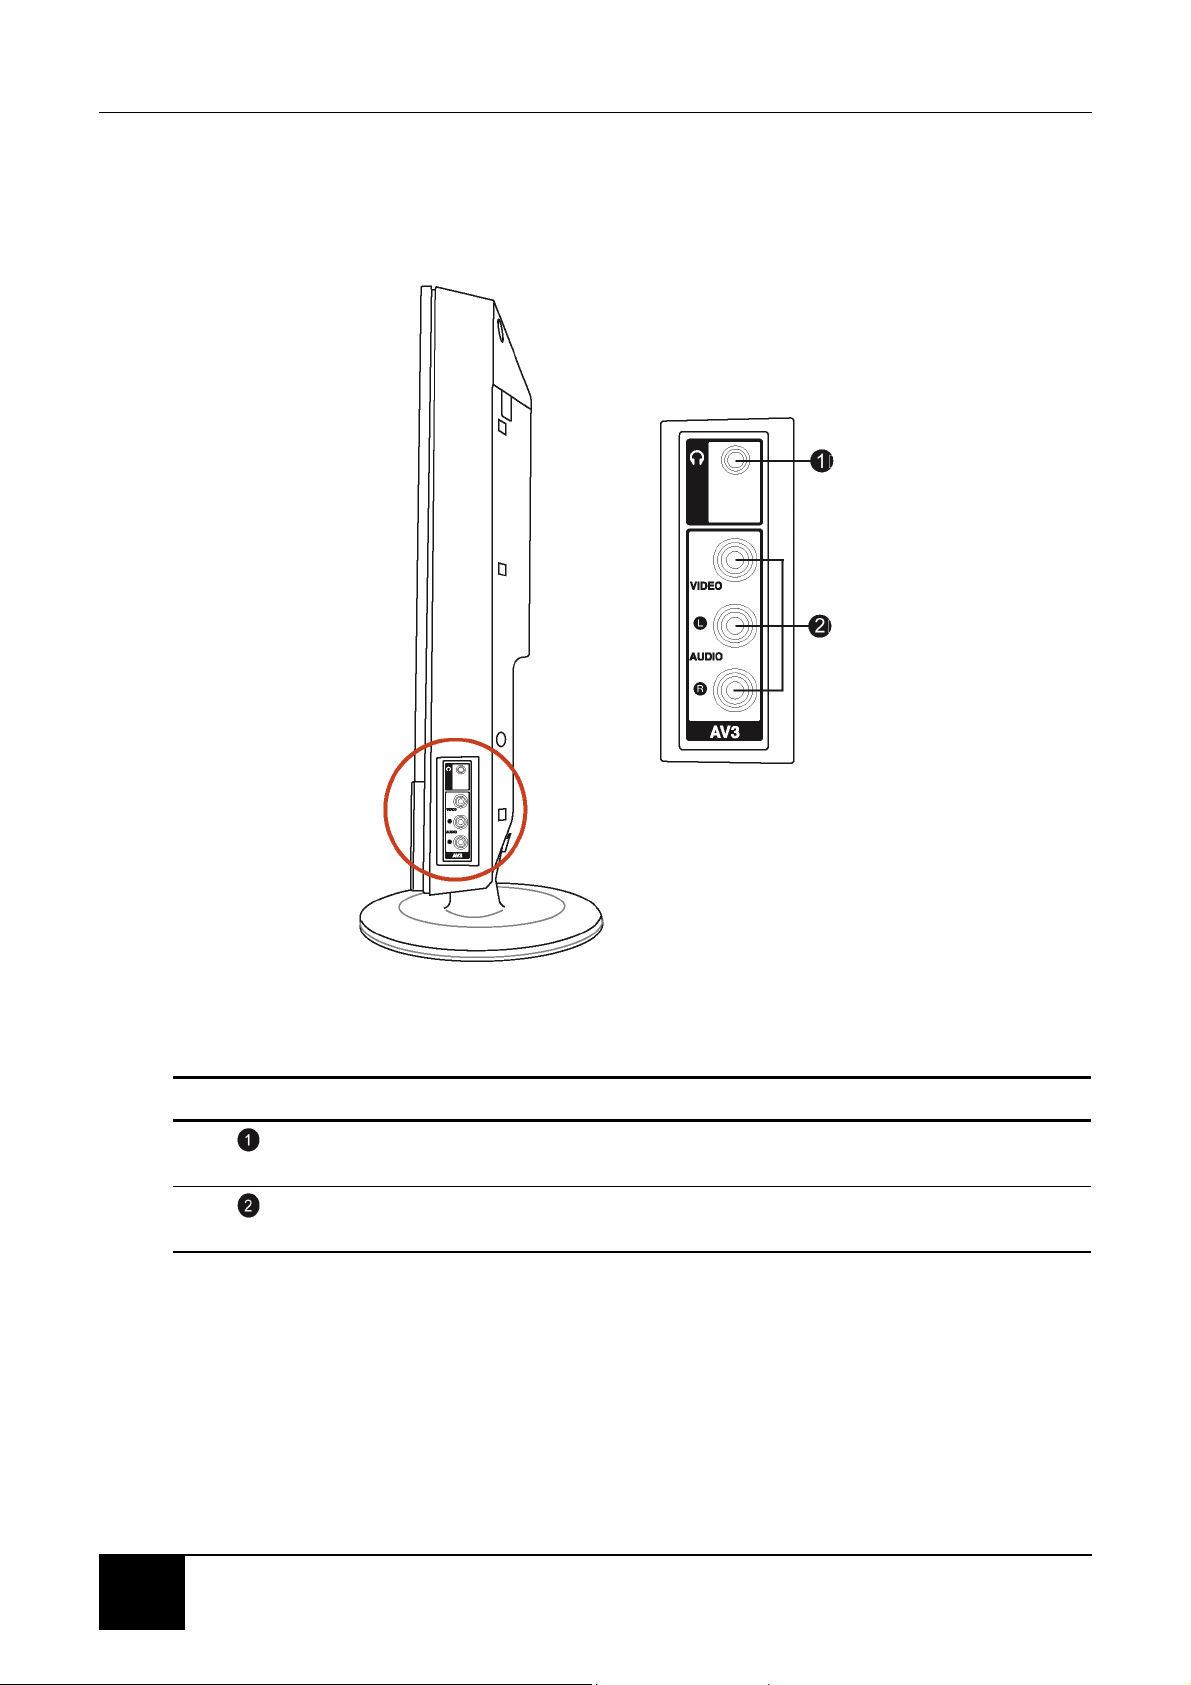
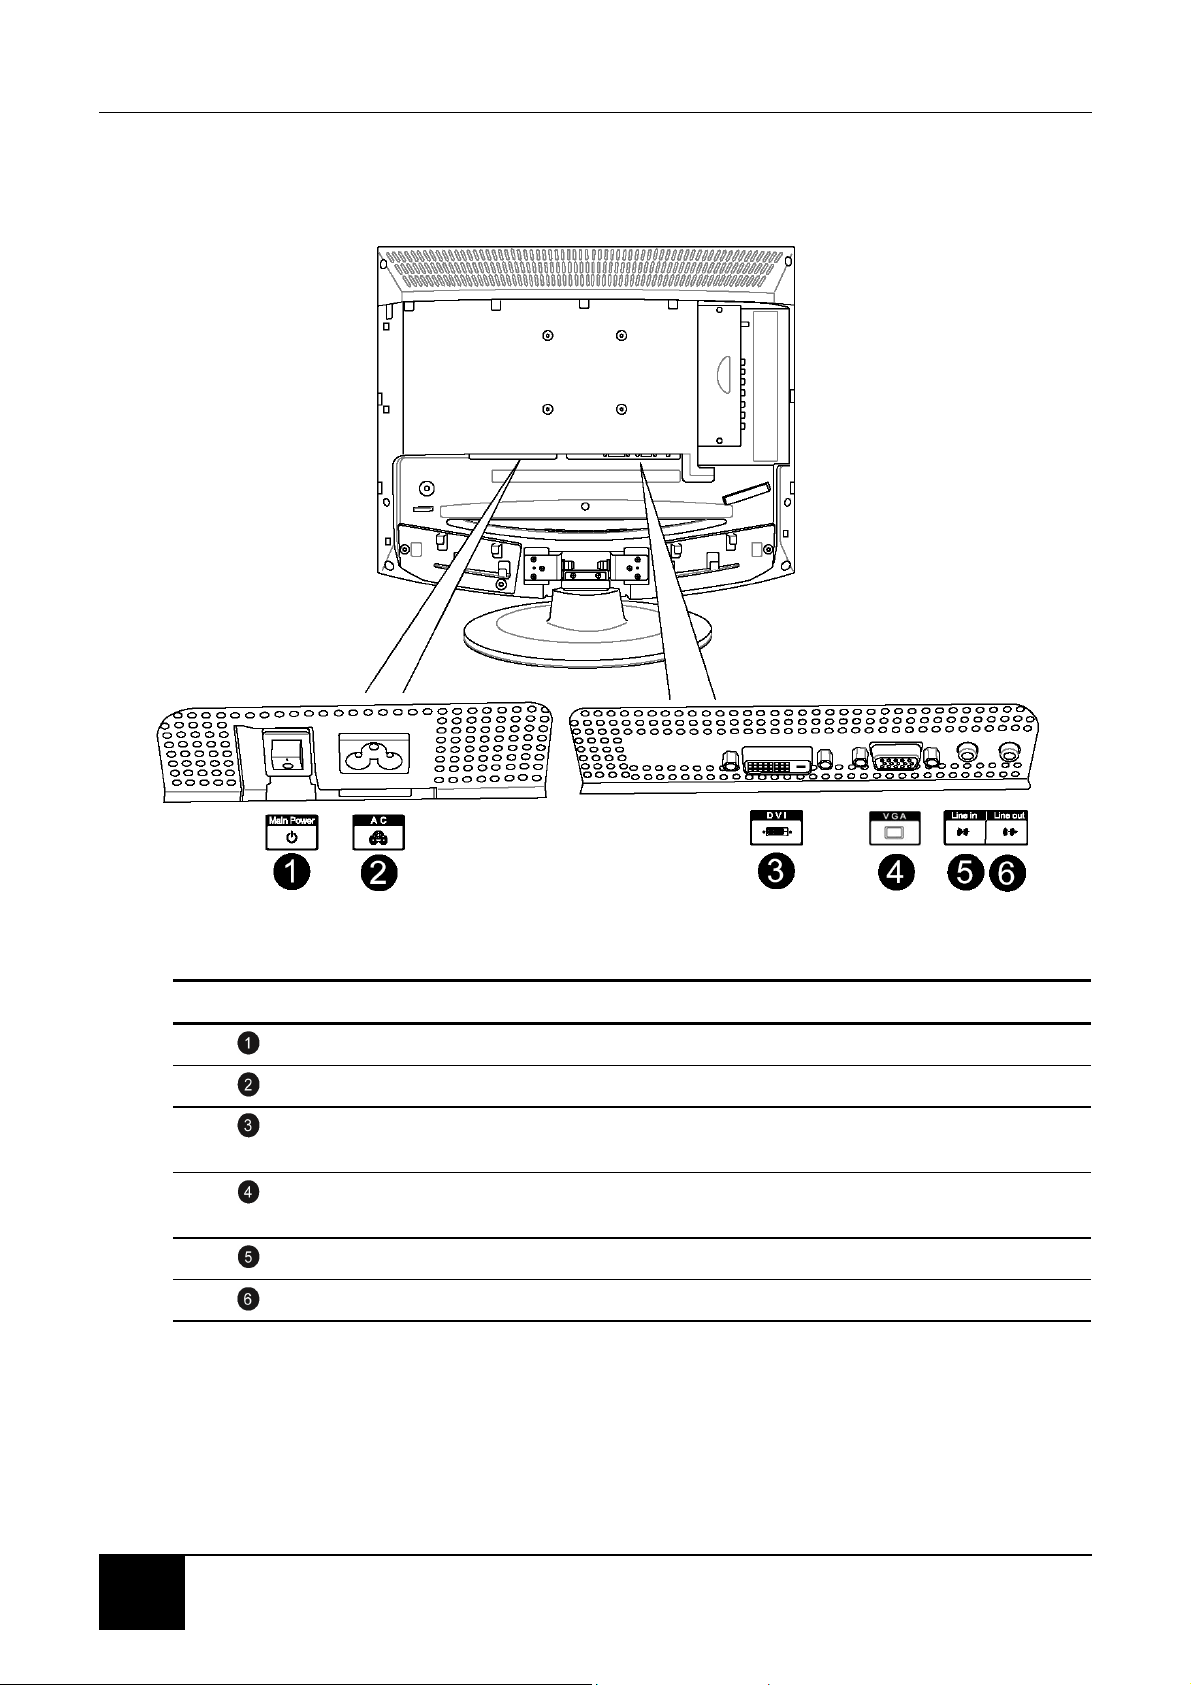
2-2 Right-side Connectors
CONNECTOR DESCRIPTION
Headphone Jack - Connect amplified speakers or headphones to this stereo
headphone jack. Using this jack automatically disables the built-in speakers.
Video/Audio-in - Connect composite audio/video devices, such as camcorders or
digital cameras to these.
Chapter 2 Your LCD TV At A Glance
11
11
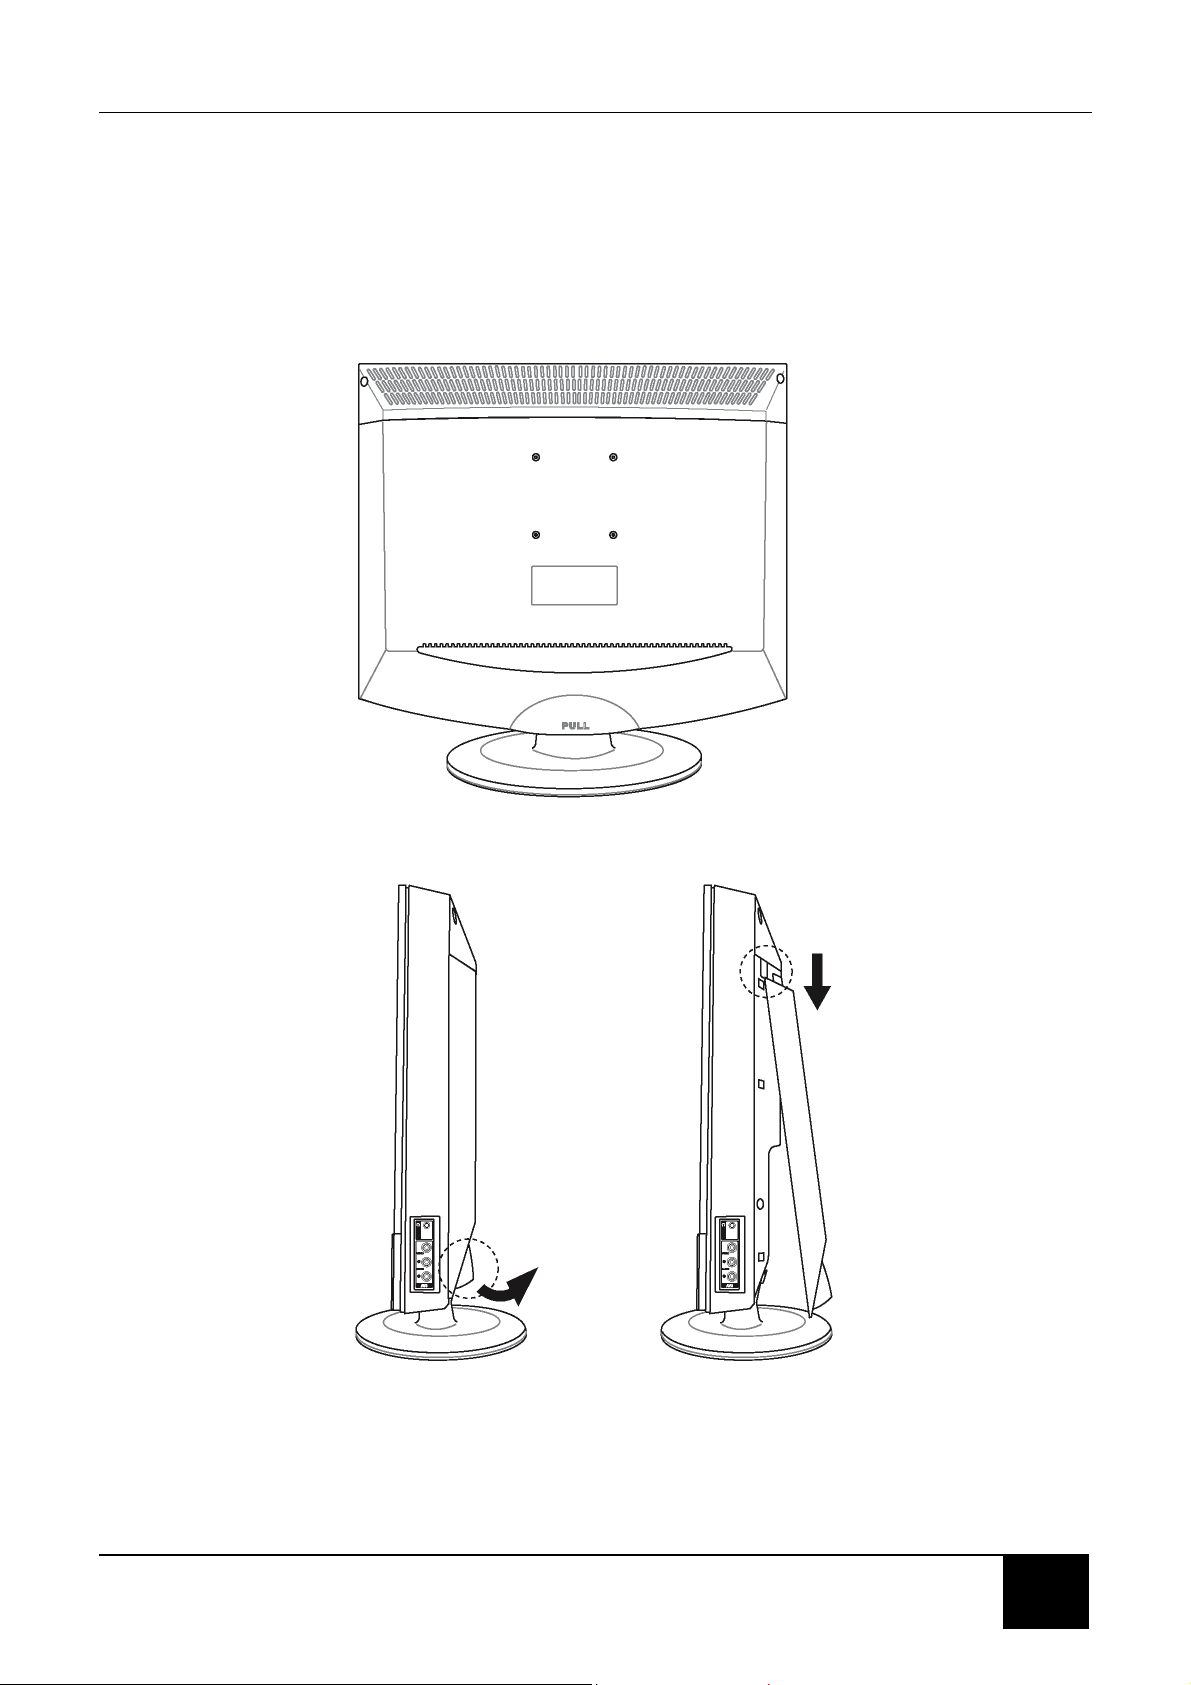
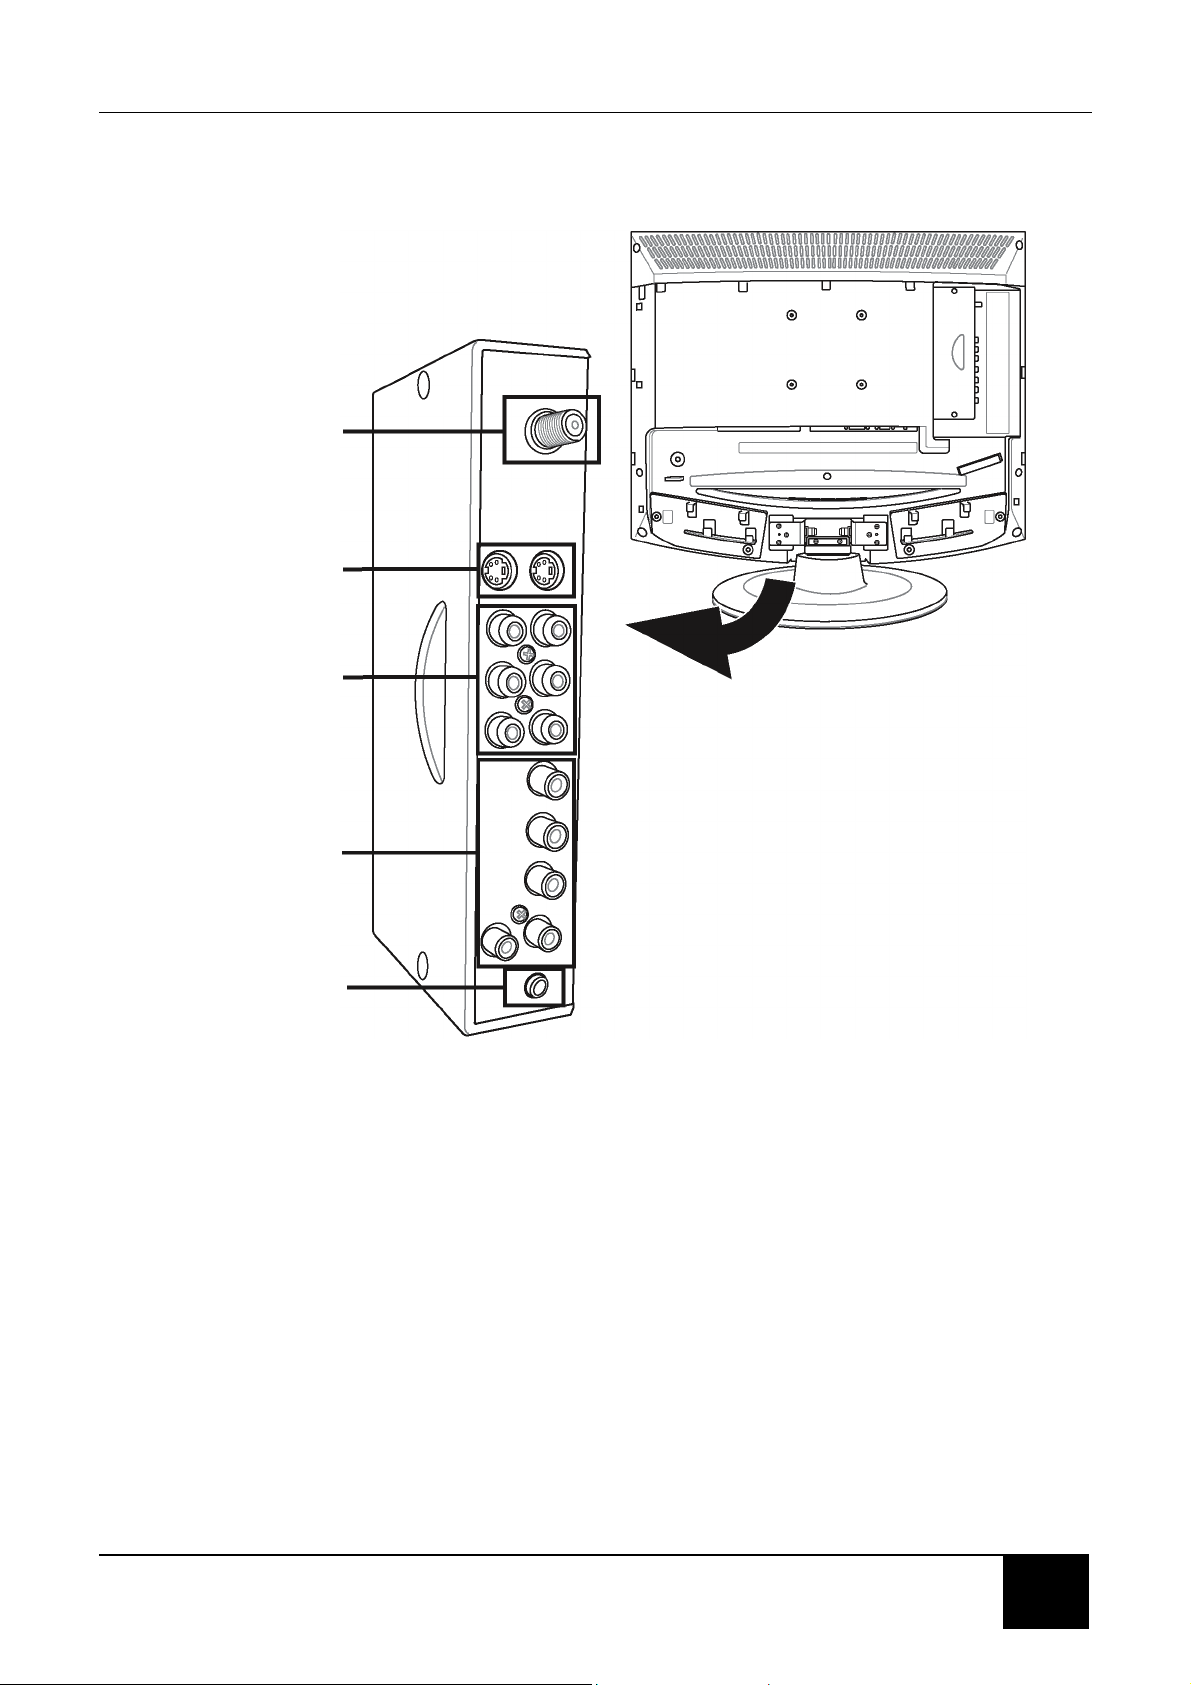
2-3 Back Connectors
To access the connectors on the back of your LCD TV, you will need to lift up and
remove the protective cover.
Chapter 2 Your LCD TV At A Glance
12
CONNECTOR DESCRIPTION
Main power switch - Turns the main power ON and OFF.
Power cord connector - Connect the power cable to this.
DVI in - Connects to a DVI video device, such as a computer or cable/Satellite
box.
VGA in - Connects to a VGA video device, such as a computer or cable/Satellite
box.
Audio in - Connects to a computer’s audio out jack.
Audio out - Connect an external amplifier or speaker to this.
Chapter 2 Your LCD TV At A Glance
13
13
UHF/VHF
(CATV)
S-Video
(S1/S2)
Composite
Video/Audio in
(AV1/AV2)
Component HDTV
Video/Audio in
(YPBPR)
Subwoofer

Chapter 2 Your LCD TV At A Glance
14
This page is intentionally left blank.
Chapter 3 Your Remote Control At A Glance
15
15
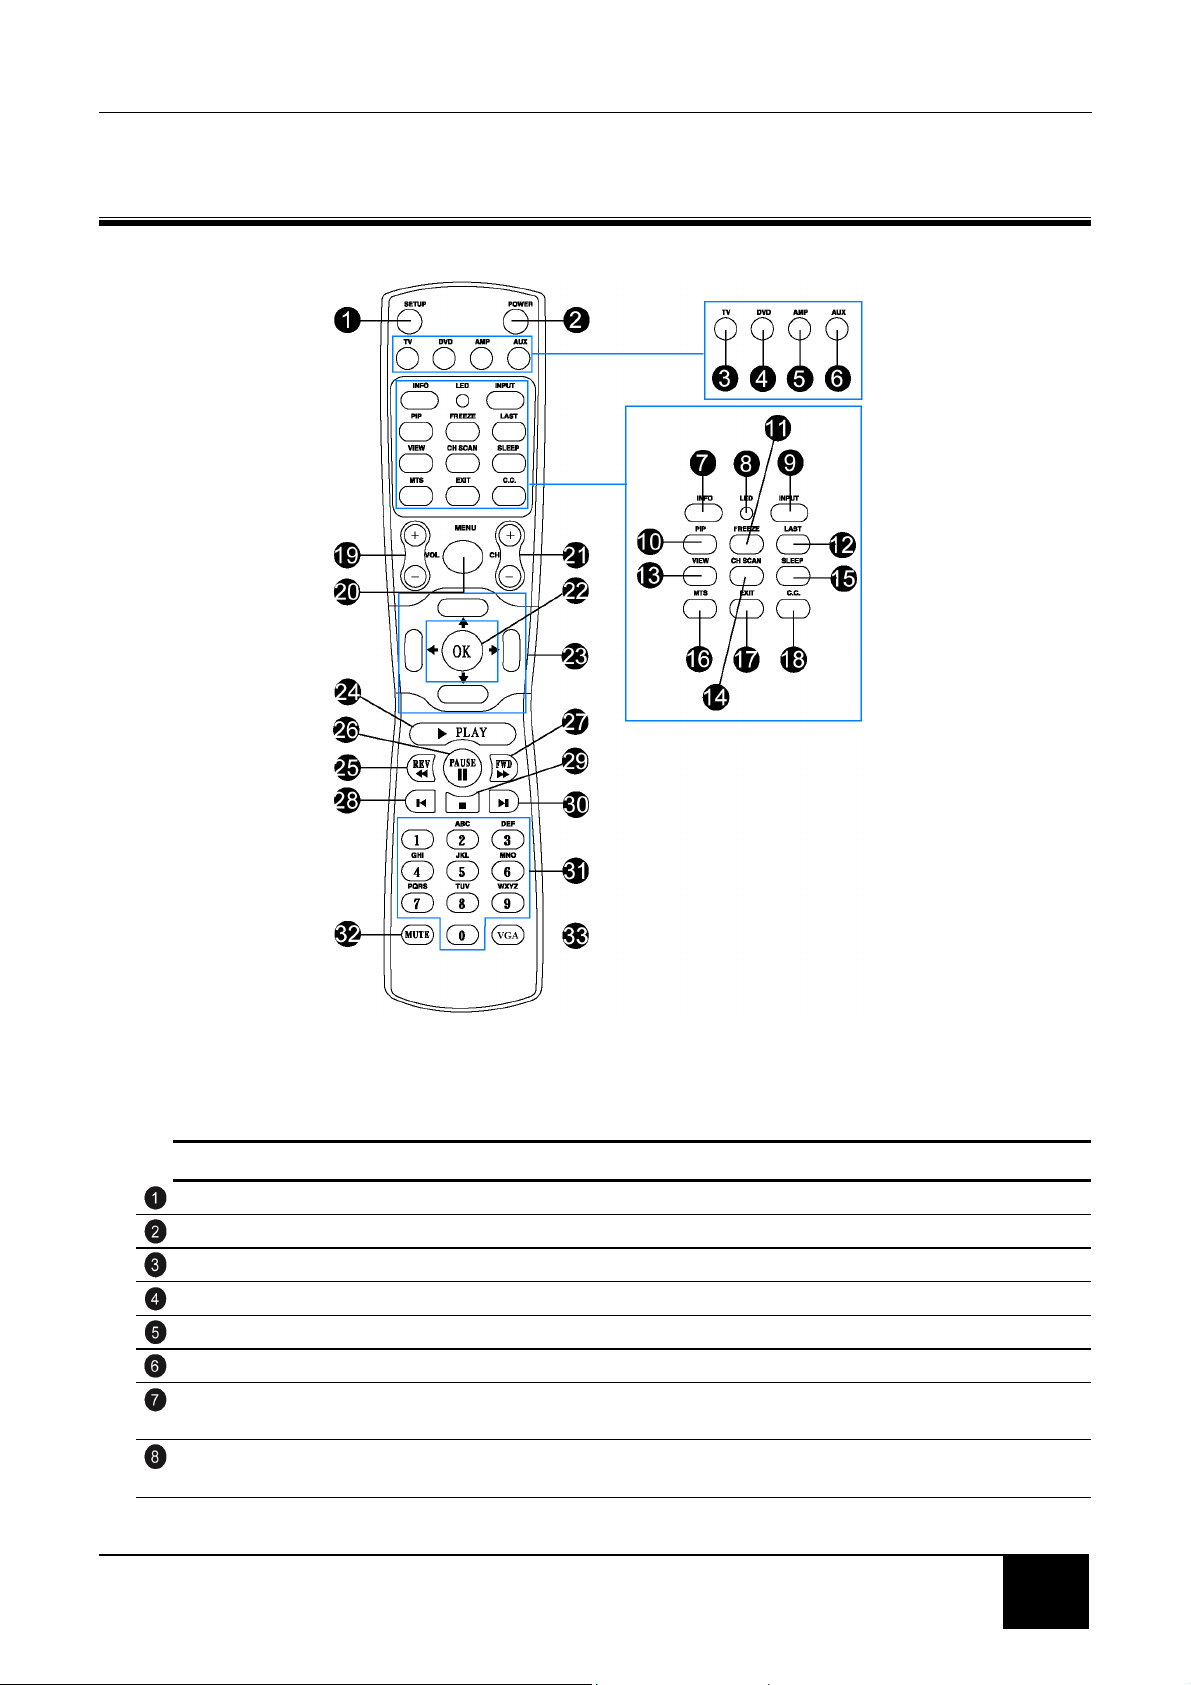
3 YOUR REMOTE CONTROL AT A GLANCE
3-1 Remote Control Buttons
CONNECTOR DESCRIPTION
SETUP Start all programming sequences.
POWER Turns the selected component ON/OFF.
TV Selects a programmed TV.
DVD Selects a programmed DVD player.
AMP Selects a programmed amplifier.
AUX Selects a programmed component.
INFO Shows the current status of your LCD TV, such as the video input source, audio
status, and channel number
LED Flashes when the remote is being programmed or is sending a signal to your LCD
TV.
Chapter 3 Your Remote Control At A Glance
16
CONNECTOR DESCRIPTION (cont’d)
INPUT Changes the input source.
PIP Turns picture-in-picture (PIP) mode on and off. PIP mode does not work when
parental controls are set.
FREEZE Freezes the display image.
LAST Recalls the last viewed channel.
VIEW Selects the picture format (Panoramic Stretch/16:9, 4:3, Zoom) that best meets your
viewing requirement.
CHSCAN Scans four channels at a time in TV mode. Works as an ENTER button in other
video modes.
SLEEP Turns on the sleep timer.
MTS Multi channel Television Sound (MTS) - Cycles through Stereo, MONO, and SAP.
EXIT Exits from the on-screen display (OSD).
C.C. Turns CLOSED CAPTION mode ON/OFF.
VOL Increases/decreases the volume.
MENU Displays menus for TV and other options.
CH Changes the channel.
OK Works as the ENTER button.
Navigation Navigates the on-screen display (OSD) menus.
PLAY Plays the CD, DVD, or VCR when the component is activated with the remote
control.
REV Rewinds the CD, DVD, or VCR when the component is activated with the remote
control.
PAUSE Pauses the CD, DVD, or VCR when the component is activated with the remote
control.
FWD Forwards the CD, DVD, or VCR when the component is activated with the remote
control.
SKIP REV Skips to the beginning the CD, DVD, or VCR when the component is activated with
the remote control.
SKIP FWD Skips to the beginning the CD, DVD, or VCR when the component is activated with
the remote control.
STOP Stops the CD, DVD, or VCR when the component is activated with the remote
control.
Number pad Selects a channel or enters a password.
MUTE Mutes or restores the sound volume.
VGR Selects the component connected to the VGR connector as the input source.
3-2 Using the Remote Control (Basic Operation)
Point the remote control towards the remote control sensor window located on the
front of your LCD TV. Make sure no objects are in the line of aim, otherwise the
remote control may not operate properly.
Chapter 4 Connecting Devices
17
17
4 CONNECTING DEVICES
Read this section to learn how to connect the following devices:
DVD players
HDTV decoder set -top boxes
VCRs
Broadcast TV and cable TV (CATV)
Computers
WARNING! Before connecting any external components, make sure to
unplug your LCD TV.
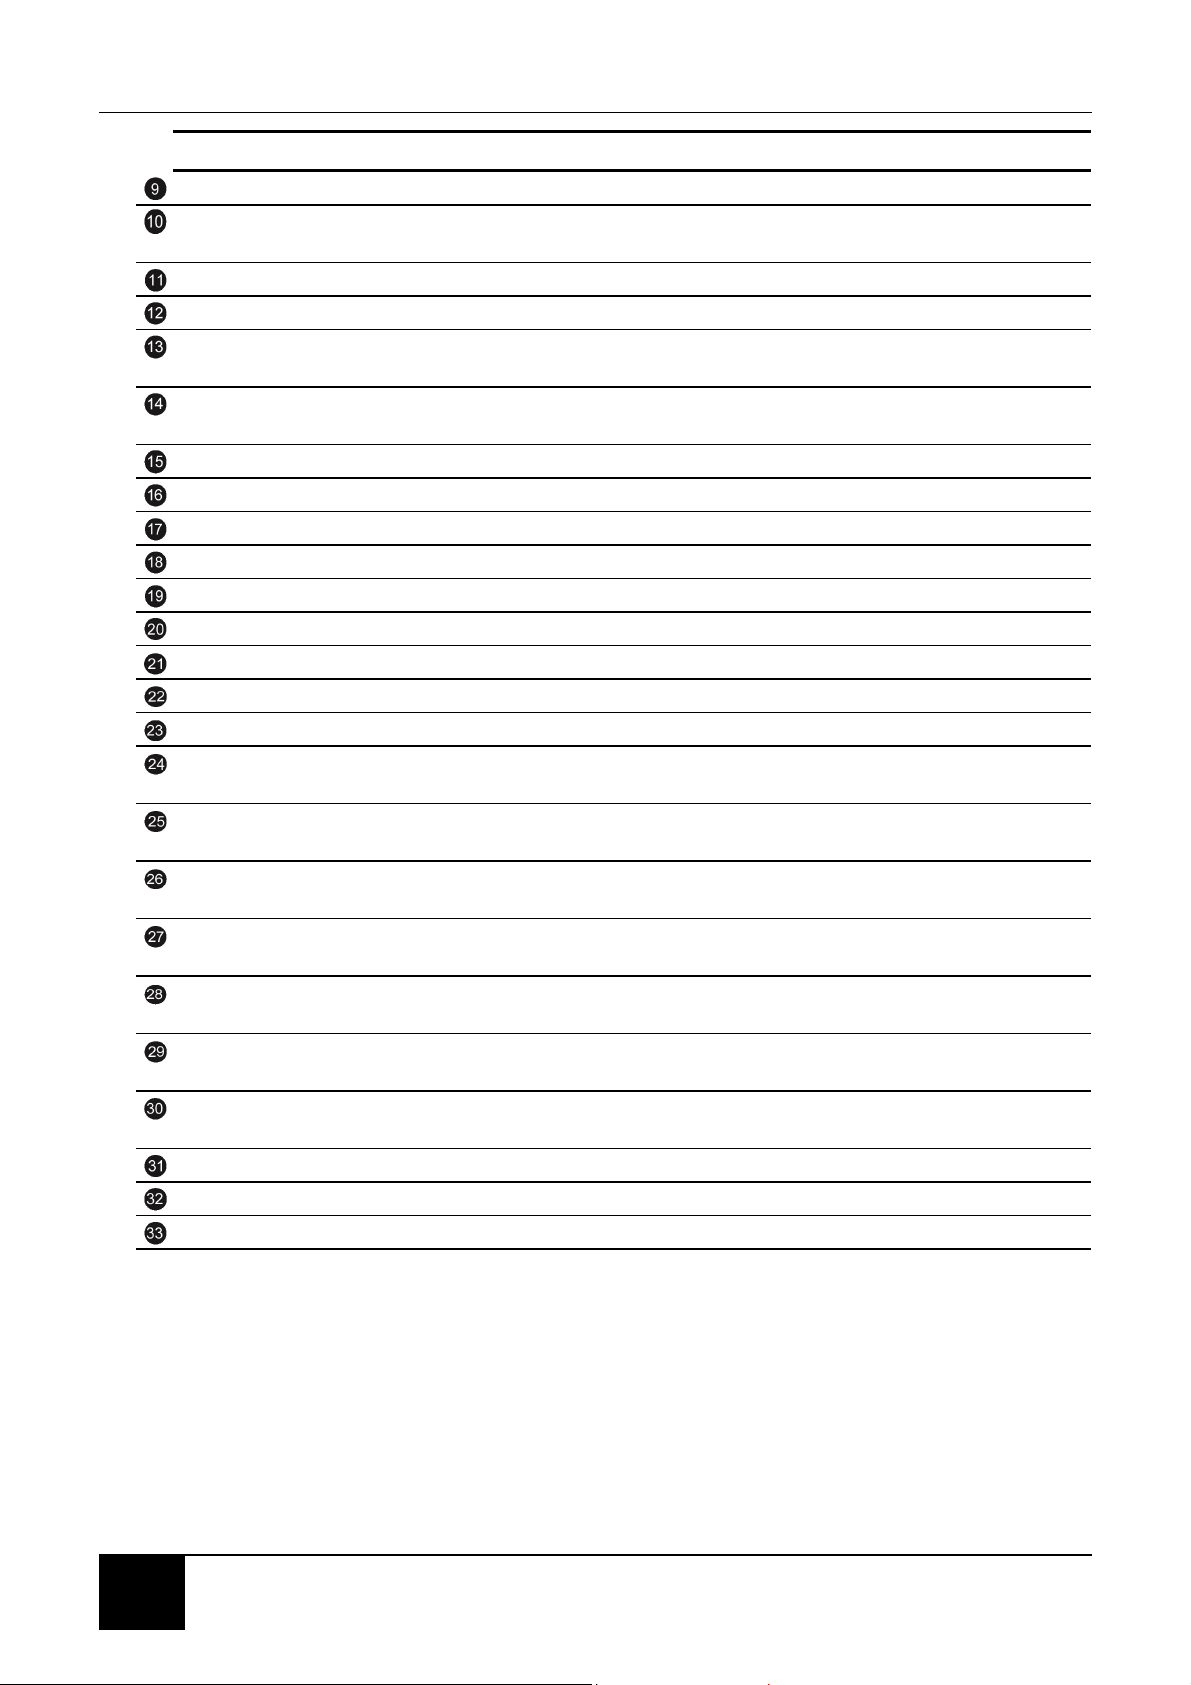
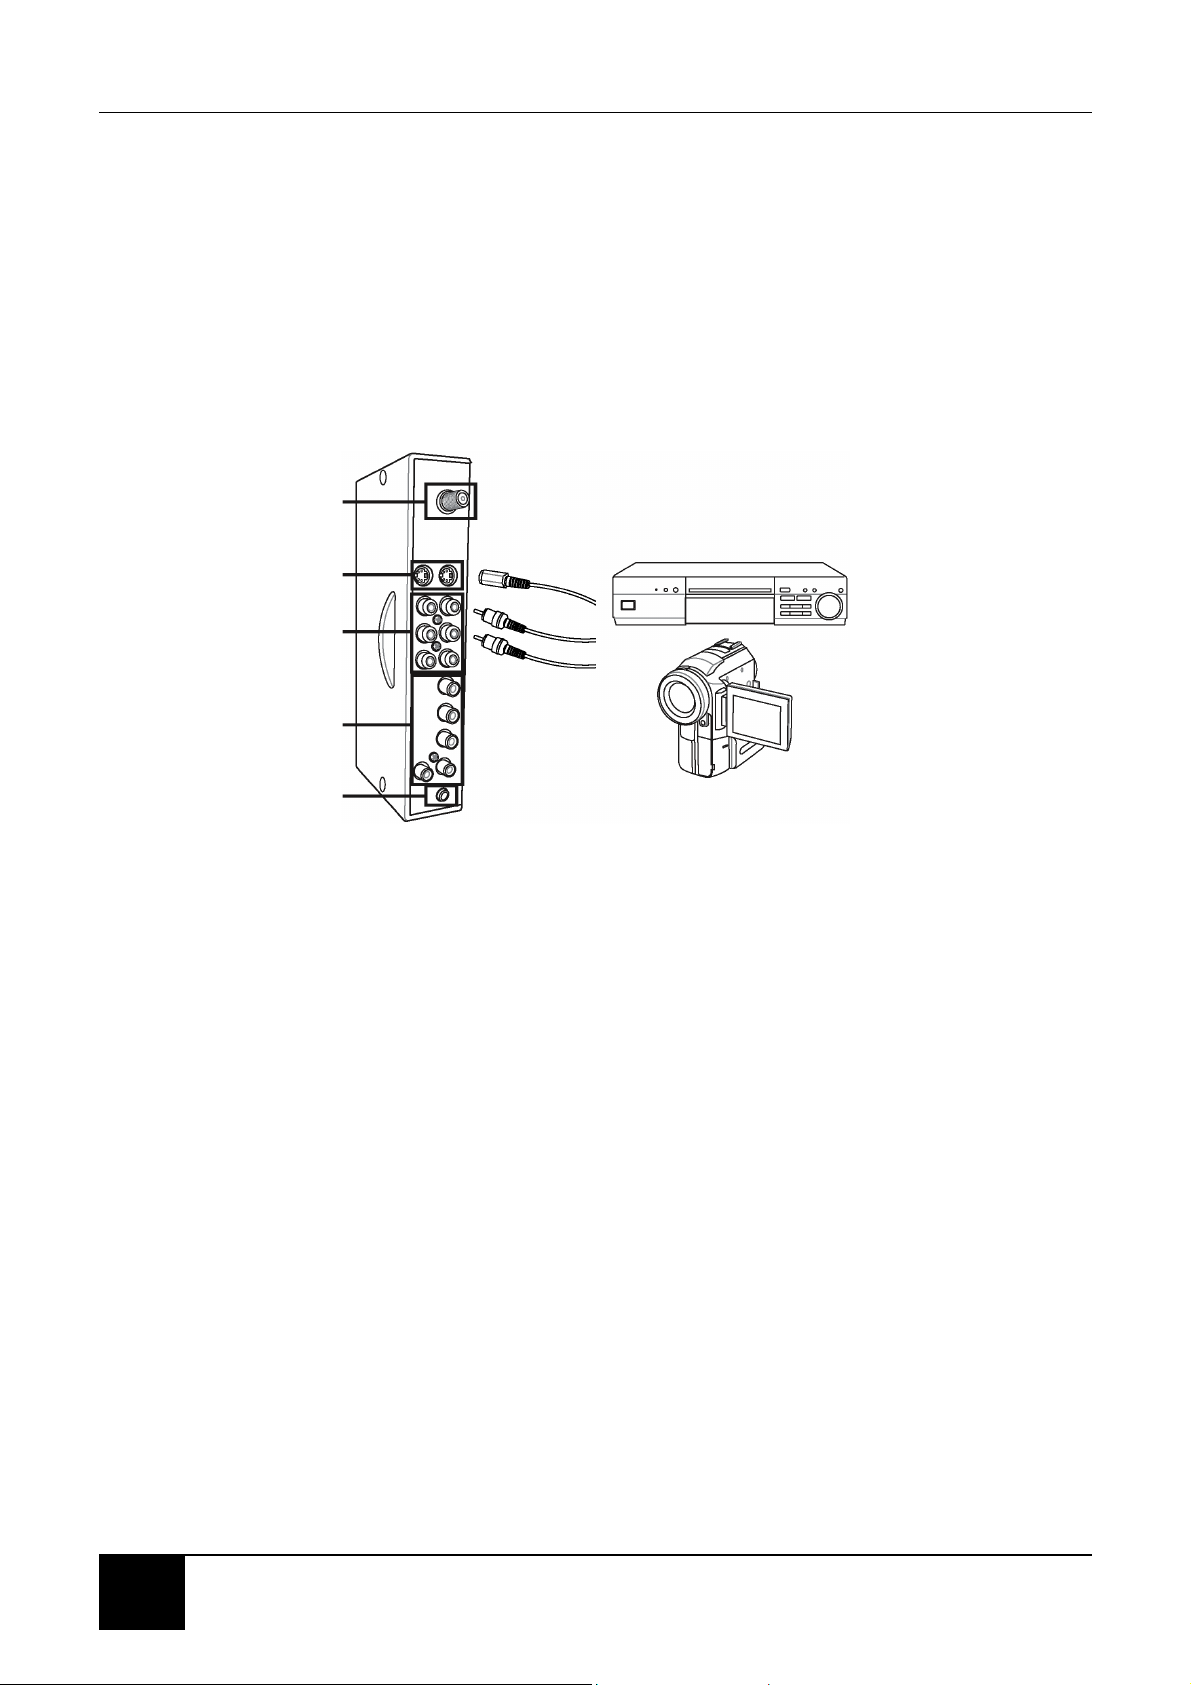
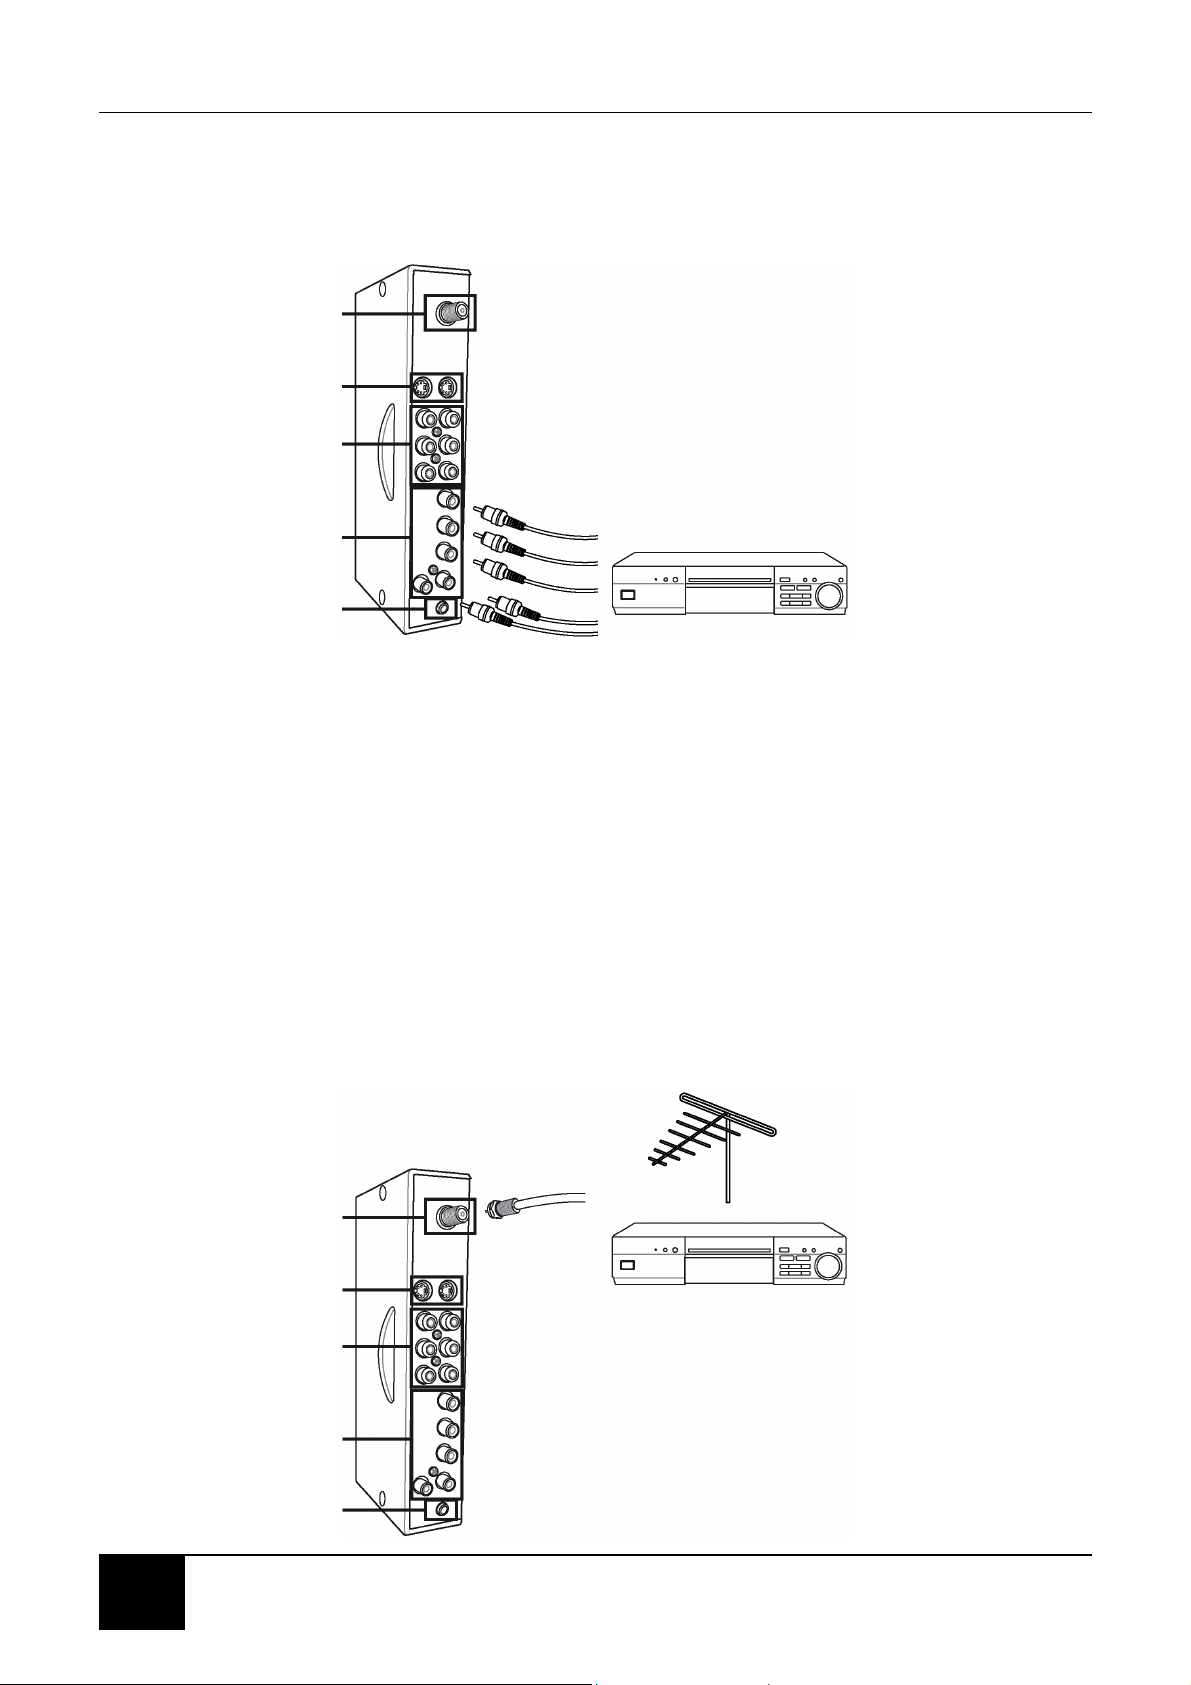
4-1 Connecting Your DVD Player
4-1-1 TO CONNECT USING COMPONENT VIDEO
1. Connect the green-colored Y jack on the back of your DVD player to the
green-colored Y jack on the back of your LCD TV.
2. Connect the red-colored PR or CR jack on the back of your DVD player to the
red-colored PRCR jack on the back of your LCD TV.
3. Connect the blue-colored PB or CB jack on the back of your DVD player to the
blue-colored PBCB jack on the back of your LCD TV.
4. Connect the red (R) and white (L) audio jacks on the back of your DVD player to
the R and L audio-in jacks on the back of your LCD TV.
5. Turn on your LCD TV, then press the INPUT button repeatedly to select YPBPR.
UHF/VHF
(CATV)
S-Video
(S1/S2)
Composite
Video/Audio in
(AV1/AV2)
Component HDTV
Video/Audio in
(YPBPR)
Subwoofer
Chapter 4 Connecting Devices
18
4-1-2 TO CONNECT USING S-VIDEO
1. Connect the S-Video jack on the back of your DVD player to one of the S-VIDEO
(S1 or S2 jacks on the back of your LCD TV with the correct optional cable
2. Connect the red (R) and white (L) audio jacks on the back of your DVD player to
the appropriately numbered AV1 or AV2 R and L audio-in jacks on the back of
your LCD TV.
3. Turn on your LCD TV (see 1-4 Turning ON the Power), then press the INPUT
button repeatedly to select AV1/S1 or AV2/S2.
4-2 Connecting Your HDTV Set-top Box
4-2-1 TO CONNECT USING COMPONENT VIDEO
1. Connect the green Y jack on the back of your HDTV set-top box to the green Y
jack on the back of your LCD TV.
2. Connect the red PR or CR jack on the back of your HDTV set-top box to the red
PRCR jack on the back of your LCD TV.
3. Connect the blue PB or CB jack on the back of your HDTV set-top box to the
blue PBCB jack on the back of your LCD TV.
4. Connect the red (R) and white (L) audio jacks on the back of your HDTV set-top
box to the R and L audio-in jacks on the back of your LCD TV.
5. Turn on your LCD TV (see 1-4 Turning ON the Power), then press the INPUT
button repeatedly to select YPBPR.
UHF/VHF
(CATV)
S-Video
(S1/S2)
Composite
Video/Audio in
(AV1/AV2)
Component HDTV
Video/Audio in
(YPBPR)
Subwoofer
Chapter 4 Connecting Devices
19
19
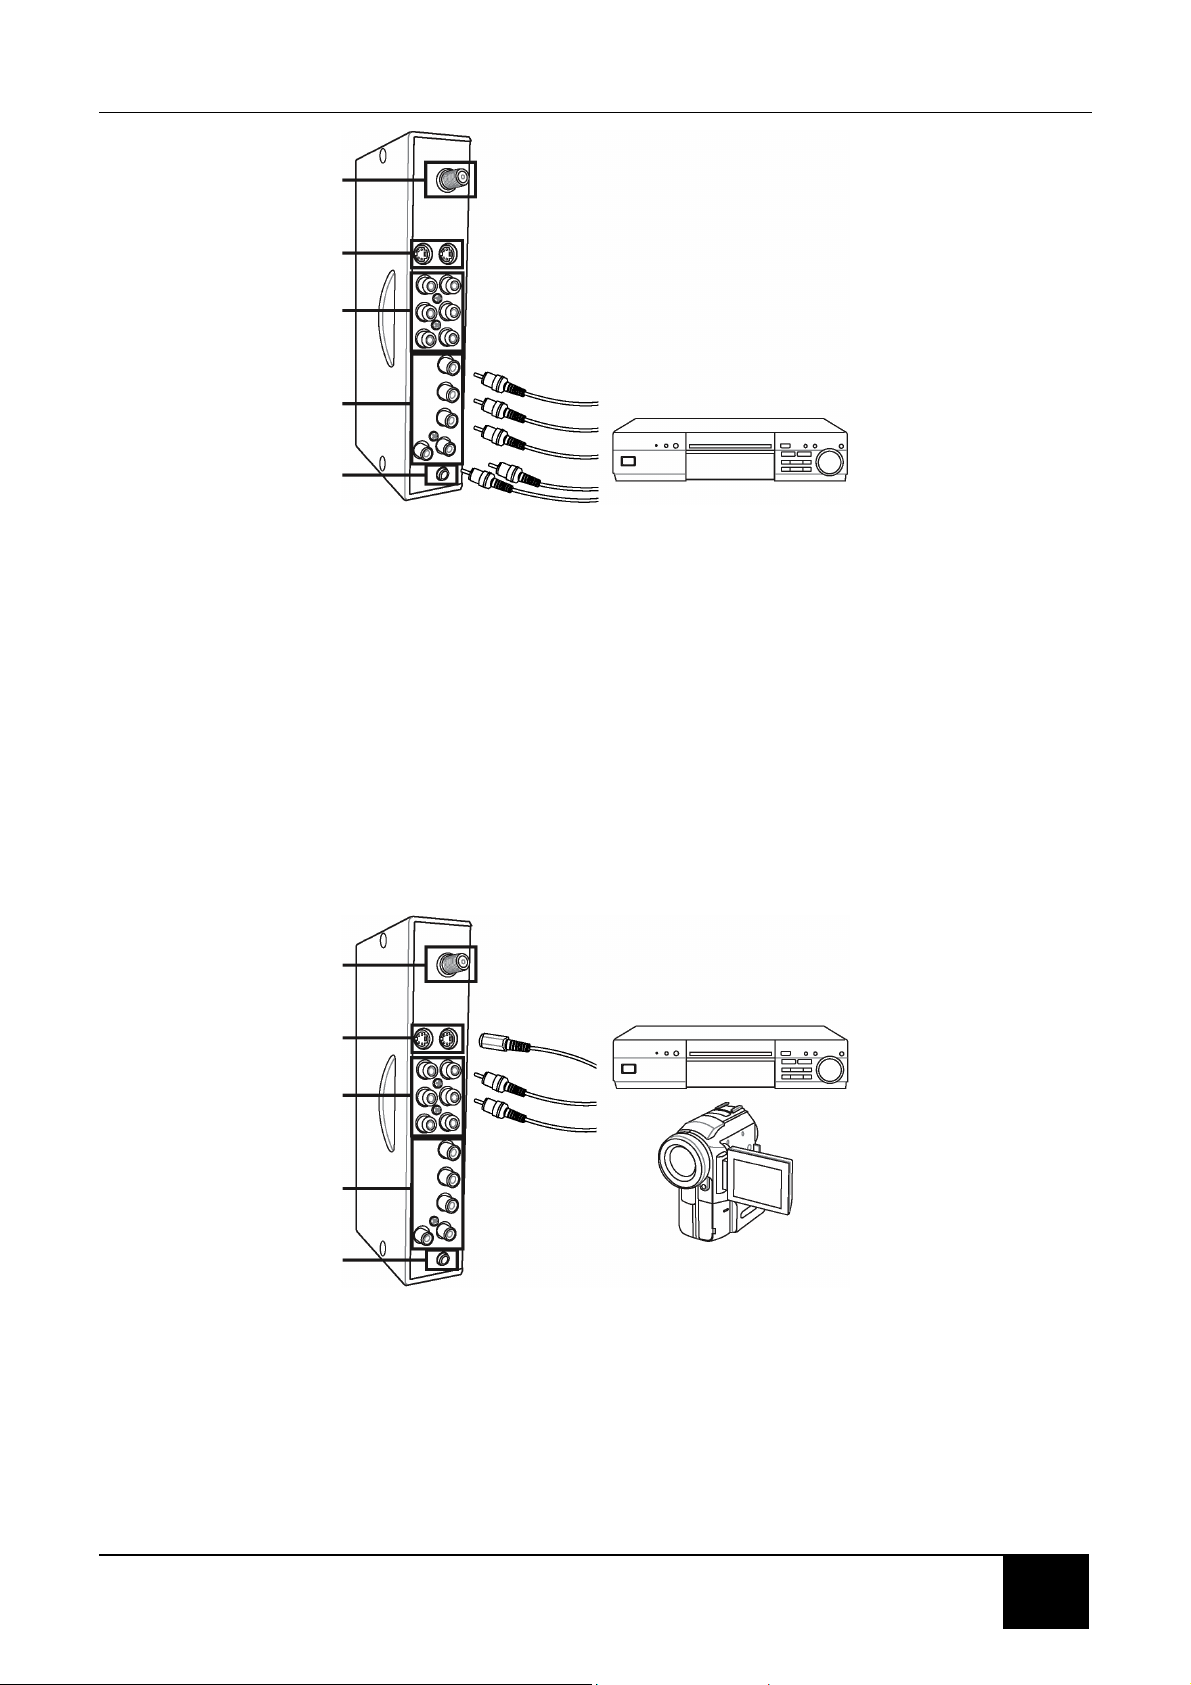
4-3 Connecting Your VCR or Video Camera
4-3-1 TO CONNECT USING S-VIDEO
1. Connect the S-Video jack on the back of your DVD player to one of the S-VIDEO
(S1 or S2 jacks on the back of your LCD TV with the correct optional cable.
2. Connect the red (R) and white (L) audio jacks on the back of your DVD player to
the appropriately numbered AV1 or AV2 R and L audio-in jacks on the back of
your LCD TV.
3. Turn on your LCD TV (see 1-4 Turning ON the Power), then press the INPUT
button repeatedly to select AV1/S1 or AV2/S2.
4-3-2 TO CONNECT USING COMPONENT VIDEO
1. Connect the yellow video jack on the back of your VCR or video camera to the
yellow AV1 or AV2 jack on the back of your LCD TV with the correct optional
cable.
2. Connect the red (R) and white (L) audio jacks on the back of your VCR or video
camera to the appropriately numbered AV1 or AV2 R and L audio-in jacks on the
back of your LCD TV.
UHF/VHF
(CATV)
S-Video
(S1/S2)
Composite
Video/Audio in
(AV1/AV2)
Component HDTV
Video/Audio in
(YPBPR)
Subwoofer
UHF/VHF
(CATV)
S-Video
(S1/S2)
Composite
Video/Audio in
(AV1/AV2)
Component HDTV
Video/Audio in
(YPBPR)
Subwoofer
Chapter 4 Connecting Devices
20
3. Turn on your LCD TV (see 1-4 Turning ON the Power), then press the INPUT
button repeatedly to select AV1/S1 or AV2/S2.
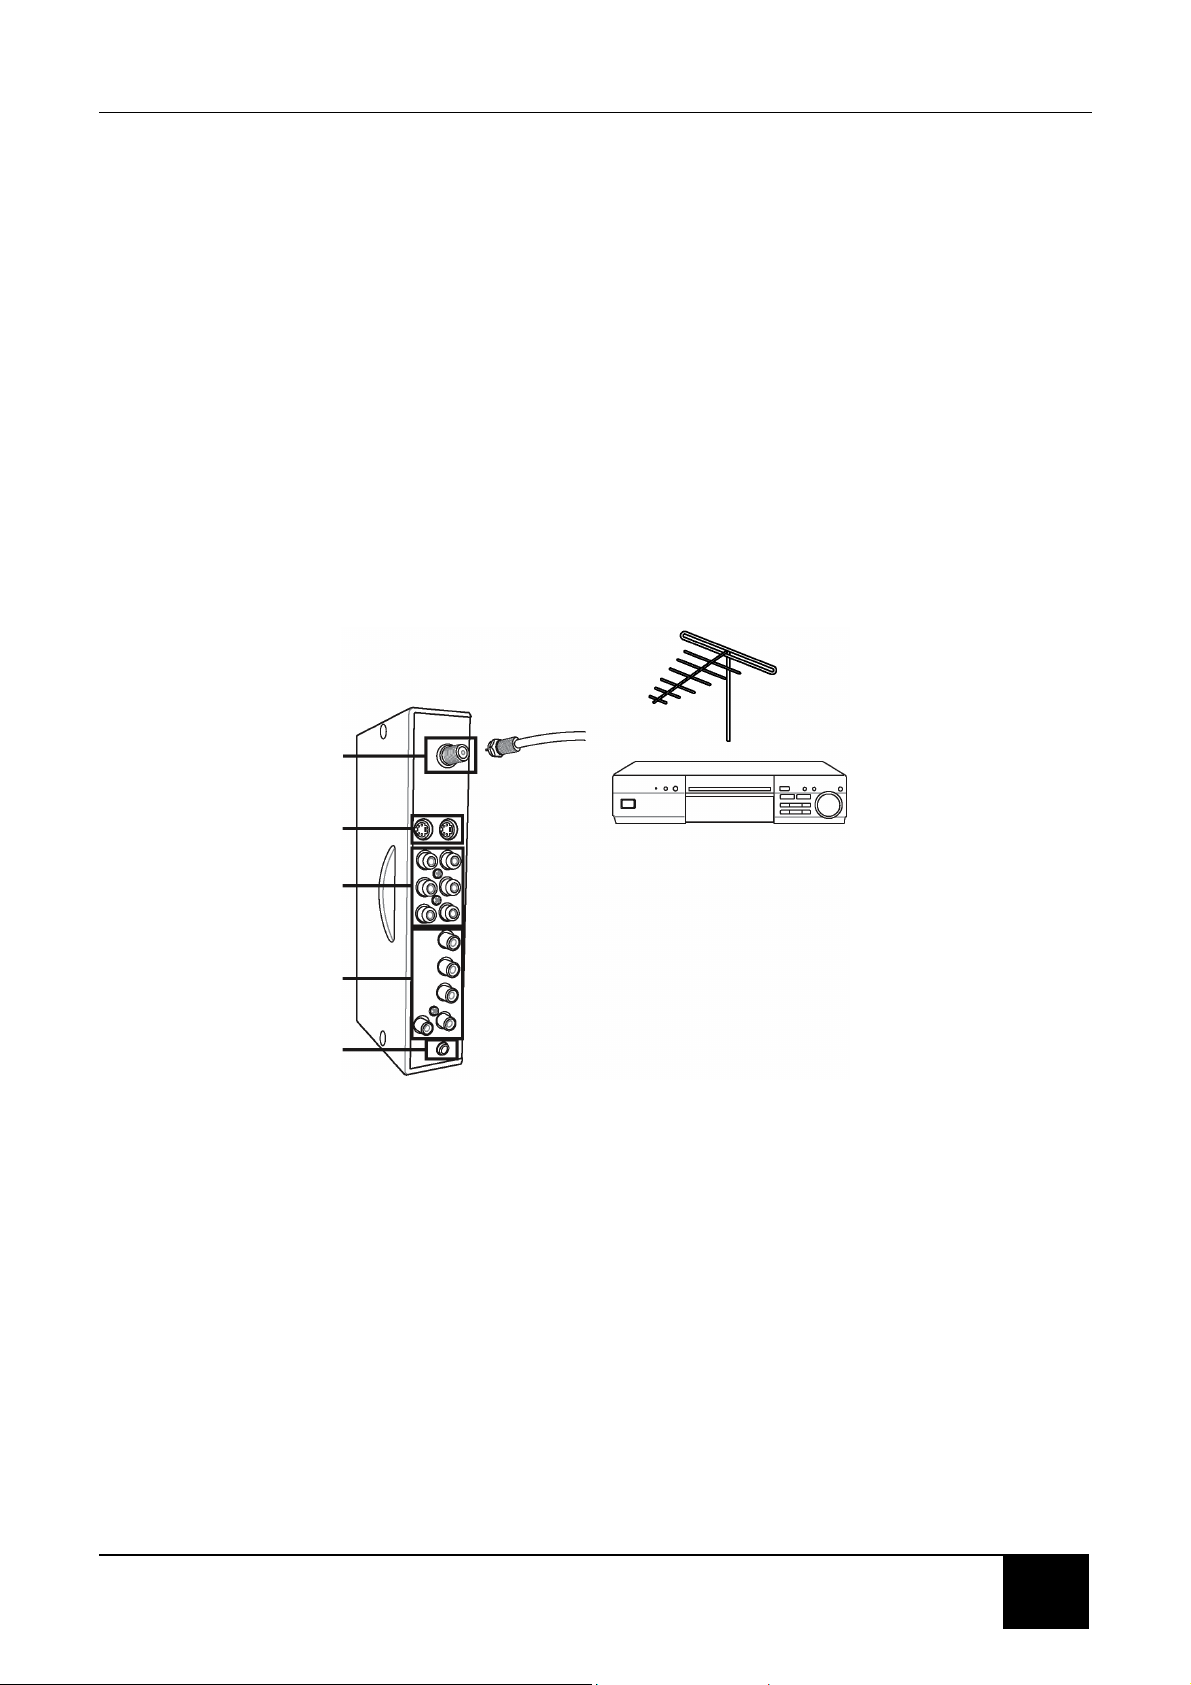
4-3-3 TO CONNECT USING COAXIAL (RF)
1. Connect the “output to TV” (RF out or Antenna out) jack on the back of your VCR
to the UHF/VHF jack on the back of your LCD TV with the correct optional cable.
2. Turn on your LCD TV (see 1-4 Turning ON the Power), then press the INPUT
button repeatedly to select CATV.
3. If you have an broadcast antenna or cable box, connect your broadcast antenna
or cable TV coaxial (RF) cable to the UHF/VHF connector on the back of your
VCR.
WARNING! If an outdoor antenna or cable system is connected to your LCD
TV, make sure that the antenna or cable system is correctly
grounded.
UHF/VHF
(CATV)
S-Video
(S1/S2)
Composite
Video/Audio in
(AV1/AV2)
Component HDTV
Video/Audio in
(YPBPR)
Subwoofer
UHF/VHF
(CATV)
S-Video
(S1/S2)
Composite
Video/Audio in
(AV1/AV2)
Component HDTV
Video/Audio in
(YPBPR)
Subwoofer
Chapter 4 Connecting Devices
21
21
4-4 Connecting Broadcast TV or Cable TV
4-4-1 TO CONNECT USING COAXIAL AUDIO AND VIDEO
1. Connect the coaxial (RF) connector from your antenna or cable box to the
HF/VHF connector on the back of your LCD TV with the correct optional cable.
2. Turn on your LCD TV (see 1-4 Turning ON the Power), then press the INPUT
button repeatedly to select CATV.
3. If you have connected a VCR to the UHF/VHF connector on the back of your
LCD TV, connect your broadcast TV or cable TV coaxial (RF) cable to the
UHF/VHF connector on the back of your VCR.
WARNING! If an outdoor antenna or cable system is connected to your LCD
TV, make sure that the antenna or cable system is correctly
grounded.
4-5 Connecting a Computer
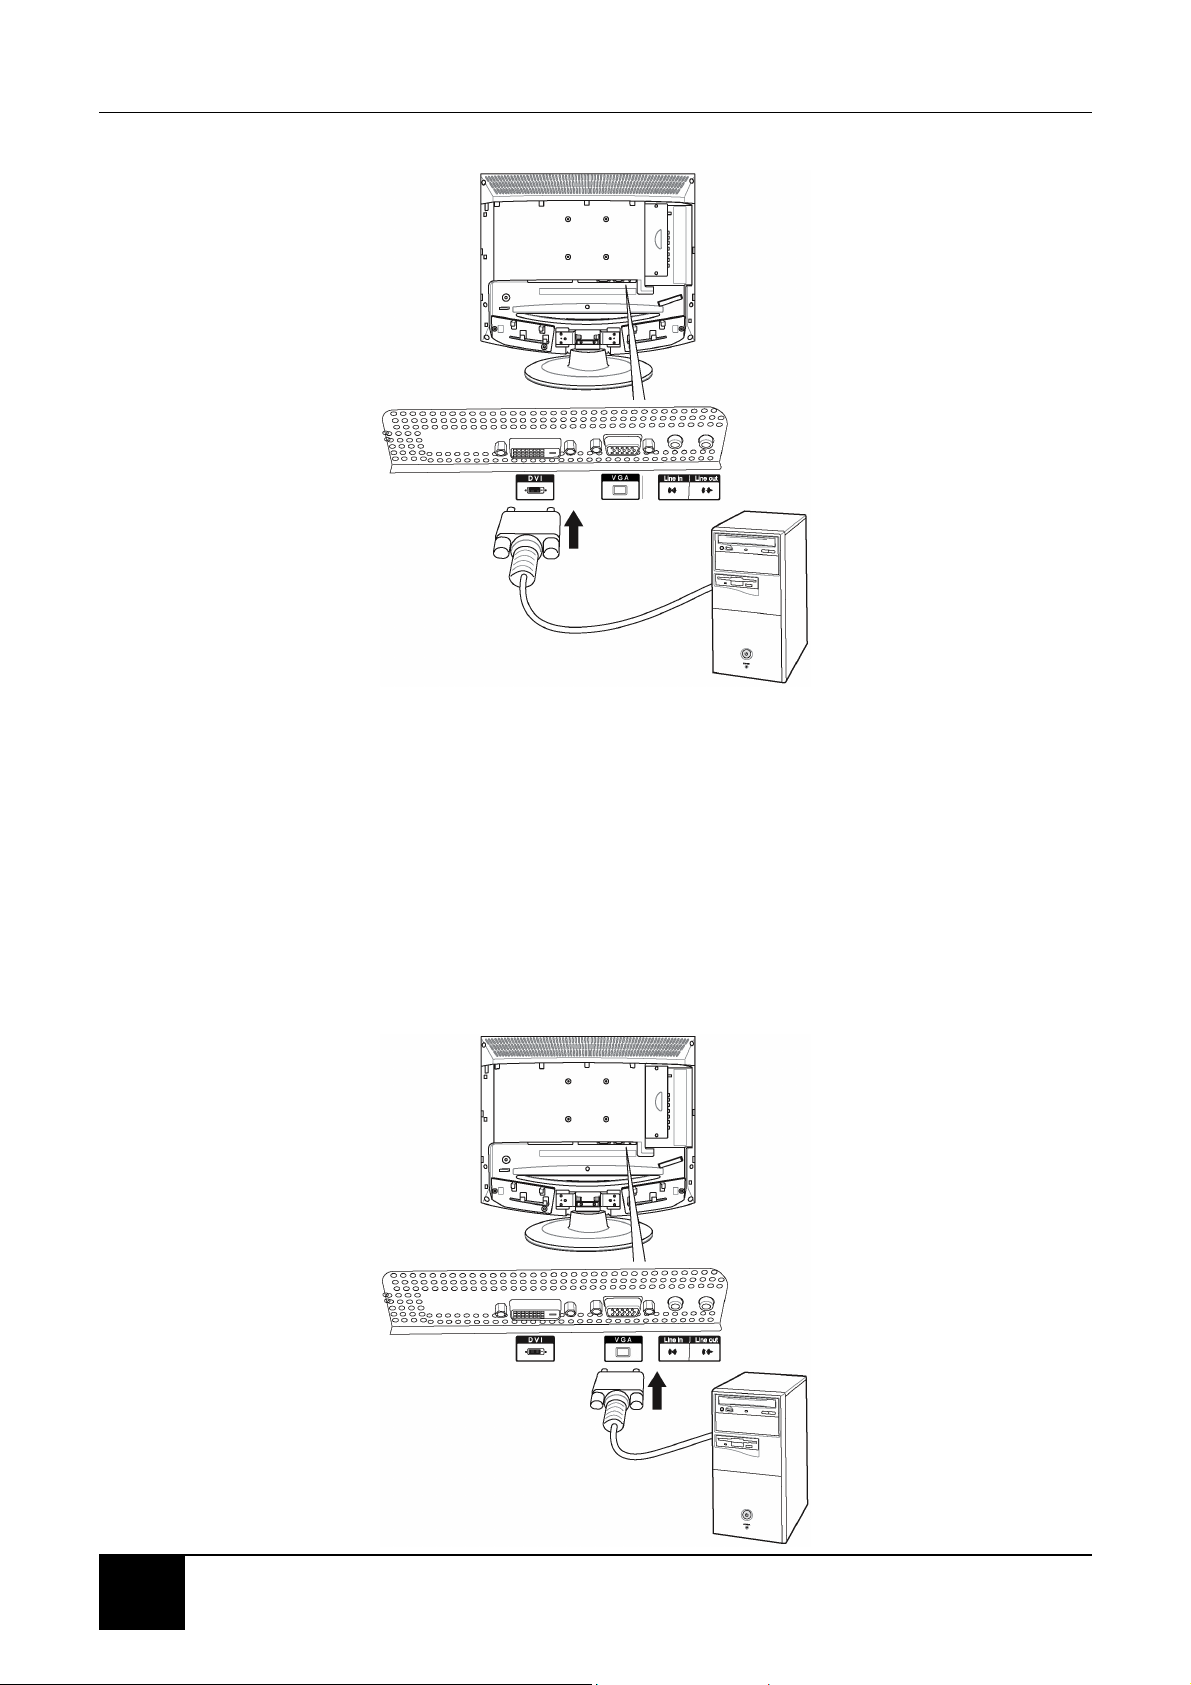
4-5-1 TO CONNECT USING DVI VIDEO
1. Connect the DVI connector on your computer to the DVI connector on the back
of your LCD TV with the correct optional cable.
2. Connect the Audio Out jack on your computer to the Line in jack on the back of
your LCD TV. See 2-2 Right-side Connectors for the location of the Line in
jack.
3. Turn on your LCD TV (see 1-4 Turning ON the Power), then press the INPUT
button repeatedly to select DVI-D.
NOTE: The DVI input of this display is compatible with HDCP Copy protection.
UHF/VHF
(CATV)
S-Video
(S1/S2)
Composite
Video/Audio in
(AV1/AV2)
Component HDTV
Video/Audio in
(YPBPR)
Subwoofer
Chapter 4 Connecting Devices
22
4-5-2 TO CONNECT USING VGA VIDEO
1. Connect the 15-pin D-Sub VGA connector on your computer to the VGA
connector on the back of your LCD TV with a VGA monitor cable.
2. Connect the Audio Out jack on your computer to the Line in jack on the back of
your LCD TV. See 2-2 Right-side Connectors for the location of the Line in
jack.
3. Turn on your LCD TV (see 1-4 Turning ON the Power), then press the INPUT
button repeatedly to select VGA.
Chapter 5 Getting Started
23
23
5 GETTING STARTED
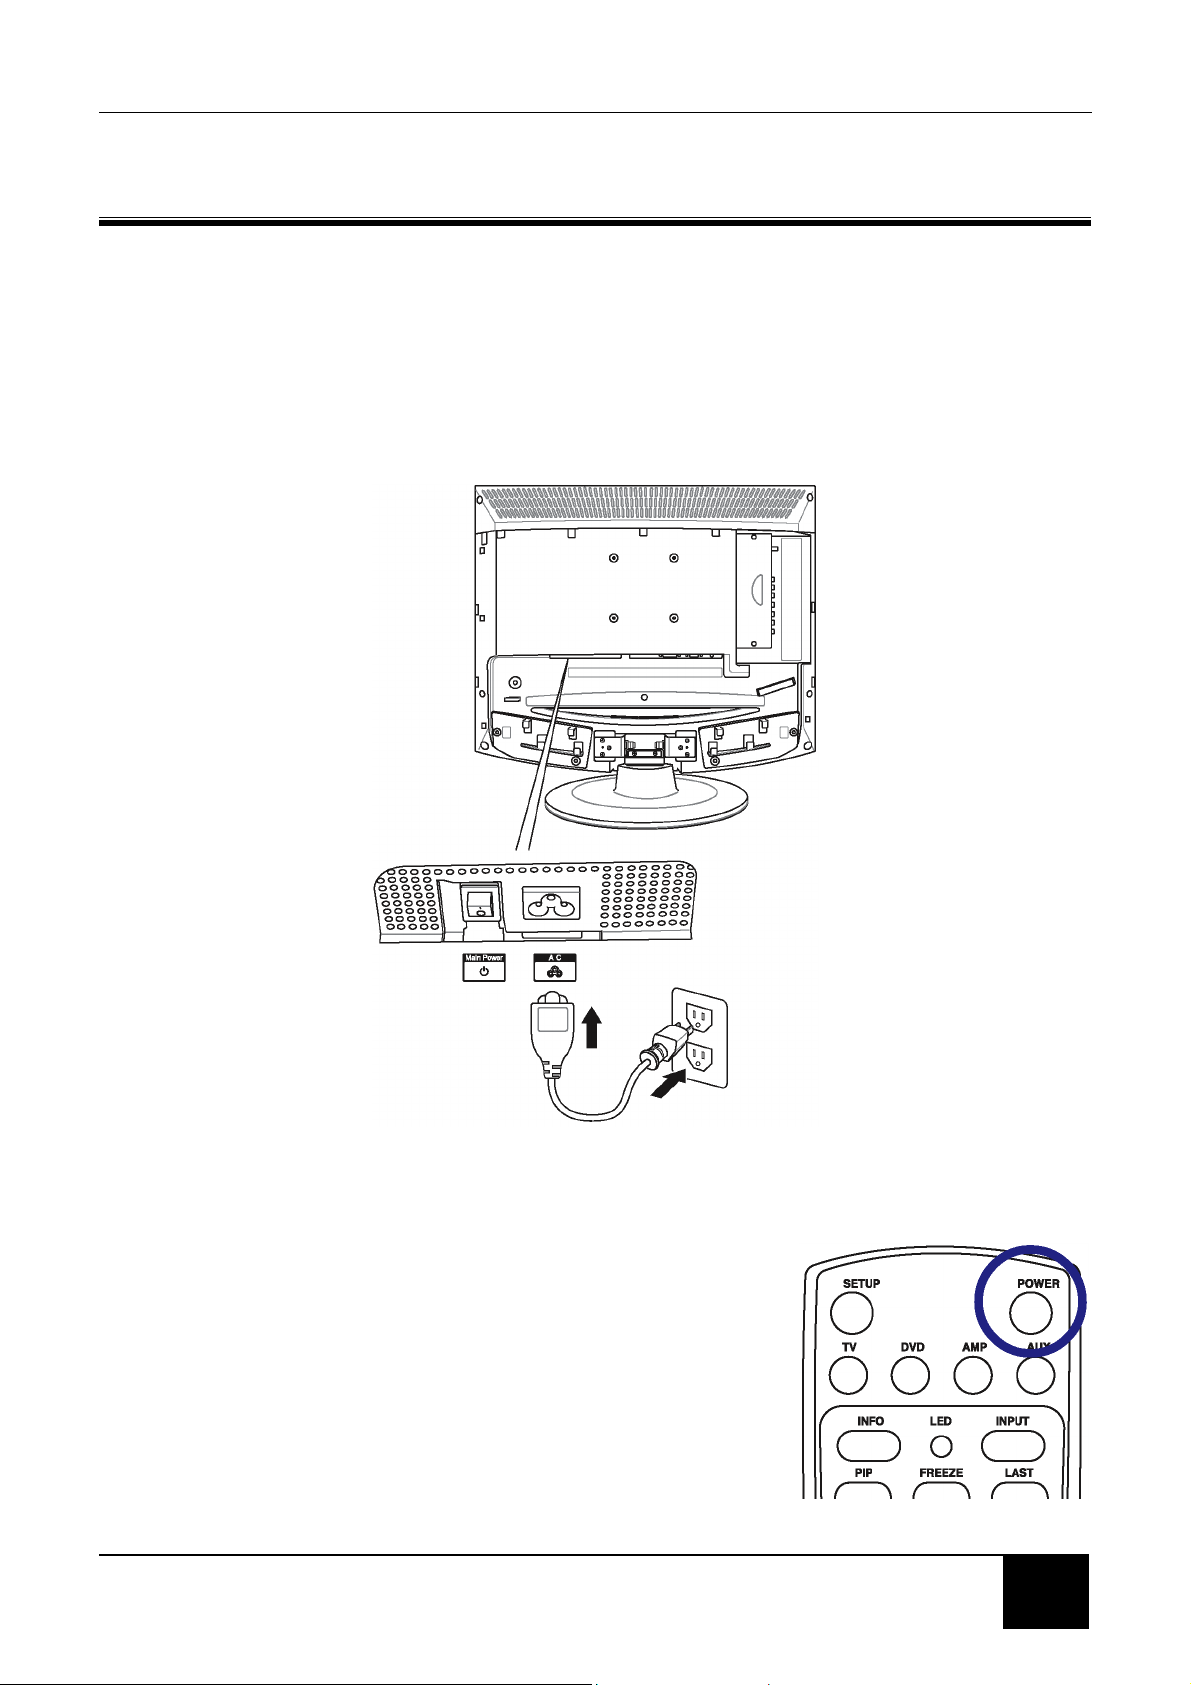
5-1 Plugging In Your LCD TV
1. Connect the power cord to the power cord connector on the back of your LCD
TV (see 2-3 Back Connectors).
2. Plug the other end of the power cord into a properly grounded electrical outlet or
surge protector.
5-2 Turning On the LCD TV
1. Press the MAIN POWER switch in the back of the
unit (see 2-3 Back Connectors for location). The
Status LED on the front turns orange and your
LCD TV is ready to turn on.
2. Press the POWER button on the front of your
LCD TV or on your remote control. The Status
LED on the front turns green.

Chapter 5 Getting Started
24
WARNING! If you will be away for an extended period of time, turn off your
LCD TV with the Main Power switch instead of using the remote
control or front POWER button. For added protection during a
lightning storm or when it is left unattended or unused for long
periods of time, unplug your LCD TV from the wall outlet and
disconnect the antenna or cable system.
Chapter 6 Adjusting Settings
25
25
6 ADJUSTING SETTINGS
6-1 Basic Operations
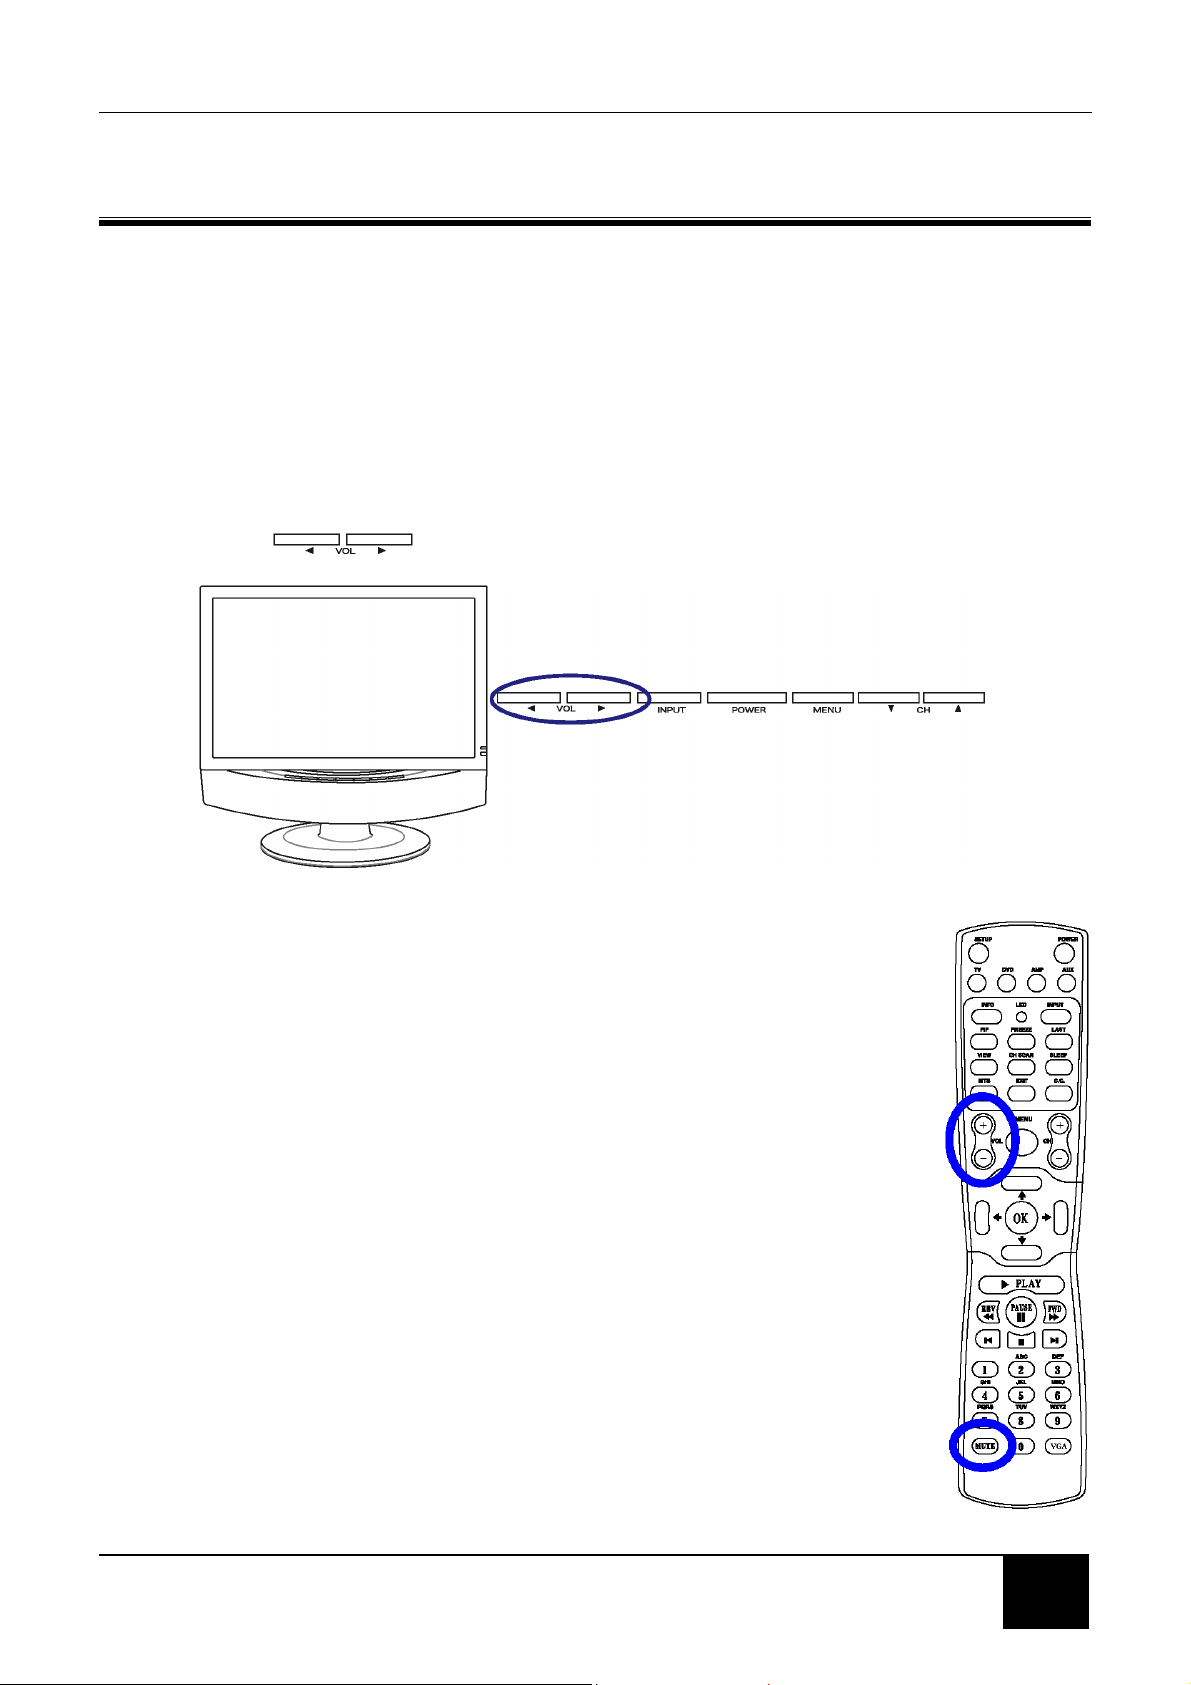
6-1-1 ADJUSTING THE VOLUME
You can adjust the volume in two ways - from your LCD TV’s front panel or by using
the remote control.
To adjust volume from the front panel:
Press to increase/decrease the sound level.
TO ADJUST VOLUME FROM THE REMOTE
Press the VOL buttons (see illustration for location) to turn up or
turn down the volume.
TO TEMPORARILY TURN OFF VOLUME (MUTE)
Press the MUTE button on the remote control.
TO TURN VOLUME BACK ON
Press the MUTE button again or press the VOL+ button.
Chapter 6 Adjusting Settings
26
6-1-2 SELECTING CHANNELS
TO SELECT CHANNELS FROM THE LCD TV
Press CH to select channel
TO SELECT CHANNELS FROM THE REMOTE
Press the +/- CH buttons (see illustration for location).
6-2 Using the On-screen Display (OSD)
Your LCD TV features an onscreen display (OSD) that lets you adjust and save
contrast, brightness, and other settings. All the function settings are accessible
either through the proper front display buttons or through the remote control. OSD
menus may be different depending on the current input source.
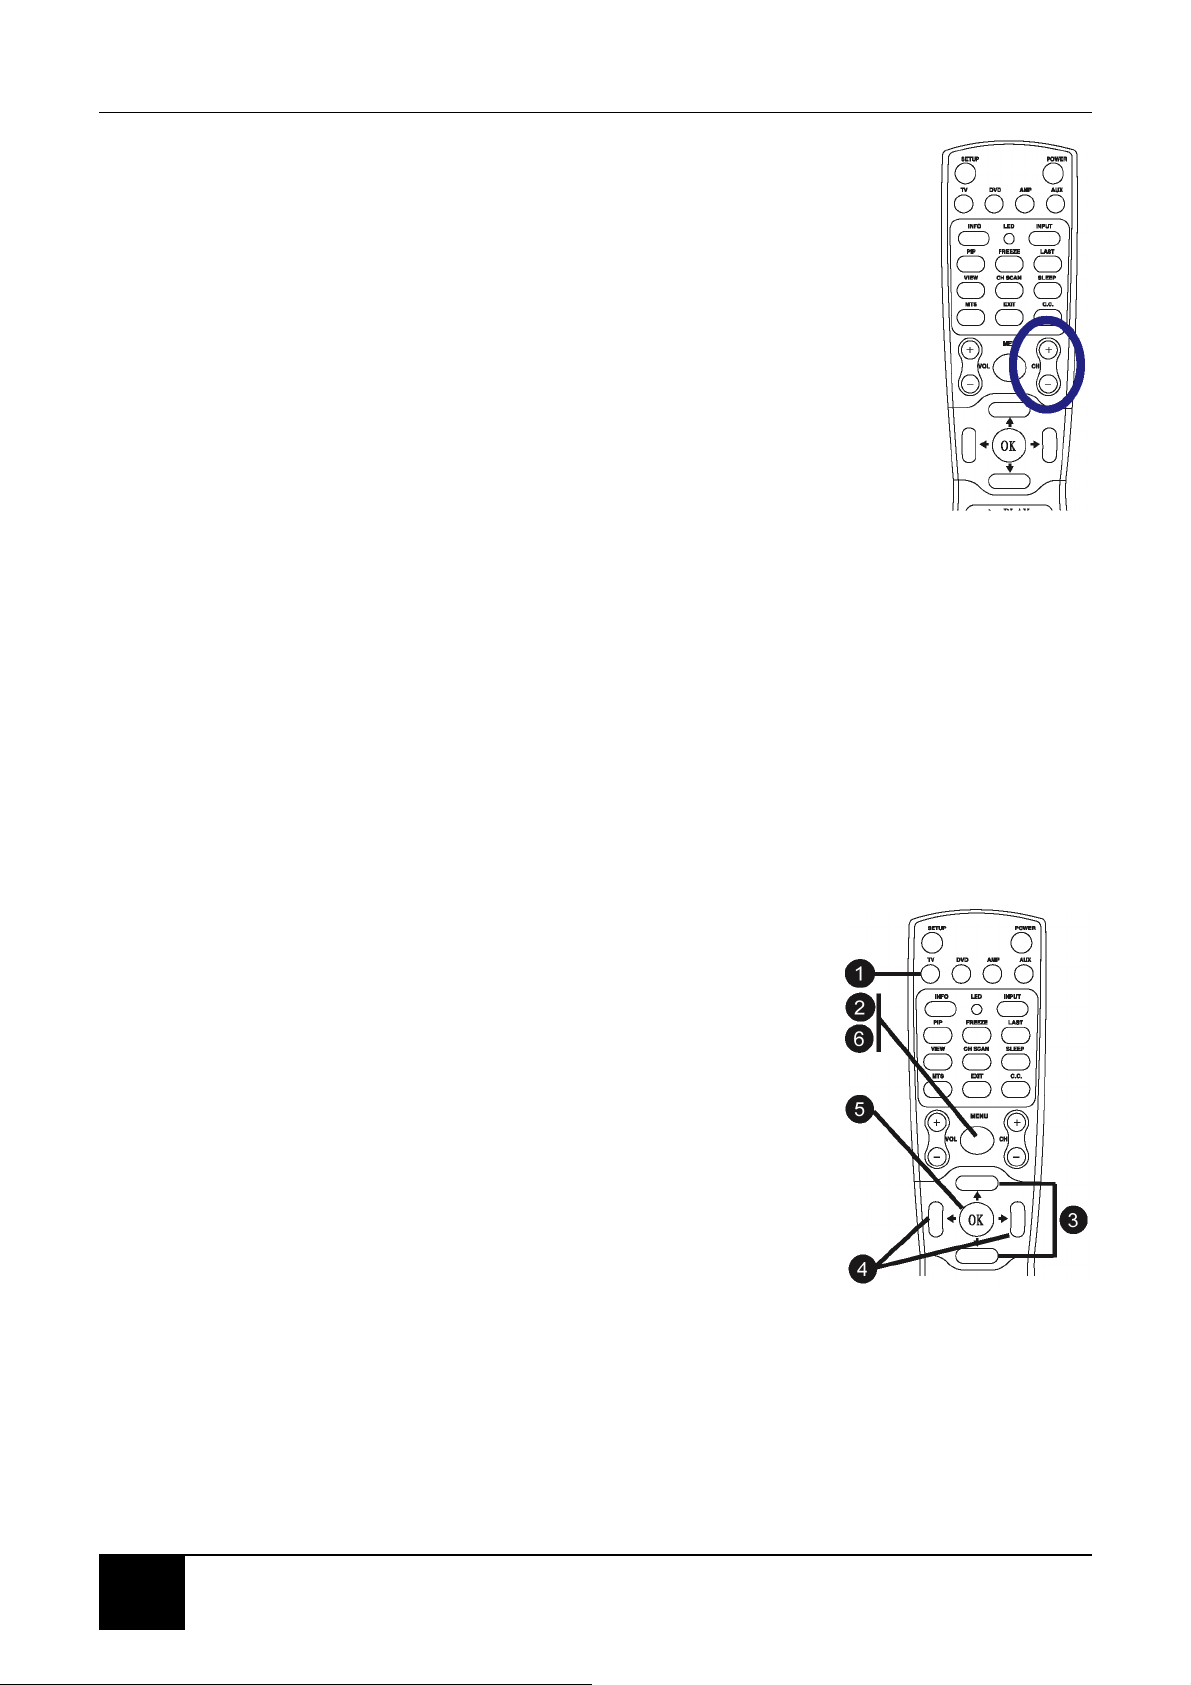
6-2-1 MAKING ADJUSTMENTS
You can access the OSD from either the front of your LCD TV display or from your
remote control.
1. With the power ON, press the TV button.
2. Press the MENU button to show the main menu.
3. Press the Navigation (UP/DOWN) buttons to
select one of the menu options.
4. Press OK on your remote control or the VOL
buttons on the front panel to access the submenu.
5. Press the Navigation (RIGHT/LEFT) buttons to
make adjustments.
6. Press the MENU button to return to the previous
menu option.
- OR -
Press the MENU button twice to close the OSD.
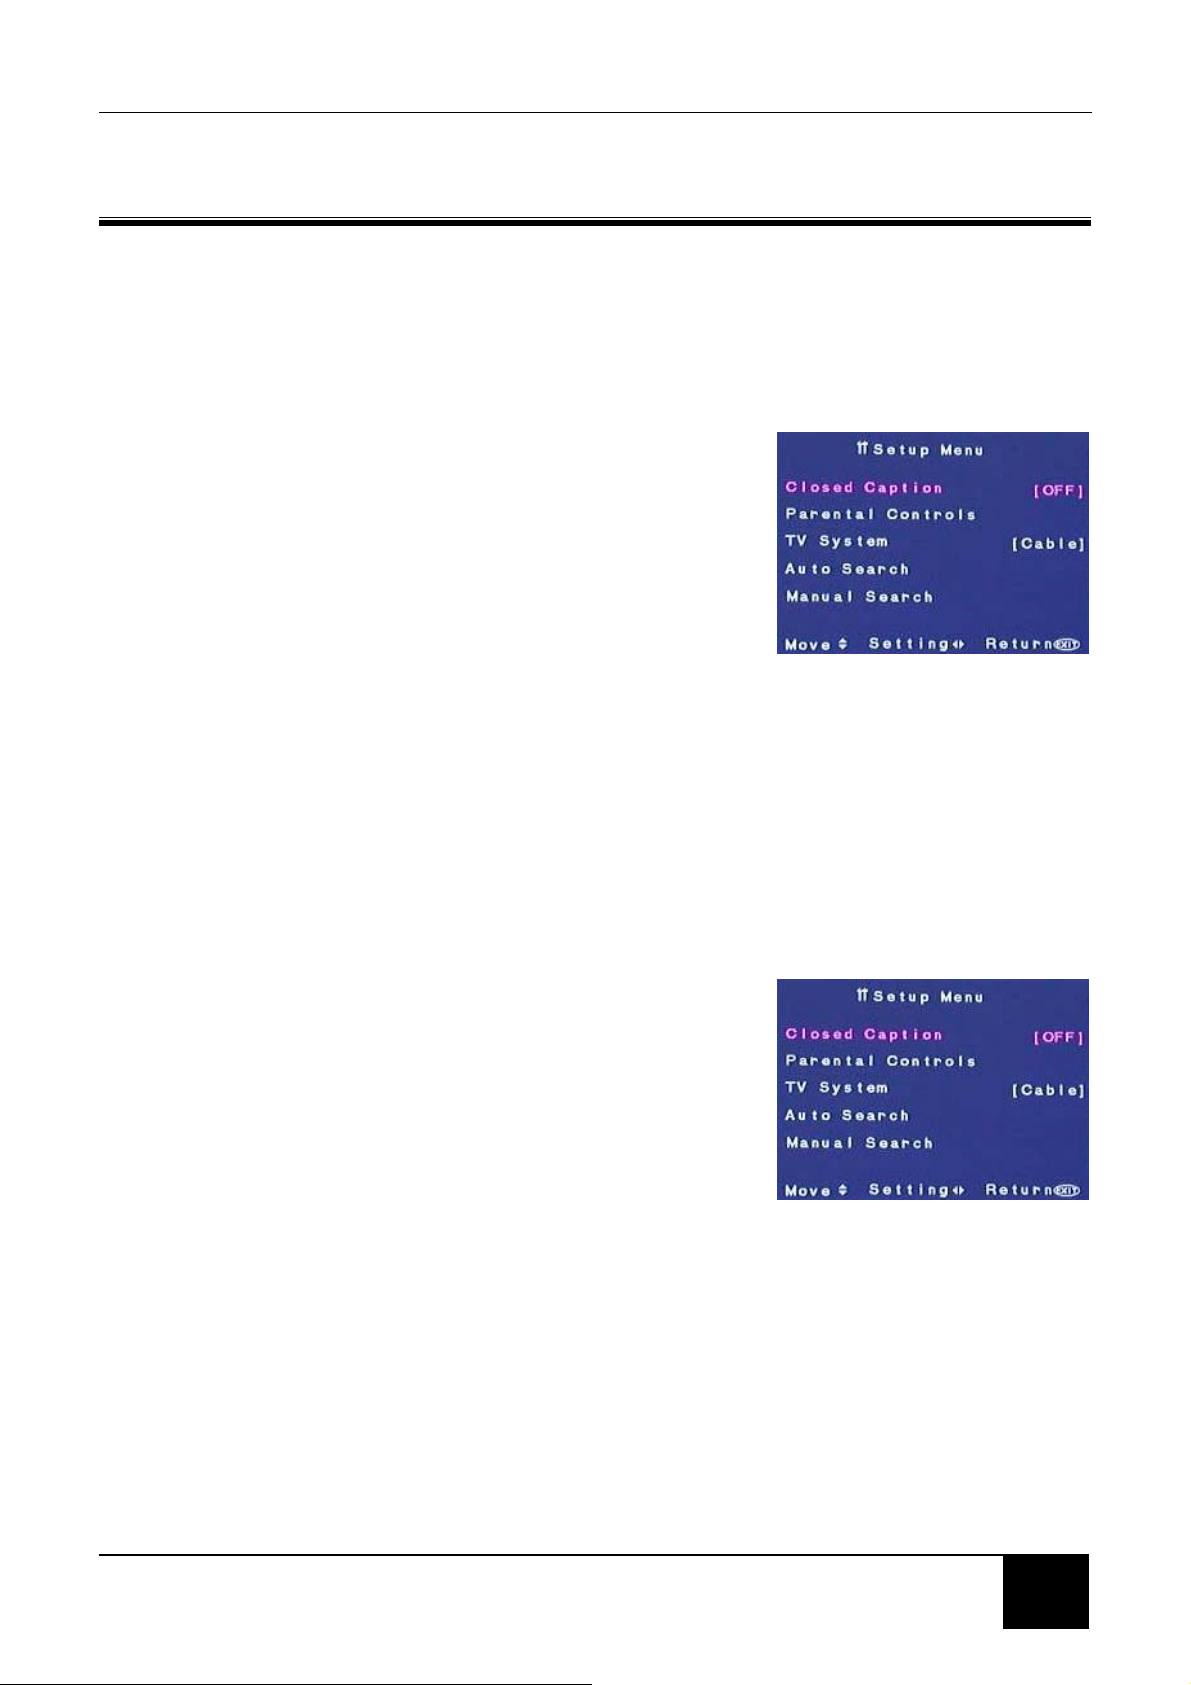
6-3 OSD Menus and Options
You can use these OSD menus and options to adjust various settings for your LCD
TV.

Chapter 6 Adjusting Settings
27
27
6-3-1 With Source Input Set to CATV, AV1/S1, AV2/S2, YPBPR
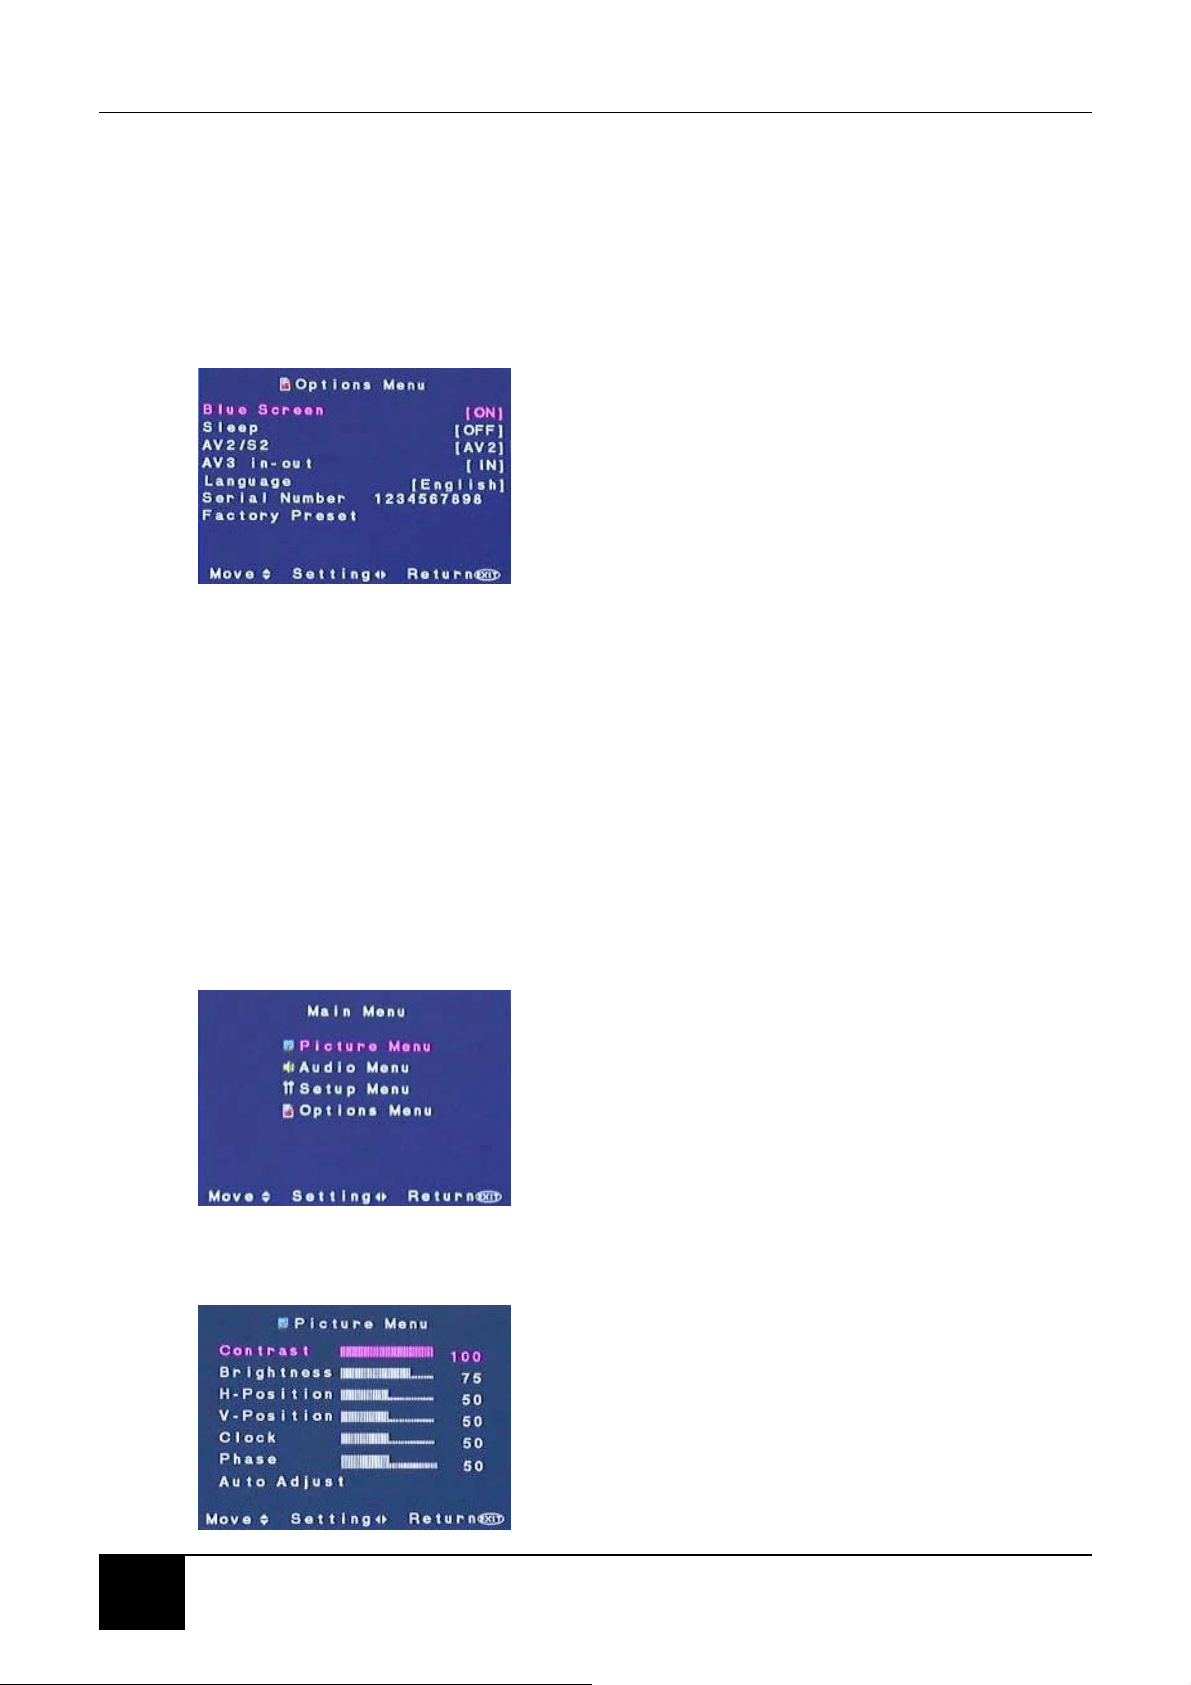
Picture Menu
Picture Menu
Contrast - Adjusts the contrast ratio.
Brightness - Adjusts the luminance of the image.
Color - Adjusts the color saturation, making colors
more or less intense.
Tint - Adjusts the color of flesh tones. Increasing
tint gives a more greenish tone while decreasing
tint gives a more reddish tone.
Sharpness - Adjusts the sharpness of the image.
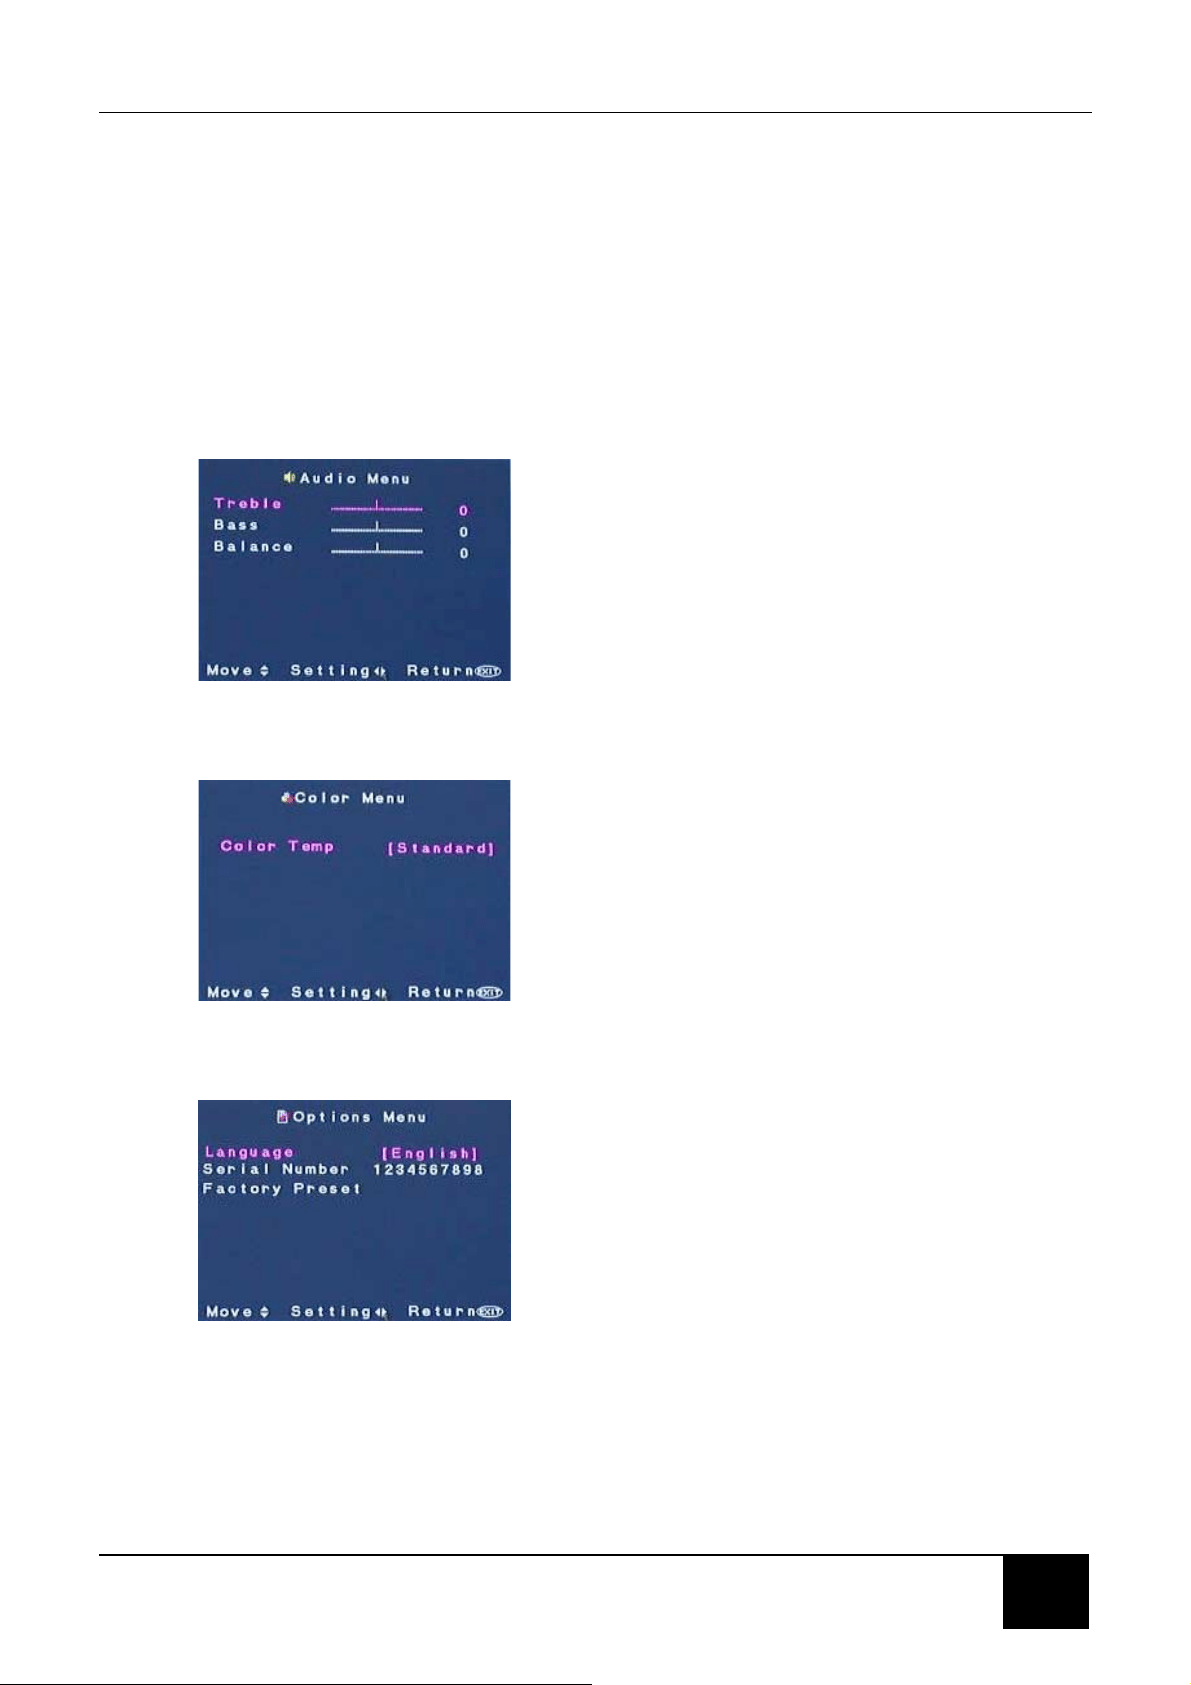
Audio Menu
Treble - Adjusts the treble value to enhance high
frequency sounds.
Bass - Adjusts the bass value to enhance the low
frequency sounds.
Balance - Adjusts the level of sounds between the
left and right speakers.
Setup Menu
Closed Caption - Turns captioning ON/ OFF and
selects the closed caption style.
Parental Controls - Activates parental controls.
This option is accessible only from the remote
control. NOTE: PIP is disabled when this option is
turned ON.
TV System - Sets the source for the tuner. If you
are using cable or a satellite dish, select Cable,
Chapter 6 Adjusting Settings
28
HRC, or IRC. If you are connected to an antenna, choose Air.
Auto Search - Select this option to add all channels that have a signal to the
channel list.
Manual Search - Select this option to add only certain channels to the channel list.
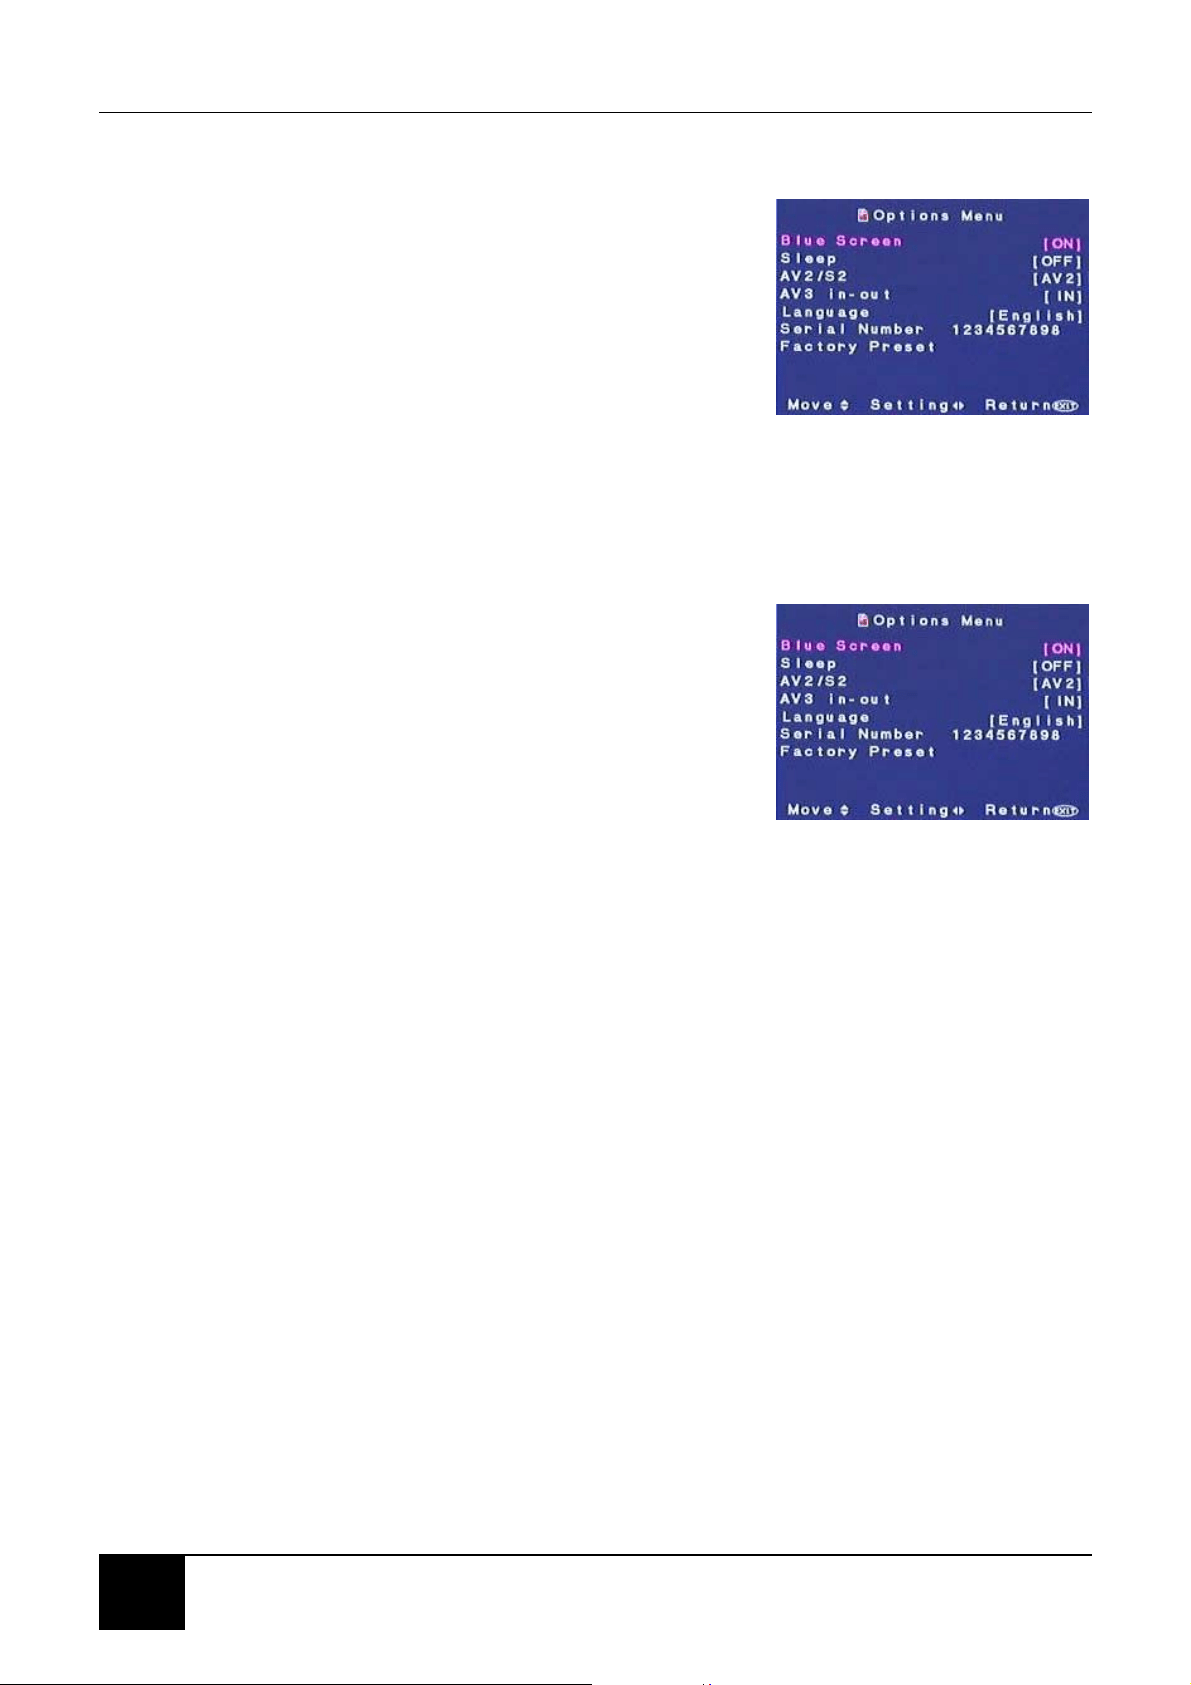
Options Menu
Blue Screen - With this option turned ON, your
LCD TV displays a blue screen when there is no
available signal.
Sleep - Turns the sleep timer ON/OFF. Select 30,
60, 90, or 120 minutes.
AV2/S2 - Selects the primary input mode for the
AV2 connection.
AV3 in-out - Sets AV3 connectors on the bottom front of your LCD TV as an AV in
or AV out connection.
Language - Changes the language of the OSD menu. Select between English,
French, or Spanish.
Serial Number - Displays your LCD TV’s serial number.
Factory Preset - Resets display settings to the factory default.
6-3-2 With Source Input Set to PC
Main Menu
Picture Menu
Contrast - Adjusts the contrast ratio.
Brightness - Adjusts the luminance of the image.
Auto Adjust - Automatically adjusts to the best
image position, as well as the best clock and phase
settings.
H-Position - Adjusts the horizontal position of the
image.
Chapter 6 Adjusting Settings
29
29
V-Position - Adjusts the vertical position of the image.
Clock - Adjusts your LCD TV to match the video input source. Used when patterns
appear.
Phase - Adjusts the picture to remove any noise such as, horizontal distortion, and
clears or sharpens the displayed characters.
NOTE: The Clock and Phase settings are only available when using the RGB
input.
Audio Menu
Treble - Adjusts the treble value to enhance high
frequency sounds.
Bass - Adjusts the bass value to enhance the low
frequency sounds.
Balance - Adjusts the level of sounds between the
left and right speakers.
Color Menu
Standard - Select to use standard or default color
setting.
Warm - Select for a more reddish tone.
Cold - Select for a more bluish tone.
Options Menu
Language - Changes the language of the OSD
menu. Select between English, French, or Spanish.
Serial Number - Displays your LCD TV’s serial
number.
Factory Preset - Resets display settings to the
factory default.

Chapter 6 Adjusting Settings
30
6-4 Choosing Your Language (LANGUAGE)
The LANGUAGE option enables you to select which language will be used for
displaying menus and indications.
1. Press the MENU button. The Main menu opens.
2. Press the Navigation (UP/DOWN) buttons to
select the Options submenu.
3. Press OK. The Options menu opens.
4. Use the Navigation (UP/DOWN) buttons to
highlight LANGUAGE and then press OK.
5. Use the Navigation (RIGHT/LEFT) buttons to
highlight the desired language.
6. When you are satisfied with your choice, press
EXIT to return to normal viewing.
6-5 Adjusting Picture Settings
Follow these steps to adjust your LCD TV image.
1. Press MENU to call up the on-screen display
(OSD) main menu.
2. Press the Navigation (UP/DOWN) buttons to
highlight Picture Menu.
3. Press the either one of the Navigation
(RIGHT/LEFT) buttons to make selection.
4. Press the Navigation (UP/DOWN) buttons to
select the option you want to adjust.
5. Press the Navigation (RIGHT/LEFT) buttons to
adjust the setting.
6. Press the Navigation (UP/DOWN) buttons to
select and adjust other picture settings.
7. Press MENU repeatedly until you exit out of the
OSD menus.
Source Input - TV/AV/SV/CS Source Input - PC
Chapter 7 Setting the Channels
31
31
7 Setting the Channel
7-1 Setting Channels Automatically (AUTO SEARCH)
Use this option to quickly add all channels that have a signal to the channel list.
TO ADD CHANNELS AUTOMATICALLY
1. Press the MENU button on the remote control to
open the OSD.
2. Press the Navigation (UP/DOWN) buttons to
select the Setup menu.
3. Press OK to open the menu.
4. Press the Navigation (UP/DOWN) buttons to
select AUTO SEARCH.
5. Press OK to start the auto scanning of channels.
6. Press EXIT to close the OSD.
7-2 Setting Channels Manually (MANUAL SEARCH)
Use this option to add certain channels to the channel list.
TO ADD CHANNELS MANUALLY
1. Press the MENU button on the remote control to
open the OSD.
2. Press the Navigation (UP/DOWN) buttons to
select the Setup menu.
3. Press OK to open the menu.
4. Press the Navigation (UP/DOWN) buttons to
select MANUAL SEARCH.
5. Press OK to select
6. Select the channel to add to the channel list.
7. Press the Navigation (RIGHT) to Add Channel.
8. Press EXIT to close the OSD.

Chapter 7 Setting the Channels
32
7-3 Removing Unwanted Channels (MANUAL SEARCH)
TO REMOVE CHANNELS
1. Press the MENU button on the remote control to
open the OSD.
2. Press the Navigation (UP/DOWN) buttons to
select the Setup menu.
3. Press OK to open the menu.
4. Press the Navigation (UP/DOWN) buttons to
select MANUAL SEARCH.
5. Press OK to select.
6. Select the channel you want to delete from the channel list.
7. Press the Navigation (LEFT) to Erase Channel.
8. Press EXIT to close the OSD.

Chapter8 Advanced Settings
33
33
8 ADVANCED SETTINGS
8-1 Setting the Sleep Timer
The sleep timer allows your LCD TV to automatically turn OFF after a given amount
of time. You can set the sleep timer using your remote control or through the
onscreen display (OSD).
TO SET THE SLEEP TIMER USING THE REMOTE CONTROL
1. Press the SLEEP button on the remote control.
The sleep timer appears at the top of your screen.
2. Press the SLEEP button one or more times to
select the time you want.
3. Press the EXIT button to hide the sleep timer
display. Your sleep timer is now running in the
background. The sleep timer will be hidden after
10 seconds.
TO TURN OFF THE SLEEP TIMER
Press the SLEEP button repeatedly until Sleep OFF
appears.
8-2 Blocking Channels
The parental controls feature prevents viewers from watching programs that are not
age-appropriate, such as programs containing violence or adult language.
The Status option in the OSD must be ON for parental controls to be in effect.
You can set parental control locks using:
MPAA (Motion Pictures Association of America)
TV Guidelines (TV Ratings)
Canadian English TV
Canadian French TV
IMPORTANT: PIP modes will not work when parental controls are turned on.

Chapter8 Advanced Settings
34
TO SET THE PARENTAL CONTROLS FOR MOVIES
1. Press the MENU button on the remote control to
open the OSD.
2. Press the Navigation (UP/DOWN) buttons to
select the Setup menu.
3. Press OK to open the menu.
4. Press the Navigation (UP/DOWN) buttons to
select the Parental Controls submenu.
5. Press OK to open the submenu.
6. Use the number pad to enter your password if prompted. If you have not set a
password, enter 0000. For more information about setting a password, see 8-3
Setting a Password.
7. Press the Navigation (UP/DOWN) buttons to select the MPAA option.
8. Press OK to open the option menu.
9. Press the Navigation (UP/DOWN) buttons to select each option, then press the
Navigation (RIGHT/LEFT) buttons to select BLOCK or UNBLOCK.
This option lets you block the following MPAA movie ratings:
G (general audience)
PG (parental guidance suggested)
PG-13 (recommended for children 13 years of age and older)
R (mature audience)
NC-17 (no one under 17 years of age)
X (no one under 17 years of age)
10. Press EXIT when you are finished making changes to this option.
8-3 Setting a Password
You control access to the parental controls with a password. The default password
is 0000. You can change the password to any four-digit number.
TO SET OR CHANGE A PASSWORD
1. Press the MENU button on the remote control to
open the OSD.
2. Press the Navigation (UP/DOWN) buttons to
select the Setup menu.
3. Press OK to open the menu.
4. Press the Navigation (UP/DOWN) buttons to
select Parental Controls.

Chapter8 Advanced Settings
35
35
5. Press OK to open the submenu.
6. Use the number pad to enter your password if prompted.
If you have not set a password, enter 0000. If you have forgotten your password,
press the front panel VOL X and CH S buttons at the same time and hold for
two seconds, then enter a new password.
7. Use the Navigation (UP/DOWN) buttons to select the Change Password
submenu.
8. Press OK to change the settings.
9. Use the number button pad to enter a new four-digit password when prompted.
10. Re-enter the new four-digit password.
11. Press EXIT to close the OSD.
8-4 Displaying Closed Caption Subtitles
Designed to help the hearing-impaired, Closed Captioning (C.C.) displays on
screen the voice content of TV programs.
TO TURN ON CLOSED CAPTIONING
1. Press the MENU button on the remote control to
open the OSD.
2. Press the Navigation (UP/DOWN) buttons to
select the Setup menu.
3. Press OK to open the menu.
4. Press the Navigation (UP/DOWN) buttons to
select Closed Caption.
5. Press OK to open the submenu.
6. Use the Navigation (RIGHT/LEFT) buttons to select Closed Caption setting.
7. Press OK to change the settings.
8. Press EXIT to close the OSD.
NOTE: Not all programs are broadcast with Closed Captioning. For a
listing of stations and show times with Closed Captioning, refer to
your local TV program listing.
Chapter8 Advanced Settings
36
8-5 Displaying the Serial Number
1. Press the MENU button on the remote control to
open the OSD.
2. Press the Navigation (UP/DOWN) buttons to
select the Options menu.
3. Press OK to open the menu.
4. The serial number is displayed on screen.
5. Press EXIT to close the OSD.
8-6 Resetting to Factory Settings
To reset to the default factory settings, follow these steps.
1. Press the MENU button on the remote control to
open the OSD.
2. Press the Navigation (UP/DOWN) buttons to
select the Options menu.
3. Press OK to open the menu.
4. Press the Navigation (UP/DOWN) buttons to
select Factory Preset.
5. Press OK.
6. Press EXIT to close the OSD.

Chapter8 Advanced Settings
37
37
9 PROGRAMMING THE REMOTE CONTROL
The TV device button has been preset to work with your LCD TV. You can program
the remote control to work with as may as seven other devices (VCR, DVD player,
satellite, etc).
9-1 Programming to Control Other Devices
TO PROGRAM TO CONTROL OTHER DEVICES
1. Turn ON the device that you want to program the remote to control.
2. On the remote control, hold down the SETUP button and press the
corresponding device button until the LED lights and stays on.
3. Enter the three-digit programming code for the device and manufacturer. For a
list of device programming codes, see 9-2 Device Program Codes. If the code
is accepted, the LED turns OFF. If the LED does not turn OFF, repeat steps 2
and 3 with the next code listed for the device and manufacturer.
NOTE: Many devices have more than one code listed. For these, start with the
first code, if that doesn't work, try the second and so on. Make sure that you try
all the codes listed until you find the one that works for the device.
4. Point the remote control at the device and press POWER. The device should
turn off.
9-2 Device Program Codes
The following is a list of device codes to be used when manually programming your
remote control. You may have to try several of the codes for each brand before
finding a code that works with your device.

Chapter 9 Programming the Remote Control
38
VCR
American high 007
Admiral 019
Adventura 059
Aiko 044
Aiwa 009,046,059,067,068
Akai 013,021,022,030,069
Amstrad 070
Asha 042
Audiovox 009
Beaumark 042
Bell & Howell 029
Broksonic 001,033,035,038,045,049,071
Calix 009
Canon 007
Capehart 003
Carver 028
CCE 027,044
Cineral 044
Citizen 009,044
Colt 027
Craig 009,018,027,042,043
Curtis Mathes 007,013,034
Daewoo 003,016,044,051
Daytron 003
Denon 014
Dynatech 059
Electrophonic 009
Electrohome 009
Emerex 004
Emerson 001,008,009,015,021,022,026,033
035,037,038,040,044,045,049,051
059,071
Fisher 018,020,024,029
Fuji 005,007
Funai 059,070
Garrard 059,070
GE 007,019,036,042
Goldstar 009,010
Go Video 047,050,072,073
Gradiente 002,059
Harley Davidson 059
Harman/Kardon 010,028
Harwood 026,027
Headguarter 017
HI-Q 018
Hitachi 013,014,030,059
Jensen 013
JVC 002,013,025
KEC 009,044
Kenwood 010,013,017,025
KLH 027
Kodak 007,009
Logik 027
Lloyd’s 037,059
LXI 009
Magnasonic 044,052
Magnavox 007,011,028,032,059
Magin 042
Marantz 007,010,028
Marta 009
MEI 007
Matsushita 007,034,048
Memorex 007,009,011,017,018,019,029,042
046,053,056,057,059
MGA 015,021,022,042
MGN technology 042
Minolta 014,030
Mitsubishi 015,019,021,022,025,074,075
Motorola 007,019
MTC 042,059
Multitech 027,059
NAP 005,006,007,009,011,014,024,030
NEC 010,012,013,025,029
Nikko 009
Nikon 006
Noblex 042
Olympus 007
Optimus 009,019,029,034,047,048,052,054
055,056,057
Optonica 023
Orion 001,035,045,049
Panasonic 007,034,041,048,056
Penney 007,009,010,012,014,020,042
Pentax 014,030
Philco 007,038
Philips 023,028,032
Pilot 009
Pioneer 025
Portland 003
Profitronic 042
Proscan 036
Protec 027
Pulsar 011
Quasar 007,034,048,056

Chapter8 Advanced Settings
39
39
Quarter 017
Quartz 017
Radio Shack 053,059
Randex 009
RCA 007,014,019,030,031,036,042
Realistic 007,009,017,018,
019,023,024,029,059
Ricon 006
Ridix 009
Runco 011
Samsung 016,042
Sanky 011,019
Sansui 013,025,043,049,059
Sanyo 017,018,029,042
Scott 015,016,033,035,039,040
Sears 007,009,014,017,018,020,024,029
030,059
Semp 016
Sharp 019,023
Shintom 027
Shogun 042
Signature 007
Singer 027
Sony 004,006,007,059
STS 014
Sylvania 007,015,028,032,059
Symphonic 052,059,070
Tatung 013
Teac 013,059
Technics 007,011,034,036
Technika 007,009,059
Thomas 059
TMK 008,037,042
Toshiba 015,016,024,039,040
Totevision 009,042
Unitech 042
Vector 016
Vector research 010,012
Vediosonic 042
Video Concepts 012,016,021,022
Wards 007,014,016,018,019,
023,027,028,040,
042,059
White Westinghouse 044
XR-1000 007,027,059
Yamaha 010,013
Zenith 005,006,011,049,059
Some models 060,061,062,063,064,065,066
SAT.
Aifa 190
Aiko 184
Alfa gold 177
Alphastar 078,124
Best 148
Channel Master 046,062
Chaparral 049,060,062,063,098,114
Citoh 125
Digital satellite TV 179,180,181,182
Drake 046,050,102,065,106,
108,115,118,121
169,170
Drake satellite 139,140,141
Dx Antenn 047
DX Communications 116
Echostar 055,057,066,099,079,
111,149,153,156
157,158,159,160,163,164,165
Equus 110
Eurostar 166
Expressvu 079
Fortec star 175,176
Fujitsu 095
General Instrument 068,091,092,093,117,126,127
Hitachi 081,261
Homecable 064
HTS 079,112
Hughes Network Sys. 077
Hughes satellite 261
Instrument 072
Intersat 113
IQ 061
IQ Prism 061
Janeil 056,095
Jerrold 068,072
JVC 079
Kenwood 096
Legend 066,099
Macom 046,089,093,126
Macom satellite 138
Magnavox 075,076
Memorex 066,076
Micro formula 171
Mina 167
Mitsubishi 168
Orb 104

Chapter 9 Programming the Remote Control
40
Orbit 162
Pace 189
Panasonic 056,074,088
Pansat 101,120,151
Panaset 187
Pbi 171
Philips 059,075,076,174
President 051
Primester 068,072,150
Prosat 145
Proscan 071
Quick draw 116
Radio Shack 091,092,071
RCA 054,070,071,082,143,183
RCA DSS 263,264,265
RC-AK 152
Realistic 052
Rural cable 091
Samsung 124,155
Scientific Atlanta 146,183
Signal super LT 930 154
Skardin 191,192,193
Sony 073
Star Trak 058,094,122,123,128
STS 047,061
STS satellite 137
Space TV 173
Sun Moon Star 188
Superguige 097,105
Tadiran 185
Technosat 163
Tedelex 161
Toshiba 053,138
Tosonic 080
Uniden 048,051,052,064,069,
075,076,090,097
099,107,109
United satellite 134,136
Veccom 171
Video pall 095
Viewstar 119
Vortec 178
Winner 144,147
Zenith 050,065,083,095,138
Zenith satellite 133,139,140,141
Some models 142,172
Cable
ABC 001,003,004,005,
006,008,009,011
194,195,246
Aeon 228
Aifa 240,251,253,255
Aikotec 267,268
Allegro 026,034
Antena 266
Antronix 015,028
APO 221
Archer 015,026,028,044
Asia 247
Asiagiant-777 233
Atlanta 005,011,038,250,254
Belcor 022
Bell & Howell 009
Best 197
Cable star 022
Cabletenna 015
Cableview 015
Century 026,241
Citizen 026,034
Colour voice 017,019
Comtronics 021
Contec 012
Cs-100 218
Digi 043
Eastern 002,207,208,209,210,227,234
Emerson 044
Everquest 010,021
Focus 035
Garrard 026
GC Electronics 022,028
Gemini 010
G.I 006,032,037,129,130,
131,257,258
259,260
GMI 198,219,229,231,232
Golden 248
Goldstar 021,025
Goodmind 044
Hamlin 013,020,031,086
Hitachi 006
Hytex 004
IEEC 206,215,216,217,239
IMC 256

Chapter8 Advanced Settings
41
41
Jasco 010,026,034
JEBSEE 223
Jerrold 003,006,007,009,010,032,037,129
130,131,196,237,238,245,262
KOKA 202,205
LEON 198,219
Magnasonic 018
Magnavox 009,018
Mechanics 035
Memorex 085
Movie Time 023
NAP 004
Novaplex 042
NSC 023
OAK 004,012
OAK Sigma 500 200
Optimus 014
Panasonic 014,024,085
Panther 043,244
Paragon 085,243,249
Philips 017,018,019,026
Pioneer 016,025,041
Popular 035
Proscan 014
Pulsar 085
Radio Shack 010,034,044,045
RCA 014
Realistic 028
Recoton 035
Regal 013,031
Regency 002
Rembrandt 006
Runco 085
Samsung 021,025
Scientific Atlanta 132,252
Seam 039
Sg 211
Signal 010,021
Signature 006
Skygiant 212,213,214
SL Marx 021
Sprucer 014
Starcom 003,010
Stargate 021,044
Starquest 010
Sylvania 001
TADA 199,236
Taicom 202,220
Tandy 030
Tay Shoen 222,225
Teleview 021
Texscan 001
TFC 033
Timeless 036
Tocom 007,008
Toshiba 085
Trans 224,226,230,235,242
Tusa 010
TV86 023
Unika 015,026,028
United artists 004
Universal 015,022,026,027,028
Videoway 029
Viewstar 018,023,030
Winer 201
WISO 203,204
Zenith 005,010,028,040,085
Zentek 035
DVD
Harman/Kardon 010
JVC 007
Kenwood 005
Magnavox 001
Mitsubishi 002
Onkyo 001
Optimus 003
Philips 001
Pioneer 003,008
Samsung 009
Sony 004
Toshiba 001
Yamaha 006
Zenith 001,011
LD
Aiwa 019
Carver 014,017,022
Denon 013,015
Disco vision 012
Funai 019
Harman/Kardon 017
Hitachi 012

Chapter 9 Programming the Remote Control
42
Magnavox 017,021
Marantz 014,017
Mitsubishi 013
NAD 013
Panasonic 020
Philips 014,017
Pioneer 012
Quasar 020
Realistic 019
Samsung 022
Sega 012
Sony 016,018
Technics 020
Theta digital 017
Yamaha 021
Zenith 017
CD
ADC 027
Adcom 044,061
Aiwa 026,041,046
Akai 045
Audio Alchemy 057
Audio-Techica 048
BSR 057,063
Burmester 073
California Audio Labs 029
Carrera 057
Carver 046,052,076
Crown 040
Curtis Mathes 029
DAK 063
DBX 064
Demon 024
Denon 090
DKK 023
Emerson 044,047,068,079
Fisher 037,052,069
Garrard 063,065,071,073,074
GE 025
Genexxa 030,047,068
Goldstar 072
Harman/Kardon 046,049,075
Hitachi 030,044
JVC 035
Kenwood 028,032,056,084,087
Kodak 066
Krell 046
Kyocare 027
Linn 046
Luxman 038
LXI 068
Magnavox 046,068
Magnavox CD-R 083
Marantz 029,046,053
Mclntosh 066
MCS 029,033
Mission 046
MTC 073
Nakamichi 043
NEC 033,061
Nikko 047,048
NSM 046
Onkyo 039,089
Optimus 023,030,032,036,042,
051,052,057,058
065,068,069,073,075,076,078
Panasonic 029,067,070,085
Paramount Pict 211
Parasound 057,073
Philips 046,066,083
Pioneer 030,062,068,078
Proscan 034
Proton 046
QED 046
Quasar 029
RCA 025,034,044,052,068,086
Realistic 044,047,051,052,053,073
Rotel 046,073
SAE 046
Sansui 046,059,068
Sanyo 036,052
Scott 044,047,068
Sears 068
Sharp 032,053,088
Sony 023
AMP
Aiwa 110
Bose 113
Carver 102
Curtis Mathes 103
Denon 096
GE 093

Chapter8 Advanced Settings
43
43
JVC 106
Kenwood 107,108
Linn 102
Luxman 097
Magnavox 102
Marantz 102,105
Nakamichi 105
NEC 101
Optimus 109
Panasonic 104
Parasound 100
Philips 102
Pioneer 092,103
Realistic 109
Sansui 091,105
Shure 101
Sony 099
Soundesign 093,098
Technics 104,112
Victor 106
Wards 092,093,098
Yamaha 094,095,107,111
TUNER
ADC 163
Adcom 164
Aiwa 128,132,139,156
Akai 123,143
Archer 203
Capetronic 163
Carver 115,119,139,153
Curtis Mathes 118,124
Denon 114,145,168
Emerson 157
Fisher 119,142,153,169
Garrard 157,158
Harman/Kardon 127,139
Inkel 121
JBL 127
JVC 122
Kenwood 117,119,123,138,147,148
Kodak 066
Krell 046
Kyocare 027
Linn 139
LXI 137
Magnavox 129,139,155,163
Marantz 118,129,139
MCS 118,151
NAD 149
Nakamichi 125,152
NEC 144
Onkyo 126,130,154
Optimus 119,124,136,137,138,
142,163,166,167,169
Panasonic 118,146,161
Philips 139,155
Pioneer 116,124,131,163,165
Proscan 120
Quasar 118
RCA 120,151,153,162,163
Realistic 133,137
Sansui 139,151
Sanyo 141,169
Scott 133,150
Sharp 138
Sherwood 121,159,160
Siemens 157
Sony 132,134
Soundesign 166
Teac 133,158
Technics 118,141,146,161
Victor 122
Wards 116,119,120,124,132,139
Yamaha 135,138
Zenith 170
CASSETTE DECK
Aiwa 183,184
Akai 191
Denon 176
Fisher 175
Garrard 193,195
JVC 188,189
Kenwood 173,174
Marantz 171
Mitsubishi 191
Onkyo 179,180,190
Optimus 172,185,194,195
Pioneer 172
Sansui 171
Sherwood 194
Sony 181,187,192
Teac 193

Chapter 9 Programming the Remote Control
44
Technics 186
Victor 189
Wards 172
Yamaha 177,178
HOME AUTOMATION
GE 197
Lite Touch 196
Radio Shack 197
TAPE
Carver 200
Denon 198
Harman/Kardon 200
Magnavox 200
Marantz 200
Philips 200
Sony 199
TURNTABLE
Aiwa 201
Carver 201
Magnavox 201
Marantz 201
Philips 201
Sony 202
VIDEO
Archer 203
GC Electronics 203
Jebsee 203
Radio Shack 203
Sony Web-TV 205
TeleCaption 204
AUDIO
Aiwa 206,210,213
Fisher 207
Harman/Kardon 215
JBL 215
JVC 209
Nikko 212
Panasonic 216
Paramount Pict 211
Philips 215,217
Polytek 218
RCA 208
Schneider 212
Scientific Atlanta 214
Sony 206,210
Soundesign 212
SSI 211

45
45
TROUBLESHOOTING AND SUPPORT
Before contacting customer service, use the following information to solve common
problems.
No Picture
Make sure that the power cord is properly plugged into a grounded electrical
outlet.
Make sure that the main power switch and power button are turned ON.
Make sure that the selected video input source is connected to a working compo-
nent.
If your LCD TV is connected to your computer in VGA mode, press any key on
your keyboard to wake up your computer.
No Sound
Try pressing the MUTE button.
Make sure that the headphones are not connected.
Check MTS settings under the OSD Audio menu.
Distorted Picture or Unusual Sounds
You may be getting interference from electrical appliances, cars, motorcycles, or
fluorescent lights. Try moving your LCD TV to another location.
Abnormal Colors
Make sure that the input source cable is connected securely and correctly to your
LCD TV.
Abnormal Patterns
Make sure that the input source cable is attached securely and correctly.
Make sure that the video input source is within the range of your LCD TV.
Compare the video input source’s specifications with your LCD TV’s
specifications.
Wrong Image Size
If you are using DVI-D or VGA mode, make sure that the H-Position and V-Position
in the OSD is set correctly.

46
Normal Picture, No Sound
Make sure that the volume is not turned down.
Make sure that the sound is not muted.
Make sure that your audio input source cables are connected securely and
correctly.
Pixel Problems
Your LCD TV is manufactured using an extremely high level of precision technology.
However, sometimes some pixels of your LCD TV may not display correctly. Pixel
defects within industry specifications are inherent to this type of product and do not
constitute a defective product.
Screen Noise
When your LCD TV’s digital capabilities exceed a digital broadcast signal, the
signal is up-converted (increased) to match your LCD TV’s display capabilities.
Up-converting can cause noise or trash.
The signal on DVI-D is HDCP encoded. Stop and restart the source.
Dim Screen
Video display devices experience degradation of brightness over the life of the
device. Normal brightness degradation is not covered by your warranty.
Remote Control Not Working
Make sure that the batteries are inserted correctly.
Make sure the remote control sensor window is not under strong lighting.
Insignia Support
If this troubleshooting information does not resolve your problem or if you have
other questions relating to your LCD TV, please visit our website at
www.insigniaproducts.com, visit your Best Buy store or call 1-877-467-4289.