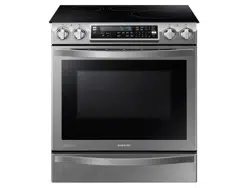
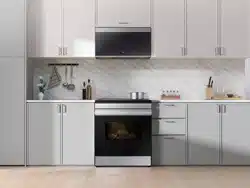
User manual Electric Range
Getting Started
SETTING THE CLOCK
The Clock must be set to the correct time of day for the automatic oven timing functions to work properly.
- The time of day cannot be changed during a timed cooking, a delay-timed cooking, or a self-cleaning cycle.
- You can choose between a 12-hour or 24-hour display. The default is 12-hour.
How to set the clock
- Start the set up. Press Clock.
- Press Clock to select AM or PM. (Skip this step on 24 hour display setting.)
- Enter the current time in hours and minutes on the number pad. eg. 1,3,0 for 1:30
- Press Clock or START SET to save the changes.
CONTROL PANEL DISPLAY MODES
Sleep Mode
Your control panel will remain in a sleep mode when not in use. Only the clock will display. You will need to wake the control panel to begin any function.
Wake Mode
To wake the control panel, touch the wake-up key. After 2 minutes without activity (or one minute when the oven is operating in standby mode), the control panel will return to Sleep mode. User preferences are available in this mode as well as timers, the oven light, and the control lock.
TURNING THE OVEN LIGHT ON AND OFF
- The oven light turns on automatically when the door is opened.
- The oven light turns off automatically when the door is closed.
- You can turn the oven light on and off manually by pressing Oven Light.
CONTROL LOCKOUT
Control lockout lets you lock the buttons on the touch pad so they cannot be activated accidentally.
Control lockout is only activated in standby mode.
How to activate the control lockout feature
1. Press Control Lock (3 sec) for 3 seconds.
The display will show “Loc” and the Lock icon continuously, as well as the current time.
All functions must be cancelled before Control lockout is activated.
This function is available only when the oven temperature is under 400 °F.
How to unlock the controls
1. Press Control Lock (3 sec) for 3 seconds.
“Loc” and the Lock icon will disappear from the display
SETTING THE KITCHEN TIMER
The timer counts down elapsed time and will beep when the time you set has elapsed. It does not start or stop cooking functions. You can use the kitchen timer with any of the other oven functions.
How to set the timer
1. Turn the timer on. Press Timer1 On/Off (Timer2 On/Off).
2. Enter the amount of time you want. Enter the amount of time you want using the number pad, eg. 1, 5. The timer can be set for any amount of time from 1 minute to 9 hours and 99 minutes. If you make a mistake, press Clear and enter the amount of time again.
3. Start the timer. Press Timer1 On/Off (Timer2 On/Off) or START SET.
4. When the set time has elapsed, the oven will beep and the display will show End until you press the pad. You can cancel the timer at any time by pressing Timer1 On/Off (Timer2 On/Off).
Induction Cooktop Cooking
HOW TO SET THE APPLIANCE FOR COOKTOP COOKING
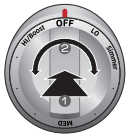
Induction cooktop control knob
1. Push the knob in.
2. Turn in either direction to the setting you want.
3. The digital displays will show " -
-  ", "
", " " or "
 ".
".
- Move the Knob dial until the desired power level setting appears in the digital display.
- (Lo),
 (Simmer),
  to (Hi), (Boost) : The selected power level setting.
 Should one or more of the cooking zones switch off before the indicated time has elapsed, see the Troubleshooting section (page 84).
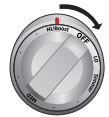
Induction power boost control
1. To use the Power boost setting, turn the control knob directly to "Hi/Boost" setting.
2. The digital displays will show "".
- The power boost function "Boost" makes additional power available to the induction cooking zone.
- Example: To bring a large volume of water to a boil. The power boost function is activated for a maximum of 10 minutes for each cooking zone. After Power Boost is finished, the cooking zones automatically return to power level "".
- If you turn the control knob to "Hi/Boost" via another power level, Induction cooking zone will be operated power level "". (Can not setting the Boost "", when you rotate the knob to left direction.)
- In certain circumstances, the Power boost function may be deactivated automatically to protect the internal electronic components of the induction element.
Induction simmer control
- To use the Power boost setting, turn the control knob “Simmer” setting.
- The digital displays will show "".
- The simmer controls "Simmer" are used to simmer and keep large quantities of foods warm such as stews and soup.
- The simmer settings of the small cooking zone are ideal for delicate foods and melting chocolate.

Virtual Flame Technology
Virtual flame technology creates the appearance of flames when you turn on an induction element.

- If the Virtual Flame option is set to On, virtual flames appear when you turn an induction control knob to an On position.
- As you turn the knob to adjust the power level, the color of the flames change. (If you select Power Boost, the flames bounce off the cookware.)
- The virtual flame may look different depending on the appearance, size, or position of the cookware. (For the best results, use cookware that matches the element size. Cookware that is too large can cover the virtual flame. Cookware that is too small can cause the virtual flame to be ill-formed.)
- Impurities on the cookware bottom or the cooktop surface can cause the virtual flame to be ill-formed or incomplete. Clean up the cookware or the cooktop surface before using them.
- To turn off the virtual flames, set the Virtual Flame option to Off in the Options menu. If the virtual flame function does not operate, check if the Virtual Flame option has been turned off in the Options menu. (See "Using the options function" on page 61.)
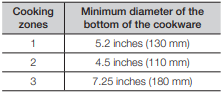
SIZE OF PANS
Induction cooking zones adapt automatically to the size of the bottom of the cookware up to a certain limit. However the magnetic part of the bottom of the cookware must have a minimum diameter depending upon the size of the cooking zone.

OPERATING NOISES
You may hear following operational noises:
- Cracking noises : A cracking noise can happen when you are using cookware which consists of two or more different materials.
- Whistling : A whistling noise occurs when both of back burners are in use. This is caused by vibration, and sounds will vary depending on weight, material of cookware or food. (Noise can be reduced by using thicker cookware.)
- Humming : A low humming sound can be heard on high power setting. This sound is generated by energy transmission, and it will disappear when cooktop is turned off.
- Clicking : Electric switches are operating.
- Hissing, Buzzing : A fan noise can be heard during cooktop/oven operation. You may continue to hear it even after cooktop/oven is turned off. This is normal in order to cool down the temperature inside. It will automatically shut off itself after a short period of time.
These noises are normal and do not indicate any defects.
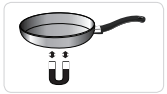
USING SUITABLE INDUCTION COOKWARE
Suitability test
Cookware is suitable for induction cooking if a magnet sticks to the bottom of the cookware and the cookware is labelled as suitable by the cookware manufacturer.
OPERATING THE OVEN
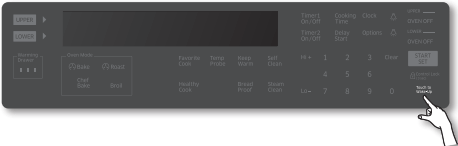
THE OVEN CONTROL PANEL
READ THE INSTRUCTIONS CAREFULLY BEFORE USING THE OVEN. For the best results, familiarize yourself with the various features and functions of the oven as described below. Detailed instructions for each feature and function follow later in this user manual.
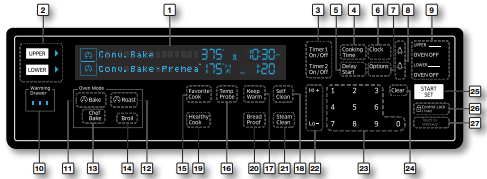
1. DISPLAY: Shows the time of day, oven temperature, whether the oven is in the chef bake, broil or self-cleaning mode, and the time set for the timer or automatic oven operations.
2. UPPER/LOWER: Use to activate the upper or lower oven for cooking operation.
3. Timer On/Off: Use to set or cancel the kitchen timer. The kitchen timer does not start or stop cooking.
4. Cooking Time: Press and then use the number pad to set the amount of time you want your food to cook. The oven will shut off when the cooking time has run out.
5. Delay Start: Press to set the oven to start and stop automatically at a time you set. (Chef bake, Conv.bake/Roast, Cooking Time, and self clean only.)
6. Clock: Use to set the time of day.
7. Options: Use to bring up the user preference menu in the display.
8. Lamp: Press to turn the oven light on or off.
9. Oven Off: Press to cancel all oven operations except the clock and timer.
10. Warming Drawer: Press to turn the warming drawer on or off. (Low, Mid, Hi)
11. Convection Bake: Use to select the Convection bake function of the oven.
12. Convection Roast: Use to select the Convection roast function of the single or upper oven.
13. Chef Bake: Use to select the chef bake function of the single or lower oven.
14. Broil: Use to select the broil function of the single or upper oven.
15. Favorite Cook: Use to save or recall a favorite cooking mode.
16. Temp Probe: Use to activate the temp probe mode.
17. Keep Warm: Use to select the keep warm function of the single oven to keep cooked foods warm.
18. Self Clean: Use to select the Self-cleaning function of the single oven.
19. Healthy Cook: Press to recall the healthy cook recipe setting of the oven.
20. Bread Proof: Use to select the Bread proof function.
21. Steam Clean: Use to select the steam cleaning function of the single oven.
22. Hi+/Lo-: Use to raise or lower the temperature and increase or decrease times.
23. Number Pad: Use to set any function requiring numbers such as the time of day on the clock, the timer, the oven temperature, the start time and length of operation for timed baking, etc.
24. Clear: Use to cancel previously entered temperature or times.
25. START SET: Use to start any cooking or cleaning function in the oven.
26. Control Lockout: Use to disable all oven functions.
27. Touch To Wake-Up: Press to activate buttons and functions on the display.
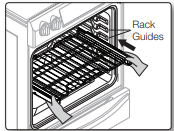
USING THE GLIDING RACK
The fully extendable Gliding Rack makes food preparation easier, especially when preparing heavier dishes. The Gliding Rack has 2 glide tracks that allow you to extend the rack well out of the oven without touching the sides of the oven walls.
Installing the Gliding rack
- With the Gliding rack in the “Closed” position and the oven off, carefully insert the Gliding Rack between the guides until the rack reaches the back.
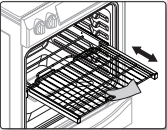
- When using the Gliding Rack in the oven, be sure to pull on the handle of the rack only to slide it in and out. If you grasp the frame while using the rack, the entire Gliding Rack will be removed.
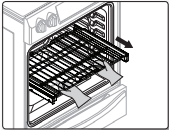
Removing the Gliding rack
- With the Sliding rack in the “Closed” position and the oven off and cool, grasp the rack and frame and pull both forward to remove.
CAUTION: Do not install the Gliding rack directly above the Flat rack and Recessed rack. You will not be able to install it properly and the rack could fall.
You can install the Gliding rack in any rack positions except the highest (level 7) and lowest (level 1) rack position in the oven.
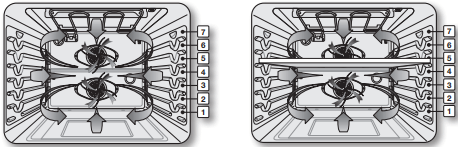
USING THE PARTITION
- To use Twin Mode operation, insert the partition.
- You cannot use the Self-Clean or Steam-Clean functions when the partition is installed in the oven cavity.
- Handle the partition with both hands.
- Use oven gloves when inserting or removing the partition.
To Install the Partition into the Oven Cavity
- Insert the partition into the 5th rack position of the cavity.
- Push the partition in until its back end rests against the back of the cavity.
- If the partition is installed correctly, the “-” icon appears on the display.

CAUTION: Range displays “-dE-”
• Check the partition to see if it is installed correctly
To Insert the Partition into the Partition Storage Location
- Open the warming drawer.
- Tilt the partition up slightly and rest it on the slides on either side of the storage location.
- Tip the partition down and push it in.

CHEF BAKING
Chef Baking mode is the traditional bake mode.
In Chef Bake mode, you can set the oven to any temperature from 175 °F to 550 °F.
Baking temperature and time will vary depending on the ingredients, size, and shape of the baking pan used.
Dark or nonstick coatings may cook food faster with more browning.
How to set the temperature
- To use Twin Mode, insert the Partition. If you are using Single Mode, skip Step 1 and go to Step 3.
- Press LOWER. (You can’t use this Chef Bake in the UPPER oven.)
- Press Chef Bake. The default temperature is 350 °F.
- Enter the temperature you want on the number pad eg. 3, 7, 5.
- Start the Chef Bake function. Press START SET. The temperature display will start to change once the oven temperature reaches 175 °F.
- If you want to cancel baking or if you have finished, press LOWER OVEN OFF. (Press OVEN OFF in single mode)
How to adjust the temperature while cooking
- Start the set up. Press Chef Bake. The display will show the present temperature, eg. 375 °F.
- Enter the temperature you want, eg. 425 °F, using the number pad.
- Complete the entry by pressing START SET. The process is the same in Twin Mode.
If you leave the oven door open for more than 2 minutes when the oven is on, all heating elements will shut off automatically
When you have finished cooking, the cooling fan will continue to run until the oven has cooled down.
For performance reasons, the convection fan may be turned on or off during the operation.
CONVECTION BAKING
By using the convection bake feature, you will be able to cook faster. You can program the oven for convection baking at any temperature between 175 °F and 550 °F.
When operating in Twin Mode, you can program the oven for convection baking at any temperature between 175 °F and 480 °F. The improved heat distribution allows for even cooking and excellent results using multiple racks at the same time. Foods cooked on a single oven rack will generally cook faster and more evenly with convection baking. Multiple oven rack cooking may slightly increase cook times for some foods, but the overall result is time saved. Breads and pastries brown more evenly.
Tip for convection baking (single mode)
The amount of time you save will vary depending on the amount and type of food you are cooking. When baking cookies or biscuits, you should use pans with no sides or very low sides to allow the heated air to circulate around the food. Using a pan with a dark finish will result in faster cooking times.
When using convection baking with a single rack, place the oven rack in position 4. If cooking on multiple racks, place the oven racks in positions 2 and 5 (when baking cookies) or 2 and 4 (when baking cakes).
How to set the oven for convection baking
1. To use Twin Mode, insert the Partition. If you are using Single Mode, skip Step 1 and go to Step 3.
2. Press UPPER or LOWER to select the partition you intend to cook in.
3. Press  Bake. The default temperature is 350 °F.
4. Enter the temperature you want, eg. 400 °F, using number pads.
5. Press START SET to begin convection baking.
The Conv.Bake icon and the adjusted oven temperature, eg. 400 °F, will appear in the display for 2 seconds.
The temperature display will start to change once the oven temperature reaches 175 °F.
A beep will sound 6 times when the oven reaches the adjusted oven temperature.
6. To turn off or cancel convection baking in Twin Mode, press UPPER OVEN OFF or LOWER OVEN OFF depending on the partition you want to turn OFF. In Single Mode, press OVEN OFF.
TIMED COOKING
In timed cooking, the oven turns on immediately and cooks for the length of time you select. At the end of the cooking time, the oven turns off automatically.
- You can use the cooking time feature only with another cooking operation (Chef Bake, Convection Bake, Convection Roast, Healthy Cook, or Favorite Cook).
How to set the oven for timed cooking
1. To use Twin Mode, insert the Partition. If you are using Single Mode, skip Step 1 and go to Step 3.
2. Press UPPER or LOWER to select the partition you intend to cook in.
3. Press the pad of the cooking operation you want, eg. CONV.BAKE. The default temperature is 350 °F.
4. Enter the temperature you want, eg. 375 °F, using the number pad.
5. Press Cooking Time.
6. Enter the cooking time you want, eg. 45 minutes, using the number pad. You can set the cooking time for any amount from 1 minute to 9 hours and 99 minutes.
7. Press START SET to begin cooking.
The temperature display will start to change once the oven temperature reaches 175 °F.
The oven will continue to cook until the set amount of time has elapsed, then turn off automatically unless the Keep Warm feature was set. (Refer to the section on the Keep Warm function on page 60.)
8. You can cancel timed cooking at any time by pressing OVEN OFF.
DELAY START
In delay start cooking, the oven’s timer turns the oven on and off at times you select in advance.
- You can use the delay start feature only with another cooking operation (Chef Bake, Convection Bake, Convection Roast, Healthy Cook, or Favorite Cook).
- You can set the oven for a delay start before setting other cooking operations.
- The clock must be set to the current time.
How to set the oven for delay start
1. To use Twin Mode, insert the Partition. If you are using Single Mode, skip Step 1 and go to Step 3.
2. Press UPPER or LOWER to select the partition you intend to cook in.
3. Press the pad of the cooking operation you want, eg. CONV.BAKE. The default temperature is 350 °F.
4. Use the number pad to enter the temperature you want, eg. 375 °F.
5. Press Cooking Time.
6. Enter the cooking time you want, eg. 45 minutes, using the number pad. You can set the cooking time for any amount of time from 1 minute to 9 hours and 99 minutes.
7. Press Delay Start.
8. Enter the time you want the oven to turn on, eg. 4:30, using the number pads.
9. Press START SET. At the set time, a short beep will sound. The oven will begin to bake. When the oven has reached the desired temperature, a long beep will sound 6 times.
USING THE KEEP WARM FUNCTION
The keep warm feature maintains an oven temperature of 170 °F and will keep cooked food warm for serving up to 3 hours after cooking has finished.
After 3 hours, the feature will shut the oven off automatically. The feature may be used without any other cooking operations or may be set to activate after a timed or delay timed cooking operation.
You should not use this feature to reheat cold foods.
How to use the Keep Warm function
- Press Keep Warm.
- Press START SET.
- Press OVEN OFF at any time to turn the feature off.
How to set the oven to activate the keep warm mode after a timed cooking
1. Set up the oven for Timed Cooking. (Refer to the section on Timed Cooking on page 53.)
2. Press Keep Warm before pressing START SET to begin cooking.
3. Press OVEN OFF at any time to turn the feature off.
USING THE BREAD PROOF FUNCTION
The Bread Proof function automatically provides the optimum temperature for the bread proof process, and therefore does not have a temperature adjustment.
1. Press Bread Proof.
2. Press START SET.
3. Press OVEN OFF at any time to turn off the Bread Proof feature.
USING THE OPTIONS FUNCTION
This function enables you to control various electronic control options. These options include temp adjust, temp unit, auto conversion, 12 hour time of day or 24 hour time of day, 12 hour energy saving, language, sound on/off, Virtual Flame, and demo mode.
The option menu is only available when the oven is not being used (not cooking).
| Options |
Feature |
| 1. Temp Adjust |
Lets you correct the temperature in the oven. |
| 2. Temp Unit |
Lets you program the oven control to display temperatures in Fahrenheit or Centigrade. |
| 3. Auto Conversion |
The convection auto conversion feature automatically converts entered regular baking temperatures to convection baking temperatures. |
| 4. Time of Day |
Lets you set the clock to display the time of day in the 12 hour or 24 hour mode. |
| 5. 12 hour energy saving |
This feature automatically turns off the oven after 12 hours during baking functions or after 3 hours during a broil function. |
| 6. Language |
Lets you select English, French, or Spanish. |
| 7. Sound On/Of |
Lets you set the oven controls to operate silently. |
| 8. Virtual Flame |
Lets you set the virtual flame technology to appear or disappear. |
| 9. Demo mode |
This option is for use by retail establishments for display purposes only. |
Temp Adjust
The temperature in the oven has been calibrated at the factory. When first using the oven, be sure to follow recipe times and temperatures. If you think the oven is too hot or too cool, you can correct the temperature in the oven. Before correcting, test a recipe by using a temperature setting that is higher or lower than the recommended temperature. The baking results should help you to decide how much of an adjustment is needed.
The oven temperature can be adjusted ±35 °F (±19 °C ).
How to correct the oven temperature
- Press Options and 1 on the number pad.
- Press Hi+ or Lo- to select higher or lower than the recommended temperature.
- Enter the adjustment you want using the number pad. (0~35)
- Press START SET to save the changes.
This adjustment will not affect the broiling or the self-cleaning temperatures. The adjustment will be retained in memory after a power failure.
Temp Unit (Fahrenheit or Celsius temperature selection)
You can program the oven control to display temperatures in Fahrenheit or Centigrade. The oven has been preset at the factory to display in Fahrenheit.
How to change the display from Fahrenheit to Celsius or Celsius to Fahrenheit
1. Press Options and 2 on the number pad.
2. Press 1 (Fahrenheit) or 2 (Celsius) on the number pad.
3. Press START SET to save the changes.
Time of Day (12hr/24hr)
The oven control can be programmed to display time of day in the 12 hour or 24 hour mode.
The oven has been preset at the factory to display in the 12 hour mode.
How to change between the 12 and 24 hour time of day display
1. Press Options and 4 on the number pad.
2. Press 1 (12hr) or 2 (24hr) on the number pad.
3. Press START SET to save the changes.
12 hour energy saving
If you accidently leave the oven on, this feature will automatically turn off the oven after 12 hours during baking functions or after 3 hours during a broil function.
How to turn the 12 hour energy saving feature on or off
1. Press Options and 5 on the number pad.
2. Press 1 (Off) or 2 (On) on the number pad.
3. Press START SET to save the changes.
Language
You can select English, French, or Spanish. The default setting is English.
How to change the language on the display
- Press Options and 6 on the number pad.
- Press 1 (EN), 2 (FR), or 3 (SP) on the number pad.
- Press START SET to save the changes.
Sound On/Off
Using Sound On/OFF, you can set the oven controls to operate silently.
How to turn the sound on or off
- Press Options and 7 on the number pad.
- Press 1 (Off) or 2 (On) on the number pad.
- Press START SET to save the changes.
Virtual Flame
You can enable or disable the virtual flame that appears when you turn the knob to start cooking.
How to turn the virtual flame on or off
- Press Options and 8 on the number pad.
- Press 1 (Off) or 2 (On) on the number pad.
- Press START SET to save the changes.
Demo mode
This option is for use by retail establishments for display purposes only. (The heating element does not operate.)
How to enable or disable the demo mode
- Press Options and 9 on the number pad.
- Press 1 (Off) or 2 (On) on the number pad.
- Press START SET to save the changes.
USING THE WARMING DRAWER
ABOUT THE WARMING DRAWER
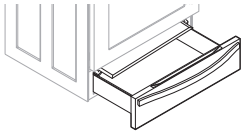
The Warming Drawer will keep hot, cooked foods warm. Always start with hot food. Do not use to warm cold food other than bread, crackers, chips, or dry cereal.
Allow approximately 25 minutes for the warming drawer to preheat.
- Do not line the warming drawer or pan with aluminum foil. Foil is an excellent heat insulator and will trap heat beneath it. This will impede the performance of the drawer and could damage the interior finish.
- Do not put liquid or water in the warming drawer.
- All foods placed in the warming drawer should be covered with a lid. When warming pastries or breads, the cover should be vented to allow moisture to escape.
- Remove serving spoons, etc. before placing containers in the warming drawer.
- Food should be kept hot in its cooking container or transferred to a heat-safe serving dish.
TURNING THE WARMING DRAWER ON OR OFF
1. Set the warming drawer to the heat level you want.
Press Warming Drawer once for low, twice for medium, or 3 times for high, or 4 times for off.
The warming drawer starts automatically once you have finished selecting the level you want.
2. To turn the warming drawer off, press Warming Drawer until the warming drawer turns off.
- Pressing OVEN OFF does not turn the warming drawer off.
- The warming drawer cannot be used during a self-cleaning cycle.
MAINTAINING YOUR APPLIANCE
SELF-CLEANING
This self-cleaning oven uses high temperatures (well above cooking temperatures) to burn off leftover grease and residue completely or reduce them to a finely powdered ash that you can wipe away with a damp cloth.
Before a self-cleaning cycle
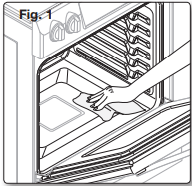
- We recommend venting your kitchen by opening a window or using a ventilation fan or hood during the self-cleaning cycle.
- Remove the wire rack, broil pan, broil pan insert, all cookware, and any aluminum foil from the oven.
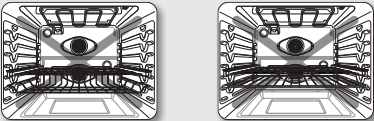
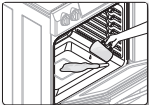
- Wipe up debris from the oven bottom. (Fig. 1)
- The silver-colored oven racks can be selfcleaned, but they will darken, lose their luster, and become hard to slide.
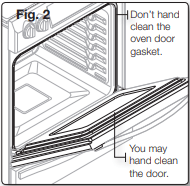
- Residue on the front frame of the range and outside the gasket on the door will need to be cleaned by hand. Clean these areas with hot water, soap-filled steel-wool pads, or cleansers such as Soft Scrub. Rinse well with clean water and dry.
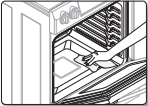
- Do not clean the gasket. The fiberglass material of the oven door gasket cannot withstand abrasion. It is essential for the gasket to remain intact. If you notice it becoming worn or frayed, replace it. (Fig. 2)
- Make sure the oven light bulb cover is in place and the oven light is off.
Remove oven racks and accessories before starting the self-clean mode.
How to run a self-cleaning cycle
1. Select the length of time for the self-cleaning operation, eg. 3 hours.
Press Self Clean once for a 3 hour clean time, twice for a 4 hour clean time, or 3 times for a 5 hour clean time.
The default setting is 3 hours.
2. Start the self-cleaning cycle.
Press START SET. The motor-driven door lock will engage automatically.
3. When the self-cleaning cycle is done, End will show in the display and a beep will sound 6 times.
How to delay the start of self-cleaning
- Press Self Clean. Select the desired self-clean time by pressing Self Clean.
- Press Delay Start.
- Enter the time you want the clean cycle to start.
- Press START SET. The display will show delay start, self clean, and the Lock icon. The motor-driven door lock will engage automatically.
- The Self-Cleaning cycle will turn on automatically at the set time.
How to turn off the self-cleaning feature
You may find it necessary to stop or interrupt a self-cleaning cycle due to smoke in the oven.
1. Press OVEN OFF.
2. You will be able to open the oven door once the oven has cooled down for approximately 1 hour.
After a self-cleaning cycle
- You may notice some white ash in the oven. Wipe it up with a damp cloth after the oven cools. (If white spots remain, remove them with a soap-filled steel wool pad and rinse thoroughly with a vinegar and water mixture.)
- If the oven is not clean after one cycle, repeat the cycle.
- You cannot set the oven for cooking until the oven is cool enough for the door to unlock.
STEAM-CLEANING
How to set the oven for steam-cleaning
For light cleaning, the Steam-cleaning function saves time and energy. For heavierduty cleaning of debris and grease, use the self-cleaning function.
- Remove all accessories from the oven.
- Pour approximately 10 oz. (300 ml) of water onto the bottom of the empty oven and close the oven door.
Use normal water only, not distilled water.
3. Press Steam Clean.
4. Press START SET.
When the operation is complete, the display will blink and a beep will sound.
5. Press OVEN OFF.
6. Clean the oven’s interior.
There will be a significant amount of water remaining on the bottom of the oven after a steam-cleaning cycle. Remove the residual water with a sponge or soft dry cloth.
After a steam-cleaning cycle
- Take care when opening the door after a steam-cleaning procedure has ended. The water on the bottom is hot.
- Open the oven door and remove the remaining water with a sponge. Do not leave the residual water in the oven for any length of time. Wipe the oven clean and dry with a soft cloth. Do not forget to wipe under the oven door seal.
- Use a detergent-soaked sponge, a soft brush, or a nylon scrubber to wipe the oven interior. Remove stubborn residue with a nylon scourer. You can remove lime deposits with a cloth soaked in vinegar.
- If the oven remains dirty, you can repeat the procedure once the oven has cooled.
- For heavy residue, such as grease left over from roasting, we recommend that you rub detergent into the residue before activating the steam-cleaning function.
- After cleaning, leave the oven door ajar at a 15 ° angle to allow the interior enamel surface to dry thoroughly
CARE AND CLEANING OF THE GLASS COOKTOP
Normal daily use cleaning
Use only a ceramic cooktop cleaner. Other creams may not be as effective.
By following these steps, you can maintain and protect the surface of your glass cooktop.
- Before using the cooktop for the first time, clean it with a ceramic cooktop cleaner. This helps protect the top and makes cleanup easier.
- Daily use of a ceramic cooktop cleaner will help keep the cooktop looking new.
- Shake the cleaning cream well. Apply a few drops of cleaner directly to the cooktop.
- Use a paper towel or a cleaning pad for ceramic cooktops to clean the entire cooktop surface.
- Use a dry cloth or paper towel to remove all cleaning residue. No need to rinse.
Potential for permanent damage to the glass surface
- Sugary spillovers (such as jellies, fudge, candy, syrups) or melted plastics can cause pitting of the surface of your cooktop. This is not covered under the warranty. You should clean the spill while it is still hot. Take special care when removing hot substances. Refer to the following section.
- When using a scraper, be sure it is new and the razor blade is still sharp. Do not use a dull or nicked blade.
Cleaning sugary spills and melted plastic
- Turn off all surface units. Remove hot pans.
- Wearing an oven mitt, use a single-edge razor-blade scraper to move the spill to a cool area of the cooktop. Remove the spill with paper towels.
- Any remaining spillover should be left until the surface of the cooktop has cooled.
- Don’t use the surface units again until all of the residue has been completely removed.
If pitting or indentations in the glass surface have already occurred, the cooktop glass will have to be replaced. In this case, service will be necessary.
TROUBLESHOOTING
Samsung works hard to ensure that you don’t have problems with your new electric range. If you run into unexpected trouble, look first for a solution in the table below. If, after trying the suggested solution, you’re still having trouble, call Samsung at 1-800-SAMSUNG (1-800-726-7864).
| PROBLEM |
POSSIBLE CAUSE |
SOLUTION |
| The range is not level. |
The appliance has been installed improperly. |
• Place the oven rack in the center of the oven. Place a level on the oven rack. Adjust the leveling legs at the base of the range until the oven rack is level.
• Insure the floor is level and strong and stable enough to adequately support the range.
|
| The floor is sagging or sloping. |
• Contact a carpenter to correct the situation. |
| The kitchen cabinets are not properly aligned and make the range appear to be not level. |
• Insure the cabinets are square and provide sufficient room for installation. |
| The appliance must be accessed for servicing and cannot be moved easily |
The kitchen cabinets are not square and built too tightly in to the appliance. |
• Contact a builder or installer to make the appliance accessible. |
| Carpet is interfering with movement of the range. |
• Provide sufficient space so the range can be lifted over the carpet. |
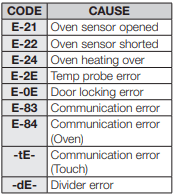
| The oven control beeps and displays an error code. |
You have a function error code.
|
• Press OVEN OFF and restart the oven. If the problem persists, disconnect all power to the range for at least 30 seconds and then reconnect the power. If this does not solve the problem, call for service. |
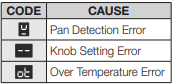
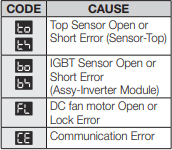
| The Cooktop control beeps and displays an error code. |
You have a function error code.
|
• Turn off the knob and set again. If the problem persists, disconnect all power to the range for at least 30 seconds and then reconnect the power. If this does not solve the problem, call for service. |
 |
• Call for service. |
| The surface units will not maintain a rolling boil or will not cook fast enough. |
You may be using inappropriate cookware. |
• Use pans which are flat and match the diameter of the surface unit selected. |
| In some areas, the power (voltage) may be low. |
• Cover the pan with a lid until the desired heat is obtained. |
| The surface units will not turn on. |
A fuse in your home may be blown or the circuit breaker tripped. |
• Replace the fuse or reset the circuit breaker. |
| The cooktop controls are set improperly. |
• Check if the correct control is set for the surface unit you are using. |
| The surface unit stops glowing when changed to a lower setting. |
This is normal. The unit is still on and hot. |
| Areas of discoloration on the cooktop. |
Food spillover was not cleaned. |
• Refer to the section on care and cleaning of the glass cooktop on page 77. |
| The surface is hot and the model features a light-colored cooktop. |
• This is normal. The surface may appear discolored when it is hot. This is temporary and will disappear as the glass cools. |
| The surface unit frequently cycles on and off. |
This is normal. |
• The element will cycle on and off to maintain the power setting. |
| The oven will not turn on. |
The range is not completely plugged into the electrical outlet. |
• Make sure the electrical plug is inserted into a live, properly grounded outlet. |
| A fuse in your home may be blown or the circuit breaker tripped. |
• Replace the fuse or reset the circuit breaker. |
| The oven controls have been set improperly |
• See the chapter on operating the oven. |
| The oven is too hot. |
• Allow the oven to cool. |
| The appliance will not turn on. |
The appliance is not completely plugged into the electrical outlet or a fuse in your home may be blown or the circuit breaker tripped. |
• Make sure the power cord is plugged into a live, properly grounded outlet. Check the fuse and circuit breakers. |
| Incomplete service wiring. |
• Call for service. |
| Power outage. |
• Check to see if the house lights will turn on. If required, call your local electric company for service. |
| The oven light will not turn on. |
The light bulb is loose or defective. |
• Tighten or replace the bulb. |
| The switch operating the light is broken. |
• Call for service. |
| Oven smokes excessively during broiling. |
The control has not been set properly. |
• Refer to the section on setting oven controls. |
| The meat has been placed too close to the element. |
• Reposition the rack to provide proper Clearance between the meat and the element. Preheat the broil element for searing. |
| The meat has not been properly prepared. |
• Remove the excess fat from the meat. Cut away fatty edges that may curl, leaving the lean intact. |
| Grease has built up on oven surfaces. |
• Regular cleaning is necessary when broiling frequently |
| Food does not bake or roast properly |
The oven controls have not been set correctly. |
• See the chapter on operating the oven. |
| The oven rack has been positioned incorrectly or is not level. |
• See the section on using the oven racks on page 42. |
| Incorrect cookware or cookware of improper size is being used. |
| The oven sensor needs to be adjusted. |
• See the section on adjusting the thermostat on page 62. |
| Food does not broil properly |
The oven controls have been set incorrectly. |
• Press BROIL |
| The rack has not been properly positioned. |
• See the broiling recommendation guide on page 56. |
| Cookware not suited for broiling. |
• Use suitable cookwar |
| In some areas, the power (voltage) may be low. |
• Preheat the broil element for 10 minutes.
• See the broiling recommendation guide on page 56.
|
| The oven temperature is too hot or too cold. |
The oven sensor needs to be adjusted. |
• See the section on adjusting the thermostat on page 62. |
| Scratches or abrasions on the cooktop surface. |
The cooktop is being cleaned improperly. |
• Scratches are not removable. Tiny scratches will become less visible in time as a result of cleaning. |
| Cookware with rough bottoms was used on the cooktop or there were coarse particles (eg. salt or sand) present between the cookware and the surface of the cooktop. |
• To avoid scratches, use the recommended cleaning procedures. Make sure cookware bottoms are clean before use, and use cookware with smooth bottoms. |
| Cookware has been slid across the cooktop surface. |
| Brown streaks or specks. |
Boilovers have been cooked onto the surface. |
• Use the blade scraper to remove soil.
• See the section on care and cleaning of the glass cooktop on page 77.
|
| Areas of discoloration with metallic sheen. |
Mineral deposits from water and food have been left on the surface of the cooktop. |
• Remove using a ceramicglass cooktop cleaning cream.
• Use cookware with clean, dry bottoms.
|
| The oven will not self-clean. |
The oven temperature is too high to set a self-clean operation. |
• Allow the range to cool and reset the controls. |
| The oven controls have been set incorrectly. |
• See the section on selfcleaning on page 70. |
| A self-cleaning cycle cannot be started if the oven lockout feature has been activated or if a radiant surface element is on. |
| “Cracking” or “popping” sound. |
This is the sound of the metal heating and cooling during both the cooking and cleaning functions. |
• This is normal. |
| Excessive smoking during a self-cleaning cycle. |
There is excessive soiling in the oven. |
• Press OVEN OFF. Open the windows to rid the room of smoke. Wait until the selfcleaning cycle is cancelled. Wipe up the excessive soil and reset the oven for selfcleaning. |
| The oven door will not open after a selfcleaning cycle. |
The oven is too hot. |
• Allow the oven to cool. |
| The oven is not clean after a self-cleaning cycle. |
The oven controls were not set correctly. |
• See the section on selfcleaning on page 70. |
| The oven was heavily soiled. |
• Wipe up heavy spillovers before starting the selfcleaning cycle. Heavily soiled ovens may need to be selfcleaned again or for a longer period of time. |
| Steam is coming out of the vent. |
When using the convection feature, it is normal to see steam coming out of the oven vent. |
• This is normal. |
| As the number of racks or amount of food being cooked increases, the amount of visible steam will increase. |
| A burning or oily odor is coming from the vent. |
This is normal in a new oven and will disappear in time. |
• To speed the process, set a self-cleaning cycle for a minimum of 3 hours.
• See the section on selfcleaning on page 70.
|
| Strong odor. |
An odor coming from the insulation around the inside of the oven is normal for the first few times the oven is used. |
• This is temporary. |
| Fan noise. |
A convection fan may automatically turn on and off. |
• This is normal. |
| Oven racks are difficult to slide. |
The shiny, silver-colored racks were cleaned in a self-cleaning cycle. |
• Apply a small amount of vegetable oil to a paper towel and wipe the edges of the oven racks with the paper towel. |
| The Display goes blank. |
A fuse in your home may be blown or the circuit breaker tripped. |
• Replace the fuse or reset the circuit breaker. |
| The Display flashes. |
There was a power failure. |
• Reset the clock. |
| The Drawer does not slide smoothly or drags. |
The drawer is out of alignment. |
• Fully extend the drawer and push it all the way in. See the page 82. |
| The drawer is over-loaded or the load is unbalanced. |
• Reduce weight. Redistribute drawer contents. |
| The Warming drawer will not work. |
A fuse in your home may be blown or circuit breaker tripped. |
• Replace the fuse or reset the circuit breaker. |
| The controls are not set correctly. |
• See the chapter on using the warming drawer on page 69. |
| Excessive condensation in the drawer. |
There is liquid present in the drawer. |
• Remove the liquid. |
| Uncovered foods. |
• Cover food with a lid. |
| The temperature is set too high. |
• Adjust the temperature to a lower setting. |
| Food dries out in the warming drawer. |
Moisture is escaping. |
• Cover food with a lid. |
| The drawer is not fully closed. |
• Push the drawer in until the latch engages. |