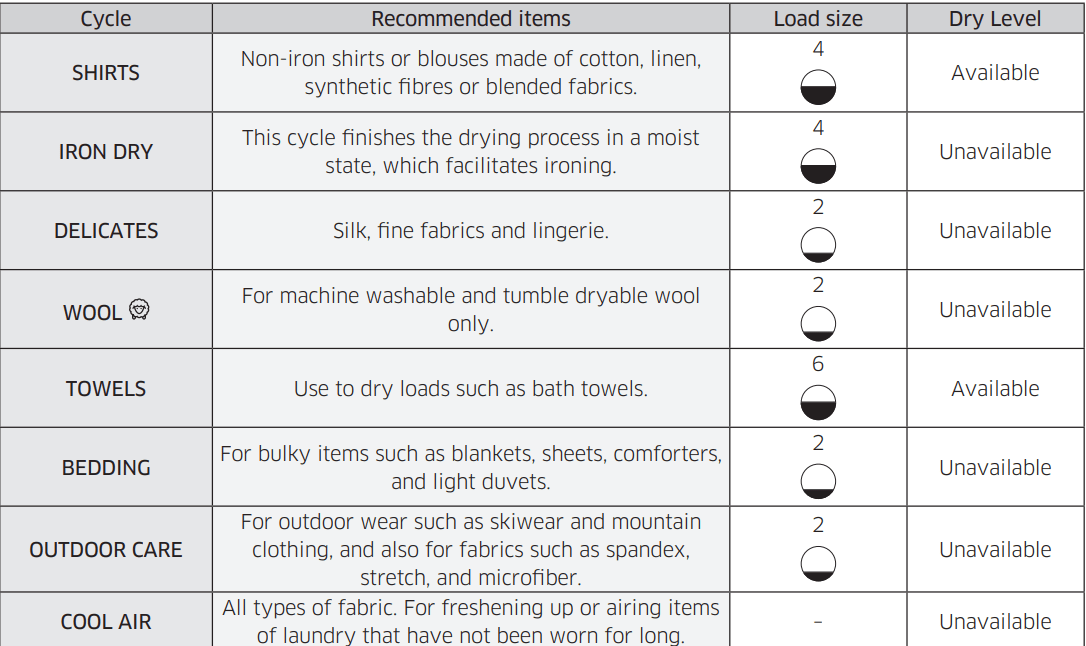
This cycle finishes the drying process in a moist state, which facilitates ironing.
4
DELICATES
For items to be handled with care such as lingerie.
2
WOOL
For machine washable and tumble dryable wool only.
For best results, turn laundry inside out before drying
2
TOWELS
Use to dry loads such as bath towels
6
BEDDING
For bulky items such as blankets, sheets, comforters, and light duvets.
2
OUTDOOR CARE
For outdoor wear such as skiwear and mountain clothing, and also for fabrics such as spandex, stretch, and microfiber. It is recommended to use this cycle after you have washed your laundry using the OUTDOOR CARE cycle with your washing machine.
2
COOL AIR
All types of fabric. For freshening up or airing items of laundry that have not been worn for long.
WARM AIR
For small, pre-dried items. The dry time defaults to 30 minutes
Timed cycle for all types of fabric except for wool and silk. Dry laundry that is still slightly damp or has already been pre-dried. Also suitable for the subsequent drying of multi-layered, thick laundry that does not dry readily.
NOTE:
This cycle is suitable for drying individual woollen fabrics, sports shoes and soft toys. Only dry these using the basket for woollens.
TIME DRY
Use to set a desired dry time
1. Turn the Cycle Selector to select TIME DRY.
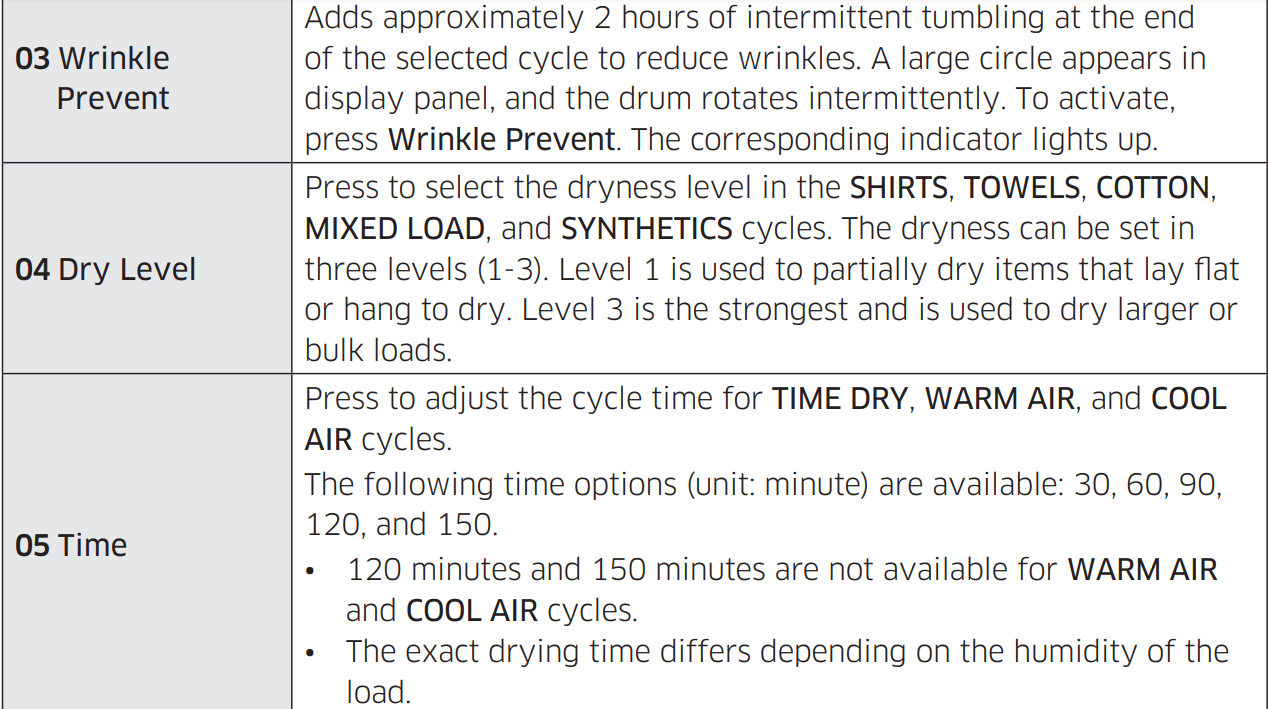
2. Press Time to set the drying time between 30 minutes and 150 minutes. Keep pressing Time cycles through the available time options in 30-minute increments.
NOTE
The actual cycle time may differ depending on the dryness of items.
QUICK DRY 35'
For drying light cotton synthetics or items that needs quick drying. The default dry time is 35 minutes.
1
SYNTHETICS
For lightly soiled blouses, and shirts that are made of polyester (Diolen, Trevira), polyamide (Perlon, nylon), or other similar blends.
4
MIXED LOAD
For mixed loads consisting of cotton and synthetic fabrics
Max
COTTON
For lightly cottons, bed linen, table linen, underwear, towels, and shirts.
Max
Cycle chart
NOTE
For best results, follow the load size recommendations for each dry cycle
Large load: Fill the drum to about ¾ full. Do not add items over this level as they need to tumble freely.
Medium load : Fill the drum to about ½ full.
Small load : Fill the drum with 3-5 items, not more than ¼ full.
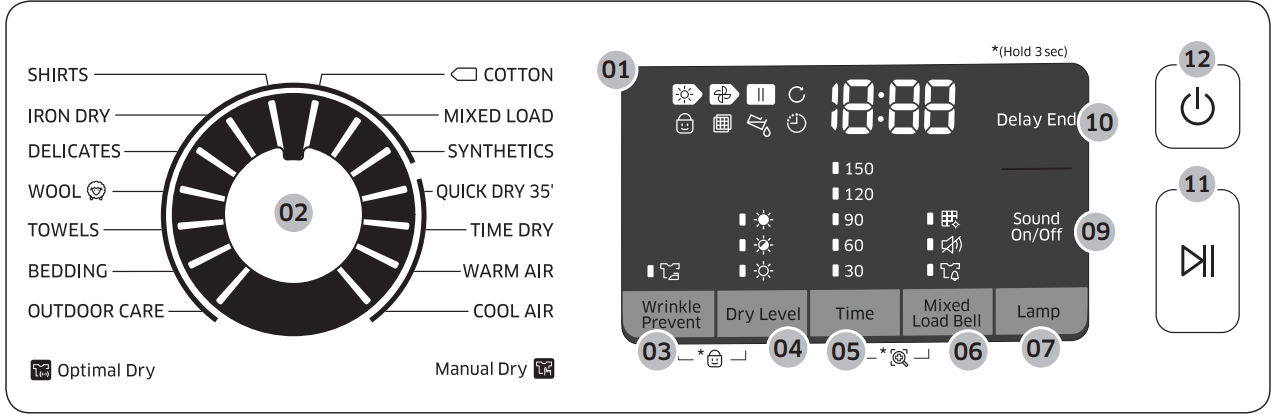
Getting started
Simple steps to start
Press Power to turn the dryer on.
Load the dryer and close the door.
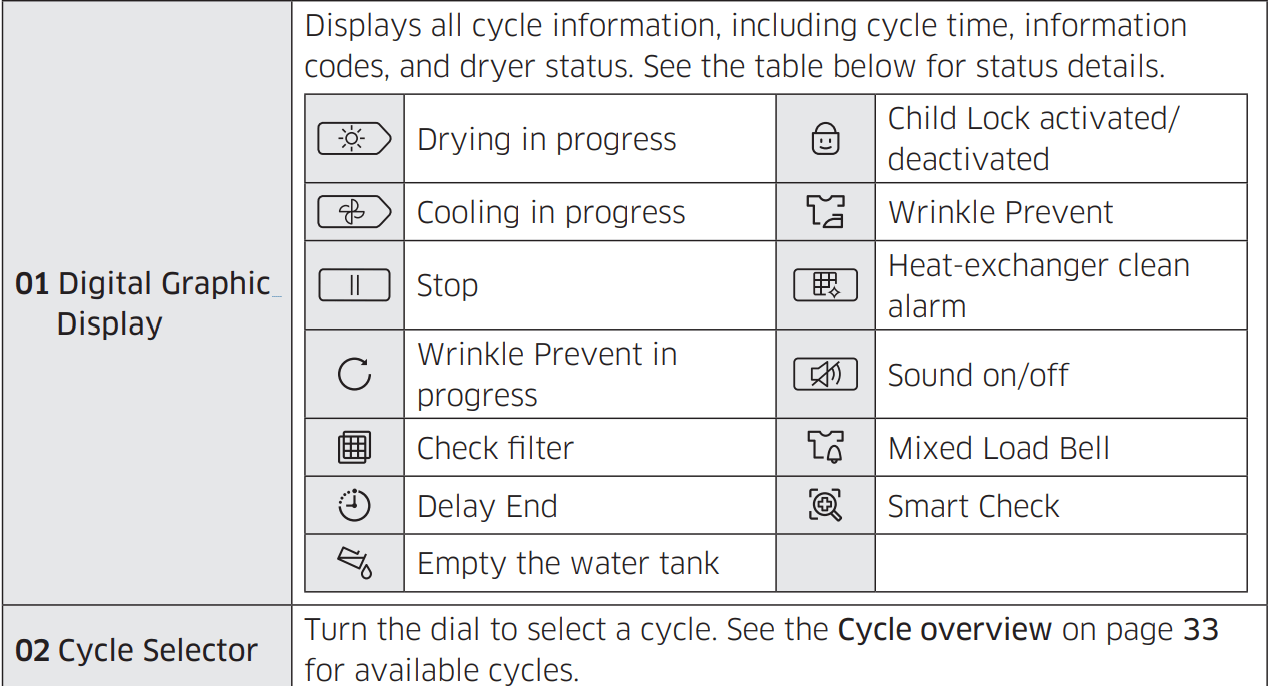
Turn the Cycle Selector to select a cycle.
Change the cycle settings (Dry Level, and Time) as necessary.
Select necessary settings and options to your preference. (Wrinkle Prevent, Lamp, Mixed Load Bell, and/or Delay End).
Press Start/Pause. The dryer indicator lights up, and the estimated cycle time appears on the display.
NOTE
The number of available settings and options differs with the cycle.
To change the cycle during operation
Press Start/Pause to stop operation.
Select a different cycle.
Press and hold Start/Pause to start new cycle
Sorting and loading
Put only one wash load in the dryer at a time.
Avoid mixing heavy and lightweight items together.
To increase drying efficiency when drying one or two items, add a dry towel to the load.
For best results, untangle items before inserting into the dryer.
Overloading restricts the tumbling process, resulting in uneven drying and wrinkling.
Unless recommended on the care label, avoid drying woolens or fiberglass items.
Avoid drying unwashed items.
Do not dry items soiled with oil, alcohol, gasoline, etc.
Rack Dry (applicable models only) Set the drying time up to 150 minutes according to the moisture and weight of the items to dry. When drying laundry using the drying rack, the TIME DRY cycle is recommended.
Position the drying rack in the drum, inserting the front lips of the rack into the holes of the door diaphram.
Place items on the rack, leaving enough space where air can circulate. For clothing items, fold and place flat on the rack. For shoes, place shoes with their soles facing down.
Close the door and press Power. Select TIME DRY, and then press Time to select the drying time.
Press Start/Pause.
A. Rack dry
Drying suggestions
Items (max 1.5 kg)
Description
Washable sweaters (block to shape and lay flat on rack)
When drying the laundry using the rack, fold and place the clothes on the rack to prevent the clothing from becoming wrinkled.
Stuffed toys (cotton or polyester fiber filled)
Stuffed toys (foam or rubber-filled)
Foam rubber pillows
Sneakers
To dry sports shoes, place the shoes on the rack so that the soles of the shoes are facing downwards.
CAUTION
Drying foam rubber, plastic, or rubber on a heat setting may cause damage to the items and lead to a fire hazard.
To prevent damage to shoes, use Dry Rack.
Cycle guide
Always follow the care label when drying. If care label instructions are not available, refer to the following table.
Bedspreads and comforters
Use the High temperature settings.
Blankets
For best results, dry only one blanket at a time
Cloth diapers
Use the High temperature settings.
Down-filled items
Do not dry on a heat setting. Doing so may cause a fire hazard. Only use the COOL AIR cycle.
Foam rubber (rug backs, stuffed toys, etc.)
Do not dry on a heat setting. Doing so may cause a fire hazard. Only use the COOL AIR cycle.
Pillows
Add a few dry towels to help tumble and fluff items. • Do not dry kapok or foam pillows with heat. Use only the COOL AIR cycle
Do not use the dryer to dry items that are not listed above
Delay End
You can set the dryer to complete a selected cycle at your set time.
Select a cycle with necessary options.
Press Delay End repeatedly to set a time between 1 hours and 24 hours in 1-hour increments.
Press Start/Pause. The corresponding indicator blinks, and the clock begins counting down to the set time.
NOTE
To cancel the Delay End settings, restart the dryer using the Power button.
Child Lock
Child Lock prevents children from playing with the dryer. When Child Lock is activated, all buttons except for the Power button are disabled.
To activate/deactivate Child Lock, simultaneously press and hold Mixed Load Bell and Smart Control or Wrinkle Prevent and Dry Level for 3 seconds.
NOTE
If Child Lock is activated, and the dryer is turned off and then on again, Child Lock remains activated.
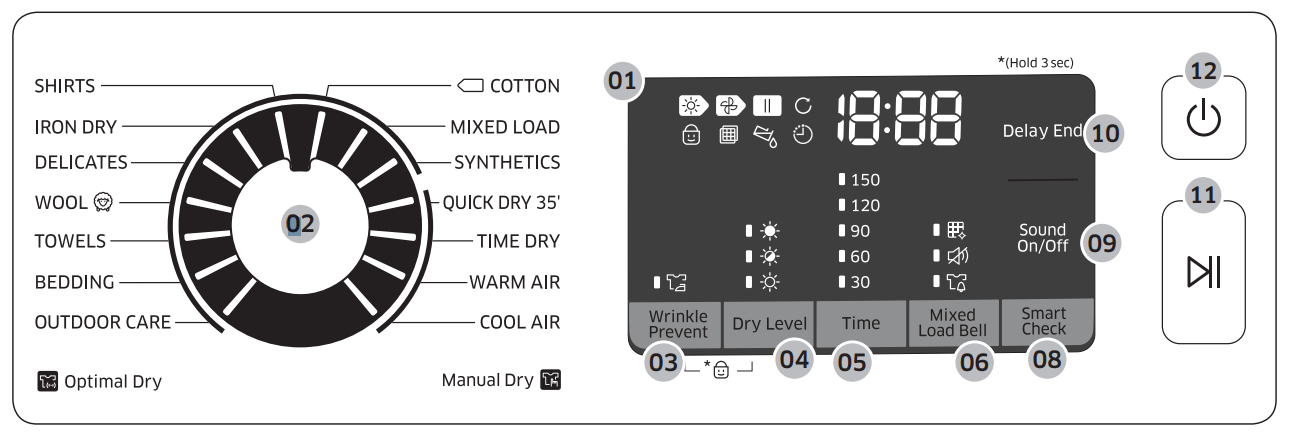
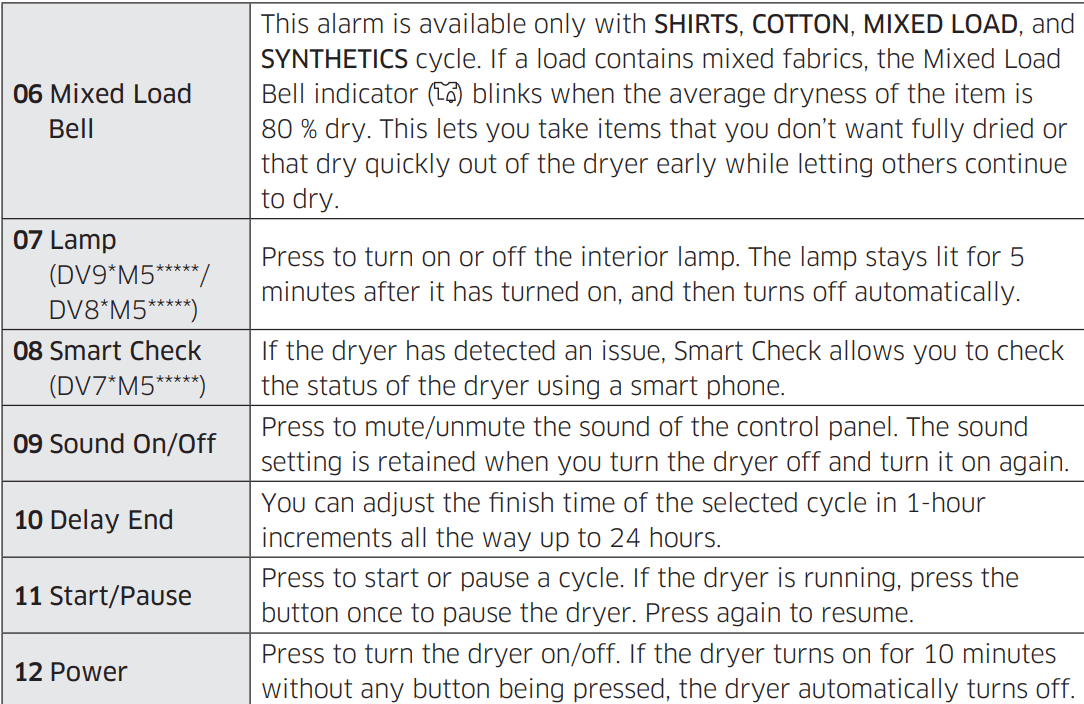
Smart Check
If the dryer has detected an issue, Smart Check allows you to check the status of the dryer using a smartphone. Please note that Smart Check can only be used for Galaxy and iPhone series smartphones.
To use Smart Check, make sure you have downloaded the Samsung Smart Washer/ Dryer app, and then follow the steps below
Press and hold Time and Mixed Load Bell for 3 seconds or press Smart Check. The LED’s on the display panel rotate, and the Smart Check code is displayed.
On the smartphone, open the Samsung Smart Washer/Dryer app and tap the Smart Check button.
Focus the smartphone’s camera on the Smart Check code shown on the display panel.
If the information code is recognized, the app provides detailed information for the issue and further instructions.
NOTE
If the dryer reflects light on the display, the smartphone may fail to recognize the information code. I
f the smartphone fails to recognize the code, manually enter the information code into the smartphone.
Maintenance
WARNING
Do not clean the dryer by directly spraying water onto the dryer.
Do not clean the dryer with benzene, thinner, alcohol, or acetone. This may cause discoloration, deformation, damage, electric shock, or fire.
Before cleaning the dryer, be sure to unplug the power cord.
Control panel
Clean with a soft, damp cloth. Do not use abrasive cleaners. Do not spray cleaners directly on the panel. Immediately wipe up any spills or liquids from the control panel.
Exterior
Clean with a soft, damp cloth. Do not use abrasive cleaners. Avoid using or placing sharp or heavy objects near/on the dryer. Keep detergent and laundry supplies on the pedestal (sold separately) or in a separate storage container.
Drum
Clean with a damp cloth with a mild, non-abrasive cleaner suitable for stainless steel. Wipe remaining residue with a clean, dry cloth.
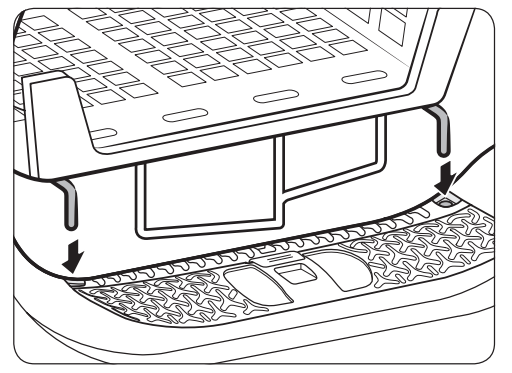
Lint filter
Clean the lint filter after each load
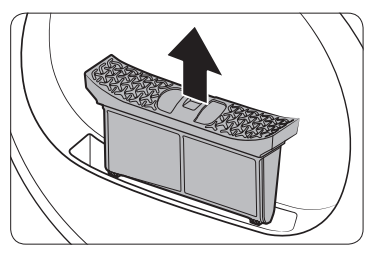
Open the door and pull the lint filter upward to remove.
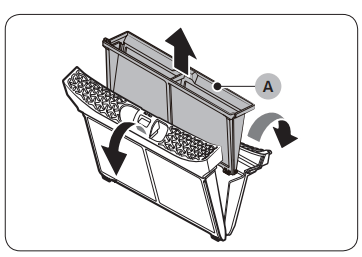
2. Open the outer filter and remove the inner filter (A).
3. Unfold both the inner filter and the outer filter.
4. Remove the lint from both filters, and then clean the filters with the cleaning brush
NOTE
To clean the filters thoroughly, clean the filters in running water, and then dry them completely.
5. Put the inner filter into the outer filter, and then reinsert the lint filter into the original position.
CAUTION
Clean the lint filter after each load. Otherwise, the drying performance may decrease.
Do not operate the dryer without the inner filter inside the outer filter.
Using the dryer with a wet lint filter may cause mold, bad odors, or a decrease in drying performance.
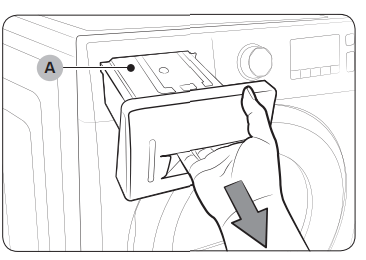
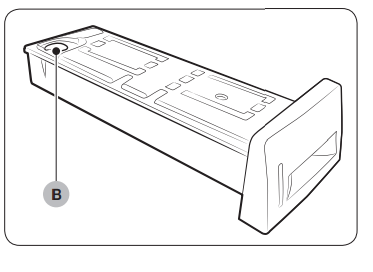
Water tank
To avoid leaks, empty the water tank after every load
Using both hands, pull the water tank (A) forward to remove.
2. Empty the water through the drain hole (B) and place the water tank back into place.
NOTE
If you empty the water tank and press Start/Pause, the corresponding indicator turns off.
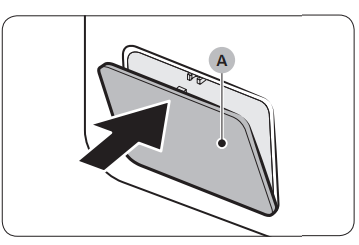
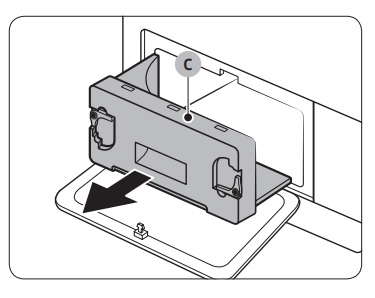
Heat exchanger
Clean the heat exchanger at least once a month. As a reminder, the heat exchanger indicator lights up on the display when the heat exchanger needs to be cleaned.
Gently press the top part of the outer cover (A) to open.
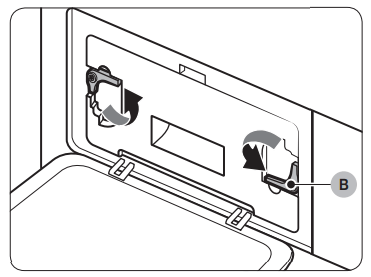
2. Unlock the fixers (B).
3. Remove the inner cover (C).
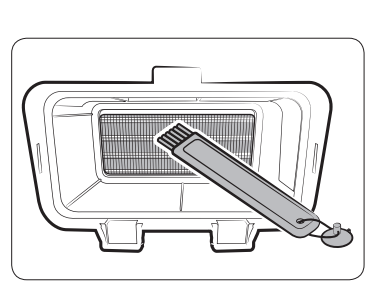
4. Clean the heat exchanger with the provided cleaning brush or a vacuum cleaner with a brush attachment. Take care not to bend or damage the heat exchanger fins when cleaning. This may lead to a decrease in drying performance.
CAUTION
• To avoid physical injury and burns, do not touch or clean the heat exchanger with bare hands.
• Do not use water to clean the heat exchanger.
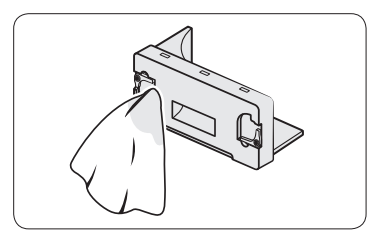
5. Clean the inner cover with a smooth, damp cloth.
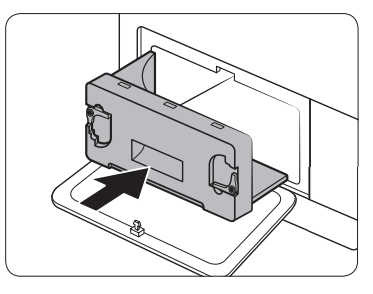
6. Reinsert the inner cover to its original position, and then lock the fixers.
7. . Close the outer cover
NOTE
After cleaning, make sure the fixers are locked.
Troubleshooting
Symptom
Action
Dryer does not run
Make sure the door is completely closed.
Make sure the power cord is plugged in.
Check the home’s circuit breaker and fuses.
Empty the water tank.
Clean the lint filter.
Dryer does not heat
Check the home’s circuit breaker and fuses.
Select a heat setting other than COOL AIR.
Check the lint filter and heat exchanger filter. Clean them if necessary.
Dryer may be in the cool-down phase of the cycle.
Dryer does not dry
Check the above, plus…
Make sure the dryer is not overloaded.
Sort light and heavy items separately.
Reposition large, bulky items to ensure even drying.
Check that the dryer is draining properly.
For small loads, add a few dry towels.
Clean the lint filter and heat exchanger filter.
Dryer is noisy
Check for coins, buttons, lighters, etc.
Make sure the dryer is level and standing firmly on the floor.
The dryer may hum due to air moving through the drum and fan. This is normal.
Dries unevenly
Seams, pockets, and other parts of clothing are harder to dry than others. This is normal.
Sort heavy and light items separately.
Dryer emits an odor
The dryer may draw household odors in from the surrounding air and then exhaust them. This is normal
Dryer turns off before the load is dry
Dryer load is too small. Add more items and restart the cycle.
Dryer load is too large. Remove items and restart the cycle.
Lint on clothes
Make sure the lint filter is clean before every load.
Dry lint-producing items (fuzzy towels) separate from lint trappers, such as black linen pants.
Divide larger loads into smaller loads.
Items still wrinkled after Wrinkle Prevent
Small loads of 1-4 items work best.
Load fewer items. Load similar type items.
Odors remain in items after Cool Air
Make sure to thoroughly wash items with strong odors
Information codes
If the dryer fails to operate, you may see an information code on the display. Check the table below and try the suggestions.
Information code
Meaning
Action
tC
Air temperature sensor issue
Clean the lint filter and/or heat exchanger filter. If this continues, call for service.
tC5
Compressor temperature sensor issue
Wait 2-3 minutes. Turn the power on and restart.
dC
Running the dryer with door open
Close the door and restart. If this continues, call for service
9C2
Low voltage detected
Check if the power cord is plugged in. If this continues, call for service.
5C
Water tank full
Drain pump is out of order
Empty the water tank, turn the power on, and restart. If this continues, call for service
For any codes not listed above, or if the information code continues to appear, call for service.


 NOTE:
NOTE: COTTON
 Large load: Fill the drum to about ¾ full. Do not add items over this level as they need to tumble freely.
 Medium load : Fill the drum to about ½ full.
 Small load : Fill the drum with 3-5 items, not more than ¼ full.