Nordi'F;c"WalkFit
o
4
1111__A.
112ENIFINEW
The
World's
Best
Walking
Workout"TM
pc'
•
Owner's
Guide
This manual downloaded from http://www.manualowl.com
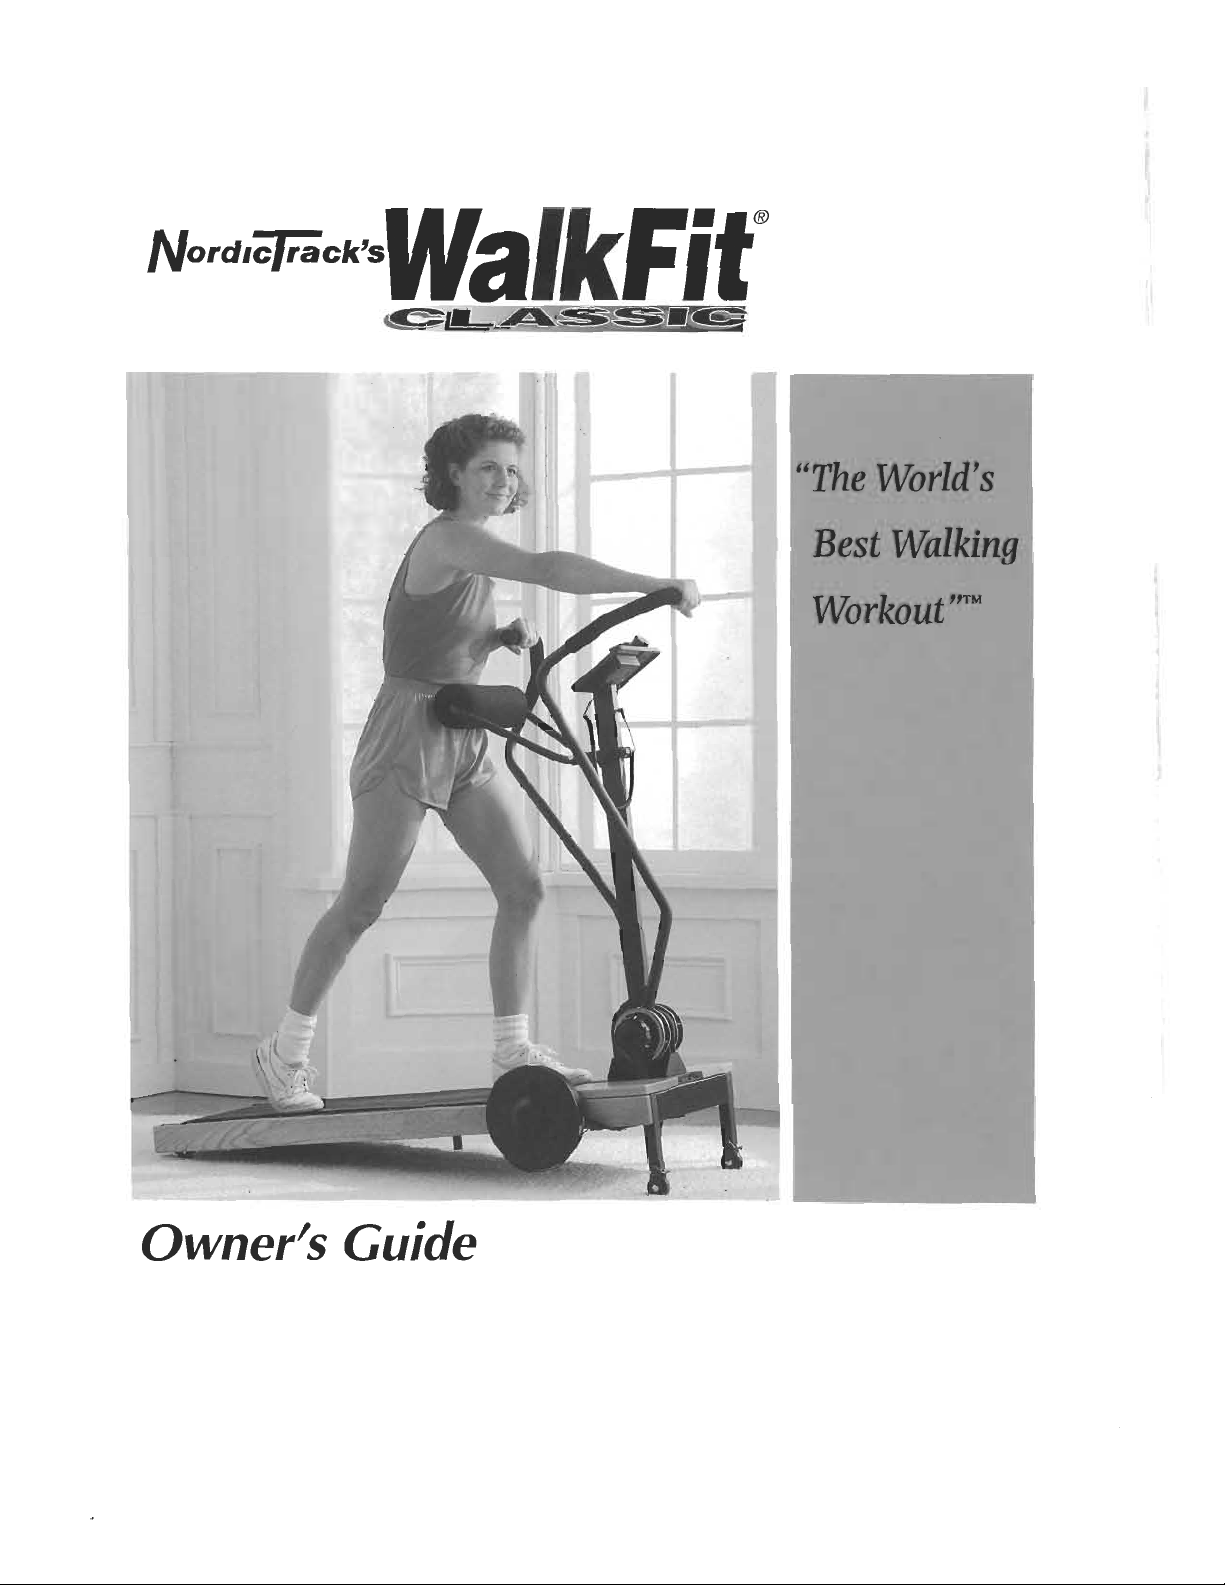
Welcome
to
the
WalkFit
Classic
Congratulations!
You
have
made
an
excellent
investment
in
your
health.
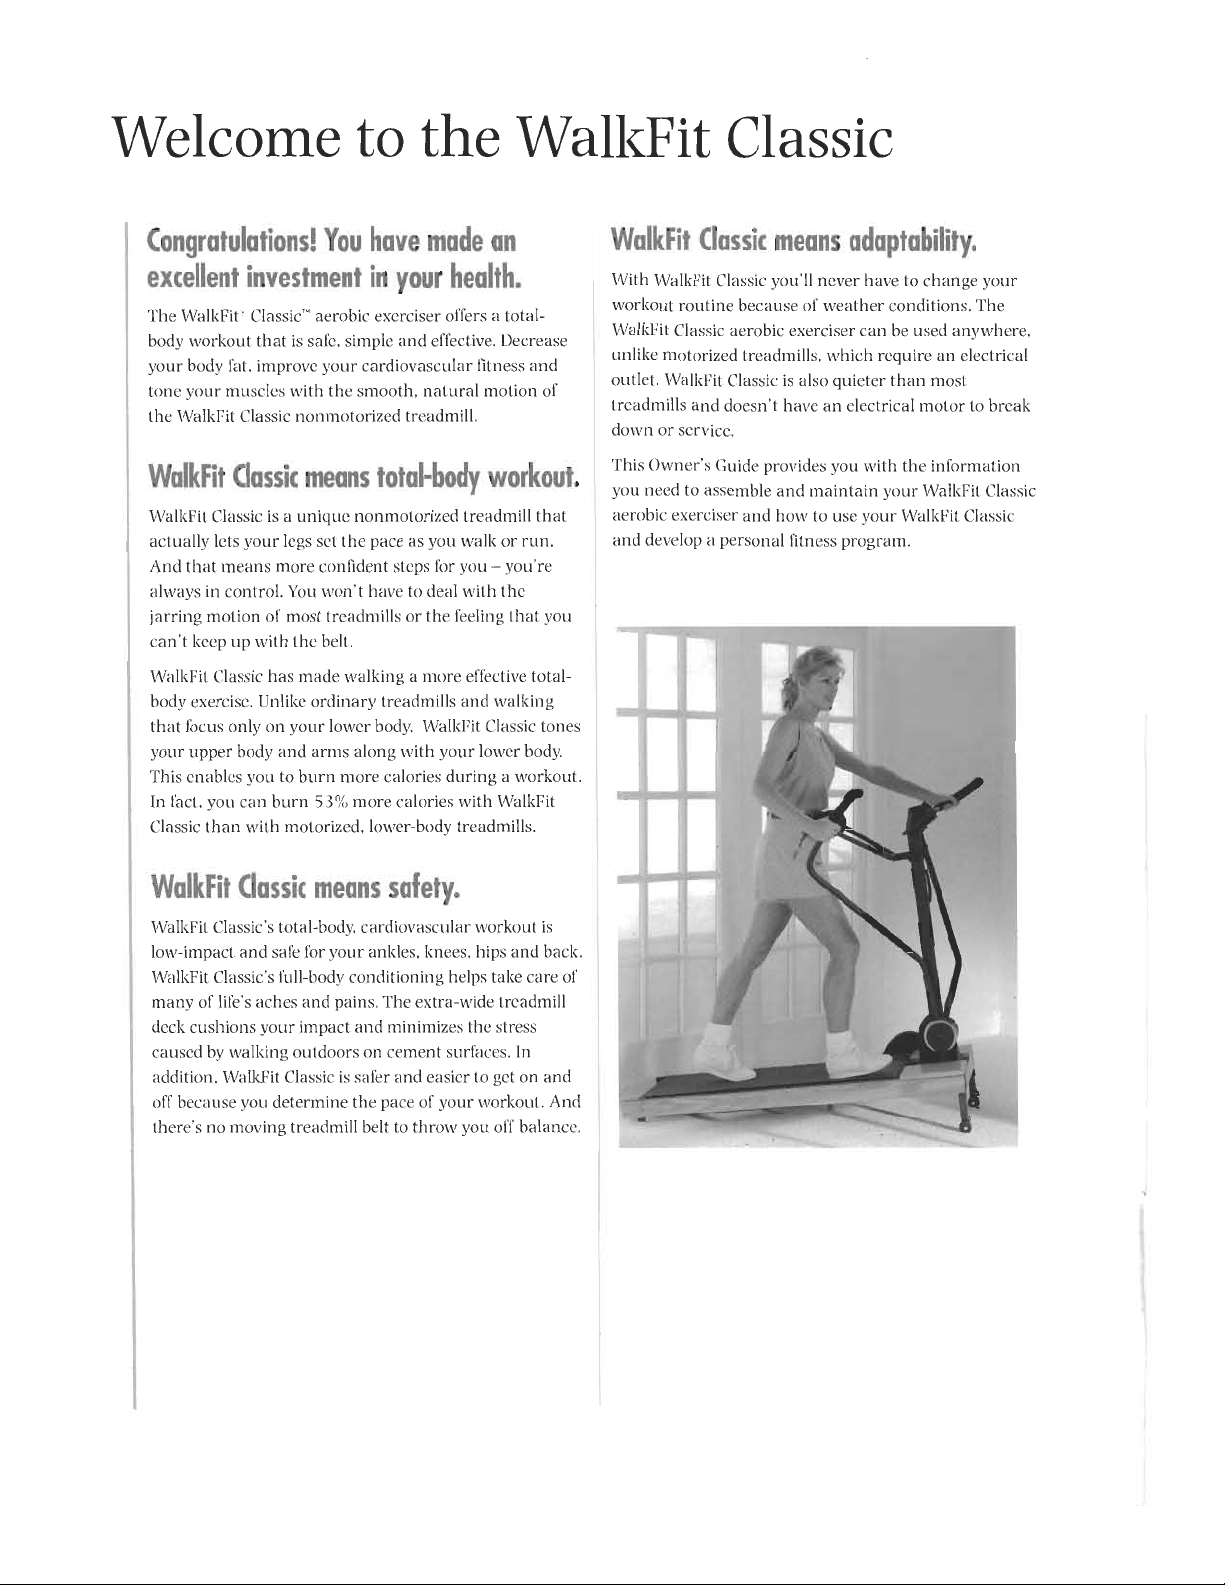
The
WalkFit'
Classic
-
aerobic
exerciser
offers
a
total
-
body
workout
that
is
safe.
simple
and
effective.
Decrease
your
body
fat.
improve
your
cardiovascular
illness
and
tone
your
muscles
with
the
smooth,
natural
motion
of
the
WalkEit
Classic
nonmotorized
treadmill.
WalkFit
Classic
means
total
-body
workout.
WalkFit
Classic
is
a
unique
nonmotorized
treadmill
that
acaually
leis
your
legs
set
the
pace
as
you
walk
or
run.
And
that
means
more
confident
steps
for
you
—
you're
always
in
control.
You
won't
have
I
o
deal
will]
the
jarring
motion
of
most
treadmills
or
ilw
feeling
that
you
can't
keep
up
with
the
belt.
Wanda
Classic
has
made
walking
a
more
effective
total
-
body
exercise.
Unlike
ordinary
treadmills
and
walking
that
focus
only
on
your
lower
body.
\Ala[kilt
Classic
tones
your
upper
body
and
arms
along
with
your
lower
body.
This
enables
you
to
burn
more
calories
during
a
workout.
In
fact.
you
can
burn
53%
more
calories
with
WalkFit
Classic
than
with
motorized,
lower
-body
treadmills.
WalkFit
Classic
means
safety.
WalkFit
Classic's
total
-body
cardiovascular
workout
is
low
-impact
and
safe
for
your
ankles,
knees,
hips
and
back.
Wal
Classic's
full
-body
conditioning
helps
take
care
of
many
of
life's
aches
and
pains.
The
extra
-wide
treadmill
deck
cushions
your
impact.
and
minimizes
the
stress
caused
by
walking
outdoors
on
cement
surfaces.
In
addition,
WM(
Classic
is
safer
and
easier
to
get
on
and
off
because
you
determine
the
pace
of
your
workout.
And
there's
no
moving
treadmill
belt
Io
throw
you
off
balance.
Walkfit
Classic
means
adaptability.
Willi
WaIkrit
Classic
you'll
never
have
to
change
your
workout
routine
because
of
weal
her
conditions.
The
WalkFit
Classic
aerobic
exerciser
can
he
used
anywhere,
unlike
motorized
treadmills.
which
require
an
electrical
outlet.
WalkFit
Classic
is
also
quieter
than
most
treadmills
and
doesn't
have
an
electrical
motor
to
break
down
or
service.
This
Owner's
Guide
provides
you
with
the
information
you
need
10
assemble
and
maintain
your
WalkFii
Classic
aerobic
exerciser
and
how
to
use
your
WalkFit.
Classic
and
develop
a
personal
fitness
program.
4
This manual downloaded from http://www.manualowl.com
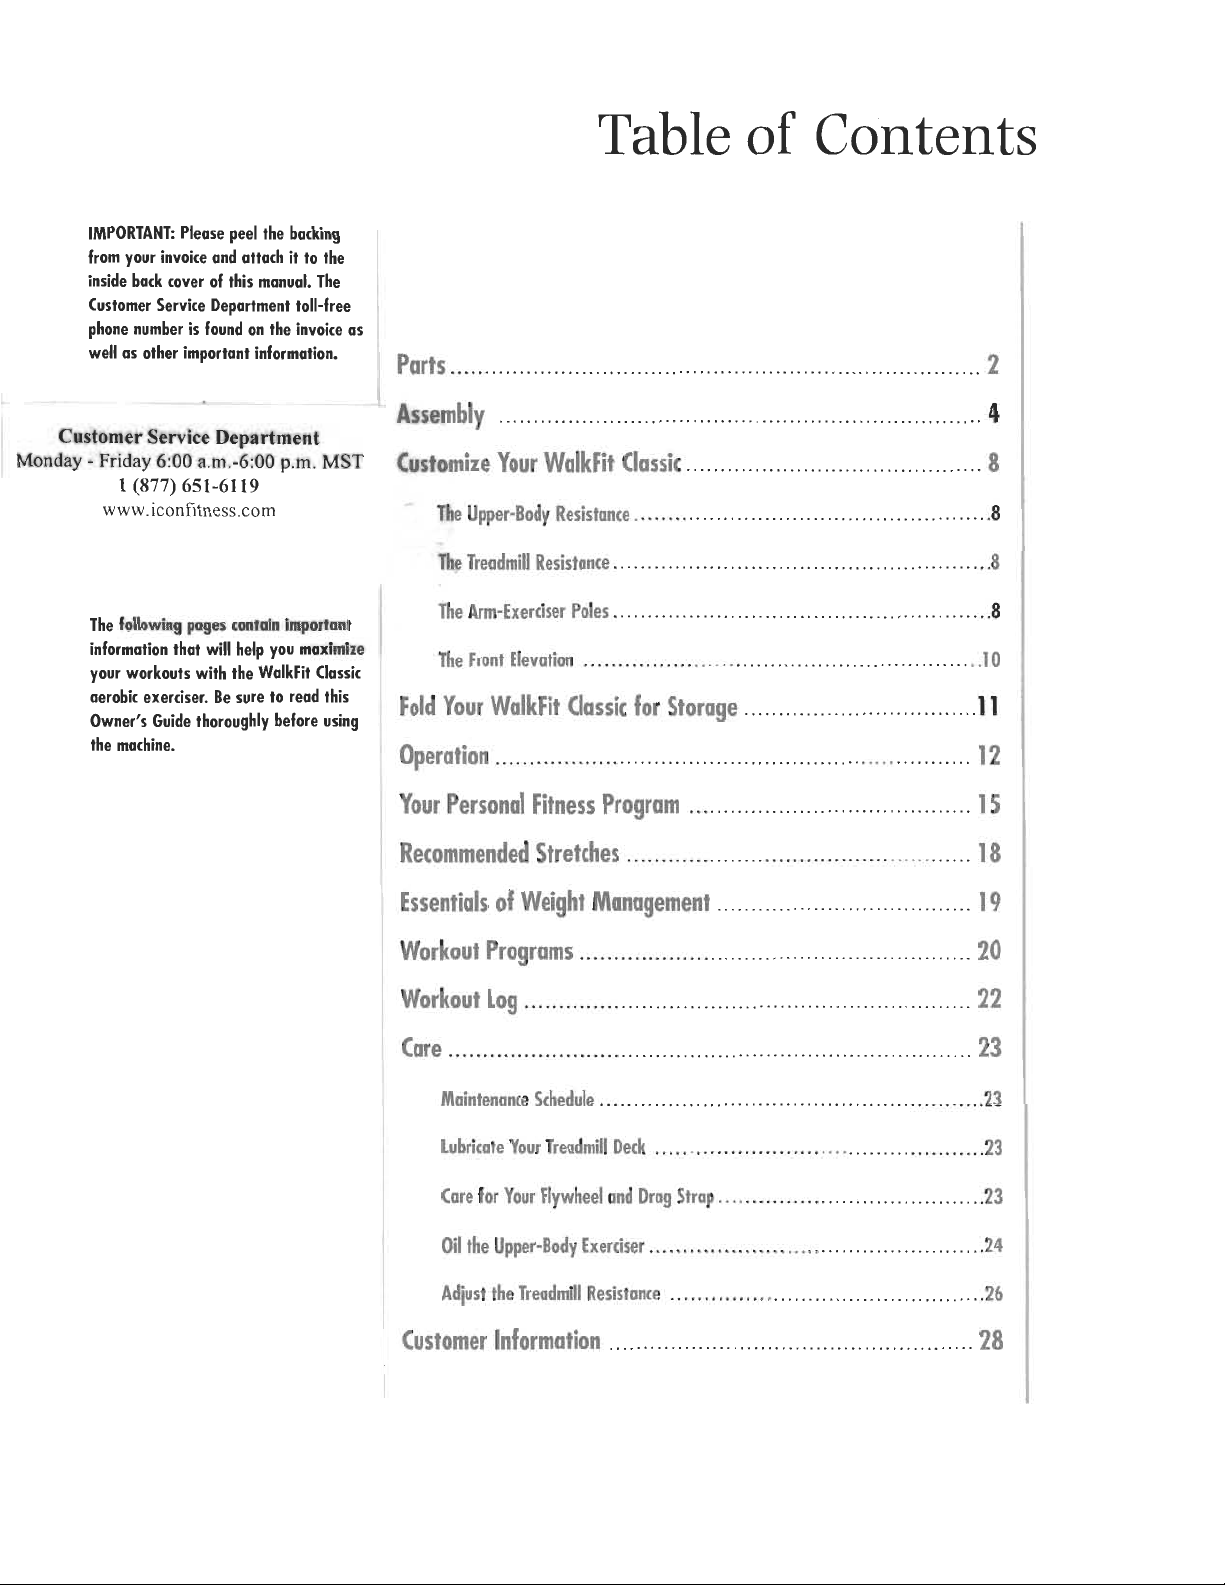
Table
of
Contents
IMPORTANT:
Please
peel
the
backing
from
your
invoice
and
attach
it
to
the
inside
back
cover
of
this
manual.
The
Customer
Service
Department
toll
-free
phone
number
is
found
on
the
invoice
as
well
as
other
important
information.
Customer
Service
Department
Monday
-
Friday
6:00
a.m.-6:00
p.m.
MST
(877)
651-.6119
www.iconfitness.com
The
following
pages
contain
important
information
that
will
help
you
maximize
your
workouts
with
the
WalkFit
Classic
aerobic
exerciser.
Be
sure
to
read
this
Owner's
Guide
thoroughly
before
using
the
machine.
Parts
2
Assembly
4
Customize
Your
WalkFit
Classic
8
The
Upper
-Body
Resistance
8
The
Treadmill
Resistance
8
The
Arm
-Exerciser
Poles
8
The
Front
Elevation
10
Fold
Your
WalkFit
Classic
for
Storage
11
Operation
12
Your
Personal
Fitness
Program
15
Recommended
Stretches
18
Essentials
of
Weight
Management
19
Workout
Programs
20
Workout
Log
22
Care
23
Maintenance
Schedule
23
Lubricate
Your
Treadmill
Deck
23
Care
for
Your
Flywheel
and
Drag
Strap
23
Oil
the
Upper
-Body
Exerciser
24
Adjust
the
Treadmill
Resistance
26
Customer
Information
28
This manual downloaded from http://www.manualowl.com
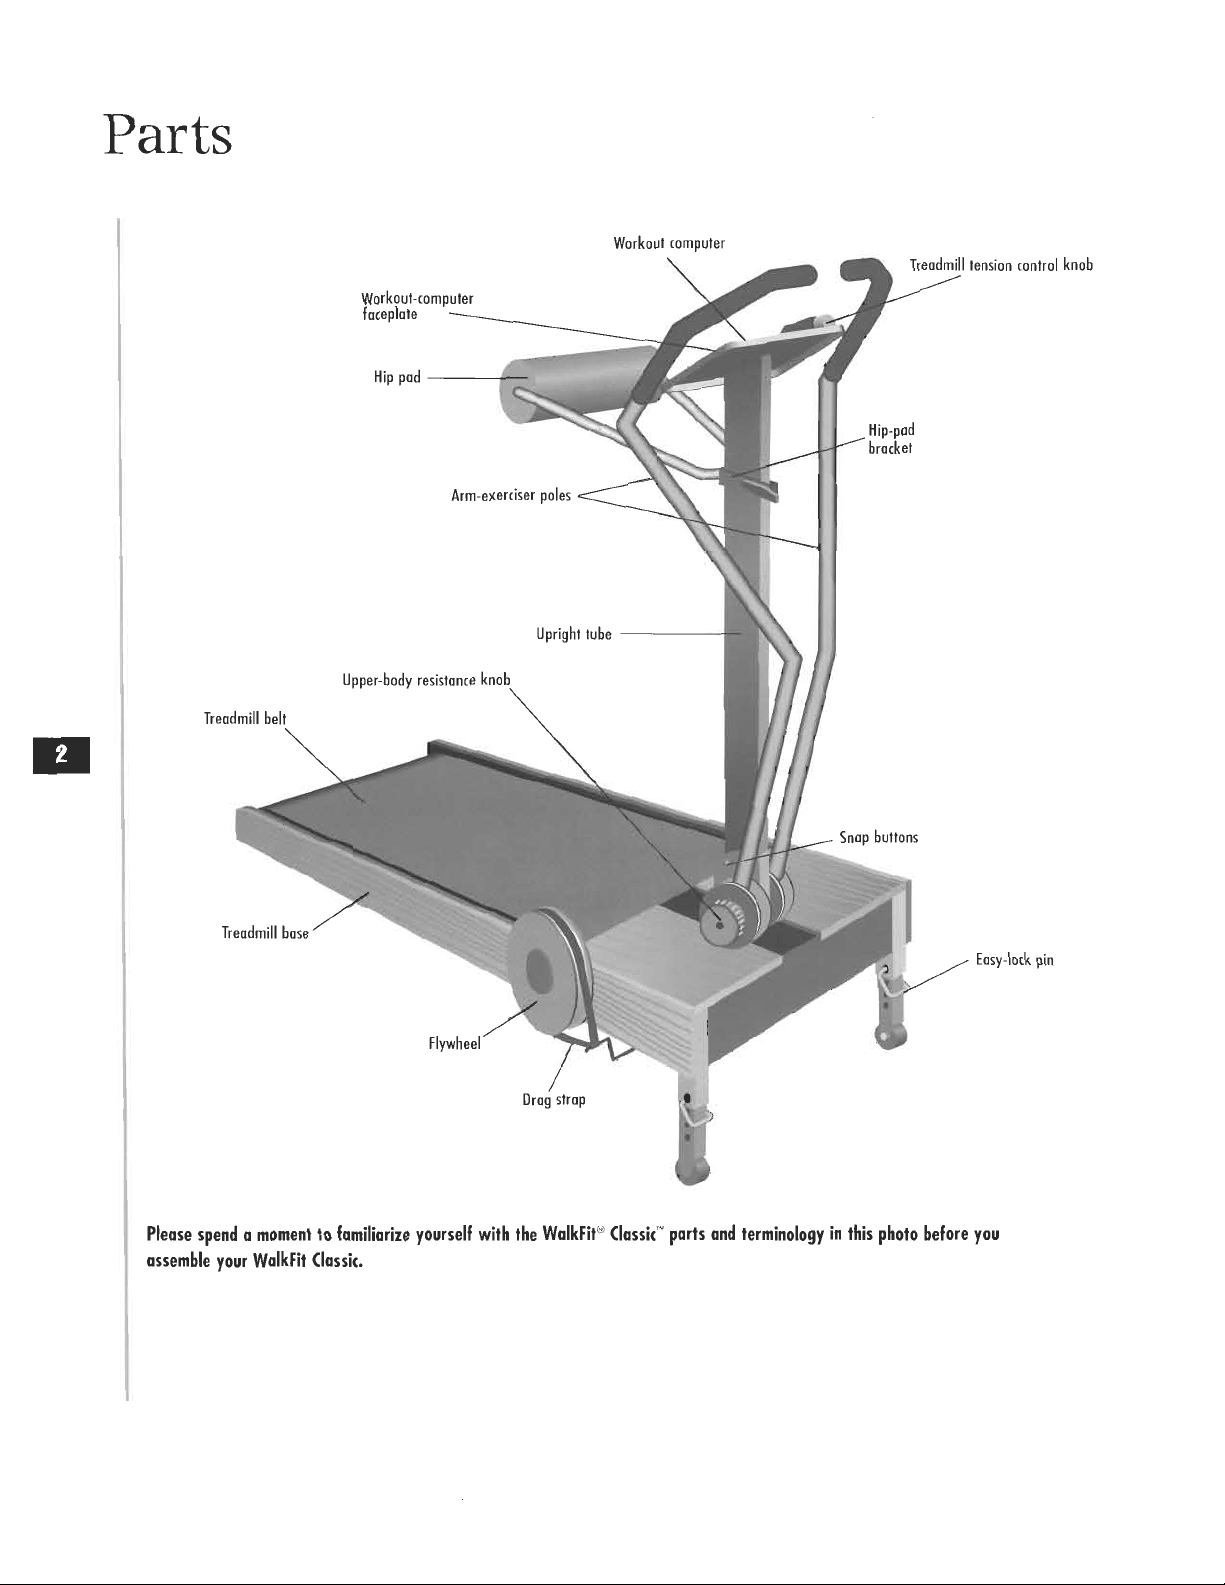
Parts
Workout
computer
Treadmill
tension
control
knob
Workout
-computer
faceplate
Hip
pad
2
Treadmill
belt
Treadmill
base
c:s
q
4k
ir
er
poles
Arm
-exerciser
Upper
-body
resistance
knob
Flywheel
Upright
tube
Drag
strap
Hip
-pad
bracket
Snap
buttons
Easy
-lock
pin
Please
spend
a
moment
to
familiarize
yourself
with
the
WalkFit"
(lassie
parts
and
terminology
in
this
photo
before
you
assemble
your
WalkFit
Classic.
This manual downloaded from http://www.manualowl.com
First.
we
suggest
that
you
unpack
your
WalkFit
Classic
aerobic
exerciser
where
you
intend
to
use
it.
Place
a
protective
covering
between
the
exerciser
and
your
carpet
or
flooring.
Please
retain
all
packing
materials
for
the
dural
ion
of
your
in
-home
trial,
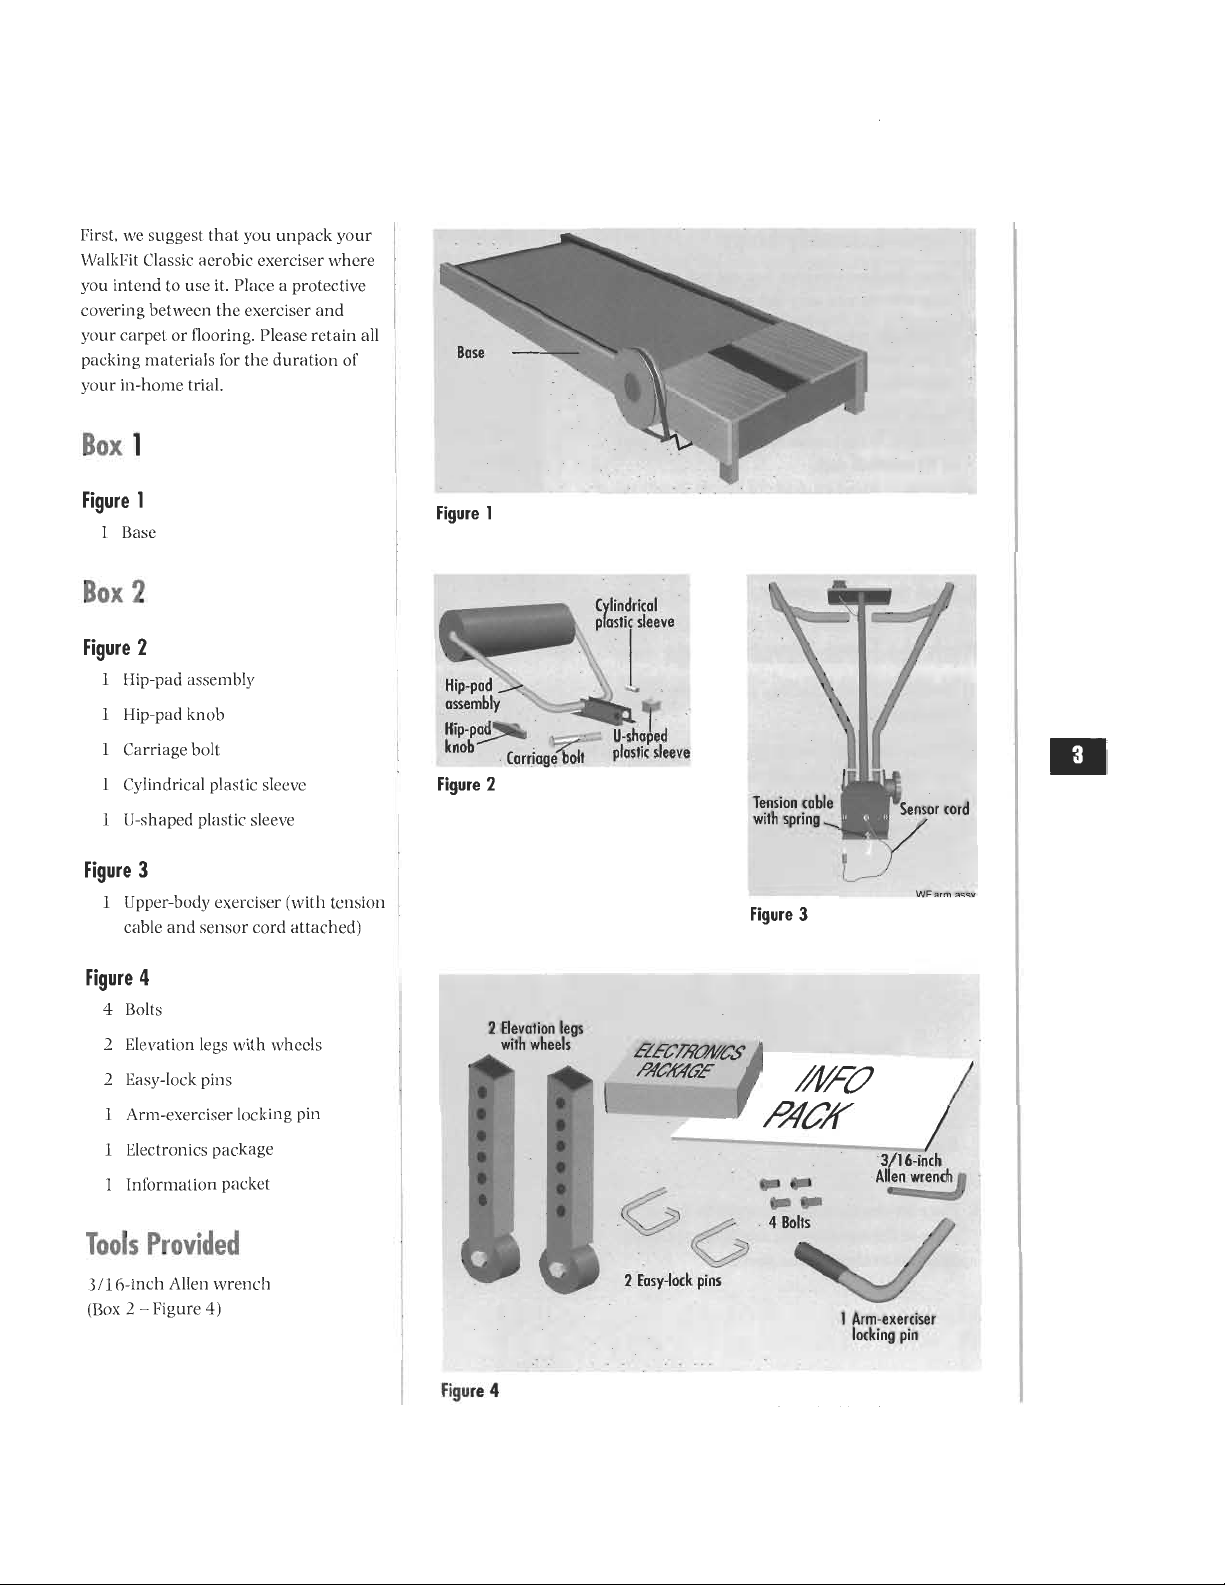
Box
1
Figure
1
I
Base
Box
2
Figure
2
1
Hip
-pad
assembly
Hip
-pad
assembly
1
I
Iip-pad
knob
1
Carriage
bolt
Carriage
bolt
1
Cylindrical
plastic
sleeve
Figure
2
r
Hip-pa
U-shaped
plastic
sleeve
U-shaped
plastic
sleeve
Tension
cable
with
spring
Sensor
cord
Figure
3
1
Upper
-body
exerciser
(with
tension
WF
:arm
cable
and
sensor
cord
attached)
Figure
3
Base
Figure
1
Cylindrical
plastic
sleeve
Figure
4
4
Bolls
2
Elevation
legs
with
wheels
2
Easy
-lock
pins
1
Arm
-exerciser
locking
pin
Eleclronics
package
1
Information
packet
Tools
Provided
3/1
6
-inch
Allen
wrench
(Box
2
• •
Figure
4)
2
Elevation
legs
with
wheels
Figure
4
hczeci
-
nnwas
/91a1462
4
0/19
3/16:inch
r
-
1
t
Allen
wrench
igfar
.
4
Bolts
2
Easy
-lock
pins
/1.
'
1
Arm
-exerciser
locking
pin
This manual downloaded from http://www.manualowl.com
Assembly
Six
Ouick
Assembly
Steps
1.
Attach
the
front
-elevation
legs
and
lock
them
into
place
with
the
two
easy
-lock
pins.
2.
Position
the
upper
-body
exerciser
over
the
front
of
the
treadmill
base
and
secure
it
with
the
four
Allen
bolts.
3.
Connect
the
tension
spring
(below
the
upper
-body
exerciser)
to
the
tension
rod
underneath
the
front
of
the
treadmill
deck.
4.
Snap
the
sensor
cord
(below
the
upper
-body
exerciser)
to
the
underside
receptacle.
5.
Attach
the
hip
pad
to
the
upright
tube.
6.
Install
the
workout
computer.
Attach
the
Front
-Elevation
Legs
1.
Remove
the
elevation
legs
and
the
two
easy
-lock
pins
from
Box
2.
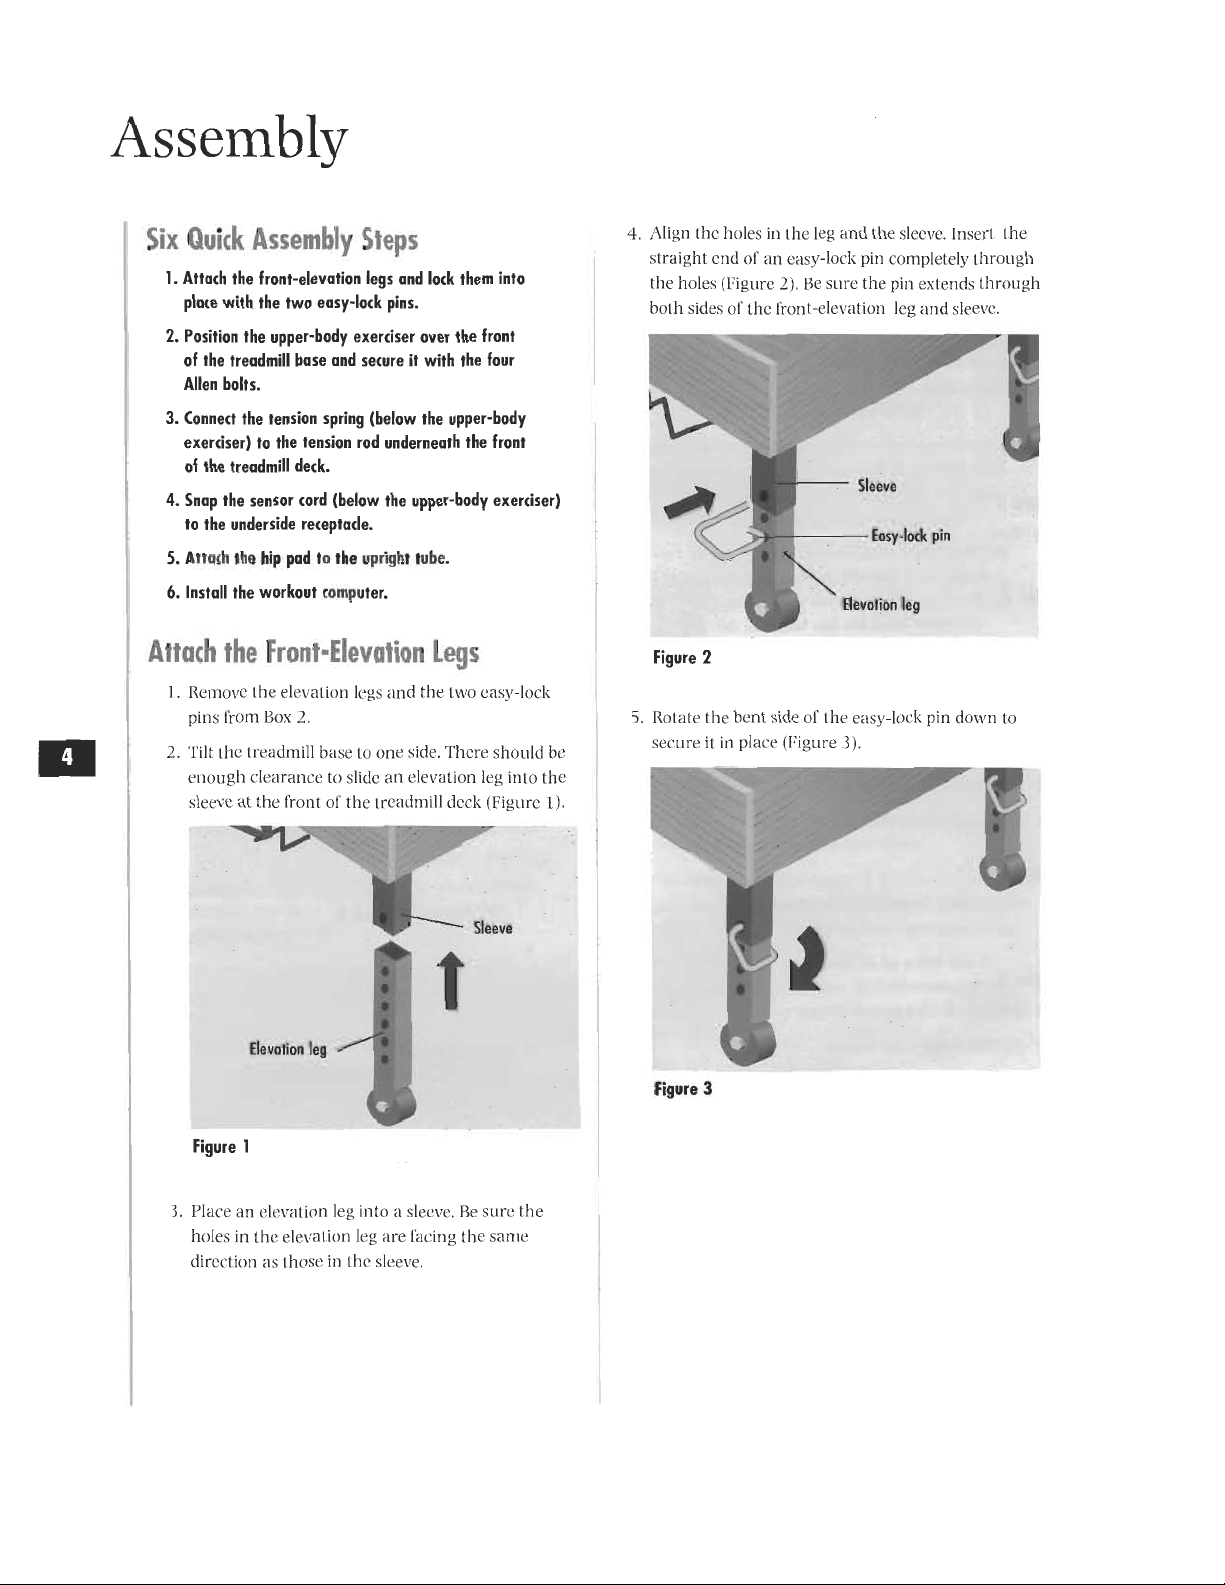
2.
Tilt
the
treadmill
base
to
one
side.
There
should
be
enough
clearance
to
slide
an
elevation
leg
into
the
sleeve
at
the
front
of
the
treadmill
deck
(Figure
1).
Elevation
leg
Figure
1
Sleeve
3.
Place
an
elevation
leg
into
a
sleeve.
Be
sure
the
holes
in
the
elevation
leg
are
facing
the
same
direction
as
those
in
the
sleeve.
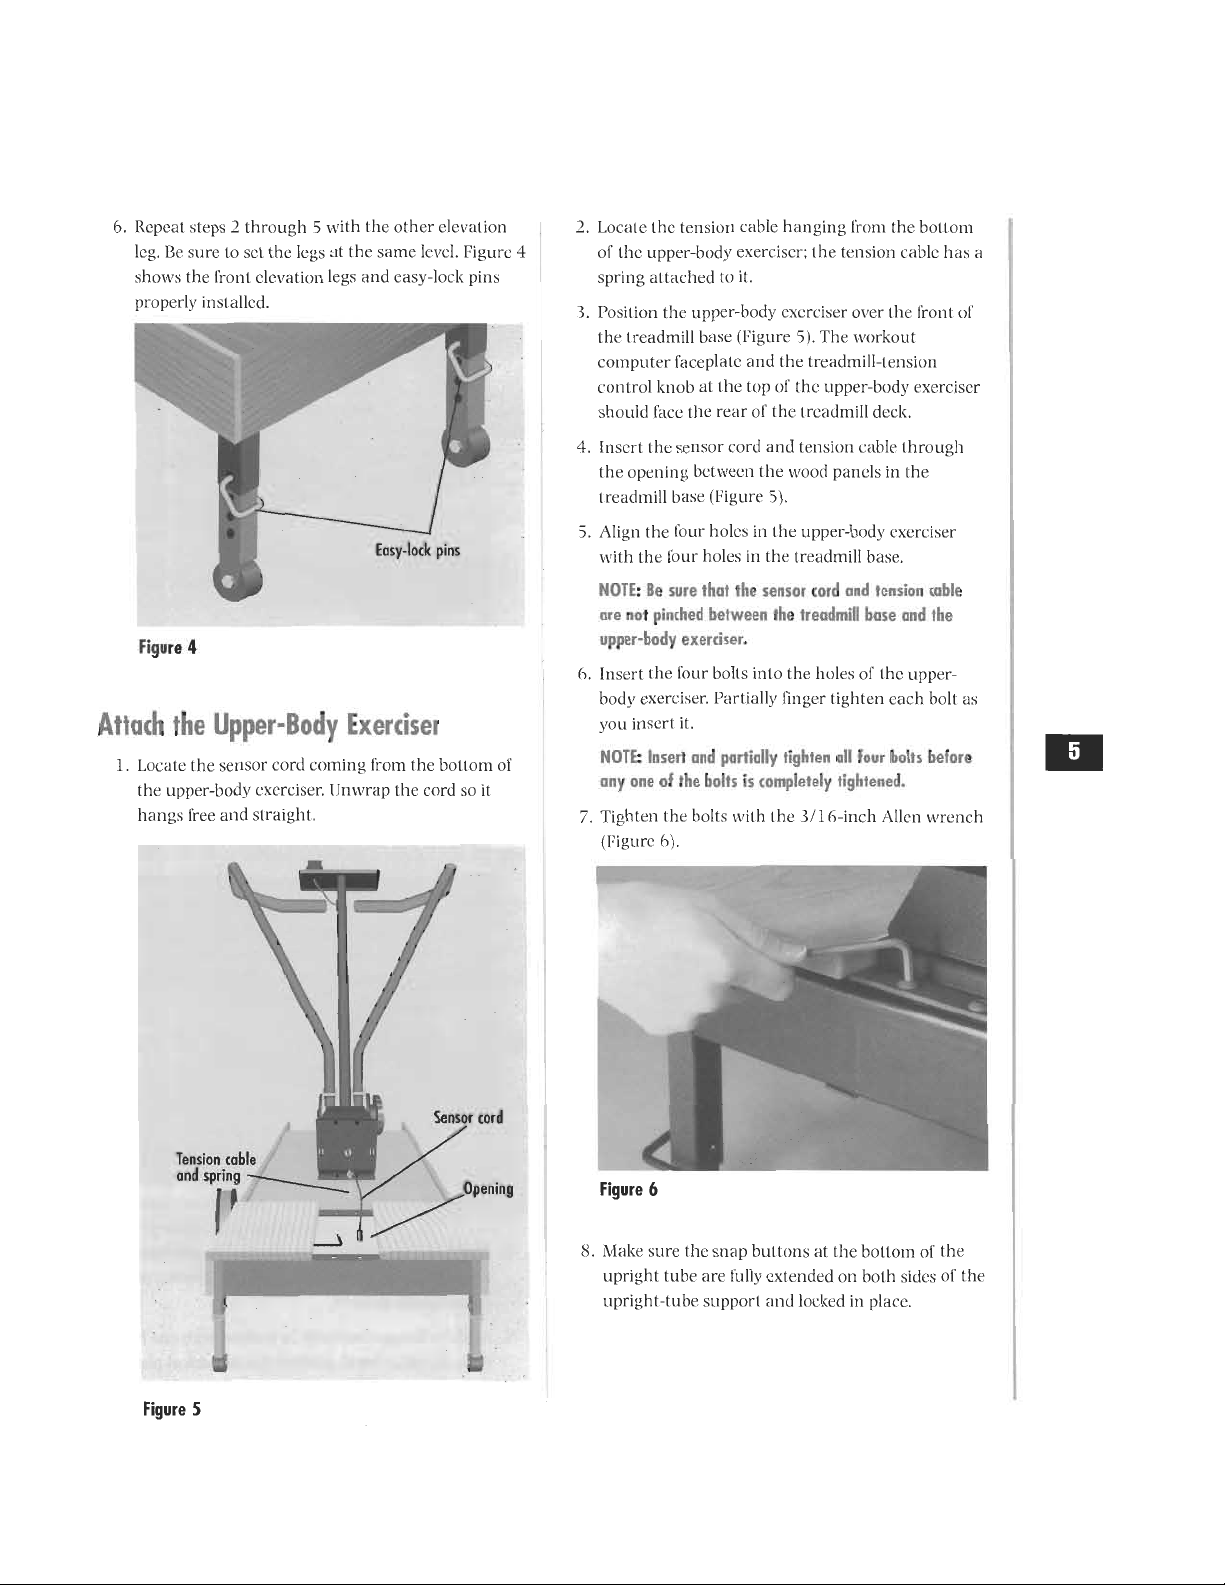
4.
Align
the
holes
in
the
leg
and
the
sleeve.
Insert.
the
straight
end
of
an
easy
-lock
pin
completely
through
the
holes
(Figure
2).
Be
sure
the
pin
extends
through
both
sides
of
the
front
-elevation
leg
and
sleeve.
Sleeve
Easy
-lock
pin
Elevation
leg
Figure
2
I
1
5.
Rotate
the
bent
side
of
the
easy
-lock
pin
down
to
secure
it
in
place
(Figure
3).
Figure
3
This manual downloaded from http://www.manualowl.com
6.
Repeat
steps
2
through
5
with
the
other
elevation
leg.
Be
sure
to
set
the
legs
at
the
same
level.
Figure
4
shows
the
front
elevation
legs
and
easy
-lock
pins
properly
installed.
Easy
-lock
pins
Figure
4
Attach
the
Upper
-Body
Exerciser
1.
Locate
the
sensor
cord
coining
from
the
bottom
of
the
upper
-body
exerciser.
Enwrap
the
cord
so
it
hangs
free
and
straight..
Tension
cable
and
spring
Figure
5
Sensor
cord
Opening
2.
Locale
the
tension
cable
hanging
from
the
bottom
of
the
upper
-body
exerciser:
the
tension
cable
has
a
spring
attached
to
it.
3.
Position
the
upper
-body
exerciser
over
the
front
of
the
treadmill
base
(Figure
5).
The
workout
computer
faceplate
and
the
treadmill
-tension
control
knob
at
the
top
of
the
upper
-body
exerciser
should
face
the
rear
of
I
he
treadmill
deck,
4.
Insert
the
sensor
cord
and
tension
cable
through
the
opening
between
the
wood
panels
in
the
treadmill
base
(Figure
5).
5.
Align
the
four
holes
in
the
upper
-body
exerciser
with
the
[bur
holes
in
the
treadmill
base,
NOTE:
Be
sure
that
the
sensor
cord
and
tension
cable
are
not
pinched
between
the
treadmill
base
and
the
upper
-body
exerciser.
6.
Insert
the
four
bolts
into
the
holes
of
the
upper
-
body
exerciser.
Partially
finger
tighten
each
bolt
as
you
insert
it.
NOTE:
Insert
and
partially
tighten
oil
four
bolts
before
any
one
of
the
bolts
is
completely
tightened.
7.
Tighten
the
bolts
with
the
3/16
-inch
Allen
wrench
(Figure
6).
Figure
6
8.
Make
sure
the
snap
buttons
at
the
bottom
of
the
upright
tube
are
fully
extended
on
both
sides
of
the
upright
-tube
support
and
locked
in
place.
This manual downloaded from http://www.manualowl.com
Connect
the
Tension
Spring
and
Attach
the
Hip
Pad
Sensor
Cord
I.
Lay
the
WalkFit
Classic:"
aerobic
exerciser
on
its
left
side
(the
side
opposite
the
flywheel).
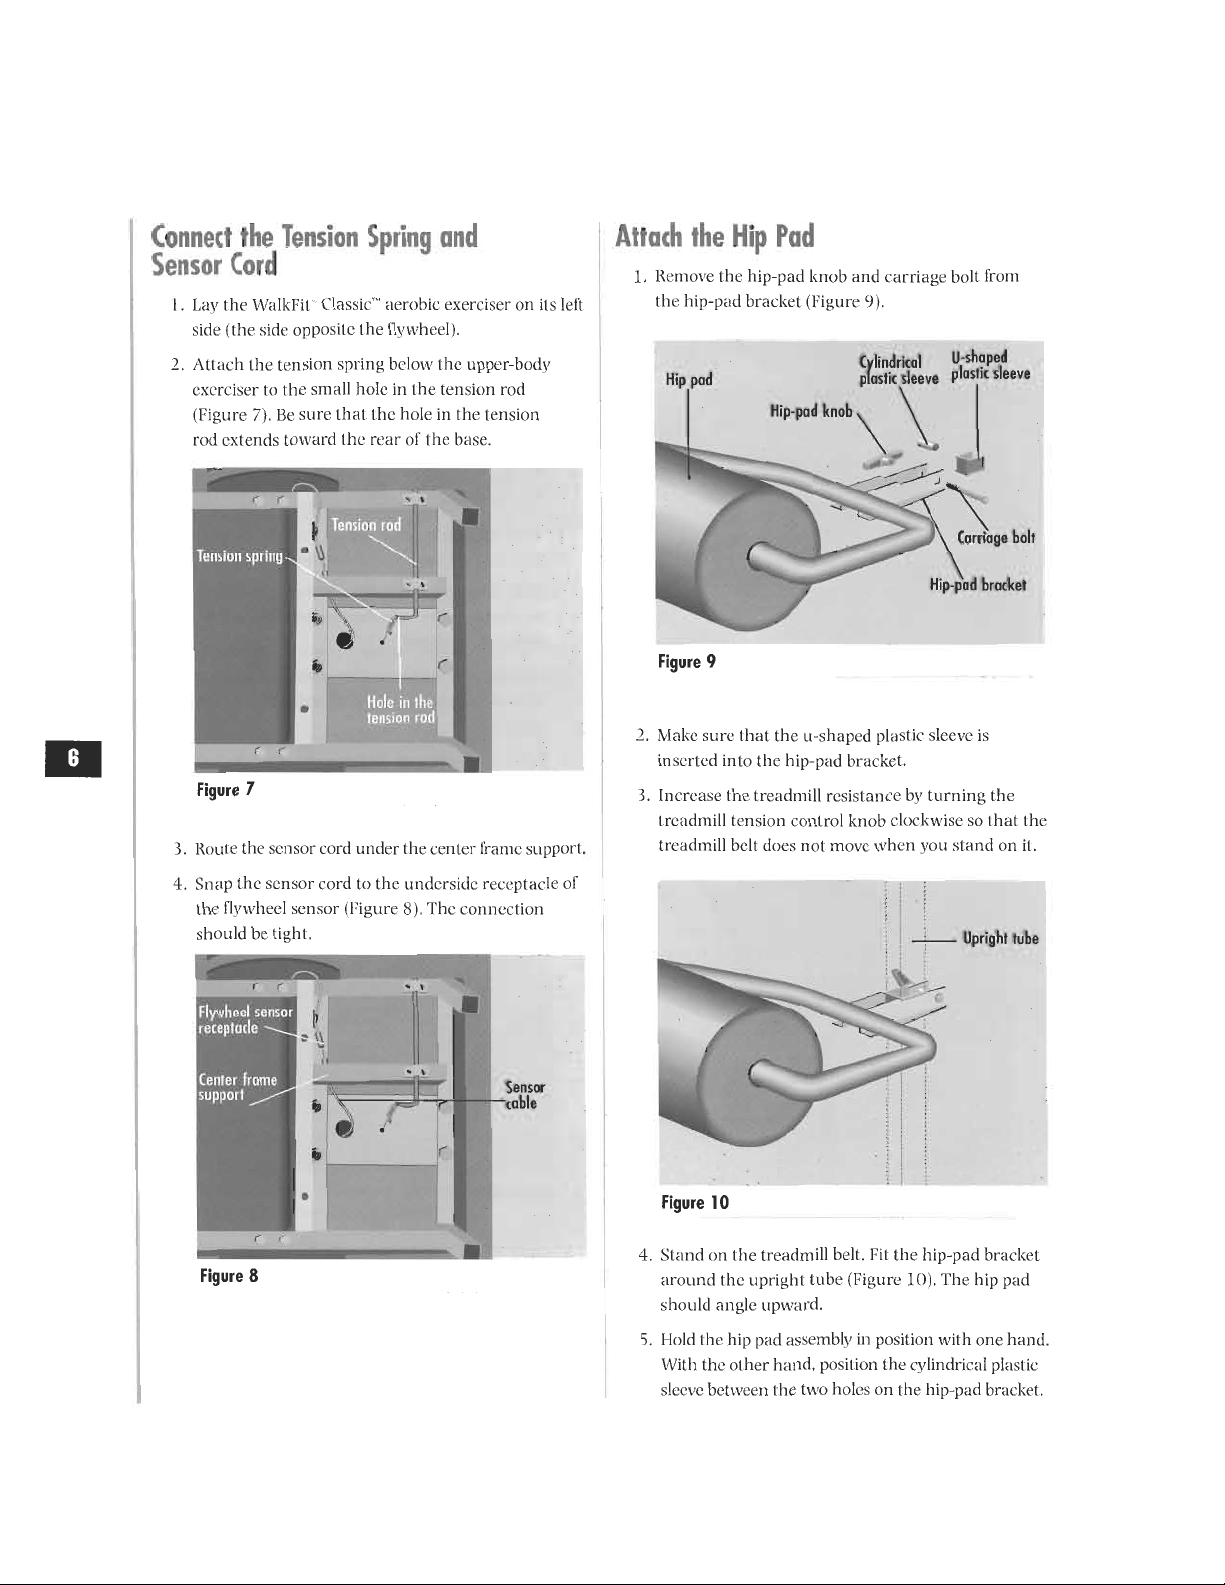
Attach
the
tension
spring
below
the
upper
-body
exerciser
to
the
small
hole
in
the
tension
rod
(Figure
7).
Be
sure
that
the
hole
in
the
tension
rod
extends
toward
the
rear
of
the
base.
Tension
spring
Hole
in
the
tension
rod
Figure
7
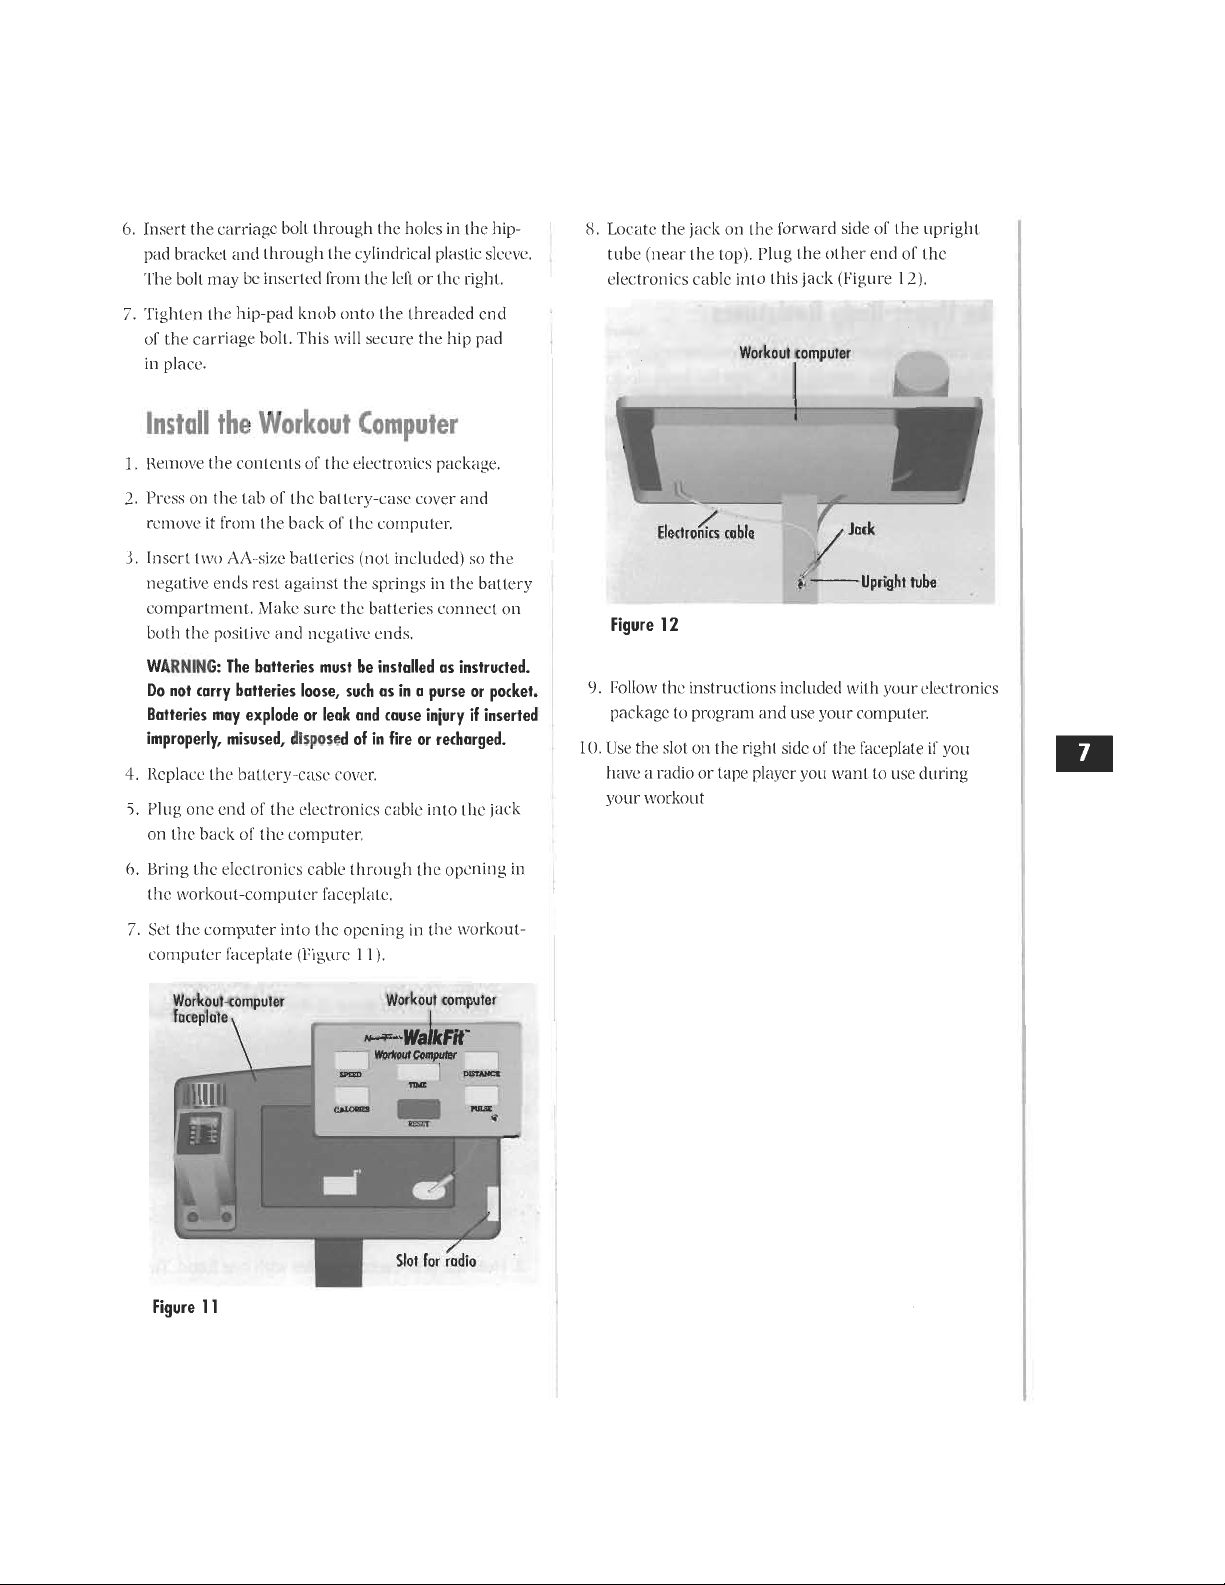
3.
Houle
the
sensor
cord
under
the
center
frame
support.
4.
Snap
the
sensor
cord
to
the
underside
receptacle
of
the
flywheel
sensor
(Figure
8).
The
connection
should
be
tight.
Flywheel
sensor
receptacle
Center
frame
support
4
Figure
8
Sensor
-
cable
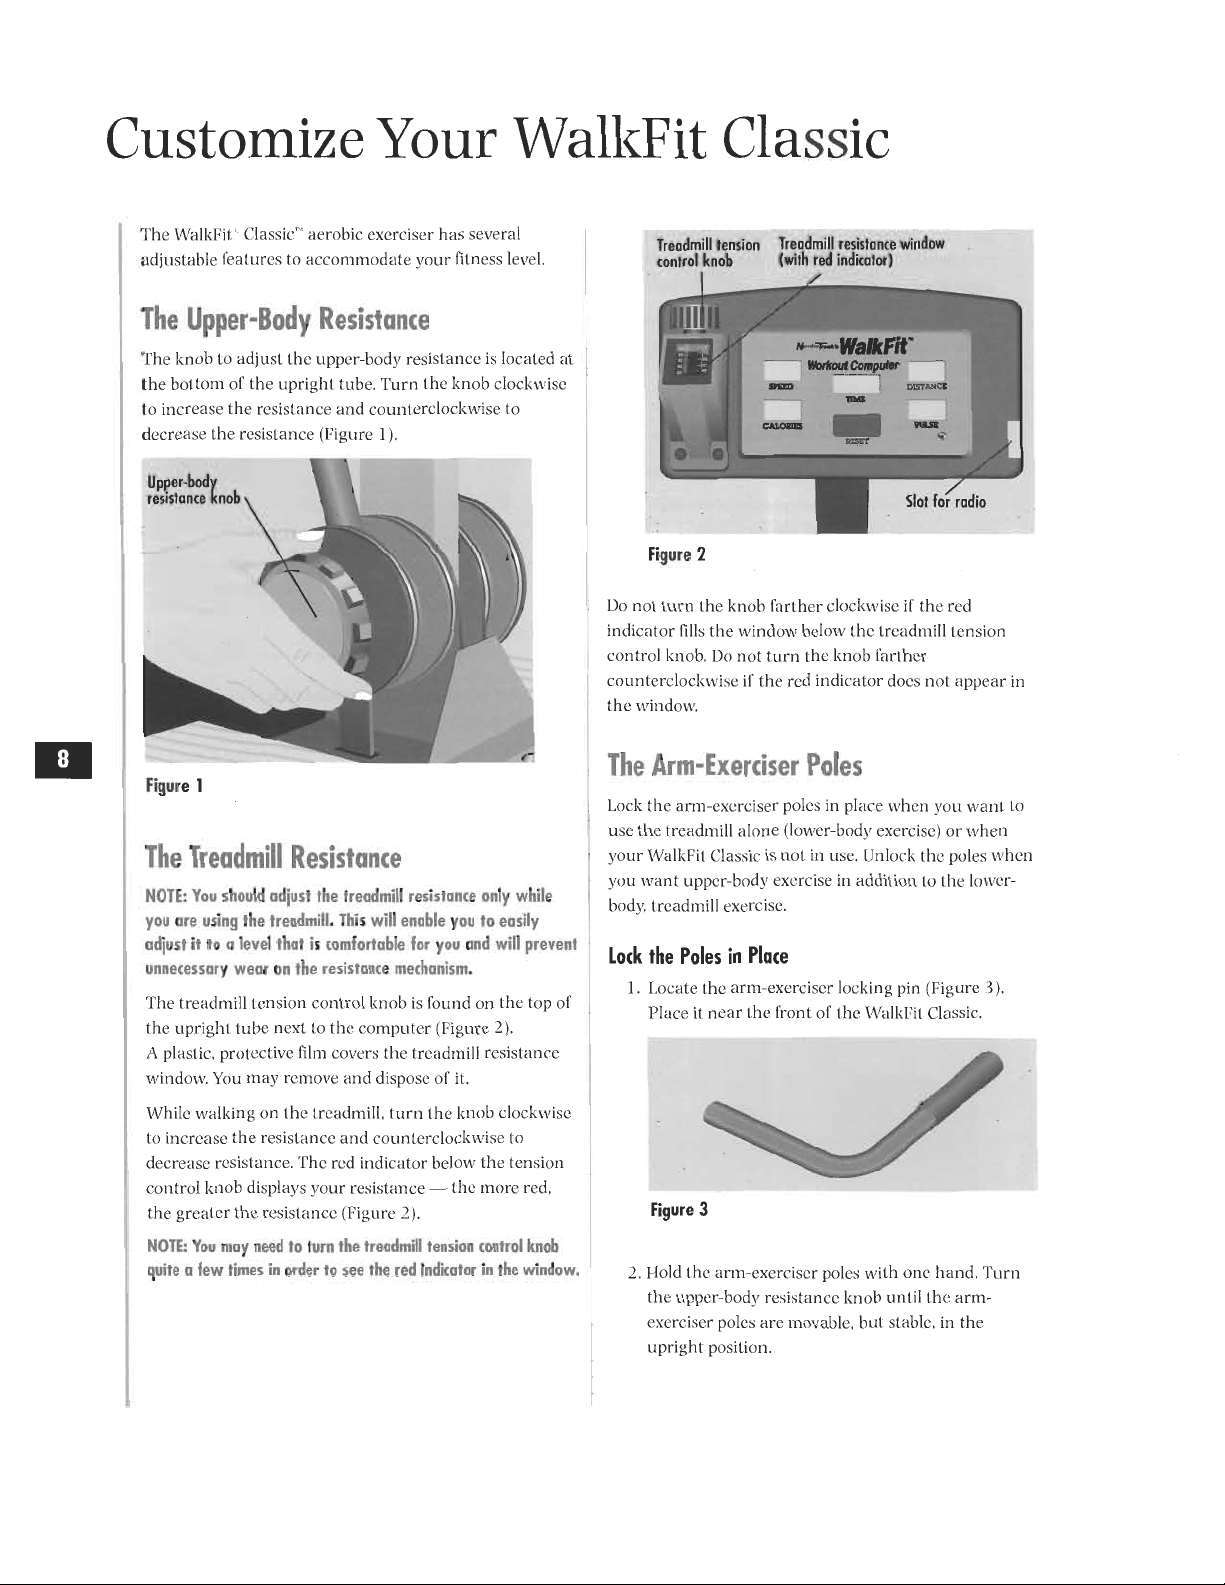
1.
Remove
the
hip
-pad
knob
and
carriage
boll
from
the
hip
-pad
bracket
(Figure
9).
Cylindrical
U-shaped
Hip
pad
plastic
sleeve
plastic
sleeve
Hip
-pad
knob
Carriage
bob
Hip
-pad
bracket
Figure
9
2.
Make
sure
that
the
u
-shaped
plastic
sleeve
is
inserted
into
the
hip
-pad
bracket.
3.
Increase
the
treadmill
resistance
by
turning
the
treadmill
tension
control
knob
clockwise
so
Ihat
the
treadmill
belt
does
not
move
when
you
stand
on
it.
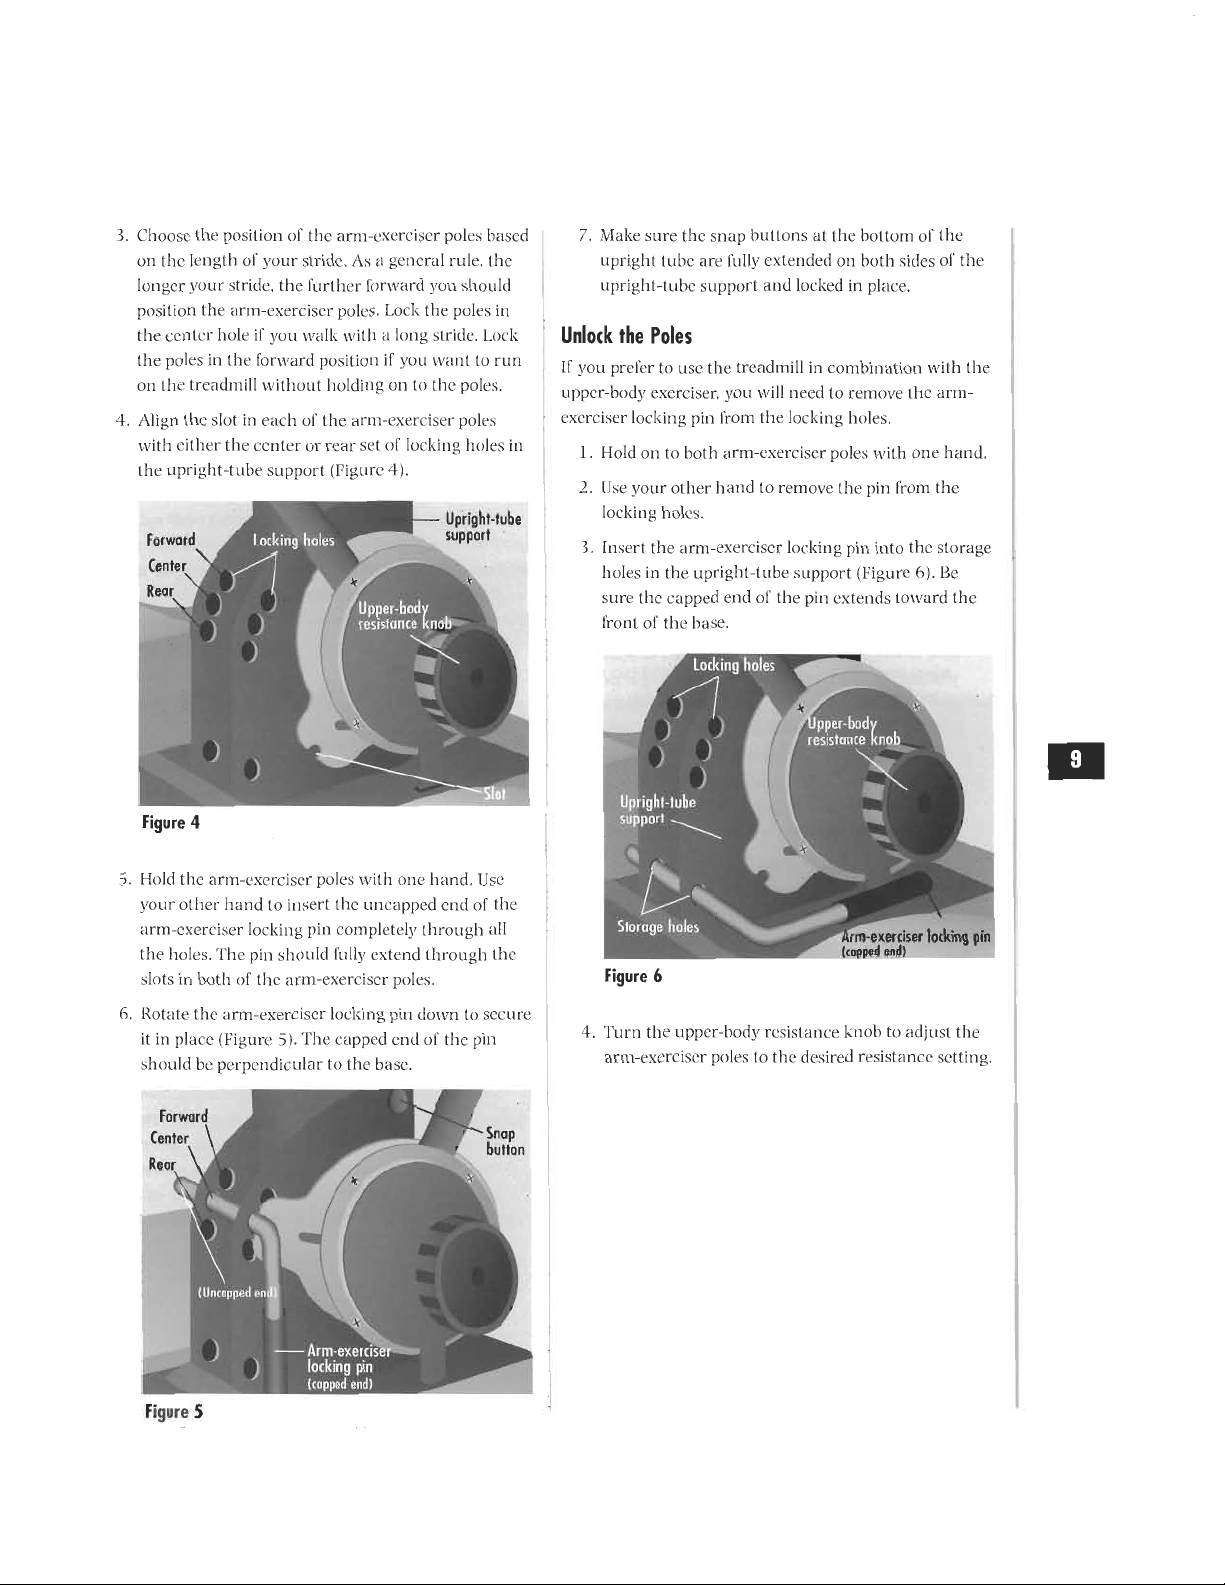
Upright
tube
Figure
10
4.
Stand
on
the
treadmill
belt.
Fil
the
hip
-pad
bracket
around
the
upright
tube
(Figure
10).
The
hip
pad
should
angle
upward.
5.
Hold
the
hip
pad
assembly
in
position
with
one
hand.
With
the
other
hand
position
the
cylindrical
plastic
sleeve
between
the
two
holes
on
the
hip
-pad
bracket.
This manual downloaded from http://www.manualowl.com
6.
Insert
the
carriage
bolt
through
the
holes
in
die
hip
-
pad
bracket
and
through
the
cylindrical
plastic
slees.v.
The
bolt
may
be
inserted
front
the
kill
or
(he
right.
7.
'Fighter,
the
hip
-pad
knob
onto
the
threaded
end
of
the
carriage
bolt.
This
will
secure
the
hip
pad
in
place.
1.
8.
Locate
the
jack
on
the
forward
side
of
the
upright
tube
(near
the
top).
Plug
the
other
end
of
the
electronics
cable
into
(his
lack
(Figure
12).
Workout
computer
Install
the
Workout
Computer
Remove
the
comenls
of
lite
electronics
package.
Press
on
the
tab
of
(he
battery
-ease
cover
and
remove
it
from
the
back
of
the
compuler.
Electronics
cable
3.
Insert
two
AA
-size
batteries
(not
included)
so
the
negative
ends
rest.
against.
Ole
springs
in
the
batter}
compartment.
Make
sure
the
batteries
conneet
on
both
the
positive
mid
negative
ends.
WARNING:
The
batteries
must
be
installed
as
instructed.
Do
not
carry
batteries
loose,
such
as
in
a
purse
or
pocket.
Batteries
may
explode
or
leak
and
cause
injury
if
inserted
improperly,
misused,
disposed
of
in
fire
or
recharged.
4.
Replace
the
battery
-case
cover.
5.
Plug
one
end
of
the
electronics
cable
into
tile
jack
on
the
back
of
the
computer.
6.
Bring
the
electronics
cable
through
the
opening
in
the
workout
-computer
faceplalc.
7.
Sol
the
computer
into
the
opening
in
the
workoul-
c.omputer
faceplate
(Figure
1
11.
Workout
-computer
Workout
computer
faceplate
.
WaikFif
Figure
11
•
Workout
Computer
CMC
I.A
-
TANcc
'DC
MIL=
Slot
for
radio
Figure
12
Upright
tube
9.
Follow
the
instructions
included
with
your
electronics
package
to
program
and
use
your
computer.
I
apse
the
slol
on
the
light
side
of
the.
faccplale
if
you
have
a
radio
or
tape
player
you
wand
to
use
during
your
workout
This manual downloaded from http://www.manualowl.com
Customize
Your
WalkFit
Classic
The
WallcFit.
Classic'
aerobic
exerciser
has
several
adjustable
features
to
accommodate
your
fitness
level.
The
Upper
-Body
Resistance
The
knob
to
adjust
the
upper
-body
resistance
is
located
at
the
bottom
of
the
upright
tube,
Turn
the
knob
clockwise
t.o
increase
the
resistance
and
counlercloc:kwisc
to
decrease
the
resistance
(Figure
D.
1s
i
Figure
1
The
Treadmill
Resistance
NOTE:
You
should
adjust
the
treadmill
resistance
only
while
you
ore
using
the
treadmill.
This
will
enable
you
to
easily
adjust
it
to
a
level
that
is
comfortable
for
you
and
will
prevent
unnecessary
wear
on
the
resistance
mechanism.
The
treadmill
tension
control
knob
is
found
on
the
top
of
the
upright
I
ube
next
to
the
computer
(Figure
2).
A
plastic,
protective
film
covers
the
treadmill
resistance
window.
You
may
remove
and
dispose
of
II.
While
walking
on
the
treadmill,
turn
the
knob
clockwise
to
increase
the
resistance
and
counterclockwise
to
decrease
resistance.
The
red
indicator
below
the
I
ension
control
knob
displays
your
resistance
—
the
more
red,
the
greater
the
resistance
(Figure
2).
NOTE:
You
may
need
to
turn
the
treadmill
tension
control
knob
quite
a
few
times
in
order
to
see
the
red
indicator
in
the
window.
Treadmill
tension
Treadmill
resistance
window
control
knob
(with
red
indicator)
z
-
wodcod
comp
?
*
SPIED
DISTANCt
Slot
for
radio
Figure
2
1)o
not
turn
the
knob
farther
clockwise
if
the
red
indicator
fills
the
window
below
the
treadmill
tension
control
knob.
Do
not
turn
the
knob
farther
counlerclockivise
if
the
red
indicator
does
not
appear
in
the
window.
The
Arm
-Exerciser
Poles
Lock
the
arm
-exerciser
poles
in
place
when
you
want
to
use
the
treadmill
alone
(lower
-body
exercise)
or
when
your
WalkFil
Classic:
is
not
in
use.
Unlock
the
poles
when
you
want
upper
-body
exercise
in
addition
to
the
lower
-
body.
treadmill
exercise.
Lock
the
Poles
in
Place
1.
Locate
the
arm
-exerciser
locking
pin
(Figure
Place
II
near
the
front
of
the
WalkFil
Classic.
Figure
3
2.
lIold
I
he
arm
-exerciser
poles
with
one
hand.
Turn
the
upper
-body
resistance
knob
unlit
the
arm
-
exerciser
poles
are
movable.
but
stable.
in
the
upright
position.
This manual downloaded from http://www.manualowl.com
3.
Choose
the
position
of
the
arm
-exerciser
poles
based
on
the
length
of
your
stride.
As
a
general
rule,
thc
longer
your
stride,
the
further
forward
you
should
position
the
arm
-exerciser
poles.
Lock
the
poles
in
the
center
hole
if
you
walk
with
a
long
stride.
Lock
the
poles
in
the
forward
position
if
you
want
to
run
on
the
treadmill
without
holding
on
to
the
poles.
4.
Align
the
slot
in
each
of
the
arm
-exerciser
poles
with
either
the
center
or
rear
set
of
locking
holes
in
the
upright
-tube
support
(Figure
4).
Forward
Center
Rear
)
Figure
4
Locking
holes
eh
Upright
-tube
support
Upper
-body
resistance
knob
3.
Hold
the
arm
-exerciser
poles
with
one
hand.
Use
your
other
hand
to
insert
the
uncapped
end
of
the
arm
-exerciser
locking
pin
completely
through
all
the
holes.
The
pin
should
fully
extend
through
the
slots
in
both
of
the
arm
-exerciser
poles.
6.
Rotate
the
arm
-exerciser
locking
pin
down
to
secure
it
in
place
(Figure
5).
The
capped
end
of
the
pin
should
be
perpendicular
to
the
base.
Forward
Center
Rear
44
%
)
tincoPPed
en
Arm-exeras
)
locking
pin
(capped
end)
Figure
5
7.
Make
sure
the
snap
buttons
at
the
bottom
of
the
upright
tube
are
fully
extended
on
both
sides
of
the
upright
-tube
support
and
locked
in
place.
Unlock
the
Poles
If
you
prefer
to
use
the
treadmill
in
combination
with
the
upper
-body
exerciser,
you
will
need
to
remove
thc
arm
-
exerciser
locking
pin
from
the
locking
holes.
1.
Hold
on
to
both
arm
-exerciser
poles
with
one
hand.
2.
Use
your
other
hand
to
remove
the
pin
from
the
locking
holes.
3.
Insert
the
arm
-exerciser
locking
pin
into
the
storage
holes
in
the
upright
-tube
support
(Figure
6).
Be
sure
the
capped
end
of
the
pin
extends
toward
the
front
of
the
base.
Locking
holes
)
Upright
-tube
support
pper-body
resistance
knob
Storage
holes
Figure
6
rm-exerciser
locking
pin
(capped
end)
4.
Turn
the
upper
-body
resistance
knob
to
adjust
the
arm
-exerciser
poles
to
the
desired
resistance
setting.
This manual downloaded from http://www.manualowl.com
The
Front
Elevation
You
can
change
the
front
elevation
of
your
Waikizil
Classic
"
to
►nary
your
workout.
The
eieval
ion
can
be
adjusted
from
six
to
eleven
degrees.
.
Till
the
VkialkFit
Classic
aerobic
exerciser
to
one
sidle
so
there
is
enough
clearance
I❑
raise
the
treadmill
deck
Oil
one
side.
Rotate
the
heal
side
of
the
pin
off
the
elevation
leg
to
release
the
easy
-lock
pin.
3.
Remo►
-e
the
easy
-lock
pin.
4.
Adjust
the
elevation
leg
10
the
desired
elevation
and
align
the
holes
in
the
ele►ation
leg
with
the
corresponding
holes
in
the
sleeve.
While
you
are
learning
to
use
the
Treadmill.
set
the.
elevation
In
the
third
hole
from
(lie
bottom
of
the
leg.
Later.
when
your
fitness
level
has
improved
and
you
want
a
more
intense
workout.
you
can
lower
the
ele►+ation
to
the
first
or
second
hole.
5.
Insert
die
straighl
end
of
an
easy
-lock
pin
completely
through
I
he
holes.
Be
sure
I
hal
the
end
of
the
pin
extends
completely
through
boll]
sides
of
he
front
elevation
leg.
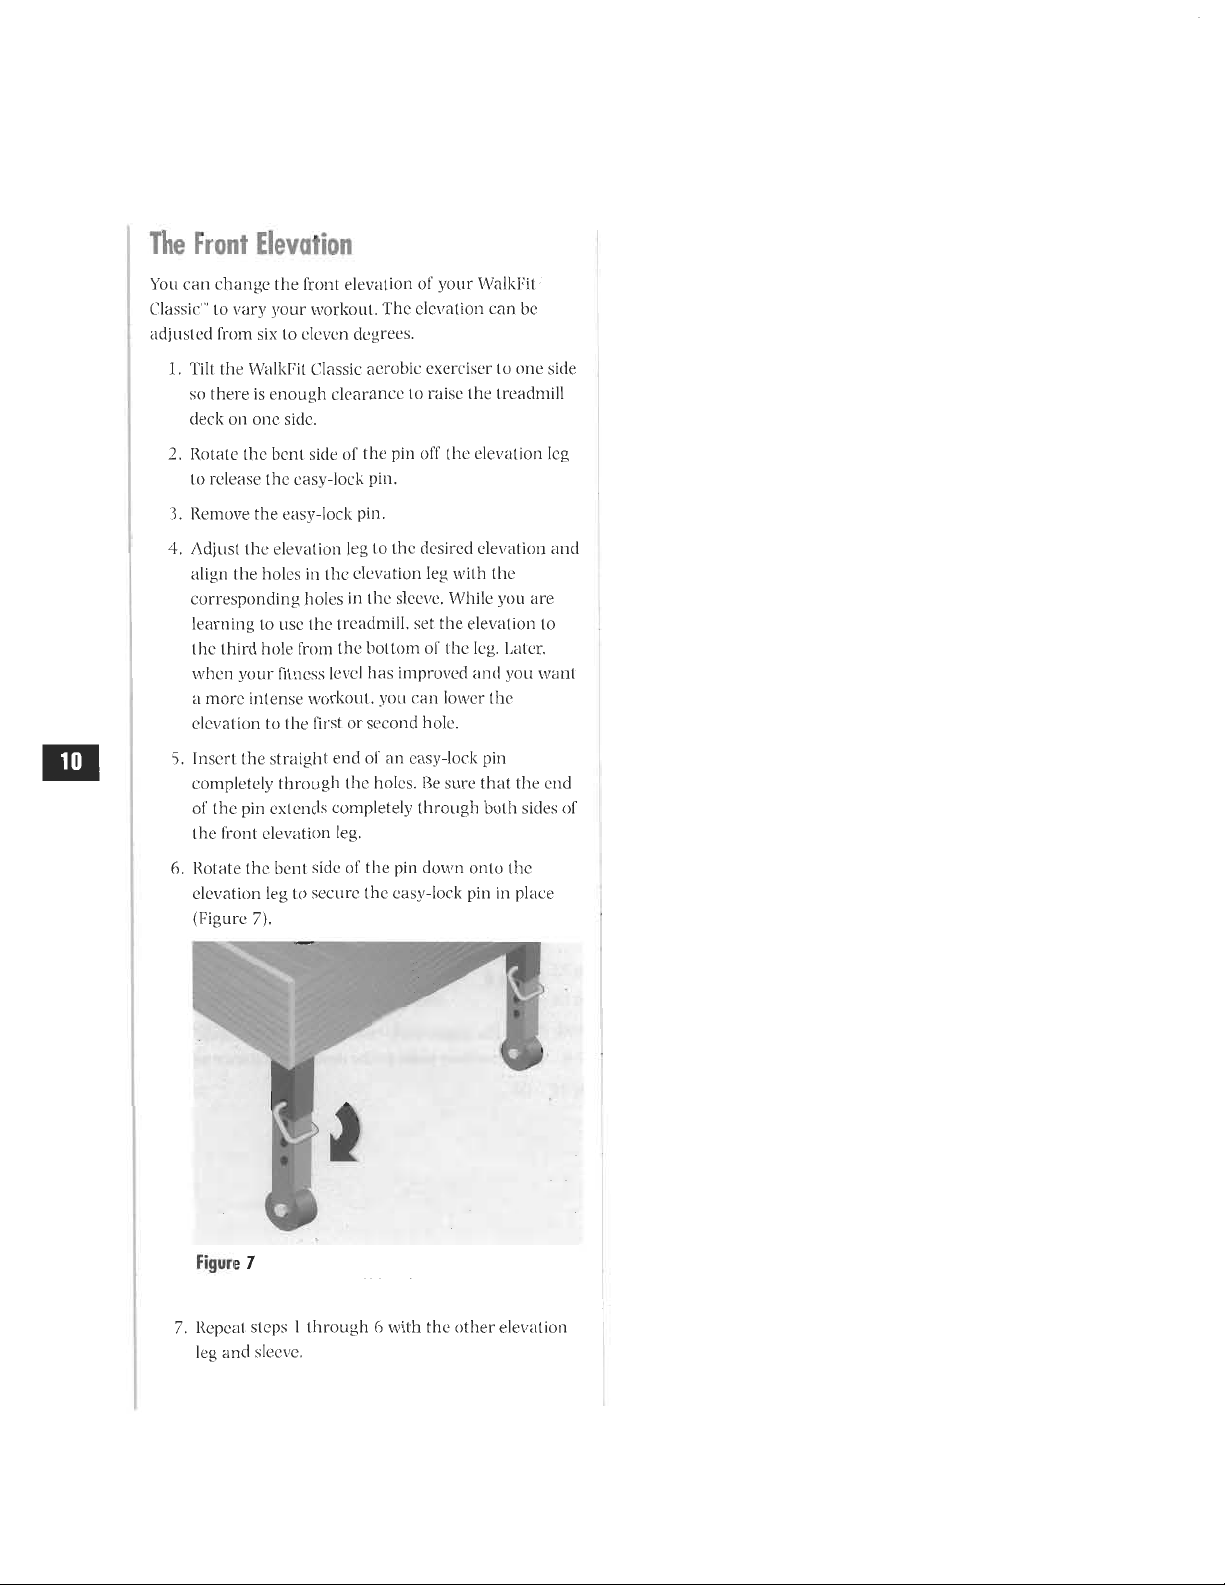
6.
Rotate
the
bent
side
of
!he
pin
down
onto
the
elevation
leg
to
secure
the
easy
-lock
pin
in
place
(Figure
7).
Figure
7
7.
Repeat
seeps
I
Ihrough
6
with
the
other
elevation
leg
and
sleeve.
This manual downloaded from http://www.manualowl.com
Fold
Your
WalkFit
Classic
for
Storage
ne
1ki7n
Classic
aerobic
exerciser
is
collapsible
for
convenient
storage.
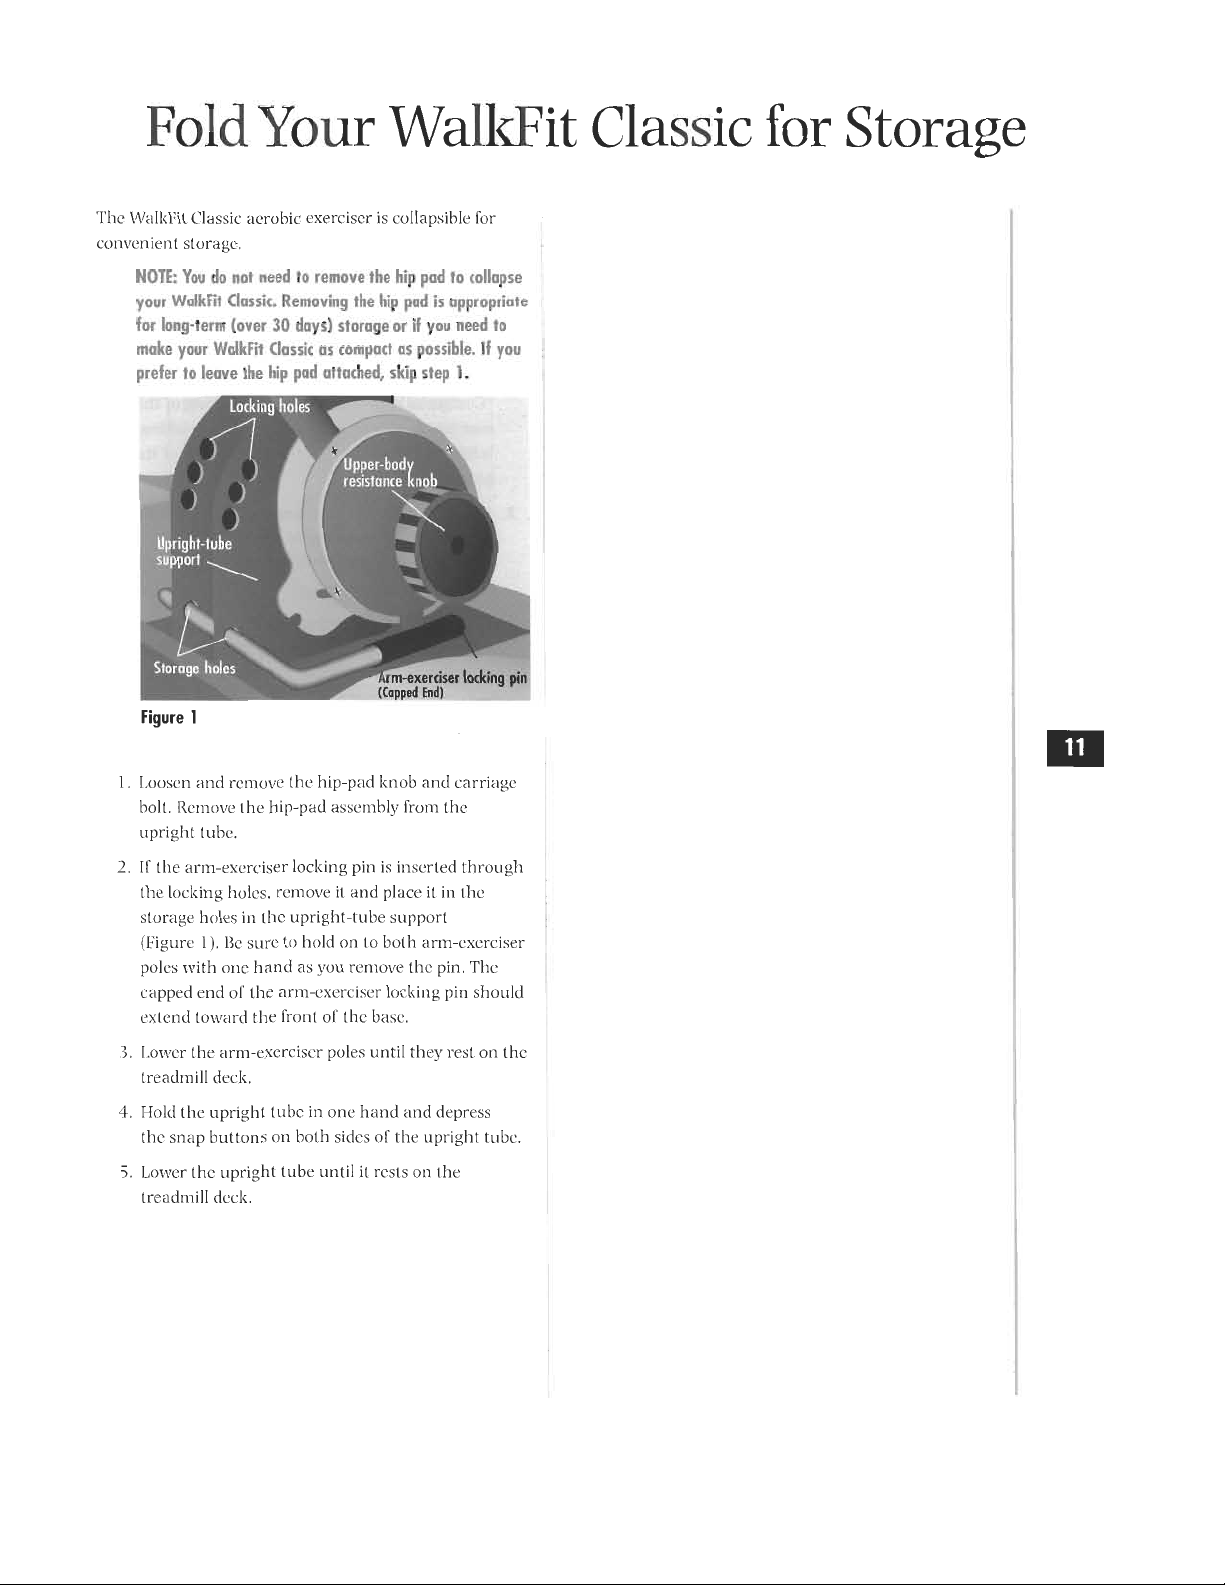
NOTE:
You
do
not
need
to
remove
the
hip
pad
to
collapse
your
WalkFit
Classic.
Removing
the
hip
pad
is
appropriate
for
long-term
(over
30
days)
storage
or
if
you
need
to
make
your
Ward
Classic
as
compact
as
possible.
If
you
prefer
to
leave
the
hip
pad
attached,
skip
step
1.
Locking
holes
)
Upright
-tube
support
Storage
holes
Figure
1
)
Upper
-body
resistance
knob
rm-exerciser
lock
(Capped
End)
1.
Loosen
and
remove
the
hip
-pad
knob
and
carriage
boll.
Remove
the
hip
-pad
assembly
from
the
uprig]il
tube.
2,
If
the
arm
-exerciser
locking
pin
is
inserted
through
the
locking
holes.
remove
it
and
place
it
in
the
storage.
holes
in
the
upright
-tube
support
(Figure
U.
Be
sure
to
hold
on
to
both
arm
-exerciser
poles
with
one
hand
as
you
remove
the
pin.
The
capped
end
01
the
arm
-exerciser
locking
pin
should
extend
toward
the
front
or
the
base.
3.
Lower
the
arm
-exerciser
poles
until
they
rest
on
the
treadmill
deck.
1.
Hold
the
upright
tube
in
one
hand
and
depress
the
snap
buttons
on
both
sides
of
the
upright
tube.
5.
Lower
the
upright
tube
until
it
rests
on
the
treadmill
deck.
This manual downloaded from http://www.manualowl.com

Operation
Before
You
Begin
CAUTION:
Keep
small
children
and
pets
away
from
the
moving
parts
of
the
exerciser
while
it
is
in
use.
1.
The
treadmill
bell
has
been
pre
-lubricated
at
our
factory.
Slightly
increase
the
lower
-body
or
treadmill
resistance
before
walking
on
the
treadmill
deck.
Use
caution
when
stepping
on
and
off
the
treadmill
deck.
You
may
want
to
hold
onto
the
locked
arm
-
exerciser
poles
as
you
get
on
and
off
the
exerciser.
Keep
a
protective
covering
under
your
exerciser
at
all
times.
Silicone
drippings
from
the
belt
or
deck
may
damage
your
flooring.
3.
Be
sure
there
is
enough
clearance
for
the
flywheel
to
turn.
There
should
be
at
least
1/2
-inch
between
the
flywheel
and
the
floor.
When
the
WalkFir-
Classic
—
is
on
carpeting,
the
flywheel
may
touch
the
carpet.
If
this occurs,
try
increasing
the
elevation
to
raise
up
the
flywheel.
Or
move
the
exerciser
to
flatter
carpeting
or
an
uncarpeted
surface.
4.
Check
to
make
sure
that
the
drag
strap
is
properly
adjusted.
There
should
be
no
more
than
one-half
inch
to
one
inch
of
strap
through
the
buckle
when
the
leg
-resistance
knob
is
turned
to
its
lowest
level.
Adjust
the
drag
strap
accordingly
if
there
is
more
than
one
inch
or
less
than
one-half
inch.
2.
5.
Make
sure
the
snap
buttons
at
the
bottom
of
the
upright
tube
are
fully
extended
on
both
sides
of
the
tube
and
locked
in
place.
6.
Adjust
the
upper
-body
resistance,
treadmill
resistance,
arm
-exerciser
poles
and
hip
pad
to
a
position
that
is
comfortable
for
you,
We
recommend
starting
with
the
front
elevation
adjusted
to
the
third
hole
from
the
bottom
of
the
leg.
Later,
when
your
fitness
level
has
increased
and
you
want
a
more
intense
workout,
you
can
lower
the
elevation
to
the
first
or
second
hole.
Follow
the
instructions
on
page
10
to
adjust
the
elevation.
IMPORTANT:
It
is
essential
to
warm
up
and
stretch
your
muscles
before
exercising.
Follow
the
guidelines
on
pages
15
through
18.
Start
With
the
Leg
Motion
Only
NOTE
You
may
want
to
hold
on
to
the
locked
arm
poles
as
you
get
on
and
off
the
machine.
1.
Lock
the
arm
-exerciser
poles
in
place.
Place
the
arm
-exerciser
poles
in
either
the
rear
or
center
locking
positions
as
described
in
the
"Customize
Your
WaIkrit
Classic"
section
of
this
manual.
Be
sure
that
the
arm
-exerciser
locking
pin
is
fully
extended
through
the
slots
in
both
of
the
arm
-exerciser
poles.
2.
Adjust
the
front
elevation
to
the
third
hole
from
the
bottom
of
each
elevation
leg.
You
may
wish
to
try
a
different
elevation
after
you
get
comfortable
walking
on
the
treadmill
surface.
3.
Check
to
make
sure
that
the
hip
pad
is
properly
adjusted.
The
top
of
the
hip
pad
should
rest
at
hip
level,
about
one
inch
below
your
navel.
It
should
be
high
enough
so
that
it
does
not
restrict
leg
movement.
4.
Grasp
the
arm
-exerciser
poles
in
a
grip
that
is
comfortable
for
you,
S.
Gently
rest
your
hips
against
the
hip
pad.
Check
to
make
sure
the
hip
pad
is
properly
adjusted
(Figure
1).
The
top
of
the
hip
pad
should
rest
at
hip
level,
about
one
inch
below
your
navel.
It
should
be
high
enough
so
that
it
does
not
restrict
leg
movement.
NOTE:
The
upright
tube
mid
hip
pad
were
designed
to
flex
while
you
work
aut.
Too
high
ti
-
7'
Figure
1
dr
lx
Too
low
c'c
1
Just
right
This manual downloaded from http://www.manualowl.com
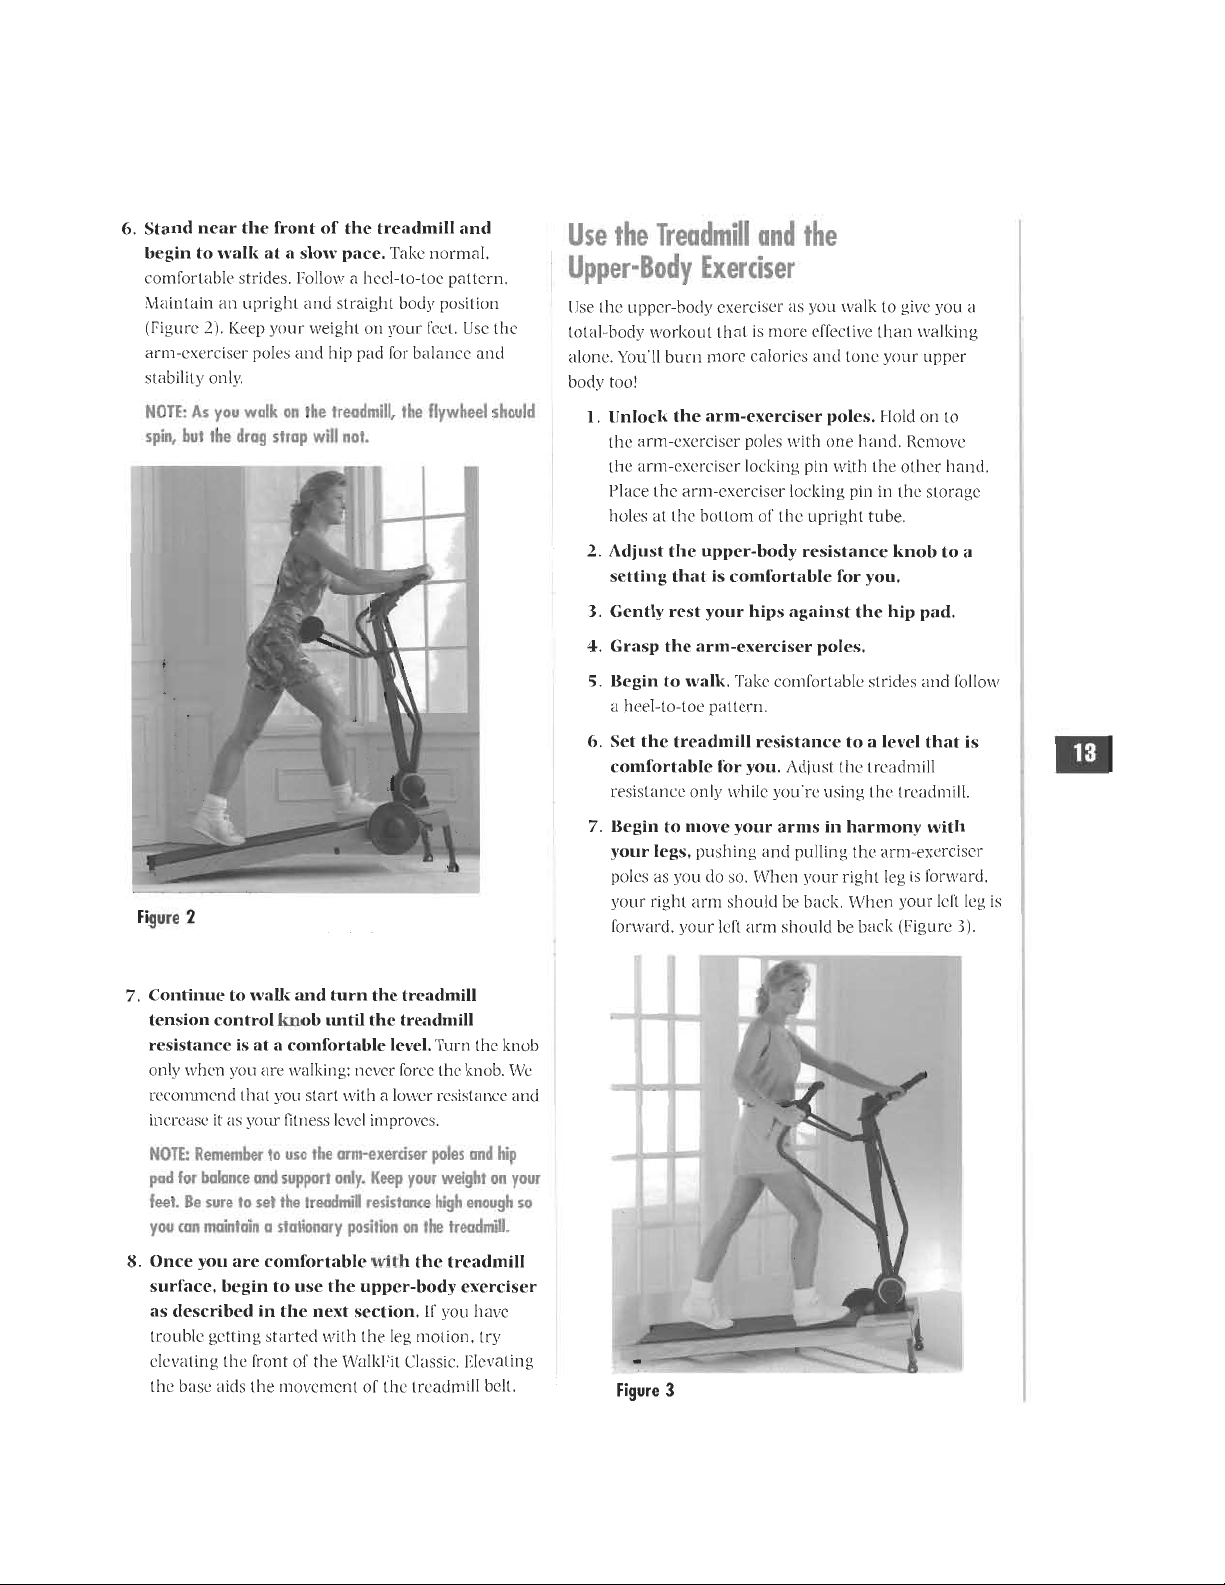
6.
Stand
near
the
front
of
the
treadmill
and
begin
to
walk
at
a
slow
pace.
Take
normal.
comfortable
strides.
Follow
a
heel
-lo
-toe
pattern.
Maintain
an
upright
and
straight
body
position
(Figure
2).
Keep
your
weight
on
your
feet.
Ilse
the
arm
-exerciser
poles
and
hip
pad
for
balance
and
stability
only.
NOTE:
As
you
walk
on
the
treadmill,
the
flywheel
should
spin,
but
the
drag
strap
will
not.
Figure
2
7.
Continue
to
walk
and
turn
the
treadmill
tension
control
knob
until
the
treadmill
resistance
is
at
a
comfortable
level.Tum
the
knob
only
when
You
are
Walking:
never
force
the
knob.
We
recommend
that
you
start
with
a
lower
resistance
and
increase
it
as
your
fitness
level
improves.
NOTE:
Remember
to
use
the
arm
-exerciser
poles
and
hip
pod
for
balance
and
support
only.
Keep
your
weight
on
your
feet.
Be
sure
to
set
the
treadmill
resistance
high
enough
so
you
can
maintain
a
stationary
position
on
the
treadmill.
8.
Once
you
arc
comfortable
with
the
treadmill
surface,
begin
to
use
the
upper
-body
exerciser
as
described
in
the
next
section.
If
you
have
trouble
getting
started
with
the
leg
motion.
try
elevating
the
front
or
the
WalkFil
Classic.
Elevating
the
base
aids
the
movement
of
the
treadmill
belt.
Use
the
Treadmill
and
the
Upper
-Body
Exerciser
Use
Ilnc
upper
-body
exerciser
as
you
walk
to
give
you
a
total
-body
workout
that
is
more
effective
than
walking
alone.
You'll
burn
more
calories
and
tone
your
upper
body
tool
I,
Unlock
the
arm
-exerciser
poles.
I
fold
on
to
the
arm
-exerciser
poles
with
one
hand.
Remove
the
arm
-exerciser
locking
pin
with
the
other
hand.
Place
the
arm
-exerciser
locking
pin
in
the
storage
holes
at
the
bottom
of
the
upright
tube,
2.
Adjust
the
upper
-body
resistance
knob
to
a
setting
that
is
comfortable
for
you.
3,
Gently
rest
your
hips
against
the
hip
pad.
4.
Grasp
the
arm
-exerciser
poles.
5.
Begin
to
walk.
Take
comfortable
strides
and
a
heel
-to
-toe
pattern'.
6.
Set
the
treadmill
resistance
to
a
level
that
is
comfortable
for
you.
Adjust
the
treadmill
resistance
only
while
you're
using
the
treadmill.
7.
Begin
to
more
your
arms
in
harmony
with
your
legs,
pushing
and
pulling
the
arm
-exerciser
poles
as
you
do
so.
When
your
right
log
is
forward.
your
right
aria
should
be
back.
When
your
left
leg
is
forward.
your
left
arm
should
be
back
(Figure
3).
Figure
3
This manual downloaded from http://www.manualowl.com
It
may
help
you
to
envision
your
right
leg
coming
to
meet
your
right
arm
and
your
left
leg
coming
to
meet
your
left
arm.
Do
not
bring
the
poles
so
far
back
that
they
hit
your
body.
Keep
your
weight
on
your
feet.
Use
the
arm
-exerciser
poles
and
hip
pad
for
balance
and
stability
only.
NOTE:
If
you
are
unable
to
achieve
or
maintain
o
smooth,
rhythmic
stride,
it
may
be
easier
to
get
the
treadmill
belt
moving
if
you
adjust
the
elevation
to
a
higher
level.
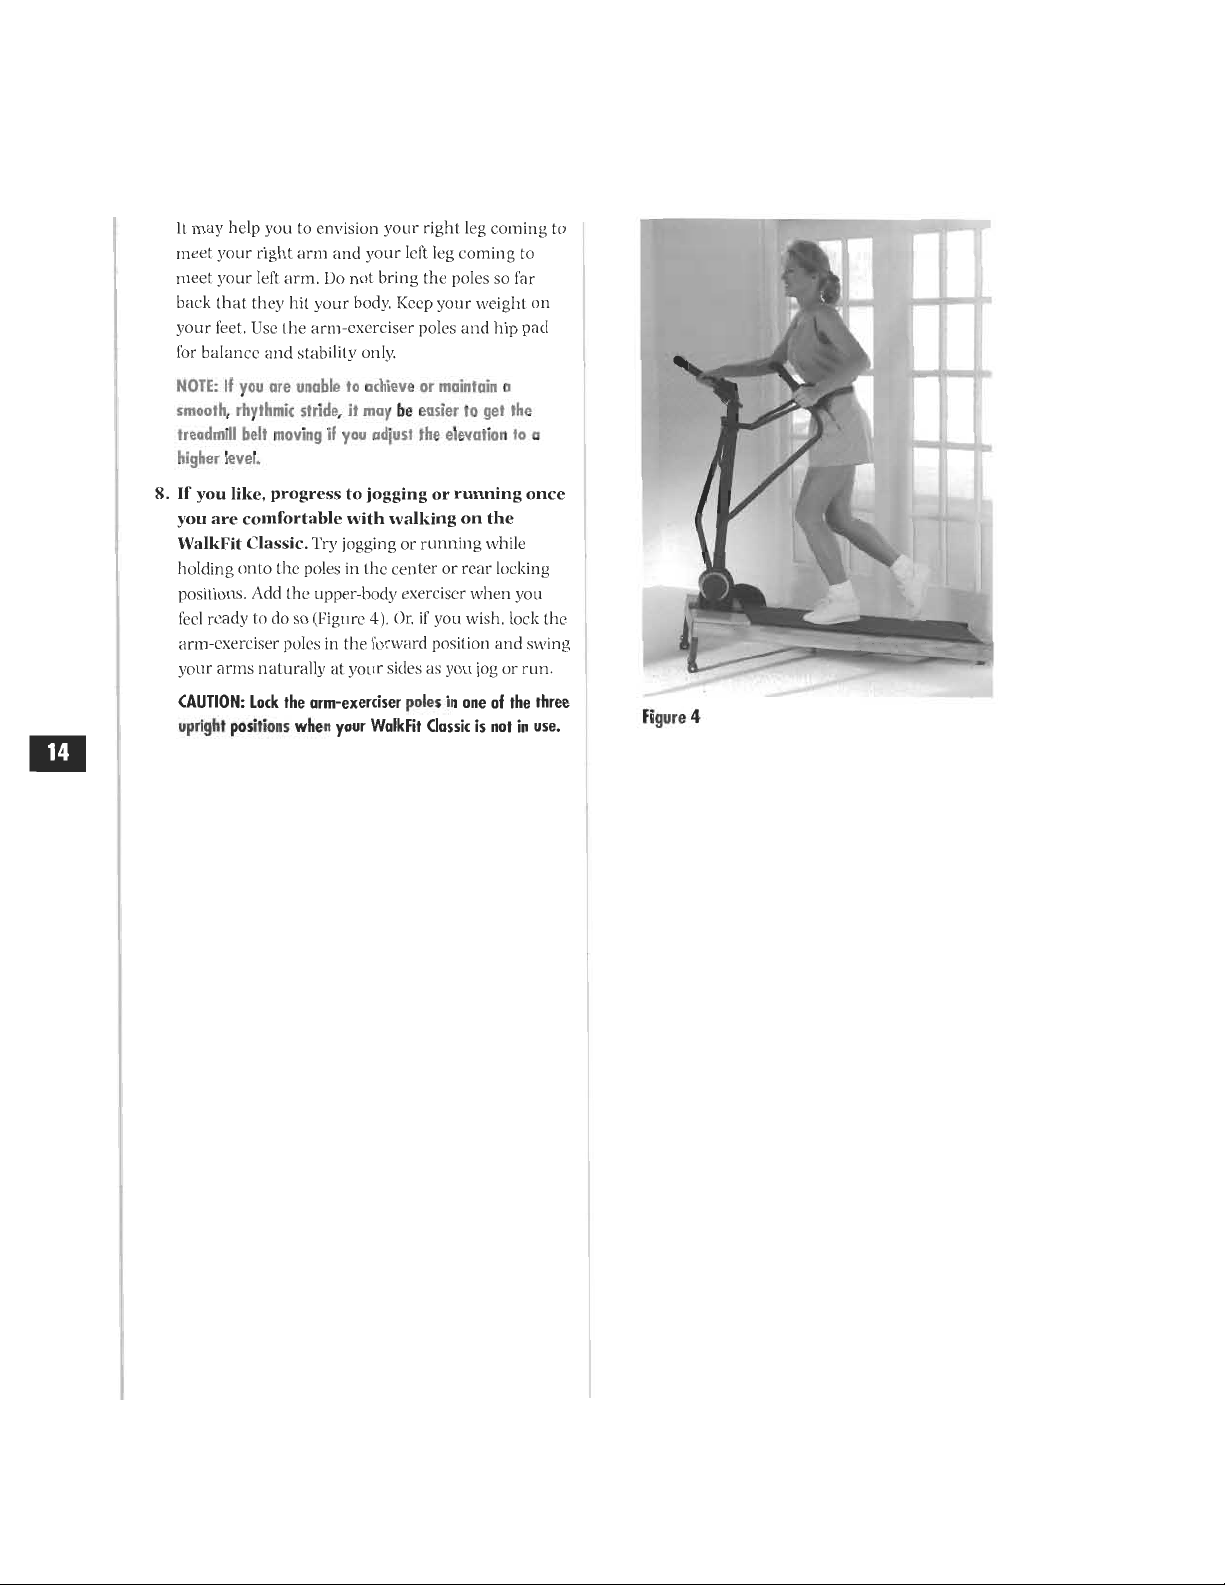
8.
If
you
like,
progress
to
jogging
or
running
once
you
are
comfortable
with
walking
on
the
WalkFit
Classic.
Try
jogging
or
running
while
holding
onto
the
poles
in
the
center
or
rear
locking
positions.
Add
the
upper
-body
exerciser
when
you
feel
ready
to
do
so
(Figure
4).
Or,
if
you
wish,
lock
the
arm
-exerciser
poles
in
the
forward
position
and
swing
your
arms
naturally
at
your
sides
as
you
jog
or
run.
CAUTION:
Lock
the
arm
-exerciser
poles
in
one
of
the
three
upright
positions
when
your
WalkFit
Classic
is
not
in
use.
14
Figure
4
This manual downloaded from http://www.manualowl.com
Your
Personal
Fitness
Program
This
section
was
developed
by
exercise
physiologists
at
The
National
Exercise
For
Life
Institute
to
help
maximize
your
use
and
enjoyment
of
the
WalkFit
Classic
"
aerobic
exerciser.
We
recommend
that
you
consult
your
physician
before
beginning
any
exercise
program.
Set
Goals
for
Yourself
Finding
the
motivation
to
exercise
and
make
positive
lifestyle
changes
can
be
challenging.
Set
attainable.
realistic
goals
and
reward
yourself
when
you
reach
them.
Below
are
some
examples
of
typical
goals
•
P.nhanced
quality
of
life
•
Improved
personal
appearance
•
1•Veight
managemenl
•
Greater
muscle
tone
and
strength
•
Improved
stamina
and
athletic
performance
Exercise
Progression
The
purpose
of
an
exercise
program
is
to
develop
physical
fitness.
A
program
consists
of
six
essential
parts
which
should
be
performed
in
the
following
order:
1.
Ill/arm-up
2.
Stretching
3.
Aerobic
conditioning
.1.
Cool
-down
5.
Strength
conditioning
6.
Stretching
1.
Warm
-Up
The
warm-up
prepares
your
body
and
mind
for
vigorous
exercise.
It
is
your
best
insurance
against
unnecessary
injury
and
muscle
soreness
—
common
reasons
for
quitting
an
exercise
program.
We
suggest
that
you
warm
up
with
three
to
five
minutes
of
slow
exercise
on
your
Bait
Classic
aerobic
exerciser.
2.
Stretching
Stretching
prepares
your
muscles
for
the
activity
they
will
be
undertaking.
A
pliable,
well
-stretched
muscle
is
less
susceptible
to
injury,
Recommended
sl
retches
arc
described
on
page
18.
3.
Aerobic
Conditioning
'lb
create
the
desired
improvements
in
personal
heall11.
aerobic
conditioning
must
include
the
proper
frequency.
duration
and
intensity
Frequency
Frequency
refers
to
the
number
of
workouts
per
week.
The
recommet
ided
number
of
workouts
is
three
to
five
days
per
week.
However.
fottr
Iii
five
workouts
per
week
istaximix,cs
fat
reduction
and
cardiovascular
development.
Duration
Duration
is
the
amount
of
time
that
the
proper
intensity
level
is
maintained.
The
timer
function
of
the
computer
can
help
you
track
your
workout
duration.
Beginners
should
start
with
10
to
20
minutes
of
aerobic
activity;
those
in
average
physical
condition
should
exercise
fife
21)
to
10
minutes:
and
highly
fit
people
should
work
out
for
30
to
60
minutes.
Intensity
Intensity
refers
to
how
hard
you
exercise
and
is
determined
by
monitoring
your
hearl
rule.
See
the
section
on
I
he
next
page.
Monitoring
.
,
Your
Ifeart
Rate.
4.
Cool
-Down
[t
is
importanl
to
cool
down
in
order
to
slowly
decrease
your
heart
rate
after
it
has
been
elevated.
'I'his
is
most
effectively
and
safely
done
by
keeping
your
legs
moving
al
a
slower
pace
for
at
least
five
r1iimiles
following
the
aerobic
phase.
5.
Strength
Conditioning
A
strength
-conditioning
program
is
an
essential
component
of
any
exercise
program.
It
adds
lean
muscle
mass
to
the
body
and
aids
in
burning
body
lat.
6.
Stretching
Stretching
alter
exercise
helps
decrease
muscle
soreness.
We
recommend
that
you
complete
the
stretches
described
on
page
i
S.
This manual downloaded from http://www.manualowl.com
Monitoring
Your
Heart
Rate
Monitoring
your
heart
rate
is
a
crucial
part
of
any
exercise
program.
There
are
three
key
I
arms
to
understand
when
monitoring
your
heart
rate:
resting
heart
rate.
maximum
heart
rate
and
target
heart
rate.
Resting
Heart
Rate
Take
your
heart
rate
before
you
begin
to
work
out.
This
is
your
resting
heart
rale.
After
you
have
finished
your
aerobic
workout
and
cool
-down.
take
your
heart
rate
again.
If
you
have
cooled
down
properly.
your
heart
rate
should
have
nearly
returned
to
its
resting
heart
rate,
it
is
very
important
that
you
cool
down
slowly
in
order
to
return
to
your
resting
heart
rate.
As
you
become
more
fit.
your
resting
heart
rale
may
actually
decrease.
You
may
also
notice
that
your
heart
rate
begins
to
return
to
its
resting
heart
rate
more
quickly
during
your
cool
-down.
Maximum
Heart
Rate
(MHR)
Your
maximum
heart
rate
is
the
maximum
number
of
times
that
your
heart
can
"pump"
during
a
minute.
To
determine
your
approximate
maximum
heart
rate.
subtract
your
age
tin
years)
from
220.
This
will
give
you
a
fairly
accurate
maximum
heart
rate
number.
but
only
clinical
stress
testing
can
provide
a
precise
MIR
reading,
Target
Heart
Rate
Your
target
heart
rate
is
expressed
as
a
percentage
or
your
maximum
heart
rate,
We
recommend
that
you
strive
to
exercise
at
70')4,
10
85%
of
your
maximum
heart
rate.
Beginning
exercisers.
however.
may
need
to
start
out
with
a
target
heart
rate
of
60%
to
70%
of
their
maximum
heart
rate.
The
chart
on
the
next
page
shows
target
heart
rate
ranges
for
beginner.
intermediate
and
advanced
exercisers.
Lse
the
chart
to
determine
the
proper
target
heart
rate
for
your
workouts.
We
recommend
that
you
check
your
target
heart
rate
at
least
twice
during
each
aerobic
conditioning
session.
First,
check
it
to
he
sure
that
you
have
reached
the
proper
intensity.
Then.
check
it
near
the
end
of
your
workout
to
verify
that
you
have
maintained
your
target
heart
rate
for
the
recommended
period
of
lime.
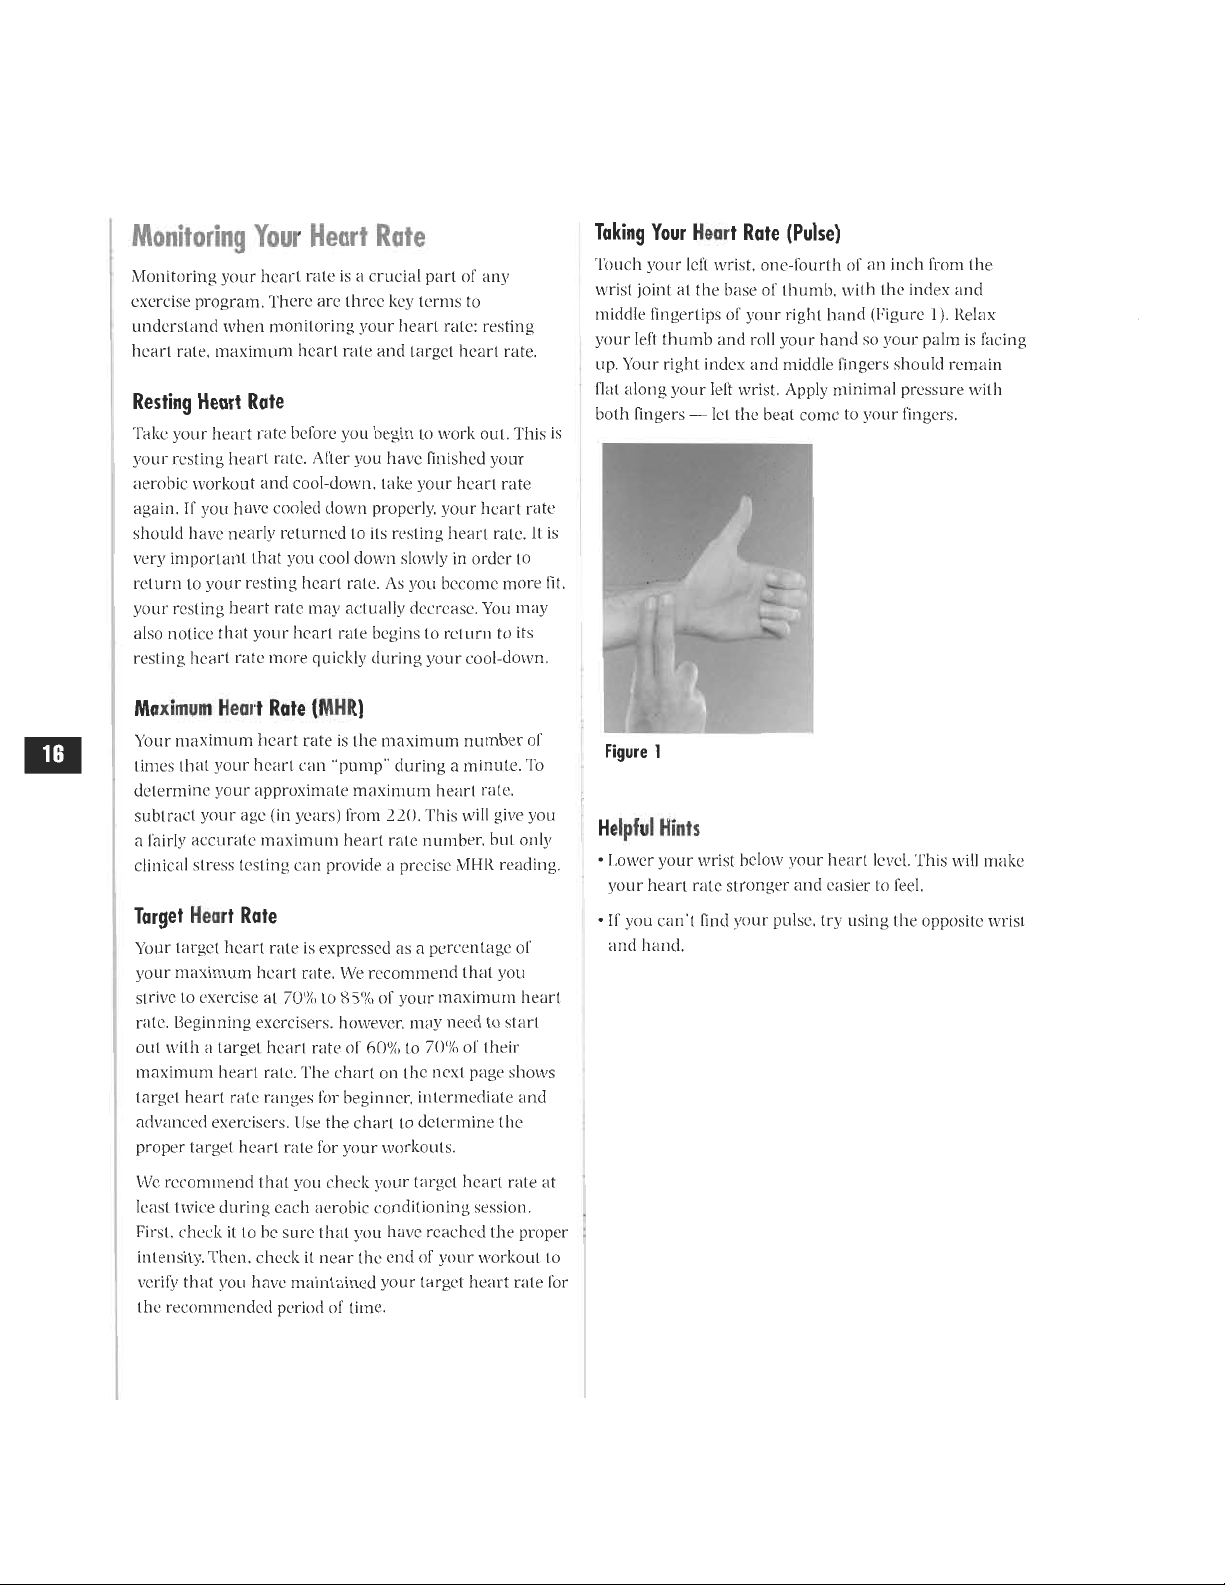
Taking
Your
Heart
Rate
(Pulse)
Touch
your
left
wrist.
one-fourth
of
an
inch
from
the
wrist
joint
al
the
base
of
thumb,
with
the
index
and
middle
fingertips
of
your
right
hand
(Figure
1).
Relax
your
left
thumb
and
roll
your
hand
so
your
palm
is
facing
up.
Your
right
index
and
middle
lingers
should
remain
flat
along
your
felt
wrist.
Apply
minimal
pressure
with
both
fingers
—
let
the
beat
conic
to
your
fingers.
Figure
1
Helpful
Hints
•
Lower
your
wrist
below
:
your
heart
level.
This
;kW
make
your
heart
rate
stronger
and
easier
to
feel
•
If
you
can't
find
your
pulse,
try
musing
the
opposite
wrist
and
hand.
This manual downloaded from http://www.manualowl.com
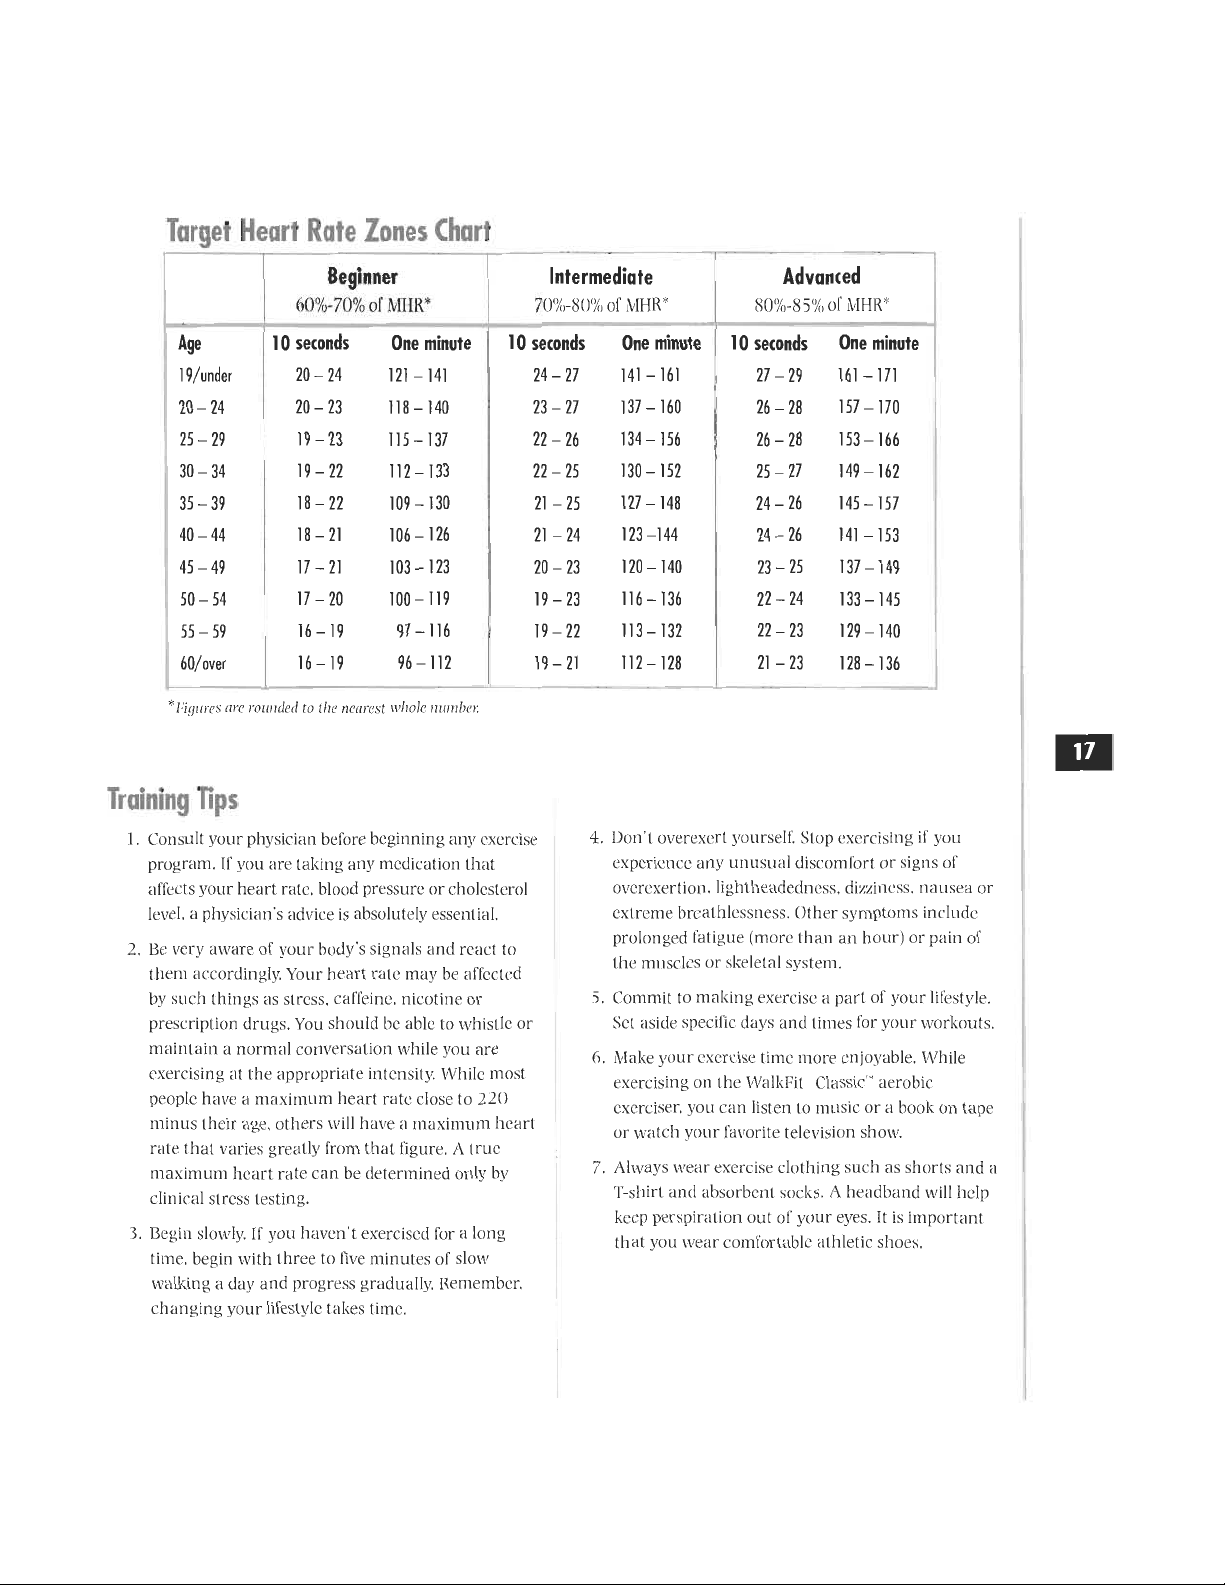
Target
Heart
Rate
Zones
Chart
Beginner
60%-70%
of
iMIHR*
Intermediate
70%-80%
of
NIFIR''
Advanced
80%-85%
of
MFIR*
Age
10
seconds
One
minute
10
seconds
One
minute
10
seconds
One
minute
19/under
20-24
121-141
24-27
141-161
27-29
161-171
20-24
20-23
118-140
23-27
137-160
26-28
157-170
25-29
19-23
115-137
22-26
134-156
26-28
153-166
30-34
19-22
112-133
22-25
130-152
25-27
149-162
35-39
18-22
109-130
21-25
127-148
24-26
145-157
40-44
18-21
106-126
21-24
123-144
24-26
141-153
45-49
17-21
103-123
20-23
120-140
23-25
137-149
50-54
17
-20
100-119
19
-23
116-136
22-24
133-145
55-59
16-19
97-116
19-22
113-132
22-23
129-140
60/over
16-19
96-112
19-21
112-128
21-23
128-136
*Figures
are
rounded
to
the
nearest
whole
number
Training
Tips
1.
Consult
your
physician
before
beginning
any
exercise
program.
If
you
are
taking
any
medication
that
affects
your
heart
rate,
blood
pressure
or
cholesterol
level,
a
physician's
advice
is
absolutely
essential.
2.
Be
very
aware
of
your
body's
signals
arid
react
to
them
accordingly
Your
heart
rate
may
be
affected
by
such
things
as
stress,
caffeine,
nicotine
or
prescription
drugs.
You
should
be
able
to
whistle
or
maintain
a
normal
conversation
while
you
are
exercising
at
the
appropriate
intensity.
While
most
people
have
a
maximum
heart
rate
close
to
220
minus
their
age,
others
will
have
a
maximum
heart
rate
that
varies
greatly
from
that
figure.
A
true
maximum
heart
rate
can
be
determined
only
by
clinical
stress
testing.
3.
Begin
slowly.
If
you
haven't
exercised
for
a
long
time,
begin
with
three
to
five
minutes
of
slow
walking
a
day
and
progress
gradually.
Remember.
changing
your
lifestyle
takes
time.
4.
Don't
overexert
yourself.
Stop
exercising
if
you
experience
any
unusual
discomfort
or
signs
of
overexertion,
lightheadedness,
dizziness,
nausea
or
extreme
breathlessness.
Other
symptoms
include
prolonged
fatigue
(more
than
an
hour)
or
pain
of
the
muscles
or
skeletal
system.
5.
Commit
to
making
exercise
a
part
of
your
lifestyle.
Set
aside
specific
days
and
times
for
your
workouts.
6.
Make
your
exercise
time
more
enjoyable.
While
exercising
on
the
WalkFit
Classic'
aerobic
exerciser,
you
can
listen
to
music
or
a
book
on
tape
or
watch
your
favorite
television
show.
7.
Always
wear
exercise
clothing
such
as
shorts
and
a
T-shirt
and
absorbent
socks.
A
headband
will
help
keep
perspiration
out
of
your
eyes.
It
is
important
that
you
wear
comfortable
athletic
shoes.
This manual downloaded from http://www.manualowl.com
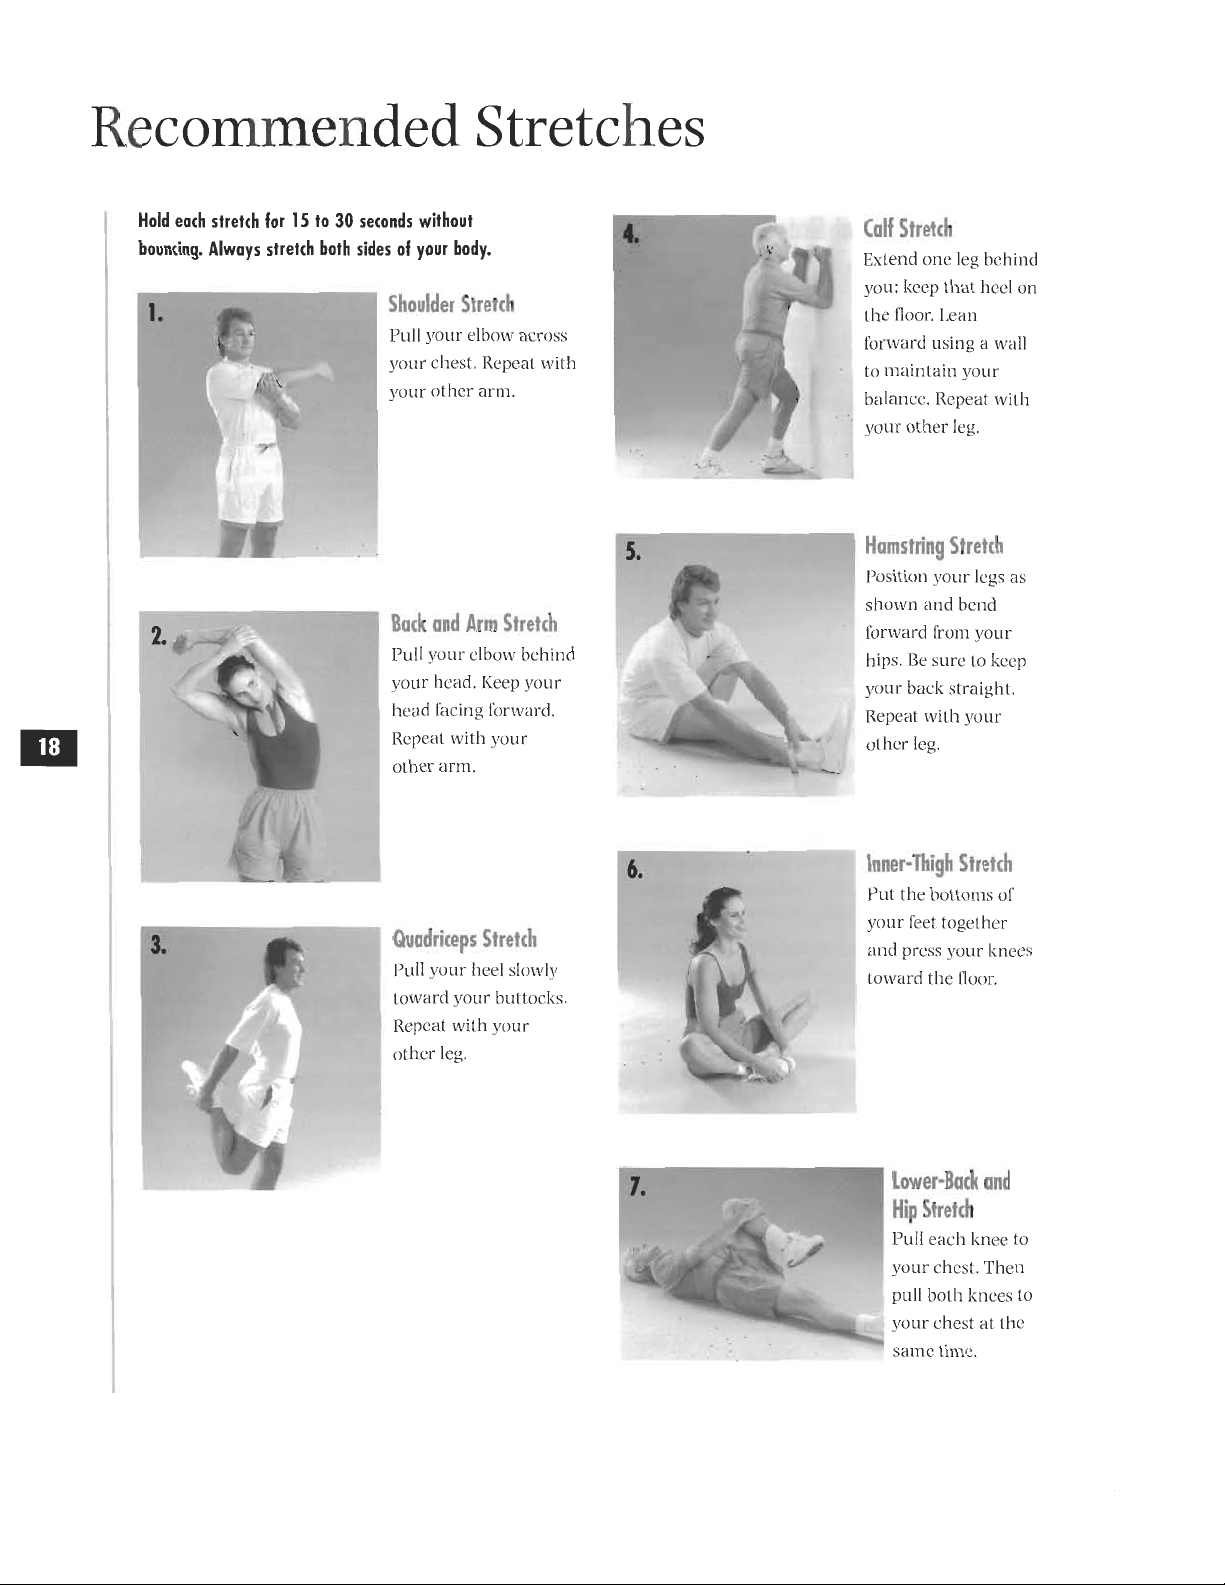
Recommended
Stretches
Hold
each
stretch
for
15
to
30
seconds
without
bouncing.
Always
stretch
both
sides
of
your
body.
,
Shoulder
Stretch
Pull
your
elbow
across
your
chest.
Repeat
with
your
other
arm.
Back
and
Arm
Stretch
Pull
your
elbow
behind
your
head.
Keep
your
head
facing
forward.
Repeat
with
your
other
arm.
Ouadriceps
Stretch
Pull
your
heel
slowly
toward
your
buttocks.
Repeat
with
your
other
leg.
Calf
Stretch
Extend
one
leg
behind
you;
keep
that
heel
on
the
floor.
Lean
forward
using
a
wall
to
maintain
your
balance.
Repeat
with
your
other
leg.
Hamstring
Stretch
Position
your
legs
as
shown
and
bend
forward
from
your
hips.
Be
sure
to
keep
your
back
straight.
Repeat
with
your
other
leg.
Inner
-Thigh
Stretch
Put
the
bottoms
of
your
feet
together
and
press
your
knees
toward
the
floor.
Lower•Back
and
Hip
Stretch
Pull
each
knee
to
your
chest.
Then
pull
both
knees
to
your
chest
at
the
same
time.
This manual downloaded from http://www.manualowl.com
Essentials
of
Weight
Management
Being
overweight
is
risky
business.
Obesity
increases
your
risk
of
high
blood
pressure
and
diabetes.
It
may
also
raise
your
blood
cholesterol
and
triglyceride
levels.
These
factors
add
up
to
a
higher
risk
of
heart
disease
and
stroke.
What's
the
Ideal
Weight
for
You?
Ideal
body
weight
varies
from
person
to
person.
depending
On
genetics,
height
and
body
structure.
Height
aud
weight
tables
that
attempt
to
predict
ideal
body
weight
based
solely
oil
body'
height
can
be
misleading.
Rather
than
focusing
on
weight
alone,
you
should
concentrate
on
your
body
composition:
the
percentage
of
your
weight
that
is
coming
from
fat.
Ideally,
a
man's
body
tat
should
he
15
to
20
percent
of
his
total
weight.
A
woman's
body
Pat
should
be
between
20
and
25
percent
of
her
total
body
weight.
Diets
Alone
Don't
Work.
There
are
Ito
miracle
diets
that
can
help
you
lose
weight.
Diet
plans
low
in
calories
may
achieve
some
weight
loss,
but
they
make
it
hard
to
gel
all
the
nutrients
that
you
need.
And
crash
diets
fail
because
they
don't
change
your
eating
habits
permanently.
Proper
weight
loss
and
management
occurs
with
a
combination
of
a
sensible
diet
and
aerobic
exercise.
That
sounds
simple
enough,
but
if
you
have
ever
tried
to
lose
weight
you
know
that
it
takes
motivation
and
determination!
Exercise
Helps
You
Keep
it
Off.
Proper
weight
loss
occurs
at
a
rate
of
one
to
two
pounds
per
week.
Long-term
success
depends
on
proper
eating
habits
complemented
by
a
regular
exercise
routine.
Exercise
helps
you
burn
calories
both
during
and
after
exercisc„Aerobic
exercise
is
oily
of
the
best
types
of
exercises
you
can
perforin.
The
most
effective
known
forms
of
aerobic
exercise
are
cross-country
skiing,
running
(jogging).
rowing.
biking
and
brisk
walking.
Spot
Reduction
is
a
Myth.
Exercising
one
part
of
your
body
won't
take
off
the
fat
in
that
specific
area.
In
fact.
research
shows
that
the
areas
in
which
you
gain
and
lose
fat
are
genetically
determined.
Only
a
regular
program
of
exercise
and
a
nutritious
diet
can
assure
you
of
a
healthy.
safe
and
natural
weight
loss.
The
fastest
way
to
a
trim
tummy
or
firm
thighs
is
a
regular
program
of
total
-body
aerobic
conditioning.
Plus.
you'll
be
pleasantly
surprised
when
the
weight
conies
off
in
other
places!
Exercise
for
Weight
Loss.
Consistent
exercise
at
the
proper
intensity.
combined
with
a
sensible
diet,
will
create
a
calorie
deficit
and
result
in
weight
loss.
An
ideal
program
for
weight
loss
is
to
exercise
at
au
intensity
of
70
to
S5
percent
of
your
Maximum
Heart
Rate
(MHEki
for
30
to
60
minutes
four
to
fi
ve
times
a
week.
(Beginning
exercisers
may
need
to
start
al
6O
to
70
percent
of
their
MI
IR
and
progress
to
the
higher
intensity)
Participatilig
in
0
strength
conditioning
program
on
an
every
-other
-day
basis
can
also
supplement
this
type
of
trainii
ig
by
increasing
your
muscle
mass.
which
is
your
body's
primary
cillorie
Make
Exercise
a
Way
of
Life.
The
"yo-yo"
cycle
of
weight
loss
is
not
only
stressful
mentally.
it
also
takes
its
toll
on
the
heart.
In
the
long
run.
the
only
way
to
slay
healthy
is
to
make
exercise
a
way
of
life,
Instead
of
thinking
of
exercise
as
a
chore.
think
of
it
as
a
way
to
jump
start
:%701.1r
morning
or
HS
your
lime
10
unwind.
Ironically.
when
people
feel
they
arc
too
busy
or
too
stressed
Out
to
exercise,
that's
exactly
when
they
need
it
the
most.
Exercise
provides
natural
stress
relief
in
the
form
of
endorphins,
your
body's
own
painkillers.
Your
body
releases
endorphins
when
you
exercise.
So.
the
next
time
you
feel
too
busy
or
stressed
out
to
exercise.
remember
that
exercise
is
"nature's
best
tranquilizer."
This manual downloaded from http://www.manualowl.com
Workout
Programs
When
you
begin
an
exercise
program,
five
to
ten
minutes
of
exercise
may
be
sufficient.
Slowly
increase
your
workout
duration
as
you
are
able
to
do
so.
Take
rest
periods
if
you
need
them.
Standard
Workout
Programs
Beginner
Walking
(poles
locked
in
place):
10
minutes
Walking
while
using
arm
-exerciser
poles:
10
minutes
Frequency:
2
—
3
days
per
week
Intensity:
60%
-
70%
of
your
maximum
heart
rate
Duration:
20
minutes
NOTE:
If
you
hove
trouble
getting
started
on
the
treadmill,
try
elevating
the
front
of
the
Wa&fir
Classic'.
When
the
base
is
elevated,
gravity
aids
the
movement
of
the
treadmill
belt.
Intermediate
Walking
(poles
locked
in
place):
15
—
20
minutes
Walking
while
using
arm
-exerciser
poles:
10
-
20
minutes
Frequency:
3
—
4
days
per
week
Intensity:
70%
-
80%
of
your
maximum
heart
rate
Duration:
25
—40
minutes
Advanced
Walking
(poles
locked
in
place):
20
—
25
minutes
Walking
while
using
arm
-exerciser
poles:
20
-
30
minutes
Frequency:
4
—
5
days
per
week
Intensity:
80%
-
85%
of
your
maximum
heart
rate
Duration:
40
—
55
minutes
This manual downloaded from http://www.manualowl.com

Workout
Programs
for
Mature
Exercisers
Beginner
Walking
(poles
locked
in
place):
10
—
20
minutes
Frequency:
2
—
3
days
per
week
Intensity:
60%
—65%
of
your
maximum
heart
rate
Duration:
10
—
20
minutes
NOTE:
if
you
have
trouble
getting
started
on
the
treadmill,
try
elevating
the
front
of
the
WolkFit
Classic.
When
the
base
is
elevated,
gravity
aids
the
movement
of
the
treadmill
belt.
Advanced
Beginner
Walking
(poles
locked
in
place):
15
minutes
Walking
while
using
arm
-exerciser
poles:
5
—
15
minutes
Frequency:
3
—
4
days
per
week
Intensity:
60%
—
65%
of
your
maximum
heart
rate
Duration:
20
—
30
minutes
Intermediate
Walking
(poles
locked
in
place):
20
—
25
minutes
Walking
while
using
arm
-exerciser
poles:
10
—
15
minutes
Frequency:
3
—
4
days
per
week
Intensity:
65%
—
75%
of
your
maximum
heart
rate
Duration:
30
—
40
minutes
Advanced
Walking
(poles
locked
in
place):
30
minutes
Walking
while
using
arm
-exerciser
poles:
5
—
20
minutes
Frequency:
4
—
5
days
per
week
Intensity:
75%
—
85%
of
your
maximum
heart
rate
Duration:
35
—
50
minutes
This manual downloaded from http://www.manualowl.com
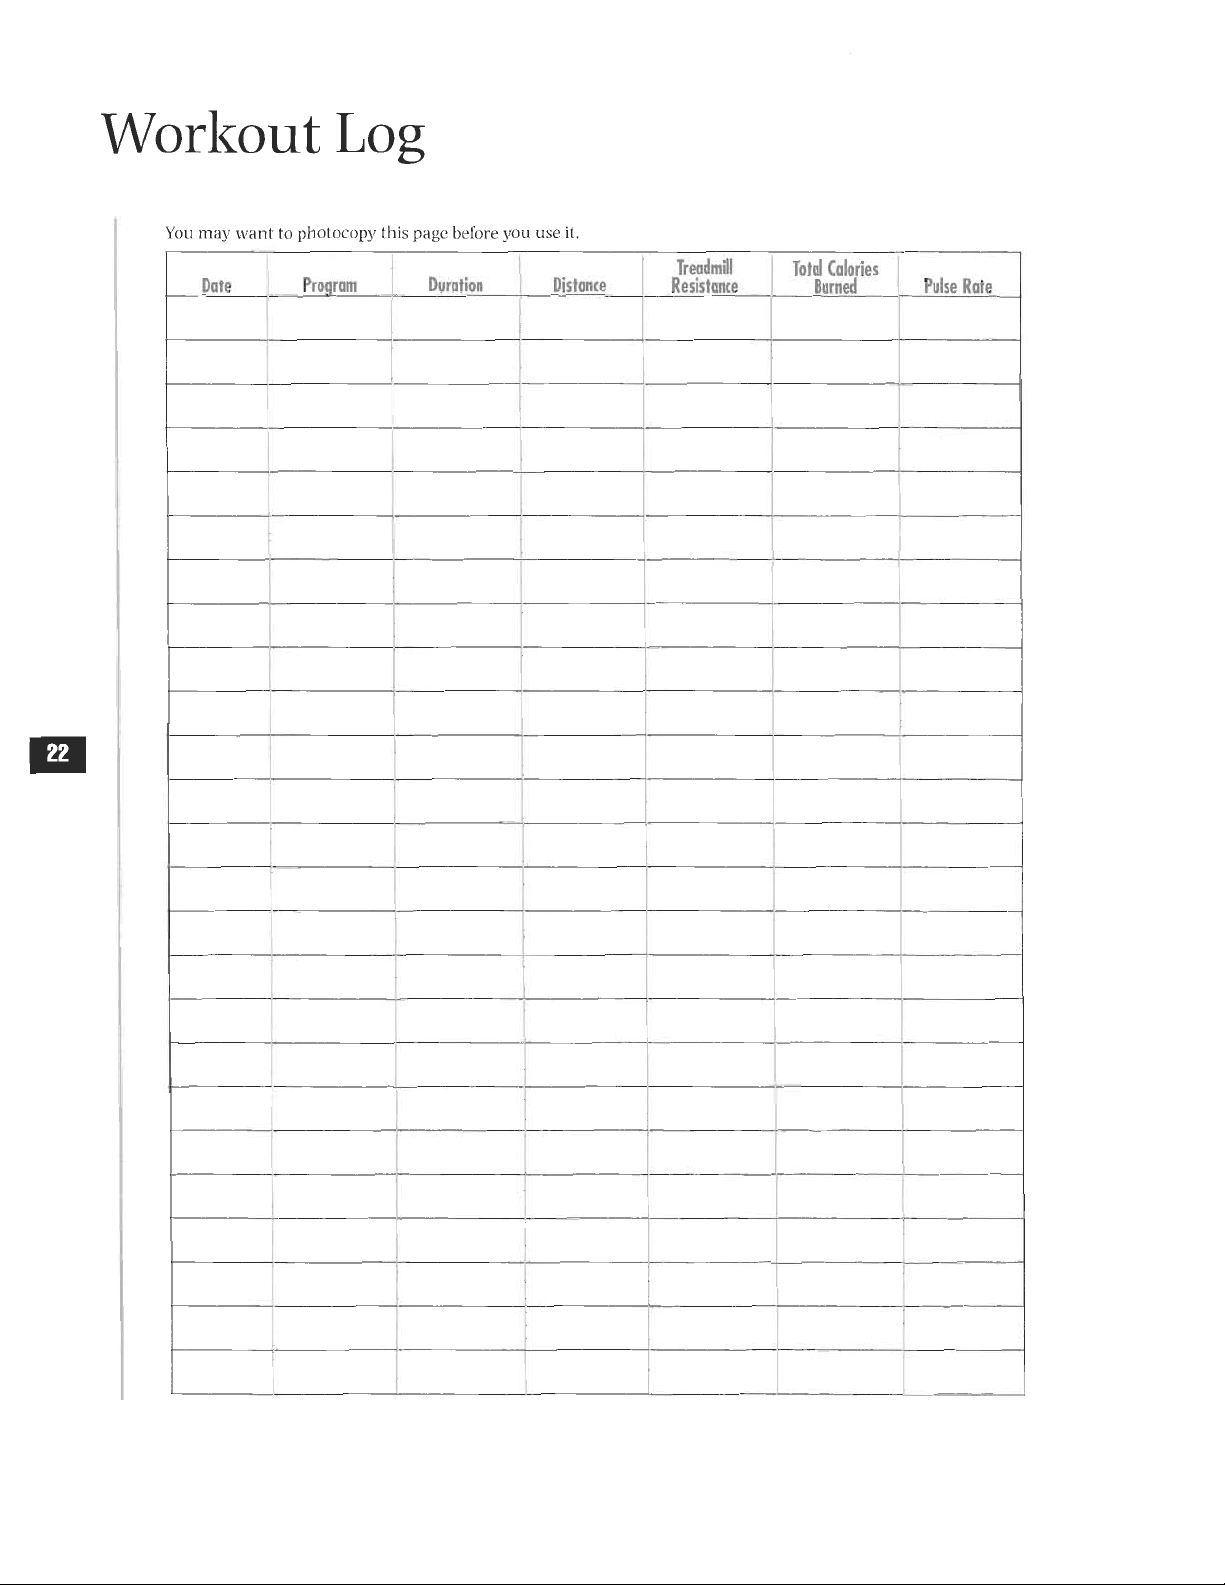
Workout
Log
YOU
may
want
to
photocopy
this
page
before
you
use
it.
Treadmill
Total
Calories
Date
Program
Duration
Distance
Resistance
Burned
Pulse
Rate
r
This manual downloaded from http://www.manualowl.com
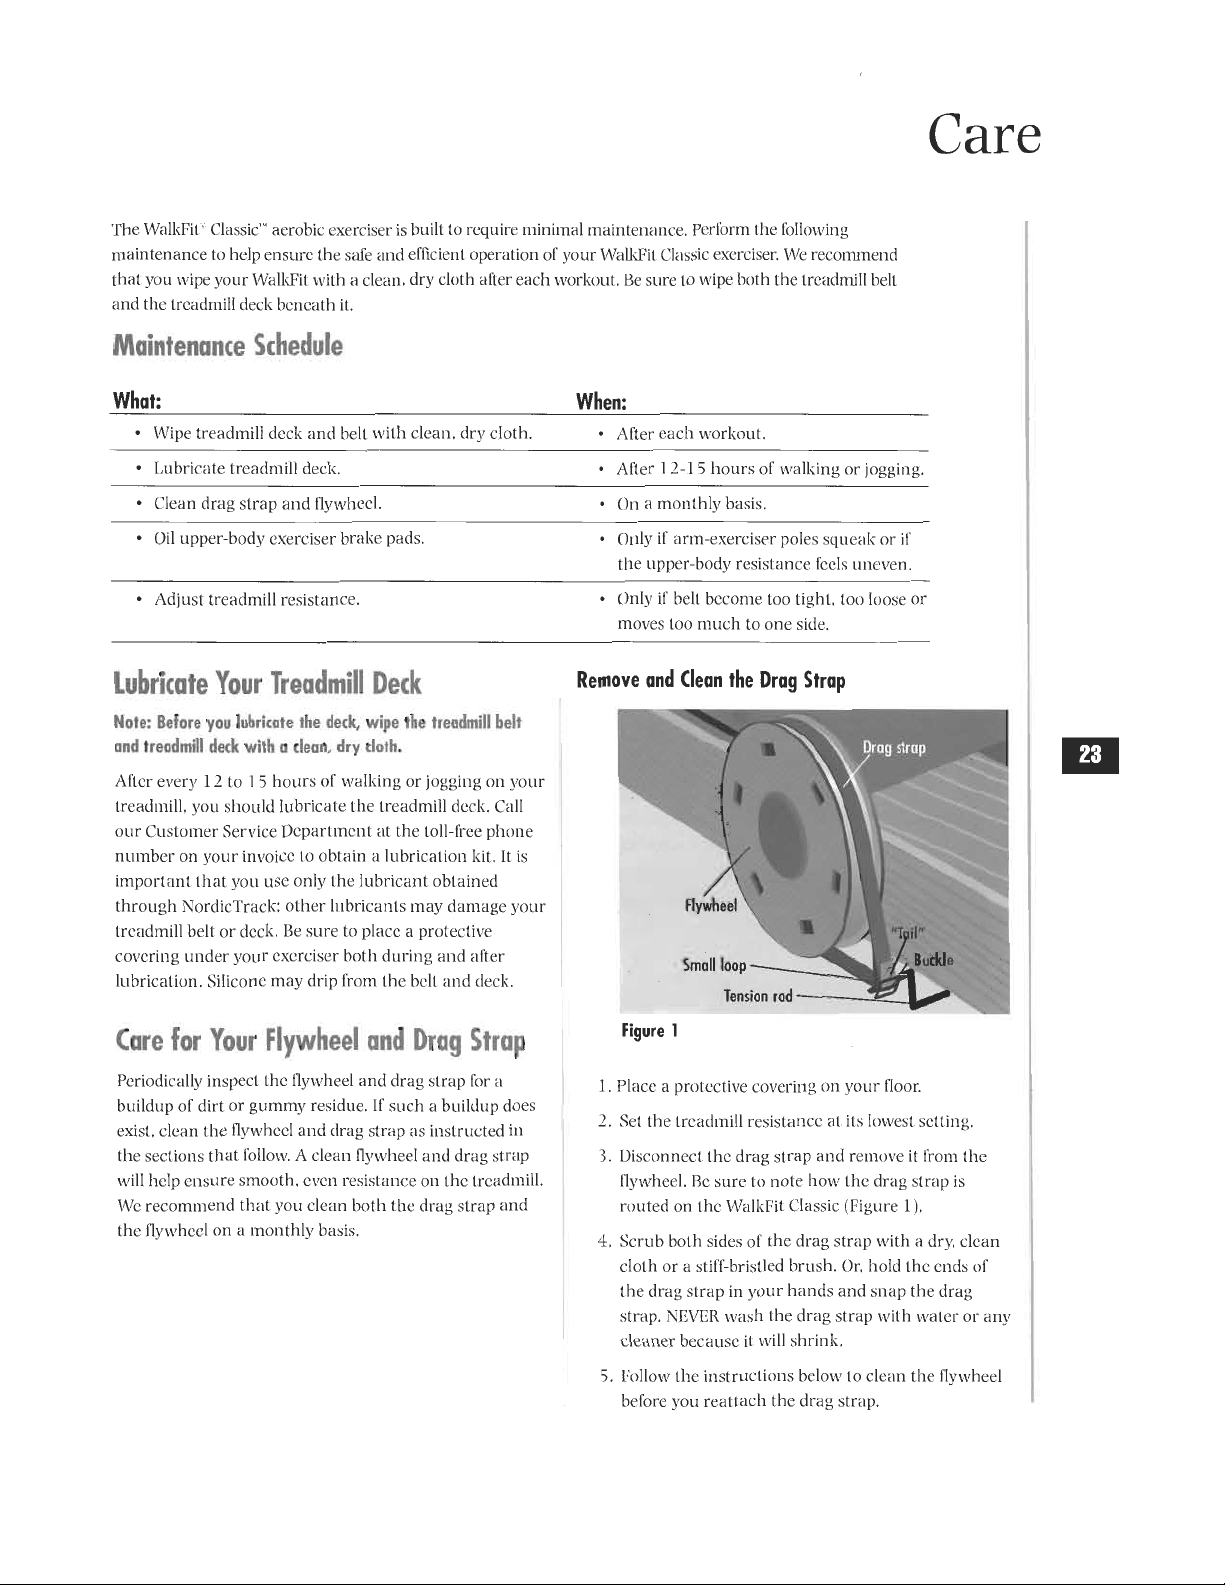
Care
The
WalkFit
Classic'
aerobic
exerciser
is
built
to
require
minimal
maintenance.
Perform
the
following
maintenance
to
help
ensure
the
safe
and
efficient
operation
of
your
WalkFit
Classic
exerciser.
We
recommend
that
you
wipe
your
WalkFit
with
a
clean,
dry
cloth
after
each
workout.
Be
sure
to
wipe
both
the
treadmill
belt
and
the
treadmill
deck
beneath
it.
Maintenance
Schedule
What:
When:
•
Wipe
treadmill
deck
and
belt
with
clean,
dry
cloth.
•
After
each
workout.
•
Lubricate
treadmill
deck.
•
After
1
2-1
5
hours
of
walking
or
jogging.
•
Clean
drag
strap
and
flywheel.
•
On
a
monthly
basis.
•
Oil
upper
-body
exerciser
brake
pads.
•
Only
if
arm
-exerciser
poles
squeak
or
if
the
upper
-body
resistance
feels
uneven.
•
Adjust
treadmill
resistance.
•
Only
if
belt
become
too
tight,
too
loose
or
moves
too
much
to
one
side.
Lubricate
Your
Treadmill
Deck
Note:
Before
you
lubricate
the
deck,
wipe
the
treadmill
belt
and
treadmill
deck
with
a
clean,
dry
cloth.
After
every
12
to
1
5
hours
of
walking
or
jogging
on
your
treadmill,
you
should
lubricate
the
treadmill
deck.
Call
our
Customer
Service
Department
at
the
toll
-free
phone
number
on
your
invoice
to
obtain
a
lubrication
kit.
It
is
important
that
you
use
only
the
lubricant
obtained
through
NordicTrack:
other
lubricants
may
damage
your
treadmill
belt
or
deck.
Be
sure
to
place
a
protective
covering
under
your
exerciser
both
during
and
after
lubrication.
Silicone
may
drip
from
the
belt
and
deck.
Care
for
Your
Flywheel
and
Drag
Strap
Periodically
inspect
the
flywheel
and
drag
strap
for
a
buildup
of
dirt
or
gummy
residue.
If
such
a
buildup
does
exist,
clean
the
flywheel
and
drag
strap
as
instructed
in
the
sections
that
follow.
A
clean
flywheel
and
drag
strap
will
help
ensure
smooth,
even
resistance
on
the
treadmill.
We
recommend
that
you
clean
both
the
drag
strap
and
the
flywheel
on
a
monthly
basis.
Remove
and
Clean
the
Drag
Strap
Flywheel
Small
loop
Tension
rod
Figure
1
prim
]
strap
Budde
1.
Place
a
protective
covering
on
your
floor.
2.
Set
the
treadmill
resistance
at
its
lowest
setting.
3.
Disconnect
the
drag
strap
and
remove
it
from
the
flywheel.
Be
sure
to
note
how
the
drag
strap
is
routed
on
the
WalkFit
Classic
(Figure
1),
4,
Scrub
both
sides
of
the
drag
strap
with
a
dry,
clean
cloth
or
a
stiff
-bristled
brush.
Or,
hold
the
ends
of
the
drag
strap
in
your
hands
and
snap
the
drag
strap.
NEVER
wash
the
drag
strap
with
water
or
any
cleaner
because
it
will
shrink.
5.
Follow
the
instructions
below
to
clean
the
flywheel
before
you
reattach
the
drag
strap.
This manual downloaded from http://www.manualowl.com
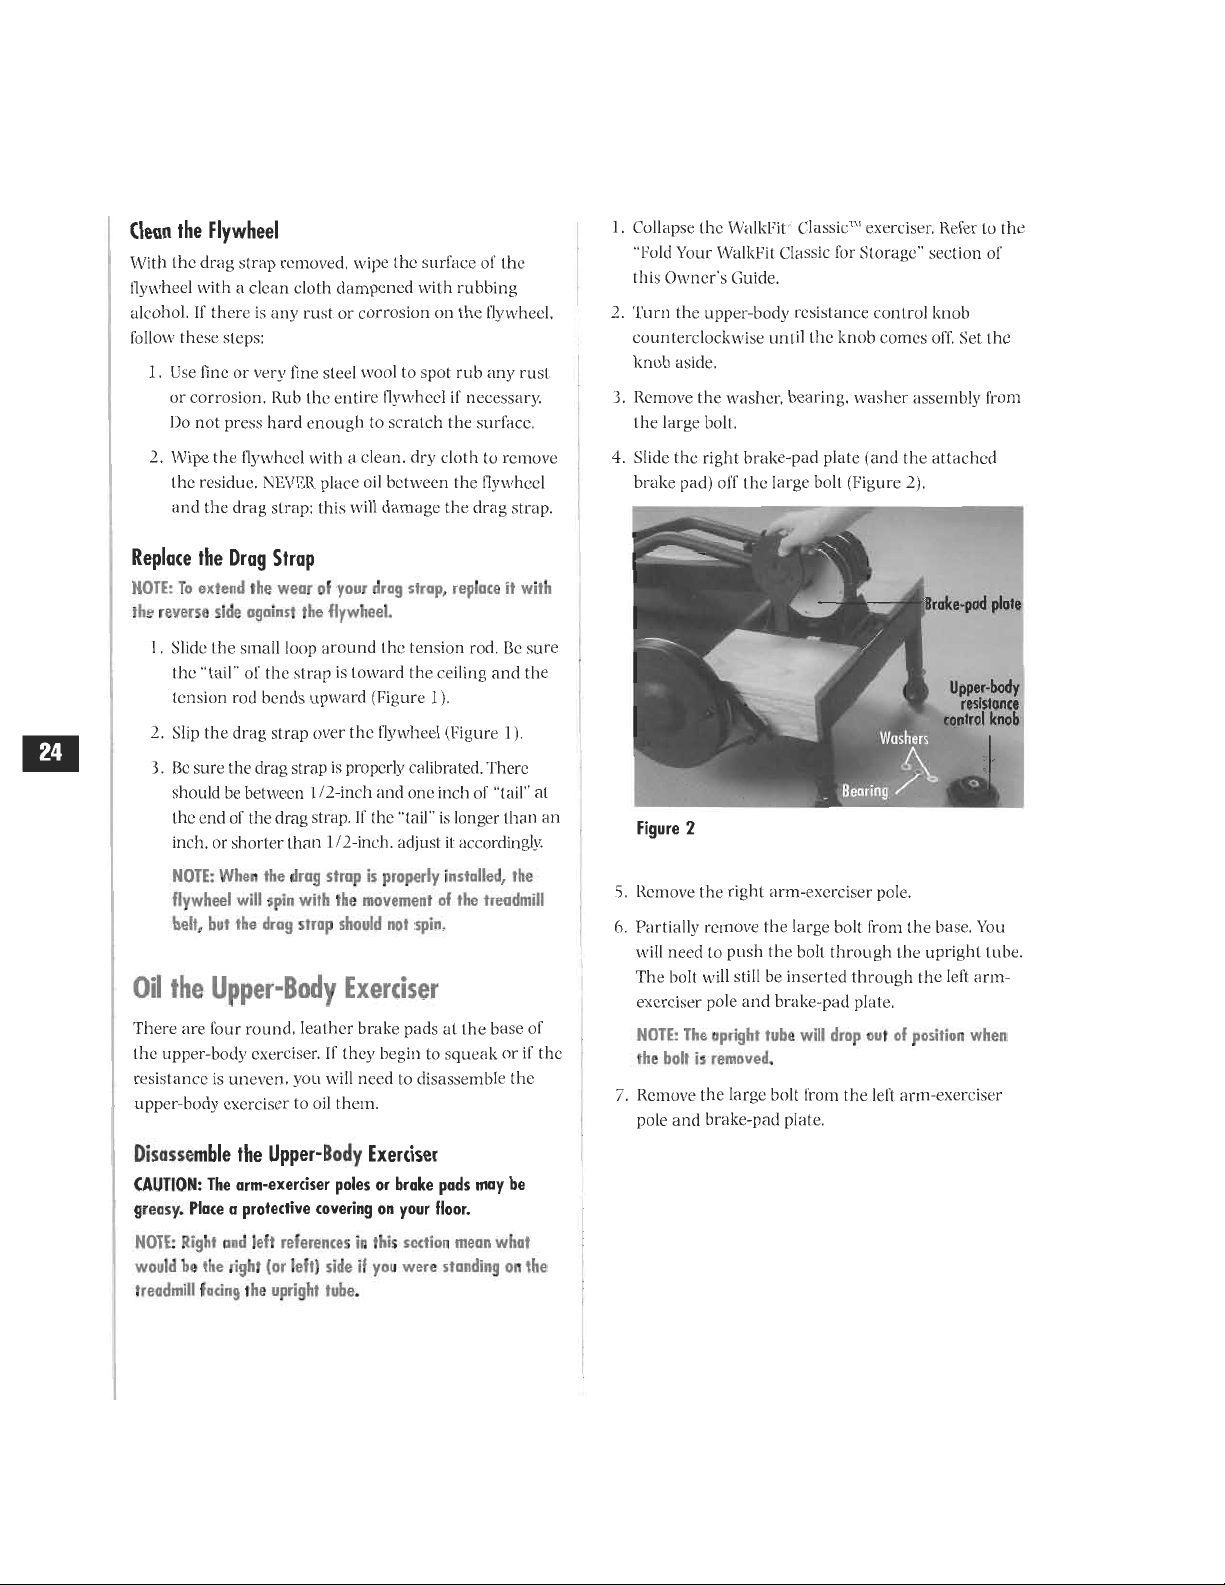
(lean
the
Flywheel
With
the
drag
strap
removed.
wipe
the
suffice
of
I
lw
flywheel
with
a
clean
cloth
dampened
with
rubbing
alcohol.
If
there
is
any
rust.
or
corrosion
on
the
flywheel.
follow
These
steps:
I
.
Use
fine
or
veer►•
fine
steel
wool
to
spol
rub
any
rust.
or
corrosion.
Rub
the
entire
flywheel
if
necessary.
Do
not.
press
hard
enough
to
scratch
the
surface.
2.
Wipe
the
flywheel
with
a
clean.
dry
cloth
to
remove
the
residue.
NEVER
place
oil
between
the
flywheel
and
the
drag
strap:
this
will
damage
the
drag
strap.
Replace
the
Drag
Strap
NOTE:
To
extend
the
wear
of
your
drag
strap,
replace
it
with
the
reverse
side
against
the
flywheel.
.
Slide
the
small
loop
around
the
tension
rod.
Be
sure
the
"l
ail"
of
the
strap
is
toward
the
ceiling
and
the
tension
rod
bends
upward
(Figure
I
).
2.
Slip
the
drag
strap
over
the
flywheel
(Figure
I).
3.
Be
sure
the
drag
strap
is
properly
calibrated.
There
should
be
between
1
/2
-inch
and
one
inch
of
"tail"
at
the
end
of
the
drag
strap.
If
the
"tail"
is
longer
than
an
inch.
or
shorter
than
1/2
-inch.
adjust
it
accordingly
NOTE:
When
the
drag
strap
is
properly
installed,
the
flywheel
will
spin
with
the
movement
of
the
treadmill
belt,
but
the
drag
strap
should
not
spin.
Oil
the
Upper
-Body
Exerciser
There
are
four
round.
leather
brake
pads
at.
the
base
of
the
upper
-body
exerciser.
If
they
begin
to
squeak
or
if
the
resistance
is
uneven,
you
will
need
to
disassemble
the
upper
-body
exerciser
to
oil
them.
Disassemble
the
Upper
-Body
Exerciser
CAUTION:
The
arm
-exerciser
poles
or
brake
pads
may
be
greasy.
Place
a
protective
covering
on
your
floor.
NOTE:
Right
and
left
references
in
this
section
mean
what
would
be
the
right
(or
left)
side
if
you
were
standing
on
the
treadmill
facing
the
upright
tube.
I.
Collapse
the
Walk
-
Fir
C`Iassic'
exerciser.
Refer
to
the
'Told
Your
Walkl?it
Classic
for
Storage"
section
of
Ibis
Owner's
Guide,
2.
Turn
the
upper
-body
resistance
control
knob
counterclockwise
until
the
knob
comes
off.
Set
the
knob
aside.
3.
Remove
the
washer,
bearing.
washer
assembly
from
lite
large
bolt.
4.
Slide
the
right
brake
-pad
plate
(and
lite
attached
brake
pad)
off
the
large
bolt
(Figure
2).
Brake
-pad
plate
4
Washe.
Bearing
Figure
2
Upper
-body
resistance
control
knob
5.
Remove
lite
right
arm
-exercise
-
poi°.
6.
Partially
remove
the
large
bolt
from
the
base.
You
►••ill
need
to
push
the
boll
through
I
he
upright
tube.
The
bolt
will
still
be
inserted
through
the
left
arm
-
exerciser
pole
and
brake
-pad
plate.
NOTE:
The
upright
tube
will
drop
out
of
position
when
the
bolt
is
removed.
7.
Remove
the
large
bolt
from
the
left
arm
-exerciser
pole
and
brake
-pad
plate.
This manual downloaded from http://www.manualowl.com
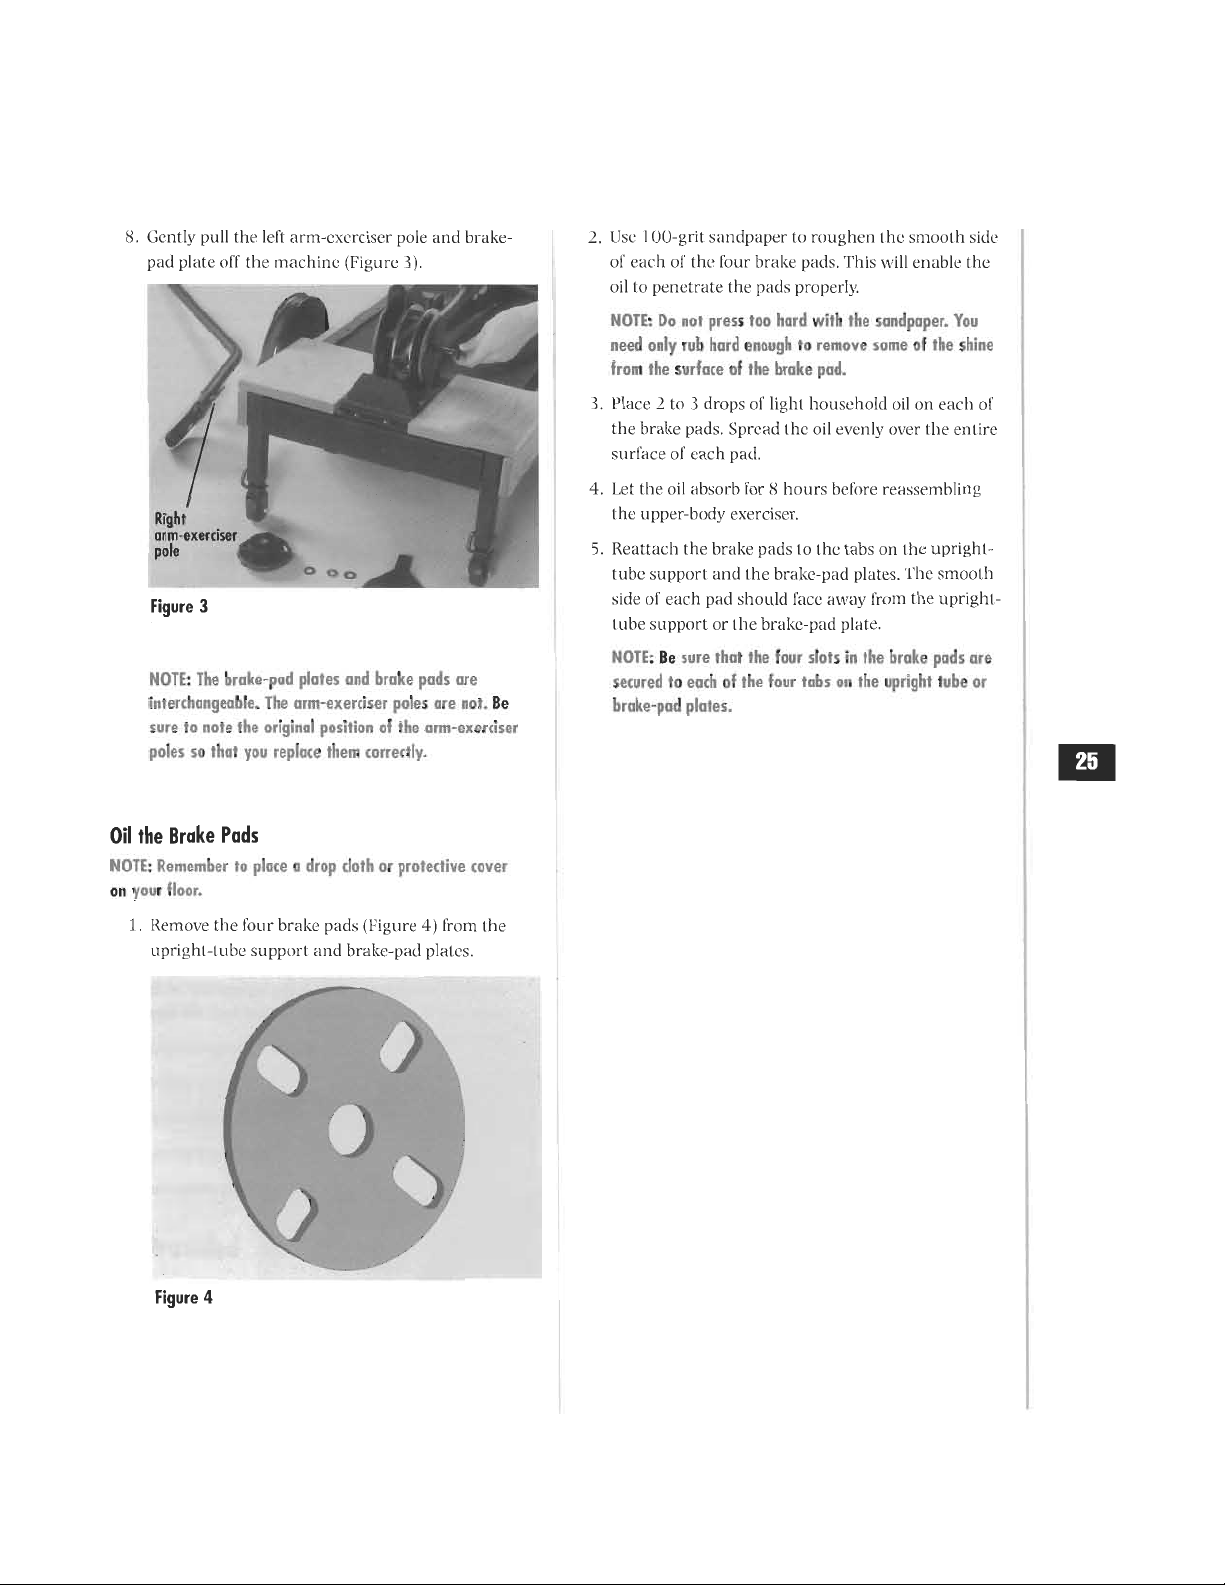
S.
Gently
pull
the
left
arm
-exerciser
pole
and
brake
-
pad
plate
off
the
machine
(Figure
3).
Right
Or
m
-exerciser
--
pole
0
Figure
3
) 0
NOTE:
The
brake
-pod
plates
and
brake
pads
are
interchangeable.
The
arm
-exerciser
poles
are
not.
Be
sure
to
note
the
original
position
of
the
arm
-exerciser
poles
so
that
you
replace
them
correctly.
Oil
the
Brake
Pads
NOTE:
Remember
to
place
a
drop
cloth
or
protective
cover
on
your
floor.
1.
Remove
the
four
brake
pads
(Figure
4)
from
the
upright
-tube
support
and
brake
-pad
plates.
Figure
4
I:se
100
-grit
sandpaper
to
roughen
the
smooth
side
of
each
of
the
four
brake
pads.
This
will
enable
the
oil
to
penetrate
he
pads
properly.
NOTE:
Do
not
press
too
hard
with
the
sandpaper.
You
need
only
rub
hard
enough
to
remove
some
of
the
shine
from
the
surface
of
the
brake
pad.
i.
!'lace
2
to
3
drops
of
light
household
oil
on
each
of
the
brake
pads.
Spread
I
he
oil
evenly
over
the
entire
surface
of
each
pad.
4.
Let
the
oil
absorb
for
8
hours
before
reassembling
I
he
upper
-body
exerciser.
5.
Reattach
the
brake
pads
to
the
tabs
on
the
upright
-
tube
support
and
I
he
brake
-pad
plates.
The
smooth
side
of
each
pad
should
face
away
from
the
uprighl-
tube
support
or
the
brake
-pad
plate.
NOTE:
Be
sure
that
the
four
slots
in
the
brake
pads
are
secured
to
each
of
the
four
tabs
on
the
upright
tube
or
brake
-pod
plates.
This manual downloaded from http://www.manualowl.com
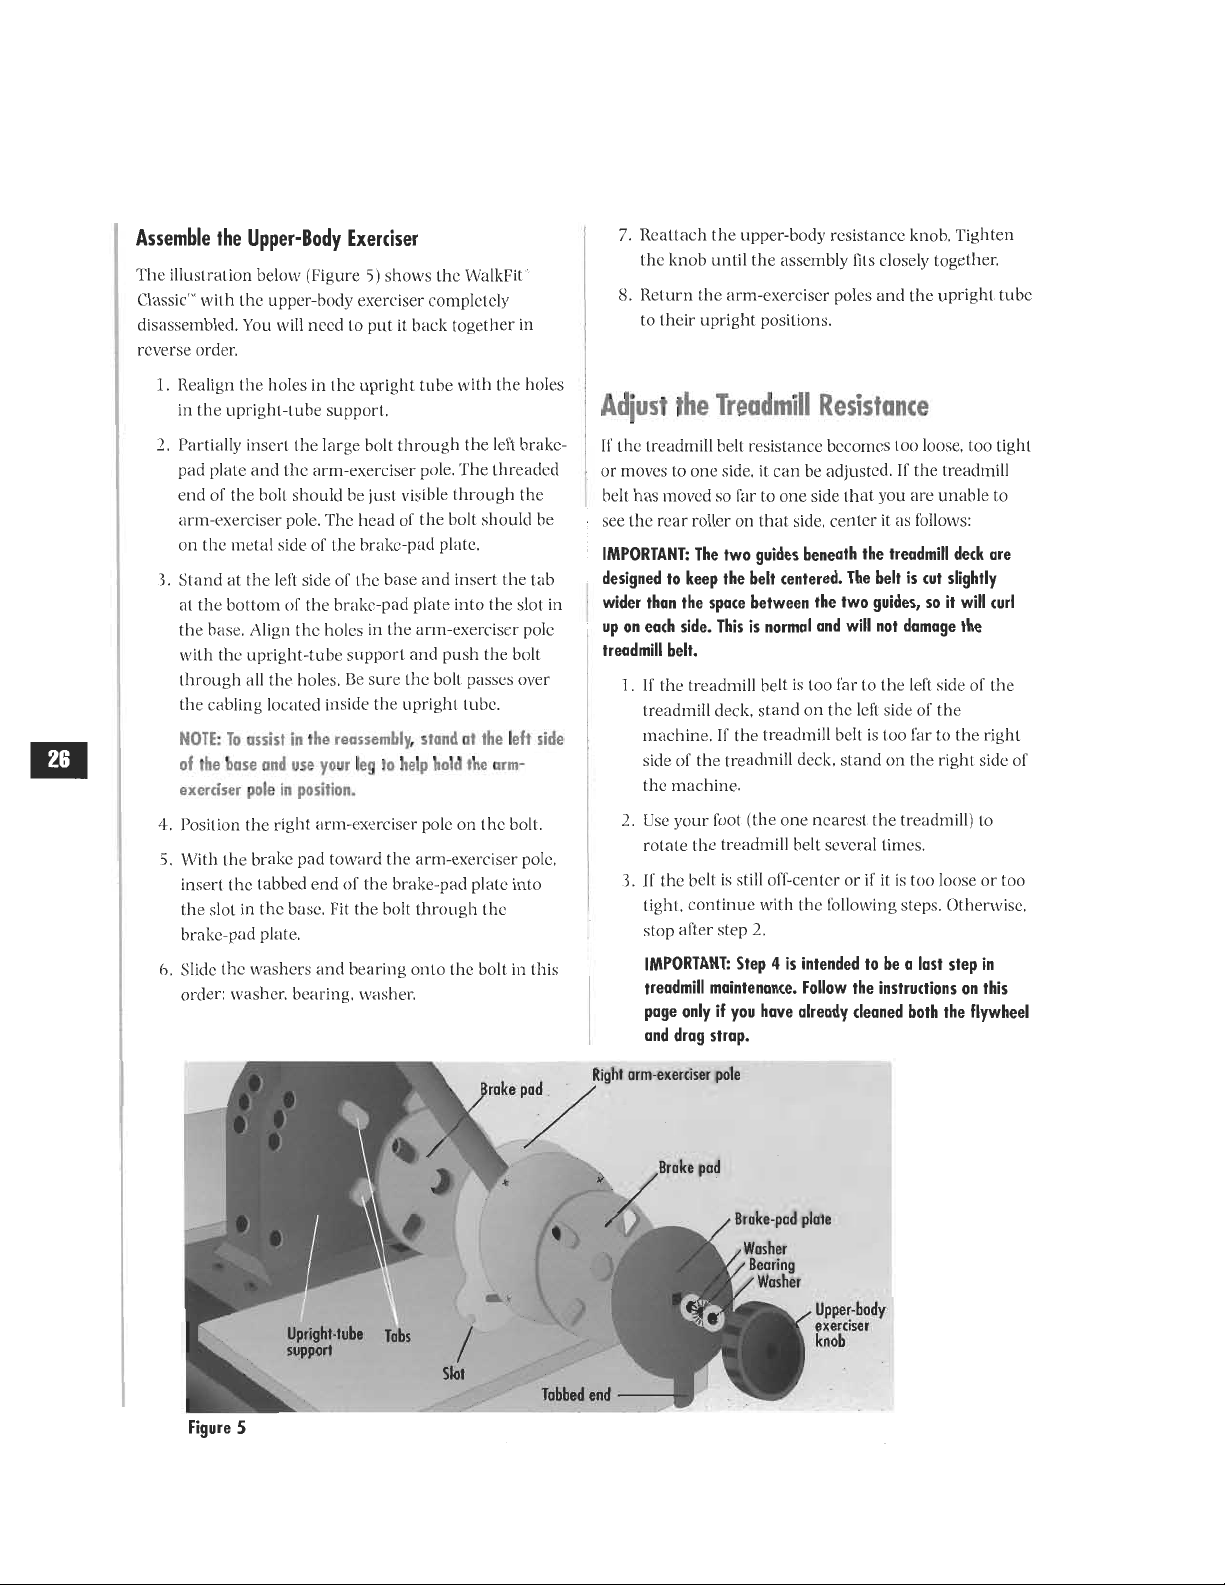
Assemble
the
Upper
-Body
Exerciser
The
illustration
below
(Figure
5)
shows
the
Classic
.
'
with
the
upper
-body
exerciser
completely
disassembled.
You
will
need
to
put
it
back
together
in
reverse
order.
1.
Realign
the
holes
in
the
upright
tube
with
the
holes
in
the
upright
-tube
support.
Partially
insert
the
large
bolt
through
the
left
brake
-
pad
plate
arid
the
arm
-exerciser
pole.
The
threaded
end
of
the
bolt
should
he
just
visible
through
the
arm
-exerciser
pole.
The
head
or
the
bolt
should
he
on
the
metal
side.
of
the
brake
-pad
plate.
3.
Stand
at
the
left
side
of
the
base
and
insert
the
tab
at
the
bottom
of
the
brake
-pad
plate
into
the
slot
in
the
base.
Align
the
holes
in
the
arm
-exerciser
pole
with
the
upright
-rube
support
and
push
the
bolt
through
all
the
holes.
Be
sure
the
bolt
passes
over
the
cabling
located
inside
the
upright
tube.
NOTE:
To
assist
in
the
reassembly,
stand
at
the
left
side
of
the
base
and
use
your
leg
to
help
hold
the
arm
-
exerciser
pole
in
position.
4.
Position
the
right
arm
-exerciser
pole
on
the
bolt.
5.
With
the
brake
pad
toward
the
arm
-exerciser
pole.
insert
the
tabbed
end
of
the
brake
-pad
plate
into
the
slot
in
the
base.
Tit
the
boll
through
the
brake
-pad
plate.
6.
Slide
the
washers
and
bearing
onto
the
boll
in
this
order:
washer,
bearing,
washer.
Upright
-tube
Tabs
support
Figure
5
5)
Slot
Broke
pod
/
4
7.
Reattach
I
he
upper
-body
resistance
knob,
Tighten
the
knob
until
the
assembly
fits
closely
together.
8.
Return the
arm
-exerciser
poles
and
the
upright
tube
to
their
upright
positions.
Adjust
the
Treadmill
Resistance
If
the
treadmill
hell
resistance
becomes
too
loose,
too
tight
or
moves
to
one
side.
it
can
he
adjusted.
IF
the
treadmill
belt
has
moved
so
far
to
one
side
that
you
are
unable
to
see
the
rear
roller
on
that
side.
center
it
as
follows:
IMPORTANT:
The
two
guides
beneath
the
treadmill
deck
are
designed
to
keep
the
belt
centered.
The
belt
is
cut
slightly
wider
than
the
space
between
the
two
guides,
so
it
will
curl
up
on
each
side.
This
is
normal
and
will
not
damage
the
treadmill
belt.
1.
If
the
treadmill
belt
is
too
far
to
the
len
side
of
the
treadmill
deck.
stand
on
the
left
side
of
the
machine.
if
the
treadmill
belt
is
too
far
to
the
right
side
of
the
treadmill
deck,
stand
on
the
right
side
of
the
machine.
2.
Cse
your
lbot
(the
one
nearest
the
treadmill)
to
rotate
the
treadmill
bell
several
limes.
3. if
the
belt
is
still
oil
-center
or
if
it
is
too
loose
or
too
tight.
continue
with
the
following
slips.
Otherwise,
slop
after
step
2.
IMPORTANT:
Step
4
is
intended
to
be
a
last
step
in
treadmill
maintenance.
Follow
the
instructions
on
this
page
only
if
you
have
already
cleaned
both
the
flywheel
and
drag
strap.
Right
arm
-exerciser
pole
Tabbed
end
Brake
pad
Brake
pad
plate
Washer
Bearing
Washer
Upper
-body
exerciser
knob
This manual downloaded from http://www.manualowl.com
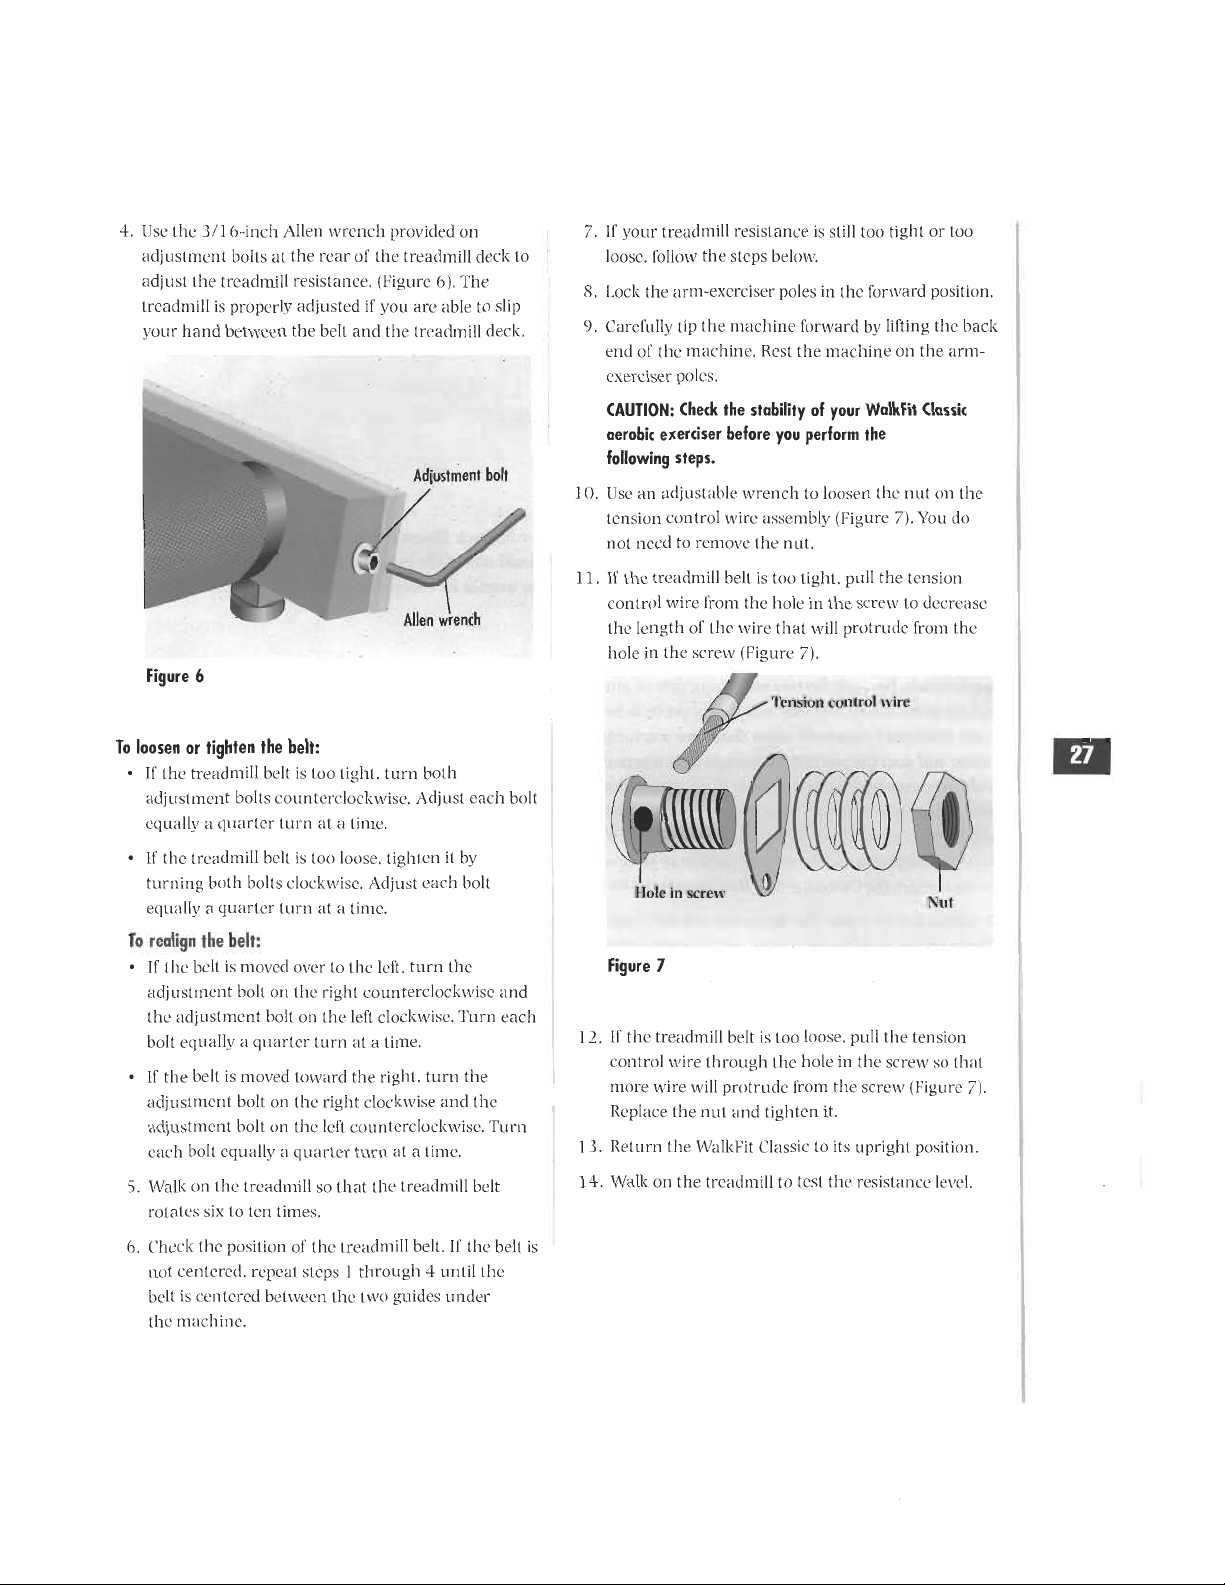
4.
Use
the
3/16
-inch
Allen
wrench
provided
on
adjustment
bolts
at
the
rear
of
the
treadmill
leek
to
adjust
the
treadmill
resistance.
(Figure
(I).
The
treadmill
is
properly
adjusted
if
you
are
able
to
slip
your
hand
between
the
belt
and
the
treadmill
deck.
Adjustment
bolt
.;"
(
"a
t
Allen
wrench
Figure
6
To
loosen
or
tighten
the
belt:
•
ri'
the
treadmill
belt
is
too
tight.
turn
both
adjustment
bolts
counterclockwise.
Adjust
each
bolt
equally
a
quarter
turn
at
a
time.
•
It
the
treadmill
belt
is
too
loose,
tighten
it
by
turning
hail
bolts
clockwise.
Adjust
each
bolt
equally
a
quarter
turn
at
a
time.
To
realign
the
belt:
•
if
the
belt
is
moved
over
to
the
left.
turn
the
adjustment
bolt
on
the
right
counterclockwise
and
Hie
adjustment
bolt
on
the
left
clockwise.
Turn
each
bolt
equally
a
qi
tarter
turn
at
a
lime.
•
11'
the
bell
is
moved
toward
the
right,
turn
the
adjnstment
bolt
on
the
right
clockwise
and
the
adjustment
bolt
on
the
left
counterclockwise.
Turn
each
bolt
equally
a
quarter
turn
at
a
lime.
5.
Walk
on
the
treadmill
so
(hat
the
treadmill
belt
rotates
six
to
ten
times.
b.
Check
the
position
of
the
treadmill
belt.
If
the
belt
is
not
centered.
repeal
steps
1
through
4
until
the
belt
is
centered
between
the
two
guides
under
the
machine.
7.
If
your
treadmill
resistance
is
still
too
tight
or
too
loose.
follow
the
steps
below.
8.
Lock
the
arm
-exerciser
poles
in
the
forward
position.
9.
Carefully
tip
the
machine
forward
by
lifting
the
back
et
id
of
the
machine.
Rest
Hie
machine
on
the
arm
-
exerciser
poles.
CAUTION:
Check
the
stability
of
your
WalkFit
Classic
aerobic
exerciser
before
you
perform
the
following
steps.
10.
Use
an
adjustable
wrench
to
loosen
the
nut
on
the
tension
control
wire
assembly
(Figure
71.
You
do
not
need
to
remove
(he
nut.
1
I.
If
the
treadmill
hell
is
too
tight.
till
the
tension
control
wire
from
tie
hole
in
the
screw
to
decrease
the
length
of
the
wire
that
will
protrude
from
the
hole
in
the
screw
(Figure
7).
'Tension
control
wire
Hole
in
screw
Figure
7
Nut
12.
11
the
treadmill
bell
is
loo
loose,
pull
the
tension
control
wire
through
the
hole
in
the
screw
si.)
that
more
wire
will
protrude
from
the
screw
(Figure
71.
Replace
Hie
nut
and
tighten
it.
1.3.
Return
the
walkFit
Classic
to
its
upright
position.
14.
Walk
on
the
treadmill
to
test
the
resistance
level.
This manual downloaded from http://www.manualowl.com

CUSTOMER
INFORMATION
Please
call
toll
free
to
our
Customer
Service
Department
with
questions
concerning
the
use
or
operation
of
your
NordicTrack
equipment.
Our
representatives
are
available:
Monday
-
Friday
6:00
a.m.
to
6:00
p.m.
MST
1
(877)
651-6119
Visit
out
website
at
www.iconfitness.com
or
e-mail
us
at
This manual downloaded from http://www.manualowl.com