The cooling fan runs during all cooking modes. The fan can be heard when it is running, and warm air may be felt as it is released from the oven vents. The fan may also run after the oven is off.
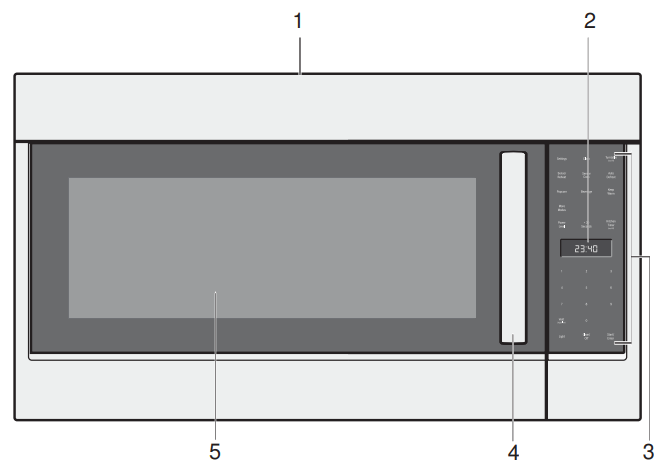
Oven Vents
The oven vents are located around the sides of the oven cavity. Warm air may be released from the top and bottom vents before, during and after cooking. It is normal to see steam escaping from these vents, and condensation may collect in this area. This area may be warm when the oven is in use. Do not block any vents, since they are important for air circulation.
Oven light (LED)
The oven light turns off to save energy after one minute with the door open. To turn the light back on, close the door and open it again.
Control panel
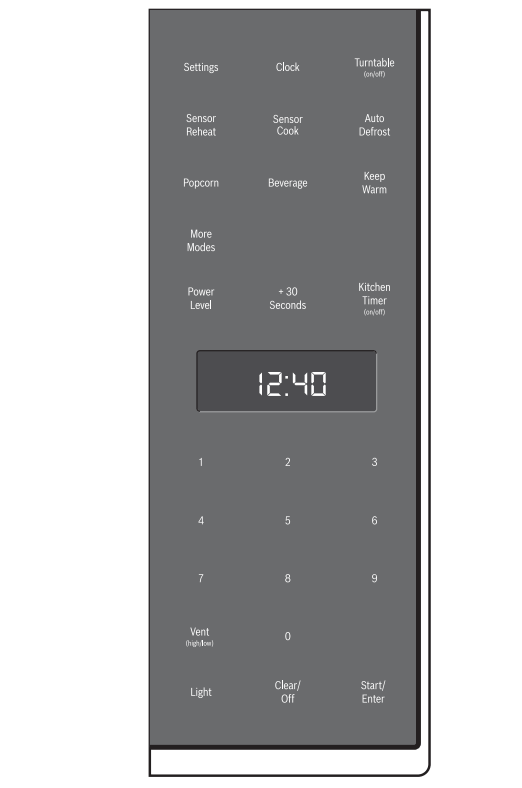
Touch keys
You can activate a function by briefly touching the corresponding touch key. Each time you touch a key a short beep will sound. A long beep will tell you that you have made an invalid input.
Touch key
Function
Settings
Change basic settings
Clock
Set time of day
Turntable (on/off)
Switches turntable on or off
Sensor Reheat
Reheat food with automatic settings
Sensor Cook
Cook food with automatic settings
Auto Defrost
Defrost food with automatic settings
Popcorn
Select popcorn bag size
Beverage
Heat beverages, select beverage size
Keep Warm
Set Keep Warm feature
More Modes
Enter more modes for convenience cooking
Power Level
Set power level for microwave operation
+30 Seconds
Add 30 seconds to microwave timer
Kitchen Timer
Set kitchen timer
0 - 9
Use the number keys to enter customized values
Vent (high/low)
Turn kitchen ventilation feature on/off
Light
Turn surface light on/off
Clear/Off
Clear entered value/turn appliance off
Start/Enter
Confirm input, start operation
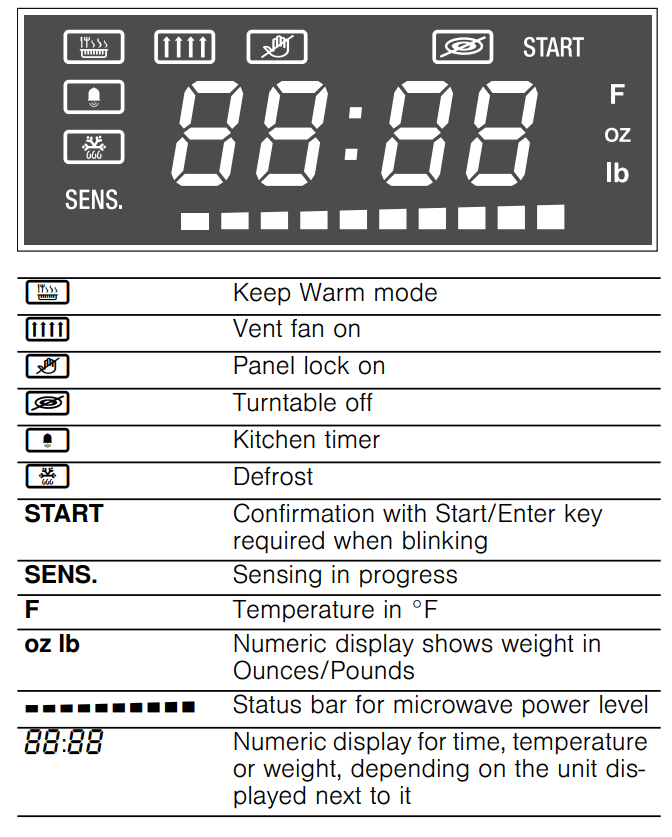
Display elements
The display gives you information on the current settings of your appliance. Blinking display elements indicate that an input is required.
Accessories
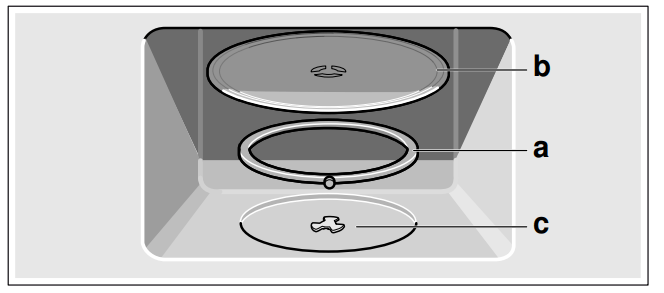
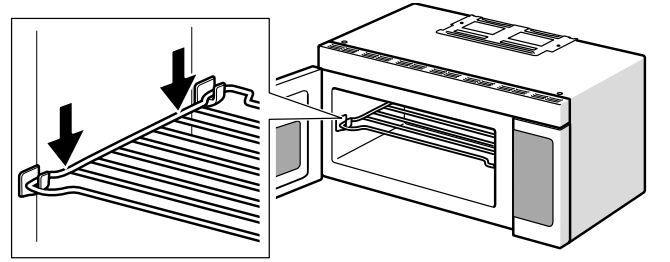
How to fit the turntable
Place the roller rest a in the recess in the oven cavity.
Let the turntable b slot in place in the drive c in the center of the floor of the oven cavity.
Note: Do not use the appliance if the turntable is not in place. Confirm that all parts are properly seated and that the turntable rotates freely when the microwave is operated.
Using the metal rack
The metal rack gives you extra space when cooking in more than one container at the same time
Place rack securely in the four plastic supports. Note: Rack must not touch metal walls or back of microwave.
Place equal amounts of food both above and below rack. Note: Amount of food must be approximately the same in both containers to balance out cooking energy
Microwave utensil guide
Suitable ovenware
Heat-resistant glass, glass-ceramic: Utility dishes, loaf dishes, pie plates, cake plates, liquid measuring cups, casseroles and bowls without metallic trim (e.g. Pyrex®, Anchor HockingTM, Corning Ware®, etc.).
China: Bowls, cups, serving plates and platters without metallic trim.
Plastic films and wraps: Plastic wrap (as a cover) - lay the plastic wrap loosely over the dish and press it to the sides. Vent plastic wrap by turning back one edge slightly to allow excess steam to escape. The dish should be deep enough so that the plastic wrap will not touch the food.
Microwave-safe plastics: Microwave-safe plastic dishes, cups, semi-rigid freezer containers and plastic bags for short cooking times. Use these with care because the plastic may soften from the heat of the food.
Paper products: Paper towels, wax paper, parchment paper, paper napkins and paper plates with no metallic trim or design. Look for the manufacturers label for any special instructions for use in the microwave oven.
Unsuitable ovenware
Metal utensils and cookware: Metal shields the food from microwave energy and produces uneven cooking. Also, avoid metal skewers, thermometers or foil trays. Metal utensils can cause arcing, which can damage your microwave oven.
Metal decoration: Bowls, cups, serving plates and platters with metallic trim.
Aluminum foil: Avoid large sheets of aluminum foil because they hinder cooking and may cause harmful arcing. Use small pieces of foil to shield poultry legs and wings. Keep ALL aluminum foil at least 1 inch (2.5 cm) from the side walls of the oven cavity and door of the microwave.
Wood: Wooden bowls and boards will dry out and may split or crack when you use them in the microwave oven. Baskets made of wood will react in the same way.
Tightly covered cookware: Be sure to leave openings for steam to escape from covered cookware. Pierce plastic pouches of vegetables or other food items before cooking. Tightly closed pouches may explode.
Brown paper: Avoid using brown paper bags. They absorb heat and can burn.
Flawed or chipped cooking utensils: Any utensil that is cracked, flawed or chipped may break in the oven.
Metal twist ties: Remove metal twist ties from plastic or paper bags. They become hot and could cause a fire.
Ovenware test
Do not turn on the microwave unless there is food inside. The following ovenware test is the only exception to this rule.
Perform the following test if you are unsure whether your ovenware is suitable for use in the microwave:
Heat the empty ovenware at maximum power for 1⁄2 to 1 minute.
Check the temperature occasionally during that time. The ovenware should still be cold or warm to the touch.
The ovenware is unsuitable if it becomes hot or if sparks are generated.
Before using the appliance for the first time
Appliance must be properly installed by a qualified technician before use.
Remove all packing materials from inside and outside the oven.
While cool, wipe with a clean, damp cloth and dry.
There may be a slight odor from your new appliance; this is normal and will disappear after a short time.
Optimum cooking results depend on proper cookware being used.
Read and understand all safety precautions and Use and Care Manual information.
Execute the following sections prior to operating:
The appliance must be completely fitted and connected.
Cleaning accessories
Before using accessories for the first time, thoroughly clean them with hot soapy water and a soft dish cloth.
Applying the program label
Apply the included program label in the desired language to the lower frame of the oven cavity, as indicated on the leaflet that carries the label.
Operation
Setting the clock
The clock can be set in 12-hour mode.
Touch Clock once.
Enter the time using the number keys. Example: To set the clock to 12:41 type in 1 2 4 1.
Touch Clock to confirm.
The time of day is displayed.
Setting the Kitchen Timer
You can set a timer value of up ot 99 minutes and 99 seconds.
Touch Kitchen Timer. The symbol lights up and is blinking.
Enter the desired time using the number keys.
Touch Kitchen Timer to confirm.
The Kitchen Timer starts counting down.
Once the set time has elapsed 4 beeps will sound. To stop the beep, touch Kitchen Timer.
To cancel the kitchen timer, touch Kitchen Timer again or open the appliance door.
Operating the Ventilation Fan
The Vent feature moves steam and other cooking vapors from the cooking surface of the range below the microwave oven.
You can set four different vent speeds.
Set the vent feature by touching Vent (high/low). The ventilation symbol will light up on the display.
Vent level
Touch Vent (high/low) key
Display
4 (high)
once
3
twice
2
3 times
1 (low)
4 times
OFF
5 times
OFF
Note: If the temperature gets too hot around the microwave oven, the fan of the vent feature will automatically turn on at the lowest setting to cool the oven. The fan will automatically turn off when the internal parts are cool. When this occurs, the vent cannot be manually turned off.
Turning the Surface Light on/off
The appliance is equipped with a cooking surface light, to light the surface underneath the appliance.
With the Light key you can set two brightness levels.
Brightness
Touch Light key
High
once
Low
twice
Off
three times
Turning the turntable on / off
For best cooking results, leave the turntable on. It can be turned off for large dishes.
To turn the turntable off,_touch Turntable (on/off) once. The symbol and OFF lights up briefly. Touch the key again to turn the turntable on. Thesymbol and ONlights up briefly.
Operating the microwave
The appliance must be turned off.
Enter the desired cooking duration with the number keys. The timer display will fill in from right to left. Example: To set a microwave cooking time of 20 minutes and 30 seconds, enter the numbers 2 0 3 0. START is blinking.
You can start microwave operation with the default power level 10 by touching Start/Enter, or - you can adjust the power level. Touch Power Level. The default power level is blinking. The segments in the bar underneath the number display also indicate the power level.
Enter the desired power level using the number keys. and the selected power level and START are blinking in the display.
Touch Start/Enter to start microwave operation. The microwave timer will start to count down.
The microwave timer can be changed during operation by touching +30 Seconds.
The power level can be changed during operation. To display the set power level, touch Power Level.
Once the microwave time has run out, four beeps will sound. The appliance turns off and the clock is displayed.
Opening appliance door during operation
Opening the appliance door during operation will interrupt the current mode. Close the appliance door and then touch Start/Enter to resume operation.
Cancel operation
Touch Clear/Off to cancel the active oven mode. The appliance turns off and the clock is displayed.
The cooling fans may continue to run for awhile and then switch off automatically.
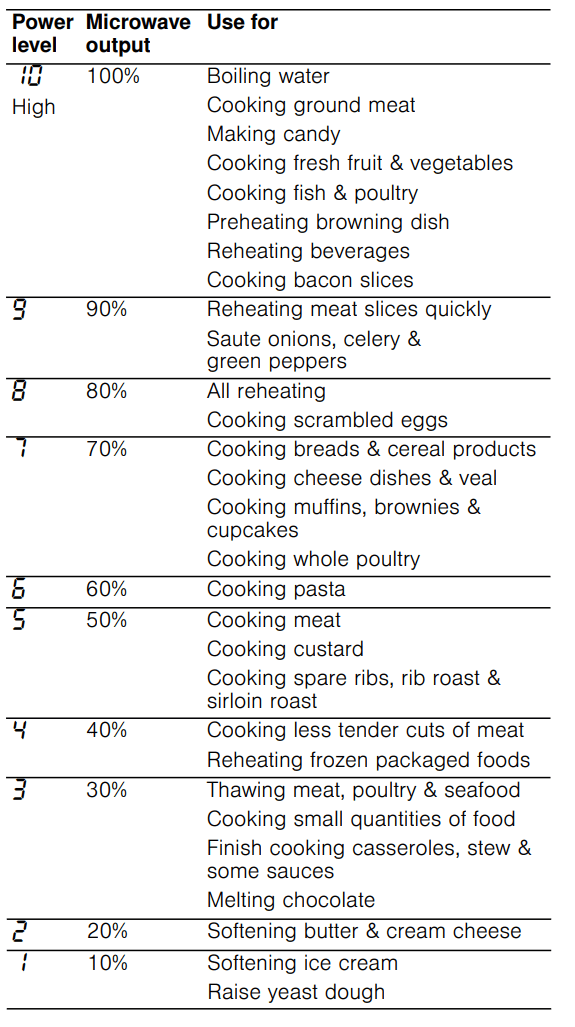
Microwave power levels
The 10 power levels available with this microwave will help you to adjust to the power output best suited for the food type you are preparing. As with any food preparation in the microwave, it is best to follow the microwave instructions that are printed on the food packaging.
The table below provides suggested power levels for various types of food that can be prepared in the microwave.
Suggestions for best results
To help you achieve the best possible results from your microwave oven, read the following suggestions below:
Storage temperature
Foods taken from the freezer or refrigerator take longer to cook.
Size
Small pieces of food cook faster than large ones. Pieces similar in size and shape will cook more evenly when cooked together. For more even results, reduce the power levels when cooking large pieces of food.
Natural moisture
Very moist foods cook more evenly because microwave energy heats water molecules very efficiently.
Stirring
Stir foods such as casseroles and vegetable from the outside to the center to distribute the heat more evenly. This will allow the food to cook faster. (Constant stirring is not necessary.)
Turning
Turn over foods such as pork chops, roasts or whole cauliflower halfway through the cook time. This will help to expose all sides equally to microwave energy.
Placing food
Place delicate areas of food items, such as asparagus tips, toward the center of the turntable tray.
Arranging food
Arrange unevenly shaped foods, such as chicken pieces or salmon, with the thicker or meatier parts toward the outside of the turntable tray.
Letting food stand
After removing the food from the microwave, cover the food with foil or a casserole lid and let it stand to finish cooking. This will help the food finish cooking in the center and avoids overcooking the outer edges. The length of stand time depends on the density and surface area of the food items.
Wrapping foods
Sandwiches and many other food types containing pre-baked bread should be wrapped in paper towels or wax paper prior to placing in the microwave to help prevent the food items from drying out while heating.
Adding cook time (+30 Seconds)
This time-saving feature will let you quickly add 30 seconds to any cook time. +30 Seconds will also start the microwave with 30 seconds at 100% power level. Each time you touch the +30 Seconds key, 30 seconds will be added to the cook time.
Auto Defrost
With the Auto Defrost feature you can defrost three different types of food by entering the weight. The ideal defrost time will be calculated by the program.
Setting Auto Defrost
Touch Auto Defrost once. and START are blinking and thesymbol lights up in the display.
Touch Auto Defrost repeatedly until the desired program number is shown in the display. Check the menu label at the bottom of the oven cavity or see program table below.
Touch Start/Enter. lb is blinking in the display.
Enter the weight of the food using the number keys.
Touch Start/Enter to start the program.
When auto defrost is finished 4 beeps will sound. The appliance turns off and the clock is displayed.
Note: A beep sounds during defrosting for all food programs to turn food over or separate pieces.
Opening appliance door during operation
Opening the appliance door during operation will interrupt the current mode. Close the appliance door and then touch Start/Enter to resume operation.
Cancel operation
Touch Clear/Off to cancel the active oven mode. The appliance turns off and the clock is displayed.
The cooling fans may continue to run for awhile and then switch off automatically.
Auto Defrost programs
Tips for defrosting
Always enter the weight in lbs when using the defrost by weight feature (see program table).
Use the defrost mode for raw food items only.
Defrosting gives best results when food to be thawed is a minimum of 0° F (taken directly from a freezer). If the food has been stored in a refrigerator-freezer that does not maintain a temperature of 5° F or below, always program a lower food weight or lower cook time to prevent cooking the food.
If the frozen food is stored outside the freezer for up to 20 minutes, enter a reduced cook time or weight.
The shape of the package will alter the defrosting time. Shallow rectangular food packets defrost more quickly than a deep frozen block of food.
Separate pieces as they begin to defrost. Separated frozen pieces of food defrost better.
Shield warm areas of food with small pieces of aluminum foil, if they start to heat up.
Use small pieces of aluminum foil to shield food items like chicken wings, leg tips and fish tails.
Do not allow aluminum foil to touch the oven cavity when defrosting.
Defrosting suggestions for meat
For best results, please read these suggestions when defrosting meat.
Meat
Weight range
Suggestions
Ground meat
0.5 to 2 lbs (8 to 48 oz)
After each stage, remove any pieces of food that are nearly defrosted. Let stand covered with foil for 5 to 10 minutes.
Steaks, chops or fish
0.5 to 3 lbs (8 to 48 oz)
Ater each stage, rearrange the food. If there are any warm or thawed portions of food, shield them with narrow pieces of aluminum foil. Remove any pieces of food that are nearly defrosted. Let stand covered for about 5 to 10 minutes.
Chicken pieces
0.5 to 3 lbs (8 to 48 oz)
After each stage, rearrange or remove any pieces of food that are nearly defrosted. Let stand covered for 10 to 20 minutes.
Sensor Reheat
The Sensor Reheat feature lets you reheat dinner plates or casseroles (8-12 oz.) for your cooking convenience.
Setting Sensor Reheat
Touch Sensor Reheat once.and START are blinking in the display.
Touch Sensor Reheat repeatedly until the desired program number is shown in the display. Check the menu label at the bottom of the oven cavity or see program table below.
Touch Start/Enter to start sensor reheat mode. The appliance starts sensing, SENS. lights up in the display. The microwave is operating during sensing. When sensing is complete, two short beeps will sound and the calculated cook time will start to count down.
Once sensor reheat is finished 4 beeps will sound. The appliance turns off and the clock is displayed.
Note: Do not open the door during the sensing process, or the program will be cancelled.
Once the calculated cook time is displayed, you can open the door to stir, turn or rearrange the food. Touch Start/Enter to resume operation.
Note:
Cover with vented plastic wrap or wax paper.
Reheat food on a microwaveable dinner plate.
Cancel operation
Touch Clear/Off to cancel the active oven mode. The appliance turns off and the clock is displayed.
The cooling fans may continue to run for awhile and then switch off automatically.
Sensor Reheat programs
Reheat cooking suggestions
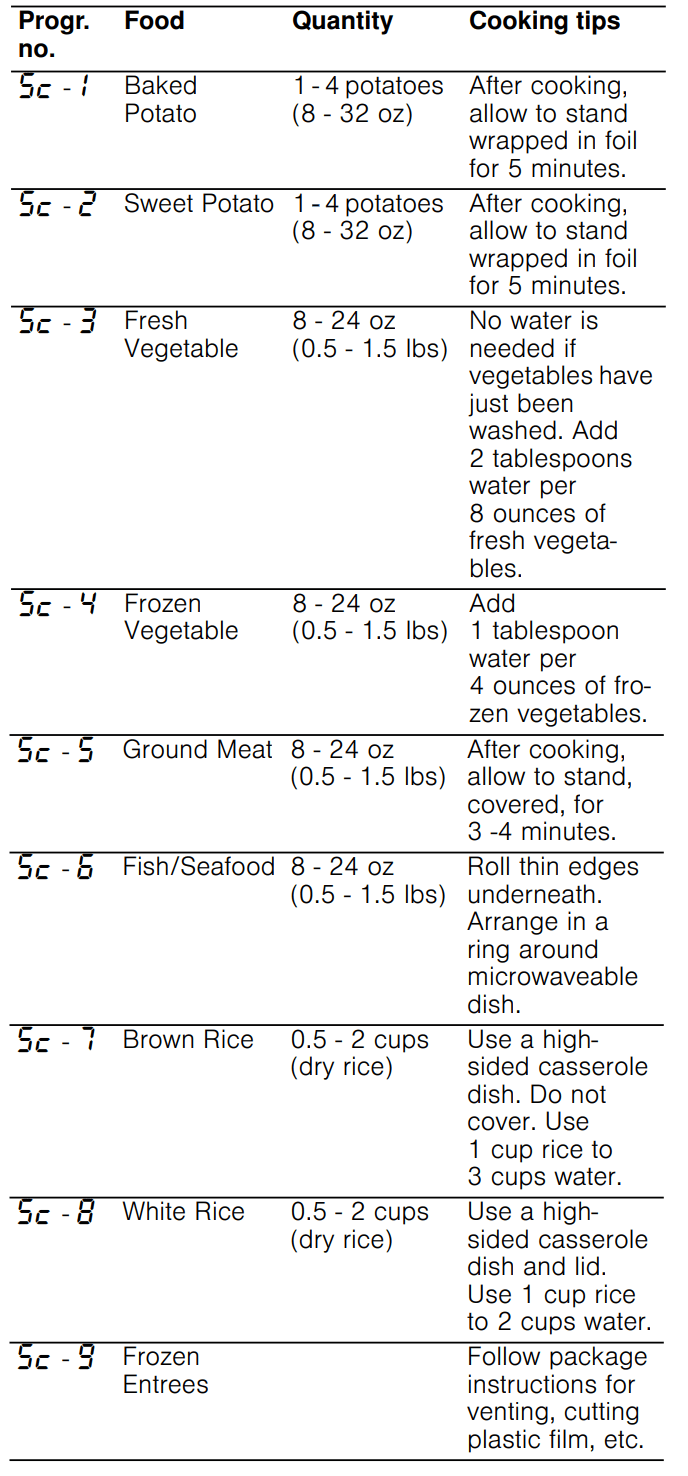
Sensor Cook
Sensor Cook allows you to cook many of your favorite foods without selecting cooking times and power levels. The microwave oven automatically determines the required cooking time for each food item.
For best results for cooking by sensor, follow these recommendations:
Food cooked with the sensor system should start from normal storage temperature.
Turntable tray, glass tray and outside of container should be dry.
Foods should always be covered loosely with microwavable plastic wrap, wax paper or lid.
Do not open the door or touch Clear/Off key during sensing time. When sensing time is over, the oven beeps twice and the remaining cooking time will appear in the display. At this time you can open the door to stir, turn or rearrange the food.
Setting Sensor Cook
Touch Sensor Cook once. and START are blinking.
Touch Sensor Cook repeatedly until the desired program number is shown in the display.
Touch Start/Enter to start sensor cook mode. SENS. lights up in the display and the appliance starts sensing.
When sensing is complete, two short beeps will sound and the calculated cook time will start to count down.
Once sensor cook is finished 4 beeps will sound. The appliance turns off and the clock is displayed.
Note: Do not open the door during the sensing process, or the program will be cancelled.
Once the calculated cook time is displayed, you can open the door to stir, turn or rearrange the food. Touch Start/Enter to resume operation.
Cancel operation
Touch Clear/Off to cancel the active oven mode. The appliance turns off and the clock is displayed.
The cooling fans may continue to run for awhile and then switch off automatically.
Sensor Cook programs
Panel Lock
The panel lock feature is very useful when cleaning the control panel. The lock will prevent accidental programming when wiping the control panel clean.
To activate the panel lock:
Touch and hold Clear/Off for more than 3 seconds. The symbol lights up in the display, a double beep sounds.
To deactivate the panel lock:
Touch and hold Clear/Off for more than 3 seconds. Thesymbol disappears from the display. The panel is unlocked.
Settings
The following basic settings of your appliance can be adjusted to your personal preferences.
Changing the settings Example: Turn clock display on/off.
Touch Settings twice. and or alternate in the display.
Touch the number key 1 to turn the clock display on, touch 2 to turn the clock display off.
Touch Start/Enter.
Touch Clear/Off to exit the settings menu.
Note: You can only change one setting at a time. To change another setting, you have to exit the settings menu first and begin from step 1.
Convenience Operation
Popcorn
Setting Popcorn mode
The popcorn feature lets you pop 3 different bag sizes of commercially packaged microwave popcorn. Use the following table to determine the setting to use.
Bag size
Touch Popcorn key
1.2 oz. (default setting)
once
2.5 oz.
twice
3.5 oz.
3 times
Example: Pop a 3.5 oz. bag of popcorn automatically:
Popcorn three times. and START are blinking in the display.
Touch Start/Enter.
The appliance starts to count down. Once the microwave time has elapsed 4 beeps will sound. The appliance turns off and the clock is displayed.
Cancel operation
Touch Clear/Off to cancel the active oven mode. The appliance turns off and the clock is displayed.
The cooling fans may continue to run for awhile and then switch off automatically.
Beverage
The beverage feature heats between 0.5 and 2 cups of a beverage. Use the table below to determine the setting to use.
Program No.
Amount
Touch Beverage key
1
0.5 cups (about 8 oz)
once
2
1 cup (about 16 oz)
twice
3
1.5 cups (about 24 oz)
3 times
4
2 cups (about 32 oz)
4 times
Cancel operation
Touch Clear/Off to cancel the active oven mode. The appliance turns off and the clock is displayed.
The cooling fans may continue to run for awhile and then switch off automatically.
Keep Warm
You can keep cooked food warm in your microwave oven for up to 60 minutes.
Setting Keep Warm
Touch Keep Warm. The symbol lights up and is blinking in the display.
Enter the desired time using the number keys.
Touch Start/Enter.
Once the set Keep Warm time has elapsed, the
appliance keeps beeping until Clear/Off is pressed.
Notes
Use the Keep Warm mode to keep cooked foods hot and ready to serve.
Food cooked covered should remain covered during Keep Warm.
Pastry items (pies, turnovers, etc.) should be uncovered.
Complete meals kept warm on a dinner plate can be covered during Keep Warm.
Cancel operation
Touch Clear/Off to cancel the active oven mode. The appliance turns off and the clock is displayed.
The cooling fans may continue to run for awhile and then switch off automatically.
More Modes
The More Modes feature offers you five more convenient programs.
Available modes
Mode no.
Name
Input
1
Melt butter
1 = 2 tablespoons
2 = 1/4cup
3 = 1/2cup
2
Melt chocolate
1 = 1 cup
2 = 2 cups
3
Soften ice cream
1 = 4 oz.
2 = 8 oz.
3 = 16 oz.
4 = 32oz.
5 = 48 oz.
4
Soften cream cheese
1 = 3 oz.
2 = 6 oz.
3 = 8 oz.
5
Time defrost
Enter defrost time
Setting More Modes
Touch More Modes once. and START are blinking in the display.
Touch More Modes repeatedly until the desired program number is shown in the display. Check the menu label at the bottom of the oven cavity or see program table above.
Touch Start/Enter. For modes 1 to 4: and START is blinking on the display. For mode 5: is blinking in the display.
Enter the desired weight category (mode 1 - 4) or enter the desired defrost time (mode 5) with the number keys.
Touch Start/Enter to start operation.
Once the cook time has elapsed, 4 beeps will sound.
The appliance turns off and the clock is displayed.
Cancel operation
Touch Clear/Off to cancel the active oven mode. The appliance turns off and the clock is displayed.
The cooling fans may continue to run for a while and then switch off automatically.
Cooking Charts
The charts can be used as a guide. Follow package or recipe directions.
Cooking meat in your microwave
Be sure to place prepared meats on a microwave-safe roasting rack in a microwave-safe dish. Start cooking the meat fat side down and if necessary, use narrow strips of aluminum foil to shield any bone tips or thin meat areas. After cooking, check the temperature in several places before letting the meat stand the recommended time. Please note that the temperatures in the following charts are temperatures at removal time; the temperature will rise during the standing period.
Stand time
Meat
Doneness
Remove from oven
After standing (10-15 min.)
Beef
Medium Well done
150°F(65°C) 160°F(71°C)
160°F(71°C) 170°F(77°C)
Pork
Medium Well done
150°F(65°C) 160°F(71°C)
160°F(71°C) 170°F(77°C)
Poultry
Dark meat Light meat
150°F(65°C) 160°F(71°C)
150°F(65°C) 160°F(71°C)
Cooking poultry in your microwave
Be sure to place poultry on a microwave-safe roasting rack in a microwave-safe dish. Cover poultry with wax paper to prevent splattering. Use narrow strips of aluminum foil to shield any bone tips or thin meat areas, or areas that start to overcook. After cooking, check the temperature in several places before letting the meat stand the recommended time.
Meat
Power level
Cook time
Directions
Whole chicken (up to 4 lbs.)
medium high (7)
180° F (82°C) dark meat 170° F (76°C) dark meat
7-10 min. /lb
Place chicken breast-side down on roasting rack. Cover with wax paper. Turn over halfway through cooking. Cook until juices run clear and meat near bone is no longer pink. Let stand for 5-10 min.
Chicken pieces (up to 4 lbs.)
medium high (7)
180° F (82°C) dark meat 170° F (76°C) dark meat
7-10 min. /lb
Place chicken bone-side down on dish, with thickest portions toward the inside of dish. Cover with wax paper. Turn over halfway through cooking. Cook until juices run clear and meat near bone is no longer pink. Let stand for 5-10 min.
Cooking eggs in your microwave
Never cook eggs in the shell and never warm hard-cooked eggs in the shell; they can explode.
Always pierce yolk on whole eggs to keep them from bursting.
Cook eggs just until set; they will become tough if overcooked.
Cooking scrambled eggs is safe.
Cooking vegetables in your microwave
Vegetables should be washed just before cooking. Rarely is extra water needed. If dense vegetables such as potatoes or carrots are being cooked, add about 1⁄4 cup of water.
Small vegetables (sliced carrots, peas, lima beans, etc.) will cook faster than larger vegetables.
Whole vegetables, such as potatoes, acorn squash or corn on the cob, should be arranged in a circle on the turntable before cooking. They will cook more evenly if turned over halfway through cooking.
Always place vegetables like asparagus and broccoli with the stem ends pointing towards the edge of the dish and the tips toward the center.
When cooking cut vegetables, always cover the dish with a lid or vented microwavable plastic wrap.
Whole, unpeeled vegetables such as potatoes, sweet potatoes, squash, eggplant, etc., should have their skin pricked in several locations before cooking to prevent them from bursting.
For more even cooking, stir or rearrange whole vegetables halfway through the cook time.
Most of the time, the denser the food, the longer the required standing time. For example, a baked potato should stand for 5 minutes before serving, while a dish of peas may be served immediately.
Cooking seafood in your microwave
Be sure to place fish on a microwave-safe roasting rack in a microwave-safe dish. Be sure to always cook fish until it flakes easily with a fork. Use a tight cover to steam fish; a lighter cover of wax paper or paper towel provides less steaming. And be sure not to overcook fish; check it for doneness at a minimum cooking time before cooking longer.
Seafood
Power level
Cook time
Directions
Fish steaks up to 11/2 lbs
medium high (7)
7–11 min. /lb
Arrange fish on roasting rack with meaty portions towards the outside of rack. Cover with wax paper. Turn over and rearrange halfway through cook time. Cook until fish flakes easily with fork.
Let stand 3-5 mins.
Fish fillets up to 1/ lbs.
medium high (7)
7–11 min. /lb
Arrange fillets in a baking dish, turning any thin pieces under. Cover with wax paper. If over / inch thick, turn over and rearrange halfway through cook time. Cook until fish flakes easily with fork.
Let stand 2-3 mins.
Shrimp up to 1/ lbs.
medium high (7)
7–11 min. /lb
Arrange shrimp in a baking dish without overlapping or layering. Cover with wax paper. Cook until firm and opaque, stirring 2 or 3 times.
Let stand 5 mins.
Cleaning and Maintenance
WARNING: Be sure the entire appliance has cooled and grease has solidified before attempting to clean any part of the appliance.
Cleaning Guide
For best performance and for safety reasons, keep the oven clean inside and outside. Take special care to keep the inner door panel and oven front frame free of food and grease build-up.
Never use abrasive scouring powder or pads on the microwave. Wipe the microwave oven inside and out with a soft cloth and and warm (not hot) mild detergent solution. Rinse and wipe completely dry.
Wipe spatters immediately with a wet paper towel, especially after cooking greasy foods like chicken or bacon.
Clean your microwave oven weekly or more often, if needed.
Never operate the oven without food in the oven cavity; this can damage the magnetron tube or glass tray. You may wish to leave a cup of water standing inside the oven when it is not in use to prevent damage if the oven is accidentally turned on.
Part --- Recommendations
Oven cavity
Keep inside (cavity) of the oven clean. Food particles and spilled liquids can stick to the oven walls, causing the oven to work less efficiently.
Wipe up spills immediately. Use a damp, clean cloth and mild soap. DO NOT use harsh detergents or abrasive cleaners.
To help loosen baked-on food particles or liquids, heat 2 cups of water (add the juice of 1 lemon if you desire to keep the oven fresh-smelling) in a 4 cup microwave-safe dish at High power for 5 minutes or until boiling. Let stand in oven cavity for 1 or 2 minutes.
Glass turntable tray
Remove glass turntable tray from the oven when cleaning the oven cavity and tray.
NOTICE:
To prevent the glass turntable from breaking, handle with care and do not put it in water immediately after cooking.
Wash the glass turntable tray in warm soapy water or in the dishwasher.
Turntable roller rest
Clean with warm, soapy water. Rinse thoroughly and dry.
Door glass
Wash with soap and water or glass cleaner. Use Fantastik® or Formula 409® on a clean sponge or paper towel and wipe clean. Avoid using abrasive cleaners, like powder cleaning agents, steel wool pads and oven cleaners.
If steam accumulates inside or outside the oven door, wipe with a soft cloth. Steam can accumulate when operating the oven in high humidity and in no way indicates microwave leakage.
Painted surfaces
Clean with hot soapy water or apply Fantastik® or Formula 409® to a clean sponge or paper towel and wipe clean. Avoid using abrasive cleaners, like powder cleaning agents, steel wool pads and oven cleaners.
Stainless steel surfaces
Always wipe or rub in the direction of the grain. Clean with a soapy sponge, then rinse and dry, or wipe with Fantastik® sprayed on a paper towel. Protect and polish with Stainless Steel Magic® and a soft cloth. Remove water spots with a cloth dampened with white vinegar. Do not use any cleanser that contains chlorine as these may rust the stainless steel
Plastic & Controls
When cool, clean with soapy water, rinse and dry.
Printed areas (words & numbers)
Do not use abrasive cleaners or petroleum-based solvents.
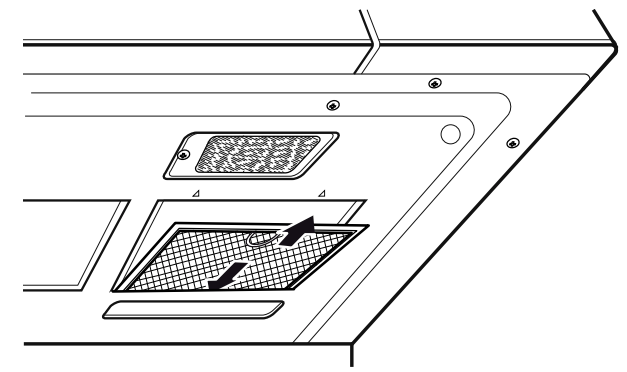
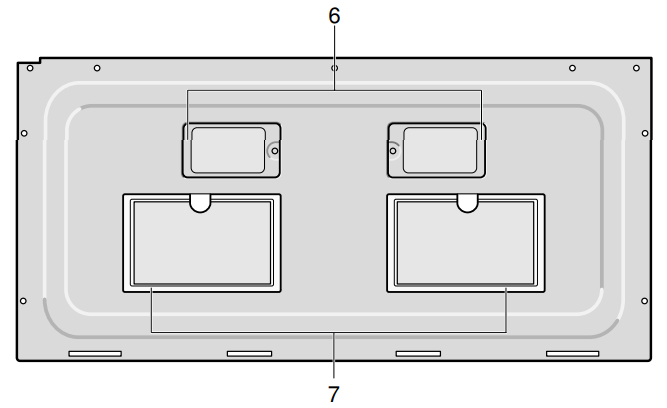
Cleaning the oven vent filters
The oven ventilation filters should be removed and cleaned often; generally at least once every month.
To remove the ventilation filters, slide the filter to the rear. Then pull filter downward and push to the other side. The filter will drop out. Repeat for the 2nd filter.
Soak the ventilation filters in hot water using a mild detergent. Rinse well and shake to dry. Do not use ammonia or wash in a dishwasher. The aluminum on the filter will corrode and darken.
To reinstall an oven ventilation filter, slide it into the side slot, then push up and toward oven to lock. Reinstall the 2nd filter using the same procedure.
Maintenance
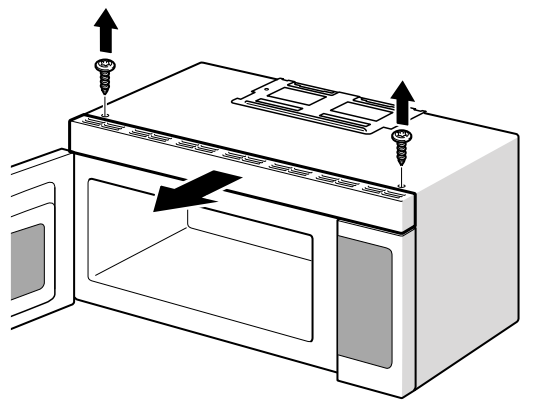
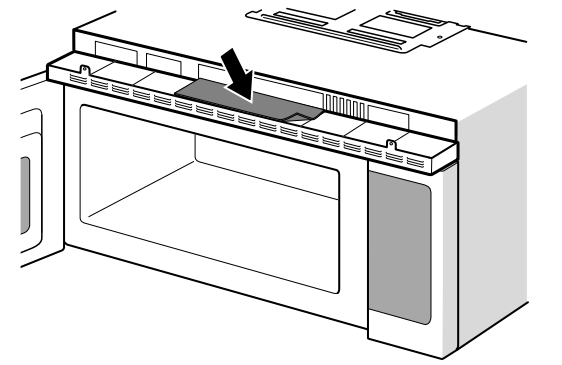
Charcoal filter replacement
The charcoal filter, which was included with your microwave oven, is used for nonvented, recirculated installation (Room Venting). The filter should be replaced every 6 to 12 months depending on use.
Disconnect power to the microwave oven at the circuit breaker panel or by unplugging.
Remove the vent grill mounting screws.
Pull the vent grill away from the unit.
Change the charcoal filter.
Carefully push the vent grill back into place and replace the screws removed in Step 2.
Note: If no charcoal filter is installed, it is not possible to bind the odorous substances in the cooking vapors
Troubleshooting
If you encounter a problem, it often will merely be something minor. Before you call customer service, consider the suggestions and instructions below:
Problem
Suggestion
Neither the microwave’s display nor oven operates.
Properly insert the plug into a grounded power outlet.
Remove the plug from the outlet, wait 10 seconds, then plug the microwave in again.
Reset the household circuit breaker or replace any blown fuses.
Plug a different appliance into the power outlet. If the other appliance will not operate, have a qualified electrician repair the outlet.
Plug the microwave into a different power outlet.
Oven display works, but the oven will not operate.
Make sure the oven door is closed securely and completely.
Check to see if packing material or other materials are stuck to the door seal.
Check for damage to the oven door.
Press the Clear/Off key twice and attempt to re-enter cooking instructions.
Power goes off before the cook time has elapsed.
If there has been a power interruption, remove the plug from the outlet; wait 10 seconds, then plug the microwave in again. If there was a power outage, the time indicator in the display will show 00:00.
Reset the clock and any cooking instructions.
Reset the household circuit breaker or replace any blown fuses.
Press the Clear/Off key twice and attempt to re-enter cooking instructions.
Plug a different appliance into the power outlet. If the other appliance will not operate, have a qualified electrician repair the outlet.
Plug the microwave into a different power outlet.
Food is cooking too slowly.
Make sure the oven is on a separate 20 amp circuit line. Operating another appliance on the same circuit can cause a voltage drop. If necessary, move the microwave to its own circuit.
Microwave is sparking, arcing occurs.
Remove any metallic utensils, cookware or metal ties from the oven cavity. If using aluminum foil, use only narrow strips and allow at least one inch between the foil and the interior oven walls.
Turntable makes noises or sticks.
Clean the turntable, roller ring and oven cavity bottom.
• Make sure the turntable and roller ring are positioned correctly.
Using the microwave causes TV or radio interference.
This is similar to the interference caused by other small appliances, such as hair dryers. Move your microwave further away from other appliances, like your TV or radio.
LED lights are not working.
Please contact Customer Service.
Note: If the oven is set to cook for more than 30 minutes at 100% power level, it will automatically adjust itself to a 80% power level after 30 minutes to avoid overcooking.
 symbol lights up and
 is blinking.
 will light up on the display.

 symbol and OFF lights up briefly. Touch the key again to turn the turntable on. The
 is blinking. The segments in the bar underneath the number display also indicate the power level.
 and the selected power level and START are blinking in the display.
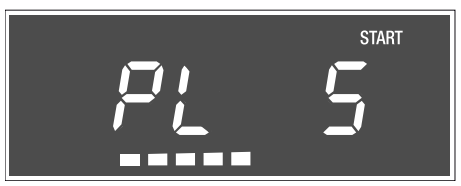
 and START are blinking and the
 symbol lights up in the display.
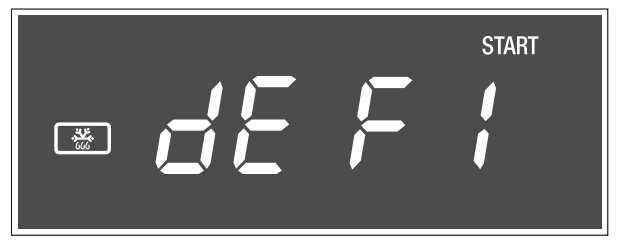
 lb is blinking in the display.
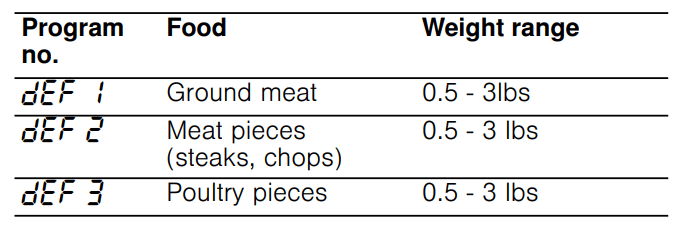
 and START are blinking in the display.


 and START are blinking.
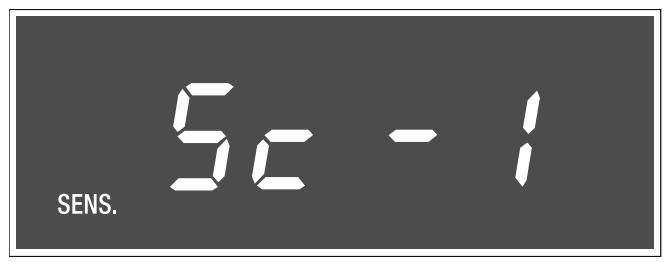
 symbol lights up in the display, a double beep sounds.
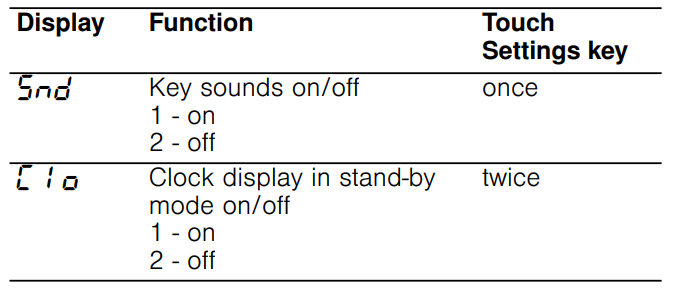
 and
and  or
or  alternate in the display.
 and START are blinking in the display.
 symbol lights up and
  is blinking in the display.
 and START are blinking in the display.