User Guide
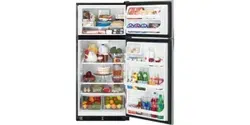
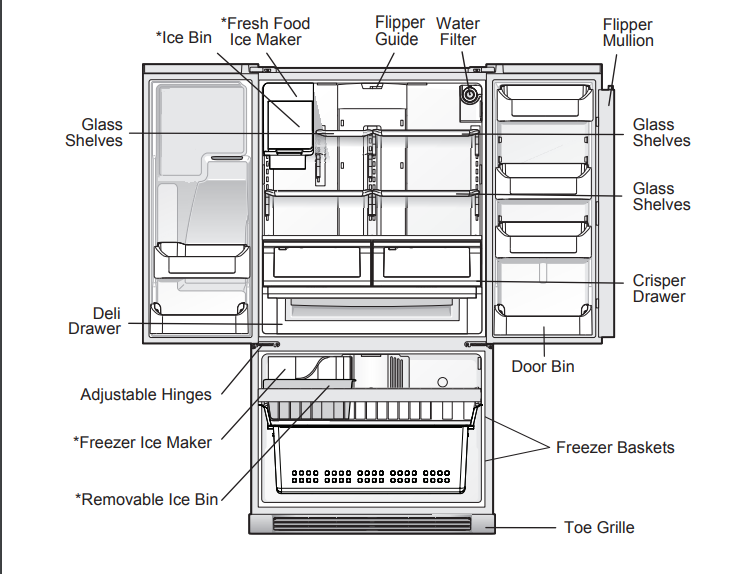
FEATURES AT A GLANCE - BASELINE MODEL
Location
- Choose a place that is near a grounded, non-GFCI, electrical outlet. Do Not use an extension cord or an adapter plug.
- If possible, place the refrigerator out of direct sunlight and away from the range, dishwasher, or other heat sources.
- The refrigerator must be installed on a floor that is level and strong enough to support a fully loaded refrigerator.
- Consider water supply availability for models equipped with an automatic ice maker.
Installation
- Allow the following clearances for ease of installation, proper air circulation, and plumbing and electrical connections:
- Sides & Top ⅜ inch (9.5 mm)
- Back 1 inch (25.4 mm)
Door opening
- Your refrigerator should be positioned to allow easy access to a counter when removing food. For best use of refrigerator drawers and freezer baskets, the refrigerator should be in a position where both can be fully opened.
INSTALLATION
- Cabinet Leveling & Refrigerator 5 Install the toe grille by fitting into place. Door Alignment (if necessary)
- Guidelines for final positioning of your refrigerator:
- All four corners of the cabinet must rest firmly on the floor.
- The front should be slightly elevated to ensure that doors close and seal properly.
- Doors should align with each other and be level.
- Most of these conditions can be met by raising or lowering the adjustable front rollers.
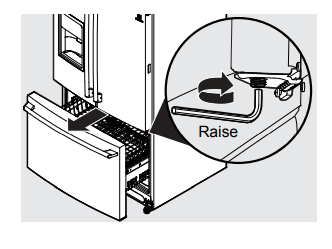
To level the cabinet using the front rollers:
- Slightly open freezer drawer if the toe grill is installed. Lift the toe grille and gently pull forward.
- Make initial cabinet adjustments by using the front roller height adjusting screws.
- Use a 3/8 inch socket wrench to turn the adjustment screws (1 per side).
- Ensure both doors are bind-free with their seals touching the cabinet on all four sides and that cabinet is stable.
- After unit is leveled, lower anti-tip leg using a 3/8 inch socket wrench until it firmly contacts the floor.
- Cabinet Leveling & Refrigerator 5 Install the toe grille by fitting into place.
To make final door height adjustments:
- Adjusting Flipper Mullion Screw
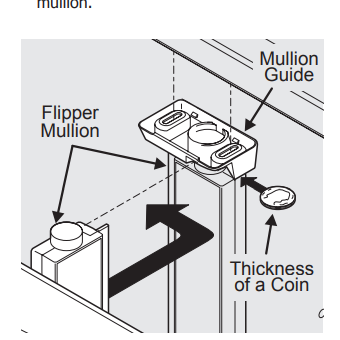
- Adjust flipper mullion height. For proper connection with the flipper mullion guide, there should be a separation about the thickness of a coin (0.060 inches, or mm) between the guide and flipper mullion.
- Re-tighten screw.
To adjust the flipper mullion:
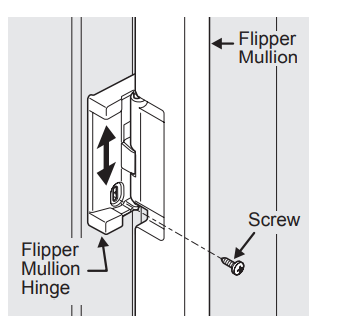
- Loosen the screw located on the flipper mullion hinge.
- Flipper
- Mullion
- Guide
- Thickness of a Coin
- Adjusting Flipper Mullion Height
INSTALLATION
- Open freezer drawer to make lower hinge visible.
- Insert 6mm Allen wrench into the shaft of the lower hinge.
- Adjust the height by turning clockwise or counterclockwise. Turning clockwise will lower the door. Turning counterclockwise will raise the door. Default setting is to the lowest height when you receive your appliance.
Getting through narrow spaces
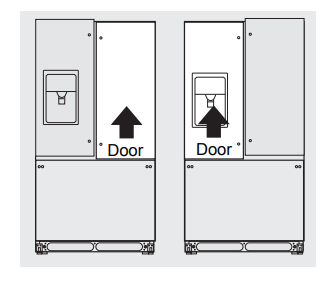
- If your refrigerator will not fit through an entrance area, you can remove the doors.
- Check first by measuring the entrance.
- To prepare for removing the doors:
- Make sure the electrical power cord is unplugged from the wall outlet.
- Open the freezer drawer and remove the toe grille (see Installation section).
- Remove any food from the door shelves and close the doors.
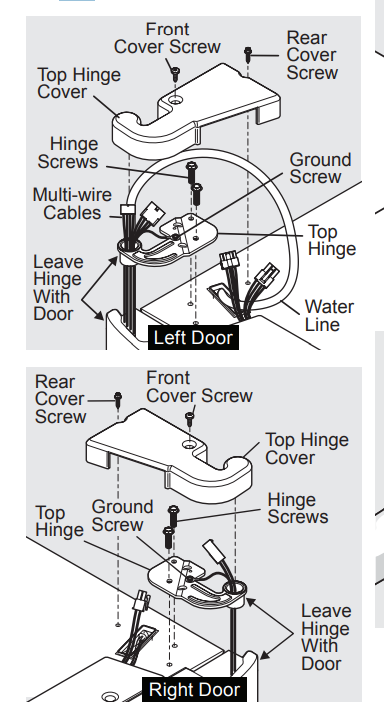
To remove the top hinge covers:
- Remove the two screws from each cover over the top door hinges.
- Lift inside edge of hinge cover and tilt back.
To reinstall the refrigerator doors:

Replace the lower hinge screws.
- Holding the door at a 90 degree angle, drop the pin down into the center hinge opening. Rotate it slightly in either direction until the door falls down into place.
- Reconnect the harnesses.
- Replace the top hinge covers.
- Reconnect electrical power cord to the wall outlet.
To reset door pin:
- If doors are removed at less than a 40 degree angle, the pin returns to the home position.
- It can be reset by turning the door upside and using a 5/32” Allen wrench to rotate the left hand pin 90 degrees clockwise and the right hand pin 90 degrees counterclockwise.
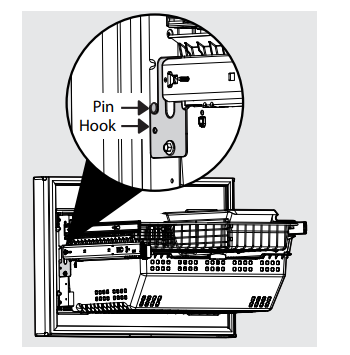
Replacing Freezer Drawer
- Extend the Freezer slides from the unit.
- Carefully align support pin with hooks on end of freezer slides and then lower freezer door onto slides.
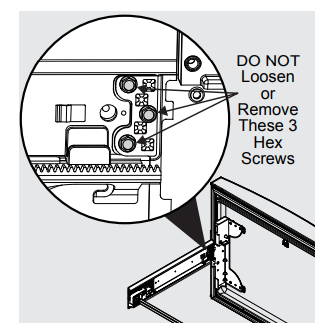
- Replace the 4 hex head screws that secure the slides to the door (2 on each side) and tighten.
- Mechanism
- Bottom
- Hinge
- Opening
- Doors at 90º
- Door Bottom)
- Reinstall top hinge.
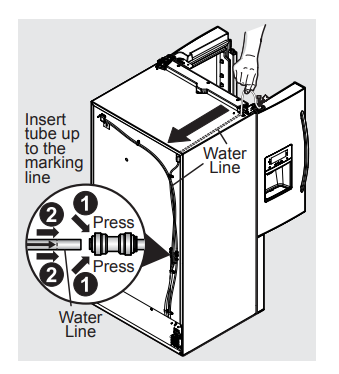
- Insert the water line in the top left tunnel pushing from the front to the back of the unit.
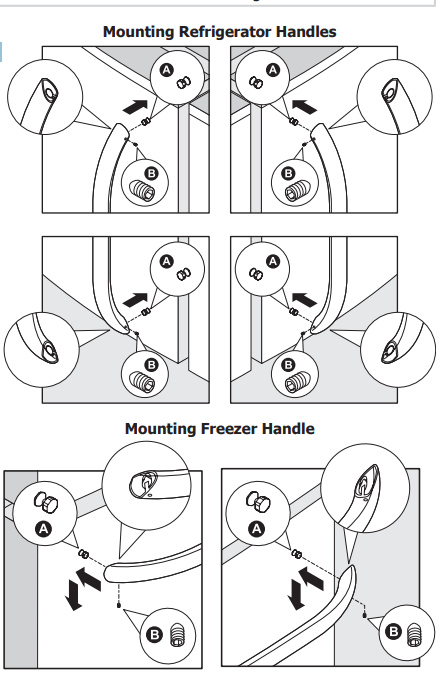
Door Handle Mounting
- Instructions for Frigidaire
- Frigidaire Gallery
- Remove handles from carton and any other protective packaging.
- Position fresh food handle end caps over upper and lower pre-installed shoulder bolts (A) that are fastened into door, ensuring the holes for the set screws are facing towards the opposite door.
- While holding handle firmly against door, fasten upper and lower Allen set screws (B) with supplied Allen wrench.
- Repeat steps 2 and 3 to install opposite handle.
- Ensure the holes for the set screws are facing towards the first door.
- Position freezer handle end caps over left and right preinstalled shoulder bolts (A) that are fastened to the door, ensuring the holes for the set screws are facing down.
- While holding handle firmly against door, loosely tighten right Allen set screw (B) with supplied Allen wrench until there is no gap between handle and door.
- Still holding the handle firmly to the door, firmly tighten left Allen set screw (B) with supplied Allen wrench.
- Return to the right Allen set screw (B) and firmly tighten with supplied Allen wrench.
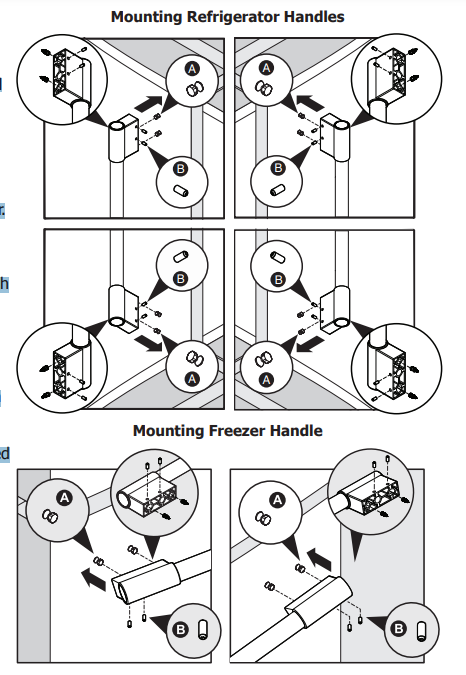
Door Handle Mounting
- Instructions for
- Frigidaire Professional®
- Remove handles from carton and any other protective packaging.
- Position fresh food handle end over upper and lower preinstalled shoulder bolts (A) that are fastened into door, ensuring the holes for the set screws are facing towards the opposite door.
- While holding handle firmly against door, fasten further most upper and further most lower Allen set screws (B) with supplied Allen wrench.
- Repeat steps 2 and 3 to install opposite handle. Ensure the holes for the set screws are facing towards the first door.
Firmly tighten the inside Allen set screws.
- Position freezer handle end over left and right pre-installed handle shoulder bolts (A) that are fastened to the door, ensuring the holes for the set screws are facing down.
- While holding handle firmly against door, loosely tighten far right Allen set screw (B) with supplied Allen wrench until there is no gap between handle and door.
- Still holding the handle firmly to the door, firmly tighten far left Allen set screw (B) with supplied Allen wrench.
- Return to the far right Allen set screw (B) and firmly tighten with supplied Allen wrench.
- Firmly tighten the inside Allen set screws
CONNECTING THE WATER SUPPLY
Before Installing The Water
- Supply Line, You Will Need:
- Basic Tools: adjustable wrench, flat-blade screwdriver, and PhillipsTM screwdriver
- Access to a household cold water line with water pressure between 30 and psi.
- A water supply line made of ¼ inch mm) OD, copper or stainless steel tubing. To determine the length of tubing needed, measure the distance from the ice maker inlet valve at the back of the refrigerator to your cold water pipe. Then add approximately 7 feet (2.1 meters), so the refrigerator can be moved out for cleaning (as shown).
- A shutoff valve to connect the water supply line to your household water system. DO NOT use a self-piercing type shutoff valve.
- Do not re-use compression fitting or use thread seal tape.
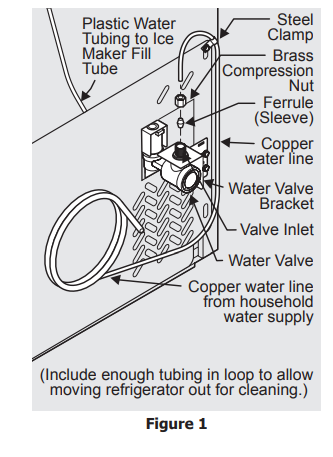
- A compression nut and ferrule (sleeve) for connecting a copper water supply line to the ice maker inlet valve.
- To Connect Water Supply Line To
Ice Maker Inlet Valve
- Disconnect refrigerator from electric power source.
- Place end of water supply line into sink or bucket. Turn ON water supply and flush supply line until water is clear. Turn OFF water supply at shutoff valve.
- Remove plastic cap from water valve inlet and discard cap.
- If you use copper tubing - Slide brass compression nut, then ferrule (sleeve) onto water supply line. Push water supply line into water valve inlet as far as it will go (¼ inch/6.4 mm). Slide ferrule sleeve) into valve inlet and finger tighten compression nut onto valve. Tighten another half turn with a wrench; DO NOT over tighten. See Figure 1.
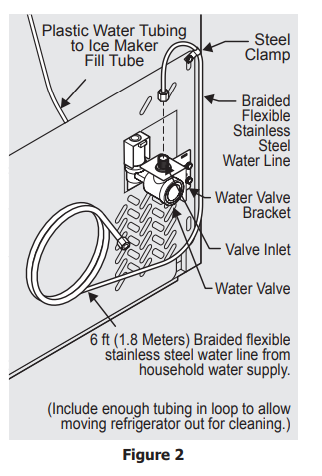
If you use braided flexible stainless steel tubing -
The nut is already assembled on the tubing. Slide nut onto valve inlet and finger tighten nut onto valve. Tighten another half turn with a wrench; DO NOT over tighten. See Figure 2.
- With steel clamp and screw, secure water supply line to rear panel of refrigerator as shown.
- Coil excess water supply line (copper tubing only), about 2½ turns, behind refrigerator as shown and arrange coils so they do not vibrate or wear against any other surface. Do not kink tubing.
- Turn ON water supply at shutoff valve and tighten any connections that leak.
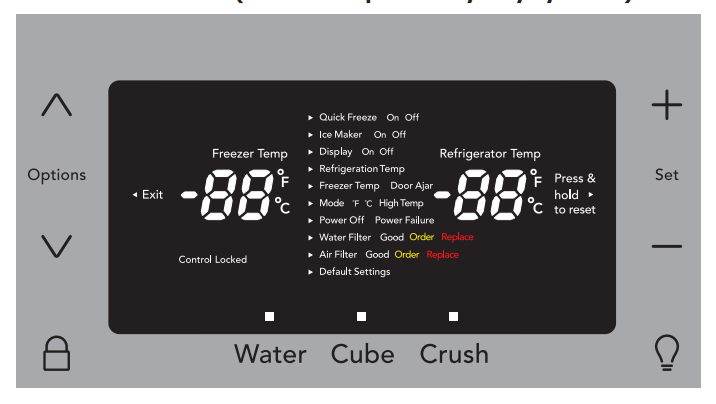
User Interface
[imege]
Power Failure
- In the event of a power failure, the power fail alert will be illuminated. Press set to acknowledge the alarm. Other modes may be turned off until the alarm is acknowledged.
- While a power fail alert is displayed on the control panel, the unit will continue normal operation.
- The power fail alert on the control panel will be removed once in the user acknowledges the power fail condition by pressing any key on the control panel.
- The high temp alarm may also be illuminated until a safe operating range temperature has been reached.
Freezer Temp
- If the freezer temperature reaches 26°F or greater, the alarm will sound and the temperature will flash. You can disable the alarm by pressing the set key but the “High Temp” indicator will illuminate until the temperature goes below 26°F.
Fresh Food Temp
- If the fresh food temperature reaches 55°F or greater, the alarm will sound and the temperature will flash. You can disable the alarm by pressing the set key but the “High Temp” indicator will illuminate until the temperature goes below 55°F.
Door Ajar
- If the freezer or fresh food doors have been left open for five minutes or more, an alarm will sound and the door ajar indicator will illuminate on the display. Press the set key to reset any system alarms.
Flapper
- When “Cube” or “Crush” is selected, if the flapper (or ice chute door) is being held open by a jammed ice cube, an alarm will sound for two minutes.
- The alarm will reset after two minutes or when the ice cube is removed and the set key is pressed to reset.
Sabbath Mode
- The Sabbath Mode is a feature that disables portions of the refrigerator and its controls in accordance with observance of the weekly
- Sabbath and religious holidays within the
- Orthodox Jewish community.
- Sabbath Mode is turned ON and OFF by simultaneously pressing and holding both the and “+” for five seconds. The display shows
Sb” while in Sabbath mode.
- In the Sabbath Mode, the High Temp alarm is active for health reasons. For example, if the door is left ajar the High Temp alarm is activated.
- The refrigerator will function normally once the door is closed, without any violation of the Sabbath/Holidays. The
- High Temp alarm is permitted when cabinet temperature is outside the safe zone for 20 minutes. The alarm silences itself after 10 minutes while the High Temp icon stays lit until the Sabbath mode is exited.
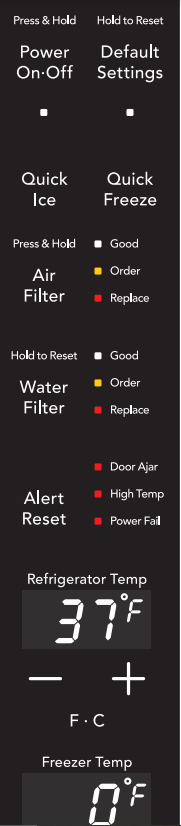
CONTROLS - NON-DISPENSER MODELS
Power On Off
- Press and hold for three seconds to turn off the cooling system to clean the refrigerator. The digital displays will read OFF.
Default Settings
- Resets all refrigerator settings such as temp, temp display and tones to their factory default settings.
Quick Freeze
- Activates a faster rate for freezing food.
- Quick Ice Temporarily increases cooling for freezer to increase the production of ice
- Air Filter Filter condition status is always displayed when door is open. Press and hold for three seconds to reset after filter change.
Water Filter
- Press and hold for three seconds to reset after filter change.
Alert Reset
- Tones emitted by each key press can be turned off based on user preference. The sounds are muted when the red indicator is lit. Warning signals will stay active.
Door Ajar
- If the door has been left open for an extended period of time, an alarm will sound and the door ajar indicator will display on the bottom display of the control panel.
- The alarm is turned off by closing the door. The alert reset key will blink to prompt the reset of any active alarms. Press this key to reset any system alarms.
High Temp
- In the event of a high temperature condition, the temperature display will blink and display “HI”. After 20 minutes, the alarm will sound and the high temp indicator will be red on the bottom of the control panel.
- Upon acknowledging the alarm, the highest temperature reached will be displayed and the refrigerator will resume normal operation.
- In case the high temp alarm is not acknowledged at the first alarm sound time out, when the door is first opened, the alarm sound will be repeated.
Power Fail
- In the event of a power failure, the power fail alert will be displayed and the temperature display will blink until the alert reset icon is pressed, acknowledging the alarm.
- Other modes may be turned off until the alarm is acknowledged. The power fail alert is turned off and the refrigerator will resume normal operation.
- The high temp alarm may also be illuminated until a safe operating range temperature has been reached.
Sabbath Mode”
- The Sabbath Mode is a feature that disables portions of the refrigerator and its controls for, in accordance with observance of the weekly
- Sabbath and religious holidays within the
- Orthodox Jewish community.
- Sabbath Mode is turned ON and OFF by simultaneously pressing and holding the freezer temp “-” and the refrigerator temp “+” indicators for five seconds. The display shows
Sabbath mode.
- In the Sabbath Mode, the High Temp alarm is active for health reasons. For example, if the door is left ajar the High Temp alarm is activated.
- The refrigerator will function normally once the door is closed, without any violation of the Sabbath/Holidays.
Power Failure
- In the event of a power failure, the power fail alert will be illuminated. Press “mute alarm” to acknowledge the alarm. Other modes may be turned off until the alarm is acknowledged.
- While a power failure alert is displayed on the control panel, the unit will continue normal operation.
- The power fail alert on the control panel will be removed once the user acknowledges the power fail condition by pressing any key on the control panel. The high temp alarm may also be illuminated until a safe operating range temperature has been reached.
Freezer Temp
- If the freezer temperature reaches 26°F or greater, the alarm will sound and the temperature will flash and the dispenser control will display “HIGH TEMP DETECTED”.
- You can disable the alarm by pressing “mute alarm” but the “HIGH TEMP DETECTED” indicator will illuminate until the temperature goes below 26°F.
Fresh Food Temp
- If the fresh food temperature reaches 55°F or greater, the alarm will sound and the temperature will flash and the dispenser control will display “HIGH TEMP DETECTED”
- . You can disable the alarm by pressing “mute alarm” but the “HIGH TEMP DETECTED” indicator will illuminate until the temperature goes below 55°F.
Door Ajar
- If the freezer or fresh food doors have been left open for five minutes or more, an alarm will sound and the door ajar indicator will illuminate on the display. Press “mute alarm” to reset any system alarms.
Flapper
- When “CUBES” or “CRUSHED” is selected, if the flapper (or ice chute door) is being held open by a jammed ice cube, an alarm will sound for two minutes and the current selection will blink on the dispenser control. The alarm will reset after two minutes or when the ice cube is removed.
- Reconnect refrigerator to electrical power source.
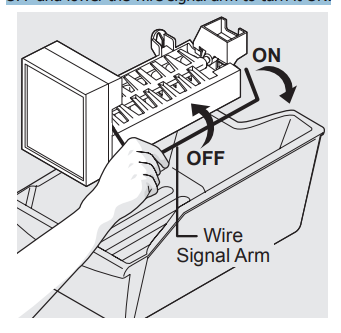
- To turn ice maker on, lower wire signal arm (freezer ice maker) or set the ice maker’s On/Off power switch to the “On” position (fresh food ice maker).
AUTOMATIC ICE & WATER DISPENSER
Ice maker operation & care
- After the refrigerator is installed properly and has cooled for several hours, the ice maker can produce ice within 24 hours. The ice maker will fill the ice bin from the rear. You must dispense some ice to force the ice forward in the bin.
- This will allow the bin to fill completely.
- Ice Maker and Storage Bin Capacity
- This ice maker should produce 2.0 to 2.5 pounds of ice per 24 hours.
- In a Standard Depth model, the ice bin will hold about 6.5 pounds of ice. In a Counter Depth model, the ice bin will hold about 4 pounds of ice.
Using the ice maker after installation
- Before making ice for the first time, be sure to prime the water supply system. Air in new plumbing lines can result in two or three empty ice maker cycles. Furthermore, if the system is not flushed, the first ice cubes may be discolored or have an odd flavor. ce maker/dispenser tips
- If your refrigerator is not connected to a water supply or the water supply is turned off, turn off the ice maker as described in the previous section.
- The following sounds are normal when the ice maker is operating:
- Motor running
- Ice dropping into ice bin
- Water valve opening or closing
Running water
- If you need a large quantity of ice at one time, it is best to get cubes directly from the ice bin.
- Ice cubes stored too long may develop an odd flavor. Empty the ice bin as explained below.
- When dispensing cubed ice, it is normal to have a small quantity of little pieces along with the whole cubes.
- To avoid splashing, dispense ice into your container before adding liquids.
- It is normal for ice to fill to the top of the ice bin.
Ice Maker (select models)
- After the refrigerator is installed properly, the ice maker can produce ice within 24 hours.
- When using the ice maker for the first time, and in order for it to work properly, it is necessary to clear air from the water tubing and the filter.
- Furthermore, if the system is not flushed, the first ice cubes may be discolored or have an odd flavor. Once the ice maker begins making ice, allow the bin to fill completely, then discard the first FULL bin of ice on a Standard Depth model, and the first TWO FULL bins of ice on a Counter
- Depth model.
Ice Maker and Storage Bin Capacity
- This ice maker should produce between 2 and pounds of ice per 24 hours depending on usage conditions. In a Standard Depth model, the ice bin will hold about 12 pounds of ice. In a Counter Depth model, the ice bin will hold about 7 pounds of ice.
- Turning the ice maker on and off The ice maker is turned off and on by lifting/ lowering the ice maker’s wire signal arm. To gain access to the ice maker, pull the freezer drawer out. Lift the wire signal arm to turn the ice maker OFF and lower the wire signal arm to turn it ON.
Cleaning the ice maker
- Clean the ice maker and ice bin at regular intervals, especially prior to vacation or moving.
- Turn off the ice maker.
- Remove the ice bin.
- Empty and carefully clean the ice bin with mild detergent. Do not use harsh or abrasive cleaners. Rinse with clean water.
- Allow the ice bin to dry completely before replacing in the freezer.
- Replace the ice bin. Turn the ice maker on.
- Remove and empty the ice bin if an extended power failure (one hour or longer) causes ice cubes in the ice bin to melt and refreeze together after power is restored.
- Remove the ice bin and shake to loosen the cubes or clean as explained above.
STORAGE FEATURES
For crisper shelves:
- Remove air seal by pushing down on the flap with a downward rotation.
- Position the air seal towards the outside end of the shelf to avoid the air tower when shelf is pushed back into place.
- Install seal by sliding lower tab of seal up into bottom rear slot of shelf with seal at a downward angle then pulling up on seal flap until seal sits snug on back of shelf and flap sits at about a 10 degree angle from shelf surface.
For glass shelves:
- Remove air seal by pushing seal straight back.
- Position the air seal towards the outside edge of the shelf to avoid the air tower when shelf is pushed back into place.
- Install seal by sliding the open channel end of the seal onto back edge of shelf until seal sits snug on back of shelf and flap sits at about a 10 degree angle from shelf surface.
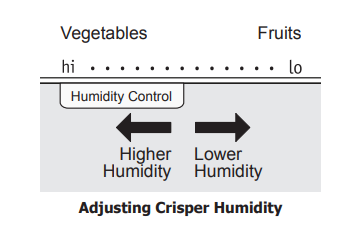
Crisper humidity control
- Crisper drawers include a sliding control for adjusting the humidity inside the crisper.
- Leafy vegetables keep best when stored with the Humidity Control set on Higher Humidity. Fresh fruits keep best when stored with the Humidity Control set on Lower Humidity.
Storage bins (varies by model)
- The doors to your fresh food compartment use a system of modular storage bins. All of these bins are removable for easy cleaning. Some of them have fixed positions, while others can be adjusted to your needs.
- Door bins are ideal for storing jars, bottles, cans, and large drink containers. They also enable quick selection of frequently used items.
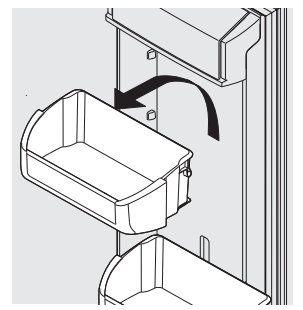
To change the position of an adjustable door bin:
- Remove all food from door bin.
- Grip the bin firmly with both hands and lift it upward.
- Remove the bin.
- Place the bin just above desired position.
- Dairy compartment
- Use the dairy compartment, at the top of the fresh food compartment door, for shortterm storage of cheese, spreads, or butter. The dairy compartment is designed to be warmer than the open area and includes a lift-up cover and a dairy divider (select models).
- Dairy Compartment
STORAGE FEATURES
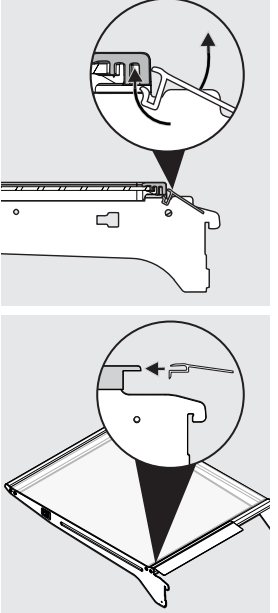
- To Remove Upper Freezer Basket
- Find the side where the basket frame is aligned to the clip opening. The basket frame should be aligned to both front and rear clips on the same side (either left or right side).
- If the basket frame is not aligned to the left or right side, push the basket sideways (to either side) until it is aligned.
- By grabbing the basket wire frame close to the frontal clip, pull up to take the basket frame out.
- Grab the basket frame close to the rear clip and pull up until it comes out of the clip.
- Once one side of the basket is off the clips or retainers, slide the basket sideways until the other side of the frame is aligned with the clip openings on the opposite side of the freezer.
- In the same way, pull up the basket frame from the frontal and rear clips until it is out of the clips.
Remove the basket.
- Reverse the steps to reinstall the basket
- Fresh food storage
- Keep the fresh food compartment between 34°F and 40°F with an optimum temperature of 37°F.
- Avoid overcrowding the refrigerator shelves, which reduces air circulation and causes uneven cooling.
- Avoid placing food in front of air ports.
- See Controls Section for illustration.)
Fruits and vegetables
- Store fruits and vegetables in crisper drawers, where trapped moisture helps preserve food quality for longer time periods.
- Wash items and remove excess water.
- Wrap any items that have strong odors or high moisture content.
- Meat
- Wrap raw meat and poultry separately and securely to prevent leaks and contamination of other foods or surfaces.
- Use the deli drawer to store meat/poultry for short-term storage. Any meat to be kept longer than two days should be frozen.
Frozen food storage
- Keep the freezer compartment at 0°F or lower.
- A freezer operates most efficiently when it is at least ⅔ full.
- Packaging foods for freezing
- To minimize food dehydration and quality deterioration, use aluminum foil, freezer wrap, freezer bags, or airtight containers.
- Force as much air out of the packages as possible and seal them tightly. Trapped air can cause food to dry out, change color, and develop an off-flavor (freezer burn).
- Wrap fresh meats and poultry with suitable freezer wrap prior to freezing.
- Do not refreeze meat that has completely thawed.
Loading the freezer
- Prior to grocery shopping, activate quick freeze” so that on your return you can ensure your newly purchased food designated for the freezer will be preserved as quickly as possible.
- Activating “quick freeze” also will help your freezer more efficiently maintain the selected temperature after placing new purchases with pre-existing frozen foods.
- Avoid adding too much warm food to the freezer at one time. This overloads the freezer, slows the rate of freezing, and can raise the temperature of frozen foods.
- Leave a space between packages, so cold air can circulate freely, allowing food to freeze as quickly as possible.
Ideas for saving energy
- Installation
- Locate the refrigerator in the coolest part of the room, out of direct sunlight, and away from heating ducts or registers.
- Do not place the refrigerator next to heat-producing appliances such as a range, oven, or dishwasher. If this is not possible, a section of cabinetry or an added layer of insulation between the two appliances will help the refrigerator operate more efficiently.
- Level the refrigerator so that the doors close tightly.
Temperature settings
- Refer to the “Controls” section for procedures on temperature settings.
- Food storage
- Avoid overcrowding the refrigerator or blocking cold air vents. Doing so causes the refrigerator to run longer and use more energy.
- Cover foods and wipe containers dry before placing them in the refrigerator.
- This cuts down on moisture build-up inside the unit.
- Organize the refrigerator to reduce door openings. Remove as many items as needed at one time and close the door as soon as possible.
- Do not place a hot container directly on a cold shelf. Remember, such an extreme temperature change may damage the glass.
CHANGING THE FILTER
Replacing your PureAir Ultra IITM air filter
- To ensure optimal filtering of refrigerator odors, you should change the air filter every six months (the filter status light on the Touch
- Panel prompts you to replace the filter after six months).
- Insert fingers in circled area.
- Push clips in to release front cover.
- Remove front cover by pulling towards you and lifting up.
- Replace air filter by sliding into slots.
- Installation of front cover is reverse of removal.
- To reset Air Filter status, refer to instructions under “Controls Section”
Locating the Filters
- Your refrigerator is equipped with water filtering system. The water filter system filters all dispensed drinking water, as well as the water used to produce ice.
Water Filter
- The water filter is located at the top right side of the fresh food compartment.
- Ordering Replacement Filters
- To order your replacement filters, please visit our online store at www.frigidaire.com/store, by calling toll-free at 1-800-599-7569, or by visiting the dealer where you purchased your refrigerator. Frigidaire recommends that you order extra filters when you first install your refrigerator, and that you replace your filters at least once every six months.
- Here is the product number to request when ordering:
- PureSource Ultra IITM Water Filter
Replacing the Water Filter
- In general, you should change the water filter every six months to ensure the highest possible water quality. Water Filter Status on the user interface prompts you to replace the filter after a standard amount of water gallons/473 liters for PureSource
- Ultra IITM) has flowed through the system.
- If your refrigerator has not been used for a period of time (during moving for example), change the filter before reinstalling the refrigerator.
- Do not use with water that is microbiologically unsafe or of unknown quality without adequate disinfection before or after the system. Systems certified for cyst reduction may be used on disinfected waters that may contain filterable cysts.
Test & certification results:
- Rated Capacity - 125 gallons/473 liters for
- PureSource Ultra IITM ice and water filter
- Rated service flow - .65 gallons per minute
- Operating Temp: Min. 33°F, Max. 100°F
- Maximum Rated Pressure - 100 pounds per square inch
- Recommended Minimum Operating
- Pressure: 30 pounds per square inch
To replace your PureSource Ultra IITM water filter:
- It is not necessary to turn the water supply off to change the filter. Be ready to wipe up any small amounts of water released during the filter replacement.
- Turn Off the ice maker power switch.
- Remove the old filter by rotating it counterclockwise (to the left) 90 degrees to release it.
- Slide the old filter cartridge straight out of the housing and discard it.
- Unpackage the new filter cartridge. Slide it into the filter housing as far as it will go with the grip end horizontal.
- Push lightly inward on the filter while rotating it clockwise (to the right). The filter will then pull itself inward as it is rotated. Rotate the filter 90 degrees until it stops and the grip end is vertical. You may be able to feel a very light click as the filter locks into place.
- Press a drinking glass against the water dispenser while checking for any leaks at the filter housing. Any spurts and sputters that occur as the system purges air out of the dispenser system are normal.
- Continue dispensing water for 3-4 minutes or until 1.5 gallons of water has flowed through the system. You will likely need to empty and refill your glass several times.
Turn On the ice maker.
- Press and hold the Water Filter reset button on the control panel for three seconds. When the display changes from
- Red to Green, the status has been reset.
CARE & CLEANING
Interior & Door Liners
- Use two tablespoons of baking soda in one quart of warm water. Be sure to wring excess water out of sponge or cloth before cleaning around controls, light bulb or any electrical part.
Glass Shelves
- Allow glass to warm to room temperature before immersing in warm water.
Toe Grille
- Vacuum dust from front of toe grille. Remove toe grille (see Installation Instructions). Vacuum backside, wipe with sudsy cloth or sponge. Rinse and dry
Exterior & Handles
- Do not use commercial household cleaners containing ammonia, bleach or alcohol to clean handles. Use a soft cloth to clean smooth handles. DO NOT use a dry cloth to clean smooth doors.
Exterior & Handles
- Never use CHLORIDE or cleaners with bleach to clean stainless steel. Clean stainless steel front and handles with non-abrasive soapy water and a dishcloth. Rinse with clean water and a soft cloth. Use a non-abrasive stainless steel cleaner.
- These cleaners can be purchased at most home improvement or major department stores. Always follow manufacturer’s instructions.
- Do not use household cleaners containing ammonia or bleach. NOTE: Always clean, wipe and dry with the grain to prevent scratching. Wash the rest of the cabinet with warm water and mild liquid detergent. Rinse well, and wipe dry with a clean soft cloth.
Ice maker is not making any ice
- Turn on ice maker. For the fresh food ice maker, press ice maker on-off button once. For the freezer ice maker, lower the arm to turn the ice maker on, or raise it and snap it in its upper position to turn the ice maker off.
- Connect the unit to the household water supply and ensure the water valve is open.
- Ensure that the supply line does not kink when the refrigerator is pushed into place against the wall.
Remove and re-install the water filter.
- Be sure to seat it fully into the locked position.
- If water dispenses slowly or not at all, or if the filter is six months old or older, it should be replaced.
- Move any item or frozen ice cubes that may block the signal arm from being in the on or down position. Additionally, the ice bin itself may be out of position so that it prevents the signal arm from dropping all the way down. Be sure the bin is pushed all the way to the rear of the shelf. See Automatic Ice MakerFreezer section in manual.
BEFORE YOU CALL
Ice maker is not making enough ice.
- Ice maker is producing less ice than you expect.
- The water filter may be clogged with foreign material.
- The water supply line is kinked.
- Saddle valve on cold water pipe is clogged or restricted by foreign material.
- Heavy traffic, opening or closing of the doors excessively.
- Freezer control is set too warm (freezer ice maker).
- Water pressure is extremely low. Cut-off and cut-on pressures are too low (well systems only).
- Reverse osmosis system is in regenerative phase.
- The ice maker will produce approximately to 2.5 pounds of ice every 24 hours depending on usage conditions.
- If water dispenses slower than normal, or if the filter is six months old or older, it should be replaced.
- Ensure that the supply line does not kink when the refrigerator is pushed into place against the wall.
- Turn off household water line valve.
- Remove valve. Clean valve. Replace valve if necessary.
- Press Fast Freeze to temporarily increase ice production rate. (Freezer ice maker only.)
- Set freezer control to colder setting to improve performance of the ice maker freezer ice maker). Allow 24 hours for temperature to stabilize.
- Have someone turn up the cut-off and cut-on pressure on the water pump system (well systems only).
- It is normal for a reverse osmosis system to be below 20 psi during the regenerative phase.
Freezer ice maker will not stop making ice (select models).
- Ice maker wire signal arm is being held down by a package in the freezer that has fallen against ice maker
- Move any item or frozen ice cubes that may block the signal arm from being in the off or upward position. See Automatic Ice Maker-Freezer section in manual.
Ice cubes are freezing together.
- Ice cubes are not being used frequently enough or interruption of power for prolonged time.
- Ice cubes are hollow (shells of ice with water inside).
- The hollow cubes break open in the bin and leak their water onto existing ice, which causes it to freeze together.
- Remove ice container and discard ice.
- The ice maker will produce fresh supply.
- Ice should be used at least twice weekly to keep the cubes separated.
- This generally occurs when the ice maker does not get enough water. This is usually the result of a clogged water filter or restricted water supply. Replace the water filter and if the condition still occurs check for a clogged Saddle Valve, water valve not turned on all the way or kinked water supply line.
Dispenser will not dispense ice.
- There is no ice in the bin to be dispensed.
- The refrigerator doors are not completely closed.
- Dispenser paddle has been pressed too long and the dispenser motor has overheated.
- See the “Ice maker is not making any ice” section above.
- Be sure the refrigerator doors are completely closed.
- The motor overload protector will reset in about three minutes and then ice can be dispensed.
Ice dispenser is jammed.
- Ice has melted and frozen around auger due to infrequent use, temperature fluctuations, and/or power outages.
- Ice cubes are jammed between ice maker and back of ice container.
- Remove ice container, thaw, and empty the contents. Clean container, wipe dry, and replace in proper position. When new ice is made, dispenser should operate.
- Remove ice cubes that are jamming the dispenser.
Dispenser will not dispense water.
- Water filter not seated properly.
- Water filter is clogged.
- Household water line valve is not open.
- Remove and reinstall the water filter. For
- Puresource Ultra II, be sure to rotate it to the right until it stops and the grip end is vertical.
- Replace filter cartridge. Be sure to rotate it to the right until it stops and the grip end is vertical.
- Open household water line valve. See
- CONCERN column AUTOMATIC ICE MAKER.
Water has an odd taste and/or odor
- Water has not been dispensed for an extended period of time.
- Unit not properly connected to cold water line.
- Draw and discard 10-12 glasses of water to freshen the supply.
- Connect unit to cold water line that supplies water to the kitchen faucet.
Door(s) will not close.
- Door was closed too hard, causing other door to open slightly.
- Refrigerator is not level.
- It rocks on the floor when moved slightly.
- Refrigerator is touching a wall or cabinet.
- Close both doors gently.
- Ensure floor is level and solid, and can adequately support the refrigerator.
- Contact a carpenter to correct a sagging or sloping floor.
- Ensure floor is level and solid, and can adequately support the refrigerator.
- Contact a carpenter to correct a sagging or sloping floor.
Compressor does not run.
- Freezer control is set to OF”.
- Refrigerator is in defrost cycle.
- Plug at electrical outlet is disconnected.
- House fuse blown or tripped circuit breaker.
- Power outage.
- Set freezer control.
- This is normal for a fully automatic defrost refrigerator. The defrost cycle occurs periodically, lasting about 30 minutes.
- Ensure plug is tightly pushed into outlet.
- Check/replace fuse with a 15 amp timedelay fuse. Reset circuit breaker.
- Check house lights. Call local electric company.
Refrigerator seems to run too much or too long.
- Your variable speed compressor is designed to run 100% of the time except during the defrost cycle. At times it will run faster, such as after a defrost cycle
- It is normal for the compressor to run continuously except during defrost mode.
Moisture collects on inside of refrigerator walls.
- Weather is hot and humid.
- Flipper mullion
- The rate of frost buildup and internal sweating increases.
- Adjust flipper mullion. (See “To adjust the flipper mullion” in the Installation section.)
Water collects on bottom side of drawer cover.
- Vegetables contain and give off moisture.
- It is not unusual to have moisture on the bottom side of the cover. Move humidity control (some models) to lower setting
Water collects in bottom of drawer.
- Washed vegetables and fruit drain while in the drawer.
- Water collecting in bottom of drawer is normal. Dry items before putting them in the drawer or store produce in tightly sealed bags to help reduce condensation inside of the drawer.
Food is freezing.
- Temperature setting is too low.
- Temperature sensor is covered by food (right side of fresh food area).
Food is covering the air ports.
- Move the setting to a higher degree.
- Allow space for air flow to the sensor.
- Allow space between the air ports and the food.