Smart Lock Manual

<1>
CONTENTS
1. INTRODUCTION
1.1 Specifications
1.2 Dimensions
1.3 Door drill hole map
1.4 Package Includes
2. INSTALLATION GUIDE
2.1 Check the Door Dimensions
2.2 Confirm the direction of the door
2.3 Install Deadbolt
2.4 Install Keypad
2.5 Install Mounting Plate
2.6 Connect the IC wired and Install the Back Panel
2.7 Insert Battery and Install Back Battery Cover
3. APP Operation Guide
3.1 Download the APP “TTLock"
3.2 Register a new account
3.3 Match the Smart Lock with APP
3.4 APP function introduction
3.5 APP Account Management or Other Operation
4. How to unlock/lock my door lock with the SMART WATCH?
5. Under what situations will the smart lock sound an alarm?
6. If the smart lock is in a non-addable state
7. FQA
02
02
03
03
04
05
05
06
08
08
09
10
10
11
12
12
12
13
16
18
18
19
20
If y
ou ha
ve an
y que
stion
s plea
se fee
l free
to co
ntact
us, w
e are
alwa
ys he
re to
he
lp
yo
u.
Em
a
il:h
om
ide
@m
in
ila
a.
com
1. INTRODUCTION
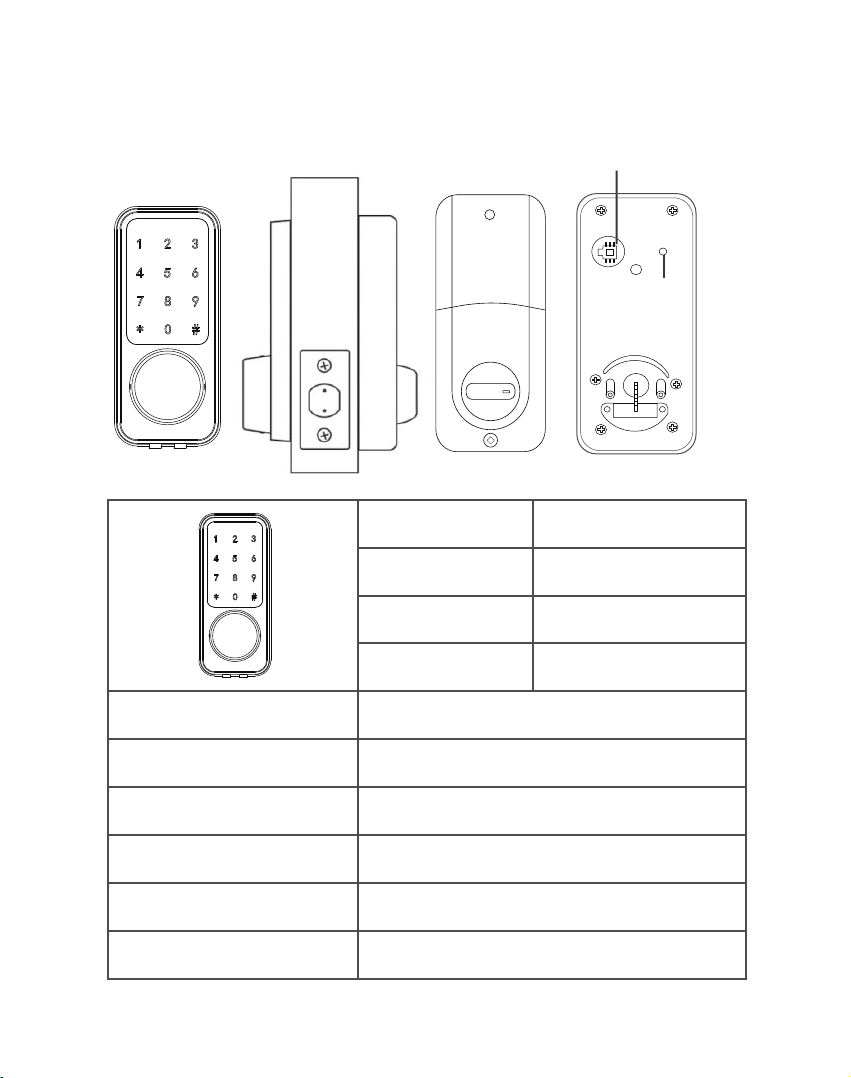
1.1 Specifications
< 2 >
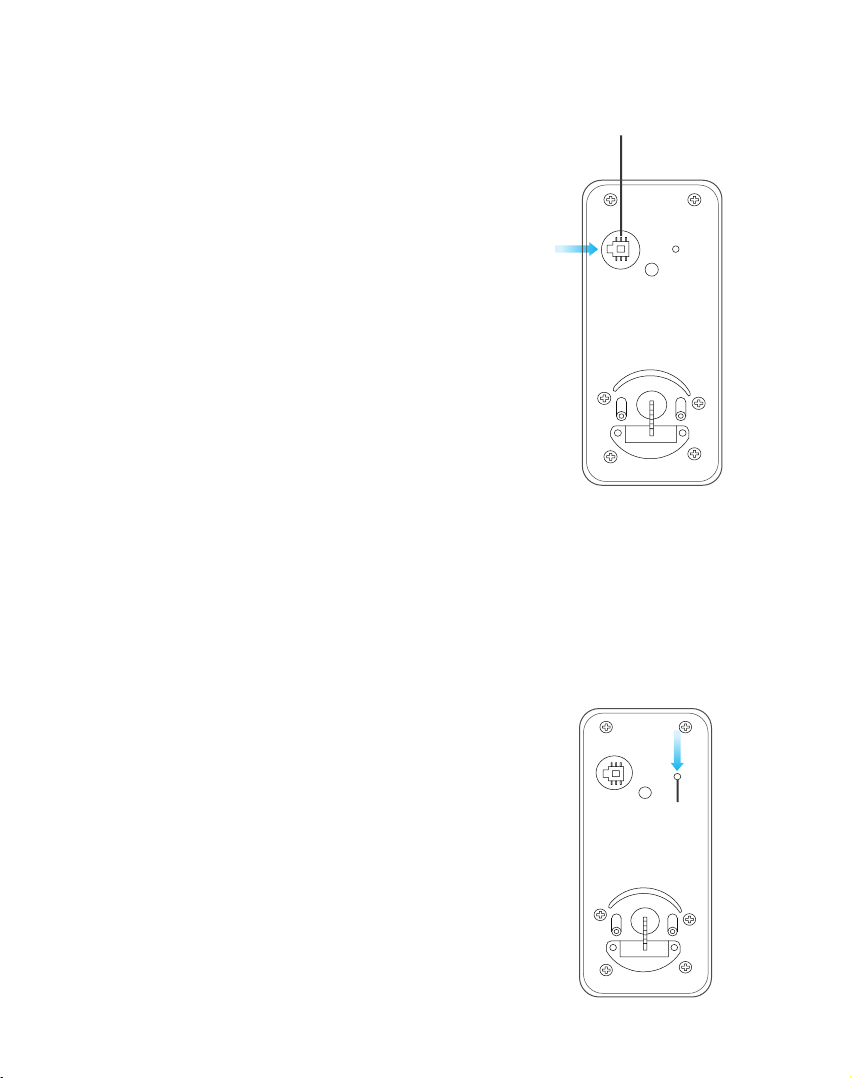
Anti-theft Alarm Prompt
Reset Button
Item No. S110BBL
Dimension
Communication mode
Unlock/Lock Way
Support System
Unlock time
Power supply
Working current
≈1.5 sec
≤30μA
≤200mA
Android 4.3/ ios 7.0 above
Bluetooth 4.0ble
Bluetooth,code,Mechanical key
137*60*37mm
Material Zinc Alloy
Weight 1.3kg
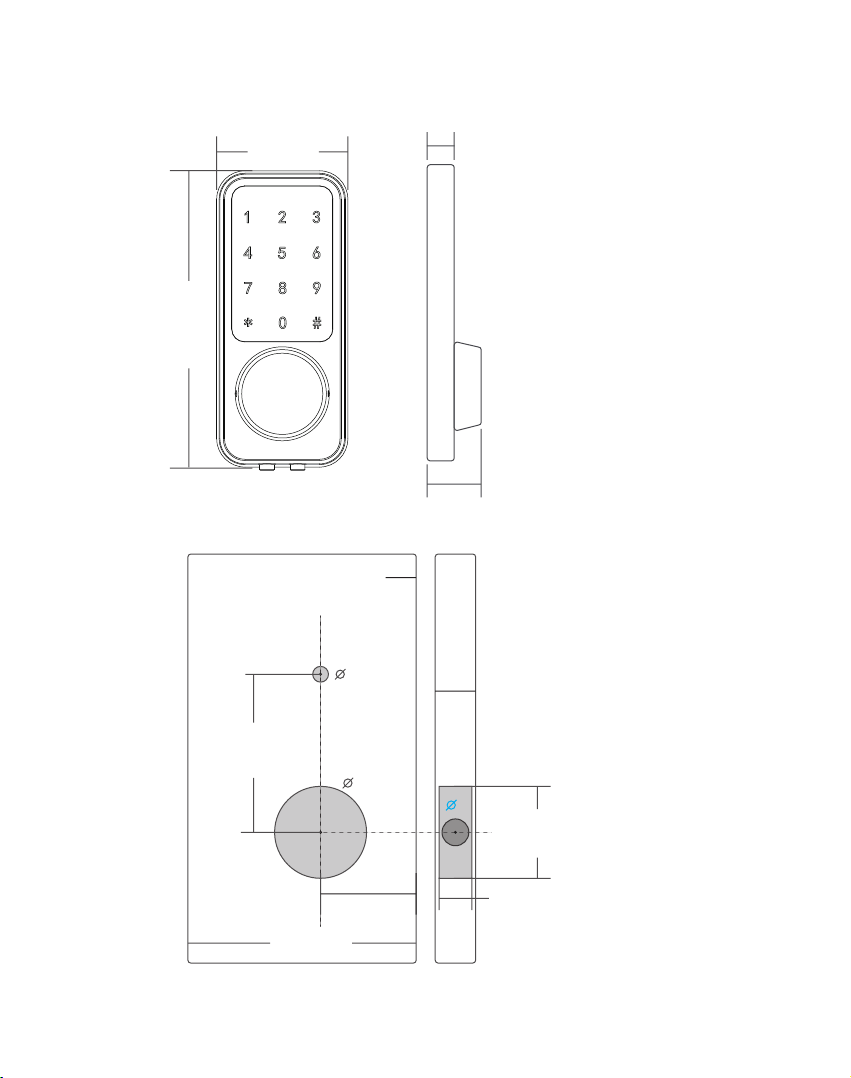
5.39"
1.14"
1.2 Dimensions
Fold on door edge
< 3 >
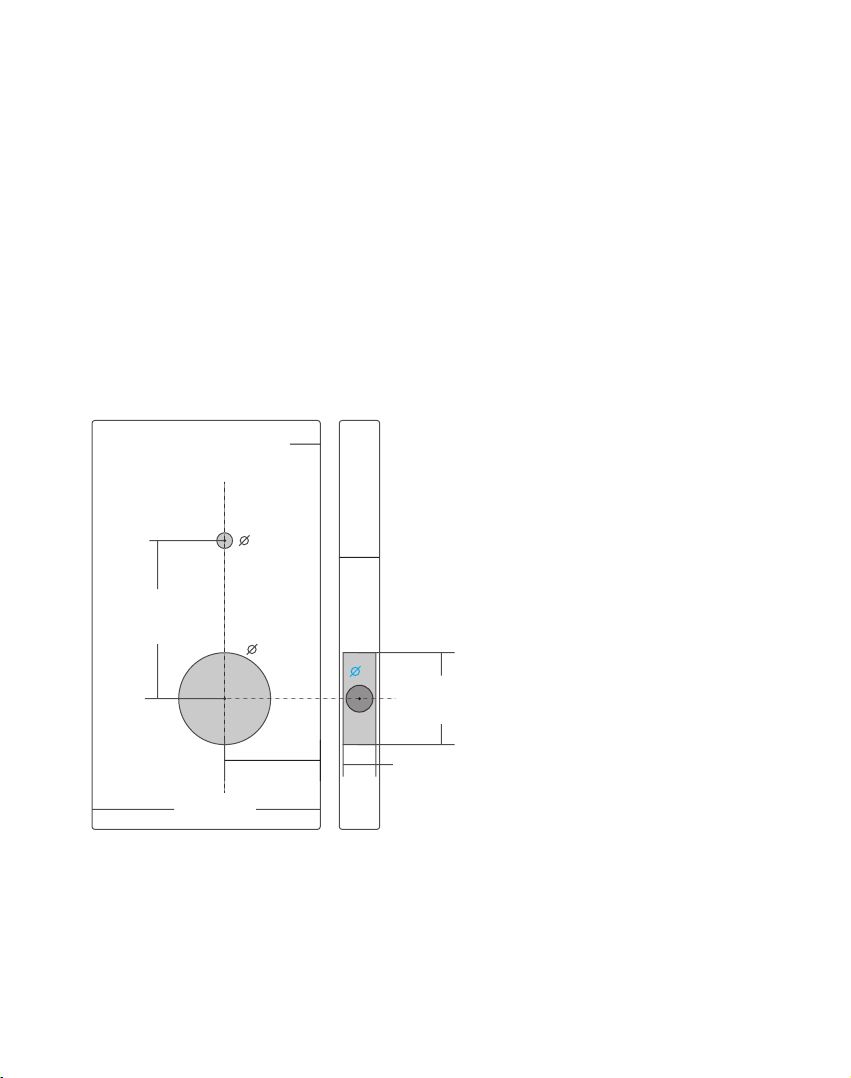
1.3 Door drill hole map
2.36"
0.47"
0.98"""'"”
The widt
h of the door
frame >=4.33"
2.36"
1.5"-1.9"
0.4insiin""
>=4.33"
1.06"
2.28
""
2.67v
"
"
2.2"
The door thickness
range :
1.5"-1.9"
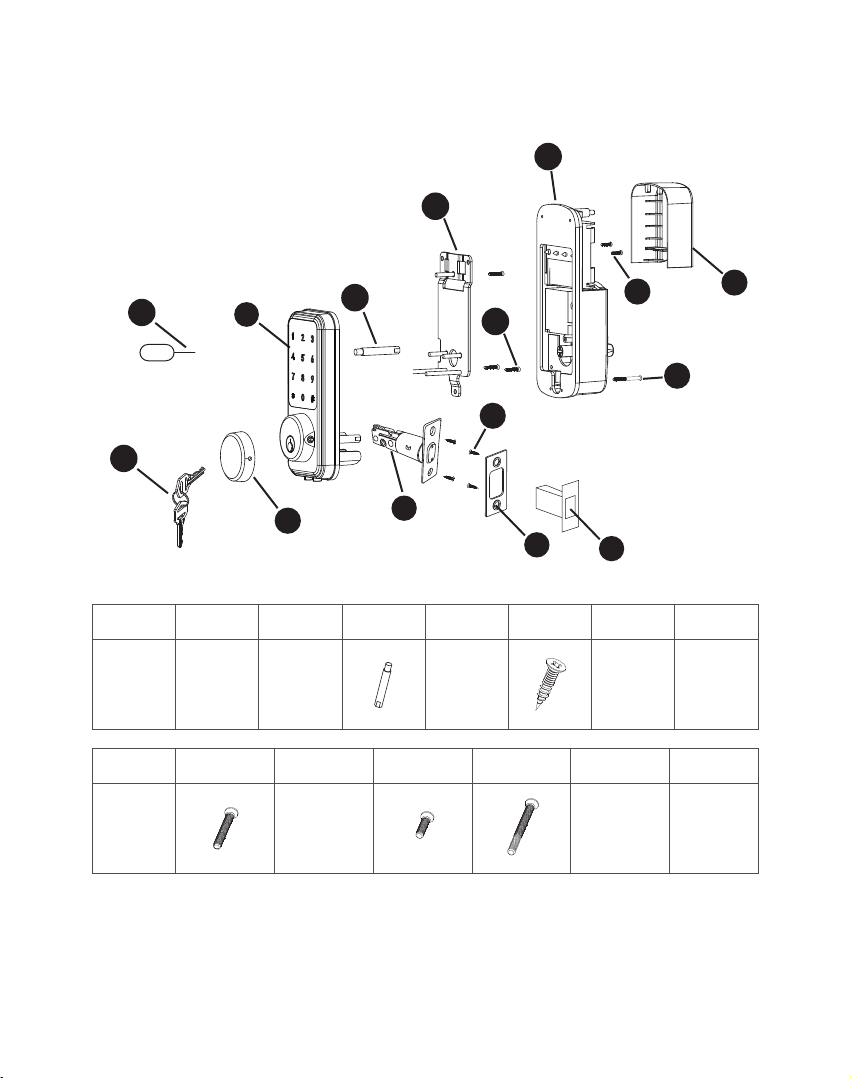
1.4 Package Includes
< 4 >
A
O
C
D
I
K
J
B
E
G
F
N
H
L
M
A*2
Key
B*1
Keyhole
Cover
C*1
Keypad
D*1 E*1
Deadbolt
F*4 G*1 H*1
Plastic Look
Groove
Strick
Plate
I*1
Mounting
Plate
J*3 K*1
Receive
Module
Battery
Cover
L*2 M*1 N*1
Card
Needle
O*1
2. INSTALLATION GUIDE
2.1 Check the Door Dimensions
<5>
Fold on door edge
0.4"""
>=
4.33"
The width of the
door fr
ame >=4.33"
0.98"
1.06"
2.28"
2.2""
2.36"
2.67
"
Door Frame
≧ 4.33"
Door Thickn
ess: 1.5"-1.9"
Compare th
e reference card and
select the reference l
ine that matches
the door siz
e.
Note:
Install and
test lock with door op
en to avoid being loc
ked out.
Note:
When perf
orming this operation
, please take protecti
ve mea-
sures and b
e careful of the meta
l edge injure yourself
.
1.5"-1.9"
The door thickness
range :1.5"-1.9"
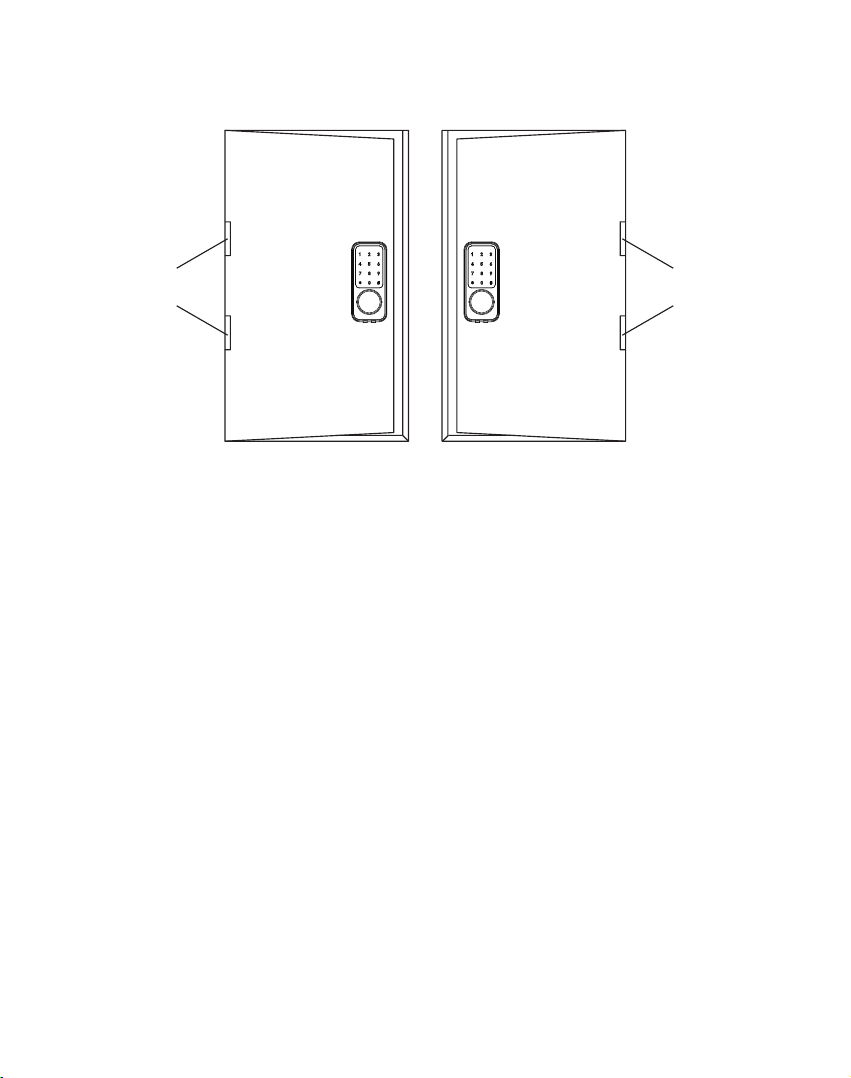
2.2 Confirm the direction of the door
<6>
If the door is left handle.
Left-handle
Open into room
Right-handle
Open into room
Hinge Hinge
1.To install the lock for left side handling, ensure the toggle button on
the back assembly is set to “L”.
2.Setting direction of the knob: Horizontal for Left handle when in
unlock status.
If the door is right handle.
1.To install the lock for right side handling, ensure the toggle button on
the back assembly is set to “R”.
2.Setting direction of the knob: Vertical for Right handle when in
unlock status.
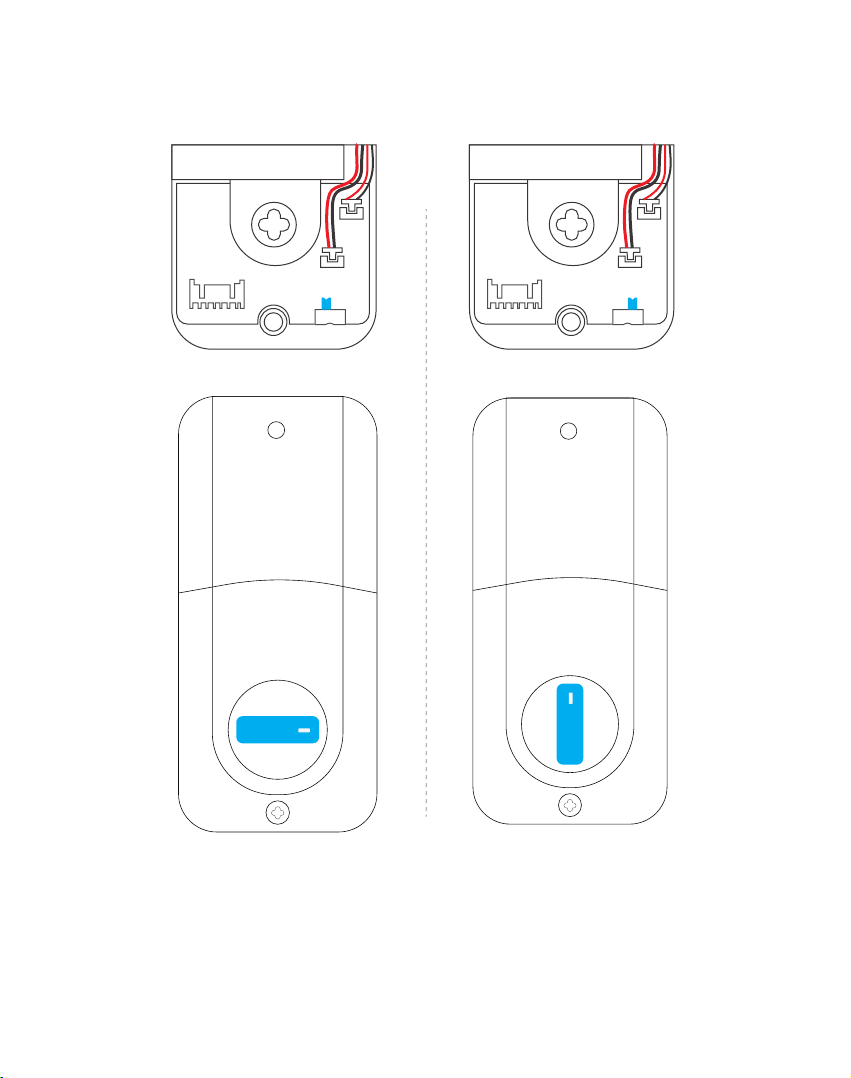
<7>
L R L R
If the door is right handle.
If the door
is left handle.
Please sure it is Horizontal
when unlock state.
Please sure it is Vertical
when unlock state.
Please sure it is "R"
Please sure it is "L"
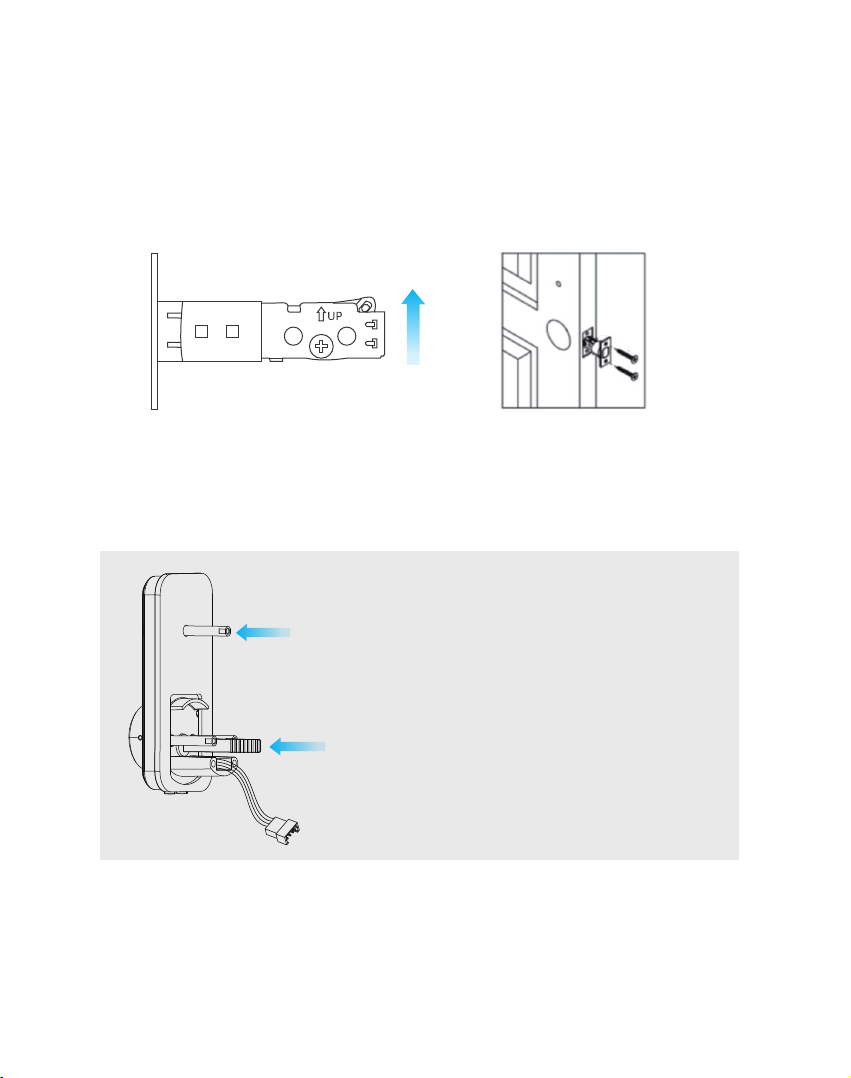
2.3 Install Deadbolt
2.4 Install Keypad
<8>
Insert the deadbolt“E”and ensure it is parallel to the door face, use
“F”to secure deadbolt.
Note: Need to stay this way up when inserting the Deadbolt.
Install “D”into keypad inner plate.
E
F
Note: The flat ruler remains vertical during the installation process.
keep the flat ruler in vertical state.
Install “D”
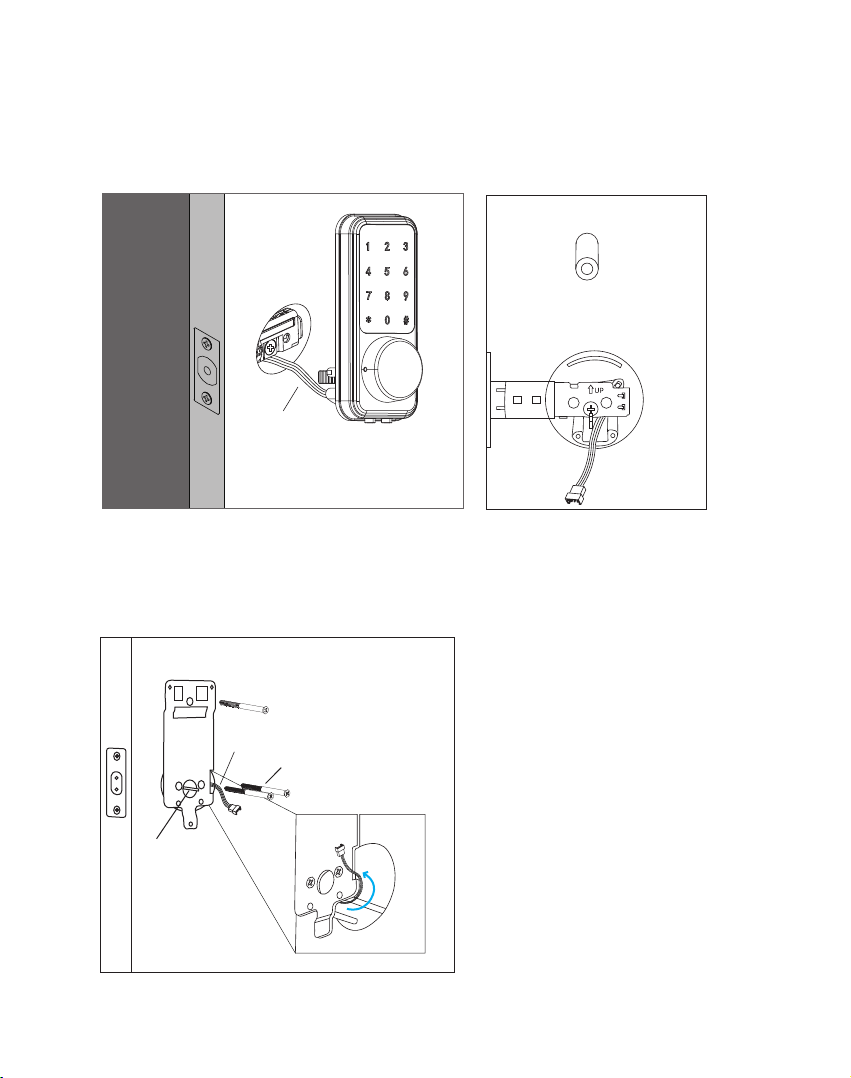
<9>
The front panel to pass through the hole and deadbolt.
Note: Please ensure theflat ruler is vertical during installation, the IC
wired need under the deadbolt and as like as the picture.
2.5 Install Mounting Plate
The IC wired around the column of the mounting plate as picture.
Install “J”.
Install“J”
IC wired
flat ruler
IC Wired
<10>
Tips:
1. Alkaline batteries are recommend in order to stabilize the power
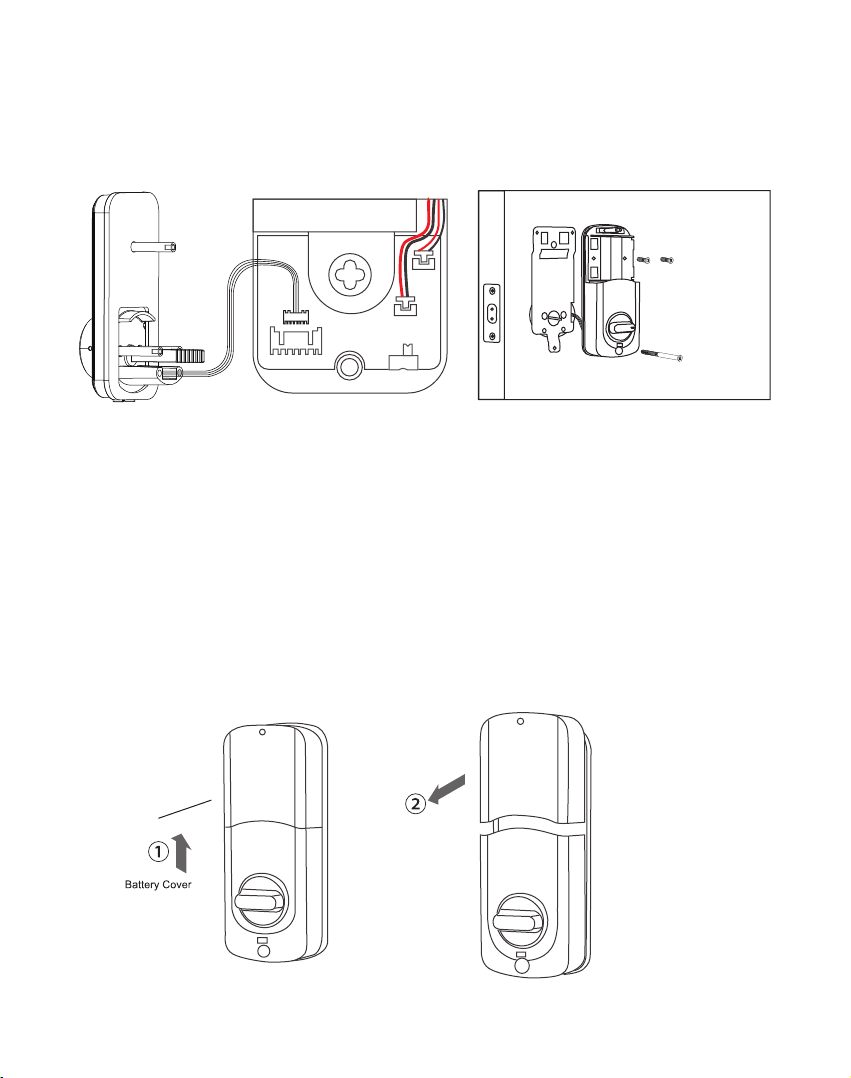
2.6 Connect the IC wired and Install the Back Panel
Connect the IC wired, and Install the Back Panel, install “L”and “M”.
L R
Install“L”
Install“M”
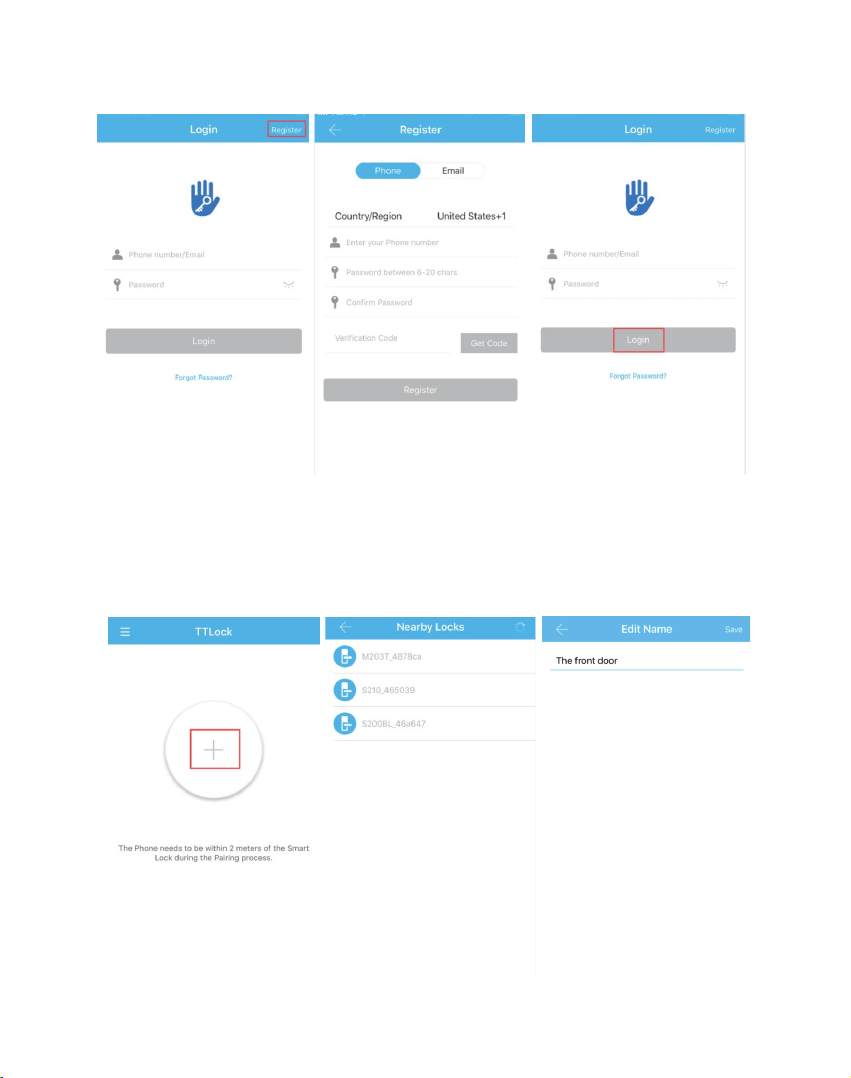
2.7 Insert Battery and Install Back Battery Cover
supply, if yo
u don't use alkaline,
battery performance w
ill be reduced
greatl
y.
2. All
setting will
be retain i
n the mem
ory even if
the batteri
es are
comp
lete dead.
If batteries
are compl
ete dead, u
sing 9v ba
ckup
batter
y to unlock
the door.

3. APP Operation Guide
<11>
Insert 4pc(AA)1.5V Alkaline
batteries and slide the battery
cover back onto the receiver module.
9V
Low Battery Alarm:
You can open your front door with a 9v battery on
the instant charging if you forget to replace the low
batteries.
Android Mobile Phone--Search “TTLock” from Google Play.
Apple Mobile Phone--please search “TTLock” from App Store.
3.1 Download the APP “TTLock"
<12>
When matching, please follow the prompt steps of the program, you
need to touch the screen, match the blue icon lock , and set the name
for the lock. Such as the front door.
3.2 Register a new account (phone number or email)
3.3 Match the Smart Lock with APP
<13>
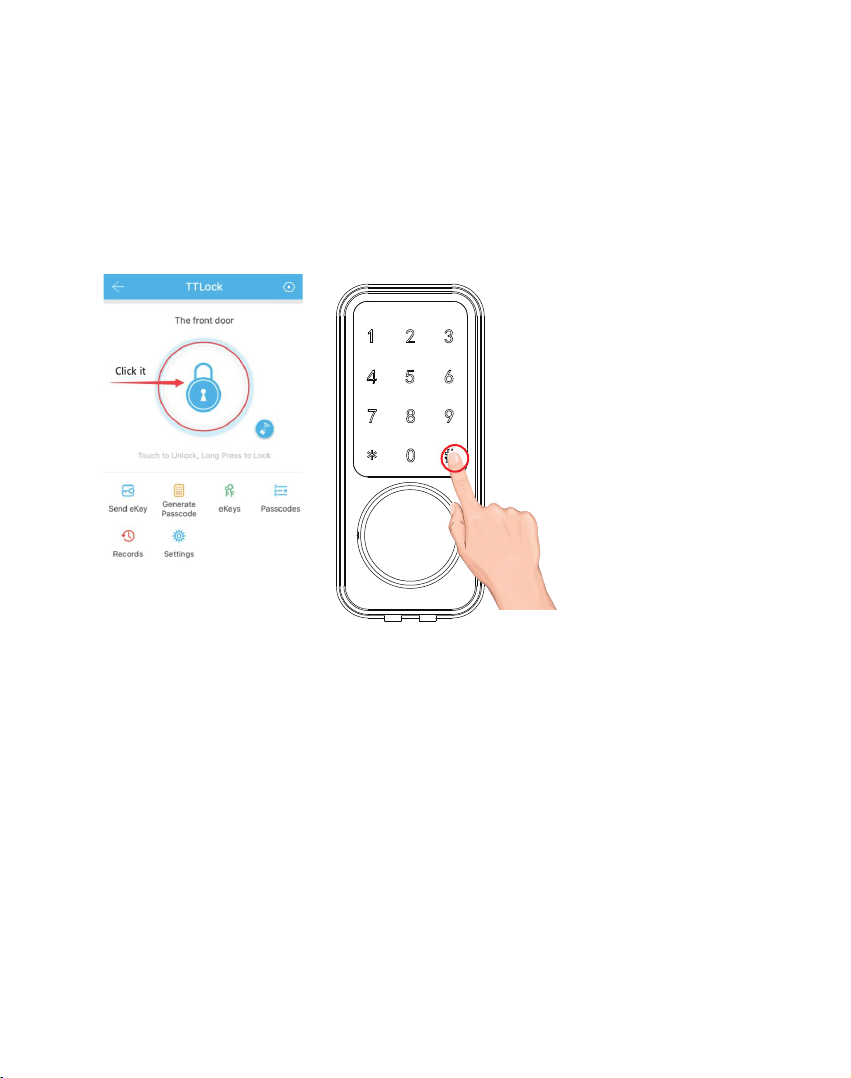
Via APP: Touch to unlock, long press to lock.
Note: Please keep your phone near the door lock within 5 meters.
Via Keypad: Enter the passcode then press “#” to unlock. Long press
“#” and hold 2s to lock.
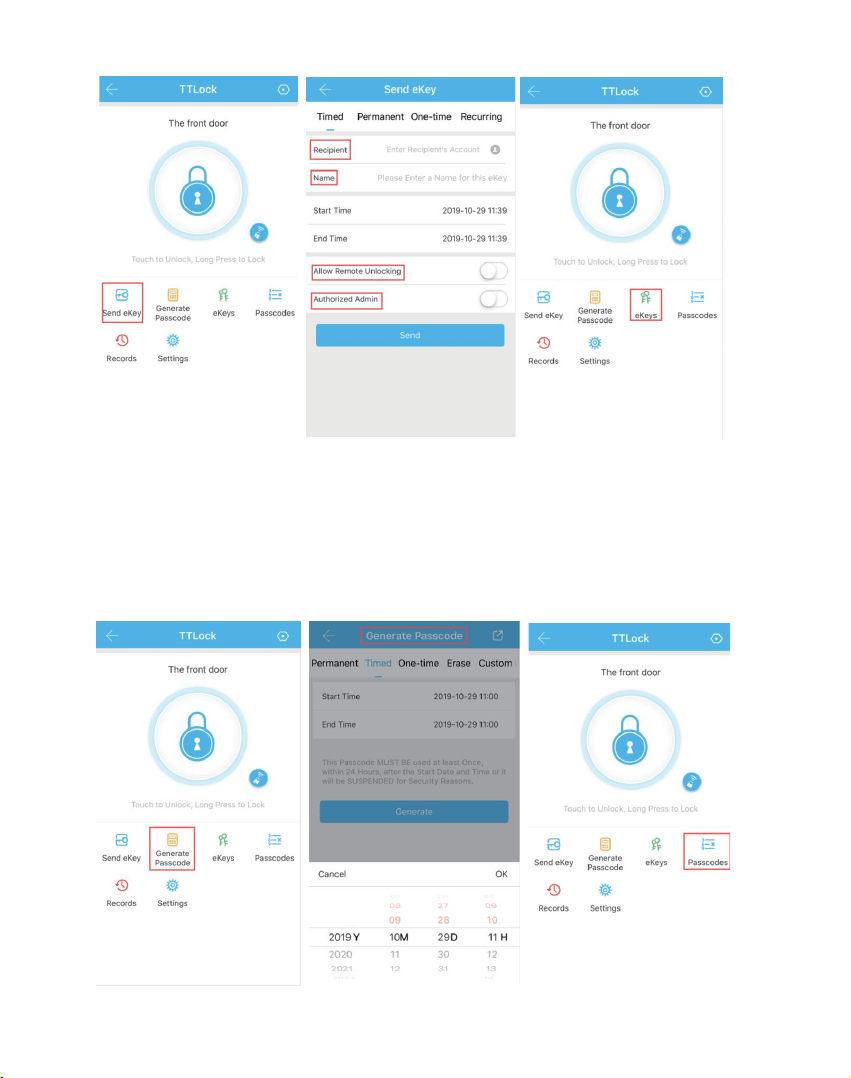
You can add multiple accounts on the app. Such as your family
member.
You can authorize the Recipient to unlock/lock via the APP. The recipi-
ent needs to download the APP.
Note: This operation need to be connected to Bluetooth and network,
the shared eKey will be stored in “eKeys”.
3.4 APP function introduction
3.4.1 Lock/Unlock (APP/Keypad)
3.4.2 Sent Ekey
<14>
You can set a variety mode of password to unlock, or share them with
others. Yourself or the recipient of passcode to unlock by entering the
passcode on the keypad.
Note: This operation need to connect Bluetooth or gateway. The
passcode will be stored in “Passcodes”.
3.4.3 Generate Passcode

<15>
It records who comes and goes, and when. For 24/7 access logs, get
all records about the door unlock/ lock anytime and anywhere.
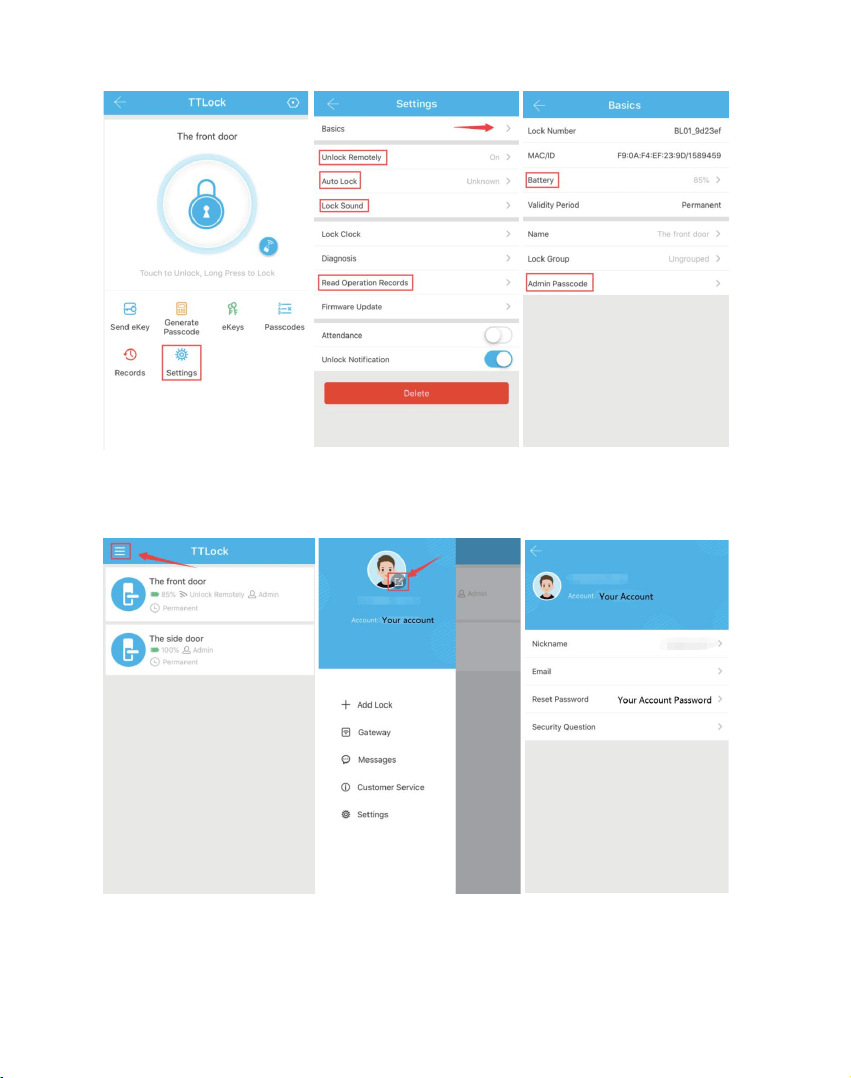
For the Bluetooth lock function setting:
1. Basics
Battery Percentage.
Lock name.
Admin Passcode (You reset your admin passcode on the APP)
2. Unlock Remotely
( Need to buy a gateway, you can remotely control your lock after
pairing.)
3. Auto Lock ( 5s,10s,15s,30s,60s,Custom)
4. Lock Sound
5. Read Operation Record, etc.
Note: These operations require Bluetooth to be turned on and a smart
lock is connected.
3.4.4 Records
3.4.5 Settings
<16>
3.5 APP Account Management or Other Operation
3.5.1 How do I reset or change my APP account login password?
<17>
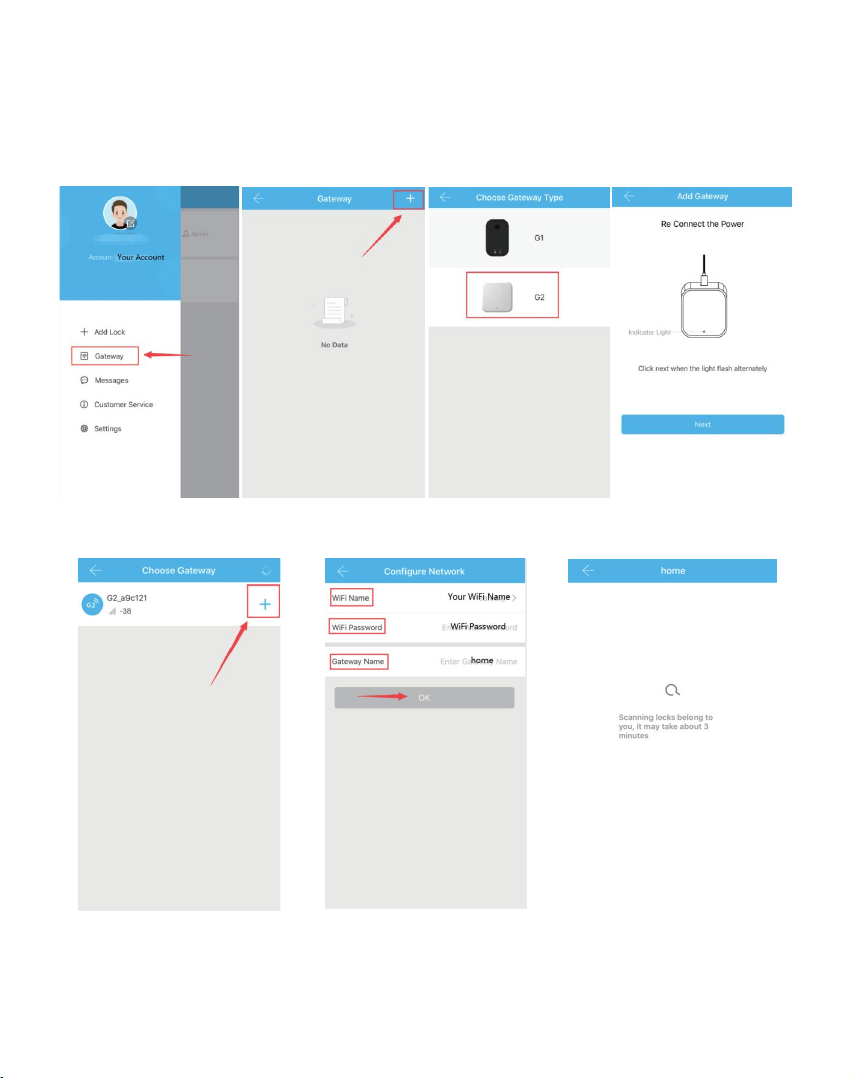
3.5.2 How to match a Wi-Fi gateway to APP? ( If you have already
purchased a gateway. )
Click it Click it Choose G1/G2 Click Next
Click it Enter your wifi password Pairing your lock
4. How to unlock/lock my door lock with the
SMART WATCH?
5. Under what situations will the smart lock sound
an alarm?
<18>
5.1 The smart lock sounds an alarm when the battery is low.
Solution: Please replace the battery or temporarily use the 9V backup
battery.
5.2 The Anti-theft Alarm Prompt button is not tightly pressed.
Solution: Always press and hold the alarm button on the front panel
during installation, otherwise it will always beeping when the battery
is inserted.
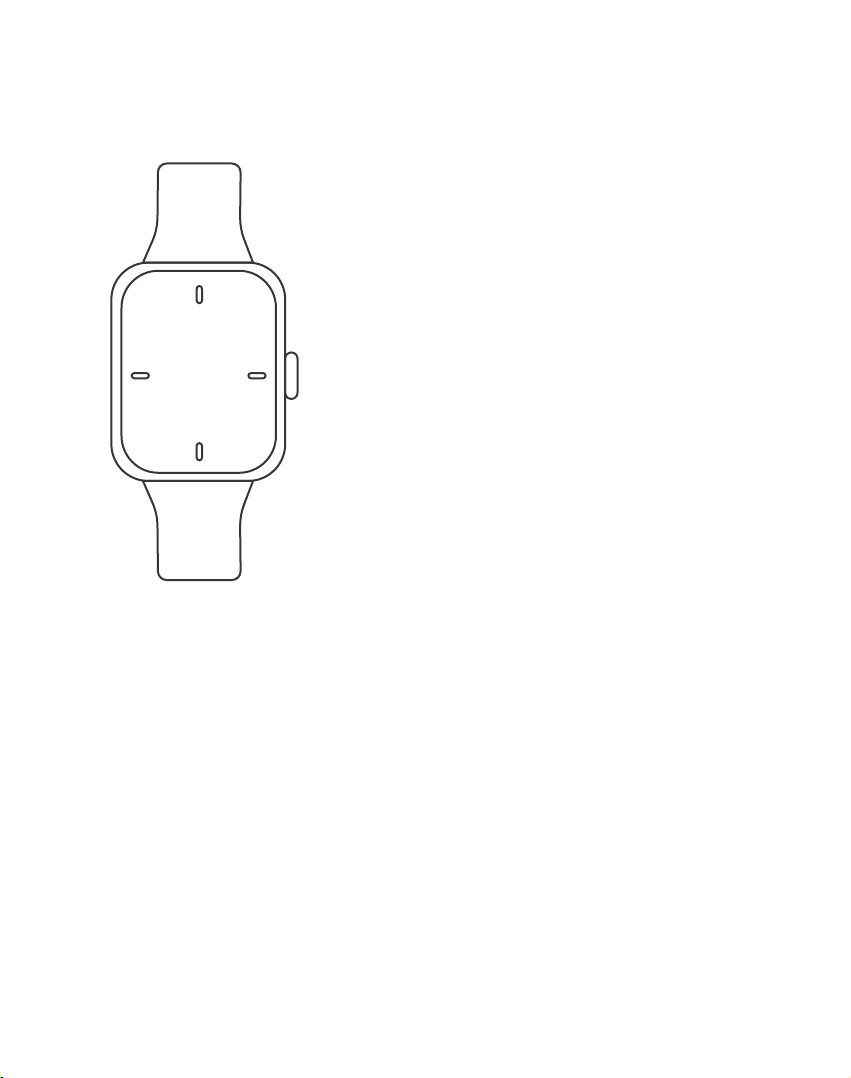
Note: All the operations, your watch
and mobile phone require a certain
range, the mobile phone network and
Bluetooth need to remain connected.
Apple watch
Android watch
08:15:56
Support Smart Watch (iwatch or
Android watch) to lock/unlock.
If the watch
is connected to the p
hone,
but it can't to
search the “TTLock
”
App. Try to
log in to the home pa
ge at
your phone
app and refresh, the
n check
in the watc
h. If all settings are no
rmal
but can't lo
ck/unlock. Opening t
he
"TTLock" Ap
p in your phone to ch
eck if
the key is in
a normal state.
6. If the smart lock is in a non-addable state
(the lock name is gray on the APP or cannot be find)
<19>
5.3 When someone breaks into your home
or the lock is loose.
Solution: You will find a record of illegal
operation in the record. Then you can check
if the lock is illegal operation or Loose state.
5.4 If you want the smart lock to never
sound an alarm.
Solution:
Turn off the anti-theft alarm: Enter "*32#
(admin password) #0#" on the keypad.
Turn on the anti-theft alarm: Enter "*32#
(admin password) #1#" on the keypad.
Note: Keep the alarm button on the front
panel always pressed when install, other-
wise it will always beeping when put in the
battery.
Anti-theft Alarm Prompt
Reset Button
Soluti
on: Pleas
e press and
hold the r
eset
butto
n 3s-5s unt
il you hear
the sound
"DiDi"
and try to
connect ag
ain.
Note: This operation IC wired and battery
need to be installed. This button is in the
front Keypad panel.

7. FQA
<20>
The solution for details of FQA, please refer to the Instructions Guide. If
necessary, please connect with our customer service.
Question Answer
How to unlock/lock
via keypad?
How to unlock/lock
via APP?
How to open the
keyhole cover?
How do I reset admin
passcode on the APP?
How to get a Wi-Fi
gateway?
Long press “#” in keypad and hold 2s to lock.
Enter the passcode then press “#” to unlock.
Touch to unlock, long press to lock. (Please keep
your phone near the door lock within 5 meters.)
Use 2 pins to press the left and right holes of the
cover at the same time.
Entering "*12#123456#Custom Admin Password#Confirm
Password #" on the keyboard.
Main Menu-Settings-Basic-Admin Passcode (Checking
Settings Part)
The IC cable is stuck with the locking tongue. You need
to correctly place the IC line according to the installation
instructions of Install Inside Mounting Plate.
You can pu
rchase an ad
ditional
“G2"
gateway, and also
to contact our customer service.
Please sure the flat rules is vertical state.
If
it is the left side
door, please sure the toggle button set
to L, the knob is vertical when in unlock status.
If it is the right side door, please sure the toggle button
set to R, the knob is horizontal when in unlock status.
Why does the
deadbolt is stu
ck out
of work?
If you can't control
your lock OR the lock
is the opposite state,
for example, when
you unlock but the
lock not work.
How do
I set admin
passco
de on the
keypad
?
( If this
lock is not
added
to the phone
)

<21>
Answer
What does the
difference between
Send eKey and
Generate Passcode?
Send eKey:
You can add multiple accounts on the app. Such as your
family member.
You can authorize the Recipient to unlock/lock via the
APP. The recipient needs to download the APP.
Generate Passcode:
You can set a variety mode of password to unlock, or
share them with others. Yourself or the passcode
recipient to unlock by entering the passcode on the
keypad.
Yes, it suppor
t voice control by alexa, but it need to
matching with Wi-Fi Gateway
.
Questions
Main menu-Settings-Auto Lock (Checking Settings Part)
Does it suppo
rt
voice
control by alexa?
How do I set up
automatic lock?
This
prod
uct h
ave a
12
mon
ths
warr
anty
.
If you
have
any que
stions ab
out our s
mart loc
ks
,
please
feel fre
e to cont
act us!
If you
interest
ed in the
"G2" Gatew
ay, plea
se let me
know,
we w
ill sent y
ou a gat
eway for
free.
Email: homide@milinaa.com


This product hav
e a 12 months wa
rranty.
If you need the install video
, please
feel free to
contact us!
Email: hom
ide@
mili
naa.
com