1. To reduce the risk of electric shock, this lamp has a
polarized plug (one blade is wider than the other ).
The plug will fit in a polarized outlet only one way. If the
plug does not fit fully into the outlet, reverse the plug.
If plug still does not fit, contact a qualified electrician.
Never use an extension cord unless the plug can be
fully inserted. Do not alter the plug.
2. Do not install non-factory wiring or any other electrical
components. Altering or modifying the lamp in any way
will
render the product unsafe.
3.
Avoid laying objects directly over the power supply cord
to avoid cutting or damaging the wire.
4. Keep curtains, shades, wall hangings and all other fabrics
and objects away from the lamp shade, light switch and
the light bulb. Lamps are not designed to support
additional weight. Do not hang any objects from the
lamp or any lamp part.
5. Place the lamp on a stable, level surface in an area
where the lamp will not be tipped over or bumped.
BULB REPLACEMENT
1. Turn off and unplug the lamp and allow bulb to cool
before replacing bulb.
2. Light bulb should never touch the lamp shade.
CLEANING AND MAINTENANCE
1. To clean: use a soft, dry cloth only.
2. Do not use chemical or abrasive cleaning solutions.
Use one 150 Watt, Type A, 3-Way bulb or CFL equivalent
bulb.
This lamp is approved for indoor use only.
DO NOT EXCEED RECOMMENDED BULB WATTAGE.
Read and Save:
6.
ASSEMBLY INSTRUCTIONS
IMPORTANT SAFETY INSTRUCTIONS
MODEL #: 18578-000
TABLE LAMP
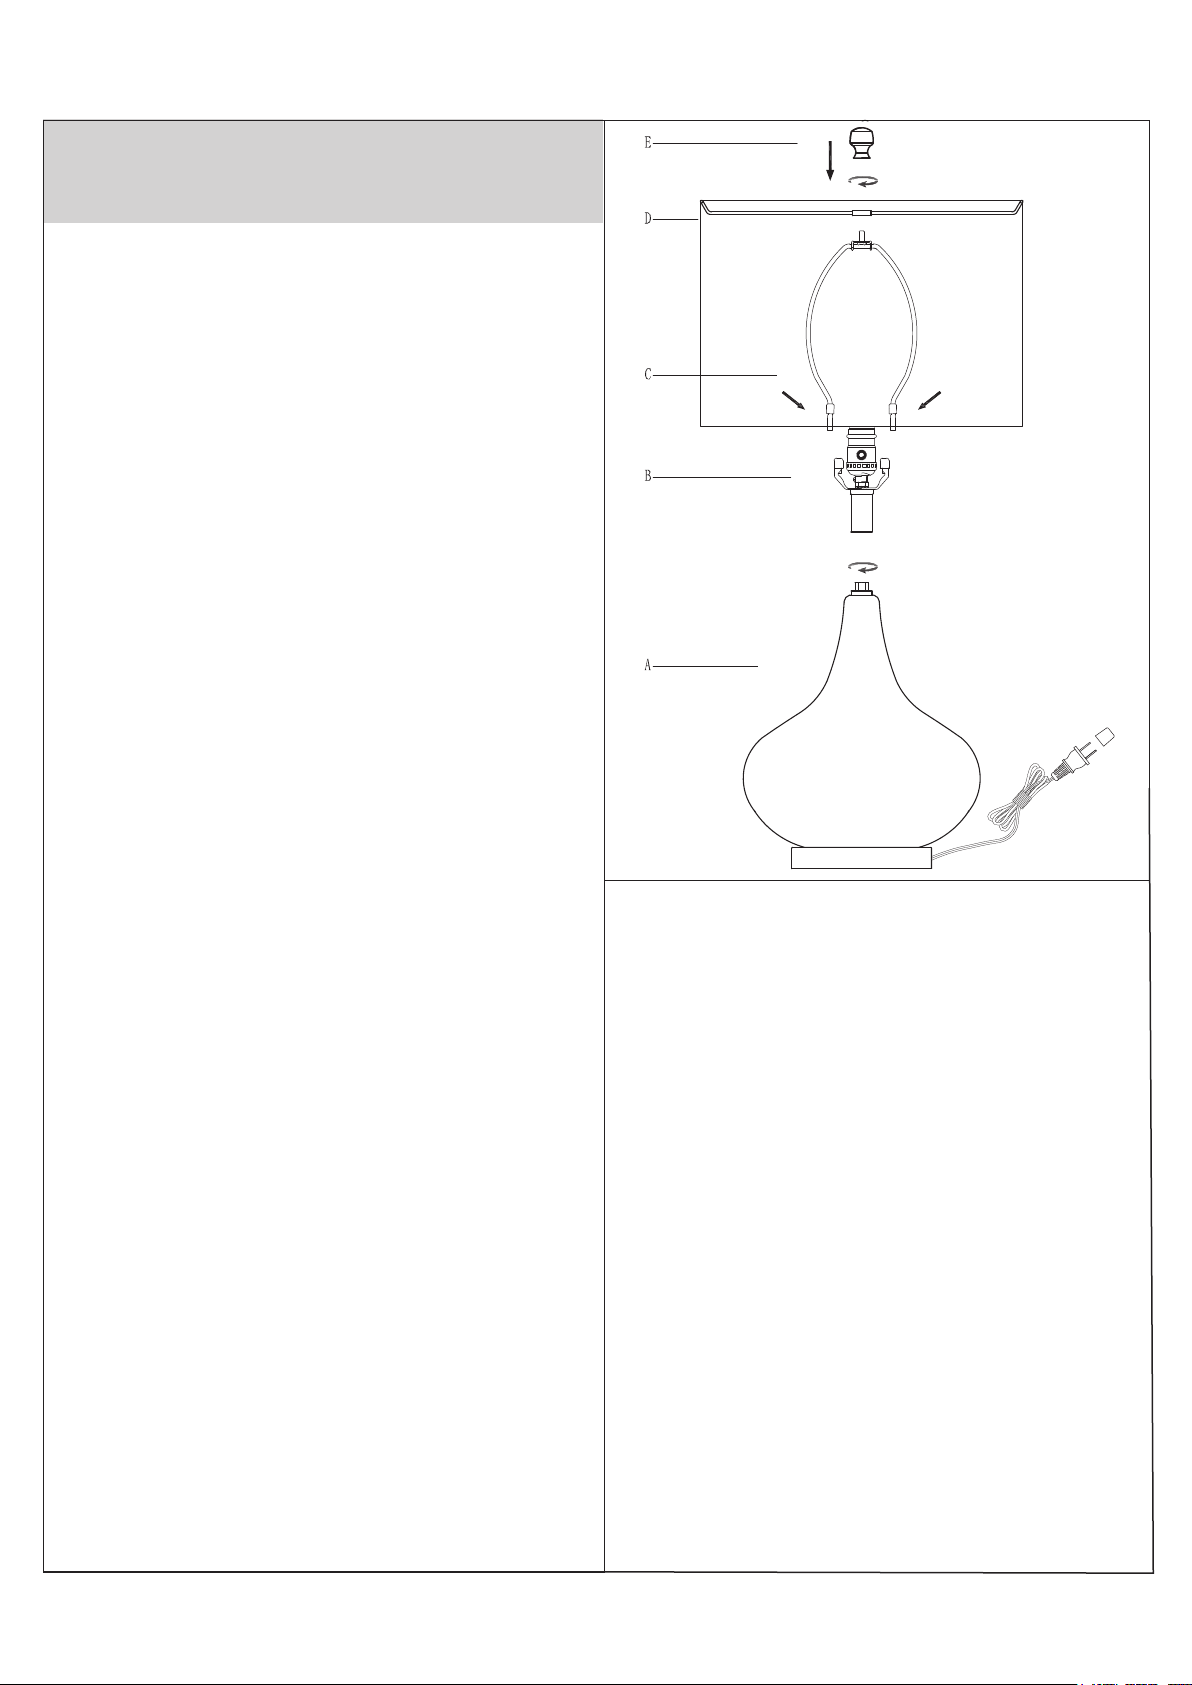
1. Place
the base (A) on a flat surface, gently pull
additional cord from lamp base (A).
2. Insert and thread socket assembly (B) into lamp
base (A) until secure.
3. Install light bulb (not included) into socket assembly (B).
4. Pinch and insert harp (C) into the harp fittings on
socket assembly (B). Slide the caps on harp (C) over
the fittings on socket assembly (B) to secure.
5. Remove the finial (E) from the harp (C).
6.
Place the shade (D) on harp (C) and secure with
finial (E).
7. Insert plug into an electrical outlet.
8. Use switch on socket assembly (B) to turn lamp
on and off.

INSTRUCCIONES DE ENSAMBLAJE
1.
2.
No instale cableado eléctrico u otros componentes
eléctricos que no vengan de fábrica con esta lámpara.
Si esta lámpara es alterada o modificada, su
seguridad se verá comprometida.
Evite colocar objetos directamente encima del cable
de abastecimiento eléctrico para evitar cortar o dañar
el cable.
3.
Mantenga cortinas, pantallas, artículos colgantes de
las paredes y todo otro artículo textil u objeto alejados
de la pantalla, el interruptor y la bombilla de la
lámpara. Las lámparas no están diseñadas para
soportar peso adicional. No cuelgue objetos de la
lámpara o de alguna parte de la misma.
Coloque la lámpara sobre una superficie estable y
pareja donde la lámpara no será volcada o golpeada
Esta lámpara ha sido aprobada para uso
exclusivamente en interiores.
Leer y conservar:
6.
4.
5.
Esta lámpara tiene un enchufe polarizado (con una
pata más ancha que la otra), para reducir el riesgo de
descarga eléctrica. El enchufe sólo puede ser
insertado en una toma de corriente polarizada de una
forma. Si el enchufe no entra en la toma de corriente,
inviértalo. Si aún así no entra, comuníquese con un
electricista calificado. Nunca use un alargador en el
que el enchufe no pueda ser insertado debidamente.
No altere el enchufe.
PARA CAMBIAR LA BOMBILLA
1. Apague y desenchufe la lámpara y permita que la
bombilla enfríe antes de cambiar la bombilla.
La bombilla nunca debería tocar la pantalla de
la lámpara.
2.
LIMPIEZA Y MANTENIMIENTO
1
.
Para limpiar, use sólo un paño suave y seco
.
No utilice limpiadores químicos o abrasivos.
Utiliza una bombilla tipo A de 150 vatios y
3 intensidades o una bombilla CFL equivalente.
NO EXCEDA EL VATAJE MÁXIMO RECOMENDADO.
2.
INSTRUCCIONES DE SEGURIDAD IMPORTANTES
MODELO #: 18578-000
LÁMPARAS DE MESA
1. Coloque la base (A) sobre una superficie plana, hala
suavemente el cable sobrante de la base de la lampara (A).
2. Coloca y enrosca el ensamblado del portabombilla
(B) en el base de la lampara (A) hasta que quede
seguro.
3. Instale una bombilla (no incluida) en la ensamblado del
portalámparas (B).
4. Aprieta y coloca el arpa (C) dentro de las muescas
correspondientes del ensamblado del portalámparas (B).
Desliza las tapas del arpa (C) sobre los acoplamientos en
el ensamblado del portalámparas (B) para asegurar.
5. Retire el florón (E) de la arpa (C).
6. Coloque la pantalla (D) en la arpa (C) y ajuste con el
florón (E).
7. Inserte el enchufe en una toma de corriente.
8. Encienda y apague la lámpara con el interruptor de la
unidad del portalámparas (B).