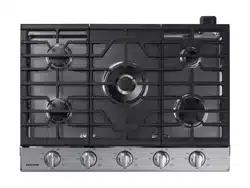
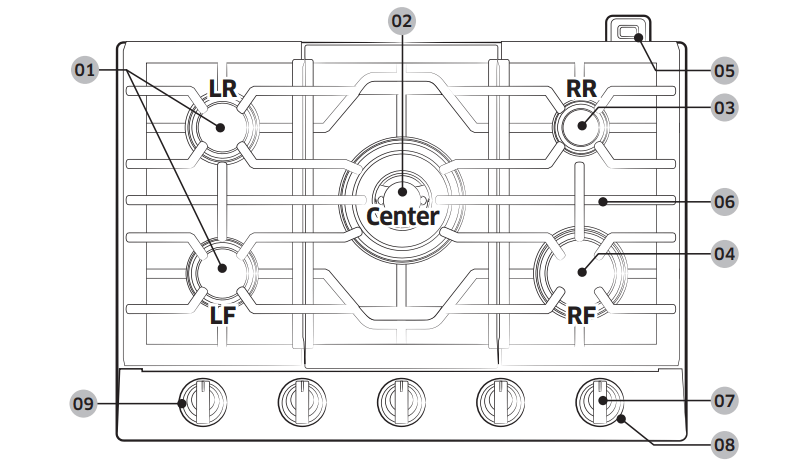
01 Left Front/Left Rear Semi rapid burners 9,500BTU
02 Center
Power burner
NA30N6555T*/NA36N6555T* : 19,000 BTU
NA30N7755T*/NA36N7755T* : 22,000 BTU
03 Right Rear
Simmer burner 5,000 BTU
04 Right Front
Rapid burner 13,000 BTU
05 Wi-Fi module
06 Grate (3)
07 Surface burner knobs (5 pcs)
08 Wi-Fi button (below knob)
09 Bluetooth button (below knob) only NA30N7755T*/NA36N7755T*
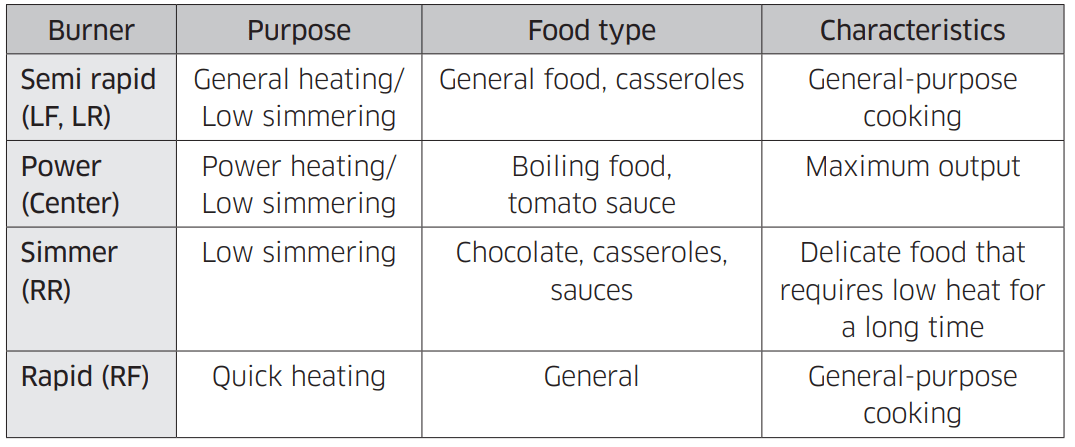
Each burner has a corresponding knob that lets you to set the flame level from LO to HI. In addition, each burner knob has a Lite setting. Turning a knob to Lite ignites the corresponding burner. The burner indicators are located above each knob and show which burner the knob controls. Each burner is designed for specific cooking purposes. See the table below.
Using the cooktop burners
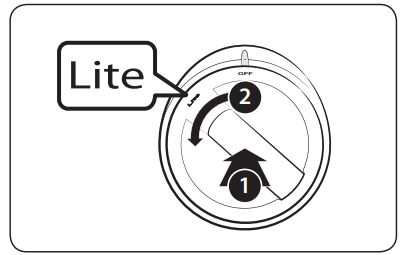
Ignition
Make sure all cooktop burners are properly installed. To light a burner:
Push in the control knob, and then turn it to the Lite position. The knob LED turns on and you will hear a “clicking” sound indicating the electronic ignition system is working properly.
After the cooktop burner lights, turn the control knob to shift it out of the Lite position and turn off the electronic ignition system.
Turn the control knob to adjust the flame level.
Manual ignition
If there is a power failure, you can ignite the burner manually. Use caution when doing this.
Hold a long gas grill lighter to the cooktop burner you want to light.
Push in the control knob for that burner, and then turn it to the Lite position. Turn on the grill lighter to ignite the burner.
After the burner is lit, turn the control knob to adjust the flame level.
Cookware
Material characteristics
• Aluminum: An excellent heat conductor. Some types of food may cause the aluminum to darken. However, anodized aluminum cookware resists staining and pitting.
• Copper: An excellent heat conductor but discolors easily.
• Stainless steel: A slow heat conductor with uneven cooking performance but is durable, easy to clean, and resists staining.
• Cast-Iron: A poor conductor but retains heat very well.
• Enamelware: Heating characteristics depend on the base material.
• Glass: A slow heat conductor. Use only glass cookware that is specified for cooktop cooking or oven use.
• Heatproof Glass-Ceramic: Can be used for either surface or oven cooking. It conducts heat very slowly and cools very slowly. Check cookware manufacturer's directions to be sure it can be used on a gas cooktop
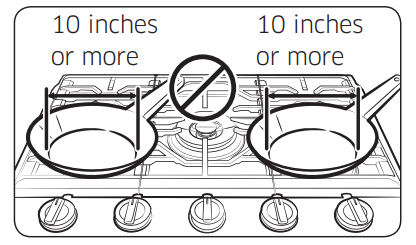
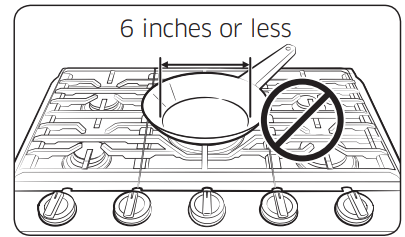
Size limitations
CAUTION
• Do not place a pan or pot with a bottom diameter of about 10 inches or more on the RF or LF burner.
CAUTION
• Do not place a pan or pot with a bottom diameter of about 6 inches or less on the center grate. This cookware may tip over. Use the rear burners for this small-sized cookware.
• Always make sure cookware handles are turned to the side or rear of the cooktop and not over other surface burners. This will minimize the chance of burns, spillovers, and the ignition of flammable materials that can occur if pots or pans are bumped accidently.
• If using glass cookware, make sure it is designed for cooktop cooking.
• Never leave plastic items on the cooktop. They can melt or ignite. Heating a sealed plastic container can cause a building up of dangerous pressure which can cause the container to explode.
• Make sure you hold the handle of a wok or a small one-handled pot while cooking.
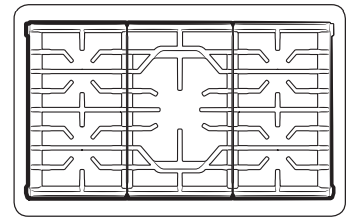
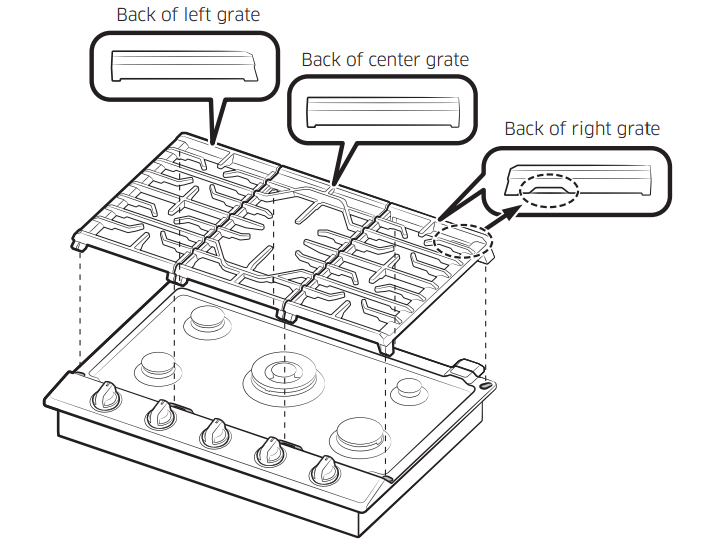
Install the grates.
To replace the grates correctly, follow these steps:
Locate the notch on the back of the right grate.
Orient the right grate so that it is on the right side of the cooktop with the notch in the back.
Gently lower the legs of the right grate into the corresponding dimples on the cooktop.
Gently lower the legs of the remaining two grates into the corresponding dimples on the cooktop as shown in the illustration.
Using the Smart Connect feature
The cooktop has built in a Wi-Fi module that you can use to sync the cooktop with the SmartThings app. On the SmartThings app, you can:
• monitor the operating status and the power level settings of the cooktop elements.
• check and change the timer settings.
Functions that can be operated from the SmartThings app may not work smoothly if communication conditions are poor or the product is installed in a place with a weak Wi-Fi signal.
How to connect the cooktop
Before you can use the remote features of your Samsung oven or cooktop, you must pair it to the SmartThings app.
Download and open the SmartThings app on your smart device.
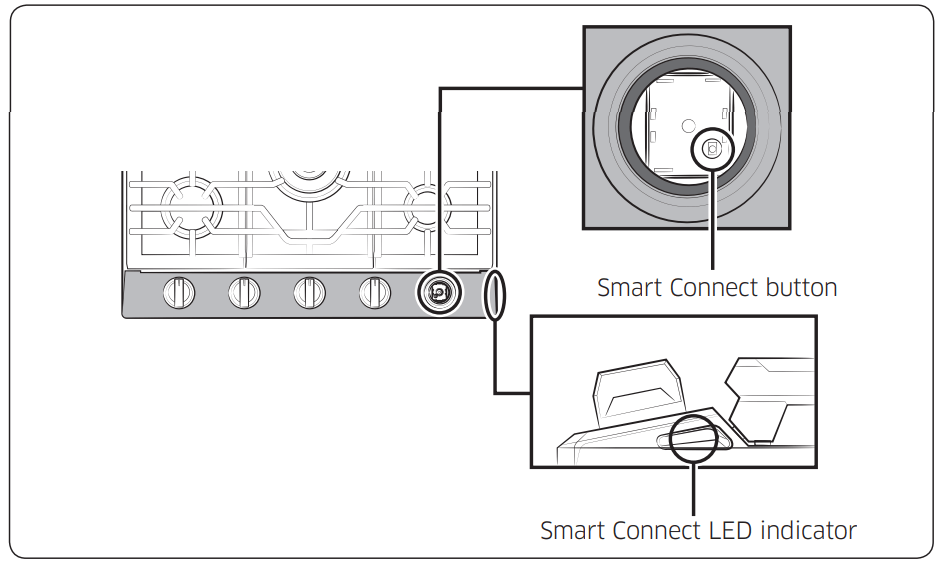
Follow the app's on-screen instructions, and then press the Smart Connect button for 3 seconds to connect your cooktop.
Once the process is complete, the Smart Connect LED indicator stops blinking and turns solid. The cooktop is connected successfully.
If the Smart Connect LED indicator does not turn in, follow the instruction on the app to reconnect.
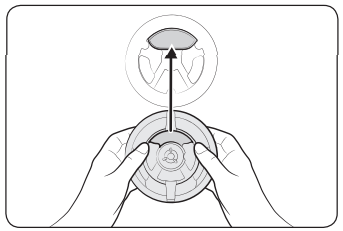
NOTE: The Smart Connect button is below the RF control knob. If you need to press the Smart Connect button, remove the RF control knob by grasping it and then pulling it straight up.
To monitor the cooktop remotely
Make sure the Smart Connect LED indicator turns on. If the Smart Connect LED indicator does not turn on, press the Smart Connect button. The cooktop can now be monitored remotely with a connected remote device.
Select the cooktop icon on the SmartThings app to open the cooktop monitor app.
Smart connect on/off
If you set the Smart Connect to Off, mobile devices cannot connect to the cooktop. To turn Smart Connect on, follow these steps:
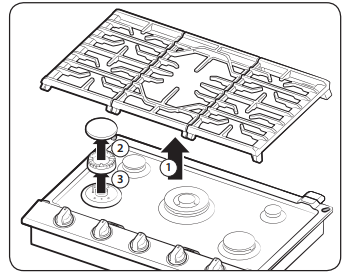
Pull the RF control knob straight up to remove it.
Press the Smart Connect button.
Put in the RF control knob.
Using the hood control feature
To connect to a hood control model and a hood:
Download and run the SmartThings app on your smartphone. Then, complete the Smart Connect procedure to connect to the cooktop.
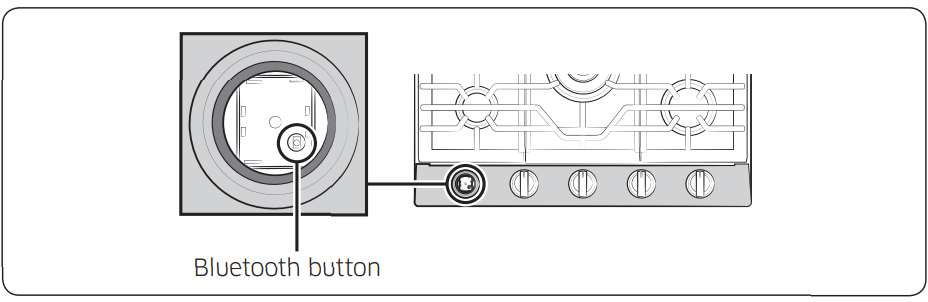
Follow the Bluetooth instructions of the hood control model and activate the Bluetooth connection.
Press the Bluetooth icon on the hood control panel. The Bluetooth icon LED blinks.
Press the Bluetooth button on the cooktop. Paring begins.
When Bluetooth pairing is finished, the Bluetooth icon LED stops blinking and glows steadily.
Follow the instructions in the user manual of the hood control model and the App guide to use the hood control.
NOTE: The Bluetooth button is below the LF control knob. If you need to press the Bluetooth button, remove the LF control knob by grasping it and then pulling it straight up.
Bluetooth on/off
Press the Bluetooth icon on the hood control panel.
Care and cleaning of the cooktop
Cooktop surface
We recommend that you remove food spills immediately after they take place.
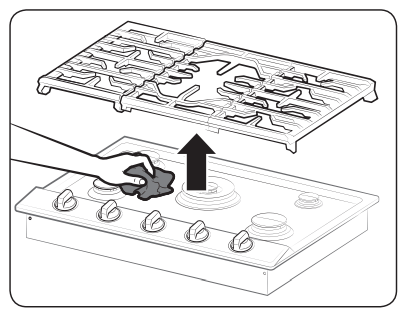
Turn off all surface burners.
Wait until all burner grates cool down, and then remove them.
Clean the cooktop surface using a soft cloth. If food spills run into gaps of the burner components, remove the burner cap and the head, and wipe up the spills.
When you are done cleaning, reinsert the burner components, and then put the burner grates back into position.
Porcelain enamel surfaces (on some models)
The porcelain enamel finish is sturdy but breakable if misused. This finish is acidresistant. However, any acidic foods with high sugar content (such as fruit, juices, tomatoes, or vinegar) should not be permitted to remain on the finish.
If an acidic food spills on the cooktop while it is hot, turn off all burners, and then use a dry paper towel or cloth to wipe the spill up right away. When the surface has cooled, wash it with an all-purpose cleaner and water. Rinse well. For other spills, such as fat spatterings, wash the cooktop with soap and water or an allpurpose cleaner after the surface has cooled. Rinse well. Polish with a dry cloth.
Stainless steel surfaces (on some models)
Remove any spills, spots, and grease stains using a soft, wet cloth.
Apply an apporoved stainless steel cleanser to a cloth or paper towel.
Clean one small area at a time, rubbing with the grain of the stainless steel if applicable.
when done, dry the surface using a soft, dry cloth.
Repeat steps 2 through 4 as many times as necessary
Control knobs
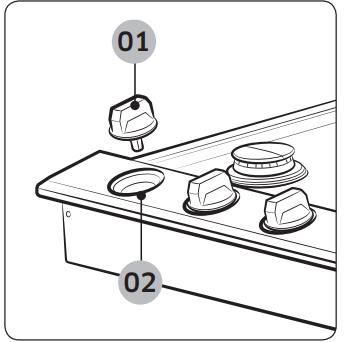
Make sure all surface burner knobs are in the OFF position.
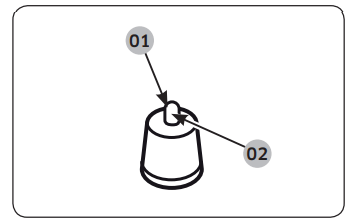
01 Grasp each knob and pull straight up to remove.
02 Spill protector. Do not remove.
Pull knobs off the control valve stems
Clean the knobs in warm, soapy water. Then rinse and dry them thoroughly.
Clean the stainless steel surfaces using stainless steel cleaner.
Re-attach the knobs in the OFF position to the control valve stems.
Burner grates and components
Turn off all surface burners and make sure they have all cooled down.
Remove the burner grates.
Remove the burner caps from the burner heads.
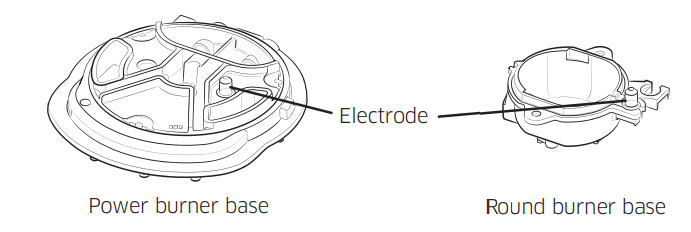
Remove the burner heads from the valve manifolds to reveal the starter electrodes.
Clean all removable grates and burner components in warm, soapy water. Do not use steel-wool pads or abrasive cleaners.
Rinse and dry grates and burner components thoroughly.
6. Return the burner heads to their positions on top of the manifold valves. Make sure a starter electrode is inserted through the hole in each burner head.
7. Return the burner caps to their positions on top of the burner heads. To ensure proper and safe operation, make sure the burner caps lie flat on top of the burner heads.
8. Re-install the burner grates in their respective positions.
9. Turn on each burner and check if it operates properly. After verifying that a burner operates normally, turn it off.
Burner caps and heads
Wash burner caps and burner heads in hot, soapy water and rinse with clean running water. You may scour with a plastic scouring pad to remove burned-on food particles.
Use a sewing needle or twist tie to unclog the small holes in the burner head, if required.
Brass burner head (Only NA30N7755T*/NA36N7755T*)
NOTE
• The brass parts of your burner will change color with use. However, this will not affect performance. You can clean the brass parts with a brass cleaner.
• After cleaning, confirm that the burner port openings aren't plugged.
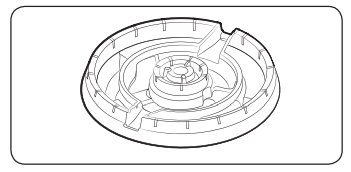
Burner bases
Make sure that no water gets into the burner bases and the brass gas orifices. Wipe clean with a damp cloth. Be careful not to scratch, deform, or damage the bases. Allow them to dry fully before using.
Electrodes
Do not attempt to remove the electrode from the cooktop or burner bases.
01 Clean this metal part
02 Do not clean this white ceramic part with an emery board
Be careful not to push in any cooktop controls while cleaning the cooktop. A slight electrical shock might result which could cause you to knock over hot cookware. Make sure that the white ceramic electrodes in the cooktop are clear of soil and dry. Clean the metal part of the electrode with a soft cloth. Do not use water to clean the igniters.
Before reassembling the surface burners, push down gently on each of the white ceramic, electrodes to make sure they are pressed against the burners bases.
Grates and wok grate
Do not clean the grates or wok grate in a dishwasher. They will be damaged.
Lift grates out when cool. Grates should be washed regularly and after spillovers. Wash them in hot, soapy water and rinse with clean water. When replacing the grates, be sure they are positioned securely over the burners.
• Rinse with hot water (do not use soap), and dry thoroughly.
• Before cooking, prepare the surface with cooking spray or vegetable oil.
• After cooking, clean the griddle with a stiff brush and hot water.
• Using soap is not recommended and harsh detergents should never be used.
• Store in a cool, dry place.
Burner head and cap replacement
Dual Burner head
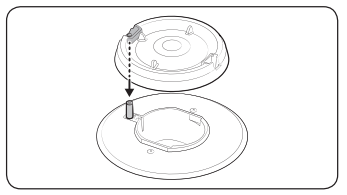
1. Orient the burner head so that the opening for the electrode lines up with the electrode.
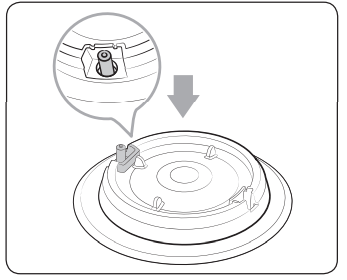
2. Install the burner head so that the electrode passes through the opening for the electrode. Make sure the burner head lies flat on the stove top.
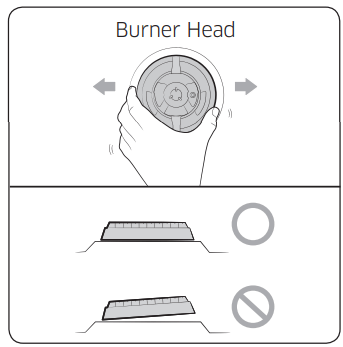
Round Burner head
1. Orient the burner head so that the opening for the electrode lines up with the electrode.
2. Install the burner head so that the electrode passes through the opening for the electrode. Make sure the burner head lies flat on the stove top.
CAUTION: Make sure all burner components (heads and caps) are reinstalled properly. They will be stable and rest flat when correctly installed.
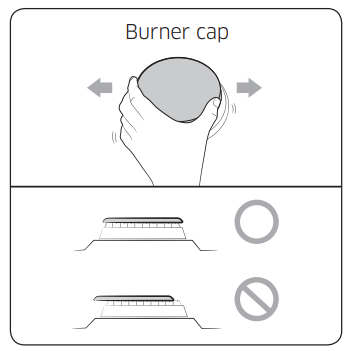
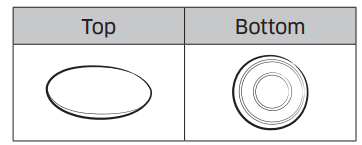
Burner cap
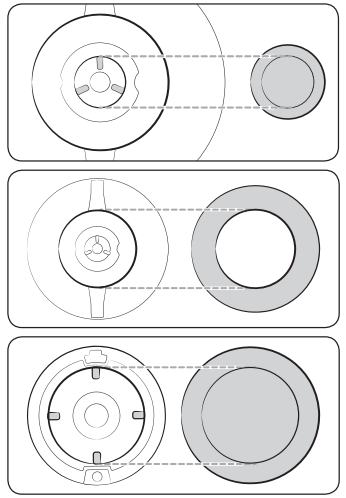
1. Match the burner caps to the burners by size, and then re-install the caps on the burner heads.
CAUTION: Make sure each cap is re-installed on the correct burner head, is centered on the burner head, and lies flat.
CAUTION: Make sure all burner components (heads and caps) are reinstalled properly. They will be stable and rest flat when correctly installed.
NOTE: The precise simmer burner (RR) cap and the inner Dual burner (Center) cap are interchangeable.
NOTE
After installation of surface burners, check the ignition.
Incorrect placement of a burner head or cap will result in poor ignition or uneven flames (as shown in the pictures).
Troubleshooting
If you encounter a problem with the cooktop, check the tables starting below, and then try the suggested actions
Checkpoints
Gas safety
Problem
Possible cause
Action
You smell gas.
The surface burner knob is not in the OFF position and the burner is not lit.
Turn the burner knob to OFF.
There is a gas leak.
Clear the room, building, or area of all occupants.
Immediately call your gas supplier from a neighbor’s phone. Do not call from your phone. It is electrical and could cause a spark that could ignite the gas. Follow the gas supplier’s instructions. If you cannot reach your gas supplier, call the fire department.
Surface burner
Problem
Cause
Action
All burners do not light.
The power cord is not plugged into the electrical outlet.
Make sure the electrical plug is plugged into a live, properly grounded outlet.
A fuse in your home may be blown or the circuit breaker may have tripped.
Replace the fuse or reset the circuit breaker.
The gas supply is not properly connected or turned on.
See the Installation Instructions that came with your cooktop.
Surface burners do not light.
The control knob is not set properly.
Push in the control knob and turn it to the Lite position.
The burner caps are not in place.
The burner base is misaligned.
Clean the electrodes.
Put the burner cap on the burner head.
Align the burner base.
A surface burner clicks during operation.
The control knob has been left in the Lite position.
After the burner lights, turn the control knob to a desired setting.
If the burner still clicks, contact a service technician.
The burners do not burn evenly
Surface burner components and caps are not assembled correctly and level.
pages 22, 23, and 24.
The surface burners are dirty.
Clean the surface burner components. (pages 20, 21, and 22.)
Very large or yellow surface burner flames
The wrong burner orifice is installed.
Check the burner orifice size. Contact your installer if you have the wrong orifice (LP gas instead of natural gas or natural gas instead of LP gas).
 on the hood control panel. The Bluetooth icon LED blinks.