User Manual Samsung NA24T4230FS/AA Gas Cooktop
Overview
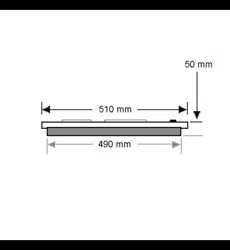
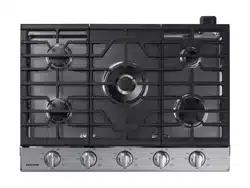
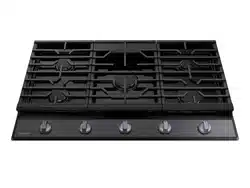
Layout

01. Left Rear
Triple crown burner
NG : 12,500 BTU
LPG : 11,500 BTU
02. Right Rear
Rapid burner
NG : 10,500 BTU
LPG : 9,000 BTU
03. Left Front / Right Front
Auxiliary burner
NG : 5,000 BTU
LPG : 5,000 BTU
04. Left Grate
05. Right Grate
06. Knobs
4 pcs
Each burner has a corresponding knob that lets you to set the flame level from LO to HI. In addition, each burner knob has a Lite setting. Turning a knob to Lite ignites the corresponding burner. The burner indicators are located above each knob and show which burner the knob controls. Each burner is designed for specific cooking purposes. See the table below.

What’s included

Using the cooktop burners
Ignition
Make sure all cooktop burners are properly installed. To light a burner:

- Fully press down the control knob for the corresponding cooking position and turn it to the left, to the Lite position, and hold it here for a few seconds at most until the burner ignites.
- After igniting, keep the control knob pressed for about 5-8 seconds more because the heat sensor that opens the gas channel has to warm up first. Set control knob to the position you want.
- Repeat steps 1 and 2 to check the operation of each cooktop burner in succession.
- The flame size can be set continuously between maximum and minimum by slowing turning the control knob.
Manual ignition
If there is a power failure, you can ignite the burner manually. Use caution when doing this.
- Hold a long gas grill lighter to the cooktop burner you want to light.
- Push in the control knob for that burner, and then turn it to the Lite position. Turn on the grill lighter to ignite the burner.
- After the burner is lit, turn the control knob to adjust the flame level.
Flame level
The flames on the burners should always stay under the cookware, and should not extend beyond the cookware bottom at any time.
WARNING
- Flames larger than the cookware bottom may result in a fire or physical injury.
- When you set a burner to simmer, do not turn the burner knob quickly. Watch the flame to make sure it stays on.
- After turning on a surface burner, make sure that the burner is ignited. Adjust the level of the flame by turning the burner knob.
- Always turn off the surface burner controls before removing cookware. All surface burner controls should be turned OFF when you are not cooking.
- Always turn the burners off before you go to sleep or go out.
- If you smell gas, turn off the gas to the cooktop and call a qualified service technician. NEVER use an open flame to locate a leak.
- If you turn the knob, but the surface burner does not ignite, turn off the control knob immediately.
- Do not operate the burner for an extended period of time without cookware on the grate. The finish on the grate may chip without cookware to absorb the heat.
- Be sure the burners and grates are cool before you place your hand, a pot holder, cleaning cloths or other materials on them.
Cookware
Requirements
- Flat bottom and straight sides
- Tight-fitting lid
- Well-balanced with the handle weighing less than the main portion of the pot or pan.
Material characteristics
- Aluminum: An excellent heat conductor. Some types of food may cause the aluminum to darken. However, anodized aluminum cookware resists staining and pitting.
- Copper: An excellent heat conductor but discolors easily.
- Stainless steel: A slow heat conductor with uneven cooking performance but is durable, easy to clean, and resists staining.
- Cast-Iron: A poor conductor but retains heat very well.
- Enamelware: Heating characteristics depend on the base material.
- Glass: A slow heat conductor. Use only glass cookware that is specified for cooktop cooking or oven use.
- Heatproof Glass-Ceramic: Can be used for either surface or oven cooking. It conducts heat very slowly and cools very slowly. Check cookware manufacturer's directions to be sure it can be used on a gas cooktop.
Size limitations
CAUTION
- Do not place a pan or pot with a bottom diameter of about 10 inches or more on the RF or LF burner.

- Always make sure cookware handles are turned to the side or rear of the cooktop and not over other surface burners. This will minimize the chance of burns, spillovers, and the ignition of flammable materials that can occur if pots or pans are bumped accidently.
- If using glass cookware, make sure it is designed for cooktop cooking.
- Never leave plastic items on the cooktop. They can melt or ignite. Heating a sealed plastic container can cause a building up of dangerous pressure which can cause the container to explode.
- Make sure you hold the handle of a wok or a small one-handled pot while cooking.
Install the grates
Note:
Install the grates as instructed below for longest life. When installed properly, the openings in the grates are centered over the burners. The two cooktop grates are designed to fit in specific positions on the cooktop.
For maximum stability, these grates should only be used in their proper positions.
- Distinguish the left and right grates. When picking up the grates, you can see the LEFT and RIGHT letters near the overhangs of the grates.
- Place the grates with the overhangs and letters at the back and the overhangs facing out. Then put the grate with the LEFT letter on the left side, and the grate with the RIGHT letter on the right side.
The left and right grate have overhangs and letters to help you locate the side grates correctly. They will stack up and be placed unevenly when you locate wrong direction. See the illustration below.

To replace the grates correctly, follow these steps:
- Overhangs must be placed outward.
- Make the rubber feet of the grates match with the panel bulge.
- Adjust the grates to place it on the panel smoothly

Care and cleaning of the cooktop
WARNING
Be sure unplug the power cord and all surfaces are cool before cleaning any part of the cooktop. If the power cord is inaccessible, turn off power to the cooktop at the breaker or fuse box.
Cooktop surface
We recommend that you remove food spills immediately after they take place.

- Turn off all surface burners.
- Wait until all burner grates cool down, and then remove them.
- Clean the cooktop surface using a soft cloth. If food spills run into gaps of the burner components, remove the burner cap and the head, and wipe up the spills.
- When you are done cleaning, reinsert the burner components, and then put the burner grates back into position.
Porcelain enamel surfaces (on some models)
The porcelain enamel finish is sturdy but breakable if misused. This finish is acid- resistant. However, any acidic foods with high sugar content (such as fruit, juices, tomatoes, or vinegar) should not be permitted to remain on the finish.
If an acidic food spills on the cooktop while it is hot, turn off all burners, and then use a dry paper towel or cloth to wipe the spill up right away. When the surface has cooled, wash it with an all-purpose cleaner and water. Rinse well. For other spills, such as fat spatterings, wash the cooktop with soap and water or an all- purpose cleaner after the surface has cooled. Rinse well. Polish with a dry cloth.
Stainless steel surfaces (on some models)
- Remove any spills, spots, and grease stains using a soft, wet cloth.
- Apply an apporoved stainless steel cleanser to a cloth or paper towel.
- Clean one small area at a time, rubbing with the grain of the stainless steel if applicable.
- When done, dry the surface using a soft, dry cloth.
- Repeat steps 2 through 4 as many times as necessary.
CAUTION
- Do not use a steel-wool pad or abrasive cleaner, which can scratch or damage the surface.
- Do not remove the cooktop surface to clean it. The gas lines leading to the burner manifolds can be damaged, resulting in a fire or system failure.
- Do not pour water into the cooktop well while cleaning the cooktop. This could leak down into the cooktop gas and electrical systems creating a risk of electrical shock or high levels of Carbon Monoxide due to corrosion of the gas valves or ports.
- Do not spray any type of cleanser into the manifold holes. The ignition system is located in those holes and must be kept free of moisture.
- Do not clean the cooktop or stainless steel parts with:
- Caustic lye (sodium hydroxide) or cleaners containing this chemical
- Hard or steel wool pads
- Abrasive materials or chemicals.
Control knobs
Make sure all surface burner knobs are in the OFF position.

- Pull the knobs off the control valve stems.
- Clean the knobs in warm, soapy water. Then rinse and dry them thoroughly.
- Clean the stainless steel surfaces using stainless steel cleaner.
- Re-attach the knobs in the OFF position to the control valve stems.
CAUTION
- Do not clean the control knobs in a dish washer.
- Do not spray cleansers directly onto the control panel. Moisture entering the electric circuits may cause electric shock or product damage.
Burner grates and components
Turn off all surface burners and make sure they have all cooled down.

1. Remove the burner grates.
2. Remove the burner caps from the burner heads.
3. Remove the burner heads from the valve manifolds to reveal the starter electrodes.
4. Clean all removable grates and burner components in warm, soapy water. Do not use steel-wool pads or abrasive cleaners.
5. Rinse and dry grates and burner components thoroughly.
6. Return the burner heads to their positions on top of the manifold valves. Make sure a starter electrode is inserted through the hole in each burner head
NOTE
See pages 17, 18 for detailed burner component re-assembly instructions.
7. Return the burner caps to their positions on top of the burner heads. To ensure proper and safe operation, make sure the burner caps lie flat on top of the burner heads.
8. Re-install the burner grates in their respective positions.
9. Turn on each burner and check if it operates properly. After verifying that a burner operates normally, turn it off.
Burner caps and heads
NOTES
Before removing the burner caps and heads, remember their size and location. Replace them in the same location after cleaning.
Wash burner caps and burner heads in hot, soapy water and rinse with clean running water. You may scour with a plastic scouring pad to remove burned-on food particles.
Use a sewing needle or twist tie to unclog the small holes in the burner head, if required.
CAUTION
- Do not wash any burner parts in a dishwasher.
- Do not use steel wool or scouring powders to clean the burners.
Burner bases
CAUTION
The burner bases cannot be removed for cleaning.
Round burner base
Make sure that no water gets into the burner bases and the brass gas orifices. Wipe clean with a damp cloth. Be careful not to scratch, deform, or damage the bases. Allow them to dry fully before using.

Electrodes
CAUTION
Do not attempt to remove the electrode from the cooktop or burner bases.

Be careful not to push in any cooktop controls while cleaning the cooktop. A slight electrical shock might result which could cause you to knock over hot cookware.
Make sure that the white ceramic electrodes in the cooktop are clear of soil and dry.
Clean the metal part of the electrode with a soft cloth. Do not use water to clean the igniters.
Before reassembling the surface burners, push down gently on each of the white ceramic, electrodes to make sure they are pressed against the burners bases.
NOTE
Do not attempt to remove the electrode from the cooktop.
Grates
CAUTION
Do not clean the grates in a dishwasher. They will be damaged. Lift grates out when cool. Grates should be washed regularly and after spillovers. Wash them in hot, soapy water and rinse with clean water. When replacing the grates, be sure they are positioned securely over the burners.
Burner head and cap replacement
Round Burner head
1. Orient the burner head so that the opening for the electrode lines up with the electrode.

2. Install the burner head so that the electrode passes through the opening for the electrode. Make sure the burner head lies flat on the stove top.

CAUTION
Make sure all burner components (heads and caps) are reinstalled properly. They will be stable and rest flat when correctly installed.

Burner cap
- Match the burner caps to the burners by size, and then re-install the caps on the burner heads.

CAUTION
Make sure each cap is re-installed on the correct burner head, is centered on the burner head, and lies flat.
CAUTION
Make sure all burner components (heads and caps) are reinstalled properly. They will be stable and rest flat when correctly installed.

NOTE

After you have re-installed the surface burners, ignite each one to ensure each one is working correctly. Incorrect placement of a burner head or cap will result in poor ignition or uneven flames (as shown in the pictures).
Troubleshooting
If you encounter a problem with the cooktop, check the tables starting below, and then try the suggested actions.
Checkpoints
Gas safety
You smell gas.
The surface burner knob is not in the OFF position and the burner is not lit.
- Turn the burner knob to OFF.
There is a gas leak.
- Clear the room, building, or area of all occupants. Immediately call your gas supplier from a neighbor’s phone. Do not call from your phone. It is electrical and could cause a spark that could ignite the gas. Follow the gas supplier’s instructions. If you cannot reach your gas supplier, call the fire department.
Surface burner
All burners do not light.
The power cord is not plugged into the electrical outlet.
- Make sure the electrical plug is plugged into a live, properly grounded outlet.
A fuse in your home may be blown or the circuit breaker may have tripped.
- Replace the fuse or reset the circuit breaker.
The gas supply is not properly connected or turned on.
- See the Installation Instructions that came with your cooktop.
Surface burners do not light.
The control knob is not set properly.
- Push in the control knob and turn it to the Lite position.
The burner caps are not in place.
The burner base is misaligned.
- Clean the electrodes.
- Put the burner cap on the burner head.
- Align the burner base.
A surface burner clicks during operation.
The control knob has been left in the Lite position.
- After the burner lights, turn the control knob to a desired setting. If the burner still clicks, contact a service technician.
The burners do not burn evenly.
Surface burner components and caps are not assembled correctly and level.
The surface burners are dirty.
- Clean the surface burner components. (See pages 15, and 17.)
Very large or yellow surface burner flames.
The wrong burner orifice is installed.
- Check the burner orifice size. Contact your installer if you have the wrong orifice (LP gas instead of natural gas or natural gas instead of LP gas).
Warranty (U.S.A)
PLEASE DO NOT DISCARD.
SAMSUNG GAS Cooktop
LIMITED WARRANTY TO ORIGINAL PURCHASER WITH PROOF OF PURCHASE
This SAMSUNG brand product, as supplied and distributed by SAMSUNG ELECTRONICS AMERICA INC. (SAMSUNG) and delivered new, in the original carton to the original consumer purchaser, is warranted by SAMSUNG against manufacturing defects in materials or workmanship for the limited warranty period, starting from the date of original purchase, of:
One (1) Year Parts and Labor
This limited warranty is valid only on products purchased and used in the United
States that have been installed, operated, and maintained according to the instructions attached to or furnished with the product. To receive warranty service, the purchaser must contact SAMSUNG at the address or phone number provided below for problem determination and service procedures. Warranty service can only be performed by a SAMSUNG authorized service center. The original dated bill of sale must be presented upon request as proof of purchase to SAMSUNG or SAMSUNG’s authorized service center to receive warranty service.
SAMSUNG will provide in-home service within the contiguous United States during the warranty period at no charge, subject to availability of SAMSUNG authorized servicers within the customer’s geographic area. If in-home service is not available, SAMSUNG may elect, at its option, to provide transportation of the product to and from an authorized service center. If the product is located in an area where service by a SAMSUNG authorized servicer is not available, you may be responsible for a trip charge or required to bring the product to a SAMSUNG authorized service center for service.
To receive in-home service, product must be unobstructed and accessible to the service agent.
During the applicable warranty period, a product will be repaired, replaced, or the purchase price refunded, at the sole option of SAMSUNG. SAMSUNG may use new or reconditioned parts in repairing a product, or replace the product with a new or reconditioned product. Replacement parts and products are warranted for the remaining portion of the original product’s warranty or ninety (90) days, whichever is longer. All replaced parts and products are the property of SAMSUNG and you must return them to SAMSUNG.
This limited warranty covers manufacturing defects in materials or workmanship encountered in normal household, noncommercial use of this product and shall not cover the following: damage that occurs in shipment, delivery, installation, and uses for which this product was not intended; damage caused by unauthorized modification or alteration of the product; product where the original factory serial numbers have been removed, defaced, changed in any way, or cannot be readily determined; cosmetic damage including scratches, dents, chips, and other damage to the product’s finishes; damage caused by abuse, misuse, pest infestations, accident, fire, floods, or other acts of nature or God; damage caused by use of equipment, utilities, services, parts, supplies, accessories, applications, installations, repairs, external wiring or connectors not supplied or authorized by SAMSUNG; damage caused by incorrect electrical line current, voltage, fluctuations and surges; damage caused by failure to operate and maintain the product according to instructions; in-home instruction on how to use your product; and service to correct installation not in accordance with electrical or plumbing codes or correction of household electrical or plumbing (i.e., house wiring, fuses, or water inlet hoses). In addition, damage to the glass cooktop caused by (i) use of cleaners other than the recommended cleaners and pads or (ii) hardened spills of sugary materials or melted plastic that are not cleaned according to the directions in the use and care guide are not covered by this limited warranty.
The cost of repair or replacement under these excluded circumstances shall be the customer’s responsibility.
Visits by an authorized servicer to explain product functions, maintenance or installation are not covered by this limited warranty. Please contact SAMSUNG at the number below for assistance with any of these issues.
EXCLUSION OF IMPLIED WARRANTIES IMPLIED WARRANTIES, INCLUDING THE IMPLIED WARRANTIES OF MERCHANTABILITY OR FITNESS FOR A PARTICULAR PURPOSE, ARE LIMITED TO ONE YEAR OR THE SHORTEST PERIOD ALLOWED BY LAW. Some states do not allow limitations on how long an implied warranty lasts, so the above limitations or exclusions may not apply to you. This warranty gives you specific rights, and you may also have other rights, which vary from state to state.
LIMITATION OF REMEDIES YOUR SOLE AND EXCLUSIVE REMEDY IS PRODUCT REPAIR, PRODUCT REPLACEMENT, OR REFUND OF THE PURCHASE PRICE AT SAMSUNG’S OPTION, AS PROVIDED IN THIS LIMITED WARRANTY. SAMSUNG SHALL NOT BE LIABLE FOR SPECIAL, INCIDENTAL OR CONSEQUENTIAL DAMAGES, INCLUDING BUT NOT LIMITED TO TIME WAY FROM WORK, HOTELS AND/OR RESTAURANT MEALS, REMODELING EXPENSES, LOSS OF REVENUE OR PROFITS, FAILURE TO REALIZE SAVINGS OR OTHER BENEFITS REGARDLESS OF THE LEGAL THEORY ON WHICH THE CLAIM IS BASED, AND EVEN IF SAMSUNG HAS BEEN ADVISED OF THE POSSIBILITY OF SUCH DAMAGES. Some states do not allow exclusion or limitation of incidental or consequential damages, so the above limitations or exclusions may not apply to you. This warranty gives you specific rights, and you may also have other rights, which vary from state to state.
SAMSUNG does not warrant uninterrupted or error-free operation of the product. No warranty or guarantee given by any other person, firm, or corporation with respect to this product shall be binding on SAMSUNG.
To obtain warranty service, please contact SAMSUNG at:

Model name & serial number
Both the model name and the serial number are marked right side of the cooktop base. For later use, write down the information onto the current page.
Warranty (CANADA)
PLEASE DO NOT DISCARD.
SAMSUNG GAS Cooktop
LIMITED WARRANTY TO ORIGINAL PURCHASER
This SAMSUNG brand product, as supplied and distributed by SAMSUNG ELECTRONICS CANADA INC. (SAMSUNG) and delivered new, in the original carton to the original consumer purchaser, is warranted by SAMSUNG against manufacturing defects in materials and workmanship for a limited warranty period of:
One (1) Year Parts and Labor
This limited warranty begins on the original date of purchase, and is valid only on products purchased and used in the Canada. To receive warranty service, the purchaser must contact SAMSUNG for problem determination and service procedures. Warranty service can only be performed by a SAMSUNG-authorized service center, and any unauthorized service will void this warranty. The original dated bill of sale must be presented upon request as proof of purchase to
SAMSUNG or SAMSUNG’s authorized service center. Samsung will provide in- home service during the one (1) year warranty period at no charge subject to availability within the contiguous Canada. In-home service is not available in all areas. To receive in-home service, product must be unobstructed and accessible to the service agent. If service is not available, Samsung may elect to provide transportation of the product to and from an authorized service center.
SAMSUNG will repair or replace this product, at our option and at no charge as stipulated herein, with new or reconditioned parts or products if found to be defective during the limited warranty period specified above. All replaced parts and products become the property of SAMSUNG and must be returned to SAMSUNG. Replacement parts and products assume the remaining original warranty, or ninety (90) days, whichever is longer.
This limited warranty shall not cover cases of incorrect electric current, voltage or supply, light bulbs, house fuses, house wiring, cost of a service call for instructions, or fixing installation errors. Furthermore, damage to the cooktop caused by the use of cleaners other than the recommended cleaners and pads and damage to the cooktop caused by hardened spills of sugary materials or melted plastic that are not cleaned according to the directions in the use and care guide are not covered. SAMSUNG does not warrant uninterrupted or error-free operation of the product.
EXCEPT AS SET FORTH HEREIN, THERE ARE NO WARRANTIES OR CONDITIONS ON THIS PRODUCT EITHER EXPRESS OR IMPLIED AND SAMSUNG DISCLAIMS ALL WARRANTIES AND CONDITIONS INCLUDING, BUT NOT LIMITED TO, ANY IMPLIED WARRANTIES AND CONDITIONS OF MERCHANTABILITY, INFRINGEMENT, OR FITNESS FOR A PARTICULAR PURPOSE. NO WARRANTY OR GUARANTEE GIVEN BY ANY PERSON, FIRM, OR CORPORATION WITH RESPECT TO THIS PRODUCT SHALL BE BINDING ON SAMSUNG. SAMSUNG SHALL NOT BE LIABLE FOR LOSS OF REVENUE OR PROFITS, FAILURE TO REALIZE SAVINGS OR OTHER BENEFITS, OR ANY OTHER GENERAL, INDIRECT, SPECIAL, INCIDENTAL, OR CONSEQUENTIAL DAMAGES CAUSED BY THE USE, MISUSE, OR INABILITY TO USE THIS PRODUCT, REGARDLESS OF THE LEGAL THEORY ON WHICH THE CLAIM IS BASED, AND EVEN IF SAMSUNG HAS BEEN ADVISED OF THE POSSIBILITY OF SUCH DAMAGES. NOR SHALL RECOVERY OF ANY KIND AGAINST SAMSUNG BE GREATER IN AMOUNT THAN THE PURCHASE PRICE OF THE PRODUCT SOLD BY SAMSUNG AND CAUSING THE LLEGED DAMAGE. WITHOUT LIMITING THE FOREGOING, PURCHASER ASSUMES ALL RISK AND LIABILITY FOR LOSS, DAMAGE, OR INJURY TO PURCHASER AND PURCHASER’S PROPERTY AND TO OTHERS AND THEIR PROPERTY ARISING OUT OF THE USE, MISUSE, OR INABILITY TO USE THIS PRODUCT. THIS LIMITED WARRANTY SHALL NOT EXTEND TO ANYONE OTHER THAN THE ORIGINAL PURCHASER OF THIS PRODUCT, IS NONTRANSFERABLE, AND STATES YOUR EXCLUSIVE REMEDY.
Some states or provinces do not allow limitations on how long an implied warranty lasts, or the exclusion or limitation of incidental or consequential damages, so the above limitations or exclusions may not apply to you.
This warranty gives you specific legal rights, and you may also have other rights which vary from state to state or province to province.
To obtain warranty service, please contact SAMSUNG at:

Registration
Please register your product online at www.samsung.com/register.
Model name & serial number
Both the model name and the serial number are marked right side of the cooktop base. . For later use, write down the information onto the current page.