User Manual for Air Purifier
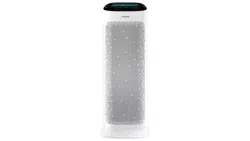
At a Glance
General
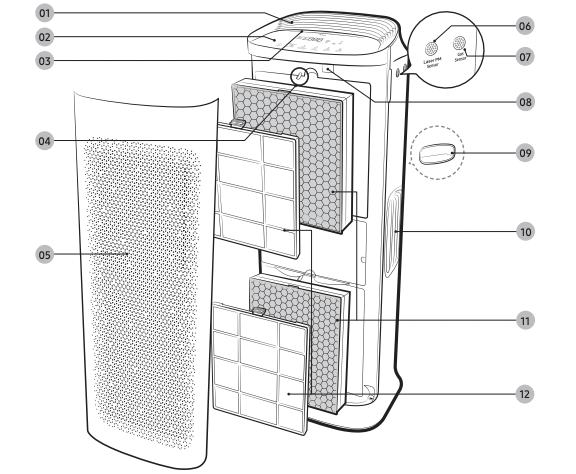
01 Air outlet (top)
02 Display and buttons
03 Display lighting
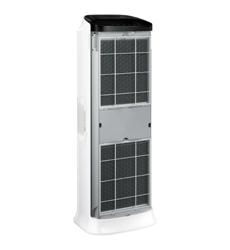
04 Filter holder
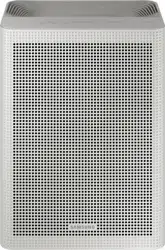
05 Air inlet / Front panel
06 Laser PM sensor
07 Gas sensor
08 Dongle mount
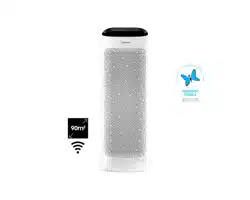
• This model is provided with integrated Wi-Fi connectivity and does not require an external dongle to use this function.
09 Handle (rear side)
10 Air outlet (side)
11 2-in-1 filter(Deodorization Filter+Dust Collecting Filter)
12 Pre-filter
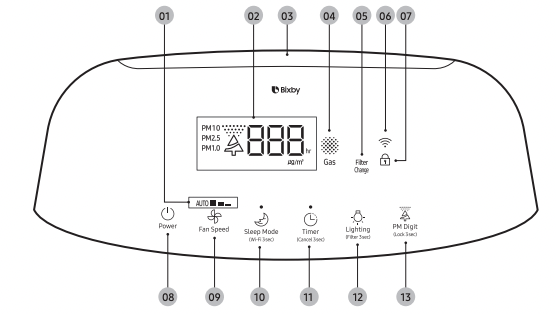
Display and buttons
|
01 Current fan speed
02 PM10 / PM2.5 / PM1.0 pollution / Concentration / Timer indicator
03 Air quality indicator
04 Gas pollution indicator
05 Filter replacement reminder
06 Wi-Fi function indicator
07 Lock indicator
08 Power button
09 Fan speed button
10 Sleep mode / Wi-Fi On or Off button
11 Timer on/off button
|
|
12 Lighting / Filter reset button
13 Air quality / Lock button
NOTE
• PM10: Dust in the air with a diameter of 10 ㎛ or less – Fine particles with about 1/5 of the diameter of a human hair
• PM2.5: Dust in the air with a diameter of 2.5 ㎛ or less – Fine particles with about 1/20 of the diameter of a human hair
• PM1.0: Dust in the air with a diameter of 1.0 ㎛ or less – Fine particles with about 1/50 of the diameter of a human hair
* Diameter of a human hair: 50 to 70 ㎛
|
Bixby is the name of a Samsung AI solution and allows you to control the product with voice. To use the voice recognition function, you must connect the SmartThings app on your smartphone to the product. If the product does not support voice recognition directly, you can only control some functions using Bixby on your Samsung smartphone.
NOTE
• Bixby only supports some languages, and the supported functions may differ depending on the geographical area.
Removing the filters
When using the 2-in-1 filters for the first time or replacing them with a new set, remove the vinyl packaging first.
 |
|
STEP 1 Remove the front panel.
• Use your thumbs to press on the top of the product and pull the front panel forward with other fingers.
STEP 2 Remove the pre-filters.
STEP 3 Release the 2-in-1 filters.
• Rotate the filter holder 90˚ anticlockwise to release the filter.
STEP 4 Remove the 2-in-1 filters.
STEP 5 Remove the vinyl packaging from the filters.
|
Assembling the filters
 |
|
STEP 1 Place the 2-in-1 filters
• Let the filters sit inside the grooves at the bottom.
• Check the insert direction before placing the filters. STEP 2 Secure the 2-in-1 filters.
• Rotate the filter holder 90° clockwise to hold the filter in place.
STEP 3 Place the pre-filters.
|
 |
|
STEP 4 Place the front panel.
• First, insert the hook on the panel into the groove at the bottom of the product.
STEP 5 Before using new filters, reset the filter replacement reminders.
• Press and hold the Lighting  button for 3 seconds or longer. button for 3 seconds or longer.
|
NOTE
• The product is not as effective when it is operated without filters.
• You may notice a subtle odour from fresh filters when using your newly purchased air purifier for the first time,
– which will disappear naturally in about a day.
• Keep the windows and doors closed whenever you can while the product is running. Ventilate the air regularly to avoid high concentration of carbon dioxide when you keep the room enclosed for a duration of time. When the filters have a weak smell, regular ventilation also reduces the smell.
• Carbon monoxide (CO) is a harmful gas that cannot be removed by the filters and usually comes from an outdoor origin.
• The frequency of filter cleaning and replacement may vary depending on the operating environment.
Tips for using the 2-in-1 filters
• Operating the product without filters may cause abnormal air noise. Be sure to use the product with the 2-in-1 filters.
• In a room with persisting odours, using the product after ventilating the room first allows more effective odour control.
– Operating the product while cooking food that has a strong odour may cause the deodorization filter to smell, and early replacement may be necessary.
• If you operate the product after it has been unused for 2 weeks or more, or if there is a smell, run a cleaning operation by running the product in a well-ventilated space at the High fan speed for 4 hours or more, or dry the filters in the sunlight for 4 hours or more. This can help remove odours from the filters.
• The filter replacement reminder generates an alert when the maximum filter operation time has been reached based on the product uptime. The frequency of filter cleaning and replacement may vary depending on the operating environment.
• Do not wash the 2-in-1 filters with water. When using the product, be sure to keep the filters away from water.
• The replacement cycle of the 2-in-1 filters can be between 6 months to 1 year, provided that the product operates 24 hours every day. (Filters can be used longer when the duration of product operation is shorter.) Filter life depends on the air quality. The life span of filters may shorten depending on the usage environment, the frequency of use, and the amount of contaminants adsorbed.
• The indicator illuminates to notify when the filters need to be replaced. However, replace them regardless of the indicator status if they are visually dirty or smell, or if the output air flow is noticeably slowing down.
• The dust collecting filter is a high performance filter that removes fine particles in the air such as particulate matter (PM) and cigarette smoke particles.
• The deodorization filter is a high-performance active carbon (charcoal) filter, effectively controlling household odours from a toilet, food, and such.
• If the filters begin to smell when you operate the product, they are no longer in usable condition and need to be replaced.
– The 2-in-1 filter is a consumable material, and even if the warranty period is free, replacement of filter that occurs during use will be charged.
• Replacement filters are available for sale from a Samsung retailer or a Samsung Service Centre.
Operation Features
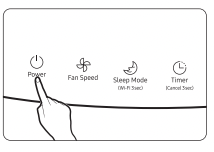
Turning the power on/off
• Press the Power button. The air purifier turns on with a notification sound and automatically begins operation.
– Sensor preparation begins upon startup with a display indication and continues for 12 seconds. The air quality is then indicated by colour and the concentration level.
– Coloured air quality indicator: PM10, PM2.5 and PM1.0 levels, and gas pollution display: PM10, PM2.5, PM1.0
Sensor loading display

• When you turn off the power and turn it back on, the product operates at the last fan speed you used.
Controlling the fan speed
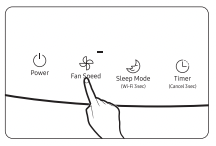
Use the button to select the intensity of air flow to purify the indoor air.
• Press the Fan speed button to change between the options.
– Each time you press the button, the fan speed changes in the order of Low → Auto → High → Medium → Low.
• In Auto mode, the fan speed is automatically adjusted to the particle and odour levels around it to keep the room clean.
– When the product detects the indoor air to be clean while operating in Auto mode, it switches to “Auto + Energy saving” mode, in which only the top air outlet is active.
– This mode will be automatically released when the air is no longer clean.
Sleep mode
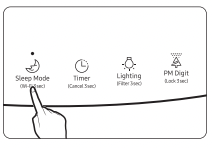
Sleep mode provides a clean, quiet and comfortable room for a good night's sleep.
• Use Sleep mode to only allow the mode indicator and turn off all other display indicators.
• Changing the fan speed when Sleep mode has been active for 10 seconds or more will cancel the mode and the sensor loading display will appear. (See ‘Sensor loading display’ on page 16.)
• Lock feature becomes unavailable while Sleep mode is on.
Cancel
• Press the Sleep mode  button or Fan speed
  button.
Timed on/off function
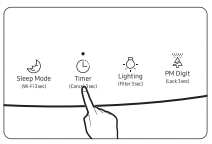
The product automatically turns off after a specified duration.
• You can select between 1 hour to 12 hours by pressing the Timed on/off  button when the product is powered on. Time can be adjusted by hour.
• Timed off is scheduled 3 seconds after selecting the desired operating hours.
Cancel
• Press and hold the Timed on/off button for at least 3 seconds or press the Timed on/off button to set the timer to
Display lighting
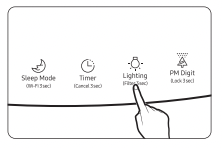
The air quality is displayed in pleasantly dimmed colour lighting.
• It reflects the PM10, PM2.5, PM1.0 or gas pollution level, whichever is the worst.
• Colours do not apply when using the product in Sleep mode.
Cancel
• Press the Lighting  button.
Turning the Wi-Fi feature on/off
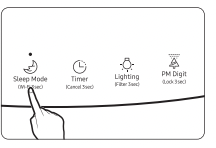
You can turn the Wi-Fi feature on or off.
• Press and hold the Sleep mode button for 3 seconds or more to turn the Wi-Fi on or off.
• To use this feature, first register the product to Samsung SmartThings app. Once connected, the Wi-Fi icon will automatically light up.
– The Wi-Fi icon only lights up when the product is connected to SmartThings app.
– About connecting to SmartThings app, see page 23.
Clearing the filter replacement reminder
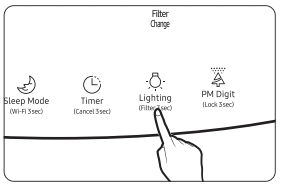
This feature notifies when to replace the 2-in-1 filters
(Deodorization Filter+Dust Collecting Filter).
• If you hear a beep and the filter replacement indicator  lights up while the product is in use, replace the filters and press the Lighting
  button for 3 seconds or more to reset. The replacement reminder turns off after blink twice with the notification sound.
• Likewise, if the filters have been replaced before activation for other reasons, reset the status by pressing the Lighting button for longer than 3 seconds.
• After resetting the filters, press the Lighting button to reset this feature as well.
CAUTION
• The filter change indicator may not work properly if you continue to use old filters without replacement or perform the reset process without filters.
Lock function
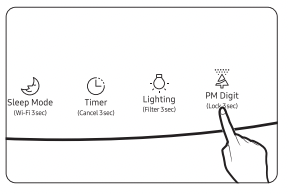
Use this feature to lock all buttons and prevent unintended button operation, especially by children.
• Press and hold the Air quality  button for 3 seconds or more to activate this feature, which locks all buttons after a beep.
• All buttons become inaccessible while Lock feature is on.
Cancel
• Press and hold the Air quality button for 3 seconds or more. The feature is released after a beep.
Checking the air quality
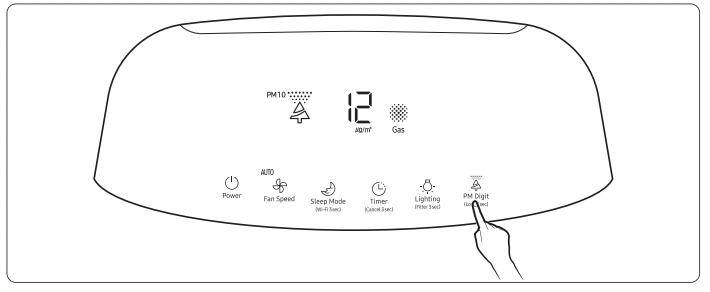
You can review the current air quality from the display panel with the colour (reflecting the PM10 / PM2.5 / PM1.0 / gas pollution) and the concentration level indicators.
• By default, the colour and PM10 / PM2.5 / PM1.0 level indicators reflect the PM10 concentration.
• Each time you press the Air quality  button, the current state is displayed in the order of PM10 → PM2.5 → PM1.0. The PM2.5 and PM1.0 levels are displayed for 10 seconds, before automatically changes to the PM10 level.
– The air quality will be ‘Very Poor’ when the PM2.5 / PM1.0 levels are worse than the PM10 level. If the concentration levels are same for all PM groups, the indicator will reflect the PM10 level.
• Air quality levels
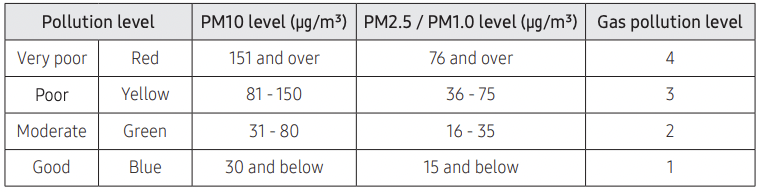
• PM10, PM2.5 and PM1.0 measurement will be displayed in numbers 05 – 999.
NOTE
• The dust concentration may vary depending on the environmental conditions (for example, when the product is near a construction site, road, or fabric sofa, or when a vacuum cleaner is used or bedding and clothes are arranged near the product, etc.).
• The following conditions may cause temporarily high readings of PM level:
– When the product is used near fur rugs or used in vets, clothes stores, or other places prone to high humidity, smoke or infestation
– When humidifiers, electric pressure cookers, sprayers and such are being used in the same room
– When the product is used where there is inflow of outside air with dust or other types of air pollution (e.g. proximity to the building’s HVAC or ventilation systems, or loose window frames)
• The gas pollution reading can be affected by odorous household items such as air fresheners, deodorants and detergents.
• If you are using more than one air purifier in the same room, the dust concentration reading on each unit may not be same as they affect air circulation. The dust concentration reading may vary depending on the sensor or product being used.
• If there is no change in the intensity of gas (odour), it may not be reflected in the gas pollution reading even though you can clearly smell it.
• PM levels on the display may differ from the official forecasts.
• Nearby electromagnetic waves or electrical noises may cause temporarily high readings of PM level.
Cleaning and Maintenance
Be sure to disconnect the power plug from the socket before cleaning the product.
Cleaning the air purifier exterior
- Dampen a soft cloth with lukewarm water and wring it out, and then wipe the product exterior with it.
- Wipe the grooves on the front panel with a cotton swab.
- If it is too hard to clean the dust from the front panel, remove the panel and wash it with water.
CAUTION
- Do not wipe the product with an alkaline detergent.
- Do not wipe the product surface with sulphuric acid, hydrochloric acid, or organic solvents (thinner, kerosene, acetone, etc.). Do not attach a sticker to the product. Failure to do so may result in damage to the product surface.
Cleaning the sensors

• If there is dust or foreign substance on a sensor, use a vacuum cleaner to clean the sensor and its surrounding.
CAUTION
• Do not put any dust into the sensor openings.
Cleaning and drying the filters
NOTE
• About removing/assembling the filters, see pages 12 and 13.
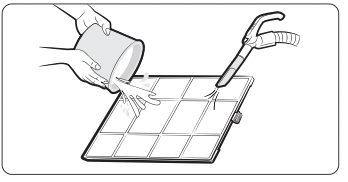
Cleaning the pre-filters
• Depending on the dust accumulation, first remove dust with a vacuum cleaner and gently wash the filter with a pH-neutral detergent diluted in lukewarm water.
– Cleaning interval: 2 weeks (when using the product 24 hours every day)
CAUTION
• Cleaning the pre-filter by rubbing with a brush or a similar tool may damage the superfine fibres.
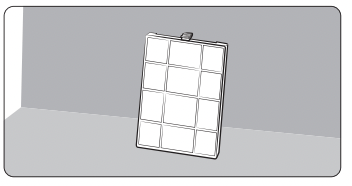
Drying the filters
• Keep the filters in the shade until completely dry and away from direct sunlight.
SmartThings app
Controlling your air purifier with SmartThings app
Smartly control your air purifier using the SmartThings app.
| Category |
Function |
Description |
Monitoring
|
Indoor air quality |
Check the indoor air cleanliness.
• Touch the icon to view the PM10 / PM2.5 / PM1.0 levels and gas cleanliness. icon to view the PM10 / PM2.5 / PM1.0 levels and gas cleanliness.
• Some of the options may not be available on your air purifier.
|
| Outdoor air quality |
You can access to air quality information for your area.
• Touch the icon to view detailed air quality information for the region you specified in the settings.
• If you cannot view any outdoor air quality information, specify your region in the settings.
|
Control
|
Power supply |
Turn your air purifier on or off. |
| Controlling the fan speed |
Select the fan speed you want. |
| Timed on/off |
Set the timed on/off times.
• You can set a total of up to 10 timed on/off times.
• You cannot set the same time for both of the timed on and timed off times.
• While you are setting a timed on/off time, no timed on/off indications are displayed on your air purifier display.
• Once you set a timed on/off time, it persists even if you unplug and plug in the power cord of your air purifier.
|
Control
|
Operation functions |
Touch the buttons for various additional functions you want to run.
• Deactivated buttons are the functions that your air purifier does not support.
|
| settings |
Check the settings for region, lighting, mute, or filters.
• If you change the region, your display panel will show the outdoor air quality information for the new region.
• You can check the filter replacement time and reset the filter replacement reminder using Filter Info. You can also view the information about replacement filters.
• Some of the options may not be available on your air purifier.
|
| Help |
Useful information to help you understand air related information and terms. |
| Device information |
View or open the version, tutorial, manual, store, self diagnosis, help desk.
• Some of the options may not be available on your air purifier.
|
Before Requesting Service
Check the following before requesting service from the Service Centre.
| Operation |
The air purifier does not operate.
• Check the power supply and turn on the air purifier again.
• Make sure that the power plug is plugged in, and then turn on the air purifier again. If it still does not operate, try a different power outlet.
• Make sure that the front panel is closed properly
|
| Sound |
The air purifier makes strange noises.
• If you move the product during operation, it may cause noise. Turn off the power before moving the product.
|
|
Odours

|
The air purifier smells strange.
• Because the air purifier sucks and circulates indoor air, if you use it in a closed space for a long time, odours generated in your home can saturate the filters.
– Remove the pre-filter, 2-in-1 filter. See if any of them smell and clean or replace them when necessary. You will be charged for replacing filters regardless of the remaining warranty.
– Open the doors and windows, and then operate the product for 3 to 4 hours.
– When grilling or frying food ingredients such as fish and meat, ventilate the room well and operate the air purifier once the odours are sufficiently removed.
• Filters can become the source of odours when you use the product along with air fresheners, diffusers, scented candles or cleaning agents, or in a recently furnished room (e.g. new paint or wallpaper).
– Ventilate until the odours are completely removed, and then operate the product.
• Operating your air purifier in a room that is constantly humid or exposing it to moisture from a humidifier can cause the filters to smell after some time.
– If the filters smell due to moisture, dry them well in sunlight before using them again.
|
|
Cleanliness

|
The cleanliness colour indicator continuously lights up in red. (The cleanliness indications are strange.)
Check the sensors for any foreign substances and clean them if necessary.
• In winter season, installing and operating the product for the first time shortly after delivery may cause the pollution level to reach 999 ㎍/m³ with the indicator illuminated in red. This is a temporary issue that happens if there is a significant temperature change from outdoor exposure causing condensation inside the unit. In this case, do not be alarmed and continue using the product. The status will be cleared within 1 to 2 hours of operation.
• The gas sensor reacts to changes in the indoor odourant level due to cooking or ventilation, causing the indicator to illuminate in red. When this happens, ventilate the room for 1 to 2 hours.
• Disconnect the power plug, then put it back after 1 minute. (To reset the sensor)
• If the indicator colour stays in red after you have followed all the provided instructions and solutions, it may be a sensor issue. In this case, please contact your local Samsung Service Centre.
• When humidifiers, electric pressure cookers, sprayers and such are being used in the same room, the pollution level may be measured as Poor.
|
|
The fan speed does not change according to cleanliness.
• Set the fan speed to Auto. The fan speed does not change automatically when it is set to Low, Medium or High, and when Sleep mode is on.
|
 |
The PM10, PM2.5, PM1.0 concentration values do not change from the Good (05) level.
• This may happen when the room is properly sealed and the air is clean. To check if the sensor is functioning, test it by tearing paper by the sensor and/or rub them to create some dust. This will cause the PM levels to change if the sensor is working properly.
– Dusting off or cleaning the room may not necessarily cause sensor feedback if the dust particles are bigger than PM10, while they are still filtered and removed from the air.
|
| Display |
The PM10, PM2.5, PM1.0 concentration values are the same continuously.
• When the air is clean, you may not see a difference between the PM10, PM2.5 and PM1.0 levels. To check if the sensor is functioning, test it by tearing paper by the sensor and/or rub them to create some dust. This will cause the PM levels to change if the sensor is working properly.
|
|
The filter replacement indicator is always turned on.
• After replacing the filters, press and hold the button for 3 seconds or more to reset the filter replacement reminder.
|
|
Strange indications appear on the display.
• Contact your local Samsung Service Centre if your air purifier displays   , ,  or or
|
| Air circulation |
The fan does not seem to circulate the air evenly.
• Your air purifier is designed to send the clean air upwards for effective circulation. Since the air circulates clockwise, you may find the output on the right relatively stronger, and weaker on the left.
|