Loading ...
Loading ...
Loading ...
145
Setting Menu
Accessories
Appendix
Before Use
Index
Basic Guide
Advanced Guide
Camera Basics
Auto Mode /
Hybrid Auto Mode
Other Shooting Modes
P Mode
Tv, Av, M, and C Mode
Playback Mode
Wi-Fi Functions
8
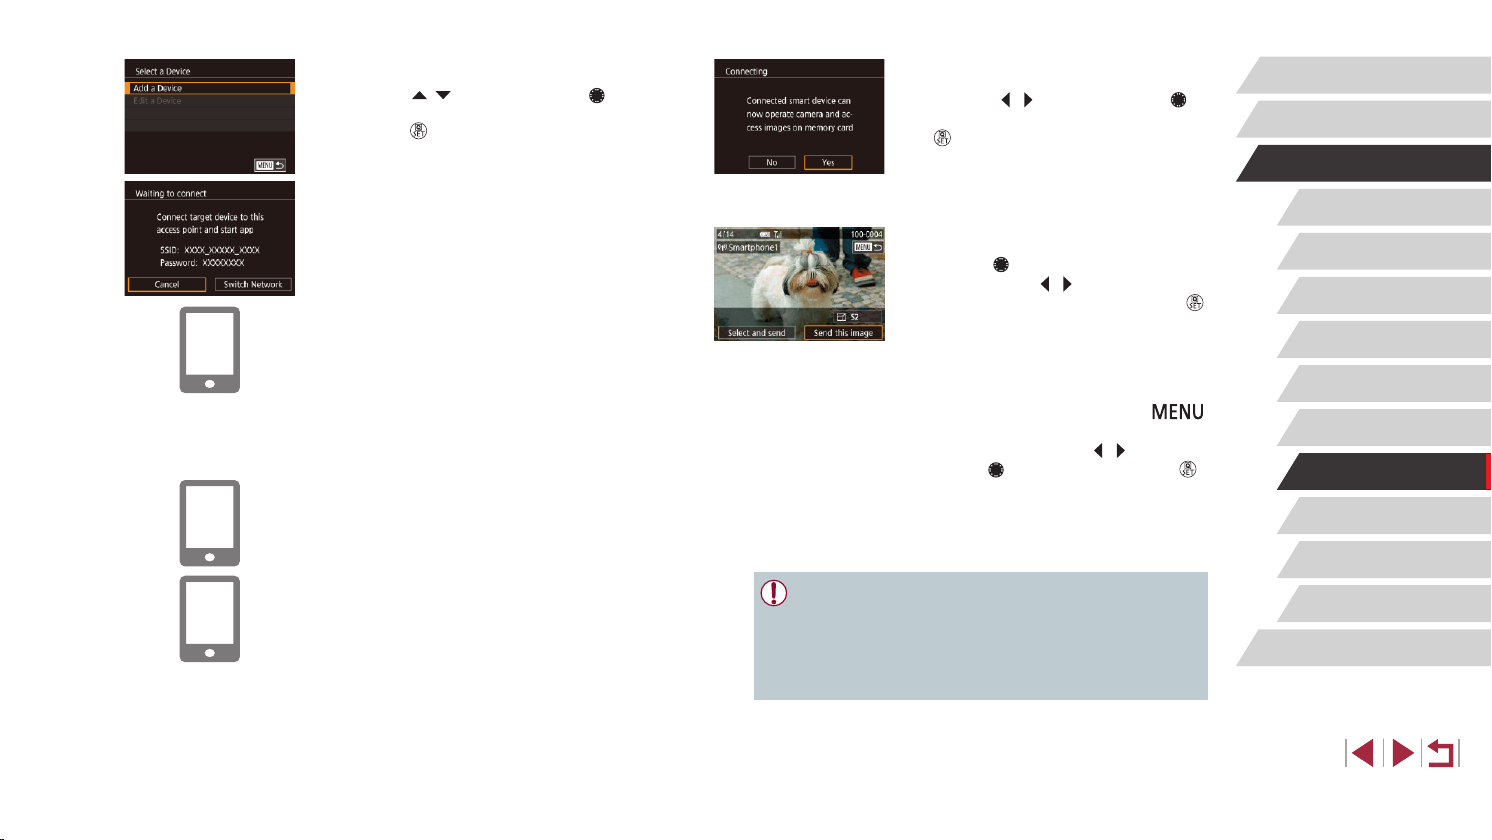
Adjust the privacy setting.
z Press the [ ][ ] buttons or turn the [ ]
dial to choose [Yes], and then press the
[
] button.
z You can now use the smartphone to
browse, import, or geotag images on the
camera or shoot remotely.
9
Send an image.
z Turn the [ ] dial to choose an image to
send, press the [
][ ] buttons to choose
[Send this image], and then press the [
]
button.
z [Transfer completed] is displayed after
the image is sent, and the image transfer
screen is displayed again.
z
To end the connection, press the [ ]
button, choose [OK] on the conrmation
screen (either press the [
][ ] buttons or
turn the [
] dial), and then press the [ ]
button. You can also use the smartphone
to end the connection.
z To add multiple smartphones, repeat the
above procedure starting from step 1.
● All images in the camera can be viewed from the connected
smartphone when you choose [Yes] in step 8. To keep camera
images private, so that they cannot be viewed from the
smartphone, choose [No] in step 8.
● Once you have registered a smartphone, you can change privacy
settings for it on the camera (
=
165).
4
Choose [Add a Device].
z Press the [ ][ ] buttons or turn the [ ]
dial to choose [Add a Device], and then
press the [ ] button.
z The camera SSID and password are
displayed.
5
Connect the smartphone to the
network.
z In the smartphone’s Wi-Fi setting menu,
choose the SSID (network name)
displayed on the camera to establish a
connection.
z In the password eld, enter the password
displayed on the camera.
6
Start Camera Connect.
z Start Camera Connect on the
smartphone.
7
Select the camera to connect to.
z On the camera selection screen
displayed on the smartphone, choose the
camera to begin pairing.
Loading ...
Loading ...
Loading ...