Loading ...
Loading ...
Loading ...
10 11
1. Remove the exterior and interior packaging. Check if all the accessories, including the instruction manual, ice scoop, water
supply hose, water hose connector, and the water draining hose are inside. If any parts are missing, please contact hOme
™
customer service at 1-800-898-3002.
2. Remove the tape that is holding the door, inner cabinet, and ice scoop to the appliance. Clean the inside of the Ice Machine
and accessories with water. Let the appliance dry completely.
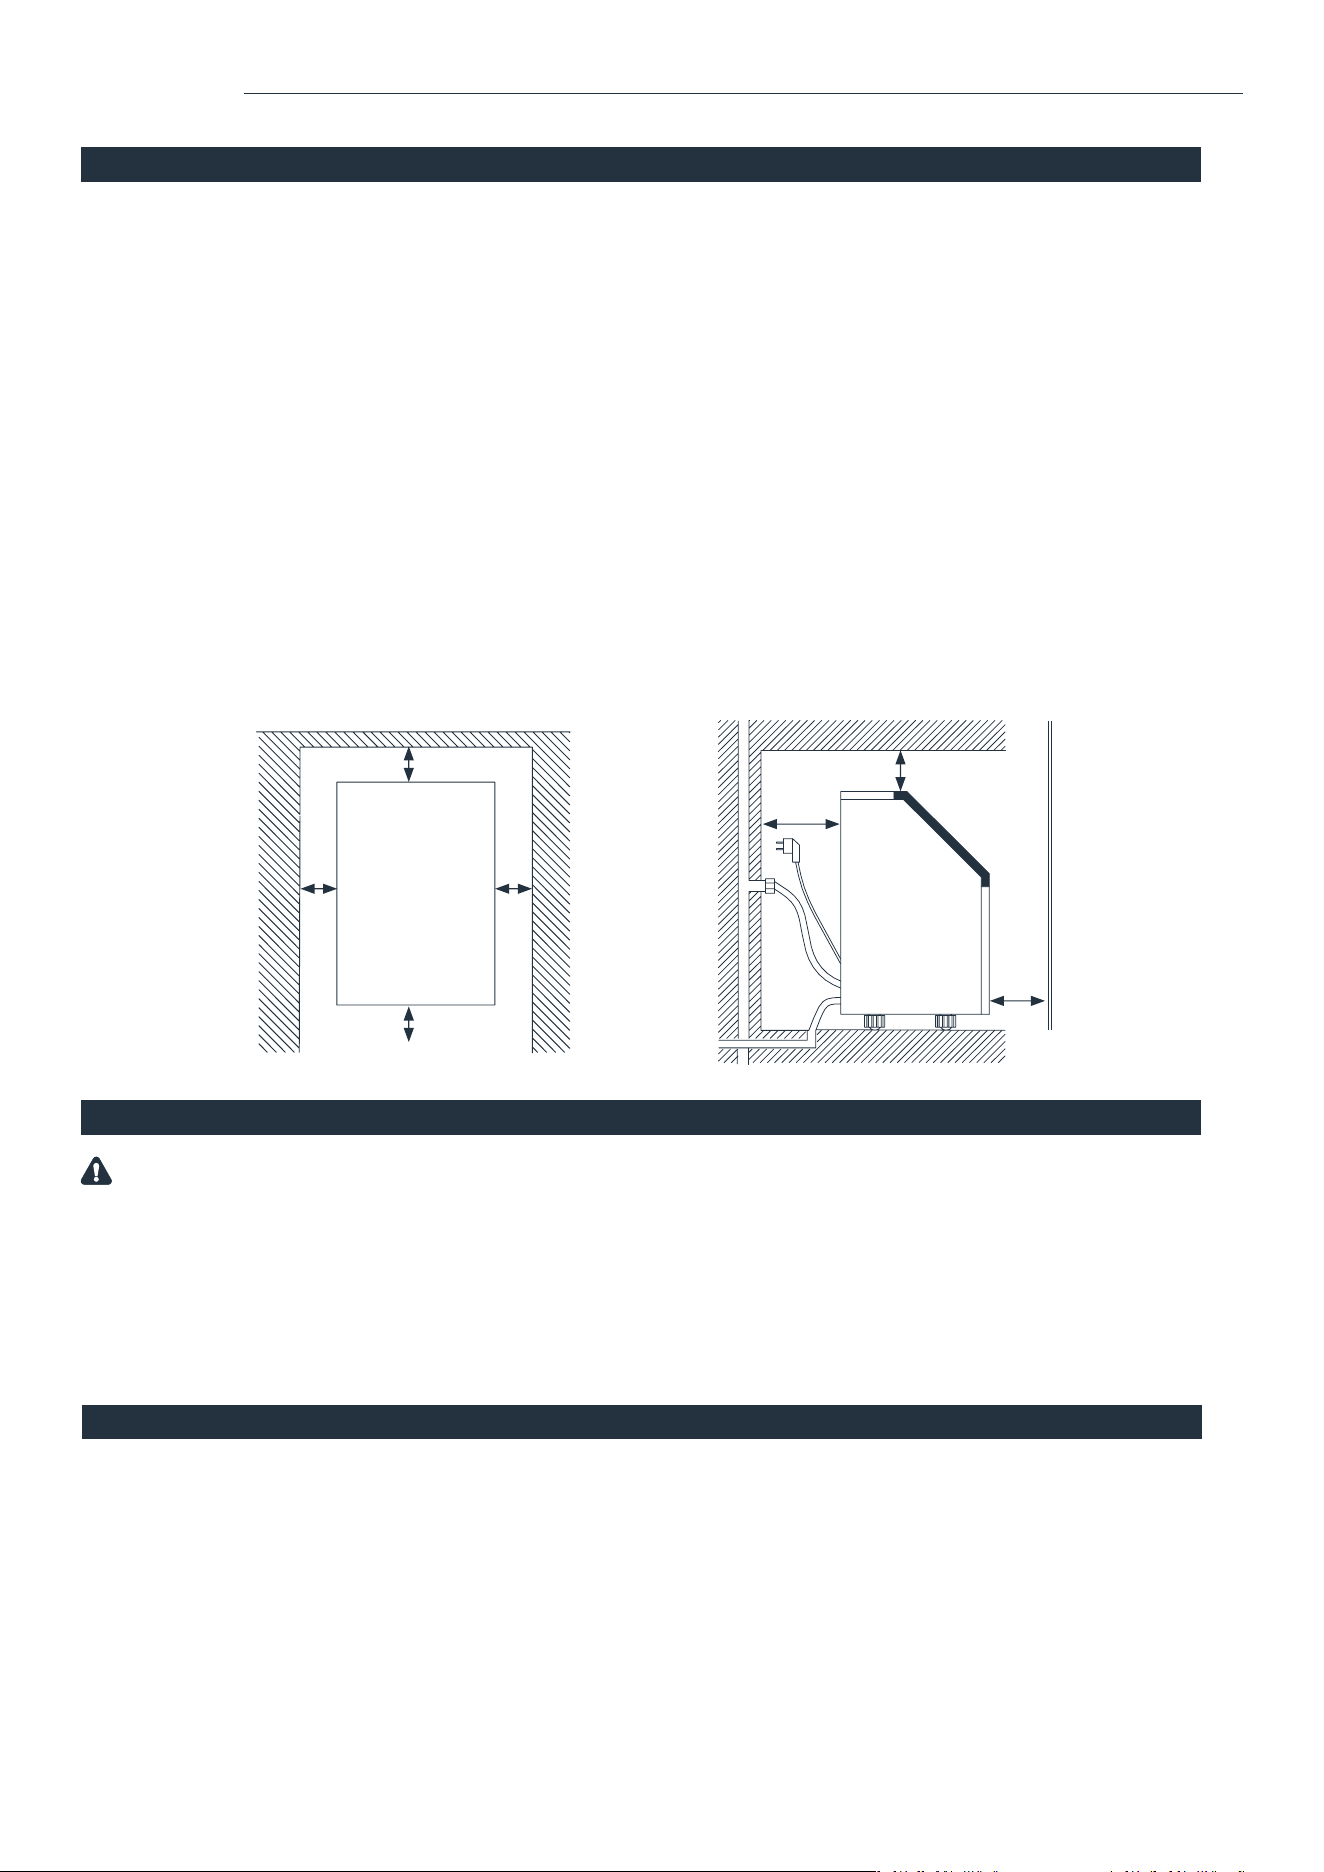
3. Put the appliance on a at surface without direct sunlight and/or other sources of heat (i.e. stove, furnace, radiator).
Make sure there is at least a 20cm (8 inches) gap between the air outlet and any obstacles, 25cm (10 inches) in front
to open the door, and at least 15cm (6 inches) between the back and the wall.
4. The appliance must be positioned so that the plug is accessible.
5. Do not put anything on top of the Ice Machine.
6. When installing the Ice Machine under a counter, follow the recommended spacing dimensions. Place electrical supplies,
water supplies, and drain xtures in the recommended locations as shown in the gure below.
7. Choose a well-ventilated area with a temperature between 10°C (50°F) and 32°C (90°F). This appliance MUST be installed in
an indoor area without wind, rain, water, spray, or drips.
8. The Ice Machine requires a continuous water supply with the pressure of 1-8 Bar. The temperature of the water inow
should be between 5°C (41°F) and 25°C (77°F) for proper operation.
9. Keep in an upright position for 24 hours before the initial power up.
WARNING: Connect to the potable water supply only. Only use drinking water.
UNPACKING AND INSTALLATION
1. It is recommended that a separate circuit, serving only your Ice Machine, be provided. Use receptacles that cannot be turned off by
a switch or pull chain. If the supply cord or plug needs to be replaced, it should be done by a certied electrician.
2. Plug your appliance into a secure, properly installed, grounded wall outlet. Under any circumstances, do not cut or remove the
third (ground) prong from the power cord. Any questions concerning power and/or grounding should be directed toward a
certied electrician.
3. This appliance requires a standard 110-120 volt, 60Hz electrical outlet.
CONNECTING YOUR ICE MACHINE
WARNING: Improper use of the grounded plug can result in the risk of electrical shock. If the power cord is damaged, please contact
hOme
™
Customer Service at 1-800-898-3002.
CLEANING YOUR ICE MACHINE BEFORE FIRST USE
Before using your appliance, it is strongly recommended to clean it thoroughly.
1. Open the Door for ice taking.
2. Clean the inside with a special ice maker cleaning uid (usually based on citric acid), warm water, and a soft cloth.
3. Then use potable water to rinse the inside parts. You can pull the water draining hose to drain out the rinsed water in
the water tank.
4. Clean the ice storage cabinet in the same way. Drain out all rinsed water from the water draining hose, which is located at the
back of the Ice Machine.
5. You must reinstall the water draining hose of the water tank and the cap of the water draining port. Otherwise, the
appliance will not make ice normally. After cleaning, you should discard the ice cubes made from the rst ice making cycle.
6. The outside of the Ice Machine should be cleaned regularly with a slightly damp cloth.
7. Dry the interior and exterior with a clean, soft cloth.
WATER CONNECTION FOR YOUR ICE MACHINE
NOTE:
• Make sure to use the new hose sets supplied with the appliance to connect to the water supply. Old hose sets should not be reused.
• The water pressure of the main water supply system should be 0.04-0.6 MPa (5.8-87 psi).
1. Connect the water supply hose to the appliance. Remove the clipper on the water supply hose port for the water supply
(indicated “B” in the following illustration), which is located at the back. Then push the anti-dust plug inwards. Use your nger to
press the circle to x the anti-dust plug. Then take down the anti-dust plug. Insert one end of the white water hose into the water
inow port. Push inwards completely and reinstall the clipper.
2. Connect the water draining hose. Pull out the water drainage cap (indicated “A” in the following illustration), then connect the draining
hose. Connect the other end of this draining hose to the main water drainage pipeline. Keep drain hose below water drainage port "A."
OPERATION OPERATION
4cm (1.6")
15cm (6")
25cm (10")
15cm (6") 15cm (6")
A
Anti-dust plug
B
Anti-dust plug
15cm (6")
20cm
(8")
Door
clearance
Air outlet
clearance
3. Connect the water supply hose to the water supply system. Install the connector to the water supply by the screw thread.
Remove the clipper from the water supply connector. Insert the other end of the hose into the water supply connector port
completely, then reinstall the clipper.
Under sink water supply
Clipper
NOTE: Remove
plugs and discard.
NOTE: Remove
plug and discard.
Loading ...
Loading ...
Loading ...