Remove all packaging materials, keep them out of children`s reach and dispose them in an environmentally friendly manner.
Clean the inside and outside of the appliance with water and a mild detergent before putting any food in it.
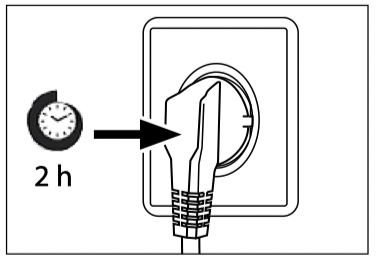
After the appliance has been levelled and cleaned, wait for at least 2 hours before connecting it to the power supply. See Section INSTALLATION.
Precool the compartments at high settings before loading with food. The function Super Cool and Super Freeze help to cool down the compartments quickly.
The refrigerator temperature and freezer temperature are automatically set to 5° C and -18° C respectively. These are the recommended settings. If desired, you can change these temperatures manually. Please see FUNCTIONS.
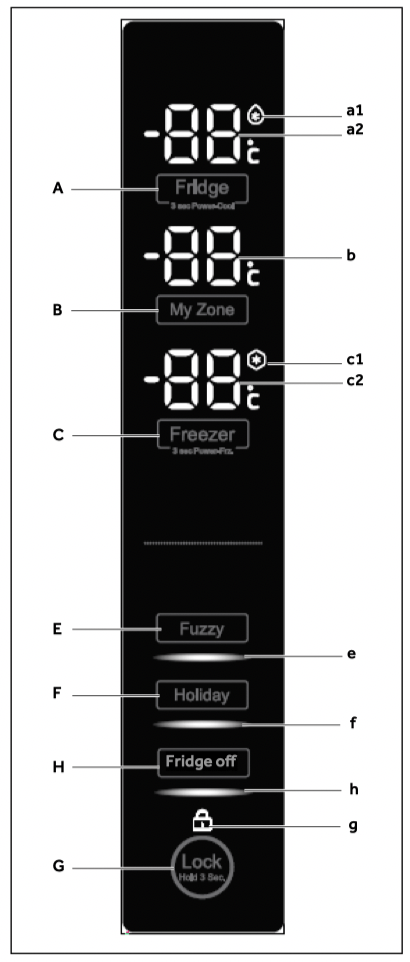
Control panel
Buttons:
A. Fridge selector
B. My Zone selector
C. Freezer selector
E. Fuzzy mode selector
F. Holiday mode selector
G. Panel lock selector
H. Fridge off- function sellector
Indicators:
a1. Super cool function
a2. Temperature fridge
b. Temperature My Zone
c1. Super freeze function
c2. Temperature freezer
e. Fuzzy mode
f. Holiday mode
g. Panel lock
h. Fridge off function
Sensor keys
The buttons on the control panel are sensor keys, which already respond when lightly touched with the finger.
Switch on /off the appliance
The appliance is in operation as soon as it is connected to the power supply.
When the appliance is powered on for the first time, indicator “c2” is shining on the display until the temperature reaches -5°C or after 1 hour working. The temperatures displayed in “a2”, “b” and “c2” will shown the actual temperatures in the compartment.
Notice
The appliance is preset to the recommended temperature of 5°C (refrigerator) and 18°C (freezer). Under normal ambient condition you need not to set a temperature. When the appliance is switched on after disconnection from the main power supply, it may take up to 12 hours for the correct temperatures to be reached.
Empty the appliance before switching off. To switch off the appliance,pull the power cord out off the power socket.
Standby-mode
The display screen turns off automatically 30 seconds after pressing a key. The display will be automatically locked. It lights up automatically when pressing any key or opening the door (Alarm does not light up the display screen).
Select the working mode
You may need to select one of the following two ways to set the appliance:
1) Fuzzy mode
Under fuzzy mode, the appliance can automatically adjust the temperature setting according to the ambient temperature and temperature change in the appliance. If you do not have any special requirements, we recommend that you use fuzzy mode (refer to FUZZY MODE).
2) Manual adjusting mode:
If you want to manually adjust the temperature of the appliance in order to store a particular food, you can set the temperature via a temperature adjusting button (refer to ADJUST THE TEMPERATURE).
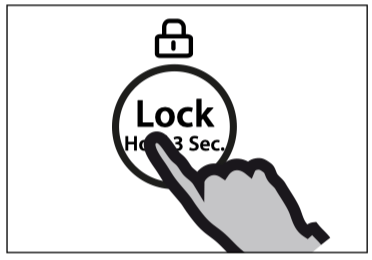
Lock/unlock panel
Touch button “G” for 3 seconds to block all panel elements against activation. The related indicator “g” is now displayed.
For unlocking press again the button.
Notice
The control panel is automatically blocked against activation if 30 seconds no button is pressed. For any settings the control panel must be unlocked.
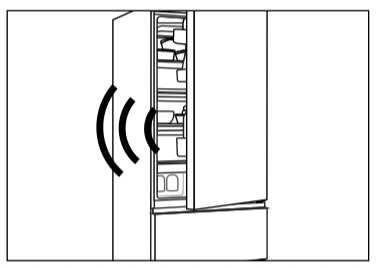
Door/drawer opening alarm
When the refrigerator door or the freezer drawer is opened for more than 3 minutes, the door/drawer opening alarm will sound. The alarm can be silenced by either closing the door/drawer or touching the control panel. If the door/drawer is left open for more than 7 minutes, the light inside the refrigerator/under the refrigerator door and control panel illumination will automatically switch off.
Adjust the temperature
The indoor temperatures are influenced by the following factors:
Ambient temperature
Frequency of door opening
Amount of stored foods
Installation of the appliance
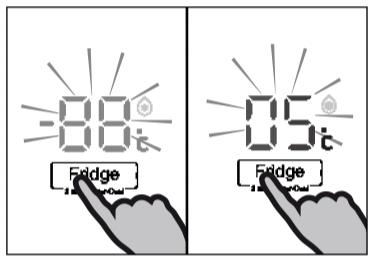
Adjust the temperature for fridge
1. Unlock the panel if it is locked.
2. Press button “A“ (Fridge) for select the fridge compartment. Indicator “a2“ is flashing.
3. Press button “A” to set the refrigerator temperature. The temperature increases in sequences of 1°C from a minimum of 2°C to a maximum of 8°C, switching to 2°C again when pressing further. The optimum temperature in the refrigerator is 5 ° C. Colder temperatures mean unnecessary energy consumption.
4. Press any key except “A“ to confirm, or the setting confirms automatically after 5 seconds. Indicator “a2“ stops flashing
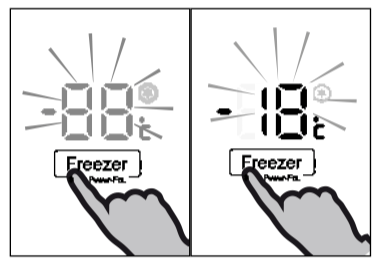
Adjust the temperature for freezer
1. Unlock the panel if it is locked.
2. Press button “C” (Freezer) for select the freezer compartment. Indicator “c2” is flashing.
3. Press button “C” (Freezer) to set the freezer temperature.
The temperature increases in sequences of 1°C from a minimum of -14°C to a maximum of -24°C, switching to -14°C again when pressing further.
The optimum temperature in the freezer is -18°C. Colder temperatures mean unnecessary energy consumption.
4. Press any key except “C” (Freezer) to confirm, or the setting confirms automatically after 5 seconds. Indicator “c2” stops flashing.
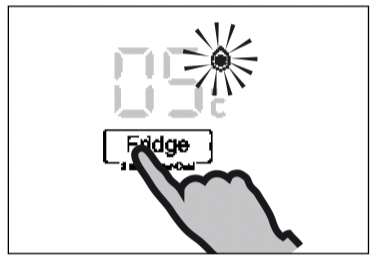
Super cool function
Switch on the Super cool function if larger quantity of food should be stored (for example after the purchase). The Super cool function accelerates the cooling of fresh food and protects the goods already stored from undesirable warming. The factory setting temperature is + 2 °C.
1. Unlock the panel if it is locked.
2. Press button “A“ (Fridge) for 3 seconds. Indicator “a1“ illuminates and the function is activated.
3. The same operation can exit super cool function.
Notice
This function will be automatically disabled after 3 hours.
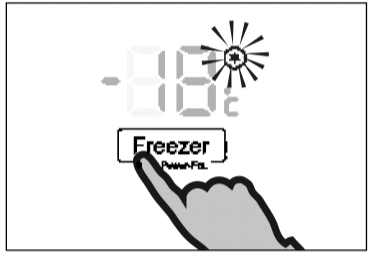
Super freeze function
Fresh food should be frozen as quickly as possible to the core. This preserved the best nutritional value, appearance and taste. The Super freeze function accelerates the freezing of fresh food and protects the goods already stored from undesirable warming. If you need to freeze a large amount of food once, it is recommended to set the Super -freeze function on ahead for 24h before the usage of frozen room.
1. Unlock the panel if it is locked.
2. Press button “C“ (Freeze) for 3 seconds Indicator “c1“ illuminates and the function is activated.
3. The same operation can exit super freeze function.
Notice
The Super-freeze function will automatically switch off after 56 hours. The appliance is then operated at the previously set temperature.
My Zone box
The fridge compartment is equipped with a My Zone box. In accordance with the food’s storage demands, the most suitable temperature can be selected to get the optimal nutritional value of the foods. Storage temperature can be adjusted between -3°C and 5°C.
+2 °C ~5 °C is suitable to store vegetable and fruit,
-2 °C ~2 °C is suitable to store fresh fish, meat cooked food in 1-2 days
-3 °C can defrost the frozen food, after defrosting the food will be part frozen, convenient for cutting and cooking
Notice
Due to different water contents of meat, some meat with more moisture will be frozen at temperatures lower than 0°C. So “immediately cut” meat should be stored in My-Zone box, with temperatures min. 0°C.
Cold-sensitive fruits like pineapple, avocado, bananas, grapefruits and vegetables such as potatoes, aubergines, beans, cucumbers, zucchini and tomatoes and cheese should not be stored in the My Zone box.
Adjust the temperature for My Zone box
1. Unlock the panel if it is locked.
2. Press button “B” (My Zone) for select the My Zone box. Indicator “b” is flashing.
3. Press button “B” (My Zone) again to set the My Zone box temperature.
The temperature increases in sequences of 1° C from a minimum of -3° C to a maximum of 5° C, switching to -3° C again when pressing further.
4. Press any key except “B” (My Zone) to confirm, or the setting confirms automatically after 5 seconds. Indicator “b” stops flashing.
Notice
My zone storage temperature setting number cannot be higher than the fridge temperature setting number.
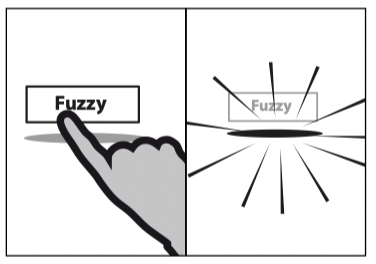
Fuzzy mode
In the Fuzzy mode, the appliance can automatically adjust the temperature setting according to the ambient temperature and temperature change in the appliance. This function is totally hand free.
Unlock the panel if it is locked.
Press button “E” (Fuzzy).
Indicator “e” illuminates and the function is activated.
The function can be deactivated by pressing button “E” (Fuzzy) again or by performing any other setting.
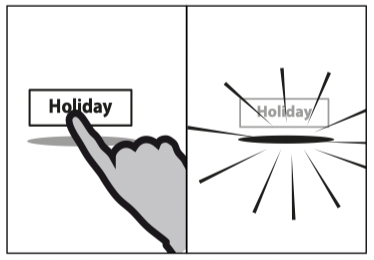
Holiday function
This function sets the refrigerator temperature permanently to 17°C.
This allows to keep the door of the empty refrigerator closed without causing an odour or mold - during a long absence (e.g. during holiday). The freezer compartment is free for your setting.
Unlock the panel if it is locked.
Press button F (Holiday).
Indicator f illuminates and the function is activated.
The function can be deactivated by pressing button F (Holiday) again or by setting the refrigerator temperature or by performing any other setting.
WARNING!
During the holiday function no goods must be stored in the refrigerator compartment. The temperature of + 17 ° C is too high for storing food.
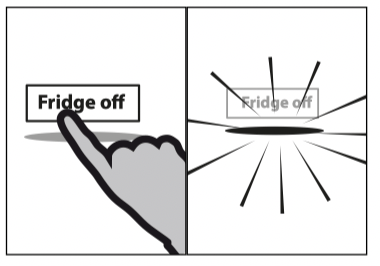
Fridge off function
This function shuts down the refrigerator. This has no effect on the freezer compartment.
1. Unlock the panel if it is locked.
2. Press button “H” (Fridge off) to select the Fridge off function. Indicator “h” illuminates and the function is activated.
3. The same operation can exit Fridge off function manually.
WARNING!
Empty the appliance before switching off.
Keep the door of the refrigerating compartment open, when Fridge off function is activated, in order to avoid odour or mold.
Tips on storing fresh food
Storing into the refrigerator compartment
Keep your fridge temperature below 5°C.
Hot food must be cooled to room temperature before storing in the appliance.
Foods stored in the refrigerator should be washed and dried before storing
Food to be stored should be properly sealed to avoid odour or taste alterations.
Do not store excessive quantities of food. Leave spaces between foods to allow cold air flowing around them, for a better and more homogeneous cooling.
Foods eaten daily should be stored at the front of the shelf.
Leave a gap between foods and the inner walls, allowing air flowing. In special way don’t store foods against the rear wall: foods could freeze against rear wall. Avoid direct contact of food (especially oily or acidic food) with the inner liner, as oil/acid can erode the inner liner. Clean away oily/acid dirt whenever it is found.
Defreeze frozen food in the fridge storage compartment. This way, you can use the frozen food to decrease the temperature in the compartment and save energy.
The ageing process of fruit and vegetables such as courgettes, melons, papaya, banana, pineapple, etc. can be accelerated in the refrigerator. Therefore, it is not advisable to store them in the refrigerator. However, the ripening of strongly green fruits can be promoted for a certain period. Onions, garlic, ginger and other root vegetables should also be stored at room temperature.
Unpleasant odours inside the fridge are a sign that something has spilled and cleaning is required. See CARE AND CLEANING.
Different foods should be placed in different areas according to their properties:
Food
Location
Butter, cheese
Upper door rack
Eggs
Door rack
Fruit, vegetables, salad
Fruit- and vegetable box or My Zone box (2°C ~ 5°C)
Meat, sausage, cheese, milk
Lower area (lowest shelf / coverage above the fruit- and vegetable box)
Dairy products, food, cans
canned
Upper area or door rack
Drinks, bottles, tubes
Door rack
Fresh meat, fresh fish, sau- sages, cooked foods
My Zone box (-2°C ~ 2°C)
Storage into the freezer compartment
Keep the freezer temperature at- 18°C.
24 hours before freezing switch on the Super-freeze function; -for small quantities of food 4-6 hours are sufficient.
Hot food must be cooled to room temperature before storing in the freezer compartment.
Food cut into small portions will freeze faster and be easier to defrost and cook. The recommended weight for each portion is less than 2.5 kg It is better to pack food before putting it into the freezer. The outside of the packaging must be dry to avoid bags sticking together. Packaging materials should be odour-free, airtight, non-poisonous and nontoxic.
In order to avoid expiration of storage periods, please note the freezing date, time limit and name of the food on the packaging according to the storage periods of different foods.
WARNING!: Acid, alkali and salt etc. could erode the internal surface of the freezer. Do not place the food having these substances (e.g. sea fish) directly on the internal surface. Salt water in the freezer should be cleaned up immediately.
Do not exceed the food storage times recommended by the manufacturers. Only take the required amount of food out of the freezer.
Consume defrosted food quickly. Defrosted food cannot be re-frozen unless it is first cooked, otherwise it may bless edible.
Do not load excessive quantities of fresh food in the freezer compartment. Refer to the freezing capacity of the freezer – See TECHNICAL DATA or data at the type plate.
Food can be stored in the freezer at a temperature of at least -18°C for 2 to 12 months, depending on its properties (e.g., meat: 3-12 months, vegetables: 6-12 months)
When freezing fresh food, avoid bringing it in contact with already frozen food. Risk of thawing!
Defreeze frozen food in the fridge. This way, you can use the frozen food to decrease the temperature in the compartment and save energy.
When storing commercially frozen foods, please follow these guidelines:
Always follow manufacturers’ guidelines for the length of time you should store food for. Do not exceed these guidelines!
Try to keep the length of time between purchase and storage as short as possible to preserve food quality.
Buy frozen foods, which have been stored at a temperature of –18 °C or below.
Avoid buying food which has ice or frost on the packaging – This indicates that the products might have been partially defrosted and refrozen at some point – temperature rises affect the quality of food.
Equipment
Multi-air-flow
The refrigerator is equipped with a multi-air-flow system, with which cool air flows are located on every shelf level. This helps to maintain a uniform temperature to ensure that your food is kept fresher for longer.
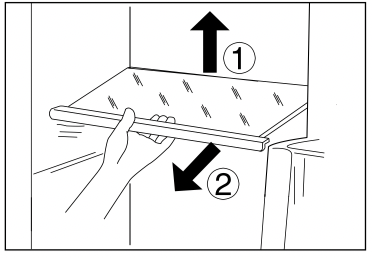
Adjustable shelves
The height of the shelves can be adjusted to fit your storage needs.
1. To relocate a shelf, remove it first by uplifting its hind edge (1) and pulling it out (2).
2. To reinstall it, put it on the lugs on both sides and push it to the most rearward position until the rear of the shelf is fixed inside the slots in the sides
Notice:
Ensure that all ends of a shelf are level.
My-Zone box
For the use and setting of the My Zone box, please check section USE (My- Zone box)
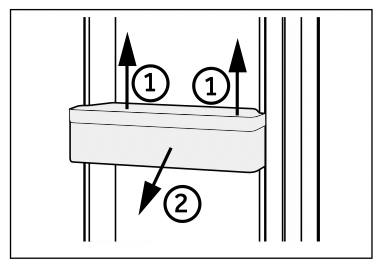
Removable door racks
The door racks can be removed for cleaning:
Place hands on each side of the rack, lift it upwards (1) and pull it out (2).
In order to insert the door rack, the above steps are carried out in reverse order.
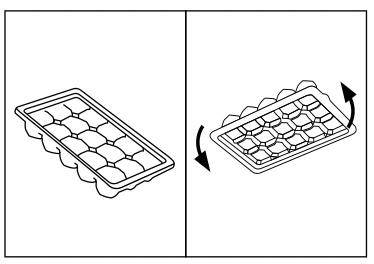
Ice cube tray
1. Fill the ice cube tray 3/4 full of water, close t with the cover and put it into the pre-freezing compartment.
2. Twist the ice cube tray slightly or hold it under flowing water to loosen the ice cubes.
Energy saving tips
Make sure the appliance is properly ventilated (see INSTALLATION).
Do not install the appliance in direct sunlight or in the near of heat sources(e.g. stoves, heaters).
Avoid unnecessarily low temperature in the appliance. The energy consumption increases the lower the temperature in the appliance is set.
Functions like SUPER COOL or SUPER FREEZE consume more energy.
Allow warm food to cool down before placing it in the appliance.
Open the appliance door as little and as briefly as possible.
Do not overfill the appliance to avoid obstructing the air flow.
Avoid air within the food packaging.
Keep door seals clean so that the door always closes correctly.
Defreeze frozen food in the fridge storage compartment.
Care and Cleaning
WARNING!
Disconnect the appliance from the power supply before cleaning.
Cleaning
Clean the appliance when only little or no food is stored.
The appliance should be cleaned every four weeks for good maintenance and to prevent bad stored food odors.
WARNING!
Do not clean the appliance with hard brushes, wire brushes, detergent powder, petrol, amyl acetate, acetone and similar organic solutions, acid or alkaline solutions. Please clean with special refrigerator detergent to avoid damage.
Do not spray or flush the appliance during cleaning.
Do not use water spray or steam to clean the appliance.
Do not clean the cold glass shelves with hot water. Sudden temperature change may cause the glass to break .
Do not touch the inside surface of the freezer storage compartment, especially with
wet hands, as your hands may freeze onto the surface.
In case of heating check the condition of frozen goods.
Always keep the door gasket clean.
Clean the inside and housing of the appliance with a sponge dampened in warm water and neutral detergent.
Rinse and dry with soft cloth.
Do not clean any of the parts of the appliance in a dishwasher.
Allow at least 5 minutes before restarting the appliance as frequent starting may damage the compressor.
Defrosting
The defrosting of the refrigerator and the freezer compartment are done automatically; no manual operation is needed.
Replacing the LED-lamps
WARNING!
Do not replace the LED lamp yourself, it must only be replaced by either the manufacturer or the authorised service agent.
The lamp adopts LED as its light source, featuring low energy consumption and long service life. If there is any abnormality, please contact the customer service . See CUSTOMER SERVICE.
Parameters of the lamp:
Non-use for a longer period
If the appliance is not used for an extended period of time, and you will not use the Holidayfunction for the refrigerator:
Take out the food.
Unplug the power cord.
Clean the appliance as described above.
Keep the door and freezer drawers/door open to prevent the creation of bad odours inside.
Notice
Turn the appliance off only if strictly necessary.
Moving the appliance
1. Remove all food and unplug the appliance.
2. Secure shelves and other moveable parts in the fridge and the freezer with adhesive tape.
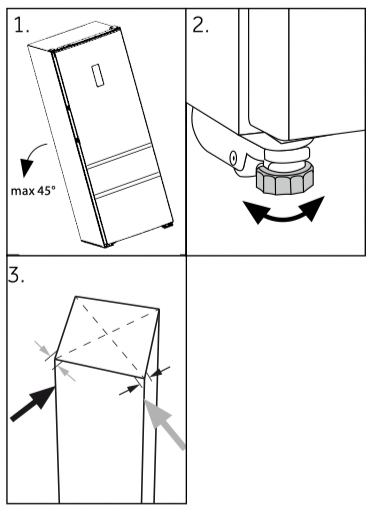
3. Do not tilt the refrigerator more than 45° to avoid damaging the refrigerating system.
WARNING!
Do not lift the appliance by its handles.
Never place the appliance horizontally on the ground.
Troubleshooting
Many occuring problems could be solved by yourself without specific expertise. In case of a problem please check all shown possibilities and follow below instructions before you contact an after sales service. See CUSTOMER SERVICE.
WARNING!
Before maintenance, deactivate the appliance and disconnect the mains plug from the mains socket.
Electrical equipment should be serviced only by qualified electrical experts, because improper repairs can cause considerable consequential damages.
A damaged supply should only be replaced by the manufacturer, its service agent or similarly qualified persons in order to avoid a hazard.
Problem
Possible Cause
Possible Solution
The compressor does not work.
• Mains plug is not connected in the mains socket.
• Connect the mains plug.
• The appliance is in the defrosting cycle
• This is normal for an automatic defrosting
The appliance runs frequently or runs for a too long period of time.
• The door/drawer gasket is dirty, worn, cracked or mismatched.
• Clean the door/drawer gasket or replace them by the cus- tomer service.
• The required air circulation is not guaranteed.
• Ensure adequate ventilation.
• The indoor or outdoor tempera- ture is too high.
• In this case, it is normal for the appliance to run longer.
• The appliance has been off power for a period of time.
• Normally, it takes 8 to 12 hours for the appliance to cool down completely.
• A door/drawer of the appliance is not tightly closed.
• Close the door/drawer and ensure the appliance is located on a level ground and there is no food or container jarring the door.
• The door/drawer has been opened too frequently or for too long.
• Do not open the door/drawer too frequently.
• The temperature setting for the freezer compartment is too low.
• Set the temperature higher until a satisfactory refrigera- tor temperature is obtained. It takes 24 hours for the refrig- erator temperature to become stable.
The inside of the re- frigerator is dirty and/ or smells.
• The inside of the refrigerator needs cleaning.
• Clean the inside of the refrig- erator.
• Food of strong odour is stored in the refrigerator.
• Wrap the food thoroughly..
It is not cold enough inside the appli- ance.
• The temperature is set too high
• Reset the temperature.
• Too warm goods has been stored.
• Always cool down goods be- fore storing them.
• Too much food has been stored at one time.
• Always store small quantities of food.
• The goods are too close to each other.
• Leave a gap between several foods allowing air flowing.
• A door/drawer of the appliance is not tightly closed.
• Close the door/drawer.
• The door/drawer has been opened too frequently or for too long.
• Do not open the door/drawer too frequently.
It is too cold inside the appliance.
• The temperature is set too low.
• Reset the temperature.
• The Super freeze/Super cool- function is activated or is running too long.
• Switch off the Super freeze/Su- per cool--function
Moisture formation on the inside of the refrigerator com- partment.
• The climate is too warm and too- damp.
• Increase the temperature.
• A door/drawer of the appliance is not tightly closed.
• Close the door/drawer.
• The door/drawer has been opened too frequently or for too long.
• Do not open the door/drawer too frequently.
• Food containers or liquids are left open.
• Let hot foods cool to room temperature and cover foods and liquids.
Moisture accumu- lates on the refrig- erators outside surface or between the doors/door and drawer.
• The climate is too warm and too damp.
• This is normal in damp climate and will change when the hu- midity decreases.
• The door/drawer is not closed tightly. The cold air in the appliance and the warm air outside it con- densates.
• Ensure that he door/drawer is tightly shut.
Strong ice and frost in the freezer com- partment.
• The goods were not adequately packaged .
• Always pack the goods well.
• A door/drawer of the appliance is not tightly closed.
• Close the door/drawer.
• The door/drawer has been opened too frequently or for too long.
• Do not open the door/drawer too frequently.
• The door/drawer gasket is dirty, worn, cracked or mismatched.
• Clean the door/drawer gasket or replace them by new ones.
• Something on the inside prevents the door/drawer to close properly.
• Reposition the shelves, door racks, or internal containers to allow the door/drawer to close.
The appliance makes abnormal sounds.
• The appliance is not located on level ground.
• Adjust the feet to level the appliance.
• The appliance touches some object around it.
• Remove objects around the appliance.
A slight sound is to be heard similar to that of flowing water.
• -
• This is normal.
You will hear alarm beep.
• The fridge storage compartment door is open.
• Close the door or silence the alarm manually.
• The temperature in the freezer is too high.
• The alarm is normal when it is first started due to relatively higher temperature. You can silence the alarm manually (see section USE).
You will hear a faint hum.
• The anti-condensation system is working
• This prevents and is normal
The interior lighting or cooling system does not work.
• Mains plug is not connected in the mains socket.
• Connect the mains plug.
• The power supply is not intact.
• Check the electrical supply to the room. Call the local electricity company!
• The LED-lamp is out of order.
• Please call the service for changing the lamp.
Power interruption
In the event of a power cut, food should remain safely cold for about 16 hours. Follow these tips during a prolonged power interruption, especially in summer:
Open the door/drawer as few times as possible.
Do not put additional food into the appliance during a power interruption.
If prior notice of a power interruption is given and the interruption duration is longer than 16 hours, make some ice and put it in a container in the top of the refrigerator compartment.
An inspection of the goods is required immediately after the interruption.
As temperature in the refrigerator will rise during a power interruption or other failure, the storage period and edible quality of food will be reduced. Any food that defrosts should be either consumed, or cooked and refrozen (where suitable) soon afterwards in order to prevent health risks.
Installation
Aigning the appliance
The appliance should be placed on a flat and solid surface.
1. Tilt the appliance slightly backwards.
2. Set the feet to the desired level. Make sure the distance to the wall on the hinge side is at least 100 mm for the door to open properly.
3. The stability can be checked by alternately bumping on the diagonals. The slightly swaying should be the same in both directions. Otherwise the frame can warp; possible leaking door seals are the result. A low tendency to the rear facilitates the closing of the door.
Waiting time
To the maintenance-free lubrication oil is located in the capsule of the compressor. This oil can get through the closed pipe system during slanting transport. Before connecting the appliance to the power supply you have to wait 2 hours so that the oil runs back into the capsule.
Electrical connection
Before each connection check if:
▶ power supply, socket and fusing are appropriate to the rating plate.
▶ the power socket is earthed and no multi-plug or extension.
▶ the power plug and socket are strictly according.
Connect the plug to a properly installed household socket.
WARNING!
To avoid risks a damaged power cord must be replaced by the customer service (see warranty card).
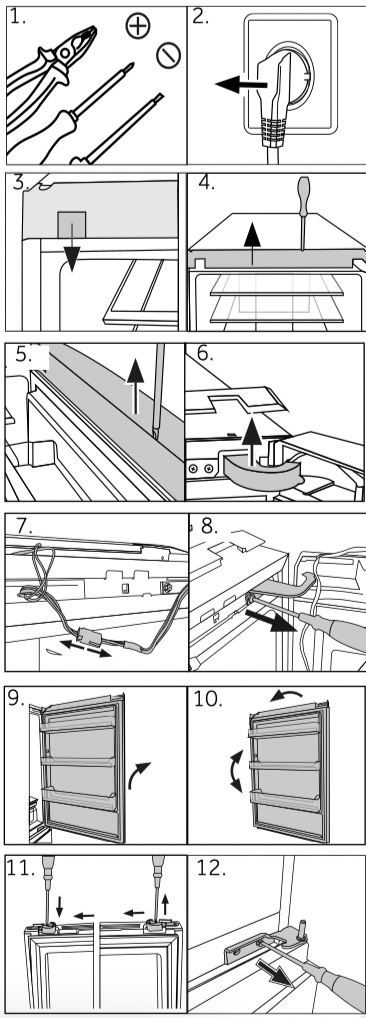
Door Reversibility
Before connecting the appliance to the power supply you should check, whether the door swing must changed from right (as delivered) to left, if this is required by the installation location and the usability.
WARNING!
The appliance is heavy. You need two persons to carry out the door reversibility.
Before any operation, first unplug the appliance from the mains .
Do not tilt the appliance more than 45 ° to prevent damage of the cooling system.
1. Provide necessary tool.
2. Unplug the appliance.
3. Remove the fixation of the cover
4. Remove the faceplate of the body
5. Remove the topplate of the upper door.
6. Remove the hinge cover.
7. Unplug the connection cable
8. Unscrew the upper hinge.
9. Lift the loose upper door carefully off the lower hinge.
10. Turn the upper door upside down and change the position of the hinge barrel on the lower side of the door.
11. Change the door stop from the current position to opposite side
12. Unscrew the lower hinge of the upper door.
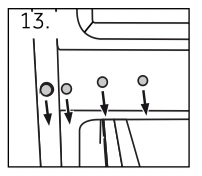
13. Change the positions of the blanking plugs and the screw on the side.
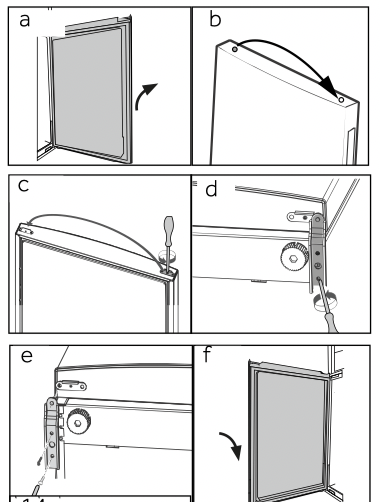
a. Remove lower door
b. Change the positions of the blanking plug at the top of the lower door.
c. Change the door stop at the bottom of the lower door from the current position to opposite side
d. Unscrew the lower hinge
e. Take out the new lower hinges from the accessory bag and screw the new lower hinge to the other side of the door opening
f. Lift the lower door carefully on to the lower hinge so that the pivot fits into the hinge barrel.
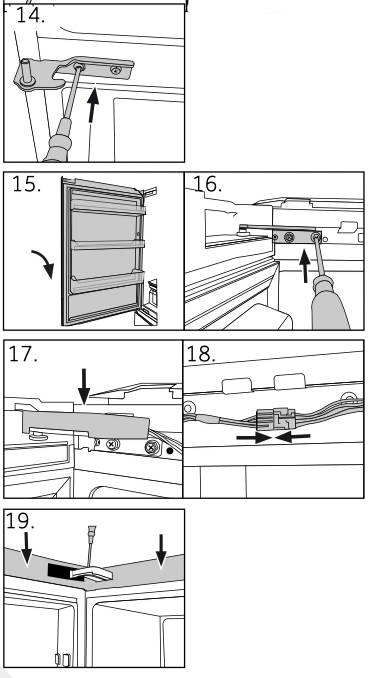
14. Take out the new hinges from the accessory bag and screw the new lower hinge of upper door to the other side of the door opening.
Be sure the pivot fits into the hinge barrel of lower door.
15. Lift the door carefully on to the lower hinge so that the pivot fits into the hinge barrel.
16. Fix the upper hinge with the screws.
17. Put the connection cable through the hinge cover (delivered in the accessory bag) and put it over the hinge.
18. Plug in the connection cable and fit it into the opening.
19. Replace faceplate and cover, fix it with the screws and reinsert the fixation (see fig. 3).
After the change of the door check that the door seals are located properly on the housing and all screws are tightened well.