Loading ...
Loading ...
Loading ...
7
English
6. Foreign materials of a conductive nature such as, but not limited to, grinding dust, metal
chips, steel wool, aluminum foil, or any buildup of metallic particles should be kept away
from charger cavities. Always unplug the charger from the power supply when there is
no battery pack in the cavity. Unplug the charger before attempting to clean.
7. Do not freeze or immerse the charger in water or any other liquid.
WARNING: Shock hazard. Don’t allow any liquid to get inside the charger. Electric shock
may result.
WARNING: Burn hazard. Do not submerge the battery pack in any liquid or allow any
liquid to enter the battery pack. Never attempt to open the battery pack for any reason. If
the plastic housing of the battery pack breaks or cracks, return to a service center for
recycling.
Storage Recommendations
1. The best storage place is one that is cool and dry, away from direct sunlight and excess
heat or cold.
2. For long storage, it is recommended to store a fully charged battery pack in a cool dry
place out of the charger for optimal results.
NOTE: Battery packs should not be stored completely depleted of charge. The battery pack
will need to be recharged before use.
SAVE THESE INSTRUCTIONS FOR
FUTURE USE
COMPONENTS
INTENDED USE
The DCN660 Cordless Finish Nailer has been designed for driving nails into wooden
workpieces.
DO NOT use under wet conditions or in presence of flammable liquids or gases.
This cordless framing nailer is a professional power tool. DO NOT let children come into
contact with the tool. Supervision is required when inexperienced operators use this tool.
WARNING: Lock the trigger lock-off in the locked position, disconnect battery pack from
tool and remove nail strips from magazine before making adjustments or personal injury may
result.
Refer to Figure 1 at the beginning of this manual for a complete list of components.
OPERATION
WARNING: To reduce the risk of serious personal injury, turn tool off and remove
the battery pack before making any adjustments or removing/installing attachments
or accessories. An accidental start-up can cause injury.
WARNING: Read the section titled Nailer Safety Warnings at the beginning of this
manual. Always wear eye and ear protection when operating this tool. Keep the nailer
pointed away from yourself and others. For safe operation, complete the following
procedures and checks before each use of the nailer.
1. Wear proper eye, hearing and respiratory protection.
2. Remove battery pack from tool.
3. Lock the pusher in the back position and remove all nail strips from the magazine.
4. Check for smooth and proper operation of contact trip and pusher assemblies. Do not
use tool if either assembly is not functioning properly. NEVER use a tool that has the
contact trip restrained in the up position.
5. NEVER use a tool that has damaged parts.
WARNING: To reduce the risk of personal injury, disconnect battery pack from tool
before performing maintenance, clearing a jammed nails, leaving work area, moving tool to
another location or handing the tool to another person.
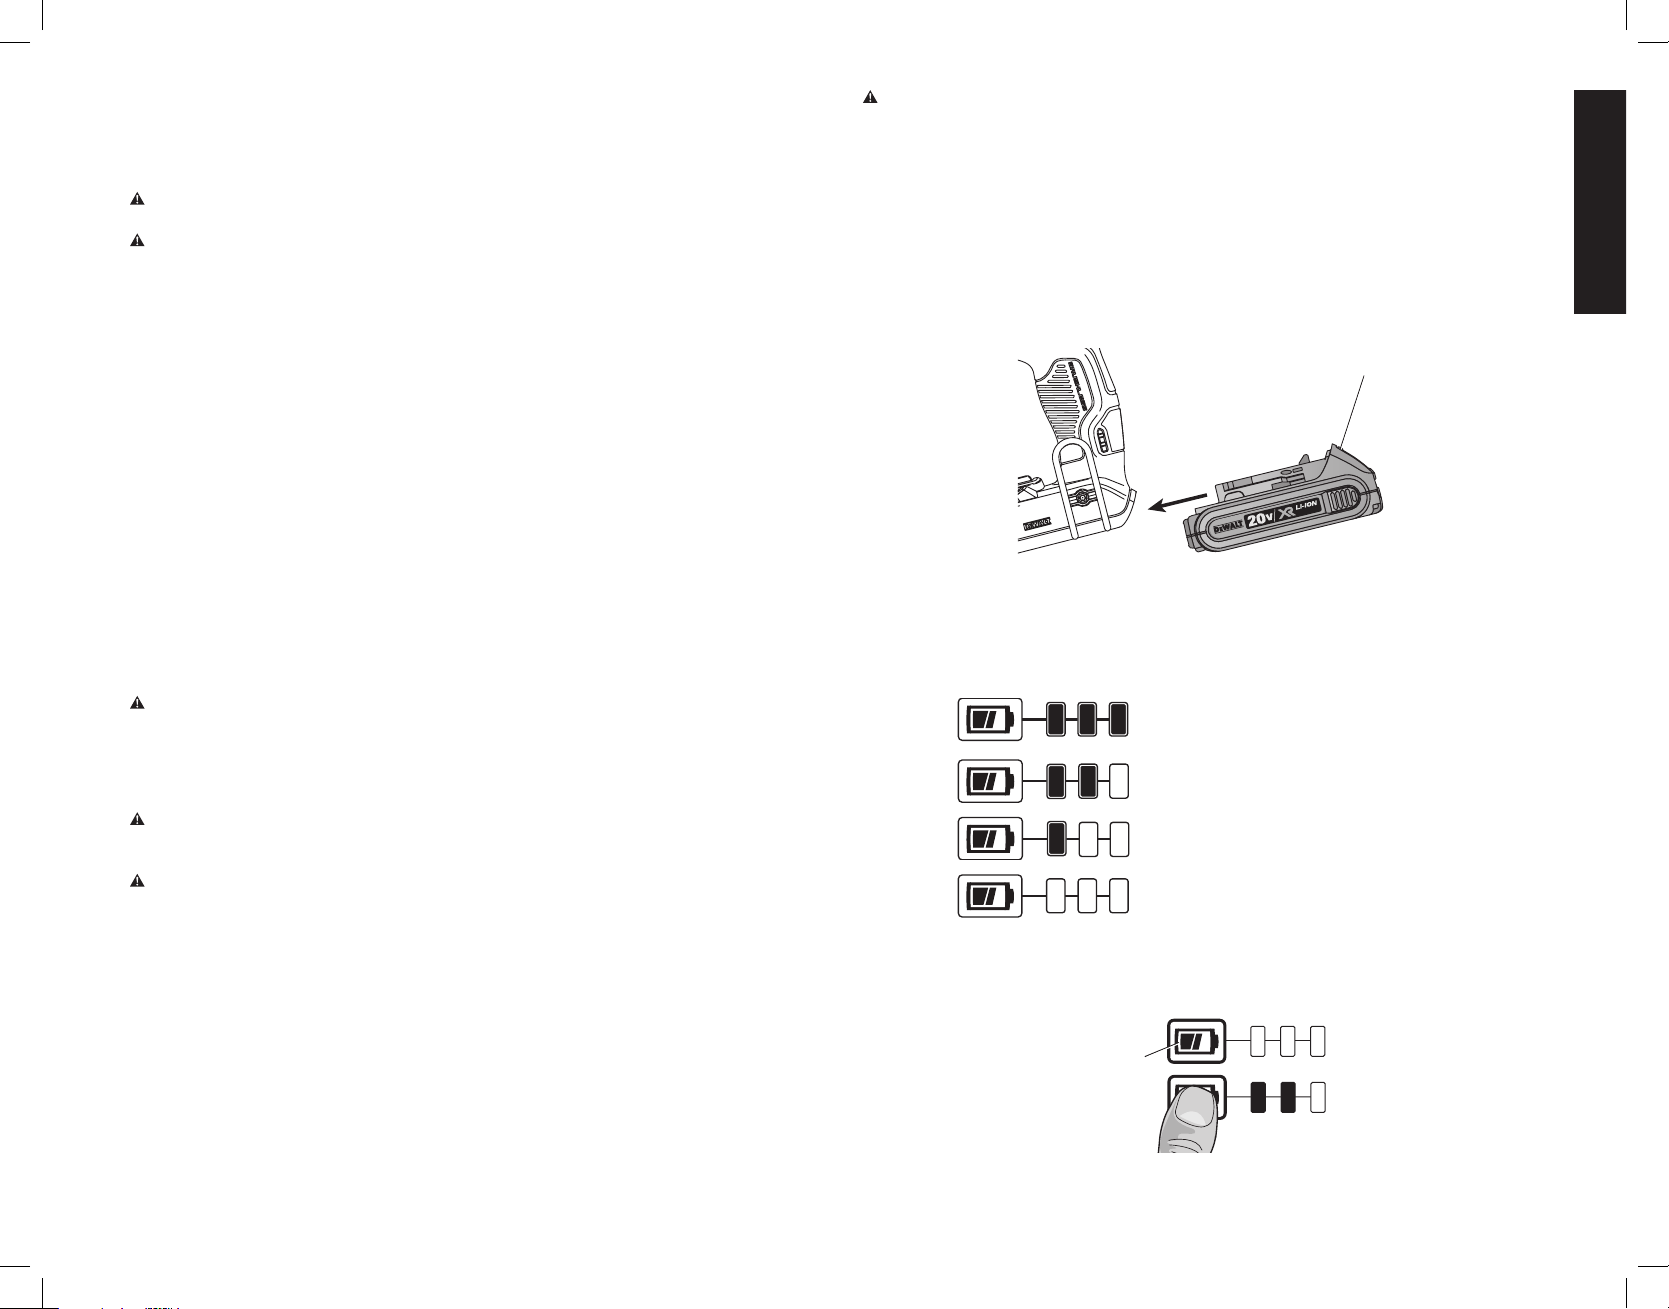
Installing and Removing the Battery Pack (Fig. 3, 4)
NOTE: For best results, make sure your battery pack is fully charged.
To install the battery pack into the tool handle, align the battery pack with the rails inside the
tool’s handle and slide it into the handle until the battery pack is firmly seated in the tool and
ensure that it does not disengage.
To remove the battery pack from the tool, press the release button (M) and firmly pull the
battery pack out of the tool handle. Insert it into the charger as described in the charger
section of this manual.
M
FIG. 3
FUEL GAUGE BATTERY PACKS (FIG. 4)
Some D
e
WALT battery packs include a fuel gauge which consists of three green LED lights
that indicate the level of charge remaining in the battery pack.
The fuel gauge is an indication of approximate levels of charge remaining in the battery pack
according to the following indicators:
75–100% charged
51–74% charged
< 50% charged
Pack needs to be charged
To actuate the fuel gauge, press and hold the fuel gauge button (X). A combination of the
three green LED lights will illuminate designating the level of charge left. When the level of
charge in the battery is below the usable limit, the fuel gauge will not illuminate and the
battery will need to be recharged.
X
FIG. 4
Loading ...
Loading ...
Loading ...