Loading ...
Loading ...
Loading ...
6
English
Chargers
Your tool uses a D
e
WALT charger. Be sure to read all safety instructions before using your
charger. Consult the chart at the end of this manual for compatibility of chargers and battery
packs.
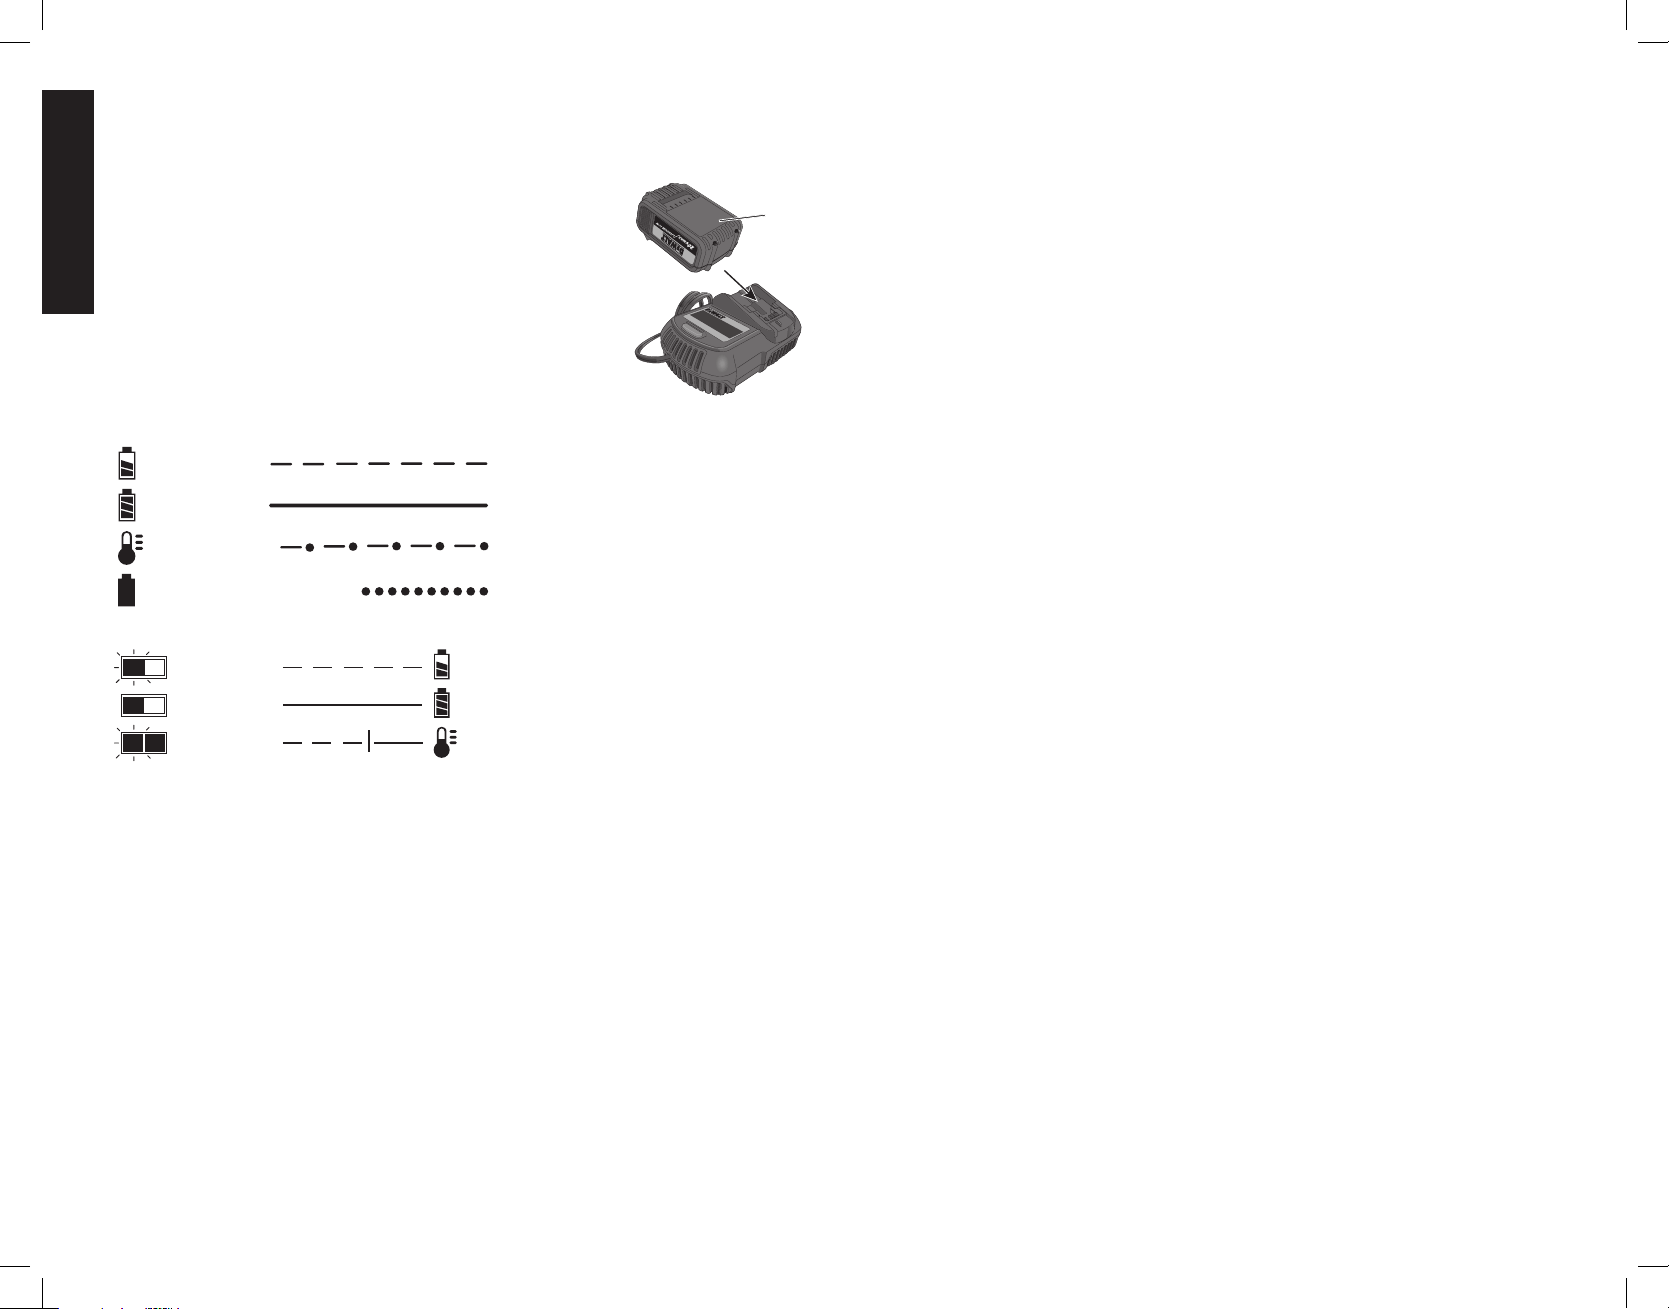
Charging Procedure (Fig. 2)
1. Plug the charger into an appropriate outlet before inserting
the battery pack.
2. Insert the battery pack (N) into the charger, as shown in
Figure 2, making sure the pack is fully seated in charger. The
red (charging) light will blink continuously, indicating that the
charging process has started.
3. The completion of charge will be indicated by the red light
remaining ON continuously. The pak is fully charged and
may be used at this time or left in the charger.
Indicator Light Operation
DCB101, DCB102, DCB103
PACK CHARGING
PACK CHARGED
x
HOT/COLD DELAY
PROBLEM PACK OR CHARGER
DCB107, DCB112, DCB113, DCB115
PACK CHARGING
PACK CHARGED
HOT/COLD DELAY
Charge Indicators
This charger is designed to detect certain problems that can arise. Problems are indicated by
the red light flashing at a fast rate. If this occurs, re-insert the battery pack into the charger.
If the problem persists, try a different battery pack to determine if the charger is working
properly. If the new pack charges correctly, then the original pack is defective and should be
returned to a service center or other collection site for recycling. If the new battery pack elicits
the same trouble indication as the original, have the charger and the battery pack tested at
an authorized service center.
HOT/COLD DELAY
DCB101, DCB102, DCB103
These chargers have a hot/cold delay feature. When the charger detects a battery that is
too hot or too cold, it automatically starts a delay, suspending charging. The red light flashes
long, then short while in the hot/cold delay mode.
Once the battery has reached an optimum temperature, the charger will automatically
resume the charging procedure. This feature ensures maximum battery life.
DCB107, DCB112, DCB113, DCB115
These chargers have a hot/cold delay feature. When the charger detects a battery that is
too hot or too cold, it automatically starts a delay, suspending charging. The red light will
continue to blink, but a yellow indicator light will be illuminated during this suspension.
N
FIG. 2
Once the battery has reached an optimum temperature, the yellow light will turn off and the
charger will automatically resume the charging procedure. This feature ensures maximum
battery life.
LEAVING THE BATTERY PACK IN THE CHARGER
The charger and battery pack can be left connected with the charge indicator showing Pack
Charged.
WEAK BATTERY PACKS: Weak batteries will continue to function but should not be
expected to perform as much work.
FAULTY BATTERY PACKS
DCB101, DCB102, DCB103
These chargers will not charge a faulty battery pack. The charger will indicate faulty battery
pack by refusing to light or by displaying problem pack or charger.
NOTE: This could also mean a problem with a charger.
DCB107, DCB112, DCB113, DCB115
These chargers will not charge a faulty battery pack. The charger will indicate faulty battery
pack by refusing to light.
NOTE: This could also mean a problem with a charger.
Wall Mounting
DCB107, DCB112, DCB113, DCB115
These chargers are designed to be wall mountable or to sit upright on a table or work
surface.
If wall mounting, locate the charger within reach of an electrical outlet. Mount the charger
securely using drywall screws at least 1” (25.4 mm) long, screwed into wood to an optimal
depth leaving approximately 7/32” (5.5 mm) of the screw exposed.
Important Charging Notes
1. Longest life and best performance can be obtained if the battery pack is charged when
the air temperature is between 65°F and 75°F (18° – 24°C). DO NOT charge the battery
pack in an air temperature below +40°F (+4.5°C), or above +104°F (+40°C). This is
important and will prevent serious damage to the battery pack.
2. The charger and battery pack may become warm to the touch while charging. This is a
normal condition, and does not indicate a problem. To facilitate the cooling of the battery
pack after use, avoid placing the charger or battery pack in a warm environment such
as in a metal shed or an uninsulated trailer.
3. A cold battery pack will charge at about half the rate of a warm battery pack. The battery
pack will charge at that slower rate throughout the entire charging cycle and will not
return to maximum charge rate even if the battery pack warms.
4. If the battery pack does not charge properly:
a. Check operation of receptacle by plugging in a lamp or other appliance;
b. Check to see if receptacle is connected to a light switch which turns power off when
you turn out the lights;
c. Move the charger and battery pack to a location where the surrounding air
temperature is approximately 65°F – 75°F (18° – 24°C);
d. If charging problems persist, take the tool, battery pack and charger to your local
service center.
5. The battery pack should be recharged when it fails to produce sufficient power on jobs
which were easily done previously. DO NOT CONTINUE to use under these conditions.
Follow the charging procedure. You may also charge a partially used pack whenever you
desire with no adverse effect on the battery pack.
Loading ...
Loading ...
Loading ...