Owner's Manual
Vacuum Cleaner
Model 116.38512
116.38613
116.38812
116.38912
116.39512
116.39612
116.39712
CAUTION:
Read and follow all
safety and operating
instructions before first
use of this product.
Sears, Roebuck and Co., Hoffman Estates, IL 60179 U.S.A.
www.sears.com
Part No. COIZAMA3_UO{D-437_827 Printed in tlSA.
Before Using Your New Vacuum ....... 2
Kenmore Vacuum Cleaner Warranty , ,o 2
Important Safety Instructions ......... 3
Parts and Features .................... 4
Assembly Instructions ............... 5-6
Operating instructions ............... 6
Pile Height Selection andSetting ........ 7
Carpet/Bare Floor Selector ........... 7
Releasing the Handle ............... 8
ON/OFF Switch ........ 8
Attachments ................ 8-10
Attachment Use Chart ............ 10
Vacuuming Tips ............... 11
Performance Features ............. 1t .12
Vacuum Cleaner Care ................. 13
Vacuum Storage .......................... 13
Cleaning Exterior and Attachments ..... 13
Dust Bag Changing ................... 14
Fitter Changing ................... I5
Belt Changing and Agitator Cleaning ° 16-18
Clog Removal ..................... 19
Light Bulb Changing ................. 20
Agitator Servicing ............. 21
Agitator Assembly ............. 21
Troubleshooting ............... 22
Requesting Assistance Or Service . 23
Please read this guide. It will help you assemble and operate your new Kenmore vacuum in
the safest and most effective way.
For more information about vacuum cleaner care and operation, call your nearest Sears store°
You will need the complete model and serial numbers when requesting information. Your vacu-
um's model and serial numbers are located on the Model and Serial Number Plate.
Use the space be!ow to record the model number and serial number of your new Kenmore
vacuum.
Model No...........
Serial No,
Date of Purchase
Keep this book and your sales check (receipt) in a safe place for future reference..
This warranty is for one year from the date of purchase, and includes only private household
vacuum cleaner use. During the warranty year, when this vacuum cleaner is operated and
maintained according to the owner's manual instructions, Sears will repair any defects in
material or workmanship free of charge.
This warranty excludes vacuum bags, belts, light bulbs, and filters, which are expendable parts
and become worn during normal use.
For warranty service, return this vacuum cleaner to the nearest Sears Service Center in
the United States.
This warranty applies only while this product is in use in the United States. This warranty gives
you specific legal rights, and you may also have other rights which vary from state to state°
Sears, Roebuck and Co,, D/817 WA, Hoffman Estates, IL 60179
2
n
WARNING
Your safety is important to us. To reduce the risk of fire, electrical shock, injury
to persons or damage when using your vacuum cleaner, follow basic safety pre.
cautions including the following:
Read this manual before assembling or
using your vacuum cleaner_
Use your cleaner only as described in
this manual Use only with Sears recom-
mended attachments.
To reduce the risk of electrical shock -
Do not use outdoors or on wet surfaces,
Disconnect electrical supply before any
servicing or cleaning.. Failure to do so
could result in electrical shock or person-
al injury.
Always turn cleaner off before unplug-
ging.
Do not unplug by pulling on cord. To
unptug, grasp the plug, not the cord.
Do not use with damaged cord or plug. If
cleaner is not working as it should, has
been dropped, damaged, left outdoors, or
dropped into water, return it to a Sears
Service Center.
Do not pull or carry by cord, use cord as
a handle, close door on cord, or pull cord
around sharp edges or corners° Do not
run cleaner over cord. Keep cord away
from heated surfaces.
Do not leave cleaner when plugged in.
Unplug from outlet when not in use and
before servicing°
Do not allow to be used as a toy. Close
attention is necessary when used by or
near children.
Do not handle plug or cleaner withwet
hands,
Do not use with any opening blocked;
keep free of dust, lint, hair and anything
that may reduce air flow.
Keep hair, loose clothing, fingers, and all
parts of body away from openings and
moving parts.
Do not use cleaner without dust bag
and/or filters in place°
Always change the dust bag after vacu-
uming carpet cleaners or freshener, pow-
ders and fine dust. These products clog
the bag, reduce airflow and can cause
the bag to burst. Failure to change bag
could cause permanent damage to the
cleaner,
Do not use the cleaner to pick up sharp
hard objects, small toys, pins, paper, etc.
They may damage the cleaner or dust
bag.
Do not pick up anything that is burning
or smoking, such as cigarettes, matches,
or hot ashes.
Do not use cleaner to pick up flammable
or combustible liquids (gasoline, cleaning
fluids, perfumes, etC_r),or use in areas
where they may be present. The fumes
from these substances can create a fire
hazard or explosion.
Use extra care when cleaning on stairs°
Do not put on chairs, tables, etc. Keep
on floor.
You are responsible for making sure that
your vacuum cleaner is not used by any-
Do not put any objects into openings, one unable to operate it properly.
SAVE THESE NSTRUCTIONS
Proper assembly and safe use of your vacuum cleaner are your responsibilities_ Your
cleaner is intended only for household use. Read this Owner's Manual carefully for
important use and safety information. This guide contains safety statements under
warning and caution symbols. Please pay special attention to these boxes and follow
any instructions given. WARNING statements alert you to such dangers as fire, electri-
cal shock, burns and personal injury. CAUTION statements alert you to such dangers
as personal injury and/or property damage_
i i i i ,,,,,,,,,,,,,,,, , ...........................
3

It is important to know your vacuum cleaner's parts and features to assure its proper and
safe use. Review these before using your cleaner.,
item Part No. Part No.
In U.S. In Canada
Dust Bag 20-50690 20-50690C
, ,,, ,
Headlight Bulb 20-5240 20-40600
Belt 20-5275 2040096
Exhaust Filter 20-86881 .............20-86881C
Motor Safety Filter 20-86884 20-86884C
On/Off
Switch
Sensor
I (Some Models)
Performance
Indicator
(Some Models)
Quick Release
Powe
Lower
Cord Hooks
Carry
Crevice
Tool --_
Telescoping
Dusting
Brush
Combination
Brush
Handle
Release
Pedal
Model/Serial
Numbers
ll li Swivel Hose
Stretch Hose
Motor
Protector
Agitator
(Underneath)
Floor Selector
Nozzle
Cover
Latch
Base
Headlight (Underneath)
Spare Belt
(Underneath Nozzle Cover,
Behind Height Adjust Assembly)
EXTENSION HOSE KITS
SOME MODELS
Extension Hose
._SOME MODELS
_T_ Adaptor
toor BrUShan d
4
WARNING
Electrical Shock Hazard
Do not plug into the electrical sup-
ply until the assembly is complete.
Failure to do so could result in elec-
trical shock or injury°
Before assembling vacuum, check the
PACKING LIST on the cover of the separate
Repair Parts List, Use this list to verify that
you have received all the components of
your new Kenmore vacuum_
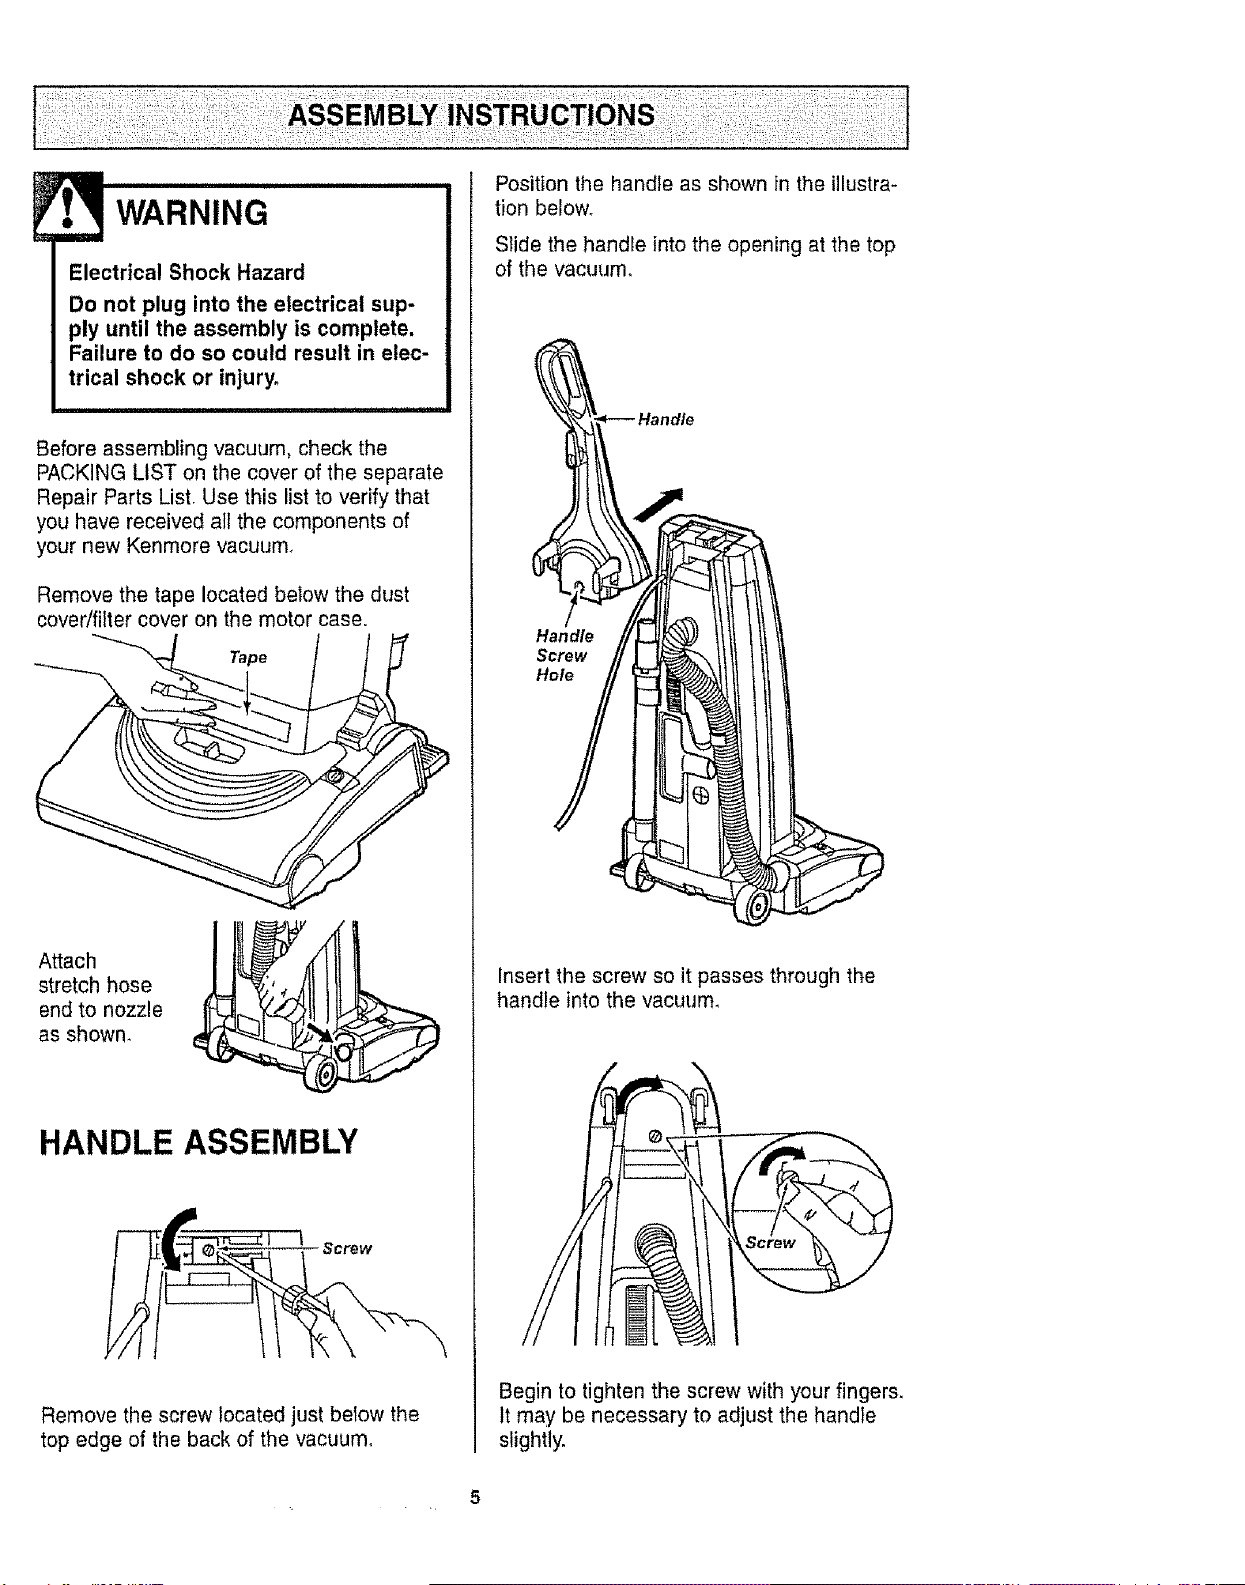
Remove the tape located below the dust
cover/filter cover on the motor case.
Tape
Attach
stretch hose
end to nozzle
as shown_
HANDLE ASSEMBLY
Remove the screw located just below the
top edge of the back of the vacuum°
Position the handle as shown in theillustra-
tionbelow_
Slide the handle into the opening at the top
of the vacuum°
Insert the screw so it passes through the
handle into the vacuum,
Begin to tighten the screw with your fingers.
It may be necessary to adjust the handle
slightly.
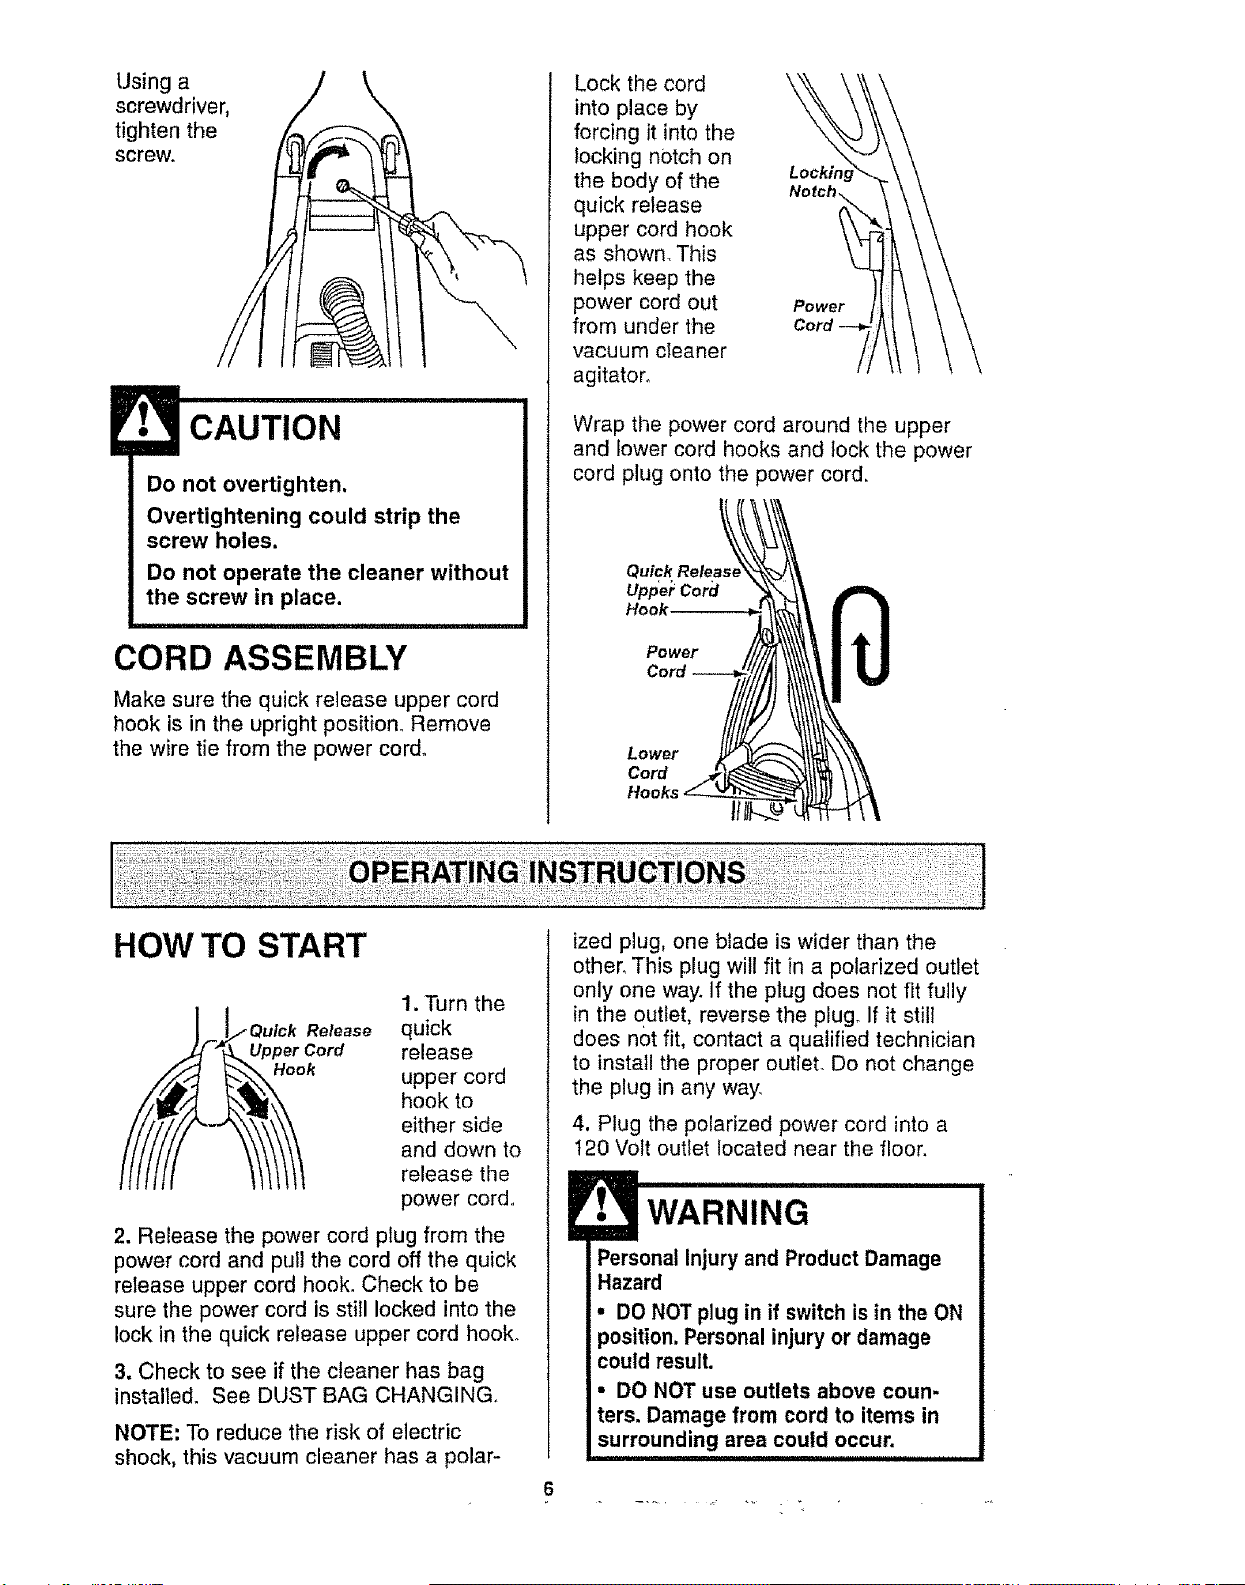
Usinga
screwdriver,
tightenthe
screw.
CAUTION
Do not overtighten.
Overtightening could strip the
screw holes.
Do not operate the cleaner without
the screw in place.
CORD ASSEMBLY
Make sure the quick release upper cord
hook is in the upright position. Remove
the wire tie from the power cord.
Lock the cord
into place by
forcing it into the
locking notch on
the body of the
quick release
upper cord hook
as shown_ This
helps keep the
power cord out
from under the
vacuum cleaner
agitator.
Lock#
Power
Wrap the power cord around the upper
and lower cord hooks and lock the power
cord plug onto the power cord.
Uppe_Cord
Hook
Power
Cord
Lower
Cord
HOW TO START
] F _Qulck Release
"_ Upper Cord
1. Turn the
quick
release
upper cord
hook to
either side
and down to
release the
power cord..
2. Release the power cord plug from the
power cord and pull the cord off the quick
release upper cord hook. Check to be
sure the power cord is still locked into the
lock in the quick release upper cord hook.
3. Check to see if the cleaner has bag
installed. See DUST BAG CHANGING,,
NOTE; To reduce the risk of electric
shock, this vacuum cleaner has a polar-
ized plug, one blade is wider than the
other, This plug will fit in a polarized outlet
only one way. If the plug does not fit fully
in the outlet, reverse the plugo If it still
does not fit, contact a qualified technician
to install the proper outlet. Do not change
the plug in any way.
4, Plug the polarized power cord into a
I20 Volt outlet located near the floor.
Personal Injury and Product Damage
Hazard
• DO NOT plug in if switch is in the ON
position. Personal injury or damage
could result.
• DO NOT use outlets above coun-
ters. Damage from cord to items in
surrounding area could occur.
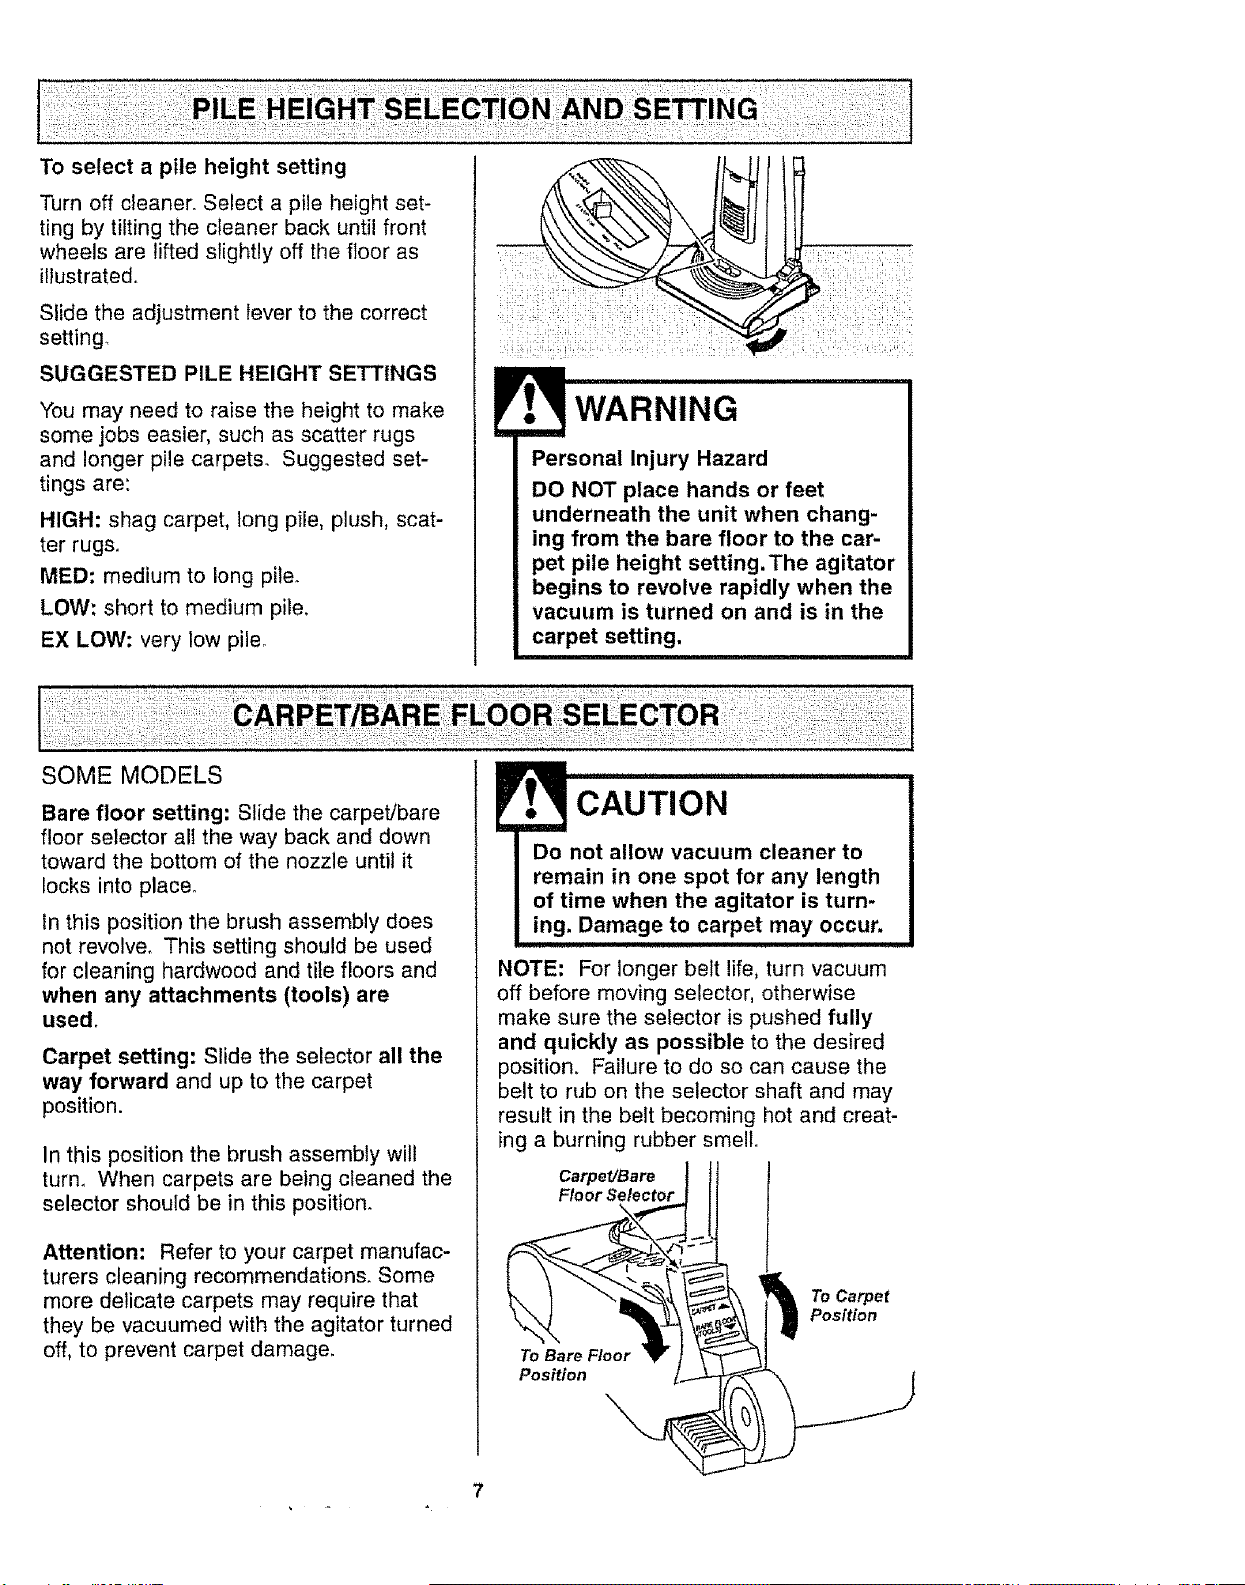
Toselect apile height setting
Turn off cleaner. Select a pile height set-
ting by tilting the cleaner back until front
wheels are lifted slightly off the floor as
illustratedo
Slide the adjustment lever to the correct
setting.
SUGGESTED PILE HEIGHT SETTINGS
You may need to raise the height to make
some jobs easier, such as scatter rugs
and longer pile carpets. Suggested set-
tings are:
HIGH: shag carpet, long pile, plush, scat-
ter rugs,
MED: medium to long pile.
LOW: short to medium pile,
EX LOW: very low pile_
WARNING
Personal Injury Hazard
DO NOT place hands or feet
underneath the unit when chang-
ing from the bare floor to the car-
pet pile height setting.The agitator
begins to revolve rapidly when the
vacuum is turned on and is in the
carpet setting,
SOME MODELS
Bare floor setting: Slide the carpet/bare
floor selector alI the way back and down
toward the bottom of the nozzle until it
locks into place°
In this position the brush assembly does
not revolve. This setting should be used
for cleaning hardwood and tile floors and
when any attachments (tools) are
used.
Carpet setting: Slide the selector all the
way forward and up to the carpet
position.
In this position the brush assembly will
turn. When carpets are being cleaned the
selector should be in this position.
Attention: Refer to your carpet manufac-
turers cleaning recommendations. Some
more delicate carpets may require that
they be vacuumed with the agitator turned
off, to prevent carpet damage.
NOTE: For longer belt life, turn vacuum
off before moving selector, otherwise
make sure the selector is pushed fully
and quickly as possible to the desired
position. Failure to do so can cause the
belt to rub on the selector shaft and may
result in the belt becoming hot and creat-
ing a burning rubber smell.
Carpet/Bare
Floor Selector
To Bare Floor
Position
\
To Carpet
Position
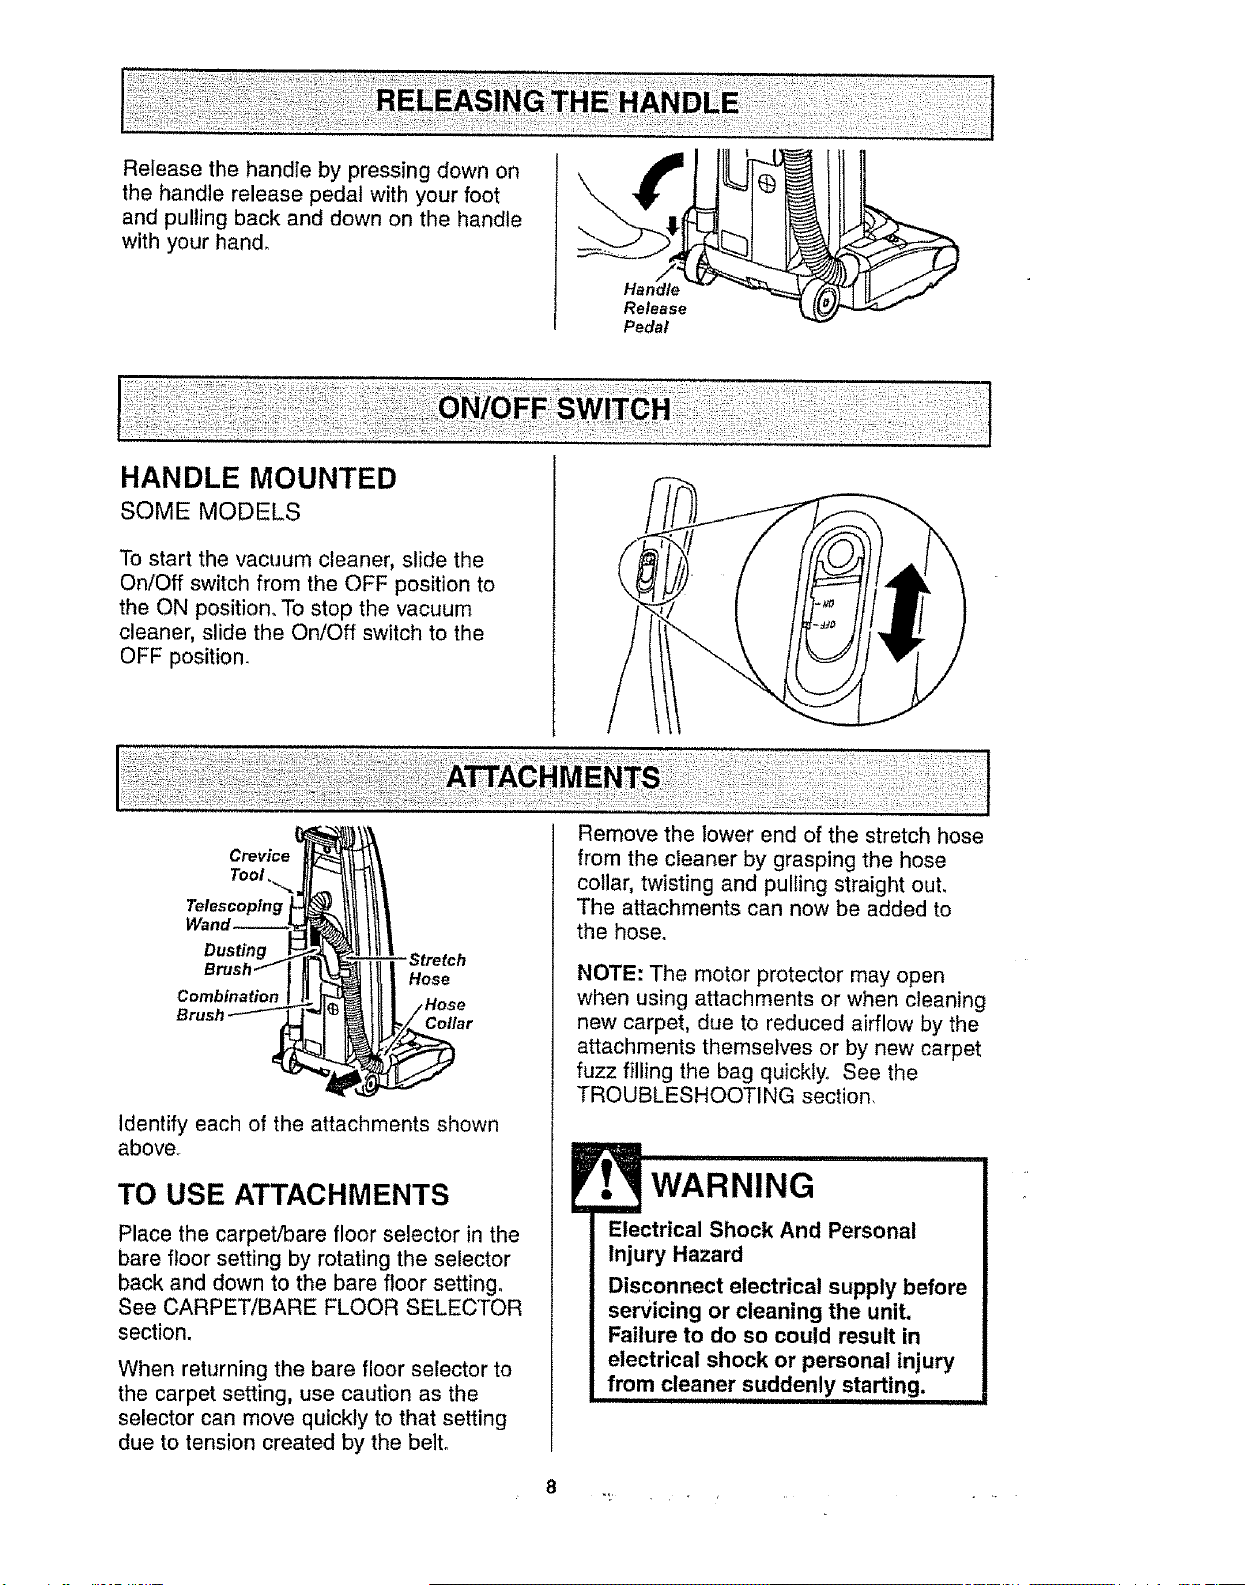
Release the handle by pressing down on
the handle release pedal with your foot
and pulling back and down on the handle
with your hand,
Release
Pedal
HANDLE MOUNTED
SOME MODELS
To start the vacuum cleaner, slide the
On/Off switch from the OFF position to
the ON position. To stop the vacuum
cleaner, slide the On/Off switch to the
OFF position.
Tool,.._
Telescoping
Dusting
Combination
Hose
Collar
Identify each of the attachments shown
above,
TO USE ATTACHMENTS
Place the carpet/bare floor selector in the
bare floor setting by rotating the selector
back and down to the bare floor setting,
See CARPET/BARE FLOOR SELECTOR
section.
When returning the bare floor selector to
the carpet setting, use caution as the
selector can move quickly to that setting
due to tension created by the belto
Remove the lower end of the stretch hose
from the cleaner by grasping the hose
collar, twisting and pulling straight out,
The attachments can now be added to
the hose.
NOTE: The motor protector may open
when using attachments or when cleaning
new carpet, due to reduced airflow by the
attachments themselves or by new carpet
fuzz filling the bag quickly. See the
TROUBLESHOOTING section,
WARNING
Electrical Shock And Personal
Injury Hazard
Disconnect electrical supply before
servicing or cleaning the unit,
Failure to do so could result in
electrical shock or personal injury
from cleaner suddenly starting,
,l,,,H,,,i ,
8

Theattached
hoseswivelsto
makecleaning Swivel-.
easier in every
direction.
Remove the
hose from the
hose clip by
pulling straight
out.
TELESCOPING WAND WITH
SUCTION CONTROL SLIDE
SOME MODELS
Crevice
Tool
Telescoping
Wand
Remove the
telescoping
wand from
its storage
position,
Remove the crevice tool from its storage
position in the wan& Turn the locking ring to
the UNLOCK position.
Extend the wand to its full length_ Turn the
locking ring to the LOCK position, Attach
the extension wand onto the open end of
the hose.
Suction
Wand -'-'_ "_ Control Slide
Upper
Wand
Align the tabs on the extension wand with
the "J" slots in the hose. Push the wand into
the hose and twist to the right to lock.
To achieve maximum reach
with the attachments, add
the crevice tool to the end Hose.
of the wand by inserting
and twisting slightly suction
Control
Telescoping
Wand,
Crevice
Tool
When using the
dusting brush or
the combination
brush, they may
be attached
directly to the
wand or placed
on the end of
the crevice tool.,
TO OPERATE SUCTION
CONTROL SLIDE
Telescoping Wand
When using
attachments for
cleaning
draperies, small
rugs with low pile
and other
delicate items,
twist the suction
control slide to the open position. This lever
is located on the telescoping wand, close to
the hose.
\
Suction
Control
Slide
This will reduce suction for ease of cleaning.
NOTE: Return suction control slide to the
closed position for normal cleaning..
CAUTION
When using attachments, be careful
not to overextend the stretch hose
when reaching. Trying to reach
beyond the hose stretch capability
could cause the cleaner to tip over.
Make sure the carpet/bare floor
selector is in the bare floor position,
Damage to the floor surface may
occur if the carpet setting is used,
7-' _' _ • _ .........
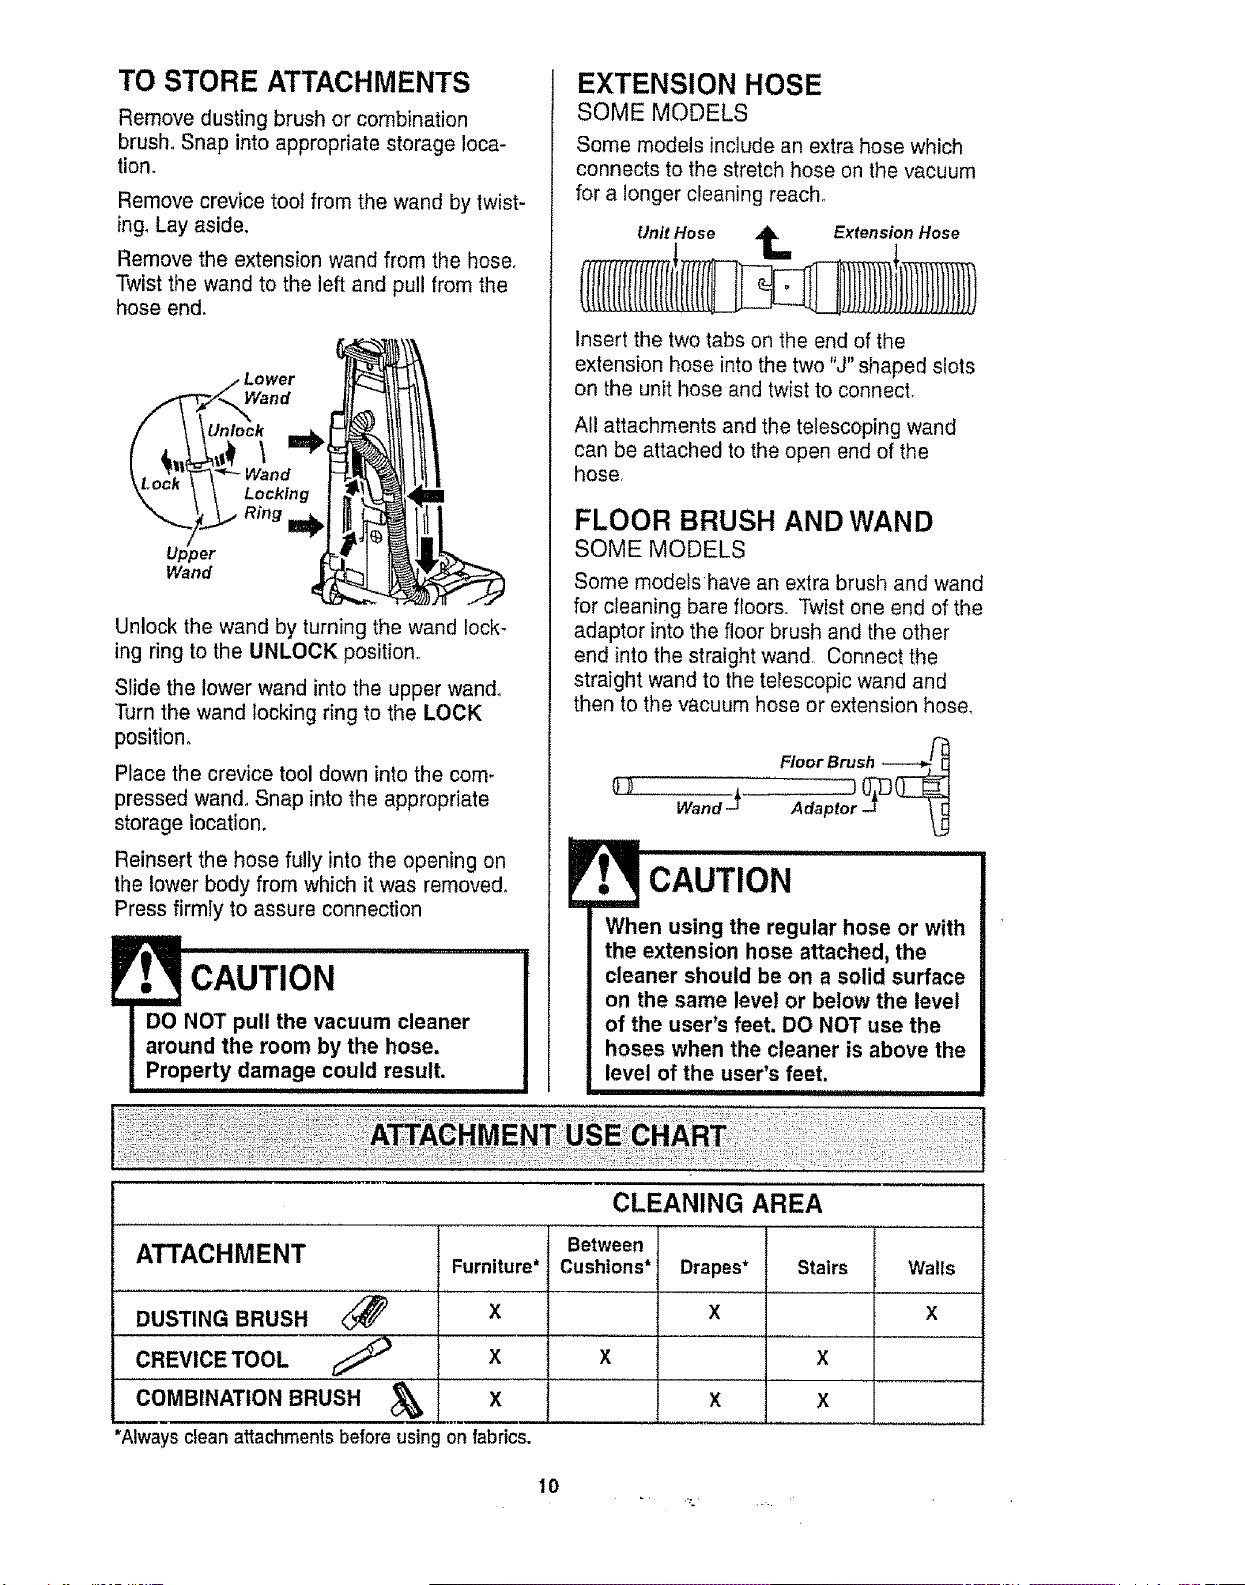
TO STORE ATTACHMENTS
Remove dusting brush or combination
brush_ Snap into appropriate storage loca-
tion,
Remove crevice toot from the wand by twist-
ing, Lay aside.
Remove the extension wand from the hose,
Twist the wand to the left and pull from the
hose end,
Unlock the wand by turning the wand lock-
ing ring to the UNLOCK position.
Slide the lower wand into the upper wand,
Turn the wand locking ring to the LOCK
position,
Place the crevice tool down into the com-
pressed wand, Snap into the appropriate
storage location.
Reinsert the hose fully into the opening on
the lower body from which it was removed,
Press firmly to assure connection
EXTENSION HOSE
SOME MODELS
Some models include an extra hose which
connects to the stretch hose on the vacuum
for a longer cleaning reach°
Unit Hose _ Extension Hose
Insert the two tabs on the end of the
extension hose into the two "J" shaped slots
on the unit hose and twist to connect.
All attachments and the telescoping wand
can be attached to the open end of the
hose,
FLOOR BRUSH AND WAND
SOME MODELS
Some models have an extra brush and wand
for cleaning bare floors. Twist one end of the
adaptor into the floor brush and the other
end into the straight wand, Connect the
straight wand to the terescopic wand and
then to the vacuum hose or extension hose,
Floor Brush ----_
Wand J Adaptor 0_
L_
CAUTION
When using the regular hose or with
the extension hose attached, the
cleaner should be on a solid surface
on the same level or below the level
of the user's feet. DO NOT use the
hoses when the cleaner is above the
level of the user's feet.
CLEANING AREA
ATTACHMENT
DUSTING BRUSH
CREVICETOOL _ X
COMBINATION BRUSH _I X
*Always cleanattachmentsbefore using on fabrics.
Furniture*
X
Between
Cushions*
Drapes*
X
Stairs Walls
X
X
X
X
X
10
Carpet edges.
Guide either side or the front of the noz-
zle along a baseboard° The full length
brushes help remove dirt at carpet edges.
Stairs.
Put handle in full upright position, Place
the carpet/bare floor selector in the bare
floor position. Use the crevice tool or fab-
ric brush. Set the On/Off switch to ON.
Personal Injury Hazard
Use care if vacuum cleaner is
placed on stairs. If it falls, person-
al injury or property damage could
result.
i1,1
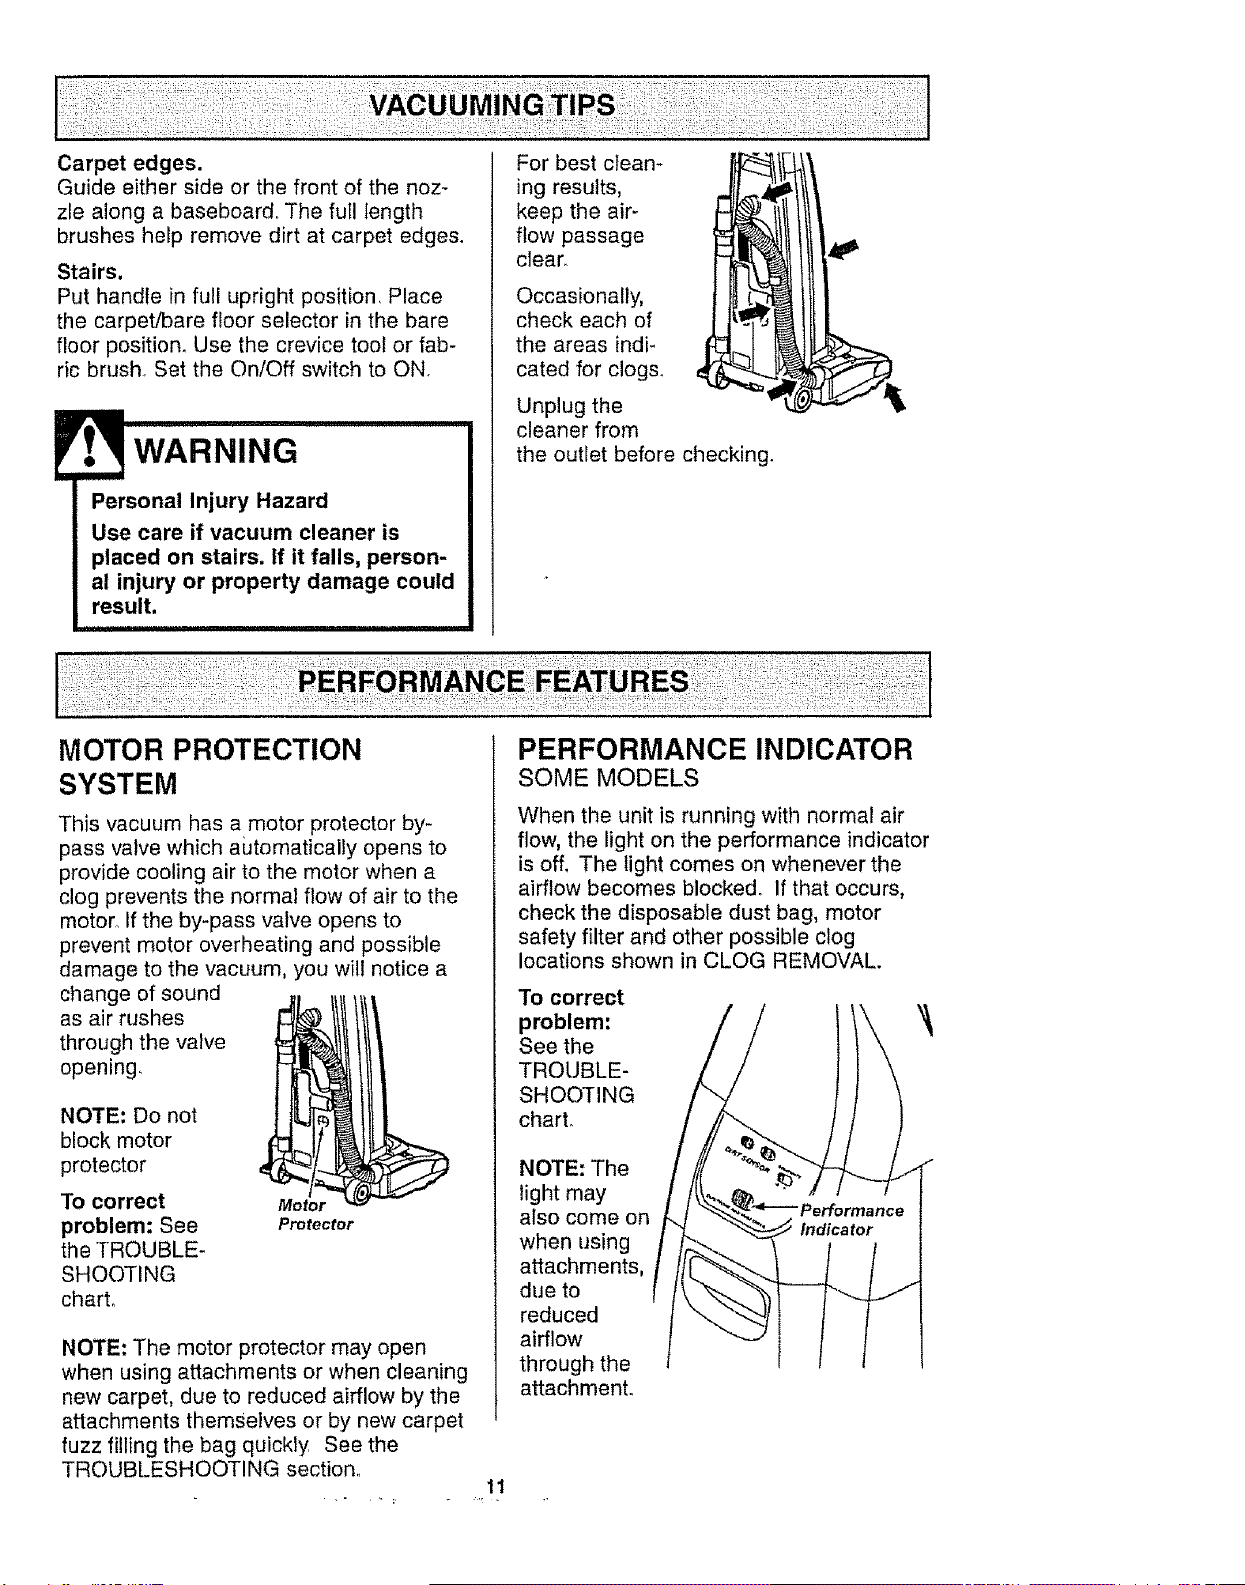
For best clean-
ing results,
keep the air-
flow passage
clear.
Occasionally,
check each of
the areas indi-
cated for clogs°
Unplug the
cleaner from
the outiet before checking.
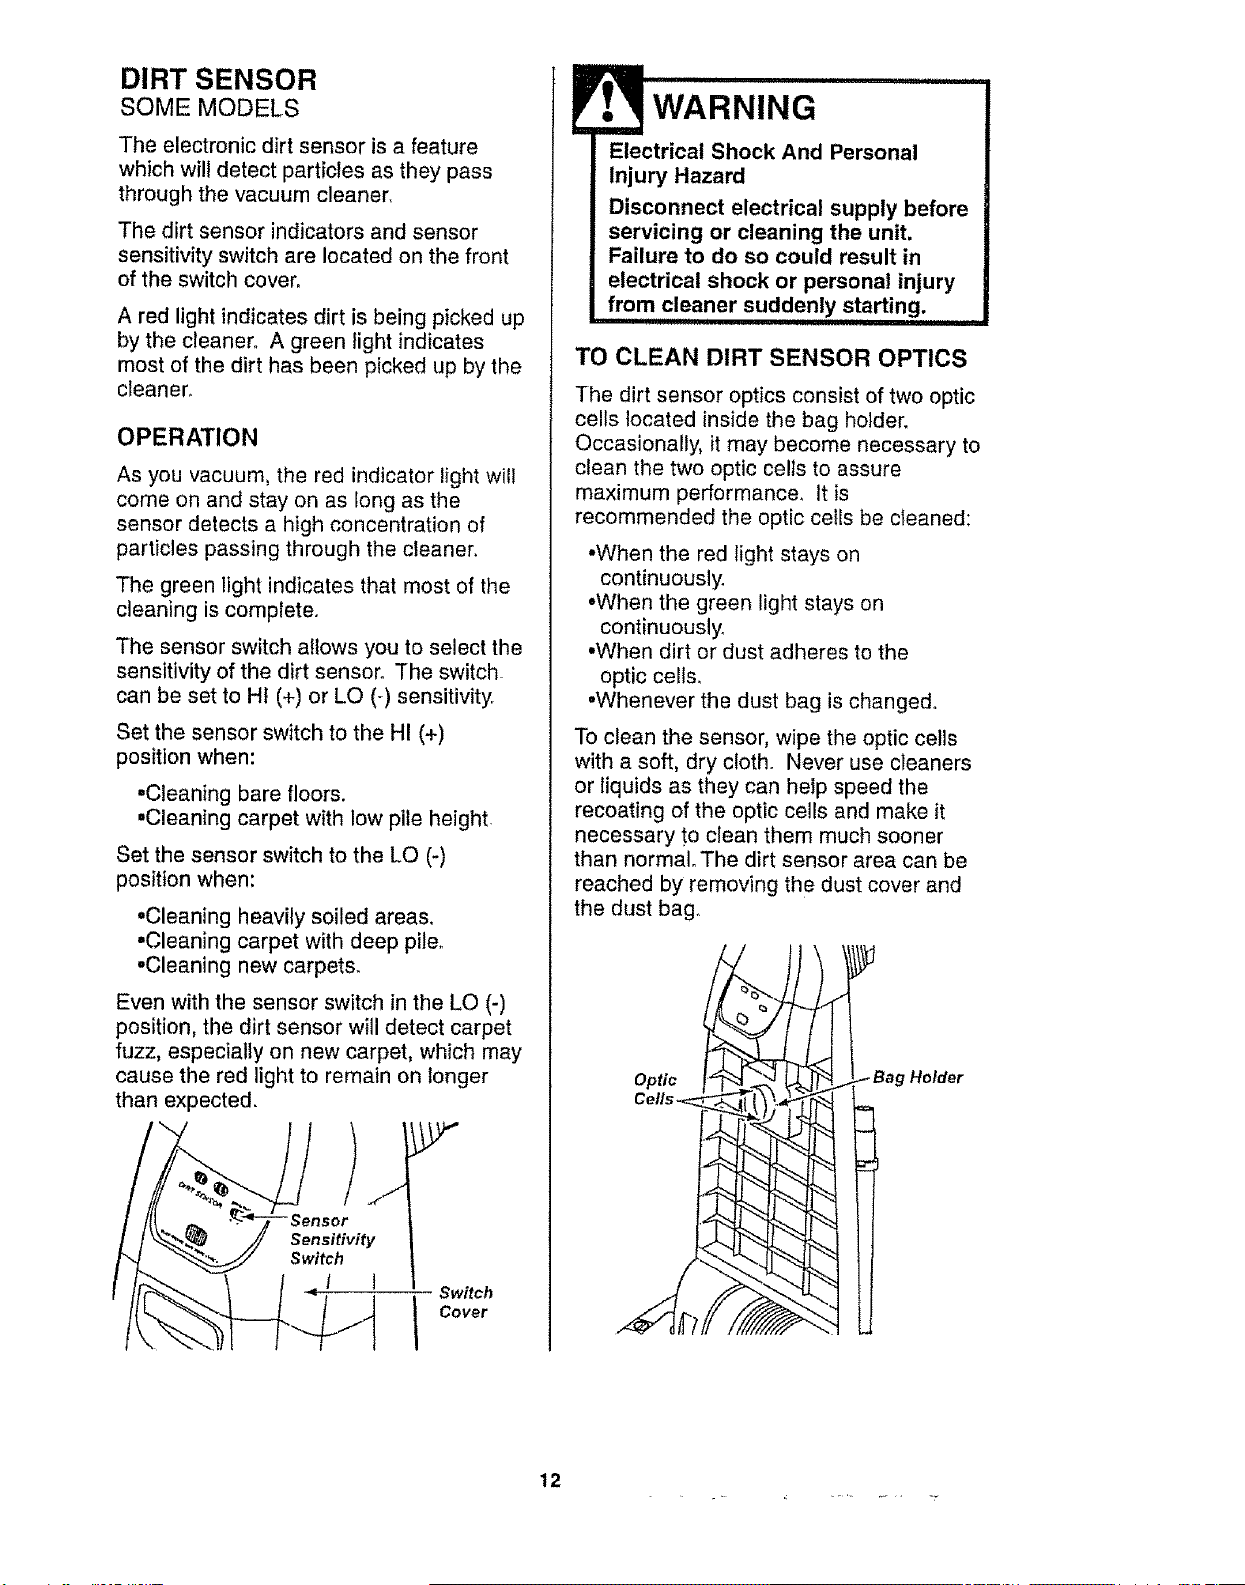
MOTOR PROTECTION
SYSTEM
This vacuum has a motor protector by-
pass valve which automatically opens to
provide cooling air to the motor when a
clog prevents the normal flow of air to the
motor° If the by-pass valve opens to
prevent motor overheating and possible
damage to the vacuum, you will notice a
change of sound
as air rushes
through the valve
opening,
NOTE: Do not
block motor
protector
To correct
problem: See
the TROUBLE-
SHOOTING
chart,.
Motor
Protector
NOTE: The motor protector may open
when using attachments or when cleaning
new carpet, due to reduced airflow by the
attachments themselves or by new carpet
fuzz filling the bag quickly See the
TROUBLESHOOTING section.
11
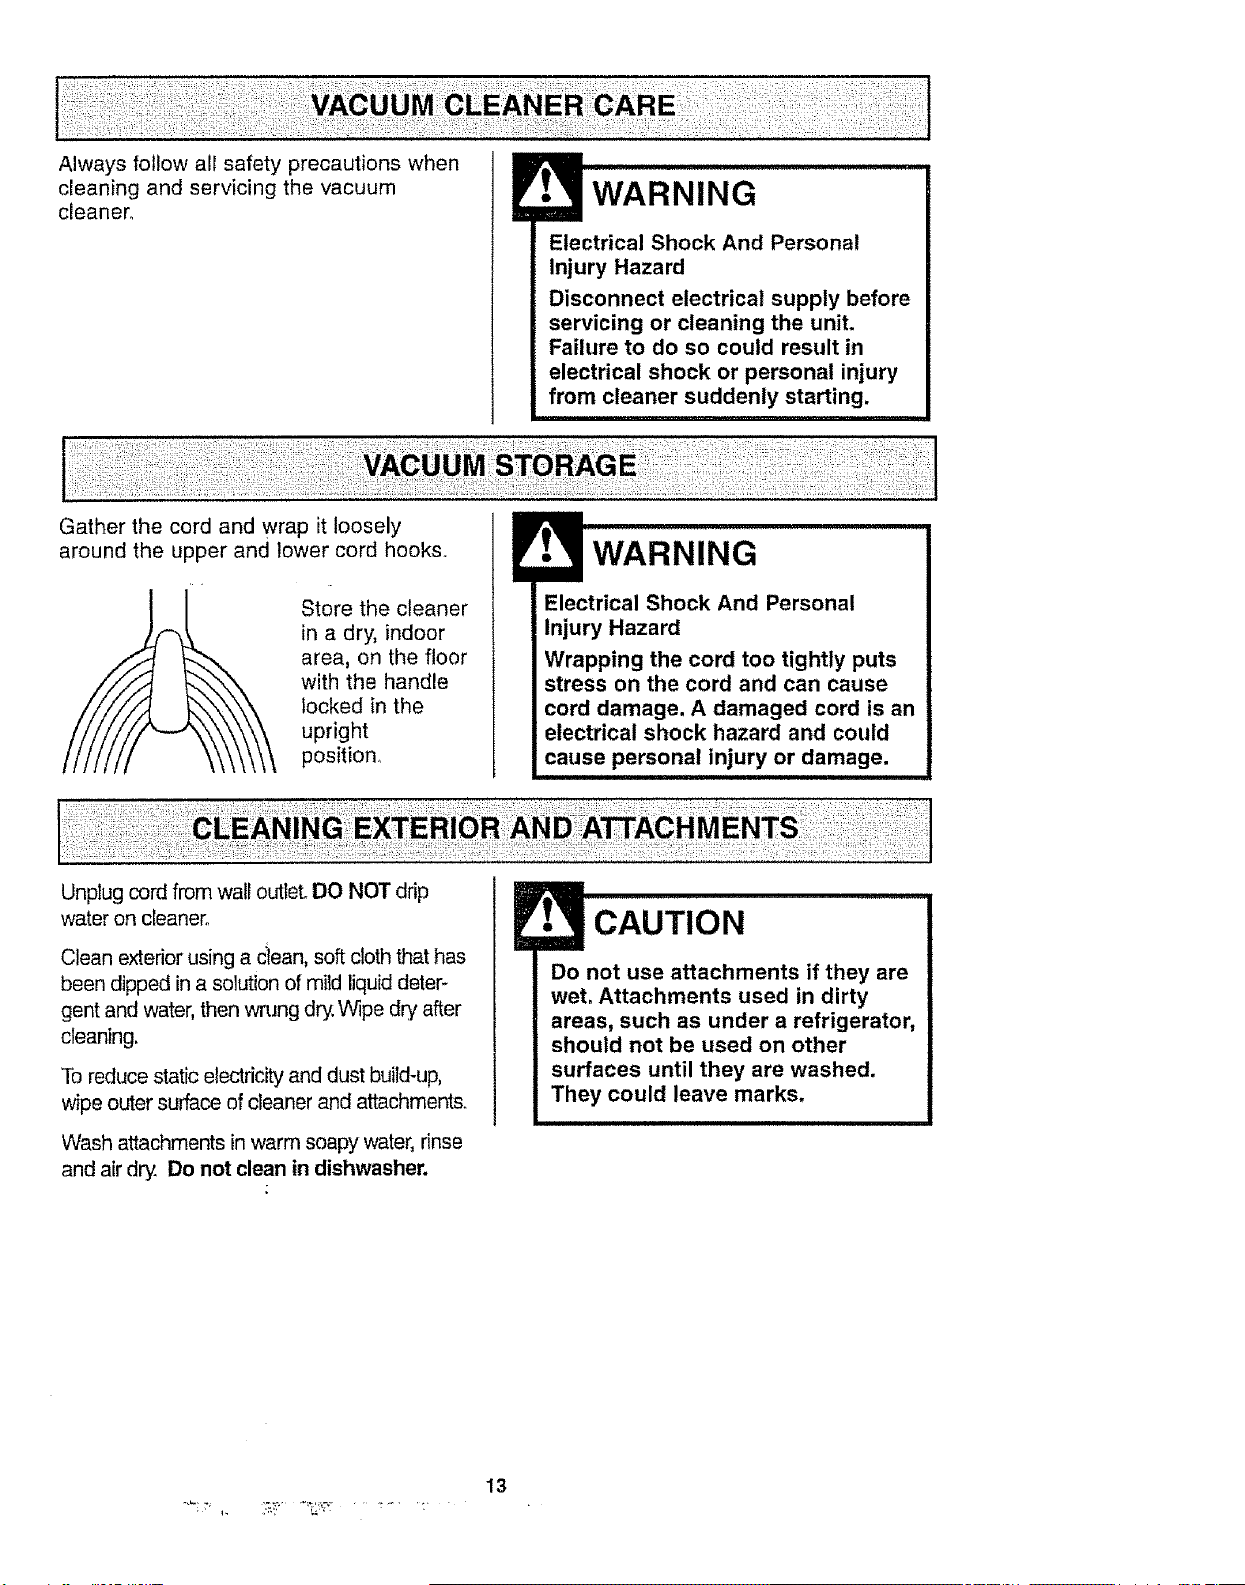
PERFORMANCE INDICATOR
SOME MODELS
When the unit is running with normal air
flow, the light on the performance indicator
is off, The light comes on whenever the
airflow becomes blocked. If that occurs,
check the disposable dust bag, motor
safety filter and other possible clog
locations shown in CLOG REMOVAL.
To correct
problem:
See the
TROUBLE-
SHOOTING
chart.
NOTE: The
light may
also come on
when using
attachments,
due to
reduced
airflow
through the
attachment.
DIRT SENSOR
SOME MODELS
The electronic dirt sensor is a feature
which will detect particles as they pass
through the vacuum cleaner,
The dirt sensor indicators and sensor
sensitivity switch are located on the front
of the switch coven
A red light indicates dirt is being picked up
by the cleaner° A green light indicates
most of the dirt has been picked up by the
cleanen
OPERATION
As you vacuum, the red indicator light will
come on and stay on as long as the
sensor detects a high concentration of
particles passing through the cleaner.
The green light indicates that most of the
cleaning is complete.
The sensor switch allows you to select the
sensitivity of the dirt senson The switch
can be set to Ht (+) or LO (-) sensitivityr
Set the sensor switch to the HI (+)
position when:
•Cleaning bare floors.
,Cleaning carpet with low pile height
Set the sensor switch to the LO (-)
position when:
•Cleaning heavily soiled areas,
•Cleaning carpet with deep pile.
=Cleaning new carpets.
Even with the sensor switch in the LO (-)
position, the dirt sensor will detect carpet
fuzz, especially on new carpet, which may
cause the red light to remain on longer
than expected.
Sensitivity
Switch
t I
Switch
I Cover
WARNING ............
Electrical Shock And Personal
Injury Hazard
Disconnect electrical supply before
servicing or cleaning the unit.
Failure to do so could result in
electrical shock or personal injury
from cleaner suddenly starting.
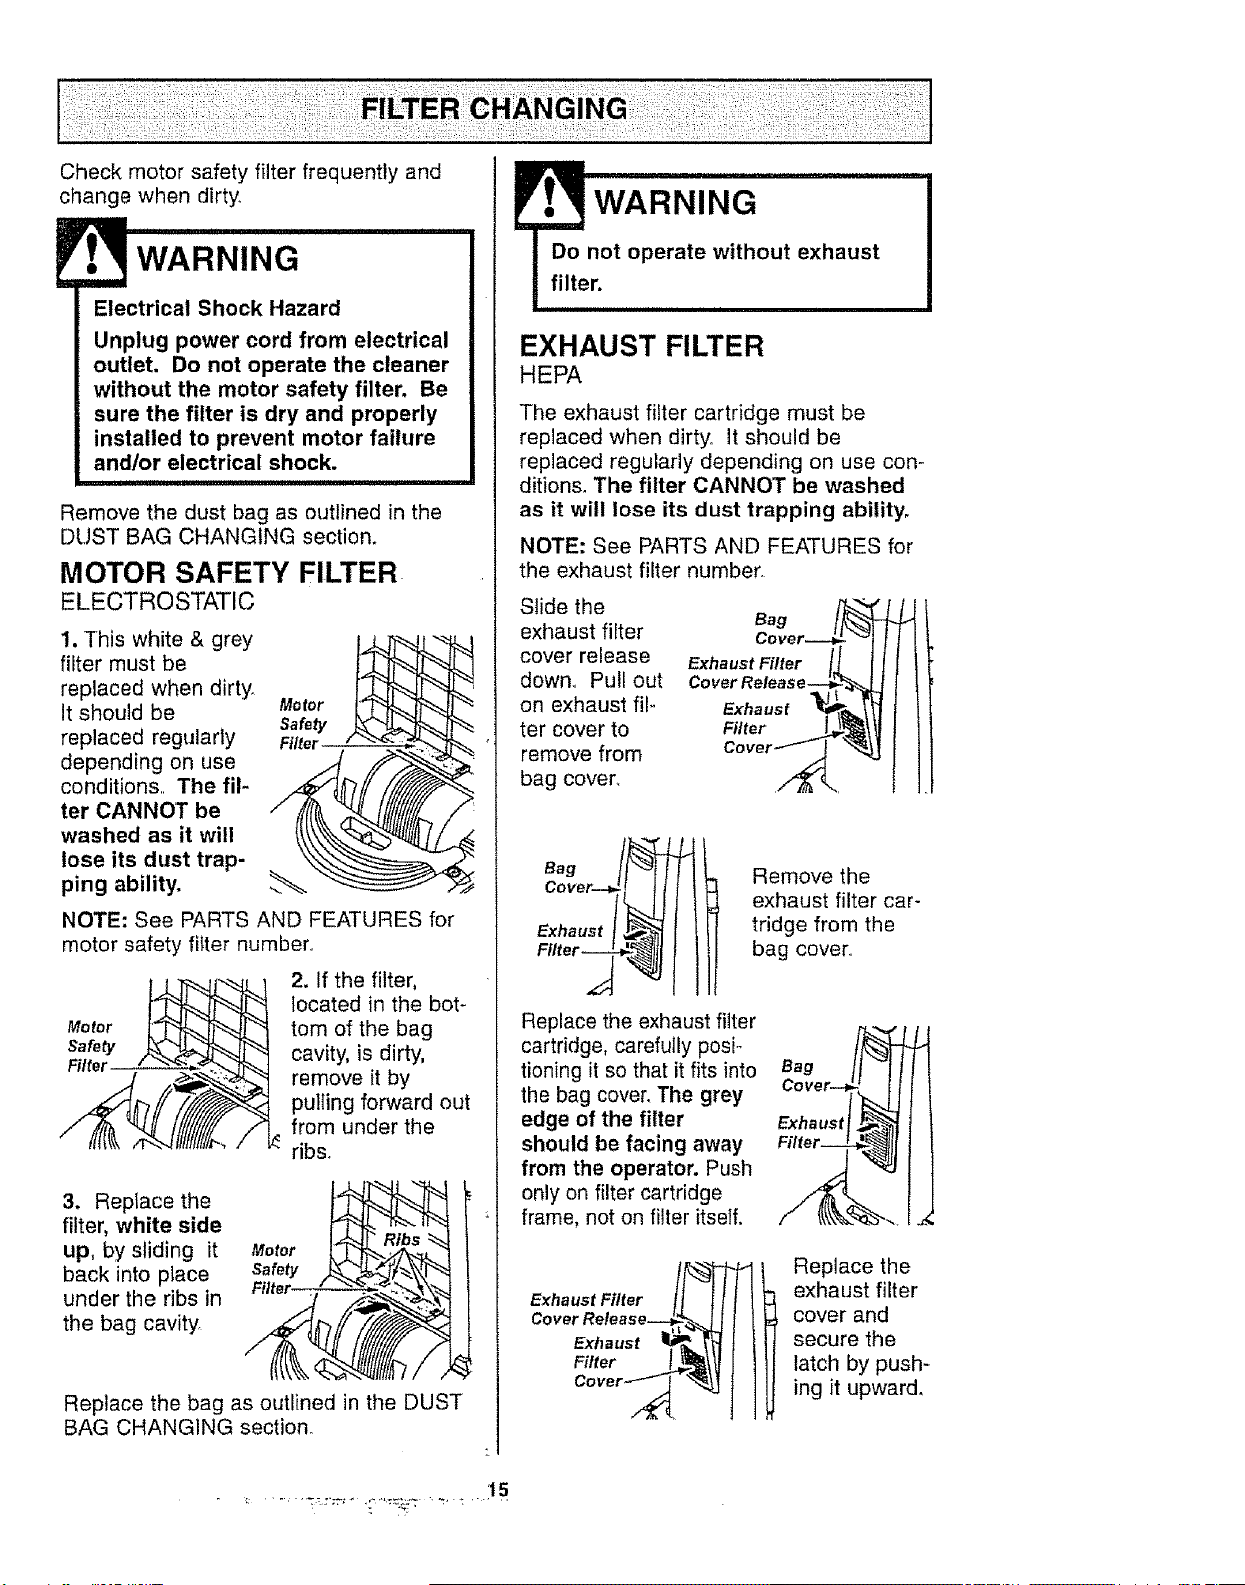
TO CLEAN DIRT SENSOR OPTICS
The dirt sensor optics consist of two optic
cells located inside the bag holder.
Occasionally, it may become necessary to
clean the two optic cells to assure
maximum performance, It is
recommended the optic cells be cleaned:
•When the red light stays on
continuously.
=When the green light stays on
continuously°
•When dirt or dust adheres to the
optic cells,
•Whenever the dust bag is changed.
To clean the sensor, wipe the optic cells
with a soft, dry cloth. Never use cleaners
or liquids as they can help speed the
recoating of the optic cells and make it
necessary to clean them much sooner
than normal° The dirt sensor area can be
reached by removing the dust cover and
the dust bag,,
Optic
Holder
12
Alwaysfollowall safetyprecautionswhen
cleaningand servicing the vacuum
cleaner.
Electrical Shock And Personal
Injury Hazard
Disconnect electrical supply before
servicing or cleaning the unit.
Failure to do so could result in
electrical shock or personal injury
from cleaner suddenly starting.
Gather the cord and wrap it loosely
around the upper and lower cord hooks..
Store the cleaner
in a dry, indoor
area, on the floor
with the handle
locked in the
upright
position1
WARNING
Electrical Shock And Personal
Injury Hazard
Wrapping the cord too tightly puts
stress on the cord and can cause
cord damage. A damaged cord is an
electrical shock hazard and could
cause personal injury or damage.
Unplug cord from wall outlet. DO NOT drip
water on cleaner°
Clean exterior using a clean, soft cloth that has
been dipped in a solution of mild liquid deter-
gent and water, then wrung dry:,Wipe dry after
cleaning.
To reduce static electricity and dust build-up,
wipe outer surface of cleaner and attachments.
Wash attachments in warm soapy water, rinse
and air dry. Do not clean in dishwasher.
E• CAUTION
Do not use attachments if they are
wet. Attachments used in dirty
areas, such as under a refrigerator,
should not be used on other
surfaces until they are washed.
They could leave marks.
13

TO REMOVE DUST BAG
iii nl ,innl, , i
WARNING
Always unplug power cord from
electrical outlet before performing
any service on vacuum.
Pull out on the
bag cover
release located
near the top of
the bag cover.
Bag /_l l
Cover_
oovor-ll
Grasp the dust bag
collar and pull gen-
tly, carefully remov-
ing the dust bag.
'Throw away the
used dust bag.
Do not reuse.
Pull the bag
cover forward
and lift up
Remove and
lay aside.
Bag
BagHolder Check the bag
holder and the
- Bag Cavity motor safety ill-
ter_ If either is
blocked, check
Safety TROUBLE_
Filter SHOOTING.
CAUTION
NEVER REUSE A DUST BAG. Very
fine materials, such as carpet
freshener, face powder, fine dust,
plaster, soot, etc. can clog the bag
and cause it to burst before it is
full. Change bag more often when
vacuuming these materials.
TO REPLACE DUST BAG
Unfold the
new dust bag° oust
Fold the safety Bag
seal tab on the
new dust bag
away from the
opening that
fits on the bag
holder.
NOTE: See PARTS AND FEATURES for
Bag number.
insert the dust bag
onto the bag holder
completely by holding
the bag collar.
Tuck the bag
behind each of
the four bag
retention corner
flaps shown here.
Be sure the bot-
tom and sides of
the dust bag are
completely within
bag cavity prior to
replacing the bag
cover_
Place the dust bag
collar into position.
Position the bag
cover so its
positioning tabs
fit into the body
positioning tab
slots,
Close the bag
cover_
You will hear a
distinct snap
when cover is
securely closed.
Check to see
that the dust
bag is fully enclosed in the bag cover.
14 ....
Checkmotorsafetyfilterfrequentlyand
changewhendirty.
WARNING
Electrical Shock Hazard
Unplug power cord from electrical
outlet. Do not operate the cleaner
without the motor safety filter. Be
sure the filter is dry and properly
installed to prevent motor failure
and/or electrical shock.
Remove the dust bag as outlined in the
DUST BAG CHANGING section.
MOTOR SAFETY FILTER
ELECTROSTATIC
1. This white & grey
filter must be
replaced when dirt;,/.
It should be
replaced regularly
depending on use
conditions,, The fil-
ter CANNOT be
washed as it will
lose its dust trap-
ping ability.
Motor f_
Safety ._"._ "_h_
Filter " "_."_
NOTE: See PARTS AND FEATURES for
motor safety filter number,r
Filter " "_'__
2. If the filter,
located in the bot-
tom of the bag
cavity, is dirty,
remove it by
pulling forward out
from under the
ribs.
3. Replace the
filter, white side
up, by sliding it
back into place
under the ribs in
the bag cavity
Motor
Replace the bag as outlined in the DUST
BAG CHANGING section.
WARNING
Do not operate without exhaust
filter.
EXHAUST FILTER
HEPA
The exhaust filter cartridge must be
replaced when dirty. It should be
replaced regularly depending on use con-
ditions. The filter CANNOT be washed
as it will lose its dust trapping ability.
NOTE: See PARTS AND FEATURES for
the exhaust filter number,
Slide the
exhaust fiffer
cover release
down. Pull out
on exhaust film
ter cover to
remove from
bag cover_
Exhaust Filter /1 I1
COvet Release._t_L_
cover_ _
Remove the
exhaust filter car-
tridge from the
bag cover..
Replace the exhaust filter
cartridge, carefully posio
tioning it so that it fits into
the bag cover. The grey
edge of the filter
should be facing away
from the operator. Push
only on filter cartridge
frame, not on filter itself.
Bag
Exhaust
Exhaust Filter !_
Cover Release
Exhaust _-_'_
Fittor / 1t!
Cover __
Replace the
exhaust filter
cover and
secure the
latch by push-
ing it upward.
15
WARNING
Electrical Shock Or Personal Injury
Hazard
Disconnect electrical supply before
servicing or cleaning the unit.
Failure to do so could result in
electrical shock or personal injury
from cleaner suddenly starting.
Frequently check and remove hair, string
and lint build-up in the brush area. If
build-up becomes excessive, follow the
steps below.
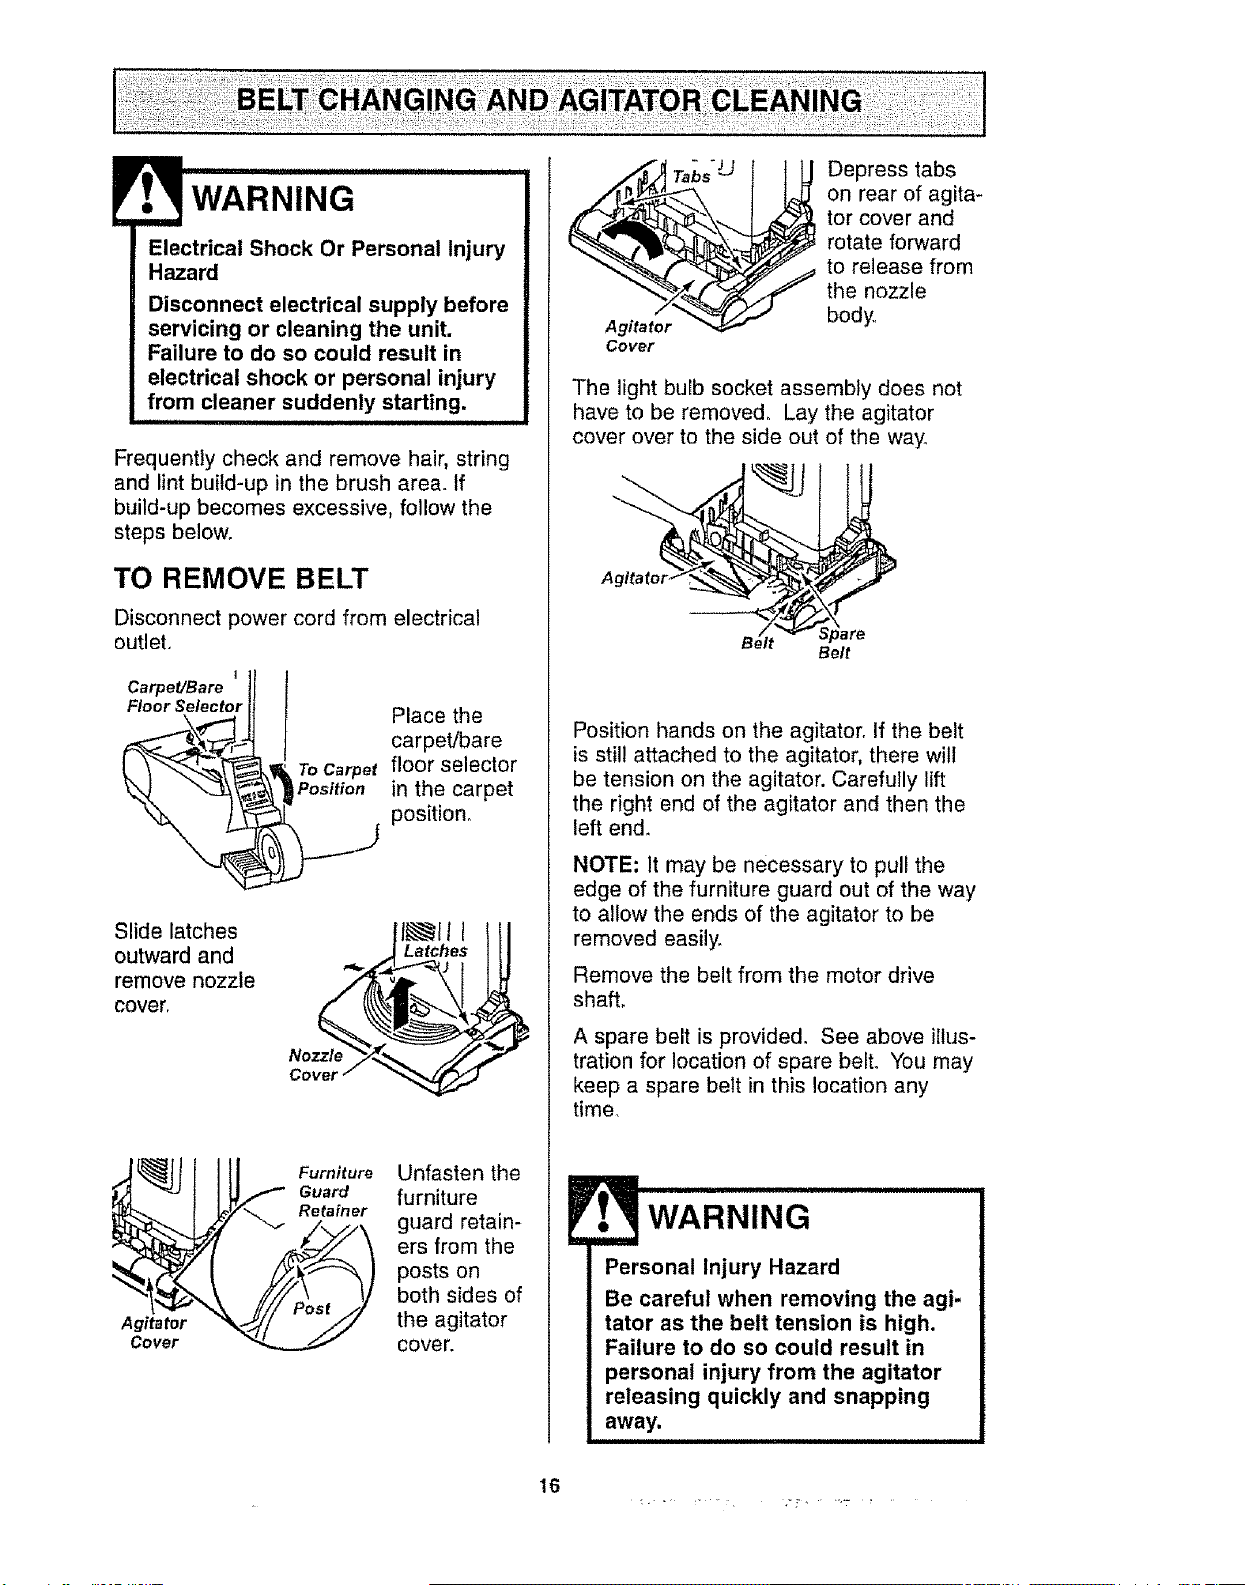
TO REMOVE BELT
Disconnect power cord from electrical
outlet.
I
Carpet/Bare
Floor Selector
Place the
carpet/bare
_ o Carpet floor selector
Position in the carpet
_ positiono
Slide latches
outward and
remove nozzle
cover,
Latches
Nozzle
Agitator
Cover
Furniture
Guard
Retainer
Unfasten the
furniture
guard retain-
ers from the
posts on
both sides of
the agitator
cover.
T.-b,"U Depress tabs
on rear of agita-
tor cover and
rotate forward
to release from
the nozzle
body
The light buEb socket assembly does not
have to be removed. Lay the agitator
cover over to the side out of the way.
Belt
Position hands on the agitator. If the belt
is still attached to the agitator, there will
be tension on the agitator. Carefully lift
the right end of the agitator and then the
left end.
NOTE; It may be necessary to pull the
edge of the furniture guard out of the way
to allow the ends of the agitator to be
removed easily.
Remove the belt from the motor drive
shaft,
A spare belt is provided. See above illus-
tration for location of spare belt. You may
keep a spare belt in this location any
time.
E WARNING
Personal Injury Hazard
Be careful when removing the agi-
tator as the belt tension is high,
Failure to do so could result in
personal injury from the agitator
releasing quickly and snapping
away.
16

TO CLEAN AGITATOR
NOTE: In order to keep cleaning efficiency
high and to prevent damage to your vacu-
urn, the agitator must be cleaned e_
the b_!,t is changed.
The agitator must be cleaned according to
the following schedule:
Vacuum Use Clean Aqitator
HEAVY every week
(used daily)
MODERATE
(used 2-3 times/week)
every month
LIGHT
(used 1 time/week)
every 2 months
Remove ant dirt or derbris in the belt path
area or in the agitator area.
Exploded View - Agitator
Assembly
Washer Agitator Unit
Cap Belt Pulley End
Cap
\
End Cap
Carefully remove
the brush end
caps and remove
any string or
debris located on
the agitator
assembly, end
caps, washers or
agitator shaft.
NOTE: Replace the end caps, See the
exploded view for correct assembly,
TO REPLACE BELT
Make sure that the carpet/bare floor selec-
tor is in the carpet position.
Loop the new belt on the motor shaft.
Belt _w
Pulley Belt
Motor
Shaft
CarpeUBare Floor
Selector Shaft
BELT ROUTING
Correct Routing of Belt
(Selector in Carpe_on)
I_, I Belt / _'_ , Carpet!Bare
Agitator / Motor
Carpet/Bare Floor Shaft
Selector Shaft
Incorrect Routing of Belt
(Belt on Selector _;haft)
_CarpeUBare
Floor Pedal
Agitator Mo tot
Carpet/Bare Floor Shaft
Selector Shaft
Incorrect Routing of Belt
(Selector in Bare Floor Position)
i _, Carpe t/Bare
{ _, ['}Floor Pedal
k
Agitator Belt Carpet/Bare Floor
Selector Shaft
NOTE: See PARTS AND FEATURES for
belt number.
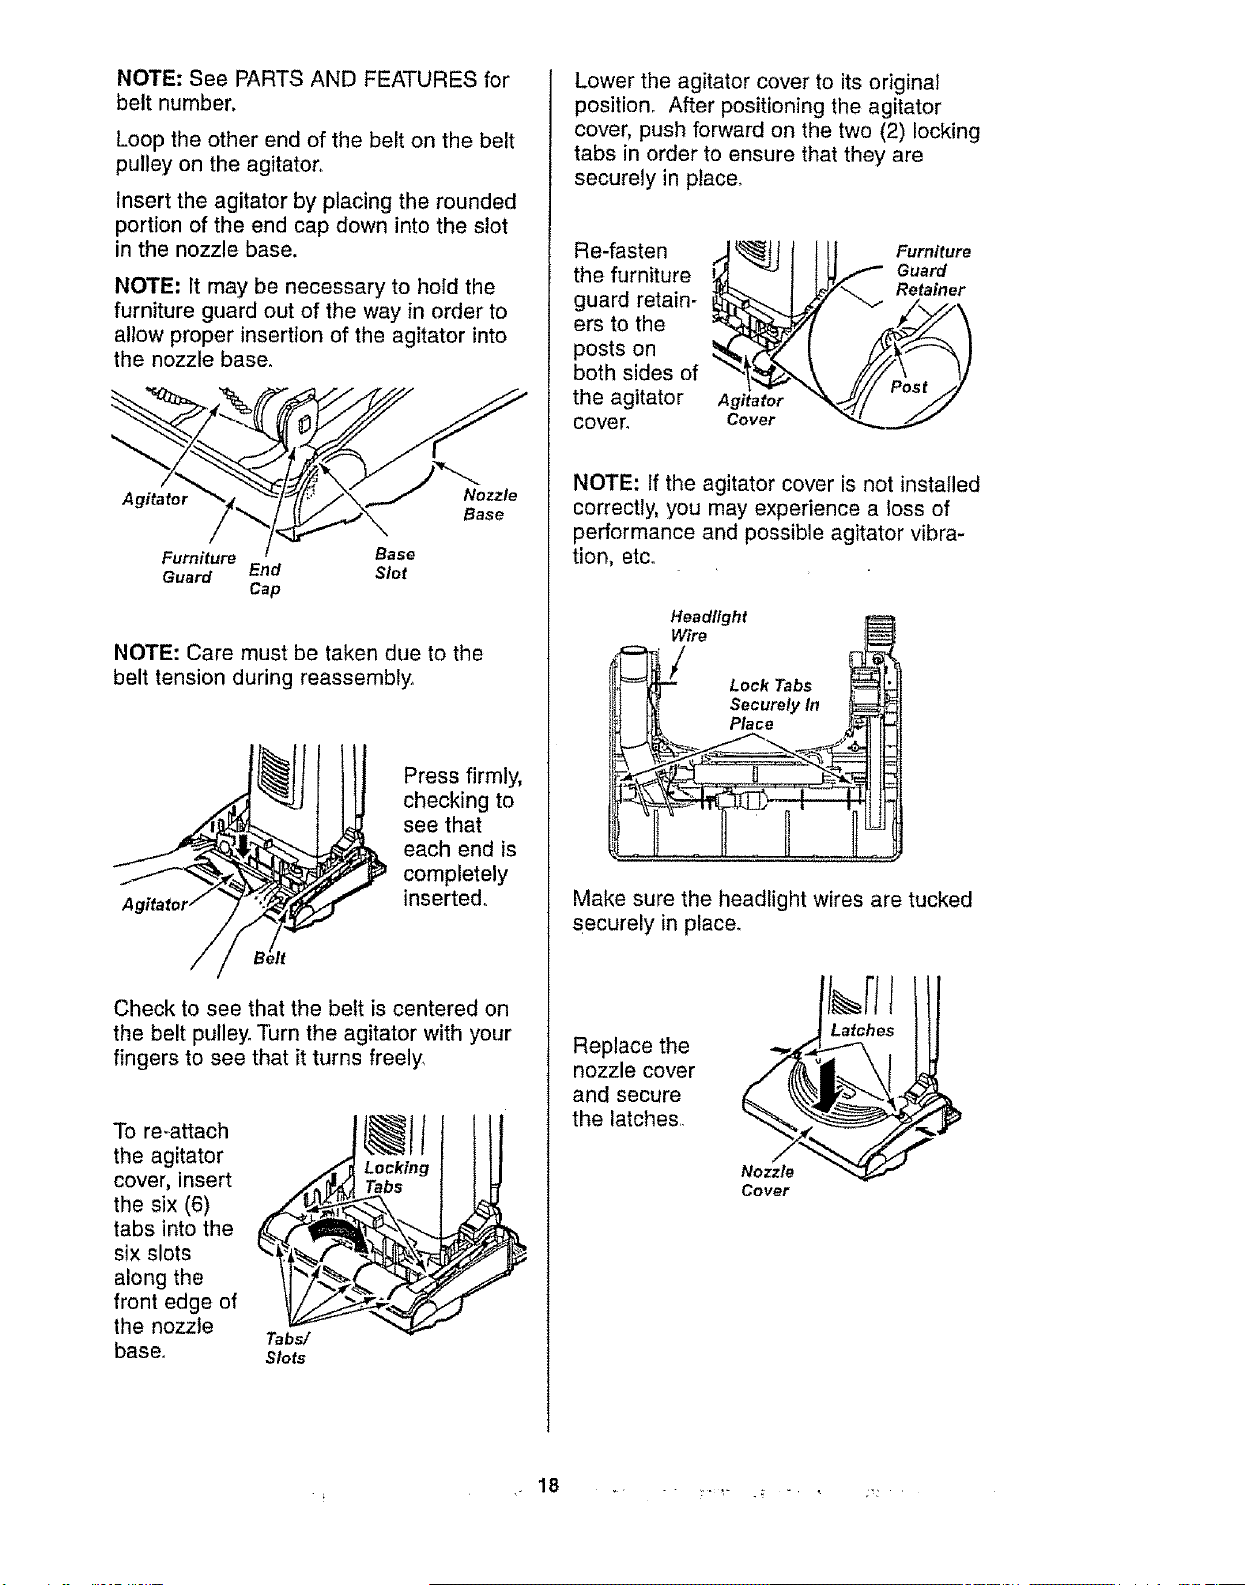
Loop the other end of the belt on the belt
pulley on the agitator.
Insert the agitator by placing the rounded
portion of the end cap down into the slot
in the nozzle base.
NOTE: It may be necessary to hold the
furniture guard out of the way in order to
allow proper insertion of the agitator into
the nozzle base.
Agitator Nozzle
Base
Furniture Base
Guard End Slot
Cap
NOTE: Care must be taken due to the
belt tension during reassembly.
Press firmly,
checking to
see that
each end is
completely
inserted.
Check to see that the belt is centered on
the belt pulley. Turn the agitator with your
fingers to see that it turns freely_
To re-attach
the agitator _
cover, insert
the six (6)
tabs into the _
six slots
along the _.
front edge of
the nozzle
Tabs/
base. Slots
Locking
Tabs
J
Lower the agitator cover to its original
position. After positioning the agitator
cover, push forward on the two (2) locking
tabs in order to ensure that they are
securely in place.
Re-fasten
the furniture
guard retain-
ers to the
posts on
both sides of
the agitator
cover°
Agitator
Cover
Furniture
Guard
Retainer
NOTE: If the agitator cover is not installed
correctly, you may experience a loss of
performance and possible agitator vibra-
tion, etc°
Headlight
Wire
ook,obs
I N ecurety In
J [i[ Place
Make sure the headlight wires are tucked
securely in place.
Replace the
nozzle cover
and secure
the latches.
Nozzle
Cover
1
18
Alwaysfollowallsafetyprecautionswhen
cleaningandservicingthevacuum
cleaner.
WARNING
Electrical Shock Or Personal Injury
Hazard
Disconnect electrical supply before
servicing or cleaning the unit.
Failure to do so could result in
electrical shock or personal injury
from cleaner suddenly starting.
iiiiii i iiiii iiiii, iiii i
If the cleaner does not seem to have ade-
quate suction, first check if the dust bag is
full or if a filter is Clogged. See DUST
BAG CHANGING and FILTER CHANG-
ING.
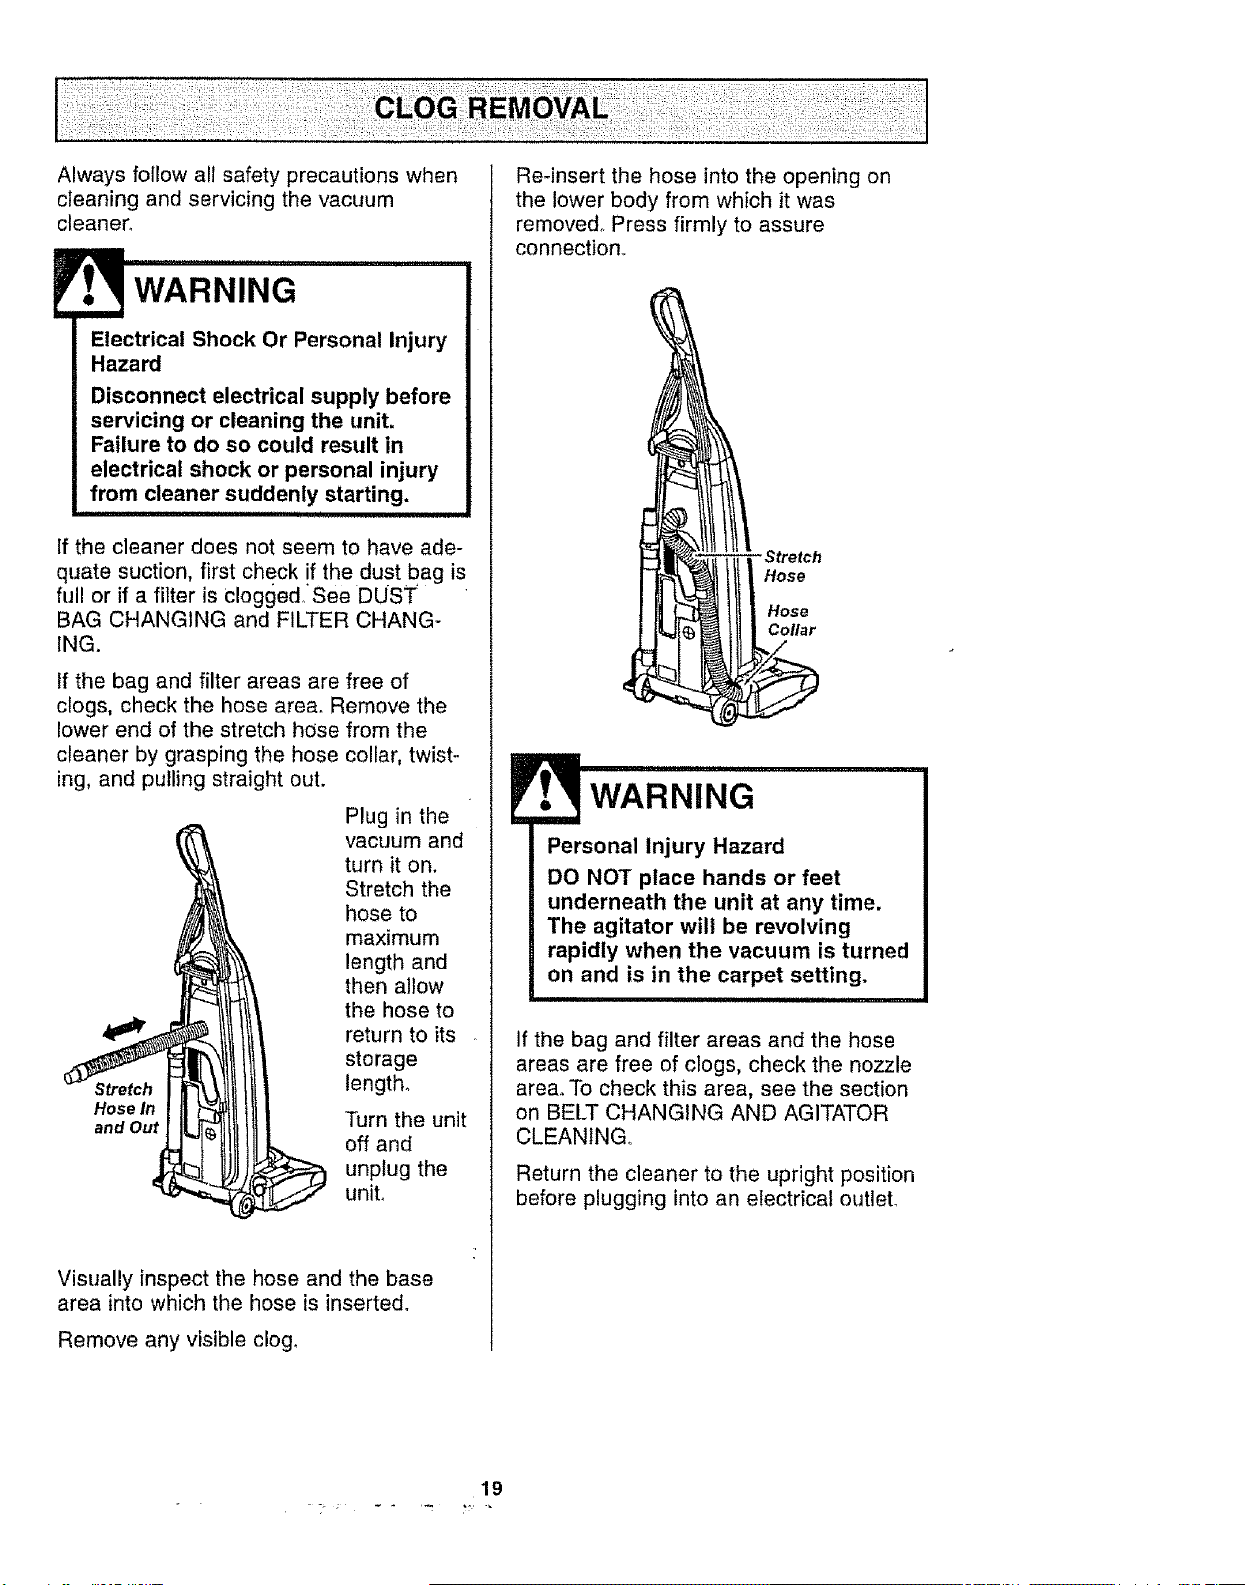
If the bag and filter areas are free of
clogs, check the hose area. Remove the
lower end of the stretch hose from the
cleaner by grasping the hose collar, twist-
ing, and pulling straight out.
Plug in the
vacuum and
turn it on.
Stretch the
hose to
maximum
length and
then allow
the hose to
return to its
storage
length_
Hose In
and Out Turn the unit
off and
unplug the
unit°
Visually inspect the hose and the base
area into which the hose is inserted.
Remove any visible clog,
Re-insert the hose into the opening on
the lower body from which it was
removed° Press firmly to assure
connection
-Stretch
Hose
Hose
Collar
WARNING
Personal Injury Hazard
DO NOT place hands or feet
underneath the unit at any time.
The agitator will be revolving
rapidly when the vacuum is turned
on and is in the carpet setting.
iii i
If the bag and filter areas and the hose
areas are free of clogs, check the nozzle
area. To check this area, see the section
on BELT CHANGING AND AGITATOR
CLEANING,
Return the cleaner to the upright position
before plugging into an electrical outleL
19
WARNING
Electrical Shock Or Personal Injury
Hazard
Disconnect electrical supply before
servicing or cleaning the unit.
Failure to do so could result in
electrical shock or personal injury
from cleaner suddenly starting.
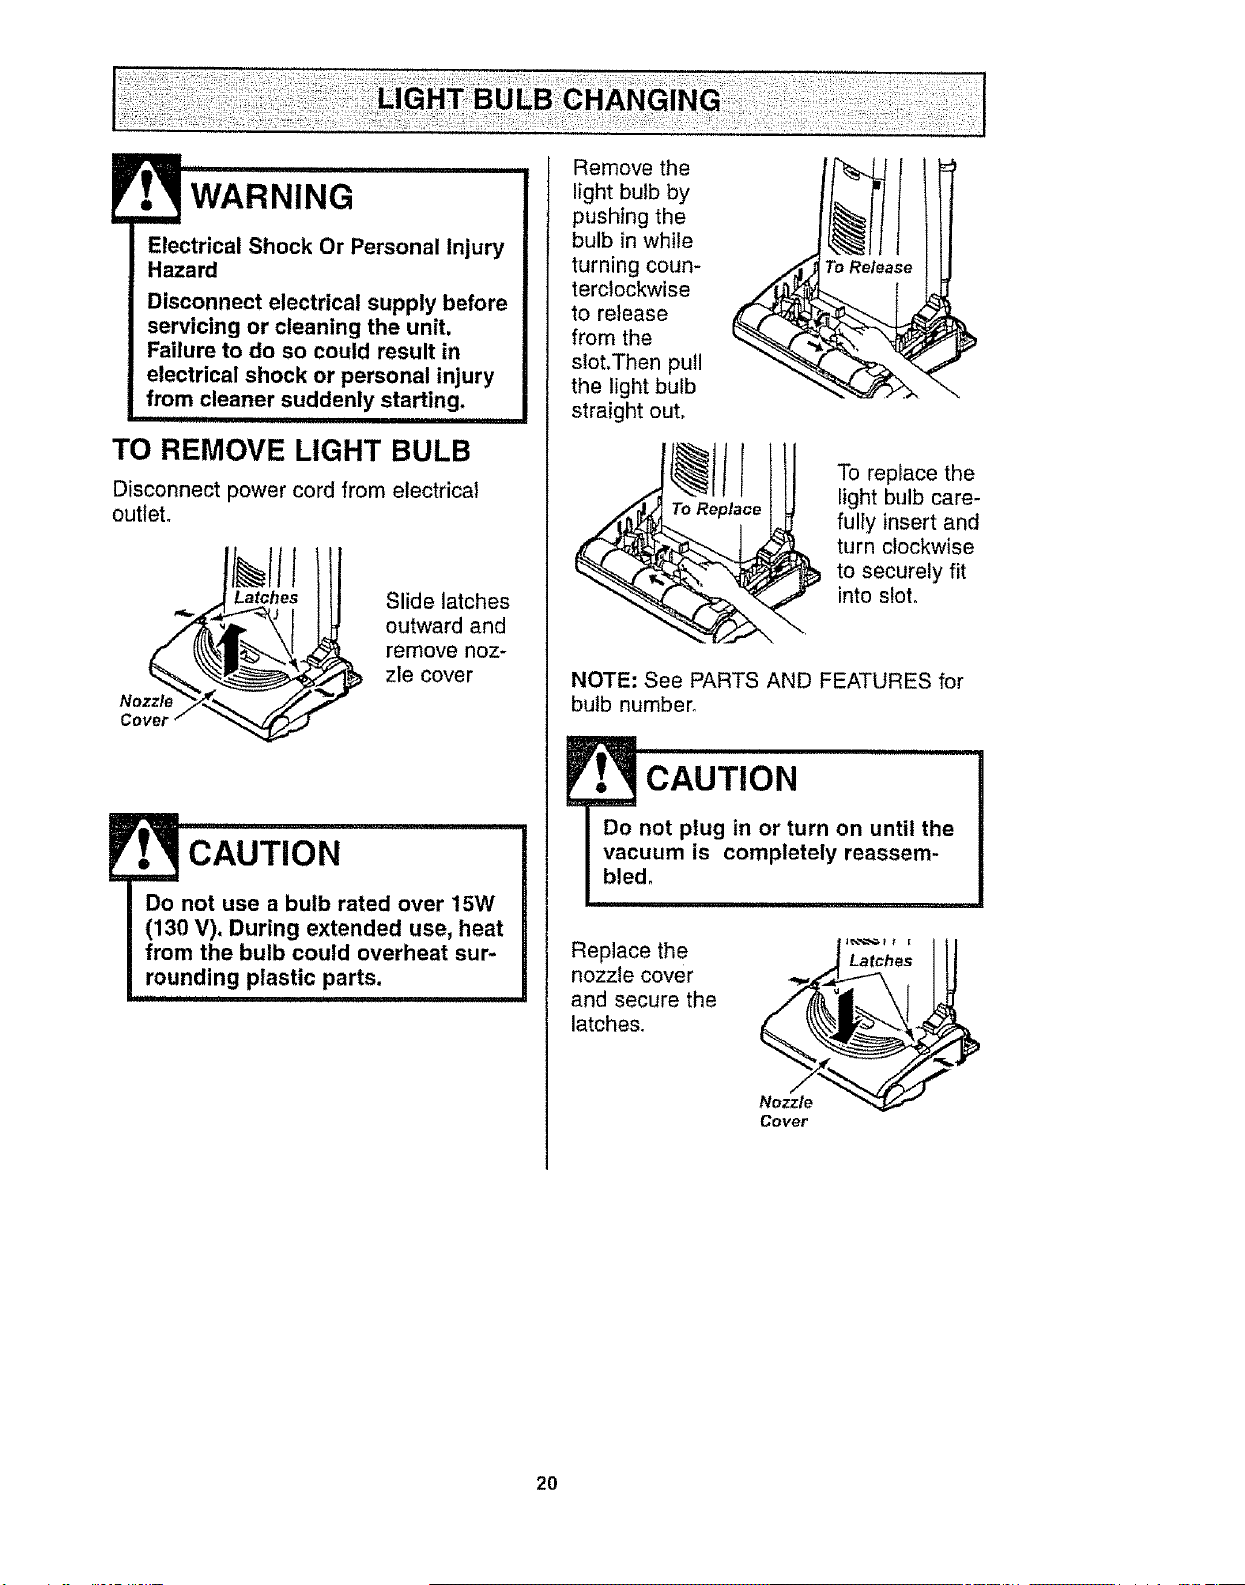
TO REMOVE LIGHT BULB
Disconnect power cord from electrical
outleL
Nozzle
Slide latches
outward and
remove noz-
zle cover
CAUTION
Do not use a bulb rated over 15W
(130 V). During extended use, heat
from the bulb could overheat sur-
rounding plastic parts.
............ i
Remove the
light bulb by
pushing the
bulb in while
turning coun-
terclockwise
to release
from the
slot.Then pull
the light bulb
straight out,
To Release I
To replace the
light bulb care-
fully insert and
turn clockwise
to securely fit
into sloto
NOTE: See PARTS AND FEATURES for
bulb number_
Replace the
nozzle cover
and secure the
latches.
Nozzle _-
Cover
20
m
WARNING
Electrical Shock Or Personal Injury
Hazard
Disconnect electrical supply before
servicing or cleaning the unit.
Failure to do so could result in
electrical shock or personal injury
from cleaner suddenly starting.
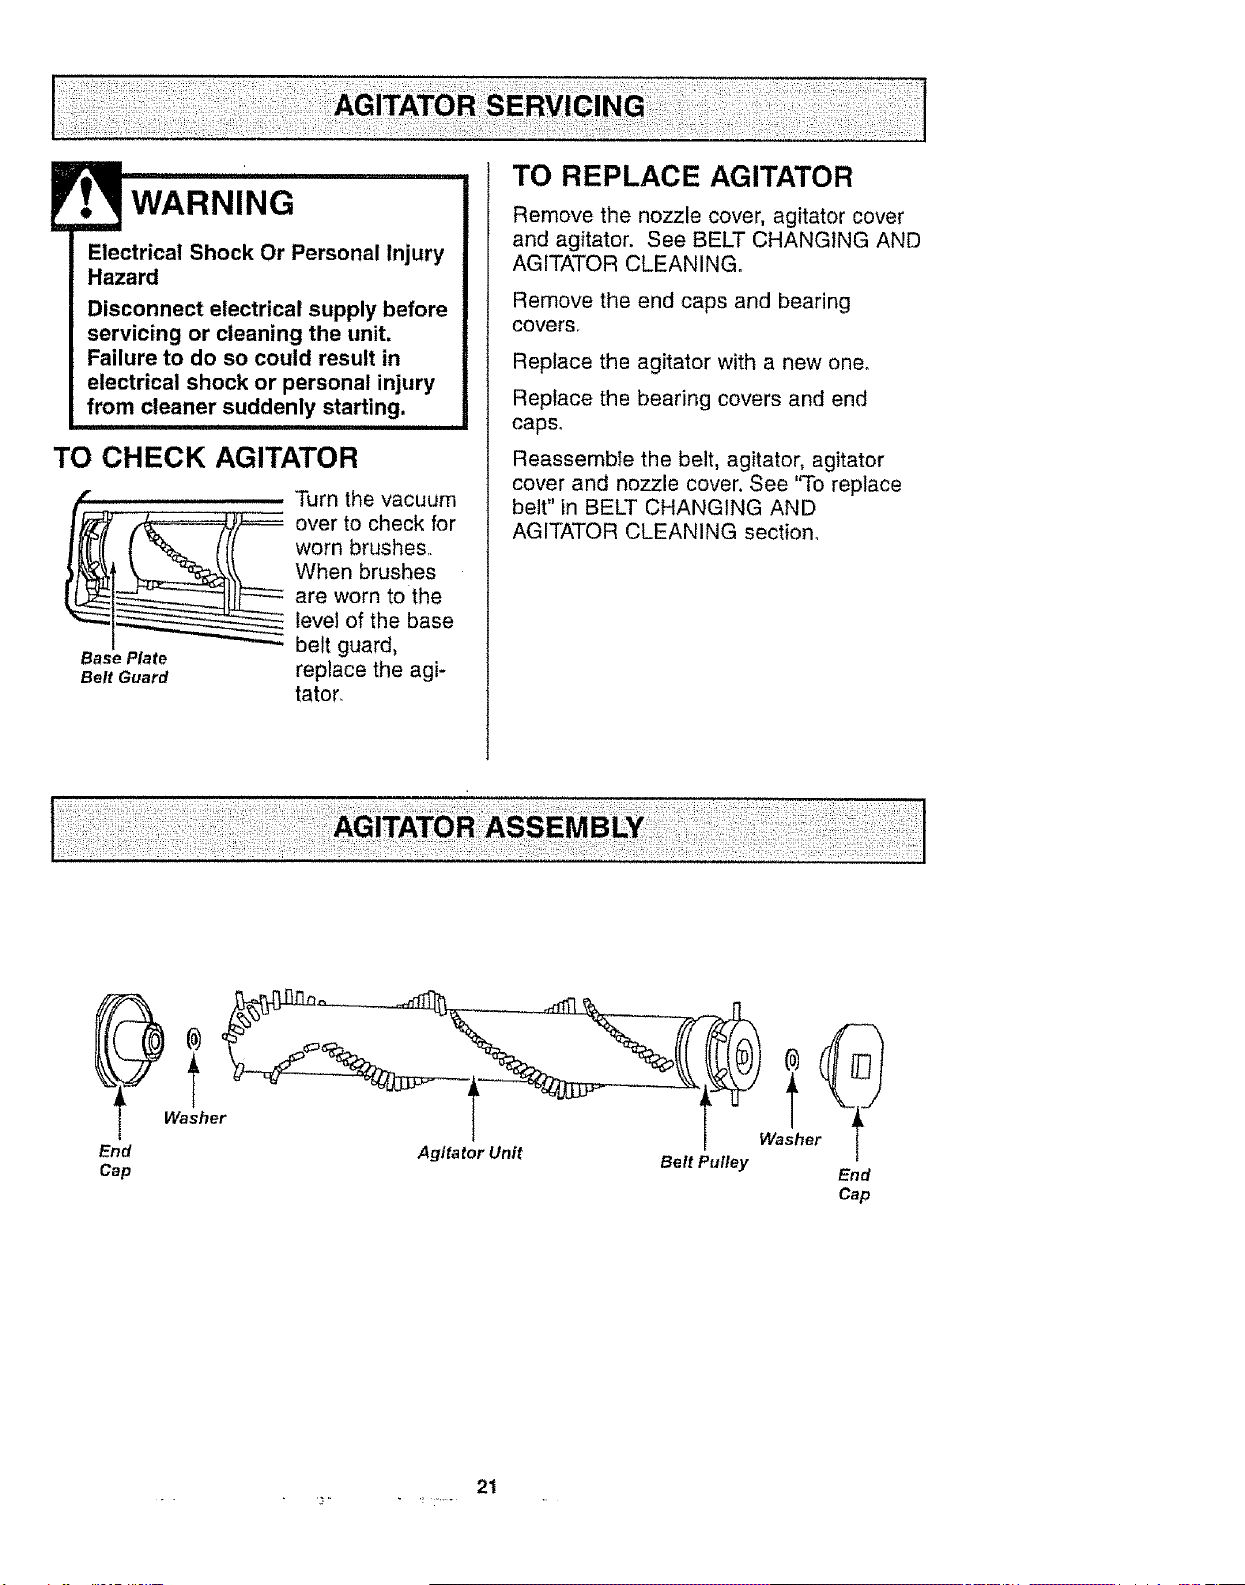
TO CHECK AGITATOR
........... Turn the vacuum
__ ver to check for
worn brushes,,
When brushes
are worn to the
level of the base
Base Plate belt guard,
Belt Guard replace the agi-
tator.
.... TO REPLACE AGITATOR
Remove the nozzle cover, agitator cover
and agitator. See BELT CHANGING AND
AGITATOR CLEANING.
Remove the end caps and bearing
covers,
Replace the agitator with a new one.
Replace the bearing covers and end
caps.
Reassemble the belt, agitator, agitator
cover and nozzle cover, See 'q'o replace
belt" in BELT CHANGING AND
AGITATOR CLEANING section.
End
Cap
Washe !he
Agitator Unit
Belt Pufley End
Cap
2t
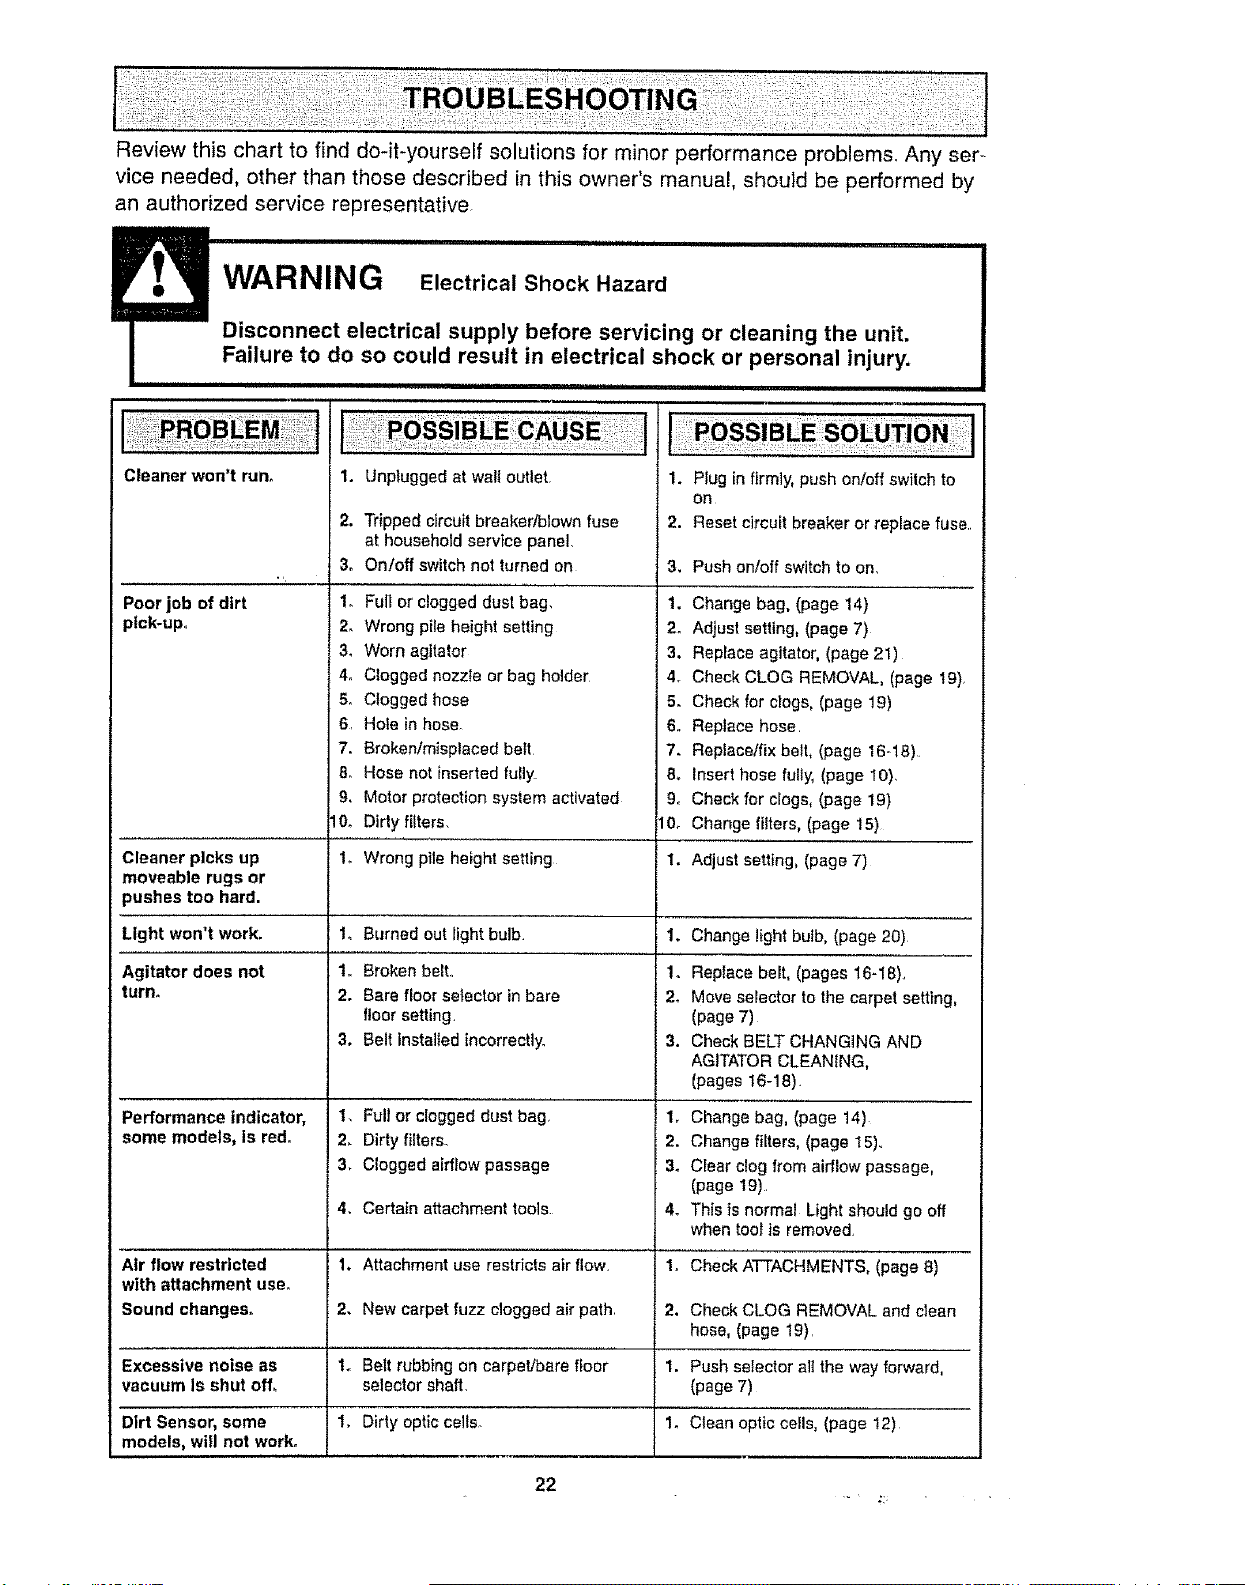
Review this chart to find do-it-yourself solutions for minor performance problems_ Any ser-
vice needed, other than those described in this owner's manual, should be performed by
an authorized service representative,
iF, WARNING Electrical...............................................................Shock Hazard
Disconnect electrical supply before servicing or cleaning the unit.
Failure to do so could result in electrical shock or personal injury.
ii i,ii IHII
Cleaner won't run. 1.
2.
3.
Poor job of dirt 1,
pick-up. 2.
34
4o
5o
6,
7.
8_
9,
I0.
Unplugged at wali outlet.
Tripped circuit breaker/blown fuse
at household service panel.
On!off switch not turned on
Full or clogged dust bag,
Wrong pile height setting
Worn agitator
Clogged nozzle or bag holder
Clogged hose
Hole in hose
Broken/misplaced belt
1. Plug in firmly, push on/off switch to
OR
2. Reset circuit breaker or replace fuse.,
Hose not inserted fully 8.
Motor protection system activated 9.
Dirty fitters. 10.
3. Push on/off switch to on.
1. Change bag. (page 14)
2. Adjust setting, (page 7)
3. Replace agitator, (page 21)
4. Check CLOG REMOVAL, (page 19)_
5. Check for clogs, (page 19)
6. Replace hose
7. Replace/fix belt, (page 16-18).
Insert hose fully, (page 10),
Check for clogs, (page 19)
Change filters, (page 15)
Cleaner picks up 1o Wrong pile height setting 1. Adjust setting, (page 7)
moveable rugs or
pushes too hard.
Light won't work. Burned out light bulb. Change lightbulb, (page 20)
"L
1o
2.
3,
Broken belt.,
Bare floorsetector in bare
floorsetting.
Belt installed incorrectly.
2.
3.
4.
1.
2.
1.
1.
Full or clogged dust bag.
Dirty filters.
Clogged airflow passage
1.
1o
2.
3.
Agitator does not
turn.
2.
3.
4.
1,
2,
1.
1o
Performance indicator,
some models, Is red.
Replace belt, (pages 16-I8),,
Move serector to the carpet setting,
(page 7)
Check BELT CHANGING AND
AGITATOR CLEANING,
(pages t6-18).
Change bag, (page 14)
Change filters, (page 15)_,
Ciear clog from airflow passage,
(page 19).
This is normal Light should go off
when toolts removed,
Certain attachment tools
Air flow restricted Attachment use restricts air flow, Check ATTACHMENTS, (page 8)
with attachment use,
Sound changes. New carpet fuzz clogged air path Check CLOG REMOVAL and clean
hose, (page 19),
Excessive noise as Belt rubbingon carpet/bare floor Push selector all the way forward,
vacuum Is shut off, selector shaft. (page 7)
Dirt Sensor, some Dirty optic celts_ Clean opticceils, (page !2)
models, will not work°
22
For
repair of major brand appliances in your own home ...
no matter who made it, no matter who sold it!
1-800-4-MY-HOME ® Anytime, day or night
(1-800-469-4663) (USA and Canada)
www.searsocom www.sears.ca
For repair of carry-in products like vacuums, lawn equipment, and
electronics, call for the nearest Sears Parts and Repair Center.
1-800-488-1222 Anytime, day or night (U.S A, only)
www,sears.com
For the replacement parts, accessories and owner's manuals
that you need to do-it-yourself, call Sears PartsDirectSU!
1-800-366-PART 6 a,m - tl p.m, 7 days a week
(1-800-366-7278) (U,SA only)
www.sears.comipartsdirect
To purchase or inquire about a Sears Service Agreement
or Sears Maintenance Agreement:
1-800-827-6655 (USoA,) 1-800-361-6665 (Canada)
7 a.m.- 5 pro., CST, Mon,- Sat, 9 a,m.- 8 pm, EST, M - E 4 pro. SaL
Pard pedir servicio de reparaci6n a
domicilio, y para ordenar piezas:
1-888-SU-HOGAR su
(1-888-784-6427)
Au Canada pour service en fran;ais:
1-800-LE-FOYER Mc
(1-800-533-6937)
www,,sears ca
HomeCentral
© Sears, Roebuck and Co.
Ti._ r sM k f
® Registered Trademark I " Tradema k t Service Mar o Sears, Roebuck and Co.
® Marca Registrada / T_,_Marca de Fdbrica / sMMarca de Servicio de Sears, Roebuck and Co,
McMarque de commerce / MDMarque d_posSe de Sears, Roebuck and Co.
z
23
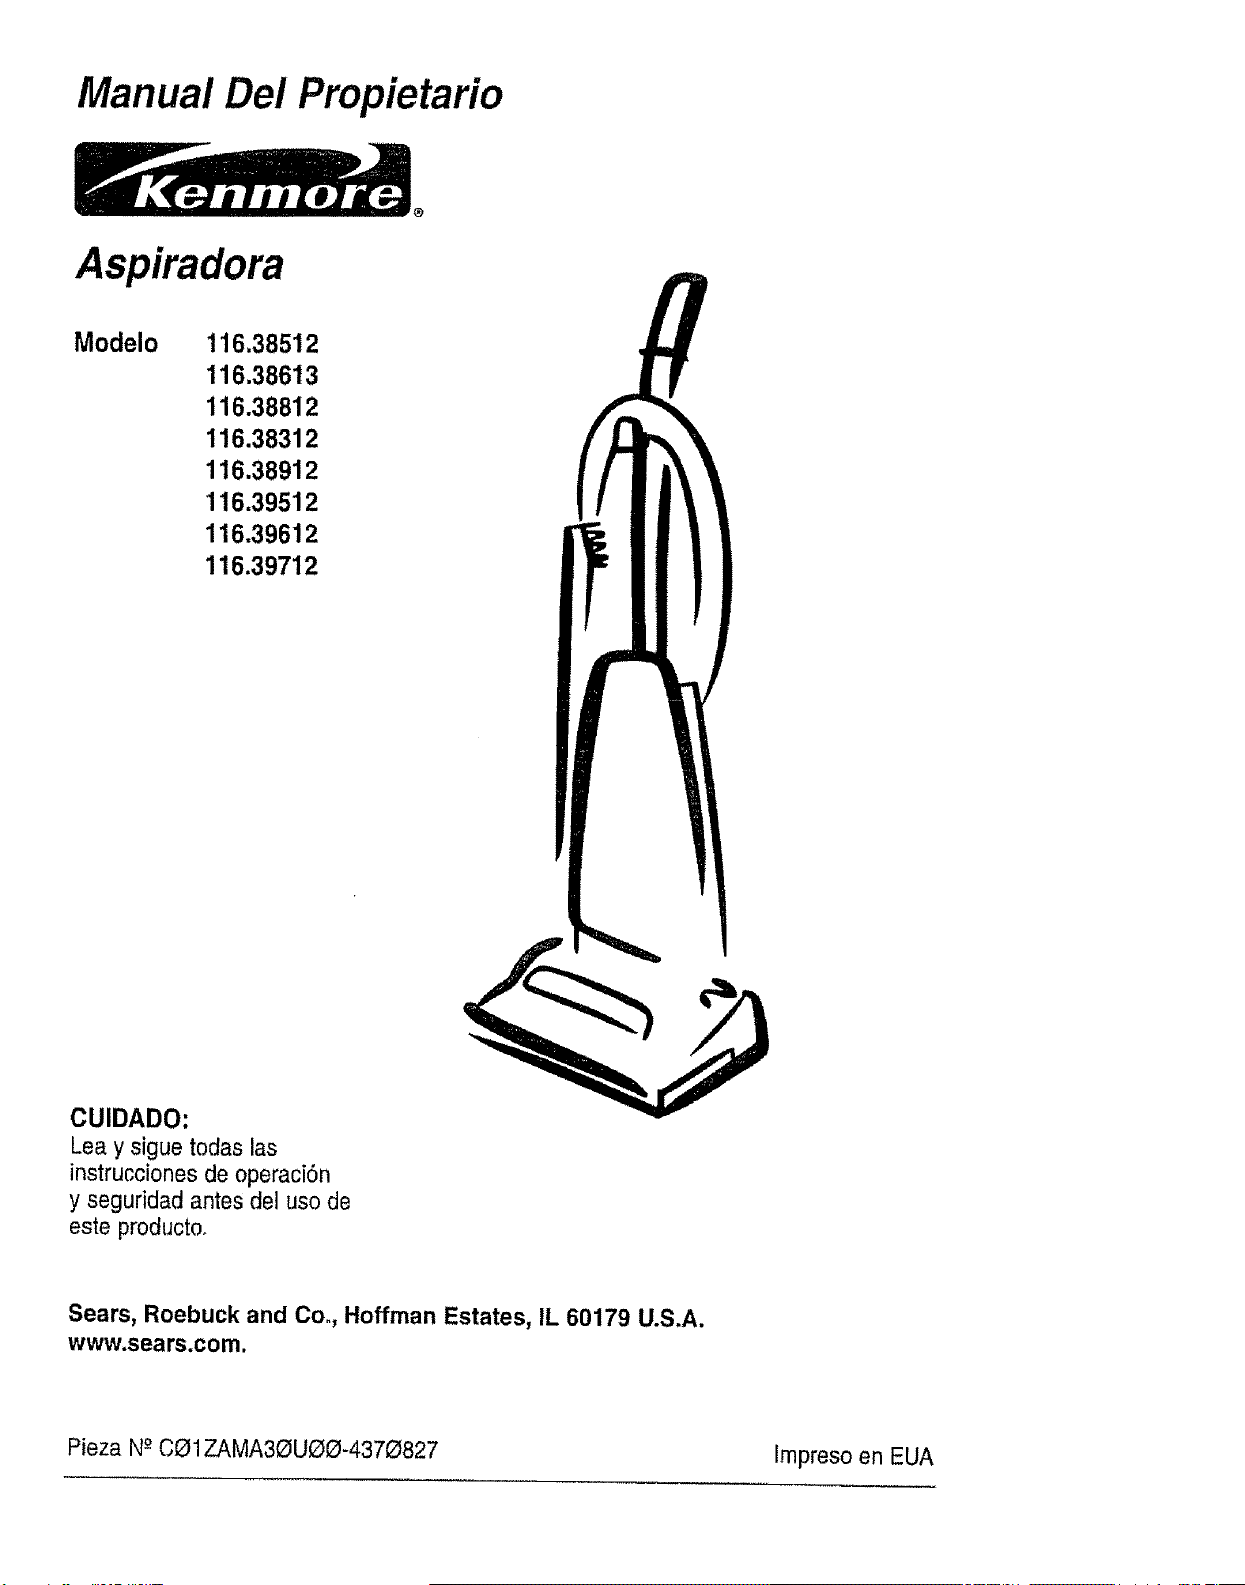
Manual Del Propietario
Aspiradora
Modelo 116.38512
116.38613
116.38812
116.38312
116.38912
116.39512
116.39612
116.39712
CUIDADO:
Lea y sigue todas las
instrucciones de operaci6n
y seguridad antes del uso de
este producto.
Sears, Roebuck and Co., Hoffman Estates, IL 60179 U.S.A.
www.sears.com.
Pieza N-_CO1ZAMA30UOO-4370827 Impreso en EUA
Antes de usar su aspiradora nueva ..... 2
Garantia de la aspiradora de Kenmore 2
Instrucciones importantes de
seguridad ........................... 3
Piezas y caractedsticas ................ 4
Instrucciones de ensamblamiento ...... 5-6
tnstrucciones de operaci6n .............. 6
Ajusle y selecci6nde nivelde petede la
alfombra ................................ 7
Selectorde pisos conallombra y .......... 7
sinalfombra
Desprendimientodet mango.............. 8
Interrupterde encendidolapagado ........... 8
Accesorios ........................ 8-10
Cuadrode usede losaccesorios ............ 10
Sugerenciasparaaspirar .............. tl
Caracterfsticasde rendimiento ........ 11-12
Cuidado de la aspiradora ............. !3
Almacenamientode la aspiradora ...... 13
Umpiezadel exteriory de los accesorios .. 13
Cambio de la bolsa para po[vo ......... t4
Cambio detfiltros .................... 15
Cambio de la correa y limplezadet
agilador ........................ 16-18
C6mo eliminarlos residuesde basura
en}osconductos ........................ 19
Camb{odela bombil{a ........... 20
Cuidadodel agitador ................. 21
Ensambledel agitador .............. 21
Reconocimiento de problemas ........... 22
lnformaci6n de assistancia
o servicio ............................ 23
Perfavorteaesta guia que leayudaraa assemblary operar su aspiradoranuevade Kenmoreen una manera
m_s seguray effectiva.
Paramasinformaci6nacercadel cuidado y operaci6nde estaaspirador,1tameasu tienda Searsmas cercana.
Cuandoprequnteperinformaci6nusted necisitar6el nt_merocompletede eeriey modelode la aspiradoraque
est_ Iocadoen laplacade los nt_merosde modelo y eerie.
Use el espacio de abajo para registrarel nL_merode modeloy serie para su nuevaaspiradorade Kenmore.
N0merode Modelo.
NtJmerode Serie,
Fechade Compra
Matengaestelibre y su recibe enu lugar segure pararefereneiasfuturas,
GARANTiALIMITADADE UN ANO DE LA ASPIRADORA KENMORE
Eslagaranlia es peruna6o desde lafechade compra,e inctuyesolamenteel usede ta aspiradoraen hogares
privados,Duranteel are de garantia, cuando la aspiradoraesoperaday mantenidadeacuerdoatmanual de
instruccionesdel due5o,Searsreparar6 cualquierclefectoen materialeso fabricaci6nlibrede cargo.
Esta garantfaexcluyelasbotsasde colecci6n, correas,lamparilias,y fittros,tas cualessonpartes gastabiesque
sedeterioranconeluso normal,
Para el servicio de garant[a,retorneesta aspiradoraal Centrede ServicioSearsm_s cercanoen los
EstadosUnities.
Esta garantiaseapHcasolamentemientras estepmductoest6enuseen losEstadosUnidos.Esta garantiale
da a ustedderechos Iegalesespecificos, y ustedpuedetenertambi6notrosderechoeloscuales varfande
estadeaestade,
Sears,Roebuckand Co., D/817WA,HoffmanEstates,tL 60179
ADVERTENCIA
Suseguridad es muy importantepara nosotros.Parareducirel riesgo de incendio,cheque
el_ctrico,lesi6n corporalo daSos al utilizar suaspiradora,actde de acuerdo con precauciones
b_isicasde seguridad,entre elias:
Leaestemanualantes de armar o utilizarsu
aspiradora.
Use suaspiradorat_nicamenteenlaforma
descritaen este manual.Use I_nicamentecon
accesodosrecomendadosper Sears.
Para reducirel riesgode chequeel6ctrico,no use
su aspiradoraa[aire libre ni sobresuperficies
mojadaso
Desconecte la fuente de electricdadantesde
darservicioo limpiar. De Iocontrario podrfa
causar unchequeelectdco o lesi6ncorporal.
Siempredebe apagarsu aspiradoraanies de
desconectarlao
No desconecteiaaspiradora tirandodeecord6n
el6ctrieo Paradesconeetada,haleel enchufe,no
el cord6n_
No usela aspiradorasi e[ cordbno el enchufe
est,.daSadoSi laaspiradorano est_
funcionandoadecuadamenteosi se ha dejado
caer, est&daSada,seha dejado expuestaa ra
intempedeo se ha dejadocaer enagua,devu61-
valaa un Centredeservicio de Sears.
Nohale ni transportela aspiradoraper el cordSn;
no useel cordSncome mango;nocierrepuerlas
sobreel cordSn;no hale e!cordSnsobrerebor-
des agudosni esquinas_Nopase la aspiradora
sobree!cordSn.Mantenga el cordSnalejadode
superficiescalientes.
No abandonelaaspiradoracuandoest_ conec-
tada.Descon_ctelacuando nolaest_ usandoy
antes dedarle servicio.
No permitaquesea utilizadacomejuguete.rSe
requieretenermayorcuidadocuandosea
utilizadaenla proximidadde niSeso per niSos.
No toquela aspiradorani el enchufeconias
manesmojadas.
Nocoloqueobjetos en lasaberturas.
G
Noutilice la aspiradorasi a[gunaabertura est,.
bloqueada;mant_ngalatibrede polvo,pelusa,
cabellosy cualquieracosa que podria disminuir
el flujo de aire.
Mantengaelcabello, ropasuelta,dedosy todas
[aspartesdetcuerpoalejados delasaberturas y
piezas mec_.nicas.
No usa laaspiradorasin tener instaradalabolsa
para polvoy/o losfiltros.
Cambie siempre la boisa para polvodespu_sde
aspirarlimpiadoresdealfombraso desodorantes,
tatcosy pelvesfines Estosproductos atascanla
bolsa, reducenel flujode aire y puedencausar
que _stase rompa.Si no cambia la bolsapodria
ecasionar daSopermanentea la aspiradora..
No use[aaspiradorapara levantarobjetos agu-
dos, juguetespequeSos,alfileres,papel, etc.
PodrfandaSartaaspiradoraota bolsa para polvo
No levanteningunacosa que seest_ quemando
o emitiendohumo,come cigarrillos,ceriilos o
cenizascalientes.
No usela aspiradorapara aspirarliquidos
inflamableso combustibles(gasolina, liquidos
para limpieza,perfumes,etc.) niIa useen
lugaresdonde 8stospodrian estar presentes_Los
vaporesdeestassustanoias puedencrear un
peligrode incendioo explosl6n.
Tenga cuidadoespecial al ulilizar la aspiradora
en escalones.No la coloquesobre sillas,mesas,
etc. Mant_ngalaenel pisoo
Usted es responsabledeasegurarqua su aspira-
dora no sea utilizadaperningunapersonaque no
pueda manejarlacorrectarnente..
ESTAS INSTRUCClONES
El armadoy usesegurode su aspiradorason su responsabilidad Esta aspiradoraha sidedisefada
exclusivamentepara use dom_stico..La aspiradoradeber&almacenarseen un lugar seco yen el inte-
rior.Leaesle Manualdel propietariodelenidamente,puescontiene informaci6nimportanle sobre segu-
ridady use.Esta quiacontiene informaciOnsobre seguridaddebajodesimbotosde adverliencia
cuidade Perfavor pongaatenci6n especiala estasinstruccionesdadas. Advertencia: Este
informaci6nle alertar,_con el poligrode fuego, chequeselectdcos,quemadas y lesiones Cuidade:
Estetnformaci6nlea]ertara a peligroscometesionesy da5osde propiedad_
i Hi i,ll i, Hl l H, i i i i IHH IHHHI I H HI
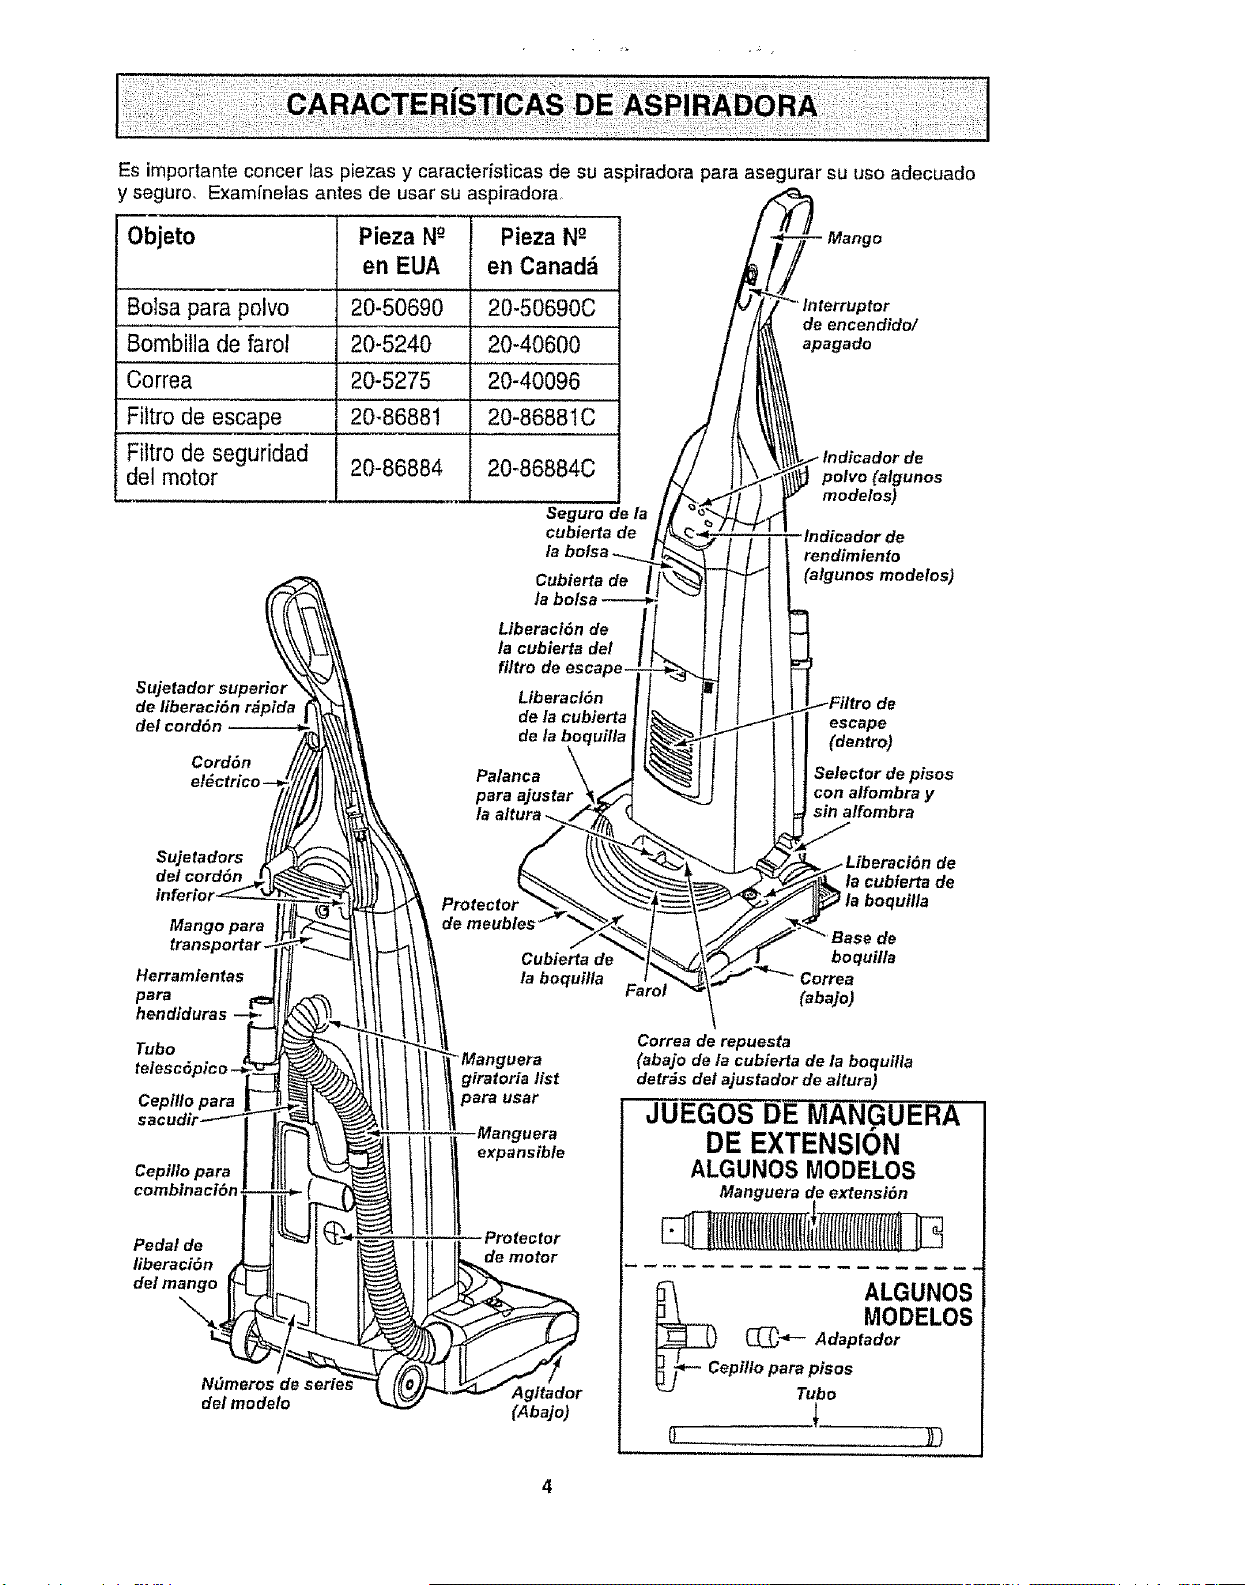
Es importante concer las p[ezas y caracteristicas de su aspiradora para asegurar su uso adecuado
y seguro_ Examfnelas antes de usar su aspiradora
Objeto
Bolsa para polvo
Bombitla de farol
Correa
Filtro de escape
Fittro de seguridad
del motor
Sujetador superior
de liberaci6n r#pida
del cord6n
Cord6n
Pieza N_ Pieza N_
en EUA en Canadfi
20-50690 20-50690C
20-5240 20-40600
20-5275 20-40096
20-86881 20-8688IC
20-86884
20-86884C
Seguro de
cubie_ade
Cubierta de
/a
Liberaci6n de
la cubierta del
fi/tro
Liberaci6n
de la cublerta
-Mango
de eneendido/
apagado
de
polvo(atgunos
modelos)
indicador de
rendimiento
(algunos modelos)
de
escape
(dentro)
Palanca Selector de pisos
para ajustar con alfombra y
sin alfombra
de/cord6n
Mango para
Herramlentas
para
Protector
de
de
la cubierta de
Tubo
telescSpico -J
Cepil!o para
sacudir----_-
Cepi/lo para
combinaciSn
Pedal de
liberaci6n
de/mango
Ndmeros dE
del modelo
de
Cubierta de boquilla
la boqui/la Correa
{abajo)
Correa de repuesta
I _Manguera (abajo de la cubierta de la boquilla
giratoria list detr_s
t para usar del ajustador de altura)
JUEGOS DF MANGUERA I
i ii,_i_ DE EXTENSION
!
ALGUNOS MODELOS I
Manguera de extensi6n I
ALGUNOS|
-.-- MODELOS|
Adoptedor|
F cop.,oper°p soo t
"" Tubo I
(Abajo)
I
J
ADVERTENClA.................
Peligrode choqueeldctrico
No conectela aspiradorahasta que ter_
mine de armada°De 1ocontrariopodHa
causar un choqueel_ctrico o lesi6n corpo-
ral,
/ ii, ii1,1= H
AntAntes de armar la aspiradora,chequeela LISTA
DE EMBALAJE en ia cubierta separadade la Lista
de Partes para Reparaci6n Use esta fistaparaveri-
ficar que ha recibidotodas las componentesdesu
nuevaaspiradota Kenmore
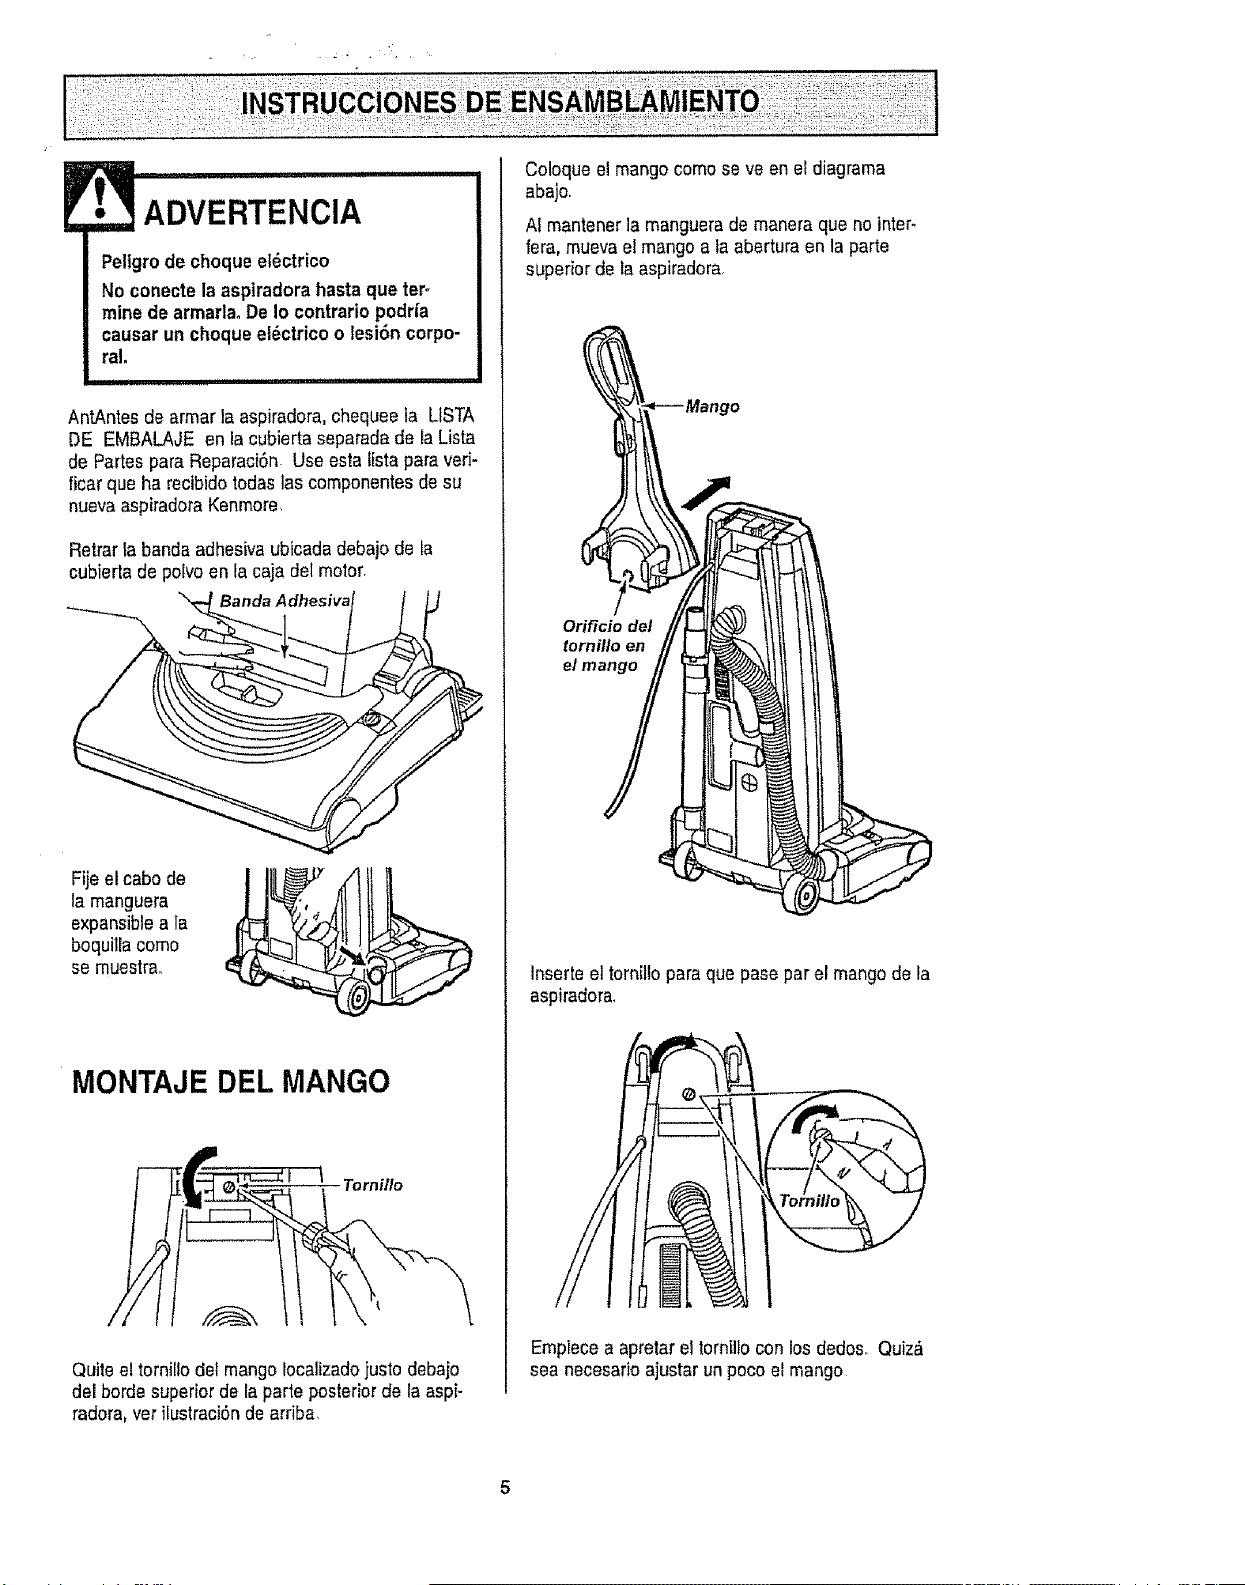
Retrar la banda adhesiva ubicadadebajo de la
cubierta de polvoenla caja detmotor,
.=
Fijeelcabode
la manguera
expansibleala
boquilla como
se muestrao
MONTAJE DEL MANGO
Tornillo
Quiteel tornillodel mangolocalizadojusto debajo
del borde superiorde la parte posteriorde la aspi-
radora,verilustraci6nde arriba,
Coloque el mangocomo se ve en eEdiagrama
abajo,
AI mantener lamanguerade maneraque no inter-
fera, mueva el mango a la abertura en la parte
superior de la aspiradora,
_ Mango
Orificio del
i
Inserteel tornillopara que pasepar el mangode la
aspiradora
Empiecea apretarel tornilloconlos dedos_Quiz&
sea necesarloajustarun poco el mango

Aprieteeltornilio
conundestornit-
lador,
\
CUIDADO
No apriete demasiado el tornitlo.
Si Io aprieta demasiado podHa arruinar
los orificios para el tornillo.
No opere ta aspiradora sin tener tnstala=
do el tornillo.
ii1,111 ii
COLOCACIONDEL CORDON
Asegt#ese de que el sujetador superior del cor-
d6n de liberaci6n r_.pida se encuentre en posi-
ciSn vertical Quite el aiambre con el que est_
atado el cord6n el_ctrico.
Fije el cord6n en
posiciSn,
forz_ndolo en ra
ranura de bloqueo
ubicada en el Hendidura
cuerpo de! de
sujetador superior
deFcord6n, como
se muestra, Esto
ayuda a que el
cord6n no se Cord6n
enrede debajo del etec
agitador de la
aspiradora,
Enrolie elcordSn eI_ctrico atrededor de los
sujetadores superior y inferior y presione la
ranura del enchufe sobre et cordSn.
Sujetador superior
de liberaci6n r&pida
del cord6n
Cord6n
el#ctricl
Sujetadors
inferior
PARA COMENZAR
_o Sujetad°r
uperior de
eraci6n
ida del
rd6n
1. Gire el
sujetador
del cord6n
de lado a
lado y
hacia abajo
para Iiberar
el cord6n
e[_ctrico_
2, Desprenda el enchufe del cord6n el_ctrico y
quite el cord6n del sujetador superior.
Compruebe que el cord6n el6ctrico sigue fijado
en la ranura de bloqueo de] sujetador superior
3. Verifique que la aspiradora tenga instalada
una bolsa, Consulte la CAMBIO DE LA
BOLSA PARA POLVO,
NOTA: Para reducir et riesgo de choque
elf_ctrico, esta aspirad0ra cuenta con una
clavija polarizada, uno de los contactos es m_s
ancho que el otro. La clavija s61opuede
introducirse de una manera en el enchufe. Si la
clavija no cabe bien en el enchufe, invi_rtala, Si
at)n no cabe, liame a un etectricista para que
instale un enchufe correcto. No altere la cFavija
de ninguna manerao
4, Conecte el cord6n el6ctrico polarizado en un
enchufe de t20 voltios que se encuentre cerca
del piso,
ADVERTENCIA
Peligrode lesi6npersonaly daSoal
NO conecte la aspiradora si el inte-
en la posici6n ON. Podria
resultar en lesi6n personal o dafioo
• NO use los enchufes Iocalizados so-
bre los muebles° Los objetos cercanos
podrian resultar daSados.
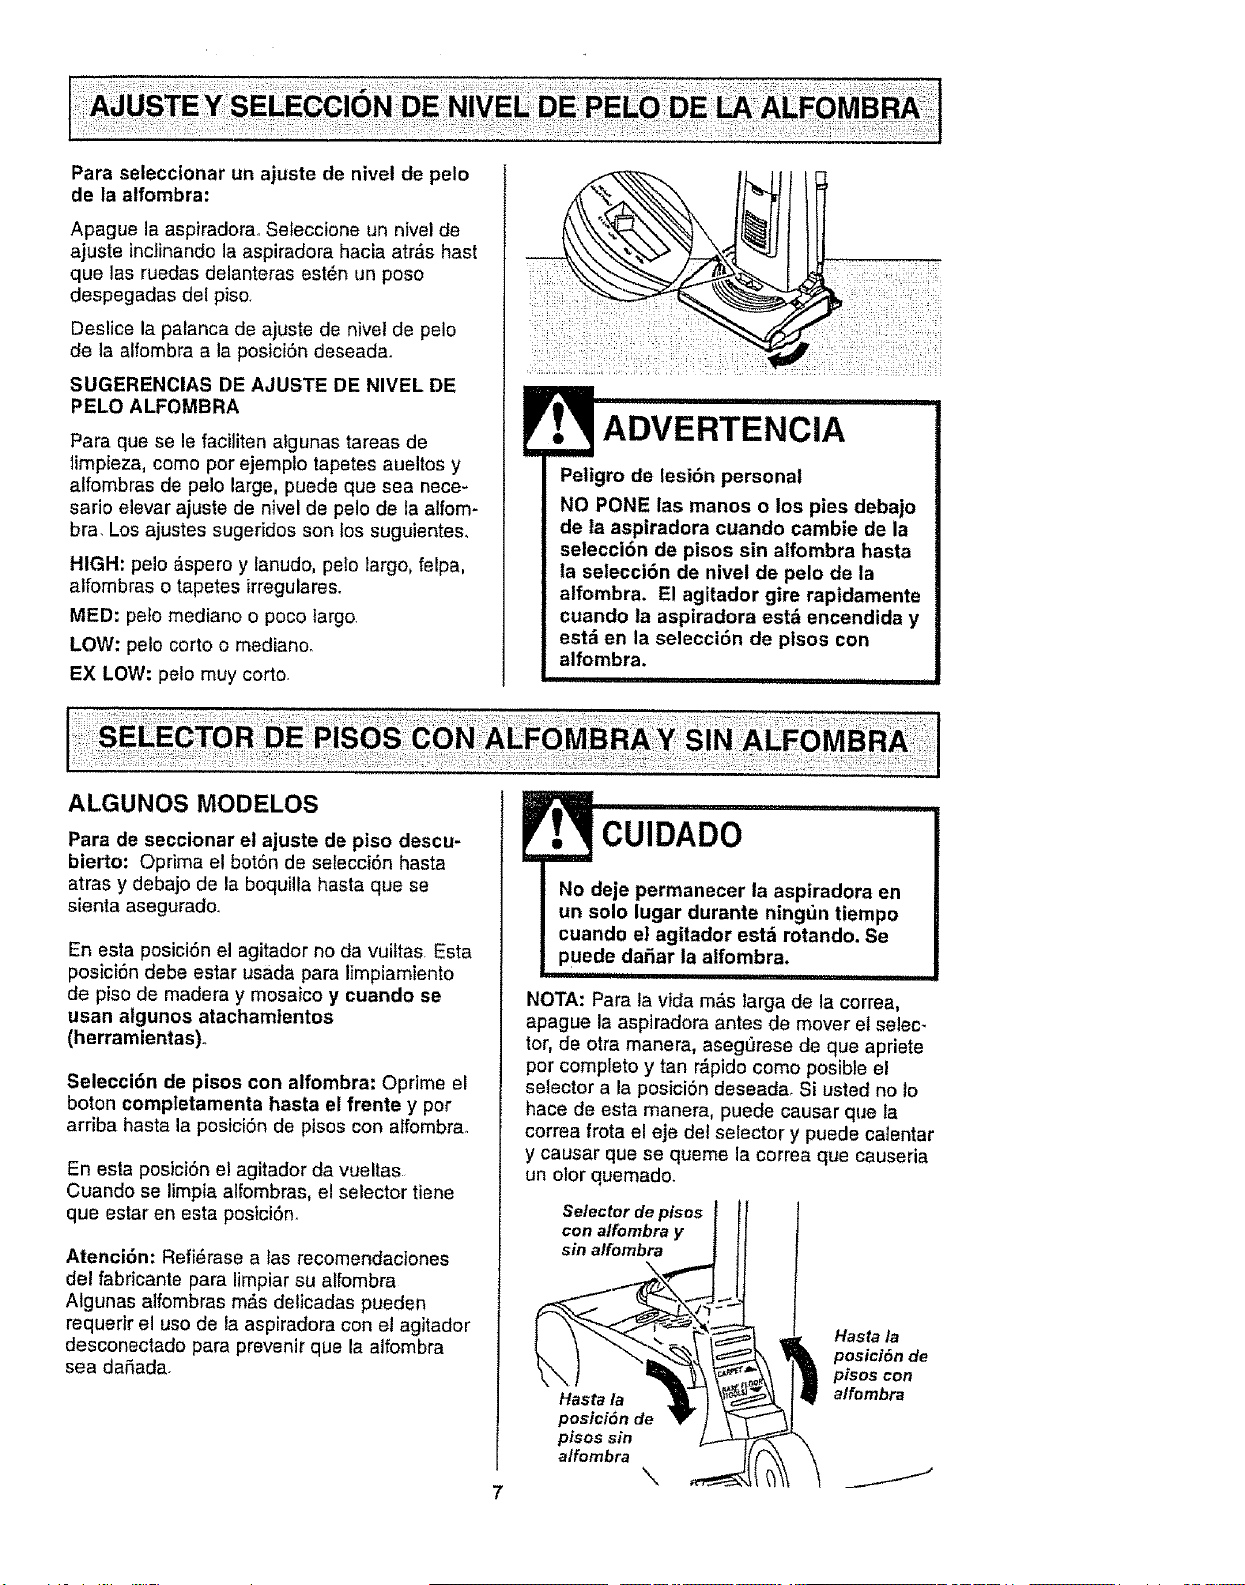
Paraselecctonarunajustedeniveldepelo
delaalfombra:
Apague la aspiradora., Seleccione un nivel de
ajuste inctinando la aspiradora hacia atr&s hast
que las ruedas delanteras est_n un poso
despegadas del piso.
Deslice la palanca de ajuste de nive! de pelo
de la alfombra a la posici6n deseada.
SUGERENCIAS DE AJUSTE DE NIVEL DE
PELO ALFOMBRA
Para que se le faciliten algunas tareas de
timpieza, como por ejemplo tapetes aueltos y
alfombras de pelo large, puede que sea nece-
sario elevar ajuste de nivel de pelo de la alfom-
bra. Los ajustes sugeridos son los suguientes,
HIGH: pelo &spero y lanudo, pelo largo, felpa,
alfombras o tapetes irregulares.
MED: pelo mediano o poco largo
LOW: peto corto o medianoo
EX LOW: pelo muy corto.
Pellgro de lest6n personal
NO PONE las manos o los pies debajo
de la aspiradora cuando cambie de la
selecci6n de pisos sin alfombra hasta
la selecci6n de nivel de pelo de la
alfombra. El agitador gire rapidamente
cuando la aspiradora est_ encendida y
estd en la selecci6n de plsos con
alfombra.
iii ..............
ALGUNOS MODELOS
Para de seccionar el ajuste de piso descu-
bierto: Oprima el bot6n de selecci6n hasta
atras y debajo de la boquilla hasta que se
sienta asegurado..
En esta posici6n el agitador no da vuiftas Esta
posici6n debe estar usada para limpiamiento
de piso de madera y mosaico y cuando se
usan algunos atachamtentos
(herramientas).
Selecci6n de pisos con alfombra: Oprime el
boton completamenta hasta el frente y per
arriba hasta la posici6n de pisos con atfombra_
En esta posici6n el agitador da vueltas
Cuando se limpia alfombras, el selector tiene
que estar en esta posici6n_
Atenci6n: Refi6rase alas recomendaciones
del fabricante para limpiar su alfombra
Algunas alfombras m&s delicadas pueden
requerir el uso de la aspiradora con el agitador
desconectado para prevenir que la alfombra
sea daSada.
CUIDADO
No deje permanecer la aspiradora en
un solo lugar durante ning_Jntiempo
cuando el agitador est_ rotando. Se
puede daSar la alfombra.
iii i ................
NOTA: Para la vida m_s larga de la correa,
apague la aspiradora antes de mover el selec-
tor, de otra manera, aseg_rese de que apriete
por completo y tan r,_pidocomo posible el
selector a la posici6n deseada. Si usted no 1o
hace de esta manera, puede causar que la
correa frota el eje del selector y puede calentar
y causar que se queme la correa que causeria
un olor quemado.
Selector de pisos
con alfombra y
sin alfombra
Hasta la
posici6n de
pisos sin
alfombra
\
Hasta la
posici6n de
pisos con
alfombra
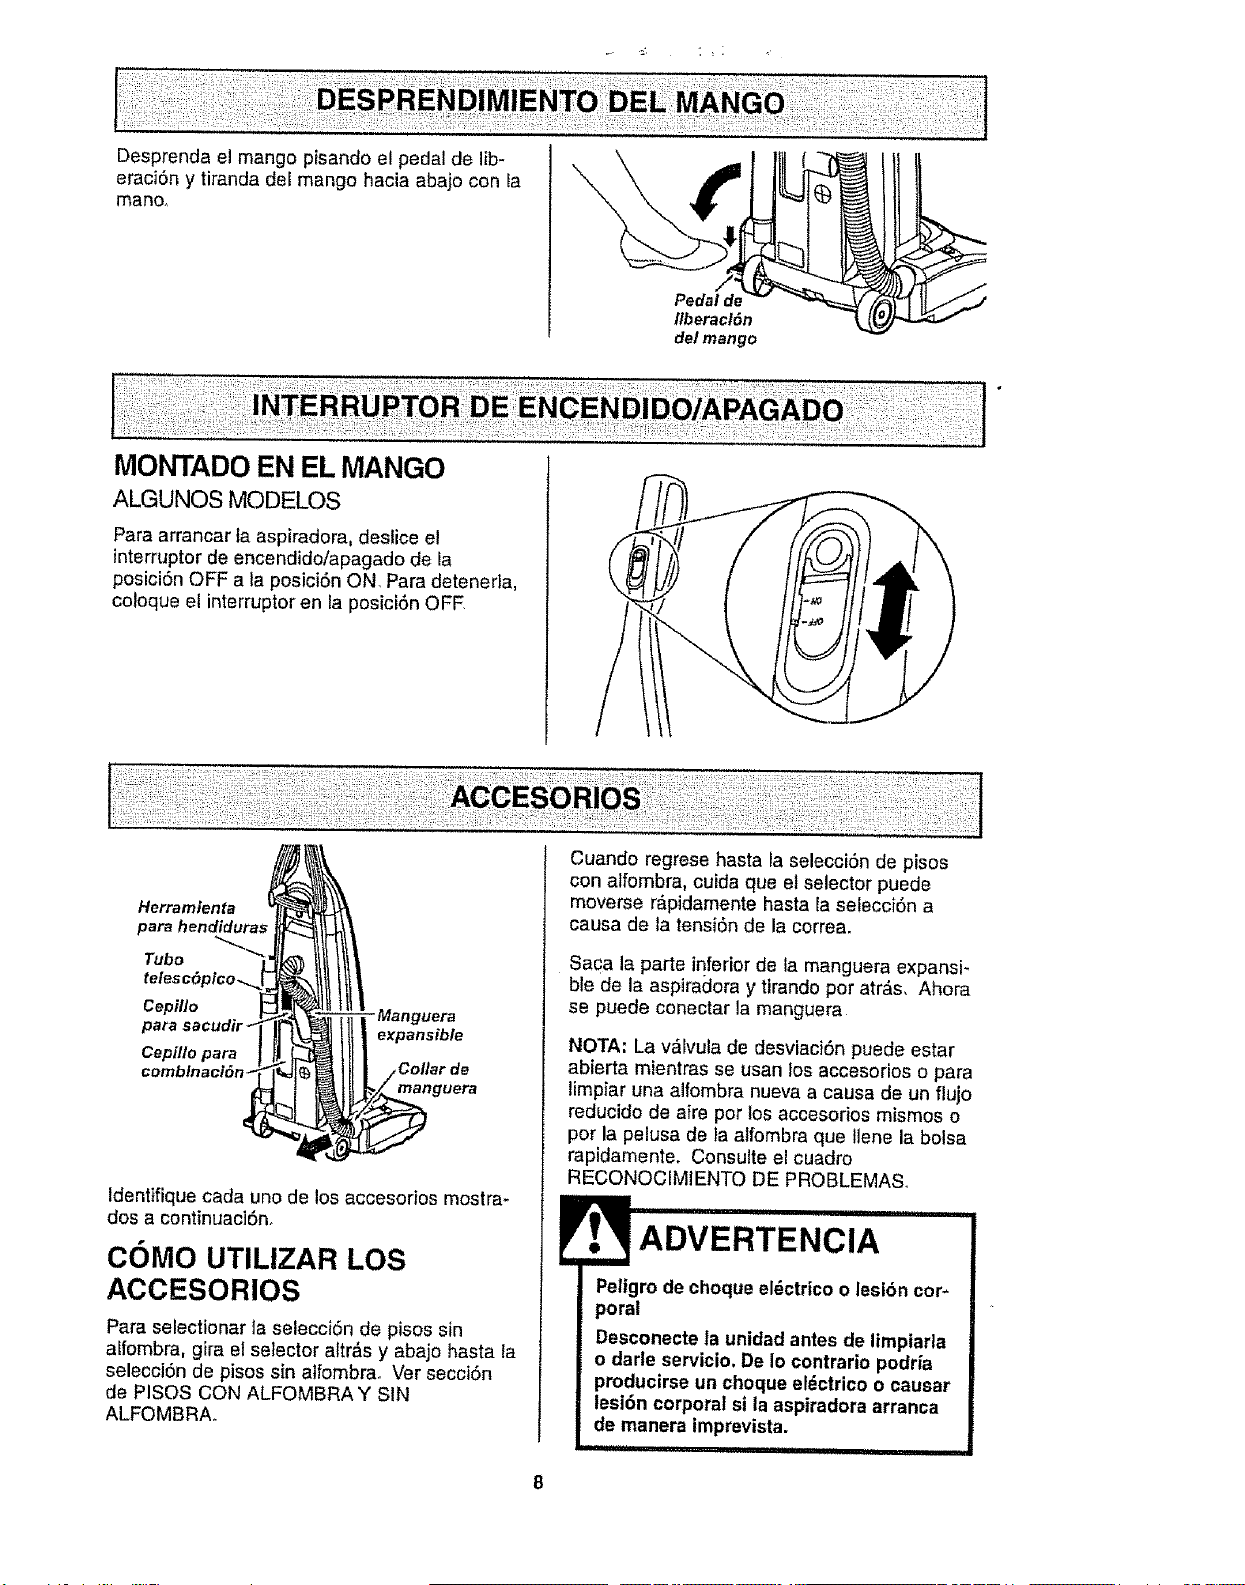
Desprenda el mango pisando el pedal de lib-
erac]6n y tiranda del mango hacia abajo con Ia
mano.
Pedal de
fiberacl6n
del mango
t
MONTADO EN EL MANGO
ALGUNOS MODELOS
Para arrancar ta aspiradora, deslice el
interrupter de encendido/apagado de la
posici6n OFF a la posici6n ON. Para detenerla,
coloque el interruptor en la posici6n OFF
Herramienta
para hendidura_
Tubo
Cepil/o
para
CepiJlo para
expansible
manguera
Identifique cada uno de los accesorios mostra-
dos a continuac]6n.
COMO UTILIZAR LOS
ACCESORIOS
Para selectionar la selecci6n de pisos sin
alfombra, gira el selector altr&s y abajo hasta la
selecci6n de pisos sin atfombra. Ver secci6n
de PISOS CON ALFOMBRA Y SIN
ALFOMBRA°
...............
Cuando regress hasta la selecci6n de pisos
con alfombra, cuida que el selector puede
moverse r_,pidamente basra la selecci6n a
causa de ta tensi6n de la correa.
Saca la parts inferior de la manguera expansi-
ble de la aspiradora y tirandoper atr&s. Ahora
se puede conectar la manguera
NOTA: La v_lvula de desviaci6n puede estar
abierta mientras se usan los accesorios o para
limpiar una alfombra nueva a causa de un fiujo
reducido de a}re pot los accesorios mismos o
pot la pelusa de ta alfombra que llene la bolsa
rapidamente. Consulte el cuadro
RECONOCIMIENTO DE PROBLEMAS.
Peligro de choque el_ctrico o leslbn cop
poral
Desconecte la unidad antes de lirnpiarla
o darle servicio. De Io contrario podria
producirse un choque eldctrico o causar
lesi6n corporal si la aspiradora arranca
de manera imprevista.
,i, I , _11111 iiiii,iiiii ii

La manguera
incorporada gira
para facilitar la
]impieza en cual-
quier direcci6n.,
Para quitar la
manguera, tire
de la manguera
del collar.
Giratoria-
TUBe TELESCOPICO CON
CONTROL DE ASPIRAClON
ALGUNOS MODELOS
I1!ttltl .erra .io.ta
I pera
hendiduras
.Tube
te/esc6pico
Saque el tube
telesc6pico
de su lugar
de alma
cenamiento
Retire la herramienta para hendiduras de su
lugar de almacenamiento dentro del tube..Gire
el are de bloqueo hasta la posici6n UNLOCK,
Despliegue e! tube comptetamente Gire et are
de bloqueo del tube hasta la posiciSn LOCK.
instale el tube de extensiSn en el extreme
abierto de la manguera,
Tube Deslizador
inferior_ ".. decontrol
Tubo
superior
Alinee las pestaSas del tube de extensiSn con
las ranuras en forma de "J" de la manguera,
Empuje el tube dentro de la manguera y gire
hacia la derecha para bloquearlo.
Para obtener la m_,xima Iongitud con
los acceserios, instale la Manguera,
herramienta para hendi-
duras en et extreme
del tubooPara
hacedo, intro- Destizaclor
dSzcala en el de control de
tube y gfrela un
poco.
Tubo
destacado
para hendiduras
Cuando use el
cepillo para sacudir
o el cepillo para
combinaciSn, puede
instalartos
directamente en el
tube o en extreme
de la herramienta
para hendidura&
PARA OPERAR EL
DESLIZADOR DE CONTROL
DE ASPIRACION
Tube telesc6pico
Cuando use
aceesodos Desllzador
para limpiar de control
cortinas, de aspiraci6n
tapetes
pequeRos de
pelo corte y
otros art{culos
delbados, gire
el deslizador de control de aspiraciSn a la
posiciSn abierta.. Este selector se encuentra en
el tube telesc6pico, cerca de la manguerao
Esto reducir_, la potencia de aspiraciSn para
facilitar laIimpieza.
NOTA:ColoqueeldeslLzadorde c_ntrolde aspiraci6n
a la posici6ncerradaparalalimpiezanormal.
Cuando use los accesorlos, tonga cui-
dado de no estlrar demastado la man-
guera expansible para tratar de alcanzar
mds lejos. SI trata de estirar la manguera
m_s de 1odebido, podria causar que la
aspiradora se venga abajo. Aseg0rese de
que el selector para alfombra/sin alfombra
est_ en la posici6n para "sin alfombra", Se
puede hacer dafio a la superficie del ptso
si el selector para atfombra/sin alfombra
estd en la posiciSn para "alfombra'.
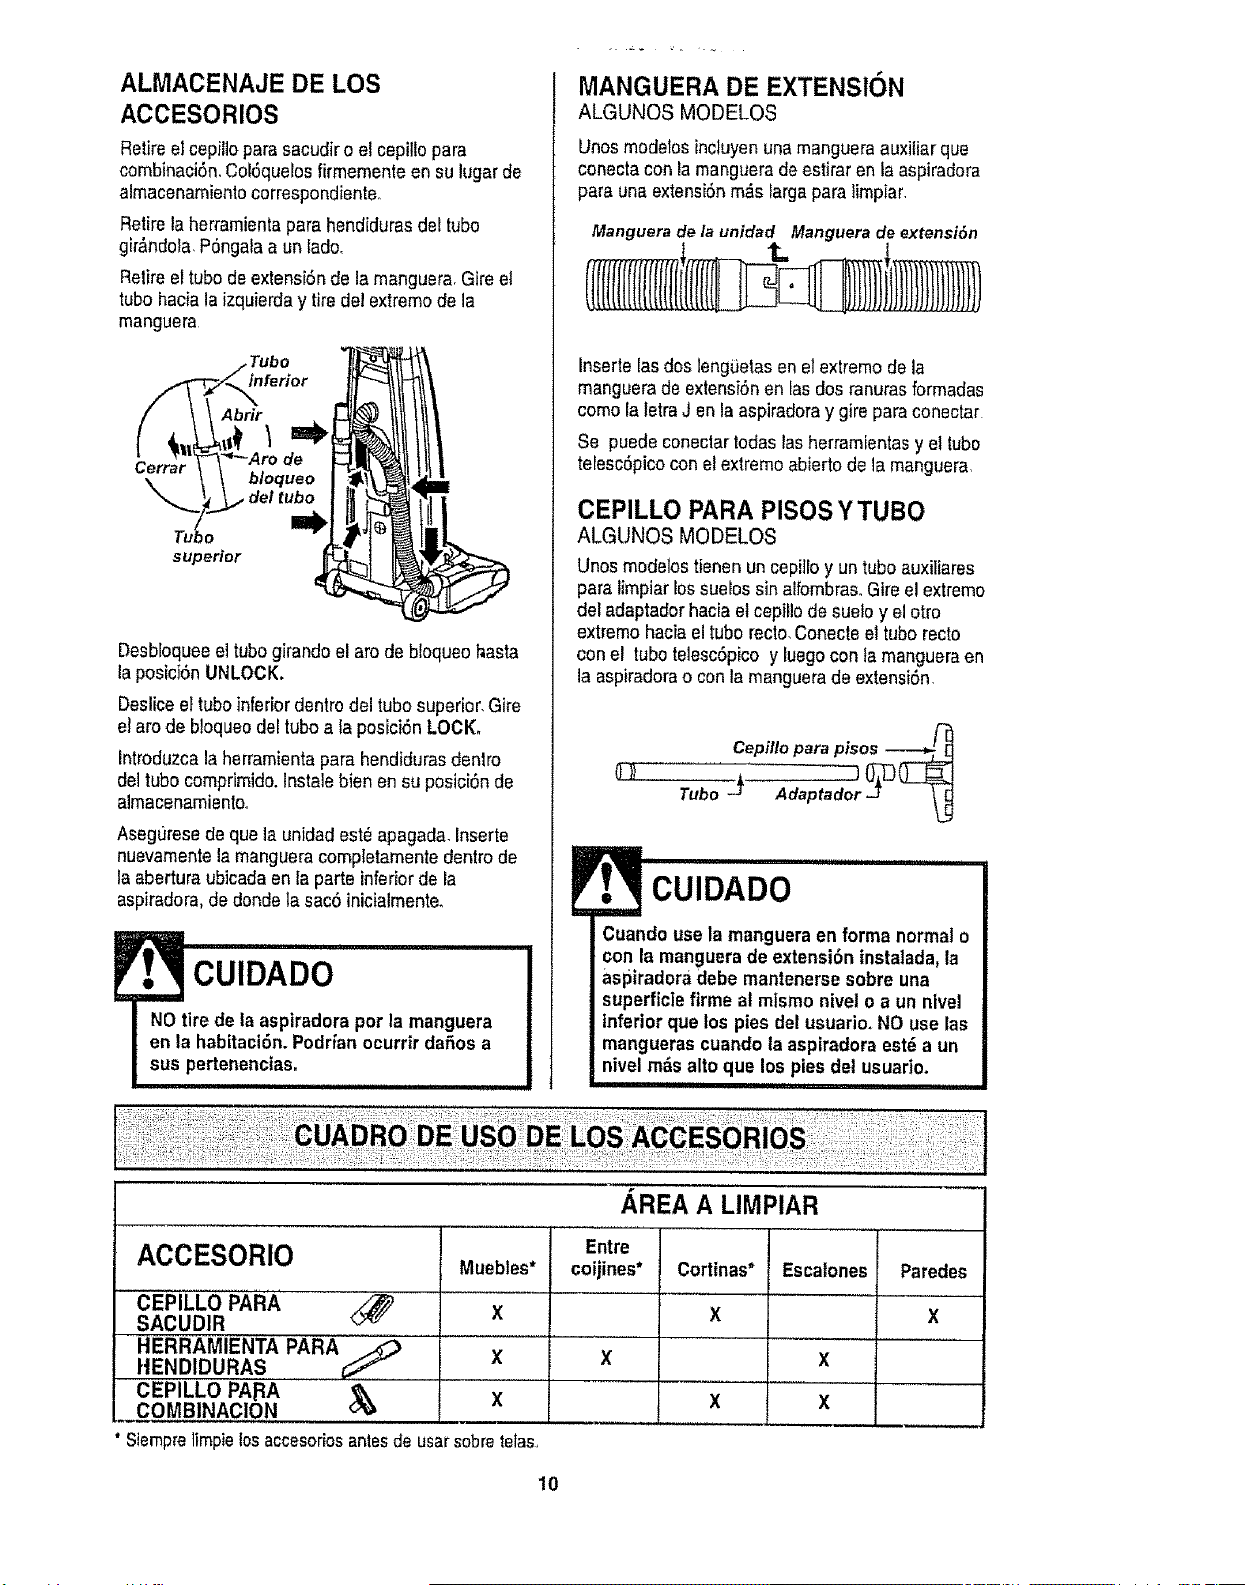
ALMACENAJE DE LOS
ACCESORIOS
Retireelcepiitopara sacudiro el cepillopara
combinaciSn,Col6quelosfirmementean su lugar de
almacenamientocorrespondiente,,
Retirelaherramientapara hendidurasdet tube
gir_ndola,PSngalaa un lade,
Retireettubede extensiSnde la manguera,Gire el
tube haciala izquierday tire del extremede la
manguera
Abrir
Cerrar
bloqueo
del tubo
o
superior 4
Desbloqueeel tubegkando el are de bloqueohasta
laposici6nUNLOCK.
Desticeel tubeinferiordentrodel tube superior,Gire
el are de b!oqueodeetubea taposiciSnLOCK,
Introduzcalaherramientapara hendidurasdentro
del tubecomprimido,lnstale bien en su posici6n de
almacenamientoo
Aseguresedeque la unidadest_apagada,Inserte
nuevamentela mangueracompletamentedentrode
la abertura ubicadaen la parte inferiorde la
aspiradora,dedondela sac6 inicialmente.
lU iii i i i
CUIDADO
NOtire de la aspiradora per la manguera
en la habitaci6noPodrianocurrir dafiosa
sus pertenencias_
MANGUERA DE EXTENSION
ALGUNOS MODELOS
Unosmodetosincluyenuna mangueraauxiliar que
conectacon la mangueradeestiraren la aspiradora
para una extensi6nm_s Iargapara timpiar,
Manguera de la unidad Manguera de extensi6n
Insertelasdos lengiJetasen el extremede la
manguerade extensi6nen tasdos ranurasformadas
come la letraJ en la aspiradoray gire paraconectar
Se puede coneclartodas lasherramientasyel tube
telesc6picocon elextremeabierto de lamanguera,
CEPILLO PARA PISOS Y TUBO
ALGUNOS MODELOS
Unos modelostienen un cepilloy untube auxiliares
para limpiarlossuebs sin alfombras,Gire el extreme
del adaptadorhaciael cepil!ode suelo y el otro
extremehaciael tube recto,Conecteel tube recto
conel tubetelescSpicoy luegocon famangueraen
la aspiradorao conla manguerade extensiSn,
Cepillo para pisos
CUIDADO .....................
Cuandouse la manguera en forma normal o
con la manguerade extensi6ninstalada,la
aspiradera debe mantenerse sobre una
superficiefirme at mismonivel o a un nlvel
inferiorque los pies del usuario.NO use las
manguerascuandola aspiradoraest6 a un
nivelm_s alto que los pies del usuario.
iii iiiiiiii I iii Will II
AREA A LIMPIAR
Entre
ACCESORIO Muebles* coijines* Cortinas* Escatones Paredes
X X X
X X X
X X X
i
CEPILLO PARA <_
SACUDIR
HERRAMIENTA PARA
HENDIDURAS
CEPILLO PApA &
,. COMBINACION
Siempre limpie los accesorios antes de usar sobre tetas.,
10
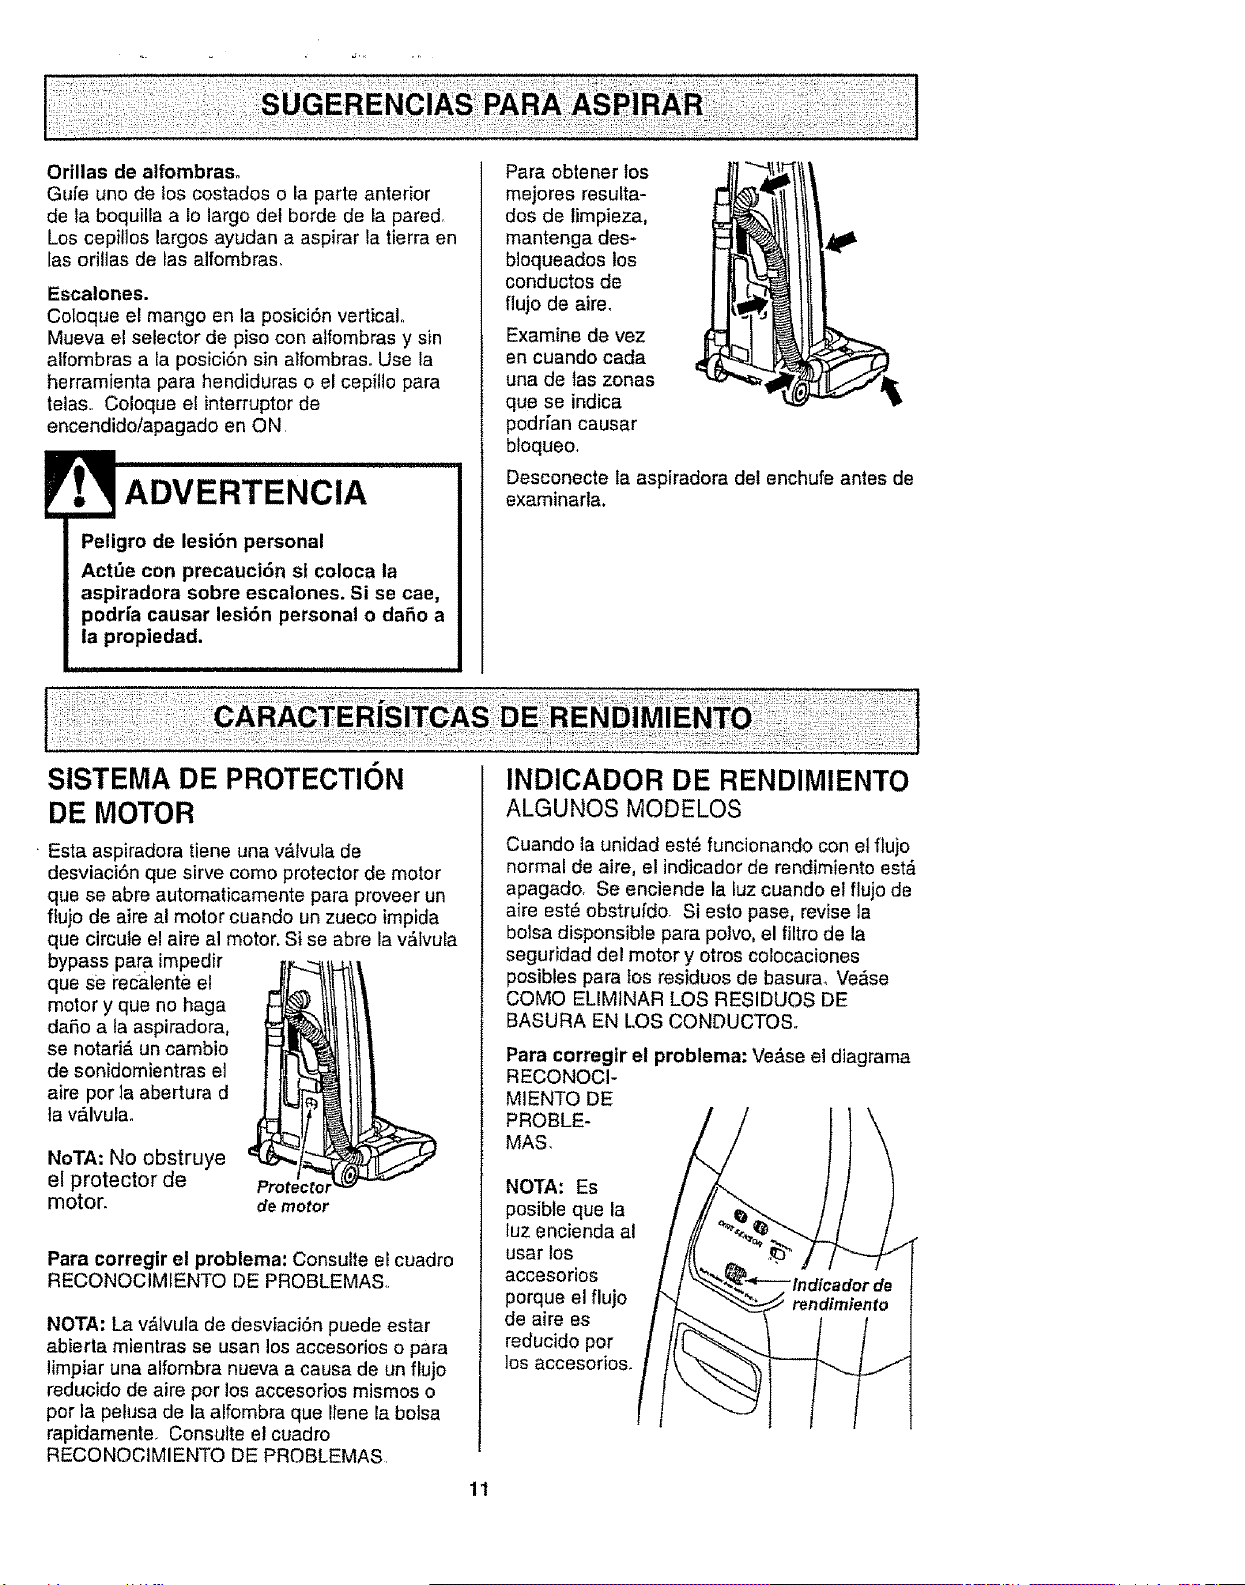
Orillasde alfombraso
Gufe uno de los costados o la parte anterior
de la boquilEaalo largo det borde de la pared.
Los cepillos largos ayudan a aspirar la tierra en
[asori!las de tas alfombras.
Escalones.
Coloque el mango en la posiciSn vertical°
Mueva el selector de piso con alfombras y sin
alfombras a la posici6n sin alfombras. Use la
herramienta para hendiduras o el cepillo para
telas.. Coloque el interrupterde
encendido/apagado en ON
ADVERTENCIA
Peligro de lesiSn personal
Act_e con precauci6n si coloca la
aspiradora sobre escalones. Si se cae,
podrfa causar lesi6n personal o daSo a
la propiedad.
Para obtener los
mejores resulta-
dos de limpieza,
mantenga des-
bloqueados los
conductos de
flujo de aire_
Examine de vez
en cuando cada
una de las zonas
que se indica
podfian causar
bloqueo.
Desconecte la aspiradora det enchufe antes de
examinarla,
SISTEMA DE PROTECTION
DE MOTOR
Esta aspiradora tiene una v_.lvula de
desviaciSn que sirve coma protector de motor
que se abre automaticamente para proveer un
fiujo de aire al motor cuando un zueco impida
que circute el aire al motor. Si se abre la v&tvula
bypass para impedir
que se recalente el
motor y que no haga
daSo a ta aspiradora,
se notari& un cambio
de sonidomientras el
aire per la abertura d
la v_.lvulao
NoTA: No obstruye
e! protector de
motor.
demotor
Para corregir el problema: Consulte el cuadro
RECONOCIMIENTO DE PROBLEMAS
NOTA: La v,_lvula de desviaci6n puede estar
abierta mientras se usan los accesorios o para
limpiar una alfombra nueva a causa de un flujo
reducido de aire per los accesorios mismos o
per la pehJsa de la alfombra que Ilene la botsa
rapidamente_ Consutte el cuadro
RECONOCIMIENTO DE PROBLEMAS.
INDlCADOR DE RENDIMIENTO
ALGUNOS MODELOS
Cuando la unidad est6 funcionando con etflujo
normal de aire, el indicador de rendimiento est_
apagado. Se enciende la luz cuando el flujo de
aire est_ obstrufdo Si esto pase, revise la
bolsa disponsible para polvo, el filtro de la
seguridad del motor y otros colocaciones
posibles para los residues de basurao Verse
COMe ELIMINAR LOS RESIDUES DE
BASURA EN LOS CONDUCTOS.r
Para corregtr el problema: Ve&se el diagrama
RECONOCI-
M1ENTO DE
PROBLE-
MAS.
NOTA: Es
posibte que la
luz encienda al
usar los
accesorios
porque el flujo
de aire es
reducido per
los accesorios.
11
INDICADOR DE POLVO
ALGUNOS MODELOS
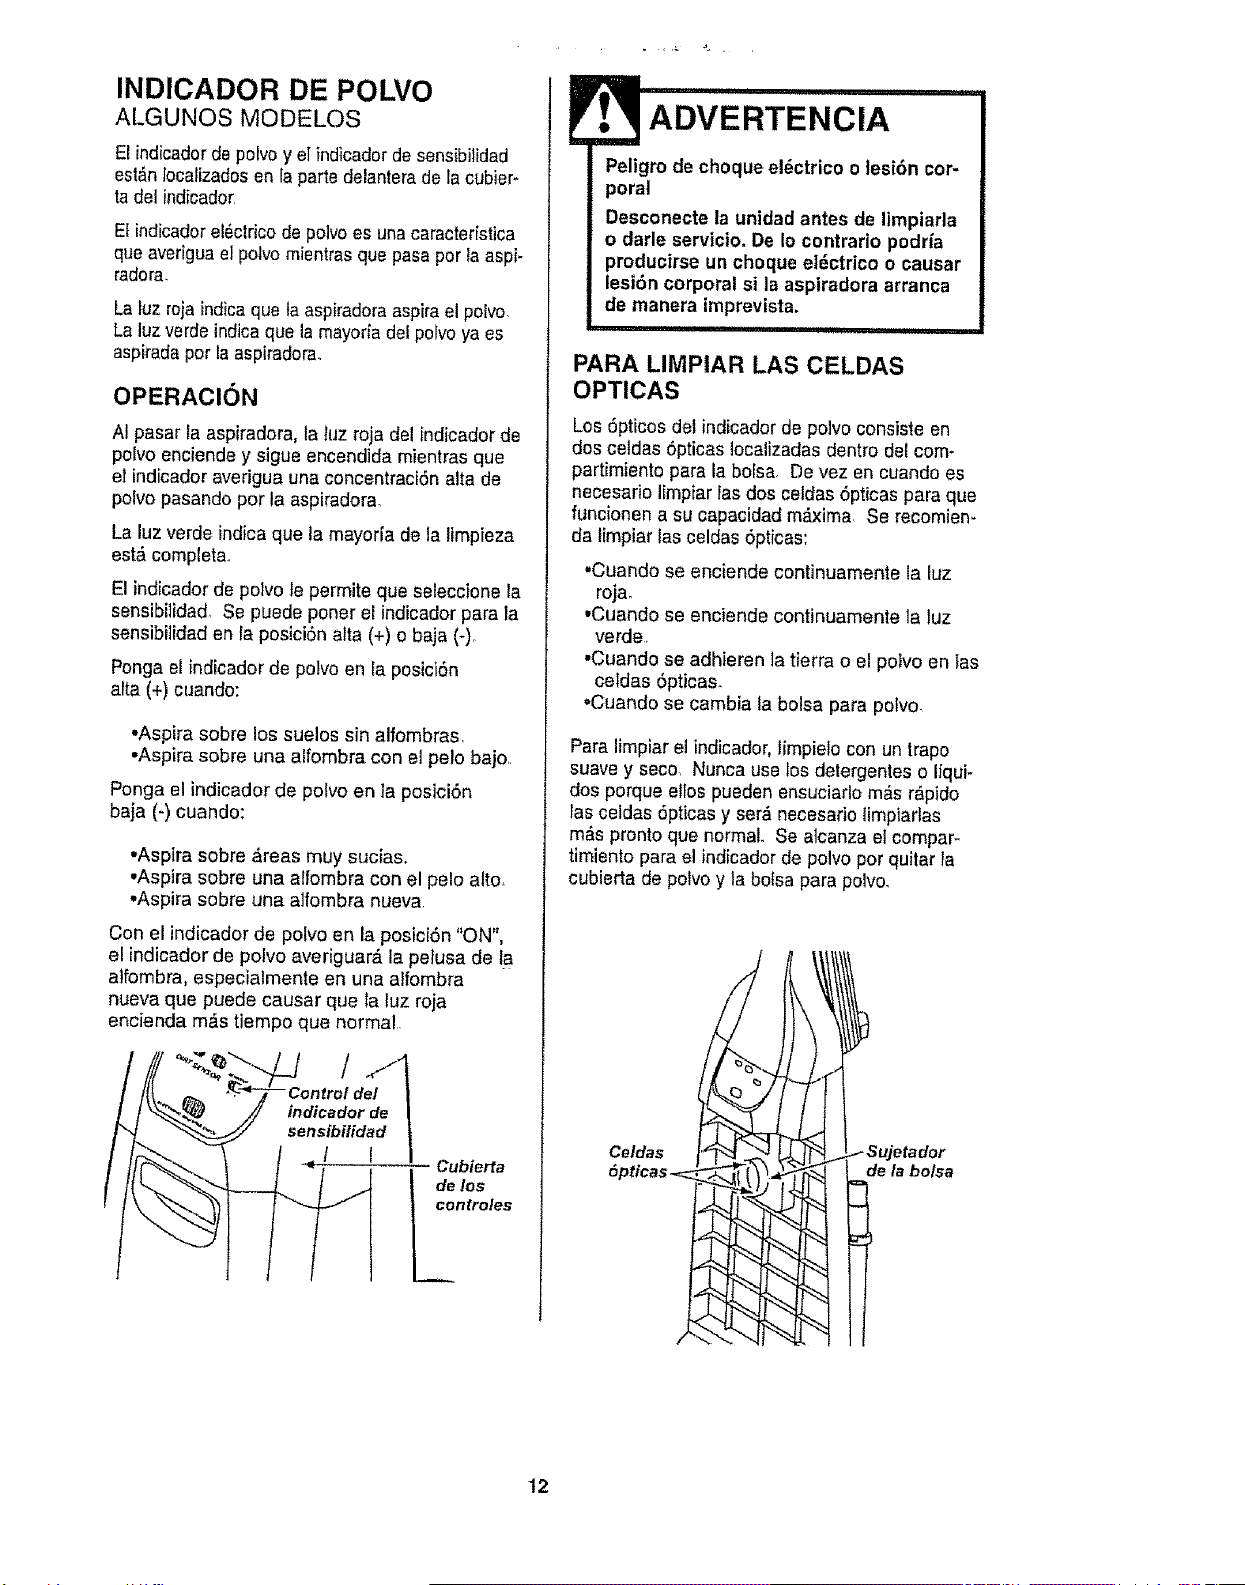
El indicadorde poivo y elindicador de sensibilidad
est_n Iocafizadosen la parte delanterade la cubier-
tadel indicador
El indicadore!Sctricodepolvoes una caracteristica
que averiguael potvo mientrasque pasaper la aspi-
radora.
La luz rojaindica que la aspiradoraaspirael polvo,
La luz verdeindica que la mayodade! poivoya es
aspiradaper la aspiradora_
OPERAClON
AI pasar la aspiradora, la luz roja del indicador de
polvo enciende y sigue encendida mientras que
el indicador averigua una concentraci6n alia de
polvo pasando por la aspiradora,
La luz verde indica que la mayoria de la limpieza
est& completa.
El indicador de potvo le permite que _eleccione la
sensibilidad Se puede poner el indicador para la
sensibitidad en la pesiciOn alta (+) o baja (-)o
Ponga el indicador de polvo en la posici6n
alta (+) cuando:
•Aspira sobre los suelos sin alfombras,
•Aspira sobre una alfombra con el pelo bajo
Ponga el indicado_ de poivo en la posici6n
baja (-) cuando:
•Aspira sobre &reas muy sucias.
•Aspira sobre una alfombra con el pelo alto.
•Aspira sobre una alfombra nueva
Con el indicadorde potvo en la posici6n "ON",
el indicador de polvo averiguar_, la petusa de la
alfombra, especialmente en una alfombra
nueva que puede causar que la tuz roja
encienda m,_stiempo que normal
Cubierta
de los
controles
Peligro de cheque el6ctrico o tesi6n cor-
poral
Desconecte la unidad antes de limpiarla
o darle servicio. De io contrario podria
producirse un cheque el_ctrico o causar
lesi6n corporal sl la aspiradora arranca
de manera imprevista.
ii ql,i ii i,11111
PARA LIMPIAR LAS CELDAS
OPTICAS
Los 5pticos del indicador de polvo consisteen
dos celdas 6pticas Iocalizadas dentro delcome
partimiento para la bolsa, De vez en cuando es
necesario limpiar las dos celdas 6pticas para que
funcionen a su capacidad m_i.xima Se recomien-
da limpiar ias celdas Opticas:
.Cuando se enciende continuamente la luz
rOjao
•Cuando se enciende continuamente la luz
verde
•Cuando se adhieren la tierra o el polvo en las
celdas 6pticas.
.Cuando se cambia la bolsa para polvo
Para limpiar et indicador, limpielo con un trapo
suave y seco Nunca use los detergentes o liqui-
dos porque etlos pueden ensuciarlo m_s r_,p_,do
rasceldas 5pttcas y ser_ necesario limpiartas
m;% pronto que normal. Se alcanza el compar_
timiento para el indicador de polvo perquitar la
cubierta de polvo y la bolsa para polvo.
/ Sujetador
de la bolsa
12
Sigasiempretodaslasinstruccionesde
segufidadallimpiarydarleservicioasu
aspiradora,
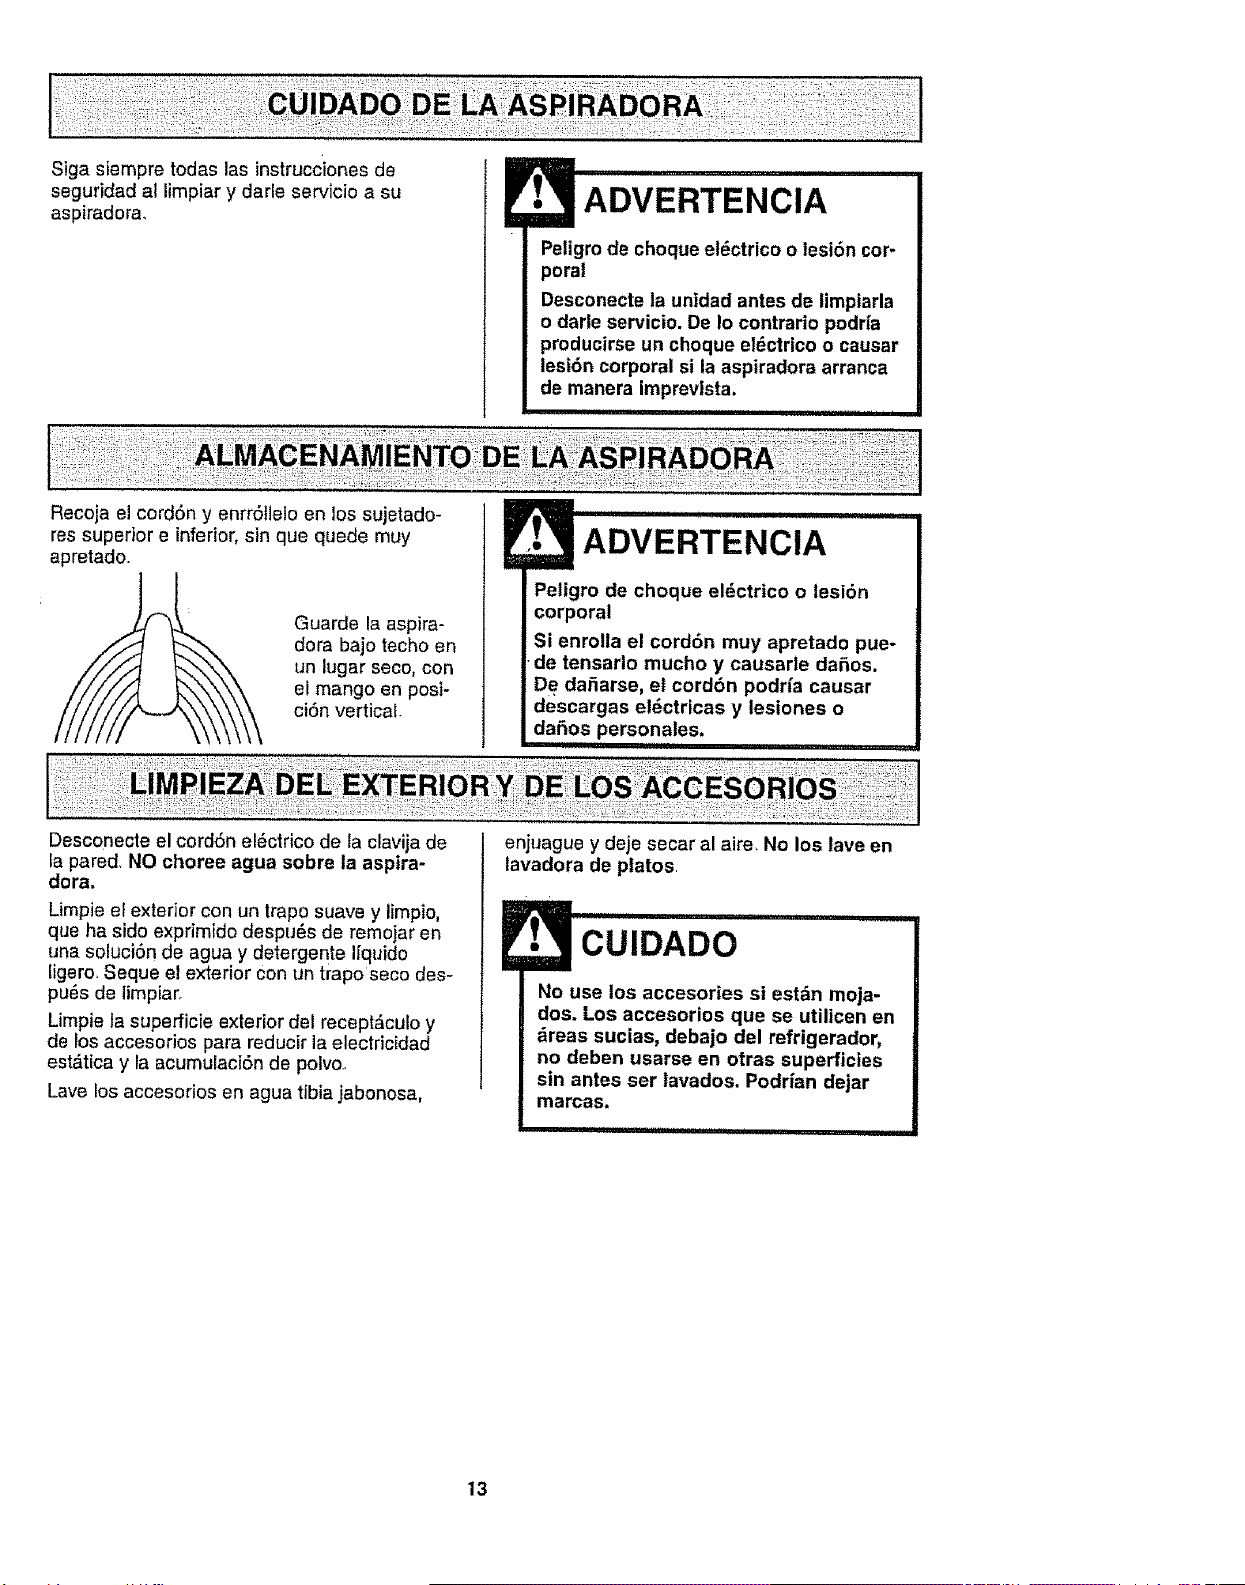
Recojaelcord6nyenrrStle!oenlossujetado-
Peligro de choque el6ctrico o lesi6n cor-
poral
Desconecte la unldad antes de limpiarla
o darle servicio. De Io contrario podrfa
producirse un choque el6ctrtco o causar
lest6n corporal si la aspiradora arranca
de manera imprevlsta.
res superior e inferior,sin que quede muy
apretado
Guarde la aspira-
dora bajo techo en
un lugar seco, con
el mango en posi-
ci6n vertical
Peligro de choque el_ctrico o lesi6n
corporal
Si enrolla el cord6n muy apretado pue-
•de tensarlo mucho y causarle daSos.
De daSarse, et cord6n podrfa causar
descargas elSctricas y lesiones o
daSos personales.
Desconecte el cord6n el#ctrico de la clavija de
la pared, NO choree agua sobre la aspira-
dora.
Limpie el exterior con un trapo suave y limpio,
que ha sido exprimido despu_s de remojar en
una soluci6n de agua y de/ergente I[quido
figero Seque el exterior con un trapo seco des-
pu6s de limpiaro
Limpie la superficie exterior del recept&culo y
de Ios accesorios para reducir la electricidad
est&tica y la acumulaciSn de polvo
Lave los accesorios en agua tibia jabonosa,
enjuague y deje secar al aire, No los lave en
lavadora de platos
CUIDADO
No use los accesories si est_n moja-
dos. Los accesorios que se utilicen en
_reas sucias, debajo del refrigerador,
no deban usarse en otras superficies
sin antes ser lavados. Podrian dejar
marcas.
i itltl,tti i ,tttt,tt i
13

i
PARA QUITAR LA BOLSA
PARA POLVO
ADVERTENCIA
Siempre desconecte el cord6n _lectri+
co antes de reparar alguna parte de la
aspiradora.
Tire hacia ade-
lantede la Iib-
eraci6nsituada
cerca de la parte
superiorde la
cublertade bolsa+
iPi............. i iii
L+o+o,oo+ I
la cubierta _,.._,/ ['_
Cubiertadelt I I I I
Tirede la cubierta
de la bolsa hacia
el frente,Retirala
y d_jelaa un lade.
Tomeetcollar de la
borsapara polvoytire
concuidadopara retirar
la bolsaparapotvo.
Tire tabolsa usadaa la
basura,NO|a vuelva a
usa_
_Bo_a
pam
polvo
ta bolsa
I
-- Cavldad para
la bolsa
- Filtro de
seguridad
de/motor
Reviseel sujetador
de la bolsa yel fiitro
de seguridaddel
motor.
Si estuvieran
bloqueades,
consulte la labiade
diagnSsticode
problemas.
NUNCA REUTILICE UNA BOLSA PARA
POLVO.Los materlales muy fines, tales
come desodorantes para alfombras, talco
facial, polvo fine, yeso, hollln, pelusa de
alfombras nuevas, etc, pueden atascar la
bolsa y causar que se rompa antes de que
est_ llena. Cambie la bolsa m_s seguido
cuando aspire este tipo de materiales.
14
PARA CAMBIAR LA BOLSA
Desdoble la bolsa
para polvo nueva. Bolsapara Leng_Jetade
Doble la leng£teta polvo seguridad
de seguridad de la _tl /"__._
nueva boisa para
potvo en direcciOn
coot++oa,aObe,-
tufa qua va en el
sujetador de ta
bolsa,
NOTA: Consulte las PIEZAS Y
CARACTER[STICAS para determinar er N_ de la
bolsa para polvo,
Inserte la bolsa para polvo
completamente sobre el
sujetador de la bolsa suje+
tandola bolsa per el collar,
Coloque elcollar de la bolsa
en posici6n
AsegL_reseque ia Leng#etas
bolsa se queda deretencl#n
detras de las dela bolsa
leng0etas de
retenci6n de cada
lade demostradas
aqui Aseg_kese
de qua la parte
inferiorde la bolsa
para polvo est6
completamente
dentro de la CaVidadpara la bolsaantes de
instaiar la cubierta de la bolsa
co,oquo,ooubierta de la bole
LengiJetas sa de manera
que las pesta+
_as entre en fas
ranura de posi-
ci6n del cuerpo
Cierre la cubierta de
la bolsa,
AI escucharun
chasquido
caracterfstico ser_ dela
indicaci6nde que la
cubiertahacerrado
bien.
Aseg_rese deque
la bolsa para polvo est_ instalada pot
completo en la cubierta de bolsa.
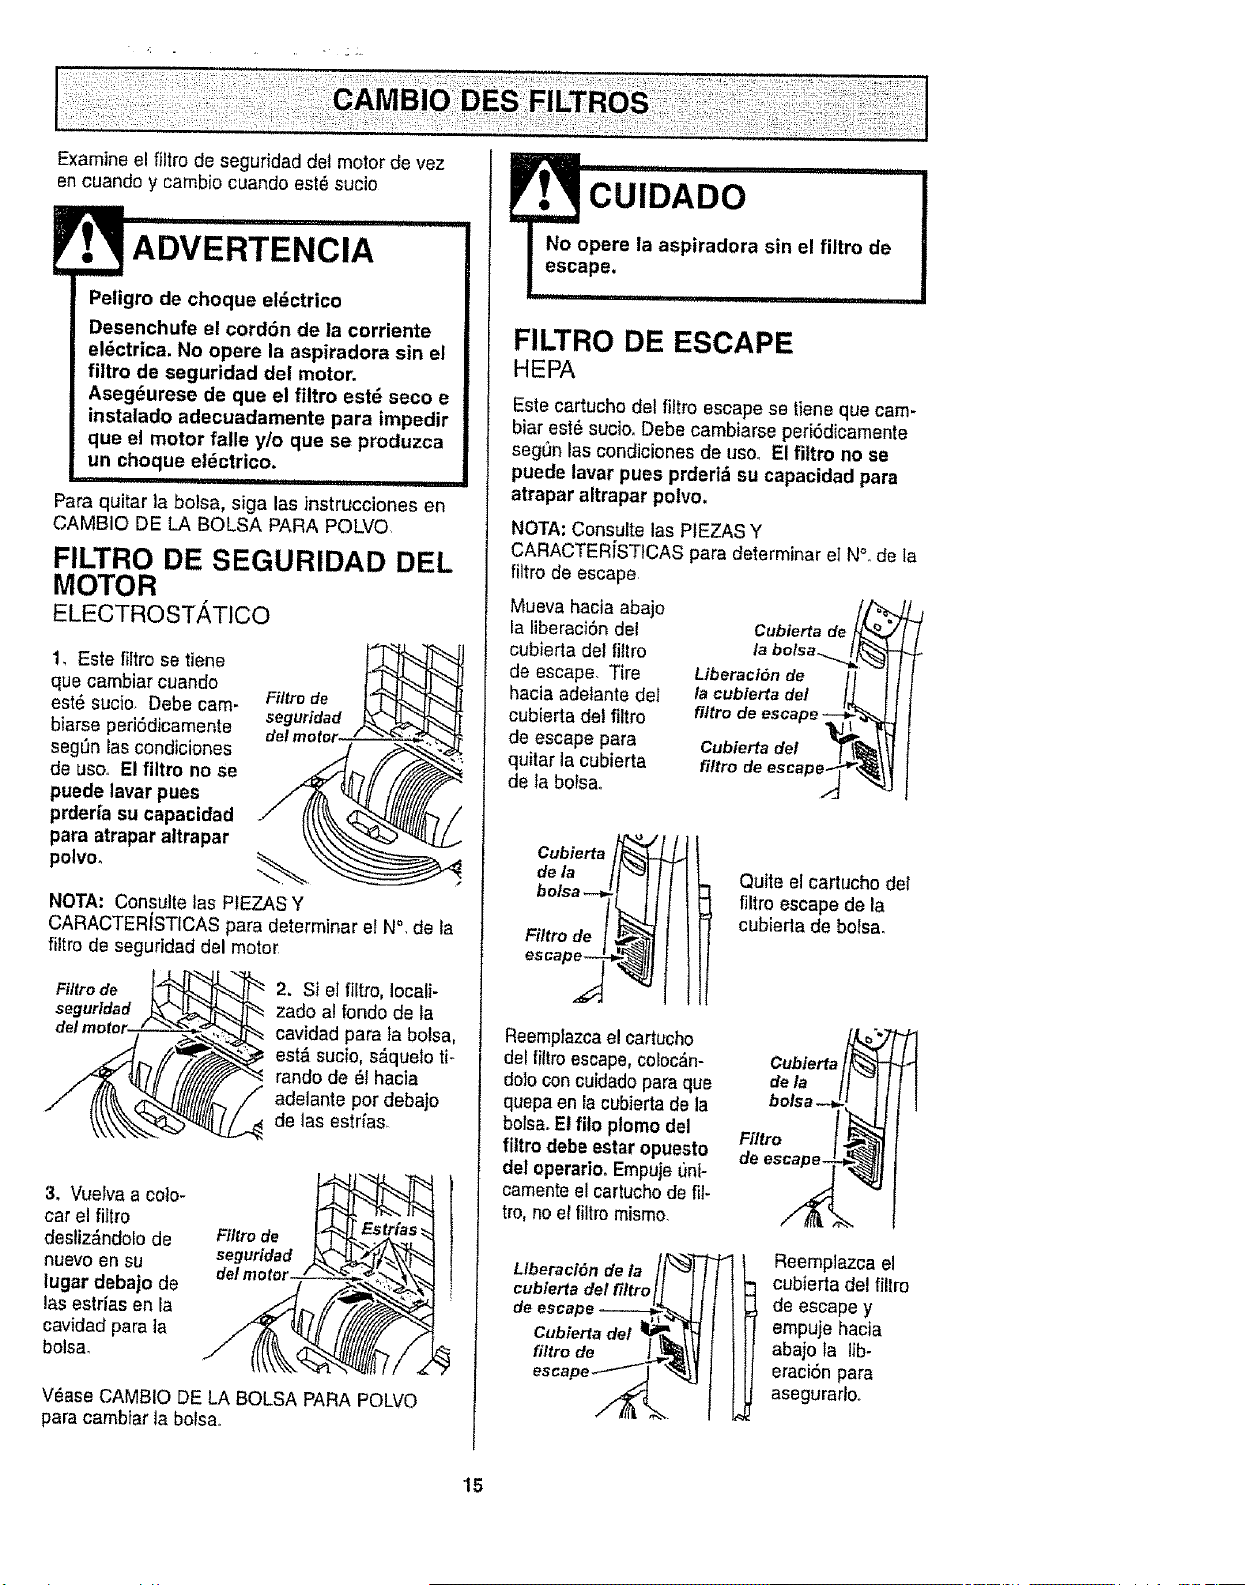
Examine el filtro de seguridad det motor de vez
en cuandc y cambio cuando est6 sucio
i1,111111i , i ii, ,11
I
Peligro de choque el6ctrico
Desenchufe el cord6n de la corriente
e|_ctrica, No opere la aspiradora sin el
flltro de seguridad del motor.
Aseg6urese de qua el filtro est6 seco e
instalado adecuadamente para impedir
que el motor falle y/o que se produzca
un choque el_ctrico.
Para quitar la bolsa, siga las instrucciones en
CAMBIO DE LA BOLSA PARA POLVO
FILTRO DE SEGURIDAD DEL
MOTOR
ELECTROST,_,TICO
1, Este filtro se tiene
que cambiar cuando
este sucio, Debe cam-
biarse periSdicamelite
seg_n las condiciones
de usoo El filtro no se
puede lavar pues
prder[a su capacidad
para atrapar altrapar
polvo°
Filtro de
seguridad
NOTA: Consulte las PIEZASY
CARACTERiSTICAS para determinar eI N°, de ta
fittro de seguridad del motor
Filtro de
seguridad
2. Si el fiitro, Iocali-
zado al folido de la
cavidad para fa bolsa,
est& sucio, s_quelo ti-
rando de 6t hacia
adelante per debajo
de las estr[as.
3. Vuelva a cole-
car el filtro
desliz_ndolode
nuevo ell SU
|ugar debajo de
las estriasen la
cavidad pare {a
bolsa_
F?Jtrode
seguridad
V_ase CAMBIO DE LA BOLSA PARA POLVO
para cambfarla bolsa,,
CUIDADO "
No opere la aspiradora sin el filtro de
escape.
Z:_ T II IIII =
FILTRO DE ESCAPE
HEPA
Este cartucho del liltro escapese tiene que cam-
biar est6 suciooDebe cambiarse peri6dicamente
seg'3nlas condicienes de use. El fi|tro no se
puede lavar pues prderl_ su capacldad para
atrapar altrapar polvo.
NOTA: CensuRe las PtEZAS Y
CARACTERiSTICAS para determinar elN°. de la
fiitro de escape
Mueva hacia abajo
la liberaci6n del Cubiertade
cubierta del filtro la
de escape. Tire Liberaci6nde
hacia adetante del t'acublertadel
cubierta del filtro filtrode escape
de escape para Cublertade!
quitar ]a cubierta fittrode
de la bolsa,.
Cubierta
dela l J
bolsa --_! I l
Filtro de [ _
escape_
SN
Reemptazcael cartucho
del filtro escape,coloc_n-
dole con cuidadopara que
quepa en la cubierta de la
botsa.Elfito ptomo del
filtro debe estar opuesto
del operario.Empujeunl-
camenteel cartuchode fil-
tro, no el filtro mismo.
Llberac/6n de la _'-_[
cublertadel filtroi
deescape - _
Cubiertadel !_
filtrode
escape_
Quite el cartucho det
filtro escape de la
cubierla de bolsa.
Cubierta_
Filfro f ,_
,e
Reemplazca el
cubierta del filtro
de escape y
empujehacia
abajo la lib-
eraci6n para
asegurarlo.
15

.OW.TE.C..
Peligro de cheque electrico o lesi6n
corporal
Desconecte la unidad antes de lim-
piarla o darle serviciOr De Io contrario
podria produclrse un cheque el_ctrico
o causar lesi6n corporal si la asplra-
dora arranca de manera imprevlsta.
, i ............................
Frecuentemante revise el &rea del cepillo y qui-
te todo pale, cord6n o pelusa qua se haya acu-
mulado. Si laacumulaci6n es excesiva, siga las
instruccionesa continuaci6n,
PARA QUITAR LA CORREA
Desconecte el cordSn el_ctrico del enchufeo
Selector de pisos
con affombra y Mueva el
sin alfombra selector de
i_ ,_ _ pisoscon
,_ alfombra y
, Hasta la
k ! sina rom-
_,,.x4 "-_'_ _ plsos con bra a _a
_ posicidn a
la posiciSn
con alfomo
bra.
Deslice las
liberaciones
haciaafuera
y quite la
cubierta de
Iaboquilla,
IIL II I
..! Pestillos
Cubierta
del agitador
Sujetador
de!protector
demeubles
Suelte los
sujetadores
del protector
de muebtes
de las pss-
ta6as en
ambos lades
de la cubier-
ta del agita-
dor,
n/___ LengiJetas
Cubierta
Det agitader
Tire hacia aba)ode
las leng_etasen ia
parte atrasera del
agitator y rusde
hacia adelante para
liberar de la unidad
de boquilla,
No es necesario quitar el ensamblede portal,m-
paras. Coloque al lade la cubierta del agitador.
Agitader.__
;orreade
repuesta
Coloque las manes en el agitator. Si la correa ya
est& instaladaen el agitador, habr& tensf6n en el
agitator. Tengacuiclado cuando levanta el agita-
tor de la boquilla.
NOTA: puede ser necesario tirar del borde del
protector de muebtss para que los extremes del
rotor se puedan saoar con facilidad..
Quite ta correa o rota del e}e de transmisi6nde1
motor,
Una correa de repuesta est&disponible,. Vea a la
ilustraci6npara la Iocaei6n de la correade
repdestal. La coi'rea de repuesta se puede
guardar en el mismo sitioo
ADVERTENCIA
Peligro de lesi6n personal
Tenga cuidado al quitar el cepillo ciffn-
drico, la tensi6n de ta correa es gran-
de. Si no tiene precauci6n podrla suffir
una lesi6n personal si el cepillo se l|-
beta rdptdamente y sale d/sparadoo
16
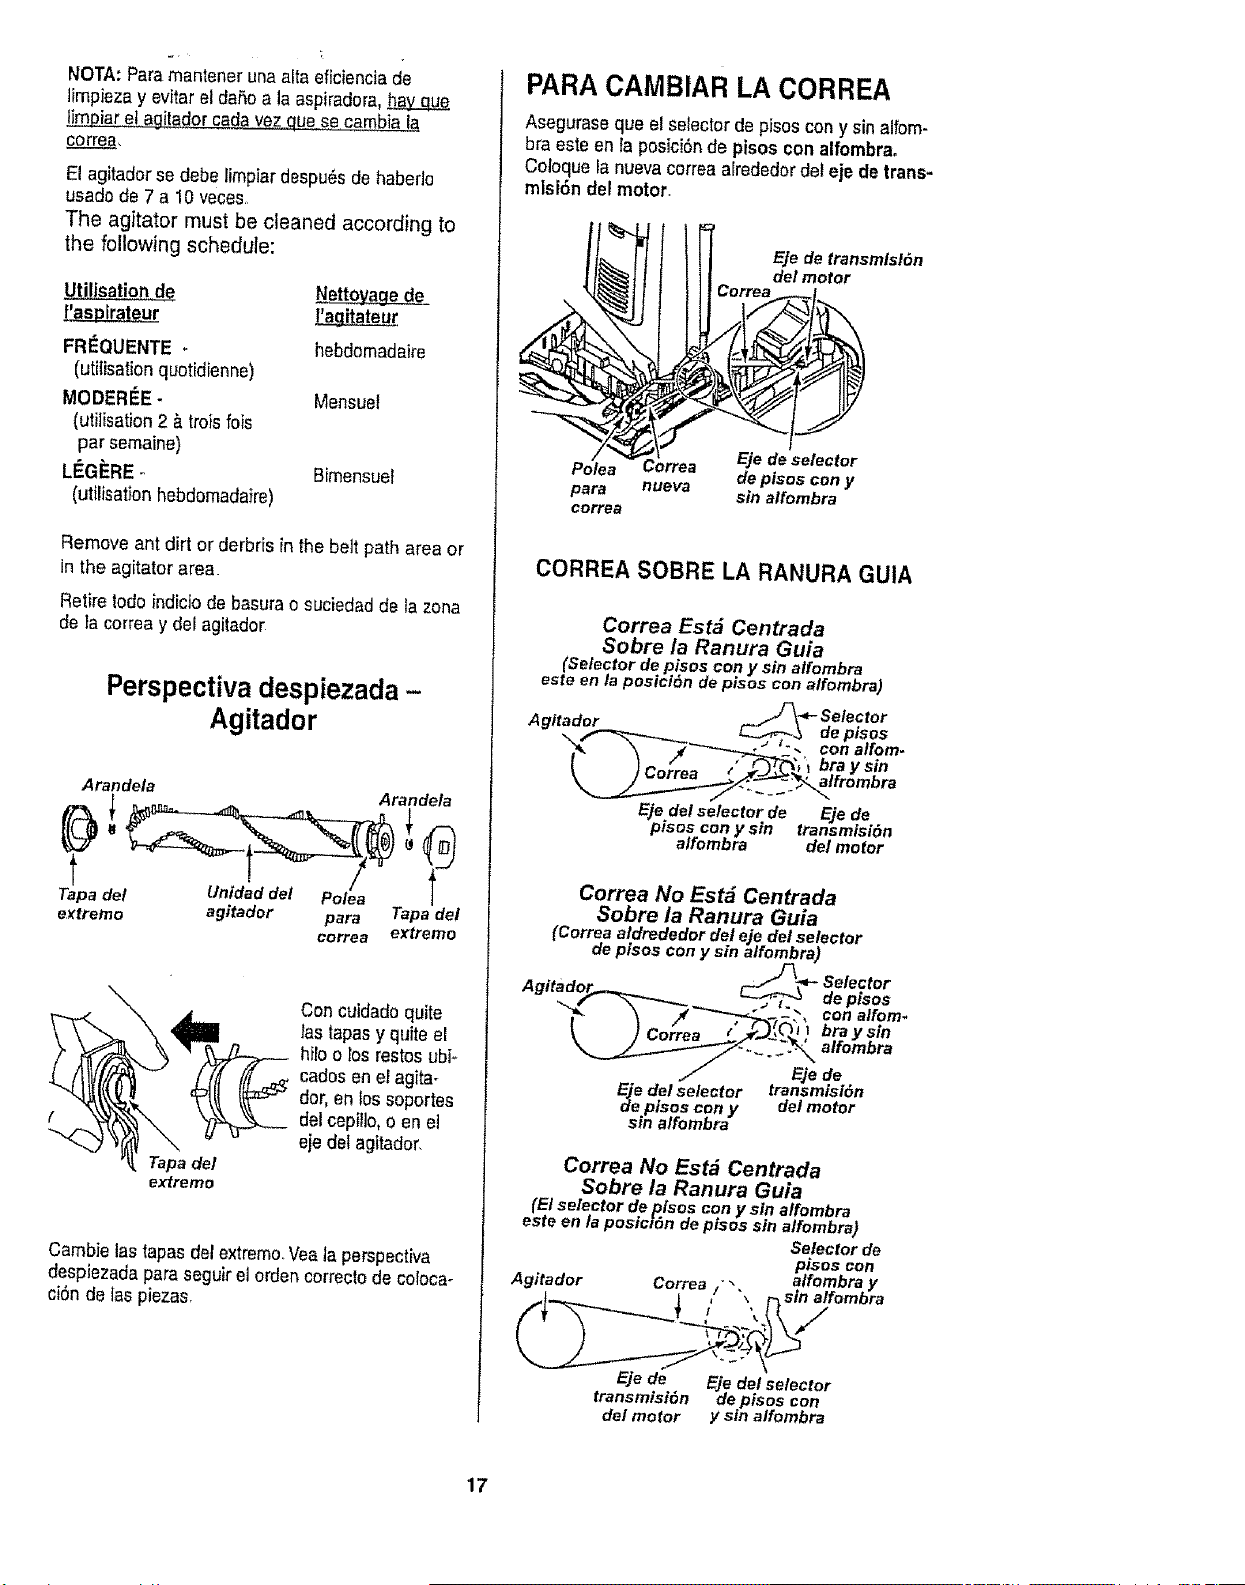
NOTA:Paramantenerunaaltaeficienciade
]impiezay evitar el daSoa la aspiradora,ha_h&Y__qEe
_itador cadavez que seca_a
correa,
El agitadorse debe lirnpiardespu_sde haberlo
usado de 7 a 10 veces
The agitator must be cleaned according to
the following schedule:
_ti!isatio_ de Nettoyage de_
l_a_gitateur
FRI_QUENTE - hebdomadaire
[utitisationqLtotidienne)
MODERIEE- Mensuet
(utilisation 2 & trois lois
par semaine)
LEGERE _ Bimensuet
(utilisation hebdomadaire)
Remove ant dirt or derbris in the bett path area or
in the agitator area.
Retire rodeindicio de basurao suciedad de la zona
de }aco,tea y del agitador
Perspectiva despiezada -
Agitador
Arandela Arande/a
rapa del t nidad e Polea
e_tremo agitador para Tapadel
eorrea extreme
Tapa del
extreme
Con cuidadoquite
tas tapasy quite el
hiFootos restos ubi-
cados en el agita-
dot, en Ios soportes
del cepiilo,o en et
eje del agitador,
Cambie las tapas dotextreme.Veataperspectiva
despiezada para seguirel orden correctode eoloca-
ai6n de Ias piezas.
PARACAMBIAR LA CORREA
Aseguraseque el selectorde pisos cony sinalfom-
bra este enfa posici6nde pisoscon alfornbra.
Coloque la nuevacorrea arrededordel eje de trans-
misi6n del motor.
E]e de transmlslSn
dot motor
Eje de selector
Polea Correa de pisos con y
para nueva sin alfombra
correa
CORREA SOBRE LA RANURA GUIA
Correa Estd Centrada
Sobre ia Ranura Guia
(Selector de pisos con y sin alfombra
este en la posici(_n de pisos con alfombra)
A,_d _. _-_4,- Selector
"___-"-___o > ". conalfom-
[ " _- /" _ / _', 't bra y sin
\ t uorrea __.J.-J-'_-_'_"alfrombra
Ejedel selector de Ejede
pisos cony sin transmisi6n
alfombra del motor
Correa No Est& Centrada
Sobre ia Ranura Guia
(Correa aldrededor del eje del selector
de pisos con y sin alfombra)
A " 'd _)_.-*- Selector
g_ta o__..._._ _ de pisos
"_ \ #_-.-T_',_- , conalfom.
t OJ bray sm
Correa _' ' Ifq
.-_ a ombra
// Eje de
Eiedel selector transmisl6n
_e pisos cony delmotor
sin a/fombra
Correa No Est_ Centrada
Sobre la Ranura Guia
(El selector de pisos con y sin alfombra
esteen taposicl_n depfses sin alfombra)
Selectorde
pisoscon
E]e de Eje det selector
transmisi6n de pisos con
del motor y sin alfombra
17
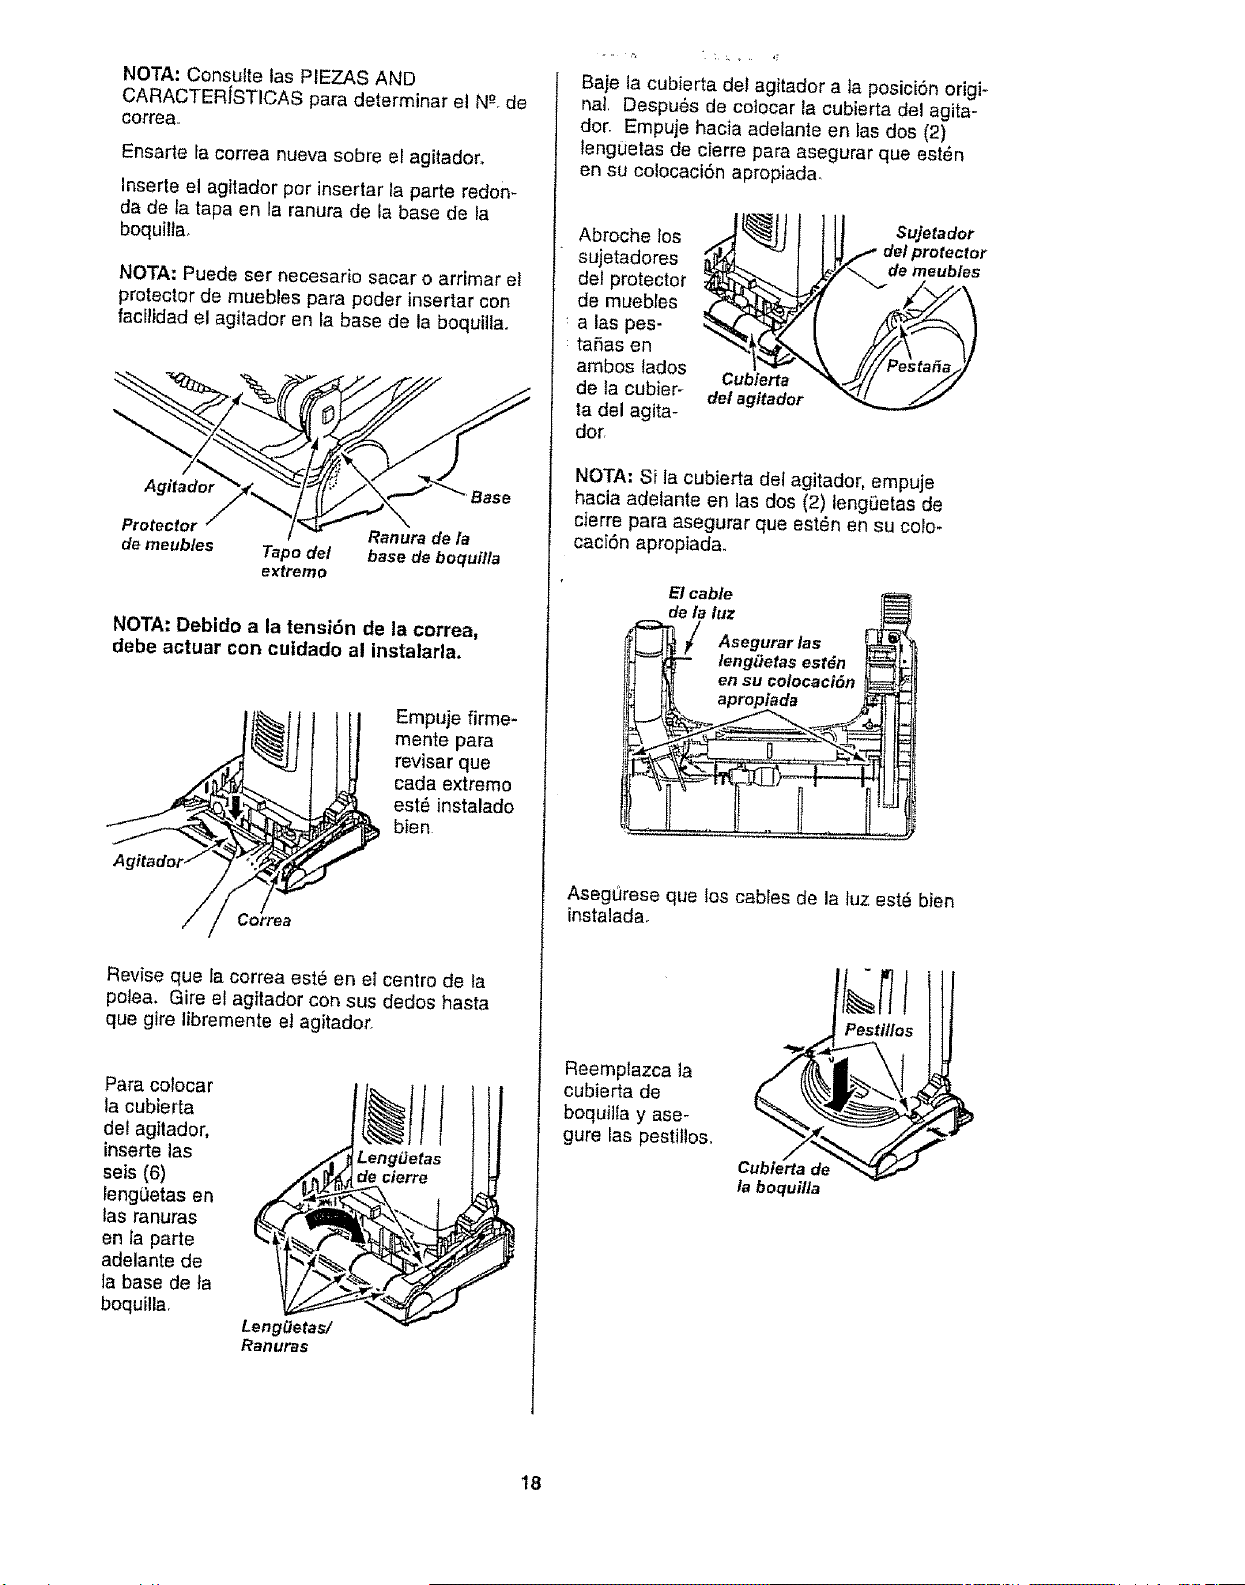
NOTA:ConsultetasPIEZASAND
CARACTERiSTICASparadeterminarelN_-.de
correa,,
Ensartefacorreanuevasobreelagitadoro
Inserteelagitadorperinsertarlaparteredon-
dadetatapaer_laranuradelabasedela
boquilta,
NOTA:Puedesetnecesariosacaro arrimar el
protector de muebles para poder insertar con
facilidad el agitador en la base de la boquilla,
Agitador Base
Protector Ranura de la
de meubles Tape del base de boquitla
extreme
NOTA: Debido a la tensi6n de la correa,
debe actuar con cuidado al instalarla.
Empuje firme-
mente para
revisar que
cada extreme
est6 instalado
bien
Revise que la correa est6 en el centre de la
polea. Gire el agttador con sus dedos hasta
que gire libremente el agitador,
Para colocar
la cubierta
del ag;lador.
ir_serte las
seis (6)
lengiJetas en
las ranuras %_
en la parte
adelante de _.
la base de fa
boquilla,
Lengaetas/
Ranuras
LengLJetas
de cierre
r
Baje la cubierta del agitador a la posici6n origF
hal, Despu6s de cotocar la cubierta del agita-
dor. Empuje hacia adelante en las dos (2)
lenguetas de cierre para asegurar que est_n
en su colocaci6n apropiada_
Abroche los
sujetadores
del protector
de muebles
alas pes-
taSas en
ambos tados
de la cubier-
ta del agita-
dot,
Cubierta
del agitador
Sujetador
dot protector
de meub/es
NOTA: Si la cubierta del agitador, empuje
hacia adelante en las dos (2) lengi]etas de
cierre para asegurar que est6n en su colo-
caei6n apropiada.
E1cable
dela luz i_
'_ / Asegurarlas _
_'_ leng(Jetasest_n l_
j _ en su colocaci6n
D_ apropiada _ _¢
AsegQrese que los cables de la tuz est6 bier_
instalada.
Reemplazca la
cubierta de
boquilla y ase-
gure las pestil_os.
Pestlllos
la boquilla
18

Procedasiempreconprecaucionesdeseguri-
dadallimpiarydarserviciolaaspiradora,
ADVERTENCIA
Peligro de choque el6ctrico o lesi6n
corporal
Desconecte la unidad antes de lim-
piarla o darle servicio. De Io contrario
podrfa producirse un choque el_ctrico
o causar lesi6n corporal si la aspira-
dora arranca de manera imprevista.
.......... i ,i
Si considera que ia aspiradora no aspira bien
asegurese primero de que la bolsa no est_
Ilena y de que el _tro no est_ atascado, Con-
suite las instrucciones sobre CAMBIO DE LA
BOLSA PARA POLVO y LtMPIEZA DES
FILTROS,
Si las zonas del _tro y la belsa no est&n atas-
cadas, examine Jazona de la manguera, Retire
el extremo inferiorde la manguera expansible
de la aspiradora tom&ndola por el collar y
tirando de hacia arriba,
Enchufe la
aspiradora y
enci_ndala,
Estire al
m_ximo la
manguera y
luego permita
que se encoja
hasta su
tama6o normal
de almacena-
miento.
Extienday
afloje la Apague la
manguera unidad y
descon_ctela_
Examine visualmente la zona de la base donde
se inserta la manguera.
Retire cuaiquier material bloqueante_
Inserte nuevamentela manguera en la abertura
de la parte inferior de donde la retirSoEmpuje con
firmezapara asegurarse de que quede bien
conectada,
Manguera
expansible
Collar
dela
manguera
ADVERTE ' IA "' i
Peligro de lesi6n personal
NO coloque nunca las manos ni los
pies debajo de la unidad, El agitador
dar_ vueltas r&pidamente cuanda ta
aspiradora est6 encendida y est_ en la
poslci6n "carpet setting,, (con alfom-
bra).
IUI= ii, U I
Si tas zonas del fi]troy la bolsa y las zonas de
la manguera no est&n atascadas, examine la
zona de la boquiltaoPara examinar dicha zona,
consutte la secciSn sobre CAMBIO DE LA
CORREA Y LIMPIEZA DEL AGITADOR.
Coloque la aspiradora en la posici6n vertical
antes de conectarla en el enchufe
19
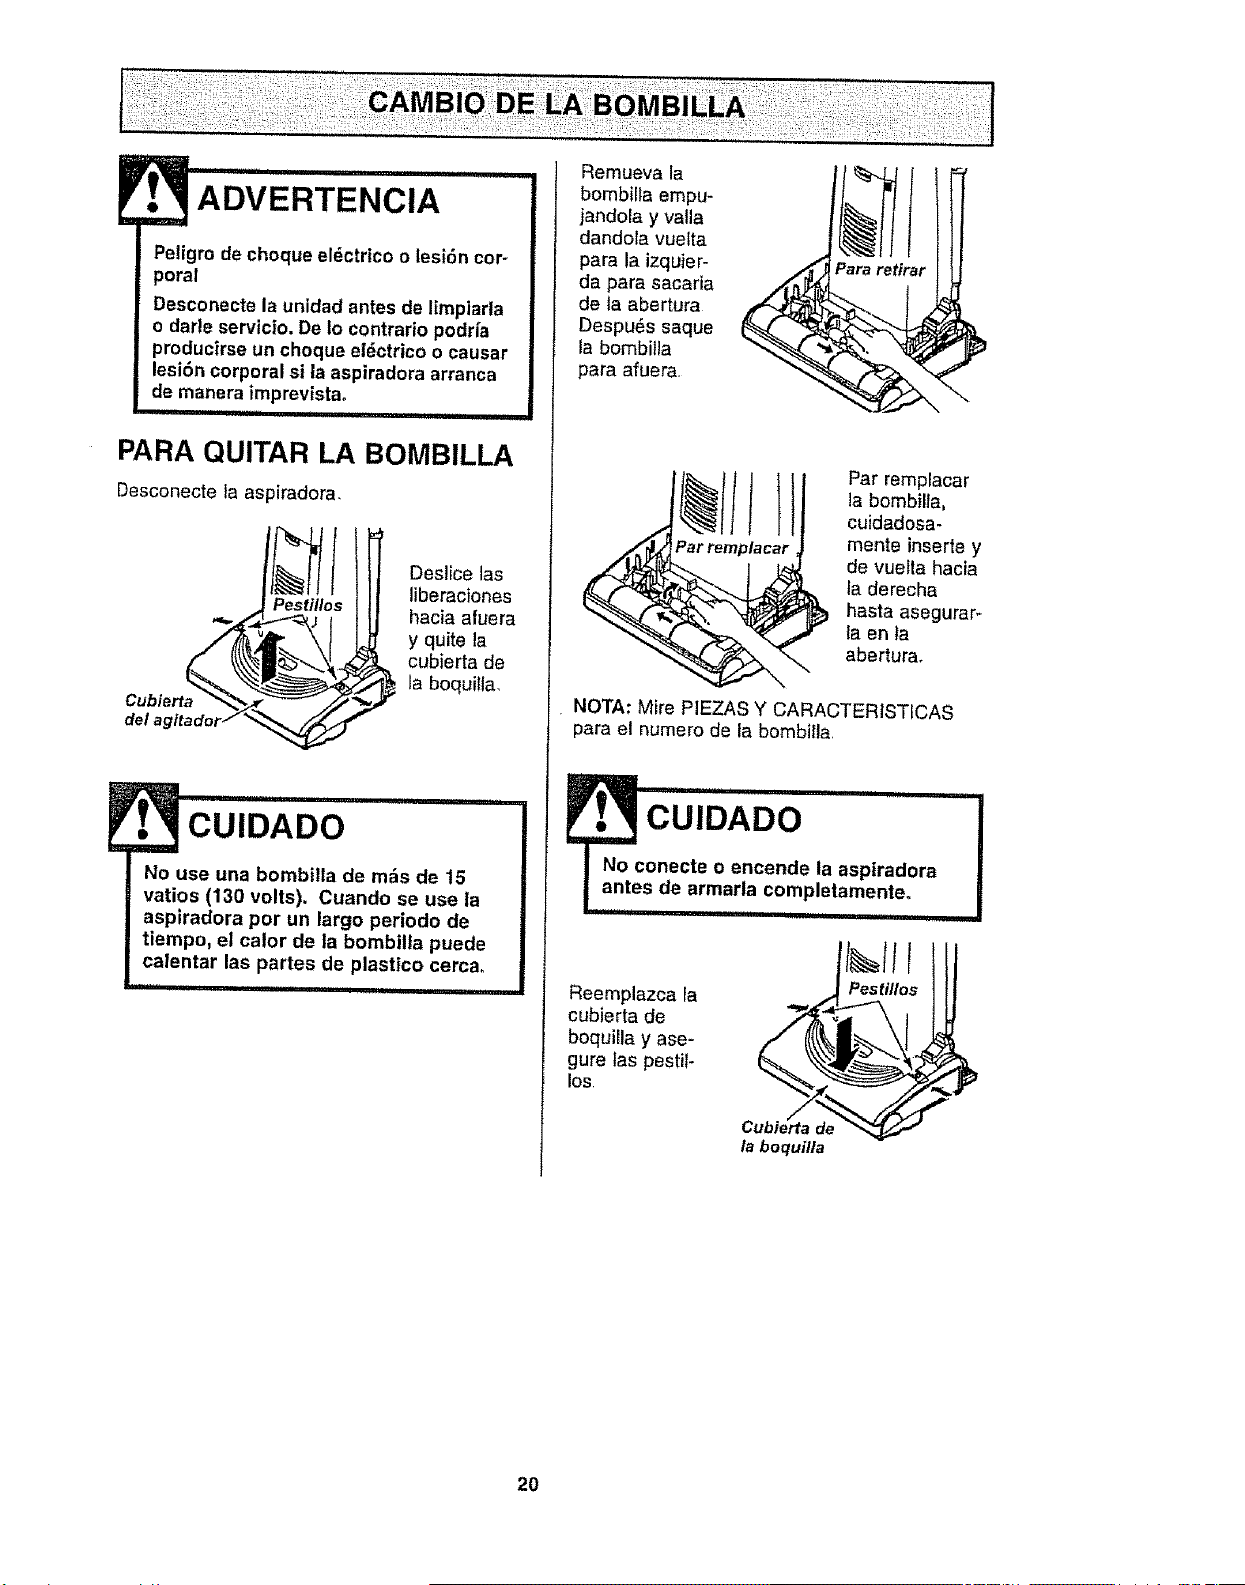
ADVERTENCIA
Peligro de cheque eldctrico o lesi6n cor-
poral
Desconecte la unidad antes de I_mpiarla
o darte servic|o. De 1ocontrario podria
producirse un cheque eldctrico o causar
lesi6n corporal si la aspiradora arranca
de manera imprevistao
iiiiiiiiil,lllllllUi,H i ii iii
PARA QUITAR LA BOMBILLA
Desconecte la aspiradora.
ip_es_ti/lls Deslice 1as
liberaciones
hacia afuera
Cublerta _ y quite la
cubierta de
la boquilla.
del _glt
CUIDADO
I o use una bombilla de mrs de 15
vatios (130 volts). Cuando se use la
aspiradora per un largo periodo de
tiempo, et calor de la bombilla puede
calentar las partes de plastico cerca.
iiiii ii ............................
Remueva ta
bombilla empu-
jandola y valla
dandola vuelta
para la izquier-
da para sacada
de la abertura
Despu_s saque
la bombilJa
para afuera
Par remplacar
la bombilla,
cuidadesa-
mente inserte y
de vuetta hacia
fa derecha
basra asegurar-
fa en ta
abertura.
NOTA: Mire PIEZAS Y CARACTER/STICAS
para el numero de ta bombilla,
N cUiDADO .....................!
onecte o encende la aspiradora
s de armarla completa..me.nte...
Reemplazca la
cubierta de
boquilla y ase-
gure tas pestil-
los
/a boquflla
20
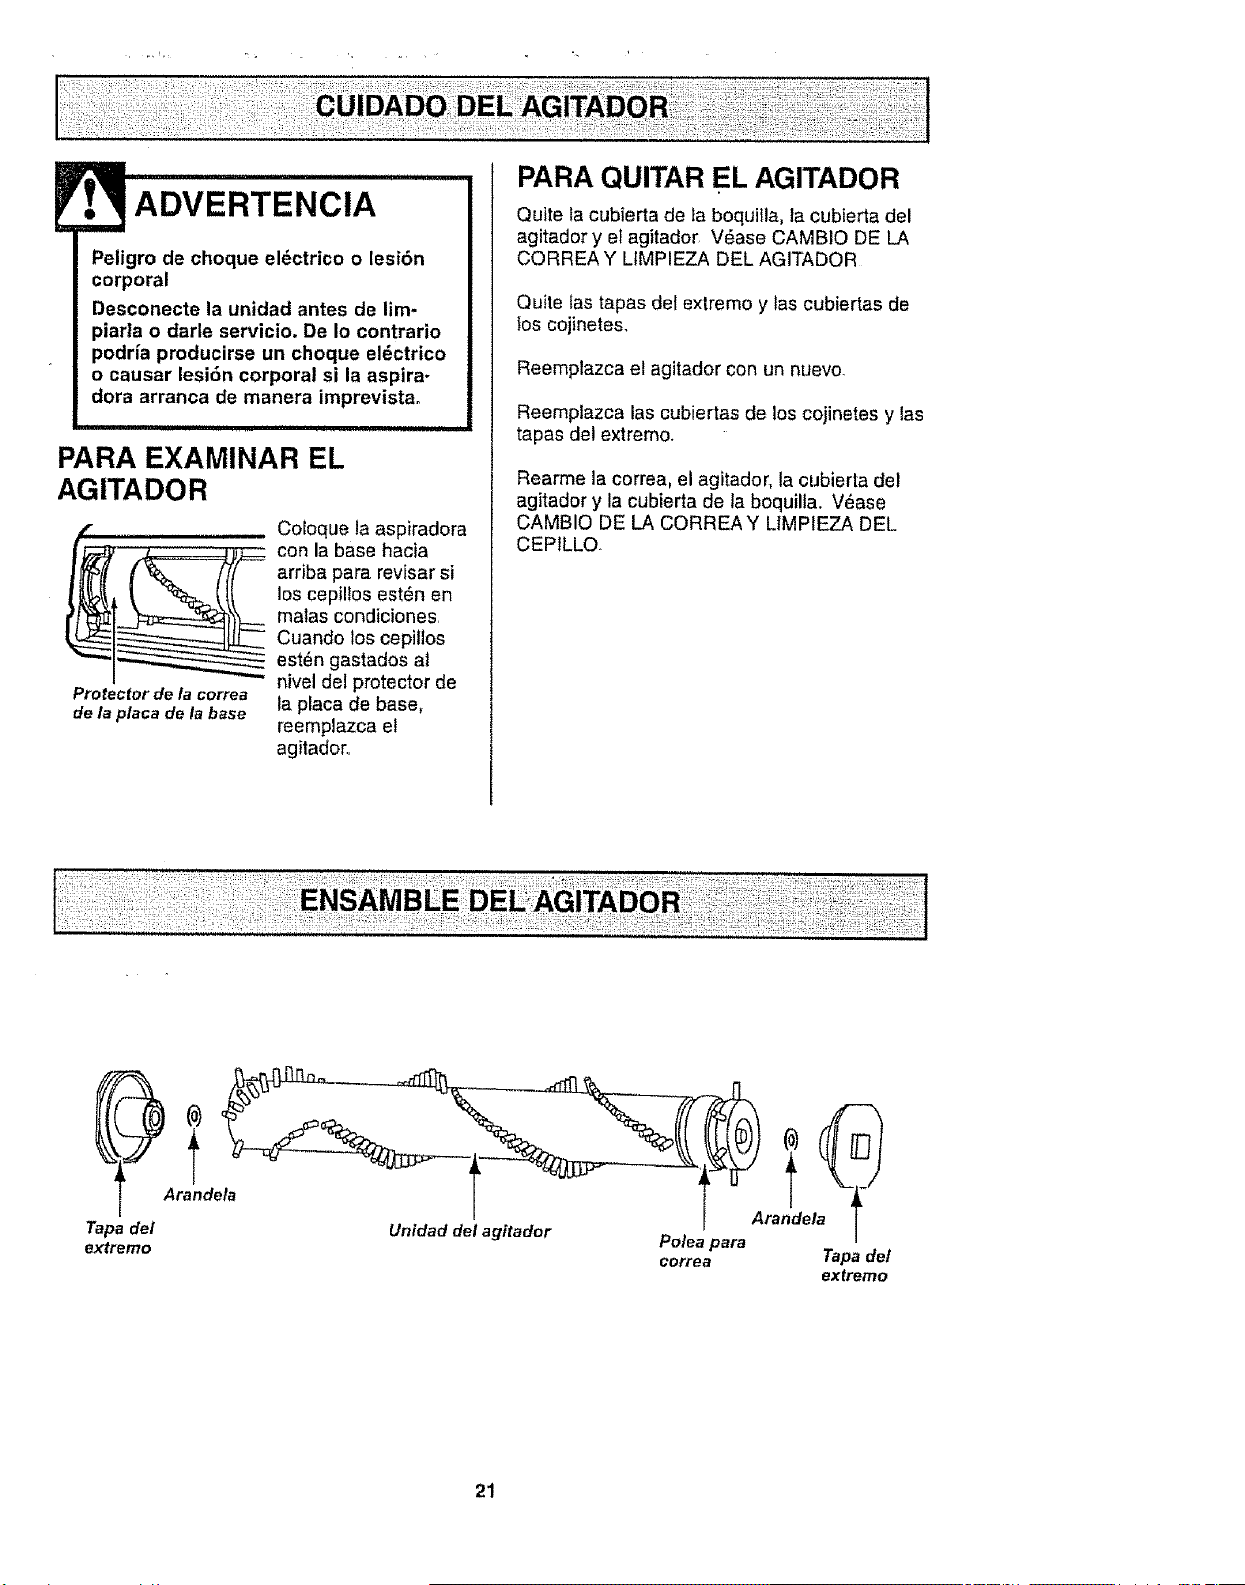
ADVERTENCIA
Peligro de choque el_ctrico o lesi6n
corporal
Desconecte la unidad antes de lim-
piarla o darle servicio. De Io contrario
podria producirse un choque el6ctrico
o causar lesi6n corporal si la aspira-
dora arranca de manera imprevistao
PARA EXAMINAR EL
AGITADOR
Protector de la correa
de la placa de la base
Cotoque la aspiradora
con la base hacia
arriba para revisar si
los cepillos est_n en
malas condiciones.
Cuando los cepitlos
est_n gastados at
nivel del protector de
la placa de base,
reempfazca el
agitador,.
PARA QUITAR EL AGITADOR
Qutte la cubierta de la boquilla, la cubierta del
agitador y e_agitador V_ase CAMBIO DE LA
CORREA Y LIMPIEZA DEL AGITADOR
Quite ias tapas def extremo y tas cubiertas de
los cojinetes.
Reemplazca el agitador con un nuevo.
Reemplazca las cubiertas de los cojinetes y las
tapas del extremo.
Rearme la correa, el agitador, la cubierta del
agitador y la cubierta de la boquilla. V_ase
CAMBIO DE LA CORREAY L1MPIEZA DEL
CEPILLO.
Tapa del
extremo
Arandeta
Unidad del agitador
Polea )ara
eorrea
Tapa det
extremo
21
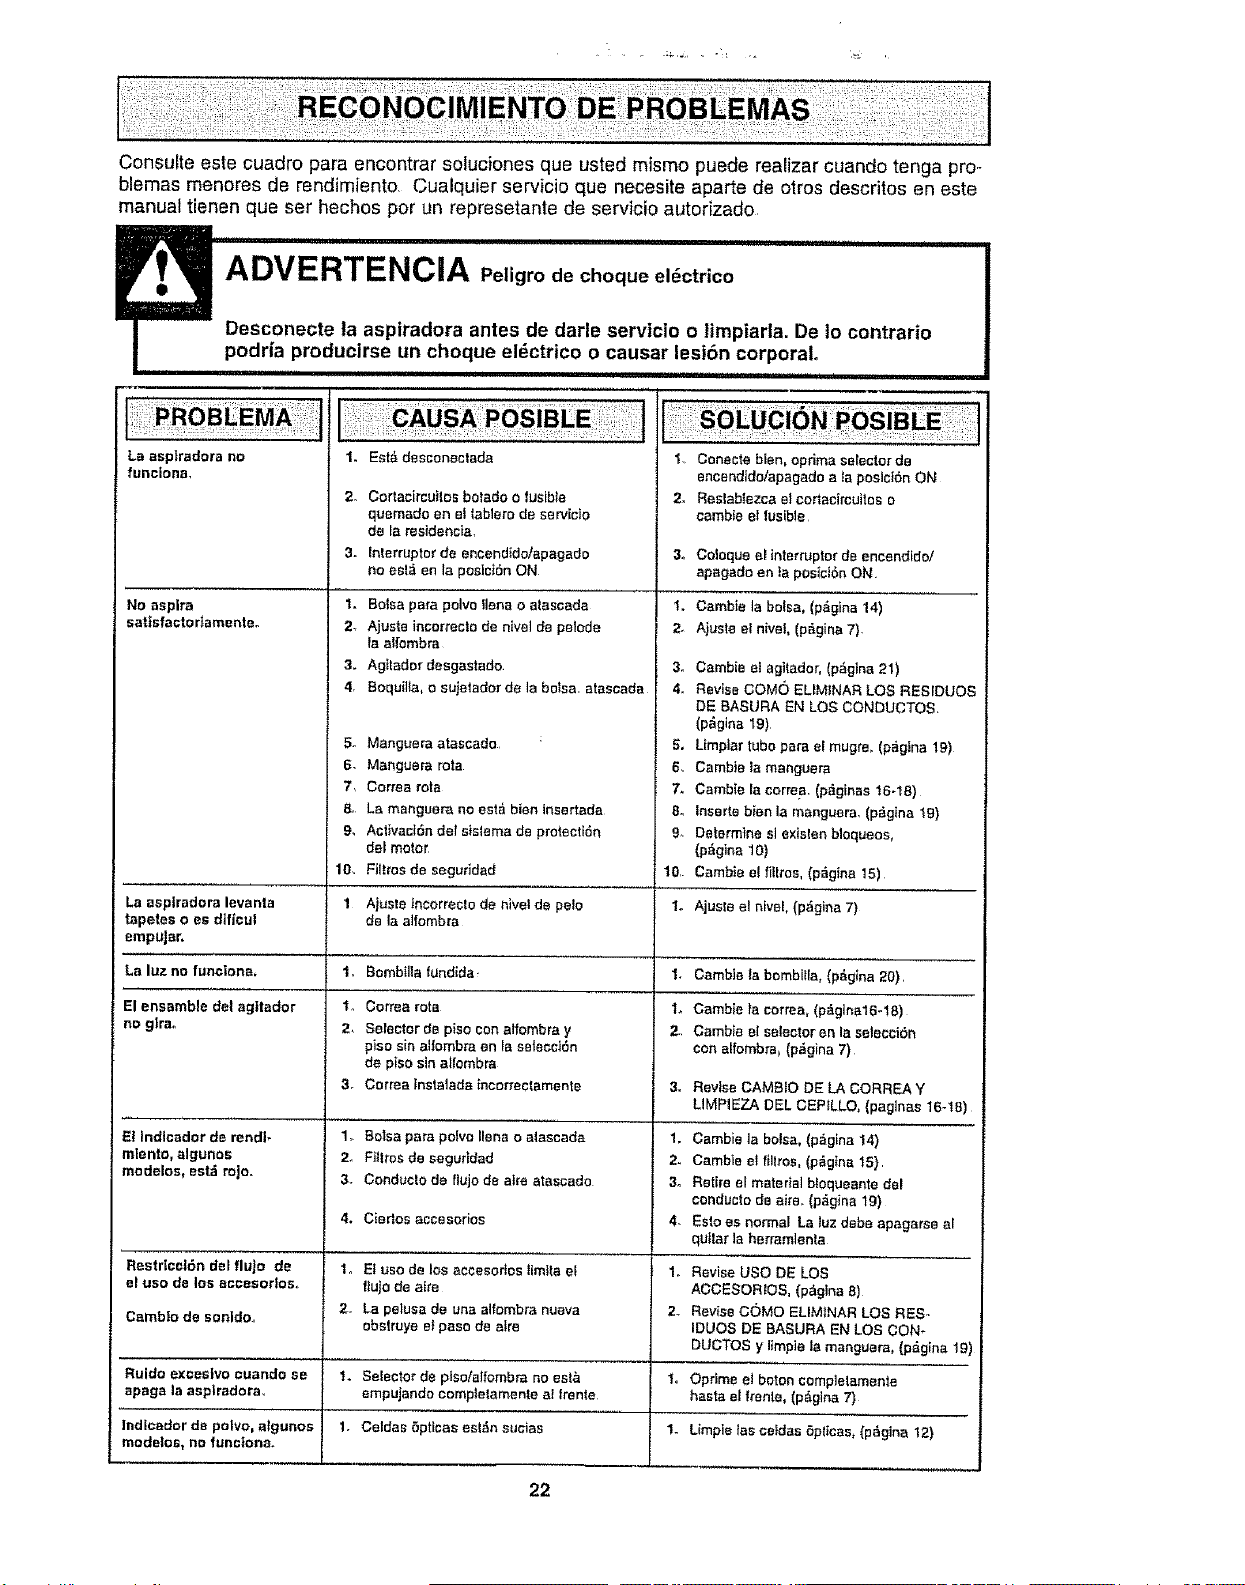
Consufte este cuadro para encontrar soluciones qua usted mismo puede realizar cuando tenga pro-
blemas menores de rendimiento Cualquier servicio que necesite aparte de otros descritos en este
manual tienen que set hechos per un represetante de servicio autodzado
iiiiii iii iii1,1111i, iiiii i i
ADVERTENCIA Peligro de cheque el_ctrico
Desconecte la aspiradora antes de darle servicio o limpiarla. De 1ocontrario
podria producirse un cheque el_ctrico o causar lesi6n corporal
IIIqlllll i1,1 ii ,11 iiiii i i
La esptradora no
funciona,
No aspire
sattsfaete damertte_
La esplradora levanta
tapetes o es dtficut
empHar,
Le Iuz no funcione.
El ensamble del ag|tador
no glrao
El Indlcador de rendF
mlento, algunos
medelos, estd rojo.
Restr|ccl6n del flujo de
el use de los acoesorlos..
Cambie de sonldo_
Ruido exceslvo euando se
apaga la asptradora
lndicader de poivo, algunes
modetos, no func|ona_
1. Eat& desconectada I,, Conecteblen, optima selector de
encendido/apagado ata poslci6n ON
2_
3_
2_
3.
4.
6,
7,
9.
10,
1
Io
2,
1,
2_
3.
4,
1.
2,,
,}°
1.
Cortacircuites botade o fusible 2.
quemado en et tablero de servicio
de la residencia,
interrupter de encendide/apagado 3.
no est_ en la poeic_6n ON
Bolsa pare pelvo liens o atascada 1.
Ajuste incorrecto de nivel de pelode 2.
la alfombra
Agttader desgastade. 3o
Boquilla, e sujetader de la betsa, atasoada 4o
Manguera atascade : 5.
Manguera rota 6_
Correa rote 7_
La manguera no esta bien inserteda 8.
Ael_vaci6n del sistema de protecti6n 9.
del motor
Filttes de seguddad 10
Ajuste incorrecto de nivel de pale 1o
de la alfombra
Bombilla tundida_
Cerrea rata
Selector ds piso con alfombra y
piso sin atfombra on VasetecciOn
de piso sin alI'ombra
Cortes _nslalade incorrectamente 3_
Balsa pare polvo liana o ataseada 1.
Flilres de segurldad 2.
Conduc|o de flujo de atre atascado 3.
Ciertos accesedos 4.
El use de los accesortos timtta el 1.
tlujo de eke
La pelusa de una alfombra nueva 2_
obslruye e_paso de eke
Selector de plso!alfombra no eat& 1,,
empujando complelamente at Irente
Oeldas 6prices est_n sueias 1.
Reslablezca etcortacircuitee o
cambie el fusible
Coloque el interrupterde encendido/
apagado en ia posicf6nON
Gamble la bolsa, (p&gina 14)
Ajusle el nivel, (p_gina 7).
Cambie el ag]tador, (p6gina 21)
Revise COMe EUMtNAR LOS RESIDUES
DE BASURA EN LOS CONDUCTOS.
(p_gina 19)
Umplar tube pare ef mugre, (paglna 19)
Cambie la mar_guera
Camb_ela eerrea, (p_ginas !6-18)
inserte bien la manguera, (p6gina t9)
Determine el exislenblequeos,
(p_gina 10)
Cambie e_fitlros, (p_gina 15)
Ajuste el nivel, (p_gina7)
I, Oambie labombilla,(p_gina20),
t. Oambteta corms, (p_glna16-18)
2. Gamble el selestor en la seleeci6n
con alfembra_(p&gina 7)
Revise CAMBIO DE LA CORREA Y
UMPIEZA DEL CEPILLO, (pag]nas 16-18)
Cambie la bolsa, (pagina 14)
Cambie el tillros, (p_gtna 15)
Retire elmaterial b!oqueente del
cenducto de air& (p_.gina 19)
EsIo es normal La luz deba apagaree al
quIlar la herramlenla
Revise use DE LOS
ACCESORtOS, (p_glna 8)
Revise CC}MO ELIMINAR LOS RES..
IDUOS DE BASURA EN LOS CON*
DUCTOS y iimpie la manguara, (p_gina 19)
Opdme eJ baton completamente
haste el frente, (p#,gina 7)
Limple los celdas 5pltcas, {p6gina 12)
22
i!i <i!<(I !ilii!i!i:ii!ii!ili
5! <:_!i-
For
. 5: : J-, ,i:'¸ L
repair of major brand appliances in your own home ...
no matter who made it, no matter who sold it!
1-800-4-MY-HOME ® Anytime, day or night
(1-800-469-4663) (US.A and Canada)
www,sears.corn
www.sears.ca
For repair of carry-in products like vacuums, lawn equipment, and
electronics, call for the nearest Sears Parts and Repair Center. '
1-800-488-1222 Anytime, day or night (U.&Ao only) i
E
www.searsocom
For the replacement parts, accessories and owner's manuals i
that you need to do-it-yourself, Call Sears PartsDirectSM!
1-800-366-PART 6a.mo- I1 p.m, 7days aweek
(1_800-366_7278) (U,SA. only)
www.sears.corn/partsdirect
To purchase or inquire about a Sears Service Agreement
or Sears Maintenance Agreement:
] :
1-800-827-6655 (u SA. )
7am -5pm. CST, Mon-Sat.
1-800-361-6665 (Canada)
9 a.m - 8 p.m. EST, M - F,4 p.m, Sat.
Pare pedir servicio de "eparaci6n a
domicilio, y pare ordenar piezas:
1-888.SU-HOGAR sM
(1-888-784-6427)
Au Canada pour service en fran_ais:
1-800-LE-FOYER _c
(1_800-533-6937)
wvcc/.sears ,ca
© Sears, Roebuckand Co.
HomeCentral --
H i 1
® Registered Trademark / TMTrademark / SMService Mark of Sears, Roebuck and Coo
® Marca Registrada / TMMarca de F_brica / sMMarca de Servicio de Sears, Roebuck and Co.
McMarque de commerce t MDMarque d_pos6e de Sears, Roebuck and Co
23